120
Start Documaker Working with XML Files version 11.3

Start
Documaker
Working with XML Files
version 11.3

PUBLICATION COPYRIGHT NOTICECopyright © 2008 Skywire Software, L.L.C. All rights reserved.Printed in the United States of America.This publication contains proprietary information which is the property of Skywire Software or its subsidiaries. This publication may also be protected under the copyright and trade secret laws of other countries.
TRADEMARKSSkywire® is a registered trademark of Skywire Software, L.L.C.Docucorp®, its products (Docucreate™, Documaker™, Docupresentment™, Docusave®, Documanage™, Poweroffice®, Docutoolbox™, and Transall™) , and its logo are trademarks or registered trademarks of Skywire Software or its subsidiaries.The Docucorp product modules (Commcommander™, Docuflex®, Documerge®, Docugraph™, Docusolve®, Docuword™, Dynacomp®, DWSD™, DBL™, Freeform®, Grafxcommander™, Imagecreate™, I.R.I.S. ™, MARS/NT™, Powermapping™, Printcommander®, Rulecommander™, Shuttle™, VLAM®, Virtual Library Access Method™, Template Technology™, and X/HP™ are trademarks of Skywire Software or its subsidiaries.Skywire Software (or its subsidiaries) and Mynd Corporation are joint owners of the DAP™ and Document Automation Platform™ product trademarks.Docuflex is based in part on the work of Jean-loup Gailly and Mark Adler.Docuflex is based in part on the work of Sam Leffler and Silicon Graphic, Inc.Copyright © 1988-1997 Sam Leffler.Copyright © 1991-1997 Silicon Graphics, Inc.Docuflex is based in part on the work of the Independent JPEG Group.The Graphic Interchange Format© is the Copyright property of CompuServe Incorporated. GIFSM is a Service Mark property of CompuServe Incorporated.Docuflex is based in part on the work of Graphics Server Technologies, L.P.Copyright © 1988-2002 Graphics Server Technologies, L.P.All other trademarks, registered trademarks, and service marks mentioned within this publication or its associated software are property of their respective owners.
SOFTWARE COPYRIGHT NOTICE AND COPY LIMITATIONSYour license agreement with Skywire Software or its subsidiaries, authorizes the number of copies that can be made, if any, and the computer systems on which the software may be used. Any duplication or use of any Skywire Software (or its subsidiaries) software in whole or in part, other than as authorized in the license agreement, must be authorized in writing by an officer of Skywire Software or its subsidiaries.
PUBLICATION COPY LIMITATIONSLicensed users of the Skywire Software (or its subsidiaries) software described in this publication are authorized to make additional hard copies of this publication, for internal use only, as long as the total number of copies does not exceed the total number of seats or licenses of the software purchased, and the licensee or customer complies with the terms and conditions of the License Agreement in effect for the software. Otherwise, no part of this publication may be copied, distributed, transmitted, transcribed, stored in a retrieval system, or translated into any human or computer language, in any form or by any means, electronic, mechanical, manual, or otherwise, without permission in writing by an officer of Skywire Software or its subsidiaries.
DISCLAIMERThe contents of this publication and the computer software it represents are subject to change without notice. Publication of this manual is not a commitment by Skywire Software or its subsidiaries to provide the features described. Neither Skywire Software nor it subsidiaries assume responsibility or liability for errors that may appear herein. Skywire Software and its subsidiaries reserve the right to revise this publication and to make changes in it from time to time without obligation of Skywire Software or its subsidiaries to notify any person or organization of such revision or changes.The screens and other illustrations in this publication are meant to be representative, not exact duplicates, of those that appear on your monitor or printer.
Skywire Software, L.L.C.3000 Internet BoulevardSuite 200Frisco, Texas 75034www.skywiresoftware.com
Phone: (U. S.)(EMEA)
972.377.1110+44 (0) 1372 366 200
FAX: (U. S.)(EMEA)
972.377.1109+44 (0) 1372 366 201
Support: (U. S.)(EMEA)
866.4SKYWIRE+44 (0) 1372 366 [email protected]
Notice
iii
Contents
Chapter 1, Introduction
2 Overview
3 Setting Up the XML Add-On
4 Setting Up Documaker Workstation
4 Setting Up the XML Export Format
5 Setting Up the XML Import Format
5 Setting Up the XML Message Format
6 Setting Up Docupresentment
8 Using the Parser
8 Byte order marks
9 XML File Format
10
Chapter 2, Importing and Exporting XML Files with Documaker Workstation
12 Modifying INI Files
12 Setting up the XML export format
12 Setting up the XML import format
13 Creating an XML Export File
15 Example Documaker XML File Format
19 Form options
20 Importing a Documaker XML File
21 Transforming XML Files
21 Appending output transformations
Chapter 3, Importing and Exporting XML Files with Documaker Server
33 Using the File Option
33 Using the INI Option

iv
34 Using the SCH Option
34 Using the GVM Option
Chapter 4, Using XML Extract Files
36 Mapping Formatted Data from Extract Files
38 Searching an XML Extract File
39 Handling Overflow
40 Triggering Forms and Images
40 Using the ElementText option
41 Using XPath
41 XPath Syntax
41 Axes
42 Symbols
42 Functions
43 Expressions
44 Using the XPath Testing Utility
44 Example 1
45 Example 2
45 Example 3
45 Example 4
45 Example 5
46 Example 6
46 Example 7
46 Example 8
47 Example 9
47 Example 10
48 Example XML File
Chapter 5, Using DAL XML Functions and XPath
50 Scenarios
50 Scenario 1
50 Scenario 2
51 Using XML Built-in Functions
51 LoadXMLList
51 DestroyList

v
51 GetListElem
51 IsXMLError
52 XMLFind
52 XMLFirst
52 XMLNext
52 XMLGetCurName
53 XMLGetCurText
53 XMLFirstAttrib
53 XMLNextAttrib
53 XMLAttrName
53 XMLAttrValue
54 XMLNthText
54 XMLNthAttrName
54 XMLNthAttrValue
55 Using the XML Path Locator
55 Axes
55 Function calls
55 Operators or signs
55 Expressions
56 Element list
56 Attribute list
56 Text list
57 Text string
Chapter 6, Additional Ways to Use XML and Documaker Server
60 Mapping Fields with XPath
61 Referencing DAL and GVM Using XML
63 Running Documaker Server Using an XML Job Ticket
64 Creating Multiple Print Files Using the PrintFormset Rule
Chapter 7, Using IDS to Run Documaker Server
66 Overview
67 Setting Up IDS
67 DOCSERV.INI file
67 DAP.INI file

vi
67 RPEX1.INI file
68 Setting up multiple IDS servers
69 Setting Up Documaker Server
69 FSISYS.INI or FSIUSER.INI file
69 AFGJOB.JDT file
70 Naming Conventions for Output Files
71 Controlling Documaker Server
73 INI options
73 Returns
73 Error messages
Chapter 8, Frequently Asked Questions
94 Is XML the same as HTML?
94 Who developed the XML parser?
94 What is an XML tag?
94 What is an XML attribute?
95 What is a schema?
95 What XML standards are accepted by Skywire Software software?
96 Are ampersands (&) and octothorpes (#) supported in XML files?
96 What tag names cannot be used in XML?
97 How do you send an XML input file to Documaker?
97 How do you export an XML file from Documaker Workstation?
97 What are the Unicode capabilities of XML?
98 How do you set up Docupresentment to use XML?
99 Can the SOAP standard be used with Docupresentment?
100 How can Docupresentment run Documaker using XML job-tickets?
101 Can you use DAL with XML files?
101 Scenario 1
102 Scenario 2
102 Are triggers set the same way when you use XML files in Documaker?
103 Can you use the Concat rule with XML?
103 Can you use the SetAddr rule with XML?
103 Can you use the PrintIf rule with XML?
104 How does Documaker deal with empty tags in XML files?
104 How are overflows defined?

vii
105 How do you handle overflow within overflow using XML?
105 Can you use the LoadExtractData and UseXMLExtract rules in single-step mode?
105 Which version of XML does Transall support?
105 How do you write HTML pages to output XML via Docupresentment?
106 What are some common XML-related errors?
107 Index

viii

1
Chapter 1
Introduction
Full support for XML in Documaker products was introduced in version 10.2. This support provides a variety of features for...
• Importing and Exporting XML Files with Documaker Workstation on page 11
• Importing and Exporting XML Files with Documaker Server on page 27
• Using XML Extract Files on page 35
• Using DAL XML Functions and XPath on page 49
• Additional Ways to Use XML and Documaker Server on page 59
• Using IDS to Run Documaker Server on page 65
• Frequently Asked Questions on page 93
This chapter includes information on these topics:
• Overview on page 2
• Setting Up the XML Add-On on page 3
• XML File Format on page 9
Introduction
2
OVERVIEW XML (Extensible Markup Language) is a simple, flexible, text format language used primarily for data exchange. It is a structured language containing a definition of the data as well as the data itself. Here are a couple of links you may find useful:
www.w3c.org/XML
www.w3.org/TR/xpath
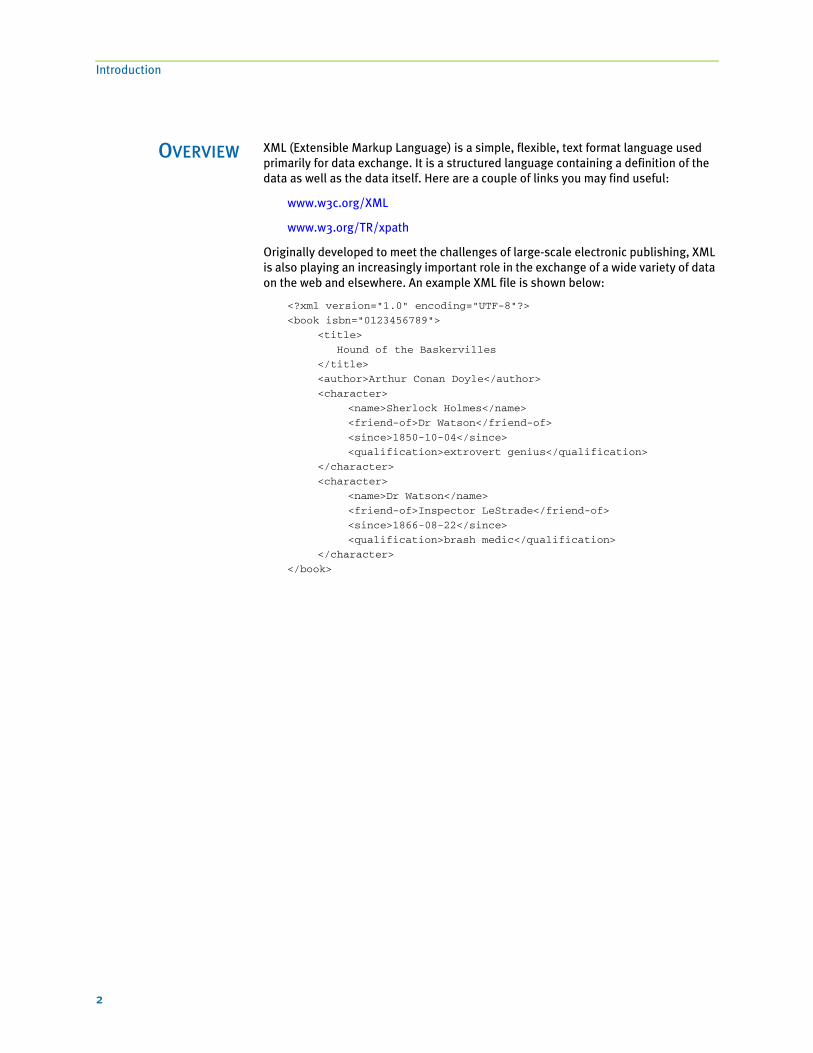
Originally developed to meet the challenges of large-scale electronic publishing, XML is also playing an increasingly important role in the exchange of a wide variety of data on the web and elsewhere. An example XML file is shown below:
<?xml version="1.0" encoding="UTF-8"?>
<book isbn="0123456789">
<title>
Hound of the Baskervilles
</title>
<author>Arthur Conan Doyle</author>
<character>
<name>Sherlock Holmes</name>
<friend-of>Dr Watson</friend-of>
<since>1850-10-04</since>
<qualification>extrovert genius</qualification>
</character>
<character>
<name>Dr Watson</name>
<friend-of>Inspector LeStrade</friend-of>
<since>1866-08-22</since>
<qualification>brash medic</qualification>
</character>
</book>

Setting Up the XML Add-On
3
SETTING UP THEXML ADD-ON
With the XML add-on, you can import and export XML files while using Documaker Workstation and you can send and receive XML messages. Setting up the new import and export capabilities is similar to setting up any import/export file format.
To import and export XML files in Documaker Workstation, you use these XML add-on functions:
NOTE: The ability to work with XML files is included in Documaker Workstation, but must be purchased separately by PPS users. You must also have a Docupresentment license to use the messaging features in the WXMEntryHookExtXMLLoad and WXMImportXMLArchive functions because they call Docupresentment files.
To use the XML add-on, you must first set up the import, export, and messaging functions. If applicable, you then set up Docupresentment.
Function This function lets you...
WXMImportXML Import data from an XML file into a form set.
WXMExportXML Export data from a form set to an XML file.
WXMEntryHookExtXMLLoad Send messages from the system to any type of message server.
WXMImportXMLArchive Send messages from the system to any type of message server.

Introduction
4
SETTING UP DOCUMAKER WORKSTATION
To use the import and export functions, you must also add this control group and options to your FSISYS.INI or FSIUSER.INI file:
< XML_Imp_Exp >
Ext = .xml
File = export
Path = c:\fap\mstrres\SAMPCO
SuppressDlg = No
AppendedExport = No
Follow the instructions below to complete the import, export, and messaging setup.
Setting Up the XML Export Format
Follow these steps to set up the XML export format:
1 Open the FSISYS.INI file in the resource library for which you want to use export files. You can use any text editor to open this file.
2 Locate the ExportFormats control group. Most text editors have a find or search function you can use to quickly find this group heading. Then add the following line:
This assumes 09 is not already being used. Here is an example:
< ExportFormats >
09=;XM;XML Export;WXMW32->WXMExportXML
Option Description
Ext (Optional) Enter the extension for the output files. The default is XML.)
File (Optional) Enter a file name, such as XMLEXP. If you omit this option the system prompts the user to enter the file name.
Path (Optional) Enter the path, such as \xmlfile. If you omit this option, the system defaults to the current directory.
SuppressDlg (Optional) Enter Yes to suppress the File Selection window. The default is No.
For this export format Enter...
XML 09=;XM;XML Export;WXMW32->WXMExportXML

Setting Up the XML Add-On
5
Setting Up the XML Import Format
Follow these steps to set up the XML import format:
1 Open the FSISYS.INI file in the resource library for which you want to use export files. You can use any text editor to open this file.
2 Locate the ImportFormats control group. Most text editors have a find or search function you can use to quickly find this group heading. Then add the following line:
This assumes 09 is not already being used. Here is an example:
< ImportFormats >
09=;XM;XML Import;WXMW32->WXMImportXML
Setting Up the XML Message Format
To send a message from Documaker Workstation to a message handling program such as IDS or MQSeries, you must add an option to either the ImportFormats or AFEProcedures control groups.
One example of sending and receiving a message from Documaker Workstation to a message handling program is to retrieve an archived record from Documaker Workstation via Docupresentment. You can do this two ways:
• Set it up as an import hook by adding the WXMImportXMLArchive function to ImportFormats control group.
< ImportFormats >
07=;XR;XML Import from IDS;WXMW32->WXMImportXMLArchive
(This assumes 07 is not already being used.)
• Set it up as an entry hook by specifying the WXMEntryHookExtXMLLoad function as the parameter for EntryFormset option in the AFEProcedures control group.
< AFEProcedures >
EntryFormset = WXMW32->WXMEntryHookExtXMLLoad
For this import format Enter...
XML 09=;XM;XML Import;WXMW32->WXMImportXML

Introduction
6
SETTING UP DOCUPRESENTMENT
If you are using Docupresentment as the message server, you must also add the INI options shown below to let Documaker Workstation retrieve an archived record from Docupresentment and load data into a form set before any data is entered by a user.
The archived record is retrieved using the Key1, Key2 and KeyID entered on the New Form Set window. For this to happen, you must set up the following request type in the DOCSERV.INI file for Docupresentment:
< ReqType:GetXML>
function = atcw32->ATCLogTransaction
function = atcw32->ATCLoadAttachment
function = atcw32->ATCUnloadAttachment
function = dprw32->DPRSetConfig
function = dprw32->DPRLocateOneRecord,Key1,Key2,KeyID
function = dprw32->DPRRetrieveFormset
function = dprw32->DPRPrint
function = dprw32->DPRProcessTemplates
function = atcw32->ATCSendFile, DOCC_XML, SENDBACKPAGE, TEXT
You can use any name for the archive library, as long as the same MRL name is used in Documaker Workstation.
You can set up this feature as an entry or import hook:
< AFEProcedures >
EntryFormset = WXMOS2->WXMEntryHookExtXMLLoad
or
< ImportFormats >
07=;XR;XML Import from IDS;WXMW32->WXMImportXMLArchive
If you set it up as an entry or import hook, you must also set up these INI options:
< XML_Imp_Exp >
DSIUseNTUserID =
DSIVARS =
DSIIgnoreTimeoutError =
DSIAttachedVarFile =
DSIImportLevel =
DSITimeout =
DSIReqType =
DSIRecordDFD =
Option Description
DSIUseNTUserID (Optional) Set this option to Yes to use the NT user ID. The default is No. This gives you a way to pass the NT user ID in the queue instead of the normal DMWS ID.
DSIVARS (Optional) Enter variable;value, where variable is the variable name and value is its value. This lets you identify a constant list of variables to be sent in the queue.
DSIIgnoreTimeoutError (Optional) Enter Yes to continue processing if a timeout occurs. The default is No. This gives you a way to ignore a timeout when waiting on a return queue.

Setting Up the XML Add-On
7
If the request for an XML file comes back with an error, as opposed to a time-out, IDS displays an error message.
DSIAttachedVarFile (Optional) The default is DOCC_XML. Set this option to the attachment name if it differs from DOCC_XML. This gives you a way to specify the variable name the XML file is attached to.
DSIImportLevel (Optional) This option is typically used by programmers. Enter 2 if you want the hook to operate on the FAP_MSGOPEN level. Enter 3 if you want it to operate on the FAP_MSGRUN level. The default is 2.
DSITimeout (Optional) Enter the number of milliseconds you want for the time-out. The default is 60000 milliseconds or 60 seconds.
DSIReqType (Optional) Enter the name of the request type of the message placed in the queue. The default is GETXML.
DSIRecordDFD (Optional) Enter the name of a DFD file. The system tries to match variable fields sent in the request to field values in this DFD file. It then attaches the DFD record to the end of the message.
Option Description

Introduction
8
Using the Parser
The system uses the Expat XML parser, which was originally developed for Netscape. It is a third-party library. You cannot plug in your own parser. Here are some links if you want more information on Expat:
http://expat.sourceforge.net/
http://sourceforge.net/projects/expat/
The Expat parser supports these encodings:
• UTF-8
• ISO-8859-1
• US-ASCII
You should be able to use any of these encodings to pass information to Docupresentment, DSI APIs, or Documaker. Docupresentment sends back UTF-8.
Byte order marks Some XML editors and software add the Byte Order Mark (BOM) to the beginning of the XML file, starting at offset 1. For example, if your XML file has UTF-8 encoding, the first three bytes of your XML file would contain...
EE BB BF
If, however, you open this file in a browser, you will not see this information. Furthermore, not all text editors display these values file. One sure way to find out if your XML file includes the BOM is to view the file using the Type DOS command.
The GenData program can handle XML files which include the BOM, but you must allow for this offset went you define the SeachMask option. Here are some examples:
If the BOM is included for UTF-8, define the SearchMask option as shown here:
< ExtractKeyField >
SeachMask = 4,<?xml
If the BOM is not included, define the SearchMask option as shown here:
< ExtractKeyField >
SeachMask = 1,<?xml
If you define the SearchMask option incorrectly, the GenData program will not create transaction trigger records.

Setting Up the XML Add-On
9
XML FILE FORMAT
Here is an example of the format of the XML file the system creates:
Form set global data
Group
Form
Multi-page image
Multi-line field
Form global fields
Recipient information
<?xml version="1.0" encoding="UTF-8"?>
<DOCUMENT TYPE="RPWIP" VERSION="10.2">
<DOCSET NAME="">
<FIELD NAME="POLICY NBR">P1234-1</FIELD>
<FIELD NAME="RENEWAL NBR">1234-2</FIELD>
<FIELD NAME="AGENT'S NBR">6789</FIELD>
<FIELD NAME="EFFECT DATE">10/1/02</FIELD>
<FIELD NAME="EXPIRE DATE">10/1/03</FIELD>
<FIELD NAME="INSURED NAME">John A. Doe</FIELD>
<FIELD NAME="ADDR1">2345 Anystreet</FIELD>
<FIELD NAME="CITY">Anytown</FIELD>
<FIELD NAME="STATE">GA</FIELD>
<FIELD NAME="ZIP CODE">30339</FIELD>
<FIELD NAME="BUSINESS DESC1">Business</FIELD>
<FIELD NAME="BUSINESS DESC2">Personal</FIELD>
<FIELD NAME="BUSINESS DESC3">Property</FIELD>
<FIELD NAME="DATE">09/27/02</FIELD>
<GROUP NAME="" NAME1="DOCUCORP PACKAGE"NAME2="PROFESSIONAL INSURANCE">
<FORM NAME="Professional Dec">
<DESCRIPTION>Professional Declarations</DESCRIPTION>
<FIELD NAME="FORM LINE1">Form Letter</FIELD>
<RECIPIENT NAME="AGENT" COPYCOUNT="1"/>
<RECIPIENT NAME="HOME OFFICE" COPYCOUNT="1"/>
<RECIPIENT NAME="INSURED" COPYCOUNT="1"/>
<SHEET>
<PAGE>
<SECTION NAME="profdec"/>
</PAGE>
</SHEET>
</FORM>
<FORM NAME="Form Letter">
<DESCRIPTION>Form Letter</DESCRIPTION>
<RECIPIENT NAME="AGENT" COPYCOUNT="1"/>
<RECIPIENT NAME="HOME OFFICE" COPYCOUNT="1"/>
<RECIPIENT NAME="INSURED" COPYCOUNT="1"/>
<SHEET>
<PAGE>
<SECTION NAME="let~tbl">
<FIELD NAME="Coverage">Automobile</FIELD>
<FIELD NAME="Extra">
<P><FONT SIZE="12"FACE="Univers ATT"
Page
Multi-page form
Image local fields

Introduction
10
Keep in mind...
• DAPOPTIONS should have a value of M for multi-page FAP images. There are other FAP image options, but only M is applicable in XML.
Use DAPINSTANCE to provide a page number for multi-page FAP images. If the image does not span multiple pages, omit the DAPINSTANCE value.
• When you have multiple XML transactions within a single file, separate each transaction with a line feed. This is a requirement of Documaker software, not the XML parser.
• Although you do not have to include line feeds inside the XML for a transaction, Docucorp suggests you add a line feed after each element tag. This makes it easier to read the file and helps in debugging your XML. A message like
Line 255, column 8, syntax is incorrect
is easier to diagnose than
Line 1, column 156780, syntax is incorrect.
<PAGE>
<SECTION NAME="let~tbl">
<DAPINSTANCE VALUE="2"/>
<DAPOPTIONS VALUE="M"/>
</SECTION>
</PAGE>
</SHEET>
</FORM>
</GROUP>
</DOCSET>
</DOCUMENT>
Indicates a second page

11
Chapter 2
Importing and Exporting XML Files with Documaker Workstation
This chapter tells you how to set up your system to import and export XML files while using Documaker Workstation (PPS).
These topics are discussed:
• Modifying INI Files on page 12
• Creating an XML Export File on page 13
• Example Documaker XML File Format on page 15
• Importing a Documaker XML File on page 20
• Transforming XML Files on page 21
NOTE: To import and export XML files in PPS, you must purchase a separate license for this add-on feature. Contact your sales representative for more information.
Importing and Exporting XML Files with Documaker Workstation
12
MODIFYING INIFILES
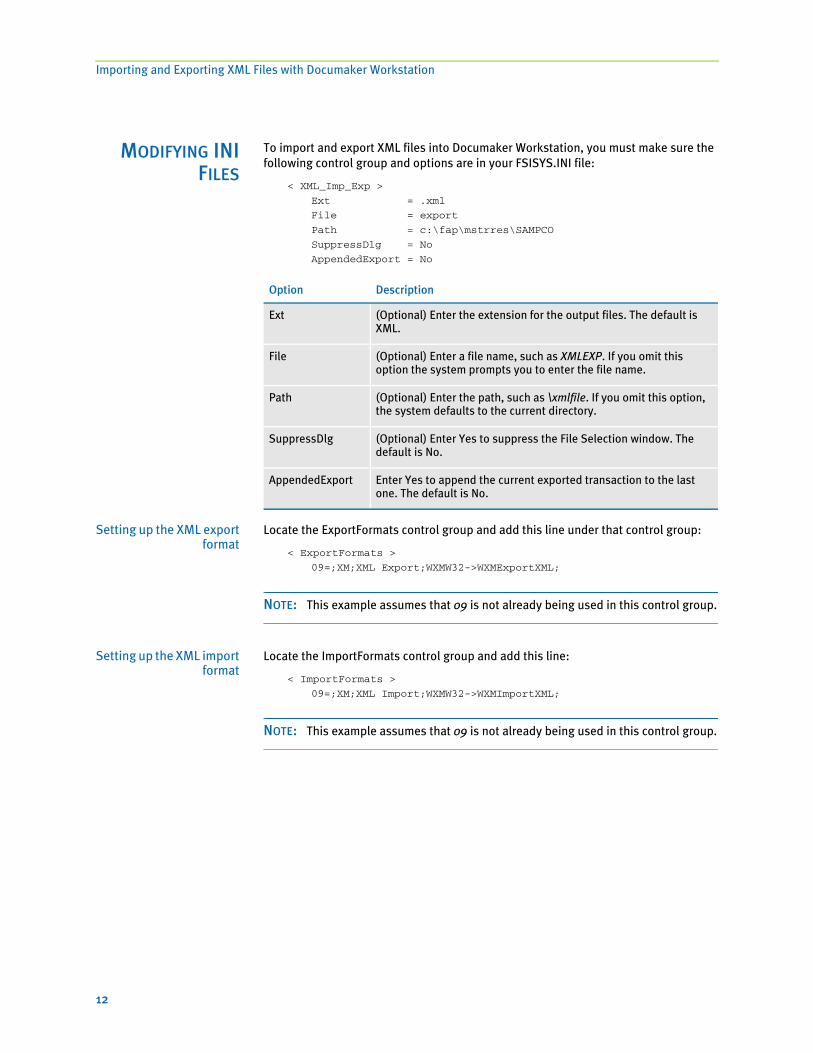
To import and export XML files into Documaker Workstation, you must make sure the following control group and options are in your FSISYS.INI file:
< XML_Imp_Exp >
Ext = .xml
File = export
Path = c:\fap\mstrres\SAMPCO
SuppressDlg = No
AppendedExport = No
Setting up the XML exportformat
Locate the ExportFormats control group and add this line under that control group:
< ExportFormats >
09=;XM;XML Export;WXMW32->WXMExportXML;
NOTE: This example assumes that 09 is not already being used in this control group.
Setting up the XML importformat
Locate the ImportFormats control group and add this line:
< ImportFormats >
09=;XM;XML Import;WXMW32->WXMImportXML;
NOTE: This example assumes that 09 is not already being used in this control group.
Option Description
Ext (Optional) Enter the extension for the output files. The default is XML.
File (Optional) Enter a file name, such as XMLEXP. If you omit this option the system prompts you to enter the file name.
Path (Optional) Enter the path, such as \xmlfile. If you omit this option, the system defaults to the current directory.
SuppressDlg (Optional) Enter Yes to suppress the File Selection window. The default is No.
AppendedExport Enter Yes to append the current exported transaction to the last one. The default is No.

Creating an XML Export File
13
CREATING AN XMLEXPORT FILE
To create an XML export file, follow these steps:
1 Start Documaker Workstation (PPS). Select the File, New option.
2 Complete the Form Selection window and press Ok.
3 Enter data on the forms and complete the form set using the File, Complete option.
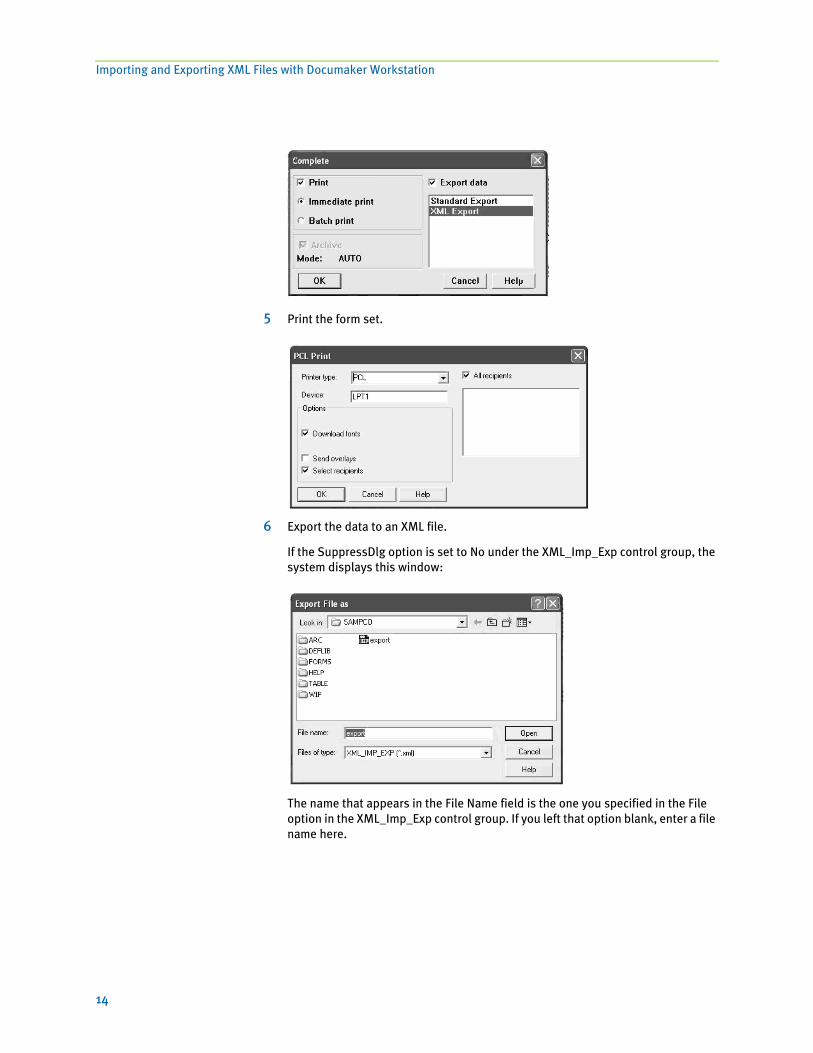
4 Next, check the Print and Export Data fields. Then click XML Export and Ok.
Importing and Exporting XML Files with Documaker Workstation
14
5 Print the form set.
6 Export the data to an XML file.
If the SuppressDlg option is set to No under the XML_Imp_Exp control group, the system displays this window:
The name that appears in the File Name field is the one you specified in the File option in the XML_Imp_Exp control group. If you left that option blank, enter a file name here.

Example Documaker XML File Format
15
EXAMPLEDOCUMAKER XML
FILE FORMAT
The XML file created from Documaker Workstation (PPS) should look similar to the file excerpts shown below.
<?xml version="1.0" encoding="UTF-8"?>
<DOCUMENT TYPE="RPWIP" VERSION="10.3">
<DOCSET NAME="">
<FXRFILE NAME="rel102sm"/>
<GROUP NAME="" NAME1="DOCUCORP PACKAGE" NAME2="VERSION 103">
<FORM NAME="Tersub - Basic" OPTIONS="R">
<DESCRIPTION>Tersub - Basic Paragraph Assem</DESCRIPTION>
<FIELD NAME="FIELDTwo">8:30 AM</FIELD>
<FIELD NAME="FIELDThree">5:30PM</FIELD>
<RECIPIENT NAME="AGENT" COPYCOUNT="1" CODE="" SEQUENCE="1"/>
<RECIPIENT NAME="HOME OFFICE" COPYCOUNT="1" CODE=""
SEQUENCE="2"/>
<RECIPIENT NAME="INSURED" COPYCOUNT="1" CODE="" SEQUENCE="3"/>
:
</FORM>
</GROUP>
</DOCSET>
</DOCUMENT>
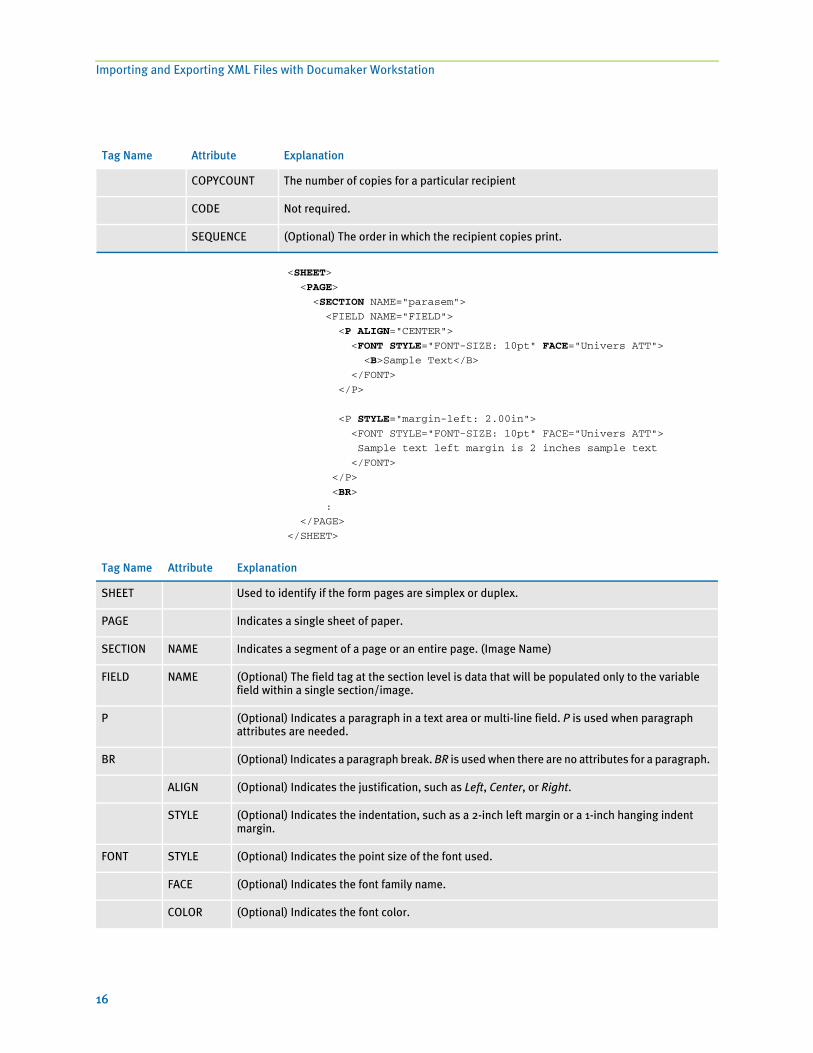
This table lists the system-generated tag names and attributes and gives an explanation of each.
Tag Name Attribute Explanation
?xml The XML declaration line
DOCUMENT TYPE The Documaker Standard Header. The attribute Type is hard-coded to be exported as RPWIP.
VERSION The version of the software being used.
DOCSET NAME The name of the document set that contains all forms required to process a single transaction, which is usually the FORM.DAT file.
GROUP NAME1, NAME2, NAME3
The key names used in the FORM.DAT file to group a set of common forms, such as Key1 = Company, Key2 = LOB, and so on.
FORM NAME The name of a single document containing one or more pages and options that define the form. See Form options on page 19 for more information.
DESCRIPTION (Optional) A user-defined description of the form.
FIELD NAME (Optional) A field tag can be at the document, form, or section level, depending on the field scope. Fields tags at the...- Document level will be populated to all identically named variable fields in all images and all forms in a form set.- Form level will be populated to all identically named variable fields in all images in the current form.- Section level will be populated only to the variable field within a single section/image.
RECIPIENT NAME The name used to identify who receives a copy or copies of a form set, or any part of a form set.
Importing and Exporting XML Files with Documaker Workstation
16
<SHEET>
<PAGE>
<SECTION NAME="parasem">
<FIELD NAME="FIELD">
<P ALIGN="CENTER">
<FONT STYLE="FONT-SIZE: 10pt" FACE="Univers ATT">
<B>Sample Text</B>
</FONT>
</P>
<P STYLE="margin-left: 2.00in">
<FONT STYLE="FONT-SIZE: 10pt" FACE="Univers ATT">
Sample text left margin is 2 inches sample text
</FONT>
</P>
<BR>
:
</PAGE>
</SHEET>
COPYCOUNT The number of copies for a particular recipient
CODE Not required.
SEQUENCE (Optional) The order in which the recipient copies print.
Tag Name Attribute Explanation
Tag Name Attribute Explanation
SHEET Used to identify if the form pages are simplex or duplex.
PAGE Indicates a single sheet of paper.
SECTION NAME Indicates a segment of a page or an entire page. (Image Name)
FIELD NAME (Optional) The field tag at the section level is data that will be populated only to the variable field within a single section/image.
P (Optional) Indicates a paragraph in a text area or multi-line field. P is used when paragraph attributes are needed.
BR (Optional) Indicates a paragraph break. BR is used when there are no attributes for a paragraph.
ALIGN (Optional) Indicates the justification, such as Left, Center, or Right.
STYLE (Optional) Indicates the indentation, such as a 2-inch left margin or a 1-inch hanging indent margin.
FONT STYLE (Optional) Indicates the point size of the font used.
FACE (Optional) Indicates the font family name.
COLOR (Optional) Indicates the font color.

Example Documaker XML File Format
17
<P>
<FONT STYLE="FONT-SIZE: 10pt" FACE="Univers ATT">
Skywire Software’s customer and technical support personnel
are available to answer any questions you may having concerning
your systems. You can call them between the hours of
<INPUT NAME="FIELDTwo" VALUE="8:30 AM" SIZE="7" MAXLENGTH="25"
ACCESSKEY="F"/>
:
</FONT>
</P>
<BR>
<P>
<UL TYPE="CIRCLE">
<LI>
<FONT STYLE="FONT-SIZE: 10pt" FACE="Univers ATT">Sample Text</FONT>
</LI>
<LI>
<FONT STYLE="FONT-SIZE: 10pt" FACE="Univers ATT">Sample Text</FONT>
</LI>
</UL>
</P>
B (Optional) Indicates bold text.
I (Optional) Indicates italicized text.
U (Optional) Indicates underlined text.
Tag Name Attribute Explanation
Tag Name Attributes Explanation
INPUT NAME (Optional) Indicates the name of an embedded variable field.
VALUE (Optional) Contains the data in the variable field.
SIZE (Optional) Indicates the length of the data.
MAXLENGTH (Optional) Indicates the length of the variable field.
ACCESSKEY (Optional) Specifies the scope of the field. Enter G (global), F (form global), or L (image local)

Importing and Exporting XML Files with Documaker Workstation
18
UL TYPE (Optional) Indicates an unordered bullet list, such as one using symbol bullets. The type of bullet can be circle, square, or disc.When importing text areas and multi-line fields from an XML file, the system modifies the default bullet size to match that used in Image Editor and Entry. This size is one-third of the font size. This only affects imported XML files which contain unordered bullet lists.
OL TYPE (Optional) Indicates an ordered bullet list, such as a numbered list or an outline. The type can be:- Arabic number (1, 2, 3, and so on)- Upper case letter (A, B, C, and so on)- Lower case letter (a, b, c, and so on)- Upper case Roman numeral (I, II, III, IV, and so on)- Lower case Roman numeral (i, ii, iii, iv, and so on)
LI (Optional) Indicates a bullet list item.
Tag Name Attributes Explanation
Example Documaker XML File Format
19
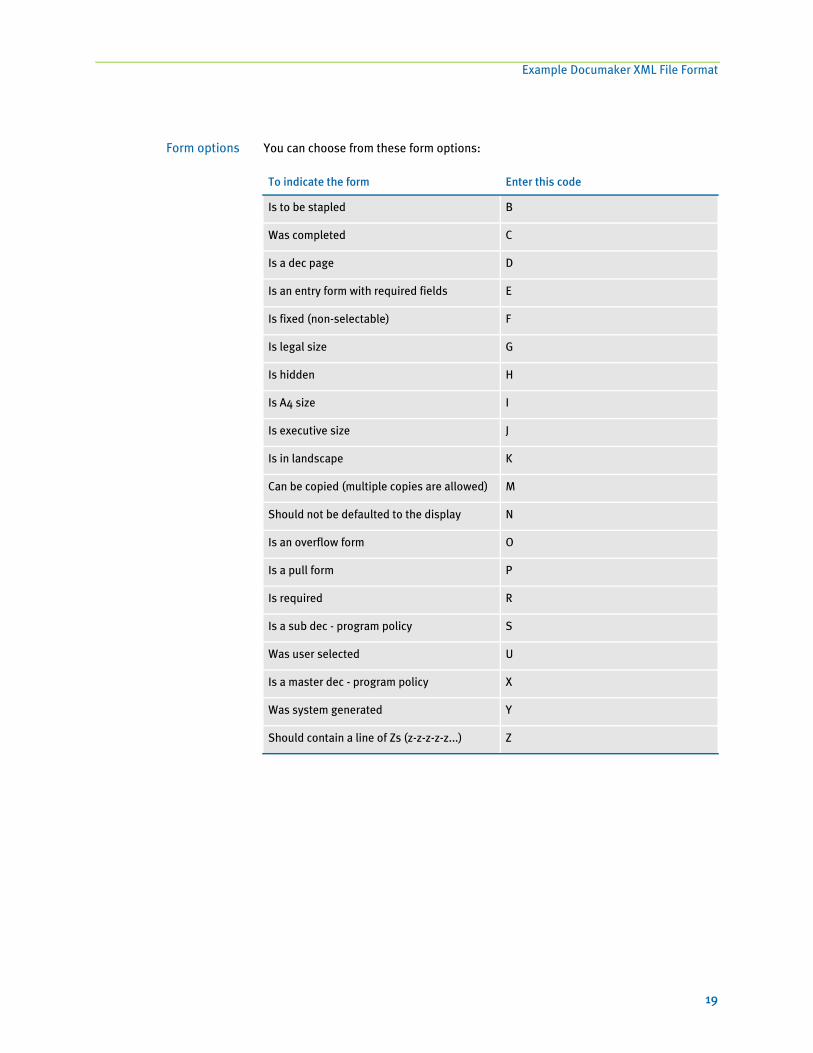
Form options You can choose from these form options:
To indicate the form Enter this code
Is to be stapled B
Was completed C
Is a dec page D
Is an entry form with required fields E
Is fixed (non-selectable) F
Is legal size G
Is hidden H
Is A4 size I
Is executive size J
Is in landscape K
Can be copied (multiple copies are allowed) M
Should not be defaulted to the display N
Is an overflow form O
Is a pull form P
Is required R
Is a sub dec - program policy S
Was user selected U
Is a master dec - program policy X
Was system generated Y
Should contain a line of Zs (z-z-z-z-z...) Z

Importing and Exporting XML Files with Documaker Workstation
20
IMPORTING ADOCUMAKER XML
FILE
Follow these steps to import a Documaker XML file:
1 Start Documaker Workstation (PPS). Select the File, New option. The Form Selection window appears. From the Form Selection window, click Import.
2 Click XML Import as the format.
3 Select the XML file you want to import.
4 Complete the Forms Selection window and click Ok.
Your form set should be populated with data from your XML import file.

Transforming XML Files
21
TRANSFORMINGXML FILES
You can export an XML file with XSLT transformation. This lets you transform the output XML file into another format, such as HTML or text. The final output format is determined by the XSLT template you choose.
The system transforms an export file with the XSLTW32.EXE program using the XSL template you specified with the XSLTName option.
To enable the export, add this option to the ExportFormats control group:
< ExportFormats >
01 =;Mx;Export with XSL;WXMW32->WXMExportWithXSL
Then add these options:
< ExportWithXSL >
XSLTName =
Executable =
Debug =
NOTE: The default control group used by the WXMExportWithXSL rule is the ExportWithXSL control group. If you specify another control group and one of its options are missing, the system uses the values from the ExportWithXSL control group.
You can define several INI options in the ExportFormats control group if you want to display multiple output processing options, each with its own XSL template. Here is an example:
< ExportFormats >
01 =;M1;Export with XSL;WXMW32->WXMExportWithXSL
02 =;M2;Export with XSL;WXMW32->WXMExportWithXSL
Each option listed under the ExportFormats control group requires a matching ExportWithXSL control group:
< ExportWithXSL:M1 >
XSLTName =
Executable =
Debug =
< ExportWithXSL:M2 >
XSLTName =
Executable =
Debug =
Appending outputtransformations
You can append multiple XSLT output transformations to the same file using this INI option:
Option Description
XSLTName The full or relative path and name of the XSLT template.
Executable (Optional) The full path and name of the program. If omitted, the system looks for the XSLTW32.EXE program in the directory where the AFEMNW32.EXE program is located.
Debug (Optional) Enter Yes to leave temporary files in place.

Importing and Exporting XML Files with Documaker Workstation
22
< ExpFile_CD >
AppendedExport = Yes
This example transforms an XML export into a semicolon-delimited output file you can import into Excel. It also uses the XSLTW32.EXE program for the transformation.
First, you need these INI options:
< ExportFormats >
01 =;M1;Export with XSL;WXMW32->WXMExportWithXSL
< ExportWithXSL:M1 >
XSLTName = x:\rp\mstrres\aeic\xsl\output1.xsl
Executable =
Debug = No
And this XSL style sheet:
<?xml version="1.0" encoding="UTF-8"?>
<xsl:stylesheet
xmlns:xsl="http://www.w3.org/1999/XSL/Transform"
version="1.0">
<xsl:output method="text" encoding="ISO-8859-1" />
<!-- global variables -->
<xsl:template match="/">
<xsl:call-template name="process"/>
</xsl:template>
<xsl:template name="process">
<xsl:variable name="semicolon" select="';'"/>
<xsl:variable name="root" select="DOCUMENT/DOCSET"/>
<xsl:variable name="policy" select="$root/
FIELD[@NAME='POLICY']"/>
<xsl:variable name="insnam" select="$root/
FIELD[@NAME='INSNAM']"/>
<xsl:variable name="insnam2" select="$root/
FIELD[@NAME='INSNAM2']"/>
<xsl:variable name="insad1" select="$root/
FIELD[@NAME='INSAD1']"/>
<xsl:variable name="insad2" select="$root/
FIELD[@NAME='INSAD2']"/>
<xsl:variable name="inszip" select="$root/
FIELD[@NAME='INSZIP']"/>
<xsl:variable name="agent" select="$root/
FIELD[@NAME='AGENT']"/>
<xsl:variable name="effdte" select="$root/
FIELD[@NAME='EFFDTE']"/>
<xsl:variable name="expdte" select="$root/
FIELD[@NAME='EXPDTE']"/>
<xsl:variable name="cddesc" select="$root/
FIELD[@NAME='CDDESC_BUSDSC']"/>
<xsl:variable name="premo_prop" select="$root/
FIELD[@NAME='PREMO_PROP']"/>
<xsl:variable name="advprem" select="$root/
FIELD[@NAME='ADVPREM']"/>
<xsl:variable name="totpre" select="$root/
FIELD[@NAME='TOTPRE']"/>
<xsl:variable name="galmt" select="$root/
FIELD[@NAME='GALMT']"/>

Transforming XML Files
23
<xsl:variable name="prcolmt" select="$root/
FIELD[@NAME='PRCOLMT']"/>
<xsl:variable name="pailmt" select="$root/
FIELD[@NAME='PAILMT']"/>
<xsl:variable name="perocc" select="$root/
FIELD[@NAME='PEROCC']"/>
<xsl:variable name="fdlmt" select="$root/
FIELD[@NAME='FDLMT']"/>
<xsl:variable name="medlmt" select="$root/
FIELD[@NAME='MEDLMT']"/>
<xsl:value-of select="concat($policy, $semicolon)"/>
<xsl:value-of select="concat($insnam, $semicolon)"/>
<xsl:value-of select="concat($insnam2, $semicolon)"/>
<xsl:value-of select="concat($insad1, $semicolon)"/>
<xsl:value-of select="concat($insad2, $semicolon)"/>
<xsl:value-of select="concat($inszip, $semicolon)"/>
<xsl:value-of select="concat($agent, $semicolon)"/>
<xsl:value-of select="concat($effdte, $semicolon)"/>
<xsl:value-of select="concat($expdte, $semicolon)"/>
<xsl:value-of select="concat($cddesc, $semicolon)"/>
<xsl:value-of select="concat($premo_prop, $semicolon)"/>
<xsl:value-of select="concat($advprem, $semicolon)"/>
<xsl:value-of select="concat($totpre, $semicolon)"/>
<xsl:value-of select="concat($galmt, $semicolon)"/>
<xsl:value-of select="concat($prcolmt, $semicolon)"/>
<xsl:value-of select="concat($pailmt, $semicolon)"/>
<xsl:value-of select="concat($perocc, $semicolon)"/>
<xsl:value-of select="concat($fdlmt, $semicolon)"/>
<xsl:value-of select="concat($medlmt, $semicolon)"/>
<xsl:text>
</xsl:text>
</xsl:template>
</xsl:stylesheet>
And this XML export file:
<?xml version="1.0" encoding="UTF-8" ?>
- <DOCUMENT TYPE="RPWIP" VERSION="10.3">
- <DOCSET NAME="">
<FIELD NAME="POLICY">A108</FIELD>
<FIELD NAME="INSNAM">SAM MALONE</FIELD>
<FIELD NAME="INSNAM2">CHEERS, INC.</FIELD>
<FIELD NAME="NEW">X</FIELD>
<FIELD NAME="INSAD1">123 MAIN ST</FIELD>
<FIELD NAME="INSAD2">SUITE 100</FIELD>
<FIELD NAME="INSCTY">ATLANTA</FIELD>
<FIELD NAME="INSST">GA</FIELD>
<FIELD NAME="INSZIP">23033</FIELD>
<FIELD NAME="AGENT">12345</FIELD>
<FIELD NAME="AGYNAM">Docucorp Insurance Agency</FIELD>
<FIELD NAME="AGYAD1">2727 Paces Ferry Road S.E.</FIELD>
<FIELD NAME="AGYAD2">Suite II-900</FIELD>
<FIELD NAME="AGYCTY">Atlanta</FIELD>
<FIELD NAME="AGYST">GA</FIELD>
<FIELD NAME="AGYZIP">30339</FIELD>
<FIELD NAME="PRMSTE">GA</FIELD>
<FIELD NAME="EFFDTE">07/05/2003</FIELD>

Importing and Exporting XML Files with Documaker Workstation
24
<FIELD NAME="EXPDTE">07/05/2004</FIELD>
<FIELD NAME="TERM">366 DAYS</FIELD>
<FIELD NAME="CDDESC_BUSDSC">BAR & GRILL</FIELD>
<FIELD NAME="PREMO_PROP">12,000.00</FIELD>
<FIELD NAME="ADVPREM">12,000.00</FIELD>
<FIELD NAME="FEEDESC1">Policy Tax</FIELD>
<FIELD NAME="FEEDESC1 TAX">3%</FIELD>
<FIELD NAME="FEEAMT1">360.00</FIELD>
<FIELD NAME="FEEDESC2">Stamping Fee</FIELD>
<FIELD NAME="FEEAMT2">250.00</FIELD>
<FIELD NAME="OTHCHG">610.00</FIELD>
<FIELD NAME="TOTPRE">12,610.00</FIELD>
<FIELD NAME="CSIGNEDLOC">Atlanta, GA</FIELD>
<FIELD NAME="SIGNED DATE">07/30/2003</FIELD>
<FIELD NAME="SIGNED TIME">09:25:18</FIELD>
<FIELD NAME="OPINIT">DOCUCORP</FIELD>
<FIELD NAME="SIGNATURE">Authorized Representative</FIELD>
<FIELD NAME="GALMT">1,000,000</FIELD>
<FIELD NAME="PRCOLMT">1,000,000</FIELD>
<FIELD NAME="PAILMT">1,000,000</FIELD>
<FIELD NAME="PEROCC">1,000,000</FIELD>
<FIELD NAME="FDLMT">1,000,000</FIELD>
<FIELD NAME="MEDLMT">1,000,000</FIELD>
- <GROUP NAME="" NAME1="American Equity" NAME2="INTERLINE">
- <FORM NAME="FS100 10-2000">
<DESCRIPTION>Schedule of Forms/End</DESCRIPTION>
<FIELD NAME="FORM DESC LINE">Forms Applicable - INTERLINE</FIELD>
<FIELD NAME="FORM DESC LINE #003">A100J 02-1999 Policy Jacket -
AEIC</FIELD>
<FIELD NAME="FORM DESC LINE #004">A100 03-1997 Common Policy Dec -
AEIC</FIELD>
<FIELD NAME="FORM DESC LINE #005">A101 03-1997 Minimum Earned
Premium Endt</FIELD>
<FIELD NAME="FORM DESC LINE #006">A104 10-1998 Service of Suit</
FIELD>
<FIELD NAME="FORM DESC LINE #007">IL0017 11-1998 Common Policy
Conditions</FIELD>
<FIELD NAME="FORM DESC LINE #008">IL0021 04-1998 Nuclear Energy
Liab Excl Endt</FIELD>
<FIELD NAME="FORM DESC LINE #010">Forms Applicable - GENERAL
LIABILITY</FIELD>
<FIELD NAME="FORM DESC LINE #012">CL150 01-2000 General Liab
Coverage Part</FIELD>
<FIELD NAME="FORM DESC LINE #013">L003 03-1997 Amendment of Premium
Condition</FIELD>
<FIELD NAME="FORM DESC LINE #014">L005 01-2000 Contractual Liab
Limitation</FIELD>
<FIELD NAME="FORM DESC LINE #015">L007 07-1998 Ded Liab Ins-w/Costs
per Claim</FIELD>
<FIELD NAME="FORM DESC LINE #016">L150 01-2000 Additional
Exclusions</FIELD>
<FIELD NAME="FORM DESC LINE #017">CG0001 07-1998 Comm General Liab
Cov Form</FIELD>
<FIELD NAME="FORM DESC LINE #018">CG2160 09-1998 Excl - Year 2000
Computer Prob</FIELD>

Transforming XML Files
25
<RECIPIENT NAME="EXTRA COPY" COPYCOUNT="1" />
<RECIPIENT NAME="GENERAL AGENT" COPYCOUNT="1" />
<RECIPIENT NAME="HOME OFFICE" COPYCOUNT="1" />
<RECIPIENT NAME="ORIGINAL" COPYCOUNT="1" />
<RECIPIENT NAME="RETAIL AGENT" COPYCOUNT="1" />
- <SHEET>
- <PAGE>
<SECTION NAME="FORMSCHA" />
</PAGE>
</SHEET>
</FORM
</DOCSET>
</DOCUMENT>
The output file looks like this:
A108;SAM MALONE;CHEERS, INC.;123 MAIN ST;SUITE 100;23033;12345;07/
05/2003;07/05/2004;; 12,000.00;
12,000.00;;1,000,000;1,000,000;1,000,000;1,000,000;1,000,000;1,000,000;
You can import this file into an Excel spreadsheet.

Importing and Exporting XML Files with Documaker Workstation
26

27
Chapter 3
Importing and Exporting XML Files with Documaker Server
To import and export XML files in Documaker Server, you use the ImportXMLFile and ImportXMLExtract rules. These rules work similar to the other import rules, such as ImportFile.
For more information on these rules, see
• ImportXMLExtract on page 28
• ImportXMLFile on page 31
Keep in mind that importing XML is not the same as using an XML file as your extract file. Import assumes you are using a specific file layout that describes your document in a predefined manner.

Importing and Exporting XML Files with Documaker Server
28
ImportXMLExtract
Use this form set rule (level 2) to import a file which consists of one or more XML transactions into the GenData program for processing. Using this file, the GenData program creates the recipient batch, NAFile, POLFile, and NewTrn files that you can print, archive, or both using the GenPrint and GenArc programs.
You append multiple export files to create the import XML file. The export files are created using the Documaker Workstation XML Export option. This illustration shows an example file comprised of export files appended to one another:
Syntax ImportXMLExtract;;;
NOTE: You can only use this rule for single-step processing.
Transaction 1<?xml version="1.0"?>
<Document Type="Docucorp Universal" Version="5.0">
<DocSet>
<ArcEffectiveDate></ArcEffectiveDate>
<Library Name="Docucorp Insurance"></Library>
<Key1 Name=”Company”>DocuInsur</Key1>
<KeyY2 Name=”Lob”>Package Policy</Key2>
<TransactionID Name="PolicyNum">1010j</TransactionID>
…
…
Transaction 2<?xml version="1.0"?>
<Document Type="Docucorp Universal" Version="5.0">
<DocSet>
<ArcEffectiveDate></ArcEffectiveDate>
<Library Name="Docucorp Insurance"></Library>
<Key1 Name=”Company”>DocuInsur</Key1>
<KeyY2 Name=”Lob”>Package Policy</Key2>
<TransactionID Name="PolicyNum">1110j</TransactionID>
…
…
Transaction 3<?xml version="1.0"?>
<Document Type="Docucorp Universal" Version="5.0">
<DocSet>
<ArcEffectiveDate></ArcEffectiveDate>
<Library Name="Docucorp Insurance"></Library>
<Key1 Name=”Company”>DocuInsur</Key1>
<KeyY2 Name=”Lob”>Package Policy</Key2>
<TransactionID Name="PolicyNum">1210j</TransactionID>
…
…

29
Although there are no parameters for this rule keep in mind:
• Create a simplified AFGJOB.JDT file when you use this rule. For instance, omit these rules:
LoadRcpTbl
LoadExtractData
RunSetRcpTbl
CreateGlbVar
LoadDDTDefs
InitOvFlw
SetOvFlwSym
ResetOvFlw
NOTE: For information on these and other rules, see the Rules Reference.
• Use the NoGenTrnTransactionProc rule because the XML file has no transaction information on the first line.
• Place the ImportXMLExtract rule in the <Base Form Set Rules> section of the AFGJOB.JDT file after the BuildFormList rule or any custom rule that creates a form set.
• In the TRN_File control group, set MaxExtRecLen option to the length of the longest record in the import file.
• In the TRN_Fields control group, include only the Key1, Key2, and KeyID options. Set these options to dummy data, because the GVM variables are set to the data values in the XMLTags2GVM control group during processing.
• Define the XMLTags2GVM control group in your FSISYS.INI file as shown here:
< XMLTags2GVM >
GVM = XMLTag, (Req/Opt)
Where GVM is the name of the GVM variable and XMLTag is the tag name in the XML file. Include Req or Opt to specify whether it is required or optional. If it is required and is not present in the XML file, processing will terminate. Here is an example:
< XMLTags2GVM >
Key1 = Key1, Req
Key2 = Key2, Req
KeyID = TransactionID, Opt
Example Assume you have the following items defined in your master resource library. See XML File Format on page 9 for an example of an import file in the standard XML file format.
Here is an example of the INI options you need in your FSISYS.INI file:
< Data >
AFGJOBFile = .\deflib\afgjob.jdt
ExtrFile = .\extract\extrfile.xml

Importing and Exporting XML Files with Documaker Server
30
< ExtractKeyField >
SearchMask = 1,<?xml
< Key1Table >
XML = XML
< Key2Table >
XML = XML
< KeyIDTable >
XML = XML
< Trigger2Archive >
Key1 = Key1
Key2 = Key2
KeyID = KeyID
RunDate = RunDate
< TRN_Fields >
Key1 = 3,3,N
Key2 = 3,3,N
KeyID = 3,3,N
< TRN_File >
BinaryExt = N
MaxExtRecLen= 175
< XMLTags2GVM >
Key1 = Key1,Req
Key2 = Key2,Req
KeyID = TransactionID,Opt
Here is an excerpt from a sample AFGJOB.JDT file:
< Base Rules >
;RULStandardJobProc;;;
…
< Base Form Set Rules >
;NoGenTrnTransactionProc;;;
;BuildFormList;;;
;ImportXMLExtract;;;
…
…

31
ImportXMLFile
Use this form set rule (level 2) to import an XML file which specifies a Documaker Server document layout. The XML document must conform to the Documaker Standard XML format.
NOTE: Importing an XML document in this manner does not let you map additional XML information other than that specified in the Documaker Standard XML format.
Syntax ;ImportXMLFile;;option;
There are several ways to specify the import file in the option parameter:
Keep in mind:
• Create a simplified AFGJOB.JDT file when you use this rule. For instance, omit these rules:
LoadRcpTbl
LoadExtractData
RunSetRcpTbl
CreateGlbVar
LoadDDTDefs
InitOvFlw
SetOvFlwSym
ResetOvFlw
Option Description
FILE Enter the name and path of the import file.
INI Enter the INI control group and option in which the import file is defined. Separate the control group and option with a comma.
SCH Enter the search criteria and the file name data, separated by a space. The name of the file, including its path, that you want to import should be contained in the record in the file indicated by the ExtrFile option in the Data control group.The search criteria are one or more comma delimited data pairs, offsets and character string, used as the search mask for finding the record in the specified file.The file name data is a comma delimited data pair that defines the offset and length of the file name in the record defined by the search criteria parameter.
GVM Enter the global variable name (GVM) that contains the file name and path information.

Importing and Exporting XML Files with Documaker Server
32
NOTE: For information on these and other rules, see the Rules Reference.
• Use the NoGenTrnTransactionProc rule because the XML file has no transaction information on the first line.
• Place the ImportXMLExtract rule in the Base Form Set Rules section of the AFGJOB.JDT file after the BuildFormList rule or any custom rule that creates a form set.
• In the TRN_File control group, set MaxExtRecLen option to the length of the longest record in the import file.
• In the TRN_Fields control group, include only the Key1, Key2, and KeyID options. Set these options to dummy data, because the GVM variables are set to the data values in the XMLTags2GVM control group during processing.
• Define the XMLTags2GVM control group in your FSISYS.INI file as shown here:
< XMLTags2GVM >
GVM = XMLTag, (Req/Opt)
Where GVM is the name of the GVM variable and XMLTag is the tag name in the XML file. Include Req or Opt to specify required or optional. If it is required and is not present in the XML file, processing terminates. Here is an example:
< XMLTags2GVM >
Key1 = Key1, Req
Key2 = Key2, Req
KeyID = TransactionID, Opt
Example These examples show the different ways you can define the import file when you use this rule. Assume you have the following items defined in your master resource library. For an example of the standard XML file format, see XML File Format on page 9. Here are sample INI settings in your FSISYS.INI file:
< Data >
AFGJOBFile = .\deflib\afgjob.jdt
ExtrFile = .\extract\dummy.dat
< ExtractKeyField >
SearchMask = 1,XML_FILE_NAME
< Key1Table >
XML = xml
< Key2Table >
XML = xml
< KeyIDTable >
XML = xml
< Trigger2Archive >
Key1 = Key1
Key2 = Key2
KeyID = KeyID
RunDate = RunDate
< TRN_Fields >
Key1 = 1,3,N
Key2 = 5,5,N
KeyID = 10,4,N
< TRN_File >
33
BinaryExt = N
MaxExtRecLen = 175
< XMLTags2GVM >
Key1 = Key1,Req
Key2 = Key2,Req
KeyID = TransactionID,Opt
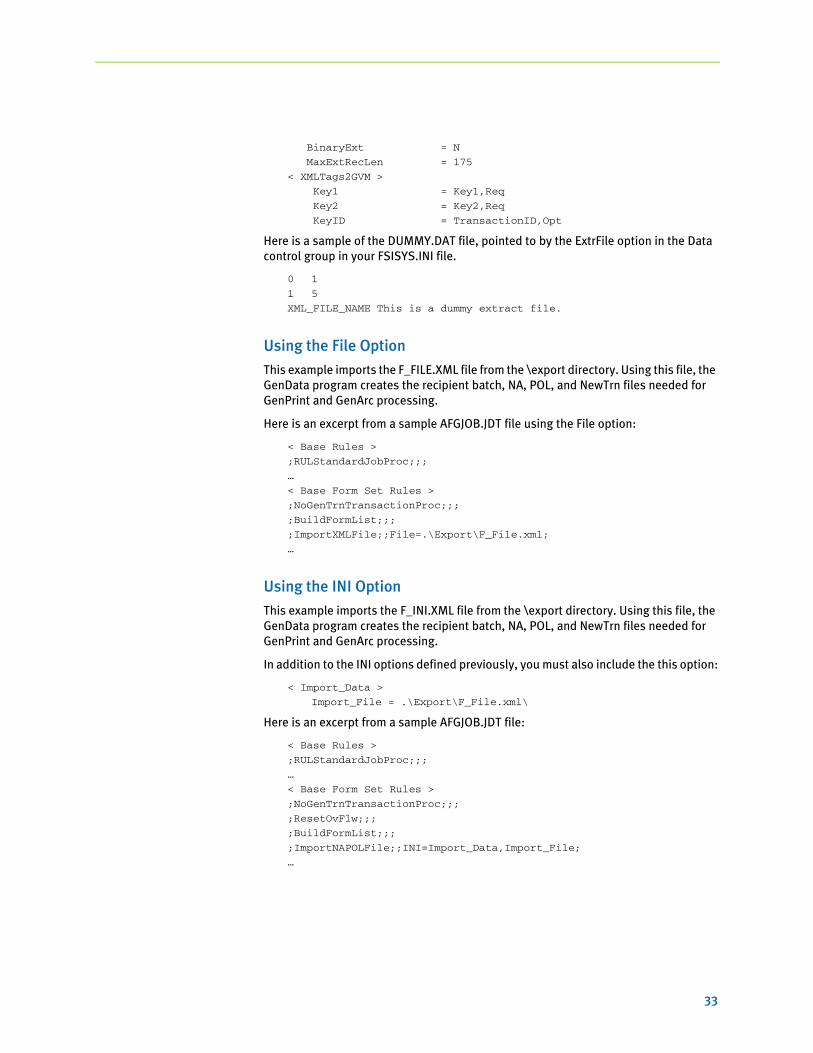
Here is a sample of the DUMMY.DAT file, pointed to by the ExtrFile option in the Data control group in your FSISYS.INI file.
0 1
1 5
XML_FILE_NAME This is a dummy extract file.
Using the File Option
This example imports the F_FILE.XML file from the \export directory. Using this file, the GenData program creates the recipient batch, NA, POL, and NewTrn files needed for GenPrint and GenArc processing.
Here is an excerpt from a sample AFGJOB.JDT file using the File option:
< Base Rules >
;RULStandardJobProc;;;
…
< Base Form Set Rules >
;NoGenTrnTransactionProc;;;
;BuildFormList;;;
;ImportXMLFile;;File=.\Export\F_File.xml;
…
Using the INI Option
This example imports the F_INI.XML file from the \export directory. Using this file, the GenData program creates the recipient batch, NA, POL, and NewTrn files needed for GenPrint and GenArc processing.
In addition to the INI options defined previously, you must also include the this option:
< Import_Data >
Import_File = .\Export\F_File.xml\
Here is an excerpt from a sample AFGJOB.JDT file:
< Base Rules >
;RULStandardJobProc;;;
…
< Base Form Set Rules >
;NoGenTrnTransactionProc;;;
;ResetOvFlw;;;
;BuildFormList;;;
;ImportNAPOLFile;;INI=Import_Data,Import_File;
…
Importing and Exporting XML Files with Documaker Server
34
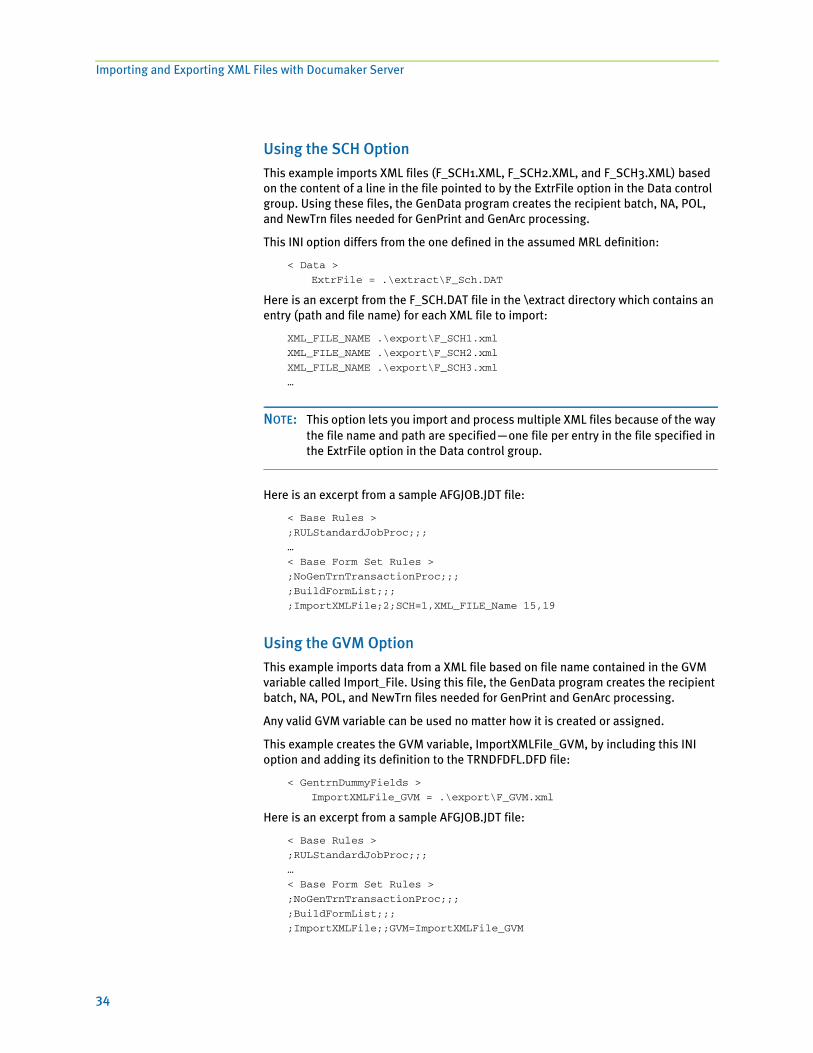
Using the SCH Option
This example imports XML files (F_SCH1.XML, F_SCH2.XML, and F_SCH3.XML) based on the content of a line in the file pointed to by the ExtrFile option in the Data control group. Using these files, the GenData program creates the recipient batch, NA, POL, and NewTrn files needed for GenPrint and GenArc processing.
This INI option differs from the one defined in the assumed MRL definition:
< Data >
ExtrFile = .\extract\F_Sch.DAT
Here is an excerpt from the F_SCH.DAT file in the \extract directory which contains an entry (path and file name) for each XML file to import:
XML_FILE_NAME .\export\F_SCH1.xml
XML_FILE_NAME .\export\F_SCH2.xml
XML_FILE_NAME .\export\F_SCH3.xml
…
NOTE: This option lets you import and process multiple XML files because of the way the file name and path are specified—one file per entry in the file specified in the ExtrFile option in the Data control group.
Here is an excerpt from a sample AFGJOB.JDT file:
< Base Rules >
;RULStandardJobProc;;;
…
< Base Form Set Rules >
;NoGenTrnTransactionProc;;;
;BuildFormList;;;
;ImportXMLFile;2;SCH=1,XML_FILE_Name 15,19
Using the GVM Option
This example imports data from a XML file based on file name contained in the GVM variable called Import_File. Using this file, the GenData program creates the recipient batch, NA, POL, and NewTrn files needed for GenPrint and GenArc processing.
Any valid GVM variable can be used no matter how it is created or assigned.
This example creates the GVM variable, ImportXMLFile_GVM, by including this INI option and adding its definition to the TRNDFDFL.DFD file:
< GentrnDummyFields >
ImportXMLFile_GVM = .\export\F_GVM.xml
Here is an excerpt from a sample AFGJOB.JDT file:
< Base Rules >
;RULStandardJobProc;;;
…
< Base Form Set Rules >
;NoGenTrnTransactionProc;;;
;BuildFormList;;;
;ImportXMLFile;;GVM=ImportXMLFile_GVM
35
Chapter 4
Using XML Extract Files
You can set up Documaker Server to use extract files in XML format. To do so, you must first set up the system, see Setting Up the XML Add-On on page 3 for more information.
NOTE: During setup, keep in mind the SuppressDlg option is not applicable for XML extract files. This option only applies when you are importing and exporting XML files.
Once you have set up the XML Add-On, you can use these rules to create an alternative data search method so you can do direct XML mapping within the Documaker Server:
This chapter contains information on these topics:
• Mapping Formatted Data from Extract Files on page 36
• Searching an XML Extract File on page 38
• Handling Overflow on page 39
• Triggering Forms and Images on page 40
• Mapping Formatted Data from Extract Files on page 36
Rule Description
UseXMLExtract Uses the extract list loaded by the transaction as the source of the XML tree.
XMLFileExtract Assumes the extract list contains the name of an external file which is the source of the XML tree.
For more information, see the Rules Reference.

Using XML Extract Files
36
MAPPINGFORMATTED DATA
FROM EXTRACTFILES
You can map data with XML markup directly into multi-line variable fields. This lets you specify...
• End of paragraph or end of line syntax (including CR/LF)
• Text formatting
• Paragraph attributes
• Bullets
and so on. Whatever is supported in Skywire Software standard XML file format for text areas is now supported for multi-line fields.
This feature is designed for data mapping from an XML extract file into a multi-line variable field in a FAP file. The data on the XML node (element and its descendants) being mapped must comply with the standard Skywire Software XML format.
This feature adds new syntax for XPath, which is not W3C standard XPath syntax. When XPath is specified, you can append the following:
.xml()
and it will return a string of XML for data mapping.
Data mapping is done by supporting the mapped data that contains the XML string — just as if it had been loaded from a file on disk.
Keep in mind...
• The data must start with element named FIELD.
• If the text area can possibly overflow to next page, set the Can Grow and Can Span Pages attributes as desired on the multi-line field. Also determine whether to set the Can Grow attribute on the image. In most cases, you should choose to include the TextMergeParagraph rule to defer formatting of text areas until embedded fields are mapped. In addition, you can use the CanSplitImage rule when you are not using the Can Span options and want the image to break across pages if the position of the image on the page warrants this action.
• You cannot have other FAP objects below the multi-line field on the same image. When these are pushed down, extra pages can be created.
• You should include the CheckImageLoaded rule when mapping multi-line variable fields, unless the FAP files are loaded via INI options
Here is an example of an XML extract file:
<?xml version="1.0" encoding="UTF-8"?>
<My_Extract_Data>
<FIELD><P>First line of data.</P><P>End of <B><U>field</U></B> data.</P></FIELD>
<KeyInfo PolicyNumber="APV 10003" State="OH" LOB="Auto" AgencyCode="5432" PrintType="Duplex" PrintAgentCopy="False" System_Date="06/02/2003"/>
<Print_Header>
....
Based on the example, this XPath syntax returns the text highlighted above in red:
/descendant::My_Extract_Data/FIELD.xml()

Mapping Formatted Data from Extract Files
37
Since the XML string returned from XPath can exceed the 1K limit of regular data mapping, the Move_It rule was enhanced to handle the mapping of an unlimited size of data (but limited to available memory).
Using the Move_It rule To get the desired result, you must add the B flag to the Move_It rule format mask. Here is an example DDT line using both examples from above:
;0;0;FIELD;0;1024;FIELD;0;1024;B;move_it;!/descendant::My_Extract_Data/FIELD.xml();N;N;N;N;3715;2899;11010;

Using XML Extract Files
38
SEARCHING ANXML EXTRACT
FILE
Keep in mind the extract list and the XML tree are separate. Once the XML tree is loaded, it remains loaded and can be searched by subsequent rules — just like any extract list.
The system lets you use these search methods:
• An XDB token reference such as ?TOKEN looked up in the XDB to get the actual search text
• The legacy Offset,Mask method such as 10,HEADERREC)
• An XML search text, such as !/descendant::Item
In most cases, the XBD token reference will be the preferred method.
An XDB entry can return either a legacy offset/length search mask or an XML search path. XML search masks must begin with an exclamation mark (!). The leading exclamation mark is not actually sent to the search routine.
You can use text movement and formatting rules, like Move_It, MoveNum, FmtDate, and FmtNumber, to do simple operations, but keep in mind some of the more complicated options may not work.
For instance, Move_It supports a same record flag. This does not work in XML searches. Likewise, Move_Num supports several binary input data types like BCD and you cannot include those in XML at present.
More complicated rules that have multiple search criteria like SetAddr, SubExtractList, and Concat do not work with XML files.

Handling Overflow
39
HANDLINGOVERFLOW
The XML search infrastructure has position support.
/descendant::Forms/child::form[position()=2]/child::field1
The 2 in this case indicates you want the second form child. Since you would not want to write the search to work with every explicit number, you must indicate where the overflow variable fits into the equation, as shown here:
/descendant::Forms/child::form[position()=****]/child::field1
The system first scans the search to see if a replacement is needed for the overflow value. In this case, it would insert the 2 (taken from the overflow variable value) and then do the actual XML search.
You can also handle overflow within overflow by specifying an overflow variable name in the search. For instance, suppose you have multiple cars and each car can have multiple drivers.
<car>
<driver>Tom<driver/>
<driver>Tim<driver/>
<car/>
<car>
<driver>Sally<driver/>
<car/>
If you had two overflow variables, one working for car and one for driver, you could create a search like this:
/descendant::car[**carvar**]/child::driver[**drivevar**]
Where the system gets two overflow variables and insert them into the search text.
Using XML Extract Files
40
TRIGGERINGFORMS AND
IMAGES
You can do simple triggering based upon the existence of a node. For example, this
/child::car
would trigger a form if car is a child of the root node. Referring back to the earlier example, you could make it trigger two of the same forms because there are two cars.
The system supports value matching. So you can do the following:
/child::car[child::driver="Tom"]
Or, you can use the RecipIf rule to trigger an image with custom rule parameters, as shown in this example:
A={!/child::car/child::driver 1,7}::if (A='Tom')::return("^1^")::end::;
If there is such a value in that element in the XML file, the image would trigger. For this to work, define the offset of the variable attribute as 1 and the length of the data you want to compare.
You can also use XML search strings such as these:
Using the ElementTextoption
Note that when the XPath specifies an element node such as
//BookStore/Book
it returns the element handle and either its element text or its first attribute value if there is no element text. If you want to use this to map a field, you can use the ElementText INI option to better control what XPath returns. For instance, here is an excerpt from an XML file:
...
< BookStore >
< Book Category = "Fiction"> </Book>
...
Since there is no text for the element/node Book in this excerpt, this XPath statement returns the first attribute value, which equals Fiction.
//BookStore/Book
With the ElementText option set to Yes, which is the default, nothing is returned. If you set this option to No, the first attribute is returned. Here is an example of the ElementText option:
< XPath >
ElementText = Yes
This string Finds
!descendant::PolicyNumber The PolicyNumber value
!descendant::Forms/child::Form All forms

Using XPath
41
USING XPATH XML path locator (XPath) complies with the standard syntax specifications (W3C standards) found in the XML Path Language, but differs in some regards because it was developed to support the Rules Processor. Because this version of XPath has some limitations, you should check the syntax using the XPATHW32 utility.
XPATH SYNTAX
Here are examples of the valid axes, function calls, signs, and operators to help you understand and use the XPath syntax.
Axes
You have these axes:
When used, an axis is always followed by a context node name separated by two colons (::). For example, the syntax descendant::para locates all para descendants of the current context node.
Name Used to locate the
ancestor Ancestors of the current context node
ancestor-or-self Ancestors of the current context node and itself
parent Parents of the current context node
descendant Descendants of the current context node
descendant-or-self Descendants of the current context node and itself
attribute Attributes of the current context node
child Children of the current context node
following-sibling Following siblings of the current context node
following Context nodes that follow the current node
preceding-sibling Preceding siblings of the current context node
preceding Context nodes that precede the current node
self Self context node

Using XML Extract Files
42
Symbols
You can use these calculation operators:
Where !=, <, >, + can be used as calculation operators in function position(), such as, [position()=2], [position()!=2], [3+i], [position()<5], and so on. The equals sign (=) is also used for evaluations such as @Name=’Auto’.
You can use these symbols in a valid XPath:
Where the pair of brackets ( [ ] ) enclose a condition for evaluation, the at symbol (@) is an abbreviation of the attribute, the asterisk (*) is used for a wild card search, and others are used in a valid XPath, as shown below.
Functions
You can use these functions:
= != < > + -
/ // * :: [ ] @
Function Returns
concat(string, string, string… The concatenation of the strings
last() The last element in the selection
name() The name of the selected elements
node() The node names
position() The position of selected elements
text() The text of selected elements
string(object) The string from the context node
xml() The output buffer containing all descendents of the specified element

Using XPath
43
Expressions
You can use abbreviated syntax with XPath. Here are the valid expressions:
Abbreviated syntax Full syntax
* child::*
para child::para
chapter/para child::chapter/child::para
para[1] child::para[position()=1]
/chapter/para[last()] /child::chapter/child::para[position()=last()]
text() child::text()
node() child::node()
para[@type] child::para[attribute::type]
para[@type="warning"] child::para[attribute::type="warning"]
para[@type="warning"][2+i] child::para[attribute::type="warning"][position()#2+i]
chapter[title] child::chapter[child::title]
chapter[title=’Introduction’] child::chapter[child::title="Introduction"]
doc//para child::doc/descendant-or-self::node()/child::para
@* attribute::*
@type attribute::type
[@name=’warning’] [attribute::name=’warning’]
//para /descendant-or-self::node()/child::para
. self::node()
.//para self::node/descendant-or-self::node()/child::para
.. parent::node()
../chapter parent::node()/child::chapter
../@type parent::node()/attribute::type

Using XML Extract Files
44
USING THE XPATH TESTING UTILITY
Here is the syntax of the XPATHW32 testing utility:
xpathw32 /f= xml file /e=starting node /x= search path
The /e parameter specifies the node where the search of the XPath starts. You can omit this parameter if you want the search to start from the beginning. A pair of double quotes is required to enclose the search mask. Here is an example:
xpathw32 /f=“d:\test\test.xml” /x=“Forms/Form/Car[@Name=’Car1’]/text()”
This example searches the node Car with the attribute Name=“Car1”. It then retrieves its text and returns a text string similar to this one:
Text string = Car 1 is Toyota
These examples illustrate some search paths most frequently used in Documaker RP applications. Run the testing tool yourself for the answer.
Example 1 These examples search for a list of nodes with or without conditions. Keep in mind a condition is always placed within brackets, as shown here: [condition].
This Returns
Forms/Form/Car A list of the Car nodes
Forms/Form/Car[@*][position()<3]
The first two nodes in the Car node list
Forms/Form/Car[@Name][position()>1]
A list of the Car nodes above the first element
Forms/Form/Car[text()][position()!=2]
A list of the Car nodes, excluding the second one
Forms/Form/Car[Model] A list of Car nodes that have a child named Model
Forms/Form/Car/node() A list of children nodes under the Car nodes
Forms/Form/Car/Coverage[1] A list of first child Coverage under the Car nodes
Forms/Form/Car[@Name=’Car1’]/Coverage
A list of nodes Coverage under Car1
Using XPath
45
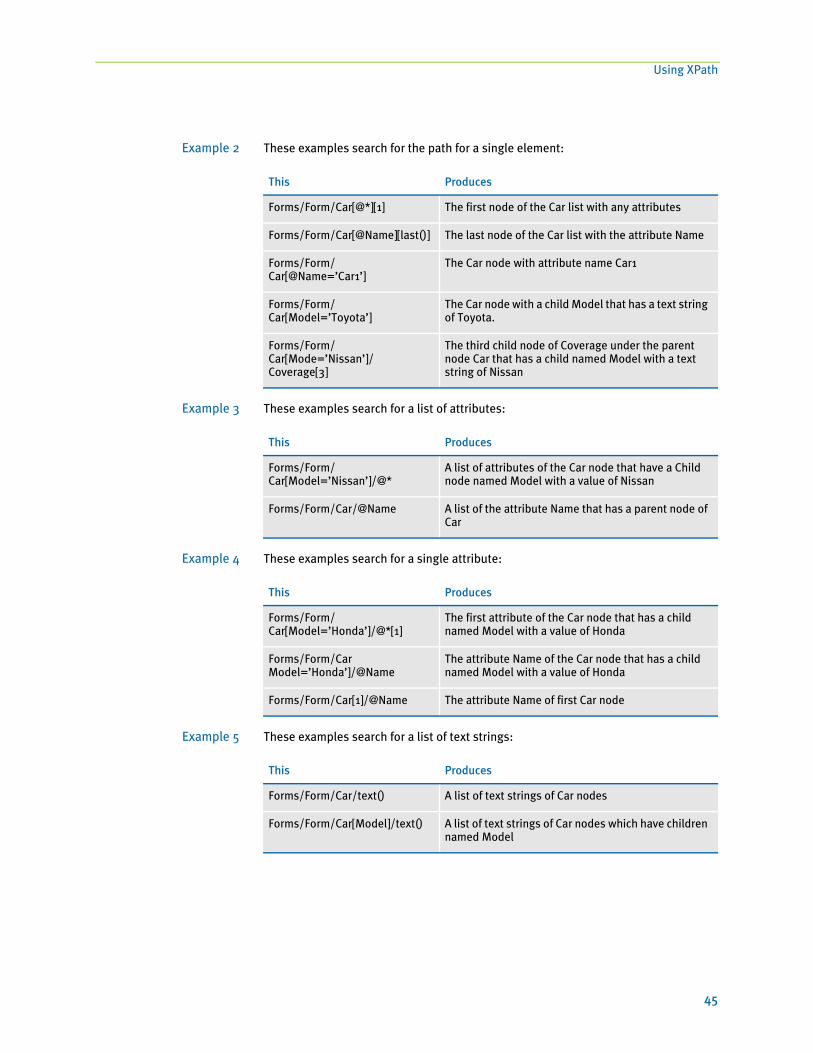
Example 2 These examples search for the path for a single element:
Example 3 These examples search for a list of attributes:
Example 4 These examples search for a single attribute:
Example 5 These examples search for a list of text strings:
This Produces
Forms/Form/Car[@*][1] The first node of the Car list with any attributes
Forms/Form/Car[@Name][last()] The last node of the Car list with the attribute Name
Forms/Form/Car[@Name=’Car1’]
The Car node with attribute name Car1
Forms/Form/Car[Model=’Toyota’]
The Car node with a child Model that has a text string of Toyota.
Forms/Form/Car[Mode=’Nissan’]/Coverage[3]
The third child node of Coverage under the parent node Car that has a child named Model with a text string of Nissan
This Produces
Forms/Form/Car[Model=’Nissan’]/@*
A list of attributes of the Car node that have a Child node named Model with a value of Nissan
Forms/Form/Car/@Name A list of the attribute Name that has a parent node of Car
This Produces
Forms/Form/Car[Model=’Honda’]/@*[1]
The first attribute of the Car node that has a child named Model with a value of Honda
Forms/Form/Car Model=’Honda’]/@Name
The attribute Name of the Car node that has a child named Model with a value of Honda
Forms/Form/Car[1]/@Name The attribute Name of first Car node
This Produces
Forms/Form/Car/text() A list of text strings of Car nodes
Forms/Form/Car[Model]/text() A list of text strings of Car nodes which have children named Model

Using XML Extract Files
46
Example 6 These examples search for a single text string:
NOTE: There are three types of returned lists: elements, attributes, and text. When a list includes only one element, the structure returns a single element instead of a list.
Example 7 These examples search for the name of elements:
Example 8 These examples concatenate text strings:
This Produces
Forms/Form/Car[Model=’Toyota’]/text()
The text string of the Car node which has a child name Model with a value of Toyota
Forms/Form/Car[Model='Honda']/parent/text()
The text string of the node Form which has a child named Car that, in turn, has a child named Model with a value of Honda
This Returns
//*[name()=’Car’] “Car” nodes
Forms/Form/*[name()=’Car’][2]/text()
A text string of second “Car” nodes
This Returns
concat('Car1', 'and', 'Car2')" A string “Car1 and Car2”
concat(//Car[@Name='Car1'], 'and',//Car[@Name='Car3'], 'are imported cars.'))
A string “Toyata and Nissan are imported cars.”

Using XPath
47
Example 9 These examples search for strings:
Example 10 This examples returns a buffer that contains all descendants of the specified element:
Note that the XPath must point to a single element, such as Car[2] in the example.
This Returns
string(‘ 12345’) The string “ 12345”
string(//Car[2]/*[1]) The string of the first child of the second Car node
This Produces
xpathw32 /f=cars.xml /x="//Car[2]/xml() <Car Name=" Car2">Car 2 is Honda<Model>Honda</Model><Coverage>Cover 4</Coverage><Coverage>Cover 5</Coverage><Coverage>Cover 6</Coverage></Car>

Using XML Extract Files
48
EXAMPLE XML FILE
Here is an example XML file (TEST.XML):
<?xml version="1.0" encoding="UTF-8"?>
<!--Sample XML file generated by XML Spy v4.2 U (http://www.xmlspy.com)-->
<Forms>
<Form>
<Car Name=" Car1">Car 1 is Toyata
<Model>Toyota</Model>
<Coverage>Cover 1</Coverage>
<Coverage>Cover 2</Coverage>
<Coverage>Cover 3</Coverage>
</Car>
<Car Name=" Car2">Car 2 is Honda
<Model>Honda</Model>
<Coverage>Cover 4</Coverage>
<Coverage>Cover 5</Coverage>
<Coverage>Cover 6</Coverage>
</Car>
<Car Name="Car3">Car 3 is Nissan
<Model>Nissan</Model>
<Coverage>Cover 7</Coverage>
<Coverage>Cover 8</Coverage>
<Coverage>Cover 9</Coverage>
</Car>
</Form>
</Forms>

49
Chapter 5
Using DAL XML Functions and XPath
The DAL XML API extends existing DAL functionality so Documaker Server applications can access a specified XML document and retrieve XML data via a DAL script.
This chapter discusses:
• Scenarios on page 50
• Using XML Built-in Functions on page 51
• Using the XML Path Locator on page 55
Using DAL XML Functions and XPath
50
SCENARIOS There are two scenarios in which you would use DAL XML API functions:
Scenario 1 A Documaker Server program, such as GenData, loads an XML document and extracts the XML tree at the transaction level using the XMLFileExtract rule. This rule creates a list type DAL variable with a default name of %extract and pushes it onto the DAL stack.
Then you can call other XML API functions in a DAL script to access the XML tree and extract XML data.
Here are examples of the form set and image rules you would add and a DAL script that would call the XML API functions.
• Add this in the AFGJOB.JDT file:
;XMLFileExtract;2;File=.\deflib\test.xml
The rule loads the XML file and creates a list type DAL variable to pass the XML tree to the XML API function.
• Add this in your DDT file:
;0;0;DALXMLSCRIPT;0;9;DALXMLSCRIPT;0;9;;DAL;Call("TEST.DAL");N;N;N;N;4792;19444;11010;
TEST.DAL is the name of the DAL script file.
• Here is an example of the DAL script:
%listH=XMLFind(%extract, “Forms”, “Form”);
#rc=XMLFirst(%listH);
if #rc=0
return(“Failed to XMLFirst”);
end
aStr=XMLGetCurText(%listH);
return(aStr);
%listH denotes a list type DAL variable. #rc denotes an integer type DAL variable. aStr denotes a string type DAL variable.
Scenario 2 You can also load the XML document and create the XML tree at a specific image field by calling the LoadXMLList rule from a DAL script. You must set the calling procedure in the DDT file as shown in Scenario 1.
Here is an example of DAL script file:
%xListH=LoadXMLList("test.xml");
%listH=XMLFind(%xListH,"Forms","Form/@*");
aStr=XMLNthAttrValue(%listH,2);
#rc=DestroyList(%xListH);
return(aStr);

Using XML Built-in Functions
51
USING XMLBUILT-IN
FUNCTIONS
The DAL XML API function are registered in keywords, called built-in functions. A DAL XML built-in function performs an operation on a set of parameters and returns a DAL variable in one of the three types: list, integer, or string.
NOTE: A list type DAL variable always begins with a percent sign (%) and an integer type DAL variable always begins with an octothorpe (#). Floating decimal numbers begin with a dollar sign ($). A string type DAL variable does not begin with a leading symbol.
Here are brief descriptions of the DAL XML built-in functions:
LoadXMLList %xListH=LoadXMLList(filename);
This function loads a XML document and extracts a XML tree. The only required input parameter is the XML document file name. This function returns the XML tree in the list type DAL variable.
For an example, see the DAL script in scenario 2.
DestroyList #rc=DestroyList(%xListH);
This function destroys the XML tree created by LoadXMLList. The input parameter is a list type DAL variable that passes the XML tree handle. This function returns one (1) for success or zero (0) for failure. The return DAL variable is of integer type.
For an example, see the DAL script in scenario 2.
GetListElem aStr=GetListElem(%xListH, SrchCriteria);
This function has two input parameters. The first is a list type DAL variable that passes the XML tree handle. The second is a string type DAL variable that passes the search criteria.
The search criteria can be a node name, followed by up to five pairs of attribute names and values. If success, it returns a text string which contains the first element that matches the search criteria.
This example returns the text of the first matched element node Form with the attribute name ID and value Agent.
%xListH=LoadXMLList(“test.xml”);
aStr= GetListElem(%xListH, “Form”, “ID”, “Agent”);
return(aStr);
IsXMLError IsXMLError;
This function checks the list for error status. The input parameter is a list type DAL variable that passes the XML tree handle. This function returns one (1) if there no errors occur or zero (0) if errors do occur.
Using DAL XML Functions and XPath
52
XMLFind Result=XMLFind(%xListH, srchnode, xpath);
This function locates the XML path from the extracted XML tree and returns a list of matched elements to a list type DAL variable or a matched text to a string type DAL variable, depending on the search request.
This function has three input parameters. The first is a list type DAL variable passed from either the XMLFileExtract rule or the LoadXMLList built-in function. The second is a string type DAL variable that passes a node name from which the search starts. The third is also a string type DAL variable that passes the XML location. If you omit the second parameter, the search starts from the root of the XML tree.
Result can be a list type or a string type DAL variable.
For an example, see the next section.
XMLFirst #rc=XMLFirst(%listH);
This function takes one input parameter, a list type DAL variable. The variable can be either a XML tree or a list of extracted elements. In any cases, it sets the current pointer to the first element in the specified list. This function returns one (1) for success or zero (0) for failure.
This example returns text from the last element in the list.
aStr="Text not found!";
%xListH=LoadXMLList("test.xml");
%listH=XMLFind(%xListH,"Forms","Form[text()]");
#rc=XMLFirst(%listH);
loop:
if #rc=0
goto endloop:
end
aStr=XMLGetCurName(%listH);
#rc=XMLNext(%listH);
goto loop:
endloop:
#rc=DestroyList(%xListH);
return(aStr);
XMLNext #rc=XMLNext(%listH);
This function is similar to XMLFirst. It sets the current pointer to the next node or element in the specified list and returns one (1) for success or zero (0) for failure.
For an example, see XMLFirst.
XMLGetCurName aStr=XMLGetCurName(%listH);
This function takes one input parameter of the list type. It can be either an XML tree or a list of elements. It returns the element name from the current element. The return value is the string type.
For an example see XMLFirst.

Using XML Built-in Functions
53
XMLGetCurText aStr=XMLGetCurText(%listH);
This function is similar to XMLGetCurName. It returns the text from the current element. The return value is the string type. The message is similar to that from the XMLGetCurName function.
For an example see XMLFirst.
XMLFirstAttrib rc=XMLFirstAttrib(%listH);
This function has one input parameter of a list type variable. It can be an element or attribute list. This function sets the attribute pointer to the first attribute for the current element in the element list or to the first attribute element in the attribute list.
If the input is an element list, use these functions to retrieve the attribute name and value:
• XMLAttrName
• XMLAttrValue
If the input is an attribute list, use these functions to retrieve attribute name and value:
• XMLNthAttrName
• XMLNthAttrValue
For examples, see XMLAttrName and XMLNthAttrName.
XMLNextAttrib rc=XMLNextAttrib(%listH);
This function is similar to XMLFirstAttrib. It sets the current attribute pointer to the next attribute for the current element in the list or to the next attribute element in the attribute list.
For an example, see XMLAttrName and XMLNthAttrName.
XMLAttrName aStr=XMLAttrName(%listH);
This function takes a list type DAL variable of input parameter. It returns the name of the current attribute pointed to by the XMLFirstAttrib and XMLNextAttrib functions.
The example returns the second attribute name of the first Form is the list.
aStr="Attribute not found!";
%xList=LoadXMLList("test.xml");
%listH=XMLFind(%xList,"Forms","Form");
#rc=XMLFirst(%listH);
#rc=XMLFirstAttrib(%listH);
#rc=XMLNextAttrib(%listH);
if #rc > 0
aStr=XMLAttrName(%listH);
end
#rt=DestroyList(%xList);
return(aStr);
XMLAttrValue aStr=XMLAttrValue(%listH);
This function is similar to XMLAttrName. It returns the value of the current attribute pointed to by the XMLFirstAttrib and XMLNextAttrib functions.
For an example, see XMLAttrName. Use XMLAttrValue to replace XMLAttrName.
Using DAL XML Functions and XPath
54
XMLNthText aStr=XMLNthText(%listH,#index);
This function has two input parameters. One is a list type DAL variable that passes a text list. The other is an integer type DAL variable that passes an index number. It returns the nth text value indicated by the index number.
In this example, LoadXMLList returns a text list and XMLNthText gets the first text.
AStr=”Text not found”;
%xList=LoadXMLList("test.xml");
%listH=XMLFind(%xList,"Forms","Form/text()");
aStr=XMLNthtext(%listH, 1);
#rt=DestroyList(%xList);
return(aStr);
XMLNthAttrName aStr=XMLNthAttrValue(%listH,#index);
This function has two input parameters. One is a list type DAL variable that passes an attribute list. The other is a integer type DAL variable that passes an index number. It returns the nth attribute name indicated by the index number.
In this example, XMLFind returns a list of attributes and XMLNthAttrName returns the name of the first attribute in the list.
aStr="Attribute not found!";
%xList=LoadXMLList("test.xml");
%listH=XMLFind(%xList,"Forms","Form/@*");
aStr=XMLNthAttrName(%listH, 1);
end
#rt=DestroyList(%xList);
return(aStr);
XMLNthAttrValue aStr=XMLNthAttrValue(%list,#index);
This function is similar to XMLNthAttrName. It returns the nth attribute value indicated by the index number.
For an example, see XMLNthAttrName. Use XMLNthAttrValue to replace XMLNthAttrName.

Using the XML Path Locator
55
USING THE XMLPATH LOCATOR
The XMLFind function is called the DAL XML path locator or DAL XPath. It is a limited version of the XML path and does not cover all aspects defined in the W3C literature.
Refer to W3C recommendations for the description of XPointer and XPath syntax. You can use the XPATHW32 testing tool to verify the applicable specifications of Skywire Software’s DAL XPath. Run the XPATHW32 program to get the syntax.
Below is a summary of XML path specifications for DAL XPath:
Axes These axes apply:
Function calls You can use these function calls:
Operators or signs You can use these operators or signs:
Expressions You can use abbreviated syntax, as this table shows:
ancestor ancestor-or-self attribute
child descendant descendant-or-self
following following-sibling parent
preceding preceding-sibling self
last() position() node()
text() name(node-set) string(object)
concat(string, string, string…)
= != < > + - / // * :: [ ]
For... Use this abbreviation:
child::* *
child::para para
child::chapter/child::para chapter/para
child::para[position()=1] para[1]
/child::chapter/child::para[position()=last()] /chapter/para[last()]
child::text() text()
child::node() node()
child::para[attribute::type] para[@type]
child::para[attribute::type="warning"] para[@type="warning"]
child::para[attribute::type="warning"][position()=2] para[@type="warning"][2]
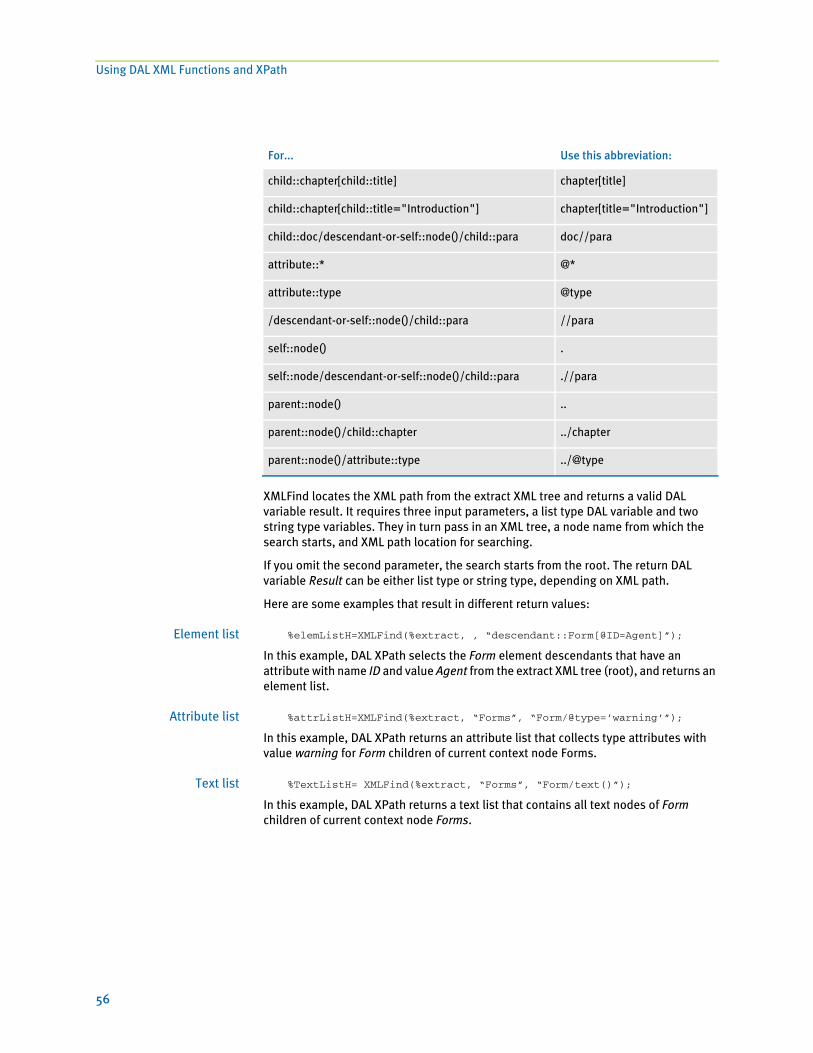
Using DAL XML Functions and XPath
56
XMLFind locates the XML path from the extract XML tree and returns a valid DAL variable result. It requires three input parameters, a list type DAL variable and two string type variables. They in turn pass in an XML tree, a node name from which the search starts, and XML path location for searching.
If you omit the second parameter, the search starts from the root. The return DAL variable Result can be either list type or string type, depending on XML path.
Here are some examples that result in different return values:
Element list %elemListH=XMLFind(%extract, , “descendant::Form[@ID=Agent]”);
In this example, DAL XPath selects the Form element descendants that have an attribute with name ID and value Agent from the extract XML tree (root), and returns an element list.
Attribute list %attrListH=XMLFind(%extract, “Forms”, “Form/@type=’warning’”);
In this example, DAL XPath returns an attribute list that collects type attributes with value warning for Form children of current context node Forms.
Text list %TextListH= XMLFind(%extract, “Forms”, “Form/text()”);
In this example, DAL XPath returns a text list that contains all text nodes of Form children of current context node Forms.
child::chapter[child::title] chapter[title]
child::chapter[child::title="Introduction"] chapter[title="Introduction"]
child::doc/descendant-or-self::node()/child::para doc//para
attribute::* @*
attribute::type @type
/descendant-or-self::node()/child::para //para
self::node() .
self::node/descendant-or-self::node()/child::para .//para
parent::node() ..
parent::node()/child::chapter ../chapter
parent::node()/attribute::type ../@type
For... Use this abbreviation:

Using the XML Path Locator
57
Text string aStr=XMLFind(%extract, Forms, “string(Form[2])”);
It returns the text of second child Form of the current context node Forms.
aStr=XMLFind(%extract, “Forms”, “concat(“Get form 2 text: ”, “Form[2])”);
It returns the concatenation of the text string Get form 2 text: , and the text of the second child Form of current context node Forms.
aStr=XMLFind(%extract, “Forms”, “name()”);
It returns the name of current context node.

Using DAL XML Functions and XPath
58

59
Chapter 6
Additional Ways to Use XML and Documaker Server
This chapter describes other ways you can use XML and Documaker Server.
This chapter discusses:
• Mapping Fields with XPath on page 60
• Referencing DAL and GVM Using XML on page 61
• Running Documaker Server Using an XML Job Ticket on page 63
• Creating Multiple Print Files Using the PrintFormset Rule on page 64

Additional Ways to Use XML and Documaker Server
60
MAPPING FIELDSWITH XPATH
The GenTrn program and the NoGenTrnTransactionProc rule let you use the TRN_Fields control group to map all of your fields with the XPath. To let the system know you are using the XML file, set the XMLTrnFields option in the TRN_File control group to Yes and also set the XMLExtract option in the RunMode control group to Yes.
Here is an example:
< RunMode >
XMLExtract = Yes
< TRN_File >
XMLTrnFields= Yes
< TRN_Fields >
Company = !/Forms/Key1
LOB = !/Forms/Key2
PolicyNum = !/Forms/PolicyNum
RunDate = !/Forms/RunDate;DM-4;D4
NOTE: Use this format for the Trn_Fields options:
(Field in the Transaction DFD File) = XPath;Field Format
Be sure to include the leading exclamation mark (!). This tells the system to use an XML path search but is not part of the actual search routine. Do not specify whether a field is a key. The system does not support multiple (search) keys with the XML implementation.
If you are selectively excluding transactions, in your exclude file, instead of an offset and SearchMask, replace it with the XPath. Here is an example:
!/Forms[PolicyType="OLD"]
Referencing DAL and GVM Using XML
61
REFERENCINGDAL AND GVM
USING XML
The system lets you reference the GVM and DAL expressions before it rebuilds XPath search masks. The format is as follows:
=XXX(expression)
where XXX is one of the supported ways of finding data from a symbol, such as DAL or GVM.
Here are the standard access methods:
• =(“expression”) returns the value of a DAL symbol represented by expression
Here is an example:
!/Forms/Data1[Data2="**=("dalVar")**"]/Data3
dalVar is a DAL symbol. If the value of this variable is Two, the system resolves the expression and returns the following XPath search mask:
!/Forms/Data1[Data2="Two"]/Data3
• =(expression) returns the value of a DAL variable named in the expression which contain a name of another DAL variable.
Here is an example:
!/Forms/Data1[Data2="**=(dalVar2)**"]/Data3
If you assign dalVar2 equal to another DAL variable called dalVar which holds a value of Two, here is the result:
!/Forms/Data1[Data2="Two"]/Data3
• =DAL(“expression”) returns the value of a DAL script named by expression.
Here is an example:
!/Forms/Data1[Data2="**=DAL("test.dal")**"]/Data3
The system runs the named DAL script and returns the value as a result of that run. If test.dal returns a value of Three, the expression is resolved and this XPath search mask is the result:
!/Forms/Data1[Data2="Three"]/Data3
• =GVM(“expression”) returns the value of a GVM symbol named by the expression.
Here is an example:
!/Forms/Data1[Data2="**=GVM("gvmVar")**"]/Data3
gvmVar is a GVM symbol. If the value for this symbol is One, the system resolves the expression and returns this XPath search mask:
!/Forms/Data1[Data2="One"]/Data3
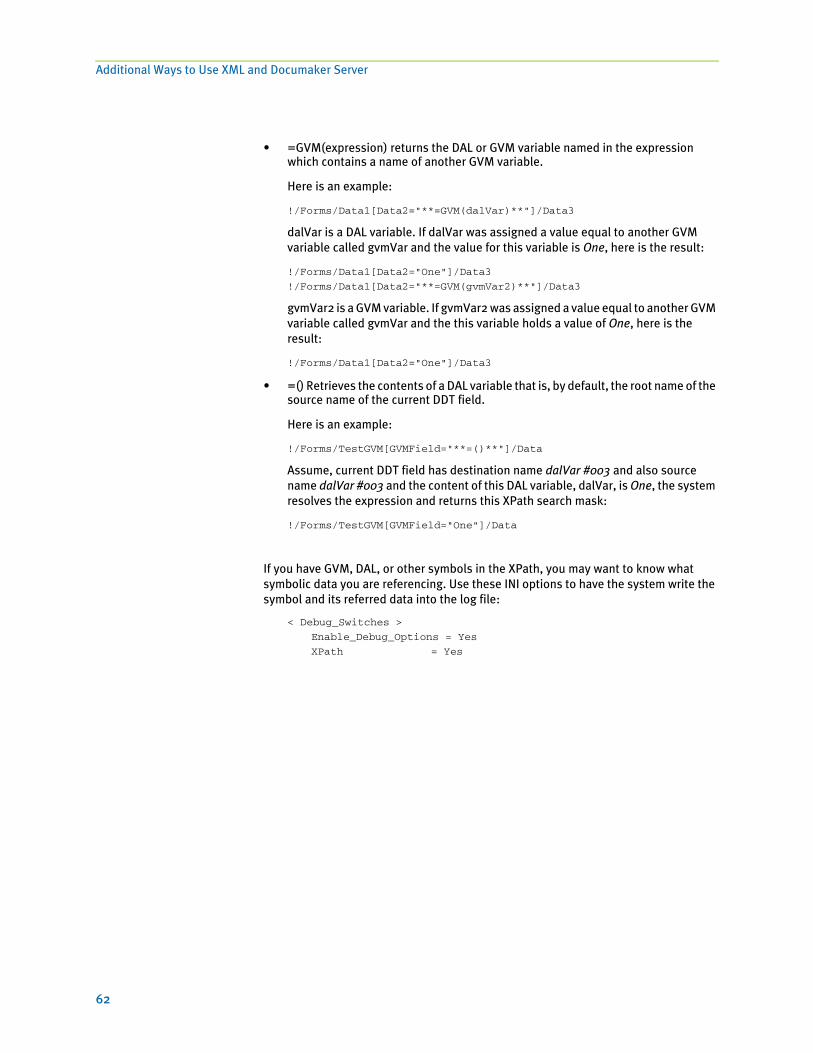
Additional Ways to Use XML and Documaker Server
62
• =GVM(expression) returns the DAL or GVM variable named in the expression which contains a name of another GVM variable.
Here is an example:
!/Forms/Data1[Data2="**=GVM(dalVar)**"]/Data3
dalVar is a DAL variable. If dalVar was assigned a value equal to another GVM variable called gvmVar and the value for this variable is One, here is the result:
!/Forms/Data1[Data2="One"]/Data3
!/Forms/Data1[Data2="**=GVM(gvmVar2)**"]/Data3
gvmVar2 is a GVM variable. If gvmVar2 was assigned a value equal to another GVM variable called gvmVar and the this variable holds a value of One, here is the result:
!/Forms/Data1[Data2="One"]/Data3
• =() Retrieves the contents of a DAL variable that is, by default, the root name of the source name of the current DDT field.
Here is an example:
!/Forms/TestGVM[GVMField="**=()**"]/Data
Assume, current DDT field has destination name dalVar #003 and also source name dalVar #003 and the content of this DAL variable, dalVar, is One, the system resolves the expression and returns this XPath search mask:
!/Forms/TestGVM[GVMField="One"]/Data
If you have GVM, DAL, or other symbols in the XPath, you may want to know what symbolic data you are referencing. Use these INI options to have the system write the symbol and its referred data into the log file:
< Debug_Switches >
Enable_Debug_Options = Yes
XPath = Yes

Running Documaker Server Using an XML Job Ticket
63
RUNNINGDOCUMAKER
SERVER USING ANXML JOB TICKET
Now you can run Documaker Server from another application using an XML job ticket. You receive results in an XML job log file.
The layout of these files is the same as those used by IDS for running Documaker Server. See Using IDS to Run Documaker Server on page 65 for more information.
The name of the Job ticket is passed to the GenData program on the command line as
/jticket= parameter
The default name is JOBTICKET.XML.
To set this up replace the StandardJobProc rule with the TicketJobProc rule. Keep in mind you must run Documaker Server in single step mode, since only the GenData program is executed.
You can specify the name of the resulting job log file using this command line parameter:
/jlog=
The default is JOBLOG.XML.

Additional Ways to Use XML and Documaker Server
64
CREATINGMULTIPLE PRINTFILES USING THE
PRINTFORMSETRULE
The PrintFormset rule lets you create multiple print files when you run the GenData program in single-step mode.
NOTE: When running in multi-step mode, use the MultFilePrint callback functionality.
To use this feature, add these options to PrintFormset control group:
< PrintFormset >
MultiFilePrint = Yes
LogFileType = XML
LogFile = (log file name and path)
The log file that is created is either a semicolon-delimited text file, formatted like the file created by the MultiFilePrint callback function or an XML file. Here is an example of the layout of the XML file:
<?xml version="1.0" encoding="UTF-8" ?>
- <LOGFILE>
- <TRANSACTION INSTANCE="1">
<BATCH NAME="Logical Batch Name">.\data\BATCH1.BCH</BATCH>
<GROUP1 NAME="Company">SAMPCO</GROUP1>
<GROUP2 NAME="Lob">LB1</GROUP2>
<TRANSACTIONID NAME="PolicyNum">1234567</TRANSACTIONID>
<TRANSACTIONTYPE NAME="TransactionType">T1</TRANSACTIONTYPE>
<RECIPIENT NAME="INSURED">INSUREDS COPY</RECIPIENT>
<FILE>DATA\0rDcP7WxytE8ECp5jexhWXVqkV840Vw_F-GykT_VMfd.PDF</FILE>
</TRANSACTION>
- <TRANSACTION INSTANCE="2">
<BATCH NAME="Logical Batch Name">.\data\BATCH2.BCH</BATCH>
<GROUP1 NAME="Company">SAMPCO</GROUP1>
<GROUP2 NAME="Lob">LB1</GROUP2>
<TRANSACTIONID NAME="PolicyNum">1234567</TRANSACTIONID>
<TRANSACTIONTYPE NAME="TransactionType">T1</TRANSACTIONTYPE>
<RECIPIENT NAME="COMPANY">COMPANY COPY</RECIPIENT>
<FILE>DATA\0v3l7pBdVqHceoRL5hf2xqjJ7WMxiRVO9U70iFiIcne.PDF</FILE>
</TRANSACTION>
</LOGFILE>
Use the options in the DocSetNames control group to determine which XML elements are created. The values in this control group are the same as those written to a recipient batch or TRN file.
Option Description
MultiFilePrint Set this option to Yes to allow multiple file print.
LogFileType Specifies the type of the log file. Enter XML for an XML file. Any other entry results in a text file.
LogFile Specifies the name of the log file. Include the full path. If you omit the path, the system uses DATAPATH. If you omit this option, the system creates a file named TMP.LOG. If you enter XML in the LogFileType option and a different extension here, the system uses XML.

65
Chapter 7
Using IDS to Run Documaker Server
This chapter tells you how to set up IDS and Documaker Server so IDS can run Documaker Server as a subordinate process.
This chapter discusses:
• Overview on page 66
• Setting Up IDS on page 67
• Setting Up Documaker Server on page 69
• Controlling Documaker Server on page 71

Using IDS to Run Documaker Server
66
OVERVIEW When using IDS to run Documaker Server, web clients communicate with IDS using queues. IDS communicates with Documaker Server via XML files called job tickets and job logs, as shown below.
IDS can start or stop Documaker Server as needed, without user interaction. One IDS session controls one Documaker Server process. You can, however, implement multiple IDS sessions and have multiple Documaker Server processes as well.
The ServerBaseProc rule replaces the RULStandardJobProc rule and lets IDS run Documaker Server as a separate, stay alive process. This means Documaker Server only has to start once and IDS can continue even if Documaker Server fails. See ServerBaseProc on page 89 for more information.
Keep in mind these limitations:
• You can only run Documaker Server in single step mode. Consult the Documaker Server System Reference for more information on single step processing.
• You must run Documaker on Windows XP or Windows 2000.
• If any IDS transaction specifies a different resource setup, the Documaker Server process will automatically re-initialize to change to those resources. Such resource changes can affect the overall performance of the system.
• During processing, some INI options can be changed by the client. Since some Documaker Server rules use static variables and store INI values in memory, it is possible that a client will be unable to change an INI option if those Documaker Server rules are used. To handle these situations, you must restart Documaker Server.
Web Client
IDSDocumaker
Server (GenData)
VB\COM\ Java Client
XML Job Ticket
XML Job Log

Setting Up IDS
67
SETTING UP IDS To set up IDS so that it will run Documaker Server, you will need to make the following changes in the following INI files:
DOCSERV.INI file Make these changes in the DOCSERV.INI file, or the INI file the IDS is configured to use. Here is an example of how to add a request type for Documaker Server:
< ReqType:RPD >
function = atcw32->ATCLogTransaction
function = atcw32->ATCLoadAttachment
function = atcw32->ATCUnloadAttachment
function = dprw32->DPRSetConfig
function = rpdw32->RPDCheckRPRun
function = rpdw32->RPDCreateJob
function = rpdw32->RPDProcessJob
If necessary, you can add two more request types, one to check if Documaker Server is running and one to stop Documaker Server. Here is an example:
< ReqType:CHECK >
function = atcw32->ATCLogTransaction
function = atcw32->ATCLoadAttachment
function = atcw32->ATCUnloadAttachment
function = dprw32->DPRSetConfig
function = rpdw32->RPDCheckRPRun
< ReqType:STOP >
function = atcw32->ATCLogTransaction
function = atcw32->ATCLoadAttachment
function = atcw32->ATCUnloadAttachment
function = dprw32->DPRSetConfig
function = rpdw32->RPDStopRPRun
You will also need to add the following IDS rule to the ReqType:INI control group:
function = rpdw32->RPDStopRPRun
DAP.INI file Add a configuration option for a the master resource library you will use. Here is an example which is based on the RPEX1 master resource library:
< Configurations >
CONFIG = RPEX1
< Config:RPEX1 >
INIFile = RPEX1.INI
RPEX1.INI file Make these changes in the RPEX1.INI file (or the INI file you are using for your configuration):
< IDSServer >
ExtrPath = e:\fap\mstrres\rpex1\extract\
PrintPath = e:\fap\mstrres\rpex1\data\
WaitForStart = 60
SleepingTime = 500
MaxWaitTime = 120
GENSemaphoreName = gendata
RPDSemaphoneName = rpdrunrp
PrintFileCacheTime = 7200
TextFileCacheTime = 7200
< RPDRunRP >
Executable = e:\rel101\shipw32\gendaw32.exe
Directory = e:\fap\mstrres\rpex1\

Using IDS to Run Documaker Server
68
UserINI = e:\fap\mstrres\rpex1\fsiuser.ini
BaseLocation = http://10.8.10.69/fap/mstrres/rpex1/data/
< Printer >
PrtType = PDF
< Debug >
RPDProcessJob = Yes
Setting up multiple IDSservers
The semaphores used by IDS and Documaker Server are global for a computer, so if you need multiple IDS processes on the same computer, each IDS process and subordinate Documaker Server process should use different semaphore names.
The semaphore names are generated automatically by IDS for each additional IDS instance. These names are passed to Documaker Server as command line parameters. No user intervention is usually needed.
To specify the own naming conventions for these semaphores, do so by changing these INI options:
< IDSServer >
GENSemaphoreName =
RPDSemaphoreName =
Keep in mind the names must be unique for a computer, so two IDS servers will have to use two different INI files specifying semaphore names.

Setting Up Documaker Server
69
SETTING UPDOCUMAKER
SERVER
The first step is to set up Documaker Server to run in a single step mode. See the Documaker Server System Reference for more information
Keep in mind these considerations...
• If the Documaker Server executables and DLLs are located on the network, the start time for Documaker Server can be significant. Keep in mind, however, that the start time only affects the first transaction. Subsequent transactions will process much more quickly. If the start time exceeds 10 seconds, consider changing the WaitForStart option to a higher value.
• All of the standard Documaker Server performance-related INI options are available even when IDS runs Documaker Server as a subordinate process. For best results, optimize Documaker Server’s performance before using it with IDS.
• Documaker Server will run fastest if the resource files for Documaker Server, as well as input and output files, are physically located on the computer where IDS and Documaker Server are running.
In addition, you will need to make changes to your FSISYS.INI or FSIUSER.INI files and to your AFGJOB.JDT file.
FSISYS.INI or FSIUSER.INIfile
Be sure to turn off all Documaker Server stop options, as shown here:
< GenDataStopOn >
BaseErrors = No
TransactionErrors = No
ImageErrors = No
FieldErrors = No
Also, add the following control groups and options:
< IDSServer >
SleepingTime = 500
GENSemaphoreName = gendata
RPDSemaphoneName = rpdrunrp
< Debug >
RULServerJobProc = Yes
< PrintFormsSet >
MultiFilePrint = Yes
LogFileType = XML
LogFile = .\data\printlog.xml
AFGJOB.JDT file Change the base rule from RULStandardBaseProc, as shown here:
<Base Rules>
;RULServerJobProc;1;;
...
The ServerBaseProc rule replaces the RULStandardJobProc rule and lets IDS run Documaker Server as a separate, stay alive process. This means Documaker Server only has to start once and IDS can continue even if Documaker Server fails.
Using IDS to Run Documaker Server
70
Naming Conventions for Output Files
The output files from Documaker Server use the names generated by the IDS rules and submitted to Documaker Server in the job ticket file. If you need different names, provide them in the IDS request. In this case, you must make sure the names are unique or else they will be overwritten. The names generated by IDS can consist of up to 45 characters and are similar to the names generated by the DPRPrint rule in IDS.
The directory where the output files are created is determined in this manner:
• If the file name and path was provided, the system uses that information.
• If the file name was provided, but the path was omitted, the system looks for the path in the PRINTPATH attachment variable.
• If the path is not in the PRINTPATH attachment variable, the system looks for the PrintPath INI option in the IDSServer control group.
• If no path was specified in the PrintPath INI option, the system places the output file in the current directory.
The extension of the output files is determined in this manner:
• If the name and extension was provided in the attachment, the system uses that information.
• If the name and extension were omitted, the system generates a name and uses the printer type as the extension for the print output files. For other files, the system looks for the FileExt option in the IDSServer control group to find the extension. The default is DAT.

Controlling Documaker Server
71
CONTROLLINGDOCUMAKER
SERVER
To control Documaker Server via IDS, use these IDS rules:
• RPDCheckAttachments - Checks the required input attachment variables and INI options before starting the GenData program.
• RPDCheckRPRun - Makes sure Documaker Server is running. If Documaker Server is not running, this rule starts it.
• RPDCreateJob - Finds the attachment variables for each of the values in the job ticket and adds them to the XML tree. The XML tree is added to the RPDJobTicket DSI variable so the next rule can use it.
• RPDProcessJob - Gets the XML tree from the RPDJobTicket variable and writes it to a file. This file is used as the job ticket which triggers the Documaker Server process.
• RPDStopRPRun - Receives the current process ID from the DSI variable RPDRunProcess and then terminates Documaker Server.
Using IDS to Run Documaker Server
72
RPDCheckAttachments
Use this rule to check the required input attachment variables and INI options before starting the GenData program.
Syntax _DSIEXPORT DWORD _DSIAPI RPDCheckAttachments (DSIHANDLE hdsi,
char * pszParms,
ULONG ulMsg,
ULONG ulOptions)
Parameters
This rule runs before the RPDCheckRPRun rule. Using this rule, ReqType becomes:
< ReqType:RPD >
function = atcw32->ATCLogTransaction
function = atcw32->ATCLoadAttachment
function = atcw32->ATCUnloadAttachment
function = irlw32->IRLCopyAttachment
function = dprw32->DPRSetConfig
function = RPDW32->RPDCheckAttachments
function = RPDW32->RPDCheckRPRun
function = RPDW32->RPDCreateJob
function = RPDW32->RPDProcessJob
The expected attachment variables are checked only if they are in the RPDAttachments control group. Here is an example:
< RPDAttachments >
Variable = ReqType
Variable = Config
Variable = PrintBatches
Variable = ExtrFile
If the ExtrFile option is required, the rule checks to see if it exists. Keep in mind the ExtrFile option includes a full path. If you omit the path, the system uses the path specified in the ExtrPath option as the default path.
This rule also checks these options in the RPDRunRP control group:
< RPDRunRP >
Executable = d:\RP\Mstrres\gendaw32.exe
Directory = d:\RP\Mstrres\rpex1\
UserINI = fsiuser
If the UserINI option does not include a drive letter, the system will look at the Directory option to find the path, so the full UserINI name becomes:
d:\RP\Mstrres\rpex1\fsiuser.ini
Parameter Description
DSIHANDLE hInstanceDSI instance handle
char * pszParms Pointer to rule parameter string unsigned long
ulMsg DSI_MSG, such as DSI_MSGRUNF unsigned long
ulOptions options
Controlling Documaker Server
73
In other cases, you can set the UserINI option, as shown here:
Directory = d:\ProgIDS\RP\Mstrres\Validate\W32exe\
UserINI = fsiuser
So the full UserINI name becomes:
d:\ProgIDS\RP\Mstrres\Validate\W32exe\fsiuser.ini
This rule also makes sure the USERINI.INI file exists. For UNIX, if the first byte is “/”, the system looks at the UserINI option for the full path, for example:
UserINI = /ProgIDS/RP/Mstrres/Deflib
Otherwise, the system uses the path specified in the Directory option. Keep in mind that if you omit the UserINI option, the system uses the FSIUSER.INI file instead.
INI options < RPDAttachments >
Variable = ReqType
Variable = Config
Variable = PrintBatches
Variable = ExtrFile
< IDSServer >
ExtrPath = d:\fap\mstrres\rpex1\extract\
< RPDRunRP >
Executable = d:\rel101\rps100\shipw32\gendaw32.exe
Directory = d:\fap\mstrres\rpex1\
UserINI = fsiuser
Returns Success or failure.
Error messagesMessage Description
RPD0001 Can not locate variable #VARIABLE,# in the attachment list at #LOCATION,#.
RPD0004 Can not add variable #VARIABLE,# to attachment at #LOCATION,#.
RPD0007 File #FILENAME,# does not exists. Failed to #LOCATION,#.
RPD0009 The INI option #INIOPTION,# could not be located in the group #INIGROUP,#.

Using IDS to Run Documaker Server
74
RPDCheckRPRun
Use this rule to make sure Documaker Server is running. If Documaker Server is not running, this rule starts it.
Syntax _DSIEXPORT DWORD _DSIAPI RPDCheckRPRun (DSIHANDLE hdsi,
char * pszParms,
ULONG ulMsg,
ULONG ulOptions)
Parameters
To determine if Documaker Server is running, the rule looks at the CONFIG value. If the CONFIG value is not the same as it was in the previous run, this rule stops and then restarts Documaker Server.
On the RUNF message, this rule looks to see if a Documaker Server process exists and starts one if needed. On the RUNR message, this rule stops the Documaker Server process if there was an error.
On DSI_MSGRUNF, this rule first checks to see if Documaker Server is running by detecting the gendata semaphore created by RULServerBaseProc rule. If the semaphore does not exist, Documaker Server is not running. This rule then starts Documaker Server and creates a semaphore called rpdrunrp.
This lets Documaker Server check the status of the IDS by detecting the existence of the semaphore. It also lets Documaker Server terminate normally in case IDS stops.
To handle situations where you have multiple master resource libraries (MRLs), the rule checks the CONFIG value for every job process to see if a new MRL is requested. If the CONFIG value changes, the rule stops the current Documaker Server process and starts another one which uses the new MRL.
On DSI_MSGRUNR, this rule terminates Documaker Server if errors occur.
Input attachmentvariables
Parameter Description
DSIHANDLE hInstance DSI instance handle
char * pszParms Pointer to rule parameter string unsigned long
ulMsg DSI_MSG, such as DSI_MSGRUNF unsigned long
ulOptions options
Variable Description
CONFIG The configuration for the master resource library (MRL). See also the DPRSetConfig rule and the setup with multiple master resource directories.

Controlling Documaker Server
75
Output DSI variables
INI options You can use these INI options:
< RPDRunRP >
Executable =
Directory =
UserINI =
< IDSServer >
GENSemaphoreName =
RPDSemaphoreName =
Returns Success or failure.
Error messages
Variable Description
RPDRunProcess This value is the process ID for the Documaker Server process.
RPDSemaphoreName The semaphore name from the RPDSemaphore INI option.
GENSemaphoreName The semaphore name from the GENSemaphore INI option.
RPDRunSemaphore Stores the RPDSemaphore handle.
RPDJobLogName The name of the job log file name to use.
RPDJobTicketName The name of the job ticket file name to use.
Option Description
RPDRunRP control group
Executable The name and path of the program you want to execute, such as d:\rpsetup\gendaw32.exe.
Directory The path to the master resource library, where you want to run Documaker Server.
UserINI (Optional) The name and path of the INI file you want to use. The default is the FSIUSER.INI located in the directory specified by the Directory option.
IDSServer control group
GENSemaphoreName The name of the semaphore. The default is gendata.
RPDSemaphoreName The name of the semaphore. The default is rpdrunrp.
Message Description
RPD0001 Cannot locate variable #VARIABLE,# in the attachment list at #LOCATION,#.
RPD0004 Cannot add variable #VARIABLE,# to attachment at #LOCATION,#.
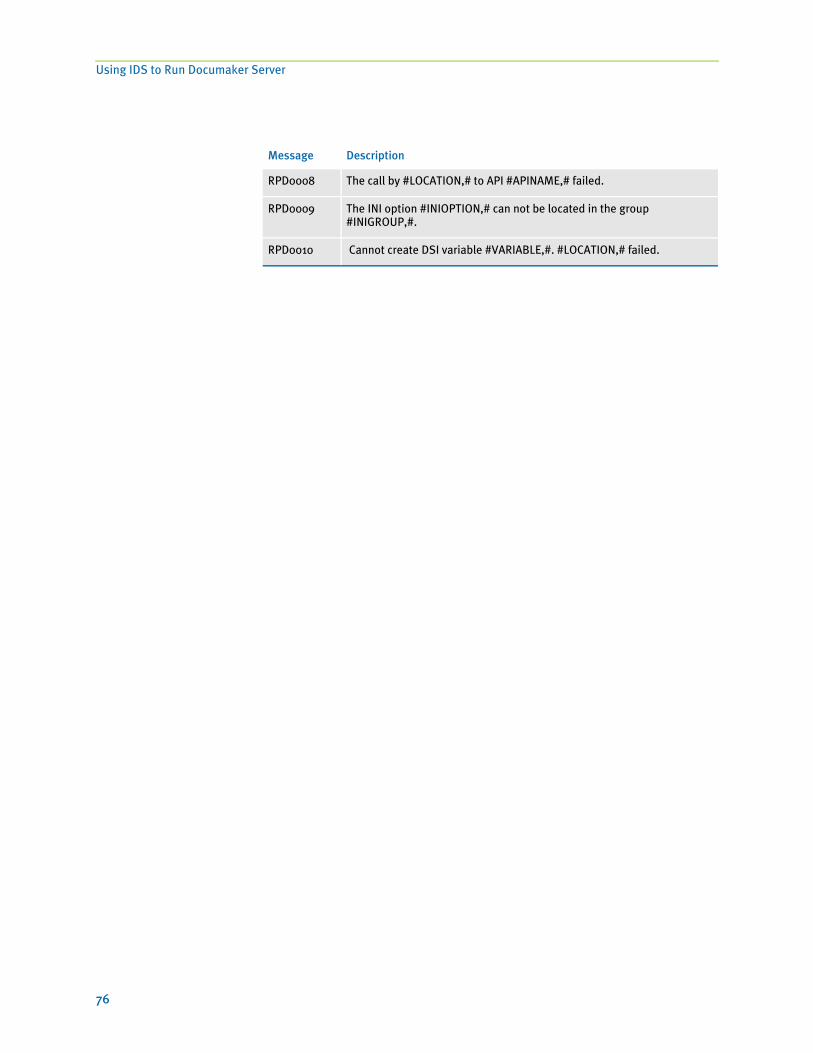
Using IDS to Run Documaker Server
76
RPD0008 The call by #LOCATION,# to API #APINAME,# failed.
RPD0009 The INI option #INIOPTION,# can not be located in the group #INIGROUP,#.
RPD0010 Cannot create DSI variable #VARIABLE,#. #LOCATION,# failed.
Message Description

Controlling Documaker Server
77
RPDCreateJob
Use this rule to find the attachment variables for each of the values in the job ticket and add them to the XML tree. The XML tree is added to the RPDJOBTICKET DSI variable so the next rule can use it.
Keep in mind that the RPDCreateJob rule always adds the DbLogFile XML element to the job ticket. If a value for this element is not in the job ticket, a unique file name is generated and added. If an attachment variable or INI option is present but set to a blank value, the RPDCreateJob rule does not add the DbLogFile element.
Syntax _DSIEXPORT DWORD _DSIAPI RPDCreateJob (DSIHANDLE hdsi,
char * pszParms,
ULONG ulMsg,
ULONG ulOptions)
Parameters
On DSI_MSGRUNF, this rule creates the XML document for the job ticket that triggers the job processing. You should direct your results to designated directories and use unique file names, especially if you want to support multiple MRL setups, multiple Documaker Server processes, or multiple job processes.
You can change INI options via attachment variables. These changes are added onto the XML tree so Documaker Server can update the INI options in memory.
On DSI_MSGRUNR, this rule processes the XML document of the job log, and all values of the XML tree are added to the output attachment.
Input attachmentvariables
You can use these input attachment variables:
Parameter Description
DSIHANDLE hInstance DSI instance handle
char * pszParms Pointer to rule parameter string unsigned long
ulMsg DSI_MSG, such as DSI_MSGRUNF unsigned long
ulOptions options
Variable Description
ExtrFile Extract file name and path. This is a required input file.
MsgFile (Optional) Message file name and path. If you omit the path, the PrintPath attachment variable is used. If the PrintPath was omitted, the system uses the PrintPath defined in the IDSServer control group. If the file name is omitted, the system creates a 46-byte unique file name.
ErrFile (Optional) Error file name and path. If you omit the path, the PrintPath attachment variable is used. If the PrintPath was omitted, the system uses the PrintPath defined in the IDSServer control group. If the file name is omitted, the system creates a 46-byte unique file name.
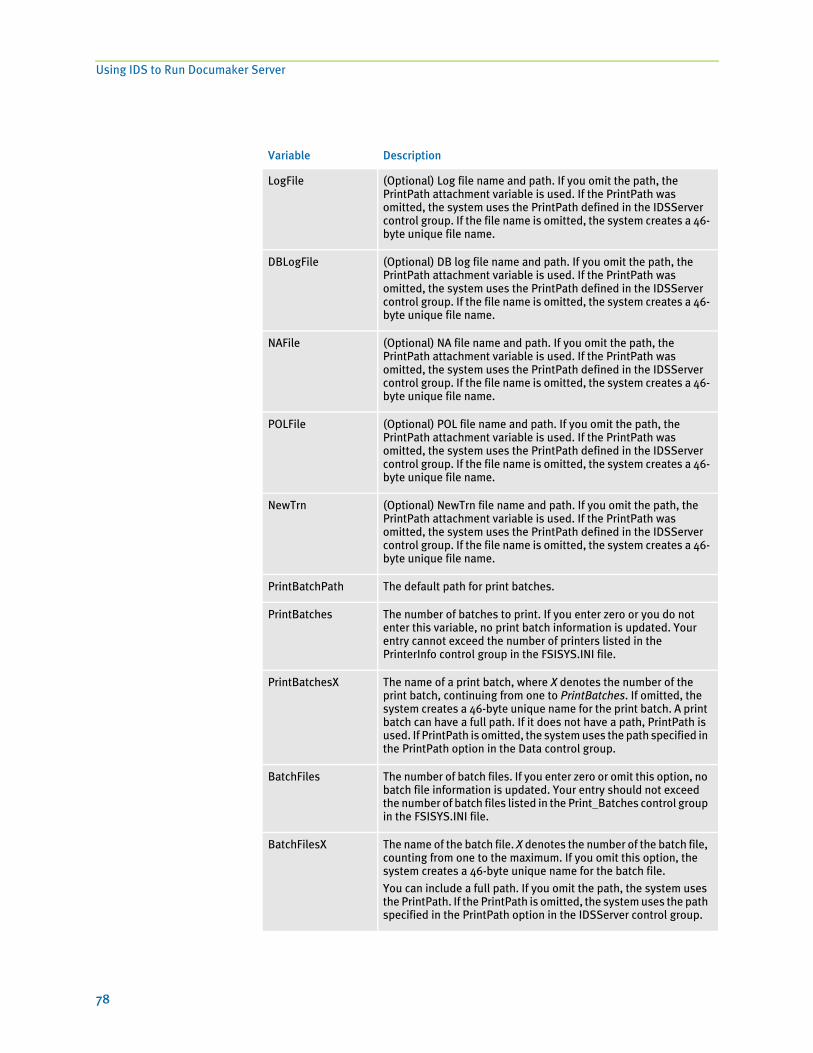
Using IDS to Run Documaker Server
78
LogFile (Optional) Log file name and path. If you omit the path, the PrintPath attachment variable is used. If the PrintPath was omitted, the system uses the PrintPath defined in the IDSServer control group. If the file name is omitted, the system creates a 46-byte unique file name.
DBLogFile (Optional) DB log file name and path. If you omit the path, the PrintPath attachment variable is used. If the PrintPath was omitted, the system uses the PrintPath defined in the IDSServer control group. If the file name is omitted, the system creates a 46-byte unique file name.
NAFile (Optional) NA file name and path. If you omit the path, the PrintPath attachment variable is used. If the PrintPath was omitted, the system uses the PrintPath defined in the IDSServer control group. If the file name is omitted, the system creates a 46-byte unique file name.
POLFile (Optional) POL file name and path. If you omit the path, the PrintPath attachment variable is used. If the PrintPath was omitted, the system uses the PrintPath defined in the IDSServer control group. If the file name is omitted, the system creates a 46-byte unique file name.
NewTrn (Optional) NewTrn file name and path. If you omit the path, the PrintPath attachment variable is used. If the PrintPath was omitted, the system uses the PrintPath defined in the IDSServer control group. If the file name is omitted, the system creates a 46-byte unique file name.
PrintBatchPath The default path for print batches.
PrintBatches The number of batches to print. If you enter zero or you do not enter this variable, no print batch information is updated. Your entry cannot exceed the number of printers listed in the PrinterInfo control group in the FSISYS.INI file.
PrintBatchesX The name of a print batch, where X denotes the number of the print batch, continuing from one to PrintBatches. If omitted, the system creates a 46-byte unique name for the print batch. A print batch can have a full path. If it does not have a path, PrintPath is used. If PrintPath is omitted, the system uses the path specified in the PrintPath option in the Data control group.
BatchFiles The number of batch files. If you enter zero or omit this option, no batch file information is updated. Your entry should not exceed the number of batch files listed in the Print_Batches control group in the FSISYS.INI file.
BatchFilesX The name of the batch file. X denotes the number of the batch file, counting from one to the maximum. If you omit this option, the system creates a 46-byte unique name for the batch file.You can include a full path. If you omit the path, the system uses the PrintPath. If the PrintPath is omitted, the system uses the path specified in the PrintPath option in the IDSServer control group.
Variable Description
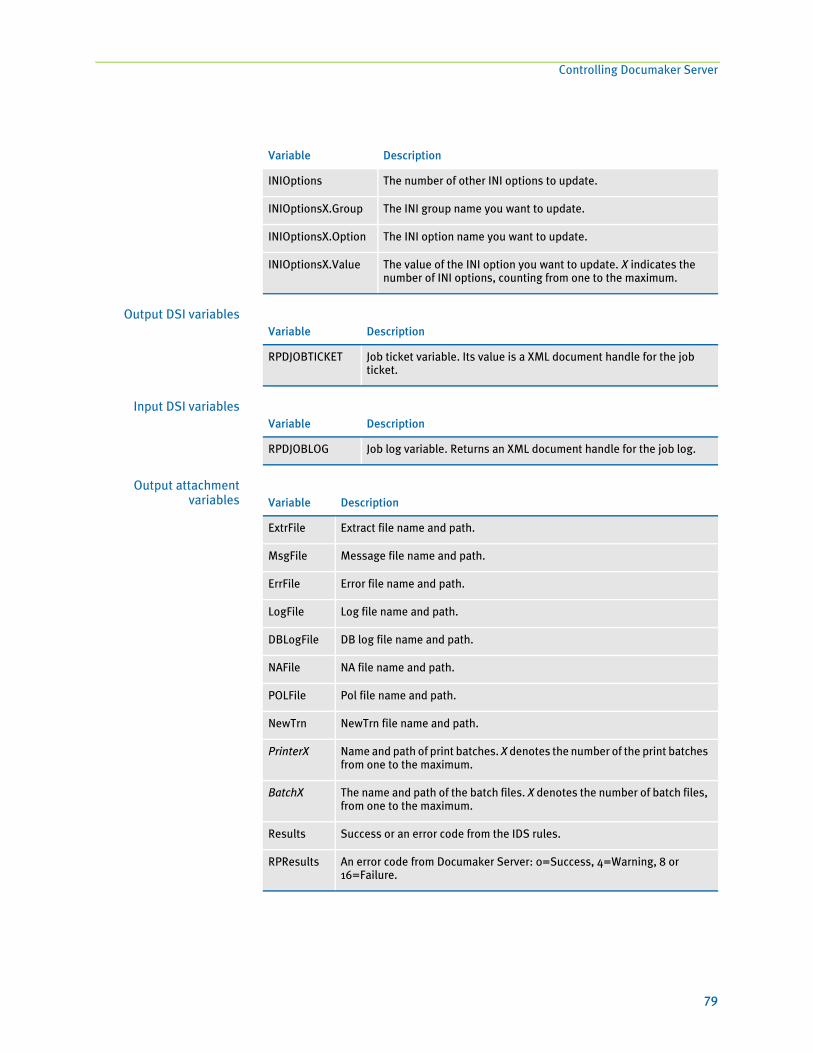
Controlling Documaker Server
79
Output DSI variables
Input DSI variables
Output attachmentvariables
INIOptions The number of other INI options to update.
INIOptionsX.Group The INI group name you want to update.
INIOptionsX.Option The INI option name you want to update.
INIOptionsX.Value The value of the INI option you want to update. X indicates the number of INI options, counting from one to the maximum.
Variable Description
Variable Description
RPDJOBTICKET Job ticket variable. Its value is a XML document handle for the job ticket.
Variable Description
RPDJOBLOG Job log variable. Returns an XML document handle for the job log.
Variable Description
ExtrFile Extract file name and path.
MsgFile Message file name and path.
ErrFile Error file name and path.
LogFile Log file name and path.
DBLogFile DB log file name and path.
NAFile NA file name and path.
POLFile Pol file name and path.
NewTrn NewTrn file name and path.
PrinterX Name and path of print batches. X denotes the number of the print batches from one to the maximum.
BatchX The name and path of the batch files. X denotes the number of batch files, from one to the maximum.
Results Success or an error code from the IDS rules.
RPResults An error code from Documaker Server: 0=Success, 4=Warning, 8 or 16=Failure.

Using IDS to Run Documaker Server
80
Note that the input attachments for PrintBatchX should be in the same order as those for PrinterX, as defined in the PrintInfo control group in the FSISYS.INI file. Also keep in mind that PrinterX and BatchX are option names you define in the PrintInfo and Print_Batches control groups.
INI options < IDSServer >
PrintPath =
PrintFileCacheTime =
TextFileCacheTime =
< Printer >
PrtType =
< RPDRunRP >
BaseLocation =
Returns Success or failure.
Error messages
Option Description
IDSServer control group
PrintPath Used as a default path for print batches and the rest of the output files.
PrintFileCacheTime The length of time, in seconds, you want the system to store the print files. At expiration time, the system removes the print batch files. The default is 1800 (30 minutes). Note that only print files with the 46-byte unique name created by the system are cached.
TextFileCacheTime The length of time, in seconds, you want the system to store the text files. At expiration time, the system removes the text files. The default is 1800 (30 minutes). Note that only text files with the 46-byte unique name created by the system are cached.
Printer control group
PrtType The type of print batch file. Your entry must be consistent with the control group defined in the FSISYS.INI file. For instance, if you set up a PrtType:PDF control group there, enter PDF here.
RPDRunRP control group
BaseLocation The URL to the output data directory. Your entry must be consistent with the PrintPath or other defined data path.
Message Description
RPD0002 Cannot create #TAGNAME,# at #LOCATION,#.
RPD0003 Cannot create DSI variable #VARIABLE,# at #LOCATION,#.

Controlling Documaker Server
81
RPD0004 Cannot add variable #VARIABLE,# to attachment at #LOCATION,#.
RPD0005 Cannot locate DSI variable #VARIABLE,# at #LOCATION,#.
RPD0006 DSI variable #VARIABLE,# does not contain valid data. Failed to #LOCATION,#.
Message Description

Using IDS to Run Documaker Server
82
RPDProcessJob
Use this rule to get the XML tree from the DSI variable RPDJobTicket and write it to a file written on the RUNF message. On the RUNR message, this rule waits for the job log file. The job log file is located in the same directory and is loaded as an XML file on the RUNR message.
Syntax _DSIEXPORT DWORD _DSIAPI RPDProcessJob (DSIHANDLE hdsi,
char * pszParms,
ULONG ulMsg,
ULONG ulOptions)
Parameters
The IDS variable RPDJobLog is created with the XML job log. The RPDJobLog variable and the XML tree associated with it is destroyed in this rule on the TERM message.
You can set the maximum amount of time to wait using the MaxWaitTime option. On the RUNR message, this rule also removes the job log file from disk. You can also control the removal of the job log file with the RPDProcessJob INI option. This option is for debugging purposes only.
On DSI_MSGRUNF, this rule receives the XML document handle from the DSI variable RPDJobTicket, and writes the XML tree into the JOBTICKET.XML file specified in the Directory option.
On DSI_MSGRUNR, this rule waits until it receives the job log file (JOBLOG.XML), from Documaker Server. You specify how long the system should wait using the SleepingTime INI option. If the waiting time exceeds the limit, the rule stops Documaker Server.
The system locates a job log placed in the directory specified in the Directory INI option. The job log file is loaded into an XML document so the XML tree can be written out in attachments. Whether the JOBLOG.XML file should be removed, depends on your entry in the RPDProcessJob INI option.
Input IDS variables
Parameter Description
DSIHANDLE hInstance DSI instance handle
char * pszParms Pointer to rule parameter string unsigned long
ulMsg DSI_MSG, such as DSI_MSGRUNF unsigned long
ulOptions options
Variable Description
RPDJobTicket A job ticket variable. It returns the XML document handle for the job ticket.
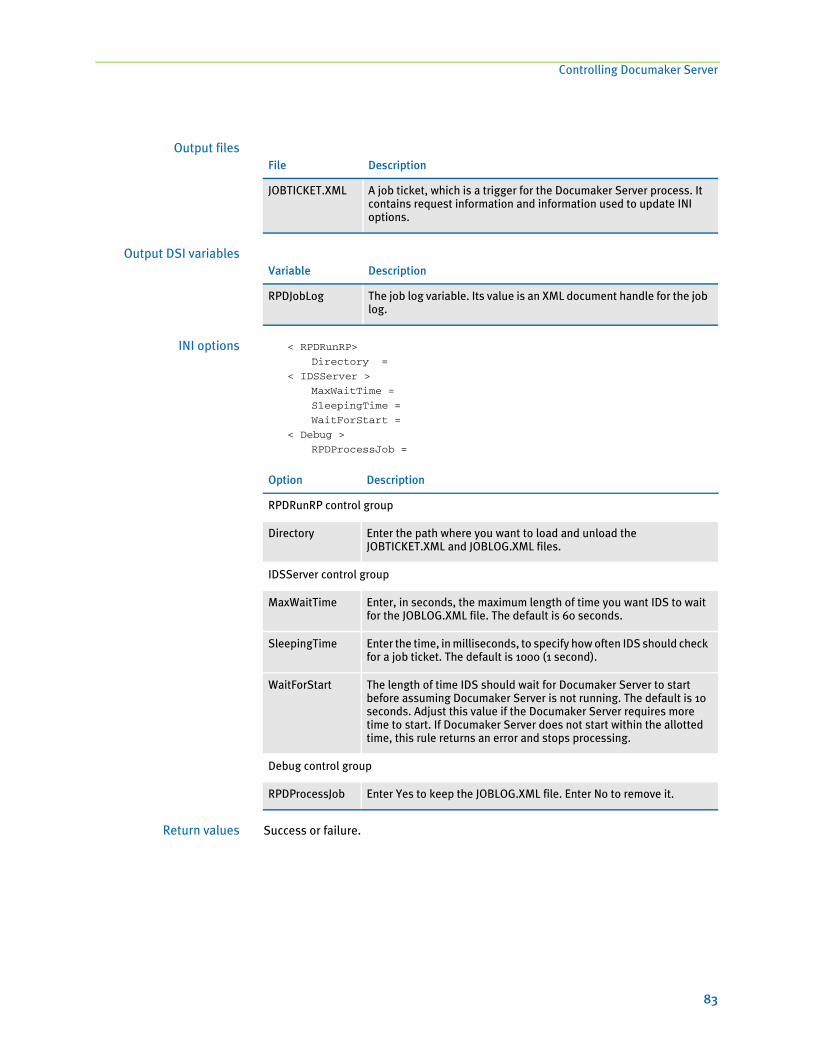
Controlling Documaker Server
83
Output files
Output DSI variables
INI options < RPDRunRP>
Directory =
< IDSServer >
MaxWaitTime =
SleepingTime =
WaitForStart =
< Debug >
RPDProcessJob =
Return values Success or failure.
File Description
JOBTICKET.XML A job ticket, which is a trigger for the Documaker Server process. It contains request information and information used to update INI options.
Variable Description
RPDJobLog The job log variable. Its value is an XML document handle for the job log.
Option Description
RPDRunRP control group
Directory Enter the path where you want to load and unload the JOBTICKET.XML and JOBLOG.XML files.
IDSServer control group
MaxWaitTime Enter, in seconds, the maximum length of time you want IDS to wait for the JOBLOG.XML file. The default is 60 seconds.
SleepingTime Enter the time, in milliseconds, to specify how often IDS should check for a job ticket. The default is 1000 (1 second).
WaitForStart The length of time IDS should wait for Documaker Server to start before assuming Documaker Server is not running. The default is 10 seconds. Adjust this value if the Documaker Server requires more time to start. If Documaker Server does not start within the allotted time, this rule returns an error and stops processing.
Debug control group
RPDProcessJob Enter Yes to keep the JOBLOG.XML file. Enter No to remove it.

Using IDS to Run Documaker Server
84
Error messagesMessage Description
RPD0003 Cannot create the DSI variable #VARIABLE,# at #LOCATION,#.
RPD0004 Cannot add the variable #VARIABLE,# to attachment at #LOCATION,#.
RPD0005 Cannot locate the DSI variable #VARIABLE,# at #LOCATION,#.
RPD0006 The DSI variable #VARIABLE,# does not contain valid data. Failed to #LOCATION,#.
RPD0007 The file #FILENAME,# does not exist. Failed to #LOCATION,#.
RPD0008 The call by #LOCATION,# to API #APINAME,# failed.
RPD0009 The INI option #INIOPTION,# cannot be located in the group #INIGROUP,#.

Controlling Documaker Server
85
RPDStopRPRun
Use this rule to stop Documaker Server. To do so, you need to execute the request type STOP as described in the topic, Setting Up IDS on page 67.
This rule is also used as an INIT/TERM rule and is registered on IDS under the ReqType:INI control group. You can use this rule to make sure that when IDS stops, Documaker Server also stops.
Syntax _DSIEXPORT DWORD _DSIAPI RPDStopRPRun (DSIHANDLE hdsi,
char * pszParms,
ULONG ulMsg,
ULONG ulOptions)
Parameters
This rule receives the current process ID from the DSI variable RPDRunProcess and then terminates Documaker Server.
Return values Success or failure.
Parameter Description
DSIHANDLE hInstance DSI instance handle
char * pszParms Pointer to rule parameter string unsigned long
ulMsg DSI_MSG, such as DSI_MSGRUNF unsigned long
ulOptions options

Using IDS to Run Documaker Server
86
RULServerBaseProc
When you use IDS to run Documaker Server, this rule replaces the RULStandardBaseProc rule and is registered as RULServerJobProc.
Syntax ;RULServerBaseProc;;;
Insert this rule in the AFGJOB.JDT file as the first rule.
This rule looks for a job ticket file in the current working directory and loads it as an XML file. All of the values on the XML tree are added to or updated in the INI options. After Documaker Server finishes processing, the rule checks the status. If there are errors, it returns a no more bases return code on the next iteration. This terminates Documaker Server.
This rule uses a polling technique—sleep a while and check for the file existence— which you can configure using INI options. The rule loads the job ticket and sets INI options used when running subsequent rules. On the post message, this rule creates a job log XML tree and writes it to disk. If any necessary values are missing from the XML job ticket, these values are generated and changed (or appended) in the INI context.
On RP_PRE_PROC_B, this rule creates a semaphore (gendata), which makes it possible for the IDS RPDCheckRPRun rule to detect the status of Documaker Server when the next processing job starts.
This rule stays in waiting status and checks for the existence of job ticket file (JOBTICKET.XML) and the rpdrunrp semaphore. As soon as the job ticket file is detected, this rule loads it onto the XML tree and uses the contents of the XML tree to update INI options in memory.
If the rule does not detect the rpdrunrp semaphore, the rule terminates Documaker Server by returning a msgNO_MORE_BASES return code. It also creates a GVM variable (DSISERV) so the CUSInitPrint rule can re-initialize printers after the job process is complete. This GVM variable can be used by any of the Documaker Server rules to detect if the Documaker Server is running under IDS, if different logic is needed.
On RP_POST_PROC_B, the rule writes out the job log file and removes the job ticket file. If the RULServerJobPRoc option is set to Yes, a copy of the file will be obtained for debugging purposes.
INI options Use these INI options with this rule:
< Data >
DataPath =
ExtrFile =
MsgFile =
ErrFile =
LogFile =
DBLogFile =
NAFile =
POLFile =
NewTrn =
< PrinterInfo >
Printer =
< Printer >
Port =
< Print_Batches >

Controlling Documaker Server
87
Batch1 = batch1.bch
< IDSServer >
SleepingTime =
GENSemaphoreName =
RPDSemaphoreName =
< Debug >
RULServerJobProc =
< PrintFormSet >
MultiFilePrint =
LogFileType =
LogFile =
Option Description
Data control group
DataPath Used as the default path if you omit PrintPath.
ExtrFile Enter the name and path of the extract file.
MsgFile Enter the name and path of the message file.
ErrFile Enter the name and path of the error file.
LogFile Enter the name and path of the log file.
DBLogFile Enter the name and path of the DB log file.
NAFile Enter the name and path of the NA file.
POLFile Enter the name and path of the POL file.
NewTrn Enter the name and path of the NewTrn file.
PrinterInfo control group
Printer Enter the designated printers for print batches.
Printer control group
Port Enter the name of the print batch file for each designated printer. Note the group name is defined by the printer option in the PrinterInfo control group.
Print_Batches control group
Batch1 Then name of the batch file.
IDSServer control group
SleepingTime Enter the amount of time in milliseconds you want the system to wait before it checks for a job ticket. The default is 1000 (1 second).
GENSemaphoreName Enter the name of the semaphore. The default is gendata.
RPDSemaphoreName Enter the name of the semaphore. The default is rpdrunrp.

Using IDS to Run Documaker Server
88
Input file JOBTICKET.XML
Output file JOBLOG.XML
Debug control group
RULServerJobProc Enter Yes if you want errors appended to the ErrFile, the LogTrace file to record the trace, and the JobLog file to be renamed and saved.
PrintFormSet control group
MultiFilePrint Enter Yes to generate multiple print files which use 46-byte unique names.To identify which recipients are in which print batch, enter No or omit this option.This causes the PrintFormSet rule to save the printer for the print batch along with its recipient information. The RULServerBaseProc rule then adds three new tags for each print batch file and adds them to the JOBLOG.XML file.For example, for the print batch file on PRINTER1, the system creates these new tags:
<PRINTER1RECIP>Insured</PRINTER1RECIP>
<PRINTER1CODE>001</PRINTER1CODE>
<PRINTER1DESC>Insured Copy</PRINTER1DESC>
LogFileType Specify the type of print log file, such as XML or TEXT.
LogFile Enter the name and path of the print log file. If you omit the extension, the system uses the LogFileType option to determine the extension.
Option Description

Controlling Documaker Server
89
ServerBaseProc
When you use IDS to run Documaker Server, this rule replaces the RULStandardJobProc rule.
Syntax ;ServerBaseProc;;;
Insert this rule in the AFGJOB.JDT file as the first rule.
This rule looks for a job ticket file in the current working directory and loads it as an XML file. All of the values on the XML tree are added to or updated in the INI options. After Documaker Server finishes processing, the rule checks the status. If there are errors, it returns a no more bases return code on the next iteration. This terminates Documaker Server.
This rule uses a polling technique—sleep a while and check for the file existence— which you can configure using INI options. The rule loads the job ticket and sets INI options used when running subsequent rules. On the post message, this rule creates a job log XML tree and writes it to disk. If any necessary values are missing from the XML job ticket, these values are generated and changed (or appended) in the INI context.
On RP_PRE_PROC_B, this rule creates a semaphore (gendata), which makes it possible for the IDS RPDCheckRPRun rule to detect the status of Documaker Server when the next processing job starts.
This rule stays in waiting status and checks for the existence of job ticket file (JOBTICKET.XML) and the rpdrunrp semaphore. As soon as the job ticket file is detected, this rule loads it onto the XML tree and uses the contents of the XML tree to update INI options in memory.
If the rule does not detect the rpdrunrp semaphore, the rule terminates Documaker Server by returning a msgNO_MORE_BASES return code. It also creates a GVM variable (DSISERV) so the CUSInitPrint rule can re-initialize printers after the job process is complete. This GVM variable can be used by any of the Documaker Server rules to detect if the Documaker Server is running under IDS, if different logic is needed.
On RP_POST_PROC_B, the rule writes out the job log file and removes the job ticket file. If the RULServerJobPRoc option is set to Yes, a copy of the file will be obtained for debugging purposes.
INI options < Data >
DataPath =
ExtrFile =
MsgFile =
ErrFile =
LogFile =
DBLogFile =
NAFile =
POLFile =
NewTrn =
< PrinterInfo >
Printer =
< Printer >
Port =
< Print_Batches >
Batch1 = batch1.bch
< IDSServer >
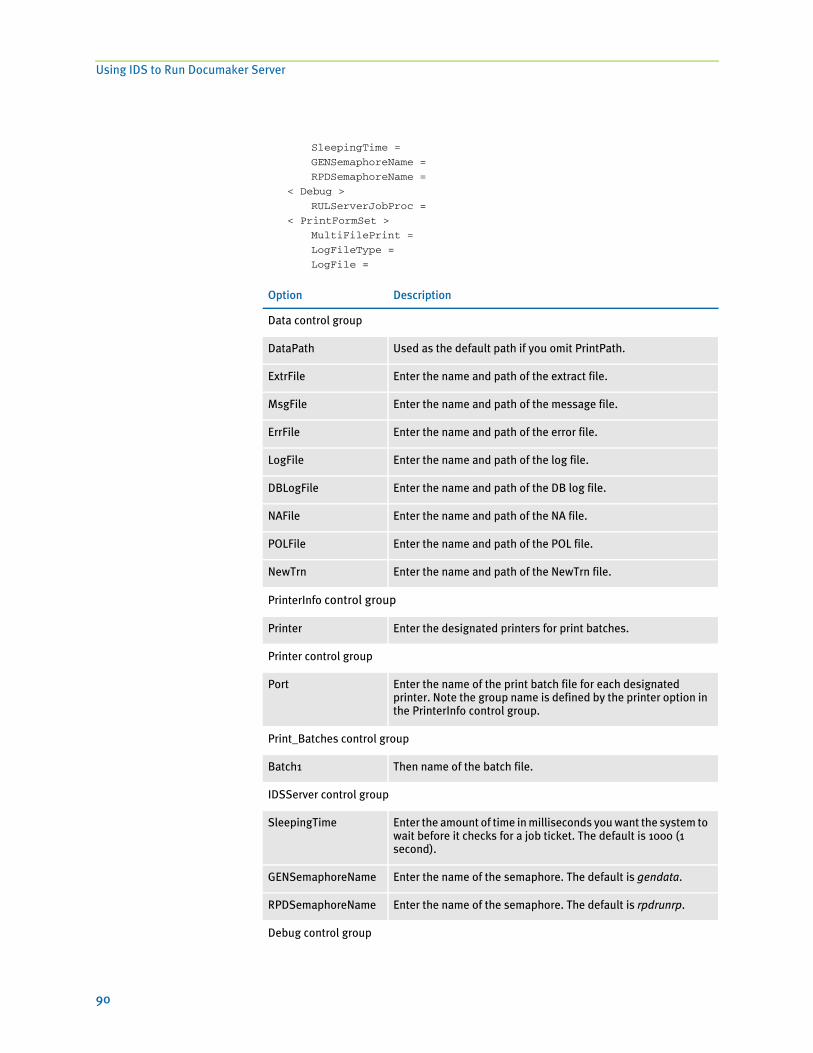
Using IDS to Run Documaker Server
90
SleepingTime =
GENSemaphoreName =
RPDSemaphoreName =
< Debug >
RULServerJobProc =
< PrintFormSet >
MultiFilePrint =
LogFileType =
LogFile =
Option Description
Data control group
DataPath Used as the default path if you omit PrintPath.
ExtrFile Enter the name and path of the extract file.
MsgFile Enter the name and path of the message file.
ErrFile Enter the name and path of the error file.
LogFile Enter the name and path of the log file.
DBLogFile Enter the name and path of the DB log file.
NAFile Enter the name and path of the NA file.
POLFile Enter the name and path of the POL file.
NewTrn Enter the name and path of the NewTrn file.
PrinterInfo control group
Printer Enter the designated printers for print batches.
Printer control group
Port Enter the name of the print batch file for each designated printer. Note the group name is defined by the printer option in the PrinterInfo control group.
Print_Batches control group
Batch1 Then name of the batch file.
IDSServer control group
SleepingTime Enter the amount of time in milliseconds you want the system to wait before it checks for a job ticket. The default is 1000 (1 second).
GENSemaphoreName Enter the name of the semaphore. The default is gendata.
RPDSemaphoreName Enter the name of the semaphore. The default is rpdrunrp.
Debug control group

Controlling Documaker Server
91
Input file JOBTICKET.XML
Output file JOBLOG.XML
RULServerJobProc Enter Yes to get a copy of the job ticket file before the system removes it.
PrintFormSet control group
MultiFilePrint Enter Yes to generate multiple print files which use 46-byte unique names.To identify which recipients are in which print batch, enter No or omit this option.This causes the PrintFormSet rule to save the printer for the print batch along with its recipient information. The RULServerBaseProc rule then adds three new tags for each print batch file and adds them to the JOBLOG.XML file.For example, for the print batch file on PRINTER1, the system creates these new tags:
<PRINTER1RECIP>Insured</PRINTER1RECIP>
<PRINTER1CODE>001</PRINTER1CODE>
<PRINTER1DESC>Insured Copy</PRINTER1DESC>
LogFileType Specify the type of print log file, such as XML or TEXT.
LogFile Enter the name and path of the print log file. If you omit the extension, the system uses the LogFileType option to determine the extension.
Option Description

Using IDS to Run Documaker Server
92
93
Chapter 8
Frequently Asked Questions
This chapter provides answers to commonly asked questions.

Frequently Asked Questions
94
Is XML the same as HTML?
No. XML is primarily a data exchange format and contains the data definitions and the data. HTML can contain data and layout, however the definitions of the data are not defined in tags (such as <author>) as they are in XML. These tags are defined in a schema.
To portray XML data in a page layout an XSL (Extensible Stylesheet Language) file is required. This would contain information such as position, fonts, and so on.
The benefits of XML over HTML are that it is becoming an industry standard accepted format for data transfer and it has a more defined structure. When an XML file has a valid structure it is known as being well formed.
Who developed the XML parser?
The system uses the Expat XML parser, which was originally developed for Netscape. It is a third-party library. You cannot plug in your own parser. Here are some links if you want more information on Expat:
http://expat.sourceforge.net/
http://sourceforge.net/projects/expat/
What is an XML tag?
XML tags are created like HTML tags. There is a start tag and a closing tag.
<TAG>content</TAG>
The closing tag uses a slash after the opening bracket. The text between the brackets is called an element. Keep in mind...
• Tags are case sensitive.
• Starting tags always need a closing tag.
• All tags must be nested properly.
• Comments can be used in the same way as HTML, for instance <!--Comments-->
Empty tags can be defined as <TAG/>. Empty tags do not require a closing tag.
What is an XML attribute?
Elements in XML can use attributes. The syntax is:
<element attribute-name=”attribute-value”>…</element>
The value of an attribute needs to be quoted, even if it contains only numbers. For example:
<car color = “red”>Volvo</car>
The same entry could be defined without using attributes:
<car>
<brand>Volvo</brand>
<color>red</color>
</car>

95
What is a schema?
A schema is a map of the structure of the data. This is presented in an XML type layout. Using the sample XML file on the previous page the schema for this would be as shown below.
<?xml version="1.0" encoding="utf-8"?>
<xs:schema xmlns:xs="http://www.yourco.org//XMLSchema">
<xs:element name="book">
<xs:complexType>
<xs:sequence>
<xs:element name="title" type="xs:string"/>
<xs:element name="author" type="xs:string"/>
<xs:element name="character" minOccurs="0" maxOccurs="unbounded">
<xs:complexType>
<xs:sequence>
<xs:element name="name" type="xs:string"/>
<xs:element name="friend-of" type="xs:string" minOccurs="0"
maxOccurs="unbounded"/>
<xs:element name="since" type="xs:date"/>
<xs:element name="qualification" type="xs:string"/>
</xs:sequence>
</xs:complexType>
</xs:element>
</xs:sequence>
<xs:attribute name="isbn" type="xs:string"/>
</xs:complexType>
</xs:element>
</xs:schema>
What XML standards are accepted by Skywire Software software?
XML standards are set and defined by the W3C organization (www.w3c.org). This is a consortium of over 450 organizations that set and define common standards and protocols in use on the World Wide Web. Skywire Software products use the XML 1.0 standard and will support the following encoding:
• UTF-8
• ISO-8859-1
• US-ASCII
You should be able to use any of these encodings to pass information to Docupresentment, DSI APIs or Documaker Server. Docupresentment sends back UTF-8.

Frequently Asked Questions
96
Are ampersands (&) and octothorpes (#) supported in XML files?
Yes, however some characters must be defined as entity references or character references. For instance, you can use octothorpes in XML files as shown here:
<message>Use #1 before using #2</message>
Entity references begin with an ampersand (&) and end with a semicolon (;). These are predefined codes within the XML specification for commonly used characters. Here are some examples:
Character references begin with an ampersand and an octothorpe (&#) and end with a semicolon (;) . These are used for characters which are not commonly used and do not already have entity references pre-defined.
Here are some examples:
Refer to the W3C (www.w3c.org) for more information on special characters.
What tag names cannot be used in XML?
There are a number of restrictions for tag names. These include:
• No tag names can start with xml.
• Tag names cannot start with underscores or numbers.
• Names cannot contain semicolons (:).
• There cannot be a space after the opening < character.
Reserved words are defined by the W3C. Some of the words that cannot be used include:
Character In XML
& &
“ "
‘ '
> >
< <
Character In XML
é é
í í
ü ü
If Typeswitch Item Node
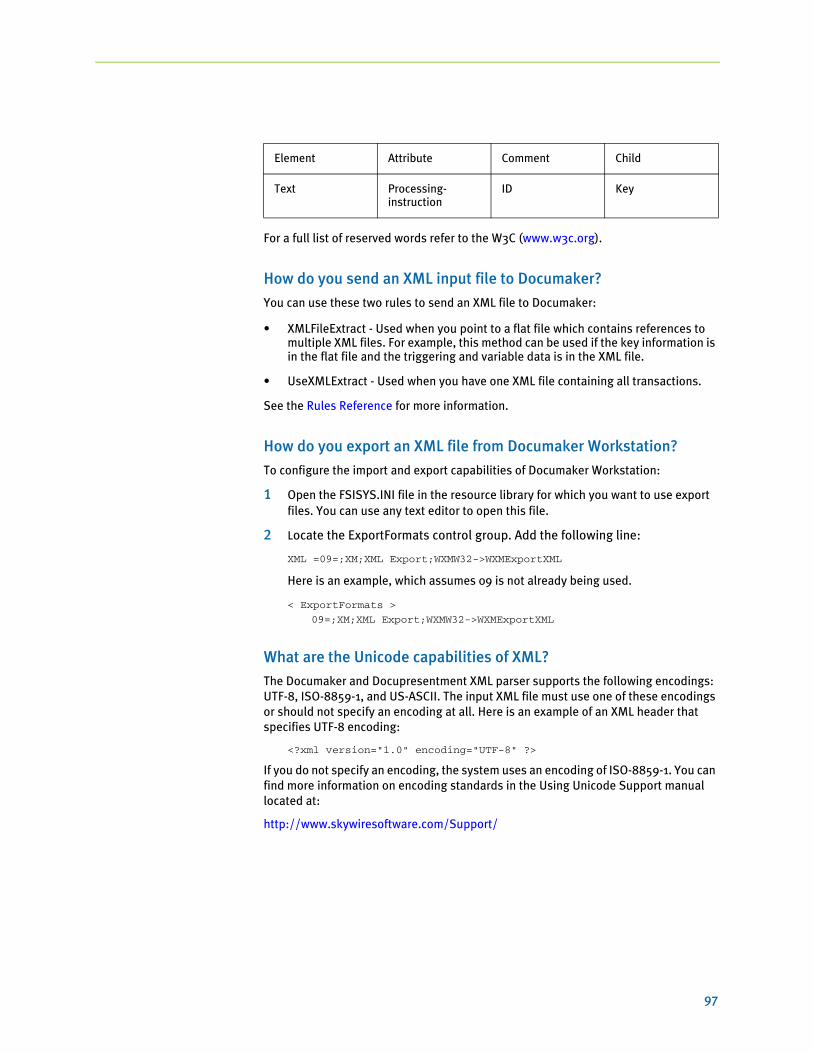
97
For a full list of reserved words refer to the W3C (www.w3c.org).
How do you send an XML input file to Documaker?
You can use these two rules to send an XML file to Documaker:
• XMLFileExtract - Used when you point to a flat file which contains references to multiple XML files. For example, this method can be used if the key information is in the flat file and the triggering and variable data is in the XML file.
• UseXMLExtract - Used when you have one XML file containing all transactions.
See the Rules Reference for more information.
How do you export an XML file from Documaker Workstation?
To configure the import and export capabilities of Documaker Workstation:
1 Open the FSISYS.INI file in the resource library for which you want to use export files. You can use any text editor to open this file.
2 Locate the ExportFormats control group. Add the following line:
XML =09=;XM;XML Export;WXMW32->WXMExportXML
Here is an example, which assumes 09 is not already being used.
< ExportFormats >
09=;XM;XML Export;WXMW32->WXMExportXML
What are the Unicode capabilities of XML?
The Documaker and Docupresentment XML parser supports the following encodings: UTF-8, ISO-8859-1, and US-ASCII. The input XML file must use one of these encodings or should not specify an encoding at all. Here is an example of an XML header that specifies UTF-8 encoding:
<?xml version="1.0" encoding="UTF-8" ?>
If you do not specify an encoding, the system uses an encoding of ISO-8859-1. You can find more information on encoding standards in the Using Unicode Support manual located at:
http://www.skywiresoftware.com/Support/
Element Attribute Comment Child
Text Processing-instruction
ID Key
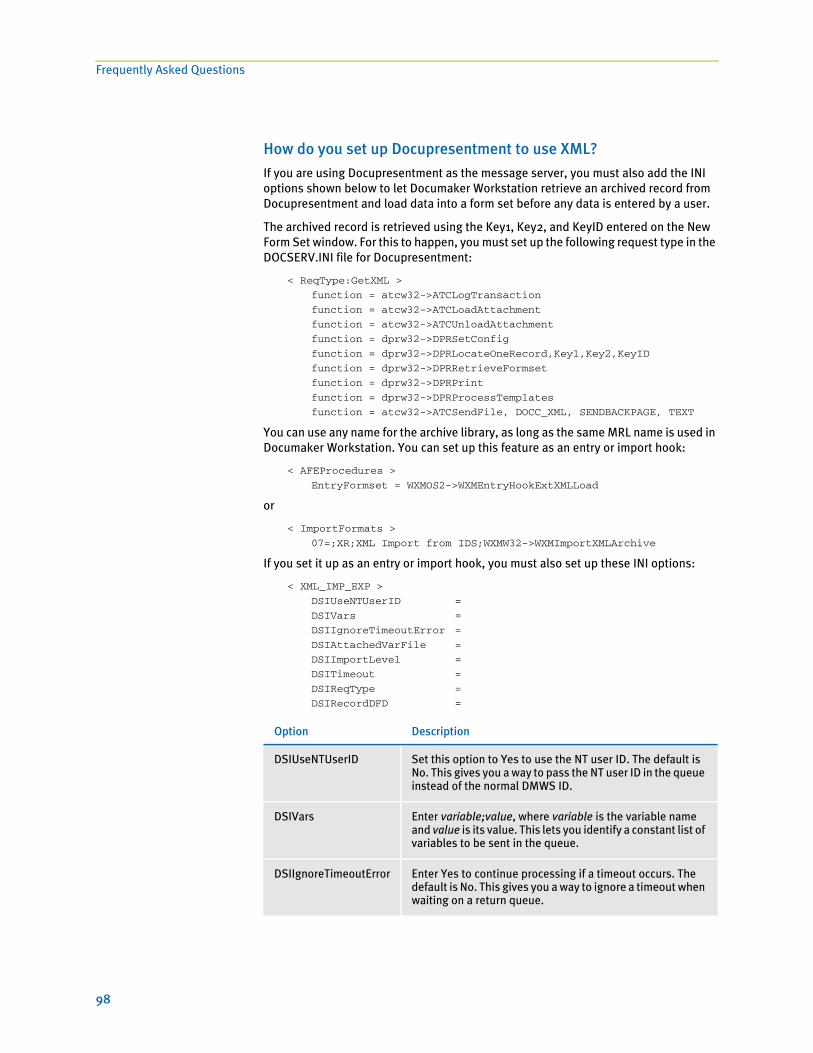
Frequently Asked Questions
98
How do you set up Docupresentment to use XML?
If you are using Docupresentment as the message server, you must also add the INI options shown below to let Documaker Workstation retrieve an archived record from Docupresentment and load data into a form set before any data is entered by a user.
The archived record is retrieved using the Key1, Key2, and KeyID entered on the New Form Set window. For this to happen, you must set up the following request type in the DOCSERV.INI file for Docupresentment:
< ReqType:GetXML >
function = atcw32->ATCLogTransaction
function = atcw32->ATCLoadAttachment
function = atcw32->ATCUnloadAttachment
function = dprw32->DPRSetConfig
function = dprw32->DPRLocateOneRecord,Key1,Key2,KeyID
function = dprw32->DPRRetrieveFormset
function = dprw32->DPRPrint
function = dprw32->DPRProcessTemplates
function = atcw32->ATCSendFile, DOCC_XML, SENDBACKPAGE, TEXT
You can use any name for the archive library, as long as the same MRL name is used in Documaker Workstation. You can set up this feature as an entry or import hook:
< AFEProcedures >
EntryFormset = WXMOS2->WXMEntryHookExtXMLLoad
or
< ImportFormats >
07=;XR;XML Import from IDS;WXMW32->WXMImportXMLArchive
If you set it up as an entry or import hook, you must also set up these INI options:
< XML_IMP_EXP >
DSIUseNTUserID =
DSIVars =
DSIIgnoreTimeoutError =
DSIAttachedVarFile =
DSIImportLevel =
DSITimeout =
DSIReqType =
DSIRecordDFD =
Option Description
DSIUseNTUserID Set this option to Yes to use the NT user ID. The default is No. This gives you a way to pass the NT user ID in the queue instead of the normal DMWS ID.
DSIVars Enter variable;value, where variable is the variable name and value is its value. This lets you identify a constant list of variables to be sent in the queue.
DSIIgnoreTimeoutError Enter Yes to continue processing if a timeout occurs. The default is No. This gives you a way to ignore a timeout when waiting on a return queue.

99
If the request for an XML file comes back with an error, as opposed to a time out, Docupresentment displays an error message.
Can the SOAP standard be used with Docupresentment?
Docupresentment version 1.7 added a new open and documented queue control message format based on XML and the evolving SOAP standard. The XML message format is supported by the MSMQ and MQSeries queues, but is not supported by the generic queue system that ships with the base Docupresentment product. The base product queues use a proprietary message format.
You can find more information on the XML and SOAP on the W3C WEB site:
http://www.w3.org/
You can also find information about SOAP messages with attachments at:
http://www.w3.org/tr/soap-attachments
NOTE: Skywire Software will follow the evolving standards of SOAP and UDDI and move toward universal messaging. The first version of the DSI message format is based on XML and complies with many of the initial standards for SOAP message envelopes. Later versions will move transactions and servers toward fuller SOAP and UDDI compliance.
Skywire Software has used message queuing as a means of serializing requests and responses between loosely coupled clients and servers without requiring one-to-one connections. MQ Series has evolved into a standard program-to-program message bus for integrating loosely coupled applications.
DSIAttachedVarFile The default is DOCC_XML. Set this option to the attachment name if it differs from DOCC_XML. This gives you a way to specify the variable name the XML file is attached to.
DSIImportLevel This option is typically used by programmers. Enter 2 if you want the hook to operate on the FAP_MSGOPEN level. Enter 3 if you want it to operate on the FAP_MSGRUN level. The default is 2.
DSITimeout Enter the number of milliseconds you want for the time-out. The default is 60000 milliseconds or 60 seconds.
DSIReqType Enter the name of the request type of the message placed in the queue. The default is GETXML.
DSIRecordDFD Enter the name of a DFD file. The system tries to match variable fields sent in the request to field values in this DFD file. It then attaches the DFD record to the end of the message.
Option Description

Frequently Asked Questions
100
Docupresentment includes the client and server sides of the DSI (document server interface) system and of the DQM (document queuing and messaging) system. These interface layers help manage connections between multiple simultaneous clients and multiple simultaneous servers. The DQM layer provides a logical abstract layer over the physical process of accessing the queue, so one implementation can support and switch between multiple queuing systems. This layer supports these models:
• A generic system that ships with Docupresentment (handled by DCBLIB)
• Support for Microsoft MSMQ (handled by MQLIB)
• Support for IBM MQ Series (handled by QSRLIB)
The DSI system provides a logical abstract layer over the physical process of assembling, delivering, and parsing of a message, so the initiator of the message does not have to know the physical format of the message, and is insulated from internal software changes to the message format between product versions.
For instance, you can use the DSI messaging client with Documaker Workstation so Documaker Workstation can work with
• External systems via either MQ Series or MSMQ messaging middleware.
• Docupresentment as a bridge to a legacy system to retrieve data for import.
The first ability means second is optional. You can also use your own internal programs and interface using MQSeries.
The advantage of having a logical abstract layer is that it lets you deploy applications for different message queuing systems without requiring program changes. Only minimal setup changes are required to test or deploy the same application with a different queuing system. By abstracting the message format, applications are insulated from internal changes to the message format and can use the Skywire Software APIs to correctly assemble or disassemble messages.
The disadvantage of message format abstraction is that non-Skywire Software applications might be required to use Skywire Software APIs to communicate with Skywire Software applications.
On some platforms, it may not be practical to invoke these APIs. The proprietary nature of the original message format further complicates the issue.
If you are integrating with Docupresentment as the server, the message format documentation is not necessary. If, however, you are integrating with another application, the message format may be needed if you do not use Docupresentment APIs and you can communicate via MQSeries.
For additional information on SOAP and Docupresentment, see the Internet Document Server Guide.
How can Docupresentment run Documaker using XML job-tickets?
If you have a license for both Documaker and Docupresentment (also known as the Internet Document Server or IDS), you can set up Docupresentment to run Documaker as a subordinate process. Web clients communicate with Docupresentment using queues. Docupresentment communicates with Documaker via XML files called job tickets and job logs.
This diagram illustrates the process:
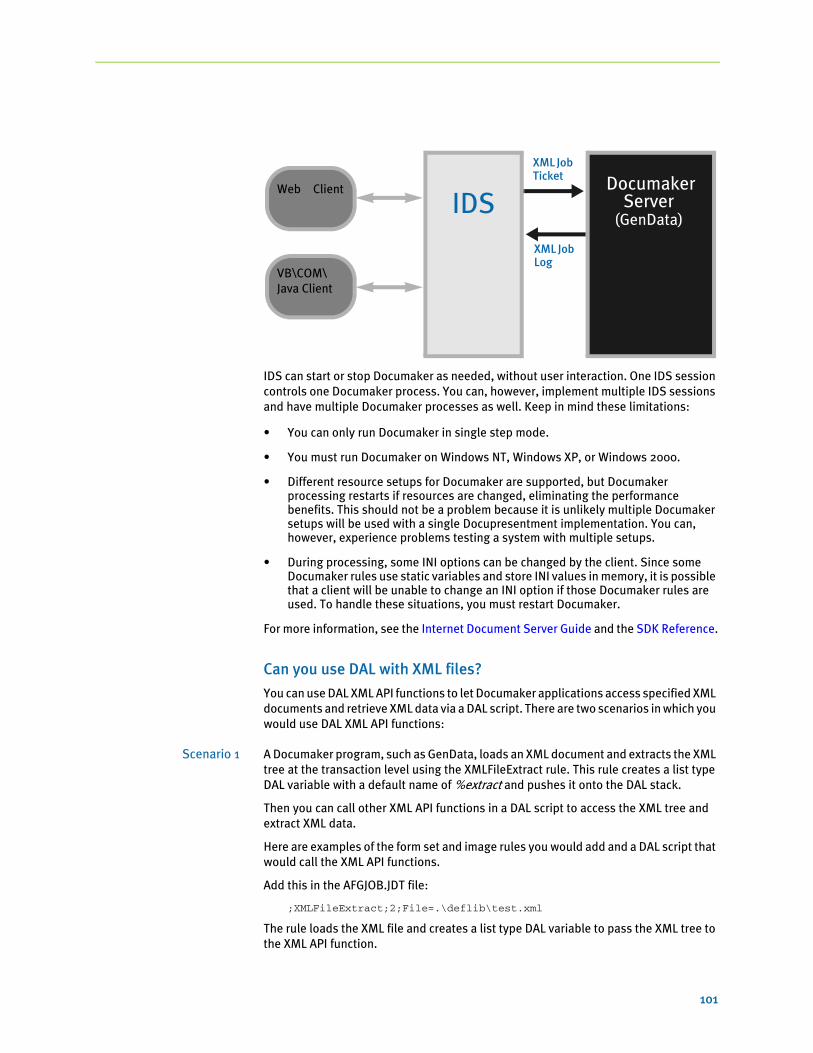
101
IDS can start or stop Documaker as needed, without user interaction. One IDS session controls one Documaker process. You can, however, implement multiple IDS sessions and have multiple Documaker processes as well. Keep in mind these limitations:
• You can only run Documaker in single step mode.
• You must run Documaker on Windows NT, Windows XP, or Windows 2000.
• Different resource setups for Documaker are supported, but Documaker processing restarts if resources are changed, eliminating the performance benefits. This should not be a problem because it is unlikely multiple Documaker setups will be used with a single Docupresentment implementation. You can, however, experience problems testing a system with multiple setups.
• During processing, some INI options can be changed by the client. Since some Documaker rules use static variables and store INI values in memory, it is possible that a client will be unable to change an INI option if those Documaker rules are used. To handle these situations, you must restart Documaker.
For more information, see the Internet Document Server Guide and the SDK Reference.
Can you use DAL with XML files?
You can use DAL XML API functions to let Documaker applications access specified XML documents and retrieve XML data via a DAL script. There are two scenarios in which you would use DAL XML API functions:
Scenario 1 A Documaker program, such as GenData, loads an XML document and extracts the XML tree at the transaction level using the XMLFileExtract rule. This rule creates a list type DAL variable with a default name of %extract and pushes it onto the DAL stack.
Then you can call other XML API functions in a DAL script to access the XML tree and extract XML data.
Here are examples of the form set and image rules you would add and a DAL script that would call the XML API functions.
Add this in the AFGJOB.JDT file:
;XMLFileExtract;2;File=.\deflib\test.xml
The rule loads the XML file and creates a list type DAL variable to pass the XML tree to the XML API function.
Web Client
IDSDocumaker
Server (GenData)
VB\COM\ Java Client
XML Job Ticket
XML Job Log

Frequently Asked Questions
102
Add this in your DDT file:
;0;0;DALXMLSCRIPT;0;9;DALXMLSCRIPT;0;9;;DAL;Call("TEST.DAL");N;N;N;N;4792;19444;11010;
TEST.DAL is the name of the DAL script file. DALXMLSCRIPT is the name of the variable field in the FAP file.
Here is an example of the DAL script:
%listH=XMLFind(%extract, “Forms”, “Form”);
#rc=XMLFirst(%listH);
if #rc=0
return(“Failed to XMLFirst”);
end
aStr=XMLGetCurText(%listH);
return(aStr);
%listH denotes a list type DAL variable. #rc denotes an integer type DAL variable.
aStr denotes a string type DAL variable.
Scenario 2 You can also load the XML document and create the XML tree at a specific image field by calling the LoadXMLList rule from a DAL script. You must set the calling procedure in the DDT file as shown in Scenario 1.
Here is an example of DAL script file:
%xListH=LoadXMLList("test.xml");
%listH=XMLFind(%xListH,"Forms","Form/@*");
aStr=XMLNthAttrValue(%listH,2);
#rc=DestroyList(%xListH);
return(aStr);
For more information, see the DAL Reference.
Are triggers set the same way when you use XML files in Documaker?
No, triggers are set differently when you use XML. The XML file should contain the names of the forms to trigger.
If the FORM.DAT has all recipients set to zero copy counts, then those forms will be removed from the form set. The recipient copy count should be set in the FORM.DAT file. For example, based on
<car>
<driver>Tom<driver/>
<driver>Tim<driver/>
<car/>
<car>
<driver>Sally<driver/>
<car/>
You can do simple triggering based on the existence of a node. For example, this
/child::car
would trigger a form if car is a child of the root node. You could make it trigger two of the same forms because there are two cars.
The system supports value matching. So you can do the following:
103
/child::car[child::driver="Tom"]
Or, you can use the RecipIf rule to trigger an image with custom rule parameters, as shown in this example:
A={!/child::car/child::driver 1,7}::if
(A='Tom ')::return("^1^")::end::;
If there is such a value in that element in the XML file, the image would trigger. For this to work, define the offset of the variable attribute as 1 and the length of the data you want to compare.
For more information, see the Documaker Server System Reference.
Can you use the Concat rule with XML?
You cannot use the Concat rule with XML files. Instead, use a DAL script. Here is an example:
;0;0;CITYSTATEZIP;0;30;CITYSTATEZIP;0;30;;DAL;csz=@("ADDR-CITY")&', '&@("ADDR-STATE")&' '&@("ADDR-ZIP")::Return csz)::;;N;N;N;N;135;1972;16010;
See the DAL Reference for more information.
Can you use the SetAddr rule with XML?
You cannot use the SetAddr rules with XML files. Instead, use the RemoveWhiteSpace rule to remove the white space from between fields. This rule works similarly to the SetAddr rules, but is not address specific.
See the Rules Reference for more information.
Can you use the PrintIf rule with XML?
You cannot use the PrintIf rule with XML files. Instead, use a DAL script. Here is an example:
;0;0;COMPANY;0;8;COMPANY;0;8;;DAL;if (@("PRINTIFSUB")="A")THEN ANSWER1="Accident":: elseif (@("PRINTIFSUB")="C")THEN ANSWER1= "Casualty"::end::return (ANSWER1)::;N;N;N;N;11292;919;12010;
See the DAL Reference for more information.

Frequently Asked Questions
104
How does Documaker deal with empty tags in XML files?
Documaker and Docupresentment use the same XML loading routine. The XML loading routine does not care whether you define all of the fields that might occur in a FAP file, nor does it care whether if field data is missing, so no error is produced when you load an XML file with missing field tags.
Just make sure the XML file you are loading is valid according to Documaker’s XML standards.
If, however, you export the form set, you may get similar same results — if the FAP files were loaded, the empty fields are written into the XML file with no data. If the FAP files are not loaded, the system only includes those fields created during the run — which is usually limited to just the fields with data.
The entries you can use to indicate empty tags are:
<SingleTag />
<EmptyTags></EmptyTags>
<SpacedOut > </SpacedOut>
<NulEval ># \NoSuchObject #</NulEval>
How are overflows defined?
When you define the SetOvFlow rule in the AFGJOB.JDT file, use the XML tag shown here:
;SetOvFlwSym;1;covsym,xml,1;
When you define the IncOvSym rule in the DDT file, use the XML tag, shown here:
;IncOvSym;covsym,xml;
If an image contains XML data on the same level, use the !descendant parameter instead of XPath:
<name>
<fielda>
<fieldb>xxxxx<\fieldb>
<fieldc>yyyyy<\fieldc>
<\fielda>
<\name>
The data for <fieldb> and <fieldc> are on the same level so you cannot use an XPath of:
!\name\fielda\fieldb[**ovsym**]
!\name\fielda\fieldc[**ovsym**]
You would have to use:
!descendant::fieldb[**ovsym**]
!descendant::fieldc[**ovsym**]

105
How do you handle overflow within overflow using XML?
Use the SetRecipFromImage rule with the XML overflow variable to get this to work.
Image A (which overflows will trigger image B using the SetRecipFromImage rule)
Image B (which overflows will trigger image C using the SetRecipFromImage rule)
and so on...
See the Rules Reference for more information.
Can you use the LoadExtractData and UseXMLExtract rules in single-step mode?
When running in single- or two-step mode, omit the LoadExtractData rule. Including it makes the GenData program enter a processing loop.
You can use the UseXMLExtract rule in single-step, two-step, or multi-step mode. When you use this rule in multi-step mode, place it after the LoadExtractData rule. In single-step or two-step mode, place it after the NoGenTrnTransactionProc rule.
You do not have to use the UseXMLExtract rule with the LoadExtractData rule when running in single-step or two-step mode.
Which version of XML does Transall support?
XML version 1.0 is compliant with Transall. Transall version 10.2 (20011101) supports both reading and writing XML files.
How do you write HTML pages to output XML via Docupresentment?
Modify the RECIPS.HTM page to add an XML option to the drop-down box on the page. Here is an example:
<BR>
<B> Output file type:</B>
<SELECT NAME="PRTTYPE">
<OPTION> PDF
<OPTION> XML
</SELECT>
<BR>
Then modify the DAP.INI file to make sure the PrtType control group is set to XML and not PDF, as follows:
< Printer >
PrtType = XML
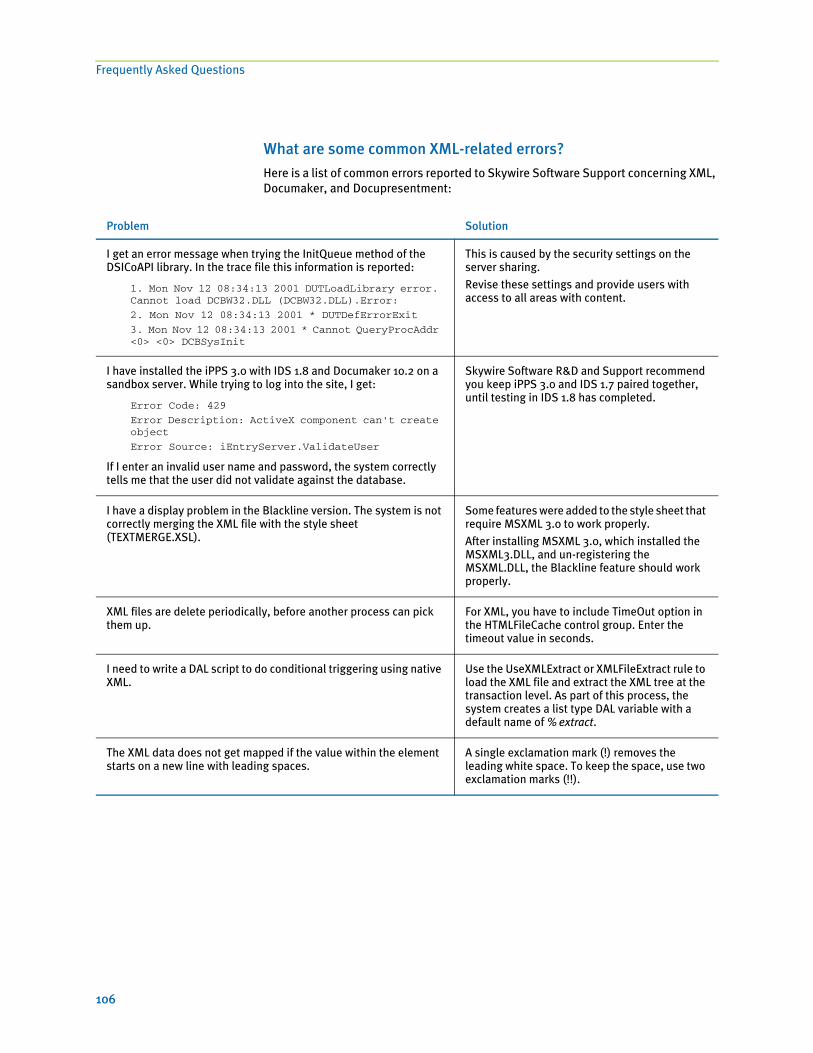
Frequently Asked Questions
106
What are some common XML-related errors?
Here is a list of common errors reported to Skywire Software Support concerning XML, Documaker, and Docupresentment:
Problem Solution
I get an error message when trying the InitQueue method of the DSICoAPI library. In the trace file this information is reported:
1. Mon Nov 12 08:34:13 2001 DUTLoadLibrary error. Cannot load DCBW32.DLL (DCBW32.DLL).Error:
2. Mon Nov 12 08:34:13 2001 * DUTDefErrorExit
3. Mon Nov 12 08:34:13 2001 * Cannot QueryProcAddr <0> <0> DCBSysInit
This is caused by the security settings on the server sharing. Revise these settings and provide users with access to all areas with content.
I have installed the iPPS 3.0 with IDS 1.8 and Documaker 10.2 on a sandbox server. While trying to log into the site, I get:
Error Code: 429
Error Description: ActiveX component can't create object
Error Source: iEntryServer.ValidateUser
If I enter an invalid user name and password, the system correctly tells me that the user did not validate against the database.
Skywire Software R&D and Support recommend you keep iPPS 3.0 and IDS 1.7 paired together, until testing in IDS 1.8 has completed.
I have a display problem in the Blackline version. The system is not correctly merging the XML file with the style sheet (TEXTMERGE.XSL).
Some features were added to the style sheet that require MSXML 3.0 to work properly.After installing MSXML 3.0, which installed the MSXML3.DLL, and un-registering the MSXML.DLL, the Blackline feature should work properly.
XML files are delete periodically, before another process can pick them up.
For XML, you have to include TimeOut option in the HTMLFileCache control group. Enter the timeout value in seconds.
I need to write a DAL script to do conditional triggering using native XML.
Use the UseXMLExtract or XMLFileExtract rule to load the XML file and extract the XML tree at the transaction level. As part of this process, the system creates a list type DAL variable with a default name of %extract.
The XML data does not get mapped if the value within the element starts on a new line with leading spaces.
A single exclamation mark (!) removes the leading white space. To keep the space, use two exclamation marks (!!).

107
Index
Symbols
!descendant parameter 104
A
ampersandsin XML files 96
ancestor 41
attributes 94
B
Byte Order Mark 8
C
character references 96
child 41
Concat ruleand XML 103

108
D
DALand XML 101expressions 61
DAPINSTANCE 10
DAPOPTIONS 10
Debug option 21
descendant 41
DFD filesDSIRecordDFD option 7
DOCSERV.INI filesetting up a message server 6
Documaker Serverrunning through IDS 101
Docupresentment 3
DSIAttachedVarFile option 7, 99
DSIIgnoreTimeoutError option 6, 98
DSIImportLevel option 7, 99
DSIRecordDFD option 6, 7, 99
DSIReqType option 7, 99
DSITimeout option 7, 99
DSIUseNTUserID option 6, 98
DSIVARS option 6
DSIVars option 98
E
elements 94
ElementText option 40
Enable_Debug_Options option 62
encodings 8
entity references 96
EntryFormset option 5, 6
Executable option 21
Expat XML parser 8, 94
export files 13
ExportFormats control group 97setting up export formats 4, 5
Ext option 4
Extensible Stylesheet Language 94
extract filesXML files 38
ExtractKeyField control group 8
F
fieldsmapping 40
file formatsXML 15
File option 4
formstriggering in XML files 40
FSISYS.INI fileconfiguring export options 4, 5
G
GVMexpressions 61
H
HTMLcompared to XML 94
I
IDSusing XML 98
IDsDSIUseNTUserID option 6
imagestriggering in XML files 39, 40

109
ImportXMLExtract ruledefined 28
ImportXMLFile ruledefined 31
ISO-8859-1 8, 95
L
LoadExtractData ruleand XML 105
M
mapping fields 40
message serverssetting up 6
messaging 5
N
NoGenTrnTransactionProc ruleand XML 105
O
octothorpesin XML files 96
overflowand XML 105XML files 39
P
parent 41
Path option 4
PrintIf ruleand XML 103
R
referencing symbolic data 62
RemoveWhiteSpace ruleand XML 103
RULServerBaseProc ruledefined 86
S
schema 94, 95
SeachMask option 8
self 41
ServerBaseProc ruledefined 89
SetAddr rulesand XML 103
SetOvFlow ruleand XML 104
SetRecipFromImage ruleand XML 105
sibling 41
SOAP 99
SuppressDlg option 4, 14
T
tags 94names of 96
Index
110
timeoutsDSIIgnoreTimeoutError option 6DSITimeout option 7
Transalland XML 105
triggersand XML 102
U
UDDI 99
Unicodeand XML 97
US-ASCII 8, 95
user IDsDSIUseNTUserID option 6
UseXMLExtract ruleand XML 105overview 35XML input files 97
UTF-8 8, 95
W
WXMEntryHookExtXMLLoad function 3, 5
WXMExportXML function 3
WXMImportXML function 3
WXMImportXMLArchive function 3, 5
X
XMLand DAL 101and overflow 104, 105and Transall 105and triggers 102and Unicode 97common errors 106compared to HTML 94defined 2empty tags 104export format 4import format 5job tickets 100message format 5parser 94path locator 41reserved words 96standards 95
XML extract filesmapping data 36
XML filesas extract files 35creating an export file 13file format 15importing 20transforming 21

111
XML fle format 15
XML parser 8
XML_IMP_EXP control group 4, 6
XMLFileExtract rule 35, 97
XPath 41search masks 61
XPath option 62
XPATHW32 utility 41, 44
XSLT templates 21
XSLTName option 21

Index
112


![An Overview on XML Semantic Disambiguation from ... · approaches since they are not part of the core XML data [40, 182]. Fig. 2. XML document tree T representing XML document 1 in](https://static.documents.pub/doc/80x56/5e762307e0f73339ea2eefc6/an-overview-on-xml-semantic-disambiguation-from-approaches-since-they-are-not.jpg)


