26
WORKSHOP MANUAL 125 cc ENGINE FD1 GB
| Date post: | 10-Mar-2018 |
| Category: |
Documents |
| Upload: | duongkhanh |
| View: | 221 times |
| Download: | 1 times |
WO
RK
SHO
P M
AN
UA
L 1
25 c
cENGINE FD1
GB

1
CONTENTS
INTRODUCTION
Page ...................................................................... 2
CHARACTERISTICS
Page ...................................................................... 3
MAINTENANCE PLAN
Page ...................................................................... 4
SETTING UP
Page ...................................................................... 5
TIGHTENING TORQUES AND SPECIAL TOOLS
Page ...................................................................... 6
DISMANTLING AND REASSEMBLYPROCEDURE
Removing engine from vehicle .............................. 7Placing engine on its support ................................ 7Cylinder head ..................................................... 8-9Cylinder - Piston ............................................. 10-11Primary transmission assembly...................... 11-12Relay box ....................................................... 12-13Opening of housings ...................................... 13-18
- right hand cover- oil pump- right hand housing- crankshaft assy
Closing of housings ........................................ 18-19Carburettor - choke assembly ............................. 19
SPECIFIC POINTS
Timing setting ...................................................... 20Adjustment of valve clearance ............................ 21Dismantling of the cylinder head ................... 22-23Replacement of the water pump ......................... 24
Information
Before dismantling, get rid of any dirt by cleaning the chassis - engine assembly.When dismantling, keep together all parts originally paired together or paired due towear. Paired parts must be reused together or replaced together; they will have beenplaced in the order they were dismantled in, thus making refitting easier.Any parts which are changed must be replaced with original PEUGEOT parts. Checkthe state of the tightness seals, “ O ” rings and paper seals each time a dismantlingoperation is carried out.Lubricate all paired parts and bearings correctly when reassembling.

2
INTRODUCTION
This workshop manual concerns the FD1 engine which equips the Elyséo 125 cm³4-stroke model. It is intended to be used by dealers and their qualified mechanics.Bearing in mind that it is not possible to group together in one document all that amechanic needs to know, the person who uses this manual should have a basicknowledge of mechanical concepts and repair operations, in order to carry outinterventions under the best conditions of efficiency and safety.
4-stroke oil4T SPECIAL 10 W 40
UNIFLO 10W40
Relay box oil
GEAR OIL GX-80W90 .................................................Réf. 753009
High temperature grease ....................................................................Réf. 752093
Coolant (Peugeot) ..................................................................................Procor 3000or equivalent (type : degree of protection up to -25°)
- A GOOD MECHANIC WORKS IN AN ORDERLY MANNER- TIME SAVING = MONEY SAVING

CHARACTERISTICS
Main characteristics Chassis
ENGINE MARKING
NumberType
XXXXXXXXXFD1
identification marking
VIN number (17 characters)
manufacturer’splate
- ENGINE4 stroke water cooledBore x stroke ....................................................... 57 X 48,9Displacement ....................................................... 124,8 cm3
Compression ratio ........................................................ 11,7- Maximum power : ......................... 9 kW at 8750 rpm- Maximum torque : .................... 10,2 Nm at 7500rpm- Timing :
Diagrams ................................ AOA = 10° ........ AOE = 40°................................................ RFA = 40° ......... RFE = 10°Lubrication .......................... oil pump type trochoid MIKUNI
- Ignition :Advance ........................................................ mapping typeSpark plug ................................................. 5 KΩ resistance. normal use...................................................... NGK CR7E. severe use ...................................................... NGK CR8EElectrode gap ......................................................... 0.6 mm
- Carburettor :.......................................................... MIKUNI with vacuumIdling speed ............................................... 1 600 rpm +100Initial position of the air screw ................... Unscrew: 2 turns5-notch needle ....................... 4CZ3 2nd notch from the topMain jet ......................................................................... 125Idling jet .......................................................................... 35
- Flywheel ............................................... MITSUBA- Starter .................................................. MITSUBA
Identification : VGAG2AB . . . . . . . . . .
FT tyre .............................................................. 120/70 x 12RR tyre ............................................................. 130/70 x 12Pressure when cold : front ..................................... 1,5 bar
rear ...................................... 1,8 bar
Capacities (litre)
Petrol tank ..................................................................... 8,5Engine oil sump ........................................................... 1,25 . with filter change ..................................................... 1,1 . without filter change ................................................ 1,0Relay box .................................................................... 0,12
Dimensions (mm)
Overall length .............................................................1 900Overall width (without mirrors) ...................................... 720Overall height (without mirrors) ................................... 1 230Wheelbase .................................................................1 368
Weight (kg)
Kerb weight .................................................................. 140
Transmission
Clutch assy ................................ centrifugal, automatic typePrimary transmission .............................. by trapezoidal beltReduction gear ........................................ with 2 gear trains
oiloil0,1
2L0,1
2L
3
Battery / electrolyte level
Spark plug
Air filter
Oil filter
Clutch shoe
Brake fluid *
Brake pad wear
Coolant *
Engine oil
Relay box oil
Inflation pressure / Tyres
Rear brake cables and cam
Front suspension rear shock absorber
Valve play
Steering play
Engine fixation
Tightening bolt, screw, nut
Variator : belt(1) , rollers(2) , slides(2)
Carburettor : idle speed adjustment
Stands
Fuel pipework
5000 kms or 12 month
20000 kmstous les10000 kms
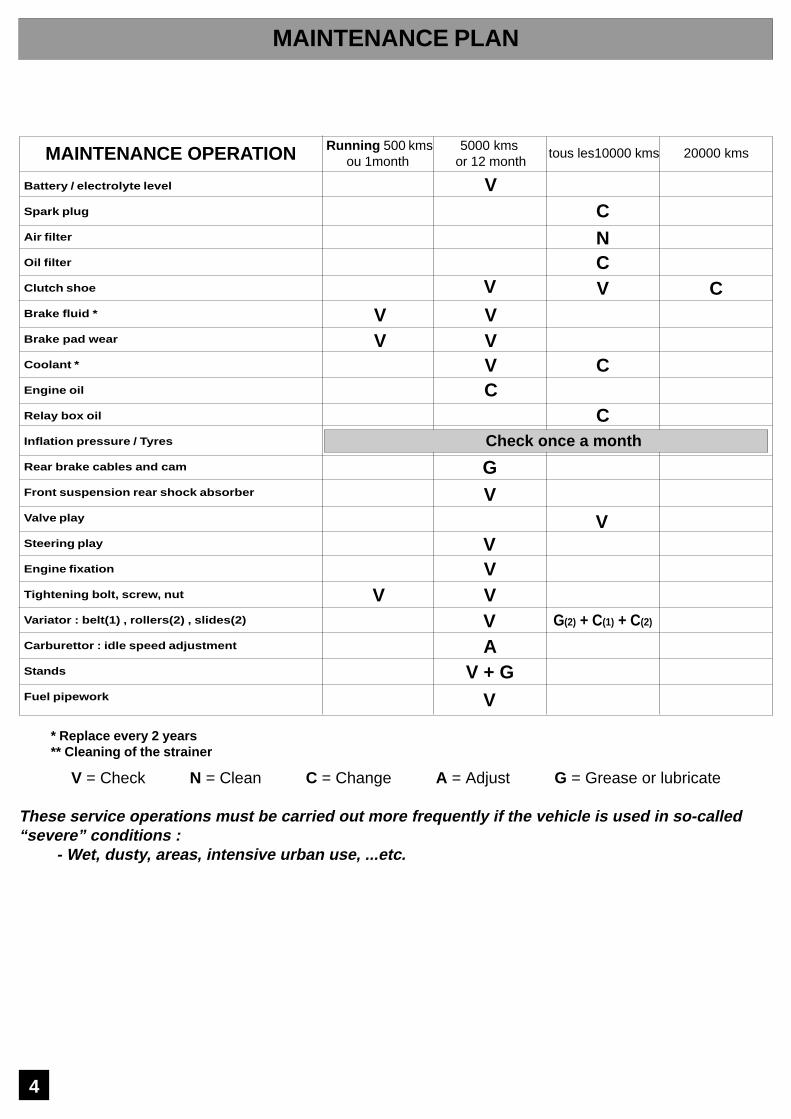
V = Check N = Clean C = Change A = Adjust G = Grease or lubricate
These service operations must be carried out more frequently if the vehicle is used in so-called“severe” conditions :
- Wet, dusty, areas, intensive urban use, ...etc.
G(2) + C(1) + C(2)
Running 500 kmsou 1month
Check once a month
V
* Replace every 2 years** Cleaning of the strainer
MAINTENANCE PLAN
4
CNCV C
V VV V
V CC
C
GV
VVVVV
AV + G
V
V
V
MAINTENANCE OPERATION

SETTING UP
1. Preparation of the battery
Charging a dry battery:- Take out the battery.- Remove the six filling caps and the air vent plug.- Fill with electrolyte (35 % sulphuric acid =
1,28 g / cm³) up to the level marked “ UPPER LEVEL ”Reference ...................................... 752740 ................... 1 L...................................................... 752741 ................... 5 L- Leave the battery to settle for approximately half an hour.
Top up the level if necessary.- Charge the battery for at least 7 hours with a current of
1.2 A, using a regulated charger or for 2 hours maximum usinga non-regulated charger.
- Put the battery back in its place and connect the vapourevacuation pipe to it.
- Connect the red wire connector to and the green wireearth connector to .
- From then on, the battery level should be topped up ifnecessary using distilled water only.
2. Fuel
- Capacity ............................................................. 8.5 Litres- Lead free petrol 95 or 98.
3. Checking of levels
Relay box oil :- Put the vehicle on its stand on a level surface- Loosen and remove the filling screw and make sure that
the oil level comes up to the filling neck.Capacity ........................................................................ 0,12 L
- Tighten the screw to 12 Nm.
Engine housing oil :- Check the level via the eyehole on the right hand housing
(approximately 0.25 L difference between the top and bottomof the eyehole)
Coolant :- Check that the level is level with the top of the screw
thread in the expansion valve.Capacity .......................................................................... 1.5 L
4. Checks before handing over to thecustomer
- Pay special attention to the tightening of the wheel nutsfront .......................................................................... 65 Nmrear ......................................................................... 110 Nm- Check that the nuts and bolts are tightened correctly.- Check the adjustment and efficiency of the brakes.- Check the inflation pressure of the tyres when cold :front ......................................................................... 1,5 barrear .......................................................................... 1,8 bar- Check that the lights and signalling devices are working
properly (rear light, indicators, brake light, horn), and also thedifferent telltales.
- Carry out a road test.
5
+-
Maxi
Mini

TIGHTENING TORQUES AND SPECIAL TOOLS
Engine part
Assembly screws of :- Housings .....................................................10 Nm- Covers .........................................................10 Nm- Starter .........................................................10 Nm- Stator ..........................................................10 Nm- Sensor .........................................................10 Nm- Oil pump......................................................10 Nm- Cylinder head ..............................................23 Nm- Drive pulley .................................................70 Nm- Driven pulley ...............................................70 Nm- Rotor ...........................................................70 Nm- Engine housing plug....................................40 Nm- Relay box cap .............................................12 Nm- Spark plug ...................................................10 Nm- Camshaft support ..........................................7 Nm
Cycle part
- Front wheel axis nut ....................................65 Nm- Rear wheel nut .......................................... 110 Nm- Engine articulation on bracket pivot ............60 Nm- Rod articulation on chassis ........................ 60 Nm- RR shock absorber upper fixation ...............45 Nm- RR shock absorber lower fixation ...............23 Nm- Exhaust nuts on cylinder .............................16 Nm- Handlebar nut .............................................40 Nm- Steering counter nut ....................................70 Nm- Front brake calliper .....................................30 Nm
- Screw and nut 5 mm .....................................7 Nm- Screw and nut 6 mm ...................................10 Nm- Screw and nut 8 mm ...................................22 Nm- Screw and nut 10 mm .................................35 Nm- Screw and nut 12 mm .................................60 Nm
- Engine support ............................................ 64765- Adaptation for engine support * ................ 753711- Flywheel clamp ........................................... 68570- Piston snap ring pliers ............................... 752000- Tool for removing and opening housing ...... 64706- Protective end piece lar ge modelfor openinghousing .......................................................... 69098- Retaining dowel pin ..................................... 64710- Nut with spindle ........................................... 69104- Clutch assy compression tool * ................. 754005- Adjustable lug wrench ............................... 752237- Torque wrench + extension + reduction part 69802- Torque wrench + extension + reduction part .........
................................................................ 753977- Flywheel remover * ................................... 754003- Immobilisation tool * .................................. 754004- Circlips pliers ............................................... 69117- Spindle ........................................................ 64712- Housing plate * .......................................... 754006- Crankshaft adjustment pin * ...................... 754033- Camshaft adjustment pin * ........................ 754034- Valve compressor * ................................... 754035- Mechanical seal pusher * .......................... 754007- Water pump seal pusher * ........................ 754008- Water pump bushing pusher* ................... 754009- Ignition housing seal pusher * ................... 754036- Crankshaft assy bearing remover * .......... 754037- Clamp with clip .......................................... 750539
* specific tools 125cm³
Tightening torques Special tools
6
DISMANTLING AND REASSEMBLY PROCEDURE
- Disconnect the battery
- Remove. rear fairing, disconnect the rear light. right and left fairing. rear right and left fairing. intake muffler
- Drain. engine. cooling circuit (disconnect the pipe on the inlet tube and
the pipe on the cylinder head in order to facilitate draining)
- Disconnect. vacuum take off on cylinder head, breather, carburettor, oil
filler, rear brake control
- Disconnect. interference suppresser, starter , oil pressure sensor,
coolant temperature sensor, flywheel outlet connector, choke,throttle control, remove the carburettor
- Suspend the rear of the vehicle. remove the lower fixations of the shock absorbers. withdraw one shaft from the engine bracket pivot.
The engine is taken off the chassis with the exhaust, the rearwheel, the suspension half arm and the stand.
. remove these parts
- Position the engine on its support
Removing engine from vehicle
Placing engine on its support
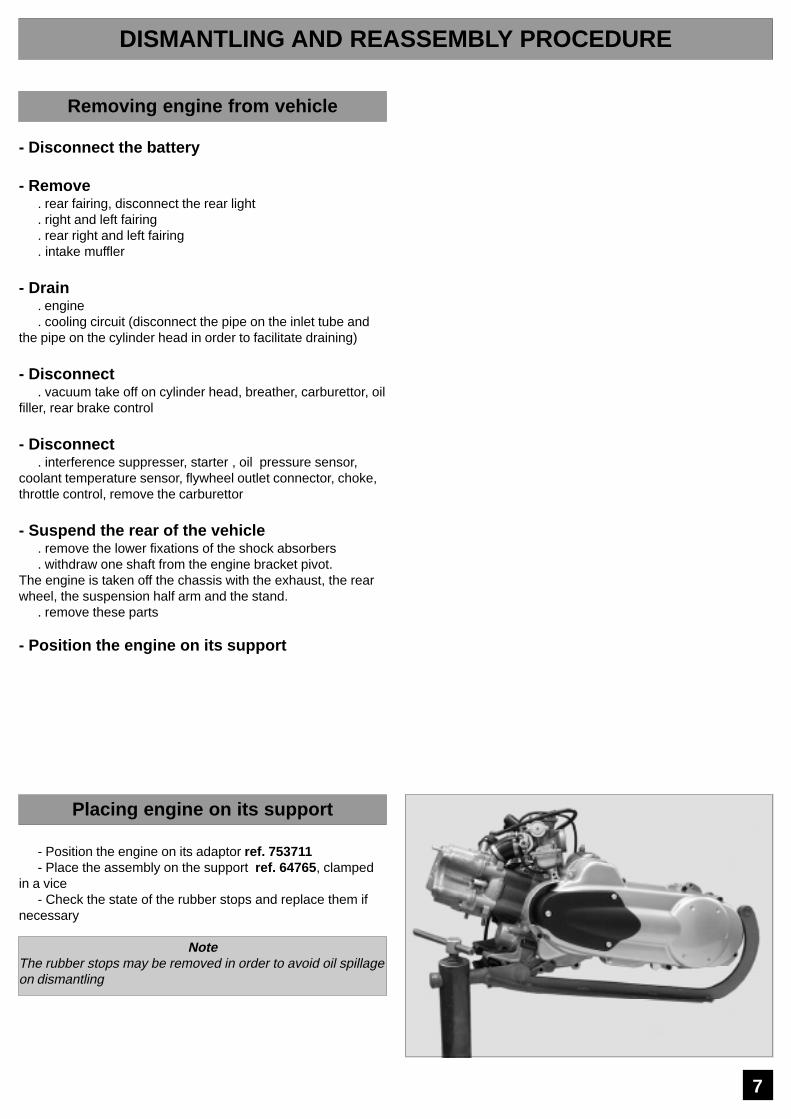
- Position the engine on its adaptor ref. 753711- Place the assembly on the support ref. 64765 , clamped
in a vice- Check the state of the rubber stops and replace them if
necessary
NoteThe rubber stops may be removed in order to avoid oil spillageon dismantling
7
Cylinder head
8
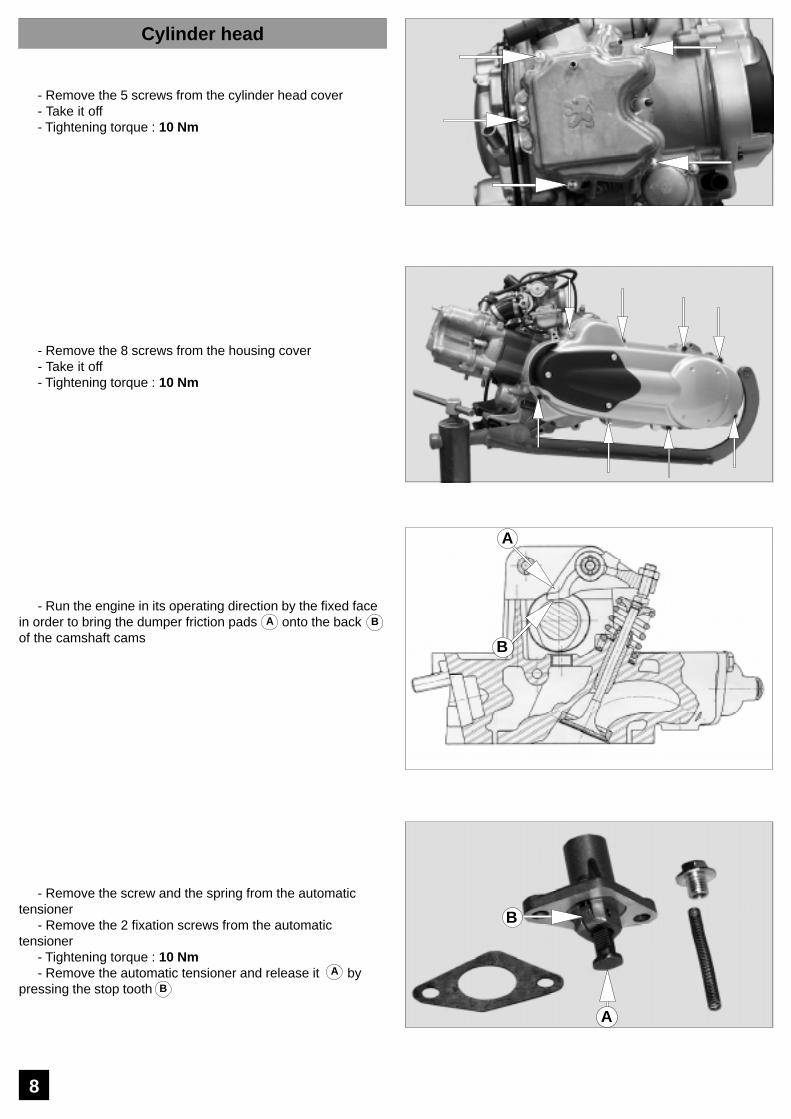
- Remove the 5 screws from the cylinder head cover- Take it off- Tightening torque : 10 Nm
- Remove the 8 screws from the housing cover- Take it off- Tightening torque : 10 Nm
- Run the engine in its operating direction by the fixed facein order to bring the dumper friction pads onto the backof the camshaft cams
- Remove the screw and the spring from the automatictensioner
- Remove the 2 fixation screws from the automatictensioner
- Tightening torque : 10 Nm- Remove the automatic tensioner and release it by
pressing the stop tooth
A B
A
B
A
B
A
B
9
64651
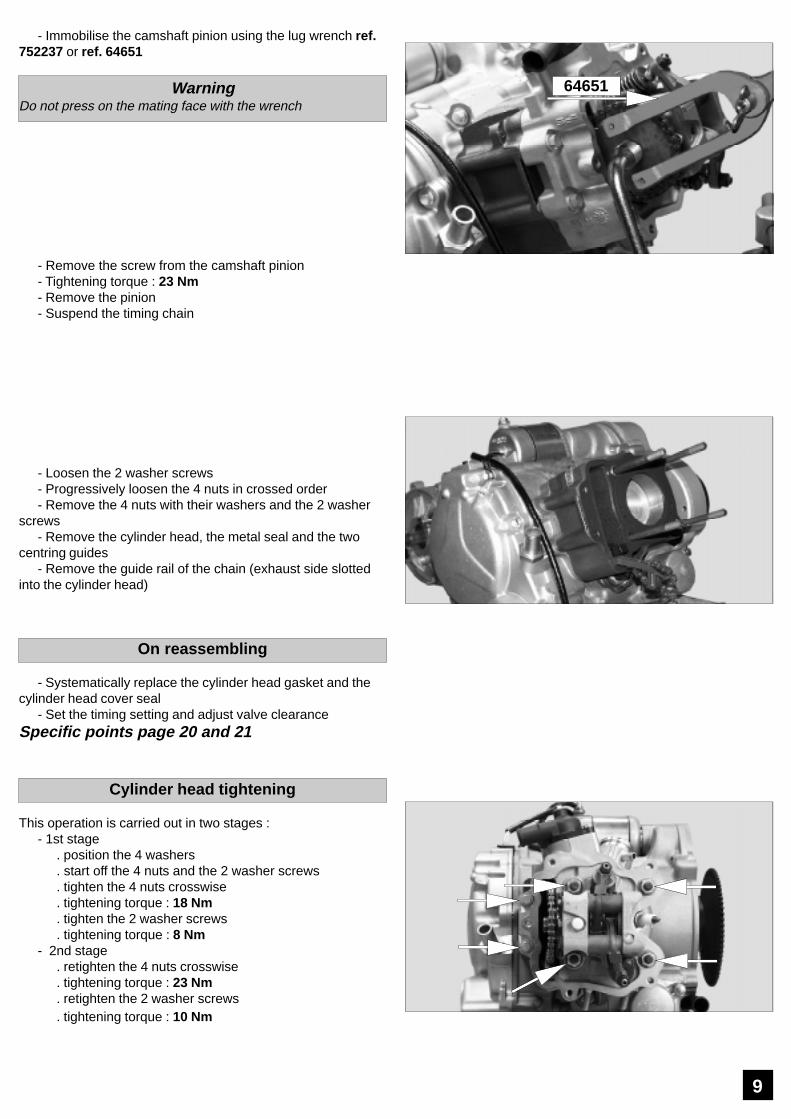
On reassembling
- Systematically replace the cylinder head gasket and thecylinder head cover seal
- Set the timing setting and adjust valve clearanceSpecific points page 20 and 21
Cylinder head tightening
This operation is carried out in two stages :- 1st stage
. position the 4 washers
. start off the 4 nuts and the 2 washer screws
. tighten the 4 nuts crosswise
. tightening torque : 18 Nm
. tighten the 2 washer screws
. tightening torque : 8 Nm- 2nd stage
. retighten the 4 nuts crosswise
. tightening torque : 23 Nm
. retighten the 2 washer screws
. tightening torque : 10 Nm
- Immobilise the camshaft pinion using the lug wrench ref.752237 or ref. 64651
WarningDo not press on the mating face with the wrench
- Remove the screw from the camshaft pinion- Tightening torque : 23 Nm- Remove the pinion- Suspend the timing chain
- Loosen the 2 washer screws- Progressively loosen the 4 nuts in crossed order- Remove the 4 nuts with their washers and the 2 washer
screws- Remove the cylinder head, the metal seal and the two
centring guides- Remove the guide rail of the chain (exhaust side slotted
into the cylinder head)

10
- Next to the oil pressure switch- Tightening torque : 10 Nm- Remove 1 screw CHC- Tightening torque : 12 Nm- Remove the cylinder- Free the piston carefully- Suspend the chain once again- Remove the base seal and the two centring guides of the
engine housing
- Tip the engine onto its side- Remove the ring- Push the piston pin- Remove the piston
WarningThe timing chain must be passed through the timing well andsuspended when refitting the cylinder
Cylinder - piston
A
B
A
B
Reassembly
The arrow engraved on the piston top must be pointingtowards the timing sideThe piston pin and the cylinder well must be lubricated, thesnap rings and the seals must be replaced (base and cylinderhead). The cylinder must be lowered with care by compressingthe rings one at a time after having already positioned them onthe piston (see assembly of rings page 11).
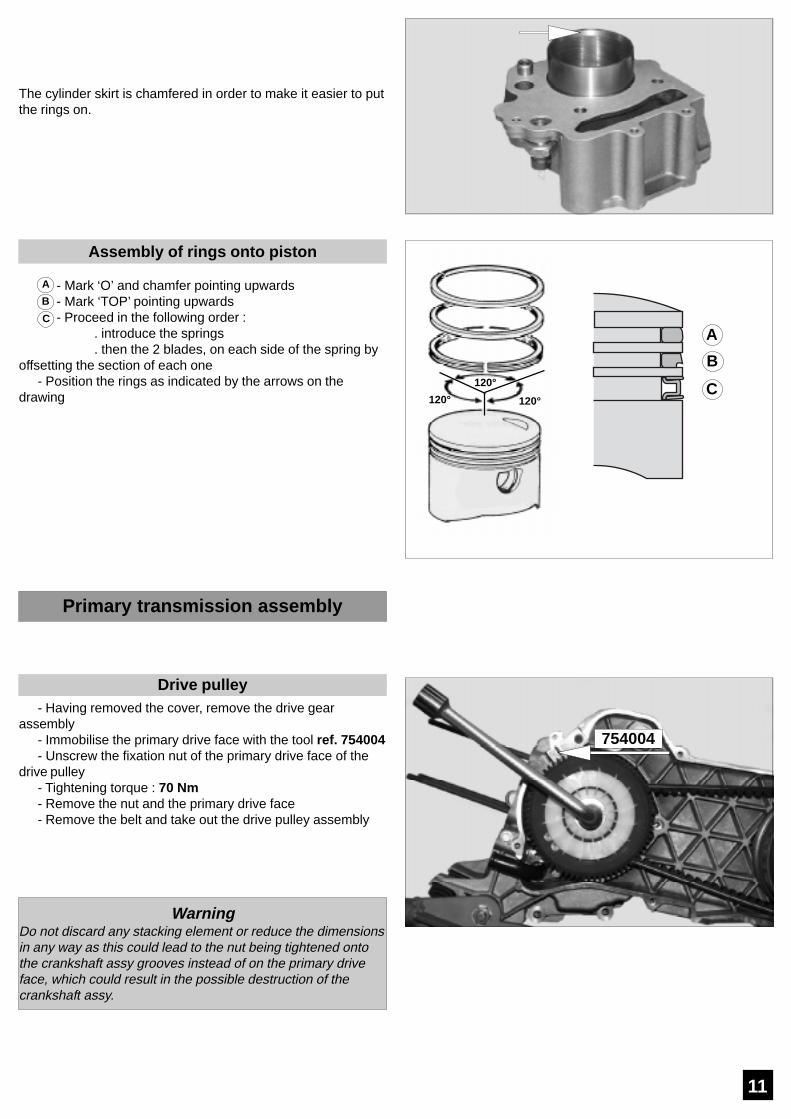
Drive pulley- Having removed the cover, remove the drive gear
assembly- Immobilise the primary drive face with the tool ref. 754004- Unscrew the fixation nut of the primary drive face of the
drive pulley- Tightening torque : 70 Nm- Remove the nut and the primary drive face- Remove the belt and take out the drive pulley assembly
WarningDo not discard any stacking element or reduce the dimensionsin any way as this could lead to the nut being tightened ontothe crankshaft assy grooves instead of on the primary driveface, which could result in the possible destruction of thecrankshaft assy.
Primary transmission assembly
Assembly of rings onto piston
- Mark ‘O’ and chamfer pointing upwards- Mark ‘TOP’ pointing upwards- Proceed in the following order :
. introduce the springs
. then the 2 blades, on each side of the spring byoffsetting the section of each one
- Position the rings as indicated by the arrows on thedrawing
A
B
C
A
B
C
754004
11
120°
120° 120°
The cylinder skirt is chamfered in order to make it easier to putthe rings on.

- Remove the guide hub and the 3 screws for holding downthe cover using a screwdriver.
- Remove the cover, the ramp, the 3 guides (one assemblyorientation, the guide must be fully inserted into the ramp) andthe 6 rollers.
- After cleaning check the rollers in particular; they must notshow any traces of wear.
Reassembly- Reverse procedure to dismantling after having lubricated
the rollers, the ramp and the bore of the movable drive faceusing high temperature grease ref. 752093
NoteThe rollers should be checked every 5000 kms.The belt must be changed every 10 000 kms.
Driven pulley- Immobilise the clutch assy drum using the lug wrench
ref. 752237 or ref. 64651- Unscrew the nut and remove the clutch drum and the
driven pulley assembly- Tightening torque : 70 Nm
NoteThe clutch shoes should be checked every 5000 Kms
- Immobilise the assembly using the tool ref. 754005 in avice
- Loosen the special nut using a socket wrench6 socket M 46
- Remove in order. the clutch shoe assembly, the spring, the centring
sleeve of the spring- Tightening torque : 50 Nm
- Having drained the relay box- Tightening torque : 12 Nm- Purge screw (page 13)- Remove the 5 fixation screws from the cover- Tightening torque : 10 Nm
Relay box
12
64651
C

- Remove the cover with the primary shaft, the seal and thetwo centring guides
. the primary shaft is removed from the cover using amallet, taking care to turn the shaft
- Remove the friction washer from the countershaft 15 x 30x 0.5
- Remove the secondary shaft, taking care not to damagethe seal
- Check that the air vent pipes are not blocked- If the seal is damaged in any way, oil will run out through
the evacuation slit located behind it- Remove the countershaft as well as its 2nd friction
washer 15 x 30 x 0.5
NoteCheck the state of all these parts and replace if necessary
NoteFill the box with 0.12 litre ESSO GX 80 W 90 ref. 753009Tightening torque for the level screw: 12 Nm
- Evacuation hole- Level screw- Purge screw
COUNTERSHAFT
metal washer
Cover side
metal washer
Right hand cover
- Remove the 8 screws- Remove the cover- Tightening torque : 10 Nm
Opening of engine housings
13
A
B
C
A
BC
A
A

- Immobilise the rotor using tool ref. 68570- Remove the nut- Tightening torque : 70 Nm- Place the protective end piece on the end of the
crankshaft ref. 69098- Screw the flywheel remover ref. 754003 onto the rotor
and work on the push screw of the flywheel remover until therotor comes free
- Remove the 1st deflector (2 screws)- Tightening torque : 10 Nm- Remove the chain tensioning pad (1 screw)- Tightening torque : 10 Nm
- Take the 2 circlips off the plastic pinions, remove themand remove the 2 shafts
- When reassembling systematically replace the 2 circlips- Remove the 2nd deflector (2 screws)- Tightening torque : 10 Nm
ImportantRemove the timing chain making note of itsrotation direction
14
68570
754003
Oil pumpIt is only accessible at this stage in dismantling
- Remove 3 screws- Tightening torque : 10 Nm- Remove the oil pump
NoteBefore reassembly immerse the pump in engine oil

Right hand housing
Starter- Remove the 2 screws- Tightening torque : 10 Nm- Free the starter- Check the state of the “ O ” ring
- Remove the 8 screws from the right hand half housingincluding :
. 2 outer
. 1 right side
. 1 left side necessitating removal of thetransmission cover
- Tightening torque : 10 Nm
15
- Remove the 2 screws from the sensor and the 3 screwsfrom the coil
- Remove the assembly- Tightening torque : 10 Nm
NoteThe right hand cover also ensures lubrication of the con’rodbig end via the crankshaft end.
Tightness is ensured by a lip seal on the outer side, in contactwith the housing shoulder and held in place by a circlips on theother side.
- Systematically check that the seal is in good condition andreplace it if necessary.
- Lubricate the housing before putting it in place with thepusher ref. 754036
Coil - sensor
AB
A
B
!
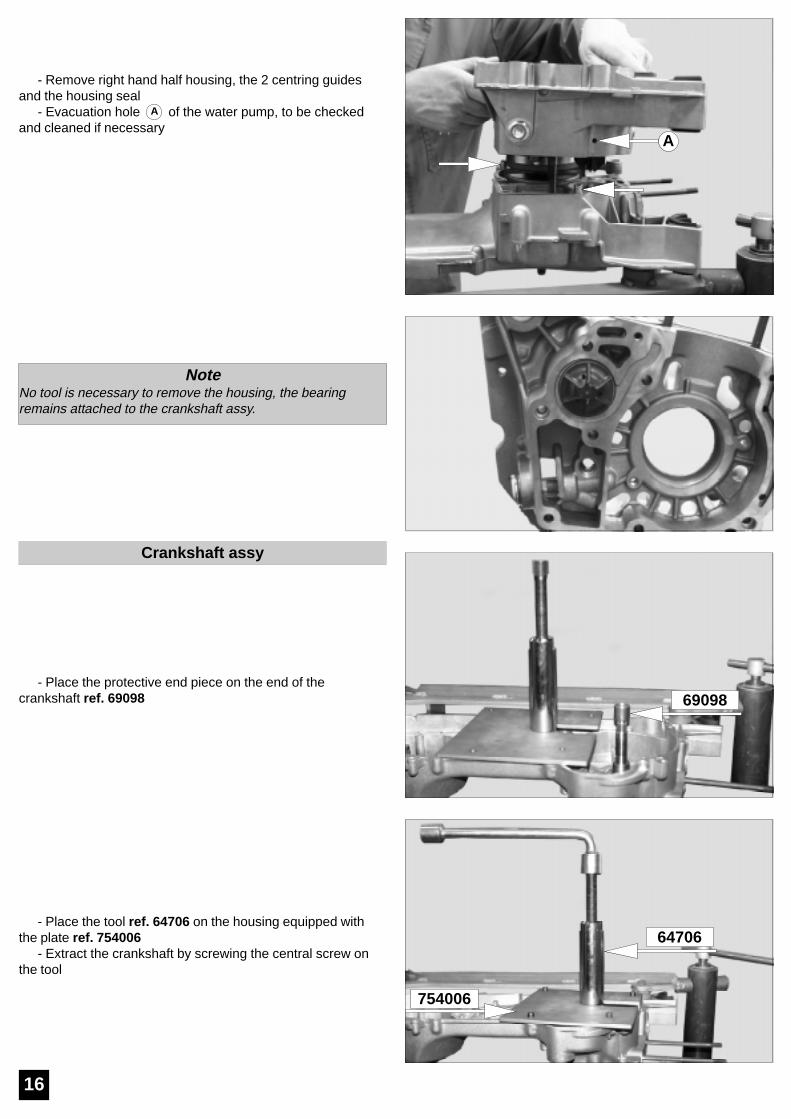
Crankshaft assy
- Place the protective end piece on the end of thecrankshaft ref. 69098
- Place the tool ref. 64706 on the housing equipped withthe plate ref. 754006
- Extract the crankshaft by screwing the central screw onthe tool
16
A
69098
754006
64706
- Remove right hand half housing, the 2 centring guidesand the housing seal
- Evacuation hole of the water pump, to be checkedand cleaned if necessary
NoteNo tool is necessary to remove the housing, the bearingremains attached to the crankshaft assy.
A

Position of “ V ”
Replacement of left hand bearing and seal
The bearing can be replaced by means of a press or by theheating method (without going over 200°). The seal whichmust be replaced on each dismantling, must be positionedlevel with the housing, the lips on the chamber side of theflywheel.
CommentIf the crankshaft bearing on the left hand side remains in place,use the extraction tool ref. 754037
17
Checking the crankshaft assythe maximum lateral play of the con’rod big end must not begreater than : 0.7 mmthe values read at the check points must not be greater than0.05 mm
Oil filter- Remove the 2 screws from the cover- Take it off with its “ O ” ring seal, check the state of it and
replace it if necessary- Remove the filter- Tightening torque : 10 Nm (no specific assembly
orientation).
Regulation valve
The oil regulation valve and the anti-degauging plate are onlyaccessible after having removed the right hand housing
- Tightening torque : 40 NmView of drain plug and strainer
- Tightening torque : 40 Nm
WarningIt is essential that the strainer be cleaned every time the oil ischanged and the copper seal is replaced.

Closing of housings
Assembly of crankshaft in the left housing- Insert the crankshaft into the bearing- Screw the spindle ref. 64712 onto the end of the
crankshaft- Insert the tool ref. 64706 fitted with the plate
ref. 754006 onto the spindle
- Centre the assembly on the housing by putting 4 screwsin place
- Place the centring device ref. 64710- Screw the nut spindle ref. 69104 onto the spindle whilst
supporting the crankshaft assy
18
64712
64706
64710
69104
754006
- The tightness of the water inlet tube is ensured by an“ O ”ring seal (2 screws)
- Tightening torque : 10 Nm

19
Carburettor - choke assembly
Adjustment of the mixture adjusting and idling screws, seegeneral characteristics
Idling screw
Mixture adjusting screw
To facilitate holding the crankshaft assy, use the rotor insertedinto its cotter on the right hand side. Continue to screw the nutspindle in order to bring the crankshaft into contact with thebearing whilst keeping the con’rod positioned in the direction ofthe cylinder studs
- Put the two centring guides in position on the left handhousing
- Put the housing seal in place (without oil or grease)
- Present the right hand housing paying attention to insertthe antidegauging plate into position in the left hand housingThe joining of the 2 housings should not require any effort
- Position the 8 screws (2 of which are external)- Tightening torque : 10 Nm- Level off the housing seal, lubricate the crankshaft assy
Once this operation is complete, proceed with reassembly inreverse order of the timing chain, the deflectors and drivegears of the water pump and the oil pump and of the cylinder /piston / cylinder head assembly.
Set the timing and adjust valve clearance
Specific points pages 20 and 21

This operation is necessary after having removed the cylinderhead, the cylinder / piston assy and opened the housings
- Remove the cylinder head cover, the right hand cover, theautomatic tensioner screw
- The automatic tensioner in order to release it (see page 8)- Insert the pin ref. 754033 into the housing- Turn the crankshaft assy until it clicks into the cottering
hole
- Put the camshaft gear screw in position- Remove the indexing cap- Insert the pin ref. 754034- Turn the camshaft until it clicks into place- Remove the camshaft gear screw
- Check that the timing chain is correctly placed on thecrankshaft assy gear
- Position the chain on the camshaft gear- Position the camshaft gear in such a way as to be able to
immobilise it using the lug wrench ref. 752237 orref. 64651
- Put the chain tensioner and the spring with its screw inposition
- Tighten the screw by exerting a force in an anticlockwisedirection on the lug wrench, taking care not to press on themating face with the wrench
- Tightening torque : 23 Nm- Remove the pins- Turn the engine twice in its normal rotation direction- Carry out a check using the pins
ImportantPut the cap back into place on the indexing hole in the cylinderhead. If it is forgotten, this may disrupt the lubrication circuitand may cause certain parts to seize up.
SPECIFIC POINTS
Timing setting
20
64651
754034
754033

Adjustment of valve clearance
21
- Turn the engine manually either by the drive pulley or bythe rotor in its normal rotation direction
- Bring the dumper friction pads onto the back ofthe cams
- Adjust the clearance for each valve by acting on thedumper screw
- Clearances : .......................................... 10/100 for intake....................................... 25/100 for exhaust
- Immobilise the dumper adjustment screw- Tighten the counternut
Checking the adjustmentFor the intake valves, a 15/100 shim should not passFor the exhaust valves, a 30/100 shim should not passIf this is not the case, carry out the adjustment operation again.
A
BA B

Any work on the cylinder head requires the water temperaturesensor and the thermostatic valve to be removed
- Remove the water temperature sensor- Tightening torque : 10 Nm- Remove the 2 screws from the cover of the thermostatic
valve and take it off- Tightening torque : 10 Nm- The drain screw is located on the cover with a fibre
seal
Camshaft- Remove the 3 screws and take off the stop plate- Tightening torque : 7 Nm- Remove the camshaft
CommentThe stop plate has 2 functions :
- Positioning of the camshaft- Passage of oil between the 2 axes of the dumpers
Dumpers
- Remove the 2 axes of the dumpers, lubrication hole onthe plate side
- Remove the intake and exhaust dumpers
Dismantling the cylinder head
22
A
B
C
A
B
C

23
754035
Valves
- Compress the valve with the tool ref. 754035- Remove the two half cones- Release the spring- Remove the tool
- Remove the upper cup- Remove the spring, (note the sense in which it was
removed in order to replace it in its initial position)- Remove the lower washer- Remove the valve- Repeat the operation for the second valve
WarningWhen reassembling, put the two half cones in place withgrease in the valve stem groove; do not slide the two halfcones with the cup by releasing the tool.
Before reassemblyIt is essential to check that oil passages are not obstructedand to remove any carbonised deposits from all parts.
On reassemblyAll parts removed such as the camshaft, valves, dumpershafts, dumpers must be lubricated thoroughly in order toavoid any risk of seizing when the vehicle is started (spray witha grease such as Molykote with MoS2 for assembly)
Set the timing and adjust valve clearanceSpecific points pages 20 and 21
CommentNo do not reuse a valve stem seal which has been removed

24
- Open the housings- Remove the right hand housing- Unscrew the fan
NoteAny work carried out on the water pump necessitatessystematic replacement of all parts.
- Remove the circlips on the bearing side- Take off the bearing on the timing side by pushing it with
the pump control shaft- Take off the mechanical seal on the fan side- Take off the seal on the fan side- Take off the needle bearing cage on the fan side
Reassembly procedure- Force fit the needle bearing cage level with the chamfer in
the housing on the fan side with the pusher ref. 754009- Assemble the pump control shaft with its bearing- Force fit the pump control shaft assembly, with the
bearing resting against the housing shoulder- Put the circlips in place in the groove- Force fit the seal, with the lips resting against the housing
shoulder with the pusher ref. 754008- Force fit the mechanical seal with the special tool ref.
754007
NoteThe new mechanical seal is delivered coated with a blockingproduct on the surface in contact with the housing.Take care not to damage this product when handling it.
Replacement of the water pump
754007

25
recommande
N° 11.754014.00
In the aim of constant im
provement, P
eugeot Motocycles reserves the right to m
odify, delete or add to the references mentioned
.D
C/P
S/D
OC
/SH
Imp. in U
.E. I3R
15/04/99 ed1 (Non contractual photos)


