12
2-in-1 Cordless Li-ion Grass Trimmer/Edger
| Date post: | 06-Apr-2018 |
| Category: |
Documents |
| Upload: | aka-tomas-de-torquemada |
| View: | 220 times |
| Download: | 0 times |

8/2/2019 Worx_WG165_2 in 1 Cordless Li Ion Grass Trimmer Edger User Manual
http://slidepdf.com/reader/full/worxwg1652-in-1-cordless-li-ion-grass-trimmer-edger-user-manual 1/11
2-in-1 Cordless Li-ion Grass Trimmer/Edger
8/2/2019 Worx_WG165_2 in 1 Cordless Li Ion Grass Trimmer Edger User Manual
http://slidepdf.com/reader/full/worxwg1652-in-1-cordless-li-ion-grass-trimmer-edger-user-manual 2/11

8/2/2019 Worx_WG165_2 in 1 Cordless Li Ion Grass Trimmer Edger User Manual
http://slidepdf.com/reader/full/worxwg1652-in-1-cordless-li-ion-grass-trimmer-edger-user-manual 3/11

8/2/2019 Worx_WG165_2 in 1 Cordless Li Ion Grass Trimmer Edger User Manual
http://slidepdf.com/reader/full/worxwg1652-in-1-cordless-li-ion-grass-trimmer-edger-user-manual 4/11

8/2/2019 Worx_WG165_2 in 1 Cordless Li Ion Grass Trimmer Edger User Manual
http://slidepdf.com/reader/full/worxwg1652-in-1-cordless-li-ion-grass-trimmer-edger-user-manual 5/11
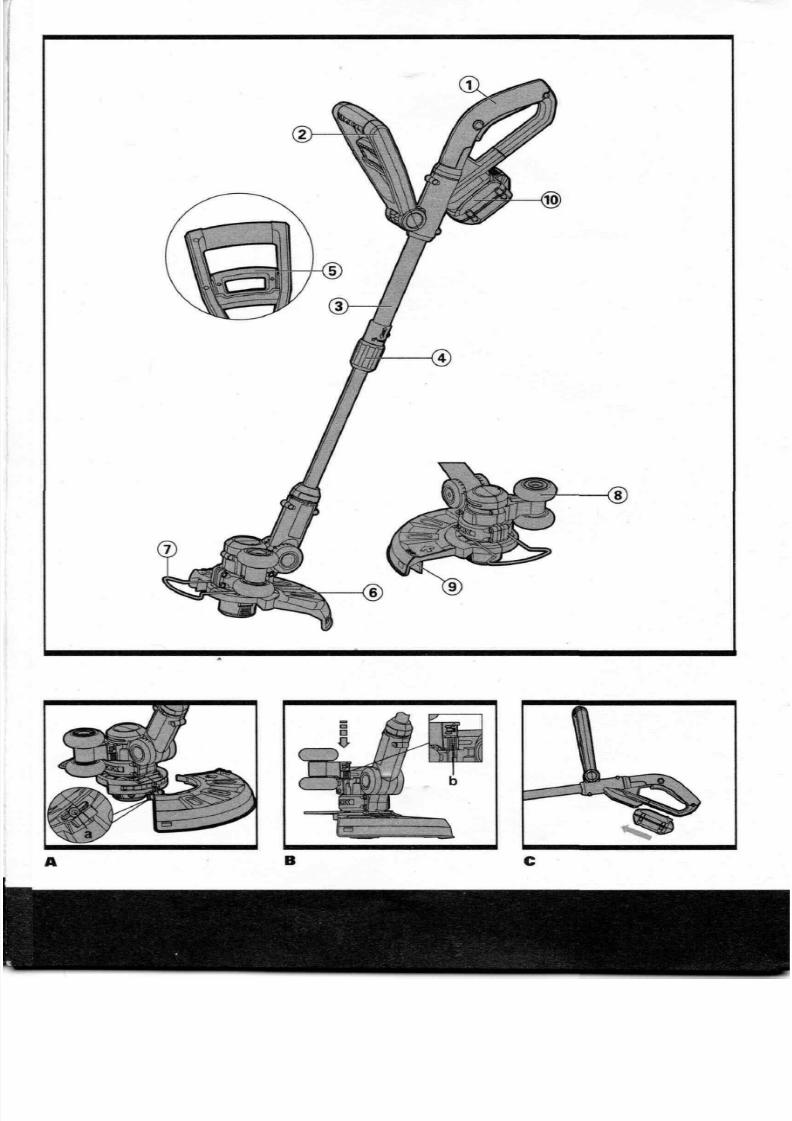
1. REAR HANDLE
2. AUXILIARY HANDLE
3. TELESCOPIC SHAFT
4. LOCKING COLLAR
5. AUXILIARY HANDLE LOCKING LEVER
6. SAFETY GUARD
7. FLOWER GUARD
8. EDGER WHEEL
9. LINE CUTTER
10. BATTERY PACK
11.TRIMMER HEAD COVER (See Fig K2)
12. CAPRELEASE LATCH (See Fig K2)
13. SPOOL (See Fig K2)
14.TRIMMER HEAD (See Fig K2)
15. EYELET (See Fig K2)
16. LINE FEED BUTTON (See Fig K1)
17.WALL MOUNT BRACKET (See Fig L)
* Not all the accessories illustratedor describedare included instandarddelivery-

8/2/2019 Worx_WG165_2 in 1 Cordless Li Ion Grass Trimmer Edger User Manual
http://slidepdf.com/reader/full/worxwg1652-in-1-cordless-li-ion-grass-trimmer-edger-user-manual 6/11
TECHNICAL DATA
Voltage 24V== Li-ion
No load speed 8500/min
Cutting diameter 10"
Line diameter 0.065"
Charging time 3-5hr
Machineweight 5.6lbs
ACCESSORIES
Safety guard
Charger
Battery pack
Edger wheelWall mount bracket
W e recommend that you purchase your accessories from the same store that sold you the tool.
Use good quality accessories marked with a well-known brand name. Choose the type according
to the work you intend to undertake. Refer to the accessory packaging for further details. Store
personnel canassist you and offer advice.

8/2/2019 Worx_WG165_2 in 1 Cordless Li Ion Grass Trimmer Edger User Manual
http://slidepdf.com/reader/full/worxwg1652-in-1-cordless-li-ion-grass-trimmer-edger-user-manual 7/11
S A F E T Y I N S T R U C T I O N S
WARNING!When using electric
gardening appliances, basic safety
precautions should always be followed to
reduce the risk of fire, electric shock, and
personal injury, including the following:
WARNING: Read all instructionsFO R ALL APPLIANCES
1) Avoid Dangerous Environment - Don't use
appliances in damp or wet locations.
2) Don't Use In Rain.
3) Keep Children Away - All visitors should be
kept at a distance from work area.
4) Dress Properly - Do not wear loose
clothing or jewelry. They can be caught in
moving parts.Wear protective clothing;
use of rubber gloves, long pants, longsleeved shirt and substantial footwear is
recommended when working outdoors.
Wear protective hair covering to contain
long hair.
5 ) Use Safety Glasses - Always use face or
dust mask if operation is dusty.
6) Use Right Appliance - Do not use appliance
for any job except that for which it is
intended.
7) Avoid Unintentional Starting - Don't carry
plugged-in appliancewith finger on switch.
Be sure switch is off when plugging in.
8) Don't ForceAppliance - It will do the job
better and with less likelihood of a risk of
injury at the rate for which it was designed.
9) Don't overreach - Keep proper footing and
balance at all times.
10)Stay Alert -Watch what you aredoing. Use
common sense. Do not operate appliance
when you aretired.
11)Store IdleAppliances Indoors -When not in
use, appliances should be stored indoors
in dry, and high or locked-up place - out of
reach of children.
12)Maintain ApplianceWith Care - Keep
cutting edge sharp and clean for best
performance and to reduce the risk of
injury. Follow instructions for lubricating
and changingaccessories. Inspect
appl iance cord periodically, and if
damaged, have it repaired by an authorized
service facility. Inspect extension cords
periodically and replace i f damaged. Keep
handles dry, clean, and f ree from oil and
grease.
13)Check Damaged Parts - Before further use
of the appliance, a guard or other part that
is damaged should be carefu lly checked
to determine that it will operate properly
and perform its intended function. Check
for alignment of moving parts, binding ofmoving parts, breakage of parts, mounting,
and any other condition that may affect
its operation.A guard or other part that is
damaged should be properly repaired or
replaced by an authorized service center
unless indicated elsewhere in this manual.
INSTRUCTION MANUAL FORBATTERY -
OPERATED GARDENING APPLIANCES
1.The instruction manual for all battery-operated gardening appliances shall contain
the followingor equivalent instructions:
1) Do not charge appliance in rain, or in wet
locations.
2) Do not use battery-operated appliance in
rain.
3 ) When replacing batteries, all batteries
should be replaced at the same time.
Mixing fresh and discharged batteries
could increase internal cell pressure andrupture the discharge battery(ies). (Applies
to products employing more than one
separately replaceable primary battery.)
4) When inserting batteries into this product,
the proper polarity or direction must be
observed. Reverse insertion of batteries
can result in leakage or explosion. (Applies
to product employing more than one
separately replaceable primary battery.)
5 )Avoid Unintentional Starting
- Do notinsert battery with finger on switch. Be sure
switch is off when inserting battery.
6) Remove or disconnect battery before
servicing, cleaning or removing material
from the gardening appliance.
2.The instruction manual for all battery-
operated products employing a detachable or
separable battery shall contain the following
or equivalent instructions:
1) Useonly the following type and size
battery(ies): WA3524, WA3524.1, WA35 25
8/2/2019 Worx_WG165_2 in 1 Cordless Li Ion Grass Trimmer Edger User Manual
http://slidepdf.com/reader/full/worxwg1652-in-1-cordless-li-ion-grass-trimmer-edger-user-manual 8/11
2) Do not dispose of the battery(ies) in a
fire.The cell may explode. Check with
local codes fo r possible special disposal
instructions.
3 ) Do not open or mutilate the battery(ies).
Released electrolyte is corrosive and may
cause damage to the eyes or skin. It may
be toxic if swal lowed.4) Exercise care in handling batteries in order
not to short thebattery with conducting
materials such as rings, bracelets, and
keys. The battery or conductor may
overheat and cause burns.
SAVETHESE INSTRUCTIONS
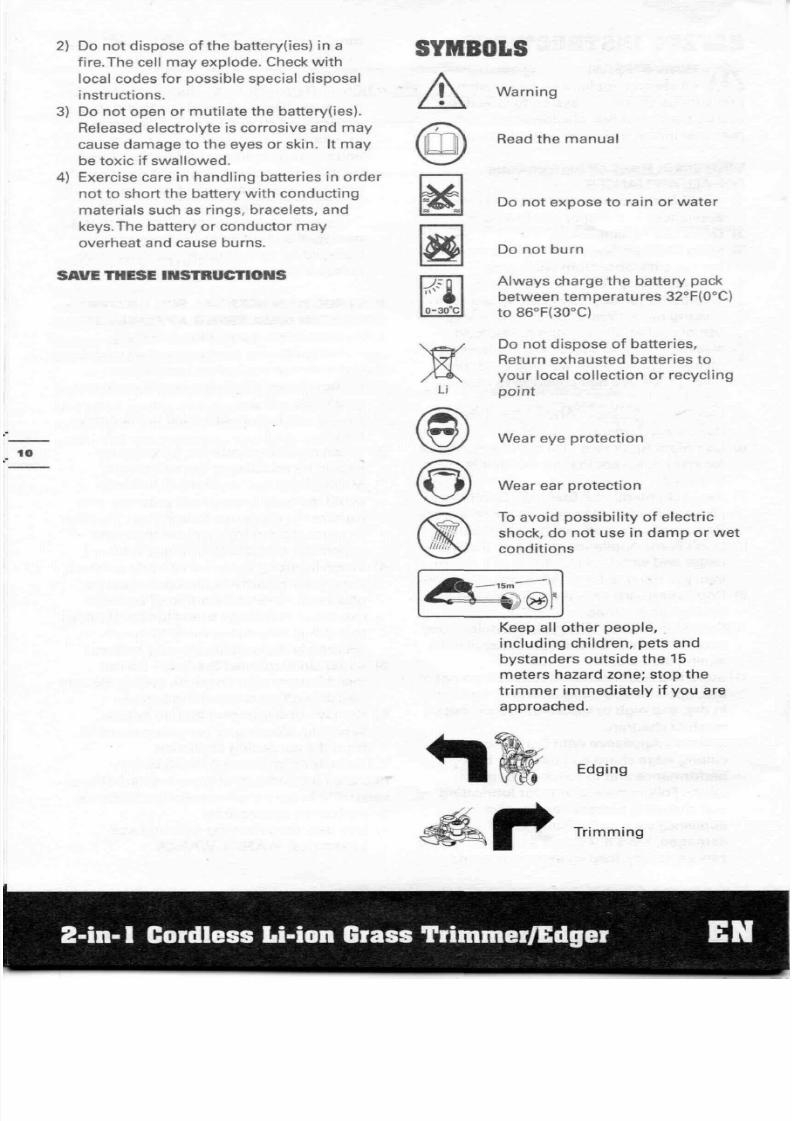
S Y M B O L S
Warning
Read the manual
Do not expose to rain or water
Do not burn
Always charge the battery pack
between temperatures 32°F(0°C)
to 86°F(30°C)
Do not dispose of batteries,
Return exhausted batteries to
your local collection or recycling
point
Wear eye protection
Wear ear protection
To avoid possibility of electric
shock, do not use in damp or wet
conditions
Keep all other people,
including children, pets and
bystanders outside the 15
meters hazard zone; stop the
trimmer immediately if you are
approached.
Edging
Trimming

8/2/2019 Worx_WG165_2 in 1 Cordless Li Ion Grass Trimmer Edger User Manual
http://slidepdf.com/reader/full/worxwg1652-in-1-cordless-li-ion-grass-trimmer-edger-user-manual 9/11
A S S E M B L Y
1. ASSEMBLY OF THE SAFETY GUARD
(See Fig A)
Fix the safety guard to the trimmer head
makingsure the sides are located into the
grooves on the trimmer head.
Secure the safety guard onto the trimmer
head with the screw (a ) provided.
2. ASSEMBLE OF THE EDGERWHEEL
(See Fig B)
Insert the edger wheel assembly onto grooves
of cutting head. Make sure the groove of the
wheel is locked in the metal plate.
Press the release button (b) on the wheel and
pull out to take off the wheel.
O P E R A T I O N I N S T R U C T I O N S
WARNING! Thecharger and battery
pack arespecially designed to work
together so do not attempt to use any other
devices. Never insert or allow metallic objects
into your charger or battery pack connections
because of an electrical fai lure and hazard will
occur.
1. BEFORE USING YOUR CORDLESS
GRASS TRIMMER
Your battery pack is UNCHARGED and you must
charge once before use.
The battery charger supplied is matched to the
Li-ion battery installed in the machine. Do not
use another battery charger.
2. CHARGING YOUR BATTERY PACK
The Li-ion battery is protected against deep
discharging. When the battery is empty, the
machine is switched off by means of a protective
circuit Thetrimmer head no longer rotates.
In awarm environment or after heavy use, the
battery pack may becometoo hot to permit
charging.Allow time for the battery to cool
down before recharging.
3. TO REMOVE ORINSTALL BATTERY
PACK (See Fig C)
Depress the battery releasebutton to
release battery pack from your trimmer.
After recharging, insert the battery pack into
trimmer's battery port. A simple push and
slight pressure will be sufficient.
4. SAFETY ON/OFF SWITCH (See Fig D)
Your switch is locked off to prevent accidental
starting. Depress lock off button (c)then on/off
switch (d) and release lock off button (c). Yourswitch is now on.To switch off, just release the
on/off switch.
WARNING! The cuttinghead
continues to rotate after the
trimmer hasbeen switched off; wait until
it hascompletely stopped then lay down
the tool.
5. ADJUSTMENT OF THETELESCOPIC
SHAFT (See Fig E)Unscrew the locking collar (4) in the direction
indicated to unlock.
Adjust the length of the telescopic shaft to the
most comfortable length.
Tighten the lower lockingcollar.
6. MAINHANDLE ROTATION (See Fig
F1&F2)
Holding the lower housing then pull upward
the shaft, then rotate 90 degree clockwise,then release, the shaft will be locked in
position automatically.
7. ADJUSTMENT OFAUXILIARY HANDLE
(See Fig G)
Pull up the auxiliary handle locking lever (5) .
Hold the lever and rotate the auxiliary handle
to the most comfortable and balanced
position.
Release the lever, your auxiliary handle has
been locked.
8. ADJUSTMENT OF THETRIMMER
HEAD ANGLE TO THE SHAFT (See Fig
H1&H2)
Adjust the trimmer head angle downwards,
Put your one foot on the motor house, then
grip the main handle, apply adequate force to
adjust, asshown in Fig H1.
Adjust the trimmer head angle upwards, Put
your one foot on the safety guard, then grip

8/2/2019 Worx_WG165_2 in 1 Cordless Li Ion Grass Trimmer Edger User Manual
http://slidepdf.com/reader/full/worxwg1652-in-1-cordless-li-ion-grass-trimmer-edger-user-manual 10/11
the main handle, apply adequate force to
adjust, as shown in Fig H2.
9. SPACER GUARD (See Fig I)
Push the flower guard in and out into place
before trimming, asshown in Figure I. Make
sure the flower guard is locked firmly in place.
OPERATION
WARNING: Always wear the eye
protection. Never lean over the trimmer
head. Rocks or debris can ricochet or be thrown
into eyes and face and cause blindness or other
serious injury.When operatingunit, check for
the following:
Wear eyeprotection and heavy clothing. Hold
front handlewith one hand and auxiliary handle
with the other hand. Keep unit below waist
level. Work only from your right to your left to
ensure debris is thrown away from you.Without
bendingover, keep line near and parallel to the
ground (perpendicular when edging) and not
crowded into material being cut.
WARNING: Make sure that line is
fed out before operation. Make sure
motor is up to full speed before trimming
or edging.
WARNING: Useonly 0.065" (1.65mm)cutting line, diameter line. Other sizes of
line will not feed properly and will result in
improper cutting head function or can cause
serious injury. Do not useother material
such as wire, string, rope, etc.Wire can break
off during cuttingand become a dangerous
projectile that can cause serious injury.
Trimming
Hold the bottom of the trimmer head about
3.25"(8 cm) above the ground and at an angle.
Allow only the tip of line to make contact. Do
not force trimmer line into work area.
Edging (See Fig J)
Holding the lower housing then pull upwards
the shaft, then rotate 90 degree clockwise. (Fig
F1)
Adjust trimmer head angle to be the lowest
horizontal setting.Then position the wheel on
the ground for edge mode.The guard has two
white line guides to indicate thecutting line
position.Align these marks with the edge of
your lawn.
While edging, al low the tip of the line to make
contact. Do not force the line.The rotation
wheel helps protect the unit and keeps the
unit from contacting the ground.Take extra
caution while edging as objects can be thrown
from the trimmer line.
AUTOMATIC LINE FEED SYSTEMWhen initially switching on the trimmer, a
small length of line is fed out.
A 'clattering' noise will beheard when the
lines hit the line cutter. DO NOT BEALARMED
this is quit normal. After about 5seconds the
linewill be cut to the correct length and the
noise will reduce as the motor receives full
speed.
If the noise of the line being cut can't be
heard, more line will need to be fed out.To feed more line, it is first necessary to allow
the trimmer to stop completely, then restart,
allowing the motor to reach full speed.
Repeat above until you hear the lines hitting
against the line cutter. (Do not repeat this
procedure more than 6times)
TO MANUALLY FEED THE LINE (See Fig
K1)
If required, line can be feed out manually
To operate, press and release manual line feed
button (16) , while gently pulling out the line
until it is long enough to reach the line cutter.
If the line extends past the line cutter, too
much line has been fed out.
If too much line is fed out, remove the spool
cap and turn spool counter-clockwise until the
line is at the desired length.
TO REMOVETHE CAP (See Fig K2)
Press and hold in the two latches (12) .Pull cap away from the spool holder
When refitting the spool cap.
Keep all areas of the cap and spool holder
clean.
Replace thecap, pressingfirmly down
towards the spool holder to ensure cap is fully
located into position.
Check that the cap is correctly fitted by trying
to remove it without depressing the two
latches.
8/2/2019 Worx_WG165_2 in 1 Cordless Li Ion Grass Trimmer Edger User Manual
http://slidepdf.com/reader/full/worxwg1652-in-1-cordless-li-ion-grass-trimmer-edger-user-manual 11/11
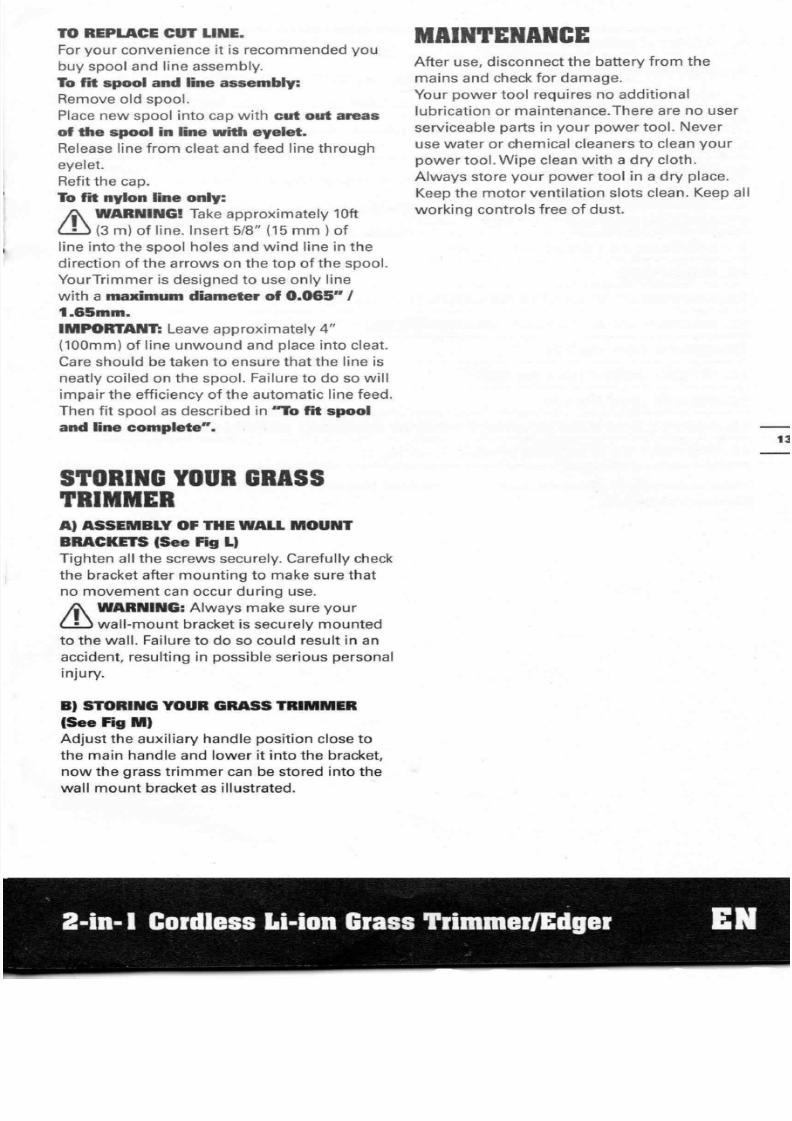
TO REPLACE CUT LINE.
For your convenience it is recommended you
buy spool and line assembly.
To fit spool and line assembly:
Remove old spool.
Place new spool into capwith cut out areas
of the spool in line with eyelet.
Release line from cleat and feed line through
eyelet.Refit th e cap.
To fit nylon line only:
WARNING! Take approximately 10ft
(3 m) of line. Insert 5/8" (15 mm ) of
line into the spool holes and wind line in the
direction of the arrows on the top of the spool.
YourTrimmer is designed to useonly line
with a maximum diameter of 0.065"/
1.65mm.
IMPORTANT: Leave approximately 4"(100mm) of line unwound and place into cleat.
Care should be taken to ensure that the line is
neatly coiled on the spool. Failure to do so will
impair the efficiency of the automatic line feed.
Then fit spool asdescribed in "To fit spool
and line complete".
S T O R I N G Y O U R G R A S S
T R I M M E RA) ASSEMBLY OF THE WALL MOUNT
BRACKETS (See Fig L)
Tighten all the screws securely. Carefully check
the bracket after mounting to make sure that
no movement canoccur during use.
WARNING: Always make sure your
wall-mount bracket is securely mounted
to the wall. Failure to do so could result in an
accident, resulting in possible serious personal
injury.
B) STORING YOUR GRASSTRIMMER
(See Fig M)
Adjust the auxiliary handle position close to
the main handle and lower it into the bracket,
now the grass trimmer can be stored into the
wall mount bracket as illustrated.
M A I N T E N A N C E
After use, disconnect the battery from the
mains and check for damage.
Your power tool requires no additional
lubrication or maintenance.There are no user
serviceable parts in your power tool. Never
use water or chemical cleaners to clean your
power tool.Wipe clean with a dry cloth.
Always store your power tool in a dry place.
Keep the motor ventilation slots clean. Keep all
working controls free of dust.


