1 Installing EPS 400/200 Overfloor Heating Boards Wunda EPS 400 Overfloor boards are lightweight and Super-Strong with a very high compressive strength and are fully approved by Mapei and Ultra Tile for tiling directly onto using their flexible tile adhesives without the need for a separate backerboard or intermediate layer. (Carpet, Vinyl and Karndean will require a suitable intermediate backer board). Wunda EPS 200 overfloor boards are suitable for Laminate and Wood floor finishes. (Carpet, Vinyl and Karndean will require a suitable intermediate backer board). You will need: • Craft knife • Metal edged rule Also recommended: • Marker pen • Fine toothed saw • Pipe cutter • Aluminium tape • Pair of tough work gloves • Knee protection • Eye protection FLOOR HEATING WUNDA F01b EPS Overfloor Heating Boards ✆ 0800 5420 816 www.wundafloorheating.co.uk THE BRAND YOU CAN TRUST Revision date: 24/7/2017 Application : PLAIN BOARD - NO FOIL suitable for brand new highly insulated properties 50 MICRONS - THINNEST FOIL COVERING suitable for new builds where rapid response is not required. 100 MICRONS - MEDIUM FOIL COVERING suitable for well insulated properties where rapid response is not required. 200 MICRONS - THICKEST FOIL FOR RAPID RESPONSE suitable in all property types, including refurbishments & renovations EPS Overfloor Boards have been designed for quick and simple fitting whilst avoiding the weight, mess and drying times of a traditional underfloor system that’s buried in thick concrete. Using basic tools and a Wunda system layout drawing, installation is easily achieved by systematically cutting, arranging and sticking the boards in place using Wunda quick drying board spray adhesive or Mapei Ultrabond ECO 380 adhesive. Both EPS 400 & EPS 200 are available with a choice of Aluminium covering, depending on the heating response required.
Transcript
1
Installing EPS 400/200 Overfloor Heating BoardsWunda EPS 400 Overfloor boards are lightweight and Super-Strong with a very high compressive strength and are fully approved by Mapei and Ultra Tile for tiling directly onto using their flexible tile adhesives without the need for a separate backerboard or intermediate layer. (Carpet, Vinyl and Karndean will require a suitable intermediate backer board). Wunda EPS 200 overfloor boards are suitable for Laminate and Wood floor finishes. (Carpet, Vinyl and Karndean will require a suitable intermediate backer board).
✆ 0800 5420 816 www.wundafloorheating.co.ukTHE BRAND YOU CAN TRUST
Revision date: 24/7/2017
Application :PLAIN BOARD - NO FOIL suitable for brand new highly insulated properties
50 MICRONS - THINNEST FOIL COVERING suitable for new builds where rapid response is not required.
100 MICRONS - MEDIUM FOIL COVERING suitable for well insulated properties where rapid response is not required.
200 MICRONS - THICKEST FOIL FOR RAPID RESPONSE suitable in all property types, including refurbishments & renovations
EPS Overfloor Boards have been designed for quick and simple fitting whilst avoiding the weight, mess and drying times of a traditional underfloor system that’s buried in thick concrete.
Using basic tools and a Wunda system layout drawing, installation is easily achieved by systematically cutting, arranging and sticking the boards in place using Wunda quick drying board spray adhesive or Mapei Ultrabond ECO 380 adhesive.
Both EPS 400 & EPS 200 are available with a choice of Aluminium covering, depending on the heating response required.
2
Floor preparationEPS Overfloor can be fixed to new or existing concrete/screed or wooden floors which must be dry and level remove any loose paint or coverings. Floors must be free from oil, grease, damp,
dust and debris or any other substances that will prevent the adhesive from adhering.When fixing EPS Overfloor boards to a concrete or screed floor, ensure a damp proof membrane has been installed, if not or unsure then apply a liquid damp proof membrane and allow to cure fully before fixing any boards.
When fixing EPS Overfloor boards onto a wooden/timber floor ensure any loose flooring is secured, replace any missing or damaged boards. Ensure the floor is firm and level allow any adhesives to dry fully before fixing Overfloor boards.
If fixing EPS Overfloor to a non-porous substrate such as existing tiles, they will need thorough cleaning with a de-greasing agent, such as scrubbing with a combination of methylated spirits and wire wool. Coat the tiles with Wunda spray adhesive first and then coat the back of the EPS board with Wunda spray adhesive, allow both to become tacky and then bring the two surfaces together. (Test a small patch first to ensure compatibility)
1
5
3
2
3a 3b
4a
Fitting perimeter strip
Cutting boards
Passing pipe through walls
Study the pipe layout drawing
Before laying the floor heating boards, remove skirting boards and any doors that will require trimming to accommodate the floor heating boards and final floor finish (2a). Fit perimeter
edge strip around the outside edges of the area to be heated using the sticky tape on the back or a hand staple gun. This will help reduce heat loss and allow for expansion (2b). Any height excess can be trimmed off once the final floor finish has been laid. If intending to lay carpets with edge grippers fix a suitably sized batten up to same height as the Overfloor board around the room perimeter. Lay the Overfloor boards flush against the batten when installing, this will allow fitment of carpet gripper at a later stage.
4 When floor heating pipes need to pass through walls, drill the holes before laying and
fixing boards to prevent any damage to the boards. Protect and seal the pipe ends with tape. To prevent kinking, one person should feed the pipe through the hole whilst another draws the pipe through from the other side (4a).
Before attempting to lay any floor heating boards, familiarise yourself with the system
layout drawing, noting manifold position. The drawing will detail the orientation and position of boards (5a)Plan the routes for transitional pipe runs and transitional boards.
Some cutting of boards will be required this is easily achieved with a fine toothed saw or craft knife. We advise wearing gloves as the aluminium edges can be sharp.
Some cutting of boards will be required, this is
easily achieved with a craft knife or fine toothed saw (3a).
Extra pipe channels and routes can be cut by hand or using an electric router (3b).
PLEASE NOTE: These boards are not intended to be bonded to an Asphalt surface. Please call our our technical support team for advice before commencing work.
✆ 0800 5420 816 www.wundafloorheating.co.ukTHE BRAND YOU CAN TRUST
2a 2b
5a
Revision date: 24/7/2017
EPS Board Preparation & CuttingEps Overfloor boards include straight pipe runs, return ends and a transitional area on every board
(6a).
These boards are designed for easy installation, cutting to shape where required. Transitional pipe runs, additional corners, 90°bends and extra pipe channels will normally be required and are simply cut from a main board (6b/c) These main boards should be used in conjunction with Wunda transitional boards in areas of high pipe concentration.
3
Before laying any boards familiarise yourself with the system layout drawing noting direction of boards, potential cutting required and transitional areas. If you are inexperienced in laying Overfloor heating we strongly suggest completing a ‘dry’ lay of all boards before using any adhesive. Identify joins between boards using a marker pen (6e). Once you are satisfied that all boards have been cut and marked for an area (6f) they can be lifted in preparation of fixing the boards permanently in place (6g).
6
6a
6b 6c
100mm6d
6e 6f 6g
Transitional Area
Straight Run
When cutting and creating new bends into a board keep the radius gradual and no sharper than in a main board. The water flow around a pipe circuit should always go to potential cold areas first, for example external walls and areas of high glazing. We suggest wearing flat soled shoes or trainers whilst walking on the boards. Pipe should be set back from walls to avoid future placement of carpet grippers etc. (6d). Ensure boards are dry and free from dirt, dust or any other contaminants before laying. Keep any off-cuts as they may be required later on.
7
WUNDA F01bEPS Overfloor Heating Boards
✆ 0800 5420 816 www.wundafloorheating.co.ukTHE BRAND YOU CAN TRUST
Return End Fixing boards to an existing or new floor Board spray adhesive method. Ensure subfloor is dry, clean, stable, level and free from oil, grease, loose paint and any obstructions. Secure any loose boards, fill any holes, dips or low points in the floor. When using Wunda spray adhesive users must be aware of the environment in which the spray is to be applied.
Ensure adequate ventilation, open windows and doors, do not use in confined areas. Wear suitable protective gloves, face mask and clothing. Prior to use, check compatibility, spray a small test patch onto the substrate. Some non-porous floors such as existing tiles will need thorough cleaning with a de-greasing agent such as scrubbing with a combination of methylated spirits and wire wool. apply a coat of spray adhesive to the existing tile surface and the underside of the Overfloor board.
Allow both surfaces to become tacky before bringing together (we recommend testing a small patch to test compatibility). Place the board carefully onto the adhesive making sure you have selected the correct board and orientation. Apply an even and frim pressure, make sure the board is in full contact with the adhesive and floor below.
When using Wunda spray to bond EPS boards onto existing floor boards, both the floor boards and the underside of the EPS board will require a covering of Wunda spray adhesive. This is necessary as older floor boards often develop concave or convex surface due to distortions occurring in the wood over time (see illustration 7e on pg 5) and this will potentially reduce the effective adhesion area. Coating both the floor boards and board will reduce this effect and create maximum contact between the two surfaces giving a firm and secure fixing. As before, always carry out a test area with Wunda spray and board before commencing with the rest of the install.
Revision date: 24/7/2017
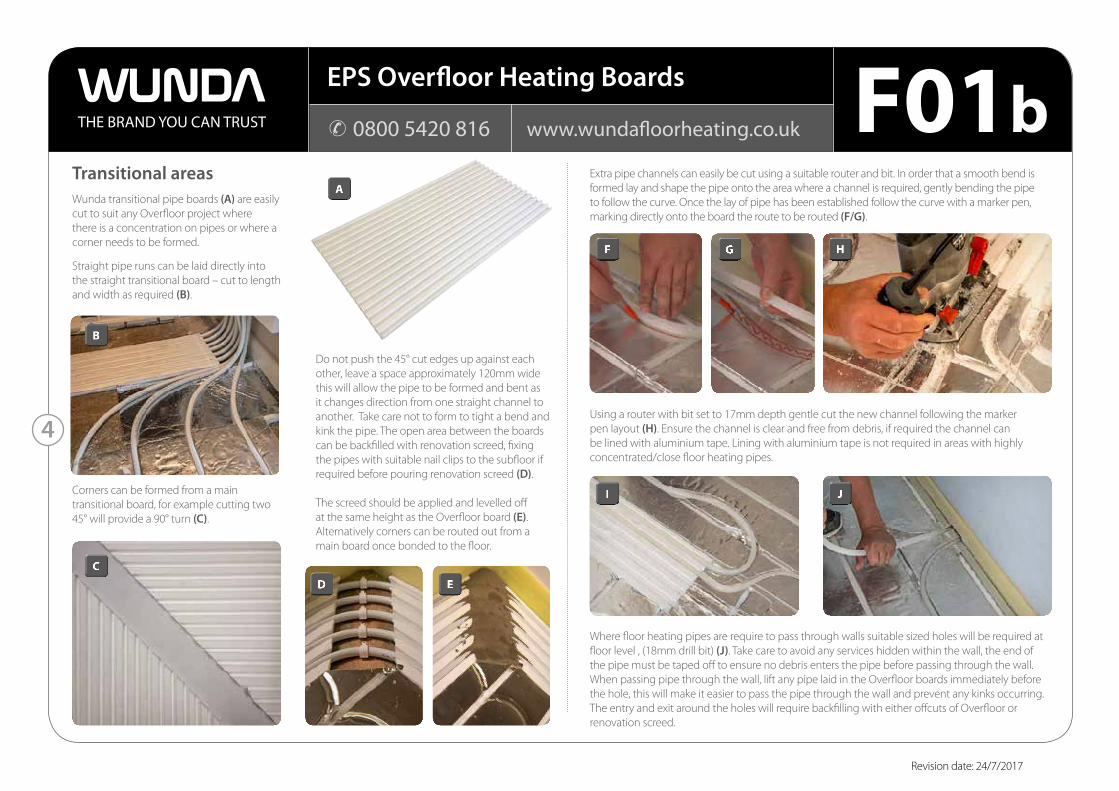
Transitional areasWunda transitional pipe boards (A) are easily cut to suit any Overfloor project where there is a concentration on pipes or where a corner needs to be formed.
Straight pipe runs can be laid directly into the straight transitional board – cut to length and width as required (B).
Corners can be formed from a main transitional board, for example cutting two 45° will provide a 90° turn (C).
Using a router with bit set to 17mm depth gentle cut the new channel following the marker pen layout (H). Ensure the channel is clear and free from debris, if required the channel can be lined with aluminium tape. Lining with aluminium tape is not required in areas with highly concentrated/close floor heating pipes.
Where floor heating pipes are require to pass through walls suitable sized holes will be required at floor level , (18mm drill bit) (J). Take care to avoid any services hidden within the wall, the end of the pipe must be taped off to ensure no debris enters the pipe before passing through the wall. When passing pipe through the wall, lift any pipe laid in the Overfloor boards immediately before the hole, this will make it easier to pass the pipe through the wall and prevent any kinks occurring. The entry and exit around the holes will require backfilling with either offcuts of Overfloor or renovation screed.
4
Extra pipe channels can easily be cut using a suitable router and bit. In order that a smooth bend is formed lay and shape the pipe onto the area where a channel is required, gently bending the pipe to follow the curve. Once the lay of pipe has been established follow the curve with a marker pen, marking directly onto the board the route to be routed (F/G).
Do not push the 45° cut edges up against each other, leave a space approximately 120mm wide this will allow the pipe to be formed and bent as it changes direction from one straight channel to another. Take care not to form to tight a bend and kink the pipe. The open area between the boards can be backfilled with renovation screed, fixing the pipes with suitable nail clips to the subfloor if required before pouring renovation screed (D).
The screed should be applied and levelled off at the same height as the Overfloor board (E). Alternatively corners can be routed out from a main board once bonded to the floor.
WUNDA F01bEPS Overfloor Heating Boards
✆ 0800 5420 816 www.wundafloorheating.co.ukTHE BRAND YOU CAN TRUST
A
B
CD E
F
I J
G H
Revision date: 24/7/2017
5
When bonding the boards in place, we suggest starting in a corner and work along the furthest
outside wall first, when you reach the opposite corner start a new row. Ensure that the pipe channels line up as you lay each board.
A helpful tip is to mark around the board onto the floor with a marker pen before spraying adhesive. This will allow you to spray the adhesive right up to the board edges minimising overspray and wastage. (7a)
Spray at a distance of 10-20cm (4-8”) towards the substrate surface, applying a uniform and even coat of adhesive, obtaining 80-100% coverage (7b) the spray is coloured to aid application. Allow the adhesive to tack off until no adhesive transfers to the knuckle when touched (7c).
Avoid over applying spray adhesive as this is not necessary with this type of adhesive. Ensure correct board or cut out section has been chosen before placing onto the spray adhesive, press down applying adequate pressure to achieve maximum contact and strength (7d).
✆ 0800 5420 816 www.wundafloorheating.co.ukTHE BRAND YOU CAN TRUST
When using Wunda spray to bond EPS boards onto existing floor boards, both the floor boards and the underside of the EPS board will require a covering of Wunda spray adhesive. This is necessary as older floor boards often develop a concave or convex surface due to distortions occurring in the wood over time (see illustration 7e) and this will potentially reduce the effective adhesion area. Coating both the floor boards and board will reduce this effect and create maximum contact between the two surfaces giving a firm and secure fixing. As before, always carry out a test area with Wunda spray and board before commencing with the rest of the install. Seriously uneven floors may require levelling first.
Important: When Bonding onto older floorboards
EPS Overfloor Board
Floorboard
Potential areas of poor contact
Floorboard Floorboard
7e
Revision date: 24/7/2017
6
Before laying pipe make sure all pipe channels are clear from debris, check and familiarise yourself with
the pipe layout drawing (9a) plan where to begin and the pipe routes for each individual loop of pipe.
The layout drawing will indicate the length of each pipe loop required. Do not cut the pipe before laying as you may need to change the route due to unforeseen circumstances.
Wunda Pert/Al/Pert pipe is recommended for use in all Overfloor systems due to it’s flexible, lightweight and easy to handle properties. Always begin laying pipe at the manifold allowing a bit extra for final connection to the manifold identify each loop flow, return and loop number using a permanent marker (9b).
If not using a pipe decoiler the pipe can be easily installed by two people, the first walks with the pipe coil and reels it out while the second person carefully walks along the pipe pushing the pipe down into the straight pipe channel (9c – 9d).
Starting with a few square meters at a time apply Mapei Ultrabond ECO 380 to the substrate using a 2mm (A2) tooth comb spreader (8a). Do not use Mapei Ultrabond ECO 380 as a filler to level out gaps, cracks or uneven substrates as this will greatly reduce the coverage achieved and increase drying times. Any uneven screed or concrete floors should be levelled with a renovation screed first.
Leave the Mapei Ultrabond ECO 380 to become tacky before laying any boards – generally 10-30 minutes dependant on the substrate, environment conditions and temperature.The boards can now be applied to the adhesive, starting with one board at a time, usually the furthest corner of the room (8b). Systematically work across the outside wall fixing each board in turn (8c). When you reach the opposite side of the room return to the beginning and start the next row ensuring that pipe channels line up.
Installing floor heating pipe into EPS boardsUsing Mapei Ultrabond Eco 380 to bond boards to the floor
✆ 0800 5420 816 www.wundafloorheating.co.ukTHE BRAND YOU CAN TRUST
As an alternative to using Wunda spray adhesive, Mapei Ultrabond ECO 380 is approved. With a strong bond of EPS Overfloor to all kinds of absorbent,
stable, level substrates including concrete/screed and existing wooden floors. Floors must be free from oil, grease, damp, paint and debris or any other substances that will prevent the adhesive from bonding to the floor. ECO 380 must be allowed to fully cure before any foot traffic or laying floor heating pipes.
A good tip is to insert a small off cut of pipe into the pipe channel where the boards meet (8d). After laying each board, carefully walk on the board applying adequate and even pressure ensuring the board has taken to the adhesive. Take care as boards may slip on the adhesive, if any boards squeak when walked on carefully lift the board, re-apply adhesive and repeat the above steps (8a-8d). Allow sufficient time for the Mapei Ultrabond ECO 380 to fully dry before allowing any foot traffic as boards may slip and move (generally 24-48 hours drying dependant on the substrate, environment conditions and temperature.)
8b 8c 8d
8a
9a
Revision date: 24/7/2017
7
If laying pipe without the aid of a pipe de-coiler when you reach the end of a straight run employ the technique of rotating the whole coil through 180° towards the direction of the return channel (9d/e)
This will help deter the pipe from trying to twist, ease the pipe around and into the bend. Lay the pipe into the return or corner gently forming and pushing the pipe gently into the channel as it forms around the bend (9d/e).
Do not try and form the bend before laying the pipe as this could potentially result in a kink in the pipe. If a kink occurs, wrap the pipe in a cloth for protection and gently squeeze with pliers to re-shape. Alternatively the pipe can be lifted out of the boards and moved backwards so the kinked section now lays in a straight channel.
Once all pipe has been laid into the boards, ensure each loop has been identified with flow, return and loop number (9b). This will help eliminate mistakes when connecting the pipe to the manifold at a later stage. Protect your newly laid floor heating system from site traffic by covering with boards where walking is necessary.
If pipe work is not installed correctly it may sit proud of the Overfloor board, it can be tapped down using a wooden batten across the board and gently tapped with a hammer (9f) or aluminium tape can be used to secure the pipe. Alternatively on bends simply remove a section of the EPS board and secure the pipe to the floor below using a suitable nail clip on wooden floors and replacing the nail for a raw plug and screw on screeded floors (9g-9i).
9d 9e
9g
9h 9i
9f
TIP: In the unlikely event of a kink in the pipe occurring, wrap the pipe in a cloth for protection and gently squeeze with pliers to re-shape.
✆ 0800 5420 816 www.wundafloorheating.co.ukTHE BRAND YOU CAN TRUST
Revision date: 24/7/2017
8
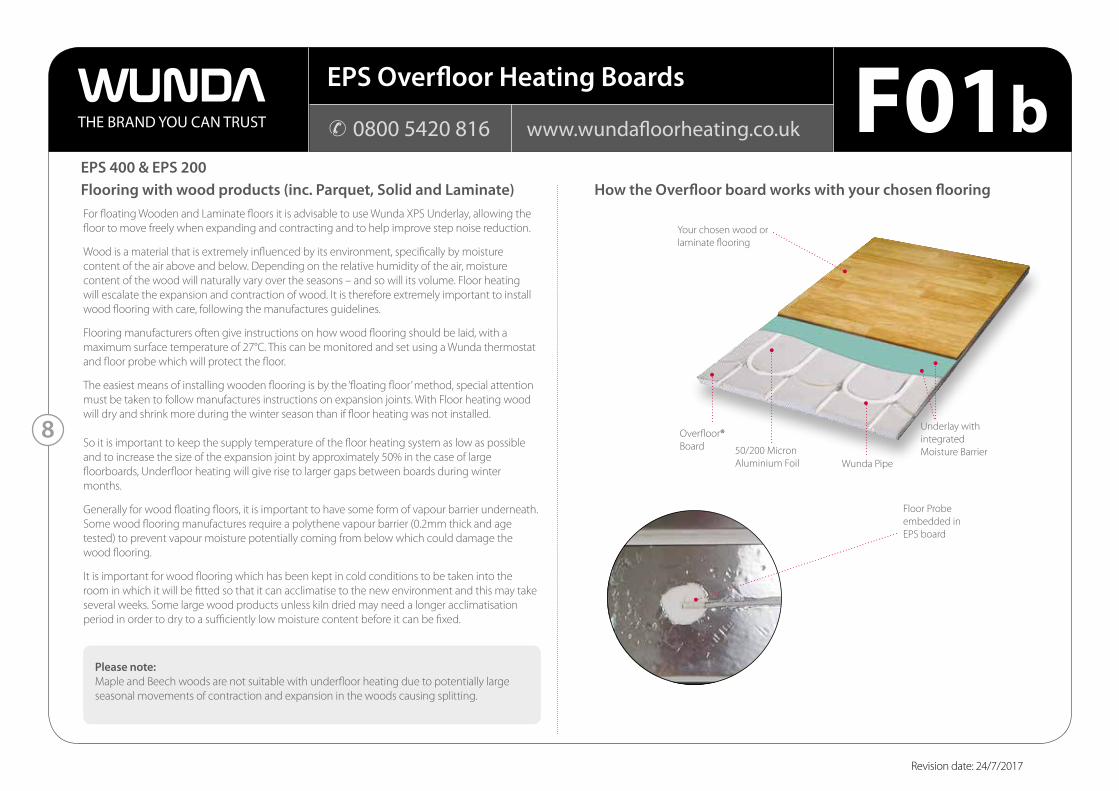
Flooring with wood products (inc. Parquet, Solid and Laminate)EPS 400 & EPS 200
How the Overfloor board works with your chosen flooringFor floating Wooden and Laminate floors it is advisable to use Wunda XPS Underlay, allowing the floor to move freely when expanding and contracting and to help improve step noise reduction.
Wood is a material that is extremely influenced by its environment, specifically by moisture content of the air above and below. Depending on the relative humidity of the air, moisture content of the wood will naturally vary over the seasons – and so will its volume. Floor heating will escalate the expansion and contraction of wood. It is therefore extremely important to install wood flooring with care, following the manufactures guidelines.
Flooring manufacturers often give instructions on how wood flooring should be laid, with a maximum surface temperature of 27°C. This can be monitored and set using a Wunda thermostat and floor probe which will protect the floor.
The easiest means of installing wooden flooring is by the ‘floating floor’ method, special attention must be taken to follow manufactures instructions on expansion joints. With Floor heating wood will dry and shrink more during the winter season than if floor heating was not installed.
So it is important to keep the supply temperature of the floor heating system as low as possible and to increase the size of the expansion joint by approximately 50% in the case of large floorboards, Underfloor heating will give rise to larger gaps between boards during winter months.
Generally for wood floating floors, it is important to have some form of vapour barrier underneath. Some wood flooring manufactures require a polythene vapour barrier (0.2mm thick and age tested) to prevent vapour moisture potentially coming from below which could damage the wood flooring.
It is important for wood flooring which has been kept in cold conditions to be taken into the room in which it will be fitted so that it can acclimatise to the new environment and this may take several weeks. Some large wood products unless kiln dried may need a longer acclimatisation period in order to dry to a sufficiently low moisture content before it can be fixed.
Floor Probeembedded in EPS board
Wunda Pipe50/200 Micron Aluminium Foil
Your chosen wood or laminate flooring
Underlay with integrated Moisture Barrier
Overfloor® Board
Please note:Maple and Beech woods are not suitable with underfloor heating due to potentially large seasonal movements of contraction and expansion in the woods causing splitting.
✆ 0800 5420 816 www.wundafloorheating.co.ukTHE BRAND YOU CAN TRUST
Revision date: 24/7/2017
9
Carpet
General recommendations for installing wood flooringFlooring manufacturers give instructions on how wood flooring should be laid, and make reference to floor surface temperatures not exceeding 270C . Wunda always recommends the use of thermostats with floor probes to limit floor surface temperatures. The maximum total thickness of wood floor covering should not exceed 25mm.
Install the wood flooring on top of a suitable underlay, remembering to leave adequate space at the expansion joints for the wood to expand and contract over the seasons, usually the space is made available along adjacent walls so that the space will be covered by skirting board on wall.
ParquetParquet should be installed according to suppliers instructions. Parquets of a laminated type (three layers) give smaller expansion and contraction over the seasons. Solid parquets have larger moisture movements than laminated parquets.
Solid wood (floorboards)Solid floorboards should be placed so that the direction of the grain is at 90 degrees to the direction of the pipe. If the floorboards are to be fixed rather than a floating floor, suitable advice should be available from your supplier, however fixing with an acrylic adhesive will allow for expansion and contraction of floorboards over the system.
LaminateLaminates are usually quite thin (7 - 10mm), which from an energy perspective are more efficient than other thicker wood floorings. They should either be glued or ‘clicked’ together according to the manufacturers instructions. Several laminates are delivered with a vapour barrier and/or an acoustic layer attached to the bottom.
Vinyl, Linoleum, Karndean, Amtico, CorkThese floor finishes cannot be placed directly on the Overfloor boards and will require an intermediate layer that gives a level, sound and uniform surface.
Prime the aluminium surface of the Overfloor boards with primer and pour a 5mm bed of renovation/ levelling screed as an intermediate layer, this will give a level and uniform subfloor for these finishes to be laid onto.
Alternatively the use of 6mm plywood sheets screwed down with countersunk screws, paying close attention to the floor heating pipes below will provide a firm stable base.
MAXIMUM COMBINED TOG value of floor finish and plywood/subfloors should not exceed 2 TOG for the floor heating to remain effective. Plywood sheets can be screwed and glued using MAPEI ULTRABOND S955 if desired. For more information on floor covering suitability with floor heating please consult your chosen floor covering supplier.
If intending to lay carpets with edge grippers fix a suitably sized batten up to the same height as the Overfloor board around the room perimeter, this will allow fitment of carpet gripper at a later stage.
Prime the aluminium surface of the Overfloor boards with primer and pour a 5mm bed of renovation/ levelling screed as an intermediate layer, this will give a level and uniform subfloor for the carpet to be laid onto. Alternatively the use of 6mm plywood sheets screwed down with countersunk screws, paying close attention to the floor heating pipes below will provide a firm stable base for laying suitable ‘porous’ underlay and open weave carpets that will work with floor heating.
✆ 0800 5420 816 www.wundafloorheating.co.ukTHE BRAND YOU CAN TRUST
Revision date: 24/7/2017
MAXIMUM COMBINED TOG value of carpet, underlay and plywood/subfloors should not exceed 2 TOG for the floor heating to remain effective. Plywood sheets can be screwed and glued using MAPEI ULTRABOND S955 if desired. For more information on floor covering suitability with floor heating please consult your chosen floor covering supplier.
10
Ultra Tile Adhesive – Installation guide for tiling onto Wunda 400EPS overfloor boardsInstalling ceramic, vitrified, quarry, porcelain & natural stone tilesBefore commencing tiling all EPS400 boards must be installed correctly and provide a sound, stable and level substrate. The EPS boards must be clean and free from contamination or substances which could inhibit adhesion. Floor heating pies must be installed and pressure tested prior to floor finish being laid.
STAGE 1Ultra Floor Prime IT Multi-surface primer
Prime It Multi-surface primer is used to prepare the aluminium surface of our EPS400 Overfloor boards prior to tiling directly onto using Granfix ULTIMATE FLEX tile adhesive. Applied neat to the entire surface of the aluminium, pipe and any exposed pipe channels – 1 tub = 50sqm coverage.
Prime IT Multi-surface primer must be applied neat to the entire aluminium surface of Wunda EPS400 Overfloor boards prior to bonding tiles with Granfix ULTIMATE FLEX tile adhesive. All boards must be secured to the substrate in accordance with our Overfloor installation instructions, all boards must be clean, dry and all floor heating pipe work laid before priming. DO-NOT fill empty pipe channels with off cuts of pipe – leave exposed.
Prime the entire surface of the aluminium, floor heating pipes and any empty pipe channels with a neat coat of Prime IT using a suitable roller. Once the primer has fully dried tiles can be fixed using Granfix ULTIMATE FLEX tile adhesive. Any empty pipe channels must first be filled with adhesive using a smooth edged trowel before finally applying with a notched trowel to achieve the bed thickness required.
Under no circumstances should the floor heating be used to aid or speed up the drying of any floor heating board adhesives or tile adhesives including grout. When heating the system for the first time, ensure any heat is introduced gradually to protect the floor from thermal shock.
IMPORTANT: Movement/Expansion joints – should be incorporated as British standard recommendations.
STAGE 2Granfix ULTIMATE FLEX adhesive
Granfix ULTIMATE FLEX is a highly polymer modified single part S2 flexible tile adhesive designed for use with floor heating. Tried, tested & approved by ULTRA for tiling Ceramics, Slate, Quarries,
✆ 0800 5420 816 www.wundafloorheating.co.ukTHE BRAND YOU CAN TRUST
Revision date: 24/7/2017
WETROOM SYSTEM can be used to prepare areas prior to tiling providing strength and flexibility and still enable tiles to adhere.
This two-component system consists of a brush applied flexible waterproof coating and 10m membrane tape. Compatible for use with floor heating, tiles can be applied 24 hours after application.
WETROOM SYSTEM can be applied to most common substrates including moisture sensitive backgrounds such as Wunda EPS400 floor heating board, plaster, plasterboard and
tile backing boards, it may be used beneath ceramic, porcelain, natural stone and glass tiles.
Porcelain & Limestone directly onto Wunda EPS400 Overfloor boards when primed with Prime IT. Coverage +/- 4 sqm per 20kg bag at 3mm depth with back-buttering.
The entire aluminium surface of Wunda EPS400 heating boards, empty pipe channels and floor heating pipes must be primed with Prime IT prior to tiling with ULTIMATE FLEX tile adhesive. The product sets in 40 minutes and can accept light foot traffic in 2 hours at 20°C. Used to fix most floor tiles directly onto the Overfloor board without the need for an admix, when set ULTIMATE FLEX is water resistant.
When grouting the grout selected must have ‘flexible’ characteristics, once the tiling and grout has been carried out, the temperature must remain the
same for a minimum of 7 days. After this time, the floor heating can be bought up to full working temperature slowly. A maximum water temperature increase of 5°C per day is recommended.
• Approved for use to bond directly onto Wunda EPS400 Overfloor boards• Conforms to BS EN 12004 & 12002 C2FS2• Pot life 40 minutes• Grout after 3.5 hours• Applications 3mm – 20mm• Under floor heating compatible• Ultimate S2 flexibility• No Admix required• Water resistant
WETROOM SYSTEM
11 Ultrabond Eco S955 1K
Mapei Aquadefence and Mapeband
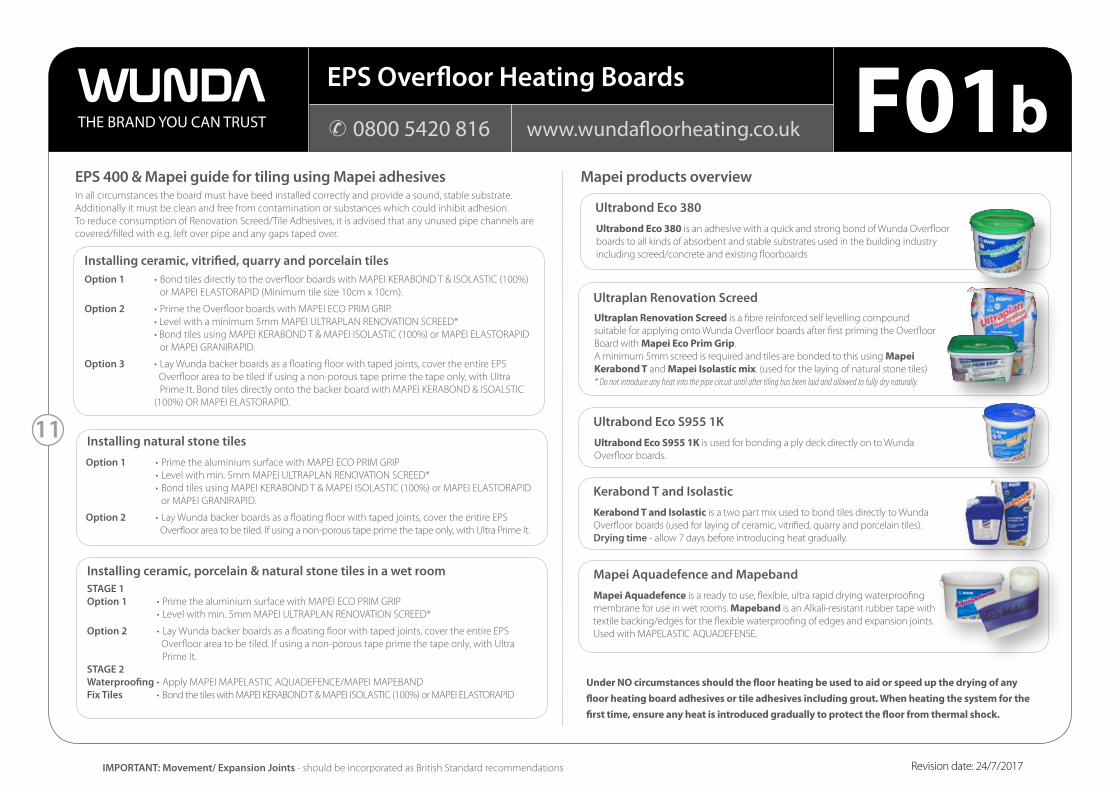
Ultrabond Eco 380Ultrabond Eco 380 is an adhesive with a quick and strong bond of Wunda Overfloor boards to all kinds of absorbent and stable substrates used in the building industry including screed/concrete and existing floorboards
IMPORTANT: Movement/ Expansion Joints - should be incorporated as British Standard recommendations
Ultrabond Eco S955 1K is used for bonding a ply deck directly on to Wunda Overfloor boards.
Mapei Aquadefence is a ready to use, flexible, ultra rapid drying waterproofing membrane for use in wet rooms. Mapeband is an Alkali-resistant rubber tape with textile backing/edges for the flexible waterproofing of edges and expansion joints. Used with MAPELASTIC AQUADEFENSE.
Kerabond T and IsolasticKerabond T and Isolastic is a two part mix used to bond tiles directly to Wunda Overfloor boards (used for laying of ceramic, vitrified, quarry and porcelain tiles). Drying time - allow 7 days before introducing heat gradually.
Ultraplan Renovation ScreedUltraplan Renovation Screed is a fibre reinforced self levelling compound suitable for applying onto Wunda Overfloor boards after first priming the Overfloor Board with Mapei Eco Prim Grip. A minimum 5mm screed is required and tiles are bonded to this using Mapei Kerabond T and Mapei Isolastic mix. (used for the laying of natural stone tiles)* Do not introduce any heat into the pipe circuit until after tiling has been laid and allowed to fully dry naturally.
✆ 0800 5420 816 www.wundafloorheating.co.ukTHE BRAND YOU CAN TRUST
Under NO circumstances should the floor heating be used to aid or speed up the drying of any floor heating board adhesives or tile adhesives including grout. When heating the system for the first time, ensure any heat is introduced gradually to protect the floor from thermal shock.
Revision date: 24/7/2017
Installing ceramic, vitrified, quarry and porcelain tilesOption 1 • Bond tiles directly to the overfloor boards with MAPEI KERABOND T & ISOLASTIC (100%) or MAPEI ELASTORAPID (Minimum tile size 10cm x 10cm).
Option 2 • Prime the Overfloor boards with MAPEI ECO PRIM GRIP. • Level with a minimum 5mm MAPEI ULTRAPLAN RENOVATION SCREED* • Bond tiles using MAPEI KERABOND T & MAPEI ISOLASTIC (100%) or MAPEI ELASTORAPID or MAPEI GRANIRAPID.
Option 3 • Lay Wunda backer boards as a floating floor with taped joints, cover the entire EPS Overfloor area to be tiled if using a non-porous tape prime the tape only, with Ultra Prime It. Bond tiles directly onto the backer board with MAPEI KERABOND & ISOALSTIC (100%) OR MAPEI ELASTORAPID.
Installing natural stone tiles
Installing ceramic, porcelain & natural stone tiles in a wet room
Option 1 • Prime the aluminium surface with MAPEI ECO PRIM GRIP • Level with min. 5mm MAPEI ULTRAPLAN RENOVATION SCREED* • Bond tiles using MAPEI KERABOND T & MAPEI ISOLASTIC (100%) or MAPEI ELASTORAPID or MAPEI GRANIRAPID.
Option 2 • Lay Wunda backer boards as a floating floor with taped joints, cover the entire EPS Overfloor area to be tiled. If using a non-porous tape prime the tape only, with Ultra Prime It.
STAGE 1Option 1 • Prime the aluminium surface with MAPEI ECO PRIM GRIP • Level with min. 5mm MAPEI ULTRAPLAN RENOVATION SCREED*
Option 2 • Lay Wunda backer boards as a floating floor with taped joints, cover the entire EPS Overfloor area to be tiled. If using a non-porous tape prime the tape only, with Ultra Prime It.STAGE 2Waterproofing • Apply MAPEI MAPELASTIC AQUADEFENCE/MAPEI MAPEBAND Fix Tiles • Bond the tiles with MAPEI KERABOND T & MAPEI ISOLASTIC (100%) or MAPEI ELASTORAPID
EPS 400 & Mapei guide for tiling using Mapei adhesivesIn all circumstances the board must have beed installed correctly and provide a sound, stable substrate. Additionally it must be clean and free from contamination or substances which could inhibit adhesion. To reduce consumption of Renovation Screed/Tile Adhesives, it is advised that any unused pipe channels are covered/filled with e.g. left over pipe and any gaps taped over.
12
Important Information
Technical Information
The heat output of this underfloor heating system must be limited to a maximum supply water temperature of 500C and a maximum floor surface temperature of 270C for wooden floors. Underfloor heating cannot compensate for large heat losses of an inadequately insulated house. Please note that underfloor heating systems can give an approximate heat output of 120W/m2 with ceramic and stone tile coverings and 100W/m2 with wooden coverings (up to 16mm thick).
“When mixed floor solutions are being served from the same manifold, a floor probe must be used in the floor solution with the lower maximum supply temperature. This is to limit the temperature in these floor areas and prevent damage to the floor solution and/or floor finish.”