ATI, XCLAIM, ImpacTV, and Mac2TV are trademarks and/or registered trademarks of ATI Technologies Inc. All other company and/or product nameare trademarks and/or registered trademarks of their respective manufacturPricing, availability, features, performance and specifications are subject to change without notice. Product may not be exactly as shown in the diagram
All rights reserved, including those to reproduce this manual or parts thereoany form without the express written permission of ATI Technologies Inc.
ATI
ice,
se
tice
DisclaimerWhile every precaution has been taken in the preparation of this document,Technologies Inc. assumes no liability to any party for errors or omissions contained in the Software or related documentation, any interruption of servloss or interruption of business or anticipatory profits or for incidental or consequential damages in connection with the furnishing, performance, or uof the Software and related documentation.
ATI Technologies Inc. reserves the right to make changes without further noto a product or system described herein to improve reliability, function or design.
Page ii
Table of Contents
1. Getting Started............................................... 1Introduction.....................................................................1What You'll Need ...........................................................2Related Documentation .................................................2
2. Installing Your Hardware............................ 3Using XCLAIM VRÕs Connectors.................................4Installing your XCLAIM VR .........................................5About Monitor Sensing .................................................9
3. Installing Your Software............................ 11About ATI Software .....................................................11Installing Software .......................................................12
4. Multimedia Features................................... 15ATI Displays Control Panel ........................................16Viewing 3D Graphics...................................................20Using QuickTime Playback.........................................26Using QuickTime Video Capture...............................27Using Mac2TV Video Out ...........................................30Control Strip Modules .................................................39Adding XCLAIM TV....................................................40
A. Troubleshooting Tips................................. 41Before Contacting Customer Support .......................41Solutions to Common Problems.................................41
B. Specifications............................................... 45Video Mode Table ........................................................453D Mode Table..............................................................46Memory Upgrade .........................................................47Specifications.................................................................48
C. Compliance Information ........................... 51
Page iii
Page iv
Getting Started
Introduction
XCLAIM VR is the ultimate 3D gaming and multimedia solution for your PCI Macintosh. Your new accelerator is Þve products in one:
¥ QuickDraw 3D accelerator providing arcade style 3D gaming action
¥ QuickDraw accelerator supporting resolutions up to 1152x870
¥ QuickTime playback accelerator for full screen, full motion, TV quality video
¥ QuickTime capture engine for capturing stills or QuickTime movies up to 320x240 at 30 frames per second
¥ Mac2TV video out enabling big screen presentations, game play and movie output to video tape
The ATI Displays control panel provides quick access to all of XCLAIM VRÕs easy-to-use features, and you have instant access to help using Apple Guide.
1
Page 1
What You'll Need
The XCLAIM VR card runs with the following minimum system requirements:
¥ Power Macintosh or Mac OS compatible with a PCI expansion slot
¥ Macintosh System software 7.5.5 or later
¥ Apple monitor or VGA-style monitor
¥ QuickTime 2.5 or later (included)
¥ QuickDraw 3D 1.5.1 or later (included)
¥ Minimum 16MB memory (QuickDraw 3D requires 16MB of memory)
Related Documentation
The README Þle summarizes the latest product revisions. Click the README icon on the installation disk to open this Þle.
The XCLAIM VR card comes with ATI Guide, which provides online help about using the features of your card. Access the ATI Guide by clicking on the Apple Guide icon on the ATI Displays control panel.
The ATI Guide also contains a glossary of video related glossary terms. Glossary items are shown in bold throughout this userÕs guide.
Page 2
Installing Your Hardware
XCLAIM VR Þts into connectors called expansion slots, inside your computer.
Your Macintosh has one or more slots, each designed to accept Peripheral Component Interconnect (PCI) cards.
The following procedure details the installation of a card in a typical Mac OS PCI-based tower. If your system does not match this conÞguration, please refer to your system documentation for expansion card installation instructions.
! WARNING
¥ The manufacturer assumes no liability for any damage, caused directly or indirectly, by improper installation of components by unauthorized service personnel. If you do not feel comfortable performing the installation, consult a qualiÞed technician.
¥ Make sure power is off during installation; otherwise, damage to system components, the graphics accelerator card, and injury to yourself may result.
NOTE
2
Page 3
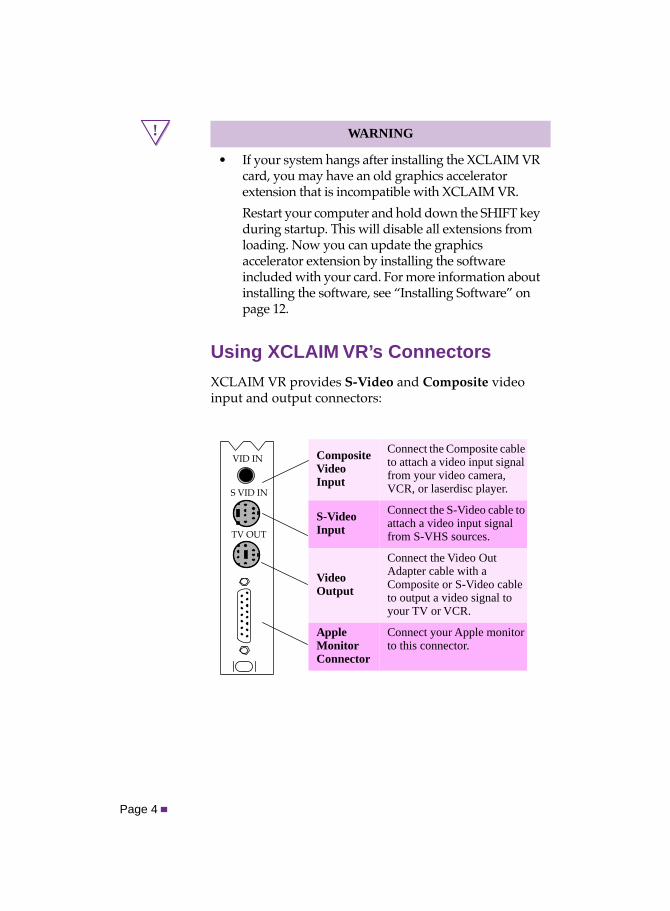
Using XCLAIM VR’s Connectors
XCLAIM VR provides S-Video and Composite video input and output connectors:
! WARNING
¥ If your system hangs after installing the XCLAIM VR card, you may have an old graphics accelerator extension that is incompatible with XCLAIM VR.
Restart your computer and hold down the SHIFT key during startup. This will disable all extensions from loading. Now you can update the graphics accelerator extension by installing the software included with your card. For more information about installing the software, see ÒInstalling SoftwareÓ on page 12.
Composite Video Input
Connect the Composite cable to attach a video input signal from your video camera, VCR, or laserdisc player.
S-Video Input
Connect the S-Video cable to attach a video input signal from S-VHS sources.
Video Output
Connect the Video Out Adapter cable with a Composite or S-Video cable to output a video signal to your TV or VCR.
Apple Monitor Connector
Connect your Apple monitor to this connector.
VID IN
S VID IN
TV OUT
Page 4
Installing your XCLAIM VR
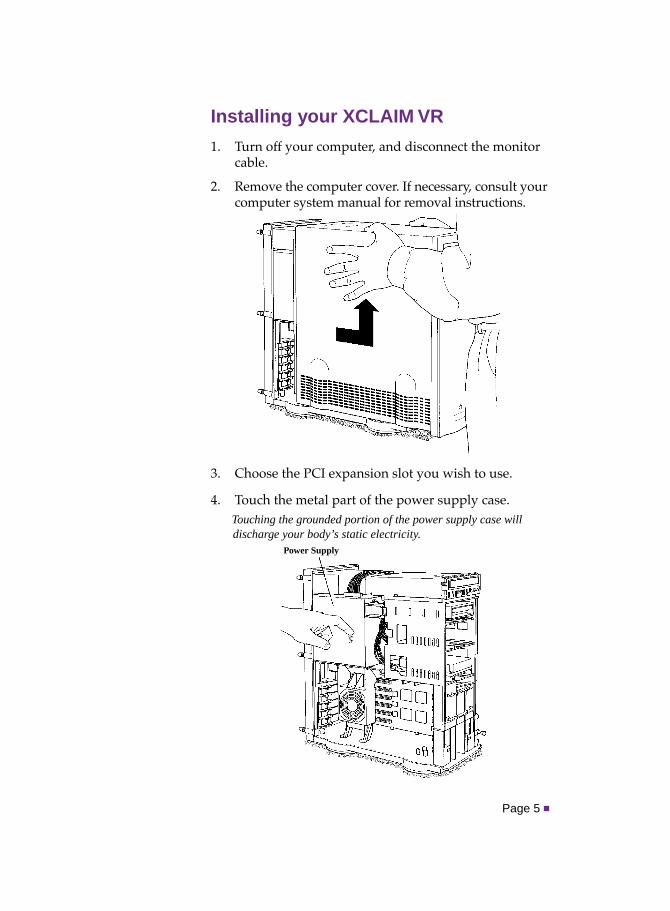
1. Turn off your computer, and disconnect the monitor cable.
2. Remove the computer cover. If necessary, consult your computer system manual for removal instructions.
3. Choose the PCI expansion slot you wish to use.
4. Touch the metal part of the power supply case.Touching the grounded portion of the power supply case will discharge your body’s static electricity.
Power Supply
Page 5
5. Lower the auxiliary fan.
6. Remove the metal access cover from the expansion slot you want to use.
To lower the fan, squeeze the sides to unlatch it.
1. To release the access port cover ,pull the two levers next to the access
port apart.
2. Slide the access port cover out and away from the access port.
Page 6
ion
7. Align the connector on the card with the PCI expansion slot and press Þrmly until fully seated.
Do not force the card. The card should fit snugly into the expansslot.
If you plan to use multiple displays, you must install a card for each monitor. Repeat steps 6 and 7 for each display.
8. Replace the auxiliary fan.
9. Replace the computer cover.
Connector
ConnectorPCI Expansion Slot
Page 7
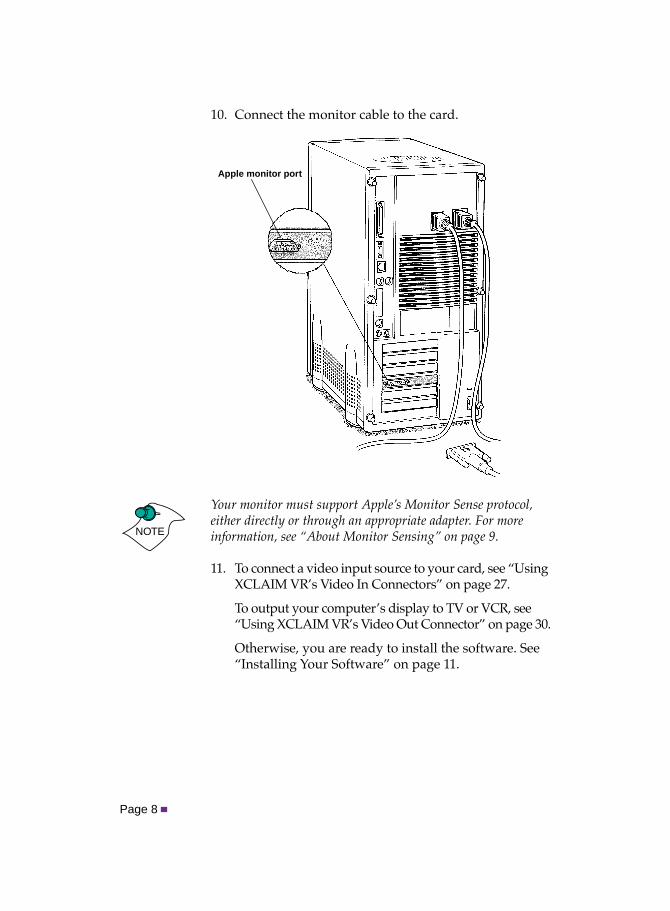
10. Connect the monitor cable to the card.
Your monitor must support AppleÕs Monitor Sense protocol, either directly or through an appropriate adapter. For more information, see ÒAbout Monitor SensingÓ on page 9.
11. To connect a video input source to your card, see ÒUsing XCLAIM VRÕs Video In ConnectorsÓ on page 27.
To output your computerÕs display to TV or VCR, see ÒUsing XCLAIM VRÕs Video Out ConnectorÓ on page 30.
Otherwise, you are ready to install the software. See ÒInstalling Your SoftwareÓ on page 11.
Apple monitor port
NOTE
Page 8
About Monitor Sensing
AppleÕs Monitor Sensing speciÞcation allows graphics cards to identify the attached monitor. During startup, the XCLAIM VR checks the status of three of the Þfteen pins on the Apple monitor port. It then auto-conÞgures itself according to the monitor sense code detected and enables all resolutions supported by the monitor. Since the XCLAIM VR relies on this sense code to correctly auto-conÞgure during startup, the monitor must supply the appropriate sense code.
In a case where your monitor does not directly supply the sense code information, an adapter can be used to set the appropriate sense code for your monitor. Typically, an adapter is used to connect a VGA monitor to the Apple monitor port, or to simply supply the correct monitor sense code information.
If the adapter supplies the sense code information for only one resolution, then that resolution will be the only one available, even if the monitor supports multiple resolutions. Therefore, when using an adapter to supply the sense code, it must be designed to supply the proper code for the monitor you are using it with; otherwise, the XCLAIM VR cannot correctly auto-conÞgure itself for the attached monitor.
Although the XCLAIM VR card does not output Sync-on-Green (SOG) signals directly, adapters are available that can overlay the Composite Synchronization Signal and send it through the Green video signal line so that you can use an SOG monitor. Monitors requiring an SOG signal usually have only three BNC connectors (RGB).
For more information about obtaining a sense code or synchronization signal adapter, contact ATI Customer Support or ask your dealer. For information about how to contact ATI Customer Support, select the Support button on the ATI Displays Control panel.
Page 9
Page 10
Installing Your Software
About ATI Software
XCLAIM VR requires that several components be added to your System folder and to your Preferences folder. The XCLAIM VR Installer does this for you and installs the following:
ATI Displays Control Panel
The ATI Displays control panel lets you conÞgure your card and access software and hardware features. These features are described in the section ÒATI Displays Control PanelÓ on page 16.
ATI Multimedia Components
ATIÕs Multimedia Components are placed in the Extensions folder, within your System folder. They enable all of the multimedia features of your card, including 3D and 2D acceleration, QuickTime acceleration, video capture, and Mac2TV video out.
ATI Guide File
The ATI Guide Þle is the online help for the ATI Displays control panel. It is placed in the Extensions folder within the System folder. For more information about using the ATI Guide, see ÒATI GuideÓ on page 19.
3
Page 11
st
Installing Software
1. Insert the XCLAIM VR installation disk into your disk drive.
2. Double-click on the XCLAIM VR Installer icon.
3. Follow the instructions that appear on the screen.
Under most circumstances, you should click Standard Install. However, if you only want to install certain parts of the ATI multimedia software, click Custom Install.
Upon completion of the installation process, a file containing a liof installed files and their location on your hard disk is created allowing you to locate any file installed during the installation process.
The installer application checks your system to determine if you have the latest version of the required software. If you do not have the appropriate Apple Software, a dialog appears explaining what software needs to be installed. The XCLAIM VR accelerator card includes the required versions of QuickTime and QuickDraw 3D software.
The ATI splash screen and legal notice appears.
NOTE
Page 12
e
4. When you see a message that the installation was successful, click restart.
Your system restarts.
or
To perform further installations, click Continue.The XCLAIM VR Standard Install window appears.
or
To return to Finder, click Quit.
You need to manually restart your system to complete thinstallation of XCLAIM VR’s software.
To complete the installation, you must restart your computer.
Page 13
Page 14
Multimedia Features
Your XCLAIM VR is Þve multimedia products in one. You can use your new graphics accelerator card to do the following:
¥ Watch full screen, full motion, TV-quality video using QuickTime playback acceleration
¥ Capture up to 320x240 at 30 frames per second using QuickTime capture
¥ Play arcade style 3D games and experience virtual reality at home or in cyberspace using QuickDraw 3D acceleration
¥ Output movies to tape or play games on television with Mac2TV video out
¥ Experience high-performance, high-resolution, true-color graphics with QuickDraw acceleration
The following information describes these new multimedia features in more detail and suggests ways you can optimize your machine to get the most out of your new card.
4
Page 15
ATI Displays Control Panel
The ATI Displays control panel provides access to the various multimedia features that XCLAIM VR has to offer. To open the ATI Displays control panel, select Control Panel from the Apple menu, then select ATI Displays.
For detailed instructions on how to set up and use these features, please refer to the ATI Guide, which can be accessed through the ATI Displays control panel.
Status Area
Look in the Status Area to determine your current monitor, screen resolution, and color depth. To change these settings, use the Monitors feature.
Identify Displays
If you have more than one display connected to your system, you can identify and conÞgure each display. The ATI Displays control panel will identify all the displays connected to your system, but will only conÞgure displays that are connected to ATI cards.
Page 16
Display Details
The Details window gives you information about speciÞc software components needed to enable each of XCLAIM VRÕs features. Check the Details window to determine the Þles and version numbers of the software components installed in your system folder during the installation process. The Details window also lists the Apple system software required for XCLAIM VR (QuickTime, QuickDraw 3D).
Keyboard Shortcuts
This feature allows you to use a pop-up menu to change your desktop settings without exiting your current application. You can conÞgure, enable or disable shortcut features when you click the Shortcut icon in the control panel.
The ATI Popup Menu only displays the valid and safe modes available for the attached monitor(s). Additional modes may be accessed through the Monitors & Sound control panel or the control strip.
Different ATI cards offer distinct keyboard shortcut options, so not all shortcuts appear on every ATI card.
NOTE
Page 17
Popup Menu and Hot Keys remain inactive when dialogs appear on the screen. For example, while using the Monitors & Sound control panel, the Popup Menu and Hot Keys are disabled.
Monitors
The Monitors feature provides access to the standard Mac OS Monitors & Sound control panel. You can use this panel to select color depths and resolutions, and set up multiple monitors. For more information on this panel refer to the Mac OS Guide that comes with your computer.
Mac2TV Video Out
XCLAIM VR can be attached to a television or VCR. You can export QuickTime movies to video tape or view your computerÕs display on a television. Mac2TV is ideal for playing games, giving presentations, watching movies, and browsing the Internet. For more information about Mac2TV Video Out, see ÒUsing Mac2TV Video OutÓ on page 30.
Page 18
ATI Guide
The ATI Guide is an additional source of information when you are working with the ATI Displays control panel. It behaves similarly to the Mac OS Guide that comes with your computer.
Access the ATI Guide by clicking on the Apple Guide icon on the ATI Displays control panel. The ATI Guide stays in front of other windows on the screen so the instructions are always visible. To move the ATI Guide window to another location, drag it by the title bar.
Select a topic from the main ATI Guide window to get detailed instructions for a speciÞc task. To return to the main ATI Guide window, click the Topics icon in the lower-left corner of the Guide window. When youÕre Þnished using ATI Guide, click the close box.
Customer Support
You can obtain Customer Support information by clicking the ATI icon in the ATI Displays control panel. You can also generate a problem report. Please refer to the ATI Guide for instructions on generating a problem report.
Before calling about a suspected problem, please complete the problem report, and have the report Þle either on-screen or printed out for reference during your call. Important information about your system is automatically included when you generate the report.
Page 19
Viewing 3D Graphics
XCLAIM VRÕs QuickDraw 3D Acceleration supports the following advanced 3D graphics capabilities:
¥ QuickDraw 3D RAVE Support
¥ Six perspectively correct texture mapping functions
¥ 16-bit z-buffering (a process that removes hidden surfaces)
¥ Flat and Gouraud shading
¥ Alpha blending and fog effects
¥ Video texture and texture lighting
These features make it possible to quickly render 3D graphics, produce atmospheric effects, calculate light and color shading, and determine which objects are in the foreground and which are in the background.
XCLAIM VR only displays 3D graphics in thousands and millions of colors. 3D acceleration is not supported when your color depth is 256 colors because there are too few colors to display complex 3D textures. To change your color depth, use the control strip, ATI Popup Menu, or the Monitors & Sound control panel.
You can use the 3D Memory Monitor to see how memory on your XCLAIM VR is allocated when displaying 3D graphics. This will allow you to optimize 3D performance. You can also adjust the compression of textures using the 3D Texture Compression feature.
3D Texture Compression
You can adjust the 3D texture compression using the 3D features included with XCLAIM VR. Some 3D textures demand a signiÞcant amount of memory. To free up some memory you can use 3D texture compression.
Page 20
Adjusting Texture Compression
When running 3D graphics, 3D textures are loaded into the memory on your XCLAIM VR card. You can adjust the texture compression to compress the 3D textures in memory. Compressed textures take up less space so that more textures can be loaded.
If you set your texture compression to None, you will get the best image quality but your 3D textures may take up a lot of memory.
Medium texture compression will compress your 32-bit textures to 16-bit, thus reducing the memory required by a texture in half.
High compression will compress your 32- and 16-bit textures to 8-bit. High texture compression will save the most memory but the loss in data may affect the image quality.
3D Memory Monitor
XCLAIM VR supports advanced 3D features including MIP maps, gouraud shading, fog effects, and texture mapping. The 3D Memory Monitor shows how available memory in the video card is allocated when displaying 3D graphics.
Change
Page 21
Using the 3D Memory Monitor
When you open 3D graphics on your Mac, run the 3D Memory Monitor to see how your XCLAIM VR has allocated 3D memory.
To open the 3D Memory Monitor
1. Select Control Panels from the Apple Menu.
2. Select ATI Displays.
3. Click on the 3D Memory icon.When you open a 3D application window, you can see how the additional memory required for 3D graphics is allocated.
The 3D Memory Monitor shows you how the memory on your XCLAIM VR has been allocated between display, textures, and buffers. If you use up all XCLAIM VRÕs available memory, your computer drops 3D textures and substitute Gouraud shading.
Display
Screen indicates the amount of graphics memory allocated to the displayÕs resolution and color depth. Desktop Pattern indicates the amount of memory used by your desktop pattern.
Page 22
To reduce the memory allocated to Display memory:
¥ change the color depth from millions to thousands
¥ decrease your screen resolution
Textures
Texture indicates the number and size of texture maps loaded by 3D applications to add realism to 3D models and environments. Bitmap indicates the memory allocated to non-3D elements like 2D and video.
To reduce the memory allocated to Texture memory:
¥ reduce the amount of textures in your 3D graphic
¥ adjust 3D texture compression (See ÒAdjusting Texture CompressionÓ on page 21.)
Buffers
Back Buffer and Z Buffer are directly related to the size of the 3D window.
To reduce the memory allocated to Buffer memory:
¥ reduce the size of the display window containing 3D graphics
¥ reduce the number of the display windows containing 3D graphics
Page 23
3D Quality
Texture mapping helps provide realistic quality images by placing photo-realistic images or textures on a 3D object. When these textured objects appear in the High Quality setting, additional texture Þltering, or blending takes place. In some applications or games, this additional texture Þltering may not be desirable. For this reason, ATI provides the 3D quality option to toggle the 3D texture Þltering routines off and on.
You should experiment with this setting to get the best quality and performance from your application or game.
Selection:
¥ High - Additional 3D texture Þltering is enabled providing a premium rendering mode.
¥ Standard - Provides standard texture Þltering.
The default setting for 3D Quality is High.
NOTE
Page 24
3D Sync
Your XCLAIM VR graphics accelerator provides superior 3D performance by performing many tasks in offscreen memory including graphic rendering. Depending on the 3D scene, the refresh rate of your computer monitor, and the game or application, you may notice some slight horizontal ßickering or ÒtearingÓ. This ßicker is caused by the different rates at which the display performs a complete screen redraw, and when the XCLAIM VR moves images located in offscreen memory to the display buffer. Synchronizing the redraw and the write to the display buffer provides a ßicker-free 3D window.
¥ On (Synchronize with vertical refresh) - Provides a ßicker-free 3D window. The display is synchronized with the vertical refresh, so there isnÕt any ßickering or ÒtearingÓ in the 3D window.
¥ Off (Do not synchronize with vertical refresh) - Provides a boost in performance, but in some games and applications it can introduce ßickering or ÒtearingÓ in the 3D window.
You should experiment with these settings to Þnd the proper setting for your application.
Page 25
Using QuickTime Playback
XCLAIM VRÕs QuickTime playback acceleration allows you to stretch even the smallest movies to full screen size without compromising frame rate or image quality. XCLAIM VRÕs hardware scaler maintains the original quality of your QuickTime movie when scaling to a larger sizeÑeven full screen.
XCLAIM VRÕs QuickTime playback acceleration displays in millions of colors, even if the current color depth setting is 256 colors or grayscale. When scaling video, XCLAIM VR uses special hardware techniques (alpha blending and chroma interpolation) to enhance the video quality instead of just repeating pixels.
To use XCLAIM VRÕs playback acceleration, you must have QuickTime version 2.5 or greater installed on your computer. A compatible version of QuickTime is included on the XCLAIM VR Extras CD-ROM.
Optimizing Video Playback
When you scale a movie, your system switches from QuickTimeÕs software scaler to XCLAIM VRÕs hardware scaler to produce better results. However, QuickTime will not switch to hardware scaling in the following situations:¥ playing video in double size
Try manually scaling the video slightly off exactly double the size.
¥ pausing the video
¥ using single frame advance
¥ watching the video in reverse
¥ playing a video that has not been saved in Cinepak or Indeo compressed format
QuickTime clips must be in Cinepak (the most common QuickTime movie format) or Indeo format to be scaled by XCLAIM VR. To determine if a video will be accelerated using XCLAIM VRÕs hardware scaler, check the video format.
NOTE
Page 26
To check the format of a video
1. Open the movie using Apple Movie Player.
2. Select Get Info.
3. From the 1st pull down menu, select Video Track.
4. From the 2nd pull down menu, select Format.
5. Read the format type. Remember, only Cinepak and Indeo formats use XCLAIM VRÕs QuickTime acceleration and hardware scaler.
Some multimedia titles on CD-ROM incorporate QuickTime clips that do not allow movies to be stretched during playback. These QuickTime clips cannot be accelerated while viewing the multimedia title.
Using QuickTime Video Capture
Using XCLAIM VRÕs QuickTime capture, you can capture up to 320x240 at up to 30 frames per second! You can capture still images or QuickTime movies from video tape, camcorder, TV or laserdisc. To capture video, you can use the Xclaim Video Player or any application that supports QuickTime capture.
Using XCLAIM VR’s Video In Connectors
You can connect a VCR or camcorder to one of your XCLAIM VRÕs video in connectors. Use this feature to capture video on your computer from an outside video source.
To input a video signal from a VCR to your computer
This procedure describes how to connect a VCR to your XCLAIM VR. You can use this procedure to connect other video sources, such as a camcorder, to the video in of your XCLAIM VR.
1. Turn off your computer and VCR.
2. Ensure that XCLAIM VR is installed correctly.
3. Determine if your VCR has an S-Video or Composite video output connection.
NOTE
NOTE
Page 27
4. Looking at the back of your computer, locate your XCLAIM VR card.
5. Using an S-Video or Composite cable, attach one end of the cable to the video in of your XCLAIM VR card and the other to the video out of your VCR.
6. Turn on your computer and your VCR.
Using XCLAIM VR’s Video Capture with Third Party Applications
XCLAIM VRÕs video input can be used with any third party application that supports QuickTime capture through video digitizer components. To determine if the application supports QuickTime capture, see the applicationÕs documentation.
To capture video using third party applications
Not all applications work exactly as described in this procedure. See your application documentation for specific instructions.
1. Ensure that the video source (VCR or camcorder) is properly connected to XCLAIM VR. (For more information, see ÒUsing XCLAIM VRÕs Video In ConnectorsÓ on page 27).
2. Launch the application and select the video capture feature.
3. Select the Video Settings.
4. Select Source from the main popup menu which normally is set to Compression.
5. Ensure that the Digitizer is set to ATI Video Digitizer.
NOTE
Page 28
6. Ensure that the Input matches the type of video source (Composite or S-Video) you have connected to XCLAIM VR.
Optimizing Video Capture
The quality of your capture depends on the quality of the video source and the type of system you are using to capture. Follow these suggestions to ensure that you are getting the best capture possible:
¥ turn off virtual memory
¥ disable your network and Þle sharing capabilities (i.e. AppleTalk)
¥ add additional RAM (32MB recommended)
¥ capture at 16 bit color depth (this gives better capture rates than 8 or 32 bit color depth)
¥ defragment your hard drive
¥ turn off the menu bar clock
¥ reduce the size of the capture window (You will be able to scale it to full screen later with XCLAIM VRÕs playback acceleration.)
You need a high-speed hard drive with lots of available hard disk space. An ideal drive would be an AV drive (6MB per second) or a Fast drive (4MB per second) using a SCSI-2 controller. Your drive needs to write at least 5MB per second to capture video at 320x240 at 30 frames per second. Check the speciÞcations of your hard drive in your system manual.
Page 29
Make sure that you have the available hard disk space you need to capture your video. If you capture 15 seconds of video at 30 frames per second with a window size of 320 x 240, you need about 60 MB of hard disk space. After you have captured your video, you can use post-compression to decrease its size. A typical 60 MB video capture will compress to about 10 MB using the Cinepak post-compression format.
For more information about optimizing QuickTime capture, see the QuickTime FAQ (Frequently Asked Questions) located on the XCLAIM VR Extras CD-ROM.
Using Mac2TV Video Out
XCLAIM VRÕs Mac2TV Video Out feature allows you to output your computerÕs display to your TV or VCR. Anything you can display on your monitor can be output to your TV or VCR.
¥ View computer output directly on your television in either NTSC or PAL formats with advanced ßicker reduction and artifact suppression
¥ Connect using Composite or S-Video output capabilities
¥ Mac2TV provides a big-screen experience for playing games, giving presentations, and browsing the Internet.
Using XCLAIM VR’s Video Out Connector
Your XCLAIM VR includes Mac2TV Video Out. You can use this feature to connect your XCLAIM VR to a TV or VCR.
To output your computerÕs display to a TV
1. Turn off your computer and TV.
2. Ensure your XCLAIM VR card is installed correctly.
3. Looking at the back of your computer, locate your XCLAIM VR card.
Page 30
4. Connect the video out adapter to the Video Out of your XCLAIM VR card. (See diagram below.)
5. Determine if your TV has an S-Video or Composite video input connection.
6. Attach one end of an S-Video or Composite cable to the video out adapter and the other to the video in connector of your TV.
Although the video out adapter has two connectors for S-Video and Composite cables, you only need to connect one to your TV, either Composite or S-Video. If your TV has both input connections, S-Video will produce best results.
You can connect two TVs to your XCLAIM VR card using both output connectors on the video out adapter. One TV must support the Composite format and the other must support the S-Video format. Both TVÕs will display the same image simultaneously.
7. Turn on your computer and your TV.
Now that you have connected your XCLAIM VR card to a TV, you need to enable Mac2TV. For more information, see ÒEnabling Mac2TVÓ on page 33.
Video OutConnector
CompositeConnector
S-VideoConnector
Video Out Adapter
NOTE
NOTE
Page 31
To connect your computerÕs display to a VCR to record to video tape
1. Turn off your computer and VCR.
2. Ensure your XCLAIM VR card is installed correctly.
3. Looking at the back of your computer, locate your XCLAIM VR card.
4. Connect the video out adapter to the Video Out of your XCLAIM VR card. (See diagram below.)
5. Determine if your VCR has an S-Video or Composite video input connection.
6. Attach one end of an S-Video or Composite cable to the video out adapter and the other to the video in connector of your VCR.
Although the video out adapter has two connectors for S-Video and Composite cables, you only need to connect one to your VCR, either Composite or S-Video. If your VCR has both input connections, S-Video will produce best results.
You can connect a TV and a VCR to your XCLAIM VR card using both output connectors on the video out adapter. One must support the Composite format and the other must support the S-Video format.
Video OutConnector
CompositeConnector
S-VideoConnector
Video Out Adapter
NOTE
Page 32
7. Turn on your computer, VCR, and TV.
If you are connecting your XCLAIM VR card to a VCR, make sure that your VCR is connected to a television that you can use as your computerÕs display. For information about connecting a television to your VCR, see the documentation supplied with your VCR.
Now that you have connected your XCLAIM VR card to a VCR, you need to enable Mac2TV.
Enabling Mac2TV
Mac2TV allows you to output a video signal to either a TV or VCR. There are three methods of turning on Mac2TV; through the ATI Displays control panel, through the Mac OS Monitors & Sound control panel, and through the Mac OS Control Strip.
When using Mac2TV you can either send the video signal to a television or video recorder in PAL or NTSC format, or use Simulscan to send the signal to both your computer monitor and the video recorder or television. When looking at the resolution list PAL, NTSC, and Simulscan are listed to the right of the resolutions and frequency.
Simulscan is only available at 60 Hz (NTSC) vertical refresh rates.
NOTE
! WARNING
¥ When you initially turn on Mac2TV Video Out, your monitor display is dimmed. Monitors which do not support the 60 Hz vertical refresh rate for NTSC, or 50 Hz vertical refresh rate for PAL required by video equipment may be damaged when Mac2TV is enabled. Dimming your monitor is a safety feature, protecting your monitor from any potential damage.
¥ When using Mac OS 7.5.5, always use the ATI Displays control panel to display the video signal on your TV.
NOTE
Page 33
ATI Displays Control Panel
1. Open the ATI Displays control panel.
2. Click on the Mac2TV icon
3. In the Video Output box, click Video Output On.
A message appears to warn you that your monitor will be dimmed.
4. Click OK.A message appears on your TV stating that your display has been successfully switched to TV.
5. Click OK.
If you do not click OK to the message on the TV, your display will return to your monitor after a few seconds.
Page 34
Monitors & Sound control panel
1. Open the Monitors & Sound control panel.
2. Select the video output resolution and frequency you want to use.
With Mac OS 7.6 and later, Video out modes are displayed with the type of signal (PAL, Simulscan, or NTSC) appended to the resolution.
A message appears stating that your monitor settings have changed.
3. Click OK
If you do not click OK to the message on the TV, your display will return to your monitor after a few seconds.
Control Strip
1. Select the video output resolution and frequency you want to use.
With Mac OS 7.6 and later, Video out modes are displayed with the type of signal (PAL, Simulscan, or NTSC) appended to the resolution.
A message appears stating that your monitor settings have changed.
2. Click OK
If you do not click OK to the message on the TV, your display will return to your monitor after a few seconds.
With Mac OS 7.5.5, the type of video signal is not displayed in either the Monitors & Sound control panel or the Control Strip. All video resolutions are sorted and grouped by frequency. However, you should use only the ATI Displays control panel for the Mac2TV function with Mac OS 7.5.5 since this is the only way to ensure the proper video mode is displayed on your TV.
!
Page 35
Changing Display Configurations
Starting your Mac with Mac2TV enabled
If you have Mac2TV display enabled when you shut down, the next time you startup your TV is your display. If you shut down with Mac2TV enabled, and remove the connection to the TV, the next time you startup the ATI software switches the video signal to your computer monitor.
Using a TV as your only display
If you are using television display only, disconnect your monitor from your XCLAIM VR card. XCLAIM VR detects that you have a TV attached and automatically starts with Mac2TV display enabled.
Optimizing Mac2TV
You can optimize your TV display using the video out preferences. Viewing images on your TV can be improved by changing the contrast, brightness, or size of your display.
Page 36
To set the video out preferences, click the Mac2TV icon on the ATI Displays Control Panel.
Saturation, hue, and brightness are the three qualities which constitute what we normally refer to as ÒcolorÓ.
¥ Saturation is the amount of color present that distinguishes pale or washed-out colors from vivid ones.
¥ Hue, often used as a synonym for ÒcolorÓ, is the quality that distinguishes among red, green, yellow, and so on.
¥ Brightness is related to the amount of light emitted by your display or reßected from an object. This quality enables you to describe an object as ÒbrightÓ or ÒdimÓ.
Hue is generally not adjusted. Depending on the TV, however, it may be necessary or desirable to adjust the hue to approximate the monitorÕs display.
Contrast is a ratio of how far the whitest whites are from the blackest blacks. If the contrast is too high, the image may look stark, like pure white squares on a jet-black background. If the contrast is too low, the image may look gray or washed out.
Page 37
Color Blender adjusts the overall color shifts inherent in NTSC and PAL signals. On some televisions and video output devices, this color shift is more apparent than on others. The minimum adjustment is automatically determined by the XCLAIM VR card depending video mode and resolution, TV standard, and vertical size of the video signal. If you adjust the slider to a minimum level lower than the level determined by XCLAIM VR, the slider automatically moves back to the minimum level determined by the accelerator card.
Anti-Flicker reduces the amount of display ßicker. Display ßicker is both a distraction and tiring to your eyes, and is most pronounced when text is being displayed.
Dot Crawl is an undesirable characteristic of many Composite televisions that is seen as thin, jagged edges moving around objects on the screen. The ÒFrozenÓ setting freezes, or eliminates, the dot crawl, and is especially useful for viewing pictures or stills. S-video equipment does not exhibit this effect.
Reducing Edge Distortion
When using a television for your display, you may see some edge distortion on the left and right side of your television screen. This effect depends on your television and the application you are running.
To reduce edge distortion, you can:
¥ increase the horizontal size by clicking the right Size arrow, or
¥ reduce the brightness by adjusting the brightness slider.
Viewing Text on Television
Due to the different technology used in the manufacturing of televisions and monitors, standard text may look too small on your television. You can compensate for this by using larger fonts.
Page 38
To change your font size
1. Click the Apple menu.
2. Select Control Panels.
3. Select Views.
4. Choose a larger font size.
Control Strip Modules
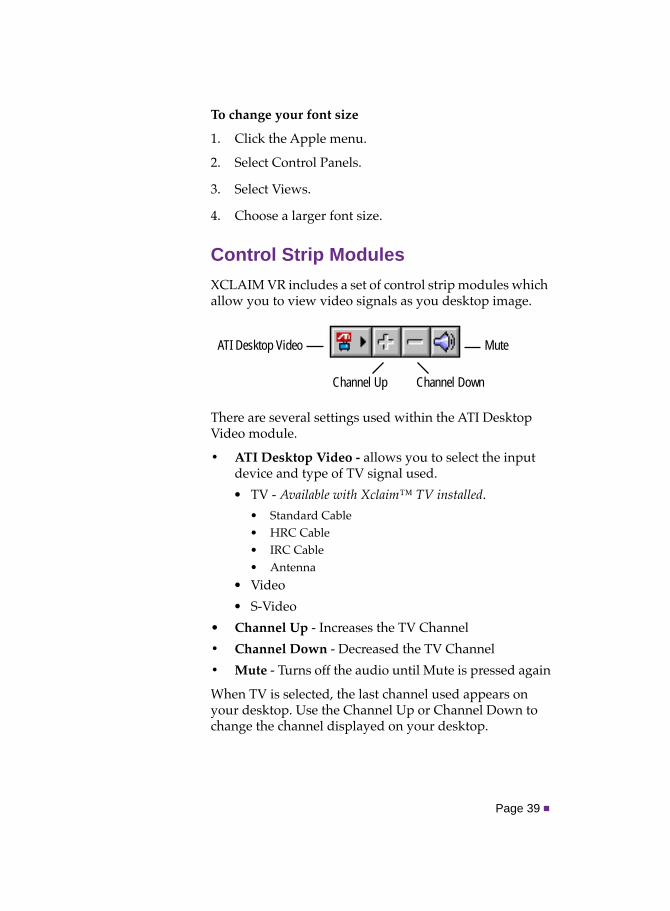
XCLAIM VR includes a set of control strip modules which allow you to view video signals as you desktop image.
There are several settings used within the ATI Desktop Video module.
¥ ATI Desktop Video - allows you to select the input device and type of TV signal used.
¥ TV - Available with Xclaimª TV installed.
¥ Standard Cable¥ HRC Cable¥ IRC Cable¥ Antenna
¥ Video
¥ S-Video
¥ Channel Up - Increases the TV Channel
¥ Channel Down - Decreased the TV Channel
¥ Mute - Turns off the audio until Mute is pressed again
When TV is selected, the last channel used appears on your desktop. Use the Channel Up or Channel Down to change the channel displayed on your desktop.
ATI Desktop Video
Channel Up Channel Down
Mute
Page 39
Adding XCLAIM TV
Maximize the power of your Macintosh and revolutionize your TV viewing experience by adding ATI XCLAIM TV to XCLAIM VR. With XCLAIM TV, your Mac OS computer can receive a television signal and display it on your monitor while you work. Or, let your computer watch television for you.
XCLAIM TV features intelligent television functionality, including the ability to zoom in on the action, monitor your favorite channels simultaneously and record transcripts. Plus XCLAIM TV offers true stereo sound, taking computer TV technology to new heights.
Once you try XCLAIM TV, youÕll wonder how you ever watched TV without it.
Page 40
Troubleshooting Tips
Before Contacting Customer Support
If you have a general question, or encounter problems with your card, please review this information completely before contacting Customer Support.
You can create a problem report from the ATI Displays control panel. Please refer to the ATI Guide for instructions on generating this problem report, and for general troubleshooting tips not covered in this section.
Before calling about a suspected problem, please complete the problem report, and have the report Þle either on-screen or printed out for reference during your call. Important information about your system is automatically included when you generate the report.
Solutions to Common Problems
Why can't I get a resolution higher than 640x480?
¥ The problem likely relates to Monitor Sensing. Any monitor connected to an Apple-type monitor port must supply Òsense code informationÓ so that the graphics card can conÞgure itself for the attached monitor. If the detected sense code does not represent the capabilities of your monitor, then the card cannot conÞgure itself properly. You need to attach a monitor adapter that supplies the proper sense code for your monitor. Monitor adapters can be obtained from the monitor manufacturer, or from your local Apple Authorized Dealer.
A
Page 41
I am using a monitor adapter to supply the sense code, but I only get one resolution, even though I have a multiscan monitor. Why?
¥ If the adapter is conÞgurable, you need to adjust it to one of the multiscan options that best matches your monitor. If the adapter is not conÞgurable, you need a new adapter with the proper sense code for a multiscan monitor.
I have a monitor with three BNC connectors. Why won't it work with my XCLAIM VR card?
¥ Monitors that only have three BNC connectors require a synchronization (ÒsyncÓ) signal to be sent down the green line. This is called Sync-on-Green (SOG). ATI accelerator cards do not output an SOG signal. Adapters are available for your Macintosh to convert the separate sync signal from the ATI card to an SOG signal for the monitor. Check with your local Apple Authorized Dealer for availability of SOG adapters.
I have a monitor with Þve BNC connectors. Why won't it work with my XCLAIM VR card?
¥ For a cable with Þve BNC connectors, ensure that they are all connected to the monitor. If only three of the cables are connected (i.e., R, G, and B), the monitor is expecting a Sync-on-Green (SOG) signal.
¥ Some monitors may have a switch to set the monitor to either SOG or separate sync. If the switch is set to SOG, the monitor will show a scrambled display. Setting the switch to separate/composite sync may resolve the problem.
¥ A number of BNC cables, even though they are designed for Macintosh computers, do not supply the sense code needed by the graphics card. Using an adapter which sets the appropriate sense code should solve the problem.
Page 42
Can the XCLAIM VR work in all Power Macintosh computers?
¥ No, the XCLAIM VR only works with PCI-based Power Macintosh computers. The minimum system requirements for the XCLAIM VR are listed in ÒWhat You'll NeedÓ on page 2.
Where can I get a memory module upgrade for my XCLAIM VR card?
¥ Memory upgrade modules are available either from your dealer, or they can be purchased directly from ATI. For information about contacting ATI, click the ATI icon in the Displays control panel.
Page 43
Page 44
B Specifications
Video Mode Table
This video mode table lists the color depth capabilities for the supported resolutions on the 4MB and 8MB XCLAIM VR cards.
Please consult your monitorÕs speciÞcations to determine which resolutions are available with your display.
Color depth is measured in bits per pixel (bpp):
¥ 8 bpp = 256 colors
¥ 16 bpp = thousands (32,768 colors)
¥ 32 bpp = millions (16.7 million colors)
DisplayResolution
Vertical Refresh Hz
MaximumColors at 4MB
Maximum Colors at 8MB
512 x 384 70 millions millions
640 x 480 60, 67, 72, 75, 85, 90, 100, 120
millions millions
640 x 870 75 millions millions
800 x 600 56, 60, 72, 75,85,90, 100, 120
millions millions
832 x 624 75 millions millions
1024 x 768 60, 70, 75, 85, 90 millions millions
1024 x 768 100, 120 millions millions
1152 x 870 75 millions millions
Page 45
3D Mode Table
The 3D mode table measures the number of full screen 3D windows that are possible to display at a given resolution. For example, a value of 2.75 means that there is enough memory left over in the current mode to run 2 full screen 3D windows and another at 3/4 the size of full screen. A value of 0.40 means that largest 3D window will be just less than 1/2 the size of full screen.
In the following table, 3D windows are considered to use a back buffer and Z buffer and no texture compression. You could increase the number of full screen 3D windows possible by using texture compression.
3D acceleration is not supported when your color depth is 256 colors. In this color depth, there are too few colors to display complex 3D textures.
Resolution ColorsFull screen 3D windows possible
4MB 8MB
512 x 384Thousands 4.50 10.00
Millions 2.75 6.25
640 x 480Thousands 2.75 6.25
Millions 1.50 3.75
800 x 600Thousands 1.50 3.75
Millions 0.75 2.25
832 x 624Thousands 1.50 3.50
Millions 0.60 2.00
1024 x 768Thousands 0.75 2.00
Millions > 0.25 1.00
1152 x 870Thousands 0.50 1.50
Millions — 0.75
NOTE
Page 46
Memory Upgrade
If you currently have a 4MB XCLAIM VR card, you can upgrade to 8MB by adding a 4MB SGRAM upgrade module.
By adding additional memory you do not gain additional 2D resolutions or color depths since a 4MB XCLAIM VR card provides 32-bit colors in all supported resolutions. However, adding an additional 4MB of RAM allows you to open additional 3D windows and store additional 3D textures.
To obtain a memory module upgrade, please contact ATI or your dealer. For information about contacting ATI, click the ATI icon in the ATI Displays control panel.
Page 47
Specifications
System Requirements
¥ Power Macintosh or Mac OS compatible computer with a PCI slot
Operating System
¥ Macintosh System software (version 7.5.5 or higher)
¥ QuickTime (version 2.5 or higher)
¥ QuickDraw 3D (version 1.5.1 or higher)
Nexus GA and ATI Multimedia components are Mac OS 8 compatible.
Graphics Controller
¥ ATI 3D RAGE PRO Ñ 64-bit graphics and multimedia accelerator chip.
Video Display Buffer
¥ 4MB SGRAM memory upgradeable to 8MB.
¥ 64-bit memory interface.
Bus
¥ 32-bit PCI local bus compliant with PCI version 2.1 speciÞcation.
Sync Signals
¥ Separate horizontal and vertical sync at TTL levels.
¥ Composite sync at TTL levels.
Video Memory Address
¥ Supports PCI Multimedia Standard.
¥ Supports 16MB relocatable memory aperture.
NOTE
Page 48
Display Connector
¥ Apple Connector - Apple DB-15
Other Connectors
¥ S-Video In connector
¥ Composite In connector
¥ Video out adapter for S-Video and composite video out
Video Interrupt
¥ PCI interrupt request enabled; interrupt is auto conÞgured by system.
Power
¥ +5V +/- 5%, @ 1.3A typical.
Environment
¥ Ambient Temperature: 50° to 122° F (10° to 50° C) operation. 32° to 162° F (0° to 70° C) storage.
¥ Relative Humidity: 5% to 90% non-condensing operation. 0% to 95% storage.
MTBF
¥ 120,000 hours.
EMC Certification
¥ FCC Class B
Safety
¥ PCB made from UL-listed ßame retardant material.
Page 49
Page 50
C Compliance Information
FCC Compliance Information
This equipment has been tested and found to comply with the limits for a Class B digital device, pursuant to Part 15 of the FCC Rules. These limits are designed to provide reasonable protection against harmful interference in a residential installation.
This equipment generates, uses and can radiate radio frequency energy and, if not installed and used in accordance with manufacturer's instructions, may cause harmful interference to radio communications. However, there is no guarantee that interference will not occur in a particular installation.
If this equipment does cause harmful interference to radio or television reception, which can be determined by turning the equipment off and on, the user is encouraged to try to correct the interference by one or more of the following measures:
¥ Re-orient or relocate the receiving antenna.
¥ Increase the separation between the equipment and receiver.
¥ Connect the equipment to an outlet on a circuit different from that to which the receiver is connected.
This device is in conformity with part 15 of the FCC Rules. Operation of this product is subject to the following two conditions: (1) this device may not cause harmful interference, and (2) this device must accept any interference received, including interference that may cause undesired operation.
Page 51
Consult the dealer or an experienced technician for help.
Industry Canada Compliance Statement
ICES-003 This Class B digital apparatus meets all requirements of the Canadian Interference-Causing Equipment Regulations.
Cet appareil num�rique de la Classe B Respecte toutes les exigences du R�glement sur le mat�rial brouiller du Canada.
CE Compliance Information
EMC Directive 89/336/EEC and Amendment 92/31/EEC, Class B Digital Device
EN 50081-1, Generic Emissions Standard for Residential, Commercial and Light Industrial Products
(EN 55022/CISPR 22, Limits and Methods of Measurement of Radio Interference Characteristics Information Technology Equipment) Warning: This is a Class B product. In a domestic environment this product may cause radio interference in which case the user may be required to take adequate measures.
EN 50082-1, Generic Immunity Standard for Residential, Commercial and Light Industrial Products
(IEC 801-2, IEC 801-3, IEC 801-4)
¥ The use of shielded cables for connection of the monitor to the graphics card is required to ensure compliance with FCC regulations.
¥ Changes or modiÞcations to this unit not expressly approved by the party responsible for compliance could void the user's authority to operate this equipment.
Page 52
Directive EMC 89/336/CEE et amendement 92/31/CEE, dispositif num�rique de Classe B
EN 50081-1, Norme sur les �missions g�n�riques pour les produits domestiques, commerciaux et industriels l�gers
(EN 55022/CISPR 22, Limites et m�thodes de mesure des caract�ristiques d'interf�rences radiophoniques, Mat�riel des technologies de l'information) Mise en garde: ceci est un produit de Classe B. Il risque produire des interf�rences radiophoniques dans un environnement domestique auquel cas l'utilisateur peut se voir demand� de prendre des mesures ad�quates.
EN 50082-1, Norme sur l'immunit� g�n�rique pour produits domestiques, commerciaux et industriels l�gers.
(CEI 801-2, CEI 801-3, CEI 801-4)
EMC Richtlinie 89/336/EEC und �nderung 92/31/EEC, Digitales Ger�t der Klasse B
EN 50081-1, Allgemeiner Emissions-Standard f�r Haushalt- und kommerzielle Produkte sowie Erzeugnisse der Leichtindustrie
(EN 55022/CISPR 22, Beschr�nkungen und Verfahren der Messung von informationstechnischen Ausr�stungen mit Funkst�rmerkmalen)
Warnung: Dies ist ein Erzeugnis der Klasse B. Dieses Erzeugnis kann Funkst�rungen im Wohnbereich verursachen; in diesem Fall k�nnen entsprechende Ma§nahmen seitens des Benutzers erforderlich sein.
EN 50082-1. Allgemeiner UnempÞndlichkeits-Standard f�r Haushalt- und kommerzielle Produkte sowie Erzeugnisse der Leichtindustrie