104
XMEDIUS.COM XMediusFAX 8.0 Installation and Maintenance Guide
XMEDIUS.COM
XMEDIUS.COM
XMEDIUS.COM
XMEDIUS.COM
XMediusFAX 8.0Installation and Maintenance Guide


XMediusFAX
Version Number 8.0.0.431 – November 2017.
Patents
• Protected by US Patents 4,994,926; 5,291,302; 5,459,584; 6,643,034; 6,785,021; 7,283,270.
• Protected by Canadian Patents 1,329,852; 2,101,327; 2,417,202.
• Additional US, Europe and Japan patents pending.
Acknowledgments
This software includes several libraries and software owned by third parties and distributed under theirrespective license. For more information see the \3rd folder included in this distribution (whenapplicable).
• ACE/TAO: Copyright © 1993-2009, Douglas C. Schmidt and his research group at WashingtonUniversity, University of California, Irvine, and Vanderbilt University.• Apache POI: Copyright © 2003-2014, The Apache Software Foundation• Axis: Copyright © 1999-2004, the Apache Software Foundation. All Rights Reserved.• Birt: Copyright © 2004, 2009, the Actuate Corporation.• cURL: Copyright © 1996 - 2011, Daniel Stenberg, ([email protected]). All rights reserved.• CxImage: Copyright © 1995, Alejandro Aguilar Sierra ([email protected]). Copyright ©
2001-2008, Davide Pizzolato.• Eclipse Info Center: Copyright (c) 2007 IBM Corporation and others.• Firebird: Copyright © 2000-2011, Borland/Inprise. All Rights Reserved.• Google Gson: Copyright © 2008-2011, Google Inc.• Google Guice: Copyright © Google Inc.• GPL Ghostscript: Copyright © 2010 Artifex Software, Inc. All rights reserved.• ICU: Copyright © 1995-2011, International Business Machines Corporation and others.• ini4j: Copyright 2005 [ini4j] Development Team. All Rights Reserved.• JacORB: Copyright © The JacORB project, 1997-2006.• Java (JRE/JDK): Copyright 2013, Oracle America, Inc. All rights reserved. Use is subject to licenseterms. ORACLE and JAVA trademarks and all ORACLE- and JAVA-related trademarks, service marks,logos and other brand designations are trademarks or registered trademarks of Oracle in the U.S. andother countries.• jaxws: Copyright 1997-2007 Sun Microsystems, Inc. All rights reserved.• JPEG: Copyright © 1991-2011, Thomas G. Lane.• JSON spirit: Copyright © 2007-2011 John W. Wilkinson. Distributed under MIT License.• Leptonica: Copyright © 2001-2015, Dan Bloomberg.• LibGIF: Copyright © 1989-1990, Gershon Elber. Copyright © 1990-1996, Eric S. Raymond. Copyright© 1998, Toshio Kuratomi.• Libphonenumber: Copyright © 2008-2011, Google Inc., Ian Galpin, Ben Gertzfield.• LibPNG: Copyright © 1995-1996 Guy Eric Schalnat, Group 42 Inc. Copyright © 1996-1997 AndreasDilger. Copyright © 1998-2010 Glenn Randers-Pehrson.• LibTIFF: Copyright © 1988-1997, Sam Leffler. Copyright © 1991-1997, Silicon Graphics Inc.• mysql-connector-java: Copyright © 2000, 2011, Oracle and/or its affiliates. All rights reserved.• OpenDS: Copyright © 2002-2006 Sleepycat Software. All rights reserved.• OpenID4Java Library : Copyright © 2006-2008 Sxip Identity Corporation.

• OpenSSL: Copyright © 1998-2011, the OpenSSL Project. Copyright © 1995-1998 Eric Young([email protected]). All Rights Reserved.• Protobuf: Copyright © 2008 Google Inc.• Python: Copyright © 2001-2010, Python Software Foundation.• Simplexlsx: Copyright © 2012-2013, Pavel Akimov.• Struts: Copyright © 1999-2011, The Apache Software Foundation. All Rights Reserved.• Tesseract Open Source OCR Engine: Copyright © 1985-2005, Hewlett-Packard. Copyright ©
2005-2015, Google Inc.• Tomcat: Copyright © 1999-2011, The Apache Software Foundation. All Rights Reserved.• WinPcap: Copyright © 1999 - 2005 NetGroup, Politecnico di Torino (Italy). / Copyright © 2005 - 2010CACE Technologies, Davis (California). All rights reserved.• wkhtmltopdf: Copyright © 2008,2009 Wkhtmltopdf Authors.• Xalan: Copyright © 2005, The Apache Software Foundation. All Rights Reserved.• Xerces: Copyright © 1999-2011, The Apache Software Foundation. All Rights Reserved.• ZLib: Copyright © 1995-2010, Jean-loup Gailly and Mark Adler. All Rights Reserved.
Disclaimer
XMedius reserves the right to make changes and alterations to its software and documentation withoutprior notification.
Although every attempt has been made to accurately describe and document the product, XMediusdoes not guarantee that documentation is without error or omission. XMedius is not responsible forany loss of data that may occur during the operation of its software. Nor does XMedius recognize anyliability that such losses may occasion.
No part of this publication may be reproduced or altered, by any means whatever, manual or electronic,without the prior written consent of XMedius.
All other trademarks, brand names, or product names are the property, trademarks, or registeredtrademarks of their rightful owners.
References to other products or software imply no warranty of XMediusFAX software by themanufacturers of those products and software.
Copyright
XMediusFAX software and documentation © 2002-2016 XMedius Solutions Inc.
All rights reserved. Unauthorized duplication, copying and/or replication is strictly prohibited.
Contact Information
• Web: www.xmedius.com• Sales: [email protected]• Licenses: [email protected]
Americas, Asia and Oceania:XMedius3400 de Maisonneuve Blvd. West, Suite 1135Montreal, Quebec H3Z 3B8 – CANADA - PO Box 48• Telephone: +1-514-787-2100• Tollfree North America: 1-888-766-1668• Fax: +1-514-787-2111

Europe, Middle-East and Africa (EMEA):XMedius31-33, rue des Beaux Soleils95520 Osny – France• Telephone: +33 (0)1 57 61 30 54• Fax: +33 (0)9 70 26 19 22
Technical Support
On-premises software:• Web: support.xmediusfax.com• Email: [email protected]• Tel. Americas: +1-866-615-3066 (North America only) | +1-514-787-2122• Tel. EMEA: +33 (0)1 57 61 30 30• Tel. APAC: 0011-800-132-00000 (Australia only) | +1-514-787-2122
Cloud solution:• Web: support.xmedius.com• Email: [email protected]• Tel. North America: +1-855-867-5065• Tel. Europe: +33 (0)1 57 61 30 20

Table of Contents
Chapter 1 : Introduction......................................................................................................1Guide Overview.................................................................................................................................................1The XMediusFAX Modules...............................................................................................................................1Licensing...........................................................................................................................................................2
Chapter 2 : Installation Requirements...............................................................................5Server Requirements........................................................................................................................................5
Recommended Server Resources.......................................................................................................................................5
Server OS Minimum Requirements.....................................................................................................................................6
Supported Virtualization Software.......................................................................................................................................6
Supported Mail Servers........................................................................................................................................................6
Other Supported Software....................................................................................................................................................6
Supported Communication Interfaces................................................................................................................................7
Client Requirements.........................................................................................................................................8Client Hardware and OS Minimum Requirements..............................................................................................................8
Supported Mail Clients..........................................................................................................................................................9
Supported Web Browsers (for Web Applications).............................................................................................................9
Supported Productivity Suites.............................................................................................................................................9
Multi-Function Devices (MFDs)..........................................................................................................................................10
Mobile Applications.............................................................................................................................................................10
Chapter 3 : Server Applications: Installation..................................................................11Installation Process........................................................................................................................................11
Server Installation...............................................................................................................................................................12
Disabling the Microsoft SMTP Service..............................................................................................................................19
Site Configuration: Wizard.................................................................................................................................................19
Third Party Software ......................................................................................................................................24WinPCap...............................................................................................................................................................................24
Ghostscript..........................................................................................................................................................................25
MySQL..................................................................................................................................................................................25
J2SE Runtime (JRE) & J2SE Development Kit (JDK)......................................................................................................25
Apache Tomcat....................................................................................................................................................................26
IIS Redirector.......................................................................................................................................................................26
XMediusFAX Installation and Maintenance Guide i
Table of Contents

Python..................................................................................................................................................................................26
Chapter 4 : Basic Configurations.....................................................................................29Services Rights Configurations....................................................................................................................29
Associating a Service with a Windows Admin Account..................................................................................................29
Setting a Pre-Initialized Office Environment for the Rasterizer......................................................................................30
Activating/ Updating the License and Setting the Channels......................................................................30Basic Site Configuration................................................................................................................................31Basic System Configuration..........................................................................................................................31
Chapter 5 : Secured HTTP (HTTPS) Configurations......................................................33Secured HTTP (HTTPS) Configurations.......................................................................................................33
Basic Scenario.....................................................................................................................................................................33
Chapter 6 : SMTP Integration...........................................................................................35SMTP Integration: Overview..........................................................................................................................35The XMediusFAX SMTP Gateway..................................................................................................................35
Using a Mail Server for Sending Faxes.............................................................................................................................36
Using a Mail Relay Server for Receiving Notifications....................................................................................................36
Fax/Mail Servers Typical Deployment...............................................................................................................................37
Microsoft Exchange Integration....................................................................................................................37Allowing Sending of Faxes with a FAX Address Space..................................................................................................37
Procedure...........................................................................................................................................................................................38
Allowing Reception of Mail Notification Messages..........................................................................................................38
Microsoft Outlook Forms...............................................................................................................................39Publishing the Forms..........................................................................................................................................................39
Known Issues and Solutions..............................................................................................................................................41
IBM Notes Form..............................................................................................................................................41IBM Notes Form Installation...............................................................................................................................................41
Signing the Database........................................................................................................................................................................42
Installing and configuring the Fax Memo Template.......................................................................................................................42
Synchronizing the Mail Template Databases..................................................................................................................................45
Configuring the IBM Notes Form.....................................................................................................................................................46
Redirecting the Fax.com Domain to the SMTP Gateway...............................................................................................................46
Optional: Customizing the Domain Name Used to Redirect the Forms.........................................................................47
Using TLS for SMTP with XMediusFAX........................................................................................................48Configuring IIS for SMTP TLS in Output...........................................................................................................................48
Testing the SMTP TLS Output Configuration...................................................................................................................53
Configuring IIS for SMTP TLS in Input..............................................................................................................................54
Chapter 7 : Microsoft Exchange UM Integration............................................................57
ii XMediusFAX Installation and Maintenance Guide
Table of Contents
Integrating XMediusFAX as Fax Solution for MS Exchange UM................................................................57Configuring Exchange UM for Fax Reception and Redirection.................................................................58Configuring XMediusFAX for Fax Reception With Exchange UM..............................................................59
Configuring the Incoming Routing Table of a Site for UM Routing................................................................................60
Configuring the Mail Notification Profile for UM Integration...........................................................................................61
Outlook Forms vs Exchange UM Format: Mail Notification Behaviors..........................................................................62
Chapter 8 : Microsoft Online Products Integration........................................................63Integration Planning: Office 365 and Exchange Online..............................................................................63Limitations due to Microsoft Office 365 and Exchange Online..................................................................63
Limitations on SMTP Integration.......................................................................................................................................64
Limitations on Fax Utilities for Office Applications.........................................................................................................65
Limitations on Server Features..........................................................................................................................................66
Microsoft Exchange Online Integration........................................................................................................66Allowing the Sending of Faxes..........................................................................................................................................67
Allowing the Reception of Mail Notification Messages...................................................................................................68
Chapter 9 : Client Applications: Installation...................................................................69Client Applications Installation.....................................................................................................................69Client Silent Installation.................................................................................................................................72Installing the Fax Merge Macros (MS Word and OpenOffice.org)..............................................................75
Installation Procedure for Microsoft Word........................................................................................................................76
Installation Procedure for OpenOffice.org........................................................................................................................76
Installing the Microsoft Office Internet Fax Service for XMediusFAX.......................................................77Installation on a Single Computer.....................................................................................................................................77
Installation by Massive Deployment through Group Policy............................................................................................78
Chapter 10 : Backup..........................................................................................................79Backing Up XMediusFAX...............................................................................................................................79Backing Up Users Phone Books...................................................................................................................79
Chapter 11 : Upgrades......................................................................................................81Upgrading Server Applications.....................................................................................................................81
Before Upgrading........................................................................................................................................................81
Upgrading Server Applications.................................................................................................................................82
Chapter 12 : Maintenance.................................................................................................83Modifying a Server Installation......................................................................................................................83Modifying a Client Installation.......................................................................................................................83Managing the Services...................................................................................................................................84Applying Hotfixes (Software Patches)..........................................................................................................84
XMediusFAX Installation and Maintenance Guide iii
Table of Contents
Chapter 13 : Uninstallation...............................................................................................85Complete Removal of Server Applications..................................................................................................85Complete Removal of Client Applications...................................................................................................85Removing Published Forms..........................................................................................................................85
Removing Published Forms in Outlook............................................................................................................................86
Removing Published Forms in IBM Notes........................................................................................................................86
Uninstalling the Microsoft Office Internet Fax Service Configuration for XMediusFAX..........................86Uninstallation from a Single Computer.............................................................................................................................87
Uninstallation by Massive Deployment through Group Policy.......................................................................................87
iv XMediusFAX Installation and Maintenance Guide
Table of Contents

IntroductionChapter 1
Guide Overview
This guide provides:
• The hardware and software requirements for installing and using XMediusFAX(server and clientapplications).
• The XMediusFAX applications installation procedures for the server side.• Some information on basic system and site configuration.• Some recommendations on SMTP Integration and the procedures for integrating Microsoft Exchange and
for installing custom fax forms (MS Outlook and IBM Notes).• Concepts and procedures about Microsoft Exchange UM Integration.• The XMediusFAX client applications and tools installation procedures.• The maintenance procedures for the server and the client applications.• The uninstallation procedures of the server and client applications.
The XMediusFAX Modules
An XMediusFAX system consists of a series of modules installed on one or more servers. Each moduleinstalls one or more executables running as services. Each service hosts one or more components thatexecute specific tasks. Installed components can be monitored via the administration interface (ServicesStatus).
Fax Manager Module
The fax manager module is at the heart of the fax system. All persistent storage (configurations, fax detailrecords and media files) are managed by the components installed with this module. When several instancesof the components managing the storage are installed in the same fax system, their persistent storage datawill be automatically replicated on all active instances.
Services installed are:
Monitors faults and supervises failover;XMFaultTolerance
Manages all Site configurations (users, profiles, etc.);XMCoConfig
Manages all System configurations;XMConfigManager
Manages the incoming and outgoing fax queues anddistributes jobs to all other components. Also manages themedia file database;
XMFaxManager
XMediusFAX 8.0 | Installation and Maintenance Guide 1
Chapter 1 | Introduction
Stores and manages access to the fax detail records.XMFaxArchive
Fax Driver Module
The fax driver module is responsible for sending and receiving faxes using the H.323/SIP (T.38/G.711)protocols or fax boards. A fax driver can handle multiple simultaneous fax calls, and several fax driver modulescan be installed within a fax system. When more than one driver is installed on a system, outgoing faxes willautomatically load-balance between the drivers.
Service installed: XMFaxDriver
Rasterizer Module
The rasterizer converts documents (doc, pdf, txt, xls, jpg, htm, etc.) into fax format (TIFF). To do theconversion, it uses native applications and specialized converters. Since document conversion isprocessing-intensive, it is common to install more than one rasterizer on a system. When more than onerasterizer is installed on a system, conversion jobs will automatically load-balance between the rasterizers.
Service installed: XMDocumentRasterizer
SMTP Gateway
The SMTP gateway provides a way to submit fax jobs using e-mail clients, and to send back e-mail notifications.The gateway acts as an SMTP mail server (listens on port 25) to accept new fax jobs (i.e., it cannot run ona server where another SMTP server is in use). When more than one SMTP gateway is installed on a system,notifications will automatically load-balance between the gateways. The SMTP gateway handles all SMTPmessages including those sent by Microsoft Exchange.
Note: For more information about using SMTP with XMediusFAX and planning specific deployments orconfigurations with mail servers, see The XMediusFAX SMTP Gateway on page 35.
Service installed: XMSMTPGateway
XML Gateway
The XML gateway provides a way to submit fax jobs by using an XML document that specifies the recipients,sender information, fax options and attachments. This is usually used for fax broadcasting or fax automation.The gateway scans specific folders for “xml” fax job and submits them to the fax manager. The XML gatewayis also used in collaboration with SendFAX and WebCompose.
Service installed: XMXMLGateway
Licensing
XMediusFAX is a licensed software, which means you must have an official license to be able to configureand use it properly.
Purpose and Effects of the XMediusFAX License
The purpose of the XMediusFAX license is to control the Fax Server at two levels:
• System components limits – maximum number of:
• users• sites• gateways• channels
2 XMediusFAX 8.0 | Installation and Maintenance Guide
Chapter 1 | Introduction

• Features availability (some of them can be enabled or disabled)
The license settings may vary according to the terms defined with your XMediusFAX reseller.
Note: For more details on licensed features, please refer to the XMediusFAX Administration Guide.
Default License
When installing XMediusFAX for the first time on a server, a default license is automatically installed forevaluation purposes, that:
• enables one instance of each component• enables a total of two channels (FoIP and fax boards) in evaluation mode• enables up to 10 sites with no time limit• allows for 100 users• applies a watermark on every fax page
Note: If you decide to use the system permanently and according to your needs, you must eventuallyreplace this default license by the actual license you purchased, using your activation code (see below).
License Activation and Update
When a new license is available for your system, it must be activated and updated in order to replace theone currently installed. Such an update is required in the following cases:
• License purchase for first XMediusFAX installation (to replace the default license described above)• License add-on purchase (for example when additional channels or special licensed features are required
afterwards)• XMediusFAX upgrade (not always compulsory)
The XMediusFAX license can be automatically updated by entering in XMediusFAX admininstration interfacethe activation code you receive by e-mail after the purchase.
Note: If you already have an activation code (from a previous license purchase), it will remain valid forthis operation, unless you received a new one.
To know how to activate and update your XMediusFAX license, see Activating/ Updating the License andSetting the Channels on page 30.
Floating Licence Scheme
XMediusFAX Floating License allows the Driver, SMTP Gateway, XML Gateway and Rasterizer componentsto be installed on any server. Although each of those components will register to a centralised floating licensescheme controlled by the FaxManager. In turn the FaxManager is restricted to work on servers with specificMAC. The number of running instances of the SMTP Gateway, XML Gateway, Rasterizers and Driver Channelsis limited by the license.
Channels are limited by two properties:
• total number of channels throughout the system (the channel property in the License file),• total number of channels per type throughout the system (FoIP and fax board channels properties in the
License file).
The number of channels is set in the administration interface for XMediusFAX. For more details, see theAdministration Guide.
XMediusFAX 8.0 | Installation and Maintenance Guide 3
Chapter 1 | Introduction

4 XMediusFAX 8.0 | Installation and Maintenance Guide
Chapter 1 | Introduction

Installation RequirementsChapter 2
Server Requirements
Recommended Server Resources
NetworkMemoryLogical Processors(2)Fax Channels(1)
For G.711 FaxingFor T.38 Faxing
100 Mbps4 GB2 @ 2.4 GHz2 @ 1.8 GHz24 or less
100 Mbps4 GB4 @ 2.4 GHz2 @ 1.8 GHz48 or less
100 Mbps6 GB8 @ 2.4 GHz2 @ 2.4 GHz96 or less
1 Gbps8 GB16 @ 2.4 GHz4 @ 2.4 GHz300 or less
These recommendations are based on a 50% inbound / 50% outbound traffic. Faxes are assumed to have 3 pages.Supplementary distributed rasterizer & gateway may be required depending on the traffic shape.
Important: The system must be dedicated to the XMediusFAX application.
(1) Number of channels in single server configuration. To double the channel capacity (up to 600 channels), you cansetup a fax system in a cluster configuration with distributed channels (both servers meeting the above requirements).To build a fax system solution with more than 600 channels, contact our sales engineering group.(2) Some functionalities, such as document rendering or image content processing, may notably increase CPU usage.
Storage Considerations
For 1,000,000 outbound faxes
(Assuming single recipient fax with a 200KB word document, one50KB cover sheet, resulting in a 150 KB tiff)
• ~400 GB (fax images)• +20 GB (SQL DB records & indexes)
For 1,000,000 inbound faxes
(Assuming 3 page 150 KB faxes)• ~150 GB (fax images)• +20 GB (SQL DB records & indexes)
XMediusFAX 8.0 | Installation and Maintenance Guide 5
Chapter 2 | Installation Requirements
Server OS Minimum Requirements
XMediusFAX must be installed on servers supporting any of the following Operating Systems:
• Windows Server 2016 (including IIS 10.0)• Windows Server 2012 R2 / 2012 (including IIS 8.0)• Windows Server 2008 R2 (including IIS 7.5)• Windows Server 2008 64-bit or 32-bit
XMediusFAX requires IIS (for the supported versions of IIS, see Other Supported Software on page 6).
Note: Do not install XMediusFAX on a server that is running another fax server solution, even whileyou're testing the product.
Supported Virtualization Software
• VMWare Workstation 14 / 12 / 11 / 10 / 9• VMWare ESXi 6.5 / 6.0 / 5.5 / 5.0 / 4.5• Microsoft Hyper-V• Citrix Xen Server 7.2 / 7.0 / 6.5 / 6.2 / 6.0 / 5.2 / 5.0
Supported Mail Servers
In the corporate environment, XMediusFAX currently supports these mail servers:
• Microsoft Exchange 2016 / 2013 / 2010 SP3 / 2010 / 2007• Microsoft Exchange Online (with some limitations – see Limitations due to Microsoft Office 365 and
Exchange Online on page 63)• IBM Domino 9.0.1 / 9.0 / 8.5.3 FP4 / 8.5• SMTP-compliant mail servers
Note: Integrating Exchange or Domino with XMediusFAX allows the use of specific forms and featuresthat are useful for the faxing process.
Other Supported Software
For the IIS-Tomcat Redirector
(see IIS Redirector on page 26)
• Internet Information Services (IIS) 10 / 8.0 / 7.5 / 7.0 / 6.0
Note: During the installation of XMediusFAX, the C:\INETPUB\default.htm file is replaced, whichwill cause any IIS based application that was already running on the server to break.
6 XMediusFAX 8.0 | Installation and Maintenance Guide
Chapter 2 | Installation Requirements

For the Rasterizer Module
Software supported as conversion engines used by the XMediusFAX Rasterizer module:
• Microsoft Office 2016 / 2013 / 2010 (64-bit and 32-bit)• Microsoft Office 2007• Microsoft Office 365 (with some limitations – see Limitations due to Microsoft Office 365 and Exchange
Online on page 63)• OpenOffice.org 4.1.1 / 4.0 / 3.4• Microsoft Internet Explorer 11 / 10 / 9
Supported Communication Interfaces
Fax Boards
PCI TypeLine TypeProduct FamilyBrand
PCIe/PCIxAnalog LoopstartTR1034Brooktrout
PCIe/PCIxAnalog & DID ComboTR1034Brooktrout
PCIe/PCIxT-1 PRI/RBTR1034Brooktrout
PCIe/PCIxE-1 PRI/RBTR1034Brooktrout
PCIe/PCIxBRI (Euro ISDN)TR1034Brooktrout
PCIBRI (Euro ISDN)Diva ServerEicon
PCI & PCIeT-1 E-1 PRI/RBDiva ServerEicon
PCIAnalog LoopstartDiva ServerEicon
Note: Before installing XMediusFAX with a fax board, you must install and configure the Driver of theconcerned fax board:
• For a Brooktrout fax board, you can find this Driver in the 3rd\dialogic_brooktrout folder from thedistribution media: boston.msi.
• For an Eicon Diva fax board, you can download this Driver from the Dialogic Website:http://www.dialogic.com/support/downind.aspx. The minimum version to install is:Diva SystemRelease8.5WIN SU4, available for 32-bit and 64-bit versions of Windows.
VoIP Peers ( H.323, SIP T.38/G.711)
Table 1: VoIP Gateways
SupportedSignaling Protocol(1)
ModelSupplier
SIPMediaPack 11x Analog; Mediant 600, 800, 1000x and 2000; TrunkPack-260 DigitalAudioCodes
H323G350, G450, G650 and G700 Media GatewaysAvaya
SIP/H3231700, 1800, 2600, 2800, 2900, 3600, 3700, 3800, 3900, 7200, 7300 and 7600CMM Series; AS5300, AS5400 and AS5800 Series
Cisco (2)
XMediusFAX 8.0 | Installation and Maintenance Guide 7
Chapter 2 | Installation Requirements
SupportedSignaling Protocol(1)
ModelSupplier
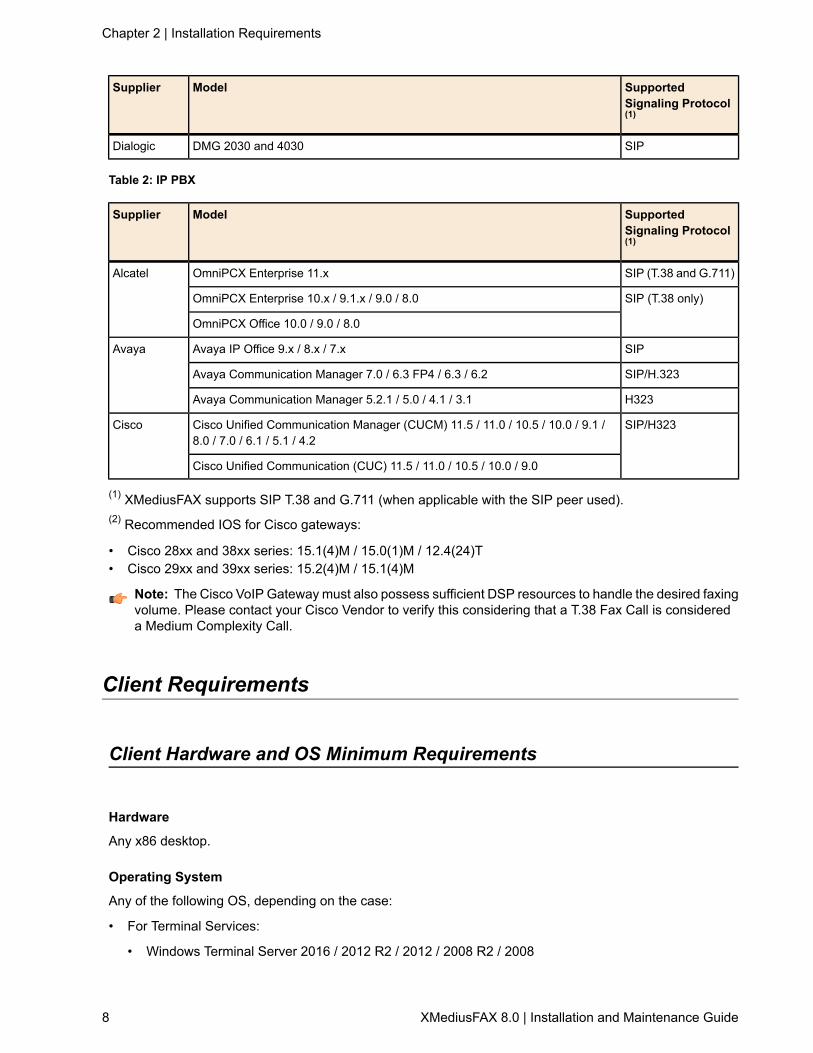
SIPDMG 2030 and 4030Dialogic
Table 2: IP PBX
SupportedSignaling Protocol(1)
ModelSupplier
SIP (T.38 and G.711)OmniPCX Enterprise 11.xAlcatel
SIP (T.38 only)OmniPCX Enterprise 10.x / 9.1.x / 9.0 / 8.0
OmniPCX Office 10.0 / 9.0 / 8.0
SIPAvaya IP Office 9.x / 8.x / 7.xAvaya
SIP/H.323Avaya Communication Manager 7.0 / 6.3 FP4 / 6.3 / 6.2
H323Avaya Communication Manager 5.2.1 / 5.0 / 4.1 / 3.1
SIP/H323Cisco Unified Communication Manager (CUCM) 11.5 / 11.0 / 10.5 / 10.0 / 9.1 /8.0 / 7.0 / 6.1 / 5.1 / 4.2
Cisco
Cisco Unified Communication (CUC) 11.5 / 11.0 / 10.5 / 10.0 / 9.0
(1) XMediusFAX supports SIP T.38 and G.711 (when applicable with the SIP peer used).(2) Recommended IOS for Cisco gateways:
• Cisco 28xx and 38xx series: 15.1(4)M / 15.0(1)M / 12.4(24)T• Cisco 29xx and 39xx series: 15.2(4)M / 15.1(4)M
Note: The Cisco VoIP Gateway must also possess sufficient DSP resources to handle the desired faxingvolume. Please contact your Cisco Vendor to verify this considering that a T.38 Fax Call is considereda Medium Complexity Call.
Client Requirements
Client Hardware and OS Minimum Requirements
Hardware
Any x86 desktop.
Operating System
Any of the following OS, depending on the case:
• For Terminal Services:
• Windows Terminal Server 2016 / 2012 R2 / 2012 / 2008 R2 / 2008
8 XMediusFAX 8.0 | Installation and Maintenance Guide
Chapter 2 | Installation Requirements

• Citrix XenApp 7.6 / 7.2
• For Workstations:
• Windows 10 / 8.1 / 8 / 7
Supported Mail Clients
Any SMTP based messaging system such as:
• Microsoft Outlook 2016 / 2013 / 2010 (64-bit and 32-bit)• Microsoft Outlook 2007• Microsoft Outlook within Office 365 (with some limitations – see Limitations due to Microsoft Office 365
and Exchange Online on page 63)• Windows Mail• IBM Notes 9.0.1 / 9.0 / 8.5.3 FP4 / 8.5
Note: Customers using the XMediusFAX Custom Outlook Forms must use PDF-based notificationsalong with Adobe Acrobat Reader as TIFF-based notifications are not supported in that specific context.
Supported Web Browsers (for Web Applications)
On desktops:
• Microsoft Internet Explorer 11 / 10 / 9 / 8• Microsoft Edge• Mozilla Firefox 36+• Google Chrome 41+
On mobile devices:
• Safari on iOS• Default mobile browser on iPhone/iPad• Default mobile browser on Android phone/tablet
Supported Productivity Suites
• Microsoft Office 2016 / 2013 / 2010 (64-bit and 32-bit)• Microsoft Office 2007• Microsoft Office 365 (with some limitations – see Limitations due to Microsoft Office 365 and Exchange
Online on page 63)• OpenOffice.org 4.1.1 / 4.0 / 3.4
XMediusFAX 8.0 | Installation and Maintenance Guide 9
Chapter 2 | Installation Requirements

Multi-Function Devices (MFDs)
For T.37 (Email) Integration
XMediusFAX can be integrated with most Multi-Function Devices (MFDs) via T.37 protocol. This supportallows users to fax scanned documents, simply by entering a fax number on the MFD or minimally allow theusers to email scanned documents to an address reserved for the fax system.
The following requirements must be met in order to send faxes from MFDs:
• The MFD must support the ITU T.37 specification• The SMTP Gateway component must be licensed, installed and properly configured
MFD Connectors
Several connectors are also available (under license) to provide a full-featured user experience (instead ofthe basic T.37 protocol) on some MFD models that are compatible with technologies such as eCopy ShareScan,Fuji Xerox Apeos iiX, Lexmark eSF, Ricoh ESA, Sharp OSA, Xerox ConnectKey and Xerox EIP.
Each connector has its own requirements. Contact your sales representative for more details.
Mobile Applications
An XMediusFAX mobile application is available:
• For iOS (iPad and iPhone) – search XMediusFAX on the Apple's App Store.• For Android (tablet and phone) – search XMediusFAX on Google Play.
This application allows users to send faxes from their mobile device.
Restriction: This application can be used only by XMediusFAX Internal Users (i.e. users that aremanaged within XMediusFAX, as opposed to users synchronized from an external directory).
Requirements
To know the specific device and OS requirements for this application, please refer to the App Store / GooglePlay description.
To use the application, you must at least ensure that:
• Your company network infrastructure will allow your mobile devices to communicate with your XMediusFAXsystem, and
• Your XMediusFAX license includes the Web Services feature.
10 XMediusFAX 8.0 | Installation and Maintenance Guide
Chapter 2 | Installation Requirements

Server Applications: InstallationChapter 3
Installation Process
This section details typical first-time installations of the XMediusFAX server applications, in FoIP or with afax board.
Note: At least one server installation must precede the installation of any gateway or client component.The installation procedure generates a log file which can be found in C:\ProgramFiles\XMediusFAX\Trace. The name of the file is XMInstallLog.log. Each subsequent installation ofXMediusFAX modules appends to this file.
Installing XMediusFAX with a Fax Board
If you are going to install XMediusFAX with a fax board, the board must be already assembled in the computerthat will host the fax server. Also, the correct Driver must be installed and configured prior to the XMediusFAXinstallation:
• For a Brooktrout board, go to the 3rd\dialogic_brooktrout folder from the distribution media and runthe boston.msi file, then configure the Driver using the installed software.
• For an Eicon Diva board, download the Driver from the Dialogic Website(http://www.dialogic.com/support/downind.aspx), install it and then configure it using the installed software.The minimum version to install is: Diva System Release 8.5WIN SU4, available for 32-bit and 64-bitversions of Windows.
Precision about MS Office Installation
Installing any version of Microsoft Office after you have installed XMediusFAX will re-assign file associations.This specifically makes reference to the installation of a document rasterizer, in which case .rtf files will beassociated with Word. To properly rasterize RTF files, XMediusFAX requires that these files be associatedwith Wordpad. If you have installed Microsoft Office after installing XMediusFAX, execute the following stepsto restore the proper file associations.
1. Navigate to this folder: Program Files\XMediusFAX\bin\util.2. Execute rtf.reg.
Note: Office Assistant can interfere with rasterization and should not be installed. If it is present, it shouldbe uninstalled.
XMediusFAX 8.0 | Installation and Maintenance Guide 11
Chapter 3 | Server Applications: Installation
Server Installation
Note: If you are installing XMediusFAX with a fax board, please refer first to section: Installation Processon page 11.
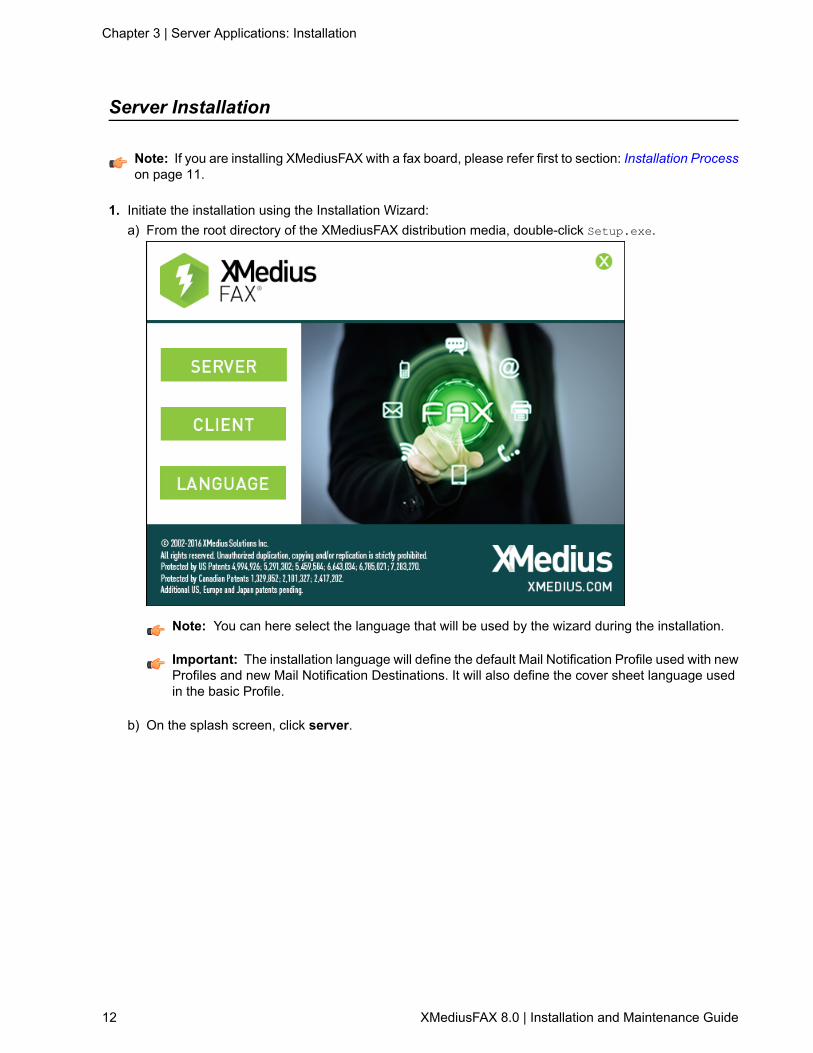
1. Initiate the installation using the Installation Wizard:a) From the root directory of the XMediusFAX distribution media, double-click Setup.exe.
Note: You can here select the language that will be used by the wizard during the installation.
Important: The installation language will define the default Mail Notification Profile used with newProfiles and new Mail Notification Destinations. It will also define the cover sheet language usedin the basic Profile.
b) On the splash screen, click server.
12 XMediusFAX 8.0 | Installation and Maintenance Guide
Chapter 3 | Server Applications: Installation

c) Follow the Wizard instructions (each time click Next), starting with:
• License Agreement (acceptance required for installing)• Destination Folder ( XMediusFAX files installation path)
2. Choose the System Setup Type:
Leave the Create a new system option selected, as you are installing XMediusFAX for the first time.
Note: The Join an existing system can only be used if you are extending a system that is alreadyinstalled, in order to add redundancy to some modules.
3. Choose the server components to install or not:
XMediusFAX 8.0 | Installation and Maintenance Guide 13
Chapter 3 | Server Applications: Installation
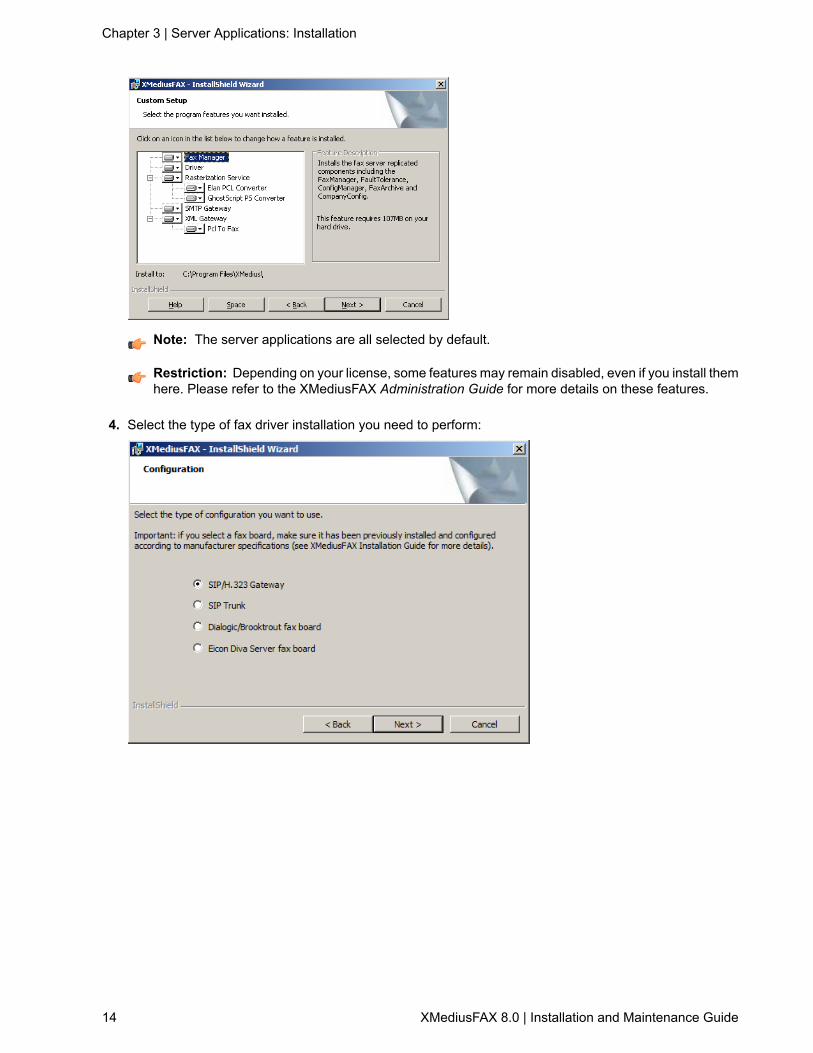
Note: The server applications are all selected by default.
Restriction: Depending on your license, some features may remain disabled, even if you install themhere. Please refer to the XMediusFAX Administration Guide for more details on these features.
4. Select the type of fax driver installation you need to perform:
14 XMediusFAX 8.0 | Installation and Maintenance Guide
Chapter 3 | Server Applications: Installation
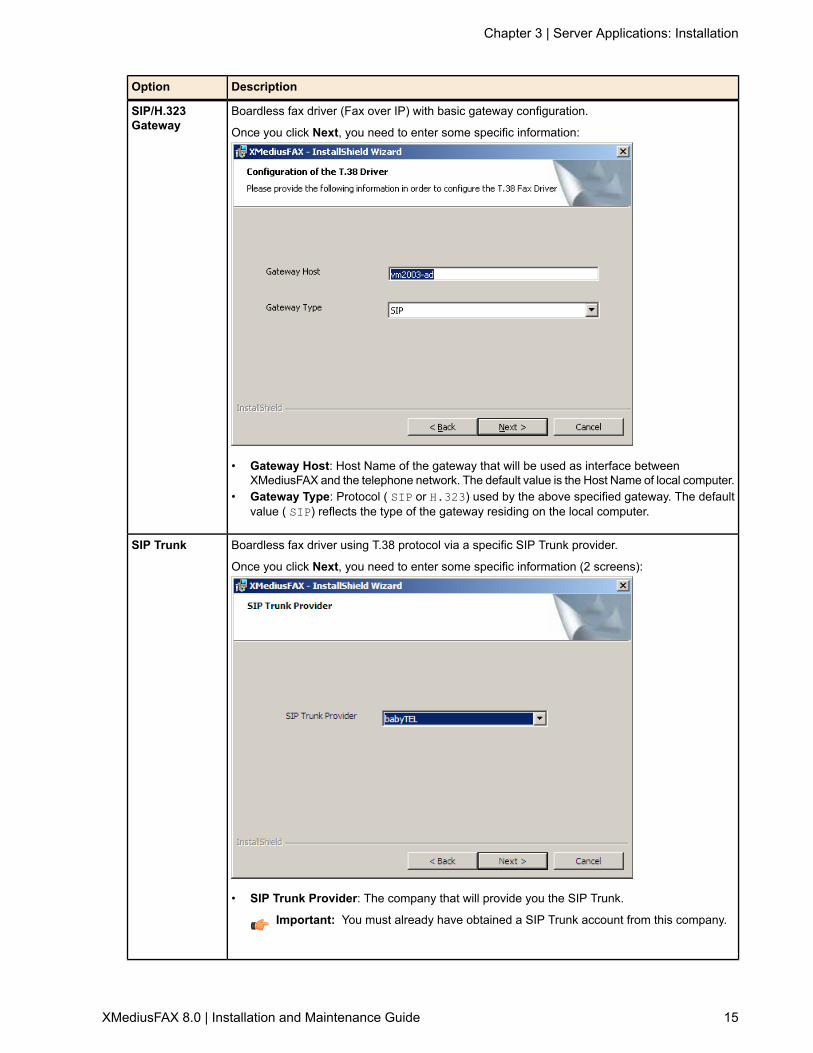
DescriptionOption
Boardless fax driver (Fax over IP) with basic gateway configuration.
Once you click Next, you need to enter some specific information:
SIP/H.323Gateway
• Gateway Host: Host Name of the gateway that will be used as interface betweenXMediusFAX and the telephone network. The default value is the Host Name of local computer.
• Gateway Type: Protocol ( SIP or H.323) used by the above specified gateway. The defaultvalue ( SIP) reflects the type of the gateway residing on the local computer.
Boardless fax driver using T.38 protocol via a specific SIP Trunk provider.
Once you click Next, you need to enter some specific information (2 screens):
SIP Trunk
• SIP Trunk Provider: The company that will provide you the SIP Trunk.
Important: You must already have obtained a SIP Trunk account from this company.
XMediusFAX 8.0 | Installation and Maintenance Guide 15
Chapter 3 | Server Applications: Installation

DescriptionOption
Note: You should have received all this information from your SIP Trunk provider:
• User ID• Authentication ID• SIP Password (to be entered twice)• Outbound Proxy
Remember: All this information will be managed by the system to properly configure SIPSecurity and SIP Peer within the XMediusFAX Driver properties. For more details on thesesubjects, see the XMediusFAX Administration Guide.
Attention: Make sure to fill these fields with the exact strings communicated by your SIPTrunk provider: any misspelling would force you to manually reconfigure the Driver, whichwould be far more complicated than here.
Though, if such a situation would happen, it is recommended to uninstall the Fax Driver andreinstall it as you are curently doing. To do this, simply use the current XMediusFAX installerto modify the installation: one time by unselecting the Driver component, and then again byreselecting it (and reconfigure it using the above screens).
Fax board driver for Dialogic/Brooktrout device.Dialogic/Brooktroutfax board Note: Before clicking Next, you must be sure that you already installed and configured the
Boston pnp Driver. If it is not the case, cancel the XMediusFAX installation and refer toInstallation Process on page 11.
Fax board driver for Eicon Diva device.Eicon DivaServer fax board Note: Before clicking Next, you must be sure that you already installed and configured the
Eicon Diva Driver. If it is not the case, cancel the XMediusFAX installation and refer toInstallation Process on page 11.
5. Setup the administrator account you will use to login to the XMediusFAX administration interface:
16 XMediusFAX 8.0 | Installation and Maintenance Guide
Chapter 3 | Server Applications: Installation

Enter the credentials for the main System Administrator account. The default proposed name isAdministrator.
Note: The password is temporary; you will have to change it at first login.
6. Start the installation:
a) Click Install.b) Manage preliminary software installation using the Third Party Software Installer:
XMediusFAX 8.0 | Installation and Maintenance Guide 17
Chapter 3 | Server Applications: Installation

Note: Third Party Software are software packages required by several components ofXMediusFAX to function as designed. You will be advised on which packages need to be installed.See Third Party Software on page 24 for details.
c) Click OK to proceed.
Note: If you checked WinPCap, follow the procedure of the WinPcap Installer that will pop up.
d) Click Done once the Third Party Software installation is complete.InstallShield now starts XMediusFAX installation, which will take a few minutes.
7. Finalize the installation:
a) Leave the First Time Setup Wizard box checked if you wish to benefit from a basic automaticconfiguration of your fax system (see Site Configuration: Wizard on page 19).
Note: If you choose to uncheck this box, you can use the Basic Configuration method detailedon Basic Site Configuration on page 31.
18 XMediusFAX 8.0 | Installation and Maintenance Guide
Chapter 3 | Server Applications: Installation

b) Click Finish.
Important: When installing XMediusFAX for the first time on a server, a default license is automaticallyinstalled for evaluation purposes. If you decide to use the system permanently and according to yourneeds, you must eventually replace this default license by the actual license you purchased, using theactivation code you received by e-mail (see Activating/ Updating the License and Setting the Channelson page 30).
Disabling the Microsoft SMTP Service
Note: This procedure can only be done after installing the server applications.
Note: Since XMediusFAX SMTP gateway service uses system port 25, the same port as Microsoft’sSMTP service, conflicts may arise. Disable Microsoft’s SMTP service before starting the XMediusFAXSMTP gateway service.
1. In Windows, click Start ➤ Settings ➤ Control Panel.2. In the Control Panel, double-click Administrative Tools, then Services.3. Right- click on the Simple Mail Transport Protocol (SMTP) service and select Stop.4. Set the SMTP service to Disable.5. Start the XMSMTPGateway service. (By default the SMTP service is set to Automatic).6. Close the Services window and the Control Panel.
Site Configuration: Wizard
The role of the First Time Setup Wizard is to perform the minimal system configuration so that you can beginfaxing immediately. The Wizard performs the tasks listed below:
• Creates a Site• Sets the Site QOS to 0/0/240• Sets the XML Poll folder to the Site Name• Removes SMTP Messages Require Authentication from default profile• Sets the CSID of the default profile to the Site name• Creates the User and sets its Password• Sets the Site SMTP Postmaster to the Administrator's SMTP address• Sets the Site Routing Table to route to the User• Sets the System Routing Table to route to the Site, with CSID set to Site Name• Sets the Alert Notification to go to the Administrator's SMTP address through the specified Mail Relay
Server• Sets the SMTP Gateway (if installed) Mail Relay Server• Produces a summary and instructions on how to use the system. This summary is also automatically
saved to a file
Note: If you do not choose to use the Wizard, all these configurations can be managed from theXMediusFAX Administration interface. However, the Administrator has the option to run this applicationat a later time from the XMediusFAX directory by executing the following file:[install_path]\XMediusFAX\Bin\Util\FirstTimeSetup.exe
The Wizard opens on the following screen:
XMediusFAX 8.0 | Installation and Maintenance Guide 19
Chapter 3 | Server Applications: Installation
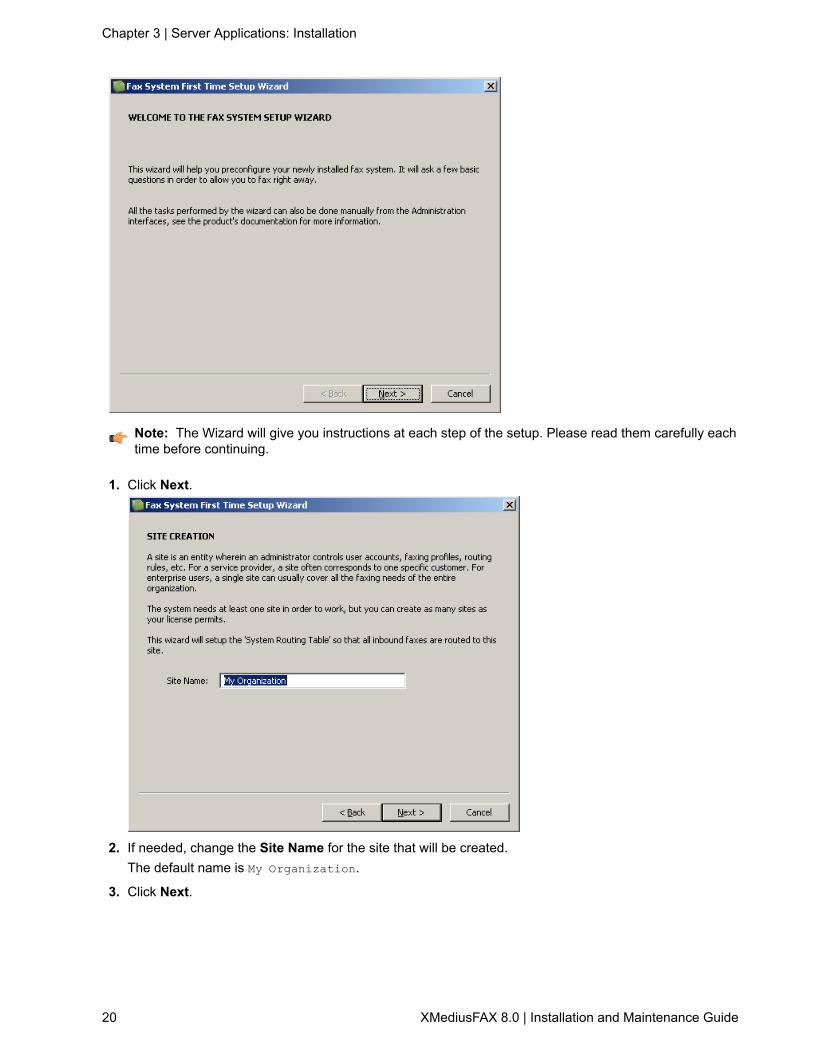
Note: The Wizard will give you instructions at each step of the setup. Please read them carefully eachtime before continuing.
1. Click Next.
2. If needed, change the Site Name for the site that will be created.The default name is My Organization.
3. Click Next.
20 XMediusFAX 8.0 | Installation and Maintenance Guide
Chapter 3 | Server Applications: Installation

4. perform the user configuration:a) Select the type of users you wish to add to your fax system:
• The Internal Users Database option will allow you (later, through this wizard) to create a first userin the internal users list of XMediusFAX. You will be able to add other internal users afterwards,through the administration interface.
• The Active Directory Integration with NT Authenticaton option will allow you (later, through thiswizard) to set connection parameters in order to give faxing rights to all users in your Active Directory.
b) If you are going to perform the Microsoft Exchange UM integration, check the box.The Wizard will add an Exchange UM Rule to the Incoming Routing Table of the created site and willalso configure the Basic Mail Notification Profile to use the Exchange UM form for notifications.
Note: This selection requires the creation of a new Receive Connector on your Exchange Server(see Configuring the Mail Notification Profile for UM Integration on page 61). For more informationon Exchange UM integration, see Integrating XMediusFAX as Fax Solution for MS Exchange UMon page 57.
5. Click Next.
XMediusFAX 8.0 | Installation and Maintenance Guide 21
Chapter 3 | Server Applications: Installation

6. Enter the Administrator's Email and the hostname of the Mail Server of your company.
Note: If you selected Active Directory Integration with NT Authenticaton during the userconfiguration, the Administrator's Email must refer to a valid user in your Active Directory.
7. Click Next.Depending on the selection of users type you made during the user configuration:
• If you selected Internal Users Database during the user configuration, you can now enter a first userfor your fax system.
Enter the User's SMTP Address and a Password for this user.
• If you selected Active Directory Integration with NT Authenticaton during the user configuration,you can now configure the Active Directory Integration:
22 XMediusFAX 8.0 | Installation and Maintenance Guide
Chapter 3 | Server Applications: Installation
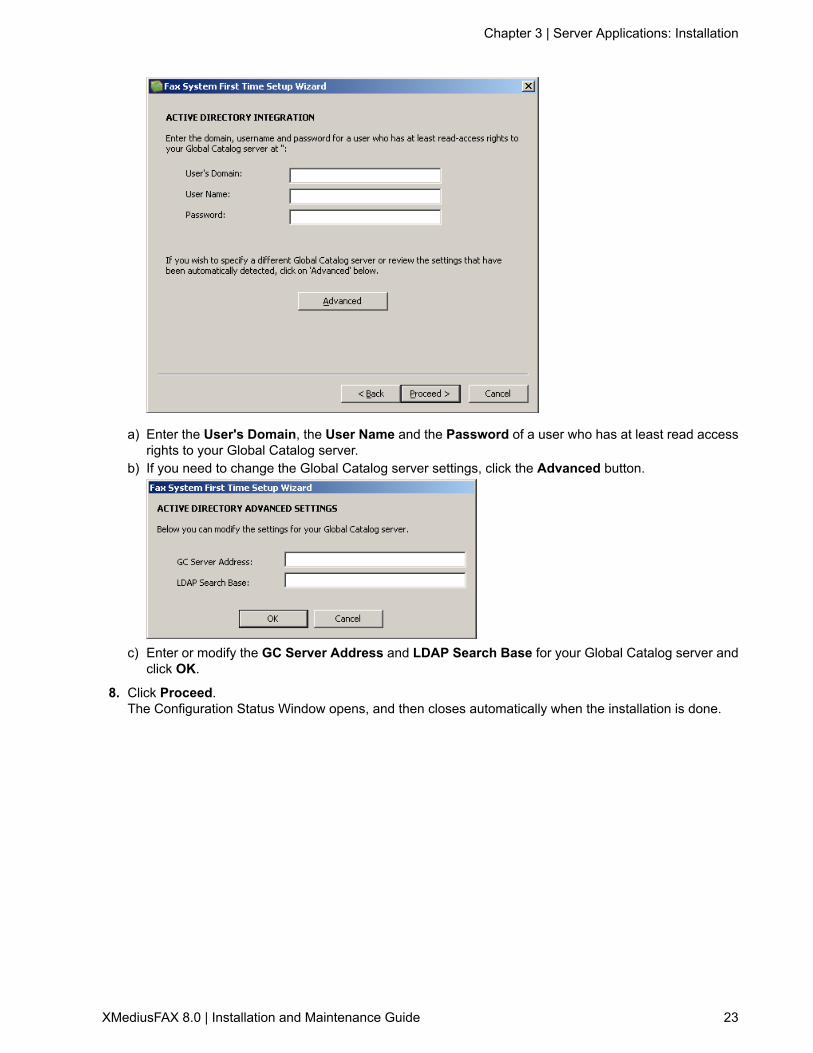
a) Enter the User's Domain, the User Name and the Password of a user who has at least read accessrights to your Global Catalog server.
b) If you need to change the Global Catalog server settings, click the Advanced button.
c) Enter or modify the GC Server Address and LDAP Search Base for your Global Catalog server andclick OK.
8. Click Proceed.The Configuration Status Window opens, and then closes automatically when the installation is done.
XMediusFAX 8.0 | Installation and Maintenance Guide 23
Chapter 3 | Server Applications: Installation

9. Click Finish.
Third Party Software
Prior to installing XMediusFAX server components, a software analyzer / installer tool ensures that criticalthird-party software have been correctly installed as required by the selected XMediusFAX components. Thisgives more flexibility and control over the deployment and its results.
You will find in the following sections a quick description of each third-party software that may be automaticallyinstalled during the server applications installation of XMediusFAX:
• WinPCap on page 24• Ghostscript on page 25• MySQL on page 25• J2SE Runtime (JRE) & J2SE Development Kit (JDK) on page 25• Apache Tomcat on page 26• IIS Redirector on page 26• Python on page 26
WinPCap
WinPCap is necessary to enable the network packet capture feature in XMediusFAX.
The network packet capture feature enables XMediusFAX to save the communications data between thedriver and the gateway, for troubleshooting purposes if problems occur during some of these communications.
Default Installation PathVersion Number
C:\Program Files (x86)\WinPcap4.1.3
24 XMediusFAX 8.0 | Installation and Maintenance Guide
Chapter 3 | Server Applications: Installation
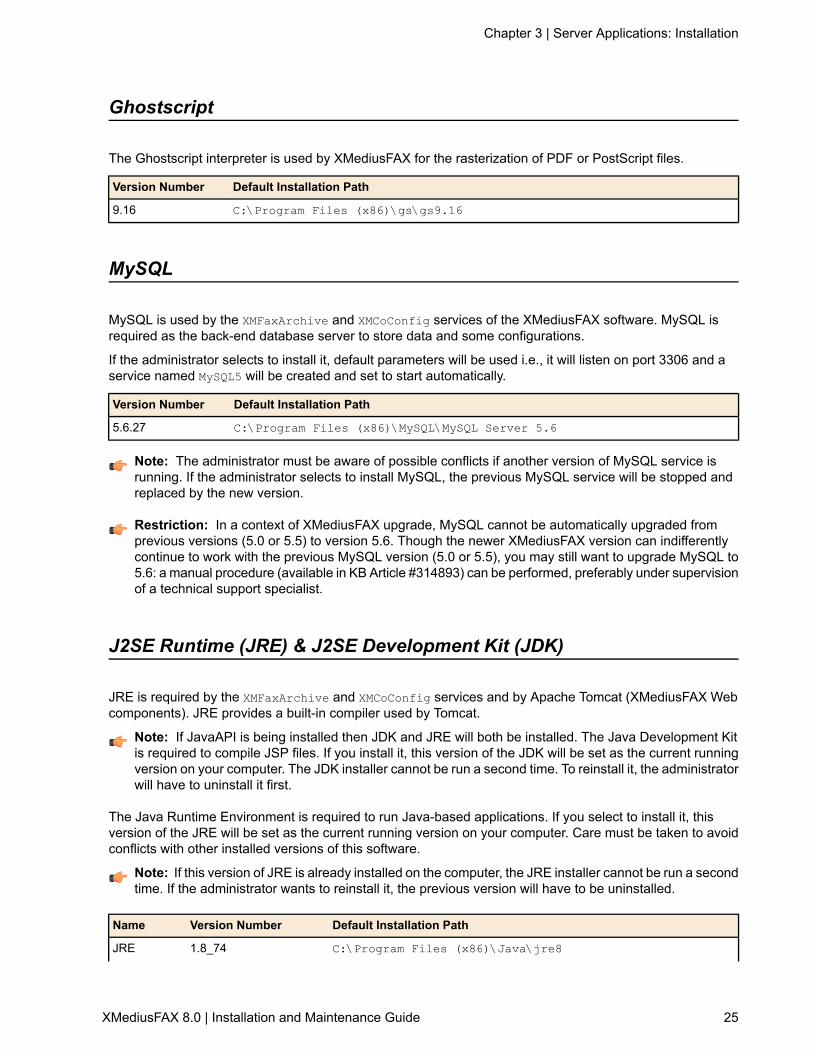
Ghostscript
The Ghostscript interpreter is used by XMediusFAX for the rasterization of PDF or PostScript files.
Default Installation PathVersion Number
C:\Program Files (x86)\gs\gs9.169.16
MySQL
MySQL is used by the XMFaxArchive and XMCoConfig services of the XMediusFAX software. MySQL isrequired as the back-end database server to store data and some configurations.
If the administrator selects to install it, default parameters will be used i.e., it will listen on port 3306 and aservice named MySQL5 will be created and set to start automatically.
Default Installation PathVersion Number
C:\Program Files (x86)\MySQL\MySQL Server 5.65.6.27
Note: The administrator must be aware of possible conflicts if another version of MySQL service isrunning. If the administrator selects to install MySQL, the previous MySQL service will be stopped andreplaced by the new version.
Restriction: In a context of XMediusFAX upgrade, MySQL cannot be automatically upgraded fromprevious versions (5.0 or 5.5) to version 5.6. Though the newer XMediusFAX version can indifferentlycontinue to work with the previous MySQL version (5.0 or 5.5), you may still want to upgrade MySQL to5.6: a manual procedure (available in KB Article #314893) can be performed, preferably under supervisionof a technical support specialist.
J2SE Runtime (JRE) & J2SE Development Kit (JDK)
JRE is required by the XMFaxArchive and XMCoConfig services and by Apache Tomcat (XMediusFAX Webcomponents). JRE provides a built-in compiler used by Tomcat.
Note: If JavaAPI is being installed then JDK and JRE will both be installed. The Java Development Kitis required to compile JSP files. If you install it, this version of the JDK will be set as the current runningversion on your computer. The JDK installer cannot be run a second time. To reinstall it, the administratorwill have to uninstall it first.
The Java Runtime Environment is required to run Java-based applications. If you select to install it, thisversion of the JRE will be set as the current running version on your computer. Care must be taken to avoidconflicts with other installed versions of this software.
Note: If this version of JRE is already installed on the computer, the JRE installer cannot be run a secondtime. If the administrator wants to reinstall it, the previous version will have to be uninstalled.
Default Installation PathVersion NumberName
C:\Program Files (x86)\Java\jre81.8_74JRE
XMediusFAX 8.0 | Installation and Maintenance Guide 25
Chapter 3 | Server Applications: Installation

Default Installation PathVersion NumberName
C:\Program Files (x86)\Java\jdk1.8.0.741.8_74JDK
Note: JDK may be installed in the Client install, depending on the selected applications.
Apache Tomcat
Apache Tomcat is required to run the JSP scripts for the web components of the XMediusFAX software andis dependent on JRE to run. Therefore if the Fax Manager feature of XMediusFAX has not been selected forinstallation, the web components will not be installed and neither Tomcat nor JRE will be available for selectionin the Third party Installer.
If however, the administrator selects to install the Fax Manager feature, Tomcat and JRE will be displayedin the Third party Installer. When Tomcat is selected, the default parameters will be used, i.e. it will listen onport 8080 and a service named Apache Tomcat will be created and set to start automatically.
Default Installation PathVersion Number
C:\Program Files (x86)\Apache Software Foundation\Tomcat 7.07.0.64
Note: Apache Tomcat is required to run the web components. If this version has already been installed,the installer will not select it by default. The administrator can opt to reinstall it. Doing so will stop theApache Tomcat service and restart it after installation. If another version of Tomcat is found, the olderversion of the Tomcat service will be stopped and set to a disabled state. The new Apache Tomcat servicewill be installed and started.
IIS Redirector
The IIS Redirector (an ISAPI filter) is used to hook IIS to Tomcat. Its function is to allow the use of IIS as theWeb Server, but redirects all Java-related execution to Tomcat. If the administrator selects to install theredirector, a virtual folder and an ISAPI filter named jakarta will be added to the IIS “Default Web Site”.
ISApi Redirector will be installed in the Tomcat folder.
Note: The installation of the IIS Redirector will not be selected if IIS is not installed on the computer.Also, if you installed IIS 7, you must additionally install the following Role Services of the Web Server(IIS):
• IIS6 Metabase Compatibility• ISAPI Filters• ISAPI Extensions• Windows Authentication (optional component required to use NT authentication for the Web client)
Python
Description of the Python language and of its use in XMediusFAX.
Note: Depending on your license, the XMediusFAX feature associated to this third party software maybe disabled.
26 XMediusFAX 8.0 | Installation and Maintenance Guide
Chapter 3 | Server Applications: Installation

Python is a dynamic object-oriented programming language. It is used by XMediusFAX to allow the creationand use of more flexible features at two levels of the process of faxes:
• Customized rules for the fax incoming routing table• Customized destinations for the fax notifications
It will be automatically installed through the server and client installations, depending on the modules selectedto be installed.
Default Installation PathVersion Number
C:\Python272.7.10
Note: Python may be installed in the Client install, depending on the selected applications.
For more information on the Python language, see the website: http://www.python.org.
XMediusFAX 8.0 | Installation and Maintenance Guide 27
Chapter 3 | Server Applications: Installation

28 XMediusFAX 8.0 | Installation and Maintenance Guide
Chapter 3 | Server Applications: Installation
Basic ConfigurationsChapter 4
Services Rights Configurations
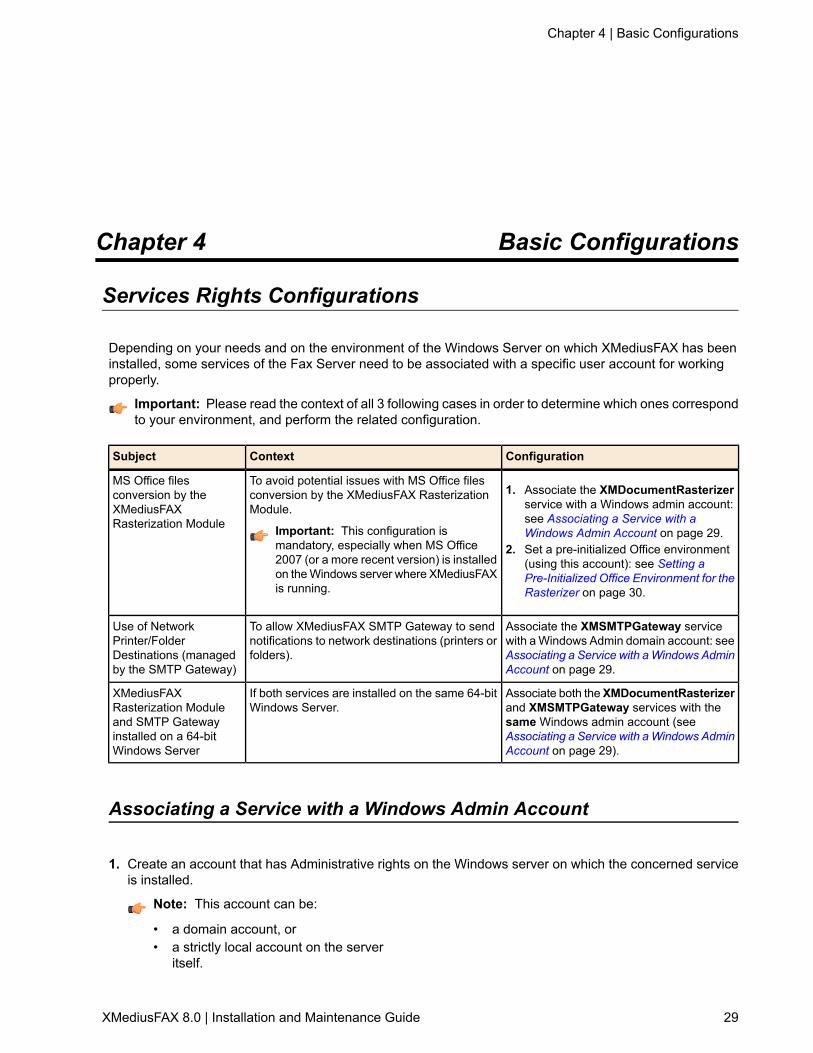
Depending on your needs and on the environment of the Windows Server on which XMediusFAX has beeninstalled, some services of the Fax Server need to be associated with a specific user account for workingproperly.
Important: Please read the context of all 3 following cases in order to determine which ones correspondto your environment, and perform the related configuration.
ConfigurationContextSubject
To avoid potential issues with MS Office filesconversion by the XMediusFAX RasterizationModule.
MS Office filesconversion by theXMediusFAXRasterization Module
1. Associate the XMDocumentRasterizerservice with a Windows admin account:see Associating a Service with aWindows Admin Account on page 29.Important: This configuration is
mandatory, especially when MS Office 2. Set a pre-initialized Office environment(using this account): see Setting a2007 (or a more recent version) is installed
on the Windows server where XMediusFAXis running.
Pre-Initialized Office Environment for theRasterizer on page 30.
Associate the XMSMTPGateway servicewith a Windows Admin domain account: see
To allow XMediusFAX SMTP Gateway to sendnotifications to network destinations (printers orfolders).
Use of NetworkPrinter/FolderDestinations (managedby the SMTP Gateway)
Associating a Service with aWindows AdminAccount on page 29.
Associate both theXMDocumentRasterizerand XMSMTPGateway services with the
If both services are installed on the same 64-bitWindows Server.
XMediusFAXRasterization Moduleand SMTP Gateway same Windows admin account (seeinstalled on a 64-bitWindows Server
Associating a Service with aWindows AdminAccount on page 29).
Associating a Service with a Windows Admin Account
1. Create an account that has Administrative rights on the Windows server on which the concerned serviceis installed.
Note: This account can be:
• a domain account, or• a strictly local account on the server
itself.
XMediusFAX 8.0 | Installation and Maintenance Guide 29
Chapter 4 | Basic Configurations

2. Configure the concerned service to log on using the account you have granted administrative privileges:a) Access the Windows services management interface (i.e. Start ➤ Run ➤ services.msc).b) Locate the concerned service (e.g. XMDocumentRasterizer or XMSMTPGateway) and edit its
properties.c) Under the Log On tab, select This account and enter the information of the administrative account
you just created.d) Restart the concerned service.
Setting a Pre-Initialized Office Environment for the Rasterizer
1. If you have Office 2007 installed on the server, ensure that you have applied at least Service Pack 1.2. Log out of Windows and log in using the administrative account that you have set to run the
XMDocumentRasterizer service (see Associating a Service with a Windows Admin Account on page29).
3. Open MS Word and MS Excel to ensure that no Welcome screen or error messages occur.
Note: It is not likely that any error will occur; however these applications must not display any promptmessage when they are started, otherwise the Rasterizer will not work properly.
4. Once you have resolved any prompt or error messages, reboot the server.
Activating/ Updating the License and Setting the Channels
Procedure to update your XMediusFAX license with the latest purchased license and set the fax driverchannels accordingly.
Important: Activating and updating a new license (as shown below) requires Internet access on thecomputer where this action is performed.
Otherwise only, the license can still be updated by manual installation of a license file (not shown here;for more information, please refer to the XMediusFAX Administration Guide).
To update the license and adjust your channel settings:
1. Log into the fax system administration interface and browse to: General Settings ➤ Properties.2. Select the License tab.3. Paste in the Activation Code field the activation code you received by email.
Note: If you already have an activation code (from a previous license purchase), it will remain validfor this operation, unless you received a new one.
4. Click Update/Activate now to activate and automatically update your license via the Internet.
Note: This operation might take several seconds.
5. Click OK.6. Restart the XMFaxDriver to update the number of channels (if applicable) according to the new license.7. Verify and adjust (if needed) the settings related to your fax channels:
• Driver ➤ Properties ➤ Options ➤ FoIP Channel Configuration: the Maximum Number OfChannels must have been automatically updated in accordance with the new license.
30 XMediusFAX 8.0 | Installation and Maintenance Guide
Chapter 4 | Basic Configurations

Note: If you have more than one driver installed, you can adjust the Preferred Number OfChannels for each driver.
• Driver ➤ Channels ➤ [Channel] ➤ Properties: you can set the channel mode ( Receive, Send orBoth) for each available channel.
• Sites ➤ [Site] ➤ Properties ➤ Quality of Service ➤ Connections: if you are using more than onesite, you can adjust channel quotas for each site.
For more information about these settings, see the XMediusFAX Administration Guide.
Basic Site Configuration
This procedure is a list of actions to do in order to basically configure your Site after installing the fax server.To know precisely how to perform them, and for more information about the related concepts, please referto the XMediusFAX Administrator Guide.
1. Log into the administration interface and access the Configuration section of your site.2. In the Profiles node, create and setup profiles according to your needs (list of cover sheets, CSID and
security).3. In the Users node, create or import users as required.4. In the Incoming Routing Table node:
a) Set the properties of the Default Rule and enter the address to use for misrouted faxes.This is usually the fax administrator’s e-mail address.
b) Set the incoming routing table by creating and configuring routing rules.For example: associate DNIS to a list of destinations, most likely the e-mail address of a user.
5. In the General Settings node, access the Properties:a) Click the General tab to configure the Incoming Fax Notifications and the Rasterization Options.b) Click the SMTP tab to set the Feedback Address (in case of transmission failure) for the gateway for
SMTP and to add, if needed, Trusted Mail Servers.The Feedback Address is usually the fax administrator’s e-mail address.
Basic System Configuration
This procedure is a list of actions to do in order to basically configure the system side of your fax server. Toknow precisely how to perform them, and for more information about the related concepts, please refer tothe XMediusFAX Administrator Guide.
1. Log into the administration interface as a system administrator and access the Configuration section ofthe system.
2. In the Driver ➤ Channels node of your host:a) Access the Properties of each channel.b) Review the mode settings: Inbound, Outbound or Both.
3. In the SMTP Gateway node of your host:a) Access the Properties.b) Review the current gateway for SMTP settings.
We recommend that an external dedicated server be used for relaying mail.
XMediusFAX 8.0 | Installation and Maintenance Guide 31
Chapter 4 | Basic Configurations

4. In the Modification Table node:a) According to your local dial plan, add new items to the table and configure them.b) Setup the modification table to properly handle local calls, then test it.
5. If needed, create a new site and configure its properties.a) For a basic configuration of this site, see Basic Site Configuration on page 31.b) Add the entry for the new site on the system routing table by specifying the DNIS ranges associated
with that site.
32 XMediusFAX 8.0 | Installation and Maintenance Guide
Chapter 4 | Basic Configurations

Secured HTTP (HTTPS) ConfigurationsChapter 5
Secured HTTP (HTTPS) Configurations
Several XMediusFAX clients use HTTP requests to communicate with the server. This includes:
• The Web clients:
• Web administration interface• Web access for users
• The other Web tools such as:
• Fax Account Monitoring Spot tool• Web Fax Composer printer
• The SendFAX client• The fax forms for mail clients (Outlook and Notes)
XMediusFAX allows you to secure these HTTP requests by using HTTPS (HTTP with SSL).
This requires a few configuration on both the server and client side (see Basic Scenario on page 33).
Restriction: This chapter does not apply to HTTPS configuration for the XMediusFAX Web Services.For more information, see the XMediusFAX Administration Guide.
Basic Scenario
Basically, you have to perform some configuration for allowing the clients to use HTTPS connection: on theserver side (through IIS) and on the client side.
1. On the server side:a) Ensure to have IIS installed and properly configured (already working in HTTP).b) Enable HTTPS in IIS (refer to the IIS documentation).
2. Ensure that the certificate of the server is trusted on the client side.
Note: If the certificate is signed by a trusted certification authority that is listed in the environment ofthe client, the certificate will automatically be trusted by the clients. Otherwise, you will need to addthe certificate into the appropriate Trusted Root Certification Authorities container.
3. Setup all concerned clients for using HTTPS:Depending on the client:
XMediusFAX 8.0 | Installation and Maintenance Guide 33
Chapter 5 | Secured HTTP (HTTPS) Configurations

ActionClient
Users will simply use https in the URL field of the Web Browser (instead of http).Web clients (User andAdmininstrator)
Configure https during installation (see Client Applications Installation on page 69), orafter (see XMediusFAX User Guide).
SendFAX and other Webtools
Configure https during installation (see SMTP Integration: Overview on page 35).Fax Forms (Outlook orNotes)
34 XMediusFAX 8.0 | Installation and Maintenance Guide
Chapter 5 | Secured HTTP (HTTPS) Configurations
SMTP IntegrationChapter 6
SMTP Integration: Overview
One of the major features of XMediusFAX is to enable users to send and receive faxes as emails directlythrough their SMTP client. Therefore, it is important to know some details on the way XMediusFAX managesSMTP and about the other features that you can benefit from through SMTP.
Note: Depending on your license, some or all of the SMTP features described here may be unavailable.Please consult your license terms.
Attention: This chapter does not apply to the integration of Microsoft online products (Office 365 /Exchange Online service). See Integration Planning: Office 365 and Exchange Online on page 63 toknow the specific configurations to perform and the XMediusFAX functionality limitations due to the useof these products.
In this chapter, you will find:
• Details on the XMediusFAX SMTP Gateway and recommendations about linking it to a mail server (seeThe XMediusFAX SMTP Gateway on page 35).
• The procedures and recommendations for integrating Microsoft Exchange as mail server for XMediusFAX(see Microsoft Exchange Integration on page 37).
• The procedure for installing customized forms for Microsoft Outlook when your deployment includesExchange as mail server (see Microsoft Outlook Forms on page 39).
• The procedure for installing a customized composition form for IBM Notes when your deployment includesDomino as mail server (see IBM Notes Form on page 41).
• Recommendations (and procedures) if you wish to use TLS encryption for SMTP with XMediusFAX (seeUsing TLS for SMTP with XMediusFAX on page 48).
The XMediusFAX SMTP Gateway
The XMSmtpGateway module of XMediusFAX (called SMTP Gateway) has the two usual basic functions ofa mail server, allowing the Fax Server to:
• Receive emails from XMediusFAX users in order to convert them into faxes;• Send emails to XMediusFAX users for notification purpose (including received faxes and fax sending
reports).
Therefore, the SMTP Gateway can be directly connected to the outside (for the fax/email needs) and willwork basically like a mail server in that case.
XMediusFAX 8.0 | Installation and Maintenance Guide 35
Chapter 6 | SMTP Integration
However, if you wish to increase security and queues performance when using XMediusFAX, it is highlyrecommended to connect the SMTP Gateway to a real mail server with which your Fax Server will benefitfrom many features that are dedicated to emails management. In some cases, you might also benefit fromother features that are specific to fax management, like the Microsoft Outlook fax composition and notificationforms or the IBM Notes fax composition form (depending on your license; see Microsoft Outlook Forms onpage 39 or IBM Notes Form on page 41 for more information).
To know the benefits related to the use of a mail server for sending faxes or receiving notifications by email,see sections: Using a Mail Server for Sending Faxes on page 36 and Using a Mail Relay Server for ReceivingNotifications on page 36.
A typical fax server/mail server deployment is described in section: Fax/Mail Servers Typical Deployment onpage 37.
Using a Mail Server for Sending Faxes
When a user is sending a fax by email, XMediusFAX finally receives it through its SMTP Gateway(XMSmtpGateway module), where the email is converted into a fax.
For this, a direct connection is possible between the user and the SMTP Gateway. However, by inserting amail server in front of the SMTP Gateway, you can benefit from all special features that such a device canprovide, including:
• A more flexible management and a better performance of email queues (suspend or redirect queues,manage simultaneous messages...)
• Spam filtering• Virus checking
Therefore, it is highly recommended to include a mail server to your deployment if you plan to allow users tosend faxes by email. Any mail server can be used for this.
Note: Mail servers like Microsoft Exchange and IBM Domino can give you access to additional faxingfeatures, depending on your XMediusFAX license (see Microsoft Outlook Forms on page 39 or IBMNotes Form on page 41 for more details).
Using a Mail Relay Server for Receiving Notifications
When a user is expecting to receive email notifications (sending reports or received faxes) from XMediusFAX,the SMTP Gateway is able to send these emails to any mail relay server (locally or on the Internet). However,it is highly recommended to insert a corporate mail relay server in front of the SMTP Gateway, in order tomanage locally all the emails sent by the SMTP Gateway before relaying them to the outside. Additionally,you can benefit from all special features that such a device can provide, allowing:
• To eliminate the effect of communications delays (from the Fax Server perspective) with external servers(especially through the Internet)
• To receive NDR (Non Delivery Report) messages in case the mail server would not be able to deliversome notifications sent by the Fax Server
If you plan to allow users to receive email notifications and if you have already a corporate mail system, youshould use it for relaying all emails sent by the SMTP Gateway. Any local mail relay server can be used forthis too.
Note: Mail servers like Microsoft Exchange can give you access to additional notification features,depending on your XMediusFAX license (see Microsoft Outlook Forms on page 39 for more details).
36 XMediusFAX 8.0 | Installation and Maintenance Guide
Chapter 6 | SMTP Integration
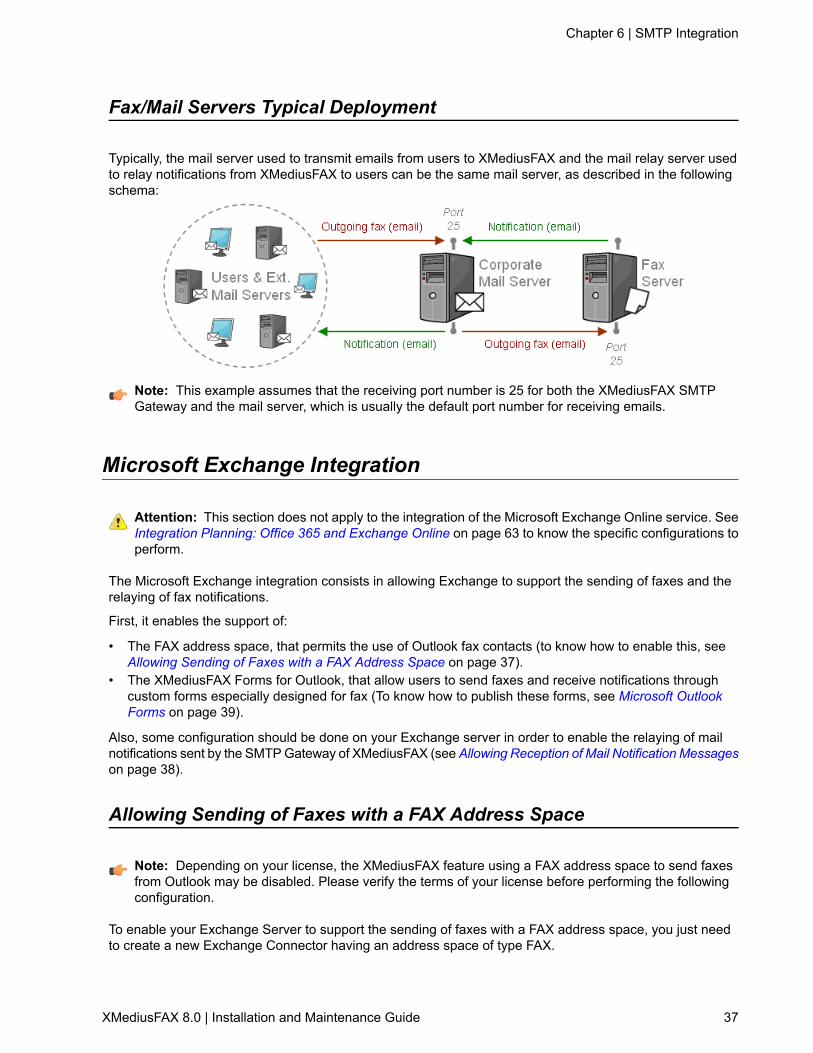
Fax/Mail Servers Typical Deployment
Typically, the mail server used to transmit emails from users to XMediusFAX and the mail relay server usedto relay notifications from XMediusFAX to users can be the same mail server, as described in the followingschema:
Note: This example assumes that the receiving port number is 25 for both the XMediusFAX SMTPGateway and the mail server, which is usually the default port number for receiving emails.
Microsoft Exchange Integration
Attention: This section does not apply to the integration of the Microsoft Exchange Online service. SeeIntegration Planning: Office 365 and Exchange Online on page 63 to know the specific configurations toperform.
The Microsoft Exchange integration consists in allowing Exchange to support the sending of faxes and therelaying of fax notifications.
First, it enables the support of:
• The FAX address space, that permits the use of Outlook fax contacts (to know how to enable this, seeAllowing Sending of Faxes with a FAX Address Space on page 37).
• The XMediusFAX Forms for Outlook, that allow users to send faxes and receive notifications throughcustom forms especially designed for fax (To know how to publish these forms, see Microsoft OutlookForms on page 39).
Also, some configuration should be done on your Exchange server in order to enable the relaying of mailnotifications sent by the SMTP Gateway of XMediusFAX (see Allowing Reception of Mail NotificationMessageson page 38).
Allowing Sending of Faxes with a FAX Address Space
Note: Depending on your license, the XMediusFAX feature using a FAX address space to send faxesfrom Outlook may be disabled. Please verify the terms of your license before performing the followingconfiguration.
To enable your Exchange Server to support the sending of faxes with a FAX address space, you just needto create a new Exchange Connector having an address space of type FAX.
XMediusFAX 8.0 | Installation and Maintenance Guide 37
Chapter 6 | SMTP Integration

Procedure
This procedure shows how to create a Send Connector with address space of type FAX to forward all faxesto the XMediusFAX SMTP gateway.
1. Open the Exchange Management Shell.2. From the command prompt, execute the following command:
New-SendConnector -Name <ConnectorName> -AddressSpace"fax:*;1" -SmartHosts "<SMTPGateway>" -DNSRoutingEnabled$false -SourceTransportServers "<HubTransportServers>"
• <ConnectorName> must be replaced by the name you wish to give to the connector.• <SMTPGateway>must be replaced with the hostname or IP address of the host where the XMediusFAX
SMTP Gateway is running.• <HubTransportServers> must be replaced with the names of the Hub Transport servers that can use
this Send connector.
For example:New-SendConnector -Name FaxServer -AddressSpace "fax:*;1" -SmartHosts"faxserver.mycompany.com" -DNSRoutingEnabled $false -SourceTransportServers"server01"
Note: For more information about the New-SendConnector command, refer to the following Weblink: http://technet.microsoft.com/en-us/library/aa998936(EXCHG.80).aspx
From the Exchange Management Console, the SEND connector will appear in the organization’s HubTransport list.
Allowing Reception of Mail Notification Messages
Integrating Microsoft Exchange as mail relay server means that all SMTP messages (mail notifications) comingfrom the XMediusFAX SMTP Gateway must be accepted by Exchange in order to relay them to internal orexternal mailboxes (depending on the Fax Server configuration).
38 XMediusFAX 8.0 | Installation and Maintenance Guide
Chapter 6 | SMTP Integration
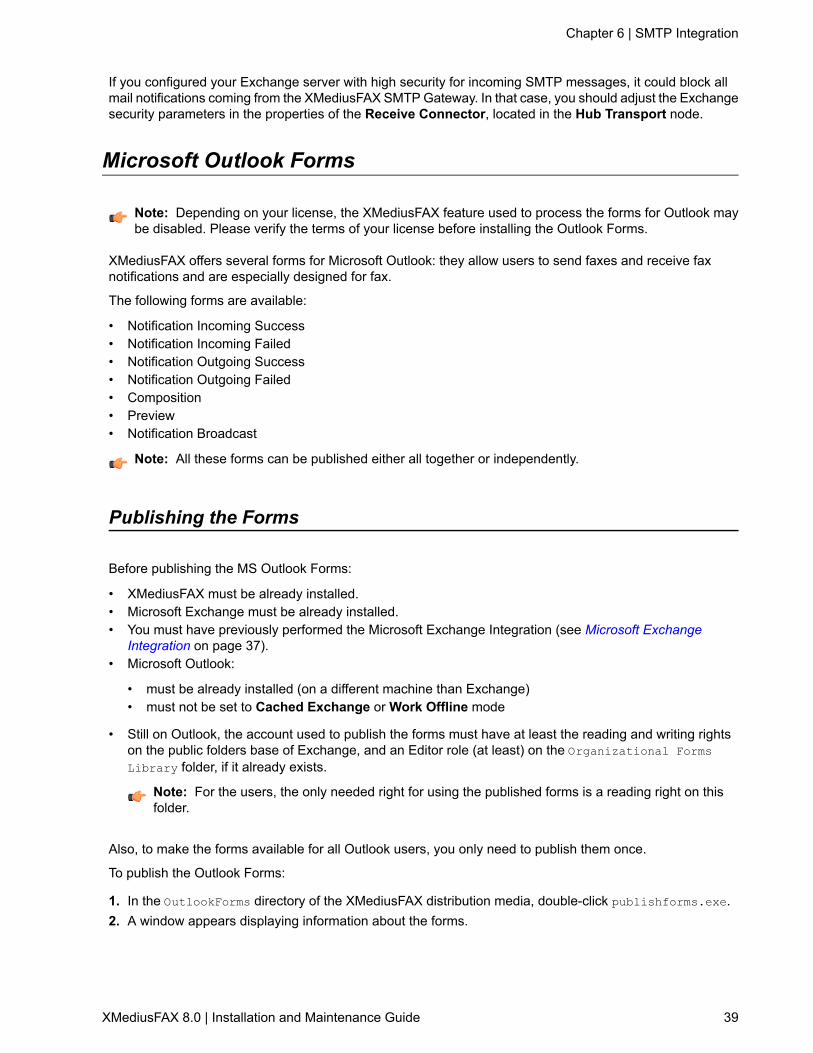
If you configured your Exchange server with high security for incoming SMTP messages, it could block allmail notifications coming from the XMediusFAX SMTP Gateway. In that case, you should adjust the Exchangesecurity parameters in the properties of the Receive Connector, located in the Hub Transport node.
Microsoft Outlook Forms
Note: Depending on your license, the XMediusFAX feature used to process the forms for Outlook maybe disabled. Please verify the terms of your license before installing the Outlook Forms.
XMediusFAX offers several forms for Microsoft Outlook: they allow users to send faxes and receive faxnotifications and are especially designed for fax.
The following forms are available:
• Notification Incoming Success• Notification Incoming Failed• Notification Outgoing Success• Notification Outgoing Failed• Composition• Preview• Notification Broadcast
Note: All these forms can be published either all together or independently.
Publishing the Forms
Before publishing the MS Outlook Forms:
• XMediusFAX must be already installed.• Microsoft Exchange must be already installed.• You must have previously performed the Microsoft Exchange Integration (see Microsoft Exchange
Integration on page 37).• Microsoft Outlook:
• must be already installed (on a different machine than Exchange)• must not be set to Cached Exchange or Work Offline mode
• Still on Outlook, the account used to publish the forms must have at least the reading and writing rightson the public folders base of Exchange, and an Editor role (at least) on the Organizational FormsLibrary folder, if it already exists.
Note: For the users, the only needed right for using the published forms is a reading right on thisfolder.
Also, to make the forms available for all Outlook users, you only need to publish them once.
To publish the Outlook Forms:
1. In the OutlookForms directory of the XMediusFAX distribution media, double-click publishforms.exe.2. A window appears displaying information about the forms.
XMediusFAX 8.0 | Installation and Maintenance Guide 39
Chapter 6 | SMTP Integration
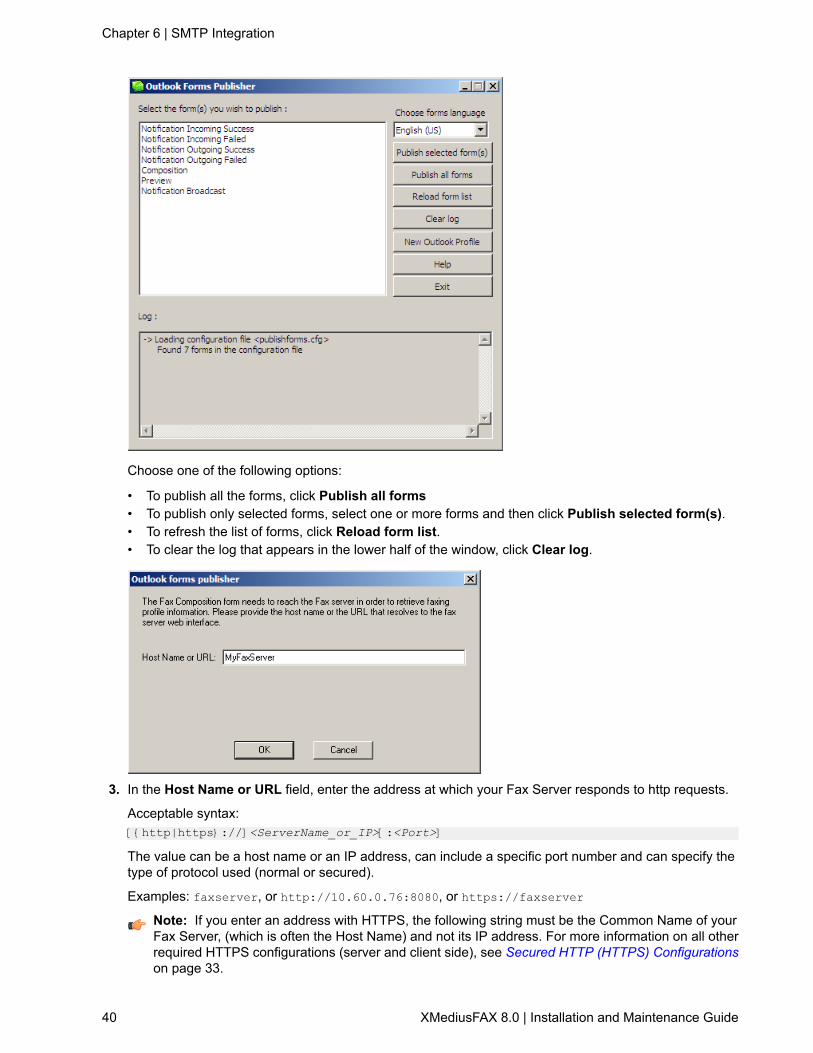
Choose one of the following options:
• To publish all the forms, click Publish all forms• To publish only selected forms, select one or more forms and then click Publish selected form(s).• To refresh the list of forms, click Reload form list.• To clear the log that appears in the lower half of the window, click Clear log.
3. In the Host Name or URL field, enter the address at which your Fax Server responds to http requests.
Acceptable syntax:[{http|https}://]<ServerName_or_IP>[:<Port>]
The value can be a host name or an IP address, can include a specific port number and can specify thetype of protocol used (normal or secured).
Examples: faxserver, or http://10.60.0.76:8080, or https://faxserver
Note: If you enter an address with HTTPS, the following string must be the Common Name of yourFax Server, (which is often the Host Name) and not its IP address. For more information on all otherrequired HTTPS configurations (server and client side), see Secured HTTP (HTTPS) Configurationson page 33.
40 XMediusFAX 8.0 | Installation and Maintenance Guide
Chapter 6 | SMTP Integration
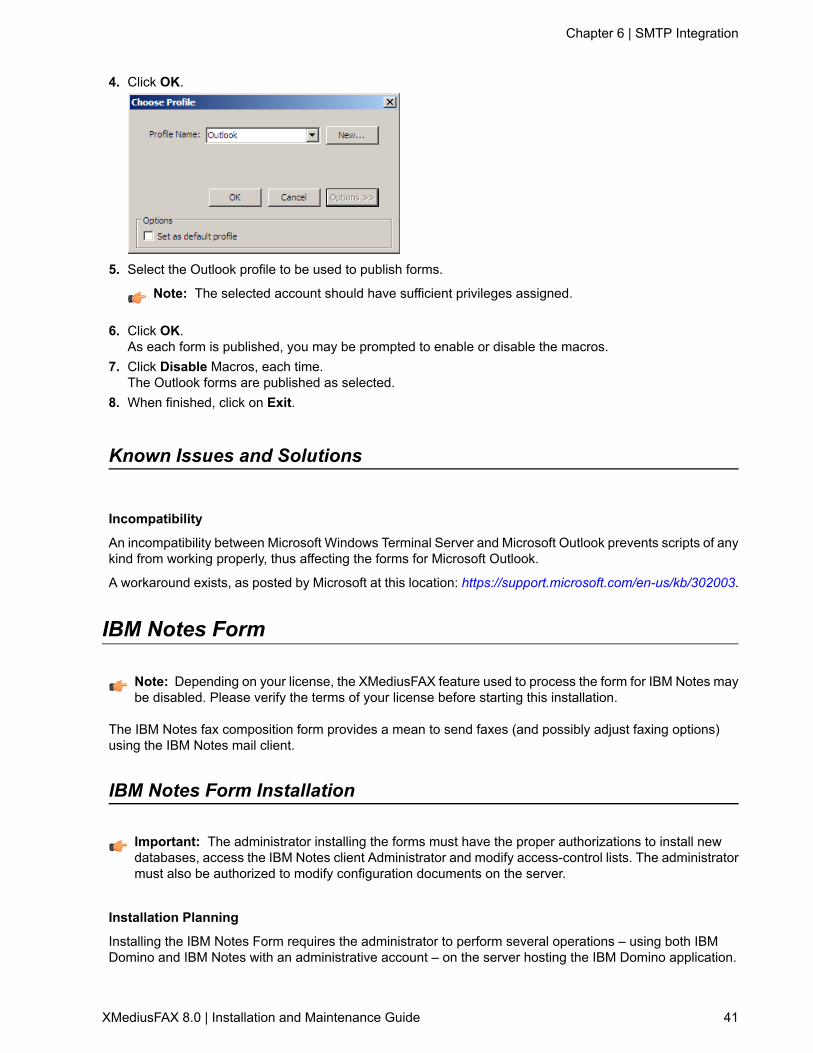
4. Click OK.
5. Select the Outlook profile to be used to publish forms.
Note: The selected account should have sufficient privileges assigned.
6. Click OK.As each form is published, you may be prompted to enable or disable the macros.
7. Click Disable Macros, each time.The Outlook forms are published as selected.
8. When finished, click on Exit.
Known Issues and Solutions
Incompatibility
An incompatibility between Microsoft Windows Terminal Server and Microsoft Outlook prevents scripts of anykind from working properly, thus affecting the forms for Microsoft Outlook.
A workaround exists, as posted by Microsoft at this location: https://support.microsoft.com/en-us/kb/302003.
IBM Notes Form
Note: Depending on your license, the XMediusFAX feature used to process the form for IBM Notes maybe disabled. Please verify the terms of your license before starting this installation.
The IBM Notes fax composition form provides a mean to send faxes (and possibly adjust faxing options)using the IBM Notes mail client.
IBM Notes Form Installation
Important: The administrator installing the forms must have the proper authorizations to install newdatabases, access the IBM Notes client Administrator and modify access-control lists. The administratormust also be authorized to modify configuration documents on the server.
Installation Planning
Installing the IBM Notes Form requires the administrator to perform several operations – using both IBMDomino and IBM Notes with an administrative account – on the server hosting the IBM Domino application.
XMediusFAX 8.0 | Installation and Maintenance Guide 41
Chapter 6 | SMTP Integration

Here are the main installation steps (you will further find all detailed steps for each):
1. Signing the Database on page 422. Installing and configuring the Fax Memo Template on page 423. Synchronizing the Mail Template Databases on page 454. Configuring the IBM Notes Form on page 465. Redirecting the Fax.com Domain to the SMTP Gateway on page 46
After this, all targeted IBM Notes users will be able to use the installed form.
Signing the Database
The database must first be signed by an administrator, to vouch for its integrity:
1. Put the database files on the IBM Domino server:a) In Microsoft Windows Explorer, browse to the <DominoInstallPath>\Data directory, on the server's
hard drive.b) Create a sub-directory called Fax.c) Copy the Fax_Memo_Install.nsf and FAXconfiguration.nsf database files, from the NotesForms
folder in the XMediusFAX distribution media to the Fax sub-directory you just created.
Note: .nsf stands forNotes Storage Facility. These files represent typical IBM Notes databases.
2. Find the database files in the Domino Administrator:a) Start the Domino Administrator by clicking Start ➤ Programs ➤ IBM Applications ➤ IBM Domino
Administrator.b) Once logged in, click on the tab for the server (domain), on which the database that you want to sign
is located.c) Click on the Files tab.d) In the panel at the left, double-click on the Fax folder.
3. Sign the database files:a) In the panel at the center of the window, select both databases (Fax Memo Install and Fax Configuration),
right-click and select Sign.b) Choose either of the following, as per your organization’s policy:
• Active User's ID to sign using your ID.• Active Server's ID to sign using the ID of the server that stores the database or template.
c) Click OK.d) In the Create Cross Certificate dialog that appears, click Yes.
A dialog box may appear, showing the number of databases processed and the number of errors thatoccurred (if any). See the Notes Log for details.
Installing and configuring the Fax Memo Template
The goal is to modify the organization’s mail template as little as possible. This installation basically does thefollowing:
• copies the current mail template into the Fax sub-directory (MailFaxTemplate.ntf). The copy becomesthe new template and is used to refresh the mail databases,
• integrates the fax form design elements into the copy of the mail template,
42 XMediusFAX 8.0 | Installation and Maintenance Guide
Chapter 6 | SMTP Integration
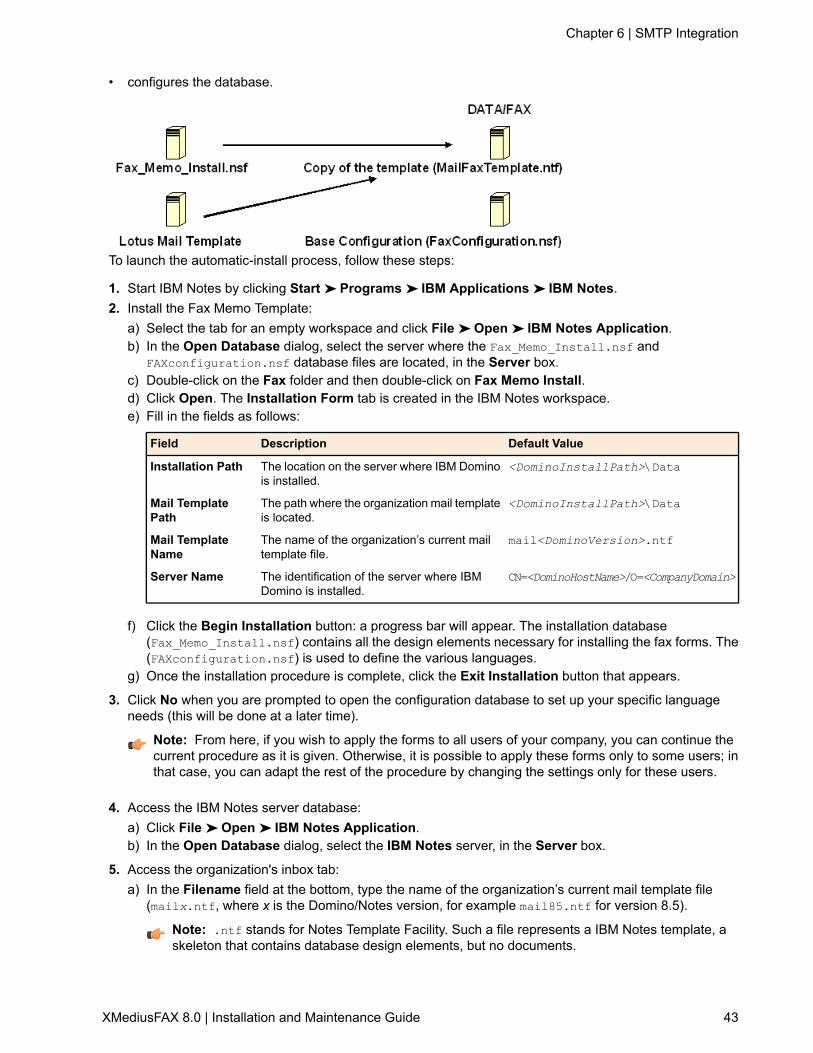
• configures the database.
To launch the automatic-install process, follow these steps:
1. Start IBM Notes by clicking Start ➤ Programs ➤ IBM Applications ➤ IBM Notes.2. Install the Fax Memo Template:
a) Select the tab for an empty workspace and click File ➤ Open ➤ IBM Notes Application.b) In the Open Database dialog, select the server where the Fax_Memo_Install.nsf and
FAXconfiguration.nsf database files are located, in the Server box.c) Double-click on the Fax folder and then double-click on Fax Memo Install.d) Click Open. The Installation Form tab is created in the IBM Notes workspace.e) Fill in the fields as follows:
Default ValueDescriptionField
<DominoInstallPath>\DataThe location on the server where IBM Dominois installed.
Installation Path
<DominoInstallPath>\DataThe path where the organization mail templateis located.
Mail TemplatePath
mail<DominoVersion>.ntfThe name of the organization’s current mailtemplate file.
Mail TemplateName
CN=<DominoHostName>/O=<CompanyDomain>The identification of the server where IBMDomino is installed.
Server Name
f) Click the Begin Installation button: a progress bar will appear. The installation database(Fax_Memo_Install.nsf) contains all the design elements necessary for installing the fax forms. The(FAXconfiguration.nsf) is used to define the various languages.
g) Once the installation procedure is complete, click the Exit Installation button that appears.
3. Click No when you are prompted to open the configuration database to set up your specific languageneeds (this will be done at a later time).
Note: From here, if you wish to apply the forms to all users of your company, you can continue thecurrent procedure as it is given. Otherwise, it is possible to apply these forms only to some users; inthat case, you can adapt the rest of the procedure by changing the settings only for these users.
4. Access the IBM Notes server database:a) Click File ➤ Open ➤ IBM Notes Application.b) In the Open Database dialog, select the IBM Notes server, in the Server box.
5. Access the organization's inbox tab:a) In the Filename field at the bottom, type the name of the organization’s current mail template file
(mailx.ntf, where x is the Domino/Notes version, for example mail85.ntf for version 8.5).
Note: .ntf stands for Notes Template Facility. Such a file represents a IBM Notes template, askeleton that contains database design elements, but no documents.
XMediusFAX 8.0 | Installation and Maintenance Guide 43
Chapter 6 | SMTP Integration
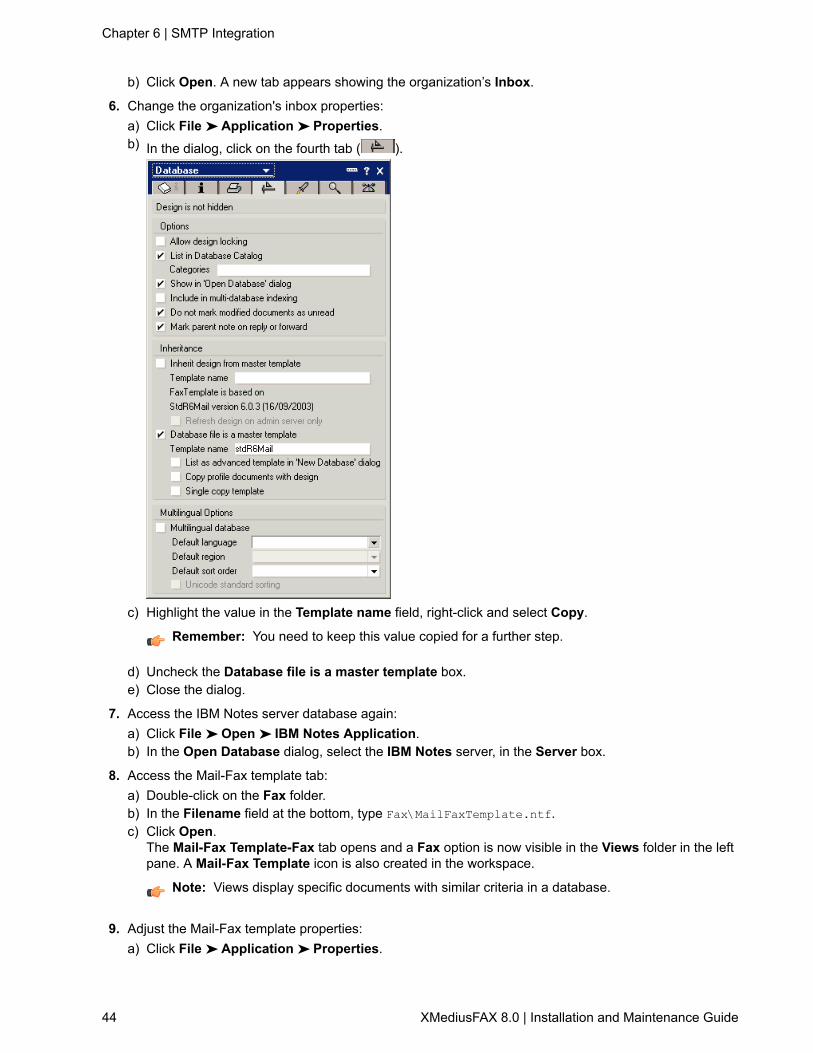
b) Click Open. A new tab appears showing the organization’s Inbox.
6. Change the organization's inbox properties:a) Click File ➤ Application ➤ Properties.b) In the dialog, click on the fourth tab ( ).
c) Highlight the value in the Template name field, right-click and select Copy.
Remember: You need to keep this value copied for a further step.
d) Uncheck the Database file is a master template box.e) Close the dialog.
7. Access the IBM Notes server database again:a) Click File ➤ Open ➤ IBM Notes Application.b) In the Open Database dialog, select the IBM Notes server, in the Server box.
8. Access the Mail-Fax template tab:a) Double-click on the Fax folder.b) In the Filename field at the bottom, type Fax\MailFaxTemplate.ntf.c) Click Open.
The Mail-Fax Template-Fax tab opens and a Fax option is now visible in the Views folder in the leftpane. A Mail-Fax Template icon is also created in the workspace.
Note: Views display specific documents with similar criteria in a database.
9. Adjust the Mail-Fax template properties:a) Click File ➤ Application ➤ Properties.
44 XMediusFAX 8.0 | Installation and Maintenance Guide
Chapter 6 | SMTP Integration
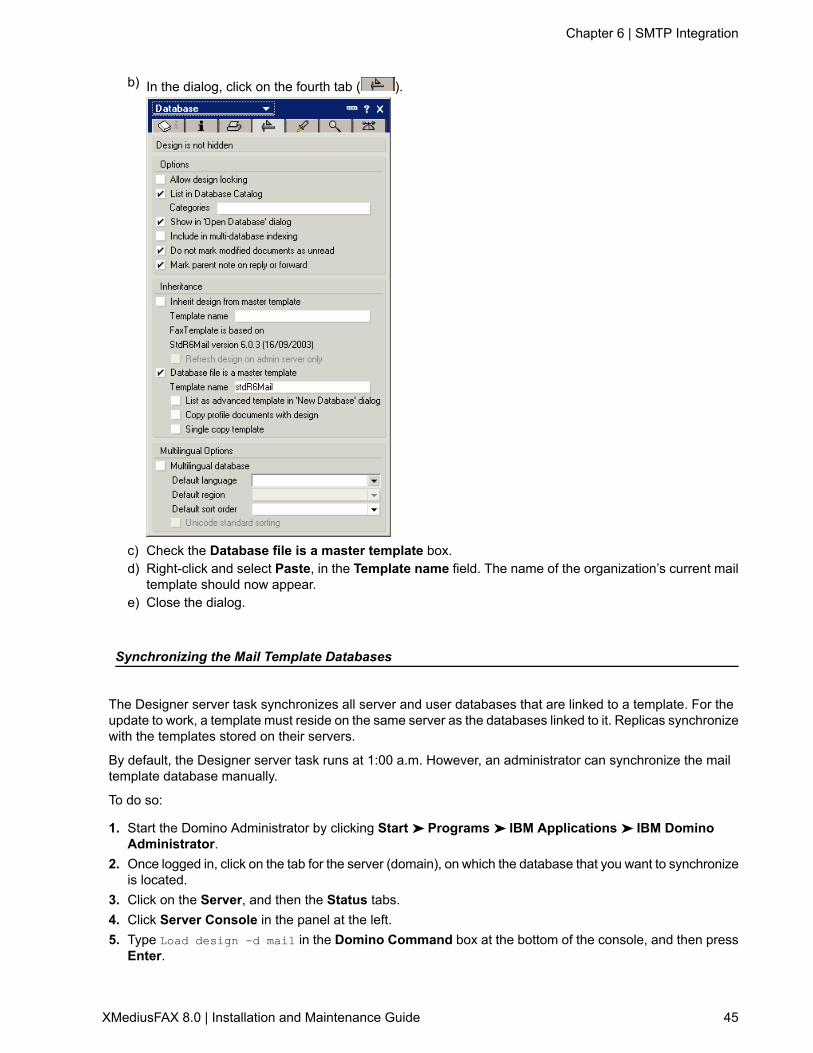
b) In the dialog, click on the fourth tab ( ).
c) Check the Database file is a master template box.d) Right-click and select Paste, in the Template name field. The name of the organization’s current mail
template should now appear.e) Close the dialog.
Synchronizing the Mail Template Databases
The Designer server task synchronizes all server and user databases that are linked to a template. For theupdate to work, a template must reside on the same server as the databases linked to it. Replicas synchronizewith the templates stored on their servers.
By default, the Designer server task runs at 1:00 a.m. However, an administrator can synchronize the mailtemplate database manually.
To do so:
1. Start the Domino Administrator by clicking Start ➤ Programs ➤ IBM Applications ➤ IBM DominoAdministrator.
2. Once logged in, click on the tab for the server (domain), on which the database that you want to synchronizeis located.
3. Click on the Server, and then the Status tabs.4. Click Server Console in the panel at the left.5. Type Load design -d mail in the Domino Command box at the bottom of the console, and then press
Enter.
XMediusFAX 8.0 | Installation and Maintenance Guide 45
Chapter 6 | SMTP Integration

Configuring the IBM Notes Form
1. Start IBM Notes by clicking Start ➤ Programs ➤ IBM Applications ➤ IBM Notes.2. Create and open the Fax Configuration tab:
a) Select the tab for an empty workspace and click File ➤ Open ➤ IBM Notes Application.b) In the Open Database dialog that appears, select the server where the FAXconfiguration.nsf
database file is located, in the Server box.c) Double-click on the Fax folder and then double-click on Fax Configuration.d) Click Open.
The Fax Configuration tab is created in the IBM Notes workspace.
3. Adjust the Form settings for connection to the Fax Server:a) Select the language for which you want to make the modification.b) Double-click the value in the Profile Web Address column and edit the address.
Acceptable syntax:[{http|https}://]<ServerName_or_IP>[:<Port>]/fax/Profile.jsp?ProfileVersion=3
The value must include the host name or IP address of the Fax Server. Optionally, it can include aspecific port number and can specify the type of protocol used (normal or secured).
Examples:faxserver/fax/Profile.jsp?ProfileVersion=3
http://10.60.0.76:8080/fax/Profile.jsp?ProfileVersion=3
https://faxserver/fax/Profile.jsp?ProfileVersion=3
Note: If you enter an address with HTTPS, the following string must be the Common Name ofyour Fax Server, (which is often the Host Name) and not its IP address. For more information onall other required HTTPS configurations (server and client side), see Secured HTTP (HTTPS)Configurations on page 33.
c) Repeat all these steps for all the languages being used.
4. Click Save & Close.5. Close the IBM Notes Application
Redirecting the Fax.com Domain to the SMTP Gateway
The Notes Form template is pre-configured to use the domain Fax.com by default in order to differentiate itfrom a regular email. A rule must be additionally created in the Domino server to perform the proper redirectionto the Fax Server:
46 XMediusFAX 8.0 | Installation and Maintenance Guide
Chapter 6 | SMTP Integration

1. Start the Domino Administrator by clicking Start ➤ Programs ➤ IBM Applications ➤ IBM DominoAdministrator.
2. Click on the tab for the server (domain).3. Click the Configuration tab.4. Expand the Messaging item in the left-hand panel and click on Domains.5. Click Add Domain.
6. Under the Basics tab, select Foreign SMTP Domain in the Domain type field.7. Under the Routing tab, type Fax.com in the Internet Domain field.8. In the Internet host field, enter the host name or IP address of the computer hosting the XMediusFAX
SMTP gateway.9. Click Save & Close.
A new entry called Fax.com should be visible in the central panel of the Administrator.10. Close the IBM Domino Administrator.
Optional: Customizing the Domain Name Used to Redirect the Forms
If for some reason you need to change the domain Fax.com used by default to redirect the Notes Form toXMediusFAX:
1. Change the domain redirection rule on the Domino server:a) Start the Domino Administrator and access the Domains configuration screen.b) Select the existing fax domain (Fax.com by default).c) Under the Routing tab, type the new domain name in the Internet Domain field.
d) Click Save & Close, then close the IBM Domino Administrator.
2. Change the fax domain name in the Notes Form configuration:a) Start the IBM Notes Application and access the Fax Configuration tab.
XMediusFAX 8.0 | Installation and Maintenance Guide 47
Chapter 6 | SMTP Integration

b) Select the language for which you want to make the modification.c) Adjust the value in the Fax Domain column according to the new fax domain name.d) Repeat the previous steps for all the languages being used.e) Click Save & Close, then close the IBM Notes Application.
Using TLS for SMTP with XMediusFAX
If you wish to increase security on SMTP messages (emails) managed by XMediusFAX, the best solution isto insert a mail server in front of the XMediusFAX SMTP Gateway and configure this email server in order tosupport TLS. Then, your TCP connections will be encrypted (if external servers support TLS too).
Note: For more information about using a mail server with XMediusFAX and about all additional benefitsthis can provide, see The XMediusFAX SMTP Gateway on page 35.
Though, if your local deployment does not include any mail server, you can easily install a small mail relayingsoftware that support TLS on another computer of your local network (or even on the same computer as theFax Server). Among easily available mail relay servers, IIS (Internet Information Services) on Windows andSendmail on other platforms provide easy to configure solutions.
The IIS on Windows offers the benefit of being used and configured directly on the computer hostingXMediusFAX. If this solution may be more convenient, as it does not require the use of another computer, itis however a bit more complex to configure. Therefore, you will find two procedures as examples in thisdocumentation:
1. The first one will describe a typical IIS configuration enabling the support of TLS on SMTP messages usedfor notifications (SMTP Gateway output): see Configuring IIS for SMTP TLS in Output on page 48.
2. The second one will describe a typical IIS configuration enabling the support of TLS on SMTP messagesused for sending faxes (SMTP Gateway input), in addition to the previous case: see Configuring IIS forSMTP TLS in Input on page 54.
Configuring IIS for SMTP TLS in Output
To enable the support of TLS on SMTP messages used for notifications (SMTP Gateway output) on thecomputer hosting XMediusFAX:
1. Verify if the SMTP Service of IIS is installed and enabled on the computer hosting XMediusFAX:a) Verify its presence in the Windows Services: Simple Mail Transfer Protocol (SMTP)b) If the service is not present, install the following Windows component:
• Before Windows 2008:Application Server➤ Internet Information Services (IIS)➤SMTPService• From Windows 2008: Turn Windows features on or off ➤ Features ➤ Add Features ➤ SMTP
Server
48 XMediusFAX 8.0 | Installation and Maintenance Guide
Chapter 6 | SMTP Integration

c) In the Windows Services, access the properties of the SMTP service and set its Startup Type toAutomatic (if it is not already).
Note: Do not start the service now: it must be first configured. If it was already started, you shouldstop it now.
2. Configure IIS as TLS output Gateway:a) Access the Internet Information Services (IIS) Manager.
b) In the left frame of the Manager, expand the host node, right-click the Default SMTP Virtual Servernode and select Rename.
c) Give the node an appropriate name, for example: “Output SMTP Virtual Server”.d) Right-click again the renamed node and select Properties.
e) In the General tab, click Advanced.
XMediusFAX 8.0 | Installation and Maintenance Guide 49
Chapter 6 | SMTP Integration
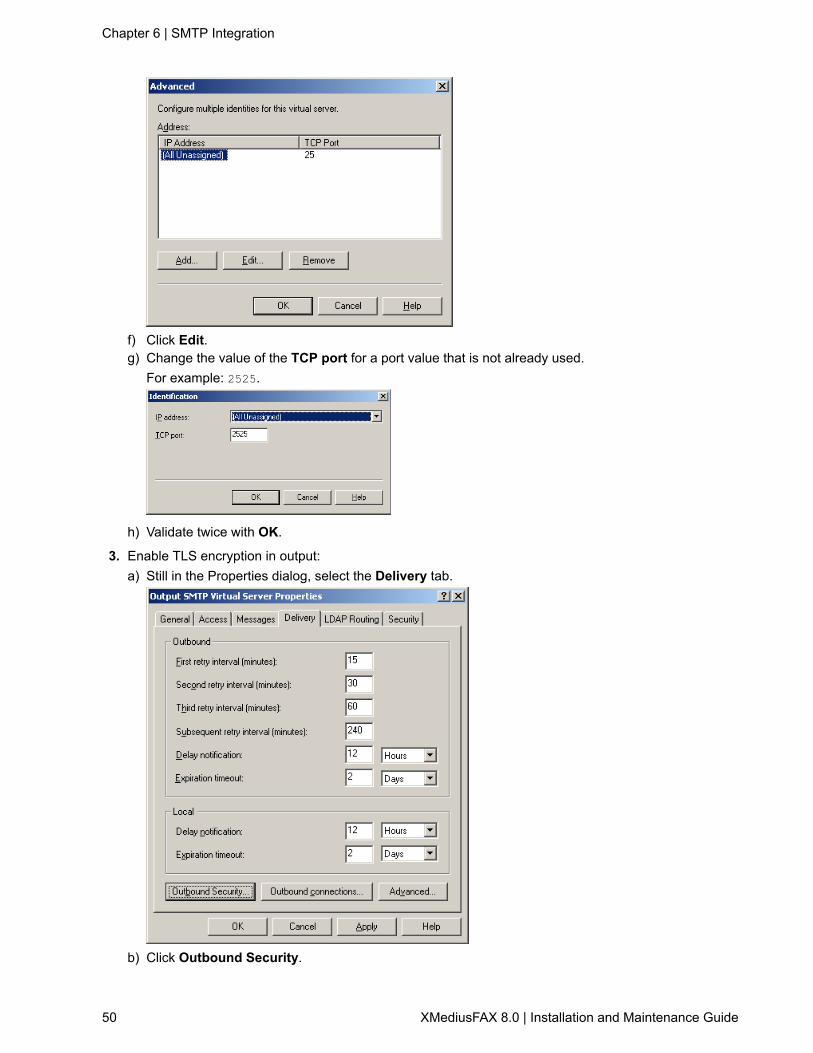
f) Click Edit.g) Change the value of the TCP port for a port value that is not already used.
For example: 2525.
h) Validate twice with OK.
3. Enable TLS encryption in output:a) Still in the Properties dialog, select the Delivery tab.
b) Click Outbound Security.
50 XMediusFAX 8.0 | Installation and Maintenance Guide
Chapter 6 | SMTP Integration
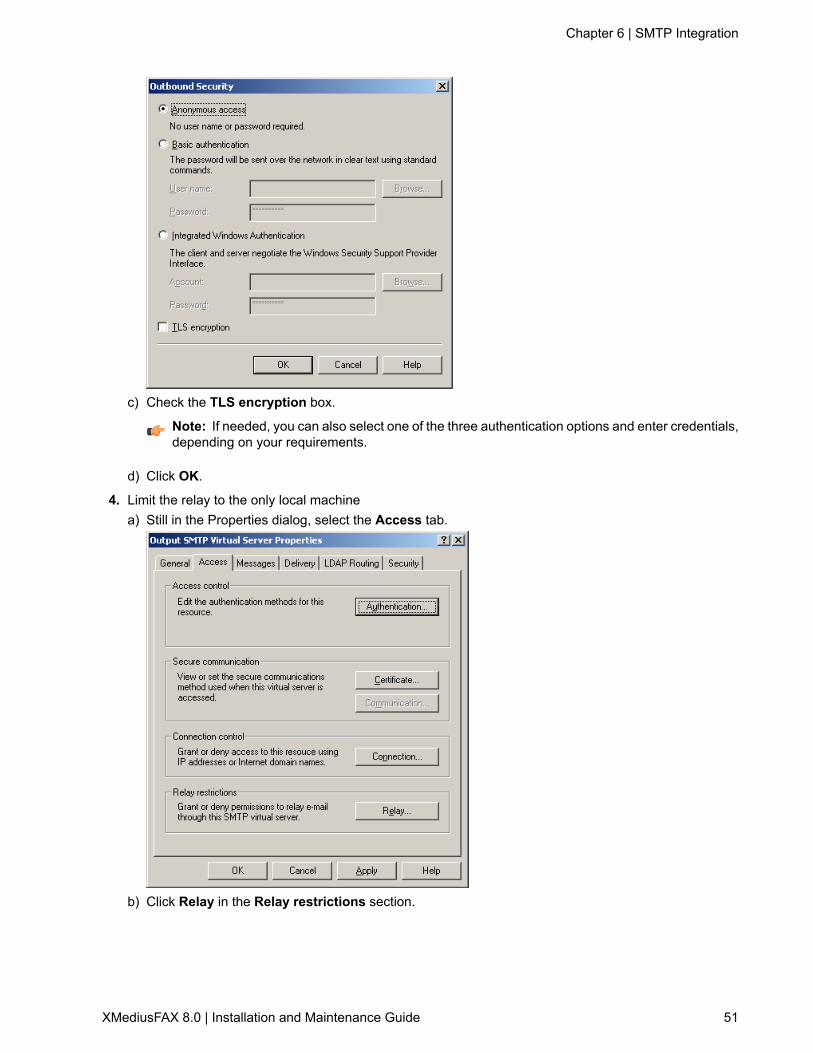
c) Check the TLS encryption box.
Note: If needed, you can also select one of the three authentication options and enter credentials,depending on your requirements.
d) Click OK.
4. Limit the relay to the only local machinea) Still in the Properties dialog, select the Access tab.
b) Click Relay in the Relay restrictions section.
XMediusFAX 8.0 | Installation and Maintenance Guide 51
Chapter 6 | SMTP Integration

c) Select the Only the list below option and click Add.
d) Select the Single Computer option.e) Use the DNS Lookup button and enter localhost in the appearing dialog, then validate.
The corresponding IP address appears now in the IP address field.f) Click OK three times to validate and close the Properties dialog.
5. Start the service using the button.The red mark should disappear from the node.
6. Configure XMediusFAX for relaying SMTP to IIS:a) In the XMediusFAX administration interface, access the System Configuration ➤ [Host] ➤ SMTP
Gateway properties.b) In the Mail Delivery Method section of the Gateway Settings tab, select the Relay to an SMTP
Server option.c) In the Host Name field, enter the host name and port number corresponding to the IIS SMTP input:
According to the example used, the value should be: localhost:2525.
52 XMediusFAX 8.0 | Installation and Maintenance Guide
Chapter 6 | SMTP Integration

Note: Authentication is no more needed here, as IIS and the Fax Server are on the same machine.
d) Click OK to validate.
IIS and XMediusFAX are now configured for using TLS on SMTP in output.
If you wish to test this configuration, see Testing the SMTP TLS Output Configuration on page 53.
If you wish to configure IIS for SMTP TLS in Input, in addition to the configuration you just made, seeConfiguring IIS for SMTP TLS in Input on page 54.
Testing the SMTP TLS Output Configuration
To perform this test, you must have configured your system according to the procedure described inConfiguringIIS for SMTP TLS in Output on page 48. It is assumed the SMTP Gateway of your Fax Server was alreadyworking correctly in output before this configuration.
The purpose of this test is to make the Fax Server generate a mail notification in order to see if it is wellrelayed by the SMTP Virtual Server of IIS.
This can be done for example by sending a new fax from a user account whose profile is set to receive mailnotifications (for more details about sending a fax, see the XMediusFAX User Guide).
If the user does not receive any mail notification for the fax sent, you can try to troubleshoot the problem byfollowing these steps:
1. From the SystemMonitor➤Outbound History node of the administration interface, open the Properties(accessed by right-click) of the fax that has been sent and select the Feedback Sent To tab.Here, the Error Code normally indicates 0, which means the test is successful. If not, continue to followthis procedure.
2. Access the two following folders of the current machine and check their content:
• C:\Inetpub\mailroot\Badmail
• C:\Inetpub\mailroot\Queue
If these folders contain files, continue this procedure.
Note: It is normal that you see files in the Queue folder during the process. It becomes abnormalwhen a file stays in it permanently.
3. Access the Windows Event Viewer: Start ➤ Programs ➤ Administrative Tools ➤ Event Viewer.4. In the left frame, select System.5. In the right frame, double-click messages whose Source is SMTPSVC.
The message window that opens should inform you on the problem.
XMediusFAX 8.0 | Installation and Maintenance Guide 53
Chapter 6 | SMTP Integration

Configuring IIS for SMTP TLS in Input
This procedure assumes you have already configured IIS for SMTP TLS in output (see Configuring IIS forSMTP TLS in Output on page 48).
To enable the support of TLS on SMTP messages used for sending faxes (SMTP Gateway input) on thecomputer hosting XMediusFAX (through IIS):
1. On the current machine, create a new folder: C:\Inetpub\inboundmail.2. Make the XMediusFAX SMTP Gateway listen on another port than 25, for example 2526:
a) Create the following new registry key:HKEY_LOCAL_MACHINE\SOFTWARE\Interstar Technologies\XMedius\SMTPGateway\Settings\Port, of type String.
b) Give it the value 2526 (as per our example).c) Restart the XMSmtpGateway service.
3. Create and configure a second instance of SMTP Virtual Server on IIS:a) Access the Internet Information Services (IIS) Manager.b) In the left frame of the Manager, right-click the host node and select New ➤ SMTP Virtual Server.
c) Name the virtual server (for example, “Input SMTP Virtual Server”) and click Next.
54 XMediusFAX 8.0 | Installation and Maintenance Guide
Chapter 6 | SMTP Integration

d) Leave the selection on (All Unassigned) and click Next.
e) Browse for the folder created at the first step (in our example: C:\Inetpub\inboundmail), validateand click Next.
f) Enter the value example.com and click Finish.
Note: This value is not an example, it must be precisely the indicated value, that corresponds toa non-existing domain – it is what we need here.
The new SMTP Virtual Server appears now in the IIS Manager.4. Configure IIS to forward SMTP messages to XMediusFAX:
a) Right-click the newly created node, select Properties.b) Select the Delivery tab and click Outbound connections.
XMediusFAX 8.0 | Installation and Maintenance Guide 55
Chapter 6 | SMTP Integration

c) Change the value of the TCP port for the value entered through the registry key for the SMTP Gatewayinput.In our example, the value is 2526.
d) Validate with OK and click Advanced.
e) In the Smart host field, enter [127.0.0.1].
Note: This is the local host IP address. Note that the square brackets are mandatory here.
f) Validate with OK.
5. Enable the relay through this Virtual Server for all SMTP messages coming from any computer:a) Select the Access tab and click Relay.b) Select the All except the list below option.c) Leave the list empty and validate with OK.
6. Enable TLS in input by using a certificate:a) Still in the Access tab, click Certificate.
The Web Server CertificateWizard appears, with which you will be able to select your TLS certificate.b) Follow the wizard depending on the way you managed to obtain your certificate.c) Once your certificate is selected, click OK to close the Properties dialog.
7. Start the service using the button.The red mark should disappear from the node.
IIS and XMediusFAX are now configured for supporting TLS on SMTP in intput.
If you wish to test this configuration, you just need to send a test fax by using your usual mail client software(see the XMediusFAX User Guide for more details). If the fax is processed by the Fax Server, the test issuccessful.
56 XMediusFAX 8.0 | Installation and Maintenance Guide
Chapter 6 | SMTP Integration
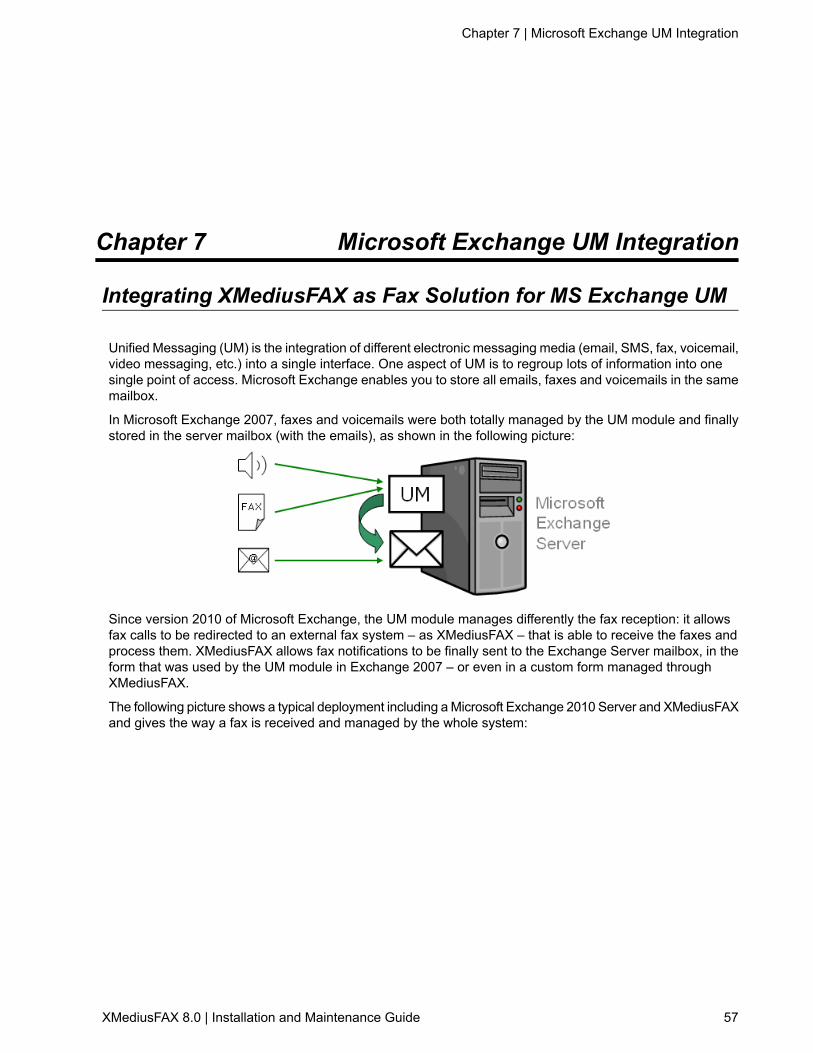
Microsoft Exchange UM IntegrationChapter 7
Integrating XMediusFAX as Fax Solution for MS Exchange UM
Unified Messaging (UM) is the integration of different electronic messaging media (email, SMS, fax, voicemail,video messaging, etc.) into a single interface. One aspect of UM is to regroup lots of information into onesingle point of access. Microsoft Exchange enables you to store all emails, faxes and voicemails in the samemailbox.
In Microsoft Exchange 2007, faxes and voicemails were both totally managed by the UM module and finallystored in the server mailbox (with the emails), as shown in the following picture:
Since version 2010 of Microsoft Exchange, the UM module manages differently the fax reception: it allowsfax calls to be redirected to an external fax system – as XMediusFAX – that is able to receive the faxes andprocess them. XMediusFAX allows fax notifications to be finally sent to the Exchange Server mailbox, in theform that was used by the UM module in Exchange 2007 – or even in a custom form managed throughXMediusFAX.
The following picture shows a typical deployment including a Microsoft Exchange 2010 Server and XMediusFAXand gives the way a fax is received and managed by the whole system:
XMediusFAX 8.0 | Installation and Maintenance Guide 57
Chapter 7 | Microsoft Exchange UM Integration
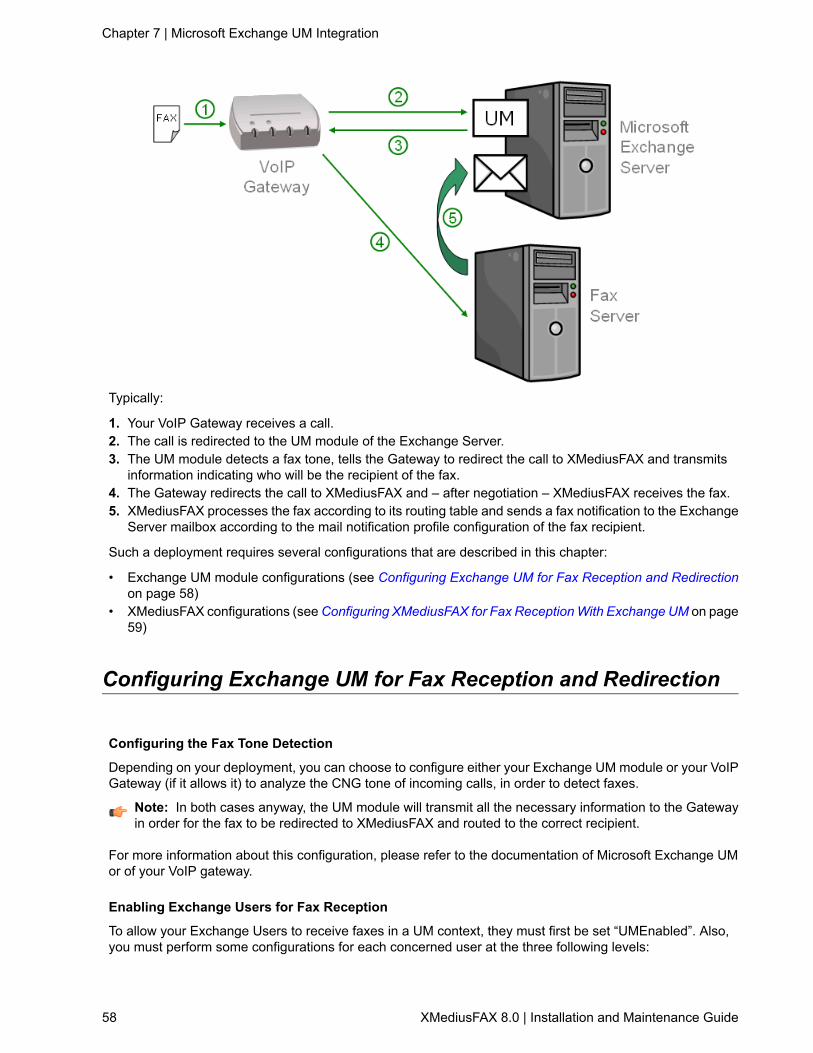
Typically:
1. Your VoIP Gateway receives a call.2. The call is redirected to the UM module of the Exchange Server.3. The UM module detects a fax tone, tells the Gateway to redirect the call to XMediusFAX and transmits
information indicating who will be the recipient of the fax.4. The Gateway redirects the call to XMediusFAX and – after negotiation – XMediusFAX receives the fax.5. XMediusFAX processes the fax according to its routing table and sends a fax notification to the Exchange
Server mailbox according to the mail notification profile configuration of the fax recipient.
Such a deployment requires several configurations that are described in this chapter:
• Exchange UM module configurations (see Configuring Exchange UM for Fax Reception and Redirectionon page 58)
• XMediusFAX configurations (seeConfiguring XMediusFAX for Fax ReceptionWith Exchange UM on page59)
Configuring Exchange UM for Fax Reception and Redirection
Configuring the Fax Tone Detection
Depending on your deployment, you can choose to configure either your Exchange UM module or your VoIPGateway (if it allows it) to analyze the CNG tone of incoming calls, in order to detect faxes.
Note: In both cases anyway, the UM module will transmit all the necessary information to the Gatewayin order for the fax to be redirected to XMediusFAX and routed to the correct recipient.
For more information about this configuration, please refer to the documentation of Microsoft Exchange UMor of your VoIP gateway.
Enabling Exchange Users for Fax Reception
To allow your Exchange Users to receive faxes in a UM context, they must first be set “UMEnabled”. Also,you must perform some configurations for each concerned user at the three following levels:
58 XMediusFAX 8.0 | Installation and Maintenance Guide
Chapter 7 | Microsoft Exchange UM Integration
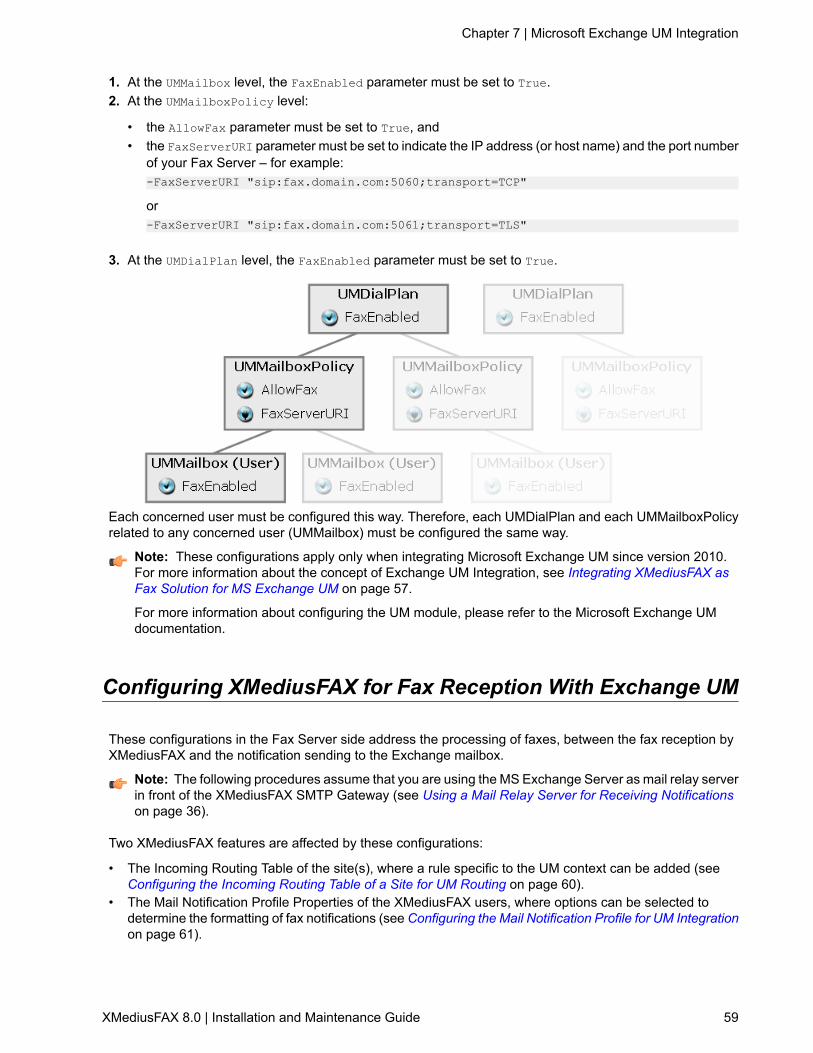
1. At the UMMailbox level, the FaxEnabled parameter must be set to True.2. At the UMMailboxPolicy level:
• the AllowFax parameter must be set to True, and• the FaxServerURI parameter must be set to indicate the IP address (or host name) and the port number
of your Fax Server – for example:-FaxServerURI "sip:fax.domain.com:5060;transport=TCP"
or-FaxServerURI "sip:fax.domain.com:5061;transport=TLS"
3. At the UMDialPlan level, the FaxEnabled parameter must be set to True.
Each concerned user must be configured this way. Therefore, each UMDialPlan and each UMMailboxPolicyrelated to any concerned user (UMMailbox) must be configured the same way.
Note: These configurations apply only when integrating Microsoft Exchange UM since version 2010.For more information about the concept of Exchange UM Integration, see Integrating XMediusFAX asFax Solution for MS Exchange UM on page 57.
For more information about configuring the UM module, please refer to the Microsoft Exchange UMdocumentation.
Configuring XMediusFAX for Fax Reception With Exchange UM
These configurations in the Fax Server side address the processing of faxes, between the fax reception byXMediusFAX and the notification sending to the Exchange mailbox.
Note: The following procedures assume that you are using the MS Exchange Server as mail relay serverin front of the XMediusFAX SMTP Gateway (see Using a Mail Relay Server for Receiving Notificationson page 36).
Two XMediusFAX features are affected by these configurations:
• The Incoming Routing Table of the site(s), where a rule specific to the UM context can be added (seeConfiguring the Incoming Routing Table of a Site for UM Routing on page 60).
• The Mail Notification Profile Properties of the XMediusFAX users, where options can be selected todetermine the formatting of fax notifications (see Configuring the Mail Notification Profile for UM Integrationon page 61).
XMediusFAX 8.0 | Installation and Maintenance Guide 59
Chapter 7 | Microsoft Exchange UM Integration
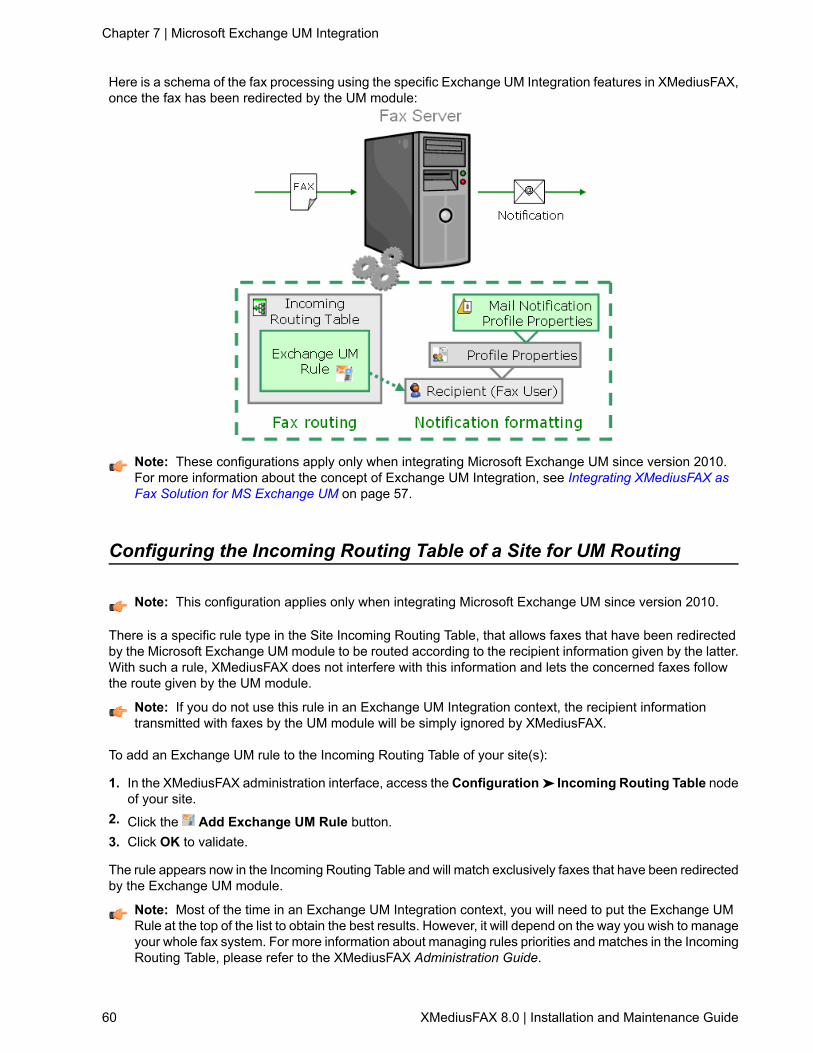
Here is a schema of the fax processing using the specific Exchange UM Integration features in XMediusFAX,once the fax has been redirected by the UM module:
Note: These configurations apply only when integrating Microsoft Exchange UM since version 2010.For more information about the concept of Exchange UM Integration, see Integrating XMediusFAX asFax Solution for MS Exchange UM on page 57.
Configuring the Incoming Routing Table of a Site for UM Routing
Note: This configuration applies only when integrating Microsoft Exchange UM since version 2010.
There is a specific rule type in the Site Incoming Routing Table, that allows faxes that have been redirectedby the Microsoft Exchange UM module to be routed according to the recipient information given by the latter.With such a rule, XMediusFAX does not interfere with this information and lets the concerned faxes followthe route given by the UM module.
Note: If you do not use this rule in an Exchange UM Integration context, the recipient informationtransmitted with faxes by the UM module will be simply ignored by XMediusFAX.
To add an Exchange UM rule to the Incoming Routing Table of your site(s):
1. In the XMediusFAX administration interface, access the Configuration ➤ Incoming Routing Table nodeof your site.
2. Click the Add Exchange UM Rule button.3. Click OK to validate.
The rule appears now in the Incoming Routing Table and will match exclusively faxes that have been redirectedby the Exchange UM module.
Note: Most of the time in an Exchange UM Integration context, you will need to put the Exchange UMRule at the top of the list to obtain the best results. However, it will depend on the way you wish to manageyour whole fax system. For more information about managing rules priorities and matches in the IncomingRouting Table, please refer to the XMediusFAX Administration Guide.
60 XMediusFAX 8.0 | Installation and Maintenance Guide
Chapter 7 | Microsoft Exchange UM Integration
In addition to this, you can configure XMediusFAX to provide notifications in the usual Exchange UM form(2007) when a fax is routed by an Exchange UM Rule: see Configuring the Mail Notification Profile for UMIntegration on page 61.
Configuring the Mail Notification Profile for UM Integration
Note: This configuration applies only when integrating Microsoft Exchange UM since version 2010.
To receive fax notifications by email in the usual Exchange UM form (2007), all users indicated by the UMmodule must:
• Exist in a directory known by the Fax Server (see the Directories Integration section of the XMediusFAXAdministration Guide for more details).
• Have their Profile set to use a Mail Notification Profile configured for Exchange UM integration, as describedin the following procedure.
For more details on Profiles and Mail Notification Profiles, see the XMediusFAX Administration Guide.
Note: The following configuration is useful only if you have added an Exchange UM Rule to the IncomingRouting Table of your site (see Configuring the Incoming Routing Table of a Site for UM Routing on page60).
To configure XMediusFAX to provide notifications in the usual Exchange UM form when a fax is routed byan Exchange UM Rule:
1. In the XMediusFAX administration interface, access the Configuration➤ Mail Notification Profiles nodeof your site.
2. Access the properties of the concerned Mail Notification Profile or create a new one, depending on yourneeds (see the Mail Notification Profiles section of the XMediusFAX Administration Guide for more details).
3. In the Exchange Integration section of the Notification Options tab, select Generate Exchange UMMessage Format for Inbound Faxes Redirected from Exchange UM.
Note: You can choose to configure this section differently if you wish to customize a bit more themail notifications management on this profile. To know the behaviors you can expect depending onthe possible combinations of the two checkboxes in the Exchange Integration section, see OutlookForms vs Exchange UM Format: Mail Notification Behaviors on page 62.
4. Validate the configuration with OK.
Note: Using this feature (Generate Exchange UMMessage Format for Inbound Faxes Redirectedfrom Exchange UM) requires the creation of a new Receive Connector with special permissions onyour Exchange Server (see the following step).
5. From the prompt of the Exchange Management Shell, create a new Receive Connector by executing thefollowing command:New-ReceiveConnector -Name <ConnectorName> -Bindings "0.0.0.0:25"-RemoteIPRanges <FaxServerIpAddress> -AuthMechanism ExternalAuthoritative-PermissionGroups ExchangeServers,Partners
• <ConnectorName> must be replaced by the name you wish to give to the connector.• <FaxServerIpAddress> must be replaced with the hostname(s) or IP address(es) of the host(s) where
the XMediusFAX SMTP Gateway is running.
Note: The permissions enabled for this connector are only the following ones:
• Authentication ➤ Externally Secured• Permission Groups ➤ Exchange Servers
XMediusFAX 8.0 | Installation and Maintenance Guide 61
Chapter 7 | Microsoft Exchange UM Integration
• Permission Groups ➤ Partners
These permissions are too different from the ones usually set on the default Receive Connector. Thisis the reason why a new connector dedicated for the XMediusFAX SMTP Gateway is created here.
Outlook Forms vs Exchange UM Format: Mail Notification Behaviors
While configuring Mail Notification Profile properties for Exchange UM users, you can use different combinationsof the two checkboxes in the Exchange Integration section (see Configuring the Mail Notification Profile forUM Integration on page 61) depending on your needs.
As you will see in the following table, the format of mail notifications received by users for each checkboxcombination will depend on the type of fax that is processed by the Incoming Routing Table:
• Incoming faxes in UM context, which means faxes that have been routed by the Exchange UM Rule (seeConfiguring the Incoming Routing Table of a Site for UM Routing on page 60) – and therefore redirectedpreviously by the Exchange UM module.
• Other incoming faxes, which means faxes that have not been redirected by the Exchange UM module orthat have been routed by any other rule than the Exchange UM Rule.
Note: To understand that these cases are possible, remember that a Mail Notification Profile can beshared by several users; some of them may be Exchange UM users as some others may not.
Notification Format for Other FaxesNotification Format for Faxes in UMContext
OutlookForms
ExchangeUMFormat
No special formatting.No special formatting.
No special formatting.Use of the specific Exchange UM format.X
Use of the XMediusFAX custom forms forOutlook.
Use of the XMediusFAX custom forms forOutlook.
X
Use of the XMediusFAX custom forms forOutlook.
Use of the specific Exchange UM format.XX
Note: Several specific configurations are required before using these two features:
• For Generate Exchange UM Message Format for Inbound Faxes Redirected from ExchangeUM (represented by “Exchange UM Format” in the table), see Configuring the Mail Notification Profilefor UM Integration on page 61
• For Enable Use of Customized Outlook Forms (represented by “Outlook Forms” in the table), seeMicrosoft Outlook Forms on page 39.
62 XMediusFAX 8.0 | Installation and Maintenance Guide
Chapter 7 | Microsoft Exchange UM Integration
Microsoft Online Products IntegrationChapter 8
Integration Planning: Office 365 and Exchange Online
XMediusFAX can be integrated with Microsoft Office 365 and Exchange Online.
However:
• Some XMediusFAX functionalities may be limited due to these online solutions (see Limitations due toMicrosoft Office 365 and Exchange Online on page 63).
• To integrate Exchange Online in order to allow users to send faxes by email and receive email notifications,you must perform some specific configurations (see Microsoft Exchange Online Integration on page 66).
Limitations due to Microsoft Office 365 and Exchange Online
Some XMediusFAX functionalities can be limited depending on the Microsoft online product plan and on yourcurrent deployment. Here are some potential scenarios:
1. Your Microsoft Exchange might be:
• an Exchange Online service, or• a local Exchange server (installed on your premises), or• a mix of both solutions (i.e. an Exchange Online service and an Exchange server part of the same
organization).
2. Your users' Microsoft Office might be:
• an Office 365 subscription with online applications, or• an Office 365 subscription with locally installed applications, or• a classic Office suite installed locally, or• a mix of all these solutions.
Based on this, it is recommended to review the following list of XMediusFAX functionalities that remainavailable (tagged YES) or not (tagged NO). Further explanations on each item are provided in subsequentsections.
SMTP Integration
Note: The following table only provides a summary. For more details, see Limitations on SMTP Integrationon page 64.
XMediusFAX 8.0 | Installation and Maintenance Guide 63
Chapter 8 | Microsoft Online Products Integration

LocalExchange
ExchangeOnline
LocalOutlook
OutlookOnline
Functionality
YES*Faxing/being notified through SMTP
YESNOYESNOSending Faxes with a "FAX" Address Space
YESNOYESNOPublishing and using Outlook Forms
YESNO**YESNOSending faxes with SendFAX through Outlook/Exchange
YESYESYESNODisplaying a MAPI Phone Book in SendFAX
YESYESYESNOUsing PrintToMail
* Subject to configurations if using the Exchange Online service (seeMicrosoft Exchange Online Integrationon page 66).** SendFAX can still be used when directly connected to XMediusFAX (see Sending faxes with SendFAXthrough Outlook/Exchange on page 65).
Utilities for Office Applications
Note: The following table only provides a summary. For more details, see Limitations on Fax Utilitiesfor Office Applications on page 65.
Local OfficeOffice OnlineFunctionality
YESYES***Printing to SendFAX, PrintToMail, Web Fax Composer Printer from Officeapplications
YESNOBroadcasting Faxes Using Mail Merge from Microsoft Word
*** Through PDF output printed from the Web browser (see Printing to SendFAX, PrintToMail, Web FaxComposer Printer from Office Applications on page 65).
Server Features
Note: The following table only provides a summary. For more details, see Limitations on Server Featureson page 66.
Office local apps(on server)
Office 365 (onlineapps)
Functionality
YESNORasterizing Office 365 Documents
NOOffice 365 User Directory Integration
Limitations on SMTP Integration
Here are the details of limitations on XMediusFAX SMTP functionalities due to the use of Microsoft onlineproducts.
Sending Faxes with a "FAX" Address Space
The Exchange Online service does not provide the ability to create Send Connectors with custom addressspaces such as "FAX".
As a consequence, users whose Outlook is connected to an Exchange Online service will not be able to:
64 XMediusFAX 8.0 | Installation and Maintenance Guide
Chapter 8 | Microsoft Online Products Integration

• send faxes using the syntax [FAX:fax_number] in the "To" field of an email, and• send faxes by selecting Outlook contacts whose "Business Fax" field was preset for this.
Instead, users will still be able to use traditional SMTP addressing to send their faxes: [email protected](subject to configurations – see Microsoft Exchange Online Integration on page 66).
Publishing and using Outlook Forms
The Exchange Online service does not support public folders, where the XMediusFAX Outlook Forms shouldbe published in order to be used. Additionally, the fax composition form requires the use of a "FAX" addressspace, which is also not supported by the Exchange Online service (see above). Finally, the online versionof Outlook in Office 365 does not support forms at all.
As a consequence, users whose Outlook is connected to an Exchange Online service will not be able to useany of the XMediusFAX composition and notification forms.
Instead, users will still be able to benefit from the traditional SMTP functionalities to send faxes and receivenotifications by email (subject to configurations – see Microsoft Exchange Online Integration on page 66).
Sending faxes with SendFAX through Outlook/Exchange
SendFAX configured in Outlook mode (i.e. to send the faxes through Outlook connected to Exchange) requiresthe use of a "FAX" address space, which is not supported by the Exchange Online service (see above).
As a consequence, SendFAX cannot be configured in Outlook mode for users whose Outlook is connectedto an Exchange Online service.
Instead, these users must have their SendFAX configured for direct connection to the fax system (XMLGateway interface) and will not find their faxes in their Outlook Sent Items.
Displaying a MAPI Phone Book (GAL & Contacts) in SendFax
MAPI needs to be installed locally to SendFAX in order to access the Global Address List and contacts ofMAPI phone books. This condition cannot be met when using the online version of Outlook in Office 365.
As a consequence, users of the online version of Outlook cannot display MAPI Phone Books in SendFAX.
On the contrary, users of a locally installed version of Outlook managed via Office 365 will be able to benefitfrom this functionality.
Using PrintToMail
The PrintToMail virtual printer will only be able to open a new email (with attachment) when the user's defaultemail client is locally installed, which excludes the online version of Outlook in Office 365.
As a consequence, users of the online version of Outlook cannot use the PrintToMail functionality.
On the contrary, users of a locally installed version of Outlook managed via Office 365 will be able to benefitfrom this functionality.
Limitations on Fax Utilities for Office Applications
Here are the details of limitations on XMediusFAX Office utilities due to the use of Microsoft online products.
Printing to SendFAX, PrintToMail, Web Fax Composer Printer from Office Applications
The online versions of Office 365 applications cannot print directly on a local printer, but can print (actually,generate and display) a PDF output of the document in the Web browser, which provides the ability to printlocally.
XMediusFAX 8.0 | Installation and Maintenance Guide 65
Chapter 8 | Microsoft Online Products Integration

As a consequence, users of the online versions of Office 365 applications will be able to use the XMediusFAXvirtual printers (print to SendFAX, PrintToMail and Web Fax Composer Printer), as long as they pass throughthis additional PDF print step.
For their part, users of locally installed versions of Office 365 applications will still be able to normally benefitfrom these functionalities.
Broadcasting Faxes Using Mail Merge from Microsoft Word
The online versions of Office 365 applications do not support macros.
As a consequence, the XMediusFAX fax broadcasting functionality (using mail merge) cannot be used byusers of the online version of Microsoft Word.
On the contrary, users of locally installed versions of Office 365 applications will be able to benefit from thisfunctionality.
Limitations on Server Features
Here are the details of limitations on XMediusFAX server features due to the use of Microsoft online products.
Rasterization of Office Documents by the XMediusFAX Server
To render documents, XMediusFAX requires native applications to be installed on the server running theXMDocumentRasterizer service, which excludes the use of online versions of Office 365 applications inthat context.
Installed versions of Office 365 applications on the server hosting the XMDocumentRasterizer service willproperly manage the conversion of Office documents.
Office 365 User Directory and XMediusFAX Directories Integration
The user directory of Office 365 is not exposed to external applications, which does not allow XMediusFAXadministrators to add it to its Directories Integration.
However, Microsoft offers a means to synchronize a local Active Directory to the Office 365 User Directory.This allows administrators to manage Office 365 users from the company Active Directory, which can still bepart of the XMediusFAX Directories Integration.
Microsoft Exchange Online Integration
Integrating XMediusFAX within a context of use of the Microsoft Exchange Online service consists in allowingthe XMediusFAX SMTP Gateway to:
• receive – from the outside – emails that are intended to be sent as faxes, and• deliver fax notification emails to the Exchange Online service.
This section provides solutions to achieve both aspects of such an integration.
Important: In all cases, a mail relay server should be installed on your premises, in front of yourXMediusFAX SMTP Gateway, in order to avoid the latter to be directly exposed to the Internet. By doingso, you will benefit from all special features that a mail server can provide, including:
• A more flexible management and a better performance of email queues (suspend or redirect queues,manage simultaneous messages...)
• Spam filtering• Virus checking
66 XMediusFAX 8.0 | Installation and Maintenance Guide
Chapter 8 | Microsoft Online Products Integration

• SMTP security (using TLS)
Allowing the Sending of Faxes
Conceptually, to allow users to send faxes via XMediusFAX using any mail client connected to any mailserver, you need to:
1. Dedicate a domain or a subdomain for faxing purposes (i.e. it will be the one the users will enter in the"To" field in order to send an email as a fax).
2. Make all emails sent to this domain or subdomain be relayed to your XMediusFAX SMTP Gateway.
When the mail client is connected to an Exchange Online service, you have two possibilities to achieve this:
• Configuring your Exchange Online service for conditional mail routing, OR• Configuring an MX record in the DNS Server that serves your domain.
Note: In both cases, you will also need to have your NAT/Firewall and your local mail relay serverproperly configured so that the emails will be eventually routed to your XMediusFAX SMTP Gateway.
Scenario 1: Configuring Exchange Online for Conditional Mail Routing
Restriction: This scenario allows only the users sending emails through your Exchange Online serviceto benefit from the mail-to-fax functionality.
Note: The instructions below explain the overall concepts behind the configurations that are requiredon your Exchange Online. For more detailed information on these concepts, please refer to Microsoft'sonline help: https://technet.microsoft.com/library/ms.exch.eac.connectorselection(v=exchg.150).aspx
Using your Exchange Admin Center, you need to create two items:
1. A connector (mail flow ➤ connectors):
• Configure the connector direction:
• From: "Office 365";• To: "Your organization's email server" (in fact, your on-premises mail server that will relay the
messages to your XMediusFAX).
• Follow the connector creation wizard to configure the route from Exchange Online to your on-premisesmail server (according to your needs and your current on-premises deployment).
• Ensure to make the connector available for use with a transport rule only (option to select duringconfiguration).
2. A transport rule (mail flow ➤ rules) having the following criteria:
• "Apply this rule if…" – Enter the subdomain name you want to dedicate to fax (for example:fax.<your_public_domain>.com).
• "Do the following…" – Ensure to redirect the messages to the above created connector.
Scenario 2: Configuring an MX Record in your DNS Server
Note: This scenario – which is actually the general scenario to make the XMediusFAX SMTP Gatewayavailable from the Internet – allows anyone to benefit from the mail to fax feature (as long as the senderis part of the authorized users of XMediusFAX). The counterpart is that it facilitates potential spamming.
On the DNS Server that serves your domain:
XMediusFAX 8.0 | Installation and Maintenance Guide 67
Chapter 8 | Microsoft Online Products Integration
1. Create an MX record that represents your fax-dedicated domain (for example:fax.<your_public_domain>.com).
2. Point this MX record to the public IP address of the premises where your mail relay server is installed.
Allowing the Reception of Mail Notification Messages
To allow your users to receive fax notifications using a mail client connected to your Exchange Online service,you need to ensure that all email notifications coming from XMediusFAX will be properly relayed to yourExchange Online service.
To do so:
1. Configure your XMediusFAX SMTP Gateway to target your on-premises mail relay server for this:
From the XMediusFAX administration interface, enter your mail relay server host name or IP address inHosts ➤ [fax_server_host] ➤ SMTP Gateway ➤ Mail Delivery Method ➤ Relay to an SMTP Server➤ Host Name.
2. Using your online Exchange Admin Center, create a connector (mail flow ➤ connectors) with direction:
• From: "Your organization's email server" (in fact, your on-premises mail relay server)• To: "Office 365"
Note: For further information/recommendations on the subject, please refer to Microsoft's online help:https://technet.microsoft.com/library/dn751020(v=exchg.150).aspx.
3. Configure your on-premises mail relay server to relay the emails received from XMediusFAX directly toyour Exchange Online server.
Note: You may need to configure your firewall to allow your on-premises mail relay server to reachexternal mail ports (25) through the Internet.
68 XMediusFAX 8.0 | Installation and Maintenance Guide
Chapter 8 | Microsoft Online Products Integration
Client Applications: InstallationChapter 9
Client Applications Installation
The server installation must precede the installation of the client applications.
The client applications set includes the following components:
• SendFAX / Phone Book• Web Fax Composer Printer• Print To Mail• Outlook Add-in• Fax Account Monitoring Spot• Cover Sheet Editor• Tiff Viewer• MMC Snap-in• Java API
Note: The above set is available via the installation splash screen (or through the installation files locatedin the Client folder of the installation media).
A reduced client applications set including only independent applications usable by most of the users(no administration tools) is available through the installation files located in theClientRedistribution folder of the installation media:
• SendFAX / Phone Book• Web Fax Composer Printer• Print To Mail• Outlook Add-in• Fax Account Monitoring Spot• Cover Sheet Editor• Tiff Viewer
Note: XMediusFAX client installer will perform a per-machine installation and, as such, requires necessaryprivileges. Per-user installation is not supported.
Note: The installation procedure generates a log file which can be found in the Trace folder of the serverinstallation folder. The name of the file is XMInstallLog.log. Each subsequent installation ofXMediusFAX modules appends to this file.
1. In the Client directory (or the ClientRedistribution directory) of the XMediusFAX distribution media,double-click Setup.exe.
2. Select the language and click OK.
XMediusFAX 8.0 | Installation and Maintenance Guide 69
Chapter 9 | Client Applications: Installation
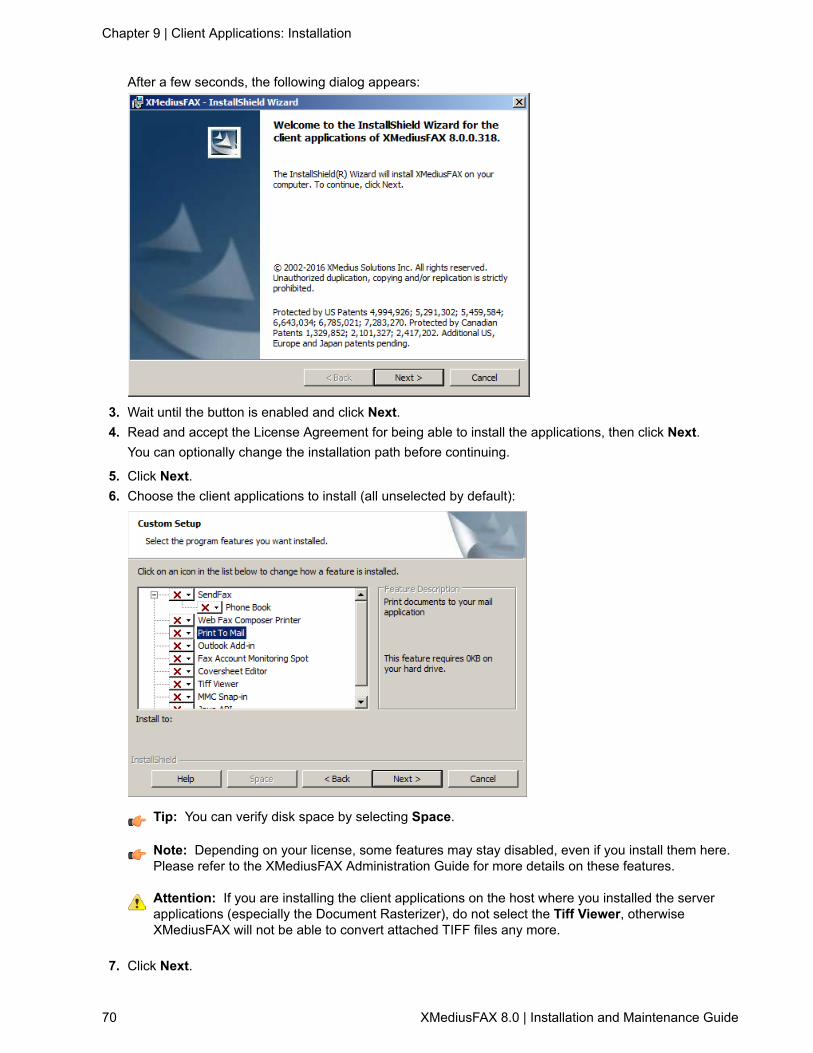
After a few seconds, the following dialog appears:
3. Wait until the button is enabled and click Next.4. Read and accept the License Agreement for being able to install the applications, then click Next.
You can optionally change the installation path before continuing.
5. Click Next.6. Choose the client applications to install (all unselected by default):
Tip: You can verify disk space by selecting Space.
Note: Depending on your license, some features may stay disabled, even if you install them here.Please refer to the XMediusFAX Administration Guide for more details on these features.
Attention: If you are installing the client applications on the host where you installed the serverapplications (especially the Document Rasterizer), do not select the Tiff Viewer, otherwiseXMediusFAX will not be able to convert attached TIFF files any more.
7. Click Next.
70 XMediusFAX 8.0 | Installation and Maintenance Guide
Chapter 9 | Client Applications: Installation
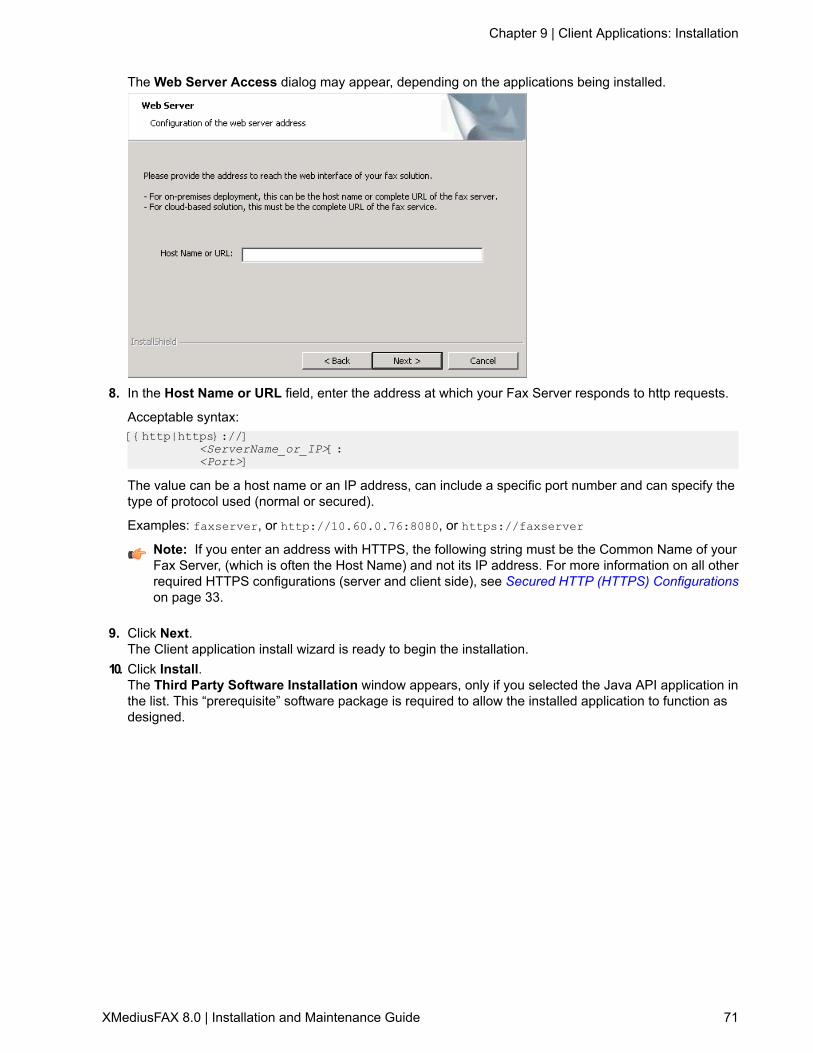
The Web Server Access dialog may appear, depending on the applications being installed.
8. In the Host Name or URL field, enter the address at which your Fax Server responds to http requests.
Acceptable syntax:[{http|https}://]
<ServerName_or_IP>[:<Port>]
The value can be a host name or an IP address, can include a specific port number and can specify thetype of protocol used (normal or secured).
Examples: faxserver, or http://10.60.0.76:8080, or https://faxserver
Note: If you enter an address with HTTPS, the following string must be the Common Name of yourFax Server, (which is often the Host Name) and not its IP address. For more information on all otherrequired HTTPS configurations (server and client side), see Secured HTTP (HTTPS) Configurationson page 33.
9. Click Next.The Client application install wizard is ready to begin the installation.
10. Click Install.The Third Party Software Installation window appears, only if you selected the Java API application inthe list. This “prerequisite” software package is required to allow the installed application to function asdesigned.
XMediusFAX 8.0 | Installation and Maintenance Guide 71
Chapter 9 | Client Applications: Installation
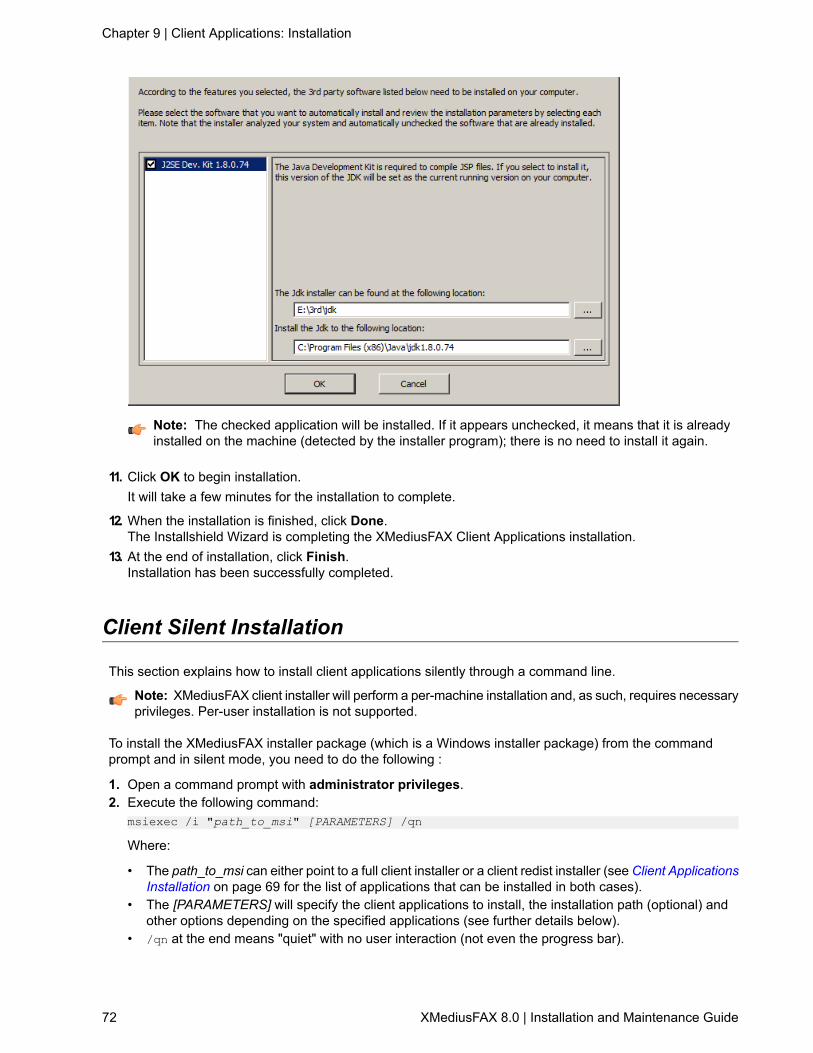
Note: The checked application will be installed. If it appears unchecked, it means that it is alreadyinstalled on the machine (detected by the installer program); there is no need to install it again.
11. Click OK to begin installation.It will take a few minutes for the installation to complete.
12. When the installation is finished, click Done.The Installshield Wizard is completing the XMediusFAX Client Applications installation.
13. At the end of installation, click Finish.Installation has been successfully completed.
Client Silent Installation
This section explains how to install client applications silently through a command line.
Note: XMediusFAX client installer will perform a per-machine installation and, as such, requires necessaryprivileges. Per-user installation is not supported.
To install the XMediusFAX installer package (which is a Windows installer package) from the commandprompt and in silent mode, you need to do the following :
1. Open a command prompt with administrator privileges.2. Execute the following command:
msiexec /i "path_to_msi" [PARAMETERS] /qn
Where:
• The path_to_msi can either point to a full client installer or a client redist installer (seeClient ApplicationsInstallation on page 69 for the list of applications that can be installed in both cases).
• The [PARAMETERS] will specify the client applications to install, the installation path (optional) andother options depending on the specified applications (see further details below).
• /qn at the end means "quiet" with no user interaction (not even the progress bar).
72 XMediusFAX 8.0 | Installation and Maintenance Guide
Chapter 9 | Client Applications: Installation

Note: The [PARAMETERS] are all passed in the form KEY=VALUE and separated by spaces (i.e.KEY1=VALUE1 KEY2=VALUE2), and the KEY names are case sensitive. If VALUE contains spaces, you haveto put it inside double quotes.
Tip: For additional msiexec parameters, please consulthttps://technet.microsoft.com/en-ca/library/cc759262.aspx
Main Parameters
DescriptionParameter
Mandatory – specifies which applications to install. Values can be:ADDLOCAL=
• ALL (installs all applications contained in the msi), or• A list of comma separated strings, depending on the applications you want to install
and according to the application list provided below.
Optional – specifies an alternate installation path(%PROGRAMFILES(X86)%\XMediusFAX by default).
INSTALLDIR=
Applications to Install
Note: If you are installing all applications (ADDLOCAL=ALL), skip this section.
Strings to SpecifyApplication
basic_configuration,basic_configuration_all_lang,basic_configuration_xmediusAny combination of theapplications below Note: This string is mandatory, should you install one or several of the
applications listed below.
sendfax,sendfax_all_lang,sendfax_xmediusfaxSendFAX
phonebook,phonebook_all_langSendFAX Phone Book
printtoweb,printtoweb_all_langWeb Fax Composer Printer
printtomail,printomail_all_langPrint To Mail
outlookaddin,outlookaddin_all_langOutlook Add-in
spot,spot_all_langFax Account Monitoring Spot
coversheeteditor,coversheeteditor_all_lang,coversheeteditor_xmediusfaxCover Sheet Editor
tiffviewer,tiffviewer_all_lang,tiffviewer_xmediusfaxTiff Viewer
mmcsnapin, mmcsnapin_all_lang, mmcsnapin_xmediusMMC Snap-in*
javaapiJava API*
* Not available in "Client Redistribution" installer.
Additional Parameters
All these parameters are optional; they simply allow administrators to pre-configure some settings in theclients on behalf of the users. If they are not set here, the users will need to perform the configurationsthemselves.
XMediusFAX 8.0 | Installation and Maintenance Guide 73
Chapter 9 | Client Applications: Installation

DescriptionParameter
To specify the address at which your Fax Server responds to httprequests.
CFG_WEBSERVER_HOST=
Note: This setting is shared by SendFAX, the Web Fax ComposerPrinter and the Fax Account Monitoring Spot.
Acceptable syntax:[{http|https}://]<ServerName_or_IP>[:<Port>]
The value can be a host name or an IP address, can include a specificport number and can specify the type of protocol used (normal orsecured).
Examples: faxserver, or http://10.60.0.76:8080, orhttps://faxserver
Note: If you enter an address with HTTPS, the following string mustbe the Common Name of your Fax Server, (which is often the HostName) and not its IP address. For more information on all otherrequired HTTPS configurations (server and client side), see SecuredHTTP (HTTPS) Configurations on page 33.
To specify the way faxes will be submitted from SendFAX toXMediusFAX.
Possible Values are:
CFG_SENDFAX_LOGIN_TYPE=
• 1 = send faxes through outlook/exchange• 2 = send faxes through XML Gateway, using anonymous account• 3 = send faxes through XML Gateway, using NT account (default)• 4 = send faxes through XML Gateway, using a specific user/password
(SendFax will prompt for this user/password)
This option applies only to SendFAX – configured for Exchangeconnection.
Possible Values are:
CFG_SENDFAX_RETRIEVE_AD_USER_INFO=
• 0 = don't retrieve default sender information from Active Directory• 1 = retrieve default sender information from Active Directory (default)
This option applies only to SendFAX.
Possible Values are:
CFG_SENDFAX_FORCE_WIZARD_ON_FIRST_LOGIN=
• 0 = SendFax will not display its configuration wizard if it has all theinformation it needs
• 1 = SendFax will display its configuration wizard even if it has all theinformation it needs (default)
To specify which interface will be used by default when SendFAX islaunched via the XMediusFAX virtual printer.
Possible Values are:
CFG_SENDFAX_SIMPLE_MODE=
• 0 = full interface (default)• 1 = basic interface
74 XMediusFAX 8.0 | Installation and Maintenance Guide
Chapter 9 | Client Applications: Installation

DescriptionParameter
To enable/disable the ability of SendFAX to send emails.
Possible values are:
CFG_SENDFAX_RELAY_SERVER_ENABLE=
• 0 = disabled• 1 = enabled (default)
To specify the mail relay server address to be used for the emailfunctionality of SendFAX.
Example:CFG_SENDFAX_RELAY_SERVER_ADDRESS=smtp.example.com
CFG_SENDFAX_RELAY_SERVER_ADDRESS=
To specify the default file format for email attachments in the emailfunctionality of SendFAX.
Possible Values are:
CFG_SENDFAX_EMAIL_FILE_FORMAT=
• 0 = PDF (default)• 1 = TIFF
Example: Installing SendFax and its Phone Book
The following command will install SendFax and its Phone Book in the default installationfolder and setup the Web Server's address (to be used by SendFAX):msiexec /i "d:\Client\XMediusFAX x.x.x.xxx (Client).msi"ADDLOCAL=basic_configuration,basic_configuration_all_lang,basic_configuration_xmedius,sendfax,sendfax_all_lang,sendfax_xmediusfax,phonebook,phonebook_all_langCFG_WEBSERVER_HOST=faxserver.example.com /qn
Example: Installation in an Alternate Folder
The following command will simply install SendFax (without its Phone Book) in folderE:\program files\FaxServer:msiexec /i "d:\Client\XMediusFAX x.x.x.xxx (Client).msi"ADDLOCAL=basic_configuration,basic_configuration_all_lang,basic_configuration_xmedius,sendfax,sendfax_all_lang,sendfax_xmediusfaxINSTALLDIR="E:\program files\FaxServer" /qn
Installing the Fax Merge Macros (MS Word and OpenOffice.org)
All the tools needed for installing the fax merge macros are available on the user's computer since the SendFaxclient is installed (see Client Applications Installation on page 69). By default, these tools can be found at thefollowing path: <install_path>\Client\MailMerge.
Note: The installation depends on the text application used (MS Word or OpenOffice.org), and on itsversion. Therefore, several installation procedures are described here.
Important: To ensure that the fax merge macros function properly, when you install MS Office, makesure the Visual Basic for Applications (VBA) component is installed along with it.
XMediusFAX 8.0 | Installation and Maintenance Guide 75
Chapter 9 | Client Applications: Installation

Installation Procedure for Microsoft Word
1. Go to the <install_path>\Client\MailMerge folder.2. Run the WordRibbonSetup.exe file.
The following dialog appears:
3. Click Install the MS Word Fax Add-In.4. After the installation, start Microsoft Word.
A new tab Fax should appear in the ribbon, and under this tab, two functions: Send Fax and Fax Merge.
For using these functions, please refer to the XMediusFAX User Guide.
Installation Procedure for OpenOffice.org
1. Open OpenOffice.org Writer.2. In the menu bar, select Tools ➤ Options, then select the OpenOffice.org ➤ Security node.3. Click Macro Security.4. If the selected option is Very High or High, select the Medium option and click OK.5. Click OK.6. Open the faxmacros.sxw document located in the <install_path>/Client/MailMerge folder.7. Click Enable Macros.
The document opens with two buttons:
8. Click on the Install fax macros button to launch the installation.After confirmation, the macros are installed.
Note: A message box indicates that you must close and restart OpenOffice.org and the quick launchbar (icon at the bottom-right of the screen) in order for the installation to be effective.
9. Restart OpenOffice.org Writer.The Fax menu, containing the FaxBroadcast and SendFax submenus appears now between the Toolsand Window menus.
If the macro security was changed to allow this installation, it should be set again to its original level, as shownat the first steps of the procedure.
76 XMediusFAX 8.0 | Installation and Maintenance Guide
Chapter 9 | Client Applications: Installation

Installing the Microsoft Office Internet Fax Service forXMediusFAX
MS Office programs include a built-in Internet Fax Service functionality allowing users to connect directly toa fax service provider that will send the fax for them.
XMediusFAX users can send faxes through XMediusFAX by selecting this feature, as long as all of thefollowing points are true on the users computers:
• Microsoft Office is installed.• The Office installation includes necessarily Microsoft Outlook, which has been configured to send emails.• The following Microsoft feature is installed, depending on the version of MS Office:
• For MS Office 2007: Microsoft Office Document Imaging (MODI, installed by default and available fromthe MS Office installation program, under “Office Tools”).
• For MS Office 2010 and above: the Microsoft Windows fax printer driver (installed by default on WindowsVista and above, also available on Windows 2008 through the Fax Server role).
Note: If you have any issues finding or installing MODI or the Windows fax printer driver, please referto the Microsoft support.
Note: It could happen that the feature does not work because of 64-bit incompatibility, for exampleif MS Office 2007 would be installed on Windows 2008 64-bit.
• Some specific configuration (described here) has been performed by an administrator.
All the tools needed to configure Microsoft Office for using the Internet Fax Service with XMediusFAX areavailable on the XMediusFAX distribution media at the path: Tools\OfficeFax.
The configuration can be done:
• On single computers (one by one): Installation on a Single Computer on page 77, or• By massive deployment (all computers at the same time): Installation by Massive Deployment through
Group Policy on page 78
Installation on a Single Computer
To install the Internet Office Fax Service configuration for XMediusFAX:
1. From the computer to configure, access the Tools\OfficeFax folder of the XMediusFAX distributionmedia.
2. Make a local copy of the OfficeFaxInstall.reg file.3. Edit this file using a text editor:
a) Identify the block of registry keys corresponding to the version of Microsoft Office running on thiscomputer.
b) In the identified block, replace the [SMTP Domain] placeholder with the appropriate string (domainname, FQDN, etc...) that your mail server will resolve to the IP address of your fax server.For example: fax.example.com
Note: Take care to not remove any other string or character than the [SMTP Domain] placeholder.
c) Save and close the file.
XMediusFAX 8.0 | Installation and Maintenance Guide 77
Chapter 9 | Client Applications: Installation
4. Execute the modified OfficeFaxInstall.reg file.
This computer is now configured to use the Microsoft Office Internet Fax Service feature with XMediusFAXthrough the specified SMTP domain.
Installation by Massive Deployment through Group Policy
To be able to massively deploy the Internet Office Fax Service configuration for XMediusFAX, you need toperform the following steps including a configuration of your Active Directory:
1. From any computer, logon with an account having administrative permissions on your Active Directory.2. Access the Tools\OfficeFax folder of the XMediusFAX distribution media.3. Make a local copy of the OfficeFaxInstall.reg file.4. Edit this file using a text editor:
a) In all blocks of registry keys (each block corresponding to a different version of Office), replace the[SMTP Domain] placeholder with the appropriate string (domain name, FQDN, etc...) that your mailserver will resolve to the IP address of your fax server.For example: fax.example.com
Note: Take care to not remove any other string or character than the [SMTP Domain] placeholder.
b) Save and close the file.
5. Configure your Active Directory as follows:a) Open the Active Directory Users and Computers.b) Select the target domain for the deployment (the domain corresponding to the targeted users).c) Under this domain, select an existing Organizational Unit containing targeted users and display its
Properties.
Note: All the members of this unit will be subject to the deployment.
d) Under the Group Policy tab, create a new Group Policy Object and edit it.e) Select User Configuration ➤ Windows Settings ➤ Scripts Logon/Logoff.f) Display the Properties of the Logon item.g) Add the following files to the Logon folder (using the Show Files button):
• OfficeFaxInstall.reg (the local one you modified with the correct SMTP domain)• OfficeFaxRegistryInstall.cmd (directly from the XMediusFAX distribution media)
h) Add a new script and Browse for selecting the OfficeFaxRegistryInstall.cmd file you just addedto the Logon folder.
i) Validate and go back to the Active Directory Users and Computers main interface.j) Repeat all these steps for any Organizational Unit that is concerned by the deployment described here.
From now, every user registered within the Organizational Units you just edited above will get their InternetOffice Fax Service feature silently configured on next logon. All these users will be able to use the featurewith XMediusFAX through the specified SMTP domain.
78 XMediusFAX 8.0 | Installation and Maintenance Guide
Chapter 9 | Client Applications: Installation

BackupChapter 10
Backing Up XMediusFAX
For security reasons, you can decide to backup all existing files and data concerning XMediusFAX. It isrecommended that you do it on all the machines part of the XMediusFAX system.
1. Stop all XMediusFAX services and MySQL services before starting the backup.For more information on how to manage services, see Managing the Services on page 84.
2. Make a copy of all the following XMediusFAX folders, found in the folder where the fax server was installed:
• the Data folder1
• the Bin folder• the Config folder
3. Make a copy of the MySQL Data folder, found in the folder where MySQL was installed.4. Export the HKEY_LOCAL_MACHINE\SOFTWARE\Interstar Technologies key from Regedit to a .reg file.5. Once the backup is complete, restart all XMediusFAX services and MySQL services.
Backing Up Users Phone Books
To preserve their phone books, individual users can backup the following folder:
Users\<username>\AppData\Roaming\Fax\PhoneBook.
1 The MediaStore subfolder of the Data folder contains a lot of files and may take a really long time to backup. The fileswithin this folder are not touched during the upgrade procedure, so, unless you want to take the full backup of your systemfor archiving purpose, you may want to skip this subfolder.
XMediusFAX 8.0 | Installation and Maintenance Guide 79
Chapter 10 | Backup

80 XMediusFAX 8.0 | Installation and Maintenance Guide
Chapter 10 | Backup

UpgradesChapter 11
Upgrading Server Applications
Before Upgrading
XMediusFAX can be upgraded from an earlier version by simply running the installer of the newer version.However, we highly recommended that you read and follow the step-by-step upgrade procedure describedin this section. Before proceeding with the upgrade, please take note of the following:
• The upgrade will have to be performed on all servers that are part of the XMediusFAX system. This includesall the servers that run the core (replicated) software, all the “worker-only” servers (computers runningonly Drivers, Rasterizers and Gateways) and all the computers running the MMC Administration snap-in.Other client tools, such as SendFAX, can be upgraded at a later time as they are compatible with the newServer version.
• The target system for the upgrade must be fully functional. Do not upgrade a system with componentshaving problems to start and become active.
• The upgrade modifies the files that hold the state of the system. This includes multiple files located under<xmediusFAX>\Data and the MySQL databases.
• The upgrade process will backup any state-related file it modifies, with the exception of the databases(CompanyConfig and XmediusArchive).
• Installing the new version will overwrite some configuration files present in <xmediusFAX>\Config (thisis not related to the System or Site Configurations made through the administrator snap-in). If you appliedcustom modifications to these files, you may want to review them after the installation.
• The upgrade installs, if needed, new third party software, disabling the old versions but leaving theminstalled on the computer.
• The web-related package (xmedius.war) will be replaced during the upgrade. If you made custommodifications to the web interface, you will have to re-apply them after the upgrade.
• You should review the release notes of the software as they list a few changes from earlier versions thatare of interest for administrators.
• If you have built custom tools (external notification software, JavaApi scripts, reports that query the archivedatabase etc.), it is highly recommended that you check to make sure those tools will integrate properlywith the new version of XMediusFAX. Install the software on a test system before upgrading your productionsystem.
• Also, verify if the version you are going to install for the upgrade requires a new license (not alwayscompulsory). If this is the case, make sure to initiate a request for the new license early enough, as youwill need to activate it after the upgrade in order to ensure continuity of your fax server operation.
Note: If you are using a Brooktrout fax board, you must upgrade the Boston pnp Driver to version 6.0minimum (available in the 3rd\dialogic_brooktrout folder from the XMediusFAX distribution media)before upgrading XMediusFAX. This requires first to stop the Driver service.
XMediusFAX 8.0 | Installation and Maintenance Guide 81
Chapter 11 | Upgrades
Upgrading Server Applications
To upgrade your server in safe conditions, see first Before Upgrading on page 81.
The following steps are made to facilitate the upgrade process and to ensure that your production server(s)are back online as fast as possible. The upgrade process should follow these guidelines:
1. Stop all outbound and inbound faxing traffic and wait until the outgoing queue is clear. You can also usePerfmon to monitor the FaxManager's internal queues and make sure everything has been delivered.
2. On all computers running only “worker” components of the XMediusFAX system (only Drivers, Rasterizersor Gateways), run <xmediusFAX>\bin\util\xmsc.exe -oa to stop the services (you can also opt to stopthe services via Windows Services).
3. If you have a replicated system (two FaxManagers within the same system), stop all the XMediusFAXservices on one of them and wait until their status shows “Fault” in the Services Status (XMediusFAXAdministration Snap-In). To stop the services you can run <xmediusFAX>\bin\util\xmsc.exe -oa. It isimportant to let the services terminate properly. Make sure that all the components become Active/Primaryon the other server.
4. On the remaining server, stop all the services. Again, you can use <xmediusFAX>\bin\util\xmsc.exe-oa. It is important to let the services terminate properly.
5. Close any running instance of the XMediusFAX Administration snap-in.6. At this point, it is highly recommended to perform a backup of all the data (see below).7. Upgrade the XMediusFAX server applications:
a) Beginning with the last server on which you stopped the services, perform the upgrade by running thenew XMediusFAX installer.
b) You will also be prompted with the Third Party Installer application to upgrade the necessary 3rd partysoftware (see the description of the Third Party Software Installer in the previous chapter).
Note: The 3rd-party software upgrades that are required are then automatically performed bydefault (unless you unselect them). However, there can be exceptions: see MySQL on page 25.
c) After XMediusFAX upgrade, update the license (if required) by following the procedure:Activating/ Updating the License and Setting the Channels on page 30.
Note: If you already have an activation code (from a previous license purchase), it will remainvalid for this operation, unless you received a new one.
8. Once the update is completed successfully on that server, proceed with the replicated server, if presentand then the “worker-only” servers (if any are present).
82 XMediusFAX 8.0 | Installation and Maintenance Guide
Chapter 11 | Upgrades
MaintenanceChapter 12
Modifying a Server Installation
How to add or remove server applications.
On the concerned server:
1. From the root directory of the XMediusFAX installation media, double-click Setup.exe.2. Click Server on the splash screen.3. In the Program Maintenance dialog, select Modify.
Note: We do not recommended you use theRepair option. If you have problems with your installation,contact XMediusFAX technical support.
4. In the Custom Setup screen, select or unselect applications according to your needs.
Note: A red X indicates that the application is not currently installed.
Note: Depending on your license, some features may stay disabled, even if you install them here.Please refer to the XMediusFAX Administration Guide for more details on these features.
5. Follow setup wizard instructions to complete the installation.
Modifying a Client Installation
How to add or remove client applications.
On the client computer:
1. In the Client directory of theXMediusFAX installation media, double-click Setup.exe.2. Select the language and click OK.3. In the Program Maintenance dialog, select Modify.
Note: We do not recommended you use theRepair option. If you have problems with your installation,contact XMediusFAX technical support.
4. In the Custom Setup screen, select or unselect applications according to your needs.
Note: A red X indicates that the application is not currently installed.
Note: Depending on your license, some features may stay disabled, even if you install them here.Please refer to the XMediusFAX Administration Guide for more details on these features.
XMediusFAX 8.0 | Installation and Maintenance Guide 83
Chapter 12 | Maintenance

5. Follow setup wizard instructions to complete the installation.
Managing the Services
This section shows how to easily and quickly stop or start the services of the fax server.
As an alternative to the use of Windows Services interface, a tool is provided with XMediusFAX, allowing youto manage easily the services of the fax server. To access this tool (a command-line executable file):
1. Through the command line, access the C:\Program Files\XMediusFAX\Bin\Util folder.2. Choose the action to perform:
• Type xmsc -ra If you need to restart (i.e. stop and restart immediately) all the services, or• Type xmsc -oa If you need to stop all the services, or• Type xmsc -aa If you need to start all the services.
3. Validate the command.
Note: The services may take a few minutes to change status.
Applying Hotfixes (Software Patches)
Software Patches are sometimes produced in order to solve issues reported in the released version ofXMediusFAX. Depending on the issue that is intended to be fixed, one or several hotfixes can be madeavailable for installation.
Before installing any hotfix, you must carefully read the instructions provided along with it through a text file(<component_name>.txt) – knowing that each hotfix has its own specific instructions:
• Hotfix installation procedure• Information about the effects on the system during hotfix installation• History of the fixed issues of the concerned component (latest on top)
84 XMediusFAX 8.0 | Installation and Maintenance Guide
Chapter 12 | Maintenance
UninstallationChapter 13
Complete Removal of Server Applications
To completely remove the XMediusFAX server applications from a computer:
1. In Windows, click Start ➤ Settings ➤ Control Panel.2. In the Control Panel, double-click Add/Remove Programs.3. Click on the XMediusFAX Version_Number (Server Applications) item.4. Click Remove.5. In the appearing Confirm dialog, click Yes.
It will take a few minutes for the uninstallation to complete. You can observe the progress, however, withthe status bar that is displayed.
6. Browse to, and delete the \Program Files\XMediusFAX directory.7. Execute the following command (to delete the \MySQL\XMediusArchive directory):
call <mysql>\bin\mysqladmin.exe" -f drop xmediusarchive
(<mysql> must be replaced by the MySQL installation path.)
Complete Removal of Client Applications
To completely remove the system client applications from a computer:
1. In Windows, click Start ➤ Settings ➤ Control Panel.2. In the Control Panel, double-click Add/Remove Programs.3. Click on the XMediusFAX <Version_Number> (Client Applications) item.4. Click Remove.5. In the appearing Confirm dialog, click Yes.
It may take a few minutes for the uninstall to complete.
Removing Published Forms
If you wish to uninstall XMediusFAX Forms that have been published, you may have to refer to the on-linehelp of your mail client, as the way to do it can be different depending on the version of the software.
XMediusFAX 8.0 | Installation and Maintenance Guide 85
Chapter 13 | Uninstallation

Removing Published Forms in Outlook
To delete a form that you have published but no longer need, you need to access theManage Formswindow.You can access this window two ways, either through the Tools menu, or through the Properties window ofa folder.
To remove a published form:
1. Access the Manage Forms window:
• Using the folder properties:
a) Right-click a folder (typically the folder in which the form was published) and click Properties.b) Select the Forms tab and click Manage.
• Without selecting a folder:
a) Select Tools ➤ Options.b) Select the Other tab and click Advanced Options.c) Click Custom Forms.d) Click Manage Forms.
2. If you need to select the forms library or folder that contains the published form:a) Click Set to open the Set Library To window.b) Select the concerned forms library or folder and click OK.
3. Select the form you want to remove and click Delete.
Removing Published Forms in IBM Notes
To remove the forms that you have published, you only need to reverse some actions done during theinstallations of these forms:
1. Refer to the section: Installing and configuring the Fax Memo Template on page 42 and redo the appropriateproperty modification actions (in organization's inbox properties and Mail-Fax template properties) to revertto the original configuration.
2. Refer to the section: Synchronizing the Mail Template Databases on page 45 in order to apply the changes.3. If needed, delete the MailFaxTemplate.ntf file that was copied in the <DominoInstallPath>\Data\Fax
directory.
Uninstalling the Microsoft Office Internet Fax ServiceConfiguration for XMediusFAX
All the tools needed to uninstall the Microsoft Office configuration for using the Internet Fax Service withXMediusFAX are available on the XMediusFAX distribution media at the path: Tools\OfficeFax.
The uninstallation can be done:
• From single computers (one by one): Uninstallation from a Single Computer on page 87, or• By massive deployment (from all computers at the same time): Uninstallation by Massive Deployment
through Group Policy on page 87
86 XMediusFAX 8.0 | Installation and Maintenance Guide
Chapter 13 | Uninstallation
Uninstallation from a Single Computer
To uninstall the Internet Office Fax Service configuration for XMediusFAX:
1. From the computer concerned by the uninstallation, access the Tools\OfficeFax folder of the XMediusFAXdistribution media.
2. Execute the OfficeFaxRemove.reg file.
The Microsoft Office Internet Fax Service feature configuration for XMediusFAX is now removed.
Uninstallation by Massive Deployment through Group Policy
To be able to massively uninstall the Internet Office Fax Service configuration for XMediusFAX, you need toperform the following steps including a configuration of your Active directory:
1. From any computer, logon with an account having administrative permissions on your Active Directory2. Access the Tools\OfficeFax folder of the XMediusFAX distribution media.3. Configure your Active Directory as follows:
a) Open the Active Directory Users and Computers.b) Select the target domain for the deployment (the domain corresponding to the targeted users).c) Under this domain, select an existing Organizational Unit containing targeted users and display its
Properties.
Note: All the members of this unit will be subject to the deployment.
d) Under the Group Policy tab, edit the Group Policy Object that was created for the installation of thefeature.
e) Select User Configuration ➤ Windows Settings ➤ Scripts Logon/Logoff.f) Display the Properties of the Logon item.g) If it still exists (from the feature installation),Remove the script named OfficeFaxRegistryInstall.cmd,
as it is now useless.h) Add the following files directly from the XMediusFAX distribution media to the Logon folder (using the
Show Files button):
• OfficeFaxRemove.reg
• OfficeFaxRegistryRemove.cmd
i) Add a new script and Browse for selecting the OfficeFaxRegistryRemove.cmd file you just addedto the Logon folder.
j) Validate and go back to the Active Directory Users and Computers main interface.k) Repeat all these steps for any Organizational Unit that is concerned by the uninstallation described
here.
From now, every user registered within the Organizational Units you just edited above will get their InternetOffice Fax Service feature configuration silently removed on next logon.
XMediusFAX 8.0 | Installation and Maintenance Guide 87
Chapter 13 | Uninstallation
88 XMediusFAX 8.0 | Installation and Maintenance Guide
Chapter 13 | Uninstallation

Index
Aadding
client components 83server components 83
administration interfacebasic site configuration 31basic system configuration 31system monitoring 1
administratorspermissions needed to install the forms for IBM Notes 41
Bbacking up
system 79users phone books 79
basic configuration 31site 31system 31
Cclient
componentsadding or removing 83
installing applications 69slient installation 72
client applications 69client hardware
installation requirements 8client operating system
installation requirements 8clients
uninstalling completely 85components 1concepts and planning 1configuring
the forms for IBM Notes 46
Ddocument conversion 2
Eequipment
installation requirements for T.38 V 7Exchange UM
definition 57integration
configuring fax reception 58configuring fax tone detection 58configuring the fax server
mail notification profile 61
Exchange UM (continued)integration (continued)
configuring the fax server (continued)principle 59UM rule 60
fax solution 57mail notification behaviors with Outlook forms 62
Ffax boards
installation requirements 7fax driver 2
services 2fax manager 1
services 1fax server
components 1modules 1system
monitoring in the administration interface 1First Time Setup 19First Time Setup Wizard 19forms for IBM Notes
configuringchanging the fax domain 47
installingadministrator permissions 41redirecting the fax domain towards the gateway forSMTP 46signing the database 42synchronizing the mail template databasesimmediately 45
installing fax memo 42forms for Microsoft Outlook
publishing 39
Ggateways
for SMTPredirecting the IBM Notes fax domain 46services 2
for XMLservices 2
installation requirements 7
HH.323 protocol 2
IIBM Notes
forms 41
XMediusFAX Installation and Maintenance Guide Index - 1

IBM Notes FormsPublishing 41
installation requirementclient hardware 8client operating system 8
installation requirementsequipment for T.38 (VoIP) 7fax boards 7gateways 7licensing 2mail clients 9mail servers 6servers
hardware 5operating system 6other softwares 6
web clients 9installing
server applications 12the forms for IBM Notes 41
installing the client applications 69installing the server applications 11
LLaunching The First Time Setup Wizard 19license
default /demo license 3logs
server installation 11site client installation 69
Mmail clients
installation requirements 9mail servers
installation requirements 6modules 1, 2
fax driver 2fax manager 1rasterizer 2
OOutlook forms
known issues and solutions 41mail notification behaviors with Exchange UM 62overview 39publishing 39
Rrasterizer 2
services 2removing
client components 83server components 83
repairingclient installation 83server installation 83
Sserver
installing the applications 12upgrading 82
servers 1, 5, 6, 11, 24, 25, 26, 83, 85components
adding or removing 83installation
log 11re-assigning file associations 11third-party software
Apache Tomcat settings 26IIS Redirector 26Installing JRE and JDK 25Installing MySQL 25
installing the applications 11requirements
hardware 5operating system 6other softwares 6
uninstalling completely 85services 1, 2, 84
for the fax driver 2for the fax manager 1for the gateway
for SMTP 2for XML 2
for the rasterizer 2management 84
silent installationclients 72
SIP protocol 2site
basic configuration 31site client
insallationlogs 69
SMTP 2, 35, 36, 37, 38, 48, 53, 54, 66, 67, 68Gateway 35integration
MS ExchangeFAX address space (2007+) 38fax sending 37mail notifications 38purpose 37
MS Exchange Onlinefax sending 67mail notifications 68purpose 66
overview 35typical deployment 37using mail relay server (receiving notifications) 36using mail server (sending faxes) 36using TLS
overview 48with IIS, in input 54with IIS, in output 48with IIS, in output (testing) 53
system 1, 31, 79backing up 79basic configuration 31
Index -2 XMediusFAX Installation and Maintenance Guide

system administratorsclients
uninstalling completely 85servers
componentsadding or removing 83
repairing the installation 83uninstalling completely 85
TT.38 (VoIP)
required equipment 7third-party software 24, 27
Python 27
Uuninstalling applications completely
client 85
uninstalling applications completely (continued)server 85
upgradingthe server 82
usersbacking up the phone books 79
Wweb clients
installation requirements 9
XXMediusFAX
installing the server applications 11XML 2
XMediusFAX Installation and Maintenance Guide Index - 3

Index -4 XMediusFAX Installation and Maintenance Guide


Installation and Maintenance GuideNoncontractual document
*253673638*XMedius Solutions Inc.
3400, boul. de Maisonneuve Ouest - Bureau 1135Montréal, Québec H3Z 3B8 - Canada
www.xmedius.com


