E Xten Integration Installation Instructions: Before you begin: Ensure you have an update copy of your Operating system including Direct X8.1 or higher. You can download this update free of charge from Microsoft at the following links. Click here for Windows 98/ME or click here for Windows 2000/XP to download the latest version. (Hint: Windows XP , Vista or 7 users and anyone who has the latest Windows Updates will not have to do this step.) Step 1: Install the Xten X-Lite, X-Pro, Eyebeam or BRIA Softphone. Step 2: Download and install Eutectics Xten integration software. Follow this link http://www.eutecticsinc.com/download14/DISK1/IPP200_XtenSoftPhone.htm to install the software. Step 3: Plug in the Eutectics IPP Phone to the PC and let it install itself. If you are prompted for the location of the drivers, enter “C:\programs files\eutectics\XtenSoftphone-IPP200 “as the file path. Step 4: Configure the Xten software to use the IPP Phone. Configuring EYEBEAM™ or newer Xten If you are using the new Xten (Counterpath) Eyebeam product then there are a couple of advanced settings which may improve your voice quality. The default settings for eyebeam make use of the software AGC (Automatics Gain Control) and software VAD (Voice Activity Detection) capabilities of the softphone client. These capabilities do not always provide the best performance and may in fact degrade voice quality when used with Eutectics USB devices. In order to check and modify these settings go to the Xten eyebeam Settings - Media – Audio menu and select the General Tab as see below. Page 1 06/18/2010
Transcript
E
Xten Integration Installation Instructions: Before you begin: Ensure you have an update copy of your Operating system including Direct X8.1 or higher. You can download this update free of charge from Microsoft at the following links. Click here for Windows 98/ME or click here for Windows 2000/XP to download the latest version. (Hint: Windows XP , Vista or 7 users and anyone who has the latest Windows Updates will not have to do this step.) Step 1: Install the Xten X-Lite, X-Pro, Eyebeam or BRIA Softphone. Step 2: Download and install Eutectics Xten integration software. Follow this link http://www.eutecticsinc.com/download14/DISK1/IPP200_XtenSoftPhone.htm to install the software. Step 3: Plug in the Eutectics IPP Phone to the PC and let it install itself. If you are prompted for the location of the drivers, enter “C:\programs files\eutectics\XtenSoftphone-IPP200 “as the file path. Step 4: Configure the Xten software to use the IPP Phone. Configuring EYEBEAM™ or newer Xten If you are using the new Xten (Counterpath) Eyebeam product then there are a couple of advanced settings which may improve your voice quality. The default settings for eyebeam make use of the software AGC (Automatics Gain Control) and software VAD (Voice Activity Detection) capabilities of the softphone client. These capabilities do not always provide the best performance and may in fact degrade voice quality when used with Eutectics USB devices. In order to check and modify these settings go to the Xten eyebeam Settings - Media – Audio menu and select the General Tab as see below.
E In addition select the Devices Menu as shown below:
Verify that the Device is set to the IPP Device name (IPP200, 400, 500, 700 or IPP2000 for Windows XP) or if you are using an older system such as Windows 2000/98 then the device should be USB Audio Device as in the above picture. Uncheck the Enable Acoustic echo cancellation and the Enable VAD (Voice Activity Detection) check boxes. These settings are not needed for Eutectics devices and may degrade voice quality.
Page 3 06/18/2010
E On newer versions of the eyeBeam client – the DIAGNOSTICS window will not appear – and the option does not have to be enabled. Instead please make sure that the Call Notification Call Alerts option is set to Always Notify. If this is not done the Eutectics Device or attached phone will not RING properly.
To access this screen right click on the eyeBeam client and select the OPTIONS dialog. Click the Alerts & Sounds icon to get to the proper page.
Page 4 06/18/2010
E
Page 5 06/18/2010
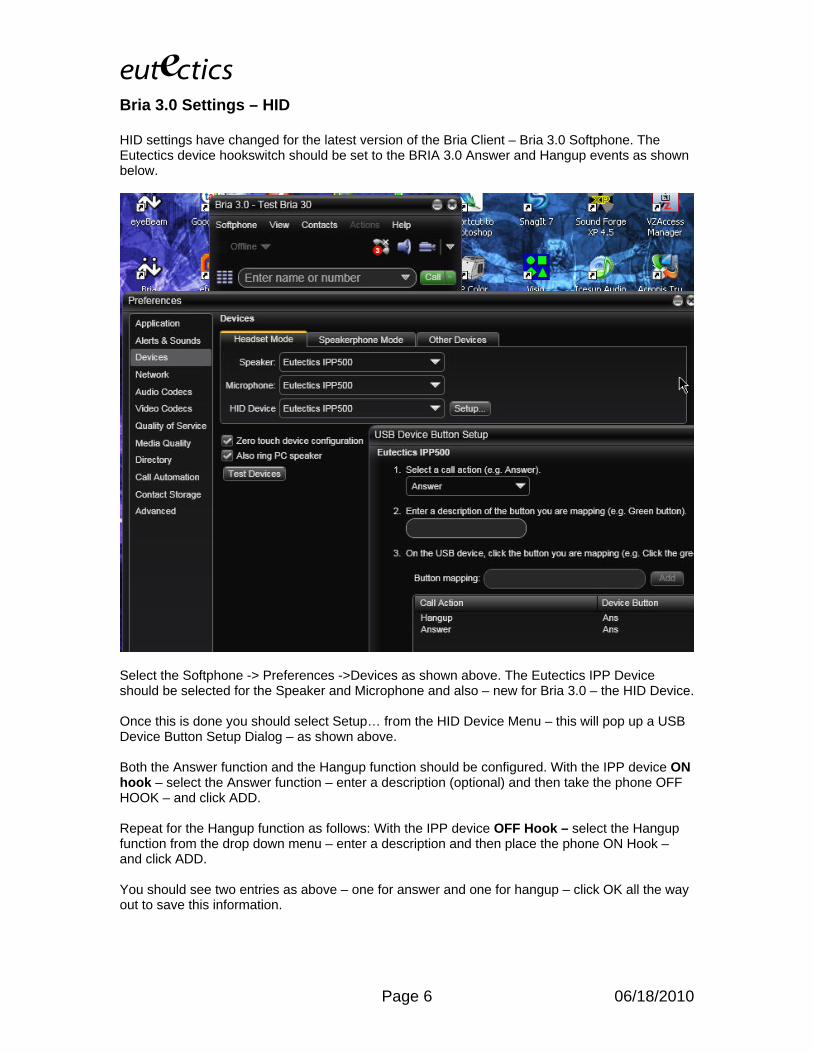
E Bria 3.0 Settings – HID HID settings have changed for the latest version of the Bria Client – Bria 3.0 Softphone. The Eutectics device hookswitch should be set to the BRIA 3.0 Answer and Hangup events as shown below.
Select the Softphone -> Preferences ->Devices as shown above. The Eutectics IPP Device should be selected for the Speaker and Microphone and also – new for Bria 3.0 – the HID Device. Once this is done you should select Setup… from the HID Device Menu – this will pop up a USB Device Button Setup Dialog – as shown above. Both the Answer function and the Hangup function should be configured. With the IPP device ON hook – select the Answer function – enter a description (optional) and then take the phone OFF HOOK – and click ADD. Repeat for the Hangup function as follows: With the IPP device OFF Hook – select the Hangup function from the drop down menu – enter a description and then place the phone ON Hook – and click ADD. You should see two entries as above – one for answer and one for hangup – click OK all the way out to save this information.
Page 6 06/18/2010
E Now whn the IPP device is used to answer a call – or to hangup – the proper events will be sent to the new Bria 3.0 softphone. You do nto need to do this for other Counterpath devices – only the new BRIA 3.0 has this enhanced function built into the softphone itself.
Page 7 06/18/2010
E Older Xten Clients
1. For Older xten clients - open the quick Menu on the Xten client by right clicking on the Xten client and choosing Diagnostics from the Menu.
Make sure that the Diagnostics option is checked. You will see a Diagnostics window tab in the Windows Task Bar. You do not need to do anything with it – just always make sure that this option is checked to ensure proper operation of the integration.
Page 8 06/18/2010
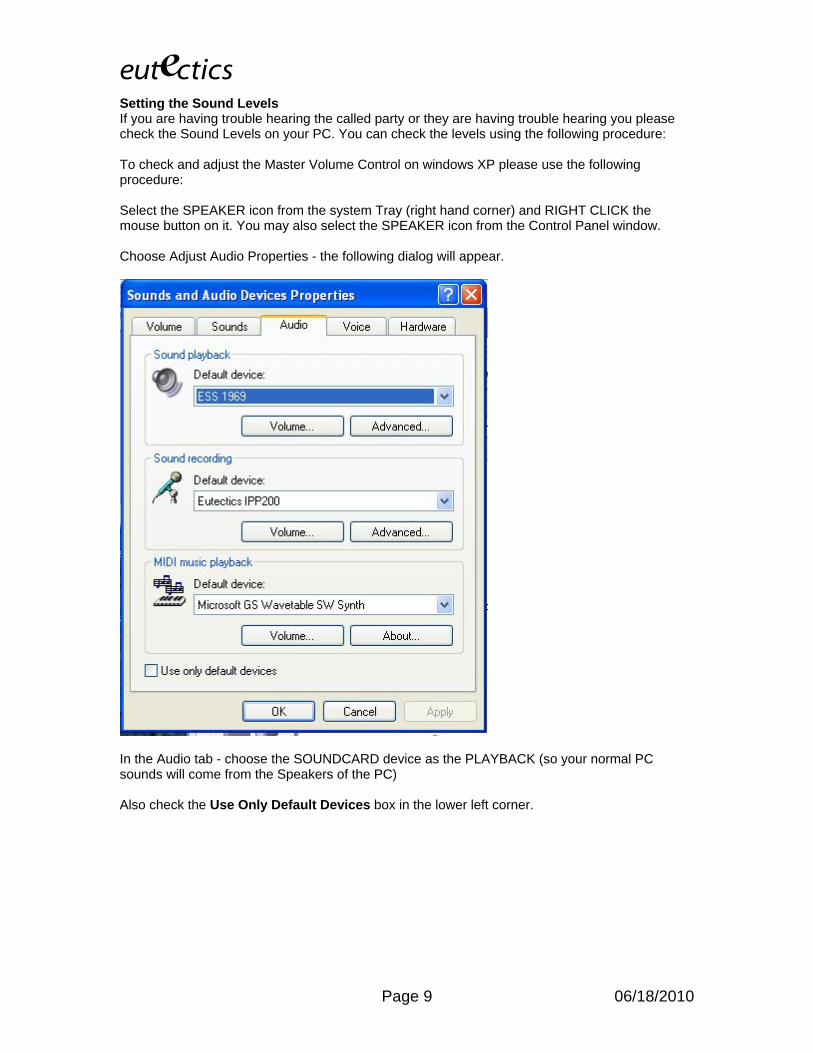
E Setting the Sound Levels If you are having trouble hearing the called party or they are having trouble hearing you please check the Sound Levels on your PC. You can check the levels using the following procedure: To check and adjust the Master Volume Control on windows XP please use the following procedure: Select the SPEAKER icon from the system Tray (right hand corner) and RIGHT CLICK the mouse button on it. You may also select the SPEAKER icon from the Control Panel window. Choose Adjust Audio Properties - the following dialog will appear.
In the Audio tab - choose the SOUNDCARD device as the PLAYBACK (so your normal PC sounds will come from the Speakers of the PC) Also check the Use Only Default Devices box in the lower left corner.
Page 9 06/18/2010
E
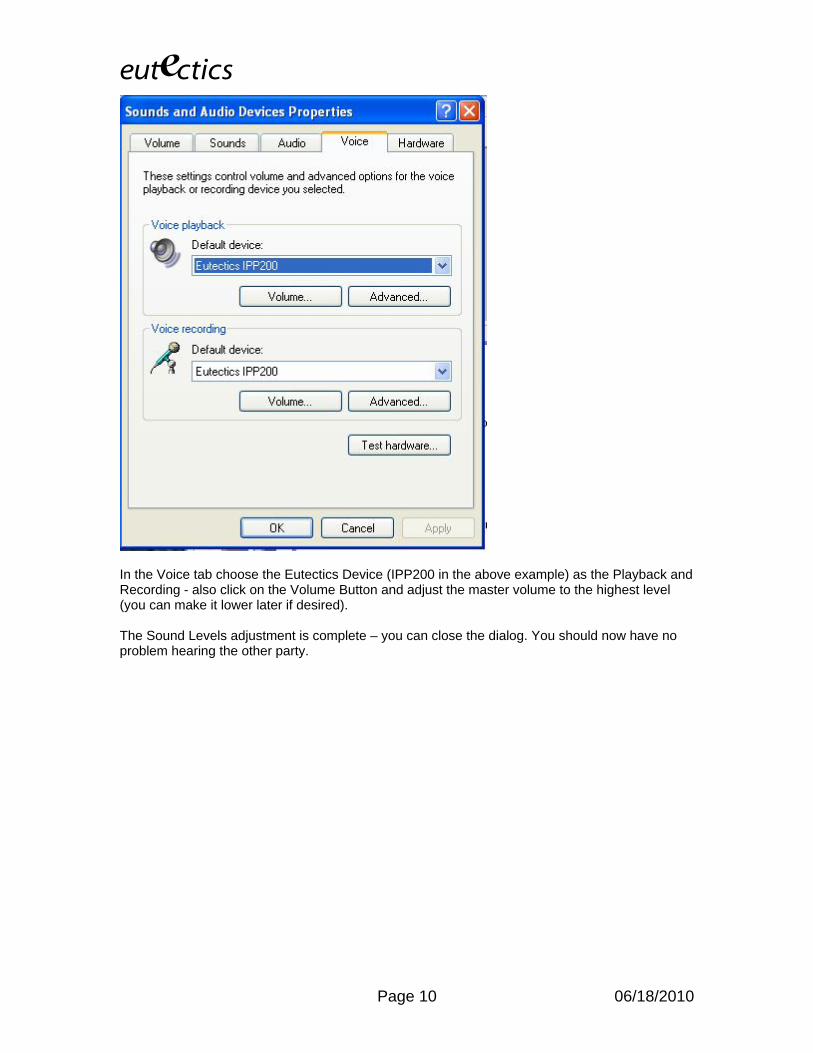
In the Voice tab choose the Eutectics Device (IPP200 in the above example) as the Playback and Recording - also click on the Volume Button and adjust the master volume to the highest level (you can make it lower later if desired). The Sound Levels adjustment is complete – you can close the dialog. You should now have no problem hearing the other party.
Page 10 06/18/2010
E
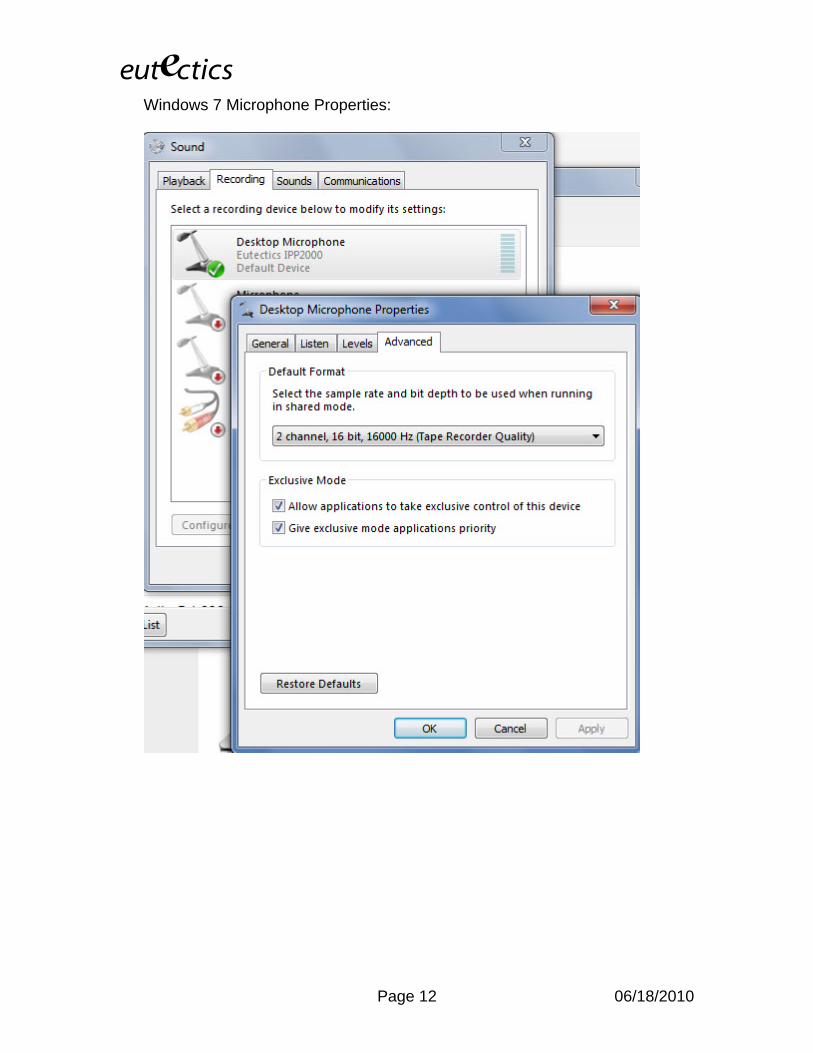
Vista or Windows 7 Users Windows Vista has some additional settings required for proper operation of the Eutectics Devices. The microphone device must be configured as default STEREO capture mode. Using the dialog below – please select the Default Format as 2 channel, 16 bit in shared mode.
This setting is important to ensure proper operation of the integration on Windows Vista or Windows 7.
Page 11 06/18/2010
E Windows 7 Microphone Properties:
Page 12 06/18/2010
E Also the Setting of the IPP device as the Default Communications device should be verified as shown below:
Page 13 06/18/2010
E Windows is a registered trademark of Microsoft Corporation in the United States and other countries.