30
Your Complete Guide on how to use your new Golf Improvement System Cure Your Slice Drive Longer Chip Closer Hole More Putts Shoot Lower Scores

Your Complete Guide on how to use your new Golf Improvement System
Cure Your Slice Drive Longer Chip Closer Hole More Putts Shoot Lower Scores

Golf is about to get easier!Congratulations on purchasing a T2hole Golf Improvement System. It’s a revolutionary new Golf Improvement System that is recommended by top Tour coach and Master Golf Professional, Denis Pugh, (see left) as well as by many other PGA professionals.
Gone are the days when you have to use makeshift implements such as clubs, head covers, boxes and
other foreign objects. At last you have got a system specifically designed for golf improvement, and with its help you will soon be hitting the ball further and straighter, pitching and chipping closer and holing a lot more putts.
The Golf Improvement System has been scientifically designed to help both beginners and experienced golfers and it is different from all other products on the market in as much as it will help you to improve all aspects of your game from your driving right through to your putting. What’s more, it doesn’t just offer quick fixes for temporary swing faults. Instead, it helps you to develop a set of sound ‘set-up’ fundamentals - stance, alignment and swing path – all of which are vital if you are to improve your consistency and lower your scores.
The Golf Improvement System is robust yet forgiving, giving you important sensory feedback as you develop your swing. It is designed to be used on the practice ground, at the range, in your home, garden or office, in fact almost anywhere you have the room to set it up and swing a club.
The Golf Improvement System can be used for numerous different exercises to improve both your long game and short game. However, before you get started, you have to follow a simple set of assembly instructions. If you have any difficulties visit www.t2hole.com where further help is available.
Please note that all instructions are aimed at right-handed golfers. However, the Golf Improvement System can be used just as easily by left-handers. Simply reverse the instructions and the photographs, work on the drills and watch your scores tumble as a result.
1
Introduction

Black markings indicate 10 degree increments
Your T2hole Golf Improvement SystemComponents1 2 Swing Arms2 Set of Bristles (1 x concave and 1 x convex)3 Swing Arm Slider4 Swing Arm Bezel Cap (green)5 Ball Locator6 Bar Connector7 Interface8 Interface Buckle9 Bridge10Bridge Bezel Cap (green)11Height Adjuster12Bar End Caps13Height Adjuster Stickers14Sets of Customisation Stickers 15Central Bars (aluminium)16Foot Alignment Bars (aluminium)17 Instructional DVD by Denis Pugh18 Bespoke Storage Bag
Components
2
A Push the circular Swing Arm Bezel Cap (green) into the Swing Arm Slider, then push these into the slot in the Swing Arm holding the convex shaped Bristles.B Connect the two Central Bars using the Bar Connector.C Push the Interface into the shorter of the two Central Bars and then clip in the Ball Indicator & Interface Buckle on to the Interface.D Slide the two connected Central Bars through the Height AdjusterE Push the two Foot Alignment Bars into the Bridge and place over the Height Adjuster. F Now clip in the Bridge Bezel Cap (green).G Push the three Cap Ends into the open ends of the Aluminium Bars. H Attach the Stickers onto the Height Adjuster. These are designed to fit the part exactly so please do not fold or cut them.I Place the Inner Swing Arm on to the Interface Buckle.
To begin with, please check to make sure all the parts have been included. Every effort has been made to supply you with all the components, but, in the unlikely event something is missing, please contact www.T2hole.com and we will send you the missing part(s) by return.
The T2hole Golf Improvement System is designed to be easy to put together and, once assembled, will break down into four main parts for easy storage. Pleaserefertothediagram(overleaf)to help identify the parts and also refer to our website for further assembly instructions.
Assembly Instructions

B
AssemblyInstructions
3
A
I
1212
12
1413
9
4
11
610
15
7
15
1616
C
C
HD
G
1
2
5 83 4
E F

Storage Once assembled your Golf Improvement System splits easily into four parts. Simply lift up the Foot Bars, fold back the Bristles underneath the Swing Arms (as shown) to protect them from damage and place in either the storage bag or your golf bag (as shown). The Ball Locator is designed to be easily removable. We recommend that during general use, once you have established the correct position for the ball, you remove the Ball Locator, only using it from time to time to check your ball position.
Storage
4

OPtIOn1 Pre-Set Distance Feature One of the product’s premier features is that you can take it out of the box, assemble it, and start to play golf using the pre-set distance feature; this is particularly useful for newcomers to the game, or those who do not have access to a PGA Professional.
With your Golf Improvement System in front of you, select the club you want to use.
(For demonstration purposes we are using a 9-iron and a golfer who is 5ft 10ins tall)
Now simply slide the Foot Alignment Bar along the Central Bar until your height and the club you are using are next to each other. You are now the correct distance from the ball.
Set-upthet2holeGolfImprovementSystemgivesyouthreeoptionsforgettingyouset-upcorrectly
Set-upOption1
5

1.Stand up straight with your arms comfortably extended in front of you so that your club is parallel to the ground.
2. Without altering the position of your arms or club, simply bend from the hips until the club comes to rest on the ground.
3.Now flex your knees slightly to adopt an athletic stance. You should feel balanced and poised.
Correct Posture All the Aluminium Bars are reversible; please ensure that the bars are ‘blank’ side up before you start.With your Golf Improvement System in front of you, carry out the following well-known posture routine:
6
OPtIOn2
Customise Your T2hole Golf Improvement SystemAlternatively, you can use the enclosed Customisation Stickers to mark your correct width of stance, ball position and the distance you should stand from the ball. Please note all the above will differ, depending on your height and other physical characteristics.
Set-upOption2

Ball PositionThere is a certain amount of personal preference here as well.
1. One school of thought is to keep the ball and left foot in the same position for all clubs, and then simply vary your stance width by moving your right foot (seephotono1).
2. The second and more commonly-used method is to start with (seephotono2)the ball in the centre of your stance for your short irons, and then move it forwards the longer the club you use. When using a Driver the ball should be played just inside the leading foot.
YourGolfImprovementSystemcanaccommodateeitherpreference(seebelow).
Stance WidthThe basic rule for stance width is the longer the club, the wider the stance. It is generally accepted that when you use your driver your feet should be approximately shoulder width apart, and as the clubs become shorter, the stance width becomes narrower.
Your stance width is somewhat personal. However, you should feel comfortable and able to make a good turn without losing your balance.
7
Set-upOption2
1 2
Customise Your Set-up PositionsWhen you are happy with your posture, stance width and ball position, simply use your Customisation Stickers to mark your ideal positions for each club in your bag, or alternatively you may just want to customise a selection of positions (seephotoright), it’s a personal choice.note:mark your stance width from your instep.

8
OPtIOn3
PGA Professional CustomisationDo not underestimate the importance of a good quality, consistent set-up. It’s a well-known fact that 85-95% of poor shots can be traced back to a bad or inconsistent set-up.
For the ultimate in precision we highlyrecommendyou take your Golf Improvement System to your local PGA golf professional and get him to customise it specifically for you, from sand wedge to driver. Youwillthenhavethecorrectset-upforeveryclubinthebag,allthetime,everytime!
General Advice & InformationDuring our extensive testing we found that the best improvements occurred when users alternated their practice, for example 10-15 minutes using the Golf Improvement System, then 10-15 minutes without. This stopped users becoming too reliant on the system, and gave them a chance to practise unaided, like they would play.
When standing up against the foot alignment bars, leave a small gap, approximately a ¼-½inch.
Dotakeextracareifusingtheproductindoors.
Start Improving Your GameYou can use your Golf Improvement System to improve your long game, your short game and your putting. To do that, simply choose the area you want to work on and then select the appropriate drill. Some drills require you to use the complete Golf Improvement System. Others utilise only part of the system so you might need to adapt the equipment accordingly.
Set-upOption3

Improving Your AlignmenttheProblemTour professionals spend hours working on their alignment but it is something many amateurs do not check often enough. Some amateurs tend to aim well left of their target while others aim well to the right.
theSolutionAs you stand behind your ball looking at the target, the channel created between the two swing arms should be aiming directly at the target. Check that your Foot Alignment Bars are parallel to the Swing Arms and target line, and also at 90 degrees to the Central Bars. This is the correct position.
Alignment
9
Make Sure Your Clubhead is Pointing at the TargettheProblemYou might well be surprised about how many golfers fail to line the clubhead up with their target and then wonder why they are hitting the ball off line.
theSolutionThe ball locator is designed to create the correct square position (see right). Providing you have set up your Golf Improvement System correctly, your clubface will automatically be in the correct position.
Shortiron
Midiron
Driver
Parallel
Target Line
Swing Path
90º

theSolutionThere are two ways in which you can use the T2hole Golf Improvement System to cure your slice and both will produce excellent results if you are prepared to work at them for a short period of time.
Curing Common Swing FaultsItissometimessaidthataround90-95%ofgolfersslicetheballandwewouldnotarguewiththatstatistic.
The good news is that you can use your T2hole Golf Improvement System to cure even the most persistent slice, not to mention many other swing faults. (see the following pages). To get started, all you have to do is set up your Golf Improvement System in the prescribed manner and then use it to engrain the correct movement into your mind.
CureYourSlice
10
Cure Your SlicetheProblemThe slice is a weak shot that starts left of the target and then finishes well to the right.
A slice is usually caused by an out-to-in swing path which creates a glancing blow, resulting in that all too familiar curving ball flight.

Before
After
CureYourSlice
11
Cure Your SliceDrillno.1Place the Outer Swing arm about 2-3 inches outside the ball as shown, ensure your feet and shoulders are square to the target and then use a mid-iron to make some swings. To begin with you will probably find you hit the bristles on the downswing (seebefore) but don’t worry because they are manufactured to withstand that sort of punishment. You are trying to utilise a more in-to-square-to-in movement on the downswing and through swing which will result in straight shots or even a draw. Practise the correct swing path and your slice will soon be a thing of the past (seeafter).
Set-up
Classic out-to-in swing path
Correct swing path

CureYourSlice
12
Cure Your SliceDrillno.2This drill will help cure your slice in two ways. Firstly, it will help you learn the correct swing path, secondly, it will encourage the correct forearm rotation. Take a mid-iron and then adopt a square address position in which your shoulders, hips and feet are all parallel to your target line (seephotos1-4). Now rotate the Alignment Bar so your feet are at 30 degrees, so that you right foot is slightly behind you and practise some swings from that position. This closed stance will help you to clear your right side on the backswing and get your back facing the target. When you swing back down, you should feel as if you are swinging along the line of the Foot Alignment Bar in order to produce an in-to-out swing path (seephotoright), this coupled with the correct forearm rotation will help you close the clubface and produce a nice draw shot, instead of a slice.
Set-up
1 2 3 4
note:You should practise this drill in slow motion to start with and then steadily increase your speed until you are swinging normally. Once competent at 30 degrees, repeat the process with the Alignment Bar at 20 degrees and then 10 degrees before returning it to its original position aiming directly at the target. By this time the in-to-out swing path and forearm rotation should be engrained into your mind and you should be hitting much straighter shots.

Driving LongertheProblemHitting your irons well, but not getting those extra yards with the Driver?
Here are two likely faults....
i) Incorrect angle of attack. Unlike irons, modern deep-faced drivers are designed to be hit with an ascending blow (on the up swing), this produces a better ball flight and longer shots.
ii) Poor set-up. When driving, the ball should be placed further forward in your stance, generally off the left heel. Mistakenly, however, in an effort to achieve this, some of us may end up stretching to reach the ball at address, inadvertently opening our shoulders as a result (seeaboveleft). This usually results in an ‘out-to-in’ swing path, producing a slice, or if the hands release fully, a pulled shot straight left. Neither of which is much fun!
theSolutionHere is a fantastic drill that will cure both faults at once.
Set up your Golf Improvement System so that your ball locator is 1-3 inches behind your ball (on a tee) as shown. Now take up your address position but, instead of having your clubface directly behind the ball, place it behind the ball locator, ie 1-3 inches behind the ball. This will stop you stretching for the ball and opening your shoulders. From this position, make your normal swing avoiding the ball locator on the through swing. This will help to encourage a more ascending blow and result in longer drives.
DriverLonger
13
Wrong Correct

Cure Your Push & HooktheProblemSometimes your swing path may be too ‘in-to-out’, which will result in either a push shot, straight right, if you don’t release your hands correctly, or a hook, curving left, if you release your hands fully in an effort to counteract your incorrect swing path. Again neither shots are much fun.
Before
14
CureYourPush&Hook
theSolutionThe push and hook shots are primarily caused by attacking the ball too much from inside the line. To overcome a push/hook shot you need to use the Inner Swing Arm as shown. Place it as pictured and then practise swinging without touching it. This will encourage a better swing path and will help you to hit a soft draw instead.
Set-up
After

Improve Your Ball Striking CorrectBallCompression
theProblemIf you are struggling for distance and ball control it might be the result of unhinging your wrists too quickly on the downswing and, consequently, then not being able to compress the ball. It’s a common problem but can be quickly solved with a couple of sessions using your Golf Improvement System.
15
ImproveBallStriking
theSolutionCompressionDrillno.1Place the Inner Swing Arm about 12-15 inches behind you (asabove) and with the Bristles pointing about 45-degrees towards you. Use a medium-to-short iron. Start with your arms parallel to the ground and your wrists fully hinged. Make your swing trying to feel the delay in the unhinging of your wrists until later in your downswing, hence avoiding the bristles and producing a much more solid strike. Your ball striking will feel and sound more solid and you will soon see your distance and accuracy improve.

16
ImproveBallStriking
Compression Drill No.2For this drill use a short iron. Place the ball 2-4 inches in front of the ball locator as shown (photoright). Take your standard set-up (not forgetting to move everything forward 2 -4 inches) Now simply practise hitting shots whilst trying to avoid contacting the ball locator (photos1-3). Like with the previous drill, you should soon be feeling and hearing a much more solid sounding ball contact.
1 2
3
2-4ʺ 2-4ʺ
2-4ʺ

17
thePre-SetDrill
The Pre-Set DrilltheProblemAre you inconsistent or not striking the ball as well as you want? If so, try this drill, you will be pleasantly surprised by the results.
theSolutionFor this drill, take your stance so that your feet are up against the Foot Alignment Bar. The idea is that when your club is parallel to the ground it will be positioned directly over the Alignment Bar (asshown). When your club is parallel to the ground, your wrists should be slightly hinged, not cupped or bowed, and the toe of your club should be pointing up in the air (or a fraction closed). From this pre-set position, simply turn your shoulders through 90-degrees to the top of your backswing. Then pause and swing slowly down and through. Practise this movement until it becomes habitual.
Set-up
18
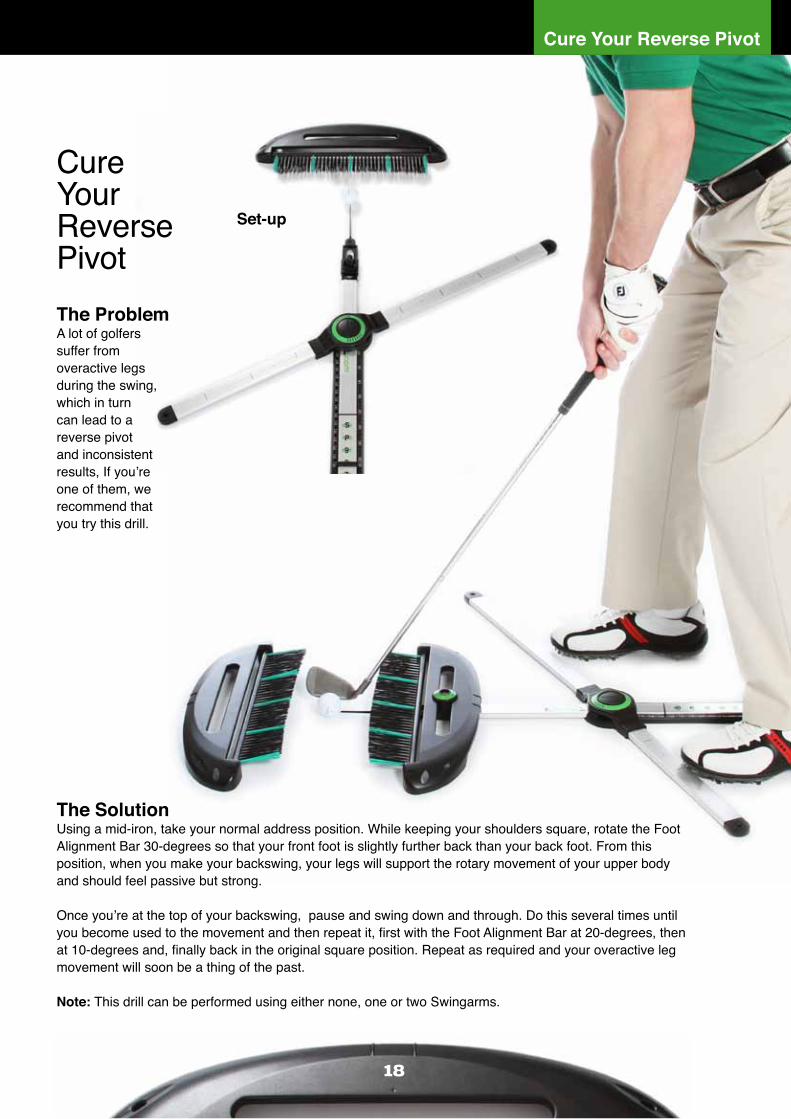
CureYourReversePivot
theSolutionUsing a mid-iron, take your normal address position. While keeping your shoulders square, rotate the Foot Alignment Bar 30-degrees so that your front foot is slightly further back than your back foot. From this position, when you make your backswing, your legs will support the rotary movement of your upper body and should feel passive but strong.
Once you’re at the top of your backswing, pause and swing down and through. Do this several times until you become used to the movement and then repeat it, first with the Foot Alignment Bar at 20-degrees, then at 10-degrees and, finally back in the original square position. Repeat as required and your overactive leg movement will soon be a thing of the past.
note:This drill can be performed using either none, one or two Swingarms.
Cure Your Reverse PivottheProblemA lot of golfers suffer from overactive legs during the swing, which in turn can lead to a reverse pivot and inconsistent results, If you’re one of them, we recommend that you try this drill.
Set-up

19
OnePiecetakeaway
theSolutionTo develop a solid, one-piece takeaway, practise this drill at the range, in your lounge, or wherever else you may be.
Arrange your Golf Improvement System as shown, with the Inner Swing Arm about 12-18 inches behind the ball and the Bristles pointing straight up in the air. Then, simply swing back smoothly keeping the triangle intact for the first part of the swing, If you are doing the drill correctly, you should gently brush the top of the Bristles on the way back.
The One Piece Takeaway DrilltheProblemIt is sometimes said that the first 10-15 inches is the most important part of your swing. All good golfers have a repeatable, one-piece takeaway but, in contrast, many amateurs tend to be too “wristy” and to pick the club up too quickly, resulting in a loss of both distance and accuracy.
Set-up
note:For more advanced players, complete your backswing and make your stroke avoiding the bristles on the downswing and practise your ball compression at the same time (see DVD)

The Extension DrilltheProblemMany golfers slice, or don’t hit the ball as far as they could, simply because they don’t swing through the ball correctly. This drill helps you to overcome this problem and to strike the ball much better.
Itisimportantnottouseaballwhenyouareperformingthisdrill.
theSolutionSet up your Golf Improvement System as shown with the Inner Swing Arm about 12-14 inches in front of the ball position and the Bristles pointing directly upwards. Make a few half swings to ensure you are in the correct position and clipping the top of the Bristles as you swing through.Next, move the Swing Arm another 1-2 inches further forwards (away from the ball position) and again swing through, still trying to touch the top of the Bristles. This will give you the feeling of extending correctly in the through swing. Practise the motion for 2-3 minutes at a time and the feeling will soon become engrained in your mind.
20
theExtension
Set-up

Shaping Your ShotsHow to Hit a DrawtheProblemWhen we were developing the T2hole Golf Improvement System, numerous habitual slicers asked us if it could help them to hit a gentle draw. The good news is that it can, and will also help you to hit the ball a bit further as well.
21
HitADraw
theSolutionSet the T2hole Golf Improvement System up with the Swing Arms and the Foot Alignment Bar all aiming 10-degrees right of your target and the ball slightly back in your stance, with your feet, hips and shoulders all parallel to the Foot Alignment Bar. With the help of the Ball Locator, placeyourclubheadfacingthetarget,thentakeyourgrip(theclubfaceshouldappearclosed). Now, simply swing back and through, ensuring that you don’t hit the bristles. Practise this in slow motion to begin with, and then gradually increase your speed. Do it properly and in no time at all you’ll be hitting that elusive little draw.
Set-up
targetLine
SwingPath

22
HitAFade
theSolutionSet up the Swing Arms and Foot Alignment Bar parallel to the target and then move them all about 10-degrees to the left of your target. Address the ball with your feet, hips and shoulders all parallel to the Foot Alignment Bars and the ball slightly forward in your stance. Now with the help of the ball locator placetheclubheadfacingthetarget,andthentakeyourgrip (the club face should appear open) Now, slowly at first, practise swinging without making contact with the Bristles on the Swing Arms. In no time at all, you’ll be hitting gentle fades. It’s as simple as that.
Set-up
targetLine
SwingPath
How to Hit a Fade theProblemThere are occasions in every round when you’d love to be able to hit a gentle left to right fade, perhaps round a tree or to a pin cut behind a bunker on the right-hand side of the green. Well, it’s easy if you practise this simple drill.

23
ShortGame
Start Improving Your Short Game
Improve Your PitchingThe L to L Pitching Drill
theProblemThere are a lot of golfers who do not have much of an idea what a good pitching action feels like. The drill above – and its companion L-to-L drill below – helps to overcome this deficiency and also establishes good swing positions, great swing path and a proper release.
theSolutionPlace the two Swing Arms parallel to the Foot Alignment Bar, in a neutral position.
Start the drill with the club parallel to the ground on the backswing and the toe of your club pointing up and then simply swing slowly down and through the Swing Arms until your club is in a similar position on the follow through. Remember to turn your body through as well. Repeat this movement as often as you can and it will pay rich dividends for both your long game and short game.
As an alternative to this drill, you can take it one stage further and start with your arms parallel to the ground and your wrists hinged creating an “L” (seebelow). Now, simply swing through to create a mirror image.

Improve Your Chipping Technique theProblemWhether you’re a beginner, a single figure handicapper or a pro, you need a reliable chipping technique if you’re going to get up-and-down from off the green on a regular basis. Here’s how to develop one using your T2hole Golf Improvement System.
24
Chippingtechnique
theSolutionTake your normal grip or putting grip (personal preference) and choke down the shaft a couple of inches. With your feet fairly close together, set your Foot Alignment Bar at about 10-degrees open (front foot back). Play the ball a bit back in your stance, with your hands slightly forward, and with your weight favouring the front foot (all as shown). Now, simply make a simple pendulum-like stroke with your arms and shoulders endeavouring to avoid making contact with the Swing Arms. That’s your basic chip shot in a nutshell.
Set-up
OpenStance
targetLine

Stop Thinning Your Chip ShotstheProblemAre you one of those people who consistently thins or duffs your chips? Are you inconsistent round the greens? If so, practise this drill and you’ll soon be getting up and down more regularly.
25
ChipShots
theSolutionAs with the other chipping drill, the first thing you need to do is to set up the Foot Alignment Bar so that it’s 10-degrees open. Place one of the Swing Arms 8 inches behind the ball and, using the same address position and technique as before, practise swinging back and through without touching the Bristles on the Swing Arm.Practise this Drill regularly and you’ll soon develop a nice, crisp, downward chipping action.
Set-up

Hole More Putts Putting Alignment Drill
theProblemIf you are inconsistent on the greens or tend to miss more than your share of short putts you might want to try this simple drill. It will soon improve your technique and give you the confidence to roll your putts into the hole.
26
ImproveYourPutting
theSolutionTo start with, place the two Swing Arms parallel and about 6 inches apart. Once you get more proficient at this drill, you should move the Swing Arms a bit closer together, so that there is not
much room between your putter and the Swing Arms.
If you are a linear putter, and tend to take the club straight back and through using a face-balanced putter, rotate the
Bristles so that they are pointing upwards (photos1) Conversely, if you use a heel-toe balanced putter and tend to swing slightly inside-to-inside, rotate the Bristles so they are horizontal, or nearly
touching the floor (seephotos2).
Now, simply practise your stroke by swinging between the Swing Arms, ensuring you avoid hitting them either on the back swing or the through swing.
Move the Swing Arms closer together as you become more proficient at this drill. When the Swing Arms are close, and you’re still not hitting them, you know your putting stroke is good.
Youcanrepeattheabovedrillsusingjustonehandonly;thisisafavouritedrillofmanyprosandleadstofantasticcontrol.
1.Linear
Face-balancedPutter
2.InsidetoInside
Heel-toeBalancedPutter

theProblemIf your putting stroke lacks rhythm and is ineffective, you might need to simplify your technique. If so, try this Pendulum Putting drill and you’ll soon see improved results.
27
PendulumPutting
Pendulum Putting Drill
theSolutionSet up your Golf Improvement System as above to correspond with your preferred putting style (seeexplanationonpreviouspage). Then using the green Bristles as indicators, start practising your putting stroke, concentrating on making a solid, pendulum stroke, the same distance back and through. Take these feelings on to the course, and you’ll be holing more putts in no time.
Reduce the Hole Size DrilltheProblemShort range putts can be very unnerving at the best of times but, by performing this simple drill, you will reduce the fear factor and be able to putt much more confidently out on the course.
theSolutionPlace your two swing arms slightly inside the edge of the hole, as shown, basically reducing the size of the hole fractionally. Now hit a series of putts from 1ft, 2ft, 3ft.... You can, of course, vary both the width of the hole and length of the putts. After practising this drill for a while the hole will seem huge on your next round of golf!
This drill can be done anywhere and you do not necessarily even need a hole, just use the swing arms to simulate a hole.

theProblemYou hit a driver on a slight upswing, you compress the ball with your iron shots and you should try to impart ‘top spin’ when you putt. So if you are not getting the ball rolling nicely on the greens then try the following drill.
28
RollYourPuttsCorrectly
Get Your Putts Rolling Correctly
theSolutionHere’s a great drill to help create that ‘top spin’ and get those putts rolling properly. Place the ball slightly in front of the ball locator, (shownabove). Now make your putting stroke, missing the locator and hitting the ball slightly on the up stroke, imparting that top spin and achieving a great roll (photos1-3). Your putts will roll better across the green and end up in the hole more often.
1
2
3

29
Finally
FinallyWe hope that you enjoy using the T2hole Golf Improvement System and genuinely believe that, if you practise with it, your golf will improve.
The beauty of this product is that it has many uses. We covered a number in this manual, but don’t be restricted, let your imagination and needs find different ways to configure your system and help you to improve.
thankyouforyourcustom.
Kindregards.
Allatt2hole


