43
Your EdVenture into Robotics 10 Lesson plans Activity sheets and Worksheets
Your EdVenture into Robotics
10 Lesson plans
Activity sheets and Worksheets

Lesson 1 Worksheet 1.1 – Meet Edison Edison is a small programmable robot that is compatible with LEGO products.
Edison uses sensors and motors to interact with the world. In the images below you can
see Edison’s sensors, buttons and switches.
Play button – Start program Stop button – Press to stop a program Record button – 1 press = download program, 3 presses = read barcode
Edison’s line tracking sensor is made up
of two parts a red LED light and a light
sensor.
The line tracking sensor also reads
special barcodes that activate pre-
installed programs.
The EdComm cable is used to download your
programs to Edison. It connects into the
headphone socket on your computer or tablet.
Line tracking sensor Power switch
Edison’s power switch and line tracking sensor
EdComm programming cable
Buzzer/clap detector Record button
Stop button
Play button
Left light sensor Left infrared LED
Left red LED
Right light sensor Right infrared LED
Right red LED
Get to know Edison’s sensors and buttons
Name: ________________________
www.meetedison.com
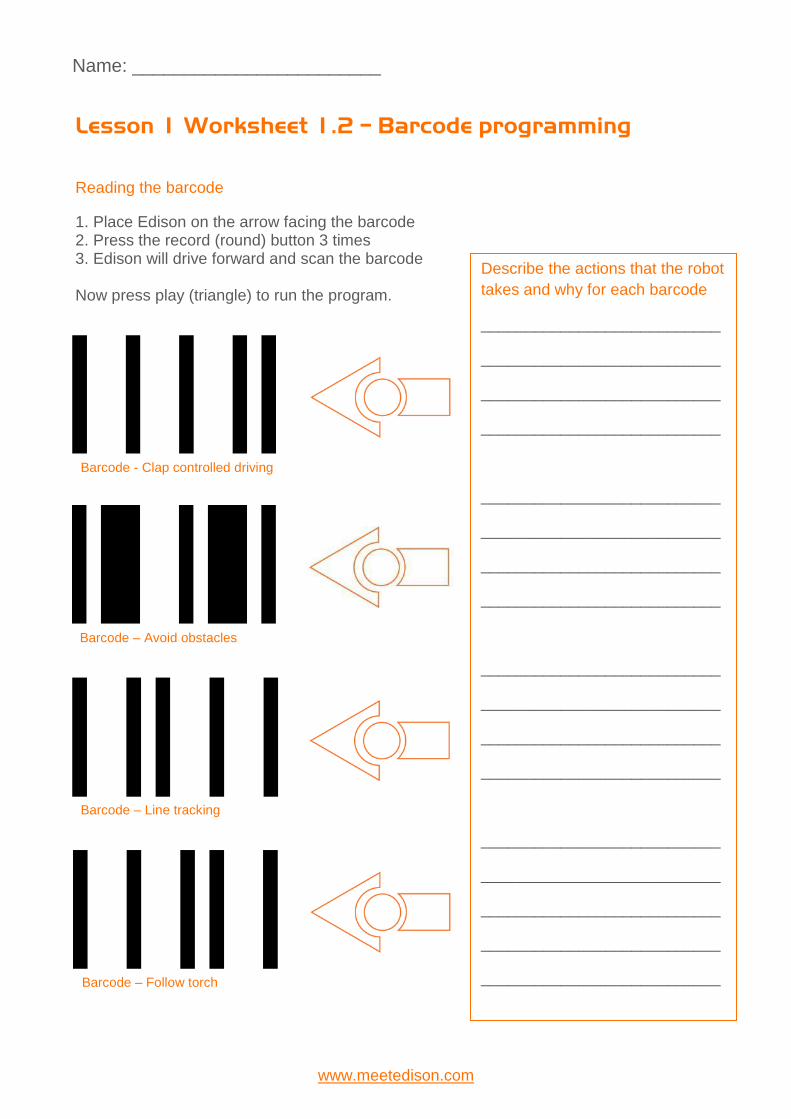
Lesson 1 Worksheet 1.2 – Barcode programming
Reading the barcode
1. Place Edison on the arrow facing the barcode 2. Press the record (round) button 3 times 3. Edison will drive forward and scan the barcode Now press play (triangle) to run the program.
Barcode - Clap controlled driving
Barcode – Avoid obstacles
Barcode – Line tracking
Barcode – Follow torch
Describe the actions that the robot
takes and why for each barcode
___________________________
___________________________
___________________________
___________________________
___________________________
___________________________
___________________________
___________________________
___________________________
___________________________
___________________________
___________________________
___________________________
___________________________
___________________________
___________________________
___________________________
Name: ________________________
www.meetedison.com

Lesson 1 Worksheet 1.3 – Meet EdWare This is EdWare and is the software used to program the Edison robot.
To get familiar with EdWare and programming, grab icons from the palette on the left and
drag them onto the programming area. Place the icons between the ‘start’ and ‘end’ icons.
Select an icon and adjust the settings in the icon property box to control how Edison
responds to that icon. Use the help text as a guide while programming. Everything you
need to know about an icon can be found here. The variables section is where you can
create and view little pieces of Edison’s memory.
What are the names of the four major icon groups?
______________
______________
______________
______________
Icon palette
A simple two icon program
Icon is selected and can be edited
Programming area
Icon properties box Icon help text Variables
Name: ________________________
www.meetedison.com
Lesson 1 Worksheet 1.4 – Downloading a test program
Open the test program. File name: Test Program.edw (Windows location: C:\Program
Files\EdWare\My Programs)
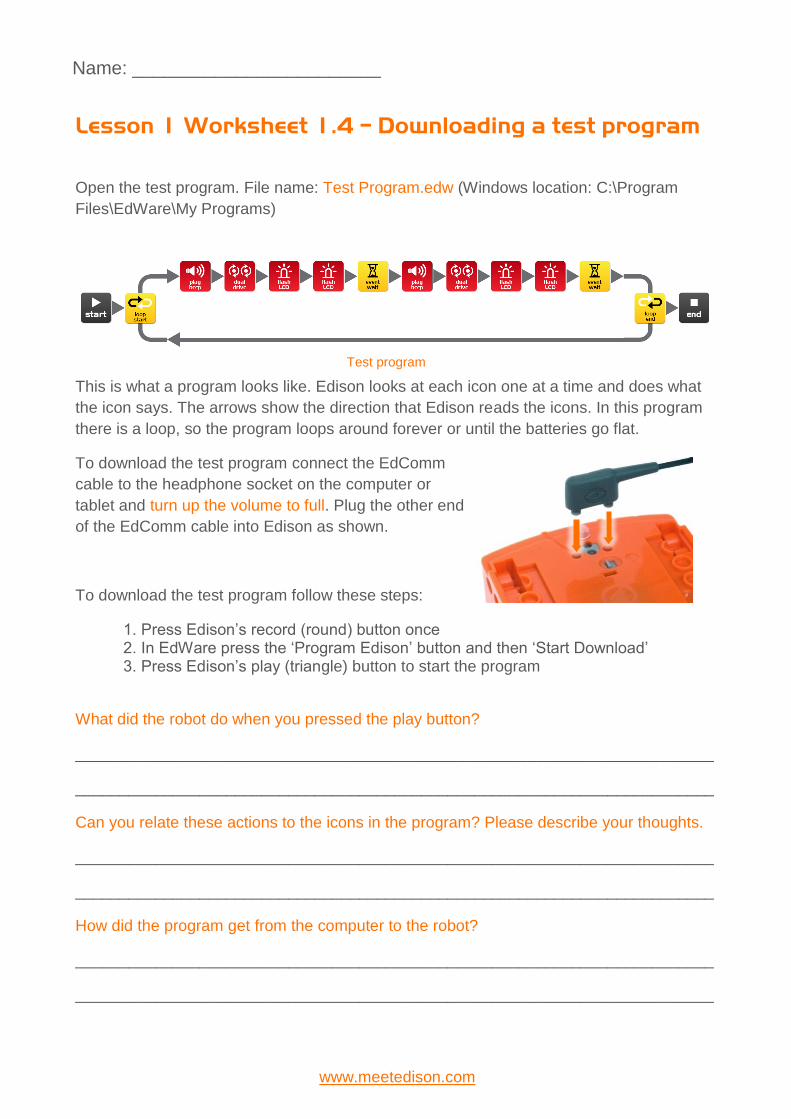
This is what a program looks like. Edison looks at each icon one at a time and does what
the icon says. The arrows show the direction that Edison reads the icons. In this program
there is a loop, so the program loops around forever or until the batteries go flat.
To download the test program connect the EdComm
cable to the headphone socket on the computer or
tablet and turn up the volume to full. Plug the other end
of the EdComm cable into Edison as shown.
To download the test program follow these steps:
1. Press Edison’s record (round) button once 2. In EdWare press the ‘Program Edison’ button and then ‘Start Download’ 3. Press Edison’s play (triangle) button to start the program
What did the robot do when you pressed the play button?
________________________________________________________________________
________________________________________________________________________
Can you relate these actions to the icons in the program? Please describe your thoughts.
________________________________________________________________________
________________________________________________________________________
How did the program get from the computer to the robot?
________________________________________________________________________
________________________________________________________________________
Test program
Name: ________________________
www.meetedison.com

Lesson 2 Worksheet 2.1 – Drive the robot forward
Write the following program to drive the Edison robot forward. Use the activity sheet or
coloured tape on a desk as start and stop markers.
Set the ‘Seconds pass’ (replace?) to an amount of time in seconds to have the robot start
from behind the start line and stop 1 cm (0.5 in) before the finish line.
Minimum amount of time is 0.01 seconds.
Maximum amount of time is 327.67 seconds.
Try different amounts of time until your robot drives forward and stops just before the finish
line.
What is the correct amount of time to get your robot from the start to the finish?
__________
Describe what the robot is doing and why?
________________________________________________________________________
________________________________________________________________________
________________________________________________________________________
Name: ________________________ Name: ________________________
www.meetedison.com
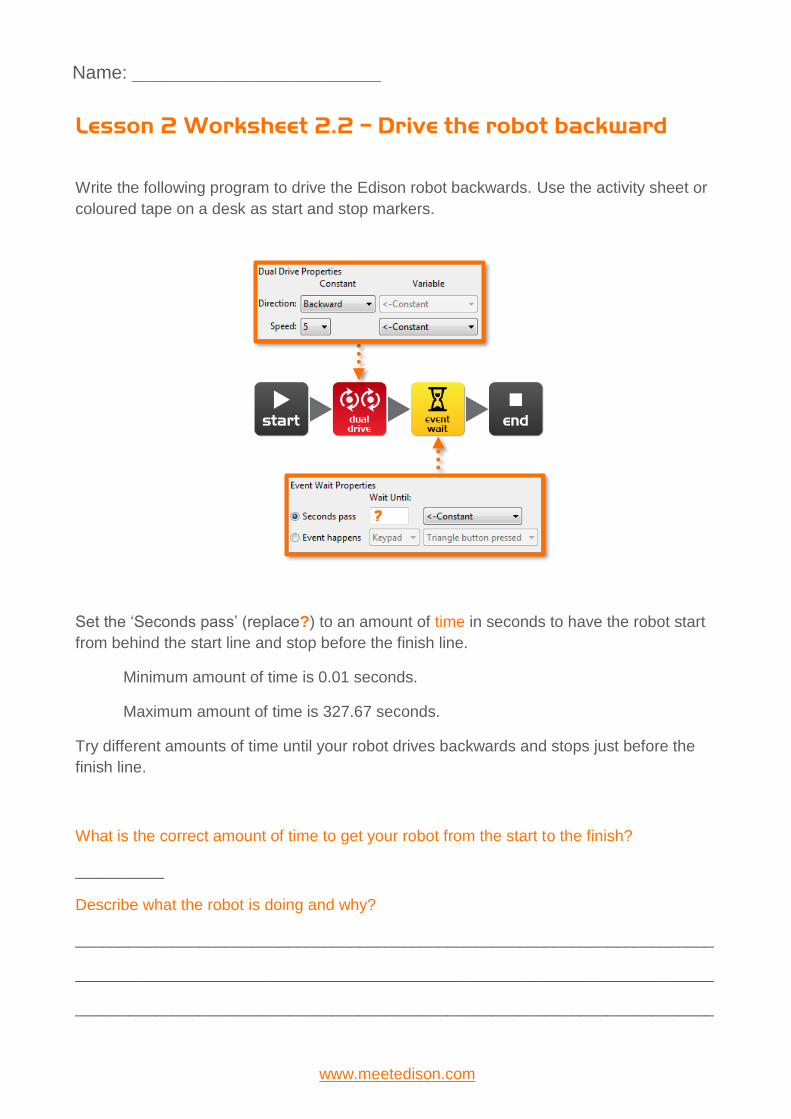
Lesson 2 Worksheet 2.2 – Drive the robot backward
Write the following program to drive the Edison robot backwards. Use the activity sheet or
coloured tape on a desk as start and stop markers.
Set the ‘Seconds pass’ (replace?) to an amount of time in seconds to have the robot start
from behind the start line and stop before the finish line.
Minimum amount of time is 0.01 seconds.
Maximum amount of time is 327.67 seconds.
Try different amounts of time until your robot drives backwards and stops just before the
finish line.
What is the correct amount of time to get your robot from the start to the finish?
__________
Describe what the robot is doing and why?
________________________________________________________________________
________________________________________________________________________
________________________________________________________________________
Name: ________________________
www.meetedison.com

Lesson 2 Worksheet 2.3 – Forward and then backward
Write the following program to drive the Edison robot forward and then backward. Use the
activity sheet or coloured tape on a desk as start and stop markers.
Set the ‘Seconds pass’ (replace?) to an amount of time in seconds to have the robot start
from behind the start line and stop before the finish line, then drive backwards and stop
before the start line.
Minimum amount of time is 0.01 seconds.
Maximum amount of time is 327.67 seconds.
Try different amounts of time until your robot drives forwards and backwards and stops just
before the start line.
What are the correct times to drive forward and backward?
Forward __________ Backward __________
Describe what the robot is doing and why?
________________________________________________________________________
________________________________________________________________________
________________________________________________________________________
Name: ________________________
www.meetedison.com
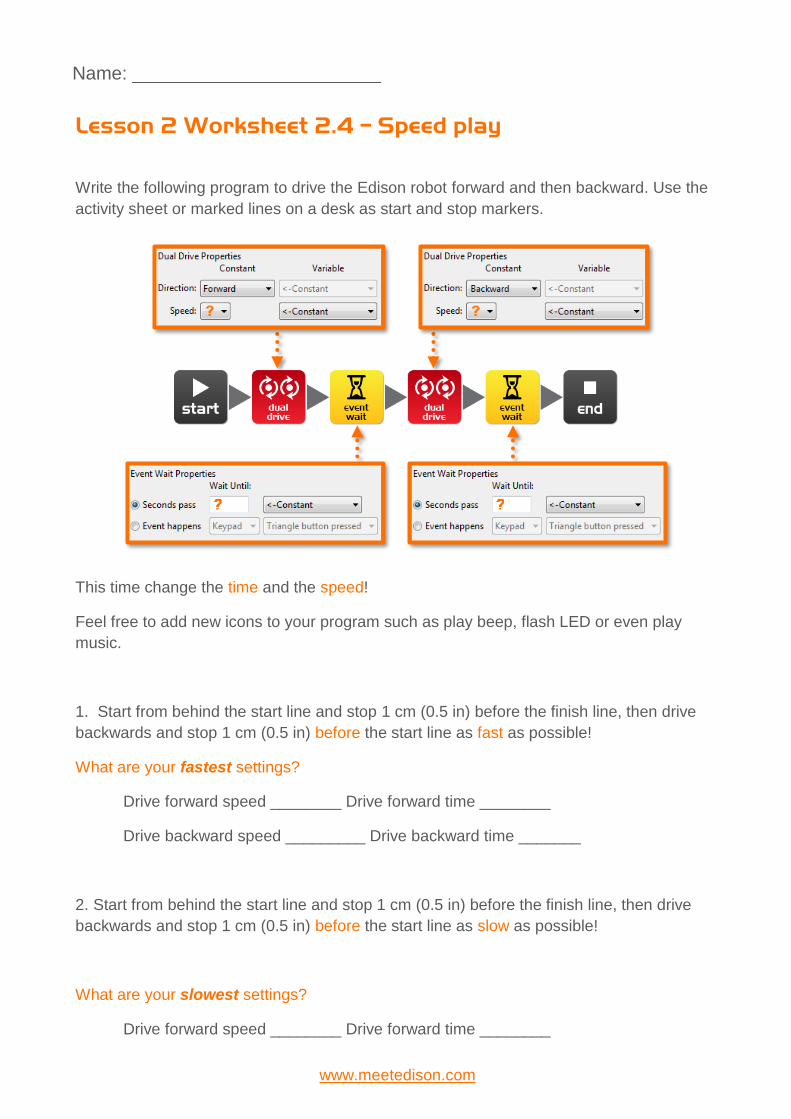
Lesson 2 Worksheet 2.4 – Speed play
Write the following program to drive the Edison robot forward and then backward. Use the
activity sheet or marked lines on a desk as start and stop markers.
This time change the time and the speed!
Feel free to add new icons to your program such as play beep, flash LED or even play
music.
1. Start from behind the start line and stop 1 cm (0.5 in) before the finish line, then drive
backwards and stop 1 cm (0.5 in) before the start line as fast as possible!
What are your fastest settings?
Drive forward speed ________ Drive forward time ________
Drive backward speed _________ Drive backward time _______
2. Start from behind the start line and stop 1 cm (0.5 in) before the finish line, then drive
backwards and stop 1 cm (0.5 in) before the start line as slow as possible!
What are your slowest settings?
Drive forward speed ________ Drive forward time ________
Drive backward speed _________ Drive backward time _______
Name: ________________________
www.meetedison.com

Lesson 2 Activity sheet 2.1
FINISH LINE
START LINE
Name: ________________________
www.meetedison.com

Lesson 3 Worksheet 3.1 – Right turn 90 degrees
Write the following program to turn the Edison robot right 90 degrees (90°). Use Activity
sheet 3.1 or marked lines on a desk as start and stop markers.
Set the ‘Seconds pass’ (replace?) to an amount of time in seconds to have the robot turn
right exactly 90°.
Minimum amount of time is 0.01 seconds.
Maximum amount of time is 327.67 seconds.
Try different amounts of time until your robot turns right from the start point to the end
point.
What is the correct amount of time to get your robot to turn 90°?
__________
Describe what the robot is doing and why?
________________________________________________________________________
________________________________________________________________________
________________________________________________________________________
Name: ________________________
www.meetedison.com
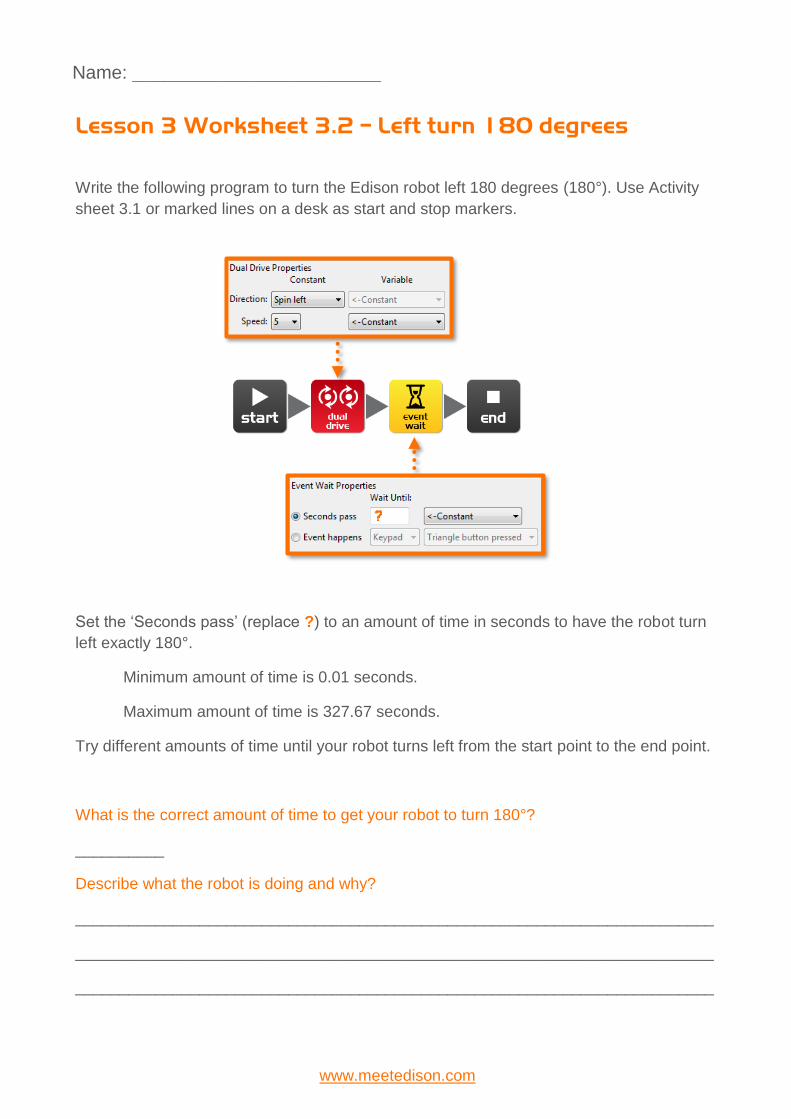
Lesson 3 Worksheet 3.2 – Left turn 180 degrees
Write the following program to turn the Edison robot left 180 degrees (180°). Use Activity
sheet 3.1 or marked lines on a desk as start and stop markers.
Set the ‘Seconds pass’ (replace ?) to an amount of time in seconds to have the robot turn
left exactly 180°.
Minimum amount of time is 0.01 seconds.
Maximum amount of time is 327.67 seconds.
Try different amounts of time until your robot turns left from the start point to the end point.
What is the correct amount of time to get your robot to turn 180°?
__________
Describe what the robot is doing and why?
________________________________________________________________________
________________________________________________________________________
________________________________________________________________________
Name: ________________________
www.meetedison.com

Lesson 3 Worksheet 3.3 – Right turn, then left turn
Write the following program to turn the Edison robot right 90 degrees (90°) and then left
180 degrees (180°). Use Activity sheet 3.1 or marked lines on a desk as start and stop
markers.
Set the ‘Seconds pass’ (replace?) to an amount of time in seconds to have the robot turn
right exactly 90° and then left 270° (90° + 180°) degrees.
Minimum amount of time is 0.01 seconds.
Maximum amount of time is 327.67 seconds.
Try different amounts of time until your robot turns 90° right from the start point to the end
point and then left 270° to the bottom end point.
What is the correct amount of time to get your robot to turn 90°, then 270°?
90°: _______, 270°: _________
Describe what the robot is doing and why?
________________________________________________________________________
________________________________________________________________________
________________________________________________________________________
Name: ________________________
www.meetedison.com
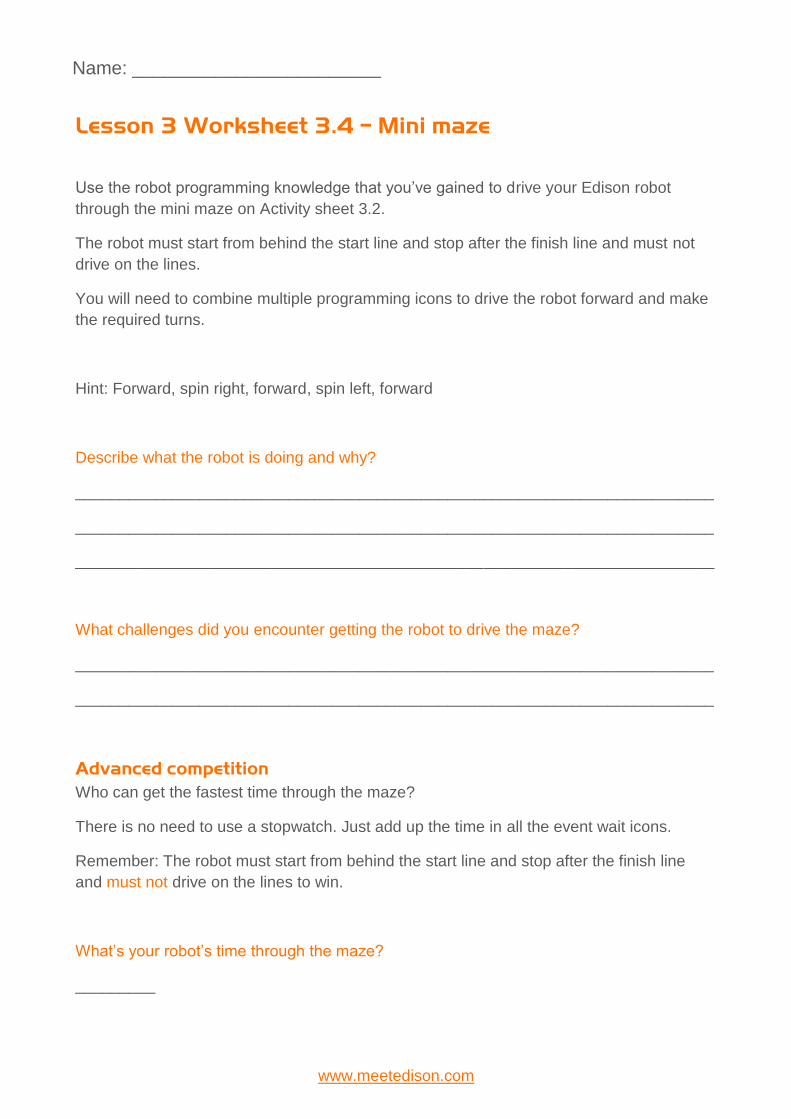
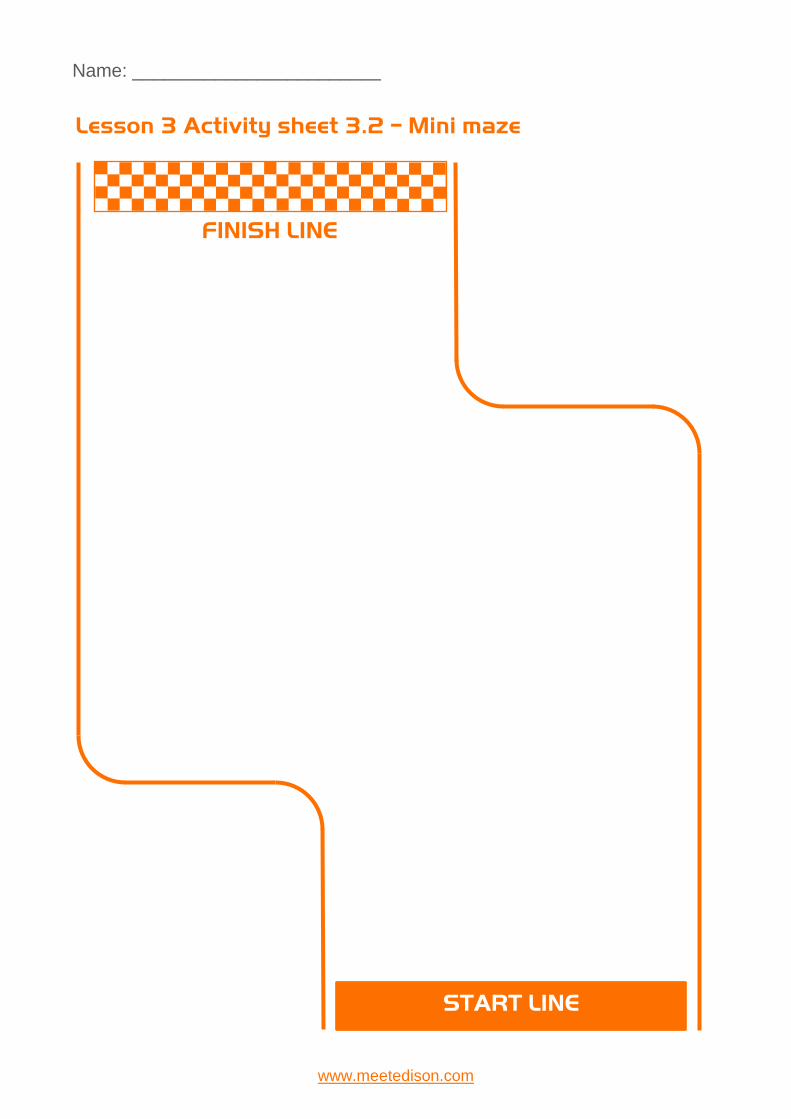
Lesson 3 Worksheet 3.4 – Mini maze
Use the robot programming knowledge that you’ve gained to drive your Edison robot
through the mini maze on Activity sheet 3.2.
The robot must start from behind the start line and stop after the finish line and must not
drive on the lines.
You will need to combine multiple programming icons to drive the robot forward and make
the required turns.
Hint: Forward, spin right, forward, spin left, forward
Describe what the robot is doing and why?
________________________________________________________________________
________________________________________________________________________
________________________________________________________________________
What challenges did you encounter getting the robot to drive the maze?
________________________________________________________________________
________________________________________________________________________
Advanced competition Who can get the fastest time through the maze?
There is no need to use a stopwatch. Just add up the time in all the event wait icons.
Remember: The robot must start from behind the start line and stop after the finish line
and must not drive on the lines to win.
What’s your robot’s time through the maze?
_________
Name: ________________________
www.meetedison.com
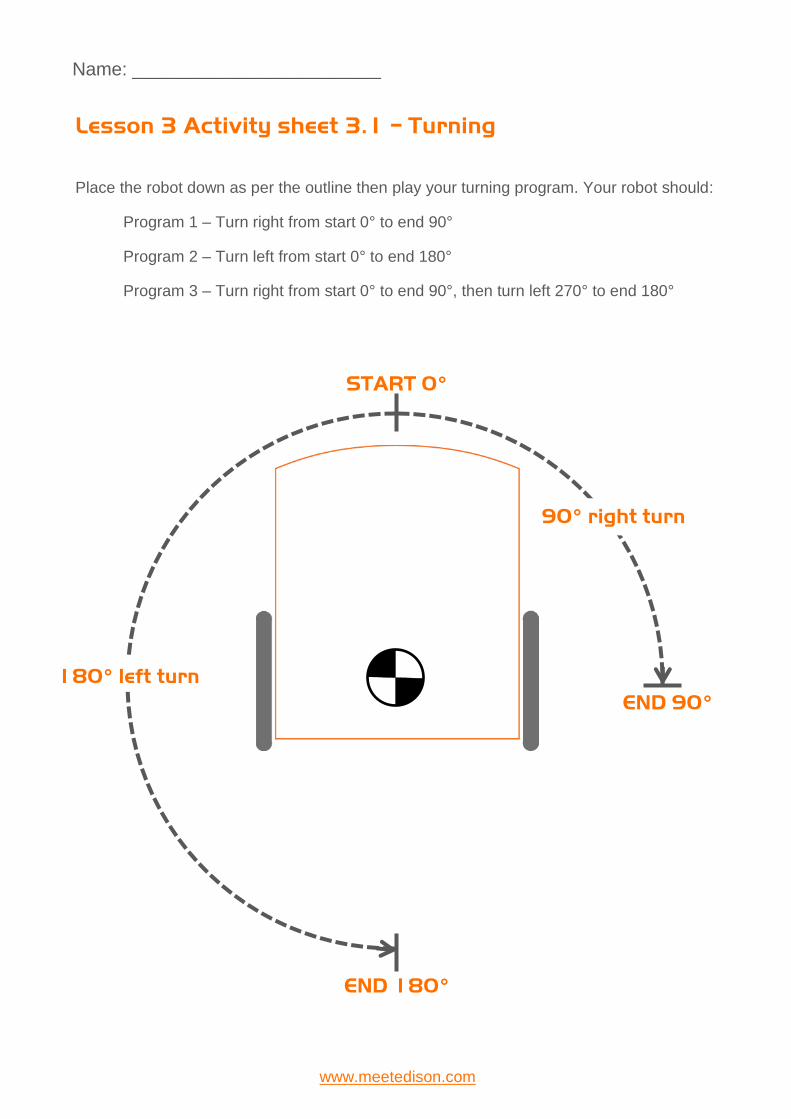
Lesson 3 Activity sheet 3.1 – Turning
Place the robot down as per the outline then play your turning program. Your robot should:
Program 1 – Turn right from start 0° to end 90°
Program 2 – Turn left from start 0° to end 180°
Program 3 – Turn right from start 0° to end 90°, then turn left 270° to end 180°
END 180°
START 0°
90° right turn
END 90° 180° left turn
Name: ________________________
www.meetedison.com
Lesson 3 Activity sheet 3.2 – Mini maze
START LINE
FINISH LINE
Name: ________________________
www.meetedison.com

Lesson 4 Worksheet 4.1 – Challenge
Choose a robot driving challenge for yourself and program your Edison robot to drive that
challenge.
Here are some examples, but you can come up with your own challenge.
Drive around and obstacle, such as a cup or pencil case
Drive around the border of a desk without driving off the edge
Create a maze on a large piece of paper
Create a maze using building blocks
Remember that you can use other programming icons such as flash LED, play beep and
play music to be creative.
What is your robot driving challenge?
________________________________________________________________________
________________________________________________________________________
________________________________________________________________________
What was difficult about writing this program?
________________________________________________________________________
________________________________________________________________________
________________________________________________________________________
What additional programming icons did you include in your program and what did they do?
________________________________________________________________________
________________________________________________________________________
________________________________________________________________________
Name: ________________________
www.meetedison.com
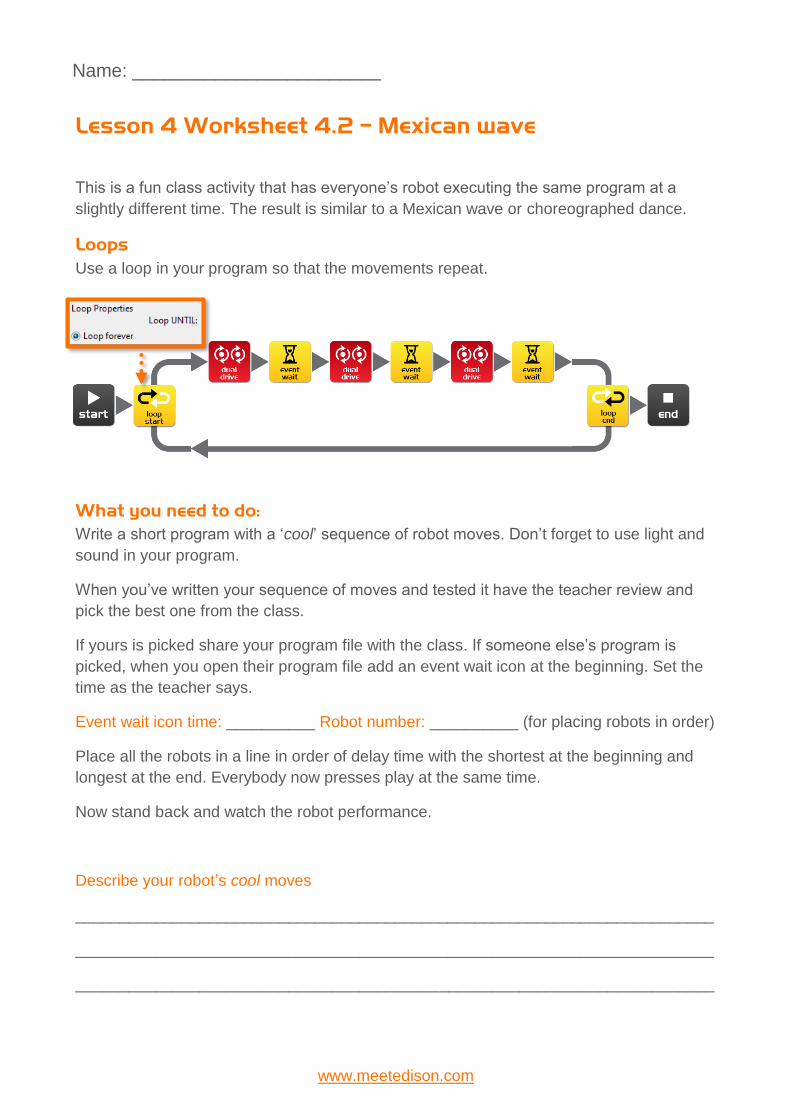
Lesson 4 Worksheet 4.2 – Mexican wave
This is a fun class activity that has everyone’s robot executing the same program at a
slightly different time. The result is similar to a Mexican wave or choreographed dance.
Loops Use a loop in your program so that the movements repeat.
What you need to do: Write a short program with a ‘cool’ sequence of robot moves. Don’t forget to use light and
sound in your program.
When you’ve written your sequence of moves and tested it have the teacher review and
pick the best one from the class.
If yours is picked share your program file with the class. If someone else’s program is
picked, when you open their program file add an event wait icon at the beginning. Set the
time as the teacher says.
Event wait icon time: __________ Robot number: __________ (for placing robots in order)
Place all the robots in a line in order of delay time with the shortest at the beginning and
longest at the end. Everybody now presses play at the same time.
Now stand back and watch the robot performance.
Describe your robot’s cool moves
________________________________________________________________________
________________________________________________________________________
________________________________________________________________________
Name: ________________________
www.meetedison.com
Lesson 5 Design brief worksheet 5.1 – My program In the future robots will be our helpers. We already have Roomba the robot vacuum
cleaner, so this future isn’t too far away. Think of a useful task that your robot can perform,
and then write a program for it to do that task.
Here are some examples:
Dance to music – an entertainment robot
Vacuum cleaner – very handy in the home
Security robot – keep your pencil case safe
1. Discuss Discuss this with your partner or other students to decide on a useful robot application that
you can program.
2. Describe Before you start writing your program describe below the problem that your robot is going
to solve and how it is going to solve it.
The problem is…__________________________________________________________
________________________________________________________________________
________________________________________________________________________
My robot will solve this by…__________________________________________________
________________________________________________________________________
________________________________________________________________________
3. Write your program Plan your program before you start to put icons into place. Use the icons that you have
learned to use, but you may also try out other icons.
4. Failure? Not everything works out the way you think it will first time. No sweat! Try again, but first
describe what went wrong. Why didn’t your program work first time? Remember this:
Thomas Edison famously failed 10,000 times before he successfully invented the light
bulb! So, keep trying!
________________________________________________________________________
________________________________________________________________________
________________________________________________________________________
________________________________________________________________________
Name: ________________________
www.meetedison.com

Lesson 5 Design brief worksheet 5.2 – My program
5. Describe some of the programming icons in your program Draw and colour in the programming icons below. Then describe what they do in your
program.
What is the name of this icon? _____________________
What does this icon do? __________________________
______________________________________________
______________________________________________
______________________________________________
______________________________________________
What is the name of this icon? _____________________
What does this icon do? __________________________
______________________________________________
______________________________________________
______________________________________________
______________________________________________
What is the name of this icon? _____________________
What does this icon do? __________________________
______________________________________________
______________________________________________
______________________________________________
______________________________________________
Name: ________________________
www.meetedison.com

Lesson 6 Worksheet 6.1 – Flash LED in response to clap
Write the following program to have the Edison robot flash the left LED in response to a
loud sound such as a clap.
In this program the first event wait icon is not being used to wait for time. Instead the
program will not continue from this point until a specific event occurs.
Within the first event wait icon’s properties box select the ‘Event happens’ radio button and
then select the event type you think is required to respond to a clap.
What distance can the robot sense your claps?
__________
What is the purpose of the loop icons in this program and what would happen if the loop
icons were not there?
________________________________________________________________________
________________________________________________________________________
________________________________________________________________________
Name: ________________________
www.meetedison.com

Lesson 6 Worksheet 6.2 – Drive in response to a clap
Write the following program to have the Edison robot drive forward in response to a clap.
The Edison robot’s sound sensor is not just sensitive to claps, but can also respond to any
loud sound. This includes the robot’s motors, gears and wheels, which also make sound
as they turn. To prevent the sound of the robot driving from triggering the sound sensor
there are two additional icons used in this program and are marked above with orange
stars. The first event wait icon is set to 0.1 seconds and gives the robot’s motors time to
stop. The second event wait icon is set to wait for a clap, however it is being used here to
clear the robot’s memory of any clap detections that were triggered by motor noise.
You will need to use these two icons after stopping the motors if you are using the clap
sensor.
Experiment with different directions in the first dual drive icon and with the following event
wait icon to create different movements.
What other directions and times did you try?
Experiment 1: direction ___________, time____________
Experiment 2: direction ___________, time____________
Experiment 3: direction ___________, time____________
Name: ________________________
www.meetedison.com
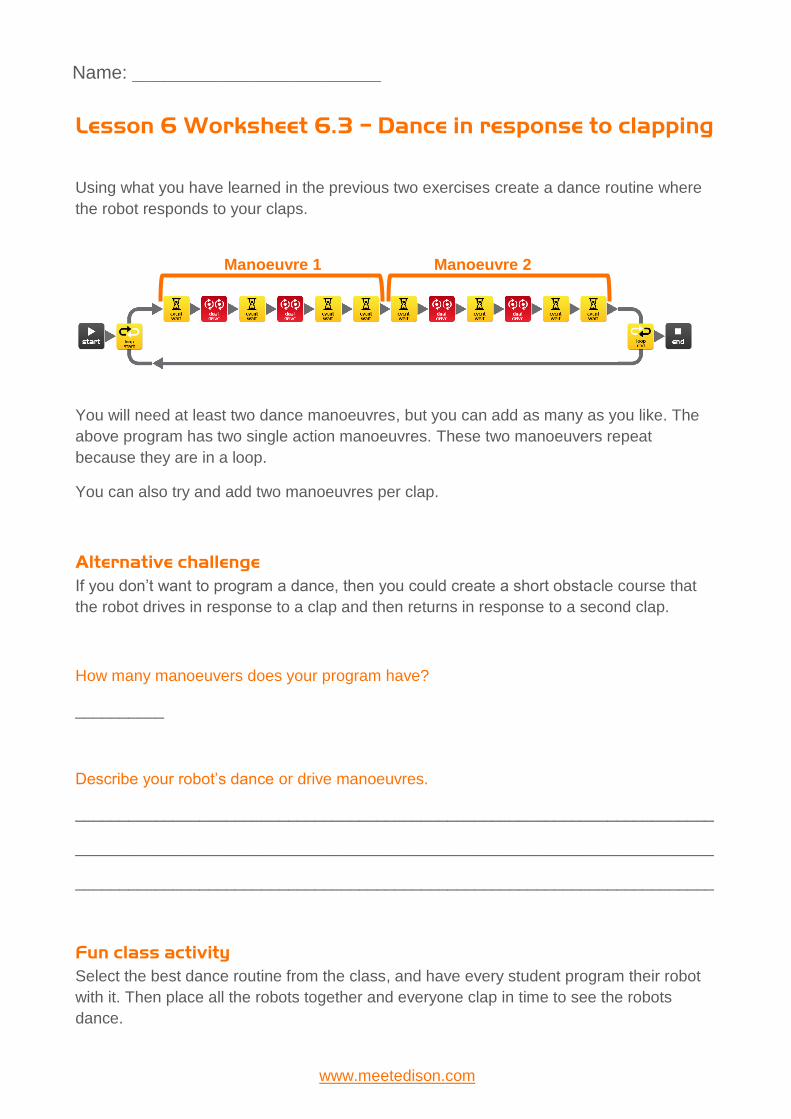
Lesson 6 Worksheet 6.3 – Dance in response to clapping
Using what you have learned in the previous two exercises create a dance routine where
the robot responds to your claps.
You will need at least two dance manoeuvres, but you can add as many as you like. The
above program has two single action manoeuvres. These two manoeuvers repeat
because they are in a loop.
You can also try and add two manoeuvres per clap.
Alternative challenge If you don’t want to program a dance, then you could create a short obstacle course that
the robot drives in response to a clap and then returns in response to a second clap.
How many manoeuvers does your program have?
__________
Describe your robot’s dance or drive manoeuvres.
________________________________________________________________________
________________________________________________________________________
________________________________________________________________________
Fun class activity Select the best dance routine from the class, and have every student program their robot
with it. Then place all the robots together and everyone clap in time to see the robots
dance.
Manoeuvre 1 Manoeuvre 2
Name: ________________________
www.meetedison.com

Calibrate obstacle detection You can control the sensitivity of Edison’s obstacle detection system. By making it more
sensitive Edison can detect obstacles further away, and by making it less sensitive Edison
will only detect very close obstacles.
Reading the barcode 1. Place Edison facing the barcode on the right side 2. Press the record (round) button 3 times 3. Edison will drive forward and scan the barcode
Set maximum sensitivity First scan the above barcode, then press the play (triangle) button. Edison is now in
calibration mode. Remove any obstacles in front of Edison.
The left sensitivity is calibrated first.
1. Repeatedly press the play button (this increases sensitivity) until the left red LED is
flickering.
2. Repeatedly press the record (round) button (this decreases the sensitivity) until the LED
completely stops flickering.
3. Press the stop (square) button to calibrate the right side.
4. Repeatedly press the play button until the right red LED is flickering. Now repeatedly
press the record button until the LED completely stops flickering.
5. Press the stop button and the calibration is complete.
Custom sensitivity You can set the distance that obstacles are detected by placing an obstacle in front of
Edison and repeating steps 1 through 5.
Barcode – Calibrate obstacle detection
Name: ________________________
www.meetedison.com

Lesson 7 Worksheet 7.1 – Infrared obstacle detection
The Edison robot is equipped with infrared (IR) ‘vision’. IR light is not visible to the human
eye, so you can’t see this light, but it allows Edison to ‘see’ in the dark.
For Edison to detect obstacles IR light is emitted forward from the left and right side of the
robot. If the IR light is reflected off an obstacle such as a wall, then the reflected light is
detected by Edison’s single IR detector. The IR detector is in the front centre of the robot.
In the illustration below there is an obstacle to Edison’s left, so only IR light from the left
emitter is reflected. From the received signal Edison can determine that there is an
obstacle to the left, but no obstacle to the right.
Emitted IR light is shown in red and reflected IR light is shown in blue.
Draw the emitted IR light and reflected IR light for this obstacle.
IR light emitter
IR light emitter
IR light detector
IR light emitter
IR light emitter
IR light detector
Name: ________________________
www.meetedison.com

Lesson 7 Worksheet 7.2 – Detect obstacle and stop
Write the following program to have the Edison robot drive until it encounters an obstacle.
The red (control group) detect obstacle icon is required to turn the obstacle detection
system on and starts the IR light emitters.
The dual drive speed is set to 5 to allow the robot to detect an obstacle before colliding
with it. If the speed is too fast then the robot will crash into obstacles.
At what distance can the robot detect obstacles?
__________
Have you seen this type of invisible detection before and where?
________________________________________________________________________
________________________________________________________________________
Where else do you think this type of detection technology could be used?
________________________________________________________________________
________________________________________________________________________
Name: ________________________
www.meetedison.com

Lesson 7 Worksheet 7.3 – Detect obstacle and avoid
Write the following program to have the Edison robot drive until it encounters an obstacle,
then turn 180° and drive for 1 second away from the obstacle.
In lesson 3 (Worksheet 3.2), you found the right amount of time to have the robot to turn
180°. Use this time again where indicated above by the orange question mark (?).
What is the correct amount of time to get your robot to turn 180 degrees?
__________
What do you think makes this program incomplete and how could you improve it?
________________________________________________________________________
________________________________________________________________________
________________________________________________________________________
________________________________________________________________________
________________________________________________________________________
Name: ________________________
www.meetedison.com

Lesson 7 Worksheet 7.4 – Obstacle avoidance
Write the following program to have the Edison robot continuously drive avoiding
obstacles.
Try experimenting with different amounts of time in the second event wait icon. This time
setting determines how long the robot turns for and is indicated above by the orange
question mark (?).
What do you think is the best time setting for the robot to turn?
____________
Why is this time setting the best? What does the robot do differently to make it better?
________________________________________________________________________
________________________________________________________________________
________________________________________________________________________
Name: ________________________
www.meetedison.com

Lesson 7 Worksheet 7.5 – Right and left detection Write the following program to have the Edison robot continuously drive avoiding obstacles
to the left and right.
In the above program we are using ‘IF’ icons. These are very important icons, because
they give the robot the ability to make decisions without human guidance. When this
occurs in a robot it is now called an autonomous robot, as it has artificial intelligence.
An ‘If’ icon asks whether a condition is true or false. If the result is true the program takes
the path with a tick. If the result is false the program takes the path with the cross.
The above program has three different paths that it can take based on where an obstacle
is. Explain in your own words what these three paths cause the robot to do.
No obstacle detected: ______________________________________________________
Obstacle detected on right: __________________________________________________
Obstacle detected on left: ___________________________________________________
Because the robot can make decisions is it alive!? Why do you think so?
________________________________________________________________________
________________________________________________________________________
________________________________________________________________________
Name: ________________________
www.meetedison.com
Lesson 8 Worksheet 8.1 – Line tracking sensor
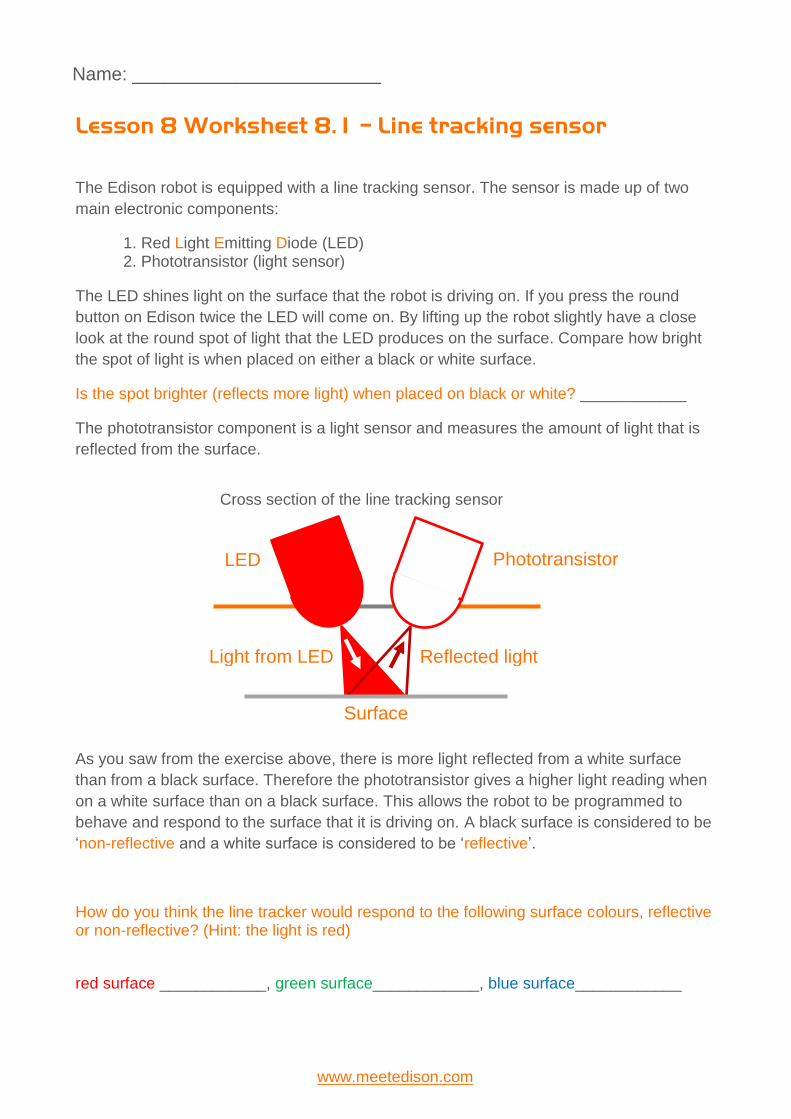
The Edison robot is equipped with a line tracking sensor. The sensor is made up of two
main electronic components:
1. Red Light Emitting Diode (LED) 2. Phototransistor (light sensor)
The LED shines light on the surface that the robot is driving on. If you press the round
button on Edison twice the LED will come on. By lifting up the robot slightly have a close
look at the round spot of light that the LED produces on the surface. Compare how bright
the spot of light is when placed on either a black or white surface.
Is the spot brighter (reflects more light) when placed on black or white? ____________
The phototransistor component is a light sensor and measures the amount of light that is
reflected from the surface.
As you saw from the exercise above, there is more light reflected from a white surface
than from a black surface. Therefore the phototransistor gives a higher light reading when
on a white surface than on a black surface. This allows the robot to be programmed to
behave and respond to the surface that it is driving on. A black surface is considered to be
‘non-reflective and a white surface is considered to be ‘reflective’.
How do you think the line tracker would respond to the following surface colours, reflective or non-reflective? (Hint: the light is red)
red surface ____________, green surface____________, blue surface____________
LED Phototransistor
Light from LED Reflected light
Surface
Cross section of the line tracking sensor
Name: ________________________
www.meetedison.com

Lesson 8 Worksheet 8.2 – Drive until a black line
Write the following program to have the Edison robot drive on a white surface (reflective)
until a black line (non-reflective) is crossed.
To use the line tracking sensor in a program you must first turn the sensor on. This also
activates the red LED.
Use the black line on Activity sheet 8.1 or draw a black line on a piece of white paper. You
can also use black electrical tape on a white desk. Drive the robot towards the black line
and he will stop.
On Activity sheet 8.1 there are also three coloured lines. These are red, blue and green.
Drive Edison towards each of the lines and see if he stops.
Is there a colour that Edison can’t detect (see) very well? Which colour is it? __________
Why do you think this is happening?
________________________________________________________________________
________________________________________________________________________
________________________________________________________________________
Name: ________________________
www.meetedison.com

Lesson 8 Worksheet 8.3 – Drive inside a border
Write the following program to have the Edison robot drive within a border.
Use Activity sheet 8.2 as a border or create your own using a large piece of paper and a
thick black marker.
You can also use black electrical tape on a white desk to create a large border.
If you create a large border try adding lots of robots to see what happens.
Also, experiment with different speeds.
How fast can the robot go before there are problems?
________
What happens when the robot drives too fast?
________________________________________________________________________
________________________________________________________________________
________________________________________________________________________
Name: ________________________
www.meetedison.com

Lesson 8 Worksheet 8.4 – Follow a line
Write the following program to have the Edison robot follow a black line.
This program uses the ‘IF’ icon to allow the robot to decide what to do. If the line tracking
sensor is on a reflective surface (white), then drive forward right at speed 4. If the line
tracking sensor is not on a reflective surface, then drive forward left at speed 4. When the
robot is on white it drives right when the robot is on black it drives left. As it does this it
moves forward and tracks the edge of the line.
Place the robot inside the track on Activity sheet 8.2 and watch the robot track the line.
Which way does it travel (clockwise or anti-clockwise)? ____________
Place the robot outside the track on Activity sheet 8.2 and watch the robot track the line.
Which way does it travel (clockwise or anti-clockwise)? ____________
Why do you think the robot doesn’t go in the same direction around the track?
________________________________________________________________________
________________________________________________________________________
________________________________________________________________________
Name: ________________________
www.meetedison.com
Lesson 8 Activity sheet 8.1 – Line tracking sensor
STOP HERE
STOP HERE? STOP HERE? STOP HERE?
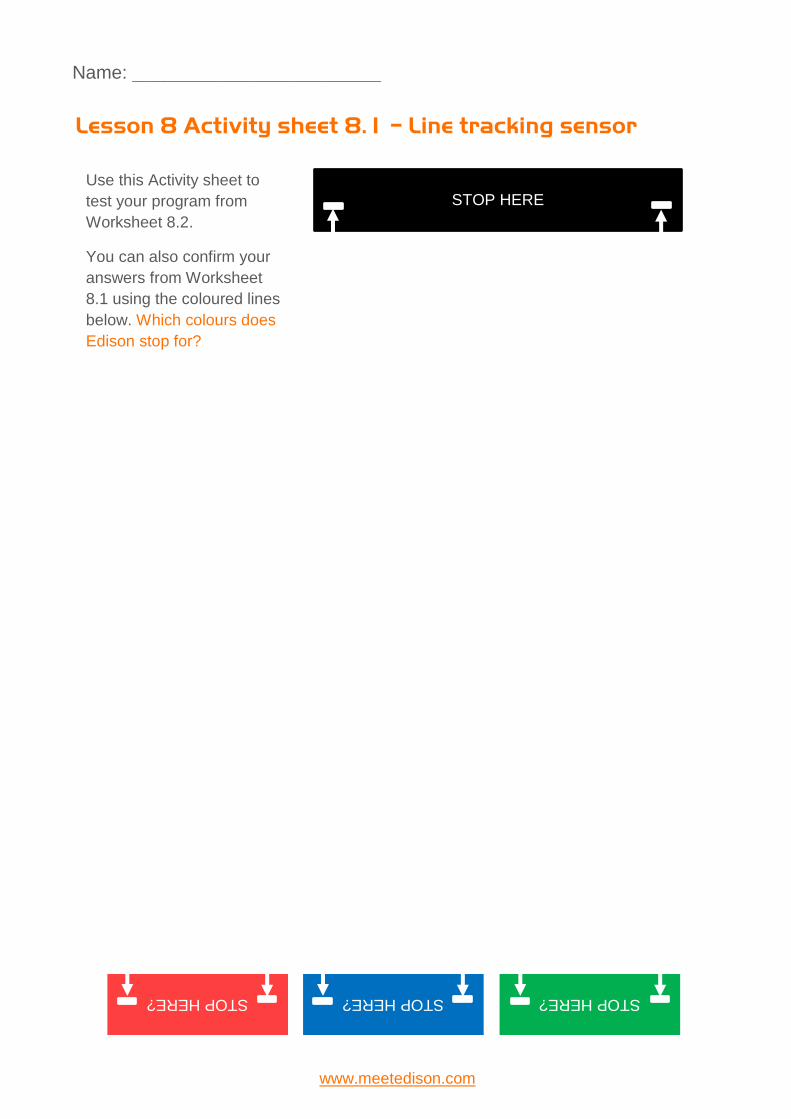
Use this Activity sheet to
test your program from
Worksheet 8.2.
You can also confirm your
answers from Worksheet
8.1 using the coloured lines
below. Which colours does
Edison stop for?
Name: ________________________
www.meetedison.com

Lesson 8 Activity sheet 8.2 – Line tracking sensor
Attention! Start the robot next to the line, not on it.
Name: ________________________
www.meetedison.com

Lesson 9 Worksheet 9.1 – Understanding variables
A variable is small piece of computer memory for
storing data. What makes variables so useful is
that this data can change while the program is
running, hence the name variable.
Variables store numbers like 10, 106, 1,482 etc.
and allow a computer program to do maths, this is
something that computers are very good at.
The Edison robot has two types of variables that are called ‘bytes’ and ‘words’. Byte
variables can store numbers that range from 0 to 255. Word variables can store numbers
that range from -32,767 to +32,767.
To make variables easy to use we give them names. This helps us humans remember
what type of information is stored in them. In EdWare, you can name your variables just
about anything you like. You could name one ‘Fred’, but that might not be a very helpful
name for remembering what type of information is stored in Fred. A better name might be
‘Light_Level’. This type of name makes it very easy to remember what the variable is used
for and what type of data to find there.
Now that you know about variables let’s
create one in EdWare for our next
programs.
Click the ‘Add Variable’ button in the top
left corner and a pop up box will appear.
Type in the name of your variable as ‘Light_Level’,
select the variable range as +/-32767 (word) and set
the initial value to zero. Now click OK and your variable
will be added to the variables table in the bottom right
corner.
What type of variable would you use for storing the following numbers (byte or word)?
12 _________, 192 _________, 801 _________, -42 _________, 27,901_________
Add Variable
Name: ________________________
www.meetedison.com
Lesson 9 Worksheet 9.2 – Light alarm
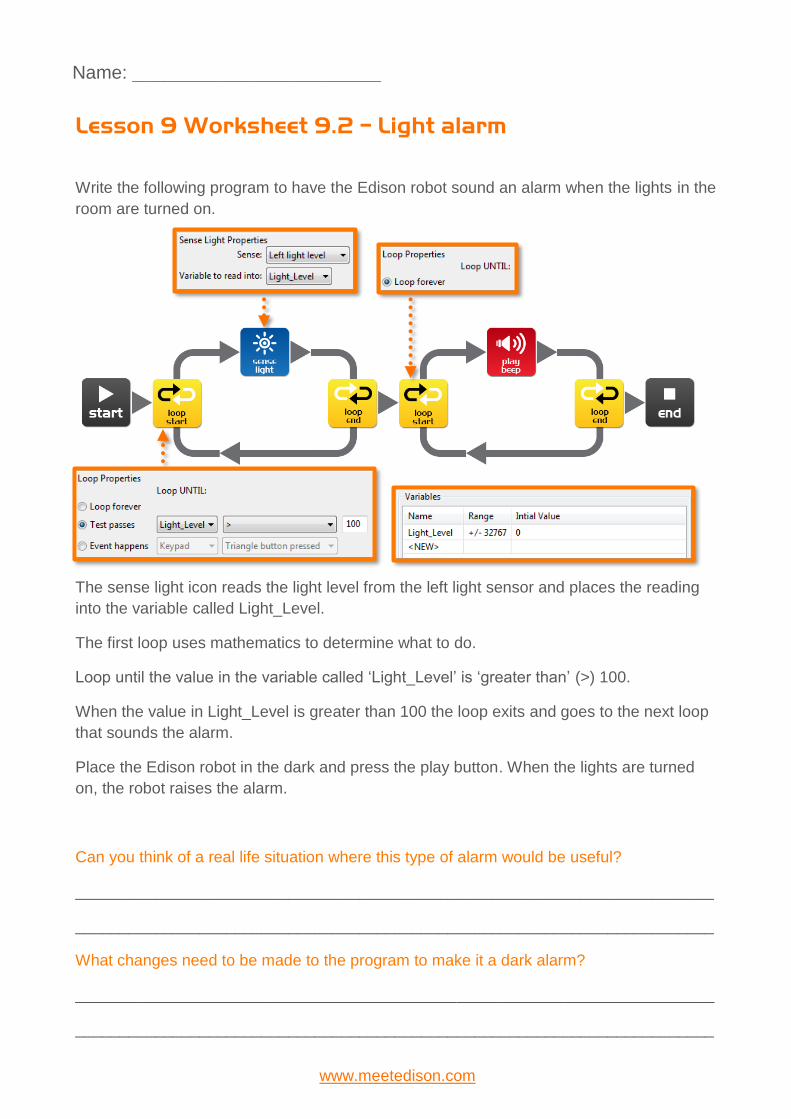
Write the following program to have the Edison robot sound an alarm when the lights in the
room are turned on.
The sense light icon reads the light level from the left light sensor and places the reading
into the variable called Light_Level.
The first loop uses mathematics to determine what to do.
Loop until the value in the variable called ‘Light_Level’ is ‘greater than’ (>) 100.
When the value in Light_Level is greater than 100 the loop exits and goes to the next loop
that sounds the alarm.
Place the Edison robot in the dark and press the play button. When the lights are turned
on, the robot raises the alarm.
Can you think of a real life situation where this type of alarm would be useful?
________________________________________________________________________
________________________________________________________________________
What changes need to be made to the program to make it a dark alarm?
________________________________________________________________________
________________________________________________________________________
Name: ________________________
www.meetedison.com
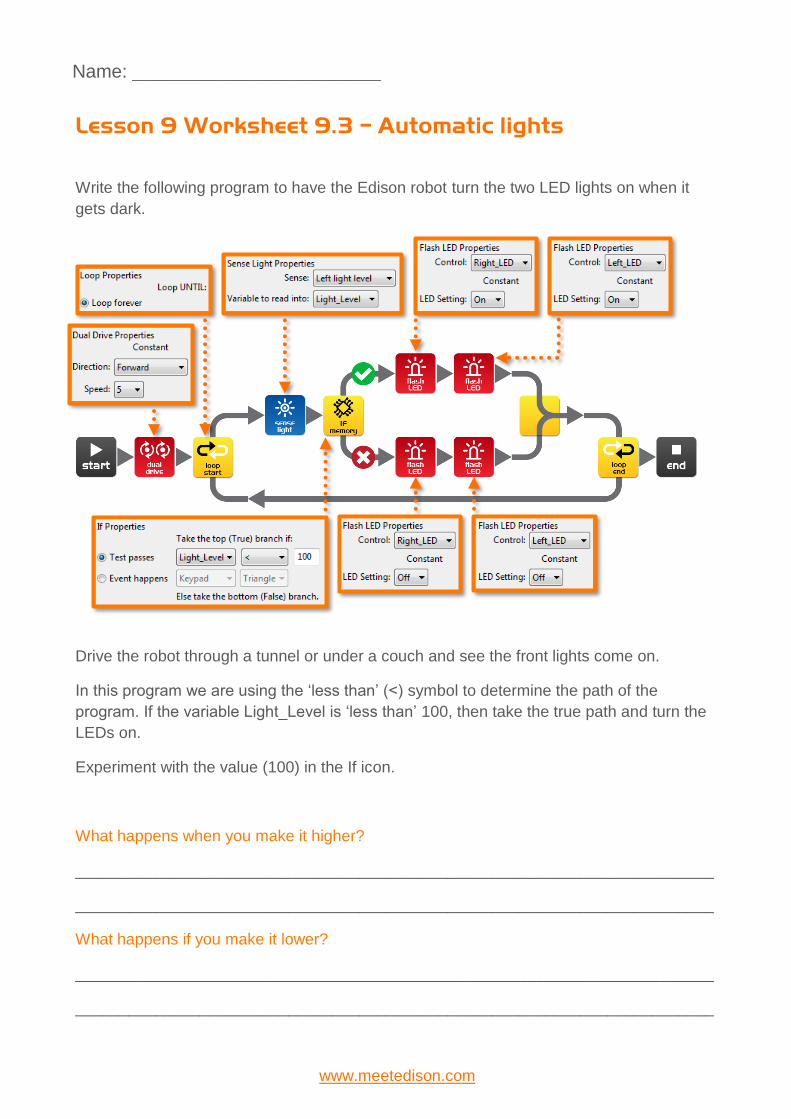
Lesson 9 Worksheet 9.3 – Automatic lights
Write the following program to have the Edison robot turn the two LED lights on when it
gets dark.
Drive the robot through a tunnel or under a couch and see the front lights come on.
In this program we are using the ‘less than’ (<) symbol to determine the path of the
program. If the variable Light_Level is ‘less than’ 100, then take the true path and turn the
LEDs on.
Experiment with the value (100) in the If icon.
What happens when you make it higher?
________________________________________________________________________
________________________________________________________________________
What happens if you make it lower?
________________________________________________________________________
________________________________________________________________________
Name: ________________________
www.meetedison.com
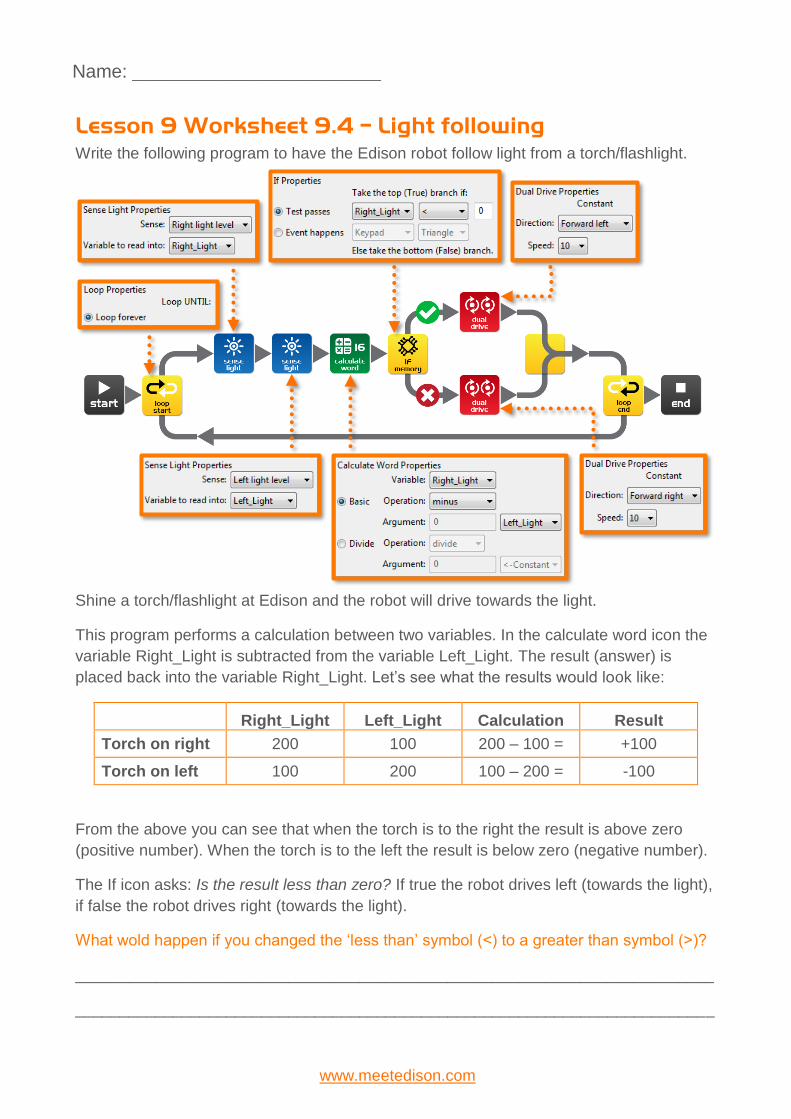
Lesson 9 Worksheet 9.4 – Light following Write the following program to have the Edison robot follow light from a torch/flashlight.
Shine a torch/flashlight at Edison and the robot will drive towards the light.
This program performs a calculation between two variables. In the calculate word icon the
variable Right_Light is subtracted from the variable Left_Light. The result (answer) is
placed back into the variable Right_Light. Let’s see what the results would look like:
Right_Light Left_Light Calculation Result
Torch on right 200 100 200 – 100 = +100
Torch on left 100 200 100 – 200 = -100
From the above you can see that when the torch is to the right the result is above zero
(positive number). When the torch is to the left the result is below zero (negative number).
The If icon asks: Is the result less than zero? If true the robot drives left (towards the light),
if false the robot drives right (towards the light).
What wold happen if you changed the ‘less than’ symbol (<) to a greater than symbol (>)?
________________________________________________________________________
________________________________________________________________________
Name: ________________________
www.meetedison.com
Lesson 10 Design brief worksheet 10.1 – My program The video ‘Humans need not apply’ provided insight into how robots might be used in the
future. Think of a useful task that your robot can perform, and then write a program for it to
do that task.
Here are some examples:
Rescue robot – The robot drives within a border looking for a lost person (mini
figure or doll). When the robot locates the person it raises the alarm.
Driverless car – The robot drives on a designated road (line) without hitting people,
other cars or buildings (toys).
Battle robots – Send robots to war rather than soldiers. Create a sumo ring and
program two or more robots to look for each other and then charge to push the
other out of the sumo ring.
1. Discuss Discuss this with your partner or other students to decide on a useful robot application that
you can program.
What were some of the ideas that came up?
________________________________________________________________________
________________________________________________________________________
________________________________________________________________________
________________________________________________________________________
________________________________________________________________________
What were the reasons why one of the ideas was not feasible?
________________________________________________________________________
________________________________________________________________________
________________________________________________________________________
________________________________________________________________________
________________________________________________________________________
Name: ________________________
www.meetedison.com
2. Describe Before you start writing your program describe below the problem that your robot is going
to solve and how it is going to solve it (solution).
Problem:
________________________________________________________________________
________________________________________________________________________
________________________________________________________________________
________________________________________________________________________
________________________________________________________________________
Solution:
________________________________________________________________________
________________________________________________________________________
________________________________________________________________________
________________________________________________________________________
________________________________________________________________________
3. Write your program Plan your program before you start to put icons into place. Use the icons that you have
learned to use, but you may also try out other icons.
4. Failure? Not everything works out the way you think it will first time. No sweat! Try again, but first
describe what went wrong. Why didn’t your program work first time? Remember this:
Thomas Edison famously failed 10,000 times before he successfully invented the light
bulb! So, keep trying!
________________________________________________________________________
________________________________________________________________________
________________________________________________________________________
________________________________________________________________________
________________________________________________________________________
Name: ________________________
www.meetedison.com

Lesson 10 Design brief worksheet 10.2 – My program
5. Describe some of the programming icons in your program Draw and colour in the programming icons below. Then describe what they do in your
program.
What is the name of this icon? _____________________
What does this icon do? __________________________
______________________________________________
______________________________________________
______________________________________________
______________________________________________
What is the name of this icon? _____________________
What does this icon do? __________________________
______________________________________________
______________________________________________
______________________________________________
______________________________________________
What is the name of this icon? _____________________
What does this icon do? __________________________
______________________________________________
______________________________________________
______________________________________________
______________________________________________
Name: ________________________
www.meetedison.com
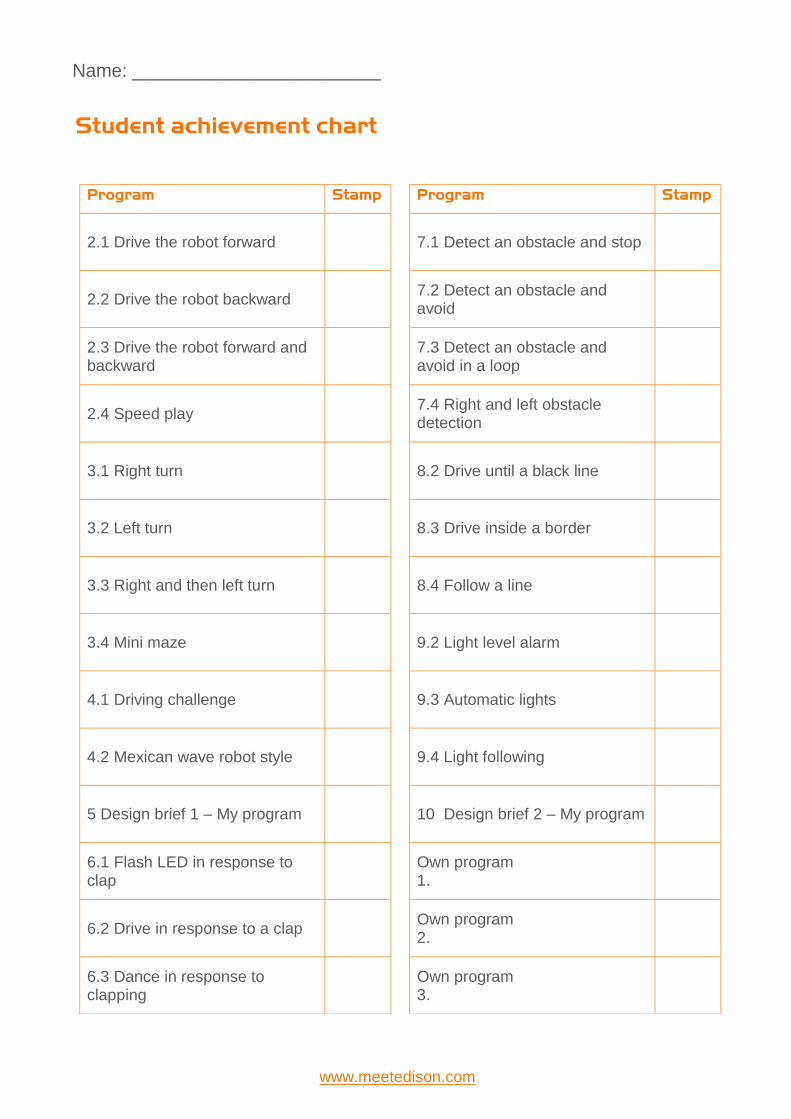
Student achievement chart
Program Stamp Program Stamp
2.1 Drive the robot forward 7.1 Detect an obstacle and stop
2.2 Drive the robot backward 7.2 Detect an obstacle and avoid
2.3 Drive the robot forward and backward
7.3 Detect an obstacle and avoid in a loop
2.4 Speed play 7.4 Right and left obstacle detection
3.1 Right turn 8.2 Drive until a black line
3.2 Left turn 8.3 Drive inside a border
3.3 Right and then left turn 8.4 Follow a line
3.4 Mini maze 9.2 Light level alarm
4.1 Driving challenge 9.3 Automatic lights
4.2 Mexican wave robot style 9.4 Light following
5 Design brief 1 – My program 10 Design brief 2 – My program
6.1 Flash LED in response to clap
Own program 1.
6.2 Drive in response to a clap Own program 2.
6.3 Dance in response to clapping
Own program 3.
Name: ________________________
www.meetedison.com


