® Registered Trademark / TM Trademark / SM Service Mark of Sears Brands, LLC® Marca Registrada / TM Marca de F·brica / SM Marca de Servicio de Sears Brands, LLCMC Marque de commerce / MD Marque déposée de Sears Brands, LLC
ONE YEAR FULL WARRANTY ON CRAFTSMAN® PRODUCTIf this Craftsman product fails due to a defect in material or workmanship within one year from the date of purchase, RETURN IT TO THE NEAREST SEARS STORE OR PARTS AND REPAIR CENTER OR OTHER CRAFTSMAN OUTLET IN THE UNITED STATES FOR FREE REPLACEMENT.This warranty does not include expendable parts such as lamps, batteries, bits or blades.If this Craftsman product is used for commercial or rental purposes, this warranty applies for only 90 days from the date of purchase.This warranty gives you specific legal rights, and you may also have other rights, which vary from state to state.Sears, Roebuck and Co., Hoffman Estates, IL 60179
SAVE THESE INSTRUCTIONS!READ ALL INSTRUCTIONS!
7-24-06
NOTAS
59
3
SAFETY SYMBOLS
SYMBOL MEANING
SAFETY ALERT SYMBOL: Indicates DANGER, WARNING, OR CAUTION. May be used in conjunction with other symbols or pictographs.
WARNING
CAUTION
DANGER DANGER: Failure to obey this safety warning WILL result in death or serious injury to yourself or to others. Always follow the safety precautions to reduce the risk of fire, electric shock and personal injury.
Failure to obey this safety warning CAN result in death or serious injury to yourself or to others. Always follow the safety precautions to reduce the risk of fire, electric shock and personal injury.
Failure to obey this safety warning MAY result in personal injury to yourself or others or property damage. Always follow the safety precautions to reduce the risk of fire, electric shock and personal injury.
DAMAGE PREVENTION AND INFORMATION MESSAGES These inform user of important information and/or instructions that could lead to equipment or other property damage if not followed. Each message is preceded by the word “NOTE:” as in the example below:
The purpose of safety symbols is to attract your attention to possible dangers. The safety symbols, and the explanations with them, deserve your careful attention and understanding. The symbol warnings DO NOT by themselves eliminate any danger. The instructions and warnings they give are no substitutes for proper accident prevention measures.
NOTE: Equipment and/or property damage may result if these instructions are not followed.
!
WARNING: The operation of any tool with a circular blade can result in foreign objects being thrown into your eyes, which can result in severe eye damage. Before beginning power tool operation, ALWAYS wear safety goggles or safety glasses with side shield and a full-face shield when needed. We recommend a Wide Vision Safety Mask for use over eyeglasses or standard safety glasses with side shield, available at Sears Stores or other Craftsman Outlets.
WARNING: BE SURE to read and understand all safety instructions in this manual, including all safety alert symbols such as “DANGER”, “WARNING” and “CAUTION”, BEFORE using this saw. Failure to follow all instructions listed below may result in electric shock, fire and/or serious personal injury.
!
!
!
!
!
7-24-06
58
3. Verifique el estado de todos los cables eléctricos.4. Mantenga las aberturas del motor libres de aceite, grasa y aserrín o astillas y guarde la herramienta en un lugar seco.5. Asegúrese que todas las piezas móviles estén bien lubricadas, particularmente después de una larga exposición a condiciones húmedas y/o sucias.
MANTENIMIENTO cont.
MATENIMIENTO DE RUTINA cont.
Si la hoja no sigue una línea recta: • Los dientes están sin filo. Esto es producto de golpear objetos duros tales como clavos, lo cual hace que los dientes pierdan el filo de un lado. La hoja tiende a cortar del lado con los dientes más afilados. • La base está fuera de línea o doblada. • La hoja está doblada. • La guía de borde o guía recta no se está usando.
Si la hoja se atasca o emite humo producto de la fricción: • La hoja no tiene filo. • La hoja está al revés • La hoja está doblada • La pieza de trabajo no está soportada adecuadamente. • Se está usando una hoja inadecuada.
DETENCCIÓN Y RESOLUCIÓN DE PROBLEMAS
ACCESORIOS
ADVERTENCIA: El uso de conexiones o accesorios no recomendados para esta herramienta podrían ser peligrosos y podrían resultar en lesiones graves.
!
LUBRICACIÓNTodas los rodamientos en esta herramienta han sido lubricados con lubricante de alto grado suficiente para la vida útil de la herramienta en condiciones normales de operación. Por lo tanto, no se requiere de ulterior lubricación.
Sears y otros puntos de venta Craftsman cuenta con una amplia selección de hojas de 7 1/4 pulgadas Craftsman de acero con dientes con punta de carburo de tungsteno, diseñadas para aplicaciones específicas de corte. También existen disponibles empaques a granel para contratistas
Sears y otros puntos de venta Craftsman también ofrecen cabrillas, escuadras de encofrado y combinadas, bordes rectos, guías de borde y una gran variedad de abrazaderas para ayudarle con todas sus necesidades de aserrado.
Visite su tienda local Sears u otro punto de venta Craftsman o compre por Internet en sears.com/craftsman.
4
SAFETY INSTRUCTIONS
WARNING: BE SURE to read and understand all instructions in this manual before using this circular saw. Failure to follow all instructions may result in hazardous radiation exposure, electric shock, fire and/or serious personal injury.
!
1. Keep your work area clean and well lit. Cluttered workbenches and dark areas invite accidents.
2. DO NOT operate power tools in explosive atmospheres, such as in the presence of flammable liquids, gases, or dust. Power tools create sparks which may ignite the dust or fumes.
3. Keep bystanders, children and visitors away while operating a power tool. Distractions can cause you to lose control.
4. Make your workshop childproof with padlocks and master switches. Lock tools away when not in use.
5. MAKE SURE the work area has ample lighting so you can see the work and that there are no obstructions that will interfere with safe operation BEFORE using your saw.
WORK AREA SAFETY
PERSONAL SAFETY 1. KNOW your power tool. Read the operator's manual carefully. Learn the saw's applications and limitations, as well as the specific potential hazards related to this tool.
2. STAY ALERT, watch what you are doing and use common sense when operating a power tool.
3. DO NOT use tool while tired or under the influence of drugs, alcohol or medication. A moment of inattention while operating power tools may result in serious personal injury.
4. DRESS properly. DO NOT wear loose clothing or jewelry. Pull back long hair. Keep your hair, clothing, and gloves away from moving parts. Air vents often cover moving parts and should also be avoided. Loose clothing, jewelry or long hair can be caught in moving parts.
5. AVOID accidental starting. Be sure switch is in “OFF” position before plugging in. DO NOT carry tools with your finger on the switch. Carrying tools with your finger on the switch or plugging in tools that have the switch in the “ON” position invites accidents.
6. REMOVE adjusting keys or wrenches before turning the tool “ON”. A wrench that is left attached to a rotating part of the tool may result in personal injury.
7-24-06
57
ADVERTENCIA: Para asegurar seguridad y confiabilidad, toda reparación debe ser realizada por técnicos calificados en un Centro de Servicio Sears.
!
Se ha encontrado que las herramientas eléctricas están sujetas a desgaste y fallas prematuras cuando se utilizan sobre botes de fibra de vidrio y autos deportivos, tablaroca, compuesto de relleno o yeso. Las astillas y residuos de estos materiales son altamente abrasivos para la piezas de herramientas eléctricas, tales como rodamientos, cepillos, conmutadores, etc. Consecuentemente, no se recomienda que esta herramienta sea utilizada para trabajos extensos sobre cualquier material de fibra de vidrio, tablaroca, compuesto de relleno o yeso. Durante cualquier uso sobre estos materiales, es extremadamente importante que la herramienta sea limpiada con frecuencia usando un propulsor de aire.
ADVERTENCIA: Para su seguridad, apague SIEMPRE el interruptor y desenchufe la sierra circular de la fuente de alimentación antes de realizar cualquier mantenimiento o limpieza.
!
ADVERTENCIA: Use siempre gafas de seguridad con protectores laterales al operar herramientas eléctricas, o al soplar polvo. Si la operación es polvorienta, use también una mascarilla antipolvo.
!
MATENIMIENTO DE RUTINA
El mantenimiento periódico permite una vida útil larga y un funcionamiento libre de problemas. Mantenga un cronograma de limpieza, lubricación y mantenimiento. Como práctica de mantenimiento preventivo común, siga los siguientes pasos recomendados:
ADVERTENCIA: NUNCA deje que fluido de frenos, gasolina, productos a base de petróleo, aceites penetrantes, etc. entren en contacto con las piezas plásticas. Los químicos pueden dañar, debilitar o destruir el plástico, lo cual podría resultar en lesiones personales graves.
!
MANTENIMIENTO
1. Al finalizar el trabajo, limpie la herramienta para permitir un funcionamiento ininterrumpido de la herramienta a lo largo del tiempo.2. Use paños limpios y húmedos para limpiar la herramienta.
HACIENDO CORTES DE BOLSILLO cont. (Fig. 17)
4. Una vez completado el corte, libere el gatillo y permita que la hoja se detenga por completo. Una vez detenida la hoja, retírela de la pieza de trabajo. Si las esquinas de su bolsillo no se han cortado por completo, use una sierra manual para darle el acabado a las esquinas.
ADVERTENCIA: NUNCA amarre el protector inferior de la hoja en posiciónlevantada. Dejar la hoja expuesta podría resultar en lesiones graves.
!
FUNCIONAMIENTO cont.
5
SAFETY INSTRUCTIONS cont.
7. Do not overreach. Keep proper footing and balance at all times. Proper footing and balance enables better control of the tool in unexpected situations.
8. ALWAYS SECURE YOUR WORK. Use clamps or a vise to hold work when practical. It is safer than using your hand and frees both hands to operate tool.
9. USE SAFETY EQUIPMENT. Always wear eye protection. Dust mask, non-skid safety shoes, hard hat, or hearing protection must be used for appropriate conditions.
10. DO NOT USE ON A LADDER or unstable support. Stable footing on a solid surface enables better control of the tool in unexpected situations.
WARNING: BE SURE to read and understand all instructions before operating this saw. Failure to follow all instructions listed below may result inelectric shock, fire and/or serious personal injury.
!
TOOL USE AND CARE SAFETY
PERSONAL SAFETY cont.
1. ALWAYS use clamps or other practical ways to secure and support the workpiece to a stable platform. Holding the work by hand or against your body is unstable and may lead to loss of control.
2. DO NOT force the tool. Use the correct tool and blade for your application. The correct tool and blade will do the job better and safer at the rate for which it is designed.
3. DO NOT use the tool if switch does not turn it “On” or “Off”. Any tool that cannot be controlled with the switch is dangerous and must be repaired.
4. DISCONNECT the plug from the power source before making any adjustments, changing accessories or storing the tool. Such preventive safety measures reduce the risk of starting the tool accidentally.
5. NEVER leave the tool running. ALWAYS turn it off. DO NOT leave the tool until it comes to a complete stop.
6. STORE idle tools out of the reach of children and other untrained persons. Tools are dangerous in the hands of untrained users.
7. MAINTAIN tools with care. Keep cutting tools sharp and clean. Properly maintained tools with sharp cutting edges are less likely to bind and are easier to control.
8. CHECK for misalignment or binding of moving parts, breakage of parts, and any other condition that may affect the tool's operation. If damaged, have the tool serviced before using. Many accidents are caused by poorly maintained tools.
9. USE ONLY accessories that are recommended for this tool. Accessories that may be suitable for one tool may become hazardous when used on another tool.
7-24-06
56
HACIENDO CORTES DE BOLSILLO (Fig. 17)
ADVERTENCIA: SIEMPRE ajuste la configuración del bisel en cero antes de hacer un corte de bolsillo. Intentar un corte de bolsillo en cualquier otra configuración podría resultar en pérdida de control de la herramienta y consiguienteslesiones graves.
!
1. Ajuste en cero la configuración del bisel, establezca la configuración de profundidad correcta de la hoja, luego use la palanca del protector inferior de la hoja para oscilar el protector hacia arriba.
ADVERTENCIA: SIEMPRE levante el protector inferior de la hoja desde la palanca para evitar lesiones graves.
!
FUNCIONAMIENTO cont.
Fig. 17
Fig. 16aLine of Cut
45o Indicator
BEVEL TRAC™ “Indicador De Linea De Corteo Automatico ”cont. (ver a Fig. 16a)
NOTA: Ya que cambia el espesor de las hojas, HACES UN CORTE PRUEBA en la material pedacito contra la línea de guía para determinar cuanto, si alguno, debes compensar a la hoja desde la línea de guía para un corte preciso.
2. Mientras sostiene el protector inferior de la hoja hacia arriba desde la palanca, descanse la parte delantera de la base de la hoja plana contra la pieza de trabajo con el mango posterior levantado para que la hoja no toque la pieza de trabajo (ver la Fig. 17).3. Apriete el interruptor gatillo para encender la sierra. SIEMPRE permita que la hoja alcance su máxima velocidad, luego lentamente baje la hoja sobre la pieza de trabajo hasta que la base esté plana contra la pieza de trabajo A MEDIDA que la hoja penetra en el material, usted DEBE liberar la palanca del protector inferior de la hoja.
WARNING: Do not permit fingers to touch the terminals of plug when installing or removing the plug from the outlet.
!
ELECTRICAL SAFETY
1. Double insulated tools are equipped with a polarized plug (one blade is wider than the other). This plug will fit in a polarized outlet only one way. If the plug does not fit fully in the outlet, reverse the plug. If it still does not fit, contact a qualified electrician to install a polarized outlet. Do not change the plug in any way.
Cover of Grounded Outlet Box
2. Double insulation eliminates the need for the three-wire grounded power cord and grounded power supply system. Applicable only to Class II (double-insulated) tools. This circular saw is a double insulated tool.
WARNING: Double insulation DOES NOT take the place of normal safety precautions when operating this tool.
!
3. BEFORE plugging in the tool, BE SURE that the outlet voltage supplied is within the voltage marked on the tool's data plate. DO NOT use “AC only” rated tools with a DC power supply.
4. AVOID body contact with grounded surfaces, such as pipes, radiators, ranges and refrigerators. There is an increased risk of electric shock if your body is grounded.
5. DO NOT expose power tools to rain or wet conditions or use power tools in wet or damp locations. Water entering a power tool will increase the risk of electric shock.
6. INSPECT tool cords for damage. Have damaged tool cords repaired at a Sears Service Center. BE SURE to stay constantly aware of the cord location and keep it well away from the moving blade.
7. DO NOT abuse the cord. NEVER use the cord to carry the tool by or pull the plug from the outlet. Keep cord away from heat, oil, sharp edges or moving parts. Replace damaged cords immediately. Damaged cords increase the risk of electric shock.
7-24-06
55
ADVERTENCIA: Sujete y soporte SIEMPRE la pieza de trabajo de manera segura. Mantenga SIEMPRES control adecuado sobre la sierra. No sujetar y soportar la pieza de trabajo y la pérdida de control sobre la sierra podrían resultar en lesiones graves.
!
1. La sierra 10865 puede ajustarse para cortar a cualquier ángulo entre 0° y 48°.2. Al hacer cortes biselados de 45°, alinee el lado izquierdo de la muesca en la base de la sierra con la línea de lápiz en la pieza de trabajo (ver la Fig. 13). 3. Al realizar un corte de bisel SOSTENGA la sierra FIRMEMENTE con ambas monos (ver la Fig. 16).4. Reestablezca el borde delantero de la base de la pieza de trabajo, luego apriete el gatillo para encender la sierra. SIEMPRE permita que la hoja alcance su maxima velocidad, luego guíe la sierra en la pieza de trabajo.5. Una vez completado el corte, libere el interruptor gatillo y permita que la hoja se detenga por completo en el corte. NO retire la sierra de la pieza de trabajo mientras la hoja continue en movimiento. Dañaría su corte en bisel y podría ocasionar el Rebote
ADVERTENCIA: Si la hoja entra en contacto con la pieza de trabajo antesde alcanzar su máxima velocidad, podría ocasionar que la sierra rebote hacia usted, resultando en posibles lesiones graves.
!
FUNCIONAMIENTO cont.
Línea de corte
Indicador de 45o Fig. 16
45
0o o
BEVEL TRAC™ “Indicador De Linea De Corteo Automatico ” (ver a Fig. 16a)La Sierra Circular 10866 equipa con un rasgo innovador para cortando más preciso y eficiente. Bevel Trac™ El “Indicador de Linea de Corteo Automatico” for straight line and bevel cutting
Aquí son instrucciones:1. Marca su pieza de trabajo con lápis al punto de corteo.2. Ajusta su sierra para la línea de corte, recto como 90°, o bisel , de 0° a 55°.3. Como ajusta la hoja, la “Línea de Indicador de Corteo Automatico LASER TRAC™” roja mueva y señala a la línea de corte de la hoja. 4. Después de ajustar la sierra por el ángulo que quieres cortar, apriete la palanca de bloqueo para ajuste del bisel. 5. Pone la sierra en la pieza de trabajo, alinea la aguja roja con la línea de lapis y haga su corta!
WARNING: Check extension cords before each use. If damaged replace immediately. Never use tool with a damaged cord since touching the damaged area could cause electrical shock, resulting in serious injury.
!
CAUTION: Keep the extension cord clear of the working area. Position the cord so that it will not get caught on lumber, tools or other obstructions while you are working with a power tool.
!
SERVICE SAFETY
1. If any part of this saw is missing or should break, bend, or fail in any way; or should any electrical component fail to perform properly: SHUT OFF the power switch and remove the saw plug from the power source and have the missing, damaged or failed parts replaced BEFORE resuming operation.
2. Tool service must be performed only at a Sears Parts and Repair Center. Service or maintenance performed by unqualified personnel could result in a risk of injury.
3. When servicing a tool, use only identical replacement parts. Follow instructions in the maintenance section of this manual. Use of unauthorized parts or failure to follow maintenance instructions may create a risk of electric shock or injury.
SAFETY SYMBOLS FOR YOUR TOOL
� V.......................................................................Volts� A......................................................................Amps Hz.................................................................... Hertz� W.....................................................................Watts� min.................................................................. Minutes� ....................................................................Alternating current� ...............................................................Direct current� no ....................................................................No-load speed� .....................................................................Class II construction, Double Insulated� .../min..............................................................Revolutions or Strokes per minute� .....................................................................Indicates danger, warning or caution. � It means attention! Your safety is involved.
The label on your tool may include the following symbols. �
!
EXTENSION CORDS Use a proper extension cord. ONLY use cords listed by Underwriters Laboratories (UL). Other extension cords can cause a drop in line voltage, resulting in a loss of power and overheating of tool. For this tool an AWG (American Wire Gauge) size of at least 14-gauge is recommended for an extension cord of 25-ft. or less in length. Use 12-gauge for an extension cord of 50-ft. Extension cords 100-ft. or longer are not recommended. Remember, a smaller wire gauge size has greater capacity than a larger number (14-gauge wire has more capacity than 16-gauge wire; 12-gauge wire has more capacity than 14-gauge). When in doubt use the smaller number. When operating a power tool outdoors, use an outdoor extension cord marked “W-A” or “W”. These cords are rated for outdoor use and reduce the risk of electric shock.
7-24-06
54
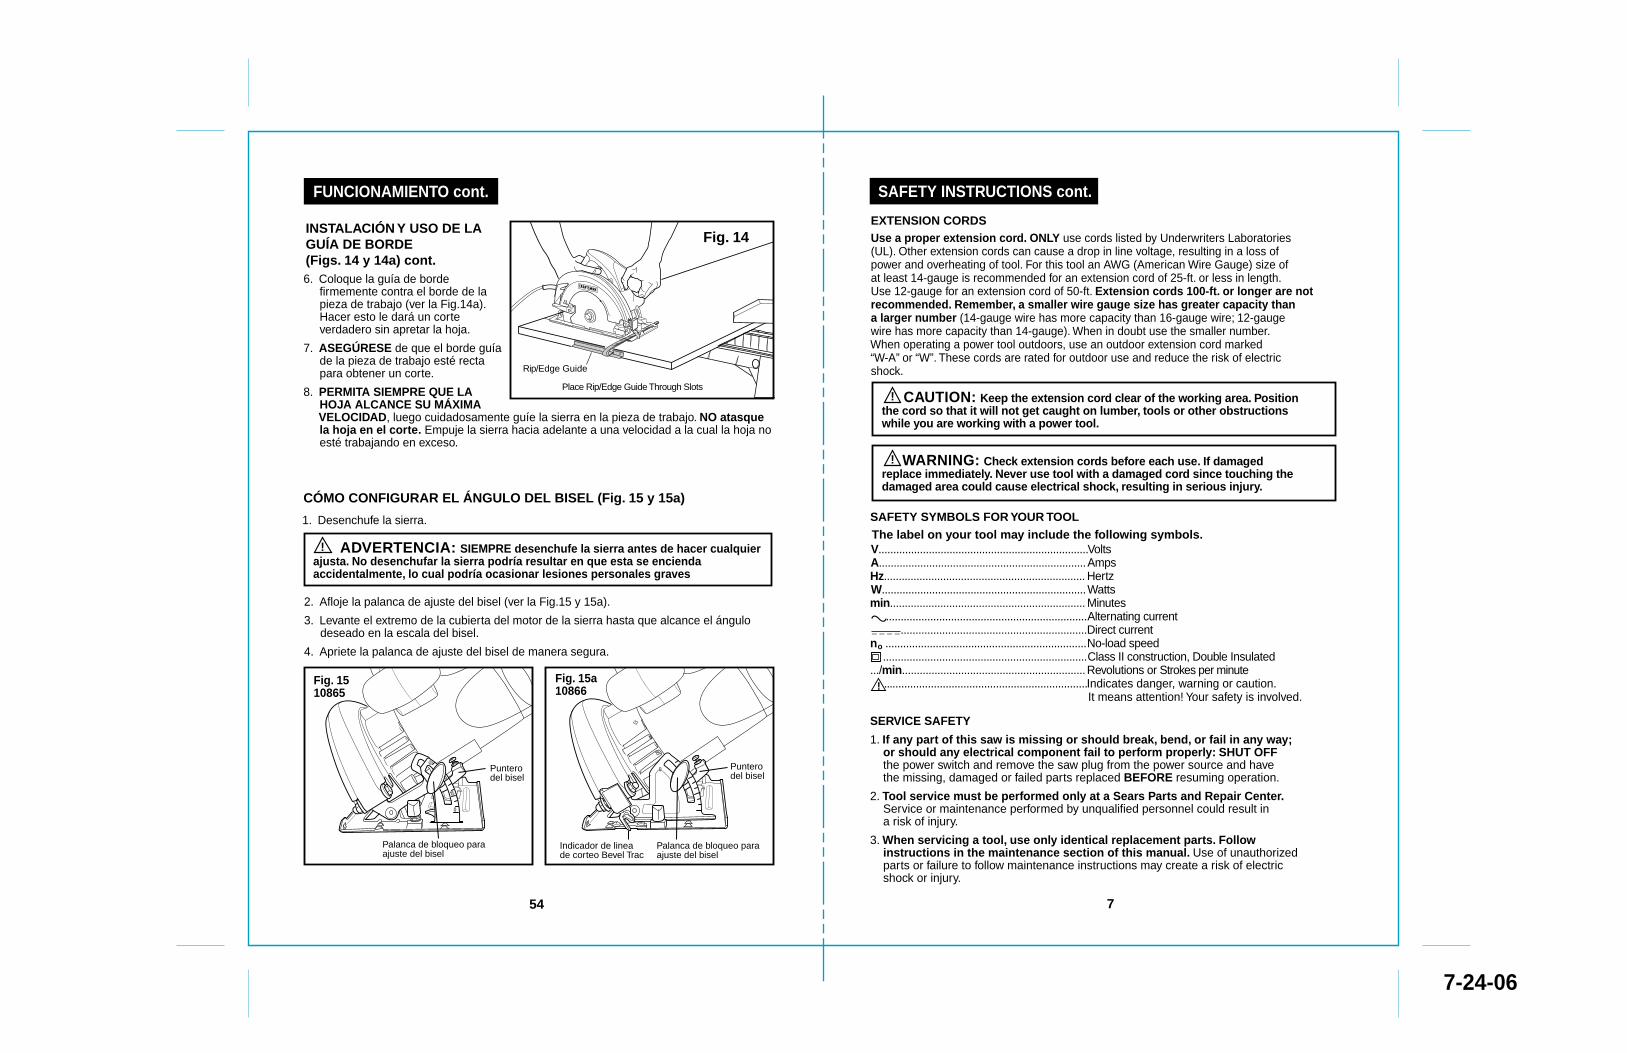
CÓMO CONFIGURAR EL ÁNGULO DEL BISEL (Fig. 15 y 15a)
ADVERTENCIA: SIEMPRE desenchufe la sierra antes de hacer cualquier ajusta. No desenchufar la sierra podría resultar en que esta se encienda accidentalmente, lo cual podría ocasionar lesiones personales graves
!
6. Coloque la guía de borde firmemente contra el borde de la pieza de trabajo (ver la Fig.14a). Hacer esto le dará un corte verdadero sin apretar la hoja.
7. ASEGÚRESE de que el borde guía de la pieza de trabajo esté recta para obtener un corte.
8. PERMITA SIEMPRE QUE LA HOJA ALCANCE SU MÁXIMA VELOCIDAD, luego cuidadosamente guíe la sierra en la pieza de trabajo. NO atasque la hoja en el corte. Empuje la sierra hacia adelante a una velocidad a la cual la hoja no esté trabajando en exceso.
1. Desenchufe la sierra.
INSTALACIÓN Y USO DE LA GUÍA DE BORDE (Figs. 14 y 14a) cont.
FUNCIONAMIENTO cont.
Puntero del bisel
Puntero del bisel
Palanca de bloqueo para ajuste del bisel
Palanca de bloqueo para ajuste del bisel
Place Rip/Edge Guide Through Slots
Rip/Edge Guide
Indicador de linea de corteo Bevel Trac
Fig. 14
2. Afloje la palanca de ajuste del bisel (ver la Fig.15 y 15a).
3. Levante el extremo de la cubierta del motor de la sierra hasta que alcance el ángulo deseado en la escala del bisel.
4. Apriete la palanca de ajuste del bisel de manera segura.
Fig. 15a 10866
Fig. 15 10865
15
0
0
55
15
0
0
48
8
SAFETY INSTRUCTIONS cont.
Keep hands away from cutting area and blade. Keep your second hand on the auxiliary handle or motor housing. If both hands are holding the saw, the blade cannot cut them.
DANGER:!
CAUTION: Blades coast after saw is switched off.!
SAFETY RULES FOR CIRCULAR SAWS
1. KEEP your body positioned to either side of the saw blade and not in direct line with the saw blade. Kickback could cause the saw to jump backwards. (See “Kickback…What Causes It and Ways to Prevent It” on pages 18 and 19).
2. DO NOT reach underneath the work. The guard cannot protect you from the blade beneath the workpiece.
When sawing through a workpiece, the lower blade guard DOES NOT cover the blade on the underside of the workpiece (Pg. 17 Fig. 4). ALWAYS keep your hands and fingers away from the cutting area.
DANGER:!
3. CHECK lower guard for proper closing BEFORE each use. DO NOT operate the saw if the lower guard does not move freely and close instantly. Never clamp or tie the lower guard in the open position. If the saw is accidentally dropped, the lower guard may be bent. Raise the lower guard with the retracting lever. The guard is operating properly when it moves freely, does not touch the blade or any other part in all angles and depths of cut, and readily returns to the closed position. 4. CHECK the operation and condition of the lower guard spring. If the guard and the spring are not operating properly, they MUST BE serviced before use. The lower guard may operate sluggishly, due to damaged parts, gummy deposits, or a buildup of debris. DO NOT operate your saw until the damage has been repaired or replaced. 5. The lower guard should be retracted manually ONLY for making special cuts, such as pocket or compound cuts. ALWAYS raise the lower guard by retracting its lever. As soon as the blade enters the material, the lower guard MUST be released. For all other sawing, the lower guard should operate automatically. 6. ALWAYS make sure that the lower guard is covering the blade BEFORE placing the saw down on a work bench or floor. An unprotected moving blade will cause the saw to walk backwards, cutting whatever is in its path. Make note of the time it takes for the blade to stop spinning after the switch is released. 7. NEVER hold the piece being cut in your hands or across your legs. It is important to support the workpiece properly in order to minimize body exposure, blade binding, or loss of control. 8. HOLD TOOL by insulated gripping surfaces (handles) when performing an operation where the cutting tool may contact hidden wiring or its own cord. Contact with a “live” wire will make the exposed metal parts of the tool “live” and shock the operator. 9. ALWAYS clamp the workpiece securely so it will not move when making the cut. 10. When ripping, ALWAYS USE a rip fence or straight edge guide. This improves the accuracy of the cut and reduces the chance of the blade binding. 11. ALWAYS USE blades that have the correct size and shape (diamond vs. round) arbor holes. Blades that do not match the mounting hardware of the saw will run erratically and cause loss of control.
7-24-06
53
La sierra 10866 viene con una guía de borde de 6-pulgadas de largo en la guía lateral. Esta le permite hacer cortes paralelos precisos al darle acabado a su pieza de trabajo. La misma se sujeta a la base de la sierra. El brazo de la guía de borde está estampado 0 a 8 pulgadas para fácil ajuste de su corte.
1. Desenchufe la sierra.
INSTALACIÓN Y USO DE LA GUÍA DE BORDE (Fig. 14)
ADVERTENCIA: SIEMPRE desenchufe la sierra antes de hacer cualquier ajuste. No desenchufar la sierra podría resultar en que esta se encienda accidentalmente, lo cual podría ocasionar lesiones personales graves.
!
HACER CORTES AL FILOSIEMPRE use una guía al hacer cortes al filo largos o anchos con su sierra. Puede usar un borde recto o usar la guía de borde que se incluyó con su sierra.
USO DE UN BORDE RECTO (Fig. 13)
2. Posicione la guía de borde de manera tal que el brazo con los incrementos en pulgadas esté de cara hacia arriba. Deslice el brazo de la guía de borde en las ranuras de montaje en la parte delantera de la base de la sierra (ver la Fig. 14).3. Ajuste la guía de borde a la longitud de corte deseada.4. Apriete la guía de borde con el tornillo de sujeción5. Sujete y soporte la pieza de trabajo de manera segura antes de realizar el corte.
1. Puede hacer una guía para corte al filo eficiente sujetando un borde recto a su pieza de trabajo. 2. Cuidadosamente, guíe la sierra a lo largo del borde recto para obtener un corte al filo recto (ver la Fig. 13). 3. SIEMPRE DEJE QUE LA HOJA ALCANCE SU MÁXIMA VELOCIDAD, luego cuidadosamente guía la sierra en la pieza de trabajo. NO atasque la hoja en el corte. Empuje la sierra hacia adelante a una velocidad a la cual la hoja no esté trabajando en exceso.
ADVERTENCIA: Sujete y soporte SIEMPRE la pieza de trabajo de manerasegura. Mantenga SIEMPRES control adecuado sobre la sierra. No sujetar y soportar la pieza de trabajo y la pérdida de control sobre la sierra podrían resultar en lesiones graves.
!
Borde Recto
FUNCIONAMIENTO cont.
Fig. 13
9
SAFETY INSTRUCTIONS cont.
SAFETY RULES FOR CIRCULAR SAWS cont.
12. NEVER use damaged or incorrect blade washers or bolts. The blade washers and bolts were specially designed for your saw, for optimum performance and safety of operation.13. NEVER cut more than one piece at a time. DO NOT STACK more than one workpiece on the worktable at a time.14. AVOID awkward operations and hand positions where a sudden slip could cause your hand to move into the blade. 15. NEVER reach into the cutting path of the blade.
WARNING: BE SURE to read and understand all instructions. Failure to follow all instructions listed below may result in electric shock, fire and/or serious personal injury.
!
ADDITIONAL RULES FOR SAFE OPERATION
WARNING: Use of this tool can generate dust containing chemicals known to cause cancer, birth defects or other reproductive harm. Some examples of these chemicals are: • Lead from lead-based paints. • Crystalline silica from bricks and cement and other masonry products. • Arsenic and chromium, from chemically treated lumber. Your risk from these exposures varies, depending upon how often you do this type of work. To reduce your exposure to these chemicals: • Work in a well-ventilated area. • Work with approved safety equipment, such as those dust masks that are specially designed to filter out microscopic particles.Avoid prolonged contact with dust from power sanding, sawing, grinding, drilling and other construction activities. Wear protective clothing and wash exposed areas with soap and water. Allowing dust to get into your mouth, eyes, or lay on the skin may promote absorption of harmful chemicals.
!
WARNING: Use of this tool can generate and/or disburse dust, which may cause serious and permanent respiratory or other injury. Always use NIOSH/OSHA approved respiratory protection appropriate for the dust exposure. Direct particles away from face and body.
!
1. Know your power tool. Read operator's manual carefully. Learn the applications and limitations, as well as the specific potential hazards related to this tool. Following this rule will reduce the risk of electric shock, fire or serious injury.2. ALWAYS wear safety glasses or eye shields when using this saw. Everyday eyeglasses have only impact-resistant lenses; they are NOT safety glasses. 3. PROTECT your lungs. Wear a face mask or dust mask if the operation is dusty.
7-24-06
52
NOTA: En vista que el espesor de las hojas varía, HAGA UN CORTE DE PRUEBA en material de desecho a lo largo de la línea guía para determinar de cuánto debe separar, si es el caso, la hoja de la línea guía para permitir que la línea de fractura de la hoja produzca un corte preciso.
FUNCIONAMIENTO cont.
HACIENDO CORTES CRUZADOS Y CORTES AL FILO cont.:BEVEL TRAC™ “Indicador De Linea De Corteo Automatico ”La Sierra Circular 10866 equipa con un rasgo innovador para cortando más preciso y eficiente. Bevel Trac™ El “Indicador de Linea de Corteo Automatico para cortes rectos y bisel. Aquí son instrucciones:1. Marca su pieza de trabajo con lápis al punto de corteo.2. Ajusta su sierra para la línea de corte, recto como 90°, o bisel , de 0° a 55°.3. Como ajusta la hoja, la “Línea de Indicador de Corteo Automatico LASER TRAC™” roja mueva y señala a la línea de corte de la hoja. 4. Después de ajustar la sierra por el ángulo que quieres cortar, apriete la palanca de bloqueo para ajuste del bisel. 5. Pone la sierra en la pieza de trabajo, alinea la aguja roja con la línea de lapis y haga su corta!
Línea de corte
Indicador de 0o
Fig. 12a10866
10
SAFETY INSTRUCTIONS cont.
4. PROTECT your hearing. Wear appropriate personal hearing protection during use. Under some conditions and duration of use, noise from this product may contribute to hearing loss.5. ALL VISTORS AND BYSTANDERS MUST wear the same safety equipment that the operator of the saw wears. 6. INSPECT the tool cords periodically and if damaged have them repaired at your nearest Sears Service Center or other Authorized Service Facility. BE AWARE of the cord location.7. ALWAYS check the tool for damaged parts. Before further use of the tool, a guard or other part that is damaged should be carefully checked to determine if it will operate properly and perform its intended function. Check for misalignment or binding of moving parts, breakage of parts, and any other condition that may affect the tool's operation. A guard or other part that is damaged should be properly repaired or replaced at a Sears Service center.8. INSPECT and remove all nails from lumber before sawing.9. SAVE THESE INSTRUCTIONS. Refer to them frequently and use them to instruct others who may use this tool. If someone borrows this tool, make sure they have these instructions also.
ADDITIONAL RULES FOR SAFE OPERATION cont.
GLOSSARY OF TERMS FOR WOODWORKING
SpindleThe shaft on which a blade or cutting tool is mounted. Also called the Arbor.Revolutions Per Minute (RPM)The number of turns completed by a spinning object in one minute.Saw Blade PathThe area over, under, behind or in front of the blade, as it applies to the workpiece. That area which will be or has been cut by the blade.Set The distance that the saw blade tooth is bent (or set) outward from the face of the blade.Miter CutA cutting operation made with the blade at any angle other than 90o to the fence.Compound Miter CutA compound miter cut is a cut made using a miter angle and a bevel angle at the same time. Cross cutA cutting or shaping operation made against the grain of the workpiece.Bevel CutA cutting operation made with the blade at any angle other than 90o to the miter table.Dado CutA non-through cut which produces a square-sided notch or trough in the workpiece (requires special blade).Chamfer CutA cut removing a wedge from a block of wood so the end (or part of the end) is angled at other than 90o.
7-24-06
51
2. Al hacer cortes cruzados o cortes al filo con el número 10865, alinee la línea de corte con el lado derecho de la muesca al lado del indicador 0 (ver la Fig. 12).
Para ayudarle a mantener el control cont.:10. Apriete el gatillo para encender la sierra. SIEMPRE permita que la hoja alcance su máxima velocidad antes de comenzar a cortar en la pieza de trabajo11. Al hacer el corte, SIEMPRE, aplique una presión estable y equitativa. Forzar la sierra producirá cortes imprecisos y podría acortar la vida útil de la sierra u ocasionar el Rebote.12. Una vez finalizado el corte, libere el gatillo y deje que la hoja se detenga por completo. NO retire la sierra de la pieza de trabajo mientras la hoja continúe en movimiento.
Al aserrar una pieza de trabajo, el protector inferior de la hoja NO cubre la parte inferior de la hoja que sobresale de la pieza de trabajo (ver la Fig. 4, página 17). Mantenga SIEMPRE sus manos y dedos lejos del área de corte. Cualquier parte de su cuerpo que entre en contacto con la hoja en movimiento podría resultar en lesiones graves.
HACIENDO CORTES CRUZADOS Y CORTES AL FILO (Fig. 12 y 12a)
ADVERTENCIA: Sujete y soporte SIEMPRE la pieza de trabajo de manera segura. Mantenga SIEMPRES control adecuado sobre la sierra. No sujetar y soportar la pieza de trabajo y la pérdida de control sobre la sierra podrían resultar en lesiones graves.
!
1. SIEMPRE use su sierra con las manos posicionadas correctamente (ver la Fig. 12).
ADVERTENCIA: Mantenga SIEMPRE el control apropiado sobre la sierra para asegurar un aserrado más seguro y fácil. La pérdida de control sobre la sierra podría ocasionar accidentes que resulten en posibles lesiones graves.
!
FUNCIONAMIENTO cont.
PELIGRO:
Línea de corte
Indicador de 0o
Fig. 1210865
45
0o o
11
UNPACKING
1. Included with your circular saw is the cutting blade, which is unassembled and packed separately with the 10865, and is assembled on the saw on the 10866. Also a blade wrench is stored in the saw's base on both models, for use in installing or changing the blade. The 10866 saw also includes an edge guide. 2. Inspect the saw carefully to make sure that no breakage or damage has occurred during shipping. If any of the items mentioned are missing (refer to PARTS LIST illustration see Fig.1 page 12), return the saw to your nearest Sears store or Craftsman outlet to have the saw replaced.
WARNING: Your saw should NEVER be connected to the power source when you are assembling parts, making adjustments, installing or removing blades, cleaning or when it is not in use. Disconnecting the saw will prevent accidental starting, which could cause serious personal injury.
!
GLOSSARY OF TERMS FOR WOODWORKING
Ripping or Rip CutA cutting operation along the length of the workpiece.Freehand CutPerforming a cut without using a fence, miter gauge, fixture, work clamp, or other proper device to keep the workpiece from twisting or moving during the cut.Through SawingAny cutting operation where the blade extends completely through the thickness of the workpiece.Non-Through CutsAny cutting operation where the blade does not extend completely through the thickness of the workpiece, like a dado cut.Leading EndThe end of the workpiece pushed into tool first.KerfThe material removed by the blade in a through cut or the slot produced by the blade in a non-through or partial cut.KickbackA hazard that can occur when the blade binds or stalls, throwing the workpiece back toward operator.Workpiece or MaterialThe item on which the cutting operation is being done. The surfaces of a workpiece are commonly referred to as faces, ends and edges.GumA sticky, sap-based residue from wood products.Resin A sticky, sap-based substance that has hardened.
WARNING: If any parts are broken or missing, DO NOT attempt to plug in the power cord or operate saw until the broken or missing parts are replaced. Failure to do so could result in possible serious injury.
!
7-24-06
50
COMENZAR A CORTAR (Fig. 10)
ADVERTENCIA: Sujete y soporte SIEMPRE la pieza de trabajo de manera segura.Mantenga SIEMPRES control adecuado sobre la sierra. No sujetar y soportar la pieza de trabajo y la pérdida de control sobre la sierra podrían resultar en lesiones graves.
!
1. SIEMPRE use su sierra con las manos posicionadas de manera correcta, con una mano operando el interruptor gatillo y la otra sobre el mango delantero de asistencia (ver la Fig. 10).
ADVERTENCIA: Mantenga SIEMPRE el control apropiado sobre la sierra para asegurar un aserrado más seguro y fácil. La pérdida de control sobre la sierra podría ocasionar accidentes que resulten en posibles lesiones graves.
2. NUNCA use la sierra con sus manos posicionadas como se muestra en la Fig. 11
Para ayudarle a mantener el control:3. SIEMPRE soporte la pieza de trabajo cerca del corte.4. SIEMPRE soporte la pieza de trabajo de manera tal que el corte quede a su derecha.5. SIEMPRE sujete la pieza de trabajo para que no se mueva durante el corte. Coloque la pieza de trabajo con el lado bueno hacia abajo.
NOTA: El lado bueno de la pieza de trabajo es el lado del cual la apariencia es importante.
6. Antes de comenzar a cortar, dibuje una línea guía a lo largo de la línea de corte deseada, luego coloque el borde delantero de la base de la hoja sobre esa parte de la pieza de trabajo que esté sólidamente soportada (ver la Fig. 10). 7. NUNCA coloque la sierra sobre la parte de la pieza de trabajo que se caerá al realizar el corte (ver la Fig. 11). 8. SIEMPRE mantenga el cordón alejado del área de corte. SIEMPRE coloque el cordón de manera tal que no cuelgue sobre la pieza de trabajo cuando esté realizando el corte. 9. Sostenga la sierra firmemente con ambas manos (ver la Fig. 7).
Usar la sierra con un cordón dañado podría resultar en lesiones graves o muerte. Si el cordón está dañado, hágalo reemplazar antes de usar nuevamente la sierra.
!
ADVERTENCIA: Si el cordón cuelga sobre la pieza de trabajo durante el corte, libere de inmediato el interruptor gatillo. Para evitar lesiones, desenchufe la sierra y mueva el cordón para prevenir que cuelgue nuevamente.
FUNCIONAMIENTO cont.
PELIGRO:
Fig. 11
Fig. 10
Incorrecto
Correcto
49
ADVERTENCIA: SIEMPRE desenchufe la sierra antes de hacer cualquier ajuste. No desenchufar la sierra podría resultar en que se encienda accidentalmente y ocasione lesiones personales graves.
!
PARA CONFIGURAR LA PROFUNIDAD DE LA HOJA (Fig. 8a)
2. Levante la palanca de ajuste de la profundidad de corte para aflojar la base (ver la Fig. 8).3. Determine la profundidad de corte deseada.4. Ubique la escala de profundidad de corte en la parte posterior del protector superior de la hoja (ver la Fig. 8a).5. Sostenga la base de la sierra plana contra el borde de la pieza de trabajo y levante o baje la sierra hasta que la marca del indicador en la abrazadera quede alineado con la muesca en el protector de la hoja a la marca de profundidad de corte deseada.6. Apriete la palanca de ajuste de la profundidad de corte.
Abrazadera de ajuste
Escala para Profundidad del Corte
HACER AJUSTES DE LOS CORTES EN PROFUNDIDAD (Fig. 8)Use SIEMPRE la configuración de profundidad de hoja correcta. La configuración de profundidad correcta de la hoja no debe ser más de 1/4 pulgada por debajo del material que se está cortando (ver la Fig. 5). Permitir una mayor profundidad incrementará la posibilidad de rebote y ocasionará que el corte no sea preciso. Su sierra está equipada con una escala para cortes en profundidad que ofrece una mayor precisión para la profundidad de corte. La escala para profundidad de corte está ubicada en la parte interna posterior del protector superior de la hoja.
1. Desenchufe la sierra.
FUNCIONAMIENTO cont.
7-24-06
Fig. 8a
Fig. 8
Escala para profundidad del Corte
Para levantar
Para bajar
Abrazadera
Marca de Indicador
Palanca de ajuste en profundidad
Aflojar
ApretarBase
12
5. Operator's Manual
PARTS LIST(Fig. 1)
1. Saw 2. Blade (unassembled on 10865 assembled on 10866)
3. Edge Guide
(with 10866)
4. Blade Wrench (for changing the blade)
UNPACKING cont.
!
2. Place saw on its side on a flat surface.3. To loosen the depth-of-cut adjustment lever, raise the saw up all the way and tighten lever. This gives you easier access to blade mounting area (see Fig. 2a).4. Place saw upright, on its base and on a flat surface (see Fig. 2a).5. To loosen the spindle clamping screw “A”, depress the spindle lock button (see Fig. 2). Place the blade wrench on the spindle clamping screw “A”. Move the wrench back and forth until you feel the spindle lock button depress further and it locks the blade in position so the spindle clamping screw can be removed. Keeping the spindle lock button firmly depressed, turn the spindle screw counterclockwise to remove.
WARNING: To prevent personal injury, ALWAYS disconnect the plug from power source BEFORE assembling parts, making adjustments or installing blades.
INSTALLING THE BLADE (Figs. 2 and 2a)
1. Saw should not be plugged into power source.
ASSEMBLY
Carefully remove the blade from its packing, inspect it to be sure that it is not cracked or damaged.
Depth-of-Cut Adjustment Lever
Fig. 2a
“A” Spindle Clamping Screw
Outer “D” Washer
®
Blade Rotation teeth point up at front
Fig. 2
SpindleLock Button
71
®
Amps12
Loosen
Tighten
48
1. Mantenga SIEMPRE un agarre firme con ambas manos en la sierra (ver la Fig. 7) y posicione su cuerpo y brazos de manera tal que le permitan resistir las fuerzas del Rebote. Las fuerzas del Rebote pueden ser controladas por el operador, si se toman las precauciones apropiadas.2. Si la hoja se atasca o si interrumpe un corte por cualquier motivo, libere SIEMPRE el gatillo y sostenga la sierra sin moverla en el material hasta que la hoja se detenga por completo. NUNCA intente retirar la hoja en movimiento, o podría ocurrir el Rebote. VERIFIQUE y tome las acciones correctivas para eliminar la causa de atascamiento de la hoja.3. Inspeccione la pieza de trabajo para verificar si existe presencia de nudos o clavos antes de cortar. Nunca corte un nudo o clavo.4. NO corte madera deformada o mojada (ver la Fig. 6a).5. Soporte SIEMPRE panales grandes para minimizar el riesgo de que la hoja quede apretada y Rebote. Los paneles grandes tienen la tendencia a combarse bajo su propio peso (ver la Fig. 6a). DEBE colocar soportes debajo del panel, uno cerca de la línea de corte y otro cerca del borde el panel (ver la Fig. 6).6. Al reiniciar el corte en la pieza de trabajo, CENTRE la hoja en la línea de fractura y asegúrese que los dientes de la sierra no estén enganchados en el material. Si la hoja de la sierra se atasca, podría caminar hacia arriba o Rebotar desde la pieza de trabajo al encender nuevamente la sierra.7. NO use hojas sin filo o dañadas. Las hojas sin filo, instaladas incorrectamente o engomadas producen líneas de fractura angostas que ocasionan una fricción excesiva, el atasco de la hoja y el Rebote8. MANTENGA la hoja en la configuración de profundidad correcta. La configuración de profundidad no debe exceder 1/4 pulgada debajo del material que se está cortando (ver la Fig. 5). ASEGÚRESE que la profundidad de la hoja y las palancas de bloqueo de ajuste estén apretadas y seguras ANTES de realizar el corte. Si el ajuste de la hoja se mueve durante el corte, podría ocasionar que la hoja se atasque y Rebote.9. USE PRECAUCIÓN EXTRA al hacer un “Corte de Bolsillo” en paredes existentes u otras áreas ciegas. La hoja que sobresale podría cortar objetos que ocasionen el Rebote.
! PELIGRO: Libere SIEMPRE el interruptor gatillo si la hoja se atasca o si la sierra se bloquea. El rebote podría ocasionar que usted pierda el control de la sierra, resultando en lesiones graves.
Maneras para prevenir el Rebote
FUNCIONAMIENTO cont.
Fig. 7
7-24-06
13
11. Replace the “D” washer. 12. Firmly hold down spindle lock button as you replace the spindle screw and hand tighten it in a clockwise direction. Then use blade wrench to tighten the spindle clamping screw thoroughly.
6. Completely remove the spindle clamping screw “A” and the outer “D” washer (see Fig. 2a). 7. The remaining washer is the inner bushing washer that fits around the spindle shaft and it does not need to be removed. 8. Put a drop of oil onto the inner bushing washer and outer “D” washer where they will touch the blade. 9. Raise lower blade guard using the blade guard lever and hold it in the raised position for the next step. 10. Place the saw blade inside the lower blade guard, onto the spindle shaft and against the inner bushing.
NOTE: The teeth of the blade should point upward at the front of the saw as shown in (Fig. 2a).
NOTE: NEVER use a blade that is too thick to allow the “D” washer to engage with the flat side of the spindle.
WARNING: BE SURE to wear protective work gloves while handling a saw blade. The blade can injure unprotected hands.
!
ASSEMBLY cont.
WARNING: A 7 1/4-inch blade is the maximum blade capacity of your saw. A larger than 71/4-inch blade will come in contact with the blade guards. Also, NEVER use a blade that is so thick that it prevents the outer blade washer from engaging with the flat side of the spindle. Blades that are too large or too thick can result in an accident causing serious injury.
!
INSTALLING THE BLADE cont. (Figs. 2 and 2a)
REMOVING THE BLADE (Figs. 2 and 2a) 1. Unplug the saw. 2. Follow steps 2. through 6. of “INSTALLING THE BLADE” and remove the blade (see Fig. 2a).
47
1. El rebote es una reacción repentina debido a que la hoja de la sierra está presionada, se atasca o está mal alineada, lo cual ocasiona que la sierra descontroladamente se levante y salga de la pieza de trabajo, hacia atrás, hacia el operador.2. Cuando la hoja está presionada o se atasca debido a que la línea de fractura se cierra, la hoja se atasca y la reacción del motor empuja la unidad rápidamente hacia atrás, hacia el operador.3. Si la hoja se tuerce o está mal alineada durante el corte, los dientes en el borde posterior de la hoja pueden hundirse en la parte superior de la superficie de la madera. Esto ocasiona que la hoja escale hacia afuera de la línea de fractura y salte hacia atrás, hacia el operador.4. Aserrar en nudos de la madera o clavos en la pieza de trabajo pueden ocasionar el Rebote.5. Aserrar en madera mojada o deformada puede ocasionar el Rebote (ver la Fig. 6a).6. Forzar un corte o no soportar la pieza de trabajo correctamente puede ocasionar un Rebote (ver la Fig. 6a).7. El Rebote puede resultar del mal uso de la herramienta y/o procedimientos o condiciones de funcionamiento erradas. Puede evitarse al tomar las precauciones apropiadas que se lista a continuación.
REBOTE…QUÉ LO OCASIONA Y CÓMO AYUDAR A PREVENIRLO (Fig. 5)
La hoja está demasiado en profundidad
Profundidad correcta de la hoja
REBOTE
Correcto
Las causas del rebote
FUNCIONAMIENTO cont.
Errado
Fig. 5
Fig. 6
Fig. 6a
7-24-06
14
DESCRIPTION
NOTE: Before attempting to use your saw, familiarize yourself with all of the operating features and safety requirements.
KNOW YOUR CIRCULAR SAW (Fig. 3)
Your circular saw has a precision-built electric motor and it should only be connected to a 120-volt, 60-Hz AC ONLY power supply (normal household current). DO NOT operate on direct current (DC). This large voltage drop will cause a loss of power and the motor will overheat. If the saw does not operate when plugged into correct 120-volt, 60-Hz AC ONLY outlet, check the power supply. The saw has an 8-ft., 2-wire power cord (no adapter needed).
These Circular Saws have the following features: 1. 9-10865 12 Amp, 4800 RPM (no-load speed) motor, and 9-10866 13 Amp, 5200 RPM (no-load speed) motor for power and torque for fast, sure cuts in wood, plywood, hardboard and wood-base materials. 2. 9-10866 - Innovative Bevel Trac™ “Auto Sliding Line-of-cut Indicator” automatically points to your line of cut! 3. Quick depth-of-cut adjustments with a maximum depth of cut: 9-10865 - 27/16-in. at 90°; 113/16-in. at 48° 9-10866 - 27/16-in. at 90°; 115/32-in. at 55° 4. Easy to read Bevel Cut Scale adjusts bevel capacity; 9-10865 ; 0° to 48° 9-10866 ; 0° to 55° 5. Die-cast aluminum blade guards are epoxy coated for durability and extra strength 6. Extended length Trigger Switch with Power Lock-off Button for maximum control and comfort. Power lock-off button must be pressed in for trigger switch to turn saw “on”. 7. Large stamped Steel Base provides stability, glides smoothly 8. Ergonomically designed Boomerang Rear Handle and Front Assist Handle (soft-grip front handle on 9-10866) provide positive gripping, control, balance and comfort. 9. Includes Craftsman® 24 tooth carbide-tipped steel combination blade. 10. Top mounted Blade Spindle Lock for easy blade changes.11. 9-10866 includes Edge Guide to help produce accurate cuts.12. Sawdust ejection chute helps direct dust and chips away from operator.13. Permanently lubricated 100% ball bearings for smooth operation and long life.14. Durable machined gearing for efficient power transmission.
46
FUNCIONAMIENTO
HOJAS DE SIERRAToda hoja de sierra debe mantenerse limpia, afilada y ajustada adecuadamente para que corte eficientemente. El uso de una hoja sin filo pone tensión en exceso en la sierra e incrementa el peligro de rebote. Guarde hojas adicionales a la mano, para tener siempre hojas afiladas disponibles. La goma y pez negra endurecida sobre la hoja frena la sierra. Use removedor de goma y pez negra, agua caliente o kerosén para retirarlos. NO use gasolina.
SISTEMA DE PROTECCIÓN DE LA HOJA (Fig. 4)El protector inferior de la hoja, adherido a su sierra circular, está allí para su protección. NUNCA debe ser alterado por cualquier motivo. Si se llegara a dañar o comienza a girar lentamente, NO use su sierra hasta que el daño haya sido reparado o reemplazado. Deje SIEMPRE el protector en su posición correcta de funcionamiento cuando use la sierra.
La Hoja de 1/4 pulgada o menos estará expuesta del lado inferior de la pieza de trabajo.
La Palanca del Protector Inferior de la Hoja está en la posición LEVANTADA al realizar un corte.
PRECAUCIÓN: NUNCE use la sierra cuando el protector no esté funcionando apropiadamente. El protector debe ser revisado para verificar su funcionamiento apropiado antes de cada uso. Si la sierra cae al piso, verifique si el protector inferior y parachoques han sufrido daños en toda su configuración de profundidad antes de usar la sierra. NOTA: El protector funciona apropiadamente cuando se mueve libremente y regresa prontamente a su posición cerrada. Si por cualquier motivo su protector de hoja inferior no se cierra libremente, lleve la sierra a su Centro de Reparación Sears más cercano antes de usarla.
!
El Protector Inferior de la Hoja se retrae automáticamente cuando se realice un corte.
DESCRIPCIÓN cont.
ESPECIFICACIONES DEL PRODUCTO 9-10866
Entrada
Clasificación
Velocidad sin carga
Profundidad de corte a 90°
Profundidad de corte a 55°
Ángulo máximo de biselado
Diámetro de la hoja
13 Amps
120V, 60Hz AC
5200 RPMs
27/16 pulgadas (61.97mm)
115/32 pulgadas (37.3 mm)
55°
71/4 pulgadas (184 mm)
Fig. 4
®
7-24-06
15
Fig. 3
DESCRIPTION cont.
These Circular Saws have the following features: cont.
La Sierras Circulares ofrencen las siguientes características: cont.
Fig. 3
Tornillo de sujeción del husillo
Base
Palanca de bloqueo para ajuste del bisel
Escala del bisel
Tornillo de retención/sujeción del borde guíaRanuras de
montaje para el borde guía
Mango delantero de asistencia
Protector inferior de la hoja
Palanca del protector inferior de la hoja
Mango posterio
Interruptor gatillo
Protectorsuperior de la hoja
Cubierta del motor
Hoja
Botón de bloqueo del husillo
Base
Palanca del protector inferior de la hoja
Escala para corte en profundidad
Mango delantero de asistencia
Cubierta del motor
Llave de la hoja sealmacena en la base
71
®
Amps12
71
®
Amps13
9-10866 - Innovador Bevel Trac™ “Indicador de linea de corteo automatico”
ESPECIFICACIONES DEL PRODUCTO 9-10865
Entrada
Clasificación
Velocidad sin carga
Profundidad de corte a 90°
Profundidad de corte a 48°
Ángulo máximo de biselado
Diámetro de la hoja
12 Amps
120V, 60Hz AC
4800 RPMs
27/16 pulgadas (61.97mm)
113/16 pulgadas (46.03 mm)
48°
71/4 pulgadas (184 mm)
7-24-06
16
DESCRIPTION cont.
OPERATION
SAW BLADESAll saw blades need to be kept clean, sharp and properly set in order to cut efficiently. Using a dull blade places a heavy load on the saw and increases the danger of kickback. Keep extra blades on hand, so sharp blades are always available. Gum and wood pitch hardened on the blade slows the saw down. Use gum and pitch remover, hot water or kerosene to remove them. DO NOT use gasoline.
BLADE GUARD SYSTEM (Fig. 4)The lower blade guard, attached to your circular saw, is there for your protection and safety. It should NEVER be altered for any reason. If it becomes damaged or begins to return slowly or sluggishly, DO NOT operate your saw until the damage has been repaired or replaced. ALWAYS leave the guard in its correct operating position when using the saw.
Fig. 4
Blade 1/4-in. or less is Exposed on Underside of Workpiece
Lower Blade Guard lever is in UP position when making a cut
CAUTION: NEVER use the saw when the guard is not operating properly. The guard should be checked for correct operation before each use. If you drop your saw, check the lower blade guard and bumper for damage at all depth settings before using. NOTE: The guard is operating properly when it moves freely and then readily returns to the closed position. If for any reason your lower blade guard and bumper does not close freely, take the saw to your nearest Sears Repair Center for service before using it.
!
Lower Blade Guard retractsautomaticallywhen cut isbeing made
®
PRODUCT SPECIFICATIONS 9-10866
Input
Rating
No Load Speed
Cutting Depth at 90°
Cutting Depth at 55°
Maximum Bevel Angle
Blade Diameter
13 Amps
120V, 60Hz AC
5200 RPMs
27/16-in. (61.97mm)
115/32-in. (37.3 mm)
55°
71/4-in. (184 mm)
17
OPERATION cont.
1. Kickback is a sudden reaction to a pinched, bound or misaligned saw blade, which causes an uncontrolled saw to lift up and out of the workpiece and toward the operator.
2. When the blade is pinched or bound tightly by the kerf closing down, the blade stalls and the motor reaction drives the unit rapidly back towards the operator.
3. If the blade becomes twisted or misaligned in the cut, the teeth at the back edge of the blade can dig into the top surface of the wood. This causes the blade to climb out of the kerf and jump back towards the operator.
4. Sawing into knots or nails in the workpiece can cause Kickback.
5. Sawing into wet or warped lumber can cause Kickback. (see Fig. 6a)
6. Forcing a cut, or not supporting the workpiece correctly can cause Kickback. (see Fig. 6a)
7. Kickback is a result of tool misuse and/or incorrect operating procedures or conditions. It can be avoided by taking the proper precautions, on page 19.
KICKBACK…WHAT CAUSES IT AND WAYS TO HELP PREVENT IT (Fig. 5)The Causes of Kickback
Fig. 5
KICKBACK
Correct Blade Depth Blade is Set Too Deep
Right
Fig. 6
Wrong
Fig. 6a
7-24-06
44
DESCRIPCIÓN
NOTA: Antes de intentar usar su sierra, familiarícese con todos las características operacionales y requerimientos de seguridad.
CONOZCA SU SIERRA CIRCULAR (Fig. 3)
Su sierra circular cuenta con un motor eléctrico construido a precisión y sólo debe ser conectado a una fuente de alimentación de 120 voltios, 60-Hz AC SOLAMENTE (corrientenormal del hogar). NO opere con corriente directa (DC). Esta gran caída en voltaje ocasionará pérdida de potencia y el motor se sobrecalentará. Si la sierra no funciona cuando se enchufa correctamente en una toma de 120 voltios, 60-Hz AC SOLAMENTE, verifique la fuente de alimentación. Esta sierra cuenta con un cordón de alimentación de 8 pies, 2 alambres (no requiere adaptador).
La Sierras Circulares ofrencen las siguientes características: 1. 9-10865 Motor de 12 Amp, 4800 RPM (velocidad sin carga) 9-10866 Motor de 13 Amp, 5200 RPM (velocidad sin carga) ofrecen fuerza y torque para cortes rápidos y seguros en madera, madera contrachapada, madera prensada y materiales a base de madera. 2. 9-10866 - Innovador Bevel Trac™ “Indicador de linea de corteo automatico” indica automáticamente a su linea de corte! 3. Ajustes rápidos para profundidad de corte con una profundidad maxima de corte de: 9-10865 - 27/16 pulgadas a 90°; 113/16 pulgadas a 48° 9-10866 - 27/16 pulgadas a 90°; 115/32 pulgadas a 55° 4. Escala para corte en bisel de fácil lectura se ajusta para una capacidad biselado desde: 9-10865 - desde 0° hasta 48° 9-10866 - desde 0° hasta 55° 5. Protectores de la hoja aluminio moldeado son cubiertos con epoxy para mayor fuerza y durabilidad. 6. Interruptor gatillo de mayor longitud con botón de bloque para máximo control y confort. Botón de bloque apagado tiene que ser apretado así quel interruptor de gatillo enciende la sierra. 7. Grande base de acero sellado que ofrece estabilidad y se desliza suavemente 8. Mango posterior y Mango de asistencia delantero, contorneados y diseñados ergonómicamente, (de agarre suave en 9-10866) para un agarre seguro, control, balance y confort. 9. Incluye hoja de acero Craftsman® 24 dientes con punta de carburo de tungsteno para uso combinación. 10. Bloqueo superior del husillo de la hoja ensamblada para cambios fáciles de la hoja. 11. 9-10866 incluye borde guía para ayudar a producir cortes precisos.12. Conducto de eyección de aserrín ayuda a dirigir el polvo y astillas lejos del operador.13. Rodamientos esféricos permanentemente lubricados al 100% para un funcionamiento ininterrumpido y de larga duración.14. Engranajes maquinados duraderos para una transmisión de energía eficiente.
18
OPERATION cont.
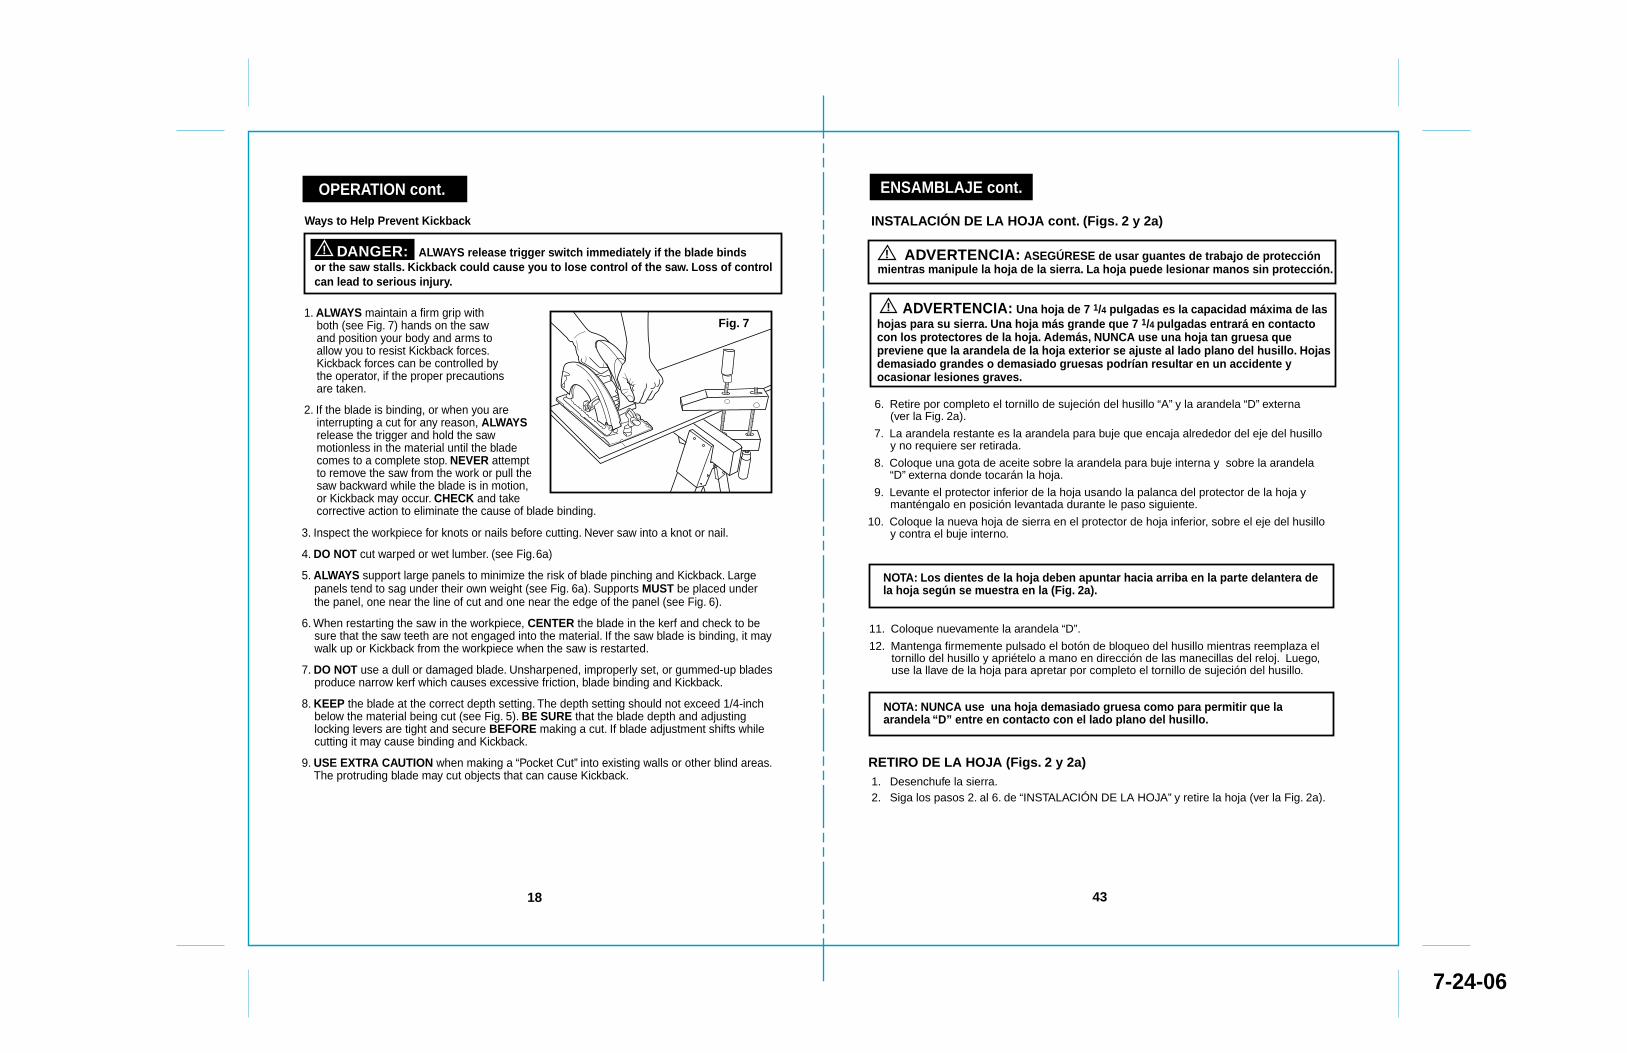
1. ALWAYS maintain a firm grip with both (see Fig. 7) hands on the saw and position your body and arms to allow you to resist Kickback forces. Kickback forces can be controlled by the operator, if the proper precautions are taken.
2. If the blade is binding, or when you are interrupting a cut for any reason, ALWAYS release the trigger and hold the saw motionless in the material until the blade comes to a complete stop. NEVER attempt to remove the saw from the work or pull the saw backward while the blade is in motion, or Kickback may occur. CHECK and take corrective action to eliminate the cause of blade binding.
! DANGER: ALWAYS release trigger switch immediately if the blade binds or the saw stalls. Kickback could cause you to lose control of the saw. Loss of controlcan lead to serious injury.
Ways to Help Prevent Kickback
Fig. 7
3. Inspect the workpiece for knots or nails before cutting. Never saw into a knot or nail.
4. DO NOT cut warped or wet lumber. (see Fig. 6a)
5. ALWAYS support large panels to minimize the risk of blade pinching and Kickback. Large panels tend to sag under their own weight (see Fig. 6a). Supports MUST be placed under the panel, one near the line of cut and one near the edge of the panel (see Fig. 6).
6. When restarting the saw in the workpiece, CENTER the blade in the kerf and check to be sure that the saw teeth are not engaged into the material. If the saw blade is binding, it may walk up or Kickback from the workpiece when the saw is restarted.
7. DO NOT use a dull or damaged blade. Unsharpened, improperly set, or gummed-up blades produce narrow kerf which causes excessive friction, blade binding and Kickback.
8. KEEP the blade at the correct depth setting. The depth setting should not exceed 1/4-inch below the material being cut (see Fig. 5). BE SURE that the blade depth and adjusting locking levers are tight and secure BEFORE making a cut. If blade adjustment shifts while cutting it may cause binding and Kickback.
9. USE EXTRA CAUTION when making a “Pocket Cut” into existing walls or other blind areas. The protruding blade may cut objects that can cause Kickback.
7-24-06
43
11. Coloque nuevamente la arandela “D”.
12. Mantenga firmemente pulsado el botón de bloqueo del husillo mientras reemplaza el tornillo del husillo y apriételo a mano en dirección de las manecillas del reloj. Luego, use la llave de la hoja para apretar por completo el tornillo de sujeción del husillo.
6. Retire por completo el tornillo de sujeción del husillo “A” y la arandela “D” externa (ver la Fig. 2a).
7. La arandela restante es la arandela para buje que encaja alrededor del eje del husillo y no requiere ser retirada.
8. Coloque una gota de aceite sobre la arandela para buje interna y sobre la arandela “D” externa donde tocarán la hoja.
9. Levante el protector inferior de la hoja usando la palanca del protector de la hoja y manténgalo en posición levantada durante le paso siguiente.
10. Coloque la nueva hoja de sierra en el protector de hoja inferior, sobre el eje del husillo y contra el buje interno.
NOTA: Los dientes de la hoja deben apuntar hacia arriba en la parte delantera de la hoja según se muestra en la (Fig. 2a).
NOTA: NUNCA use una hoja demasiado gruesa como para permitir que la arandela “D” entre en contacto con el lado plano del husillo.
ADVERTENCIA: ASEGÚRESE de usar guantes de trabajo de protección mientras manipule la hoja de la sierra. La hoja puede lesionar manos sin protección.
!
ENSAMBLAJE cont.
ADVERTENCIA: Una hoja de 7 1/4 pulgadas es la capacidad máxima de las hojas para su sierra. Una hoja más grande que 7 1/4 pulgadas entrará en contacto con los protectores de la hoja. Además, NUNCA use una hoja tan gruesa que previene que la arandela de la hoja exterior se ajuste al lado plano del husillo. Hojas demasiado grandes o demasiado gruesas podrían resultar en un accidente y ocasionar lesiones graves.
!
INSTALACIÓN DE LA HOJA cont. (Figs. 2 y 2a)
RETIRO DE LA HOJA (Figs. 2 y 2a) 1. Desenchufe la sierra. 2. Siga los pasos 2. al 6. de “INSTALACIÓN DE LA HOJA” y retire la hoja (ver la Fig. 2a).
19
OPERATION cont.
WARNING: ALWAYS unplug saw before making any adjustments. Failure to unplug the saw could result in accidental starting which can cause serious personalinjury.
!
TO SET THE BLADE DEPTH (Fig. 8a)
2. Raise the depth-of-cut adjustment lever to loosen the base (see Fig. 8).3. Determine the desired depth of cut.4. Locate the depth-of-cut scale on the back of the upper blade guard (see Fig. 8a).5. Hold the base of the saw flat against the edge of the workpiece and then raise or lower the saw until the indicator mark on the bracket aligns with the notch on the blade guard at the desired depth-of-cut mark.
6. Tighten depth-of-cut adjustment lever.
Adjusting Bracket
Depth- of-Cut Scale
MAKING DEPTH-OF-CUT ADJUSTMENTS (Fig. 8)ALWAYS use the correct blade depth setting. The correct blade depth setting for all cuts should not be more than 1/4-inch below the material being cut (see Fig 5). Allowing more depth will increase the chance of kickback and cause the cut to be rough. Your saw is equipped with a depth-of-cut scale that provides increased depth-of-cut accuracy. The depth-of-cut scale is located on the inside back of the upper blade guard.
Fig. 8a
1. Unplug the saw.
Fig. 8
Depth-Of-Cut Scale
To Raise
To Lower
Bracket
Indicator Mark
Depth Adjust Lever
Loosen
TightenBase
7-24-06
42
5. Manual del Operador
LISTA DE PARTES(Fig. 1)
1. Sierra 2. Hoja (sin ensamblar en 10865 instalada en 10866)
3. Guía Lateral
(con 10866)
4. Llave de la Hoja (para cambiar la hoja)
DESMPACADO cont.
!
2. Coloque la sierra sobre un lado sobre una superficie plana. 3. Para aflojar la palanca de ajuste de la profundidad de corte, levante la sierra por complete y apriete la palanca. Esto le da mejor acceso al área de montaje de la hoja (ver la Fig. 2a).4. Levante la sierra, sobre su base y sobre una superficie plana (ver la Fig. 2a).5. Para aflojar el tornillo de sujeción del husillo “A”, pulse el botón de bloqueo del husillo (ver la Fig. 2). Coloque la llave de la hoja sobre el tornillo de sujeción del husillo “A”. Mueva la llave hacia delante y hacia atrás hasta que sienta que el botón de bloqueo del husillo se hunde aún más y bloquea la hoja en posición de manera tal que el tornillo de sujeción del eje pueda ser retirado. Manteniendo el botón de bloqueo del husillo firmemente hundido, gire el tornillo del husillo en sentido contrario a las manecillas del reloj para poder retirarlo.
ADVERTENCIA: Para prevenir lesiones personales, desconecte SIEMPRE el enchufe de la fuente de alimentación ANTES de ensamblar piezas, hacer ajustes o instalar las hojas.
INSTALACIÓN DE LA HOJA (Figs. 2 y 2a)
1. La sierra no debe estar enchufada a la fuente de alimentación.
ENSAMBLAJE
Cuidadosamente, retire la hoja del empaque, inspecciónela para asegurarse de que no está agrietada ni dañada.
Palanca de ajuste de corte en profundidad
Tornillo de Sujeción del husillo “A”
Arandela “D” Externa
Los dientes de rotación de la hoja apuntan hacia arriba adelante
Fig. 2
Botón de bloqueo del husillo
71
®
Amps12
Fig. 2a
® Afloje
41
DESEMPACADO
1. Junto a su sierra circular se incluye una hoja de corte cual es no ensamblada y es empacada por separado con la sierra 10865, y que viene ensamblada en la sierra 10866. También, una llave de hoja, almacenada en la base en ambas sierras, para ser utilizada al instalar o cambiar la hoja. La sierra 10866 también se incluye una guía lateral. 2. Inspeccione la sierra cuidadosamente para asegurarse de que no han ocurrido roturas ni daños durante el transporte. Si faltase cualquiera de los ítems mencionados (refiérase a la LISTA DE PARTES de la página 12), regrese la sierra a su tienda Sears o punto de venta Craftsman más cercano para que la sierra sea reemplazada.
ADVERTENCIA: Su sierra NUNCA debe ser conectada a la fuente de alimentación cuando usted esté ensamblando piezas, hacienda ajustes, instalando o retirando hojas, limpiándola o cuando no esté en uso. Desconecte la sierra para prevenir que se encienda accidentalmente, lo cual ocasionaría lesiones personales graves.
!
ADVERTENCIA: Si cualquier de las piezas están rotas o faltantes, NO intente enchufar el cordón de alimentación ni usar la sierra hasta que las piezas rotas o faltantes hayan sido reemplazadas. No cumplir con esta instrucción podría resultar en posibles lesiones graves.
!
GLOSARIO DE TÉRMINOS PARA TRABAJO EN MADERA
Chaflán Corte efectuado para eliminar una cuña de un bloque de madera de modo que el extremo (o parte de éste) quede a un ángulo diferente de 90o. Corte al filo Una operación de corte a lo largo de la longitud de la pieza de trabajo.Corte manos libresRealizar un corte sin usar una guía, un calibre de inglete, sujeción, abrazadera de trabajo, ni otro dispositivo apropiado para prevenir que la pieza de trabajo gire o se mueva durante el corte.Aserrado en profundidadCualquier operación de corte donde la hoja se extiende por completo a través del espesor de la pieza de trabajo.Cortes no en profundidadCualquier operación de corte dónde la hoja no se extiende por complete a través del espesor de la pieza de trabajo, como por ejemplo un corte rasurado.Borde delanteroEl extremo de la pieza de trabajo que entra en contacto con la herramienta primero.Línea de fracturaEl material retirado por la hoja en un corte en profundidad o la ranura producida por la hoja en un corte no en profundidad o parcial.ReboteUn peligro que puede ocurrir cuando la hoja se atasca, lanzando la pieza de trabajo hacia atrás hacia el operador.Pieza de trabajo o materialEl objeto sobre el cual se está realizando la operación de corte. Las superficies de la pieza de trabajo se denominan comúnmente caras, extremos o bordesGoma Un residuo pegajoso a base de savia proveniente de productos de madera.Resina Sustancia pegajosa a base de savia que se ha endurecido
7-24-06
20
STARTING A CUT (Fig. 10)
OPERATION cont.
WARNING: ALWAYS clamp and support workpiece securely. ALWAYS maintain proper control of saw. Failure to clamp and support workpiece and loss of control of saw could result in serious injury.
!
1. ALWAYS use your saw with your hands positioned correctly, with one hand operating the trigger switch and the other on the front assist handle (see Fig. 10).
WARNING: ALWAYS maintain proper control of the saw to make sawing safer and easier. Loss of control of the saw could cause an accident resulting in possible serious injury.
2. NEVER use the saw with your hands positioned as shown in Fig. 11To Help Maintain Control:3. ALWAYS support the workpiece near the cut.4. ALWAYS support the workpiece so the cut will be on your right.5. ALWAYS clamp the workpiece so it will not move during the cut. Place the workpiece with the good side down.
NOTE: The good side of the workpiece is the side where appearance is important.
6. Before starting a cut, draw a guideline along the desired line of cut, then place the front edge of the saw base on that part of the workpiece that is solidly supported (see Fig.10).7. NEVER place the saw on the part of the workpiece that will fall off when the cut is made (see Fig. 11).8. ALWAYS keep the cord away from the cutting area. ALWAYS place the cord so it does not hang up on the workpiece when making a cut.9. Hold the saw firmly with both hands (see Fig 10).
Using the saw with a damaged cord could result in serious injury or death. If the cord has been damaged, have it replaced before using the saw again.
!
WARNING: If the cord hangs up on the workpiece during a cut, release the trigger switch immediately. To avoid injury, unplug the saw and move the cord to prevent it from hanging up again.
Fig. 11
Fig. 10
Right
Wrong
40
NORMAS ADICIONALES PARA UN FUNCIONAMIENTO SEGURO cont.
GLOSARIO DE TÉRMINOS PARA TRABAJO EN MADERA
INSTRUCCIONES DE SEGURIDAD cont.
3. PROTEJA sus pulmones. Use una mascara para la cara o mascarilla antipolvo si la operación generará polvo.4. PROTEJA sus oídos. Use protección personal para los oídos apropiada durante el uso. Bajo ciertas condiciones, el ruido producido por esta herramienta podría contribuir a la pérdida de audición.5. TODOS LOS VISITANTES Y OBSEVADORES DEBEN usar el mismo equipo de seguridad usado por el operador de la sierra.6. INSPECCIONE los cordones de herramienta periódicamente y si están dañados, haga que los reparen en su Centro de Servicio Sears o Instalación de Servicio Autorizada. ESTÉ CONCIENTE de la ubicación del cordón.7. Revise SIEMPRE la herramienta para verificar si existen piezas dañadas. Antes de continuar usando esta herramienta, si un protector u otra pieza están dañados, debe ser inspeccionada cuidadosamente para determinar si funcionará apropiadamente y si realizará la función para la cual fue diseñada. Verifique si existe mala alineación o atascado de piezas móviles, rotura de piezas y cualquier otra condición que podría afectar el funcionamiento de la herramienta. Un protector u otra pieza dañada debe ser reparado apropiadamente o reemplazado en el Centro de Servicio Sears.8. INSPECCIONE y retire todo clavo de la madera antes de proceder a aserrar.9. GUARDE ESTAS INSTRUCCIONES. Refiérase a ellas frecuentemente y úselas para instruir a los demás sobre el uso de esta herramienta. Si alguien toma prestada la herramienta, asegúrese que también tenga acceso a estas instrucciones.
Husillo El eje sobre el cual la hoja o herramienta de corte es montada. También se le conoce como Eje.Revoluciones Por Minuto (RPM)El número de giros completos de un objeto rotativo en un minutoCamino de la hoja de la sierraEl área sobre, debajo, detrás y frente a la hoja, a medida que se aplica a la pieza de trabajo. Esa área que se cortará o se ha cortado con la hojaTriscado La distancia a la cual el diente de la hoja de la sierra es doblado hacia fuera desde la cara de la hoja.Corte a inglete Una operación de corte hecha con la hoja a un ángulo diferente de 90o con respecto al tope-guía.Corte a inglete combinadoUn corte a inglete combinado es un corte usando un ángulo de inglete y un ángulo de bisel al mismo tiempo.Corte cruzadoUna operación de corte o de formado en sentido contrario a la veta de la pieza de trabajo.Corte biseladoUna operación de corte hecha con una hoja a cualquier ángulo distinto a 90o de la mesa de inglete.Corte de ranuraUn corte sin traspaso que produce una muesca o un canal de lado a lado en la pieza de trabajo (se requiere una hoja especial).
7-24-06
21
OPERATION cont.
TO HELP MAINTAIN CONTROL cont.:10. Squeeze the trigger switch to start the saw. ALWAYS let the blade reach full speed before you begin the cut into the workpiece.11. When making a cut, ALWAYS use steady, even pressure. Forcing the saw causes rough cuts and could shorten the life of the saw or cause Kickback. 12. After completing your cut, release the trigger switch and allow the blade to come to a complete stop. DO NOT remove the saw from the workpiece while the blade is moving.
When sawing through a workpiece, the lower blade guard DOES NOT cover the blade on the underside of the workpiece (see Fig. 4, page 17). ALWAYS keep your hands and fingers away from the cutting area. Any part of your body coming in contact with the moving blade will result in serious injury.
MAKING CROSS CUTS AND RIP CUTS (Fig. 12 and 12a)
WARNING: ALWAYS clamp and support workpiece securely. ALWAYS maintain proper control of saw. Failure to clamp and support workpiece and loss of control of saw could result in serious injury.
!
Fig. 1210865
Line of Cut
0o Indicator
45
0o o
2. When making cross or rip cuts with the 10865, align your line of cut with the right side of the notch by the 0o indicator (see Fig. 12).
1. ALWAYS use your saw with your hands positioned correctly (see Fig. 12).
WARNING: ALWAYS maintain proper control of the saw to make sawing safer and easier. Loss of control of the saw could cause an accident resulting in possible serious injury.
!
39
NORMAS DE SEGURIDAD PARA SIERRAS CIRCULARES cont.10. Al aserrar al hilo, USE SIEMPRE una guía de corte o guía de corte recto. Esto mejora la precisión del corte y reduce la posibilidad de atascamiento de la hoja.11. USE SIEMPRE hojas del tamaño correcto y forma correcta del orificio para el eje (diamante vs. redondo). Las hojas que no concuerdan con la pieza de montaje de la sierra girarán de manera errática y ocasionarán la pérdida de control.12. NUNCA use arandelas o pernos de la hoja, dañados o incorrectos. Las arandelas y pernos de la hoja fueron diseñados especialmente para su sierra, para un óptimo rendimiento y funcionamiento seguro.13. NUNCA corte más de una pieza a la vez. NO APILE más de una pieza de trabajo sobre la mesa de trabajo a la vez.14. EVITE un funcionamiento o posicionamiento de las manos incómodo dónde un resbalón repentino podría ocasionar que su mano se mueva en el camino de la hoja.15. NUNCA alcance debajo del camino de corte de la hoja.
ADVERTENCIA: ASEGÚRESE de leer y entender todas las instrucciones. No seguir todas las instrucciones listadas a continuación podría resultar en descargas eléctricas, incendio y/o lesiones personales graves.
!
NORMAS ADICIONALES PARA UN FUNCIONAMIENTO SEGURO
ADVERTENCIA: Uso de esta herramienta puede generar polvo que contiene químicos que se sabe pueden producir cancer, defectos de nacimiento u otros daños reproductivos. Algunos ejemplos de estos químicos son: • El plomo que contienen las pinturas con base de plomo • El sílice cristalino de los ladrillos, cemento y otros productos de albañilería • El arsénico y el cromo de la madera tratada químicamente.Su riesgo al exponerse a estos químicos varía dependiendo de la frecuencia con que haga este tipo de trabajo. Para reducir la exposicíon a estos químicos: • Trabaje en un area con buena ventilación • Trabaje con un equipo de seguridad aprobado tales como las máscaras para proteger deo polvo que está especialmente diseñadas para filtrar partículas microscópicasEvita contacto prolongado con polvo producidas por enarenado, aserrado, triturado, perforado y otros trabajos de construcción. Use ropa protectora y lave las áreas expuestas con agua y jabón.Permitir que el polvo penetre en su boca, ojos o descanse sobre la piel puede promover la absorción de químicos dañinos.
!
ADVERTENCIA: El uso de esta herramienta puede generar y/o emitir polvo, el cual podría ocasionar daños respiratorios graves y permanentes u otras lesiones. Use siempre protección respiratoria NIOSH/OSHA aprobada contra la exposición al polvo. Dirija las partículas lejos de su cara y cuerpo.
!
1. Conozca su herramienta eléctrica. Lea el manual del operador cuidadosamente. Aprenda las aplicaciones y limitaciones, así como los riesgos potenciales de esta herramienta. Seguir esta norma reducirá el riesgo de descargas eléctricas, incendio y lesiones graves.2. Use SIEMPRE gafas de seguridad o protectores para los ojos al usar esta sierra. Las gafas para todos los días solo cuentan con lentes resistentes al impacto; NO son gafas de seguridad.
INSTRUCCIONES DE SEGURIDAD cont.
7-24-06
22
OPERATION cont.
MAKING CROSS CUTS AND RIP CUTS cont.: BEVEL TRAC™ The “Auto Sliding Line Of Cut Indicator” (see Fig. 12a)The 10866 Circular Saw comes with an innovative feature for more precise and efficient cutting. Bevel Trac™ The “Auto Sliding Line-of-Cut Indicator" for accurate straight line and bevel cutting!
Here's how it works: 1. Mark your workpiece with a pencil line at the point to be cut. 2. Adjust your saw for straight line, 90°, or bevel, 0° to 55° cutting. 3. As you adjust blade, the red Bevel Trac™ “Line-of-Cut Indicator” will automatically move and point to the blade's cutting line. 4. After adjusting your saw to the angle you want, tighten bevel adjustment lever. 5. Place the saw up to workpiece, align the red pointer to pencil line and proceed to make your cut!
NOTE: Since the thickness of blades varies, MAKE A TRIAL CUT in scrap material along the guideline to determine how much, if any, you should offset the blade from the guideline to allow for the kerf of the blade to get an accurate cut.
Line of Cut
0o Indicator
Fig. 12a10866
38
Mantenga las manos lejos de los bordes cortantes y la hoja. Mantenga su segunda mano en el mango auxiliar o cubierta del motor. Si ambas manos están sosteniendo la sierra, la hoja no podrá cortarlas.
PELIGRO: !
PRECAUCIÓN: La hoja deceleran una vez apagada la sierra.!
NORMAS DE SEGURIDAD PARA SIERRAS CIRCULARES
1. MANTENGA su cuerpo posicionado a cualquiera de los lados de la hoja de la sierra y no en línea directa con la hoja. El rebote podría ocasionar que la sierra salte hacia atrás. (Ver “Rebote…Qué lo Ocasiona y Maneras para Prevenirlo” en las páginas 18 y 19).
2. NO se extienda para alcanzar debajo del trabajo. El protector no le protegerá de la hoja debajo de la pieza de trabajo.
Al aserrar la pieza de trabajo, el protector inferior de la hoja NO cubre la hoja del lado inferior de la pieza de trabajo (Pág. 17 Fig. 4). Mantenga SIEMPRE sus manos y dedos lejos del área de corte.
PELIGRO: !
3. VERIFIQUE que el protector inferior se cierra adecuadamente ANTES de cada uso. NO use la sierra si el protector inferior no se mueve libremente y no cierra instantáneamente. Nunca sujete ni amarre el protector inferior en posición abierta. Si la sierra es dejada caer accidentalmente, el protector inferior podría doblarse. Levante el protector inferior usando la palanca retráctil. El protector funciona apropiadamente si se mueve libremente, no toca la hoja ni ninguna otra parte en cualquier ángulo y profundidad de corte y si prontamente regresa a la posición de cierre. 4. VERIFIQUE el funcionamiento y condición del resorte de protector inferior. Si el protector y resorte no funcionan apropiadamente, DEBEN ser reparados antes del uso. El protector inferior de la hoja podría funcionar lentamente, debido a piezas dañadas, depósitos gomosos o acumulación de detritos. NO opera su sierra hasta que se haya reparado o reemplazado el daño. 5. El protector inferior debe retraerse manualmente SOLO para hacer cortes especiales, tales como cortes de bolsillo o compuestos. Levante SIEMPRE el protector inferior utilizando la palanca retráctil correspondiente. En cuanto la hoja penetre el material, el protector inferior DEBE ser liberado. Para toda otro corte, el protector inferior debe funcionar automáticamente. 6. Asegúrese SIEMPRE que el protector inferior esté cubriendo la hoja ANTES de colocar la sierra sobre un banco de trabajo o en el suelo. Una hoja móvil sin protección ocasionará que la sierra se desplace hacia atrás, cortando lo que encuentre en su camino. Preste atención a cuánto tiempo le toma a la hoja dejar de girar después de que se libere el interruptor. 7. NUNCA sostenga en sus manos la pieza que se está cortando ni en sus piernas. Es importante soportar la pieza de trabajo apropiadamente para minimizar la exposición del cuerpo, el atascamiento de la hoja o la pérdida de control. 8. SOSTENGA LA HERRAMIENTA por los mangos aislados al realizar operaciones dónde la herramienta de corte pueda entrar en contacto con cables escondidos o con su propio cordón. El contacto con un cable “vivo” hará que las piezas metálicas expuestas electrocuten al operador. 9. Sujete SIEMPRE la pieza de trabajo de manera segura para que no se mueva al realizar el corte.
INSTRUCCIONES DE SEGURIDAD cont.
7-24-06
23
OPERATION cont.
The 10866 saw comes with an edge guide that is 6-inches long on the guide edge. It allows you to make accurate parallel cuts when trimming a workpiece. It attaches to the saw's base. The arm of the edge guide is stamped 0 to 8-inches or easy adjustment of your cut.
1. Unplug the saw.
INSTALLING AND USING THE EDGE GUIDE (Fig. 14)
WARNING: ALWAYS unplug saw before making any adjustments. Failure to unplug the saw could result in accidental starting which can cause serious personal injury.
!
MAKING RIP CUTS
ALWAYS use a guide when making long or wide rip cuts with your saw. You can use either a straight edge or use the edge guide that was included with your saw.
USING A STRAIGHT EDGE (Fig. 13)
2. Position the edge guide so the arm with the inch increments is facing “up”. Slide the arm of the edge guide into the mounting slots at the front of the saw's base (see Fig. 14).
3. Adjust the edge guide to the desired length of cut.
4. Tighten the edge guide retaining screw.
5. Clamp and support the workpiece securely before making your cut.
Fig. 13
1. You can make an efficient rip guide by clamping a straight edge to your workpiece. 2. Carefully guide the saw along the straight edge for a straight rip cut (see Fig. 13). 3. ALWAYS LET THE BLADE REACH FULL SPEED, then carefully guide the saw into the workpiece. DO NOT bind the blade in the cut. Push the saw forward at a speed where the blade is not laboring.
WARNING: ALWAYS clamp and support workpiece securely. ALWAYS maintain proper control of saw. Failure to clamp and support workpiece combinedwith loss of control of saw could result in serious injury.
!
Straight Edge
37
ADVERTENCIA: Verifique el cordón de extensión antes de cada uso. Si el mismo presenta daños, reemplácelo de inmediato. Nunca use una herramienta con un cordón dañado, ya que tocar el área dañada del cordón podría ocasionar descargas eléctricas, resultando en lesiones graves.
!
PRECAUCIÓN: Mantenga el cordón de extensión fuera del área de trabajo. Posicione el cordón de manera tal que no quedará atrapado en la madera, las herramientas u otras obstrucciones mientras trabaje con una herramienta eléctrica.
!
SEGURIDAD EN EL SERVICIO1. Si cualquier pieza de esta sierra falta o se rompe, dobla o falla de cualquier modo; o si cualquier componente eléctrico llegara a fallar: APAGUE el interruptor de alimentación y reitre el enchufe de la fuente de alimentación y que las piezas faltantes, dañadas o defectuosas sean reemplazadas ANTES de resumir el uso.2. Todo servicio a la herramienta debe ser realizado solo por el Centro de Repuestos y Reparación Sears. El servicio o mantenimiento por personal no calificado podría resultar en riesgos de lesiones.3. Al prestar servicio a la herramienta, use sólo piezas de repuesto idénticas. Siga las instrucciones en la sección sobre mantenimiento de este manual. El uso de piezas no autorizadas o no seguir las instrucciones de mantenimiento podría crear un riesgo de descarga eléctrica o lesión.
SÍMBOLOS DE SEGURIDAD EN SU HERRAMIENTA
� V......................................................................Voltios A......................................................................Amperios Hz....................................................................Hertz W.....................................................................Vatios min..................................................................Minutos� ....................................................................Corriente Alterna ...............................................................Corriente Directa no ....................................................................Velocidad sin carga .....................................................................Construcción Clase II, Doble Aislamiento .../min..............................................................Revoluciones o ciclos por minuto .....................................................................Indica peligro, advertencia o precaución. ¡¡¡Significa atención!!! Se encuentra involucrada su segur idad.
La etiqueta de su herramienta podría incluir los símbolos siguientes:
!
CORDONES DE EXTENSIÓN Use un cordón de extensión apropiado. SOLO use cordones listados bajo Underwriters Laboratories (UL). Otros cordones de extensión podrían ocasionar una caída en el voltaje de la línea, resultando en la pérdida de energía y sobrecalentamiento de la herramienta. Para esta herramienta, se recomienda un cordón de extensión de tamaño AWG (American Wire Gauge) por lo menos de calibre 14 de longitud de 25 pies o menos. Use un cordón de extensión calibre 12 para 50 pies de longitud Los cordones de extensión de 100 pies o más no se recomiendan. Recuerde, un cable de menor calibre tiene mayor capacidad que uno de mayor número (cables calibre 14 tienen más capacidad que cables calibre 16; cables de calibre 12 tienen más capacidad que los de calibre 14). En caso de dudas, use un número más pequeño. Al usar herramientas eléctricas en exteriores, use un cordón de extensión marcado “W-A” o “W”. Estos cordones cuentan con clasificación para uso en exteriores y reducen el riesgo de descargas eléctricas.
INSTRUCCIONES DE SEGURIDAD cont.
7-24-06
24
OPERATION cont.
HOW TO SET YOUR BEVEL ANGLE (Fig. 15 and 15a)
WARNING: ALWAYS unplug saw before making any adjustments. Failure to unplug the saw could result in accidental starting which can cause serious personal injury.
!
6. Place the edge guide firmly against the edge of the workpiece (See Fig. 14). Doing this will give you a true cut without pinching the blade.
7. BE SURE that the guiding edge of the workpiece is straight so you can get a straight cut.
8. ALWAYS LET THE BLADE REACH FULL SPEED, then carefully guide the saw into the workpiece. DO NOT bind the blade in the cut. Push the saw forward at a speed where the blade is not laboring.
1. Unplug the saw.
INSTALLING AND USING THE EDGE GUIDE cont.
Place Rip/Edge Guide Through Slots
Rip/Edge Guide
Bevel Adjustment Lever
Fig. 15a 10866
Fig. 15 10865
Bevel Adjustment LeverBevel Trac Indicator
Bevel Pointer
Fig. 14
2. Loosen bevel adjustment lever (see Fig.15 and 15a).
3. Raise the motor housing end of the saw until you reach the desired angle setting on the bevel scale.
4. Tighten the adjustment lever securely.
15
0
0
55
15
0
0
48 Bevel Pointer
36
ADVERTENCIA: No permita que los dedos toquen los terminales de un enchufe al instalar o retirar el enchufe de la toma.
!
SEGURIDAD ELÉCTRICA
1. Las herramientas con doble aislamiento están equipadas con un enchufe polarizado (una hoja más ancha que la otra). Este enchufe se ajustará a una toma polarizada en un solo sentido. Si el enchufe no entra por completo en la toma, revierta el enchufe. Si aún no entra, contacte a un electricista calificado para que instale una toma polarizada. No cambie el enchufe en ningún modo.
2. El doble aislamiento elimina la necesidad de cordones de alimentación de tres alambres para conexión a tierra y sistemas de alimentación con conexión a tierra. Aplica sólo para herramientas Clase II (con doble aislamiento). Esta sierra circular es una herramienta con doble aislamiento.
Tapa de caja de tomacorriente conectado atierra
ADVERTENCIA: El doble aislamiento NO reemplaza la implementación de normales precauciones de seguridad al usar esta herramienta.
!
3. ANTES de enchufar la herramienta, ASEGÚRESE que el voltaje de la toma provisto se encuentra dentro del rango de voltaje marcado en la placa de datos de la herramienta. NO use herramientas con clasificación “AC solamente” con fuentes de alimentación DC.
4. EVITE el contacto corporal con superficies con conexión a tierra, tales como tuberías, radiadores, estufas y refrigeradores. Existe un mayor riesgo de descargas eléctricas si su cuerpo hace contacto a tierra.
5. NO exponga las herramientas eléctricas a la lluvia ni a condiciones de humedad ni use herramientas eléctricas en lugares mojados o húmedos. El agua que penetra en la herramienta eléctrica incrementará el riesgo de descargas eléctricas.
6. INSPECCIONE el cordón de la herramienta para verificar la presencia de daños. Entregue cordones de herramientas dañados al Centro de Servicio Sears. ASEGÚRESE de estar constantemente conciente de la ubicación del cordón y manténgalo lejos de la hoja en movimiento.
7. NO abuse el cordón. NUNCA use el cordón para transportar la herramienta ni para halar el enchufe de la toma. Mantenga el cordón lejos del calor, aceite, bordes filosos o piezas móviles. Remplace todo cordón dañado de inmediato. Los cordones dañados incrementan el riesgo de descargas eléctricas.
INSTRUCCIONES DE SEGURIDAD cont.
9. USE SÓLO accesorios recomendados para esta herramienta. Los accesorios que podrían ser aptos para una herramienta podrían tornarse peligrosos cuando se usan con otra herramienta.
SEGURIDAD EN EL USO Y CUIDADO DE LA HERRAMIENTA cont.
7-24-06
25
OPERATION cont.
WARNING: ALWAYS clamp and support workpiece securely. ALWAYS maintain proper control of saw. Failure to clamp and support workpiece and loss of control of saw could result in serious injury.
!
MAKING BEVEL CUTS (Figs. 16 and 16a)
1. Your saw 10865 can be adjusted to cut at any angle between 0° and 48°. 2. When making 45° bevel cuts, line the left side of the notch in the saw's base with the penciled line of cut on your workpiece (see Fig. 13).3. When making a bevel cut HOLD the saw FIRMLY with both hands (see Fig. 16).4. Rest the front edge of the base on the workpiece, then squeeze the trigger switch to start the saw. ALWAYS let the blade reach full speed, then guide the saw into the workpiece.5. After completing your cut, release the trigger switch and allow the blade to come to a complete stop in the cut. DO NOT remove the saw from the workpiece while the blade is moving. It will damage your bevel cut and cause Kickback.
WARNING: If the blade comes in contact with the workpiece before it reaches full speed, it could cause the saw to kickback towards you, possibly resulting in serious injury.
!
Fig. 16Line of Cut
45o Indicator
45
0o o
BEVEL TRAC™ The “Auto Sliding Line Of Cut Indicator” (see Fig. 16a)The 10866 Circular Saw comes with an innovative feature for more precise and efficient cutting. Bevel Trac™ The “Auto Sliding Line-of-Cut Indicator" for accurate straight line and bevel cutting!
Here's how it works: 1. Mark your workpiece with a pencil line at the point to be cut. 2. Adjust your saw for bevel, 0° to 55° cutting. 3. As you adjust blade, the red Bevel Trac™ “Line-of-Cut Indicator” will automatically move and point to the blade's cutting line. 4. After adjusting your saw to the angle you want, tighten bevel adjustment lever. 5. Place the saw up to workpiece, align the red pointer to pencil line and proceed to make make your cut!
35
INSTRUCCIONES DE SEGURIDAD cont.
ADVERTENCIA: ASEGÚRESE de leer y entender todas las instrucciones antes de usar esta sierra. No seguir todas las instrucciones indicadas a continuación podría resultar en descargas eléctricas, incendio y/o lesiones personales graves.
!
SEGURIDAD EN EL USO Y CUIDADO DE LA HERRAMIENTA
SEGURIDAD PERSONAL cont.
1. SIEMPRE use abrazaderas u otras maneras practicas de asegurar y soportar la pieza de trabajo sobre una plataforma estable. Sostener el trabajo con las manos o contra su cuerpo es inestable y podría resultar en pérdida de control. 2. NO fuerce la herramienta. Use la herramienta y hoja correcta para su aplicación. La herramienta y hoja correcta lograrán el trabajo mejor y de manera más segura a la velocidad para lo cual fueron diseñadas. 3. NO use la herramienta si el interruptor no la enciende o apaga. Cualquier herramienta que no puede ser controlada mediante el interruptor es peligrosa y debe ser reparada. 4. DESCONECTE el enchufe de la fuente de alimentación antes de hacer cualquier ajuste, cambiar accesorios o guardar la herramienta. Tales medidas preventivas de seguridad reducen el riesgo de que la herramienta se encienda accidentalmente. 5. NUNCA deje la herramienta en funcionamiento. Apáguela SIEMPRE. NO deje la herramienta sin supervisión hasta que se haya detenido por completo. 6. ALMACENE las herramientas sin uso fuera del alcance de los niños y otras personas no capacitadas para ello. Las herramientas son peligrosas en manos de usuarios no capacitados. 7. Presente MANTENIMIENTO a las herramientas con cuidado. Mantenga las herramientas de corte afiladas y limpias. Las herramientas que reciben el mantenimiento apropiado con laterales de corte afilados evitarán atascarse y serán más fáciles de controlar. 8. VERIFIQUE si existe una mala alineación o atascamiento de piezas móviles, rotura de piezas y cualquier otra condición que podría afectar el funcionamiento de la herramienta. Si existen daños, haga que la herramienta sea reparada antes de usarla. Muchos accidentes son ocasionados por herramientas mal mantenidas
8. ASEGURE SIEMPRE SU TRABAJO. Use abrazaderas o un tornillo de banco para sostener el trabajo cuando sea práctico. Es más seguro que usar sus manos y libera ambas manos para manejar la herramienta. 9. USE EQUIPO DE SEGURIDAD. Siempre use protección para los ojos. Las máscaras antipolvo, zapatos de seguridad antiresbalantes, cascos o protección para los oídos debe usarse en condiciones apropiadas. 10. NO USE LA HERRAMIENTA SOBRE UNA ESCALERA o soporte inestable. Una posición firme y estable sobre una superficie sólida permite un mejor control de la herramienta en situaciones inesperadas.
7-24-06
26
OPERATION cont.
MAKING POCKET CUTS ( Fig. 17)
WARNING: ALWAYS adjust bevel setting to zero before making a pocket cut. Attempting a pocket cut at any other setting can result in a loss of control of the saw, which can result in serious injury.
!
1. Adjust the bevel setting to zero, set the blade to the correct blade depth setting, then use the lower blade guard lever to swing the guard up.
2. While holding the lower blade guard up by the lever, firmly rest the front of the saw base flat against the workpiece with the rear handle raised so the blade does not touch the workpiece (see Fig 17). 3. Squeeze the trigger switch to start the saw. ALWAYS let the blade reach full speed, then slowly lower the blade onto the workpiece until the base is flat against the workpiece. AS the blade enters the material, you MUST release the lower blade guard lever.
WARNING: ALWAYS raise the lower blade guard with the lever to avoid serious injury.
!
Fig. 16aLine of Cut
45o Indicator
BEVEL TRAC™ The “Auto Sliding Line Of Cut Indicator” cont. (see Fig. 16a)
NOTE: Since the thickness of blades varies, MAKE A TRIAL CUT in scrap material along the guideline to determine how much, if any, you should offset the blade from the guideline to allow for the kerf of the blade to get an accurate cut.
Fig. 17
34
INSTRUCCIONES DE SEGURIDAD
ADVERTENCIA: ASEGÚRESE de leer y entender todas las instrucciones en este manual antes de usar esta sierra circular. No seguir todas las instrucciones podría resultar en exposición a radiaciones peligrosas, descargas eléctricas, incendio y/o lesiones personales graves.
!
SEGURIDAD EN EL ÁREA DE TRABAJO
SEGURIDAD PERSONAL 1. CONOZCA su herramienta. Lea el manual del operador cuidadosamente. Aprenda las aplicaciones y limitaciones de la sierra, así como los peligros potenciales específicos relacionados con esta herramienta. 2. MANTÉNGASE ALERTA, mire lo que está hacienda y use sentido común al usar una herramienta eléctrica. 3. NO use la herramienta si está cansado o bajo la influencia de drogas, alcohol o medicamentos. Un momento de falta de atención mientras usa herramientas eléctricas podría resultar en lesiones personales graves. 4. VISTA apropiadamente. No use ropa suelta o joyas. Amarre el cabello largo hacia atrás. Mantenga su cabello, ropa y guantes lejos de piezas móviles. La ropa suelta o el cabello largo podrían quedar atrapados en las piezas móviles. Las aperturas de ventilación cubren la mayoría de piezas móviles y deben evitarse. 5. EVITE la encendida de manera accidental. Asegúrese de que el interruptor esté en la posición “OFF” (“APAGADO”) antes de enchufar la herramienta. NO sostenga herramientas con su dedo en el interruptor. Llevar herramientas con su dedo en el interruptor o enchufar las herramientas con el interruptor en la posición “ON” (“ENCENDIDO”) atrae accidentes. 6. RETIRE las llaves de ajuste o llave de la hoja antes de encender la herramienta. Una llave dejada en la parte rotativa de la herramienta podría resultar en lesiones personales. 7. No se extienda para alcanzar. Mantenga una posición firme y balanceada en todo momento. Una posición firme y balanceada permite un mejor control de la herramienta en situaciones inesperadas.
1. Mantenga su área de trabajo limpia y bien iluminada. Los bancos de trabajo atestados y las áreas oscuras atraen accidentes.2. NO use herramientas eléctricas en ambientes explosivos, tales como en presencia de líquidos, gases o polvos inflamables. Las herramientas eléctricas producen chispas que podrían encender el polvo o gases. 3. Mantenga a observadores, niños y visitantes lejos mientras use una herramienta eléctrica. Las distracciones podrían ocasionar que pierda el control. 4. Mantenga su talle de trabajo a prueba de niños usando candados e interruptores maestros. Guarde bajo llave las herramientas cuando no las esté usando.5. ASEGÚRESE que el área de trabajo cuente con luz suficiente para que pueda ver el trabajo y que no existen obstrucciones que interferirán con el uso seguro ANTES de usar su sierra.
7-24-06
27
WARNING: To ensure safety and reliability, all repairs - with the exception of the externally accessible brushes - should be performed by a qualified servicetechnician at a Sears Service Center.
!
It has been found that electric tools are subject to accelerated wear and possible premature failure when they are used to work on fiber glass boats and sports cars, wallboard, spackling compounds or plaster. The chips and grindings from these materials are highly abrasive to electrical tool parts, such as bearings, brushes, commutators, etc. Consequently, it is not recommended that this tool be used for extended work on any fiberglass material, wallboard, spackling compound or plaster. During any use on these materials, it is extremely important that the tool is cleaned frequently by blowing with an air jet.
WARNING: For your safety, ALWAYS turn off switch and unplug circular saw from the power source before performing any maintenance or cleaning.
!
WARNING: Always wear safety goggles or safety glasses with side shields during power tool operations, or when blowing dust. If operation is dusty, also wear a dust mask.
!
ROUTINE MAINTENANCE
Periodic maintenance allows for long life and trouble-free operation. A cleaning, lubrication and maintenance schedule should be maintained. As a common preventive maintenance practice, follow these recommended steps:
WARNING: DO NOT at any time let brake fluids, gasoline, petroleum-based products, penetrating oils, etc. come in contact with plastic parts. Chemicals can damage, weaken or destroy plastic, which may result in serious personal injury.
!
MAINTENANCE
1. When work has been completed, clean the tool to allow smooth functioning of the tool over time.2. Use clean damp cloths to wipe the tool.
OPERATION cont.
WARNING: NEVER tie the lower blade guard in the raised position. Leaving the blade exposed could result in serious injury.
!
4. After you complete the cut, release the trigger switch and allow the blade to come to a complete stop. After the blade has stopped, remove it from the workpiece. If the corners of your pocket cut are not completely cut through, use a hand finishing saw to finish the corners.
MAKING POCKET CUTS cont. ( Fig. 17)
33
SÍMBOLOS DE SEGURIDAD
DEFINICIÓN DE LOS SÍMBOLOS
SÍMBOLO DE ALERTA DE SEGURIDAD: Indica PELIGRO, ADVERTENCIA o PRECAUCIÓN. Puede ser utilizado en conjunto con otros símbolos o pictograma.
ADVERTENCIA:
PRECAUCIÓN:
PELIGRO: No obedecer esta advertencia de seguridad RESULTARÁ en muerte o lesión grave a usted o terceros. Siga siempre las precauciones de seguridad para reducir el riesgo de incendio, descargas eléctricas y lesiones personales.
No obedecer esta advertencia de seguridad PUEDEresultar en muerte o lesiones graves a usted o terceros. Siga siempre las precauciones de seguridad para reducir el riesgo de incendio, descargas eléctricas y lesiones personales.
No obedecer esta advertencia de seguridad PODRÍA resultar en lesiones personales a usted o terceros. Siga siempre las precauciones de seguridad para reducir el riesgo de incendio, descargas eléctricas y lesiones personales.
PREVENCIÓN DE DAÑOS Y MENSAJES INFORMATIVOS Estos informan al usuario sobre información y/o instrucciones importantes que podrían conllevar a daños al equipo u otra propiedad si no se siguen. Cada mensaje es precedido por la palabra “NOTA:” como se muestra en el ejemplo a continuación:
El propósito de los símbolos de seguridad es llamar su atención a posibles peligros. Los símbolos de seguridad y las explicaciones que los acompañan, merecen su cuidadosa atención y entendimiento. Las advertencias mediante símbolo por sí solas NO eliminan el peligro. Las instrucciones y advertencias que ofrecen no sustituyen las medidas de prevención de accidentes apropiadas.
NOTA: Si estas instrucciones no se siguen podría resultar en daños al equipo y/o a la propiedad.
!
ADVERTENCIA: El funcionamiento de cualquier herramienta con una hoja circular podrían resultar en objetos foráneos arrojados en sus ojos, lo cual podrían resultar en daños graves a los ojos. Antes de comenzar a usar herramientas eléctricas, SIEMPRE use gafas de seguridad con protectores laterales y protectores de cara completa cuando sea necesario. Nosotros recomendamos una Máscara de Seguridad de Visión Amplia para usar sobre gafas de seguridad estándar con protectores laterales, la cual está disponible en las Tiendas Sears u otros Puntos de Venta Craftsman.
ADVERTENCIA: ASEGÚRESE de leer y entender todas las instrucciones de seguridad en este manual, incluyendo todos los símbolos de alerta de seguridad tales como “PELIGRO”, “ADVERTENCIA” y “PRECAUCIÓN”, ANTES de usar esta sierra. El incumplimiento en seguir todas las instrucciones indicadas a continuación podría resultar en descargas eléctricas, incendio y/o lesiones personales graves.
!
!
!
!
!USE SUS
7-24-06
28
If the blade does not follow a straight line: • Teeth are dull. This is caused by hitting a hard object such as a nail, dulling teeth on one side. The blade tends to cut to the side with the sharpest teeth. • Base is out of line or bent. • Blade is bent. • Edge guide or straight edge is not being used.
If the blade binds or smokes from friction: • Blade is dull. • Blade is on backwards. • Blade is bent. • Workpiece is not properly supported. • Incorrect blade is being used.
TROUBLESHOOTING
Sears and other Craftsman outlets have a large selection of 7 1/4-inch Craftsman steel carbide-tipped blades designed for specific cutting applications. Contractor bulk packs are also available.
Sears and other Craftsman outlets also offer sawhorses, combination and framing squares, straight edges, edge guides, and a large assortment of clamps to help you with all your sawing needs.
Visit your local Sears store or other Craftsman outlets or shop sears.com/craftsman.
ACCESSORIES
WARNING: The use of attachments or accessories that are not recommended for this tool might be dangerous and could result in serious injury.
!
MAINTENANCE cont.
LUBRICATION
All of the bearings in this tool are lubricated with a sufficient amount of high-grade lubricant for the life of the tool under normal operating conditions. Therefore, no further lubrication is required.
ROUTINE MAINTENANCE cont.:
3. Check the state of all electrical cables.4. Keep the motor air openings free from oil, grease and sawdust or woodchips, and store tool in a dry place.5. Be certain that all moving parts that are exposed are well lubricated, particularly after lengthy exposure to damp and/or dirty conditions.
32
Garantía…………………………………....................…………Página 32 Símbolos de Seguridad ………………….……......................Página 33 Instrucciones de Seguridad………………....................……...Páginas 34 - 40 Glosario de Términos………………………….........................Páginas 40 - 41 Desempacado………………………………....................……..Páginas 41 - 42 Ensamblaje............................................................................Páginas 42 - 43Descripción ………………………………....................……….Páginas 44 - 46 Funcionamiento …………………………....................………. Páginas 46 - 57Mantenimiento....................................................................... Páginas 58 - 59 Detección y Resolución de Problemas..................................Página 59Accesorios............................................................................. Página 59Números de Teléfono del Servicio de Piezas de Repuesto de Sears………............... . ....................Contratapa
TABLA DE CONTENIDO
GARANTíA DE UN AÑO COMPLETO SOBRE PRODUCTOS CRAFTSMAN®
Si este producto Craftsman falla debido a defectos en el material o mano de obra entre un año desde la fecha de compra, REGRÉSELO A LA TIENDA SEARS O CENTRO DE PARTES Y PIEZAS DE REPUESTOS U OTRO PUNTO DE VENTA CRAFTSMAN MÁS CERCANO EN LOS ESTADOS UNIDOS PARA REEMPLAZO SIN GRATUITO.Esta garantía no incluye piezas desechables, tales como lámparas, pilas, brocas o cuchillas.Si esta herramienta Craftsman se utiliza para fines comerciales o de alquiler, esta garantía aplica solo para 90 días desde la fecha de compra.Esta garantía le otorga derechos legales específicos, y es posible que también cuente con otros derechos, los cuales varían de un estado a otro.Sears, Roebuck and Co., Hoffman Estates, IL 60179
¡GUARDE ESTAS INSTRUCCIONES!¡LEA TODAS LAS INSTRUCCIONES!
7-24-06
29
NOTES
Manual del Operador
Sears, Roebuck and Co., Hoffman Estates, IL 60179 U.S.A.Visite nuestra página Web Craftsman®: www.craftsman.com