Z-Stack User’s Guide For SmartRF05EB and CC2530 ZigBee-2007 Release Version 2.4.0 Document Number: SWRU189 Texas Instruments, Inc. San Diego, California USA Copyright 2009-2010 Texas Instruments, Inc. All rights reserved.
Transcript
Z-Stack User’s Guide For
SmartRF05EB and CC2530
ZigBee-2007 Release Version 2.4.0
Document Number: SWRU189
Texas Instruments, Inc. San Diego, California USA
Copyright 2009-2010 Texas Instruments, Inc. All rights reserved.
Z-Stack User's Guide - CC2530 SWRU189 Version 1.4
Revision Description Date
1.0 Initial release 04/02/2009
1.1 Updated section 5.3, updated for 2.2.2 release 09/14/2009
1.2 Fixed f8wConfig.cfg file path in section 7, updated for 2.3.0 release 12/16/2009
1.3 Updated for 2.3.1 release 05/19/2010
1.4 Updated for 2.4.0 release 11/13/2010
i Copyright 2009-2010 Texas Instruments, Inc. All rights reserved.
5. CONFIGURING AND USING Z-STACK.......................................................................................................3 5.1. CONFIGURING Z-STACK ..............................................................................................................................3 5.2. BUILDING SAMPLEAPP DEVICES .................................................................................................................3 5.3. BUILDING A SAMPLEAPP COORDINATOR DEVICE .......................................................................................3
6. Z-STACK DEMONSTRATION.......................................................................................................................6 6.1. SWITCHES AND LEDS..................................................................................................................................6 6.2. RUNNING THE SAMPLE APPLICATION..........................................................................................................8
7. PANID AND CHANNEL SELECTION ..........................................................................................................9 7.1. ENERGY LEVEL .........................................................................................................................................10 7.2. IEEE ADDRESS SELECTION .......................................................................................................................11
Table of Figures FIGURE 1: SMARTRF05 EVALUATION BOARDS – REV 1.3 AND REV 1.7 ........................................................................1 FIGURE 2: POWER SWITCH AND POWER SOURCE SELECTION (REV 1.3 / REV 1.7) .........................................................3 FIGURE 3: LOCATING THE SAMPLE APPLICATION PROJECT ...........................................................................................4 FIGURE 4: SELECTING THE DEMOEB CONFIGURATION..................................................................................................4 FIGURE 5: BUILDING THE SAMPLE APPLICATION...........................................................................................................5 FIGURE 6: DOWNLOADING THE SAMPLE APPLICATION..................................................................................................5 FIGURE 7: QUIT DEBUGGING THE SAMPLE APPLICATION ..............................................................................................6 FIGURE 8: SMARTRF05EB JOYSTICK ON REV 1.3 / 1.7 BOARDS....................................................................................7 FIGURE 9: SMARTRF05EB BUTTONS ON REV 1.3 / 1.7 BOARDS....................................................................................7 FIGURE 10: SMARTRF05EB LEDS ON REV 1.3 / 1.7 BOARDS .......................................................................................7 FIGURE 11: COORDINATOR DEVICE JUMPER ON REV 1.3 / 1.7 BOARDS .........................................................................8 FIGURE 12: PANID CONFIGURATION IN F8WCONFIG.CFG.............................................................................................10 FIGURE 13: CHANNEL CONFIGURATION IN F8WCONFIG.CFG ........................................................................................10
Table of Tables TABLE 1: JOYSTICK/BUTTON LOGICAL SWITCH MAPPING.............................................................................................7 TABLE 2: LOGICAL LED MAPPING ON REV 1.3 / 1.7 BOARDS .......................................................................................7 TABLE 3: DEFAULT CHANNEL SELECT BIT MAP............................................................................................................9
ii Copyright 2009-2010 Texas Instruments, Inc. All rights reserved.
Z-Stack User's Guide - CC2530 SWRU189 Version 1.4
1. Introduction
1.1. Scope This document accompanies the Texas Instruments Z-Stack™ solution for use with the CC2530 ZigBee Development Kit. Z-Stack is a complete protocol stack and application development solution that conforms to ZigBee Alliance standards (www.zigbee.org).
2. Product Package Description
2.1. Installation Package Contents The downloaded Z-Stack installation package contains all of the documentation and software required to install, configure, and develop applications using Z-Stack. The package employs a Microsoft Windows-based installation application which guides the installation process.
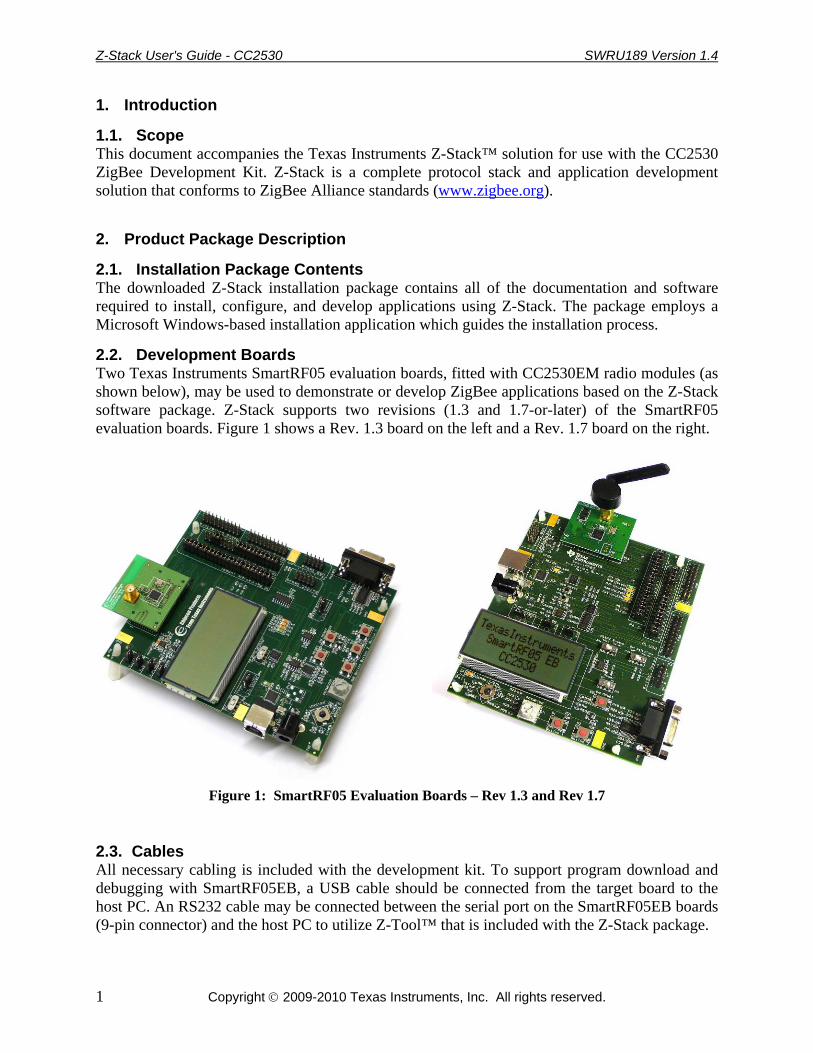
2.2. Development Boards Two Texas Instruments SmartRF05 evaluation boards, fitted with CC2530EM radio modules (as shown below), may be used to demonstrate or develop ZigBee applications based on the Z-Stack software package. Z-Stack supports two revisions (1.3 and 1.7-or-later) of the SmartRF05 evaluation boards. Figure 1 shows a Rev. 1.3 board on the left and a Rev. 1.7 board on the right.
2.3. Cables All necessary cabling is included with the development kit. To support program download and debugging with SmartRF05EB, a USB cable should be connected from the target board to the host PC. An RS232 cable may be connected between the serial port on the SmartRF05EB boards (9-pin connector) and the host PC to utilize Z-Tool™ that is included with the Z-Stack package.
1 Copyright 2009-2010 Texas Instruments, Inc. All rights reserved.
3.1. Host Computer Requirements Z-Stack and Z-Tool are designed for installation on a personal computer running Microsoft Windows XP Professional or later. The following are the minimum requirements for the platform hosting Z-Stack and Z-Tool:
.NET 1.1 Framework Windows XP Service Pack 1 (if using Windows XP) 1 USB port for download/debug of SmartRF05EB boards 1 serial port for Z-Tool communication with the SmartRF05EB board
3.2. Development System Requirements Z-Stack provides a complementary offering to the IAR Embedded Workbench (EW8051) suite of software development tools. These tools support project management, compiling, assembling, linking, downloading, and debugging. The Texas Instruments SmartRF Flash Programmer, is a tool that provides various programming capabilities when using SmartRF05-based development kits. Required support for the Z-Stack target development system:
IAR Systems Embedded Workbench for 8051 Texas Instruments SmartRF Flash Programmer Texas Instruments ZStack-CC2530-2.4.0 or ZStack-CC2530-2.4.0-1.4.0
4. Product Installation Procedures
4.1. Install Z-Stack Package Z-Stack is provided via Windows-based installation programs. ZStack-CC2530-2.4.0.exe is the “core” package, including the latest Z-Stack files and libraries along with one simple sample application. ZStack-CC2530-2.4.0-1.4.0.exe is the “full” package, including all components of the “core”, along with additional sample applications, additional documentation, and Z-Tool. Installing either of these Z-Stack packages will create the required directory structure and load software and documentation files. After installation, be sure to review the README.txt file for a summary of new features and changes with this Z-Stack release.
4.2. Install IAR EW8051 Package Obtain and install Embedded Workbench for 8051 from IAR Systems. The project and library files included in this release of Z-Stack were built and tested with EW8051 version 7.60. When considering an upgrade to a newer version of EW8051, it will be necessary to verify that installed project and library files are compatible with the newer development tools.
4.3. Install SmartRF Flash Programmer Package Obtain and install the SmartRF Flash Programmer from Texas Instruments. Connect one of the SmartRF05EB boards to the PC (via USB cable) and run this program. This will install required Windows drivers and verify that the PC is ready to communicate with the SmartRF05EB boards.
4.4. Initial Device IEEE Addresses Each CC2530EM board in the development kit has been pre-programmed with a unique 64-bit IEEE address. These “Primary” addresses, programmed by Texas Instruments at the factory, are located in the “read only” Information Memory of the CC2530 processor. At a later time, the user may want to override the pre-programmed IEEE address – see Section 7.2 for details.
2 Copyright 2009-2010 Texas Instruments, Inc. All rights reserved.
5.1. Configuring Z-Stack For the purposes of this release, the ZigBee Logical Device Type and Profile are pre-configured in the IAR project file. Z-Stack devices can be configured in one of three ways:
ZigBee Coordinator – This device is configured to start the IEEE 802.15.4 network and will serve as the PAN Coordinator in that network.
ZigBee Router – This device is configured to join an existing network, associate to a Coordinator or Router, and then allow other devices to associate to it. It will route data packets in the network.
ZigBee End Device – This device is configured to join an existing network and will associate with a Coordinator or Router.
5.2. Building SampleApp Devices The remainder of this section describes programming SmartRF05EB+CC2530EM boards to set up a simple ZigBee network with 2 or more nodes - a Coordinator and one or more Routers. The demonstration uses a “SampleApp” project file that provides separate configurations to uniquely build Coordinator and Router devices, a well as, a general “Demo” device. The “Demo” device permits user selection of Coordinator/Router operation by setting a jumper on the SmartRF05EB board. The following examples provide details on building, downloading, and running the “Demo” sample application on two or more devices.
5.3. Building a SampleApp Coordinator Device
Make sure all development tools have been installed (Sections 4.1 – 4.3)
Connect a SmartRF05EB board to the development PC with a USB cable.
Power up the SmartRF05EB. There are 3 ways to supply power to the board: batteries, USB connection, or a DC power supply. To provide power from batteries, pins 1-2 of jumper block P11 must be connected. Otherwise, connect pins 2-3 to use USB or a DC supply (note below the slight P11 difference on Rev 1.3 and Rev 1.7-or-later boards). The board can be powered ON or OFF using switch P8.
Figure 2: Power Switch and Power Source Selection (Rev 1.3 / Rev 1.7)
If Windows prompts to install a device driver, don’t let it connect to Windows Update. Instead, let Windows try to find the required driver automatically. If that fails, browse to: C:\Program Files\IAR Systems\Embedded Workbench 5.0\8051\drivers\Texas Instruments to locate the necessary files.
3 Copyright 2009-2010 Texas Instruments, Inc. All rights reserved.
Z-Stack User's Guide - CC2530 SWRU189 Version 1.4
Using Windows, navigate to the SampleApp project directory and launch the IAR Embedded Workbench by double clicking on the SampleApp.eww file:
Figure 3: Locating the Sample Application Project
Select the DemoEB configuration from the Workspace pull-down menu:
Figure 4: Selecting the DemoEB Configuration
4 Copyright 2009-2010 Texas Instruments, Inc. All rights reserved.
Z-Stack User's Guide - CC2530 SWRU189 Version 1.4
Build the application by pulling down the Project menu and clicking on Rebuild All:
Figure 5: Building the Sample Application
Download by pulling down the Project menu and clicking on Download and Debug:
Figure 6: Downloading the Sample Application
5 Copyright 2009-2010 Texas Instruments, Inc. All rights reserved.
Z-Stack User's Guide - CC2530 SWRU189 Version 1.4
After downloading to the CC2530EM is complete, exit the debugger by pulling down the Debug menu and clicking on Stop Debugging:
Figure 7: Quit Debugging the Sample Application
Remove power from the SmartRF05EB by switching P8 to OFF. Disconnect the SmartRF05EB from the USB cable and set it aside.
Repeat the previous steps to program more CC2530EM boards. At least two boards must be programmed to run the “Demo” sample application.
When all devices have been programmed, exit the Embedded Workbench IDE.
6. Z-Stack Demonstration
6.1. Switches and LEDs In this, and other Z-Stack sample application documents, references are made to switches and LEDs that are located on evaluation boards. These devices are used to control certain Z-Stack features and display device and application status. All pairs of screenshots shown in this section (Figures 8–11) have Rev 1.3 boards on the left and Rev 1.7-or-later boards on the right. Some procedures require user input via “logical” switches, commonly referred to as SW1 - SW5. SmartRF05EB boards have a 5-position joystick, located in the lower left corner of the board. The joystick, designated U1, provides the 5 switch inputs shown in Table 1. Pressing the joystick to the “up” position (toward the LCD) activates the SW1 input. Switch inputs SW2 - SW4 result from pressing the joystick to the right, down, and left positions, respectively. SW5 occurs when the joystick is pressed straight down when in the center position. Button1 and Button2 provide the “logical” SW6 and SW7 inputs to Z-Stack.
6 Copyright 2009-2010 Texas Instruments, Inc. All rights reserved.
Z-Stack User's Guide - CC2530 SWRU189 Version 1.4
Figure 8: SmartRF05EB Joystick on Rev 1.3 / 1.7 Boards
Figure 9: SmartRF05EB Buttons on Rev 1.3 / 1.7 Boards
Joystick/Button Software Mapping Description
UP SW1 Joystick UP RIGHT SW2 Joystick RIGHT DOWN SW3 Joystick DOWN LEFT SW4 Joystick LEFT
Z-Stack sample applications use “logical” LEDs to display status information. SmartRF05EB boards have four 4 colored LEDs, referred to in application software as LED1 - LED4.
Figure 10: SmartRF05EB LEDs on Rev 1.3 / 1.7 Boards
LED Software Mapping Color
D1/LED1 LED1 Green D2/LED2 LED2 Red D3/LED3 LED3 Yellow D4/LED4 LED4 Blue/Red
Table 2: Logical LED Mapping on Rev 1.3 / 1.7 Boards
7 Copyright 2009-2010 Texas Instruments, Inc. All rights reserved.
Z-Stack User's Guide - CC2530 SWRU189 Version 1.4
6.2. Running the Sample Application Initially, place all of the devices on the same table or work area. You will establish the network while the devices are all in view of each other. Later, you can experiment with various distances and different power-up sequences. After each of the CC2530EM boards has been programmed with the “Demo” configuration of SampleApp, one of the boards needs to be designated as a ZigBee Coordinator. This is done by placing a jumper across pins on the P18 jumper block. On Rev 1.3 boards, the jumper connects pins 7-9 (below, left). On Rev 1.7-or-later boards, the jumper connects pins 9-11 (below, right). Make sure that only one SmartRF05EB board has a jumper on P18.
Initially, begin execution of the programmed SampleApp by applying power to the device that is configured as the ZigBee Coordinator. This device performs a scan of the programmed ZigBee channel (see Section 7), temporarily flashing LED1. Once the device successfully starts up a network, LED3 (yellow) will turn on and LED1 will stop flashing. Next, power up a ZigBee Router device (no jumper on P18). This device will now scan the programmed ZigBee channel for a network, temporarily flashing LED1. Once it joins the network started by the Coordinator, LED3 (yellow) will be turned on and LED1 will stop flashing. If desired, turn on more Router devices and each of them will turn on their LED3 after joining the network. Once the network has been formed, the SampleApp will provide a very simple demonstration of ZigBee wireless communication. The sample application performs the following three functions:
- Periodic (about 5 seconds) broadcast of a message to all network devices - When button SW1 is pressed, broadcast of a message to devices subscribed to Group 1 - When button SW2 is pressed, toggles a devices’ membership in Group 1
When each SampleApp device starts up, it is subscribed to Group 1 and will receive and process messages sent to Group 1 from any other device. In this demonstration, a device will flash its LED1 (green) when a Group 1 message is received. So, when the network is initially started up, pressing button SW1 on any device will broadcast a message, causing all of the other devices to flash their LED1. Pressing button SW2 on a device toggles that device’s membership in Group 1, allowing the user to enable/disable LED1 flashing on that device. The discussion above assumes each device has been programmed and disconnected from the development PC. When necessary, a target device can be controlled from the IAR IDE, providing for standard debugging features such as breakpoints, single-stepping, viewing of memory and register contents, etc.
8 Copyright 2009-2010 Texas Instruments, Inc. All rights reserved.
Z-Stack User's Guide - CC2530 SWRU189 Version 1.4
7. PanID and Channel Selection The ZigBee 2007 specification defines the use of a 16-bit Personal Area Network Identifier (PanID) to uniquely identify a network. Z-Stack provides the user with two methods of selecting a PanID when starting or joining a network by setting the value of ZDAPP_CONFIG_PAN_ID. For a Coordinator device, setting this value to 0xFFFF forces it to start a network with a PanID equal to the least significant 16-bits of its IEEE address. For a Router device, setting this parameter to 0xFFFF causes the device to join the “best” network it can discover within the specified channel list, any other value causes it to use the exact value specified. The “best” network is defined as the beacon response to scan commands that has the highest received signal strength (RSSI). The IEEE 802.15.4 specification defines 16 channels in the 2.4 GHz frequency range. These channels are assigned numbers 11 through 26. Z-Stack initially defaults to channel 11, but the user can select a different channel by changing DEFAULT_CHANLIST. This parameter is a bit map field, with each bit representing a single channel. As shown below, the initial default channel 11 (0xB) is represented by 0x00000800 (11th bit in the field, starting from bit 0).
ZDAPP_CONFIG_PAN_ID and DEFAULT_CHANLIST may be defined as a compile options the IAR IDE, as well as, in a project’s configuration command file. Configuration command files are located in the applicable …\Projects\zstack\Tools\CC2530DB folder. As shown below, lines in the f8wConfig.cfg file specify the PanID that will be used when the Z-Stack devices start up. This is the recommended location for developers to establish specific settings for their projects. This feature allows developers set up a “personal” PanID to avoid conflict with others.
9 Copyright 2009-2010 Texas Instruments, Inc. All rights reserved.
Z-Stack User's Guide - CC2530 SWRU189 Version 1.4
Figure 12: PanID Configuration in f8wconfig.cfg
As shown below, entries in the f8wConfig.cfg file also specify the channel(s) that will be used when the Z-Stack devices start up. This feature allows developers set up a “personal” channel and to avoid conflict with others. Multiple channels can be specified by including the appropriate bits in the DEFAULT_CHANLIST definition.
Figure 13: Channel Configuration in f8wconfig.cfg
7.1. Energy Level The Coordinator will start a network on a selected channel only if the energy level on that channel is below a threshold value. The threshold value is set to -45dBm and can be modified by changing the MAX_SCAN_ENERGY definition in the mac_scan.c file (available only with TIMAC and Z-Stack source distributions). The value of this parameter minus 83 gives the maximum tolerated energy level in dBm. To ensure that the Coordinator will always find a suitable channel to start a network on, it is recommended that more than one channel is selected.
10 Copyright 2009-2010 Texas Instruments, Inc. All rights reserved.
Z-Stack User's Guide - CC2530 SWRU189 Version 1.4
7.2. IEEE Address Selection Every ZigBee device requires a unique 64-bit IEEE address. Z-Stack uses the following four-level hierarchy to determine the IEEE address that will be used for the device when it operates:
1. Read from Z-Stack non-volatile memory 2. Look-up from Secondary IEEE location 3. Look-up from Primary IEEE location 4. Create temporary using random number generation
Under normal circumstances, when a Z-Stack device boots up, it reads the IEEE address from non-volatile memory (NV) that was stored during a previous “run” of the device. NV memory retains parameters, including the IEEE address, for occasions when the device resets, typically after a power failure. The IEEE address in NV memory gets saved under 3 possible scenarios – initially from steps 2-3 of the hierarchy listed above, or later by delivery from an external source (such as via serial I/O from a PC-hosted program like Z-Tool). During a device reset process, if the “read from NV memory” operation fails, Z-Stack will first attempt to find an IEEE address at the Secondary IEEE address location (step 2). If that fails, it will then attempt to find an address in the Primary IEEE address location (step 3). Finally, if that fails, Z-Stack will generate a “temporary” address using random numbers (step 4). In steps 2 and 3, the IEEE address gets written to NV memory – on the next device reset this address will be read from NV memory (step 1). In a development environment (NV_RESTORE not used), the temporary IEEE address is not written to NV memory, so each time the device gets reset it will have a different IEEE address than before. The Secondary IEEE address location is found on the last page of the CC2530 flash memory, at an offset of 0x0018 bytes from the last memory address. For a 256-Kbyte device, the IEEE address can be commissioned at 0x3FFE8-0x3FFEF. This address location is provided for the user to override the TI pre-programmed Primary address “at the factory”. Device programming tools that work with Z-Stack are set up to preserve IEEE addresses stored at this location. During a device reset process, if an IEEE address cannot be found in NV memory or in the Secondary IEEE address location, Z-Stack will attempt to read a TI pre-programmed Primary IEEE address from locations 0x00C-0x013 of the device “information memory”. In the rare event that the CC2530 device does not have a pre-programmed Primary IEEE address, a temporary 64-bit address beginning with 0xF8 will be generated using the system’s random number generator. Z-Stack permits the IEEE address to be updated in NV memory via the standard NV_Write API. This allows developers to change the address at their discretion, using Z-Tool or another equivalent mechanism. In the production environment, it is probably advisable to disable this capability since a deployed ZigBee device should not be allowed to change its IEEE address.
11 Copyright 2009-2010 Texas Instruments, Inc. All rights reserved.
Z-Stack User's Guide - CC2530 SWRU189 Version 1.4
12 Copyright 2009-2010 Texas Instruments, Inc. All rights reserved.
4. Wireless Medium Access Control (MAC) and Physical Layer (PHY) Specifications for Low-Rate Wireless Personal Area Networks (LR-WPANs), IEEE Standard 802.15.4, 05/12/2003.