27
SPO – Systems support Zebra GC420t User Guide SPO-NA-BG-125, V4.0

SPO – Systems support
Zebra GC420t User Guide
SPO-NA-BG-125, V4.0

© IZUM, 2018
COBISS, COMARC, COBIB, COLIB, IZUM are registered trademarks owned by IZUM.
© IZUM, 11. 1. 2018, SPO-NA-BG-125, V4.0 i
CONTENTS
1 Introduction ......................................................................................................... 1
2 Using the GC420t printer .................................................................................... 1
2.1 Description ....................................................................................................................... 1 2.2 Connecting to power supply and installing printer .......................................................... 4
2.2.1 Connecting the printer to power supply ................................................................ 4 2.2.2 USB installation .................................................................................................... 6 2.2.3 Serial communications installation ....................................................................... 6 2.2.4 Drivers and computer network connection ........................................................... 6
3 Installing the printer............................................................................................. 7
3.1 Windows environment ..................................................................................................... 7
3.2 VT510 terminal ................................................................................................................ 7
4 Loading media roll and transfer ribbon ............................................................... 7
5 Maintenance procedures .................................................................................... 10
5.1 Calibrating label length .................................................................................................. 10 5.2 Status light descriptions ................................................................................................. 11
5.3 Cleaning the thermal printhead ...................................................................................... 12
6 Downloading the library logo ............................................................................ 12
7 Installing the driver ............................................................................................ 13
8 Printer settings (for COBISS) ............................................................................ 15
8.1 Settings in the MS Windows environment .................................................................... 15 8.2 Settings in COBISS/Connect for COBISS2 ................................................................... 17 8.3 Setting logical destinations in COBISS3 ....................................................................... 19
9 Potential printing problems ............................................................................... 22
9.1 Label misalignment ........................................................................................................ 22 9.2 Skipping a label .............................................................................................................. 23
Zebra GC420t User Guide SPO
ii © IZUM, 11. 1. 2018, SPO-NA-BG-125, V4.0
FIGURES
Figure 1: VT510 terminal and printer ............................................................................................. 1 Figure 2: Personal computer and printer ......................................................................................... 1
Figure 3: Interfaces – serial, parallel and USB ............................................................................... 2 Figure 4: GC420t printer ................................................................................................................. 3 Figure 5: Opening the printer .......................................................................................................... 3 Figure 6: Closing the printer with a “snap” .................................................................................... 4 Figure 7: Connecting to power supply ............................................................................................ 5
Figure 8: USB installation............................................................................................................... 6 Figure 9: Serial installation ............................................................................................................. 6
Figure 10: Adjusting the media guides when inserting the media roll ........................................... 7 Figure 11: Placing the media roll .................................................................................................... 8 Figure 12: Pulling the media through the media guides ................................................................. 8 Figure 13: Loading transfer ribbon ................................................................................................. 9
Figure 14: Calibrating label length ............................................................................................... 10 Figure 15: Cleaning the printhead ................................................................................................. 12
Figure 16: Downloading ............................................................................................................... 13 Figure 17: Final message when downloading the logo ................................................................. 13 Figure 18: Selecting the right software and driver pack for the GC420t model ........................... 14
Figure 19: Control Panel with Devices and Printers ..................................................................... 15
Figure 20: Printing Preferences ..................................................................................................... 16
Figure 21: Advanced Setup ........................................................................................................... 16 Figure 22: First option, setting up printer in the connection ......................................................... 18
Figure 23: Second option, setting up application printing ............................................................ 19 Figure 24: Third option, setting up under tab – connection .......................................................... 19 Figure 25: COBISS3 user interface .............................................................................................. 19
Figure 26: Logical destinations editor .......................................................................................... 20 Figure 27: Setting logical destinations .......................................................................................... 20
Figure 28: Detailed settings .......................................................................................................... 21 Figure 29: Refreshing settings in the COBISS3 user interface ..................................................... 21 Figure 30: Loading factory defaults .............................................................................................. 22 Figure 31: Calibrating medium ..................................................................................................... 23

SPO Zebra GC420t User Guide
© IZUM, 11. 1. 2018, SPO-NA-BG-125, V4.0 1/23
1 Introduction
This document presents the use of the printer (connecting to power supply, changing paper, etc.)
when working in the COBISS system.
2 Using the GC420t printer
2.1 Description
A detailed description of the GC420t printer can be found in the English manual at:
http://www.zebra.com/content/dam/zebra/manuals/en-us/printer/gc420t-ug-en.pdf.
Within the COBISS system, the Zebra GC420t printer can be installed on the VT510 terminal or
a personal computer (see Figures 1 and 2).
Figure 1: VT510 terminal and printer
Figure 2: Personal computer and printer
Three printer communication interfaces are installed in the printer by default:
• parallel,
• serial,
• USB.
Zebra GC420t User Guide SPO
2/23 © IZUM, 11. 1. 2018, SPO-NA-BG-125, V4.0
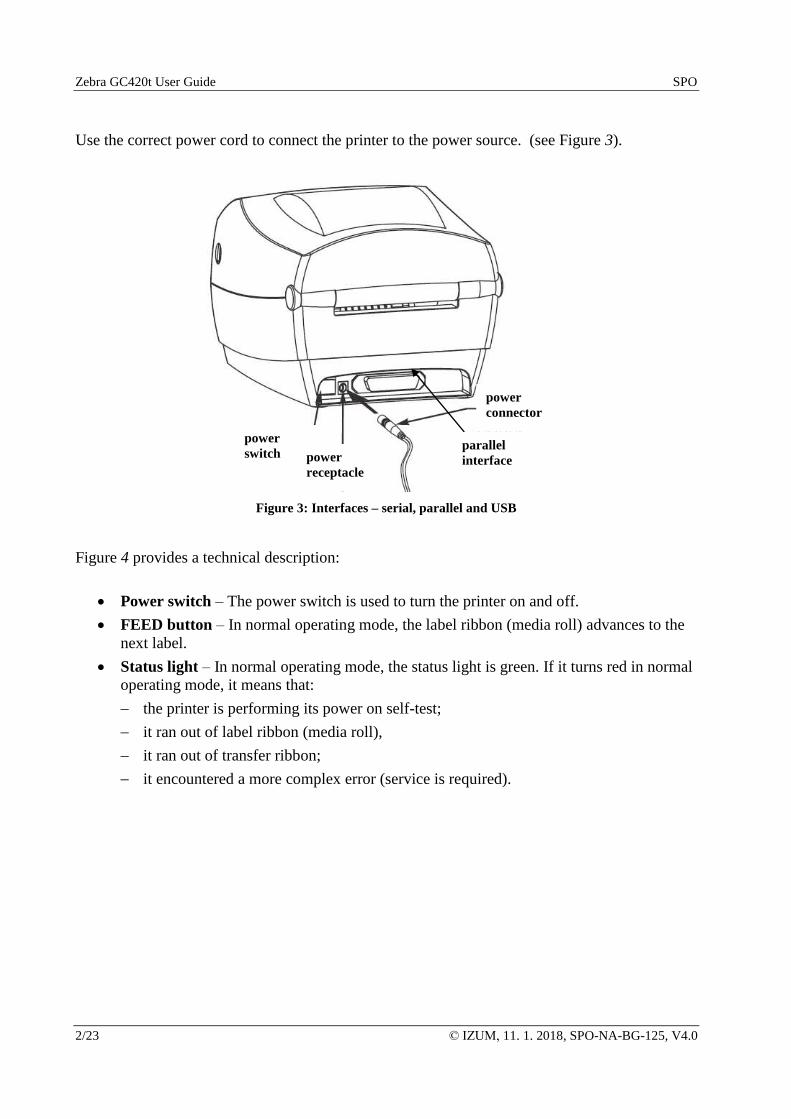
Use the correct power cord to connect the printer to the power source. (see Figure 3).
Figure 3: Interfaces – serial, parallel and USB
Figure 4 provides a technical description:
• Power switch – The power switch is used to turn the printer on and off.
• FEED button – In normal operating mode, the label ribbon (media roll) advances to the
next label.
• Status light – In normal operating mode, the status light is green. If it turns red in normal
operating mode, it means that:
the printer is performing its power on self-test;
it ran out of label ribbon (media roll),
it ran out of transfer ribbon;
it encountered a more complex error (service is required).
power
switch
power
connector
power
receptacle
parallel
interface
SPO Zebra GC420t User Guide
© IZUM, 11. 1. 2018, SPO-NA-BG-125, V4.0 3/23
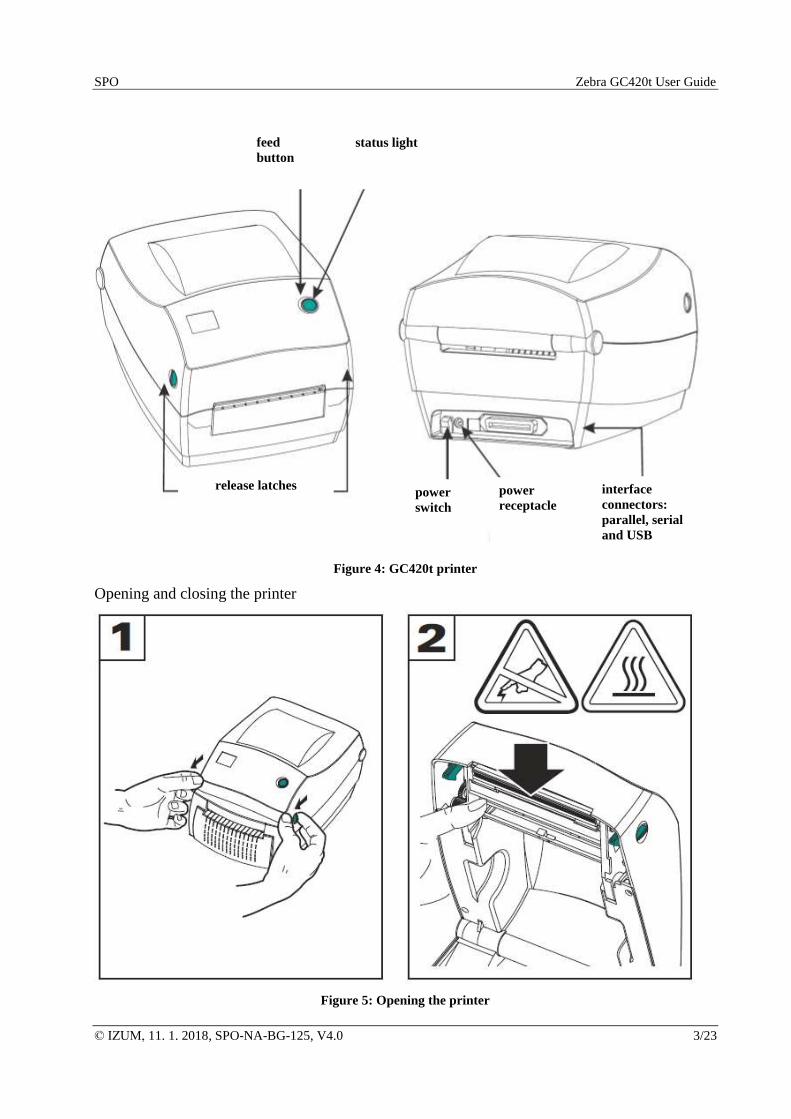
Figure 4: GC420t printer
Opening and closing the printer
Figure 5: Opening the printer
feed
button
status light
release latches power
switch
power
receptacle
interface
connectors:
parallel, serial
and USB
Zebra GC420t User Guide SPO
4/23 © IZUM, 11. 1. 2018, SPO-NA-BG-125, V4.0
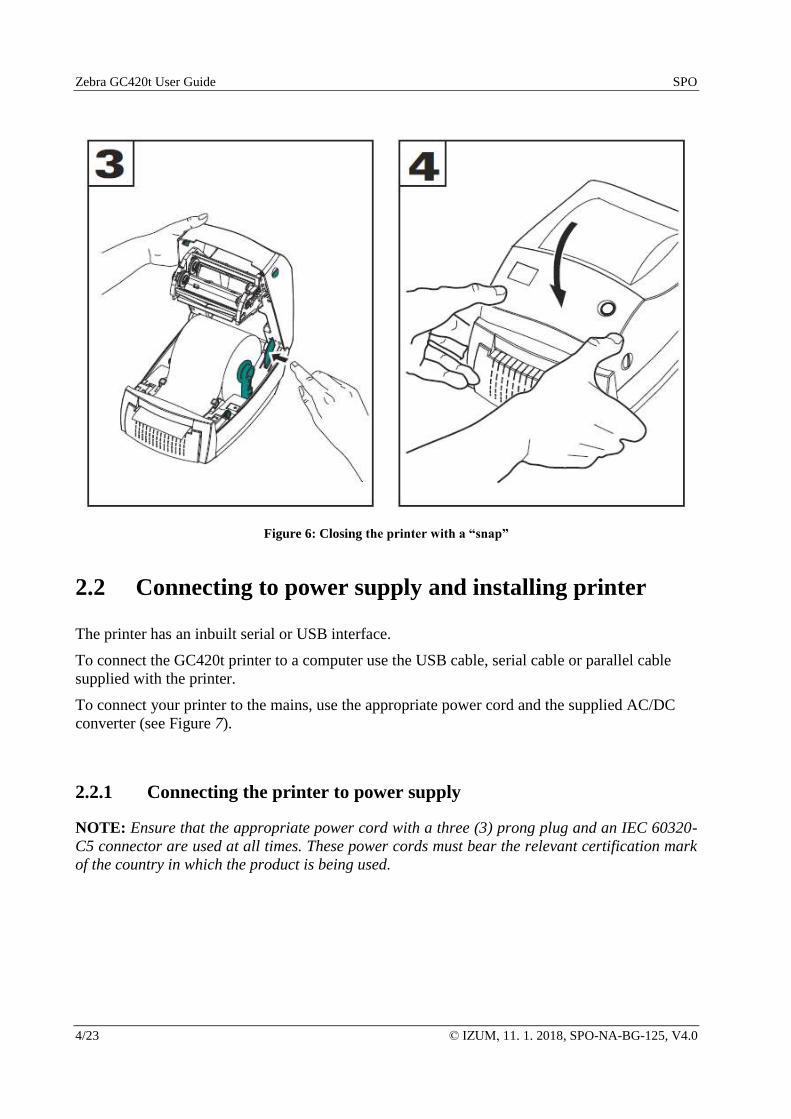
Figure 6: Closing the printer with a “snap”
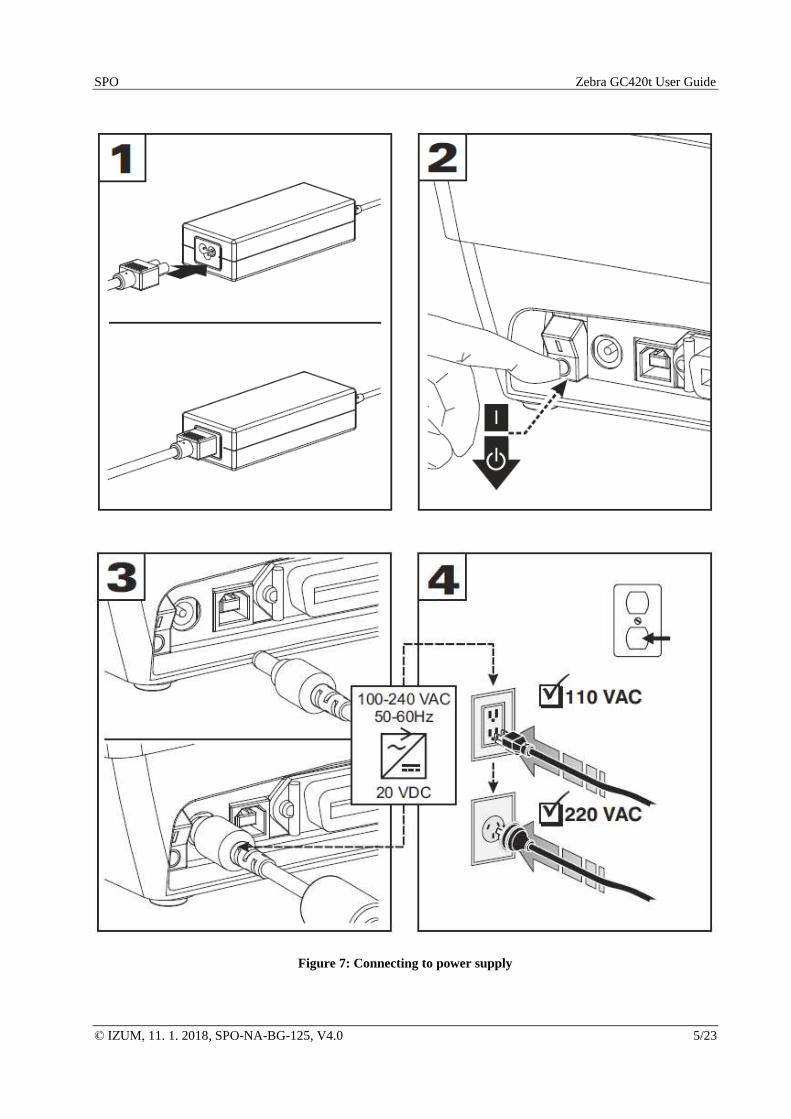
2.2 Connecting to power supply and installing printer
The printer has an inbuilt serial or USB interface.
To connect the GC420t printer to a computer use the USB cable, serial cable or parallel cable
supplied with the printer.
To connect your printer to the mains, use the appropriate power cord and the supplied AC/DC
converter (see Figure 7).
2.2.1 Connecting the printer to power supply
NOTE: Ensure that the appropriate power cord with a three (3) prong plug and an IEC 60320-
C5 connector are used at all times. These power cords must bear the relevant certification mark
of the country in which the product is being used.
SPO Zebra GC420t User Guide
© IZUM, 11. 1. 2018, SPO-NA-BG-125, V4.0 5/23
Figure 7: Connecting to power supply
Zebra GC420t User Guide SPO
6/23 © IZUM, 11. 1. 2018, SPO-NA-BG-125, V4.0
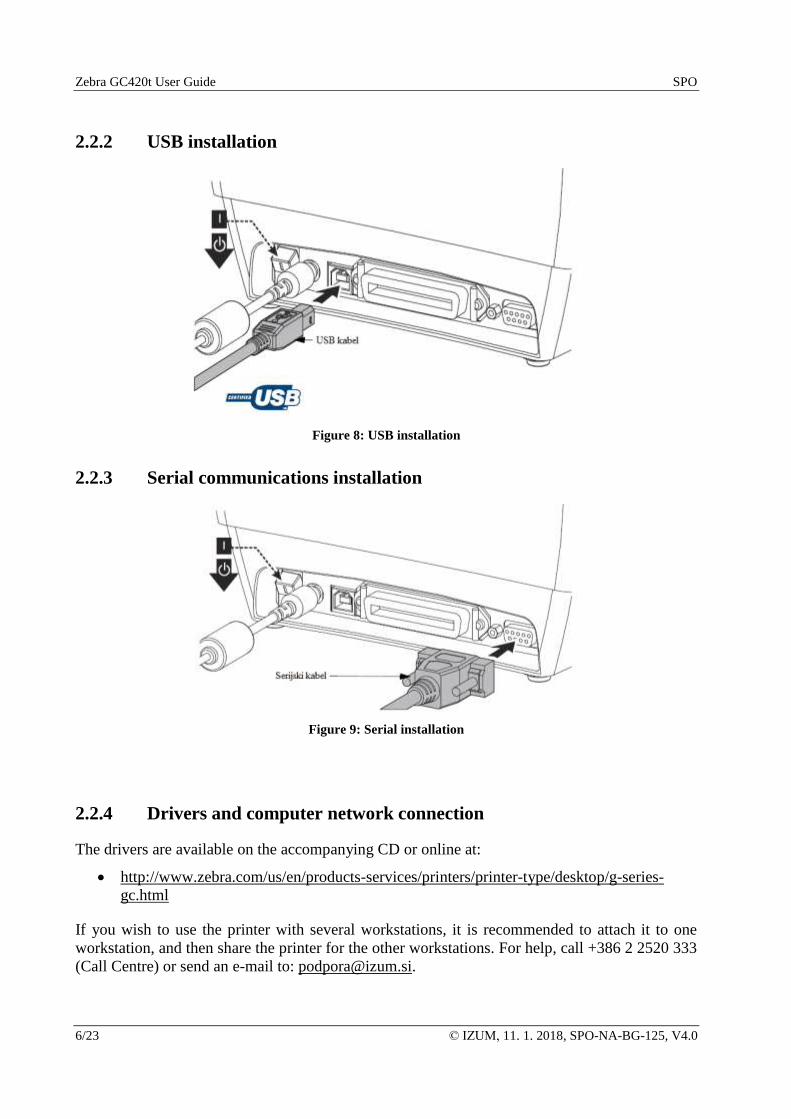
2.2.2 USB installation
Figure 8: USB installation
2.2.3 Serial communications installation
Figure 9: Serial installation
2.2.4 Drivers and computer network connection
The drivers are available on the accompanying CD or online at:
• http://www.zebra.com/us/en/products-services/printers/printer-type/desktop/g-series-
gc.html
If you wish to use the printer with several workstations, it is recommended to attach it to one
workstation, and then share the printer for the other workstations. For help, call +386 2 2520 333
(Call Centre) or send an e-mail to: [email protected].
SPO Zebra GC420t User Guide
© IZUM, 11. 1. 2018, SPO-NA-BG-125, V4.0 7/23
3 Installing the printer
3.1 Windows environment
To install the GC420t printer in the Windows environment, use the ZDesigner GC420t driver.
NOTE: Do not use the ZDesigner GC420t (EPL) driver.
3.2 VT510 terminal
Use the £ key to get to Set up and then set the printer parameter values with regards to the
output used. The printer can be attached to comm1, comm2 or Parallel:
Set Up Terminal
Printer - Port select -(S1= Comm2 print= Comm1)or
(S1= comm1 print= comm2)or
(S1= commX print= parallel); X=1,2
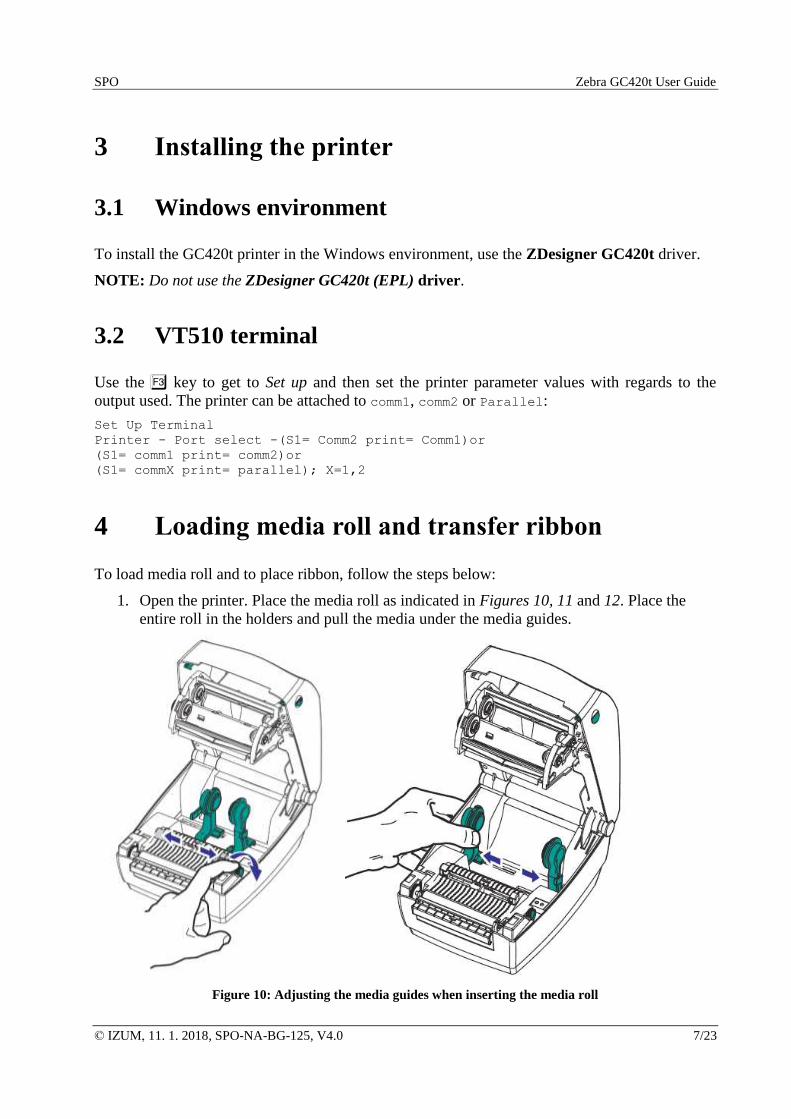
4 Loading media roll and transfer ribbon
To load media roll and to place ribbon, follow the steps below:
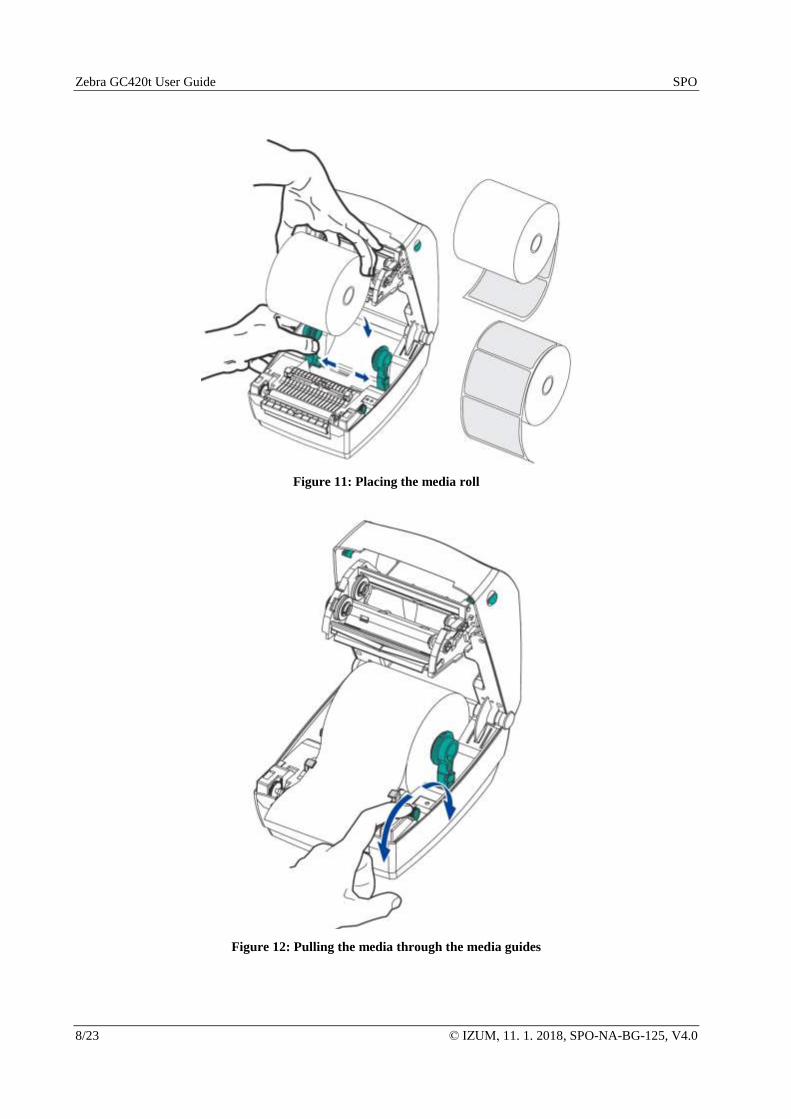
1. Open the printer. Place the media roll as indicated in Figures 10, 11 and 12. Place the
entire roll in the holders and pull the media under the media guides.
Figure 10: Adjusting the media guides when inserting the media roll
Zebra GC420t User Guide SPO
8/23 © IZUM, 11. 1. 2018, SPO-NA-BG-125, V4.0
Figure 11: Placing the media roll
Figure 12: Pulling the media through the media guides
SPO Zebra GC420t User Guide
© IZUM, 11. 1. 2018, SPO-NA-BG-125, V4.0 9/23
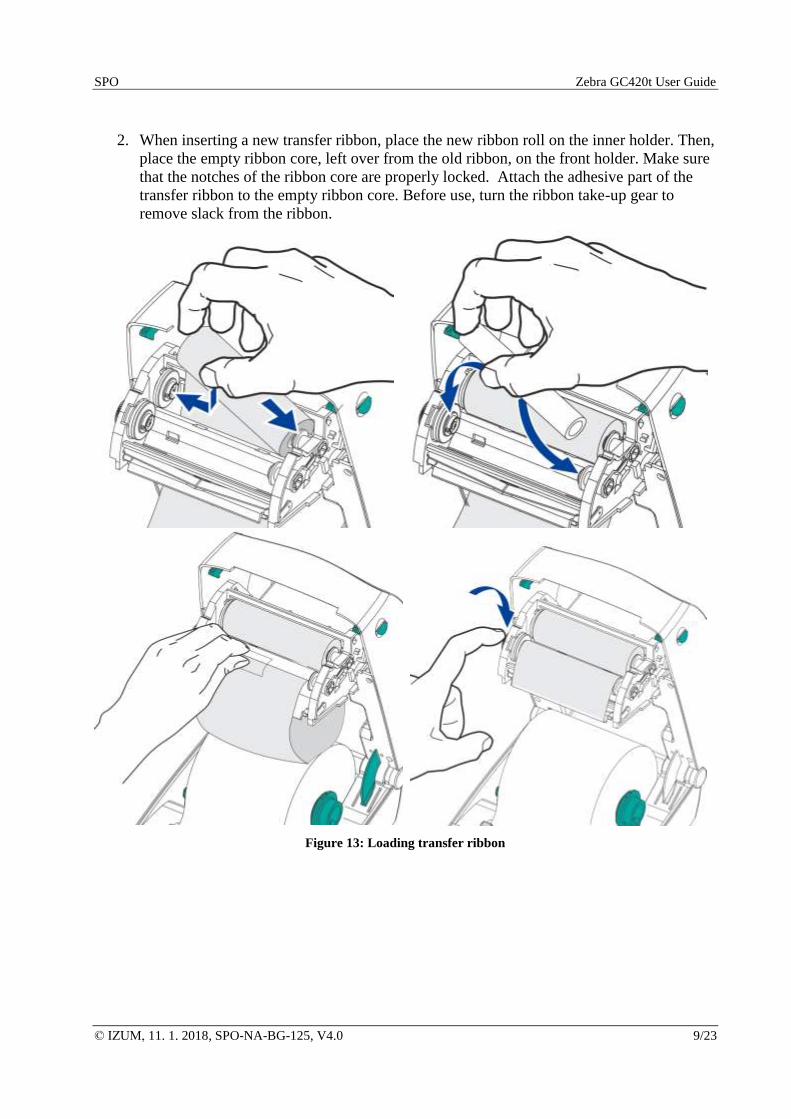
2. When inserting a new transfer ribbon, place the new ribbon roll on the inner holder. Then,
place the empty ribbon core, left over from the old ribbon, on the front holder. Make sure
that the notches of the ribbon core are properly locked. Attach the adhesive part of the
transfer ribbon to the empty ribbon core. Before use, turn the ribbon take-up gear to
remove slack from the ribbon.
Figure 13: Loading transfer ribbon
Zebra GC420t User Guide SPO
10/23 © IZUM, 11. 1. 2018, SPO-NA-BG-125, V4.0
5 Maintenance procedures
5.1 Calibrating label length
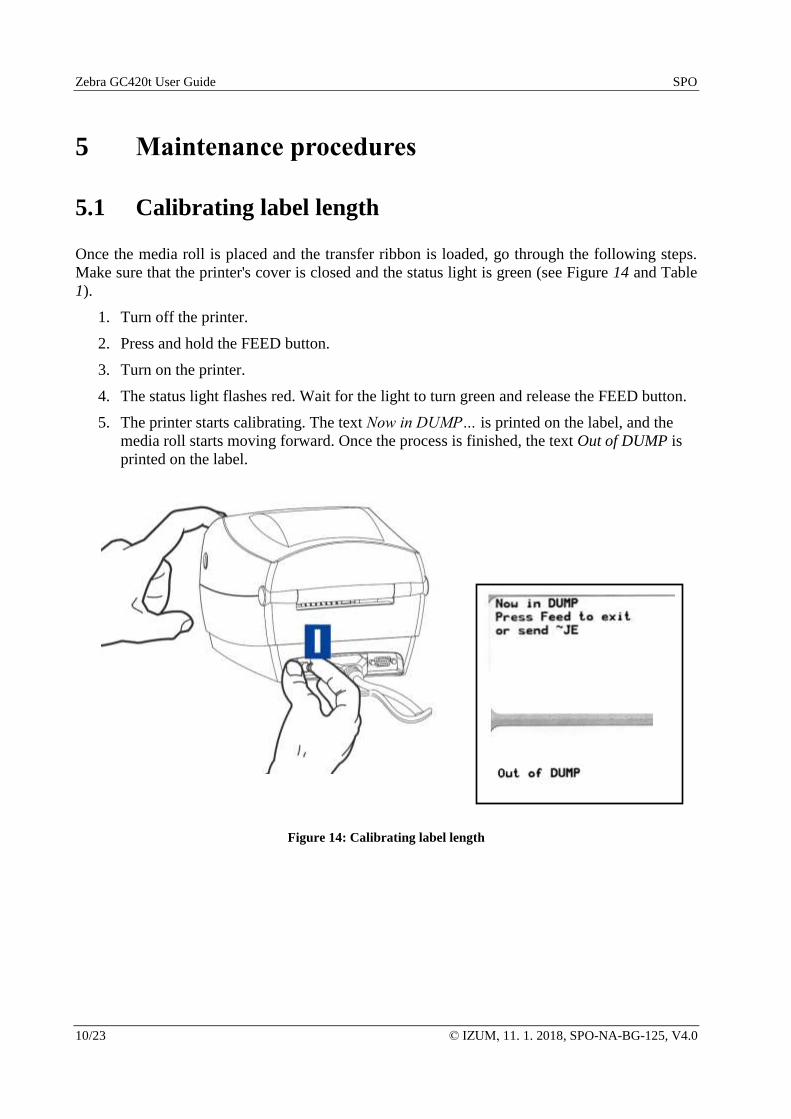
Once the media roll is placed and the transfer ribbon is loaded, go through the following steps.
Make sure that the printer's cover is closed and the status light is green (see Figure 14 and Table
1).
1. Turn off the printer.
2. Press and hold the FEED button.
3. Turn on the printer.
4. The status light flashes red. Wait for the light to turn green and release the FEED button.
5. The printer starts calibrating. The text Now in DUMP… is printed on the label, and the
media roll starts moving forward. Once the process is finished, the text Out of DUMP is
printed on the label.
Figure 14: Calibrating label length
SPO Zebra GC420t User Guide
© IZUM, 11. 1. 2018, SPO-NA-BG-125, V4.0 11/23
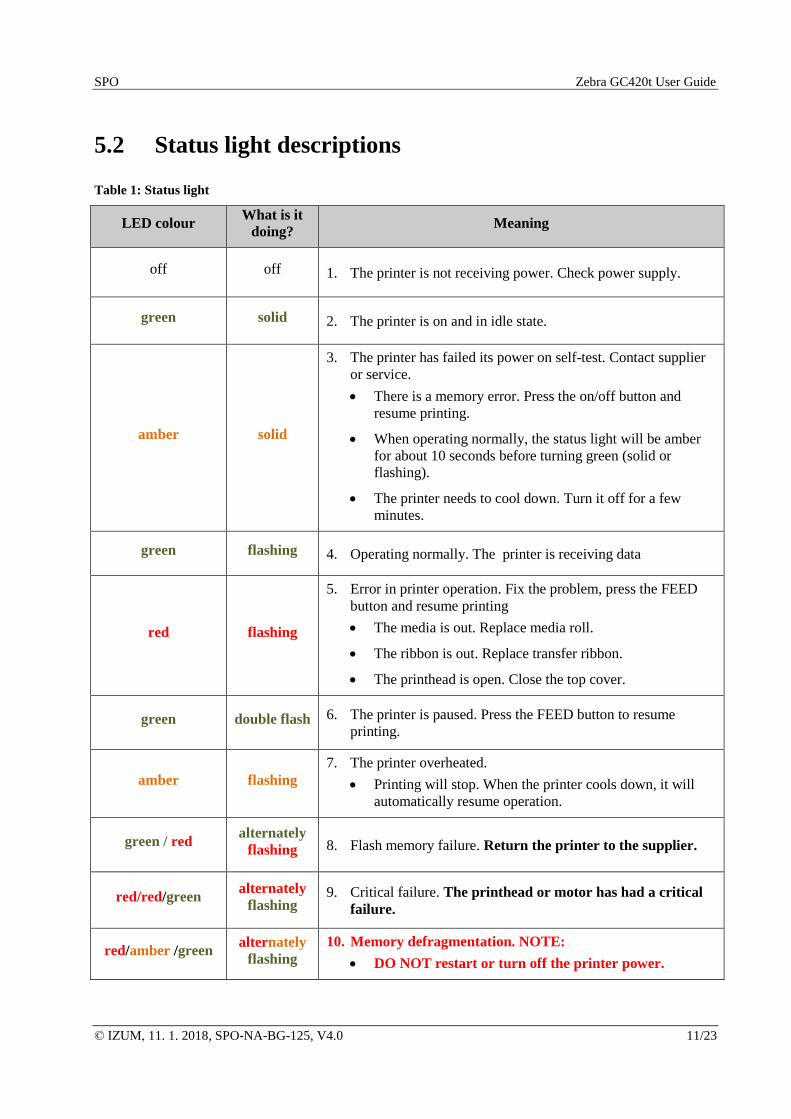
5.2 Status light descriptions
Table 1: Status light
LED colour What is it
doing? Meaning
off off 1. The printer is not receiving power. Check power supply.
green solid 2. The printer is on and in idle state.
amber solid
3. The printer has failed its power on self-test. Contact supplier
or service.
• There is a memory error. Press the on/off button and
resume printing.
• When operating normally, the status light will be amber
for about 10 seconds before turning green (solid or
flashing).
• The printer needs to cool down. Turn it off for a few
minutes.
green flashing 4. Operating normally. The printer is receiving data
red flashing
5. Error in printer operation. Fix the problem, press the FEED
button and resume printing
• The media is out. Replace media roll.
• The ribbon is out. Replace transfer ribbon.
• The printhead is open. Close the top cover.
green double flash 6. The printer is paused. Press the FEED button to resume
printing.
amber flashing
7. The printer overheated.
• Printing will stop. When the printer cools down, it will
automatically resume operation.
green / red alternately
flashing 8. Flash memory failure. Return the printer to the supplier.
red/red/green alternately
flashing 9. Critical failure. The printhead or motor has had a critical
failure.
red/amber /green alternately
flashing
10. Memory defragmentation. NOTE:
• DO NOT restart or turn off the printer power.
Zebra GC420t User Guide SPO
12/23 © IZUM, 11. 1. 2018, SPO-NA-BG-125, V4.0
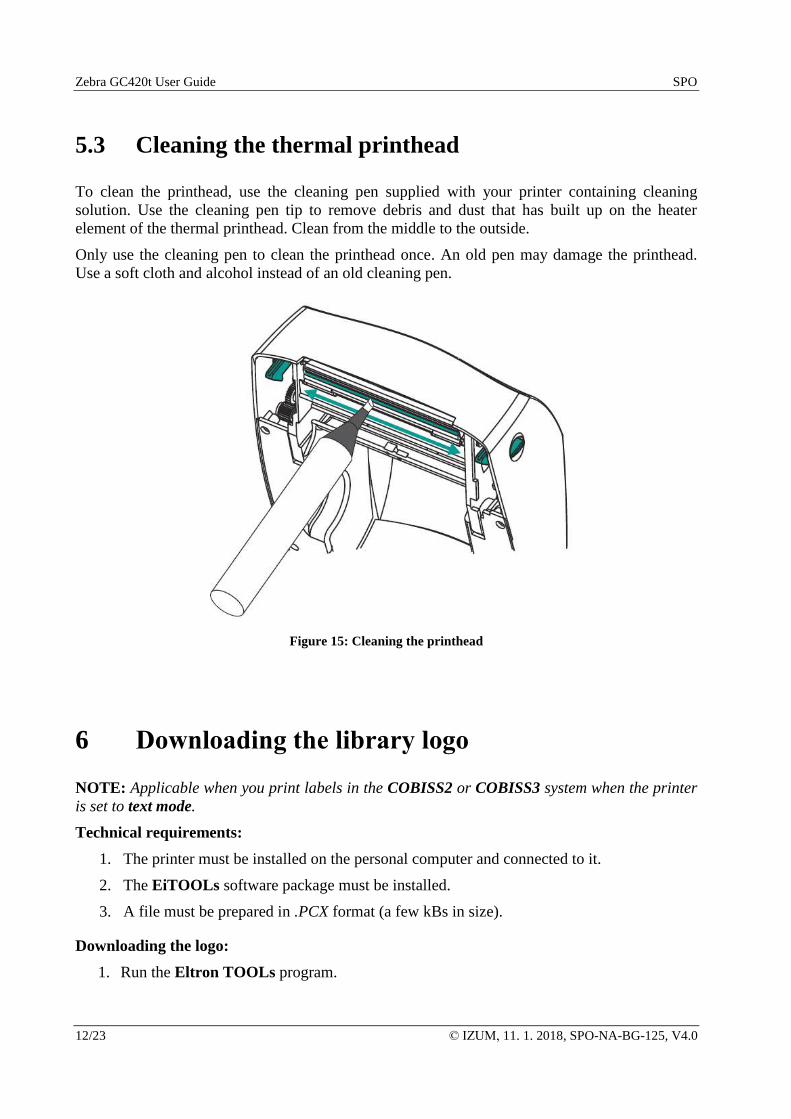
5.3 Cleaning the thermal printhead
To clean the printhead, use the cleaning pen supplied with your printer containing cleaning
solution. Use the cleaning pen tip to remove debris and dust that has built up on the heater
element of the thermal printhead. Clean from the middle to the outside.
Only use the cleaning pen to clean the printhead once. An old pen may damage the printhead.
Use a soft cloth and alcohol instead of an old cleaning pen.
Figure 15: Cleaning the printhead
6 Downloading the library logo
NOTE: Applicable when you print labels in the COBISS2 or COBISS3 system when the printer
is set to text mode.
Technical requirements:
1. The printer must be installed on the personal computer and connected to it.
2. The EiTOOLs software package must be installed.
3. A file must be prepared in .PCX format (a few kBs in size).
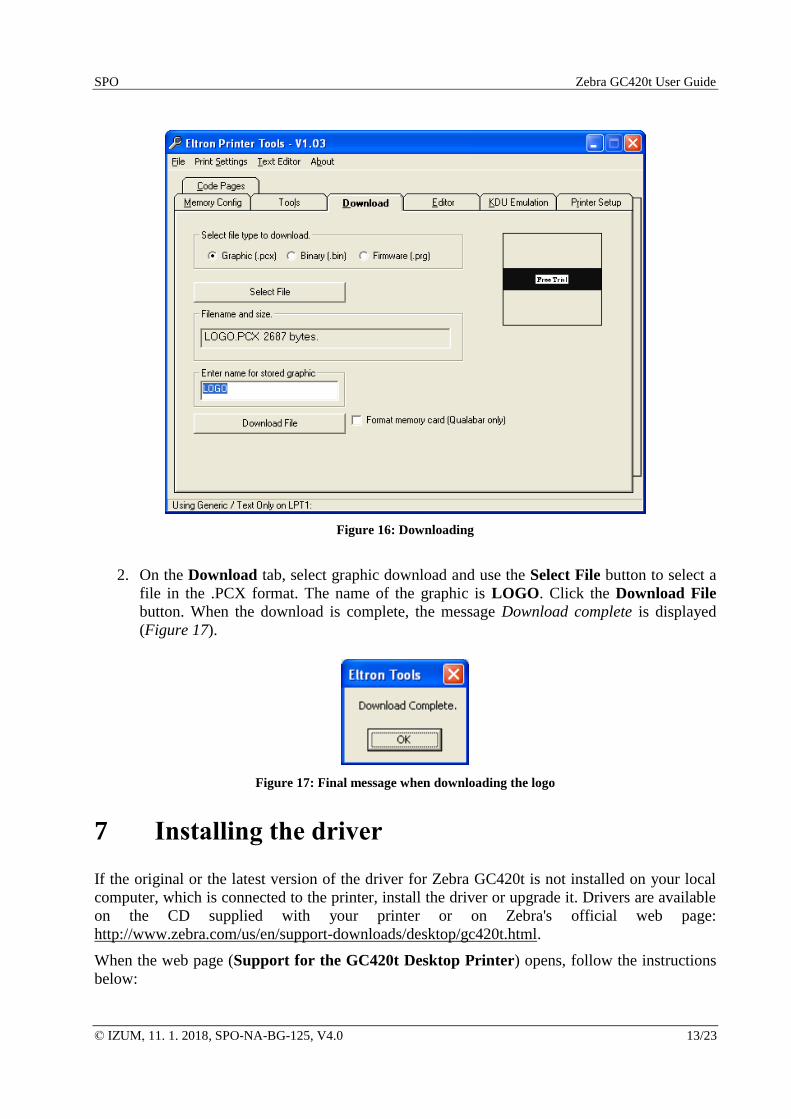
Downloading the logo:
1. Run the Eltron TOOLs program.
SPO Zebra GC420t User Guide
© IZUM, 11. 1. 2018, SPO-NA-BG-125, V4.0 13/23
Figure 16: Downloading
2. On the Download tab, select graphic download and use the Select File button to select a
file in the .PCX format. The name of the graphic is LOGO. Click the Download File
button. When the download is complete, the message Download complete is displayed
(Figure 17).
Figure 17: Final message when downloading the logo
7 Installing the driver
If the original or the latest version of the driver for Zebra GC420t is not installed on your local
computer, which is connected to the printer, install the driver or upgrade it. Drivers are available
on the CD supplied with your printer or on Zebra's official web page:
http://www.zebra.com/us/en/support-downloads/desktop/gc420t.html.
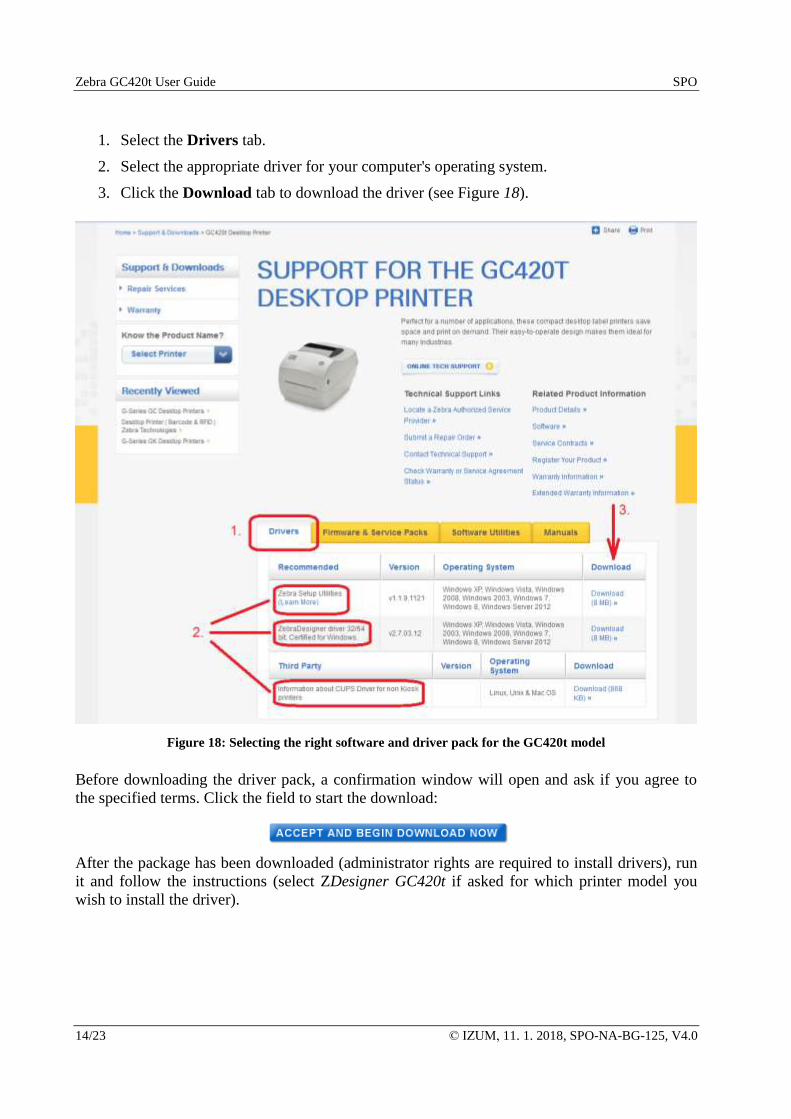
When the web page (Support for the GC420t Desktop Printer) opens, follow the instructions
below:
Zebra GC420t User Guide SPO
14/23 © IZUM, 11. 1. 2018, SPO-NA-BG-125, V4.0
1. Select the Drivers tab.
2. Select the appropriate driver for your computer's operating system.
3. Click the Download tab to download the driver (see Figure 18).
Figure 18: Selecting the right software and driver pack for the GC420t model
Before downloading the driver pack, a confirmation window will open and ask if you agree to
the specified terms. Click the field to start the download:
After the package has been downloaded (administrator rights are required to install drivers), run
it and follow the instructions (select ZDesigner GC420t if asked for which printer model you
wish to install the driver).
SPO Zebra GC420t User Guide
© IZUM, 11. 1. 2018, SPO-NA-BG-125, V4.0 15/23
8 Printer settings (for COBISS)
8.1 Settings in the MS Windows environment
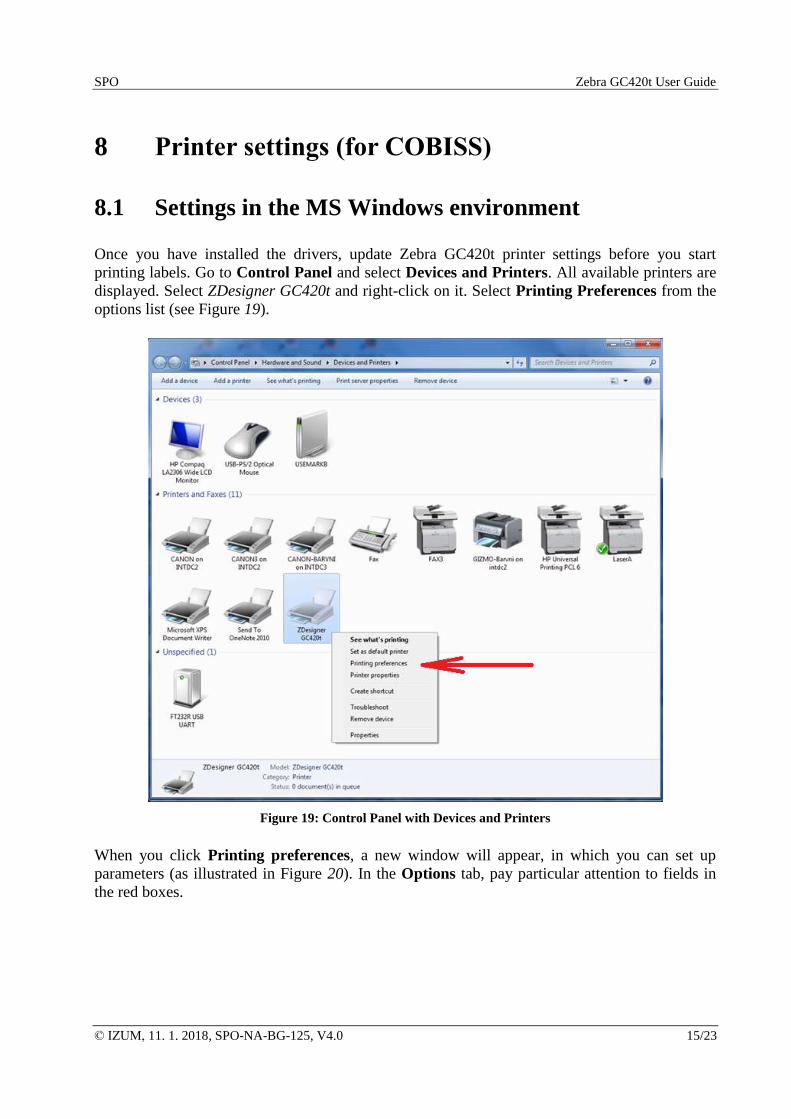
Once you have installed the drivers, update Zebra GC420t printer settings before you start
printing labels. Go to Control Panel and select Devices and Printers. All available printers are
displayed. Select ZDesigner GC420t and right-click on it. Select Printing Preferences from the
options list (see Figure 19).
Figure 19: Control Panel with Devices and Printers
When you click Printing preferences, a new window will appear, in which you can set up
parameters (as illustrated in Figure 20). In the Options tab, pay particular attention to fields in
the red boxes.
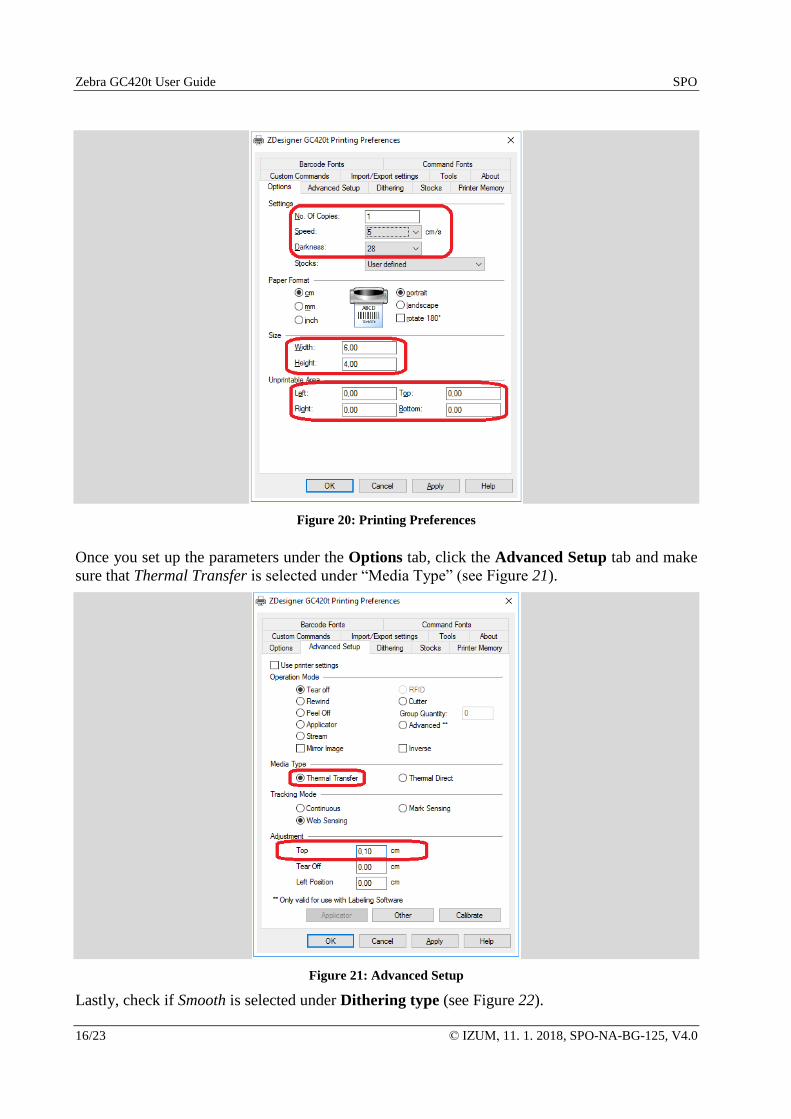
Zebra GC420t User Guide SPO
16/23 © IZUM, 11. 1. 2018, SPO-NA-BG-125, V4.0
Figure 20: Printing Preferences
Once you set up the parameters under the Options tab, click the Advanced Setup tab and make
sure that Thermal Transfer is selected under “Media Type” (see Figure 21).
Figure 21: Advanced Setup
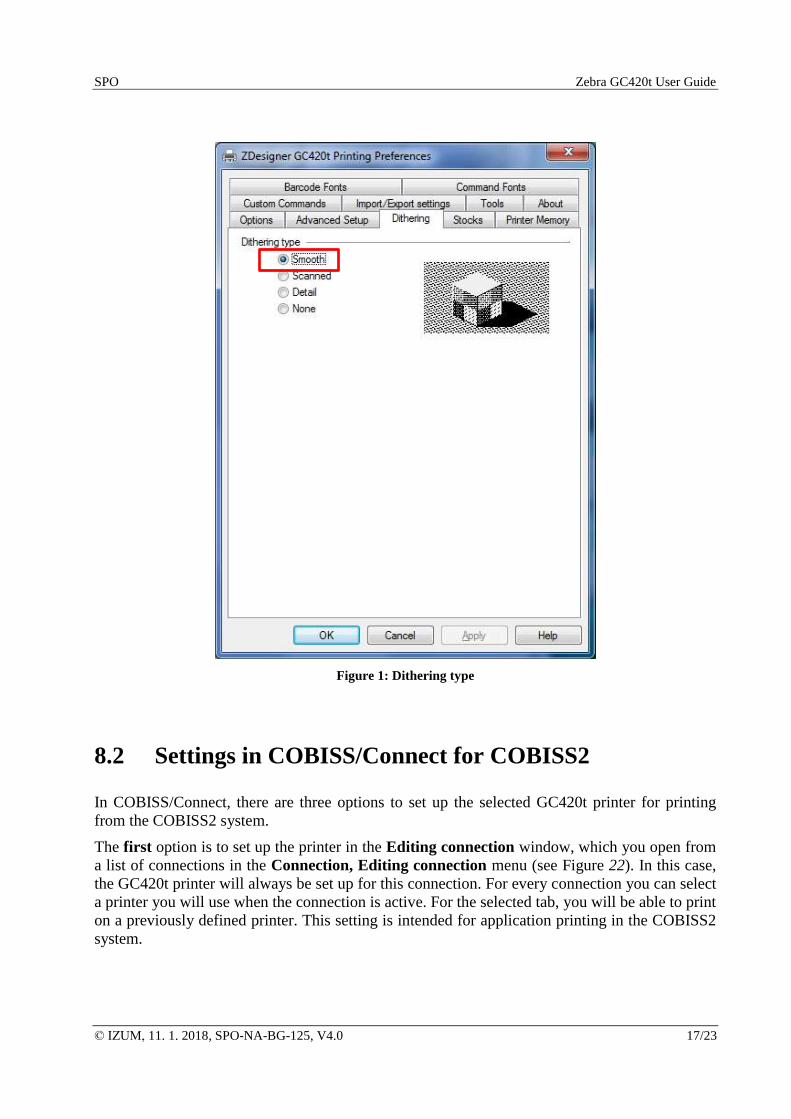
Lastly, check if Smooth is selected under Dithering type (see Figure 22).
SPO Zebra GC420t User Guide
© IZUM, 11. 1. 2018, SPO-NA-BG-125, V4.0 17/23
Figure 1: Dithering type
8.2 Settings in COBISS/Connect for COBISS2
In COBISS/Connect, there are three options to set up the selected GC420t printer for printing
from the COBISS2 system.
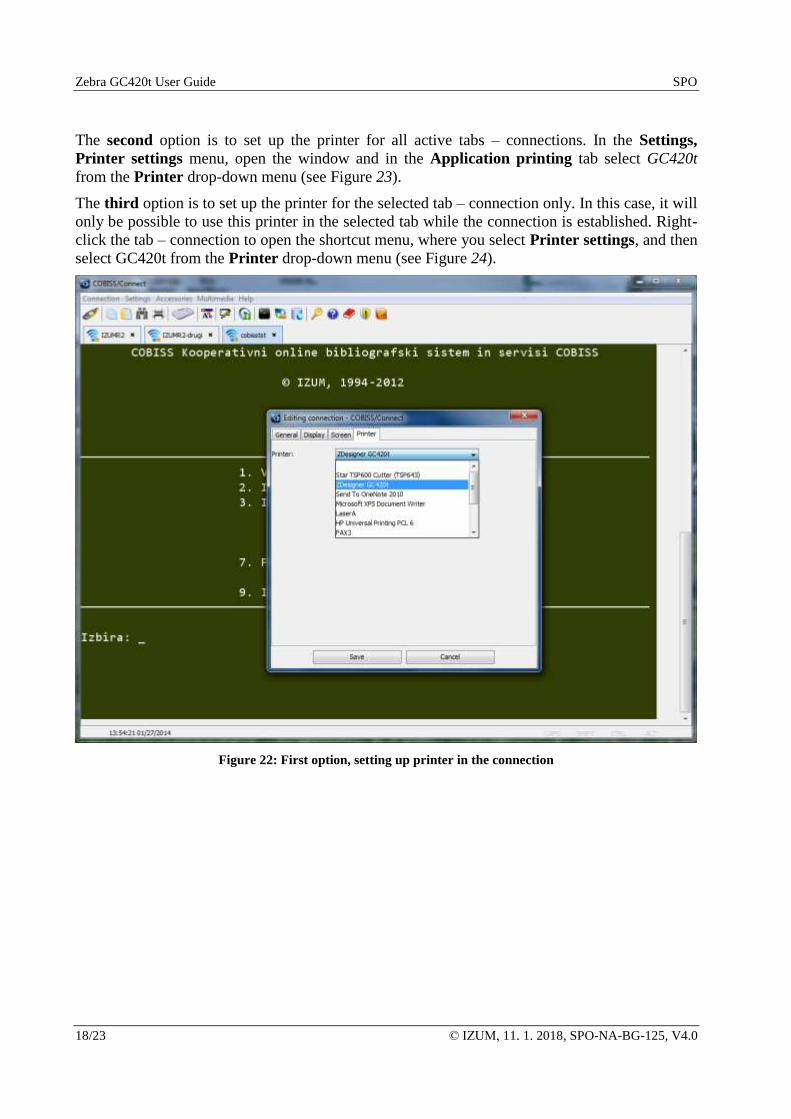
The first option is to set up the printer in the Editing connection window, which you open from
a list of connections in the Connection, Editing connection menu (see Figure 22). In this case,
the GC420t printer will always be set up for this connection. For every connection you can select
a printer you will use when the connection is active. For the selected tab, you will be able to print
on a previously defined printer. This setting is intended for application printing in the COBISS2
system.
Zebra GC420t User Guide SPO
18/23 © IZUM, 11. 1. 2018, SPO-NA-BG-125, V4.0
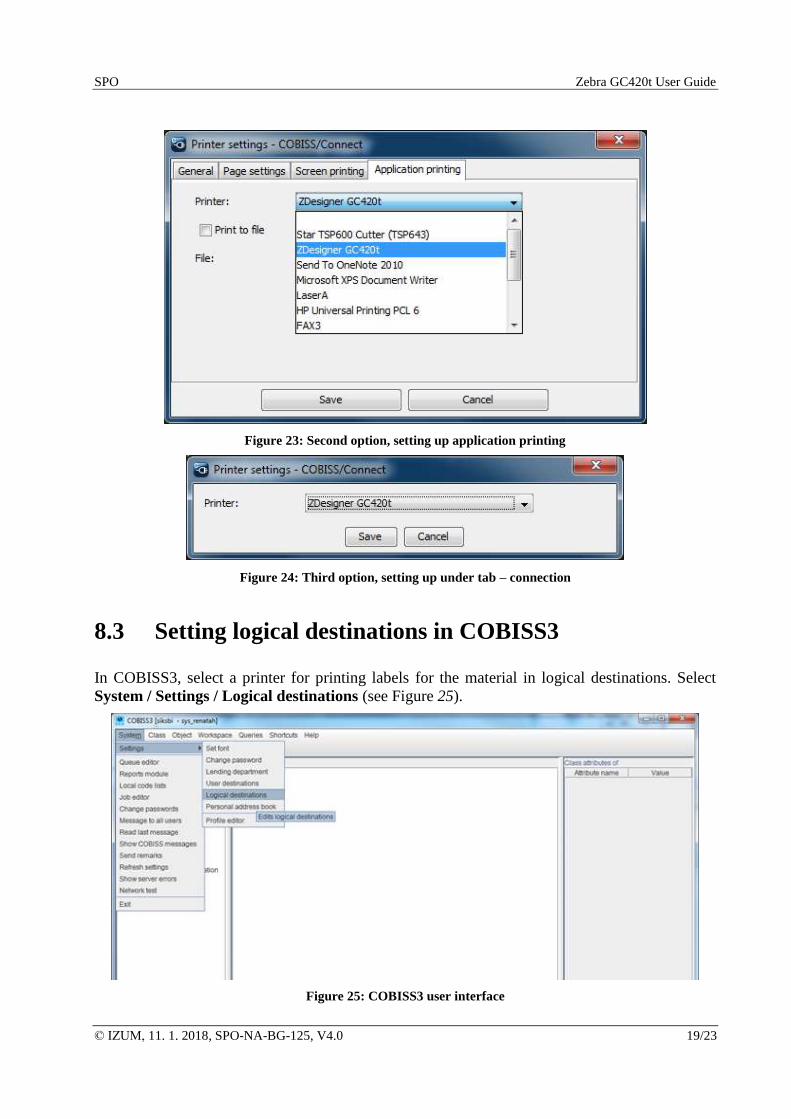
The second option is to set up the printer for all active tabs – connections. In the Settings,
Printer settings menu, open the window and in the Application printing tab select GC420t
from the Printer drop-down menu (see Figure 23).
The third option is to set up the printer for the selected tab – connection only. In this case, it will
only be possible to use this printer in the selected tab while the connection is established. Right-
click the tab – connection to open the shortcut menu, where you select Printer settings, and then
select GC420t from the Printer drop-down menu (see Figure 24).
Figure 22: First option, setting up printer in the connection
SPO Zebra GC420t User Guide
© IZUM, 11. 1. 2018, SPO-NA-BG-125, V4.0 19/23
Figure 23: Second option, setting up application printing
Figure 24: Third option, setting up under tab – connection
8.3 Setting logical destinations in COBISS3
In COBISS3, select a printer for printing labels for the material in logical destinations. Select
System / Settings / Logical destinations (see Figure 25).
Figure 25: COBISS3 user interface
Zebra GC420t User Guide SPO
20/23 © IZUM, 11. 1. 2018, SPO-NA-BG-125, V4.0
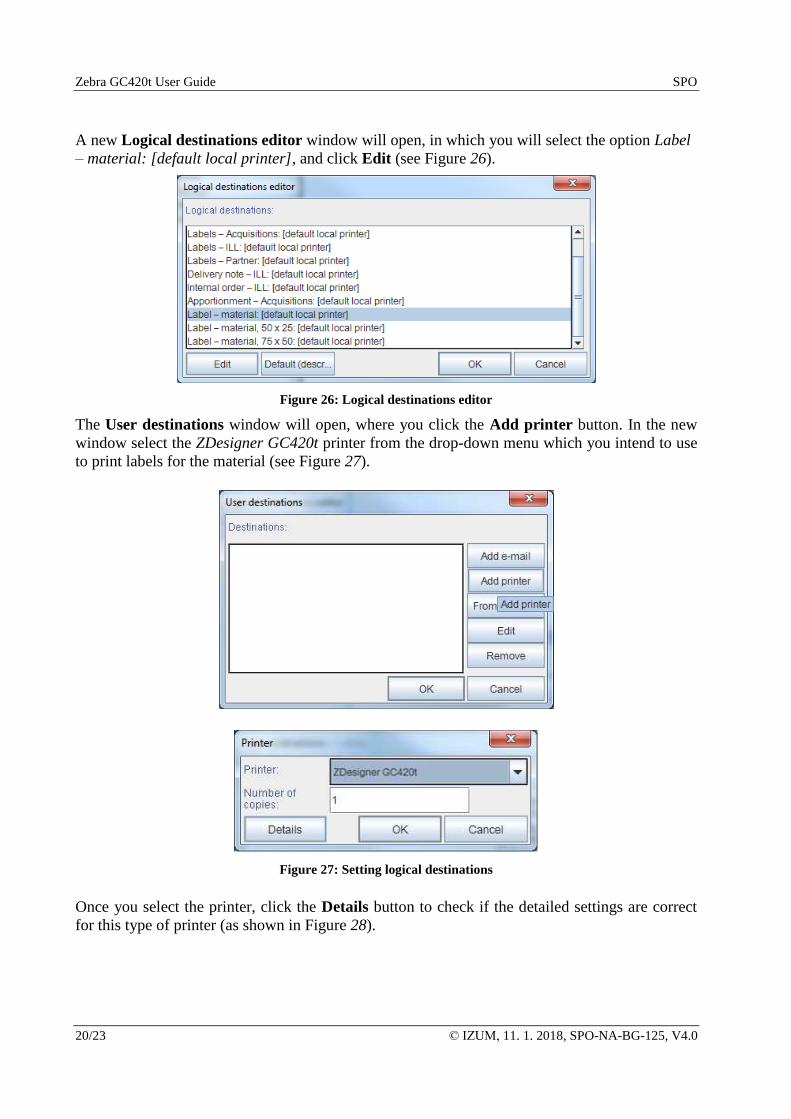
A new Logical destinations editor window will open, in which you will select the option Label
– material: [default local printer], and click Edit (see Figure 26).
Figure 26: Logical destinations editor
The User destinations window will open, where you click the Add printer button. In the new
window select the ZDesigner GC420t printer from the drop-down menu which you intend to use
to print labels for the material (see Figure 27).
Figure 27: Setting logical destinations
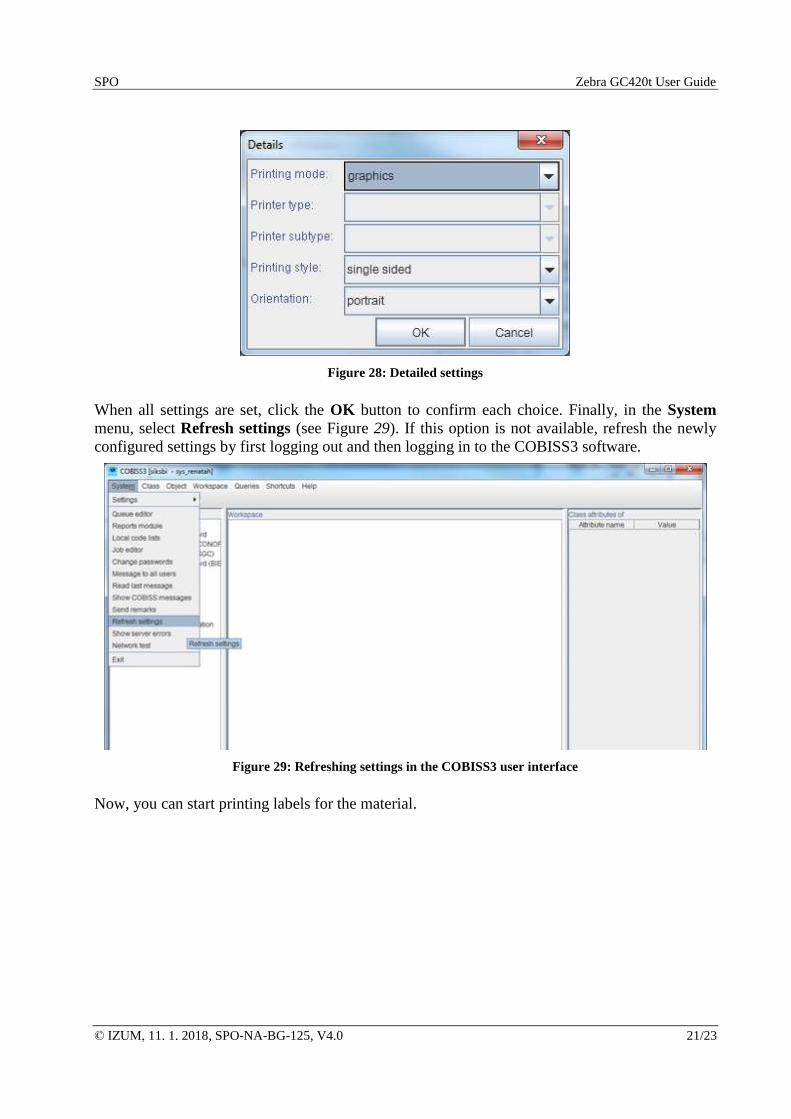
Once you select the printer, click the Details button to check if the detailed settings are correct
for this type of printer (as shown in Figure 28).
SPO Zebra GC420t User Guide
© IZUM, 11. 1. 2018, SPO-NA-BG-125, V4.0 21/23
Figure 28: Detailed settings
When all settings are set, click the OK button to confirm each choice. Finally, in the System
menu, select Refresh settings (see Figure 29). If this option is not available, refresh the newly
configured settings by first logging out and then logging in to the COBISS3 software.
Figure 29: Refreshing settings in the COBISS3 user interface
Now, you can start printing labels for the material.
Zebra GC420t User Guide SPO
22/23 © IZUM, 11. 1. 2018, SPO-NA-BG-125, V4.0
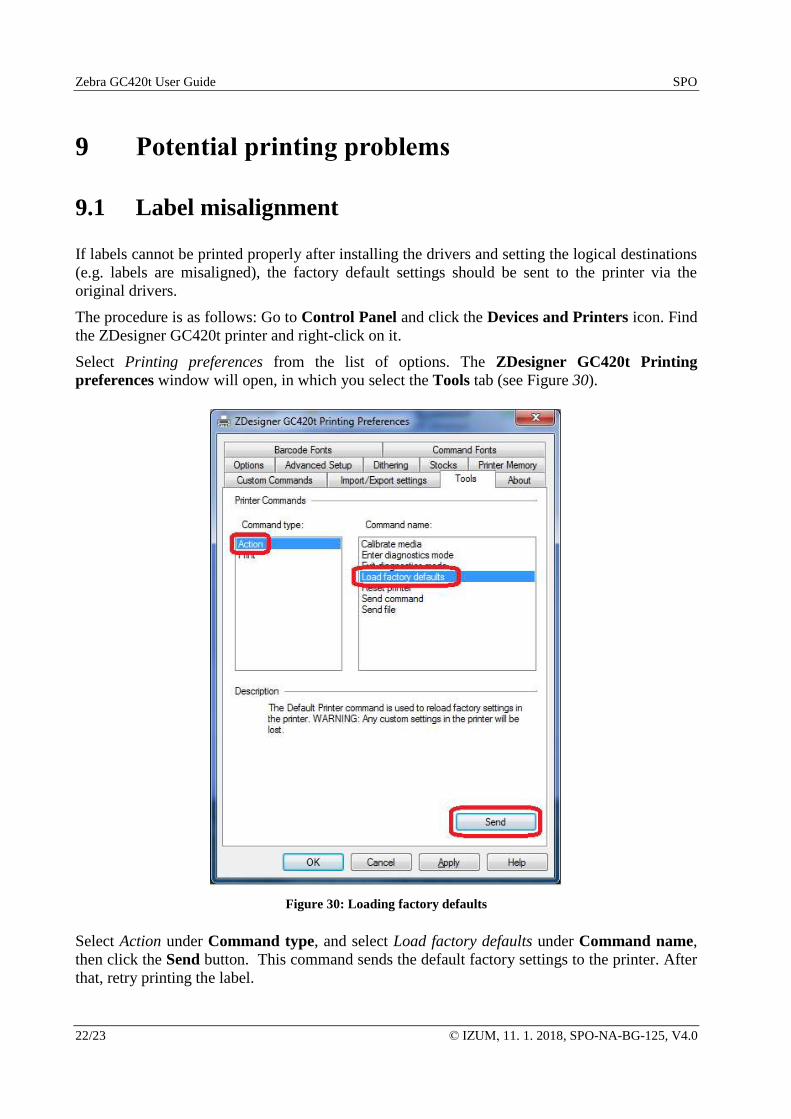
9 Potential printing problems
9.1 Label misalignment
If labels cannot be printed properly after installing the drivers and setting the logical destinations
(e.g. labels are misaligned), the factory default settings should be sent to the printer via the
original drivers.
The procedure is as follows: Go to Control Panel and click the Devices and Printers icon. Find
the ZDesigner GC420t printer and right-click on it.
Select Printing preferences from the list of options. The ZDesigner GC420t Printing
preferences window will open, in which you select the Tools tab (see Figure 30).
Figure 30: Loading factory defaults
Select Action under Command type, and select Load factory defaults under Command name,
then click the Send button. This command sends the default factory settings to the printer. After
that, retry printing the label.
SPO Zebra GC420t User Guide
© IZUM, 11. 1. 2018, SPO-NA-BG-125, V4.0 23/23
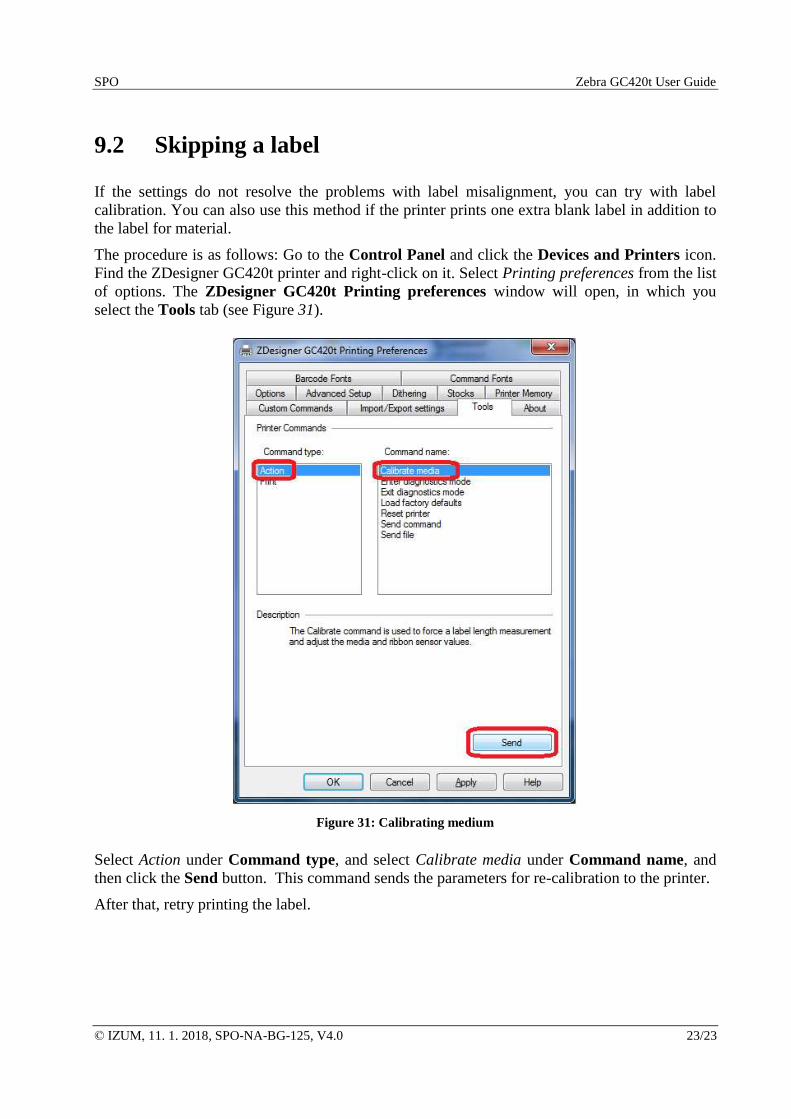
9.2 Skipping a label
If the settings do not resolve the problems with label misalignment, you can try with label
calibration. You can also use this method if the printer prints one extra blank label in addition to
the label for material.
The procedure is as follows: Go to the Control Panel and click the Devices and Printers icon.
Find the ZDesigner GC420t printer and right-click on it. Select Printing preferences from the list
of options. The ZDesigner GC420t Printing preferences window will open, in which you
select the Tools tab (see Figure 31).
Figure 31: Calibrating medium
Select Action under Command type, and select Calibrate media under Command name, and
then click the Send button. This command sends the parameters for re-calibration to the printer.
After that, retry printing the label.


![[MS-SPO]: SharePoint Protocols Overviewinteroperability.blob.core.windows.net/files/MS-SPO/[MS-SPO]-16022… · Release: February 26, 2016 [MS-SPO]: SharePoint Protocols Overview](https://static.documents.pub/doc/80x56/5f834595e55dce791d3d0e82/ms-spo-sharepoint-protocols-over-ms-spo-16022-release-february-26-2016-ms-spo.jpg)

