96
www.novell.com/documentation Server Installation Guide ZENworks® 11
| Date post: | 10-Sep-2018 |
| Category: |
Documents |
| Upload: | phungquynh |
| View: | 250 times |
| Download: | 0 times |
www.novell.com/documentation
Server Installation GuideZENworks® 11
Legal Notices
Novell, Inc. makes no representations or warranties with respect to the contents or use of this documentation, and specifically disclaims any express or implied warranties of merchantability or fitness for any particular purpose. Further, Novell, Inc. reserves the right to revise this publication and to make changes to its content, at any time, without obligation to notify any person or entity of such revisions or changes.
Further, Novell, Inc. makes no representations or warranties with respect to any software, and specifically disclaims any express or implied warranties of merchantability or fitness for any particular purpose. Further, Novell, Inc. reserves the right to make changes to any and all parts of Novell software, at any time, without any obligation to notify any person or entity of such changes.
Any products or technical information provided under this Agreement may be subject to U.S. export controls and the trade laws of other countries. You agree to comply with all export control regulations and to obtain any required licenses or classification to export, re-export or import deliverables. You agree not to export or re-export to entities on the current U.S. export exclusion lists or to any embargoed or terrorist countries as specified in the U.S. export laws. You agree to not use deliverables for prohibited nuclear, missile, or chemical biological weaponry end uses. See the Novell International Trade Services Web page (http://www.novell.com/info/exports/) for more information on exporting Novell software. Novell assumes no responsibility for your failure to obtain any necessary export approvals.
Copyright © 2007 - Novell, Inc. All rights reserved. No part of this publication may be reproduced, photocopied, stored on a retrieval system, or transmitted without the express written consent of the publisher.
Novell, Inc.1800 South Novell PlaceProvo, UT 84606U.S.A.www.novell.com
Online Documentation: To access the latest online documentation for this and other Novell products, see the Novell Documentation Web page (http://www.novell.com/documentation).
Novell Trademarks
For Novell trademarks, see the Novell Trademark and Service Mark list (http://www.novell.com/company/legal/trademarks/tmlist.html).
Third-Party Materials
All third-party trademarks are the property of their respective owners.
Contents
About This Guide 5
1 System Requirements 7
1.1 Primary Server Requirements . . . . . . . . . . . . . . . . . . . . . . . . . . . . . . . . . . . . . . . . . . . . . . . . . . . . . . . 71.2 Managed Device Requirements . . . . . . . . . . . . . . . . . . . . . . . . . . . . . . . . . . . . . . . . . . . . . . . . . . . . . 13
1.2.1 Windows Managed Device Requirements . . . . . . . . . . . . . . . . . . . . . . . . . . . . . . . . . . . . . . 131.2.2 Linux Managed Device Requirements . . . . . . . . . . . . . . . . . . . . . . . . . . . . . . . . . . . . . . . . . 17
1.3 Satellite Requirements . . . . . . . . . . . . . . . . . . . . . . . . . . . . . . . . . . . . . . . . . . . . . . . . . . . . . . . . . . . . 181.3.1 Windows Device Performing Satellite Roles . . . . . . . . . . . . . . . . . . . . . . . . . . . . . . . . . . . . 191.3.2 Linux Device Performing Satellite Roles . . . . . . . . . . . . . . . . . . . . . . . . . . . . . . . . . . . . . . . 20
1.4 Database Requirements. . . . . . . . . . . . . . . . . . . . . . . . . . . . . . . . . . . . . . . . . . . . . . . . . . . . . . . . . . . 211.5 LDAP Directory Requirements . . . . . . . . . . . . . . . . . . . . . . . . . . . . . . . . . . . . . . . . . . . . . . . . . . . . . . 231.6 Inventoried-Only Device Requirements . . . . . . . . . . . . . . . . . . . . . . . . . . . . . . . . . . . . . . . . . . . . . . . 231.7 Administration Browser Requirements . . . . . . . . . . . . . . . . . . . . . . . . . . . . . . . . . . . . . . . . . . . . . . . . 261.8 Installation User Requirements . . . . . . . . . . . . . . . . . . . . . . . . . . . . . . . . . . . . . . . . . . . . . . . . . . . . . 261.9 Supported Smart Cards and Smart Card Readers . . . . . . . . . . . . . . . . . . . . . . . . . . . . . . . . . . . . . . 26
2 Coexistence with Other ZENworks Products 27
2.1 ZENworks Desktop Management . . . . . . . . . . . . . . . . . . . . . . . . . . . . . . . . . . . . . . . . . . . . . . . . . . . 272.1.1 Server Coexistence . . . . . . . . . . . . . . . . . . . . . . . . . . . . . . . . . . . . . . . . . . . . . . . . . . . . . . . 272.1.2 Agent Coexistence. . . . . . . . . . . . . . . . . . . . . . . . . . . . . . . . . . . . . . . . . . . . . . . . . . . . . . . . 27
2.2 ZENworks Asset Management. . . . . . . . . . . . . . . . . . . . . . . . . . . . . . . . . . . . . . . . . . . . . . . . . . . . . . 302.3 ZENworks Endpoint Security Management . . . . . . . . . . . . . . . . . . . . . . . . . . . . . . . . . . . . . . . . . . . . 312.4 ZENworks Patch Management . . . . . . . . . . . . . . . . . . . . . . . . . . . . . . . . . . . . . . . . . . . . . . . . . . . . . 312.5 ZENworks Server Management . . . . . . . . . . . . . . . . . . . . . . . . . . . . . . . . . . . . . . . . . . . . . . . . . . . . . 312.6 ZENworks Linux Management . . . . . . . . . . . . . . . . . . . . . . . . . . . . . . . . . . . . . . . . . . . . . . . . . . . . . . 312.7 ZENworks Handheld Management . . . . . . . . . . . . . . . . . . . . . . . . . . . . . . . . . . . . . . . . . . . . . . . . . . 32
3 Preparation 33
3.1 Understanding What the ZENworks Installation Does . . . . . . . . . . . . . . . . . . . . . . . . . . . . . . . . . . . . 333.2 Gathering Installation Information . . . . . . . . . . . . . . . . . . . . . . . . . . . . . . . . . . . . . . . . . . . . . . . . . . . 333.3 Preinstallation Tasks. . . . . . . . . . . . . . . . . . . . . . . . . . . . . . . . . . . . . . . . . . . . . . . . . . . . . . . . . . . . . . 34
3.3.1 Verifying That the Minimum Requirements Have Been Met . . . . . . . . . . . . . . . . . . . . . . . . 343.3.2 Creating an Installation DVD from the ISO Download . . . . . . . . . . . . . . . . . . . . . . . . . . . . . 353.3.3 Creating an External Certificate. . . . . . . . . . . . . . . . . . . . . . . . . . . . . . . . . . . . . . . . . . . . . . 353.3.4 Installing an External ZENworks Database . . . . . . . . . . . . . . . . . . . . . . . . . . . . . . . . . . . . . 373.3.5 Installing Mono 2.0.1-1.17 on SLES 11 . . . . . . . . . . . . . . . . . . . . . . . . . . . . . . . . . . . . . . . . 46
4 Installing the ZENworks Server 47
4.1 Performing the Installation . . . . . . . . . . . . . . . . . . . . . . . . . . . . . . . . . . . . . . . . . . . . . . . . . . . . . . . . . 474.2 Performing an Unattended Installation . . . . . . . . . . . . . . . . . . . . . . . . . . . . . . . . . . . . . . . . . . . . . . . . 57
4.2.1 Creating Your Response File . . . . . . . . . . . . . . . . . . . . . . . . . . . . . . . . . . . . . . . . . . . . . . . . 574.2.2 Performing the Installation . . . . . . . . . . . . . . . . . . . . . . . . . . . . . . . . . . . . . . . . . . . . . . . . . . 59
4.3 Verifying Installation . . . . . . . . . . . . . . . . . . . . . . . . . . . . . . . . . . . . . . . . . . . . . . . . . . . . . . . . . . . . . . 594.4 Post-Installation Tasks . . . . . . . . . . . . . . . . . . . . . . . . . . . . . . . . . . . . . . . . . . . . . . . . . . . . . . . . . . . . 60
Contents 3
4 ZEN
4.4.1 Tasks for All Platforms . . . . . . . . . . . . . . . . . . . . . . . . . . . . . . . . . . . . . . . . . . . . . . . . . . . . . 614.4.2 Tasks for VMware ESX . . . . . . . . . . . . . . . . . . . . . . . . . . . . . . . . . . . . . . . . . . . . . . . . . . . . 63
5 Installing the ZENworks Adaptive Agent 65
6 Uninstalling ZENworks Software 67
6.1 Correct Order for Uninstalling ZENworks Software . . . . . . . . . . . . . . . . . . . . . . . . . . . . . . . . . . . . . . 676.2 Uninstalling a Windows Primary Server, Satellite, or Managed Device . . . . . . . . . . . . . . . . . . . . . . . 686.3 Uninstalling a Linux Primary Server . . . . . . . . . . . . . . . . . . . . . . . . . . . . . . . . . . . . . . . . . . . . . . . . . 71
6.3.1 Uninstalling ZENworks Software and Removing the Device from the Zone . . . . . . . . . . . . 716.3.2 Uninstalling ZENworks Software While Retaining the Device in the Zone . . . . . . . . . . . . . 72
6.4 Uninstalling a Linux Satellite or Managed Device . . . . . . . . . . . . . . . . . . . . . . . . . . . . . . . . . . . . . . . 736.4.1 Zone-Level Uninstallation . . . . . . . . . . . . . . . . . . . . . . . . . . . . . . . . . . . . . . . . . . . . . . . . . . 736.4.2 Local Uninstallation . . . . . . . . . . . . . . . . . . . . . . . . . . . . . . . . . . . . . . . . . . . . . . . . . . . . . . . 75
A Installation Executable Arguments 77
B Installing Dependent RPM Packages on a Linux Device 79
B.1 Red Hat Enterprise Linux Server . . . . . . . . . . . . . . . . . . . . . . . . . . . . . . . . . . . . . . . . . . . . . . . . . . . 79B.2 SUSE Linux Enterprise Server . . . . . . . . . . . . . . . . . . . . . . . . . . . . . . . . . . . . . . . . . . . . . . . . . . . . . . 83
C Troubleshooting 87
C.1 Troubleshooting Installation . . . . . . . . . . . . . . . . . . . . . . . . . . . . . . . . . . . . . . . . . . . . . . . . . . . . . . . . 87C.2 Uninstallation Error Messages . . . . . . . . . . . . . . . . . . . . . . . . . . . . . . . . . . . . . . . . . . . . . . . . . . . . . . 94C.3 Post Installation Troubleshooting . . . . . . . . . . . . . . . . . . . . . . . . . . . . . . . . . . . . . . . . . . . . . . . . . . . . 96
works 11 Server Installation Guide
About This Guide
This ZENworks 11 Server Installation Guide includes information to help you successfully install Novell ZENworks 11 .
ZENworks Virtual Appliance 11 is also available as a virtual appliance that can be deployed to the supported virtual infrastructure. This virtual appliance is built on the customized SUSE Linux Enterprise Server 11 JeOS (SLES 11 SP1), and is pre-installed with ZENworks 11 .
For more information on how to deploy and manage ZENworks Appliance, see the ZENworks Virtual Appliance 11 Deployment and Administration Reference.
The information in this guide is organized as follows:
Chapter 1, “System Requirements,” on page 7
Chapter 2, “Coexistence with Other ZENworks Products,” on page 27
Chapter 3, “Preparation,” on page 33
Chapter 4, “Installing the ZENworks Server,” on page 47
Chapter 5, “Installing the ZENworks Adaptive Agent,” on page 65
Chapter 6, “Uninstalling ZENworks Software,” on page 67
Appendix A, “Installation Executable Arguments,” on page 77
Appendix B, “Installing Dependent RPM Packages on a Linux Device,” on page 79
Appendix C, “Troubleshooting,” on page 87
Audience
This guide is intended for ZENworks administrators.
Feedback
We want to hear your comments and suggestions about this manual and the other documentation included with this product. Please use the User Comments feature at the bottom of each page of the online documentation.
Additional Documentation
ZENworks 11 is supported by other documentation (in both PDF and HTML formats) that you can use to learn about and implement the product. For additional documentation, see the .
About This Guide 5

6 ZENworks 11 Server Installation Guide

1 1System Requirements
The following sections provide the Novell ZENworks 11 requirements for hardware and software, for requirement specific to subsequent releases refer to “Update for ZENworks 11 SP2 - System Requirements”:
Section 1.1, “Primary Server Requirements,” on page 7
Section 1.2, “Managed Device Requirements,” on page 13
Section 1.3, “Satellite Requirements,” on page 18
Section 1.4, “Database Requirements,” on page 21
Section 1.5, “LDAP Directory Requirements,” on page 23
Section 1.6, “Inventoried-Only Device Requirements,” on page 23
Section 1.7, “Administration Browser Requirements,” on page 26
Section 1.8, “Installation User Requirements,” on page 26
Section 1.9, “Supported Smart Cards and Smart Card Readers,” on page 26
1.1 Primary Server RequirementsThe server where you install the Primary Server software must meet the following requirements:
Table 1-1 Primary Server Requirements
Item Requirements Additional Details
Server Usage
Your server might be capable of handling tasks in addition to the tasks a Primary Server performs for ZENworks 11 . However, we recommend that any server where you install the Primary Server software be used only for ZENworks 11 purposes.
For example, you might not want the server to do the following:
Host Novell eDirectory
Host Novell Client32
Host Active Directory
Be a terminal server
System Requirements 7
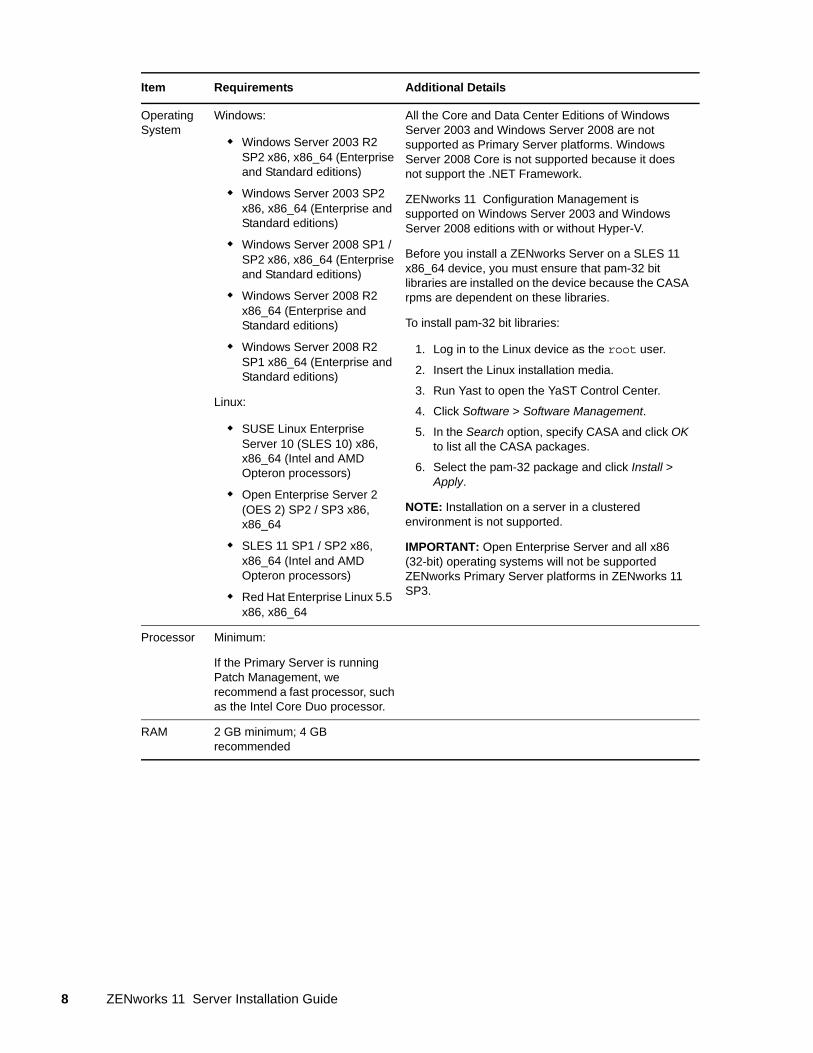
Operating System
Windows:
Windows Server 2003 R2 SP2 x86, x86_64 (Enterprise and Standard editions)
Windows Server 2003 SP2 x86, x86_64 (Enterprise and Standard editions)
Windows Server 2008 SP1 / SP2 x86, x86_64 (Enterprise and Standard editions)
Windows Server 2008 R2 x86_64 (Enterprise and Standard editions)
Windows Server 2008 R2 SP1 x86_64 (Enterprise and Standard editions)
Linux:
SUSE Linux Enterprise Server 10 (SLES 10) x86, x86_64 (Intel and AMD Opteron processors)
Open Enterprise Server 2 (OES 2) SP2 / SP3 x86, x86_64
SLES 11 SP1 / SP2 x86, x86_64 (Intel and AMD Opteron processors)
Red Hat Enterprise Linux 5.5 x86, x86_64
All the Core and Data Center Editions of Windows Server 2003 and Windows Server 2008 are not supported as Primary Server platforms. Windows Server 2008 Core is not supported because it does not support the .NET Framework.
ZENworks 11 Configuration Management is supported on Windows Server 2003 and Windows Server 2008 editions with or without Hyper-V.
Before you install a ZENworks Server on a SLES 11 x86_64 device, you must ensure that pam-32 bit libraries are installed on the device because the CASA rpms are dependent on these libraries.
To install pam-32 bit libraries:
1. Log in to the Linux device as the root user.
2. Insert the Linux installation media.
3. Run Yast to open the YaST Control Center.
4. Click Software > Software Management.
5. In the Search option, specify CASA and click OK to list all the CASA packages.
6. Select the pam-32 package and click Install > Apply.
NOTE: Installation on a server in a clustered environment is not supported.
IMPORTANT: Open Enterprise Server and all x86 (32-bit) operating systems will not be supported ZENworks Primary Server platforms in ZENworks 11 SP3.
Processor Minimum:
If the Primary Server is running Patch Management, we recommend a fast processor, such as the Intel Core Duo processor.
RAM 2 GB minimum; 4 GB recommended
Item Requirements Additional Details
8 ZENworks 11 Server Installation Guide
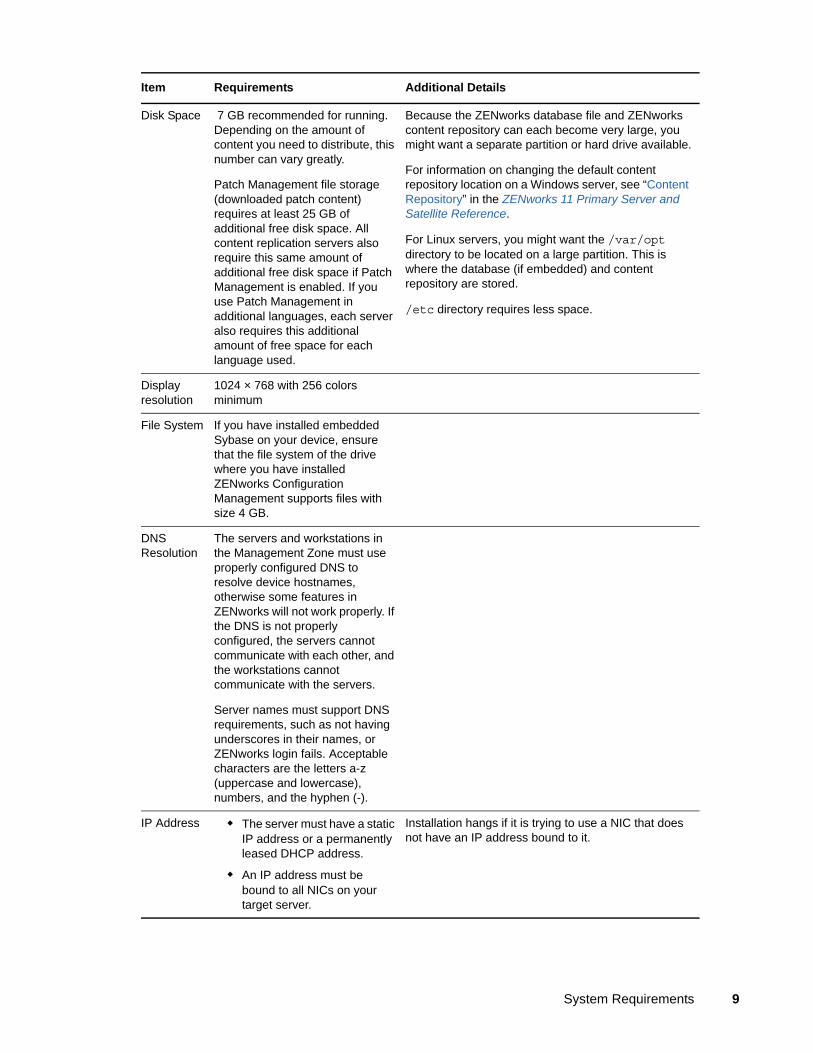
Disk Space 7 GB recommended for running. Depending on the amount of content you need to distribute, this number can vary greatly.
Patch Management file storage (downloaded patch content) requires at least 25 GB of additional free disk space. All content replication servers also require this same amount of additional free disk space if Patch Management is enabled. If you use Patch Management in additional languages, each server also requires this additional amount of free space for each language used.
Because the ZENworks database file and ZENworks content repository can each become very large, you might want a separate partition or hard drive available.
For information on changing the default content repository location on a Windows server, see “Content Repository” in the ZENworks 11 Primary Server and Satellite Reference.
For Linux servers, you might want the /var/opt directory to be located on a large partition. This is where the database (if embedded) and content repository are stored.
/etc directory requires less space.
Display resolution
1024 × 768 with 256 colors minimum
File System If you have installed embedded Sybase on your device, ensure that the file system of the drive where you have installed ZENworks Configuration Management supports files with size 4 GB.
DNS Resolution
The servers and workstations in the Management Zone must use properly configured DNS to resolve device hostnames, otherwise some features in ZENworks will not work properly. If the DNS is not properly configured, the servers cannot communicate with each other, and the workstations cannot communicate with the servers.
Server names must support DNS requirements, such as not having underscores in their names, or ZENworks login fails. Acceptable characters are the letters a-z (uppercase and lowercase), numbers, and the hyphen (-).
IP Address The server must have a static IP address or a permanently leased DHCP address.
An IP address must be bound to all NICs on your target server.
Installation hangs if it is trying to use a NIC that does not have an IP address bound to it.
Item Requirements Additional Details
System Requirements 9

Microsoft .NET (Only for Windows)
The Microsoft .NET 3.5 SP1 framework and its latest updates must be installed and running on the Windows Primary Server in order to install ZENworks 11 .
On Windows Server 2003/2008, you are given the option to launch the .NET installation during the installation of ZENworks. If you select the option, .NET is automatically installed.
On Windows Server 2008 R2, .NET 3.5 SP1 is available by default. However, you need to enable it. You are given the option to enable .NET during the installation of ZENworks. If you select the option, .NET is automatically enabled.
For more information on how to enable the .NET framework, see “Enabling the .NET Framework” in the ZENworks 11 Discovery, Deployment, and Retirement Reference.
Item Requirements Additional Details
10 ZENworks 11 Server Installation Guide
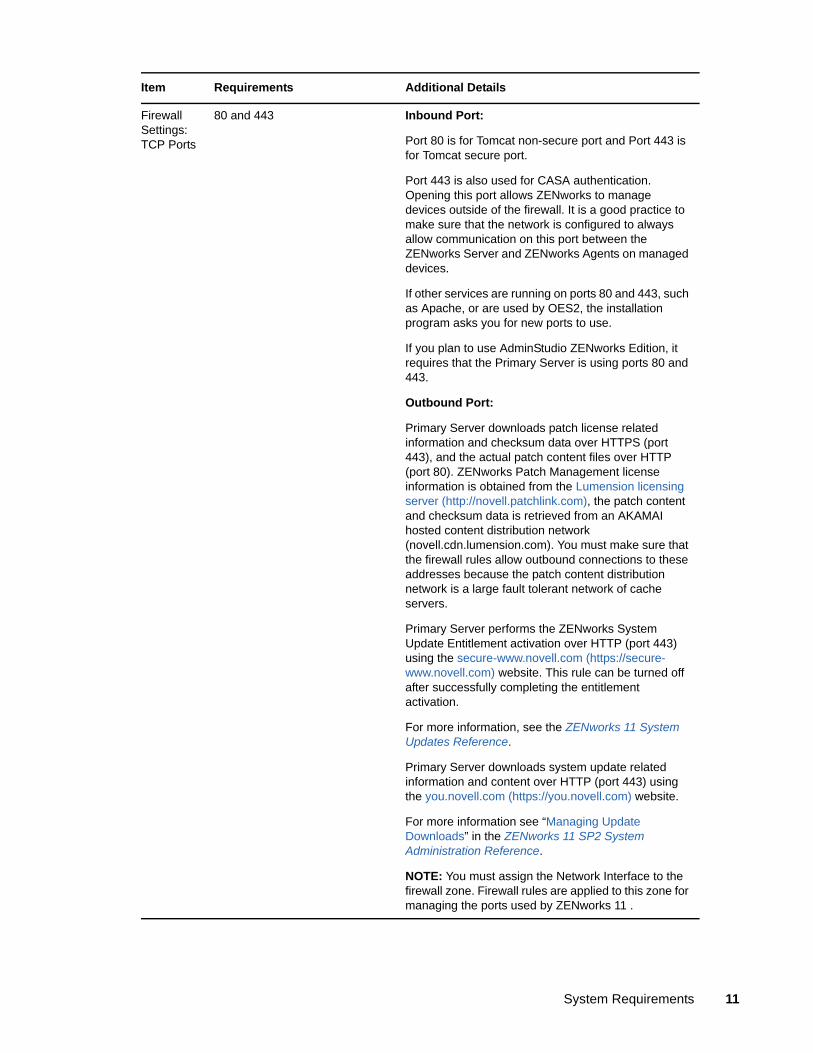
Firewall Settings: TCP Ports
80 and 443 Inbound Port:
Port 80 is for Tomcat non-secure port and Port 443 is for Tomcat secure port.
Port 443 is also used for CASA authentication. Opening this port allows ZENworks to manage devices outside of the firewall. It is a good practice to make sure that the network is configured to always allow communication on this port between the ZENworks Server and ZENworks Agents on managed devices.
If other services are running on ports 80 and 443, such as Apache, or are used by OES2, the installation program asks you for new ports to use.
If you plan to use AdminStudio ZENworks Edition, it requires that the Primary Server is using ports 80 and 443.
Outbound Port:
Primary Server downloads patch license related information and checksum data over HTTPS (port 443), and the actual patch content files over HTTP (port 80). ZENworks Patch Management license information is obtained from the Lumension licensing server (http://novell.patchlink.com), the patch content and checksum data is retrieved from an AKAMAI hosted content distribution network (novell.cdn.lumension.com). You must make sure that the firewall rules allow outbound connections to these addresses because the patch content distribution network is a large fault tolerant network of cache servers.
Primary Server performs the ZENworks System Update Entitlement activation over HTTP (port 443) using the secure-www.novell.com (https://secure-www.novell.com) website. This rule can be turned off after successfully completing the entitlement activation.
For more information, see the ZENworks 11 System Updates Reference.
Primary Server downloads system update related information and content over HTTP (port 443) using the you.novell.com (https://you.novell.com) website.
For more information see “Managing Update Downloads” in the ZENworks 11 SP2 System Administration Reference.
NOTE: You must assign the Network Interface to the firewall zone. Firewall rules are applied to this zone for managing the ports used by ZENworks 11 .
Item Requirements Additional Details
System Requirements 11
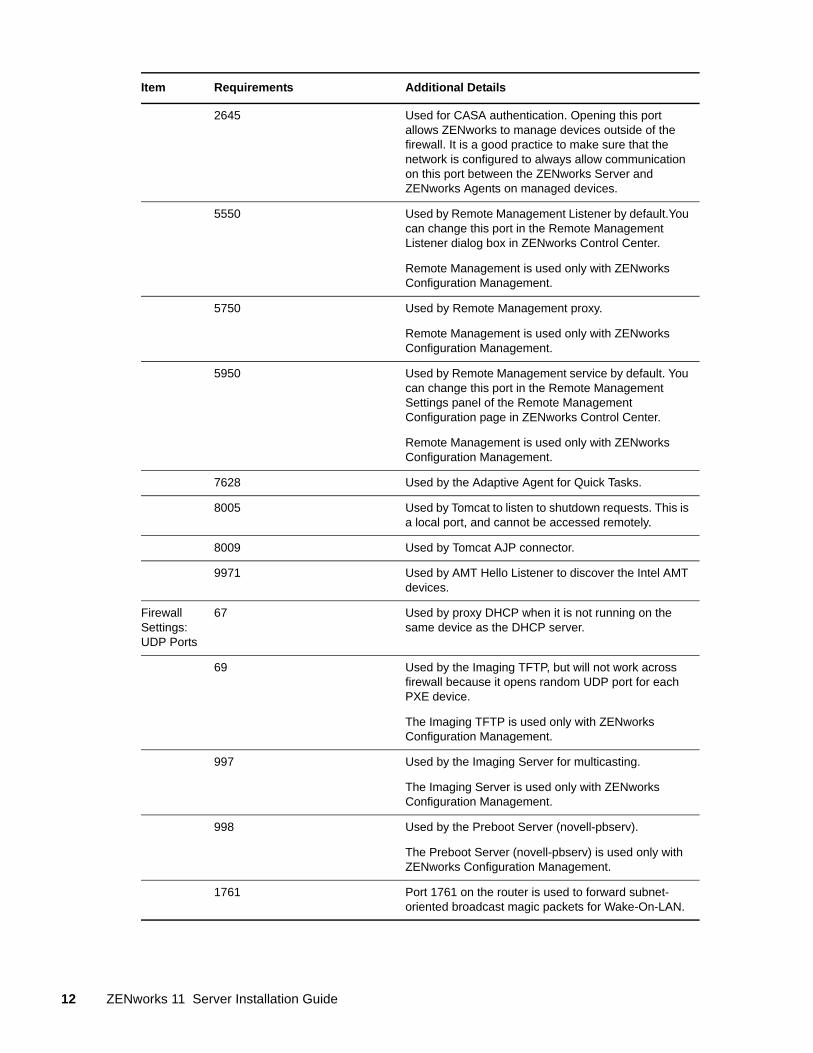
2645 Used for CASA authentication. Opening this port allows ZENworks to manage devices outside of the firewall. It is a good practice to make sure that the network is configured to always allow communication on this port between the ZENworks Server and ZENworks Agents on managed devices.
5550 Used by Remote Management Listener by default.You can change this port in the Remote Management Listener dialog box in ZENworks Control Center.
Remote Management is used only with ZENworks Configuration Management.
5750 Used by Remote Management proxy.
Remote Management is used only with ZENworks Configuration Management.
5950 Used by Remote Management service by default. You can change this port in the Remote Management Settings panel of the Remote Management Configuration page in ZENworks Control Center.
Remote Management is used only with ZENworks Configuration Management.
7628 Used by the Adaptive Agent for Quick Tasks.
8005 Used by Tomcat to listen to shutdown requests. This is a local port, and cannot be accessed remotely.
8009 Used by Tomcat AJP connector.
9971 Used by AMT Hello Listener to discover the Intel AMT devices.
Firewall Settings: UDP Ports
67 Used by proxy DHCP when it is not running on the same device as the DHCP server.
69 Used by the Imaging TFTP, but will not work across firewall because it opens random UDP port for each PXE device.
The Imaging TFTP is used only with ZENworks Configuration Management.
997 Used by the Imaging Server for multicasting.
The Imaging Server is used only with ZENworks Configuration Management.
998 Used by the Preboot Server (novell-pbserv).
The Preboot Server (novell-pbserv) is used only with ZENworks Configuration Management.
1761 Port 1761 on the router is used to forward subnet-oriented broadcast magic packets for Wake-On-LAN.
Item Requirements Additional Details
12 ZENworks 11 Server Installation Guide
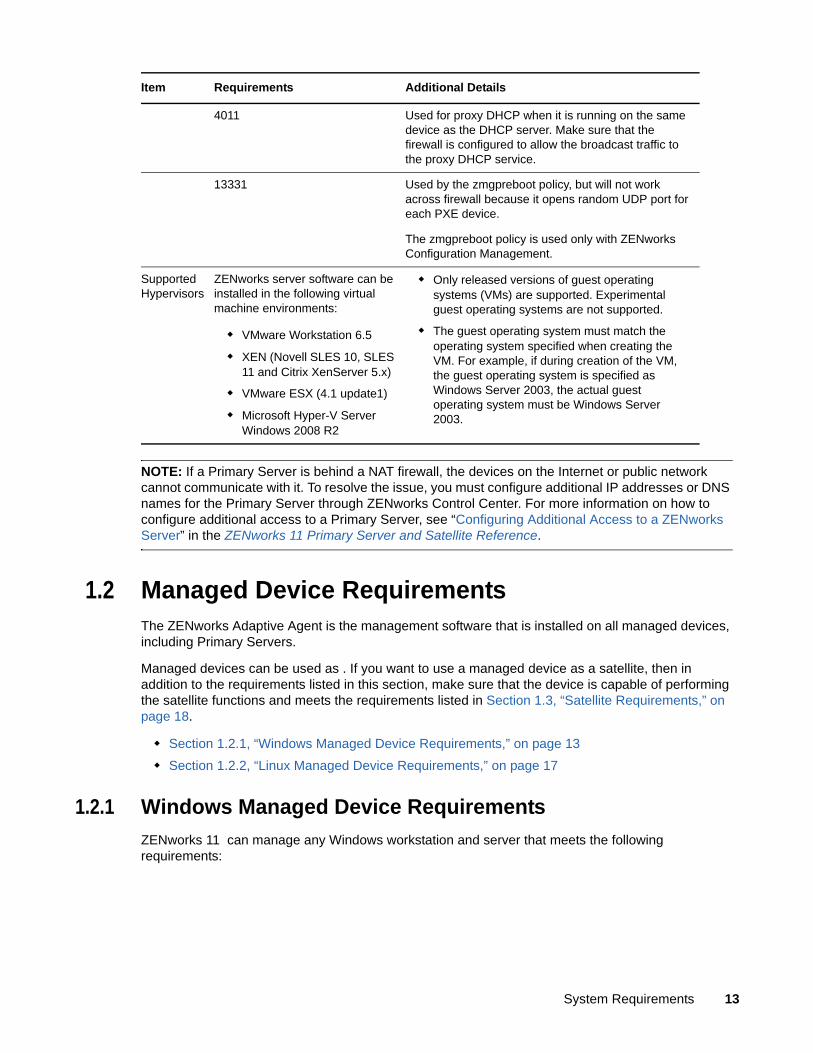
NOTE: If a Primary Server is behind a NAT firewall, the devices on the Internet or public network cannot communicate with it. To resolve the issue, you must configure additional IP addresses or DNS names for the Primary Server through ZENworks Control Center. For more information on how to configure additional access to a Primary Server, see “Configuring Additional Access to a ZENworks Server” in the ZENworks 11 Primary Server and Satellite Reference.
1.2 Managed Device RequirementsThe ZENworks Adaptive Agent is the management software that is installed on all managed devices, including Primary Servers.
Managed devices can be used as . If you want to use a managed device as a satellite, then in addition to the requirements listed in this section, make sure that the device is capable of performing the satellite functions and meets the requirements listed in Section 1.3, “Satellite Requirements,” on page 18.
Section 1.2.1, “Windows Managed Device Requirements,” on page 13
Section 1.2.2, “Linux Managed Device Requirements,” on page 17
1.2.1 Windows Managed Device Requirements
ZENworks 11 can manage any Windows workstation and server that meets the following requirements:
4011 Used for proxy DHCP when it is running on the same device as the DHCP server. Make sure that the firewall is configured to allow the broadcast traffic to the proxy DHCP service.
13331 Used by the zmgpreboot policy, but will not work across firewall because it opens random UDP port for each PXE device.
The zmgpreboot policy is used only with ZENworks Configuration Management.
Supported Hypervisors
ZENworks server software can be installed in the following virtual machine environments:
VMware Workstation 6.5
XEN (Novell SLES 10, SLES 11 and Citrix XenServer 5.x)
VMware ESX (4.1 update1)
Microsoft Hyper-V Server Windows 2008 R2
Only released versions of guest operating systems (VMs) are supported. Experimental guest operating systems are not supported.
The guest operating system must match the operating system specified when creating the VM. For example, if during creation of the VM, the guest operating system is specified as Windows Server 2003, the actual guest operating system must be Windows Server 2003.
Item Requirements Additional Details
System Requirements 13
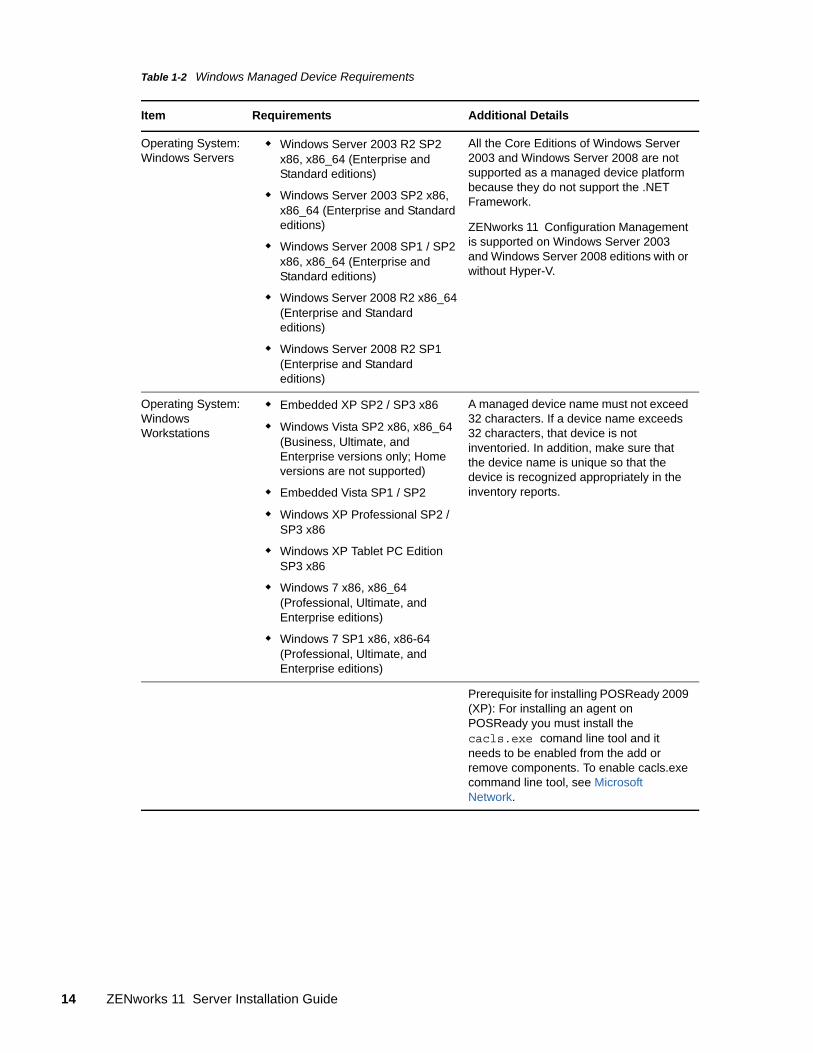
Table 1-2 Windows Managed Device Requirements
Item Requirements Additional Details
Operating System: Windows Servers
Windows Server 2003 R2 SP2 x86, x86_64 (Enterprise and Standard editions)
Windows Server 2003 SP2 x86, x86_64 (Enterprise and Standard editions)
Windows Server 2008 SP1 / SP2 x86, x86_64 (Enterprise and Standard editions)
Windows Server 2008 R2 x86_64 (Enterprise and Standard editions)
Windows Server 2008 R2 SP1 (Enterprise and Standard editions)
All the Core Editions of Windows Server 2003 and Windows Server 2008 are not supported as a managed device platform because they do not support the .NET Framework.
ZENworks 11 Configuration Management is supported on Windows Server 2003 and Windows Server 2008 editions with or without Hyper-V.
Operating System: Windows Workstations
Embedded XP SP2 / SP3 x86
Windows Vista SP2 x86, x86_64 (Business, Ultimate, and Enterprise versions only; Home versions are not supported)
Embedded Vista SP1 / SP2
Windows XP Professional SP2 / SP3 x86
Windows XP Tablet PC Edition SP3 x86
Windows 7 x86, x86_64 (Professional, Ultimate, and Enterprise editions)
Windows 7 SP1 x86, x86-64 (Professional, Ultimate, and Enterprise editions)
A managed device name must not exceed 32 characters. If a device name exceeds 32 characters, that device is not inventoried. In addition, make sure that the device name is unique so that the device is recognized appropriately in the inventory reports.
Prerequisite for installing POSReady 2009 (XP): For installing an agent on POSReady you must install the cacls.exe comand line tool and it needs to be enabled from the add or remove components. To enable cacls.exe command line tool, see Microsoft Network.
14 ZENworks 11 Server Installation Guide
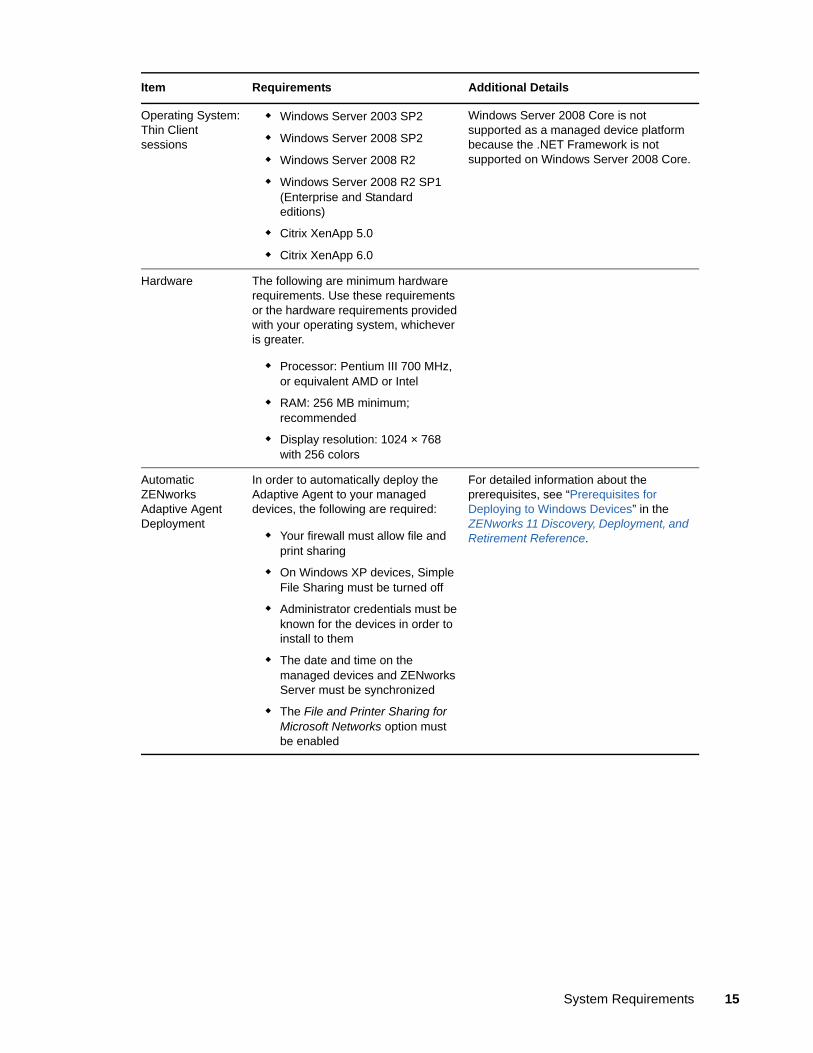
Operating System: Thin Client sessions
Windows Server 2003 SP2
Windows Server 2008 SP2
Windows Server 2008 R2
Windows Server 2008 R2 SP1 (Enterprise and Standard editions)
Citrix XenApp 5.0
Citrix XenApp 6.0
Windows Server 2008 Core is not supported as a managed device platform because the .NET Framework is not supported on Windows Server 2008 Core.
Hardware The following are minimum hardware requirements. Use these requirements or the hardware requirements provided with your operating system, whichever is greater.
Processor: Pentium III 700 MHz, or equivalent AMD or Intel
RAM: 256 MB minimum; recommended
Display resolution: 1024 × 768 with 256 colors
Automatic ZENworks Adaptive Agent Deployment
In order to automatically deploy the Adaptive Agent to your managed devices, the following are required:
Your firewall must allow file and print sharing
On Windows XP devices, Simple File Sharing must be turned off
Administrator credentials must be known for the devices in order to install to them
The date and time on the managed devices and ZENworks Server must be synchronized
The File and Printer Sharing for Microsoft Networks option must be enabled
For detailed information about the prerequisites, see “Prerequisites for Deploying to Windows Devices” in the ZENworks 11 Discovery, Deployment, and Retirement Reference.
Item Requirements Additional Details
System Requirements 15
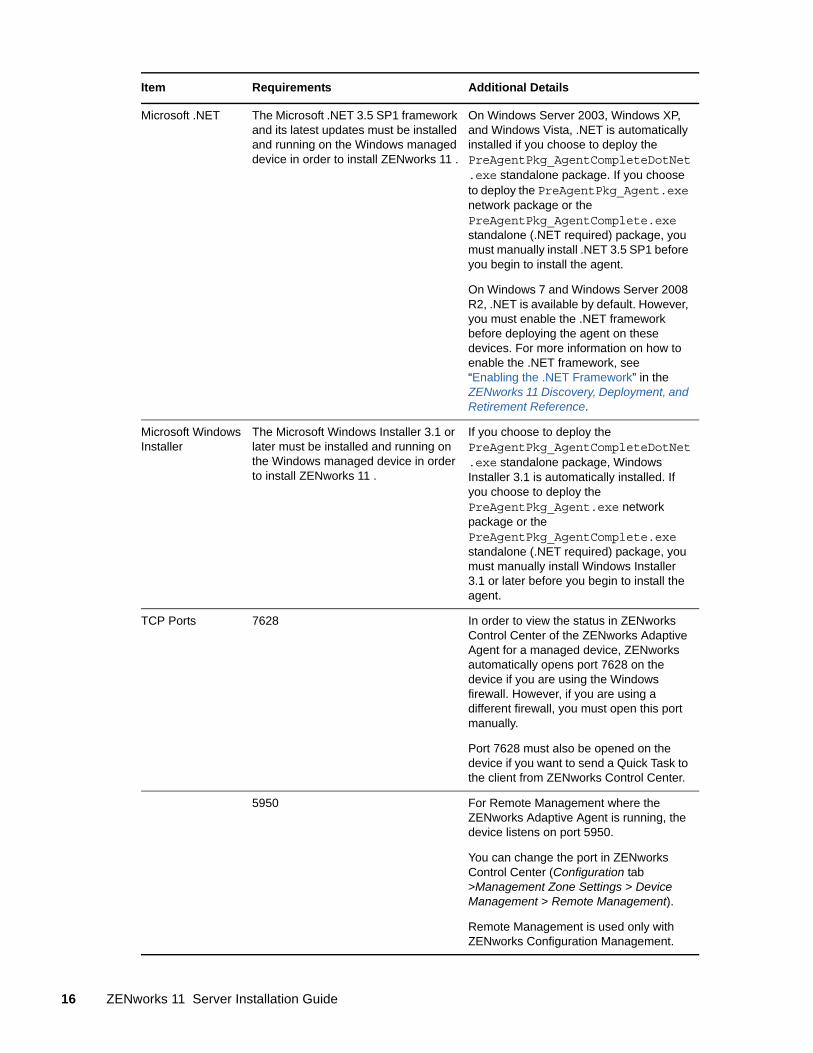
Microsoft .NET The Microsoft .NET 3.5 SP1 framework and its latest updates must be installed and running on the Windows managed device in order to install ZENworks 11 .
On Windows Server 2003, Windows XP, and Windows Vista, .NET is automatically installed if you choose to deploy the PreAgentPkg_AgentCompleteDotNet.exe standalone package. If you choose to deploy the PreAgentPkg_Agent.exe network package or the PreAgentPkg_AgentComplete.exe standalone (.NET required) package, you must manually install .NET 3.5 SP1 before you begin to install the agent.
On Windows 7 and Windows Server 2008 R2, .NET is available by default. However, you must enable the .NET framework before deploying the agent on these devices. For more information on how to enable the .NET framework, see “Enabling the .NET Framework” in the ZENworks 11 Discovery, Deployment, and Retirement Reference.
Microsoft Windows Installer
The Microsoft Windows Installer 3.1 or later must be installed and running on the Windows managed device in order to install ZENworks 11 .
If you choose to deploy the PreAgentPkg_AgentCompleteDotNet.exe standalone package, Windows Installer 3.1 is automatically installed. If you choose to deploy the PreAgentPkg_Agent.exe network package or the PreAgentPkg_AgentComplete.exe standalone (.NET required) package, you must manually install Windows Installer 3.1 or later before you begin to install the agent.
TCP Ports 7628 In order to view the status in ZENworks Control Center of the ZENworks Adaptive Agent for a managed device, ZENworks automatically opens port 7628 on the device if you are using the Windows firewall. However, if you are using a different firewall, you must open this port manually.
Port 7628 must also be opened on the device if you want to send a Quick Task to the client from ZENworks Control Center.
5950 For Remote Management where the ZENworks Adaptive Agent is running, the device listens on port 5950.
You can change the port in ZENworks Control Center (Configuration tab >Management Zone Settings > Device Management > Remote Management).
Remote Management is used only with ZENworks Configuration Management.
Item Requirements Additional Details
16 ZENworks 11 Server Installation Guide
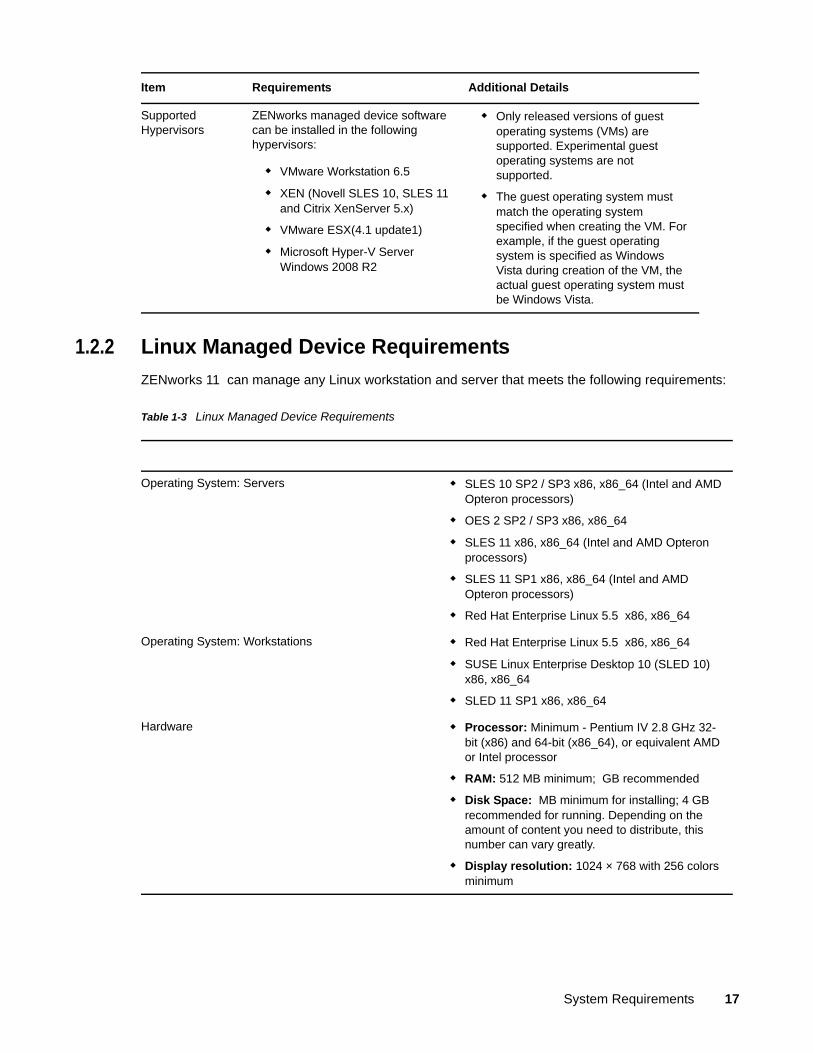
1.2.2 Linux Managed Device Requirements
ZENworks 11 can manage any Linux workstation and server that meets the following requirements:
Table 1-3 Linux Managed Device Requirements
Supported Hypervisors
ZENworks managed device software can be installed in the following hypervisors:
VMware Workstation 6.5
XEN (Novell SLES 10, SLES 11 and Citrix XenServer 5.x)
VMware ESX(4.1 update1)
Microsoft Hyper-V Server Windows 2008 R2
Only released versions of guest operating systems (VMs) are supported. Experimental guest operating systems are not supported.
The guest operating system must match the operating system specified when creating the VM. For example, if the guest operating system is specified as Windows Vista during creation of the VM, the actual guest operating system must be Windows Vista.
Item Requirements Additional Details
Operating System: Servers SLES 10 SP2 / SP3 x86, x86_64 (Intel and AMD Opteron processors)
OES 2 SP2 / SP3 x86, x86_64
SLES 11 x86, x86_64 (Intel and AMD Opteron processors)
SLES 11 SP1 x86, x86_64 (Intel and AMD Opteron processors)
Red Hat Enterprise Linux 5.5 x86, x86_64
Operating System: Workstations Red Hat Enterprise Linux 5.5 x86, x86_64
SUSE Linux Enterprise Desktop 10 (SLED 10) x86, x86_64
SLED 11 SP1 x86, x86_64
Hardware Processor: Minimum - Pentium IV 2.8 GHz 32-bit (x86) and 64-bit (x86_64), or equivalent AMD or Intel processor
RAM: 512 MB minimum; GB recommended
Disk Space: MB minimum for installing; 4 GB recommended for running. Depending on the amount of content you need to distribute, this number can vary greatly.
Display resolution: 1024 × 768 with 256 colors minimum
System Requirements 17
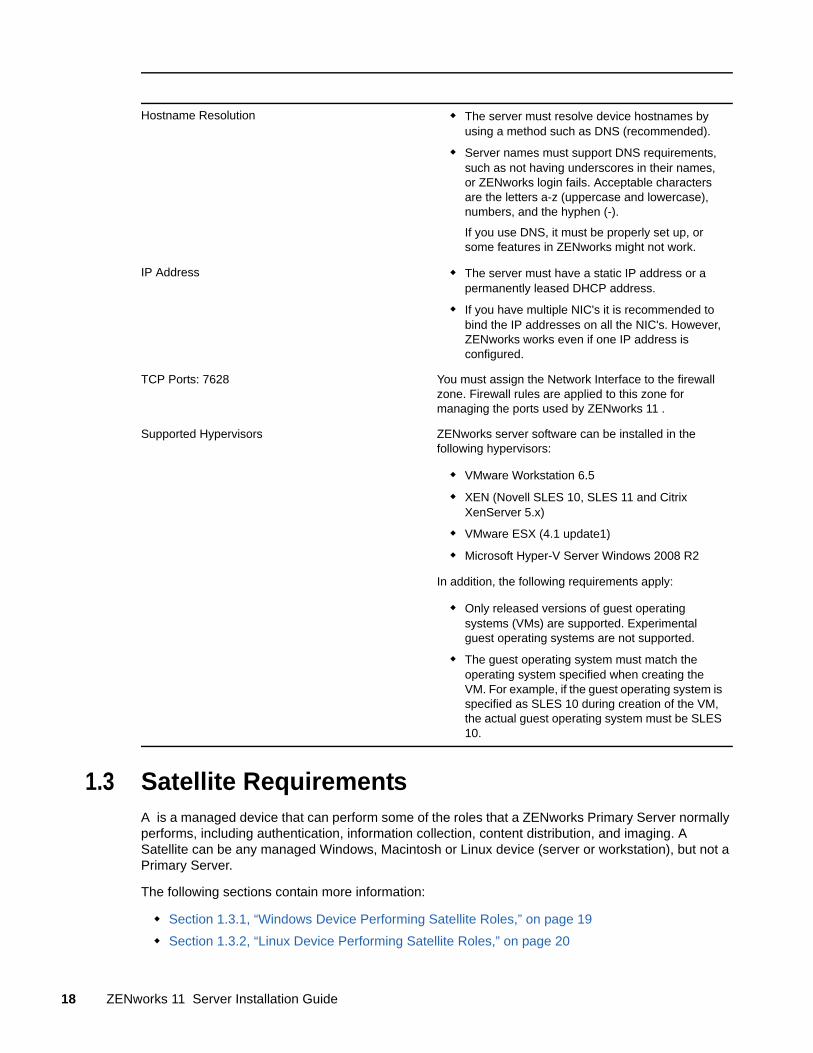
1.3 Satellite RequirementsA is a managed device that can perform some of the roles that a ZENworks Primary Server normally performs, including authentication, information collection, content distribution, and imaging. A Satellite can be any managed Windows, Macintosh or Linux device (server or workstation), but not a Primary Server.
The following sections contain more information:
Section 1.3.1, “Windows Device Performing Satellite Roles,” on page 19
Section 1.3.2, “Linux Device Performing Satellite Roles,” on page 20
Hostname Resolution The server must resolve device hostnames by using a method such as DNS (recommended).
Server names must support DNS requirements, such as not having underscores in their names, or ZENworks login fails. Acceptable characters are the letters a-z (uppercase and lowercase), numbers, and the hyphen (-).
If you use DNS, it must be properly set up, or some features in ZENworks might not work.
IP Address The server must have a static IP address or a permanently leased DHCP address.
If you have multiple NIC's it is recommended to bind the IP addresses on all the NIC's. However, ZENworks works even if one IP address is configured.
TCP Ports: 7628 You must assign the Network Interface to the firewall zone. Firewall rules are applied to this zone for managing the ports used by ZENworks 11 .
Supported Hypervisors ZENworks server software can be installed in the following hypervisors:
VMware Workstation 6.5
XEN (Novell SLES 10, SLES 11 and Citrix XenServer 5.x)
VMware ESX (4.1 update1)
Microsoft Hyper-V Server Windows 2008 R2
In addition, the following requirements apply:
Only released versions of guest operating systems (VMs) are supported. Experimental guest operating systems are not supported.
The guest operating system must match the operating system specified when creating the VM. For example, if the guest operating system is specified as SLES 10 during creation of the VM, the actual guest operating system must be SLES 10.
18 ZENworks 11 Server Installation Guide
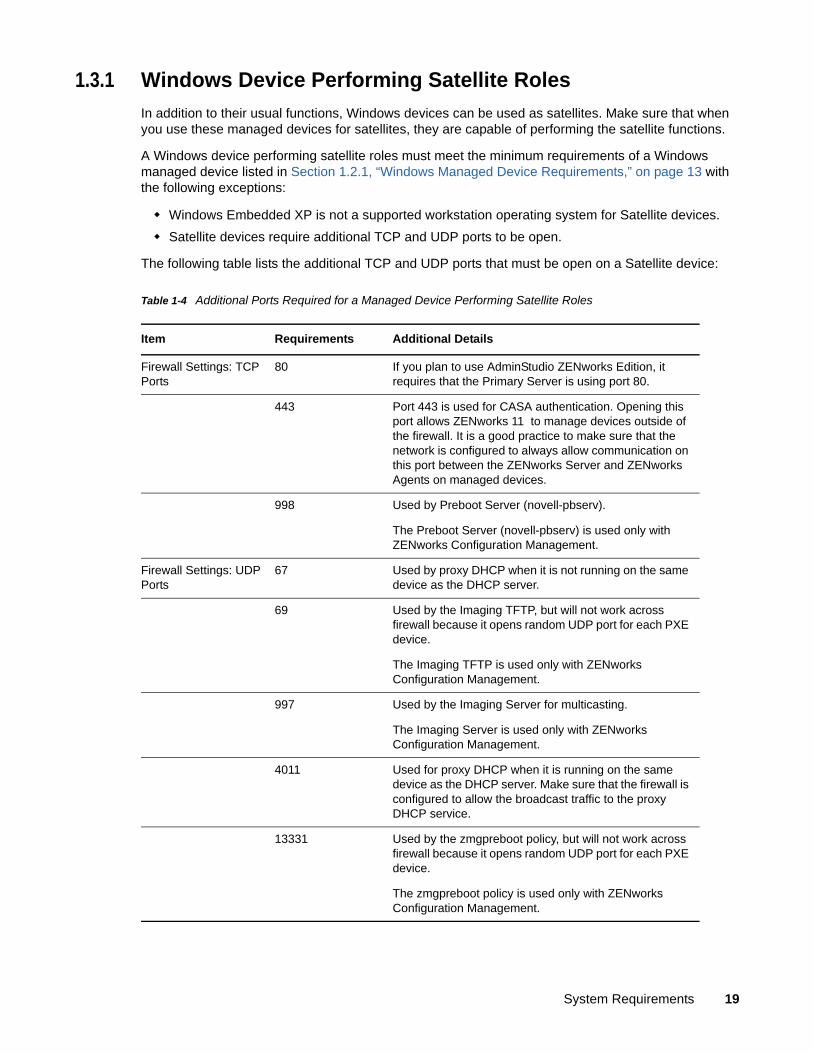
1.3.1 Windows Device Performing Satellite Roles
In addition to their usual functions, Windows devices can be used as satellites. Make sure that when you use these managed devices for satellites, they are capable of performing the satellite functions.
A Windows device performing satellite roles must meet the minimum requirements of a Windows managed device listed in Section 1.2.1, “Windows Managed Device Requirements,” on page 13 with the following exceptions:
Windows Embedded XP is not a supported workstation operating system for Satellite devices.
Satellite devices require additional TCP and UDP ports to be open.
The following table lists the additional TCP and UDP ports that must be open on a Satellite device:
Table 1-4 Additional Ports Required for a Managed Device Performing Satellite Roles
Item Requirements Additional Details
Firewall Settings: TCP Ports
80 If you plan to use AdminStudio ZENworks Edition, it requires that the Primary Server is using port 80.
443 Port 443 is used for CASA authentication. Opening this port allows ZENworks 11 to manage devices outside of the firewall. It is a good practice to make sure that the network is configured to always allow communication on this port between the ZENworks Server and ZENworks Agents on managed devices.
998 Used by Preboot Server (novell-pbserv).
The Preboot Server (novell-pbserv) is used only with ZENworks Configuration Management.
Firewall Settings: UDP Ports
67 Used by proxy DHCP when it is not running on the same device as the DHCP server.
69 Used by the Imaging TFTP, but will not work across firewall because it opens random UDP port for each PXE device.
The Imaging TFTP is used only with ZENworks Configuration Management.
997 Used by the Imaging Server for multicasting.
The Imaging Server is used only with ZENworks Configuration Management.
4011 Used for proxy DHCP when it is running on the same device as the DHCP server. Make sure that the firewall is configured to allow the broadcast traffic to the proxy DHCP service.
13331 Used by the zmgpreboot policy, but will not work across firewall because it opens random UDP port for each PXE device.
The zmgpreboot policy is used only with ZENworks Configuration Management.
System Requirements 19
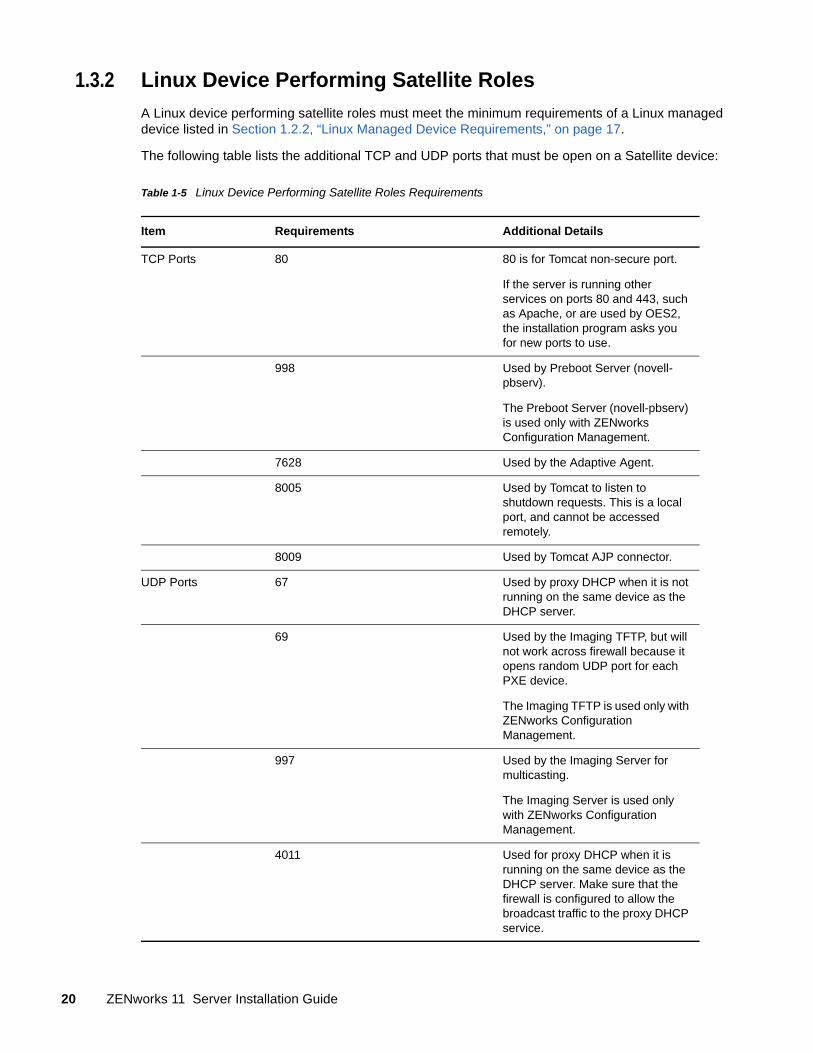
1.3.2 Linux Device Performing Satellite Roles
A Linux device performing satellite roles must meet the minimum requirements of a Linux managed device listed in Section 1.2.2, “Linux Managed Device Requirements,” on page 17.
The following table lists the additional TCP and UDP ports that must be open on a Satellite device:
Table 1-5 Linux Device Performing Satellite Roles Requirements
Item Requirements Additional Details
TCP Ports 80 80 is for Tomcat non-secure port.
If the server is running other services on ports 80 and 443, such as Apache, or are used by OES2, the installation program asks you for new ports to use.
998 Used by Preboot Server (novell-pbserv).
The Preboot Server (novell-pbserv) is used only with ZENworks Configuration Management.
7628 Used by the Adaptive Agent.
8005 Used by Tomcat to listen to shutdown requests. This is a local port, and cannot be accessed remotely.
8009 Used by Tomcat AJP connector.
UDP Ports 67 Used by proxy DHCP when it is not running on the same device as the DHCP server.
69 Used by the Imaging TFTP, but will not work across firewall because it opens random UDP port for each PXE device.
The Imaging TFTP is used only with ZENworks Configuration Management.
997 Used by the Imaging Server for multicasting.
The Imaging Server is used only with ZENworks Configuration Management.
4011 Used for proxy DHCP when it is running on the same device as the DHCP server. Make sure that the firewall is configured to allow the broadcast traffic to the proxy DHCP service.
20 ZENworks 11 Server Installation Guide
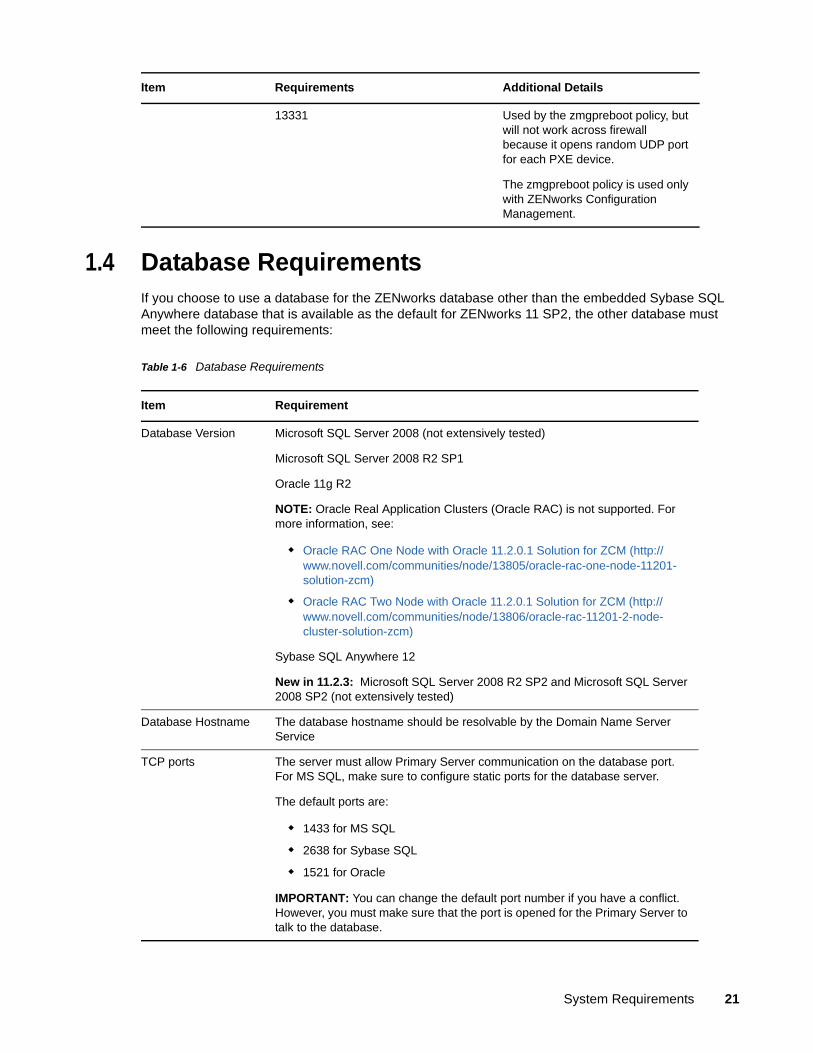
1.4 Database RequirementsIf you choose to use a database for the ZENworks database other than the embedded Sybase SQL Anywhere database that is available as the default for ZENworks 11 SP2, the other database must meet the following requirements:
Table 1-6 Database Requirements
13331 Used by the zmgpreboot policy, but will not work across firewall because it opens random UDP port for each PXE device.
The zmgpreboot policy is used only with ZENworks Configuration Management.
Item Requirements Additional Details
Item Requirement
Database Version Microsoft SQL Server 2008 (not extensively tested)
Microsoft SQL Server 2008 R2 SP1
Oracle 11g R2
NOTE: Oracle Real Application Clusters (Oracle RAC) is not supported. For more information, see:
Oracle RAC One Node with Oracle 11.2.0.1 Solution for ZCM (http://www.novell.com/communities/node/13805/oracle-rac-one-node-11201-solution-zcm)
Oracle RAC Two Node with Oracle 11.2.0.1 Solution for ZCM (http://www.novell.com/communities/node/13806/oracle-rac-11201-2-node-cluster-solution-zcm)
Sybase SQL Anywhere 12
New in 11.2.3: Microsoft SQL Server 2008 R2 SP2 and Microsoft SQL Server 2008 SP2 (not extensively tested)
Database Hostname The database hostname should be resolvable by the Domain Name Server Service
TCP ports The server must allow Primary Server communication on the database port. For MS SQL, make sure to configure static ports for the database server.
The default ports are:
1433 for MS SQL
2638 for Sybase SQL
1521 for Oracle
IMPORTANT: You can change the default port number if you have a conflict. However, you must make sure that the port is opened for the Primary Server to talk to the database.
System Requirements 21
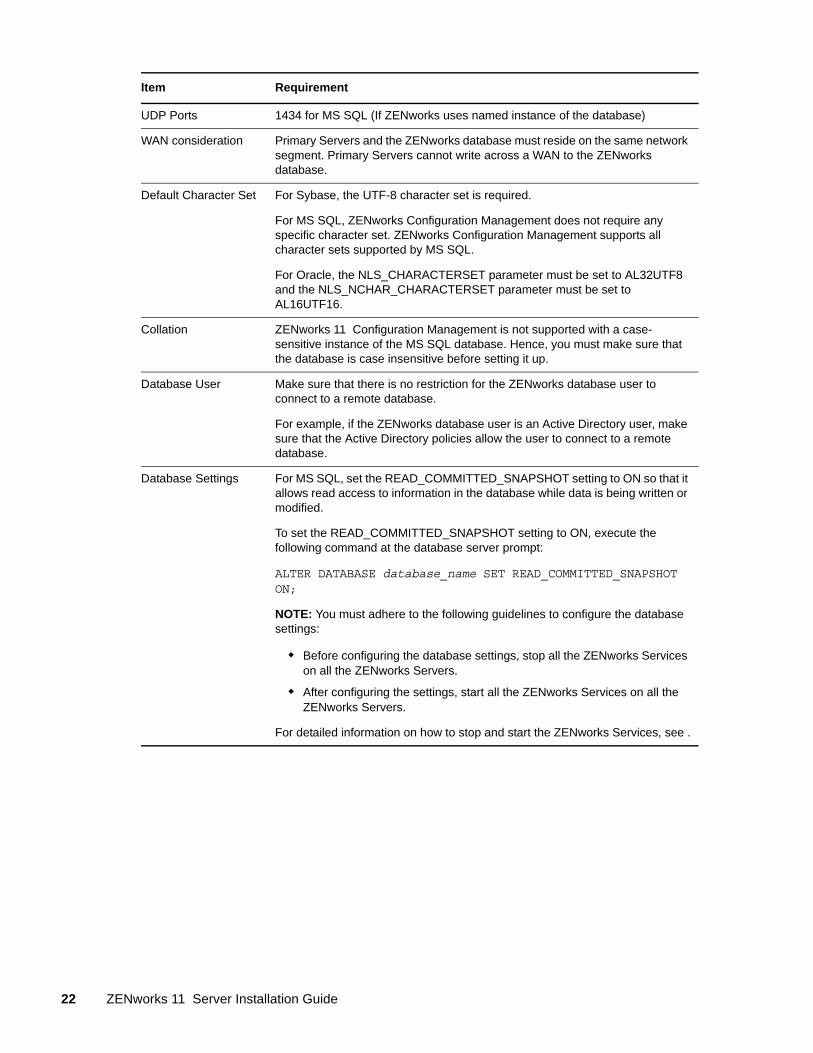
UDP Ports 1434 for MS SQL (If ZENworks uses named instance of the database)
WAN consideration Primary Servers and the ZENworks database must reside on the same network segment. Primary Servers cannot write across a WAN to the ZENworks database.
Default Character Set For Sybase, the UTF-8 character set is required.
For MS SQL, ZENworks Configuration Management does not require any specific character set. ZENworks Configuration Management supports all character sets supported by MS SQL.
For Oracle, the NLS_CHARACTERSET parameter must be set to AL32UTF8 and the NLS_NCHAR_CHARACTERSET parameter must be set to AL16UTF16.
Collation ZENworks 11 Configuration Management is not supported with a case-sensitive instance of the MS SQL database. Hence, you must make sure that the database is case insensitive before setting it up.
Database User Make sure that there is no restriction for the ZENworks database user to connect to a remote database.
For example, if the ZENworks database user is an Active Directory user, make sure that the Active Directory policies allow the user to connect to a remote database.
Database Settings For MS SQL, set the READ_COMMITTED_SNAPSHOT setting to ON so that it allows read access to information in the database while data is being written or modified.
To set the READ_COMMITTED_SNAPSHOT setting to ON, execute the following command at the database server prompt:
ALTER DATABASE database_name SET READ_COMMITTED_SNAPSHOT ON;
NOTE: You must adhere to the following guidelines to configure the database settings:
Before configuring the database settings, stop all the ZENworks Services on all the ZENworks Servers.
After configuring the settings, start all the ZENworks Services on all the ZENworks Servers.
For detailed information on how to stop and start the ZENworks Services, see .
Item Requirement
22 ZENworks 11 Server Installation Guide
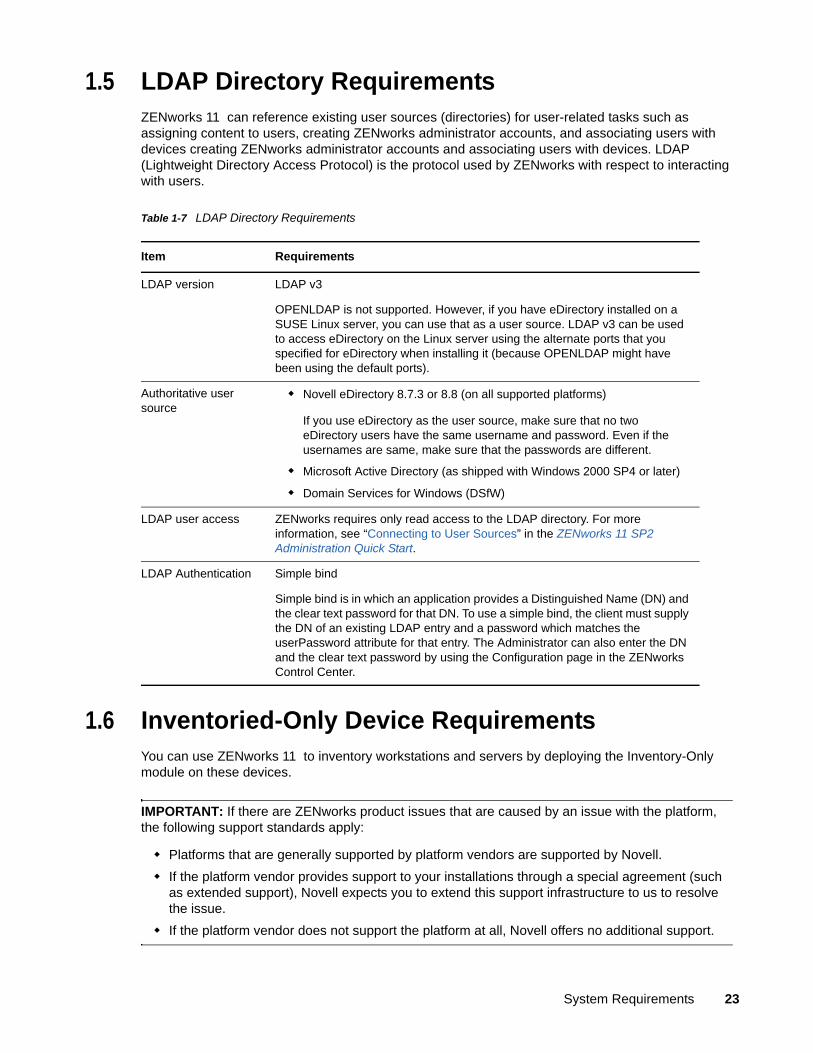
1.5 LDAP Directory RequirementsZENworks 11 can reference existing user sources (directories) for user-related tasks such as assigning content to users, creating ZENworks administrator accounts, and associating users with devices creating ZENworks administrator accounts and associating users with devices. LDAP (Lightweight Directory Access Protocol) is the protocol used by ZENworks with respect to interacting with users.
Table 1-7 LDAP Directory Requirements
1.6 Inventoried-Only Device RequirementsYou can use ZENworks 11 to inventory workstations and servers by deploying the Inventory-Only module on these devices.
IMPORTANT: If there are ZENworks product issues that are caused by an issue with the platform, the following support standards apply:
Platforms that are generally supported by platform vendors are supported by Novell.
If the platform vendor provides support to your installations through a special agreement (such as extended support), Novell expects you to extend this support infrastructure to us to resolve the issue.
If the platform vendor does not support the platform at all, Novell offers no additional support.
Item Requirements
LDAP version LDAP v3
OPENLDAP is not supported. However, if you have eDirectory installed on a SUSE Linux server, you can use that as a user source. LDAP v3 can be used to access eDirectory on the Linux server using the alternate ports that you specified for eDirectory when installing it (because OPENLDAP might have been using the default ports).
Authoritative user source
Novell eDirectory 8.7.3 or 8.8 (on all supported platforms)
If you use eDirectory as the user source, make sure that no two eDirectory users have the same username and password. Even if the usernames are same, make sure that the passwords are different.
Microsoft Active Directory (as shipped with Windows 2000 SP4 or later)
Domain Services for Windows (DSfW)
LDAP user access ZENworks requires only read access to the LDAP directory. For more information, see “Connecting to User Sources” in the ZENworks 11 SP2 Administration Quick Start.
LDAP Authentication Simple bind
Simple bind is in which an application provides a Distinguished Name (DN) and the clear text password for that DN. To use a simple bind, the client must supply the DN of an existing LDAP entry and a password which matches the userPassword attribute for that entry. The Administrator can also enter the DN and the clear text password by using the Configuration page in the ZENworks Control Center.
System Requirements 23
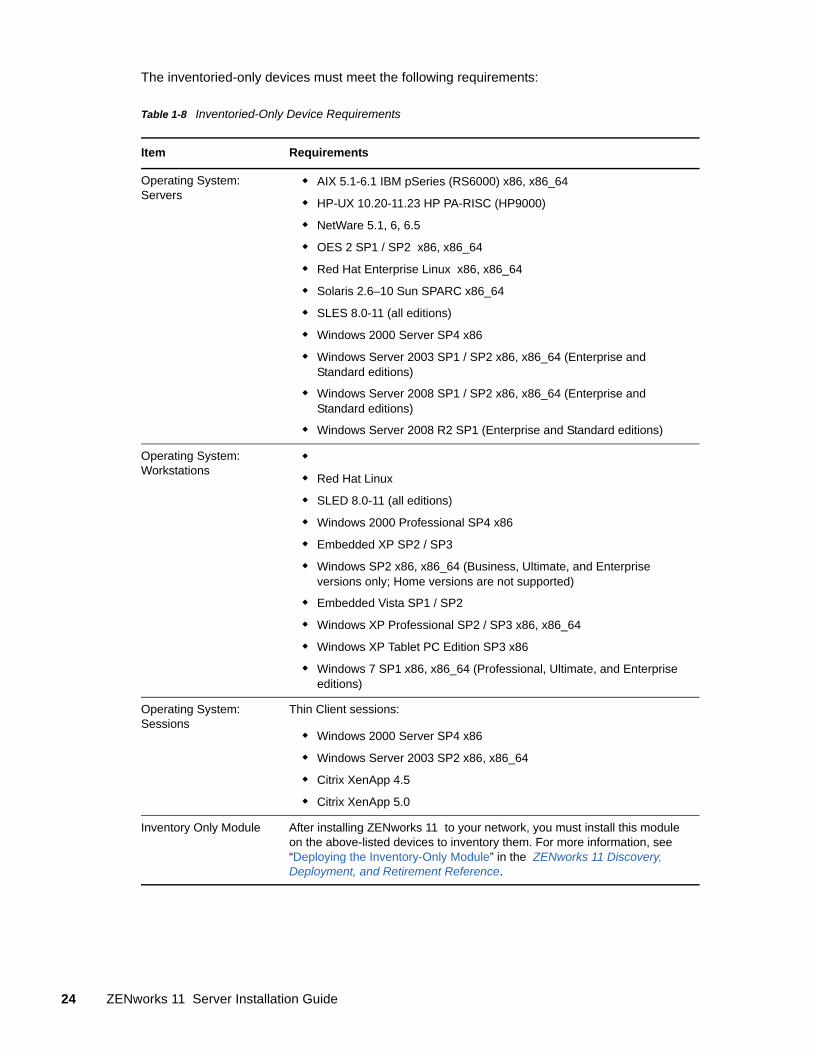
The inventoried-only devices must meet the following requirements:
Table 1-8 Inventoried-Only Device Requirements
Item Requirements
Operating System: Servers
AIX 5.1-6.1 IBM pSeries (RS6000) x86, x86_64
HP-UX 10.20-11.23 HP PA-RISC (HP9000)
NetWare 5.1, 6, 6.5
OES 2 SP1 / SP2 x86, x86_64
Red Hat Enterprise Linux x86, x86_64
Solaris 2.6–10 Sun SPARC x86_64
SLES 8.0-11 (all editions)
Windows 2000 Server SP4 x86
Windows Server 2003 SP1 / SP2 x86, x86_64 (Enterprise and Standard editions)
Windows Server 2008 SP1 / SP2 x86, x86_64 (Enterprise and Standard editions)
Windows Server 2008 R2 SP1 (Enterprise and Standard editions)
Operating System: Workstations
Red Hat Linux
SLED 8.0-11 (all editions)
Windows 2000 Professional SP4 x86
Embedded XP SP2 / SP3
Windows SP2 x86, x86_64 (Business, Ultimate, and Enterprise versions only; Home versions are not supported)
Embedded Vista SP1 / SP2
Windows XP Professional SP2 / SP3 x86, x86_64
Windows XP Tablet PC Edition SP3 x86
Windows 7 SP1 x86, x86_64 (Professional, Ultimate, and Enterprise editions)
Operating System: Sessions
Thin Client sessions:
Windows 2000 Server SP4 x86
Windows Server 2003 SP2 x86, x86_64
Citrix XenApp 4.5
Citrix XenApp 5.0
Inventory Only Module After installing ZENworks 11 to your network, you must install this module on the above-listed devices to inventory them. For more information, see “Deploying the Inventory-Only Module” in the ZENworks 11 Discovery, Deployment, and Retirement Reference.
24 ZENworks 11 Server Installation Guide
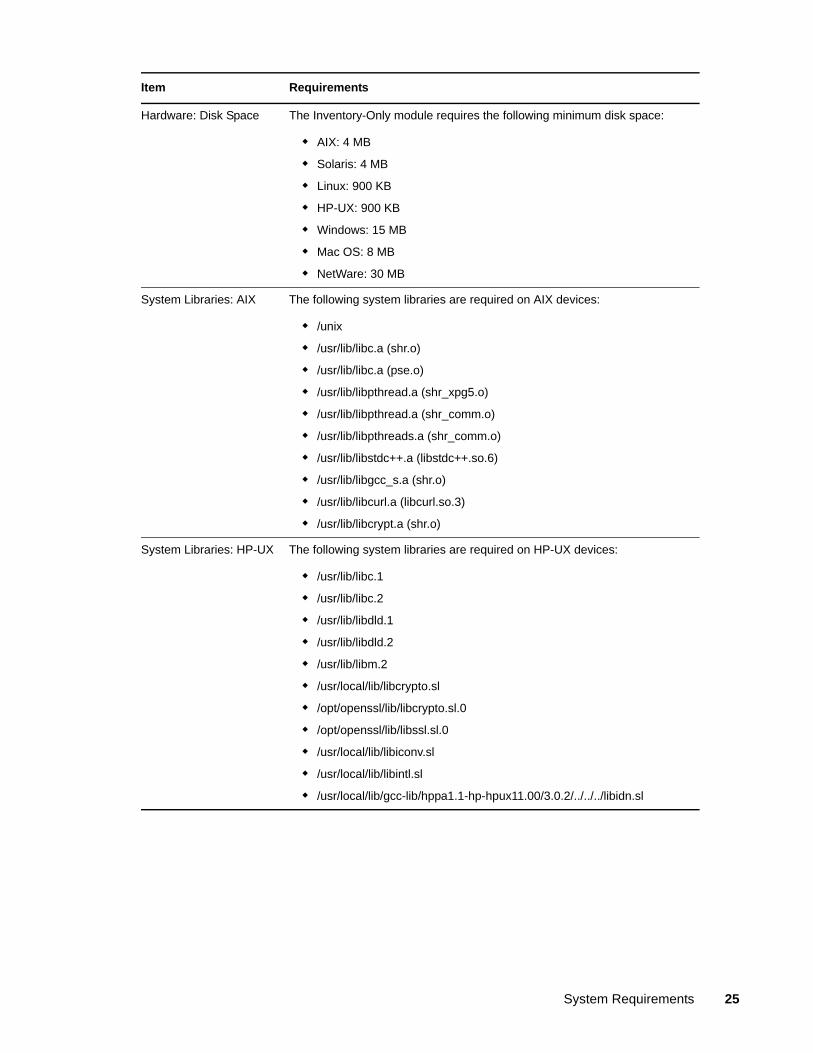
Hardware: Disk Space The Inventory-Only module requires the following minimum disk space:
AIX: 4 MB
Solaris: 4 MB
Linux: 900 KB
HP-UX: 900 KB
Windows: 15 MB
Mac OS: 8 MB
NetWare: 30 MB
System Libraries: AIX The following system libraries are required on AIX devices:
/unix
/usr/lib/libc.a (shr.o)
/usr/lib/libc.a (pse.o)
/usr/lib/libpthread.a (shr_xpg5.o)
/usr/lib/libpthread.a (shr_comm.o)
/usr/lib/libpthreads.a (shr_comm.o)
/usr/lib/libstdc++.a (libstdc++.so.6)
/usr/lib/libgcc_s.a (shr.o)
/usr/lib/libcurl.a (libcurl.so.3)
/usr/lib/libcrypt.a (shr.o)
System Libraries: HP-UX The following system libraries are required on HP-UX devices:
/usr/lib/libc.1
/usr/lib/libc.2
/usr/lib/libdld.1
/usr/lib/libdld.2
/usr/lib/libm.2
/usr/local/lib/libcrypto.sl
/opt/openssl/lib/libcrypto.sl.0
/opt/openssl/lib/libssl.sl.0
/usr/local/lib/libiconv.sl
/usr/local/lib/libintl.sl
/usr/local/lib/gcc-lib/hppa1.1-hp-hpux11.00/3.0.2/../../../libidn.sl
Item Requirements
System Requirements 25
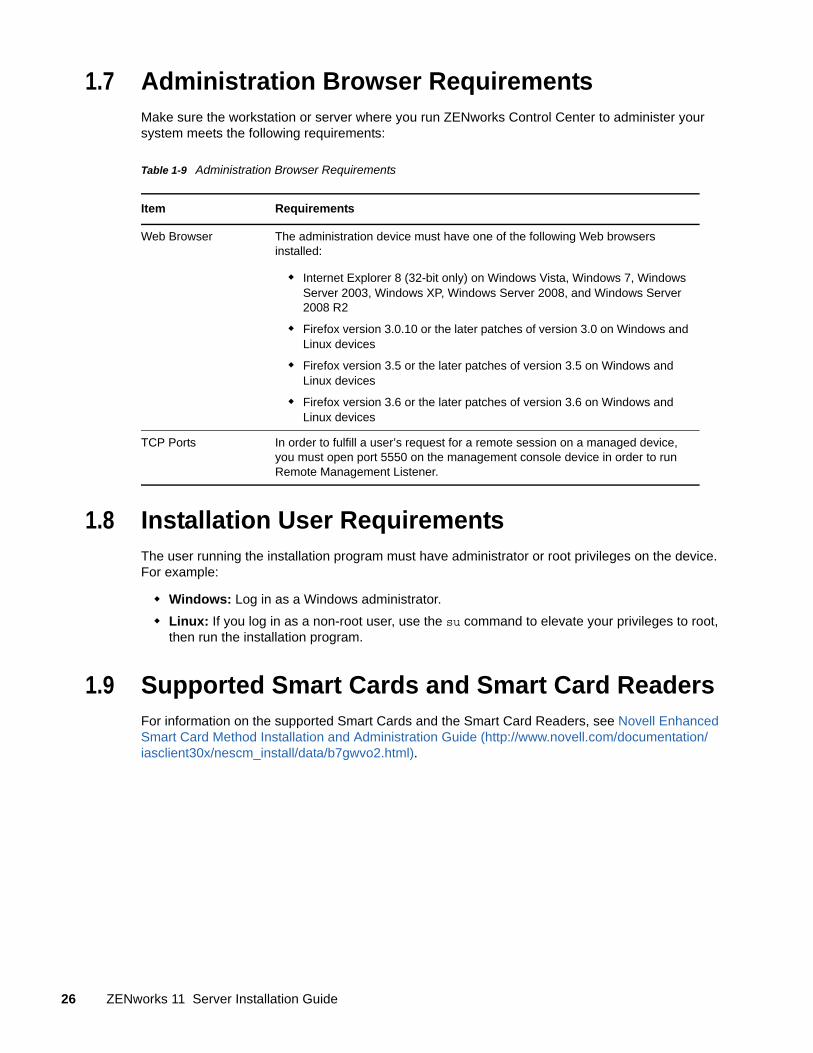
1.7 Administration Browser RequirementsMake sure the workstation or server where you run ZENworks Control Center to administer your system meets the following requirements:
Table 1-9 Administration Browser Requirements
1.8 Installation User RequirementsThe user running the installation program must have administrator or root privileges on the device. For example:
Windows: Log in as a Windows administrator.
Linux: If you log in as a non-root user, use the su command to elevate your privileges to root, then run the installation program.
1.9 Supported Smart Cards and Smart Card ReadersFor information on the supported Smart Cards and the Smart Card Readers, see Novell Enhanced Smart Card Method Installation and Administration Guide (http://www.novell.com/documentation/iasclient30x/nescm_install/data/b7gwvo2.html).
Item Requirements
Web Browser The administration device must have one of the following Web browsers installed:
Internet Explorer 8 (32-bit only) on Windows Vista, Windows 7, Windows Server 2003, Windows XP, Windows Server 2008, and Windows Server 2008 R2
Firefox version 3.0.10 or the later patches of version 3.0 on Windows and Linux devices
Firefox version 3.5 or the later patches of version 3.5 on Windows and Linux devices
Firefox version 3.6 or the later patches of version 3.6 on Windows and Linux devices
TCP Ports In order to fulfill a user’s request for a remote session on a managed device, you must open port 5550 on the management console device in order to run Remote Management Listener.
26 ZENworks 11 Server Installation Guide
2 2Coexistence with Other ZENworks Products
If your environment includes other ZENworks products, please refer to the following sections for coexistence information you should be aware of before installing ZENworks 11 :
Section 2.1, “ZENworks Desktop Management,” on page 27
Section 2.2, “ZENworks Asset Management,” on page 30
Section 2.3, “ZENworks Endpoint Security Management,” on page 31
Section 2.4, “ZENworks Patch Management,” on page 31
Section 2.5, “ZENworks Server Management,” on page 31
Section 2.6, “ZENworks Linux Management,” on page 31
Section 2.7, “ZENworks Handheld Management,” on page 32
2.1 ZENworks Desktop ManagementThe following information applies to ZENworks 11 coexistence with ZENworks 7.x Desktop Management (ZDM 7). ZENworks 11 does not coexist with ZENworks for Desktops 4.x or ZENworks 6.5 Desktop Management.
2.1.1 Server Coexistence
The ZENworks 11 Server cannot coexist with the ZDM 7 Server or Agent. Do not install a ZENworks 11 Server on any network server that already has a ZDM 7 Server or Agent installed.
2.1.2 Agent Coexistence
The ZENworks 11 Adaptive Agent can coexist with the ZDM 7 Agent if Asset Management or Patch Management is the only ZENworks Adaptive Agent feature installed on the device.
The ZDM 7 Agent must be installed on a device before the ZENworks 11 Adaptive Agent. Installing the ZDM 7 Agent after the ZENworks 11 Adaptive Agent can have undesirable consequences, including being able to start Windows only in Safe mode until the agents are removed.
When you install the Adaptive Agent on a ZDM 7 registered device, the ZDM 7 GUID is used to register the device in the ZENworks 11 Management Zone. This provides a migration path for the device if you decide to move from ZDM 7 to ZENworks 11 .
The ZDM 7 Agent is automatically uninstalled when you install the Configuration Management features (Policy Management, Bundle Management, Remote Management, User Management, Imaging and Endpoint Security Management) because Configuration Management features overlap with ZDM 7 Agent functionality.
To summarize, you can use ZDM 7 and ZENworks 11 Asset Management or ZENworks 11 Patch Management on the same device, but you cannot use ZDM 7 and ZENworks 11 Configuration Management or ZENworks 11 Endpoint Security Management on the same device.
Coexistence with Other ZENworks Products 27
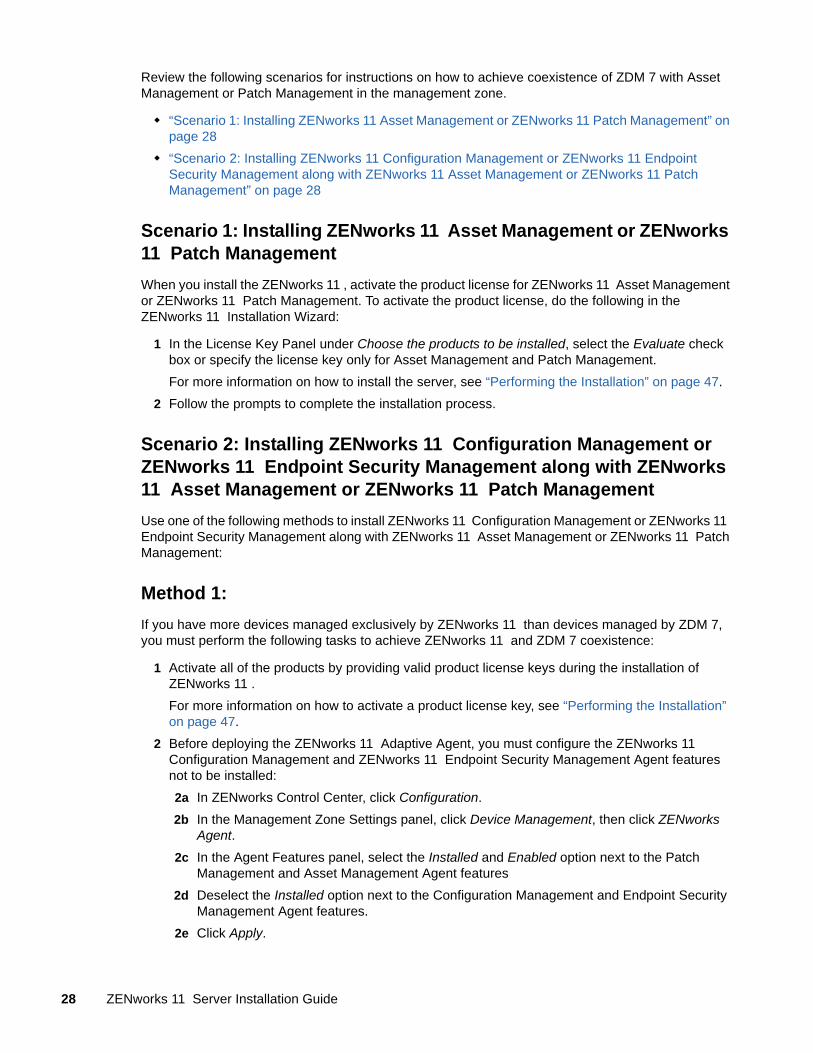
Review the following scenarios for instructions on how to achieve coexistence of ZDM 7 with Asset Management or Patch Management in the management zone.
“Scenario 1: Installing ZENworks 11 Asset Management or ZENworks 11 Patch Management” on page 28
“Scenario 2: Installing ZENworks 11 Configuration Management or ZENworks 11 Endpoint Security Management along with ZENworks 11 Asset Management or ZENworks 11 Patch Management” on page 28
Scenario 1: Installing ZENworks 11 Asset Management or ZENworks 11 Patch Management
When you install the ZENworks 11 , activate the product license for ZENworks 11 Asset Management or ZENworks 11 Patch Management. To activate the product license, do the following in the ZENworks 11 Installation Wizard:
1 In the License Key Panel under Choose the products to be installed, select the Evaluate check box or specify the license key only for Asset Management and Patch Management.
For more information on how to install the server, see “Performing the Installation” on page 47.
2 Follow the prompts to complete the installation process.
Scenario 2: Installing ZENworks 11 Configuration Management or ZENworks 11 Endpoint Security Management along with ZENworks 11 Asset Management or ZENworks 11 Patch Management
Use one of the following methods to install ZENworks 11 Configuration Management or ZENworks 11 Endpoint Security Management along with ZENworks 11 Asset Management or ZENworks 11 Patch Management:
Method 1:
If you have more devices managed exclusively by ZENworks 11 than devices managed by ZDM 7, you must perform the following tasks to achieve ZENworks 11 and ZDM 7 coexistence:
1 Activate all of the products by providing valid product license keys during the installation of ZENworks 11 .
For more information on how to activate a product license key, see “Performing the Installation” on page 47.
2 Before deploying the ZENworks 11 Adaptive Agent, you must configure the ZENworks 11 Configuration Management and ZENworks 11 Endpoint Security Management Agent features not to be installed:
2a In ZENworks Control Center, click Configuration.
2b In the Management Zone Settings panel, click Device Management, then click ZENworks Agent.
2c In the Agent Features panel, select the Installed and Enabled option next to the Patch Management and Asset Management Agent features
2d Deselect the Installed option next to the Configuration Management and Endpoint Security Management Agent features.
2e Click Apply.
28 ZENworks 11 Server Installation Guide
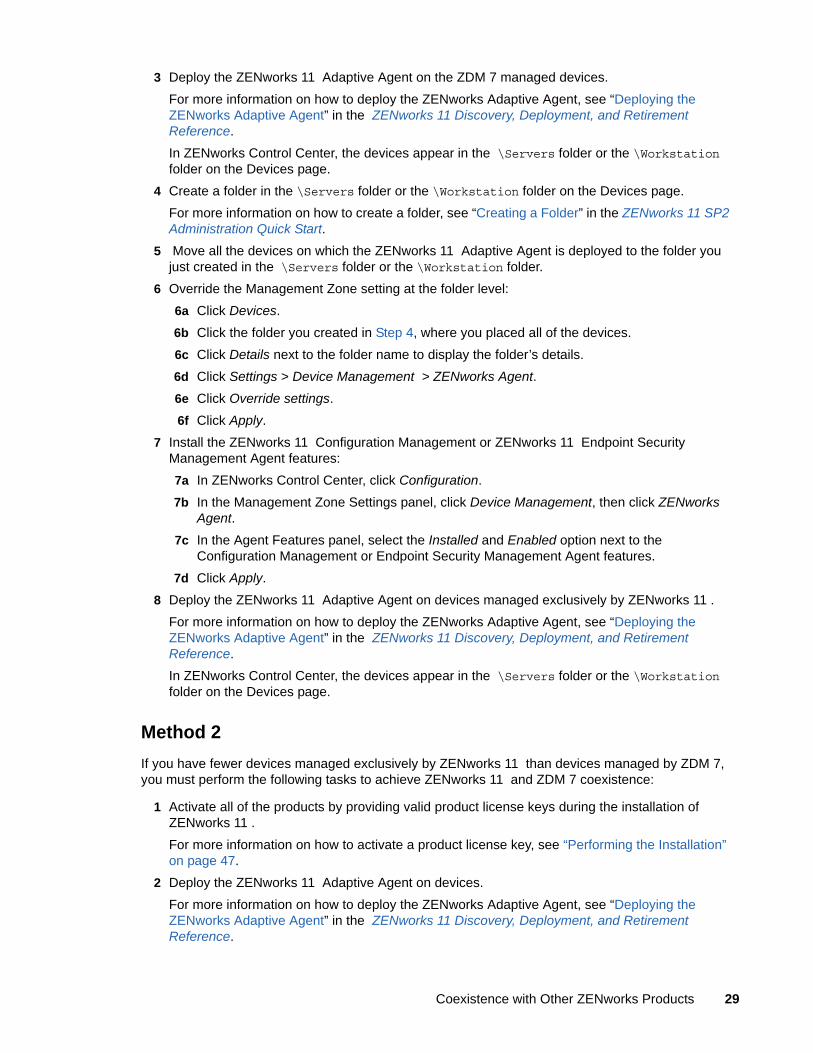
3 Deploy the ZENworks 11 Adaptive Agent on the ZDM 7 managed devices.
For more information on how to deploy the ZENworks Adaptive Agent, see “Deploying the ZENworks Adaptive Agent” in the ZENworks 11 Discovery, Deployment, and Retirement Reference.
In ZENworks Control Center, the devices appear in the \Servers folder or the \Workstation folder on the Devices page.
4 Create a folder in the \Servers folder or the \Workstation folder on the Devices page.
For more information on how to create a folder, see “Creating a Folder” in the ZENworks 11 SP2 Administration Quick Start.
5 Move all the devices on which the ZENworks 11 Adaptive Agent is deployed to the folder you just created in the \Servers folder or the \Workstation folder.
6 Override the Management Zone setting at the folder level:
6a Click Devices.
6b Click the folder you created in Step 4, where you placed all of the devices.
6c Click Details next to the folder name to display the folder’s details.
6d Click Settings > Device Management > ZENworks Agent.
6e Click Override settings.
6f Click Apply.
7 Install the ZENworks 11 Configuration Management or ZENworks 11 Endpoint Security Management Agent features:
7a In ZENworks Control Center, click Configuration.
7b In the Management Zone Settings panel, click Device Management, then click ZENworks Agent.
7c In the Agent Features panel, select the Installed and Enabled option next to the Configuration Management or Endpoint Security Management Agent features.
7d Click Apply.
8 Deploy the ZENworks 11 Adaptive Agent on devices managed exclusively by ZENworks 11 .
For more information on how to deploy the ZENworks Adaptive Agent, see “Deploying the ZENworks Adaptive Agent” in the ZENworks 11 Discovery, Deployment, and Retirement Reference.
In ZENworks Control Center, the devices appear in the \Servers folder or the \Workstation folder on the Devices page.
Method 2
If you have fewer devices managed exclusively by ZENworks 11 than devices managed by ZDM 7, you must perform the following tasks to achieve ZENworks 11 and ZDM 7 coexistence:
1 Activate all of the products by providing valid product license keys during the installation of ZENworks 11 .
For more information on how to activate a product license key, see “Performing the Installation” on page 47.
2 Deploy the ZENworks 11 Adaptive Agent on devices.
For more information on how to deploy the ZENworks Adaptive Agent, see “Deploying the ZENworks Adaptive Agent” in the ZENworks 11 Discovery, Deployment, and Retirement Reference.
Coexistence with Other ZENworks Products 29
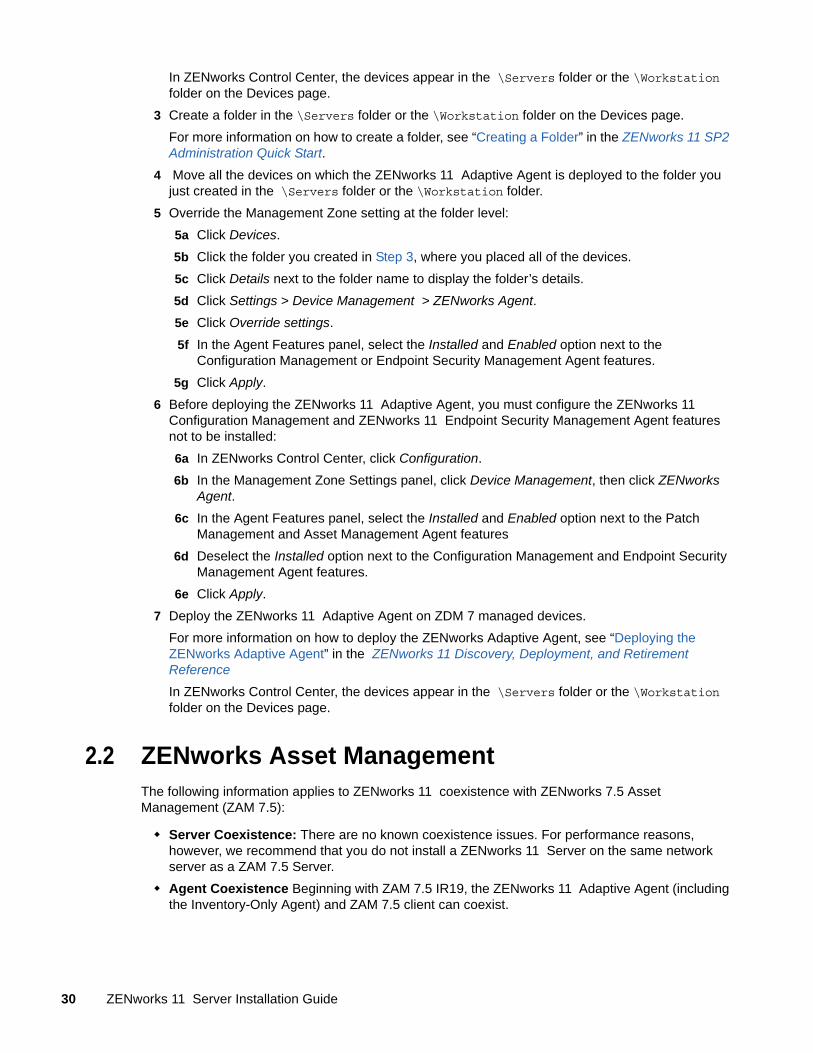
In ZENworks Control Center, the devices appear in the \Servers folder or the \Workstation folder on the Devices page.
3 Create a folder in the \Servers folder or the \Workstation folder on the Devices page.
For more information on how to create a folder, see “Creating a Folder” in the ZENworks 11 SP2 Administration Quick Start.
4 Move all the devices on which the ZENworks 11 Adaptive Agent is deployed to the folder you just created in the \Servers folder or the \Workstation folder.
5 Override the Management Zone setting at the folder level:
5a Click Devices.
5b Click the folder you created in Step 3, where you placed all of the devices.
5c Click Details next to the folder name to display the folder’s details.
5d Click Settings > Device Management > ZENworks Agent.
5e Click Override settings.
5f In the Agent Features panel, select the Installed and Enabled option next to the Configuration Management or Endpoint Security Management Agent features.
5g Click Apply.
6 Before deploying the ZENworks 11 Adaptive Agent, you must configure the ZENworks 11 Configuration Management and ZENworks 11 Endpoint Security Management Agent features not to be installed:
6a In ZENworks Control Center, click Configuration.
6b In the Management Zone Settings panel, click Device Management, then click ZENworks Agent.
6c In the Agent Features panel, select the Installed and Enabled option next to the Patch Management and Asset Management Agent features
6d Deselect the Installed option next to the Configuration Management and Endpoint Security Management Agent features.
6e Click Apply.
7 Deploy the ZENworks 11 Adaptive Agent on ZDM 7 managed devices.
For more information on how to deploy the ZENworks Adaptive Agent, see “Deploying the ZENworks Adaptive Agent” in the ZENworks 11 Discovery, Deployment, and Retirement Reference
In ZENworks Control Center, the devices appear in the \Servers folder or the \Workstation folder on the Devices page.
2.2 ZENworks Asset ManagementThe following information applies to ZENworks 11 coexistence with ZENworks 7.5 Asset Management (ZAM 7.5):
Server Coexistence: There are no known coexistence issues. For performance reasons, however, we recommend that you do not install a ZENworks 11 Server on the same network server as a ZAM 7.5 Server.
Agent Coexistence Beginning with ZAM 7.5 IR19, the ZENworks 11 Adaptive Agent (including the Inventory-Only Agent) and ZAM 7.5 client can coexist.
30 ZENworks 11 Server Installation Guide
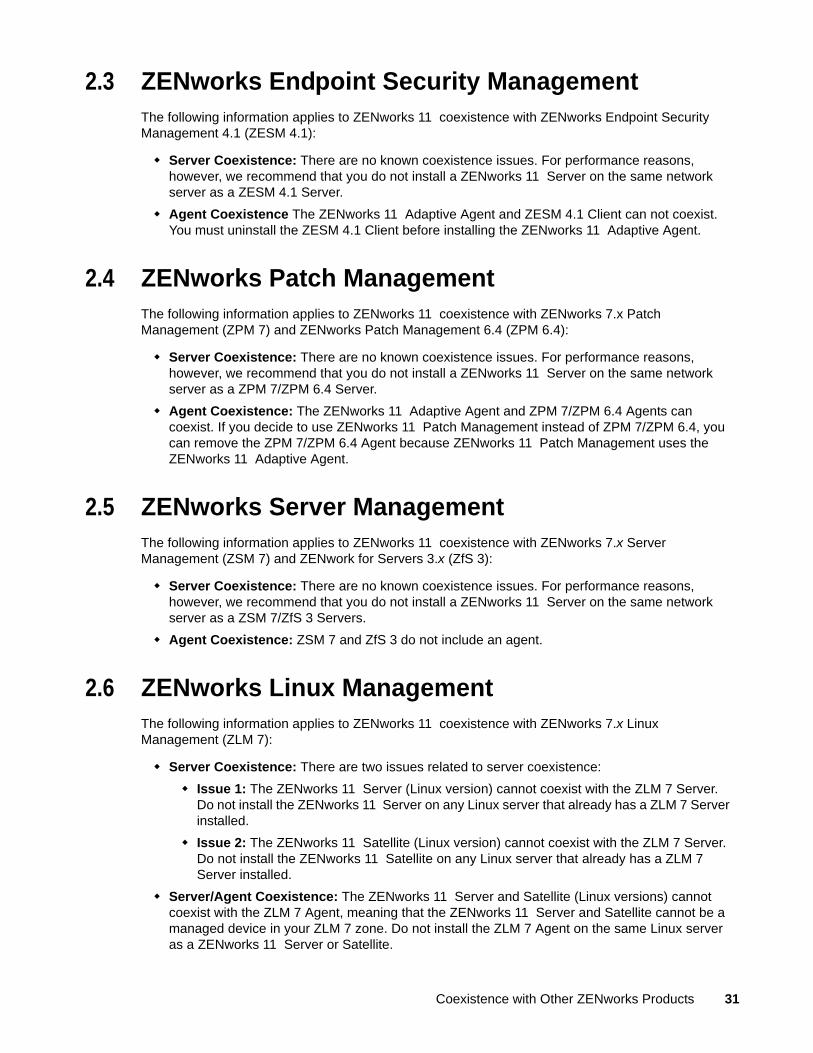
2.3 ZENworks Endpoint Security ManagementThe following information applies to ZENworks 11 coexistence with ZENworks Endpoint Security Management 4.1 (ZESM 4.1):
Server Coexistence: There are no known coexistence issues. For performance reasons, however, we recommend that you do not install a ZENworks 11 Server on the same network server as a ZESM 4.1 Server.
Agent Coexistence The ZENworks 11 Adaptive Agent and ZESM 4.1 Client can not coexist. You must uninstall the ZESM 4.1 Client before installing the ZENworks 11 Adaptive Agent.
2.4 ZENworks Patch ManagementThe following information applies to ZENworks 11 coexistence with ZENworks 7.x Patch Management (ZPM 7) and ZENworks Patch Management 6.4 (ZPM 6.4):
Server Coexistence: There are no known coexistence issues. For performance reasons, however, we recommend that you do not install a ZENworks 11 Server on the same network server as a ZPM 7/ZPM 6.4 Server.
Agent Coexistence: The ZENworks 11 Adaptive Agent and ZPM 7/ZPM 6.4 Agents can coexist. If you decide to use ZENworks 11 Patch Management instead of ZPM 7/ZPM 6.4, you can remove the ZPM 7/ZPM 6.4 Agent because ZENworks 11 Patch Management uses the ZENworks 11 Adaptive Agent.
2.5 ZENworks Server ManagementThe following information applies to ZENworks 11 coexistence with ZENworks 7.x Server Management (ZSM 7) and ZENwork for Servers 3.x (ZfS 3):
Server Coexistence: There are no known coexistence issues. For performance reasons, however, we recommend that you do not install a ZENworks 11 Server on the same network server as a ZSM 7/ZfS 3 Servers.
Agent Coexistence: ZSM 7 and ZfS 3 do not include an agent.
2.6 ZENworks Linux ManagementThe following information applies to ZENworks 11 coexistence with ZENworks 7.x Linux Management (ZLM 7):
Server Coexistence: There are two issues related to server coexistence:
Issue 1: The ZENworks 11 Server (Linux version) cannot coexist with the ZLM 7 Server. Do not install the ZENworks 11 Server on any Linux server that already has a ZLM 7 Server installed.
Issue 2: The ZENworks 11 Satellite (Linux version) cannot coexist with the ZLM 7 Server. Do not install the ZENworks 11 Satellite on any Linux server that already has a ZLM 7 Server installed.
Server/Agent Coexistence: The ZENworks 11 Server and Satellite (Linux versions) cannot coexist with the ZLM 7 Agent, meaning that the ZENworks 11 Server and Satellite cannot be a managed device in your ZLM 7 zone. Do not install the ZLM 7 Agent on the same Linux server as a ZENworks 11 Server or Satellite.
Coexistence with Other ZENworks Products 31
If your device has the ZENworks Linux Management Server installed, you must manually uninstall the ZENworks Linux Management Server before installing the ZENworks Configuration Management Server. However, if your device has the ZENworks Linux Management Agent installed, you need not manually uninstall the ZENworks Linux Management Agent because it is automatically uninstalled from the device while installing the ZENworks Configuration Management Server.
Agent Coexistence: If your device has the ZENworks Linux Management Agent installed, you need not manually uninstall the ZENworks Linux Management Agent because it is automatically uninstalled from the device while installing the ZENworks Configuration Management Agent. You cannot uninstall ZENworks 7.3 Linux Management Agent on ZENworks 11 Inventoried-Only devices because ZENworks 7.3 Linux Management Agent removes the files which are used by ZENworks 11 Inventory-Only Agent.
2.7 ZENworks Handheld ManagementThe following information applies to ZENworks 11 coexistence with ZENworks 7.x Handheld Management, ZENworks for Handhelds 5.x, and ZENwork for Handhelds 3.x:
Server Coexistence: There are no known coexistence issues. For performance reasons, however, we recommend that you do not run the ZENworks 11 Server on the same network server as the traditional ZENworks Handheld Management Servers.
32 ZENworks 11 Server Installation Guide

3 3Preparation
The following sections provide information to prepare you for the installation of ZENworks 11 :
Section 3.1, “Understanding What the ZENworks Installation Does,” on page 33
Section 3.2, “Gathering Installation Information,” on page 33
Section 3.3, “Preinstallation Tasks,” on page 34
3.1 Understanding What the ZENworks Installation DoesThe first time you install ZENworks 11 , you establish the Management Zone with a Primary Server, which is the first server you install to. Other Primary Servers can then be installed into that Management Zone.
The ZENworks installation program does the following during installation of your first Primary Server:
Creates the Management Zone
Creates a password that you supply for the default ZENworks Administrator account
Establishes and populates the ZENworks database
The ZENworks installation does the following during installation of any Primary Server:
Installs the ZENworks Adaptive Agent so that it can be managed
Installs ZENworks Control Center (ZCC)
Installs the zman command line utility
Installs and starts the ZENworks services
The Adaptive Agent is installed on managed devices from files on the Primary Server. For more information, see“ZENworks Adaptive Agent Deployment” in the ZENworks 11 SP2 Administration Quick Start.
You have three installation methods:
To learn what you need to know before installing ZENworks, continue with Section 3.2, “Gathering Installation Information,” on page 33.
3.2 Gathering Installation InformationDuring installation of ZENworks 11 , you need to know the following information:
Installation method to use (GUI, command line, or unattended)
Graphical User Interface: A graphical user interface (GUI) installation program that works with both Windows and Linux servers is provided on the installation CD. For Linux servers, GUI capability must already be installed.
Preparation 33
Command Line: A command line installation is available, but only for Linux servers. The Windows and Linux installation executables can both be run from a command line for purposes of using installation arguments, but for Windows it only starts the GUI installation program.
Unattended: You can use either installation method to create a response file for an unattended installation of ZENworks to other servers.
Installation path (for Windows only)
Management Zone (zone name, username, password, and port)
Database choice (embedded Sybase SQL, remote OEM Sybase SQL, external Sybase SQL, external Microsoft SQL, or Oracle database)
For more information, see Section 3.3, “Preinstallation Tasks,” on page 34.
Database information (server name, port, database name, username, password, named instance, domain, and whether you are using Windows or SQL Server authentication)
For Oracle and MS SQL, ensure that the database username adheres to the following conventions:
The name must begin with an alphabetic character.
The following characters cannot be used: - (hyphen) or . (period). Additionally, @ cannot be used in username for Oracle.
Certificate Authority information (internal, or signed certificate, private key, and public certificate) in DER format
License keys (60-day trial options are available)
If you choose to deploy Primary Servers behind a L4 switch, ensure that all such Primary servers are running on the same HTTP and HTTPS ports.
For more information on these items, see Table 4-1, “Installation Information,” on page 49.
To start a ZENworks installation, continue with Section 3.3, “Preinstallation Tasks,” on page 34.
3.3 Preinstallation TasksPerform the following applicable tasks, then continue with Section 4.1, “Performing the Installation,” on page 47:
Section 3.3.1, “Verifying That the Minimum Requirements Have Been Met,” on page 34
Section 3.3.2, “Creating an Installation DVD from the ISO Download,” on page 35
Section 3.3.3, “Creating an External Certificate,” on page 35
Section 3.3.4, “Installing an External ZENworks Database,” on page 37
Section 3.3.5, “Installing Mono 2.0.1-1.17 on SLES 11,” on page 46
3.3.1 Verifying That the Minimum Requirements Have Been Met
Before you begin the ZENworks installation, ensure that the following requirements are met:
Ensure that the device where you want to install the Primary Server software fulfills the necessary requirements. For more information, see Chapter 1, “System Requirements,” on page 7.
(Conditional) If you plan to install the Primary Server software on 64-bit Windows Server 2003 or 64-bit Windows Server 2008, ensure that the device has Windows Installer 4.5 or later installed.
34 ZENworks 11 Server Installation Guide
3.3.2 Creating an Installation DVD from the ISO Download
If you obtained the ZENworks software as an ISO image download, do one of the following to create the installation DVD:
“Using Windows to Create a ZENworks Installation DVD from an ISO Image” on page 35
“Using Linux to Create a ZENworks Installation DVD from an ISO Image” on page 35
Using Windows to Create a ZENworks Installation DVD from an ISO Image
1 Download the ZENworks 11 installation ISO image from the Novell Web site (http://www.novell.com/) and copy it to a temporary location on your Windows device.
2 Burn the ISO image to a DVD.
Using Linux to Create a ZENworks Installation DVD from an ISO Image
Optionally, you can simply run the installation program from the ISO mount point, instead of burning the DVD:
1 Download the ZENworks 11 installation ISO image from the Novell Web site (http://www.novell.com/) and copy it to a temporary location on your Linux device.
2 Do one of the following:
Mount the ISO image by using the following command:
mount -o loop /tempfolderpath/isoimagename.iso mountpoint
Replace tempfolderpath with the path to the temporary folder, replace isoimagename with the ZENworks ISO filename, and replace mountpoint with the path to the file system location where you want to mount the image. The path specified by mountpoint must already exist.
For example:
mount -o loop /zcm11/ZCM11.iso /zcm11/install
Burn the ISO image to a DVD.
3.3.3 Creating an External Certificate
If you plan to use external certificates, install openssl and create individual server certificate with subject as the server’s Fully Qualified Domain Name (FQDN) for all the devices on which you plan to install ZENworks Primary Server or to use it as Satellites with the authentication role configured.
Do the following to create an individual certificate file:
1 To generate a private key that is needed to create a certificate signing request (CSR), enter the following command:
openssl genrsa -out zcm.pem 2048
2 To create a CSR that can be signed by the external CA, enter the following command:
openssl req -new -key zcm.pem -out zcm.csr
Preparation 35
When you are asked for “YOUR name,” enter the full DNS name assigned to the server where you are installing ZENworks 11 .
3 To convert the private key from PEM format to DER format, enter the following command:
openssl pkcs8 -topk8 -nocrypt -in zcm.pem -inform PEM -out zcmkey.der -outform DER
The private key must be in the PKCS8 DER format, and the signed certificate must be in the X.509 DER format. You can use the OpenSSL command line tool to convert your keys to the proper format. This tool can be obtained as part of the Cygwin toolkit, or as part of your Linux distribution.
4 Use the CSR and generate a certificate by using Novell ConsoleOne, Novell iManager or a true external CA such as Verisign.
“Generating a Certificate by Using Novell ConsoleOne” on page 36
“Generating a Certificate by Using Novell iManager” on page 37
Generating a Certificate by Using Novell ConsoleOne
1 Ensure that eDirectory is configured as the CA.
2 Issue the certificate for the Primary Server.
2a Launch Novell ConsoleOne.
2b Log in to the eDirectory tree as an administrator with the appropriate rights. For more information about the appropriate rights, see the Entry Rights Needed to Perform Tasks section in the Certificate Server documentation at the Novell Documentation Web site (http://www.novell.com/documentation).
2c From the Tools menu, click Issue Certificate.
2d Browse for and select the zcm.csr file.
2e Click Next.
2f Complete the wizard by accepting the default values.
2g Specify the certificate basic constraints, then click Next.
2h Specify the validity period, the effective and expiration dates then click Next.
2i Click Finish.
2j Choose to save the certificate in the DER-format, and specify a name for the certificate.
3 Export the Organizational CA's self-signed certificate.
3a Log in to eDirectory from ConsoleOne.
3b In the Security container, right-click the CA, then click Properties.
3c In the Certificates tab, select the self-signed certificate.
3d Click Export.
3e When prompted to export the private key, click No.
3f Export the certificate in DER format and choose the location in which you want to save the certificate.
3g Click Finish.
You should now have the three files that you need to install ZENworks using an external CA.
36 ZENworks 11 Server Installation Guide

Generating a Certificate by Using Novell iManager
1 Ensure that eDirectory is configured as the CA.
2 Issue the certificate for the Primary Server.
2a Launch Novell iManager.
2b Log in to the eDirectory tree as an administrator with the appropriate rights. For more information about the appropriate rights, see the Entry Rights Needed to Perform Tasks (http://www.novell.com/documentation/crt27/?page=/documentation/crt27/crtadmin/data/a2zibyo.html#a2zibyo) section in the Novell Certificate Server 2.7 documentation.
2c From the Roles and Tasks menu, click Novell Certificate Server > Issue Certificate.
2d Click Browse to browse for and select the CSR file, zcm.csr.
2e Click Next.
2f Accept the default values for the key type, the key usage, and the extended key usage, then click Next.
2g Accept the default certificate basic constraints, then click Next.
2h Specify the validity period, the effective and expiration dates then click Next. Depending upon your needs, change the default validity period (10 years).
2i Review the parameters sheet. If it is correct, click Finish. If it is incorrect, click Back until you reach the point where you need to make changes.
When you click Finish, a dialog box is displayed explains that a certificate has been created. This exports the certificate into the binary DER-format.
2j Download and save the issued certificate
3 Export the Organizational CA's self-signed certificate.
3a Log in to eDirectory from iManager.
3b From the Roles and Tasks menu, click Novell Certificate Server > Configure Certificate Authority.
This displays the property pages for the Organizational CA, which include a General page, a CRL Configuration page, a Certificates page, and other eDirectory-related pages.
3c Click Certificates, then select Self Signed Certificate.
3d Click Export.
This starts Certificate Export wizard.
3e Deselect the Export the Private Key option, and choose the export format as DER.
3f Click Next, then save the exported certificate.
3g Click Close.
You should now have the three files that you need to install ZENworks using an external CA.
3.3.4 Installing an External ZENworks Database
If you want to install and use the embedded Sybase database for ZENworks 11 Configuration Management, see Section 4.1, “Performing the Installation,” on page 47.
If you want to set up an external database, you have the following options:
Set up the database during the Primary Server installation: This is the quickest and easiest method. For detailed information about this method, see Section 4.1, “Performing the Installation,” on page 47.
Preparation 37
Set up the database externally before installing the Primary Server: This option is especially useful if your database administrator is not the same as your ZENworks administrator. Detailed information about this method is provided in this section.
During the ZENworks installation you have the following options to install or create external ZENworks databases:
Install to a new remote OEM Sybase database
Install to an existing Sybase SQL Anywhere external database
Install to an existing Microsoft SQL Server external database
Create a new Microsoft SQL Server external database
Install to an existing Oracle user schema
Create a new Oracle user schema
Some of these options require you to complete certain tasks for creating or setting up external databases before ZENworks can write to them during installation. Complete the prerequisites, then continue with the database installation.
“Prerequisites for Installing External Databases” on page 38
“Performing the External ZENworks Database Installation” on page 40
Prerequisites for Installing External Databases
Review the applicable sections:
“Prerequisites for Remote OEM Sybase” on page 38
“Prerequisites for Remote Sybase SQL Anywhere” on page 38
“Prerequisites for Microsoft SQL Server” on page 39
“Prerequisites for Oracle” on page 39
Prerequisites for Remote OEM Sybase
Before installing ZENworks 11 to create the Management Zone, you must install the remote OEM Sybase database on your remote database server so that it can be properly configured during installation of the Primary Server that hosts the database.
NOTE: For this database, Novell Support provides problem determination, provision of compatibility information, installation assistance, usage support, ongoing maintenance, and basic troubleshooting. For additional support, including extended troubleshooting and error resolution, see the Sybase Support Web site (http://www.sybase.com/support).
Prerequisites for Remote Sybase SQL Anywhere
Before installing and configuring the Sybase SQL Anywhere database for ZENworks 11 , make sure the following prerequisites are met:
Install and set up the Sybase SQL Anywhere database so that it can be updated when you install ZENworks 11 on the Primary Server.
Ensure that the database user has read/write permissions to create and modify the tables on the database server.
38 ZENworks 11 Server Installation Guide
NOTE: For this database, Novell Support provides problem determination, provision of compatibility information, installation assistance, usage support, ongoing maintenance, and basic troubleshooting. For additional support, including extended troubleshooting and error resolution, see the Sybase Support Web site (http://www.sybase.com/support).
Prerequisites for Microsoft SQL Server
Before installing and configuring the Microsoft SQL Server database for ZENworks 11, ensure that the Microsoft SQL Server software is installed on the database server so that the ZENworks installation program can create the new Microsoft SQL database. For instructions on installing the Microsoft SQL Server software, refer to the Microsoft documentation.
Prerequisites for Oracle
During the installation of the ZENworks database on Oracle, you can choose to create a new user schema or specify an existing one that resides on a server in your network.
Create a new user schema: If you choose to create a new user schema, ensure that the following requirements are met:
You must be aware of the database administrator credentials.
A tablespace must already exist for associating to the Oracle access user.
The tablespace must have sufficient space to create and store the ZENworks database schema.The tablespace requires a minimum of 100 MB to create the ZENworks database schema without any data in it.
Use an existing user schema: You can install to an existing Oracle user schema that resides on a server in your network in the following scenarios:
The database administrator creates a user schema with the necessary rights and you receive the credentials for that user schema from the database administrator. In this case, the database administrator credentials are not required to install to an existing Oracle user schema.
You create a user schema in the Oracle database and choose to use it during ZENworks 11 installation.
If you choose to use an existing user schema, ensure that the following requirements are met:
Ensure that the tablespace has sufficient space to create and store the ZENworks database schema.The tablespace requires a minimum of 100 MB to create ZENworks database schema without any data in it.
Ensure that the quota for the user schema is set to Unlimited on the tablespace that you plan to configure during the installation.
Ensure that the user schema has the following rights to create the database.
CREATE SESSION
CREATE_TABLE
CREATE_VIEW
CREATE_PROCEDURE
CREATE_SEQUENCE
CREATE_TRIGGER
IMPORTANT: For Oracle databases, performance can be affected by whether you configure your database to use shared server or dedicated server processes. Each ZENworks Primary Server is configured with a database connection pool whose size fluctuates with the ZENworks
Preparation 39
system load. This pool can grow at peak loads to a maximum of 200 concurrent database connections per Primary Server. If your Oracle database is configured to use dedicated server processes, it is possible that your database server resource usage can reach undesirable levels that affect performance when there are multiple Primary Servers in your zone. If you encounter this problem, consider changing your ZENworks database to use shared server processes.
Performing the External ZENworks Database Installation
1 Make sure that the server where you plan to install the external database fulfills the requirements in Section 1.4, “Database Requirements,” on page 21 and “Prerequisites for Installing External Databases” on page 38.
2 Start the database installation program.
2a On the server where you want to install the external database, insert the Novell ZENworks 11 installation DVD.
If the DVD autoruns the database installation program, exit the program.
If the server is Windows, continue with Step 2b. If the server is Linux, skip to Step 2c.
2b For Windows, enter the following at the command prompt on the external database server:
DVD_drive:\setup.exe -c
or
If ZENworks 11 has already been installed on a device, and if you want to use the device to configure another instance of the ZENworks database (on the same device or on another device) by using the external database installation program, run the following command:
DVD_drive:\setup.exe -c --zcminstall
2c For Linux, run the following command on the external database server:
sh /media/cdrom/setup.sh -c
This provides additional options that you do not have when installing the Primary Server, especially if you want to make your OEM database a remote database. You can view the SQL files generating the ZENworks database, create access users, view creation commands (OEM Sybase only), and so on.
or
If ZENworks 11 has already been installed on a device, and if you want to use the device to configure another instance of the ZENworks database (on the same device or on another device) by using the external database installation program, run the following command:
mounted_DVD_drive/setup.sh -c --zcminstall
Using the sh command resolves rights issues.
Only the GUI installation is available for installing a database.
3 On the Select ZENworks Database page, select one of the following:
OEM Sybase SQL Anywhere: Installs the default Sybase database for ZENworks. It is configured as a service, the database user is created, and the required tables for the Primary Server are established.
If you select this option, you must use the -o (or --sybase-oem) parameter with the setup.exe installation executable in order to successfully install to the database when you install the Primary Server software. This parameter allows ZENworks to authenticate the database prior to performing any operations on it.
You should use the -o parameter only when you are using the Sybase installation that is provided on the Novell ZENworks 11 installation DVD.
40 ZENworks 11 Server Installation Guide
You must also select the Remote Sybase SQL Anywhere option during installation of the Primary Server.
Sybase SQL Anywhere: Sets up an existing Sybase database for writing ZENworks information to it.
Microsoft SQL Server: Creates a ZENworks database on a Microsoft SQL Server.
Oracle: Specifies a user schema that you can use to set up an external Oracle database schema for use with ZENworks.
IMPORTANT: For external databases, the server hosting the database must have time synchronization with each of the Primary Servers in the Management Zone, when the databases are installed.
4 Click Next.
5 During installation, refer to the following information for details on the installation data that you need to know (you can also click the Help button for similar information):
“OEM Sybase SQL Anywhere Database Installation Information” on page 41
“Sybase SQL Anywhere Database Installation Information” on page 42
“MS SQL Database Installation Information” on page 43
“Oracle Database Installation Information” on page 45
6 Continue with Section 4.1, “Performing the Installation,” on page 47.
OEM Sybase SQL Anywhere Database Installation Information
The information you need is listed in the order of the installation flow.
Table 3-1 OEM Sybase SQL Anywhere Information
Installation Information
Explanation
Sybase Database Installation
Specify the path to where you want the OEM copy of the Sybase SQL Anywhere database software installed. On the target Windows server, only the drives that are currently mapped on the server are available.
The default path is drive:\novell\zenworks, which you can change. The installation program creates the \novell\zenworks directory for the installation of Sybase.
Sybase Server Configuration
Specify the port used by the Sybase SQL Anywhere database server. By default, it is 2638. Change the default port number if you have a conflict.
Sybase Access Configuration
Defaults are provided for some of the information, which you can change as necessary.
Database Name: Specify a name for the database to be created.
Username: Specify a name to create a new user who can access the database.
Password: Specify the password to be used to the access the database.
Database Server Name: Specify a name for the Sybase SQL Anywhere database server.
Preparation 41
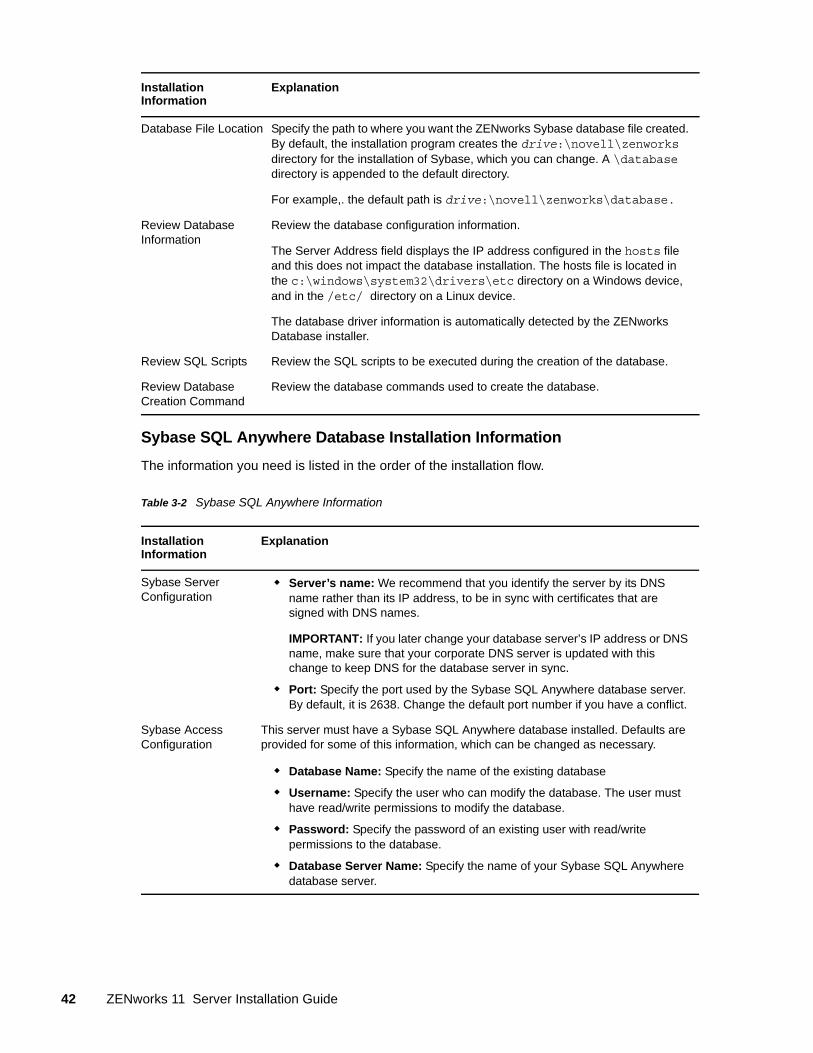
Sybase SQL Anywhere Database Installation Information
The information you need is listed in the order of the installation flow.
Table 3-2 Sybase SQL Anywhere Information
Database File Location Specify the path to where you want the ZENworks Sybase database file created. By default, the installation program creates the drive:\novell\zenworks directory for the installation of Sybase, which you can change. A \database directory is appended to the default directory.
For example,. the default path is drive:\novell\zenworks\database.
Review Database Information
Review the database configuration information.
The Server Address field displays the IP address configured in the hosts file and this does not impact the database installation. The hosts file is located in the c:\windows\system32\drivers\etc directory on a Windows device, and in the /etc/ directory on a Linux device.
The database driver information is automatically detected by the ZENworks Database installer.
Review SQL Scripts Review the SQL scripts to be executed during the creation of the database.
Review Database Creation Command
Review the database commands used to create the database.
Installation Information
Explanation
Sybase Server Configuration
Server’s name: We recommend that you identify the server by its DNS name rather than its IP address, to be in sync with certificates that are signed with DNS names.
IMPORTANT: If you later change your database server’s IP address or DNS name, make sure that your corporate DNS server is updated with this change to keep DNS for the database server in sync.
Port: Specify the port used by the Sybase SQL Anywhere database server. By default, it is 2638. Change the default port number if you have a conflict.
Sybase Access Configuration
This server must have a Sybase SQL Anywhere database installed. Defaults are provided for some of this information, which can be changed as necessary.
Database Name: Specify the name of the existing database
Username: Specify the user who can modify the database. The user must have read/write permissions to modify the database.
Password: Specify the password of an existing user with read/write permissions to the database.
Database Server Name: Specify the name of your Sybase SQL Anywhere database server.
Installation Information
Explanation
42 ZENworks 11 Server Installation Guide
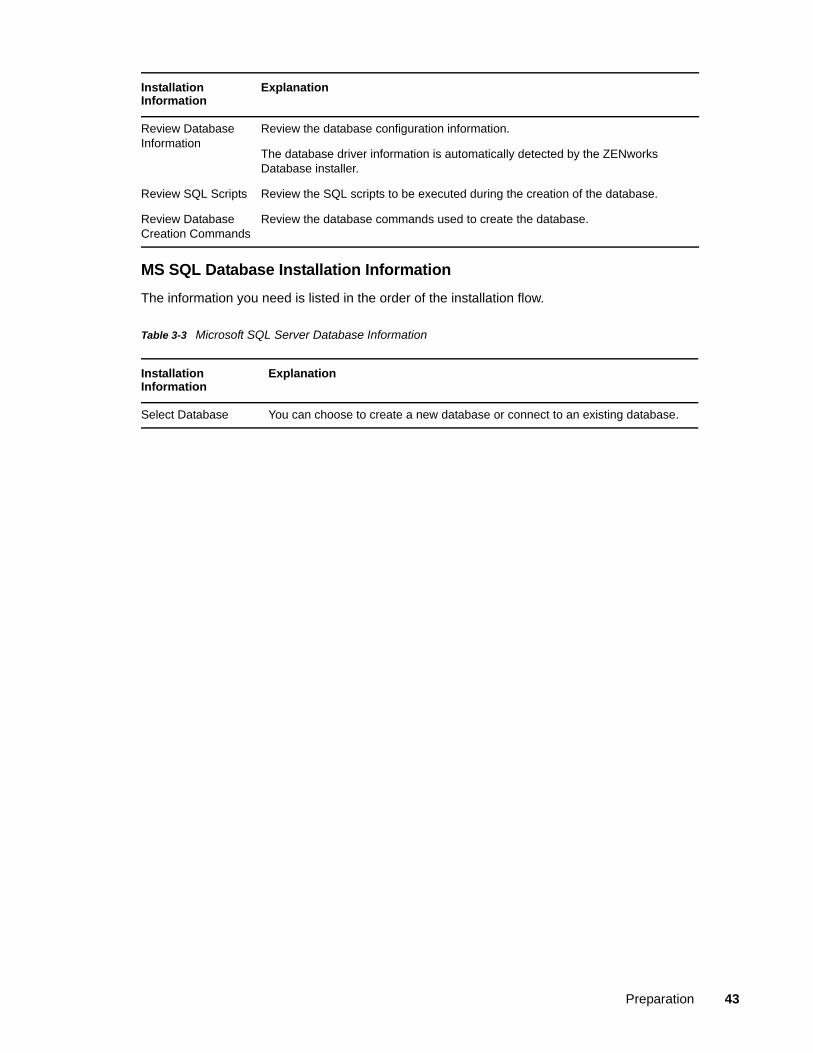
MS SQL Database Installation Information
The information you need is listed in the order of the installation flow.
Table 3-3 Microsoft SQL Server Database Information
Review Database Information
Review the database configuration information.
The database driver information is automatically detected by the ZENworks Database installer.
Review SQL Scripts Review the SQL scripts to be executed during the creation of the database.
Review Database Creation Commands
Review the database commands used to create the database.
Installation Information
Explanation
Select Database You can choose to create a new database or connect to an existing database.
Installation Information
Explanation
Preparation 43
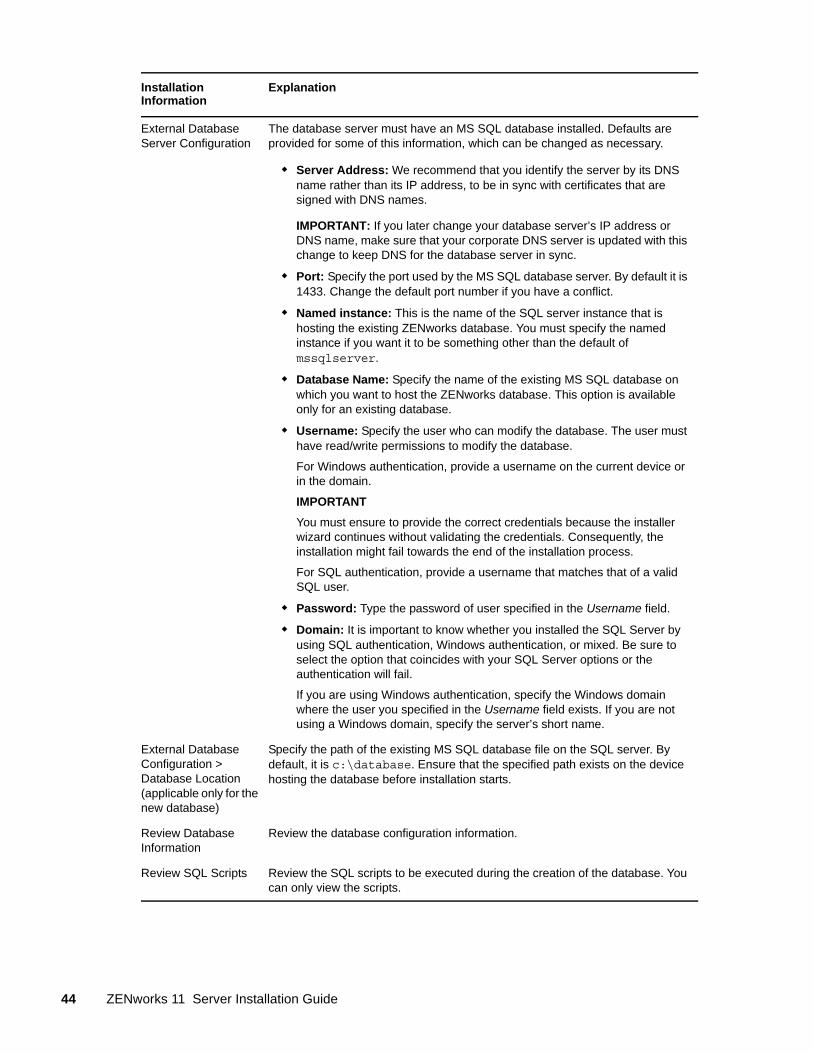
External Database Server Configuration
The database server must have an MS SQL database installed. Defaults are provided for some of this information, which can be changed as necessary.
Server Address: We recommend that you identify the server by its DNS name rather than its IP address, to be in sync with certificates that are signed with DNS names.
IMPORTANT: If you later change your database server’s IP address or DNS name, make sure that your corporate DNS server is updated with this change to keep DNS for the database server in sync.
Port: Specify the port used by the MS SQL database server. By default it is 1433. Change the default port number if you have a conflict.
Named instance: This is the name of the SQL server instance that is hosting the existing ZENworks database. You must specify the named instance if you want it to be something other than the default of mssqlserver.
Database Name: Specify the name of the existing MS SQL database on which you want to host the ZENworks database. This option is available only for an existing database.
Username: Specify the user who can modify the database. The user must have read/write permissions to modify the database.
For Windows authentication, provide a username on the current device or in the domain.
IMPORTANT
You must ensure to provide the correct credentials because the installer wizard continues without validating the credentials. Consequently, the installation might fail towards the end of the installation process.
For SQL authentication, provide a username that matches that of a valid SQL user.
Password: Type the password of user specified in the Username field.
Domain: It is important to know whether you installed the SQL Server by using SQL authentication, Windows authentication, or mixed. Be sure to select the option that coincides with your SQL Server options or the authentication will fail.
If you are using Windows authentication, specify the Windows domain where the user you specified in the Username field exists. If you are not using a Windows domain, specify the server’s short name.
External Database Configuration > Database Location (applicable only for the new database)
Specify the path of the existing MS SQL database file on the SQL server. By default, it is c:\database. Ensure that the specified path exists on the device hosting the database before installation starts.
Review Database Information
Review the database configuration information.
Review SQL Scripts Review the SQL scripts to be executed during the creation of the database. You can only view the scripts.
Installation Information
Explanation
44 ZENworks 11 Server Installation Guide
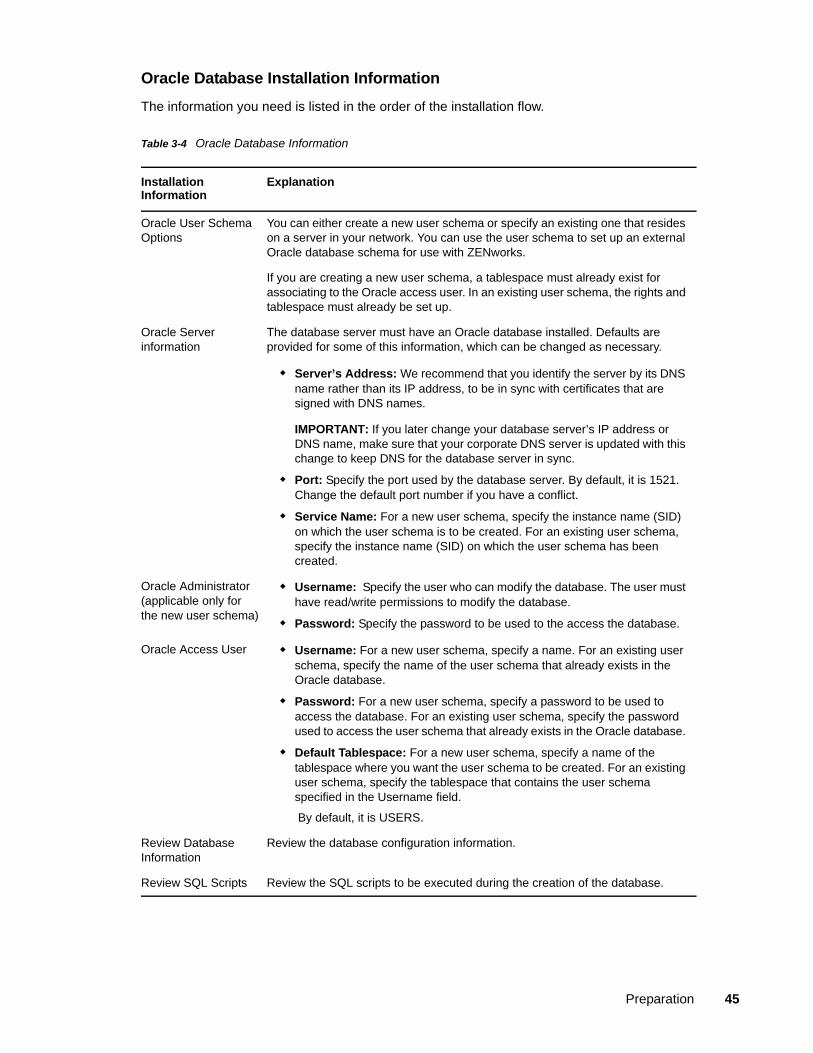
Oracle Database Installation Information
The information you need is listed in the order of the installation flow.
Table 3-4 Oracle Database Information
Installation Information
Explanation
Oracle User Schema Options
You can either create a new user schema or specify an existing one that resides on a server in your network. You can use the user schema to set up an external Oracle database schema for use with ZENworks.
If you are creating a new user schema, a tablespace must already exist for associating to the Oracle access user. In an existing user schema, the rights and tablespace must already be set up.
Oracle Server information
The database server must have an Oracle database installed. Defaults are provided for some of this information, which can be changed as necessary.
Server’s Address: We recommend that you identify the server by its DNS name rather than its IP address, to be in sync with certificates that are signed with DNS names.
IMPORTANT: If you later change your database server’s IP address or DNS name, make sure that your corporate DNS server is updated with this change to keep DNS for the database server in sync.
Port: Specify the port used by the database server. By default, it is 1521. Change the default port number if you have a conflict.
Service Name: For a new user schema, specify the instance name (SID) on which the user schema is to be created. For an existing user schema, specify the instance name (SID) on which the user schema has been created.
Oracle Administrator (applicable only for the new user schema)
Username: Specify the user who can modify the database. The user must have read/write permissions to modify the database.
Password: Specify the password to be used to the access the database.
Oracle Access User Username: For a new user schema, specify a name. For an existing user schema, specify the name of the user schema that already exists in the Oracle database.
Password: For a new user schema, specify a password to be used to access the database. For an existing user schema, specify the password used to access the user schema that already exists in the Oracle database.
Default Tablespace: For a new user schema, specify a name of the tablespace where you want the user schema to be created. For an existing user schema, specify the tablespace that contains the user schema specified in the Username field.
By default, it is USERS.
Review Database Information
Review the database configuration information.
Review SQL Scripts Review the SQL scripts to be executed during the creation of the database.
Preparation 45
3.3.5 Installing Mono 2.0.1-1.17 on SLES 11
If your SLES 11 device on which you want to install ZENworks 11 Configuration Management does not have Mono installed, do the following to install Mono 2.0.1-1.17:
1 Start the ZENworks 11 Configuration Management installation program by using one of the following methods:.
Graphical User Interface (GUI) installation: Mount the Novell ZENworks 11 installation DVD, then run sh /media/cdrom/setup.sh. Using the sh command resolves rights issues.
Command Line installation: Do the following:
1. On the installation server, insert the Novell ZENworks 11 installation DVD.
2. Mount the DVD.
3. To start a command line installation, do the following:
a. To a directory where all (including “others”) have read and execute access, either mount the DVD or copy the DVD’s files.
This cannot be in /root or any directory under it.
If you copy the DVD's files, make sure that all (including “others”) continue to have read and execute access to the destination directories.
b. Run the following command:
sh /mount_location/setup.sh -e
2 Install Mono bundled with ZENworks 11 Configuration Management.
3 (Optional) The ZENworks 11 Configuration Management installation program allows you to continue to install ZENworks 11 Configuration Management. For more information on how to
install ZENworks, see Section 4.1, “Performing the Installation,” on page 47.
46 ZENworks 11 Server Installation Guide
4 4Installing the ZENworks Server
The Novell ZENworks 11 installation media includes the following products:
ZENworks 11 Configuration Management
ZENworks 11 Asset Management
ZENworks 11 Endpoint Security Management
ZENworks 11 Patch Management
Asset Inventory for UNIX/Linux
All six products are always installed. You activate a product by supplying a valid product license during the installation or after the installation (through the ZENworks management console). If you do not have a valid license for a product, you can evaluate the product for 60 days. You can start the evaluation period during installation or after the installation.
Configuration Management, Asset Management, Patch Management and Endpoint Security Management can be used together or independently. ZENworks 11 Asset Inventory for UNIX/Linux requires Configuration Management or Asset Management.
Perform the tasks in the following sections to install the ZENworks 11 software:
Section 4.1, “Performing the Installation,” on page 47
Section 4.2, “Performing an Unattended Installation,” on page 57
Section 4.3, “Verifying Installation,” on page 59
Section 4.4, “Post-Installation Tasks,” on page 60
NOTE:
As with any product, if you are testing or reviewing ZENworks 11 , we recommend that you deploy the product in a non-production environment.
Before installing ZENworks server on a Windows device, you must run the Windows Update on the device to ensure that all the available updates are installed on the device. Subsequently, disable the Windows Update to ensure that there are no further updates on the device when ZENworks server is installed on the device.
4.1 Performing the Installation1 Start the ZENworks installation program by using one of the following methods:
“Graphical User Interface (GUI) Installation” on page 47
“Command Line Installation (Linux only)” on page 48
Graphical User Interface (GUI) Installation
1. On the installation server, insert the Novell ZENworks 11 installation DVD.
For Windows, the installation page where you can select the language is displayed. If it is not automatically displayed after inserting the DVD, run setup.exe from the root of the DVD.
Installing the ZENworks Server 47
For Linux, mount the DVD, then run sh /media/cdrom/setup.sh. Using the sh command resolves rights issues.
2. If you installed an external OEM Sybase server (see Section 3.3.4, “Installing an External ZENworks Database,” on page 37), you must run the executable manually with the following parameter in order for that database to be properly updated during this Primary Server installation:
DVD_drive\setup.exe -o
3. Continue with Step 2 below.
NOTE: When installing ZENworks 11 SP1SP2 on Windows, Strawberry Perl is installed in the root directory to meet the Perl runtime requirement for the ppkg_to_xml tool that should run on both Windows and Linux. This tool is required to read the RPM package files to extract the package metadata and create Linux bundles or Dependency bundles with these packages.
Command Line Installation (Linux only)
1. On the installation server, insert the Novell ZENworks 11 installation DVD.
2. Mount the DVD.
3. To start a command line installation, do the following:
a. To a directory where all (including “others”) have read and execute access, either mount the DVD or copy the DVD’s files.
This cannot be in /root or any directory under it.
If you copy the DVD's files, make sure that all (including “others”) continue to have read and execute access to the destination directories.
b. Run the following command:
sh /mount_location/setup.sh -e
For more information on installation arguments, see Appendix A, “Installation Executable Arguments,” on page 77.
4. Continue with Step 2 below.
2 During installation, refer to the information in Table 4-1, “Installation Information,” on page 49 for details on the installation data that you need to know.
If you are using the GUI installation, you can also click the Help button for similar information.
For the command line method, you can type back and press Enter to return to a previous installation option to make changes.
3 Do one of the following on the Windows device:
If you selected to reboot automatically (you selected the Yes, restart the system option during installation; see “Rebooting (or not)” on page 56), continue with Verifying Installation after the booting process has completed and the services have started.
If you selected to reboot manually (you selected the No, I will restart the system myself option during installation; see “Rebooting (or not)” on page 56), you must wait for the installation to complete and the services to start in order to verify it in Verifying Installation.
NOTE: On Windows or Linux, part of completing the installation process is for the database to be updated and for the PRU to be downloaded and installed, both of which cause high CPU utilization during their processes. This can cause the services to start up slowly, which can also affect how long it takes for ZENworks Control Center to open.
48 ZENworks 11 Server Installation Guide
4 Continue with Section 4.3, “Verifying Installation,” on page 59.
5 Do any of the following that are applicable, then continue with Step 4:
To create another Primary Server for the Management Zone using the same installation method that you just used, return to Step 1.
If you created a response file in order to perform an unattended installation on other servers, continue with Section 4.2.2, “Performing the Installation,” on page 59.
The information you need is listed in the order of the installation flow.
Table 4-1 Installation Information
Installation Information
Explanation
Installation path For Windows, the default is %ProgramFiles%. You can change it to any path currently available on the server except to the %systemdrive%/Program Files directory if the server is a 64-bit Windows device. However, the installation path that you specify must contain English characters only.
NOTE: On the Windows server, installation of ZENworks 11 from mapped drive is not supported.
The installation program creates the Novell\ZENworks directory here for the installation of the ZENworks software files.
IMPORTANT: If you want to install Reporting Server on a 64-bit Windows device that is using an Oracle database, you must specify a customized location to install ZENworks Configuration Management. This customized location must not include any parentheses in the pathname because Reporting Server fails to install in a path that has parentheses.
NOTE: If you want to install ZENworks Reporting Server, ensure that short MS-DOS (also called 8.3) style naming convention is available for the installation location of the ZENworks 11 Server. By default, 8.3 is enabled on the device. For more information on how to enable 8.3 see, Microsoft documentation (http://technet.microsoft.com/en-us/library/cc959352.aspx)
If you need more disk space for your content repository than is in the Windows path that is available during installation, you can change the path to another location after completing the installation. For more information, see .
For Linux, several fixed installation paths are used:
/opt/novell/zenworks/
/etc/opt/novell/zenworks
/var/opt/novell/zenworks
/var/opt/novell/log/zenworks/
If you are concerned about disk space on the Linux server, the /var/opt directory is where the database and content repository reside. Make sure it is on a partition large enough for them.
Installing the ZENworks Server 49
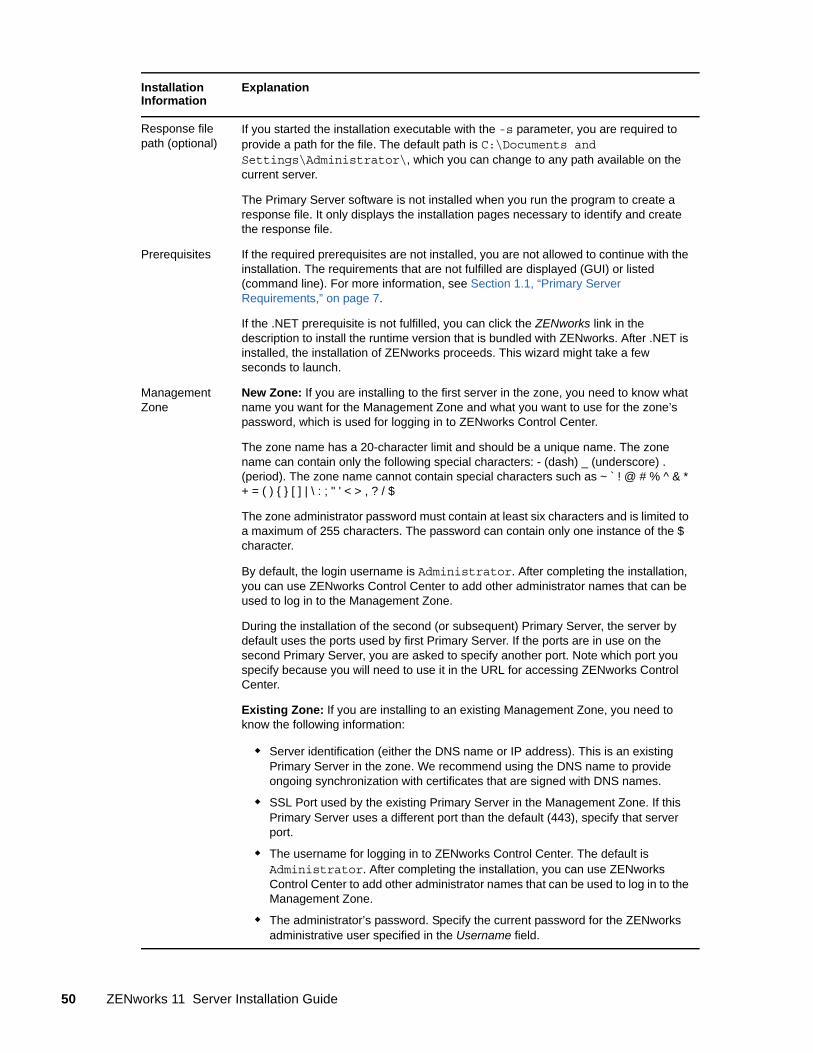
Response file path (optional)
If you started the installation executable with the -s parameter, you are required to provide a path for the file. The default path is C:\Documents and Settings\Administrator\, which you can change to any path available on the current server.
The Primary Server software is not installed when you run the program to create a response file. It only displays the installation pages necessary to identify and create the response file.
Prerequisites If the required prerequisites are not installed, you are not allowed to continue with the installation. The requirements that are not fulfilled are displayed (GUI) or listed (command line). For more information, see Section 1.1, “Primary Server Requirements,” on page 7.
If the .NET prerequisite is not fulfilled, you can click the ZENworks link in the description to install the runtime version that is bundled with ZENworks. After .NET is installed, the installation of ZENworks proceeds. This wizard might take a few seconds to launch.
Management Zone
New Zone: If you are installing to the first server in the zone, you need to know what name you want for the Management Zone and what you want to use for the zone’s password, which is used for logging in to ZENworks Control Center.
The zone name has a 20-character limit and should be a unique name. The zone name can contain only the following special characters: - (dash) _ (underscore) . (period). The zone name cannot contain special characters such as ~ ` ! @ # % ^ & * + = ( ) { } [ ] | \ : ; " ' < > , ? / $
The zone administrator password must contain at least six characters and is limited to a maximum of 255 characters. The password can contain only one instance of the $ character.
By default, the login username is Administrator. After completing the installation, you can use ZENworks Control Center to add other administrator names that can be used to log in to the Management Zone.
During the installation of the second (or subsequent) Primary Server, the server by default uses the ports used by first Primary Server. If the ports are in use on the second Primary Server, you are asked to specify another port. Note which port you specify because you will need to use it in the URL for accessing ZENworks Control Center.
Existing Zone: If you are installing to an existing Management Zone, you need to know the following information:
Server identification (either the DNS name or IP address). This is an existing Primary Server in the zone. We recommend using the DNS name to provide ongoing synchronization with certificates that are signed with DNS names.
SSL Port used by the existing Primary Server in the Management Zone. If this Primary Server uses a different port than the default (443), specify that server port.
The username for logging in to ZENworks Control Center. The default is Administrator. After completing the installation, you can use ZENworks Control Center to add other administrator names that can be used to log in to the Management Zone.
The administrator’s password. Specify the current password for the ZENworks administrative user specified in the Username field.
Installation Information
Explanation
50 ZENworks 11 Server Installation Guide
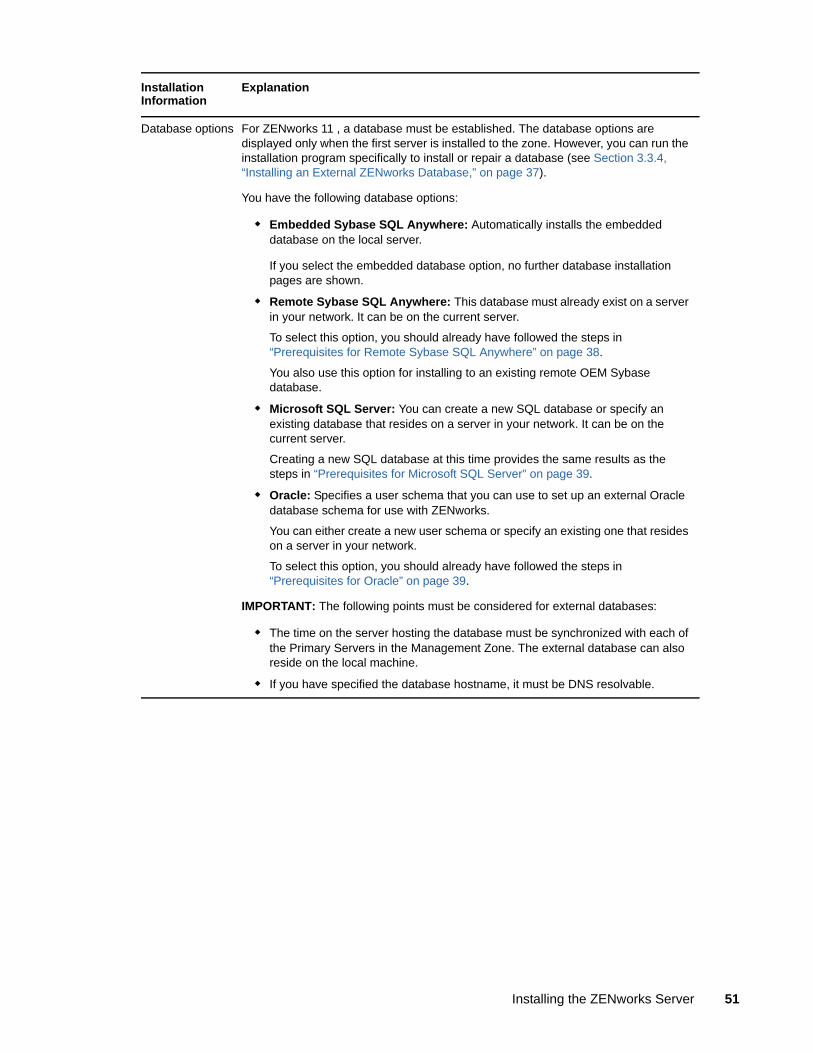
Database options For ZENworks 11 , a database must be established. The database options are displayed only when the first server is installed to the zone. However, you can run the installation program specifically to install or repair a database (see Section 3.3.4, “Installing an External ZENworks Database,” on page 37).
You have the following database options:
Embedded Sybase SQL Anywhere: Automatically installs the embedded database on the local server.
If you select the embedded database option, no further database installation pages are shown.
Remote Sybase SQL Anywhere: This database must already exist on a server in your network. It can be on the current server.
To select this option, you should already have followed the steps in “Prerequisites for Remote Sybase SQL Anywhere” on page 38.
You also use this option for installing to an existing remote OEM Sybase database.
Microsoft SQL Server: You can create a new SQL database or specify an existing database that resides on a server in your network. It can be on the current server.
Creating a new SQL database at this time provides the same results as the steps in “Prerequisites for Microsoft SQL Server” on page 39.
Oracle: Specifies a user schema that you can use to set up an external Oracle database schema for use with ZENworks.
You can either create a new user schema or specify an existing one that resides on a server in your network.
To select this option, you should already have followed the steps in “Prerequisites for Oracle” on page 39.
IMPORTANT: The following points must be considered for external databases:
The time on the server hosting the database must be synchronized with each of the Primary Servers in the Management Zone. The external database can also reside on the local machine.
If you have specified the database hostname, it must be DNS resolvable.
Installation Information
Explanation
Installing the ZENworks Server 51
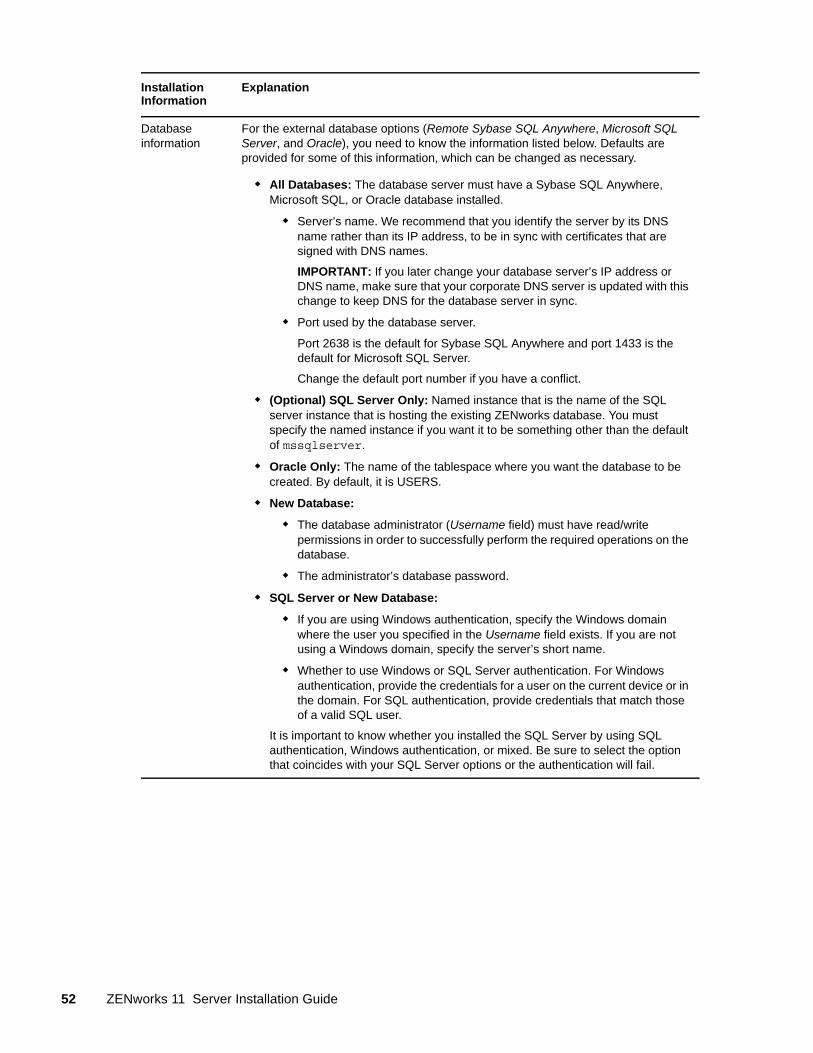
Database information
For the external database options (Remote Sybase SQL Anywhere, Microsoft SQL Server, and Oracle), you need to know the information listed below. Defaults are provided for some of this information, which can be changed as necessary.
All Databases: The database server must have a Sybase SQL Anywhere, Microsoft SQL, or Oracle database installed.
Server’s name. We recommend that you identify the server by its DNS name rather than its IP address, to be in sync with certificates that are signed with DNS names.
IMPORTANT: If you later change your database server’s IP address or DNS name, make sure that your corporate DNS server is updated with this change to keep DNS for the database server in sync.
Port used by the database server.
Port 2638 is the default for Sybase SQL Anywhere and port 1433 is the default for Microsoft SQL Server.
Change the default port number if you have a conflict.
(Optional) SQL Server Only: Named instance that is the name of the SQL server instance that is hosting the existing ZENworks database. You must specify the named instance if you want it to be something other than the default of mssqlserver.
Oracle Only: The name of the tablespace where you want the database to be created. By default, it is USERS.
New Database:
The database administrator (Username field) must have read/write permissions in order to successfully perform the required operations on the database.
The administrator’s database password.
SQL Server or New Database:
If you are using Windows authentication, specify the Windows domain where the user you specified in the Username field exists. If you are not using a Windows domain, specify the server’s short name.
Whether to use Windows or SQL Server authentication. For Windows authentication, provide the credentials for a user on the current device or in the domain. For SQL authentication, provide credentials that match those of a valid SQL user.
It is important to know whether you installed the SQL Server by using SQL authentication, Windows authentication, or mixed. Be sure to select the option that coincides with your SQL Server options or the authentication will fail.
Installation Information
Explanation
52 ZENworks 11 Server Installation Guide

Database access For the external database options (Remote Sybase SQL Anywhere, Microsoft SQL Server, and Oracle), you need to know the information listed below. Defaults are provided for some of this information, which can be changed as necessary.
All Databases: This server must have a Sybase SQL Anywhere, Microsoft SQL, or Oracle database installed.
Database name. Replace zenworks_MY_ZONE with either the desired database name, or an existing database name.
Database username. This user must have read/write permissions to modify the database.
If Windows authentication is also selected, the specified user must already exist when you create a new SQL database. The user is granted login access to SQL Server and read/write access to the ZENworks database that is created.
For an existing database, specify a user with sufficient permissions to the database.
Database password. For a new database, this password is automatically generated if SQL authentication is selected. For an existing database, specify the password of an existing user with read/write permissions to the database.
Sybase Databases Only: The name of your Sybase SQL Anywhere database server.
Oracle Databases Only: The name of the tablespace where you want the database to be created. By default, it is USERS.
Microsoft SQL Databases Only:
If you are using Windows authentication, specify the Windows domain where the user you specified in the Username field exists. If you are not using a Windows domain, specify the server’s short name.
Whether to use Windows or SQL Server authentication. For Windows authentication, provide the credentials for a user on the current device or in the domain. For SQL authentication, provide credentials that match those of a valid SQL user.
It is important to know whether you installed the SQL Server by using SQL authentication, Windows authentication, or mixed. Be sure to select the option that coincides with your SQL Server options or the authentication will fail.
SSL configuration (shown only for first server installed in the Management Zone)
In order to enable SSL communications, an SSL certificate must be added to the ZENworks server. Select whether to use an internal or external certificate authority (CA).
For subsequent installations of Primary Servers to the Management Zone, the CA established by the first server’s installation is used for the zone.
IMPORTANT: After you install ZENworks 11 , you can only change the internal certificate to an external certificate on Primary Servers. For more information, see .
The Restore Default buttons restore the paths to those that were displayed when you first accessed this page.
Installation Information
Explanation
Installing the ZENworks Server 53
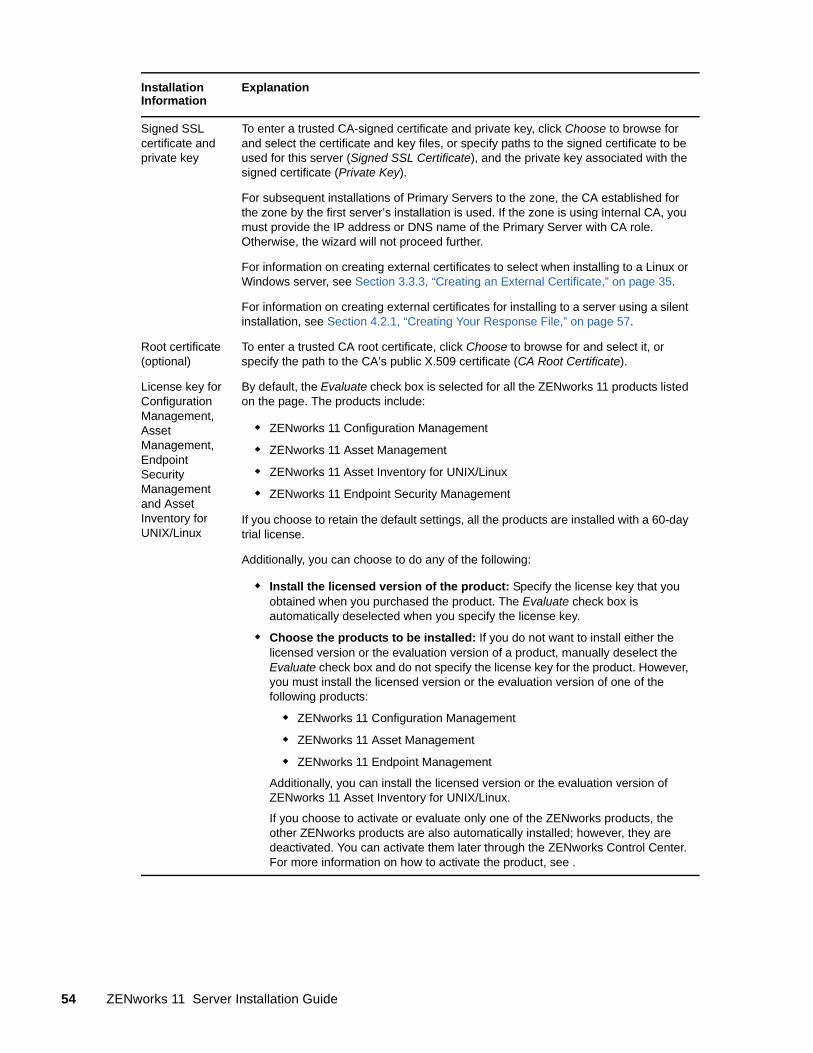
Signed SSL certificate and private key
To enter a trusted CA-signed certificate and private key, click Choose to browse for and select the certificate and key files, or specify paths to the signed certificate to be used for this server (Signed SSL Certificate), and the private key associated with the signed certificate (Private Key).
For subsequent installations of Primary Servers to the zone, the CA established for the zone by the first server’s installation is used. If the zone is using internal CA, you must provide the IP address or DNS name of the Primary Server with CA role. Otherwise, the wizard will not proceed further.
For information on creating external certificates to select when installing to a Linux or Windows server, see Section 3.3.3, “Creating an External Certificate,” on page 35.
For information on creating external certificates for installing to a server using a silent installation, see Section 4.2.1, “Creating Your Response File,” on page 57.
Root certificate (optional)
To enter a trusted CA root certificate, click Choose to browse for and select it, or specify the path to the CA’s public X.509 certificate (CA Root Certificate).
License key for Configuration Management, Asset Management, Endpoint Security Management and Asset Inventory for UNIX/Linux
By default, the Evaluate check box is selected for all the ZENworks 11 products listed on the page. The products include:
ZENworks 11 Configuration Management
ZENworks 11 Asset Management
ZENworks 11 Asset Inventory for UNIX/Linux
ZENworks 11 Endpoint Security Management
If you choose to retain the default settings, all the products are installed with a 60-day trial license.
Additionally, you can choose to do any of the following:
Install the licensed version of the product: Specify the license key that you obtained when you purchased the product. The Evaluate check box is automatically deselected when you specify the license key.
Choose the products to be installed: If you do not want to install either the licensed version or the evaluation version of a product, manually deselect the Evaluate check box and do not specify the license key for the product. However, you must install the licensed version or the evaluation version of one of the following products:
ZENworks 11 Configuration Management
ZENworks 11 Asset Management
ZENworks 11 Endpoint Management
Additionally, you can install the licensed version or the evaluation version of ZENworks 11 Asset Inventory for UNIX/Linux.
If you choose to activate or evaluate only one of the ZENworks products, the other ZENworks products are also automatically installed; however, they are deactivated. You can activate them later through the ZENworks Control Center. For more information on how to activate the product, see .
Installation Information
Explanation
54 ZENworks 11 Server Installation Guide
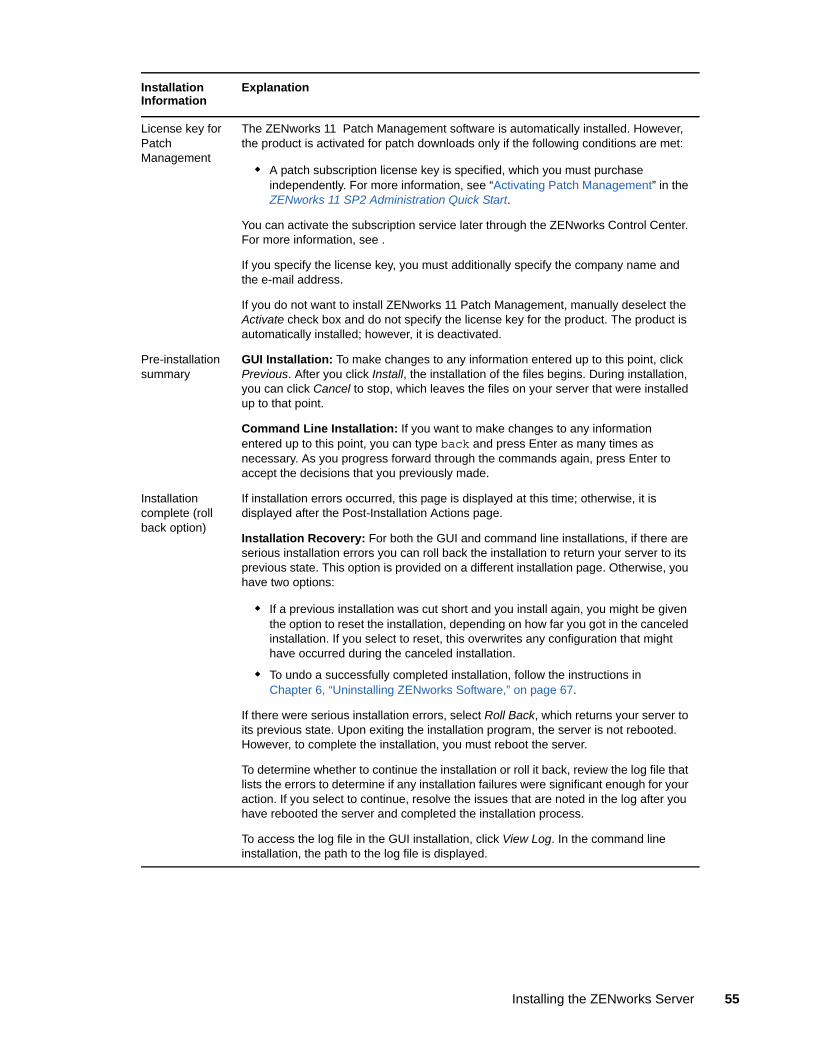
License key for Patch Management
The ZENworks 11 Patch Management software is automatically installed. However, the product is activated for patch downloads only if the following conditions are met:
A patch subscription license key is specified, which you must purchase independently. For more information, see “Activating Patch Management” in the ZENworks 11 SP2 Administration Quick Start.
You can activate the subscription service later through the ZENworks Control Center. For more information, see .
If you specify the license key, you must additionally specify the company name and the e-mail address.
If you do not want to install ZENworks 11 Patch Management, manually deselect the Activate check box and do not specify the license key for the product. The product is automatically installed; however, it is deactivated.
Pre-installation summary
GUI Installation: To make changes to any information entered up to this point, click Previous. After you click Install, the installation of the files begins. During installation, you can click Cancel to stop, which leaves the files on your server that were installed up to that point.
Command Line Installation: If you want to make changes to any information entered up to this point, you can type back and press Enter as many times as necessary. As you progress forward through the commands again, press Enter to accept the decisions that you previously made.
Installation complete (roll back option)
If installation errors occurred, this page is displayed at this time; otherwise, it is displayed after the Post-Installation Actions page.
Installation Recovery: For both the GUI and command line installations, if there are serious installation errors you can roll back the installation to return your server to its previous state. This option is provided on a different installation page. Otherwise, you have two options:
If a previous installation was cut short and you install again, you might be given the option to reset the installation, depending on how far you got in the canceled installation. If you select to reset, this overwrites any configuration that might have occurred during the canceled installation.
To undo a successfully completed installation, follow the instructions in Chapter 6, “Uninstalling ZENworks Software,” on page 67.
If there were serious installation errors, select Roll Back, which returns your server to its previous state. Upon exiting the installation program, the server is not rebooted. However, to complete the installation, you must reboot the server.
To determine whether to continue the installation or roll it back, review the log file that lists the errors to determine if any installation failures were significant enough for your action. If you select to continue, resolve the issues that are noted in the log after you have rebooted the server and completed the installation process.
To access the log file in the GUI installation, click View Log. In the command line installation, the path to the log file is displayed.
Installation Information
Explanation
Installing the ZENworks Server 55
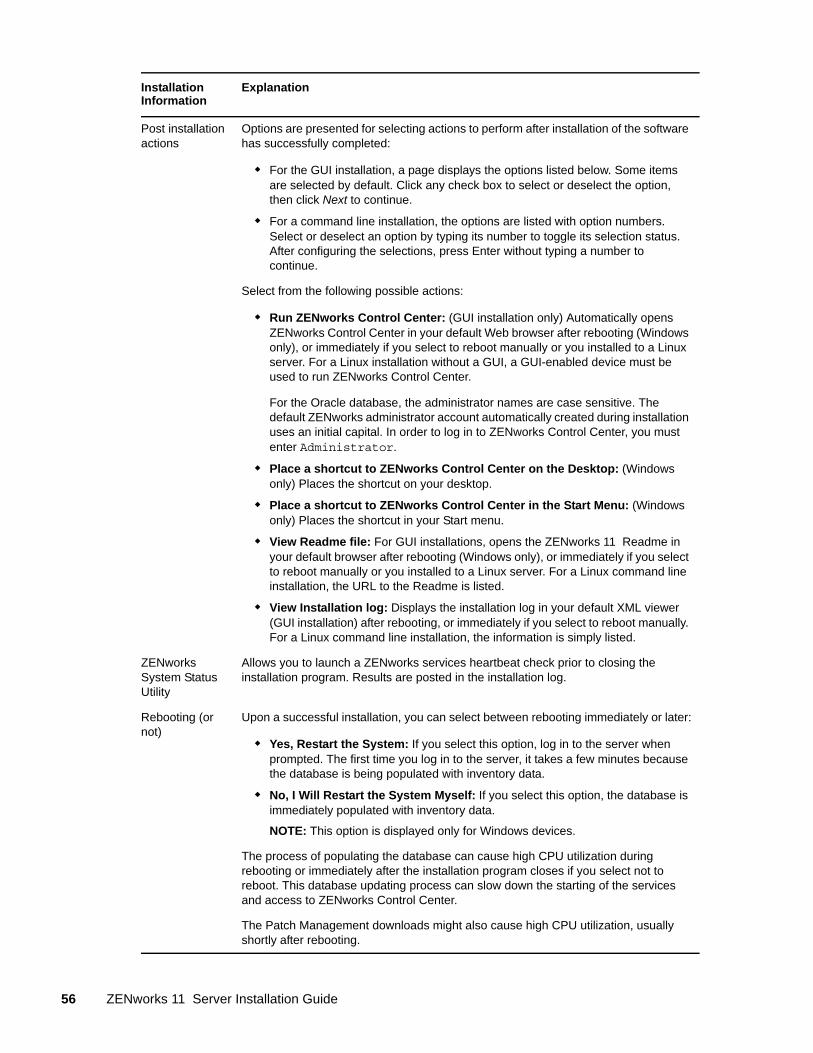
Post installation actions
Options are presented for selecting actions to perform after installation of the software has successfully completed:
For the GUI installation, a page displays the options listed below. Some items are selected by default. Click any check box to select or deselect the option, then click Next to continue.
For a command line installation, the options are listed with option numbers. Select or deselect an option by typing its number to toggle its selection status. After configuring the selections, press Enter without typing a number to continue.
Select from the following possible actions:
Run ZENworks Control Center: (GUI installation only) Automatically opens ZENworks Control Center in your default Web browser after rebooting (Windows only), or immediately if you select to reboot manually or you installed to a Linux server. For a Linux installation without a GUI, a GUI-enabled device must be used to run ZENworks Control Center.
For the Oracle database, the administrator names are case sensitive. The default ZENworks administrator account automatically created during installation uses an initial capital. In order to log in to ZENworks Control Center, you must enter Administrator.
Place a shortcut to ZENworks Control Center on the Desktop: (Windows only) Places the shortcut on your desktop.
Place a shortcut to ZENworks Control Center in the Start Menu: (Windows only) Places the shortcut in your Start menu.
View Readme file: For GUI installations, opens the ZENworks 11 Readme in your default browser after rebooting (Windows only), or immediately if you select to reboot manually or you installed to a Linux server. For a Linux command line installation, the URL to the Readme is listed.
View Installation log: Displays the installation log in your default XML viewer (GUI installation) after rebooting, or immediately if you select to reboot manually. For a Linux command line installation, the information is simply listed.
ZENworks System Status Utility
Allows you to launch a ZENworks services heartbeat check prior to closing the installation program. Results are posted in the installation log.
Rebooting (or not)
Upon a successful installation, you can select between rebooting immediately or later:
Yes, Restart the System: If you select this option, log in to the server when prompted. The first time you log in to the server, it takes a few minutes because the database is being populated with inventory data.
No, I Will Restart the System Myself: If you select this option, the database is immediately populated with inventory data.
NOTE: This option is displayed only for Windows devices.
The process of populating the database can cause high CPU utilization during rebooting or immediately after the installation program closes if you select not to reboot. This database updating process can slow down the starting of the services and access to ZENworks Control Center.
The Patch Management downloads might also cause high CPU utilization, usually shortly after rebooting.
Installation Information
Explanation
56 ZENworks 11 Server Installation Guide
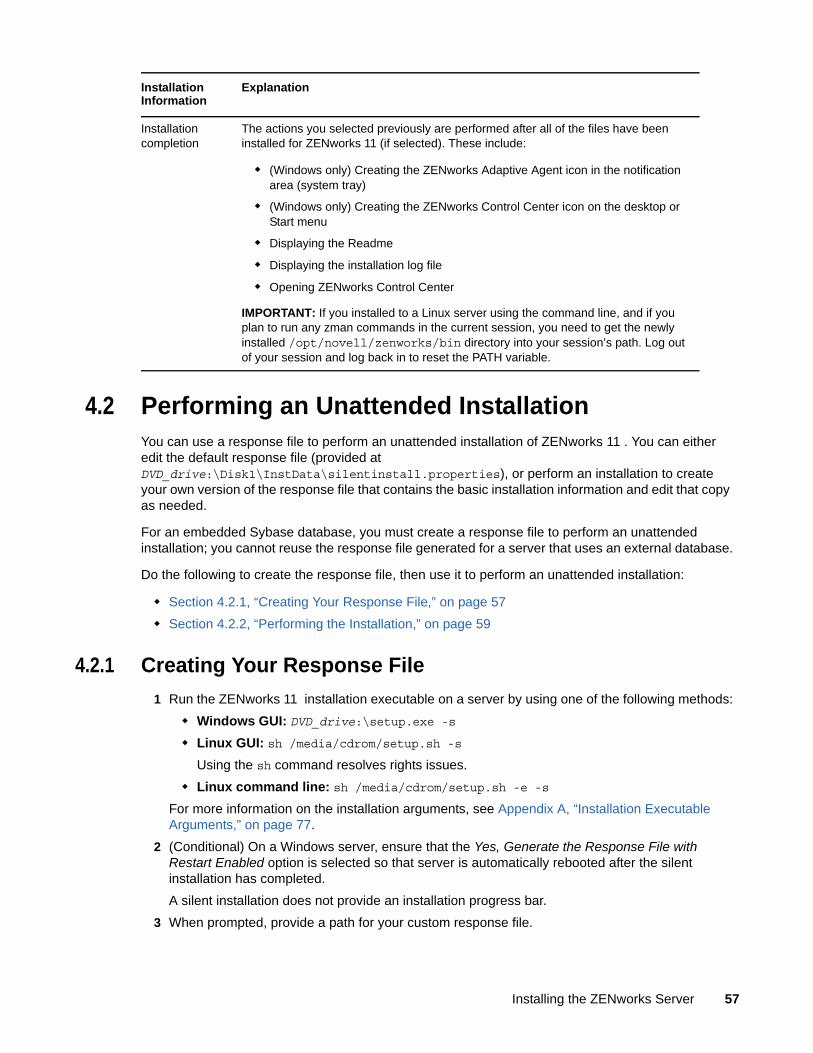
4.2 Performing an Unattended InstallationYou can use a response file to perform an unattended installation of ZENworks 11 . You can either edit the default response file (provided at DVD_drive:\Disk1\InstData\silentinstall.properties), or perform an installation to create your own version of the response file that contains the basic installation information and edit that copy as needed.
For an embedded Sybase database, you must create a response file to perform an unattended installation; you cannot reuse the response file generated for a server that uses an external database.
Do the following to create the response file, then use it to perform an unattended installation:
Section 4.2.1, “Creating Your Response File,” on page 57
Section 4.2.2, “Performing the Installation,” on page 59
4.2.1 Creating Your Response File
1 Run the ZENworks 11 installation executable on a server by using one of the following methods:
Windows GUI: DVD_drive:\setup.exe -s
Linux GUI: sh /media/cdrom/setup.sh -s
Using the sh command resolves rights issues.
Linux command line: sh /media/cdrom/setup.sh -e -s
For more information on the installation arguments, see Appendix A, “Installation Executable Arguments,” on page 77.
2 (Conditional) On a Windows server, ensure that the Yes, Generate the Response File with Restart Enabled option is selected so that server is automatically rebooted after the silent installation has completed.
A silent installation does not provide an installation progress bar.
3 When prompted, provide a path for your custom response file.
Installation completion
The actions you selected previously are performed after all of the files have been installed for ZENworks 11 (if selected). These include:
(Windows only) Creating the ZENworks Adaptive Agent icon in the notification area (system tray)
(Windows only) Creating the ZENworks Control Center icon on the desktop or Start menu
Displaying the Readme
Displaying the installation log file
Opening ZENworks Control Center
IMPORTANT: If you installed to a Linux server using the command line, and if you plan to run any zman commands in the current session, you need to get the newly installed /opt/novell/zenworks/bin directory into your session’s path. Log out of your session and log back in to reset the PATH variable.
Installation Information
Explanation
Installing the ZENworks Server 57
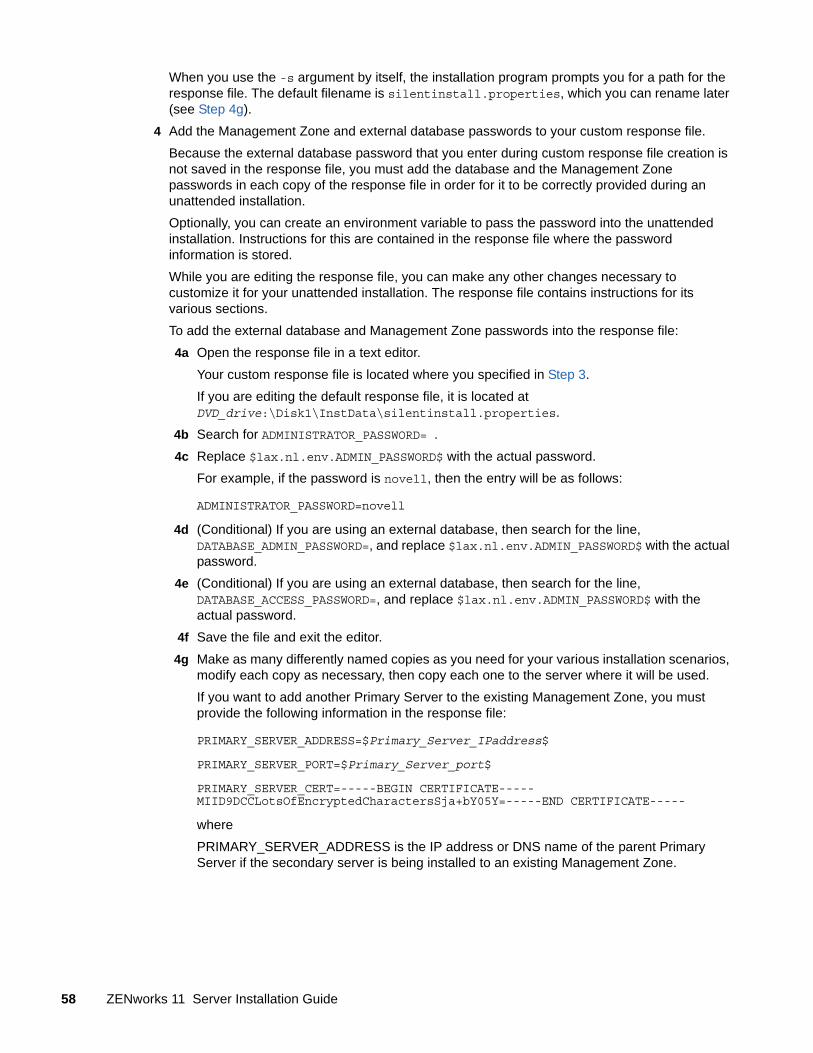
When you use the -s argument by itself, the installation program prompts you for a path for the response file. The default filename is silentinstall.properties, which you can rename later (see Step 4g).
4 Add the Management Zone and external database passwords to your custom response file.
Because the external database password that you enter during custom response file creation is not saved in the response file, you must add the database and the Management Zone passwords in each copy of the response file in order for it to be correctly provided during an unattended installation.
Optionally, you can create an environment variable to pass the password into the unattended installation. Instructions for this are contained in the response file where the password information is stored.
While you are editing the response file, you can make any other changes necessary to customize it for your unattended installation. The response file contains instructions for its various sections.
To add the external database and Management Zone passwords into the response file:
4a Open the response file in a text editor.
Your custom response file is located where you specified in Step 3.
If you are editing the default response file, it is located at DVD_drive:\Disk1\InstData\silentinstall.properties.
4b Search for ADMINISTRATOR_PASSWORD= .
4c Replace $lax.nl.env.ADMIN_PASSWORD$ with the actual password.
For example, if the password is novell, then the entry will be as follows:
ADMINISTRATOR_PASSWORD=novell
4d (Conditional) If you are using an external database, then search for the line, DATABASE_ADMIN_PASSWORD=, and replace $lax.nl.env.ADMIN_PASSWORD$ with the actual password.
4e (Conditional) If you are using an external database, then search for the line, DATABASE_ACCESS_PASSWORD=, and replace $lax.nl.env.ADMIN_PASSWORD$ with the actual password.
4f Save the file and exit the editor.
4g Make as many differently named copies as you need for your various installation scenarios, modify each copy as necessary, then copy each one to the server where it will be used.
If you want to add another Primary Server to the existing Management Zone, you must provide the following information in the response file:
PRIMARY_SERVER_ADDRESS=$Primary_Server_IPaddress$
PRIMARY_SERVER_PORT=$Primary_Server_port$
PRIMARY_SERVER_CERT=-----BEGIN CERTIFICATE-----MIID9DCCLotsOfEncryptedCharactersSja+bY05Y=-----END CERTIFICATE-----
where
PRIMARY_SERVER_ADDRESS is the IP address or DNS name of the parent Primary Server if the secondary server is being installed to an existing Management Zone.
58 ZENworks 11 Server Installation Guide

PRIMARY_SERVER_PORT is the SSL port used by the parent Primary Server if the secondary server is being installed to an existing Management Zone. By default, it is 443.
PRIMARY_SERVER_CERT= is the certificate you specified on the parent Primary Server if the secondary server is being installed to an existing Management Zone. The certificate must be in the base64 encoded string format of an x509 certificate, and the certificate string must be specified in one line. The above is just an example of the certificate information.
5 After you have completed modifications to your custom response file, copy it from the path that you specified in Step 3 to a location on each server where you will use it for the unattended installation.
6 To use the updated response file, continue with Section 4.2.2, “Performing the Installation,” on page 59.
NOTE: If you want to install Microsoft .NET by using silent install properties file, you need to manually set the value in the silent file as INSTALL_DOT_NET=1.
4.2.2 Performing the Installation
1 On the installation server where you will perform an unattended installation, insert the Novell ZENworks 11 installation DVD.
For Windows, if the installation page where you can select the language is displayed, click Cancel to exit the GUI installation.
For Linux, mount the installation DVD.
2 To start the unattended installation, use the -f option in the command:
For Windows, run DVD_drive:\setup.exe -s -f path_to_file.
For Linux, run sh /media/cdrom/setup.sh -s -f path_to_file.
where path_to_file is either the full path to the response file that you created in Section 4.2.1, “Creating Your Response File,” on page 57, or a directory containing the silentinstall.properties file (it must use that filename).
Using the sh command resolves rights issues.
If you renamed the updated response file, include its new name with the path.
If a filename is not given, or if either the path or file does not exist, the -f parameter is ignored and the default installation (GUI or command line) is run instead of an unattended installation.
3 To create another Primary Server for the Management Zone by performing an unattended installation, return to Step 1; otherwise, continue with Step 4.
4 After the installation has completed, continue with Section 4.3, “Verifying Installation,” on page 59.
4.3 Verifying InstallationPerform the following steps if you want to verify a successful installation.
1 After the installation has completed and the server has been rebooted, do any of the following to verify that ZENworks 11 is running:
Run ZENworks Control Center
If ZENworks Control Center did not automatically start, use the following URL to open ZENworks Control Center in a Web browser:
Installing the ZENworks Server 59
https://DNS_name_or_IP_address_of_Primary_Server/zenworks
This can be done either on the server where you just installed ZENworks, or on a qualified workstation.
Check the Windows services by using the GUI
On the server, click Start, select Administrative Tools > Services, then review the status of the Novell ZENworks Loader and Novell ZENworks Server services.
If they are not running, start the ZENworks services. Right-click the Novell ZENworks Server service, select Start, right-click the Novell ZENworks Loader service, then select Start.
The Restart option stops all related services that are already running and starts each of them in their correct order, including Novell ZENworks Loader.
Check the Windows services by using a command line
On the server, click Start, click Run, then run the following command:
ZENworks_installation_path\bin\novell-zenworks-configure -c SystemStatus
This lists all ZENworks services and their statuses.
To start the services, run the following command:
ZENworks_installation_path\bin\novell-zenworks-configure -c Start
Check the Linux services by using the configuration command
On the server, run the following command:
/opt/novell/zenworks/bin/novell-zenworks-configure -c SystemStatus
This lists all ZENworks services and their statuses.
To start the services, run the following command:
/opt/novell/zenworks/bin/novell-zenworks-configure -c Start
Check the Linux services by using the specific services’ commands
On the server, run the following commands:
/etc/init.d/novell-zenserver status
/etc/init.d/novell-zenloader status
If the services are not running, run the following commands to start the ZENworks services:
/etc/init.d/novell-zenserver start
/etc/init.d/novell-zenloader start
4.4 Post-Installation TasksPerform the tasks in the following sections after installing the ZENworks 11 software:
Section 4.4.1, “Tasks for All Platforms,” on page 61
Section 4.4.2, “Tasks for VMware ESX,” on page 63
60 ZENworks 11 Server Installation Guide
4.4.1 Tasks for All Platforms
After successfully installing ZENworks 11 , perform the following tasks:
If you have ZENworks Configuration Management 10.x managed devices or Satellites in your network and want to register the devices to a new ZENworks 11 Management Zone so that they can be automatically upgraded to ZENworks 11, you must import ZENworks 11 System Update from the appropriate ZENworks 11 installation media in to the newly installed zone. For detailed information about importing ZENworks 11 System Update into the newly installed zone, see TID 7007958 in the Novell Support Knowledgebase (http://support.novell.com/search/kb_index.jsp).
(Optional) If you want to set certain configuration parameters for how ZENworks is run on a Primary Server, see .
Take a reliable backup of the ZENworks database on a regular basis.
For more information on how to back up the ZENworks database, see .
Procure and note down the credentials of the database.
To procure the credentials of the internal database, use one of the following commands:
zman dgc -U administrator_name -P administrator_password
or
zman database-get-credentials -U administrator_name -P administrator_password
To procure the credentials of the external database, contact the database administrator.
Take a reliable backup of the ZENworks Server (which only needs to be done one time).
For more information on how to back up the ZENworks Server, see .
Take a reliable backup of the Certificate Authority.
For more information on how to back up the Certificate Authority, see .
(Conditional) If you turn on the firewall on Windows Primary Server, you must configure the server to allow the following ZENworks 11 Configuration Management Imaging applications through the firewall by adding them to the Windows Firewall Exceptions list:
novell-pbserv.exe
novell-proxydhcp.exe
novell-tftp.exe
novell-zmgprebootpolicy.exe
For more information, review the following sections:
“Adding Imaging Applications as Exceptions to Firewall on Windows Server 2003” on page 61
“Adding Imaging Applications as Exceptions to Firewall on Windows Server 2008” on page 62
Adding Imaging Applications as Exceptions to Firewall on Windows Server 2003
1 From the desktop Start menu, click Settings > Control Panel.
2 Double-click Windows Firewall.
The Windows Firewall window is displayed.
3 Click the Exceptions tab.
4 Click Add Program.
The Add a Program window is displayed.
Installing the ZENworks Server 61
5 Click Browse to browse for and select novell-pbserv.exe.
All the Imaging applications including novell-pbserv.exe are located in the zenworks_installation_directory\novell\zenworks\bin\preboot directory
6 Click OK.
novell-pbserv.exe is added to the Programs and Services list and is automatically enabled.
7 Repeat Step 4 through Step 6 to add the following Imaging applications to the Exceptions list:
novell-proxydhcp.exe
novell-tftp.exe
novell-zmgprebootpolicy.exe
8 Click OK.
Adding Imaging Applications as Exceptions to Firewall on Windows Server 2008
1 From the desktop Start menu, click Settings > Control Panel.
2 Double-click Windows Firewall.
The Windows Firewall window is displayed.
3 In the left pane, click Allow a program or feature through Windows Firewall.
4 Click the Exceptions tab.
5 Click Add Program.
The Add a Program window is displayed.
6 Click Browse to browse for and select novell-pbserv.exe.
All the Imaging applications including novell-pbserv.exe are located in the zenworks_installation_directory\novell\zenworks\bin\preboot directory
7 Click OK.
novell-pbserv.exe is added to the Programs and Services list and is automatically enabled.
8 Repeat Step 5 through Step 7 to add the following Imaging applications to the Exceptions list:
novell-proxydhcp.exe
novell-tftp.exe
novell-zmgprebootpolicy.exe
9 Click OK.
NOTE
After installing the server on Linux device, /opt/novell/zenworks/bin is not added to the PATH variable and hence the commands in that directory cannot be used directly. Do any of the following on the Linux device to run the commands from /opt/novell/zenworks/bin:
Relogin to the device.
Specify the complete path to access the command.
For example: /opt/novell/zenworks/bin/zac
62 ZENworks 11 Server Installation Guide
4.4.2 Tasks for VMware ESX
For optimal performance of the Primary Servers running on VMware ESX, set the reserved memory size to the size of the guest operating system memory. For more information, see TID 7005382 in Novell Support Knowledgebase (http://support.novell.com/search/kb_index.jsp).
In addition, if the ZENworks 11 guest operating system supports VMware ESX, enable additional Java commands to set large pages, as follows:
-XX:+UseLargePages
For more information on memory reservation and large memory pages, see Java in Virtual Machines on VMware ESX: Best Practices (http://www.vmware.com/files/pdf/Java_in_Virtual_Machines_on_ESX-FINAL-Jan-15-2009.pdf).
Finally you need to perform the following tasks:
“Enabling Additional Java Options on Windows” on page 63
“Enabling the Additional Java Options on Linux” on page 64
Enabling Additional Java Options on Windows
1 At the command prompt, run the following command:
zenserverw
2 In the Java tab, add the option that you want to enable to an appropriate location under the Java Options. Ensure that each option is on a separate line.
3 Start the Novell ZENworks Server services:
3a Click Start > Settings > Control Panel
3b Double-click Administrative Tools > Services.
3c Double-click Novell ZENworks Server.
3d In the Novell ZENworks Service Properties dialog box, click Start > OK.
4 Stop the Novell ZENworks Server services:
4a Click Start > Settings > Control Panel
4b Double-click Administrative Tools > Services.
4c Double-click Novell ZENworks Server.
4d In the Novell ZENworks Service Properties dialog box, click Stop > OK.
NOTE: If the Novell ZENworks Server properties dialog box is not displayed or the service fails to start, there is either a compatibility problem with the newly added option or the syntax is incorrect. To troubleshoot the service startup, enable the logging options on the Logging tab:
Set the log path. For example, c:\.
Set the Redirect Stdout. For example, c:\stdout.log
Set the Redirect Stderr.log. For example, c:\stderr.log
Installing the ZENworks Server 63
Enabling the Additional Java Options on Linux
1 Create a backup then open /etc/init.d/novell-zenserver.
2 In the CATALINA_OPTS string, add the appropriate options, separated by spaces, before the -XX:PermSize option.
CATALINA_OPTS is used to configure the Tomcat container options. For more information on Tomcat, see the Tomcat online documentation.
3 To restart the Novell ZENworks Server services, run the following command:
/etc/init.d/novell-zenserver start
4 To stop the Novell ZENworks Server services, run the following command:
/etc/init.d/novell-zenserver stop
NOTE: If the Novell ZENworks Server fails to start, there is a compatibility problem with the newly added option or the syntax is incorrect. To troubleshoot the service startup, run the following command:
/etc/init.d/novell-zenserver debug
The following log file is displayed:
/opt/novell/zenworks/share/tomcat/logs/catalina.out
64 ZENworks 11 Server Installation Guide
5 5Installing the ZENworks Adaptive Agent
Any device you want to manage through ZENworks must deploy the ZENworks Adaptive Agent. The Adaptive Agent distributes software, enforces policies, collects software and hardware inventory, monitors software usage and license compliance, and performs all other ZENworks management tasks on the managed device.
For detailed information on deploying the ZENworks Adaptive Agent, see “ZENworks Adaptive Agent Deployment” in the ZENworks 11 Discovery, Deployment, and Retirement Reference.
IMPORTANT: Before you install ZENworks Adaptive Agent on a device, you must consider the following:
If you plan to install the ZENworks Adaptive Agent on a device that has ZENworks 7 Desktop Management Agent or the ZENworks Endpoint Security Management 4.1 Client already installed, you might encounter coexistence issues. For more information on the coexistence issues, see Coexistence with Other ZENworks Products before continuing with “ZENworks Adaptive Agent Deployment” in the ZENworks 11 Discovery, Deployment, and Retirement Reference
During the ZENworks Adaptive Agent installation, you must ensure that no other installation process is in progress on the device. If any installation process is in progress when ZENworks Adaptive agent is being installed on the device, then one of the following might occur:
The ZENworks agent installation on the device might fail. For example, if the Windows Update is active on a device on which ZENworks agent installation is in progress, then some updates might get simultaneously installed on the device resulting in the ZENworks agent installation failure.
The ZENworks agent installation might pause until the other installation process is completed.
If you are installing or updating ZCM on a Windows XP device which has HP Drive Guard installed, then ensure that HP Drive Guard version must be 1.20.5.1 and above.
Devices running the Firmware interface as UEFI, the FDE install fails. However, agent install completes. For such devices, FDE component must be uninstalled, otherwise every agent refresh would cause an FDE install failure.
Installing the ZENworks Adaptive Agent 65

66 ZENworks 11 Server Installation Guide
6 6Uninstalling ZENworks Software
You can uninstall the ZENworks software from Primary Servers, Satellites, and managed devices. If ZENworks Reporting Server is installed on a Primary Server, you must first uninstall the ZENworks Reporting Server (see “Uninstalling ZENworks Software” in the ZENworks 11 Server Installation Guide), then uninstall the ZENworks software.
The embedded ZENworks database can only be removed by uninstalling the ZENworks software from the Primary Server hosting the Management Zone. If you are using an external database, the database remains intact after the uninstallation. To uninstall an external ZENworks database, see the instructions provided by the database manufacturer.
NOTE: To uninstall the ZENworks software from a Windows server or managed device, you must ensure that the device is not running in safe mode.
Review the following sections for more information:
Section 6.1, “Correct Order for Uninstalling ZENworks Software,” on page 67
Section 6.2, “Uninstalling a Windows Primary Server, Satellite, or Managed Device,” on page 68
Section 6.3, “Uninstalling a Linux Primary Server,” on page 71
Section 6.4, “Uninstalling a Linux Satellite or Managed Device,” on page 73
6.1 Correct Order for Uninstalling ZENworks SoftwareWhen uninstalling ZENworks software from selected components of your Management Zone (for example, a Primary Server or a managed device), there is no specific order that you need to follow.
However, if you want to completely remove the ZENworks software from all components in your Management Zone (effectively removing ZENworks from your environment), we recommend that you uninstall the software in the reverse order that it was installed. This means that you would:
1. Uninstall the Adaptive Agent from each managed device.
2. Uninstall all Satellite devices.
3. Uninstall all Primary Servers other than your database Primary Server. Your database Primary Server is the one that is hosting the embedded ZENworks database. Or, if you are using an external ZENworks database, it is the first Primary Server that was installed.
If you don’t uninstall all Primary Servers before your database Primary Server, those Primary Servers become orphaned when you delete the database Primary Server and cannot be uninstalled from ZENworks Control Center.
4. Uninstall the database Primary Server.
Uninstalling ZENworks Software 67
6.2 Uninstalling a Windows Primary Server, Satellite, or Managed DeviceBefore uninstalling the ZENworks software from the Windows Satellite, if you demote the device to managed device, you must run the uninstallation program only after the Satellite roles (Authentication, Imaging, Content, and Collection) are removed from the device. To ensure that the
roles are removed from the Windows managed device, double click the icon in the notification area. The left navigation pane should not contain the Satellite pages.
Uninstalling the ZENworks Adaptive Agent does not roll back the previously enforced Printer policies and does not remove the Browser Bookmarks policy settings from the user’s Favorites. For more information, see “Troubleshooting Policy Management” in ZENworks 11 Configuration Policies Reference.
To uninstall a Windows Primary Server, Satellite, or managed device:
1 On the server or managed device, run:
zenworks_installation_directory\novell\zenworks\bin\ZENworksUninstall.exe
To see the list of uninstall options, run ZENworksUninstall.exe --help
2 Refer to the information in the following table during uninstallation.
The information is listed in the order of the uninstallation flow.
Information Explanation
Administrator Information of the zone to which the device is registered
Configure the following settings:
Primary Server: Specify the IP address of the Primary server in the following format:
https:// IP_address or DNS_name_of_the_server:port_number
NOTE: You must specify the port number if you are not using the default port.
Username: Specify the username. By default, the username is administrator.
Password: Specify the password for the ZENworks administrative user specified in the Username field.
Local Uninstallation Only (Retain the Device in the Zone): Select this option if you only want to uninstall ZENworks software from the device. The device continues to be registered in the Management Zone.
NOTE: Ensure that you have the permission to uninstall the ZENworks Adaptive Agent. The Allow Users to Uninstall Agent option must be selected by the zone administrator in ZENworks Control Center (the Configuration tab > Management Zone Settings > Device Management > ZENworks Agent > General).
This option is useful if you don’t have a connection with the Management Zone when you want to remove ZENworks from the device, or if the device’s ZENworks installation is corrupted and needs to be reinstalled.
If you select the Local Uninstallation Only (Retain the Device in the Zone) option, then click Next, the Components To Be Retained page is displayed.
68 ZENworks 11 Server Installation Guide
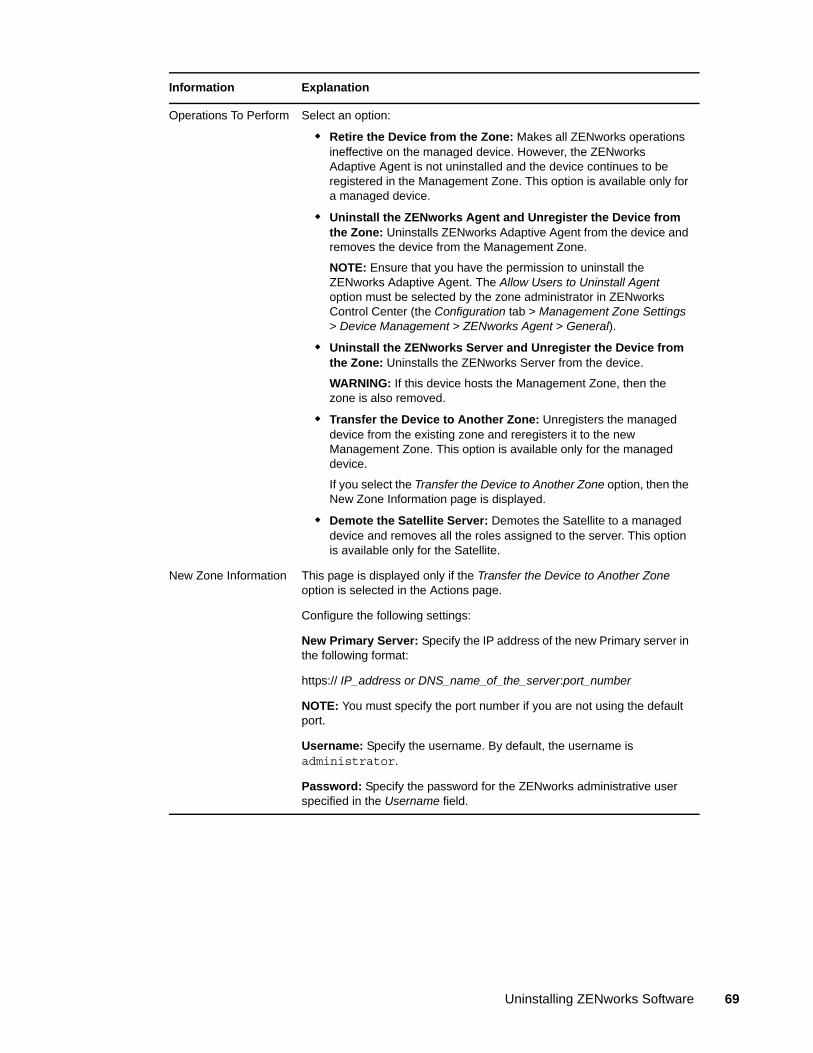
Operations To Perform Select an option:
Retire the Device from the Zone: Makes all ZENworks operations ineffective on the managed device. However, the ZENworks Adaptive Agent is not uninstalled and the device continues to be registered in the Management Zone. This option is available only for a managed device.
Uninstall the ZENworks Agent and Unregister the Device from the Zone: Uninstalls ZENworks Adaptive Agent from the device and removes the device from the Management Zone.
NOTE: Ensure that you have the permission to uninstall the ZENworks Adaptive Agent. The Allow Users to Uninstall Agent option must be selected by the zone administrator in ZENworks Control Center (the Configuration tab > Management Zone Settings > Device Management > ZENworks Agent > General).
Uninstall the ZENworks Server and Unregister the Device from the Zone: Uninstalls the ZENworks Server from the device.
WARNING: If this device hosts the Management Zone, then the zone is also removed.
Transfer the Device to Another Zone: Unregisters the managed device from the existing zone and reregisters it to the new Management Zone. This option is available only for the managed device.
If you select the Transfer the Device to Another Zone option, then the New Zone Information page is displayed.
Demote the Satellite Server: Demotes the Satellite to a managed device and removes all the roles assigned to the server. This option is available only for the Satellite.
New Zone Information This page is displayed only if the Transfer the Device to Another Zone option is selected in the Actions page.
Configure the following settings:
New Primary Server: Specify the IP address of the new Primary server in the following format:
https:// IP_address or DNS_name_of_the_server:port_number
NOTE: You must specify the port number if you are not using the default port.
Username: Specify the username. By default, the username is administrator.
Password: Specify the password for the ZENworks administrative user specified in the Username field.
Information Explanation
Uninstalling ZENworks Software 69
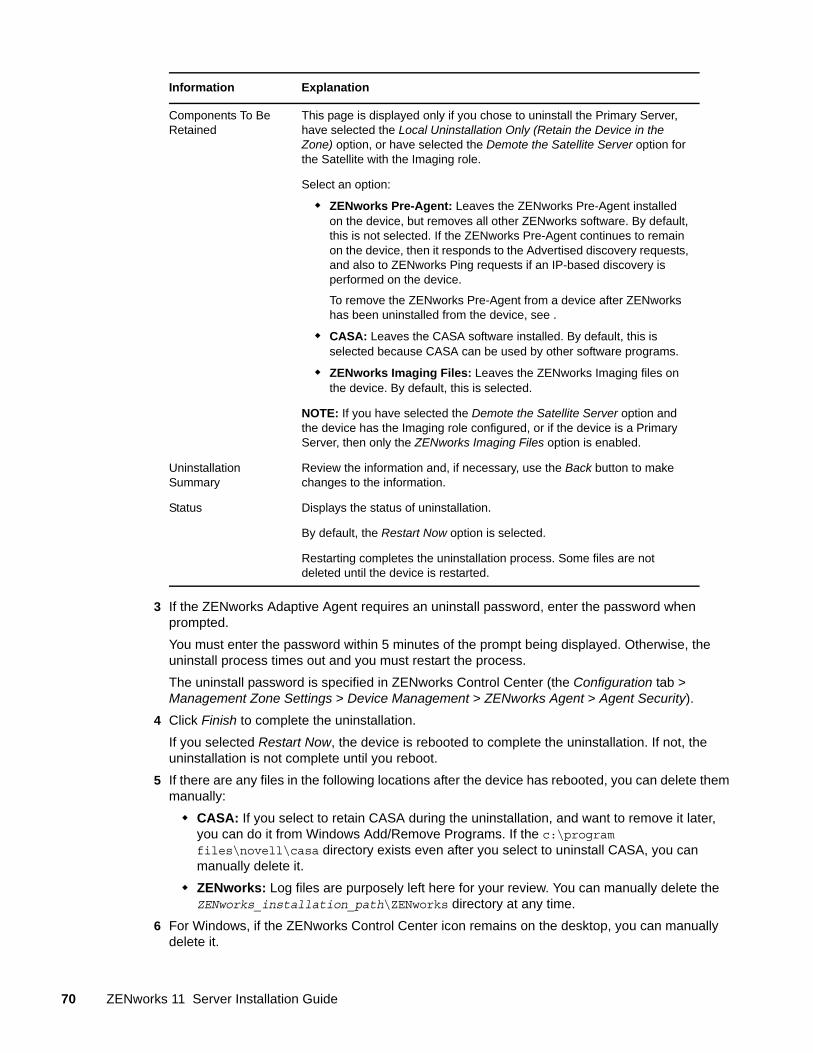
3 If the ZENworks Adaptive Agent requires an uninstall password, enter the password when prompted.
You must enter the password within 5 minutes of the prompt being displayed. Otherwise, the uninstall process times out and you must restart the process.
The uninstall password is specified in ZENworks Control Center (the Configuration tab > Management Zone Settings > Device Management > ZENworks Agent > Agent Security).
4 Click Finish to complete the uninstallation.
If you selected Restart Now, the device is rebooted to complete the uninstallation. If not, the uninstallation is not complete until you reboot.
5 If there are any files in the following locations after the device has rebooted, you can delete them manually:
CASA: If you select to retain CASA during the uninstallation, and want to remove it later, you can do it from Windows Add/Remove Programs. If the c:\program files\novell\casa directory exists even after you select to uninstall CASA, you can manually delete it.
ZENworks: Log files are purposely left here for your review. You can manually delete the ZENworks_installation_path\ZENworks directory at any time.
6 For Windows, if the ZENworks Control Center icon remains on the desktop, you can manually delete it.
Components To Be Retained
This page is displayed only if you chose to uninstall the Primary Server, have selected the Local Uninstallation Only (Retain the Device in the Zone) option, or have selected the Demote the Satellite Server option for the Satellite with the Imaging role.
Select an option:
ZENworks Pre-Agent: Leaves the ZENworks Pre-Agent installed on the device, but removes all other ZENworks software. By default, this is not selected. If the ZENworks Pre-Agent continues to remain on the device, then it responds to the Advertised discovery requests, and also to ZENworks Ping requests if an IP-based discovery is performed on the device.
To remove the ZENworks Pre-Agent from a device after ZENworks has been uninstalled from the device, see .
CASA: Leaves the CASA software installed. By default, this is selected because CASA can be used by other software programs.
ZENworks Imaging Files: Leaves the ZENworks Imaging files on the device. By default, this is selected.
NOTE: If you have selected the Demote the Satellite Server option and the device has the Imaging role configured, or if the device is a Primary Server, then only the ZENworks Imaging Files option is enabled.
Uninstallation Summary
Review the information and, if necessary, use the Back button to make changes to the information.
Status Displays the status of uninstallation.
By default, the Restart Now option is selected.
Restarting completes the uninstallation process. Some files are not deleted until the device is restarted.
Information Explanation
70 ZENworks 11 Server Installation Guide
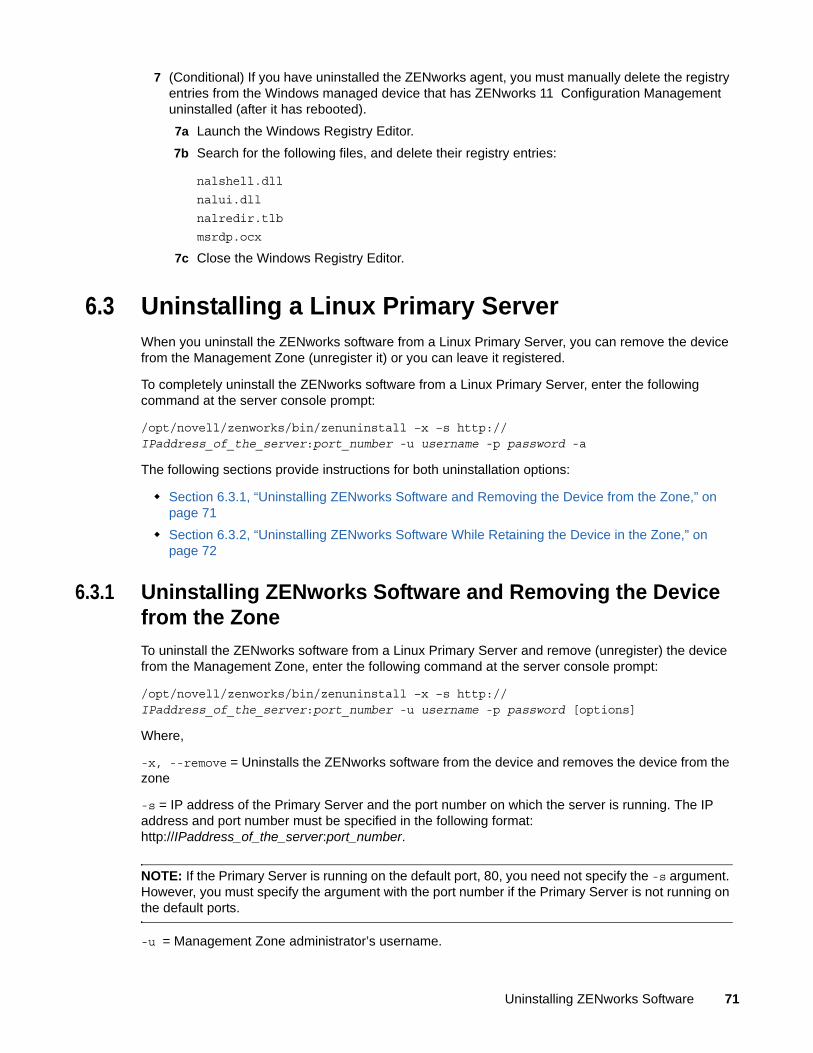
7 (Conditional) If you have uninstalled the ZENworks agent, you must manually delete the registry entries from the Windows managed device that has ZENworks 11 Configuration Management uninstalled (after it has rebooted).
7a Launch the Windows Registry Editor.
7b Search for the following files, and delete their registry entries:
nalshell.dll
nalui.dll
nalredir.tlb
msrdp.ocx
7c Close the Windows Registry Editor.
6.3 Uninstalling a Linux Primary Server When you uninstall the ZENworks software from a Linux Primary Server, you can remove the device from the Management Zone (unregister it) or you can leave it registered.
To completely uninstall the ZENworks software from a Linux Primary Server, enter the following command at the server console prompt:
/opt/novell/zenworks/bin/zenuninstall –x –s http://IPaddress_of_the_server:port_number -u username -p password -a
The following sections provide instructions for both uninstallation options:
Section 6.3.1, “Uninstalling ZENworks Software and Removing the Device from the Zone,” on page 71
Section 6.3.2, “Uninstalling ZENworks Software While Retaining the Device in the Zone,” on page 72
6.3.1 Uninstalling ZENworks Software and Removing the Device from the Zone
To uninstall the ZENworks software from a Linux Primary Server and remove (unregister) the device from the Management Zone, enter the following command at the server console prompt:
/opt/novell/zenworks/bin/zenuninstall –x –s http://IPaddress_of_the_server:port_number -u username -p password [options]
Where,
-x, --remove = Uninstalls the ZENworks software from the device and removes the device from the zone
-s = IP address of the Primary Server and the port number on which the server is running. The IP address and port number must be specified in the following format: http://IPaddress_of_the_server:port_number.
NOTE: If the Primary Server is running on the default port, 80, you need not specify the -s argument. However, you must specify the argument with the port number if the Primary Server is not running on the default ports.
-u = Management Zone administrator’s username.
Uninstalling ZENworks Software 71
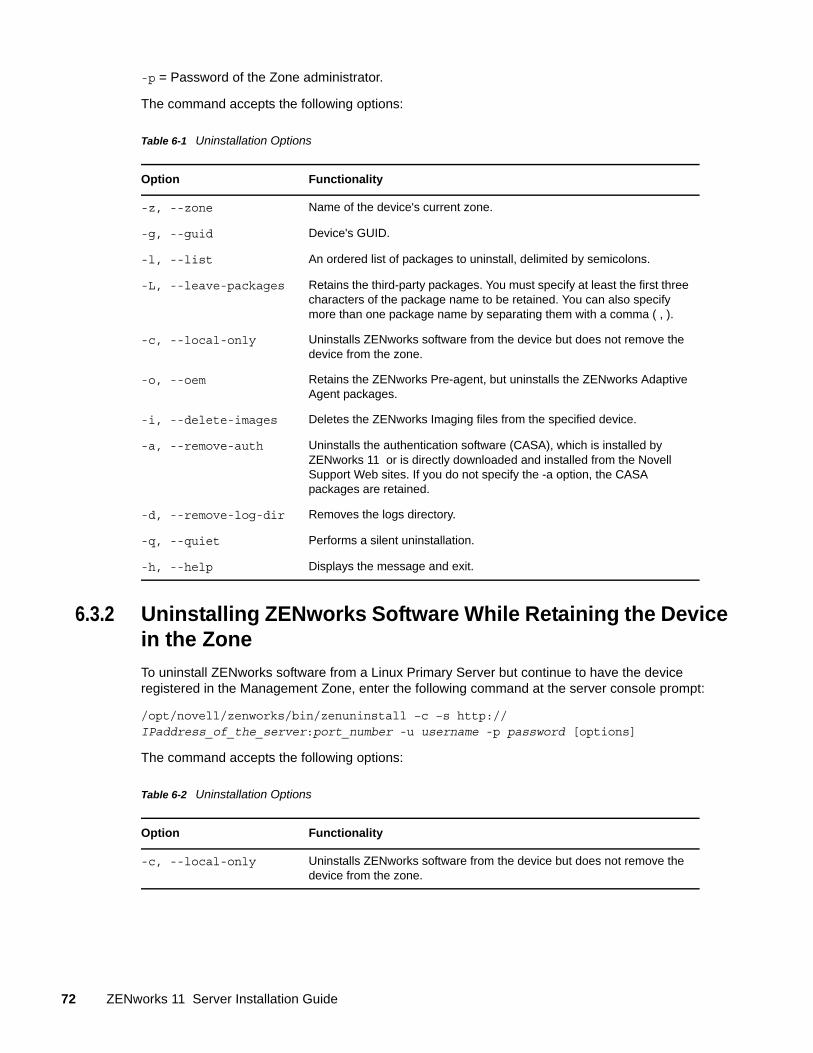
-p = Password of the Zone administrator.
The command accepts the following options:
Table 6-1 Uninstallation Options
6.3.2 Uninstalling ZENworks Software While Retaining the Device in the Zone
To uninstall ZENworks software from a Linux Primary Server but continue to have the device registered in the Management Zone, enter the following command at the server console prompt:
/opt/novell/zenworks/bin/zenuninstall –c –s http://IPaddress_of_the_server:port_number -u username -p password [options]
The command accepts the following options:
Table 6-2 Uninstallation Options
Option Functionality
-z, --zone Name of the device's current zone.
-g, --guid Device's GUID.
-l, --list An ordered list of packages to uninstall, delimited by semicolons.
-L, --leave-packages Retains the third-party packages. You must specify at least the first three characters of the package name to be retained. You can also specify more than one package name by separating them with a comma ( , ).
-c, --local-only Uninstalls ZENworks software from the device but does not remove the device from the zone.
-o, --oem Retains the ZENworks Pre-agent, but uninstalls the ZENworks Adaptive Agent packages.
-i, --delete-images Deletes the ZENworks Imaging files from the specified device.
-a, --remove-auth Uninstalls the authentication software (CASA), which is installed by ZENworks 11 or is directly downloaded and installed from the Novell Support Web sites. If you do not specify the -a option, the CASA packages are retained.
-d, --remove-log-dir Removes the logs directory.
-q, --quiet Performs a silent uninstallation.
-h, --help Displays the message and exit.
Option Functionality
-c, --local-only Uninstalls ZENworks software from the device but does not remove the device from the zone.
72 ZENworks 11 Server Installation Guide
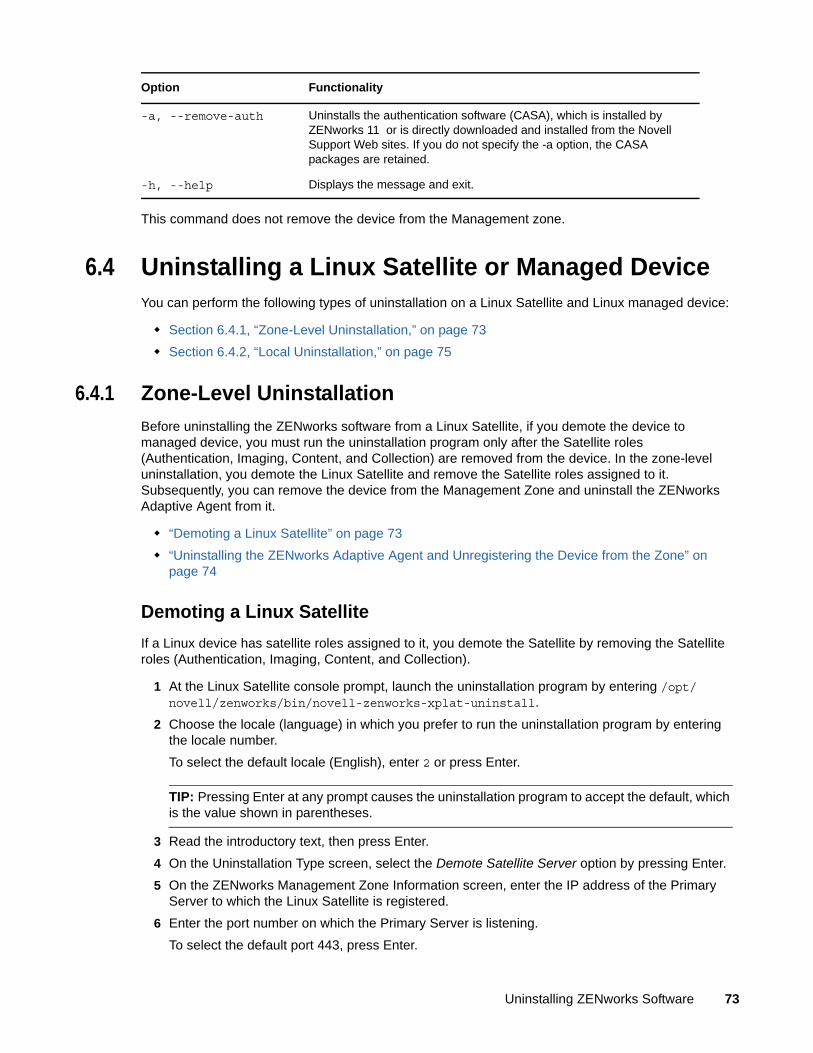
This command does not remove the device from the Management zone.
6.4 Uninstalling a Linux Satellite or Managed DeviceYou can perform the following types of uninstallation on a Linux Satellite and Linux managed device:
Section 6.4.1, “Zone-Level Uninstallation,” on page 73
Section 6.4.2, “Local Uninstallation,” on page 75
6.4.1 Zone-Level Uninstallation
Before uninstalling the ZENworks software from a Linux Satellite, if you demote the device to managed device, you must run the uninstallation program only after the Satellite roles (Authentication, Imaging, Content, and Collection) are removed from the device. In the zone-level uninstallation, you demote the Linux Satellite and remove the Satellite roles assigned to it. Subsequently, you can remove the device from the Management Zone and uninstall the ZENworks Adaptive Agent from it.
“Demoting a Linux Satellite” on page 73
“Uninstalling the ZENworks Adaptive Agent and Unregistering the Device from the Zone” on page 74
Demoting a Linux Satellite
If a Linux device has satellite roles assigned to it, you demote the Satellite by removing the Satellite roles (Authentication, Imaging, Content, and Collection).
1 At the Linux Satellite console prompt, launch the uninstallation program by entering /opt/novell/zenworks/bin/novell-zenworks-xplat-uninstall.
2 Choose the locale (language) in which you prefer to run the uninstallation program by entering the locale number.
To select the default locale (English), enter 2 or press Enter.
TIP: Pressing Enter at any prompt causes the uninstallation program to accept the default, which is the value shown in parentheses.
3 Read the introductory text, then press Enter.
4 On the Uninstallation Type screen, select the Demote Satellite Server option by pressing Enter.
5 On the ZENworks Management Zone Information screen, enter the IP address of the Primary Server to which the Linux Satellite is registered.
6 Enter the port number on which the Primary Server is listening.
To select the default port 443, press Enter.
-a, --remove-auth Uninstalls the authentication software (CASA), which is installed by ZENworks 11 or is directly downloaded and installed from the Novell Support Web sites. If you do not specify the -a option, the CASA packages are retained.
-h, --help Displays the message and exit.
Option Functionality
Uninstalling ZENworks Software 73
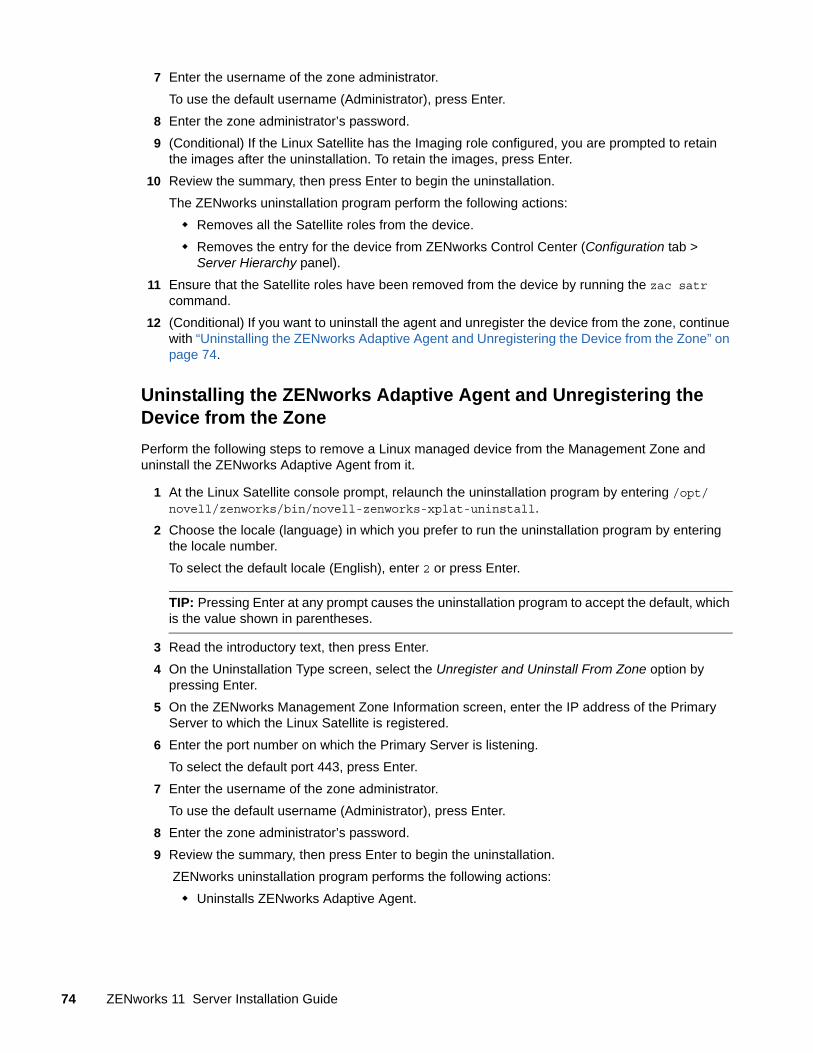
7 Enter the username of the zone administrator.
To use the default username (Administrator), press Enter.
8 Enter the zone administrator’s password.
9 (Conditional) If the Linux Satellite has the Imaging role configured, you are prompted to retain the images after the uninstallation. To retain the images, press Enter.
10 Review the summary, then press Enter to begin the uninstallation.
The ZENworks uninstallation program perform the following actions:
Removes all the Satellite roles from the device.
Removes the entry for the device from ZENworks Control Center (Configuration tab > Server Hierarchy panel).
11 Ensure that the Satellite roles have been removed from the device by running the zac satr command.
12 (Conditional) If you want to uninstall the agent and unregister the device from the zone, continue with “Uninstalling the ZENworks Adaptive Agent and Unregistering the Device from the Zone” on page 74.
Uninstalling the ZENworks Adaptive Agent and Unregistering the Device from the Zone
Perform the following steps to remove a Linux managed device from the Management Zone and uninstall the ZENworks Adaptive Agent from it.
1 At the Linux Satellite console prompt, relaunch the uninstallation program by entering /opt/novell/zenworks/bin/novell-zenworks-xplat-uninstall.
2 Choose the locale (language) in which you prefer to run the uninstallation program by entering the locale number.
To select the default locale (English), enter 2 or press Enter.
TIP: Pressing Enter at any prompt causes the uninstallation program to accept the default, which is the value shown in parentheses.
3 Read the introductory text, then press Enter.
4 On the Uninstallation Type screen, select the Unregister and Uninstall From Zone option by pressing Enter.
5 On the ZENworks Management Zone Information screen, enter the IP address of the Primary Server to which the Linux Satellite is registered.
6 Enter the port number on which the Primary Server is listening.
To select the default port 443, press Enter.
7 Enter the username of the zone administrator.
To use the default username (Administrator), press Enter.
8 Enter the zone administrator’s password.
9 Review the summary, then press Enter to begin the uninstallation.
ZENworks uninstallation program performs the following actions:
Uninstalls ZENworks Adaptive Agent.
74 ZENworks 11 Server Installation Guide
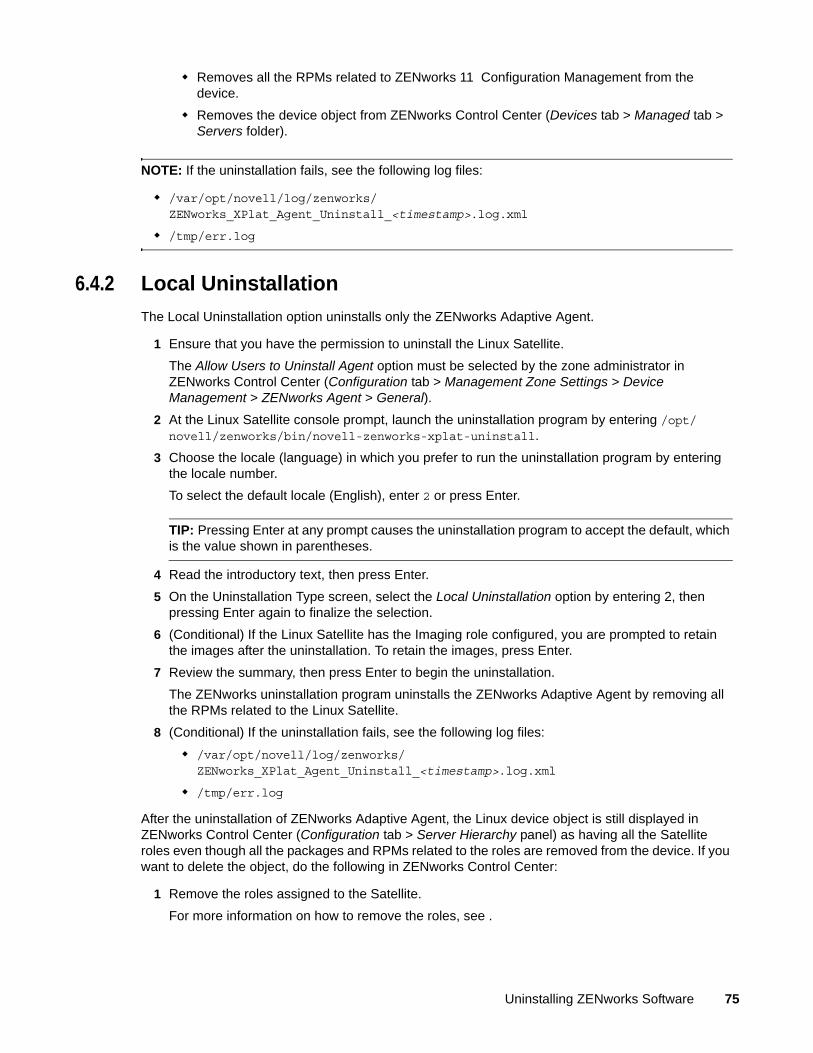
Removes all the RPMs related to ZENworks 11 Configuration Management from the device.
Removes the device object from ZENworks Control Center (Devices tab > Managed tab > Servers folder).
NOTE: If the uninstallation fails, see the following log files:
/var/opt/novell/log/zenworks/ZENworks_XPlat_Agent_Uninstall_<timestamp>.log.xml
/tmp/err.log
6.4.2 Local Uninstallation
The Local Uninstallation option uninstalls only the ZENworks Adaptive Agent.
1 Ensure that you have the permission to uninstall the Linux Satellite.
The Allow Users to Uninstall Agent option must be selected by the zone administrator in ZENworks Control Center (Configuration tab > Management Zone Settings > Device Management > ZENworks Agent > General).
2 At the Linux Satellite console prompt, launch the uninstallation program by entering /opt/novell/zenworks/bin/novell-zenworks-xplat-uninstall.
3 Choose the locale (language) in which you prefer to run the uninstallation program by entering the locale number.
To select the default locale (English), enter 2 or press Enter.
TIP: Pressing Enter at any prompt causes the uninstallation program to accept the default, which is the value shown in parentheses.
4 Read the introductory text, then press Enter.
5 On the Uninstallation Type screen, select the Local Uninstallation option by entering 2, then pressing Enter again to finalize the selection.
6 (Conditional) If the Linux Satellite has the Imaging role configured, you are prompted to retain the images after the uninstallation. To retain the images, press Enter.
7 Review the summary, then press Enter to begin the uninstallation.
The ZENworks uninstallation program uninstalls the ZENworks Adaptive Agent by removing all the RPMs related to the Linux Satellite.
8 (Conditional) If the uninstallation fails, see the following log files:
/var/opt/novell/log/zenworks/ZENworks_XPlat_Agent_Uninstall_<timestamp>.log.xml
/tmp/err.log
After the uninstallation of ZENworks Adaptive Agent, the Linux device object is still displayed in ZENworks Control Center (Configuration tab > Server Hierarchy panel) as having all the Satellite roles even though all the packages and RPMs related to the roles are removed from the device. If you want to delete the object, do the following in ZENworks Control Center:
1 Remove the roles assigned to the Satellite.
For more information on how to remove the roles, see .
Uninstalling ZENworks Software 75
2 Click the Devices tab > Servers folder.
3 Select the check box next to the Linux server, then click Delete.
76 ZENworks 11 Server Installation Guide
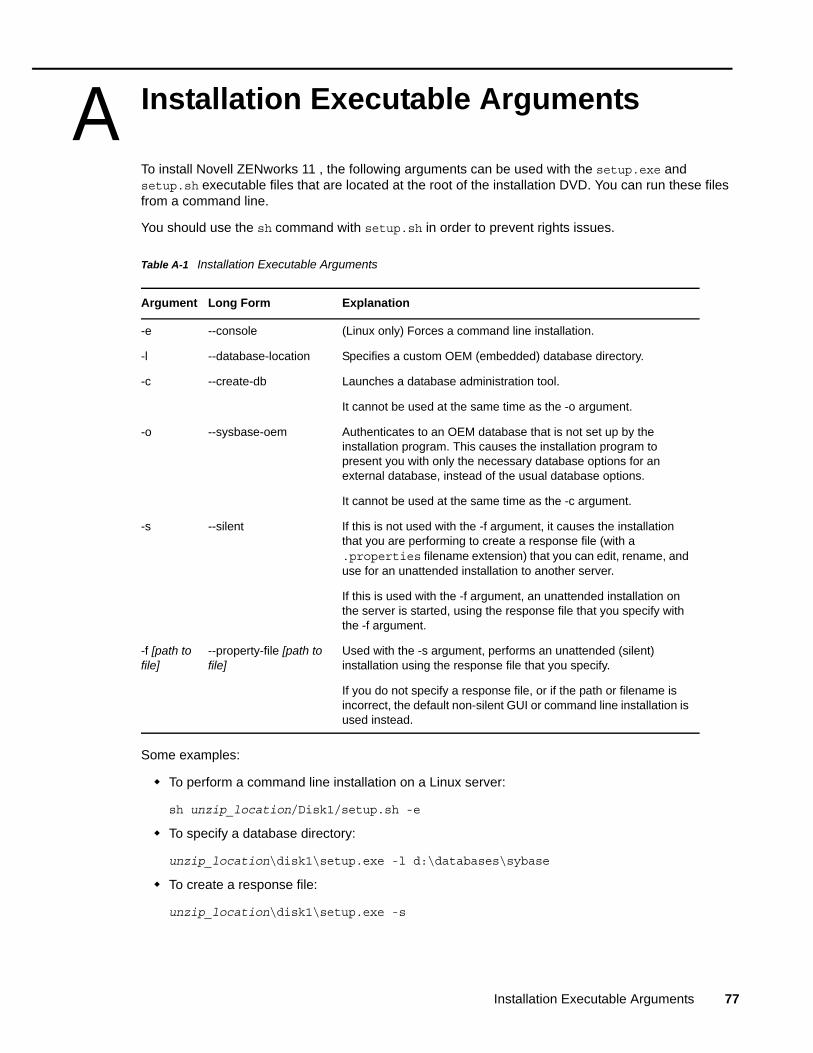
A AInstallation Executable Arguments
To install Novell ZENworks 11 , the following arguments can be used with the setup.exe and setup.sh executable files that are located at the root of the installation DVD. You can run these files from a command line.
You should use the sh command with setup.sh in order to prevent rights issues.
Table A-1 Installation Executable Arguments
Some examples:
To perform a command line installation on a Linux server:
sh unzip_location/Disk1/setup.sh -e
To specify a database directory:
unzip_location\disk1\setup.exe -l d:\databases\sybase
To create a response file:
unzip_location\disk1\setup.exe -s
Argument Long Form Explanation
-e --console (Linux only) Forces a command line installation.
-l --database-location Specifies a custom OEM (embedded) database directory.
-c --create-db Launches a database administration tool.
It cannot be used at the same time as the -o argument.
-o --sysbase-oem Authenticates to an OEM database that is not set up by the installation program. This causes the installation program to present you with only the necessary database options for an external database, instead of the usual database options.
It cannot be used at the same time as the -c argument.
-s --silent If this is not used with the -f argument, it causes the installation that you are performing to create a response file (with a .properties filename extension) that you can edit, rename, and use for an unattended installation to another server.
If this is used with the -f argument, an unattended installation on the server is started, using the response file that you specify with the -f argument.
-f [path to file]
--property-file [path to file]
Used with the -s argument, performs an unattended (silent) installation using the response file that you specify.
If you do not specify a response file, or if the path or filename is incorrect, the default non-silent GUI or command line installation is used instead.
Installation Executable Arguments 77
To perform an unattended installation:
unzip_location\disk1\setup.exe -s -f c:\temp\myinstall_1.properties
For more information, see Section 4.2, “Performing an Unattended Installation,” on page 57.
78 ZENworks 11 Server Installation Guide
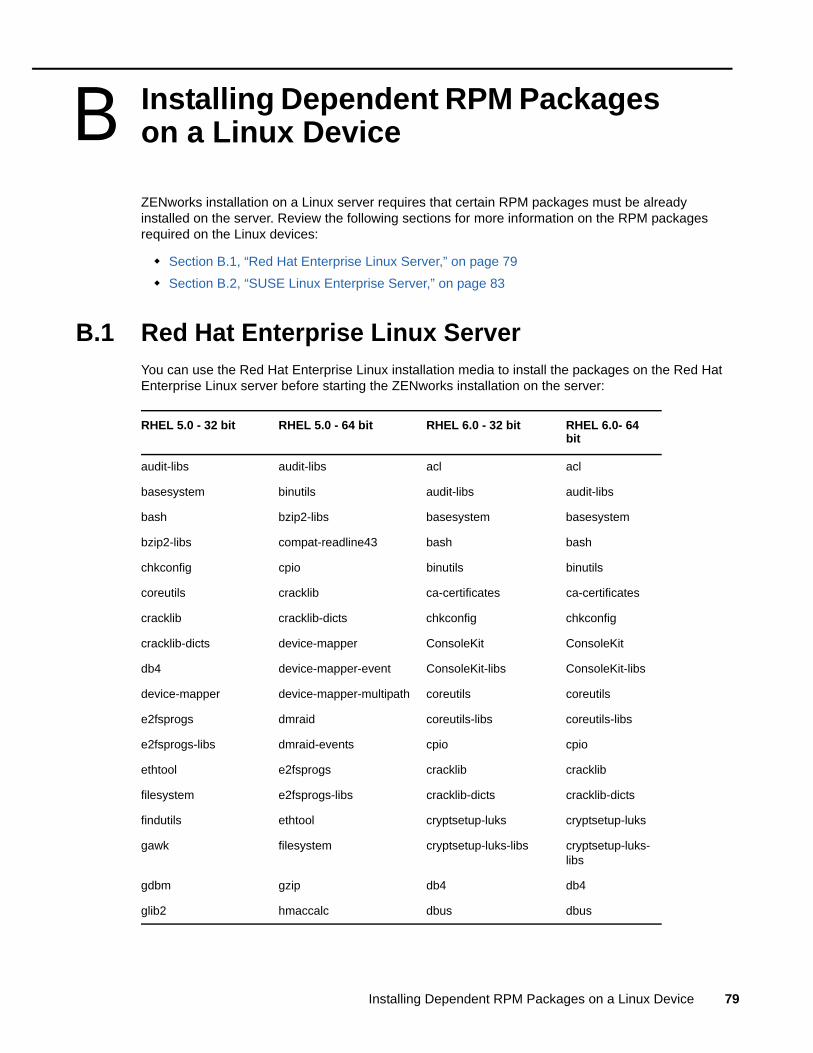
B BInstalling Dependent RPM Packages on a Linux Device
ZENworks installation on a Linux server requires that certain RPM packages must be already installed on the server. Review the following sections for more information on the RPM packages required on the Linux devices:
Section B.1, “Red Hat Enterprise Linux Server,” on page 79
Section B.2, “SUSE Linux Enterprise Server,” on page 83
B.1 Red Hat Enterprise Linux Server You can use the Red Hat Enterprise Linux installation media to install the packages on the Red Hat Enterprise Linux server before starting the ZENworks installation on the server:
RHEL 5.0 - 32 bit RHEL 5.0 - 64 bit RHEL 6.0 - 32 bit RHEL 6.0- 64 bit
audit-libs audit-libs acl acl
basesystem binutils audit-libs audit-libs
bash bzip2-libs basesystem basesystem
bzip2-libs compat-readline43 bash bash
chkconfig cpio binutils binutils
coreutils cracklib ca-certificates ca-certificates
cracklib cracklib-dicts chkconfig chkconfig
cracklib-dicts device-mapper ConsoleKit ConsoleKit
db4 device-mapper-event ConsoleKit-libs ConsoleKit-libs
device-mapper device-mapper-multipath coreutils coreutils
e2fsprogs dmraid coreutils-libs coreutils-libs
e2fsprogs-libs dmraid-events cpio cpio
ethtool e2fsprogs cracklib cracklib
filesystem e2fsprogs-libs cracklib-dicts cracklib-dicts
findutils ethtool cryptsetup-luks cryptsetup-luks
gawk filesystem cryptsetup-luks-libs cryptsetup-luks-libs
gdbm gzip db4 db4
glib2 hmaccalc dbus dbus
Installing Dependent RPM Packages on a Linux Device 79
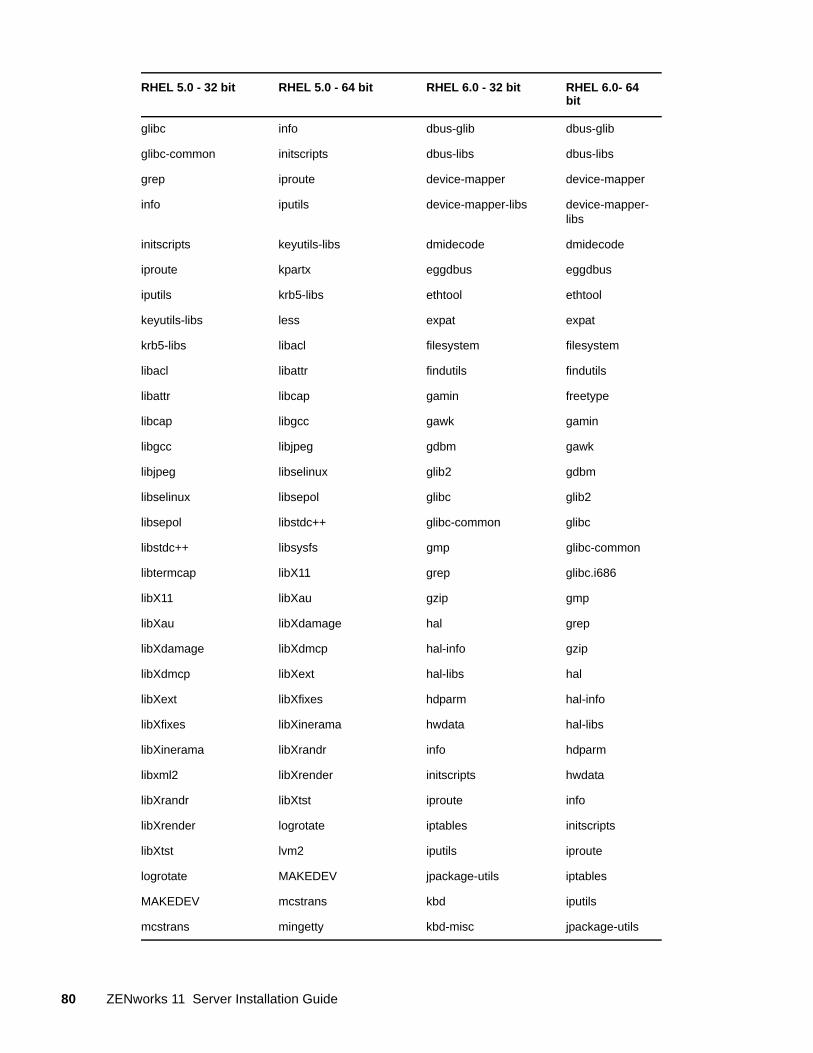
glibc info dbus-glib dbus-glib
glibc-common initscripts dbus-libs dbus-libs
grep iproute device-mapper device-mapper
info iputils device-mapper-libs device-mapper-libs
initscripts keyutils-libs dmidecode dmidecode
iproute kpartx eggdbus eggdbus
iputils krb5-libs ethtool ethtool
keyutils-libs less expat expat
krb5-libs libacl filesystem filesystem
libacl libattr findutils findutils
libattr libcap gamin freetype
libcap libgcc gawk gamin
libgcc libjpeg gdbm gawk
libjpeg libselinux glib2 gdbm
libselinux libsepol glibc glib2
libsepol libstdc++ glibc-common glibc
libstdc++ libsysfs gmp glibc-common
libtermcap libX11 grep glibc.i686
libX11 libXau gzip gmp
libXau libXdamage hal grep
libXdamage libXdmcp hal-info gzip
libXdmcp libXext hal-libs hal
libXext libXfixes hdparm hal-info
libXfixes libXinerama hwdata hal-libs
libXinerama libXrandr info hdparm
libxml2 libXrender initscripts hwdata
libXrandr libXtst iproute info
libXrender logrotate iptables initscripts
libXtst lvm2 iputils iproute
logrotate MAKEDEV jpackage-utils iptables
MAKEDEV mcstrans kbd iputils
mcstrans mingetty kbd-misc jpackage-utils
RHEL 5.0 - 32 bit RHEL 5.0 - 64 bit RHEL 6.0 - 32 bit RHEL 6.0- 64 bit
80 ZENworks 11 Server Installation Guide
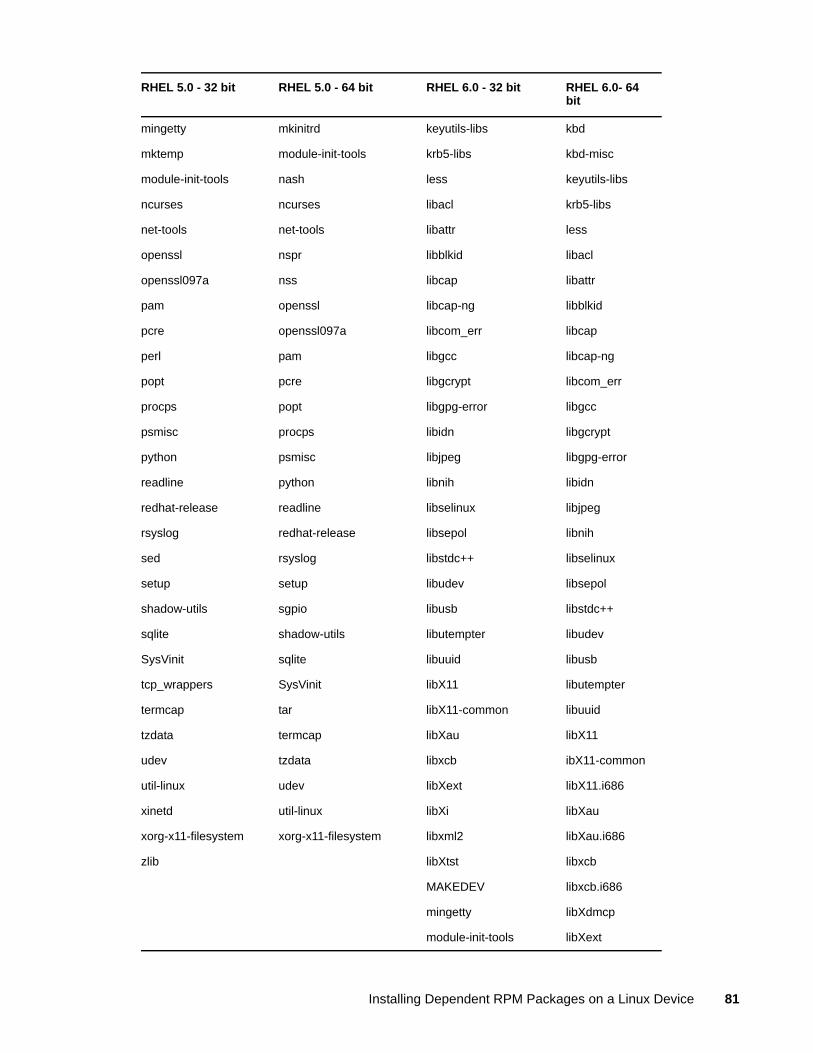
mingetty mkinitrd keyutils-libs kbd
mktemp module-init-tools krb5-libs kbd-misc
module-init-tools nash less keyutils-libs
ncurses ncurses libacl krb5-libs
net-tools net-tools libattr less
openssl nspr libblkid libacl
openssl097a nss libcap libattr
pam openssl libcap-ng libblkid
pcre openssl097a libcom_err libcap
perl pam libgcc libcap-ng
popt pcre libgcrypt libcom_err
procps popt libgpg-error libgcc
psmisc procps libidn libgcrypt
python psmisc libjpeg libgpg-error
readline python libnih libidn
redhat-release readline libselinux libjpeg
rsyslog redhat-release libsepol libnih
sed rsyslog libstdc++ libselinux
setup setup libudev libsepol
shadow-utils sgpio libusb libstdc++
sqlite shadow-utils libutempter libudev
SysVinit sqlite libuuid libusb
tcp_wrappers SysVinit libX11 libutempter
termcap tar libX11-common libuuid
tzdata termcap libXau libX11
udev tzdata libxcb ibX11-common
util-linux udev libXext libX11.i686
xinetd util-linux libXi libXau
xorg-x11-filesystem xorg-x11-filesystem libxml2 libXau.i686
zlib libXtst libxcb
MAKEDEV libxcb.i686
mingetty libXdmcp
module-init-tools libXext
RHEL 5.0 - 32 bit RHEL 5.0 - 64 bit RHEL 6.0 - 32 bit RHEL 6.0- 64 bit
Installing Dependent RPM Packages on a Linux Device 81
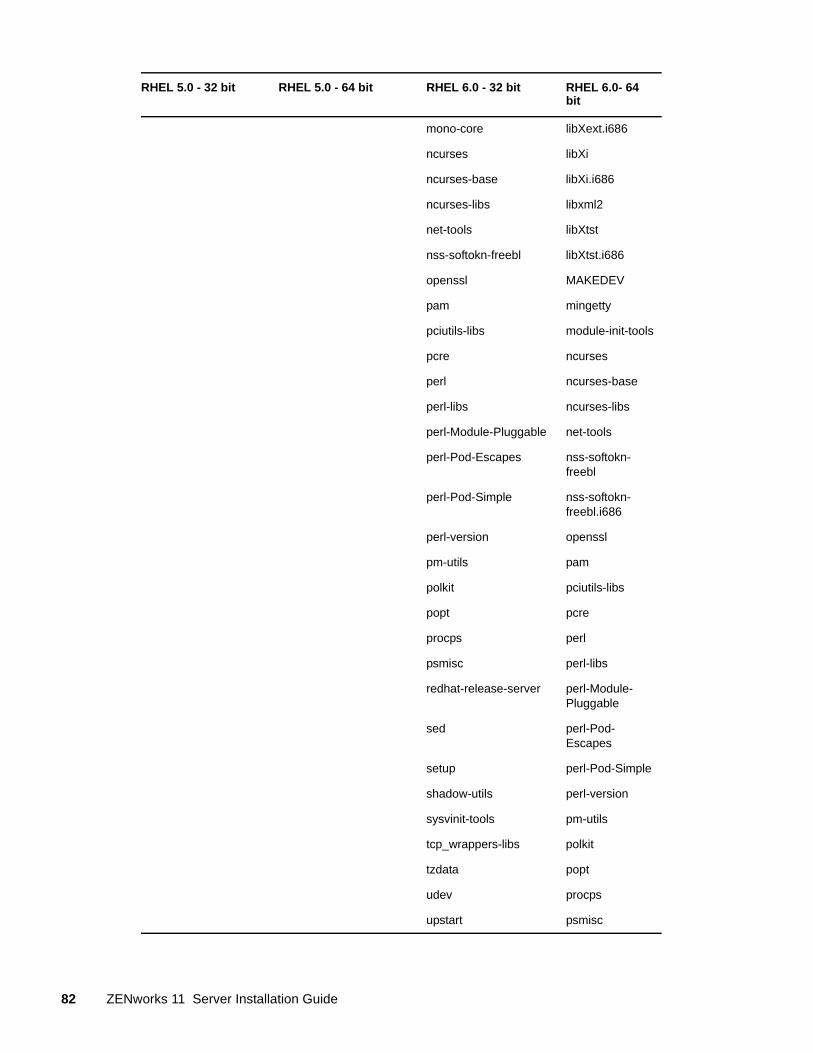
mono-core libXext.i686
ncurses libXi
ncurses-base libXi.i686
ncurses-libs libxml2
net-tools libXtst
nss-softokn-freebl libXtst.i686
openssl MAKEDEV
pam mingetty
pciutils-libs module-init-tools
pcre ncurses
perl ncurses-base
perl-libs ncurses-libs
perl-Module-Pluggable net-tools
perl-Pod-Escapes nss-softokn-freebl
perl-Pod-Simple nss-softokn-freebl.i686
perl-version openssl
pm-utils pam
polkit pciutils-libs
popt pcre
procps perl
psmisc perl-libs
redhat-release-server perl-Module-Pluggable
sed perl-Pod-Escapes
setup perl-Pod-Simple
shadow-utils perl-version
sysvinit-tools pm-utils
tcp_wrappers-libs polkit
tzdata popt
udev procps
upstart psmisc
RHEL 5.0 - 32 bit RHEL 5.0 - 64 bit RHEL 6.0 - 32 bit RHEL 6.0- 64 bit
82 ZENworks 11 Server Installation Guide
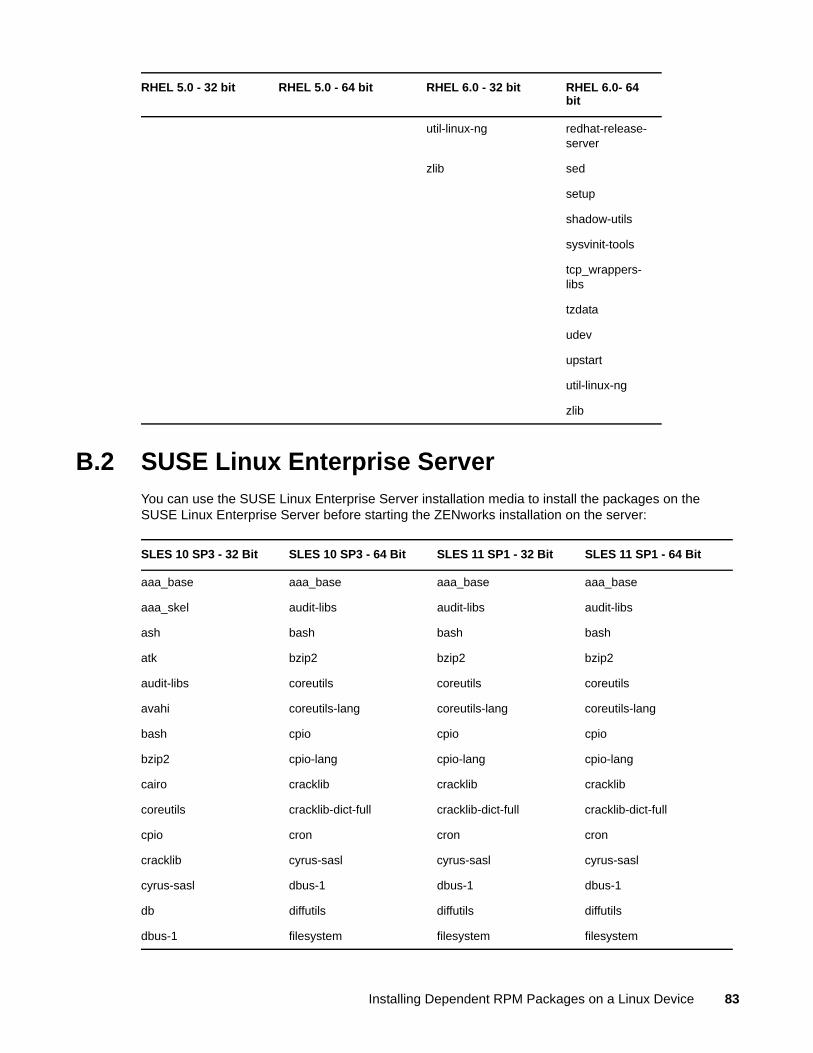
B.2 SUSE Linux Enterprise ServerYou can use the SUSE Linux Enterprise Server installation media to install the packages on the SUSE Linux Enterprise Server before starting the ZENworks installation on the server:
util-linux-ng redhat-release-server
zlib sed
setup
shadow-utils
sysvinit-tools
tcp_wrappers-libs
tzdata
udev
upstart
util-linux-ng
zlib
RHEL 5.0 - 32 bit RHEL 5.0 - 64 bit RHEL 6.0 - 32 bit RHEL 6.0- 64 bit
SLES 10 SP3 - 32 Bit SLES 10 SP3 - 64 Bit SLES 11 SP1 - 32 Bit SLES 11 SP1 - 64 Bit
aaa_base aaa_base aaa_base aaa_base
aaa_skel audit-libs audit-libs audit-libs
ash bash bash bash
atk bzip2 bzip2 bzip2
audit-libs coreutils coreutils coreutils
avahi coreutils-lang coreutils-lang coreutils-lang
bash cpio cpio cpio
bzip2 cpio-lang cpio-lang cpio-lang
cairo cracklib cracklib cracklib
coreutils cracklib-dict-full cracklib-dict-full cracklib-dict-full
cpio cron cron cron
cracklib cyrus-sasl cyrus-sasl cyrus-sasl
cyrus-sasl dbus-1 dbus-1 dbus-1
db diffutils diffutils diffutils
dbus-1 filesystem filesystem filesystem
Installing Dependent RPM Packages on a Linux Device 83
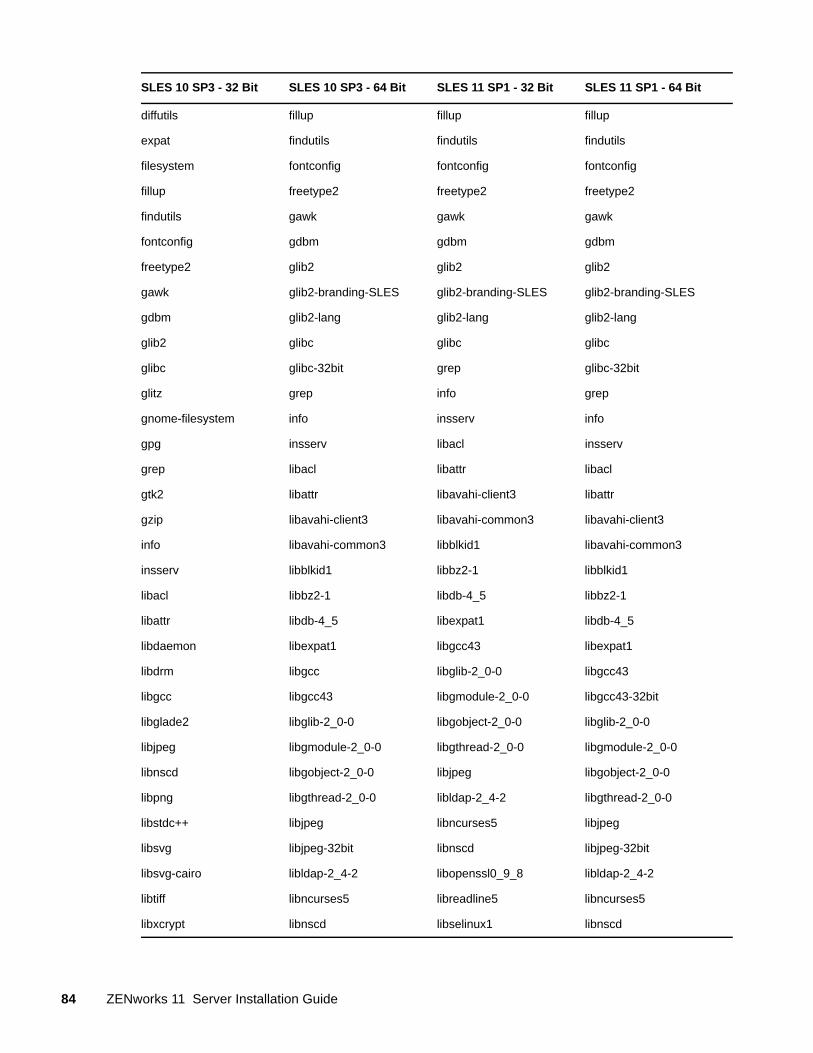
diffutils fillup fillup fillup
expat findutils findutils findutils
filesystem fontconfig fontconfig fontconfig
fillup freetype2 freetype2 freetype2
findutils gawk gawk gawk
fontconfig gdbm gdbm gdbm
freetype2 glib2 glib2 glib2
gawk glib2-branding-SLES glib2-branding-SLES glib2-branding-SLES
gdbm glib2-lang glib2-lang glib2-lang
glib2 glibc glibc glibc
glibc glibc-32bit grep glibc-32bit
glitz grep info grep
gnome-filesystem info insserv info
gpg insserv libacl insserv
grep libacl libattr libacl
gtk2 libattr libavahi-client3 libattr
gzip libavahi-client3 libavahi-common3 libavahi-client3
info libavahi-common3 libblkid1 libavahi-common3
insserv libblkid1 libbz2-1 libblkid1
libacl libbz2-1 libdb-4_5 libbz2-1
libattr libdb-4_5 libexpat1 libdb-4_5
libdaemon libexpat1 libgcc43 libexpat1
libdrm libgcc libglib-2_0-0 libgcc43
libgcc libgcc43 libgmodule-2_0-0 libgcc43-32bit
libglade2 libglib-2_0-0 libgobject-2_0-0 libglib-2_0-0
libjpeg libgmodule-2_0-0 libgthread-2_0-0 libgmodule-2_0-0
libnscd libgobject-2_0-0 libjpeg libgobject-2_0-0
libpng libgthread-2_0-0 libldap-2_4-2 libgthread-2_0-0
libstdc++ libjpeg libncurses5 libjpeg
libsvg libjpeg-32bit libnscd libjpeg-32bit
libsvg-cairo libldap-2_4-2 libopenssl0_9_8 libldap-2_4-2
libtiff libncurses5 libreadline5 libncurses5
libxcrypt libnscd libselinux1 libnscd
SLES 10 SP3 - 32 Bit SLES 10 SP3 - 64 Bit SLES 11 SP1 - 32 Bit SLES 11 SP1 - 64 Bit
84 ZENworks 11 Server Installation Guide
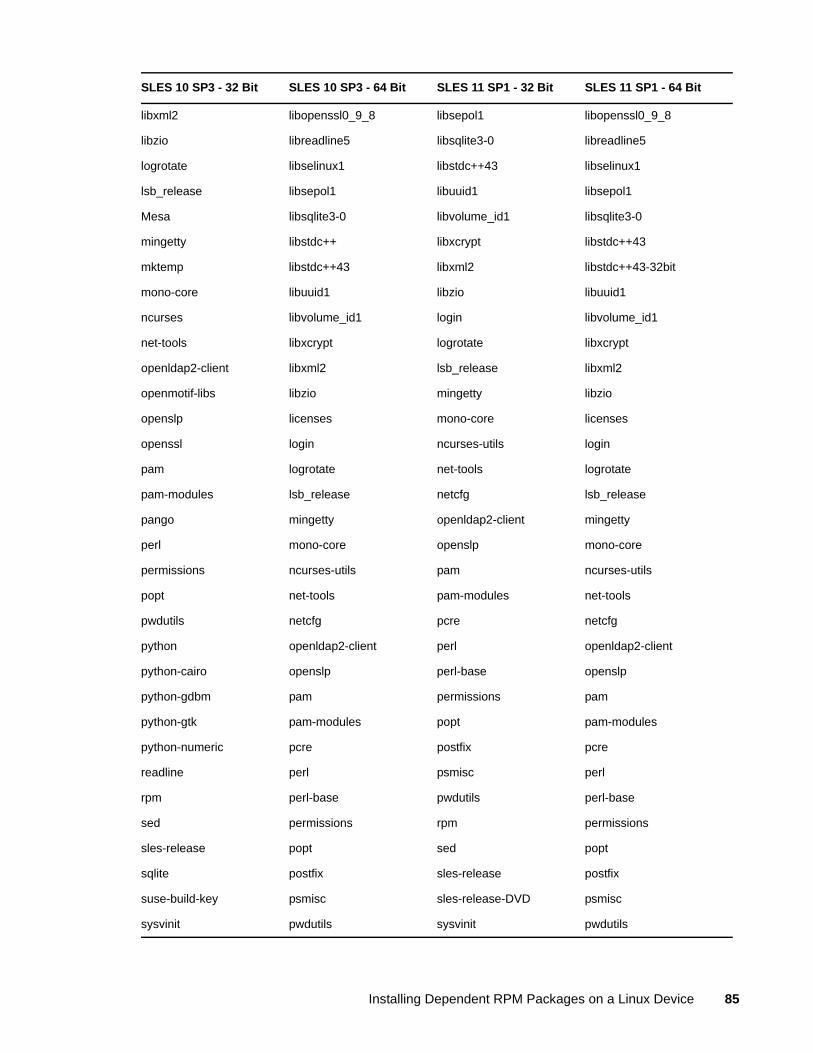
libxml2 libopenssl0_9_8 libsepol1 libopenssl0_9_8
libzio libreadline5 libsqlite3-0 libreadline5
logrotate libselinux1 libstdc++43 libselinux1
lsb_release libsepol1 libuuid1 libsepol1
Mesa libsqlite3-0 libvolume_id1 libsqlite3-0
mingetty libstdc++ libxcrypt libstdc++43
mktemp libstdc++43 libxml2 libstdc++43-32bit
mono-core libuuid1 libzio libuuid1
ncurses libvolume_id1 login libvolume_id1
net-tools libxcrypt logrotate libxcrypt
openldap2-client libxml2 lsb_release libxml2
openmotif-libs libzio mingetty libzio
openslp licenses mono-core licenses
openssl login ncurses-utils login
pam logrotate net-tools logrotate
pam-modules lsb_release netcfg lsb_release
pango mingetty openldap2-client mingetty
perl mono-core openslp mono-core
permissions ncurses-utils pam ncurses-utils
popt net-tools pam-modules net-tools
pwdutils netcfg pcre netcfg
python openldap2-client perl openldap2-client
python-cairo openslp perl-base openslp
python-gdbm pam permissions pam
python-gtk pam-modules popt pam-modules
python-numeric pcre postfix pcre
readline perl psmisc perl
rpm perl-base pwdutils perl-base
sed permissions rpm permissions
sles-release popt sed popt
sqlite postfix sles-release postfix
suse-build-key psmisc sles-release-DVD psmisc
sysvinit pwdutils sysvinit pwdutils
SLES 10 SP3 - 32 Bit SLES 10 SP3 - 64 Bit SLES 11 SP1 - 32 Bit SLES 11 SP1 - 64 Bit
Installing Dependent RPM Packages on a Linux Device 85
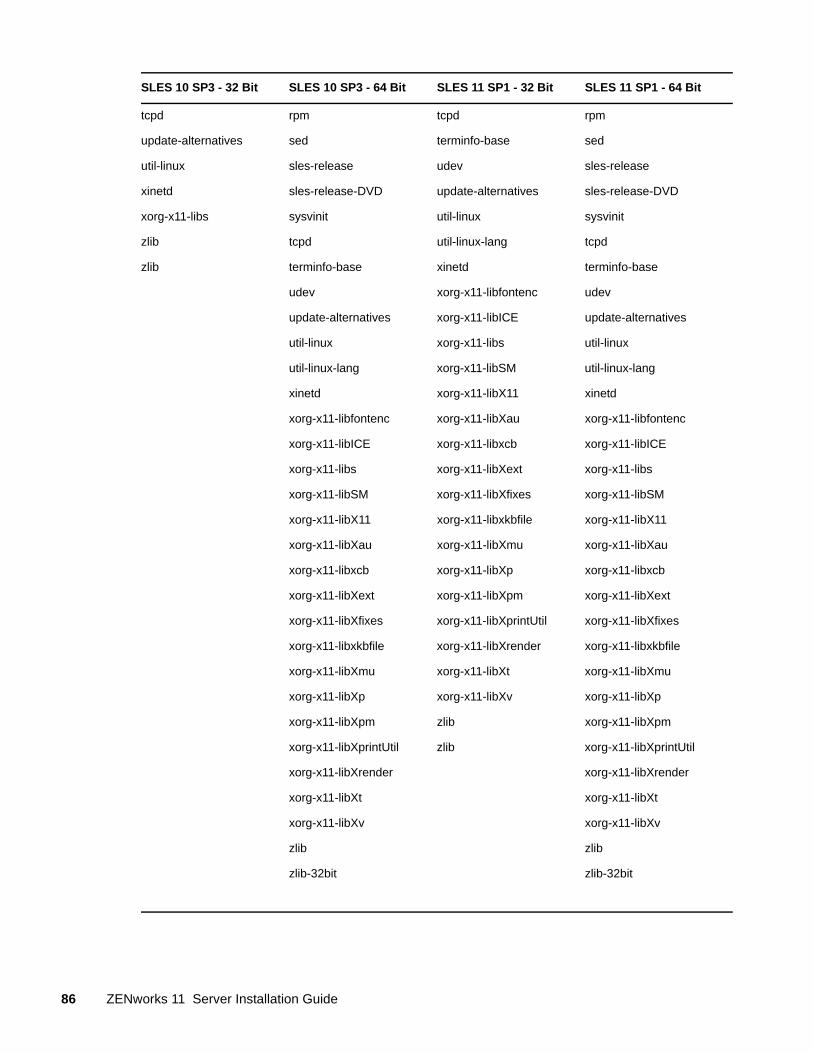
tcpd rpm tcpd rpm
update-alternatives sed terminfo-base sed
util-linux sles-release udev sles-release
xinetd sles-release-DVD update-alternatives sles-release-DVD
xorg-x11-libs sysvinit util-linux sysvinit
zlib tcpd util-linux-lang tcpd
zlib terminfo-base xinetd terminfo-base
udev xorg-x11-libfontenc udev
update-alternatives xorg-x11-libICE update-alternatives
util-linux xorg-x11-libs util-linux
util-linux-lang xorg-x11-libSM util-linux-lang
xinetd xorg-x11-libX11 xinetd
xorg-x11-libfontenc xorg-x11-libXau xorg-x11-libfontenc
xorg-x11-libICE xorg-x11-libxcb xorg-x11-libICE
xorg-x11-libs xorg-x11-libXext xorg-x11-libs
xorg-x11-libSM xorg-x11-libXfixes xorg-x11-libSM
xorg-x11-libX11 xorg-x11-libxkbfile xorg-x11-libX11
xorg-x11-libXau xorg-x11-libXmu xorg-x11-libXau
xorg-x11-libxcb xorg-x11-libXp xorg-x11-libxcb
xorg-x11-libXext xorg-x11-libXpm xorg-x11-libXext
xorg-x11-libXfixes xorg-x11-libXprintUtil xorg-x11-libXfixes
xorg-x11-libxkbfile xorg-x11-libXrender xorg-x11-libxkbfile
xorg-x11-libXmu xorg-x11-libXt xorg-x11-libXmu
xorg-x11-libXp xorg-x11-libXv xorg-x11-libXp
xorg-x11-libXpm zlib xorg-x11-libXpm
xorg-x11-libXprintUtil zlib xorg-x11-libXprintUtil
xorg-x11-libXrender xorg-x11-libXrender
xorg-x11-libXt xorg-x11-libXt
xorg-x11-libXv xorg-x11-libXv
zlib zlib
zlib-32bit zlib-32bit
SLES 10 SP3 - 32 Bit SLES 10 SP3 - 64 Bit SLES 11 SP1 - 32 Bit SLES 11 SP1 - 64 Bit
86 ZENworks 11 Server Installation Guide

C CTroubleshooting
The following sections provide solutions to the problems you might encounter while installing or uninstalling Novell ZENworks 11 :
Section C.1, “Troubleshooting Installation,” on page 87
Section C.2, “Uninstallation Error Messages,” on page 94
Section C.3, “Post Installation Troubleshooting,” on page 96
C.1 Troubleshooting InstallationThis section provides solutions to problems you might encounter when installing ZENworks 11 .
“ZENworks 11 Configuration Management installation might fail on 64-bit Windows Server 2003 and 64-bit Windows Server 2008” on page 88
“Installing from the root directory on a Linux device fails to create the self-signed certificates” on page 88
“Configuring the ZENworks Server to an Oracle database fails” on page 88
“Unable to establish a remote desktop session with a Windows device running the ZENworks 11 Configuration Management installation program” on page 89
“Installing a second server gives an error message” on page 89
“Installation on Linux fails” on page 89
“Configure Action fails because of an error detected by HotSpot Virtual Machine” on page 89
“Unable to install NetIdentity from Novell Client 32 on a device that has ZENworks installed” on page 90
“ZENworks 11 Configuration Management Installation fails if you choose to configure ZENworks Server with the external Sybase database” on page 90
“Unable to open the ZENworks 11 Configuration Management Installation logs by using a Web browser on a non-English Primary Server” on page 91
“Unable to install .NET 3.5 SP1 on Windows Server 2008” on page 91
“A warning message is displayed while installing ZENworks Configuration Management on Linux devices” on page 92
“Unable to install the ZENworks Adaptive Agent on a McAfee fully protected device” on page 92
“ZENworks-related files might be reported as malicious software during the ZENworks Adaptive Agent installation” on page 93
“Installation of ZENworks Adaptive Agent on a Terminal Server hangs” on page 93
“ZENworks 11 installation on an RHEL device might fail” on page 93
“On Windows XP, installing the ZENworks Adaptive Agent with the Remote Management component through Remote Desktop Connection hangs” on page 94
Troubleshooting 87
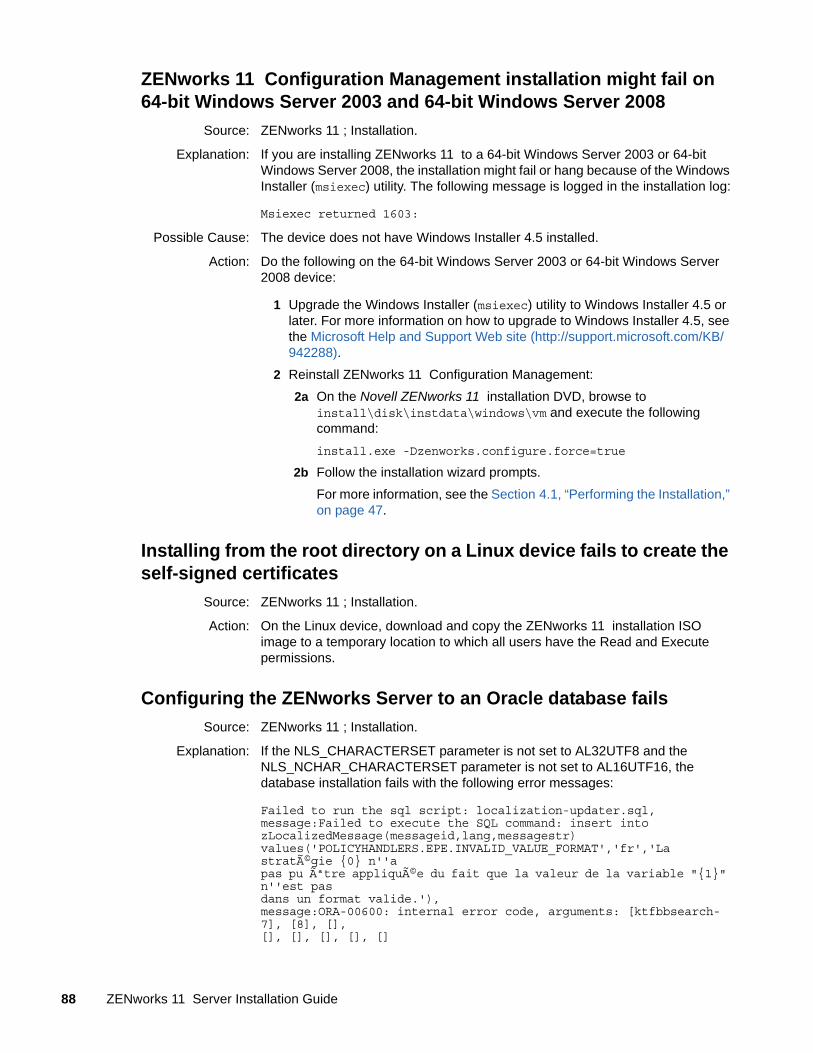
ZENworks 11 Configuration Management installation might fail on 64-bit Windows Server 2003 and 64-bit Windows Server 2008
Source: ZENworks 11 ; Installation.
Explanation: If you are installing ZENworks 11 to a 64-bit Windows Server 2003 or 64-bit Windows Server 2008, the installation might fail or hang because of the Windows Installer (msiexec) utility. The following message is logged in the installation log:
Msiexec returned 1603:
Possible Cause: The device does not have Windows Installer 4.5 installed.
Action: Do the following on the 64-bit Windows Server 2003 or 64-bit Windows Server 2008 device:
1 Upgrade the Windows Installer (msiexec) utility to Windows Installer 4.5 or later. For more information on how to upgrade to Windows Installer 4.5, see the Microsoft Help and Support Web site (http://support.microsoft.com/KB/942288).
2 Reinstall ZENworks 11 Configuration Management:
2a On the Novell ZENworks 11 installation DVD, browse to install\disk\instdata\windows\vm and execute the following command:
install.exe -Dzenworks.configure.force=true
2b Follow the installation wizard prompts.
For more information, see the Section 4.1, “Performing the Installation,” on page 47.
Installing from the root directory on a Linux device fails to create the self-signed certificates
Source: ZENworks 11 ; Installation.
Action: On the Linux device, download and copy the ZENworks 11 installation ISO image to a temporary location to which all users have the Read and Execute permissions.
Configuring the ZENworks Server to an Oracle database fails
Source: ZENworks 11 ; Installation.
Explanation: If the NLS_CHARACTERSET parameter is not set to AL32UTF8 and the NLS_NCHAR_CHARACTERSET parameter is not set to AL16UTF16, the database installation fails with the following error messages:
Failed to run the sql script: localization-updater.sql,message:Failed to execute the SQL command: insert intozLocalizedMessage(messageid,lang,messagestr)values('POLICYHANDLERS.EPE.INVALID_VALUE_FORMAT','fr','La stratégie {0} n''apas pu être appliquée du fait que la valeur de la variable "{1}" n''est pasdans un format valide.'),message:ORA-00600: internal error code, arguments: [ktfbbsearch-7], [8], [],[], [], [], [], []
88 ZENworks 11 Server Installation Guide
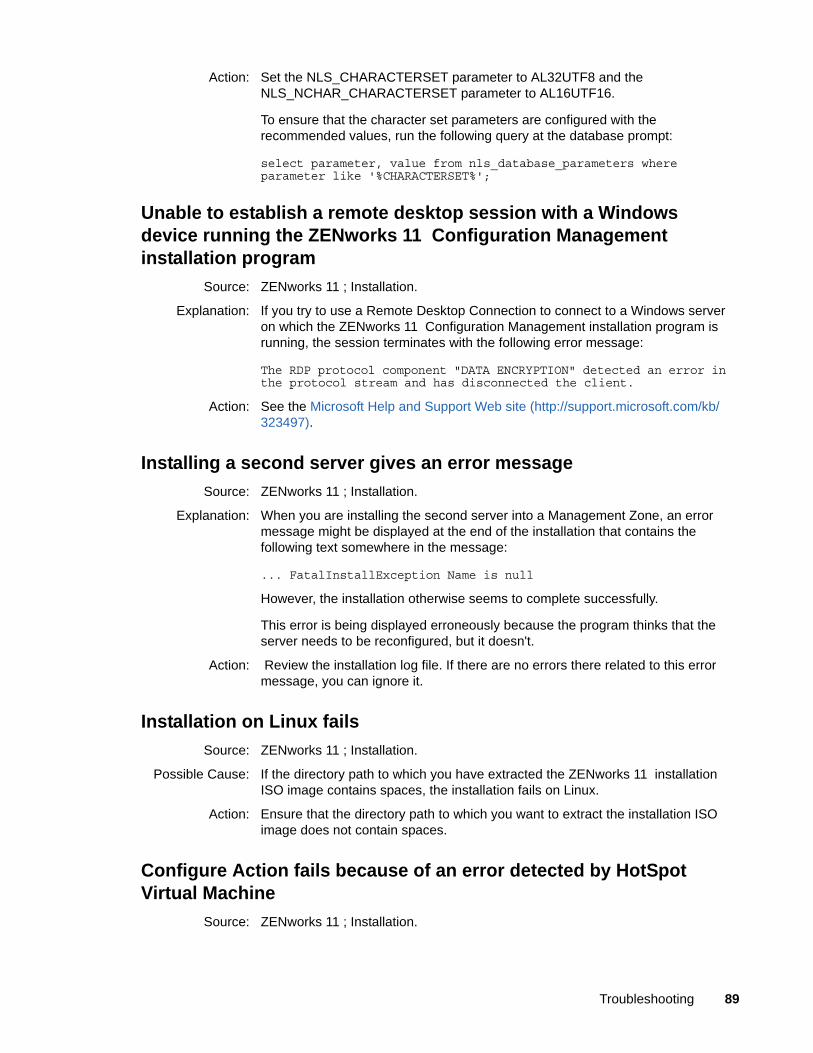
Action: Set the NLS_CHARACTERSET parameter to AL32UTF8 and the NLS_NCHAR_CHARACTERSET parameter to AL16UTF16.
To ensure that the character set parameters are configured with the recommended values, run the following query at the database prompt:
select parameter, value from nls_database_parameters where parameter like '%CHARACTERSET%';
Unable to establish a remote desktop session with a Windows device running the ZENworks 11 Configuration Management installation program
Source: ZENworks 11 ; Installation.
Explanation: If you try to use a Remote Desktop Connection to connect to a Windows server on which the ZENworks 11 Configuration Management installation program is running, the session terminates with the following error message:
The RDP protocol component "DATA ENCRYPTION" detected an error in the protocol stream and has disconnected the client.
Action: See the Microsoft Help and Support Web site (http://support.microsoft.com/kb/323497).
Installing a second server gives an error message
Source: ZENworks 11 ; Installation.
Explanation: When you are installing the second server into a Management Zone, an error message might be displayed at the end of the installation that contains the following text somewhere in the message:
... FatalInstallException Name is null
However, the installation otherwise seems to complete successfully.
This error is being displayed erroneously because the program thinks that the server needs to be reconfigured, but it doesn't.
Action: Review the installation log file. If there are no errors there related to this error message, you can ignore it.
Installation on Linux fails
Source: ZENworks 11 ; Installation.
Possible Cause: If the directory path to which you have extracted the ZENworks 11 installation ISO image contains spaces, the installation fails on Linux.
Action: Ensure that the directory path to which you want to extract the installation ISO image does not contain spaces.
Configure Action fails because of an error detected by HotSpot Virtual Machine
Source: ZENworks 11 ; Installation.
Troubleshooting 89
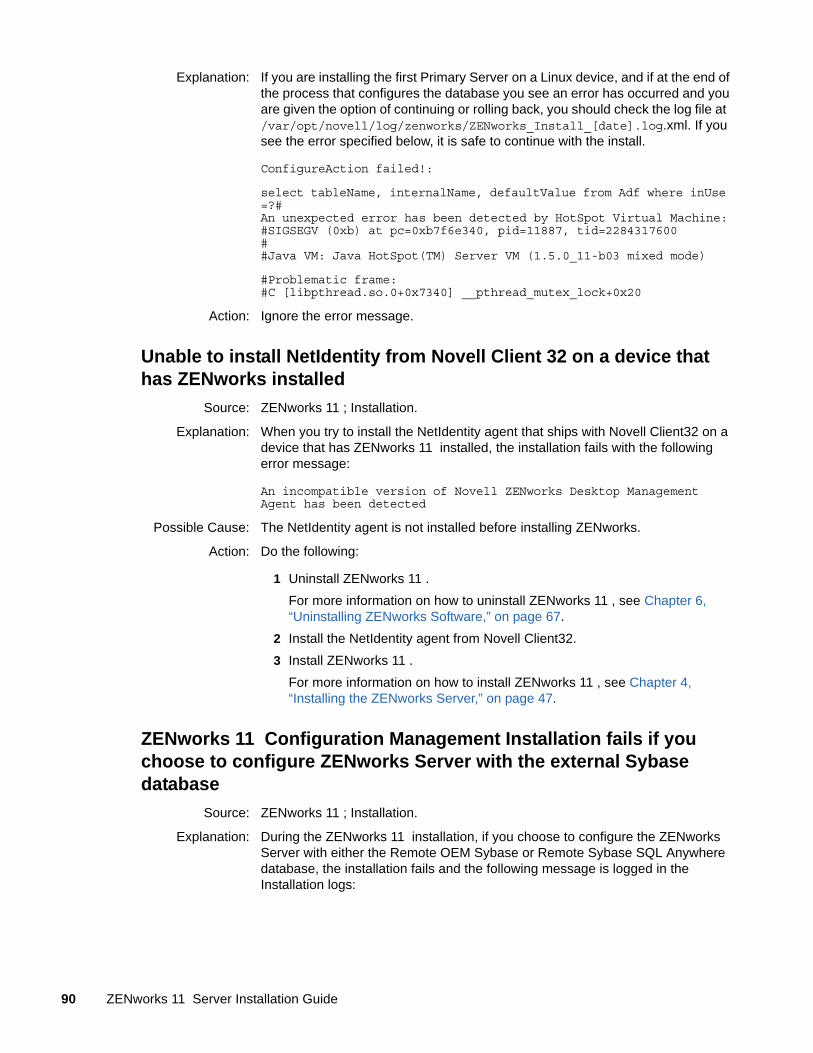
Explanation: If you are installing the first Primary Server on a Linux device, and if at the end of the process that configures the database you see an error has occurred and you are given the option of continuing or rolling back, you should check the log file at /var/opt/novell/log/zenworks/ZENworks_Install_[date].log.xml. If you see the error specified below, it is safe to continue with the install.
ConfigureAction failed!:
select tableName, internalName, defaultValue from Adf where inUse =?#An unexpected error has been detected by HotSpot Virtual Machine:#SIGSEGV (0xb) at pc=0xb7f6e340, pid=11887, tid=2284317600##Java VM: Java HotSpot(TM) Server VM (1.5.0_11-b03 mixed mode)
#Problematic frame:#C [libpthread.so.0+0x7340] __pthread_mutex_lock+0x20
Action: Ignore the error message.
Unable to install NetIdentity from Novell Client 32 on a device that has ZENworks installed
Source: ZENworks 11 ; Installation.
Explanation: When you try to install the NetIdentity agent that ships with Novell Client32 on a device that has ZENworks 11 installed, the installation fails with the following error message:
An incompatible version of Novell ZENworks Desktop Management Agent has been detected
Possible Cause: The NetIdentity agent is not installed before installing ZENworks.
Action: Do the following:
1 Uninstall ZENworks 11 .
For more information on how to uninstall ZENworks 11 , see Chapter 6, “Uninstalling ZENworks Software,” on page 67.
2 Install the NetIdentity agent from Novell Client32.
3 Install ZENworks 11 .
For more information on how to install ZENworks 11 , see Chapter 4, “Installing the ZENworks Server,” on page 47.
ZENworks 11 Configuration Management Installation fails if you choose to configure ZENworks Server with the external Sybase database
Source: ZENworks 11 ; Installation.
Explanation: During the ZENworks 11 installation, if you choose to configure the ZENworks Server with either the Remote OEM Sybase or Remote Sybase SQL Anywhere database, the installation fails and the following message is logged in the Installation logs:
90 ZENworks 11 Server Installation Guide
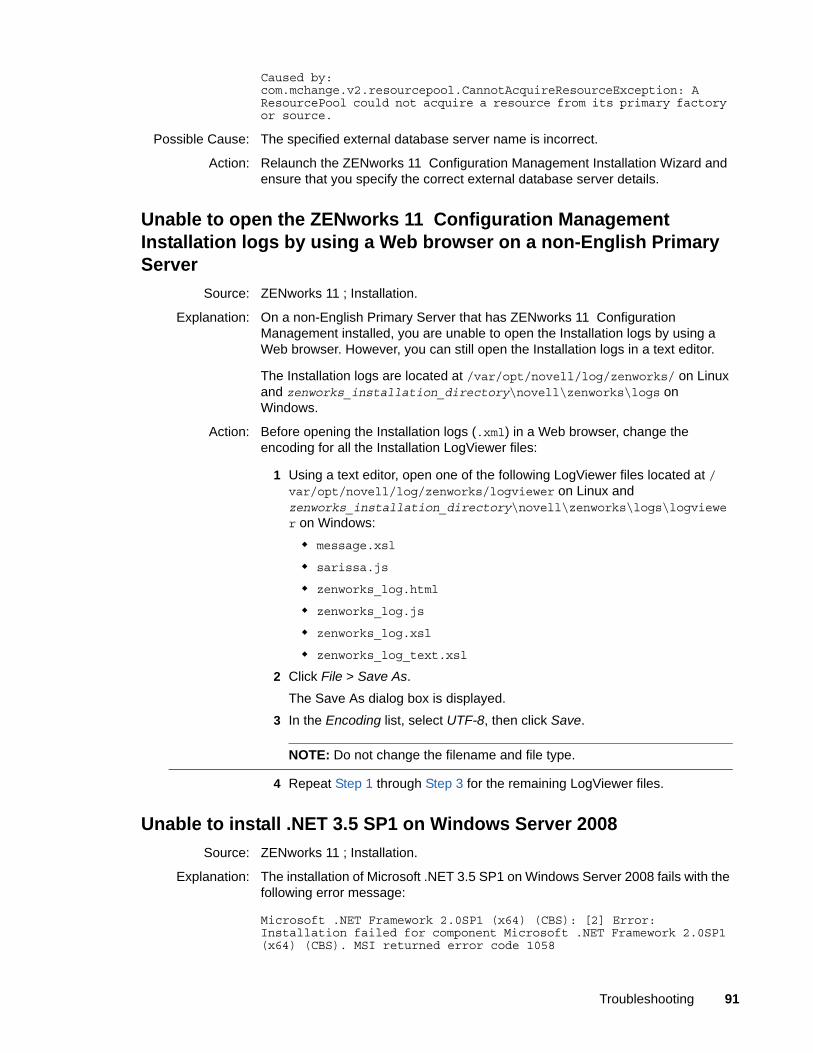
Caused by: com.mchange.v2.resourcepool.CannotAcquireResourceException: A ResourcePool could not acquire a resource from its primary factory or source.
Possible Cause: The specified external database server name is incorrect.
Action: Relaunch the ZENworks 11 Configuration Management Installation Wizard and ensure that you specify the correct external database server details.
Unable to open the ZENworks 11 Configuration Management Installation logs by using a Web browser on a non-English Primary Server
Source: ZENworks 11 ; Installation.
Explanation: On a non-English Primary Server that has ZENworks 11 Configuration Management installed, you are unable to open the Installation logs by using a Web browser. However, you can still open the Installation logs in a text editor.
The Installation logs are located at /var/opt/novell/log/zenworks/ on Linux and zenworks_installation_directory\novell\zenworks\logs on Windows.
Action: Before opening the Installation logs (.xml) in a Web browser, change the encoding for all the Installation LogViewer files:
1 Using a text editor, open one of the following LogViewer files located at /var/opt/novell/log/zenworks/logviewer on Linux and zenworks_installation_directory\novell\zenworks\logs\logviewer on Windows:
message.xsl
sarissa.js
zenworks_log.html
zenworks_log.js
zenworks_log.xsl
zenworks_log_text.xsl
2 Click File > Save As.
The Save As dialog box is displayed.
3 In the Encoding list, select UTF-8, then click Save.
NOTE: Do not change the filename and file type.
4 Repeat Step 1 through Step 3 for the remaining LogViewer files.
Unable to install .NET 3.5 SP1 on Windows Server 2008
Source: ZENworks 11 ; Installation.
Explanation: The installation of Microsoft .NET 3.5 SP1 on Windows Server 2008 fails with the following error message:
Microsoft .NET Framework 2.0SP1 (x64) (CBS): [2] Error: Installation failed for component Microsoft .NET Framework 2.0SP1 (x64) (CBS). MSI returned error code 1058
Troubleshooting 91
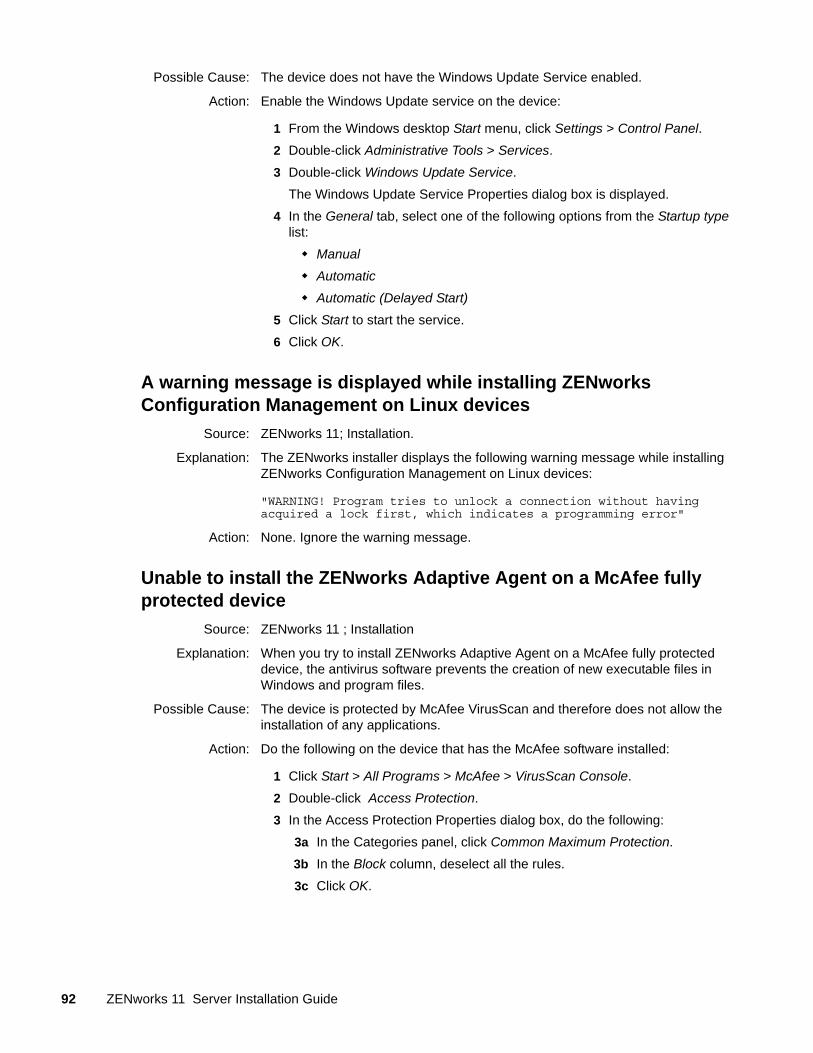
Possible Cause: The device does not have the Windows Update Service enabled.
Action: Enable the Windows Update service on the device:
1 From the Windows desktop Start menu, click Settings > Control Panel.
2 Double-click Administrative Tools > Services.
3 Double-click Windows Update Service.
The Windows Update Service Properties dialog box is displayed.
4 In the General tab, select one of the following options from the Startup type list:
Manual
Automatic
Automatic (Delayed Start)
5 Click Start to start the service.
6 Click OK.
A warning message is displayed while installing ZENworks Configuration Management on Linux devices
Source: ZENworks 11; Installation.
Explanation: The ZENworks installer displays the following warning message while installing ZENworks Configuration Management on Linux devices:
"WARNING! Program tries to unlock a connection without having acquired a lock first, which indicates a programming error"
Action: None. Ignore the warning message.
Unable to install the ZENworks Adaptive Agent on a McAfee fully protected device
Source: ZENworks 11 ; Installation
Explanation: When you try to install ZENworks Adaptive Agent on a McAfee fully protected device, the antivirus software prevents the creation of new executable files in Windows and program files.
Possible Cause: The device is protected by McAfee VirusScan and therefore does not allow the installation of any applications.
Action: Do the following on the device that has the McAfee software installed:
1 Click Start > All Programs > McAfee > VirusScan Console.
2 Double-click Access Protection.
3 In the Access Protection Properties dialog box, do the following:
3a In the Categories panel, click Common Maximum Protection.
3b In the Block column, deselect all the rules.
3c Click OK.
92 ZENworks 11 Server Installation Guide
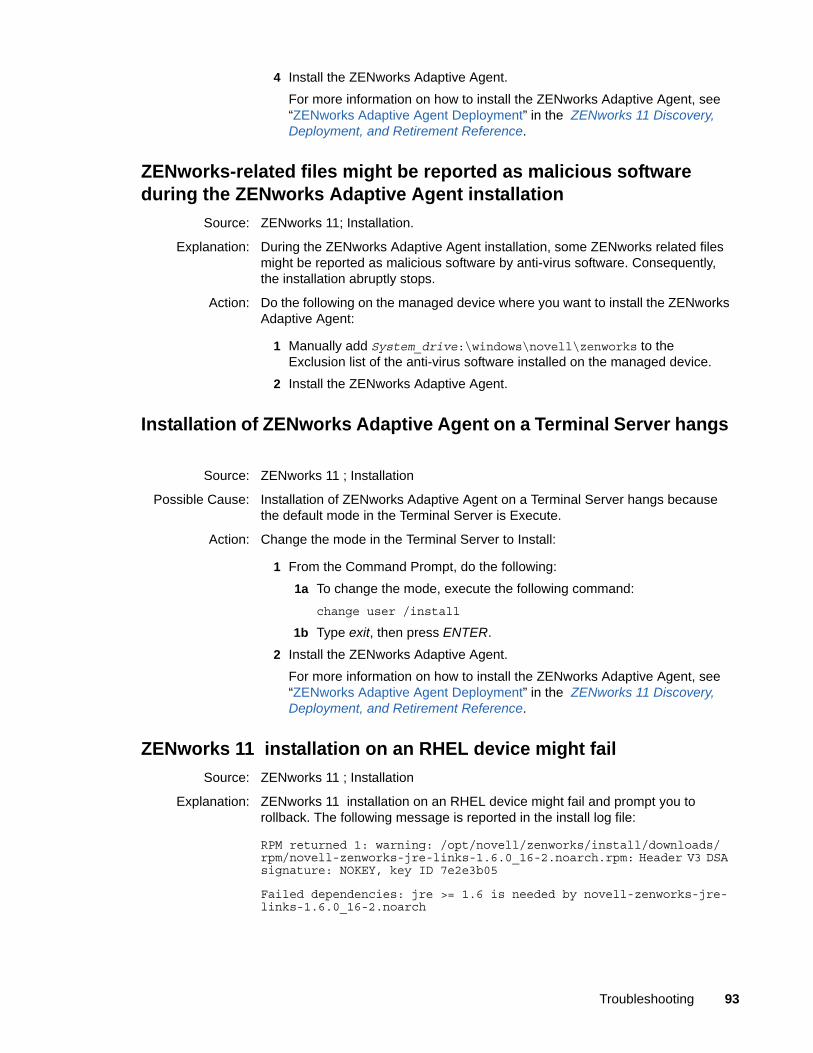
4 Install the ZENworks Adaptive Agent.
For more information on how to install the ZENworks Adaptive Agent, see “ZENworks Adaptive Agent Deployment” in the ZENworks 11 Discovery, Deployment, and Retirement Reference.
ZENworks-related files might be reported as malicious software during the ZENworks Adaptive Agent installation
Source: ZENworks 11; Installation.
Explanation: During the ZENworks Adaptive Agent installation, some ZENworks related files might be reported as malicious software by anti-virus software. Consequently, the installation abruptly stops.
Action: Do the following on the managed device where you want to install the ZENworks Adaptive Agent:
1 Manually add System_drive:\windows\novell\zenworks to the Exclusion list of the anti-virus software installed on the managed device.
2 Install the ZENworks Adaptive Agent.
Installation of ZENworks Adaptive Agent on a Terminal Server hangs
Source: ZENworks 11 ; Installation
Possible Cause: Installation of ZENworks Adaptive Agent on a Terminal Server hangs because the default mode in the Terminal Server is Execute.
Action: Change the mode in the Terminal Server to Install:
1 From the Command Prompt, do the following:
1a To change the mode, execute the following command:
change user /install
1b Type exit, then press ENTER.
2 Install the ZENworks Adaptive Agent.
For more information on how to install the ZENworks Adaptive Agent, see “ZENworks Adaptive Agent Deployment” in the ZENworks 11 Discovery, Deployment, and Retirement Reference.
ZENworks 11 installation on an RHEL device might fail
Source: ZENworks 11 ; Installation
Explanation: ZENworks 11 installation on an RHEL device might fail and prompt you to rollback. The following message is reported in the install log file:
RPM returned 1: warning: /opt/novell/zenworks/install/downloads/rpm/novell-zenworks-jre-links-1.6.0_16-2.noarch.rpm: Header V3 DSA signature: NOKEY, key ID 7e2e3b05
Failed dependencies: jre >= 1.6 is needed by novell-zenworks-jre-links-1.6.0_16-2.noarch
Troubleshooting 93
Action: Perform the following tasks:
1 Roll back the ZENworks 11 installation.
2 Manually install JRE by running the following command at the terminal:
rpm -ivh <BUILD_ROOT>/Common/rpm/jre-<VERSION>.rpm
3 Install ZENworks 11 . For more information on how to install ZENworks 11 , see “Performing the Installation” on page 47.
On Windows XP, installing the ZENworks Adaptive Agent with the Remote Management component through Remote Desktop Connection hangs
Source: ZENworks 11 ; Installation
Explanation: If you remotely connect to a managed device by using Remote Desktop Connection (RDP) and install ZENworks Adaptive Agent, the installation hangs.
Action: To fix the issue, download the patch from the Microsoft Support Web site (http://support.microsoft.com/kb/952132) and install it on the managed device prior to
installing the ZENworks Adaptive Agent.
C.2 Uninstallation Error MessagesThis section contains detailed explanations of the error messages you might encounter when uninstalling ZENworks 11 :
“Unable to proceed because the device does not exist in the Management Zone. For more information, see http://www.novell.com/documentation/zcm10 for details.” on page 94
“Unable to proceed because the uninstaller is not able to determine the roles assigned to the device. For more information, see http://www.novell.com/documentation/zcm10 for details.” on page 95
“WARN_PACKAGES_NOT_REMOVED message is displayed when the uninstallation completes on a Linux device” on page 95
“Uninstalling ZENworks on a OES Linux device fails to delete the database folders on the device” on page 95
Unable to proceed because the device does not exist in the Management Zone. For more information, see http://www.novell.com/documentation/zcm10 for details.
Source: ZENworks 11 ; Uninstallation on Linux Satellite.
Possible Cause: The specified IP address of the Primary Server to which the Linux Satellite is registered is incorrect.
Action: Specify the correct IP address of the Primary Server to which the Linux Satellite is registered.
94 ZENworks 11 Server Installation Guide
Unable to proceed because the uninstaller is not able to determine the roles assigned to the device. For more information, see http://www.novell.com/documentation/zcm10 for details.
Source: ZENworks 11 ; Uninstallation on Linux Satellite.
Action: Ensure that the Primary server to which the Linux Satellite is registered is up and running, and the server is accessible by the Linux Satellite.
Action: For detailed information about the issue, see the following logs:
/var/opt/novell/log/zenworks/Zenworks_Satellite_Servertimestamp.xml
/tmp/err.log
Action: If the problem persists, contact Novell Support (http://www.novell.com/support).
WARN_PACKAGES_NOT_REMOVED message is displayed when the uninstallation completes on a Linux device
Source: ZENworks 11 ; Uninstallation on a Linux device.
Explanation: When the uninstallation completes on a OES Linux or a RHEL device, the following error message is logged in the Console logs:
The following error occurred during the uninstall:WARN_PACKAGES_NOT_REMOVED
Action: Ignore the error message.
Uninstalling ZENworks on a OES Linux device fails to delete the database folders on the device
Source: ZENworks 11 ; Uninstallation on Open Enterprise Server 2 (OES Linux).
Explanation: On uninstalling ZENworks from a OES Linux device, the database folders on the device do not get deleted and the following message is logged in the Console logs:
System.TypeInitializationException: An exception was thrown by the type initializer for Mono.Unix.Native.Syscall ---> System.DllNotFoundException: libMonoPosixHelper.so at (wrapper managed-to-native) Mono.Unix.Native.Syscall:_L_ctermid () at Mono.Unix.Native.Syscall..cctor () [0x00000] --- End of inner exception stack trace --- at ZENworksUninstall.LinuxUninstaller.adjustPermissions (System.String path) [0x00000] at ZENworksUninstall.LinuxUninstaller.removeFiles () [0x00000] at ZENworksUninstall.ZENworksUninstallerSkeleton.Uninstall (ZENworksUninstall.Arguments args) [0x00000]
Action: Manually delete the /var/opt/novell/zenworks/database folder on the device.
Troubleshooting 95
C.3 Post Installation TroubleshootingThis section provides solutions to problems you might encounter after installing ZENworks 11 .
“Unable to access ZENworks Control Center of a ZENworks Server installed on a OES or SLES device” on page 96
Unable to access ZENworks Control Center of a ZENworks Server installed on a OES or SLES device
Source: ZENworks 11 ; Installation.
Explanation: During the installation of ZENworks Server on OES or SLES device, if you have specified the port as 8080, the installation is successful. However, you might not be able to access the ZENworks Control Center of the ZENworks Server from any device.
Action: To access the ZENworks Control Center of the ZENworks Server, perform the following steps on the OES or SLES device on which you have installed the ZENworks Server:
1 Start YaST.
2 Click Firewall
3 In the Firewall Configuration Window, click Allowed Services.
4 Click Advanced.
5 In the Additional Allowed Ports dialog box, replace http-alt in the TCP Ports and UDP Ports options with 8080 and complete the Wizard.
96 ZENworks 11 Server Installation Guide


