23
M-Series 1

M-Series
1

ZOLL M-Series
2

Electrode Connection
3
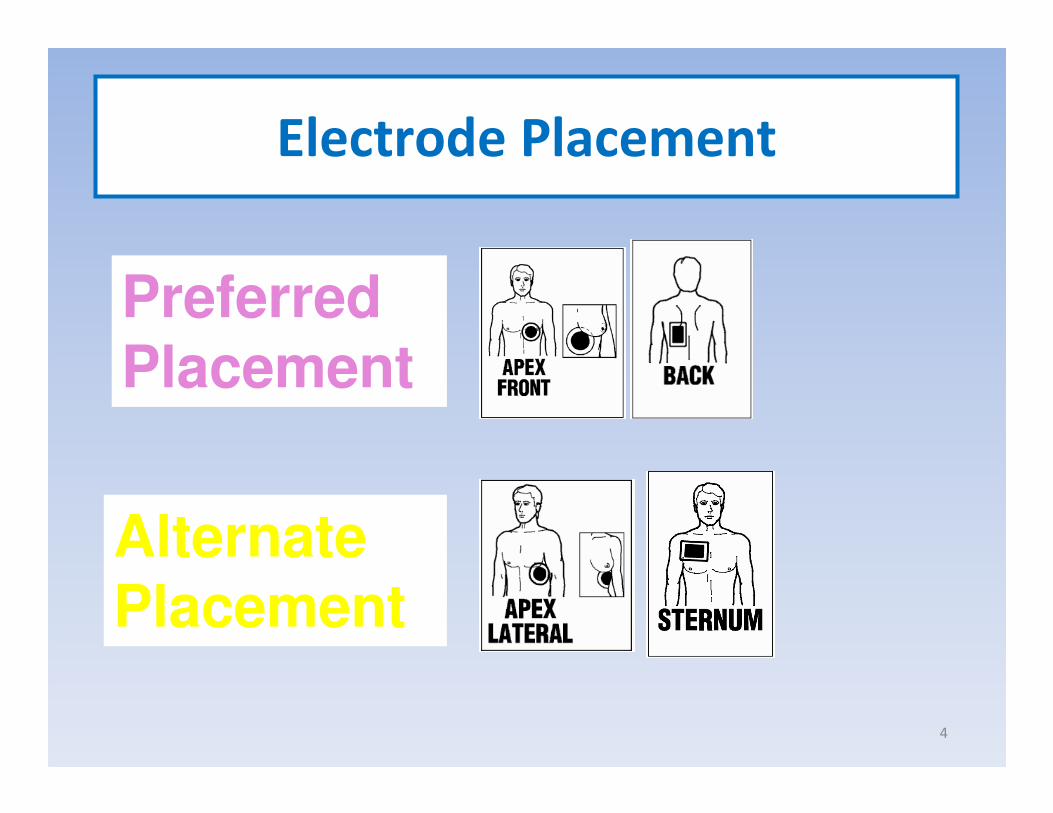
Electrode Placement
4
Preferred Placement
Alternate Placement

Internal Spoons
5
Used by MD for Internal Defibrillation for Open Heart Surgery Patients ONLY
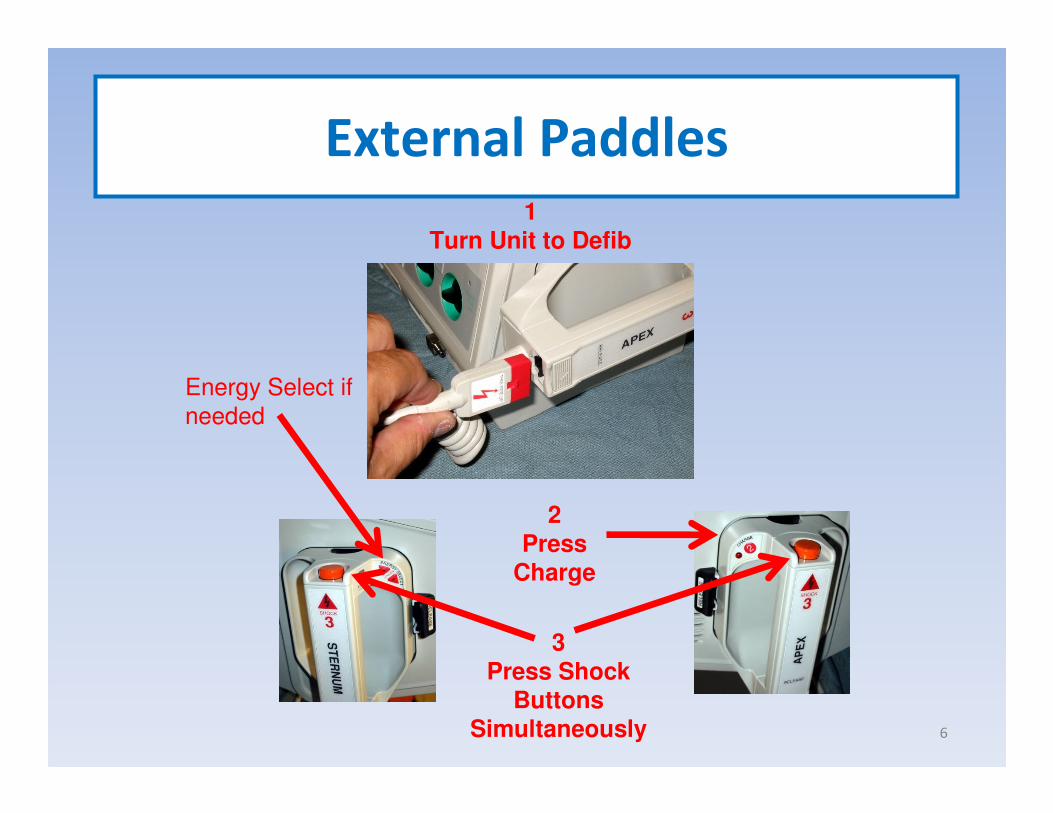
External Paddles
6
Energy Select if
needed
2
Press
Charge
3
Press Shock Buttons
Simultaneously
1
Turn Unit to Defib

Joule Settings
7
Recommended ACLS Defibrillation Protocols With the ZOLL Rectilinear Biphasic Waveform
ZOLL Biphasic
1st
Shock 120 Joules
Defibrillation 2nd
Shock 150 Joules
3rd
and Subsequent 200 Joules
Pedi Defib 1st
Shock 2 Joules/kg
Subsequent 4 Joules/kg
1st
Shock 5 Joules
2nd
Shock 10 Joules
Internal Defib 3rd
Shock 20 Joules
4th
Shock 30 Joules
5th
Shock 50 Joules
The settings are the “appropriate biphasic equivalent” of monophasic equipment and
are to be used as a guide for direct physician orders deviating from hospital protocol.
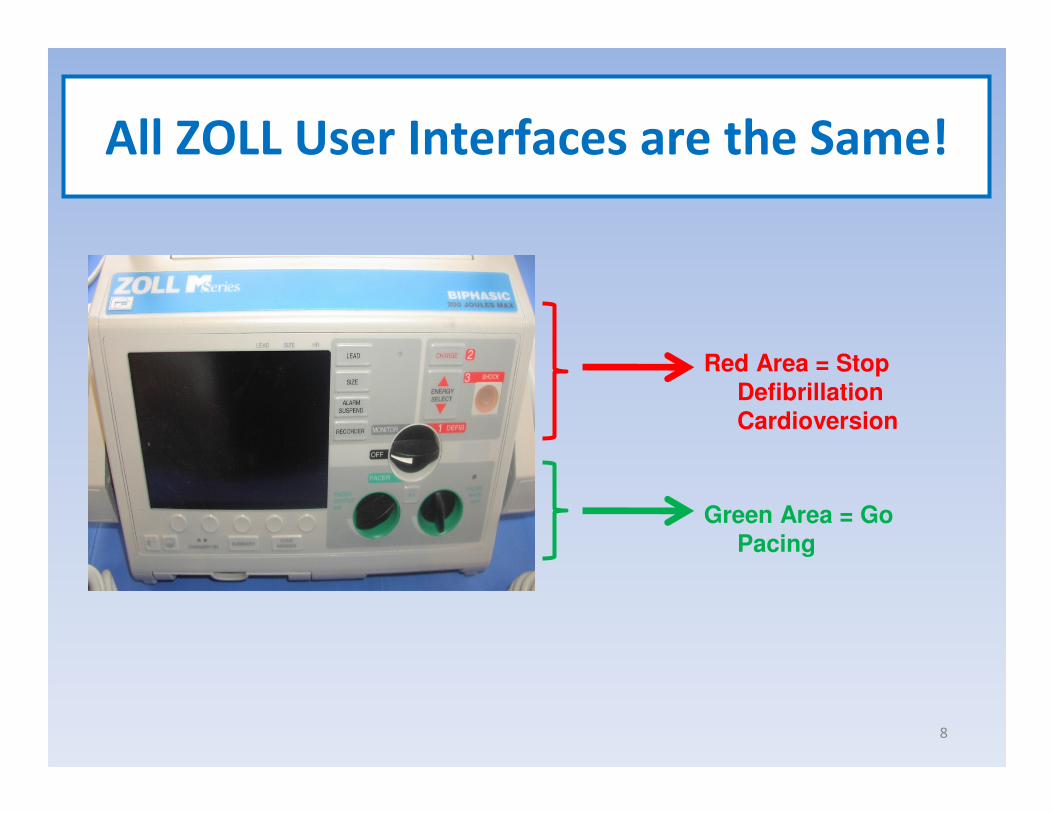
All ZOLL User Interfaces are the Same!
Red Area = Stop
Defibrillation
Cardioversion
Green Area = Go
Pacing
8
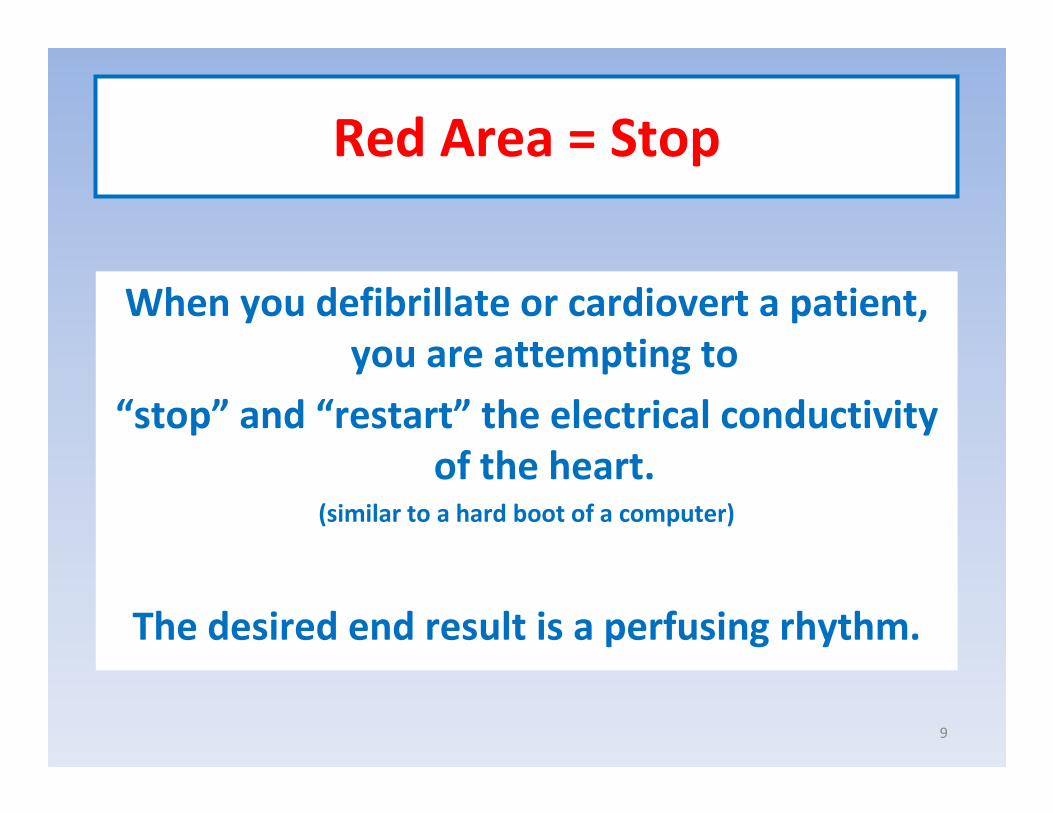
Red Area = Stop
When you defibrillate or cardiovert a patient,
you are attempting to
“stop” and “restart” the electrical conductivity
of the heart. (similar to a hard boot of a computer)
The desired end result is a perfusing rhythm.
9

DefibrillationAdvanced and Basic Providers
Place the pads on the patient .
Preferred placement is anterior/posterior.
(Heart Sandwich)
Advanced Providers
1. Turn the Unit On (1)
2. If Shockable rhythm,
press charge (2)
3. Press Shock Button
when lit (3)
Basic Providers
1. Turn the Unit On (1)
2. Press Analyze (2)
3. Follow verbal and
visible prompts (3)
10

AED for BLS UsersWhen you press “Analyze” unit will tell you to
“Stand Clear” and interpret the ECG Rhythm
If unit interprets a
“Shockable”
Rhythm, the unit
will charge itself and tell you to
“Press Shock”
If unit interprets a
“Non-Shockable”
Rhythm, the unit will
tell you “No Shock
Advised” and remind you to
“Perform CPR”
11
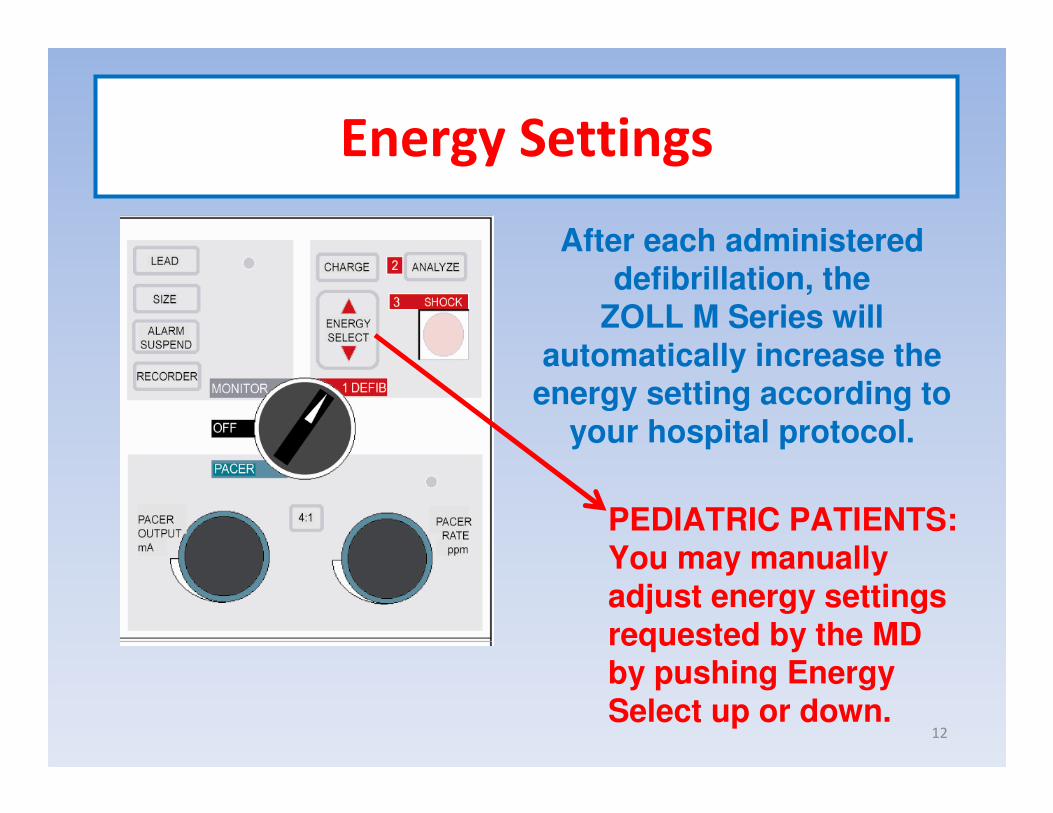
Energy Settings
After each administered defibrillation, the
ZOLL M Series will automatically increase the
energy setting according to your hospital protocol.
PEDIATRIC PATIENTS: You may manually adjust energy settings requested by the MD by pushing Energy Select up or down.
12
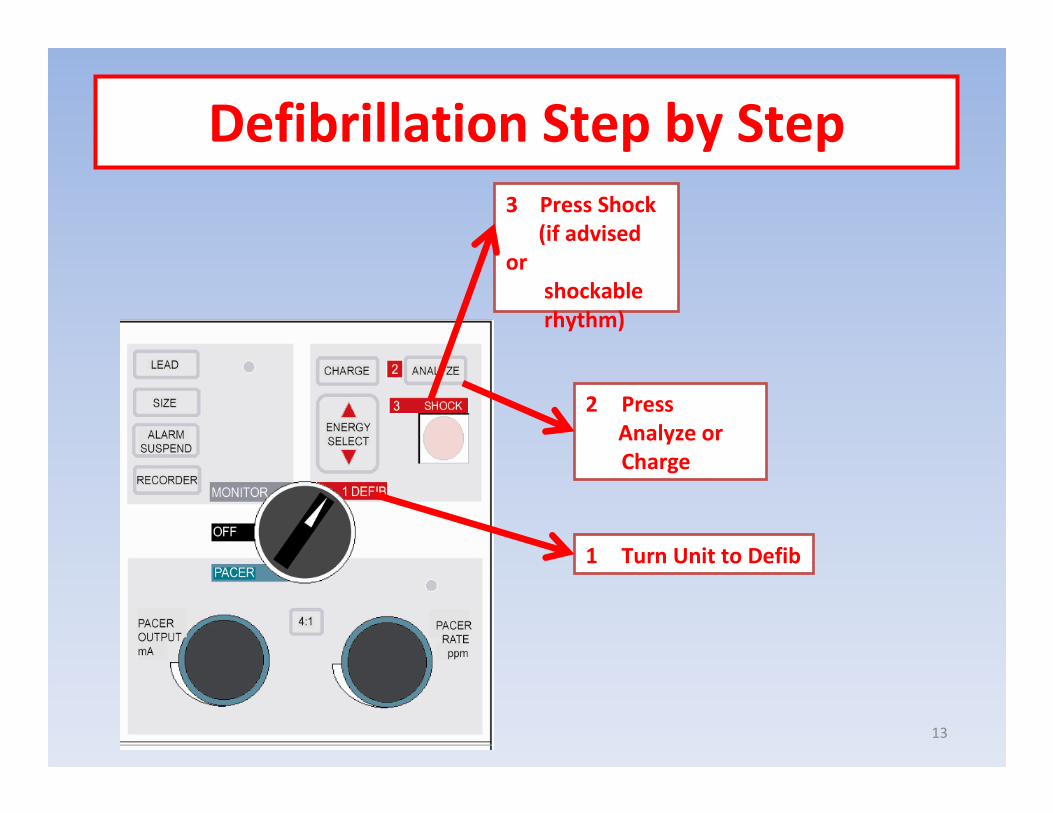
Defibrillation Step by Step
1 Turn Unit to Defib
2 Press
Analyze or
Charge
3 Press Shock
(if advised
or
shockable
rhythm)
13
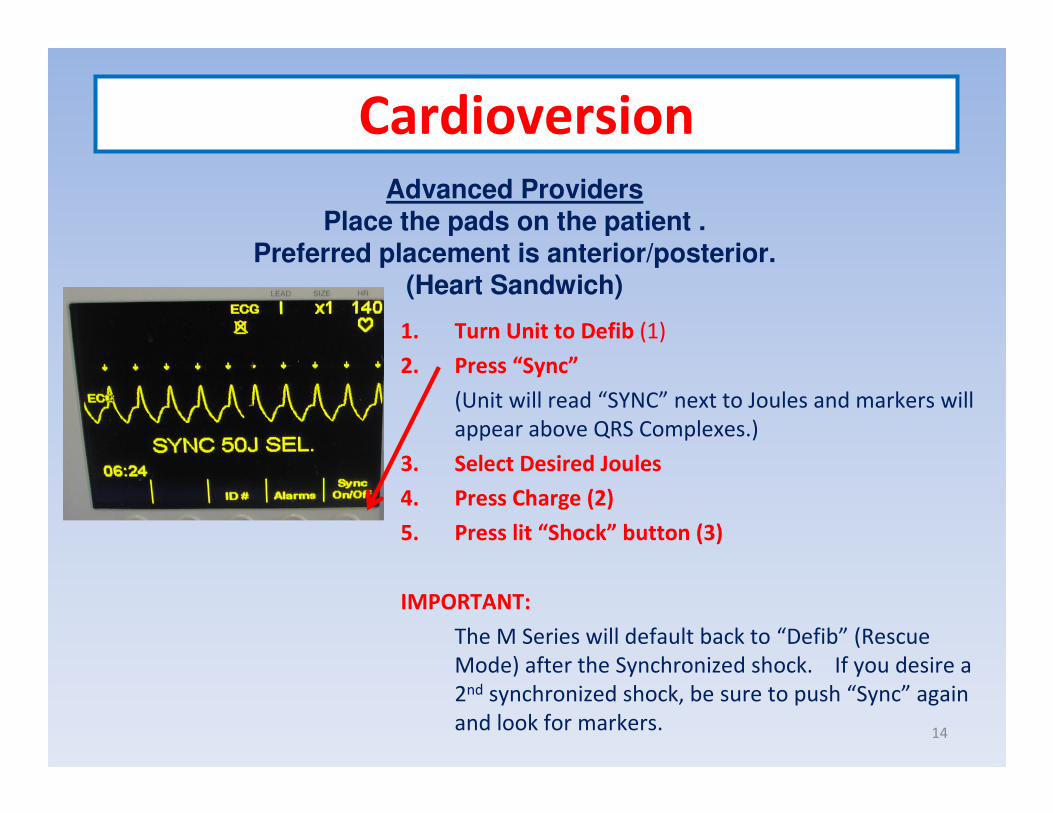
Cardioversion
1. Turn Unit to Defib (1)
2. Press “Sync”
(Unit will read “SYNC” next to Joules and markers will
appear above QRS Complexes.)
3. Select Desired Joules
4. Press Charge (2)
5. Press lit “Shock” button (3)
IMPORTANT:
The M Series will default back to “Defib” (Rescue
Mode) after the Synchronized shock. If you desire a
2nd synchronized shock, be sure to push “Sync” again
and look for markers.
Advanced ProvidersPlace the pads on the patient .
Preferred placement is anterior/posterior. (Heart Sandwich)
14

Important
The M Series will default back to “Defib” mode
after sync shock administered.
If you choose to administer subsequent cardioversionshocks, be sure to remember to push the “Sync” button
each and every time.
15

Pacing1. Turn to Pacing (Green Area)
A downward deflection will
appear with pt rhythm.2. Increase mA until you
receive capture of the heart.
(One downward deflection
for every QRS complex)
3. Increase mA approximately
10% after capture.4. Adjust rate as requested by
MD.
5. Pacer automatically
defaults to a demand pacer.6. To view intrinsic rhythm
during pacing, press and
hold 4:1 button.7. Should you want to change
to Async Pacing, press Async on/off along bottom prompt. 16
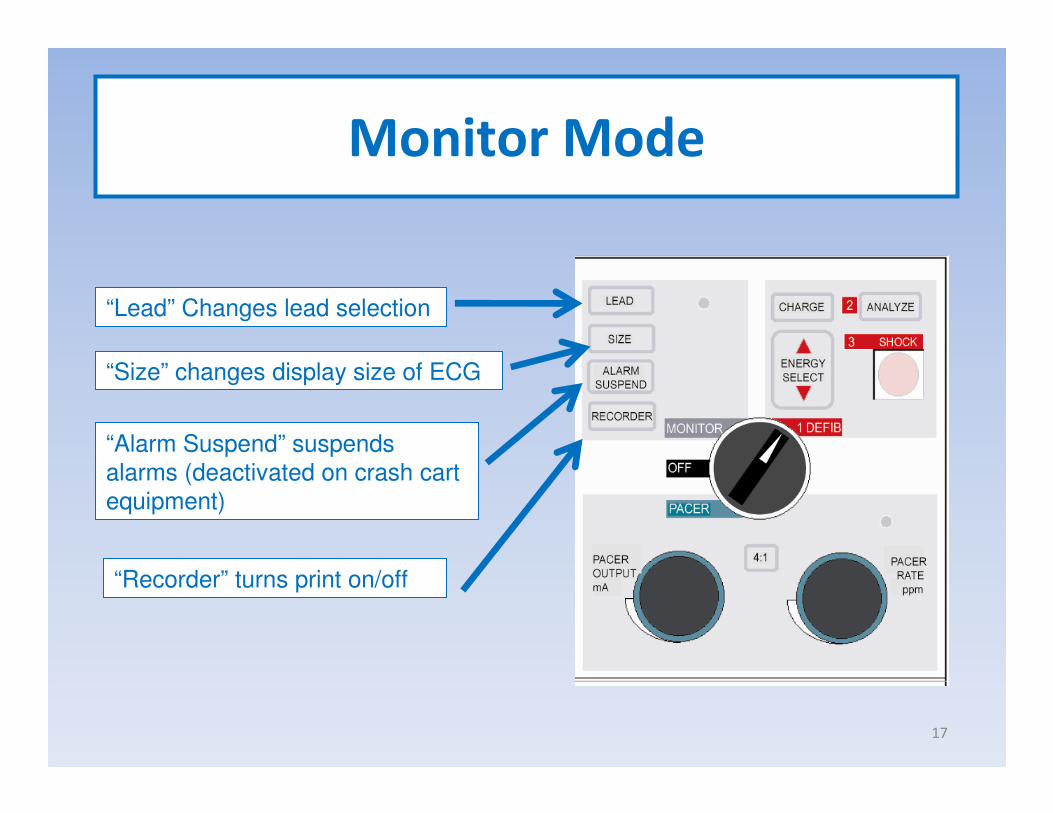
Monitor Mode
“Lead” Changes lead selection
“Size” changes display size of ECG
“Alarm Suspend” suspends
alarms (deactivated on crash cart
equipment)
“Recorder” turns print on/off
17

7. Plug MFC back into pads to be “Code Ready”.
1. Unplug MFC from pads and plug into test port.
(Black port attached to Cable)
2. Turn unit on. (1)
3. Energy select 30 joules.
4. Press Charge. (2)
5. Press Shock. (3)
6. Printer will print result.
TestingUNPLUG UNIT FROM THE ELECTRICAL OUTLET PRIOR
TO TESTING
18

Battery
19
• The most common cause of defibrillation failures are
battery related
• A new, fully charged battery pack has enough energy to
do 1 of the following
a.) 35 Defibrillator shocks at maximum energy
b.) 1.5 hours of continuous ECG monitoring
c.) 1.0 hour of continuous ECG monitoring and pacing
• Recharge (plug in unit to wall) or replace battery when
LOW BATTERY or REPLACE BATTERY are displayed on the
screen

Paper
20
If Check recorder is displayed,
evaluate the paper tray at the
bottom of the M-series
• Locate the RELEASE label and
press the ridge down located
below the label
• Slide tray out
• Replace paper with one square
dangling outside of tray.
• Red grid up, black arrows out
Press RECORDER button to confirm
proper placement

Summary buttonprinting a partial summary
Press Summary button
Summary Menu
• Press the Print Chart softkey
• Press the Print Range softkey
• Press Prev Event or Next Event
softkey to select the first event
for Printing
• Press the Print softkey
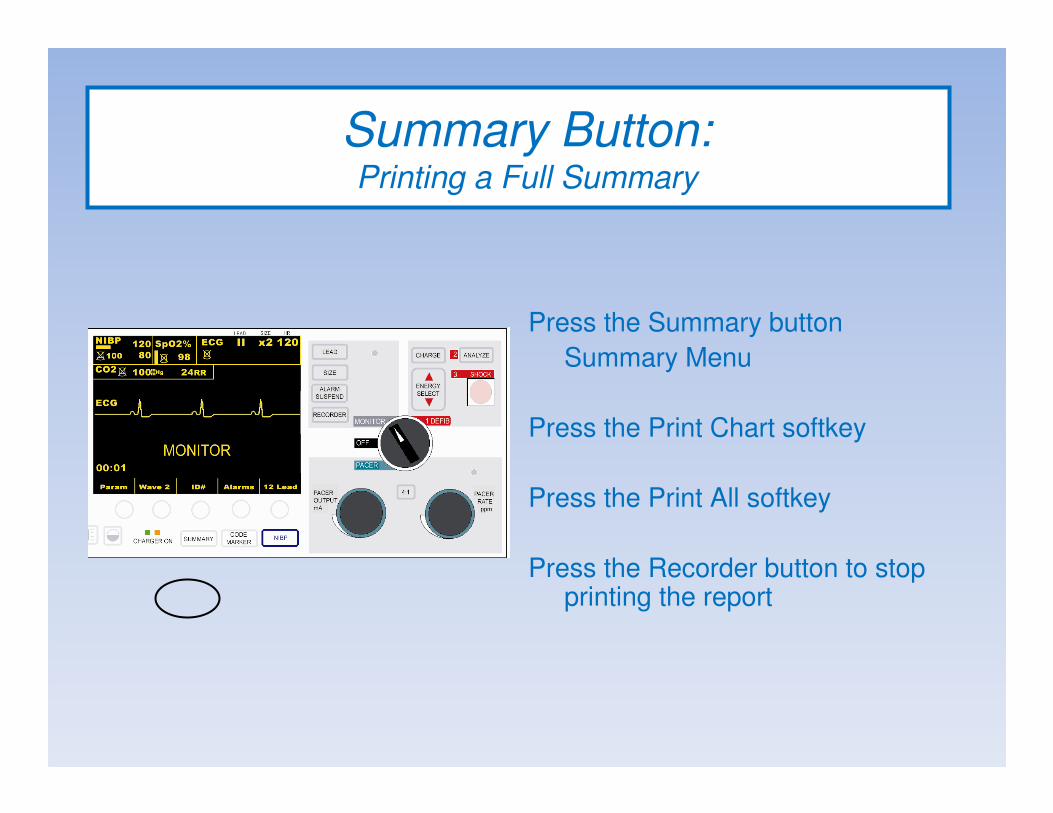
Summary Button:Printing a Full Summary
Press the Summary button
Summary Menu
Press the Print Chart softkey
Press the Print All softkey
Press the Recorder button to stop printing the report

Printing an Incident Log An abbreviated list of all events recorded in the summary report
which includes the time of occurrence.
Events such as the following: • M-Series turned on
• Defibrillation advisory messages
• Defibrillation shocks (including energy levels)
• Pacer mode activated
• Alarms triggered / Code markers
Press and release the Summary button
Press the Print Log softkey


