8
Using the FAST-FIX FLEX Meniscal Repair System All-zone all-inside meniscal repair A knee repair technique guide as described by Jorge Chahla, MD, PhD

Using the FAST-FIX FLEX Meniscal Repair System
All-zone all-inside meniscal repair
A knee repair technique guide as described by
Jorge Chahla, MD, PhD

1 TECHNIQUE GUIDE 1 TECHNIQUE GUIDE
ALL-ZONE ALL-INSIDE MENISCAL REPAIR
IntroductionThe FAST-FIX◊ FLEX has been designed to bend the needle and shaft; which can enhance accessibility by reaching tears previously unreachable using predicate device FAST-FIX 360.1-3 Compared to the FAST-FIX 360, the new in-line orientation of the implants creates a 25% smaller insertion area, while still being 23% stronger.4* All of this is done via a reliable, one-handed1,3 deployment that you can feel, see and hear.1
Reverse CurvedThe bevel and orientation of the needle on the FAST-FIX FLEX Reverse Curved Meniscal Repair System has been designed to make it easy to pierce the underside of the meniscus with the aim of producing a flat, more desirable repair.5
“FAST-FIX FLEX will revolutionize the all-inside meniscal repair device world. Delivering characteristics of FAST-FIX 360, the gold standard in meniscal repair, FLEX adds new features enabling surgeons to address previously inaccessible tears through the quick and reproducible all-inside approach; while
improving upon the tried and true technique.”
– Dr. Chahla
FLEX Fix Finish
All-zone all-inside meniscal repair1-3
*Repair strength, as demonstrated in biochemical testing.
TECHNIQUE GUIDE 2
ALL-ZONE ALL-INSIDE MENISCAL REPAIR
Assessing and preparing the repair site
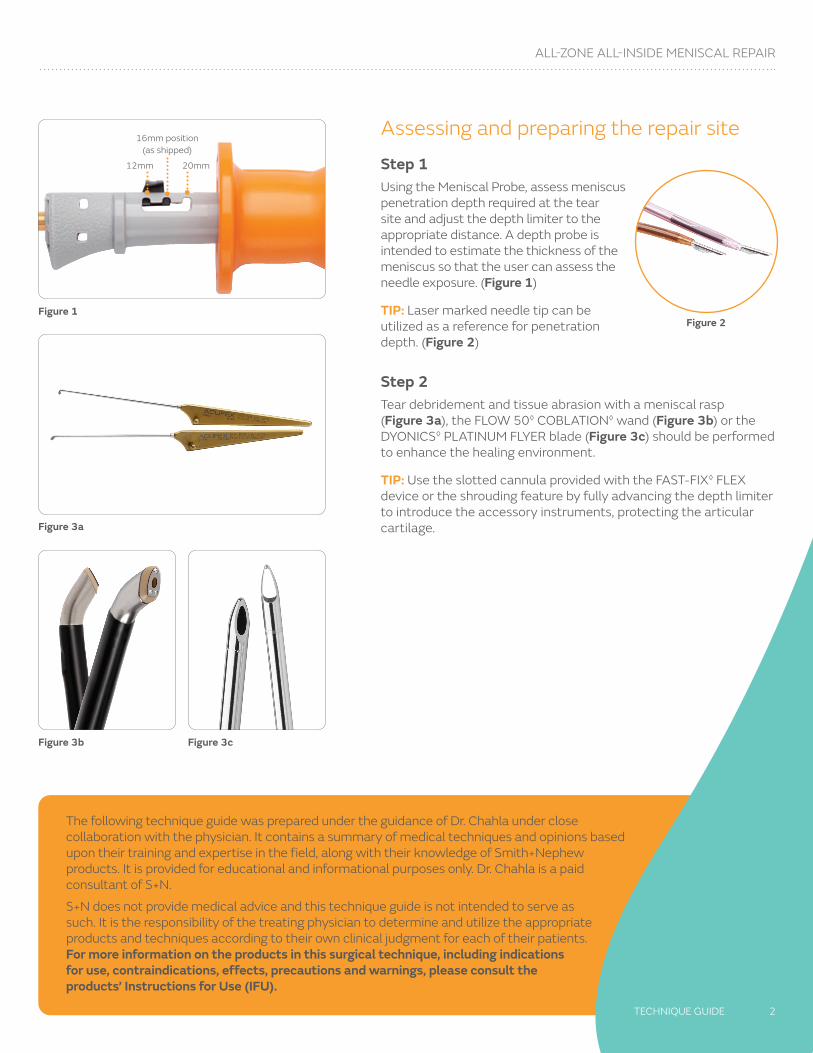
Step 1Using the Meniscal Probe, assess meniscus penetration depth required at the tear site and adjust the depth limiter to the appropriate distance. A depth probe is intended to estimate the thickness of the meniscus so that the user can assess the needle exposure. (Figure 1)
TIP: Laser marked needle tip can be utilized as a reference for penetration depth. (Figure 2)
Step 2Tear debridement and tissue abrasion with a meniscal rasp (Figure 3a), the FLOW 50◊ COBLATION◊ wand (Figure 3b) or the DYONICS◊ PLATINUM FLYER blade (Figure 3c) should be performed to enhance the healing environment.
TIP: Use the slotted cannula provided with the FAST-FIX◊ FLEX device or the shrouding feature by fully advancing the depth limiter to introduce the accessory instruments, protecting the articular cartilage.
Figure 1
Figure 3a
16mm position (as shipped)
12mm 20mm
Figure 3b Figure 3c
Figure 2
The following technique guide was prepared under the guidance of Dr. Chahla under close collaboration with the physician. It contains a summary of medical techniques and opinions based upon their training and expertise in the field, along with their knowledge of Smith+Nephew products. It is provided for educational and informational purposes only. Dr. Chahla is a paid consultant of S+N.
S+N does not provide medical advice and this technique guide is not intended to serve as such. It is the responsibility of the treating physician to determine and utilize the appropriate products and techniques according to their own clinical judgment for each of their patients. For more information on the products in this surgical technique, including indications for use, contraindications, effects, precautions and warnings, please consult the products’ Instructions for Use (IFU).

3 TECHNIQUE GUIDE
ALL-ZONE ALL-INSIDE MENISCAL REPAIR
Bending tipsIf, in the physician’s opinion, more or less curvature is preferred to access the tear site, use the provided Bend Tool to modify distal needle or proximal shaft.
For tears in the posterior, consider no bending. For tears in the mid-body, consider bending only the needle. For tears in the anterior, consider bending the needle and the shaft. Normal curvature usually better for femoral side of the meniscus and reverse for tibial side.
Distal needle bending
Step 1Observe the orientation of the needle slot and distal bevel angle. Align the bevel with the Bend Tool bevel and insert the distal needle into the Distal Bend Tool channel. (Figure 4)
NOTE: Align the needle bevel prior to insertion into bend tool.
Step 2 Bend distal needle until the desired curvature is achieved and then remove needle from Bend Tool. (Figure 6a and 6b)
NOTE: Maximum bend is when the shaft contacts the STOP wall. (Figure 5)
WARNING: Excessive bending of the delivery needle beyond the Bend Tool may compromise implant deployment.
NOTE: Bend tool does not provide measurement. Maximum bend degree was established by bench-top testing.
Figure 4
Figure 5
Figure 6a
Figure 6b
Bend measurements6
FFF Curved FFF Reverse CurvedPre-bend needle 24 degrees -12 degrees
Max needle bend 35 degrees -22 degrees
Pre-bend shaft 0 degrees 0 degrees
Max shaft bend 80 degrees -80 degrees

TECHNIQUE GUIDE 4
ALL-ZONE ALL-INSIDE MENISCAL REPAIR
Figure 7a
Proximal shaft bendingInsert needle into proximal bend feature. Press on the tube to fully seat the tube against the back slot of the Bend Tool (Figure 7a and 7b). The black arrow on the Bend Tool must be proximal to the black tube on the needle. Bend the needle to the desired curvature by applying pressure along the proximal shaft.
TIP: For added safety, shroud the needle prior to bending the shaft. Put the thumb on the black arrow for more stability.
WARNING: Excessive bending of the shaft beyond the Bend Tool may compromise implant deployment.
Align the arrow in the Bend Tool proximal to the black tube (Figure 8) – DO NOT bend the shaft along the black tube. (Figure 9)
Figure 7b
Figure 8
Figure 9
5 TECHNIQUE GUIDE
ALL-ZONE ALL-INSIDE MENISCAL REPAIR
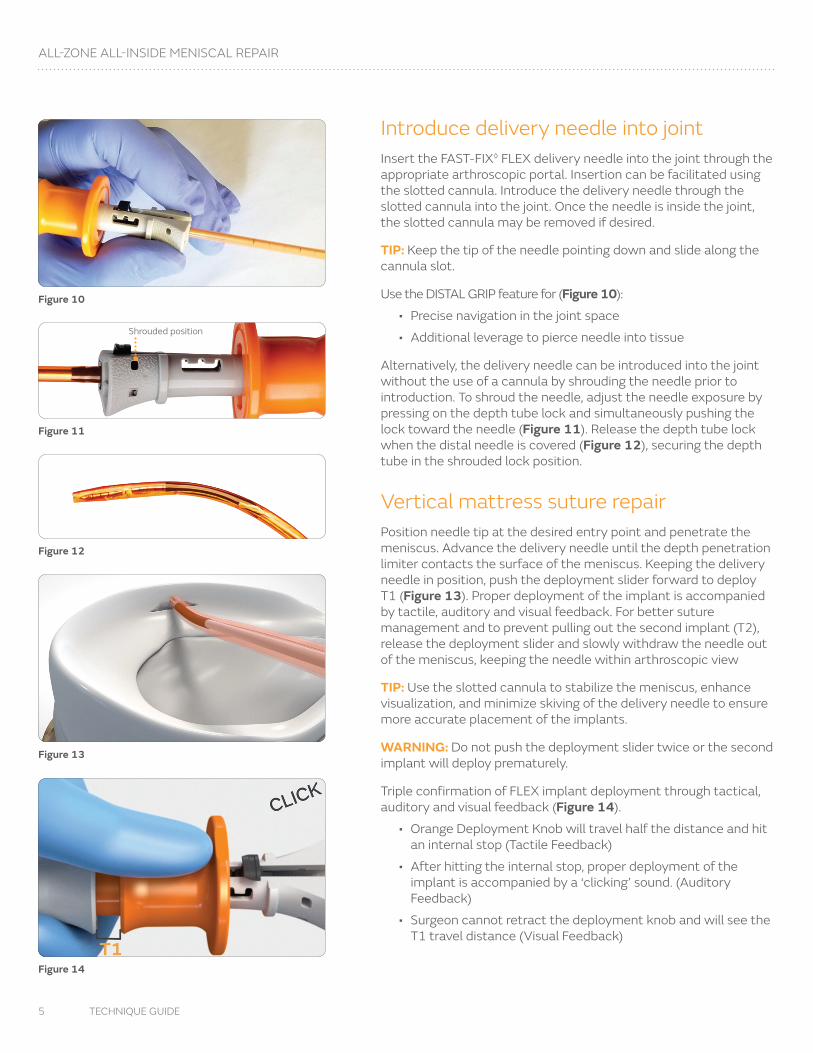
Introduce delivery needle into jointInsert the FAST-FIX◊ FLEX delivery needle into the joint through the appropriate arthroscopic portal. Insertion can be facilitated using the slotted cannula. Introduce the delivery needle through the slotted cannula into the joint. Once the needle is inside the joint, the slotted cannula may be removed if desired.
TIP: Keep the tip of the needle pointing down and slide along the cannula slot.
Use the DISTAL GRIP feature for (Figure 10):
• Precise navigation in the joint space
• Additional leverage to pierce needle into tissue
Alternatively, the delivery needle can be introduced into the joint without the use of a cannula by shrouding the needle prior to introduction. To shroud the needle, adjust the needle exposure by pressing on the depth tube lock and simultaneously pushing the lock toward the needle (Figure 11). Release the depth tube lock when the distal needle is covered (Figure 12), securing the depth tube in the shrouded lock position.
Vertical mattress suture repairPosition needle tip at the desired entry point and penetrate the meniscus. Advance the delivery needle until the depth penetration limiter contacts the surface of the meniscus. Keeping the delivery needle in position, push the deployment slider forward to deploy T1 (Figure 13). Proper deployment of the implant is accompanied by tactile, auditory and visual feedback. For better suture management and to prevent pulling out the second implant (T2), release the deployment slider and slowly withdraw the needle out of the meniscus, keeping the needle within arthroscopic view
TIP: Use the slotted cannula to stabilize the meniscus, enhance visualization, and minimize skiving of the delivery needle to ensure more accurate placement of the implants.
WARNING: Do not push the deployment slider twice or the second implant will deploy prematurely.
Triple confirmation of FLEX implant deployment through tactical, auditory and visual feedback (Figure 14).
• Orange Deployment Knob will travel half the distance and hit an internal stop (Tactile Feedback)
• After hitting the internal stop, proper deployment of the implant is accompanied by a ‘clicking’ sound. (Auditory Feedback)
• Surgeon cannot retract the deployment knob and will see the T1 travel distance (Visual Feedback)
Figure 10
Figure 11
Figure 12
Figure 13
Figure 14
Shrouded position

TECHNIQUE GUIDE 6
ALL-ZONE ALL-INSIDE MENISCAL REPAIR
Figure 15
Figure 17
Figure 18
Figure 19
Remove needle from first deployment location and position needle tip to bridge the tear. The entry point for the second (T2) implant should be at least 5mm from the tear site. Advance the delivery needle until the depth penetration limiter contacts the surface of the meniscus (Figure 15). Keeping the delivery needle in position, push the deployment slider all the way forward to deploy T2 (Figure 16). As with T1, proper deployment of the implant is accompanied by tactile, auditory and visual feedback. Slowly withdraw the delivery needle from the meniscus and the joint after deployment of T2.
Tension repairRemove the delivery needle from the knee, pulling the free end of the suture out of the joint. The free end of the suture is pulled to advance the sliding knot and reduce the meniscal tear (Figure 17). It is normal to encounter firm resistance as the knot is snugged down. It is important to pull the free end of the suture directly perpendicular to the tear site. Wrap the suture around several fingers and use the tibia as a fulcrum to provide a controlled method of tightening the knot. Slowly and steadily apply tension to the suture. In most cases, this steady pulling of the suture will cinch the knot down.
A knot pusher suture cutter, such as the side loading NOVOCUT◊ Suture Manager (Figure 18), can be used to assist with tensioning the knot. Position the NOVOCUT Suture Manager on the suture tail by sliding the loading lever and setting the suture into the window. Once the suture is within the loading window, release the loading lever to secure the NOVOCUT Suture Manager on the suture. Introduce knot pusher suture cutter into joint space. Use the NOVOCUT Suture Manager to facilitate knot advancement by simultaneously pulling on the suture tail and pushing the NOVOCUT Suture Manager against the knot until the knot reaches its intended position.
TIP: For left-handed use, flip the handle over and load the suture from the opposite side.
Knot cuttingFinish tensioning the knot. Slide the NOVOCUT Suture Manager to the knot and rest it on top of the knot (Figure 19). Relax tension on the limb, advance the orange cutting lever, and then pull back on the limb to cut the suture. Remove knot pusher suture cutter from joint space.
Figure 16

Ordering information
FAST-FIX FLEX◊ Meniscal Repair System
Reference # Description
72205324FAST-FIX FLEX Curved Inserter Needle, Bender, Cannula Set
72205325FAST-FIX FLEX Reverse Curved Inserter Needle, Bender, Cannula Set
CTX-C001 NOVOCUT◊ Suture Manager
Accessories
Reference # Description
015186 Meniscal Depth Probe, reusable
014549 45° Diamond Rasp, reusable
014550 90° Diamond Rasp, reusable
Blade
Reference # Description
72205292 DYONICS◊ PLATINUM 4.0 FLYER Blade
COBLATION◊
Reference # Description
72290105 WEREWOLF◊ COBLATION System
72290007 WEREWOLF Wired Foot Pedal
72290008 WEREWOLF Wireless Foot Pedal
72290037 FLOW 50◊ Wand
Learn more at smith-nephew.com
Endoscopy Smith & Nephew, Inc.150 Minuteman RoadAndover, MA 01810
www.smith-nephew.comT +978 749 1000US Customer Service: +1 800 343 5717
◊ Trademark of Smith+Nephew. All trademarks acknowledged. ©2021 Smith+Nephew. All rights reserved. 28940 V2 05/21
Additional instruction To order the instruments used in this technique, call +1 800 343 5717 in the U.S. or contact an authorized Smith+Nephew representative. Prior to performing this technique, consult the Instructions for Use documentation provided with individual components – including indications, contraindications, warnings, cautions and instructions.
Caution: U.S. Federal law restricts this device to sale by or on the order of a physician.
References
1. Smith+Nephew 2021.Validation, FAST-FIX FLEX. Internal Report. 15010267 Rev A. 2. Smith+Nephew 2021.Validation, FAST-FIX FLEX. Attachment B. Internal Report. 15010267Rev A. 3. Smith+Nephew 2021.FAST-FIX FLEX- Surgeon Surveys. Internal Memo. 4. Smith+Nephew 2020.Biomechanical Testing, FAST-FIX FLEX. Internal Report. 15010180 Rev A.5. Li WP, Chen Z, Song B, Yang R, Tan W. The FasT-Fix Repair Technique for Ramp Lesion of the Medial Meniscus. Knee Surg Relat Res. 2015;27(1):56-60. 6. Smith+Nephew 2021.Competitive, FAST-FIX FLEX Dimensional Analysis. Internal Report. 15010919 Rev A.


