39
Zoom CONFIGURATION GUIDE: Intercoms Document Part # 931706A CyberData Corporation 3 Justin Court Monterey, CA 93940 (831) 373-2601
Zoom CONFIGURATION GUIDE: Intercoms
Document Part # 931706A
CyberData Corporation 3 Justin Court
Monterey, CA 93940 (831) 373-2601
CyberData Corporation 3 Justin Court, Monterey, CA 93940
www.cyberdata.net P 831.373.2601 | F 831.373.4193
ZOOM CONFIGURATION GUIDE: INTERCOMS
Doc. 931706A Page 1
Zoom Configuration Guide: Intercoms Document #931706A COPYRIGHT NOTICE: © 2019, CyberData Corporation, ALL RIGHTS RESERVED. This configuration guide and related materials are the copyrighted property of CyberData Corporation. No part of this configuration guide or related materials may be reproduced or transmitted, in any form or by any means (except for internal use by licensed customers), without prior express written permission of CyberData Corporation. This configuration guide, and the products, software, firmware, and/or hardware described in this configuration guide are the property of CyberData Corporation, provided under the terms of an agreement between CyberData Corporation and recipient of this configuration guide, and their use is subject to that agreement and its terms. DISCLAIMER: Except as expressly and specifically stated in a written agreement executed by CyberData Corporation, CyberData Corporation makes no representation or warranty, express or implied, including any warranty or merchantability or fitness for any purpose, with respect to this configuration guide or the products, software, firmware, and/or hardware described herein, and CyberData Corporation assumes no liability for damages or claims resulting from any use of this configuration guide or such products, software, firmware, and/or hardware. CyberData Corporation reserves the right to make changes, without notice, to this configuration guide and to any such product, software, firmware, and/or hardware. OPEN SOURCE STATEMENT: Certain software components included in CyberData products are subject to the GNU General Public License (GPL) and Lesser GNU General Public License (LGPL) “open source” or “free software” licenses. Some of this Open Source Software may be owned by third parties. Open Source Software is not subject to the terms and conditions of the CyberData COPYRIGHT NOTICE or software licenses. Your right to copy, modify, and distribute any Open Source Software is determined by the terms of the GPL, LGPL, or third party, according to who licenses that software. Software or firmware developed by CyberData that is unrelated to Open Source Software is copyrighted by CyberData, subject to the terms of CyberData licenses, and may not be copied, modified, reverse-engineered, or otherwise altered without explicit written permission from CyberData Corporation. TRADEMARK NOTICE: CyberData Corporation and the CyberData Corporation logos are trademarks of CyberData Corporation. Other product names, trademarks, and service marks may be the trademarks or registered trademarks of their respective owners.
CyberData Corporation 3 Justin Court, Monterey, CA 93940
www.cyberdata.net P 831.373.2601 | F 831.373.4193
ZOOM CONFIGURATION GUIDE: INTERCOMS
Doc. 931706A Page 2 Revision Information
• 9-27-19 Initial Release

CyberData Corporation 3 Justin Court, Monterey, CA 93940
www.cyberdata.net P 831.373.2601 | F 831.373.4193
ZOOM CONFIGURATION GUIDE: INTERCOMS
Doc. 931706A Page 3 Table of Contents
Table of Contents ............................................................................................................................ 3 1.0 Setup Diagram .......................................................................................................................... 4 2.0 Test Setup Equipment ............................................................................................................... 5 3.0 Before You Start ....................................................................................................................... 6 4.0 Configuration Procedure: Common Area Phone ...................................................................... 8 5.0 Configuration Procedure: Setting up the Paging Extension ................................................... 15 6.0 Configuration Procedure: Setting up the Nightringer extension ............................................. 24 7.0 Using the CyberData Intercom in a Zoom system. ................................................................. 33 7.1 Setting the Dialout Extension – Single button intercom ......................................................... 33 7.2 Calling with a Keypad Intercom ............................................................................................. 34 7.2.1 Setting up Speed Dial Operation.......................................................................................... 35 7.2.2 Setting up Security Mode Operation .................................................................................... 36 7.3 Activating the on-board relay ................................................................................................. 37 8.0 Contact CyberData Corporation ............................................................................................. 38
CyberData Corporation 3 Justin Court, Monterey, CA 93940
www.cyberdata.net P 831.373.2601 | F 831.373.4193
ZOOM CONFIGURATION GUIDE: INTERCOMS
Doc. 931706A Page 4
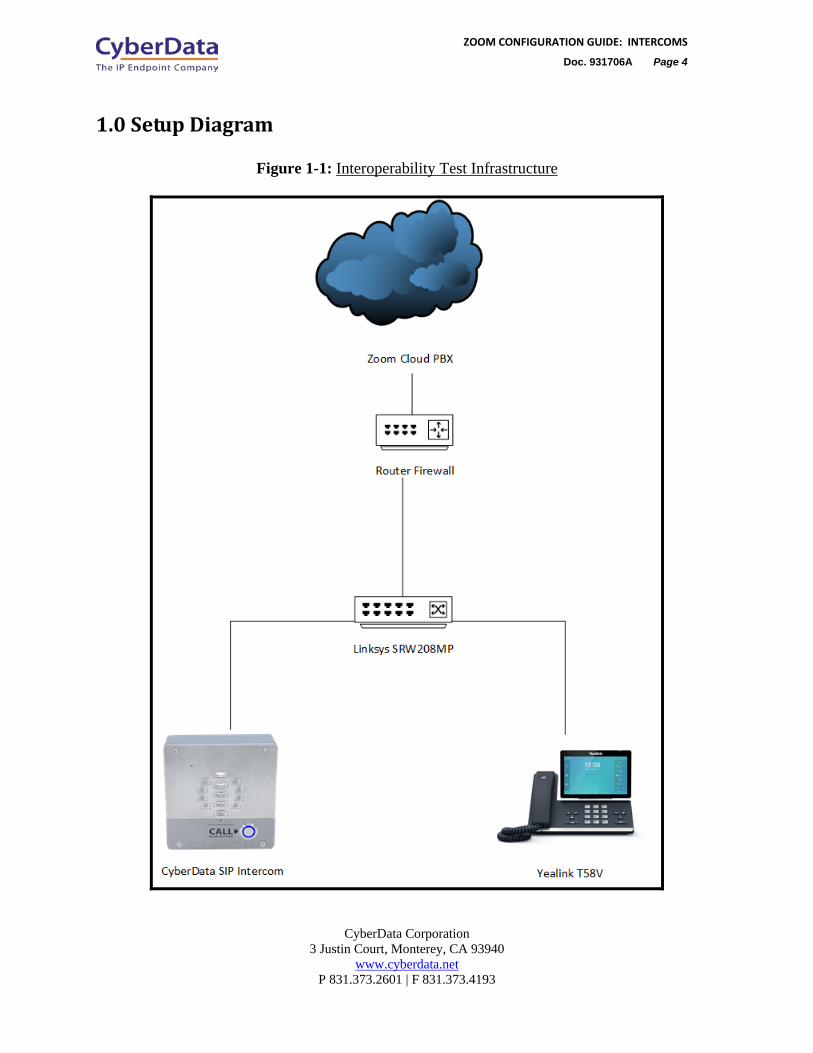
1.0 Setup Diagram
Figure 1-1: Interoperability Test Infrastructure

CyberData Corporation 3 Justin Court, Monterey, CA 93940
www.cyberdata.net P 831.373.2601 | F 831.373.4193
ZOOM CONFIGURATION GUIDE: INTERCOMS
Doc. 931706A Page 5
2.0 Test Setup Equipment This section describes the products used for interoperability testing with Zoom.
Table 2-1: Setup Equipment
EQUIPMENT MODEL or PART NUMBER FIRMWARE VERSION
CYBERDATA OUTDOOR INTERCOM 011186 20.1.0
CYBERDATA OUTDOOR KEYPAD INTERCOM 011214 20.0.0
CYBERDATA INDOOR INTERCOM 011211 20.0.0
CYBERDATA INDOOR INTERCOM WITH KEYPAD 011113 20.0.0
CYBERDATA INDOOR INTERCOM (FLUSH MOUNT) 011272 20.0.0
CYBERDATA INDOOR INTERCOM WITH KEYPAD (FLUSH MOUNT) 011123 20.0.0
CYBERDATA H.264 VIDEO INTERCOM 011410 1.4.1
CYBERDATA H.264 VIDEO INTERCOM WITH KEYPAD 011414 1.4.1
CYBERDATA OUTDOOR INTERCOM WITH RFID 011477 1.0.0
CYBERDATA H.264 VIDEO INTERCOM WITH RFID 011478 1.1.0
SIP EMERGENCY INTERCOM 011209 20.0.0
YEALINK T58A 58.83.3.6
LINKSYS SWITCH SRW208MP ---

CyberData Corporation 3 Justin Court, Monterey, CA 93940
www.cyberdata.net P 831.373.2601 | F 831.373.4193
ZOOM CONFIGURATION GUIDE: INTERCOMS
Doc. 931706A Page 6 3.0 Before You Start
This configuration guide documents the integration process of a CyberData SIP Intercom. Network Advisories Zoom uses a Fully Qualified Domain Name (FQDN) for the SIP server and Outbound Proxy addresses. The CyberData Intercom needs to perform a DNS A query to resolve the IP address of Zoom’s Outbound Proxy FQDN. It is necessary to ensure the configured DNS server(s) have an A record for the Outbound Proxy address. In addition, be sure to verify the following ports are available for the intercom to use:
• TCP 5060-5061, 5091 (SIP) • UDP 10500 (RTP)
The intercom will need to traverse the public internet in order to operate with Zoom in the cloud. The intercom’s paging extension uses SIP port 5060 to receive SIP messages. The Nightringer extension uses SIP port 5061 to receive SIP messages. Both extensions will send SIP messages to port 5091, the port used by Zoom’s Outbound Proxy. SIP ports 5060-5061 and RTP port 10500 are the default values on all noted firmware levels. Alternatively, SIP ports for the paging and Nightringer extension are configurable on the SIP page of the web interface. The RTP port setting on the SIP page is used for both extensions. The CyberData Discovery Utility can be used to locate CyberData devices on your network. You may download it from the following web address: https://www.cyberdata.net/pages/discovery Note: DHCP addressing mode is enabled on default on all noted firmware levels.
CyberData Corporation 3 Justin Court, Monterey, CA 93940
www.cyberdata.net P 831.373.2601 | F 831.373.4193
ZOOM CONFIGURATION GUIDE: INTERCOMS
Doc. 931706A Page 7 Product Documentation and Utilities
Before you start, download the Operation and Quick Start guides from the intercom’s product webpage: Outdoor Intercom (011186): https://files.cyberdata.net/assets/011186/011186_931544E_SIP_Outdoor_Intercom_Operations_Guide.pdf Outdoor Intercom with Keypad (011214): https://files.cyberdata.net/assets/011214/011214_931562B_SIP_Outdoor_Intercom_with_Keypad_Ops_Guide.pdf SIP H.264 Video Outdoor Intercom (011410): http://files.cyberdata.net/assets/011410/011410_931334E_Video_Outdoor_Intercom_Ops_Guide.pdf SIP H.264 Video Outdoor Intercom with Keypad (011414): http://files.cyberdata.net/assets/011414/011414_931338E_Video_Outdoor_Keypad_Intercom_Ops_Guide.pdf SIP Outdoor Intercom with RFID (011477): http://files.cyberdata.net/assets/011477/011477_931663A_Outdoor_Intercom_with_RFID_Ops_Guide.pdf SIP H.264 Video Outdoor Intercom with RFID (011478): http://files.cyberdata.net/assets/011478/011478_931667A_Outdoor_Video_Intercom_with_RFID_Ops_Guide.pdf SIP Indoor Intercom (011211): http://files.cyberdata.net/assets/011211/011211_931604A_Indoor_Intercom_Ops_Guide.pdf SIP Indoor Intercom with Keypad (011113): http://files.cyberdata.net/assets/011113/011113_931579A_SIP_Indoor_Intercom_with_Keypad_Ops_Guide.pdf SIP Indoor Intercom – Flush Mount (011272): http://files.cyberdata.net/assets/011272/011272_931608B_Flush_Mount_Intercom_Ops_Guide.pdf SIP Indoor Intercom with Keypad – Flush Mount (011123): http://files.cyberdata.net/assets/011123/011123_931583A_SIP_Indoor_Intercom_with_Keypad_Flush_Mount_Ops_Guide.pdf SIP Emergency Intercom (011209) https://files.cyberdata.net/assets/011209/011209_931600A_Emergency_Intercom_Ops_Guide.pdf

CyberData Corporation 3 Justin Court, Monterey, CA 93940
www.cyberdata.net P 831.373.2601 | F 831.373.4193
ZOOM CONFIGURATION GUIDE: INTERCOMS
Doc. 931706A Page 8 4.0 Configuration Procedure: Common Area Phone
There are several different extension types that can be used on the Zoom platform. This guide provides instructions to register the CyberData Speaker as a Common Area Phone. Registering in a different capacity may require creating a user profile and providing an email address. See Zoom documentation for more details.
1. Log into Zoom. https://zoom.us/signin
Figure 4-1: Log into Zoom

CyberData Corporation 3 Justin Court, Monterey, CA 93940
www.cyberdata.net P 831.373.2601 | F 831.373.4193
ZOOM CONFIGURATION GUIDE: INTERCOMS
Doc. 931706A Page 9 2. From the Profile page select the “Phone System Management” section and the ‘Users &
Rooms’ subsection.
Figure 4-2: Profile Landing Page
Note: Some text from the profile page has been hidden to protect sensitive information.

CyberData Corporation 3 Justin Court, Monterey, CA 93940
www.cyberdata.net P 831.373.2601 | F 831.373.4193
ZOOM CONFIGURATION GUIDE: INTERCOMS
Doc. 931706A Page 10 3. From the “Users & Rooms” page select ‘Common Area Phones’.
Figure 4-3: Phone System Management
Note: Some text from this page has been hidden to protect sensitive information.

CyberData Corporation 3 Justin Court, Monterey, CA 93940
www.cyberdata.net P 831.373.2601 | F 831.373.4193
ZOOM CONFIGURATION GUIDE: INTERCOMS
Doc. 931706A Page 11 4. From the “Common Area Phones” press the ‘Add’ Button to create a new common area
phone to be used by the device. Note: The MAC address of the speaker will be required to create the common area phone.
Figure 4-4: Common Area Phones
5. After clicking the Add button a Pop-up will appear that allows extension creation.
CyberData Corporation 3 Justin Court, Monterey, CA 93940
www.cyberdata.net P 831.373.2601 | F 831.373.4193
ZOOM CONFIGURATION GUIDE: INTERCOMS
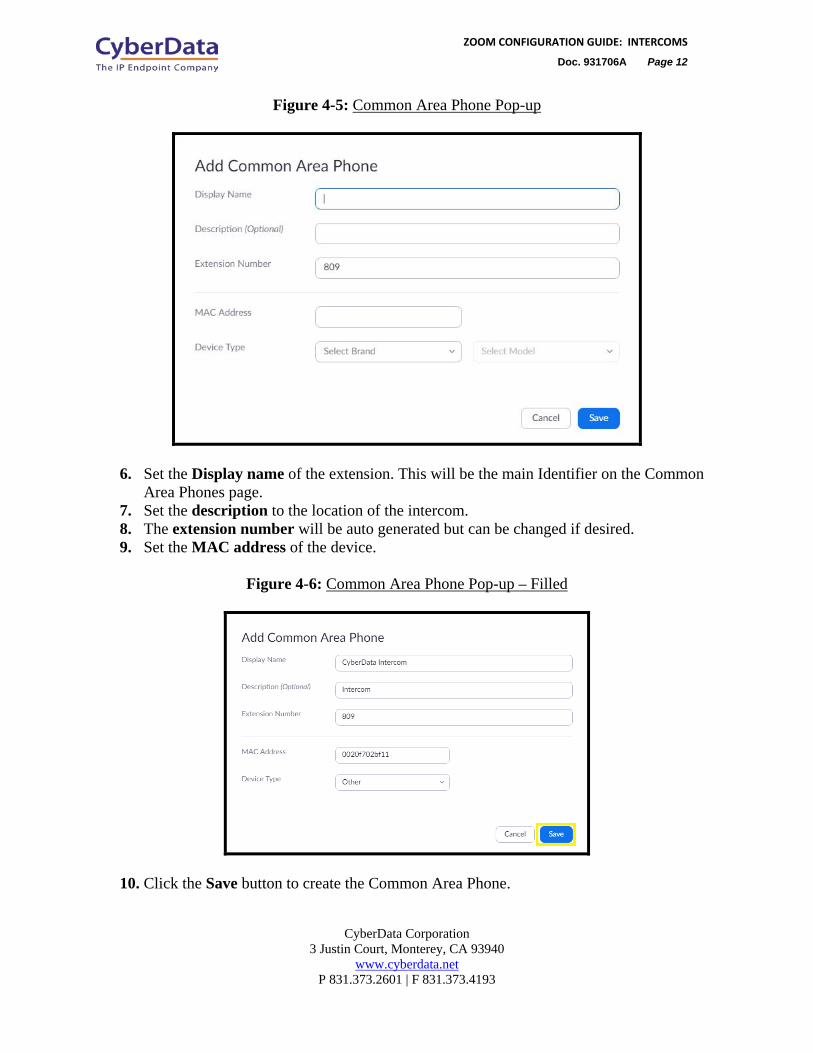
Doc. 931706A Page 12 Figure 4-5: Common Area Phone Pop-up
6. Set the Display name of the extension. This will be the main Identifier on the Common Area Phones page.
7. Set the description to the location of the intercom. 8. The extension number will be auto generated but can be changed if desired. 9. Set the MAC address of the device.
Figure 4-6: Common Area Phone Pop-up – Filled
10. Click the Save button to create the Common Area Phone.

CyberData Corporation 3 Justin Court, Monterey, CA 93940
www.cyberdata.net P 831.373.2601 | F 831.373.4193
ZOOM CONFIGURATION GUIDE: INTERCOMS
Doc. 931706A Page 13 11. Once created, the new extension will appear in the list.
Figure 4-7: Common Area Phone list
12. Press the “Provision” button on the extension that was just created.
CyberData Corporation 3 Justin Court, Monterey, CA 93940
www.cyberdata.net P 831.373.2601 | F 831.373.4193
ZOOM CONFIGURATION GUIDE: INTERCOMS
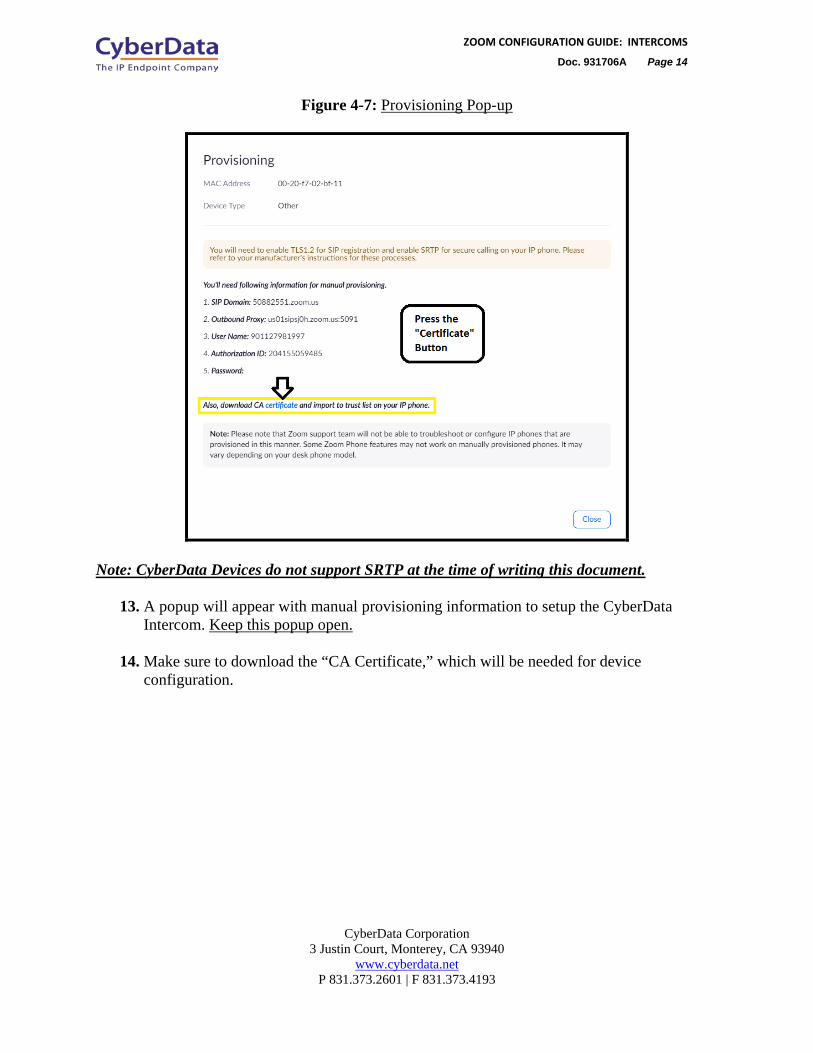
Doc. 931706A Page 14 Figure 4-7: Provisioning Pop-up
Note: CyberData Devices do not support SRTP at the time of writing this document.
13. A popup will appear with manual provisioning information to setup the CyberData Intercom. Keep this popup open.
14. Make sure to download the “CA Certificate,” which will be needed for device
configuration.
CyberData Corporation 3 Justin Court, Monterey, CA 93940
www.cyberdata.net P 831.373.2601 | F 831.373.4193
ZOOM CONFIGURATION GUIDE: INTERCOMS
Doc. 931706A Page 15 5.0 Configuration Procedure: Setting up the Paging Extension
If you are configuring through the web interface, use the following steps to login to the web interface of your CyberData device.
Table 5-1: Setting Name correlation
CyberData Setting Zoom Provisioning Pop-up Primary SIP Server SIP Domain Outbound Proxy Outbound Proxy Port
Outbound Proxy
Primary SIP User ID User Name Primary SIP Auth ID Authorization ID Primary SIP Auth Password Password
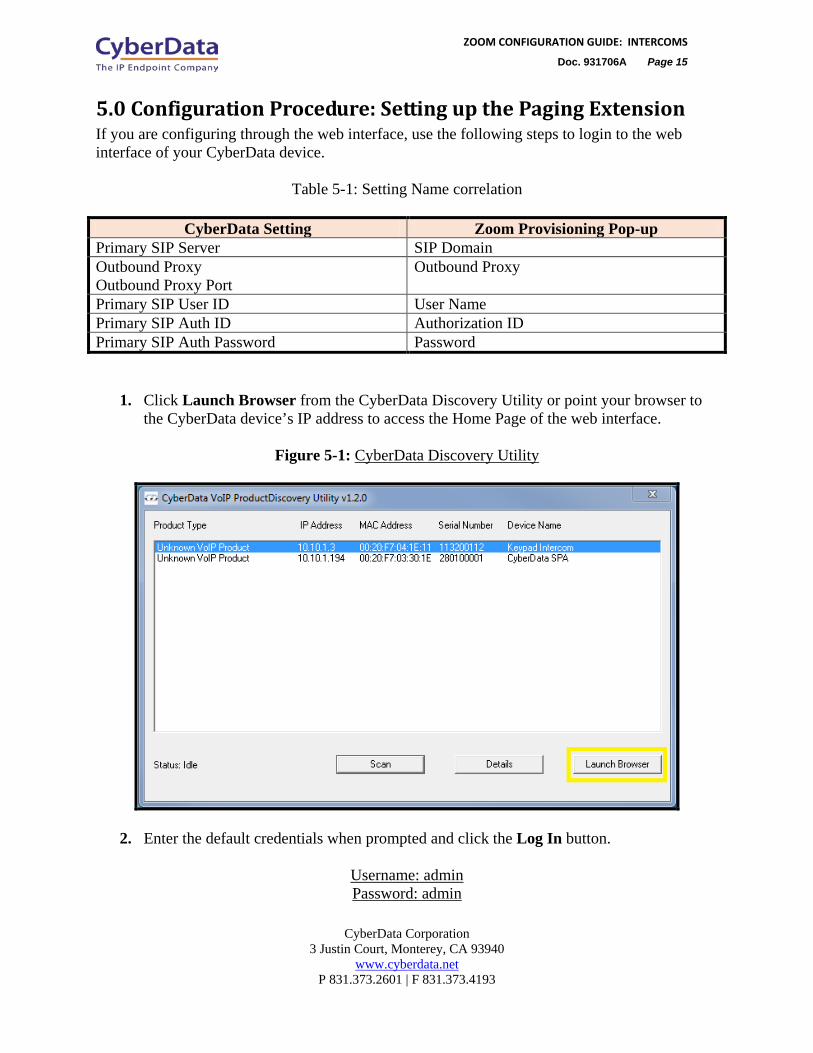
1. Click Launch Browser from the CyberData Discovery Utility or point your browser to the CyberData device’s IP address to access the Home Page of the web interface.
Figure 5-1: CyberData Discovery Utility
2. Enter the default credentials when prompted and click the Log In button.
Username: admin Password: admin

CyberData Corporation 3 Justin Court, Monterey, CA 93940
www.cyberdata.net P 831.373.2601 | F 831.373.4193
ZOOM CONFIGURATION GUIDE: INTERCOMS
Doc. 931706A Page 16 Figure 5-2: Web Interface Login
3. From the Home tab press the ‘Device’ Tab.
CyberData Corporation 3 Justin Court, Monterey, CA 93940
www.cyberdata.net P 831.373.2601 | F 831.373.4193
ZOOM CONFIGURATION GUIDE: INTERCOMS
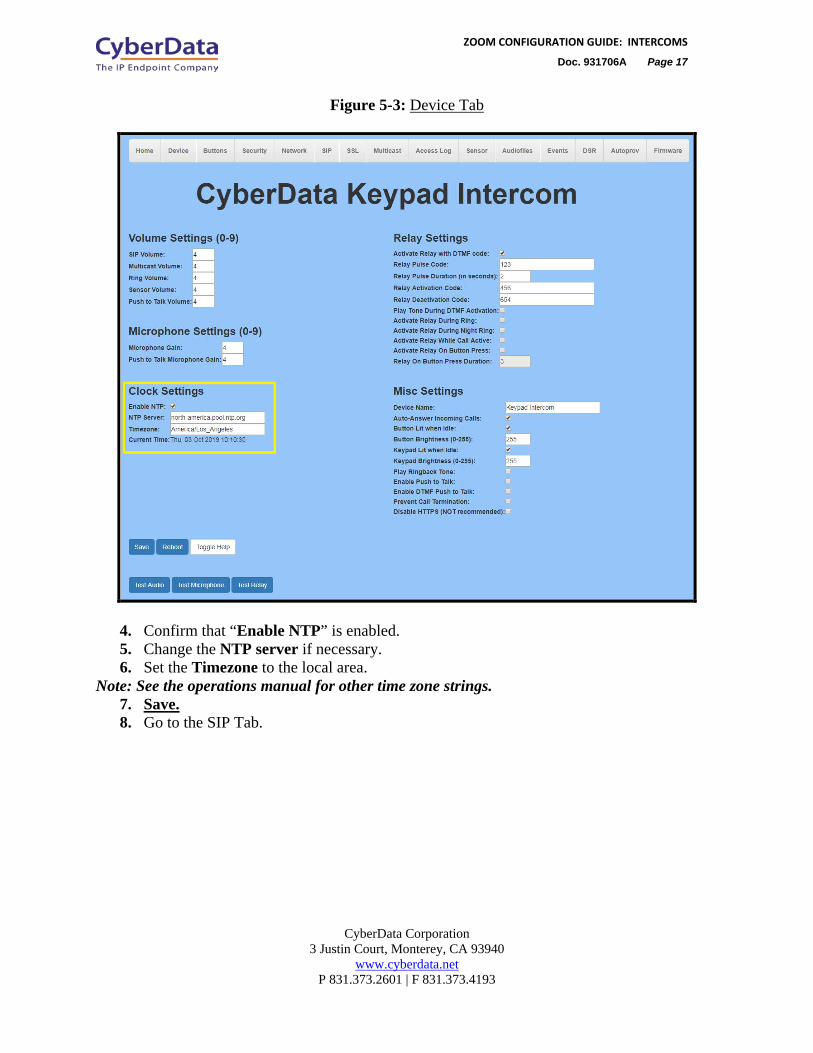
Doc. 931706A Page 17 Figure 5-3: Device Tab
4. Confirm that “Enable NTP” is enabled. 5. Change the NTP server if necessary. 6. Set the Timezone to the local area.
Note: See the operations manual for other time zone strings. 7. Save. 8. Go to the SIP Tab.

CyberData Corporation 3 Justin Court, Monterey, CA 93940
www.cyberdata.net P 831.373.2601 | F 831.373.4193
ZOOM CONFIGURATION GUIDE: INTERCOMS
Doc. 931706A Page 18 Figure 5-4: SIP Tab
9. Set the ‘SIP Transport Protocol’ to TLS. 10. Keep TLS version set to “1.2 Only (Recommended)”. 11. Check the box for “Verify Server Certificate”. 12. Set the Primary SIP Server to the SIP Domain from the configuration Popup. 13. Set the Primary SIP User ID to the Username from the configuration Popup. 14. Set the Primary SIP Auth ID to the Authorization ID from the configuration Popup. 15. Set the Primary SIP Auth Password to the password provided in the configuration
Popup. 16. Set the Outbound proxy and Outbound Proxy port to the address provided in the
configuration Popup. Note: Make sure to separate the port from the outbound proxy information provided by zoom.
17. Check the box for “Force Selected Codec”. 18. Save. 19. Go to the ‘SSL’ Tab.

CyberData Corporation 3 Justin Court, Monterey, CA 93940
www.cyberdata.net P 831.373.2601 | F 831.373.4193
ZOOM CONFIGURATION GUIDE: INTERCOMS
Doc. 931706A Page 19 Figure 5-5: SSL Tab
20. Press the ‘Choose Files’ button.

CyberData Corporation 3 Justin Court, Monterey, CA 93940
www.cyberdata.net P 831.373.2601 | F 831.373.4193
ZOOM CONFIGURATION GUIDE: INTERCOMS
Doc. 931706A Page 20 Figure 5-6: Choose file Pop-up
21. Select the “sbc_ca.pem” file and press the Open button. 22. Press the “Import CA Certificate” button to load the cert.

CyberData Corporation 3 Justin Court, Monterey, CA 93940
www.cyberdata.net P 831.373.2601 | F 831.373.4193
ZOOM CONFIGURATION GUIDE: INTERCOMS
Doc. 931706A Page 21 Figure 5-7: Import CA Certificate
23. Once imported, confirm the file is listed with the other certificates.
CyberData Corporation 3 Justin Court, Monterey, CA 93940
www.cyberdata.net P 831.373.2601 | F 831.373.4193
ZOOM CONFIGURATION GUIDE: INTERCOMS
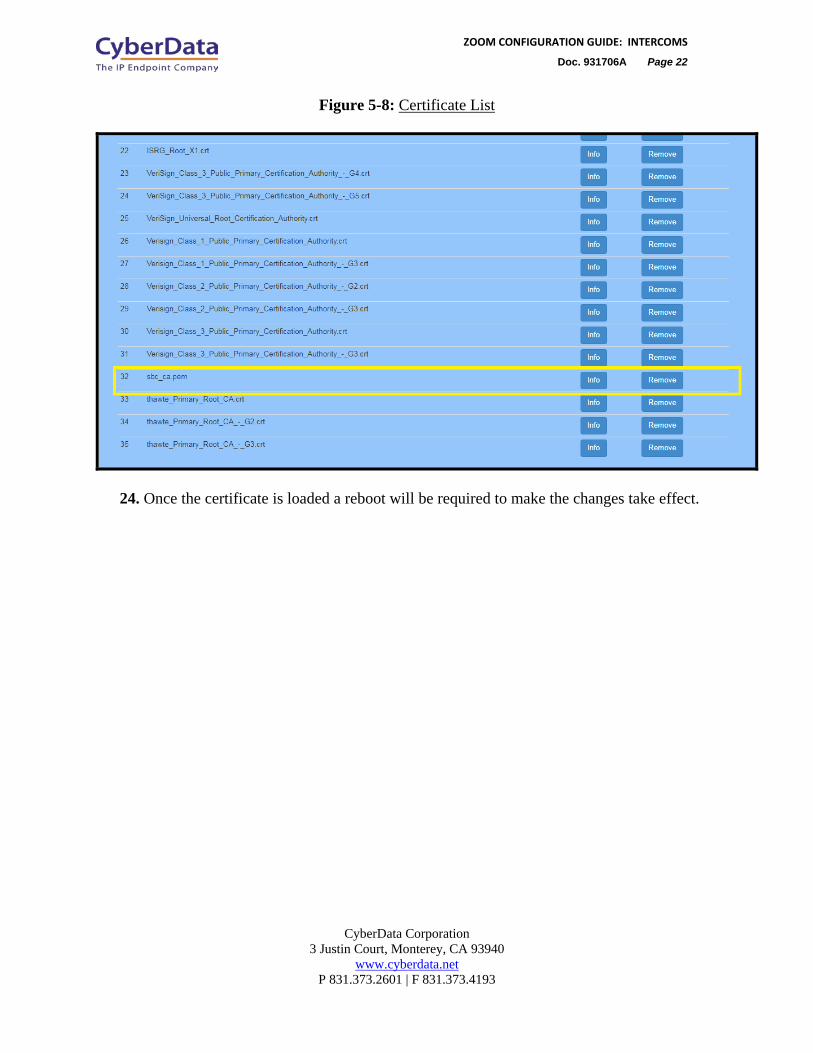
Doc. 931706A Page 22 Figure 5-8: Certificate List
24. Once the certificate is loaded a reboot will be required to make the changes take effect.
CyberData Corporation 3 Justin Court, Monterey, CA 93940
www.cyberdata.net P 831.373.2601 | F 831.373.4193
ZOOM CONFIGURATION GUIDE: INTERCOMS
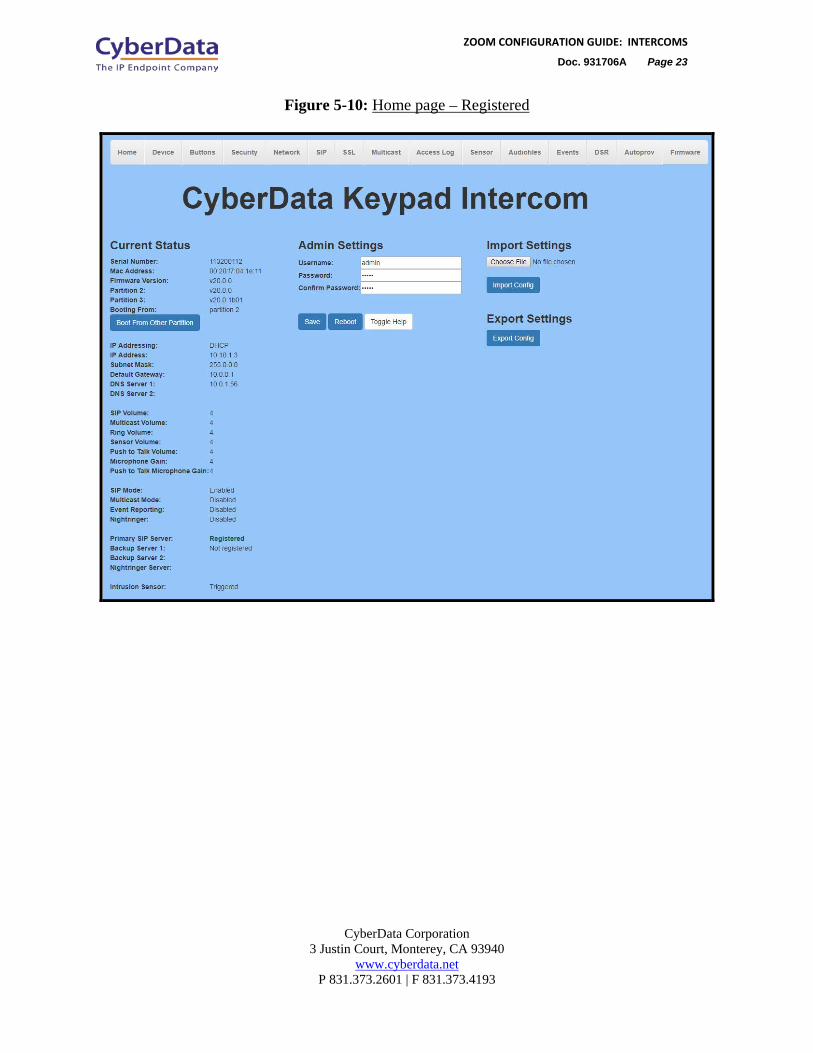
Doc. 931706A Page 23 Figure 5-10: Home page – Registered

CyberData Corporation 3 Justin Court, Monterey, CA 93940
www.cyberdata.net P 831.373.2601 | F 831.373.4193
ZOOM CONFIGURATION GUIDE: INTERCOMS
Doc. 931706A Page 24 6.0 Configuration Procedure: Setting up the Nightringer
extension
Table 6-1: Setting Name correlation
CyberData Setting Zoom Provisioning Pop-up SIP Server SIP Domain Outbound Proxy Outbound Proxy Port
Outbound Proxy
User ID User Name Authenticate ID Authorization ID Authenticate Password Password
1. Click Launch Browser from the CyberData Discovery Utility or point your browser to the CyberData device’s IP address to access the Home Page of the web interface.
Figure 6-1: CyberData Discovery Utility
2. Enter the default credentials when prompted and click the Log In button.
Username: admin Password: admin

CyberData Corporation 3 Justin Court, Monterey, CA 93940
www.cyberdata.net P 831.373.2601 | F 831.373.4193
ZOOM CONFIGURATION GUIDE: INTERCOMS
Doc. 931706A Page 25 Figure 6-2: Web Interface Login
3. From the Home tab press the ‘Device’ Tab.

CyberData Corporation 3 Justin Court, Monterey, CA 93940
www.cyberdata.net P 831.373.2601 | F 831.373.4193
ZOOM CONFIGURATION GUIDE: INTERCOMS
Doc. 931706A Page 26 Figure 6-2: Device Tab
4. Confirm that “Enable NTP” is enabled. 5. Change the NTP server if necessary. 6. Set the Timezone to the local area.
Note: See the operations manual for other time zone strings. 7. Save. 8. Go to the SIP Tab.
CyberData Corporation 3 Justin Court, Monterey, CA 93940
www.cyberdata.net P 831.373.2601 | F 831.373.4193
ZOOM CONFIGURATION GUIDE: INTERCOMS
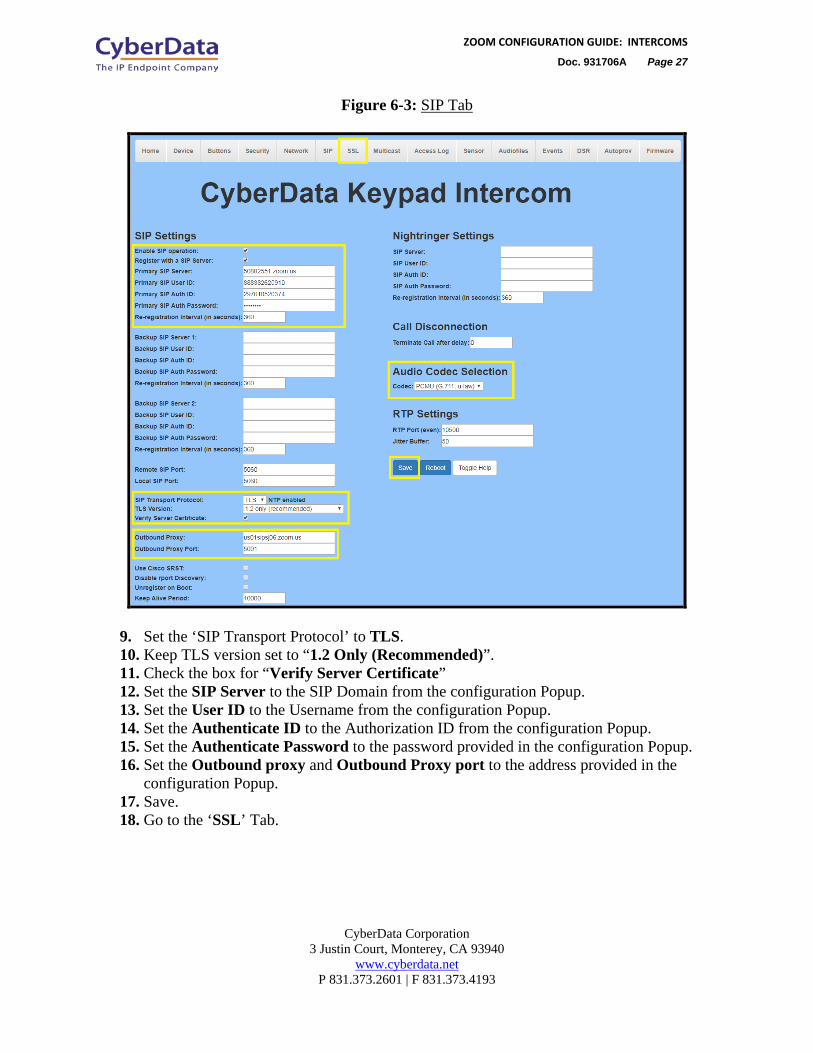
Doc. 931706A Page 27 Figure 6-3: SIP Tab
9. Set the ‘SIP Transport Protocol’ to TLS. 10. Keep TLS version set to “1.2 Only (Recommended)”. 11. Check the box for “Verify Server Certificate” 12. Set the SIP Server to the SIP Domain from the configuration Popup. 13. Set the User ID to the Username from the configuration Popup. 14. Set the Authenticate ID to the Authorization ID from the configuration Popup. 15. Set the Authenticate Password to the password provided in the configuration Popup. 16. Set the Outbound proxy and Outbound Proxy port to the address provided in the
configuration Popup. 17. Save. 18. Go to the ‘SSL’ Tab.

CyberData Corporation 3 Justin Court, Monterey, CA 93940
www.cyberdata.net P 831.373.2601 | F 831.373.4193
ZOOM CONFIGURATION GUIDE: INTERCOMS
Doc. 931706A Page 28 Figure 6-4: SSL Tab
19. Press the ‘Choose Files’ button.
CyberData Corporation 3 Justin Court, Monterey, CA 93940
www.cyberdata.net P 831.373.2601 | F 831.373.4193
ZOOM CONFIGURATION GUIDE: INTERCOMS
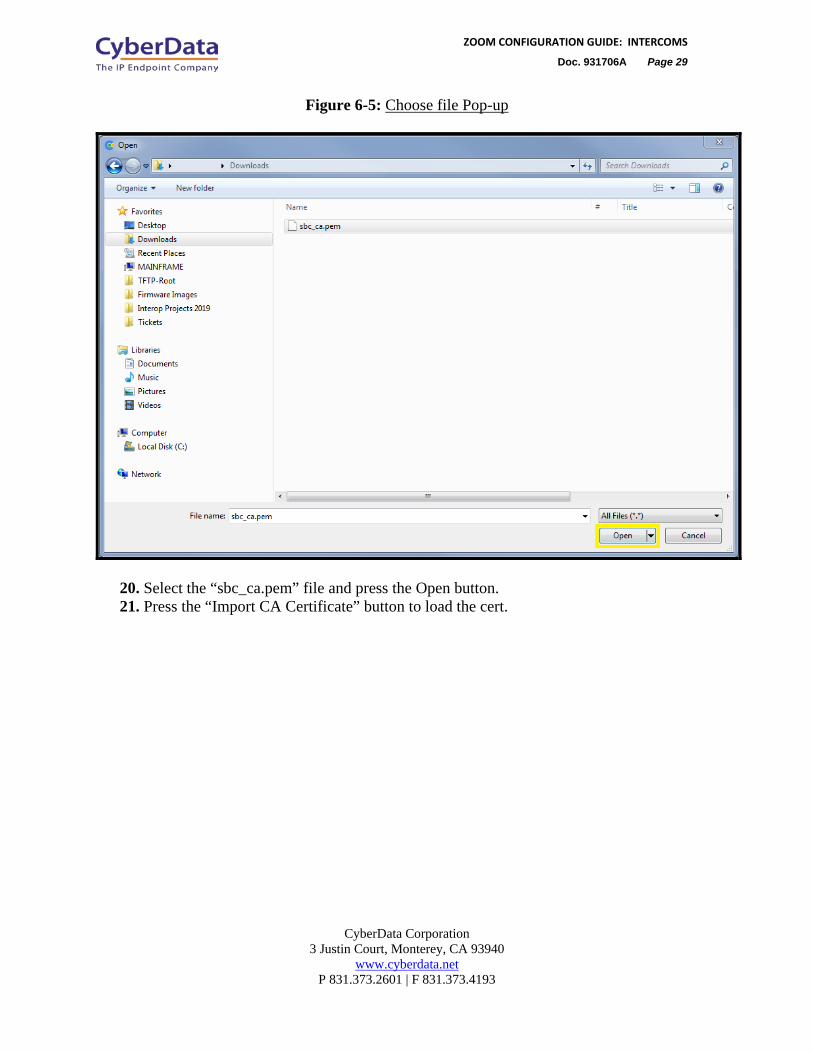
Doc. 931706A Page 29 Figure 6-5: Choose file Pop-up
20. Select the “sbc_ca.pem” file and press the Open button. 21. Press the “Import CA Certificate” button to load the cert.
CyberData Corporation 3 Justin Court, Monterey, CA 93940
www.cyberdata.net P 831.373.2601 | F 831.373.4193
ZOOM CONFIGURATION GUIDE: INTERCOMS
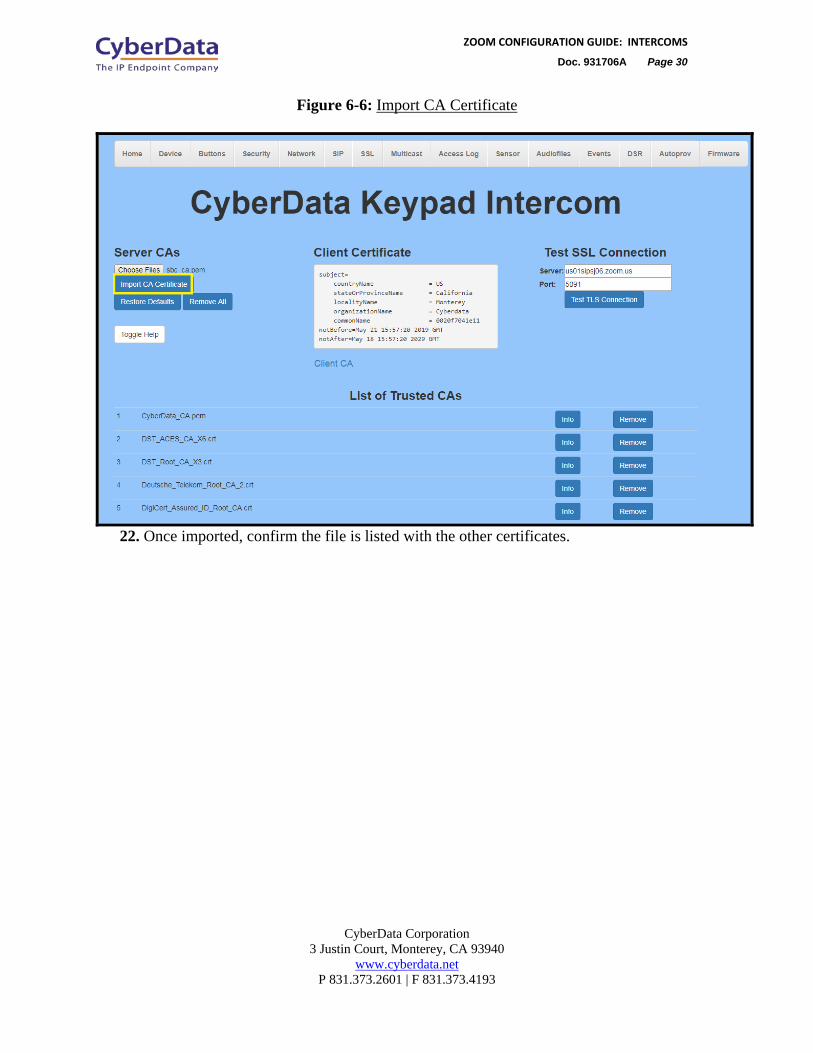
Doc. 931706A Page 30 Figure 6-6: Import CA Certificate
22. Once imported, confirm the file is listed with the other certificates.

CyberData Corporation 3 Justin Court, Monterey, CA 93940
www.cyberdata.net P 831.373.2601 | F 831.373.4193
ZOOM CONFIGURATION GUIDE: INTERCOMS
Doc. 931706A Page 31 Figure 6-7: Certificate List
23. Once the certificate is loaded a reboot will be required to make the changes take effect.

CyberData Corporation 3 Justin Court, Monterey, CA 93940
www.cyberdata.net P 831.373.2601 | F 831.373.4193
ZOOM CONFIGURATION GUIDE: INTERCOMS
Doc. 931706A Page 32 Figure 6-8: Common Area Phones

CyberData Corporation 3 Justin Court, Monterey, CA 93940
www.cyberdata.net P 831.373.2601 | F 831.373.4193
ZOOM CONFIGURATION GUIDE: INTERCOMS
Doc. 931706A Page 33 7.0 Using the CyberData Intercom in a Zoom system.
CyberData Intercoms are used for access control. Depending on the number of keys the intercom has there are different ways to use the intercom. A single button intercom can be configured to call a number when the call button is pressed. The Keypad variants can take advantage of the keypad and dial numbers to make a call. There are several different modes that can be used on Keypad intercoms.
7.1 Setting the Dialout Extension – Single button intercom Once the intercom is registered with Zoom the “Dial out Extension” will need to be set for the intercom to call a number when the front Call Button has been pressed. This number can be either a direct extension, ring group/ call queue, or a direct phone number.
1. After Logging into the intercom go to the SIP Tab. 2. On the SIP Tab set the Dial out Extension to the address you want the intercom to call. 3. The Extension ID of the intercom is what should appear on the caller ID of the intercom.
Figure 7-1: Set the Dial out Extension
CyberData Corporation 3 Justin Court, Monterey, CA 93940
www.cyberdata.net P 831.373.2601 | F 831.373.4193
ZOOM CONFIGURATION GUIDE: INTERCOMS
Doc. 931706A Page 34 7.2 Calling with a Keypad Intercom
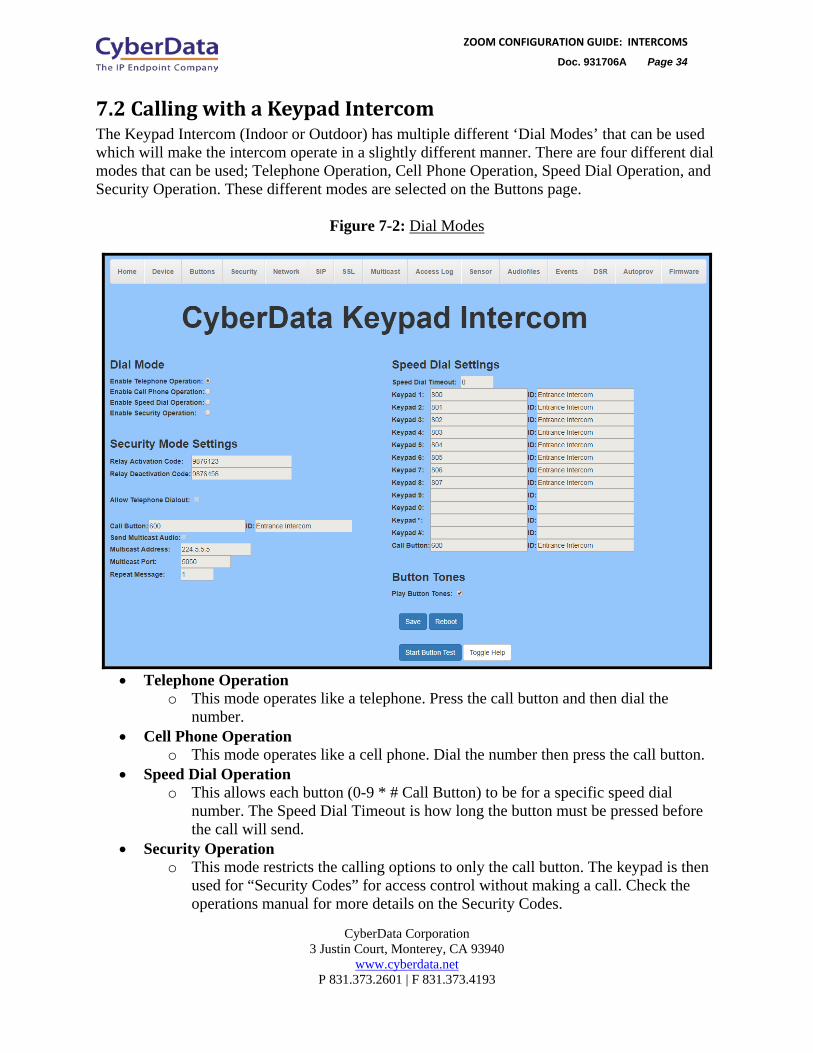
The Keypad Intercom (Indoor or Outdoor) has multiple different ‘Dial Modes’ that can be used which will make the intercom operate in a slightly different manner. There are four different dial modes that can be used; Telephone Operation, Cell Phone Operation, Speed Dial Operation, and Security Operation. These different modes are selected on the Buttons page.
Figure 7-2: Dial Modes
• Telephone Operation
o This mode operates like a telephone. Press the call button and then dial the number.
• Cell Phone Operation o This mode operates like a cell phone. Dial the number then press the call button.
• Speed Dial Operation o This allows each button (0-9 * # Call Button) to be for a specific speed dial
number. The Speed Dial Timeout is how long the button must be pressed before the call will send.
• Security Operation o This mode restricts the calling options to only the call button. The keypad is then
used for “Security Codes” for access control without making a call. Check the operations manual for more details on the Security Codes.

CyberData Corporation 3 Justin Court, Monterey, CA 93940
www.cyberdata.net P 831.373.2601 | F 831.373.4193
ZOOM CONFIGURATION GUIDE: INTERCOMS
Doc. 931706A Page 35 7.2.1 Setting up Speed Dial Operation
After setting the dial mode to Speed Dial Operation, the Speed Dial settings will be configurable. Speed Dial Timeout is how long the button will need to be pressed to make a call; if set to 0 the call will send immediately.
Figure 7-3: Speed Dial Settings
CyberData Corporation 3 Justin Court, Monterey, CA 93940
www.cyberdata.net P 831.373.2601 | F 831.373.4193
ZOOM CONFIGURATION GUIDE: INTERCOMS
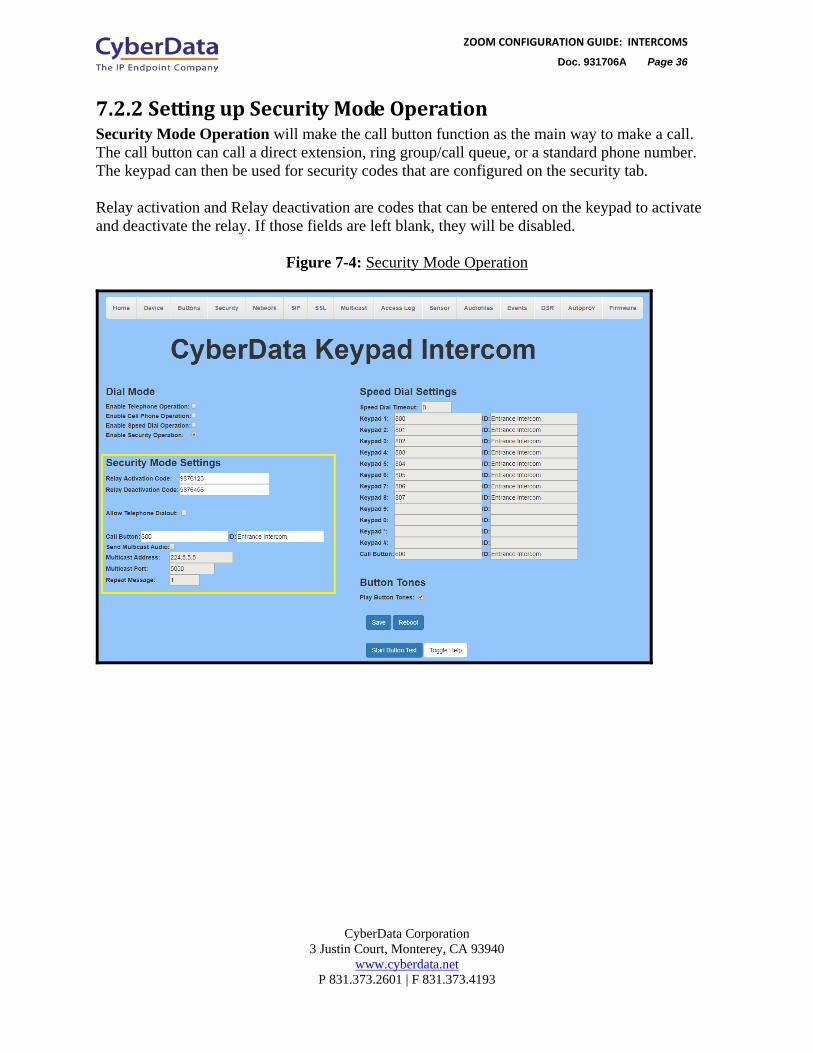
Doc. 931706A Page 36 7.2.2 Setting up Security Mode Operation
Security Mode Operation will make the call button function as the main way to make a call. The call button can call a direct extension, ring group/call queue, or a standard phone number. The keypad can then be used for security codes that are configured on the security tab. Relay activation and Relay deactivation are codes that can be entered on the keypad to activate and deactivate the relay. If those fields are left blank, they will be disabled.
Figure 7-4: Security Mode Operation
CyberData Corporation 3 Justin Court, Monterey, CA 93940
www.cyberdata.net P 831.373.2601 | F 831.373.4193
ZOOM CONFIGURATION GUIDE: INTERCOMS
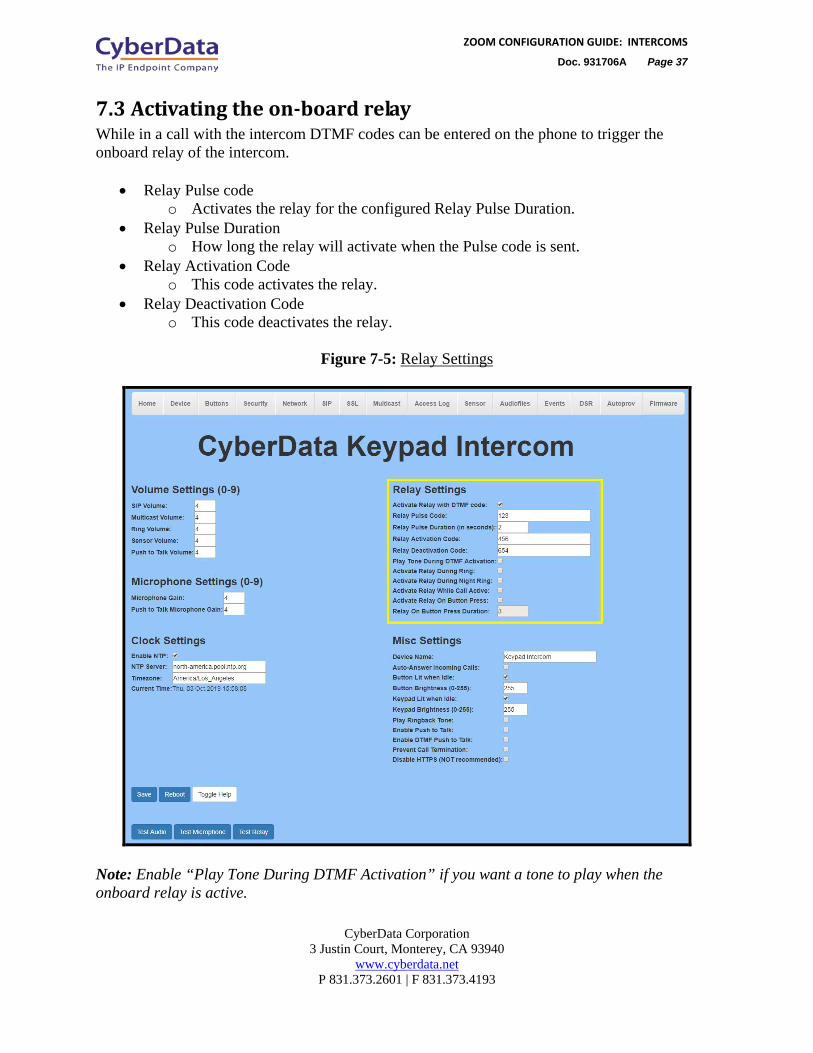
Doc. 931706A Page 37 7.3 Activating the on-board relay
While in a call with the intercom DTMF codes can be entered on the phone to trigger the onboard relay of the intercom.
• Relay Pulse code o Activates the relay for the configured Relay Pulse Duration.
• Relay Pulse Duration o How long the relay will activate when the Pulse code is sent.
• Relay Activation Code o This code activates the relay.
• Relay Deactivation Code o This code deactivates the relay.
Figure 7-5: Relay Settings
Note: Enable “Play Tone During DTMF Activation” if you want a tone to play when the onboard relay is active.
CyberData Corporation 3 Justin Court, Monterey, CA 93940
www.cyberdata.net P 831.373.2601 | F 831.373.4193
ZOOM CONFIGURATION GUIDE: INTERCOMS
Doc. 931706A Page 38 8.0 Contact CyberData Corporation
Sales For sales-related questions, please visit our Contact CyberData Sales web page for more information. Technical Support For CyberData Technical Support, please submit a Contact CyberData VoIP Technical Support form on our website. The CyberData VoIP Technical Support Contact form initiates a troubleshooting ticket which CyberData uses for quality assurance purposes. Additionally, the Contact VoIP Tech Support form tells us which phone system you are using, the make and model of the network switch, and other essential troubleshooting information we need to efficiently assist with a resolution. Please also include as much detail as possible in the Describe Problem section of the form. Your installation is extremely important to us. Documentation Feedback We realize changes to the software or hardware of the Zoom PBX solution may render this document obsolete. We welcome and encourage documentation feedback to ensure continued applicability.
![[MS-SIP]: Session Initiation Protocol ExtensionsMS-SIP]-160714.pdf · [MS-SIP]: Session Initiation Protocol Extensions ... sip. . . . ...](https://static.documents.pub/doc/80x56/5f144311cb0953247f1ddd57/ms-sip-session-initiation-protocol-extensions-ms-sip-160714pdf-ms-sip.jpg)


