66
LIFEPAK ® 15 monitor/defibrillator Instructor guide
| Date post: | 21-Mar-2023 |
| Category: |
Documents |
| Upload: | khangminh22 |
| View: | 0 times |
| Download: | 0 times |
LIFEPAK® 15 monitor/defibrillator
Instructor guide

ContentsHow to use this guide ...................................................................................................1
Training tips .....................................................................................................................1
Early defibrillation ........................................................................................................2
Biphasic energy ...............................................................................................................2
Device power ....................................................................................................................3
Batteries ............................................................................................................................3
AC power ...........................................................................................................................4
DC power ..........................................................................................................................5
Loading paper ..................................................................................................................6
Device maintenance ......................................................................................................7
AED training course ....................................................................................................11
Learning objectives ........................................................................................................11
Equipment and materials ...............................................................................................11
LIFEPAK 15 monitor/defibrillator AED training class ..................................................11
Controls and features .................................................................................................12
AED operation................................................................................................................13
Manual training course .............................................................................................15
Learning objectives ........................................................................................................15
Equipment and materials ...............................................................................................15
LIFEPAK 15 monitor/defibrillator Manual User Training Class ...................................16
Controls and features .................................................................................................17
Connectors for IP monitoring configuration .................................................................23
Connectors for temperature monitoring configuration.................................................24
Back view ........................................................................................................................25
Home screen ...................................................................................................................26
Manual defibrillation .................................................................................................27
Synchronized cardioversion procedure ..............................................................30
Noninvasive pacing .....................................................................................................32
ECG monitoring .............................................................................................................34
Acquiring a 12-lead ECG ............................................................................................37
SpO2, SpCO, and SpMet monitoring .......................................................................38

Pulse Oximetry ..............................................................................................................38
SpCO and SpMet ............................................................................................................39
Keys to successful SpCO and SpMet monitoring .............................................40
Monitoring noninvasive blood pressure .............................................................41
Monitoring EtCO2 .........................................................................................................42
Monitoring Invasive Pressure .................................................................................43
Monitoring continuous temperature ...................................................................44
Vital signs and ST segment trends ........................................................................44
Data management ........................................................................................................47
Other functions .............................................................................................................49
Instructor guide | 1
How to use this guideThe LIFEPAK 15 monitor/defibrillator is easy to use and enables clinicians at every level to focus on the most important task at hand—saving a patient’s life. The LIFEPAK 15 device is highly intuitive to use, and adapts to various patient environments. With this comprehensive guide, you’ll be able to train your staff to effectively use the device.
This instructor guide is an introduction to the basic operation of the LIFEPAK 15 device. It does not suggest protocols or policies regarding the use of the defibrillator. Refer to the Operating Instructions for complete directions for use, indications, contraindications, warnings, precautions and potential adverse events.
This outline has been designed for factory default configuration based on the 2010 American Heart Association Guidelines. It is important to be familiar with the configuration of your particular defibrillator. Moving, removing, highlighting and adding content to this outline to meet individual user needs is encouraged. Hands-on practice and application with scenarios promote learning retention.
Training tipsThis guide is divided into five sections:
Device power, paper change and maintenance
AED operation
Manual operation
Optional features
Data management and other functions
The AED mode is easy for healthcare professionals of all skill levels to quickly understand and use. This training course reviews the basic operation of the LIFEPAK 15 device in AED mode. The manual mode operation is for ALS providers and reviews the manual operation and functions of the LIFEPAK 15 device.
The LIFEPAK 15 device retains data for two or more patients when you switch the power off or remove the batteries. The device automatically stores a CODE SUMMARY™ report as part of the patient report for each patient. This section describes how to access this information and other functions associated with the LIFEPAK 15 device.
All sections are optimally taught in a hands-on format. Instructors should first demonstrate how to use the defibrillator and then have students practice. Ideally, students will receive enough practice and coaching from the instructor to ensure they can use the device with confidence in an actual emergency.
2 | Instructor guide for the LIFEPAK 15 monitor/defibrillator/
Early defibrillationA recent New England Journal of Medicine study of 6,789 in-hospital cardiac arrest events due to ventricular fibrillation or pulseless ventricular tachycardia reported 70% received defibrillation in 2 or less minutes from recognition of Cardiac Arrest (CA). The survival rate (significantly) declined for the 30% of the patients who received defibrillation more than two minutes after cardiac arrest.1
The American Heart Association (AHA) recommends defibrillation within 2 minutes or less of collapse in the hospital setting. The AHA suggests hospitals deploy AEDs throughout the hospital to achieve this target and train staff to use the AEDs.
AEDs can help your hospital improve its ability to deliver the first shock within the recommended 2 minutes or less guidelines. The LIFEPAK 15 monitor/defibrillator can be used in AED mode to defibrillate without having to learn ECG interpretation. The AED is simple to use because it is designed to automatically analyze the patient’s heart rhythm and advise you which steps to take. In AED mode the device automatically selects the appropriate energy dosing.
Biphasic energyHealthcare providers may have questions about recommended energy dosing for biphasic waveforms because different defibrillator manufacturers recommend different energy dosing protocols. It is important to clarify the correct recommended energy dose for biphasic waveforms in order to avoid possible confusion that may result in a delay of therapy. Biphasic technology provides the option to escalate to 360J for best results. Studies have shown that refibrillation is common among ventricular fibrillation (VF) CA patients and that defibrillation of recurring episodes of VF is increasingly difficult.2,3,4 LIFEPAK devices give you the option to escalate your energy dosing up to 360J for difficult-to-defibrillate patients.
Fortunately, all AEDs are programmed to follow a predefined energy dosing protocol. In other words, the healthcare provider doesn’t have to worry about energy dosing. The AED performs this automatically.
A biphasic waveform sends current one way at the start of the shock and then reverses it so the current flows in the opposite direction. Stryker recommends a dosing protocol of 200-300-360 Joules and this is the factory default setting in all LIFEPAK defibrillators. Stryker believes this energy protocol can help minimize unnecessary CPR interruptions that result from ineffective defibrillation shocks.

Device power, Paper change, and Maintenance

Instructor guide | 3
Device powerThe LIFEPAK 15 monitor/defibrillator operates either on battery power using two Lithium-ion batteries or with auxiliary power using the AC Power Adapter or DC Power Adapter.
BatteriesThe LIFEPAK 15 device uses lithium-ion batteries with a typical operating time for two new fully charged batteries of 360 minutes for monitoring, 340 minutes pacing or for 420 360 Joule shocks. The batteries can be recharged in the device if connected to an approved AC or DC power adapter or by removing the batteries and placing them in an approved battery charger. Batteries may be charged in the Station and Mobile Li-ion Battery Charger, the REDI-CHARGE® battery charger, or in the monitor/defibrillator if it is connected to auxiliary power (AC or DC power adapter).
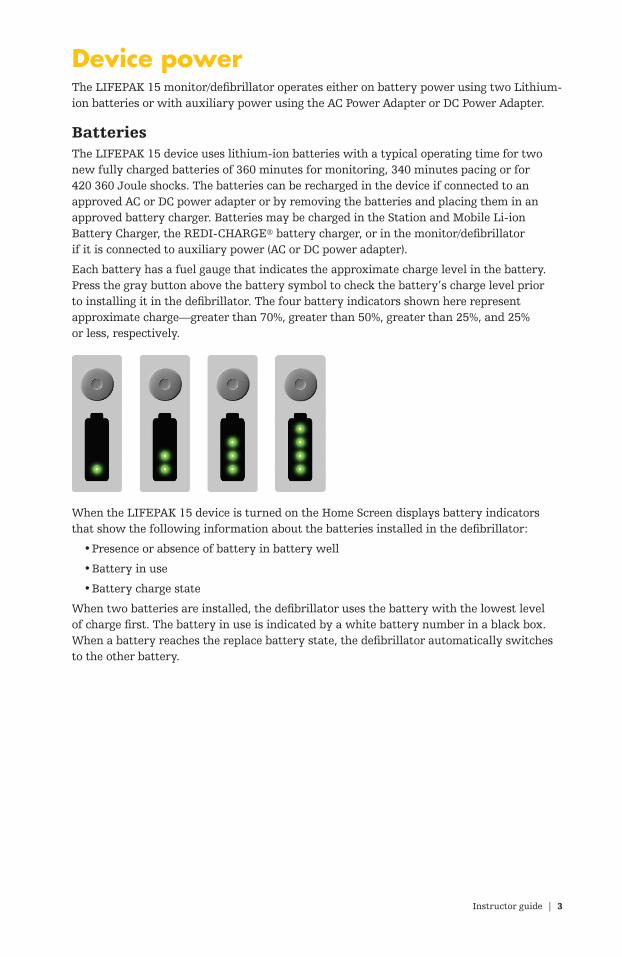
Each battery has a fuel gauge that indicates the approximate charge level in the battery. Press the gray button above the battery symbol to check the battery’s charge level prior to installing it in the defibrillator. The four battery indicators shown here represent approximate charge—greater than 70%, greater than 50%, greater than 25%, and 25% or less, respectively.
When the LIFEPAK 15 device is turned on the Home Screen displays battery indicators that show the following information about the batteries installed in the defibrillator:
• Presence or absence of battery in battery well
• Battery in use
• Battery charge state
When two batteries are installed, the defibrillator uses the battery with the lowest level of charge first. The battery in use is indicated by a white battery number in a black box. When a battery reaches the replace battery state, the defibrillator automatically switches to the other battery.
4 | Instructor guide for the LIFEPAK 15 monitor/defibrillator/
Indicator Meaning Description
Active battery
The defibrillator is using the battery in well 1 for power. Battery status indicators display up to four green bars. Each green bar represents approximately 25% remaining charge. For example, three green bars indicate about 75% remaining charge.
Low batteryBattery in well 1 is in use and is low. One yellow bar indicates 5% to 10% remaining charge.
Very low battery
Battery in well 1 is in use and is very low. One red flashing bar indicates 0 to 5% remaining charge. The defibrillator automatically switches to the other battery only if adequate charge is available. If both batteries show red bars, the REPLACE BATTERY voice prompt occurs.
Unrecognized battery
Battery in well 2 is not in use. Battery communication failed or a non-Stryker battery is installed. The battery may power the defibrillator but the level of charge is unknown and low battery messages and prompts will not occur.
No battery installed or fault detected
No battery is installed in battery well 1, or a fault was detected in the battery in well 1 and the device will not use the battery.
AC powerTo use AC power;
1. Connect the AC power cord to the power adapter and a grounded AC outlet
2. Confirm LED strip on power adapter is illuminated
3. Connect power adapter output cable to power adapter
4. Connect green end of output cable to auxiliary power connector on back of defibrillator
5. Confirm and LEDs are illuminated
Note: At least one battery should be installed at all times. Keep monitor/defibrillator connected to auxiliary power whenever possible to maintain battery charge level.
Instructor guide | 5
LED is illuminated whenever connected to auxiliary power, whether defibrillator is on or off
LED is illuminated if batteries are fully charged. LED flashes if either battery is being charged
LOW BATTERY and REPLACE BATTERY warning messages do not occur when connected to auxiliary power
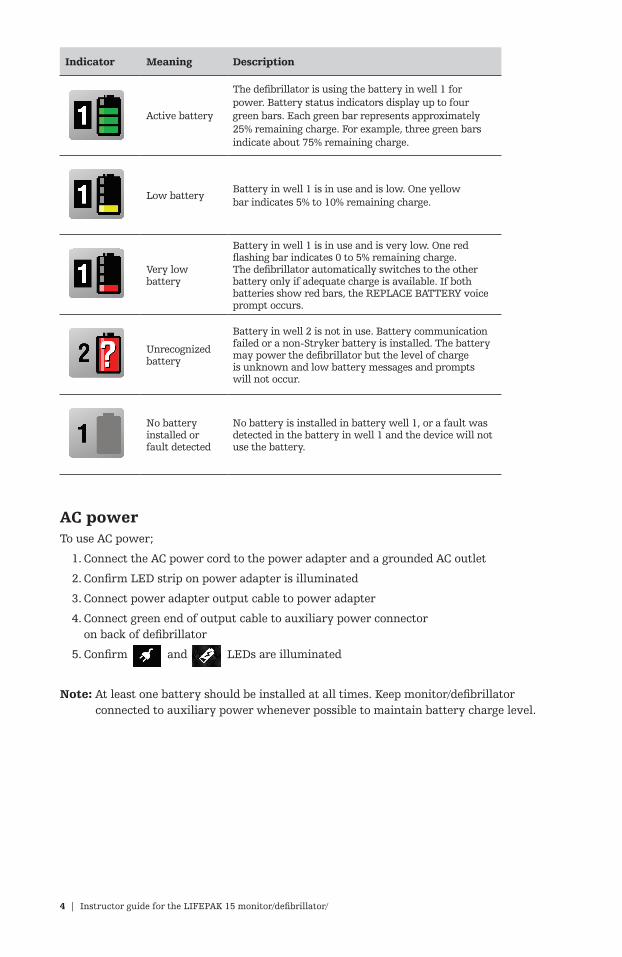
To quickly determine whether power source is battery or auxiliary power, either:
• Check LED. Illuminated LED indicates auxiliary power in use; or
• Check whether battery well number is highlighted. Highlighted battery well number indicates battery in use.
Battery Charging Indicator Behaviors
Steady green Installed batteries are fully charged.
Flashing green One or both installed batteries are being charged.
Off No batteries are installed or a battery is unable to be charged.
DC powerTo use the DC Power Adapter:
1. Connect the DC power cable to the power adapter and a 12 Vdc power source.
2. Verify that the green LED strip illuminates.
3. Connect the power adapter output cable to the power adapter.
4. Connect the green end of the power adapter output cable to the auxiliary power connector on the back of the monitor/defibrillator.
5. Verify that the AUXILIARY POWER LED on the defibrillator is illuminated.
6. If at least one battery is installed in the device, verify that the BATTERY CHARGING indicator is illuminated or flashing. Indicator behaviors are shown in the Table above.
Battery LED
6 | Instructor guide for the LIFEPAK 15 monitor/defibrillator/
Loading paperCheck the amount of paper in the printer as part of the daily check according to the Operator’s Checklist provided in the back of the Operating Instructions.
The printer is equipped with an out-of-paper sensor to protect the printer printhead. The sensor automatically turns off the printer if paper runs out or the printer door is open.
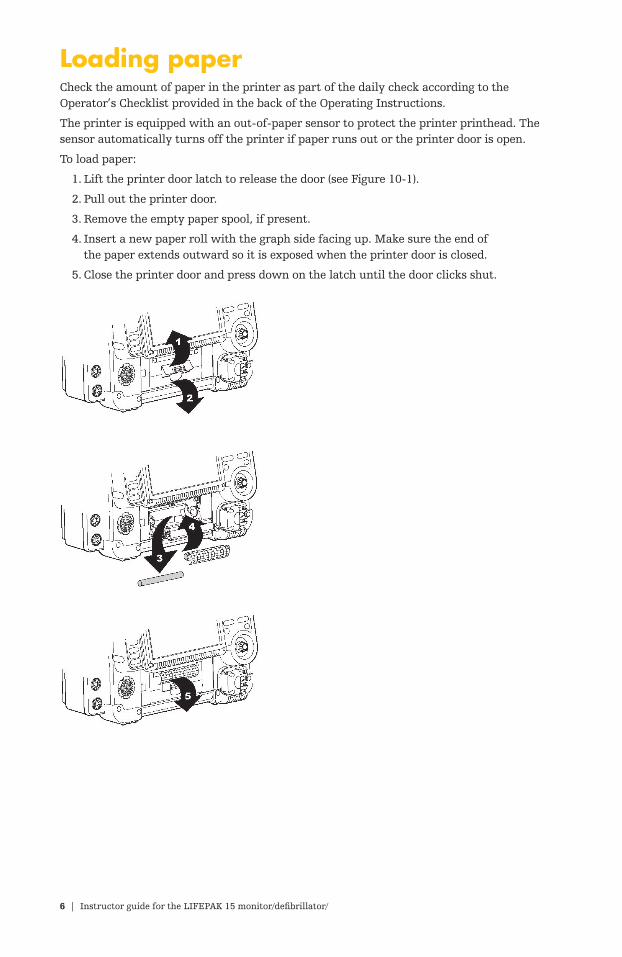
To load paper:
1. Lift the printer door latch to release the door (see Figure 10-1).
2. Pull out the printer door.
3. Remove the empty paper spool, if present.
4. Insert a new paper roll with the graph side facing up. Make sure the end of the paper extends outward so it is exposed when the printer door is closed.
5. Close the printer door and press down on the latch until the door clicks shut.
Instructor guide | 7
Device maintenanceMost hospitals and EMS services have specific protocols for maintaining their defibrillators. Stryker provides a variety of tools designed to help manage inspection and maintenance procedures. Training for staff would depend on a hospital’s or EMS service’s particular approach.
BLS-trained responders should be familiar with several of the device maintenance procedures. How much detail you choose to go into will depend on your hospital’s protocols.
References to buttons are indicated in BOLD and display messages are indicated in ITALICS. For complete information, review the Operating Instructions for the device.
TaskCheck defibrillator for Daily Auto Test results, if configured on.
User actions• Ensure that the batteries are fully charged.• Ensure that the defibrillator is plugged into the AC
power adapter and that the adapter is plugged into electricity, if applicable.
• Ensure that the QUIK-COMBO® therapy cable is connected to the defibrillator.
or• Ensure the standard paddles are clean, dry and
properly seated in the paddle wells and connected to the defibrillator.
If the defibrillator detects a problem during the self-test the printed report will indicate SELF TEST FAILED. The SERVICE LED will illuminate the next time it is turned on.
Defibrillator should be checked daily following the auto test to confirm the test passed. If test failed or incomplete perform the manual user test.
TaskPerform QUIK-COMBO therapy cable check in Manual mode:*
User actions 1. Disconnect and examine cable for cracking,
damage, broken, or bent parts or pins. 2. Connect therapy cable to defibrillator and the
Test Load. 3. Select 200 JOULES and press CHARGE. 4. Press (SHOCK) button. 5. Confirm ENERGY DELIVERED message appears. 6. Remove the Test Load from cable.**
(PADDLES LEADS OFF appears if Paddles lead displayed.)
* The defibrillator delivers up to 360 Joules of electrical energy. Unless discharged properly, this electrical energy may cause serious personal injury or death. Do not attempt to perform this test unless you are qualified by training and experience.
** Failure to remove the Test Load may result in delay of therapy during patient use.
Instructor activityConfirm test load is connected to QUIK-COMBO cable.
8 | Instructor guide for the LIFEPAK 15 monitor/defibrillator/
TaskPerform standard (hard) paddles check in Manual mode.*
User actions 1. Disconnect and examine cable for cracking,
damage, broken or bent parts or pins. 2. Connect paddles to defibrillator. 3. Examine for paddle surface pitting and presence
of dried or wet gel. 4. Press LEAD. Select Paddles. 5. On paddles, turn ENERGY SELECT dial
to 10 JOULES. 6. With paddles in paddle wells, press CHARGE
button on paddle. 7. Press only one (SHOCK) button and release.
Confirm that energy was not discharged. 8. Press the other (SHOCK) and release. Confirm
that energy was not discharged. 9. Press both (SHOCK) and confirm ABNORMAL
ENERGY DELIVERED message appears. 10. Remove paddles from wells, and confirm artifact
on screen. 11. Place paddle surfaces together, and confirm flat
line on screen. 12. Return paddles securely to paddle wells.
TaskInspect the physical condition of the defibrillator.
User actionInspect defibrillator for damage and foreign substances.
TaskInspect power source.
User actions• Confirm that batteries are fully charged.• Confirm that Auxiliary Power Indicator
is on if applicable.
TaskCheck therapy and ECG electrodes.
User actionsCheck QUIK-COMBO and EGG electrodes for “use by” date and that a spare set is available.
TaskExamine accessory cables.
User actionsInspect all cables including power cord for cracks, broken or bent parts and pins, and, if applicable, paddle surfaces for pitting.
TaskDisconnect defibrillator from AC power.Press ON.Look for SELF-TEST message and illumination of LEDs.
User actions
Defibrillator turns on.• If defibrillator doesn’t turn on, contact qualified
service personnel.• There should not be low battery or replace battery
messages visible. If visible, it means one or both batteries need to be charged.
Instructor activityThis only applies to devices with the AC Power Adapter.

Instructor guide | 9
TaskPerform Manual User Test.Press ON.• Press OPTIONS.• Select USER TEST.
User actions• Confirm AC MAINS LED is lit, if applicable.• User action, defibrillator labels, text/voice prompts
and information• The manual user test should be performed if your
protocol requires more frequent testing than the recommended daily auto test, or the daily auto test failed or did not complete.
Note: If the defibrillator is in AED mode, switch to manual mode by Pressing the ENERGY SELECT button.
Device will print the test results when the test completes.
If the user test fails, contact qualified service personnel.
TaskCleaning
User actionsClean the LIFEPAK 15 monitor/defibrillator, cables and accessories with a damp sponge or cloth. Do not use bleach. Use only the agents listed below:
• Quarternary ammonium compounds• Isopropyl alcohol• Peracetic (peroxide) acid solutions

10 | Instructor guide for the LIFEPAK 15 monitor/defibrillator/

AED operation


Instructor guide | 11
AED training courseThe AED mode is highly intuitive and easy for healthcare professionals of all skill levels to quickly understand and use. This training course reviews the basic operation of the LIFEPAK 15 device in AED mode.
Learning objectivesThe overall objective of this inservice is to provide an overview of the basic steps of operation of the identified controls, indicators and connectors of the LIFEPAK 15 device. Upon completion of this course, participants will be able to:
• Verbalize the importance of early defibrillation.
• Locate and identify the defibrillator’s front panel controls, indicators and connectors.
• Demonstrate QUIK-COMBO electrode application.
• Demonstrate steps for automated external defibrillation (AED).
• Demonstrate the paper change.
• Demonstrate routine daily testing.
Equipment and materialsThe following is a list of accessories and support material recommended for training on the LIFEPAK 15 device. It is essential that all equipment be inspected and tested to ensure proper function prior to training according to the Basic Orientation section of the Operating Instructions.
Equipment• LIFEPAK 15 monitor/defibrillator
Accessories• QUIK-COMBO therapy cable
• Test Load
• EDGE System™ electrodes with QUIK-COMBO connector (or clip-on training electrodes)
• QUIK-COMBO 3-lead or 12-lead patient simulator
• AC power adapter and cord if applicable
• ECG printer paper
Support materials• Quick Reference Cards
• Self Assessment Form for BLS Users
• Operating Instructions
• Performance Evaluations
LIFEPAK 15 monitor/defibrillator AED training classThe following lists the content that should be covered during a typical AED operation training class.
• Early defibrillation
• Biphasic technology
• Controls and features
• AED operation
• Device maintenance and power

12 | Instructor guide for the LIFEPAK 15 monitor/defibrillator/
Controls and featuresIn this section, the goal is to point out the different buttons and physical features pertinent to an AED user. Each of these features will be reviewed in greater detail later in this guide. Refer to the Operating Instructions for additional information.
AED buttonsThree buttons used for AED operation.
1. ON
2. ANALYZE
3.
CPRUsed to turn the metronome off and on.
Speed dialScrolls through and selects menu items.
Therapy cable connectorConnects therapy cable to the device.
Therapy cable (not shown)The therapy cable is a defibrillation cable that attaches to therapy electrodes. The LIFEPAK 15 device should be stored with the therapy cable plugged into the lower right-hand side of the device.
CPR
AED buttons1. ON2. ANALYZE3. (SHOCK)
Speed dial
Therapy cable connector
Instructor guide | 13
AED operationThe AED mode on the LIFEPAK 15 device is easy to use because it automatically analyzes the patient’s heart rhythm and advises you which steps to take. In AED mode the device automatically selects the appropriate energy dosing.
References to buttons are indicated in BOLD and display messages are indicated in ITALICS. For complete information, review the Operating Instructions.
TaskVerify the patient is in cardiopulmonary arrest: unconscious/unresponsive, not breathing normally, and showing no signs of circulation.Press ON.
User action, defibrillator labels, text/voice prompts and informationNote the CONNECT ELECTRODES message and voice prompt occurs until the patient is connected to the AED.
TaskPrepare the patient for therapy electrode placement.Connect therapy electrodes to the therapy cable, and confirm cable connection to the defibrillator.
User action, defibrillator labels, text/voice prompts and informatio 1. Bare patient’s chest. 2. Remove excessive chest hair. 3. Clean and dry skin. 4. Abrade the skin briefly using a dry towel or
gauze for better electrode adhesion to the skin.• Do not use alcohol, tincture of benzoin or
antiperspirant to prepare the skin.
Instructor activityConnect therapy cable to the rhythm simulator and set rhythm to VF.
TaskApply therapy electrodes to patient’s chest in anterior-lateral position.
Instructor activityConfirm correct placement.
TaskPress ANALYZE button to initiate analysis. Stop CPR.
User actionsYou will see and hear the PUSH ANALYZE message.
• Stop all motion including CPR.• Do not move the LIFEPAK 15 device
while analyzing.• Clear everyone away from patient.
TaskFollow screen messages andvoice prompts.Confirm everyone is clear.Press (SHOCK) button to discharge AED.
User actionsYou will see and hear ANALYZING NOW STAND CLEAR, PUSH TO SHOCK followed by a “shock ready” tone and flashing shock LED. 1. State “All Clear” and observe that all personnel
are clear of the patient and immediate area. 2. Press (SHOCK) button to discharge AED.
When the (SHOCK) button is pressed, you will see Energy Delivered message indicating energy transfer was completed.
Note: If the (SHOCK) button is not pressed within 60 seconds, or if the SPEED DIAL is pressed to cancel charging, the defibrillator disarms and the DISARMING message appears.
Note: When energy transfer is complete, the shock counter increases by 1. This will continue to increase incrementally with every energy transfer.
14 | Instructor guide for the LIFEPAK 15 monitor/defibrillator/
TaskSTART CPR. analysis. Stop CPR.
User action, defibrillator labels, text/voice prompts and informationSTART CPR screen message will appear.
• A CPR timer will countdown 2 minutes or CPR time duration.
• A metronome automatically provides 30:2 audible compression “tocks” and ventilation prompts. To silence the metronome press CPR. To restart the metronome, press CPR again.
Instructor activityPlace rhythm simulator in nonshockable rhythm.
TaskThe CPR metronome.
The CPR metronome provides audible “tocks” that guide the user to deliver CPR with proper timing.
In AED Mode, the default C:V ratio is Adult – no airway because most patients in cardiac arrest are adults who have an initially unsecured airway.
TaskStop CPR and push ANALYZE.
User action, defibrillator labels, text/voice prompts and informationWhen the CPR countdown time ends, you will see and hear PUSH ANALYZE.
This message stays on the screen and the voice prompt will repeat every 20 seconds until the ANALYZE button is pressed.
TaskConfirm everyone is clear.
User action, defibrillator labels, text/voice prompts and informationIf the AED detects a nonshockable rhythm, you will see and hear NO SHOCK ADVISED.
TaskSTART CPR.
User action, defibrillator labels, text/voice prompts and informationStart CPR per voice prompt and screen message.
• A CPR timer will countdown 2 minutes and the metronome will begin again.
• Continue to follow screen messages and voice prompts until the advanced care team arrives.
TaskTroubleshooting messages
User action, defibrillator labels, text/voice prompts and informationCONNECT ELECTRODES message and voice prompt occur.
• If therapy electrodes are not connected to the therapy cable.
or• If therapy electrodes are not placed
on the patient’s chest.CONNECT CABLE message occurs.
• If the therapy cable is not connected to the defibrillator.
MOTION DETECTED, STOP MOTION message occurs.• If motion is detected during the ECG analysis, you
will see and hear MOTION DETECTED, STOP MOTION, followed by a warning tone. Analysis is delayed by no more than 10 seconds due to motion detection. After 10 seconds, even if motion is still present, the analysis proceeds to completion.
TaskSwitching from AED to Manual ModeSwitching from Manual Mode to AED mode
User action, defibrillator labels, text/voice prompts and information
• Enter manual mode by pressing the ENERGY SELECT button once to switch to manual mode.
• Pressing ANALYZE while the device is in manual mode will return device to AED mode.
Instructor activityHave students switch device between AED and manual mode and back to AED mode.

Manual operation


Manual training courseThe manual mode training course is intended for the ALS-trained healthcare professionals and reviews the manual operation and functions of the LIFEPAK 15 monitor/defibrillator. This training course reviews all of the advanced cardiovascular life support tools available on the LIFEPAK 15 device.
Learning objectivesThe overall objective of the inservice is to provide an overview of the basic steps of operation of the identified controls, indicators and connectors of the LIFEPAK 15 device. Upon completion of this course, participants will be able to:
• Verbalize the importance of early defibrillation.
• Locate and identify the defibrillator’s front panel controls, indicators and connectors.
• Demonstrate QUIK-COMBO electrode application.
• Demonstrate steps for manual defibrillation.
• State the procedure for synchronized cardioversion.
• List the operational steps for noninvasive pacing.
• Demonstrate ECG, pulse oximetry monitoring and other optional features of the LIFEPAK 15 device (if applicable).
• Describe the print process, and recalling the code summary.
• Explain the power sources.
• Demonstrate routine daily testing.
Equipment and materialsThe following is a list of accessories and support material recommended for ACLS training on the LIFEPAK 15 device. It is essential that all equipment be inspected and tested to ensure proper function prior to training.
Equipment• LIFEPAK 15 monitor/defibrillator
Accessories• QUIK-COMBO therapy cable
• Test Load
• EDGE System electrodes with QUIK-COMBO connector (or clip-on training electrodes)
• QUIK-COMBO 3-lead or 12-lead patient simulator
• 3-wire, 4-wire or 5-wire ECG cable
• 12-Lead cable and precordial leads (if applicable)
• LIFEPAK 15 monitor/defibrillator standard adult detachable hard paddles (if applicable)
• Optional accessories (if applicable)
• SpO2 or Rainbow® sensors
• EtCO2 cannula and T-piece connector
• NIPB cuffs
• Temperature adapter and probes
• AC power adapter and cord (if applicable)
• 100 mm ECG printer paper
Instructor guide | 15

Support Materials• Quick Reference Cards
• Self Assessment forms
• Operating Instructions
• Performance Evaluations
LIFEPAK 15 monitor/defibrillator Manual User Training ClassThe following lists the content that should be covered during a typical Manual User Training Class.
• Early defibrillation
• Biphasic energy
• Controls and features
• Manual defibrillation
• Synchronized cardioversion
• Noninvasive pacing
• ECG monitoring
• 12-Lead ECG acquisition and transmission (if applicable)
• Pulse oximetry or Rainbow technology (if applicable)
• EtCO2 (if applicable)
• NIBP (if applicable)
• Temperature (if applicable)
• Invasive pressures (if applicable)
• Data management
• Device maintenance
16 | Instructor guide for the LIFEPAK 15 monitor/defibrillator/
Instructor guide | 17
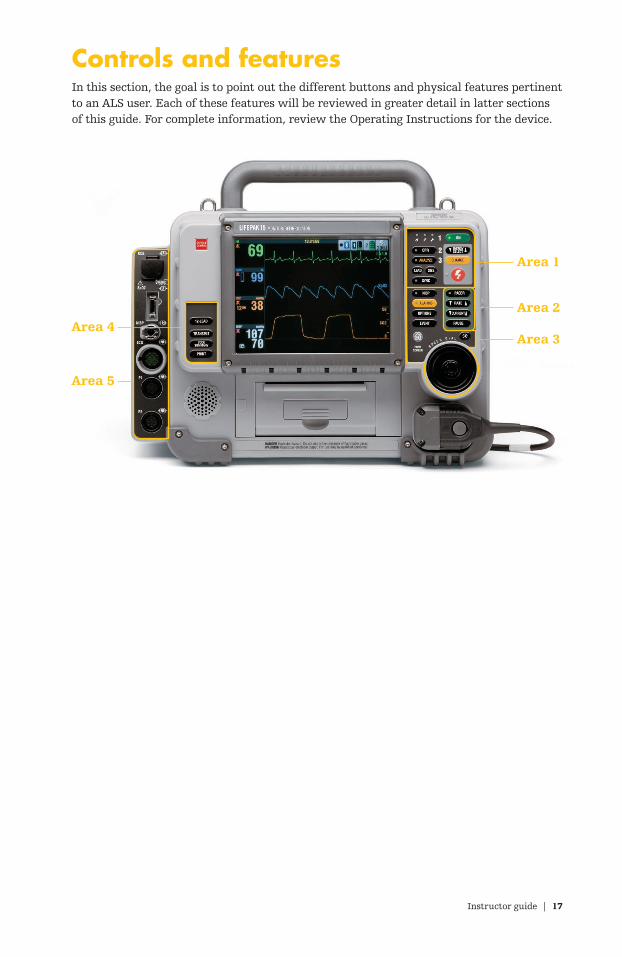
Controls and featuresIn this section, the goal is to point out the different buttons and physical features pertinent to an ALS user. Each of these features will be reviewed in greater detail in latter sections of this guide. For complete information, review the Operating Instructions for the device.
Area 1
Area 2
Area 3
Area 5
Area 4
ON
ENERGY SELECT
CHARGE
CPR
ANALYZE
SIZE
SYNC
LEAD
SIZEChanges ECG size
18 | Instructor guide for the LIFEPAK 15 monitor/defibrillator/
SYNCActivates synchronized mode
LEADChanges ECG Lead
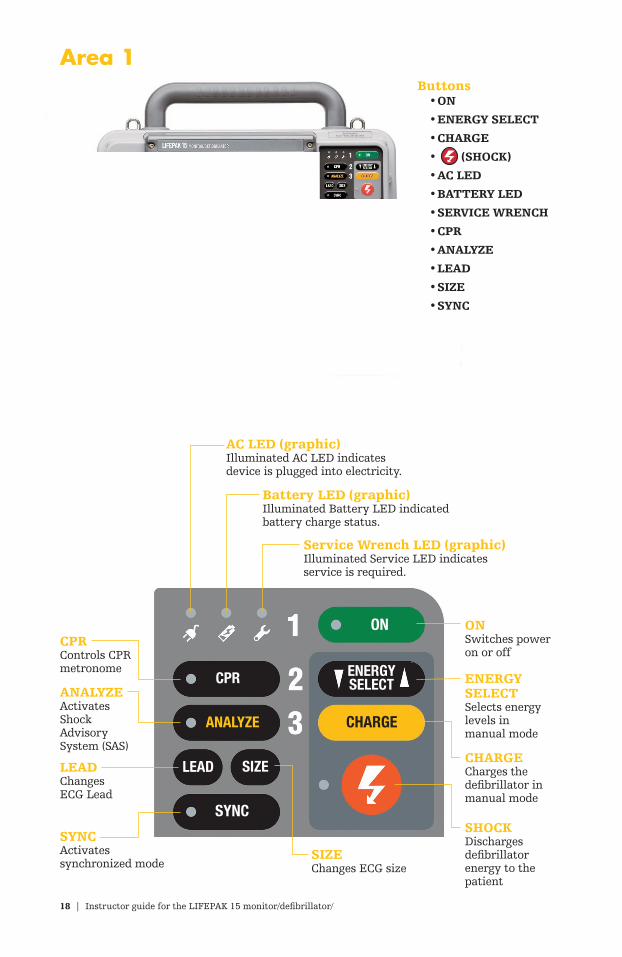
Buttons• ON
• ENERGY SELECT
• CHARGE
• (SHOCK)
• AC LED
• BATTERY LED
• SERVICE WRENCH
• CPR
• ANALYZE
• LEAD
• SIZE
• SYNC
Area 1
ONSwitches power on or off
SHOCKDischarges defibrillator energy to the patient
CHARGECharges the defibrillator in manual mode
ENERGY SELECTSelects energy levels in manual mode
AC LED (graphic)Illuminated AC LED indicates device is plugged into electricity.
Battery LED (graphic)Illuminated Battery LED indicated battery charge status.
Service Wrench LED (graphic)Illuminated Service LED indicates service is required.
CPRControls CPR metronome
ANALYZEActivates Shock Advisory System (SAS)
Instructor guide | 19
Area 2
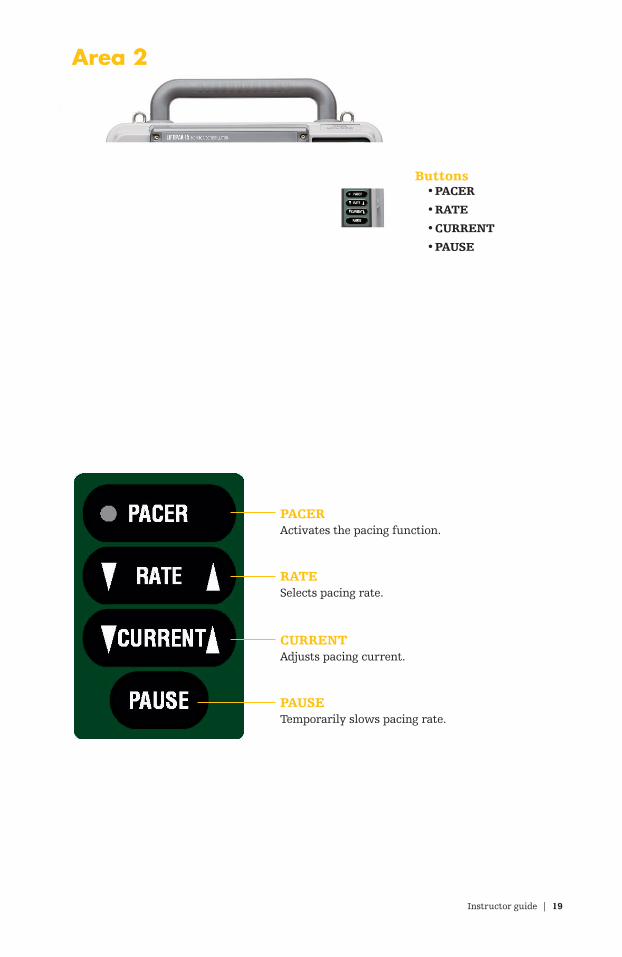
Buttons• PACER
• RATE
• CURRENT
• PAUSE
PACERActivates the pacing function.
RATESelects pacing rate.
CURRENT Adjusts pacing current.
PAUSETemporarily slows pacing rate.
NIBP
ALARMS
OPTIONS
EVENT
20 | Instructor guide for the LIFEPAK 15 monitor/defibrillator/
Area 3
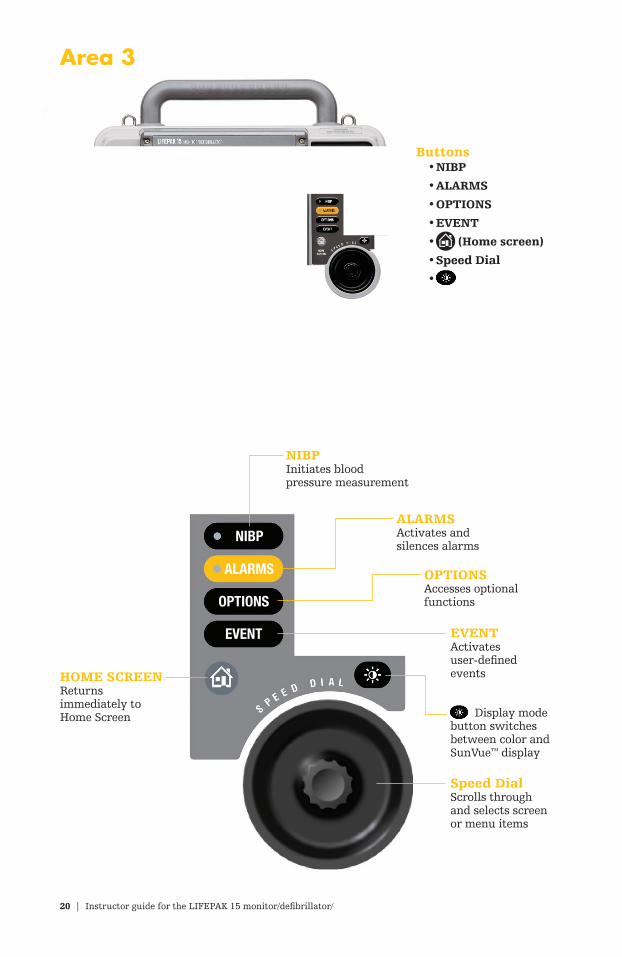
Buttons• NIBP
• ALARMS
• OPTIONS
• EVENT
• (Home screen)
• Speed Dial
•
HOME SCREENReturns immediately to Home Screen
NIBPInitiates blood pressure measurement
ALARMSActivates and silences alarms
OPTIONSAccesses optional functions
EVENTActivates user-defined events
Speed DialScrolls through and selects screen or menu items
Display mode button switches between color and SunVue™ display
12-LEAD
TRANSMIT
CODE SUMMARY
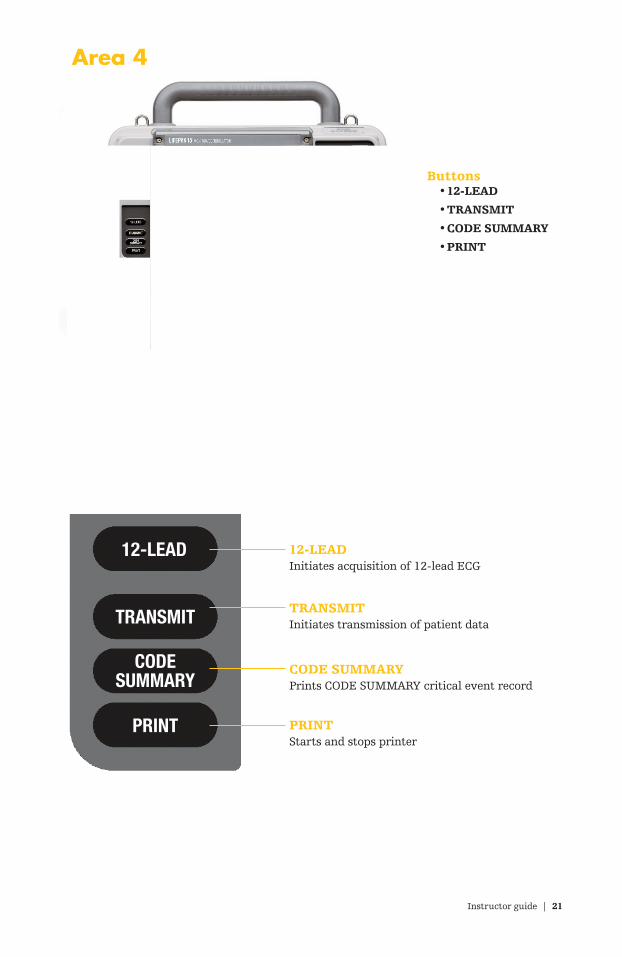
Instructor guide | 21
Area 4
Buttons• 12-LEAD
• TRANSMIT
• CODE SUMMARY
12-LEADInitiates acquisition of 12-lead ECG
TRANSMITInitiates transmission of patient data
CODE SUMMARY Prints CODE SUMMARY critical event record
PRINTStarts and stops printer
22 | Instructor guide for the LIFEPAK 15 monitor/defibrillator/
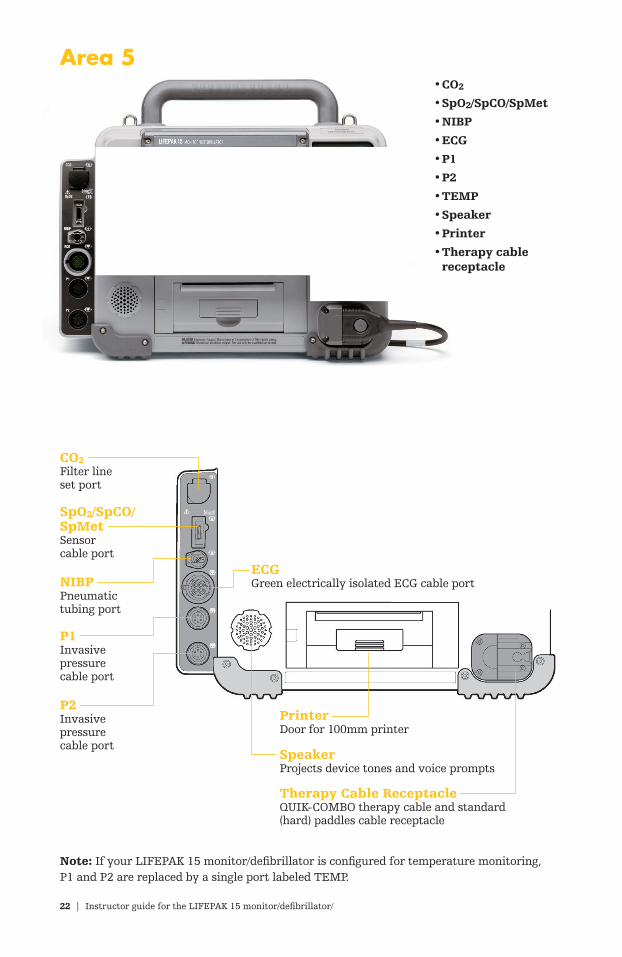
Area 5• CO2
• SpO2/SpCO/SpMet
• NIBP
• ECG
• P1
• P2
• TEMP
• Speaker
• Printer
• Therapy cable receptacle
CO2Filter line set port
Note: If your LIFEPAK 15 monitor/defibrillator is configured for temperature monitoring, P1 and P2 are replaced by a single port labeled TEMP.
SpeakerProjects device tones and voice prompts
PrinterDoor for 100mm printer
Therapy Cable ReceptacleQUIK-COMBO therapy cable and standard (hard) paddles cable receptacle
SpO2/SpCO/SpMetSensor cable port
NIBPPneumatic tubing port
ECGGreen electrically isolated ECG cable port
P1Invasive pressure cable port
P2Invasive pressure cable port
Instructor guide | 23
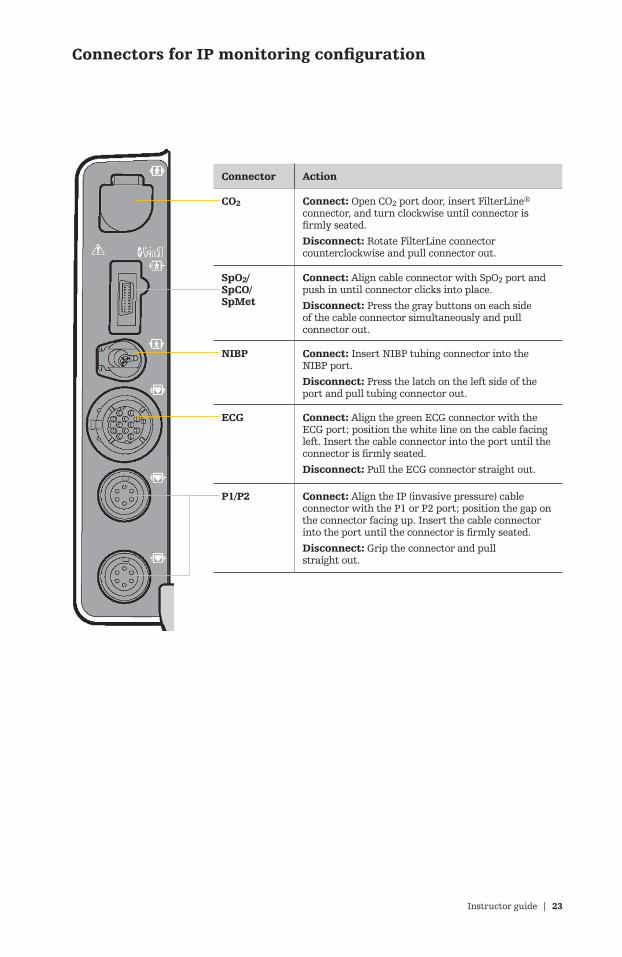
Connectors for IP monitoring configuration
Connector Action
CO2 Connect: Open CO2 port door, insert FilterLine® connector, and turn clockwise until connector is firmly seated.
Disconnect: Rotate FilterLine connector counterclockwise and pull connector out.
SpO2/ SpCO/ SpMet
Connect: Align cable connector with SpO2 port and push in until connector clicks into place.
Disconnect: Press the gray buttons on each side of the cable connector simultaneously and pull connector out.
NIBP Connect: Insert NIBP tubing connector into the NIBP port.
Disconnect: Press the latch on the left side of the port and pull tubing connector out.
ECG Connect: Align the green ECG connector with the ECG port; position the white line on the cable facing left. Insert the cable connector into the port until the connector is firmly seated.
Disconnect: Pull the ECG connector straight out.
P1/P2 Connect: Align the IP (invasive pressure) cable connector with the P1 or P2 port; position the gap on the connector facing up. Insert the cable connector into the port until the connector is firmly seated.
Disconnect: Grip the connector and pull straight out.
24 | Instructor guide for the LIFEPAK 15 monitor/defibrillator/
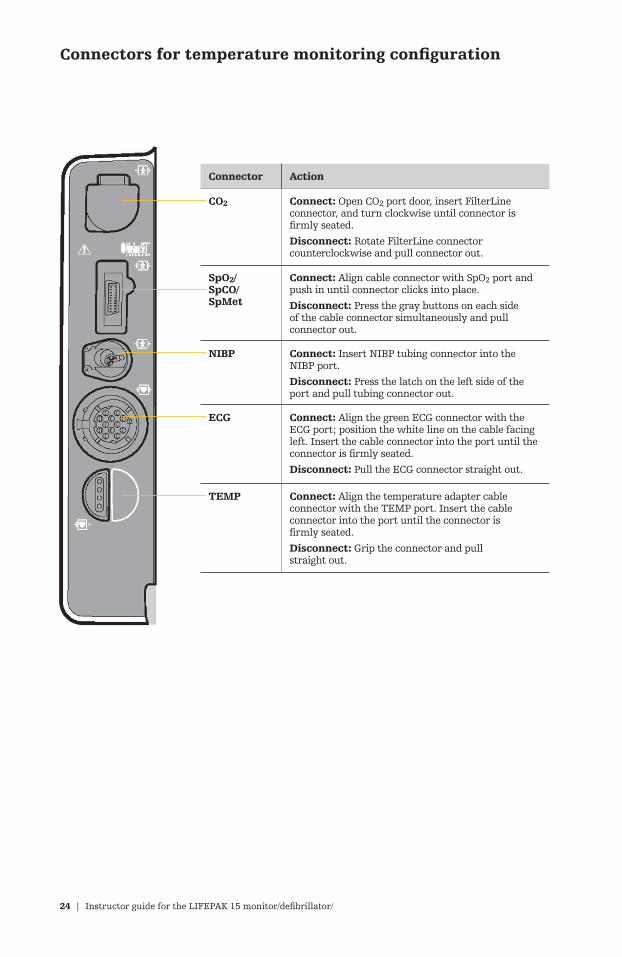
Connectors for temperature monitoring configuration
Connector Action
CO2 Connect: Open CO2 port door, insert FilterLine connector, and turn clockwise until connector is firmly seated.
Disconnect: Rotate FilterLine connector counterclockwise and pull connector out.
SpO2/ SpCO/ SpMet
Connect: Align cable connector with SpO2 port and push in until connector clicks into place.
Disconnect: Press the gray buttons on each side of the cable connector simultaneously and pull connector out.
NIBP Connect: Insert NIBP tubing connector into the NIBP port.
Disconnect: Press the latch on the left side of the port and pull tubing connector out.
ECG Connect: Align the green ECG connector with the ECG port; position the white line on the cable facing left. Insert the cable connector into the port until the connector is firmly seated.
Disconnect: Pull the ECG connector straight out.
TEMP Connect: Align the temperature adapter cable connector with the TEMP port. Insert the cable connector into the port until the connector is firmly seated.
Disconnect: Grip the connector and pull straight out.
Instructor guide | 25
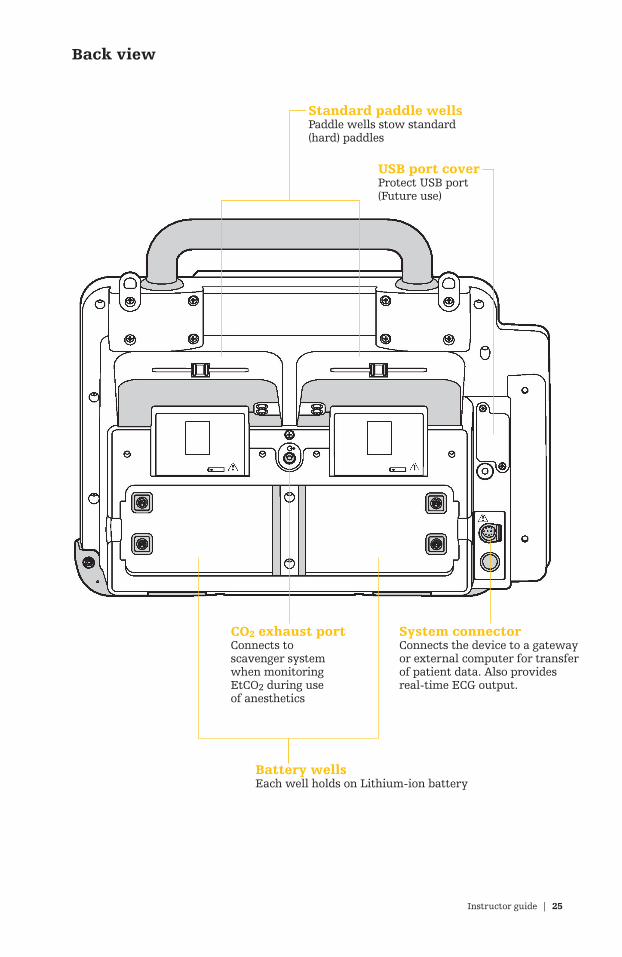
Back view
Battery wellsEach well holds on Lithium-ion battery
CO2 exhaust portConnects to scavenger system when monitoring EtCO2 during use of anesthetics
Standard paddle wellsPaddle wells stow standard (hard) paddles
USB port coverProtect USB port (Future use)
System connectorConnects the device to a gateway or external computer for transfer of patient data. Also provides real-time ECG output.
26 | Instructor guide for the LIFEPAK 15 monitor/defibrillator/
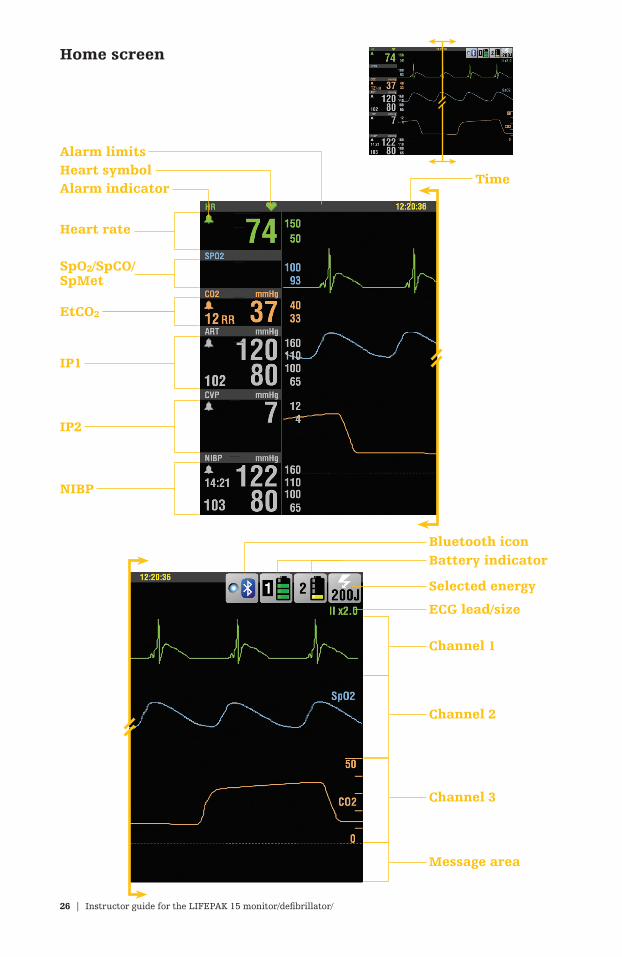
Home screen
Time
Alarm limitsHeart symbolAlarm indicator
Heart rate
SpO2/SpCO/SpMet
EtCO2
IP1
IP2
NIBP
Bluetooth iconBattery indicator
Selected energy
ECG lead/size
Channel 1
Channel 2
Channel 3
Message area
Instructor guide | 27
Manual defibrillationA direct current defibrillator applies a brief, intense pulse of electricity to the heart muscle. The LIFEPAK 15 monitor/defibrillator delivers this energy through disposable electrodes, standard paddles or internal paddles applied to the patient’s chest. Defibrillation is only one aspect of the medical care required to resuscitate a patient with a shockable ECG rhythm. Depending on the situation, other supportive measures may include:
• Cardiopulmonary resuscitation (CPR)
• Administration of supplemental oxygen
• Drug therapy
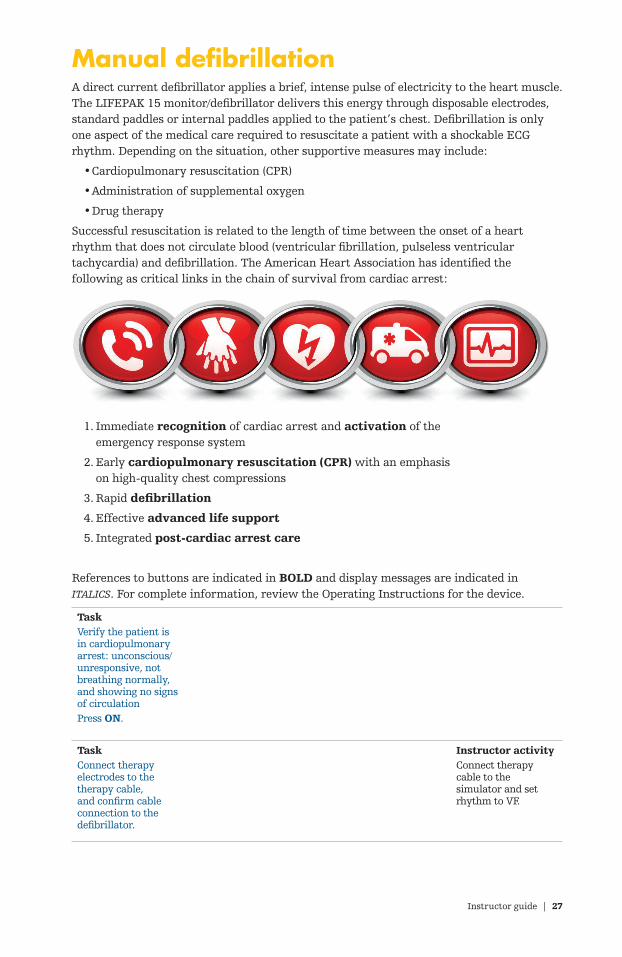
Successful resuscitation is related to the length of time between the onset of a heart rhythm that does not circulate blood (ventricular fibrillation, pulseless ventricular tachycardia) and defibrillation. The American Heart Association has identified the following as critical links in the chain of survival from cardiac arrest:
1. Immediate recognition of cardiac arrest and activation of the emergency response system
2. Early cardiopulmonary resuscitation (CPR) with an emphasis on high-quality chest compressions
3. Rapid defibrillation
4. Effective advanced life support
5. Integrated post-cardiac arrest care
References to buttons are indicated in BOLD and display messages are indicated in ITALICS. For complete information, review the Operating Instructions for the device.
TaskVerify the patient is in cardiopulmonary arrest: unconscious/ unresponsive, not breathing normally, and showing no signs of circulationPress ON.
TaskConnect therapy electrodes to the therapy cable, and confirm cable connection to the defibrillator.
Instructor activityConnect therapy cable to the simulator and set rhythm to VF.

28 | Instructor guide for the LIFEPAK 15 monitor/defibrillator/
TaskPrepare the patient for therapy electrode placement.Apply therapy electrodes to patient’s chest in anterior-lateral position. Note: If needed, refer to anterior-lateral placement, section 4 of the Operating Instructions.
User action, defibrillator labels, text/voice prompts and information
• Remove all clothing from the patient’s chest. • Remove excessive chest hair.• Clean and dry the skin.• Do not use alcohol, tincture of benzoin, or
antiperspirant to prepare the skin.• Ensure pads are in sealed package and the
use by date has not passed.• Avoid placement over the nipple, bony
prominences, dressings, implantable defibrillators, or the diaphragm if possible.
• Apply therapy electrodes to patient’s chest in anterior-lateral position.
• If using standard paddles, apply conductive gel to the electrodes and place paddles on the patient’s chest.
Note: Impedance is measured whenever the defibrillator is charged. To ensure therapeutic patient impedance levels, you should always charge the defibrillator when the standard paddle or QUIK-COMBO electrodes are in contact with the patient’s chest.
Instructor activityDemonstrate anterior lateral position with therapy electrodes
TaskPress ENERGY SELECT.
User action, defibrillator labels, text/voice prompts and informationSelect Joules per hospital-specific or training protocols, if applicable.
TaskTo change energy selection.
User action, defibrillator labels, text/voice prompts and informationIf energy selection is changed after charging has started, the energy is removed. Press CHARGE to restart charging.
TaskPress CHARGE.Press SPEED DIAL to disarm.
User action, defibrillator labels, text/voice prompts and informationWhile the defibrillator is charging, a charging bar appears and a ramping tone sounds, indicating the charging energy level.
When defibrillator is fully charged, an overlay appears.
TaskMake certain all personnel, including the operator, stand clear of the patient, bed, and any equipment connected to the patient.Press the (SHOCK) button to discharge energy to the patient.
User action, defibrillator labels, text/voice prompts and informationState “All Clear” and observe that all personal are clear of the patient and immediate area.
Confirm ECG rhythms and available energy.

Instructor guide | 29
TaskPress CPR button.
User action, defibrillator labels, text/voice prompts and information 1. Start CPR according to protocol. 2. To activate the metronome, press CPR. 3. Select the desired Age-Airway setting
using the SPEED DIAL. 4. Adult – No Airway 30:2 (default) 5. Adult – Airway 10:1 6. Youth – No Airway 15:2 7. Youth – Airway 10:1 8. Stop Metronome.
• To stop the metronome, select STOP METRONOME from the CPR menu.
DiscussThe CPR metronome.
The CPR metronome provides audible “tocks” that guide the user to deliver CPR with proper timing.
In Manual Mode, the user can choose the most appropriate C:V ratio based on the patient’s age and current airway status.
30 | Instructor guide for the LIFEPAK 15 monitor/defibrillator/
Synchronized cardioversion procedureThe LIFEPAK 15 monitor/defibrillator can be configured to remain in synchronous mode or to return to asynchronous mode after discharge. It is important that you know how your defibrillator is configured.
References to buttons are indicated in BOLD and display messages are indicated in ITALICS. For complete information, review the Operating Instructions for the device.
TaskPress ON.
TaskAttach patient ECG cables and ECG electrodes on the patient. Select Lead II or the lead with greatest QRS complex amplitude (positive or negative).Observe the ECG rhythm.Press SYNC.Observe the ECG rhythm.Prepare the patient’s skin for therapy electrode application. Connect the therapy electrodes to the therapy cable, confirm cable connect to the device.Apply therapy electrodes to the patient in the anterior-lateral position. If using standard paddles, apply conductive gel to the paddles and place paddles on the patient’s chest.
User action, defibrillator labels, text/voice prompts and information
• Bare patient’s chest.• Ensure chest is clean and dry.• Remove excessive chest hair.• Prepare electrode site with brisk rub. • Ensure electrodes are in sealed package and the
use by date has not passed.• Avoid placement over the nipple, bony
prominences, dressings, implantable defibrillators or the diaphragm if possible.
Note: To monitor the ECG through therapy electrodes, place the electrodes in the anterior-lateral position and select paddles lead.
Confirm the Sync LED blinks with each detected QRS complex.
Note: Press SYNC again to deactivate synchronous mode.
Confirm that a triangle sense marker appears near the middle of each QRS complex. If the sense markers do not appear or are displayed in the wrong locations (for example, on the T-wave), select another lead.
Instructor activityConnect QUIK-COMBO Therapy Cable to the simulator and set rhythm to VT.
TaskPress ENERGY SELECT.
User action, defibrillator labels, text/voice prompts and informationSelect Joules per protocols, if applicable.
TaskPress CHARGE.

Instructor guide | 31
TaskMake certain all personnel, including operator, stand clear of the patient, bed, and any equipment connect to the patient.Confirm rhythm and available energy.
TaskPress and hold
(SHOCK) button(s) until you see ENERGY DELIVERED on screen.
User action, defibrillator labels, text/voice prompts and informationIf (SHOCK) buttons are not pressed within 60 seconds, stored energy is internally removed.
Note: If the energy selection is changed after charging has started, the energy is removed internally. Press CHARGE to restart charging
32 | Instructor guide for the LIFEPAK 15 monitor/defibrillator/
Noninvasive pacingThe noninvasive pacemaker can be used for either demand (synchronous) or nondemand (asynchronous) pacing modes.
The demand mode is used for most patients. In the demand mode, the LIFEPAK 15 monitor/defibrillator/pacemaker inhibits pacing when it senses the patient’s own beats, if the ECG amplitude is too low to detect the patient’s beats or if an ECG lead becomes detached so that the ECG rhythm is not present, the pacemaker generates pacing pulses asynchronously.
ECG monitoring during pacing must be performed with the ECG electrodes and patient ECG cable. Pacing therapy electrodes cannot be used to monitor ECG rhythm and deliver pacing current at the same time. Be sure to place the therapy electrodes in the proper locations as described in the pacing procedure. Improper electrode placement may make a difference in the capture threshold.
References to buttons are indicated in BOLD and display messages are indicated in ITALICS. For complete information, review the Operating Instructions for the device.
TaskPress ON.
Instructor activityConnect QUIK-COMBO therapy cable to the simulator and set rhythm to bradycardia.
TaskConnect the patient ECG cable, apply ECG electrodes to the ECG cable and patient, and select Lead I, II or III.Identify the QUIK-COMBO electrode sites on the patient. Prepare patient’s skin for electrode application.
User action, defibrillator labels, text/voice prompts and informationTo receive the best monitoring signal, ensure there is adequate space between the ECG electrodes and the QUIK-COMBO electrodes.
For pacing, use either the anterior-lateral or anterior-posterior position.
TaskPress the PACER button.Observe the ECG rhythm.
User action, defibrillator labels, text/voice prompts and informationConfirm the PACER LED illuminates, indicating that the power is on.
Note: If the REMOVE TEST PLUG message appears, disconnect the test plug and connect therapy electrodes to QUIK-COMBO therapy cable.
Confirm that a triangle sense marker appears near the middle of each QRS complex. If the sense markers do not appear or are displayed in the wrong location (i.e.: T wave) select another lead.
TaskPress the RATE button.
User action, defibrillator labels, text/voice prompts and information
• Turn SPEED DIAL (changes rate in increments of 5 ppm) or press RATE button (changes rate in increments of 10 ppm) to desired pacing rate.
• Pacing rate range from 40 to 170 ppm.• Set rate to 80 ppm.

Instructor guide | 33
TaskPress the CURRENT button.
User action, defibrillator labels, text/voice prompts and informationTurn SPEED DIAL (changes current in increments of 5mA) or press CURRENT button (changes rate in increments of 10mA) to increase current until electrical capture occurs.
• For each delivered pacing stimulus, the PACER indicator flashes off and a positive pace marker displays on the ECG waveform.
• Pacing current range from 0 to 200mA.• Many patients achieve capture at 50 to 100mA,
although individual thresholds vary. The simulator achieves electrical capture at 65mA. Most simulators achieves electrical capture between 65 and 75mA.
TaskAssess for mechanical capture.
User action, defibrillator labels, text/voice prompts and informationBoth electrical and mechanical capture must occur in order for noninvasive pacing to benefit the patient.
• Palpate patient’s pulse and obtain blood pressure to assess for mechanical capture.
• Consider use of sedation/analgesia if necessary for patient discomfort.
User action, defibrillator labels, text/voice prompts and informationNote: To interrupt pacing and view the patient’s intrinsic rhythm, press and hold the PAUSE button. This causes the pacer to pace at 25% of the set rate. Release the PAUSE button to resume pacing at the set rate. An ECG strip prints automatically for as long as the button is held.
TaskTo stop pacing.
User action, defibrillator labels, text/voice prompts and informationTo stop pacing reduce current to zero or press PACER.
To defibrillate and stop noninvasive pacing, press the ENERGY SELECT button or charge the defibrillator. Pacing automatically stops.
Proceed with defibrillation.
Instructor activitySet simulator to VF and demonstrate defibrillation while pacing.
DiscussTroubleshooting• User observation.• ECG leads off
during pacing.
User action, defibrillator labels, text/voice prompts and informationIf the monitor detects ECG leads off during pacing, pacing continues at a fixed rate (nondemand pacing) until the ECG lead is reattached. During fixed-rate pacing, the pacemaker delivers pulses at the set pace rate regardless of any intrinsic beats that the patient may have. The monitor continues to display the pacing rate (ppm) and the current (mA). To reestablish demand pacing, reattach the ECG lead.
While pacing, visually monitor the patient at all times, do not rely on the ECG LEADS OFF warning to detect changes in pacing function. Routinely assess the ECG for proper sensing, pace pulse delivery, electrical and mechanical capture
TaskQUIK-COMBO electrodes off during pacing.
User action, defibrillator labels, text/voice prompts and informationIf the therapy electrodes detach during pacing, the CONNECT ELECTRODES and PACING STOPPED messages appear and an alarm sounds. The pacing rate is maintained and the current resets to 0mA. Reattaching the electrodes silences the alarm and removes the CONNECT ELECTRODES message. The current remains at 0mA until the current is increased manually.
Instructor activityDisconnect LL lead from simulator
34 | Instructor guide for the LIFEPAK 15 monitor/defibrillator/
ECG monitoringThere are two methods for selecting or changing the ECG lead. Both methods are available on your LIFEPAK 15 monitor/defibrillator. The leads available depend on the ECG cable (3-wire, 4-wire, 5-wire, or precordial leads) connected to the defibrillator.
References to buttons are indicated in BOLD and display messages are indicated in ITALICS. For complete information, review the Operating Instructions for the device.
TaskPress ON.
Instructor activityConnect ECG cable leads to the simulator and choose a rhythm
TaskAttach the ECG cable to the monitor
TaskIdentify the appropriate electrode sites on the patient
User action, defibrillator labels, text/voice prompts and informationPrepare the patient skin for electrode application:
• Remove excessive hair at electrode site. Avoid placing electrodes over tendons and major muscle masses.
• For oily skin, clean skin with an alcohol pad.• Dry the site with a brisk rub.
TaskApply ECG electrodes
User action, defibrillator labels, text/voice prompts and information
• Confirm package is sealed and use by date has not passed.
• Attach an electrode to each lead wire.• Grasp electrode tab and peel electrode from carrier.• Inspect electrode gel for moisture content and to
confirm gel is intact.• Apply the electrode flat to skin. Smooth
tape outwardly. Avoid pressing the center of the electrode.
• Secure the trunk cable clasp to the patient’s clothing.
TaskSelect the lead on the monitor screen
User action, defibrillator labels, text/voice prompts and information
• Channel 1 op channel displays the primary ECG waveform and is always visible when ECG is displayed.
• Lead options available are dependent on which ECG cable is used.
• Change lead by pressing the LEAD button and select the desired lead with the SPEED DIAL or by pressing the LEAD button.
• Adjust the ECG size by pressing the SIZE button and select the size with the SPEED DIAL or by pressing the SIZE button.
TaskOptional: Channel 2 and 3 waveforms
User action, defibrillator labels, text/voice prompts and information
• This can display an additional ECG waveform or a continuation of the Channel 1 ECG.
• At the home screen, rotate the SPEED DIAL to highlight Channel 2 or 3.
• Press the SPEED DIAL. An overlay appears with the monitoring choice for the selected channel.
• Rotate and press the SPEED DIAL to select monitoring choice.

Instructor guide | 35
TaskAdjusting the Systole Tone Volume.
User action, defibrillator labels, text/voice prompts and informationHighlight and select heart rate (HR) in the monitoring area of the screen.
• Rotate the SPEED DIAL to the desired volume.• Press the HOME SCREEN to exit.
DiscussPress PRINT to obtain an ECG printout.
User action, defibrillator labels, text/voice prompts and informationPrints continuously until you press the PRINT button again to stop printing.

36 | Instructor guide for the LIFEPAK 15 monitor/defibrillator/

Optional features

Instructor guide | 37
Acquiring a 12-lead ECGThe 12-lead electrocardiogram is used to identify, diagnose, and treat patients with cardiac disorders and is useful in the early detection and prompt treatment of patients with acute ST elevation myocardial infarction (STEMI).
References to buttons are indicated in BOLD and display messages are indicated in ITALICS. For complete information, review the Operating Instructions for the device.
TaskTo acquire a 12-lead ECGPress ON.
Instructor activityConnect the 12-lead ECG cable leads to the simulator and choose a rhythm.
TaskAttach the ECG cable to the monitor.
TaskIdentify the appropriate electrode sites on the patient.
User action, defibrillator labels, text/voice prompts and informationAmplitude of the pulse bar indicates relative signal strength.
• Remove excessive hair at electrode site. Avoid placing electrodes over tendons and major muscle masses.
• For oily skin, clean skin with an alcohol pad.• Dry the site with a brisk rub.
TaskApply ECG electrodes.
User action, defibrillator labels, text/voice prompts and information 1. Confirm package is sealed and use by date
has not passed. 2. Attach an electrode to each lead wire. 3. Grasp electrode tab and peel electrode
from carrier. 4. Inspect electrode gel for moisture content
and to confirm gel is intact. 5. Apply the electrode flat to skin. Smooth tape
outwardly. Avoid pressing the center of the electrode.
6. Secure the trunk cable clasp to the patient’s clothing.
TaskPress 12-lead.Enter patients age and sex.
User action, defibrillator labels, text/voice prompts and information 1. The 12-LEAD/AGE menu appears.
• Use the SPEED DIAL to select the age. Note: Always enter the patient’s age if the patient is 15 years old or younger. If you do not enter an age, the default value of 50 years is used by the interpretive analysis program and annotated on the 12-lead ECG report. 2. The 12-LEAD/SEX menu appears.
• Use the SPEED DIAL to select the patient’s sex.
Note: If you do not enter the sex, the default of male is used by the interpretive analysis program and is annotated on the 12-lead ECG report. 3. The monitor acquires, analyzes, and
automatically prints the 12-lead ECG.
38 | Instructor guide for the LIFEPAK 15 monitor/defibrillator/
SpO2, SpCO, and SpMet monitoringSpO2, SpCO™, and SpMet™ are optional features for the LIFEPAK 15 monitor/defibrillator. When all three options (SpO2, SpCO, and SpMet) are installed, the pulse oximeter measures functional oxygen saturation (SpO2), carboxyhemoglobin concentration (SpCO), and methemoglobin concentration (SpMet) in the blood.
IMPORTANT! Masimo® Rainbow® sensors are necessary to monitor SpO2, SpCO, and SpMet. These combination sensors as well as SpO2-only sensors are available for use with the LIFEPAK 15 device. While Masimo SpO2-only sensors with red connector are compatible with the LIFEPAK 15 device monitor, Masimo Rainbow sensors are not compatible with other LIFEPAK defibrillator/monitors.
Pulse OximetryEtCO2 monitoring is used to detect trends in the level of expired CO2. It is used for monitoring breathing efficacy and treatment effectiveness in acute cardiopulmonary care, for example, to determine if adequate compressions are being performed during CPR or to rapidly detect whether an endotrachael tube has been placed successfully.
References to buttons are indicated in BOLD and display messages are indicated in ITALICS. For complete information, review the Operating Instructions for the device.
DiscussTurn the defibrillator ON.
User action, defibrillator labels, text/voice prompts and informationPress On.
TaskConnect the SpO2 cable to the monitor.
User action, defibrillator labels, text/voice prompts and informationAttach the sensor to the SpO2 cable and the patient..
• When the defibrillator is turned on, the oximeter turns on and performs a self-test that requires up to 10 seconds.
• A sleep mode is activated within 10 seconds of disconnecting the sensor.
• The oximeter will return to normal mode after detecting a sensor or a patient signal.
TaskObserve the pulse bar for fluctuation.
User action, defibrillator labels, text/voice prompts and informationAmplitude of the pulse bar indicates relative signal strength. the menu.
TaskDisplay waveform.
User action, defibrillator labels, text/voice prompts and information
• Select waveform channel 2 using the SPEED DIAL.
• Select SpO2 from the Waveform menu.• The SpO2 waveform automatically sizes itself
to provide optimum waveform viewing
TaskAdjust SpO2 volume.
User action, defibrillator labels, text/voice prompts and information 4. Highlight and select SpO2 on the home screen
with the SPEED DIAL: 5. Highlight and select SpO2 VOLUME. 6. Rotate the SPEED DIAL to the desired volume. 7. Press the SPEED DIAL to set the volume.

Instructor guide | 39
TaskAdjust sensitivity.
User action, defibrillator labels, text/voice prompts and information 1. Highlight and select SpO2 on the home
screen with the SPEED DIAL and then select SENSITIVITY.
• Normal sensitivity is the default.• High sensitivity allows monitoring in low
perfusion states, but is more susceptible to artifact.
TaskAdjust averaging time.
User action, defibrillator labels, text/voice prompts and information 2. Highlight and select SpO2 on the home
screen with the SPEED DIAL and select AVERAGING TIME.
3. Turn the SPEED DIAL to select and set averaging time.
Options:• 4 seconds (for patients with rapidly
changing values)• 8 seconds (recommended for most patients)• 12 and 16 seconds (when artifact is affecting
the performance of the pulse oximeter)
SpCO and SpMetMonitoring SpCO and SpMet assists in identifying the often hidden conditions of carboxyhemoglobinemia (carbon monoxide poisoning) and methemoglobinemia (a condition that impedes delivery of oxygen to the tissues). Low levels of both SpCO and SpMet are normally found in the blood; however, early detection of significantly high levels can lead to proper diagnosis and treatment and can help improve patient outcome.
References to buttons are indicated in BOLD and display messages are indicated in ITALICS. For complete information, review the Operating Instructions for the device.
TaskTurn the defibrillator ON.
User action, defibrillator labels, text/voice prompts and informationPress ON.
TaskConnect the Rainbow SpO2 cable to the monitor.
User action, defibrillator labels, text/voice prompts and informationAttach the Rainbow sensor to the SpO2 cable and the patient.
TaskVerify that an SpCO/SpMet sensor is in use. Only Rainbow sensors are capable of reading SpCO/SpMet.
User action, defibrillator labels, text/voice prompts and information
• When the defibrillator is turned on, the oximeter turns on and performs a self-test that requires up to 20 seconds.
• A sleep mode is activated within 10 seconds of disconnecting the sensor.
• The oximeter will return to normal mode after detecting a sensor or a patient signal.
TaskPress PRINT to obtain SpCO or SpMet value.
User action, defibrillator labels, text/voice prompts and informationPress PRINT
• If dashes (---) appear on printout instead of values for SpCO or SpMet, allow a few more seconds for measurement to be obtained.
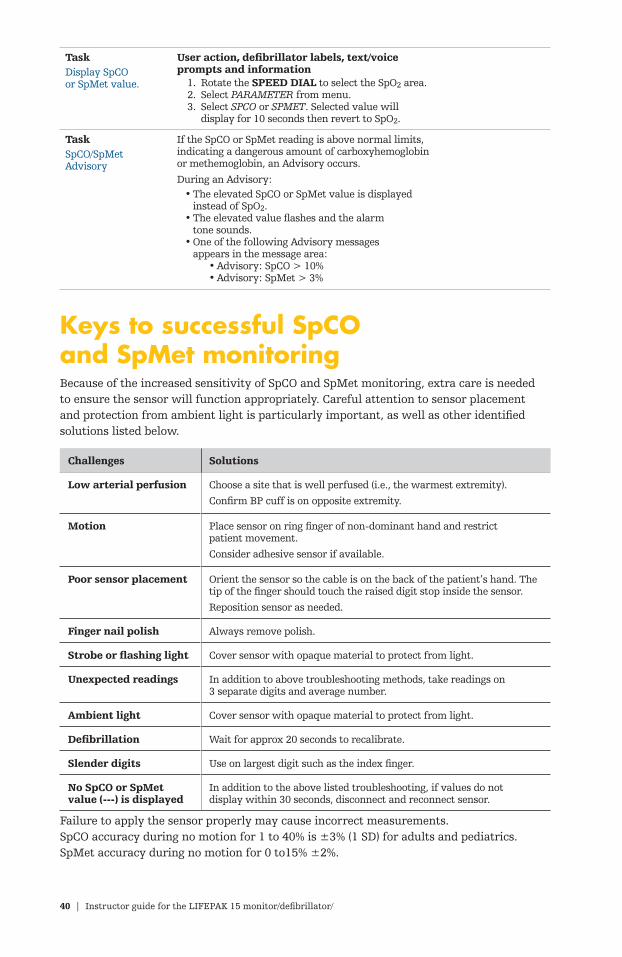
40 | Instructor guide for the LIFEPAK 15 monitor/defibrillator/
TaskDisplay SpCO or SpMet value.
User action, defibrillator labels, text/voice prompts and information 1. Rotate the SPEED DIAL to select the SpO2 area. 2. Select PARAMETER from menu. 3. Select SPCO or SPMET. Selected value will
display for 10 seconds then revert to SpO2.
TaskSpCO/SpMet Advisory
If the SpCO or SpMet reading is above normal limits, indicating a dangerous amount of carboxyhemoglobin or methemoglobin, an Advisory occurs.
During an Advisory:• The elevated SpCO or SpMet value is displayed
instead of SpO2.• The elevated value flashes and the alarm
tone sounds.• One of the following Advisory messages
appears in the message area:• Advisory: SpCO > 10%• Advisory: SpMet > 3%
Keys to successful SpCO and SpMet monitoringBecause of the increased sensitivity of SpCO and SpMet monitoring, extra care is needed to ensure the sensor will function appropriately. Careful attention to sensor placement and protection from ambient light is particularly important, as well as other identified solutions listed below.
Challenges Solutions
Low arterial perfusion Choose a site that is well perfused (i.e., the warmest extremity).
Confirm BP cuff is on opposite extremity.
Motion Place sensor on ring finger of non-dominant hand and restrict patient movement.
Consider adhesive sensor if available.
Poor sensor placement Orient the sensor so the cable is on the back of the patient’s hand. The tip of the finger should touch the raised digit stop inside the sensor.
Reposition sensor as needed.
Finger nail polish Always remove polish.
Strobe or flashing light Cover sensor with opaque material to protect from light.
Unexpected readings In addition to above troubleshooting methods, take readings on 3 separate digits and average number.
Ambient light Cover sensor with opaque material to protect from light.
Defibrillation Wait for approx 20 seconds to recalibrate.
Slender digits Use on largest digit such as the index finger.
No SpCO or SpMet value (---) is displayed
In addition to the above listed troubleshooting, if values do not display within 30 seconds, disconnect and reconnect sensor.
Failure to apply the sensor properly may cause incorrect measurements.SpCO accuracy during no motion for 1 to 40% is ±3% (1 SD) for adults and pediatrics.SpMet accuracy during no motion for 0 to15% ±2%.
Instructor guide | 41
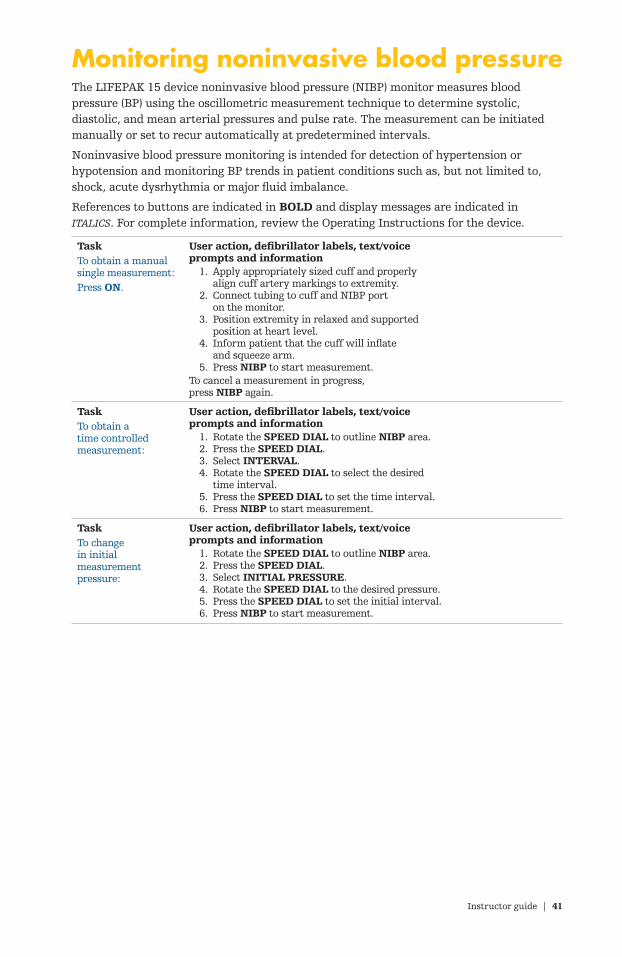
Monitoring noninvasive blood pressureThe LIFEPAK 15 device noninvasive blood pressure (NIBP) monitor measures blood pressure (BP) using the oscillometric measurement technique to determine systolic, diastolic, and mean arterial pressures and pulse rate. The measurement can be initiated manually or set to recur automatically at predetermined intervals.
Noninvasive blood pressure monitoring is intended for detection of hypertension or hypotension and monitoring BP trends in patient conditions such as, but not limited to, shock, acute dysrhythmia or major fluid imbalance.
References to buttons are indicated in BOLD and display messages are indicated in ITALICS. For complete information, review the Operating Instructions for the device.
TaskTo obtain a manual single measurement:Press ON.
User action, defibrillator labels, text/voice prompts and information 1. Apply appropriately sized cuff and properly
align cuff artery markings to extremity. 2. Connect tubing to cuff and NIBP port
on the monitor. 3. Position extremity in relaxed and supported
position at heart level. 4. Inform patient that the cuff will inflate
and squeeze arm. 5. Press NIBP to start measurement.
To cancel a measurement in progress, press NIBP again.
TaskTo obtain a time controlled measurement:
User action, defibrillator labels, text/voice prompts and information 1. Rotate the SPEED DIAL to outline NIBP area. 2. Press the SPEED DIAL. 3. Select INTERVAL. 4. Rotate the SPEED DIAL to select the desired
time interval. 5. Press the SPEED DIAL to set the time interval. 6. Press NIBP to start measurement.
TaskTo change in initial measurement pressure:
User action, defibrillator labels, text/voice prompts and information 1. Rotate the SPEED DIAL to outline NIBP area. 2. Press the SPEED DIAL. 3. Select INITIAL PRESSURE. 4. Rotate the SPEED DIAL to the desired pressure. 5. Press the SPEED DIAL to set the initial interval. 6. Press NIBP to start measurement.
42 | Instructor guide for the LIFEPAK 15 monitor/defibrillator/
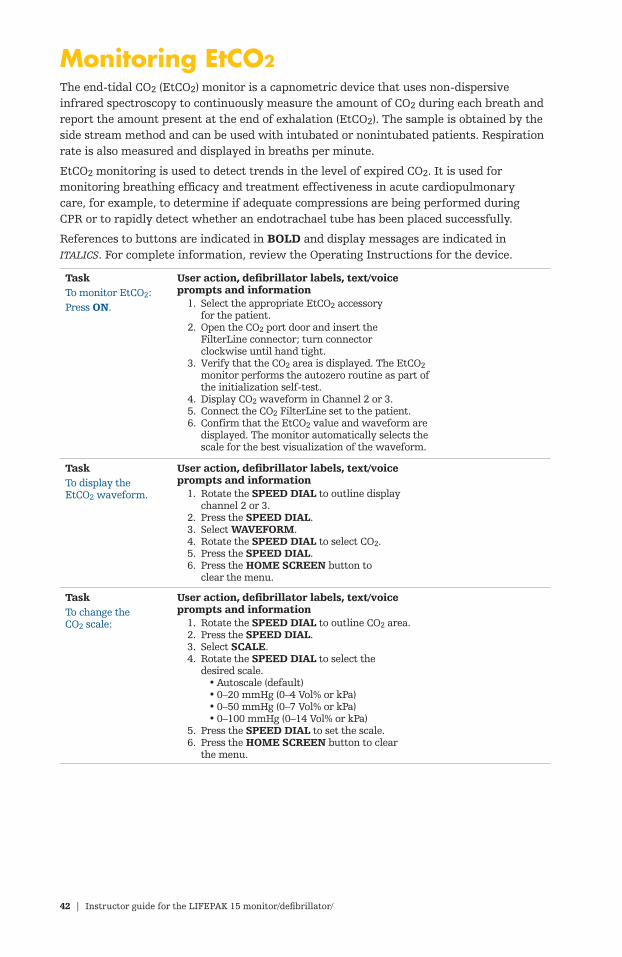
Monitoring EtCO2The end-tidal CO2 (EtCO2) monitor is a capnometric device that uses non-dispersive infrared spectroscopy to continuously measure the amount of CO2 during each breath and report the amount present at the end of exhalation (EtCO2). The sample is obtained by the side stream method and can be used with intubated or nonintubated patients. Respiration rate is also measured and displayed in breaths per minute.
EtCO2 monitoring is used to detect trends in the level of expired CO2. It is used for monitoring breathing efficacy and treatment effectiveness in acute cardiopulmonary care, for example, to determine if adequate compressions are being performed during CPR or to rapidly detect whether an endotrachael tube has been placed successfully.
References to buttons are indicated in BOLD and display messages are indicated in ITALICS. For complete information, review the Operating Instructions for the device.
TaskTo monitor EtCO2:Press ON.
User action, defibrillator labels, text/voice prompts and information
1. Select the appropriate EtCO2 accessoryfor the patient.
2. Open the CO2 port door and insert the FilterLine connector; turn connectorclockwise until hand tight.
3. Verify that the CO2 area is displayed. The EtCO2 monitor performs the autozero routine as part of the initialization self-test.
4. Display CO2 waveform in Channel 2 or 3.5. Connect the CO2 FilterLine set to the patient.6. Confirm that the EtCO2 value and waveform are
displayed. The monitor automatically selects the scale for the best visualization of the waveform.
TaskTo display the EtCO2 waveform.
User action, defibrillator labels, text/voice prompts and information
1. Rotate the SPEED DIAL to outline display channel 2 or 3.
2. Press the SPEED DIAL.3. Select WAVEFORM.4. Rotate the SPEED DIAL to select CO2.5. Press the SPEED DIAL.6. Press the HOME SCREEN button to
clear the menu.
TaskTo change the CO2 scale:
User action, defibrillator labels, text/voice prompts and information
1. Rotate the SPEED DIAL to outline CO2 area.2. Press the SPEED DIAL.3. Select SCALE.4. Rotate the SPEED DIAL to select the
desired scale.• Autoscale (default)• 0–20 mmHg (0–4 Vol% or kPa)• 0–50 mmHg (0–7 Vol% or kPa)• 0–100 mmHg (0–14 Vol% or kPa)
5. Press the SPEED DIAL to set the scale.6. Press the HOME SCREEN button to clear
the menu.
Instructor guide | 43
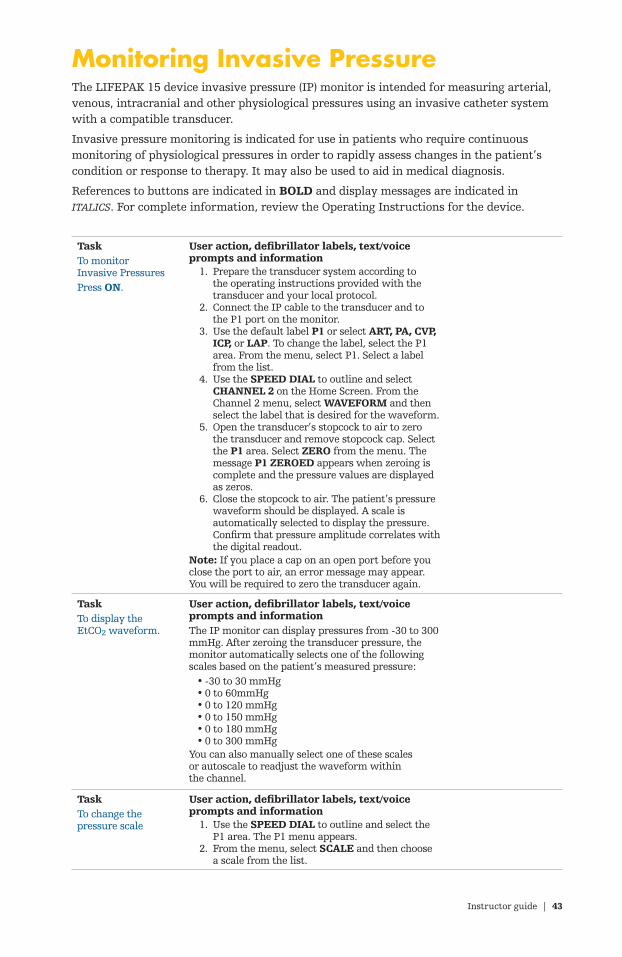
Monitoring Invasive PressureThe LIFEPAK 15 device invasive pressure (IP) monitor is intended for measuring arterial, venous, intracranial and other physiological pressures using an invasive catheter system with a compatible transducer.
Invasive pressure monitoring is indicated for use in patients who require continuous monitoring of physiological pressures in order to rapidly assess changes in the patient’s condition or response to therapy. It may also be used to aid in medical diagnosis.
References to buttons are indicated in BOLD and display messages are indicated in ITALICS. For complete information, review the Operating Instructions for the device.
TaskTo monitor Invasive PressuresPress ON.
User action, defibrillator labels, text/voice prompts and information 1. Prepare the transducer system according to
the operating instructions provided with the transducer and your local protocol.
2. Connect the IP cable to the transducer and to the P1 port on the monitor.
3. Use the default label P1 or select ART, PA, CVP, ICP, or LAP. To change the label, select the P1 area. From the menu, select P1. Select a label from the list.
4. Use the SPEED DIAL to outline and select CHANNEL 2 on the Home Screen. From the Channel 2 menu, select WAVEFORM and then select the label that is desired for the waveform.
5. Open the transducer’s stopcock to air to zero the transducer and remove stopcock cap. Select the P1 area. Select ZERO from the menu. The message P1 ZEROED appears when zeroing is complete and the pressure values are displayed as zeros.
6. Close the stopcock to air. The patient’s pressure waveform should be displayed. A scale is automatically selected to display the pressure. Confirm that pressure amplitude correlates with the digital readout.
Note: If you place a cap on an open port before you close the port to air, an error message may appear. You will be required to zero the transducer again.
TaskTo display the EtCO2 waveform.
User action, defibrillator labels, text/voice prompts and informationThe IP monitor can display pressures from -30 to 300 mmHg. After zeroing the transducer pressure, the monitor automatically selects one of the following scales based on the patient’s measured pressure:
• -30 to 30 mmHg• 0 to 60mmHg• 0 to 120 mmHg• 0 to 150 mmHg• 0 to 180 mmHg• 0 to 300 mmHg
You can also manually select one of these scales or autoscale to readjust the waveform within the channel.
TaskTo change the pressure scale
User action, defibrillator labels, text/voice prompts and information 1. Use the SPEED DIAL to outline and select the
P1 area. The P1 menu appears. 2. From the menu, select SCALE and then choose
a scale from the list.

44 | Instructor guide for the LIFEPAK 15 monitor/defibrillator/
Monitoring continuous temperatureThe LIFEPAK 15 device temperature monitor is intended for use in patients who require continuous monitoring of body temperature.
References to buttons are indicated in BOLD and display messages are indicated in ITALICS. For complete information, review the Operating Instructions for the device.
TaskTo Monitor Continuous Temperature:Press ON.
User action, defibrillator labels, text/voice prompts and information 1. Connect adapter cable to TEMP port on monitor. 2. Connect temperature probe to adapter cable. 3. Place temperature probe on patient according
to probe Instructions for Use. 4. Confirm temperature reading appears
and is stable.
Vital signs and ST segment trendsThe trends feature of the LIFEPAK 15 monitor/defibrillator provides the ability to graphically display and document the patient’s vital signs (VS) and ST segment measurements for up to eight hours. VS trending is intended for use with any patient who requires continuous monitoring of vital signs over an extended period of time to identify changes in patient condition and to document patient response to therapy. ST trending is intended for use with patients suspected of having acute ischemic events, such as unstable angina, and for patients during treatment of an acute ischemic event. ST segment measurement is initiated using a 12-lead ECG and is derived using the University of Glasgow 12-Lead ECG Analysis Program.
References to buttons are indicated in BOLD and display messages are indicated in ITALICS. For complete information, review the Operating Instructions for the device.
TaskHow VS trends work
User action, defibrillator labels, text/voice prompts and information
• Each active vital sign can be displayed graphically for time ranges of 30 minutes, and 1, 2, 4, and 8 hours.
• The vital signs are HR, SpO2, SpCO, SpMet, CO2, and RR; and systolic, diastolic and mean pressures.
• Data is sampled every 30 seconds. If valid data is not available, a blank space is substituted on the graph.
• NIBP values are plotted only when an NIBP measurement is obtained.
• VS measurements are not averaged or filtered. • No messages or alarms occur based on changes
in VS measurements.

Instructor guide | 45
TaskHow ST trends work
User action, defibrillator labels, text/voice prompts and information
• ST measurements can be displayed graphically for time ranges of 30 minutes, and 1, 2, 4, and 8 hours.
• ST trending is initiated by obtaining the patient’s first 12-lead ECG.
• The ST J-point (STJ) measurement is plotted on the ST trend graph.
• When all leads of the 12-lead ECG cable are attached to the patient, STJ measurements are obtained automatically every 30 seconds.
• If a lead is off, or the ECG data is too noisy, ST measurements are not obtained and the graph shows a blank for that time period.
• If an STJ measurement in any lead deviates from the initial measurement by 1 mm (0.1 mV) or more and the deviation persists for 2.5 minutes, the monitor automatically prints another 12-lead ECG.
TaskTo display trend graphs:
User action, defibrillator labels, text/voice prompts and information 1. Rotate the SPEED DIAL to outline Channel 2 or
3, and then press the SPEED DIAL to select the channel. The Channel menu appears.
2. Select WAVEFORM, and then select TREND. 3. Select SOURCE, and then select the desired
VS or ST.• The default setting for SCALE and
RANGE is AUTO. • When AUTO is used, the monitor
automatically updates the scale so that all values are displayed and all data from Power On to the present time is visible.
• If you change scale or range, some data may not be visible because it is off scale or out of range.
4. Press HOME SCREEN. The graph for the selected VS or ST appears in the channel.
Note: To initiate ST trends, you must obtain a 12-lead ECG. The initial ECG provides the baseline ST measurement and initiates the ST trends feature.
TaskTo print trend graphs:
User action, defibrillator labels, text/voice prompts and information 1. Press OPTIONS. The Options menu appears. 2. Rotate and then press the SPEED DIAL
to select PRINT. 3. Select REPORT, and then select
TREND SUMMARY. 4. Select PRINT. The Trend Summary Report
prints graphs of all actively monitored VS and ST trends.

46 | Instructor guide for the LIFEPAK 15 monitor/defibrillator/

Data management and other features

Instructor guide | 47
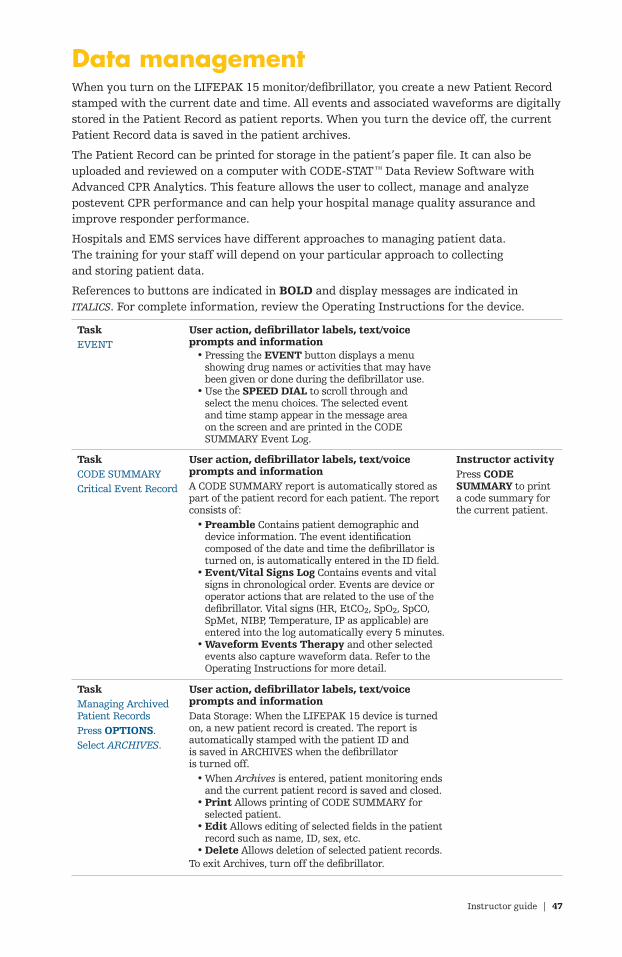
Data managementWhen you turn on the LIFEPAK 15 monitor/defibrillator, you create a new Patient Record stamped with the current date and time. All events and associated waveforms are digitally stored in the Patient Record as patient reports. When you turn the device off, the current Patient Record data is saved in the patient archives.
The Patient Record can be printed for storage in the patient’s paper file. It can also be uploaded and reviewed on a computer with CODE-STAT™ Data Review Software with Advanced CPR Analytics. This feature allows the user to collect, manage and analyze postevent CPR performance and can help your hospital manage quality assurance and improve responder performance.
Hospitals and EMS services have different approaches to managing patient data. The training for your staff will depend on your particular approach to collecting and storing patient data.
References to buttons are indicated in BOLD and display messages are indicated in ITALICS. For complete information, review the Operating Instructions for the device.
TaskEVENT
User action, defibrillator labels, text/voice prompts and information
• Pressing the EVENT button displays a menu showing drug names or activities that may have been given or done during the defibrillator use.
• Use the SPEED DIAL to scroll through and select the menu choices. The selected event and time stamp appear in the message area on the screen and are printed in the CODE SUMMARY Event Log.
TaskCODE SUMMARYCritical Event Record
User action, defibrillator labels, text/voice prompts and informationA CODE SUMMARY report is automatically stored as part of the patient record for each patient. The report consists of:
• Preamble Contains patient demographic and device information. The event identification composed of the date and time the defibrillator is turned on, is automatically entered in the ID field.
• Event/Vital Signs Log Contains events and vital signs in chronological order. Events are device or operator actions that are related to the use of the defibrillator. Vital signs (HR, EtCO2, SpO2, SpCO, SpMet, NIBP, Temperature, IP as applicable) are entered into the log automatically every 5 minutes.
• Waveform Events Therapy and other selected events also capture waveform data. Refer to the Operating Instructions for more detail.
Instructor activityPress CODE SUMMARY to print a code summary for the current patient.
TaskManaging Archived Patient RecordsPress OPTIONS.Select ARCHIVES.
User action, defibrillator labels, text/voice prompts and informationData Storage: When the LIFEPAK 15 device is turned on, a new patient record is created. The report is automatically stamped with the patient ID and is saved in ARCHIVES when the defibrillator is turned off.
• When Archives is entered, patient monitoring ends and the current patient record is saved and closed.
• Print Allows printing of CODE SUMMARY for selected patient.
• Edit Allows editing of selected fields in the patient record such as name, ID, sex, etc.
• Delete Allows deletion of selected patient records.To exit Archives, turn off the defibrillator.

48 | Instructor guide for the LIFEPAK 15 monitor/defibrillator/
DiscussMemory Capacity
User action, defibrillator labels, text/voice prompts and informationThe LIFEPAK 15 device retains data for two or more patients when you switch the power off. The number of patient reports stored depends on various factors, including the number of displayed waveforms, the duration of each use, and the type of therapy. Typically, memory capacity includes up to 100 single waveform reports. When memory capacity is reached, the defibrillator deletes an entire Patient Record using a “first in, first out” priority. Deleted records cannot be retrieved.
DiscussUploading data to CODE-STAT with Advanced CPR Analytics
User action, defibrillator labels, text/voice prompts and informationPatient reports and data can be easily downloaded from your LIFEPAK 15 device to a computer that has either the CODE-STAT Data Review Software with Advanced CPR Analytics or DT EXPRESS™ Data Transfer Software loaded on it. A download wizard makes this process simple and quick once the software has been loaded on the computer. This feature allows the user to collect, manage, and analyze post-event CPR performance.
TaskPrinting a record
User action, defibrillator labels, text/voice prompts and information 1. Press PRINT to turn on printer.
• Printout 8 second delay.• Printout will include channels displayed
on screen. 2. Press PRINT to turn off printer.
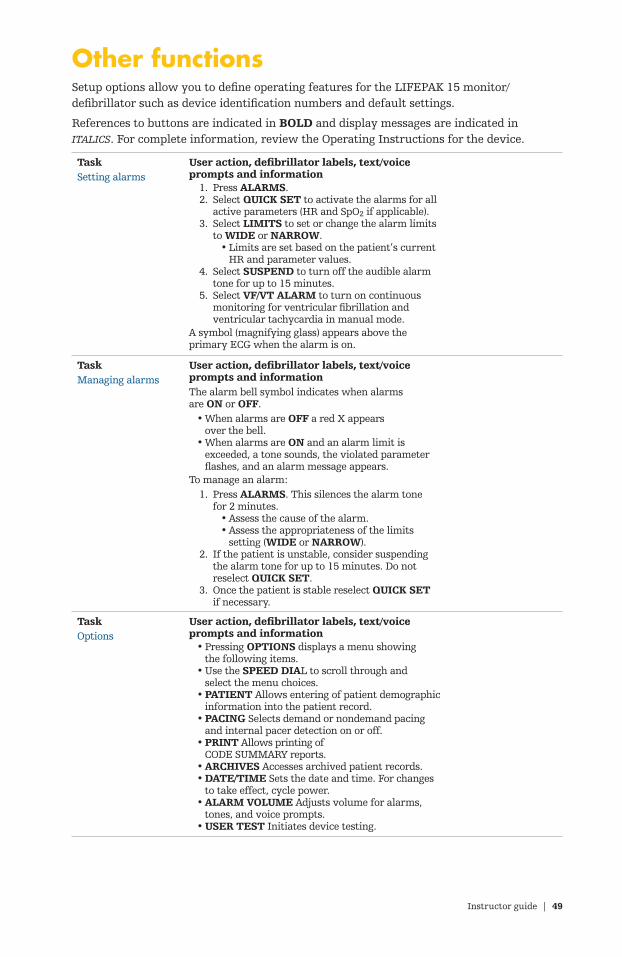
Instructor guide | 49
Other functionsSetup options allow you to define operating features for the LIFEPAK 15 monitor/defibrillator such as device identification numbers and default settings.
References to buttons are indicated in BOLD and display messages are indicated in ITALICS. For complete information, review the Operating Instructions for the device.
TaskSetting alarms
User action, defibrillator labels, text/voice prompts and information 1. Press ALARMS. 2. Select QUICK SET to activate the alarms for all
active parameters (HR and SpO2 if applicable). 3. Select LIMITS to set or change the alarm limits
to WIDE or NARROW.• Limits are set based on the patient’s current
HR and parameter values. 4. Select SUSPEND to turn off the audible alarm
tone for up to 15 minutes. 5. Select VF/VT ALARM to turn on continuous
monitoring for ventricular fibrillation and ventricular tachycardia in manual mode.
A symbol (magnifying glass) appears above the primary ECG when the alarm is on.
TaskManaging alarms
User action, defibrillator labels, text/voice prompts and informationThe alarm bell symbol indicates when alarms are ON or OFF.
• When alarms are OFF a red X appears over the bell.
• When alarms are ON and an alarm limit is exceeded, a tone sounds, the violated parameter flashes, and an alarm message appears.
To manage an alarm: 1. Press ALARMS. This silences the alarm tone
for 2 minutes.• Assess the cause of the alarm.• Assess the appropriateness of the limits
setting (WIDE or NARROW). 2. If the patient is unstable, consider suspending
the alarm tone for up to 15 minutes. Do not reselect QUICK SET.
3. Once the patient is stable reselect QUICK SET if necessary.
TaskOptions
User action, defibrillator labels, text/voice prompts and information
• Pressing OPTIONS displays a menu showing the following items.
• Use the SPEED DIAL to scroll through and select the menu choices.
• PATIENT Allows entering of patient demographic information into the patient record.
• PACING Selects demand or nondemand pacing and internal pacer detection on or off.
• PRINT Allows printing of CODE SUMMARY reports.
• ARCHIVES Accesses archived patient records.• DATE/TIME Sets the date and time. For changes
to take effect, cycle power.• ALARM VOLUME Adjusts volume for alarms,
tones, and voice prompts.• USER TEST Initiates device testing.

50 | Instructor guide for the LIFEPAK 15 monitor/defibrillator/
Instructor guide | 51
LIFEPAK® 15 Monitor/Defibrillator
BRIEF SUMMARY OF INDICATIONS AND IMPORTANT SAFETY INFORMATION
LIFEPAK 15 is a complete acute cardiac care response system designed for basic life support (BLS) and advanced life support (ALS) patient management protocols. INTENDED USE: LIFEPAK 15 intended for use by trained medical personnel out-of-doors, in indoor emergency care settings, and is designed to be used for ground transportation. Monitoring and therapy functions may only be used on one patient at a time. Manual mode monitoring and therapy functions are intended for use on adult and pediatric patients. Automated external defibrillation (AED) mode intended for use on patients ≥ 8 years of age.
INDICATIONS FOR USE – MANUAL DEFIBRILLATION: Indicated for termination of certain potentially fatal arrhythmias, such as ventricular fibrillation and symptomatic ventricular tachycardia. Delivery of energy in synchronized mode is a method for treating atrial fibrillation, atrial flutter, paroxysmal supraventricular tachycardia and, in relatively stable patients, ventricular tachycardia. CONTRAINDICATIONS - MANUAL DEFIBRILLATION: Contraindicated in treatment of PEA and asystole. AED MODE: To be used only on patients in cardiopulmonary arrest. Patient must be unconscious, pulseless, and not breathing normally before using defibrillator to analyze patient’s ECG rhythm. In AED mode, the LIFEPAK 15 is intended for use on pediatric patients ≥ 8 years of age.
CONTRAINDICATIONS - AED MODE: None known.
INDICATIONS FOR USE – MONITORING. AQUIRING 12-LEAD ECG: 12-lead electrocardiogram used to identify, diagnose, and treat patients with cardiac disorders and is useful in early detection and prompt treatment of patients with STEMI. MONITORING SPO2, SPCO, AND SPMET: Pulse oximetry indicated for use in any patient who is at risk of developing hypoxemia, carboxyhemoglobinemia, or methemoglobinemia. SpO2 monitoring may be used during no motion and motion conditions, and in patients who are well or poorly perfused. SpCO and SpMet accuracies have not been validated under motion or low perfusion conditions. MONITORING NONINVASIVE BLOOD PRESSURE: Intended for detection of hypertension or hypotension and monitoring blood pressure trends in patient conditions. NIBP monitoring not indicated for neonatal patients <1-month-old. MONITORING EtCO2: Used to detect trends in level of expired CO2, used for monitoring breathing efficacy and treatment effectiveness in acute cardiopulmonary care. MONITORING INVASIVE PRESSURE: Indicated for use in patients who require continuous monitoring of physiological pressures to rapidly assess changes in patient’s condition or response to therapy. May also be used to aid diagnosis. MONITORING CONTINUOUS TEMPERATURE: Indicated for use in patients who require continuous monitoring of body temperature.
MONITORING CONTRAINDICATIONS: None known.
Operating Instructions provide important information to help you operate LIFEPAK 15. Become familiar with all terms and warnings. GENERAL DANGER: Explosion hazard. GENERAL/THERAPY/MANUAL DEFIBRILLATION WARNINGS and CAUTION: Shock or fire hazards • Possible patient skin burns and ineffective energy delivery • Possible device failure, damage, inability to deliver therapy, shutdown, loss of power during patient care, improper device performance • Possible electrical interference with device performance or with other equipment • Safety risk • Failure to detect change in ECG rhythm • Possible failure to detect out of range condition • Possible interference with implanted electrical device • Possible paddle damage • Possible incorrect energy delivery. CPR METRONOME WARNING: CPR delivered when not needed. SYNCHRONIZED CARDIOVERSION WARNING: Possible lethal arrhythmia. NONINVASIVE PACING WARNING: Possible inability to pace, interruption of therapy, ineffective pacing, and patient skin burns. PEDIATRIC ECG MONITORING AND MANUAL MODE THERAPY: Possible patient skin burns. AED WARNINGS: Possible misinterpretation of data or ECG misinterpretation • Pediatric patient safety risk. ECG MONITORING WARNING: Possible misinterpretation of ECG data. 12-LEAD ECG WARNINGS: Possible inability to obtain diagnostic quality 12-lead ECG or inaccurate diagnosis • Possible incorrect treatment with reperfusion therapy. SPO2, SPCO, AND SPMET WARNINGS AND CAUTION: Shock or burn hazard • Inaccurate pulse oximeter readings • Possible skin injury • Possible strangulation • Inaccurate SPO2, SPCO and/or SPMET readings • Possible equipment damage. NIBP MONITORING WARNINGS AND CAUTION: Possible loss of IV access and inaccurate infusion rate, circulation impairment or inaccurate blood pressure or oxygen saturation readings • Possible patient harm • Equipment damage. EtCO2 MONITORING WARNINGS AND CAUTION: Fire hazard • Possible inaccurate patient assessment or inaccurate CO2 readings • Possible strangulation • Infection hazard • Possible equipment damage. IP MONITORING WARNINGS: Possible inaccurate pressure readings, air embolism, blood loss or loss of sterility • Possible patient injury or equipment damage • Possible lethal arrhythmia • Increased intracranial pressure. TEMPERATURE MONITORING WARNINGS: Possible inaccurate temperature readings • Infection hazard • Possible strangulation. VITAL SIGN/ST SEGMENT TRENDS WARNING: Inaccurate interpretation of patient status.
U.S. Federal law restricts this device to sale by or on the order of a physician.
Please consult Operating Instructions at www.strykeremergencycare.com or call 800.442.1142 for complete list of indications, contraindications, warnings, cautions, potential adverse events, safety and effectiveness data, instructions for use and other important information.
For further information, please contact your Stryker representative or visit our website at strykeremergencycare.com
Emergency CareThis document is intended solely for the use of healthcare professionals. A healthcare professional must always rely on his or her own professional clinical judgment when deciding whether to use a particular product when treating a particular patient. Stryker does not dispense medical advice and recommends that healthcare professionals be trained in the use of any particular product before using it.
The information presented is intended to demonstrate Stryker’s product offerings. A healthcare professional must always refer to operating instructions for complete directions for use indications, contraindications, warnings, cautions, and potential adverse events, before using any of Stryker’s products. Products may not be available in all markets because product availability is subject to the regulatory and/or medical practices in individual markets. Please contact your representative if you have questions about the availability of Stryker’s products in your area. Specifications subject to change without notice.
Stryker or its affiliated entities own, use, or have applied for the following trademarks or service marks: CodeManagement Module, CODE-STAT, CODE SUMMARY, DT EXPRESS, EDGE System, LIFEPAK, QUIK-COMBO, REDI-CHARGE, REDI-PAK, Stryker, SunVue. All other trademarks are trademarks of their respective owners or holders.
The absence of a product, feature, or service name, or logo from this list does not constitute a waiver of Stryker’s trademark or other intellectual property rights concerning that name or logo.
07/2020 GDR 3309799_D Copyright © 2020 Stryker
References
1. Chan PS, Krumholz HM, Nichol G, Nallamothu BK. “Delayed time to defibrillation afterin-hospital cardiac arrest.” NEJM. 2008;358:9–17.
2. Stiell IG, Walker RG, Nesbitt LP, et al. “The BIPHASIC Trial: A randomized comparison of fixedlower versus escalating higher energy levels for defibrillation in out-of-hospital cardiac arrest.”Circulation. 2007;115:1511–1517.
3. Koster RW, Walker RG, Chapman F. “Recurrent ventricular fibrillation during advanced lifesupport care of patients with prehospital cardiac arrest.” Resuscitation. 2008;78:252–257.
4. Walsh SJ, McClelland AJ, Owens CG, et al. “Efficacy of distinct energy delivery protocolscomparing two biphasic defibrillators for cardiac arrest.” Am J Cardiology. 2004;94:378–380.
Manufactured by:
Physio-Control, Inc. 11811 Willows Road NE Redmond, WA, 98052 U.S.A. Toll free 800 442 1142 strykeremergencycare.com
Stryker European Operations B.V.Herikerbergweg 1101101 CM AmsterdamNetherlandsTel +31 (0)43 3620008
Fax +31 (0)43 3632001
Distributed by:Stryker Canada 2 Medicorum Place Waterdown, Ontario L8B 1W2 Canada Toll free 800 668 8323
Stryker UK LtdStryker HouseHambridge RoadNewbury, BerkshireRG14 5AWUnited Kingdom


