160
15/20/15 LED-TV Operating instuction for TV sets with the type designation „TY” www.metz-ce.de
| Date post: | 21-Feb-2023 |
| Category: |
Documents |
| Upload: | khangminh22 |
| View: | 0 times |
| Download: | 0 times |
15/2
0/15
LED-TV Operating instuctionfor TV sets with the type designation „TY”
www.metz-ce.de
Dear Customer,thank you very much for choosing a Metz product.
We have created menu navigation in this TV set that provides youwith an easy- to-understand user interface.
You can access the help menu during all modes of operation in orderto make adjustments to your settings.
But before switching on for the first time, you should at any rate readchapters 1 to 5 and 9 of the user's guide.
In the box• TV set
• Remote control + two AAA batteries
• Power cord
• Operating instructions
• Productdatasheet
• Energydatasheet
• Energylabel
• Unit base
Operating instructions for the following LCD TV sets:see accompanying datasheet.
Explanation
Hint, note
Beware of health risks!
+
"Metz Consumer Electronics GmbH hereby declares that all the TVsets listed on the attached data sheet comply with the basic require-ments and other relevant regulations of Guideline 2014/53/EU ."
Web address where you can find the declarations of conformity:www.metz.de.
This product contains free software distributed under the GNUGeneral Public License (GPL) and/or the GNU Lesser General PublicLicense (LGPL). You may redistribute and / or publish it under theterms of the GNU General Public License and/or the GNU LesserGeneral Public License, as published by the Free Software Founda-tion, either according to version 2 of the license, or (depending onyour option) any later version.
This programme is distributed in the hope that it will be useful, butWITHOUT ANY WARRANTY, especially without the implied warranty ofMERCHANTABILITY or FITNESS FOR A PARTICULAR PURPOSE. Detailscan be found in the GNU General Public License (GPL) and the GNULesser General Public License (LGPL).You can obtain the software from the Metz Consumer ElectronicsGmbH customer service ([email protected] or by writing toOhmstraße 55, D-90513 Zirndorf, Germany). You can download theGNU General Public License (GPL) and the GNU Lesser GeneralPublic License (LGPL) from http://www.gnu.org/licenses/.
2
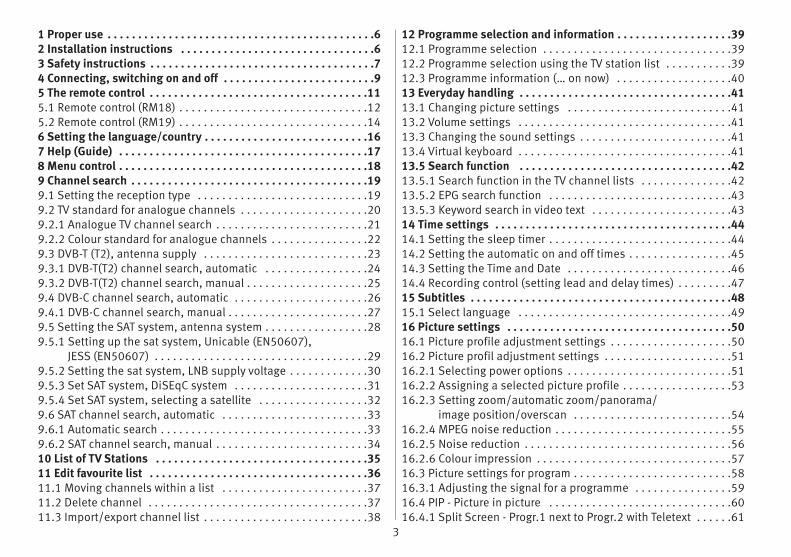
1 Proper use . . . . . . . . . . . . . . . . . . . . . . . . . . . . . . . . . . . . . . . . . . . .62 Installation instructions . . . . . . . . . . . . . . . . . . . . . . . . . . . . . . . .63 Safety instructions . . . . . . . . . . . . . . . . . . . . . . . . . . . . . . . . . . . . .74 Connecting, switching on and off . . . . . . . . . . . . . . . . . . . . . . . . .95 The remote control . . . . . . . . . . . . . . . . . . . . . . . . . . . . . . . . . . . .115.1 Remote control (RM18) . . . . . . . . . . . . . . . . . . . . . . . . . . . . . . .125.2 Remote control (RM19) . . . . . . . . . . . . . . . . . . . . . . . . . . . . . . .146 Setting the language/country . . . . . . . . . . . . . . . . . . . . . . . . . . .167 Help (Guide) . . . . . . . . . . . . . . . . . . . . . . . . . . . . . . . . . . . . . . . . .178 Menu control . . . . . . . . . . . . . . . . . . . . . . . . . . . . . . . . . . . . . . . . .189 Channel search . . . . . . . . . . . . . . . . . . . . . . . . . . . . . . . . . . . . . . .199.1 Setting the reception type . . . . . . . . . . . . . . . . . . . . . . . . . . . .199.2 TV standard for analogue channels . . . . . . . . . . . . . . . . . . . . .209.2.1 Analogue TV channel search . . . . . . . . . . . . . . . . . . . . . . . . .219.2.2 Colour standard for analogue channels . . . . . . . . . . . . . . . .229.3 DVB-T (T2), antenna supply . . . . . . . . . . . . . . . . . . . . . . . . . . .239.3.1 DVB-T(T2) channel search, automatic . . . . . . . . . . . . . . . . .249.3.2 DVB-T(T2) channel search, manual . . . . . . . . . . . . . . . . . . . .259.4 DVB-C channel search, automatic . . . . . . . . . . . . . . . . . . . . . .269.4.1 DVB-C channel search, manual . . . . . . . . . . . . . . . . . . . . . . .279.5 Setting the SAT system, antenna system . . . . . . . . . . . . . . . . .289.5.1 Setting up the sat system, Unicable (EN50607),
JESS (EN50607) . . . . . . . . . . . . . . . . . . . . . . . . . . . . . . . . . . .299.5.2 Setting the sat system, LNB supply voltage . . . . . . . . . . . . .309.5.3 Set SAT system, DiSEqC system . . . . . . . . . . . . . . . . . . . . . .319.5.4 Set SAT system, selecting a satellite . . . . . . . . . . . . . . . . . .329.6 SAT channel search, automatic . . . . . . . . . . . . . . . . . . . . . . . .339.6.1 Automatic search . . . . . . . . . . . . . . . . . . . . . . . . . . . . . . . . . .339.6.2 SAT channel search, manual . . . . . . . . . . . . . . . . . . . . . . . . .3410 List of TV Stations . . . . . . . . . . . . . . . . . . . . . . . . . . . . . . . . . . .3511 Edit favourite list . . . . . . . . . . . . . . . . . . . . . . . . . . . . . . . . . . . .3611.1 Moving channels within a list . . . . . . . . . . . . . . . . . . . . . . . .3711.2 Delete channel . . . . . . . . . . . . . . . . . . . . . . . . . . . . . . . . . . . .3711.3 Import/export channel list . . . . . . . . . . . . . . . . . . . . . . . . . . .38
12 Programme selection and information . . . . . . . . . . . . . . . . . . .3912.1 Programme selection . . . . . . . . . . . . . . . . . . . . . . . . . . . . . . .3912.2 Programme selection using the TV station list . . . . . . . . . . .3912.3 Programme information (… on now) . . . . . . . . . . . . . . . . . . .4013 Everyday handling . . . . . . . . . . . . . . . . . . . . . . . . . . . . . . . . . . .4113.1 Changing picture settings . . . . . . . . . . . . . . . . . . . . . . . . . . .4113.2 Volume settings . . . . . . . . . . . . . . . . . . . . . . . . . . . . . . . . . . .4113.3 Changing the sound settings . . . . . . . . . . . . . . . . . . . . . . . . .4113.4 Virtual keyboard . . . . . . . . . . . . . . . . . . . . . . . . . . . . . . . . . . .4113.5 Search function . . . . . . . . . . . . . . . . . . . . . . . . . . . . . . . . . . .4213.5.1 Search function in the TV channel lists . . . . . . . . . . . . . . .4213.5.2 EPG search function . . . . . . . . . . . . . . . . . . . . . . . . . . . . . .4313.5.3 Keyword search in video text . . . . . . . . . . . . . . . . . . . . . . .4314 Time settings . . . . . . . . . . . . . . . . . . . . . . . . . . . . . . . . . . . . . . .4414.1 Setting the sleep timer . . . . . . . . . . . . . . . . . . . . . . . . . . . . . .4414.2 Setting the automatic on and off times . . . . . . . . . . . . . . . . .4514.3 Setting the Time and Date . . . . . . . . . . . . . . . . . . . . . . . . . . .4614.4 Recording control (setting lead and delay times) . . . . . . . . .4715 Subtitles . . . . . . . . . . . . . . . . . . . . . . . . . . . . . . . . . . . . . . . . . . .4815.1 Select language . . . . . . . . . . . . . . . . . . . . . . . . . . . . . . . . . . .4916 Picture settings . . . . . . . . . . . . . . . . . . . . . . . . . . . . . . . . . . . . .5016.1 Picture profile adjustment settings . . . . . . . . . . . . . . . . . . . .5016.2 Picture profil adjustment settings . . . . . . . . . . . . . . . . . . . . .5116.2.1 Selecting power options . . . . . . . . . . . . . . . . . . . . . . . . . . .5116.2.2 Assigning a selected picture profile . . . . . . . . . . . . . . . . . .5316.2.3 Setting zoom/automatic zoom/panorama/
image position/overscan . . . . . . . . . . . . . . . . . . . . . . . . . .5416.2.4 MPEG noise reduction . . . . . . . . . . . . . . . . . . . . . . . . . . . . .5516.2.5 Noise reduction . . . . . . . . . . . . . . . . . . . . . . . . . . . . . . . . . .5616.2.6 Colour impression . . . . . . . . . . . . . . . . . . . . . . . . . . . . . . . .5716.3 Picture settings for program . . . . . . . . . . . . . . . . . . . . . . . . . .5816.3.1 Adjusting the signal for a programme . . . . . . . . . . . . . . . .5916.4 PIP - Picture in picture . . . . . . . . . . . . . . . . . . . . . . . . . . . . . .6016.4.1 Split Screen - Progr.1 next to Progr.2 with Teletext . . . . . .61
3
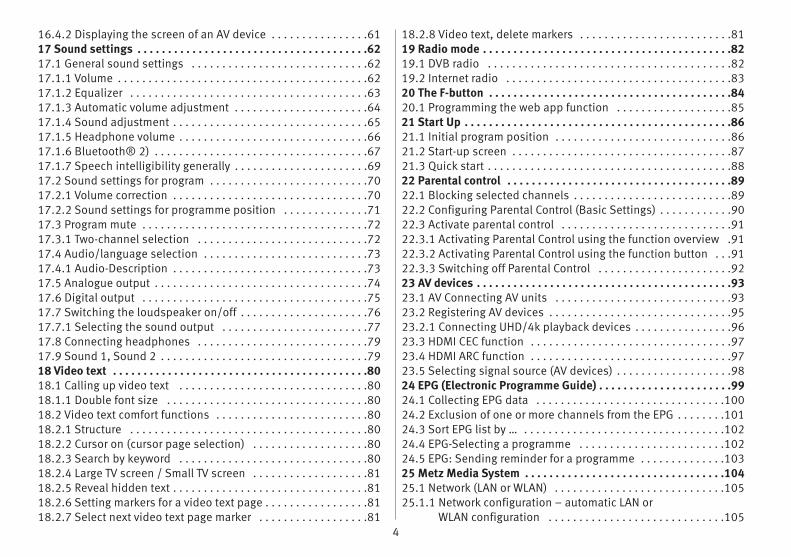
16.4.2 Displaying the screen of an AV device . . . . . . . . . . . . . . . .6117 Sound settings . . . . . . . . . . . . . . . . . . . . . . . . . . . . . . . . . . . . . .6217.1 General sound settings . . . . . . . . . . . . . . . . . . . . . . . . . . . . .6217.1.1 Volume . . . . . . . . . . . . . . . . . . . . . . . . . . . . . . . . . . . . . . . . .6217.1.2 Equalizer . . . . . . . . . . . . . . . . . . . . . . . . . . . . . . . . . . . . . . .6317.1.3 Automatic volume adjustment . . . . . . . . . . . . . . . . . . . . . .6417.1.4 Sound adjustment . . . . . . . . . . . . . . . . . . . . . . . . . . . . . . . .6517.1.5 Headphone volume . . . . . . . . . . . . . . . . . . . . . . . . . . . . . . .6617.1.6 Bluetooth® 2) . . . . . . . . . . . . . . . . . . . . . . . . . . . . . . . . . . .6717.1.7 Speech intelligibility generally . . . . . . . . . . . . . . . . . . . . . .6917.2 Sound settings for program . . . . . . . . . . . . . . . . . . . . . . . . . .7017.2.1 Volume correction . . . . . . . . . . . . . . . . . . . . . . . . . . . . . . . .7017.2.2 Sound settings for programme position . . . . . . . . . . . . . .7117.3 Program mute . . . . . . . . . . . . . . . . . . . . . . . . . . . . . . . . . . . . .7217.3.1 Two-channel selection . . . . . . . . . . . . . . . . . . . . . . . . . . . .7217.4 Audio/language selection . . . . . . . . . . . . . . . . . . . . . . . . . . .7317.4.1 Audio-Description . . . . . . . . . . . . . . . . . . . . . . . . . . . . . . . .7317.5 Analogue output . . . . . . . . . . . . . . . . . . . . . . . . . . . . . . . . . . .7417.6 Digital output . . . . . . . . . . . . . . . . . . . . . . . . . . . . . . . . . . . . .7517.7 Switching the loudspeaker on/off . . . . . . . . . . . . . . . . . . . . .7617.7.1 Selecting the sound output . . . . . . . . . . . . . . . . . . . . . . . .7717.8 Connecting headphones . . . . . . . . . . . . . . . . . . . . . . . . . . . .7917.9 Sound 1, Sound 2 . . . . . . . . . . . . . . . . . . . . . . . . . . . . . . . . . .7918 Video text . . . . . . . . . . . . . . . . . . . . . . . . . . . . . . . . . . . . . . . . . .8018.1 Calling up video text . . . . . . . . . . . . . . . . . . . . . . . . . . . . . . .8018.1.1 Double font size . . . . . . . . . . . . . . . . . . . . . . . . . . . . . . . . .8018.2 Video text comfort functions . . . . . . . . . . . . . . . . . . . . . . . . .8018.2.1 Structure . . . . . . . . . . . . . . . . . . . . . . . . . . . . . . . . . . . . . . .8018.2.2 Cursor on (cursor page selection) . . . . . . . . . . . . . . . . . . .8018.2.3 Search by keyword . . . . . . . . . . . . . . . . . . . . . . . . . . . . . . .8018.2.4 Large TV screen / Small TV screen . . . . . . . . . . . . . . . . . . .8118.2.5 Reveal hidden text . . . . . . . . . . . . . . . . . . . . . . . . . . . . . . . .8118.2.6 Setting markers for a video text page . . . . . . . . . . . . . . . . .8118.2.7 Select next video text page marker . . . . . . . . . . . . . . . . . .81
18.2.8 Video text, delete markers . . . . . . . . . . . . . . . . . . . . . . . . .8119 Radio mode . . . . . . . . . . . . . . . . . . . . . . . . . . . . . . . . . . . . . . . . .8219.1 DVB radio . . . . . . . . . . . . . . . . . . . . . . . . . . . . . . . . . . . . . . . .8219.2 Internet radio . . . . . . . . . . . . . . . . . . . . . . . . . . . . . . . . . . . . .8320 The F-button . . . . . . . . . . . . . . . . . . . . . . . . . . . . . . . . . . . . . . . .8420.1 Programming the web app function . . . . . . . . . . . . . . . . . . .8521 Start Up . . . . . . . . . . . . . . . . . . . . . . . . . . . . . . . . . . . . . . . . . . . .8621.1 Initial program position . . . . . . . . . . . . . . . . . . . . . . . . . . . . .8621.2 Start-up screen . . . . . . . . . . . . . . . . . . . . . . . . . . . . . . . . . . . .8721.3 Quick start . . . . . . . . . . . . . . . . . . . . . . . . . . . . . . . . . . . . . . . .8822 Parental control . . . . . . . . . . . . . . . . . . . . . . . . . . . . . . . . . . . . .8922.1 Blocking selected channels . . . . . . . . . . . . . . . . . . . . . . . . . .8922.2 Configuring Parental Control (Basic Settings) . . . . . . . . . . . .9022.3 Activate parental control . . . . . . . . . . . . . . . . . . . . . . . . . . . .9122.3.1 Activating Parental Control using the function overview .9122.3.2 Activating Parental Control using the function button . . .9122.3.3 Switching off Parental Control . . . . . . . . . . . . . . . . . . . . . .9223 AV devices . . . . . . . . . . . . . . . . . . . . . . . . . . . . . . . . . . . . . . . . . .9323.1 AV Connecting AV units . . . . . . . . . . . . . . . . . . . . . . . . . . . . .9323.2 Registering AV devices . . . . . . . . . . . . . . . . . . . . . . . . . . . . . .9523.2.1 Connecting UHD/4k playback devices . . . . . . . . . . . . . . . .9623.3 HDMI CEC function . . . . . . . . . . . . . . . . . . . . . . . . . . . . . . . . .9723.4 HDMI ARC function . . . . . . . . . . . . . . . . . . . . . . . . . . . . . . . . .9723.5 Selecting signal source (AV devices) . . . . . . . . . . . . . . . . . . .9824 EPG (Electronic Programme Guide) . . . . . . . . . . . . . . . . . . . . . .9924.1 Collecting EPG data . . . . . . . . . . . . . . . . . . . . . . . . . . . . . . .10024.2 Exclusion of one or more channels from the EPG . . . . . . . .10124.3 Sort EPG list by … . . . . . . . . . . . . . . . . . . . . . . . . . . . . . . . . .10224.4 EPG-Selecting a programme . . . . . . . . . . . . . . . . . . . . . . . .10224.5 EPG: Sending reminder for a programme . . . . . . . . . . . . . .10325 Metz Media System . . . . . . . . . . . . . . . . . . . . . . . . . . . . . . . . .10425.1 Network (LAN or WLAN) . . . . . . . . . . . . . . . . . . . . . . . . . . . .10525.1.1 Network configuration – automatic LAN or
WLAN configuration . . . . . . . . . . . . . . . . . . . . . . . . . . . . .1054
25.1.2 Setting the LAN or WLAN network configurations manually 10625.1.3 Setup WLAN . . . . . . . . . . . . . . . . . . . . . . . . . . . . . . . . . . . .10625.1.4 Testing the network connection . . . . . . . . . . . . . . . . . . . .10625.1.5 Media Server . . . . . . . . . . . . . . . . . . . . . . . . . . . . . . . . . . .10725.2 Hybrid broadcast broadband TV (HbbTV) . . . . . . . . . . . . . .10925.2.1 Accessing HbbTV . . . . . . . . . . . . . . . . . . . . . . . . . . . . . . . .11025.2.2 Exiting HbbTV . . . . . . . . . . . . . . . . . . . . . . . . . . . . . . . . . .11025.3 Internet Timer . . . . . . . . . . . . . . . . . . . . . . . . . . . . . . . . . . . .11126 Smart TV Internet portal . . . . . . . . . . . . . . . . . . . . . . . . . . . . .11427 Opening the Media Player . . . . . . . . . . . . . . . . . . . . . . . . . . .11627.1 Using the media player . . . . . . . . . . . . . . . . . . . . . . . . . . . .11627.1.1 Photos – photo overview . . . . . . . . . . . . . . . . . . . . . . . . .11627.1.2 Start show . . . . . . . . . . . . . . . . . . . . . . . . . . . . . . . . . . . . .11727.2 Music . . . . . . . . . . . . . . . . . . . . . . . . . . . . . . . . . . . . . . . . . . .11727.2.1 Slideshow with music . . . . . . . . . . . . . . . . . . . . . . . . . . . .11727.3 Videos . . . . . . . . . . . . . . . . . . . . . . . . . . . . . . . . . . . . . . . . . .11827.4 Data formats . . . . . . . . . . . . . . . . . . . . . . . . . . . . . . . . . . . . .11828 Digital-/USB recording to hard disk . . . . . . . . . . . . . . . . . . .11928.1 Hard disk instructions . . . . . . . . . . . . . . . . . . . . . . . . . . . . .11928.2 Activating your TV for USB recording . . . . . . . . . . . . . . . . . .12028.3 Format external hard disk . . . . . . . . . . . . . . . . . . . . . . . . . .12228.4 Settings for the internal/external hard disk . . . . . . . . . . . .12328.4.1 PVR Timer or Recording Defaults . . . . . . . . . . . . . . . . . . .12428.4.2 Basic settings for series recordings . . . . . . . . . . . . . . . . .12528.4.3 Series timer recording using EPG . . . . . . . . . . . . . . . . . . .12528.5 Delayed television viewing (Time shift) . . . . . . . . . . . . . . .12628.5.1 Saving time shift buffer as recording . . . . . . . . . . . . . . . .12728.6 Recording a broadcast . . . . . . . . . . . . . . . . . . . . . . . . . . . . .12828.6.1 Direct recording of a program . . . . . . . . . . . . . . . . . . . . . .12828.6.2 Configuring a programme as a series timer . . . . . . . . . . .12828.6.3 EPG: Recording a programme (single or series) . . . . . . .12928.6.4 Accurate Recording (Accurate Rec) . . . . . . . . . . . . . . . . .13028.7 Recording plan (Overview of programmed recording timers)131
29 The Recordings archive . . . . . . . . . . . . . . . . . . . . . . . . . . . . . .13229.1 Playing programs from the Recordings archive . . . . . . . . .13229.2 Pause playback, Rewind, Fast-Forward . . . . . . . . . . . . . . .13229.3 Edit recording (marking / cutting) . . . . . . . . . . . . . . . . . . . .13329.4 Deleting programs from the Recordings archive . . . . . . . .13429.5 Slow motion . . . . . . . . . . . . . . . . . . . . . . . . . . . . . . . . . . . . .13529.6 Delete protections . . . . . . . . . . . . . . . . . . . . . . . . . . . . . . . .13529.6.1 Activating deletion protection . . . . . . . . . . . . . . . . . . . . .13529.6.2 Désactiver le protégé . . . . . . . . . . . . . . . . . . . . . . . . . . . .13529.7 Parental control . . . . . . . . . . . . . . . . . . . . . . . . . . . . . . . . . .13629.8 Continuous playback . . . . . . . . . . . . . . . . . . . . . . . . . . . . . .13629.8.1 Activating endless playback . . . . . . . . . . . . . . . . . . . . . . .13629.8.2 Deactivating endless playback . . . . . . . . . . . . . . . . . . . .13629.9 Change file name . . . . . . . . . . . . . . . . . . . . . . . . . . . . . . . . .13729.10 Creating a new folder . . . . . . . . . . . . . . . . . . . . . . . . . . . . .13730 The “File Manager” . . . . . . . . . . . . . . . . . . . . . . . . . . . . . . . . .13831 Software update . . . . . . . . . . . . . . . . . . . . . . . . . . . . . . . . . . . .13931.1 Software update using the Metz homepage . . . . . . . . . . . .14031.2 Software update over the Internet . . . . . . . . . . . . . . . . . . . .14132 Inserting / removing a CA module . . . . . . . . . . . . . . . . . . . . .14233 Range of functions . . . . . . . . . . . . . . . . . . . . . . . . . . . . . . . . . .14334 Operation via the Metz Remote app . . . . . . . . . . . . . . . . . . .14434.1 Requirements . . . . . . . . . . . . . . . . . . . . . . . . . . . . . . . . . . . .14434.2 Download the Metz Remote app . . . . . . . . . . . . . . . . . . . . .14435 Operating more than one TV in a single room . . . . . . . . . . .14636 Glossary . . . . . . . . . . . . . . . . . . . . . . . . . . . . . . . . . . . . . . . . . .14737 Cleaning the device . . . . . . . . . . . . . . . . . . . . . . . . . . . . . . . . .15038 Problem, Possible causes, Remedy . . . . . . . . . . . . . . . . . . . .15139 Technical data . . . . . . . . . . . . . . . . . . . . . . . . . . . . . . . . . . . . .15340 Special instructions for TV sets with OLED technology . . . .154
5
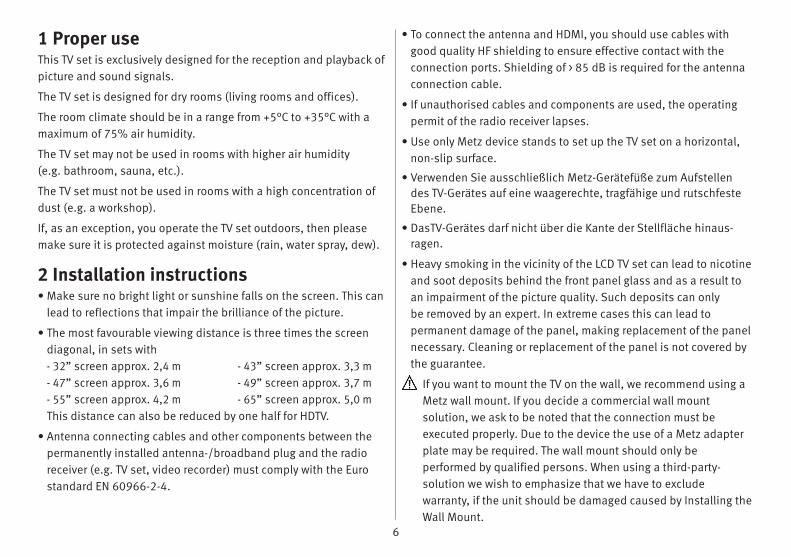
1 Proper useThis TV set is exclusively designed for the reception and playback ofpicture and sound signals.
The TV set is designed for dry rooms (living rooms and offices).
The room climate should be in a range from +5°C to +35°C with amaximum of 75% air humidity.
The TV set may not be used in rooms with higher air humidity (e.g. bathroom, sauna, etc.).
The TV set must not be used in rooms with a high concentration ofdust (e.g. a workshop).
If, as an exception, you operate the TV set outdoors, then pleasemake sure it is protected against moisture (rain, water spray, dew).
2 Installation instructions• Make sure no bright light or sunshine falls on the screen. This can
lead to reflections that impair the brilliance of the picture.
• The most favourable viewing distance is three times the screendiagonal, in sets with- 32” screen approx. 2,4 m - 43” screen approx. 3,3 m- 47” screen approx. 3,6 m - 49” screen approx. 3,7 m- 55” screen approx. 4,2 m - 65” screen approx. 5,0 mThis distance can also be reduced by one half for HDTV.
• Antenna connecting cables and other components between thepermanently installed antenna-/broadband plug and the radioreceiver (e.g. TV set, video recorder) must comply with the Eurostandard EN 60966-2-4.
• To connect the antenna and HDMI, you should use cables withgood quality HF shielding to ensure effective contact with theconnection ports. Shielding of > 85 dB is required for the antennaconnection cable.
• If unauthorised cables and components are used, the operatingpermit of the radio receiver lapses.
• Use only Metz device stands to set up the TV set on a horizontal,non-slip surface.
• Verwenden Sie ausschließlich Metz-Gerätefüße zum Aufstellendes TV-Gerätes auf eine waagerechte, tragfähige und rutschfesteEbene.
• DasTV-Gerätes darf nicht über die Kante der Stellfläche hinaus-ragen.
• Heavy smoking in the vicinity of the LCD TV set can lead to nicotineand soot deposits behind the front panel glass and as a result toan impairment of the picture quality. Such deposits can only be removed by an expert. In extreme cases this can lead to permanent damage of the panel, making replacement of the panelnecessary. Cleaning or replacement of the panel is not covered bythe guarantee.
If you want to mount the TV on the wall, we recommend using aMetz wall mount. If you decide a commercial wall mount solution, we ask to be noted that the connection must beexecuted properly. Due to the device the use of a Metz adapterplate may be required. The wall mount should only beperformed by qualified persons. When using a third-party-solution we wish to emphasize that we have to excludewarranty, if the unit should be damaged caused by Installing theWall Mount.
6
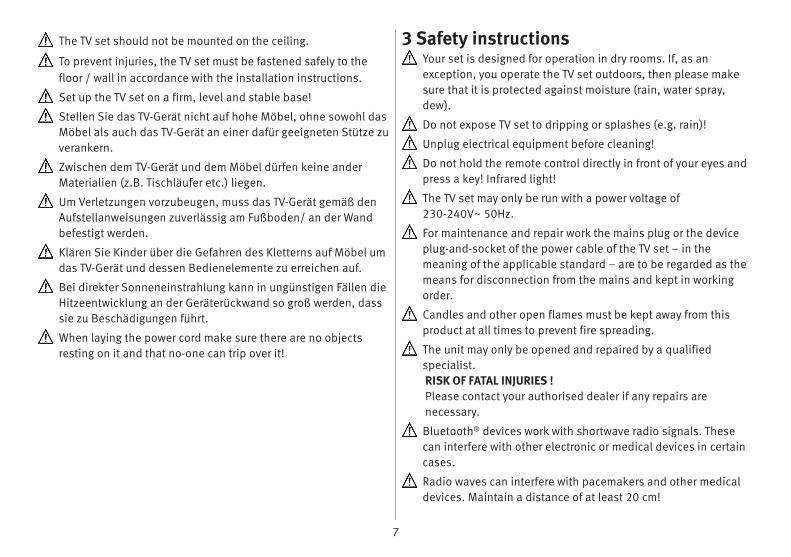
The TV set should not be mounted on the ceiling.
To prevent injuries, the TV set must be fastened safely to thefloor / wall in accordance with the installation instructions.
Set up the TV set on a firm, level and stable base!
Stellen Sie das TV-Gerät nicht auf hohe Möbel, ohne sowohl dasMöbel als auch das TV-Gerät an einer dafür geeigneten Stütze zuverankern.
Zwischen dem TV-Gerät und dem Möbel dürfen keine anderMaterialien (z.B. Tischläufer etc.) liegen.
Um Verletzungen vorzubeugen, muss das TV-Gerät gemäß denAufstellanweisungen zuverlässig am Fußboden/ an der Wandbefestigt werden.
Klären Sie Kinder über die Gefahren des Kletterns auf Möbel umdas TV-Gerät und dessen Bedienelemente zu erreichen auf.
Bei direkter Sonneneinstrahlung kann in ungünstigen Fällen dieHitzeentwicklung an der Geräterückwand so groß werden, dasssie zu Beschädigungen führt.
When laying the power cord make sure there are no objectsresting on it and that no-one can trip over it!
3 Safety instructionsYour set is designed for operation in dry rooms. If, as an exception, you operate the TV set outdoors, then please makesure that it is protected against moisture (rain, water spray,dew).
Do not expose TV set to dripping or splashes (e.g. rain)!
Unplug electrical equipment before cleaning!
Do not hold the remote control directly in front of your eyes andpress a key! Infrared light!
The TV set may only be run with a power voltage of 230-240V~ 50Hz.
For maintenance and repair work the mains plug or the deviceplug-and-socket of the power cable of the TV set – in themeaning of the applicable standard – are to be regarded as themeans for disconnection from the mains and kept in workingorder.
Candles and other open flames must be kept away from thisproduct at all times to prevent fire spreading.
The unit may only be opened and repaired by a qualified specialist. RISK OF FATAL INJURIES !Please contact your authorised dealer if any repairs are necessary.
Bluetooth® devices work with shortwave radio signals. Thesecan interfere with other electronic or medical devices in certaincases.
Radio waves can interfere with pacemakers and other medicaldevices. Maintain a distance of at least 20 cm!
7
• A cold device may only be turned on in a cold room once any condensation on the screen has evaporated.
• TV sets require adequate cooling. The openings at the back maynot be covered by curtains, etc. The ventilation slits on the bottom of the set must remain freelyaccessible, since this is how the device draws in cool air.
• Make sure there is an adequate cooling air flow if you put yourdevice into a built-in cabinet.
• Do not set up/suspend your device directly next to or above aheater; this could impair the device cooling.
• No burning candles or vessels with liquid may be placed on orabove the TV set.Hot wax and liquids that get into the interior of the device destroythe electric components of your TV set. In these cases the electrical safety of the device can no longer beguaranteed.
• Thunder storms are a danger for electrical devices. If lightning hitsthe power cable or antenna, the device can be damaged, even if itis switched off. During thunder storms disconnect the mains plugand antenna plug from the socket or the TV set.
• No rechargeable batteries may be inserted in the battery compartment of the remote control. Only two LR03/AM4/AAA 1.5 V micro batteries may be used.
• This TV set is exclusively designed for the reception and playbackof picture and sound signals.
• Do not display still pictures, logos, 4:3 formats with margins, etc for a long period. There is a risk that these still pictures couldlead to markings on the screen.
• Soot and dust deposits can accumulate behind the front panelglass of the LCD TV set without a visible source of soot being present. These soot and dust deposits are also known as “fogging” or “magic dust”. There are scattered instances of thisphenomenon, but especially during the warm-up period and afterrenovation work or in new constructions. Various factors arementioned as the cause, see too the reports on the Internet.In such cases cleaning or replacement of the panel is excludedfrom the guarantee, since it does not involve a set defect, butrather an external influence.
• The screen surface should only be cleaned with a soft, drycleaning cloth (e.g. microfibre cloth).
• To remove stubborn dirt or smears, it is possible to clean thescreen with a slightly damp, soft cloth. Also see Chap. 29.
Never use cleaning solution on the screen surface! If anycleaning solution penetrates beneath the screen's lower frame,it will result in irreparable damage to the components.
8
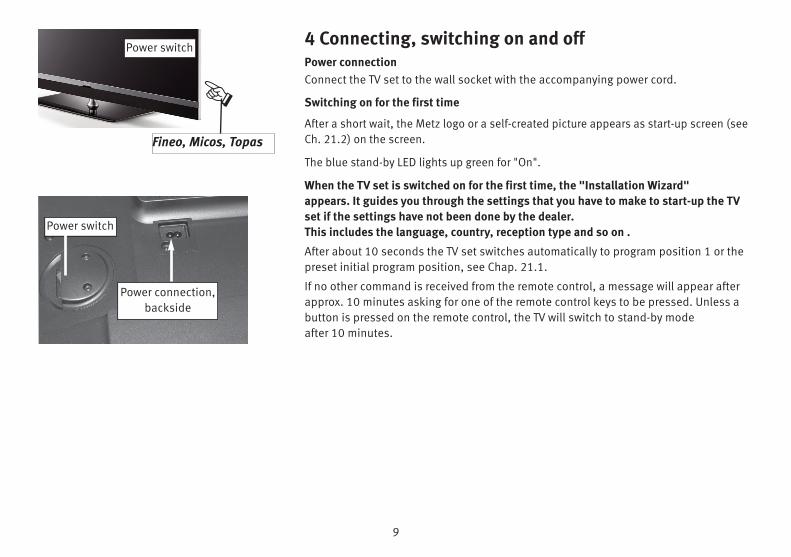
4 Connecting, switching on and offPower connectionConnect the TV set to the wall socket with the accompanying power cord.
Switching on for the first time
After a short wait, the Metz logo or a self-created picture appears as start-up screen (seeCh. 21.2) on the screen.
The blue stand-by LED lights up green for "On".
When the TV set is switched on for the first time, the "Installation Wizard" appears. It guides you through the settings that you have to make to start-up the TVset if the settings have not been done by the dealer. This includes the language, country, reception type and so on .
After about 10 seconds the TV set switches automatically to program position 1 or thepreset initial program position, see Chap. 21.1.
If no other command is received from the remote control, a message will appear afterapprox. 10 minutes asking for one of the remote control keys to be pressed. Unless abutton is pressed on the remote control, the TV will switch to stand-by mode after 10 minutes.
9
Power switch
Power switch
Fineo, Micos, Topas
+
Power connection, backside
10
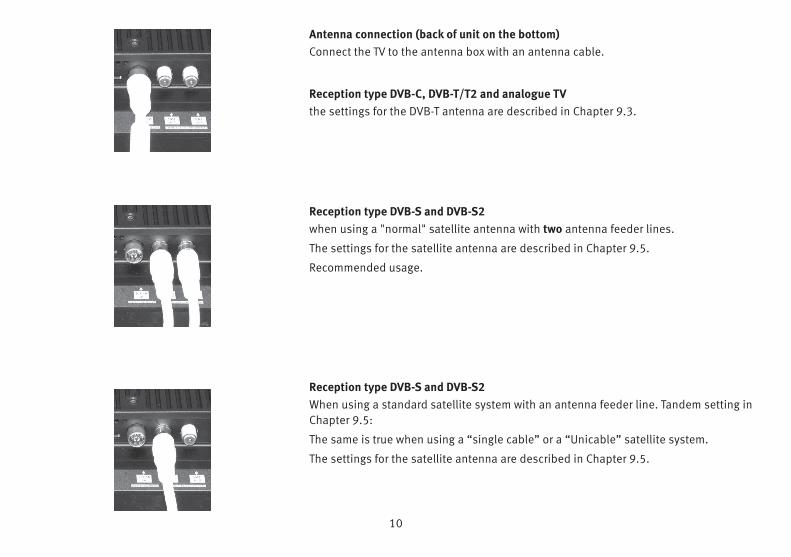
Antenna connection (back of unit on the bottom)Connect the TV to the antenna box with an antenna cable.
Reception type DVB-C, DVB-T/T2 and analogue TVthe settings for the DVB-T antenna are described in Chapter 9.3.
Reception type DVB-S and DVB-S2when using a "normal" satellite antenna with two antenna feeder lines.
The settings for the satellite antenna are described in Chapter 9.5.
Recommended usage.
Reception type DVB-S and DVB-S2When using a standard satellite system with an antenna feeder line. Tandem setting inChapter 9.5:
The same is true when using a “single cable” or a “Unicable” satellite system.
The settings for the satellite antenna are described in Chapter 9.5.
11
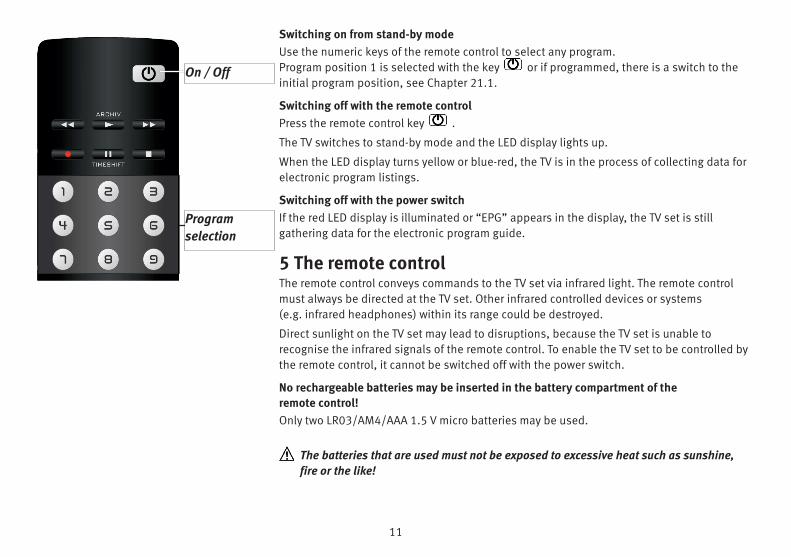
Switching on from stand-by modeUse the numeric keys of the remote control to select any program. Program position 1 is selected with the key or if programmed, there is a switch to theinitial program position, see Chapter 21.1.
Switching off with the remote controlPress the remote control key .
The TV switches to stand-by mode and the LED display lights up.
When the LED display turns yellow or blue-red, the TV is in the process of collecting data forelectronic program listings.
Switching off with the power switchIf the red LED display is illuminated or “EPG” appears in the display, the TV set is still gathering data for the electronic program guide.
5 The remote controlThe remote control conveys commands to the TV set via infrared light. The remote controlmust always be directed at the TV set. Other infrared controlled devices or systems (e.g. infrared headphones) within its range could be destroyed.
Direct sunlight on the TV set may lead to disruptions, because the TV set is unable to recognise the infrared signals of the remote control. To enable the TV set to be controlled bythe remote control, it cannot be switched off with the power switch.
No rechargeable batteries may be inserted in the battery compartment of the remote control!Only two LR03/AM4/AAA 1.5 V micro batteries may be used.
The batteries that are used must not be exposed to excessive heat such as sunshine,fire or the like!
On / Off
Program selection
12
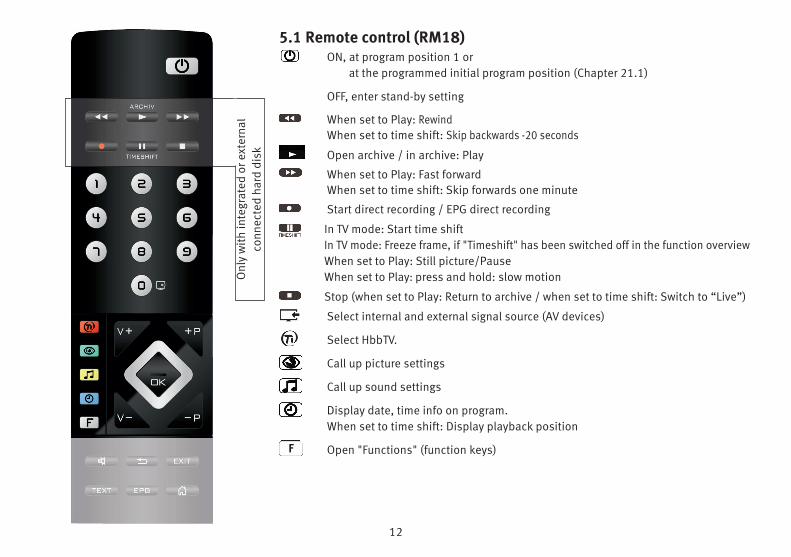
5.1 Remote control (RM18)ON, at program position 1 or
at the programmed initial program position (Chapter 21.1)
OFF, enter stand-by setting
When set to Play: RewindWhen set to time shift: Skip backwards -20 seconds
Open archive / in archive: Play
When set to Play: Fast forwardWhen set to time shift: Skip forwards one minute
Start direct recording / EPG direct recording
In TV mode: Start time shiftIn TV mode: Freeze frame, if "Timeshift" has been switched off in the function overview When set to Play: Still picture/PauseWhen set to Play: press and hold: slow motion
Stop (when set to Play: Return to archive / when set to time shift: Switch to “Live”)
Select internal and external signal source (AV devices)
Select HbbTV.
Call up picture settings
Call up sound settings
Display date, time info on program.When set to time shift: Display playback position
Open "Functions" (function keys)F
Onl
y w
ith in
tegr
ated
or e
xter
nal
conn
ecte
d ha
rd d
isk
13
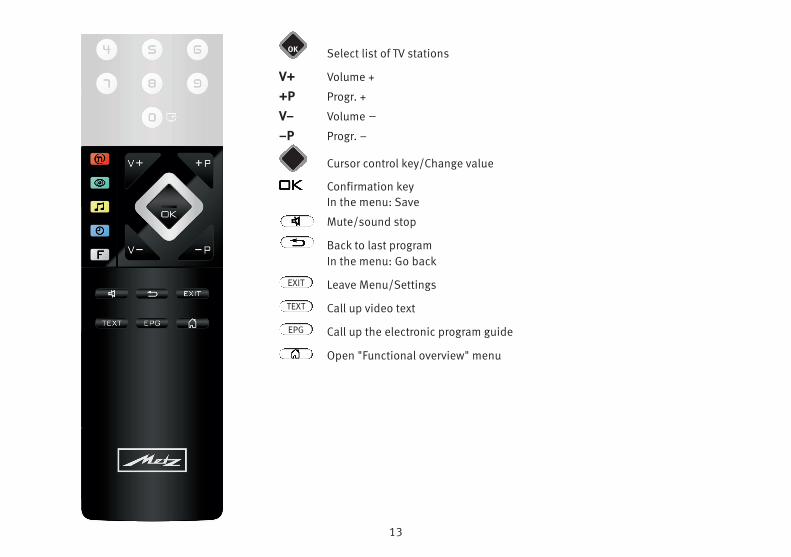
Select list of TV stations
V+ Volume +
+P Progr. +
V– Volume ––P Progr. –
Cursor control key/Change value
Confirmation keyIn the menu: Save
Mute/sound stop
Back to last program In the menu: Go back
Leave Menu/Settings
Call up video text
Call up the electronic program guide
Open "Functional overview" menu
EXIT
TEXT
EPG
OK
14
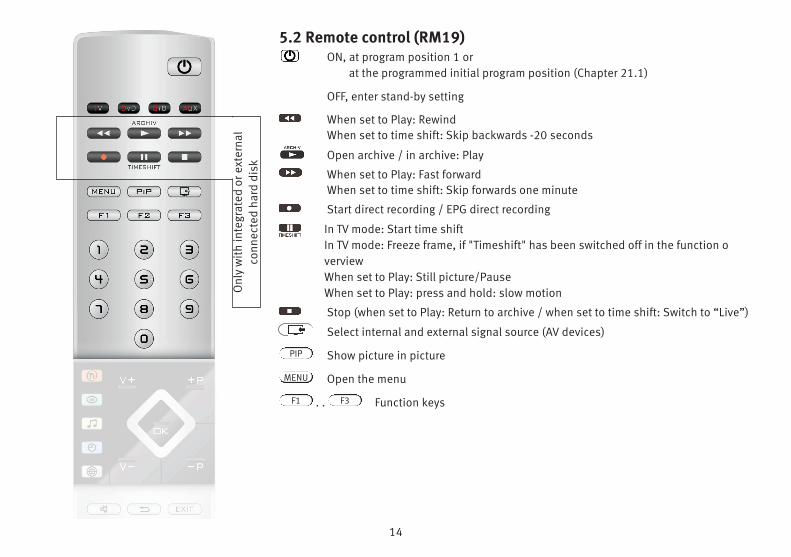
5.2 Remote control (RM19)ON, at program position 1 or
at the programmed initial program position (Chapter 21.1)
OFF, enter stand-by setting
When set to Play: RewindWhen set to time shift: Skip backwards -20 seconds
Open archive / in archive: Play
When set to Play: Fast forwardWhen set to time shift: Skip forwards one minute
Start direct recording / EPG direct recording
In TV mode: Start time shift In TV mode: Freeze frame, if "Timeshift" has been switched off in the function overviewWhen set to Play: Still picture/PauseWhen set to Play: press and hold: slow motion
Stop (when set to Play: Return to archive / when set to time shift: Switch to “Live”)
Select internal and external signal source (AV devices)
Show picture in picture
Open the menu
. . Function keys
PIP
MENU
F1 F3
Onl
y w
ith in
tegr
ated
or e
xter
nal
conn
ecte
d ha
rd d
isk

15
Select HbbTV
Call up picture settings
Call up sound settings
Display date, time info on program.When set to time shift: Display playback position
Open Smart TV internet portal
Select list of TV stations
V+ Volume +
+P Progr. +
V– Volume ––P Progr. –
Cursor control key/Change value
Confirmation keyIn the menu: Save
Mute/sound stop
Back to last program In the menu: Go back
Leave Menu/Settings
Call up video text
Call up the electronic program guide
Open "Functional overview" menu
OK
EXIT
TEXT
EPG
16
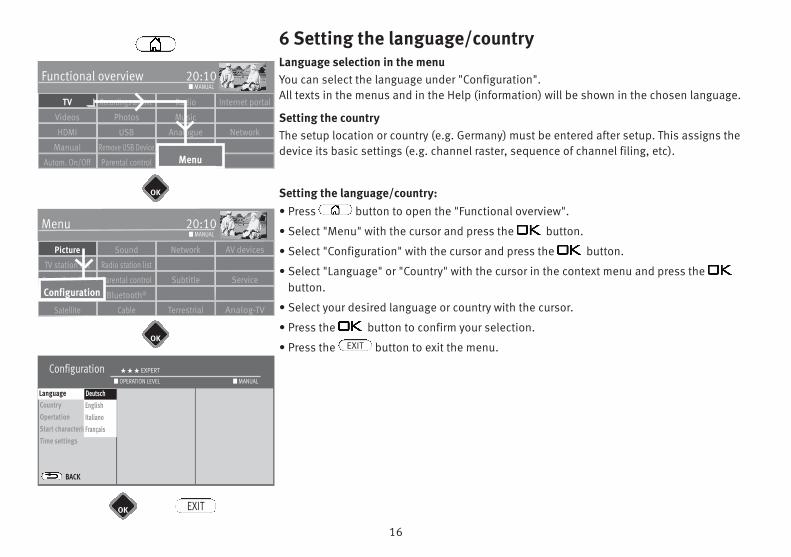
6 Setting the language/countryLanguage selection in the menuYou can select the language under "Configuration".All texts in the menus and in the Help (information) will be shown in the chosen language.
Setting the countryThe setup location or country (e.g. Germany) must be entered after setup. This assigns thedevice its basic settings (e.g. channel raster, sequence of channel filing, etc).
Setting the language/country: • Press button to open the "Functional overview".
• Select "Menu" with the cursor and press the button.
• Select "Configuration" with the cursor and press the button.
• Select "Language" or "Country" with the cursor in the context menu and press thebutton.
• Select your desired language or country with the cursor.
• Press the button to confirm your selection.
• Press the button to exit the menu.EXIT
Radio Internet portalRecordings archiveTV
Functional overview 20:10
MusicPhotosVideos
Analogue NetworkUSBHDMI
FilemanagerRemove USB DeviceManual
Parental control MenuAutom. On/Off
■ MANUAL
Network AV devicesSoundPicture
Menu 20:10
Radio station listTV station list
Subtitle ServiceParental controlRecordings/EPG
Bluetooth®
Terrestrial Analog-TVCableSatellite
■ MANUAL
OK
OK
OK
Configuration H H H EXPERT
LanguageCountry DeutschlandOpertationStart characteristicsTime settings
BACK
■ MANUAL■ OPERATION LEVEL
Language DeutschEnglishItalianoFrançais
Deutsch
Configuration
EXIT
17
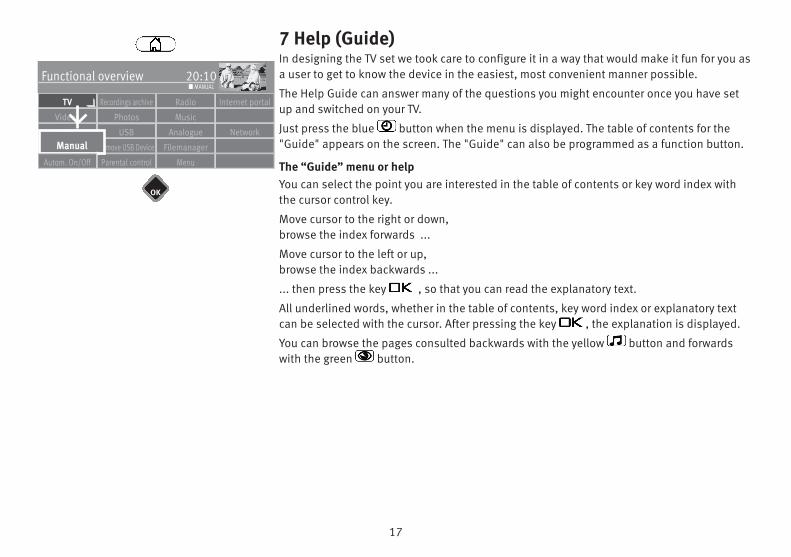
7 Help (Guide)In designing the TV set we took care to configure it in a way that would make it fun for you asa user to get to know the device in the easiest, most convenient manner possible.
The Help Guide can answer many of the questions you might encounter once you have setup and switched on your TV.
Just press the blue button when the menu is displayed. The table of contents for the"Guide" appears on the screen. The "Guide" can also be programmed as a function button.
The “Guide” menu or helpYou can select the point you are interested in the table of contents or key word index withthe cursor control key.
Move cursor to the right or down, browse the index forwards ...
Move cursor to the left or up, browse the index backwards ...
... then press the key , so that you can read the explanatory text.
All underlined words, whether in the table of contents, key word index or explanatory textcan be selected with the cursor. After pressing the key , the explanation is displayed.
You can browse the pages consulted backwards with the yellow button and forwardswith the green button.
Radio Internet portalRecordings archiveTV
Functional overview 20:10
MusicPhotosVideos
Analogue NetworkUSBHDMI
FilemanagerRemove USB DeviceManual
Parental control Menu
ManualAutom. On/Off
■ MANUAL
OK
18
Network AV devicesSoundPicture
Menu 20:10
Radio station listTV station list
Subtitle ServiceParental controlRecordings/EPG
Terrestrial Analog-TVCableSatellite
■ MANUAL
Configuration
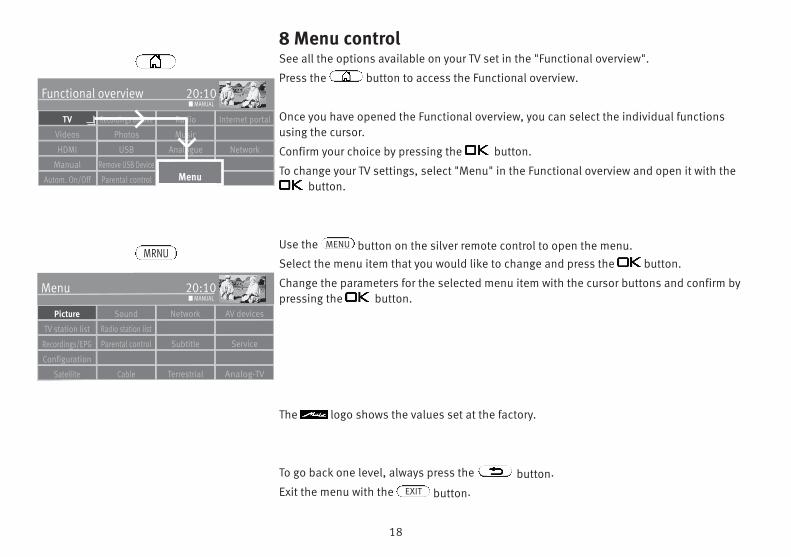
8 Menu controlSee all the options available on your TV set in the "Functional overview".
Press the button to access the Functional overview.
Once you have opened the Functional overview, you can select the individual functionsusing the cursor.
Confirm your choice by pressing the button.
To change your TV settings, select "Menu" in the Functional overview and open it with thebutton.
Use the button on the silver remote control to open the menu.Select the menu item that you would like to change and press the button.
Change the parameters for the selected menu item with the cursor buttons and confirm bypressing the button.
The logo shows the values set at the factory.
To go back one level, always press the button.
Exit the menu with the button.EXIT
MENU
Radio Internet portalRecordings archiveTV
Functional overview 20:10
MusicPhotosVideos
Analogue NetworkUSBHDMI
FilemanagerRemove USB DeviceManual
Parental control MenuAutom. On/Off
■ MANUAL
MRNU
19
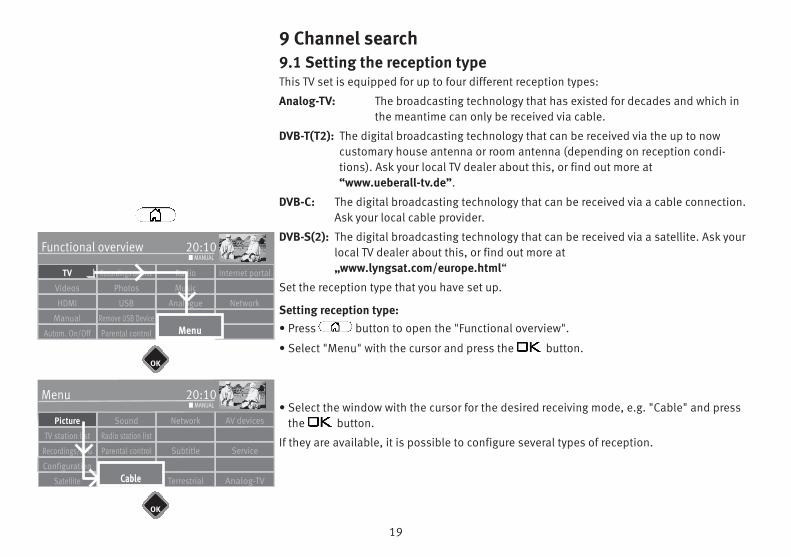
9 Channel search9.1 Setting the reception typeThis TV set is equipped for up to four different reception types:
Analog-TV: The broadcasting technology that has existed for decades and which inthe meantime can only be received via cable.
DVB-T(T2): The digital broadcasting technology that can be received via the up to now customary house antenna or room antenna (depending on reception condi-tions). Ask your local TV dealer about this, or find out more at “www.ueberall-tv.de”.
DVB-C: The digital broadcasting technology that can be received via a cable connection.Ask your local cable provider.
DVB-S(2): The digital broadcasting technology that can be received via a satellite. Ask yourlocal TV dealer about this, or find out more at „www.lyngsat.com/europe.html“
Set the reception type that you have set up.
Setting reception type:• Press button to open the "Functional overview".
• Select "Menu" with the cursor and press the button.
• Select the window with the cursor for the desired receiving mode, e.g. "Cable" and pressthe button.
If they are available, it is possible to configure several types of reception.
Radio Internet portalRecordings archiveTV
Functional overview 20:10
MusicPhotosVideos
Analogue NetworkUSBHDMI
FilemanagerRemove USB DeviceManual
Parental control MenuAutom. On/Off
■ MANUAL
Network AV devicesSoundPicture
Menu 20:10
Radio station listTV station list
Subtitle ServiceParental controlRecordings/EPG
Terrestrial Analog-TVCableCableSatellite
■ MANUAL
OK
OK
Configuration
20
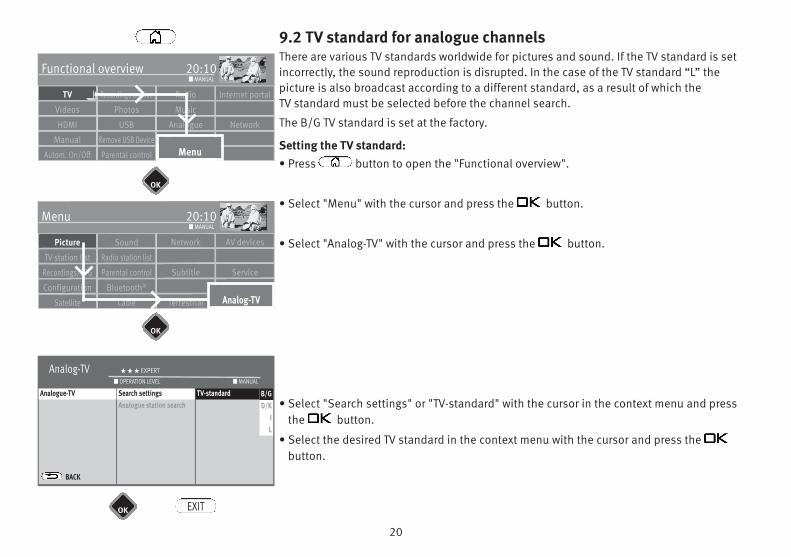
9.2 TV standard for analogue channelsThere are various TV standards worldwide for pictures and sound. If the TV standard is setincorrectly, the sound reproduction is disrupted. In the case of the TV standard “L” thepicture is also broadcast according to a different standard, as a result of which the TV standard must be selected before the channel search.
The B/G TV standard is set at the factory.
Setting the TV standard:• Press button to open the "Functional overview".
• Select "Menu" with the cursor and press the button.
• Select "Analog-TV" with the cursor and press the button.
• Select "Search settings" or "TV-standard" with the cursor in the context menu and pressthe button.
• Select the desired TV standard in the context menu with the cursor and press thebutton.
Radio Internet portalRecordings archiveTV
Functional overview 20:10
MusicPhotosVideos
Analogue NetworkUSBHDMI
FilemanagerRemove USB DeviceManual
Parental control MenuAutom. On/Off
■ MANUAL
Network AV devicesSoundPicture
Menu 20:10
Radio station listTV station list
Subtitle ServiceParental controlRecordings/EPG
Bluetooth®
Terrestrial Analog-TVCable Analog-TVSatellite
■ MANUAL
OK
OK
Configuration
OK
Analog-TV H H H EXPERT
Analog-TV
BACK
Search settingsAnalogue station search
■ MANUAL■ OPERATION LEVEL
TV-standardSearch settingsAnalogue-TV B/GD/K
IL
B/G
EXIT
21
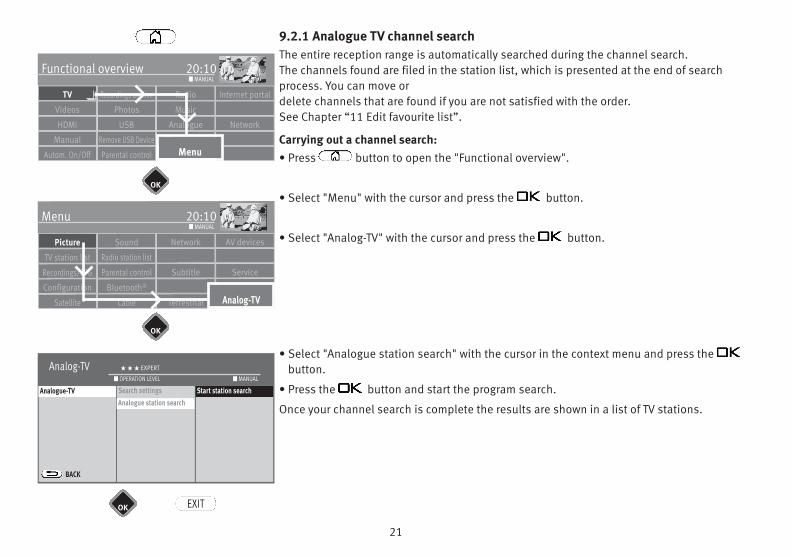
9.2.1 Analogue TV channel searchThe entire reception range is automatically searched during the channel search. The channels found are filed in the station list, which is presented at the end of searchprocess. You can move or delete channels that are found if you are not satisfied with the order. See Chapter “11 Edit favourite list”.
Carrying out a channel search:• Press button to open the "Functional overview".
• Select "Menu" with the cursor and press the button.
• Select "Analog-TV" with the cursor and press the button.
• Select "Analogue station search" with the cursor in the context menu and press thebutton.
• Press the button and start the program search.
Once your channel search is complete the results are shown in a list of TV stations.
Radio Internet portalRecordings archiveTV
Functional overview 20:10
MusicPhotosVideos
Analogue NetworkUSBHDMI
FilemanagerRemove USB DeviceManual
Parental control MenuAutom. On/Off
■ MANUAL
Network AV devicesSoundPicture
Menu 20:10
Radio station listTV station list
Subtitle ServiceParental controlRecordings/EPG
Bluetooth®
Terrestrial Analog-TVCable Analog-TVSatellite
■ MANUAL
OK
OK
Configuration
OK
Analog-TV H H H EXPERT
Analog-TV
BACK
Search settingsSendersuche analog
■ MANUAL■ OPERATION LEVEL
Start station search
EXIT
Analogue station searchAnalogue-TV
22
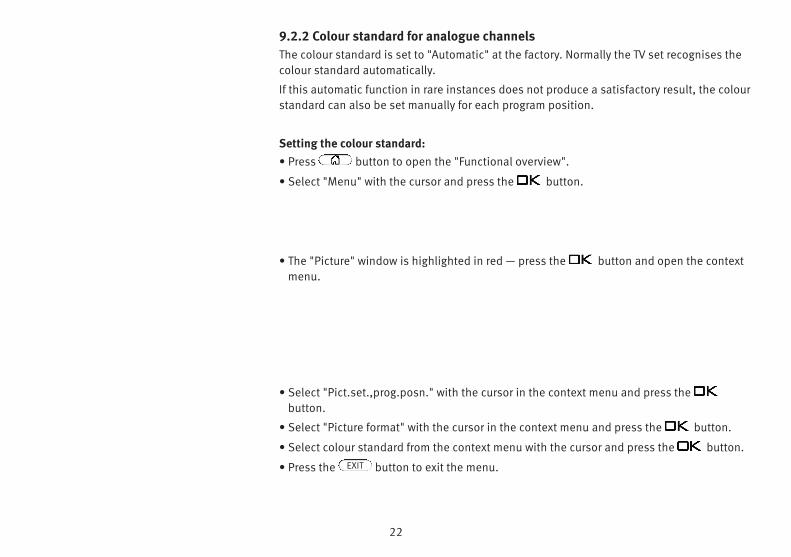
9.2.2 Colour standard for analogue channelsThe colour standard is set to "Automatic" at the factory. Normally the TV set recognises thecolour standard automatically.
If this automatic function in rare instances does not produce a satisfactory result, the colourstandard can also be set manually for each program position.
Setting the colour standard:• Press button to open the "Functional overview".
• Select "Menu" with the cursor and press the button.
• The "Picture" window is highlighted in red — press the button and open the contextmenu.
• Select "Pict.set.,prog.posn." with the cursor in the context menu and press thebutton.
• Select "Picture format" with the cursor in the context menu and press the button.
• Select colour standard from the context menu with the cursor and press the button.
• Press the button to exit the menu.EXIT
23
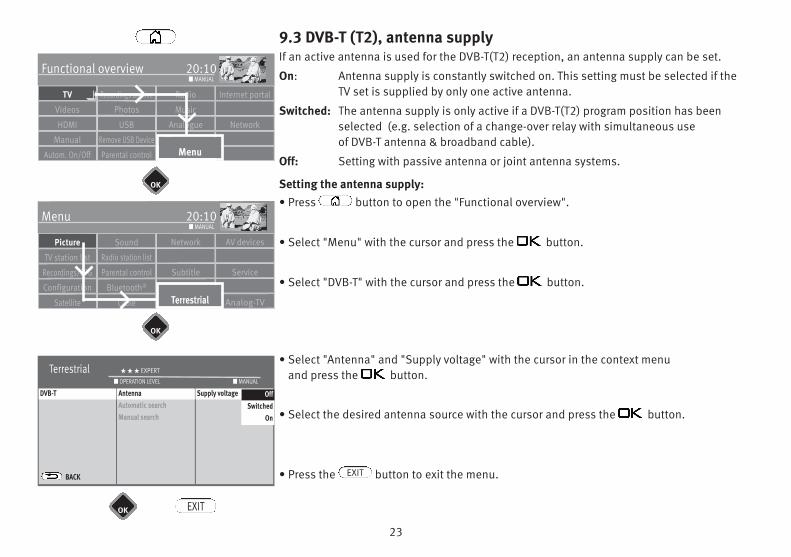
9.3 DVB-T (T2), antenna supplyIf an active antenna is used for the DVB-T(T2) reception, an antenna supply can be set.
On: Antenna supply is constantly switched on. This setting must be selected if the TV set is supplied by only one active antenna.
Switched: The antenna supply is only active if a DVB-T(T2) program position has beenselected (e.g. selection of a change-over relay with simultaneous use of DVB-T antenna & broadband cable).
Off: Setting with passive antenna or joint antenna systems.
Setting the antenna supply:• Press button to open the "Functional overview".
• Select "Menu" with the cursor and press the button.
• Select "DVB-T" with the cursor and press the button.
• Select "Antenna" and "Supply voltage" with the cursor in the context menu and press the button.
• Select the desired antenna source with the cursor and press the button.
• Press the button to exit the menu.EXIT
Radio Internet portalRecordings archiveTV
Functional overview 20:10
MusicPhotosVideos
Analogue NetworkUSBHDMI
FilemanagerRemove USB DeviceManual
Parental control MenuAutom. On/Off
■ MANUAL
Network AV devicesSoundPicture
Menu 20:10
Radio station listTV station list
Subtitle ServiceParental controlRecordings/EPG
Bluetooth®
Terrestrial Analog-TVCable TerrestrialSatellite
■ MANUAL
OK
OK
Configuration
OK
Terrestrial H H H EXPERT
DVB-T
BACK
AntennaAutomatic searchManual search
■ MANUAL■ OPERATION LEVEL
Supply voltageAntennaDVB-T
EXIT
OffSwitched
On
Off
24
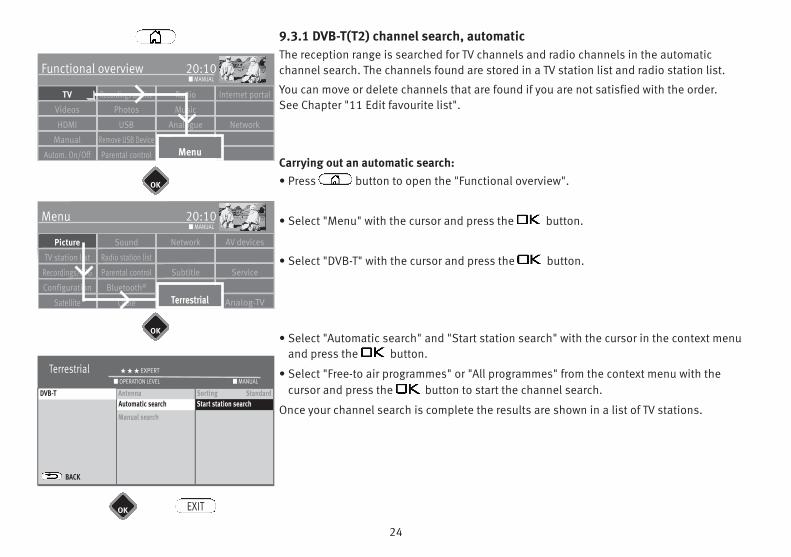
9.3.1 DVB-T(T2) channel search, automaticThe reception range is searched for TV channels and radio channels in the automaticchannel search. The channels found are stored in a TV station list and radio station list.
You can move or delete channels that are found if you are not satisfied with the order. See Chapter "11 Edit favourite list".
Carrying out an automatic search:• Press button to open the "Functional overview".
• Select "Menu" with the cursor and press the button.
• Select "DVB-T" with the cursor and press the button.
• Select "Automatic search" and "Start station search" with the cursor in the context menuand press the button.
• Select "Free-to air programmes" or "All programmes" from the context menu with thecursor and press the button to start the channel search.
Once your channel search is complete the results are shown in a list of TV stations.
Radio Internet portalRecordings archiveTV
Functional overview 20:10
MusicPhotosVideos
Analogue NetworkUSBHDMI
FilemanagerRemove USB DeviceManual
Parental control MenuAutom. On/Off
■ MANUAL
Network AV devicesSoundPicture
Menu 20:10
Radio station listTV station list
Subtitle ServiceParental controlRecordings/EPG
Bluetooth®
Terrestrial Analog-TVCable TerrestrialSatellite
■ MANUAL
OK
OK
Configuration
OK
Terrestrial H H H EXPERT
DVB-T
BACK
AntennaAutomatic searchManual search
Sorting Standard■ MANUAL■ OPERATION LEVEL
Start station search
EXIT
Automatic searchDVB-T
25
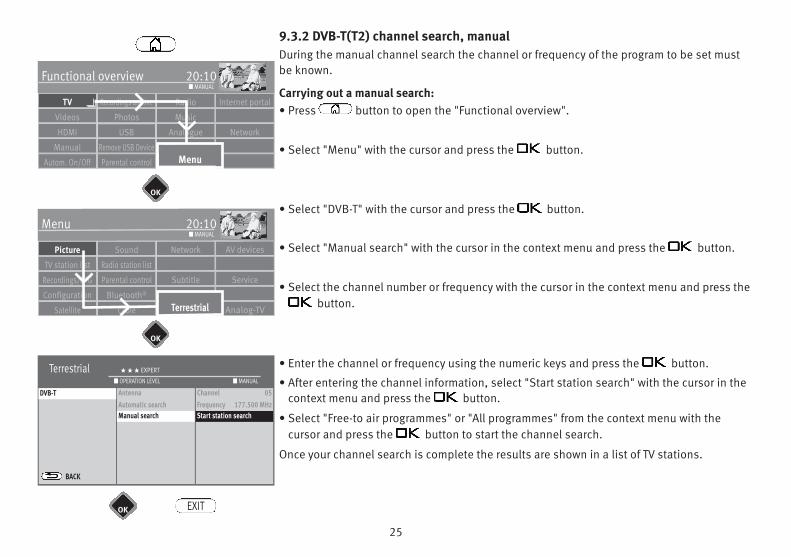
9.3.2 DVB-T(T2) channel search, manualDuring the manual channel search the channel or frequency of the program to be set mustbe known.
Carrying out a manual search:• Press button to open the "Functional overview".
• Select "Menu" with the cursor and press the button.
• Select "DVB-T" with the cursor and press the button.
• Select "Manual search" with the cursor in the context menu and press the button.
• Select the channel number or frequency with the cursor in the context menu and press thebutton.
• Enter the channel or frequency using the numeric keys and press the button.
• After entering the channel information, select "Start station search" with the cursor in thecontext menu and press the button.
• Select "Free-to air programmes" or "All programmes" from the context menu with thecursor and press the button to start the channel search.
Once your channel search is complete the results are shown in a list of TV stations.
Radio Internet portalRecordings archiveTV
Functional overview 20:10
MusicPhotosVideos
Analogue NetworkUSBHDMI
FilemanagerRemove USB DeviceManual
Parental control MenuAutom. On/Off
■ MANUAL
Network AV devicesSoundPicture
Menu 20:10
Radio station listTV station list
Subtitle ServiceParental controlRecordings/EPG
Bluetooth®
Terrestrial Analog-TVCable TerrestrialSatellite
■ MANUAL
OK
OK
Configuration
OK
Terrestrial H H H EXPERT
DVB-T
BACK
AntennaAutomatic searchManual search
Channel 05Frequency 177.500 MHzStart station search
■ MANUAL■ OPERATION LEVEL
Start station search
EXIT
Manual search
DVB-T
26
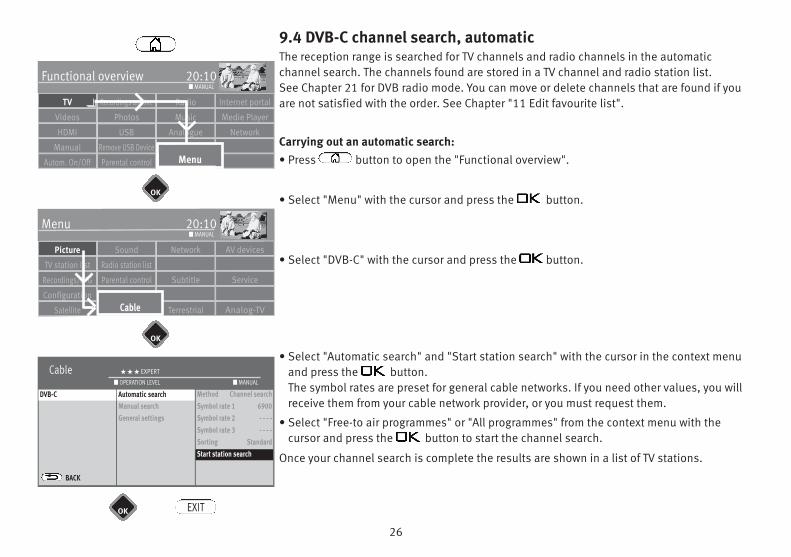
9.4 DVB-C channel search, automaticThe reception range is searched for TV channels and radio channels in the automaticchannel search. The channels found are stored in a TV channel and radio station list. See Chapter 21 for DVB radio mode. You can move or delete channels that are found if youare not satisfied with the order. See Chapter "11 Edit favourite list".
Carrying out an automatic search:• Press button to open the "Functional overview".
• Select "Menu" with the cursor and press the button.
• Select "DVB-C" with the cursor and press the button.
• Select "Automatic search" and "Start station search" with the cursor in the context menuand press the button.The symbol rates are preset for general cable networks. If you need other values, you willreceive them from your cable network provider, or you must request them.
• Select "Free-to air programmes" or "All programmes" from the context menu with thecursor and press the button to start the channel search.
Once your channel search is complete the results are shown in a list of TV stations.
Radio Internet portalRecordings archiveTV
Functional overview 20:10
Music Medie PlayerPhotosVideos
Analogue NetworkUSBHDMI
FilemanagerRemove USB DeviceManual
Parental control MenuAutom. On/Off
■ MANUAL
Network AV devicesSoundPicture
Menu 20:10
Radio station listTV station list
Subtitle ServiceParental controlRecordings/EPG
Bluetooth®Ser-
Terrestrial Analog-TVCableCableSatellite
■ MANUAL
OK
OK
Configuration
OK
Cable H H H EXPERT
DVB-T
BACK
Automatic searchManual searchGeneral settings
Method Channel searchSymbol rate 1 6900Symbol rate 2 - - - - Symbol rate 3 - - - -Sorting StandardStart station search
■ MANUAL■ OPERATION LEVEL
Start station search
EXIT
Automatic searchDVB-C
27
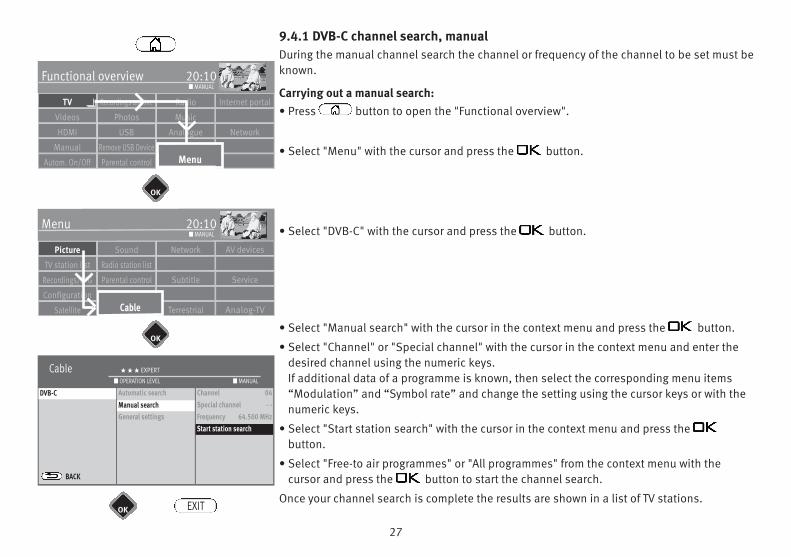
9.4.1 DVB-C channel search, manualDuring the manual channel search the channel or frequency of the channel to be set must beknown.
Carrying out a manual search:• Press button to open the "Functional overview".
• Select "Menu" with the cursor and press the button.
• Select "DVB-C" with the cursor and press the button.
• Select "Manual search" with the cursor in the context menu and press the button.
• Select "Channel" or "Special channel" with the cursor in the context menu and enter thedesired channel using the numeric keys.If additional data of a programme is known, then select the corresponding menu items“Modulation” and “Symbol rate” and change the setting using the cursor keys or with thenumeric keys.
• Select "Start station search" with the cursor in the context menu and press thebutton.
• Select "Free-to air programmes" or "All programmes" from the context menu with thecursor and press the button to start the channel search.
Once your channel search is complete the results are shown in a list of TV stations.
Radio Internet portalRecordings archiveTV
Functional overview 20:10
MusicPhotosVideos
Analogue NetworkUSBHDMI
FilemanagerRemove USB DeviceManual
Parental control MenuAutom. On/Off
■ MANUAL
Network AV devicesSoundPicture
Menu 20:10
Radio station listTV station list
Subtitle ServiceParental controlRecordings/EPG
Bluetooth®Blue
Terrestrial Analog-TVCableCableSatellite
■ MANUAL
OK
OK
Configuration
OK
Cable H H H EXPERT
DVB-T
BACK
Automatic searchManual searchGeneral settings
Channel 04Special channel - -Frequency 64.500 MHzStart station search
■ MANUAL■ OPERATION LEVEL
Start station search
EXIT
Manual searchDVB-C
28
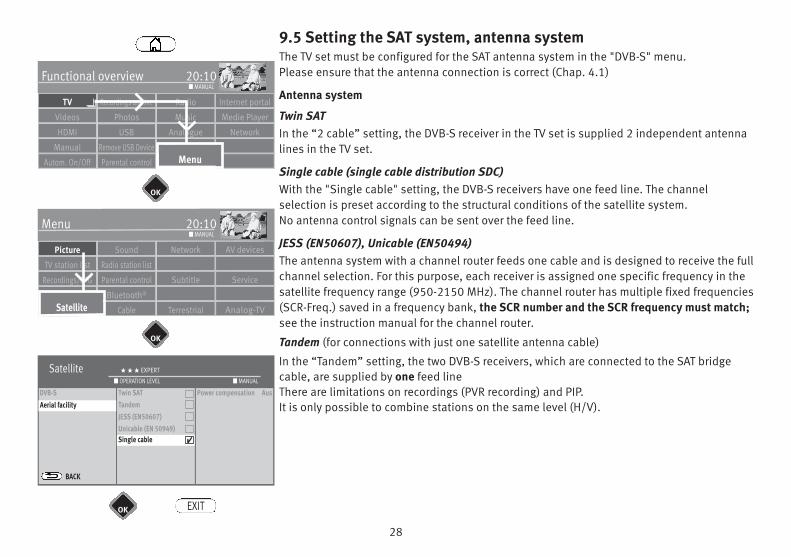
9.5 Setting the SAT system, antenna systemThe TV set must be configured for the SAT antenna system in the "DVB-S" menu.Please ensure that the antenna connection is correct (Chap. 4.1)
Antenna system
Twin SAT In the “2 cable” setting, the DVB-S receiver in the TV set is supplied 2 independent antennalines in the TV set.
Single cable (single cable distribution SDC)With the "Single cable" setting, the DVB-S receivers have one feed line. The channel selection is preset according to the structural conditions of the satellite system. No antenna control signals can be sent over the feed line.
JESS (EN50607), Unicable (EN50494)The antenna system with a channel router feeds one cable and is designed to receive the fullchannel selection. For this purpose, each receiver is assigned one specific frequency in thesatellite frequency range (950-2150 MHz). The channel router has multiple fixed frequencies(SCR-Freq.) saved in a frequency bank, the SCR number and the SCR frequency must match;see the instruction manual for the channel router.
Tandem (for connections with just one satellite antenna cable)
In the “Tandem” setting, the two DVB-S receivers, which are connected to the SAT bridgecable, are supplied by one feed lineThere are limitations on recordings (PVR recording) and PIP. It is only possible to combine stations on the same level (H/V).
Radio Internet portalRecordings archiveTV
Functional overview 20:10
Music Medie PlayerPhotosVideos
Analogue NetworkUSBHDMI
FilemanagerRemove USB DeviceManual
Parental control MenuAutom. On/Off
■ MANUAL
Network AV devicesSoundPicture
Menu 20:10
Radio station listTV station list
Subtitle ServiceParental controlRecordings/EPG
Bluetooth®
Terrestrial Analog-TVCableSatellite
■ MANUAL
OK
OK
Configuration
OK
Satellite H H H EXPERT
DVB-SAerial facility
BACK
Twin SATTandemJESS (EN50607)Unicable (EN 50949)Manual search
Power compensation Aus■ MANUAL■ OPERATION LEVEL
EXIT
Single cable
Aerial facility
Satellite
4
4
4
29
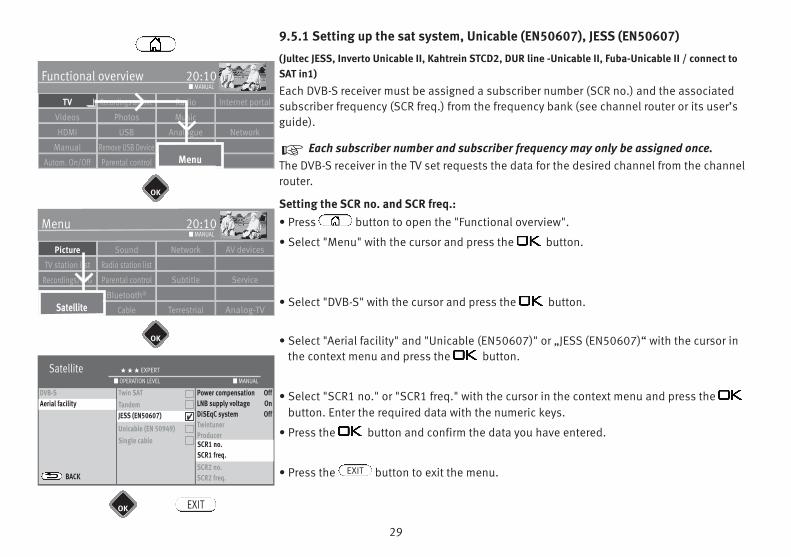
9.5.1 Setting up the sat system, Unicable (EN50607), JESS (EN50607)
(Jultec JESS, Inverto Unicable II, Kahtrein STCD2, DUR line -Unicable II, Fuba-Unicable II / connect toSAT in1)
Each DVB-S receiver must be assigned a subscriber number (SCR no.) and the associatedsubscriber frequency (SCR freq.) from the frequency bank (see channel router or its user’sguide).
Each subscriber number and subscriber frequency may only be assigned once.The DVB-S receiver in the TV set requests the data for the desired channel from the channelrouter.
Setting the SCR no. and SCR freq.:• Press button to open the "Functional overview".
• Select "Menu" with the cursor and press the button.
• Select "DVB-S" with the cursor and press the button.
• Select "Aerial facility" and "Unicable (EN50607)" or „JESS (EN50607)“ with the cursor inthe context menu and press the button.
• Select "SCR1 no." or "SCR1 freq." with the cursor in the context menu and press thebutton. Enter the required data with the numeric keys.
• Press the button and confirm the data you have entered.
• Press the button to exit the menu.
+
EXIT
Radio Internet portalRecordings archiveTV
Functional overview 20:10
MusicPhotosVideos
Analogue NetworkUSBHDMI
FilemanagerRemove USB DeviceManual
Parental control MenuAutom. On/Off
■ MANUAL
Network AV devicesSoundPicture
Menu 20:10
Radio station listTV station list
Subtitle ServiceParental controlRecordings/EPG
Bluetooth®
Terrestrial Analog-TVCableSatellite
■ MANUAL
OK
OK
Configuration
OK EXIT
Satellite
Satellite H H H EXPERT
DVB-SAerial facility
BACK
Twin SATTandemJESS (EN50607)Unicable (EN 50949)Single cable
Power compensation OffLNB supply voltage OnDiSEqC system OffTwintunerProducerSCR1 no.SCR1 freq.SCR2 no.SCR2 freq.
■ MANUAL■ OPERATION LEVEL
JESS (EN50607)Aerial facility
SCR1 no.SCR1 freq.
4
4
4
4
4
4
30
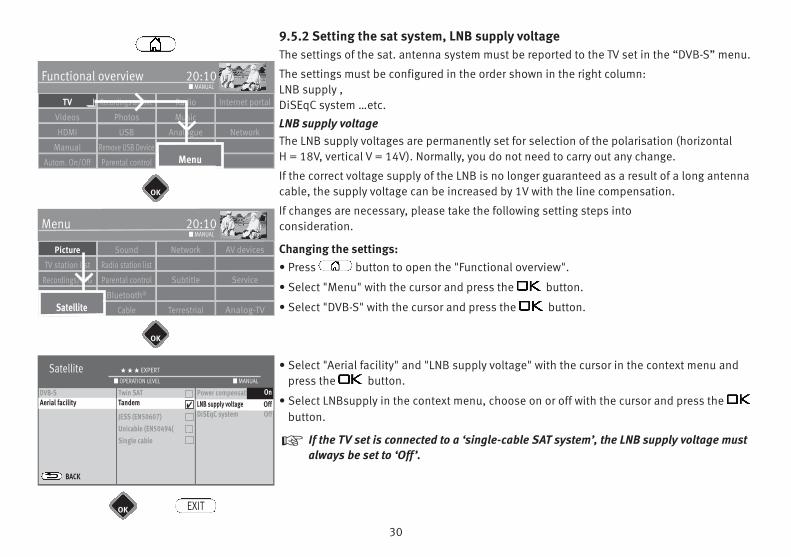
9.5.2 Setting the sat system, LNB supply voltageThe settings of the sat. antenna system must be reported to the TV set in the “DVB-S” menu.
The settings must be configured in the order shown in the right column: LNB supply , DiSEqC system …etc.
LNB supply voltageThe LNB supply voltages are permanently set for selection of the polarisation (horizontal H = 18V, vertical V = 14V). Normally, you do not need to carry out any change.
If the correct voltage supply of the LNB is no longer guaranteed as a result of a long antennacable, the supply voltage can be increased by 1V with the line compensation.
If changes are necessary, please take the following setting steps into consideration.
Changing the settings:• Press button to open the "Functional overview".
• Select "Menu" with the cursor and press the button.
• Select "DVB-S" with the cursor and press the button.
• Select "Aerial facility" and "LNB supply voltage" with the cursor in the context menu andpress the button.
• Select LNBsupply in the context menu, choose on or off with the cursor and press thebutton.
If the TV set is connected to a ‘single-cable SAT system’, the LNB supply voltage mustalways be set to ‘Off’.
+
Radio Internet portalRecordings archiveTV
Functional overview 20:10
MusicPhotosVideos
Analogue NetworkUSBHDMI
FilemanagerRemove USB DeviceManual
Parental control MenuAutom. On/Off
■ MANUAL
Network AV devicesSoundPicture
Menu 20:10
Radio station listTV station list
Subtitle ServiceParental controlRecordings/EPG
Bluetooth®
Terrestrial Analog-TVCableSatellite
■ MANUAL
OK
OK
Configuration
OK
Satellite H H H EXPERT
DVB-S
BACK
Twin SATTandemJESS (EN50607)Unicable (EN50494(Single cable
Power compensation OffLNB supply voltage OnDiSEqC system Off
■ MANUAL■ OPERATION LEVEL
EXIT
Aerial facility Tandem
Satellite
LNB supply voltageEinOffOn4
4
4
4

31
9.5.3 Set SAT system, DiSEqC systemWith “DiSEqC” digital management of the satellite system via the existing antenna cable ispossible and is a prerequisite for the reception of more than two satellites (e.g. Astra,Eutelsat, Hotbird).
Management of the satellite system without “DiSEqC” is no longer possible from three satellites (e.g. ASTRA 19.2°, Eutelsat 16°, Hotbird 13°).
Switching DiSEqC system on, -off:• Press button to open the "Functional overview".
• Select "Menu" with the cursor and press the button.
• Select "DVB-S" with the cursor and press the button.
• Select "Aerial facility" and "DiSEqC system" with the cursor in the context menu and pressthe button.
• Turn on the "DiSEqC system" in the context menu using the cursor and press thebutton if DiSEqC components are integrated into your SAT antenna system.
• Press the button to exit the menu.EXIT
Radio Internet portalRecordings archiveTV
Functional overview 20:10
MusicPhotosVideos
Analogue NetworkUSBHDMI
FilemanagerRemove USB DeviceManual
Parental control MenuAutom. On/Off
■ MANUAL
Network AV devicesSoundPicture
Menu 20:10
Radio station listTV station list
Subtitle ServiceParental controlRecordings/EPG
Bluetooth®
Terrestrial Analog-TVCableSatellite
■ MANUAL
OK
OK
Configuration
OK
Satellite H H H EXPERT
DVB-S
BACK
Twin SATTandemJESS (EN50607)Unicable (EN50494(Einkabel
Power compensation OffLNB supply voltage OnDiSEqC system Of
■ MANUAL■ OPERATION LEVEL
EXIT
Aerial facility Tandem
Satellite
DiSEqC systemEinOffOn
4
4
4
4
4
32
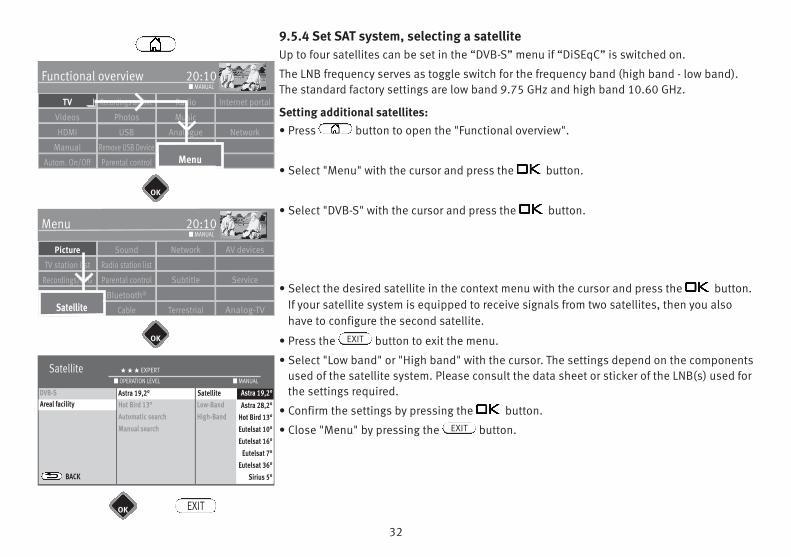
9.5.4 Set SAT system, selecting a satelliteUp to four satellites can be set in the “DVB-S” menu if “DiSEqC” is switched on.
The LNB frequency serves as toggle switch for the frequency band (high band - low band).The standard factory settings are low band 9.75 GHz and high band 10.60 GHz.
Setting additional satellites:• Press button to open the "Functional overview".
• Select "Menu" with the cursor and press the button.
• Select "DVB-S" with the cursor and press the button.
• Select the desired satellite in the context menu with the cursor and press the button.If your satellite system is equipped to receive signals from two satellites, then you alsohave to configure the second satellite.
• Press the button to exit the menu.
• Select "Low band" or "High band" with the cursor. The settings depend on the componentsused of the satellite system. Please consult the data sheet or sticker of the LNB(s) used forthe settings required.
• Confirm the settings by pressing the button.
• Close "Menu" by pressing the button.
EXIT
EXIT
Radio Internet portalRecordings archiveTV
Functional overview 20:10
MusicPhotosVideos
Analogue NetworkUSBHDMI
FilemanagerRemove USB DeviceManual
Parental control MenuAutom. On/Off
■ MANUAL
Network AV devicesSoundPicture
Menu 20:10
Radio station listTV station list
Subtitle ServiceParental controlRecordings/EPG
Bluetooth®
Terrestrial Analog-TVCableSatellite
■ MANUAL
OK
OK
Configuration
OK
Satellite H H H EXPERT
DVB-S
BACK
Astra 19,2°Hot Bird 13°Automatic searchManual search
SatellitLow-Band 9,75 GHzHigh-Band 10.60 GHz
■ MANUAL■ OPERATION LEVEL
EXIT
Astra 19,2°Areal facility
Satellite
Satellite Astra 19,2°Astra 28,2°
Hot Bird 13°Eutelsat 10°Eutelsat 16°
Eutelsat 7°Eutelsat 36°
Sirius 5°
Astra 19,2°
33
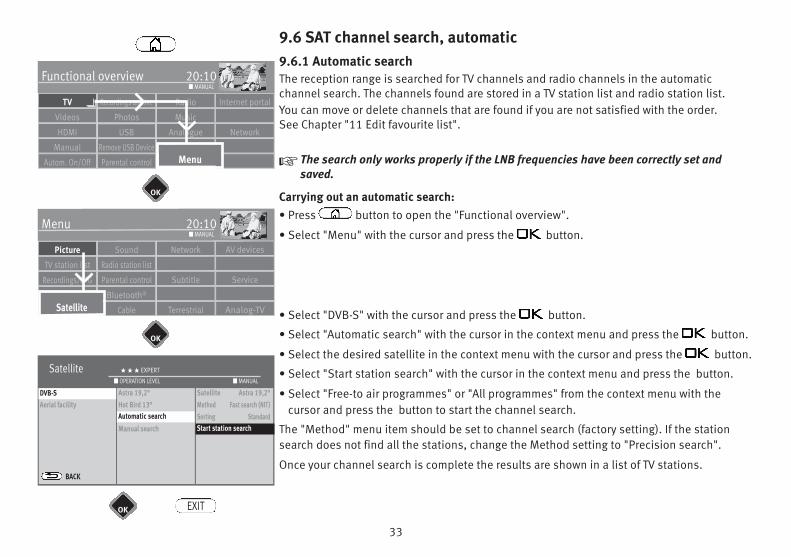
9.6 SAT channel search, automatic9.6.1 Automatic searchThe reception range is searched for TV channels and radio channels in the automaticchannel search. The channels found are stored in a TV station list and radio station list.You can move or delete channels that are found if you are not satisfied with the order. See Chapter "11 Edit favourite list".
+ The search only works properly if the LNB frequencies have been correctly set andsaved.
Carrying out an automatic search:• Press button to open the "Functional overview".
• Select "Menu" with the cursor and press the button.
• Select "DVB-S" with the cursor and press the button.
• Select "Automatic search" with the cursor in the context menu and press the button.
• Select the desired satellite in the context menu with the cursor and press the button.
• Select "Start station search" with the cursor in the context menu and press the button.
• Select "Free-to air programmes" or "All programmes" from the context menu with thecursor and press the button to start the channel search.
The "Method" menu item should be set to channel search (factory setting). If the stationsearch does not find all the stations, change the Method setting to "Precision search".
Once your channel search is complete the results are shown in a list of TV stations.
Radio Internet portalRecordings archiveTV
Functional overview 20:10
MusicPhotosVideos
Analogue NetworkUSBHDMI
FilemanagerRemove USB DeviceManual
Parental control MenuAutom. On/Off
■ MANUAL
Network AV devicesSoundPicture
Menu 20:10
Radio station listTV station list
Subtitle ServiceParental controlRecordings/EPG
Bluetooth®
Terrestrial Analog-TVCableSatellite
■ MANUAL
OK
OK
Configuration
OK
Satellite H H H EXPERT
DVB-SAerial facility
BACK
Astra 19,2°Hot Bird 13°Automatic searchManual search
Satellite Astra 19,2°Method Fast search (NIT)Sorting StandardStart station search
■ MANUAL■ OPERATION LEVEL
EXIT
Automatic search
DVB-S
Satellite
Start station search
34
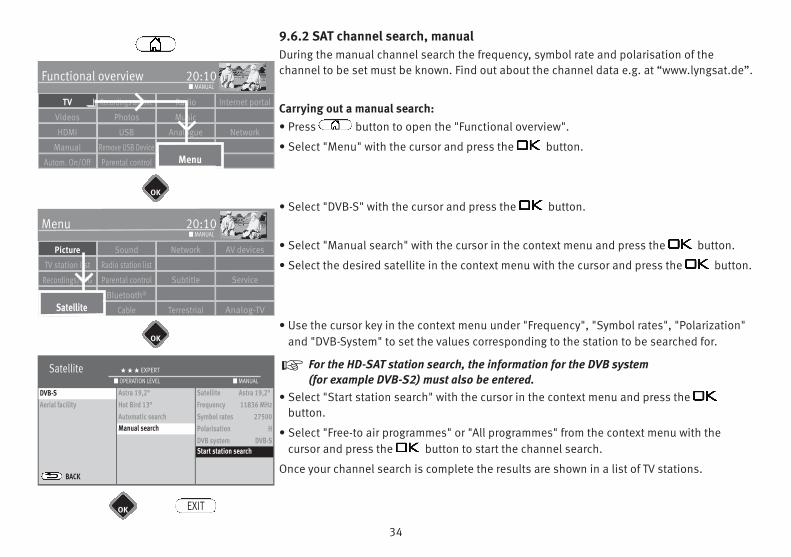
9.6.2 SAT channel search, manualDuring the manual channel search the frequency, symbol rate and polarisation of thechannel to be set must be known. Find out about the channel data e.g. at “www.lyngsat.de”.
Carrying out a manual search:• Press button to open the "Functional overview".
• Select "Menu" with the cursor and press the button.
• Select "DVB-S" with the cursor and press the button.
• Select "Manual search" with the cursor in the context menu and press the button.
• Select the desired satellite in the context menu with the cursor and press the button.
• Use the cursor key in the context menu under "Frequency", "Symbol rates", "Polarization"and "DVB-System" to set the values corresponding to the station to be searched for.
For the HD-SAT station search, the information for the DVB system (for example DVB-S2) must also be entered.
• Select "Start station search" with the cursor in the context menu and press thebutton.
• Select "Free-to air programmes" or "All programmes" from the context menu with thecursor and press the button to start the channel search.
Once your channel search is complete the results are shown in a list of TV stations.
+
Radio Internet portalRecordings archiveTV
Functional overview 20:10
MusicPhotosVideos
Analogue NetworkUSBHDMI
FilemanagerRemove USB DeviceManual
Parental control MenuAutom. On/Off
■ MANUAL
Network AV devicesSoundPicture
Menu 20:10
Radio station listTV station list
Subtitle ServiceParental controlRecordings/EPG
Bluetooth®
Terrestrial Analog-TVCableSatellite
■ MANUAL
OK
OK
Configuration
OK
Satellite H H H EXPERT
DVB-SAerial facility
BACK
Astra 19,2°Hot Bird 13°Automatic searchManual search
Satellite Astra 19,2°Frequency 11836 MHzSymbol rates 27500Polarisation HDVB system DVB-SStart station search
■ MANUAL■ OPERATION LEVEL
EXIT
Manual search
DVB-S
Satellite
Start station search

35
10 List of TV StationsOnce you have completed the channel search, the results are presented in a list (All TV channels) and then saved as a list of favourites as "TV List 1".
Under "Details", you can make the following changes/additions:
- Include channel in EPG yes/no (also see 24.2)
- Block channel (parental control settings) yes/no (also see 22.2)
- Delete or move channel (see Chap. 11.2)
- Search station name (see Chap. 13.5.1)
under "Details"
- Signalquality
- Image correction for colour intensity and signal contrast
- Volume correction (see Chap. 17.2.1)
- Search name
The TV station list can be opened while the TV is in use by pressing the button.
You can, if needed, create up to eight further TV/radio channel lists (see Chap. 11).
These additional channel lists can be customised to meet the personal preferences of theusers (only sports channels, documentaries, news, etc.)
TV station list■ MANUAL
■ TV List 1 All TV stations
01 Das Erste HD2 ZDF HD3 BR Nord HD4 SAT.15 RTL Television6 RTL27 ProSieben8 WDR HD Aachen9 SIXX10 hr HD
Mark block
Remove markingRemove entries
ShiftEPG on / off
Parental controlon / off
DetailsSearch name
Export station list
1 Das Erste HD2 ZDF HD3 BR Nord HD4 SAT.15 RTL Television6 RTL27 ProSieben8 WDR HD Aachen9 SIXX10 hr HD
1 Das Erste HD
TV station list■ FAVOURITES
~P+
1 Das Erste HD2 ZDF HD3 BR Nord HD4 SAT.15 RTL Television6 RTL27 ProSieben8 WDR Köln HD 9 kabel eins10 hr-fernsehen HD
P+
Tagesschau 20:00-20:15 noch 5 min1 Das Erste HD
~
■ Search ■ HDAV
OK
36
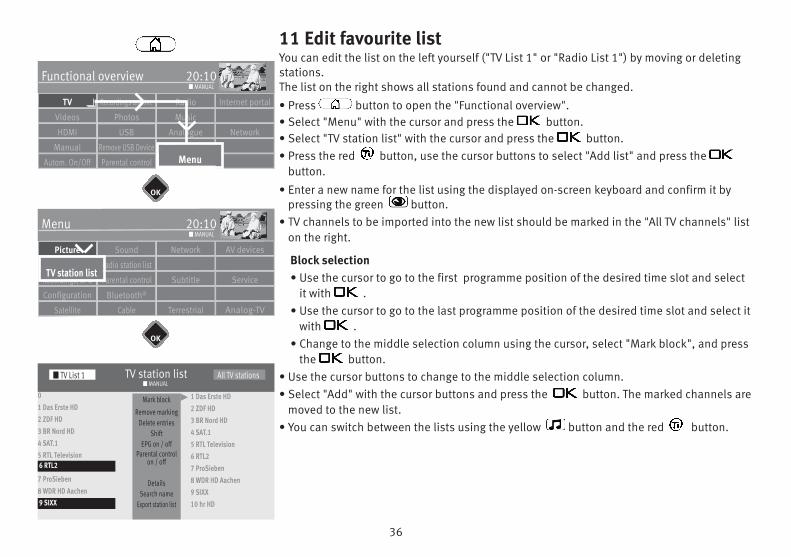
11 Edit favourite listYou can edit the list on the left yourself ("TV List 1" or "Radio List 1") by moving or deletingstations. The list on the right shows all stations found and cannot be changed.
• Press button to open the "Functional overview".• Select "Menu" with the cursor and press the button.• Select "TV station list" with the cursor and press the button.• Press the red button, use the cursor buttons to select "Add list" and press the
button.
• Enter a new name for the list using the displayed on-screen keyboard and confirm it bypressing the green button.
• TV channels to be imported into the new list should be marked in the "All TV channels" liston the right.
Block selection • Use the cursor to go to the first programme position of the desired time slot and select
it with .• Use the cursor to go to the last programme position of the desired time slot and select it
with .• Change to the middle selection column using the cursor, select "Mark block", and press
the button.• Use the cursor buttons to change to the middle selection column.• Select "Add" with the cursor buttons and press the button. The marked channels are
moved to the new list.• You can switch between the lists using the yellow button and the red button.
TV station list■ MANUAL
■ TV List 1 All TV stations
01 Das Erste HD2 ZDF HD3 BR Nord HD4 SAT.15 RTL Television6 RTL27 ProSieben8 WDR HD Aachen9 SIXX
Mark block
Remove markingDelete entries
ShiftEPG on / off
Parental controlon / off
DetailsSearch name
Export station list
1 Das Erste HD2 ZDF HD3 BR Nord HD4 SAT.15 RTL Television6 RTL27 ProSieben8 WDR HD Aachen9 SIXX10 hr HD9 SIXX
Radio Internet portalRecordings archiveTV
Functional overview 20:10
MusicPhotosVideos
Analogue NetworkUSBHDMI
FilemanagerRemove USB DeviceManual
Parental control MenuAutom. On/Off
■ MANUAL
Network AV devicesSoundPicture
Menu 20:10
Radio station listTV station list
Subtitle ServiceParental controlRecordings/EPG
Bluetooth®
Terrestrial Analog-TVCableSatellite
■ MANUAL
OK
OK
Configuration
TV station list
6 RTL2
37
11.1 Moving channels within a listIt is generally only possible to move channels in the lists on the left.
• Press the red button and select a favourites list with the cursor buttons.
• Press the button to open the selected favourites list.
• Use the cursor to select the channel you would like to move. • Press the button and highlight the channel.• Change to the middle selection column using the cursor, select "Shift", and press the
button. Use the cursor buttons to select the position at which the channel is to be addedPress the button to move the channel to this new position. Alternatively, change to the middle selection column using the cursor, select "Insert here",and press the button.
It is also possible to move several channels at once to the channel list. To do this, refer to"Marking a block" on the previous page.
11.2 Delete channelIt is generally only possible to delete channels in the lists on the left.
• Press the red button and select a favourites list with the cursor buttons.
• Press the red button to open the selected favourites list.
• Use the cursor to select the channel you would like to delete.
• Taste drücken und den Sender markieren.• Use the cursor to change to the middle selection column.• Use the cursor to select "Remove entries" and press the button.
It is also possible to delete several channels from the channel list at the same time. See"Selecting a block" on the previous page.
+
+
+
+
38
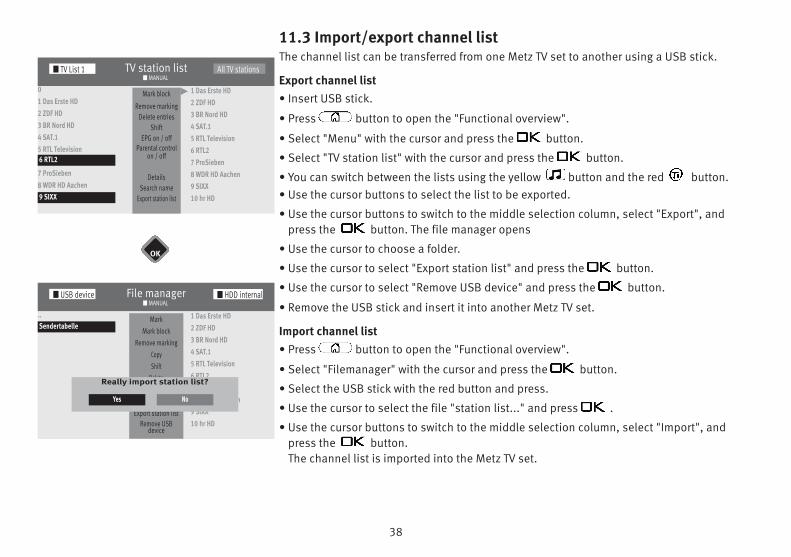
11.3 Import/export channel listThe channel list can be transferred from one Metz TV set to another using a USB stick.
Export channel list• Insert USB stick.
• Press button to open the "Functional overview".
• Select "Menu" with the cursor and press the button.
• Select "TV station list" with the cursor and press the button.
• You can switch between the lists using the yellow button and the red button.• Use the cursor buttons to select the list to be exported.
• Use the cursor buttons to switch to the middle selection column, select "Export", andpress the button. The file manager opens
• Use the cursor to choose a folder.
• Use the cursor to select "Export station list" and press the button.
• Use the cursor to select "Remove USB device" and press the button.
• Remove the USB stick and insert it into another Metz TV set.
Import channel list• Press button to open the "Functional overview".
• Select "Filemanager" with the cursor and press the button.
• Select the USB stick with the red button and press.
• Use the cursor to select the file "station list..." and press .
• Use the cursor buttons to switch to the middle selection column, select "Import", andpress the button. The channel list is imported into the Metz TV set.
TV station list■ MANUAL
■ TV List 1 All TV stations
01 Das Erste HD2 ZDF HD3 BR Nord HD4 SAT.15 RTL Television6 RTL27 ProSieben8 WDR HD Aachen9 SIXX
Mark block
Remove markingDelete entries
ShiftEPG on / off
Parental controlon / off
DetailsSearch name
Export station list
1 Das Erste HD2 ZDF HD3 BR Nord HD4 SAT.15 RTL Television6 RTL27 ProSieben8 WDR HD Aachen9 SIXX10 hr HD9 SIXX
6 RTL2
File manager■ MANUAL
■ USB device
..Sendertabelle
MarkMark block
Remove markingCopyShift
DeleteNew directory
RenameExport station list
Remove USB device
1 Das Erste HD2 ZDF HD3 BR Nord HD4 SAT.15 RTL Television6 RTL27 ProSieben8 WDR HD Aachen9 SIXX10 hr HD
OK
Sendertabelle
Really import station list?
Yes No
■ HDD internal
39
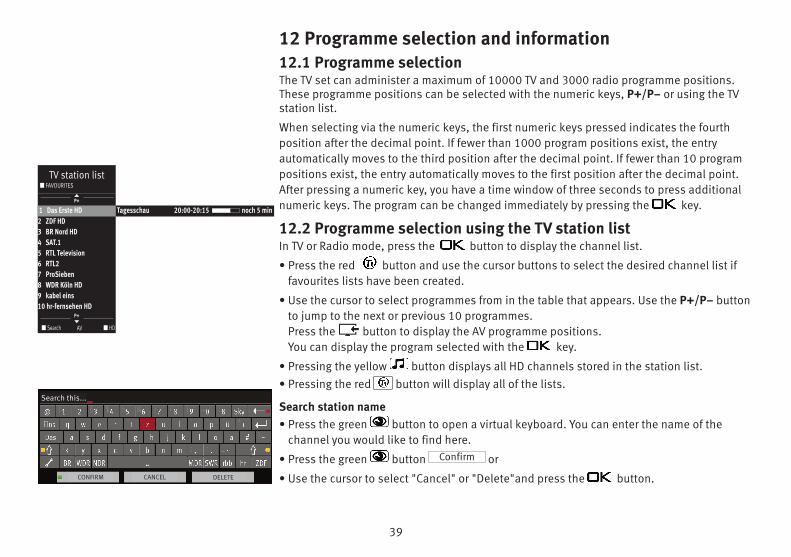
12 Programme selection and information12.1 Programme selectionThe TV set can administer a maximum of 10000 TV and 3000 radio programme positions.These programme positions can be selected with the numeric keys, P+/P– or using the TVstation list.
When selecting via the numeric keys, the first numeric keys pressed indicates the fourthposition after the decimal point. If fewer than 1000 program positions exist, the entry automatically moves to the third position after the decimal point. If fewer than 10 programpositions exist, the entry automatically moves to the first position after the decimal point.After pressing a numeric key, you have a time window of three seconds to press additionalnumeric keys. The program can be changed immediately by pressing the key.
12.2 Programme selection using the TV station listIn TV or Radio mode, press the button to display the channel list.
• Press the red button and use the cursor buttons to select the desired channel list iffavourites lists have been created.
• Use the cursor to select programmes from in the table that appears. Use the P+/P– buttonto jump to the next or previous 10 programmes. Press the button to display the AV programme positions.You can display the program selected with the key.
• Pressing the yellow button displays all HD channels stored in the station list. • Pressing the red button will display all of the lists.
Search station name• Press the green button to open a virtual keyboard. You can enter the name of the
channel you would like to find here.
• Press the green button or
• Use the cursor to select "Cancel" or "Delete"and press the button.
Confirm
TV station list■ FAVOURITES
~P+
1 Das Erste HD2 ZDF HD3 BR Nord HD4 SAT.15 RTL Television6 RTL27 ProSieben8 WDR Köln HD 9 kabel eins10 hr-fernsehen HD
P+
Tagesschau 20:00-20:15 noch 5 min1 Das Erste HD
~
■ Search ■ HDAV
CONFIRM CANCEL DELETE
Search this...
40
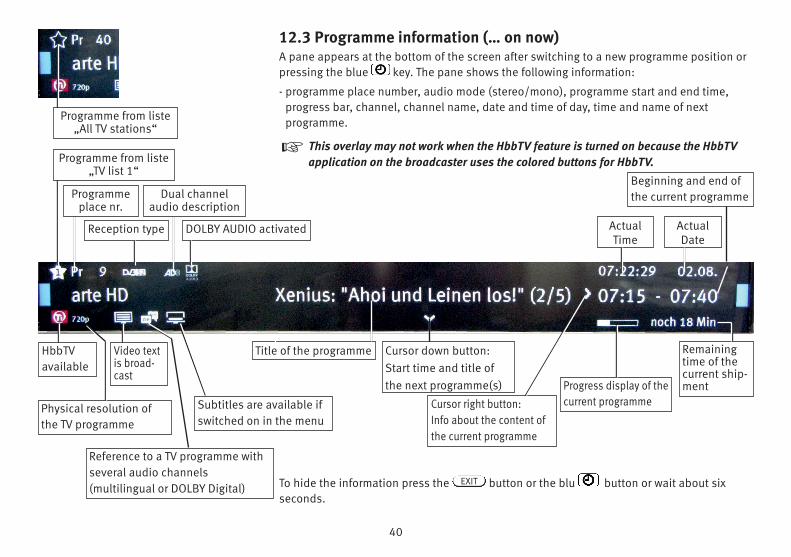
12.3 Programme information (… on now)A pane appears at the bottom of the screen after switching to a new programme position orpressing the blue key. The pane shows the following information:
- programme place number, audio mode (stereo/mono), programme start and end time,progress bar, channel, channel name, date and time of day, time and name of nextprogramme.
This overlay may not work when the HbbTV feature is turned on because the HbbTVapplication on the broadcaster uses the colored buttons for HbbTV.
To hide the information press the button or the blu button or wait about sixseconds.
+
EXIT
Subtitles are available ifswitched on in the menu
Remainingtime of thecurrent ship-ment
Beginning and end ofthe current programme
Progress display of thecurrent programmeCursor right button:
Info about the content ofthe current programme
Physical resolution ofthe TV programme
Reference to a TV programme withseveral audio channels(multilingual or DOLBY Digital)
DOLBY AUDIO activatedReception type
Title of the programme
ActualDate
ActualTime
HbbTVavailable
Video textis broad-cast
Cursor down button:Start time and title ofthe next programme(s)
Programmeplace nr.
Programme from liste„TV list 1“
Programme from liste„All TV stations“
Dual channelaudio description
41
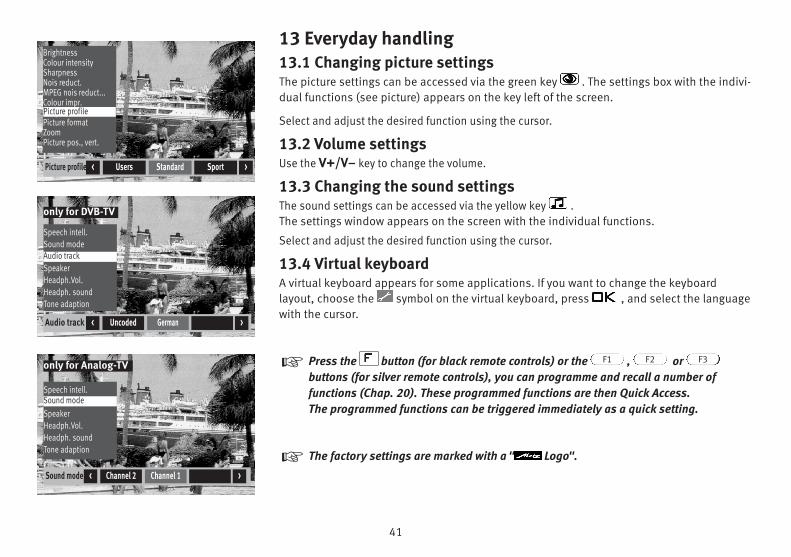
13 Everyday handling13.1 Changing picture settingsThe picture settings can be accessed via the green key . The settings box with the indivi-dual functions (see picture) appears on the key left of the screen.
Select and adjust the desired function using the cursor.
13.2 Volume settingsUse the V+/V– key to change the volume.
13.3 Changing the sound settingsThe sound settings can be accessed via the yellow key . The settings window appears on the screen with the individual functions.
Select and adjust the desired function using the cursor.
13.4 Virtual keyboardA virtual keyboard appears for some applications. If you want to change the keyboardlayout, choose the symbol on the virtual keyboard, press , and select the languagewith the cursor.
Press the button (for black remote controls) or the , or buttons (for silver remote controls), you can programme and recall a number offunctions (Chap. 20). These programmed functions are then Quick Access.The programmed functions can be triggered immediately as a quick setting.
The factory settings are marked with a " Logo".
F3F2F1+
+
BrightnessColour intensitySharpnessNois reduct.MPEG nois reduct...Colour impr.BildprofilPicture formatZoomPicture pos., vert.
Picture profile
Speech intell.Sound modeSpeakerHeadph.Vol.Headph. soundTone adaption
Sound mode
Speech intell.Sound modeAudio trackSpeakerHeadph.Vol.Headph. soundTone adaption
Audio track
Picture profile Users Standard Sport< >
Audio track Uncoded German< >
Sound mode Channel 2 Channel 1< >
only for DVB-TV
only for Analog-TV
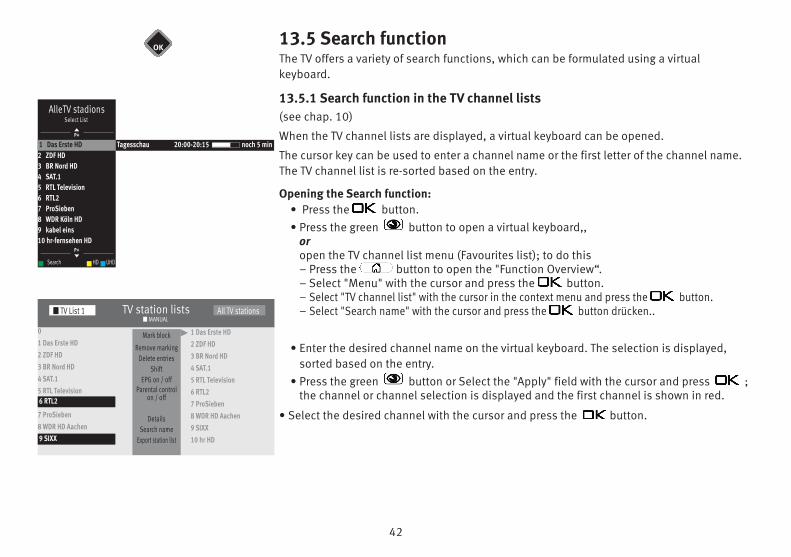
42
13.5 Search function The TV offers a variety of search functions, which can be formulated using a virtualkeyboard.
13.5.1 Search function in the TV channel lists(see chap. 10)
When the TV channel lists are displayed, a virtual keyboard can be opened.
The cursor key can be used to enter a channel name or the first letter of the channel name.The TV channel list is re-sorted based on the entry.
Opening the Search function:• Press the button.• Press the green button to open a virtual keyboard,,
oropen the TV channel list menu (Favourites list); to do this– Press the button to open the "Function Overview“.– Select "Menu" with the cursor and press the button.– Select "TV channel list" with the cursor in the context menu and press the button.– Select "Search name" with the cursor and press the button drücken..
• Enter the desired channel name on the virtual keyboard. The selection is displayed,sorted based on the entry.
• Press the green button or Select the "Apply" field with the cursor and press ;the channel or channel selection is displayed and the first channel is shown in red.
• Select the desired channel with the cursor and press the button.
TV station lists■ MANUAL
■ TV List 1 All TV stations
01 Das Erste HD2 ZDF HD3 BR Nord HD4 SAT.15 RTL Television6 RTL27 ProSieben8 WDR HD Aachen9 SIXX
Mark block
Remove markingDelete entries
ShiftEPG on / off
Parental controlon / off
DetailsSearch name
Export station list
1 Das Erste HD2 ZDF HD3 BR Nord HD4 SAT.15 RTL Television6 RTL27 ProSieben8 WDR HD Aachen9 SIXX10 hr HD9 SIXX
6 RTL2
OK
AlleTV stadionsSelect List
~P+
1 Das Erste HD2 ZDF HD3 BR Nord HD4 SAT.15 RTL Television6 RTL27 ProSieben8 WDR Köln HD 9 kabel eins10 hr-fernsehen HD
P+
Tagesschau 20:00-20:15 noch 5 min1 Das Erste HD
~
Search UHDHD
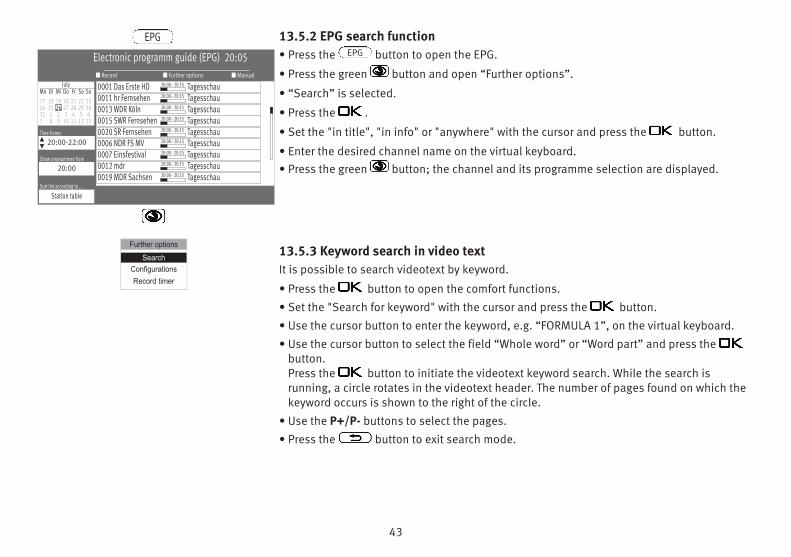
43
13.5.2 EPG search function• Press the button to open the EPG.
• Press the green button and open “Further options”.
• “Search” is selected.
• Press the .
• Set the "in title", "in info" or "anywhere" with the cursor and press the button.
• Enter the desired channel name on the virtual keyboard.• Press the green button; the channel and its programme selection are displayed.
13.5.3 Keyword search in video textIt is possible to search videotext by keyword.
• Press the button to open the comfort functions.
• Set the "Search for keyword" with the cursor and press the button.
• Use the cursor button to enter the keyword, e.g. “FORMULA 1”, on the virtual keyboard.
• Use the cursor button to select the field “Whole word” or “Word part” and press the button.Press the button to initiate the videotext keyword search. While the search isrunning, a circle rotates in the videotext header. The number of pages found on which thekeyword occurs is shown to the right of the circle.
• Use the P+/P- buttons to select the pages.
• Press the button to exit search mode.
EPG
Suche
Configurations
Record timer
Further options
Search
Electronic programm guide (EPG) 20:05
Time frame:20:00-22:00
Show programmes from20:00
Sort list according to ...Station table
■ Manual■ Further options■ RecordJuly
Mo Di Mi Do Fr Sa So17 18 19 20 21 22 2324 25 26 27 28 29 3031 1 2 3 4 5 67 8 9 10 11 12 13
s
s
0001 Das Erste HD 20:00 - 20:15 Tagesschau0011 hr Fernsehen 20:00 - 20:15 Tagesschau0013 WDR Köln 20:00 - 20:15 Tagesschau0015 SWR Fernsehen 20:00 - 20:15 Tagesschau0020 SR Fernsehen 20:00 - 20:15 Tagesschau0006 NDR FS MV 20:00 - 20:15 Tagesschau0007 Einsfestival 20:00 - 20:15 Tagesschau0012 mdr 20:00 - 20:15 Tagesschau0019 MDR Sachsen 20:00 - 20:15 Tagesschau
EPG
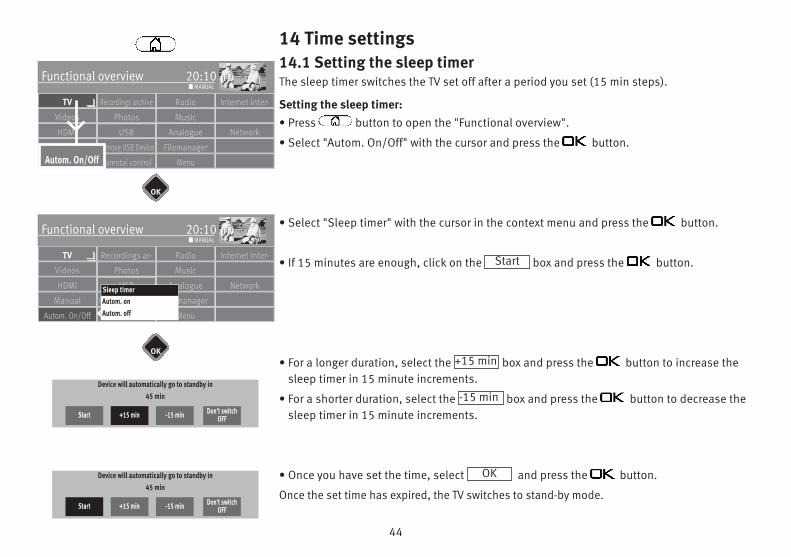
44
14 Time settings14.1 Setting the sleep timerThe sleep timer switches the TV set off after a period you set (15 min steps).
Setting the sleep timer:• Press button to open the "Functional overview".
• Select "Autom. On/Off" with the cursor and press the button.
• Select "Sleep timer" with the cursor in the context menu and press the button.
• If 15 minutes are enough, click on the box and press the button.
• For a longer duration, select the box and press the button to increase thesleep timer in 15 minute increments.
• For a shorter duration, select the box and press the button to decrease thesleep timer in 15 minute increments.
• Once you have set the time, select and press the button.
Once the set time has expired, the TV switches to stand-by mode.
Start
+15 min
-15 min
OK
Radio Internet inter-Recordings archiveTV
Functional overview 20:10
MusicPhotosVideos
Analogue NetworkUSBHDMI
FilemanagerRemove USB DeviceManual
Parental control MenuAutom. On/Off
■ MANUAL
Autom. On/Off
Radio Internet inter-Recordings ar-TV
Functional overview 20:10
MusicPhotosVideos
Analogue NetworkUSBHDMI
FilemanagerRemove USB DeviceManual
Parental control MenuAutom. On/Off
■ MANUAL
Sleep TimerAutom. onAutom. off
Device will automatically go to standby in45 min
OK
OK
Start +15 min -15 min Don't switchOFF
Device will automatically go to standby in45 min
Start +15 min -15 min Don't switchOFF
Sleep timer
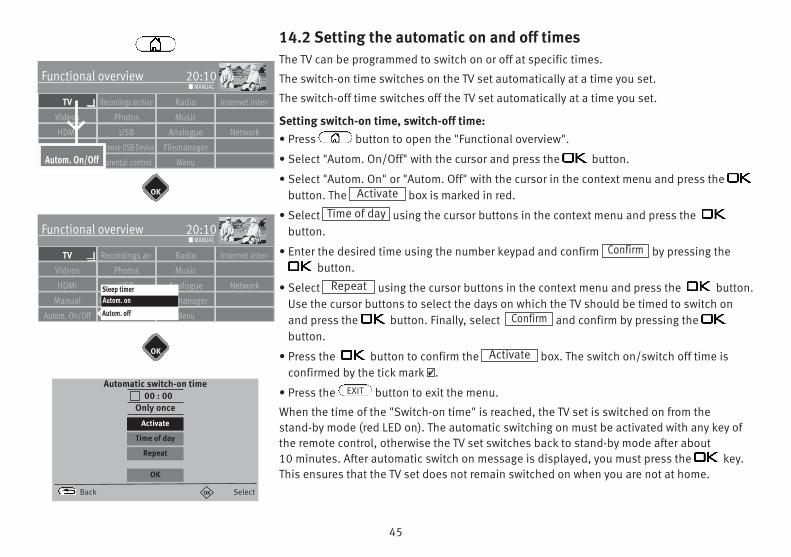
45
14.2 Setting the automatic on and off timesThe TV can be programmed to switch on or off at specific times.
The switch-on time switches on the TV set automatically at a time you set.
The switch-off time switches off the TV set automatically at a time you set.
Setting switch-on time, switch-off time:• Press button to open the "Functional overview".
• Select "Autom. On/Off" with the cursor and press the button.
• Select "Autom. On" or "Autom. Off" with the cursor in the context menu and press thebutton. The box is marked in red.
• Select using the cursor buttons in the context menu and press thebutton.
• Enter the desired time using the number keypad and confirm by pressing thebutton.
• Select using the cursor buttons in the context menu and press the button.Use the cursor buttons to select the days on which the TV should be timed to switch onand press the button. Finally, select and confirm by pressing thebutton.
• Press the button to confirm the box. The switch on/switch off time isconfirmed by the tick mark .
• Press the button to exit the menu.
When the time of the "Switch-on time" is reached, the TV set is switched on from the stand-by mode (red LED on). The automatic switching on must be activated with any key ofthe remote control, otherwise the TV set switches back to stand-by mode after about 10 minutes. After automatic switch on message is displayed, you must press the key.This ensures that the TV set does not remain switched on when you are not at home.
Activate
Time of day
Confirm
Repeat
Confirm
Activate4
EXIT
Radio Internet inter-Recordings archiveTV
Functional overview 20:10
MusicPhotosVideos
Analogue NetworkUSBHDMI
FilemanagerRemove USB DeviceManual
Parental control MenuAutom. On/Off
■ MANUAL
Autom. On/Off
Radio Internet inter-Recordings ar-TV
Functional overview 20:10
MusicPhotosVideos
Analogue NetworkUSBHDMI
FilemanagerRemove USB DeviceManual
Parental control MenuAutom. On/Off
■ MANUAL
Sleep timerAutom. EinschaltenAutom. off
OK
OK
Autom. on
Automatic switch-on time00 : 00
Only once
Back Select
Activate
Time of day
Repeat
OK
OK
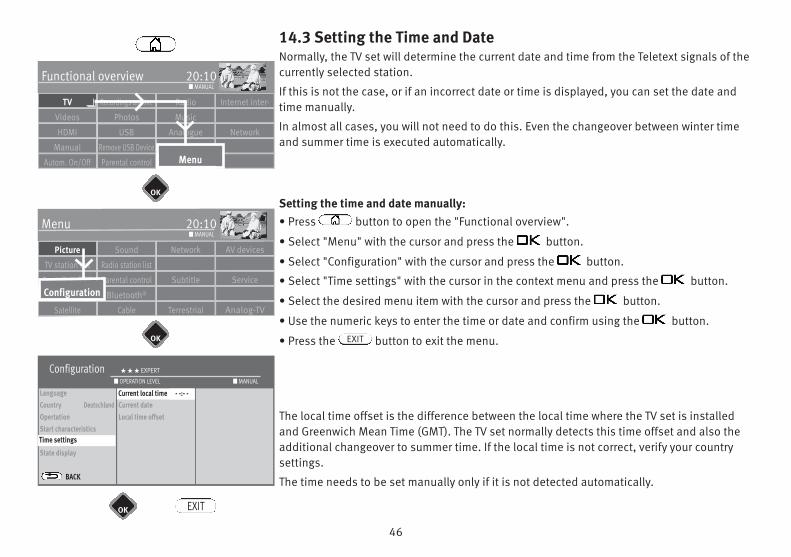
46
14.3 Setting the Time and DateNormally, the TV set will determine the current date and time from the Teletext signals of thecurrently selected station.
If this is not the case, or if an incorrect date or time is displayed, you can set the date andtime manually.
In almost all cases, you will not need to do this. Even the changeover between winter timeand summer time is executed automatically.
Setting the time and date manually:• Press button to open the "Functional overview".
• Select "Menu" with the cursor and press the button.
• Select "Configuration" with the cursor and press the button.
• Select "Time settings" with the cursor in the context menu and press the button.
• Select the desired menu item with the cursor and press the button.
• Use the numeric keys to enter the time or date and confirm using the button.
• Press the button to exit the menu.
The local time offset is the difference between the local time where the TV set is installedand Greenwich Mean Time (GMT). The TV set normally detects this time offset and also theadditional changeover to summer time. If the local time is not correct, verify your countrysettings.
The time needs to be set manually only if it is not detected automatically.
EXIT
Radio Internet inter-Recordings archiveTV
Functional overview 20:10
MusicPhotosVideos
Analogue NetworkUSBHDMI
FilemanagerRemove USB DeviceManual
Parental control MenuAutom. On/Off
■ MANUAL
Network AV devicesSoundPicture
Menu 20:10
Radio station listTV station list
Subtitle ServiceParental controlRecordings/EPG
Bluetooth®
Terrestrial Analog-TVCableSatellite
■ MANUAL
OK
OK
OK
Configuration H H H EXPERT
LanguageCountry DeutschlandOpertationStart characteristicsTime settingsState display
BACK
Aktuelle UhrzeitCurrent dateLocal time offset
■ MANUAL■ OPERATION LEVEL
Time settings
Current local time - -:- -
Configuration
EXIT
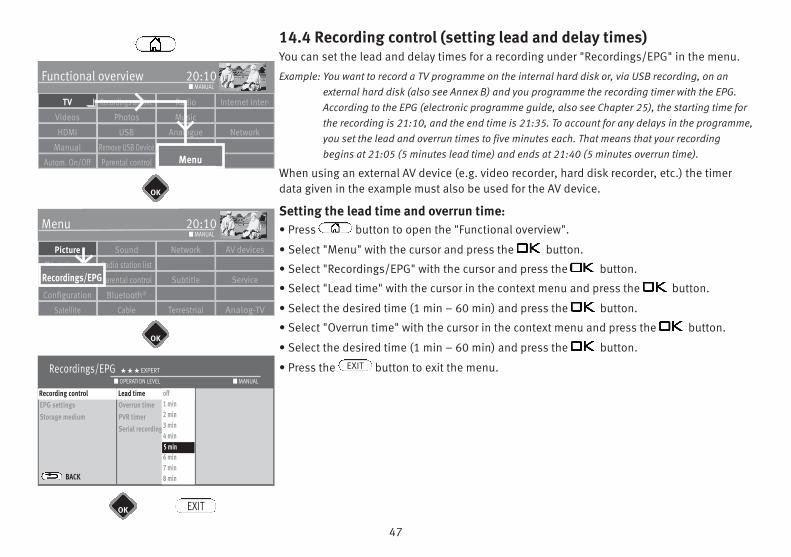
47
14.4 Recording control (setting lead and delay times)You can set the lead and delay times for a recording under "Recordings/EPG" in the menu.
Example: You want to record a TV programme on the internal hard disk or, via USB recording, on anexternal hard disk (also see Annex B) and you programme the recording timer with the EPG.According to the EPG (electronic programme guide, also see Chapter 25), the starting time forthe recording is 21:10, and the end time is 21:35. To account for any delays in the programme,you set the lead and overrun times to five minutes each. That means that your recordingbegins at 21:05 (5 minutes lead time) and ends at 21:40 (5 minutes overrun time).
When using an external AV device (e.g. video recorder, hard disk recorder, etc.) the timerdata given in the example must also be used for the AV device.
Setting the lead time and overrun time:• Press button to open the "Functional overview".
• Select "Menu" with the cursor and press the button.
• Select "Recordings/EPG" with the cursor and press the button.
• Select "Lead time" with the cursor in the context menu and press the button.
• Select the desired time (1 min – 60 min) and press the button.
• Select "Overrun time" with the cursor in the context menu and press the button.
• Select the desired time (1 min – 60 min) and press the button.
• Press the button to exit the menu.EXIT
Radio Internet inter-Recordings archiveTV
Functional overview 20:10
MusicPhotosVideos
Analogue NetworkUSBHDMI
FilemanagerRemove USB DeviceManual
Parental control MenuAutom. On/Off
■ MANUAL
Network AV devicesSoundPicture
Menu 20:10
Radio station listTV station list
Subtitle ServiceParental controlAufnahme
Bluetooth®Configuration
Terrestrial Analog-TVCableSatellite
■ MANUAL
OK
OK
OK
Recordings/EPG H H H EXPERT
Recording controlEPG settingsStorage medium
BACK
Vorlaufzeit AusOverrun time AusPVR timerSerial recording
■ MANUAL■ OPERATION LEVEL
Recording control Lead time off1 min2 min3 min4 min5 min6 min7 min8 min
5 min
Recordings/EPG
EXIT
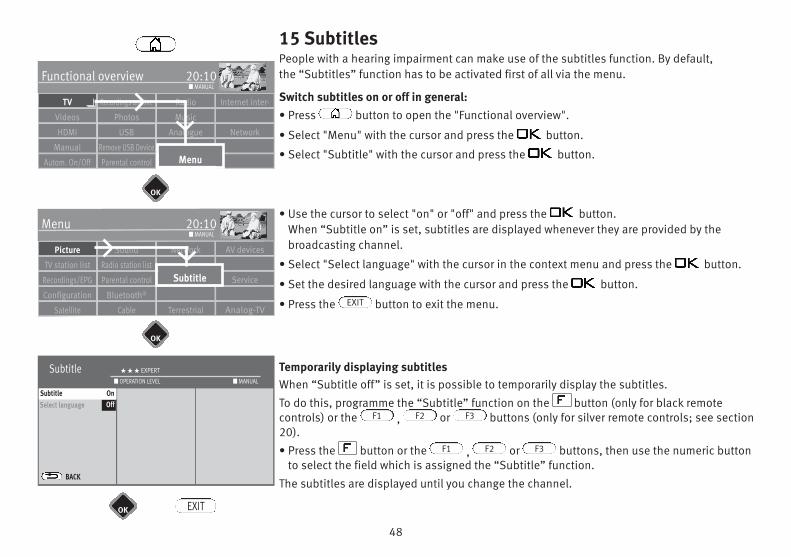
48
15 SubtitlesPeople with a hearing impairment can make use of the subtitles function. By default, the “Subtitles” function has to be activated first of all via the menu.
Switch subtitles on or off in general:• Press button to open the "Functional overview".
• Select "Menu" with the cursor and press the button.
• Select "Subtitle" with the cursor and press the button.
• Use the cursor to select "on" or "off" and press the button.When “Subtitle on” is set, subtitles are displayed whenever they are provided by thebroadcasting channel.
• Select "Select language" with the cursor in the context menu and press the button.
• Set the desired language with the cursor and press the button.
• Press the button to exit the menu.
Temporarily displaying subtitlesWhen “Subtitle off” is set, it is possible to temporarily display the subtitles.
To do this, programme the “Subtitle” function on the button (only for black remotecontrols) or the , or buttons (only for silver remote controls; see section20).
• Press the button or the , or buttons, then use the numeric buttonto select the field which is assigned the “Subtitle” function.
The subtitles are displayed until you change the channel.
EXIT
F3F2F1
F3F2F1
Radio Internet inter-Recordings archiveTV
Functional overview 20:10
MusicPhotosVideos
Analogue NetworkUSBHDMI
FilemanagerRemove USB DeviceManual
Parental control MenuAutom. On/Off
■ MANUAL
Network AV devicesSoundPicture
Menu 20:10
Radio station listTV station list
Subtitle ServiceParental controlRecordings/EPG
Bluetooth®Configuration
Terrestrial Analog-TVCableSatellite
■ MANUAL
OK
OK
OK
Subtitle H H H EXPERT
Subtitle onSelect language
BACK
■ MANUAL■ OPERATION LEVEL
Subtitle On
Subtitle
EXIT
Off
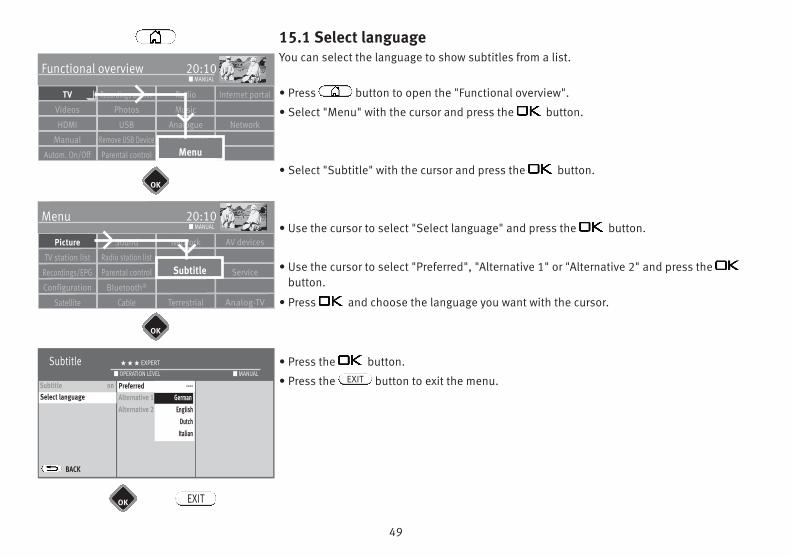
49
15.1 Select languageYou can select the language to show subtitles from a list.
• Press button to open the "Functional overview".
• Select "Menu" with the cursor and press the button.
• Select "Subtitle" with the cursor and press the button.
• Use the cursor to select "Select language" and press the button.
• Use the cursor to select "Preferred", "Alternative 1" or "Alternative 2" and press the button.
• Press and choose the language you want with the cursor.
• Press the button.
• Press the button to exit the menu.EXIT
Radio Internet portalRecordings archiveTV
Functional overview 20:10
MusicPhotosVideos
Analogue NetworkUSBHDMI
FilemanagerRemove USB DeviceManual
Parental control MenuAutom. On/Off
■ MANUAL
Network AV devicesSoundPicture
Menu 20:10
Radio station listTV station list
Subtitle ServiceParental controlRecordings/EPG
Bluetooth®Configuration
Terrestrial Analog-TVCableSatellite
■ MANUAL
OK
OK
OK
Subtitle H H H EXPERT
Subtitle onSelect language
BACK
Preferred ----Alternative 1 ----Alternative 2 ----
■ MANUAL■ OPERATION LEVEL
Select language
Subtitle
EXIT
Preferred ----DeutschEnglish
DutchItalian
German
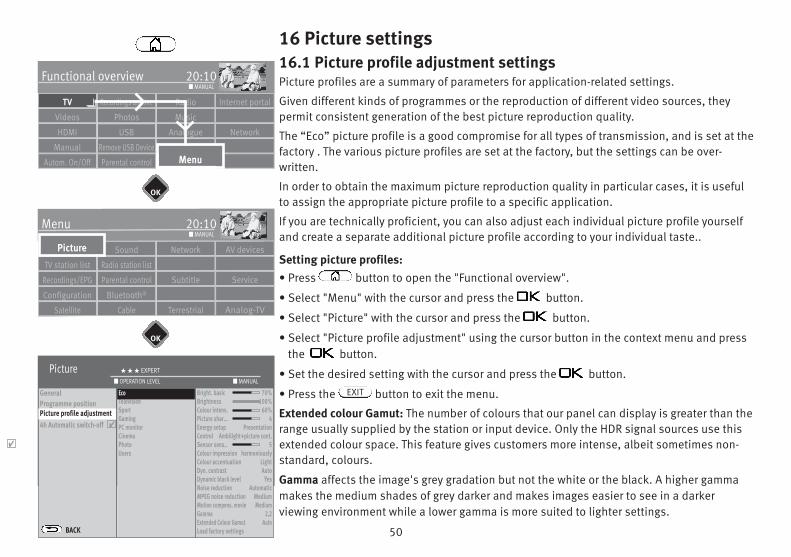
50
16 Picture settings16.1 Picture profile adjustment settingsPicture profiles are a summary of parameters for application-related settings.
Given different kinds of programmes or the reproduction of different video sources, theypermit consistent generation of the best picture reproduction quality.
The “Eco” picture profile is a good compromise for all types of transmission, and is set at thefactory . The various picture profiles are set at the factory, but the settings can be over-written.
In order to obtain the maximum picture reproduction quality in particular cases, it is usefulto assign the appropriate picture profile to a specific application.
If you are technically proficient, you can also adjust each individual picture profile yourselfand create a separate additional picture profile according to your individual taste..
Setting picture profiles: • Press button to open the "Functional overview".
• Select "Menu" with the cursor and press the button.
• Select "Picture" with the cursor and press the button.
• Select "Picture profile adjustment" using the cursor button in the context menu and pressthe button.
• Set the desired setting with the cursor and press the button.
• Press the button to exit the menu.
Extended colour Gamut: The number of colours that our panel can display is greater than therange usually supplied by the station or input device. Only the HDR signal sources use thisextended colour space. This feature gives customers more intense, albeit sometimes non-standard, colours.
Gamma affects the image's grey gradation but not the white or the black. A higher gammamakes the medium shades of grey darker and makes images easier to see in a darkerviewing environment while a lower gamma is more suited to lighter settings.
EXIT
Radio Internet portalRecordings archiveTV
Functional overview 20:10
MusicPhotosVideos
Analogue NetworkUSBHDMI
FilemanagerRemove USB DeviceManual
Parental control MenuAutom. On/Off
■ MANUAL
Network AV devicesSoundPicture
Menu 20:10
Radio station listTV station list
Subtitle Service Parental controlRecordings/EPG
Configuration Bluetooth®
Terrestrial Analog-TVCableSatellite
■ MANUAL
OK
OK
Picture H H H EXPERT
GeneralProgramme positionPicture profile adjustment4h Automatic switch-off
BACK
StandardTelevisionSportGamingPC monitorCinemaPhotoUsers
■ MANUAL■ OPERATION LEVEL
Picture profile adjustment
Eco
Picture
4
4
Bright. basic 70%Brightness 100%Colour intens. 60%Picture shar... 4Energy setup PresentationControl Ambilight+picture cont.Sensor sens.. 5Colour impression harmoniouslyColour accentuation LightDyn. contrast AutoDynamic black level YesNoise reduction AutomaticMPEG noise reduction MediumMotion compens. movie MediumGamma 2,2Extended Colour Gamut AutoLoad factory settings
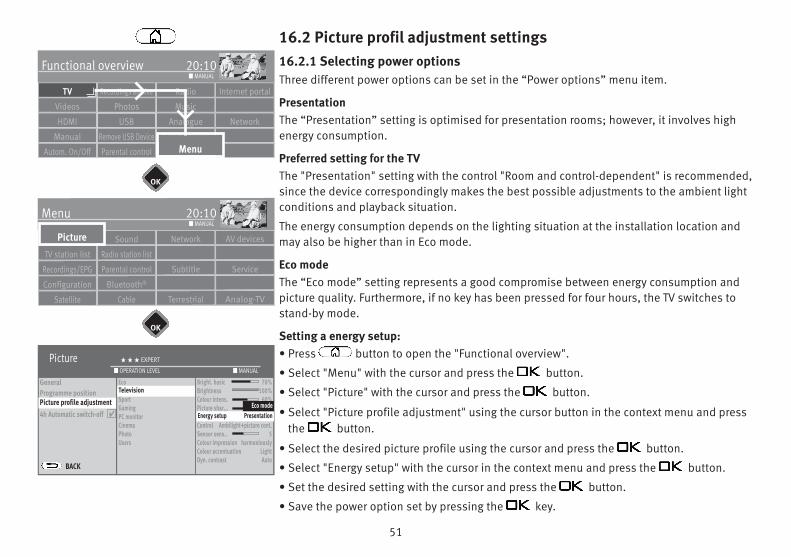
51
16.2 Picture profil adjustment settings16.2.1 Selecting power optionsThree different power options can be set in the “Power options” menu item.
PresentationThe “Presentation” setting is optimised for presentation rooms; however, it involves highenergy consumption.
Preferred setting for the TVThe "Presentation" setting with the control "Room and control-dependent" is recommended,since the device correspondingly makes the best possible adjustments to the ambient lightconditions and playback situation.
The energy consumption depends on the lighting situation at the installation location andmay also be higher than in Eco mode.
Eco modeThe “Eco mode” setting represents a good compromise between energy consumption andpicture quality. Furthermore, if no key has been pressed for four hours, the TV switches tostand-by mode.
Setting a energy setup:• Press button to open the "Functional overview".
• Select "Menu" with the cursor and press the button.
• Select "Picture" with the cursor and press the button.
• Select "Picture profile adjustment" using the cursor button in the context menu and pressthe button.
• Select the desired picture profile using the cursor and press the button.
• Select "Energy setup" with the cursor in the context menu and press the button.
• Set the desired setting with the cursor and press the button.
• Save the power option set by pressing the key.
Radio Internet portalRecordings archiveTV
Functional overview 20:10
MusicPhotosVideos
Analogue NetworkUSBHDMI
FilemanagerRemove USB DeviceManual
Parental control MenuAutom. On/Off
■ MANUAL
Network AV devicesSoundPicture
Menu 20:10
Radio station listTV station list
Subtitle ServiceParental controlRecordings/EPG
Configuration Bluetooth®
Terrestrial Analog-TVCableSatellite
■ MANUAL
OK
OK
Picture H H H EXPERT
GeneralProgramme positionPicture profile adjustment4h Automatic switch-off
BACK
EcoSportSportGamingPC monitorCinemaPhotoUsers
Bright. basic 70%Brightness 100%Colour intens. 60%Picture shar... 4Energy setup PresentationControl Ambilight+picture cont.Sensor sens.. 5Colour impression harmoniouslyColour accentuation LightDyn. contrast Auto
■ MANUAL■ OPERATION LEVEL
Picture profile adjustmentTelevision
Energy setup Presentation
Picture
4Eco mode
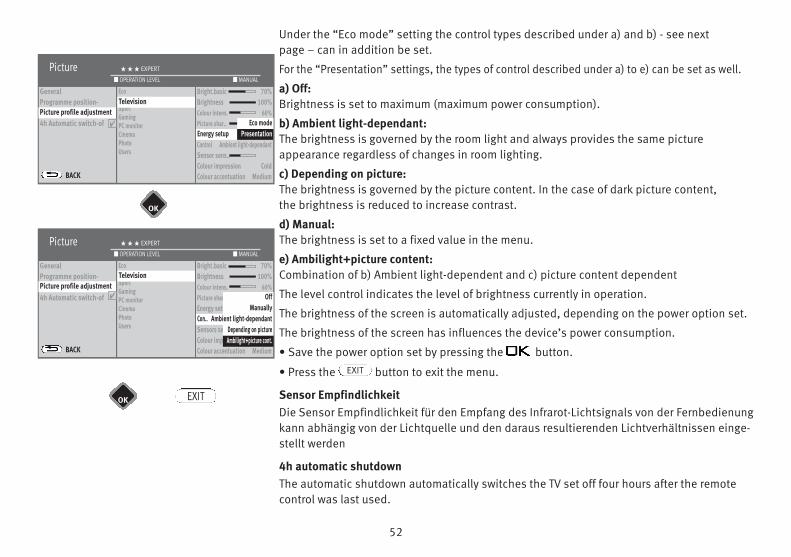
52
Under the “Eco mode” setting the control types described under a) and b) - see next page – can in addition be set.
For the “Presentation” settings, the types of control described under a) to e) can be set as well.
a) Off:Brightness is set to maximum (maximum power consumption).
b) Ambient light-dependant:The brightness is governed by the room light and always provides the same picture appearance regardless of changes in room lighting.
c) Depending on picture:The brightness is governed by the picture content. In the case of dark picture content, the brightness is reduced to increase contrast.
d) Manual:The brightness is set to a fixed value in the menu.
e) Ambilight+picture content:Combination of b) Ambient light-dependent and c) picture content dependent
The level control indicates the level of brightness currently in operation.
The brightness of the screen is automatically adjusted, depending on the power option set.
The brightness of the screen has influences the device’s power consumption.
• Save the power option set by pressing the button.
• Press the button to exit the menu.
Sensor EmpfindlichkeitDie Sensor Empfindlichkeit für den Empfang des Infrarot-Lichtsignals von der Fernbedienungkann abhängig von der Lichtquelle und den daraus resultierenden Lichtverhältnissen einge-stellt werden
4h automatic shutdownThe automatic shutdown automatically switches the TV set off four hours after the remotecontrol was last used.
EXIT
OK EXIT
OK
Picture H H H EXPERT
GeneralProgramme position-Picture profile adjustment4h Automatic switch-of
BACK
■ MANUAL■ OPERATION LEVEL
Picture H H H EXPERT
GeneralProgramme position-Picture profile adjustment4h Automatic switch-of
BACK
■ MANUAL■ OPERATION LEVEL
Picture profile adjustment
Picture profile adjustment
Bright.basic 70%Brightness 100%Colour intens. 60%Picture shar.. 4Energy setup Öko-ModusSteuerung RaumlichtabhängigSensors sens..Colour impression KühlColour accentuation Medium
Con.. Ambient light-dependantManually
Off
Depending on pictureAmbilight+picture cont.
EcoSportSportGamingPC monitorCinemaPhotoUsers
Bright.basic 70%Brightness 100%Colour intens. 60%Picture shar.. 4Energy setup Öko-ModusControl Ambient light-dependantSensor sens..Colour impression ColdColour accentuation Medium
Energy setup PresentationPresentationEco mode
EcoSportSportGamingPC monitorCinemaPhotoUsers
Television
Television
4
4
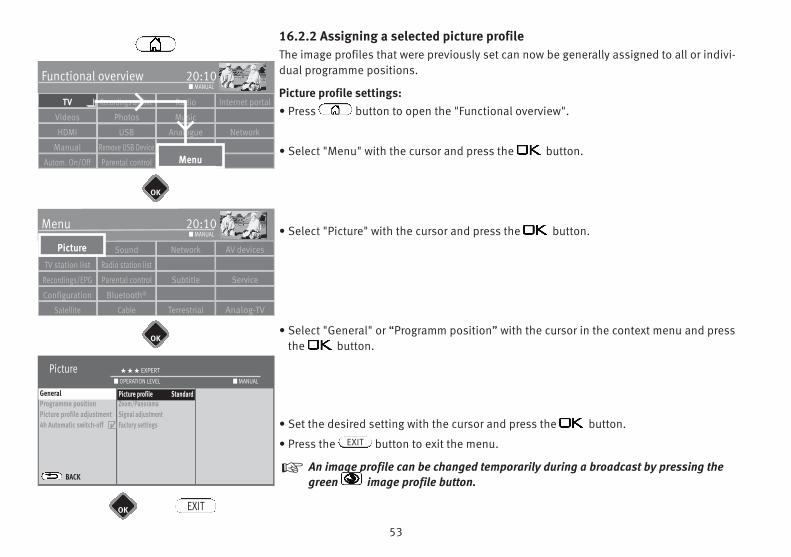
53
16.2.2 Assigning a selected picture profileThe image profiles that were previously set can now be generally assigned to all or indivi-dual programme positions.
Picture profile settings: • Press button to open the "Functional overview".
• Select "Menu" with the cursor and press the button.
• Select "Picture" with the cursor and press the button.
• Select "General" or “Programm position” with the cursor in the context menu and pressthe button.
• Set the desired setting with the cursor and press the button.
• Press the button to exit the menu.
An image profile can be changed temporarily during a broadcast by pressing thegreen image profile button.
EXIT
+
Radio Internet portalRecordings archiveTV
Functional overview 20:10
MusicPhotosVideos
Analogue NetworkUSBHDMI
FilemanagerRemove USB DeviceManual
Parental control MenuAutom. On/Off
■ MANUAL
Network AV devicesSoundPicture
Menu 20:10
Radio station listTV station list
Subtitle ServiceParental controlRecordings/EPG
Configuration Bluetooth®
Terrestrial Analog-TVCableSatellite
■ MANUAL
OK
OK
OK
Picture H H H EXPERT
GeneralProgramme positionPicture profile adjustment4h Automatic switch-off
BACK
Picture profile StandardZoom/PanoramaSignal adjustmentFactory settings
■ MANUAL■ OPERATION LEVEL
General Picture profile Standard
Picture
EXIT
4
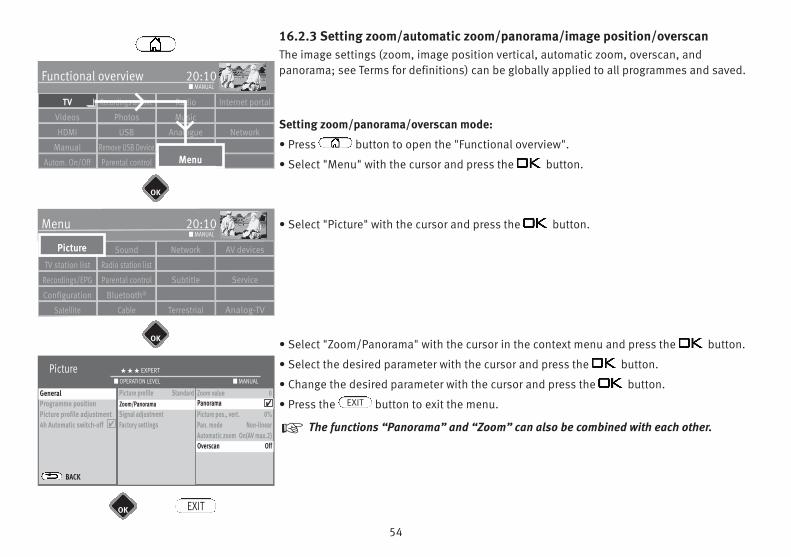
54
16.2.3 Setting zoom/automatic zoom/panorama/image position/overscanThe image settings (zoom, image position vertical, automatic zoom, overscan, andpanorama; see Terms for definitions) can be globally applied to all programmes and saved.
Setting zoom/panorama/overscan mode:
• Press button to open the "Functional overview".
• Select "Menu" with the cursor and press the button.
• Select "Picture" with the cursor and press the button.
• Select "Zoom/Panorama" with the cursor in the context menu and press the button.
• Select the desired parameter with the cursor and press the button.
• Change the desired parameter with the cursor and press the button.
• Press the button to exit the menu.
The functions “Panorama” and “Zoom” can also be combined with each other.
EXIT
+
Radio Internet portalRecordings archiveTV
Functional overview 20:10
MusicPhotosVideos
Analogue NetworkUSBHDMI
FilemanagerRemove USB DeviceManual
Parental control MenuAutom. On/Off
■ MANUAL
Network AV devicesSoundPicture
Menu 20:10
Radio station listTV station list
Subtitle ServiceParental controlRecordings/EPG
Configuration Bluetooth®
Terrestrial Analog-TVCableSatellite
■ MANUAL
OK
OK
OK
Picture H H H EXPERT
GeneralProgramme positionPicture profile adjustment4h Automatic switch-off
BACK
Zoom value 0Panorama NeinPicture pos., vert. 0%Pan. mode Non-linearAutomatic zoom On(AV max.2)Overscan Aus
■ MANUAL■ OPERATION LEVEL
GeneralPanorama
Overscan Off
Picture
EXIT
Picture profile StandardZoom/PanoramaSignal adjustmentFactory settings
Zoom/Panorama 4
4

55
16.2.4 MPEG noise reductionSystem related digital picture errors can occur in TV programs that were produced digitally.These picture defects can appear as a rectangular pattern (formation of tiny blocks) inmoving areas.
These picture faults can be reduced using MPEG noise reduction. The rectangular pattern (formation of tiny blocks) can be corrected in the “MPEG noisereduction” menu item.
Setting MPEG noise reduction:• Press button to open the "Functional overview".
• Select "Menu" with the cursor and press the button.
• Select "Picture" with the cursor and press the button.
• Select "Picture profile adjustment" with the cursor and press the button.
• Select the desired picture profile using the cursor and press the button.
• Select "MPEG noise reduction" with the cursor in the context menu and press the button.
• Choose the desired setting "Light", "Medium", "Strong", or "Off" and press the button.
• Press the button to exit the menu.EXIT
Radio Internet inter-Recordings archiveTV
Functional overview 20:10
MusicPhotosVideos
Analogue NetworkUSBHDMI
FilemanagerRemove USB DeviceManual
Parental control MenuAutom. On/Off
■ MANUAL
Network AV devicesSoundPicture
Menu 20:10
Radio station listTV station list
Subtitle ServiceParental controlRecordings/EPG
Configuration Bluetooth®
Terrestrial Analog-TVCableSatellite
■ MANUAL
OK
OK
OK
Picture H H H EXPERT
GeneralProgramme positionPicture profile adjustment4h Automatic switch-off
BACK
EcoSportSportGamingPC monitorCinemaPhotoUsers
■ MANUAL■ OPERATION LEVEL
Picture profile adjustmentTelevision
Picture
EXIT
Energy setup PresentationControl Ambilight+picture cont.Sensor sens.. 5Colour impression harmoniouslyColour accentuation LightDyn. contrast AutoDynamic black level YesNoise reduction AutomaticMPEG noise reduction MediumMotion compens. movie MediumGamma 2,2
MPEG noise reduction Medium
4
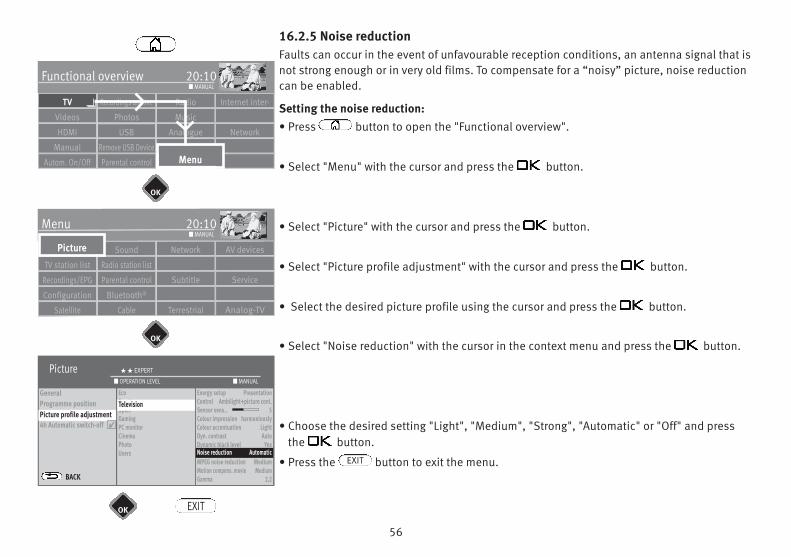
56
16.2.5 Noise reductionFaults can occur in the event of unfavourable reception conditions, an antenna signal that isnot strong enough or in very old films. To compensate for a “noisy” picture, noise reductioncan be enabled.
Setting the noise reduction:• Press button to open the "Functional overview".
• Select "Menu" with the cursor and press the button.
• Select "Picture" with the cursor and press the button.
• Select "Picture profile adjustment" with the cursor and press the button.
• Select the desired picture profile using the cursor and press the button.
• Select "Noise reduction" with the cursor in the context menu and press the button.
• Choose the desired setting "Light", "Medium", "Strong", "Automatic" or "Off" and pressthe button.
• Press the button to exit the menu.EXIT
Radio Internet inter-Recordings archiveTV
Functional overview 20:10
MusicPhotosVideos
Analogue NetworkUSBHDMI
FilemanagerRemove USB DeviceManual
Parental control MenuAutom. On/Off
■ MANUAL
Network AV devicesSoundPicture
Menu 20:10
Radio station listTV station list
Subtitle ServiceParental controlRecordings/EPG
Configuration Bluetooth®
Terrestrial Analog-TVCableSatellite
■ MANUAL
OK
OK
OK
Picture H H EXPERT
GeneralProgramme positionPicture profile adjustment4h Automatic switch-off
BACK
EcoSportSportGamingPC monitorCinemaPhotoUsers
Energy setup PresentationControl Ambilight+picture cont.Sensor sens.. 5Colour impression harmoniouslyColour accentuation LightDyn. contrast AutoDynamic black level YesNoise reduction AutomaticMPEG noise reduction MediumMotion compens. movie MediumGamma 2,2
■ MANUAL■ OPERATION LEVEL
Picture profile adjustmentTelevision
Picture
EXIT
Noise reduction Automatic
4
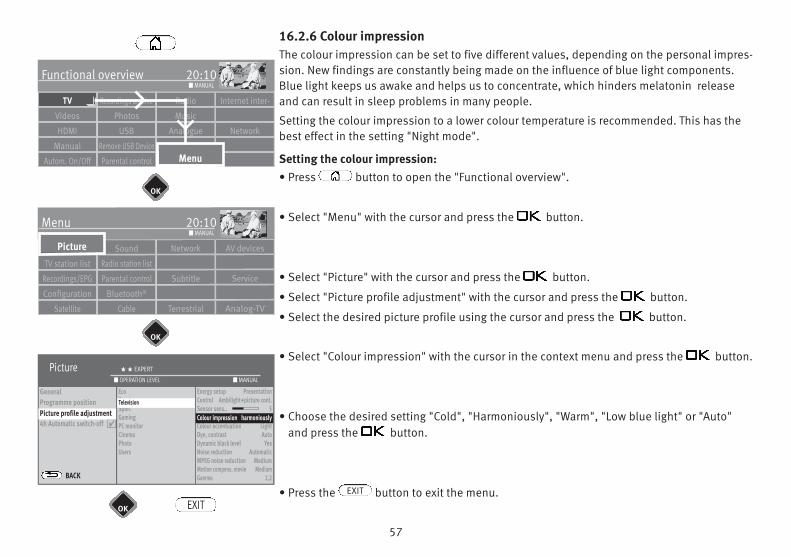
57
Radio Internet inter-Recordings archiveTV
Functional overview 20:10
MusicPhotosVideos
Analogue NetworkUSBHDMI
FilemanagerRemove USB DeviceManual
Parental control MenuAutom. On/Off
■ MANUAL
Network AV devicesSoundPicture
Menu 20:10
Radio station listTV station list
Subtitle ServiceParental controlRecordings/EPG
Configuration Bluetooth®
Terrestrial Analog-TVCableSatellite
■ MANUAL
OK
OK
OK
Picture H H EXPERT
GeneralProgramme positionPicture profile adjustment4h Automatic switch-off
BACK
EcoSportSportGamingPC monitorCinemaPhotoUsers
Energy setup PresentationControl Ambilight+picture cont.Sensor sens.. 5Colour impression harmoniouslyColour accentuation LightDyn. contrast AutoDynamic black level YesNoise reduction AutomaticMPEG noise reduction MediumMotion compens. movie MediumGamma 2,2
■ MANUAL■ OPERATION LEVEL
Television
Picture
EXIT
Colour impression harmoniously4
16.2.6 Colour impressionThe colour impression can be set to five different values, depending on the personal impres-sion. New findings are constantly being made on the influence of blue light components.Blue light keeps us awake and helps us to concentrate, which hinders melatonin releaseand can result in sleep problems in many people.
Setting the colour impression to a lower colour temperature is recommended. This has thebest effect in the setting "Night mode".
Setting the colour impression:• Press button to open the "Functional overview".
• Select "Menu" with the cursor and press the button.
• Select "Picture" with the cursor and press the button.
• Select "Picture profile adjustment" with the cursor and press the button.
• Select the desired picture profile using the cursor and press the button.
• Select "Colour impression" with the cursor in the context menu and press the button.
• Choose the desired setting "Cold", "Harmoniously", "Warm", "Low blue light" or "Auto"and press the button.
• Press the button to exit the menu.EXIT
Picture profile adjustment
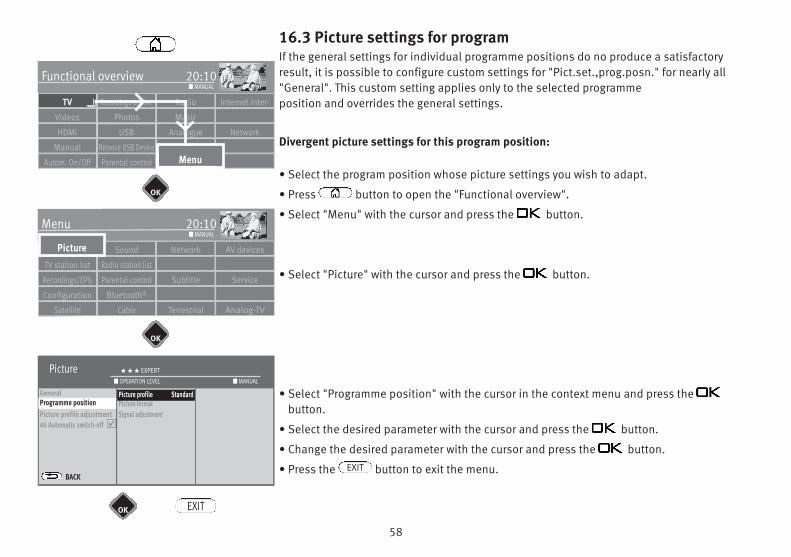
58
16.3 Picture settings for programIf the general settings for individual programme positions do no produce a satisfactoryresult, it is possible to configure custom settings for "Pict.set.,prog.posn." for nearly all"General". This custom setting applies only to the selected programme position and overrides the general settings.
Divergent picture settings for this program position:
• Select the program position whose picture settings you wish to adapt.
• Press button to open the "Functional overview".
• Select "Menu" with the cursor and press the button.
• Select "Picture" with the cursor and press the button.
• Select "Programme position" with the cursor in the context menu and press thebutton.
• Select the desired parameter with the cursor and press the button.
• Change the desired parameter with the cursor and press the button.
• Press the button to exit the menu.EXIT
Radio Internet inter-Recordings archiveTV
Functional overview 20:10
MusicPhotosVideos
Analogue NetworkUSBHDMI
FilemanagerRemove USB DeviceManual
Parental control MenuAutom. On/Off
■ MANUAL
Network AV devicesSoundPicture
Menu 20:10
Radio station listTV station list
Subtitle ServiceParental controlRecordings/EPG
Configuration Bluetooth®
Terrestrial Analog-TVCableSatellite
■ MANUAL
OK
OK
OK
Picture H H H EXPERT
GeneralProgramme positionPicture profile adjustment4h Automatic switch-off
BACK
Picture profile StandardPicture formatSignal adjustment
■ MANUAL■ OPERATION LEVEL
Programme positionPicture profile Standard
Picture
EXIT
4
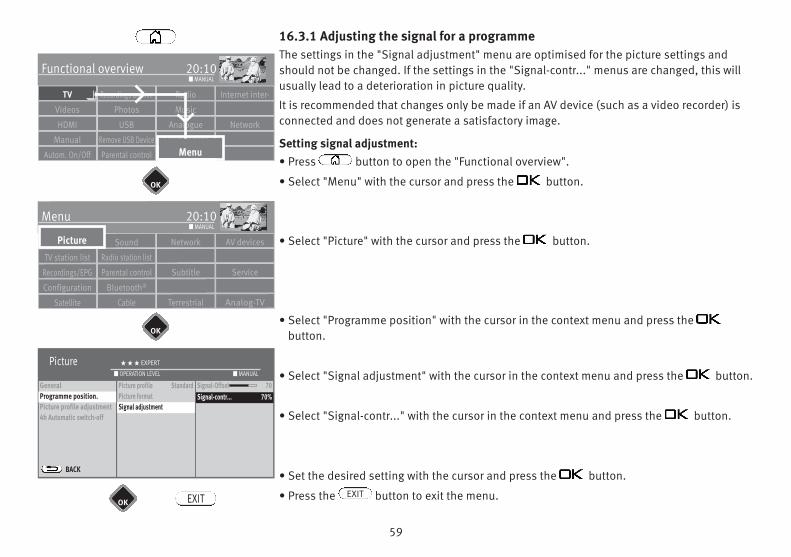
59
16.3.1 Adjusting the signal for a programmeThe settings in the "Signal adjustment" menu are optimised for the picture settings andshould not be changed. If the settings in the "Signal-contr..." menus are changed, this willusually lead to a deterioration in picture quality.
It is recommended that changes only be made if an AV device (such as a video recorder) isconnected and does not generate a satisfactory image.
Setting signal adjustment:• Press button to open the "Functional overview".
• Select "Menu" with the cursor and press the button.
• Select "Picture" with the cursor and press the button.
• Select "Programme position" with the cursor in the context menu and press thebutton.
• Select "Signal adjustment" with the cursor in the context menu and press the button.
• Select "Signal-contr..." with the cursor in the context menu and press the button.
• Set the desired setting with the cursor and press the button.
• Press the button to exit the menu.EXIT
Radio Internet inter-Recordings archiveTV
Functional overview 20:10
MusicPhotosVideos
Analogue NetworkUSBHDMI
FilemanagerRemove USB DeviceManual
Parental control MenuAutom. On/Off
■ MANUAL
Network AV devicesSoundPicture
Menu 20:10
Radio station listTV station list
Subtitle ServiceParental controlRecordings/EPG
Configuration Bluetooth®
Terrestrial Analog-TVCableSatellite
■ MANUAL
OK
OK
OK
Picture H H H EXPERT
GeneralProgramme positionPicture profile adjustment4h Automatic switch-off
BACK
Picture profile StandardPicture formatSignal adjustment
Signal-Offset 70■ MANUAL■ OPERATION LEVEL
Signal adjustmentSignal-contr... 70%
Picture
EXIT
Programme position.
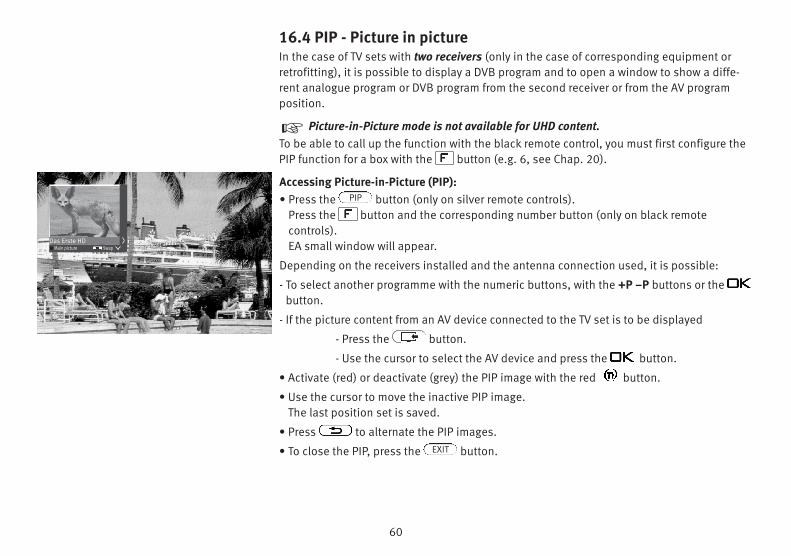
60
16.4 PIP - Picture in pictureIn the case of TV sets with two receivers (only in the case of corresponding equipment orretrofitting), it is possible to display a DVB program and to open a window to show a diffe-rent analogue program or DVB program from the second receiver or from the AV programposition.
Picture-in-Picture mode is not available for UHD content.To be able to call up the function with the black remote control, you must first configure thePIP function for a box with the button (e.g. 6, see Chap. 20).
Accessing Picture-in-Picture (PIP):• Press the button (only on silver remote controls).
Press the button and the corresponding number button (only on black remotecontrols).EA small window will appear.
Depending on the receivers installed and the antenna connection used, it is possible:
- To select another programme with the numeric buttons, with the +P –P buttons or the button.
- If the picture content from an AV device connected to the TV set is to be displayed
- Press the button.
- Use the cursor to select the AV device and press the button.
• Activate (red) or deactivate (grey) the PIP image with the red button.
• Use the cursor to move the inactive PIP image. The last position set is saved.
• Press to alternate the PIP images.
• To close the PIP, press the button.
+
PIP
EXIT
Das Erste HDMain picture Swap
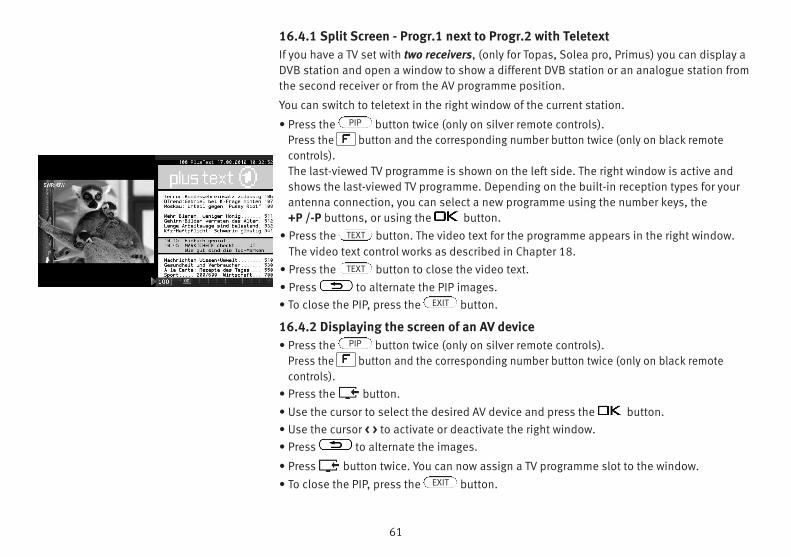
61
16.4.1 Split Screen - Progr.1 next to Progr.2 with TeletextIf you have a TV set with two receivers, (only for Topas, Solea pro, Primus) you can display aDVB station and open a window to show a different DVB station or an analogue station fromthe second receiver or from the AV programme position.
You can switch to teletext in the right window of the current station.
• Press the button twice (only on silver remote controls). Press the button and the corresponding number button twice (only on black remotecontrols).The last-viewed TV programme is shown on the left side. The right window is active andshows the last-viewed TV programme. Depending on the built-in reception types for yourantenna connection, you can select a new programme using the number keys, the+P /-P buttons, or using the button.
• Press the button. The video text for the programme appears in the right window.The video text control works as described in Chapter 18.
• Press the button to close the video text.• Press to alternate the PIP images.• To close the PIP, press the button.
16.4.2 Displaying the screen of an AV device • Press the button twice (only on silver remote controls).
Press the button and the corresponding number button twice (only on black remotecontrols).
• Press the button.
• Use the cursor to select the desired AV device and press the button.• Use the cursor < > to activate or deactivate the right window.• Press to alternate the images.
• Press button twice. You can now assign a TV programme slot to the window.
• To close the PIP, press the button.
PIP
TEXT
TEXT
EXIT
PIP
EXIT
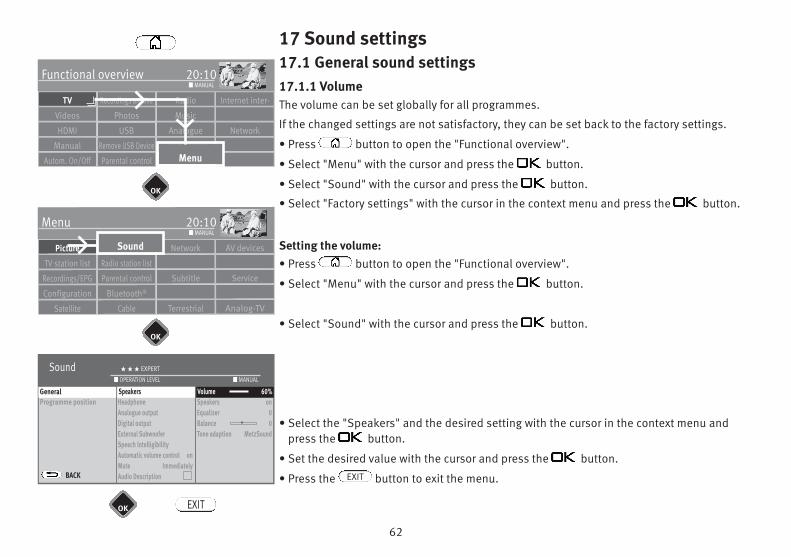
62
17 Sound settings17.1 General sound settings17.1.1 VolumeThe volume can be set globally for all programmes.
If the changed settings are not satisfactory, they can be set back to the factory settings.
• Press button to open the "Functional overview".
• Select "Menu" with the cursor and press the button.
• Select "Sound" with the cursor and press the button.
• Select "Factory settings" with the cursor in the context menu and press the button.
Setting the volume: • Press button to open the "Functional overview".
• Select "Menu" with the cursor and press the button.
• Select "Sound" with the cursor and press the button.
• Select the "Speakers" and the desired setting with the cursor in the context menu andpress the button.
• Set the desired value with the cursor and press the button.
• Press the button to exit the menu.EXIT
Radio Internet inter-Recordings archiveTV
Functional overview 20:10
MusicPhotosVideos
Analogue NetworkUSBHDMI
FilemanagerRemove USB DeviceManual
Parental control MenuAutom. On/Off
■ MANUAL
Network AV devicesSound
Menu 20:10
Radio station listTV station list
Picture
Subtitle ServiceParental controlRecordings/EPG
Configuration Bluetooth®
Terrestrial Analog-TVCableSatellite
■ MANUAL
OK
OK
OK
Sound H H H EXPERT
Sound settings, generalProgramme position
BACK
SpeakersHeadphoneAnalogue outputDigital outputExternal SubwooferSpeech IntelligibilityAutomatic volume control onMute ImmediatelyAudio Description
Volume 60%Speakers onEqualizer 0Balance 0Tone adaption MetzSound
■ MANUAL■ OPERATION LEVEL
General Speakers Volume 60%
Sound
EXIT
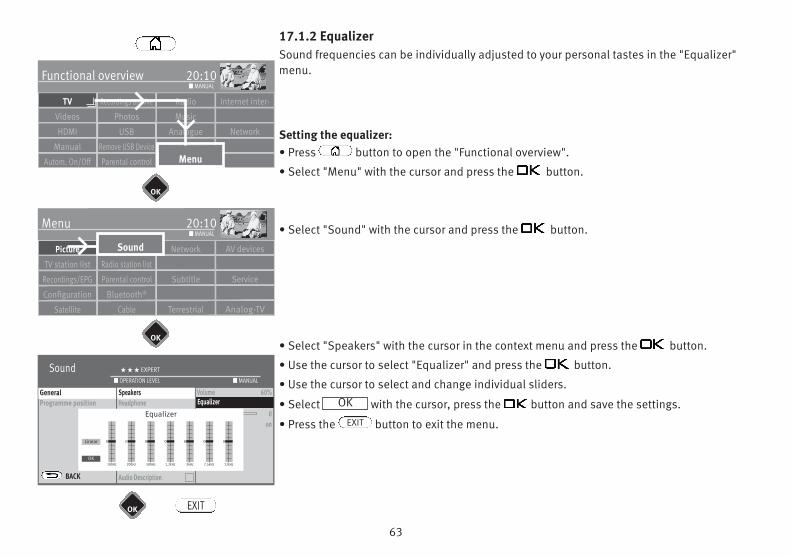
63
17.1.2 EqualizerSound frequencies can be individually adjusted to your personal tastes in the "Equalizer"menu.
Setting the equalizer: • Press button to open the "Functional overview".
• Select "Menu" with the cursor and press the button.
• Select "Sound" with the cursor and press the button.
• Select "Speakers" with the cursor in the context menu and press the button.
• Use the cursor to select "Equalizer" and press the button.
• Use the cursor to select and change individual sliders.
• Select with the cursor, press the button and save the settings.
• Press the button to exit the menu.
OK
EXIT
Sound H H H EXPERT
Sound settings, generalProgramme position
BACK
SpeakersHeadphoneAnalogue outputDigital outputExternal SubwooferSpeech IntelligibilityAutomatic volume control onMute ImmediatelyAudio Description
Volume 60%Equalizer 0Balance 0Speakers on
■ MANUAL■ OPERATION LEVEL
General SpeakersEqualizer
EXIT
Equalizer
0
100Hz
0
200Hz
0
500Hz
0
1,2kHz
0
3kHz
0
7,5kHz
0
12kHz
Linear
OK
Radio Internet inter-Recordings archiveTV
Functional overview 20:10
MusicPhotosVideos
Analogue NetworkUSBHDMI
FilemanagerRemove USB DeviceManual
Parental control MenuAutom. On/Off
■ MANUAL
Network AV devicesSound
Menu 20:10
Radio station listTV station list
Picture
Subtitle ServiceParental controlRecordings/EPG
Configuration Bluetooth®
Terrestrial Analog-TVCableSatellite
■ MANUAL
OK
OK
Sound
OK
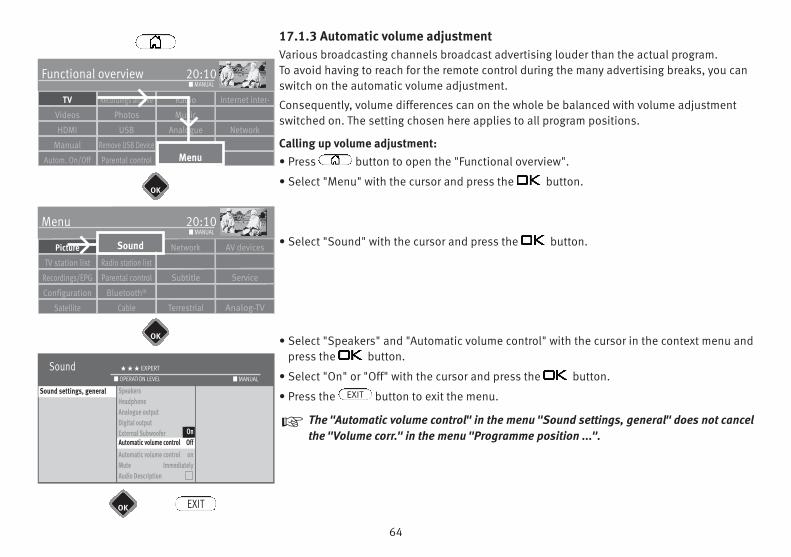
64
17.1.3 Automatic volume adjustmentVarious broadcasting channels broadcast advertising louder than the actual program. To avoid having to reach for the remote control during the many advertising breaks, you canswitch on the automatic volume adjustment.
Consequently, volume differences can on the whole be balanced with volume adjustmentswitched on. The setting chosen here applies to all program positions.
Calling up volume adjustment: • Press button to open the "Functional overview".
• Select "Menu" with the cursor and press the button.
• Select "Sound" with the cursor and press the button.
• Select "Speakers" and "Automatic volume control" with the cursor in the context menu andpress the button.
• Select "On" or "Off" with the cursor and press the button.
• Press the button to exit the menu.
The "Automatic volume control" in the menu "Sound settings, general" does not cancelthe "Volume corr." in the menu "Programme position ...".
EXIT
+
Radio Internet inter-Recordings archiveTV
Functional overview 20:10
MusicPhotosVideos
Analogue NetworkUSBHDMI
FilemanagerRemove USB DeviceManual
Parental control MenuAutom. On/Off
■ MANUAL
Network AV devicesSound
Menu 20:10
Radio station listTV station list
Picture
Subtitle ServiceParental controlRecordings/EPG
Configuration Bluetooth®
Terrestrial Analog-TVCableSatellite
■ MANUAL
Sound H H H EXPERT
Programme position SpeakersHeadphoneAnalogue outputDigital outputExternal SubwooferSpeech IntelligibilityAutomatic volume control onMute ImmediatelyAudio Description
■ MANUAL■ OPERATION LEVEL
Sound settings, general
Automatic volume control OffOn
Sound
EXIT
OK
OK
OK
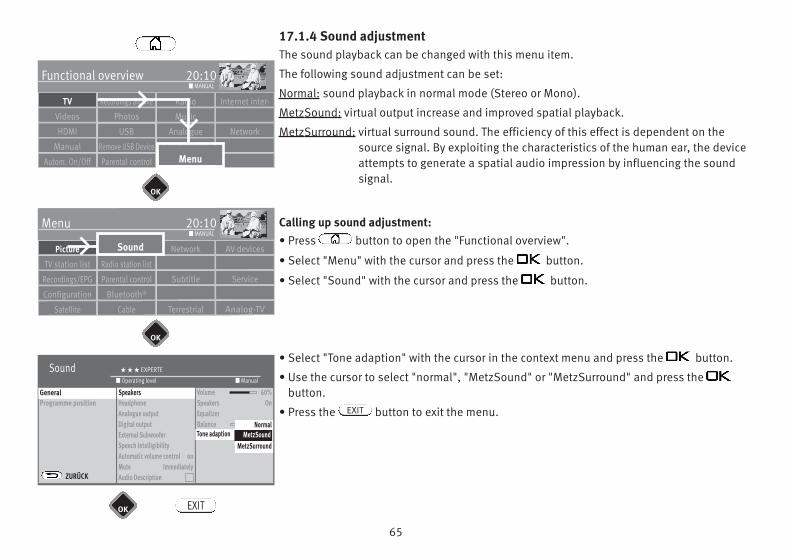
65
17.1.4 Sound adjustmentThe sound playback can be changed with this menu item.
The following sound adjustment can be set:
Normal: sound playback in normal mode (Stereo or Mono).
MetzSound: virtual output increase and improved spatial playback.
MetzSurround: virtual surround sound. The efficiency of this effect is dependent on thesource signal. By exploiting the characteristics of the human ear, the deviceattempts to generate a spatial audio impression by influencing the soundsignal.
Calling up sound adjustment: • Press button to open the "Functional overview".
• Select "Menu" with the cursor and press the button.
• Select "Sound" with the cursor and press the button.
• Select "Tone adaption" with the cursor in the context menu and press the button.
• Use the cursor to select "normal", "MetzSound" or "MetzSurround" and press thebutton.
• Press the button to exit the menu.EXIT
Radio Internet inter-Recordings archiveTV
Functional overview 20:10
MusicPhotosVideos
Analogue NetworkUSBHDMI
FilemanagerRemove USB DeviceManual
Parental control MenuAutom. On/Off
■ MANUAL
Network AV devicesSound
Menu 20:10
Radio station listTV station list
Picture
Subtitle ServiceParental controlRecordings/EPG
Configuration Bluetooth®
Terrestrial Analog-TVCableSatellite
■ MANUAL
Sound
EXIT
OK
OK
OK
Sound H H H EXPERTE
GenerellProgramme position
ZURÜCK
SpeakersHeadphoneAnalogue outputDigital outputExternal SubwooferSpeech IntelligibilityAutomatic volume control onMute ImmediatelyAudio Description
Volume 60%Speakers OnEqualizerBalance 0Tonanpassung normal
■ Manual■ Operating level
General Speakers
Tone adaption MetzSoundNormal
MetzSurroundMetzSound
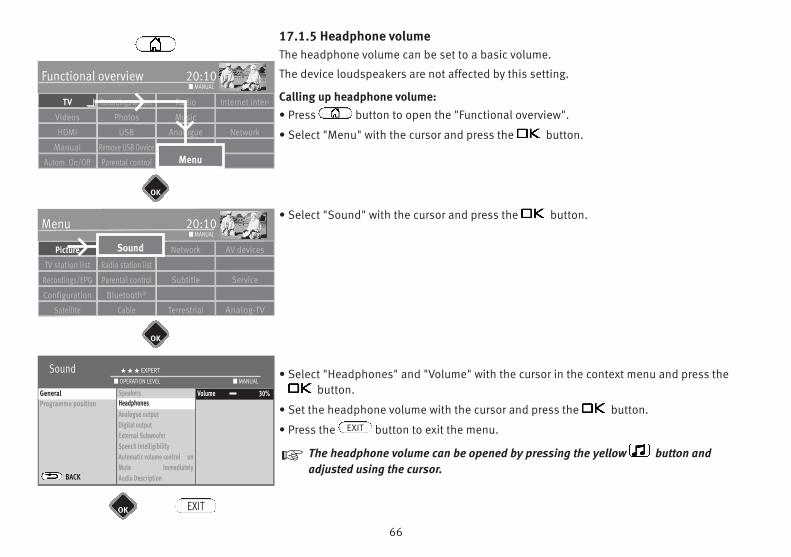
66
17.1.5 Headphone volumeThe headphone volume can be set to a basic volume.
The device loudspeakers are not affected by this setting.
Calling up headphone volume: • Press button to open the "Functional overview".
• Select "Menu" with the cursor and press the button.
• Select "Sound" with the cursor and press the button.
• Select "Headphones" and "Volume" with the cursor in the context menu and press thebutton.
• Set the headphone volume with the cursor and press the button.
• Press the button to exit the menu.
The headphone volume can be opened by pressing the yellow button and adjusted using the cursor.
EXIT
+
Radio Internet inter-Recordings archiveTV
Functional overview 20:10
MusicPhotosVideos
Analogue NetworkUSBHDMI
FilemanagerRemove USB DeviceManual
Parental control MenuAutom. On/Off
■ MANUAL
Network AV devicesSound
Menu 20:10
Radio station listTV station list
Picture
Subtitle ServiceParental controlRecordings/EPG
Configuration Bluetooth®
Terrestrial Analog-TVCableSatellite
■ MANUAL
OK
OK
OK
Sound H H H EXPERT
Sound settings, generalProgramme position
BACK
SpeakersHeadphoneAnalogue outputDigital outputExternal SubwooferSpeech IntelligibilityAutomatic volume control onMute ImmediatelyAudio Description
■ MANUAL■ OPERATION LEVEL
GeneralHeadphones
Sound
EXIT
Volume 30%
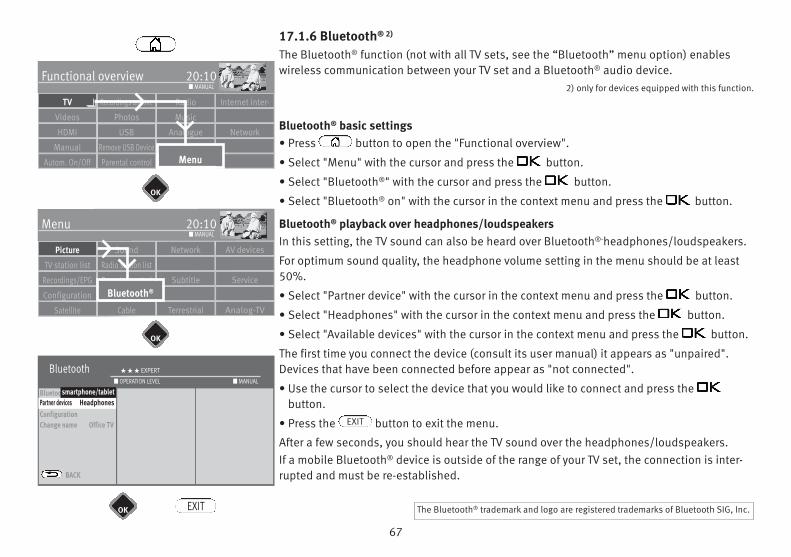
67
17.1.6 Bluetooth® 2)
The Bluetooth® function (not with all TV sets, see the “Bluetooth” menu option) enableswireless communication between your TV set and a Bluetooth® audio device.
2) only for devices equipped with this function.
Bluetooth® basic settings• Press button to open the "Functional overview".
• Select "Menu" with the cursor and press the button.
• Select "Bluetooth®" with the cursor and press the button.
• Select "Bluetooth® on" with the cursor in the context menu and press the button.
Bluetooth® playback over headphones/loudspeakersIn this setting, the TV sound can also be heard over Bluetooth®-headphones/loudspeakers.
For optimum sound quality, the headphone volume setting in the menu should be at least50%.
• Select "Partner device" with the cursor in the context menu and press the button.
• Select "Headphones" with the cursor in the context menu and press the button.
• Select "Available devices" with the cursor in the context menu and press the button.
The first time you connect the device (consult its user manual) it appears as "unpaired".Devices that have been connected before appear as "not connected".
• Use the cursor to select the device that you would like to connect and press thebutton.
• Press the button to exit the menu.
After a few seconds, you should hear the TV sound over the headphones/loudspeakers.If a mobile Bluetooth® device is outside of the range of your TV set, the connection is inter-rupted and must be re-established.
EXIT
Radio Internet inter-Recordings archiveTV
Functional overview 20:10
MusicPhotosVideos
Analogue NetworkUSBHDMI
FilemanagerRemove USB DeviceManual
Parental control MenuAutom. On/Off
■ MANUAL
Network AV devicesSound
Menu 20:10
Radio station listTV station list
Picture
Subtitle ServiceParental controlRecordings/EPG
Configuration
Terrestrial Analog-TVCableSatellite
■ MANUAL
OK
OK
OK
Bluetooth H H H EXPERT
Bluetooth onPartner Dev. HeadphonesConfigurationChange name Office TV
BACK
■ MANUAL■ OPERATION LEVEL
Partner devices Headphones
Bluetooth®
EXIT
smartphone/tablet
The Bluetooth® trademark and logo are registered trademarks of Bluetooth SIG, Inc.
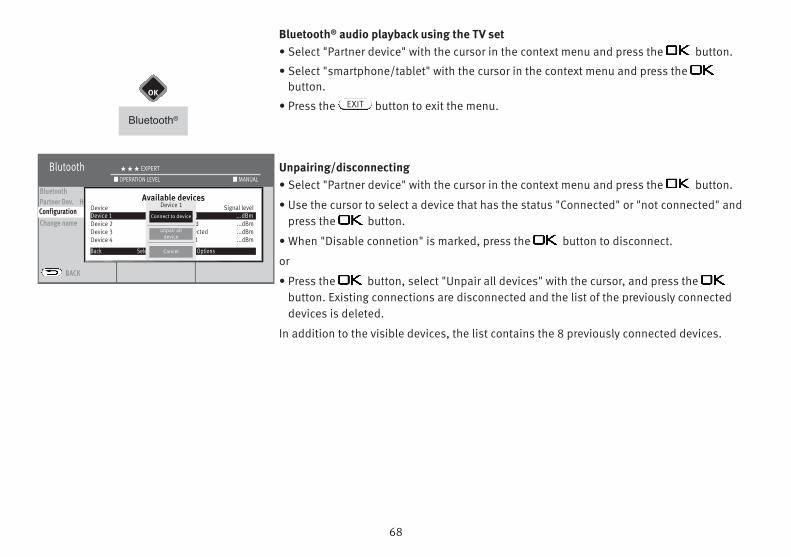
68
Bluetooth® audio playback using the TV set• Select "Partner device" with the cursor in the context menu and press the button.
• Select "smartphone/tablet" with the cursor in the context menu and press thebutton.
• Press the button to exit the menu.
Unpairing/disconnecting• Select "Partner device" with the cursor in the context menu and press the button.
• Use the cursor to select a device that has the status "Connected" or "not connected" andpress the button.
• When "Disable connetion" is marked, press the button to disconnect.
or
• Press the button, select "Unpair all devices" with the cursor, and press thebutton. Existing connections are disconnected and the list of the previously connecteddevices is deleted.
In addition to the visible devices, the list contains the 8 previously connected devices.
EXIT
Blutooth H H H EXPERT
Bluetooth onPartner Dev. HeadphonesConfigurationChange name Office TV
BACK
■ MANUAL■ OPERATION LEVEL
Configuration
Available devicesDevice Status Signal level
Device 2 Connected ...dBmDevice 3 not connected ...dBmDevice 4 not paired ...dBm
Device 1 not paired ...dBm
Back Select Options
OK
Bluetooth®
unpair all device
Connect to device
Cancel
Device 1
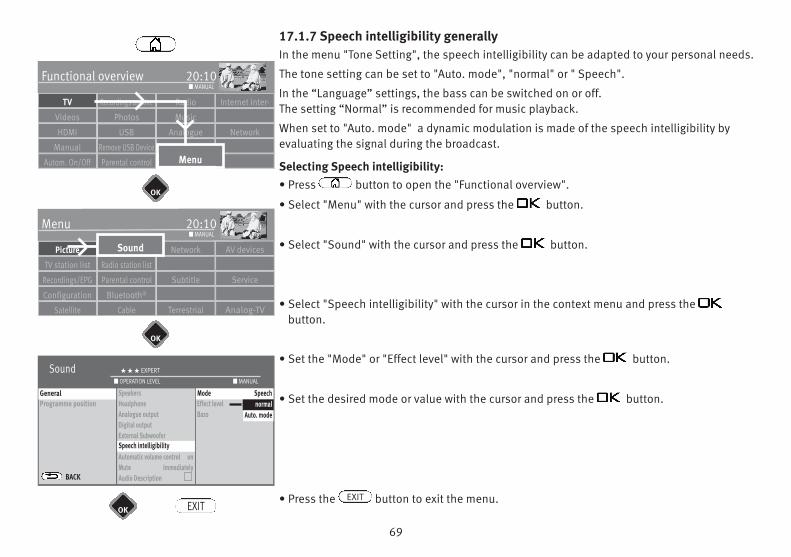
69
17.1.7 Speech intelligibility generallyIn the menu "Tone Setting", the speech intelligibility can be adapted to your personal needs.
The tone setting can be set to "Auto. mode", "normal" or " Speech".
In the “Language” settings, the bass can be switched on or off.The setting “Normal” is recommended for music playback.
When set to "Auto. mode" a dynamic modulation is made of the speech intelligibility byevaluating the signal during the broadcast.
Selecting Speech intelligibility: • Press button to open the "Functional overview".
• Select "Menu" with the cursor and press the button.
• Select "Sound" with the cursor and press the button.
• Select "Speech intelligibility" with the cursor in the context menu and press thebutton.
• Set the "Mode" or "Effect level" with the cursor and press the button.
• Set the desired mode or value with the cursor and press the button.
• Press the button to exit the menu.EXIT
Radio Internet inter-Recordings archiveTV
Functional overview 20:10
MusicPhotosVideos
Analogue NetworkUSBHDMI
FilemanagerRemove USB DeviceManual
Parental control MenuAutom. On/Off
■ MANUAL
Network AV devicesSound
Menu 20:10
Radio station listTV station list
Picture
Subtitle ServiceParental controlRecordings/EPG
Configuration Bluetooth®
Terrestrial Analog-TVCableSatellite
■ MANUAL
OK
OK
OK
Sound H H H EXPERT
Sound settings, generalProgramme position
BACK
SpeakersHeadphoneAnalogue outputDigital outputExternal SubwooferSpeech IntelligibilityAutomatic volume control onMute ImmediatelyAudio Description
Modus AutomaticEffect level 4Bass
■ MANUAL■ OPERATION LEVEL
General
Speech intelligibility
Sound
EXIT
Mode Speechnormal
Auto. mode
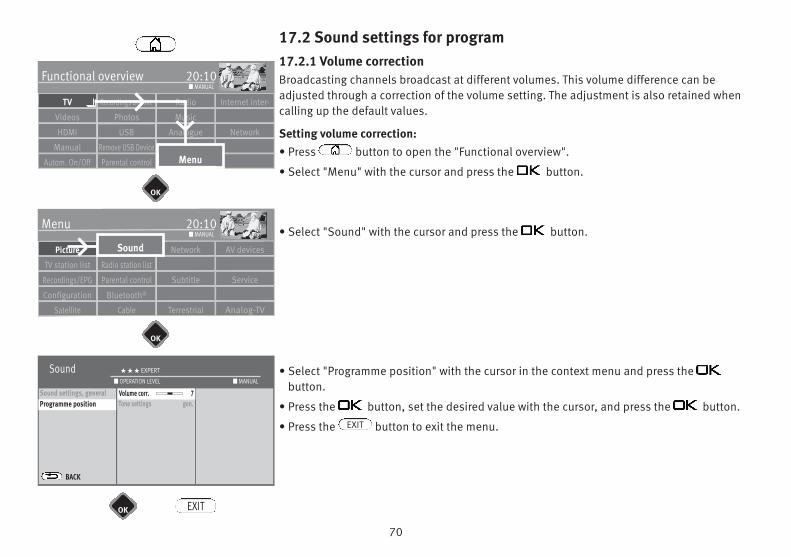
70
17.2 Sound settings for program17.2.1 Volume correctionBroadcasting channels broadcast at different volumes. This volume difference can be adjusted through a correction of the volume setting. The adjustment is also retained whencalling up the default values.
Setting volume correction:• Press button to open the "Functional overview".
• Select "Menu" with the cursor and press the button.
• Select "Sound" with the cursor and press the button.
• Select "Programme position" with the cursor in the context menu and press thebutton.
• Press the button, set the desired value with the cursor, and press the button.
• Press the button to exit the menu.EXIT
Radio Internet inter-Recordings archiveTV
Functional overview 20:10
MusicPhotosVideos
Analogue NetworkUSBHDMI
FilemanagerRemove USB DeviceManual
Parental control MenuAutom. On/Off
■ MANUAL
Network AV devicesSound
Menu 20:10
Radio station listTV station list
Picture
Subtitle ServiceParental controlRecordings/EPG
Configuration Bluetooth®
Terrestrial Analog-TVCableSatellite
■ MANUAL
OK
OK
OK
Sound H H H EXPERT
Sound settings, generalProgramme position
BACK
Volume corr. 0Tone settings gen.
■ MANUAL■ OPERATION LEVEL
Programme positionVolume corr. 7
Sound
EXIT
OK
OK
OK
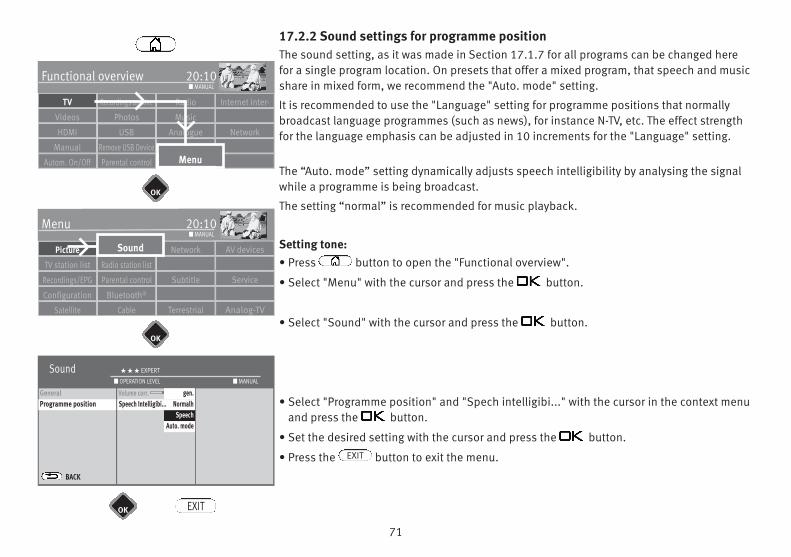
71
17.2.2 Sound settings for programme positionThe sound setting, as it was made in Section 17.1.7 for all programs can be changed herefor a single program location. On presets that offer a mixed program, that speech and musicshare in mixed form, we recommend the "Auto. mode" setting.
It is recommended to use the "Language" setting for programme positions that normallybroadcast language programmes (such as news), for instance N-TV, etc. The effect strengthfor the language emphasis can be adjusted in 10 increments for the "Language" setting.
The “Auto. mode” setting dynamically adjusts speech intelligibility by analysing the signalwhile a programme is being broadcast.
The setting “normal” is recommended for music playback.
Setting tone:• Press button to open the "Functional overview".
• Select "Menu" with the cursor and press the button.
• Select "Sound" with the cursor and press the button.
• Select "Programme position" and "Spech intelligibi..." with the cursor in the context menuand press the button.
• Set the desired setting with the cursor and press the button.
• Press the button to exit the menu.EXIT
Radio Internet inter-Recordings archiveTV
Functional overview 20:10
MusicPhotosVideos
Analogue NetworkUSBHDMI
FilemanagerRemove USB DeviceManual
Parental control MenuAutom. On/Off
■ MANUAL
Network AV devicesSound
Menu 20:10
Radio station listTV station list
Picture
Subtitle ServiceParental controlRecordings/EPG
Configuration Bluetooth®
Terrestrial Analog-TVCableSatellite
■ MANUAL
EXIT
OK
OK
OK
Sound H H H EXPERT
GeneralSound set., prog. posn.
BACK
Volume corr. 0■ MANUAL■ OPERATION LEVEL
Programme position
Sound
Speech Intelligibi... Normalhgen.
SpeechAuto. mode
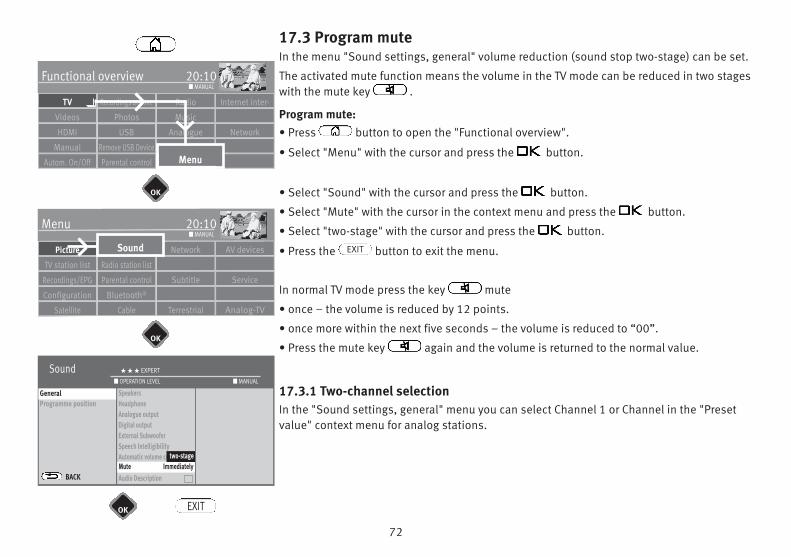
72
17.3 Program muteIn the menu "Sound settings, general" volume reduction (sound stop two-stage) can be set.
The activated mute function means the volume in the TV mode can be reduced in two stageswith the mute key .
Program mute:• Press button to open the "Functional overview".
• Select "Menu" with the cursor and press the button.
• Select "Sound" with the cursor and press the button.
• Select "Mute" with the cursor in the context menu and press the button.
• Select "two-stage" with the cursor and press the button.
• Press the button to exit the menu.
In normal TV mode press the key mute
• once – the volume is reduced by 12 points.
• once more within the next five seconds – the volume is reduced to “00”.
• Press the mute key again and the volume is returned to the normal value.
17.3.1 Two-channel selectionIn the "Sound settings, general" menu you can select Channel 1 or Channel in the "Presetvalue" context menu for analog stations.
EXIT
Radio Internet inter-Recordings archiveTV
Functional overview 20:10
MusicPhotosVideos
Analogue NetworkUSBHDMI
FilemanagerRemove USB DeviceManual
Parental control MenuAutom. On/Off
■ MANUAL
Network AV devicesSound
Menu 20:10
Radio station listTV station list
Picture
Subtitle ServiceParental controlRecordings/EPG
Configuration Bluetooth®
Terrestrial Analog-TVCableSatellite
■ MANUAL
OK
OK
OK
Sound H H H EXPERT
Sound settings, generalProgramme position
BACK
SpeakersHeadphoneAnalogue outputDigital outputExternal SubwooferSpeech IntelligibilityAutomatic volume control onMute ImmediatelyAudio Description
■ MANUAL■ OPERATION LEVEL
General
Mute Immediately
Sound
EXIT
two-stage
OK
OK
OK

73
17.4 Audio/language selectionVarious programs are broadcast with several audio channels (e.g. multilingual or Dolbydigital).
If a multilingual channel like this is selected, this is shown with a logo in the informationbox at the lower left of the screen.
Use the cursor to see the list of available languages.
Open menu:• Press the yellow button.
• Select "Audio track" with the cursor.
• One of the languages offered can be set with the cursor control key.
Symbol in black:Other audio options e.g. dd = “Dolby digital” are available, but none of the additional soundoptions offered are selected.
Symbol in white:Digital sound selected.
17.4.1 Audio-DescriptionDuring films for the blind, the scenes are described in the dialogue intervals.
Setting Audio Description:
• Press button to open the "Functional overview".
• Select "Menu" with the cursor and press the button.
• Select "Sound" with the cursor and press the button.
• Select "Mute" with the cursor in the context menu and press the button.
• Select "two-stage" with the cursor and press the button.
• Press the button to exit the menu.EXIT
Manufactured under licence from DolbyLaboratories. Dolby, Dolby Audio and the double-D symbolare trademark of Dolby laboratories.
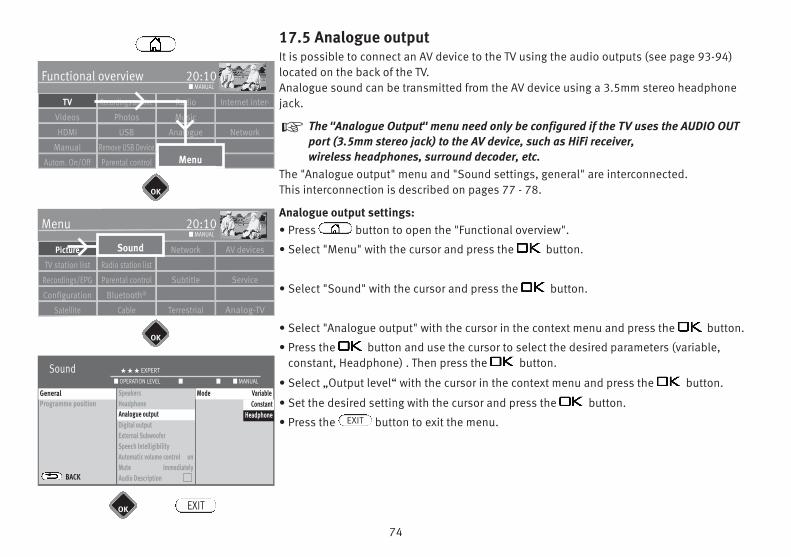
74
17.5 Analogue outputIt is possible to connect an AV device to the TV using the audio outputs (see page 93-94)located on the back of the TV.Analogue sound can be transmitted from the AV device using a 3.5mm stereo headphonejack.
The "Analogue Output" menu need only be configured if the TV uses the AUDIO OUTport (3.5mm stereo jack) to the AV device, such as HiFi receiver, wireless headphones, surround decoder, etc.
The "Analogue output" menu and "Sound settings, general" are interconnected. This interconnection is described on pages 77 - 78.
Analogue output settings:• Press button to open the "Functional overview".
• Select "Menu" with the cursor and press the button.
• Select "Sound" with the cursor and press the button.
• Select "Analogue output" with the cursor in the context menu and press the button.
• Press the button and use the cursor to select the desired parameters (variable,constant, Headphone) . Then press the button.
• Select „Output level“ with the cursor in the context menu and press the button.
• Set the desired setting with the cursor and press the button.
• Press the button to exit the menu.
+
EXIT
Radio Internet inter-Recordings archiveTV
Functional overview 20:10
MusicPhotosVideos
Analogue NetworkUSBHDMI
FilemanagerRemove USB DeviceManual
Parental control MenuAutom. On/Off
■ MANUAL
Network AV devicesSound
Menu 20:10
Radio station listTV station list
Picture
Subtitle ServiceParental controlRecordings/EPG
Configuration Bluetooth®
Terrestrial Analog-TVCableSatellite
■ MANUAL
Sound H H H EXPERT
Sound settings, generalProgramme position
BACK
SpeakersHeadphoneAnalogue outputDigital outputExternal SubwooferSpeech IntelligibilityAutomatic volume control onMute ImmediatelyAudio Description
■ MANUAL■ ■ ■ OPERATION LEVEL
General
Analogue output
Mode VariableConstant
Headphone
Sound
EXIT
OK
OK
OK
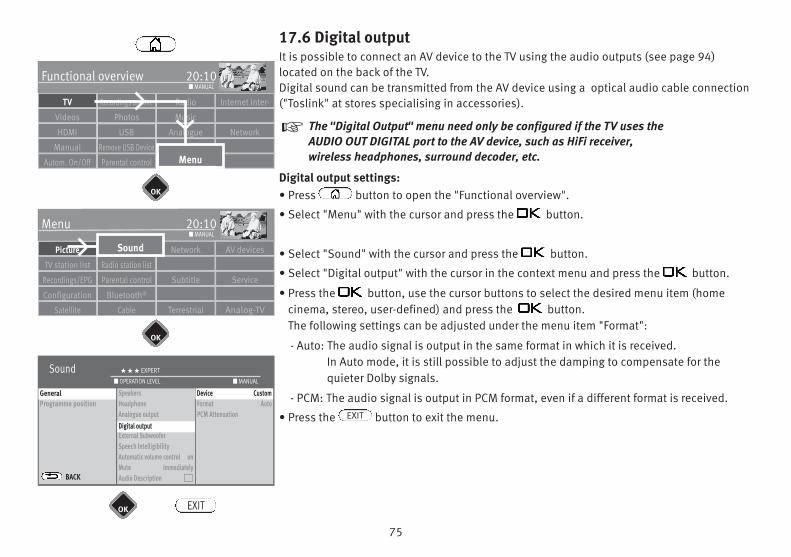
75
17.6 Digital outputIt is possible to connect an AV device to the TV using the audio outputs (see page 94)located on the back of the TV.Digital sound can be transmitted from the AV device using a optical audio cable connection("Toslink" at stores specialising in accessories).
The "Digital Output" menu need only be configured if the TV uses the AUDIO OUT DIGITAL port to the AV device, such as HiFi receiver, wireless headphones, surround decoder, etc.
Digital output settings:• Press button to open the "Functional overview".
• Select "Menu" with the cursor and press the button.
• Select "Sound" with the cursor and press the button.
• Select "Digital output" with the cursor in the context menu and press the button.
• Press the button, use the cursor buttons to select the desired menu item (homecinema, stereo, user-defined) and press the button.The following settings can be adjusted under the menu item "Format":
- Auto: The audio signal is output in the same format in which it is received.In Auto mode, it is still possible to adjust the damping to compensate for thequieter Dolby signals.
- PCM: The audio signal is output in PCM format, even if a different format is received.
• Press the button to exit the menu.
+
EXIT
Radio Internet inter-Recordings archiveTV
Functional overview 20:10
MusicPhotosVideos
Analogue NetworkUSBHDMI
FilemanagerRemove USB DeviceManual
Parental control MenuAutom. On/Off
■ MANUAL
Network AV devicesSound
Menu 20:10
Radio station listTV station list
Picture
Subtitle ServiceParental controlRecordings/EPG
Configuration Bluetooth®
Terrestrial Analog-TVCableSatellite
■ MANUAL
Sound H H H EXPERT
Sound settings, generalProgramme position
BACK
SpeakersHeadphoneAnalogue outputDigital outputExternal SubwooferSpeech IntelligibilityAutomatic volume control onMute ImmediatelyAudio Description
Device CustomFormat AutoPCM Attenuation
■ MANUAL■ OPERATION LEVEL
General
Digital output
Device Custom
Sound
EXIT
OK
OK
OK
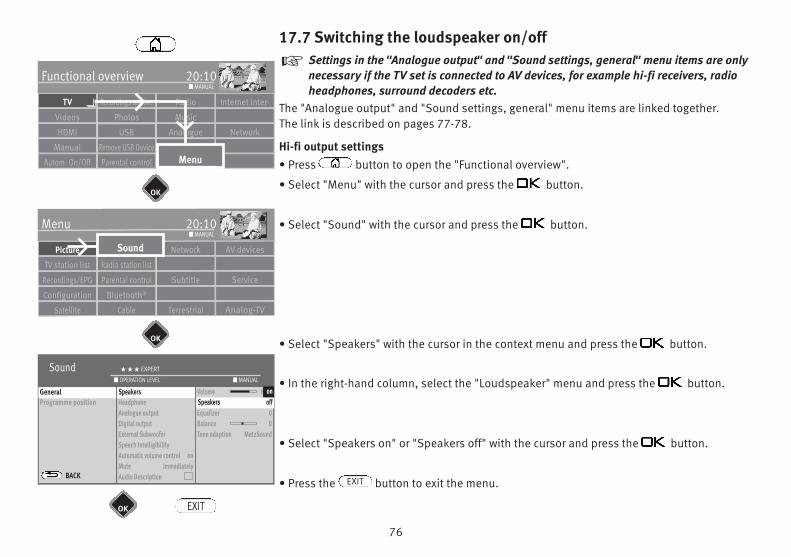
76
17.7 Switching the loudspeaker on/offSettings in the "Analogue output" and "Sound settings, general" menu items are onlynecessary if the TV set is connected to AV devices, for example hi-fi receivers, radioheadphones, surround decoders etc.
The "Analogue output" and "Sound settings, general" menu items are linked together. The link is described on pages 77-78.
Hi-fi output settings• Press button to open the "Functional overview".
• Select "Menu" with the cursor and press the button.
• Select "Sound" with the cursor and press the button.
• Select "Speakers" with the cursor in the context menu and press the button.
• In the right-hand column, select the "Loudspeaker" menu and press the button.
• Select "Speakers on" or "Speakers off" with the cursor and press the button.
• Press the button to exit the menu.
+
EXIT
Radio Internet inter-Recordings archiveTV
Functional overview 20:10
MusicPhotosVideos
Analogue NetworkUSBHDMI
FilemanagerRemove USB DeviceManual
Parental control MenuAutom. On/Off
■ MANUAL
Network AV devicesSound
Menu 20:10
Radio station listTV station list
Picture
Subtitle ServiceParental controlRecordings/EPG
Configuration Bluetooth®
Terrestrial Analog-TVCableSatellite
■ MANUAL
OK
OK
OK
Sound H H H EXPERT
Sound settings, generalProgramme position
BACK
SpeakersHeadphoneAnalogue outputDigital outputExternal SubwooferSpeech IntelligibilityAutomatic volume control onMute ImmediatelyAudio Description
Volume 60%Speakers OnEqualizer 0Balance 0Tone adaption MetzSound
■ MANUAL■ OPERATION LEVEL
General SpeakersSpeakers off
on
Sound
EXIT
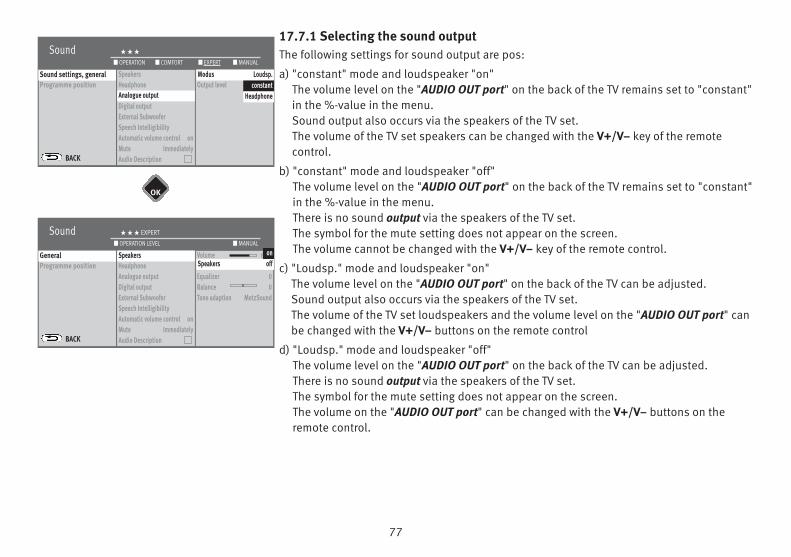
77
17.7.1 Selecting the sound outputThe following settings for sound output are pos:
a) "constant" mode and loudspeaker "on"The volume level on the "AUDIO OUT port" on the back of the TV remains set to "constant"in the %-value in the menu.Sound output also occurs via the speakers of the TV set.The volume of the TV set speakers can be changed with the V+/V– key of the remotecontrol.
b) "constant" mode and loudspeaker "off"The volume level on the "AUDIO OUT port" on the back of the TV remains set to "constant"in the %-value in the menu.There is no sound output via the speakers of the TV set. The symbol for the mute setting does not appear on the screen. The volume cannot be changed with the V+/V– key of the remote control.
c) "Loudsp." mode and loudspeaker "on"The volume level on the "AUDIO OUT port" on the back of the TV can be adjusted.Sound output also occurs via the speakers of the TV set.The volume of the TV set loudspeakers and the volume level on the "AUDIO OUT port" canbe changed with the V+/V– buttons on the remote control
d) "Loudsp." mode and loudspeaker "off"The volume level on the "AUDIO OUT port" on the back of the TV can be adjusted.There is no sound output via the speakers of the TV set. The symbol for the mute setting does not appear on the screen.The volume on the "AUDIO OUT port" can be changed with the V+/V– buttons on theremote control.
Sound H H H
Sound settings, generalProgramme position
BACK
SpeakersHeadphoneAnalogue outputDigital outputExternal SubwooferSpeech IntelligibilityAutomatic volume control onMute ImmediatelyAudio Description
Output level
■ MANUAL■ EXPERT■ COMFORT■ OPERATION
Sound settings, general
Analogue output
Modus Loudsp.constant
Headphone
Sound H H H EXPERT
Sound settings, generalProgramme position
BACK
SpeakersHeadphoneAnalogue outputDigital outputExternal SubwooferSpeech IntelligibilityAutomatic volume control onMute ImmediatelyAudio Description
Volume 60%Speakers OnEqualizer 0Balance 0Tone adaption MetzSound
■ MANUAL■ OPERATION LEVEL
General SpeakersSpeakers off
on
OK
78
e) "Headphone" mode and loudspeaker "on"The volume level on the "AUDIO OUT port" on the back of the TV can be adjusted.Sound output also occurs via the speakers of the TV set. The volume of the TV set speakers can be changed with the V+/V– buttons on the remote control. Change thevolume level on the "AUDIO OUT port":
- press the yellow key .- Select “Headph. Vol.” with the cursor control key.- Use the cursor to change the volume.
The headphone output on the front or side will also be changed.
f) "Headphone" mode and loudspeaker "off"The volume level on the "AUDIO OUT port" on the back of the TV can be adjusted.There is no sound output via the speakers of the TV set. The symbol for the mute setting does not appear on the screen. The volume of the TV setspeakers can be changed with the V+/V– buttons on the remote control.
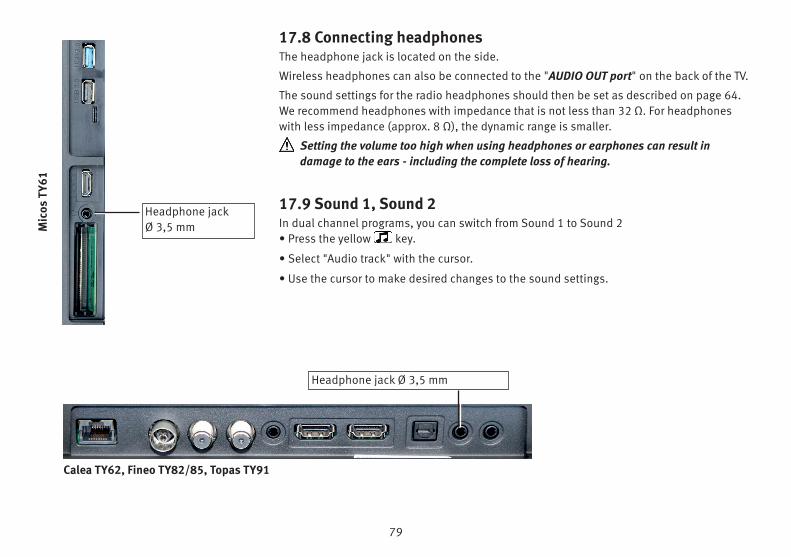
79
17.8 Connecting headphonesThe headphone jack is located on the side.
Wireless headphones can also be connected to the "AUDIO OUT port" on the back of the TV.
The sound settings for the radio headphones should then be set as described on page 64.We recommend headphones with impedance that is not less than 32 Ω. For headphoneswith less impedance (approx. 8 Ω), the dynamic range is smaller.
Setting the volume too high when using headphones or earphones can result indamage to the ears - including the complete loss of hearing.
17.9 Sound 1, Sound 2In dual channel programs, you can switch from Sound 1 to Sound 2 • Press the yellow key.
• Select "Audio track" with the cursor.
• Use the cursor to make desired changes to the sound settings.
Headphone jackØ 3,5 mm M
icos
TY6
1
Calea TY62, Fineo TY82/85, Topas TY91
Headphone jack Ø 3,5 mm
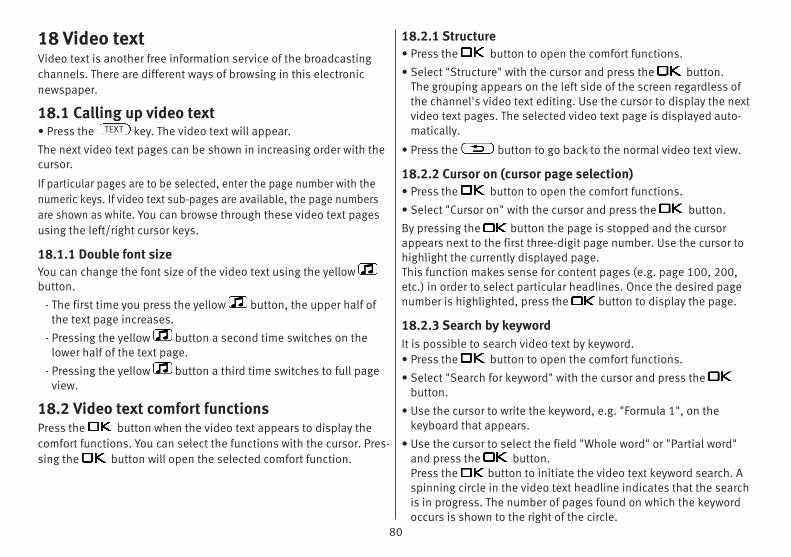
80
18 Video textVideo text is another free information service of the broadcastingchannels. There are different ways of browsing in this electronicnewspaper.
18.1 Calling up video text • Press the key. The video text will appear.
The next video text pages can be shown in increasing order with thecursor.
If particular pages are to be selected, enter the page number with thenumeric keys. If video text sub-pages are available, the page numbersare shown as white. You can browse through these video text pagesusing the left/right cursor keys.
18.1.1 Double font sizeYou can change the font size of the video text using the yellowbutton.
- The first time you press the yellow button, the upper half ofthe text page increases.
- Pressing the yellow button a second time switches on thelower half of the text page.
- Pressing the yellow button a third time switches to full pageview.
18.2 Video text comfort functionsPress the button when the video text appears to display thecomfort functions. You can select the functions with the cursor. Pres-sing the button will open the selected comfort function.
TEXT
18.2.1 Structure• Press the button to open the comfort functions.
• Select "Structure" with the cursor and press the button.The grouping appears on the left side of the screen regardless ofthe channel's video text editing. Use the cursor to display the nextvideo text pages. The selected video text page is displayed auto-matically.
• Press the button to go back to the normal video text view.
18.2.2 Cursor on (cursor page selection)• Press the button to open the comfort functions.
• Select "Cursor on" with the cursor and press the button.
By pressing the button the page is stopped and the cursorappears next to the first three-digit page number. Use the cursor tohighlight the currently displayed page. This function makes sense for content pages (e.g. page 100, 200,etc.) in order to select particular headlines. Once the desired pagenumber is highlighted, press the button to display the page.
18.2.3 Search by keywordIt is possible to search video text by keyword. • Press the button to open the comfort functions.
• Select "Search for keyword" with the cursor and press thebutton.
• Use the cursor to write the keyword, e.g. "Formula 1", on thekeyboard that appears.
• Use the cursor to select the field "Whole word" or "Partial word"and press the button.Press the button to initiate the video text keyword search. Aspinning circle in the video text headline indicates that the searchis in progress. The number of pages found on which the keywordoccurs is shown to the right of the circle.
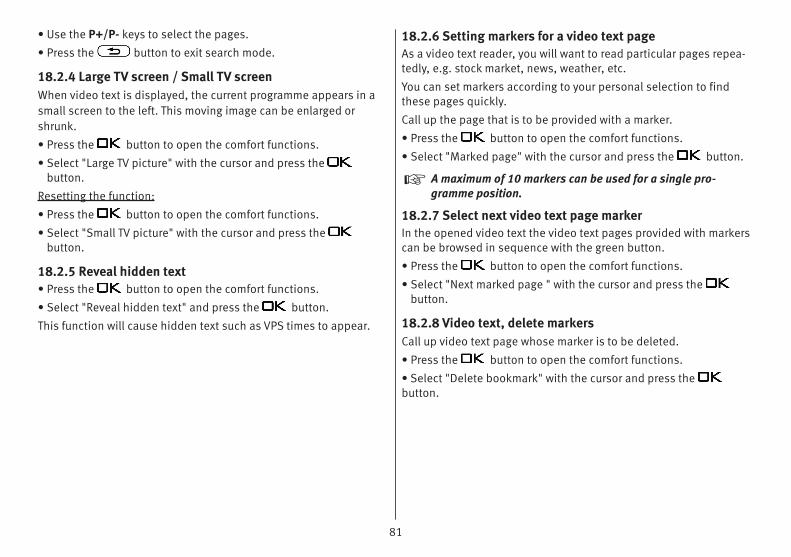
81
• Use the P+/P- keys to select the pages.
• Press the button to exit search mode.
18.2.4 Large TV screen / Small TV screenWhen video text is displayed, the current programme appears in asmall screen to the left. This moving image can be enlarged orshrunk.
• Press the button to open the comfort functions.
• Select "Large TV picture" with the cursor and press thebutton.
Resetting the function:
• Press the button to open the comfort functions.
• Select "Small TV picture" with the cursor and press thebutton.
18.2.5 Reveal hidden text• Press the button to open the comfort functions.
• Select "Reveal hidden text" and press the button.
This function will cause hidden text such as VPS times to appear.
18.2.6 Setting markers for a video text pageAs a video text reader, you will want to read particular pages repea-tedly, e.g. stock market, news, weather, etc.
You can set markers according to your personal selection to findthese pages quickly.
Call up the page that is to be provided with a marker.
• Press the button to open the comfort functions.
• Select "Marked page" with the cursor and press the button.
A maximum of 10 markers can be used for a single pro-gramme position.
18.2.7 Select next video text page markerIn the opened video text the video text pages provided with markerscan be browsed in sequence with the green button.
• Press the button to open the comfort functions.
• Select "Next marked page " with the cursor and press thebutton.
18.2.8 Video text, delete markersCall up video text page whose marker is to be deleted.
• Press the button to open the comfort functions.
• Select "Delete bookmark" with the cursor and press thebutton.
+
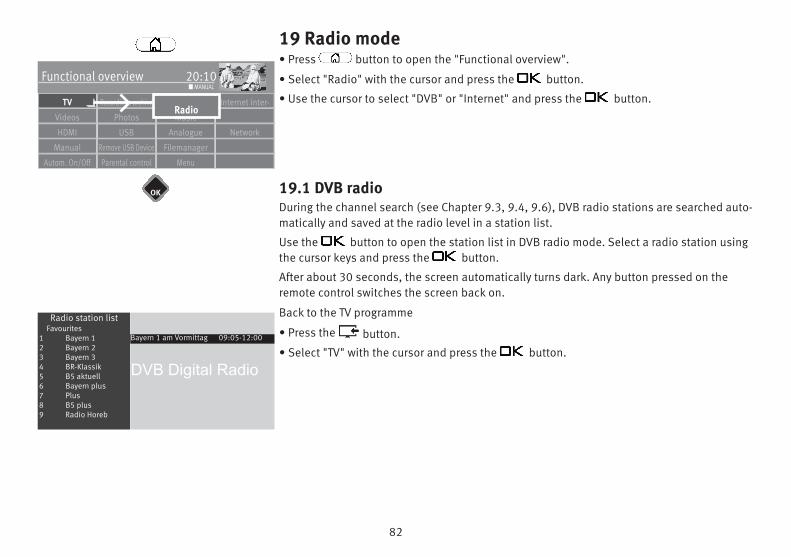
82
19 Radio mode• Press button to open the "Functional overview".
• Select "Radio" with the cursor and press the button.
• Use the cursor to select "DVB" or "Internet" and press the button.
19.1 DVB radioDuring the channel search (see Chapter 9.3, 9.4, 9.6), DVB radio stations are searched auto-matically and saved at the radio level in a station list.
Use the button to open the station list in DVB radio mode. Select a radio station usingthe cursor keys and press the button.
After about 30 seconds, the screen automatically turns dark. Any button pressed on theremote control switches the screen back on.
Back to the TV programme
• Press the button.
• Select "TV" with the cursor and press the button.
Radio Internet inter-Recordings archiveTV
Functional overview 20:10
MusicPhotosVideos
Analogue NetworkUSBHDMI
FilemanagerRemove USB DeviceManual
Parental control Menu
Radio
Autom. On/Off
■ MANUAL
OK
DVB Digital Radio
Radio station listFavourites
1 Bayern 12 Bayern 23 Bayern 34 BR-Klassik5 B5 aktuell6 Bayern plus7 Plus8 B5 plus9 Radio Horeb
Bayern 1 am Vormittag 09:05-12:00
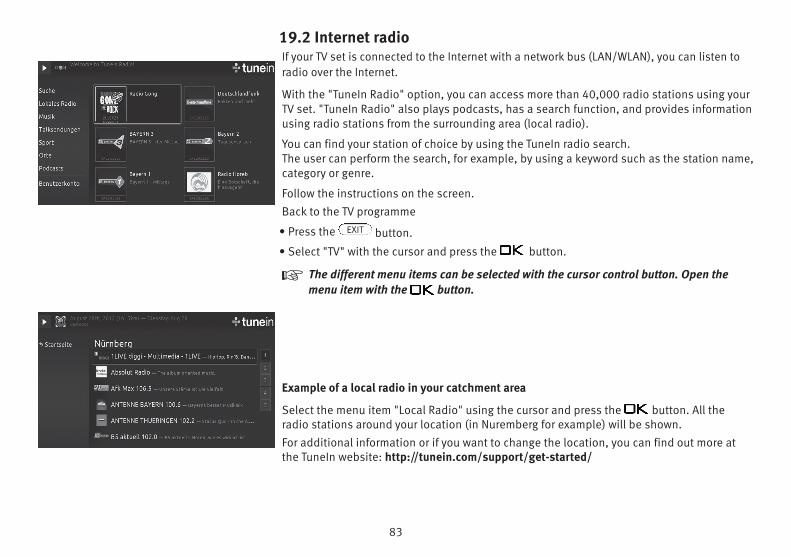
83
19.2 Internet radioIf your TV set is connected to the Internet with a network bus (LAN/WLAN), you can listen toradio over the Internet.
With the "TuneIn Radio" option, you can access more than 40,000 radio stations using yourTV set. "TuneIn Radio" also plays podcasts, has a search function, and provides informationusing radio stations from the surrounding area (local radio).
You can find your station of choice by using the TuneIn radio search.The user can perform the search, for example, by using a keyword such as the station name, category or genre.
Follow the instructions on the screen.
Back to the TV programme
• Press the button.
• Select "TV" with the cursor and press the button.
The different menu items can be selected with the cursor control button. Open themenu item with the button.
Example of a local radio in your catchment area
Select the menu item "Local Radio" using the cursor and press the button. All theradio stations around your location (in Nuremberg for example) will be shown.
For additional information or if you want to change the location, you can find out more atthe TuneIn website: http://tunein.com/support/get-started/
EXIT
+
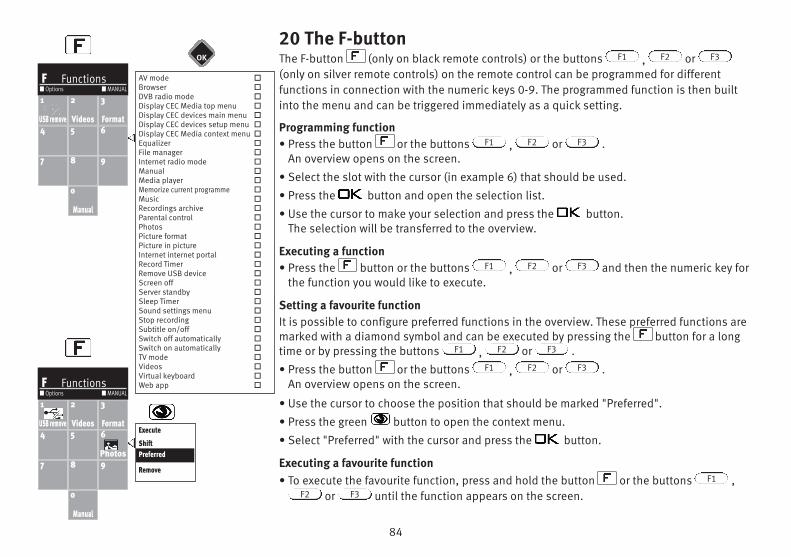
84
20 The F-buttonThe F-button (only on black remote controls) or the buttons , or(only on silver remote controls) on the remote control can be programmed for differentfunctions in connection with the numeric keys 0-9. The programmed function is then builtinto the menu and can be triggered immediately as a quick setting.
Programming function• Press the button or the buttons , or .
An overview opens on the screen.
• Select the slot with the cursor (in example 6) that should be used.
• Press the button and open the selection list.
• Use the cursor to make your selection and press the button.The selection will be transferred to the overview.
Executing a function• Press the button or the buttons , or and then the numeric key for
the function you would like to execute.
Setting a favourite functionIt is possible to configure preferred functions in the overview. These preferred functions aremarked with a diamond symbol and can be executed by pressing the button for a longtime or by pressing the buttons , or .
• Press the button or the buttons , or . An overview opens on the screen.
• Use the cursor to choose the position that should be marked "Preferred".
• Press the green button to open the context menu.
• Select "Preferred" with the cursor and press the button.
Executing a favourite function• To execute the favourite function, press and hold the button or the buttons ,
or until the function appears on the screen.
F3F2F1
F3F2F1
F3F2F1
F3F2F1
F3F2F1
F1
F3F2
1
USB remove
2
Videos
3
Format4 5 6
7 8
0
Manual
9
F Functions■ MANUAL■ Options
Execute
Shift
Bevorzugt
Remove
Preferred
AV mode □Browser □DVB radio mode □Display CEC Media top menu □Display CEC devices main menu □Display CEC devices setup menu □Display CEC Media context menu □Equalizer □File manager □Internet radio mode □Manual □Media player □Memorize current programme □Music □Recordings archive □Parental control □Photos □Picture format □Picture in picture □Internet internet portal □Record Timer □Remove USB device □Screen off □Server standby □Sleep Timer □Sound settings menu □Stop recording □Subtitle on/off □Switch off automatically □Switch on automatically □TV mode □Videos □Virtual keyboard □Web app □
1
USB remove
2
Videos
3
Format4 5 6
Photos7 8
0
Manual
9
F Functions■ MANUAL■ Options
OK

85
Moving a functionIt is possible to move a favourite function to another position in the function key selectionoverview.
• Press the button or the buttons , or . An overview opens on the screen.
• Use the cursor to select the position you would like to move.
• Press the green button to open the context menu.
• Use the cursor to select "Shift" and press the button.
• Select the new position with the cursor and press the button.
Removing a function• Press the button or the buttons , or .
An overview opens on the screen.
• Use the cursor to select the position you would like to remove.
• Press the green button to open the context menu.
• Use the cursor to select "Remove" and press the button.
20.1 Programming the web app function• Press the button or the , , buttons.
An overview opens on the screen.• Select the slot with the cursor (in example 9) that should be used.
• Press the button and open the selection list.
• Select "Web App"14) with the cursor and press the button.The selection is opened.
• Select the "YouTube" function with the cursor and press the button.The selection will be transferred to the overview.
14) The web apps are provided by a web service and can only be selected if connected tothe Internet..
F3F2F1
F3F2F1
F3F2F1
Execute
Shift
Preferred
RemoveRemove
1
USB remove
2
Videos
3
Format4 5 6
Photos7 8
0
Manual
9
F Functions■ MANUAL■ Options
1
USB remove
2
Videos
3
Format4 5 6
Photos7 8
0
Manual
9
F Functions■ MANUAL■ Options
7 8
0
Manuel
9
YouTube
F1 F3. .
.
.Vidéos □Web app □
HBBig
YouTube
Web-app □
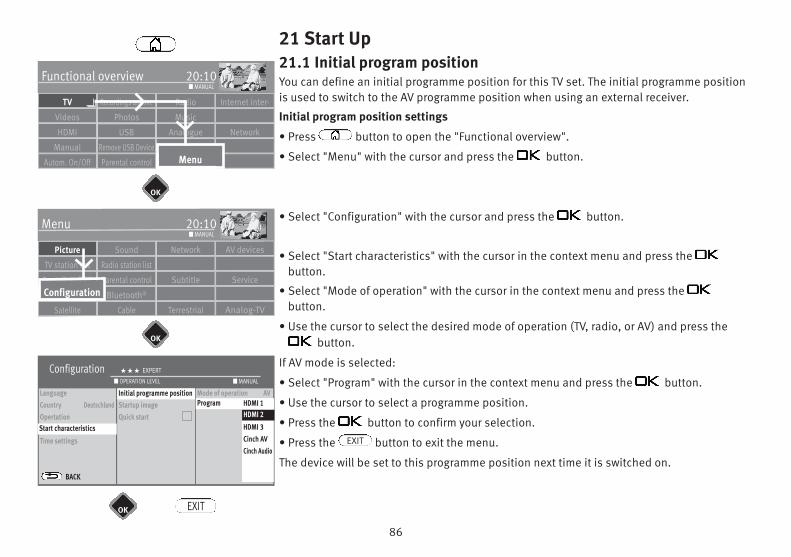
86
21 Start Up21.1 Initial program positionYou can define an initial programme position for this TV set. The initial programme positionis used to switch to the AV programme position when using an external receiver.
Initial program position settings
• Press button to open the "Functional overview".
• Select "Menu" with the cursor and press the button.
• Select "Configuration" with the cursor and press the button.
• Select "Start characteristics" with the cursor in the context menu and press thebutton.
• Select "Mode of operation" with the cursor in the context menu and press thebutton.
• Use the cursor to select the desired mode of operation (TV, radio, or AV) and press thebutton.
If AV mode is selected:
• Select "Program" with the cursor in the context menu and press the button.
• Use the cursor to select a programme position.
• Press the button to confirm your selection.
• Press the button to exit the menu.
The device will be set to this programme position next time it is switched on.
EXIT
Radio Internet inter-Recordings archiveTV
Functional overview 20:10
MusicPhotosVideos
Analogue NetworkUSBHDMI
FilemanagerRemove USB DeviceManual
Parental control MenuAutom. On/Off
■ MANUAL
Network AV devicesSoundPicture
Menu 20:10
Radio station listTV station list
Subtitle ServiceParental controlRecordings/EPG
Bluetooth®
Terrestrial Analog-TVCableSatellite
■ MANUAL
OK
OK
OK
Configuration H H H EXPERT
LanguageCountry DeutschlandOpertationStart characteristicsTime settings
BACK
StartprogrammplatzStartup imageQuick start
Mode of operation AVSchnellstart Aus
■ MANUAL■ OPERATION LEVEL
Start characteristics
Initial programme positionProgram HDMI 1
HDMI 2HDMI 3Cinch AVCinch Audio
HDMI 2
Configuration
EXIT
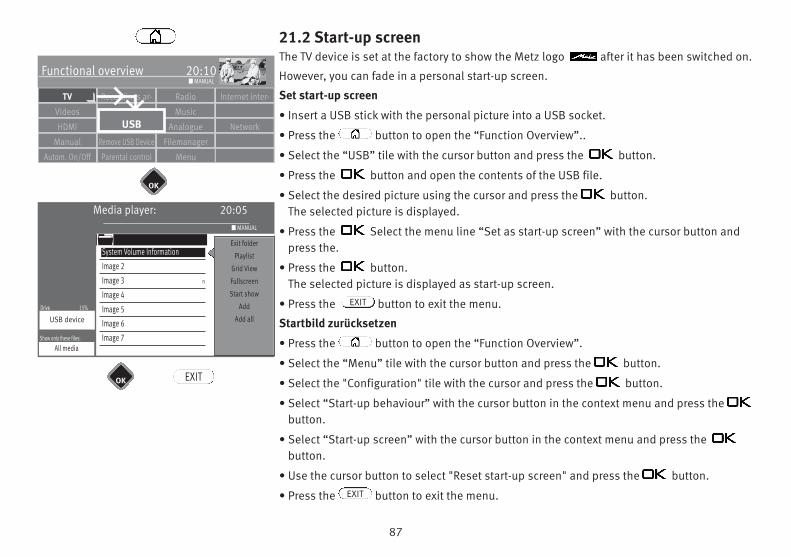
87
21.2 Start-up screenThe TV device is set at the factory to show the Metz logo after it has been switched on.
However, you can fade in a personal start-up screen.
Set start-up screen
• Insert a USB stick with the personal picture into a USB socket.
• Press the button to open the “Function Overview”..
• Select the “USB” tile with the cursor button and press the button.
• Press the button and open the contents of the USB file.
• Select the desired picture using the cursor and press the button.The selected picture is displayed.
• Press the Select the menu line “Set as start-up screen” with the cursor button andpress the.
• Press the button.The selected picture is displayed as start-up screen.
• Press the button to exit the menu.
Startbild zurücksetzen
• Press the button to open the “Function Overview”.
• Select the “Menu” tile with the cursor button and press the button.
• Select the "Configuration" tile with the cursor and press the button.
• Select “Start-up behaviour” with the cursor button in the context menu and press thebutton.
• Select “Start-up screen” with the cursor button in the context menu and press thebutton.
• Use the cursor button to select "Reset start-up screen" and press the button.
• Press the button to exit the menu.
EXIT
EXIT
Radio Internet inter-Recordings ar-TV
Functional overview 20:10
MusicPhotosVideos
Analogue NetworkUSBHDMI
FilemanagerRemove USB DeviceManual
Parental control
USB
Autom. On/Off
■ MANUAL
Media player: 20:05
Show only these files:
■ MANUAL
System Volume Information
All media
Image 2
Image 3 n
Image 4
Image 5
Image 6
Image 7
Drive 15%
USB device
Exit folder
Playlist
Grid View
Fullscreen
Start show
Add
Add all
OK
Menu
OK EXIT
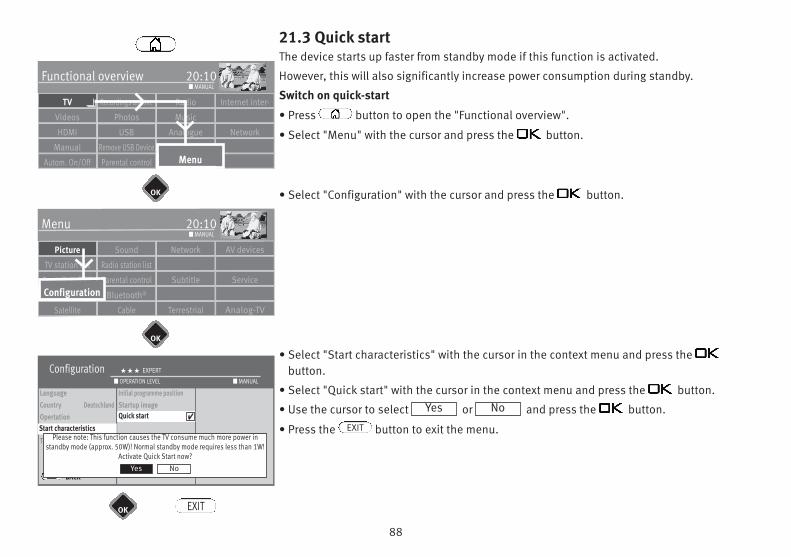
88
21.3 Quick startThe device starts up faster from standby mode if this function is activated.
However, this will also significantly increase power consumption during standby.
Switch on quick-start
• Press button to open the "Functional overview".
• Select "Menu" with the cursor and press the button.
• Select "Configuration" with the cursor and press the button.
• Select "Start characteristics" with the cursor in the context menu and press thebutton.
• Select "Quick start" with the cursor in the context menu and press the button.
• Use the cursor to select or and press the button.
• Press the button to exit the menu.
NoYes
EXIT
Radio Internet inter-Recordings archiveTV
Functional overview 20:10
MusicPhotosVideos
Analogue NetworkUSBHDMI
FilemanagerRemove USB DeviceManual
Parental control MenuAutom. On/Off
■ MANUAL
Network AV devicesSoundPicture
Menu 20:10
Radio station listTV station list
Subtitle ServiceParental controlRecordings/EPG
Bluetooth®
Terrestrial Analog-TVCableSatellite
■ MANUAL
OK
OK
OK
Configuration H H H EXPERT
LanguageCountry DeutschlandOpertationStart characteristicsTime settings
BACK
Initial programme positionStartup imageQuick start
■ MANUAL■ OPERATION LEVEL
Start characteristics
Quick start
Configuration
EXIT
Please note: This function causes the TV consume much more power instandby mode (approx. 50W)! Normal standby mode requires less than 1W!
Activate Quick Start now?Yes No
4
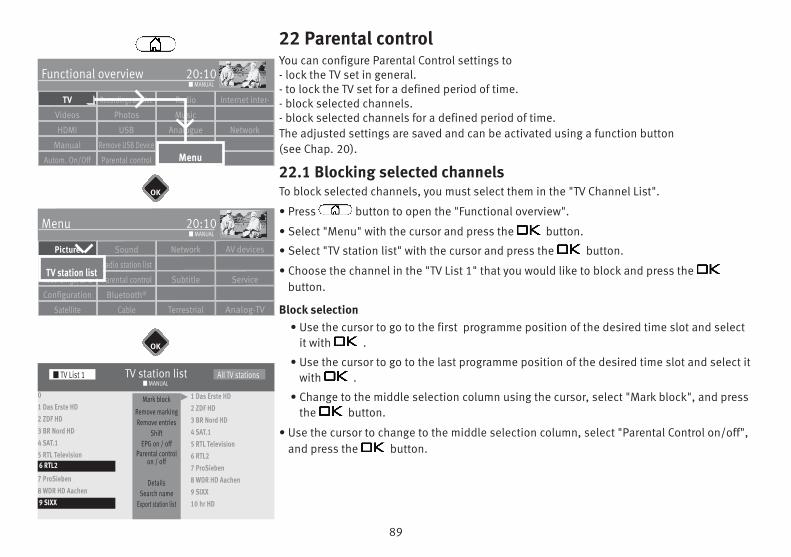
89
22 Parental controlYou can configure Parental Control settings to - lock the TV set in general.- to lock the TV set for a defined period of time.- block selected channels.- block selected channels for a defined period of time.The adjusted settings are saved and can be activated using a function button (see Chap. 20).
22.1 Blocking selected channelsTo block selected channels, you must select them in the "TV Channel List".
• Press button to open the "Functional overview".
• Select "Menu" with the cursor and press the button.
• Select "TV station list" with the cursor and press the button.
• Choose the channel in the "TV List 1" that you would like to block and press thebutton.
Block selection • Use the cursor to go to the first programme position of the desired time slot and select
it with .
• Use the cursor to go to the last programme position of the desired time slot and select itwith .
• Change to the middle selection column using the cursor, select "Mark block", and pressthe button.
• Use the cursor to change to the middle selection column, select "Parental Control on/off",and press the button.
OK
OK
TV station list■ MANUAL
■ TV List 1 All TV stations
01 Das Erste HD2 ZDF HD3 BR Nord HD4 SAT.15 RTL Television6 RTL27 ProSieben8 WDR HD Aachen9 SIXX
Mark block
Remove markingRemove entries
ShiftEPG on / off
Parental controlon / off
DetailsSearch name
Export station list
1 Das Erste HD2 ZDF HD3 BR Nord HD4 SAT.15 RTL Television6 RTL27 ProSieben8 WDR HD Aachen9 SIXX10 hr HD9 SIXX
Network AV devicesSoundPicture
Menu 20:10
Radio station listTV station list
Subtitle ServiceParental controlRecordings/EPG
Bluetooth®
Terrestrial Analog-TVCableSatellite
■ MANUAL
Configuration
TV station list
6 RTL2
Radio Internet inter-Recordings archiveTV
Functional overview 20:10
MusicPhotosVideos
Analogue NetworkUSBHDMI
FilemanagerRemove USB DeviceManual
Parental control MenuAutom. On/Off
■ MANUAL
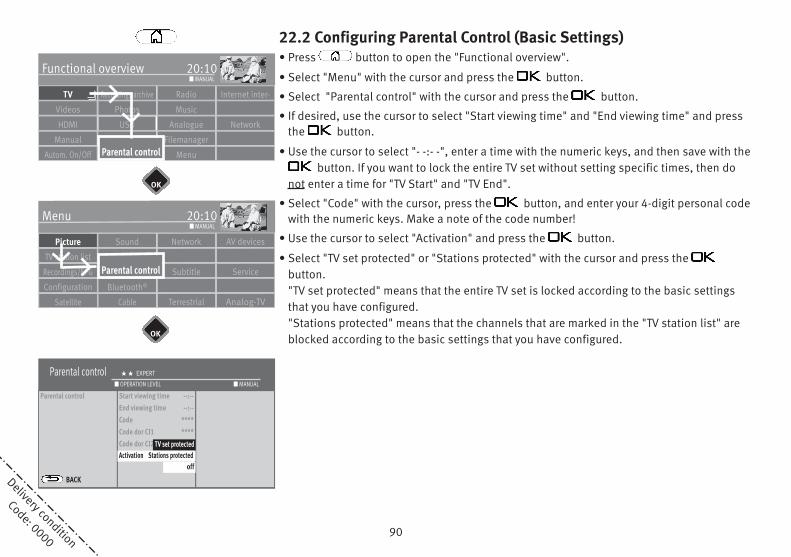
90
Delivery condition
Code: 0000
22.2 Configuring Parental Control (Basic Settings)• Press button to open the "Functional overview".
• Select "Menu" with the cursor and press the button.
• Select "Parental control" with the cursor and press the button.
• If desired, use the cursor to select "Start viewing time" and "End viewing time" and pressthe button.
• Use the cursor to select "- -:- -", enter a time with the numeric keys, and then save with thebutton. If you want to lock the entire TV set without setting specific times, then do
not enter a time for "TV Start" and "TV End".
• Select "Code" with the cursor, press the button, and enter your 4-digit personal codewith the numeric keys. Make a note of the code number!
• Use the cursor to select "Activation" and press the button.
• Select "TV set protected" or "Stations protected" with the cursor and press thebutton."TV set protected" means that the entire TV set is locked according to the basic settingsthat you have configured."Stations protected" means that the channels that are marked in the "TV station list" areblocked according to the basic settings that you have configured.
Radio Internet inter-Recordings archiveTV
Functional overview 20:10
MusicPhotosVideos
Analogue NetworkUSBHDMI
FilemanagerRemove USB DeviceManual
MenuParental controlParental controlAutom. On/Off
■ MANUAL
OK
Parental control H H EXPERT
Parental control
BACK
Start viewing time --:--End viewing time --:--Code ****Code dor CI1 ****Code dor CI2 ****Aktivierung Aus
■ MANUAL■ OPERATION LEVEL
Activation Stations protectedoff
TV set protected
OK
Network AV devicesSoundPicture
Menu 20:10
Radio station listTV station list
Subtitle ServiceParental controlRecordings/EPG
Bluetooth®
Terrestrial Analog-TVCableSatellite
■ MANUAL
Configuration
Parental control
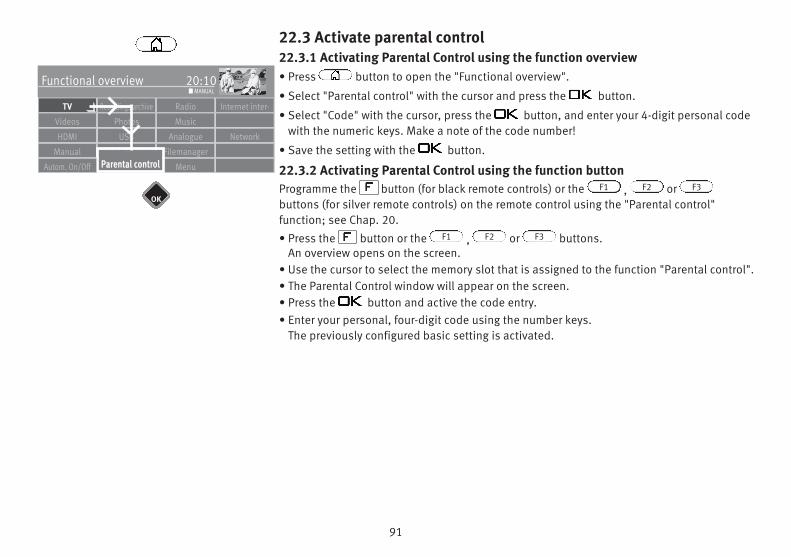
91
22.3 Activate parental control22.3.1 Activating Parental Control using the function overview• Press button to open the "Functional overview".
• Select "Parental control" with the cursor and press the button.
• Select "Code" with the cursor, press the button, and enter your 4-digit personal codewith the numeric keys. Make a note of the code number!
• Save the setting with the button.
22.3.2 Activating Parental Control using the function buttonProgramme the button (for black remote controls) or the , orbuttons (for silver remote controls) on the remote control using the "Parental control"function; see Chap. 20.
• Press the button or the , or buttons. An overview opens on the screen.
• Use the cursor to select the memory slot that is assigned to the function "Parental control".• The Parental Control window will appear on the screen.• Press the button and active the code entry.• Enter your personal, four-digit code using the number keys.
The previously configured basic setting is activated.
F3F2F1
F3F2F1
Radio Internet inter-Recordings archiveTV
Functional overview 20:10
MusicPhotosVideos
Analogue NetworkUSBHDMI
FilemanagerRemove USB DeviceManual
MenuParental controlParental controlAutom. On/Off
■ MANUAL
OK

92
22.3.3 Switching off Parental ControlIf Parental Control is active, then the code must be entered in the menu every time the TV setis switched on or operated.To switch off the Parental Control:
• Press button to open the "Functional overview".• Select "Menu" with the cursor and press the button.• Enter a 4-digit personal code using the number keys.• Select "Parental control" with the cursor and press the button.• Use the cursor to select "on" or "off" and press the button.
• Press the button to exit the menu.EXIT
Radio Internet inter-Recordings archiveTV
Functional overview 20:10
MusicPhotosVideos
Analogue NetworkUSBHDMI
FilemanagerRemove USB DeviceManual
MenuParental controlParental controlAutom. On/Off
■ MANUAL
OK
Parental control H H H EXPERT
Parental control
BACK
Start viewing time --:--End viewing time --:--Code ****Code dor CI1 ****Code dor CI2 ****Aktivierung Aus
■ MANUAL■ OPERATION LEVEL
Activation Stations protectedOff
TV set protected
EXITOK
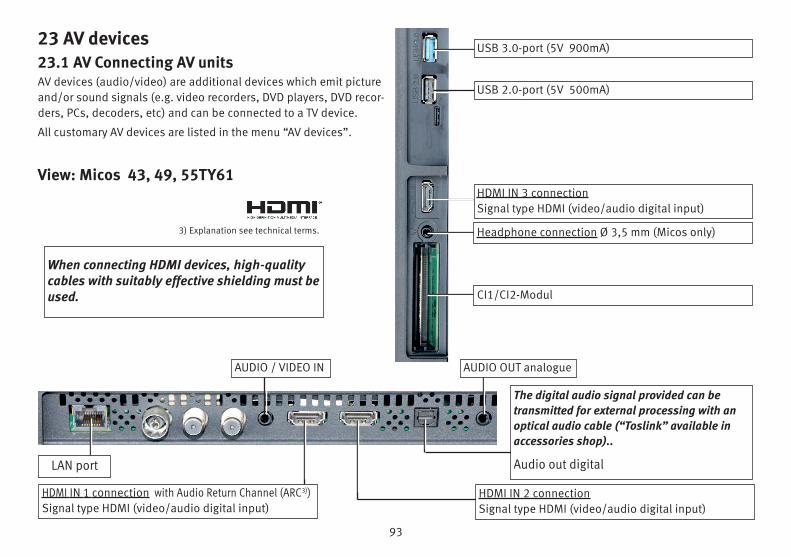
93
23 AV devices23.1 AV Connecting AV unitsAV devices (audio/video) are additional devices which emit pictureand/or sound signals (e.g. video recorders, DVD players, DVD recor-ders, PCs, decoders, etc) and can be connected to a TV device.
All customary AV devices are listed in the menu “AV devices”.
HDMI IN 1 connection with Audio Return Channel (ARC3))Signal type HDMI (video/audio digital input)
AUDIO / VIDEO IN AUDIO OUT analogue
LAN port
HDMI IN 2 connectionSignal type HDMI (video/audio digital input)
HDMI IN 3 connectionSignal type HDMI (video/audio digital input)
USB 2.0-port (5V 500mA)
USB 3.0-port (5V 900mA)
The digital audio signal provided can betransmitted for external processing with anoptical audio cable (“Toslink” available in accessories shop)..
Audio out digital
Headphone connection Ø 3,5 mm (Micos only)
CI1/CI2-Modul
When connecting HDMI devices, high-qualitycables with suitably effective shielding must beused.
View: Micos 43, 49, 55TY61
3) Explanation see technical terms.
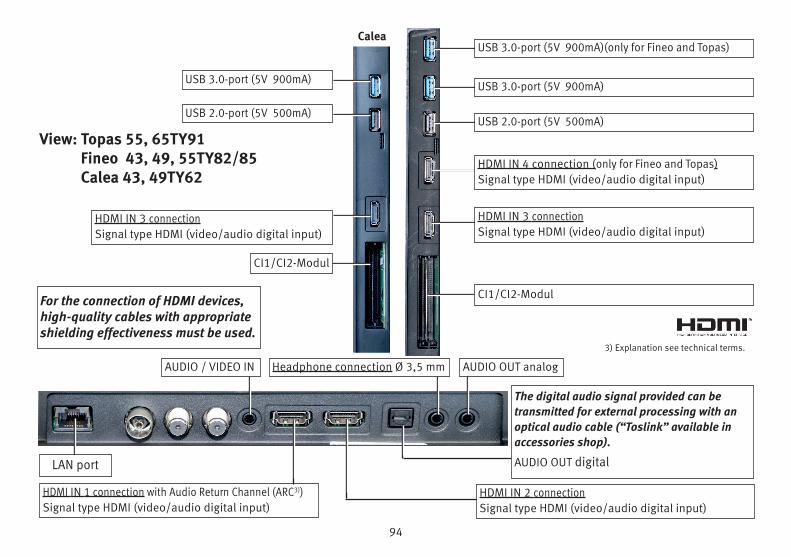
94
HDMI IN 1 connection with Audio Return Channel (ARC3))Signal type HDMI (video/audio digital input)
AUDIO / VIDEO IN AUDIO OUT analog
LAN port
HDMI IN 2 connectionSignal type HDMI (video/audio digital input)
HDMI IN 3 connectionSignal type HDMI (video/audio digital input)
HDMI IN 4 connection (only for Fineo and Topas)Signal type HDMI (video/audio digital input)
USB 3.0-port (5V 900mA)
USB 2.0-port (5V 500mA)
USB 3.0-port (5V 900mA)(only for Fineo and Topas)
The digital audio signal provided can betransmitted for external processing with anoptical audio cable (“Toslink” available in accessories shop).
AUDIO OUT digital
Headphone connection Ø 3,5 mm
CI1/CI2-ModulFor the connection of HDMI devices,high-quality cables with appropriateshielding effectiveness must be used.
View: Topas 55, 65TY91Fineo 43, 49, 55TY82/85Calea 43, 49TY62
3) Explanation see technical terms.
HDMI IN 3 connectionSignal type HDMI (video/audio digital input)
USB 3.0-port (5V 900mA)
USB 2.0-port (5V 500mA)
CI1/CI2-Modul
Calea
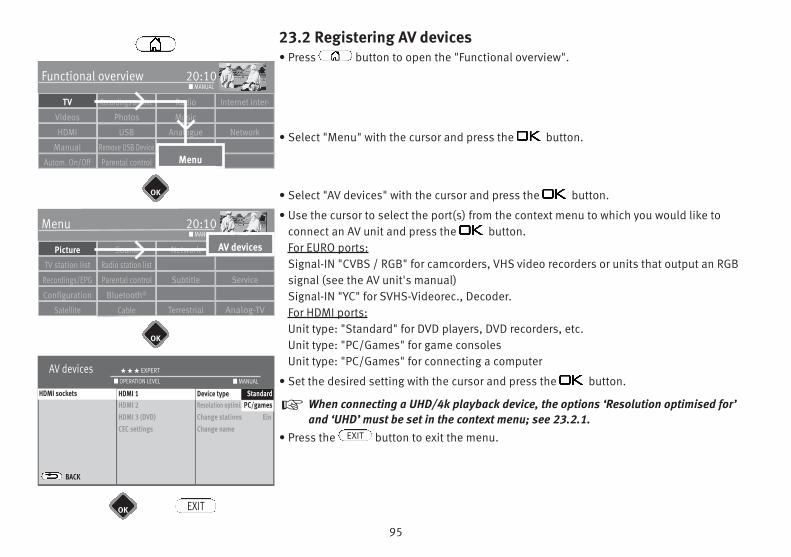
95
23.2 Registering AV devices• Press button to open the "Functional overview".
• Select "Menu" with the cursor and press the button.
• Select "AV devices" with the cursor and press the button.
• Use the cursor to select the port(s) from the context menu to which you would like toconnect an AV unit and press the button.For EURO ports:Signal-IN "CVBS / RGB" for camcorders, VHS video recorders or units that output an RGBsignal (see the AV unit's manual)Signal-IN "YC" for SVHS-Videorec., Decoder.For HDMI ports:Unit type: "Standard" for DVD players, DVD recorders, etc.Unit type: "PC/Games" for game consolesUnit type: "PC/Games" for connecting a computer
• Set the desired setting with the cursor and press the button.
When connecting a UHD/4k playback device, the options ‘Resolution optimised for’and ‘UHD’ must be set in the context menu; see 23.2.1.
• Press the button to exit the menu.
+
EXIT
Radio Internet inter-Recordings archiveTV
Functional overview 20:10
MusicPhotosVideos
Analogue NetworkUSBHDMI
FilemanagerRemove USB DeviceManual
Parental control MenuAutom. On/Off
■ MANUAL
Network AV devicesSoundPicture
Menu 20:10
Radio station listTV station list
Subtitle ServiceParental controlRecordings/EPG
Configuration Bluetooth®
Terrestrial Analog-TVCableSatellite
■ MANUAL
AV devices
EXIT
OK
OK
OK
AV devices H H H EXPERT
EURO-Buchsen
BACK
HDMI 1HDMI 2HDMI 3 (DVD)CEC settings
Geraete-Typ StandardResolution optimized for-Change stations EinChange name
■ MANUAL■ OPERATION LEVEL
HDMI sockets HDMI 1 Device type StandardPC/games
Standard
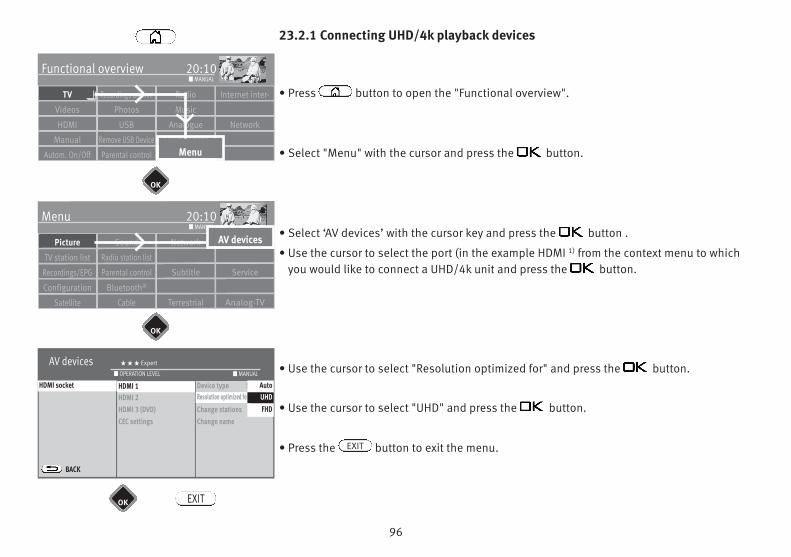
96
23.2.1 Connecting UHD/4k playback devices
• Press button to open the "Functional overview".
• Select "Menu" with the cursor and press the button.
• Select ‘AV devices’ with the cursor key and press the button .
• Use the cursor to select the port (in the example HDMI 1) from the context menu to whichyou would like to connect a UHD/4k unit and press the button.
• Use the cursor to select "Resolution optimized for" and press the button.
• Use the cursor to select "UHD" and press the button.
• Press the button to exit the menu.EXIT
AV devices H H H Expert
EURO-Buchsen
BACK
HDMI 1HDMI 2HDMI 3 (DVD)CEC settings
Device type StandardResolution optimized for-Change stations EinChange name
■ MANUAL■ OPERATION LEVEL
HDMI socket HDMI 1Resolution optimized for Ein
Auto
FHDUHD
Radio Internet inter-Recordings archiveTV
Functional overview 20:10
MusicPhotosVideos
Analogue NetworkUSBHDMI
FilemanagerRemove USB DeviceManual
Parental control MenuAutom. On/Off
■ MANUAL
Network AV devicesSoundPicture
Menu 20:10
Radio station listTV station list
Subtitle ServiceParental controlRecordings/EPG
Configuration Bluetooth®
Terrestrial Analog-TVCableSatellite
■ MANUAL
OK
OK
OK
AV devices
EXIT
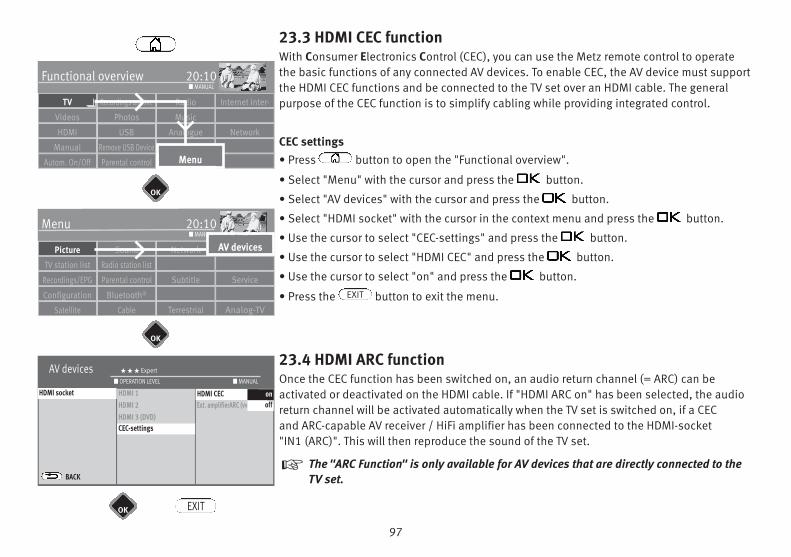
97
23.3 HDMI CEC functionWith Consumer Electronics Control (CEC), you can use the Metz remote control to operatethe basic functions of any connected AV devices. To enable CEC, the AV device must supportthe HDMI CEC functions and be connected to the TV set over an HDMI cable. The generalpurpose of the CEC function is to simplify cabling while providing integrated control.
CEC settings• Press button to open the "Functional overview".
• Select "Menu" with the cursor and press the button.
• Select "AV devices" with the cursor and press the button.
• Select "HDMI socket" with the cursor in the context menu and press the button.
• Use the cursor to select "CEC-settings" and press the button.
• Use the cursor to select "HDMI CEC" and press the button.
• Use the cursor to select "on" and press the button.
• Press the button to exit the menu.
23.4 HDMI ARC functionOnce the CEC function has been switched on, an audio return channel (= ARC) can be activated or deactivated on the HDMI cable. If "HDMI ARC on" has been selected, the audioreturn channel will be activated automatically when the TV set is switched on, if a CEC and ARC-capable AV receiver / HiFi amplifier has been connected to the HDMI-socket "IN1 (ARC)". This will then reproduce the sound of the TV set.
The "ARC Function" is only available for AV devices that are directly connected to theTV set.
EXIT
+
AV devices H H H Expert
EURO-Buchsen
BACK
HDMI 1HDMI 2HDMI 3 (DVD)CEC settings
HDMI CEC EinExt. amplifierARC (vvia HDMI1)
■ MANUAL■ OPERATION LEVEL
HDMI socket
CEC-settings
HDMI CEC Einoffon
Radio Internet inter-Recordings archiveTV
Functional overview 20:10
MusicPhotosVideos
Analogue NetworkUSBHDMI
FilemanagerRemove USB DeviceManual
Parental control MenuAutom. On/Off
■ MANUAL
Network AV devicesSoundPicture
Menu 20:10
Radio station listTV station list
Subtitle ServiceParental controlRecordings/EPG
Configuration Bluetooth®
Terrestrial Analog-TVCableSatellite
■ MANUAL
OK
OK
OK
AV devices
EXIT
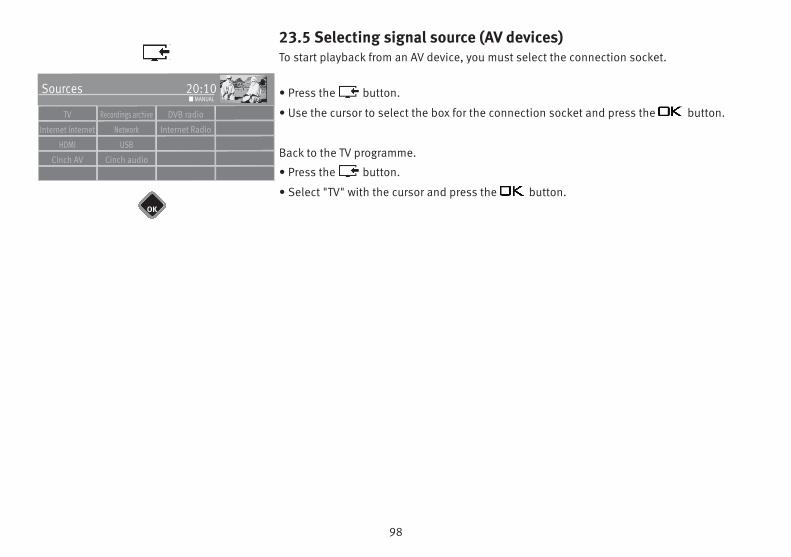
98
23.5 Selecting signal source (AV devices)To start playback from an AV device, you must select the connection socket.
• Press the button.
• Use the cursor to select the box for the connection socket and press the button.
Back to the TV programme.
• Press the button.
• Select "TV" with the cursor and press the button.OK
DVB radioRecordings archive
Sources 20:10
Internet RadioNetworkInternet internet
TV
USBHDMI
Cinch AV Cinch audio
■ MANUAL
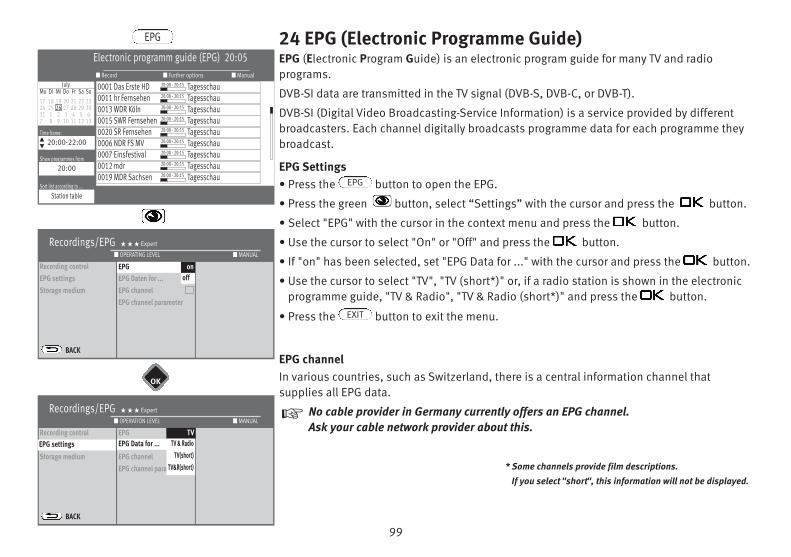
99
24 EPG (Electronic Programme Guide)EPG (Electronic Program Guide) is an electronic program guide for many TV and radioprograms.
DVB-SI data are transmitted in the TV signal (DVB-S, DVB-C, or DVB-T).
DVB-SI (Digital Video Broadcasting-Service Information) is a service provided by differentbroadcasters. Each channel digitally broadcasts programme data for each programme theybroadcast.
EPG Settings• Press the button to open the EPG.
• Press the green button, select “Settings” with the cursor and press the button.
• Select "EPG" with the cursor in the context menu and press the button.
• Use the cursor to select "On" or "Off" and press the button.
• If "on" has been selected, set "EPG Data for ..." with the cursor and press the button.
• Use the cursor to select "TV", "TV (short*)" or, if a radio station is shown in the electronicprogramme guide, "TV & Radio", "TV & Radio (short*)" and press the button.
• Press the button to exit the menu.
EPG channelIn various countries, such as Switzerland, there is a central information channel thatsupplies all EPG data.
No cable provider in Germany currently offers an EPG channel.Ask your cable network provider about this.
* Some channels provide film descriptions.
If you select "short", this information will not be displayed.
EPG
EXIT
+
Electronic programm guide (EPG) 20:05
Time frame:20:00-22:00
Show programmes from20:00
Sort list according to ...Station table
■ Manual■ Further options■ RecordJuly
Mo Di Mi Do Fr Sa So17 18 19 20 21 22 2324 25 26 27 28 29 3031 1 2 3 4 5 67 8 9 10 11 12 13
s
s
0001 Das Erste HD 20:00 - 20:15 Tagesschau0011 hr Fernsehen 20:00 - 20:15 Tagesschau0013 WDR Köln 20:00 - 20:15 Tagesschau0015 SWR Fernsehen 20:00 - 20:15 Tagesschau0020 SR Fernsehen 20:00 - 20:15 Tagesschau0006 NDR FS MV 20:00 - 20:15 Tagesschau0007 Einsfestival 20:00 - 20:15 Tagesschau0012 mdr 20:00 - 20:15 Tagesschau0019 MDR Sachsen 20:00 - 20:15 Tagesschau
EPG
Recordings/EPG H H H Expert
Recording controlEPG settingsStorage medium
BACK
EPG EinEPG Daten for ... TVEPG channelEPG channel parameter
■ MANUAL■ OPERATING LEVEL
EPG Einonoff
Recordings/EPG H H H Expert
Recording controlEPG settingsStorage medium
BACK
EPG EinEPG Daten für ... TVEPG channel NoEPG channel parameter
■ MANUAL■ OPERATION LEVEL
EPG Data for ...TV
TV & RadioTV(short)
TV&R(short)
OK
EPG settings
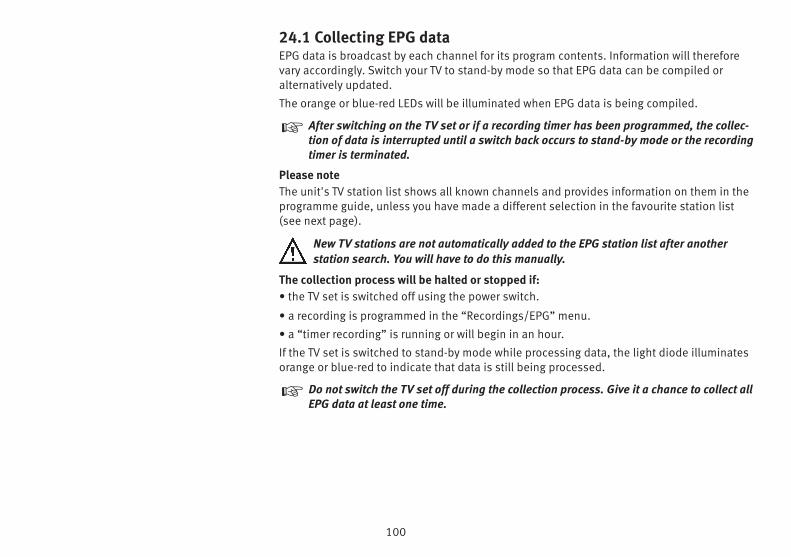
100
24.1 Collecting EPG dataEPG data is broadcast by each channel for its program contents. Information will thereforevary accordingly. Switch your TV to stand-by mode so that EPG data can be compiled or alternatively updated.
The orange or blue-red LEDs will be illuminated when EPG data is being compiled.
After switching on the TV set or if a recording timer has been programmed, the collec-tion of data is interrupted until a switch back occurs to stand-by mode or the recordingtimer is terminated.
Please noteThe unit's TV station list shows all known channels and provides information on them in theprogramme guide, unless you have made a different selection in the favourite station list(see next page).
New TV stations are not automatically added to the EPG station list after another station search. You will have to do this manually.
The collection process will be halted or stopped if:• the TV set is switched off using the power switch.
• a recording is programmed in the “Recordings/EPG” menu.
• a “timer recording” is running or will begin in an hour.
If the TV set is switched to stand-by mode while processing data, the light diode illuminatesorange or blue-red to indicate that data is still being processed.
Do not switch the TV set off during the collection process. Give it a chance to collect allEPG data at least one time.
+
+
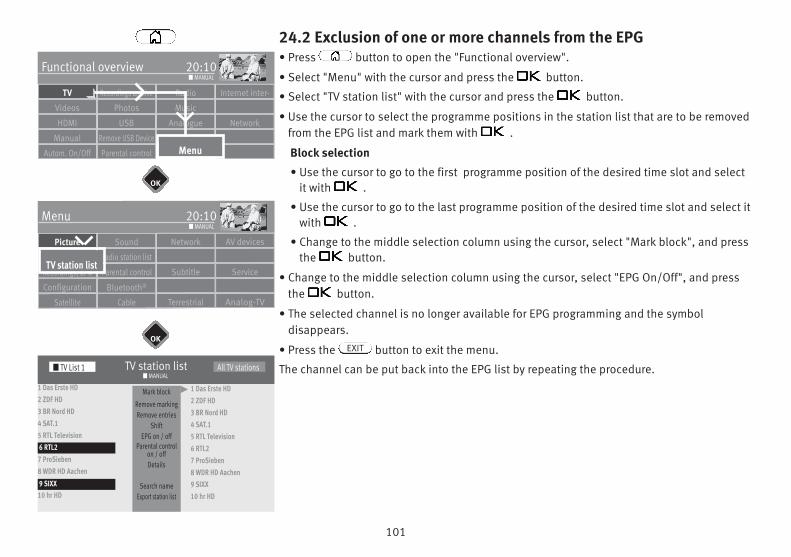
101
24.2 Exclusion of one or more channels from the EPG• Press button to open the "Functional overview".
• Select "Menu" with the cursor and press the button.
• Select "TV station list" with the cursor and press the button.
• Use the cursor to select the programme positions in the station list that are to be removedfrom the EPG list and mark them with .
Block selection
• Use the cursor to go to the first programme position of the desired time slot and selectit with .
• Use the cursor to go to the last programme position of the desired time slot and select itwith .
• Change to the middle selection column using the cursor, select "Mark block", and pressthe button.
• Change to the middle selection column using the cursor, select "EPG On/Off", and pressthe button.
• The selected channel is no longer available for EPG programming and the symbol disappears.
• Press the button to exit the menu.
The channel can be put back into the EPG list by repeating the procedure.
EXITOK
TV station list■ MANUAL
■ TV List 1 All TV stations
1 Das Erste HD2 ZDF HD3 BR Nord HD4 SAT.15 RTL Television6 RTL27 ProSieben8 WDR HD Aachen9 SIXX10 hr HD
Mark block
Remove markingRemove entries
ShiftEPG on / off
Parental controlon / offDetails
Search nameExport station list
1 Das Erste HD2 ZDF HD3 BR Nord HD4 SAT.15 RTL Television6 RTL27 ProSieben8 WDR HD Aachen9 SIXX10 hr HD
9 SIXX
Network AV devicesSoundPicture
Menu 20:10
Radio station listTV station list
Subtitle ServiceParental controlRecordings/EPG
Bluetooth®
Terrestrial Analog-TVCableSatellite
■ MANUAL
Configuration
TV station list
Radio Internet inter-Recordings archiveTV
Functional overview 20:10
MusicPhotosVideos
Analogue NetworkUSBHDMI
FilemanagerRemove USB DeviceManual
Parental control MenuAutom. On/Off
■ MANUAL
OK
6 RTL2
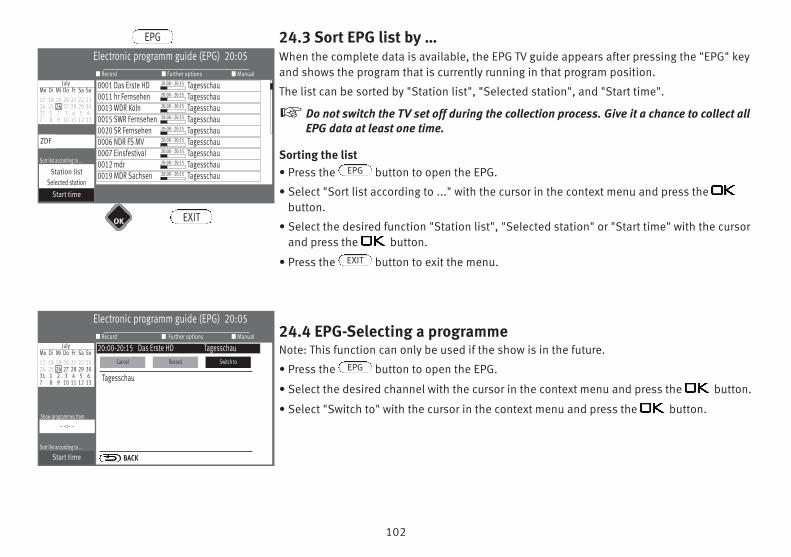
102
24.3 Sort EPG list by …When the complete data is available, the EPG TV guide appears after pressing the "EPG" keyand shows the program that is currently running in that program position.
The list can be sorted by "Station list", "Selected station", and "Start time".
Do not switch the TV set off during the collection process. Give it a chance to collect allEPG data at least one time.
Sorting the list• Press the button to open the EPG.
• Select "Sort list according to ..." with the cursor in the context menu and press thebutton.
• Select the desired function "Station list", "Selected station" or "Start time" with the cursorand press the button.
• Press the button to exit the menu.
24.4 EPG-Selecting a programmeNote: This function can only be used if the show is in the future.
• Press the button to open the EPG.
• Select the desired channel with the cursor in the context menu and press the button.
• Select "Switch to" with the cursor in the context menu and press the button.
+
EPG
EXIT
EPG
Electronic programm guide (EPG) 20:05
ZDF
Sort list according to ...
Station listSelected stationAnfangszeit
■ Manual■ Further options■ RecordJuly
Mo Di Mi Do Fr Sa So17 18 19 20 21 22 2324 25 26 27 28 29 3031 1 2 3 4 5 67 8 9 10 11 12 13
0001 Das Erste HD 20:00 - 20:15 Tagesschau0011 hr Fernsehen 20:00 - 20:15 Tagesschau0013 WDR Köln 20:00 - 20:15 Tagesschau0015 SWR Fernsehen 20:00 - 20:15 Tagesschau0020 SR Fernsehen 20:00 - 20:15 Tagesschau0006 NDR FS MV 20:00 - 20:15 Tagesschau0007 Einsfestival 20:00 - 20:15 Tagesschau0012 mdr 20:00 - 20:15 Tagesschau0019 MDR Sachsen 20:00 - 20:15 Tagesschau
EPG
Start time
Electronic programm guide (EPG) 20:05
Sort list according to ...
■ Manual■ Further options■ RecordJuly
Mo Di Mi Do Fr Sa So17 18 19 20 21 22 2324 25 26 27 28 29 3031 1 2 3 4 5 67 8 9 10 11 12 13
20:00-20:15 Das Erste HD Tagesschau
Tagesschau
BACKStart time
Cancel Record Switch to
Show programmes from- -:- -
OK EXIT
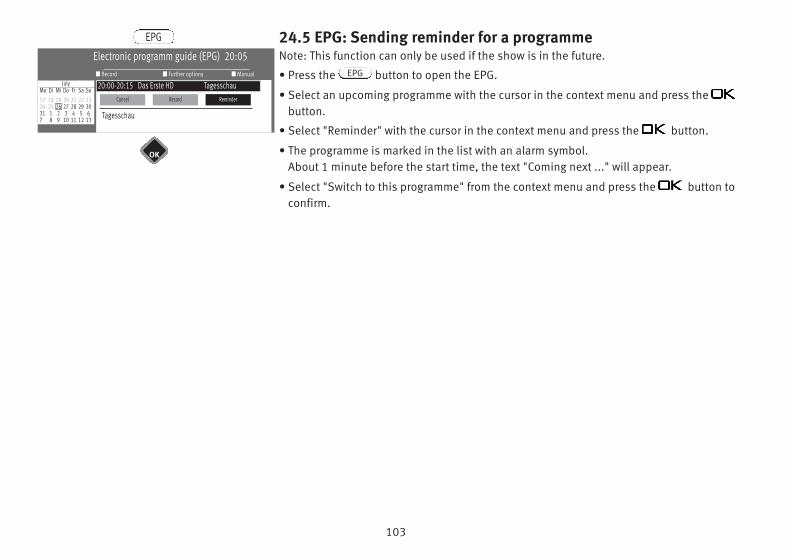
103
Electronic programm guide (EPG) 20:05■ Manual■ Further options■ Record
JulyMo Di Mi Do Fr Sa So17 18 19 20 21 22 2324 25 26 27 28 29 3031 1 2 3 4 5 67 8 9 10 11 12 13
20:00-20:15 Das Erste HD Tagesschau
Tagesschau
Cancel Record Reminder
EPG
OK
24.5 EPG: Sending reminder for a programmeNote: This function can only be used if the show is in the future.
• Press the button to open the EPG.
• Select an upcoming programme with the cursor in the context menu and press the button.
• Select "Reminder" with the cursor in the context menu and press the button.
• The programme is marked in the list with an alarm symbol.About 1 minute before the start time, the text "Coming next ..." will appear.
• Select "Switch to this programme" from the context menu and press the button toconfirm.
EPG
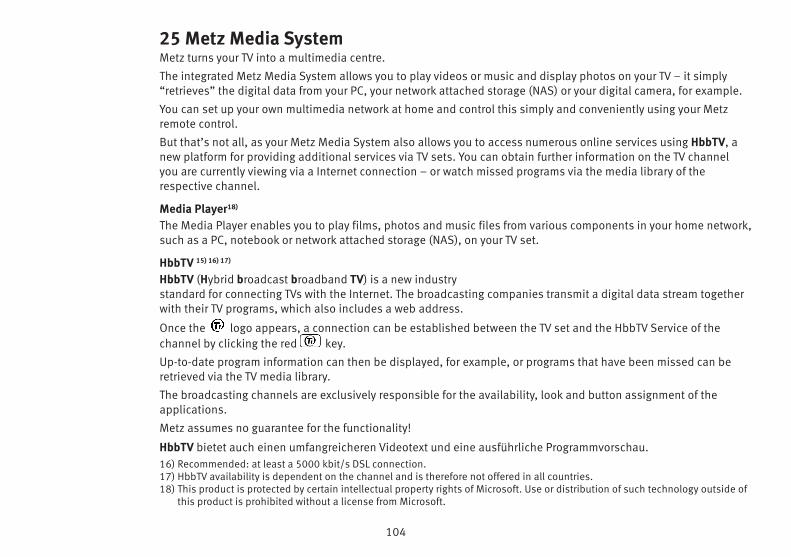
104
25 Metz Media SystemMetz turns your TV into a multimedia centre.
The integrated Metz Media System allows you to play videos or music and display photos on your TV – it simply“retrieves” the digital data from your PC, your network attached storage (NAS) or your digital camera, for example.
You can set up your own multimedia network at home and control this simply and conveniently using your Metzremote control.
But that’s not all, as your Metz Media System also allows you to access numerous online services using HbbTV, anew platform for providing additional services via TV sets. You can obtain further information on the TV channel you are currently viewing via a Internet connection – or watch missed programs via the media library of the respective channel.
Media Player18)
The Media Player enables you to play films, photos and music files from various components in your home network,such as a PC, notebook or network attached storage (NAS), on your TV set.
HbbTV 15) 16) 17)
HbbTV (Hybrid broadcast broadband TV) is a new industry standard for connecting TVs with the Internet. The broadcasting companies transmit a digital data stream togetherwith their TV programs, which also includes a web address.
Once the logo appears, a connection can be established between the TV set and the HbbTV Service of thechannel by clicking the red key.
Up-to-date program information can then be displayed, for example, or programs that have been missed can beretrieved via the TV media library.
The broadcasting channels are exclusively responsible for the availability, look and button assignment of the applications.
Metz assumes no guarantee for the functionality!
HbbTV bietet auch einen umfangreicheren Videotext und eine ausführliche Programmvorschau.16) Recommended: at least a 5000 kbit/s DSL connection.17) HbbTV availability is dependent on the channel and is therefore not offered in all countries.18) This product is protected by certain intellectual property rights of Microsoft. Use or distribution of such technology outside of
this product is prohibited without a license from Microsoft.
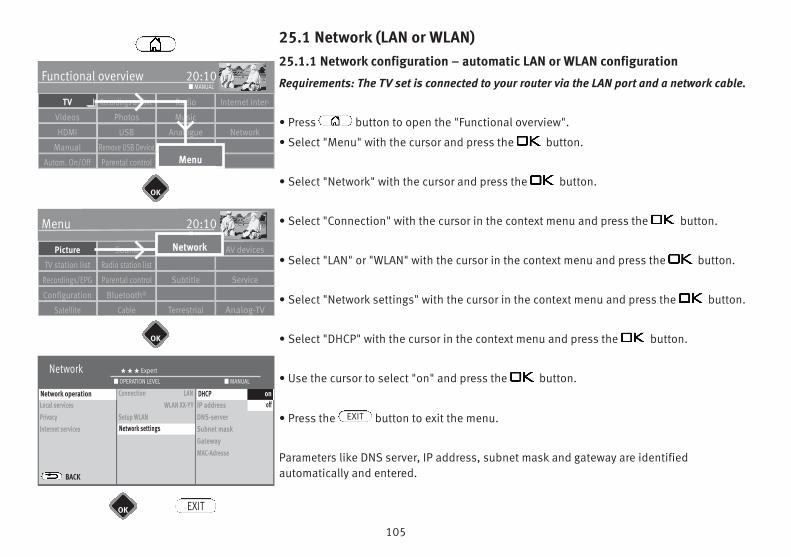
105
25.1 Network (LAN or WLAN)25.1.1 Network configuration – automatic LAN or WLAN configuration
Requirements: The TV set is connected to your router via the LAN port and a network cable.
• Press button to open the "Functional overview".
• Select "Menu" with the cursor and press the button.
• Select "Network" with the cursor and press the button.
• Select "Connection" with the cursor in the context menu and press the button.
• Select "LAN" or "WLAN" with the cursor in the context menu and press the button.
• Select "Network settings" with the cursor in the context menu and press the button.
• Select "DHCP" with the cursor in the context menu and press the button.
• Use the cursor to select "on" and press the button.
• Press the button to exit the menu.
Parameters like DNS server, IP address, subnet mask and gateway are identified automatically and entered.
EXIT
Network H H H Expert
Network operationLocal servicesPrivacyInternet services
BACK
Connection LANWLAN XX-YY
Setup WLANNetzwerk-Parameter
DHCP EinIP addressDNS-serverSubnet maskGatewayMAC-Adresse
■ MANUAL■ OPERATION LEVEL
Network operation
Network settings
DHCP onoff
Radio Internet inter-Recordings archiveTV
Functional overview 20:10
MusicPhotosVideos
Analogue NetworkUSBHDMI
FilemanagerRemove USB DeviceManual
Parental control MenuAutom. On/Off
■ MANUAL
Network AV devicesSoundPicture
Menu 20:10
Radio station listTV station list
Subtitle ServiceParental controlRecordings/EPG
Configuration Bluetooth®
Terrestrial Analog-TVCableSatellite
■ MANUAL
OK
OK
OK
Network
EXIT
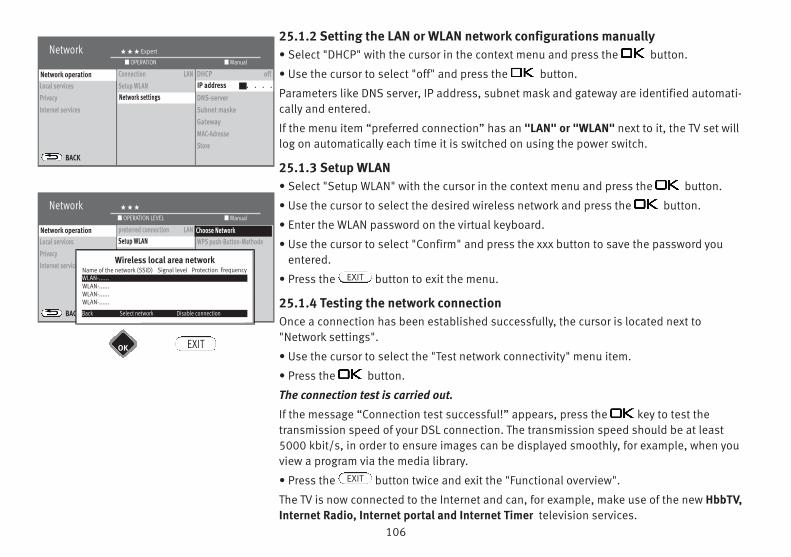
106
25.1.2 Setting the LAN or WLAN network configurations manually• Select "DHCP" with the cursor in the context menu and press the button.
• Use the cursor to select "off" and press the button.
Parameters like DNS server, IP address, subnet mask and gateway are identified automati-cally and entered.
If the menu item “preferred connection” has an "LAN" or "WLAN" next to it, the TV set willlog on automatically each time it is switched on using the power switch.
25.1.3 Setup WLAN• Select "Setup WLAN" with the cursor in the context menu and press the button.
• Use the cursor to select the desired wireless network and press the button.
• Enter the WLAN password on the virtual keyboard.
• Use the cursor to select "Confirm" and press the xxx button to save the password youentered.
• Press the button to exit the menu.
25.1.4 Testing the network connectionOnce a connection has been established successfully, the cursor is located next to "Network settings".
• Use the cursor to select the "Test network connectivity" menu item.
• Press the button.
The connection test is carried out.
If the message “Connection test successful!” appears, press the key to test the transmission speed of your DSL connection. The transmission speed should be at least 5000 kbit/s, in order to ensure images can be displayed smoothly, for example, when youview a program via the media library.
• Press the button twice and exit the "Functional overview".
The TV is now connected to the Internet and can, for example, make use of the new HbbTV,Internet Radio, Internet portal and Internet Timer television services.
EXIT
EXIT
Network H H H Expert
Network operationLocal servicesPrivacyInternet services
BACK
Connection LANSetup WLANNetzwerk-Parameter
DHCP offIP addressDNS-serverSubnet maskeGatewayMAC-AdresseStore
■ Manual■ OPERATION
Network operation
Network settings
Network H H H
Network operationLocal servicesPrivacyInternet services
BACK
preterred connection LANSetup WLANNetzwerk-ParameterTest network connectivity
Choose NetworkWPS push-Button-Methode
■ Manual■ OPERATION LEVEL
Network operation
OK EXIT
IP address . . . .
Setup WLANChoose Network
Wireless local area networkName of the network (SSID) Signal level Protection Frequency
WLAN-......WLAN-......WLAN-......
WLAN-......
Back Select network Disable connection
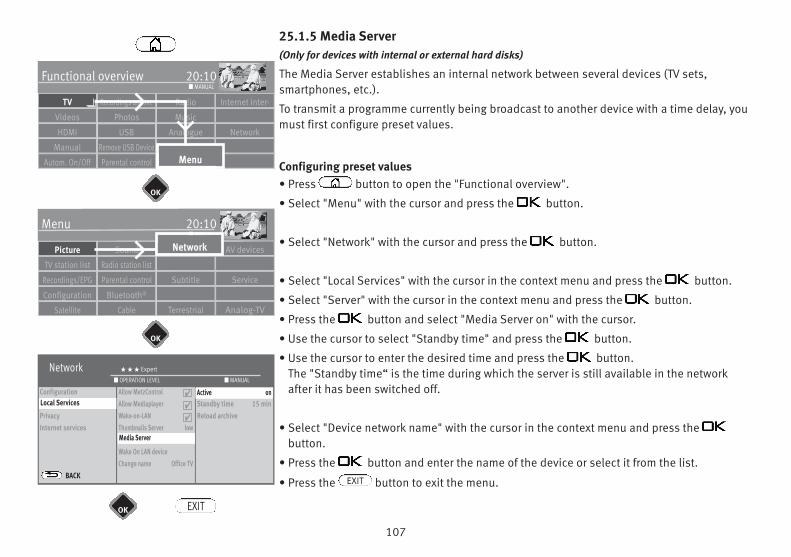
107
25.1.5 Media Server(Only for devices with internal or external hard disks)
The Media Server establishes an internal network between several devices (TV sets,smartphones, etc.).
To transmit a programme currently being broadcast to another device with a time delay, youmust first configure preset values.
Configuring preset values• Press button to open the "Functional overview".
• Select "Menu" with the cursor and press the button.
• Select "Network" with the cursor and press the button.
• Select "Local Services" with the cursor in the context menu and press the button.
• Select "Server" with the cursor in the context menu and press the button.
• Press the button and select "Media Server on" with the cursor.
• Use the cursor to select "Standby time" and press the button.
• Use the cursor to enter the desired time and press the button.The "Standby time“ is the time during which the server is still available in the networkafter it has been switched off.
• Select "Device network name" with the cursor in the context menu and press thebutton.
• Press the button and enter the name of the device or select it from the list.
• Press the button to exit the menu.EXIT
Network H H H Expert
ConfigurationLocal ServicesPrivacyInternet services
BACK
Allow MetzControlAllow MediaplayerWake-on-LANThumbnails Server lowHbbTVWake On LAN deviceChange name Office TV
DHCP EinStandby time 15 minReload archive
■ MANUAL■ OPERATION LEVEL
Local Services
Media Server
Active on
Radio Internet inter-Recordings archiveTV
Functional overview 20:10
MusicPhotosVideos
Analogue NetworkUSBHDMI
FilemanagerRemove USB DeviceManual
Parental control MenuAutom. On/Off
■ MANUAL
Network AV devicesSoundPicture
Menu 20:10
Radio station listTV station list
Subtitle ServiceParental controlRecordings/EPG
Configuration Bluetooth®
Terrestrial Analog-TVCableSatellite
■ MANUAL
OK
OK
OK
Network
EXIT
4
4
4
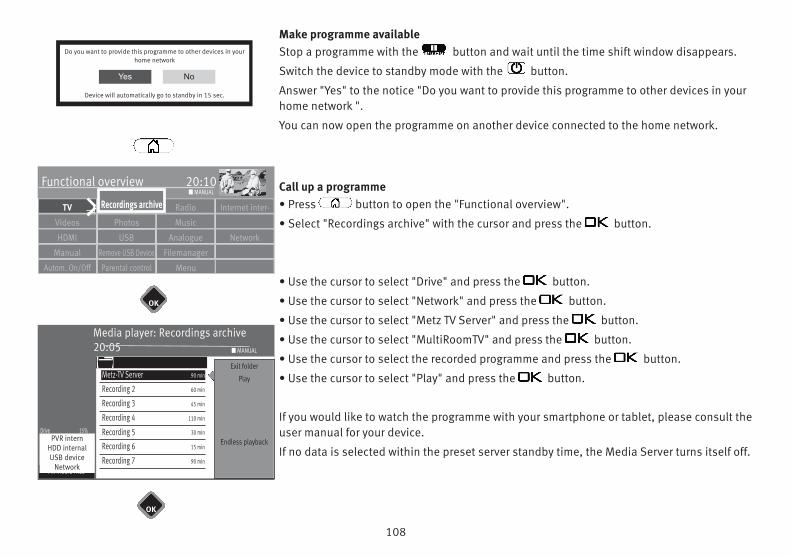
108
Make programme availableStop a programme with the button and wait until the time shift window disappears.
Switch the device to standby mode with the button.
Answer "Yes" to the notice "Do you want to provide this programme to other devices in yourhome network ".
You can now open the programme on another device connected to the home network.
Call up a programme• Press button to open the "Functional overview".
• Select "Recordings archive" with the cursor and press the button.
• Use the cursor to select "Drive" and press the button.
• Use the cursor to select "Network" and press the button.
• Use the cursor to select "Metz TV Server" and press the button.
• Use the cursor to select "MultiRoomTV" and press the button.
• Use the cursor to select the recorded programme and press the button.
• Use the cursor to select "Play" and press the button.
If you would like to watch the programme with your smartphone or tablet, please consult theuser manual for your device.
If no data is selected within the preset server standby time, the Media Server turns itself off.
Radio Internet inter-Recordings ar-TV
Functional overview 20:10
MusicPhotosVideos
Analogue NetworkUSBHDMI
FilemanagerRemove USB DeviceManual
Parental control
Recordings archive
Autom. On/Off
■ MANUAL
Media player: Recordings archive20:05
Show only these files:
■ MANUAL
Metz-TV Server 90 min
All media files
Recording 2 60 min
Recording 3 45 min
Recording 4 110 min
Recording 5 30 min
Recording 6 15 min
Recording 7 90 min
Drive 15%PVR intern
HDD internalUSB device
Network
Exit folder
Play
Endless playback
Do you want to provide this programme to other devices in yourhome network
Device will automatically go to standby in 15 sec.
Yes No
OK
OK
Menu
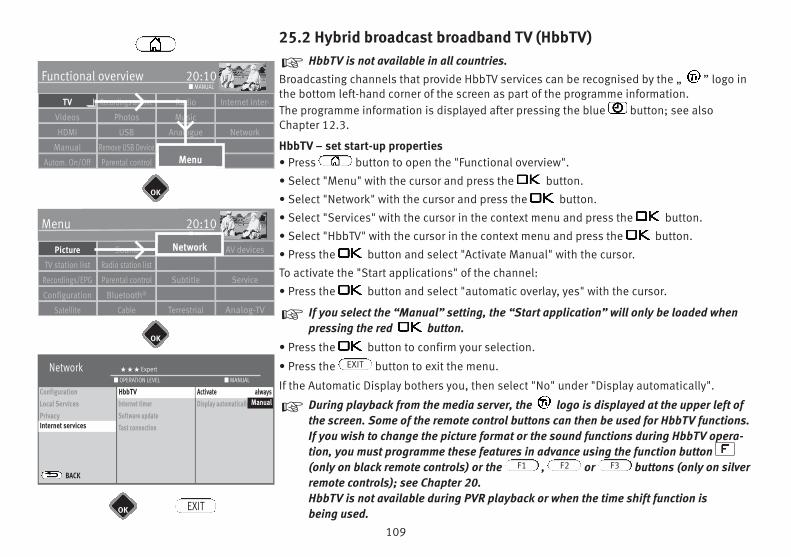
109
25.2 Hybrid broadcast broadband TV (HbbTV)HbbTV is not available in all countries.
Broadcasting channels that provide HbbTV services can be recognised by the „ ” logo inthe bottom left-hand corner of the screen as part of the programme information.The programme information is displayed after pressing the blue button; see alsoChapter 12.3.
HbbTV – set start-up properties• Press button to open the "Functional overview".
• Select "Menu" with the cursor and press the button.
• Select "Network" with the cursor and press the button.
• Select "Services" with the cursor in the context menu and press the button.
• Select "HbbTV" with the cursor in the context menu and press the button.
• Press the button and select "Activate Manual" with the cursor.
To activate the "Start applications" of the channel:
• Press the button and select "automatic overlay, yes" with the cursor.
If you select the “Manual” setting, the “Start application” will only be loaded whenpressing the red button.
• Press the button to confirm your selection.
• Press the button to exit the menu.
If the Automatic Display bothers you, then select "No" under "Display automatically".
During playback from the media server, the logo is displayed at the upper left ofthe screen. Some of the remote control buttons can then be used for HbbTV functions.If you wish to change the picture format or the sound functions during HbbTV opera-tion, you must programme these features in advance using the function button(only on black remote controls) or the , or buttons (only on silverremote controls); see Chapter 20.HbbTV is not available during PVR playback or when the time shift function is being used.
+
+
EXIT
+
F3F2F1
Network H H H Expert
ConfigurationLocal ServicesPrivacyInternet services
BACK
HbbTVInternet timerSoftware updateTast connection
Aktivieren JaDisplay automatically
■ MANUAL■ OPERATION LEVEL
Internet services
HbbTV
Radio Internet inter-Recordings archiveTV
Functional overview 20:10
MusicPhotosVideos
Analogue NetworkUSBHDMI
FilemanagerRemove USB DeviceManual
Parental control MenuAutom. On/Off
■ MANUAL
Network AV devicesSoundPicture
Menu 20:10
Radio station listTV station list
Subtitle ServiceParental controlRecordings/EPG
Configuration Bluetooth®
Terrestrial Analog-TVCableSatellite
■ MANUAL
OK
OK
OK
Network
EXIT
Activate alwaysManual
110
25.2.1 Accessing HbbTV• Switch to a channel that offers HbbTV.
• Press the red key . Once a connection has been established to the HbbTV Service ofthe channel in question, the logo moves to the upper left-hand corner of the screen. The Functional overview appears. The HbbTV service will appear.
• HbbTV menu control is subject to the control of the respective stations.Different buttons are used for operation of the HbbTV applications.
The views and control options within the HbbTV menus are dependent on the respective provider and can therefore differ from channel to channel.
• Press the key to confirm your selected settings.It may take some time, after pressing a key, before the TV set displays the selectedsettings.
25.2.2 Exiting HbbTV• HbbTV can be exited by pressing the red key or the key.
+
EXIT
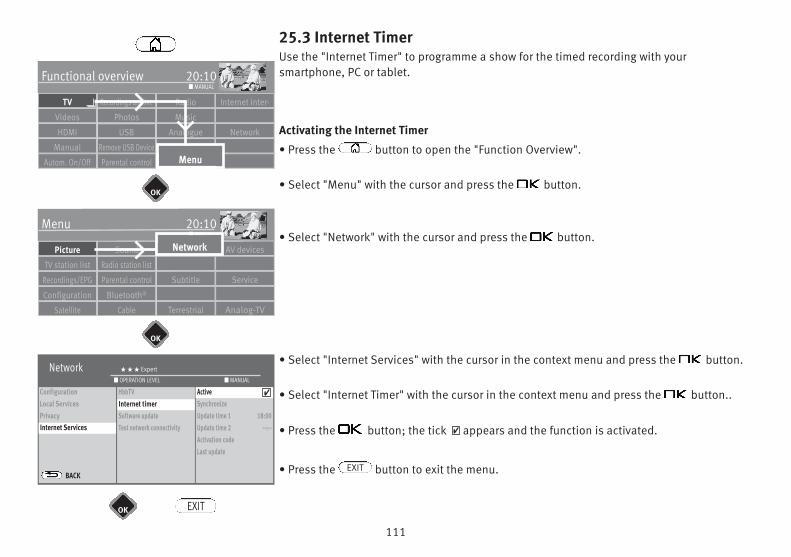
111
25.3 Internet TimerUse the "Internet Timer" to programme a show for the timed recording with yoursmartphone, PC or tablet.
Activating the Internet Timer
• Press the button to open the "Function Overview".
• Select "Menu" with the cursor and press the button.
• Select "Network" with the cursor and press the button.
• Select "Internet Services" with the cursor in the context menu and press the button.
• Select "Internet Timer" with the cursor in the context menu and press the button..
• Press the button; the tick appears and the function is activated.
• Press the button to exit the menu.
4
EXIT
Network H H H Expert
ConfigurationLocal ServicesPrivacyInternet services
BACK
HbbTVInternet timerSoftware updateTest network connectivity
ActiveSynchronizeUpdate time 1 18:00Update time 2 --:--Activation codeLast update
■ MANUAL■ OPERATION LEVEL
Internet Services
Internet timer
Radio Internet inter-Recordings archiveTV
Functional overview 20:10
MusicPhotosVideos
Analogue NetworkUSBHDMI
FilemanagerRemove USB DeviceManual
Parental control MenuAutom. On/Off
■ MANUAL
Network AV devicesSoundPicture
Menu 20:10
Radio station listTV station list
Subtitle ServiceParental controlRecordings/EPG
Configuration Bluetooth®
Terrestrial Analog-TVCableSatellite
■ MANUAL
OK
OK
OK
Network
EXIT
Active 4
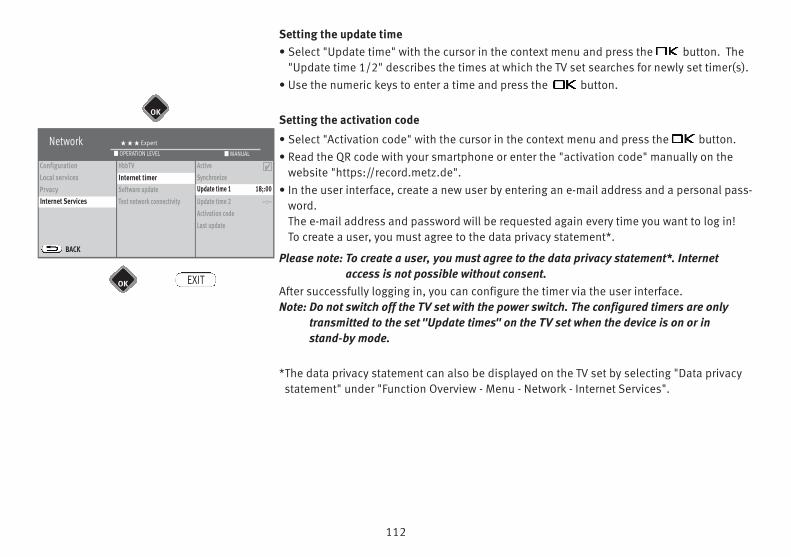
112
Setting the update time• Select "Update time" with the cursor in the context menu and press the button. The
"Update time 1/2" describes the times at which the TV set searches for newly set timer(s).• Use the numeric keys to enter a time and press the button.
Setting the activation code
• Select "Activation code" with the cursor in the context menu and press the button.• Read the QR code with your smartphone or enter the "activation code" manually on the
website "https://record.metz.de".• In the user interface, create a new user by entering an e-mail address and a personal pass-
word. The e-mail address and password will be requested again every time you want to log in!To create a user, you must agree to the data privacy statement*.
Please note: To create a user, you must agree to the data privacy statement*. Internetaccess is not possible without consent.
After successfully logging in, you can configure the timer via the user interface.Note: Do not switch off the TV set with the power switch. The configured timers are only
transmitted to the set "Update times" on the TV set when the device is on or in stand-by mode.
*The data privacy statement can also be displayed on the TV set by selecting "Data privacystatement" under "Function Overview - Menu - Network - Internet Services".
Network H H H Expert
ConfigurationLocal servicesPrvacyInternet Services
BACK
HbbTVInternet timerSoftware updateTest network connectivity
ActiveSynchronizeUpdate time 1 18:00Update time 2 --:--Activation codeLast update
■ MANUAL■ OPERATION LEVEL
Internet Services
Internet timer
OK
OK EXIT
Update time 1 18;:00
4
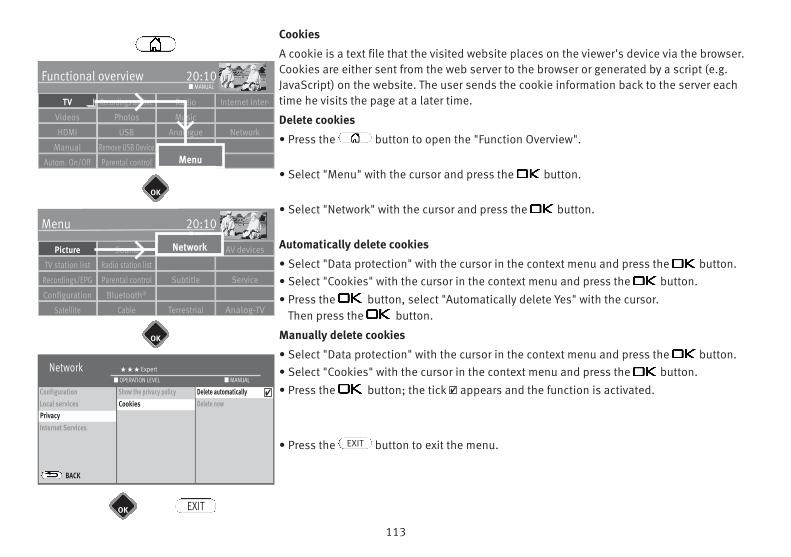
113
Cookies
A cookie is a text file that the visited website places on the viewer's device via the browser.Cookies are either sent from the web server to the browser or generated by a script (e.g.JavaScript) on the website. The user sends the cookie information back to the server eachtime he visits the page at a later time.
Delete cookies
• Press the button to open the "Function Overview".
• Select "Menu" with the cursor and press the button.
• Select "Network" with the cursor and press the button.
Automatically delete cookies
• Select "Data protection" with the cursor in the context menu and press the button.• Select "Cookies" with the cursor in the context menu and press the button.
• Press the button, select "Automatically delete Yes" with the cursor. Then press the button.
Manually delete cookies
• Select "Data protection" with the cursor in the context menu and press the button.• Select "Cookies" with the cursor in the context menu and press the button.
• Press the button; the tick appears and the function is activated.
• Press the button to exit the menu.
4
EXIT
Network H H H Expert
ConfigurationLocal servicesPrivacyInternet Services
BACK
Show the privacy policyCookies
Delete on every switch offDelete now
■ MANUAL■ OPERATION LEVEL
PrivacyCookies
Radio Internet inter-Recordings archiveTV
Functional overview 20:10
MusicPhotosVideos
Analogue NetworkUSBHDMI
FilemanagerRemove USB DeviceManual
Parental control MenuAutom. On/Off
■ MANUAL
Network AV devicesSoundPicture
Menu 20:10
Radio station listTV station list
Subtitle ServiceParental controlRecordings/EPG
Configuration Bluetooth®
Terrestrial Analog-TVCableSatellite
■ MANUAL
OK
OK
OK
Network
EXIT
Delete automatically 4
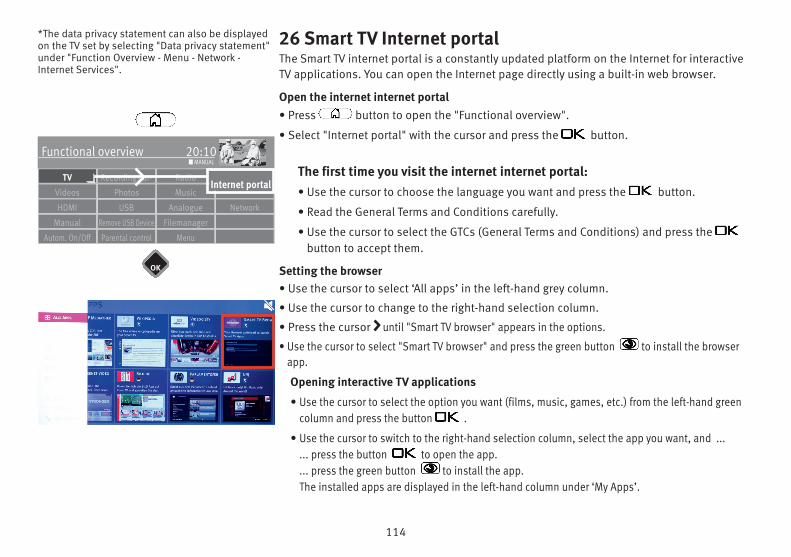
114
Radio Internet inter-Recordings ar-TV
Functional overview 20:10
MusicPhotosVideos
Analogue NetworkUSBHDMI
FilemanagerRemove USB DeviceManual
Parental control
Internet portal
Autom. On/Off
■ MANUAL
OK
Menu
*The data privacy statement can also be displayedon the TV set by selecting "Data privacy statement"under "Function Overview - Menu - Network -Internet Services".
26 Smart TV Internet portalThe Smart TV internet portal is a constantly updated platform on the Internet for interactiveTV applications. You can open the Internet page directly using a built-in web browser.
Open the internet internet portal• Press button to open the "Functional overview".
• Select "Internet portal" with the cursor and press the button.
The first time you visit the internet internet portal:• Use the cursor to choose the language you want and press the button.
• Read the General Terms and Conditions carefully.
• Use the cursor to select the GTCs (General Terms and Conditions) and press thebutton to accept them.
Setting the browser• Use the cursor to select ‘All apps’ in the left-hand grey column.
• Use the cursor to change to the right-hand selection column.
• Press the cursor until "Smart TV browser" appears in the options.
• Use the cursor to select "Smart TV browser" and press the green button to install the browserapp.
Opening interactive TV applications
• Use the cursor to select the option you want (films, music, games, etc.) from the left-hand greencolumn and press the button .
• Use the cursor to switch to the right-hand selection column, select the app you want, and ...... press the button to open the app.... press the green button to install the app.The installed apps are displayed in the left-hand column under ‘My Apps’.
115
Opening installed apps• Use the cursor to select ‘My Apps’ in the open Internet portal.
• Use the cursor to switch to the right-hand selection column and select the app you want.
• Press the button to open the app.
• Press the button to close the app.
• Press the button to exit the ‘interactive TV app’ or the ‘Internet portal’.
EXIT
EXIT
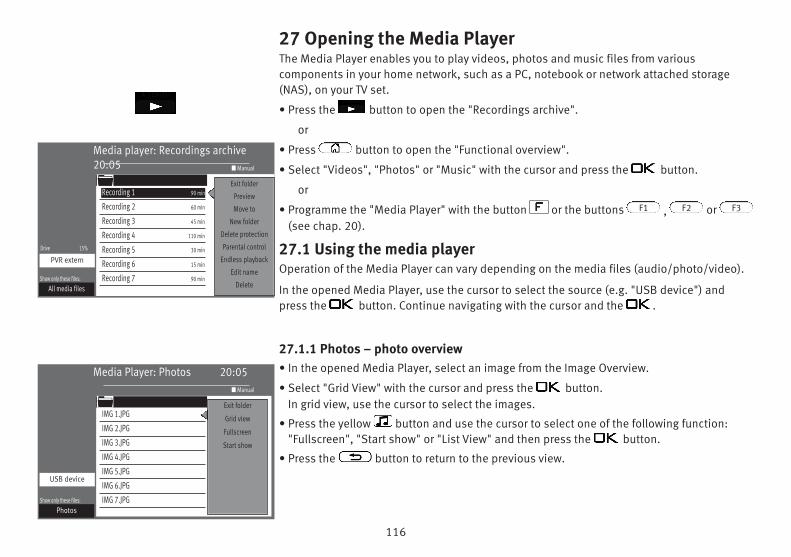
116
27 Opening the Media PlayerThe Media Player enables you to play videos, photos and music files from various components in your home network, such as a PC, notebook or network attached storage(NAS), on your TV set.
• Press the button to open the "Recordings archive".
or
• Press button to open the "Functional overview".
• Select "Videos", "Photos" or "Music" with the cursor and press the button.
or
• Programme the "Media Player" with the button or the buttons , or (see chap. 20).
27.1 Using the media playerOperation of the Media Player can vary depending on the media files (audio/photo/video).
In the opened Media Player, use the cursor to select the source (e.g. "USB device") andpress the button. Continue navigating with the cursor and the .
27.1.1 Photos – photo overview• In the opened Media Player, select an image from the Image Overview.
• Select "Grid View" with the cursor and press the button.In grid view, use the cursor to select the images.
• Press the yellow button and use the cursor to select one of the following function:"Fullscreen", "Start show" or "List View" and then press the button.
• Press the button to return to the previous view.
F3F2F1
Media Player: Photos 20:05
Show only these files:
■ Manual
IMG 1.JPG
Photos
IMG 2.JPG
IMG 3.JPG
IMG 4.JPG
IMG 5.JPG
IMG 6.JPG
IMG 7.JPG
USB device
Exit folder
Grid view
Fullscreen
Start show
Media player: Recordings archive20:05
Show only these files:
■ Manual
Recording 1 90 min
All media files
Recording 2 60 min
Recording 3 45 min
Recording 4 110 min
Recording 5 30 min
Recording 6 15 min
Recording 7 90 min
Drive 15%
PVR extern
Exit folder
Preview
Move to
New folder
Delete protection
Parental control
Endless playback
Edit name
Delete
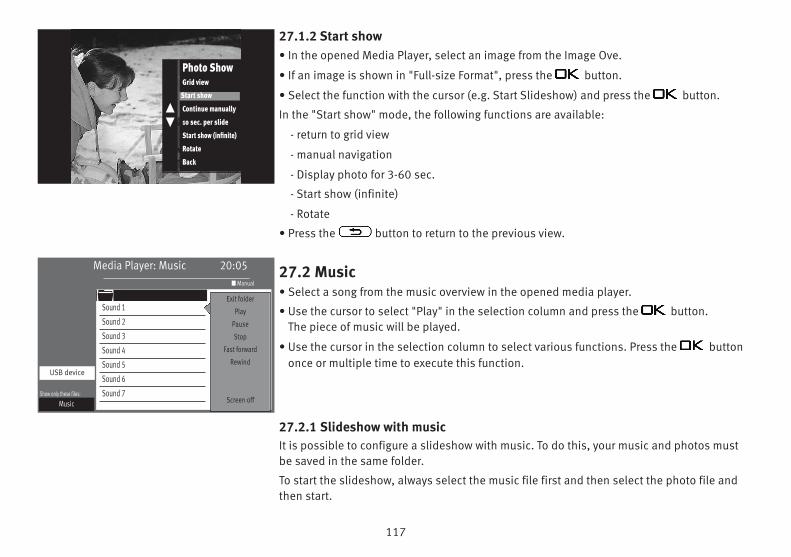
117
27.1.2 Start show• In the opened Media Player, select an image from the Image Ove.
• If an image is shown in "Full-size Format", press the button.
• Select the function with the cursor (e.g. Start Slideshow) and press the button.
In the "Start show" mode, the following functions are available:
- return to grid view
- manual navigation
- Display photo for 3-60 sec.
- Start show (infinite)
- Rotate
• Press the button to return to the previous view.
27.2 Music• Select a song from the music overview in the opened media player.
• Use the cursor to select "Play" in the selection column and press the button. The piece of music will be played.
• Use the cursor in the selection column to select various functions. Press the buttononce or multiple time to execute this function.
27.2.1 Slideshow with musicIt is possible to configure a slideshow with music. To do this, your music and photos mustbe saved in the same folder.
To start the slideshow, always select the music file first and then select the photo file andthen start.
Photo ShowGrid view
Start Bildershow
Continue manually
10 sec. per slide
Start show (infinite)
Rotate
Back
st
Start show
Media Player: Music 20:05
Show only these files:
■ Manual
Sound 1
Music
Sound 2
Sound 3
Sound 4
Sound 5
Sound 6
Sound 7
USB device
Exit folder
Play
Pause
Stop
Fast forward
Rewind
Screen off
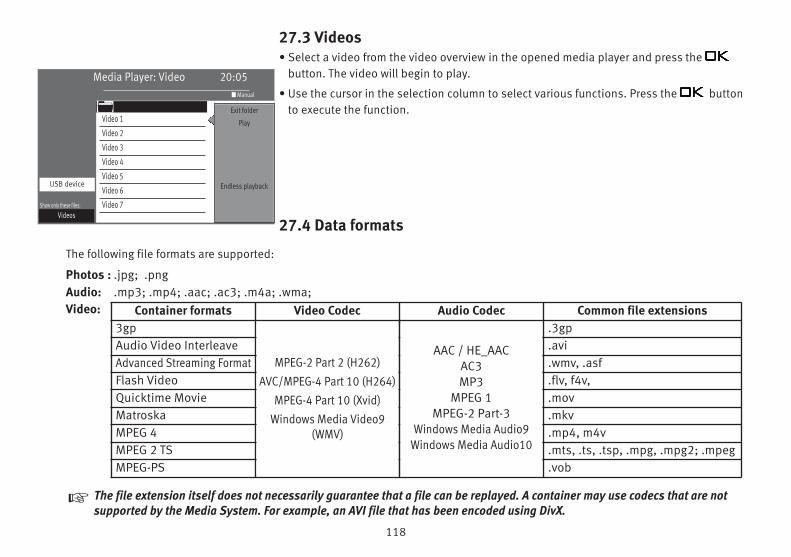
118
27.3 Videos• Select a video from the video overview in the opened media player and press the
button. The video will begin to play.
• Use the cursor in the selection column to select various functions. Press the buttonto execute the function.
27.4 Data formats
Media Player: Video 20:05
Show only these files:
■ Manual
Video 1
Videos
Video 2
Video 3
Video 4
Video 5
Video 6
Video 7
USB device
Exit folder
Play
Endless playback
The following file formats are supported:
Photos : .jpg; .pngAudio: .mp3; .mp4; .aac; .ac3; .m4a; .wma;Video:
The file extension itself does not necessarily guarantee that a file can be replayed. A container may use codecs that are notsupported by the Media System. For example, an AVI file that has been encoded using DivX.
+
Container formats Video Codec Audio Codec Common file extensions3gp .3gpAudio Video Interleave .aviAdvanced Streaming Format .wmv, .asfFlash Video .flv, f4v,Quicktime Movie .movMatroska .mkvMPEG 4 .mp4, m4vMPEG 2 TS .mts, .ts, .tsp, .mpg, .mpg2; .mpegMPEG-PS .vob
MPEG-2 Part 2 (H262)AVC/MPEG-4 Part 10 (H264)
MPEG-4 Part 10 (Xvid)Windows Media Video9
(WMV)
AAC / HE_AACAC3MP3
MPEG 1MPEG-2 Part-3
Windows Media Audio9Windows Media Audio10
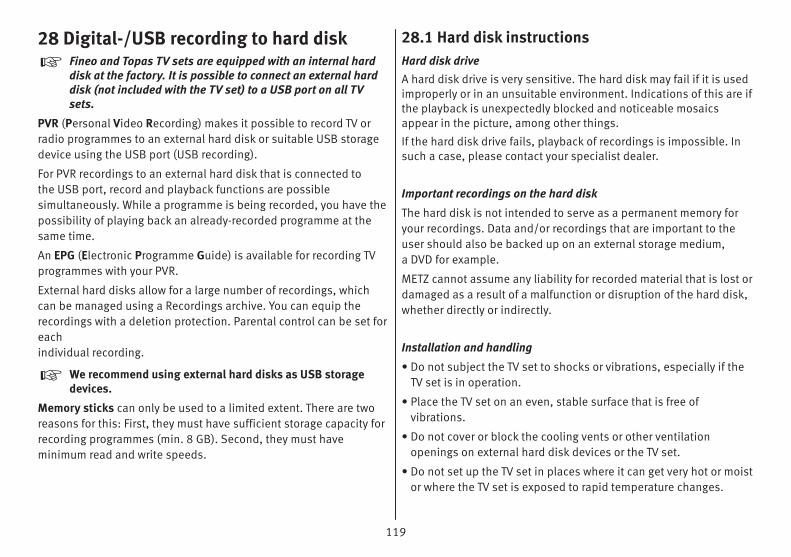
119
28 Digital-/USB recording to hard diskFineo and Topas TV sets are equipped with an internal harddisk at the factory. It is possible to connect an external harddisk (not included with the TV set) to a USB port on all TVsets.
PVR (Personal Video Recording) makes it possible to record TV orradio programmes to an external hard disk or suitable USB storagedevice using the USB port (USB recording).
For PVR recordings to an external hard disk that is connected to the USB port, record and playback functions are possible simultaneously. While a programme is being recorded, you have thepossibility of playing back an already-recorded programme at thesame time.
An EPG (Electronic Programme Guide) is available for recording TVprogrammes with your PVR.
External hard disks allow for a large number of recordings, whichcan be managed using a Recordings archive. You can equip therecordings with a deletion protection. Parental control can be set foreach individual recording.
We recommend using external hard disks as USB storagedevices.
Memory sticks can only be used to a limited extent. There are tworeasons for this: First, they must have sufficient storage capacity forrecording programmes (min. 8 GB). Second, they must haveminimum read and write speeds.
+
+
28.1 Hard disk instructionsHard disk driveA hard disk drive is very sensitive. The hard disk may fail if it is usedimproperly or in an unsuitable environment. Indications of this are ifthe playback is unexpectedly blocked and noticeable mosaicsappear in the picture, among other things.
If the hard disk drive fails, playback of recordings is impossible. Insuch a case, please contact your specialist dealer.
Important recordings on the hard disk
The hard disk is not intended to serve as a permanent memory foryour recordings. Data and/or recordings that are important to theuser should also be backed up on an external storage medium, a DVD for example.
METZ cannot assume any liability for recorded material that is lost ordamaged as a result of a malfunction or disruption of the hard disk,whether directly or indirectly.
Installation and handling
• Do not subject the TV set to shocks or vibrations, especially if theTV set is in operation.
• Place the TV set on an even, stable surface that is free of vibrations.
• Do not cover or block the cooling vents or other ventilationopenings on external hard disk devices or the TV set.
• Do not set up the TV set in places where it can get very hot or moistor where the TV set is exposed to rapid temperature changes.

120
• Do not transport the TV set while it is switched on and also notdirectly after switching it off.
• The hard-disk recorder must be shut down before switching off theLCD TV set. To do this, press the OFF button on the remotecontrol and wait until the "Please wait!" display fades or the blueLED lights up. The TV set can now be switched off using the powerbutton on the set.
Notes regarding external hard disksTo be able to connect an external hard disk to devices that do not have abuilt-in hard disk, you must first enable the recording function (see28.2).
Connect the external hard disk to the TV set via USB socket. Beforean external hard disk can be used, it must be formatted as describedin Chapter 26.2.
28.2 Activating your TV for USB recordingThis is only necessary for TV sets with an external hard-diskrecorder.
You can connect an external hard drive to your TV set and use it to recordprogrammes and for the time shift function.We call it “USB recording”. You can set up this extremely useful functionvery easily yourself. All you have to do is visit the Metz homepage, notedown the release code and enter it in your set. This service is free ofcharge and does not require registration. Your specialist dealer will behappy to do it for you if you have no Internet access.
Your Metz TV set has a specific 20-digit “request key”. Using this code youcan request the 7-digit “activation key” from the Metz homepage atwww.metz-ce.de.
+
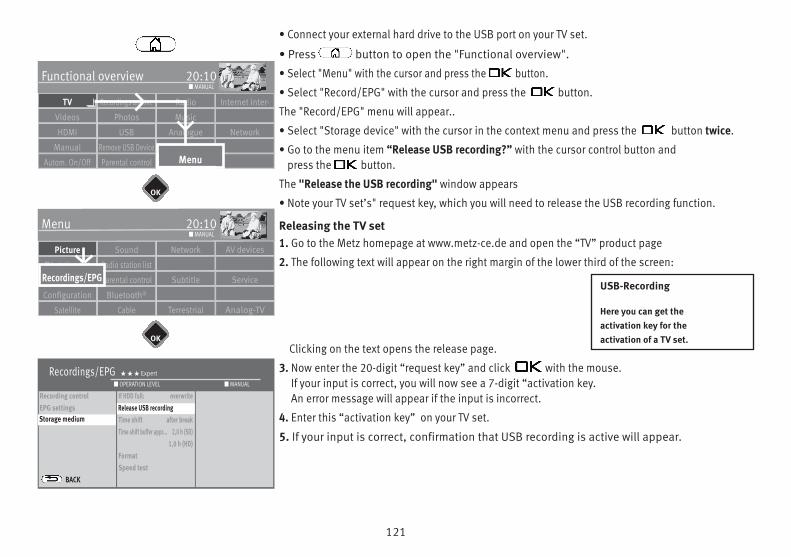
121
Radio Internet inter-Recordings archiveTV
Functional overview 20:10
MusicPhotosVideos
Analogue NetworkUSBHDMI
FilemanagerRemove USB DeviceManual
Parental control MenuAutom. On/Off
■ MANUAL
Network AV devicesSoundPicture
Menu 20:10
Radio station listTV station list
Subtitle ServiceParental controlAufnahme
Bluetooth®Configuration
Terrestrial Analog-TVCableSatellite
■ MANUAL
OK
OK
Recordings/EPG
Recordings/EPG H H H Expert
Recording controlEPG settingsStorage medium
BACK
If HDD full: overwriteRelease USB recordingTime shift after breakTime shift buffer appr... 2,0 h (SD)
1,0 h (HD)FormatSpeed test
■ MANUAL■ OPERATION LEVEL
Release USB recordingStorage medium
• Connect your external hard drive to the USB port on your TV set.
• Press button to open the "Functional overview".
• Select "Menu" with the cursor and press the button.
• Select "Record/EPG" with the cursor and press the button.
The "Record/EPG" menu will appear..
• Select "Storage device" with the cursor in the context menu and press the button twice.
• Go to the menu item “Release USB recording?” with the cursor control button and press the button.
The "Release the USB recording" window appears
• Note your TV set’s" request key, which you will need to release the USB recording function.
Releasing the TV set1. Go to the Metz homepage at www.metz-ce.de and open the “TV” product page
2. The following text will appear on the right margin of the lower third of the screen:
Clicking on the text opens the release page.
3. Now enter the 20-digit “request key” and click with the mouse. If your input is correct, you will now see a 7-digit “activation key.An error message will appear if the input is incorrect.
4. Enter this “activation key” on your TV set.
5. If your input is correct, confirmation that USB recording is active will appear.
USB-Recording
Here you can get the activation key for the activation of a TV set.
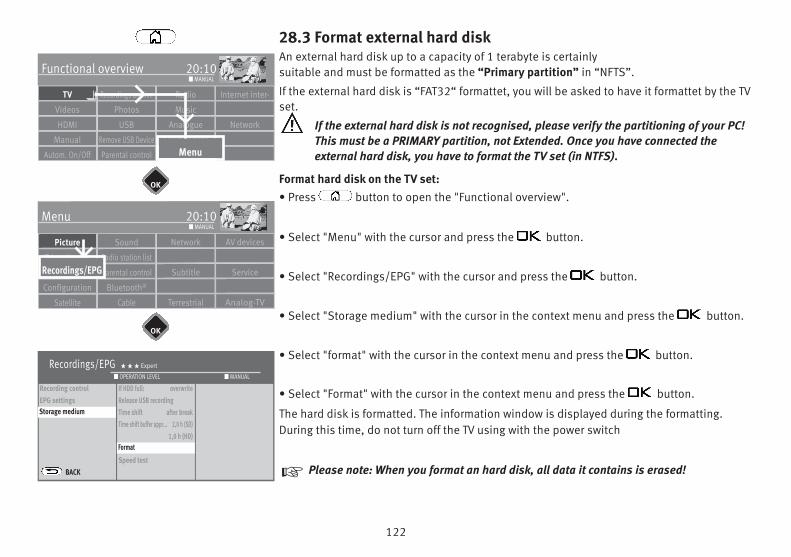
122
28.3 Format external hard diskAn external hard disk up to a capacity of 1 terabyte is certainly suitable and must be formatted as the “Primary partition” in “NFTS”.
If the external hard disk is “FAT32“ formattet, you will be asked to have it formattet by the TVset.
If the external hard disk is not recognised, please verify the partitioning of your PC! This must be a PRIMARY partition, not Extended. Once you have connected theexternal hard disk, you have to format the TV set (in NTFS).
Format hard disk on the TV set:• Press button to open the "Functional overview".
• Select "Menu" with the cursor and press the button.
• Select "Recordings/EPG" with the cursor and press the button.
• Select "Storage medium" with the cursor in the context menu and press the button.
• Select "format" with the cursor in the context menu and press the button.
• Select "Format" with the cursor in the context menu and press the button.
The hard disk is formatted. The information window is displayed during the formatting.During this time, do not turn off the TV using with the power switch
Please note: When you format an hard disk, all data it contains is erased!+
Radio Internet inter-Recordings archiveTV
Functional overview 20:10
MusicPhotosVideos
Analogue NetworkUSBHDMI
FilemanagerRemove USB DeviceManual
Parental control MenuAutom. On/Off
■ MANUAL
Network AV devicesSoundPicture
Menu 20:10
Radio station listTV station list
Subtitle ServiceParental controlAufnahme
Bluetooth®Configuration
Terrestrial Analog-TVCableSatellite
■ MANUAL
OK
OK
Recordings/EPG
Recordings/EPG H H H Expert
Recording controlEPG settingsStorage medium
BACK
If HDD full: overwriteRelease USB recordingTime shift after breakTime shift buffer appr... 2,0 h (SD)
1,0 h (HD)FormatSpeed test
■ MANUAL■ OPERATION LEVEL
Format
Storage medium
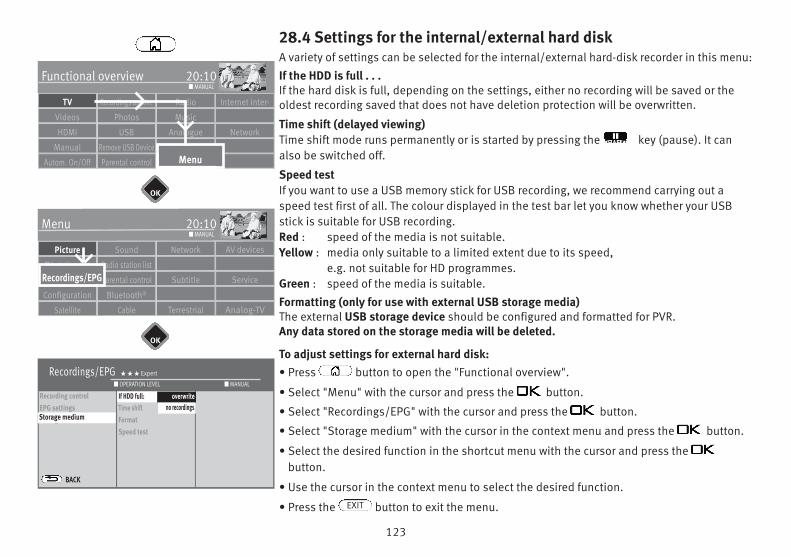
123
28.4 Settings for the internal/external hard diskA variety of settings can be selected for the internal/external hard-disk recorder in this menu:
If the HDD is full . . .If the hard disk is full, depending on the settings, either no recording will be saved or theoldest recording saved that does not have deletion protection will be overwritten.
Time shift (delayed viewing)Time shift mode runs permanently or is started by pressing the key (pause). It canalso be switched off.
Speed test If you want to use a USB memory stick for USB recording, we recommend carrying out aspeed test first of all. The colour displayed in the test bar let you know whether your USBstick is suitable for USB recording.Red : speed of the media is not suitable.Yellow : media only suitable to a limited extent due to its speed,
e.g. not suitable for HD programmes.Green : speed of the media is suitable.
Formatting (only for use with external USB storage media)The external USB storage device should be configured and formatted for PVR.Any data stored on the storage media will be deleted.
To adjust settings for external hard disk:• Press button to open the "Functional overview".
• Select "Menu" with the cursor and press the button.
• Select "Recordings/EPG" with the cursor and press the button.
• Select "Storage medium" with the cursor in the context menu and press the button.
• Select the desired function in the shortcut menu with the cursor and press thebutton.
• Use the cursor in the context menu to select the desired function.
• Press the button to exit the menu.EXIT
Radio Internet inter-Recordings archiveTV
Functional overview 20:10
MusicPhotosVideos
Analogue NetworkUSBHDMI
FilemanagerRemove USB DeviceManual
Parental control MenuAutom. On/Off
■ MANUAL
Network AV devicesSoundPicture
Menu 20:10
Radio station listTV station list
Subtitle ServiceParental controlAufnahme
Bluetooth®Configuration
Terrestrial Analog-TVCableSatellite
■ MANUAL
Recordings/EPG
Recordings/EPG H H H Expert
Recording controlEPG settingsStorage medium
BACK
If HDD full: overwriteTime shift after breakFormatSpeed test
■ MANUAL■ OPERATION LEVEL
If HDD full: überschreiben
Storage medium
overwriteno recordings
OK
OK
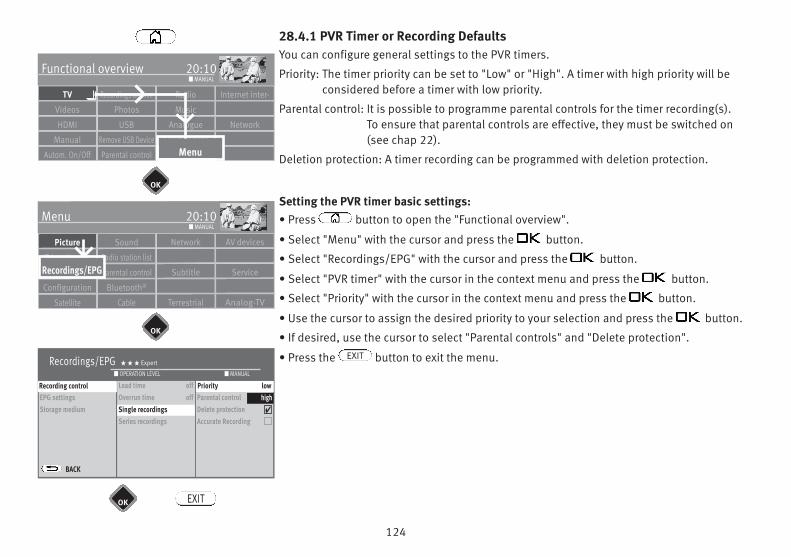
124
28.4.1 PVR Timer or Recording DefaultsYou can configure general settings to the PVR timers.
Priority: The timer priority can be set to "Low" or "High". A timer with high priority will beconsidered before a timer with low priority.
Parental control: It is possible to programme parental controls for the timer recording(s). To ensure that parental controls are effective, they must be switched on(see chap 22).
Deletion protection: A timer recording can be programmed with deletion protection.
Setting the PVR timer basic settings:• Press button to open the "Functional overview".
• Select "Menu" with the cursor and press the button.
• Select "Recordings/EPG" with the cursor and press the button.
• Select "PVR timer" with the cursor in the context menu and press the button.
• Select "Priority" with the cursor in the context menu and press the button.
• Use the cursor to assign the desired priority to your selection and press the button.
• If desired, use the cursor to select "Parental controls" and "Delete protection".
• Press the button to exit the menu.EXIT
Radio Internet inter-Recordings archiveTV
Functional overview 20:10
MusicPhotosVideos
Analogue NetworkUSBHDMI
FilemanagerRemove USB DeviceManual
Parental control MenuAutom. On/Off
■ MANUAL
Network AV devicesSoundPicture
Menu 20:10
Radio station listTV station list
Subtitle ServiceParental controlAufnahme
Bluetooth®Configuration
Terrestrial Analog-TVCableSatellite
■ MANUAL
OK
OK
OK
Recordings/EPG H H H Expert
Recording controlEPG settingsStorage medium
BACK
Lead time offOverrun time offPVR TimerSeries recordings
Priorität NiedrigParental control NeinDelete protectionAccurate Recording
■ MANUAL■ OPERATION LEVEL
Recording control
Single recordings
Priority low
Recordings/EPG
EXIT
high
OK
OK
4
4
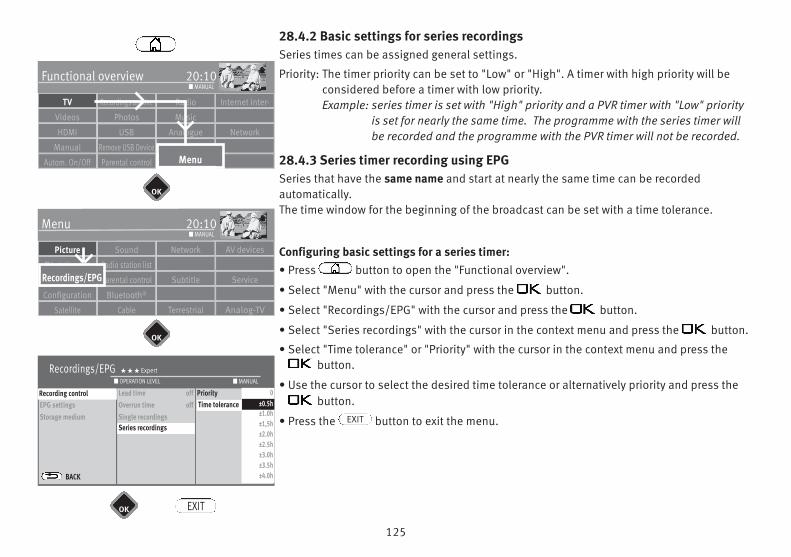
125
28.4.2 Basic settings for series recordingsSeries times can be assigned general settings.
Priority: The timer priority can be set to "Low" or "High". A timer with high priority will beconsidered before a timer with low priority.Example: series timer is set with "High" priority and a PVR timer with "Low" priority
is set for nearly the same time. The programme with the series timer willbe recorded and the programme with the PVR timer will not be recorded.
28.4.3 Series timer recording using EPGSeries that have the same name and start at nearly the same time can be recorded automatically.The time window for the beginning of the broadcast can be set with a time tolerance.
Configuring basic settings for a series timer:• Press button to open the "Functional overview".
• Select "Menu" with the cursor and press the button.
• Select "Recordings/EPG" with the cursor and press the button.
• Select "Series recordings" with the cursor in the context menu and press the button.
• Select "Time tolerance" or "Priority" with the cursor in the context menu and press thebutton.
• Use the cursor to select the desired time tolerance or alternatively priority and press thebutton.
• Press the button to exit the menu.EXIT
Radio Internet inter-Recordings archiveTV
Functional overview 20:10
MusicPhotosVideos
Analogue NetworkUSBHDMI
FilemanagerRemove USB DeviceManual
Parental control MenuAutom. On/Off
■ MANUAL
Network AV devicesSoundPicture
Menu 20:10
Radio station listTV station list
Subtitle ServiceParental controlAufnahme
Bluetooth®Configuration
Terrestrial Analog-TVCableSatellite
■ MANUAL
Recordings/EPG H H H Expert
Recording controlEPG settingsStorage medium
BACK
Lead time offOverrun time offSingle recordingsSerial recording
Priority NiedrigZeittoleranz
■ MANUAL■ OPERATION LEVEL
Recording control
Series recordings
Time tolerance
Recordings/EPG
EXIT
OK
OK
OK
0±0,5h±1.0h±1,5h±2.0h±2.5h±3.0h±3.5h±4.0h
±0.5h
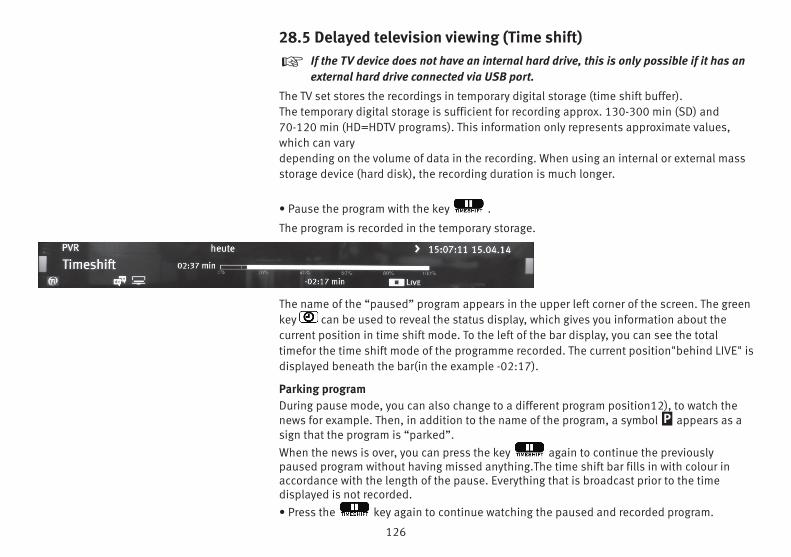
126
28.5 Delayed television viewing (Time shift)If the TV device does not have an internal hard drive, this is only possible if it has anexternal hard drive connected via USB port.
The TV set stores the recordings in temporary digital storage (time shift buffer).The temporary digital storage is sufficient for recording approx. 130-300 min (SD) and 70-120 min (HD=HDTV programs). This information only represents approximate values,which can vary depending on the volume of data in the recording. When using an internal or external massstorage device (hard disk), the recording duration is much longer.
• Pause the program with the key .
The program is recorded in the temporary storage.
The name of the “paused” program appears in the upper left corner of the screen. The greenkey can be used to reveal the status display, which gives you information about thecurrent position in time shift mode. To the left of the bar display, you can see the totaltimefor the time shift mode of the programme recorded. The current position"behind LIVE" isdisplayed beneath the bar(in the example -02:17).
Parking programDuring pause mode, you can also change to a different program position12), to watch thenews for example. Then, in addition to the name of the program, a symbol appears as asign that the program is “parked”.When the news is over, you can press the key again to continue the previouslypaused program without having missed anything.The time shift bar fills in with colour inaccordance with the length of the pause. Everything that is broadcast prior to the timedisplayed is not recorded.• Press the key again to continue watching the paused and recorded program.
+
P

127
• Press the blue button to open the status display.
• Press the button or several times briefly to skip ahead in playback by +1 minute or to rewind by -20 second increments.
• Press and hold the button to double the speed of these functions. Repeat this torewind or fast-forward the recording at up to 32x normal speed.
The time since the program was “paused” (in the example the program was paused 10:15 min. ago) is shown on the left next to the bar display. The time that the replay lagsbehind the live broadcast is shown below the bar display (03:25 min in the example).
In pause mode the program can be forwarded or rewound in 10% increments.
If you want to return to the current status of the program (“Live”) from time shift mode, thenpress the blu key If you want to return to the current status of the program (“Live”) fromtime shift mode, then press the (Stop) for the “LIVE picture” of the current program.
If the TV set is in standby mode or switched off, the recording will be lost Alternatively,you can also create a regular recording from the recording stored in the time shiftbuffer.
28.5.1 Saving time shift buffer as recording
This function is only available if a hard disk recorder is installed in the TV set.
Let us assume you are in time shift mode and are watching a current programme, which hasalready filled at least 13 minutes of the time shift buffer. Now you wish to save the partiallyrecorded programme.
• Press the button.
• Use the cursor to select and press the button.
• Use the cursor to select and press the button.
The TV set changes to "Archive Playback Mode" and records the broadcast in the background.
+
+
Start direct recording
OK (incl. timeshift buffer)
This programme is to be recorded: 10:42:150045 arte HD 10:40-11:15 Wie das Land, so der Mensch ∙REC
OK OK (with Time shift) Hide details Cancel
TV station list TV List 1 Program arte HD
Date 03. July 2014 Time of day 10:40-11:15
schemes Single recording Parental control off
Delete protection off Priority High Accurate Rec off
Recording device PVR internally Directory << Main directory >>
Title Wie das Land, so der Mensch
Record start/stop
Stop recording
Stop recording
Live
Start direct recording
Cancel
--- ------
--- ------
Stop timeshift
Start direct recording
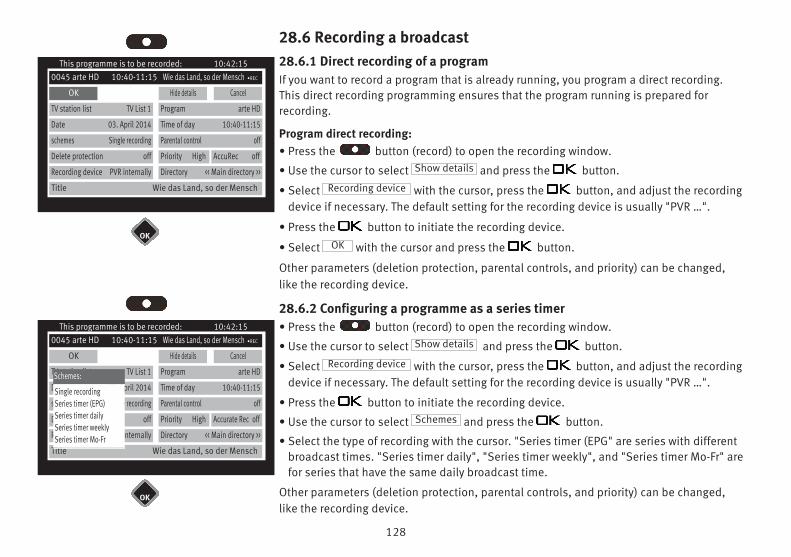
128
28.6 Recording a broadcast28.6.1 Direct recording of a programIf you want to record a program that is already running, you program a direct recording. This direct recording programming ensures that the program running is prepared for recording.
Program direct recording:• Press the button (record) to open the recording window.
• Use the cursor to select and press the button.
• Select with the cursor, press the button, and adjust the recordingdevice if necessary. The default setting for the recording device is usually "PVR …".
• Press the button to initiate the recording device.
• Select with the cursor and press the button.
Other parameters (deletion protection, parental controls, and priority) can be changed, like the recording device.
28.6.2 Configuring a programme as a series timer• Press the button (record) to open the recording window.
• Use the cursor to select and press the button.
• Select with the cursor, press the button, and adjust the recordingdevice if necessary. The default setting for the recording device is usually "PVR …".
• Press the button to initiate the recording device.
• Use the cursor to select and press the button.
• Select the type of recording with the cursor. "Series timer (EPG" are series with differentbroadcast times. "Series timer daily", "Series timer weekly", and "Series timer Mo-Fr" arefor series that have the same daily broadcast time.
Other parameters (deletion protection, parental controls, and priority) can be changed, like the recording device.
Show details
Recording device
OK
Show details
Recording device
Schemes
This programme is to be recorded: 10:42:150045 arte HD 10:40-11:15 Wie das Land, so der Mensch ∙REC
OK Hide details Cancel
TV station list TV List 1 Program arte HD
Date 03. April 2014 Time of day 10:40-11:15
schemes Single recording Parental control off
Delete protection off Priority High AccuRec off
Recording device PVR internally Directory << Main directory >>
Title Wie das Land, so der Mensch
This programme is to be recorded: 10:42:150045 arte HD 10:40-11:15 Wie das Land, so der Mensch ∙REC
OK Hide details Cancel
TV station list TV List 1 Program arte HD
Date 03. April 2014 Time of day 10:40-11:15
schemes Single recording Parental control off
Delete protection off Priority High Accurate Rec off
Recording device PVR internally Directory << Main directory >>
Title Wie das Land, so der Mensch
Single recordingSeries timer (EPG)Series timer dailySeries timer weeklySeries timer Mo-Fr
Schemes:
OK
OK
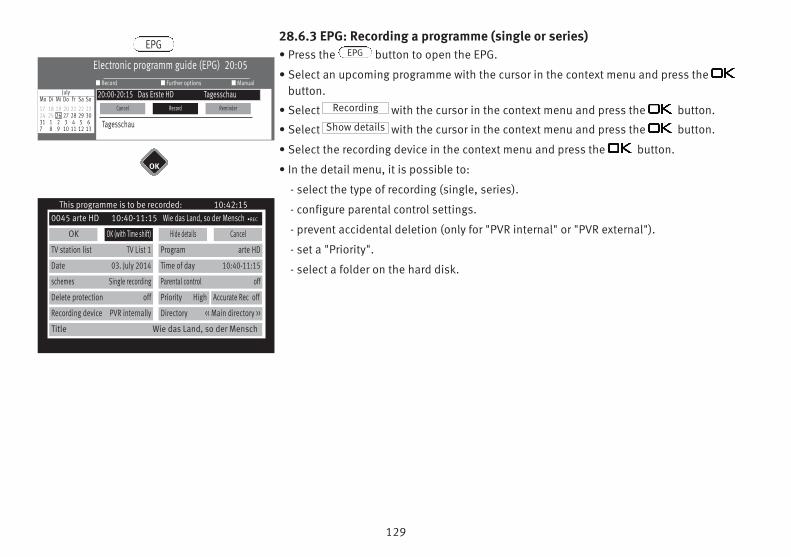
129
28.6.3 EPG: Recording a programme (single or series)• Press the button to open the EPG.
• Select an upcoming programme with the cursor in the context menu and press thebutton.
• Select with the cursor in the context menu and press the button.
• Select with the cursor in the context menu and press the button.
• Select the recording device in the context menu and press the button.
• In the detail menu, it is possible to:
- select the type of recording (single, series).
- configure parental control settings.
- prevent accidental deletion (only for "PVR internal" or "PVR external").
- set a "Priority".
- select a folder on the hard disk.
EPG
Recording
Show details
Electronic programm guide (EPG) 20:05■ Manual■ Further options■ Record
JulyMo Di Mi Do Fr Sa So17 18 19 20 21 22 2324 25 26 27 28 29 3031 1 2 3 4 5 67 8 9 10 11 12 13
20:00-20:15 Das Erste HD Tagesschau
Tagesschau
Cancel Record Reminder
EPG
OK
This programme is to be recorded: 10:42:150045 arte HD 10:40-11:15 Wie das Land, so der Mensch ∙REC
OK OK (with Time shift) Hide details Cancel
TV station list TV List 1 Program arte HD
Date 03. July 2014 Time of day 10:40-11:15
schemes Single recording Parental control off
Delete protection off Priority High Accurate Rec off
Recording device PVR internally Directory << Main directory >>
Title Wie das Land, so der Mensch
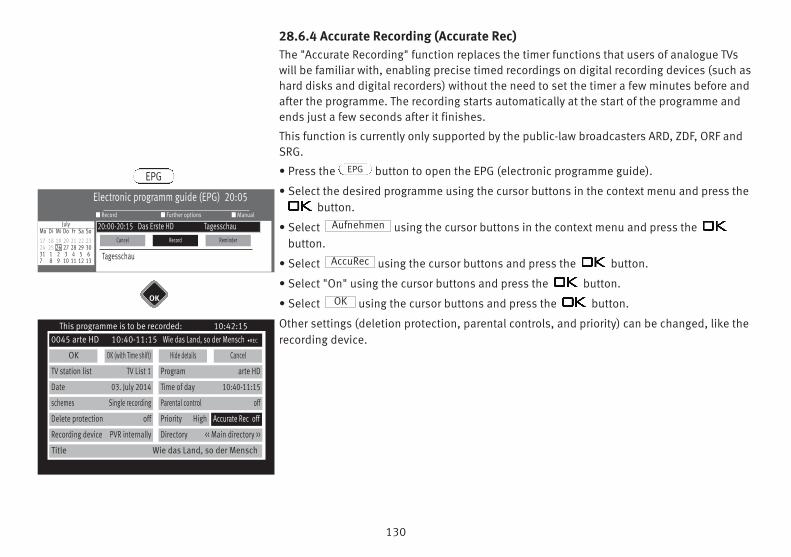
130
Electronic programm guide (EPG) 20:05■ Manual■ Further options■ Record
JulyMo Di Mi Do Fr Sa So17 18 19 20 21 22 2324 25 26 27 28 29 3031 1 2 3 4 5 67 8 9 10 11 12 13
20:00-20:15 Das Erste HD Tagesschau
Tagesschau
Cancel Record Reminder
EPG
OK
This programme is to be recorded: 10:42:150045 arte HD 10:40-11:15 Wie das Land, so der Mensch ∙REC
OK OK (with Time shift) Hide details Cancel
TV station list TV List 1 Program arte HD
Date 03. July 2014 Time of day 10:40-11:15
schemes Single recording Parental control off
Delete protection off Priority High Accurate Rec off
Recording device PVR internally Directory << Main directory >>
Title Wie das Land, so der Mensch
28.6.4 Accurate Recording (Accurate Rec)The "Accurate Recording" function replaces the timer functions that users of analogue TVswill be familiar with, enabling precise timed recordings on digital recording devices (such ashard disks and digital recorders) without the need to set the timer a few minutes before andafter the programme. The recording starts automatically at the start of the programme andends just a few seconds after it finishes.
This function is currently only supported by the public-law broadcasters ARD, ZDF, ORF andSRG.
• Press the button to open the EPG (electronic programme guide).
• Select the desired programme using the cursor buttons in the context menu and press thebutton.
• Select using the cursor buttons in the context menu and press thebutton.
• Select using the cursor buttons and press the button.
• Select "On" using the cursor buttons and press the button.
• Select using the cursor buttons and press the button.
Other settings (deletion protection, parental controls, and priority) can be changed, like therecording device.
EPG
Aufnehmen
AccuRec
OK
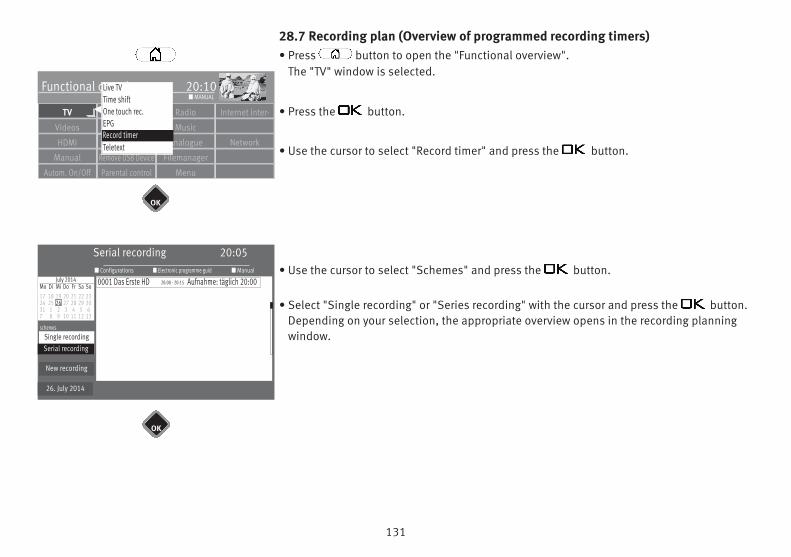
131
28.7 Recording plan (Overview of programmed recording timers)• Press button to open the "Functional overview".
The "TV" window is selected.
• Press the button.
• Use the cursor to select "Record timer" and press the button.
• Use the cursor to select "Schemes" and press the button.
• Select "Single recording" or "Series recording" with the cursor and press the button.Depending on your selection, the appropriate overview opens in the recording planningwindow.
Radio Internet inter-Recordings ar-TV
Functional overview 20:10
MusicFotosVideos
Analogue NetworkUSBHDMI
FilemanagerRemove USB DeviceManual
MenuParental controlAutom. On/Off
■ MANUAL
OK
Live TVTime shiftOne touch rec.EPGRecord timerTeletextRecord timer
Serial recording 20:05
schemesSingle recording
Serientimer
■ Manual■ Electronic programme guid■ ConfigurationsJuly 2014
Mo Di Mi Do Fr Sa So17 18 19 20 21 22 2324 25 26 27 28 29 3031 1 2 3 4 5 67 8 9 10 11 12 13
0001 Das Erste HD 20:00 - 20:15 Aufnahme: täglich 20:00
New recording
Serial recording
OK
26. July 2014
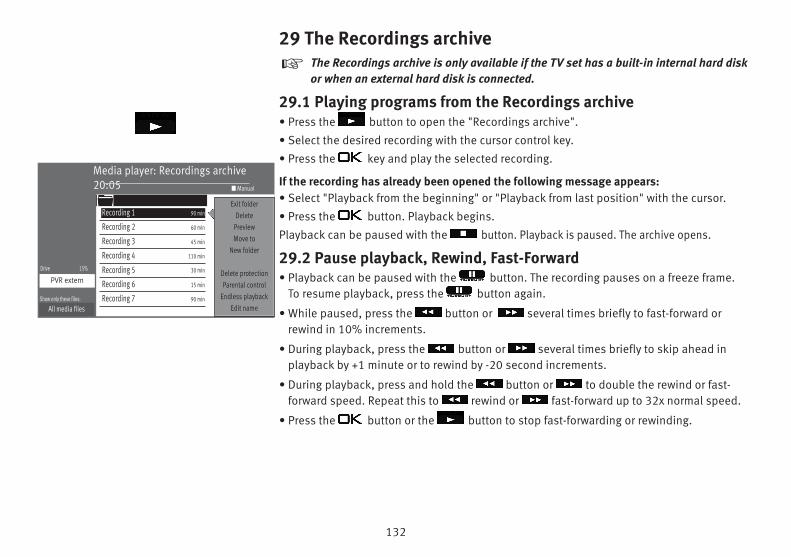
132
Media player: Recordings archive20:05
Show only these files:
■ Manual
Recording 1 90 min
All media files
Recording 2 60 min
Recording 3 45 min
Recording 4 110 min
Recording 5 30 min
Recording 6 15 min
Recording 7 90 min
Drive 15%
PVR extern
Exit folderDelete
PreviewMove to
New folder
Delete protectionParental control
Endless playbackEdit name
29 The Recordings archiveThe Recordings archive is only available if the TV set has a built-in internal hard diskor when an external hard disk is connected.
29.1 Playing programs from the Recordings archive • Press the button to open the "Recordings archive".
• Select the desired recording with the cursor control key.
• Press the key and play the selected recording.
If the recording has already been opened the following message appears:• Select "Playback from the beginning" or "Playback from last position" with the cursor.
• Press the button. Playback begins.
Playback can be paused with the button. Playback is paused. The archive opens.
29.2 Pause playback, Rewind, Fast-Forward • Playback can be paused with the button. The recording pauses on a freeze frame.
To resume playback, press the button again.
• While paused, press the button or several times briefly to fast-forward orrewind in 10% increments.
• During playback, press the button or several times briefly to skip ahead inplayback by +1 minute or to rewind by -20 second increments.
• During playback, press and hold the button or to double the rewind or fast-forward speed. Repeat this to rewind or fast-forward up to 32x normal speed.
• Press the button or the button to stop fast-forwarding or rewinding.
+

133
29.3 Edit recording (marking / cutting)Markingt markers can for example be set in a recording in order to mark important or interestingspots. Marked spots can then be selected with the or button or reached specifi-cally in pause mode.
CuttingA recording can be provided with cut marks. In this way you can exclude parts of therecording so that only the most interesting scenes can be seen.
Edit recording• Press the blue button in playback mode. The status display appears.
• Press the red button and set a cut mark.
• Move to the desired spot that is to be marked or cut with the or button.
• At the desired spot - press the green button and set a marker..- die rote Taste drücken und eine Schnittmarke setzen.A cut always consists of a starting and ending cut point. Then go to the end of the scene and press the red button again. The area between the two cut symbols changes to red. This area is automatically skipped during the replay mode.
• If you want to move to the marked spots during playback, then first press the button.
• With the or button, you can move specifically to the set markers or cut marks.Then press the button; the replay will start as of the marker or after the cut.
Recordings that have cuts and markers can be freed of them once again.
"
"
�MarkTimeline
Cut symbols
"
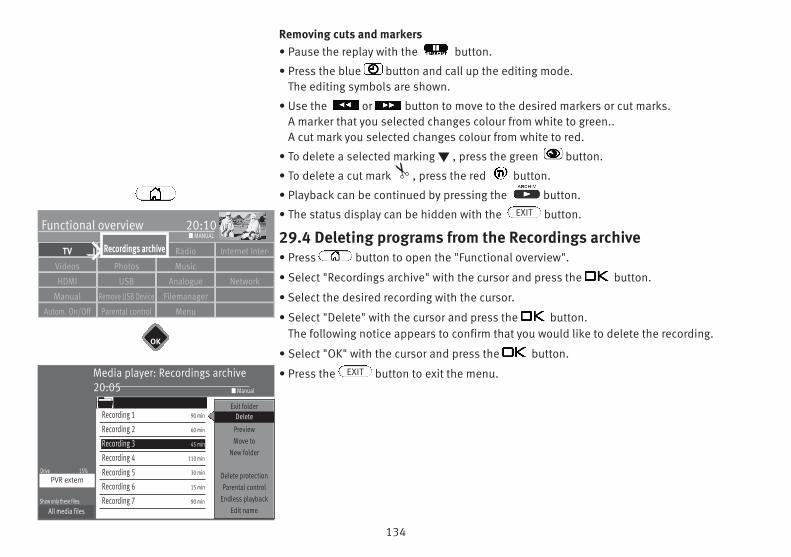
134
Radio Internet inter-Recordings ar-TV
Functional overview 20:10
MusicPhotosVideos
Analogue NetworkUSBHDMI
FilemanagerRemove USB DeviceManual
MenuParental control
Recordings archive
Autom. On/Off
■ MANUAL
OK
Media player: Recordings archive20:05
Show only these files:
■ Manual
Recording 1 90 min
All media files
Recording 2 60 min
Recording 3 45 min
Recording 4 110 min
Recording 5 30 min
Recording 6 15 min
Recording 7 90 min
Drive 15%PVR extern
Exit folderDelete
PreviewMove to
New folder
Delete protectionParental control
Endless playbackEdit name
Delete
Removing cuts and markers• Pause the replay with the button.
• Press the blue button and call up the editing mode. The editing symbols are shown.
• Use the or button to move to the desired markers or cut marks. A marker that you selected changes colour from white to green.. A cut mark you selected changes colour from white to red.
• To delete a selected marking t , press the green button.
• To delete a cut mark , press the red button.
• Playback can be continued by pressing the button.
• The status display can be hidden with the button.
29.4 Deleting programs from the Recordings archive• Press button to open the "Functional overview".
• Select "Recordings archive" with the cursor and press the button.
• Select the desired recording with the cursor.
• Select "Delete" with the cursor and press the button.The following notice appears to confirm that you would like to delete the recording.
• Select "OK" with the cursor and press the button.
• Press the button to exit the menu.
"
EXIT
EXIT
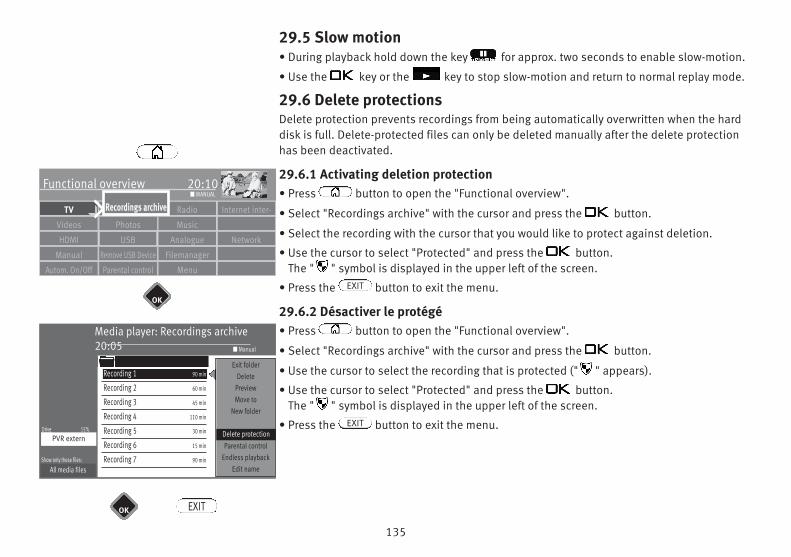
135
29.5 Slow motion• During playback hold down the key for approx. two seconds to enable slow-motion.
• Use the key or the key to stop slow-motion and return to normal replay mode.
29.6 Delete protectionsDelete protection prevents recordings from being automatically overwritten when the harddisk is full. Delete-protected files can only be deleted manually after the delete protectionhas been deactivated.
29.6.1 Activating deletion protection• Press button to open the "Functional overview".
• Select "Recordings archive" with the cursor and press the button.
• Select the recording with the cursor that you would like to protect against deletion.
• Use the cursor to select "Protected" and press the button.The " " symbol is displayed in the upper left of the screen.
• Press the button to exit the menu.
29.6.2 Désactiver le protégé• Press button to open the "Functional overview".
• Select "Recordings archive" with the cursor and press the button.
• Use the cursor to select the recording that is protected (" " appears).
• Use the cursor to select "Protected" and press the button.The " " symbol is displayed in the upper left of the screen.
• Press the button to exit the menu.
EXIT
EXIT
Radio Internet inter-Recordings ar-TV
Functional overview 20:10
MusicPhotosVideos
Analogue NetworkUSBHDMI
FilemanagerRemove USB DeviceManual
MenuParental control
Recordings archive
Autom. On/Off
■ MANUAL
OK
Media player: Recordings archive20:05
Show only these files:
■ Manual
Recording 1 90 min
All media files
Recording 2 60 min
Recording 3 45 min
Recording 4 110 min
Recording 5 30 min
Recording 6 15 min
Recording 7 90 min
Drive 15%PVR extern
Exit folderDelete
PreviewMove to
New folder
Delete protectionParental control
Endless playbackEdit name
Delete protection
OK EXIT
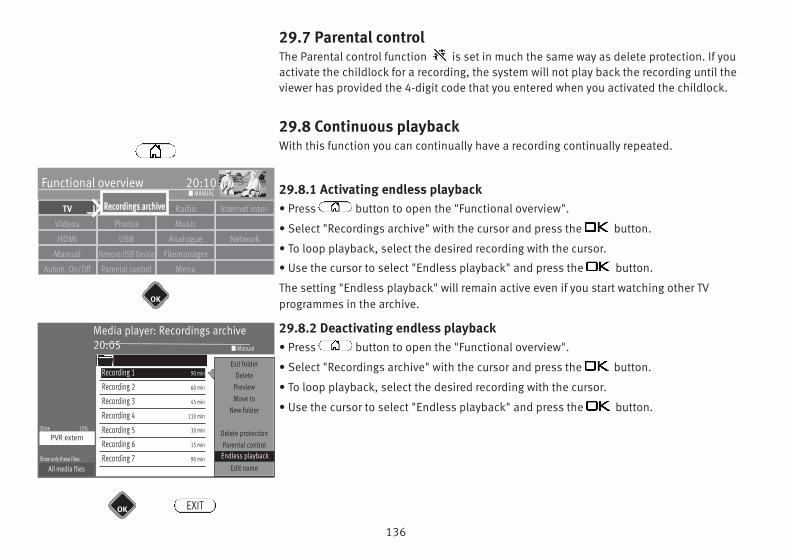
136
Radio Internet inter-Recordings ar-TV
Functional overview 20:10
MusicPhotosVideos
Analogue NetworkUSBHDMI
FilemanagerRemove USB DeviceManual
MenuParental control
Recordings archive
Autom. On/Off
■ MANUAL
OK
Media player: Recordings archive20:05
Show only these files:
■ Manual
Recording 1 90 min
All media files
Recording 2 60 min
Recording 3 45 min
Recording 4 110 min
Recording 5 30 min
Recording 6 15 min
Recording 7 90 min
Drive 15%PVR extern
Exit folderDelete
PreviewMove to
New folder
Delete protectionParental control
Endless playbackEdit name
Endless playback
OK EXIT
29.7 Parental controlThe Parental control function is set in much the same way as delete protection. If youactivate the childlock for a recording, the system will not play back the recording until theviewer has provided the 4-digit code that you entered when you activated the childlock.
29.8 Continuous playbackWith this function you can continually have a recording continually repeated.
29.8.1 Activating endless playback• Press button to open the "Functional overview".
• Select "Recordings archive" with the cursor and press the button.
• To loop playback, select the desired recording with the cursor.
• Use the cursor to select "Endless playback" and press the button.
The setting "Endless playback" will remain active even if you start watching other TVprogrammes in the archive.
29.8.2 Deactivating endless playback• Press button to open the "Functional overview".
• Select "Recordings archive" with the cursor and press the button.
• To loop playback, select the desired recording with the cursor.
• Use the cursor to select "Endless playback" and press the button.

137
29.9 Change file nameIf you do not like the name of a TV program you recorded, you can change the name.
• Press button to open the "Functional overview".
• Select "Recordings archive" with the cursor and press the button.
• Select the recording using the cursor key whose name is to be changed.
• Use the cursor to select "Edit name" and press the button.
On the keyboard that appears, delete the name and enter a new one.
29.10 Creating a new folderYou can create folders to archive your recorded broadcasts.
• Press button to open the "Functional overview".
• Select "Recordings archive" with the cursor and press the button.
• Use the cursor to select "New folder" and press the button.
• Enter the file name on the keyboard that appears.• Use the cursor to select the entry field and press the button. Confirm
Radio Internet inter-Recordings ar-TV
Functional overview 20:10
MusicPhotosVideos
Analogue NetworkUSBHDMI
FilemanagerRemove USB DeviceManual
MenuParental control
Recordings archive
Autom. On/Off
■ MANUAL
OK
Media player: Recordings archive20:05
Show only these files:
■ Manual
Recording 1 90 min
All media files
Recording 2 60 min
Recording 3 45 min
Recording 4 110 min
Recording 5 30 min
Recording 6 15 min
Recording 7 90 min
Drive 15%PVR extern
Exit folderDelete
PreviewMove to
New folder
Delete protectionParental control
Endless playbackEdit nameEdit name
OK EXIT

138
Filemanager■ MANUALUSB_2_1/ USB_1_1/
■ USB device ■ USB device
. . . .USB_2_1 (PVR) Picture 1.JPG
MarkMark block
Remove markingCopyShift
DeleteNew directory
RenameExport station list
Remove USB device
Radio Internet inter-Recordings archiveTV
Picture 1.JPG
Copy
Functional overview 20:10
MusicPhotosVideos
Analogue NetworkUSBHDMI
FilemanagerRemove USB DeviceManual
MenuParental control
FilemanagerAutom. On/Off
■ MANUAL
OK
30 The “File Manager”With the "File Manager" you can manage and process data (pictures, videos, music …) on aUSB storage device and the built-in hard disk, similar to a file manager on a PC.
Call “File Manager”• Press button to open the "Functional overview".
• Select "Filemanager" with the cursor and press the button.
• Select the source medium with the red button and press the button.
• Select the target medium with the green button and press the button.
• Use the cursor to mark the file that you would like to copy, move, or delete.
• Change to the grey middle selection column using the cursor; select, for instance, "Copy","Shift" or "Delete"; and press the button.
Copying larger files can take a long time and can be done in standby mode. In this case, thescreen is turned off and the device switches off automatically once copying has beencompleted.
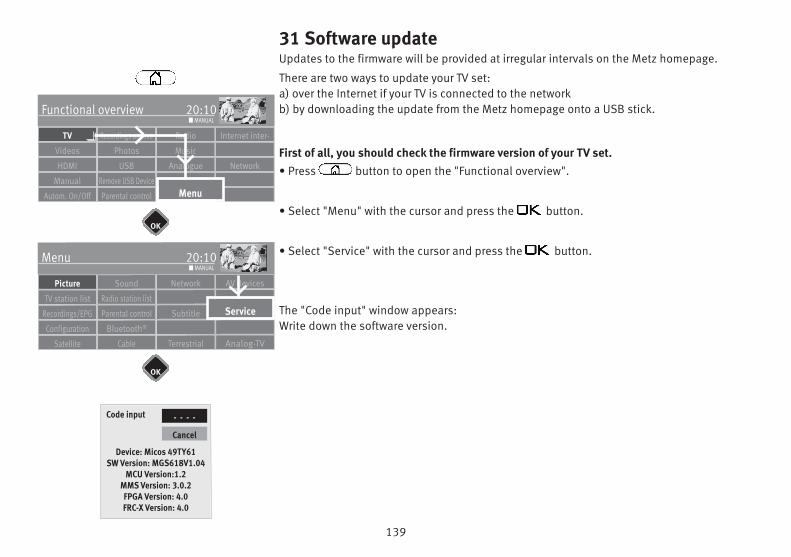
139
31 Software updateUpdates to the firmware will be provided at irregular intervals on the Metz homepage.
There are two ways to update your TV set:a) over the Internet if your TV is connected to the networkb) by downloading the update from the Metz homepage onto a USB stick.
First of all, you should check the firmware version of your TV set.• Press button to open the "Functional overview".
• Select "Menu" with the cursor and press the button.
• Select "Service" with the cursor and press the button.
The "Code input" window appears:Write down the software version.
Radio Internet inter-Recordings archiveTV
Functional overview 20:10
MusicPhotosVideos
Analogue NetworkUSBHDMI
FilemanagerRemove USB DeviceManual
Parental control MenuAutom. On/Off
■ MANUAL
Network AV devicesSoundPicture
Menu 20:10
Radio station listTV station list
Subtitle ServiceParental controlRecordings/EPG
Bluetooth®
Terrestrial Analog-TVCableSatellite
Configuration
■ MANUAL
OK
OK
Service
Code input
Device: Micos 49TY61SW Version: MGS618V1.04
MCU Version:1.2MMS Version: 3.0.2FPGA Version: 4.0FRC-X Version: 4.0
Cancel
- - - -
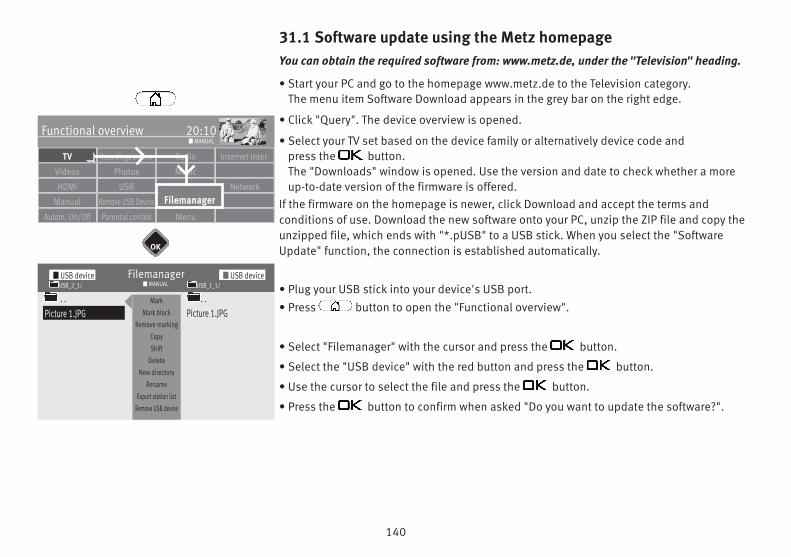
140
Filemanager■ MANUALUSB_2_1/ USB_1_1/
■ USB device ■ USB device
. . . .USB_2_1 (PVR) Picture 1.JPG
MarkMark block
Remove markingCopyShift
DeleteNew directory
RenameExport station list
Remove USB device
Radio Internet inter-Recordings archiveTV
Picture 1.JPG
Functional overview 20:10
MusicPhotosVideos
Analogue NetworkUSBHDMI
FilemanagerRemove USB DeviceManual
MenuParental control
FilemanagerAutom. On/Off
■ MANUAL
OK
31.1 Software update using the Metz homepageYou can obtain the required software from: www.metz.de, under the "Television" heading.
• Start your PC and go to the homepage www.metz.de to the Television category.The menu item Software Download appears in the grey bar on the right edge.
• Click "Query". The device overview is opened.
• Select your TV set based on the device family or alternatively device code and press the button.The "Downloads" window is opened. Use the version and date to check whether a moreup-to-date version of the firmware is offered.
If the firmware on the homepage is newer, click Download and accept the terms and conditions of use. Download the new software onto your PC, unzip the ZIP file and copy theunzipped file, which ends with "*.pUSB" to a USB stick. When you select the "SoftwareUpdate" function, the connection is established automatically.
• Plug your USB stick into your device's USB port.
• Press button to open the "Functional overview".
• Select "Filemanager" with the cursor and press the button.
• Select the "USB device" with the red button and press the button.
• Use the cursor to select the file and press the button.
• Press the button to confirm when asked "Do you want to update the software?".
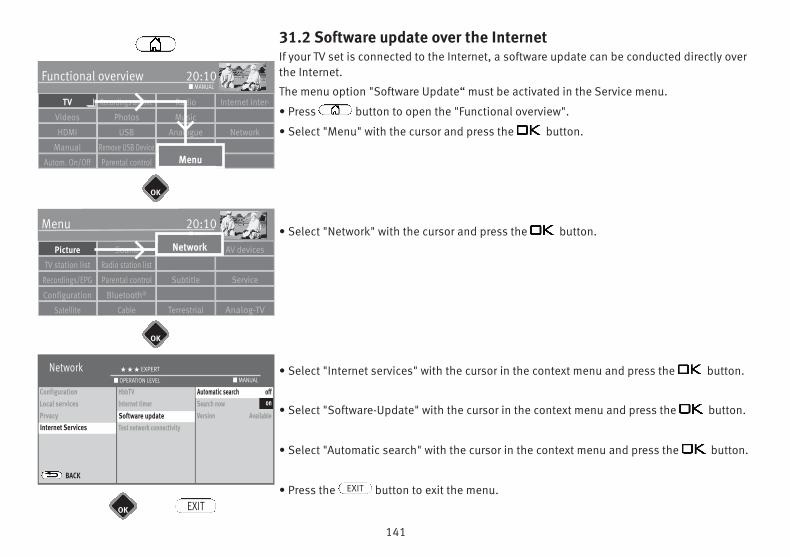
141
31.2 Software update over the InternetIf your TV set is connected to the Internet, a software update can be conducted directly overthe Internet.
The menu option "Software Update“ must be activated in the Service menu.
• Press button to open the "Functional overview".
• Select "Menu" with the cursor and press the button.
• Select "Network" with the cursor and press the button.
• Select "Internet services" with the cursor in the context menu and press the button.
• Select "Software-Update" with the cursor in the context menu and press the button.
• Select "Automatic search" with the cursor in the context menu and press the button.
• Press the button to exit the menu.EXIT
Network H H H EXPERT
ConfigurationLocal servicesPrvacyInternet Services
BACK
HbbTVInternet timerSoftware updateTest network connectivity
Internet timer activitySearch nowVersion Available
■ MANUAL■ OPERATION LEVEL
Internet ServicesSoftware update
Radio Internet inter-Recordings archiveTV
Functional overview 20:10
MusicPhotosVideos
Analogue NetworkUSBHDMI
FilemanagerRemove USB DeviceManual
Parental control MenuAutom. On/Off
■ MANUAL
Network AV devicesSoundPicture
Menu 20:10
Radio station listTV station list
Subtitle ServiceParental controlRecordings/EPG
Configuration Bluetooth®
Terrestrial Analog-TVCableSatellite
■ MANUAL
OK
OK
OK
Network
EXIT
Automatic search offon
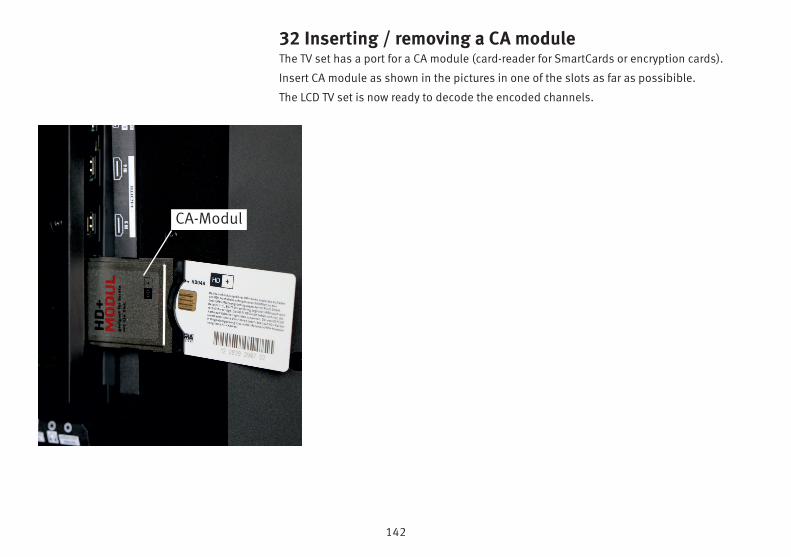
142
32 Inserting / removing a CA moduleThe TV set has a port for a CA module (card-reader for SmartCards or encryption cards).
Insert CA module as shown in the pictures in one of the slots as far as possibible.
The LCD TV set is now ready to decode the encoded channels.
CA-Modul
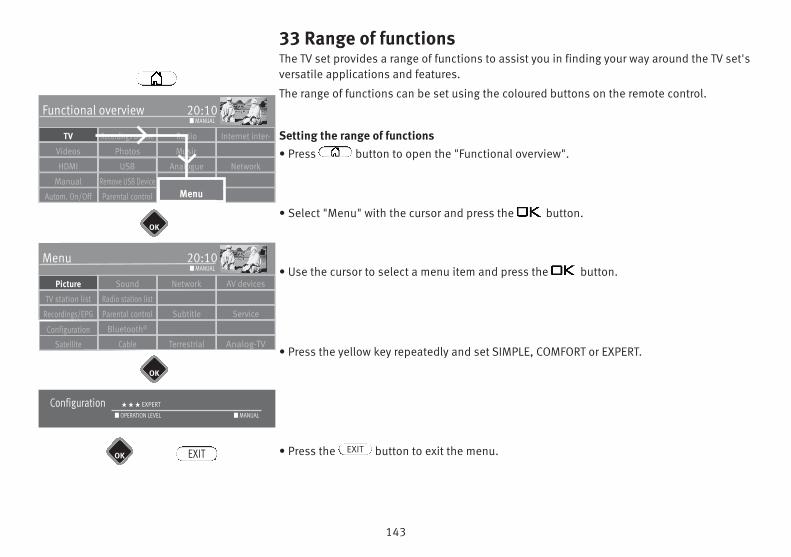
143
33 Range of functionsThe TV set provides a range of functions to assist you in finding your way around the TV set'sversatile applications and features.
The range of functions can be set using the coloured buttons on the remote control.
Setting the range of functions• Press button to open the "Functional overview".
• Select "Menu" with the cursor and press the button.
• Use the cursor to select a menu item and press the button.
• Press the yellow key repeatedly and set SIMPLE, COMFORT or EXPERT.
• Press the button to exit the menu.EXIT
Radio Internet inter-Recordings archiveTV
Functional overview 20:10
MusicPhotosVideos
Analogue NetworkUSBHDMI
FilemanagerRemove USB DeviceManual
Parental control MenuAutom. On/Off
■ MANUAL
Network AV devicesSoundPicture
Menu 20:10
Radio station listTV station list
Subtitle ServiceParental controlRecordings/EPG
Bluetooth®
Terrestrial Analog-TVCableSatellite
■ MANUAL
OK
OK
OK
Configuration H H H EXPERT
■ MANUAL■ OPERATION LEVEL
EXIT
Configuration
144
34 Operation via the Metz Remote app The app facilitates easy control of the TV set using a smartphone ortablet. On the one hand, it includes the classic button commands ofthe TV set remote control, and in addition has functions that simplifyparticular operation processes. Editing channel lists or program-ming recordings are just a few of the many options.
You can find detailed operating instructions for the Metz remote appon the Metz homepage under "Support" - "Downloads", downloadarea "Operating instructions" - "Extension / retrofitting" - "MetzREMOTE app".
34.1 Requirements• The TV set must be connected to the home network (wireless
router) via a LAN cable, Powerline LAN adapter (e.g. Devolo) orLAN-to-WLAN adapter (commercially available).
• Via the wireless network with an Apple or Android device(smartphone, certain MP3 players) linked to the router and compa-tible with the app.
• Installation der App über den Apple App Store (iTunes) oder Google Play Store (Android Market).
• Install the app via the Apple App Store (iTunes) or the Google PlayStore (Android Market).Android devices with version 2.2 and higher. As differentsmartphones have differing resolutions, the quality of the displaymay vary.
• Apple iOS devices with iOS 7.0 and higher.
34.2 Download the Metz Remote appiOS (7.0 and higher)To download and install the Metz Remote app for iPhone, iPod Touchand iPad, you need to open "iTunes". Search for "Metz Remote" inthe App Store.
Download the app and sync your iOS device to the computer. It isalso possible to download it directly from the App Store on your iOSdevice.
Android (2.2 and higher)To download the Metz Remote app for Android, go to the GooglePlay Store on the Internet:
https://play.google.com/store/apps/details?id=de.metz.android.mecaremote
or download the app directly from the Play Store on yoursmartphone. Search for "Metz Remote".
34.2.1 Setting up the TV set to use the appOperating the TV set via the "Metz Remote" app on a smartphonerequires that your TV be set up.
It is possible to select whether or not the TV set can be operated via the appunder "Local Services". You can also choose a name to identify the TV set onthe network.
If you do not enter a name for your TV set, only its IP address will bedisplayed in the network.
It is possible to select from a list of specifications or enter a uniquename.
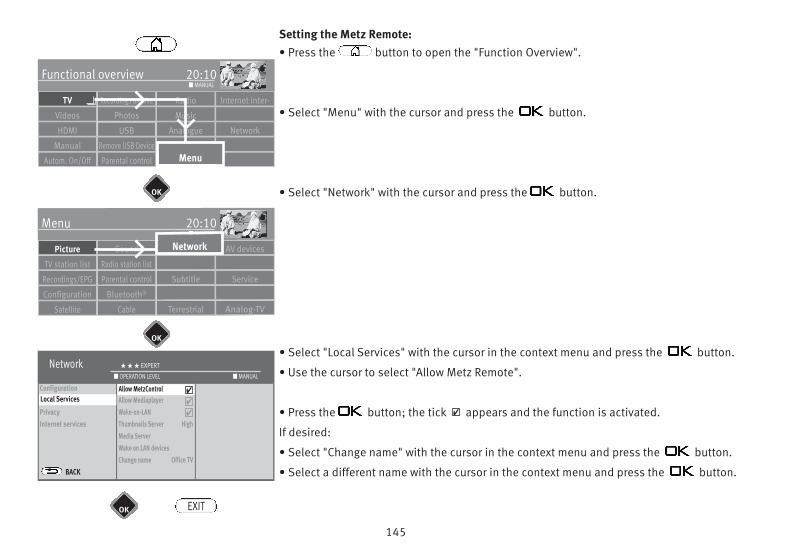
145
Radio Internet inter-Recordings archiveTV
Functional overview 20:10
MusicPhotosVideos
Analogue NetworkUSBHDMI
FilemanagerRemove USB DeviceManual
Parental control MenuAutom. On/Off
■ MANUAL
Network AV devicesSoundPicture
Menu 20:10
Radio station listTV station list
Subtitle ServiceParental controlRecordings/EPG
Configuration Bluetooth®
Terrestrial Analog-TVCableSatellite
■ MANUAL
OK
OK
OK
Network
Setting the Metz Remote:• Press the button to open the "Function Overview".
• Select "Menu" with the cursor and press the button.
• Select "Network" with the cursor and press the button.
• Select "Local Services" with the cursor in the context menu and press the button.
• Use the cursor to select "Allow Metz Remote".
• Press the button; the tick appears and the function is activated.
If desired:
• Select "Change name" with the cursor in the context menu and press the button.
• Select a different name with the cursor in the context menu and press the button.
4
Network H H H EXPERT
ConfigurationLocal ServicesPrivacyInternet services
BACK
Allow MetzControl YesAllow MediaplayerWake-on-LANThumbnails Server HighMedia ServerWake on LAN devicesChange name Office TV
■ MANUAL■ OPERATION LEVEL
Local Services
EXIT
Allow MetzControl 4
4
4
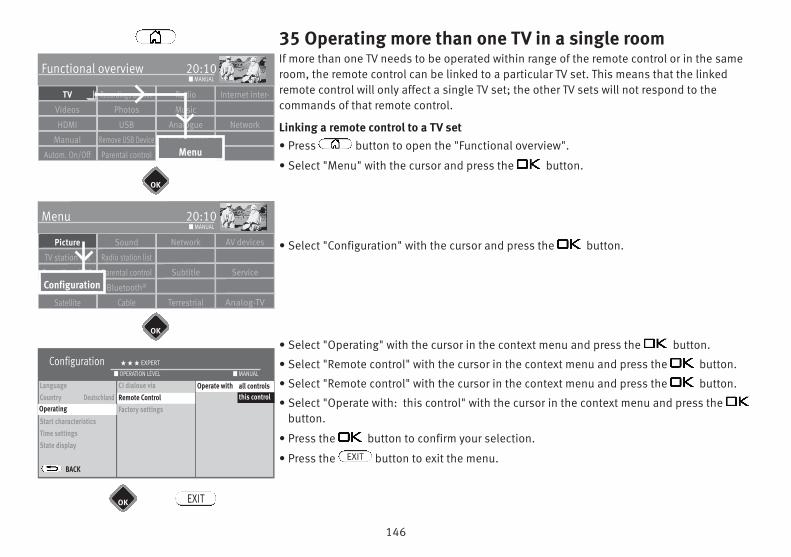
146
35 Operating more than one TV in a single roomIf more than one TV needs to be operated within range of the remote control or in the sameroom, the remote control can be linked to a particular TV set. This means that the linkedremote control will only affect a single TV set; the other TV sets will not respond to thecommands of that remote control.
Linking a remote control to a TV set• Press button to open the "Functional overview".
• Select "Menu" with the cursor and press the button.
• Select "Configuration" with the cursor and press the button.
• Select "Operating" with the cursor in the context menu and press the button.
• Select "Remote control" with the cursor in the context menu and press the button.
• Select "Remote control" with the cursor in the context menu and press the button.
• Select "Operate with: this control" with the cursor in the context menu and press thebutton.
• Press the button to confirm your selection.
• Press the button to exit the menu.EXIT
Radio Internet inter-Recordings archiveTV
Functional overview 20:10
MusicPhotosVideos
Analogue NetworkUSBHDMI
FilemanagerRemove USB DeviceManual
Parental control MenuAutom. On/Off
■ MANUAL
Network AV devicesSoundPicture
Menu 20:10
Radio station listTV station list
Subtitle ServiceParental controlRecordings/EPG
Bluetooth®
Terrestrial Analog-TVCableSatellite
■ MANUAL
OK
OK
OK
Configuration H H H EXPERT
LanguageCountry DeutschlandOpertationStart characteristicsTime settingsState display
BACK
CI dialoue viaRemote ControlFactory settings
■ MANUAL■ OPERATION LEVEL
OperatingRemote Control
Operate with all controlsthis control
Configuration
EXIT
147
Picture profileEco: Compromise for all applications.
Sports: Setting for sports channels or sports programs.
Television: Setting for animated films, DVD players and Blue Rayplayers.
Games: Preferred setting for recordings from game consoles.
PC Monitor: Preferred setting for recordings from a connected PC.
User: Your self-configured picture profile.
CodeThe settings for parental control are secured with a four-digit numerical code, which you can set. Make a note of the code numberentered. If you have forgotten the code number, consult your specialist dealer.
DHCPThe Dynamic Host Configuration Protocol permits assignment of thenetwork configuration to clients by a server. A client is a computer program that establishes contact with anothercomputer program on a server, in order to make use of its services.
DHCP enables computers to be connected automatically to anexisting network, without the need for any manual configuration.
The client must simply be configured to retrieve an IP address auto-matically. When a computer connected to the network is started, itcan automatically retrieve an IP address, the subnet mask, the defaultgateway and also DNS server and, if in use, WINS server details from aDHCP server.
36 GlossaryARC (audio return channel)An audio return channel has been implemented in the HDMI 1.4version to reduce the cabling effort between various HDMI components.
The audio return channel is always useful if a TV set integrated in ahome cinema system has a built-in digital tuner, DVD or Blu-rayplayer or another source of digital-/sound material.
The ARC function can establish an “audio return channel” via theHDMI cable to the AV device. In other words, the same cable that is normally responsible for transporting data from the AV device tothe TV set in this case transfers audio data in the opposite direction.The audio return channel makes the audio cable (Toslink) previouslyrequired in addition to the HDMI cable superfluous.
The audio return channel supports all formats, which can also betransmitted via conventional TV SPDIF connection - among others,these are Dolby Digital, DTS and PCM audio. However, formats thatcannot be transmitted via S/PDIF, e.g. all HD audio formats, are notsupported by the audio return channel.
Motion compensation“Motion compensation, film” improves the picture display for blackand white or cinema films. Motion becomes smoother and a morethree-dimensional picture appearance results.
Vertical picture positionIn the case of some wide screen films subtitles are broadcast in thelower black strip. To ensure these subtitles remain visible whenenlarged, you can move the picture upwards.
148
IP-AdressImages that remain unchanged for a long time (several hours), suchas still pictures, result in “image sticking”, i.e. lasting shadow formation. Such images should be avoided if at all possible. This effect is not permanent and disappears again after ashort time.
Volume correctionBroadcasting channels broadcast at different volumes. These volume differences can be automatically adjusted betweenchannels.
Panorama“Normal” programs in 4:3 format can be adjusted to the 16:9 format of the picture screen with the panorama function. The picture width is widened here to fill the screen.
Noise reductionSetting option to improve picture quality of optically noisy “snow pictures” in the event of unfavourable reception conditions.Depending on the degree of disturbance, different correction options are provided, which can be set individually for each program position.
Subnet The term subnet is used to define an individual portion (sub-network) of an Internet Protocol (IP) network.
Symbol rate (baud rate)The symbol or baud rate describes the data volume that is transmitted per second. The time required for the search functionincreases in proportion to the symbol rate.
Dyn. contrastThe "Dynamic contrast” setting facilitates an automatic increase inpicture contrast in the event of a low level of picture contrast.
Fine searchDuring the channel search with a stipulated symbol rate, the channels are synchronised at the centre of the channel. If this setting does not lead to a satisfactory result, fine tuning can then beset. The search operation takes considerably longer with the finesearch set.
GatewayA gateway is a network transition used in telecommunications, forexample in next Generation networks and in IP telephony.
These gateways convert digital voice, audio or image informationfrom one network format to another. Transcoding of data may alsooccur in this connection.
BrightnessBrightness (indication in %) is the basic value which is set accordingto the ambient light in the room where the TV is used. The basicsetting should be made in a dark room in a way that black picturecontent is still black.
Image stickingImages that remain unchanged for a long time (several hours), suchas still pictures, result in “image sticking”, i.e. lasting shadowformation. Such images should be avoided if at all possible. This effect is not permanent and disappears again after a short time.
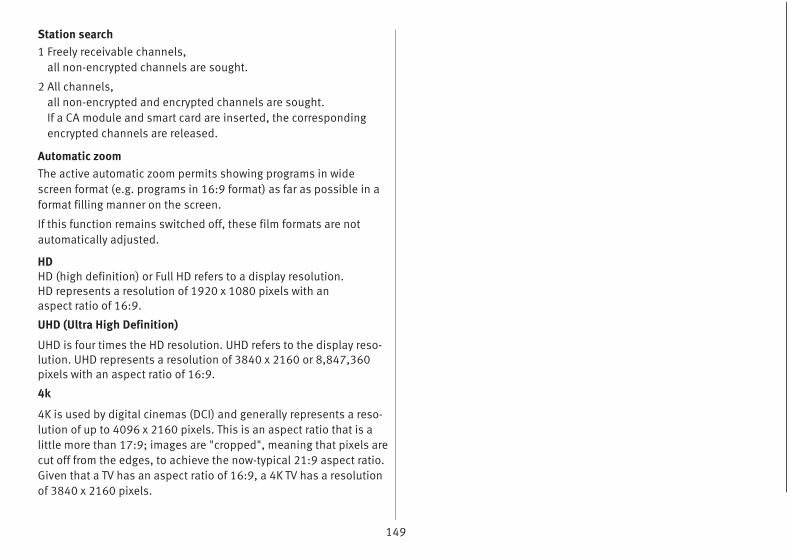
149
Station search1 Freely receivable channels,
all non-encrypted channels are sought.
2 All channels,all non-encrypted and encrypted channels are sought. If a CA module and smart card are inserted, the correspondingencrypted channels are released.
Automatic zoomThe active automatic zoom permits showing programs in widescreen format (e.g. programs in 16:9 format) as far as possible in aformat filling manner on the screen.
If this function remains switched off, these film formats are not automatically adjusted.
HDHD (high definition) or Full HD refers to a display resolution.HD represents a resolution of 1920 x 1080 pixels with anaspect ratio of 16:9.
UHD (Ultra High Definition)
UHD is four times the HD resolution. UHD refers to the display reso-lution. UHD represents a resolution of 3840 x 2160 or 8,847,360pixels with an aspect ratio of 16:9.
4k
4K is used by digital cinemas (DCI) and generally represents a reso-lution of up to 4096 x 2160 pixels. This is an aspect ratio that is alittle more than 17:9; images are "cropped", meaning that pixels arecut off from the edges, to achieve the now-typical 21:9 aspect ratio.Given that a TV has an aspect ratio of 16:9, a 4K TV has a resolutionof 3840 x 2160 pixels.
150
37 Cleaning the deviceSwitch off the device with the power switch before cleaning !
Improper handling and cleaning can cause irreparabledamage to the screen. Consequently, pay attention to therules on handling and caring for the device.
• Handle the screen surface very carefully and gently.
• Avoid any mechanical stress to the screen surface by knocking,shocks, pressure, scratching, scraping, etc, since this can lead todamage.
• Avoid contact with pointed, sharp or hard objects.
• The screen surface must be preserved against dirt.
+
Care and cleaning:• Switch off and unplug the device before cleaning.
• Take care that water or other liquids never gets into the device,since these can cause damage to the device.
• Cleaning of the screen surface must occur with a soft, dry cleaningcloth (e.g. microfibre cloth).
• If significant soiling nevertheless occurs, the screen surface canbe cleaned with a slightly moist, soft cloth. A special TFT cleaning solution (commercially available at specialised dealers) is the perfect cleaning solution.
Never use cleaning solution on the screen surface!If any cleaning solution penetrates beneath the screen's lowerframe, it will result in irreparable damage to the components.
Unplug the set immediately if foreign bodies like water, otherliquids, metal parts, etc get into the screen.
Never attempt to touch the inside of the set with any objects or with your hands. Danger of electric shock or accident.
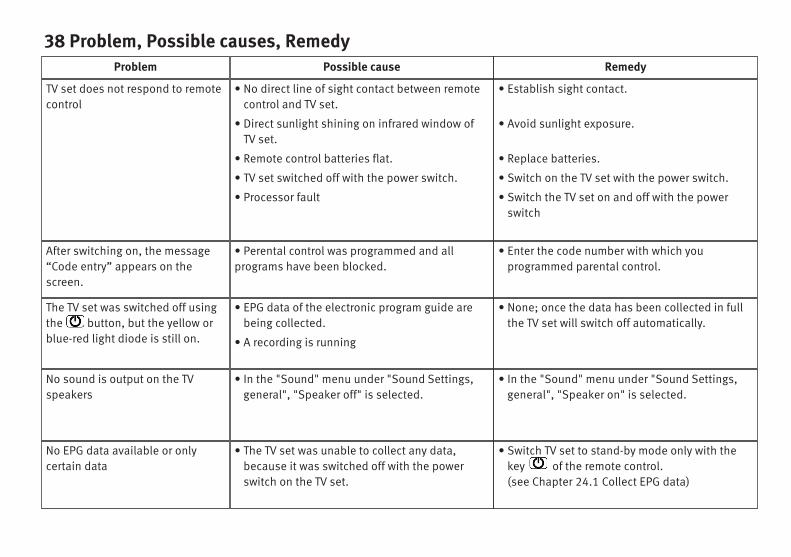
38 Problem, Possible causes, RemedyProblem Possible cause Remedy
TV set does not respond to remotecontrol
• No direct line of sight contact between remotecontrol and TV set.
• Direct sunlight shining on infrared window of TV set.
• Remote control batteries flat.
• TV set switched off with the power switch.
• Processor fault
• Establish sight contact.
• Avoid sunlight exposure.
• Replace batteries.
• Switch on the TV set with the power switch.
• Switch the TV set on and off with the powerswitch
After switching on, the message“Code entry” appears on thescreen.
• Perental control was programmed and allprograms have been blocked.
• Enter the code number with which youprogrammed parental control.
The TV set was switched off usingthe button, but the yellow orblue-red light diode is still on.
• EPG data of the electronic program guide arebeing collected.
• A recording is running
• None; once the data has been collected in fullthe TV set will switch off automatically.
No sound is output on the TV speakers
• In the "Sound" menu under "Sound Settings,general", "Speaker off" is selected.
• In the "Sound" menu under "Sound Settings,general", "Speaker on" is selected.
No EPG data available or onlycertain data
• The TV set was unable to collect any data,because it was switched off with the powerswitch on the TV set.
• Switch TV set to stand-by mode only with thekey of the remote control.(see Chapter 24.1 Collect EPG data)
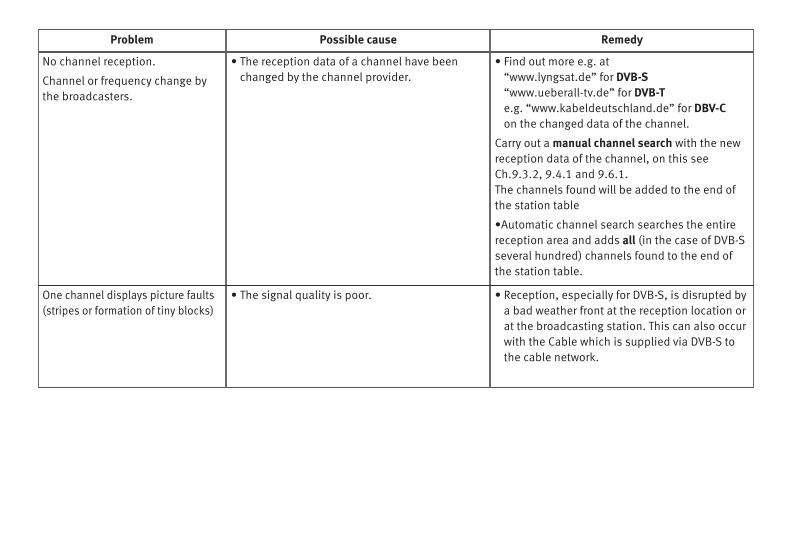
No channel reception.
Channel or frequency change bythe broadcasters.
• The reception data of a channel have beenchanged by the channel provider.
• Find out more e.g. at “www.lyngsat.de” for DVB-S“www.ueberall-tv.de” for DVB-Te.g. “www.kabeldeutschland.de” for DBV-Con the changed data of the channel.
Carry out a manual channel search with the newreception data of the channel, on this seeCh.9.3.2, 9.4.1 and 9.6.1.The channels found will be added to the end ofthe station table
•Automatic channel search searches the entirereception area and adds all (in the case of DVB-Sseveral hundred) channels found to the end ofthe station table.
Problem Possible cause Remedy
One channel displays picture faults(stripes or formation of tiny blocks)
• The signal quality is poor. • Reception, especially for DVB-S, is disrupted bya bad weather front at the reception location orat the broadcasting station. This can also occurwith the Cable which is supplied via DVB-S tothe cable network.
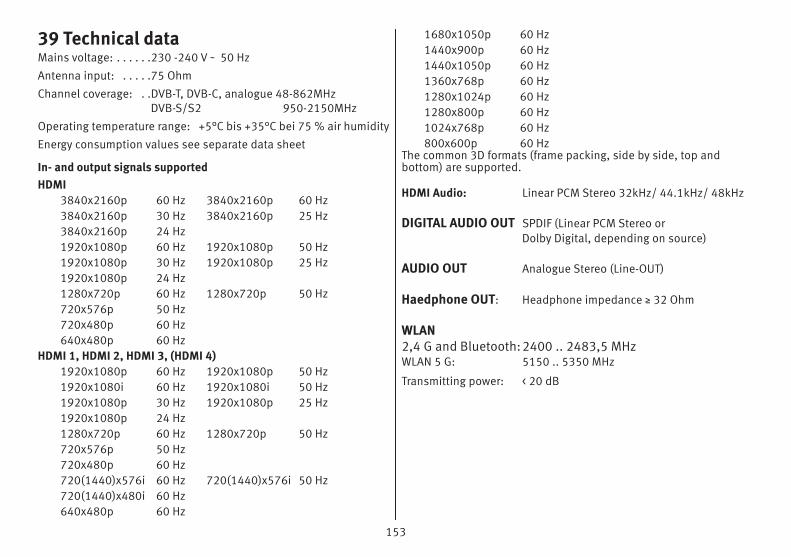
153
39 Technical dataMains voltage: . . . . . .230 -240 V ˜ 50 Hz
Antenna input: . . . . .75 Ohm
Channel coverage: . .DVB-T, DVB-C, analogue 48-862MHzDVB-S/S2 950-2150MHz
Operating temperature range: +5°C bis +35°C bei 75 % air humidity
Energy consumption values see separate data sheet
In- and output signals supportedHDMI
3840x2160p 60 Hz 3840x2160p 60 Hz3840x2160p 30 Hz 3840x2160p 25 Hz3840x2160p 24 Hz1920x1080p 60 Hz 1920x1080p 50 Hz1920x1080p 30 Hz 1920x1080p 25 Hz1920x1080p 24 Hz1280x720p 60 Hz 1280x720p 50 Hz720x576p 50 Hz720x480p 60 Hz640x480p 60 Hz
HDMI 1, HDMI 2, HDMI 3, (HDMI 4)1920x1080p 60 Hz 1920x1080p 50 Hz1920x1080i 60 Hz 1920x1080i 50 Hz1920x1080p 30 Hz 1920x1080p 25 Hz1920x1080p 24 Hz1280x720p 60 Hz 1280x720p 50 Hz720x576p 50 Hz720x480p 60 Hz720(1440)x576i 60 Hz 720(1440)x576i 50 Hz720(1440)x480i 60 Hz640x480p 60 Hz
1680x1050p 60 Hz1440x900p 60 Hz1440x1050p 60 Hz1360x768p 60 Hz1280x1024p 60 Hz1280x800p 60 Hz1024x768p 60 Hz800x600p 60 Hz
The common 3D formats (frame packing, side by side, top andbottom) are supported.
HDMI Audio: Linear PCM Stereo 32kHz/ 44.1kHz/ 48kHz
DIGITAL AUDIO OUT SPDIF (Linear PCM Stereo or Dolby Digital, depending on source)
AUDIO OUT Analogue Stereo (Line-OUT)
Haedphone OUT: Headphone impedance ≥ 32 Ohm
WLAN2,4 G and Bluetooth:2400 .. 2483,5 MHzWLAN 5 G: 5150 .. 5350 MHz
Transmitting power: < 20 dB
154
40 Special instructions for TV sets withOLED technology
"OLED twin R" televisions are equipped with OLED screen techno-logy.
The source of the OLED technology's advantages in picture quality isthe fact that OLED at subpixel level is an individually controllableself-luminous technology. The more differentiated screen control is,the more negative the effect of motionless pictures or sections ofpictures upon degradation is. Consequently, these should, if possi-ble, either be avoided or be subject to a time limit.
In normal TV operation, the device has various internal mechanismswhich prevent damage to the image quality. However, the prescri-bed automatic calibration cycles must be performed in standbymode for this purpose.
To ensure that your OLED TV always delivers a first-class image, youshould pay attention to the following points:
• Avoid still images over longer time periods.
• Avoid picture content with a still image character (e.g. a staticouter frame containing a moving image) over long periods.
• Avoid using presentation mode.
• After four hours of operation, the device starts an "RS compensationcycle" as soon as the set is switched to standby mode . “Calibration”will appear in the text display. The TV screen will remain dark. Thisprocess can take a few minutes and removes residual stress in theOLED panel control.
If this process is prevented or interrupted, the following will appear at alater time:
After four hours of use, your Metz OLED device will be calibrated for opti-mal image display at the earliest opportunity. For this to happen, the de-vice must be in standby mode. Because the device was last switched offwith the power switch, it was not possible to run the calibration.
Please switch the device to standby with the remote control. The displaywill then be calibrated.
Once only the red LED is illuminated, the device can be turned off with thepower switch. If you do not switch off to standby mode, the calibrationwill be performed automatically at the next start.If this process is prevented or interrupted, mandatory calibration willoccur at a later time, which cannot be cancelled.
The following will appear on the screen.
You did not use standby mode the last time the device was switched off.As a result, the device is now being automatically calibrated.This operation cannot be interrupted with the remote control.
Please do not switch off the device with the power switch. Once only the red LED is illuminated, can the TV can be returned to ope-ration.• After around 600 hours of operation, JB compensation will be
performed as soon as the device is put in standby mode. “Calibra-tion” will appear in the text display. The TV screen will remain dark.During the last few minutes of JB compensation, a thin white line willbe visible, travelling from top to bottom. This involves irregularlydegraded subpixels being recorded and compensated for. This process lasts about 70 minutes and removes residual voltage inthe OLED panel control.
• First switch off the TV set using the power switch when only the redstandby LED is illuminated.
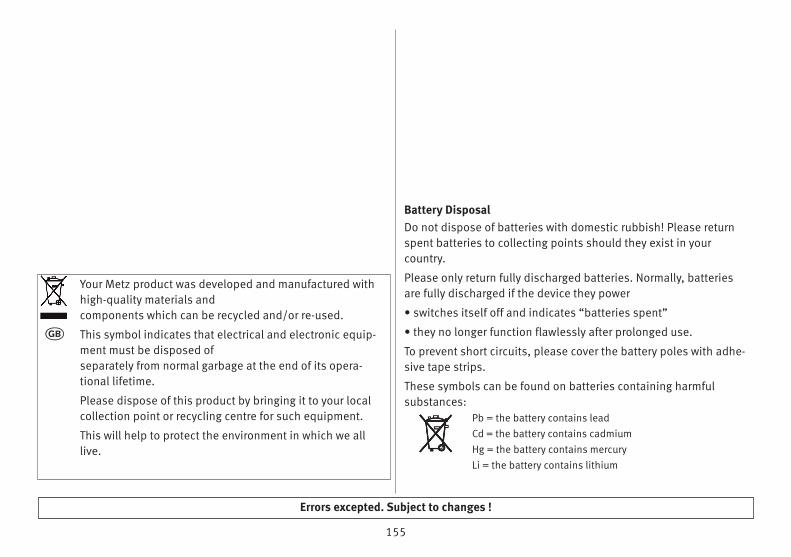
155
Your Metz product was developed and manufactured withhigh-quality materials and components which can be recycled and/or re-used.
This symbol indicates that electrical and electronic equip-ment must be disposed of separately from normal garbage at the end of its opera-tional lifetime.
Please dispose of this product by bringing it to your localcollection point or recycling centre for such equipment.
This will help to protect the environment in which we alllive.
k
Battery DisposalDo not dispose of batteries with domestic rubbish! Please returnspent batteries to collecting points should they exist in yourcountry.
Please only return fully discharged batteries. Normally, batteriesare fully discharged if the device they power
• switches itself off and indicates “batteries spent”
• they no longer function flawlessly after prolonged use.
To prevent short circuits, please cover the battery poles with adhe-sive tape strips.
These symbols can be found on batteries containing harmfulsubstances:
Pb = the battery contains leadCd = the battery contains cadmiumHg = the battery contains mercuryLi = the battery contains lithium
Errors excepted. Subject to changes !

156

AActivate parental control . . . . . . . . . . . . . . . . . . . . . . . . . . . . . . . . . . .90Activating Parental Control using the function button . . . . . . . . . . . .90Activating Parental Control using the function overview . . . . . . . . . .90Aerial facility . . . . . . . . . . . . . . . . . . . . . . . . . . . . . . . . . . . . . . . . . . . .29Analog-TV . . . . . . . . . . . . . . . . . . . . . . . . . . . . . . . . . . . . . . . . . . . . . . .19Antenna connection . . . . . . . . . . . . . . . . . . . . . . . . . . . . . . . . . . . . . . . .6Antenna supply . . . . . . . . . . . . . . . . . . . . . . . . . . . . . . . . . . . . . . . . . .23Audio description . . . . . . . . . . . . . . . . . . . . . . . . . . . . . . . . . . . . . . . .73Audio return channel . . . . . . . . . . . . . . . . . . . . . . . . . . . . . . . . . . . . .146Automatic zoom . . . . . . . . . . . . . . . . . . . . . . . . . . . . . . . . . . . . . . . . . .54AV devices . . . . . . . . . . . . . . . . . . . . . . . . . . . . . . . . . . . . . . . . . . . . . .92
BBlocking selected channels . . . . . . . . . . . . . . . . . . . . . . . . . . . . . . . .88Bluetooth® . . . . . . . . . . . . . . . . . . . . . . . . . . . . . . . . . . . . . . . . . . . . .67
CCEC . . . . . . . . . . . . . . . . . . . . . . . . . . . . . . . . . . . . . . . . . . . . . . . . . . . .96Changeover to summer time . . . . . . . . . . . . . . . . . . . . . . . . . . . . . . . .46Channel router . . . . . . . . . . . . . . . . . . . . . . . . . . . . . . . . . . . . . . . . . . .29Channel search . . . . . . . . . . . . . . . . . . . . . . . . . . . . . . . . . . . . . . . . . .19Colour standard . . . . . . . . . . . . . . . . . . . . . . . . . . . . . . . . . . . . . . . . . .22Condensation . . . . . . . . . . . . . . . . . . . . . . . . . . . . . . . . . . . . . . . . . . . . .8Configuring Parental Control (Basic Settings) . . . . . . . . . . . . . . . . . .89Cooling . . . . . . . . . . . . . . . . . . . . . . . . . . . . . . . . . . . . . . . . . . . . . . . . . .8Country . . . . . . . . . . . . . . . . . . . . . . . . . . . . . . . . . . . . . . . . . . . . . . . . .16Creating a new folder . . . . . . . . . . . . . . . . . . . . . . . . . . . . . . . . . . . . .136
DData formats . . . . . . . . . . . . . . . . . . . . . . . . . . . . . . . . . . . . . . . . . . .117Date . . . . . . . . . . . . . . . . . . . . . . . . . . . . . . . . . . . . . . . . . . . . . . . . . . .46Delayed television viewing . . . . . . . . . . . . . . . . . . . . . . . . . . . . . . . .125Delete . . . . . . . . . . . . . . . . . . . . . . . . . . . . . . . . . . . . . . . . . . . . . . . . .133Deletion protection . . . . . . . . . . . . . . . . . . . . . . . . . . . . . . . . . . . . . .134DHCP . . . . . . . . . . . . . . . . . . . . . . . . . . . . . . . . . . . . . . . . . . . . .104, 146Direct recording . . . . . . . . . . . . . . . . . . . . . . . . . . . . . . . . . . . . . . . . .127
Direct sunlight . . . . . . . . . . . . . . . . . . . . . . . . . . . . . . . . . . . . . . . . . . .11DiSEqC system . . . . . . . . . . . . . . . . . . . . . . . . . . . . . . . . . . . . . . . . . . .31DNS server . . . . . . . . . . . . . . . . . . . . . . . . . . . . . . . . . . . . . . . . . . . . .104Dolby digital . . . . . . . . . . . . . . . . . . . . . . . . . . . . . . . . . . . . . . . . . . . . .73Dual channel programs . . . . . . . . . . . . . . . . . . . . . . . . . . . . . . . . . . . .79DVB radio . . . . . . . . . . . . . . . . . . . . . . . . . . . . . . . . . . . . . . . . . . . . . . .82DVB-C . . . . . . . . . . . . . . . . . . . . . . . . . . . . . . . . . . . . . . . . . . . . . . . . . .19DVB-C channel search . . . . . . . . . . . . . . . . . . . . . . . . . . . . . . . . . . . . .26DVB-S . . . . . . . . . . . . . . . . . . . . . . . . . . . . . . . . . . . . . . . . . . . . . . . . . .19DVB-T channel search . . . . . . . . . . . . . . . . . . . . . . . . . . . . . . . . . . . . .24
EElectronic Program Guide . . . . . . . . . . . . . . . . . . . . . . . . . . . . . . . . . .98Energy setup . . . . . . . . . . . . . . . . . . . . . . . . . . . . . . . . . . . . . . . . . . . . .51EPG . . . . . . . . . . . . . . . . . . . . . . . . . . . . . . . . . . . . . . . . . . . . . . . . . . . .98Equalizer . . . . . . . . . . . . . . . . . . . . . . . . . . . . . . . . . . . . . . . . . . . . . . . .63Exclusion of one or more channels from the EPG . . . . . . . . . . . . . .100External hard disk . . . . . . . . . . . . . . . . . . . . . . . . . . . . . . . . . . . . . . .121
FFormation of tiny blocks . . . . . . . . . . . . . . . . . . . . . . . . . . . . . . . . . . .55Frequency band . . . . . . . . . . . . . . . . . . . . . . . . . . . . . . . . . . . . . . . . . .32
HHbbTV . . . . . . . . . . . . . . . . . . . . . . . . . . . . . . . . . . . . . . . . . . . .103, 109Headphone volume . . . . . . . . . . . . . . . . . . . . . . . . . . . . . . . . . . . . . . .66Hearing impairment . . . . . . . . . . . . . . . . . . . . . . . . . . . . . . . . . . . . . . .48Heavy smoking . . . . . . . . . . . . . . . . . . . . . . . . . . . . . . . . . . . . . . . . . . . .6Help . . . . . . . . . . . . . . . . . . . . . . . . . . . . . . . . . . . . . . . . . . . . . . . . . . .17Hi-fi output . . . . . . . . . . . . . . . . . . . . . . . . . . . . . . . . . . . . . . . . . . . . . .74Hi-fi receivers . . . . . . . . . . . . . . . . . . . . . . . . . . . . . . . . . . . . . . . . . . . .76High band . . . . . . . . . . . . . . . . . . . . . . . . . . . . . . . . . . . . . . . . . . . . . . .32
IImage position vertical . . . . . . . . . . . . . . . . . . . . . . . . . . . . . . . . . . . .54Import/export channel list . . . . . . . . . . . . . . . . . . . . . . . . . . . . . . . . .38In the box . . . . . . . . . . . . . . . . . . . . . . . . . . . . . . . . . . . . . . . . . . . . . . . .2Initial program position . . . . . . . . . . . . . . . . . . . . . . . . . . . . . . . . . . . .86
157
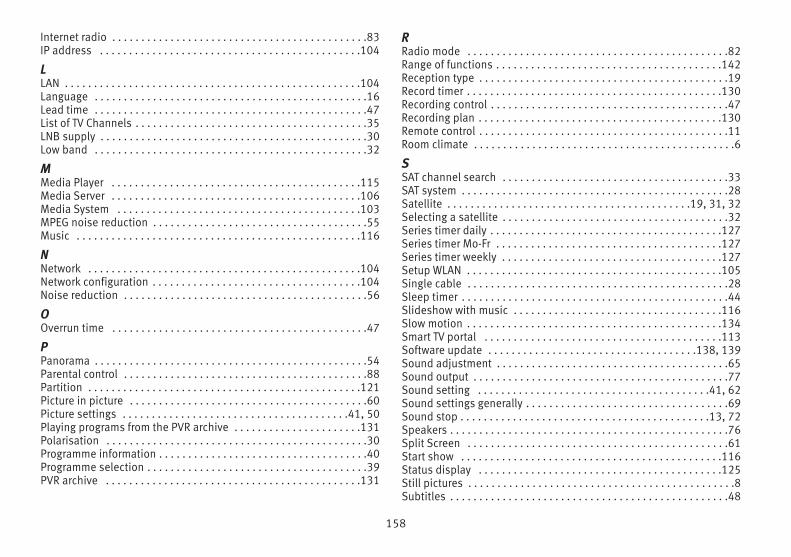
Internet radio . . . . . . . . . . . . . . . . . . . . . . . . . . . . . . . . . . . . . . . . . . . .83IP address . . . . . . . . . . . . . . . . . . . . . . . . . . . . . . . . . . . . . . . . . . . . .104
LLAN . . . . . . . . . . . . . . . . . . . . . . . . . . . . . . . . . . . . . . . . . . . . . . . . . . .104Language . . . . . . . . . . . . . . . . . . . . . . . . . . . . . . . . . . . . . . . . . . . . . . .16Lead time . . . . . . . . . . . . . . . . . . . . . . . . . . . . . . . . . . . . . . . . . . . . . . .47List of TV Channels . . . . . . . . . . . . . . . . . . . . . . . . . . . . . . . . . . . . . . . .35LNB supply . . . . . . . . . . . . . . . . . . . . . . . . . . . . . . . . . . . . . . . . . . . . . .30Low band . . . . . . . . . . . . . . . . . . . . . . . . . . . . . . . . . . . . . . . . . . . . . . .32
MMedia Player . . . . . . . . . . . . . . . . . . . . . . . . . . . . . . . . . . . . . . . . . . .115Media Server . . . . . . . . . . . . . . . . . . . . . . . . . . . . . . . . . . . . . . . . . . .106Media System . . . . . . . . . . . . . . . . . . . . . . . . . . . . . . . . . . . . . . . . . .103MPEG noise reduction . . . . . . . . . . . . . . . . . . . . . . . . . . . . . . . . . . . . .55Music . . . . . . . . . . . . . . . . . . . . . . . . . . . . . . . . . . . . . . . . . . . . . . . . .116
NNetwork . . . . . . . . . . . . . . . . . . . . . . . . . . . . . . . . . . . . . . . . . . . . . . .104Network configuration . . . . . . . . . . . . . . . . . . . . . . . . . . . . . . . . . . . .104Noise reduction . . . . . . . . . . . . . . . . . . . . . . . . . . . . . . . . . . . . . . . . . .56
OOverrun time . . . . . . . . . . . . . . . . . . . . . . . . . . . . . . . . . . . . . . . . . . . .47
PPanorama . . . . . . . . . . . . . . . . . . . . . . . . . . . . . . . . . . . . . . . . . . . . . . .54Parental control . . . . . . . . . . . . . . . . . . . . . . . . . . . . . . . . . . . . . . . . . .88Partition . . . . . . . . . . . . . . . . . . . . . . . . . . . . . . . . . . . . . . . . . . . . . . .121Picture in picture . . . . . . . . . . . . . . . . . . . . . . . . . . . . . . . . . . . . . . . . .60Picture settings . . . . . . . . . . . . . . . . . . . . . . . . . . . . . . . . . . . . . . .41, 50Playing programs from the PVR archive . . . . . . . . . . . . . . . . . . . . . .131Polarisation . . . . . . . . . . . . . . . . . . . . . . . . . . . . . . . . . . . . . . . . . . . . .30Programme information . . . . . . . . . . . . . . . . . . . . . . . . . . . . . . . . . . . .40Programme selection . . . . . . . . . . . . . . . . . . . . . . . . . . . . . . . . . . . . . .39PVR archive . . . . . . . . . . . . . . . . . . . . . . . . . . . . . . . . . . . . . . . . . . . .131
RRadio mode . . . . . . . . . . . . . . . . . . . . . . . . . . . . . . . . . . . . . . . . . . . . .82Range of functions . . . . . . . . . . . . . . . . . . . . . . . . . . . . . . . . . . . . . . .142Reception type . . . . . . . . . . . . . . . . . . . . . . . . . . . . . . . . . . . . . . . . . . .19Record timer . . . . . . . . . . . . . . . . . . . . . . . . . . . . . . . . . . . . . . . . . . . .130Recording control . . . . . . . . . . . . . . . . . . . . . . . . . . . . . . . . . . . . . . . . .47Recording plan . . . . . . . . . . . . . . . . . . . . . . . . . . . . . . . . . . . . . . . . . .130Remote control . . . . . . . . . . . . . . . . . . . . . . . . . . . . . . . . . . . . . . . . . . .11Room climate . . . . . . . . . . . . . . . . . . . . . . . . . . . . . . . . . . . . . . . . . . . . .6
SSAT channel search . . . . . . . . . . . . . . . . . . . . . . . . . . . . . . . . . . . . . . .33SAT system . . . . . . . . . . . . . . . . . . . . . . . . . . . . . . . . . . . . . . . . . . . . . .28Satellite . . . . . . . . . . . . . . . . . . . . . . . . . . . . . . . . . . . . . . . . . .19, 31, 32Selecting a satellite . . . . . . . . . . . . . . . . . . . . . . . . . . . . . . . . . . . . . . .32Series timer daily . . . . . . . . . . . . . . . . . . . . . . . . . . . . . . . . . . . . . . . .127Series timer Mo-Fr . . . . . . . . . . . . . . . . . . . . . . . . . . . . . . . . . . . . . . .127Series timer weekly . . . . . . . . . . . . . . . . . . . . . . . . . . . . . . . . . . . . . .127Setup WLAN . . . . . . . . . . . . . . . . . . . . . . . . . . . . . . . . . . . . . . . . . . . .105Single cable . . . . . . . . . . . . . . . . . . . . . . . . . . . . . . . . . . . . . . . . . . . . .28Sleep timer . . . . . . . . . . . . . . . . . . . . . . . . . . . . . . . . . . . . . . . . . . . . . .44Slideshow with music . . . . . . . . . . . . . . . . . . . . . . . . . . . . . . . . . . . .116Slow motion . . . . . . . . . . . . . . . . . . . . . . . . . . . . . . . . . . . . . . . . . . . .134Smart TV portal . . . . . . . . . . . . . . . . . . . . . . . . . . . . . . . . . . . . . . . . .113Software update . . . . . . . . . . . . . . . . . . . . . . . . . . . . . . . . . . . .138, 139Sound adjustment . . . . . . . . . . . . . . . . . . . . . . . . . . . . . . . . . . . . . . . .65Sound output . . . . . . . . . . . . . . . . . . . . . . . . . . . . . . . . . . . . . . . . . . . .77Sound setting . . . . . . . . . . . . . . . . . . . . . . . . . . . . . . . . . . . . . . . .41, 62Sound settings generally . . . . . . . . . . . . . . . . . . . . . . . . . . . . . . . . . . .69Sound stop . . . . . . . . . . . . . . . . . . . . . . . . . . . . . . . . . . . . . . . . . . .13, 72Speakers . . . . . . . . . . . . . . . . . . . . . . . . . . . . . . . . . . . . . . . . . . . . . . . .76Split Screen . . . . . . . . . . . . . . . . . . . . . . . . . . . . . . . . . . . . . . . . . . . . .61Start show . . . . . . . . . . . . . . . . . . . . . . . . . . . . . . . . . . . . . . . . . . . . .116Status display . . . . . . . . . . . . . . . . . . . . . . . . . . . . . . . . . . . . . . . . . .125Still pictures . . . . . . . . . . . . . . . . . . . . . . . . . . . . . . . . . . . . . . . . . . . . . .8Subtitles . . . . . . . . . . . . . . . . . . . . . . . . . . . . . . . . . . . . . . . . . . . . . . . .48
158
Summer time . . . . . . . . . . . . . . . . . . . . . . . . . . . . . . . . . . . . . . . . . . . .46Surround decoders . . . . . . . . . . . . . . . . . . . . . . . . . . . . . . . . . . . . . . .76Switch-off time . . . . . . . . . . . . . . . . . . . . . . . . . . . . . . . . . . . . . . . . . . .45Switch-on time . . . . . . . . . . . . . . . . . . . . . . . . . . . . . . . . . . . . . . . . . . .45Switching off . . . . . . . . . . . . . . . . . . . . . . . . . . . . . . . . . . . . . . . . . . . .11Switching off Parental Control . . . . . . . . . . . . . . . . . . . . . . . . . . . . . . .91Switching on . . . . . . . . . . . . . . . . . . . . . . . . . . . . . . . . . . . . . . . . . . . . .11
TThunder storms . . . . . . . . . . . . . . . . . . . . . . . . . . . . . . . . . . . . . . . . . . .8Time . . . . . . . . . . . . . . . . . . . . . . . . . . . . . . . . . . . . . . . . . . . . . . . . . . .46Time shift . . . . . . . . . . . . . . . . . . . . . . . . . . . . . . . . . . . . . . . . . .122, 125Timer priority . . . . . . . . . . . . . . . . . . . . . . . . . . . . . . . . . . . . . . . . . . .123Tone setting . . . . . . . . . . . . . . . . . . . . . . . . . . . . . . . . . . . . . . . . . . . . .69TV media library . . . . . . . . . . . . . . . . . . . . . . . . . . . . . . . . . . . . . . . . .103Two-channel selection . . . . . . . . . . . . . . . . . . . . . . . . . . . . . . . . . . . . .72
UUSB recording . . . . . . . . . . . . . . . . . . . . . . . . . . . . . . . . . . . . . . . . . .118USB storage device . . . . . . . . . . . . . . . . . . . . . . . . . . . . . . . . . . . . . .122
VVideo text . . . . . . . . . . . . . . . . . . . . . . . . . . . . . . . . . . . . . . . . . . . . . . .80Video text comfort functions . . . . . . . . . . . . . . . . . . . . . . . . . . . . . . . .80Videos . . . . . . . . . . . . . . . . . . . . . . . . . . . . . . . . . . . . . . . . . . . . . . . .117Viewing distance . . . . . . . . . . . . . . . . . . . . . . . . . . . . . . . . . . . . . . . . . .6Virtual keyboard . . . . . . . . . . . . . . . . . . . . . . . . . . . . . . . . . . . . . . . . . .41Volume . . . . . . . . . . . . . . . . . . . . . . . . . . . . . . . . . . . . . . . . . . . . . . . . .41Volume adjustment . . . . . . . . . . . . . . . . . . . . . . . . . . . . . . . . . . . . . . .64Volume correction . . . . . . . . . . . . . . . . . . . . . . . . . . . . . . . . . . . . . . . .70Volume differences . . . . . . . . . . . . . . . . . . . . . . . . . . . . . . . . . . . . . . .64VPS times . . . . . . . . . . . . . . . . . . . . . . . . . . . . . . . . . . . . . . . . . . . . . . .81
WWall Mount . . . . . . . . . . . . . . . . . . . . . . . . . . . . . . . . . . . . . . . . . . . . . . .6Wireless headphones . . . . . . . . . . . . . . . . . . . . . . . . . . . . . . . . . . . . .74WLAN . . . . . . . . . . . . . . . . . . . . . . . . . . . . . . . . . . . . . . . . . . . . . . . . .104
ZZoom . . . . . . . . . . . . . . . . . . . . . . . . . . . . . . . . . . . . . . . . . . . . . . . . . . .54
159
U1810_40101_00
1.04
Metz - immer erstklassig.
Metz Consumer Electronics GmbH • Ohmstraße 55 • 90516 Zirndorf/Germany
Technische Hotline:+49 (0) 911 – 97 06 180 • www.metz-ce.de • [email protected]


