288
Upgrade Guide Version 2021
| Date post: | 26-Jan-2023 |
| Category: |
Documents |
| Upload: | khangminh22 |
| View: | 0 times |
| Download: | 0 times |
Upgr ade Guide
Version 2021

M icr oSt r at egy 2021
Decem ber 2021
Copyright © 2021 by MicroStrategy Incorporated. All rights reserved.
Trademark Information
The following are either trademarks or registered trademarks of MicroStrategy Incorporated or its affi l iates in the United States and certain othercountries:
Dossier, Enterprise Semantic Graph, Expert.Now, HyperIntelligence, HyperMobile, HyperScreen, HyperVision,HyperVoice, HyperWeb, Information Like Water, Intelligent Enterprise, MicroStrategy, MicroStrategy 2019, MicroStrategy2020, MicroStrategy 2021, MicroStrategy Analyst Pass, MicroStrategy Architect, MicroStrategy Architect Pass,MicroStrategy Badge, MicroStrategy Cloud, MicroStrategy Cloud Intelligence, MicroStrategy Command Manager,MicroStrategy Communicator, MicroStrategy Consulting, MicroStrategy Desktop, MicroStrategy Developer, MicroStrategyDistribution Services, MicroStrategy Education, MicroStrategy Embedded Intelligence, MicroStrategy Enterprise Manager,MicroStrategy Federated Analytics, MicroStrategy Geospatial Services, MicroStrategy Identity, MicroStrategy IdentityManager, MicroStrategy Identity Server, MicroStrategy Integrity Manager, MicroStrategy Intelligence Server, MicroStrategyLibrary, MicroStrategy Mobile, MicroStrategy Narrowcast Server, MicroStrategy Object Manager, MicroStrategy Office,MicroStrategy OLAP Services, MicroStrategy Parallel Relational In-Memory Engine (MicroStrategy PRIME), MicroStrategyR Integration, MicroStrategy Report Services, MicroStrategy SDK, MicroStrategy System Manager, MicroStrategyTransaction Services, MicroStrategy Usher, MicroStrategy Web, MicroStrategy Workstation, MicroStrategy World, Usher,and Zero-Click Intelligence.
Other product and company names mentioned herein may be the trademarks of their respective owners.
Specifications subject to change without notice. MicroStrategy is not responsible for errors or omissions. MicroStrategy makes no warranties orcommitments concerning the availability of future products or versions that may be planned or under development.
CONTENTS
Planning Your Upgrade 4
Determine Your Upgrade Methodology 4
Pre-Upgrade Administrative Tasks 5
Upgrade Prerequisites 8
Upgrade Best Practices 8
The Upgrade Process Checklist 10
Executing the Upgrade 12
Performing an In-Place Upgrade 13
Performing a Parallel Upgrade 63
Using MicroStrategy Backup and Restore 113
Validating the Upgrade 161
URL Scanner - Identify URLs for Export 161
Integrity Manager - Upgrade Impact Testing 165
MicroStrategy Capacity Testing Tool 172
Upgrade Analysis Dossier 201
Resolving Problems Encountered During the Upgrade 211
Supplemental Information 213
Application Servers 213
Using a Response File with Configuration Wizard 236
Defining DSNs 261
Specifying Warehouse Connection Information 265
Minimizing the Impact of Data Changes for Platform Release Upgrades 284
Copyright © 2021 All Rights Reserved 4
Plann ing Your Upgr adeUpgrading to MicroStrategy 2021 can have a significant effect on yoursystem. New features and enhancements may cause changes to userworkflows as well as the data returned by report executions. To ensure asuccessful upgrade process MicroStrategy strongly recommends that youcarefully review the upgrade information covered in this in this sectionbefore beginning your upgrade.
Starting in MicroStrategy 2021 Update 4, you can install an update using afull platform installer on both Windows and Linux. This change allows you toapply an update without first installing the full platform release.
Determine Your Upgrade Methodology
Before you begin the upgrade process, you will need to decide on anupgrade methodology to follow. Choose the best option based on the size,complexity, and acceptable downtime for your particular environment.
l In-Place Upgrade: The upgrade is made directly to the current in-placeenvironment hardware. Your MicroStrategy environment will beunavailable to end users throughout the upgrade process. This optionworks best for smaller deployments and those where downtime isacceptable.
You do not need to uninstall your current version of MicroStrategy beforeupgrading. MicroStrategy recommends performing an over-install whendoing an in-place upgrade.
l Parallel Upgrade: The upgrade is first executed on a test environment.The testing environment is configured to mirror the current productionenvironment. Once the upgrade process, data validation, and performance
Upgrade Guide
Copyright © 2021 All Rights Reserved 5
tests are completed and evaluated the testing environment can beconfigured for use as the new production environment.
Pre-Upgrade Administrative Tasks
Before you begin upgrading any MicroStrategy systems ensure the followingactions have been taken.
System Preparationl All necessary hardware (if applicable) for your new environment has beenprocured.
l All necessary information from all hardware has been collected and isavailable, including:
l Fully Qualified Domain Names and IP Addresses
l Machine credentials
l Network Firewalls
l Installation paths that will be used
l Server type (.NET or J2EE)
l Review the Readme for your new version of MicroStrategy to ensure thatall minimum system requirements are met.
l If you are planning to upgrade Enterprise Manager, use CommandManager to run an Enterprise Manager data load before you upgradeIntelligence Server or you may lose access to some statistics data. Makesure the Close orphan sessions option is selected.
Backup Repositories and StoresUpgrading to a new feature release or platform release of MicroStrategy willrequire the metadata to be updated, and additionally may require updatingother repositories and stores including:
Upgrade Guide
Copyright © 2021 All Rights Reserved 6
l Collaboration Storel Platform Analytics Repositoryl Statistics Repositoryl History List Repository
MicroStrategy recommends that administrators back up metadatas, stores,and repositories before they begin the actual production migration forfallback support.
Backup Configuration Files
MicroStrategy Web
Backup any changed MicroStrategy Web configuration files:
l ../WEB-INF/xml/config/mapConfig.xml
l ../WEB-INF/xml/sys_defaults.properties
l ../WEB-INF/xml/sys_defaults.xml
l ../WEB-INF/web.xml
l ../WEB-INF/xml/AdminServers.xml
l ../WEB-INF/xml/sys_defaults_
IntelligenceServerName.properties
l ../WEB-INF/xml/sys_defaults_
IntelligenceServerName$Project.properties
l ../plugins/
l ../images/
MicroStrategy Mobile
Backup any changed MicroStrategy Mobile configuration files:
l /WEB-INF/xml/sys_defaults.properties
l /WEB-INF/xml/sys_defaults.xml
Upgrade Guide

Copyright © 2021 All Rights Reserved 7
l /WEB-INF/web.xml
l ../WEB-INF/xml/AdminServers.xml
l ../WEB-INF/xml/sys_defaults_
IntelligenceServerName.properties
l ../ WEB-INF/xml/sys_defaults_
IntelligenceServerName$Project.properties
l ../plugins/
Backup any mobile device configurations or saved any images from theMicroStrategy Photo Uploader widget, manually back them up beforeproceeding with your upgrade.
l /WEB-INF/xml/mobile
l /WEB-INF/SavedImages
If you secure your MicroStrategy Mobile connections through CertificateServer, you must upgrade your Certificate Server to support MicroStrategy2021 Mobile applications.
MicroStrategy Library
Backup any MicroStrategy Library Configuration Files:
l /webapps/MicroStrategyLibrary/images/
l /webapps/MicroStrategyLibrary/plugins/
l /webapps/MicroStrategyLibrary/WEB-INF/classes/auth/
l /webapps/MicroStrategyLibrary/WEB-
INF/classes/config/configOverride.properties
l Any other customizations including SSL configurations
MicroStrategy Collaboration
Back up the Collaboration Server notification files in the following directory:
Upgrade Guide
Copyright © 2021 All Rights Reserved 8
<INSTALL_PATH>\MicroStrategy\Collaboration Server\node_
modules\mstr-collab-svc\pluginConfig\dossier
List of fi les:
l config.json
l email-Invite.template
l email-Mention.template
Upgrade Prerequisites
Make sure all of the following conditions are met before you continue:
l Installation files have been downloaded from the MicroStrategy downloadsite.
l Acquire a license key from MicroStrategy for the version of theMicroStrategy software that you are installing.
l New Windows machines will require a login account with administrativeprivileges for the domain or target machine
l Installing MicroStrategy on Linux with a CPU-based license key willrequire root access for installation
Upgrade Best Practices
Review the following recommendations to help ensure the success andstability of your MicroStrategy system and projects when upgrading to thelatest version of MicroStrategy.
l The following versions of MicroStrategy are supported for upgrade directlyto MicroStrategy 2021:
l 10.4.xl 2019 (and related updates)l 2020 (and related updates)
Upgrade Guide

Copyright © 2021 All Rights Reserved 9
If you are currently on a version of MicroStrategy that is not supported todirectly upgrade to MicroStrategy 2021, you must first upgrade to asupported version before upgrading to MicroStrategy 2021.
l If you are currently on a version of MicroStrategy that is not supported todirectly upgrade to 2021, and are doing an in-place upgrade, do notuninstall the current version of MicroStrategy before upgrading.MicroStrategy recommends performing an over-install.
l Review the Readme for a complete list of new products, new features, andupdates in MicroStrategy.
l Follow the upgrade order and recommendations outlined in this guide, inparticular the The Upgrade Process Checklist, page 10. Always upgradethe Intelligence Server before upgrading client applications such asMicroStrategy Web, Mobile, Library, and Developer.
l Create an upgrade test environment by duplicating your productionenvironment and production metadata. Upgrade this test environment tovalidate the upgrade before using in your production environment. Forguidelines on how to test your system, see Validating the Upgrade.
l Never downgrade a machine from a newer version to an older version ofMicroStrategy. It is not supported and can cause problems. Contact TechSupport if this has been accidentally done.
l Avoid installing MicroStrategy products using virtual sessions on the hostmachine such as Windows Terminal Services. Always install MicroStrategydirectly on the server machine's physical interface, or by using a remoteconnection tool (such as Microsoft Remote Desktop) that takes full controlof the server machine's interface and creates an actual administratorsession on the machine.
l Shut down all MicroStrategy Intelligence Server nodes in a clusteredenvironment before upgrading. For more information about clusteringIntelligence Servers, see the Clustering chapter in the SystemAdministration Help.
Upgrade Guide
Copyright © 2021 All Rights Reserved 10
l Ensure that all data types assigned in existing projects are supported inthe current MicroStrategy version. If a project containing columns withunsupported data types is upgraded, the data types for those columns areassigned as "reserved," and proper data types are not assigned intemporary tables. This affects report execution. Please see the ProjectDesign Guide for a listing of the supported data types for each databasetype and additional information about changing to supported data types.
The Upgrade Process Checklist
The upgrade process described in the rest of this guide involves thefollowing high-level steps. To help ensure a successful upgrade, followthese steps in the order they are presented in this guide.
1. Prepare the MicroStrategy system and projects for upgrade.l Review information specific to your version upgrade.l Pre-upgrade information and prerequisites.
l Check for certif ied and supported configurations for all products andcomponents being installed.
l Back up the production metadata, repositories, and stores.
l Create an upgrade test environment which is a duplicate ofproduction.
2. Back up your customizations, if applicable.
3. If you are upgrading your Express installation environment, you canelect to keep the current version of tutorial or your existing database.During the upgrade, you are asked "Do you want to overwrite theexisting database?"l Select Yes to overwrite the database and existing data.l Select No to keep your current database to use with the upgrade.
4. Install and configure a MicroStrategy 2021 test environment.
Upgrade Guide
Copyright © 2021 All Rights Reserved 11
5. Using the test environment, update a copy of your product metadata.
6. Validate the test environment with functional testing, comparisons testsin Integrity Manager, and simulated end-to-end performance tests usingthe Capacity Testing Tool.
For more information, see Validating the Upgrade.
7. Upgrade and configure Intelligence Server in the productionenvironment.
8. Upgrade remaining MicroStrategy products in the productionenvironment.
Upgrade Guide
Copyright © 2021 All Rights Reserved 12
Execu t ing t he Upgr adeMicroStrategy recommends that you follow a specific product upgradesequence when upgrading MicroStrategy products across several machines.Following this upgrade sequence helps ensure that MicroStrategy productsinstalled on separate machines are interoperable, that is, they are able towork together when installed on separate machines.
The recommended upgrade sequence is as follows:
1. Intelligence Server
2. MicroStrategy Web, Web Services, Mobile, Library, and CollaborationServers.
3. MicroStrategy Narrowcast Server.
4. Remaining MicroStrategy Components:
Client applications
l Mobile and Library Mobile clientsl Developerl Office
Administrative applications
l Workstationl Command Managerl Enterprise Managerl Object Managerl Integrity Managerl Systems Managerl Platform Analytics
Upgrade Guide
Copyright © 2021 All Rights Reserved 13
Performing an In-Place Upgrade
Performing an In-Place Upgrade on a Windows DeploymentThis section covers the procedure for directly upgrading your currentlydeployed Windows environment to MicroStrategy 2021. Carefully review thePlanning Your Upgrade section before proceeding with your upgrade.
1. Install MicroStrategy 2021
Run the MicroStrategy.exe f i le included in your MicroStrategy 2021download.
Step through each of the Installation Wizard windows:
1. Accept the MicroStrategy License Agreement.
2. Update your license key.
3. Review the list of products included in your license.
4. Review the products that will be installed.
If your license includes new products or services select them forinstallation in this window.
5. The installer will display any running services that need to be stopped.Click Yes to stop them now.
6. Configure the Platform Analytics connection to PostgreSQL.
7. Configure MicroStrategy Topology.
8. Server activation information
9. Enter your contact information for server activation.
10. Choose to have an activation code sent to you now or at a later date.
11. Review the list of components you have selected for installation.
Upgrade Guide
Copyright © 2021 All Rights Reserved 14
Choose if you would like the installer to automatically reboot themachine when needed.
12. Click Install to begin.
2. Update the Metadata
After upgrading the Intelligence Server, update the metadata by performingthe procedure that follows. This procedure creates and updates metadatatables to support new features available in MicroStrategy 2021.
Updating the metadata ensure compatibil ity between your pre-existingobjects and the MicroStrategy clients. You can also take advantage of newconfiguration settings exposed through the client applications, functionality,and objects available only with the updated version of metadata.
During the metadata update process, the Configuration Wizard generatesadditional SQL for tasks such as managing indexes and primary keys. Toview this SQL during the update process, on the Summary Page of theConfiguration Wizard, in the Summary pane, click SQL Preview. In addition,once you have completed the update process, the generated SQL is saved inthe MicroStrategy common files directory. The file name isOriginalScript_generated.sql, where OriginalScript is the nameof the original SQL update script. For example, if you are updating an Oracledatabase, the original SQL update script is mdorcl.sql and the generatedSQL file is mdorcl_generated.sql.
Be aware of the following:
l For information about viewing the Configuration Wizard log file if an erroroccurs, see Resolving Problems Encountered During the Upgrade.
l The MDUpdate command line util ity that was formerly used to update themetadata is no longer supported. To update the metadata from thecommand line, you can use a response file with Configuration Wizard.
As an alternative to stepping through each page of the Configuration Wizardfor each project source that needs to be updated, you can create a response
Upgrade Guide
Copyright © 2021 All Rights Reserved 15
f i le with the update information and use that response file with theConfiguration Wizard to automatically update your metadata. For moreinformation about using a response file to update the metadata, see Using aResponse File with Configuration Wizard.
If you do not have access to the GUI mode of Configuration Wizard, youmust use a response file to update your metadata.
Prerequisites for Updating a MicroStrategy Metadata
Before attempting to update your MicroStrategy metadata to the latestversion, make sure you meet the following prerequisites:
l The metadata update process can be executed only by a MicroStrategyuser who is a member of the System Administrators user group. Having alladministrative privileges is not sufficient: the user must be a member ofthe System Administrators user group.
l The project's metadata version from which you update must be older than,or the same as, the version of the product where Configuration Wizard isinstalled that will be performing the metadata update. An older version ofthe product is not able to perform an update on a newer version ofmetadata.
l The language settings of the client, project, and Intelligence Server mustall be the same.
l The projects to be updated must not be locked. To unlock a project'smetadata, in Developer, from the Administration menu, go to Locking >Unlock Project.
l Updating old metadata directly from version 10.0 or earlier to 11.3.1 orhigher is not supported. You must move to an intermediate version first,than update to 11.3.1 or higher. The intermediate version should bebetween 10.0 and 11.3.
Database-Specific Prerequisites
Upgrade Guide
Copyright © 2021 All Rights Reserved 16
The following prerequisites are specific to the RDBMS that your projectmetadata is stored in:
l If you are using Oracle for your metadata database, make sure that theMaximum Open Cursors parameter for the database is set to at least 1500.
l If you are using SQL Server for your metadata database, MicroStrategyrecommends setting the transaction log to the Simple Recovery Modelbecause the Bulk or Full Recovery Models may fil l the transaction logduring the upgrade and cause an error.
l If you are using DB2 for your metadata database, make sure that theDynamic Sections property for the database is set to 999.
Metadata Update Process
If you attempt to update a project through the Configuration Wizard and theupdate fails, the project is locked. You must unlock the project before youattempt to upgrade the project again. To unlock a project, in Developer,from the Administration menu, go to Locking > Unlock Project.
To M ake M et adat a Updat es Using t he Con f igu r at ion Wizar d
1. Select the Upgrade existing environment to MicroStrategy SecureEnterprise option. Click Next.
2. Select the Intelligence Server components option. Click Next.
3. On the MicroStrategy Authentication page, type the username andpassword of a MicroStrategy system administrator. Click Next.
4. On the metadata Connection page, enter the database password toaccess the MicroStrategy metadata. Click Next.
The DSN and Login ID are provided based on the server configurationthat you did previously.
5. On the Select Components page, select the check boxes for eachIntelligence Server you want to upgrade.
Upgrade Guide

Copyright © 2021 All Rights Reserved 17
6. Under each selected Intelligence Server, select the system componentsyou want to upgrade:l Upgrade metadata repository: The metadata repository containsthe definitions of your MicroStrategy applications and supportingobjects. An upgrade of your metadata is required to provide supportfor all new and updated features in the most recent version ofMicroStrategy.
l Migrate History List messages: Select this check box to migrateyour existing History List repository to a new format for improvedsearch results, scalability, and performance. A file-based repositorycan be migrated to a database-based repository or a hybridrepository, and a database-based repository can be migrated to ahybrid repository.l If you select this check box, additional configuration options for thismigration are provided later, on the History List Migration page.During the upgrade process this Intelligence Server and any otherIntelligence Servers in the cluster are stopped and restarted.
l If you are using a file-based History List repository and want tocontinue using that format, clear this check box. The repository isupdated, but its format is not affected, when you restart theIntelligence Server after the upgrade.
l If you are using a database-based or hybrid History List repositoryand want to continue using the same type of repository, see 2.Update the Metadata for information about upgrading the HistoryList database.
7. Select each project you want to update. Only projects that are loadedon Intelligence Server can be updated. Project updates can include anyof the following options:
l Execute project logical upgrade: Updates the project to the mostrecent version of MicroStrategy. This option also updates the report,document, and dossier definitions to improve the performance and
Upgrade Guide

Copyright © 2021 All Rights Reserved 18
reduce the memory usage and storage requirements of reports anddocuments that were created with a previous version ofMicroStrategy.
Be aware of the following:
l If this update has already been completed, this option is namedRe-execute project logical upgrade.
l This upgrade is required to execute any additional project upgradeoptions.
l Updated Report Services documents cannot be run in previousversions of MicroStrategy.
l Depending on the number of reports and documents in the project,this update may take significant time.
8. Click Next.
9. If you selected the Migrate History List messages option, on theHistory List Target Database page, specify the necessary informationfor the History List database.
10. Click Next.
11. On the Summary page, review your upgrade choices and click Finish.
3. History List Database Repository
If you are using a database-based History List, when upgrading toMicroStrategy 2021 you must upgrade the History List database tables.MicroStrategy recommends using the Configuration Wizard to upgrade theHistory List repository.
To Upgrade the History List Repository
1. In Windows, go to Start > All Programs > MicroStrategy Tools >Configuration Wizard. The Configuration Wizard opens.
Upgrade Guide
Copyright © 2021 All Rights Reserved 19
2. Select Upgrade existing environment to MicroStrategy SecureEnterprise and click Next.
3. Select History List Repositories and click Next. .
4. Select the DSN for the History List database, and specify the logininformation.
5. To upgrade existing History List messages to the current format, selectthe Copy History List content check box.
If this check box is cleared, existing History List messages are notupgraded. The new tables required to support History List messagesare stil l created.
6. If you select to upgrade your existing History List messages, you canalso select the Compress data check box to compress all existingHistory List messages. This compression can improve the performanceof using History List messages. However, the compression of yourHistory List messages can require significant system resources duringthe upgrade.
To avoid the overhead of compressing your existing History Listmessages, clear the Compress data check box. Existing History Listmessages are not modified, but any newly created History Listmessages are created with the new compressed format.
7. Click Next.
8. Review the available information, and click Finish.
4. MicroStrategy Web and Mobile Server
Once you have upgraded Intelligence Server and updated the projectmetadata, upgrade your MicroStrategy Web and Mobile Server installations.
Before upgrading MicroStrategy Web and Mobile Server, be aware of thefollowing considerations:
Upgrade Guide
Copyright © 2021 All Rights Reserved 20
l Note your current Web customizations and review the information inMicroStrategy Web Customizations to learn how to successfully migratethese customizations.
l If you have created any mobile device configurations or saved any imagesfrom the MicroStrategy Photo Uploader widget, those configurations andimages are deleted during the upgrade unless you manually back them upbefore the upgrade and restore them after the upgrade.l To back up your configuration files, make a copy of the directory<MicroStrategyMobileServer>/WEB-INF/xml/mobile/ and all itscontents, where <MicroStrategyMobileServer> is the installationlocation of MicroStrategy Mobile Server. By default, this location isC:\Program Files (x86)\MicroStrategy\Mobile Server
ASPx or \Mobile Server JSP. Then, after you have upgraded MobileServer, copy the contents of the backed-up directory to the samecorresponding location in the new Mobile Server deployment.
l Photo Uploader images are stored in MicroStrategy Mobile Server. Toback up your Photo Uploader images, make a copy of the directory<MicroStrategyMobileServer>/WEB-INF/SavedImages/ and allits contents, where <MicroStrategyMobileServer> is theinstallation location of MicroStrategy Mobile Server. By default, thislocation is C:\Program Files (x86)\MicroStrategy\Mobile
Server ASPx or \Mobile Server JSP.l If you secure your MicroStrategy Mobile connections through CertificateServer, you must upgrade your Certificate Server to support MicroStrategy2021 Mobile applications. Enhancements to MicroStrategy CertificateServer require this step.
l After upgrading MicroStrategy Web or Mobile Server, restart the web andapplication servers along with clearing the web and application servercaches.
Upgrade Guide
Copyright © 2021 All Rights Reserved 21
.NET:
Upgrading a Windows machine (IIS) with MicroStrategy Web and MobileServer directly from an older version to a newer version upgrades bothdeployments automatically. In-place upgrades require no additional steps.To upgrade MicroStrategy Web and Mobile Server, Administrators shouldfollow the detailed instructions in Deploying with IIS (Windows).
J2EE:
Upgrading MicroStrategy Web and/or Mobile for JSP, whether it 's onWindows or Linux, only creates a new MicroStrategy.war and/orMicroStrategyMobile.war f i le. Deployments are not done by theMicroStrategy Installer and must be done by the administrator on asupported application server.
For steps specific to your J2EE environment, see:
l Deploying with Tomcat (Windows)
l Deploying with JBoss (Windows)
4.1 MicroStrategy Web Customizat ions
MicroStrategy Web customizations are developed as plugins that are storedin the plugins folder of the environment. When upgrading to a newer versionof MicroStrategy Web, the plugin upgrade differs depending on whether youare using a .NET environment on Windows or a J2EE environment onWindows or Linux.
.NET EnvironmentWhen you upgrade MicroStrategy Web in a .NET environment (IIS), theexisting plugins are automatically copied to the plugins folder of the newinstallation directory.
Upgrade Guide
Copyright © 2021 All Rights Reserved 22
J2EE EnvironmentWhen you upgrade MicroStrategy Web in a J2EE environment, you mustmanually copy your existing plugins to the plugins folder in your newdeployment folder.
1. Make a copy of your existing plugins.
2. Deploy the new MicroStrategy Web WAR file.
3. Copy your existing plugins to the new plugins folder in deploymentfolder.
For information about the plugin structure used for MicroStrategy Webcustomizations, refer to MicroStrategy Web SDK in the MicroStrategyDeveloper Library.
4.2 Migrate Web Delivery Subscript ions from Narrowcast Server toDistr ibut ion Services
Beginning with version 9.0, Distribution Services replaced NarrowcastServer as the application that delivers Web delivery subscriptions.
When you migrate all information related to Web delivery subscriptions fromyour existing Narrowcast Server to Distribution Services, you can select tomigrate Narrowcast Server users and their addresses. These users arecopied as contacts who will receive the subscriptions in DistributionServices. During the upgrade process, only user addresses are migrated;subscriptions and schedules will not be migrated.
MicroStrategy recommends that you back up the database containing yourObject Repository and Subscription Book Repository before migratingsubscriptions.
Do not back up the repositories using the Copy Repository tool inNarrowcast Server. Copy Repository assigns a new System ID to theresulting repositories, which breaks the link between Narrowcast Server and
Upgrade Guide
Copyright © 2021 All Rights Reserved 23
your existing MicroStrategy project. Making a database backup retains thislink.
You can migrate existing Narrowcast Server subscriptions to DistributionServices using the Configuration Wizard. For instructions, see the procedurebelow.
As an alternative to stepping through each page of the ConfigurationWizard, you can create a response file with the update information, and usethat response file with the Configuration Wizard to automatically migrateyour Narrowcast Server subscriptions. For more information about using aresponse file to migrate your subscriptions, including instructions, seeUsing a Response File with Configuration Wizard, page 236.
You can also migrate your subscriptions from within Developer, with theMigrate Subscriptions for Web Deliveries wizard. To access the MigrateSubscriptions for Web Deliveries wizard, in Developer, from the Toolsmenu, select Migrate Narrowcast Server Subscriptions for WebDeliveries.
To Migrate Narrowcast Server Subscript ions Using the Configurat ion
Wizard
Only the 32-bit Configuration Wizard (macfgwiz.exe) in Windows cansupport this functionality.
1. In Windows, go to Start > All Programs > MicroStrategy Tools >Configuration Wizard. The Configuration Wizard opens.
2. Select Upgrade existing environment to MicroStrategy SecureEnterprise, and then select the Narrowcast Server Web DeliverySubscriptions.
3. Click Next.
4. Step through the wizard, providing all information required.
5. Click Migrate.
Upgrade Guide
Copyright © 2021 All Rights Reserved 24
5. MicroStrategy Library
In MicroStrategy 10.9 through 11.0, MicroStrategy Library was automaticallydeployed in Tomcat and the MicroStrategyLibrary.war f i le installed inthe <INSTALL_PATH>\LibraryWebMobile directory. MicroStrategy 2019and above requires administrators to perform the upgrade for their Librarydeployment.
You must manually deploy a new Library WAR File after upgradingMicroStrategy Library.
This section contains high level steps and considerations for performing anupgrade or migrating MicroStrategy Library to a new environment.
Windows Environments
In MicroStrategy 10.9 to 11.0, MicroStrategy Library is automaticallydeployed in Tomcat and the Library.war file is installed in the <INSTALL_
PATH>\LibraryWebMobile directory. Starting in MicroStrategy 2019,administrators can choose Tomcat as an option under "Other Components"to deploy Library to Tomcat, or deselect it so that only the WAR file iscreated in the directory referenced above.
Perform the following steps when doing a direct upgrade of MicroStrategyLibrary 10.9 - 11.0 to MicroStrategy 2020.
1. Within the Tomcat directory, back up the following files:l webapps folderl server.xmll tomcat-users.xml
2. Uninstall Tomcat.
3. Install Tomcat 9.0.12 or higher.
4. Restore all backed up files in the new Tomcat installation.
5. Start Tomcat.
Upgrade Guide
Copyright © 2021 All Rights Reserved 25
The new Library.war file appears in <INSTALL_
PATH>\LibraryWebMobile.
Deploying the New WAR File
A new Library WAR File must be manually deployed after upgradingMicroStrategy Library, even between service packs.
You should backup the webapps folder as they are overwritten whendeploying new .war f i les.
Use the following steps to deploy a new WAR file for both Windows andLinux.
1. Use the MicroStrategy installer to create a new MicroStrategy 2020Library.war f i le by doing a direct upgrade or new installation.
2. Redeploy the new Library.war f i le from the Library install directoryto the J2EE server being used. See the list of supported servers.
3. Migrate your customizations to the new environment, such as:
l .../webapps/MicroStrategyLibrary/images/
l .../webapps/MicroStrategyLibrary/plugins/
l .../webapps/MicroStrategyLibrary/WEB-
INF/classes/auth/
l Customized authentication configuration, such as SAMLauthentication
l .../webapps/MicroStrategyLibrary/WEB-
INF/classes/config/configOverride.properties
l Make sure MicroStrategy Library is pointing to the correctIntelligence Server and Collaboration Server with correctauthentication setting by going to the Library Administration ControlPanel.
Upgrade Guide
Copyright © 2021 All Rights Reserved 26
l .../webapps/MicroStrategyLibrary/WEB-
INF/classes/logback.xml
l Any other customizations including SSL configurations
4. Verify that MicroStrategy Library functionality including collaboration,sharing, exporting, printing, and all other features are working properly.Ensure dossiers and documents are appearing.
The Collaboration Server is a separate component of MicroStrategy that isupgraded independently of Library. See Upgrade MicroStrategyCollaboration for more information.
6. MicroStrategy Collaboration
MicroStrategy Collaboration has been enhanced to use a central datarepository installed as part of the MicroStrategy Platform. Starting inMicroStrategy 2020 the Collaboration Server constructs the connectionstring to the MicroStrategy Data Repository during runtime. After performingthe upgrade, Collaboration Server will only support connections to theMicroStrategy Data Repository.
After upgrading Collaboration Server, the previous data repository remainsunchanged but it will not be used by the new version of Collaboration Server.Any comments stored in the previous data repository will need to be movedto the new repository to be accessible.
Migrat ing Comments to the MicroStrategy Data Repository
The Collaboration Server Administration Tool provides a way for systemadministrators to migrate comments from the previous data repository to thenew data repository. The Collaboration Administration Page will display awarning message when it detects that a previous data repository was usedby the Collaboration Server before the upgrade.
The Collaboration Server Administration Tool is a console application andwill connect to the data repository using the same configuration as the
Upgrade Guide
Copyright © 2021 All Rights Reserved 27
Collaboration Server so no user input is required to connect. The tool willprovide feedback as data is being migrated and will show a message whenthe migration is complete.
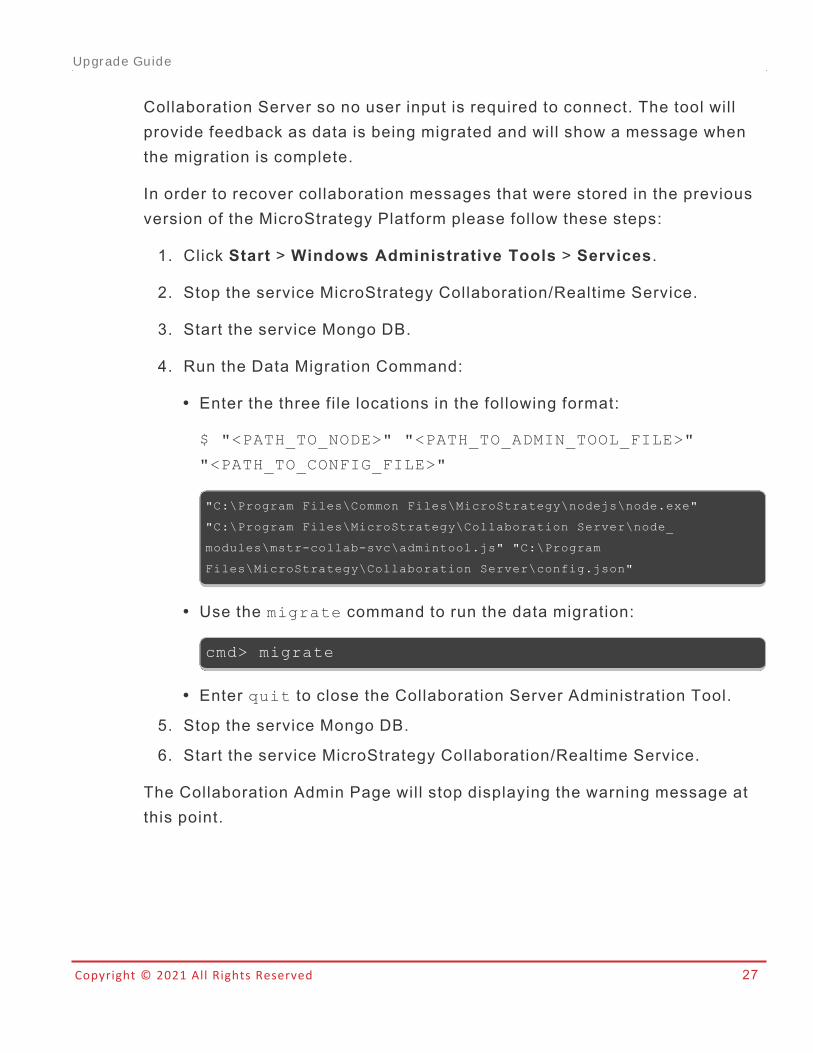
In order to recover collaboration messages that were stored in the previousversion of the MicroStrategy Platform please follow these steps:
1. Click Start > Windows Administrative Tools > Services.
2. Stop the service MicroStrategy Collaboration/Realtime Service.
3. Start the service Mongo DB.
4. Run the Data Migration Command:
l Enter the three file locations in the following format:
$ "<PATH_TO_NODE>" "<PATH_TO_ADMIN_TOOL_FILE>"
"<PATH_TO_CONFIG_FILE>"
"C:\Program Files\Common Files\MicroStrategy\nodejs\node.exe"
"C:\Program Files\MicroStrategy\Collaboration Server\node_
modules\mstr-collab-svc\admintool.js" "C:\Program
Files\MicroStrategy\Collaboration Server\config.json"
l Use the migrate command to run the data migration:
cmd> migrate
l Enter quit to close the Collaboration Server Administration Tool.
5. Stop the service Mongo DB.
6. Start the service MicroStrategy Collaboration/Realtime Service.
The Collaboration Admin Page will stop displaying the warning message atthis point.
Upgrade Guide
Copyright © 2021 All Rights Reserved 28
7. Updating the Enterprise Manager Project
Upgrading from MicroStrategy 9 to 2021 includes major enhancements andupdates to the Enterprise Manager project; whereas upgrading fromMicroStrategy 10 to 2021 does not have major enhancements and upgradesto the Enterprise Manager project. In both scenarios, you should use thelatest versions of Enterprise Manager projects with MicroStrategy 2021.
l To retain customizations created in previous Enterprise Manager projects,make separate copies of these customized copies of the out-of-the-boxobjects, or as brand-new objects. Any modifications you made to the out-of-the-box objects for an Enterprise Manager project are replaced as part of theupgrade process.
l Your Enterprise Manager statistics and warehouse are automatically updatedby the installer.
l Use the Project Duplication Wizard to make a backup of your existingEnterprise Manager project. For detailed information about using ProjectDuplication, see the Managing Your Projects chapter of the SystemAdministration Help.
1. Open Configuration Wizard.
2. Select Upgrade existing environment to MicroStrategy SecureEnterprise, and click Next.
3. Select Upgrade Enterprise Manager Project, and click Next.
4. Provide the following information:l User Name: Type the MicroStrategy user name that can access andadminister the Enterprise Manager project.
l Password: Type the password for the MicroStrategy user that canaccess and administer the Enterprise Manager project.
5. If you have an Enterprise Manager project package file (.mmp) to useinstead of the default fi le, click Advanced >>. For the Packagelocation f ield, click ... (the Browse button) to navigate to and select thepackage file.
Upgrade Guide
Copyright © 2021 All Rights Reserved 29
6. Click Next.
7. Provide the following information:l DSN: Select the data source name for your statistics repository orclick New to open the MicroStrategy Connectivity Wizard and create anew DSN.
l User Name: Type the database user name for the user that canconnect to the statistics data source.
l Password: Type the password for the user that can connect to thestatistics data source.
8. Click Next.
9. Review the summary information.
You can click Save to save the configuration as a response (.ini) fi le toupgrade your Enterprise Manager projects on other systems or to runsilent configurations at a later time. For information on running theConfiguration Wizard with a response file, see Using a Response Filewith Configuration Wizard.
10. Click Finish.
8. Upgrade the Platform Analytics Project
As of 2019, you can upgrade your Platform Analytics project in the metadataof your connected Intelligence Server. Upgrading the project isrecommended with each platform and update release in order to brings inthe latest dossiers, attributes, metrics and reporting optimizations to thePlatform Analytics project.
1. Open Configuration Wizard.
2. Select Upgrade existing environment to MicroStrategy SecureEnterprise, and click Next.
3. Select Upgrade Platform Analytics Project, and click Next.
4. Provide the following information:
Upgrade Guide
Copyright © 2021 All Rights Reserved 30
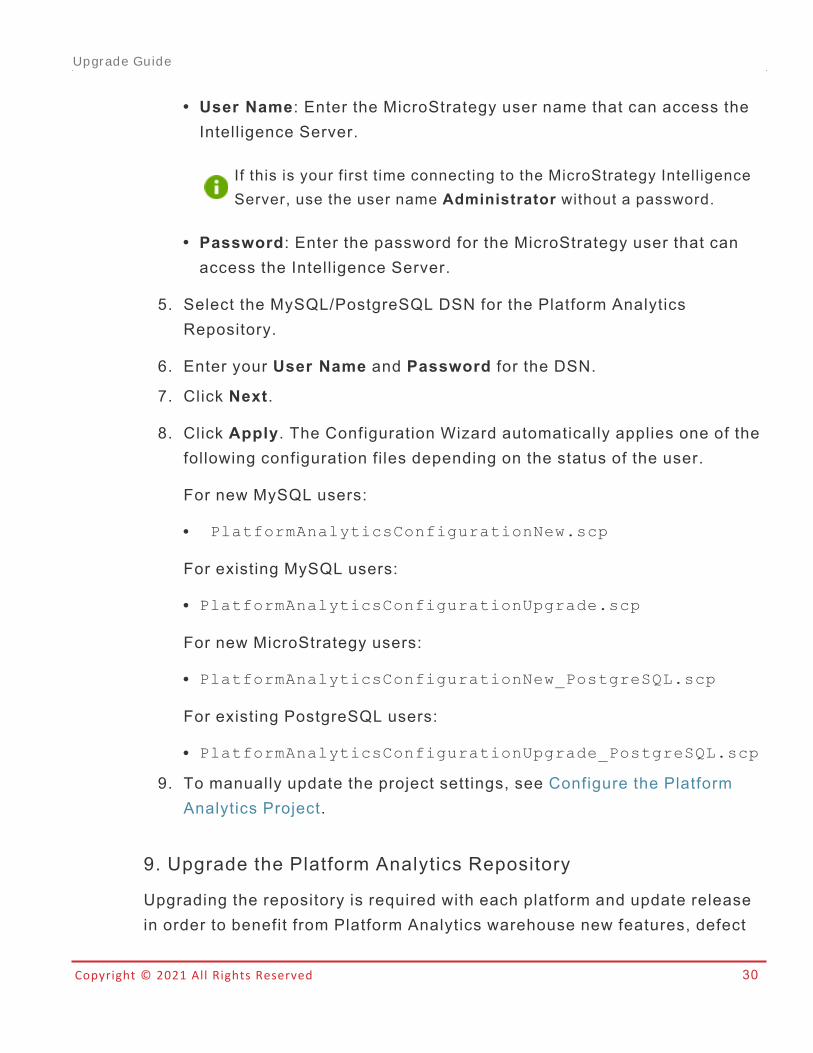
l User Name: Enter the MicroStrategy user name that can access theIntelligence Server.
If this is your first time connecting to the MicroStrategy IntelligenceServer, use the user name Administrator without a password.
l Password: Enter the password for the MicroStrategy user that canaccess the Intelligence Server.
5. Select the MySQL/PostgreSQL DSN for the Platform AnalyticsRepository.
6. Enter your User Name and Password for the DSN.
7. Click Next.
8. Click Apply. The Configuration Wizard automatically applies one of thefollowing configuration files depending on the status of the user.
For new MySQL users:
l PlatformAnalyticsConfigurationNew.scp
For existing MySQL users:
l PlatformAnalyticsConfigurationUpgrade.scp
For new MicroStrategy users:
l PlatformAnalyticsConfigurationNew_PostgreSQL.scp
For existing PostgreSQL users:
l PlatformAnalyticsConfigurationUpgrade_PostgreSQL.scp
9. To manually update the project settings, see Configure the PlatformAnalytics Project.
9. Upgrade the Platform Analytics Repository
Upgrading the repository is required with each platform and update releasein order to benefit from Platform Analytics warehouse new features, defect
Upgrade Guide

Copyright © 2021 All Rights Reserved 31
f ixes, and database structure optimizations.
The Configuration Wizard provides the following options:
l Host: Type the host name of the Platform Analytics warehouse. By default,this is set to the last successful connection value.
l Port: Type the port number of the Platform Analytics warehouse. Bydefault, this is set to the last successful connection value.
l User Name: Type the user name for the Platform Analytics warehouse. Bydefault, this is set to the value from PAConsumerConfig.yaml f i le
l Password: Type the password for the Platform Analytics warehouse user.
Depending on the warehouse type you choose for the Host and Port, youmust set the parameter whDbType to either "postgresql" or "mysql" inthe PAConsumerConfig.yaml f i le.
The default path is:
l Linux: /opt/MicroStrategy/PlatformAnalytics/Conf
l Windows: C:\Program Files (x86)\MicroStrategy\Platform
Analytics\conf
Click Next to proceed.
You can also update the Platform Analytics repository using theConfiguration Wizard in interactive mode.
How to Update the Repository in Interact ive Mode
To update the Platform Analytics repository using the ConfigurationWizard in interactive mode on Windows:
1. In a Windows console, enter one of the following commands:l For 64-bit, enter MACfgWiz_64.l For 32-bit, enter MACfgWiz.
Upgrade Guide

Copyright © 2021 All Rights Reserved 32
2. Click Enter.
3. Type 2 and click Enter to create a new response.ini f i le.
4. Type 5 and click Enter to upgrade your existing environment toMicroStrategy Analytics Enterprise.
5. Type 3 and click Enter to upgrade your Platform Analyticsrepository.
6. Enter your Platform Analytics warehouse database credentials. Bydefault, the server name, port number, and user name are set to thelast successful connection value.
If you did not change the values, leave as default. The defaultpassword can be found at C:\Program Files (x86)\CommonFiles\MicroStrategy\express_password.txt
7. By default, the configuration is saved as Response.ini in thecommon files path, C:\Program Files (x86)\CommonFiles\MicroStrategy. You can leave the field blank to use the defaultname or type a different name, and then click Enter. Theresponse.ini fi le is generated, and you are prompted whether to runthe configuration immediately.
8. Type Y and click Enter to run the configuration.
To update the Platform Analytics repository using the ConfigurationWizard in interactive mode on Linux:
1. In a Linux console window, browse to HOME_PATH where HOME_
PATH is the specified home directory during installation.
2. Browse to the bin directory.
Upgrade Guide
Copyright © 2021 All Rights Reserved 33
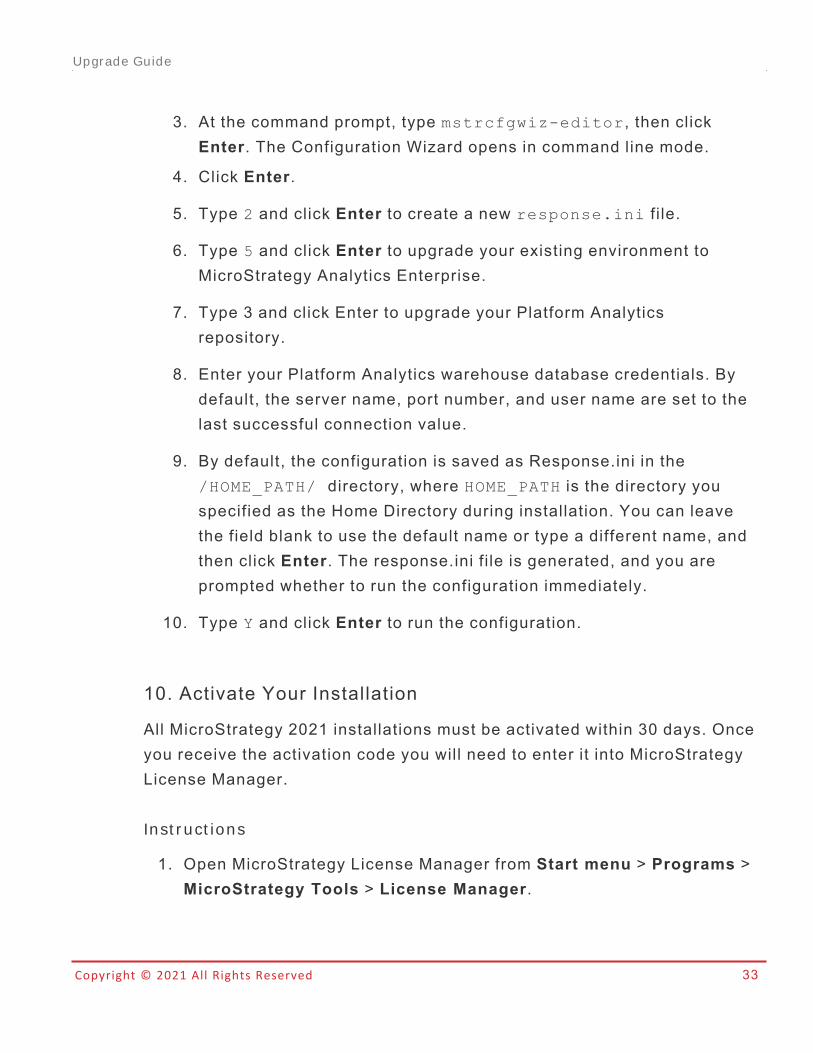
3. At the command prompt, type mstrcfgwiz-editor, then clickEnter. The Configuration Wizard opens in command line mode.
4. Click Enter.
5. Type 2 and click Enter to create a new response.ini f i le.
6. Type 5 and click Enter to upgrade your existing environment toMicroStrategy Analytics Enterprise.
7. Type 3 and click Enter to upgrade your Platform Analyticsrepository.
8. Enter your Platform Analytics warehouse database credentials. Bydefault, the server name, port number, and user name are set to thelast successful connection value.
9. By default, the configuration is saved as Response.ini in the/HOME_PATH/ directory, where HOME_PATH is the directory youspecified as the Home Directory during installation. You can leavethe field blank to use the default name or type a different name, andthen click Enter. The response.ini fi le is generated, and you areprompted whether to run the configuration immediately.
10. Type Y and click Enter to run the configuration.
10. Activate Your Installation
All MicroStrategy 2021 installations must be activated within 30 days. Onceyou receive the activation code you will need to enter it into MicroStrategyLicense Manager.
Inst r uct ions
1. Open MicroStrategy License Manager from Start menu > Programs >MicroStrategy Tools > License Manager.
Upgrade Guide
Copyright © 2021 All Rights Reserved 34
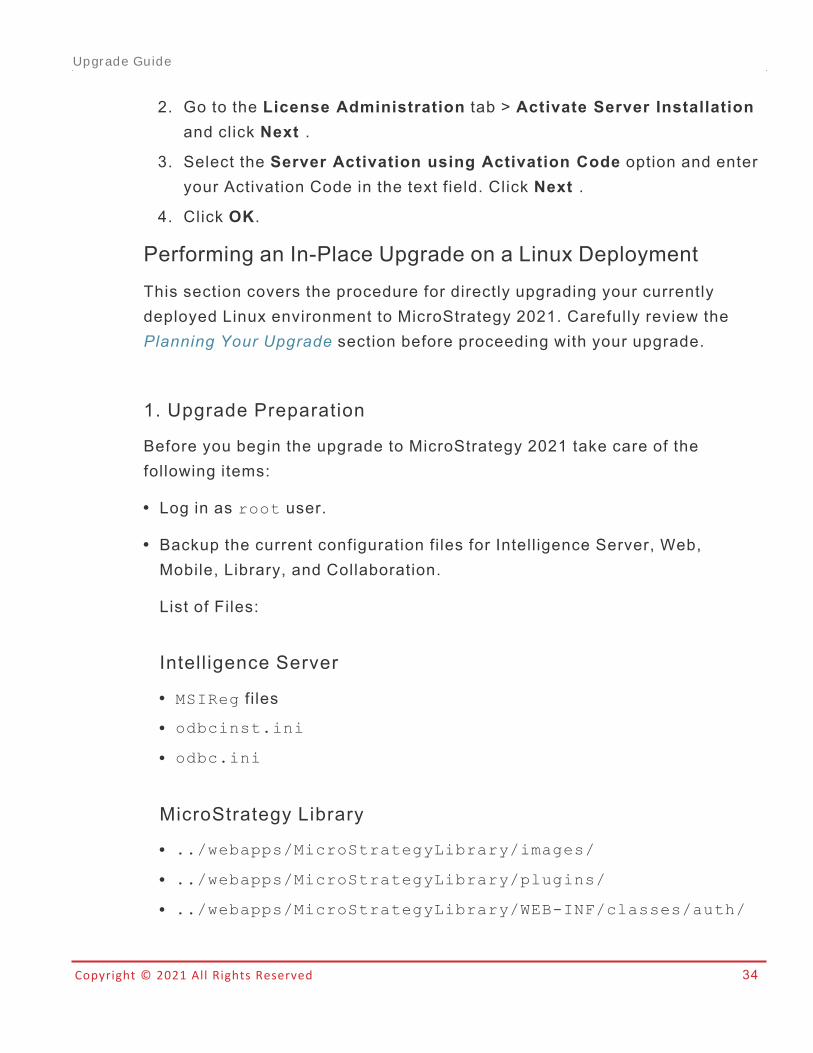
2. Go to the License Administration tab > Activate Server Installationand click Next .
3. Select the Server Activation using Activation Code option and enteryour Activation Code in the text field. Click Next .
4. Click OK.
Performing an In-Place Upgrade on a Linux DeploymentThis section covers the procedure for directly upgrading your currentlydeployed Linux environment to MicroStrategy 2021. Carefully review thePlanning Your Upgrade section before proceeding with your upgrade.
1. Upgrade Preparation
Before you begin the upgrade to MicroStrategy 2021 take care of thefollowing items:
l Log in as root user.
l Backup the current configuration files for Intelligence Server, Web,Mobile, Library, and Collaboration.
List of Files:
Intelligence Server
l MSIReg f i lesl odbcinst.ini
l odbc.ini
MicroStrategy Library
l ../webapps/MicroStrategyLibrary/images/
l ../webapps/MicroStrategyLibrary/plugins/
l ../webapps/MicroStrategyLibrary/WEB-INF/classes/auth/
Upgrade Guide
Copyright © 2021 All Rights Reserved 35
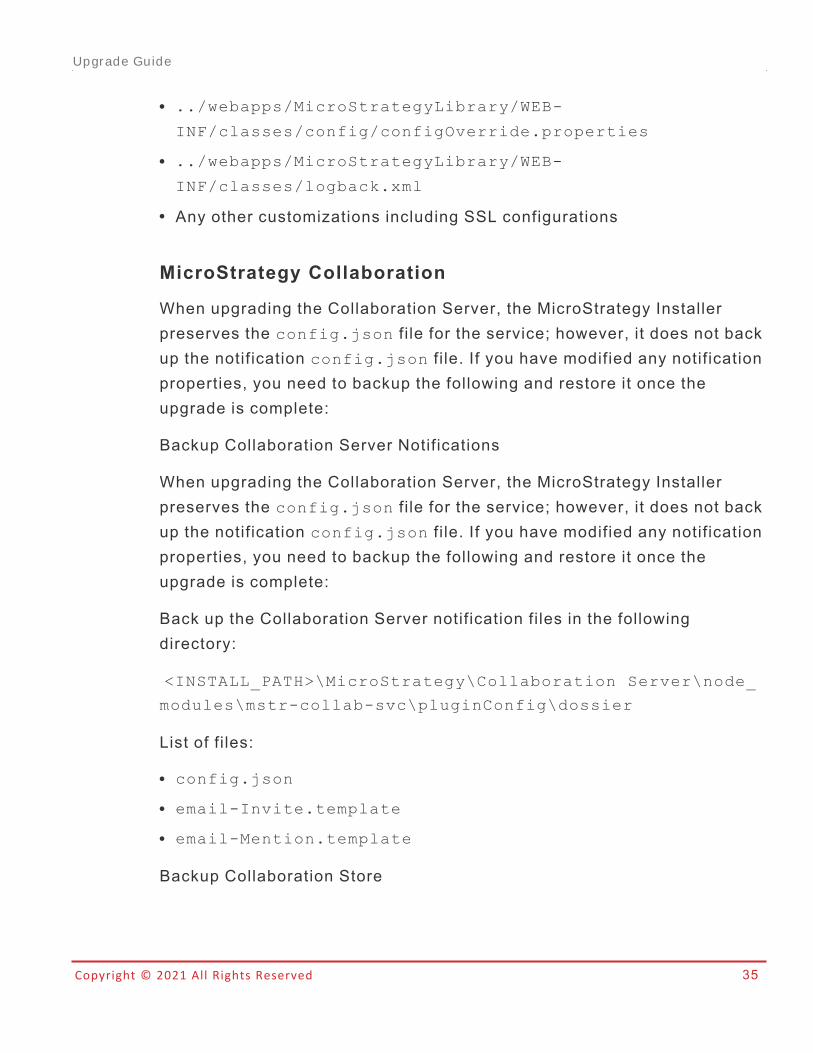
l ../webapps/MicroStrategyLibrary/WEB-
INF/classes/config/configOverride.properties
l ../webapps/MicroStrategyLibrary/WEB-
INF/classes/logback.xml
l Any other customizations including SSL configurations
MicroStrategy Collaboration
When upgrading the Collaboration Server, the MicroStrategy Installerpreserves the config.json f i le for the service; however, it does not backup the notification config.json f i le. If you have modified any notificationproperties, you need to backup the following and restore it once theupgrade is complete:
Backup Collaboration Server Notifications
When upgrading the Collaboration Server, the MicroStrategy Installerpreserves the config.json f i le for the service; however, it does not backup the notification config.json f i le. If you have modified any notificationproperties, you need to backup the following and restore it once theupgrade is complete:
Back up the Collaboration Server notification files in the followingdirectory:
<INSTALL_PATH>\MicroStrategy\Collaboration Server\node_
modules\mstr-collab-svc\pluginConfig\dossier
List of fi les:
l config.json
l email-Invite.template
l email-Mention.template
Backup Collaboration Store
Upgrade Guide
Copyright © 2021 All Rights Reserved 36
The Collaboration Server util izes MongoDB as its repository database.MongoDB has a built-in command for database backup, transfer, andrestoration.
MicroStrategy recommends that the MongoDB database be backed up on aregular basis.
Gather the following information from the dburl f ield in the config.json
f i le from each server:
l Username
l Password
l Collaboration database name
l Admin database name
1. Stop the Collaboration Server and the MongoDB service.
2. Execute the following command from the destination server:
mongodump --host <source_server_name> --db <source_db_name> --
username <source_username> --password <source_password> --
authenticationDatabase admin --excludeCollection sessions --archive
| mongorestore --username <target_username> --password<target_
password> --authenticationDatabase admin --drop --archive
3. Restart the Collaboration Service and the MongoDB service.l Send an email to your users to inform that Intelligence Server and WebServer will be down during the upgrade process.
l Halt any monitoring alerts in case false alarm triggered during upgrades.l Check the MicroStrategy Web Administration page and delete any definedTrust Relationships.
l Restart all services for the machines to be upgraded.l Execute service mstr stop to stop Tomcat, MicroStrategy Listener,and Intelligence Server.
l Unmount all current mounts to any MicroStrategy deployment.
Upgrade Guide
Copyright © 2021 All Rights Reserved 37
Unmounting is necessary to prevent the installer from attempting toremove other items in the mounted locations such as the image shares.
l To view the related mounts and locations, run:
mount | grep MicroStrategy
l To unmount each folder, run umount /<path>/<to>/<folder>. Forexample:
umount /opt/mstr/MicroStrategy/install/images
l Stop puppet if the service is running.
Use the following commands:
l Stop puppet: service puppet stop
l Get process id for any additional puppet processes: ps -ef |
grep puppet
l Kill any remaining processes: kill -9 <processID>
l Remove MicroStrategy directory and .war files from tomcat webapps andwork folders.
1. cd /opt/apache/tomcat/latest/webapps/
2. rm -rf MicroStrategy*
3. cd /opt/apache/tomcat/latest/work/Catalina/localhost
4. rm -rf MicroStrategy*
l Use df -h to check that at least 5GB of disk space is available under/opt/mstr
2. Install MicroStrategy 2021
The MicroStrategy Installation Wizard can be used in either in graphical userinterface (GUI) mode or in command line mode for Linux.
1. Navigate to your MicroStrategy 2021 download folder and thenQueryReportingAnalysis_Linux.
Upgrade Guide
Copyright © 2021 All Rights Reserved 38
2. Run the Installation Wizard:
l For GUI mode:./setup.sh
l For command line mode: ./setup.sh -console
After each step of the install process click Next, or type 1 and pressEnter, to proceed.
To quit the installation at any time during the setup, click Cancel, ortype 3 and press Enter.
3. Step through each of the Installation Wizard windows/prompts:
1. Accept the MicroStrategy License Agreement.
2. Update your license key.
3. Review the list of products included in your license.
4. Review the products to be installed.
If your license includes new products or services select them forinstallation in this window.
5. The installer displays any running services that need to bestopped. Click Yes to stop them now.
6. Configure MicroStrategy Topology.
7. Server activation information
8. Enter your contact information for server activation.
9. Choose to have an activation code sent you to now or at a laterdate.
10. Review the list of components selected for installation.
Choose if you would like the installer to automatically reboot themachine if necessary.
11. Click Install to begin.
Upgrade Guide
Copyright © 2021 All Rights Reserved 39
3. Upgrade the Drivers for Your Data Source Connections
MicroStrategy 2021 requires 64-bit drivers for all data source connections.
Upgrading from versions prior to MicroStrategy 10.4...
If you are using a version prior to MicroStrategy 10.4 and connect to yourdata source using a MicroStrategy-branded driver , the drivers are upgradedfrom 32-bit to 64-bit drivers automatically when Intelligence Server isupgraded. You must manually update the MicroStrategy odbc.iniconfiguration file to point to the location for the 64-bit driver.
All MicroStrategy-branded drivers are upgraded during the installationprocess. Simply replace the newly installed odbc.ini with the backuptaken before the upgrade.
If you connect to your data source using a driver provided by a third-partyvendor, you must install the 64-bit version of the driver from your third-partyvendor, and then create a new DSN that uses that driver to connect to yourdata source. You must also update the MicroStrategy odbc.iniconfiguration file.
After you upgrade the drivers, continue the upgrade process with 4. Connectthe Intelligence Server to the Metadata.
4. Connect the Intelligence Server to the Metadata
Use the Configuration Wizard to establish a connection between IntelligenceServer and your metadata repository.
Configure Metadata Connect ion
1. Run the MicroStrategy Configuration Wizard:
cd /opt/mstr/Microstrategy/bin
./mstrcfgwiz
2. Select Configure Intelligence Server, and click Next.
Upgrade Guide
Copyright © 2021 All Rights Reserved 40
3. From the DSN drop-down list, select the DSN used to connect to themetadata repository. Enter the User Name and Password for thedatabase.
4. Click Next.
5. Select Use the selected Server Definition as active.
6. Choose the server definition to use from the Existing ServerDefinitions pane.
7. Click Next.
Def ine t he In t el l igence Ser ver por t num ber and ot her set t ings
1. Define the Intelligence Server settings described below:l Port number: You can use the default port number (34952) or specifyanother port number. The port number is how a server processidentifies itself on the machine on which it is running. If the portnumber is used by another process, such as in a shared environment,specify an available port number.
l REST port number: You can use the default port number (34962) orspecify another port number for the REST API Server insideIntelligence Server. This port number should not be same with theIntelligence Server port number.
You can configure REST API Server logging with the Diagnosticsand Performance Logging Tool. Select the PerformanceConfiguration tab, and find the dispatcher REST Trace undercomponent Network Classes. For more information, see theConfiguring What is Logged section in the System AdministrationHelp.
l Register Intelligence Server as a Service: Select this check box toregister Intelligence Server as a service.
l Projects to load at startup: This pane displays all the projects thatare in the metadata repository. You can select projects to use with
Upgrade Guide
Copyright © 2021 All Rights Reserved 41
the server definition that you have chosen. The projects that youselect are loaded on the server at startup.
l Start Intelligence Server when finished: Select this check box tohave Intelligence Server start once you complete this configuration.
l Identify missing DSNs: Select this check box to verify that all DSNs,which are used for database instances created in MicroStrategy, arelocally available. This helps to ensure that your database instances inMicroStrategy can connect successfully to their associated datasources.
By default, this check box is cleared, which means the availability ofall local DSNs used in database instances is not verified. While thismay mean that all DSNs used in database instances are notavailable, it can save system resources required for the IntelligenceServer configuration process.
2. Click Next.
3. Secure socket layer (SSL) protocol encrypts communications betweenIntelligence Server and Developer:
Configure SSL: This option specifies whether to enable IntelligenceServer and Developer to communicate using the SSL protocol. Clearthis check box to disable the use of the SSL protocol for IntelligenceServer and Developer communications. This option also applies SSLprotocol to the REST port number.
When you select to enable the SSL protocol, you must provide thefollowing information:
l Certificate: The SSL certificate file you created for IntelligenceServer. Click the browse button to navigate to and select thecertif icate file.
Upgrade Guide
Copyright © 2021 All Rights Reserved 42
l Key: The private key file you created while requesting the certif icatefor Intelligence Server. Click the browse button to navigate to andselect the private key file.
l Password: The password that you used while creating the private keyfor the SSL certificate.
l SSL Port: The port number to use for SSL access. By default, theport is 39321.
To enable SSL protocol communication in Developer, you must use theProject Source Editor. For steps to complete the other tasks requiredto enable SSL protocol communications, refer to the SystemAdministration Help.
Configuring port requires Client Certificate: If selected, the SSLcommunications with client certif icate verification will be configured inthe Intelligence Server, but does not apply to REST port number.Provide the following information:
l SSL Port: The port number the Intelligence Server will use for SSLcommunications with client certif icate verification.
l Truststore: The location to the client certif icate truststore.
4. Click Next.
5. To specify the default statistics repository for the local IntelligenceServer and enable basic statistics logging for projects:l Make this my default Statistics Database Instance for the localIntelligence Server metadata: Select this check box to define whichstatistics repository to use for recording statistics. If you clear thischeck box, a default statistics database instance is not defined foryour Intelligence Server.
l When defining the default statistics repository, you must provide thefollowing configuration details:
Upgrade Guide
Copyright © 2021 All Rights Reserved 43
l DSN: Select the data source name for your statistics repository.
If a DSN for your statistics repository does not exist, you can clickNew to open the MicroStrategy Connectivity Wizard and create anew DSN.
l User Name: Type the database user name for the user that canconnect to the statistics data source.
l Password: Type the password for the user that can connect to thestatistics data source.
l Enable Basic Statistics (For newly created projects andexisting projects not logging statistics): Basic statistics for newprojects and any projects that are not currently logging statisticswill be enabled. You can alter the settings in Project ConfigurationEditor in MicroStrategy Developer to:o Enable additional statistics for a project.o Enable basic and additional statistics for a project if you clearedthis check box.
6. Enable and configure the Messaging Services host and port settings.
Messaging Services Host(s)/Port(s): Provide host name or IPaddress of Messaging Services.
Format for this setting should be: server1.acme.com:9092
7. Click Next.
8. Review the summary information and click Save.
9. Click Finish.
5. Update the Metadata
After upgrading the Intelligence Server, update the metadata by performingthe procedure that follows. This procedure creates and updates metadatatables to support new features available in MicroStrategy 2021.
Upgrade Guide
Copyright © 2021 All Rights Reserved 44
Updating the metadata ensure compatibil ity between your pre-existingobjects and the MicroStrategy clients. You can also take advantage of newconfiguration settings exposed through the client applications, functionality,and objects available only with the updated version of metadata.
During the metadata update process, the Configuration Wizard generatesadditional SQL for tasks such as managing indexes and primary keys. Toview this SQL during the update process, on the Summary Page of theConfiguration Wizard, in the Summary pane, click SQL Preview. In addition,once you have completed the update process, the generated SQL is saved inthe MicroStrategy common files directory. The file name isOriginalScript_generated.sql, where OriginalScript is the nameof the original SQL update script. For example, if you are updating an Oracledatabase, the original SQL update script is mdorcl.sql and the generatedSQL file is mdorcl_generated.sql.
Be aware of the following:
l If you have made any changes to the privileges assigned to the out-of-the-box MicroStrategy user groups and security roles, updating themetadata may overwrite those changes. In particular, if you have madeany changes to groups that use any privileges mentioned in the List ofupdated privileges, updating the metadata will overwrite those changes.
l For information about viewing the Configuration Wizard log file if an erroroccurs, see Resolving Problems Encountered During the Upgrade.
l The MDUpdate command line util ity that was formerly used to update themetadata is no longer supported. To update the metadata from thecommand line, you can use a response file with Configuration Wizard.
As an alternative to stepping through each page of the Configuration Wizardfor each project source that needs to be updated, you can create a responsefile with the update information and use that response file with theConfiguration Wizard to automatically update your metadata. For moreinformation about using a response file to update the metadata, see Using aResponse File with Configuration Wizard.
Upgrade Guide
Copyright © 2021 All Rights Reserved 45
If you do not have access to the GUI mode of Configuration Wizard, youmust use a response file to update your metadata.
Prerequisites for Updating a MicroStrategy Metadata
Before attempting to update your MicroStrategy metadata to the latestversion, make sure you meet the following prerequisites:
l The metadata update process can be executed only by a MicroStrategyuser who is either a member of the System Administrators user group, or isthe out-of-the-box Administrator user. Having all administrative privilegesis not sufficient: the user must be a member of the System Administratorsuser group.
l The project's metadata version from which you update must be older than,or the same as, the version of the machine where Configuration Wizard isinstalled that will be performing the metadata update An older version ofthe product is not able to perform an update on a newer version ofmetadata.
l The language settings of the client, project, and Intelligence Server mustall be the same.
l The projects to be updated must not be locked. To unlock a project'smetadata, in Developer, from the Administration menu, go to Locking >Unlock Project.
Database-Specific Prerequisites
The following prerequisites are specific to the RDBMS that your projectmetadata is stored in:
l If you are using Oracle for your metadata database, make sure that theMaximum Open Cursors parameter for the database is set to at least 1500.
l If you are using SQL Server for your metadata database, MicroStrategyrecommends setting the transaction log to the Simple Recovery Modelbecause the Bulk or Full Recovery Models may fil l the transaction logduring the upgrade and cause an error.
Upgrade Guide
Copyright © 2021 All Rights Reserved 46
l If you are using DB2 for your metadata database, make sure that theDynamic Sections property for the database is set to 999.
To M ake M et adat a Updat es Using t he Con f igu r at ion Wizar d
1. Select the Upgrade existing environment to MicroStrategy SecureEnterprise option. Click Next.
2. Select the Intelligence Server components option. Click Next.
3. On the MicroStrategy Authentication page, type the username andpassword of a MicroStrategy system administrator. Click Next.
4. On the Metadata Connection page, enter the database password toaccess the MicroStrategy metadata. Click Next.
The DSN and Login ID are provided based on the server configurationthat you did previously.
5. On the Select Components page, select the check boxes for eachIntelligence Server you want to upgrade.
6. Under each selected Intelligence Server, select the system componentsyou want to upgrade:l Upgrade metadata repository: The metadata repository containsthe definitions of your MicroStrategy applications and supportingobjects. An upgrade of your metadata is required to provide supportfor all new and updated features in the most recent version ofMicroStrategy.
l Lean Objects migration: Lean Objects are a significantly morecompact form of object representation in the metadata tables. LeanObjects are typically 25-50% smaller and will never be larger than theoriginal representation. Migrating existing objects to Lean Objectsalso allows for faster loading of objects compared to the oldrepresentation.
All new objects are created in this format, and existing objects areconverted to the new format as they are saved. Selecting Lean
Upgrade Guide
Copyright © 2021 All Rights Reserved 47
Objects migration converts all objects in the repository to the newformat at once. This option is automatically selected if you selectUpgrade metadata repository.
The Lean objects migration modifies all objects in yourMicroStrategy projects to use the new object representation. Thismigration can require a significant amount of time and resources tocomplete.
Lean Objects migration decreases the amount of disk space used byyour objects. However, the migration causes all objects in yourprojects to be resaved. Depending on your database transactionlogging policy, this may cause a temporary increase in the size ofyour metadata database.
l Update privileges: Updating the privileges ensures that users haveaccess to the same functionality that they had in previous versions ofMicroStrategy.
By default, privileges are upgraded based on the version of yourMicroStrategy metadata. However, if you previously upgraded yourMicroStrategy metadata and did not upgrade privileges along withthe metadata upgrade, you must identify the MicroStrategy versionyou most recently upgraded your privileges for.
To do this, to the right of Update privileges, click Advanced. TheSelect Privilege Version dialog box opens, with the version of yourMicroStrategy metadata selected by default. From the drop-downlist, select the version of MicroStrategy that privileges were mostrecently upgraded for and click OK.
l Migrate History List messages: Select this check box to migrateyour existing History List repository to a new format for improvedsearch results, scalability, and performance. A file-based repositorycan be migrated to a database-based repository or a hybrid
Upgrade Guide
Copyright © 2021 All Rights Reserved 48
repository, and a database-based repository can be migrated to ahybrid repository.l If you select this check box, additional configuration options for thismigration are provided later, on the History List Migration page.During the upgrade process this Intelligence Server and any otherIntelligence Servers in the cluster are stopped and restarted.
l If you are using a file-based History List repository and want tocontinue using that format, clear this check box. The repository isupdated, but its format is not affected, when you restart theIntelligence Server after the upgrade.
l If you are using a database-based or hybrid History List repositoryand want to continue using the same type of repository, forinformation about upgrading the History List database, see 5.Update the Metadata.
l Update Distribution Services Objects: Select this check box toupgrade Distribution Services subscription objects. This update isrequired to ensure that your Distribution Services subscriptions cansupport the new features and enhancements included in the mostrecent release. If you select this option, ensure that the metadatarepository has been upgraded or is selected to be upgraded as part ofthis update.
l Database Instance Update: Select this checkbox to update any MDXdatabase instances which currently use JCO 2.x to JCO 3.x. As ofMicroStrategy 10.x the Java Virtual Machine used does not supportJCO 2.x. This option will only affect MDX database instances whichare set to use JCO 2.x.
7. Select each project you want to update. Only projects that are loadedon Intelligence Server can be updated. Project updates can include anyof the following options:
l Execute project logical upgrade: Updates the project to the mostrecent version of MicroStrategy. This option also updates the report,
Upgrade Guide
Copyright © 2021 All Rights Reserved 49
document, and dossier definitions to improve the performance andreduce the memory usage and storage requirements of reports anddocuments that were created with a previous version ofMicroStrategy.
Be aware of the following:
l If this update has already been completed, this option is namedRe-execute project logical upgrade.
l This upgrade is required to execute any additional project upgradeoptions.
l Updated Report Services documents cannot be run in previousversions of MicroStrategy.
l Depending on the number of reports and documents in the project,this update may take significant time.
l Lean Objects migration: Selecting Lean Objects migration convertsall objects in this project to the new format at once.
The Lean objects migration modifies all objects in this project to usethe new object representation. This migration can require significanttime and resources to complete.
Lean Objects migration decreases the amount of disk space used byyour objects. However, the migration causes all objects in thisproject to be resaved. Depending on your database transactionlogging policy, this may cause a temporary increase in the size ofyour metadata database.
l Update Schedules: Makes previous subscriptions viewable inMicroStrategy 2021.
l Update MDX Source Objects: Updates the MDX data source objects(MDX Cubes) that were created in earlier versions of MicroStrategy totake advantage of improved performance.
Upgrade Guide
Copyright © 2021 All Rights Reserved 50
By default, if you update multiple projects and the update fails forone project, the update process continues for other projects. Thisallows you to complete all possible updates and then review anyerrors. To abort the update process for other projects when oneproject fails, clear the Update the remaining projects, even whenone project update fails check box.
Depending on the number of MDX source objects in the project, thisupdate may take significant time.
l Update OLAP Services Cube caches to PRIME: Select this checkbox to update all Intelligent Cubes to the PRIME architecture. Thisarchitecture can improve the performance of publishing IntelligentCube results through the use of parallel processing and otheroptimizations. This update is applied to all Intelligent Cubes for theproject.
l Update data import cubes (definition and cache) to PRIME:Select this check box to update all Data Import datasets to the PRIMEarchitecture. This architecture can improve the performance ofpublishing Data Import results through the use of parallel processingand other optimizations. This update is applied to data sets includedin your project through the use of Data Import.
It is easier to update OLAP Services Cube caches and data importcubes to PRIME during the upgrade process. If you do not updatethem now, each cube is updated when it is used. Doing the upgradeall at once ensures consistent performance for end users.
8. Click Next.
9. If you selected the Migrate History List messages option, on theHistory List Target Database page, specify the necessary informationfor the History List database.
10. Click Next.
Upgrade Guide
Copyright © 2021 All Rights Reserved 51
11. On the Summary page, review your upgrade choices and click Finish.
6. History List Database Repository
If you are using a database-based History List, when upgrading toMicroStrategy 2021 you must upgrade the History List database tables.
To Upgr ade t he Hist o r y List Reposi t o r y
1. From the Configuration Wizard Welcome page select Upgrade existingenvironment to MicroStrategy Secure Enterprise and click Next.
2. Select History List Repositories and click Next. .
3. Select the DSN for the History List database, and specify the logininformation.
4. To upgrade existing History List messages to the current format, selectthe Copy History List content check box.
If this check box is cleared, existing History List messages are notupgraded. The new tables required to support History List messagesare stil l created.
5. If you select to upgrade your existing History List messages, you canalso select the Compress data check box to compress all existingHistory List messages. This compression can improve the performanceof using History List messages. However, the compression of yourHistory List messages can require significant system resources duringthe upgrade.
To avoid the overhead of compressing your existing History Listmessages, clear the Compress data check box. Existing History Listmessages are not modified, but any newly created History Listmessages are created with the new compressed format.
6. Click Next.
7. Review the available information, and click Finish.
Upgrade Guide

Copyright © 2021 All Rights Reserved 52
7. MicroStrategy Web and Mobile Server
Upgrading MicroStrategy Web and Mobile Server JSP will only create newMicroStrategy.war and MicroStrategyMobile.war f i les in theinstallation directory. You will sti l l need to deploy the new .war f i le to asupported application server.
Before upgrading MicroStrategy Web and Mobile Server, be aware of thefollowing considerations:
l Backup any changed MicroStrategy Web configuration files:
l ../WEB-INF/xml/config/mapConfig.xml
l ../WEB-INF/xml/sys_defaults.properties
l ../WEB-INF/xml/sys_defaults.xml
l ../WEB-INF/web.xml
l Backup any changed MicroStrategy Mobile configuration files:
l /WEB-INF/xml/sys_defaults.properties
l /WEB-INF/xml/sys_defaults.xml
l /WEB-INF/web.xml
l Backup any mobile device configurations or saved any images from theMicroStrategy Photo Uploader widget, manually back them up beforeproceeding with your upgrade.
l /WEB-INF/xml/mobile
l /WEB-INF/SavedImages
l If you deploy any Web or Mobile customizations and review the followingSDK documentation to learn how to successfully migrate thesecustomizations:
l MicroStrategy Webl MicroStrategy Mobile
Upgrade Guide
Copyright © 2021 All Rights Reserved 53
l If you secure your MicroStrategy Mobile connections through CertificateServer, you must upgrade your Certificate Server to support MicroStrategy2021 Mobile applications.
For steps specific to your application server, see:
l Deploying with Tomcat (Linux)
8. MicroStrategy Library
In MicroStrategy 10.9 through 11.0, MicroStrategy Library was automaticallydeployed in Tomcat and the MicroStrategyLibrary.war f i le installed inthe <INSTALL_PATH>\LibraryWebMobile directory. MicroStrategy 2019and above requires administrators to perform the upgrade for their Librarydeployment.
You must manually deploy a new Library WAR File after upgradingMicroStrategy Library.
This section contains high level steps and considerations for performing anupgrade or migrating MicroStrategy Library to a new environment.
Linux Environments
In MicroStrategy 10.9 to 11.0, the MicroStrategy installer asks theadministrator to enter a path to the Tomcat folder in order to deploy theLibrary.war file and installs the WAR file in the <INSTALL_
PATH>/LibraryWebMobile directory. Starting in 2019, administrators areno longer prompted with the Tomcat directory and can deploy the WAR file tothe JEE server of choice.
Deploying the New WAR File
A new Library WAR File must be manually deployed after upgradingMicroStrategy Library, even between service packs.
Upgrade Guide
Copyright © 2021 All Rights Reserved 54
You should backup the webapps folder as they are overwritten whendeploying new .war f i les.
Use the following steps to deploy a new WAR file for both Windows andLinux.
1. Use the MicroStrategy installer to create a new MicroStrategy 2019Library.war f i le by doing a direct upgrade or new installation.
2. Redeploy the new Library.war f i le from the Library install directoryto the J2EE server being used. See the list of supported servers.
3. Migrate your customizations to the new environment, such as:
l .../webapps/MicroStrategyLibrary/images/
l .../webapps/MicroStrategyLibrary/plugins/
l .../webapps/MicroStrategyLibrary/WEB-
INF/classes/auth/
l Customized authentication configuration, such as SAMLauthentication
l .../webapps/MicroStrategyLibrary/WEB-
INF/classes/config/configOverride.properties
l Make sure MicroStrategy Library is pointing to the correctIntelligence Server and Collaboration Server with correctauthentication setting by going to the Library Administration ControlPanel.
l .../webapps/MicroStrategyLibrary/WEB-
INF/classes/logback.xml
l Any other customizations including SSL configurations
4. Verify that MicroStrategy Library functionality including collaboration,sharing, exporting, printing, and all other features are working properly.Ensure dossiers and documents are appearing.
Upgrade Guide
Copyright © 2021 All Rights Reserved 55
The Collaboration Server is a separate component of MicroStrategy that isupgraded independently of Library. See step 9. MicroStrategy Collaborationfor more information.
9. MicroStrategy Collaboration
MicroStrategy Collaboration has been enhanced to use a central datarepository installed as part of the MicroStrategy Platform. Starting inMicroStrategy 2020 the Collaboration Server constructs the connectionstring to the MicroStrategy Data Repository during runtime. After performingthe upgrade, Collaboration Server will only support connections to theMicroStrategy Data Repository.
After upgrading Collaboration Server, the previous data repository remainsunchanged but it will not be used by the new version of Collaboration Server.Any comments stored in the previous data repository will need to be movedto the new repository to be accessible.
Migrat ing Comments to the MicroStrategy Data Repository
The Collaboration Server Administration Tool provides a way for systemadministrators to migrate comments from the previous data repository to thenew data repository. The Collaboration Administration Page will display awarning message when it detects that a previous data repository was usedby the Collaboration Server before the upgrade.
The Collaboration Server Administration Tool is a console application andwill connect to the data repository using the same configuration as theCollaboration Server so no user input is required to connect. The tool willprovide feedback as data is being migrated and will show a message whenthe migration is complete.
In order to recover collaboration messages that were stored in the previousversion of the MicroStrategy Platform please follow these steps:
Upgrade Guide
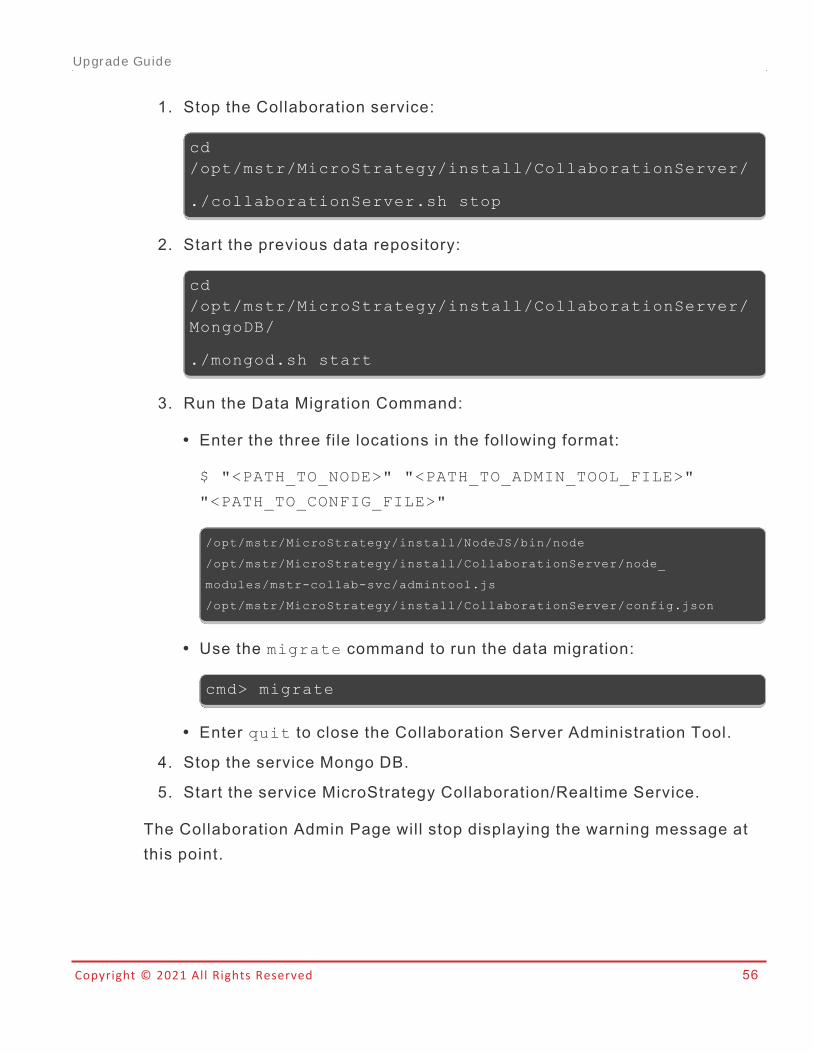
Copyright © 2021 All Rights Reserved 56
1. Stop the Collaboration service:
cd/opt/mstr/MicroStrategy/install/CollaborationServer/
./collaborationServer.sh stop
2. Start the previous data repository:
cd/opt/mstr/MicroStrategy/install/CollaborationServer/MongoDB/
./mongod.sh start
3. Run the Data Migration Command:
l Enter the three file locations in the following format:
$ "<PATH_TO_NODE>" "<PATH_TO_ADMIN_TOOL_FILE>"
"<PATH_TO_CONFIG_FILE>"
/opt/mstr/MicroStrategy/install/NodeJS/bin/node
/opt/mstr/MicroStrategy/install/CollaborationServer/node_
modules/mstr-collab-svc/admintool.js
/opt/mstr/MicroStrategy/install/CollaborationServer/config.json
l Use the migrate command to run the data migration:
cmd> migrate
l Enter quit to close the Collaboration Server Administration Tool.
4. Stop the service Mongo DB.
5. Start the service MicroStrategy Collaboration/Realtime Service.
The Collaboration Admin Page will stop displaying the warning message atthis point.
Upgrade Guide

Copyright © 2021 All Rights Reserved 57
10. Updating the Enterprise Manager Project
Upgrading from MicroStrategy 9 to 2021 includes major enhancements andupdates to the Enterprise Manager project; whereas upgrading fromMicroStrategy 10 to 2021 does not have major enhancements and upgradesto the Enterprise Manager project. In both scenarios, you should use thelatest versions of Enterprise Manager projects with MicroStrategy 2021.
l To retain customizations created in previous Enterprise Manager projects,make separate copies of these customized copies of the out-of-the-boxobjects, or as brand-new objects. Any modifications you made to the out-of-the-box objects for an Enterprise Manager project are replaced as part of theupgrade process.
l Your Enterprise Manager statistics and warehouse are automatically updatedby the installer.
l Use the Project Duplication Wizard to make a backup of your existingEnterprise Manager project. For detailed information about using ProjectDuplication, see the Managing Your Projects chapter of the SystemAdministration Help.
1. Open Configuration Wizard.
2. Select Upgrade existing environment to MicroStrategy SecureEnterprise, and click Next.
3. Select Upgrade Enterprise Manager Project, and click Next.
4. Provide the following information:l User Name: Type the MicroStrategy user name that can access andadminister the Enterprise Manager project.
l Password: Type the password for the MicroStrategy user that canaccess and administer the Enterprise Manager project.
5. If you have an Enterprise Manager project package file (.mmp) to useinstead of the default fi le, click Advanced >>. For the Packagelocation f ield, click ... (the Browse button) to navigate to and select thepackage file.
Upgrade Guide

Copyright © 2021 All Rights Reserved 58
6. Click Next.
7. Provide the following information:l DSN: Select the data source name for your statistics repository orclick New to open the MicroStrategy Connectivity Wizard and create anew DSN.
l User Name: Type the database user name for the user that canconnect to the statistics data source.
l Password: Type the password for the user that can connect to thestatistics data source.
8. Click Next.
9. Review the summary information.
You can click Save to save the configuration as a response (.ini) fi le toupgrade your Enterprise Manager projects on other systems or to runsilent configurations at a later time. For information on running theConfiguration Wizard with a response file, see Using a Response Filewith Configuration Wizard.
10. Click Finish.
11. Upgrade the Platform Analytics Project
As of 2019, you can upgrade your Platform Analytics project in the metadataof your connected Intelligence Server. Upgrading the project isrecommended with each platform and update release in order to brings inthe latest dossiers, attributes, metrics and reporting optimizations to thePlatform Analytics project.
1. Open Configuration Wizard.
2. Select Upgrade existing environment to MicroStrategy SecureEnterprise, and click Next.
3. Select Upgrade Platform Analytics Project, and click Next.
4. Provide the following information:
Upgrade Guide
Copyright © 2021 All Rights Reserved 59
l User Name: Enter the MicroStrategy user name that can access theIntelligence Server.
If this is your first time connecting to the MicroStrategy IntelligenceServer, use the user name Administrator without a password.
l Password: Enter the password for the MicroStrategy user that canaccess the Intelligence Server.
5. Select the MySQL/PostgreSQL DSN for the Platform AnalyticsRepository.
6. Enter your User Name and Password for the DSN.
7. Click Next.
8. Click Apply. The Configuration Wizard automatically applies one of thefollowing configuration files depending on the status of the user.
For new MySQL users:
l PlatformAnalyticsConfigurationNew.scp
For existing MySQL users:
l PlatformAnalyticsConfigurationUpgrade.scp
For new MicroStrategy users:
l PlatformAnalyticsConfigurationNew_PostgreSQL.scp
For existing PostgreSQL users:
l PlatformAnalyticsConfigurationUpgrade_PostgreSQL.scp
9. To manually update the project settings, see Configure the PlatformAnalytics Project.
12. Upgrade the Platform Analytics Repository
Upgrading the repository is required with each platform and update releasein order to benefit from Platform Analytics warehouse new features, defect
Upgrade Guide
Copyright © 2021 All Rights Reserved 60
f ixes, and database structure optimizations.
The Configuration Wizard provides the following options:
l Host: Type the host name of the Platform Analytics warehouse. By default,this is set to the last successful connection value.
l Port: Type the port number of the Platform Analytics warehouse. Bydefault, this is set to the last successful connection value.
l User Name: Type the user name for the Platform Analytics warehouse. Bydefault, this is set to the value from PAConsumerConfig.yaml f i le
l Password: Type the password for the Platform Analytics warehouse user.
Depending on the warehouse type you choose for the Host and Port, youmust set the parameter whDbType to either "postgresql" or "mysql" inthe PAConsumerConfig.yaml f i le.
The default path is:
l Linux: /opt/MicroStrategy/PlatformAnalytics/Conf
l Windows: C:\Program Files (x86)\MicroStrategy\Platform
Analytics\conf
Click Next to proceed.
You can also update the Platform Analytics repository using theConfiguration Wizard in interactive mode.
How to Update the Repository in Interact ive Mode
To update the Platform Analytics repository using the ConfigurationWizard in interactive mode on Windows:
1. In a Windows console, enter one of the following commands:l For 64-bit, enter MACfgWiz_64.l For 32-bit, enter MACfgWiz.
Upgrade Guide
Copyright © 2021 All Rights Reserved 61
2. Click Enter.
3. Type 2 and click Enter to create a new response.ini f i le.
4. Type 5 and click Enter to upgrade your existing environment toMicroStrategy Analytics Enterprise.
5. Type 3 and click Enter to upgrade your Platform Analyticsrepository.
6. Enter your Platform Analytics warehouse database credentials. Bydefault, the server name, port number, and user name are set to thelast successful connection value.
If you did not change the values, leave as default. The defaultpassword can be found at C:\Program Files (x86)\CommonFiles\MicroStrategy\express_password.txt
7. By default, the configuration is saved as Response.ini in thecommon files path, C:\Program Files (x86)\CommonFiles\MicroStrategy. You can leave the field blank to use the defaultname or type a different name, and then click Enter. Theresponse.ini fi le is generated, and you are prompted whether to runthe configuration immediately.
8. Type Y and click Enter to run the configuration.
To update the Platform Analytics repository using the ConfigurationWizard in interactive mode on Linux:
1. In a Linux console window, browse to HOME_PATH where HOME_
PATH is the specified home directory during installation.
2. Browse to the bin directory.
Upgrade Guide
Copyright © 2021 All Rights Reserved 62
3. At the command prompt, type mstrcfgwiz-editor, then clickEnter. The Configuration Wizard opens in command line mode.
4. Click Enter.
5. Type 2 and click Enter to create a new response.ini f i le.
6. Type 5 and click Enter to upgrade your existing environment toMicroStrategy Analytics Enterprise.
7. Type 3 and click Enter to upgrade your Platform Analyticsrepository.
8. Enter your Platform Analytics warehouse database credentials. Bydefault, the server name, port number, and user name are set to thelast successful connection value.
9. By default, the configuration is saved as Response.ini in the/HOME_PATH/ directory, where HOME_PATH is the directory youspecified as the Home Directory during installation. You can leavethe field blank to use the default name or type a different name, andthen click Enter. The response.ini fi le is generated, and you areprompted whether to run the configuration immediately.
10. Type Y and click Enter to run the configuration.
13. Activate Your Installation
All MicroStrategy 2021 installations must be activated within 30 days. Onceyou receive the activation code, you will need to enter it into MicroStrategyLicense Manager.
Instructions
1. Open MicroStrategy License Manager from Start > Programs >MicroStrategy Tools > License Manager.
2. Go to the License Administration tab > Activate Server Installation.
Upgrade Guide

Copyright © 2021 All Rights Reserved 63
3. Click Next.
4. Select the Server Activation Using Code option.
5. Enter your Activation Code in the text field.
6. Click Next.
Performing a Parallel Upgrade
Configuring an Upgrade Test EnvironmentYour MicroStrategy environment includes multiple variables, such assecurity requirements, performance requirements, and VLDB settings, thatare unique. MicroStrategy cannot anticipate all the ways these variablesmay interact with the upgrade process. Thus, MicroStrategy recommendsyou create a test environment and upgrade that environment first, thenthoroughly test the upgraded installation. Once the tests are complete, thenupgrade your production environment. This ensures that the upgrade of yourproduction environment proceeds smoothly and any unexpected difficultiesdo not require additional downtime.
For detailed information on testing your upgraded environment, see Chapter, Validating the Upgrade.
If you do not want to create a test environment, MicroStrategy recommendsthat you create and save an Integrity Manager integrity test baseline of yourreports and documents. You can then execute an integrity test against thisbaseline when the upgrade is complete, to ensure that the upgrade has notaltered any of your report results. For detailed information about usingIntegrity Manager to execute integrity tests, see the Integrity Managerchapter of the System Administration Help.
Upgrade Guide
Copyright © 2021 All Rights Reserved 64
Best Practices for Configuring an Upgrade Test Environment
MicroStrategy recommends that you follow these best practices forconfiguring your upgrade test environment:
l Do not modify any existing configuration objects. If you need additionalconfiguration objects for testing, you can either create additional objects,or duplicate an existing object and modify it. This applies to databaseinstances, connections and logins, security filters, users and user groups,and security roles.
l If your production environment is clustered, then your test environmentshould also be clustered.
l If your test and production data warehouses have different database tableprefixes, make sure you are using the correct prefixes in the testenvironment's Warehouse Catalog.
l Create an integrity test comparing reports from the upgraded testenvironment with the same reports in the production environment, so thatyou can easily see where any differences are.
l If possible, plan to execute data integrity and performance load testsagainst the production warehouse. This ensures that the test scenariosare as representative of the production environment as possible.
l If you are creating reports and documents specifically for an upgradeintegrity test, create those reports and documents before you duplicate theproduction metadata.
l If you are using connection mapping for users to access the datawarehouse, check to be sure that all users can log in to the test datawarehouse, since user passwords may differ between the test warehouseand the production warehouse.
One way to manage this is to create a new generic database login, and thenuse the following sample Command Manager script to change users'connection mappings to use this new login:
Upgrade Guide
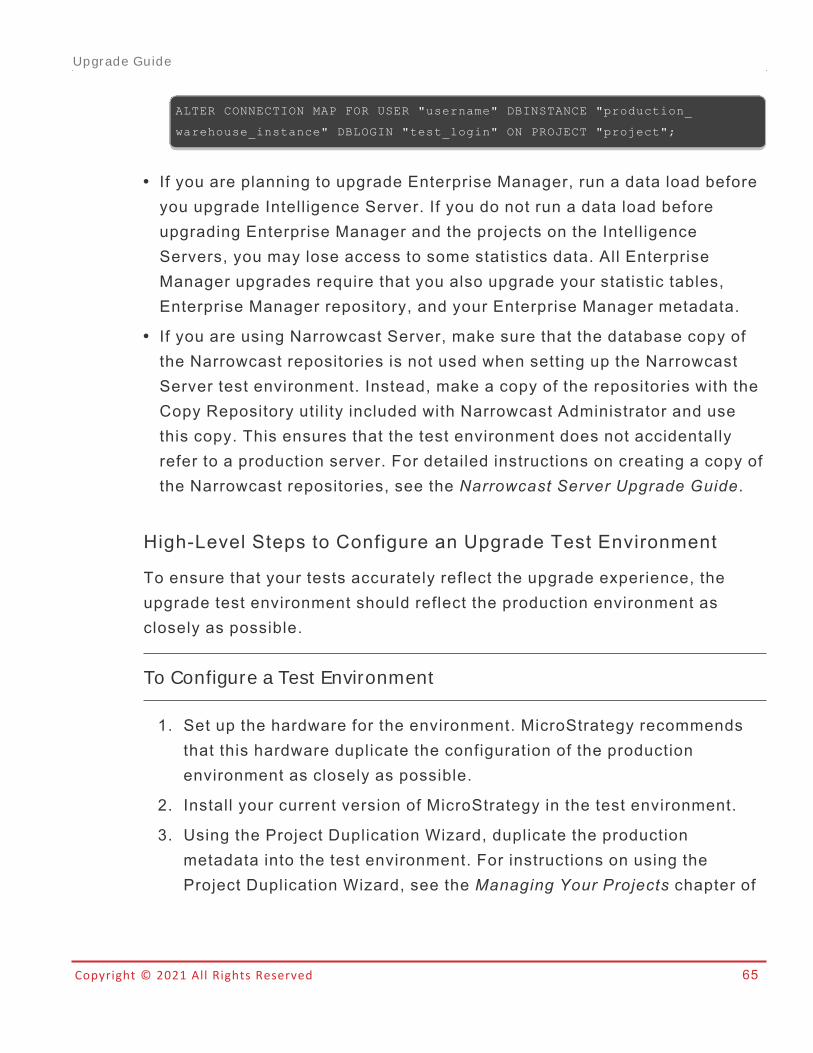
Copyright © 2021 All Rights Reserved 65
ALTER CONNECTION MAP FOR USER "username" DBINSTANCE "production_
warehouse_instance" DBLOGIN "test_login" ON PROJECT "project";
l If you are planning to upgrade Enterprise Manager, run a data load beforeyou upgrade Intelligence Server. If you do not run a data load beforeupgrading Enterprise Manager and the projects on the IntelligenceServers, you may lose access to some statistics data. All EnterpriseManager upgrades require that you also upgrade your statistic tables,Enterprise Manager repository, and your Enterprise Manager metadata.
l If you are using Narrowcast Server, make sure that the database copy ofthe Narrowcast repositories is not used when setting up the NarrowcastServer test environment. Instead, make a copy of the repositories with theCopy Repository util ity included with Narrowcast Administrator and usethis copy. This ensures that the test environment does not accidentallyrefer to a production server. For detailed instructions on creating a copy ofthe Narrowcast repositories, see the Narrowcast Server Upgrade Guide.
High-Level Steps to Configure an Upgrade Test Environment
To ensure that your tests accurately reflect the upgrade experience, theupgrade test environment should reflect the production environment asclosely as possible.
To Configure a Test Environment
1. Set up the hardware for the environment. MicroStrategy recommendsthat this hardware duplicate the configuration of the productionenvironment as closely as possible.
2. Install your current version of MicroStrategy in the test environment.
3. Using the Project Duplication Wizard, duplicate the productionmetadata into the test environment. For instructions on using theProject Duplication Wizard, see the Managing Your Projects chapter of
Upgrade Guide
Copyright © 2021 All Rights Reserved 66
the System Administration Help, or see the Project Duplication WizardHelp.
4. Make sure that your test environment Intelligence Server is connectedto your test environment metadata, and not your production metadata.
5. Using the Project Duplication Wizard, duplicate the productionmetadata into the test environment.
For instructions on using the Project Duplication Wizard, see theManaging Your Projects chapter of the System Administration Help, orsee the Project Duplication Wizard Help.
6. Ensure your test environment Intelligence Server is connected to yourtest environment metadata.
7. If you do not intend to execute your tests against a productionwarehouse, duplicate the production warehouse, and ensure that thetest environment points to the duplicate warehouse and not theproduction warehouse.
8. Upgrade the test environment, following the procedures laid out inPerforming a Parallel Upgrade on a Windows Deployment, page 66
9. Test the upgrade, following the guidelines laid out in Validating theUpgrade, page 161.
Performing a Parallel Upgrade on a Windows DeploymentThis section covers the procedure for executing a parallel upgrade of yourWindows environment to MicroStrategy 2021. Carefully review the PlanningYour Upgrade and Configuring an Upgrade Test Environment sectionsbefore proceeding with your upgrade.
1. Install MicroStrategy 2021
Follow the procedures outlined in the Installation and Configuration Help toperform a fresh installation of MicroStrategy 2021 on your test environment.
Upgrade Guide
Copyright © 2021 All Rights Reserved 67
Once you have installed and configured your test environment, proceed withStep 2. Connect the Intelligence Server to a Copy of Your Metadata.
2. Connect the Intelligence Server to a Copy of Your Metadata
Before connecting your new Intelligence Server to the metadata, make acopy of your production metadata in your database. You will connect theIntelligence Server to this metadata copy in the following steps.
Repeat these steps for each Intelligence server node in a clusteredenvironment.
Configure Metadata Connect ion
1. In Windows, go to Start > All Programs > MicroStrategy Tools >Configuration Wizard. The Configuration Wizard opens.
2. Select Configure Intelligence Server, and click Next.
3. From the DSN drop-down list, select the DSN used to connect to themetadata repository. Enter the User Name and Password for thedatabase.
4. Click Next.
5. Select Use the selected Server Definition as active.
6. Choose the server definition to use from the Existing ServerDefinitions pane.
7. Click Next.
Def ine t he In t el l igence Ser ver por t num ber and ot her set t ings
1. Define the Intelligence Server settings described below:l Port number: You can use the default port number (34952) or specifyanother port number. The port number is how a server processidentifies itself on the machine on which it is running. If the portnumber is used by another process, such as in a shared environment,
Upgrade Guide
Copyright © 2021 All Rights Reserved 68
specify an available port number.
l REST port number: You can use the default port number (34962) orspecify another port number for the REST API Server insideIntelligence Server. This port number should not be same with theIntelligence Server port number.
You can configure REST API Server logging with the Diagnosticsand Performance Logging Tool. Select the PerformanceConfiguration tab, and find the dispatcher REST Trace undercomponent Network Classes. For more information, see theConfiguring What is Logged section in the System AdministrationHelp.
l Register Intelligence Server as a Service: Select this check box toregister Intelligence Server as a service.
l Projects to load at startup: This pane displays all the projects thatare in the metadata repository. You can select projects to use withthe server definition that you have chosen. The projects that youselect are loaded on the server at startup.
l Start Intelligence Server when finished: Select this check box tohave Intelligence Server start once you complete this configuration.
l Identify missing DSNs: Select this check box to verify that all DSNs,which are used for database instances created in MicroStrategy, arelocally available. This helps to ensure that your database instances inMicroStrategy can connect successfully to their associated datasources.
By default, this check box is cleared, which means the availability ofall local DSNs used in database instances is not verified. While thismay mean that all DSNs used in database instances are notavailable, it can save system resources required for the IntelligenceServer configuration process.
2. Click Next.
Upgrade Guide
Copyright © 2021 All Rights Reserved 69
3. Secure socket layer (SSL) protocol encrypts communications betweenIntelligence Server and Developer:
Configure SSL: This option specifies whether to enable IntelligenceServer and Developer to communicate using the SSL protocol. Clearthis check box to disable the use of the SSL protocol for IntelligenceServer and Developer communications. This option also applies SSLprotocol to the REST port number.
When you select to enable the SSL protocol, you must provide thefollowing information:
l Certificate: The SSL certificate file you created for IntelligenceServer. Click the browse button to navigate to and select thecertif icate file.
l Key: The private key file you created while requesting the certif icatefor Intelligence Server. Click the browse button to navigate to andselect the private key file.
l Password: The password that you used while creating the private keyfor the SSL certificate.
l SSL Port: The port number to use for SSL access. By default, theport is 39321.
To enable SSL protocol communication in Developer, you must use theProject Source Editor. For steps to complete the other tasks requiredto enable SSL protocol communications, refer to the SystemAdministration Help.
Configuring port requires Client Certificate: If selected, the SSLcommunications with client certif icate verification will be configured inthe Intelligence Server, but does not apply to REST port number.Provide the following information:
Upgrade Guide
Copyright © 2021 All Rights Reserved 70
l SSL Port: The port number the Intelligence Server will use for SSLcommunications with client certif icate verification.
l Truststore: The location to the client certif icate truststore.
4. Click Next.
5. To specify the default statistics repository for the local IntelligenceServer and enable basic statistics logging for projects:l Make this my default Statistics Database Instance for the localIntelligence Server metadata: Select this check box to define whichstatistics repository to use for recording statistics. If you clear thischeck box, a default statistics database instance is not defined foryour Intelligence Server.
l When defining the default statistics repository, you must provide thefollowing configuration details:l DSN: Select the data source name for your statistics repository.
If a DSN for your statistics repository does not exist, you can clickNew to open the MicroStrategy Connectivity Wizard and create anew DSN.
l User Name: Type the database user name for the user that canconnect to the statistics data source.
l Password: Type the password for the user that can connect to thestatistics data source.
l Enable Basic Statistics (For newly created projects andexisting projects not logging statistics): Basic statistics for newprojects and any projects that are not currently logging statisticswill be enabled. You can alter the settings in Project ConfigurationEditor in MicroStrategy Developer to:o Enable additional statistics for a project.o Enable basic and additional statistics for a project if you clearedthis check box.
Upgrade Guide
Copyright © 2021 All Rights Reserved 71
6. Enable and configure the Messaging Services host and port settings.
Messaging Services Host(s)/Port(s): Provide host name or IPaddress of Messaging Services.
Format for this setting should be: server1.acme.com:9092
7. Click Next.
8. Review the summary information and click Save.
9. Click Finish.
3. Update the Metadata Copy
After upgrading the Intelligence Server, update the copy of your metadata byperforming the procedure that follows. This procedure creates and updatesmetadata tables to support new features available in MicroStrategy 2021.
Updating the metadata ensure compatibil ity between your pre-existingobjects and the MicroStrategy clients. You can also take advantage of newconfiguration settings exposed through the client applications, functionality,and objects available only with the updated version of metadata.
During the metadata update process, the Configuration Wizard generatesadditional SQL for tasks such as managing indexes and primary keys. Toview this SQL during the update process, on the Summary Page of theConfiguration Wizard, in the Summary pane, click SQL Preview. In addition,once you have completed the update process, the generated SQL is saved inthe MicroStrategy common files directory. The file name isOriginalScript_generated.sql, where OriginalScript is the nameof the original SQL update script. For example, if you are updating an Oracledatabase, the original SQL update script is mdorcl.sql and the generatedSQL file is mdorcl_generated.sql.
Be aware of the following:
l If you have made any changes to the privileges assigned to the out-of-the-box MicroStrategy user groups and security roles, updating the
Upgrade Guide
Copyright © 2021 All Rights Reserved 72
metadata may overwrite those changes.
l For information about viewing the Configuration Wizard log file if an erroroccurs, see Resolving Problems Encountered During the Upgrade.
l The MDUpdate command line util ity that was formerly used to update themetadata is no longer supported. To update the metadata from thecommand line, you can use a response file with Configuration Wizard.
As an alternative to stepping through each page of the Configuration Wizardfor each project source that needs to be updated, you can create a responsefile with the update information and use that response file with theConfiguration Wizard to automatically update your metadata. For moreinformation about using a response file to update the metadata, see Using aResponse File with Configuration Wizard.
If you do not have access to the GUI mode of Configuration Wizard, youmust use a response file to update your metadata.
Prerequisites for Updating a MicroStrategy Metadata
Before attempting to update your MicroStrategy metadata to the latestversion, make sure you meet the following prerequisites:
l The metadata update process can be executed only by a MicroStrategyuser who is either a member of the System Administrators user group, or isthe out-of-the-box Administrator user. Having all administrative privilegesis not sufficient: the user must be a member of the System Administratorsuser group.
l The project's metadata version from which you update must be older than,or the same as, the version of the machine where Configuration Wizard isinstalled that will be performing the metadata update An older version ofthe product is not able to perform an update on a newer version ofmetadata.
l The language settings of the client, project, and Intelligence Server mustall be the same.
Upgrade Guide
Copyright © 2021 All Rights Reserved 73
l The projects to be updated must not be locked. To unlock a project'smetadata, in Developer, from the Administration menu, go to Locking >Unlock Project.
Database-Specific Prerequisites
The following prerequisites are specific to the RDBMS that your projectmetadata is stored in:
l If you are using Oracle for your metadata database, make sure that theMaximum Open Cursors parameter for the database is set to at least 1500.
l If you are using SQL Server for your metadata database, MicroStrategyrecommends setting the transaction log to the Simple Recovery Modelbecause the Bulk or Full Recovery Models may fil l the transaction logduring the upgrade and cause an error.
l If you are using DB2 for your metadata database, make sure that theDynamic Sections property for the database is set to 999.
To M ake M et adat a Updat es Using t he Con f igu r at ion Wizar d
1. Select the Upgrade existing environment to MicroStrategy SecureEnterprise option. Click Next.
2. Select the Intelligence Server components option. Click Next.
3. On the MicroStrategy Authentication page, type the username andpassword of a MicroStrategy system administrator. Click Next.
4. On the Metadata Connection page, enter the database password toaccess the MicroStrategy metadata. Click Next.
The DSN and Login ID are provided based on the server configurationthat you did previously.
5. On the Select Components page, select the check boxes for eachIntelligence Server you want to upgrade.
6. Under each selected Intelligence Server, select the system componentsyou want to upgrade:
Upgrade Guide

Copyright © 2021 All Rights Reserved 74
l Upgrade metadata repository: The metadata repository containsthe definitions of your MicroStrategy applications and supportingobjects. An upgrade of your metadata is required to provide supportfor all new and updated features in the most recent version ofMicroStrategy.
l Lean Objects migration: Lean Objects are a significantly morecompact form of object representation in the metadata tables. LeanObjects are typically 25-50% smaller and will never be larger than theoriginal representation. Migrating existing objects to Lean Objectsalso allows for faster loading of objects compared to the oldrepresentation.
All new objects are created in this format, and existing objects areconverted to the new format as they are saved. Selecting LeanObjects migration converts all objects in the repository to the newformat at once. This option is automatically selected if you selectUpgrade metadata repository.
The Lean objects migration modifies all objects in yourMicroStrategy projects to use the new object representation. Thismigration can require a significant amount of time and resources tocomplete.
Lean Objects migration decreases the amount of disk space used byyour objects. However, the migration causes all objects in yourprojects to be resaved. Depending on your database transactionlogging policy, this may cause a temporary increase in the size ofyour metadata database.
l Update privileges: Updating the privileges ensures that users haveaccess to the same functionality that they had in previous versions ofMicroStrategy.
Upgrade Guide
Copyright © 2021 All Rights Reserved 75
By default, privileges are upgraded based on the version of yourMicroStrategy metadata. However, if you previously upgraded yourMicroStrategy metadata and did not upgrade privileges along withthe metadata upgrade, you must identify the MicroStrategy versionyou most recently upgraded your privileges for.
To do this, to the right of Update privileges, click Advanced. TheSelect Privilege Version dialog box opens, with the version of yourMicroStrategy metadata selected by default. From the drop-downlist, select the version of MicroStrategy that privileges were mostrecently upgraded for and click OK.
l Migrate History List messages: Select this check box to migrateyour existing History List repository to a new format for improvedsearch results, scalability, and performance. A file-based repositorycan be migrated to a database-based repository or a hybridrepository, and a database-based repository can be migrated to ahybrid repository.l If you select this check box, additional configuration options for thismigration are provided later, on the History List Migration page.During the upgrade process this Intelligence Server and any otherIntelligence Servers in the cluster are stopped and restarted.
l If you are using a file-based History List repository and want tocontinue using that format, clear this check box. The repository isupdated, but its format is not affected, when you restart theIntelligence Server after the upgrade.
l If you are using a database-based or hybrid History List repositoryand want to continue using the same type of repository, forinformation about upgrading the History List database, see 4.History List Database Repository.
l Update Distribution Services Objects: Select this check box toupgrade Distribution Services subscription objects. This update isrequired to ensure that your Distribution Services subscriptions can
Upgrade Guide
Copyright © 2021 All Rights Reserved 76
support the new features and enhancements included in the mostrecent release. If you select this option, ensure that the metadatarepository has been upgraded or is selected to be upgraded as part ofthis update.
l Database Instance Update: Select this checkbox to update any MDXdatabase instances which currently use JCO 2.x to JCO 3.x. As ofMicroStrategy 10.x the Java Virtual Machine used does not supportJCO 2.x. This option will only affect MDX database instances whichare set to use JCO 2.x.
7. Select each project you want to update. Only projects that are loadedon Intelligence Server can be updated. Project updates can include anyof the following options:
l Execute project logical upgrade: Updates the project to the mostrecent version of MicroStrategy. This option also updates the report,document, and dossier definitions to improve the performance andreduce the memory usage and storage requirements of reports anddocuments that were created with a previous version ofMicroStrategy.
Be aware of the following:
l If this update has already been completed, this option is namedRe-execute project logical upgrade.
l This upgrade is required to execute any additional project upgradeoptions.
l Updated Report Services documents cannot be run in previousversions of MicroStrategy.
l Depending on the number of reports and documents in the project,this update may take significant time.
l Lean Objects migration: Selecting Lean Objects migration convertsall objects in this project to the new format at once.
Upgrade Guide
Copyright © 2021 All Rights Reserved 77
The Lean objects migration modifies all objects in this project to usethe new object representation. This migration can require significanttime and resources to complete.
Lean Objects migration decreases the amount of disk space used byyour objects. However, the migration causes all objects in thisproject to be resaved. Depending on your database transactionlogging policy, this may cause a temporary increase in the size ofyour metadata database.
l Update Schedules: Makes previous subscriptions viewable inMicroStrategy 2021.
l Update MDX Source Objects: Updates the MDX data source objects(MDX Cubes) that were created in earlier versions of MicroStrategy totake advantage of improved performance.
By default, if you update multiple projects and the update fails forone project, the update process continues for other projects. Thisallows you to complete all possible updates and then review anyerrors. To abort the update process for other projects when oneproject fails, clear the Update the remaining projects, even whenone project update fails check box.
Depending on the number of MDX source objects in the project, thisupdate may take significant time.
l Update OLAP Services Cube caches to PRIME: Select this checkbox to update all Intelligent Cubes to the PRIME architecture. Thisarchitecture can improve the performance of publishing IntelligentCube results through the use of parallel processing and otheroptimizations. This update is applied to all Intelligent Cubes for theproject.
l Update data import cubes (definition and cache) to PRIME:Select this check box to update all Data Import datasets to the PRIME
Upgrade Guide
Copyright © 2021 All Rights Reserved 78
architecture. This architecture can improve the performance ofpublishing Data Import results through the use of parallel processingand other optimizations. This update is applied to data sets includedin your project through the use of Data Import.
It is easier to update OLAP Services Cube caches and data importcubes to PRIME during the upgrade process. If you do not updatethem now, each cube is updated when it is used. Doing the upgradeall at once ensures consistent performance for end users.
8. Click Next.
9. If you selected the Migrate History List messages option, on theHistory List Target Database page, specify the necessary informationfor the History List database.
10. Click Next.
11. On the Summary page, review your upgrade choices and click Finish.
4. History List Database Repository
If you are using a database-based History List, when upgrading toMicroStrategy 2021 you must create the History List database tables in thetest environment.
To Cr eat e t he Tab les in t he Hist o r y List Reposi t o r y
1. Open the MicroStrategy Configuration Wizard.
2. Select Metadata, History List and Statistics Repository Tables andclick Next.
3. Select the History List Tables check box and click Next.
4. From the DSN drop-down list, select the DSN for your History Listrepository.
If a DSN for your History List repository does not exist, you can selectNew to open the Connectivity Wizard and create a new DSN.
Upgrade Guide
Copyright © 2021 All Rights Reserved 79
5. Type a User Name and Password that can connect to the data source.
The database user you provide becomes the owner of all History Listtables and objects. The database user is required to have the Select,Create, Insert, and Drop permissions.
6. After providing a valid user name and password, you can click SQLPreview to open the SQL Preview dialog box. This dialog box providesthe SQL statements that will be executed on your data source to createthe History List tables. Click Close once you are done reviewing theSQL statements to return to the Configuration Wizard.
If you use the advanced options to change the SQL script, you can clickSQL Preview after selecting the new script to see an updated listing ofthe SQL statements that will be executed.
7. Click Advanced.
8. In the Table Prefix f ield, you can specify a prefix to be used whenHistory List tables are created in the database you select. This is anoptional configuration. However, you must use different prefixes foryour metadata tables and your History List tables if you store them inthe same database.
Most databases use a prefix of two characters. However, you cansupply as many letters, numbers, underscores (_), and periods (.) asrequired to support your database prefixes. To determine characterlimits for a prefix, refer to your third-party database vendordocumentation.
If you use a table prefix for your History List tables, you must alsodefine this table prefix when you create a database instance to connectto the History List tables.
9. In the Script f ield, a SQL script to create History List tables optimizedfor your database is selected. If you want to specify a different script,click ... to browse to and select a customized script
Upgrade Guide
Copyright © 2021 All Rights Reserved 80
10. Click Next.
11. Review the summary information.
You can click Save to save the configuration as a response (.ini) fi le toconfigure History List repositories on other systems or to run silentconfigurations at a later time.
12. Click Finish to apply the configuration and create the History Listrepository.
5.1 Updating the Enterprise Manager Project
Upgrading from MicroStrategy 9 to 2021 includes major enhancements andupdates to the Enterprise Manager project; whereas upgrading fromMicroStrategy 10 to 2021 does not have major enhancements and upgradesto the Enterprise Manager project. In both scenarios, you should use thelatest versions of Enterprise Manager projects with MicroStrategy 2021.
l To retain customizations created in previous Enterprise Manager projects,make separate copies of these customized copies of the out-of-the-boxobjects, or as brand-new objects. Any modifications you made to the out-of-the-box objects for an Enterprise Manager project are replaced as part of theupgrade process.
l To upgrade your Enterprise Manager statistics and warehouse from 10.x to2021, you must manually run the script that corresponds with your databasemanagement system type. See KB483298 for details. If you are upgradingfrom MicroStrategy 2019 to 2021, you do not need to upgrade your EnterpriseManager statistics and warehouse.
l Use the Project Duplication Wizard to make a backup of your existingEnterprise Manager project. For detailed information about using ProjectDuplication, see the Managing Your Projects chapter of the SystemAdministration Help.
Upgrade Guide
Copyright © 2021 All Rights Reserved 81
1. Open Configuration Wizard.
2. Select Upgrade existing environment to MicroStrategy SecureEnterprise, and click Next.
3. Select Upgrade Enterprise Manager Project, and click Next.
4. Provide the following information:l User Name: Type the MicroStrategy user name that can access andadminister the Enterprise Manager project.
l Password: Type the password for the MicroStrategy user that canaccess and administer the Enterprise Manager project.
5. If you have an Enterprise Manager project package file (.mmp) to useinstead of the default fi le, click Advanced >>. For the Packagelocation f ield, click ... (the Browse button) to navigate to and select thepackage file.
6. Click Next.
7. Provide the following information:l DSN: Select the data source name for your statistics repository orclick New to open the MicroStrategy Connectivity Wizard and create anew DSN.
l User Name: Type the database user name for the user that canconnect to the statistics data source.
l Password: Type the password for the user that can connect to thestatistics data source.
8. Click Next.
9. Review the summary information.
You can click Save to save the configuration as a response (.ini) fi le toupgrade your Enterprise Manager projects on other systems or to runsilent configurations at a later time. For information on running theConfiguration Wizard with a response file, see Using a Response Filewith Configuration Wizard.
Upgrade Guide
Copyright © 2021 All Rights Reserved 82
10. Click Finish.
6. Upgrade the Platform Analytics Project
As of 2019, you can upgrade your Platform Analytics project in the metadataof your connected Intelligence Server. Upgrading the project isrecommended with each platform and update release in order to brings inthe latest dossiers, attributes, metrics and reporting optimizations to thePlatform Analytics project.
1. Open Configuration Wizard.
2. Select Upgrade existing environment to MicroStrategy SecureEnterprise, and click Next.
3. Select Upgrade Platform Analytics Project, and click Next.
4. Provide the following information:l User Name: Enter the MicroStrategy user name that can access theIntelligence Server.
If this is your first time connecting to the MicroStrategy IntelligenceServer, use the user name Administrator without a password.
l Password: Enter the password for the MicroStrategy user that canaccess the Intelligence Server.
5. Select the MySQL/PostgreSQL DSN for the Platform AnalyticsRepository.
6. Enter your User Name and Password for the DSN.
7. Click Next.
8. Click Apply. The Configuration Wizard automatically applies one of thefollowing configuration files depending on the status of the user.
For new MySQL users:
l PlatformAnalyticsConfigurationNew.scp
Upgrade Guide
Copyright © 2021 All Rights Reserved 83
For existing MySQL users:
l PlatformAnalyticsConfigurationUpgrade.scp
For new MicroStrategy users:
l PlatformAnalyticsConfigurationNew_PostgreSQL.scp
For existing PostgreSQL users:
l PlatformAnalyticsConfigurationUpgrade_PostgreSQL.scp
9. To manually update the project settings, see Configure the PlatformAnalytics Project.
7. Migrate Platform Analytics Data to MicroStrategy Repository
The Platform Analytics Data Migration tool is used to help existingcustomers migrate their data from MySQL to the newly supportedPostgreSQL repository. This tool can help migrate both new and old versionsof MySQL dump files to the latest version of Platform Analytics.
Backup Prerequisites:
l C:\Program Files (x86)\MicroStrategy\Platform
Analytics\PAConsumerConfig.yaml populated with:
warehouseDbConnection:
l whHost: 127.0.0.1
l whUser: root
l whPasswd: encrypted_password
l whPort: 3306
l whDb: platform_analytics_wh
l mysql-connector-java.jar is present in PlatformAnalytics\lib
directory.
l Disk space sufficient to hold a backup of your MySQL platform_
analytics_wh database.
Upgrade Guide
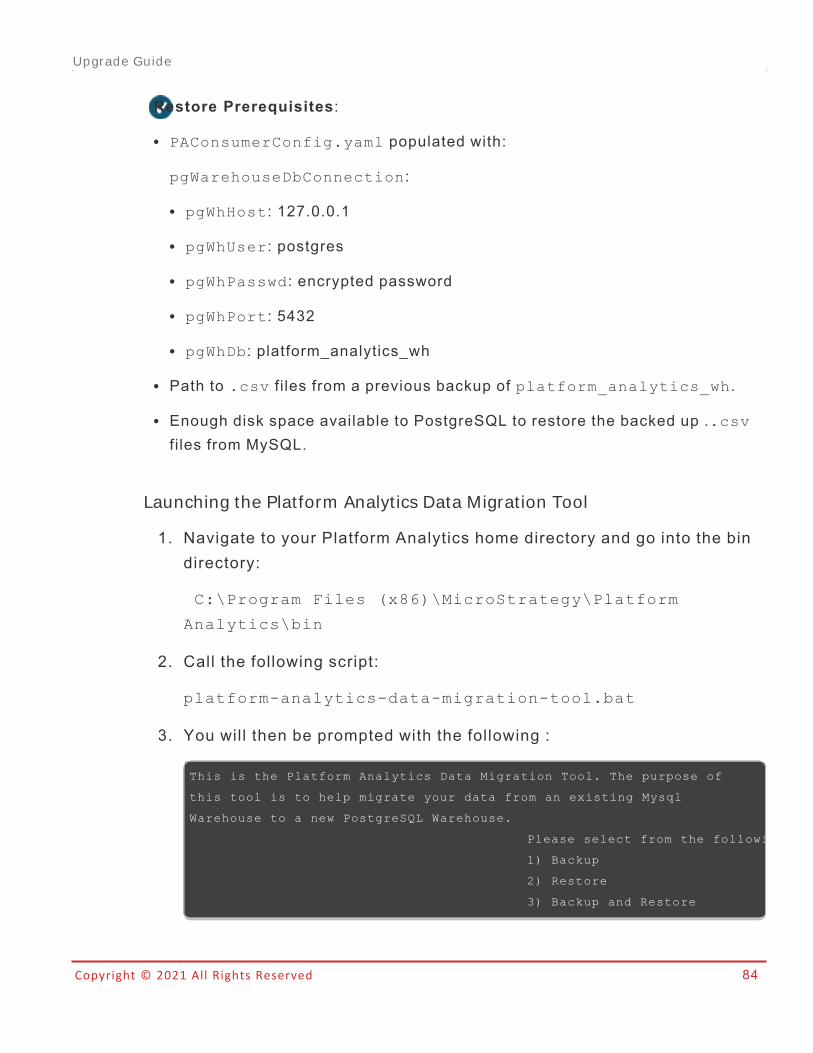
Copyright © 2021 All Rights Reserved 84
Restore Prerequisites:
l PAConsumerConfig.yaml populated with:
pgWarehouseDbConnection:
l pgWhHost: 127.0.0.1
l pgWhUser: postgres
l pgWhPasswd: encrypted password
l pgWhPort: 5432
l pgWhDb: platform_analytics_wh
l Path to .csv f i les from a previous backup of platform_analytics_wh.
l Enough disk space available to PostgreSQL to restore the backed up ..csvf i les from MySQL.
Launching the Platform Analyt ics Data Migrat ion Tool
1. Navigate to your Platform Analytics home directory and go into the bindirectory:
C:\Program Files (x86)\MicroStrategy\Platform
Analytics\bin
2. Call the following script:
platform-analytics-data-migration-tool.bat
3. You will then be prompted with the following :
This is the Platform Analytics Data Migration Tool. The purpose of
this tool is to help migrate your data from an existing Mysql
Warehouse to a new PostgreSQL Warehouse.
Please select from the following options:
1) Backup
2) Restore
3) Backup and Restore
Upgrade Guide
Copyright © 2021 All Rights Reserved 85
0) Exit
Migrat ion Workflow
Backup
1. Provide the path to the directory where the MySQL backup will bestored.
2. The tool will then begin backing up the MySQL platform_
analytics_wh specified in your PAConsumerConfig.yaml f i le,placing the backup in your specified path.
Rest or e
1. Provide the path to the directory where the MySQL backup is stored.
2. The tool will prompt you again if you are sure you are okay to drop yourPostgreSQL platform_analytics_wh schema.
3. If yes is selected, the platform_analytics_wh schema will bedropped and recreated matching the version of your MySQL dump.
4. The backup data is then imported into the newly created platform_
analytics_wh schema.
5. The platform_analytics_wh schema will then be upgraded to thelatest version of Platform Analytics.
Recommended Upgrade Procedures
1. On your new MicroStrategy 2021 machine, populate thePAConsumerConfig.yaml has the MySQL and PostgreSQLinformation shown in the prerequisites above.
Upgrade Guide
Copyright © 2021 All Rights Reserved 86
2. Copy the mysql-connector-java.jar from your previousinstallation to the Platform Analytics\lib directory on the newmachine.
3. Go to your Platform Analytics bin directory and call the platform-
analytics-data-migration-tool.bat f i le.
4. Select the Backup and Restore option (3).
5. Enter the full desired directory path for the database to be backed up toand restored from.
6. Wait until the backup is complete. The tool you will then prompt if it isokay to recreate the PostgreSQL warehouse and select yes.
7. The program will then restore your MySQL backup files into your newPostgreSQL warehouse and the data migration will be complete.
8. Migrate Comments to a New Installation of CollaborationServer
The following migration steps only apply when upgrading MicroStrategy2019 to MicroStrategy 2020 and 2021.
If you upgrading MicroStrategy 2020 to MicroStrategy 2021, use thedatabase backup and restore functionality, as described in MicroStrategyRepository.
In MicroStrategy 2021, Collaboration Server uses MicroStrategy Repositoryto store user comments. When performing a parallel upgrade, the newinstallation of Collaboration Server will be automatically configured toMicroStrategy Repository during installation. After performing the upgrade,Collaboration Server will only support connections to the MicroStrategy DataRepository. Any existing user comments will need to be migrated to the newrepository to remain accessible.
The Collaboration Server Administration Tool provides a way for systemadministrators to migrate comments from the previous data repository to thenew data repository. The Collaboration Administration Page will display a
Upgrade Guide
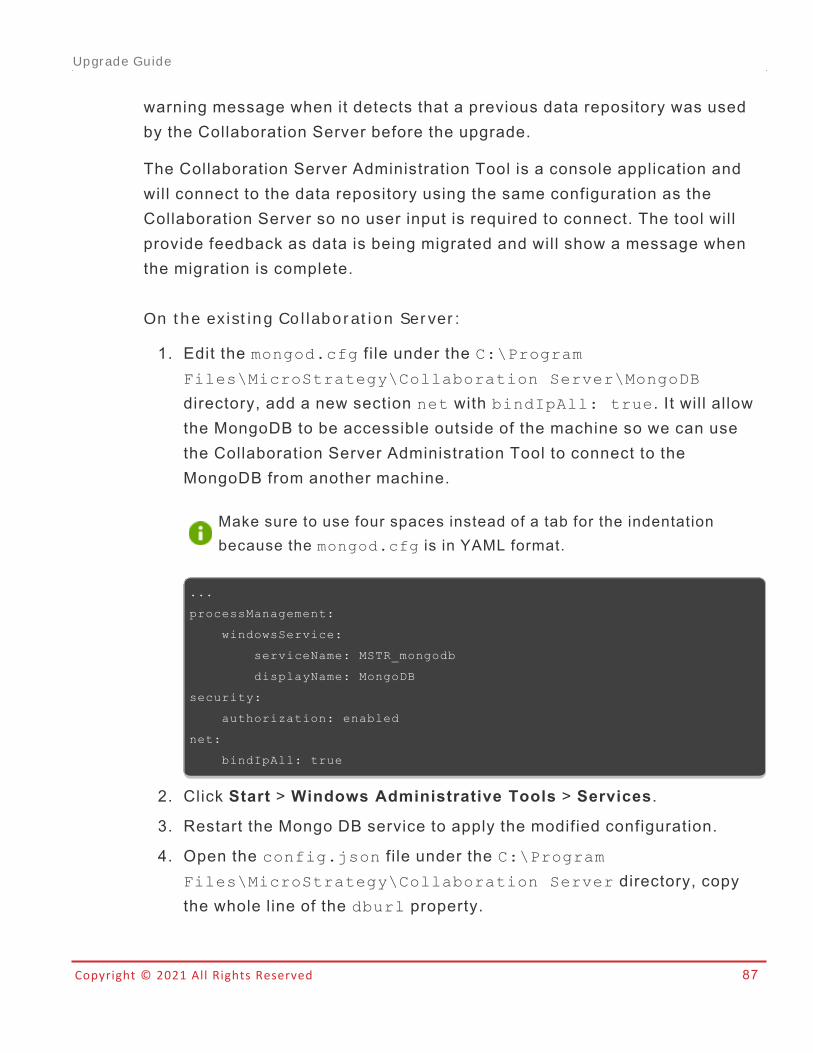
Copyright © 2021 All Rights Reserved 87
warning message when it detects that a previous data repository was usedby the Collaboration Server before the upgrade.
The Collaboration Server Administration Tool is a console application andwill connect to the data repository using the same configuration as theCollaboration Server so no user input is required to connect. The tool willprovide feedback as data is being migrated and will show a message whenthe migration is complete.
On t he exist ing Co l labor at ion Ser ver :
1. Edit the mongod.cfg f i le under the C:\Program
Files\MicroStrategy\Collaboration Server\MongoDB
directory, add a new section net with bindIpAll: true. It will allowthe MongoDB to be accessible outside of the machine so we can usethe Collaboration Server Administration Tool to connect to theMongoDB from another machine.
Make sure to use four spaces instead of a tab for the indentationbecause the mongod.cfg is in YAML format.
...
processManagement:
windowsService:
serviceName: MSTR_mongodb
displayName: MongoDB
security:
authorization: enabled
net:
bindIpAll: true
2. Click Start > Windows Administrative Tools > Services.
3. Restart the Mongo DB service to apply the modified configuration.
4. Open the config.json f i le under the C:\Program
Files\MicroStrategy\Collaboration Server directory, copythe whole line of the dburl property.
Upgrade Guide

Copyright © 2021 All Rights Reserved 88
On t he new Col labor at ion Ser ver m ach ine:
1. Click Start > Windows Administrative Tools > Services.
2. Stop the MicroStrategy Collaboration/Realtime Service.
3. Open the config.json f i le under the C:\Program
Files\MicroStrategy\Collaboration Server directory, pastethe dburl l ine at the top of the content. Replace the localhost stringin the dburl with the IP of the existing 2019 machine. Make sure thecontent is in valid JSON format. Here is an example of the modifiedconfig.json f i le.
{
"dburl": "mongodb://mstr:xxxx@{IP of the existing 2019
machine}:27017/mstr_collab?authSource=admin",
"port": 3000,
"logging": false,
"authorizationServerUrl":
"http://localhost:8080/MicroStrategyLibrary/api",
"dataSource": {
"username": "mstr_collab",
"password": "xxxxxx"
},
"scaling": "none",
"secretKey": "xxxx",
"enableConfigApi": true
}
4. Run the Data Migration Command:
l Enter the three file locations in the following format:
$ "<PATH_TO_NODE>" "<PATH_TO_ADMIN_TOOL_FILE>"
"<PATH_TO_CONFIG_FILE>"
"C:\Program Files\MicroStrategy\Common
Files\MicroStrategy\nodejs\node.exe" "C:\Program
Files\MicroStrategy\Collaboration Server\node_modules\mstr-collab-
svc\admintool.js" "C:\Program Files\MicroStrategy\Collaboration
Upgrade Guide
Copyright © 2021 All Rights Reserved 89
Server\config.json"
l Use the migrate command to run the data migration:
cmd> migrate
l Enter quit to close the Collaboration Server Administration Tool.
5. Start the service MicroStrategy Collaboration/Realtime Service.
8. Activate Your Installation
All MicroStrategy 2021 installations must be activated within 30 days. Onceyou receive the activation code you will need to enter it into MicroStrategyLicense Manager.
Inst r uct ions
1. Open MicroStrategy License Manager from Start menu > Programs >MicroStrategy Tools > License Manager.
2. Go to the License Administration tab > Activate Server Installationand click Next .
3. Select the Server Activation using Activation Code option and enteryour Activation Code in the text field. Click Next .
4. Click OK.
Performing a Parallel Upgrade on a Linux DeploymentThis section covers the procedure for executing a parallel upgrade of yourLinux environment to MicroStrategy 2021. Carefully review the PlanningYour Upgrade and Configuring an Upgrade Test Environment sectionsbefore proceeding with your upgrade.
Upgrade Guide
Copyright © 2021 All Rights Reserved 90
1. Install MicroStrategy 2021
Follow the procedures outlined in the Installation and Configuration Help toperform a fresh installation of MicroStrategy 2021 on your test environment.Once you have installed and configured your test environment, proceed withStep 2. Connect the Intelligence Server to a Copy of Your Metadata.
2. Connect the Intelligence Server to a Copy of Your Metadata
Before connecting your new Intelligence Server to the metadata, make acopy of your production metadata in your database. You will connect theIntelligence Server to this metadata copy in the following steps.
Repeat these steps for each Intelligence server node in a clusteredenvironment.
Configure Metadata Connect ion
1. Run the MicroStrategy Configuration Wizard:
cd /opt/mstr/Microstrategy/bin
./mstrcfgwiz
2. Select Configure Intelligence Server, and click Next.
3. From the DSN drop-down list, select the DSN used to connect to themetadata repository. Enter the User Name and Password for thedatabase.
4. Click Next.
5. Select Use the selected Server Definition as active.
6. Choose the server definition to use from the Existing ServerDefinitions pane.
7. Click Next.
Upgrade Guide
Copyright © 2021 All Rights Reserved 91
Def ine t he In t el l igence Ser ver por t num ber and ot her set t ings
1. Define the Intelligence Server settings described below:l Port number: You can use the default port number (34952) or specifyanother port number. The port number is how a server processidentifies itself on the machine on which it is running. If the portnumber is used by another process, such as in a shared environment,specify an available port number.
l REST port number: You can use the default port number (34962) orspecify another port number for the REST API Server insideIntelligence Server. This port number should not be same with theIntelligence Server port number.
You can configure REST API Server logging with the Diagnosticsand Performance Logging Tool. Select the PerformanceConfiguration tab, and find the dispatcher REST Trace undercomponent Network Classes. For more information, see theConfiguring What is Logged section in the System AdministrationHelp.
l Register Intelligence Server as a Service: Select this check box toregister Intelligence Server as a service.
l Projects to load at startup: This pane displays all the projects thatare in the metadata repository. You can select projects to use withthe server definition that you have chosen. The projects that youselect are loaded on the server at startup.
l Start Intelligence Server when finished: Select this check box tohave Intelligence Server start once you complete this configuration.
l Identify missing DSNs: Select this check box to verify that all DSNs,which are used for database instances created in MicroStrategy, arelocally available. This helps to ensure that your database instances inMicroStrategy can connect successfully to their associated datasources.
Upgrade Guide

Copyright © 2021 All Rights Reserved 92
By default, this check box is cleared, which means the availability ofall local DSNs used in database instances is not verified. While thismay mean that all DSNs used in database instances are notavailable, it can save system resources required for the IntelligenceServer configuration process.
2. Click Next.
3. Secure socket layer (SSL) protocol encrypts communications betweenIntelligence Server and Developer:
Configure SSL: This option specifies whether to enable IntelligenceServer and Developer to communicate using the SSL protocol. Clearthis check box to disable the use of the SSL protocol for IntelligenceServer and Developer communications. This option also applies SSLprotocol to the REST port number.
When you select to enable the SSL protocol, you must provide thefollowing information:
l Certificate: The SSL certificate file you created for IntelligenceServer. Click the browse button to navigate to and select thecertif icate file.
l Key: The private key file you created while requesting the certif icatefor Intelligence Server. Click the browse button to navigate to andselect the private key file.
l Password: The password that you used while creating the private keyfor the SSL certificate.
l SSL Port: The port number to use for SSL access. By default, theport is 39321.
To enable SSL protocol communication in Developer, you must use theProject Source Editor. For steps to complete the other tasks required
Upgrade Guide
Copyright © 2021 All Rights Reserved 93
to enable SSL protocol communications, refer to the SystemAdministration Help.
Configuring port requires Client Certificate: If selected, the SSLcommunications with client certif icate verification will be configured inthe Intelligence Server, but does not apply to REST port number.Provide the following information:
l SSL Port: The port number the Intelligence Server will use for SSLcommunications with client certif icate verification.
l Truststore: The location to the client certif icate truststore.
4. Click Next.
5. To specify the default statistics repository for the local IntelligenceServer and enable basic statistics logging for projects:l Make this my default Statistics Database Instance for the localIntelligence Server metadata: Select this check box to define whichstatistics repository to use for recording statistics. If you clear thischeck box, a default statistics database instance is not defined foryour Intelligence Server.
l When defining the default statistics repository, you must provide thefollowing configuration details:l DSN: Select the data source name for your statistics repository.
If a DSN for your statistics repository does not exist, you can clickNew to open the MicroStrategy Connectivity Wizard and create anew DSN.
l User Name: Type the database user name for the user that canconnect to the statistics data source.
l Password: Type the password for the user that can connect to thestatistics data source.
Upgrade Guide
Copyright © 2021 All Rights Reserved 94
l Enable Basic Statistics (For newly created projects andexisting projects not logging statistics): Basic statistics for newprojects and any projects that are not currently logging statisticswill be enabled. You can alter the settings in Project ConfigurationEditor in MicroStrategy Developer to:o Enable additional statistics for a project.o Enable basic and additional statistics for a project if you clearedthis check box.
6. Enable and configure the Messaging Services host and port settings.
Messaging Services Host(s)/Port(s): Provide host name or IPaddress of Messaging Services.
Format for this setting should be: server1.acme.com:9092
7. Click Next.
8. Review the summary information and click Save.
9. Click Finish.
3. Update the Metadata Copy
After upgrading the Intelligence Server, update the copy of your metadata byperforming the procedure that follows. This procedure creates and updatesmetadata tables to support new features available in MicroStrategy 2021.
Updating the metadata ensure compatibil ity between your pre-existingobjects and the MicroStrategy clients. You can also take advantage of newconfiguration settings exposed through the client applications, functionality,and objects available only with the updated version of metadata.
During the metadata update process, the Configuration Wizard generatesadditional SQL for tasks such as managing indexes and primary keys. Toview this SQL during the update process, on the Summary Page of theConfiguration Wizard, in the Summary pane, click SQL Preview. In addition,once you have completed the update process, the generated SQL is saved in
Upgrade Guide
Copyright © 2021 All Rights Reserved 95
the MicroStrategy common files directory. The file name isOriginalScript_generated.sql, where OriginalScript is the nameof the original SQL update script. For example, if you are updating an Oracledatabase, the original SQL update script is mdorcl.sql and the generatedSQL file is mdorcl_generated.sql.
Be aware of the following:
l If you have made any changes to the privileges assigned to the out-of-the-box MicroStrategy user groups and security roles, updating themetadata may overwrite those changes.
l For information about viewing the Configuration Wizard log file if an erroroccurs, see Resolving Problems Encountered During the Upgrade.
l The MDUpdate command line util ity that was formerly used to update themetadata is no longer supported. To update the metadata from thecommand line, you can use a response file with Configuration Wizard.
As an alternative to stepping through each page of the Configuration Wizardfor each project source that needs to be updated, you can create a responsefile with the update information and use that response file with theConfiguration Wizard to automatically update your metadata. For moreinformation about using a response file to update the metadata, see Using aResponse File with Configuration Wizard.
If you do not have access to the GUI mode of Configuration Wizard, youmust use a response file to update your metadata.
Prerequisites for Updating a MicroStrategy Metadata
Before attempting to update your MicroStrategy metadata to the latestversion, make sure you meet the following prerequisites:
l The metadata update process can be executed only by a MicroStrategyuser who is either a member of the System Administrators user group, or isthe out-of-the-box Administrator user. Having all administrative privileges
Upgrade Guide
Copyright © 2021 All Rights Reserved 96
is not sufficient: the user must be a member of the System Administratorsuser group.
l The project's metadata version from which you update must be older than,or the same as, the version of the machine where Configuration Wizard isinstalled that will be performing the metadata update An older version ofthe product is not able to perform an update on a newer version ofmetadata.
l The language settings of the client, project, and Intelligence Server mustall be the same.
l The projects to be updated must not be locked. To unlock a project'smetadata, in Developer, from the Administration menu, go to Locking >Unlock Project.
Database-Specific Prerequisites
The following prerequisites are specific to the RDBMS that your projectmetadata is stored in:
l If you are using Oracle for your metadata database, make sure that theMaximum Open Cursors parameter for the database is set to at least 1500.
l If you are using SQL Server for your metadata database, MicroStrategyrecommends setting the transaction log to the Simple Recovery Modelbecause the Bulk or Full Recovery Models may fil l the transaction logduring the upgrade and cause an error.
l If you are using DB2 for your metadata database, make sure that theDynamic Sections property for the database is set to 999.
To M ake M et adat a Updat es Using t he Con f igu r at ion Wizar d
1. Select the Upgrade existing environment to MicroStrategy SecureEnterprise option. Click Next.
2. Select the Intelligence Server components option. Click Next.
3. On the MicroStrategy Authentication page, type the username andpassword of a MicroStrategy system administrator. Click Next.
Upgrade Guide
Copyright © 2021 All Rights Reserved 97
4. On the Metadata Connection page, enter the database password toaccess the MicroStrategy metadata. Click Next.
The DSN and Login ID are provided based on the server configurationthat you did previously.
5. On the Select Components page, select the check boxes for eachIntelligence Server you want to upgrade.
6. Under each selected Intelligence Server, select the system componentsyou want to upgrade:l Upgrade metadata repository: The metadata repository containsthe definitions of your MicroStrategy applications and supportingobjects. An upgrade of your metadata is required to provide supportfor all new and updated features in the most recent version ofMicroStrategy.
l Lean Objects migration: Lean Objects are a significantly morecompact form of object representation in the metadata tables. LeanObjects are typically 25-50% smaller and will never be larger than theoriginal representation. Migrating existing objects to Lean Objectsalso allows for faster loading of objects compared to the oldrepresentation.
All new objects are created in this format, and existing objects areconverted to the new format as they are saved. Selecting LeanObjects migration converts all objects in the repository to the newformat at once. This option is automatically selected if you selectUpgrade metadata repository.
The Lean objects migration modifies all objects in yourMicroStrategy projects to use the new object representation. Thismigration can require a significant amount of time and resources tocomplete.
Upgrade Guide
Copyright © 2021 All Rights Reserved 98
Lean Objects migration decreases the amount of disk space used byyour objects. However, the migration causes all objects in yourprojects to be resaved. Depending on your database transactionlogging policy, this may cause a temporary increase in the size ofyour metadata database.
l Update privileges: Updating the privileges ensures that users haveaccess to the same functionality that they had in previous versions ofMicroStrategy.
By default, privileges are upgraded based on the version of yourMicroStrategy metadata. However, if you previously upgraded yourMicroStrategy metadata and did not upgrade privileges along withthe metadata upgrade, you must identify the MicroStrategy versionyou most recently upgraded your privileges for.
To do this, to the right of Update privileges, click Advanced. TheSelect Privilege Version dialog box opens, with the version of yourMicroStrategy metadata selected by default. From the drop-downlist, select the version of MicroStrategy that privileges were mostrecently upgraded for and click OK.
l Migrate History List messages: Select this check box to migrateyour existing History List repository to a new format for improvedsearch results, scalability, and performance. A file-based repositorycan be migrated to a database-based repository or a hybridrepository, and a database-based repository can be migrated to ahybrid repository.l If you select this check box, additional configuration options for thismigration are provided later, on the History List Migration page.During the upgrade process this Intelligence Server and any otherIntelligence Servers in the cluster are stopped and restarted.
l If you are using a file-based History List repository and want tocontinue using that format, clear this check box. The repository is
Upgrade Guide
Copyright © 2021 All Rights Reserved 99
updated, but its format is not affected, when you restart theIntelligence Server after the upgrade.
l If you are using a database-based or hybrid History List repositoryand want to continue using the same type of repository, forinformation about upgrading the History List database, see 4.History List Database Repository.
l Update Distribution Services Objects: Select this check box toupgrade Distribution Services subscription objects. This update isrequired to ensure that your Distribution Services subscriptions cansupport the new features and enhancements included in the mostrecent release. If you select this option, ensure that the metadatarepository has been upgraded or is selected to be upgraded as part ofthis update.
l Database Instance Update: Select this checkbox to update any MDXdatabase instances which currently use JCO 2.x to JCO 3.x. As ofMicroStrategy 10.x the Java Virtual Machine used does not supportJCO 2.x. This option will only affect MDX database instances whichare set to use JCO 2.x.
7. Select each project you want to update. Only projects that are loadedon Intelligence Server can be updated. Project updates can include anyof the following options:
l Execute project logical upgrade: Updates the project to the mostrecent version of MicroStrategy. This option also updates the report,document, and dossier definitions to improve the performance andreduce the memory usage and storage requirements of reports anddocuments that were created with a previous version ofMicroStrategy.
Be aware of the following:
l If this update has already been completed, this option is namedRe-execute project logical upgrade.
Upgrade Guide

Copyright © 2021 All Rights Reserved 100
l This upgrade is required to execute any additional project upgradeoptions.
l Updated Report Services documents cannot be run in previousversions of MicroStrategy.
l Depending on the number of reports and documents in the project,this update may take significant time.
l Lean Objects migration: Selecting Lean Objects migration convertsall objects in this project to the new format at once.
The Lean objects migration modifies all objects in this project to usethe new object representation. This migration can require significanttime and resources to complete.
Lean Objects migration decreases the amount of disk space used byyour objects. However, the migration causes all objects in thisproject to be resaved. Depending on your database transactionlogging policy, this may cause a temporary increase in the size ofyour metadata database.
l Update Schedules: Makes previous subscriptions viewable inMicroStrategy 2021.
l Update MDX Source Objects: Updates the MDX data source objects(MDX Cubes) that were created in earlier versions of MicroStrategy totake advantage of improved performance.
By default, if you update multiple projects and the update fails forone project, the update process continues for other projects. Thisallows you to complete all possible updates and then review anyerrors. To abort the update process for other projects when oneproject fails, clear the Update the remaining projects, even whenone project update fails check box.
Upgrade Guide
Copyright © 2021 All Rights Reserved 101
Depending on the number of MDX source objects in the project, thisupdate may take significant time.
l Update OLAP Services Cube caches to PRIME: Select this checkbox to update all Intelligent Cubes to the PRIME architecture. Thisarchitecture can improve the performance of publishing IntelligentCube results through the use of parallel processing and otheroptimizations. This update is applied to all Intelligent Cubes for theproject.
l Update data import cubes (definition and cache) to PRIME:Select this check box to update all Data Import datasets to the PRIMEarchitecture. This architecture can improve the performance ofpublishing Data Import results through the use of parallel processingand other optimizations. This update is applied to data sets includedin your project through the use of Data Import.
It is easier to update OLAP Services Cube caches and data importcubes to PRIME during the upgrade process. If you do not updatethem now, each cube is updated when it is used. Doing the upgradeall at once ensures consistent performance for end users.
8. Click Next.
9. If you selected the Migrate History List messages option, on theHistory List Target Database page, specify the necessary informationfor the History List database.
10. Click Next.
11. On the Summary page, review your upgrade choices and click Finish.
4. History List Database Repository
If you are using a database-based History List, when upgrading toMicroStrategy 2021 you must create the History List database tables in thetest environment.
Upgrade Guide
Copyright © 2021 All Rights Reserved 102
To Cr eat e t he Tab les in t he Hist o r y List Reposi t o r y
1. Open the MicroStrategy Configuration Wizard.
2. Select Metadata, History List and Statistics Repository Tables andclick Next.
3. Select the History List Tables check box and click Next.
4. From the DSN drop-down list, select the DSN for your History Listrepository.
If a DSN for your History List repository does not exist, you can selectNew to open the Connectivity Wizard and create a new DSN.
5. Type a User Name and Password that can connect to the data source.
The database user you provide becomes the owner of all History Listtables and objects. The database user is required to have the Select,Create, Insert, and Drop permissions.
6. After providing a valid user name and password, you can click SQLPreview to open the SQL Preview dialog box. This dialog box providesthe SQL statements that will be executed on your data source to createthe History List tables. Click Close once you are done reviewing theSQL statements to return to the Configuration Wizard.
If you use the advanced options to change the SQL script, you can clickSQL Preview after selecting the new script to see an updated listing ofthe SQL statements that will be executed.
7. Click Advanced.
8. In the Table Prefix f ield, you can specify a prefix to be used whenHistory List tables are created in the database you select. This is anoptional configuration. However, you must use different prefixes foryour metadata tables and your History List tables if you store them inthe same database.
Upgrade Guide
Copyright © 2021 All Rights Reserved 103
Most databases use a prefix of two characters. However, you cansupply as many letters, numbers, underscores (_), and periods (.) asrequired to support your database prefixes. To determine characterlimits for a prefix, refer to your third-party database vendordocumentation.
If you use a table prefix for your History List tables, you must alsodefine this table prefix when you create a database instance to connectto the History List tables.
9. In the Script f ield, a SQL script to create History List tables optimizedfor your database is selected. If you want to specify a different script,click ... to browse to and select a customized script
10. Click Next.
11. Review the summary information.
You can click Save to save the configuration as a response (.ini) fi le toconfigure History List repositories on other systems or to run silentconfigurations at a later time.
12. Click Finish to apply the configuration and create the History Listrepository.
5. Updating the Enterprise Manager Project
Upgrading from MicroStrategy 9 to 2021 includes major enhancements andupdates to the Enterprise Manager project; whereas upgrading fromMicroStrategy 10 to 2021 does not have major enhancements and upgradesto the Enterprise Manager project. In both scenarios, you should use thelatest versions of Enterprise Manager projects with MicroStrategy 2021.
l To retain customizations created in previous Enterprise Manager projects,make separate copies of these customized copies of the out-of-the-boxobjects, or as brand-new objects. Any modifications you made to the out-of-the-box objects for an Enterprise Manager project are replaced as part of the
Upgrade Guide

Copyright © 2021 All Rights Reserved 104
upgrade process.
l To upgrade your Enterprise Manager statistics and warehouse from 10.x to2021, you must manually run the script that corresponds with your databasemanagement system type. See KB483298 for details. If you are upgradingfrom MicroStrategy 2019 to 2021, you do not need to upgrade your EnterpriseManager statistics and warehouse.
l Use the Project Duplication Wizard to make a backup of your existingEnterprise Manager project. For detailed information about using ProjectDuplication, see the Managing Your Projects chapter of the SystemAdministration Help.
1. Open Configuration Wizard.
2. Select Upgrade existing environment to MicroStrategy SecureEnterprise, and click Next.
3. Select Upgrade Enterprise Manager Project, and click Next.
4. Provide the following information:l User Name: Type the MicroStrategy user name that can access andadminister the Enterprise Manager project.
l Password: Type the password for the MicroStrategy user that canaccess and administer the Enterprise Manager project.
5. If you have an Enterprise Manager project package file (.mmp) to useinstead of the default fi le, click Advanced >>. For the Packagelocation f ield, click ... (the Browse button) to navigate to and select thepackage file.
6. Click Next.
7. Provide the following information:l DSN: Select the data source name for your statistics repository orclick New to open the MicroStrategy Connectivity Wizard and create anew DSN.
l User Name: Type the database user name for the user that canconnect to the statistics data source.
Upgrade Guide
Copyright © 2021 All Rights Reserved 105
l Password: Type the password for the user that can connect to thestatistics data source.
8. Click Next.
9. Review the summary information.
You can click Save to save the configuration as a response (.ini) fi le toupgrade your Enterprise Manager projects on other systems or to runsilent configurations at a later time. For information on running theConfiguration Wizard with a response file, see Using a Response Filewith Configuration Wizard.
10. Click Finish.
6. Upgrade the Platform Analytics Project
As of 2019, you can upgrade your Platform Analytics project in the metadataof your connected Intelligence Server. Upgrading the project isrecommended with each platform and update release in order to brings inthe latest dossiers, attributes, metrics and reporting optimizations to thePlatform Analytics project.
1. Open Configuration Wizard.
2. Select Upgrade existing environment to MicroStrategy SecureEnterprise, and click Next.
3. Select Upgrade Platform Analytics Project, and click Next.
4. Provide the following information:l User Name: Enter the MicroStrategy user name that can access theIntelligence Server.
If this is your first time connecting to the MicroStrategy IntelligenceServer, use the user name Administrator without a password.
Upgrade Guide
Copyright © 2021 All Rights Reserved 106
l Password: Enter the password for the MicroStrategy user that canaccess the Intelligence Server.
5. Select the MySQL/PostgreSQL DSN for the Platform AnalyticsRepository.
6. Enter your User Name and Password for the DSN.
7. Click Next.
8. Click Apply. The Configuration Wizard automatically applies one of thefollowing configuration files depending on the status of the user.
For new MySQL users:
l PlatformAnalyticsConfigurationNew.scp
For existing MySQL users:
l PlatformAnalyticsConfigurationUpgrade.scp
For new MicroStrategy users:
l PlatformAnalyticsConfigurationNew_PostgreSQL.scp
For existing PostgreSQL users:
l PlatformAnalyticsConfigurationUpgrade_PostgreSQL.scp
9. To manually update the project settings, see Configure the PlatformAnalytics Project.
7. Migrate Platform Analytics Data to MicroStrategy Repository
The Platform Analytics Data Migration tool is used to help existingcustomers migrate their data from MySQL to the newly supportedPostgreSQL repository. This tool can help migrate both new and old versionsof MySQL dump files to the latest version of Platform Analytics.
Backup Prerequisites:
Upgrade Guide
Copyright © 2021 All Rights Reserved 107
l /MicroStrategy/install/PlatformAnalytics/PAConsumerConfig.
yaml populated with:
warehouseDbConnection:
l whHost: 127.0.0.1
l whUser: root
l whPasswd: encrypted_password
l whPort: 3306
l whDb: platform_analytics_wh
l mysql-connector-java.jar is present in PlatformAnalytics/lib
directory.
l Disk space sufficient to hold a backup of your MySQL platform_
analytics_wh database.
Restore Prerequisites:
l PAConsumerConfig.yaml populated with:
pgWarehouseDbConnection:
l pgWhHost: 127.0.0.1
l pgWhUser: postgres
l pgWhPasswd: encrypted password
l pgWhPort: 5432
l pgWhDb: platform_analytics_wh
l Path to .csv f i les from a previous backup of platform_analytics_wh.
l Enough disk space available to PostgreSQL to restore the backed up ..csvf i les from MySQL.
Upgrade Guide
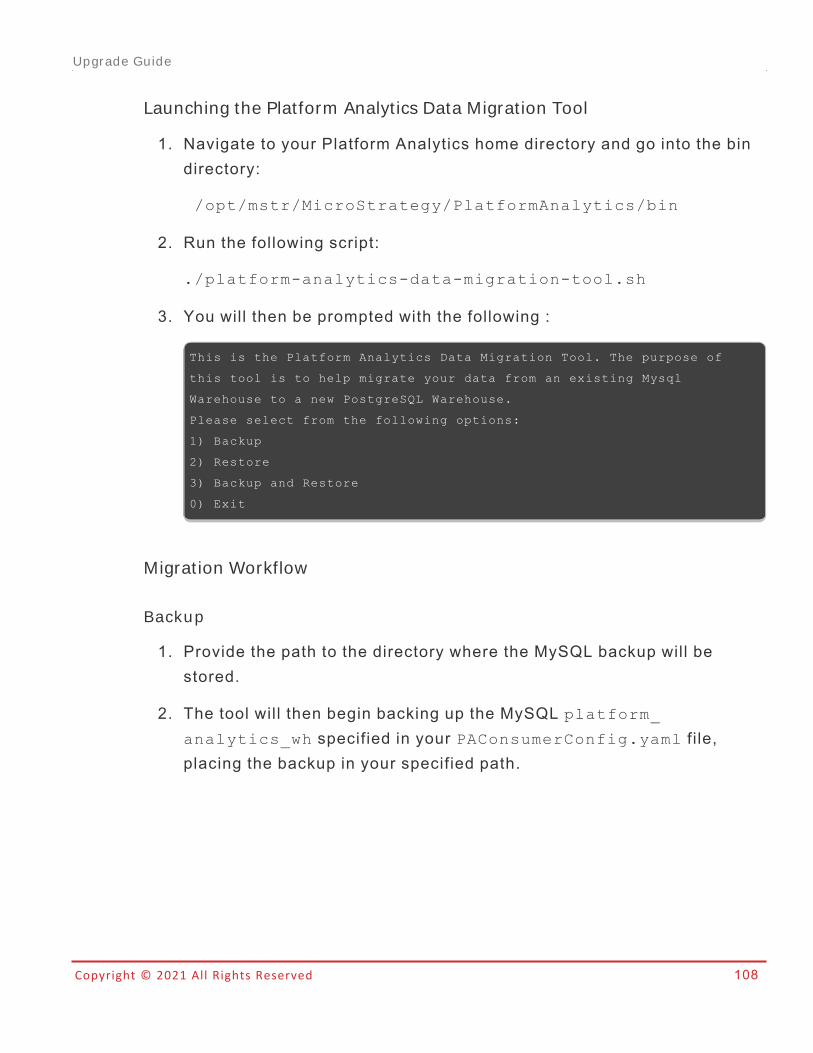
Copyright © 2021 All Rights Reserved 108
Launching the Platform Analyt ics Data Migrat ion Tool
1. Navigate to your Platform Analytics home directory and go into the bindirectory:
/opt/mstr/MicroStrategy/PlatformAnalytics/bin
2. Run the following script:
./platform-analytics-data-migration-tool.sh
3. You will then be prompted with the following :
This is the Platform Analytics Data Migration Tool. The purpose of
this tool is to help migrate your data from an existing Mysql
Warehouse to a new PostgreSQL Warehouse.
Please select from the following options:
1) Backup
2) Restore
3) Backup and Restore
0) Exit
Migrat ion Workflow
Backup
1. Provide the path to the directory where the MySQL backup will bestored.
2. The tool will then begin backing up the MySQL platform_
analytics_wh specified in your PAConsumerConfig.yaml f i le,placing the backup in your specified path.
Upgrade Guide
Copyright © 2021 All Rights Reserved 109
Rest or e
1. Provide the path to the directory where the MySQL backup is stored.
2. The tool will prompt you again if you are sure you are okay to drop yourPostgreSQL platform_analytics_wh schema.
3. If yes is selected, the platform_analytics_wh schema will bedropped and recreated matching the version of your MySQL dump.
4. The backup data is then imported into the newly created platform_
analytics_wh schema.
5. The platform_analytics_wh schema will then be upgraded to thelatest version of Platform Analytics.
Recommended Upgrade Procedures
1. On your new MicroStrategy 2021 machine, populate thePAConsumerConfig.yaml has the MySQL and PostgreSQLinformation shown in the prerequisites above.
2. Copy the mysql-connector-java.jar from your previousinstallation to the PlatformAnalytics/lib directory on the newmachine.
3. Go to your PlatformAnalytics/bin directory and call theplatform-analytics-data-migration-tool.sh f i le.
4. Select the Backup and Restore option (3).
5. Enter the full desired directory path for the database to be backed up toand restored from.
6. Wait until the backup is complete. The tool will then prompt if it is okayto recreate the PostgreSQL warehouse and select yes.
7. The program will then restore your MySQL backup files into your newPostgreSQL warehouse and the data migration will be complete.
Upgrade Guide
Copyright © 2021 All Rights Reserved 110
8. Migrate Comments to a New Installation of CollaborationServer
The following migration steps only apply when upgrading MicroStrategy2019 to MicroStrategy 2020 and 2021.
If you upgrading MicroStrategy 2020 to MicroStrategy 2021, use thedatabase backup and restore functionality, as described in MicroStrategyRepository.
In MicroStrategy 2021, Collaboration Server uses MicroStrategy Repositoryto store user comments. When performing a parallel upgrade, the newinstallation of Collaboration Server will be automatically configured toMicroStrategy Repository during installation. After performing the upgrade,Collaboration Server will only support connections to the MicroStrategy DataRepository. Any existing user comments will need to be migrated to the newrepository to remain accessible.
The Collaboration Server Administration Tool provides a way for systemadministrators to migrate comments from the previous data repository to thenew data repository. The Collaboration Administration Page will display awarning message when it detects that a previous data repository was usedby the Collaboration Server before the upgrade.
The Collaboration Server Administration Tool is a console application andwill connect to the data repository using the same configuration as theCollaboration Server so no user input is required to connect. The tool willprovide feedback as data is being migrated and will show a message whenthe migration is complete.
On t he exist ing Co l labor at ion Ser ver :
1. Edit the mongod.cfg f i le under the/opt/mstr/MicroStrategy/install/CollaborationServer/M
ongoDB/ directory, add a new section net with bindIpAll: true. It
Upgrade Guide
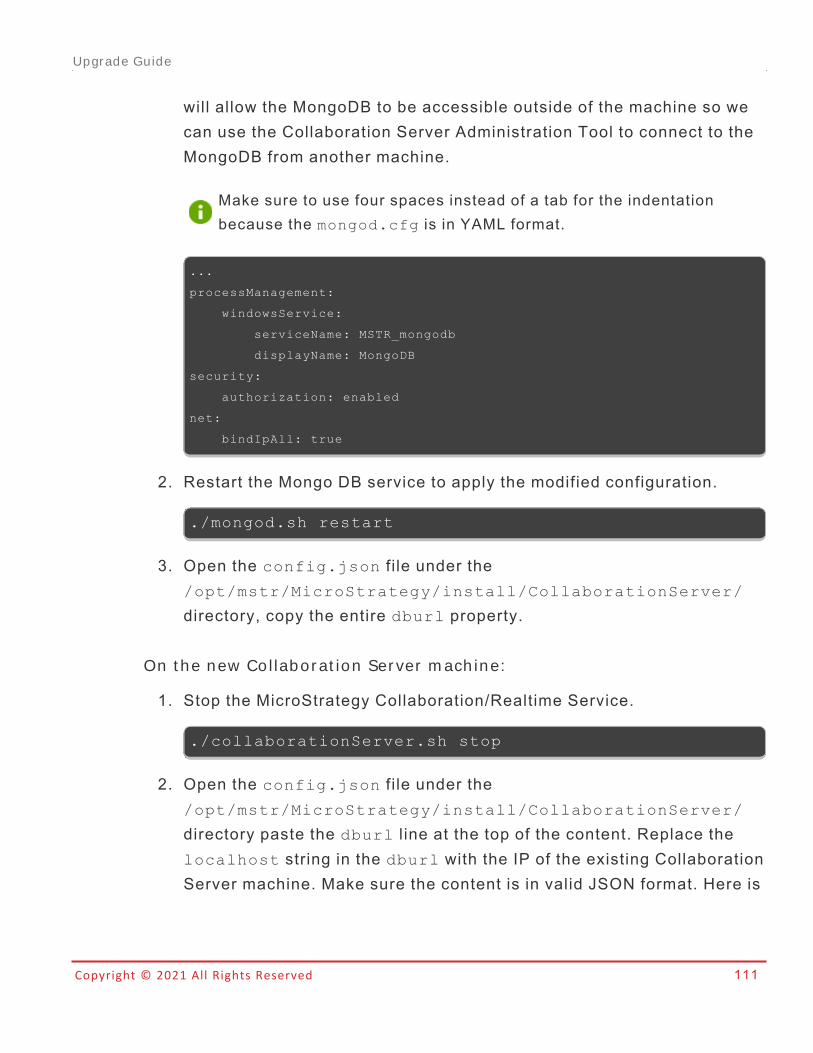
Copyright © 2021 All Rights Reserved 111
will allow the MongoDB to be accessible outside of the machine so wecan use the Collaboration Server Administration Tool to connect to theMongoDB from another machine.
Make sure to use four spaces instead of a tab for the indentationbecause the mongod.cfg is in YAML format.
...
processManagement:
windowsService:
serviceName: MSTR_mongodb
displayName: MongoDB
security:
authorization: enabled
net:
bindIpAll: true
2. Restart the Mongo DB service to apply the modified configuration.
./mongod.sh restart
3. Open the config.json f i le under the/opt/mstr/MicroStrategy/install/CollaborationServer/
directory, copy the entire dburl property.
On t he new Col labor at ion Ser ver m ach ine:
1. Stop the MicroStrategy Collaboration/Realtime Service.
./collaborationServer.sh stop
2. Open the config.json f i le under the/opt/mstr/MicroStrategy/install/CollaborationServer/
directory paste the dburl l ine at the top of the content. Replace thelocalhost string in the dburl with the IP of the existing CollaborationServer machine. Make sure the content is in valid JSON format. Here is
Upgrade Guide
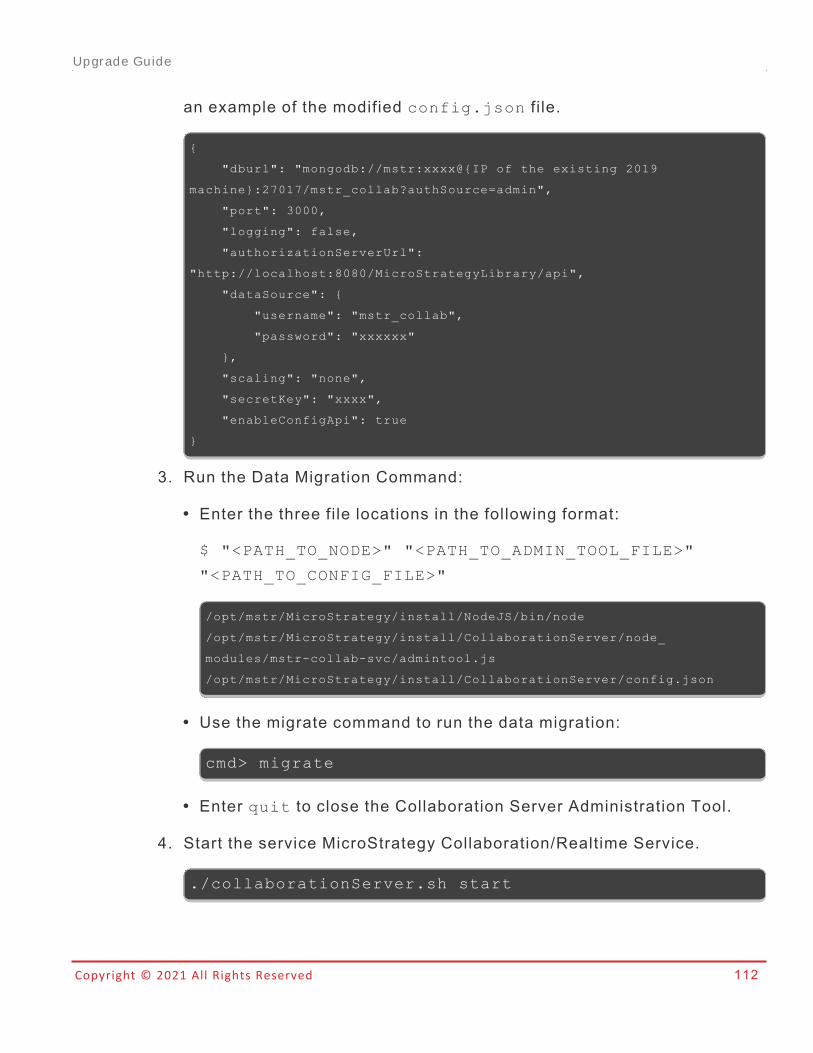
Copyright © 2021 All Rights Reserved 112
an example of the modified config.json f i le.
{
"dburl": "mongodb://mstr:xxxx@{IP of the existing 2019
machine}:27017/mstr_collab?authSource=admin",
"port": 3000,
"logging": false,
"authorizationServerUrl":
"http://localhost:8080/MicroStrategyLibrary/api",
"dataSource": {
"username": "mstr_collab",
"password": "xxxxxx"
},
"scaling": "none",
"secretKey": "xxxx",
"enableConfigApi": true
}
3. Run the Data Migration Command:
l Enter the three file locations in the following format:
$ "<PATH_TO_NODE>" "<PATH_TO_ADMIN_TOOL_FILE>"
"<PATH_TO_CONFIG_FILE>"
/opt/mstr/MicroStrategy/install/NodeJS/bin/node
/opt/mstr/MicroStrategy/install/CollaborationServer/node_
modules/mstr-collab-svc/admintool.js
/opt/mstr/MicroStrategy/install/CollaborationServer/config.json
l Use the migrate command to run the data migration:
cmd> migrate
l Enter quit to close the Collaboration Server Administration Tool.
4. Start the service MicroStrategy Collaboration/Realtime Service.
./collaborationServer.sh start
Upgrade Guide
Copyright © 2021 All Rights Reserved 113
8. Activate Your Installation
All MicroStrategy 2021 installations must be activated within 30 days. Onceyou receive the activation code, you will need to enter it into MicroStrategyLicense Manager.
Instructions
1. Open MicroStrategy License Manager from Start > Programs >MicroStrategy Tools > License Manager.
2. Go to the License Administration tab > Activate Server Installation.
3. Click Next.
4. Select the Server Activation Using Code option.
5. Enter your Activation Code in the text field.
6. Click Next.
Using MicroStrategy Backup and Restore
MicroStrategy Backup is an application that allows you to easily back upessential MicroStrategy configurations, databases, and files in existingMicroStrategy Cloud Platform for AWS or MicroStrategy Cloud Platform forAzure environments and upload backup files to AWS S3 or Azure Blob.
Restoring with MicroStrategy Backup allows you to create mirrorenvironments to test new projects, create disaster recovery environments,migrate current MicroStrategy deployment to the cloud, and more in a sameor newer MicroStrategy version.
How To Perform an Upgrade with MicroStrategy Backup1. MicroStrategy Backup Preparations
2. Install MicroStrategy Backup
3. Run MicroStrategy Backup
Upgrade Guide
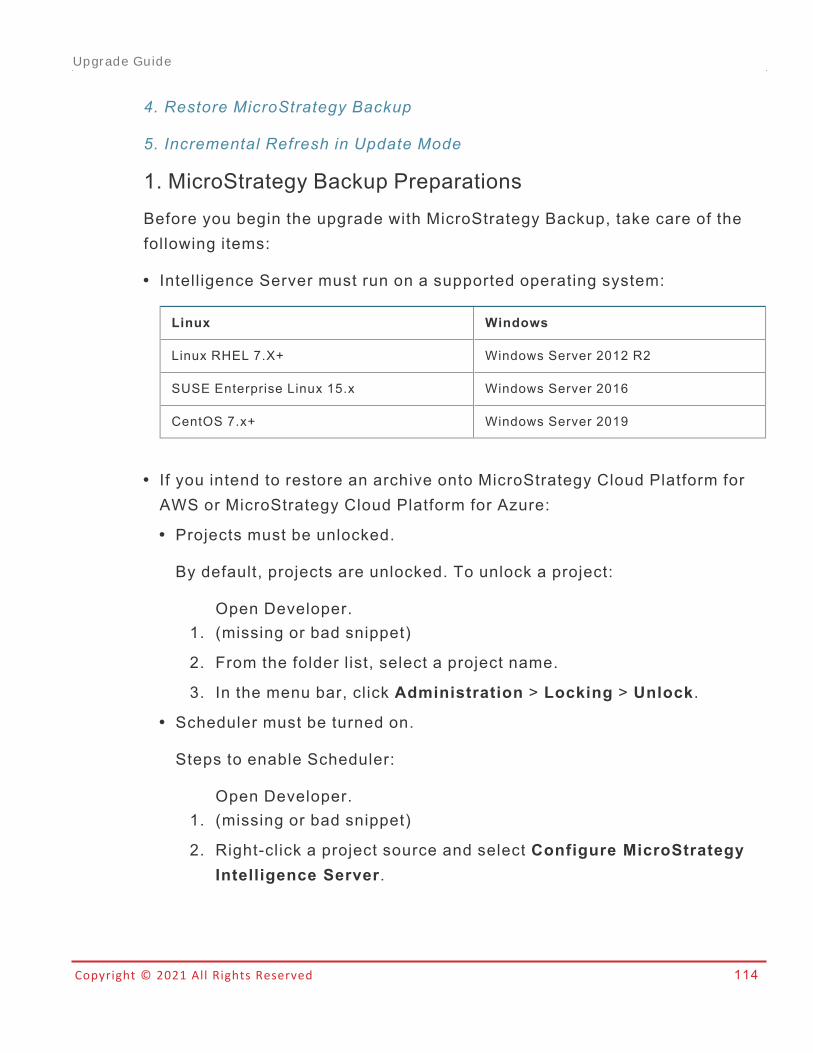
Copyright © 2021 All Rights Reserved 114
4. Restore MicroStrategy Backup
5. Incremental Refresh in Update Mode
1. MicroStrategy Backup PreparationsBefore you begin the upgrade with MicroStrategy Backup, take care of thefollowing items:
l Intelligence Server must run on a supported operating system:
Linux Windows
Linux RHEL 7.X+ Windows Server 2012 R2
SUSE Enterprise Linux 15.x Windows Server 2016
CentOS 7.x+ Windows Server 2019
l If you intend to restore an archive onto MicroStrategy Cloud Platform forAWS or MicroStrategy Cloud Platform for Azure:l Projects must be unlocked.
By default, projects are unlocked. To unlock a project:
1.Open Developer.(missing or bad snippet)
2. From the folder list, select a project name.
3. In the menu bar, click Administration > Locking > Unlock.l Scheduler must be turned on.
Steps to enable Scheduler:
1.Open Developer.(missing or bad snippet)
2. Right-click a project source and select Configure MicroStrategyIntelligence Server.
Upgrade Guide
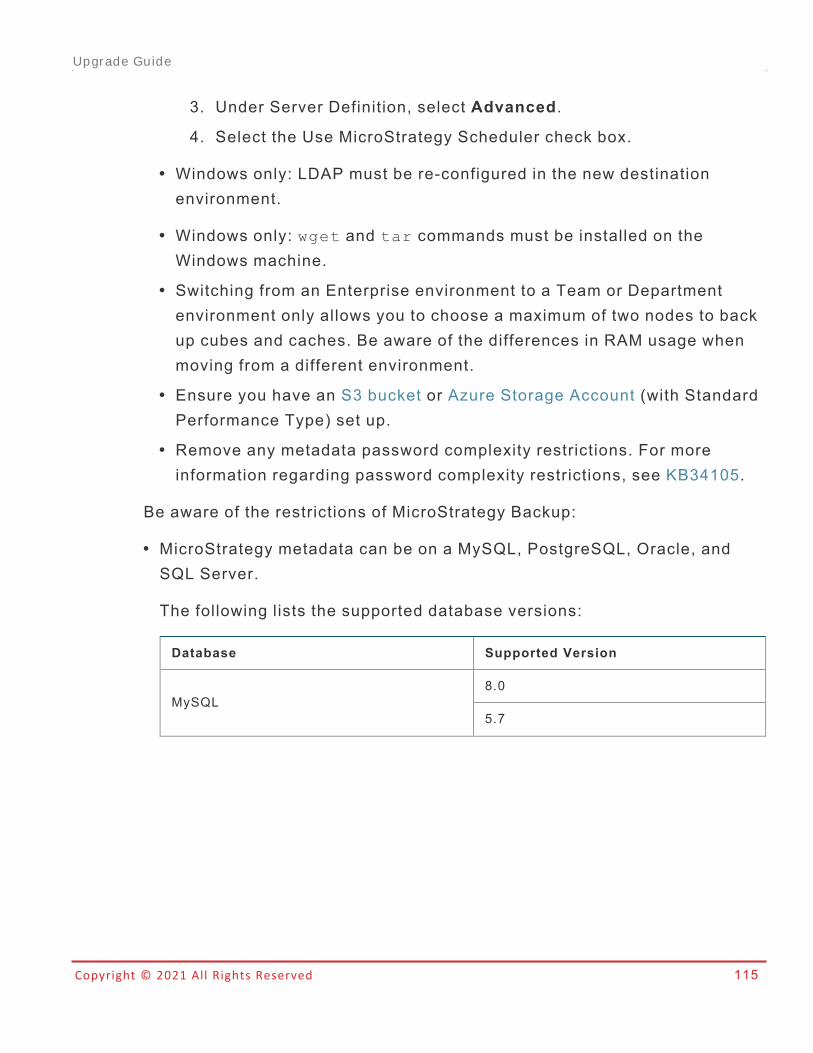
Copyright © 2021 All Rights Reserved 115
3. Under Server Definition, select Advanced.
4. Select the Use MicroStrategy Scheduler check box.
l Windows only: LDAP must be re-configured in the new destinationenvironment.
l Windows only: wget and tar commands must be installed on theWindows machine.
l Switching from an Enterprise environment to a Team or Departmentenvironment only allows you to choose a maximum of two nodes to backup cubes and caches. Be aware of the differences in RAM usage whenmoving from a different environment.
l Ensure you have an S3 bucket or Azure Storage Account (with StandardPerformance Type) set up.
l Remove any metadata password complexity restrictions. For moreinformation regarding password complexity restrictions, see KB34105.
Be aware of the restrictions of MicroStrategy Backup:
l MicroStrategy metadata can be on a MySQL, PostgreSQL, Oracle, andSQL Server.
The following lists the supported database versions:
Database Supported Version
MySQL8.0
5.7
Upgrade Guide
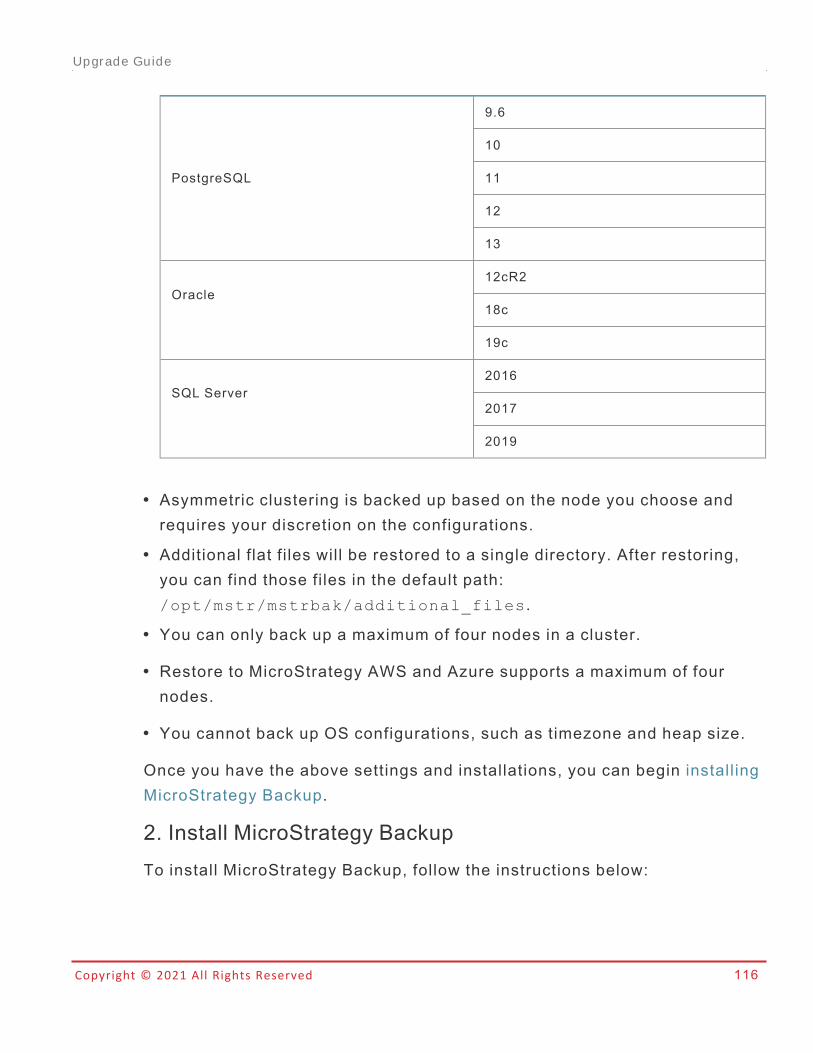
Copyright © 2021 All Rights Reserved 116
PostgreSQL
9.6
10
11
12
13
Oracle12cR2
18c
19c
SQL Server2016
2017
2019
l Asymmetric clustering is backed up based on the node you choose andrequires your discretion on the configurations.
l Additional flat fi les will be restored to a single directory. After restoring,you can find those files in the default path:/opt/mstr/mstrbak/additional_files.
l You can only back up a maximum of four nodes in a cluster.
l Restore to MicroStrategy AWS and Azure supports a maximum of fournodes.
l You cannot back up OS configurations, such as timezone and heap size.
Once you have the above settings and installations, you can begin installingMicroStrategy Backup.
2. Install MicroStrategy BackupTo install MicroStrategy Backup, follow the instructions below:
Upgrade Guide
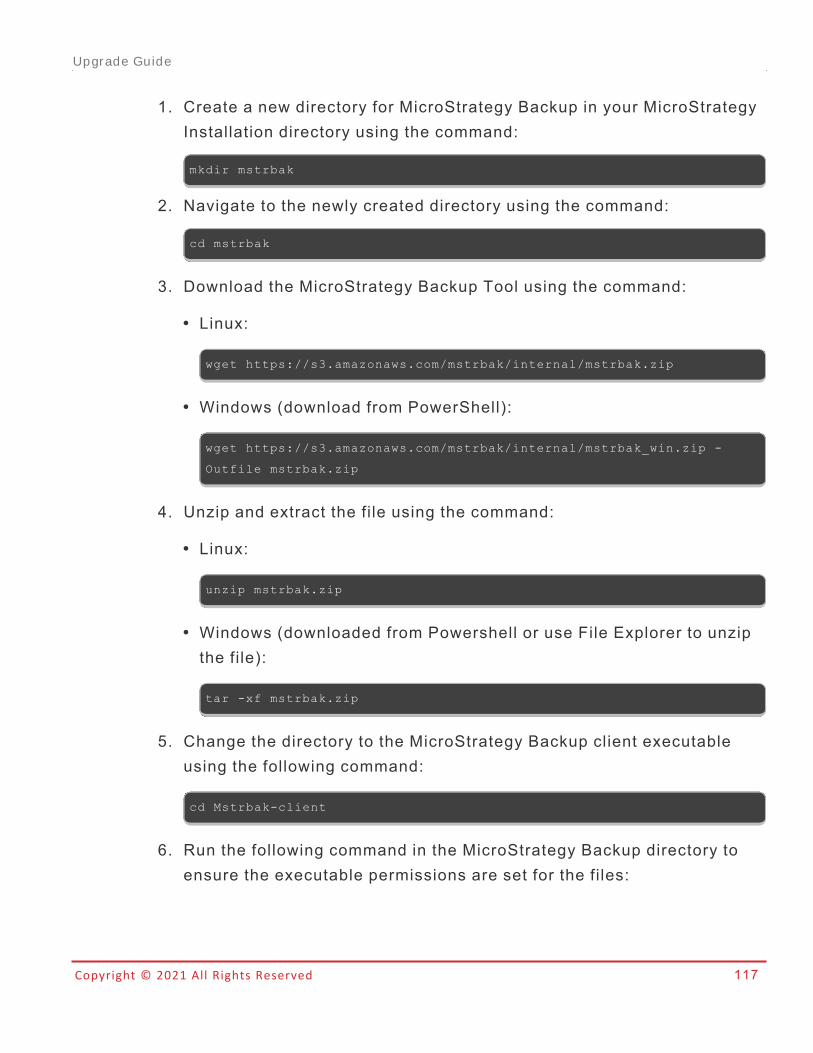
Copyright © 2021 All Rights Reserved 117
1. Create a new directory for MicroStrategy Backup in your MicroStrategyInstallation directory using the command:
mkdir mstrbak
2. Navigate to the newly created directory using the command:
cd mstrbak
3. Download the MicroStrategy Backup Tool using the command:
l Linux:
wget https://s3.amazonaws.com/mstrbak/internal/mstrbak.zip
l Windows (download from PowerShell):
wget https://s3.amazonaws.com/mstrbak/internal/mstrbak_win.zip -
Outfile mstrbak.zip
4. Unzip and extract the file using the command:
l Linux:
unzip mstrbak.zip
l Windows (downloaded from Powershell or use File Explorer to unzipthe file):
tar -xf mstrbak.zip
5. Change the directory to the MicroStrategy Backup client executableusing the following command:
cd Mstrbak-client
6. Run the following command in the MicroStrategy Backup directory toensure the executable permissions are set for the files:
Upgrade Guide
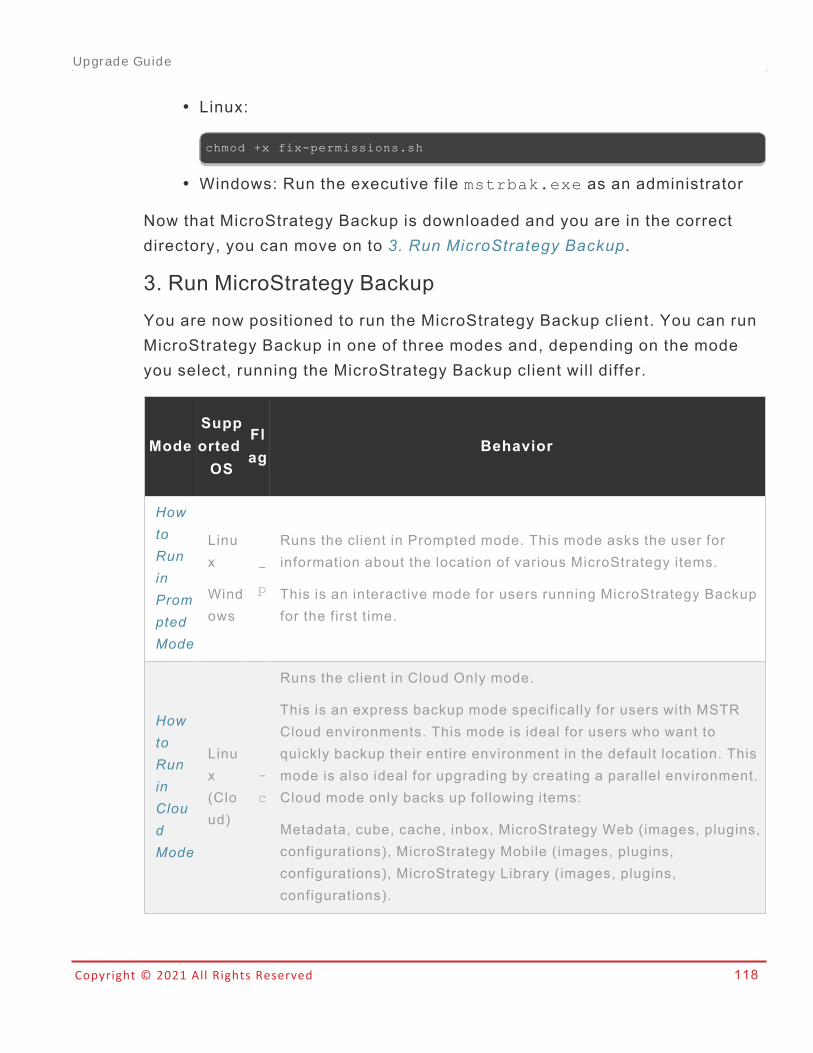
Copyright © 2021 All Rights Reserved 118
l Linux:
chmod +x fix-permissions.sh
l Windows: Run the executive file mstrbak.exe as an administrator
Now that MicroStrategy Backup is downloaded and you are in the correctdirectory, you can move on to 3. Run MicroStrategy Backup.
3. Run MicroStrategy BackupYou are now positioned to run the MicroStrategy Backup client. You can runMicroStrategy Backup in one of three modes and, depending on the modeyou select, running the MicroStrategy Backup client will differ.
ModeSupportedOS
Flag
Behavior
HowtoRuninPromptedMode
Linux
Windows
-
p
Runs the client in Prompted mode. This mode asks the user forinformation about the location of various MicroStrategy items.
This is an interactive mode for users running MicroStrategy Backupfor the first time.
HowtoRuninCloudMode
Linux(Cloud)
-
c
Runs the client in Cloud Only mode.
This is an express backup mode specifically for users with MSTRCloud environments. This mode is ideal for users who want toquickly backup their entire environment in the default location. Thismode is also ideal for upgrading by creating a parallel environment.Cloud mode only backs up following items:
Metadata, cube, cache, inbox, MicroStrategy Web (images, plugins,configurations), MicroStrategy Mobile (images, plugins,configurations), MicroStrategy Library (images, plugins,configurations).
Upgrade Guide
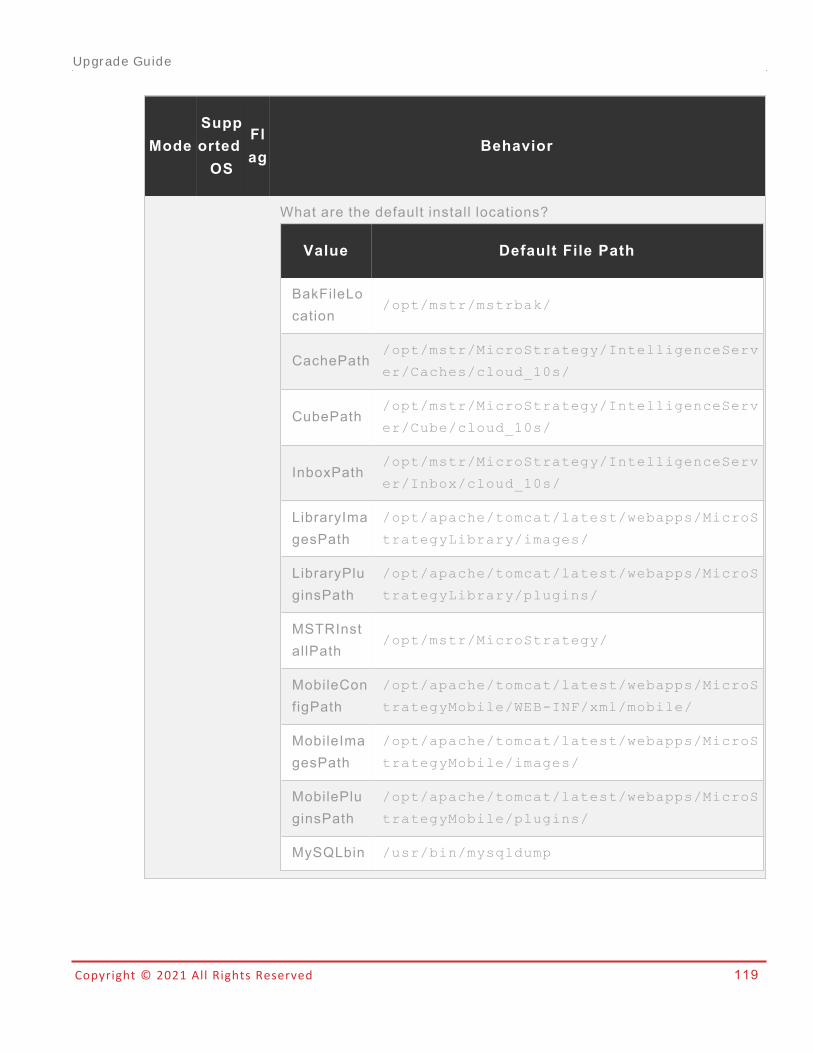
Copyright © 2021 All Rights Reserved 119
ModeSupportedOS
Flag
Behavior
What are the default install locations?
Value Default File Path
BakFileLocation
/opt/mstr/mstrbak/
CachePath/opt/mstr/MicroStrategy/IntelligenceServ
er/Caches/cloud_10s/
CubePath/opt/mstr/MicroStrategy/IntelligenceServ
er/Cube/cloud_10s/
InboxPath/opt/mstr/MicroStrategy/IntelligenceServ
er/Inbox/cloud_10s/
LibraryImagesPath
/opt/apache/tomcat/latest/webapps/MicroS
trategyLibrary/images/
LibraryPluginsPath
/opt/apache/tomcat/latest/webapps/MicroS
trategyLibrary/plugins/
MSTRInstallPath
/opt/mstr/MicroStrategy/
MobileConfigPath
/opt/apache/tomcat/latest/webapps/MicroS
trategyMobile/WEB-INF/xml/mobile/
MobileImagesPath
/opt/apache/tomcat/latest/webapps/MicroS
trategyMobile/images/
MobilePluginsPath
/opt/apache/tomcat/latest/webapps/MicroS
trategyMobile/plugins/
MySQLbin /usr/bin/mysqldump
Upgrade Guide
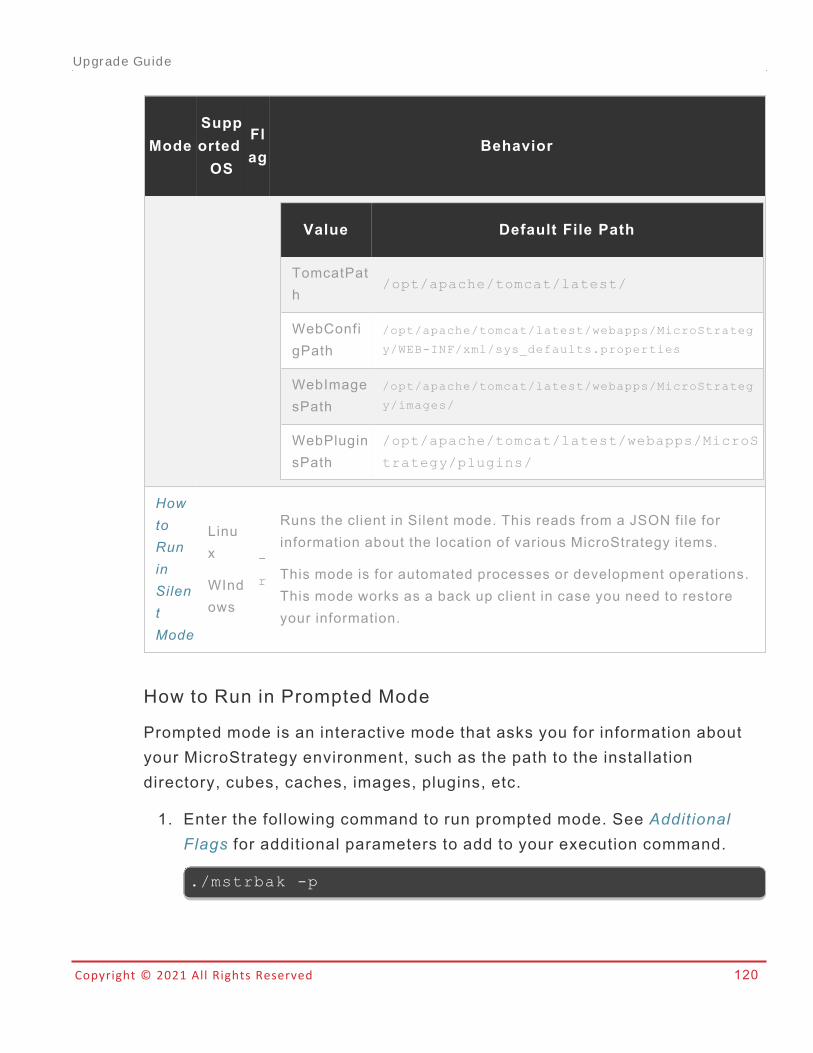
Copyright © 2021 All Rights Reserved 120
ModeSupportedOS
Flag
Behavior
Value Default File Path
TomcatPath
/opt/apache/tomcat/latest/
WebConfigPath
/opt/apache/tomcat/latest/webapps/MicroStrateg
y/WEB-INF/xml/sys_defaults.properties
WebImagesPath
/opt/apache/tomcat/latest/webapps/MicroStrateg
y/images/
WebPluginsPath
/opt/apache/tomcat/latest/webapps/MicroS
trategy/plugins/
HowtoRuninSilentMode
Linux
WIndows
-
r
Runs the client in Silent mode. This reads from a JSON file forinformation about the location of various MicroStrategy items.
This mode is for automated processes or development operations.This mode works as a back up client in case you need to restoreyour information.
How to Run in Prompted Mode
Prompted mode is an interactive mode that asks you for information aboutyour MicroStrategy environment, such as the path to the installationdirectory, cubes, caches, images, plugins, etc.
1. Enter the following command to run prompted mode. See AdditionalFlags for additional parameters to add to your execution command.
./mstrbak -p
Upgrade Guide
Copyright © 2021 All Rights Reserved 121
2. Answer the prompted questions. To find the correct input for eachentry, see How to Obtain MicroStrategy Backup Inputs.
Prompted mode questions for Linux:
1. Enter the install path. For example,/opt/mstr/MicroStrategy/.
By default, on cloud environments, the path is/opt/mstr/MicroStrategy/.
2. Enter the project source name.
Refer to KB441259 to find the correct project source name, or useCommand Manager to create a new project source name:
a. Open Project Source Manager.
b. Choose Add.
c. Enter the project source name, server name, and portnumber.
d. Click OK.
3. Enter your credentials with access to the project metadata.
If you see "invalid credentials" when connecting to a projectsource, please check whether you are executing the tool with rootprivilege.
4. Enter the name of the metadata DSN.
5. Enter your credentials for the metadata database.
6. Enter the path to the dump bin.
By default, there are three dump bin paths:
l DEFAULT_POSTGRES_BIN_PATH = “MSTR_INSTALL_
PATH/install/Repository/bin”
Upgrade Guide
Copyright © 2021 All Rights Reserved 122
l DEFAULT_MYSQL_BIN_PATH = “/usr/bin”
l DEFAULT_MONGO_PATH = “MSTR_INSTALL_
PATH/install/CollaborationServer/MongoDB/"
7. Enter your metadata prefix.
8. Enter yes to keep the same projects loaded.
Enter no and enter the names of the projects which you want toload.
For example, [“MicroStrategy Tutorial”, “Platform
Analytics”].
9. Enter yes to backup your Platform Analytics warehouse and enteryour Platform Analytics DSN name and credentials.
Enter no i f you don't want to backup your Platform Analyticswarehouse.
10. Enter yes to backup your Collaboration Server database, and thenenter the credentials to access the database and your serverdefinition.
Enter no i f you don't want to backup your Collaboration Serverdatabase.
11. Enter your server definition.
12. Enter yes to backup your History List. You will be asked whereyour history list is stored.
l Enter 1 for Metadatal Enter 2 for External warehouse
l Enter 3 for File.l Enter 4 for Hybrid - Metadata
l Enter 5 for Hybrid - External warehouse
Upgrade Guide
Copyright © 2021 All Rights Reserved 123
Enter no i f you don't want to backup your History List.
13. Enter yes to backup additional warehouses.
Enter no i f you don't want back up any additional warehouses.
14. Enter yes to backup any of your cubes and enter the full path toyour cubes.
Enter no i f you don't want to backup your cubes.
15. Enter yes to backup any of your caches and enter the full path toyour caches.
Enter no i f you don't want to backup your caches.
16. Enter yes to backup the WSRM and enter the full path to theWSRM.
Enter no i f you don't want to backup the WSRM.
17. Enter yes to backup your MicroStrategy Web images, plugins, andconfigurations:
l Enter the path to MicroStrategy Web.
By default, the path is <tomcat_install_path>/webapps/MicroStrategy/
l Enter yes to backup Web SSO configuration.
18. Enter yes to backup your MicroStrategy Mobile images, plugins,and configurations:
l Enter the path to MicroStrategy Mobile.
By default, the path is <tomcat_install_path>/webapps/MicroStrategyMobile/
Upgrade Guide
Copyright © 2021 All Rights Reserved 124
l Enter yes to backup Mobile SSO configuration.
mapConfig.xml and xml (folder for mobile configuration urls)are backed up.
19. Enter yes to backup your MicroStrategy Library images, plugins,and configurations:
l Enter the path to MicroStrategy Library.
By default, the path is <tomcat_install_path>/latest/webapps/MicroStrategyLibrary/
l Enter yes to backup Library SSO configuration.
configOverride.properties and mapConfig.xml arebacked up.
20. Enter yes to backup additional flat fi les and enter the file path(s)separated by commas.
l Department and Team: opt/mstr/mstrbak/additional_files
l Enterprise: efs/mstrbak/additional_files
21. Enter yes to backup drivers (Cloud environment only).
22. Enter yes to backup hosts files (Cloud environment only).
23. Enter yes to backup PDF Generator Images.
24. Enter yes to backup custom web apps.
Enter the path to the Web Server.
25. Enter yes to upload your backed up files to cloud storage. You willbe asked which cloud storage option to upload to.
Upgrade Guide
Copyright © 2021 All Rights Reserved 125
l Enter 1 to upload to your AWS S3 Bucket and enter the S3bucket name. If prompted, provide the S3 access keys andsecret key.
l Enter 2 to upload to your Azure Blob Storage and enter yourStroage Account Name and Container Name. If prompted,provide the Storage Account access key.
Enter no i f you don't want to upload them to your cloud storageand enter the file path to save your response file and the file pathto save your backup files.
Prompted mode questions for Windows:
1. Enter the project source name.
Refer to KB441259 to find the correct project source name, or useCommand Manager to create a new project source name:
a. Open Project Source Manager.
b. Choose Add.
c. Enter the project source name, server name, and portnumber.
d. Click OK.
2. Enter your credentials with access to the project metadata.
If you see "invalid credentials" when connecting to a projectsource, please check whether you are executing the tool with rootprivilege.
3. Enter the name of the metadata DSN.
4. Enter your credentials for the metadata database.
5. Enter your metadata prefix.
6. Enter yes to keep the same projects loaded.
Upgrade Guide

Copyright © 2021 All Rights Reserved 126
Enter no and enter the names of the projects which you want toload.
For example, [“MicroStrategy Tutorial”, “Platform
Analytics”].
7. Enter yes to backup your Platform Analytics warehouse and enteryour Platform Analytics DSN name and credentials.
Enter no i f you don't want to backup your Platform Analyticswarehouse.
8. Enter your server definition.
If you want to use the default server definition, press the Enterkey.
9. Enter yes to backup your History List. You will be asked whereyour history list is stored.
l Enter 1 for Metadatal Enter 2 for External warehouse
l Enter 3 for File.l Enter 4 for Hybrid - Metadata
l Enter 5 for Hybrid - External warehouse
Enter no i f you don't want to backup your History List.
10. Enter yes to backup any of your cubes and enter the full path toyour cubes.
Enter no i f you don't want to backup your cubes.
11. Enter yes to backup any of your caches and enter the full path toyour caches.
Enter no i f you don't want to backup your caches.
Upgrade Guide
Copyright © 2021 All Rights Reserved 127
12. Enter yes to backup your MicroStrategy Web images, plugins, andconfigurations:
l Enter the path to MicroStrategy Web.
By default, the path is <tomcat_install_path>/webapps/MicroStrategy/
l Enter yes to backup Web SSO configuration.
13. Enter yes to backup your MicroStrategy Mobile images, plugins,and configurations:
l Enter the path to MicroStrategy Mobile.
By default, the path is <tomcat_install_path>/webapps/MicroStrategyMobile/
l Enter yes to backup Mobile SSO configuration.
14. Enter yes to backup your MicroStrategy Library images, plugins,and configurations:
l Enter the path to MicroStrategy Library.
By default, the path is <tomcat_install_path>/latest/webapps/MicroStrategyLibrary/
l Enter yes to backup Library SSO configuration.
15. Enter yes to backup additional flat fi les and enter the file path(s)separated by commas.
l Department and Team: opt/mstr/mstrbak/additional_files
l Enterprise: efs/mstrbak/additional_files
16. Enter yes to backup PDF Generator Images and enter the path ofthose images.
Upgrade Guide
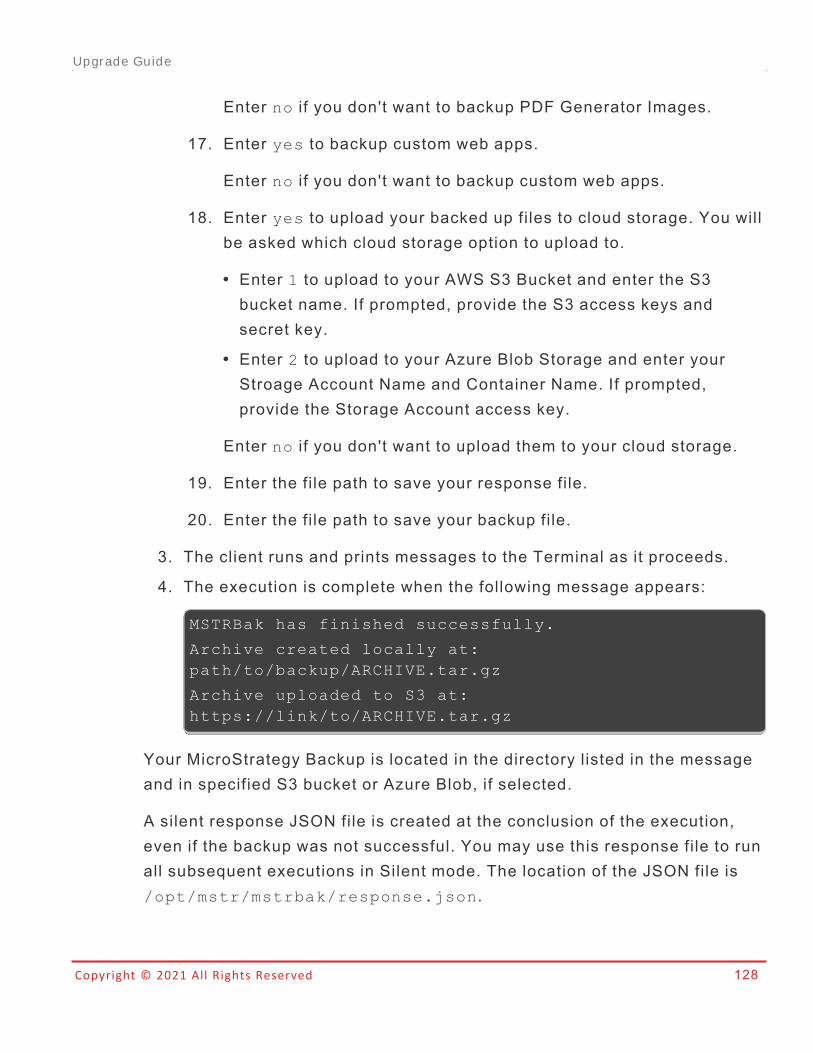
Copyright © 2021 All Rights Reserved 128
Enter no i f you don't want to backup PDF Generator Images.
17. Enter yes to backup custom web apps.
Enter no i f you don't want to backup custom web apps.
18. Enter yes to upload your backed up files to cloud storage. You willbe asked which cloud storage option to upload to.
l Enter 1 to upload to your AWS S3 Bucket and enter the S3bucket name. If prompted, provide the S3 access keys andsecret key.
l Enter 2 to upload to your Azure Blob Storage and enter yourStroage Account Name and Container Name. If prompted,provide the Storage Account access key.
Enter no i f you don't want to upload them to your cloud storage.
19. Enter the file path to save your response file.
20. Enter the file path to save your backup file.
3. The client runs and prints messages to the Terminal as it proceeds.
4. The execution is complete when the following message appears:
MSTRBak has finished successfully.
Archive created locally at:path/to/backup/ARCHIVE.tar.gz
Archive uploaded to S3 at:https://link/to/ARCHIVE.tar.gz
Your MicroStrategy Backup is located in the directory listed in the messageand in specified S3 bucket or Azure Blob, if selected.
A silent response JSON file is created at the conclusion of the execution,even if the backup was not successful. You may use this response file to runall subsequent executions in Silent mode. The location of the JSON file is/opt/mstr/mstrbak/response.json.
Upgrade Guide
Copyright © 2021 All Rights Reserved 129
If you have uploaded MicroStrategy Backup to S3 or Azure Blob, you cannow restore your backup file onto a new MicroStrategy Cloud Platform forAWS or MicroStrategy Cloud Platform for Azure environment. It supportsupgrading from the following versions to the latest MicroStrategy platformrelease.
l MicroStrategy 10.4.xl MicroStrategy 10.11.xl MicroStrategy 2019.xl MicroStrategy 2020.xl MicroStrategy 2021.x
Addit ional Flags
Append any of the following flags to the execution command as desired.
l To dump the database, enter the parameter -d. The -d parameter is onlyrecommended to be used when backing up MicroStrategy 2019 andrestoring on MicroStrategy 2019.
Note: In Windows, we do not support –d f lag.
l To receive email notifications about the backup process, enter theparameter -m <your email>.
For example,
./mstrbak -p -d -m [email protected] [email protected]
How to Obtain MicroStrategy Backup Inputs
The following list details where you can locate answers to promptedquestions.
Upgrade Guide
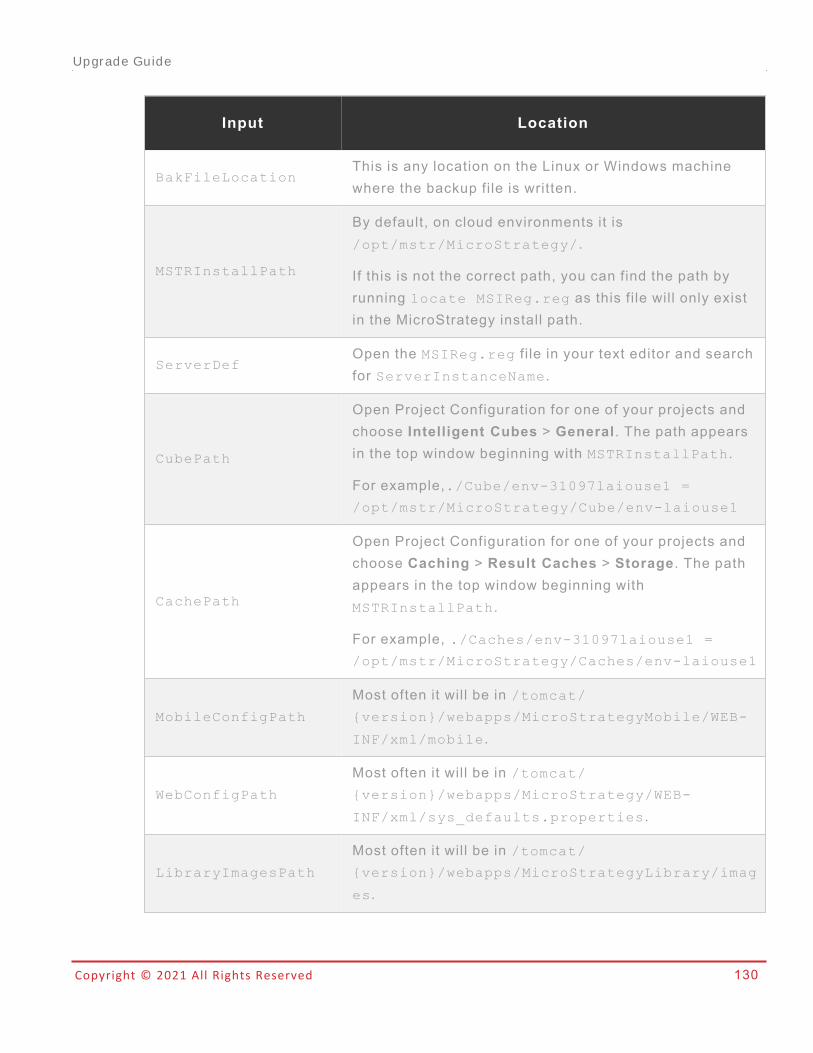
Copyright © 2021 All Rights Reserved 130
Input Location
BakFileLocationThis is any location on the Linux or Windows machinewhere the backup file is written.
MSTRInstallPath
By default, on cloud environments it is/opt/mstr/MicroStrategy/.
If this is not the correct path, you can find the path byrunning locate MSIReg.reg as this file will only existin the MicroStrategy install path.
ServerDefOpen the MSIReg.reg f i le in your text editor and searchfor ServerInstanceName.
CubePath
Open Project Configuration for one of your projects andchoose Intelligent Cubes > General. The path appearsin the top window beginning with MSTRInstallPath.
For example,./Cube/env-31097laiouse1 =
/opt/mstr/MicroStrategy/Cube/env-laiouse1
CachePath
Open Project Configuration for one of your projects andchoose Caching > Result Caches > Storage. The pathappears in the top window beginning withMSTRInstallPath.
For example, ./Caches/env-31097laiouse1 =
/opt/mstr/MicroStrategy/Caches/env-laiouse1
MobileConfigPath
Most often it will be in /tomcat/
{version}/webapps/MicroStrategyMobile/WEB-
INF/xml/mobile.
WebConfigPath
Most often it will be in /tomcat/
{version}/webapps/MicroStrategy/WEB-
INF/xml/sys_defaults.properties.
LibraryImagesPath
Most often it will be in /tomcat/
{version}/webapps/MicroStrategyLibrary/imag
es.
Upgrade Guide

Copyright © 2021 All Rights Reserved 131
Input Location
MobileImagesPath
Most often it will be in /tomcat/
{version}/webapps/MicroStrategyMobile/image
s.
WebImagesPathMost often it will be in /tomcat/
{version}/webapps/MicroStrategy/images.
LibraryPluginsPath
Most often it will be in /tomcat/
{version}/webapps/MicroStrategyLibrary/plug
ins.
MobilePluginsPath
Most often it will be in /tomcat/
{version}/webapps/MicroStrategyMobile/plugi
ns.
WebPluginsPathMost often it will be in /tomcat/
{version}/webapps/MicroStrategy/plugins.
MySQLbin Run the command which mysqldump as root.
MongoDBbin Run the command which mongodump as root.
MetadataDSN
Open the MSIReg.reg f i le and search Location. Usethe location in [HKEY_LOCAL_
MACHINE\SOFTWARE\MicroStrategy\Data
Sources\CastorServer].
HistoryListDSN
Open the Intelligence Server Configuration in Developer.Take note of the Database Instance name. Close theIntelligence Server Configuration and chooseAdministration > Configuration Managers > DatabaseInstances. Right-click and edit the database instance youfound in the Intelligence Server Configuration. ClickModify. The HistoryListDSN is the name of the ODBCdata source in the Database Connections window.
MySQLUserThis is the username of an administrator user in thedatabase.
Upgrade Guide
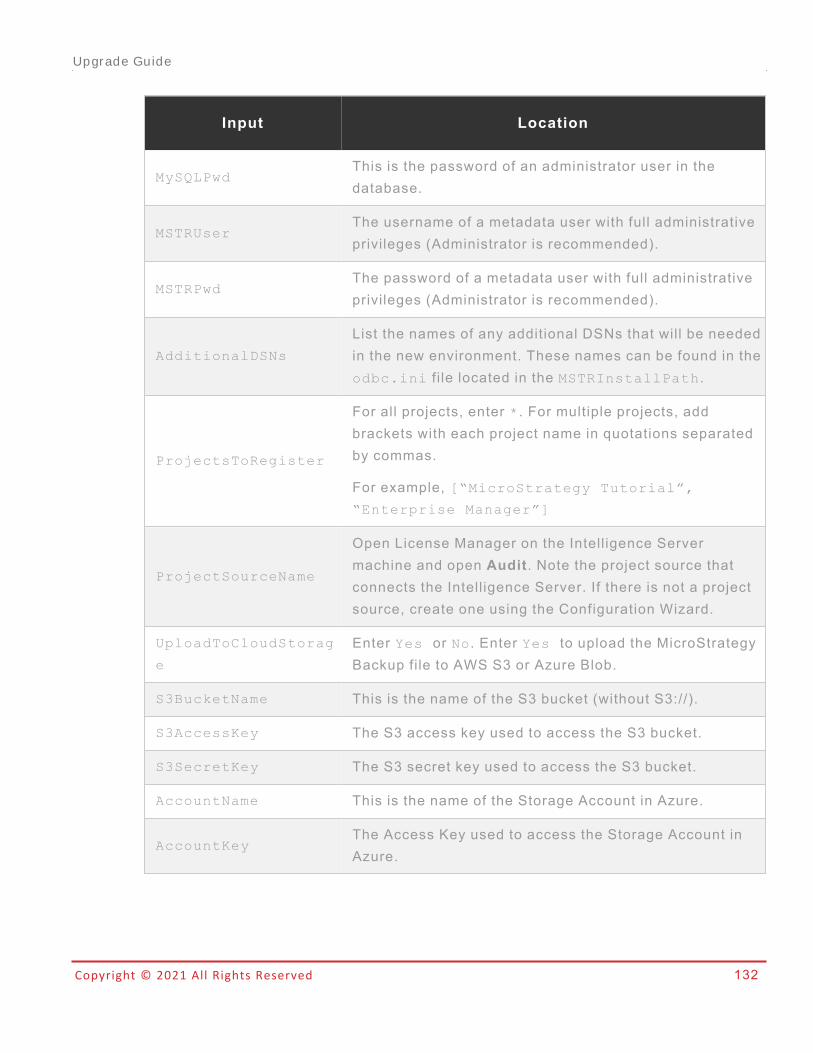
Copyright © 2021 All Rights Reserved 132
Input Location
MySQLPwdThis is the password of an administrator user in thedatabase.
MSTRUserThe username of a metadata user with full administrativeprivileges (Administrator is recommended).
MSTRPwdThe password of a metadata user with full administrativeprivileges (Administrator is recommended).
AdditionalDSNs
List the names of any additional DSNs that will be neededin the new environment. These names can be found in theodbc.ini f i le located in the MSTRInstallPath.
ProjectsToRegister
For all projects, enter *. For multiple projects, addbrackets with each project name in quotations separatedby commas.
For example, [“MicroStrategy Tutorial”,
“Enterprise Manager”]
ProjectSourceName
Open License Manager on the Intelligence Servermachine and open Audit. Note the project source thatconnects the Intelligence Server. If there is not a projectsource, create one using the Configuration Wizard.
UploadToCloudStorag
e
Enter Yes or No. Enter Yes to upload the MicroStrategyBackup file to AWS S3 or Azure Blob.
S3BucketName This is the name of the S3 bucket (without S3://).
S3AccessKey The S3 access key used to access the S3 bucket.
S3SecretKey The S3 secret key used to access the S3 bucket.
AccountName This is the name of the Storage Account in Azure.
AccountKeyThe Access Key used to access the Storage Account inAzure.
Upgrade Guide
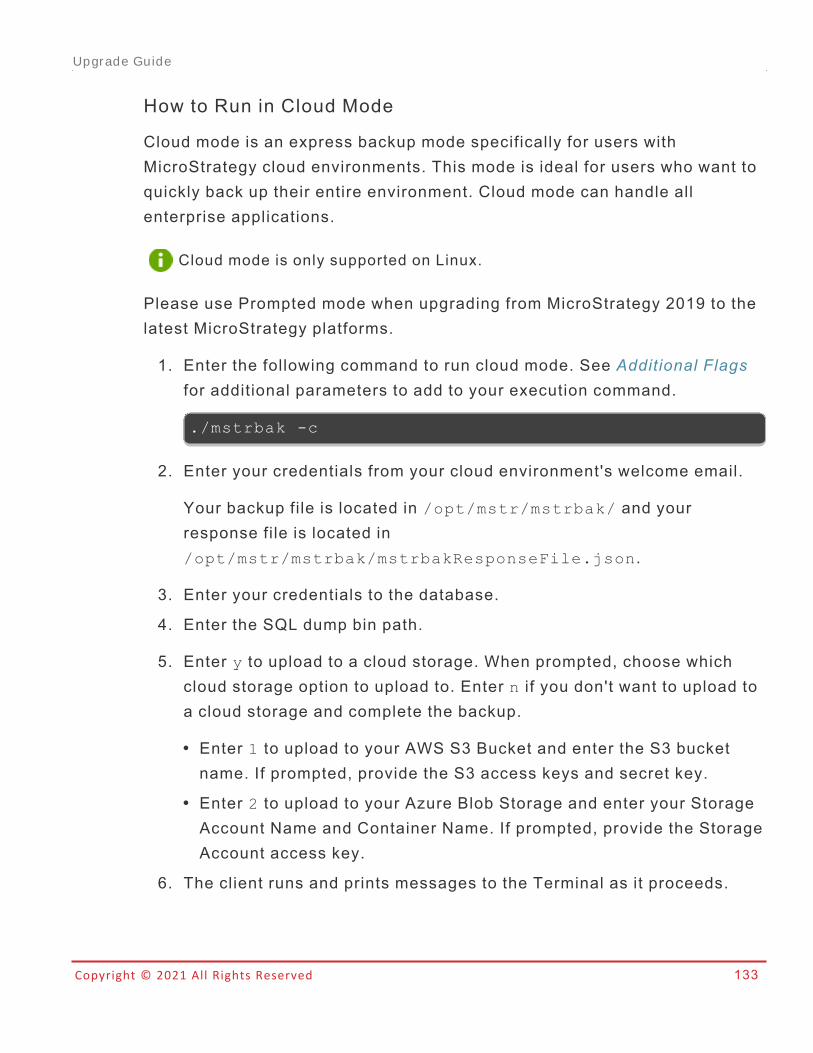
Copyright © 2021 All Rights Reserved 133
How to Run in Cloud Mode
Cloud mode is an express backup mode specifically for users withMicroStrategy cloud environments. This mode is ideal for users who want toquickly back up their entire environment. Cloud mode can handle allenterprise applications.
Cloud mode is only supported on Linux.
Please use Prompted mode when upgrading from MicroStrategy 2019 to thelatest MicroStrategy platforms.
1. Enter the following command to run cloud mode. See Additional Flagsfor additional parameters to add to your execution command.
./mstrbak -c
2. Enter your credentials from your cloud environment's welcome email.
Your backup file is located in /opt/mstr/mstrbak/ and yourresponse file is located in/opt/mstr/mstrbak/mstrbakResponseFile.json.
3. Enter your credentials to the database.
4. Enter the SQL dump bin path.
5. Enter y to upload to a cloud storage. When prompted, choose whichcloud storage option to upload to. Enter n i f you don't want to upload toa cloud storage and complete the backup.
l Enter 1 to upload to your AWS S3 Bucket and enter the S3 bucketname. If prompted, provide the S3 access keys and secret key.
l Enter 2 to upload to your Azure Blob Storage and enter your StorageAccount Name and Container Name. If prompted, provide the StorageAccount access key.
6. The client runs and prints messages to the Terminal as it proceeds.
Upgrade Guide
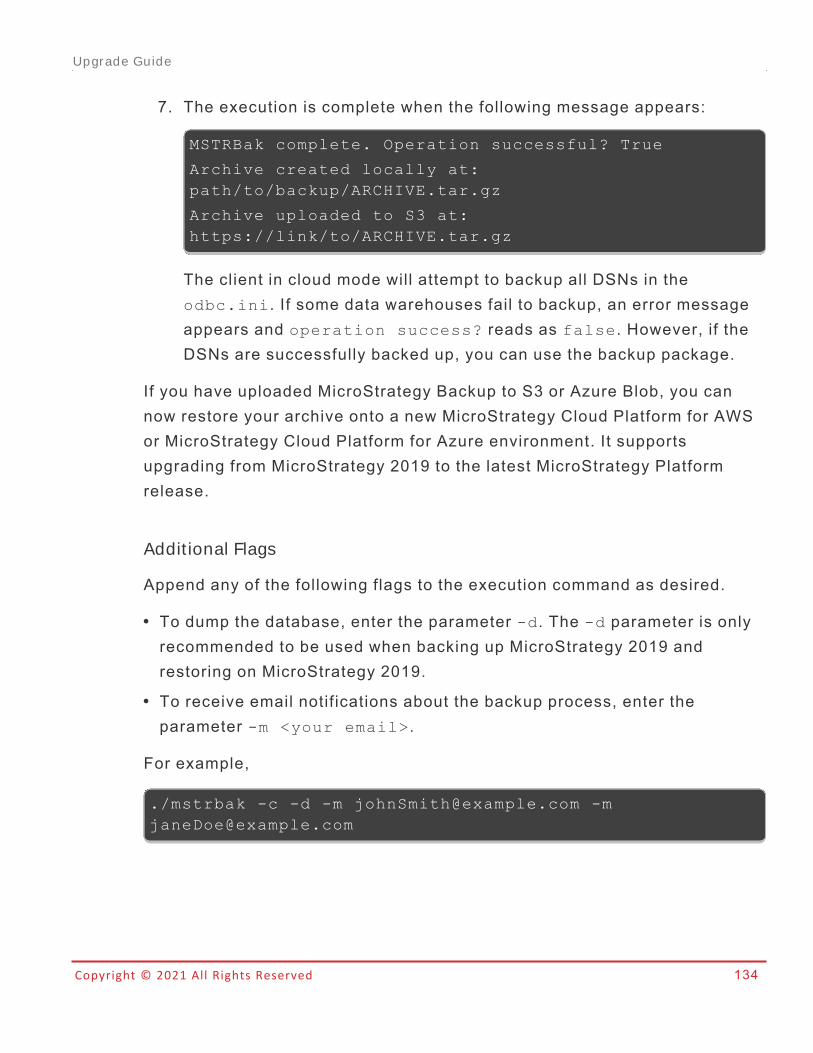
Copyright © 2021 All Rights Reserved 134
7. The execution is complete when the following message appears:
MSTRBak complete. Operation successful? True
Archive created locally at:path/to/backup/ARCHIVE.tar.gz
Archive uploaded to S3 at:https://link/to/ARCHIVE.tar.gz
The client in cloud mode will attempt to backup all DSNs in theodbc.ini. If some data warehouses fail to backup, an error messageappears and operation success? reads as false. However, if theDSNs are successfully backed up, you can use the backup package.
If you have uploaded MicroStrategy Backup to S3 or Azure Blob, you cannow restore your archive onto a new MicroStrategy Cloud Platform for AWSor MicroStrategy Cloud Platform for Azure environment. It supportsupgrading from MicroStrategy 2019 to the latest MicroStrategy Platformrelease.
Addit ional Flags
Append any of the following flags to the execution command as desired.
l To dump the database, enter the parameter -d. The -d parameter is onlyrecommended to be used when backing up MicroStrategy 2019 andrestoring on MicroStrategy 2019.
l To receive email notifications about the backup process, enter theparameter -m <your email>.
For example,
./mstrbak -c -d -m [email protected] [email protected]
Upgrade Guide
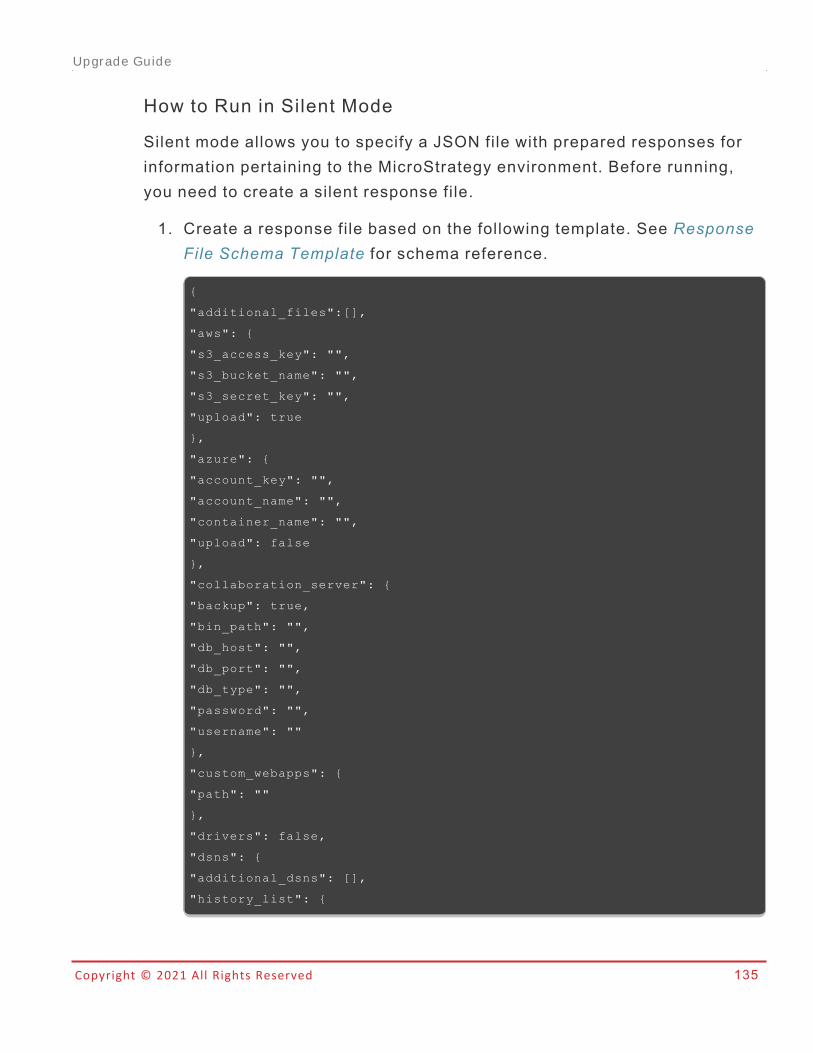
Copyright © 2021 All Rights Reserved 135
How to Run in Silent Mode
Silent mode allows you to specify a JSON file with prepared responses forinformation pertaining to the MicroStrategy environment. Before running,you need to create a silent response file.
1. Create a response file based on the following template. See ResponseFile Schema Template for schema reference.
{
"additional_files":[],
"aws": {
"s3_access_key": "",
"s3_bucket_name": "",
"s3_secret_key": "",
"upload": true
},
"azure": {
"account_key": "",
"account_name": "",
"container_name": "",
"upload": false
},
"collaboration_server": {
"backup": true,
"bin_path": "",
"db_host": "",
"db_port": "",
"db_type": "",
"password": "",
"username": ""
},
"custom_webapps": {
"path": ""
},
"drivers": false,
"dsns": {
"additional_dsns": [],
"history_list": {
Upgrade Guide
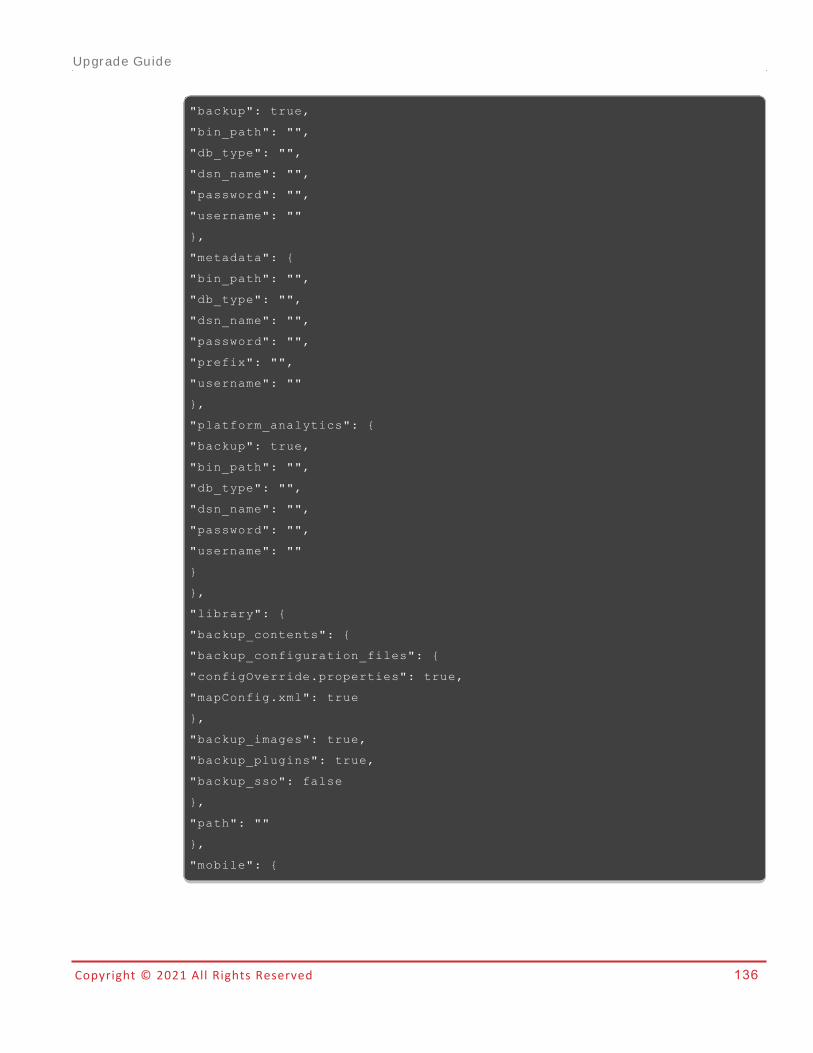
Copyright © 2021 All Rights Reserved 136
"backup": true,
"bin_path": "",
"db_type": "",
"dsn_name": "",
"password": "",
"username": ""
},
"metadata": {
"bin_path": "",
"db_type": "",
"dsn_name": "",
"password": "",
"prefix": "",
"username": ""
},
"platform_analytics": {
"backup": true,
"bin_path": "",
"db_type": "",
"dsn_name": "",
"password": "",
"username": ""
}
},
"library": {
"backup_contents": {
"backup_configuration_files": {
"configOverride.properties": true,
"mapConfig.xml": true
},
"backup_images": true,
"backup_plugins": true,
"backup_sso": false
},
"path": ""
},
"mobile": {
Upgrade Guide
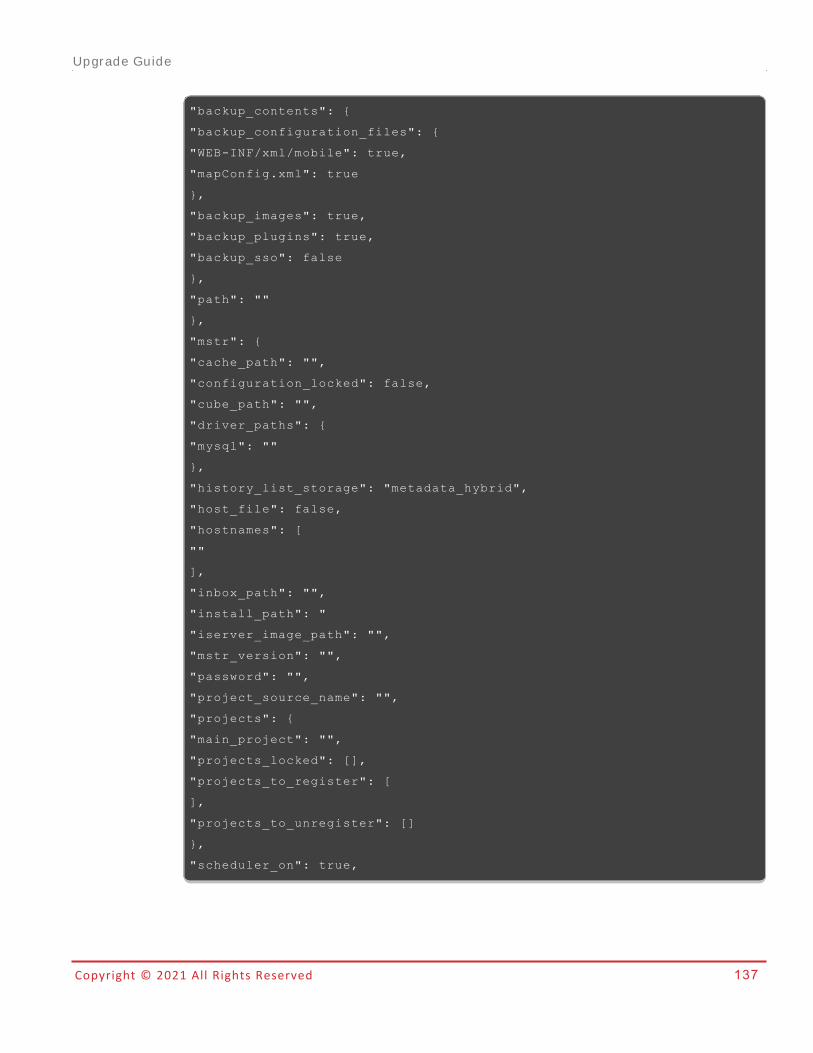
Copyright © 2021 All Rights Reserved 137
"backup_contents": {
"backup_configuration_files": {
"WEB-INF/xml/mobile": true,
"mapConfig.xml": true
},
"backup_images": true,
"backup_plugins": true,
"backup_sso": false
},
"path": ""
},
"mstr": {
"cache_path": "",
"configuration_locked": false,
"cube_path": "",
"driver_paths": {
"mysql": ""
},
"history_list_storage": "metadata_hybrid",
"host_file": false,
"hostnames": [
""
],
"inbox_path": "",
"install_path": "
"iserver_image_path": "",
"mstr_version": "",
"password": "",
"project_source_name": "",
"projects": {
"main_project": "",
"projects_locked": [],
"projects_to_register": [
],
"projects_to_unregister": []
},
"scheduler_on": true,
Upgrade Guide
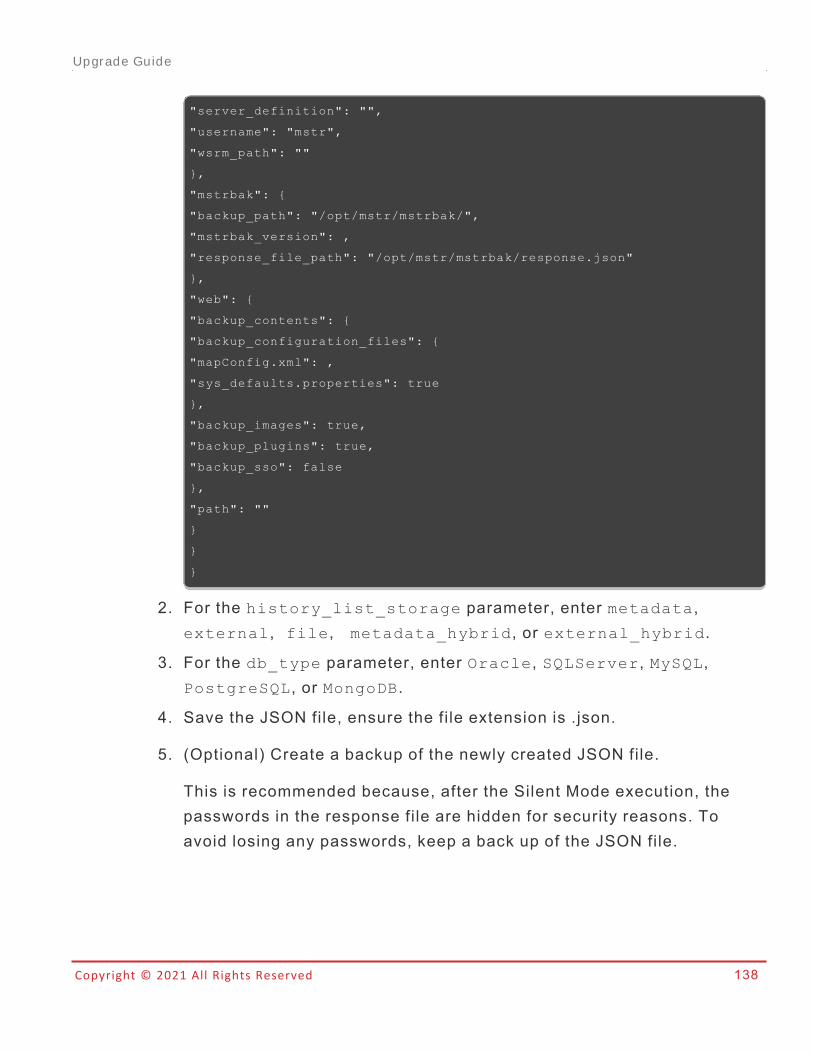
Copyright © 2021 All Rights Reserved 138
"server_definition": "",
"username": "mstr",
"wsrm_path": ""
},
"mstrbak": {
"backup_path": "/opt/mstr/mstrbak/",
"mstrbak_version": ,
"response_file_path": "/opt/mstr/mstrbak/response.json"
},
"web": {
"backup_contents": {
"backup_configuration_files": {
"mapConfig.xml": ,
"sys_defaults.properties": true
},
"backup_images": true,
"backup_plugins": true,
"backup_sso": false
},
"path": ""
}
}
}
2. For the history_list_storage parameter, enter metadata,external, file, metadata_hybrid, or external_hybrid.
3. For the db_type parameter, enter Oracle, SQLServer, MySQL,PostgreSQL, or MongoDB.
4. Save the JSON file, ensure the file extension is .json.
5. (Optional) Create a backup of the newly created JSON file.
This is recommended because, after the Silent Mode execution, thepasswords in the response file are hidden for security reasons. Toavoid losing any passwords, keep a back up of the JSON file.
Upgrade Guide
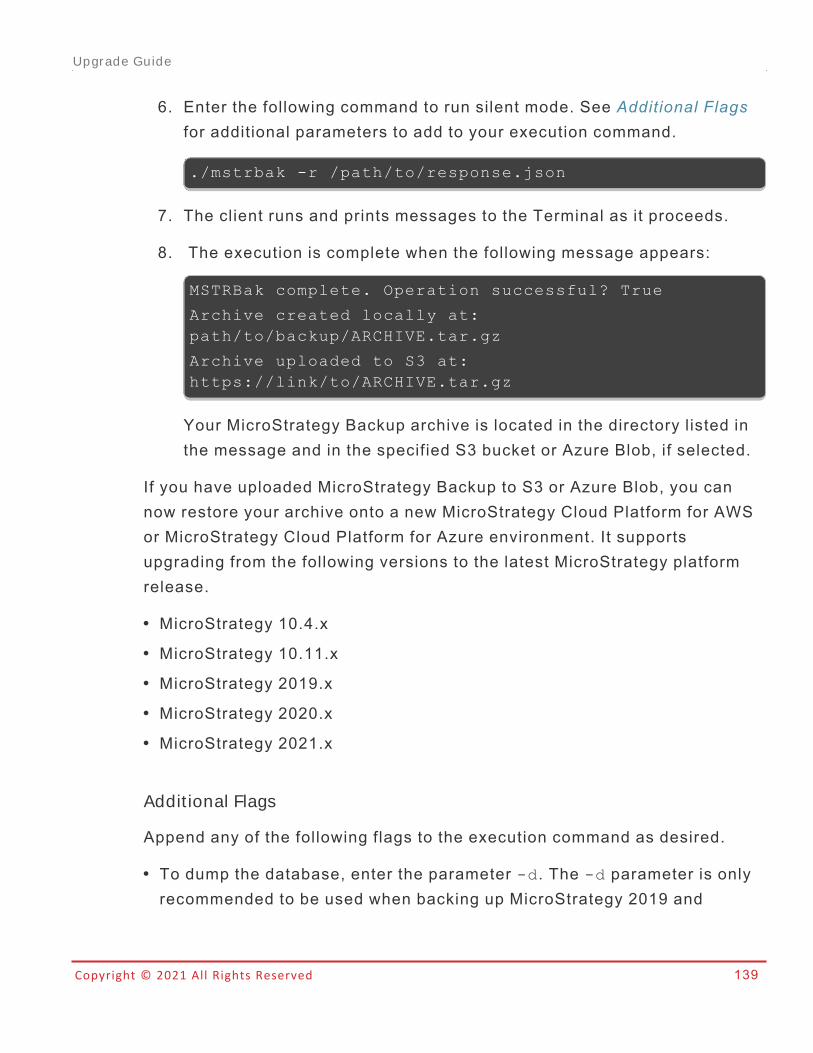
Copyright © 2021 All Rights Reserved 139
6. Enter the following command to run silent mode. See Additional Flagsfor additional parameters to add to your execution command.
./mstrbak -r /path/to/response.json
7. The client runs and prints messages to the Terminal as it proceeds.
8. The execution is complete when the following message appears:
MSTRBak complete. Operation successful? True
Archive created locally at:path/to/backup/ARCHIVE.tar.gz
Archive uploaded to S3 at:https://link/to/ARCHIVE.tar.gz
Your MicroStrategy Backup archive is located in the directory listed inthe message and in the specified S3 bucket or Azure Blob, if selected.
If you have uploaded MicroStrategy Backup to S3 or Azure Blob, you cannow restore your archive onto a new MicroStrategy Cloud Platform for AWSor MicroStrategy Cloud Platform for Azure environment. It supportsupgrading from the following versions to the latest MicroStrategy platformrelease.
l MicroStrategy 10.4.xl MicroStrategy 10.11.xl MicroStrategy 2019.xl MicroStrategy 2020.xl MicroStrategy 2021.x
Addit ional Flags
Append any of the following flags to the execution command as desired.
l To dump the database, enter the parameter -d. The -d parameter is onlyrecommended to be used when backing up MicroStrategy 2019 and
Upgrade Guide
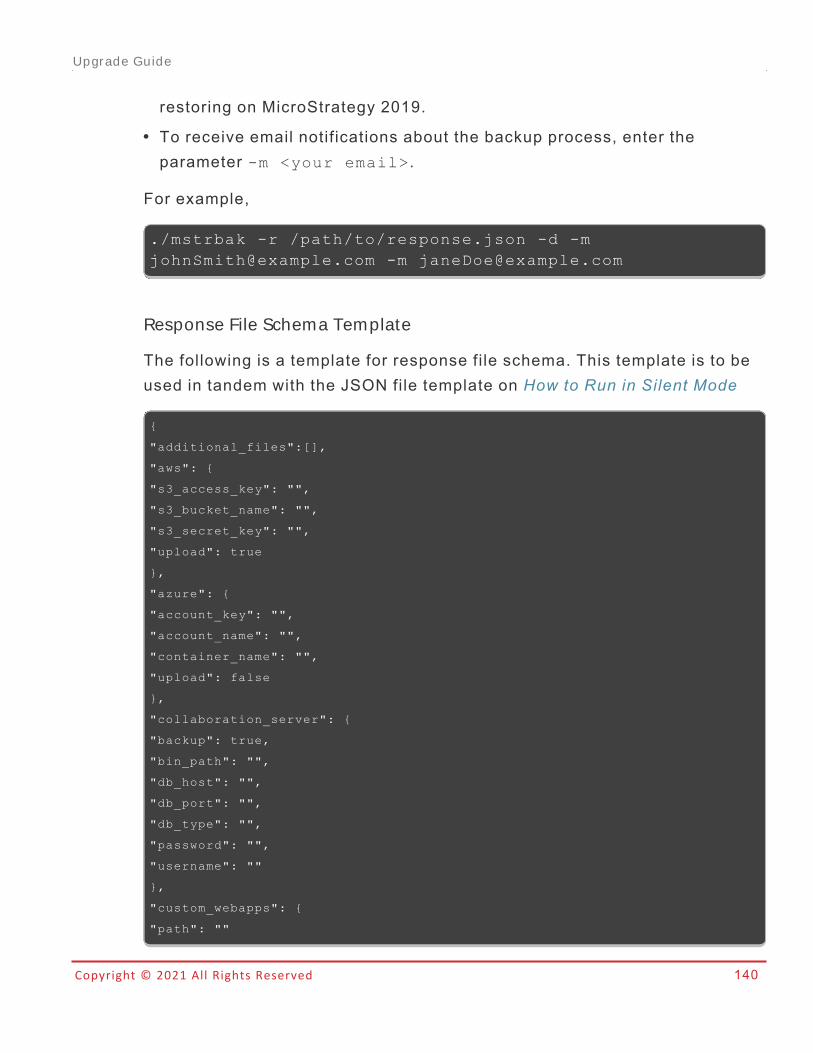
Copyright © 2021 All Rights Reserved 140
restoring on MicroStrategy 2019.l To receive email notifications about the backup process, enter theparameter -m <your email>.
For example,
./mstrbak -r /path/to/response.json -d [email protected] -m [email protected]
Response File Schema Template
The following is a template for response file schema. This template is to beused in tandem with the JSON file template on How to Run in Silent Mode
{
"additional_files":[],
"aws": {
"s3_access_key": "",
"s3_bucket_name": "",
"s3_secret_key": "",
"upload": true
},
"azure": {
"account_key": "",
"account_name": "",
"container_name": "",
"upload": false
},
"collaboration_server": {
"backup": true,
"bin_path": "",
"db_host": "",
"db_port": "",
"db_type": "",
"password": "",
"username": ""
},
"custom_webapps": {
"path": ""
Upgrade Guide

Copyright © 2021 All Rights Reserved 141
},
"drivers": false,
"dsns": {
"additional_dsns": [],
"history_list": {
"backup": true,
"bin_path": "",
"db_type": "",
"dsn_name": "",
"password": "",
"username": ""
},
"metadata": {
"bin_path": "",
"db_type": "",
"dsn_name": "",
"password": "",
"prefix": "",
"username": ""
},
"platform_analytics": {
"backup": true,
"bin_path": "",
"db_type": "",
"dsn_name": "",
"password": "",
"username": ""
}
},
"library": {
"backup_contents": {
"backup_configuration_files": {
"configOverride.properties": true,
"mapConfig.xml": true
},
"backup_images": true,
"backup_plugins": true,
"backup_sso": false
},
Upgrade Guide
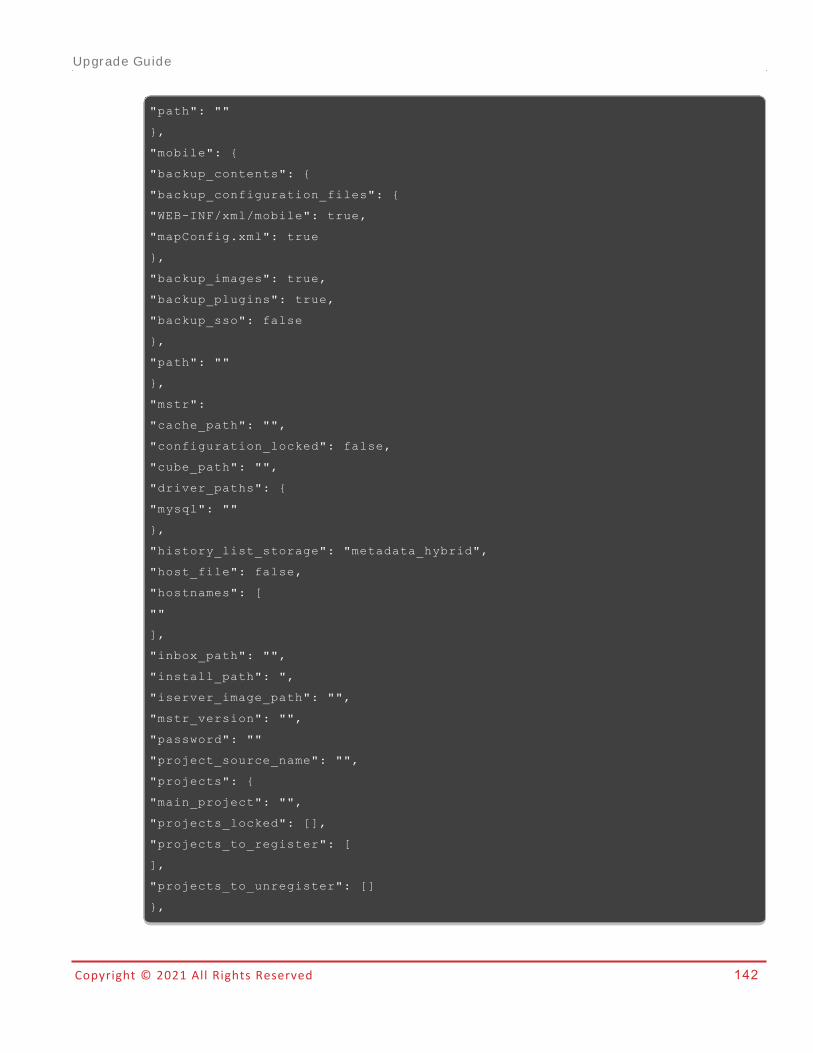
Copyright © 2021 All Rights Reserved 142
"path": ""
},
"mobile": {
"backup_contents": {
"backup_configuration_files": {
"WEB-INF/xml/mobile": true,
"mapConfig.xml": true
},
"backup_images": true,
"backup_plugins": true,
"backup_sso": false
},
"path": ""
},
"mstr":
"cache_path": "",
"configuration_locked": false,
"cube_path": "",
"driver_paths": {
"mysql": ""
},
"history_list_storage": "metadata_hybrid",
"host_file": false,
"hostnames": [
""
],
"inbox_path": "",
"install_path": ",
"iserver_image_path": "",
"mstr_version": "",
"password": ""
"project_source_name": "",
"projects": {
"main_project": "",
"projects_locked": [],
"projects_to_register": [
],
"projects_to_unregister": []
},
Upgrade Guide
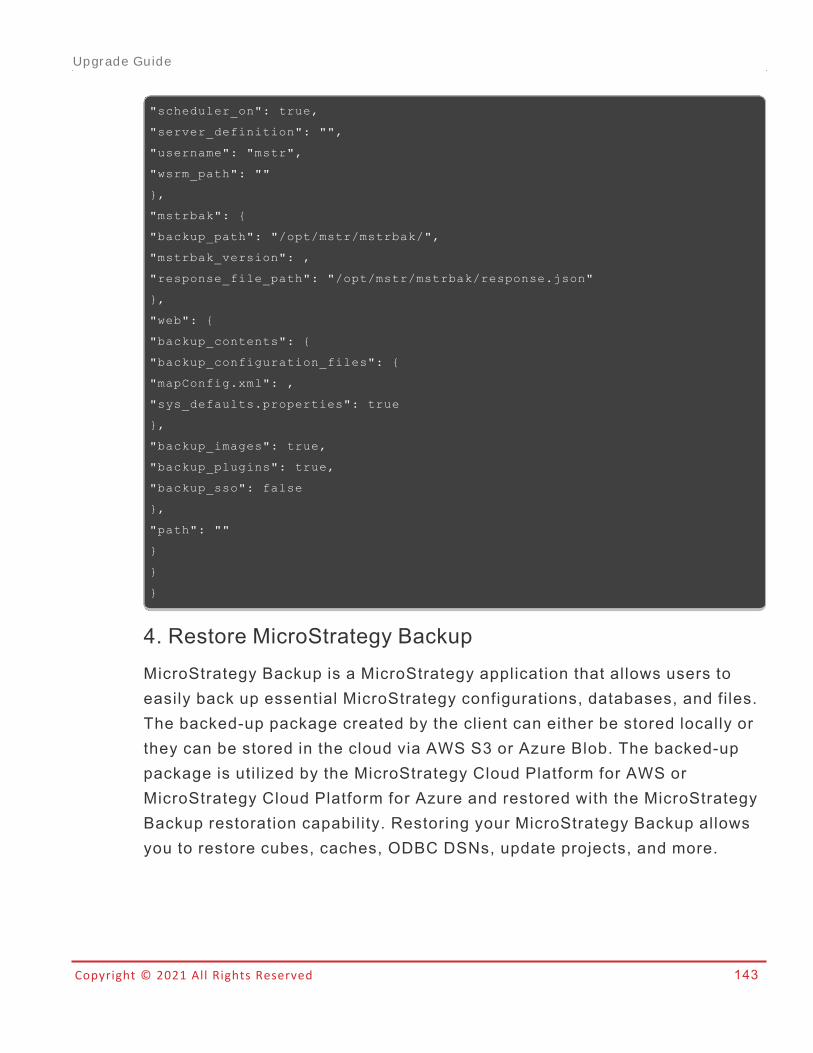
Copyright © 2021 All Rights Reserved 143
"scheduler_on": true,
"server_definition": "",
"username": "mstr",
"wsrm_path": ""
},
"mstrbak": {
"backup_path": "/opt/mstr/mstrbak/",
"mstrbak_version": ,
"response_file_path": "/opt/mstr/mstrbak/response.json"
},
"web": {
"backup_contents": {
"backup_configuration_files": {
"mapConfig.xml": ,
"sys_defaults.properties": true
},
"backup_images": true,
"backup_plugins": true,
"backup_sso": false
},
"path": ""
}
}
}
4. Restore MicroStrategy BackupMicroStrategy Backup is a MicroStrategy application that allows users toeasily back up essential MicroStrategy configurations, databases, and files.The backed-up package created by the client can either be stored locally orthey can be stored in the cloud via AWS S3 or Azure Blob. The backed-uppackage is util ized by the MicroStrategy Cloud Platform for AWS orMicroStrategy Cloud Platform for Azure and restored with the MicroStrategyBackup restoration capability. Restoring your MicroStrategy Backup allowsyou to restore cubes, caches, ODBC DSNs, update projects, and more.
Upgrade Guide
Copyright © 2021 All Rights Reserved 144
Newer MicroStrategy version backups are not allowed for restoring priorMicroStrategy versions.
Restoring to MicroStrategy AWS or Azure supports a maximum of 4 nodes.
To restore MicroStrategy Backup in AWS, you must have uploaded your backupto an S3 bucket (directly inside the bucket and not inside any folder) in 3. RunMicroStrategy Backup.
To restore MicroStrategy Backup in Azure, you must have uploaded yourbackup to an Azure Storage account which can be accessed by the newenvironment in 3. Run MicroStrategy Backup. For Azure environments,permissions should be fixed when the environment is ready to avoid relatedissues. Please refer to KB485055 for more details.
1. Log in to the MicroStrategy Cloud Platform.
2. Provision a new environment as either Team, Department, orEnterprise.
3. Under Restore an Environment, select the Restore environment fromMicroStrategy Backup check box.
4. Enter the S3 bucket or Azure Blob URL.
The Backup file can only be restored to environments with the same orhigher version numbers.
5. Click Validate.
6. Click Create Environment. Your MicroStrategy Backup is restored onyour new environment.
7. After restore, you can find all backup files in /opt/mstr/mstrbak:
Upgrade Guide
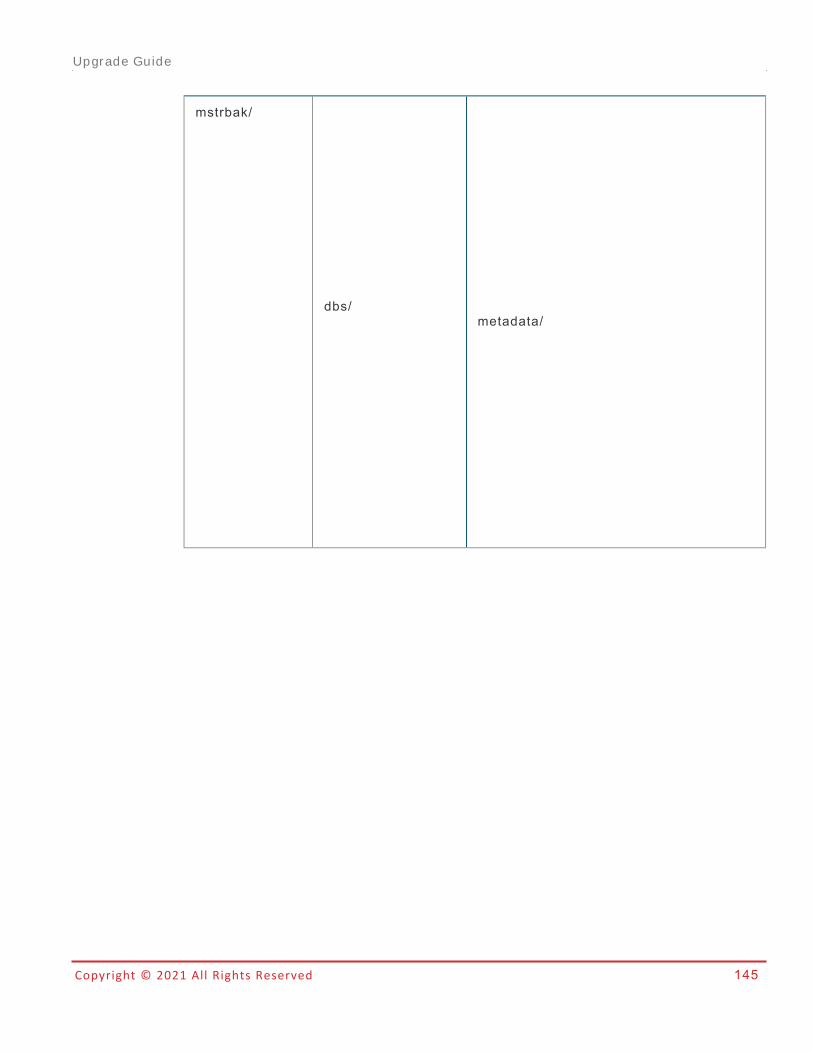
Copyright © 2021 All Rights Reserved 145
mstrbak/
dbs/metadata/
Upgrade Guide
Copyright © 2021 All Rights Reserved 146
history_list/
Upgrade Guide

Copyright © 2021 All Rights Reserved 147
mstr_collab/
Upgrade Guide

Copyright © 2021 All Rights Reserved 148
platform_analytics/
Upgrade Guide

Copyright © 2021 All Rights Reserved 149
<additional_wh.sql>
Upgrade Guide
Copyright © 2021 All Rights Reserved 150
cubes/
Upgrade Guide

Copyright © 2021 All Rights Reserved 151
caches/
Upgrade Guide

Copyright © 2021 All Rights Reserved 152
additional_files/ drivers/
Upgrade Guide
Copyright © 2021 All Rights Reserved 153
hosts
Upgrade Guide
Copyright © 2021 All Rights Reserved 154
custom_webapps/
Upgrade Guide
Copyright © 2021 All Rights Reserved 155
configs/ web/
Upgrade Guide
Copyright © 2021 All Rights Reserved 156
mobile/
library/
images/
web/
mobile/
library/
iserver_pdf_generator/
plugins/web/
mobile/
library/
SSO/
Web/Connection/
SAML/
Web_XML/
Library/
Connection/
SAML/
Web_XML/
Mobile/
SAML/
Web_XML/
inbox/
odbc.ini
odbcinst.ini
mstrbak.json
Response.json
Upgrade Guide

Copyright © 2021 All Rights Reserved 157
Windows backup and restore: LDAP must be re-configured in the newenvironment:
1. Open MicroStrategy Developer.
2. Right-click a project source and select Configure MicroStrategyIntelligence Server.
3. Go to LDAP and the Platform tab.
4. Change “LDAP server vendor name”, “LDAP Connectivity driver”,“Intelligent Server platform”, and “LDAP Connectivity file names”accordingly.
5. Incremental Refresh in Update ModeMicroStrategy Backup incremental refresh allow users to migrate newchanges, including metadatas, cubes, caches, images, plugins, and PlatformAnalytics, from the source cloud environment to the destination cloudenvironment. A typical use case scenario is when a user has parallelenvironments and want to migrate changes from one environment to anotherenvironment. For example:
l Users have a streamline workflow (DEV – QA – PROD) when upgrading.After full testing, they can leverage incremental refresh to make allchanges to pre-production before cutoff.
l Users need to have backup environment for disaster recovery.
To use incremental refresh in AWS, you must have uploaded your backup toan S3 bucket (directly inside the bucket and not inside any folder) in 3. RunMicroStrategy Backup.
To use incremental refresh in Azure, you must have uploaded your backup toan Azure Storage account which can be accessed by the new environment in3. Run MicroStrategy Backup.
Upgrade Guide
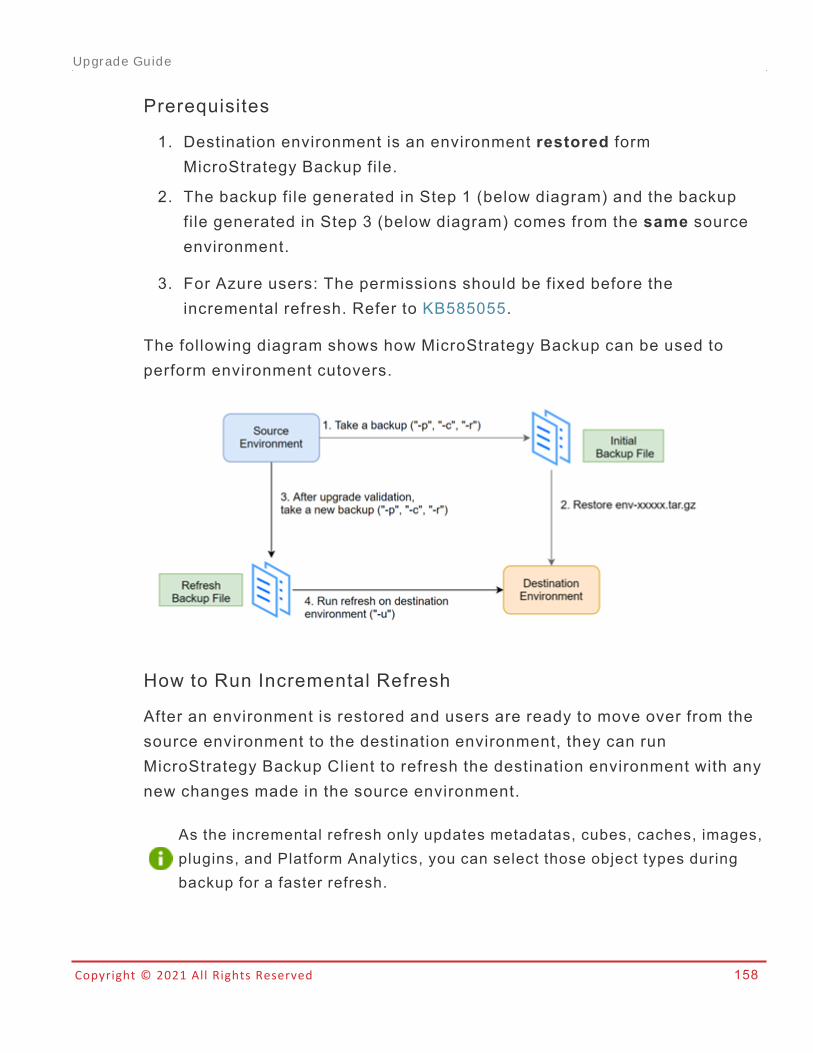
Copyright © 2021 All Rights Reserved 158
Prerequisites
1. Destination environment is an environment restored formMicroStrategy Backup file.
2. The backup file generated in Step 1 (below diagram) and the backupfile generated in Step 3 (below diagram) comes from the same sourceenvironment.
3. For Azure users: The permissions should be fixed before theincremental refresh. Refer to KB585055.
The following diagram shows how MicroStrategy Backup can be used toperform environment cutovers.
How to Run Incremental Refresh
After an environment is restored and users are ready to move over from thesource environment to the destination environment, they can runMicroStrategy Backup Client to refresh the destination environment with anynew changes made in the source environment.
As the incremental refresh only updates metadatas, cubes, caches, images,plugins, and Platform Analytics, you can select those object types duringbackup for a faster refresh.
Upgrade Guide
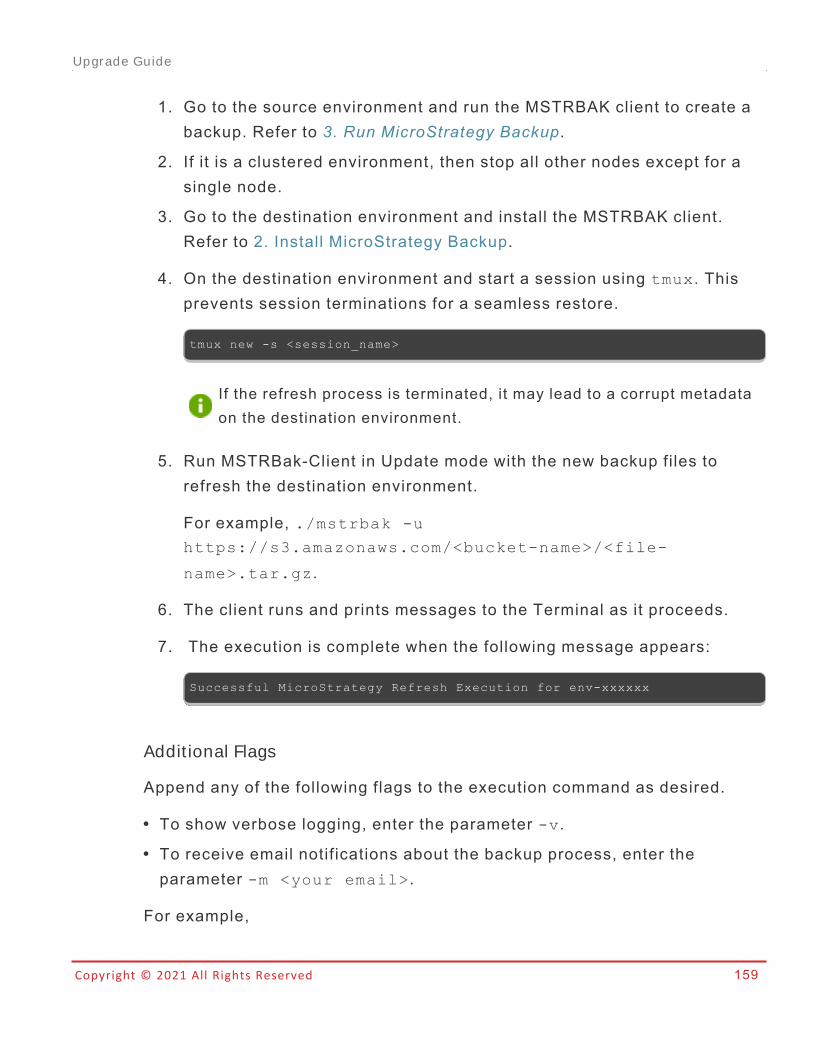
Copyright © 2021 All Rights Reserved 159
1. Go to the source environment and run the MSTRBAK client to create abackup. Refer to 3. Run MicroStrategy Backup.
2. If it is a clustered environment, then stop all other nodes except for asingle node.
3. Go to the destination environment and install the MSTRBAK client.Refer to 2. Install MicroStrategy Backup.
4. On the destination environment and start a session using tmux. Thisprevents session terminations for a seamless restore.
tmux new -s <session_name>
If the refresh process is terminated, it may lead to a corrupt metadataon the destination environment.
5. Run MSTRBak-Client in Update mode with the new backup files torefresh the destination environment.
For example, ./mstrbak -u
https://s3.amazonaws.com/<bucket-name>/<file-
name>.tar.gz.
6. The client runs and prints messages to the Terminal as it proceeds.
7. The execution is complete when the following message appears:
Successful MicroStrategy Refresh Execution for env-xxxxxx
Addit ional Flags
Append any of the following flags to the execution command as desired.
l To show verbose logging, enter the parameter -v.l To receive email notifications about the backup process, enter theparameter -m <your email>.
For example,
Upgrade Guide
Copyright © 2021 All Rights Reserved 161
Val idat ing t he Upgr adeIt is essential that you fully test your new MicroStrategy system to see how itwithstands the kind of typical day-to-day system usage your user communityrequires. If you have upgraded first in a test environment, you can run thesetests in the test environment and correct any problems you may find there.Then when you upgrade your production environment, you already have anidea of the kinds of difficulties you may encounter. For information aboutsetting up an upgrade test environment, see Configuring an Upgrade TestEnvironment, page 63.
During the test, make sure you are satisfied with the status and efficiency ofyour MicroStrategy system. If you need help, see the Readme or contactMicroStrategy Technical Support.
URL Scanner - Identify URLs for Export
As of MicroStrategy 2020 Update 1, administrators can specify which URLsor URL paths are permitted when fetching content to be included in anexport. This concept, where only certain URLs are permitted, is largelyreferred to as whitelisting. To easily identify which URLs belong in this listafter upgrading, it 's recommended to use the URL Scanner.
The URL Scanner tool allows you to scan MicroStrategy metadatas (10.4.xand higher) for URLs accessed by the exporting workflows on theIntelligence Server. It l ists all the URLs referenced by reports, documents,and dossiers and allows you to make an informed decision about whichURLs are safe to be used in your environment. Combined with the newwhitelisting functionality in MicroStrategy 2020 Update 1, this tool can beused to whitelist only those safe URLs to protect against Server SideRequest Forgery attacks.
The recommended workflow for using the URL Scanner is as follows:
Upgrade Guide
Copyright © 2021 All Rights Reserved 162
1. Review the prerequisites and system requirements.
2. Run the URL Scanner.
3. Review the scan results.
4. Add URLs and URL paths from the scan results to the whitelist.
Get StartedFirst, download the zip file from the MicroStrategy Download site and unzipit to a folder. We will refer to this as “URL Scanner Folder” going forward.
URL Scanner System Requirements
The URL Scanner supports all Microsoft Windows Systems (except MicrosoftVista) supported by MicroStrategy Developer.
The following systems are certif ied for use with this tool:
l Windows Server 2016 Enterprisel Windows Server 2019 Enterprisel Windows 10
MicroStrategy Prerequisites
l You must have the Bypass all object security access checks privilegeto use the tool.
l You must connect through a 2-tier (direct) or 3-tier project source withStandard authentication mode.
l Your machine must have MicroStrategy Developer installed.
Compatibility
The URL Scanner is compatible with metadata versions 10.4.x and above.
Run the URL Scanner
You must perform the prerequisites on Get Started before proceeding.
Upgrade Guide
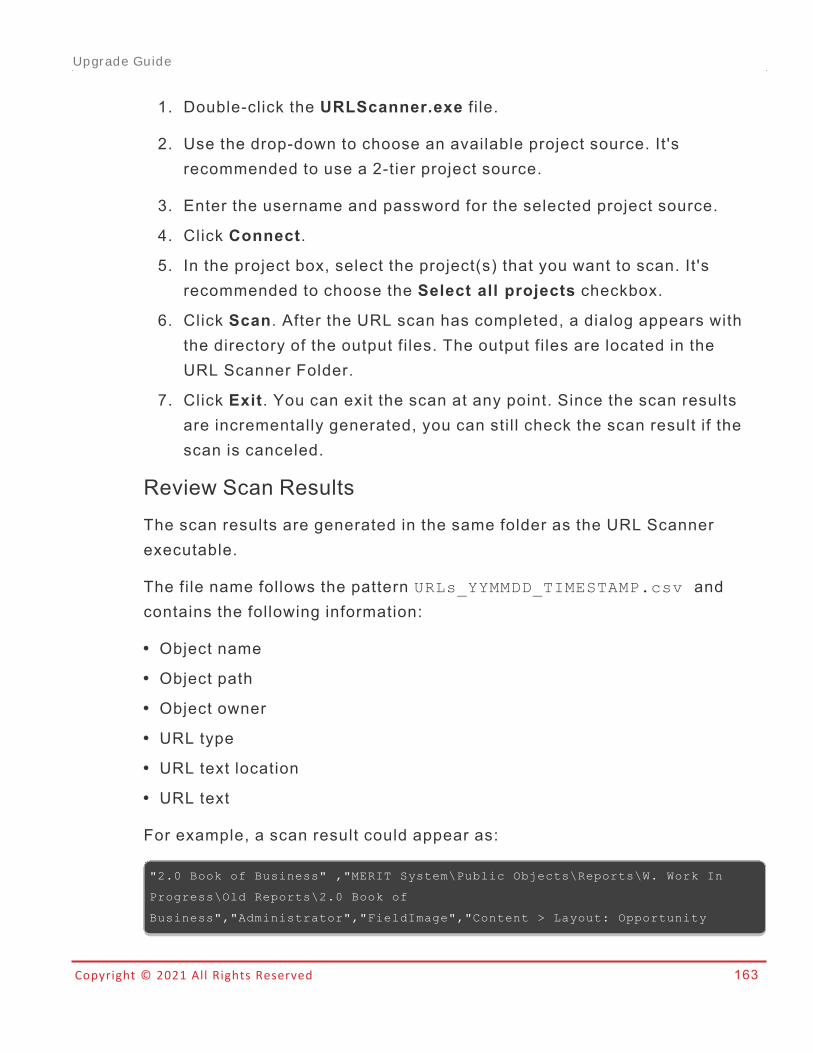
Copyright © 2021 All Rights Reserved 163
1. Double-click the URLScanner.exe f i le.
2. Use the drop-down to choose an available project source. It 'srecommended to use a 2-tier project source.
3. Enter the username and password for the selected project source.
4. Click Connect.
5. In the project box, select the project(s) that you want to scan. It 'srecommended to choose the Select all projects checkbox.
6. Click Scan. After the URL scan has completed, a dialog appears withthe directory of the output files. The output files are located in theURL Scanner Folder.
7. Click Exit. You can exit the scan at any point. Since the scan resultsare incrementally generated, you can stil l check the scan result if thescan is canceled.
Review Scan ResultsThe scan results are generated in the same folder as the URL Scannerexecutable.
The file name follows the pattern URLs_YYMMDD_TIMESTAMP.csv andcontains the following information:
l Object namel Object pathl Object ownerl URL typel URL text locationl URL text
For example, a scan result could appear as:
"2.0 Book of Business" ,"MERIT System\Public Objects\Reports\W. Work In
Progress\Old Reports\2.0 Book of
Business","Administrator","FieldImage","Content > Layout: Opportunity
Upgrade Guide
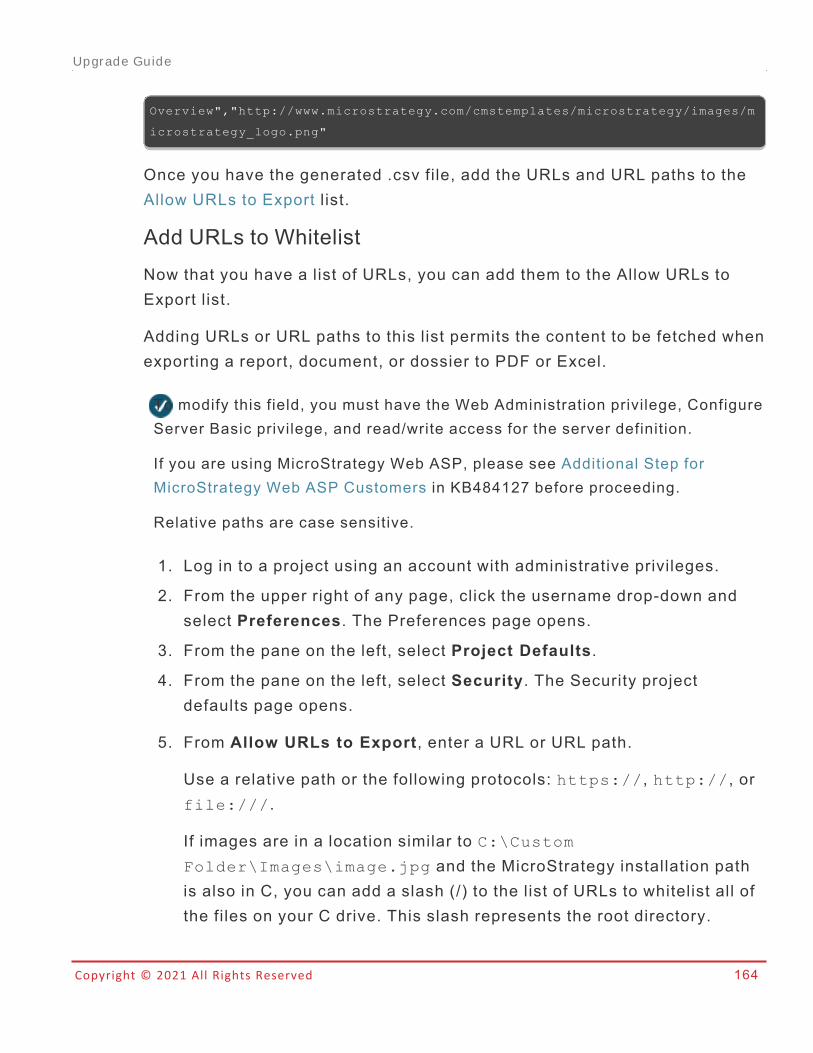
Copyright © 2021 All Rights Reserved 164
Overview","http://www.microstrategy.com/cmstemplates/microstrategy/images/m
icrostrategy_logo.png"
Once you have the generated .csv file, add the URLs and URL paths to theAllow URLs to Export list.
Add URLs to WhitelistNow that you have a list of URLs, you can add them to the Allow URLs toExport list.
Adding URLs or URL paths to this list permits the content to be fetched whenexporting a report, document, or dossier to PDF or Excel.
To modify this field, you must have the Web Administration privilege, ConfigureServer Basic privilege, and read/write access for the server definition.
If you are using MicroStrategy Web ASP, please see Additional Step forMicroStrategy Web ASP Customers in KB484127 before proceeding.
Relative paths are case sensitive.
1. Log in to a project using an account with administrative privileges.
2. From the upper right of any page, click the username drop-down andselect Preferences. The Preferences page opens.
3. From the pane on the left, select Project Defaults.
4. From the pane on the left, select Security. The Security projectdefaults page opens.
5. From Allow URLs to Export, enter a URL or URL path.
Use a relative path or the following protocols: https://, http://, orfile:///.
If images are in a location similar to C:\Custom
Folder\Images\image.jpg and the MicroStrategy installation pathis also in C, you can add a slash (/) to the list of URLs to whitelist all ofthe files on your C drive. This slash represents the root directory.
Upgrade Guide
Copyright © 2021 All Rights Reserved 165
6. Click Add.
7. Click Apply. This setting applies to all projects in your environment andaffects all MicroStrategy products that have export functionality.
8. Clear your Export cache.
9. In Developer, log in to a project source. You must have the MonitorCaches privilege.
10. Expand Administration > SystemMonitors > Caches > Documents.
11. Select a project and click OK.
12. Locate caches with the format PDF or Excel and delete them.
Once you have whitelisted the URLs found in your metadata, it isrecommended to perform Integrity Manager testing to validate the upgradeimpact.
Thereafter, administrators should review any URLs or URL paths that arestil l blocked from export.
Related Art icles
KB484127: Securing PDF and Excel Export with Whitelists
Integrity Manager - Upgrade Impact Testing
After upgrading your production environment, you should ensure that thechanges involved do not alter any of your report, document, or dossierresults. If changes have occurred, you can understand why usingMicroStrategy Integrity Manager.
MicroStrategy Integrity Manager is designed to execute and comparereports, documents, and dossiers from different versions by examining theirdata and SQL. Starting in 11.0, administrators can compare data down to thevisualization level of all content objects. Changes found during comparisontesting are logged automatically and can be viewed using the UpgradeAnalysis Dossier. See Upgrade Analysis Dossier for more information.
Upgrade Guide

Copyright © 2021 All Rights Reserved 166
For detailed information about Integrity Manager, including instructions, seethe Integrity Manager chapter in the System Administration Help.
Best Practices for Integrity TestingMicroStrategy recommends the following best practices when testing yourupgrade with Integrity Manager:
l Create all baselines using Integrity Manager 2021.
For example, if you are going to upgrade from 10.4.x to 2021 and you willnot have a live 10.4.x and 2021 both available at the same time to do aProject vs Project comparison, then upgrade a developer machine to 2021with Integrity Manager to capture the baseline for 10.4.x before upgradingit to 2021. Baselines that are created with older versions of IntegrityManager are not compatible and administrators can expect “does notcontain tags” or “does not contain relations” errors. This is due tointentional architecture changes to support new functionality.
l Create an integrity test comparing reports, documents, and dossiers fromthe upgraded test environment with the same objects in the currentproduction environment, so that you can easily see where any differencesare.
l In a comparative integrity test, you must have the same OS version andthe same font installed on your machine to use the Graph view to comparetwo PDF reports. Font rendering on a PDF is version and OS specific, sodifferences may result in formatting issues, which can affect comparisonresults.
l Execute the tests against the production data warehouse. If this is notpossible, test against a data warehouse that resembles the productiondata warehouse as closely as possible. Ensure that the tests for both theupgrade environment and the current production environment areexecuted against the same warehouse or unmatched results are returned,which is expected.
Upgrade Guide
Copyright © 2021 All Rights Reserved 167
l Execute the tests with production users, groups, and security roles,instead of specially-created integrity test users and groups, so that thetests match the production environment as closely as possible.
l If possible, select content objects with at least default prompt answers totest. Otherwise create static copies of content objects that have promptswith no default prompt answers.
l When executing a performance test, ensure no other usage or testing isbeing performed on the environments as it can result in misleading results.
Creating a Project BaselineWhen you upgrade to MicroStrategy 2021, you must ensure that reports,report services documents, and dossiers return the same results in both thecurrent environment and the upgraded environment. For customersperforming a parallel upgrade, the easiest way to do this is to use the“Project versus Project” test which will execute selected content objectsagainst two environments, one your existing production, and the other yourtest upgrade environment. Customers performing an in-place upgrade willneed to create a project baseline of your current production environment,and then after the upgrade is done, use that baseline to run the “Baselineversus Project” option. The steps below provide an example.
Create a project baseline
1. In your current MicroStrategy environment, access the Windowsdesktop with MicroStrategy clients installed.
2. Open Start Menu > MicroStrategy Products > Integrity Manager.
3. From the File menu, select Create Test.
4. Select Single Project and click Next.
Upgrade Guide
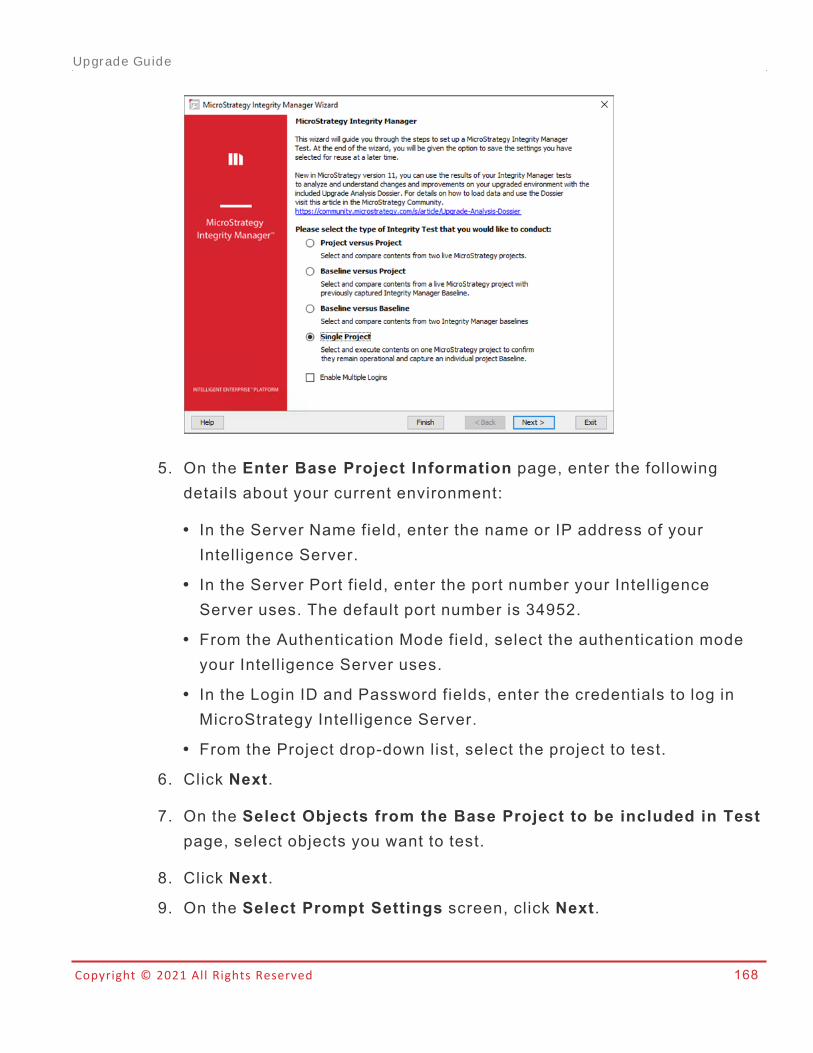
Copyright © 2021 All Rights Reserved 168
5. On the Enter Base Project Information page, enter the followingdetails about your current environment:
l In the Server Name field, enter the name or IP address of yourIntelligence Server.
l In the Server Port field, enter the port number your IntelligenceServer uses. The default port number is 34952.
l From the Authentication Mode field, select the authentication modeyour Intelligence Server uses.
l In the Login ID and Password fields, enter the credentials to log inMicroStrategy Intelligence Server.
l From the Project drop-down list, select the project to test.
6. Click Next.
7. On the Select Objects from the Base Project to be included in Testpage, select objects you want to test.
8. Click Next.
9. On the Select Prompt Settings screen, click Next.
Upgrade Guide
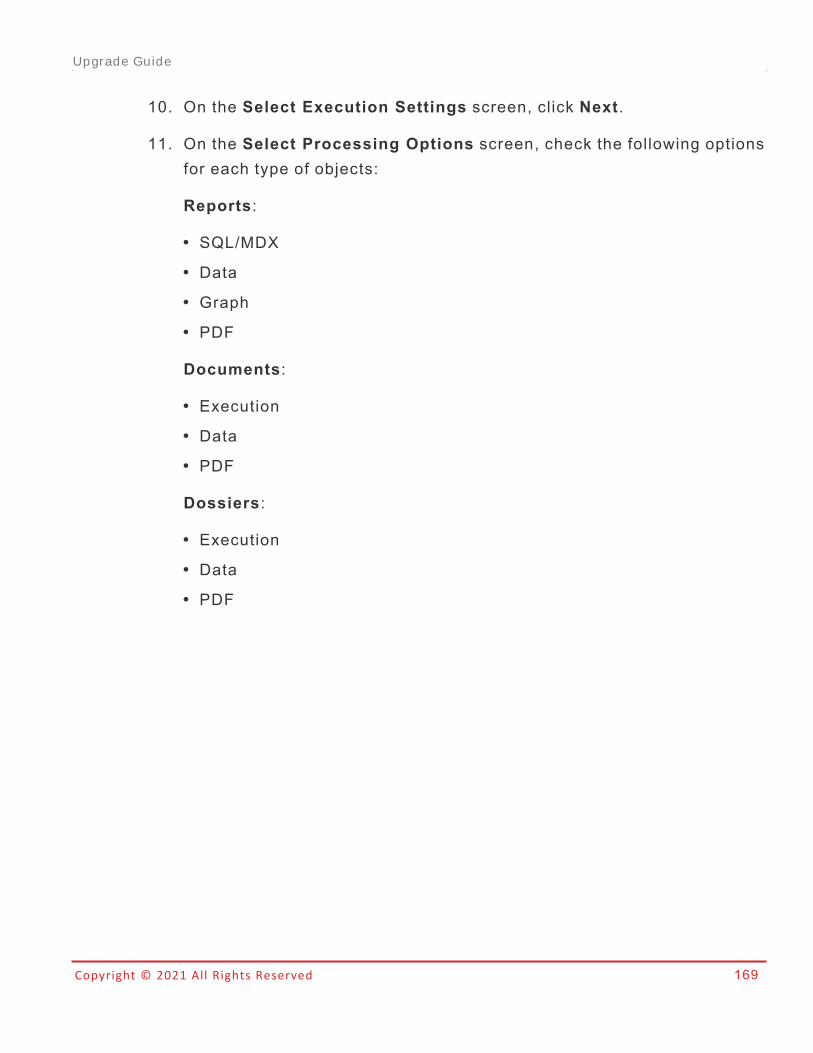
Copyright © 2021 All Rights Reserved 169
10. On the Select Execution Settings screen, click Next.
11. On the Select Processing Options screen, check the following optionsfor each type of objects:
Reports:
l SQL/MDXl Datal Graphl PDF
Documents:
l Executionl Datal PDF
Dossiers:
l Executionl Datal PDF
Upgrade Guide
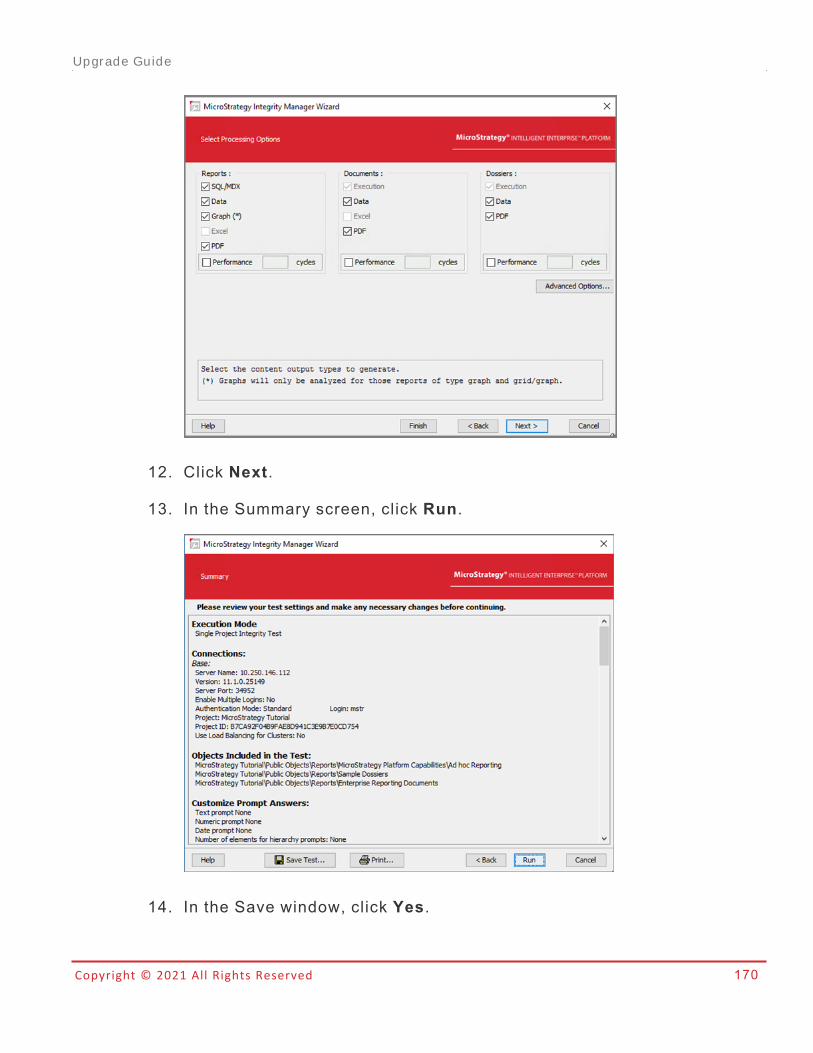
Copyright © 2021 All Rights Reserved 170
12. Click Next.
13. In the Summary screen, click Run.
14. In the Save window, click Yes.
Upgrade Guide
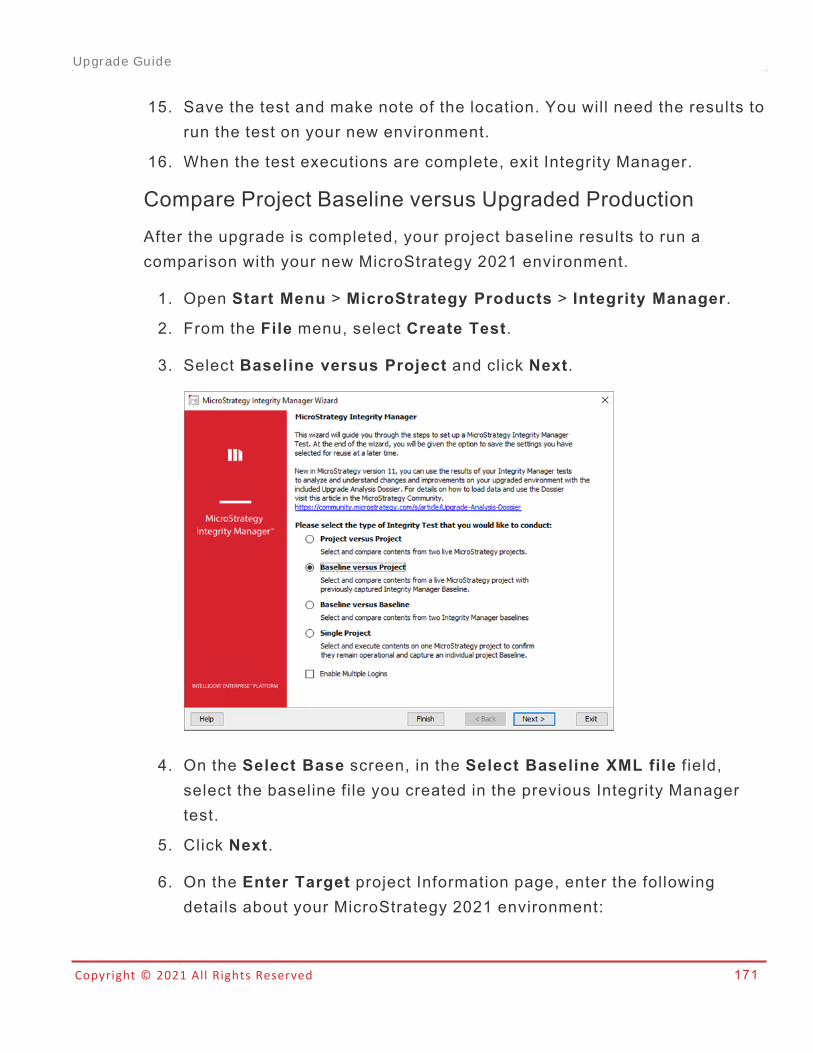
Copyright © 2021 All Rights Reserved 171
15. Save the test and make note of the location. You will need the results torun the test on your new environment.
16. When the test executions are complete, exit Integrity Manager.
Compare Project Baseline versus Upgraded ProductionAfter the upgrade is completed, your project baseline results to run acomparison with your new MicroStrategy 2021 environment.
1. Open Start Menu > MicroStrategy Products > Integrity Manager.
2. From the File menu, select Create Test.
3. Select Baseline versus Project and click Next.
4. On the Select Base screen, in the Select Baseline XML file f ield,select the baseline file you created in the previous Integrity Managertest.
5. Click Next.
6. On the Enter Target project Information page, enter the followingdetails about your MicroStrategy 2021 environment:
Upgrade Guide
Copyright © 2021 All Rights Reserved 172
l In the Server Name field, enter the name of your 2021 IntelligenceServer.
l In the Server Port field, enter the port number your IntelligenceServer uses. The default port number is 34952.
l From the Authentication Mode field, select the authentication modeyour Intelligence Server uses.
l In the Login ID and Password fields, enter the credentials to log inMicroStrategy Intelligence Server.
l From the Project drop-down list, select the project you used in thefirst test.
7. On the Select Contents to Test page, select the objects you used inthe first test.
8. Click Next.
9. On the Select Prompt Settings screen, keep all of selected options,click Next.
10. On the Select Execution Settings screen, keep all of selected options,click Next.
11. On the Select Processing Options screen, keep all of selectedoptions, click Next.
12. In the Summary screen, click Run.
13. In the Save window, click Yes and save the test.
14. When the test executions are complete, exit Integrity Manager andproceed to understanding your results using the Upgrade AnalysisDossier.
MicroStrategy Capacity Testing Tool
Capabilities and RestrictionsThe MicroStrategy Capacity Testing Tool is a client application whichconnects to deployments of the MicroStrategy platform (specifically,
Upgrade Guide
Copyright © 2021 All Rights Reserved 173
MicroStrategy Web and MicroStrategy Library if available) and runs a user-defined set of end-to-end performance tests on content objects includingRSDs (Report Services Documents), reports, Visual Insight dashboards, andDossiers. The purpose of this tool is to establish a baseline for theperformance of a MicroStrategy application or determine how a particularMicroStrategy application’s performance has been affected by an upgrade toa new version by comparing two environments.
Capabilit ies
l Test the response time of one or many content objectsl Test the response time on one more multiple MicroStrategy environmentsl Perform tests by running them once, or many times with savedconfigurations
l Runs against MicroStrategy 10.4.x and above
Restrictions
l Only non-prompted content objects are supported.l Connecting to versions of MicroStrategy without MicroStrategy Library willrequire the user to provide a list of which objects to test.
Refer to the section Configuration Files: Profiles.csv for more information.
l Connecting to MicroStrategy Web 10.4 Hotfix 5 and earlier will require theWait Page to be disabled.
Refer to the section Disabling the Wait Page in MicroStrategy Web formore information.
l The Capacity Testing Tool runs on Windows Server 2012 and WindowsServer 2016.
l The Capacity Testing Tool only runs in command-line model The Capacity Testing Tool only allows for MicroStrategy users withStandard or LDAP authentication
Upgrade Guide
Copyright © 2021 All Rights Reserved 174
l The Capacity Testing Tool requires that the user know some configurationproperties of their MicroStrategy deployment (see GatheringMicroStrategy Configurations for more information).
Getting StartedFirst, download the zip file from the MicroStrategy Download site and unzipit to a folder. We will refer to this as “Capacity Testing Tool Folder” goingforward.
Capacity Test ing Tool System Requirements
l Windows Server 2012 or 2016l 1 GB minimum hard drive storage spacel 8 GB RAMl Network connectivity to all MicroStrategy Web and MicroStrategy Library(if applicable) instances that will be used
MicroStrategy Requirements
l MicroStrategy Web connected to your Intelligence Serverl MicroStrategy Library 10.9 and above (to use the search functionality)l A MicroStrategy user that has execute permission for all content objects tobe tested
l Non-prompted content objectsl The Web statistics panel must be open on your screen. To enable the Webstatistics panel, see Before Running the Test.
Disabling the Wait Page in MicroStrategy Web
The wait page in MicroStrategy Web needs to be manually disabled whenconnecting to MicroStrategy 10.4 Hotfix 5 and earlier. This is because theURL flag to disable the wait page didn't exist until MicroStrategy 10.4 Hotfix
Upgrade Guide
Copyright © 2021 All Rights Reserved 175
6. Before using the Capacity Testing Tool, follow the steps below to disablethe wait page:
Disabling the Wait Page on J2EE Environments
1. Log in to the web server and stop the service.
2. Go to the deployment folder (Ex. webapps in Tomcat) where theMicroStrategy.war file was deployed.
3. Navigate to /MicroStrategy/WEB-INF/xml and find the filepageConfig.xml.
4. Backup pageConfig.xml as pageConfig.xml.bak.
5. Open pageConfig.xml in a text editor and do a search for allelements named maxWait and set the value to -1 for all instances.
6. Save the file and exit the editor.
7. Restart the web server service.
Disabling the Wait Page on .NET Environments
1. Log in to the web server and stop the Internet Information Services (IIS)Manager service.
2. Go the folder Web ASPx where web server is deployed. Default pathshould be C:\Program Files (x86)\MicroStrategy\Web
ASPx).
3. Navigate to Web ASPx\WEB-INF\xml and find the filepageConfig.xml.
4. Backup pageConfig.xml as pageConfig.xml.bak.
5. Open pageConfig.xml in a text editor and do a search for all of theelements named maxWait and set the value to -1 for all instances.
6. Save the file and exit the editor.
7. Restart the IIS Manager service.
Upgrade Guide
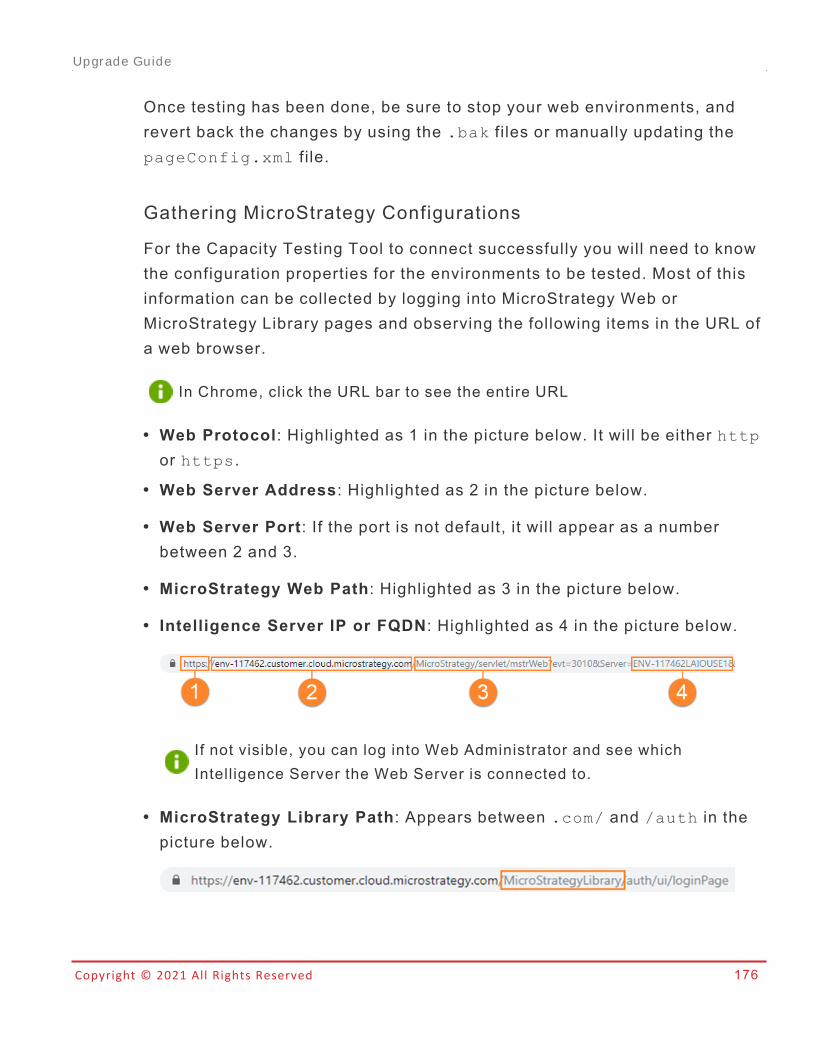
Copyright © 2021 All Rights Reserved 176
Once testing has been done, be sure to stop your web environments, andrevert back the changes by using the .bak f i les or manually updating thepageConfig.xml f i le.
Gathering MicroStrategy Configurations
For the Capacity Testing Tool to connect successfully you will need to knowthe configuration properties for the environments to be tested. Most of thisinformation can be collected by logging into MicroStrategy Web orMicroStrategy Library pages and observing the following items in the URL ofa web browser.
In Chrome, click the URL bar to see the entire URL
l Web Protocol: Highlighted as 1 in the picture below. It will be either httpor https.
l Web Server Address: Highlighted as 2 in the picture below.
l Web Server Port: If the port is not default, it will appear as a numberbetween 2 and 3.
l MicroStrategy Web Path: Highlighted as 3 in the picture below.
l Intelligence Server IP or FQDN: Highlighted as 4 in the picture below.
If not visible, you can log into Web Administrator and see whichIntelligence Server the Web Server is connected to.
l MicroStrategy Library Path: Appears between .com/ and /auth in thepicture below.
Upgrade Guide
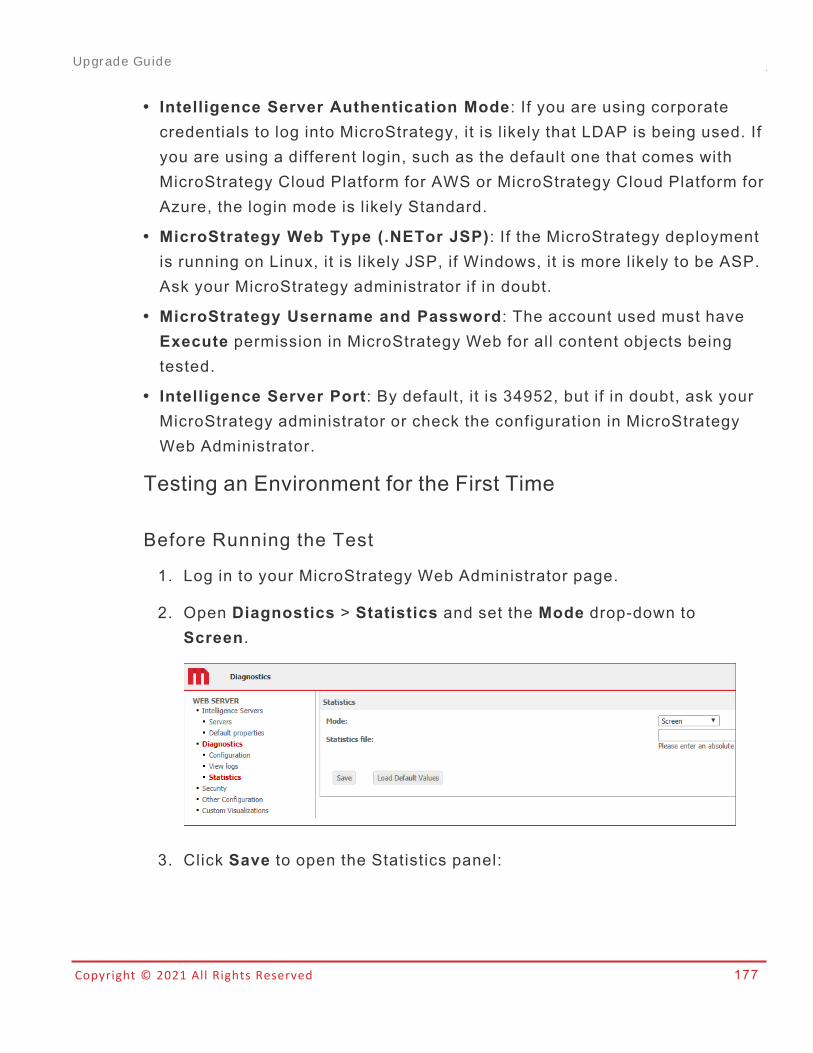
Copyright © 2021 All Rights Reserved 177
l Intelligence Server Authentication Mode: If you are using corporatecredentials to log into MicroStrategy, it is likely that LDAP is being used. Ifyou are using a different login, such as the default one that comes withMicroStrategy Cloud Platform for AWS or MicroStrategy Cloud Platform forAzure, the login mode is likely Standard.
l MicroStrategy Web Type (.NETor JSP): If the MicroStrategy deploymentis running on Linux, it is likely JSP, if Windows, it is more likely to be ASP.Ask your MicroStrategy administrator if in doubt.
l MicroStrategy Username and Password: The account used must haveExecute permission in MicroStrategy Web for all content objects beingtested.
l Intelligence Server Port: By default, it is 34952, but if in doubt, ask yourMicroStrategy administrator or check the configuration in MicroStrategyWeb Administrator.
Testing an Environment for the First Time
Before Running the Test
1. Log in to your MicroStrategy Web Administrator page.
2. Open Diagnostics > Statistics and set the Mode drop-down toScreen.
3. Click Save to open the Statistics panel:
Upgrade Guide
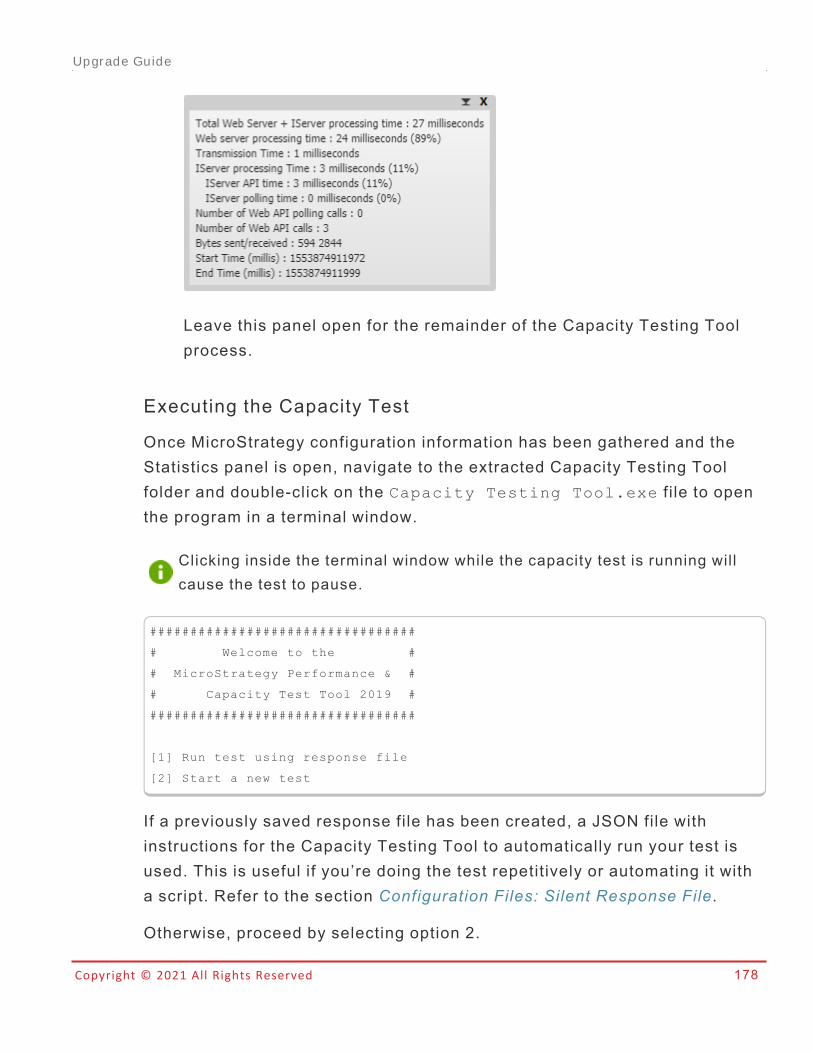
Copyright © 2021 All Rights Reserved 178
Leave this panel open for the remainder of the Capacity Testing Toolprocess.
Executing the Capacity Test
Once MicroStrategy configuration information has been gathered and theStatistics panel is open, navigate to the extracted Capacity Testing Toolfolder and double-click on the Capacity Testing Tool.exe f i le to openthe program in a terminal window.
Clicking inside the terminal window while the capacity test is running willcause the test to pause.
#################################
# Welcome to the #
# MicroStrategy Performance & #
# Capacity Test Tool 2019 #
#################################
[1] Run test using response file
[2] Start a new test
If a previously saved response file has been created, a JSON file withinstructions for the Capacity Testing Tool to automatically run your test isused. This is useful if you’re doing the test repetitively or automating it witha script. Refer to the section Configuration Files: Silent Response File.
Otherwise, proceed by selecting option 2.
Upgrade Guide
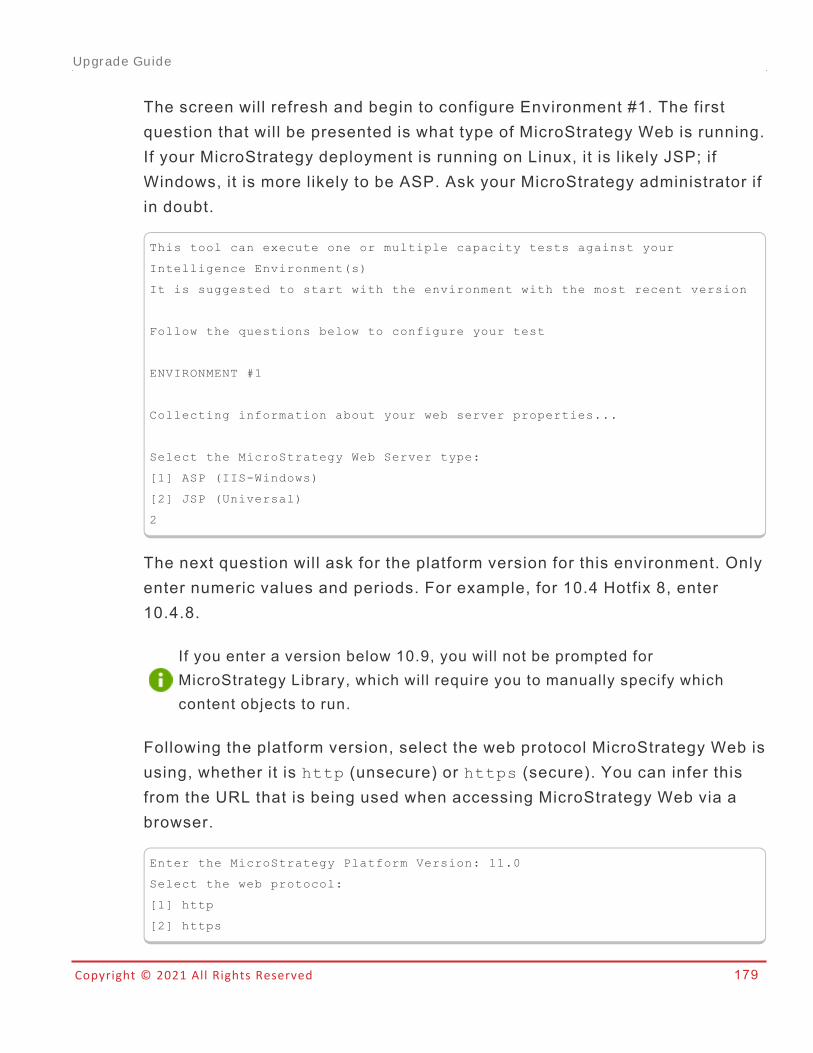
Copyright © 2021 All Rights Reserved 179
The screen will refresh and begin to configure Environment #1. The firstquestion that will be presented is what type of MicroStrategy Web is running.If your MicroStrategy deployment is running on Linux, it is likely JSP; ifWindows, it is more likely to be ASP. Ask your MicroStrategy administrator ifin doubt.
This tool can execute one or multiple capacity tests against your
Intelligence Environment(s)
It is suggested to start with the environment with the most recent version
Follow the questions below to configure your test
ENVIRONMENT #1
Collecting information about your web server properties...
Select the MicroStrategy Web Server type:
[1] ASP (IIS-Windows)
[2] JSP (Universal)
2
The next question will ask for the platform version for this environment. Onlyenter numeric values and periods. For example, for 10.4 Hotfix 8, enter10.4.8.
If you enter a version below 10.9, you will not be prompted forMicroStrategy Library, which will require you to manually specify whichcontent objects to run.
Following the platform version, select the web protocol MicroStrategy Web isusing, whether it is http (unsecure) or https (secure). You can infer thisfrom the URL that is being used when accessing MicroStrategy Web via abrowser.
Enter the MicroStrategy Platform Version: 11.0
Select the web protocol:
[1] http
[2] https
Upgrade Guide
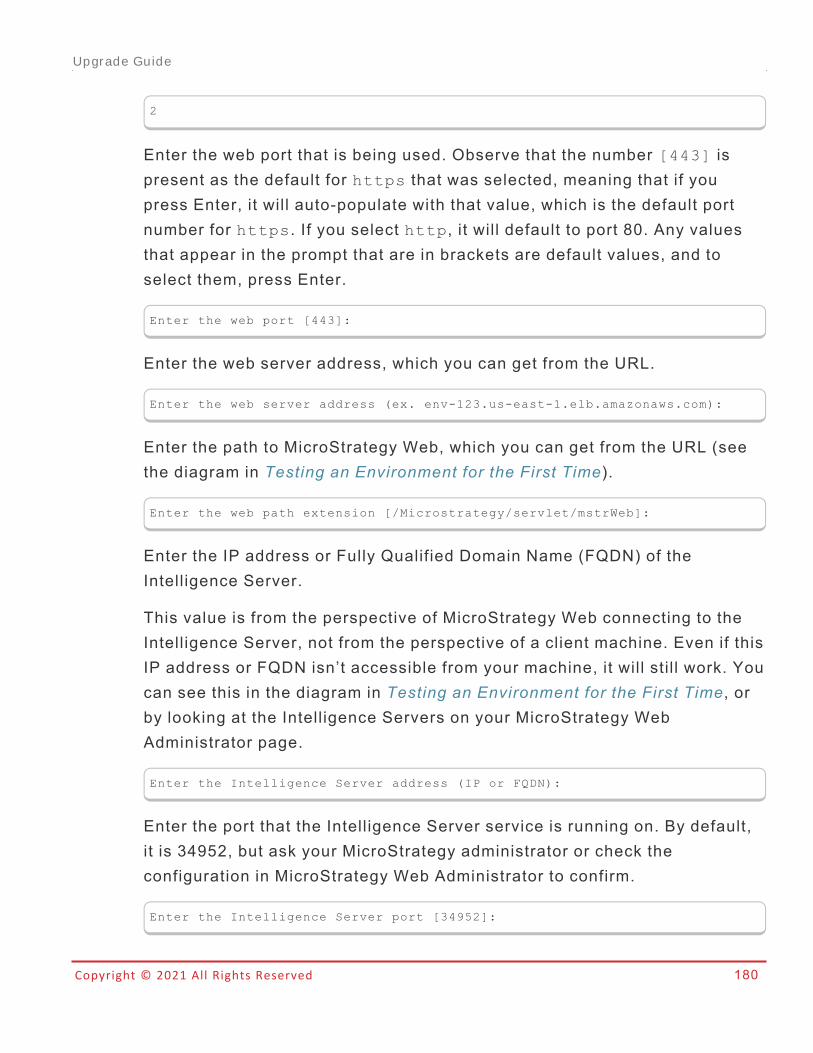
Copyright © 2021 All Rights Reserved 180
2
Enter the web port that is being used. Observe that the number [443] ispresent as the default for https that was selected, meaning that if youpress Enter, it will auto-populate with that value, which is the default portnumber for https. If you select http, it will default to port 80. Any valuesthat appear in the prompt that are in brackets are default values, and toselect them, press Enter.
Enter the web port [443]:
Enter the web server address, which you can get from the URL.
Enter the web server address (ex. env-123.us-east-1.elb.amazonaws.com):
Enter the path to MicroStrategy Web, which you can get from the URL (seethe diagram in Testing an Environment for the First Time).
Enter the web path extension [/Microstrategy/servlet/mstrWeb]:
Enter the IP address or Fully Qualified Domain Name (FQDN) of theIntelligence Server.
This value is from the perspective of MicroStrategy Web connecting to theIntelligence Server, not from the perspective of a client machine. Even if thisIP address or FQDN isn’t accessible from your machine, it will sti l l work. Youcan see this in the diagram in Testing an Environment for the First Time, orby looking at the Intelligence Servers on your MicroStrategy WebAdministrator page.
Enter the Intelligence Server address (IP or FQDN):
Enter the port that the Intelligence Server service is running on. By default,it is 34952, but ask your MicroStrategy administrator or check theconfiguration in MicroStrategy Web Administrator to confirm.
Enter the Intelligence Server port [34952]:
Upgrade Guide
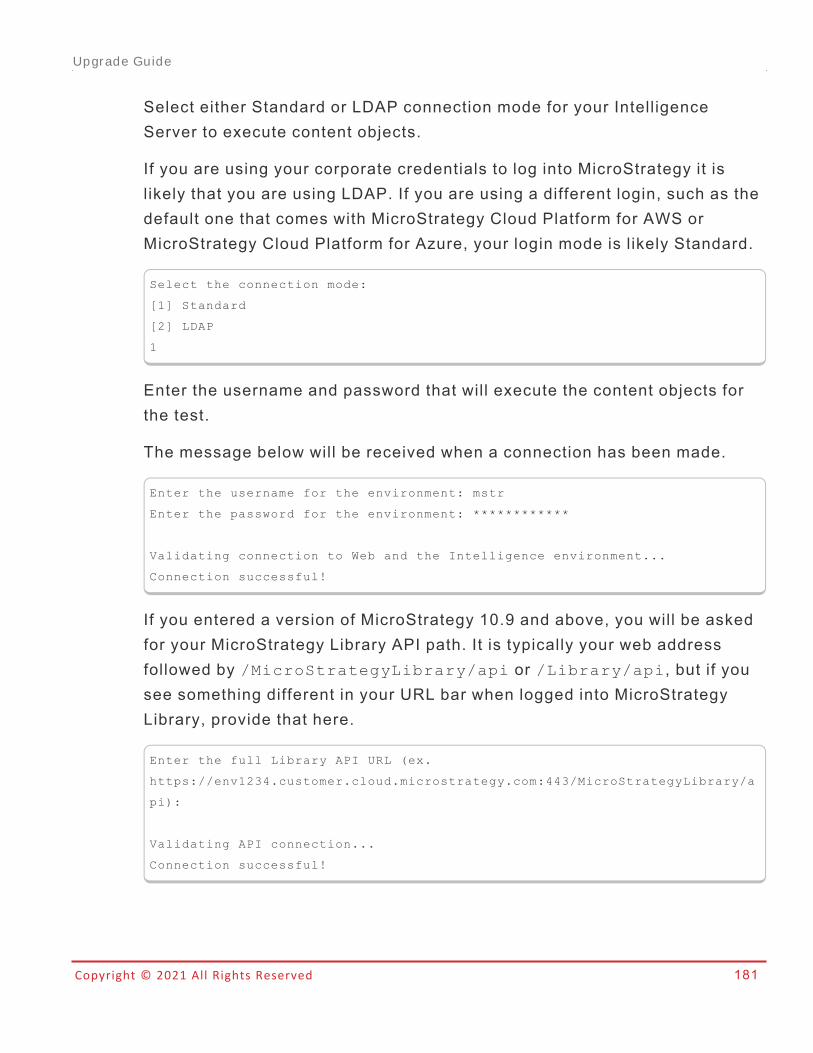
Copyright © 2021 All Rights Reserved 181
Select either Standard or LDAP connection mode for your IntelligenceServer to execute content objects.
If you are using your corporate credentials to log into MicroStrategy it islikely that you are using LDAP. If you are using a different login, such as thedefault one that comes with MicroStrategy Cloud Platform for AWS orMicroStrategy Cloud Platform for Azure, your login mode is likely Standard.
Select the connection mode:
[1] Standard
[2] LDAP
1
Enter the username and password that will execute the content objects forthe test.
The message below will be received when a connection has been made.
Enter the username for the environment: mstr
Enter the password for the environment: ************
Validating connection to Web and the Intelligence environment...
Connection successful!
If you entered a version of MicroStrategy 10.9 and above, you will be askedfor your MicroStrategy Library API path. It is typically your web addressfollowed by /MicroStrategyLibrary/api or /Library/api, but if yousee something different in your URL bar when logged into MicroStrategyLibrary, provide that here.
Enter the full Library API URL (ex.
https://env1234.customer.cloud.microstrategy.com:443/MicroStrategyLibrary/a
pi):
Validating API connection...
Connection successful!
Upgrade Guide
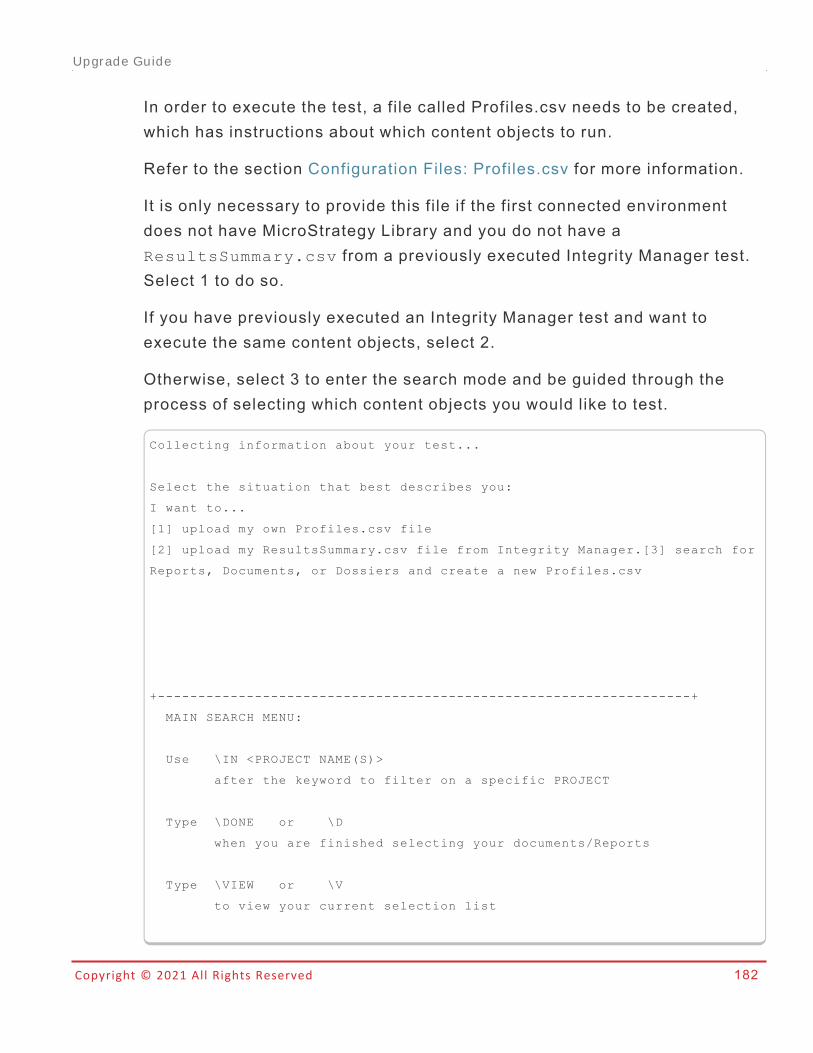
Copyright © 2021 All Rights Reserved 182
In order to execute the test, a file called Profiles.csv needs to be created,which has instructions about which content objects to run.
Refer to the section Configuration Files: Profiles.csv for more information.
It is only necessary to provide this file if the first connected environmentdoes not have MicroStrategy Library and you do not have aResultsSummary.csv from a previously executed Integrity Manager test.Select 1 to do so.
If you have previously executed an Integrity Manager test and want toexecute the same content objects, select 2.
Otherwise, select 3 to enter the search mode and be guided through theprocess of selecting which content objects you would like to test.
Collecting information about your test...
Select the situation that best describes you:
I want to...
[1] upload my own Profiles.csv file
[2] upload my ResultsSummary.csv file from Integrity Manager.[3] search for
Reports, Documents, or Dossiers and create a new Profiles.csv
+------------------------------------------------------------------+
MAIN SEARCH MENU:
Use \IN <PROJECT NAME(S)>
after the keyword to filter on a specific PROJECT
Type \DONE or \D
when you are finished selecting your documents/Reports
Type \VIEW or \V
to view your current selection list
Upgrade Guide
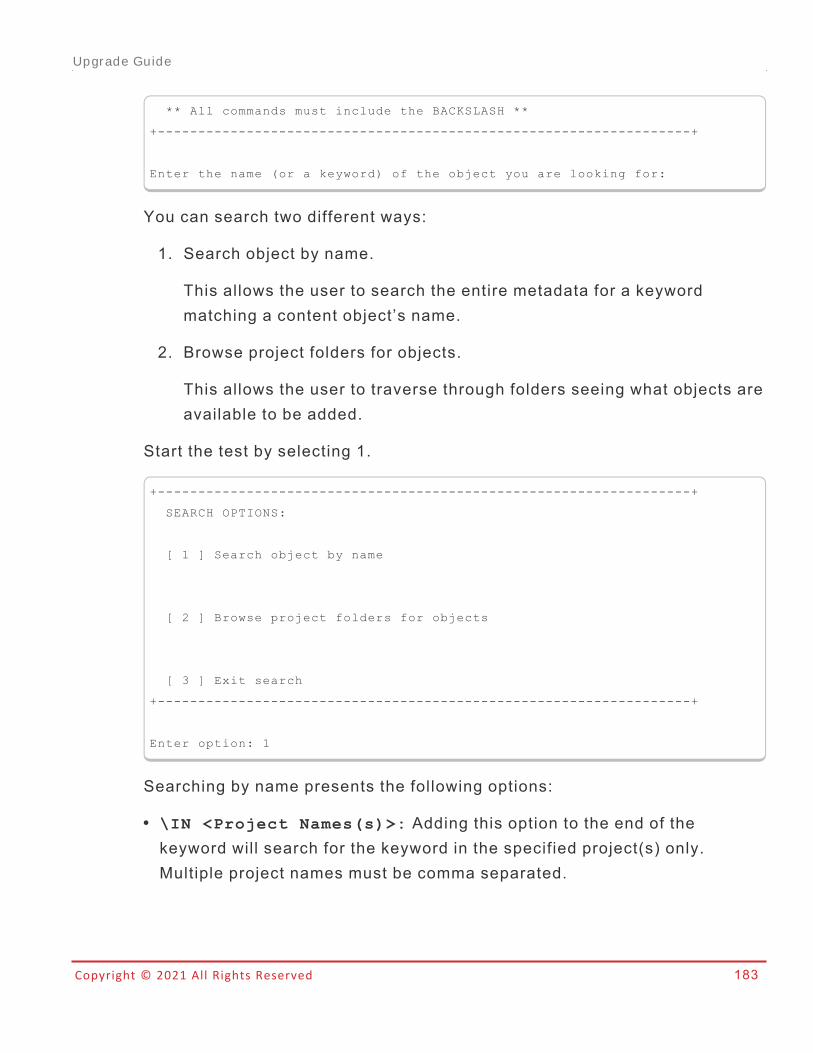
Copyright © 2021 All Rights Reserved 183
** All commands must include the BACKSLASH **
+------------------------------------------------------------------+
Enter the name (or a keyword) of the object you are looking for:
You can search two different ways:
1. Search object by name.
This allows the user to search the entire metadata for a keywordmatching a content object’s name.
2. Browse project folders for objects.
This allows the user to traverse through folders seeing what objects areavailable to be added.
Start the test by selecting 1.
+------------------------------------------------------------------+
SEARCH OPTIONS:
[ 1 ] Search object by name
[ 2 ] Browse project folders for objects
[ 3 ] Exit search
+------------------------------------------------------------------+
Enter option: 1
Searching by name presents the following options:
l \IN <Project Names(s)>: Adding this option to the end of thekeyword will search for the keyword in the specified project(s) only.Multiple project names must be comma separated.
Upgrade Guide
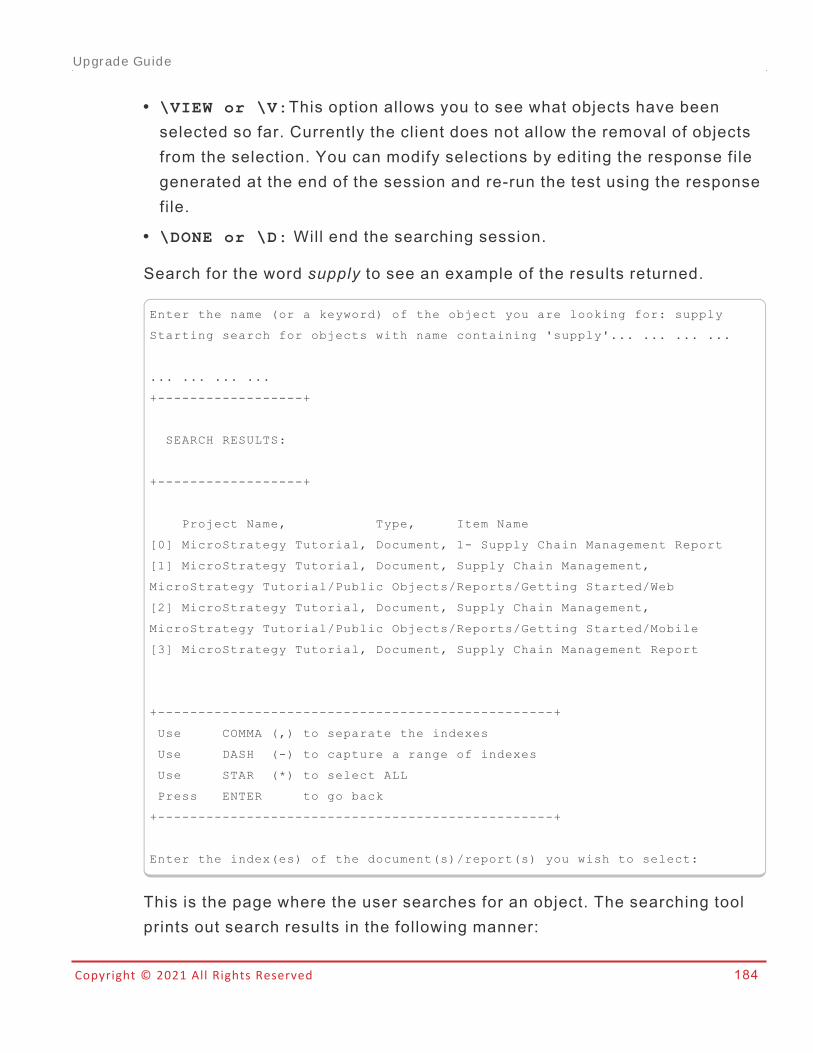
Copyright © 2021 All Rights Reserved 184
l \VIEW or \V:This option allows you to see what objects have beenselected so far. Currently the client does not allow the removal of objectsfrom the selection. You can modify selections by editing the response filegenerated at the end of the session and re-run the test using the responsefile.
l \DONE or \D: Will end the searching session.
Search for the word supply to see an example of the results returned.
Enter the name (or a keyword) of the object you are looking for: supply
Starting search for objects with name containing 'supply'... ... ... ...
... ... ... ...
+------------------+
SEARCH RESULTS:
+------------------+
Project Name, Type, Item Name
[0] MicroStrategy Tutorial, Document, 1- Supply Chain Management Report
[1] MicroStrategy Tutorial, Document, Supply Chain Management,
MicroStrategy Tutorial/Public Objects/Reports/Getting Started/Web
[2] MicroStrategy Tutorial, Document, Supply Chain Management,
MicroStrategy Tutorial/Public Objects/Reports/Getting Started/Mobile
[3] MicroStrategy Tutorial, Document, Supply Chain Management Report
+-------------------------------------------------+
Use COMMA (,) to separate the indexes
Use DASH (-) to capture a range of indexes
Use STAR (*) to select ALL
Press ENTER to go back
+-------------------------------------------------+
Enter the index(es) of the document(s)/report(s) you wish to select:
This is the page where the user searches for an object. The searching toolprints out search results in the following manner:
Upgrade Guide
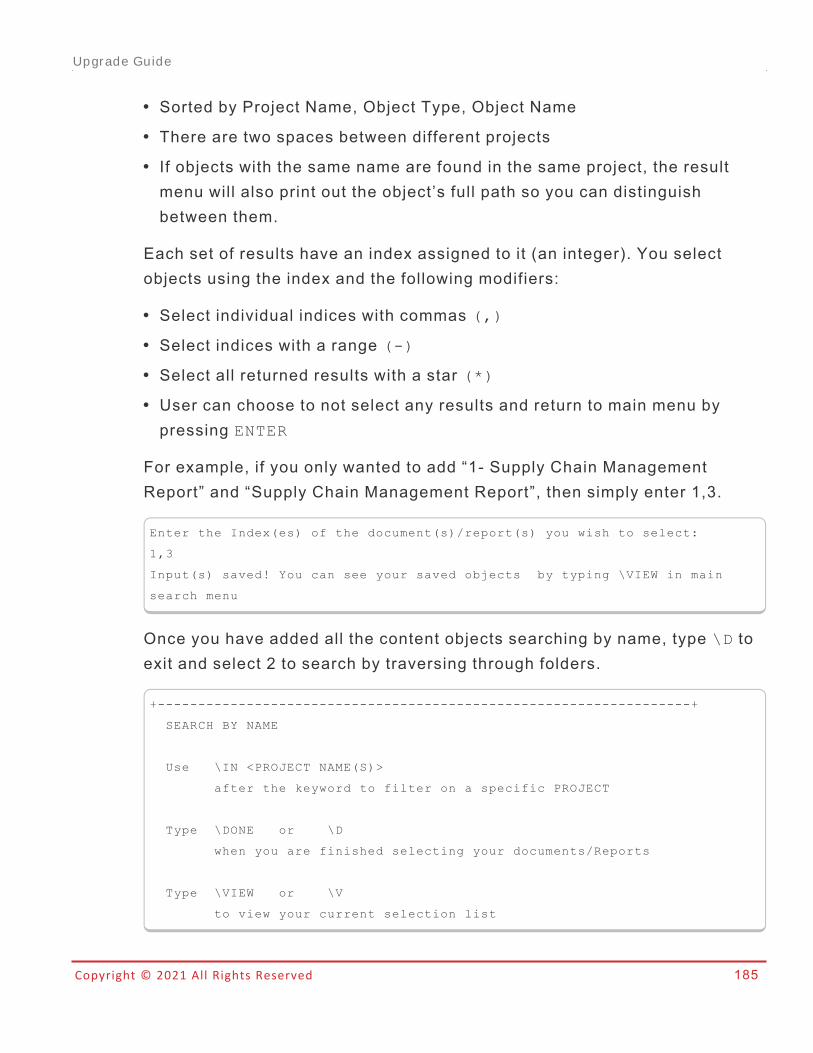
Copyright © 2021 All Rights Reserved 185
l Sorted by Project Name, Object Type, Object Namel There are two spaces between different projectsl If objects with the same name are found in the same project, the resultmenu will also print out the object’s full path so you can distinguishbetween them.
Each set of results have an index assigned to it (an integer). You selectobjects using the index and the following modifiers:
l Select individual indices with commas (,)l Select indices with a range (-)
l Select all returned results with a star (*)l User can choose to not select any results and return to main menu bypressing ENTER
For example, if you only wanted to add “1- Supply Chain ManagementReport” and “Supply Chain Management Report”, then simply enter 1,3.
Enter the Index(es) of the document(s)/report(s) you wish to select:
1,3
Input(s) saved! You can see your saved objects by typing \VIEW in main
search menu
Once you have added all the content objects searching by name, type \D toexit and select 2 to search by traversing through folders.
+------------------------------------------------------------------+
SEARCH BY NAME
Use \IN <PROJECT NAME(S)>
after the keyword to filter on a specific PROJECT
Type \DONE or \D
when you are finished selecting your documents/Reports
Type \VIEW or \V
to view your current selection list
Upgrade Guide
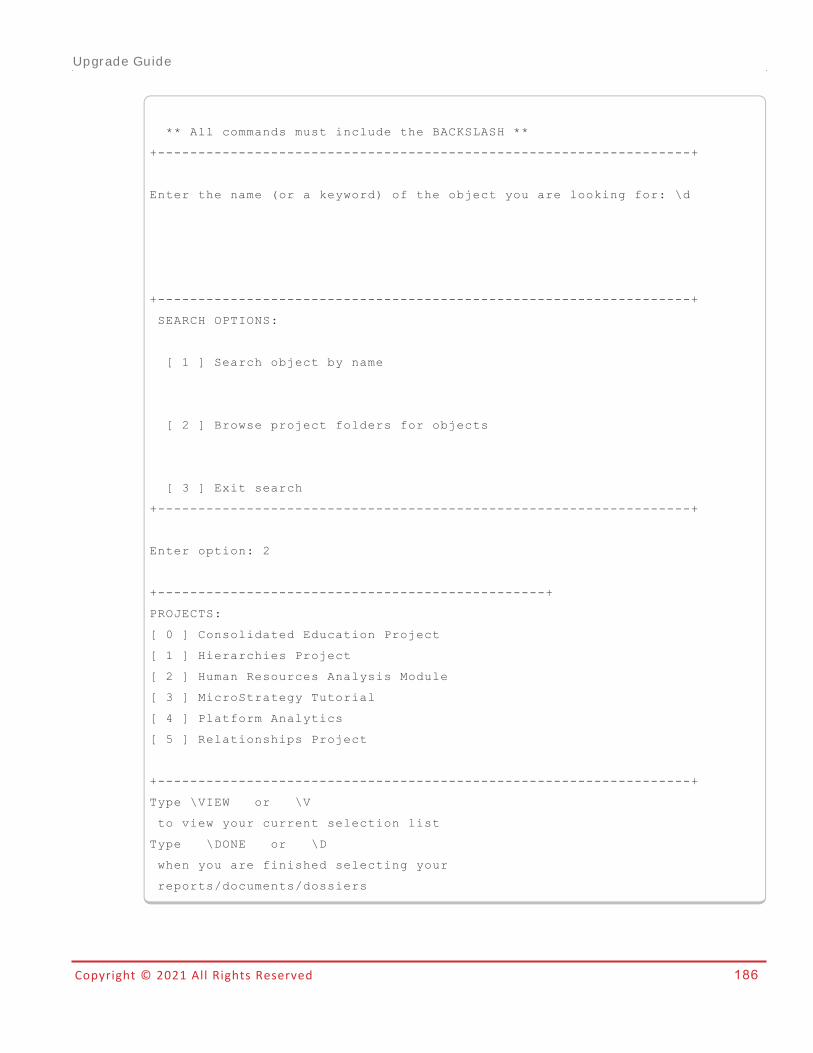
Copyright © 2021 All Rights Reserved 186
** All commands must include the BACKSLASH **
+------------------------------------------------------------------+
Enter the name (or a keyword) of the object you are looking for: \d
+------------------------------------------------------------------+
SEARCH OPTIONS:
[ 1 ] Search object by name
[ 2 ] Browse project folders for objects
[ 3 ] Exit search
+------------------------------------------------------------------+
Enter option: 2
+------------------------------------------------+
PROJECTS:
[ 0 ] Consolidated Education Project
[ 1 ] Hierarchies Project
[ 2 ] Human Resources Analysis Module
[ 3 ] MicroStrategy Tutorial
[ 4 ] Platform Analytics
[ 5 ] Relationships Project
+------------------------------------------------------------------+
Type \VIEW or \V
to view your current selection list
Type \DONE or \D
when you are finished selecting your
reports/documents/dossiers
Upgrade Guide
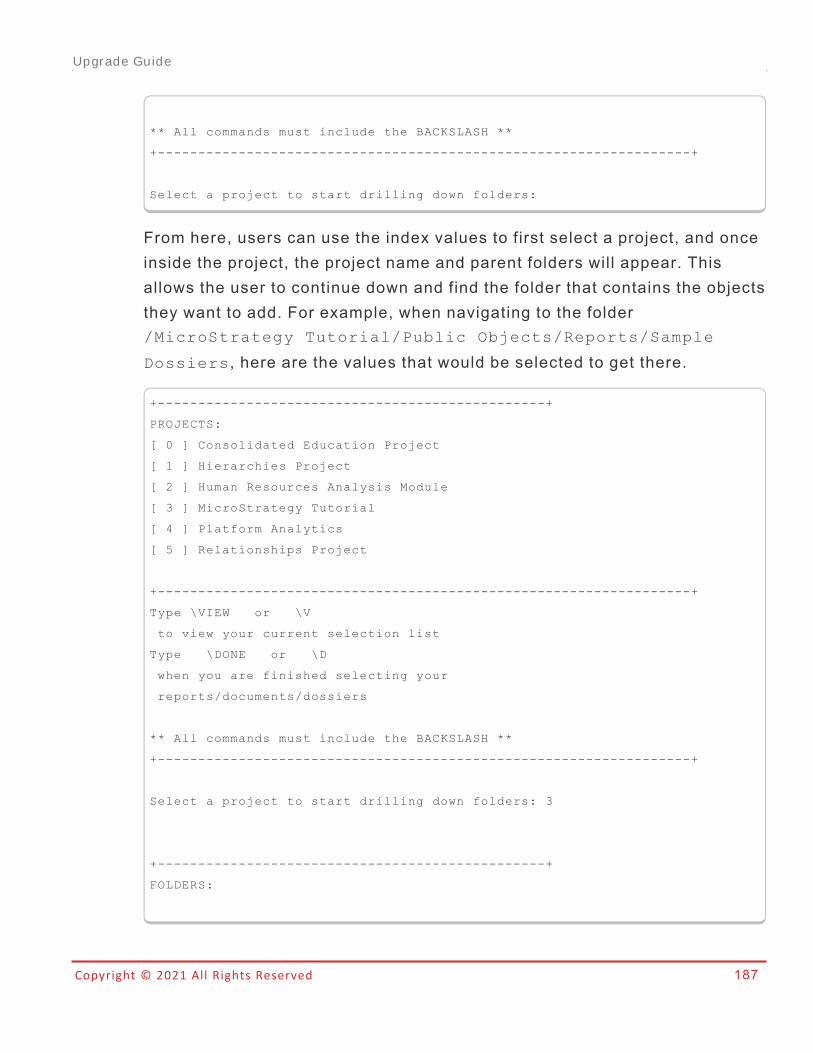
Copyright © 2021 All Rights Reserved 187
** All commands must include the BACKSLASH **
+------------------------------------------------------------------+
Select a project to start drilling down folders:
From here, users can use the index values to first select a project, and onceinside the project, the project name and parent folders will appear. Thisallows the user to continue down and find the folder that contains the objectsthey want to add. For example, when navigating to the folder/MicroStrategy Tutorial/Public Objects/Reports/Sample
Dossiers, here are the values that would be selected to get there.
+------------------------------------------------+
PROJECTS:
[ 0 ] Consolidated Education Project
[ 1 ] Hierarchies Project
[ 2 ] Human Resources Analysis Module
[ 3 ] MicroStrategy Tutorial
[ 4 ] Platform Analytics
[ 5 ] Relationships Project
+------------------------------------------------------------------+
Type \VIEW or \V
to view your current selection list
Type \DONE or \D
when you are finished selecting your
reports/documents/dossiers
** All commands must include the BACKSLASH **
+------------------------------------------------------------------+
Select a project to start drilling down folders: 3
+------------------------------------------------+
FOLDERS:
Upgrade Guide
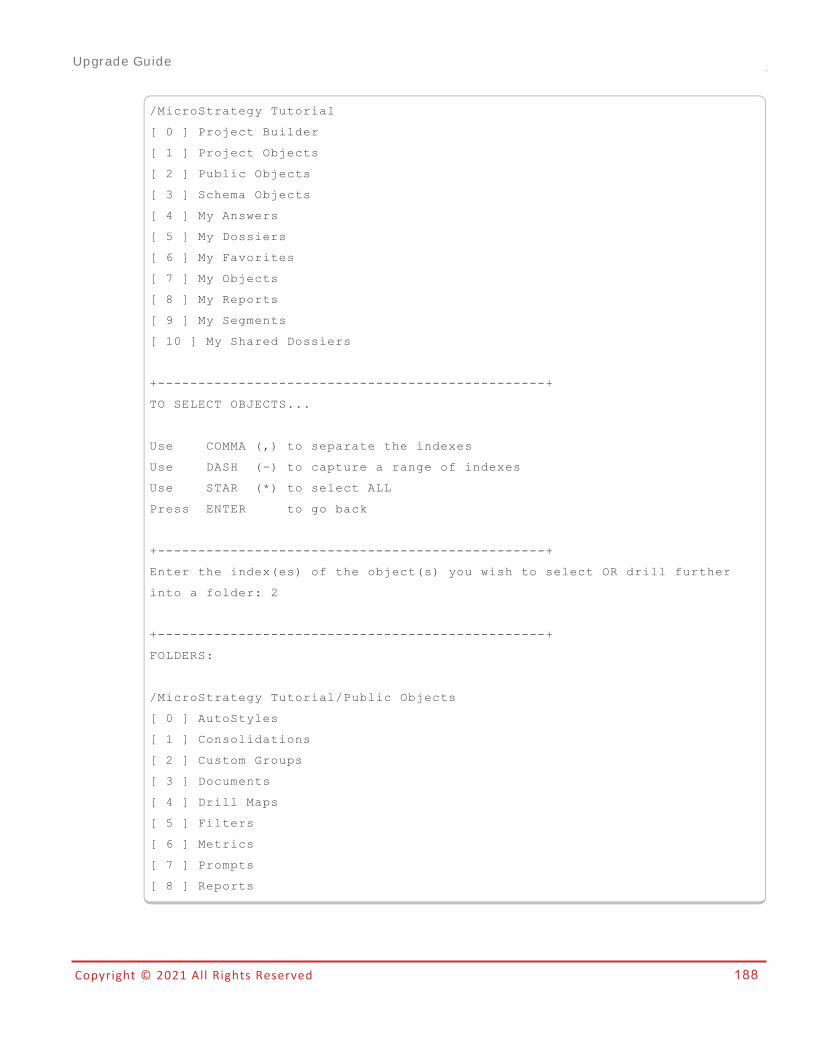
Copyright © 2021 All Rights Reserved 188
/MicroStrategy Tutorial
[ 0 ] Project Builder
[ 1 ] Project Objects
[ 2 ] Public Objects
[ 3 ] Schema Objects
[ 4 ] My Answers
[ 5 ] My Dossiers
[ 6 ] My Favorites
[ 7 ] My Objects
[ 8 ] My Reports
[ 9 ] My Segments
[ 10 ] My Shared Dossiers
+------------------------------------------------+
TO SELECT OBJECTS...
Use COMMA (,) to separate the indexes
Use DASH (-) to capture a range of indexes
Use STAR (*) to select ALL
Press ENTER to go back
+------------------------------------------------+
Enter the index(es) of the object(s) you wish to select OR drill further
into a folder: 2
+------------------------------------------------+
FOLDERS:
/MicroStrategy Tutorial/Public Objects
[ 0 ] AutoStyles
[ 1 ] Consolidations
[ 2 ] Custom Groups
[ 3 ] Documents
[ 4 ] Drill Maps
[ 5 ] Filters
[ 6 ] Metrics
[ 7 ] Prompts
[ 8 ] Reports
Upgrade Guide
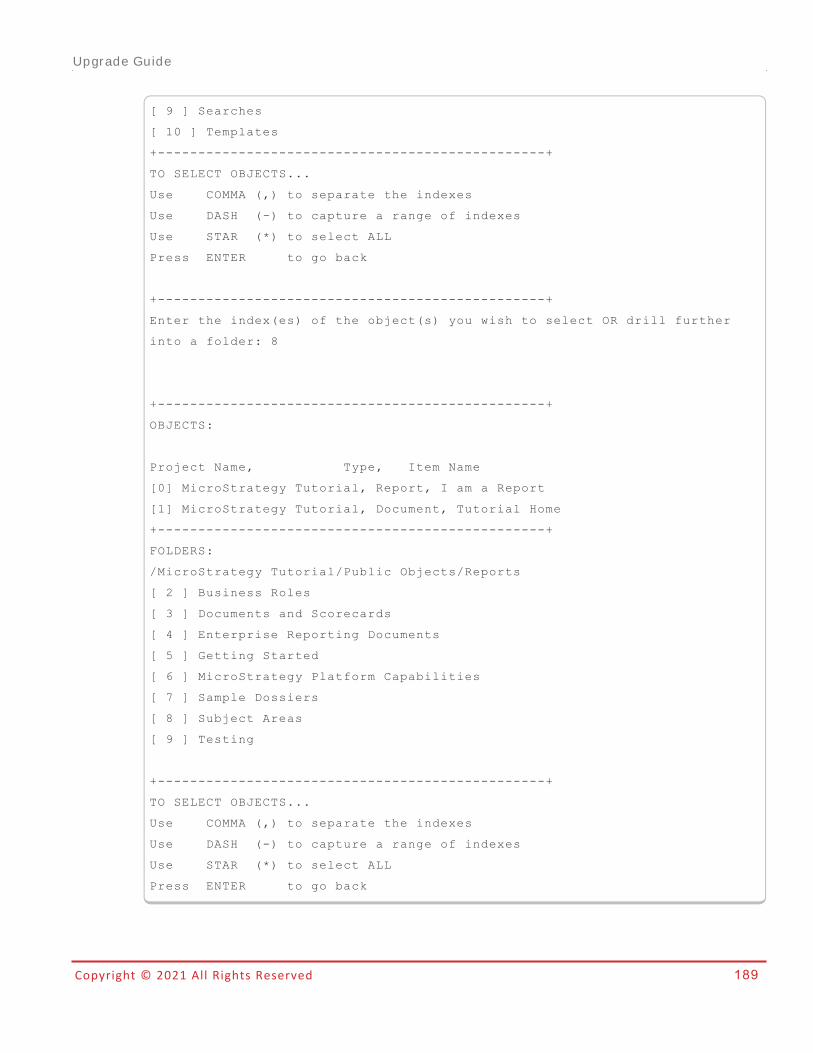
Copyright © 2021 All Rights Reserved 189
[ 9 ] Searches
[ 10 ] Templates
+------------------------------------------------+
TO SELECT OBJECTS...
Use COMMA (,) to separate the indexes
Use DASH (-) to capture a range of indexes
Use STAR (*) to select ALL
Press ENTER to go back
+------------------------------------------------+
Enter the index(es) of the object(s) you wish to select OR drill further
into a folder: 8
+------------------------------------------------+
OBJECTS:
Project Name, Type, Item Name
[0] MicroStrategy Tutorial, Report, I am a Report
[1] MicroStrategy Tutorial, Document, Tutorial Home
+------------------------------------------------+
FOLDERS:
/MicroStrategy Tutorial/Public Objects/Reports
[ 2 ] Business Roles
[ 3 ] Documents and Scorecards
[ 4 ] Enterprise Reporting Documents
[ 5 ] Getting Started
[ 6 ] MicroStrategy Platform Capabilities
[ 7 ] Sample Dossiers
[ 8 ] Subject Areas
[ 9 ] Testing
+------------------------------------------------+
TO SELECT OBJECTS...
Use COMMA (,) to separate the indexes
Use DASH (-) to capture a range of indexes
Use STAR (*) to select ALL
Press ENTER to go back
Upgrade Guide
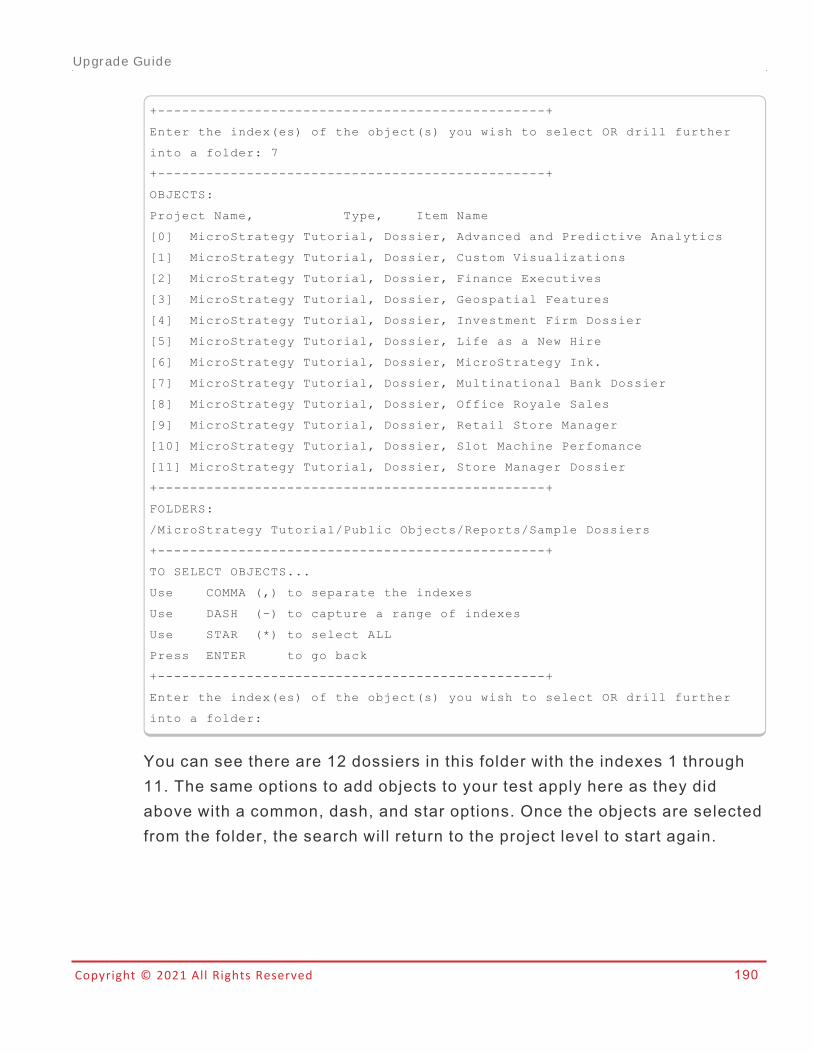
Copyright © 2021 All Rights Reserved 190
+------------------------------------------------+
Enter the index(es) of the object(s) you wish to select OR drill further
into a folder: 7
+------------------------------------------------+
OBJECTS:
Project Name, Type, Item Name
[0] MicroStrategy Tutorial, Dossier, Advanced and Predictive Analytics
[1] MicroStrategy Tutorial, Dossier, Custom Visualizations
[2] MicroStrategy Tutorial, Dossier, Finance Executives
[3] MicroStrategy Tutorial, Dossier, Geospatial Features
[4] MicroStrategy Tutorial, Dossier, Investment Firm Dossier
[5] MicroStrategy Tutorial, Dossier, Life as a New Hire
[6] MicroStrategy Tutorial, Dossier, MicroStrategy Ink.
[7] MicroStrategy Tutorial, Dossier, Multinational Bank Dossier
[8] MicroStrategy Tutorial, Dossier, Office Royale Sales
[9] MicroStrategy Tutorial, Dossier, Retail Store Manager
[10] MicroStrategy Tutorial, Dossier, Slot Machine Perfomance
[11] MicroStrategy Tutorial, Dossier, Store Manager Dossier
+------------------------------------------------+
FOLDERS:
/MicroStrategy Tutorial/Public Objects/Reports/Sample Dossiers
+------------------------------------------------+
TO SELECT OBJECTS...
Use COMMA (,) to separate the indexes
Use DASH (-) to capture a range of indexes
Use STAR (*) to select ALL
Press ENTER to go back
+------------------------------------------------+
Enter the index(es) of the object(s) you wish to select OR drill further
into a folder:
You can see there are 12 dossiers in this folder with the indexes 1 through11. The same options to add objects to your test apply here as they didabove with a common, dash, and star options. Once the objects are selectedfrom the folder, the search will return to the project level to start again.
Upgrade Guide
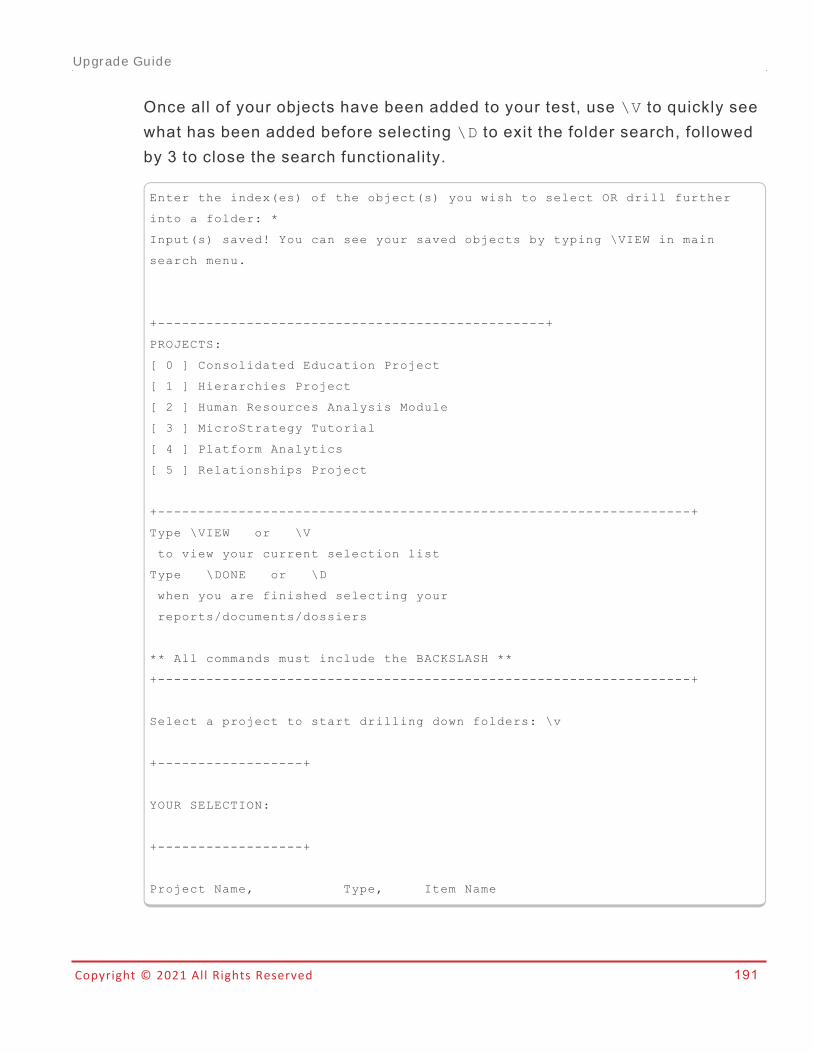
Copyright © 2021 All Rights Reserved 191
Once all of your objects have been added to your test, use \V to quickly seewhat has been added before selecting \D to exit the folder search, followedby 3 to close the search functionality.
Enter the index(es) of the object(s) you wish to select OR drill further
into a folder: *
Input(s) saved! You can see your saved objects by typing \VIEW in main
search menu.
+------------------------------------------------+
PROJECTS:
[ 0 ] Consolidated Education Project
[ 1 ] Hierarchies Project
[ 2 ] Human Resources Analysis Module
[ 3 ] MicroStrategy Tutorial
[ 4 ] Platform Analytics
[ 5 ] Relationships Project
+------------------------------------------------------------------+
Type \VIEW or \V
to view your current selection list
Type \DONE or \D
when you are finished selecting your
reports/documents/dossiers
** All commands must include the BACKSLASH **
+------------------------------------------------------------------+
Select a project to start drilling down folders: \v
+------------------+
YOUR SELECTION:
+------------------+
Project Name, Type, Item Name
Upgrade Guide
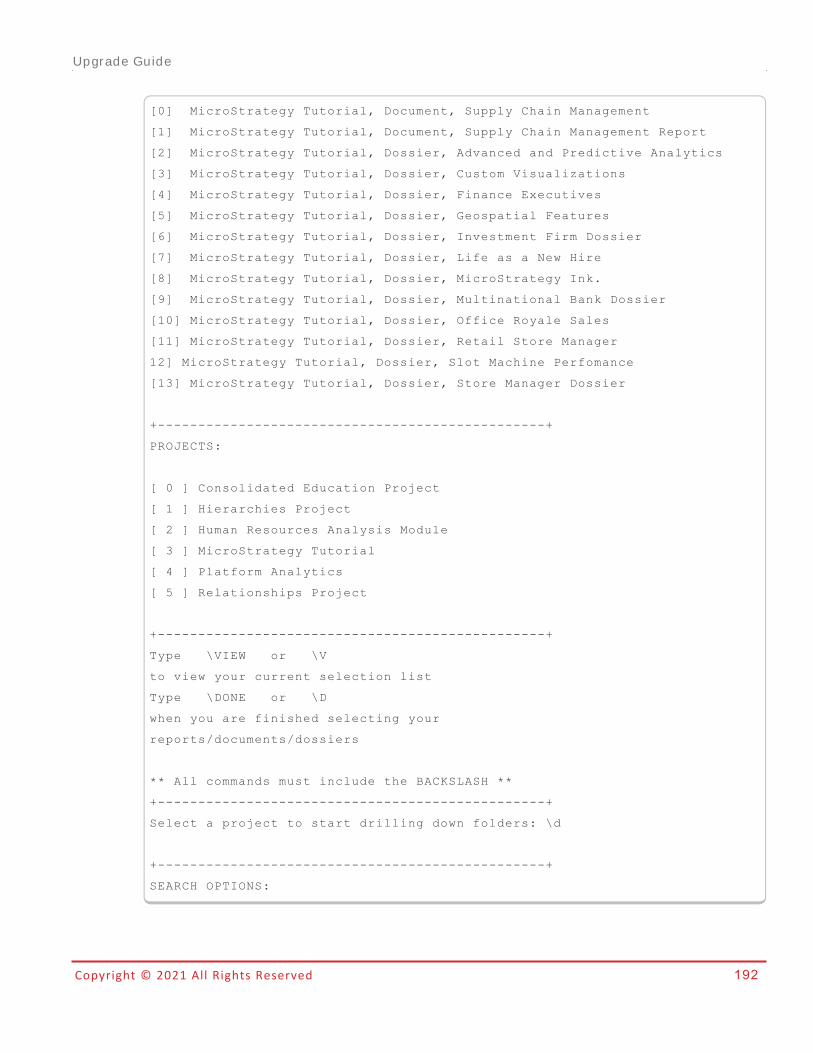
Copyright © 2021 All Rights Reserved 192
[0] MicroStrategy Tutorial, Document, Supply Chain Management
[1] MicroStrategy Tutorial, Document, Supply Chain Management Report
[2] MicroStrategy Tutorial, Dossier, Advanced and Predictive Analytics
[3] MicroStrategy Tutorial, Dossier, Custom Visualizations
[4] MicroStrategy Tutorial, Dossier, Finance Executives
[5] MicroStrategy Tutorial, Dossier, Geospatial Features
[6] MicroStrategy Tutorial, Dossier, Investment Firm Dossier
[7] MicroStrategy Tutorial, Dossier, Life as a New Hire
[8] MicroStrategy Tutorial, Dossier, MicroStrategy Ink.
[9] MicroStrategy Tutorial, Dossier, Multinational Bank Dossier
[10] MicroStrategy Tutorial, Dossier, Office Royale Sales
[11] MicroStrategy Tutorial, Dossier, Retail Store Manager
12] MicroStrategy Tutorial, Dossier, Slot Machine Perfomance
[13] MicroStrategy Tutorial, Dossier, Store Manager Dossier
+------------------------------------------------+
PROJECTS:
[ 0 ] Consolidated Education Project
[ 1 ] Hierarchies Project
[ 2 ] Human Resources Analysis Module
[ 3 ] MicroStrategy Tutorial
[ 4 ] Platform Analytics
[ 5 ] Relationships Project
+------------------------------------------------+
Type \VIEW or \V
to view your current selection list
Type \DONE or \D
when you are finished selecting your
reports/documents/dossiers
** All commands must include the BACKSLASH **
+------------------------------------------------+
Select a project to start drilling down folders: \d
+------------------------------------------------+
SEARCH OPTIONS:
Upgrade Guide
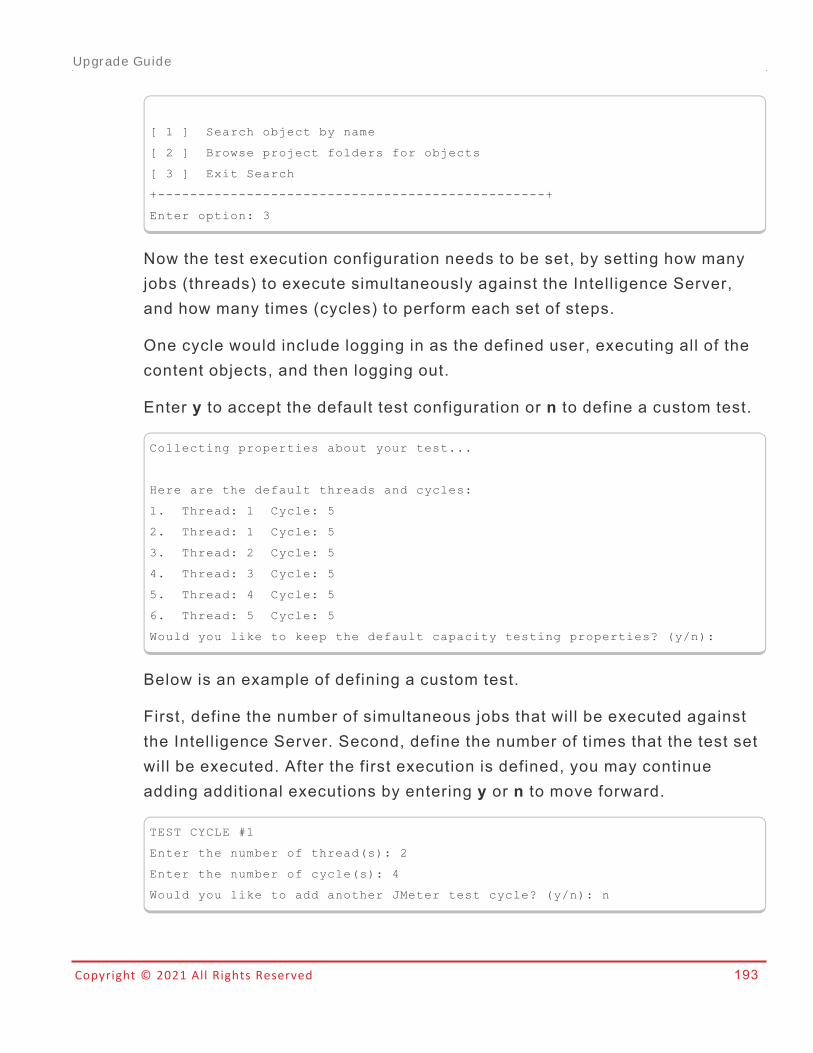
Copyright © 2021 All Rights Reserved 193
[ 1 ] Search object by name
[ 2 ] Browse project folders for objects
[ 3 ] Exit Search
+------------------------------------------------+
Enter option: 3
Now the test execution configuration needs to be set, by setting how manyjobs (threads) to execute simultaneously against the Intelligence Server,and how many times (cycles) to perform each set of steps.
One cycle would include logging in as the defined user, executing all of thecontent objects, and then logging out.
Enter y to accept the default test configuration or n to define a custom test.
Collecting properties about your test...
Here are the default threads and cycles:
1. Thread: 1 Cycle: 5
2. Thread: 1 Cycle: 5
3. Thread: 2 Cycle: 5
4. Thread: 3 Cycle: 5
5. Thread: 4 Cycle: 5
6. Thread: 5 Cycle: 5
Would you like to keep the default capacity testing properties? (y/n):
Below is an example of defining a custom test.
First, define the number of simultaneous jobs that will be executed againstthe Intelligence Server. Second, define the number of times that the test setwill be executed. After the first execution is defined, you may continueadding additional executions by entering y or n to move forward.
TEST CYCLE #1
Enter the number of thread(s): 2
Enter the number of cycle(s): 4
Would you like to add another JMeter test cycle? (y/n): n
Upgrade Guide
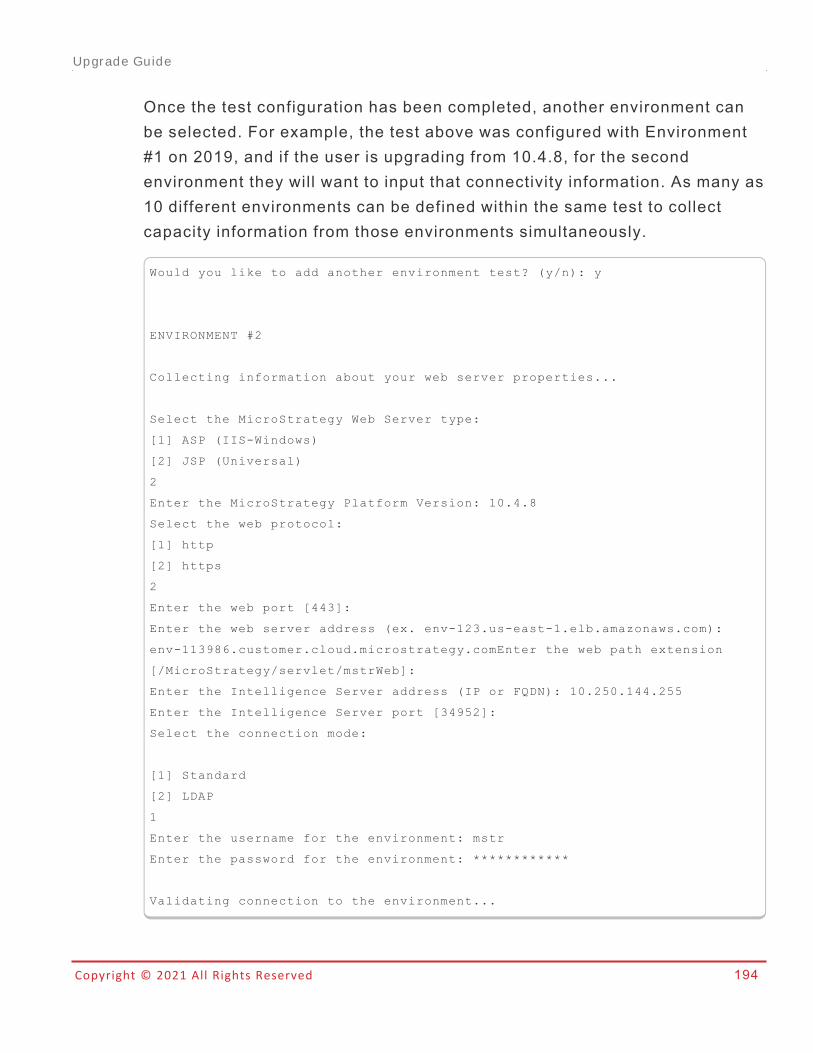
Copyright © 2021 All Rights Reserved 194
Once the test configuration has been completed, another environment canbe selected. For example, the test above was configured with Environment#1 on 2019, and if the user is upgrading from 10.4.8, for the secondenvironment they will want to input that connectivity information. As many as10 different environments can be defined within the same test to collectcapacity information from those environments simultaneously.
Would you like to add another environment test? (y/n): y
ENVIRONMENT #2
Collecting information about your web server properties...
Select the MicroStrategy Web Server type:
[1] ASP (IIS-Windows)
[2] JSP (Universal)
2
Enter the MicroStrategy Platform Version: 10.4.8
Select the web protocol:
[1] http
[2] https
2
Enter the web port [443]:
Enter the web server address (ex. env-123.us-east-1.elb.amazonaws.com):
env-113986.customer.cloud.microstrategy.comEnter the web path extension
[/MicroStrategy/servlet/mstrWeb]:
Enter the Intelligence Server address (IP or FQDN): 10.250.144.255
Enter the Intelligence Server port [34952]:
Select the connection mode:
[1] Standard
[2] LDAP
1
Enter the username for the environment: mstr
Enter the password for the environment: ************
Validating connection to the environment...
Upgrade Guide

Copyright © 2021 All Rights Reserved 195
Connection successful!
Would you like to add another environment to test (y/n): n
Once all environments have been added and the user selects n, the testconfiguration will be complete and a JSON response file will beautomatically created in the same directory where the Capacity Testing Toolexists. See Testing an Environment for the First Time for instructions on howto re-run your test later.
Select 1 to execute the saved test against the environments defined, orselect 2 to close the Capacity Testing Tool, which will close the program.
Would you like to add another environment to test (y/n): n
Prompting finished!
Successfully created response file as: <path to json file displayed here>
Please select from the following options...
[1] EXECUTE all tests
[2] EXIT and run tests later
If there are any problems that occur during the test, jmeter.log will becreated under \apache-jmeter-3.1\bin\ and additionally under thefolder Capacity_Results_Analysis for the test’s execution results.
Testing an Environment Again
Configuration Files: Profiles.csv
In order to execute tests, the Profiles.csv f i le containing the list ofcontent objects to run, is required. It is only necessary to provide this as astandalone file if the first environment does not have MicroStrategy Library.Otherwise users can select 2 and be guided through the process of selectingcontent objects. However, if 1 is selected, or a user does not haveMicroStrategy Library configured, Profiles.csv must be provided.
Upgrade Guide
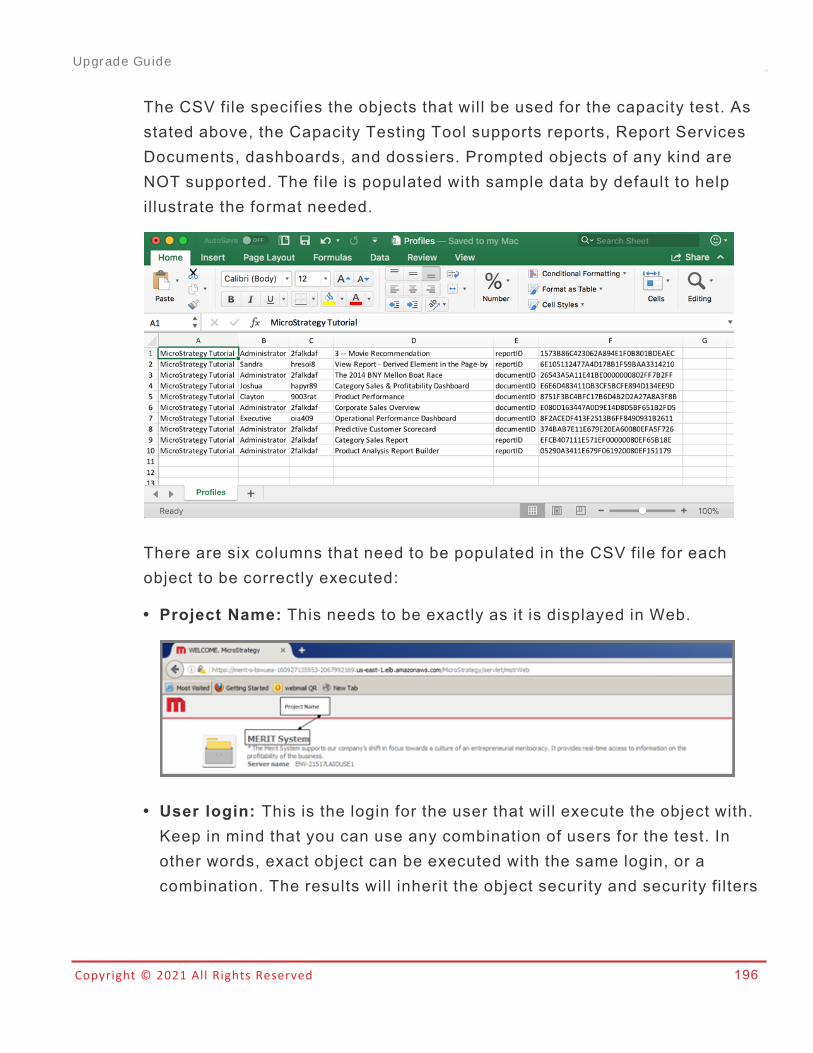
Copyright © 2021 All Rights Reserved 196
The CSV file specifies the objects that will be used for the capacity test. Asstated above, the Capacity Testing Tool supports reports, Report ServicesDocuments, dashboards, and dossiers. Prompted objects of any kind areNOT supported. The file is populated with sample data by default to helpillustrate the format needed.
There are six columns that need to be populated in the CSV file for eachobject to be correctly executed:
l Project Name: This needs to be exactly as it is displayed in Web.
l User login: This is the login for the user that will execute the object with.Keep in mind that you can use any combination of users for the test. Inother words, exact object can be executed with the same login, or acombination. The results will inherit the object security and security filters
Upgrade Guide
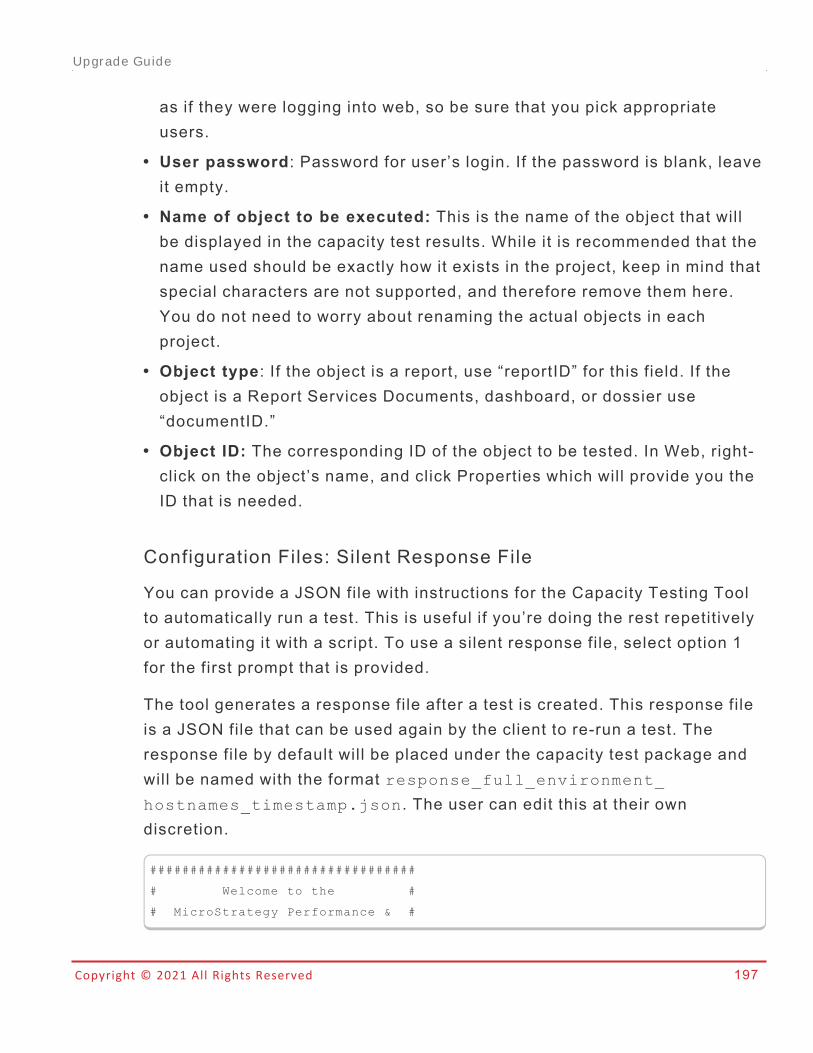
Copyright © 2021 All Rights Reserved 197
as if they were logging into web, so be sure that you pick appropriateusers.
l User password: Password for user’s login. If the password is blank, leaveit empty.
l Name of object to be executed: This is the name of the object that willbe displayed in the capacity test results. While it is recommended that thename used should be exactly how it exists in the project, keep in mind thatspecial characters are not supported, and therefore remove them here.You do not need to worry about renaming the actual objects in eachproject.
l Object type: If the object is a report, use “reportID” for this field. If theobject is a Report Services Documents, dashboard, or dossier use“documentID.”
l Object ID: The corresponding ID of the object to be tested. In Web, right-click on the object’s name, and click Properties which will provide you theID that is needed.
Configuration Files: Silent Response File
You can provide a JSON file with instructions for the Capacity Testing Toolto automatically run a test. This is useful if you’re doing the rest repetitivelyor automating it with a script. To use a silent response file, select option 1for the first prompt that is provided.
The tool generates a response file after a test is created. This response fileis a JSON file that can be used again by the client to re-run a test. Theresponse file by default will be placed under the capacity test package andwill be named with the format response_full_environment_hostnames_timestamp.json. The user can edit this at their owndiscretion.
#################################
# Welcome to the #
# MicroStrategy Performance & #
Upgrade Guide
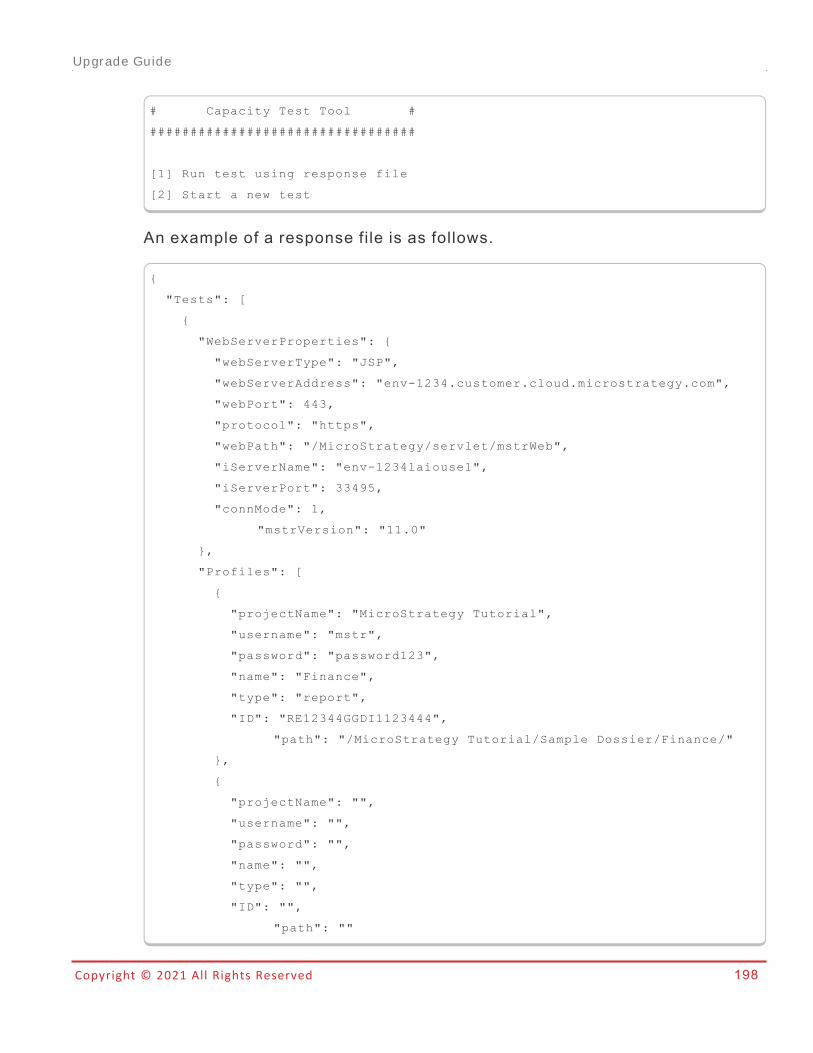
Copyright © 2021 All Rights Reserved 198
# Capacity Test Tool #
#################################
[1] Run test using response file
[2] Start a new test
An example of a response file is as follows.
{
"Tests": [
{
"WebServerProperties": {
"webServerType": "JSP",
"webServerAddress": "env-1234.customer.cloud.microstrategy.com",
"webPort": 443,
"protocol": "https",
"webPath": "/MicroStrategy/servlet/mstrWeb",
"iServerName": "env-1234laiouse1",
"iServerPort": 33495,
"connMode": 1,
"mstrVersion": "11.0"
},
"Profiles": [
{
"projectName": "MicroStrategy Tutorial",
"username": "mstr",
"password": "password123",
"name": "Finance",
"type": "report",
"ID": "RE12344GGDI1123444",
"path": "/MicroStrategy Tutorial/Sample Dossier/Finance/"
},
{
"projectName": "",
"username": "",
"password": "",
"name": "",
"type": "",
"ID": "",
"path": ""
Upgrade Guide
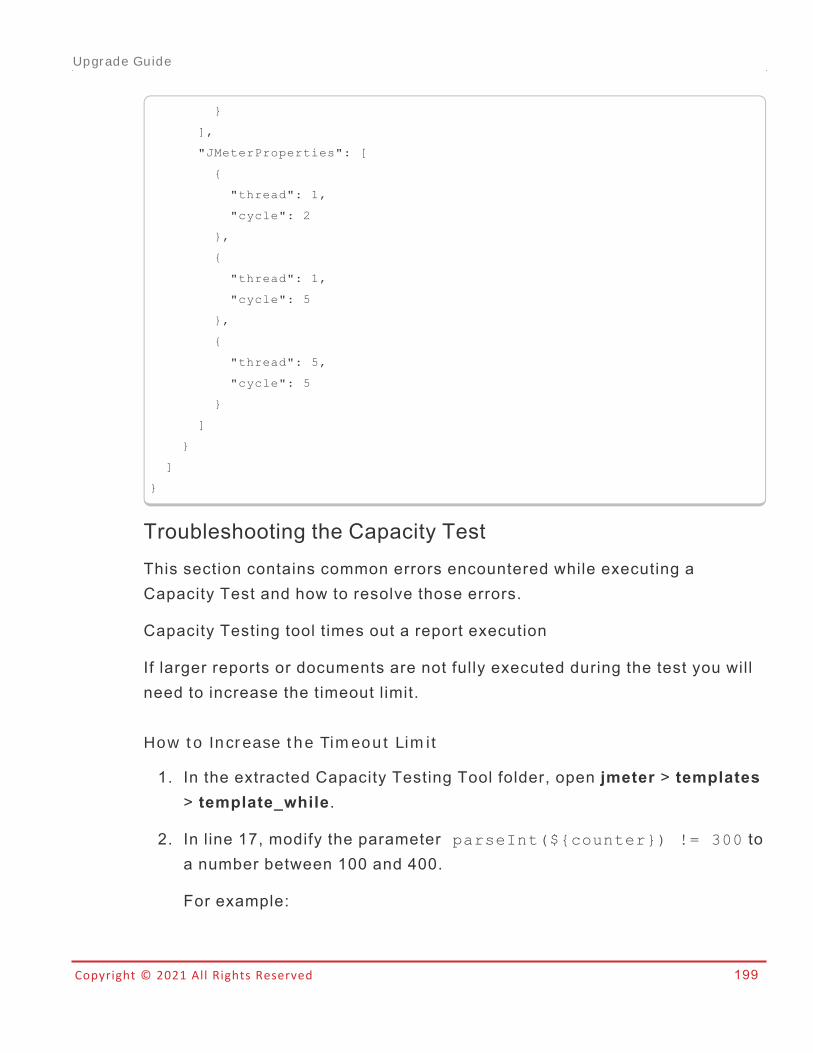
Copyright © 2021 All Rights Reserved 199
}
],
"JMeterProperties": [
{
"thread": 1,
"cycle": 2
},
{
"thread": 1,
"cycle": 5
},
{
"thread": 5,
"cycle": 5
}
]
}
]
}
Troubleshooting the Capacity TestThis section contains common errors encountered while executing aCapacity Test and how to resolve those errors.
Capacity Testing tool times out a report execution
If larger reports or documents are not fully executed during the test you willneed to increase the timeout limit.
How t o Incr ease t he Tim eou t Lim i t
1. In the extracted Capacity Testing Tool folder, open jmeter > templates> template_while.
2. In line 17, modify the parameter parseInt(${counter}) != 300 toa number between 100 and 400.
For example:
Upgrade Guide
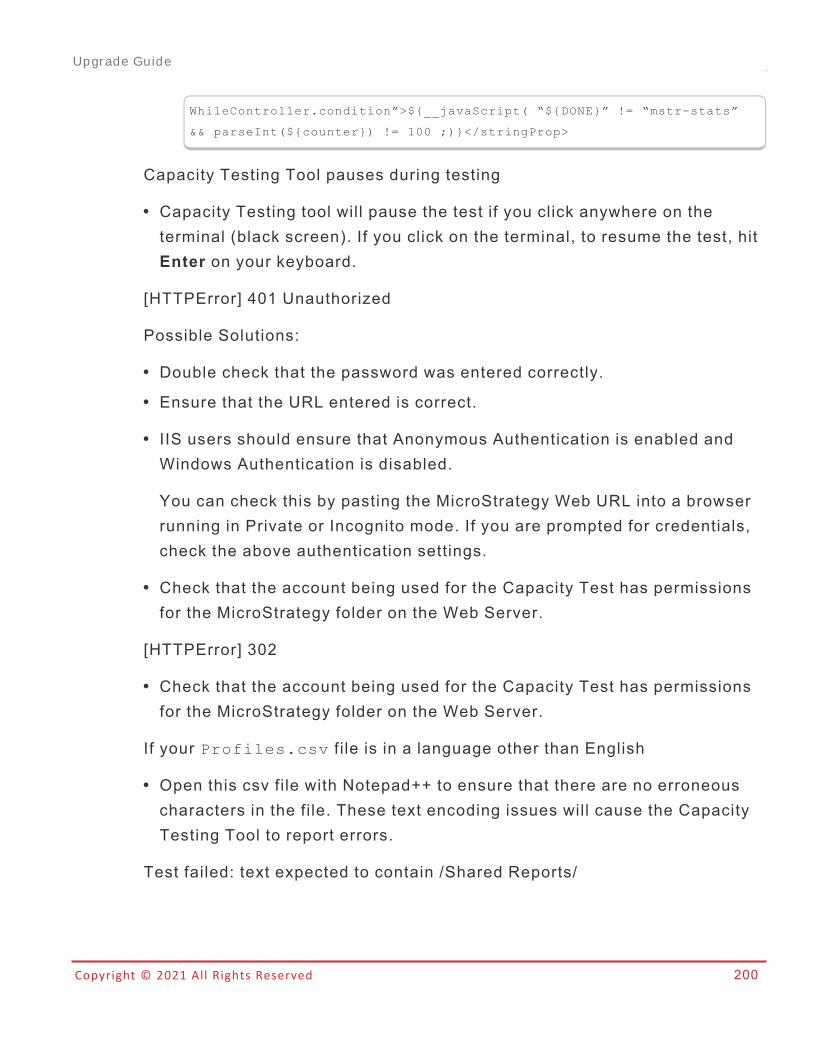
Copyright © 2021 All Rights Reserved 200
WhileController.condition”>${__javaScript( “${DONE}” != “mstr-stats”
&& parseInt(${counter}) != 100 ;)}</stringProp>
Capacity Testing Tool pauses during testing
l Capacity Testing tool will pause the test if you click anywhere on theterminal (black screen). If you click on the terminal, to resume the test, hitEnter on your keyboard.
[HTTPError] 401 Unauthorized
Possible Solutions:
l Double check that the password was entered correctly.l Ensure that the URL entered is correct.
l IIS users should ensure that Anonymous Authentication is enabled andWindows Authentication is disabled.
You can check this by pasting the MicroStrategy Web URL into a browserrunning in Private or Incognito mode. If you are prompted for credentials,check the above authentication settings.
l Check that the account being used for the Capacity Test has permissionsfor the MicroStrategy folder on the Web Server.
[HTTPError] 302
l Check that the account being used for the Capacity Test has permissionsfor the MicroStrategy folder on the Web Server.
If your Profiles.csv f i le is in a language other than English
l Open this csv file with Notepad++ to ensure that there are no erroneouscharacters in the file. These text encoding issues will cause the CapacityTesting Tool to report errors.
Test failed: text expected to contain /Shared Reports/
Upgrade Guide
Copyright © 2021 All Rights Reserved 201
l This error may appear when your Web language settings are set to alanguage other than English. To resolve the error, set the Web language toEnglish.
Test failed: text expected to contain /pageWait.css/
l This error may appear when running a Capacity Test on environmentsusing MicroStrategy version 10.4 through 10.4.5 or version 10.11. Refer toDisabling the Wait Page in MicroStrategy Web to resolve this issue.
Upgrade Analysis Dossier
The Upgrade Analysis Dossier consumes the results of comparison testingin MicroStrategy Integrity Manager and the new MicroStrategy CapacityTesting Tool to help Platform Administrators understand the impact ofupgrading from engine changes along with performance improvements.
The most recent dossier can be downloaded here.
This section will explain how to upgrade the dossier with new results fromboth Integrity Manager and the Capacity Testing Tool, along with explainingthe use of each Chapter and its corresponding Pages.
Refreshing Upgrade Impact Results1. Navigate to the output folder that was created after comparison testing
was done in Integrity Manager.
There are five files generated after running Baseline vs Project inIntegrity Manager:
l BaseObjectDependency.csv
l BaseUpgradeImpact.csv
l ResultsSummary.csv
l TargetObjectDependency.csv
l TargetUpgradeImpact.csv
Upgrade Guide
Copyright © 2021 All Rights Reserved 202
2. Copy the five files to a client machine where Workstation is installed.Once there, open the Upgrade Analysis Dossier.
3. Enable the Datasets Panel and click the three dots next toResultsSummary.csv and select Edit Dataset.
4. Click on the down-arrow next to the ResultsSummary.csv table andselect Edit Table.
5. When the screen opens, click on Choose files and then select yourResultsSummary.csv f i le and then click Open > Refresh.
6. Repeat steps 3 - 5 with the following Tables > Files:l BaseObjectDependency > BaseObjectDependency.csv
l TargetObjectDependency > TargetObjectDependency.csv
l TargetObjUpgradeImpact > TargetUpgradeImpact.csv
l TargetDepObjUpgradeImpact > TargetUpgradeImpact.csv
7. Once all of the files have been refreshed, click Update Dataset toupdate the entire dataset.
Refreshing Capacity Results1. Navigate to the output folder that was created after comparison testing
was done in Integrity Manager.
Within that folder identify two CSV files:
l Execution_Details.csv
l Summary.csv
2. Copy the two files to a client machine where Workstation is installed.Once there, open the Upgrade Analysis Dossier.
3. Enable the Datasets Panel and click the three dots next toExecution_Details.csv and select Edit Dataset.
4. Click on the down-arrow next to the Execution_Details.csv tableand select Edit Table.
Upgrade Guide
Copyright © 2021 All Rights Reserved 203
5. When the screen opens, click on Choose files and then select yourExecution_Details.csv f i le and then click Open > Refresh.
6. Repeat steps 3 - 5 for the Summary.csv table.
7. Once all of the files have been refreshed, click Update Dataset toupdate the entire dataset.
Examining Testing ResultsOnce the two datasets have been refreshed, the dossier is now ready to beexamined. Keep in mind before getting started that unless the sameenvironments and content objects (reports, Report Services Documents, anddossiers) were used for the Integrity Manager comparison testing and forCapacity Testing Tool, then the results that appear in the two chaptersexplained below will be independent of each other.
Upgrade Impact Results Chapter
Comparison testing with MicroStrategy Integrity Manager now provideslogging that helps provide a full analysis of differences found whencomparing MicroStrategy 2021 environments to MicroStrategy 10.xenvironments with an explanation of the cause and the reasons for suchchanges. This chapter of the Upgrade Analysis Dossier provides fourdifferent pages illustrating those results. These pages help to identify objectmismatches that are affected by version changes. More importantly, objectsthat have a mismatch but did not encounter a change and content objectsthat should examined in more detail, are now easily identifiable.
Object Overview Page
The Object Overview page shows the same summary information that iscontained in the ResultsSummary.html f i le. At the top, PlatformAdministrators can see the full build version from the Intelligence Serversthat were tested.
Upgrade Guide
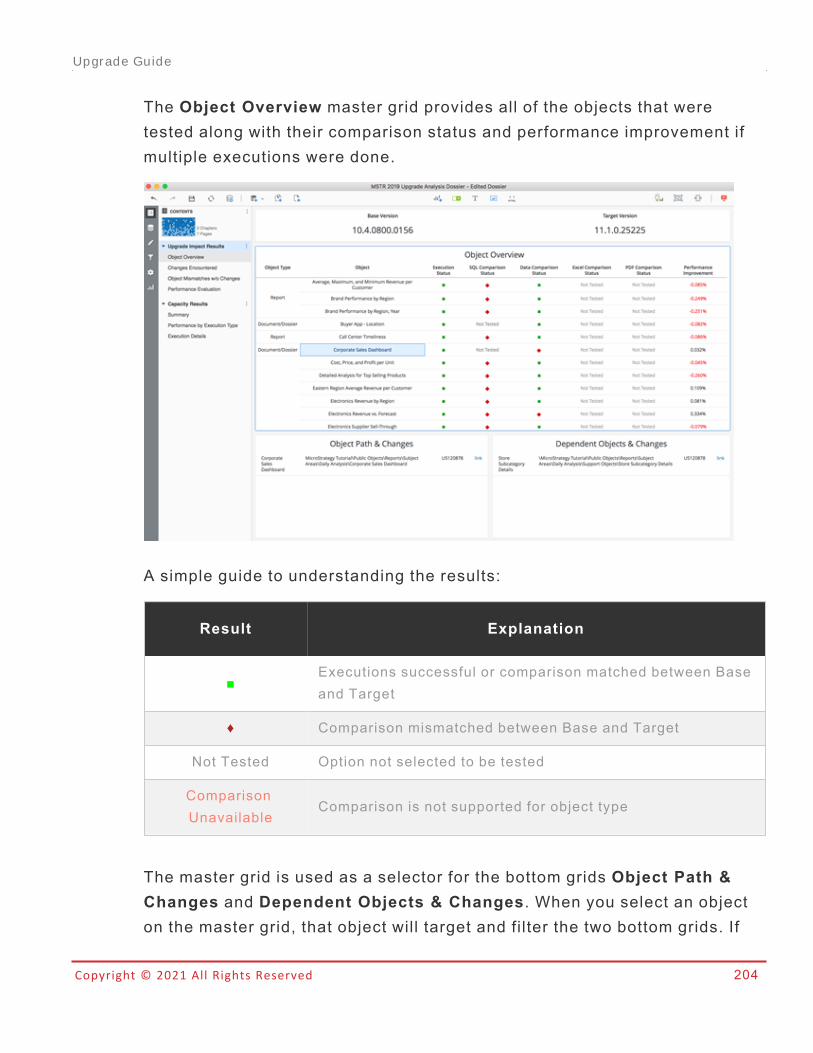
Copyright © 2021 All Rights Reserved 204
The Object Overview master grid provides all of the objects that weretested along with their comparison status and performance improvement ifmultiple executions were done.
A simple guide to understanding the results:
Result Explanation
■Executions successful or comparison matched between Baseand Target
♦ Comparison mismatched between Base and Target
Not Tested Option not selected to be tested
ComparisonUnavailable
Comparison is not supported for object type
The master grid is used as a selector for the bottom grids Object Path &Changes and Dependent Objects & Changes. When you select an objecton the master grid, that object will target and filter the two bottom grids. If
Upgrade Guide
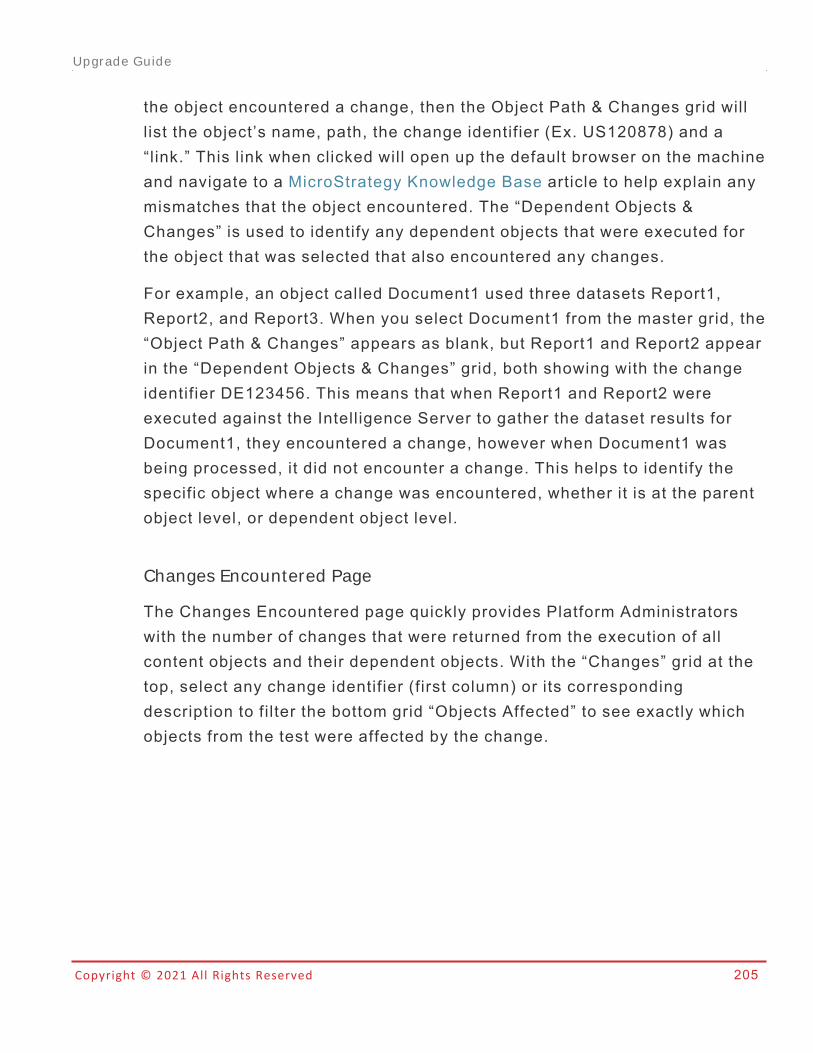
Copyright © 2021 All Rights Reserved 205
the object encountered a change, then the Object Path & Changes grid willl ist the object’s name, path, the change identifier (Ex. US120878) and a“link.” This link when clicked will open up the default browser on the machineand navigate to a MicroStrategy Knowledge Base article to help explain anymismatches that the object encountered. The “Dependent Objects &Changes” is used to identify any dependent objects that were executed forthe object that was selected that also encountered any changes.
For example, an object called Document1 used three datasets Report1,Report2, and Report3. When you select Document1 from the master grid, the“Object Path & Changes” appears as blank, but Report1 and Report2 appearin the “Dependent Objects & Changes” grid, both showing with the changeidentifier DE123456. This means that when Report1 and Report2 wereexecuted against the Intelligence Server to gather the dataset results forDocument1, they encountered a change, however when Document1 wasbeing processed, it did not encounter a change. This helps to identify thespecific object where a change was encountered, whether it is at the parentobject level, or dependent object level.
Changes Encountered Page
The Changes Encountered page quickly provides Platform Administratorswith the number of changes that were returned from the execution of allcontent objects and their dependent objects. With the “Changes” grid at thetop, select any change identifier (first column) or its correspondingdescription to filter the bottom grid “Objects Affected” to see exactly whichobjects from the test were affected by the change.
Upgrade Guide
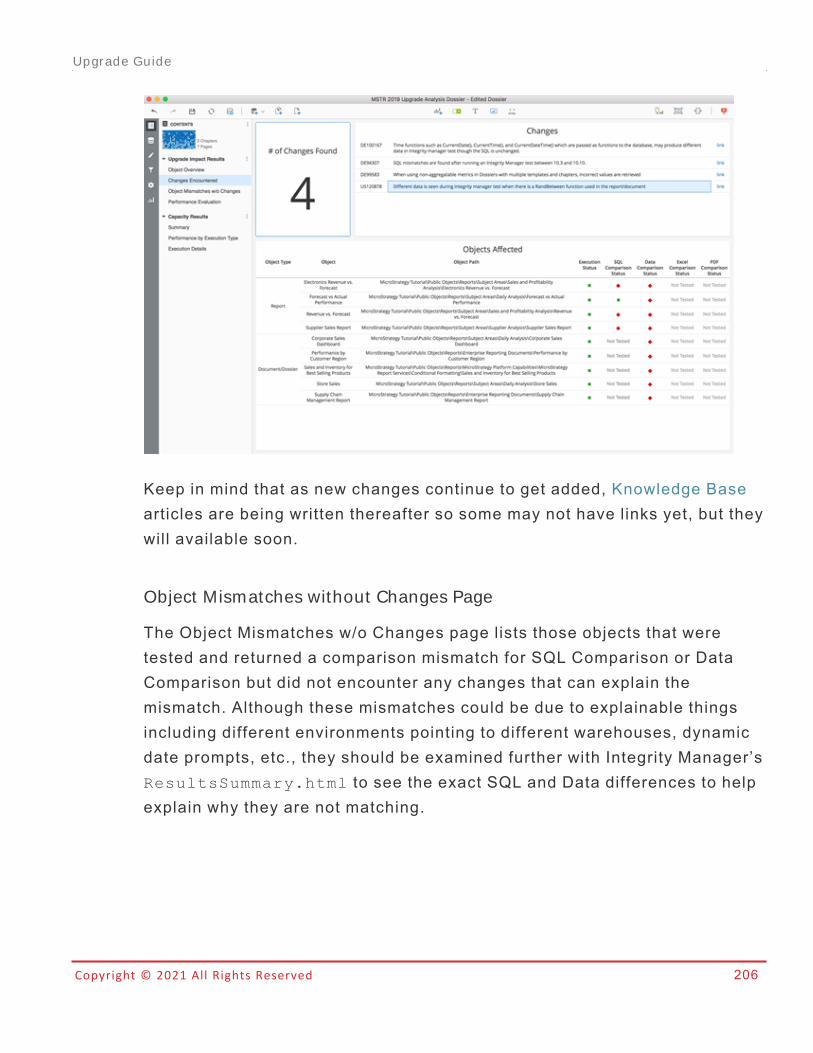
Copyright © 2021 All Rights Reserved 206
Keep in mind that as new changes continue to get added, Knowledge Basearticles are being written thereafter so some may not have links yet, but theywill available soon.
Object Mismatches without Changes Page
The Object Mismatches w/o Changes page lists those objects that weretested and returned a comparison mismatch for SQL Comparison or DataComparison but did not encounter any changes that can explain themismatch. Although these mismatches could be due to explainable thingsincluding different environments pointing to different warehouses, dynamicdate prompts, etc., they should be examined further with Integrity Manager’sResultsSummary.html to see the exact SQL and Data differences to helpexplain why they are not matching.
Upgrade Guide
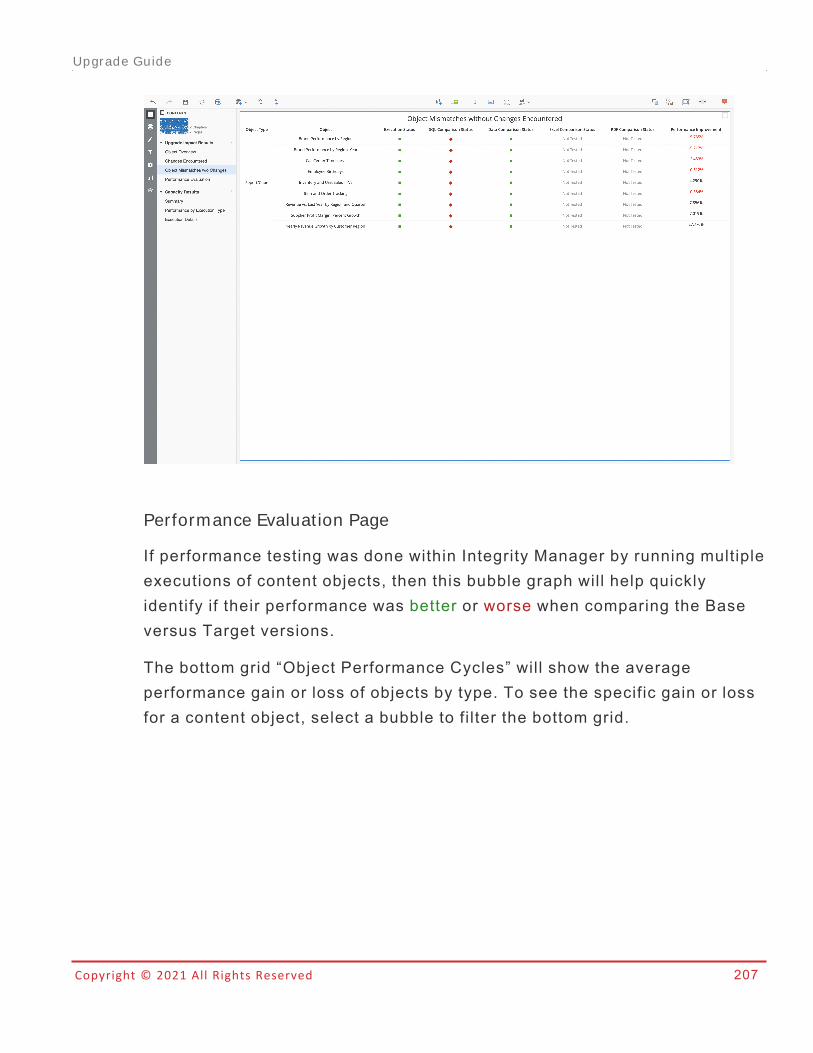
Copyright © 2021 All Rights Reserved 207
Performance Evaluat ion Page
If performance testing was done within Integrity Manager by running multipleexecutions of content objects, then this bubble graph will help quicklyidentify if their performance was better or worse when comparing the Baseversus Target versions.
The bottom grid “Object Performance Cycles” will show the averageperformance gain or loss of objects by type. To see the specific gain or lossfor a content object, select a bubble to filter the bottom grid.
Upgrade Guide
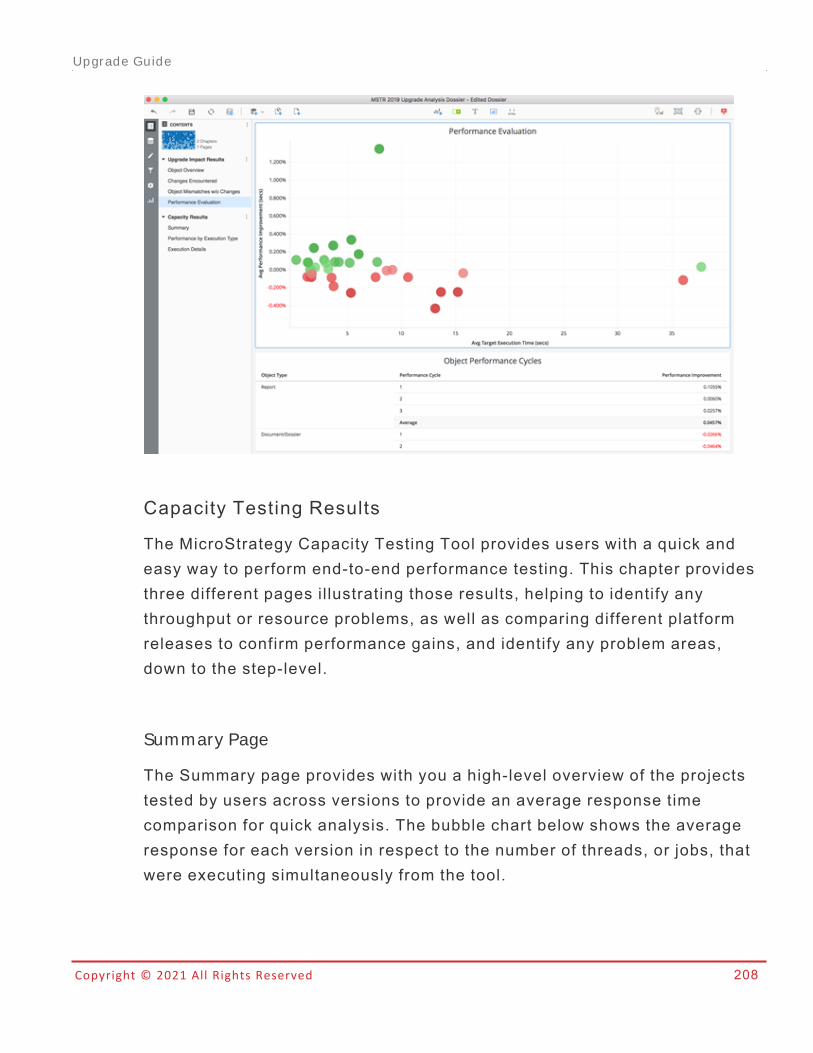
Copyright © 2021 All Rights Reserved 208
Capacity Testing Results
The MicroStrategy Capacity Testing Tool provides users with a quick andeasy way to perform end-to-end performance testing. This chapter providesthree different pages illustrating those results, helping to identify anythroughput or resource problems, as well as comparing different platformreleases to confirm performance gains, and identify any problem areas,down to the step-level.
Summary Page
The Summary page provides with you a high-level overview of the projectstested by users across versions to provide an average response timecomparison for quick analysis. The bubble chart below shows the averageresponse for each version in respect to the number of threads, or jobs, thatwere executing simultaneously from the tool.
Upgrade Guide
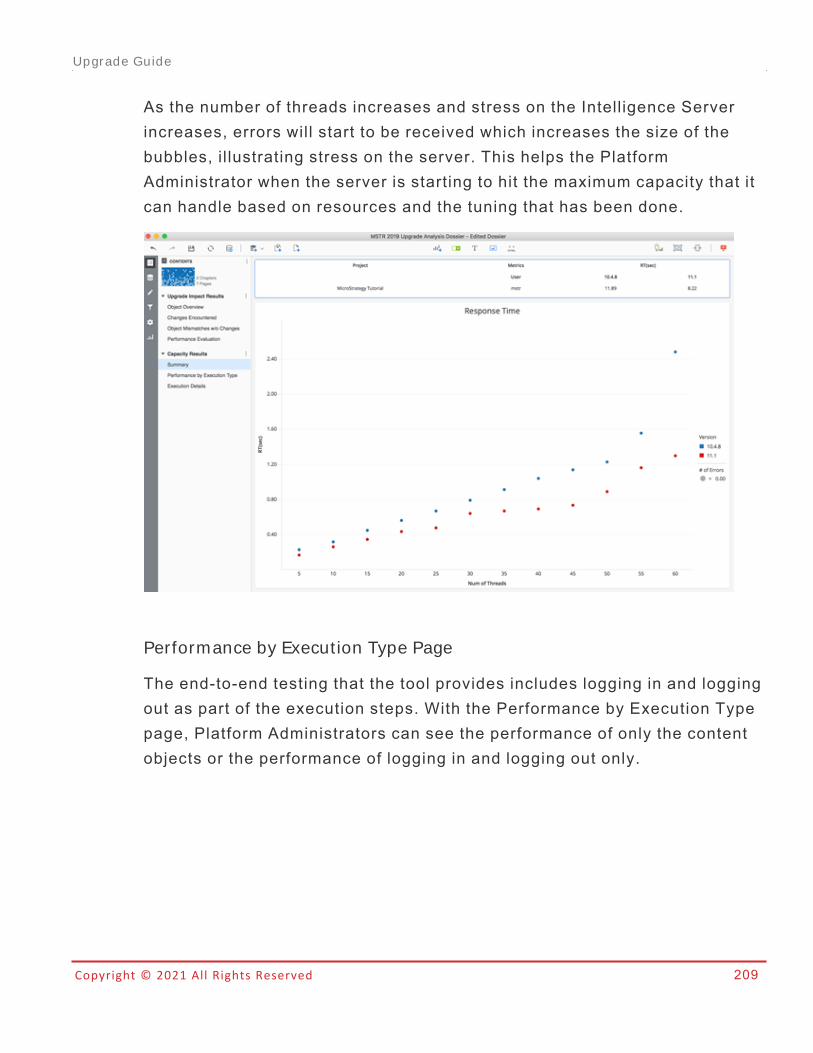
Copyright © 2021 All Rights Reserved 209
As the number of threads increases and stress on the Intelligence Serverincreases, errors will start to be received which increases the size of thebubbles, il lustrating stress on the server. This helps the PlatformAdministrator when the server is starting to hit the maximum capacity that itcan handle based on resources and the tuning that has been done.
Performance by Execution Type Page
The end-to-end testing that the tool provides includes logging in and loggingout as part of the execution steps. With the Performance by Execution Typepage, Platform Administrators can see the performance of only the contentobjects or the performance of logging in and logging out only.
Upgrade Guide
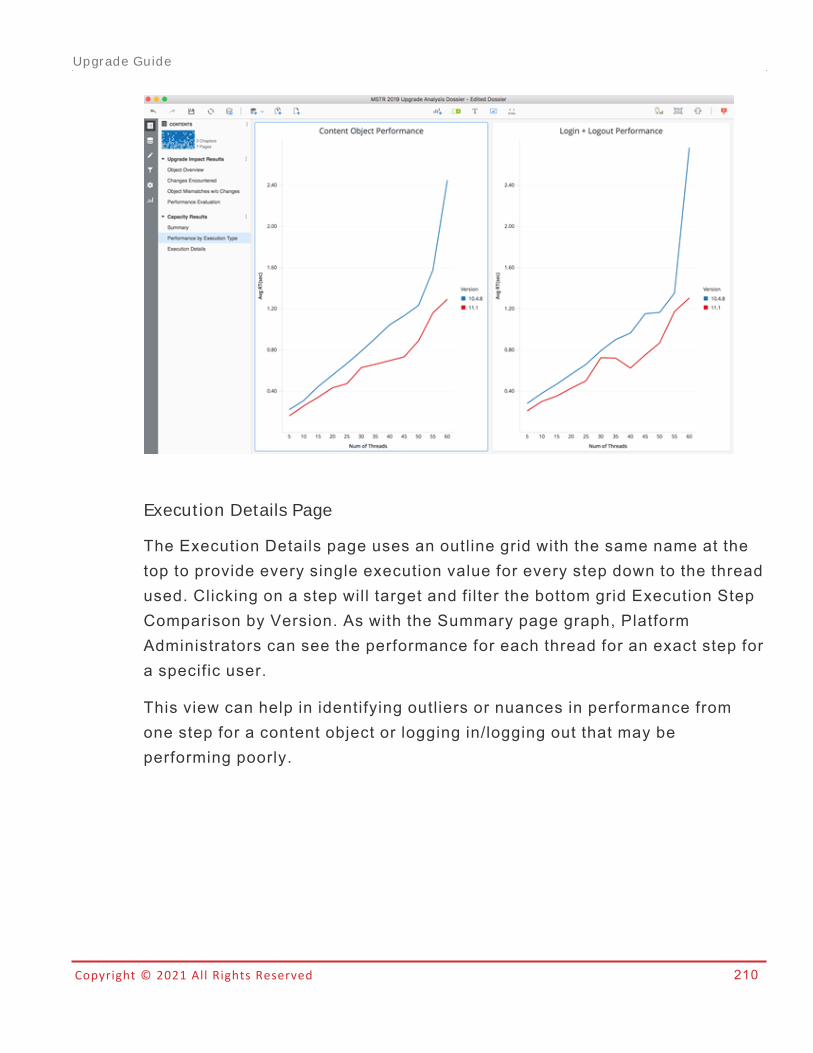
Copyright © 2021 All Rights Reserved 210
Execution Details Page
The Execution Details page uses an outline grid with the same name at thetop to provide every single execution value for every step down to the threadused. Clicking on a step will target and filter the bottom grid Execution StepComparison by Version. As with the Summary page graph, PlatformAdministrators can see the performance for each thread for an exact step fora specific user.
This view can help in identifying outliers or nuances in performance fromone step for a content object or logging in/logging out that may beperforming poorly.
Upgrade Guide
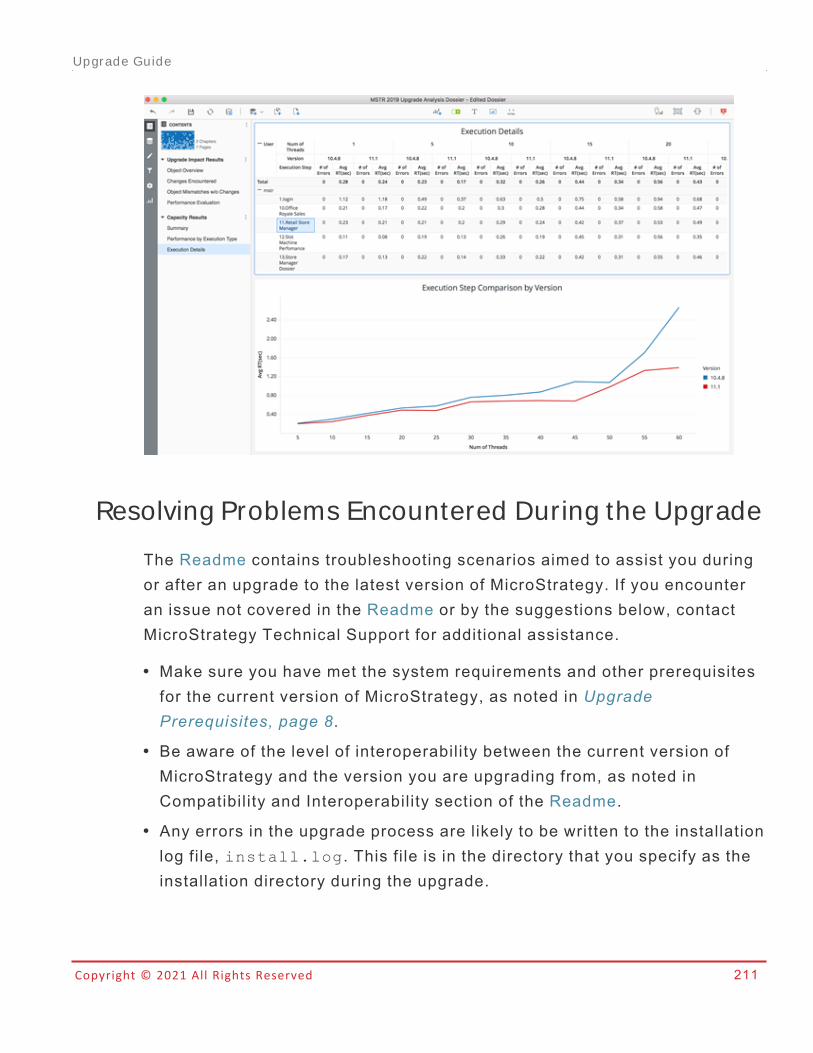
Copyright © 2021 All Rights Reserved 211
Resolving Problems Encountered During the Upgrade
The Readme contains troubleshooting scenarios aimed to assist you duringor after an upgrade to the latest version of MicroStrategy. If you encounteran issue not covered in the Readme or by the suggestions below, contactMicroStrategy Technical Support for additional assistance.
l Make sure you have met the system requirements and other prerequisitesfor the current version of MicroStrategy, as noted in UpgradePrerequisites, page 8.
l Be aware of the level of interoperability between the current version ofMicroStrategy and the version you are upgrading from, as noted inCompatibil ity and Interoperability section of the Readme.
l Any errors in the upgrade process are likely to be written to the installationlog file, install.log. This file is in the directory that you specify as theinstallation directory during the upgrade.
Upgrade Guide
Copyright © 2021 All Rights Reserved 212
l When you use the Configuration Wizard to add tables to the metadata orupdate your projects, each SQL statement that is executed is logged to theConfiguration Wizard log file, MACfgWiz.xml. This log file is in the Log
subfolder of the main MicroStrategy directory. You can analyze the log fileusing a third-party log viewer, such as the Apache Chainsaw log viewer,which can be downloaded fromhttp://logging.apache.org/chainsaw/index.html.
l If MicroStrategy Web users encounter errors after you upgradeMicroStrategy Web, you may need to clear your application and webserver caches, or your users may need to clear their browser caches. Forinstructions on how to clear these caches, see the documentation for yourweb server, application server, and web browser.
l MicroStrategy recommends upgrading to the latest version withoutuninstalling the previous version of MicroStrategy. However, in raresituations, issues may be encountered as a result of an in-place upgrade.In these situations, you may need to uninstall your existing MicroStrategyinstallation before installing the new version.
Upgrade Guide
Copyright © 2021 All Rights Reserved 213
Supp lem en t al In fo r m at ion
Application Servers
The sections below provide instructions for setting up different applicationservers to deploy MicroStrategy Web, Mobile, and Library.
Deploying with IIS (Windows)
Microsoft IIS can be used to deploy MicroStrategy Web and MicroStrategyMobile Server:
Deploying MicroStrategy Web
The ASP.NET version of MicroStrategy Web can be deployed with IIS onlyon Windows.
l You must have administrative privileges to deploy MicroStrategy Web foryour project. If this is the first time you are logging in and you have notchanged the default MicroStrategy administrative login, you can useAdministrator as the login with no password. After the first time, the username and password should be changed for security purposes.
l The Microsoft Windows' Users group must have read and executepermissions to all of the files within the MicroStrategy common files folder.This ensures that Internet Information Services has the required permissionsto host MicroStrategy Web. By default, this folder is stored in the followingdirectory location:
64-bit Windows environments:
Upgrade Guide
Copyright © 2021 All Rights Reserved 214
l C:\Program Files (x86)\Common Files\MicroStrategy
l C:\Program Files (x86)\MicroStrategy
To connect MicroStrategy Web to your Intelligence Server
1. On the Windows Start menu, go to Programs > MicroStrategy Tools >Web Administrator. The MicroStrategy Web Administrator pagewhere you connect MicroStrategy Web to the Intelligence Server opens.
2. Type the name of your Intelligence Server in the Add a servermanually box on the MicroStrategy Web Administrator page.
3. Click Connect. All projects loaded on the Intelligence Server are nowavailable from MicroStrategy Web. Click the Home icon to see the listof projects loaded on the Intelligence Server you specified.
4. Send your users the URL:
http://webservername/MicroStrategy/asp/
where webservername is the name of the computer hosting your Webserver. For example, if the name of your Web server machine is Web_Srv1, then the URL your users would use to access MicroStrategy Webwould be
http://Web_Srv1/MicroStrategy/asp
You have manually connected MicroStrategy Web to the Intelligence Server.
You can also connect automatically whenever MicroStrategy Web Server orIntelligence Server starts.
To make MicroStrategy Web connect to the Intelligence Server
automatically
1. On the MicroStrategy Web Administrator page, click Modify in theProperties column of the Intelligence Server.
Upgrade Guide
Copyright © 2021 All Rights Reserved 215
2. Select the Automatically connect to Intelligence Server when WebServer or Intelligence Server is restarted option and click Save.
Deploying Mobile Server
The ASP.NET version of MicroStrategy Mobile Server can only be deployedwith IIS only on Windows.
l You must have administrative privileges to deploy MicroStrategy MobileServer for your project. If this is the first time you are logging in and you havenot changed the default MicroStrategy administrative login, you can useAdministrator as the login with no password. After the first time, the username and password should be changed for security purposes.
l The Users group for Microsoft Windows must have read and executepermissions to all of the files within the MicroStrategy common files folder.This ensures that IIS has the required permissions to host MicroStrategyMobile Server. By default, this folder is stored in the following directorylocation:
l 64-bit Windows environments: C:\Program Files\Common
Files\MicroStrategy
l 64-bit Windows environments: C:\Program Files (x86)\Common
Files\MicroStrategy
To connect MicroStrategy Mobile Server to your Intelligence Server
1. In Windows, go to Start > Programs > MicroStrategy Tools > MobileAdministrator.
2. Type the name of your Intelligence Server in the Add a servermanually box on the MicroStrategy Mobile Server Administrator page.
3. Click Connect.
4. Click Mobile Configuration to configure your MicroStrategy Mobileapplications to communicate with Mobile Server and Intelligence
Upgrade Guide
Copyright © 2021 All Rights Reserved 216
Server. For steps on how to define this configuration, see theMicroStrategy Mobile Administration Help.
You have manually connected MicroStrategy Mobile Server to theIntelligence Server.
You can also connect automatically whenever MicroStrategy Mobile Serveror Intelligence Server starts.
To make MicroStrategy Mobile Server connect to the Intelligence
Server automatically
1. On the MicroStrategy Mobile Server Administrator page, click Modify inthe Properties column of the Intelligence Server.
2. Select the Automatically connect to Intelligence Server whenMobile Server or Intelligence Server is restarted option.
3. Click Save.
Deploying with JBoss (Windows)
This chapter provides information used to deploy and configureMicroStrategy JSP applications in a JBoss environment. You can use thesteps below to deploy MicroStrategy Web (JSP) and MicroStrategy MobileServer (JSP):
l Preconfiguration Information, page 216: configuration that must occurbefore you begin deploying MicroStrategy Web (JSP), Mobile Server (JSP)(JSP).
l Deploying MicroStrategy Web and Mobile Server, page 218: instructionsfor deploying, including step-by step procedures.
Preconfigurat ion Information
This section provides the preconfiguration information necessary to deployMicroStrategy JSP applications on JBoss on your machine.
Upgrade Guide
Copyright © 2021 All Rights Reserved 217
Inst al l ing t he JDK
If you have not installed Oracle JDK yet, download it here. Be sure to installthe JDK and not the JRE software options.
To configure the JDK, a system variable must point to the folder where youinstall the JDK. If you install the JDK to a simple folder path such as C:\then setting the system variable is easier and more likely to be correct.
Con f igu r ing t he JDK
1. On your Windows machine, go to Start > Computer > Systemproperties > Advanced system settings > Environment Variables.
The third-party products discussed below are manufactured byvendors independent of MicroStrategy, and the steps to configurethese products is subject to change. Refer to the appropriate Microsoftdocumentation for steps to access and modify the environmentvariables.
2. Under System Variables, click New to create a system variable. TheNew System Variable dialog box opens.
3. In the Variable Name box, type JAVA_HOME.
4. In the Variable Value box, specify the destination folder where youinstalled the JDK and click OK.
For example, if the fully qualified path to your JDK executable isC:\jsdk1.11.0\bin\java.exe, the value of your JAVA_HOMEvariable is C:\jsdk1.11.0.
If you have installed JDK under the Program Files folder, type Progra~1
in the destination folder; otherwise the system does not recognize thefolder. For example, C:\Progra~1\jsdk1.11.0.
Inst al l ing JBoss
You can download and install JBoss here.
Upgrade Guide
Copyright © 2021 All Rights Reserved 218
Keep track of the location in which you install JBoss, as this location is usedlater (referred to as JBOSS_HOME) to configure JBoss with a MicroStrategyJSP application deployment.
Deploying MicroStrategy Web and Mobile Server
Assuming you have made all the necessary configurations described inPreconfiguration Information, you can begin deploying MicroStrategy Web(JSP) and Mobile Server (JSP) with JBoss.
l Deploying using JBoss as a stand-alone Web container
l Configuring administrative access to MicroStrategy JSP applications
l Accessing the MicroStrategy JSP application administrative page
l Troubleshooting
Dep loying using JBoss as a st and -alone Web con t ainer
To deploy MicroStrategy JSP applicat ions using JBoss as a stand-alone
Web container
1. Locate the WAR file for your MicroStrategy JSP application.
2. Copy the WAR file to the JBOSS_HOME\server\default\deploy
directory.
3. To start JBoss, browse to JBOSS_HOME\bin. Then run the followingcommand:run.bat -b 0.0.0.0
Your MicroStrategy JSP application is deployed automatically, based on thefollowing:
l If you have configured JBoss to deploy an exploded WAR file, which isoften the default behavior, a folder is created within the JBOSS_
HOME\server\default\deploy directory:
Upgrade Guide
Copyright © 2021 All Rights Reserved 219
l When deploying MicroStrategy Web (JSP), the folder is namedMicroStrategy by default.
l When deploying MicroStrategy Mobile Server (JSP), the folder is namedMicroStrategyMobile by default.
l If you have configured JBoss to deploy an unexploded WAR file, theconfiguration files are created within the system's default temporary filedirectory. For Windows systems, the temporary file directory is commonlydefined by the TMP environment variable:l When deploying MicroStrategy Web (JSP), a /microstrategy/web-
Version/ folder is created within the temporary file directory, whereVersion is the version number for the MicroStrategy Web (JSP)product. Within this folder location, various configuration files can befound within the WEB-INF folder and its subfolders.
l When deploying MicroStrategy Mobile Server (JSP), a/microstrategy/mobile-Version/ folder is created within thetemporary file directory, where Version is the version number for theMicroStrategy Mobile Server (JSP) product. Within this folder location,various configuration files can be found within the WEB-INF folder andits subfolders.
Con f igu r ing adm in ist r at ive access t o M icr oSt r at egy JSP app l icat ions
To allow users authorized to access MicroStrategy Web Administrator,MicroStrategy Mobile Server Administrator, you must create the users andassign them the role of admin under the JBoss user configuration files. Thesteps to configure this access are below.
To configure administrat ive access to MicroStrategy JSP applicat ions
1. Browse to the directory JBOSS_HOME\server\default\conf, whereJBOSS_HOME is the location in which you installed JBoss.
Upgrade Guide
Copyright © 2021 All Rights Reserved 220
2. Create the following two files within this directory:l users.properties
l roles.properties
3. Open the users.properties f i le in a text editor.
4. Include one line for each user to grant administrative access to the WebAdministrator and Mobile Server Administrator, using the followingsyntax:user_id=user_password
For example, you create UserA and UserB with passwords 1234 and5678 respectively using the following syntax:
UserA=1234
UserB=5678
5. Save your changes and close the users.properties f i le.
6. Open the roles.properties f i le in a text editor.
7. Include one line for each user you included in the users.properties
f i le and grant them administrative access, using the following syntax:user_id=admin
For example, you define UserA and UserB to have administrativeaccess using the following syntax:
l UserA=admin
l UserB=admin
8. Save your changes and close the roles.properties f i le.
9. To start JBoss, browse to JBOSS_HOME\bin. Then run the followingcommand:run.bat -b 0.0.0.0
Now you can access and configure your MicroStrategy JSP application, asdescribed in Accessing the MicroStrategy JSP application administrativepage, page 221.
Upgrade Guide
Copyright © 2021 All Rights Reserved 221
Accessing t he M icr oSt r at egy JSP app l icat ion adm in ist r at ive page
You can use the steps below to access the administrative page for yourMicroStrategy JSP application.
To access the MicroStrategy JSP applicat ion administrat ive page
1. In a Web browser, access the administrative page by specifying thefollowing URL:l For Web (JSP):http://
localhost:8080/MicroStrategy/servlet/mstrWebAdmin
l For Mobile Server (JSP):http://
localhost
:8080/MicroStrategyMobile/servlet/mstrWebAdmin
The servlet names at the end of the URLs listed above are case-sensitive. Make sure to use the correct case when typing the servletname. If the application server is enabled with security, a dialog boxrelated to the administrator authentication opens.
2. When prompted for a user name and password, type the user name forthe administrator user you created in the roles.properties f i le andthe login information in the users.properties f i le.
3. After you are authenticated:l If you are deploying MicroStrategy Web (JSP), the MicroStrategyWeb Administrator page appears. Add and connect to an IntelligenceServer.
l If you are deploying MicroStrategy Mobile Server (JSP), theMicroStrategy Mobile Server Administrator page appears. Add andconnect to an Intelligence Server. Once connected, click MobileConfiguration to configure your MicroStrategy Mobile applications tocommunicate with Mobile Server and Intelligence Server. For steps
Upgrade Guide
Copyright © 2021 All Rights Reserved 222
on how to define this configuration, see the MicroStrategy MobileAdministration Help. Creating a configuration completes the stepsrequired to deploy Mobile Server (JSP).
4. If you are deploying MicroStrategy Web (JSP), proceed to launch theMicroStrategy Web project page. In a Web browser, accessMicroStrategy Web project using this URL:
http://localhost:8080/MicroStrategy/servlet/mstrWeb
Tr oub leshoot ing
Under certain circumstances, an error in a request involving JSON mayappear:
"Invalid JSON body, Illegal Type
(com.microstrategy.rest.model.filter.viewfilter.BranchExpression) to
deserialize: prevented for security reasons;"
In the Web server logs, a similar warning message may also appear:
WARN [org.jboss.as.jaxrs] (MSC service thread 1-2) WFLYRS0018: Explicit
usage of Jackson annotation in a JAX-RS deployment; the system will disable
JSON-B processing for the current deployment. Consider setting the
'resteasy.preferJacksonOverJsonB' property to 'false' to restore JSON-B.
When this occurs JBoss must be configured to disable Jackson. This can bydone by:
l Starting JBoss server with the following option:
./bin/standalone.sh -Dresteasy.preferJacksonOverJsonB=FALSE
l Or creating an exclusion in tag in the structure xml for theorg.jboss.resteasy.resteasy-json-binding-provider module.
See the JBoss documentation for RESTEasy JAX-RS for more informationabout this situation.
Upgrade Guide
Copyright © 2021 All Rights Reserved 223
Deploying with Tomcat (Windows)
This section provides information used to deploy and configureMicroStrategy JSP applications in a Tomcat-only environment. Forinformation on how to configure Tomcat to work with IIS, seeiishowto.html (Tomcat 9.0.x) in the Tomcat documentation. You can usethe steps below to deploy MicroStrategy Web (JSP) and MicroStrategyMobile Server (JSP):
l Preconfiguration Information, page 223: Configuration that must occurbefore you begin deploying MicroStrategy Web (JSP), Mobile Server (JSP)(JSP).
l Deploying MicroStrategy Web and Mobile Server, page 225: Instructionsfor deploying, including step-by-step procedures.
Preconfigurat ion Information
This section provides the preconfiguration information necessary to deployMicroStrategy JSP applications on Tomcat on your machine.
Inst al l ing t he JDK
If you have not installed the AdoptOpen JDK yet, download the file from thewebsite. Be sure to install the JDK and not the JRE software options.
To configure the JDK, a system variable must point to the folder where youinstall the JDK. If you install the JDK to a simple folder path such as C:\setting the system variable is easier and more likely to be correct.
Con f igu r ing t he JDK
The third-party products discussed below are manufactured by vendorsindependent of MicroStrategy, and the steps to configure these products issubject to change. Refer to the appropriate Microsoft documentation forsteps to access and modify the environment variables.
Upgrade Guide
Copyright © 2021 All Rights Reserved 224
1. From the Start menu, go to Computer > System properties >Advanced system settings > Environment Variables > SystemVariables.
2. Under , click New to create a system variable.
3. In the Variable Name f ield, type JAVA_HOME.
4. In the Variable Value f ield, type the path of the folder where youinstalled the JDK and click OK.
For example, if the fully qualified path to your JDK executable isC:\jdk1.11.0\bin\java.exe, the value of your JAVA_HOME variableis C:\jdk1.11.0.
If you have installed JDK under the Program Files folder, type Progra~1
when specifying the folder name in the Variable Value box; otherwise thesystem does not recognize the folder. For example, typeC:\Progra~1\jdk1.11.0 in the Variable Value box.
Con f igu r ing Tom cat
This procedure assumes that you have downloaded and installed Tomcat onyour machine. You can download Tomcat from the Apache website;depending on the version you want to download, you may need to locate theappropriate file in Apache's Archive area. Instructions for downloading andinstalling Tomcat are also available on the Apache website.
To configure Tomcat, a system variable must point to the folder where youinstall Tomcat. Installing Tomcat to a simple folder path such as C:\Tomcatmakes it easier to define the system variable.
The third-party products discussed below are manufactured by vendorsindependent of MicroStrategy, and the steps to configure these products issubject to change. Refer to the appropriate Microsoft documentation forsteps to access and modify the environment variables.
Upgrade Guide
Copyright © 2021 All Rights Reserved 225
1. From the Start menu, go to Computer > System properties >Advanced system settings > Environment Variables > SystemVariables.
2. Click New to create a system variable.
3. In the Variable Name f ield, type CATALINA_HOME.
4. In the Variable Value f ield, specify the path of the folder where youinstalled Tomcat and click OK. For example, if you installed Tomcatdirectly to the C drive, the destination folder is C:\Tomcat.
If you installed Tomcat under the Program Files folder, type Progra~1
when specifying the folder in the Variable Value box. Otherwise, the systemdoes not recognize the folder. For example, type C:\Progra~1\Tomcat inthe Variable Value box.
Set t ing t he Java heap size
The Java heap size for the Tomcat can be modified by defining the JAVA_
OPTS parameter in the catalina.bat f i le. For example, you can define thisparameter as follows:
JAVA_OPTS = "-Xms1024m -Xmx2048m"
This value may need to be modified to reflect the requirements of yourspecific environment. Refer to your third-party application serverdocumentation for information on how to determine a satisfactory Java heapsize for your environment.
Deploying MicroStrategy Web and Mobile Server
Assuming you have made all the necessary configurations described above,you can begin deploying MicroStrategy Web (JSP), Mobile Server (JSP)(JSP) with Tomcat.
Upgrade Guide
Copyright © 2021 All Rights Reserved 226
Dep loying using Tom cat as a st and -alone Web con t ainer
To deploy MicroStrategy JSP applicat ions using Tomcat as a stand-
alone Web container
1. Locate the WAR file for your MicroStrategy JSP application.
2. Copy the WAR file to the Tomcat\webapps folder.
3. From the Start menu, select Run.
4. Type cmd in the Open drop-down list and click OK.
5. Browse to the Tomcat\bin folder, where Tomcat is the folder in whichyou installed Tomcat. For example, in the command prompt, type
cd C:\Tomcat\bin
6. Click Enter. C:\Tomcat\bin> is displayed at the command prompt.
7. Type the required commands to start and stop Tomcat, which dependson your version of Tomcat. For example, for Tomcat 9, type Tomcat9
start to start Tomcat and type Tomcat9 stop to stop Tomcat. Referto your third-party Apache documentation for information on thecommands to start and stop Tomcat.
If you installed Tomcat under the Program Files folder, type Progra~1when you change folders in the command prompt. Otherwise, the systemdoes not recognize the folder. For example, typeC:\Progra~1\Tomcat\bin in the command prompt.
Your MicroStrategy JSP application is deployed automatically, based on thefollowing:
l If you have configured Tomcat to deploy an exploded WAR file, which isoften the default behavior, a folder is created within the Tomcat\webapps
folder:l When deploying MicroStrategy Web (JSP), the folder is namedMicroStrategy by default.
Upgrade Guide
Copyright © 2021 All Rights Reserved 227
l When deploying MicroStrategy Mobile Server (JSP), the folder is namedMicroStrategyMobile by default.
l If you have configured Tomcat to deploy an unexploded WAR file, theconfiguration files are created within the system's default temporary filedirectory. For Windows systems, the temporary file directory is commonlydefined by the TMP environment variable:l When deploying MicroStrategy Web (JSP), a /microstrategy/web-
Version/ folder is created within the temporary file directory, whereVersion is the version number for the MicroStrategy Web (JSP)product. Within this folder location, various configuration files can befound within the WEB-INF folder and its subfolders.
l When deploying MicroStrategy Mobile Server (JSP), a/microstrategy/mobile-Version/ folder is created within thetemporary file directory, where Version is the version number for theMicroStrategy Mobile Server (JSP) product. Within this folder location,various configuration files can be found within the WEB-INF folder andits subfolders.
Con f igu r ing adm in ist r at ive access you r M icr oSt r at egy JSP app l icat ions
To allow users authorized to access MicroStrategy Web Administrator,MicroStrategy Mobile Server Administrator, you must create the users andassign them the role of admin under the Tomcat user configuration file. Thesteps to configure this access are below.
To configure administrat ive access to your MicroStrategy JSP
applicat ions
1. In the Tomcat\conf folder, open the tomcat-users.xml f i le in aprogram that allows you to edit the file, such as Notepad.
Upgrade Guide
Copyright © 2021 All Rights Reserved 228
2. Add the following tag and save the file:
<user name="administrator" password="administrator"
roles="admin"/>
You can specify any value in the user name and password f ields.
3. Stop and start Tomcat from the command line.
Accessing t he M icr oSt r at egy JSP app l icat ion adm in ist r at ive page
You can use the steps below to access the administrative page for yourMicroStrategy JSP application.
1. Access the servlet by typing the following URL in a Web browser:l For Web (JSP):http://
localhost:8080/MicroStrategy/servlet/mstrWebAdmin
l For Mobile Server (JSP):http://
localhost
:8080/MicroStrategyMobile/servlet/mstrWebAdmin
The servlet names at the end of the URL are case-sensitive. Make sureto use the correct case when typing the servlet name. If the applicationserver is enabled with security, a dialog box related to the administratorauthentication opens.
If you are using Tomcat integrated with IIS, you do not need to specifythe port number in the URL. However, when using Tomcat as a stand-alone Web container, you must specify the port number. The defaultport for Tomcat is 8080.
2. When prompted for a user name and password, use the same valuesyou specified in the tomcat-users.xml f i le.
Upgrade Guide
Copyright © 2021 All Rights Reserved 229
3. If you are deploying MicroStrategy Web (JSP), the MicroStrategy WebAdministrator page appears. Add and connect to an Intelligence Server.
4. If you are deploying MicroStrategy Mobile Server (JSP), theMicroStrategy Mobile Server Administrator page appears. Add andconnect to an Intelligence Server. Once connected, click MobileConfiguration to configure your MicroStrategy Mobile applications tocommunicate with Mobile Server and Intelligence Server. For steps onhow to define this configuration, see the MicroStrategy MobileAdministration Help. Creating a configuration completes the stepsrequired to deploy Mobile Server (JSP).
Launch ing t he p r o ject
In a Web browser, access MicroStrategy Web (JSP) using this URL:
http://localhost:8080/MicroStrategy/servlet/mstrWeb
Deploying with Tomcat (Linux)
This section provides information on how to deploy and configureMicroStrategy JSP applications with Tomcat in a Linux environment. Youcan use the steps below to deploy MicroStrategy Web (JSP) andMicroStrategy Mobile Server (JSP):
l Preconfiguration Information, page 229: Configuration that must occurbefore you begin deploying MicroStrategy Web (JSP), Mobile Server (JSP)(JSP).
l Deploying MicroStrategy Web and Mobile Server, page 231: Instructionsfor deploying, including detailed steps.
Preconfigurat ion Information
This section provides the preconfiguration information necessary to deployMicroStrategy JSP applications with Tomcat on your Linux machine.
Upgrade Guide
Copyright © 2021 All Rights Reserved 230
Inst al l ing t he JDK
If you have not installed the AdoptOpen JDK yet, download the file from thewebsite. Be sure to install the JDK and not the JRE software options.
To configure the JDK, a system variable must point to the folder where youinstall the JDK. If you install the JDK to a simple folder path such as C:\setting the system variable is easier and more likely to be correct.
From the location in which to install the JDK, run the file you downloaded:
jdk-Version-linux-i586.bin
For example, to install version 1.11.0, type the following:
jdk-1_11_0-linux-i586.bin
Con f igu r ing t he JDK
1. Open the /etc/profile f i le using a program that allows you to editthe file.
2. Add the following line:
export JAVA_HOME=/PathName/jdkVersion;
where PathName is the destination folder where you installed the JDKand Version is the version, such as 1_11_0, of the JDK.
Inst al l ing Tom cat
This procedure assumes that you have downloaded and installed Tomcat ina directory named Tomcat on your machine. If you have not installedTomcat yet, download the zip file from the following links:
l Tomcat 9.0.xl Tomcat 8.0.x
Contact your System Administrator or visit the Apache website forinstructions on downloading and installing Tomcat.
Upgrade Guide
Copyright © 2021 All Rights Reserved 231
Con f igu r ing Tom cat
After you install Tomcat, you must configure Tomcat. The Tomcatconfiguration includes creating the environment variable CATALINA_HOME
and defining this environment variable to point to the Tomcat directory.
1. Open the etc/profile f i le in a program that allows you to edit the file.
2. Type the following:
export CATALINA_HOME = /PathName
where PathName is the directory where you have installed Tomcat.
For example,
export CATALINA_HOME = /Tomcat
Set t ing t he Java Heap Size
The Java heap size for the Tomcat can be modified by defining the JAVA_
OPTS parameter in the catalina.sh f i le. For example, you can define thisparameter as follows:
JAVA_OPTS = "-Xms1024m -Xmx2048m"
This value may need to be modified to reflect the requirements of yourspecific environment. Refer to your third-party application serverdocumentation for information on how to determine a satisfactory Java heapsize for your environment.
Deploying MicroStrategy Web and Mobile Server
After you have performed the configurations described above, you can begindeploying MicroStrategy JSP applications with Tomcat.
Upgrade Guide
Copyright © 2021 All Rights Reserved 232
Dep loying using Tom cat as a st andalone Web con t ainer
To deploy MicroStrategy JSP applicat ions using Tomcat as a
standalone Web container
1. Locate the WAR file for your MicroStrategy JSP application.
2. Copy the WAR file to the Tomcat/webapps directory.
To start and stop Tomcat from the command line
Type # $CATALINA_HOME/bin/startup.sh and click Enter to startTomcat, which deploys your MicroStrategy JSP applications automatically,based on the following:
l If you have configured Tomcat to deploy an exploded WAR file, which isoften the default behavior, a folder is created within the Tomcat/webapps
folder:l When deploying MicroStrategy Web (JSP), the folder is namedMicroStrategy by default.
l When deploying MicroStrategy Mobile Server (JSP), the folder is namedMicroStrategyMobile by default.
l If you have configured Tomcat to deploy an unexploded WAR file, theconfiguration files are created within the system's default temporary filedirectory. For Linux systems, the temporary file directory is usually /tmp/or /var/tmp/:l When deploying MicroStrategy Web (JSP), a /microstrategy/web-
Version/ folder is created within the temporary file directory, whereVersion is the version number for the MicroStrategy Web (JSP)product. Within this folder location, various configuration files can befound within the WEB-INF folder and its subfolders.
l When deploying MicroStrategy Mobile Server (JSP), a/microstrategy/mobile-Version/ folder is created within thetemporary file directory, where Version is the version number for the
Upgrade Guide
Copyright © 2021 All Rights Reserved 233
MicroStrategy Mobile Server (JSP) product. Within this folder location,various configuration files can be found within the WEB-INF folder andits subfolders.
Con f igu r ing adm in ist r at ive access t o M icr oSt r at egy JSP app l icat ions
To allow users authorized to access MicroStrategy Web Administrator,MicroStrategy Mobile Server Administrator, you must create the users andassign them the role of admin under the Tomcat user configuration file. Thesteps to configure this access are below.
1. In the Tomcat/conf directory, open the tomcat-users.xml f i leusing a program that allows you to edit the file.
2. Add the following tags and save the file:
<role rolename="admin"/>
<user username="admin" password="admin"
roles="admin"/>
You can specify any value in the user name and password f ields.These are used to log in to the MicroStrategy Web Administrator andMobile Server Administrator pages. The roles f ield must be admin.
3. Stop and restart Tomcat.
Now you can access and configure your MicroStrategy JSP application, asdescribed in Accessing the MicroStrategy JSP application administrativepage, page 233.
Accessing t he M icr oSt r at egy JSP app l icat ion adm in ist r at ive page
You can use the steps below to access the administrative page for yourMicroStrategy JSP application.
Upgrade Guide
Copyright © 2021 All Rights Reserved 234
1. Access the servlet by typing the following URL in a Web browser:l For Web (JSP):http://
localhost:8080/MicroStrategy/servlet/mstrWebAdmin
l For Mobile Server (JSP):http://
localhost
:8080/MicroStrategyMobile/servlet/mstrWebAdmin
The servlet names at the end of the URL are case-sensitive. Makesure to use the correct case when typing the servlet name. If theapplication server is enabled with security, a dialog box related to theadministrator authentication opens.
2. When prompted for a user name and password, use the same valuesyou specified in the tomcat-users.xml f i le.
3. After you are authenticated:l If you are deploying MicroStrategy Web (JSP), the MicroStrategyWeb Administrator page appears. Add and connect to an IntelligenceServer.
l If you are deploying MicroStrategy Mobile Server (JSP), theMicroStrategy Mobile Server Administrator page appears. Add andconnect to an Intelligence Server. Once connected, click MobileConfiguration to configure your MicroStrategy Mobile applications tocommunicate with Mobile Server and Intelligence Server. For stepson how to define this configuration, see the MicroStrategy MobileAdministration Help. Creating a configuration completes the stepsrequired to deploy Mobile Server (JSP).
4. If you are deploying MicroStrategy Web (JSP), proceed to launch theMicroStrategy project. In a Web browser, access MicroStrategy Web(JSP) using the following URL:
http://localhost:8080/MicroStrategy/servlet/mstrWeb
Upgrade Guide
Copyright © 2021 All Rights Reserved 235
Deploying MicroStrategy LibraryThe sections below provide instructions for setting up different applicationservers to deploy MicroStrategy Library.
Deploy MicroStrategy Library on JBoss
Before Deploying the MicroStrategyLibrary.war File:
Open /jboss-eap-
7.3/standalone/configuration/standalone.xml and search for"jaxrs" and disable following lines:
<!--extension module="org.jboss.as.jaxrs"/-->
<!--subsystem xmlns="urn:jboss:domain:jaxrs:1.0"/-->
Deploy by Exploded Folder:
1. Unzip MicroStrategyLibrary.war f i le as a folder, the folder nameis MicroStrategyLibrary.war.
2. Put the MicroStrategyLibrary.war folder under ./jboss-eap-7.3/standalone/deployments/.
3. Download modules_config.zip and extract it under the jboss-
eap-7.3/modules folder .
4. Download jboss-deployment-structure.xml and put it underjboss-eap-
7.3/standalone/deployments/MicroStrategyLibrary.war/W
EB-INF/.
5. In the ./jboss-eap-7.3/standalone/deployments/ foldercreate a marker file namedMicroStrategyLibrary.war.dodeploy.
Upgrade Guide
Copyright © 2021 All Rights Reserved 236
6. After deploying the marker file would be updated toMicroStrategyLibrary.war.deployed, if we want to redeploy thefolder, just rename it as before.
7. Open MicroStrategyLibrary/admin page to configure connectionto Intelligence Server and Collaboration Server.
Using a Response File with Configuration Wizard
As an alternative to stepping through each page of the Configuration Wizard,you can create a response file with the upgrade information and use thatresponse file to automatically upgrade your MicroStrategy systems.
This section provides the following information on using a response file:
Creating a Response FileMicroStrategy recommends that you create a response file through the GUImode of the Configuration Wizard. You step through the ConfigurationWizard and make your selections. Then, at the end of the ConfigurationWizard, do not click Finish. Instead, click Save. You are prompted to saveyour selections in a response file.
You can also create or modify a response file with a text editor. If you do nothave access to the GUI mode of the Configuration Wizard, this is the onlyway to create a response file. MicroStrategy supplies a blank response filetemplate, Response.ini, that you can copy and modify to create yourresponse file. This file is in the Common Files folder of your MicroStrategyinstallation. By default, this folder is C:\Program Files (x86)\Common
Files\MicroStrategy.
For information on all the parameters in the response file, see ResponseConfiguration Parameters and Options, page 240.
Upgrade Guide
Copyright © 2021 All Rights Reserved 237
Executing a Response File1. In Windows, go to Start > All Programs > MicroStrategy Tools >
Configuration Wizard. The Configuration Wizard opens.
2. Click Load.
3. Browse to the path where the response file is saved and click Open.The Summary page opens.
4. An overview of all the configuration tasks performed by the responsefile appears. Click Finish.
To Use a Response File through the Windows Command Line
1. Enter the following command in the Windows command line:
macfgwiz.exe -r "Path\response.ini"
Where Path\ is the fully qualified path to the response file.
A common location of a response file is:
C:\Program Files (x86)\Common
Files\MicroStrategy\RESPONSE.INI
If an error message is displayed, check the path and name yousupplied for the response file and make any required changes.
To Use a Response File through the Configurat ion Wizard in UNIX or
Linux
1. From a UNIX or Linux console window, browse to <HOME_PATH> where<HOME_PATH> is the directory you specified as the Home Directoryduring installation.
2. Browse to the folder bin.
3. Enter mstrcfgwiz-editor and click Enter. The Configuration Wizardopens with the Welcome page displayed.
Upgrade Guide
Copyright © 2021 All Rights Reserved 238
4. Click Enter.
5. Enter 1 to select to use a response file, and then click Enter.
6. Enter the fully qualified path to the response.ini f i le and click Enter.
/home/username/MicroStrategy/RESPONSE.INI
If an error message is displayed, check the path and name yousupplied for the response file and make any required changes.
To Use a Response File Through the UNIX/Linux Command Line
1. From a UNIX or Linux console window, browse to <HOME_PATH> where<HOME_PATH> is the directory you specified as the Home Directoryduring installation.
2. Browse to the folder bin.
3. Enter the following command in the command line and click Enter.
mstrcfgwiz-editor -response /Path/response.ini
Where Path is the fully qualified path to the response file.
For example, a common location of a response file is:
/home/username/MicroStrategy/RESPONSE.INI
If an error message is displayed, check the path and name yousupplied for the response file and make any required changes.
To Use a Response File Through the Windows Command Line
1. Type the following command in the Windows command line:
macfgwiz.exe -r "Path\response.ini"
Where Path\ is the fully qualified path to the response file.
Upgrade Guide
Copyright © 2021 All Rights Reserved 239
A common location of a response file is:
C:\Program Files (x86)\Common Files\MicroStrategy\RESPONSE.INI
If an error message is displayed, check the path and name yousupplied for the response file and make any required changes.
To Use a Response File Through the Configurat ion Wizard in UNIX or
Linux
1. From a UNIX or Linux console window, browse to <HOME_PATH> where<HOME_PATH> is the directory you specified as the Home Directoryduring installation.
2. Browse to the folder bin.
3. Enter mstrcfgwiz-editor, and click Enter. The ConfigurationWizard opens with the Welcome page displayed.
4. Click Enter.
5. Enter 1 to select to use a response file. Click Enter.
6. Enter the fully qualified path to the response.ini f i le and click Enter.
/home/username/MicroStrategy/RESPONSE.INI
If an error message is displayed, check the path and name yousupplied for the response file and make any required changes.
To Use a Response File Through the UNIX/Linux Command Line
1. From a UNIX or Linux console window, browse to <HOME_PATH> where<HOME_PATH> is the directory you specified as the Home Directoryduring installation.
2. Browse to the folder bin.
3. Enter the following command in the command line, and click Enter.
mstrcfgwiz-editor -response /Path/response.ini
Upgrade Guide
Copyright © 2021 All Rights Reserved 240
Where Path is the fully qualified path to the response file.
For example, a common location of a response file is:
/home/username/MicroStrategy/RESPONSE.INI
If an error message is displayed, check the path and name yousupplied for the response file and make any required changes.
Response Configuration Parameters and OptionsMicroStrategy recommends that you always create the response file throughthe GUI mode of the Configuration Wizard. However, you can also modify aresponse file with a text editor to make minor changes such as enteringdifferent user login and password information.
If you are manually editing the response file, make sure to save the fileusing ANSI encoding.
Upgrading Intelligence Server Components and Projects
The response file parameters in the [UpgradeServer] section upgradeIntelligence Server components and projects. The table below lists theavailable parameters and the functionality of available options for eachparameter. The options marked with Removed from 11.3.1 are ignored inthe Configuration Wizard when upgrading Intelligence Server componentsusing 11.3.1 and above.
Options Description
[UpgradeServer]
In this section you can upgrade IntelligenceServer components and the projects for anIntelligence Server.
UpgradeServer=
Defines whether to upgrade Intelligence Servercomponents and projects, as determined by thefollowing values:
Upgrade Guide

Copyright © 2021 All Rights Reserved 241
Options Description
l 1: Upgrade Intelligence Server componentsand projects.
l 0: Does not upgrade Intelligence Servercomponents and projects.
UpgradeMD=
Defines whether to upgrade the metadata, asdetermined by the following values:
l 1: Upgrades the metadata repository, whichcontains the definitions of yourMicroStrategy applications and supportingobjects. An upgrade of your metadata isrequired to provide support for all new andupdated features in the most recent versionof MicroStrategy.
l 0: Does not upgrade the metadata.
Upgrade Privileges=
Removed from 11.3.1
Defines whether to upgrade administrativeprivileges, as determined by the followingvalues:
l 1: Upgrades the privileges used to definethe features and capabilit ies available foreach MicroStrategy user. This upgrade isrequired to reflect any changes in privilegesfor the most recent version of MicroStrategy.After the upgrade is finished, you canmanually modify the privileges for your usersand user groups to ensure that all users haveaccess to the required MicroStrategyfeatures. To ensure that the updated userprivileges are in compliance with yourlicense agreement, you can use LicenseManager to audit and view user productprivileges.
l 0: Does not upgrade administrativeprivileges.
Upgrade Guide
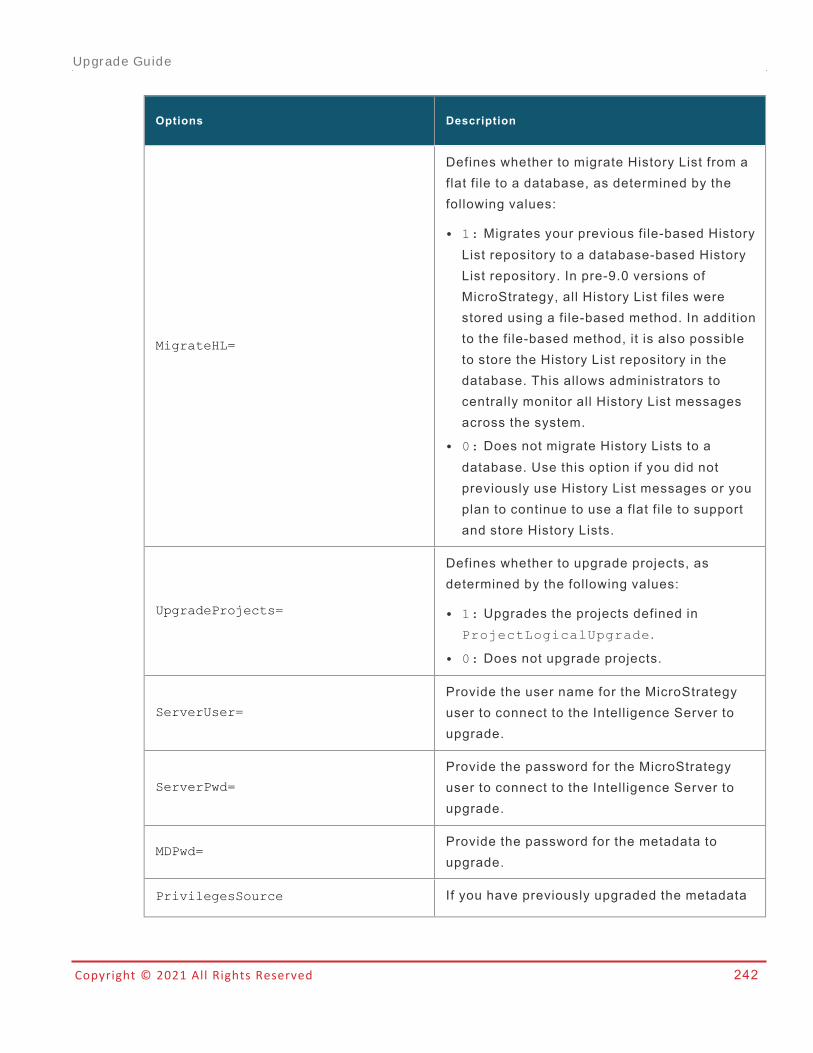
Copyright © 2021 All Rights Reserved 242
Options Description
MigrateHL=
Defines whether to migrate History List from aflat fi le to a database, as determined by thefollowing values:
l 1: Migrates your previous file-based HistoryList repository to a database-based HistoryList repository. In pre-9.0 versions ofMicroStrategy, all History List fi les werestored using a file-based method. In additionto the file-based method, it is also possibleto store the History List repository in thedatabase. This allows administrators tocentrally monitor all History List messagesacross the system.
l 0: Does not migrate History Lists to adatabase. Use this option if you did notpreviously use History List messages or youplan to continue to use a flat fi le to supportand store History Lists.
UpgradeProjects=
Defines whether to upgrade projects, asdetermined by the following values:
l 1: Upgrades the projects defined inProjectLogicalUpgrade.
l 0: Does not upgrade projects.
ServerUser=
Provide the user name for the MicroStrategyuser to connect to the Intelligence Server toupgrade.
ServerPwd=
Provide the password for the MicroStrategyuser to connect to the Intelligence Server toupgrade.
MDPwd=Provide the password for the metadata toupgrade.
PrivilegesSource If you have previously upgraded the metadata
Upgrade Guide
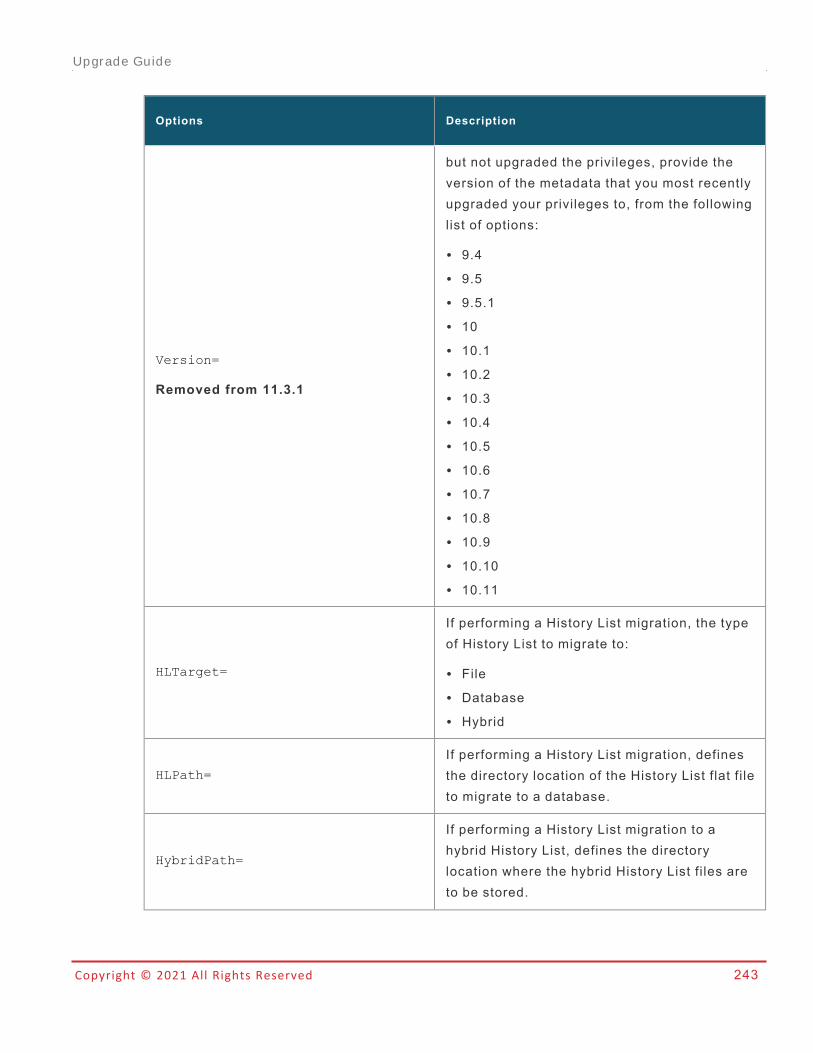
Copyright © 2021 All Rights Reserved 243
Options Description
Version=
Removed from 11.3.1
but not upgraded the privileges, provide theversion of the metadata that you most recentlyupgraded your privileges to, from the followinglist of options:
l 9.4l 9.5l 9.5.1l 10l 10.1l 10.2l 10.3l 10.4l 10.5l 10.6l 10.7l 10.8l 10.9l 10.10l 10.11
HLTarget=
If performing a History List migration, the typeof History List to migrate to:
l Filel Databasel Hybrid
HLPath=
If performing a History List migration, definesthe directory location of the History List flat fi leto migrate to a database.
HybridPath=
If performing a History List migration to ahybrid History List, defines the directorylocation where the hybrid History List fi les areto be stored.
Upgrade Guide
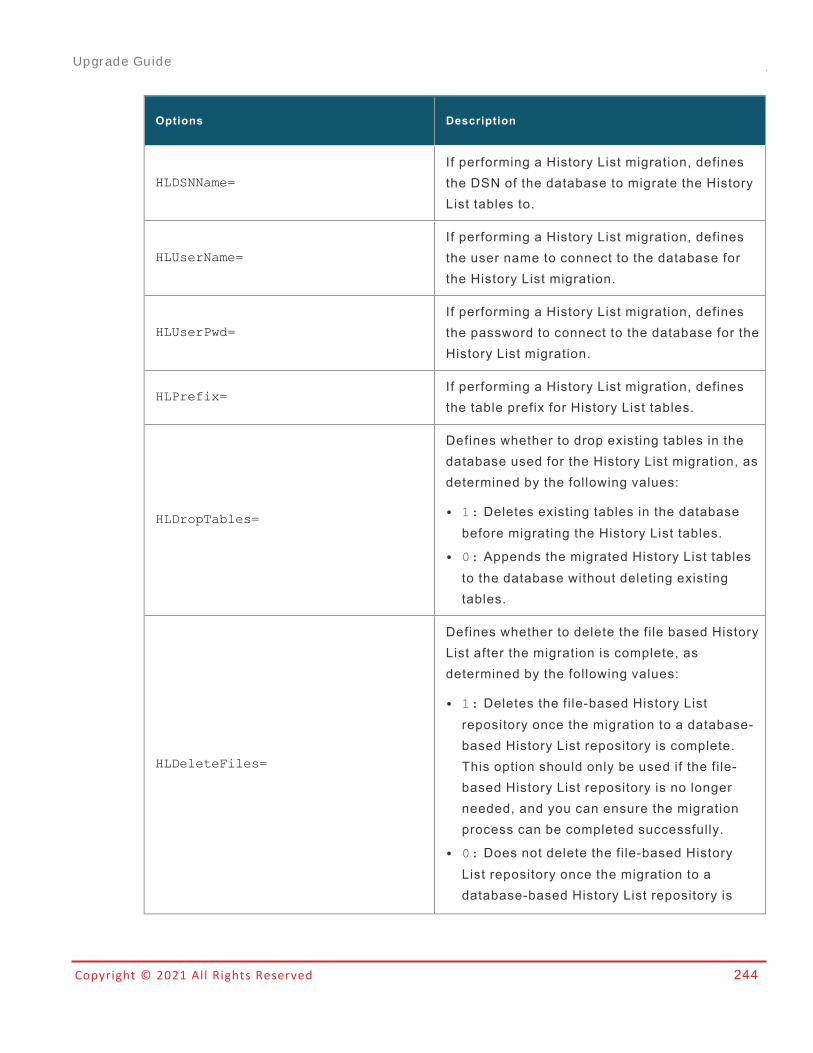
Copyright © 2021 All Rights Reserved 244
Options Description
HLDSNName=
If performing a History List migration, definesthe DSN of the database to migrate the HistoryList tables to.
HLUserName=
If performing a History List migration, definesthe user name to connect to the database forthe History List migration.
HLUserPwd=
If performing a History List migration, definesthe password to connect to the database for theHistory List migration.
HLPrefix=If performing a History List migration, definesthe table prefix for History List tables.
HLDropTables=
Defines whether to drop existing tables in thedatabase used for the History List migration, asdetermined by the following values:
l 1: Deletes existing tables in the databasebefore migrating the History List tables.
l 0: Appends the migrated History List tablesto the database without deleting existingtables.
HLDeleteFiles=
Defines whether to delete the file based HistoryList after the migration is complete, asdetermined by the following values:
l 1: Deletes the file-based History Listrepository once the migration to a database-based History List repository is complete.This option should only be used if the file-based History List repository is no longerneeded, and you can ensure the migrationprocess can be completed successfully.
l 0: Does not delete the file-based HistoryList repository once the migration to adatabase-based History List repository is
Upgrade Guide

Copyright © 2021 All Rights Reserved 245
Options Description
complete.
HLUseUTF8=
Defines whether UTF-8 encoding should beused for the History List migration on Windows,as determined by the following values:
l 1: Uses UTF-8 encoding for Windowsdrivers. This option should be used if yourdatabase and History List messages useUTF-8 encoding, and the Intelligence Serveris installed on Windows.
l 0: Does not use UTF-8 encoding.
HLUseUNIXUTF8=
Defines whether UTF-8 encoding should beused for the History List migration onUNIX/Linux, as determined by the followingvalues:
l 1: Uses UTF-8 encoding for UNIX/Linuxdrivers. This option should be used if yourdatabase and History List messages useUTF-8 encoding, and the Intelligence Serveris installed on UNIX or Linux.
l 0: Does not use UTF-8 encoding.
HLDB2zOSDBName=
Defines the database name to create or migrateHistory Lists stored in DB2 z/OS. This optionshould be used if connecting to a DB2 z/OSdatabase.
HLDB2zOSTableSpaceName=
Defines the table name to be used in thedatabase when creating or migrating theHistory List. This option should be used ifconnecting to a DB2 z/OS database.
ThreadNumber
If performing a History List repository upgradeto a hybrid History List, defines the number ofdatabase threads to use for the upgrade.
Upgrade Guide

Copyright © 2021 All Rights Reserved 246
Options Description
ProjectLogicalUpgrade=
Defines the projects to update their schedulesthat send reports and documents to caches,History Lists, and MicroStrategy Mobile assubscriptions. These subscriptions are part ofthe integrated subscription and deliveryfeatures in Intelligence Server 9.0 and laterversions. They provide the same ability to sendreports and documents to caches, HistoryLists, and MicroStrategy Mobile as theschedules in MicroStrategy pre-9.0.
This option also upgrades the reports andReport Services documents in the projects,which improves performance, reduces storagespace requirements, and ensures that graphsdisplay correctly in MicroStrategy Web 10 andDeveloper 10.
To upgrade multiple projects, you must enclosethe name of each project in curly braces {}and separate the names with a backslash \ .For example:
{Project1}\{Project2}\...\{ProjectN}
ScheduleUpdate=
Removed from 11.3.1
Defines the projects to upgrade their schedulesto the most recent version of MicroStrategy.
To upgrade multiple projects' schedules, youmust enclose the name of each project in curlybraces { } and separate the names with abackslash \ . For example:
{Project1}\{Project2}\...\{ProjectN}
MDXUpdate=
Removed from 11.3.1
Defines the projects to update their MDXsource objects (MDX cubes) that were createdin earlier versions of MicroStrategy to takeadvantage of increased performance and otherupdates.
Upgrade Guide
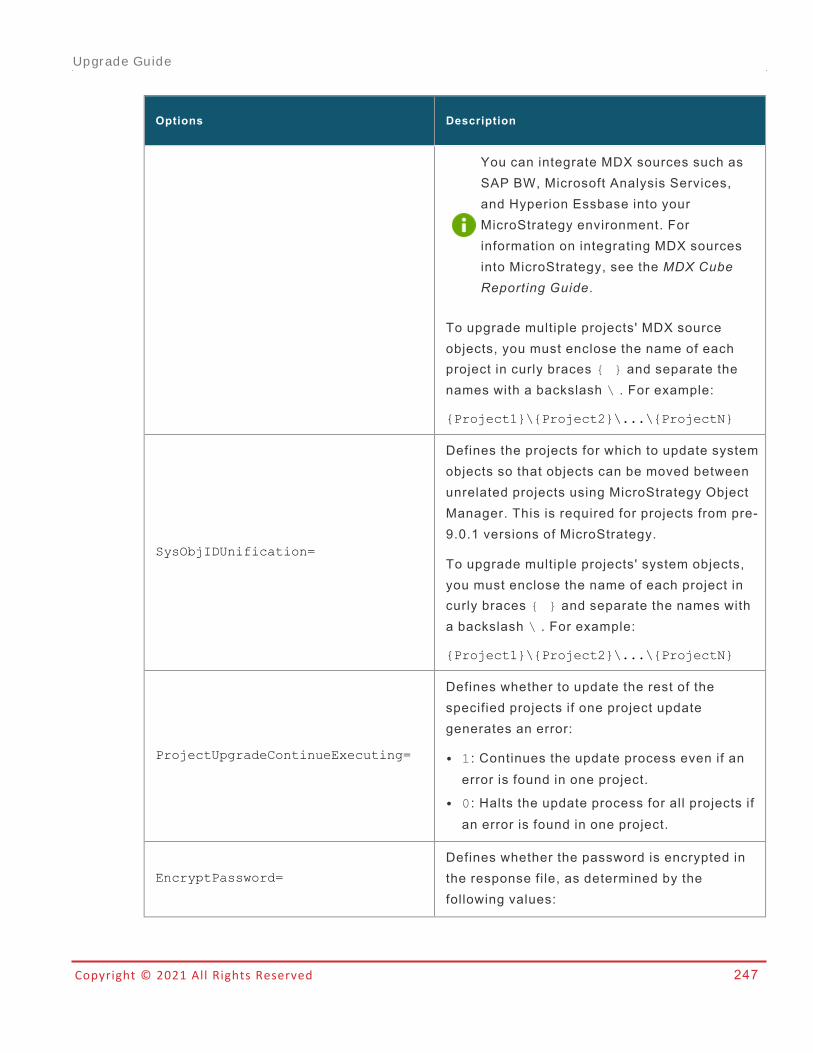
Copyright © 2021 All Rights Reserved 247
Options Description
You can integrate MDX sources such asSAP BW, Microsoft Analysis Services,and Hyperion Essbase into yourMicroStrategy environment. Forinformation on integrating MDX sourcesinto MicroStrategy, see the MDX CubeReporting Guide.
To upgrade multiple projects' MDX sourceobjects, you must enclose the name of eachproject in curly braces { } and separate thenames with a backslash \ . For example:
{Project1}\{Project2}\...\{ProjectN}
SysObjIDUnification=
Defines the projects for which to update systemobjects so that objects can be moved betweenunrelated projects using MicroStrategy ObjectManager. This is required for projects from pre-9.0.1 versions of MicroStrategy.
To upgrade multiple projects' system objects,you must enclose the name of each project incurly braces { } and separate the names witha backslash \ . For example:
{Project1}\{Project2}\...\{ProjectN}
ProjectUpgradeContinueExecuting=
Defines whether to update the rest of thespecified projects if one project updategenerates an error:
l 1: Continues the update process even if anerror is found in one project.
l 0: Halts the update process for all projects ifan error is found in one project.
EncryptPassword=
Defines whether the password is encrypted inthe response file, as determined by thefollowing values:
Upgrade Guide
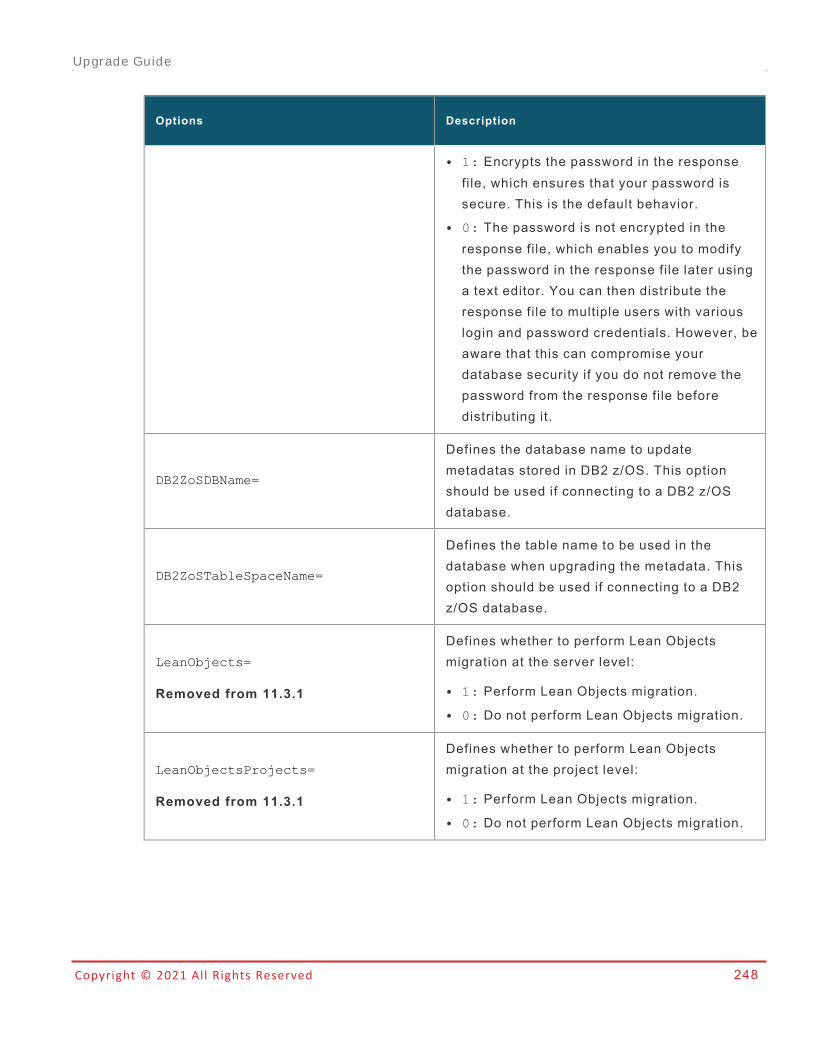
Copyright © 2021 All Rights Reserved 248
Options Description
l 1: Encrypts the password in the responsefile, which ensures that your password issecure. This is the default behavior.
l 0: The password is not encrypted in theresponse file, which enables you to modifythe password in the response file later usinga text editor. You can then distribute theresponse file to multiple users with variouslogin and password credentials. However, beaware that this can compromise yourdatabase security if you do not remove thepassword from the response file beforedistributing it.
DB2ZoSDBName=
Defines the database name to updatemetadatas stored in DB2 z/OS. This optionshould be used if connecting to a DB2 z/OSdatabase.
DB2ZoSTableSpaceName=
Defines the table name to be used in thedatabase when upgrading the metadata. Thisoption should be used if connecting to a DB2z/OS database.
LeanObjects=
Removed from 11.3.1
Defines whether to perform Lean Objectsmigration at the server level:
l 1: Perform Lean Objects migration.
l 0: Do not perform Lean Objects migration.
LeanObjectsProjects=
Removed from 11.3.1
Defines whether to perform Lean Objectsmigration at the project level:
l 1: Perform Lean Objects migration.
l 0: Do not perform Lean Objects migration.
Upgrade Guide
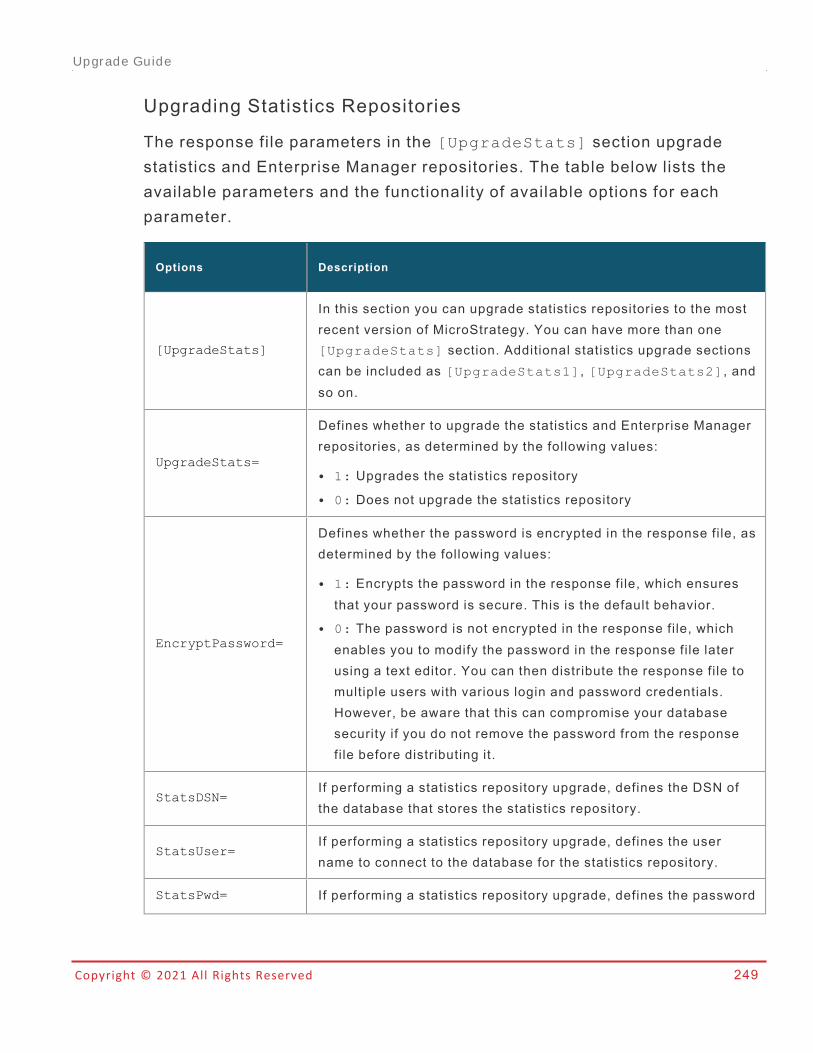
Copyright © 2021 All Rights Reserved 249
Upgrading Statistics Repositories
The response file parameters in the [UpgradeStats] section upgradestatistics and Enterprise Manager repositories. The table below lists theavailable parameters and the functionality of available options for eachparameter.
Options Description
[UpgradeStats]
In this section you can upgrade statistics repositories to the mostrecent version of MicroStrategy. You can have more than one[UpgradeStats] section. Additional statistics upgrade sectionscan be included as [UpgradeStats1], [UpgradeStats2], andso on.
UpgradeStats=
Defines whether to upgrade the statistics and Enterprise Managerrepositories, as determined by the following values:
l 1: Upgrades the statistics repository
l 0: Does not upgrade the statistics repository
EncryptPassword=
Defines whether the password is encrypted in the response file, asdetermined by the following values:
l 1: Encrypts the password in the response file, which ensuresthat your password is secure. This is the default behavior.
l 0: The password is not encrypted in the response file, whichenables you to modify the password in the response file laterusing a text editor. You can then distribute the response file tomultiple users with various login and password credentials.However, be aware that this can compromise your databasesecurity if you do not remove the password from the responsefile before distributing it.
StatsDSN=If performing a statistics repository upgrade, defines the DSN ofthe database that stores the statistics repository.
StatsUser=If performing a statistics repository upgrade, defines the username to connect to the database for the statistics repository.
StatsPwd= If performing a statistics repository upgrade, defines the password
Upgrade Guide
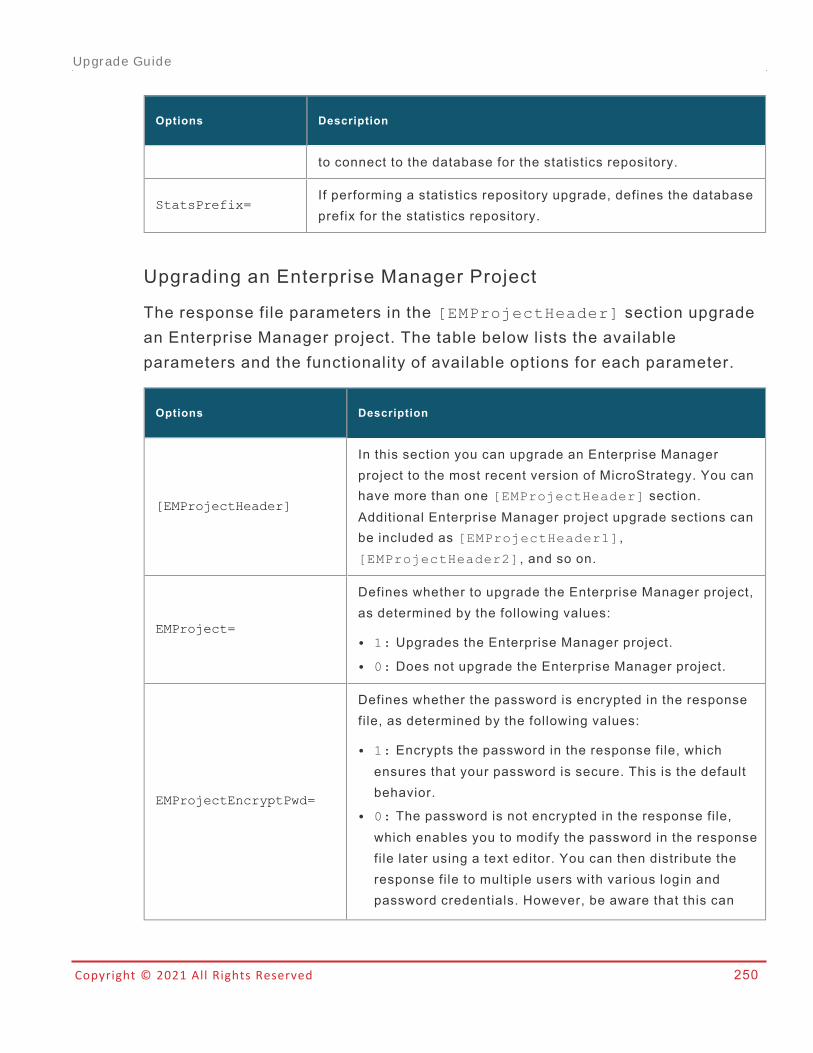
Copyright © 2021 All Rights Reserved 250
Options Description
to connect to the database for the statistics repository.
StatsPrefix=If performing a statistics repository upgrade, defines the databaseprefix for the statistics repository.
Upgrading an Enterprise Manager Project
The response file parameters in the [EMProjectHeader] section upgradean Enterprise Manager project. The table below lists the availableparameters and the functionality of available options for each parameter.
Options Description
[EMProjectHeader]
In this section you can upgrade an Enterprise Managerproject to the most recent version of MicroStrategy. You canhave more than one [EMProjectHeader] section.Additional Enterprise Manager project upgrade sections canbe included as [EMProjectHeader1],[EMProjectHeader2], and so on.
EMProject=
Defines whether to upgrade the Enterprise Manager project,as determined by the following values:
l 1: Upgrades the Enterprise Manager project.
l 0: Does not upgrade the Enterprise Manager project.
EMProjectEncryptPwd=
Defines whether the password is encrypted in the responsefile, as determined by the following values:
l 1: Encrypts the password in the response file, whichensures that your password is secure. This is the defaultbehavior.
l 0: The password is not encrypted in the response file,which enables you to modify the password in the responsefile later using a text editor. You can then distribute theresponse file to multiple users with various login andpassword credentials. However, be aware that this can
Upgrade Guide
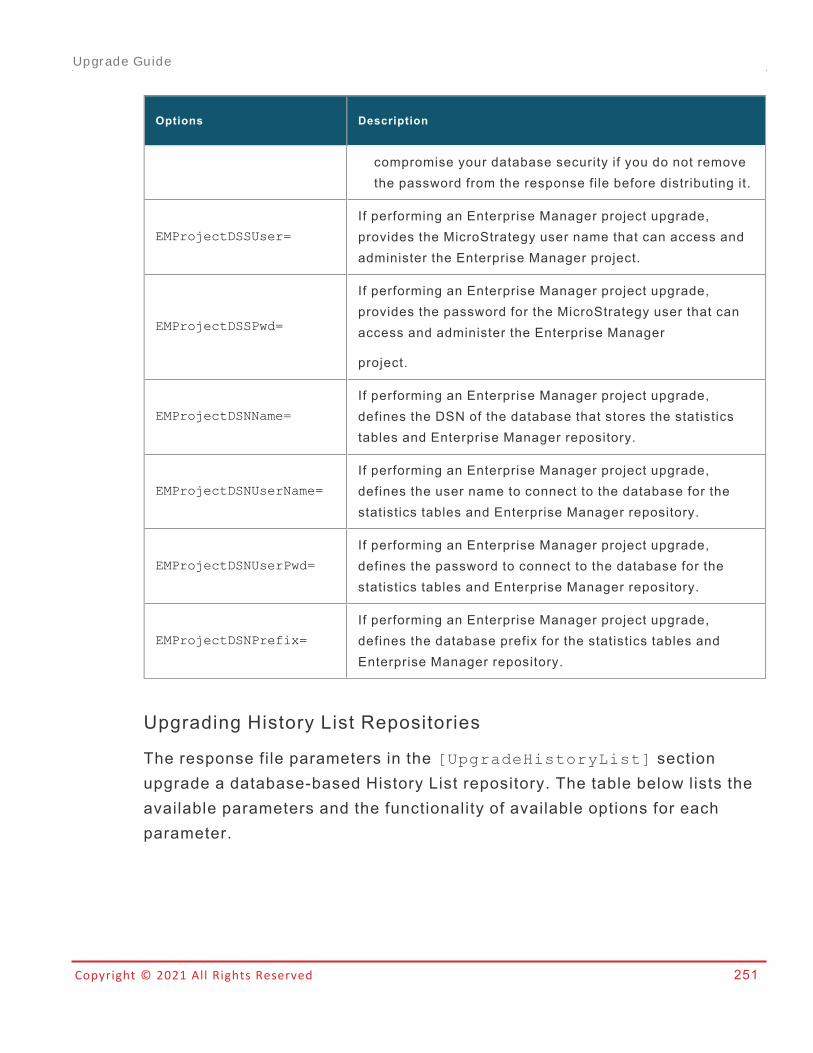
Copyright © 2021 All Rights Reserved 251
Options Description
compromise your database security if you do not removethe password from the response file before distributing it.
EMProjectDSSUser=
If performing an Enterprise Manager project upgrade,provides the MicroStrategy user name that can access andadminister the Enterprise Manager project.
EMProjectDSSPwd=
If performing an Enterprise Manager project upgrade,provides the password for the MicroStrategy user that canaccess and administer the Enterprise Manager
project.
EMProjectDSNName=
If performing an Enterprise Manager project upgrade,defines the DSN of the database that stores the statisticstables and Enterprise Manager repository.
EMProjectDSNUserName=
If performing an Enterprise Manager project upgrade,defines the user name to connect to the database for thestatistics tables and Enterprise Manager repository.
EMProjectDSNUserPwd=
If performing an Enterprise Manager project upgrade,defines the password to connect to the database for thestatistics tables and Enterprise Manager repository.
EMProjectDSNPrefix=
If performing an Enterprise Manager project upgrade,defines the database prefix for the statistics tables andEnterprise Manager repository.
Upgrading History List Repositories
The response file parameters in the [UpgradeHistoryList] sectionupgrade a database-based History List repository. The table below lists theavailable parameters and the functionality of available options for eachparameter.
Upgrade Guide
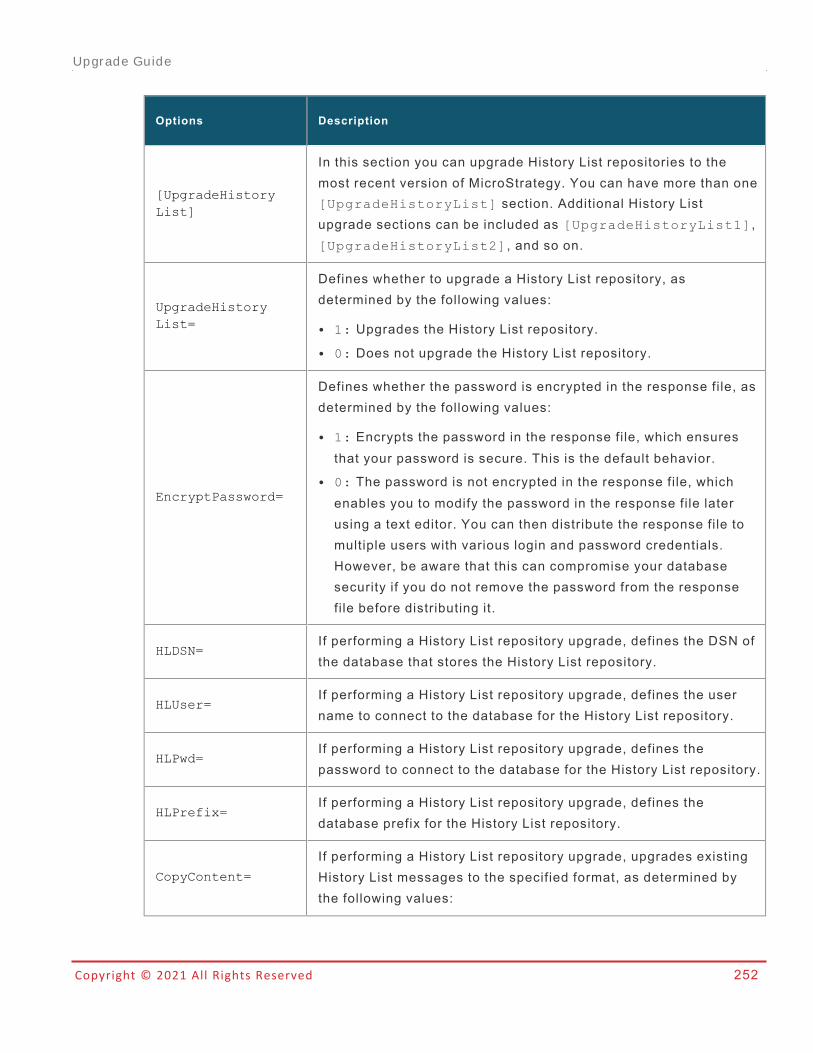
Copyright © 2021 All Rights Reserved 252
Options Description
[UpgradeHistoryList]
In this section you can upgrade History List repositories to themost recent version of MicroStrategy. You can have more than one[UpgradeHistoryList] section. Additional History Listupgrade sections can be included as [UpgradeHistoryList1],[UpgradeHistoryList2], and so on.
UpgradeHistoryList=
Defines whether to upgrade a History List repository, asdetermined by the following values:
l 1: Upgrades the History List repository.
l 0: Does not upgrade the History List repository.
EncryptPassword=
Defines whether the password is encrypted in the response file, asdetermined by the following values:
l 1: Encrypts the password in the response file, which ensuresthat your password is secure. This is the default behavior.
l 0: The password is not encrypted in the response file, whichenables you to modify the password in the response file laterusing a text editor. You can then distribute the response file tomultiple users with various login and password credentials.However, be aware that this can compromise your databasesecurity if you do not remove the password from the responsefile before distributing it.
HLDSN=If performing a History List repository upgrade, defines the DSN ofthe database that stores the History List repository.
HLUser=If performing a History List repository upgrade, defines the username to connect to the database for the History List repository.
HLPwd=If performing a History List repository upgrade, defines thepassword to connect to the database for the History List repository.
HLPrefix=If performing a History List repository upgrade, defines thedatabase prefix for the History List repository.
CopyContent=
If performing a History List repository upgrade, upgrades existingHistory List messages to the specified format, as determined bythe following values:
Upgrade Guide
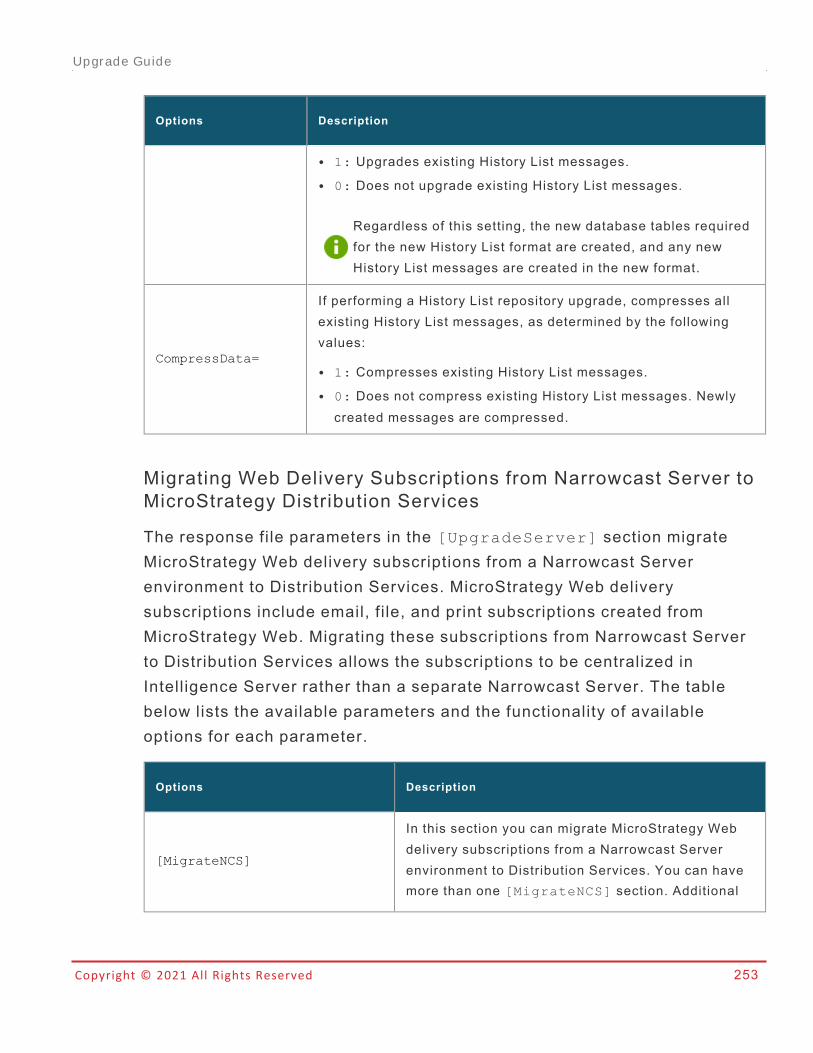
Copyright © 2021 All Rights Reserved 253
Options Description
l 1: Upgrades existing History List messages.
l 0: Does not upgrade existing History List messages.
Regardless of this setting, the new database tables requiredfor the new History List format are created, and any newHistory List messages are created in the new format.
CompressData=
If performing a History List repository upgrade, compresses allexisting History List messages, as determined by the followingvalues:
l 1: Compresses existing History List messages.
l 0: Does not compress existing History List messages. Newlycreated messages are compressed.
Migrating Web Delivery Subscriptions from Narrowcast Server toMicroStrategy Distribution Services
The response file parameters in the [UpgradeServer] section migrateMicroStrategy Web delivery subscriptions from a Narrowcast Serverenvironment to Distribution Services. MicroStrategy Web deliverysubscriptions include email, fi le, and print subscriptions created fromMicroStrategy Web. Migrating these subscriptions from Narrowcast Serverto Distribution Services allows the subscriptions to be centralized inIntelligence Server rather than a separate Narrowcast Server. The tablebelow lists the available parameters and the functionality of availableoptions for each parameter.
Options Description
[MigrateNCS]
In this section you can migrate MicroStrategy Webdelivery subscriptions from a Narrowcast Serverenvironment to Distribution Services. You can havemore than one [MigrateNCS] section. Additional
Upgrade Guide
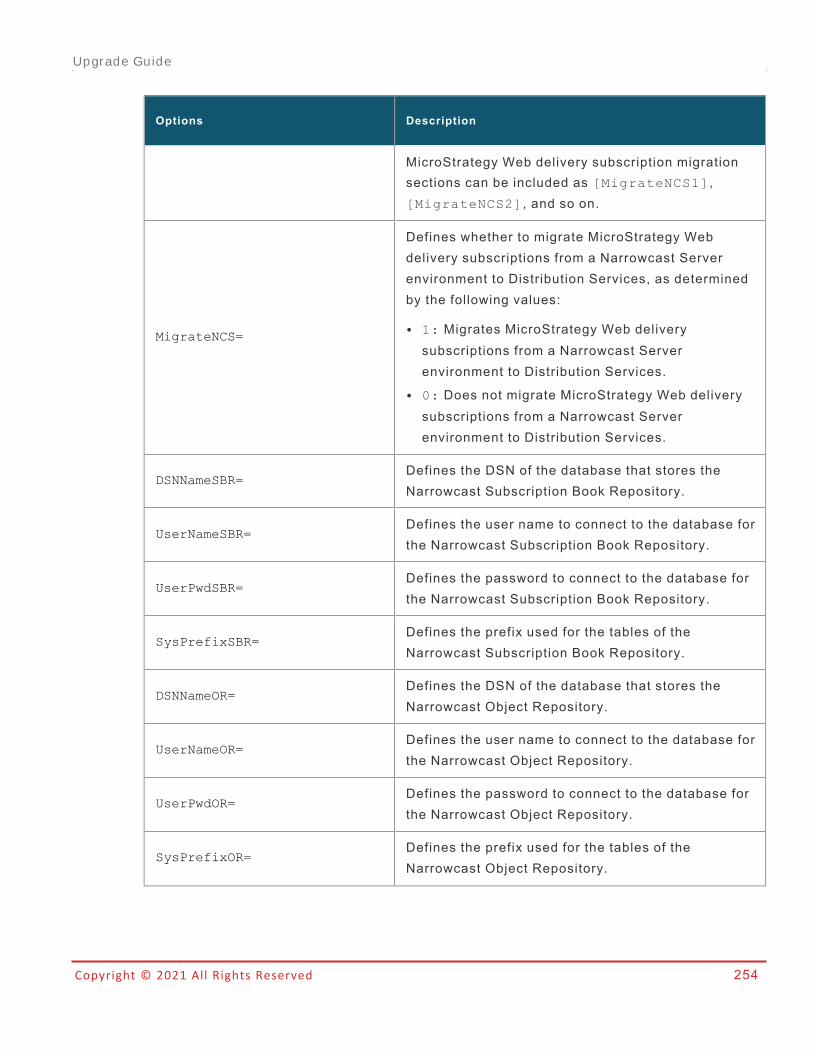
Copyright © 2021 All Rights Reserved 254
Options Description
MicroStrategy Web delivery subscription migrationsections can be included as [MigrateNCS1],[MigrateNCS2], and so on.
MigrateNCS=
Defines whether to migrate MicroStrategy Webdelivery subscriptions from a Narrowcast Serverenvironment to Distribution Services, as determinedby the following values:
l 1: Migrates MicroStrategy Web deliverysubscriptions from a Narrowcast Serverenvironment to Distribution Services.
l 0: Does not migrate MicroStrategy Web deliverysubscriptions from a Narrowcast Serverenvironment to Distribution Services.
DSNNameSBR=Defines the DSN of the database that stores theNarrowcast Subscription Book Repository.
UserNameSBR=Defines the user name to connect to the database forthe Narrowcast Subscription Book Repository.
UserPwdSBR=Defines the password to connect to the database forthe Narrowcast Subscription Book Repository.
SysPrefixSBR=Defines the prefix used for the tables of theNarrowcast Subscription Book Repository.
DSNNameOR=Defines the DSN of the database that stores theNarrowcast Object Repository.
UserNameOR=Defines the user name to connect to the database forthe Narrowcast Object Repository.
UserPwdOR=Defines the password to connect to the database forthe Narrowcast Object Repository.
SysPrefixOR=Defines the prefix used for the tables of theNarrowcast Object Repository.
Upgrade Guide
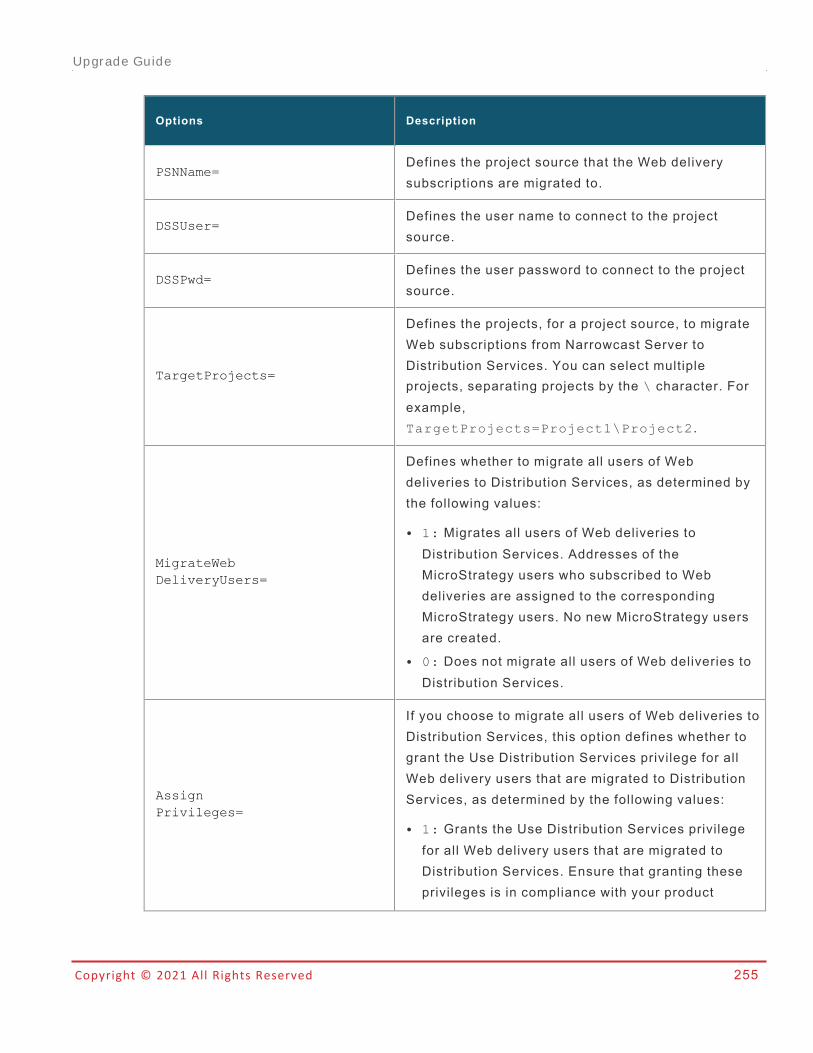
Copyright © 2021 All Rights Reserved 255
Options Description
PSNName=Defines the project source that the Web deliverysubscriptions are migrated to.
DSSUser=Defines the user name to connect to the projectsource.
DSSPwd=Defines the user password to connect to the projectsource.
TargetProjects=
Defines the projects, for a project source, to migrateWeb subscriptions from Narrowcast Server toDistribution Services. You can select multipleprojects, separating projects by the \ character. Forexample,TargetProjects=Project1\Project2.
MigrateWebDeliveryUsers=
Defines whether to migrate all users of Webdeliveries to Distribution Services, as determined bythe following values:
l 1: Migrates all users of Web deliveries toDistribution Services. Addresses of theMicroStrategy users who subscribed to Webdeliveries are assigned to the correspondingMicroStrategy users. No new MicroStrategy usersare created.
l 0: Does not migrate all users of Web deliveries toDistribution Services.
AssignPrivileges=
If you choose to migrate all users of Web deliveries toDistribution Services, this option defines whether togrant the Use Distribution Services privilege for allWeb delivery users that are migrated to DistributionServices, as determined by the following values:
l 1: Grants the Use Distribution Services privilegefor all Web delivery users that are migrated toDistribution Services. Ensure that granting theseprivileges is in compliance with your product
Upgrade Guide
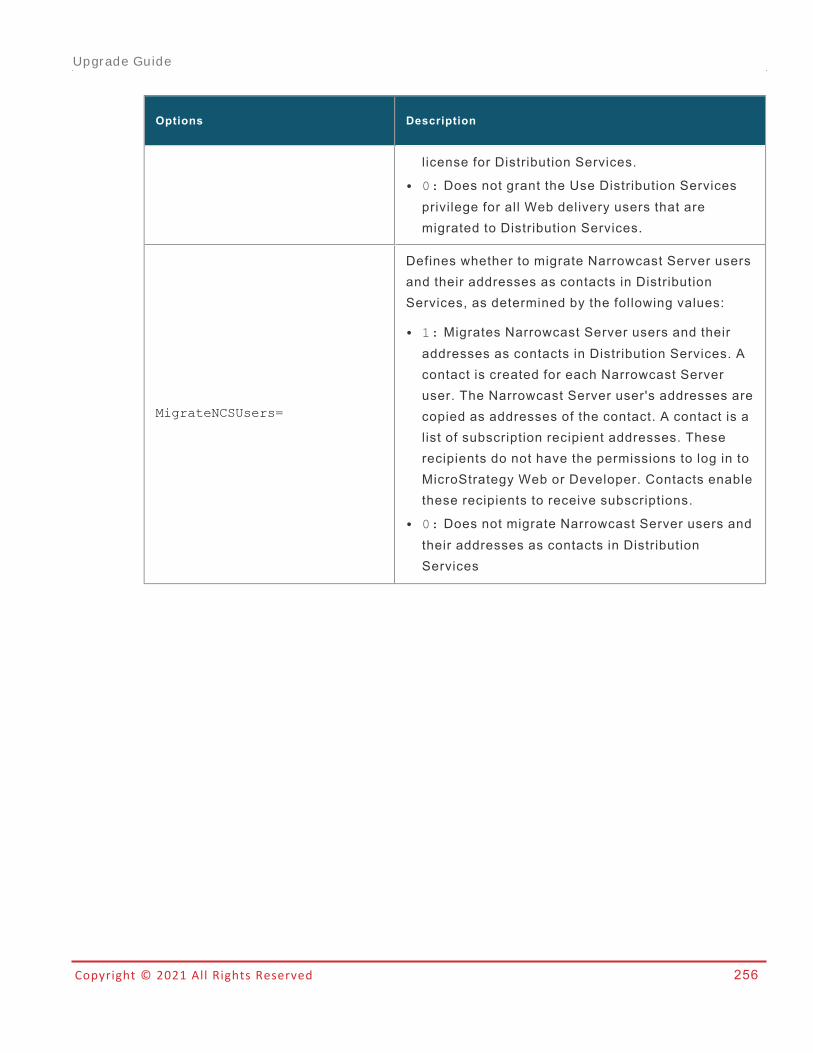
Copyright © 2021 All Rights Reserved 256
Options Description
l icense for Distribution Services.l 0: Does not grant the Use Distribution Services
privilege for all Web delivery users that aremigrated to Distribution Services.
MigrateNCSUsers=
Defines whether to migrate Narrowcast Server usersand their addresses as contacts in DistributionServices, as determined by the following values:
l 1: Migrates Narrowcast Server users and theiraddresses as contacts in Distribution Services. Acontact is created for each Narrowcast Serveruser. The Narrowcast Server user's addresses arecopied as addresses of the contact. A contact is alist of subscription recipient addresses. Theserecipients do not have the permissions to log in toMicroStrategy Web or Developer. Contacts enablethese recipients to receive subscriptions.
l 0: Does not migrate Narrowcast Server users andtheir addresses as contacts in DistributionServices
Upgrade Guide
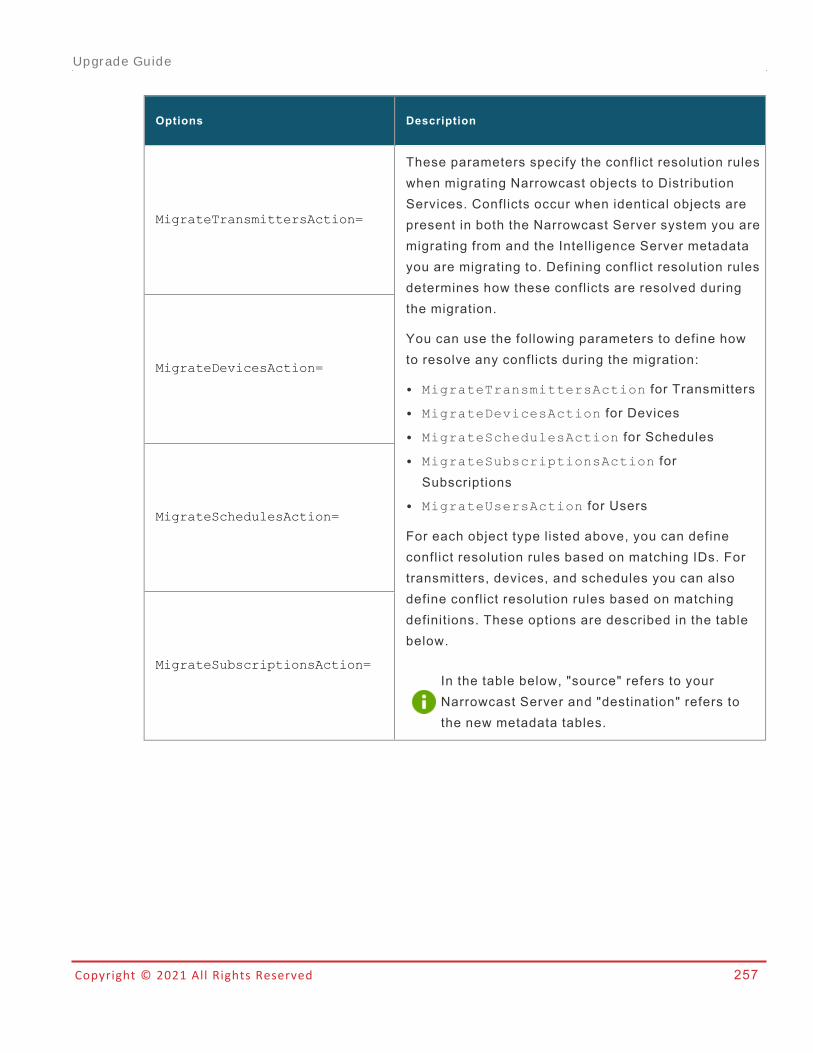
Copyright © 2021 All Rights Reserved 257
Options Description
MigrateTransmittersAction=
These parameters specify the conflict resolution ruleswhen migrating Narrowcast objects to DistributionServices. Conflicts occur when identical objects arepresent in both the Narrowcast Server system you aremigrating from and the Intelligence Server metadatayou are migrating to. Defining conflict resolution rulesdetermines how these conflicts are resolved duringthe migration.
You can use the following parameters to define howto resolve any conflicts during the migration:
l MigrateTransmittersAction for Transmitters
l MigrateDevicesAction for Devices
l MigrateSchedulesAction for Schedules
l MigrateSubscriptionsAction forSubscriptions
l MigrateUsersAction for Users
For each object type listed above, you can defineconflict resolution rules based on matching IDs. Fortransmitters, devices, and schedules you can alsodefine conflict resolution rules based on matchingdefinitions. These options are described in the tablebelow.
In the table below, "source" refers to yourNarrowcast Server and "destination" refers tothe new metadata tables.
MigrateDevicesAction=
MigrateSchedulesAction=
MigrateSubscriptionsAction=
Upgrade Guide
Copyright © 2021 All Rights Reserved 258
Options Description
MigrateUsersAction=
Upgrade Guide
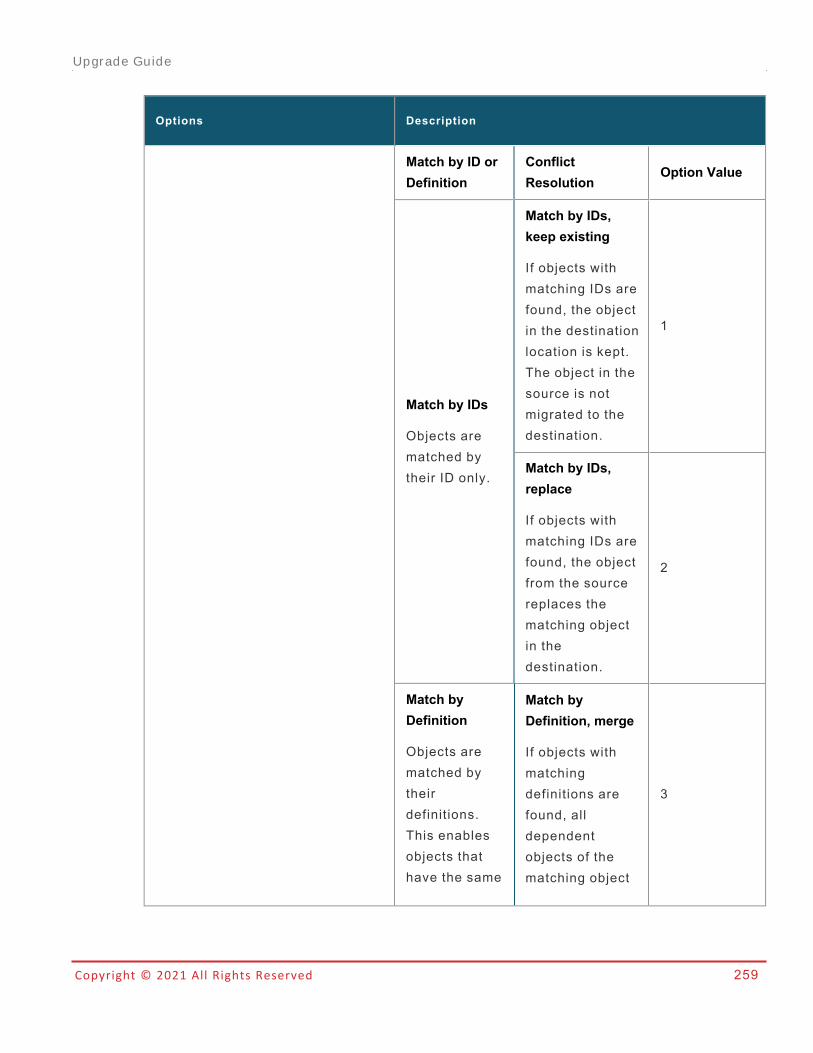
Copyright © 2021 All Rights Reserved 259
Options Description
Match by ID orDefinition
ConflictResolution
Option Value
Match by IDs
Objects arematched bytheir ID only.
Match by IDs,keep existing
If objects withmatching IDs arefound, the objectin the destinationlocation is kept.The object in thesource is notmigrated to thedestination.
1
Match by IDs,replace
If objects withmatching IDs arefound, the objectfrom the sourcereplaces thematching objectin thedestination.
2
Match byDefinition
Objects arematched bytheirdefinitions.This enablesobjects thathave the same
Match byDefinition, merge
If objects withmatchingdefinitions arefound, alldependentobjects of thematching object
3
Upgrade Guide
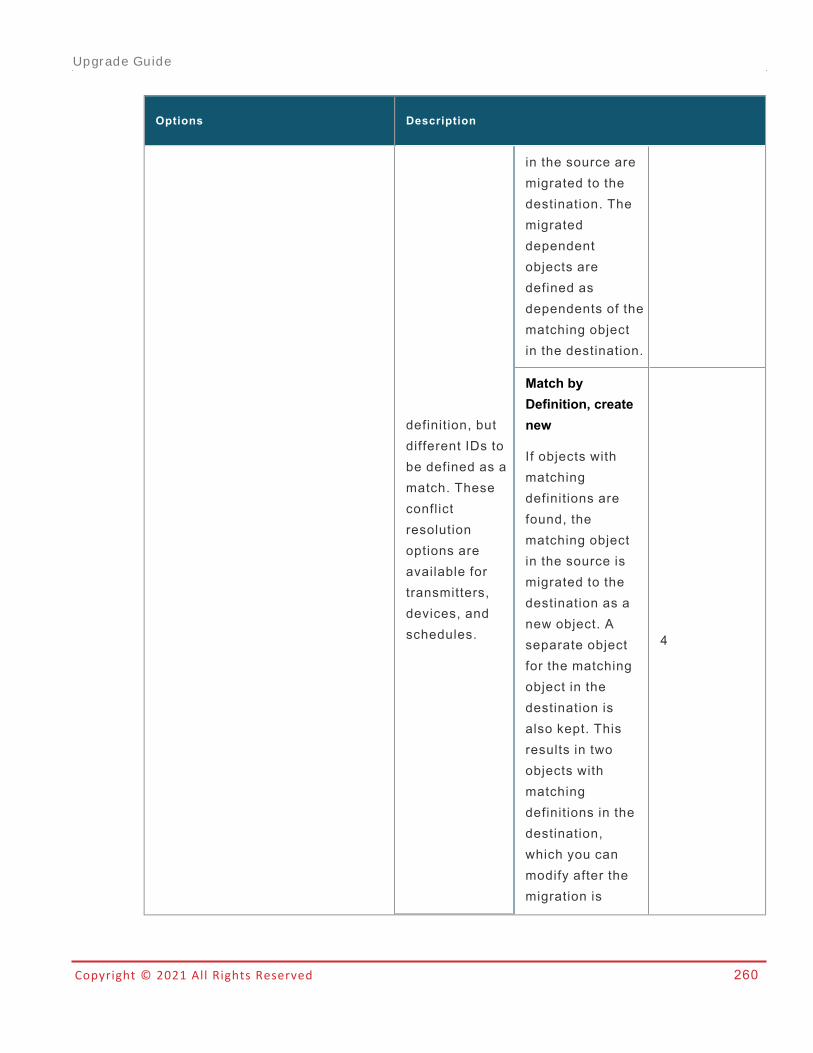
Copyright © 2021 All Rights Reserved 260
Options Description
definition, butdifferent IDs tobe defined as amatch. Theseconflictresolutionoptions areavailable fortransmitters,devices, andschedules.
in the source aremigrated to thedestination. Themigrateddependentobjects aredefined asdependents of thematching objectin the destination.
Match byDefinition, createnew
If objects withmatchingdefinitions arefound, thematching objectin the source ismigrated to thedestination as anew object. Aseparate objectfor the matchingobject in thedestination isalso kept. Thisresults in twoobjects withmatchingdefinitions in thedestination,which you canmodify after themigration is
4
Upgrade Guide
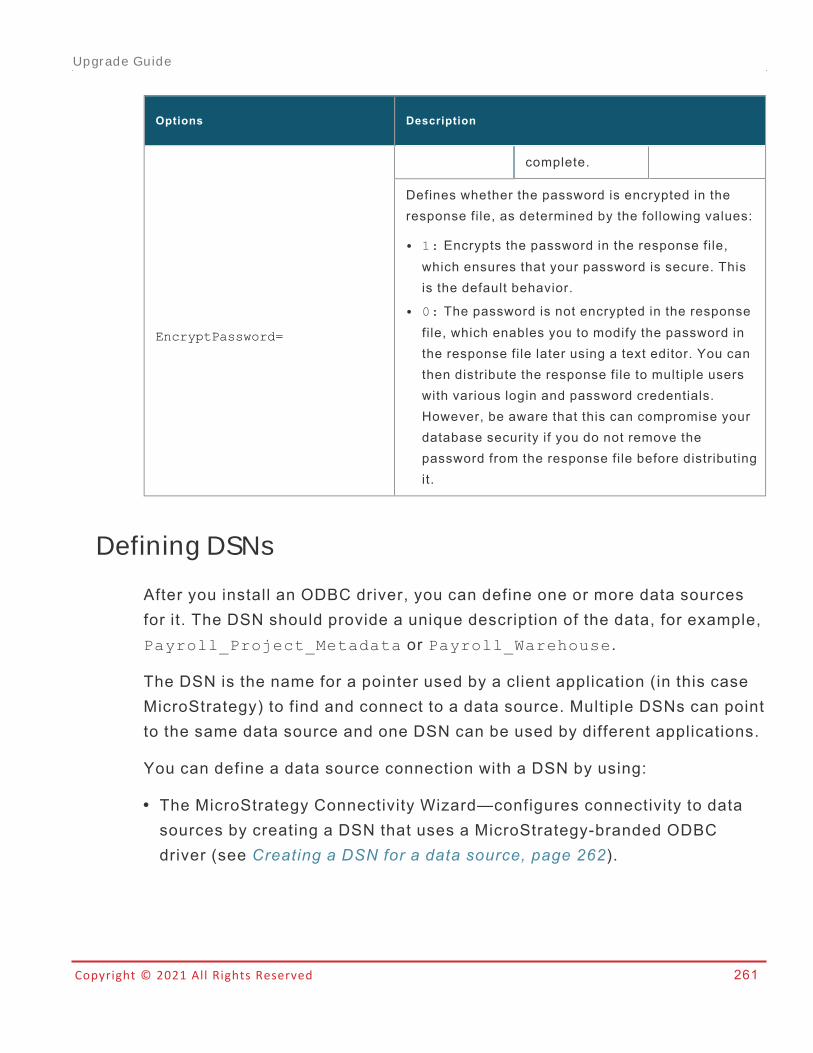
Copyright © 2021 All Rights Reserved 261
Options Description
complete.
EncryptPassword=
Defines whether the password is encrypted in theresponse file, as determined by the following values:
l 1: Encrypts the password in the response file,which ensures that your password is secure. Thisis the default behavior.
l 0: The password is not encrypted in the responsefile, which enables you to modify the password inthe response file later using a text editor. You canthen distribute the response file to multiple userswith various login and password credentials.However, be aware that this can compromise yourdatabase security if you do not remove thepassword from the response file before distributingit.
Defining DSNs
After you install an ODBC driver, you can define one or more data sourcesfor it. The DSN should provide a unique description of the data, for example,Payroll_Project_Metadata or Payroll_Warehouse.
The DSN is the name for a pointer used by a client application (in this caseMicroStrategy) to find and connect to a data source. Multiple DSNs can pointto the same data source and one DSN can be used by different applications.
You can define a data source connection with a DSN by using:
l The MicroStrategy Connectivity Wizard—configures connectivity to datasources by creating a DSN that uses a MicroStrategy-branded ODBCdriver (see Creating a DSN for a data source, page 262).
Upgrade Guide
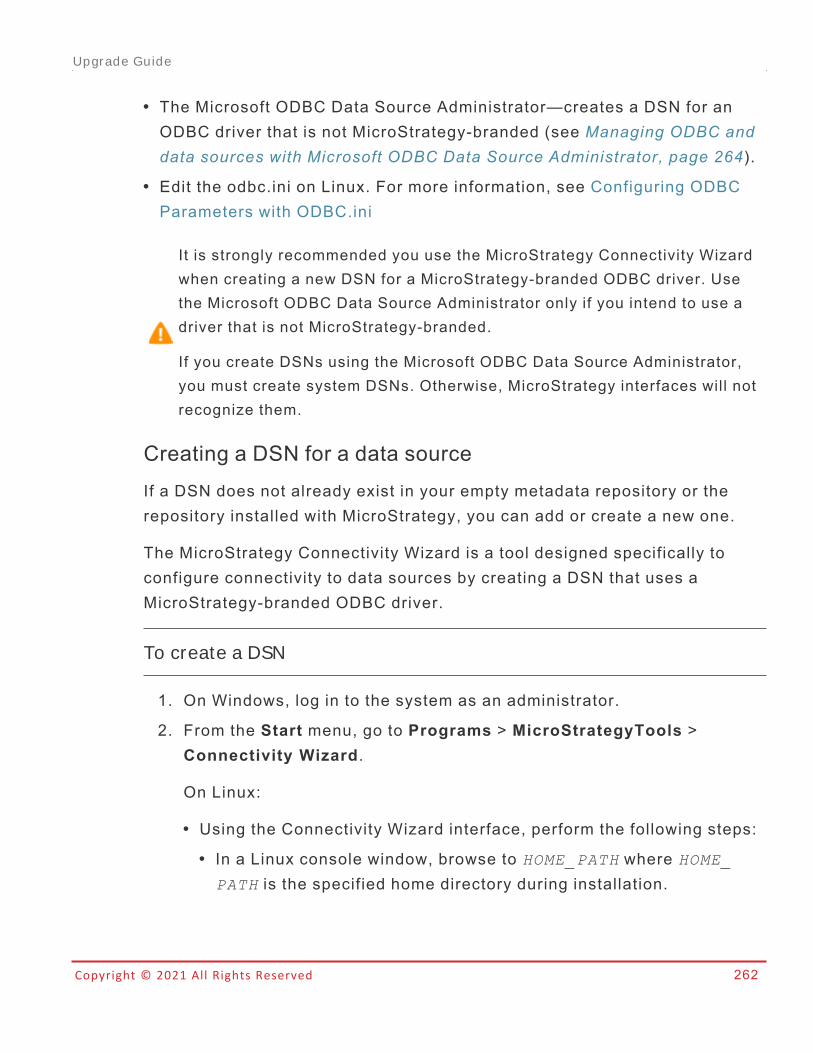
Copyright © 2021 All Rights Reserved 262
l The Microsoft ODBC Data Source Administrator—creates a DSN for anODBC driver that is not MicroStrategy-branded (see Managing ODBC anddata sources with Microsoft ODBC Data Source Administrator, page 264).
l Edit the odbc.ini on Linux. For more information, see Configuring ODBCParameters with ODBC.ini
It is strongly recommended you use the MicroStrategy Connectivity Wizardwhen creating a new DSN for a MicroStrategy-branded ODBC driver. Usethe Microsoft ODBC Data Source Administrator only if you intend to use adriver that is not MicroStrategy-branded.
If you create DSNs using the Microsoft ODBC Data Source Administrator,you must create system DSNs. Otherwise, MicroStrategy interfaces will notrecognize them.
Creating a DSN for a data sourceIf a DSN does not already exist in your empty metadata repository or therepository installed with MicroStrategy, you can add or create a new one.
The MicroStrategy Connectivity Wizard is a tool designed specifically toconfigure connectivity to data sources by creating a DSN that uses aMicroStrategy-branded ODBC driver.
To create a DSN
1. On Windows, log in to the system as an administrator.
2. From the Start menu, go to Programs > MicroStrategyTools >Connectivity Wizard.
On Linux:
l Using the Connectivity Wizard interface, perform the following steps:l In a Linux console window, browse to HOME_PATH where HOME_
PATH is the specified home directory during installation.
Upgrade Guide
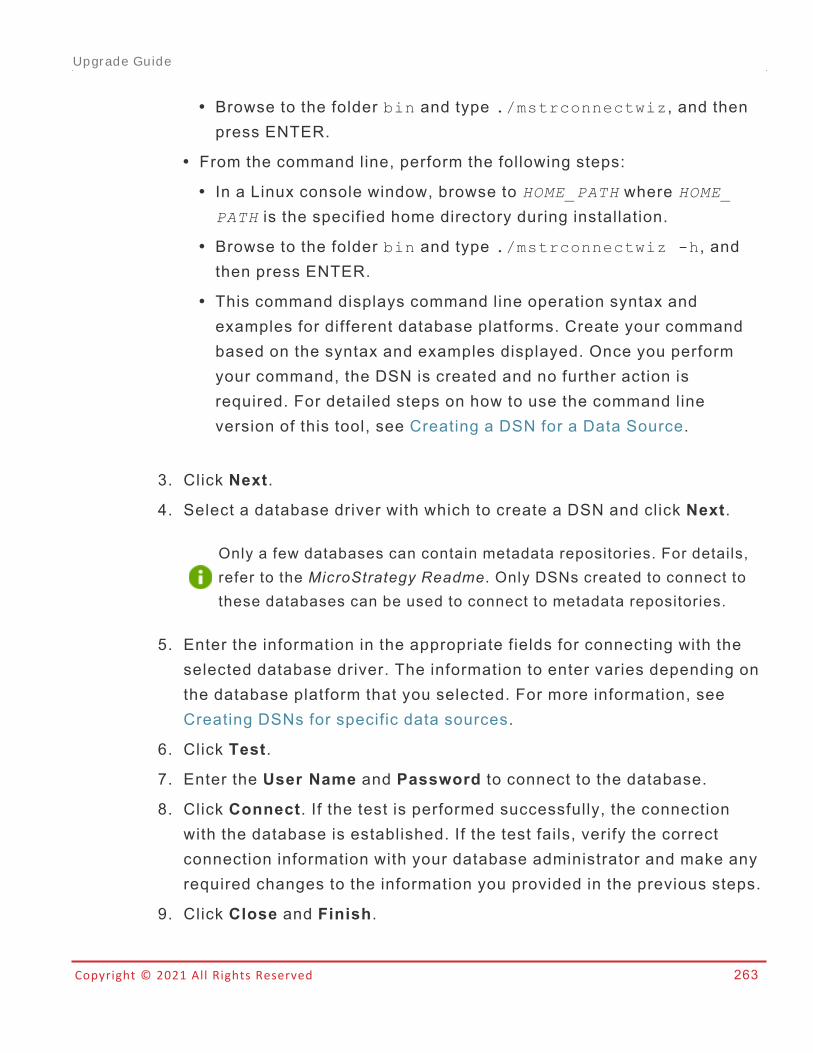
Copyright © 2021 All Rights Reserved 263
l Browse to the folder bin and type ./mstrconnectwiz, and thenpress ENTER.
l From the command line, perform the following steps:l In a Linux console window, browse to HOME_PATH where HOME_
PATH is the specified home directory during installation.l Browse to the folder bin and type ./mstrconnectwiz -h, andthen press ENTER.
l This command displays command line operation syntax andexamples for different database platforms. Create your commandbased on the syntax and examples displayed. Once you performyour command, the DSN is created and no further action isrequired. For detailed steps on how to use the command lineversion of this tool, see Creating a DSN for a Data Source.
3. Click Next.
4. Select a database driver with which to create a DSN and click Next.
Only a few databases can contain metadata repositories. For details,refer to the MicroStrategy Readme. Only DSNs created to connect tothese databases can be used to connect to metadata repositories.
5. Enter the information in the appropriate fields for connecting with theselected database driver. The information to enter varies depending onthe database platform that you selected. For more information, seeCreating DSNs for specific data sources.
6. Click Test.
7. Enter the User Name and Password to connect to the database.
8. Click Connect. If the test is performed successfully, the connectionwith the database is established. If the test fails, verify the correctconnection information with your database administrator and make anyrequired changes to the information you provided in the previous steps.
9. Click Close and Finish.
Upgrade Guide
Copyright © 2021 All Rights Reserved 264
If you already have an existing DSN with the same name as the one youprovided, a message box appears. You have the following options:
• Select Yes to make sure the DSN points to the location you areexpecting. This overwrites the existing DSN.
• Select No to save the DSN with a different name.
Repeat the above steps to create as many DSNs as you require. At aminimum, create one for your metadata and one for your warehouse.
Managing ODBC and data sources with Microsoft ODBC DataSource AdministratorThe Microsoft ODBC Data Source Administrator manages database driversand data sources on Windows. The Microsoft ODBC Data SourceAdministrator util ity creates a log with which to trace calls to data sourcesand to view, create, and edit DSNs. The util ity is available from Microsoftand is usually included with the purchase of an ODBC driver.
l It is strongly recommended that you use the Connectivity Wizard whencreating a new DSN for a MicroStrategy-branded ODBC Driver. Use theMicrosoft ODBC Data Source Administrator only if you intend to use a non-MicroStrategy driver.
l If you choose to create DSNs using the Microsoft ODBC Data SourceAdministrator, they must be system DSNs. Otherwise, MicroStrategyinterfaces cannot recognize them.
To create a DSN using the Microsoft ODBC Data Source Administrator
1. Log in to the machine as an administrator. This gives you the ability tocreate a system-wide DSN, rather than a user-specific DSN.
2. In most Windows systems you can access the ODBC Data SourceAdministrator from the Control Panel. Refer to your third-partyMicrosoft documentation for steps to access the ODBC Data SourceAdministrator tool.
Upgrade Guide
Copyright © 2021 All Rights Reserved 265
3. Click the System DSN tab.
To view all the installed ODBC drivers, click the Drivers tab.
4. Click Add.
5. Select the desired driver and click Finish.
We recommended that you select a MicroStrategy ODBC driver. Thesedrivers, whose names start with MicroStrategy, were installed whenyou installed the MicroStrategy application on the computer.
6. Enter the information in the appropriate fields to create a data sourcefor the selected database driver.
The information to enter varies depending on the database platformthat you selected, which is discussed in Creating DSNs for specific datasources.
7. Click OK.
Specifying Warehouse Connection Information
A database instance is a MicroStrategy object, created in MicroStrategyDeveloper by an administrator, that represents a connection to a datasource. A database instance specifies connection information, such as thedata source name, Login ID and password, and other data source specificinformation.
The steps to create the required components of a database instance areprovided in the following sections: Creating a database instance, page 270,Creating a database connection, page 274, and Creating a database login,page 280.
When a project architect creates a project, the architect assigns a databaseinstance to that project. A project specifies only one warehouse databaseinstance at a time, but a database instance can be assigned to multiple
Upgrade Guide
Copyright © 2021 All Rights Reserved 266
projects. Since only one data source can be included in the project'srelational schema, all reports and documents return information from asingle data source.
If you have a license for the MultiSource Option feature, you can connect aproject to multiple warehouse database instances. There can be multipledata sources that connect to the Warehouse Catalog for the project. Sincethese data source can be integrated as part of the project's relationalschema, all reports and documents can return information from multiple datasources. For information on accessing multiple data sources in a project,see the Project Design Help.
Regardless of whether you have a license for the MultiSource Option, youcan also extend a project's access to multiple data sources through otherMicroStrategy features. Freeform SQL, Query Builder, and supportingaccess through MicroStrategy to other MDX cube sources such as SAP BW,Oracle Essbase, and Microsoft Analysis Services allows non-projectdatabase instances to be included and used in a project along with thewarehouse database instances. For information on Freeform SQL and QueryBuilder, see the Advanced Reporting Help. For information on MDX cubesources, see the MDX Cube Reporting Help
These non-project database instances can allow a project to connect to thedata sources for the various features and additional data sources mentionedabove, instead of accessing the data from the project's relational schema.For more information on the Warehouse Catalog, see the Project DesignHelp.
SQL data warehouses database instancesA SQL data warehouse database instance is any database instance thatconnects to a database or other data source through SQL queries. Morespecifically, this covers database instances used for standard MicroStrategyreporting, Freeform SQL, Query Builder, data marts, and any other relationaldata source. You can also connect to History List and statistics tablesthrough SQL data warehouse database instances. The SQL data warehouse
Upgrade Guide
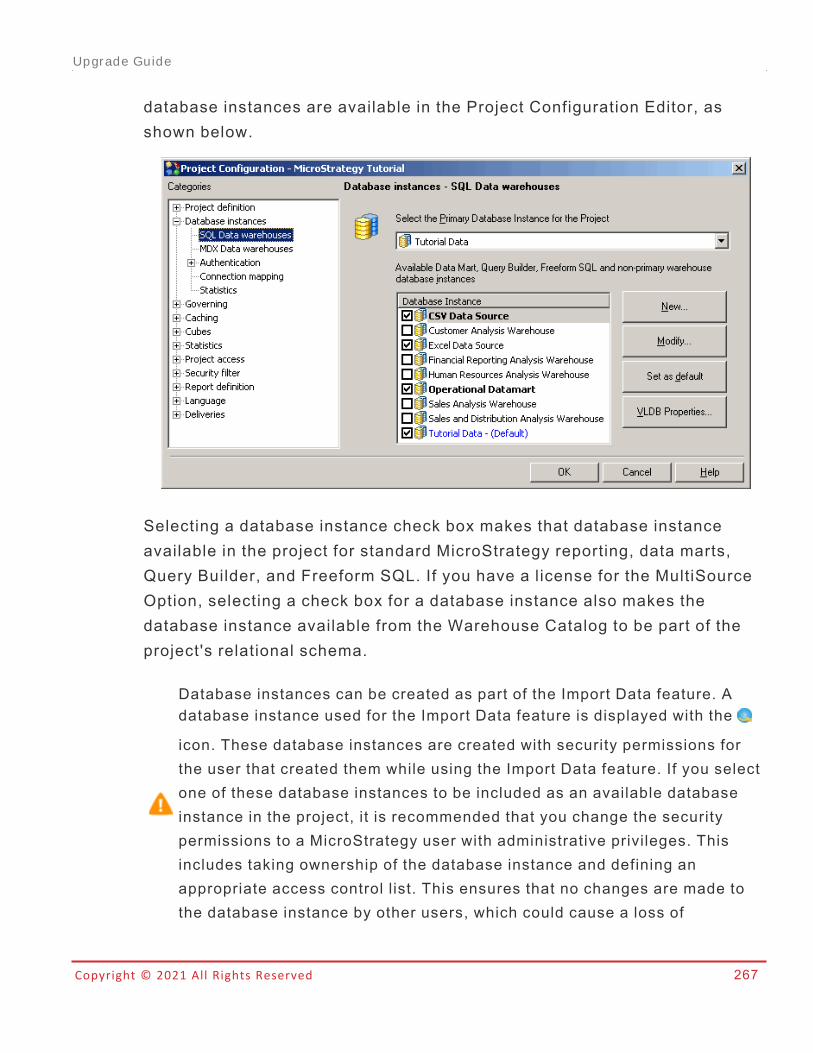
Copyright © 2021 All Rights Reserved 267
database instances are available in the Project Configuration Editor, asshown below.
Selecting a database instance check box makes that database instanceavailable in the project for standard MicroStrategy reporting, data marts,Query Builder, and Freeform SQL. If you have a license for the MultiSourceOption, selecting a check box for a database instance also makes thedatabase instance available from the Warehouse Catalog to be part of theproject's relational schema.
Database instances can be created as part of the Import Data feature. Adatabase instance used for the Import Data feature is displayed with the
icon. These database instances are created with security permissions forthe user that created them while using the Import Data feature. If you selectone of these database instances to be included as an available databaseinstance in the project, it is recommended that you change the securitypermissions to a MicroStrategy user with administrative privileges. Thisincludes taking ownership of the database instance and defining anappropriate access control list. This ensures that no changes are made tothe database instance by other users, which could cause a loss of
Upgrade Guide
Copyright © 2021 All Rights Reserved 268
connectivity to the data source. For information on the Import Data feature,refer to the MicroStrategy Web online help.
The shading and color of a database instance in the list of relationaldatabase instances reflects how the database instance is being used in theproject:
l Blue text: This is the warehouse database instance, as selected from thewarehouse database instance drop-down list. There can only be onewarehouse database instance for a project, because this databaseinstance's data is populated in the Warehouse Catalog to define theproject's relational schema. You cannot choose to disable the warehousedatabase instance for the project without first selecting a differentwarehouse database instance.
If you have a license for the MultiSource Option, the primary databaseinstance acts as the main source of data for a project and is used as thedefault database instance for tables added to the project.
For information on the Warehouse Catalog as well as accessing multipledata sources with the MultiSource Option, see the Project Design Help.
l Bold text: The project contains objects that are dependent on thedatabase instance. You cannot choose to disable a database instance thathas dependent objects for the project.
l Normal text: The database instance is not being used in the project.
Clearing the check box of a database instance removes the databaseinstance from the project and deletes any unused Freeform SQL or QueryBuilder schemas. You can clear a database instance from a project only ifthere are no dependent objects in the project for the database instance. Formore information on removing a database instance and related FreeformSQL and Query Builder schemas from a project, refer to the SystemAdministration Help.
Upgrade Guide
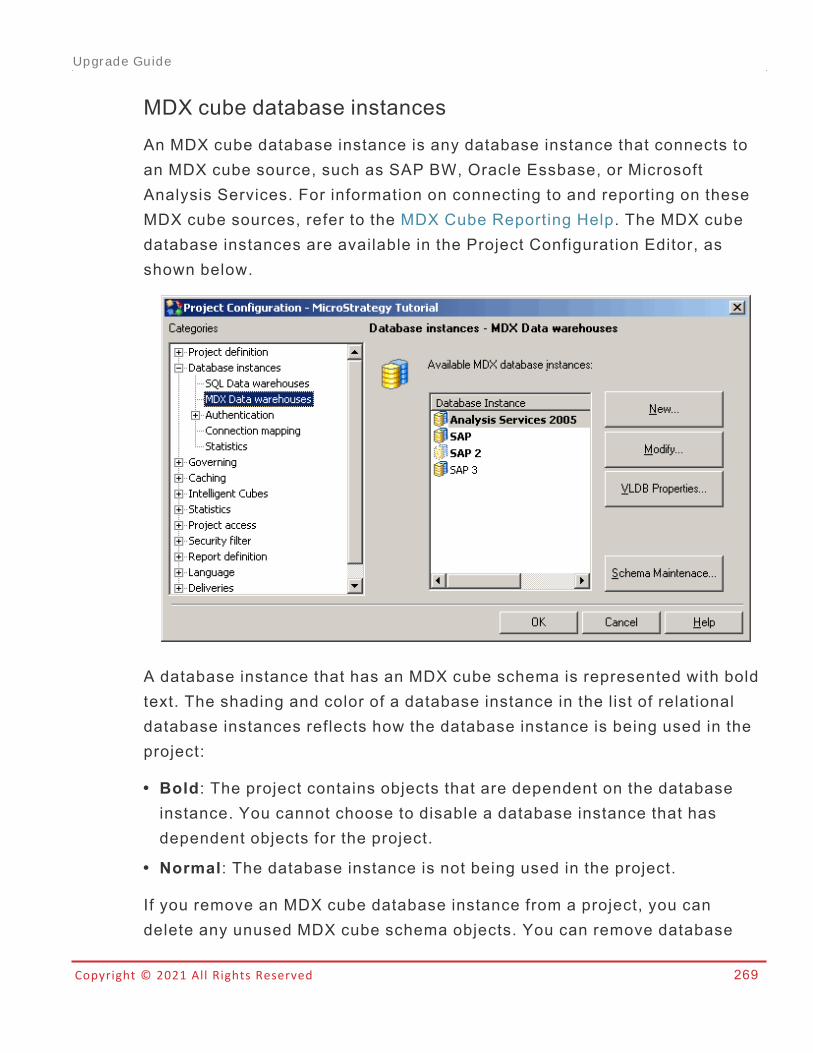
Copyright © 2021 All Rights Reserved 269
MDX cube database instancesAn MDX cube database instance is any database instance that connects toan MDX cube source, such as SAP BW, Oracle Essbase, or MicrosoftAnalysis Services. For information on connecting to and reporting on theseMDX cube sources, refer to the MDX Cube Reporting Help. The MDX cubedatabase instances are available in the Project Configuration Editor, asshown below.
A database instance that has an MDX cube schema is represented with boldtext. The shading and color of a database instance in the list of relationaldatabase instances reflects how the database instance is being used in theproject:
l Bold: The project contains objects that are dependent on the databaseinstance. You cannot choose to disable a database instance that hasdependent objects for the project.
l Normal: The database instance is not being used in the project.
If you remove an MDX cube database instance from a project, you candelete any unused MDX cube schema objects. You can remove database
Upgrade Guide
Copyright © 2021 All Rights Reserved 270
instance from a project only if there are no dependent objects in the projectfor the database instance. For more information on removing a databaseinstance and related MDX cube managed objects from a project, refer to theSystem Administration Help.
For additional information on configuring MDX cube database instances,refer to the MDX Cube Reporting Help.
MDX schema loading and maintenance
You can click Schema Maintenance to perform various tasks for an MDXcube schema that is part of your project, as described below:
l You can choose when an MDX cube schema associated with a databaseinstance is loaded for a project. By default, MDX cube schemas are loadedas needed when MDX cube reports are executed. You can also choose toload MDX cube schemas when Intelligence Server starts. For informationon defining when MDX cube schemas should be loaded, refer to the MDXCube Reporting Help.
l When you integrate MDX cube sources into MicroStrategy, the data isintegrated as an MDX cube schema. Once you integrate an MDX cubesource into MicroStrategy, you can exchange the database instance usedto connect to the MDX cube schema for a different database instance. Thisallows you to use different database instances with different login andconnection information to access an MDX cube schema. For informationon exchanging the database instance used to connect to the MDX cubeschema, refer to the MDX Cube Reporting Help.
Creating a database instanceDatabase instances are created and modified in the Database InstanceManager, which can be found by expanding Administration for a projectsource, then expanding Configuration Managers. When you choose tocreate a new database instance, the Database Instances Editor opens.
Upgrade Guide
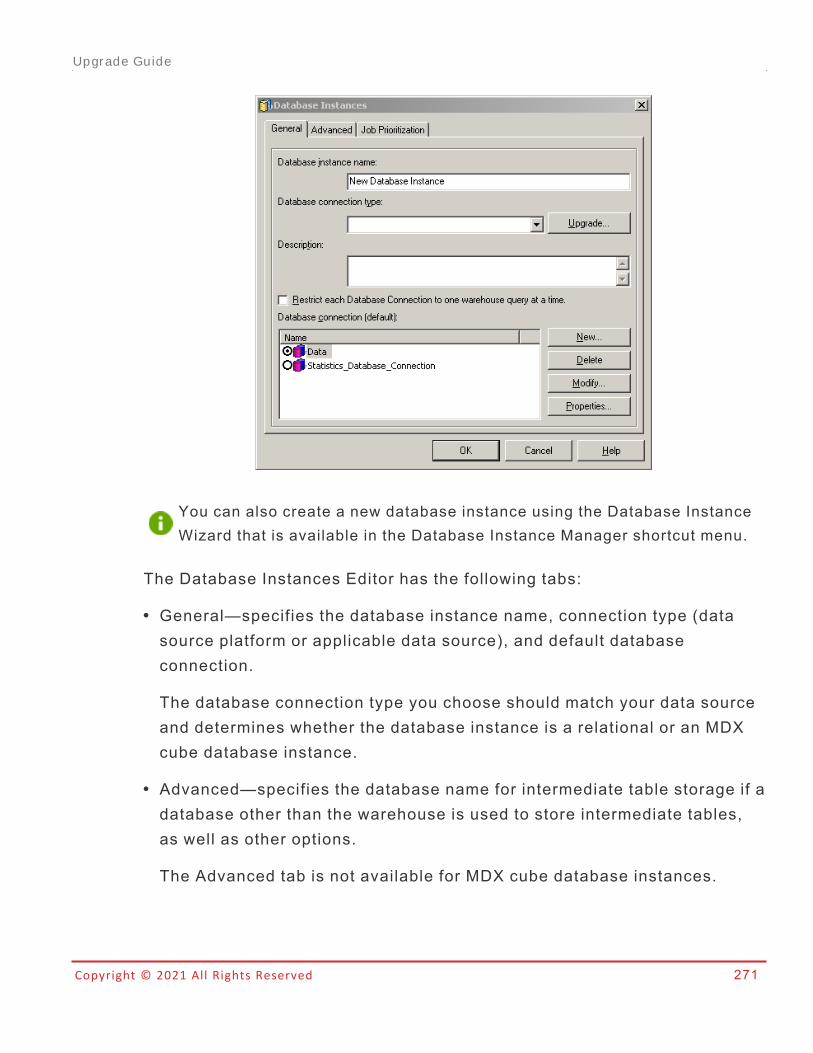
Copyright © 2021 All Rights Reserved 271
You can also create a new database instance using the Database InstanceWizard that is available in the Database Instance Manager shortcut menu.
The Database Instances Editor has the following tabs:
l General—specifies the database instance name, connection type (datasource platform or applicable data source), and default databaseconnection.
The database connection type you choose should match your data sourceand determines whether the database instance is a relational or an MDXcube database instance.
l Advanced—specifies the database name for intermediate table storage if adatabase other than the warehouse is used to store intermediate tables,as well as other options.
The Advanced tab is not available for MDX cube database instances.
Upgrade Guide
Copyright © 2021 All Rights Reserved 272
l Job Prioritization—specifies the job prioritization scheme for the instanceand the number of prioritized connections.
To create a database instance1. In MicroStrategy Developer, log in to a project source with
administrative privileges.
2. Go to Administration > Configuration Managers > DatabaseInstances.
3. From the File menu, go to New > Database Instance. The DatabaseInstances Editor opens.
4. On the General tab, in the Database instance name f ield, type thename of the database instance.
5. In the Database connection type drop-down list, select the datasource connection type according to the data source hosting yourdatabase.
If you have upgraded from a previous version of MicroStrategy, youcan click Upgrade to retrieve any database connection types that havebeen included since the previous version of MicroStrategy that youused.
6. On the Advanced tab, you can configure various options for thedatabase instance, including:l Intermediate table storage: You can specify the database name andtable name space to use when intermediate tables are created.Intermediate tables are created to support various queries.
l Database gateway support: You can support backwardscompatibil ity for database gateway support from MicroStrategyversion 6.x.
To enable database gateway support, select the Primarydatabase instance check box, and then select a primarydatabase instance from the drop-down list. The primarydatabase instance is the database instance that should be
Upgrade Guide
Copyright © 2021 All Rights Reserved 273
used for element browsing against the selected table and forqueries that do not require joins to other tables. Forinformation on database gateway support, see the ProjectDesign Help.
l Data mart optimization: You can support data mart optimization ifthe data source for the database instance is in the same data sourcethat contains data marts.
To enable data mart optimization, select the This databaseinstance is located in the same warehouse as check box,and then select a database instance from the drop-down list.
l Table prefix: If the tables in your data source use a table prefix, youcan include the table prefix to identify the proper collection of tables.Click Select to select a table prefix or define a new table prefix.
l ODBC Version: You can define which ODBC version to use for thedatabase instance, as described below:n Use 2.0 ODBC Calls: ODBC 2.0 was used in pre-9.0 versions of
MicroStrategy. You can use this option for backward compatibil ity ifyour database management system does not support ODBC 3.x.This also allows you to use extended fetch to retrieve blocks of datafrom the database into memory, instead of row by row, which isincluded in the steps Specifying Warehouse ConnectionInformation, page 265.
n Use 3.x ODBC Calls: The support of ODBC 3.x is introduced inMicroStrategy 9.0. This value is chosen by default for DatabaseInstances in MicroStrategy 9.x and higher.You should use thisoption if your database management system supports ODBC 3.x.ODBC 3.x will always use extended fetch (SQLFetchScroll) toretrieve blocks of data from the database into memory rather thanrow-by-row retrieval.
Upgrade Guide
Copyright © 2021 All Rights Reserved 274
7. On the Job Prioritization tab, you can configure how jobs areprioritized for the database instance. For information on configuring jobprioritization, see the System Administration Help.
8. On the General tab, in the Database connection (default) pane,select the default data source connection and click OK.
If the necessary database connection does not exist, you can createone by clicking New. For steps to create a database connection, seeCreating a database connection, page 274 below.
Creating a database connectionA database connection specifies the DSN and database login used to accessthe data source. A database instance designates one database connectionas the default connection for MicroStrategy users; however, users andgroups can be mapped to other database connections using connectionmapping. For more details on connection mapping, see User connectionmapping, page 282.
You create database connections in the Database Instances Editor byclicking New on the General tab. Any database connection created withinthe Database Instances Editor is available for use across all databaseinstances in the project source. For more information on creating a databaseconnection for MDX cube sources, refer to the MDX Cube Reporting Help.
When you choose to create a new database connection, the DatabaseConnections dialog box opens:
Upgrade Guide
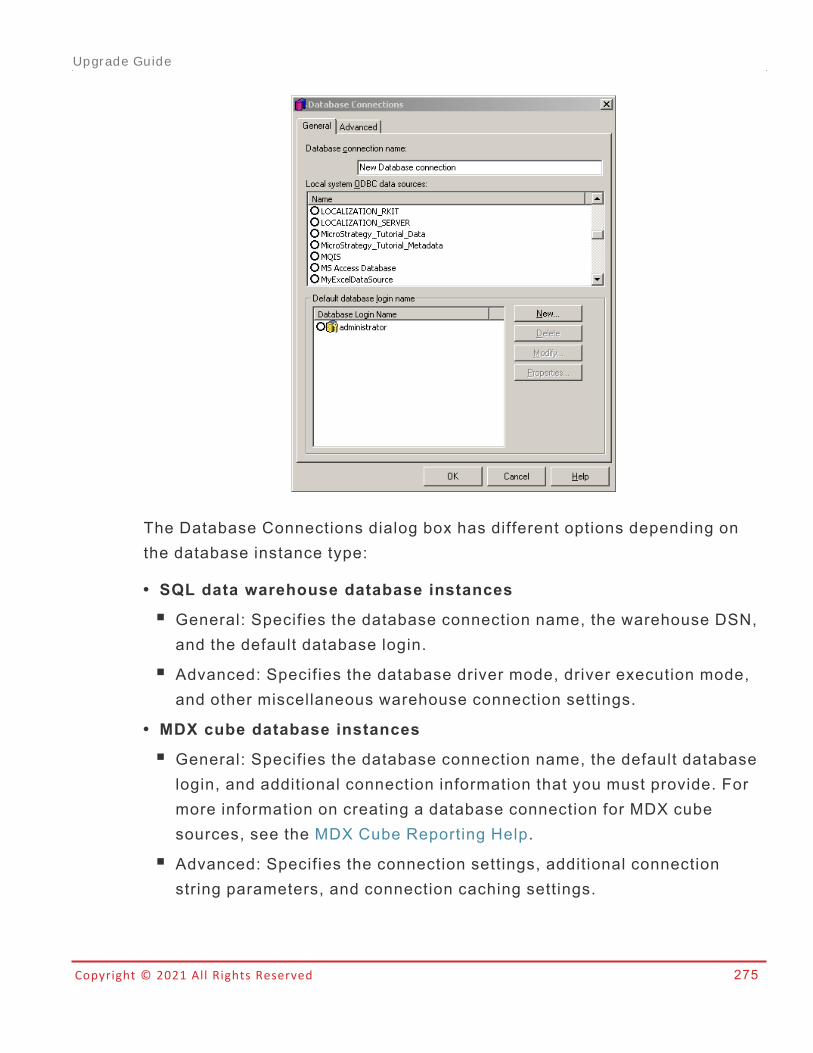
Copyright © 2021 All Rights Reserved 275
The Database Connections dialog box has different options depending onthe database instance type:
l SQL data warehouse database instancesn General: Specifies the database connection name, the warehouse DSN,
and the default database login.n Advanced: Specifies the database driver mode, driver execution mode,
and other miscellaneous warehouse connection settings.l MDX cube database instancesn General: Specifies the database connection name, the default database
login, and additional connection information that you must provide. Formore information on creating a database connection for MDX cubesources, see the MDX Cube Reporting Help.
n Advanced: Specifies the connection settings, additional connectionstring parameters, and connection caching settings.
Upgrade Guide
Copyright © 2021 All Rights Reserved 276
To create a database connection
Before moving forward, ensure that a database instance has been created asdescribed in Creating a database instance, page 270.
1. On the General tab, in the Database connection name box, type aname to identify the database connection.
2. In the Local system ODBC data sources pane, select the data sourcename for the data source.
3. On the Advanced tab, you can define various options per yourrequirements and the requirements of the database you are connectingto, including:l Database driver mode: Select one of the following database drivermodes:l Multi-process: Each connection to the warehouse database isspawned as a separate process, identified in Windows TaskManager as M8DBMPE.exe. If one process fails, such as when adatabase access thread hangs or is lost, other processes are notaffected.
l Multi-threaded: All connections to the warehouse database aremaintained inside the Intelligence Server process MSTRSVR.exe.All connections, SQL submissions, and data retrievals from thedatabase are handled within this process.
MicroStrategy recommends setting all database drivers to multi-process mode. The robustness and stability which come with multi-process mode greatly overshadow any increased efficiency thatmay come with multi-threaded mode. Problems that appear randomand sporadic in multi-threaded operation can often be resolved byswitching to multi-process mode.
l Driver execution mode: Define the driver execution mode dependingon the ODBC driver being used:
Upgrade Guide
Copyright © 2021 All Rights Reserved 277
l Asynchronous Connection: All statements allocated within theconnection should be able to run SQL asynchronously.
l Asynchronous Statement: For each statement, the asynchronousmode is explicitly set.
l Synchronous: Only one statement executes at a time. This is thedefault value.
Many newer ODBC drivers do not support asynchronous modebecause the driver is capable of opening a new thread and executinga new query while simultaneously running an earlier query. TheMicroStrategy Readme gives recommendations for the driverexecution mode options that can be used for different ODBC drivers.
l Use extended fetch: Select this check box to enable Intelligenceserver to fetch blocks of data from the database into memory, insteadof row-by-row. Be aware that this check box is only available if thedatabase instance is defined to use 2.0 ODBC calls, which is includedin the steps Specifying Warehouse Connection Information, page265. When 3.0 ODBC calls are enabled, extended fetch is alreadyenabled and this option is grayed out.
l Use parameterized queries: Select this check box to enableIntelligence server to pass data to the database in blocks instead ofrow-by-row. For information on how parameterized queries canimprove performance in MicroStrategy, see the Project Design Help.
In live dossiers connected to certif ied gateways, as well as reportsand cubes executed against a warehouse, all SQL executionscontaining text input from filters, search conditions, and text promptsare secured through parameterized queries. Starting in 2021 Update4, this functionality is also extended to transaction inputs intransaction server reports and documents. See KB485174 for moreinformation about the transaction part of this security feature and alist of certif ied gateways. See KB484512 for more information about
Upgrade Guide
Copyright © 2021 All Rights Reserved 278
the non-transaction part of this security feature and a list of certif iedgateways.
l Maximum cancel attempt time (sec): Defines the maximum amountof time the MicroStrategy Query Engine waits for a successful attemptbefore it cancels a query. Values of 0 and -1 indicate no limit.
l Maximum query execution time (sec): Defines the maximumamount of time a single pass of SQL can execute on the database.Values of 0 and -1 indicate no limit.
l Maximum connection attempt time (sec): Defines the maximumamount of time Intelligence Server waits to connect to the database.Values of 0 and -1 indicate no limit.
l Additional connection string parameters: Enables you to passadditional ODBC connection parameters to the database as part ofthe connection string. This is useful if you need to change ODBCdefaults. Click Preview to see the entire connection string.
l Table prefix: Defines a table prefix that specifies the schemacontaining the tables to access.
l Character set encoding for Windows drivers: The options listedbelow are only relevant when Intelligence Server is running on aWindows machine:n Non UTF-8 (default): Select this option if the ODBC driver returns
information in a character encoding other than UTF-8.n UTF-8: Select this option if the ODBC driver returns information in
UTF-8 character encoding. Drivers for Teradata databases mayrequire UTF-8 encoding.
l Character set encoding for UNIX drivers: The options listed beloware only relevant when Intelligence Server is running on a UNIXmachine:n Non UTF-8: Select this option if the ODBC driver returns
information in a character encoding other than UTF-8.
Upgrade Guide
Copyright © 2021 All Rights Reserved 279
n UTF-8 (default): Select this option if the ODBC driver returnsinformation in UTF-8 character encoding. Drivers for Teradatadatabases may require UTF-8 encoding.
l Connection Caching: Specify the caching of the databaseconnection using the following options:n Connection idle timeout (sec): Defines the amount of time an
inactive connection to the database remains cached until it isterminated. You must also set the Connection lifetime, describedabove, to a value greater than zero for database connections to beused by more than a single job.
Enforcement of the connection idle timeout can cause a databaseconnection to be removed before it reaches its connection lifetime.You can use this connection idle timeout to ensure that databaseconnections do not remain in Intelligence Server memory in an idlestate for an extended amount of time.
Enforcement of the connection idle timeout can cause a databaseconnection to be removed before it reaches its connection lifetime.You can use this connection idle timeout to ensure that databaseconnections do not remain in Intelligence Server memory in an idlestate for an extended amount of time.
Enforcement of the connection idle timeout can cause a databaseconnection to be removed before it reaches its connection lifetime.You can use this connection idle timeout to ensure that databaseconnections do not remain in Intelligence Server memory in an idlestate for an extended amount of time.
If you type a value of 0, when the job associated with a databaseconnection is completed, the database connection is deleted andnot put into a cache. If you type a value of -1, a databaseconnection can remain idle and considered for new jobs until thedatabase connection lifetime is reached.
Upgrade Guide
Copyright © 2021 All Rights Reserved 280
4. On the General tab, in the Default database login name pane, selectthe default database login and click OK.
If the necessary database login does not exist, you can create one byclicking New. For steps to create a database connection, see Creatinga database login, page 280 below.
Creating a database loginA database login specifies the user ID and password used to access thedata source. The database login overwrites any login information stored inthe DSN. A database connection designates one database login as thedefault login for MicroStrategy users, however users and groups can bemapped to other database logins using connection mapping.
Connection mapping is explained in User connection mapping, page 282.
You create database logins in the Database Connections dialog box byclicking New on the General tab. Any database login created within theDatabase Connections dialog box is available for use across all databaseconnections in the project source.
MicroStrategy reporting and analysis features require a general set ofdatabase login permissions that can connect to and modify the data sourceand metadata, as described below:
l For the metadata, the Select, Insert, and Update permissions are required.Intermediate tables are created in the metadata for recursive searchqueries, which requires Create and Drop permissions as well. Updatingthe schema requires the Delete permission.
l For the data warehouse, the Select, Create, Insert, and Drop permissionsare required.
When you choose to create a new database login, the Database loginsdialog box opens:
Upgrade Guide
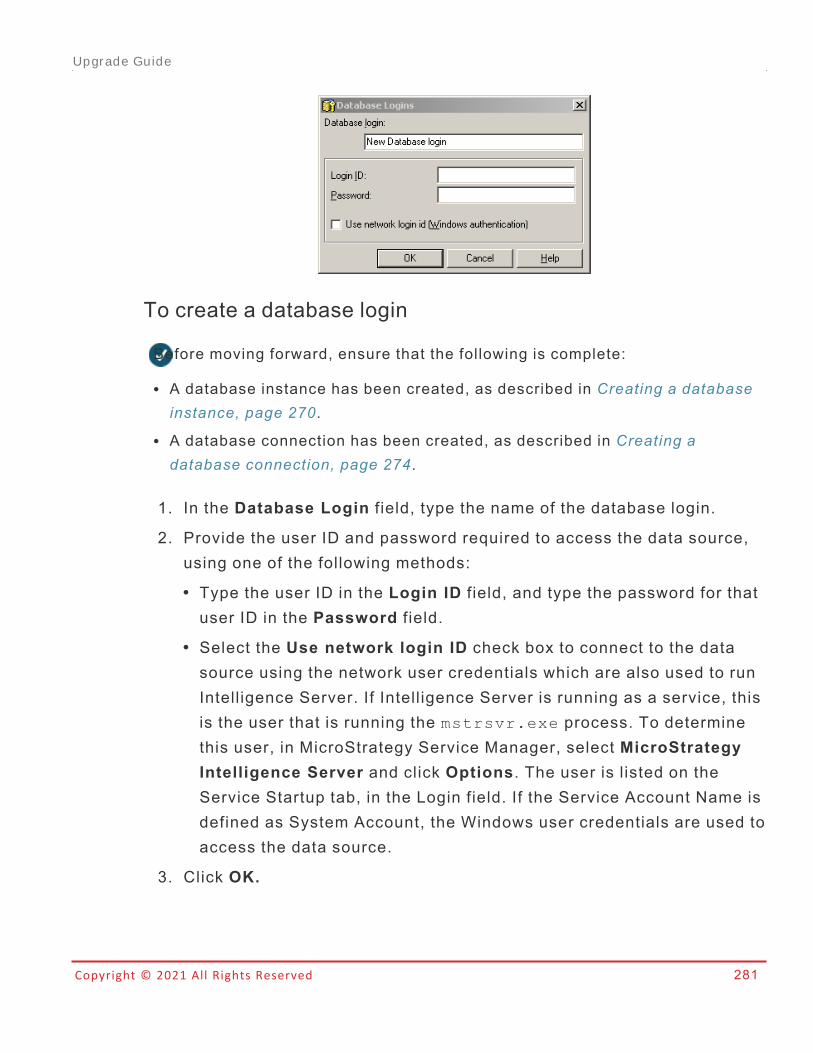
Copyright © 2021 All Rights Reserved 281
To create a database login
Before moving forward, ensure that the following is complete:
l A database instance has been created, as described in Creating a databaseinstance, page 270.
l A database connection has been created, as described in Creating adatabase connection, page 274.
1. In the Database Login f ield, type the name of the database login.
2. Provide the user ID and password required to access the data source,using one of the following methods:l Type the user ID in the Login ID f ield, and type the password for thatuser ID in the Password f ield.
l Select the Use network login ID check box to connect to the datasource using the network user credentials which are also used to runIntelligence Server. If Intelligence Server is running as a service, thisis the user that is running the mstrsvr.exe process. To determinethis user, in MicroStrategy Service Manager, select MicroStrategyIntelligence Server and click Options. The user is listed on theService Startup tab, in the Login field. If the Service Account Name isdefined as System Account, the Windows user credentials are used toaccess the data source.
3. Click OK.
Upgrade Guide
Copyright © 2021 All Rights Reserved 282
Database logins are passed to the data source any time a user executes areport or browses attribute elements. Therefore, all database logins createdin MicroStrategy Developer must be also be created as valid logins in thedata source.
User connection mappingUser connection mapping is the process of mapping MicroStrategy users todatabase connections and database logins. For MicroStrategy users toexecute reports, they must be mapped to a database connection anddatabase login.
MicroStrategy users link to database connections and logins using:
l The default database connection (and, therefore, default database login)l Specialized maps to a database connection and/or database login(different than the default connection and login) for either a user or usergroup
You can map users to connections and logins in the Project ConfigurationEditor or Command Manager. For information about how connection mapsare used, see the System Administration Help.
MicroStrategy reporting and analysis features require a general set ofdatabase login permissions to connect to and modify the data warehouseand metadata, as described below:
l For the metadata, the Select, Insert, and Update permissions are required.Intermediate tables are created in the metadata for recursive searchqueries, which requires Create and Drop permissions as well. Updatingthe schema requires the Delete permission.
l For the data warehouse, the Select, Create, Insert, and Drop permissionsare required.
Upgrade Guide
Copyright © 2021 All Rights Reserved 283
To create a connection map
Before moving forward, ensure that the following is complete:
l A database instance has been created, as described in Creating a databaseinstance, page 270.
l A database connection has been created, as described in Creating adatabase connection, page 274.
l A database login has been created, as described in Creating a databaselogin, page 280.
1. In Developer, log in to a project.
2. Right-click the project and select Project Configuration. The ProjectConfiguration Editor opens.
3. In the Categories l ist, expand the Database Instances category, andthen select Connection mapping.
4. Right-click in the Database instances - Connection mapping pane,and select New. A new connection mapping is added.
5. You can define the connection mapping by specifying the informationdescribed below:l Database Instance: The database instance which connects to thedata source required for the connection mapping.
l User: The user or user group to apply the connection mapping to.l Language: The language of the data accessed by the connectionmapping. You can use connection mappings to support datainternationalization. For information on supporting datainternationalization with connection mappings, see the Project DesignHelp.
l Database connection: The data source to connect to.l Database Login: The database login for the connection mapping.
6. Click OK.
Upgrade Guide
Copyright © 2021 All Rights Reserved 284
RelatedIf the table information is not updated, although you have performed correctsteps, see KB483323: Unable to update table structure in MicroStrategyDeveloper Warehouse Catalog.
Minimizing the Impact of Data Changes for PlatformRelease Upgrades
With each feature release, improvements and enhancements made to thedata engine can cause minor changes in the data returned when executingdossiers and documents. The impacts of these changes for customersupgrading from one feature release to the next, MicroStrategy 10.10 toMicroStrategy 10.11 for example, are minimal and can be resolved throughtypical post-upgrade testing.
For customers migrating from one platform release to the next,MicroStrategy 10.4.x to MicroStrategy 2021 for example, the cumulativeeffect of the changes can have a large impact on your execution results. Tominimize these impacts when performing a platform release upgrade,MicroStrategy Workstation allows you to choose the data engine version foreach project in your environment.
If you upgrade from MicroStrategy 2019 or earlier, you may notice the dataengine version is 2020 for all projects in your environment following anupgrade to MicroStrategy 2021. Once the metadata upgrade process iscompleted, the data engine version can be changed to 2021 on a project-by-project basis so that data changes can be identified, evaluated, andresolved while maintaining consistent performance across the rest of theenvironment. All new projects default to the 2021 data engine version.
Starting in MicroStrategy 2021, you can view and modify the Date Engineversion via MicroStrategy Developer.
What does the data engine do?
Upgrade Guide
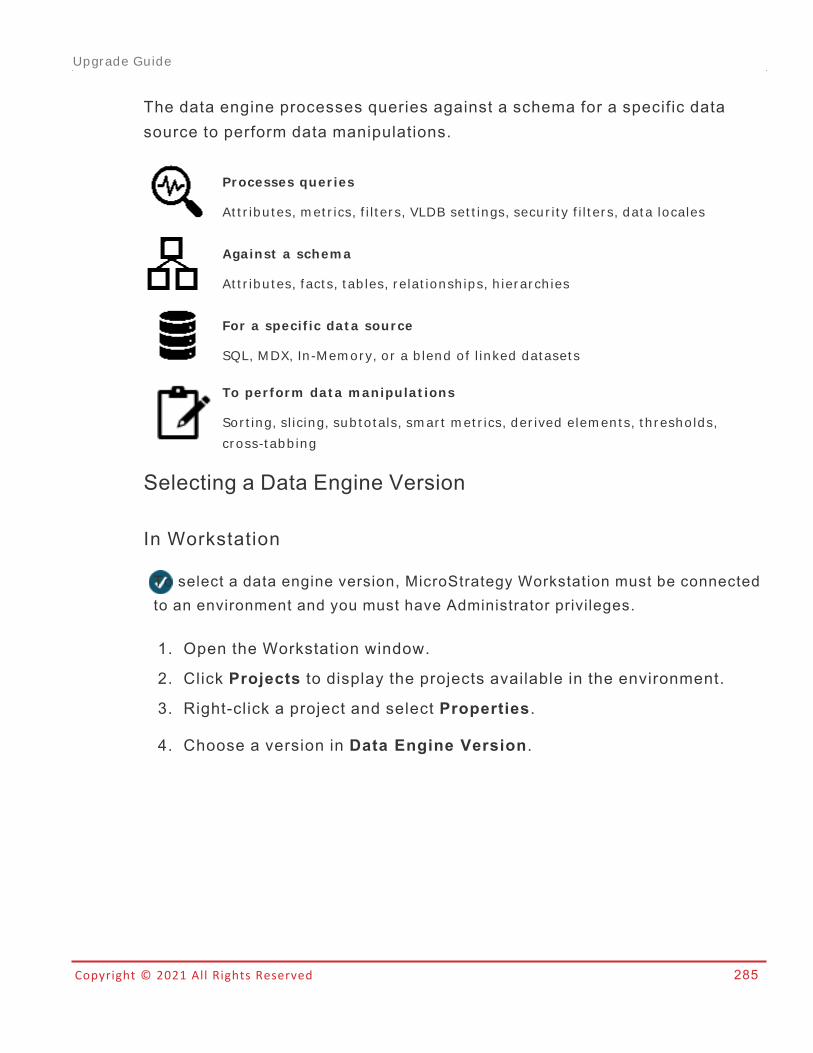
Copyright © 2021 All Rights Reserved 285
The data engine processes queries against a schema for a specific datasource to perform data manipulations.
Pr ocesses quer ies
At t r ibu t es, m et r ics, f i l t er s, VLDB set t ings, secu r i t y f i l t er s, dat a locales
Against a schem a
At t r ibu t es, f act s, t ab les, r elat ionsh ips, h ier ar ch ies
For a specif ic dat a sour ce
SQL, M DX, In -M em or y, o r a b lend of l inked dat aset s
To per for m dat a m anipulat ions
Sor t ing, sl icing, sub t o t als, sm ar t m et r ics, der ived elem en t s, t h r esho lds,
cr oss-t abb ing
Selecting a Data Engine Version
In Workstation
To select a data engine version, MicroStrategy Workstation must be connectedto an environment and you must have Administrator privileges.
1. Open the Workstation window.
2. Click Projects to display the projects available in the environment.
3. Right-click a project and select Properties.
4. Choose a version in Data Engine Version.
Upgrade Guide
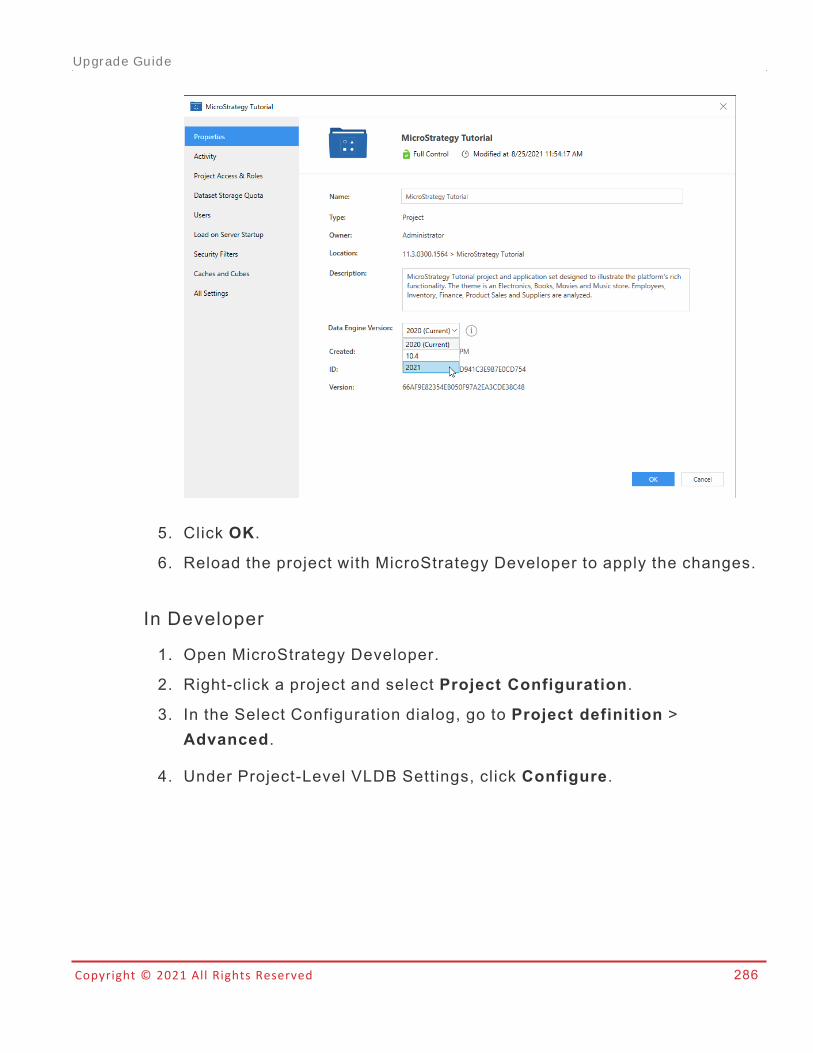
Copyright © 2021 All Rights Reserved 286
5. Click OK.
6. Reload the project with MicroStrategy Developer to apply the changes.
In Developer
1. Open MicroStrategy Developer.
2. Right-click a project and select Project Configuration.
3. In the Select Configuration dialog, go to Project definition >Advanced.
4. Under Project-Level VLDB Settings, click Configure.
Upgrade Guide
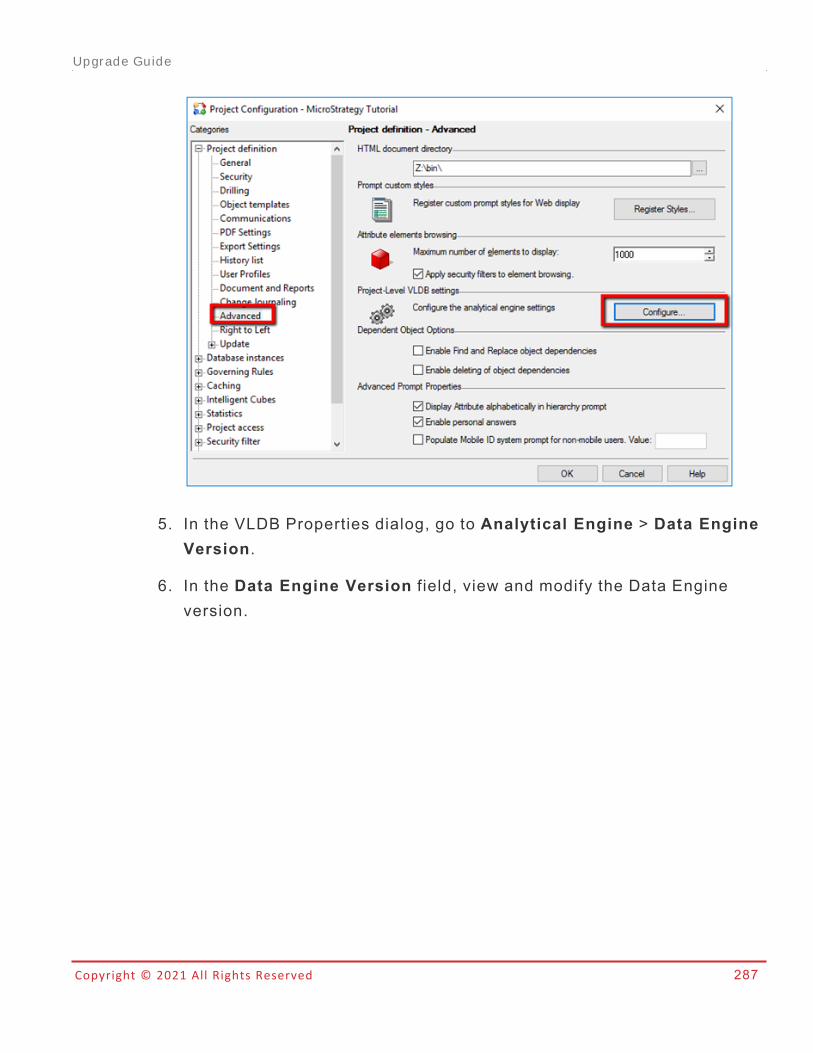
Copyright © 2021 All Rights Reserved 287
5. In the VLDB Properties dialog, go to Analytical Engine > Data EngineVersion.
6. In the Data Engine Version f ield, view and modify the Data Engineversion.
Upgrade Guide
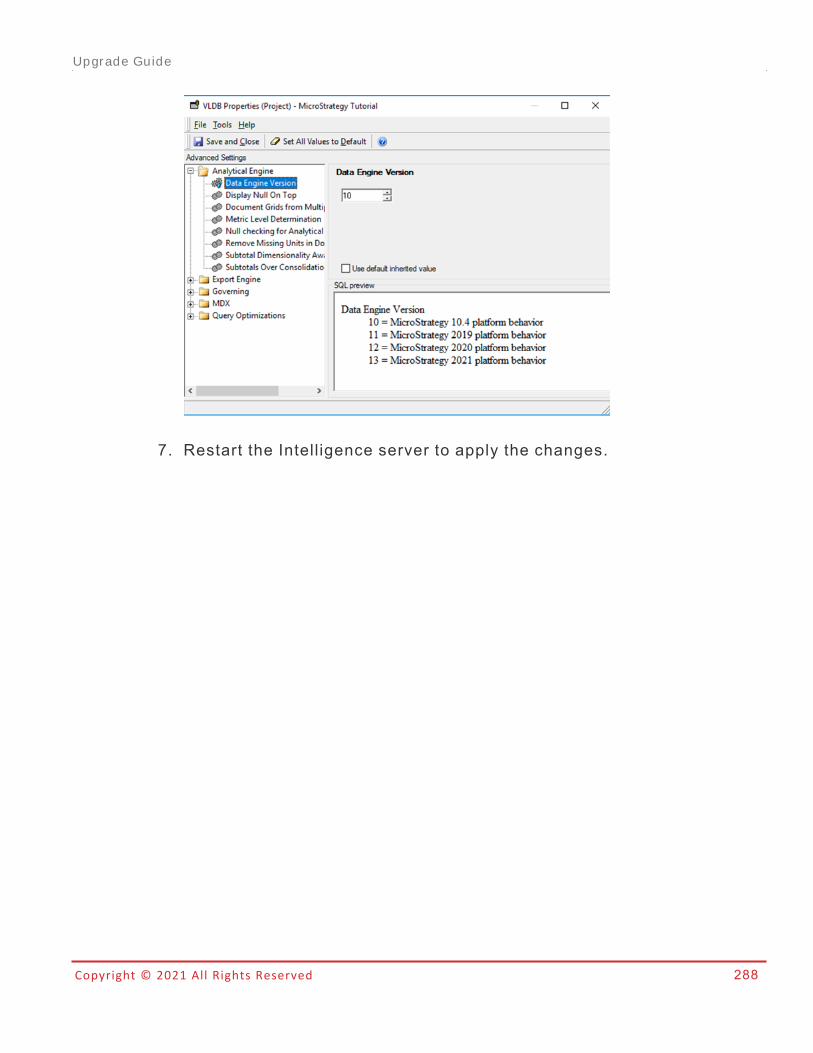
Copyright © 2021 All Rights Reserved 288
7. Restart the Intelligence server to apply the changes.
Upgrade Guide