Partitions and Volumes In Windows Server 2008 the distinction between volumes and partitions is somewhat murky. When using Disk Management, a regular partition on a basic disk is called a simple volume, even though technically a simple volume requires that the disk be a dynamic disk. As long as you use only simple volumes or partitions, you can easily convert between a basic disk (and partition) and a dynamic disk (and a volume). Once you use a feature that is supported only on dynamic disks, however, changing back to a basic disk will mean data loss. Any operation that would require conversion to a dynamic disk will give you fair warning, as shown in Figure 19-6. Figure 19-6 Disk Management will warn you before any operation that would cause a conversion to dynamic disks. When using Disk Management, the conversion to dynamic disks as required happens automatically. When using DiskPart, however, you need to explicitly specify each step of the process. Creating a Volume or Partition You can create a new volume or partition on any disk that has empty space. If the disk is dynamic, a volume is created. If the disk is a basic disk, a primary partition is created. If the empty space is part of an extended partition, a new logical drive will be created. All of them called a simple volume, but each one a different structure. Note You can no longer create an extended partition in Disk Manager. If you need to create an extended partition, you need to use DiskPart.exe. But there's really no longer any need for extended partitions. To create a new volume or partition, follow these steps: In Disk Management, right-click the unallocated disk and select the type of volume to create, as shown in Figure 19-7. Click Next. Figure 19-7 Creating a volume Depending on the number of available unallocated volumes, you see one or more options for the type of volume, 1. Partitions and Volumes https://technet.microsoft.com/en-us/library/dd163559(d=printer) 1 of 15 8/10/2017, 10:02 AM
Transcript
Partitions and Volumes
In Windows Server 2008 the distinction between volumes and partitions is somewhat murky. When using Disk
Management, a regular partition on a basic disk is called a simple volume, even though technically a simple volume
requires that the disk be a dynamic disk.
As long as you use only simple volumes or partitions, you can easily convert between a basic disk (and partition) and a
dynamic disk (and a volume). Once you use a feature that is supported only on dynamic disks, however, changing back to
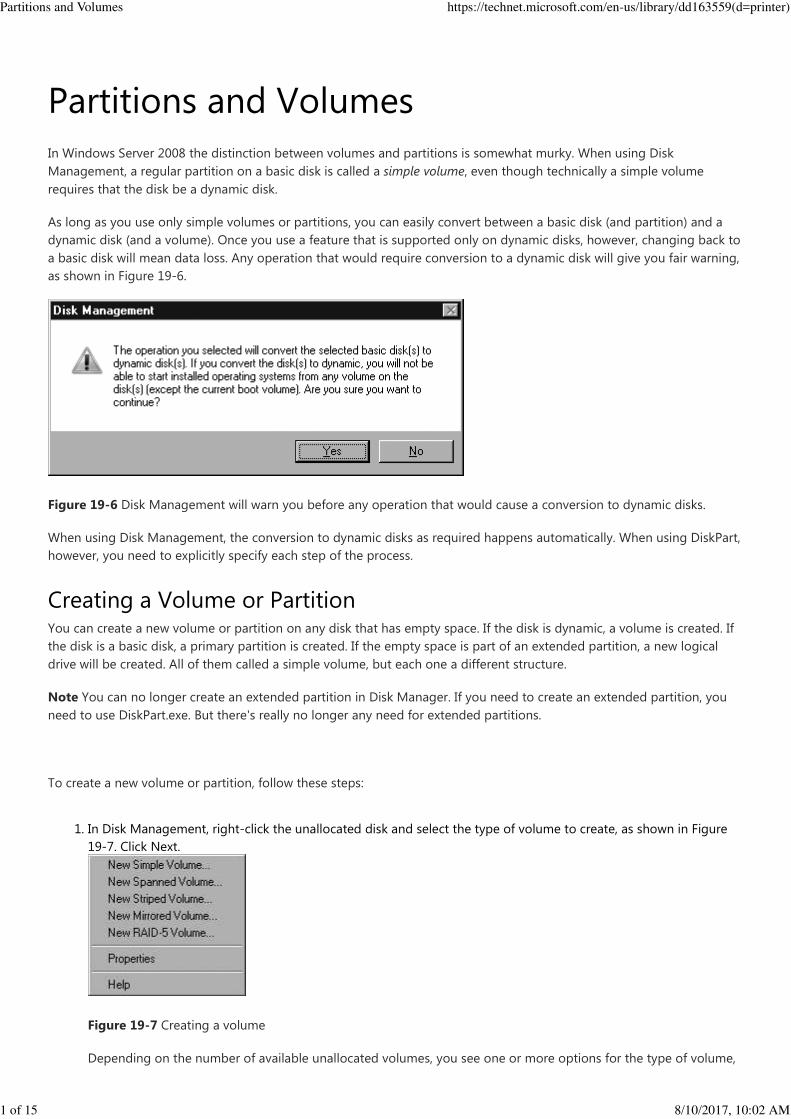
a basic disk will mean data loss. Any operation that would require conversion to a dynamic disk will give you fair warning,
as shown in Figure 19-6.
Figure 19-6 Disk Management will warn you before any operation that would cause a conversion to dynamic disks.
When using Disk Management, the conversion to dynamic disks as required happens automatically. When using DiskPart,
however, you need to explicitly specify each step of the process.
Creating a Volume or PartitionYou can create a new volume or partition on any disk that has empty space. If the disk is dynamic, a volume is created. If
the disk is a basic disk, a primary partition is created. If the empty space is part of an extended partition, a new logical
drive will be created. All of them called a simple volume, but each one a different structure.
Note You can no longer create an extended partition in Disk Manager. If you need to create an extended partition, you
need to use DiskPart.exe. But there's really no longer any need for extended partitions.
To create a new volume or partition, follow these steps:
In Disk Management, right-click the unallocated disk and select the type of volume to create, as shown in Figure
19-7. Click Next.
Figure 19-7 Creating a volume
Depending on the number of available unallocated volumes, you see one or more options for the type of volume,
1.
Partitions and Volumes https://technet.microsoft.com/en-us/library/dd163559(d=printer)
1 of 15 8/10/2017, 10:02 AM
including the following:
New Simple Volume
New Spanned Volume
New Striped Volume
New Mirrored Volume
New RAID-5 Volume
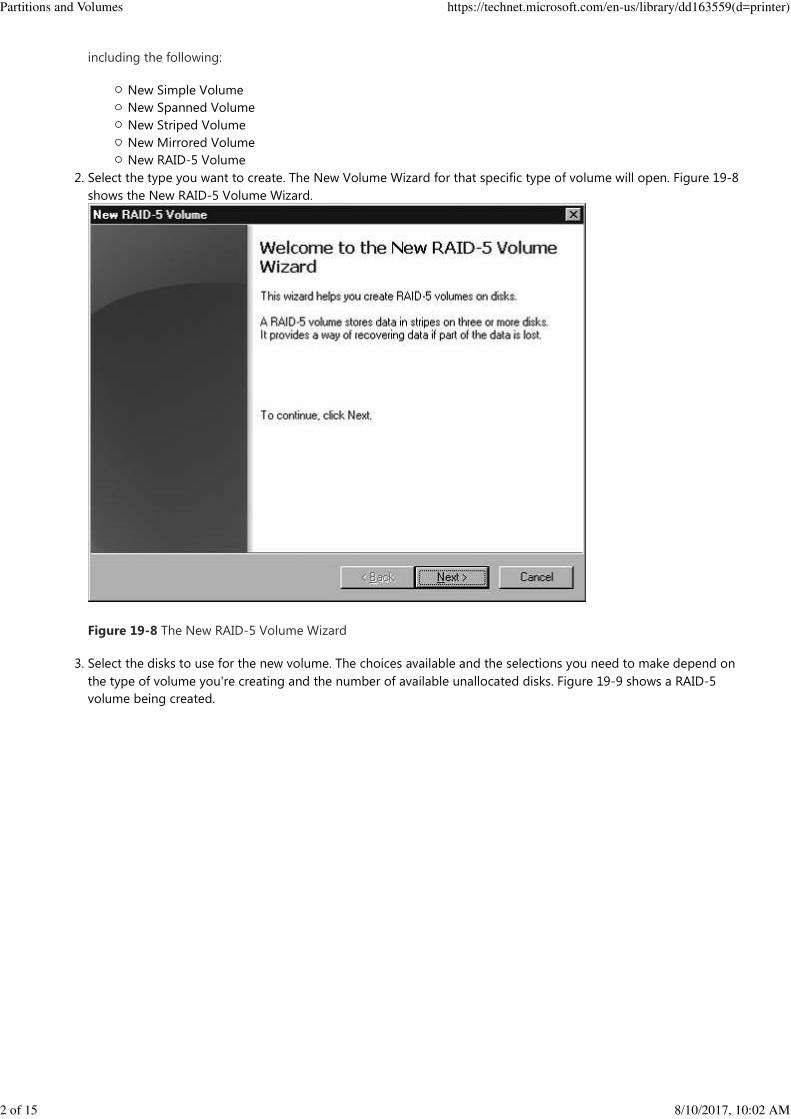
Select the type you want to create. The New Volume Wizard for that specific type of volume will open. Figure 19-8
shows the New RAID-5 Volume Wizard.
Figure 19-8 The New RAID-5 Volume Wizard
2.
Select the disks to use for the new volume. The choices available and the selections you need to make depend on
the type of volume you're creating and the number of available unallocated disks. Figure 19-9 shows a RAID-5
volume being created.
3.
Partitions and Volumes https://technet.microsoft.com/en-us/library/dd163559(d=printer)
2 of 15 8/10/2017, 10:02 AM
Figure 19-9 Select the disks that will be part of this volume.
On the same page, adjust the size of the new volume. By default, the new volume will use the maximum available
space from each of the selected disks. For spanned volumes, this will be the sum of the free space on the selected
disks; for other types of volumes, it will be the number of disks multiplied by the available space on the smallest of
the selected disks. Click Next.
4.
Select either a drive letter or a mount point for the new volume, as shown in Figure 19-10, or opt not to assign a
drive letter or path at this time. With Windows Server 2008, you can "mount" a volume on an empty subdirectory,
minimizing the number of drive letters and reducing the complexity of the storage that is displayed to the user. If
you want to take advantage of this feature, click Browse to locate the directory where you will mount the new
volume. Click Next. (See the Real World sidebar "Mounted Volumes" for more about this subject.)
5.
Partitions and Volumes https://technet.microsoft.com/en-us/library/dd163559(d=printer)
3 of 15 8/10/2017, 10:02 AM
Figure 19-10 Select a drive letter or mount point for the new volume.
Select the formatting options you want (shown in Figure 19-11). Even when mounting the volume rather than
creating a new drive, you can choose your format type without regard to the underlying format of the mount
point. Click Next.
Figure 19-11 Set the formatting options for the new volume.
6.
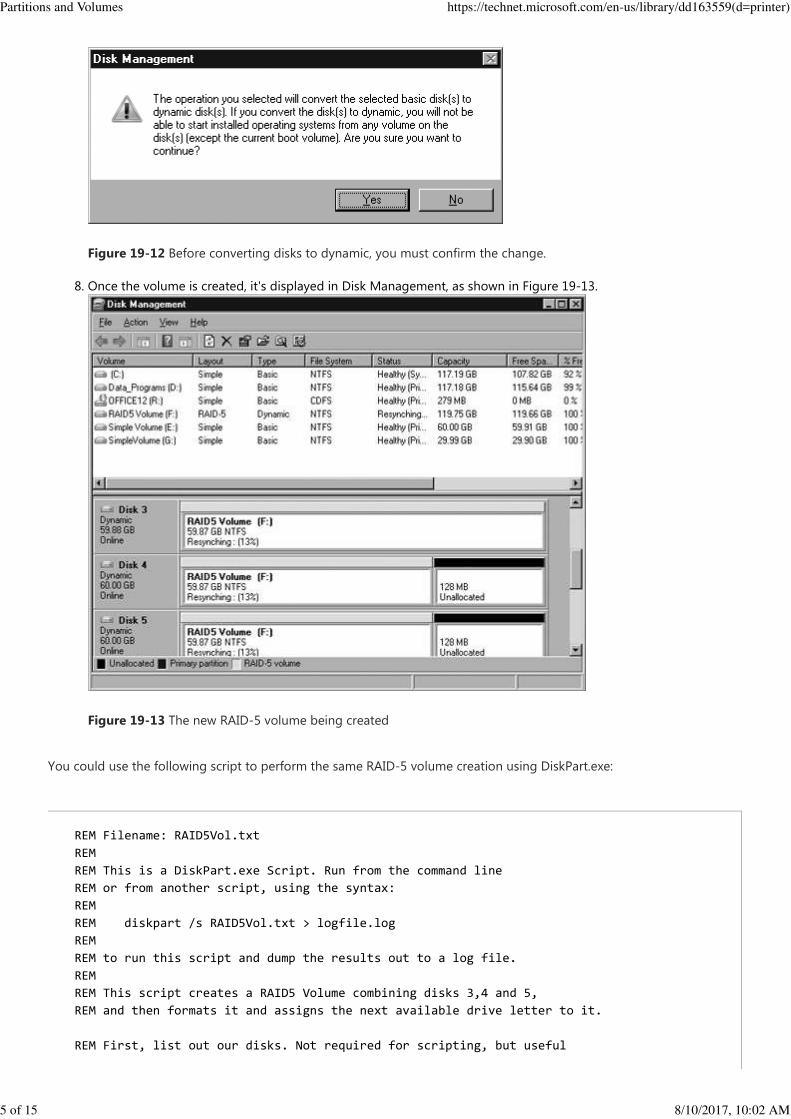
On the confirmation page, if all the options are correct, click Finish to create and format the volume. If the type
you've selected requires that the disks be converted to dynamic disks, you'll see a confirmation message from Disk
Management, as shown in Figure 19-12.
7.
Partitions and Volumes https://technet.microsoft.com/en-us/library/dd163559(d=printer)
4 of 15 8/10/2017, 10:02 AM
Figure 19-12 Before converting disks to dynamic, you must confirm the change.
Once the volume is created, it's displayed in Disk Management, as shown in Figure 19-13.
Figure 19-13 The new RAID-5 volume being created
8.
You could use the following script to perform the same RAID-5 volume creation using DiskPart.exe:
REM Filename: RAID5Vol.txt
REM
REM This is a DiskPart.exe Script. Run from the command line
REM or from another script, using the syntax:
REM
REM diskpart /s RAID5Vol.txt > logfile.log
REM
REM to run this script and dump the results out to a log file.
REM
REM This script creates a RAID5 Volume combining disks 3,4 and 5,
REM and then formats it and assigns the next available drive letter to it.
REM First, list out our disks. Not required for scripting, but useful
Partitions and Volumes https://technet.microsoft.com/en-us/library/dd163559(d=printer)
5 of 15 8/10/2017, 10:02 AM
Real World: Mounted Volumes
Windows Server 2008 borrows a concept from the UNIX world by adding the ability to mount a volume or partition on a
subfolder of an existing drive letter. A mounted volume can also have a drive letter associated with it—although it does
not need to—and it can be mounted at more than one point, giving multiple entry points into the same storage.
A volume must be mounted on an empty subfolder of an existing NTFS volume or drive. FAT and FAT32 drives do not
support mounted volumes. You can, however, mount a FAT or FAT32 volume at any mount point. (But really, it's time to
let go of FAT as a file system for hard disks!) You can mount only a single volume at a given mount point, but you can
then mount further volumes on top of an existing mounted volume, with the same rules and restrictions as any other
mount. The properties of a drive do not show all the available disk space for that drive, because they do not reflect any
volumes mounted on the drive.
You can use mounted volumes to provide a mix of redundant and nonredundant storage in a logical structure that meets
the business needs of the enterprise while hiding the complexities of the physical structure from the users. Unfortunately,
mounted volumes are not handled correctly by Network File System (NFS) shares and should be avoided in environments
where Server for NFS is used.
Creating Extended Partitions and Logical DrivesIf you have extended partitions on your disks for some reason, you can create logical drives on the partition using
DiskPart.exe. However, you no longer have a graphical way to create an extended partition or a logical drive, nor any real
need to do so. With Windows Server 2008 providing full support for GPT disks, the old limit of a maximum of four
partitions on a disk is gone—GPT disks in Windows Server 2008 support 128 partitions. If you have any existing MBR
disks that include an extended partition, either because you moved a disk from another computer to your Windows
Server 2008 computer or because you upgraded to Windows Server 2008 from an earlier version, we suggest you remove
the existing extended partition and convert the disk to GPT.
Converting a Disk to a Dynamic DiskUnlike earlier versions of Windows Server, with Windows Server 2008 you generally have no need to directly convert a
disk to a dynamic disk. Operations that require conversion to a dynamic disk will perform the conversion as part of the
operation. And deleting a volume that required dynamic disks causes the disks to convert back to basic disks in most
cases. There are a few cases where the automatic conversion doesn't happen if you're using DiskPart.exe to manipulate
the disk, but all the operations you perform in Disk Management do automatic conversions. For those few situations in
DiskPart where explicit conversion is necessary, use the following commands:
REM to show the overall environment if we need to troubleshoot problems
list disk
REM Create the volume (No SIZE parameter, so the maximum size for the
REM selected disks will be used.)
create volume RAID disk=3,4,5
REM Format the new volume.
Format fs=NTFS label="RAID 5 Volume" quick
REM Assign without parameters will choose the next available HD letter.
Assign
DISKPART> select disk <n>
Partitions and Volumes https://technet.microsoft.com/en-us/library/dd163559(d=printer)
6 of 15 8/10/2017, 10:02 AM
Where <n> is the disk number you want to convert, and where BASIC can be replaced by DYNAMIC depending on which
conversion you need to do.
Conversions can only occur when there are no structures on the disk that are not supported in the target disk type.
Converting a Disk to a GPT DiskOne of the important new features of Windows Server 2008 disk management is full support for GPT disks. GPT disk
support was initially only available in 64-bit Itanium versions of Windows Server, but with the release of Windows Server
2003 Service Pack 1 and the initial version of x64 Windows Server 2003, GPT support was added for all versions of
Windows Server 2003. In Windows Server 2008, this support is fully integrated.
You can convert a disk between MBR and GPT as long as the disk is completely empty. Unfortunately, once you've
created any partitions or volumes on the disk, you can no longer convert between the two types.
To convert a disk to GPT, follow these steps:
In Disk Management, delete any existing volumes or partitions.
Note Deleting a volume or partition will delete any data on the volume or partition. It will not destroy the data,
however, so that it might be possible to recover the data.
1.
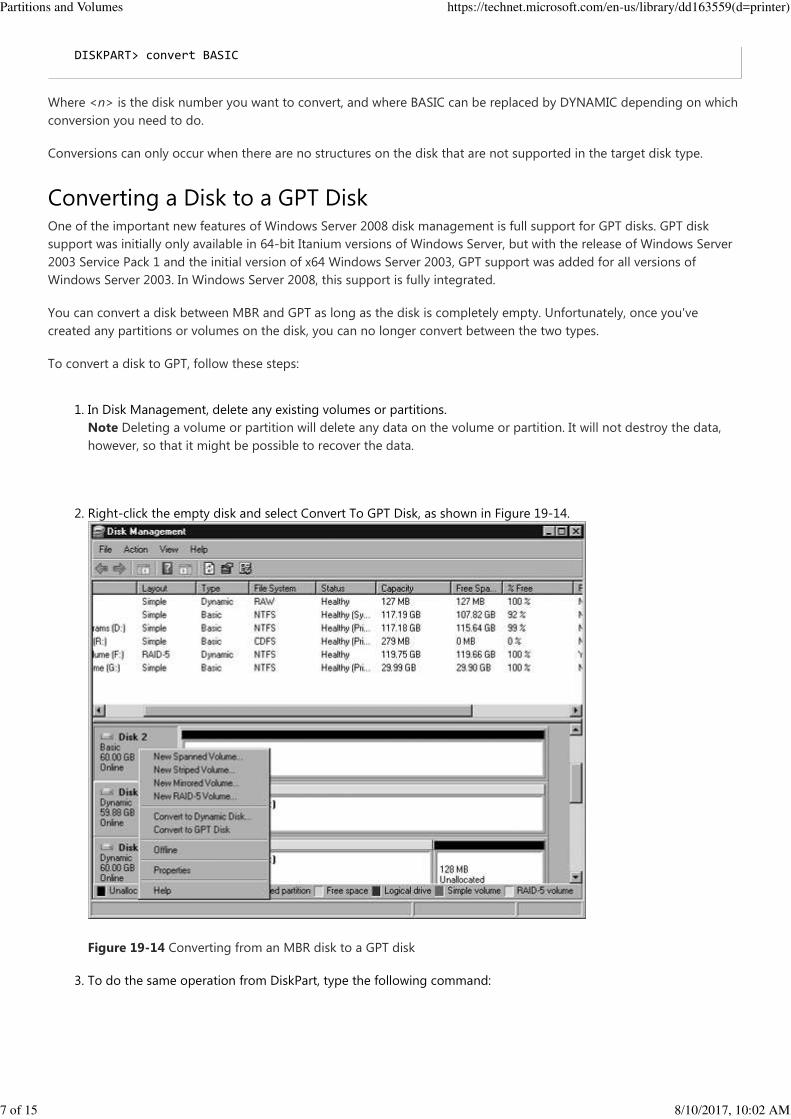
Right-click the empty disk and select Convert To GPT Disk, as shown in Figure 19-14.
Figure 19-14 Converting from an MBR disk to a GPT disk
2.
To do the same operation from DiskPart, type the following command:3.
DISKPART> convert BASIC
Partitions and Volumes https://technet.microsoft.com/en-us/library/dd163559(d=printer)
7 of 15 8/10/2017, 10:02 AM
Where <n> is the disk to be converted. That's all there is to it.
Changing the Size of a VolumeWindows Server 2008 allows you to change the size of an existing volume without losing data. You can extend the
volume, either by using additional free space on the existing disk, or by spanning onto another disk that has free space.
This capability is essentially unchanged from earlier versions of Windows Server. New to Windows Server 2008, however,
is the ability to shrink a volume without having to use a third-party product or lose data.
When you extend or shrink a volume, only a simple volume or a spanned volume can be modified: You cannot extend or
shrink striped, mirrored, or RAID-5 volumes without deleting the volume and recreating it.
Important Once you extend a volume across multiple disks, you normally cannot shrink it back down onto a single disk
without deleting the volume entirely and recreating it. This means you will lose data, so consider carefully before you
decide to extend a volume across multiple disks.
Extending a Volume
You can add space to a volume without having to back up, reboot, and restore your files if the volume is a simple volume
or a spanned volume. To extend a volume, follow these steps:
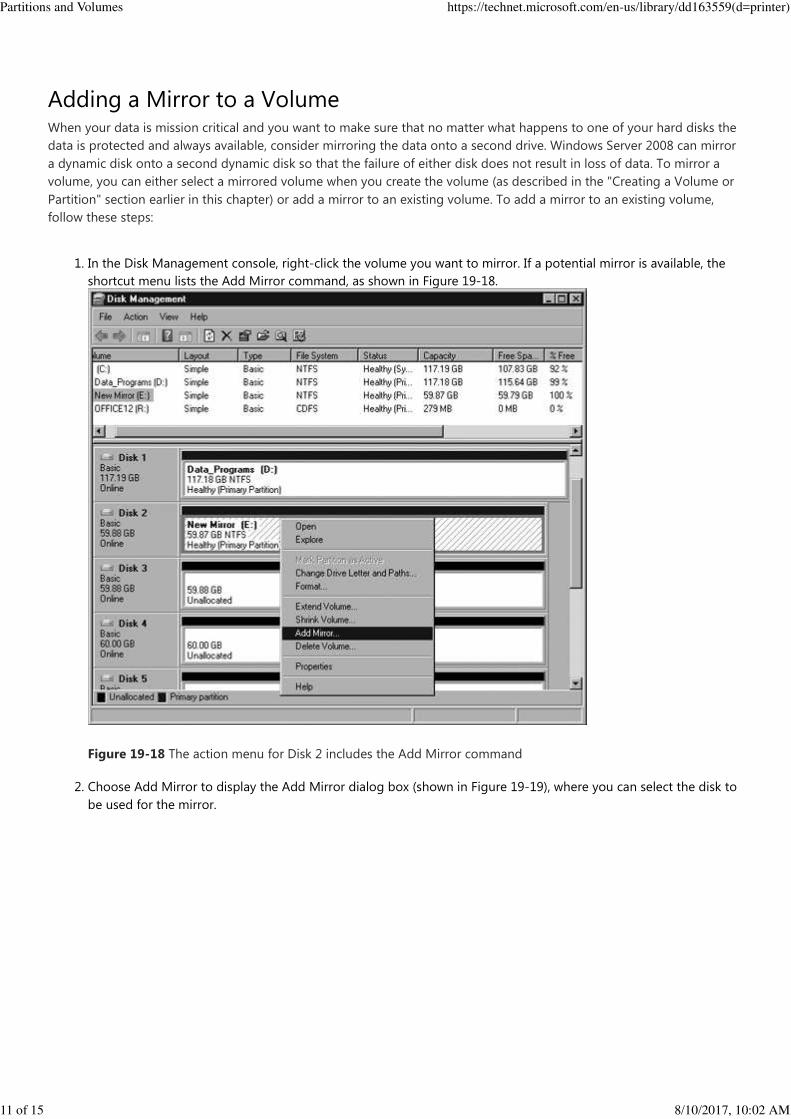
In Disk Management, right-click the volume you want to extend. Choose Extend Volume from the menu to open
the Extend Volume Wizard. Click Next.
1.
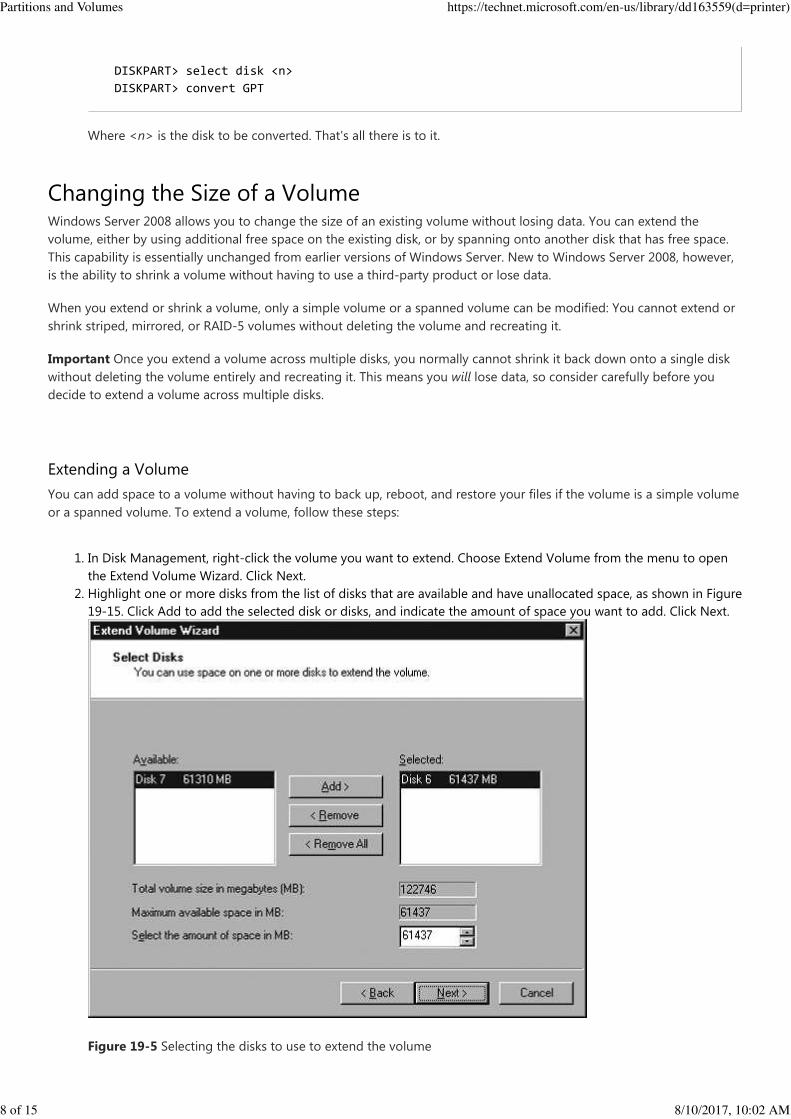
Highlight one or more disks from the list of disks that are available and have unallocated space, as shown in Figure
19-15. Click Add to add the selected disk or disks, and indicate the amount of space you want to add. Click Next.
Figure 19-5 Selecting the disks to use to extend the volume
2.
DISKPART> select disk <n>
DISKPART> convert GPT
Partitions and Volumes https://technet.microsoft.com/en-us/library/dd163559(d=printer)
8 of 15 8/10/2017, 10:02 AM
The Extend Volume Wizard displays a final confirmation page before extending the volume. Click Finish to extend
the volume, or click Cancel if you change your mind. If you need to convert any of the disks to dynamic before
extending, you'll get another confirmation prompt.
3.
To perform the same steps from the DiskPart command line, use the commands shown in Figure 19-16.
Figure 19-6 Extending a disk using the DiskPart command-line tool
4.
As you can see from the figure, using the command line to extend a volume is quite a few more steps than using Disk
Management. Given that we hardly ever extend a volume (see the Real World sidebar), it's probably just as well to use
Disk Management for this particular task. We're firm believers in using the command line whenever possible, but
sometimes it just doesn't make sense.
Note A spanned (extended) volume is actually less reliable than a simple disk. Unlike a mirror or RAID-5 volume, which
both have built-in redundancy, a spanned or striped volume will be broken and all data lost if any disk in the volume fails.
Real World: Extending—Administrator's Friend or Foe?
Most administrators have wished at some point that they could simply increase the users' home directory space on the
fly. Without having to bring the system offline for several hours while the entire volume is backed up and reformatted to
add the additional hard disks, the backup is restored, and the share points are re-created. Fun? Hardly. Risky? Certainly.
And definitely a job that means coming in on the weekend or staying late at night—in other words, something to be
avoided if at all possible.
All this makes Windows Server 2008's ability to create additional space on a volume without the need to back up the
volume, reformat the disks, and re-create the volume a seductive feature. However, if you're using conventional hard
disks without hardware RAID, you might want to think twice before jumping in. Only spanned or striped volumes allow
you to add additional storage on the fly, and, because neither is redundant, using them exposes your users to the risks of
Partitions and Volumes https://technet.microsoft.com/en-us/library/dd163559(d=printer)
9 of 15 8/10/2017, 10:02 AM
a failed drive. Yes, you have a backup, but even under the best of circumstances, you'll lose some data if you need to
restore a backup. Further, using spanned volumes actually increases your risk of a hard-disk failure. If any disk used as
part of the spanned volume fails, the entire volume is toast and will need to be restored from backup.
Why, then, would anyone use spanning? Because they have hardware RAID to provide the redundancy. This combination
offers the best of both worlds—redundancy provided by the hardware RAID controller and flexibility to expand volumes
as needed, using Disk Management. Yet another compelling argument for hardware RAID, in case you needed any more.
Shrinking a Volume
While most of the time we're concerned with increasing the size of a volume on the server, there can be occasions when
it might be convenient to shrink a volume. For example, if you are using a single large RAID array for multiple volumes,
and one of the volumes has empty space while another volume on the same array is running out of space, it would be
handy to be able to shrink the volume that has extra space and then extend the one that is running out of room. In the
past, the only way you could do this was to back up the volume you wanted to shrink, delete it, extend the volume that
needed growing, recreate the volume you deleted, and restore the backup. Possible, certainly. But both risky and highly
disruptive to your users. The other alternative was to use a third-party product, such as Acronis Disk Director Server ().
Now, in Windows Server 2008, you can use Disk Management to shrink a volume without having to delete it and recreate
it. While not quite as flexible as products like Acronis Disk Director, this new capability is all that most system
administrators will need. To shrink a volume, follow these steps:
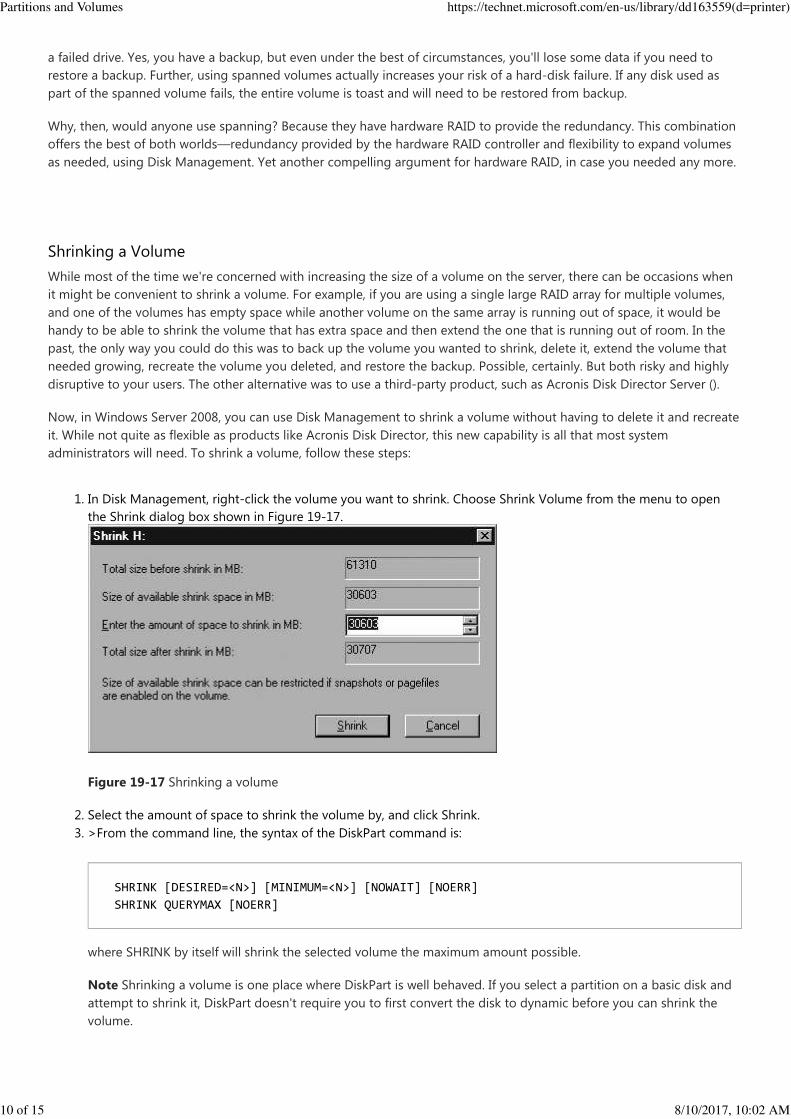
In Disk Management, right-click the volume you want to shrink. Choose Shrink Volume from the menu to open
the Shrink dialog box shown in Figure 19-17.
Figure 19-17 Shrinking a volume
1.
Select the amount of space to shrink the volume by, and click Shrink.2.
>From the command line, the syntax of the DiskPart command is:
where SHRINK by itself will shrink the selected volume the maximum amount possible.
Note Shrinking a volume is one place where DiskPart is well behaved. If you select a partition on a basic disk and
attempt to shrink it, DiskPart doesn't require you to first convert the disk to dynamic before you can shrink the