Photoshop Essentials - part 1 Workspace Pick your document size, title it, pick your orien- tation, colour mode and background colour before your create. Artboards Perfect for creating websites, apps, or story boards. Find a mobile or web preset. Make sure artboard is ticked Create new art boards
Transcript
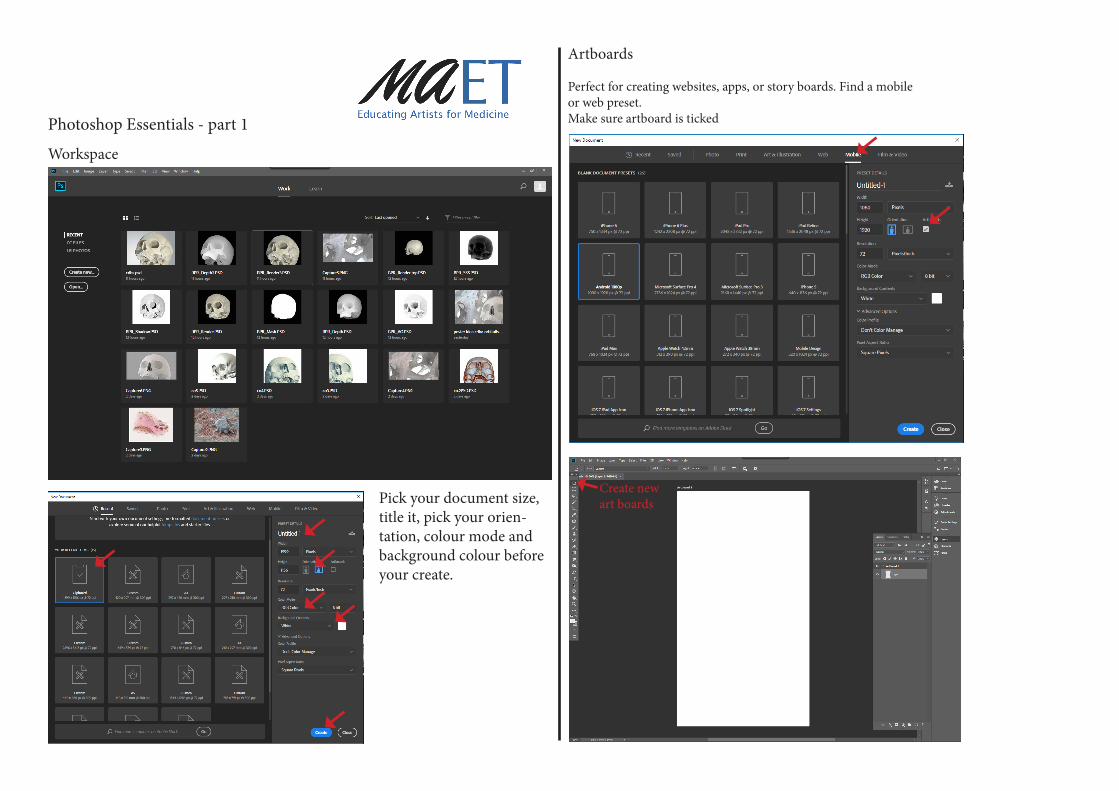
Photoshop Essentials - part 1
Workspace
Pick your document size, title it, pick your orien-tation, colour mode and background colour before your create.
Artboards
Perfect for creating websites, apps, or story boards. Find a mobile or web preset.Make sure artboard is ticked
Create new art boards
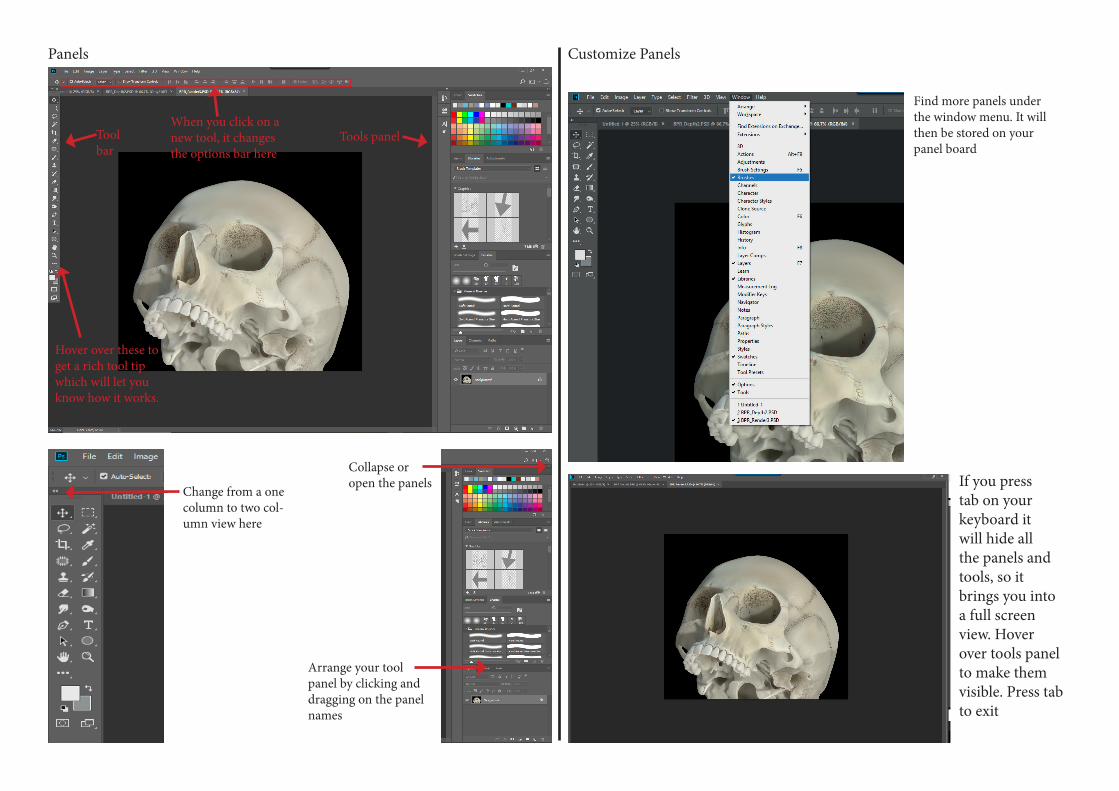
Panels
Tool bar
Tools panel
Change from a one column to two col-umn view here
Arrange your tool panel by clicking and dragging on the panel names
When you click on a new tool, it changes the options bar here
Hover over these to get a rich tool tip which will let you know how it works.
Customize Panels
Collapse or open the panels
Find more panels under the window menu. It will then be stored on your panel board
If you press tab on your keyboard it will hide all the panels and tools, so it brings you into a full screen view. Hover over tools panel to make them visible. Press tab to exit
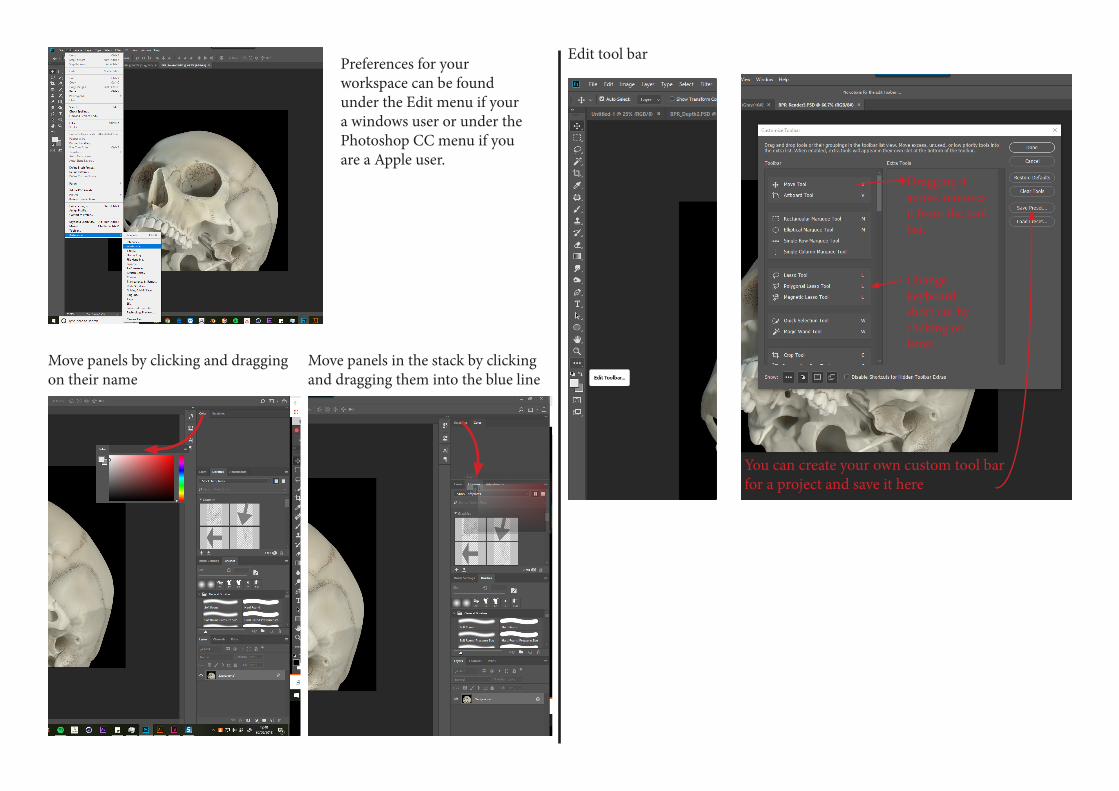
Preferences for your workspace can be found under the Edit menu if your a windows user or under the Photoshop CC menu if you are a Apple user.
Move panels by clicking and dragging on their name
Move panels in the stack by clicking and dragging them into the blue line
Edit tool bar
Dragging it across removes it from the tool bar.
Change keyboard short cut by clicking on letter
You can create your own custom tool bar for a project and save it here
Keyboard short cuts
Add more keyboard short cuts by clicking on empty box. Make sure the letter isn’t already taken! You can also edit
keyboard short cuts under the edit menu. Keyboard short cuts can be edited for menus, panels and tools
WorkspacesGo to top right hand side and click on Workspace. You may want to change it if you are working in 3D or with photography. You can change at any time. It just changes your panels. After you have customized your panels and tool bars and workspace so you might want to save it as a preset.
You can share workspaces with others and use it for different projects.You can load or delete workspaces here too.
Interface shading options
On Mac go to Photoshop CC menu or go to Edit menu preferences Interface if you are using Windows
Change boarders if you like
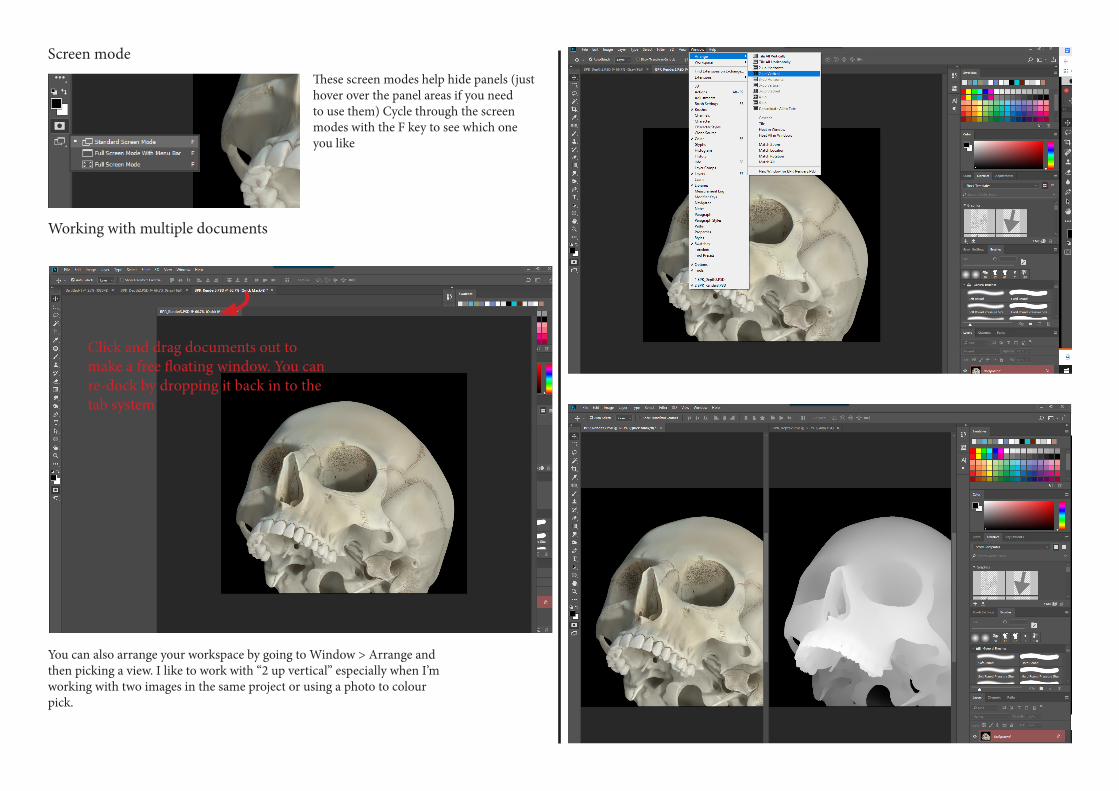
Screen modeThese screen modes help hide panels (just hover over the panel areas if you need to use them) Cycle through the screen modes with the F key to see which one you like
Working with multiple documents
Click and drag documents out to make a free floating window. You can re-dock by dropping it back in to the tab system
You can also arrange your workspace by going to Window > Arrange and then picking a view. I like to work with “2 up vertical” especially when I’m working with two images in the same project or using a photo to colour pick.
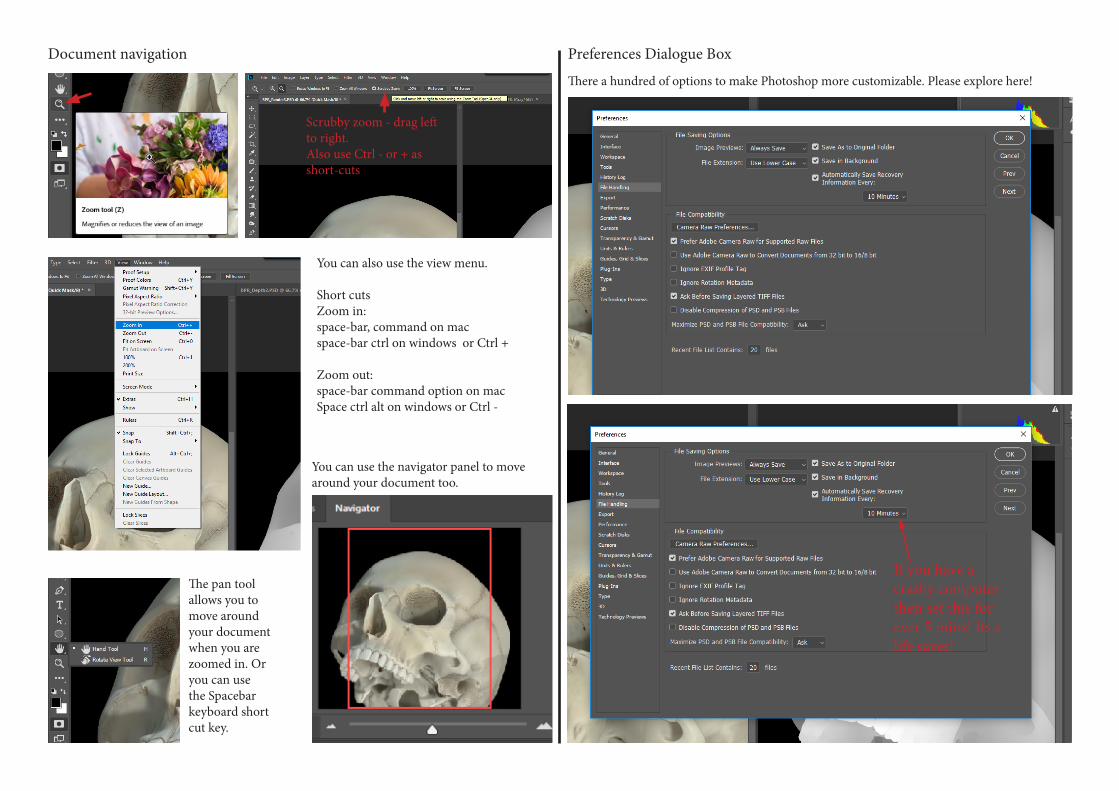
Document navigation
Scrubby zoom - drag left to right.Also use Ctrl - or + as short-cuts
You can also use the view menu.
Short cutsZoom in:space-bar, command on macspace-bar ctrl on windows or Ctrl +
Zoom out:space-bar command option on mac Space ctrl alt on windows or Ctrl -
The pan tool allows you to move around your document when you are zoomed in. Or you can use the Spacebar keyboard short cut key.
You can use the navigator panel to move around your document too.
Preferences Dialogue Box
There a hundred of options to make Photoshop more customizable. Please explore here!
If you have a crashy computer then set this for ever 5 mins! Its a life saver!
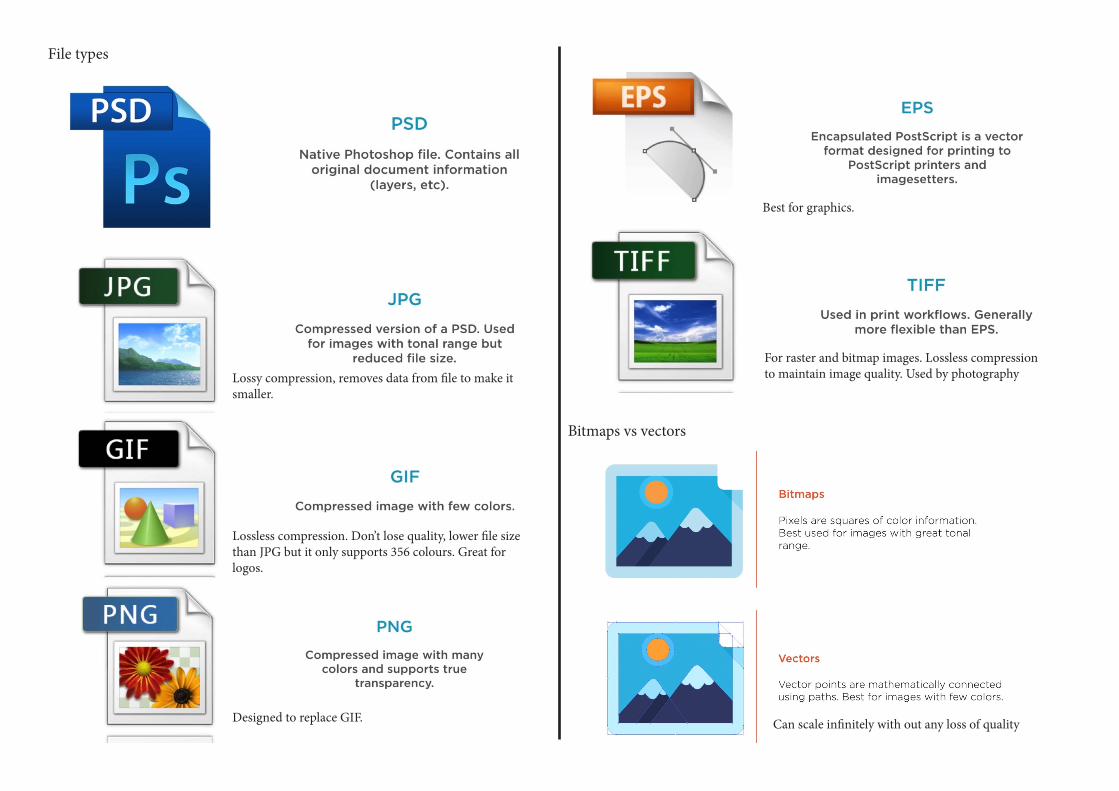
File types
Bitmaps vs vectors
Lossless compression. Don’t lose quality, lower file size than JPG but it only supports 356 colours. Great for logos.
Lossy compression, removes data from file to make it smaller.
Designed to replace GIF.
Best for graphics.
For raster and bitmap images. Lossless compression to maintain image quality. Used by photography
Can scale infinitely with out any loss of quality
Resolution3x outputs for artworkPrepress - HalftoneInject/Photos - Continuous ToneOnscreen - Display output (website and mobile)
Professional printers use CMYK (Cyan, Magenta, Yellow and Black)In the printing process little CMYK dots are placed on the paper to collectively create the illusion of the image. Paper quality determines your ‘line screen’ or pixels per inch. All to do with Dot Gain!
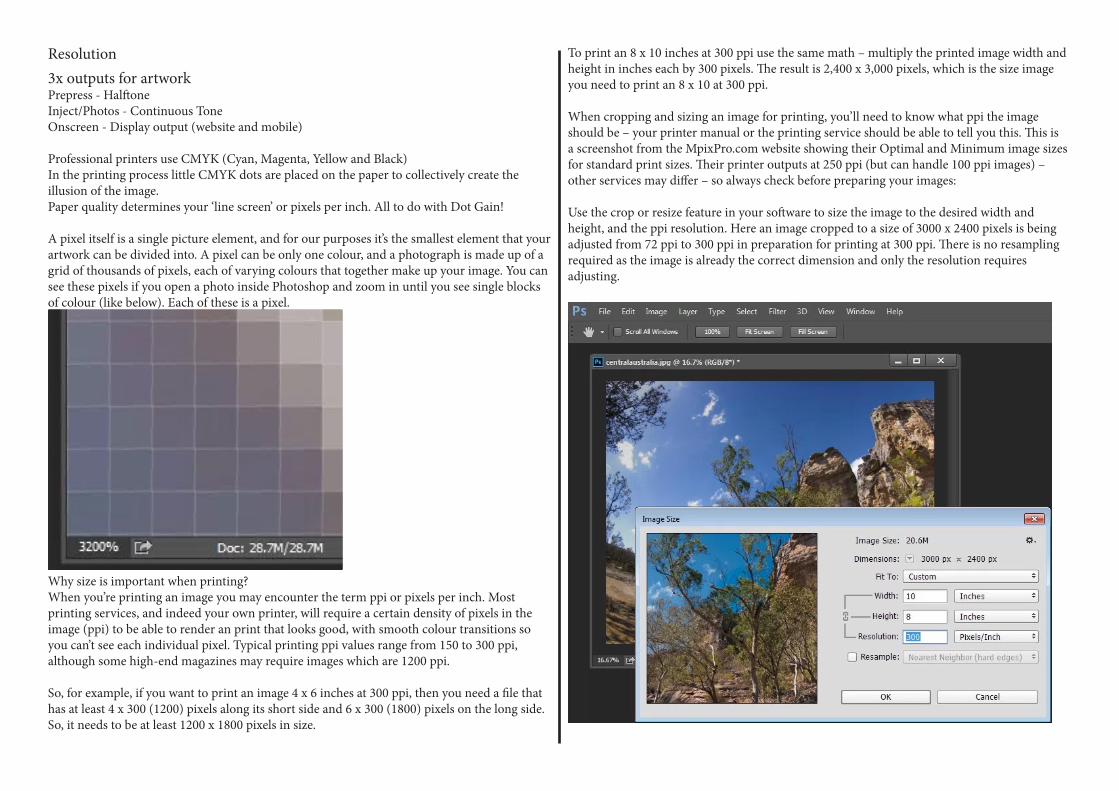
A pixel itself is a single picture element, and for our purposes it’s the smallest element that your artwork can be divided into. A pixel can be only one colour, and a photograph is made up of a grid of thousands of pixels, each of varying colours that together make up your image. You can see these pixels if you open a photo inside Photoshop and zoom in until you see single blocks of colour (like below). Each of these is a pixel.
Why size is important when printing?When you’re printing an image you may encounter the term ppi or pixels per inch. Most printing services, and indeed your own printer, will require a certain density of pixels in the image (ppi) to be able to render an print that looks good, with smooth colour transitions so you can’t see each individual pixel. Typical printing ppi values range from 150 to 300 ppi, although some high-end magazines may require images which are 1200 ppi.
So, for example, if you want to print an image 4 x 6 inches at 300 ppi, then you need a file that has at least 4 x 300 (1200) pixels along its short side and 6 x 300 (1800) pixels on the long side. So, it needs to be at least 1200 x 1800 pixels in size.
To print an 8 x 10 inches at 300 ppi use the same math – multiply the printed image width and height in inches each by 300 pixels. The result is 2,400 x 3,000 pixels, which is the size image you need to print an 8 x 10 at 300 ppi.
When cropping and sizing an image for printing, you’ll need to know what ppi the image should be – your printer manual or the printing service should be able to tell you this. This is a screenshot from the MpixPro.com website showing their Optimal and Minimum image sizes for standard print sizes. Their printer outputs at 250 ppi (but can handle 100 ppi images) – other services may differ – so always check before preparing your images:
Use the crop or resize feature in your software to size the image to the desired width and height, and the ppi resolution. Here an image cropped to a size of 3000 x 2400 pixels is being adjusted from 72 ppi to 300 ppi in preparation for printing at 300 ppi. There is no resampling required as the image is already the correct dimension and only the resolution requires adjusting.
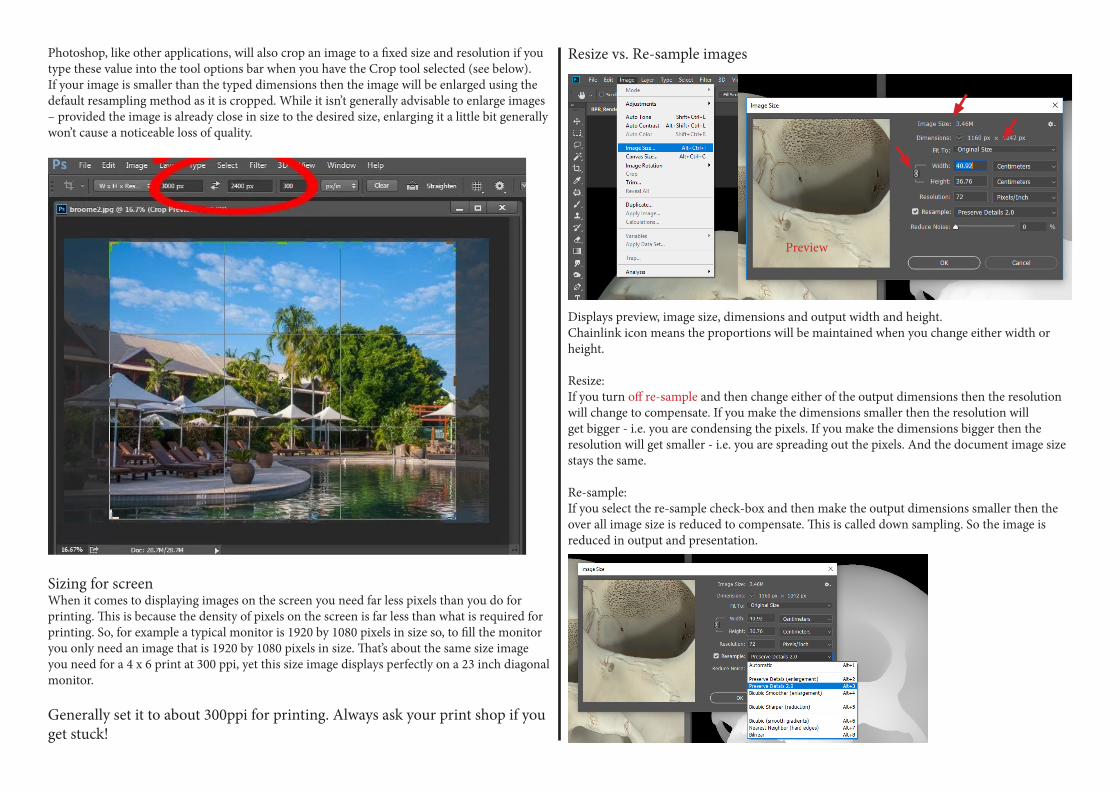
Photoshop, like other applications, will also crop an image to a fixed size and resolution if you type these value into the tool options bar when you have the Crop tool selected (see below). If your image is smaller than the typed dimensions then the image will be enlarged using the default resampling method as it is cropped. While it isn’t generally advisable to enlarge images – provided the image is already close in size to the desired size, enlarging it a little bit generally won’t cause a noticeable loss of quality.
Sizing for screenWhen it comes to displaying images on the screen you need far less pixels than you do for printing. This is because the density of pixels on the screen is far less than what is required for printing. So, for example a typical monitor is 1920 by 1080 pixels in size so, to fill the monitor you only need an image that is 1920 by 1080 pixels in size. That’s about the same size image you need for a 4 x 6 print at 300 ppi, yet this size image displays perfectly on a 23 inch diagonal monitor.
Generally set it to about 300ppi for printing. Always ask your print shop if you get stuck!
Resize vs. Re-sample images
Displays preview, image size, dimensions and output width and height.Chainlink icon means the proportions will be maintained when you change either width or height.
Resize:If you turn off re-sample and then change either of the output dimensions then the resolution will change to compensate. If you make the dimensions smaller then the resolution will get bigger - i.e. you are condensing the pixels. If you make the dimensions bigger then the resolution will get smaller - i.e. you are spreading out the pixels. And the document image size stays the same.
Re-sample:If you select the re-sample check-box and then make the output dimensions smaller then the over all image size is reduced to compensate. This is called down sampling. So the image is reduced in output and presentation.
Preview
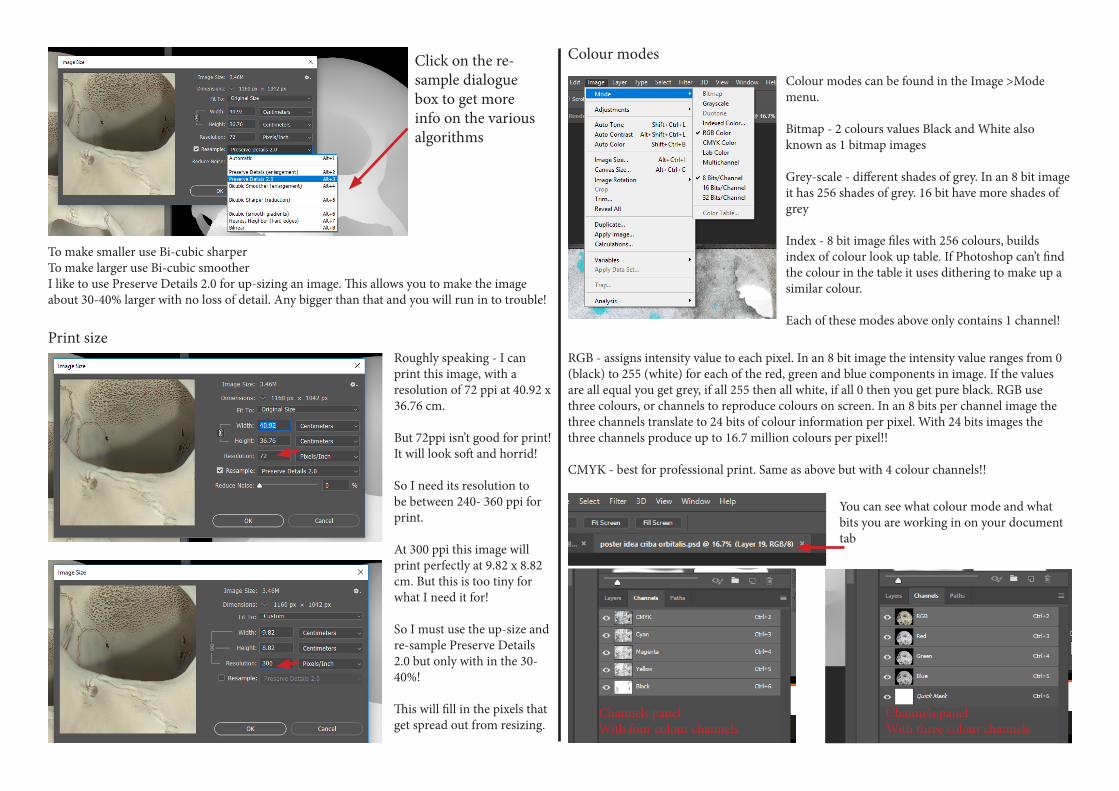
Click on the re-sample dialogue box to get more info on the various algorithms
To make smaller use Bi-cubic sharperTo make larger use Bi-cubic smoother I like to use Preserve Details 2.0 for up-sizing an image. This allows you to make the image about 30-40% larger with no loss of detail. Any bigger than that and you will run in to trouble!
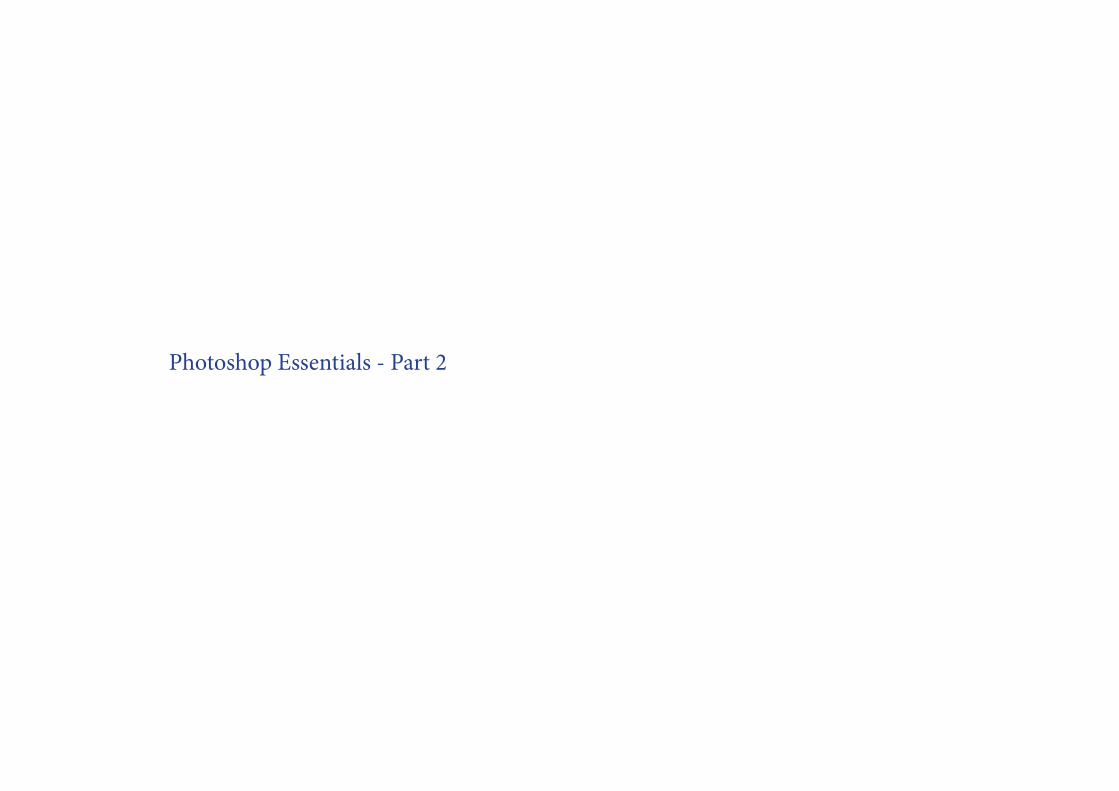
Print sizeRoughly speaking - I can print this image, with a resolution of 72 ppi at 40.92 x 36.76 cm.
But 72ppi isn’t good for print! It will look soft and horrid!
So I need its resolution to be between 240- 360 ppi for print.
At 300 ppi this image will print perfectly at 9.82 x 8.82 cm. But this is too tiny for what I need it for!
So I must use the up-size and re-sample Preserve Details 2.0 but only with in the 30-40%!
This will fill in the pixels that get spread out from resizing.
Colour modes
Colour modes can be found in the Image >Mode menu.
Bitmap - 2 colours values Black and White also known as 1 bitmap images
Grey-scale - different shades of grey. In an 8 bit image it has 256 shades of grey. 16 bit have more shades of grey
Index - 8 bit image files with 256 colours, builds index of colour look up table. If Photoshop can’t find the colour in the table it uses dithering to make up a similar colour.
Each of these modes above only contains 1 channel!
You can see what colour mode and what bits you are working in on your document tab
Channels panel With three colour channels
RGB - assigns intensity value to each pixel. In an 8 bit image the intensity value ranges from 0 (black) to 255 (white) for each of the red, green and blue components in image. If the values are all equal you get grey, if all 255 then all white, if all 0 then you get pure black. RGB use three colours, or channels to reproduce colours on screen. In an 8 bits per channel image the three channels translate to 24 bits of colour information per pixel. With 24 bits images the three channels produce up to 16.7 million colours per pixel!!
CMYK - best for professional print. Same as above but with 4 colour channels!!
Channels panel With four colour channels
Photoshop Essentials - Part 2
Selection Tool overview
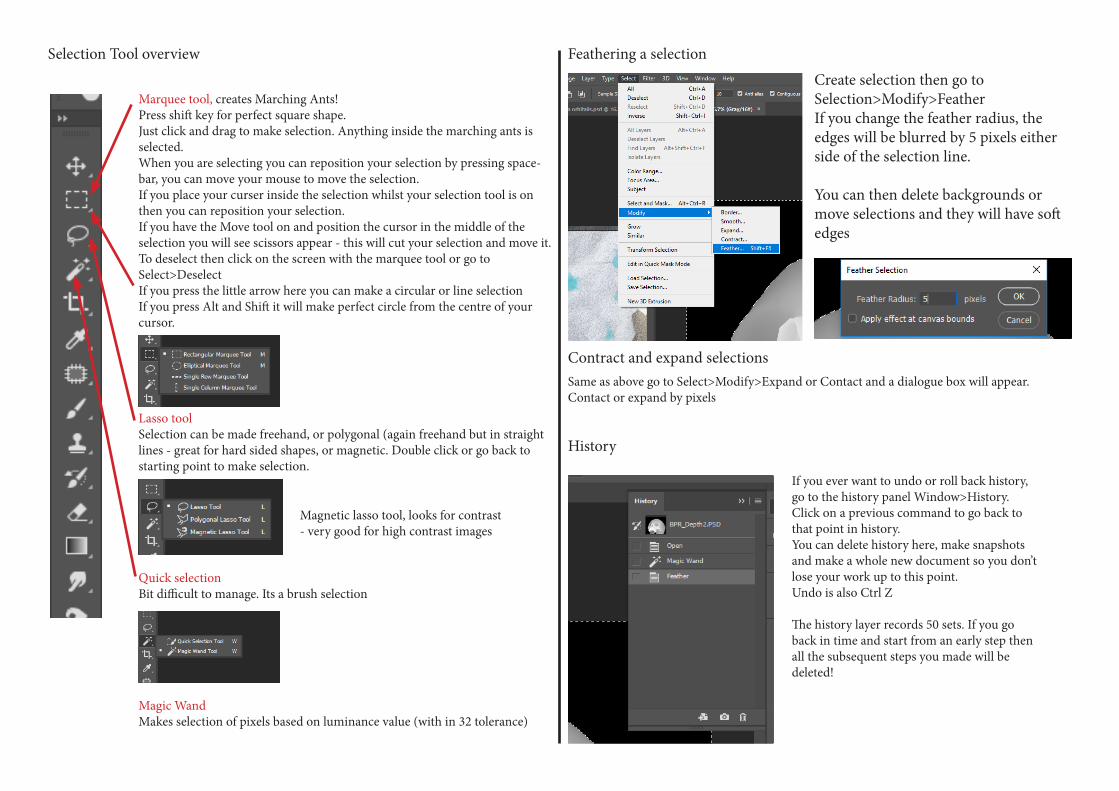
Marquee tool, creates Marching Ants!Press shift key for perfect square shape. Just click and drag to make selection. Anything inside the marching ants is selected.When you are selecting you can reposition your selection by pressing space-bar, you can move your mouse to move the selection.If you place your curser inside the selection whilst your selection tool is on then you can reposition your selection. If you have the Move tool on and position the cursor in the middle of the selection you will see scissors appear - this will cut your selection and move it.To deselect then click on the screen with the marquee tool or go to Select>DeselectIf you press the little arrow here you can make a circular or line selection If you press Alt and Shift it will make perfect circle from the centre of your cursor.
Lasso toolSelection can be made freehand, or polygonal (again freehand but in straight lines - great for hard sided shapes, or magnetic. Double click or go back to starting point to make selection.
Quick selectionBit difficult to manage. Its a brush selection
Magic WandMakes selection of pixels based on luminance value (with in 32 tolerance)
Magnetic lasso tool, looks for contrast - very good for high contrast images
Feathering a selectionCreate selection then go to Selection>Modify>FeatherIf you change the feather radius, the edges will be blurred by 5 pixels either side of the selection line.
You can then delete backgrounds or move selections and they will have soft edges
History
If you ever want to undo or roll back history, go to the history panel Window>History.Click on a previous command to go back to that point in history.You can delete history here, make snapshots and make a whole new document so you don’t lose your work up to this point.Undo is also Ctrl Z
The history layer records 50 sets. If you go back in time and start from an early step then all the subsequent steps you made will be deleted!
Contract and expand selectionsSame as above go to Select>Modify>Expand or Contact and a dialogue box will appear. Contact or expand by pixels
Copy and PasteUse this for transferring a selection of an image from one document to another.Select and then press Ctrl C or Command C for Apple.Then press Ctrl V or Command V for Apple.It will appear on its own Layer in the layer panel.Have move tool selection and then drag the selection to the other document so you don’t have to copy and paste
Scaling image
Edit>Free Transform makes boundary box appear. Click on the corner resize handles to make the selection smaller or bigger. If you press Shift it will maintain aspect ratio. Click and drag inside the boundary box to move your selection around. Once happy with the transformation press Enter or double click inside boundary box.You can also Edit>Transform if you just want to scale etc. Also useful for flipping vertically or horizontally.
Modifying selections
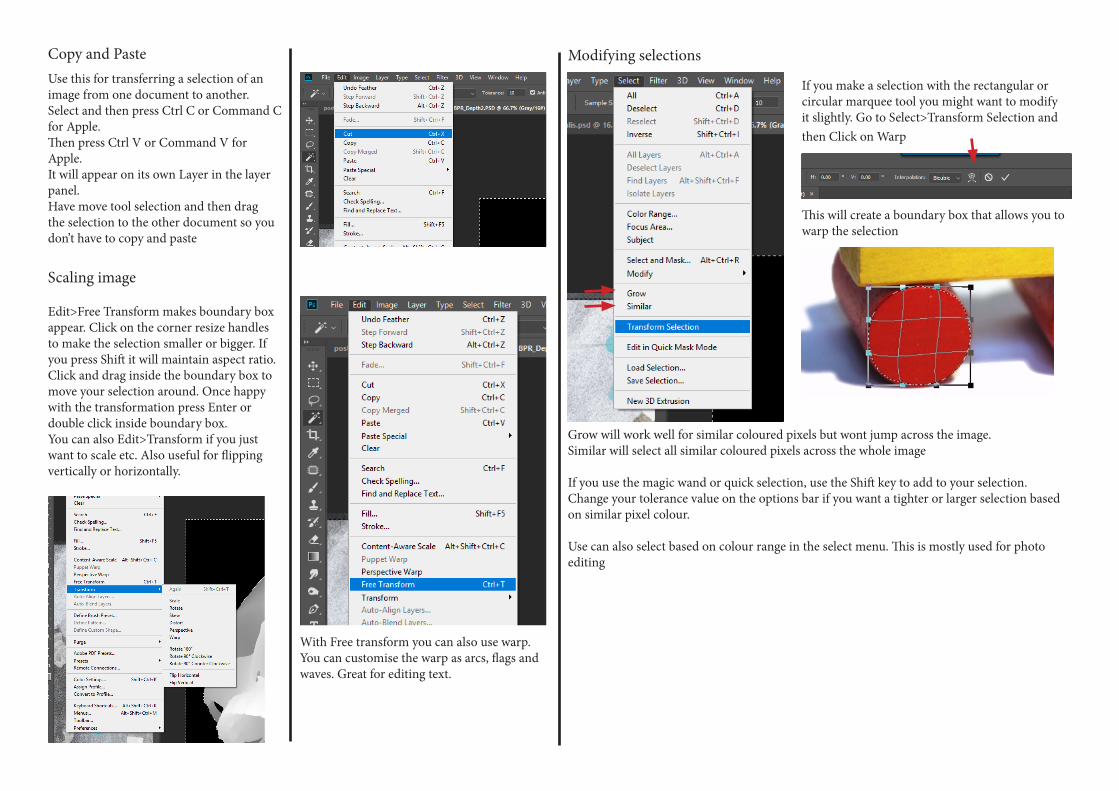
If you make a selection with the rectangular or circular marquee tool you might want to modify it slightly. Go to Select>Transform Selection and then Click on Warp
This will create a boundary box that allows you to warp the selection
Grow will work well for similar coloured pixels but wont jump across the image.Similar will select all similar coloured pixels across the whole image
If you use the magic wand or quick selection, use the Shift key to add to your selection.Change your tolerance value on the options bar if you want a tighter or larger selection based on similar pixel colour.
Use can also select based on colour range in the select menu. This is mostly used for photo editing
With Free transform you can also use warp. You can customise the warp as arcs, flags and waves. Great for editing text.
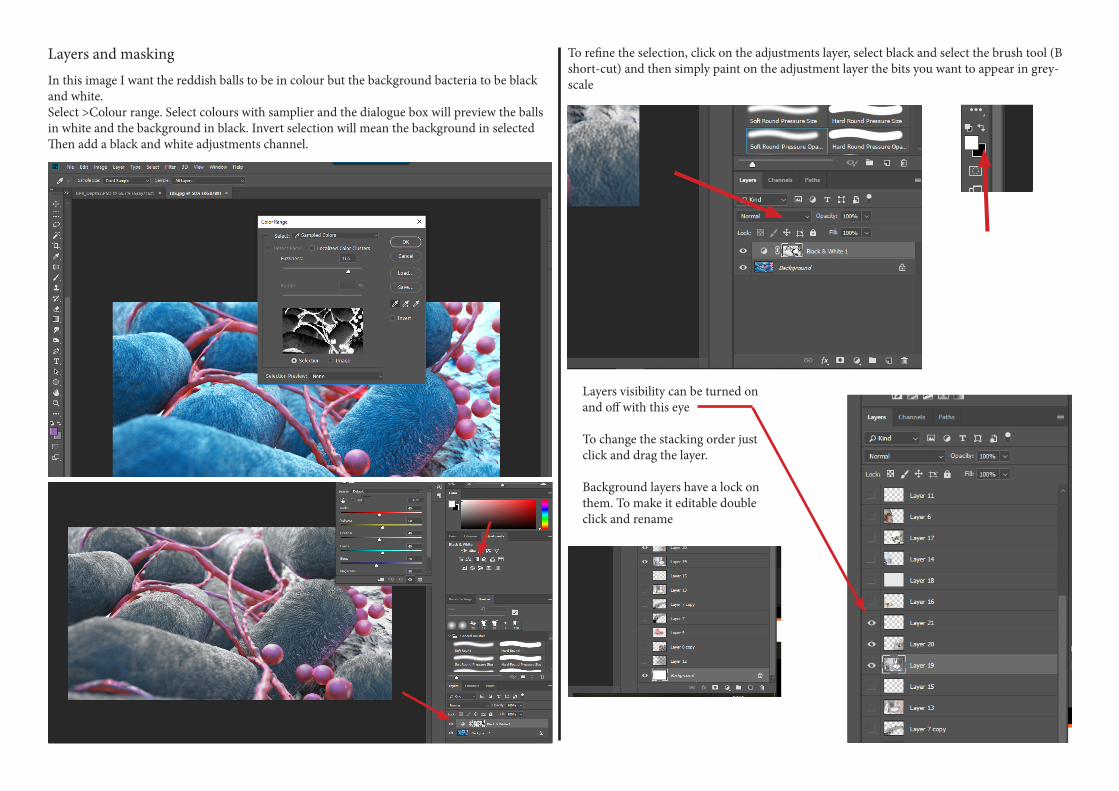
Layers and maskingIn this image I want the reddish balls to be in colour but the background bacteria to be black and white.Select >Colour range. Select colours with samplier and the dialogue box will preview the balls in white and the background in black. Invert selection will mean the background in selectedThen add a black and white adjustments channel.
To refine the selection, click on the adjustments layer, select black and select the brush tool (B short-cut) and then simply paint on the adjustment layer the bits you want to appear in grey-scale
Layers visibility can be turned on and off with this eye
To change the stacking order just click and drag the layer.
Background layers have a lock on them. To make it editable double click and rename
Opening images to layers
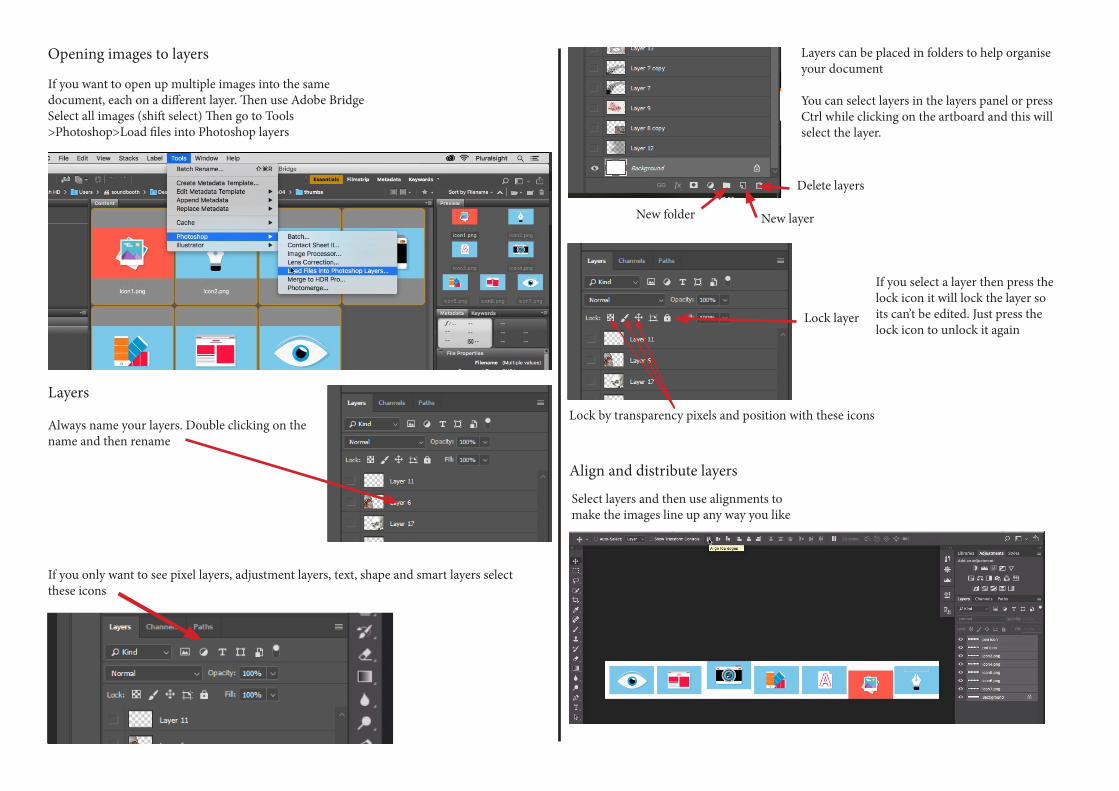
If you want to open up multiple images into the same document, each on a different layer. Then use Adobe BridgeSelect all images (shift select) Then go to Tools >Photoshop>Load files into Photoshop layers
Layers
Always name your layers. Double clicking on the name and then rename
If you only want to see pixel layers, adjustment layers, text, shape and smart layers select these icons
Delete layers
New layerNew folder
Layers can be placed in folders to help organise your document
You can select layers in the layers panel or press Ctrl while clicking on the artboard and this will select the layer.
Lock layer
If you select a layer then press the lock icon it will lock the layer so its can’t be edited. Just press the lock icon to unlock it again
Lock by transparency pixels and position with these icons
Align and distribute layers
Select layers and then use alignments to make the images line up any way you like
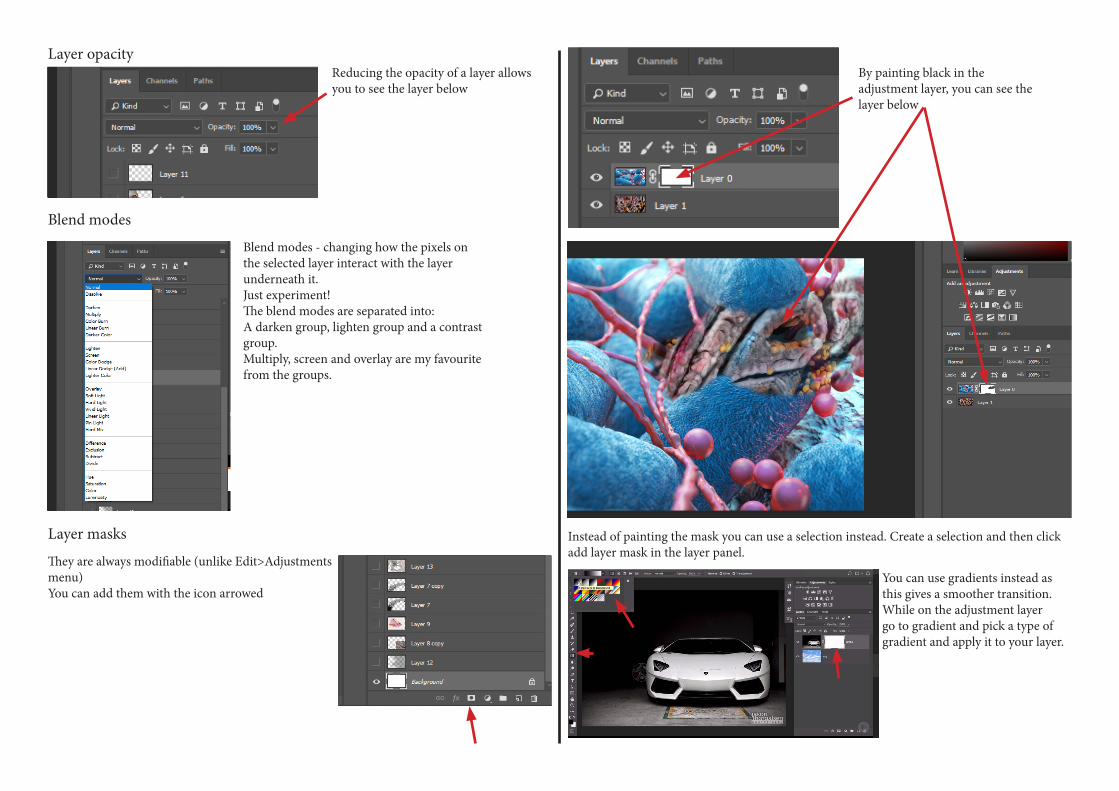
Layer opacityReducing the opacity of a layer allows you to see the layer below
Blend modes
Blend modes - changing how the pixels on the selected layer interact with the layer underneath it.Just experiment!The blend modes are separated into:A darken group, lighten group and a contrast group.Multiply, screen and overlay are my favourite from the groups.
Layer masks
They are always modifiable (unlike Edit>Adjustments menu)You can add them with the icon arrowed
By painting black in the adjustment layer, you can see the layer below
Instead of painting the mask you can use a selection instead. Create a selection and then click add layer mask in the layer panel.
You can use gradients instead as this gives a smoother transition.While on the adjustment layer go to gradient and pick a type of gradient and apply it to your layer.
Layer style
Layer styles can add effects to your layers. Drop shadow, inner glow can be good to use for vessels traveling across surfaces. You can apply multiple styles to the same layer.Click the eye icon next to the effects on the layer to turn it on or off.
You can flatten layers. Right click on layer and press merge down.
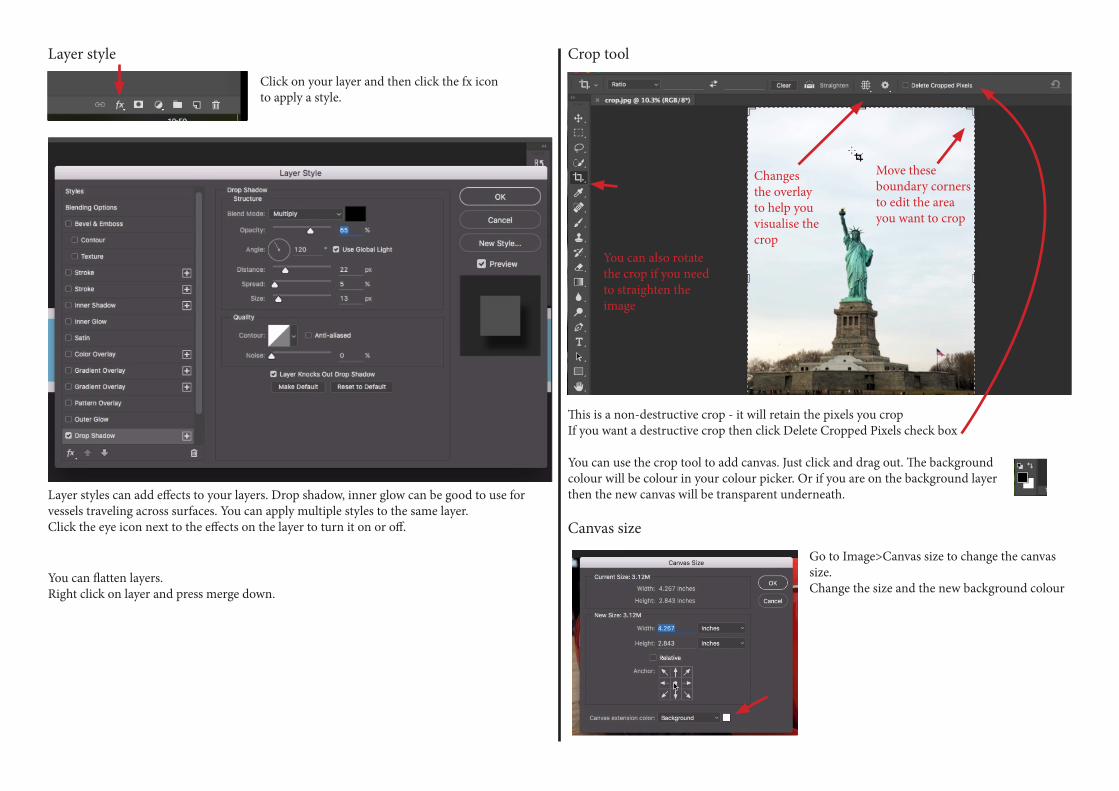
Click on your layer and then click the fx icon to apply a style.
Crop tool
Move these boundary corners to edit the area you want to crop
Changes the overlay to help you visualise the crop
This is a non-destructive crop - it will retain the pixels you cropIf you want a destructive crop then click Delete Cropped Pixels check box
You can use the crop tool to add canvas. Just click and drag out. The background colour will be colour in your colour picker. Or if you are on the background layer then the new canvas will be transparent underneath.
Canvas size
Go to Image>Canvas size to change the canvas size.Change the size and the new background colour
You can also rotate the crop if you need to straighten the image
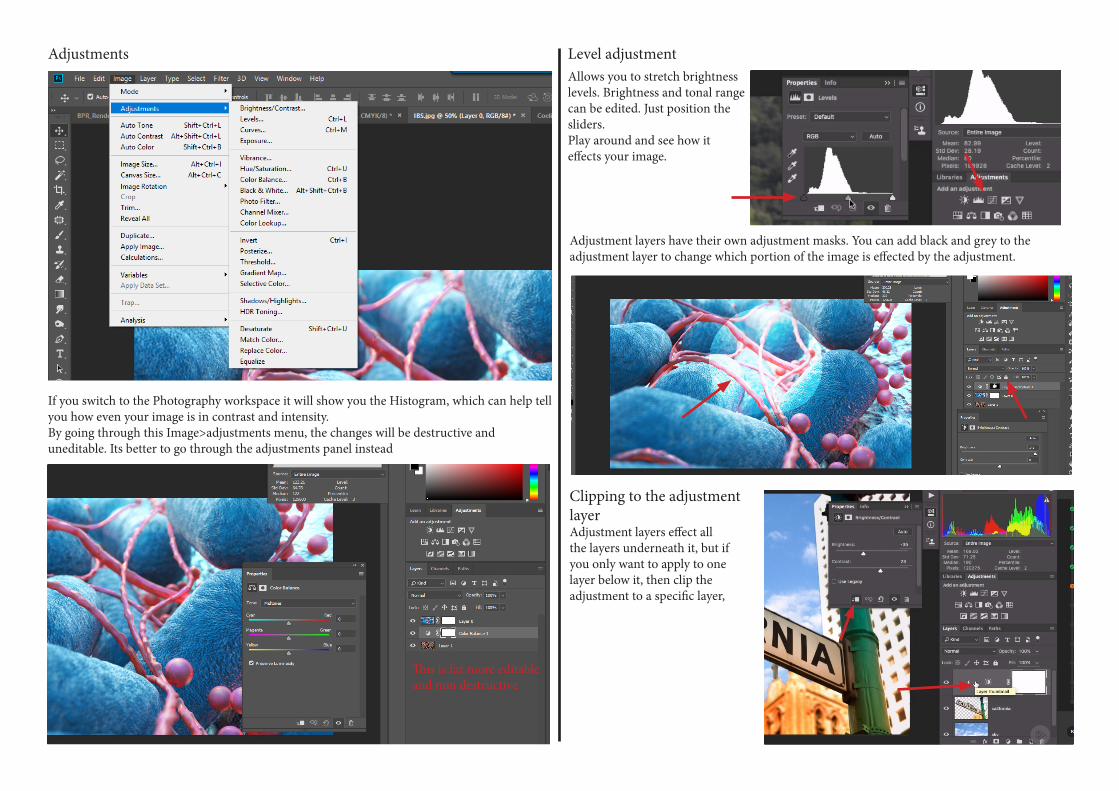
Adjustments
If you switch to the Photography workspace it will show you the Histogram, which can help tell you how even your image is in contrast and intensity.By going through this Image>adjustments menu, the changes will be destructive and uneditable. Its better to go through the adjustments panel instead
This is far more editable and non destructive
Level adjustmentAllows you to stretch brightness levels. Brightness and tonal range can be edited. Just position the sliders.Play around and see how it effects your image.
Adjustment layers have their own adjustment masks. You can add black and grey to the adjustment layer to change which portion of the image is effected by the adjustment.
Clipping to the adjustment layerAdjustment layers effect all the layers underneath it, but if you only want to apply to one layer below it, then clip the adjustment to a specific layer,
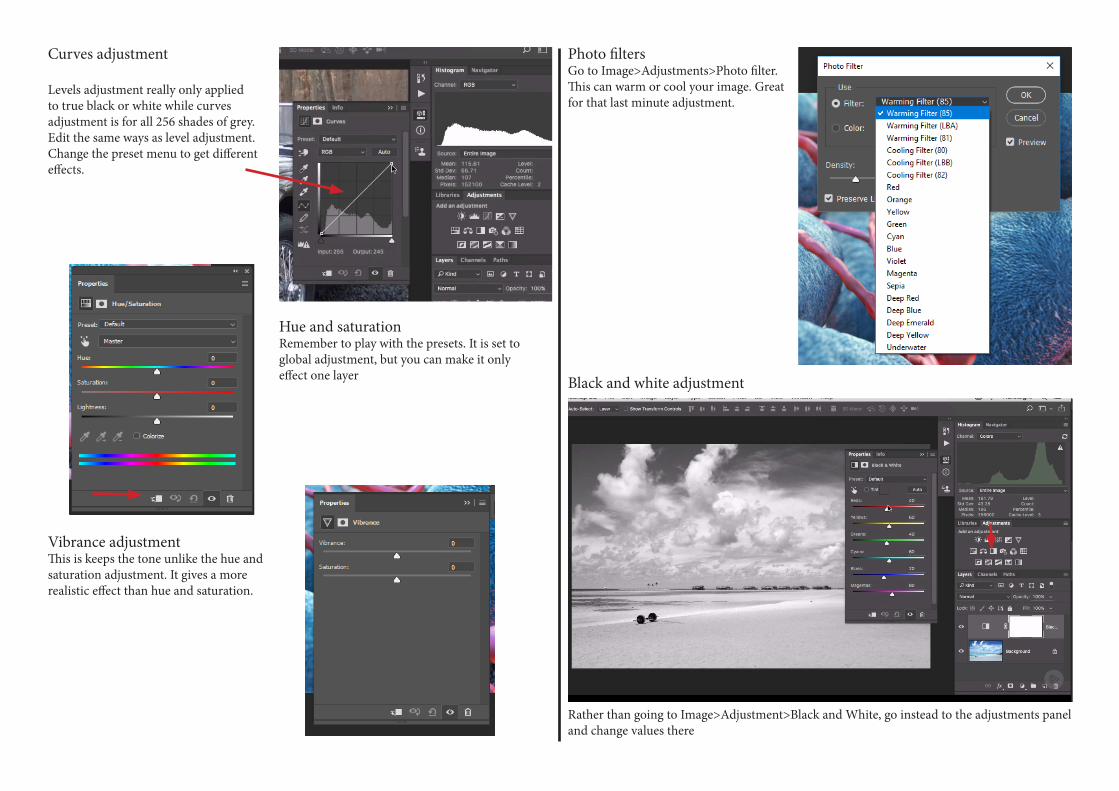
Curves adjustment
Levels adjustment really only applied to true black or white while curves adjustment is for all 256 shades of grey. Edit the same ways as level adjustment. Change the preset menu to get different effects.
Hue and saturationRemember to play with the presets. It is set to global adjustment, but you can make it only effect one layer
Vibrance adjustmentThis is keeps the tone unlike the hue and saturation adjustment. It gives a more realistic effect than hue and saturation.
Photo filtersGo to Image>Adjustments>Photo filter.This can warm or cool your image. Great for that last minute adjustment.
Black and white adjustment
Rather than going to Image>Adjustment>Black and White, go instead to the adjustments panel and change values there