15
| Date post: | 12-May-2023 |
| Category: |
Documents |
| Upload: | khangminh22 |
| View: | 0 times |
| Download: | 0 times |

Page 2 of 9
SOP SF-3-10.02 SOP for Scott ELSA Emergency Escape Breathing Devices
4. SCOPE 4.1. The SOP applies to SSF staff and other personnel who are trained per SSF SOPs for access to
the TK 252 Liquid Nitrogen Freezer Room. The procedure is to be used by personnel who (1) are in the TK 252 Liquid Nitrogen Freezer Room at the time a low oxygen condition occurs AND (2) are unable to vacate the low oxygen level area immediately. It is the responsibility of the SSF staff and SSF-trained personnel to direct non-SSF staff and untrained Collaborating Biorepository Personnel in the use of the units should this be necessary.
4.2. The M10 BiOS Room (TK 258) is outside the scope of most SSF SOPs per IU Genetics Biobank (IUGB). Use of 3M Scott ELSA EEBD(s) in TK 258 is outside the scope of this SOP, however SSF personnel monitor and maintain 3M Scott ELSA EEBD(s) utilized in TK 258 per the following sections of this SOP: 4.2.1. Section 6.2.3: Prepare and return to the area for re-use 4.2.2. Section 6.3: Maintenance
5. MATERIALS 5.1. Emergency Escape Breathing Device (EEBD) – 3M Scott ELSA EEBD-N 15-minutes (Part
number: 8007214) 5.2. Mild Soap 5.3. Clean Cloth 5.4. Airkem 33 disinfectant or equivalent 5.5. Water - not specified 5.6. Duct Tape
6. PROCEDURE
6.1. Components of the Scott ELSA EEBD 6.1.1. Equipment Schematics:
Strap
Pull Tab

Page 3 of 9
SOP SF-3-10.02 SOP for Scott ELSA Emergency Escape Breathing Devices
6.1.2. Hood, Diffuser, and Hose Assembly (referred to as Hood Assembly) Schematic Reference:
6.1.2.1. Assembly Components 6.1.2.1.1. Cylinder Assembly – comprised of Cylinder, Regulator, and Valve 6.1.2.1.2. Hood Assembly – comprised of Hood, Diffuser, and Diffuser
components per Step 6.1.2. NOTE: The Hose is not a component of the Hood Assembly.
6.2. When used for escape from TK 252 and associated area(s) due to low oxygen condition: 6.2.1. Don the emergency escape breathing device:
6.2.1.1. Lift pack to remove from wall mount. 6.2.1.2. With the Scott ELSA EEBD cylinder valve facing up and out, and the opening
pull tab easily accessible, place the carry bag on the body so that one arm is through the strap and the strap is draped behind the neck.
6.2.1.3. Lift the pull tab to open the carry bag and expose the hood. 6.2.1.4. Remove hood from pouch and hose from the bag. 6.2.1.5. Open cylinder valve completely, turning counterclockwise, until a rush of air
flows into the bag. 6.2.1.6. DO NOT put on the hood before opening the valve or if you do not hear the
sound of air rushing into the hood when the valve is opened.
1 Hood 6 Charging Port 2 Elastic Collar 7 Valve 3 Carry Case 8 Diffuser 4 Cylinder 9 Hose 5 Regulator 10 Gauge Window 2
8
5
7
4 3
1
9
6
10
Page 4 of 9
SOP SF-3-10.02 SOP for Scott ELSA Emergency Escape Breathing Devices
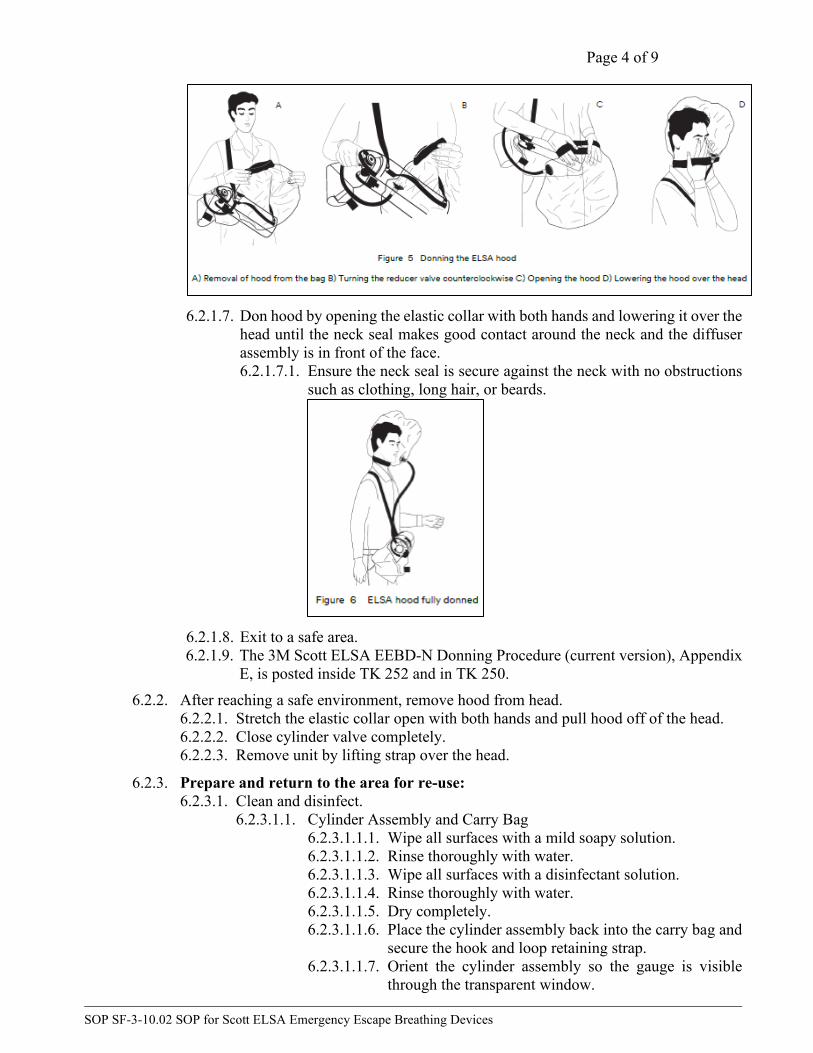
6.2.1.7. Don hood by opening the elastic collar with both hands and lowering it over the head until the neck seal makes good contact around the neck and the diffuser assembly is in front of the face. 6.2.1.7.1. Ensure the neck seal is secure against the neck with no obstructions
such as clothing, long hair, or beards.
6.2.1.8. Exit to a safe area. 6.2.1.9. The 3M Scott ELSA EEBD-N Donning Procedure (current version), Appendix
E, is posted inside TK 252 and in TK 250. 6.2.2. After reaching a safe environment, remove hood from head.
6.2.2.1. Stretch the elastic collar open with both hands and pull hood off of the head. 6.2.2.2. Close cylinder valve completely. 6.2.2.3. Remove unit by lifting strap over the head.
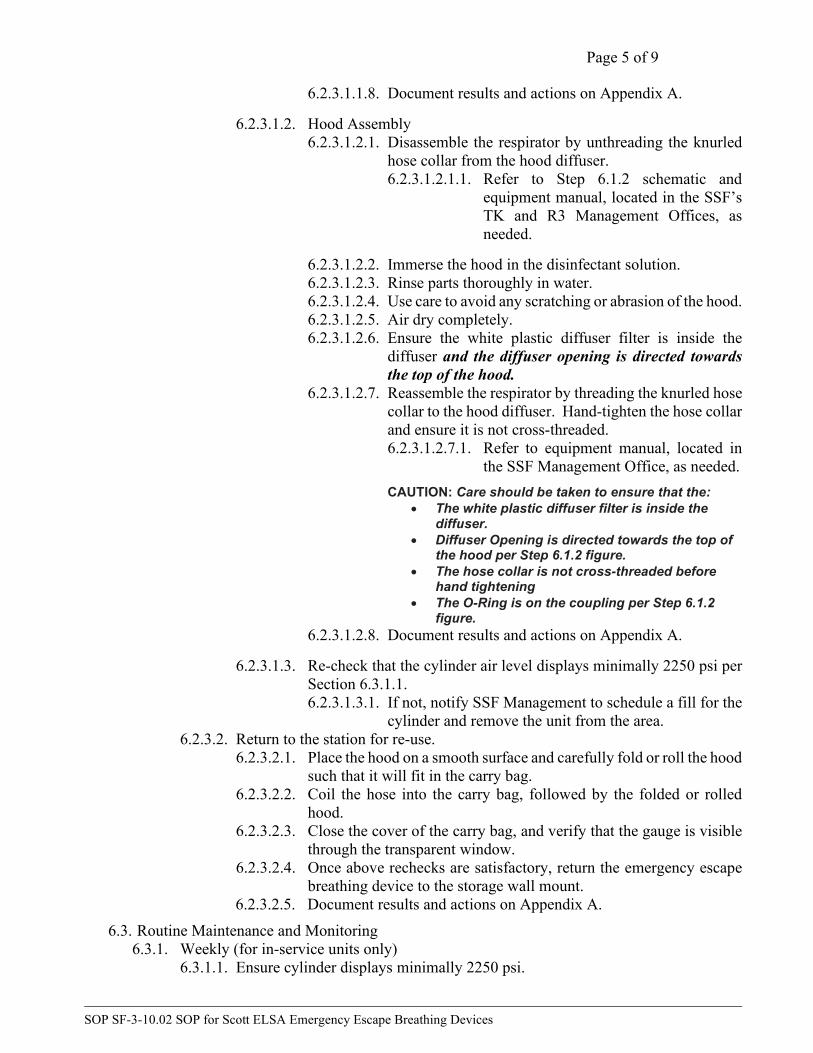
6.2.3. Prepare and return to the area for re-use: 6.2.3.1. Clean and disinfect.
6.2.3.1.1. Cylinder Assembly and Carry Bag 6.2.3.1.1.1. Wipe all surfaces with a mild soapy solution. 6.2.3.1.1.2. Rinse thoroughly with water. 6.2.3.1.1.3. Wipe all surfaces with a disinfectant solution. 6.2.3.1.1.4. Rinse thoroughly with water. 6.2.3.1.1.5. Dry completely. 6.2.3.1.1.6. Place the cylinder assembly back into the carry bag and
secure the hook and loop retaining strap. 6.2.3.1.1.7. Orient the cylinder assembly so the gauge is visible
through the transparent window.
Page 5 of 9
SOP SF-3-10.02 SOP for Scott ELSA Emergency Escape Breathing Devices
6.2.3.1.1.8. Document results and actions on Appendix A.
6.2.3.1.2. Hood Assembly 6.2.3.1.2.1. Disassemble the respirator by unthreading the knurled
hose collar from the hood diffuser. 6.2.3.1.2.1.1. Refer to Step 6.1.2 schematic and
equipment manual, located in the SSF’s TK and R3 Management Offices, as needed.
6.2.3.1.2.2. Immerse the hood in the disinfectant solution. 6.2.3.1.2.3. Rinse parts thoroughly in water. 6.2.3.1.2.4. Use care to avoid any scratching or abrasion of the hood. 6.2.3.1.2.5. Air dry completely. 6.2.3.1.2.6. Ensure the white plastic diffuser filter is inside the
diffuser and the diffuser opening is directed towards the top of the hood.
6.2.3.1.2.7. Reassemble the respirator by threading the knurled hose collar to the hood diffuser. Hand-tighten the hose collar and ensure it is not cross-threaded. 6.2.3.1.2.7.1. Refer to equipment manual, located in
the SSF Management Office, as needed.
CAUTION: Care should be taken to ensure that the: • The white plastic diffuser filter is inside the
diffuser. • Diffuser Opening is directed towards the top of
the hood per Step 6.1.2 figure. • The hose collar is not cross-threaded before
hand tightening • The O-Ring is on the coupling per Step 6.1.2
figure. 6.2.3.1.2.8. Document results and actions on Appendix A.
6.2.3.1.3. Re-check that the cylinder air level displays minimally 2250 psi per Section 6.3.1.1. 6.2.3.1.3.1. If not, notify SSF Management to schedule a fill for the
cylinder and remove the unit from the area. 6.2.3.2. Return to the station for re-use.
6.2.3.2.1. Place the hood on a smooth surface and carefully fold or roll the hood such that it will fit in the carry bag.
6.2.3.2.2. Coil the hose into the carry bag, followed by the folded or rolled hood.
6.2.3.2.3. Close the cover of the carry bag, and verify that the gauge is visible through the transparent window.
6.2.3.2.4. Once above rechecks are satisfactory, return the emergency escape breathing device to the storage wall mount.
6.2.3.2.5. Document results and actions on Appendix A. 6.3. Routine Maintenance and Monitoring
6.3.1. Weekly (for in-service units only) 6.3.1.1. Ensure cylinder displays minimally 2250 psi.

Page 6 of 9
SOP SF-3-10.02 SOP for Scott ELSA Emergency Escape Breathing Devices
6.3.1.1.1. Verify that the indicator needle on the gauge displays minimally 2250 psi. 6.3.1.1.1.1. Gauge displays psi x 10, therefore when the gauge
displays 225, the air level is 225 x 10 = 2250 psi. 6.3.1.1.2. If not filled at least to 2250 psi, remove from the area and notify SSF
Management to schedule a fill for the cylinder, see Section 6.3.5.1. 6.3.1.1.3. Document what is observed and any actions taken, if applicable, on
Appendix B. 6.3.2. Monthly (for in-service units only)
6.3.2.1. Hood Assembly 6.3.2.1.1. Check for any tears, cracking, cuts or abrasions, discoloration, holes,
damaged elastic, or lack of elasticity. 6.3.2.1.2. If present, remove from the area and notify SSF Management to
replace. 6.3.2.1.3. Document what is observed and any actions taken, if applicable, on
Appendix B.
6.3.2.2. Carry Bag 6.3.2.2.1. Check for any tears, cracking or holes deemed likely to compromise
integrity of the case. 6.3.2.2.1.1. Minor tears may be mended by SSF personnel with duct
tape. 6.3.2.2.1.2. Request management evaluation of case if unsure about
case integrity. 6.3.2.2.2. Ensure all hardware is intact. 6.3.2.2.3. Inspect Velcro for lint or dirt that could prevent it from adhering
properly. 6.3.2.2.4. Evaluate additional signs of degradation with SSF Management for
determination of replacement – DO NOT REMOVE. 6.3.2.2.5. Document what is observed and any actions taken, if applicable, on
Appendix B. 6.3.2.2.6. Return EEBD to station per Section 6.2.3.2.
6.3.2.3. Function testing 6.3.2.3.1. Remove the emergency escape breathing device from the wall
mount. 6.3.2.3.2. Place the strap over your neck or shoulder.
6.3.2.3.2.1. Verify the cylinder valve is facing forward. 6.3.2.3.3. Lift the pull tab. 6.3.2.3.4. Remove hood from pouch. 6.3.2.3.5. Open cylinder valve completely.
6.3.2.3.5.1. A rush of air should begin to flow into the bag. 6.3.2.3.5.2. If there is no air flow, remove from service and notify
SSF Management to return cylinder to manufacturer, or qualified vendor, for repair/replacement.
6.3.2.3.6. Document observations and any actions taken, if applicable, on
Appendix B. 6.3.2.3.7. Return EEBD to station per Section 6.2.3.2.

Page 7 of 9
SOP SF-3-10.02 SOP for Scott ELSA Emergency Escape Breathing Devices
6.3.3. Disassembly for Equipment Refill, Repair, or Hydrotest
6.3.3.1. Grasp the pull tab, open the flap of the carry bag, and remove the hood assembly and hose.
6.3.3.2. Disconnect the Hood Assembly from the Hose per Step 6.2.3.1.2.1. 6.3.3.3. Open the hook and loop retaining strap and remove the cylinder from the carry
bag. 6.3.3.4. Retain the Hood Assembly and Carry Bag at the SSF.
6.3.4. Every five years 6.3.4.1. Hydrotest the aluminum cylinders:
6.3.4.1.1. Hoosier Fire, Inc. or other qualified vendor 6.3.4.1.1.1. Contact Hoosier Fire, Inc, or qualified vendor to obtain
instructions on the process. 6.3.4.1.1.2. Before shipping, empty the cylinder, close valve once
empty, and disassemble equipment per Section 6.3.3. 6.3.4.1.1.3. Record the serial number of the unit (VNxxxx) found
engraved on the neck of the cylinder on Appendix C. 6.3.4.1.1.4. Transport ONLY the cylinder (not the entire apparatus). 6.3.4.1.1.5. Request transport to qualified local vendor with a
qualified hazardous goods courier or ship to non-local vendor. 6.3.4.1.1.5.1. SSF personnel are only permitted to
transport completely empty cylinders to a local approved vendor. Cylinders containing any compressed air are not to be transported by SSF personnel in vehicles.
6.3.4.1.1.6. Record date unit is couriered or shipped to vendor on Appendix C.
6.3.4.1.1.7. Upon notification of maintenance completion, schedule a qualified hazardous goods courier to return equipment to the SSF.
6.3.4.1.2. Obtain documentation and/or testing report upon completion and receipt of cylinder. Record serial number (engraved on the neck of the cylinder) of unit received on Appendix C. Verify serial number of unit received is the same serial number recorded for the unit sent out for service. 6.3.4.1.2.1. If report is not acceptable, remove equipment from
service. Contact applicable vendor for further directives. 6.3.4.1.3. Document observations and actions on Appendix C. Attach
documentation and/or testing report to Appendix C. 6.3.4.1.4. Cylinder will have been refilled as part of the testing. Therefore,
perform a leak test and document relevant actions per Section 6.3.5.1.3 once unit has been returned.
6.3.4.1.5. Notify SSF Management if unable to complete testing. 6.3.5. As needed
6.3.5.1. Cylinder re-fill (occurs concurrently with hydrotest). 6.3.5.1.1. Assess the unit as follows:
Page 8 of 9
SOP SF-3-10.02 SOP for Scott ELSA Emergency Escape Breathing Devices
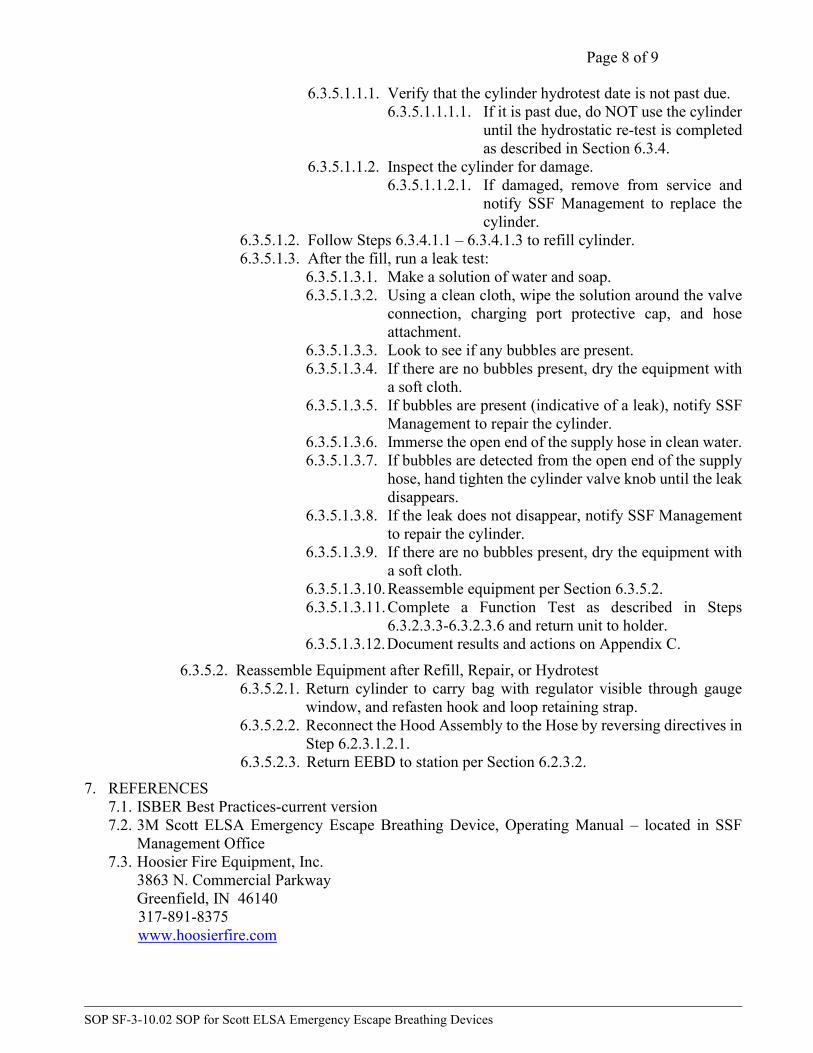
6.3.5.1.1.1. Verify that the cylinder hydrotest date is not past due. 6.3.5.1.1.1.1. If it is past due, do NOT use the cylinder
until the hydrostatic re-test is completed as described in Section 6.3.4.
6.3.5.1.1.2. Inspect the cylinder for damage. 6.3.5.1.1.2.1. If damaged, remove from service and
notify SSF Management to replace the cylinder.
6.3.5.1.2. Follow Steps 6.3.4.1.1 – 6.3.4.1.3 to refill cylinder. 6.3.5.1.3. After the fill, run a leak test:
6.3.5.1.3.1. Make a solution of water and soap. 6.3.5.1.3.2. Using a clean cloth, wipe the solution around the valve
connection, charging port protective cap, and hose attachment.
6.3.5.1.3.3. Look to see if any bubbles are present. 6.3.5.1.3.4. If there are no bubbles present, dry the equipment with
a soft cloth. 6.3.5.1.3.5. If bubbles are present (indicative of a leak), notify SSF
Management to repair the cylinder. 6.3.5.1.3.6. Immerse the open end of the supply hose in clean water. 6.3.5.1.3.7. If bubbles are detected from the open end of the supply
hose, hand tighten the cylinder valve knob until the leak disappears.
6.3.5.1.3.8. If the leak does not disappear, notify SSF Management to repair the cylinder.
6.3.5.1.3.9. If there are no bubbles present, dry the equipment with a soft cloth.
6.3.5.1.3.10. Reassemble equipment per Section 6.3.5.2. 6.3.5.1.3.11. Complete a Function Test as described in Steps
6.3.2.3.3-6.3.2.3.6 and return unit to holder. 6.3.5.1.3.12. Document results and actions on Appendix C.
6.3.5.2. Reassemble Equipment after Refill, Repair, or Hydrotest 6.3.5.2.1. Return cylinder to carry bag with regulator visible through gauge
window, and refasten hook and loop retaining strap. 6.3.5.2.2. Reconnect the Hood Assembly to the Hose by reversing directives in
Step 6.2.3.1.2.1. 6.3.5.2.3. Return EEBD to station per Section 6.2.3.2.
7. REFERENCES 7.1. ISBER Best Practices-current version 7.2. 3M Scott ELSA Emergency Escape Breathing Device, Operating Manual – located in SSF
Management Office 7.3. Hoosier Fire Equipment, Inc.
3863 N. Commercial Parkway Greenfield, IN 46140 317-891-8375 www.hoosierfire.com

Page 9 of 9
SOP SF-3-10.02 SOP for Scott ELSA Emergency Escape Breathing Devices
8. DOCUMENTATION 8.1. Usage and maintenance logs are submitted for review to SSF Management and are maintained
per SF-1-6 Controlled Document Management SOP. 8.2. All Deviations are managed per the SF-1-9 Deviation Management SOP.
9. APPENDICES 9.1. The current version of each of the following appendices is used to guide and/or implement this
SOP: APPENDIX A – Scott ELSA Emergency Escape Breathing Device Usage Log (1 Page) APPENDIX B – Scott ELSA Emergency Escape Breathing Device Weekly/Monthly
Maintenance Log (1 Page) APPENDIX C – Scott ELSA EEBD Service Maintenance Log (1 Page) APPENDIX D – Collaborating Biorepository Personnel Training (2 Pages) APPENDIX E – 3M Scott ELSA EEBD – N Donning Procedure (1 Page)
10. COLLABORATING BIOBANK TRAINING DIRECTIVES 10.1. CBP comply with Read and Understand training on SOP SF-3-10 (SOP for Scott ELSA
Emergency Escape Breathing Device Units) by continuing to and reading Collaborating Biorepository Personnel Training, Appendix D, of this SOP.
10.2. CBP comply with directives defined in Appendix D.
Appendix A Page 1 of 1
SOP SF-3-10 SOP for Scott ELSA Emergency Escape Breathing Devices Form Version 02
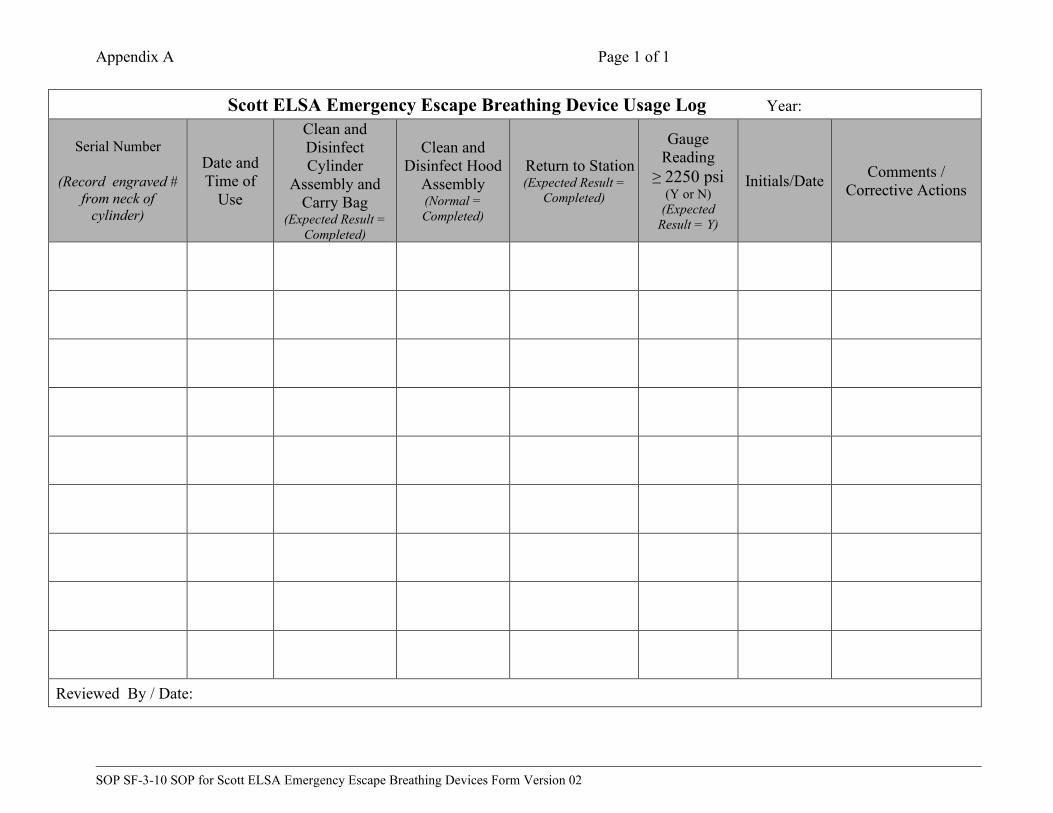
Scott ELSA Emergency Escape Breathing Device Usage Log Year:
Serial Number
(Record engraved # from neck of
cylinder)
Date and Time of
Use
Clean and Disinfect Cylinder
Assembly and Carry Bag
(Expected Result = Completed)
Clean and Disinfect Hood
Assembly (Normal = Completed)
Return to Station (Expected Result =
Completed)
Gauge Reading
≥ 2250 psi (Y or N)
(Expected Result = Y)
Initials/Date Comments / Corrective Actions
Reviewed By / Date:
Appendix B Page 1 of 1
SOP SF-3-10 SOP for Scott ELSA Emergency Escape Breathing Devices Form Version 02
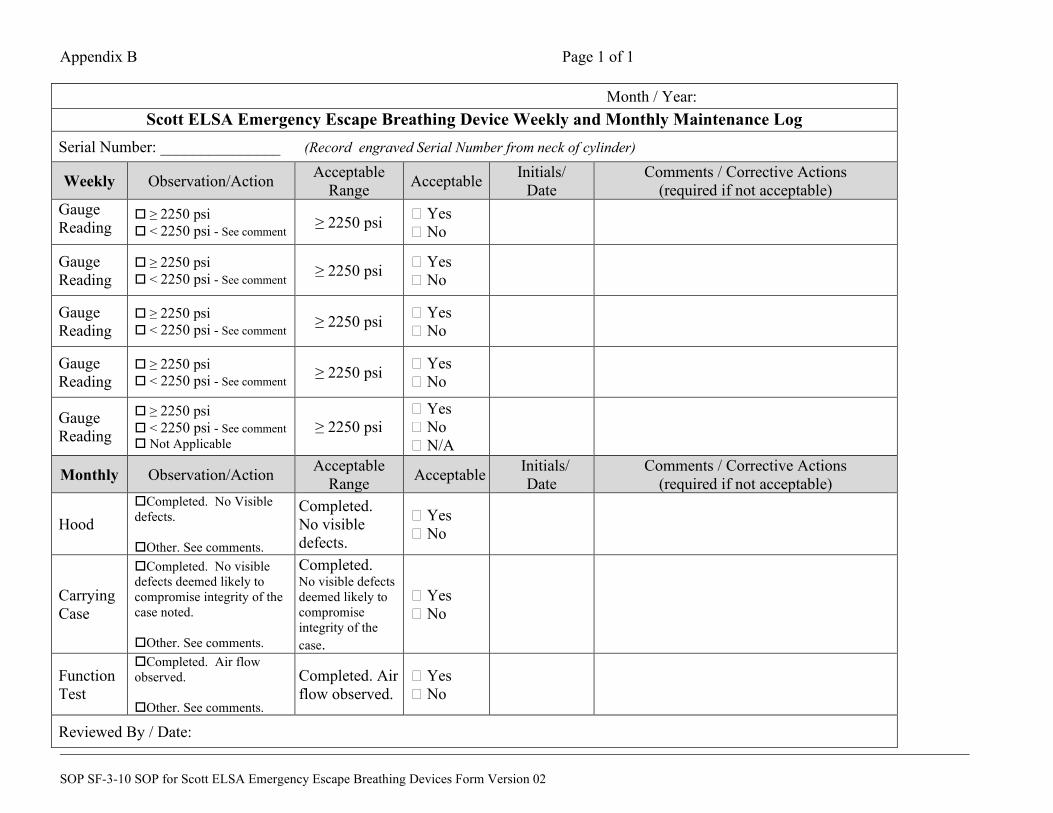
Month / Year: Scott ELSA Emergency Escape Breathing Device Weekly and Monthly Maintenance Log
Serial Number: _______________ (Record engraved Serial Number from neck of cylinder)
Weekly Observation/Action Acceptable Range Acceptable Initials/
Date Comments / Corrective Actions
(required if not acceptable) Gauge Reading
≥ 2250 psi ˂ 2250 psi - See comment ≥ 2250 psi Yes
No
Gauge Reading
≥ 2250 psi ˂ 2250 psi - See comment ≥ 2250 psi Yes
No
Gauge Reading
≥ 2250 psi ˂ 2250 psi - See comment ≥ 2250 psi Yes
No
Gauge Reading
≥ 2250 psi ˂ 2250 psi - See comment ≥ 2250 psi Yes
No
Gauge Reading
≥ 2250 psi ˂ 2250 psi - See comment Not Applicable
≥ 2250 psi Yes No N/A
Monthly Observation/Action Acceptable Range Acceptable Initials/
Date Comments / Corrective Actions
(required if not acceptable)
Hood Completed. No Visible defects. Other. See comments.
Completed. No visible defects.
Yes No
Carrying Case
Completed. No visible defects deemed likely to compromise integrity of the case noted. Other. See comments.
Completed. No visible defects deemed likely to compromise integrity of the case.
Yes No
Function Test
Completed. Air flow observed. Other. See comments.
Completed. Air flow observed.
Yes No
Reviewed By / Date:

Appendix C Page 1 of 1
SOP SF-3-10 SOP for Scott ELSA Emergency Escape Breathing Devices Form Version 01
Scott ELSA EEBD Service Maintenance Log Year:
Serial Number: _______________ Next Hydrotest Retest Due Date:____________ Hydrotest (every 5 years) Observation/Action Acceptable Range Acceptable Initials/Date
Pre-shipment Assessment: Cylinder Inspection
Completed. No repairs indicated. Other. See comments.
Completed / No repairs indicated.
Yes No
Record serial number S/N: Completed. Yes No
Unit drained of air and shipped Completed. Date___________________ Not Applicable Other. See comments.
Completed. Yes No
Unit received S/N:_____________________
Completed. S/N recorded before shipping matches S/N recorded upon receipt. Date_____________________________
Other. See comments.
Completed. Serial numbers match.
Yes No
Hydrotesting report received Testing Date_______________________
Completed. No repairs indicated. Other. See comments.
Completed / No repairs indicated.
Yes No
Fill documentation and/or report received
Fill Date__________________________ Completed. No repairs indicated. Other. See comments.
Completed / No repairs indicated.
Yes No
After fill: Leak test Completed. No leaks. No repairs indicated. Other. See comments.
Completed. No leaks / No repairs indicated.
Yes No
After fill: Function test Completed. Airflow observed. No repairs indicated. Other. See comments.
Completed. Airflow observed / No repairs indicated.
Yes No
Air Cylinder Refill (as needed) Observation/Action Acceptable Range Acceptable Initials/Date Pre-shipment Assessment: Cylinder Inspection
Completed. No repairs indicated. Other. See comments.
Completed / No repairs indicated.
Yes No
Record serial number S/N: Completed. Yes No
Unit drained of air and shipped Completed. Date___________________ Not Applicable Other. See comments.
Completed. Yes No
Fill documentation and/or report received
Fill Date__________________________ Completed. No repairs indicated. Other. See comments.
Completed / No repairs indicated.
Yes No
Unit received S/N: ________________________
Completed. S/N recorded before shipping matches S/N recorded upon receipt. Date_____________________________
Other. See comments.
Completed. Serial numbers match.
Yes No
After fill: Leak test Completed. No leaks. No repairs indicated. Other. See comments.
Completed. No leaks / No repairs indicated.
Yes No
After fill: Function test Completed. Airflow observed. No repairs indicated. Other. See comments.
Completed. Airflow observed / No repairs indicated.
Yes No
Comments / Corrective Actions (required if results are not acceptable)
Reviewed By / Date:
Appendix D Page 1 of 2
SOP SF-3-10 SOP for Scott ELSA Emergency Escape Breathing Devices Form Version 02
Collaborating Biorepository Personnel (CBP) Training 1. This Standard Operating Procedure (SOP) SF-3-10, SOP for 3M Scott ELSA-N Emergency Escape
Breathing Device (EEBD) Units, defines use of an ELSA EEBD in the TK 252 Liquid Nitrogen Freezer Room in the Indiana CTSI Specimen Storage Facility (SSF). The ELSA EEBD is used by personnel who (1) are in TK 252 at the time the oxygen level becomes dangerous (below 19%) AND (2) are not able to vacate the low oxygen level area immediately.
2. The M10 BiOS Room (TK 258) is outside the scope of SSF Standard Operating Procedures. The IU Genetics Biobank has its own procedures for safely accessing TK 258 and utilizing an EEBD, however the SSF maintains EEBD unit(s) in service in TK 258. Per Step 5 of this Appendix, equipment is returned to the SSF for cleaning after use in either TK 252 OR TK 258.
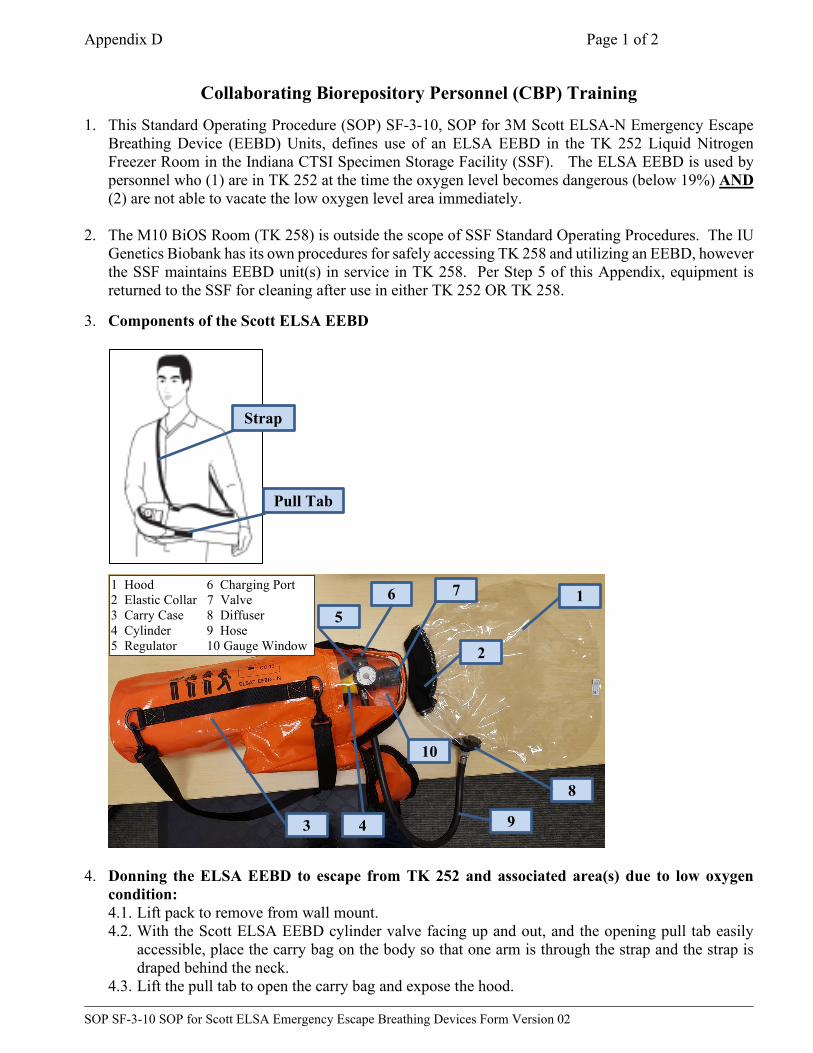
3. Components of the Scott ELSA EEBD
4. Donning the ELSA EEBD to escape from TK 252 and associated area(s) due to low oxygen condition: 4.1. Lift pack to remove from wall mount. 4.2. With the Scott ELSA EEBD cylinder valve facing up and out, and the opening pull tab easily
accessible, place the carry bag on the body so that one arm is through the strap and the strap is draped behind the neck.
4.3. Lift the pull tab to open the carry bag and expose the hood.
Strap
Pull Tab
1 Hood 6 Charging Port 2 Elastic Collar 7 Valve 3 Carry Case 8 Diffuser 4 Cylinder 9 Hose 5 Regulator 10 Gauge Window 2
8
5
7
4 3
1
9
6
10

Appendix D Page 2 of 2
SOP SF-3-10 SOP for Scott ELSA Emergency Escape Breathing Devices Form Version 02
4.4. Remove hood from pouch and hose from the bag. 4.5. Open cylinder valve completely, turning counterclockwise, until a rush of air flows into the bag. 4.6. DO NOT put on the hood before opening the valve or if you do not hear the sound of air rushing
into the hood when the valve is opened.
4.7. Don hood by opening the elastic collar with both hands and lowering it over the head until the neck seal makes good contact around the neck and the diffuser assembly is in front of the face. 4.7.1. Ensure the neck seal is secure against the neck with no obstructions such as clothing, long
hair, or beards.
4.8. Exit to a safe area. 4.9. Appendix E of this SOP is the 3M Scott ELSA EEBD-N Donning Procedure, and it is posted in
TK 252 and the Ante Room (TK 250). 4.10. After reaching a safe environment, remove hood from head.
4.10.1. Stretch the elastic collar open with both hands and pull hood off of the head. 4.10.2. Close cylinder valve completely. 4.10.3. Remove unit by lifting strap over the head.
5. After using an EEBD in TK 252 OR TK 258:
5.1. Promptly notify SSF personnel that the ELSA EEBD has been used. 5.2. Place the unit in the Equipment Out of Service area on the northern bench in TK 250 (near the
sink) for inspection and maintenance.
6. Proceed to Appendix E to review the ELSA EEBD Donning Procedure.
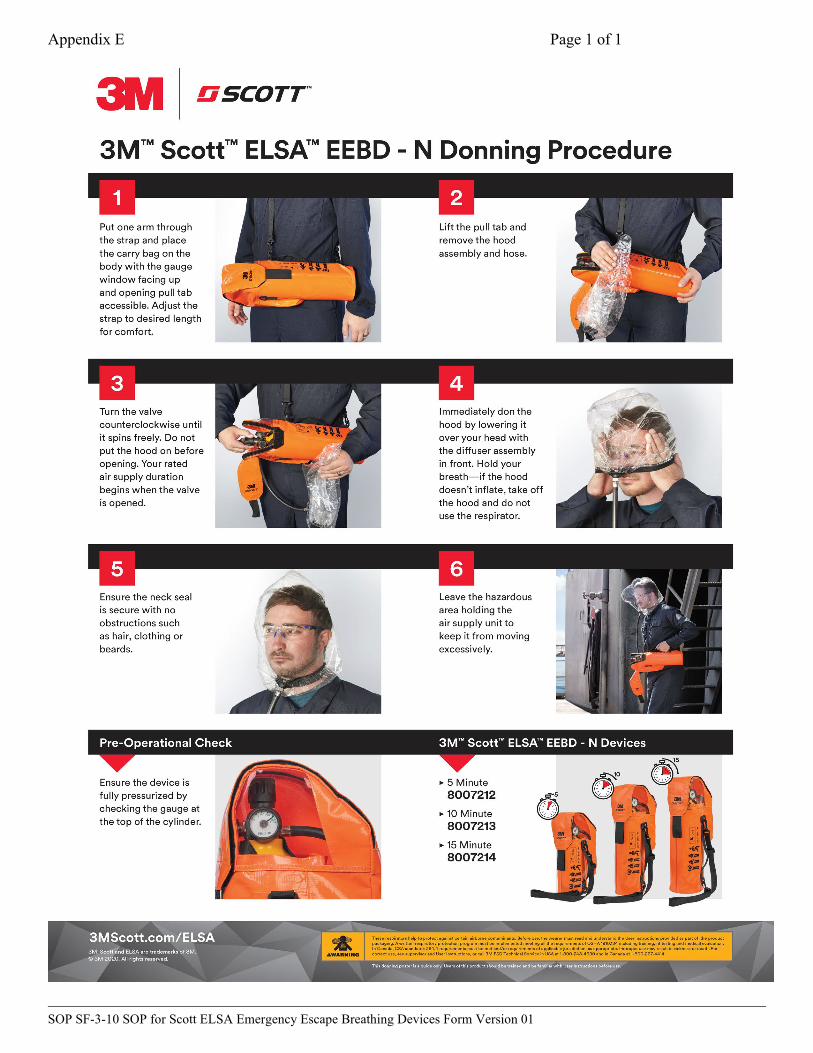
Appendix E Page 1 of 1
SOP SF-3-10 SOP for Scott ELSA Emergency Escape Breathing Devices Form Version 01


