1 * Class Description This is an introductory class for those who know how the basics of using a computer, but need help finding and organizing files of all sorts: pictures, documents, spreadsheets, music, videos, and more. Much of the lesson can be transferred to non‐Windows computers, but the focus is on Microsoft Windows. Class Length One to one‐half (1½) hours. Introduction One of the most frustrating things about using a computer can be trying to find a file you know was on your computer. That there are so many different locations for saving files doesn’t make it easy. This class will look at how you can organize your files in a way which works for you and how you can locate hard‐to‐find files. Objectives Learn the meaning of ‘drive’, ‘folder’, and ‘path’ Learn how to use Windows/File Explorer o How to select multiple files o How to move files from one destination to another o How to copy files from one destination to another o How to move files to the Recycle Bin o How to permanently delete files How to search for files Acquire ideas for effective organization of files This is a handout for you to keep. Please feel free to use it for taking notes. Windows File Management
Transcript
1 *
Class Description This is an introductory class for those who know how the basics of using a computer, but need help finding and
organizing files of all sorts: pictures, documents, spreadsheets, music, videos, and more. Much of the lesson can be
transferred to non‐Windows computers, but the focus is on Microsoft Windows.
Class Length One to one‐half (1½) hours.
Introduction One of the most frustrating things about using a computer can be trying to find a file you know was on your computer.
That there are so many different locations for saving files doesn’t make it easy. This class will look at how you can
organize your files in a way which works for you and how you can locate hard‐to‐find files.
Objectives Learn the meaning of ‘drive’, ‘folder’, and ‘path’
Learn how to use Windows/File Explorer
o How to select multiple files
o How to move files from one destination to another
o How to copy files from one destination to another
The ‘File Cabinets’ on Your Computer Most people find it easier to understand something new by relating it to something familiar. Perhaps the best familiar
thing which can be related to digital files and folders is an office filing system: a file room with rows of file cabinets; each
file cabinet with multiple drawers; each drawer with many hanging folders; one or more manila folders in each hanging
folder; and papers inside the manila folders.
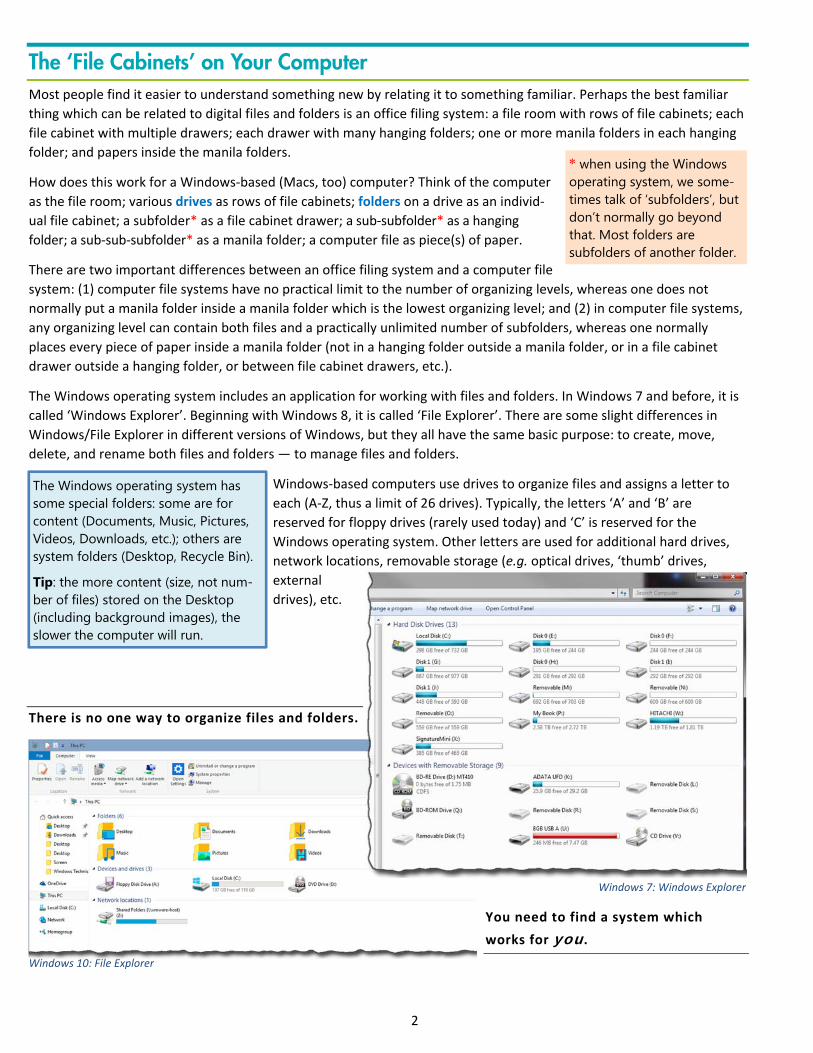
How does this work for a Windows‐based (Macs, too) computer? Think of the computer
as the file room; various drives as rows of file cabinets; folders on a drive as an individ‐
ual file cabinet; a subfolder* as a file cabinet drawer; a sub‐subfolder* as a hanging
folder; a sub‐sub‐subfolder* as a manila folder; a computer file as piece(s) of paper.
There are two important differences between an office filing system and a computer file
system: (1) computer file systems have no practical limit to the number of organizing levels, whereas one does not
normally put a manila folder inside a manila folder which is the lowest organizing level; and (2) in computer file systems,
any organizing level can contain both files and a practically unlimited number of subfolders, whereas one normally
places every piece of paper inside a manila folder (not in a hanging folder outside a manila folder, or in a file cabinet
drawer outside a hanging folder, or between file cabinet drawers, etc.).
The Windows operating system includes an application for working with files and folders. In Windows 7 and before, it is
called ‘Windows Explorer’. Beginning with Windows 8, it is called ‘File Explorer’. There are some slight differences in
Windows/File Explorer in different versions of Windows, but they all have the same basic purpose: to create, move,
delete, and rename both files and folders — to manage files and folders.
Windows‐based computers use drives to organize files and assigns a letter to
each (A‐Z, thus a limit of 26 drives). Typically, the letters ‘A’ and ‘B’ are
reserved for floppy drives (rarely used today) and ‘C’ is reserved for the
Windows operating system. Other letters are used for additional hard drives,
There is no one way to organize files and folders.
You need to find a system which
works for you.
* when using the Windows operating system, we some-times talk of ‘subfolders’, but don’t normally go beyond that. Most folders are subfolders of another folder.
The Windows operating system has some special folders: some are for content (Documents, Music, Pictures, Videos, Downloads, etc.); others are system folders (Desktop, Recycle Bin).
Tip: the more content (size, not num-ber of files) stored on the Desktop (including background images), the slower the computer will run.
Windows 7: Windows Explorer
Windows 10: File Explorer
3 *
Every drive in Windows can contain one or more files and/or one or more folders. Every folder can contain one or more
files and/or one or more (sub)folders. For file and folder names, Windows ignores letter case (most other operating
systems are case sensitive, i.e. SAMPLE.TXT, Sample.TXT, and sample.TXT are different and can coexist in the same
folder). All the names in a folder, files and sub‐folders, must be unique.
Naming Rules & Restrictions Don’t obsess over these rules. This section is for those wondering why an error message appeared or a name was changed from what was typed and
for those who want some nitty‐gritty details.
The earliest versions of Windows used 8.3 (‘eight dot three’) filenames: up to
eight characters, followed by a dot/period, then ending in a ‘file extension’ of
three or less characters, identifying the type of file (applications normally add
this automatically when saving files). Some (older) applications still use this
format.
File extensions may now exceed three characters. They are used by the
Windows operating system and by Windows/File Explorer to identify the type of
file and the application associated with it and displays this by using an icon from
the file’s application and (‘Details’ view only) to supply the information in the
‘Type’ column (e.g. ‘Microsoft Excel Worksheet’). The entire file name, including
the dot/period and the file extension is limited to 255 characters.
Using Windows/File Explorer Windows/File Explorer can be launched by clicking on the folder in
the Taskbar (circled at right). It can also be launched by clicking the
Start button and start typing windows explorer (Windows 7 and earlier) or file explorer (Windows 8 and
later) until the name appears in the menu and then clicking on the name
with the mouse or, after ensuring the name is highlighted, pressing the J
key; or by using the keyboard shortcut i+e (hold the Windows key down,
press e, then release both keys).
Restrictions: Windows has several reserved characters which cannot be used in the names of file or folders: < > (less than and greater than) : (colon) " (double quote) / \ (forward slash and backslash) | (vertical bar or pipe) ? ( question mark) * (asterisk) Neither a period nor a blank space may be used at the end of a file name or folder name. A blank space cannot be used at the beginning of a file name or folder name. File names may begin with a period, but folder names may not.
There are also reserved names: con prn aux nul com, followed by one digit, 1-9 lpt, followed by one digit, 1-9
4 *
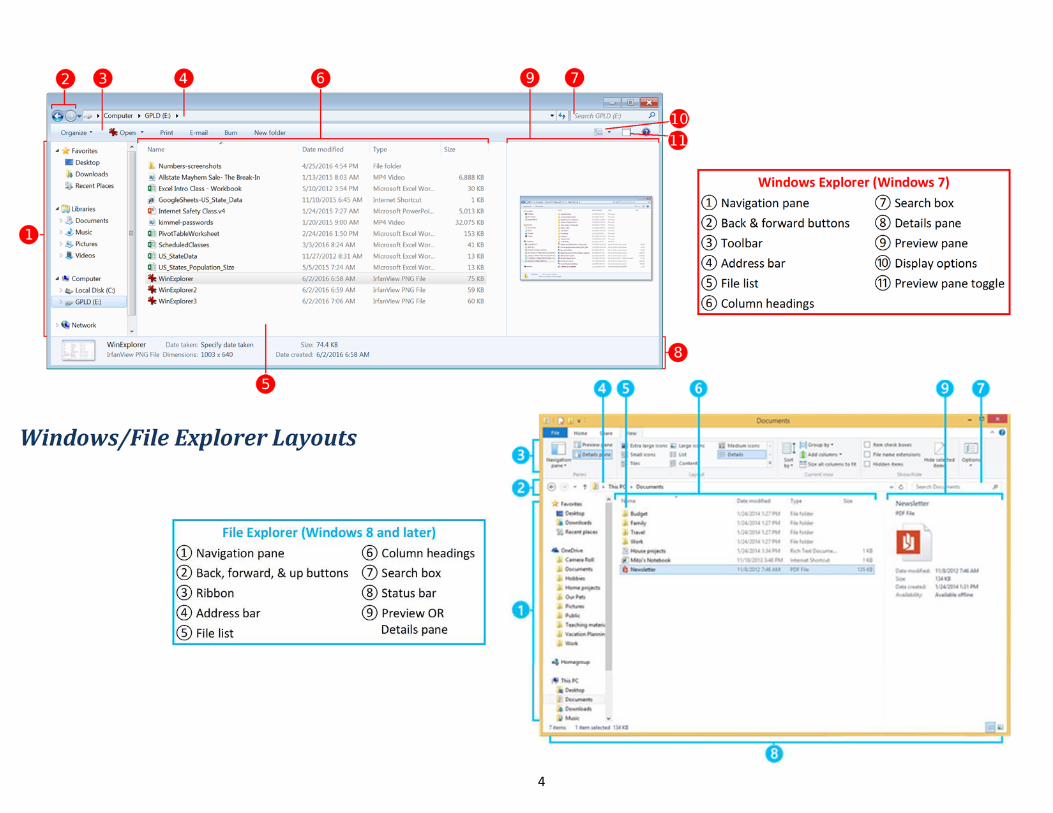
Windows/FileExplorerLayouts
Windows Explorer (Windows 7)
① Navigation pane ⑦ Search box
② Back & forward buttons ⑧ Details pane
③ Toolbar ⑨ Preview pane
④ Address bar ⑩ Display options
⑤ File list ⑪ Preview pane toggle
⑥ Column headings
File Explorer (Windows 8 and later)
① Navigation pane ⑥ Column headings
② Back, forward, & up buttons ⑦ Search box
③ Ribbon ⑧ Status bar
④ Address bar ⑨ Preview OR Details pane ⑤ File list
5 *
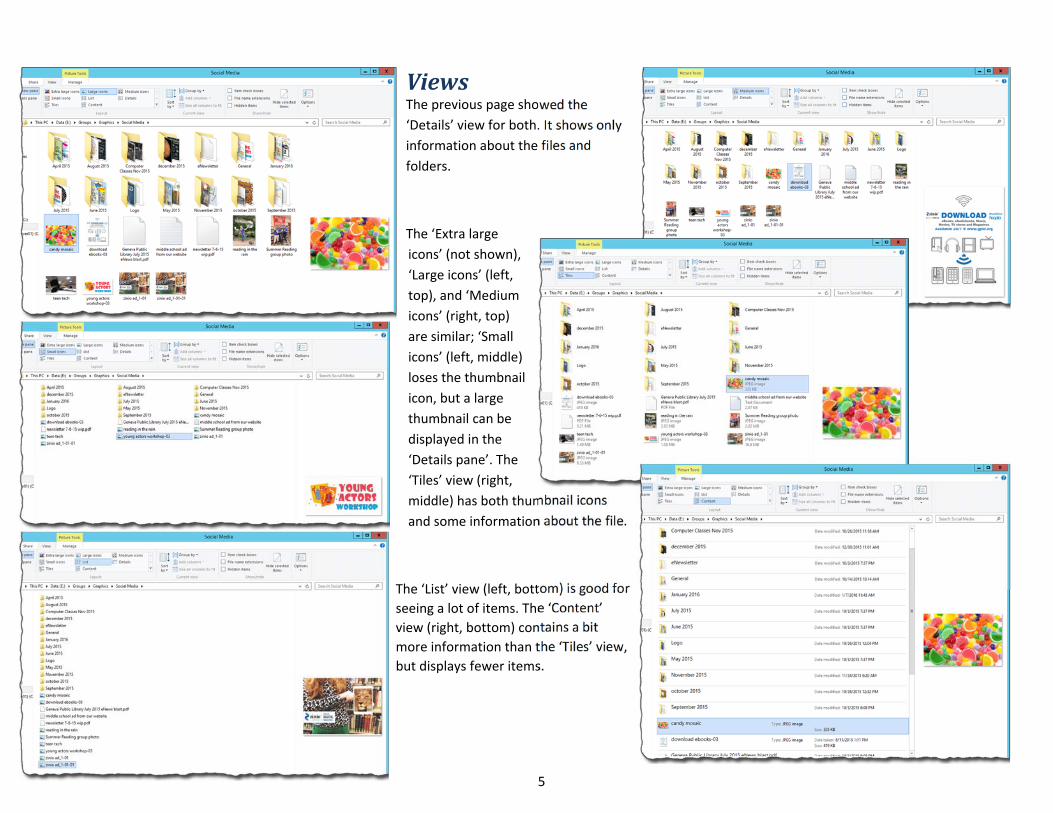
ViewsThe previous page showed the
‘Details’ view for both. It shows only
information about the files and
folders.
The ‘Extra large
icons’ (not shown),
‘Large icons’ (left,
top), and ‘Medium
icons’ (right, top)
are similar; ‘Small
icons’ (left, middle)
loses the thumbnail
icon, but a large
thumbnail can be
displayed in the
‘Details pane’. The
‘Tiles’ view (right,
middle) has both thumbnail icons
and some information about the file.
The ‘List’ view (left, bottom) is good for
seeing a lot of items. The ‘Content’
view (right, bottom) contains a bit
more information than the ‘Tiles’ view,
but displays fewer items.
6 *
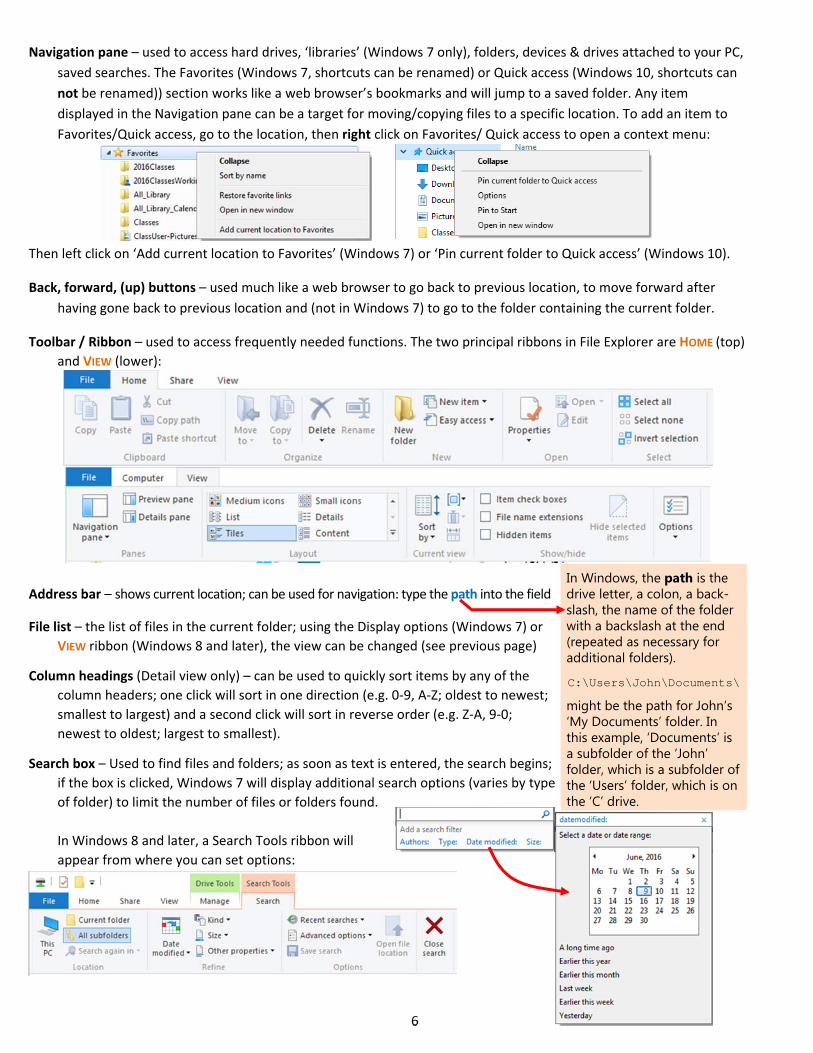
Navigation pane – used to access hard drives, ‘libraries’ (Windows 7 only), folders, devices & drives attached to your PC,
saved searches. The Favorites (Windows 7, shortcuts can be renamed) or Quick access (Windows 10, shortcuts can
not be renamed)) section works like a web browser’s bookmarks and will jump to a saved folder. Any item
displayed in the Navigation pane can be a target for moving/copying files to a specific location. To add an item to
Favorites/Quick access, go to the location, then right click on Favorites/ Quick access to open a context menu:
Then left click on ‘Add current location to Favorites’ (Windows 7) or ‘Pin current folder to Quick access’ (Windows 10).
Back, forward, (up) buttons – used much like a web browser to go back to previous location, to move forward after
having gone back to previous location and (not in Windows 7) to go to the folder containing the current folder.
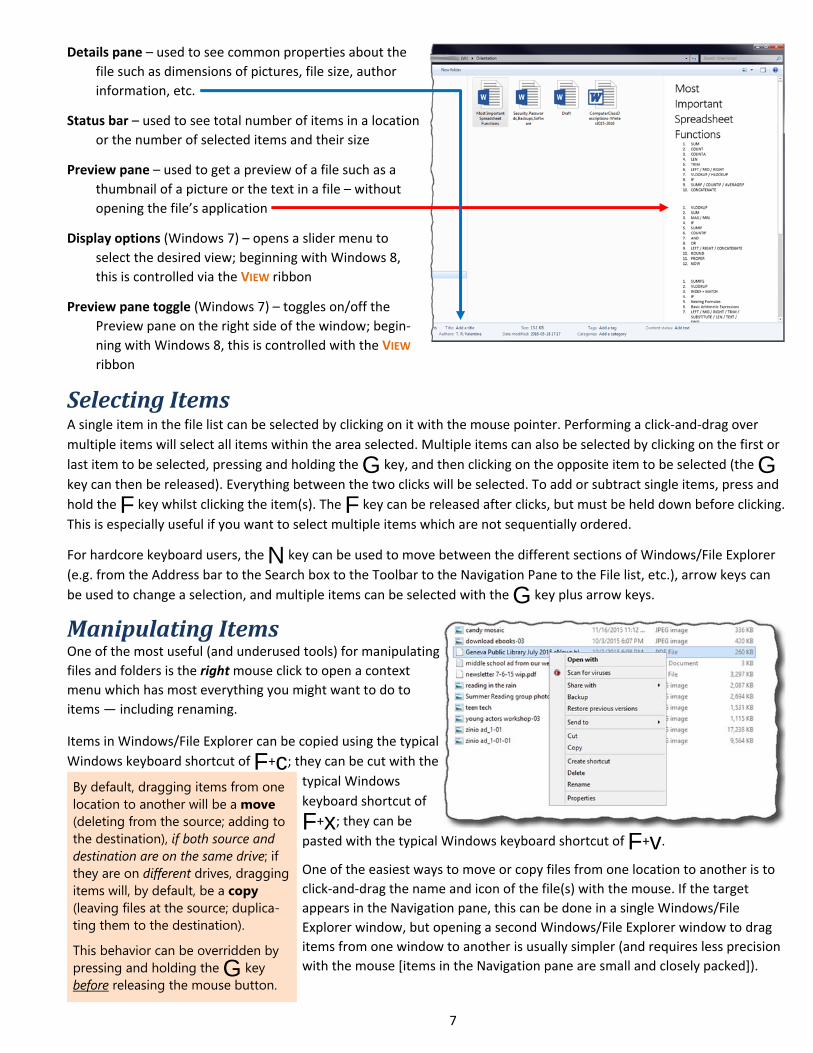
Toolbar / Ribbon – used to access frequently needed functions. The two principal ribbons in File Explorer are HOME (top)
and VIEW (lower):
Address bar – shows current location; can be used for navigation: type the path into the field
File list – the list of files in the current folder; using the Display options (Windows 7) or
VIEW ribbon (Windows 8 and later), the view can be changed (see previous page)
Column headings (Detail view only) – can be used to quickly sort items by any of the
column headers; one click will sort in one direction (e.g. 0‐9, A‐Z; oldest to newest;
smallest to largest) and a second click will sort in reverse order (e.g. Z‐A, 9‐0;
newest to oldest; largest to smallest).
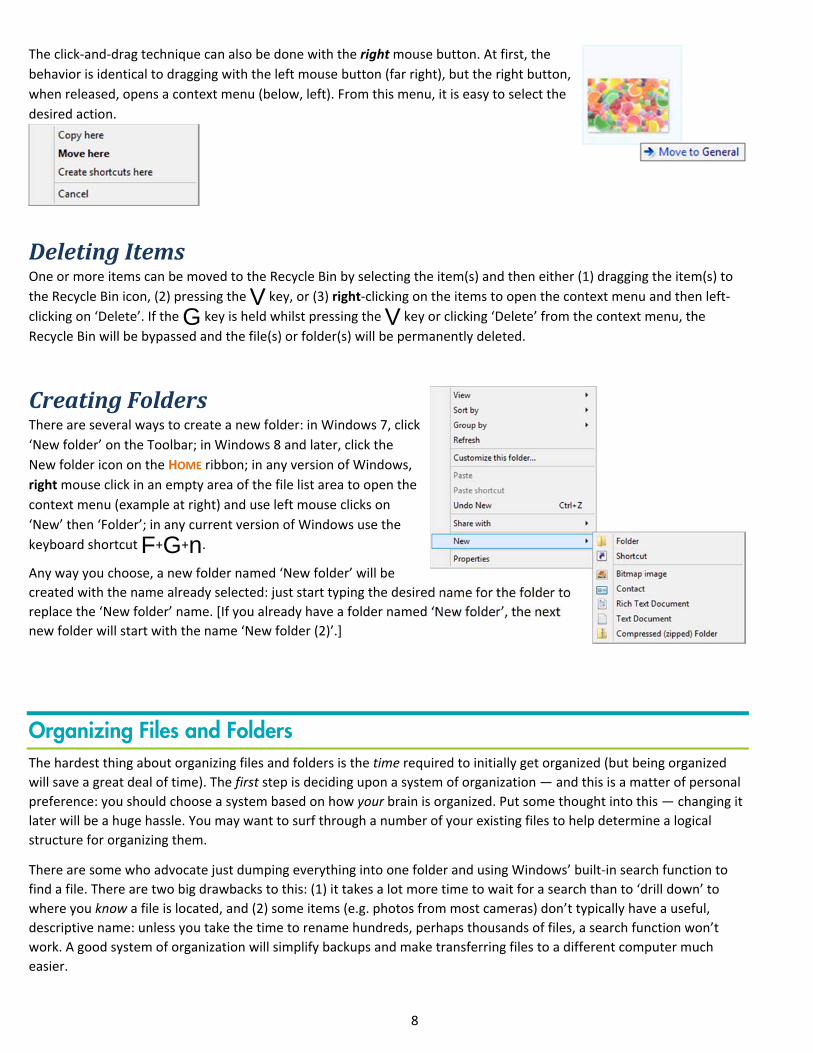
Search box – Used to find files and folders; as soon as text is entered, the search begins;
if the box is clicked, Windows 7 will display additional search options (varies by type
of folder) to limit the number of files or folders found.
In Windows 8 and later, a Search Tools ribbon will
appear from where you can set options:
In Windows, the path is the drive letter, a colon, a back-slash, the name of the folder with a backslash at the end (repeated as necessary for additional folders).
C:\Users\John\Documents\
might be the path for John’s ‘My Documents’ folder. In this example, ‘Documents’ is a subfolder of the ‘John’ folder, which is a subfolder of the ‘Users’ folder, which is on the ‘C’ drive.
7 *
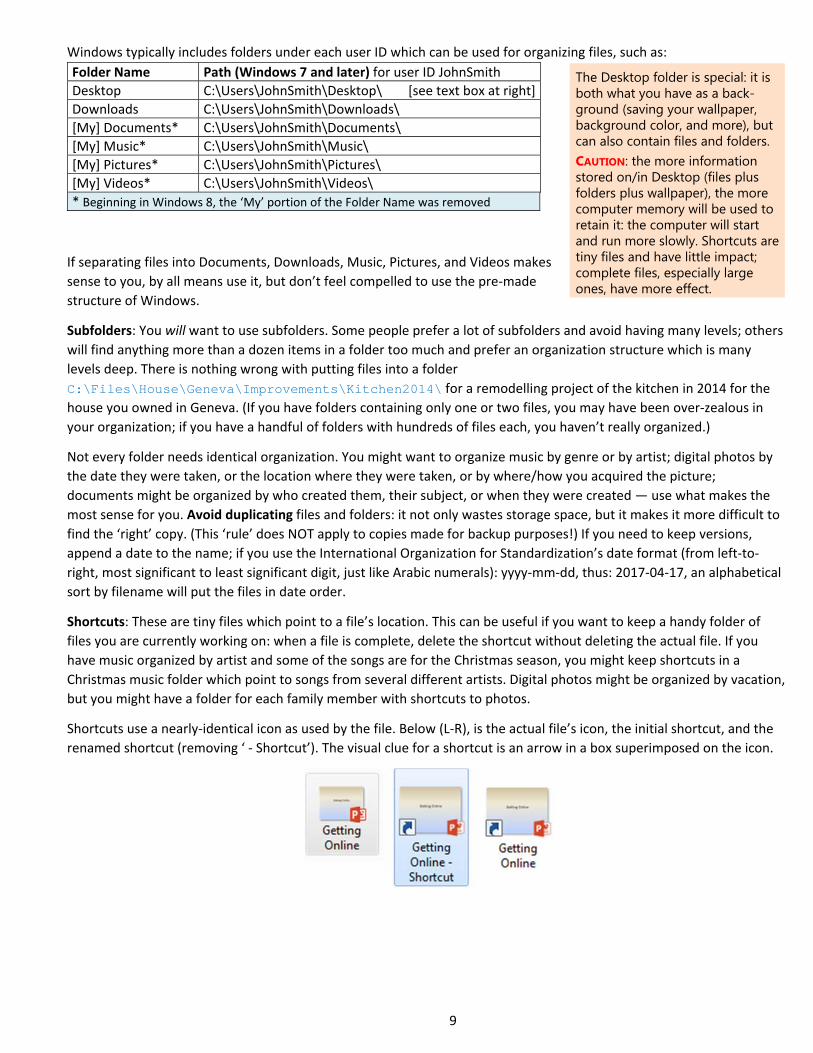
Details pane – used to see common properties about the
file such as dimensions of pictures, file size, author
information, etc.
Status bar – used to see total number of items in a location
or the number of selected items and their size
Preview pane – used to get a preview of a file such as a
thumbnail of a picture or the text in a file – without
opening the file’s application
Display options (Windows 7) – opens a slider menu to
select the desired view; beginning with Windows 8,
this is controlled via the VIEW ribbon
Preview pane toggle (Windows 7) – toggles on/off the
Preview pane on the right side of the window; begin‐
ning with Windows 8, this is controlled with the VIEW
ribbon
SelectingItemsA single item in the file list can be selected by clicking on it with the mouse pointer. Performing a click‐and‐drag over
multiple items will select all items within the area selected. Multiple items can also be selected by clicking on the first or
last item to be selected, pressing and holding the G key, and then clicking on the opposite item to be selected (the G
key can then be released). Everything between the two clicks will be selected. To add or subtract single items, press and
hold the F key whilst clicking the item(s). The F key can be released after clicks, but must be held down before clicking.
This is especially useful if you want to select multiple items which are not sequentially ordered.
For hardcore keyboard users, the N key can be used to move between the different sections of Windows/File Explorer
(e.g. from the Address bar to the Search box to the Toolbar to the Navigation Pane to the File list, etc.), arrow keys can
be used to change a selection, and multiple items can be selected with the G key plus arrow keys.
ManipulatingItemsOne of the most useful (and underused tools) for manipulating
files and folders is the right mouse click to open a context
menu which has most everything you might want to do to
items — including renaming.
Items in Windows/File Explorer can be copied using the typical
Windows keyboard shortcut of F+c; they can be cut with the
typical Windows
keyboard shortcut of
F+x; they can be
pasted with the typical Windows keyboard shortcut of F+v.
One of the easiest ways to move or copy files from one location to another is to
click‐and‐drag the name and icon of the file(s) with the mouse. If the target
appears in the Navigation pane, this can be done in a single Windows/File
Explorer window, but opening a second Windows/File Explorer window to drag
items from one window to another is usually simpler (and requires less precision
with the mouse [items in the Navigation pane are small and closely packed]).
By default, dragging items from one location to another will be a move (deleting from the source; adding to the destination), if both source and destination are on the same drive; if they are on different drives, dragging items will, by default, be a copy (leaving files at the source; duplica-ting them to the destination).
This behavior can be overridden by pressing and holding the G key before releasing the mouse button.
8 *
The click‐and‐drag technique can also be done with the right mouse button. At first, the
behavior is identical to dragging with the left mouse button (far right), but the right button,
when released, opens a context menu (below, left). From this menu, it is easy to select the
desired action.
DeletingItemsOne or more items can be moved to the Recycle Bin by selecting the item(s) and then either (1) dragging the item(s) to
the Recycle Bin icon, (2) pressing the V key, or (3) right‐clicking on the items to open the context menu and then left‐
clicking on ‘Delete’. If the G key is held whilst pressing the V key or clicking ‘Delete’ from the context menu, the
Recycle Bin will be bypassed and the file(s) or folder(s) will be permanently deleted.
CreatingFoldersThere are several ways to create a new folder: in Windows 7, click
‘New folder’ on the Toolbar; in Windows 8 and later, click the
New folder icon on the HOME ribbon; in any version of Windows,
right mouse click in an empty area of the file list area to open the
context menu (example at right) and use left mouse clicks on
‘New’ then ‘Folder’; in any current version of Windows use the
keyboard shortcut F+G+n.
Any way you choose, a new folder named ‘New folder’ will be
created with the name already selected: just start typing the desired name for the folder to
replace the ‘New folder’ name. [If you already have a folder named ‘New folder’, the next
new folder will start with the name ‘New folder (2)’.]
Organizing Files and Folders The hardest thing about organizing files and folders is the time required to initially get organized (but being organized
will save a great deal of time). The first step is deciding upon a system of organization — and this is a matter of personal
preference: you should choose a system based on how your brain is organized. Put some thought into this — changing it
later will be a huge hassle. You may want to surf through a number of your existing files to help determine a logical
structure for organizing them.
There are some who advocate just dumping everything into one folder and using Windows’ built‐in search function to
find a file. There are two big drawbacks to this: (1) it takes a lot more time to wait for a search than to ‘drill down’ to
where you know a file is located, and (2) some items (e.g. photos from most cameras) don’t typically have a useful,
descriptive name: unless you take the time to rename hundreds, perhaps thousands of files, a search function won’t
work. A good system of organization will simplify backups and make transferring files to a different computer much
easier.
9 *
Windows typically includes folders under each user ID which can be used for organizing files, such as:
If separating files into Documents, Downloads, Music, Pictures, and Videos makes
sense to you, by all means use it, but don’t feel compelled to use the pre‐made
structure of Windows.
Subfolders: You will want to use subfolders. Some people prefer a lot of subfolders and avoid having many levels; others
will find anything more than a dozen items in a folder too much and prefer an organization structure which is many
levels deep. There is nothing wrong with putting files into a folder
C:\Files\House\Geneva\Improvements\Kitchen2014\ for a remodelling project of the kitchen in 2014 for the
house you owned in Geneva. (If you have folders containing only one or two files, you may have been over‐zealous in
your organization; if you have a handful of folders with hundreds of files each, you haven’t really organized.)
Not every folder needs identical organization. You might want to organize music by genre or by artist; digital photos by
the date they were taken, or the location where they were taken, or by where/how you acquired the picture;
documents might be organized by who created them, their subject, or when they were created — use what makes the
most sense for you. Avoid duplicating files and folders: it not only wastes storage space, but it makes it more difficult to
find the ‘right’ copy. (This ‘rule’ does NOT apply to copies made for backup purposes!) If you need to keep versions,
append a date to the name; if you use the International Organization for Standardization’s date format (from left‐to‐
right, most significant to least significant digit, just like Arabic numerals): yyyy‐mm‐dd, thus: 2017‐04‐17, an alphabetical
sort by filename will put the files in date order.
Shortcuts: These are tiny files which point to a file’s location. This can be useful if you want to keep a handy folder of
files you are currently working on: when a file is complete, delete the shortcut without deleting the actual file. If you
have music organized by artist and some of the songs are for the Christmas season, you might keep shortcuts in a
Christmas music folder which point to songs from several different artists. Digital photos might be organized by vacation,
but you might have a folder for each family member with shortcuts to photos.
Shortcuts use a nearly‐identical icon as used by the file. Below (L‐R), is the actual file’s icon, the initial shortcut, and the
renamed shortcut (removing ‘ ‐ Shortcut’). The visual clue for a shortcut is an arrow in a box superimposed on the icon.
Folder Name Path (Windows 7 and later) for user ID JohnSmith
Desktop C:\Users\JohnSmith\Desktop\ [see text box at right]
Downloads C:\Users\JohnSmith\Downloads\
[My] Documents* C:\Users\JohnSmith\Documents\
[My] Music* C:\Users\JohnSmith\Music\
[My] Pictures* C:\Users\JohnSmith\Pictures\
[My] Videos* C:\Users\JohnSmith\Videos\
* Beginning in Windows 8, the ‘My’ portion of the Folder Name was removed
The Desktop folder is special: it is both what you have as a back-ground (saving your wallpaper, background color, and more), but can also contain files and folders. CAUTION: the more information stored on/in Desktop (files plus folders plus wallpaper), the more computer memory will be used to retain it: the computer will start and run more slowly. Shortcuts are tiny files and have little impact; complete files, especially large ones, have more effect.
10 April 2017
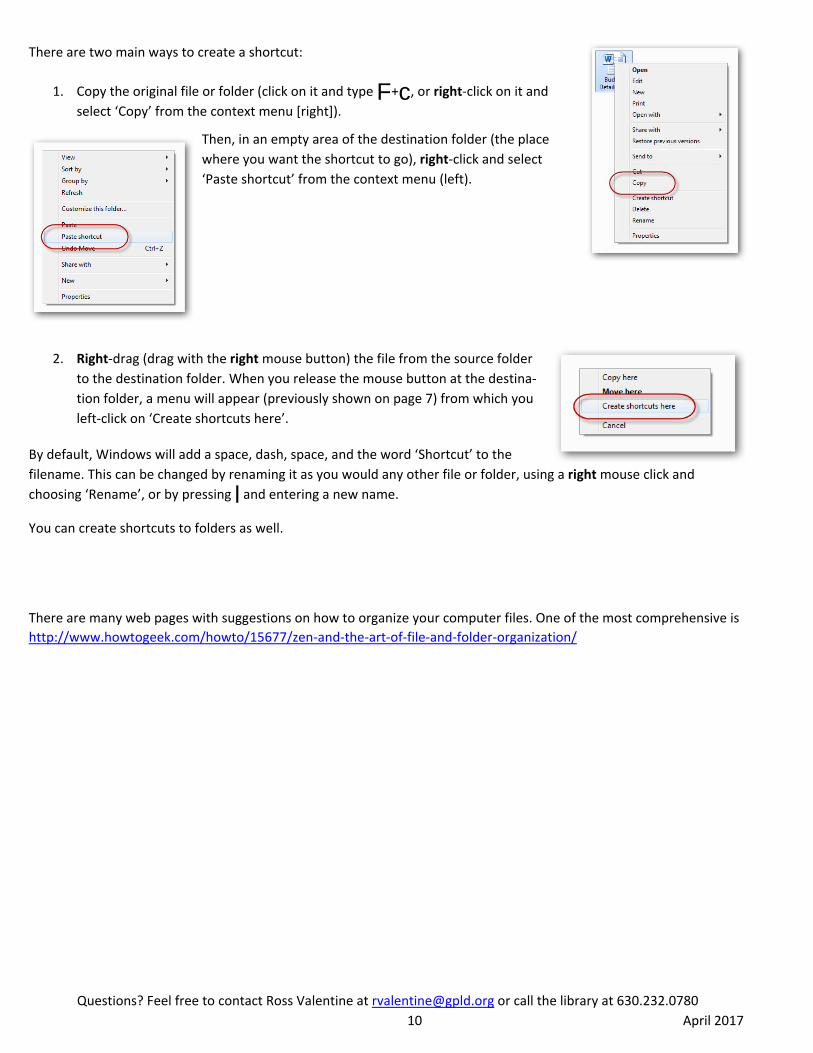
There are two main ways to create a shortcut:
1. Copy the original file or folder (click on it and type F+c, or right‐click on it and
select ‘Copy’ from the context menu [right]).
Then, in an empty area of the destination folder (the place
where you want the shortcut to go), right‐click and select
‘Paste shortcut’ from the context menu (left).
2. Right‐drag (drag with the right mouse button) the file from the source folder
to the destination folder. When you release the mouse button at the destina‐
tion folder, a menu will appear (previously shown on page 7) from which you
left‐click on ‘Create shortcuts here’.
By default, Windows will add a space, dash, space, and the word ‘Shortcut’ to the
filename. This can be changed by renaming it as you would any other file or folder, using a right mouse click and
choosing ‘Rename’, or by pressing l and entering a new name.
You can create shortcuts to folders as well.
There are many web pages with suggestions on how to organize your computer files. One of the most comprehensive is