
119 Series Fuel Gas ValveContentsIntroduction . . . . . . . . . . . . . . . . . . . . . . . . . . . . . . . . .4Specifications . . . . . . . . . . . . . . . . . . . . . . . . . . . . . . .2Description . . . . . . . . . . . . . . . . . . . . . . . . . . . . . . . . . .4Principle of Operation . . . . . . . . . . . . . . . . . . . . . . . . .4Installation . . . . . . . . . . . . . . . . . . . . . . . . . . . . . . . . . .5Startup . . . . . . . . . . . . . . . . . . . . . . . . . . . . . . . . . . . . .6Speed Adjustment . . . . . . . . . . . . . . . . . . . . . . . . . . . .6Spring Adjustment . . . . . . . . . . . . . . . . . . . . . . . . . . . .6Shutdown . . . . . . . . . . . . . . . . . . . . . . . . . . . . . . . . . . .7Maintenance . . . . . . . . . . . . . . . . . . . . . . . . . . . . . . . .7Disassembly . . . . . . . . . . . . . . . . . . . . . . . . . . . . . . . .7Assembly . . . . . . . . . . . . . . . . . . . . . . . . . . . . . . . . . . .8Parts Ordering . . . . . . . . . . . . . . . . . . . . . . . . . . . . . . .8Parts List . . . . . . . . . . . . . . . . . . . . . . . . . . . . . . . . . . .8
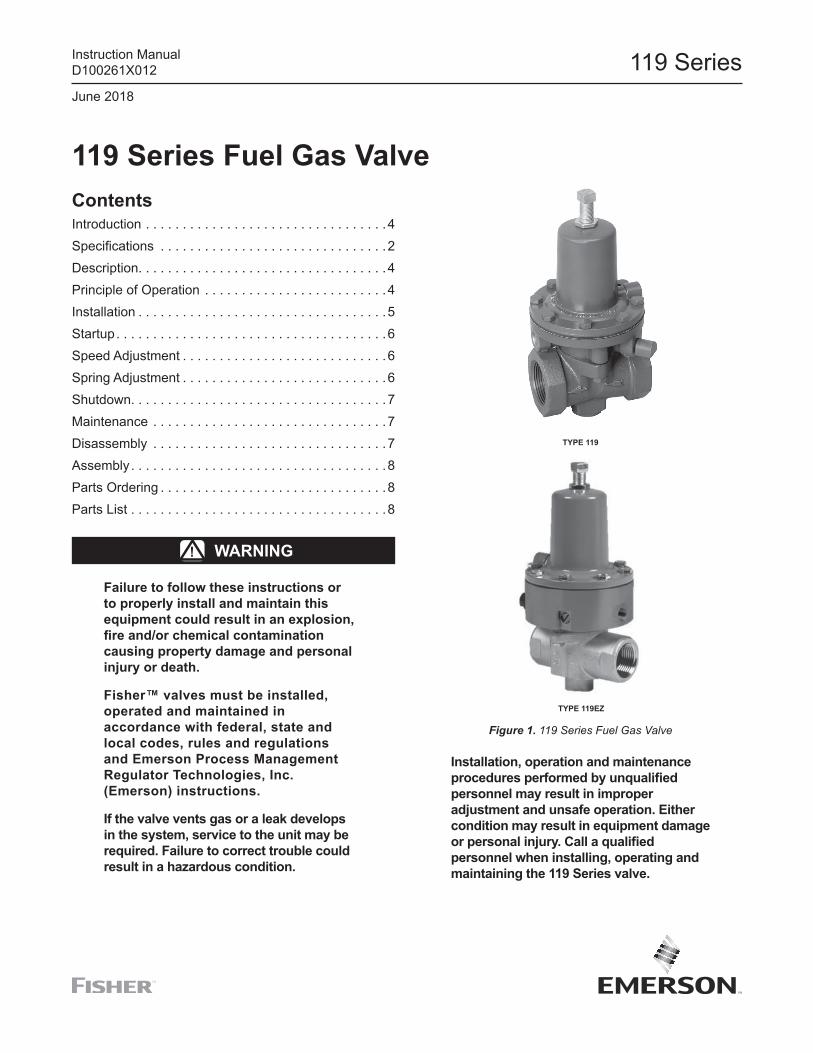
Figure 1. 119 Series Fuel Gas Valve
Type 119
Type 119eZ
! WarninG
Failure to follow these instructions or to properly install and maintain this equipment could result in an explosion, fire and/or chemical contamination causing property damage and personal injury or death.
Fisher™ valves must be installed, operated and maintained in accordance with federal, state and local codes, rules and regulations and emerson process Management regulator Technologies, inc. (emerson) instructions.
if the valve vents gas or a leak develops in the system, service to the unit may be required. Failure to correct trouble could result in a hazardous condition.
installation, operation and maintenance procedures performed by unqualified personnel may result in improper adjustment and unsafe operation. either condition may result in equipment damage or personal injury. Call a qualified personnel when installing, operating and maintaining the 119 Series valve.
Instruction ManualD100261X012
June 2018
119 Series

SpecificationsThe Specifications table lists the specifications for the 119 Series fuel gas valve. Some of the specifications of the given valve that originally comes from the factory, are stamped on the nameplate located on the spring case flange.
1. The pressure/temperature limits in this Instruction Manual, ASCO solenoid documentation and any applicable standard or code limitation should not be exceeded.2. Pressure and/or the body end connection may decrease these maximum temperatures.3. Not for use with hot water or Ammonia (NH3) .4. Minimum temperature for Cast Iron body is -20°F / -29°C.
Available Configuration Type 119: Direct-operated valve used for on-off or throttling control of noncorrosive or mildly corrosive liquids and gases Type 119eZ: Direct-operated valve with adjustable opening speed for reliable startup operation on gas burner systems Type 119eZS: Type 119EZ equipped with solenoid for valve to be operated by local control system
Body Sizes and end Connection StylesType 119:
Body SiZe, npT Body MaTerial
3/4Cast Iron, WCC Steel
1
1-1/4 Cast Iron
Types 119eZ and 119eZS:Body SiZe, npT Body MaTerial
1 Cast Iron, CF8M Stainless Steel
Spring rangesSee Table 1
Orifice Size and Flow CoefficientsSee Table 2
Maximum inlet pressure(1)
150 psig / 10.3 barMaximum Control pressure to diaphragm
150 psig / 10.3 barMaximum pressure drop(1)
150 psig / 10.3 bar for all port diameters 115 psig / 7.9 bar for Type 119EZS with ASCO 8320 Series solenoid
pressure Setting adjustmentMay be adjusted throughout each spring rangeby rotating the adjusting screw
Type 119EZS Solenoid Specifications Electric Train: Refer to ASCO 8320 Series General Service Solenoid Valve Catalog (Document Number: 8320R2) Low Power/Solar: Refer to ASCO Low Power Solutions Catalog (Document Number: V7704)
Valve plug Travel3/16 in. / 4.8 mm
actuator Control line Connection1/4 FNPT
Spring Case and Bonnet Vents1/4 FNPT
Flow directionUp through the orifice
Material Temperature Capabilities(1)(2)
Type 119:MaTerial TeMperaTure ranGe
Nitrile (NBR) -20 to 180°F / -29 to 82°C
Fluorocarbon (FKM)(3) 0 to 250°F / -18 to 121°C
Types 119eZ and 119eZS:MaTerial TeMperaTure ranGe
Nitrile (NBR)(4) -40 to 180°F / -40 to 82°C
Fluorocarbon (FKM)(3) 0 to 250°F / -18 to 121°C
Type 119eZS Solenoid Temperature Capabilities(1)
aSCo™ 8320 Series Solenoid:32 to 125°F / 0 to 52°CaSCo 8314 Series Solenoid:-13 to 131°F / -25 to 55°C
Construction MaterialsStandard ConstructionValve Body: Cast iron, WCC steel or Stainless steelSpring Case: AluminumBonnet: AluminumDisk Holder Assembly: Aluminum and Nitrile (NBR)(standard), Stainless steel and Nitrile (NBR) orStainless steel and Fluorocarbon (FKM)Orifice: Aluminum (standard) or Stainless steelDiaphragm: Nitrile (NBR) or Fluorocarbon (FKM)O-rings: Nitrile (NBR) (standard) or Fluorocarbon (FKM)Stem Wiper: Polytetrafluoroethylene (PTFE)Adjusting Screw: SteelSpring: SteelnaCe ConstructionBody: Steel or Stainless steel Disk Holder Assembly: Aluminum or Fluorocarbon (FKM)Diaphragm and Stem Assembly: Aluminum or Fluorocarbon (FKM)O-rings and Internal Retaining Rings:Fluorocarbon (FKM)
approximate Weight6 lbs / 3 kg
2
119 Series
TYPE
ORIFICE SIZE - IN.
SPRING RANGE - PSI
MATERIALCODE
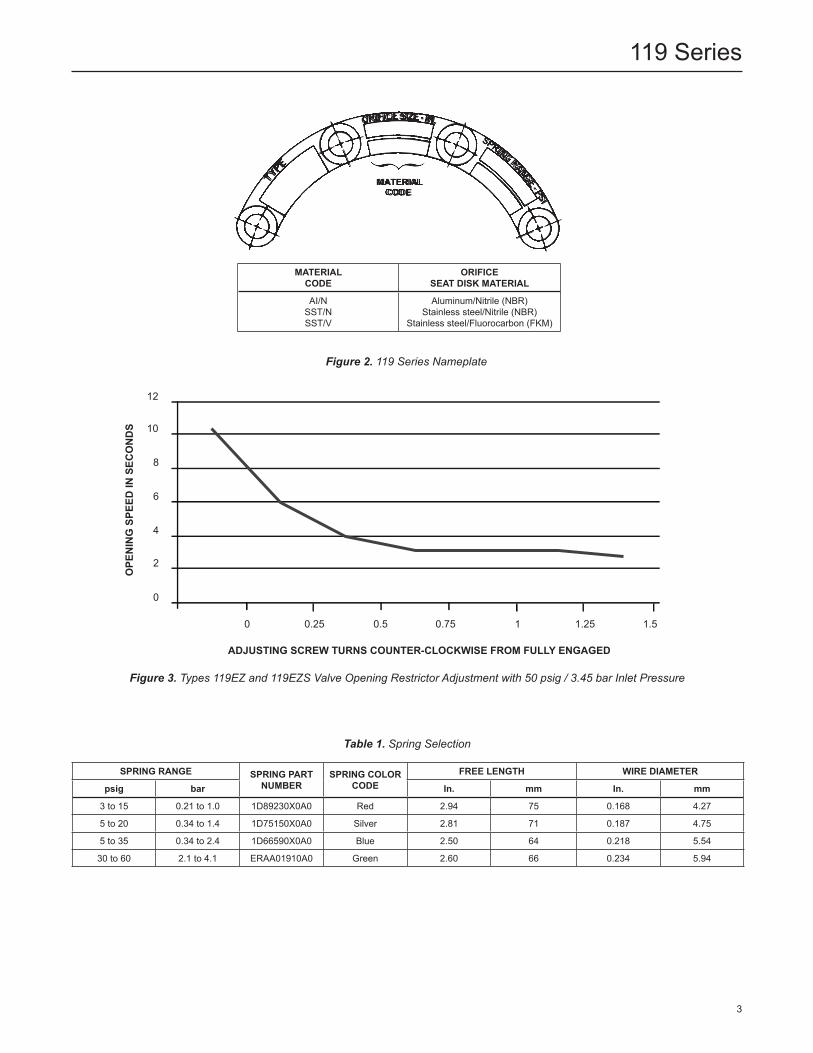
Figure 2. 119 Series Nameplate
Figure 3. Types 119EZ and 119EZS Valve Opening Restrictor Adjustment with 50 psig / 3.45 bar Inlet Pressure
MaTerialCode
oriFiCeSeaT diSk MaTerial
AI/NSST/NSST/V
Aluminum/Nitrile (NBR)Stainless steel/Nitrile (NBR)
Stainless steel/Fluorocarbon (FKM)
SprinG ranGe SprinG parT nuMBer
SprinG Color Code
Free lenGTh Wire diaMeTer
psig bar in. mm in. mm
3 to 15 0.21 to 1.0 1D89230X0A0 Red 2.94 75 0.168 4 .27
5 to 20 0.34 to 1.4 1D75150X0A0 Silver 2.81 71 0.187 4 .75
5 to 35 0.34 to 2.4 1D66590X0A0 Blue 2.50 64 0.218 5 .54
30 to 60 2.1 to 4.1 ERAA01910A0 Green 2.60 66 0.234 5.94
Table 1. Spring Selection
12
10
8
6
4
2
0
0 0.25 0.5 0.75
ADJUSTING SCREW TURNS COUNTER-CLOCKWISE FROM FULLY ENGAGED
OPE
NIN
G S
PEED
IN S
ECO
ND
S
1 1.25 1.5
3
119 Series

INLET PRESSUREOUTLET PRESSURE
ATMOSPHERIC PRESSURE
LOADING PRESSURE
introductionScope of the ManualThis instruction manual provides installation, spring adjustment, maintenance and parts information for the 119 Series valve.
descriptionThe 119 Series valve (Figure 1) is used for on-off or throttling control of noncorrosive or mildly corrosive flow media. It is designed to meet low-pressure application requirements in many varied industries.
principle of operation119 SeriesAs loading pressure is applied to the 119 Series valve diaphragm, the disk holder is pulled off the orifice. As loading pressure is reduced, the opposing spring force moves the disk holder toward the closed position, resulting in spring-close action should a loss of loading supply pressure occur.
The Type 119EZ comes equipped with an adjustment tool that can be used to modulate the valve opening speed, while still allowing for quick closing speeds. The Type 119EZS comes equipped with a solenoid control valve that opens and closes based on signal responses from the burner management system.
Burner Management SystemA Burner Management System (BMS) is a safety solution for Oil and Gas facilities that enables the safe start-up, operation and shut down of the burner section of a fire tube vessel. It reduces maintenance, improves up-time and provides a safe environment for fire tube vessels and field personnel.Reliable pressure control elements are essential to ensure a safe and efficient burner system. A burner pressure regulator needs to be able to open slow during startup, close fast during shutdown and throttle to maintain temperature during normal operation. Poor main burner pressure regulation contributes to an inefficient fuel gas pressure control system.
Figure 4. 119 Series Operational Schematics
INLET PRESSUREOUTLET PRESSURE
ATMOSPHERIC PRESSURE
LOADING PRESSURE
Type 119 Type 119eZ(1)
Type 119
M10
33
July 2007 Type 119
M1033_07/2007
1. Solenoid valve connects to loading pressure port.
M1266
INLET PRESSUREOUTLET PRESSURE
ATMOSPHERIC PRESSURE
LOADING PRESSURE
4
119 Series

In addition, if the main burner regulators require frequent monitoring, maintenance and replacement, increased operation and maintenance costs could be incurred.Emerson simplifies the complexity of fuel gas pressure control system by providing a one-stop solution, eliminating procurement challenges. Emerson’s solution works with a BMS to ensure efficient burner ignition/re-ignition, shutdown and steadily throttles to maintain temperature during normal operation. The solution is proven and robust, thereby significantly lowering maintenance expenses.
installation! WarninG
To avoid personal injury or property damage caused by controlled process fluid or bursting of pressure-retaining parts, be certain the service conditions do not exceed the limits shown in Specifications section. The leak-off and spring case vents must be kept open.
To avoid danger of fire or explosion from venting of flammable or otherwise hazardous fluid into a closed or poorly vented location, pipe the vents to a well-ventilated location, away from any buildings or windows so as not to create a further hazard.
1. Before installing the valve, be sure the valve body and associated equipment are free of damage and foreign material.
2 . The valve can be installed in any position, but the normal orientation is with the actuator portion vertical above the body. If installing the valve at an outside location, point the spring case and bonnet vents in the downward direction to protect them from moisture or foreign materials.
3 . Install the valve using accepted piping practices. Make sure that the valve is oriented so that flow through the body will match the flow direction arrow on the body.
4 . If continuous operation is required during maintenance and inspection, install a three-valve bypass around the valve.
Figure 5. Burner Management Operational Schematics
LPSD#1
START STOP ACK.
CONFIGPAGE
SCROLLEXIT
SELECTITEMCALIB.
PASSWORDREQUIRED
OPERATORACCESSIBLE
HPSD#1
*
* Optional
S
S
S
S
INLET PRESSURE
MEDIUM / LOW PRESSURE
LOADING PRESSURE
Fuel GaS
627 SerieS
67C SerieS
Burner ManaGeMenT
67CSerieS
yS
Solenoid ValVe
eMerGenCy ShuTdoWn
ValVe
Main Burner
piloT Burner
Main Burner ValVe
piloT Burner reGulaTor
piloT Solenoid
ValVe
Solenoid ValVe
Main Burner
reGulaTor
119eZ SerieS
Type 119
loadinG preSSure reGulaTor
LPSD#1
START STOP ACK.
CONFIGPAGE
SCROLLEXIT
SELECTITEMCALIB.
PASSWORDREQUIRED
OPERATORACCESSIBLE
HPSD#1
*
* Optional
S
S
S
S
INLET PRESSURE
MEDIUM / LOW PRESSURE
LOADING PRESSURE
*Optional
5
119 Series

5 . Connect the control pressure line to the 1/4 NPT connection in the valve body bonnet marked 150 psig / 10.3 bar max .
6 . For Type 119EZS, wire the solenoid per the solenoid wiring instructions, Document Number: 8320R2, for the standard ASCO™ 8320 Series solenoid using 24V DC power. Wire the low power ASCO 8314 Series solenoid per Document Number: V7704. Wiring must comply with applicable local, state and federal codes and the National Electric Code.
Startup! WarninG
The maximum inlet, differential and outlet pressures should never be exceeded during startup. use pressure gauges to monitor inlet pressure, outlet pressure and any loading pressure during startup.
1. Check that proper installation is completed and upstream and downstream equipment has been properly adjusted.
2 . Make sure all block and vent valves are closed.3 . Decompress the control spring by turning the
adjusting screw counterclockwise.
4 . Slowly open the valves in the following order: a. Loading supply and control line valve(s), if used b. Inlet block valve c. Outlet block valve
5 . Set the desired control pressure according to the Adjustment procedure.
Speed adjustment:The Types 119EZ and 119EZS have a variable restrictor to ‘control’ or ‘limit’ the rate of opening.
The restrictor (key 28) can be turned clockwise to restrict the opening speed as shown in Figure 3.
note
Special care should be taken not to adjust the speed adjustment screw past the retaining clip, as process gas may vent if adjustment screw is removed.
Spring adjustmentThe valve spring has been selected to meet the pressure condition requirements of the application as specified on the order. This pressure condition is stamped on the actuator nameplate.
ValVe TraVel oriFiCe SiZeBody SiZe(1)
3/4 In. Body 1 in. Body 1-1/4 In. Body
in. mm in. mm Cv Cg C1 Cv Cg C1 Cv Cg C1
3/16 4 .8
1/8 3 .2 0.43 12.5 29.1 0.43 12.5 29.1 0.43 12.5 29.1
3/16 4 .8 0.95 27 .8 29.3 0.95 27 .8 29.3 0.95 27 .8 29.3
1/4 6 .4 1.70 48 .3 28 .4 1.70 48 .3 28 .4 1.70 48 .3 28 .4
5/16 7.9 2 .64 76 .5 29.0 2 .64 76 .5 29.0 2 .64 76 .5 29.0
3/8 9.5 3 .22 104 32 .3 3 .3 105 31.8 3 .57 106 29.7
1/2 13 4 .7 176 37 .4 5.0 178 35 .6 5 .75 183 31.8
9/16 14 5 .6 213 38.0 5.9 218 36 .8 7 .2 230 31.9
1. Types 119EZ and 119EZS only available in 1 in. body size.
Table 2. 119 Series Valve Flow Coefficients
6
119 Series
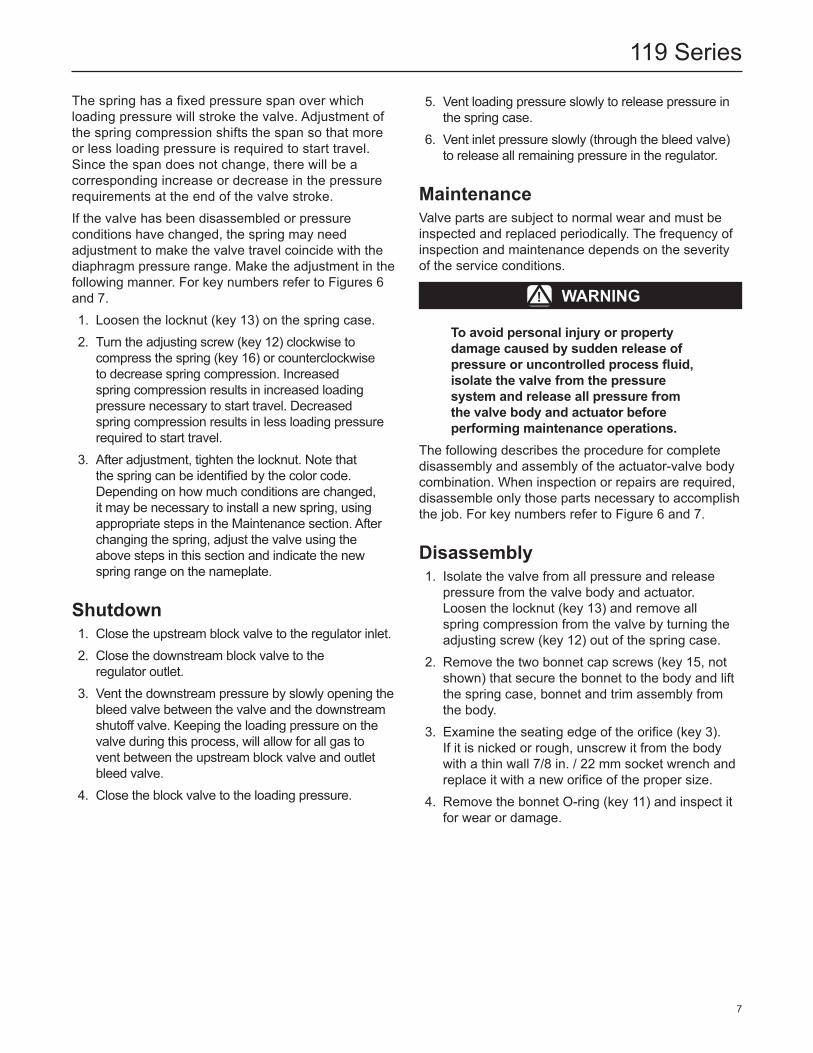
The spring has a fixed pressure span over which loading pressure will stroke the valve. Adjustment of the spring compression shifts the span so that more or less loading pressure is required to start travel. Since the span does not change, there will be a corresponding increase or decrease in the pressure requirements at the end of the valve stroke.If the valve has been disassembled or pressure conditions have changed, the spring may need adjustment to make the valve travel coincide with the diaphragm pressure range. Make the adjustment in the following manner. For key numbers refer to Figures 6 and 7.1. Loosen the locknut (key 13) on the spring case.2 . Turn the adjusting screw (key 12) clockwise to
compress the spring (key 16) or counterclockwise to decrease spring compression. Increased spring compression results in increased loading pressure necessary to start travel. Decreased spring compression results in less loading pressure required to start travel.
3 . After adjustment, tighten the locknut. Note that the spring can be identified by the color code. Depending on how much conditions are changed, it may be necessary to install a new spring, using appropriate steps in the Maintenance section. After changing the spring, adjust the valve using the above steps in this section and indicate the new spring range on the nameplate.
Shutdown1. Close the upstream block valve to the regulator inlet.2 . Close the downstream block valve to the
regulator outlet.3 . Vent the downstream pressure by slowly opening the
bleed valve between the valve and the downstream shutoff valve. Keeping the loading pressure on the valve during this process, will allow for all gas to vent between the upstream block valve and outlet bleed valve.
4 . Close the block valve to the loading pressure.
5 . Vent loading pressure slowly to release pressure in the spring case.
6 . Vent inlet pressure slowly (through the bleed valve) to release all remaining pressure in the regulator.
MaintenanceValve parts are subject to normal wear and must be inspected and replaced periodically. The frequency of inspection and maintenance depends on the severity of the service conditions .
! WarninG
To avoid personal injury or property damage caused by sudden release of pressure or uncontrolled process fluid, isolate the valve from the pressure system and release all pressure from the valve body and actuator before performing maintenance operations.
The following describes the procedure for complete disassembly and assembly of the actuator-valve body combination. When inspection or repairs are required, disassemble only those parts necessary to accomplish the job. For key numbers refer to Figure 6 and 7.
disassembly1. Isolate the valve from all pressure and release
pressure from the valve body and actuator. Loosen the locknut (key 13) and remove all spring compression from the valve by turning the adjusting screw (key 12) out of the spring case.
2 . Remove the two bonnet cap screws (key 15, not shown) that secure the bonnet to the body and lift the spring case, bonnet and trim assembly from the body.
3 . Examine the seating edge of the orifice (key 3). If it is nicked or rough, unscrew it from the body with a thin wall 7/8 in. / 22 mm socket wrench and replace it with a new orifice of the proper size.
4 . Remove the bonnet O-ring (key 11) and inspect it for wear or damage.
7
119 Series
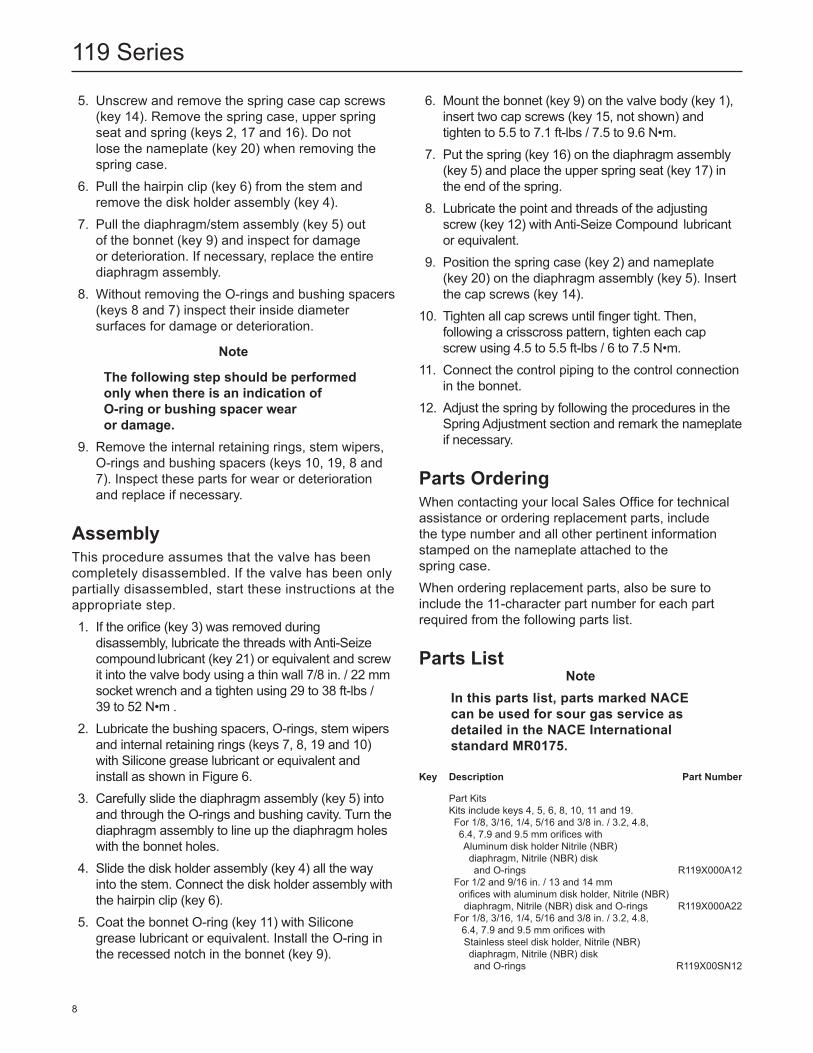
5 . Unscrew and remove the spring case cap screws (key 14). Remove the spring case, upper spring seat and spring (keys 2, 17 and 16). Do not lose the nameplate (key 20) when removing the spring case.
6 . Pull the hairpin clip (key 6) from the stem and remove the disk holder assembly (key 4).
7 . Pull the diaphragm/stem assembly (key 5) out of the bonnet (key 9) and inspect for damage or deterioration. If necessary, replace the entire diaphragm assembly.
8 . Without removing the O-rings and bushing spacers (keys 8 and 7) inspect their inside diameter surfaces for damage or deterioration.
note
The following step should be performed only when there is an indication of O-ring or bushing spacer wear or damage.
9. Remove the internal retaining rings, stem wipers, O-rings and bushing spacers (keys 10, 19, 8 and 7). Inspect these parts for wear or deterioration and replace if necessary.
assemblyThis procedure assumes that the valve has been completely disassembled. If the valve has been only partially disassembled, start these instructions at the appropriate step.1. If the orifice (key 3) was removed during
disassembly, lubricate the threads with Anti-Seize compound lubricant (key 21) or equivalent and screw it into the valve body using a thin wall 7/8 in. / 22 mm socket wrench and a tighten using 29 to 38 ft-lbs / 39 to 52 N•m .
2 . Lubricate the bushing spacers, O-rings, stem wipers and internal retaining rings (keys 7, 8, 19 and 10) with Silicone grease lubricant or equivalent and install as shown in Figure 6.
3 . Carefully slide the diaphragm assembly (key 5) into and through the O-rings and bushing cavity. Turn the diaphragm assembly to line up the diaphragm holes with the bonnet holes.
4 . Slide the disk holder assembly (key 4) all the way into the stem. Connect the disk holder assembly with the hairpin clip (key 6).
5 . Coat the bonnet O-ring (key 11) with Silicone grease lubricant or equivalent. Install the O-ring in the recessed notch in the bonnet (key 9).
6 . Mount the bonnet (key 9) on the valve body (key 1), insert two cap screws (key 15, not shown) and tighten to 5.5 to 7.1 ft-lbs / 7.5 to 9.6 N•m.
7 . Put the spring (key 16) on the diaphragm assembly (key 5) and place the upper spring seat (key 17) in the end of the spring.
8 . Lubricate the point and threads of the adjusting screw (key 12) with Anti-Seize Compound lubricant or equivalent.
9. Position the spring case (key 2) and nameplate (key 20) on the diaphragm assembly (key 5). Insert the cap screws (key 14).
10. Tighten all cap screws until finger tight. Then, following a crisscross pattern, tighten each cap screw using 4.5 to 5.5 ft-lbs / 6 to 7.5 N•m.
11. Connect the control piping to the control connection in the bonnet.
12. Adjust the spring by following the procedures in the Spring Adjustment section and remark the nameplate if necessary.
parts orderingWhen contacting your local Sales Office for technical assistance or ordering replacement parts, include the type number and all other pertinent information stamped on the nameplate attached to the spring case.When ordering replacement parts, also be sure to include the 11-character part number for each part required from the following parts list.
parts listnote
in this parts list, parts marked naCe can be used for sour gas service as detailed in the naCe international standard Mr0175.
key description part number
Part Kits Kits include keys 4, 5, 6, 8, 10, 11 and 19. For 1/8, 3/16, 1/4, 5/16 and 3/8 in. / 3.2, 4.8, 6.4, 7.9 and 9.5 mm orifices with Aluminum disk holder Nitrile (NBR) diaphragm, Nitrile (NBR) disk and O-rings R119X000A12 For 1/2 and 9/16 in. / 13 and 14 mm orifices with aluminum disk holder, Nitrile (NBR) diaphragm, Nitrile (NBR) disk and O-rings R119X000A22 For 1/8, 3/16, 1/4, 5/16 and 3/8 in. / 3.2, 4.8, 6.4, 7.9 and 9.5 mm orifices with Stainless steel disk holder, Nitrile (NBR) diaphragm, Nitrile (NBR) disk and O-rings R119X00SN12
8
119 Series

For 1/2 and 9/16 in. / 13 and 14 mm Orifices with Stainless steel disk holder, Nitrile (NBR) diaphragm, Nitrile (NBR) disk and O-rings R119X00SN22 For 1/8, 3/16, 1/4, 5/16 and 3/8 in. / 3.2, 4.8, 6.4, 7.9 and 9.5 mm orifices with Stainless steel disk holder, Fluorocarbon (FKM) diaphragm, disk and O-rings and Stainless steel disk holder R119X00SV12 For 1/2 and 9/16 in. / 13 and 14 mm Orifices with Stainless steel disk holder and Fluorocarbon (FKM) diaphragm, disk and O-rings R119X00SV22 NACE Construction For 1/8, 3/16, 1/4, 5/16 and 3/8 in. / 3.2, 4.8, 6.4, 7.9 and 9.5 mm orifices with Aluminum disk holder, Fluorocarbon (FKM) diaphragm, disk and O-rings R119XN0SV32 For 1/2 and 9/16 in. / 13 and 14 mm Orifices with Aluminum disk holder, Fluorocarbon (FKM) diaphragm, disk and O-rings R119XN0SV42 1 Valve Body For Type 119 Cast Iron NPS 3/4 / DN 20 1E987119012 NPS 1 / DN 25 ERSA01755A0 NPS 1-1/4 / DN 32 1E987519012 Steel NPS 3/4 / DN 20 1E9871X0012 NPS 1 / DN 25 1E9873X0012 For Types 119EZ and 119EZS NPS 1 / DN 25 Stainless steel ERSA00194A0 Cast Iron ERSA01755A0 2 Spring Case ERAA19719A1 3* Orifice Aluminum 1/8 in. / 3.2 mm diameter 1A936709012 3/16 in. / 4.8 mm diameter 00991209012 1/4 in. / 6.4 mm diameter 0B042009012 5/16 in. / 7.9 mm diameter 0B042109012 3/8 in. / 9.5 mm diameter 0B042209012 1/2 in. / 13 mm diameter 1A928809012 9/16 in. / 14 mm diameter 1C4252X0012 Stainless steel 1/8 in. / 3.2 mm diameter 1A936735032 3/16 in. / 4.8 mm diameter 00991235032 1/4 in. / 6.4 mm diameter 0B042035032 5/16 in. / 7.9 mm diameter 0B042135032 3/8 in. / 9.5 mm diameter 0B042235032 1/2 in. / 13 mm diameter 1A928835032 9/16 in. / 14 mm diameter 1C425235032 316 Stainless Steel (For Types 119EZ and 119EZS only) 9/16 in. / 14 mm diameter 1C4252X0022 4* Disk Holder Assembly(1)
Aluminum/Nitrile (NBR) 1/8, 3/16, 1/4, 5/16 and 3/8 in. / 3.2, 4.8, 6.4, 7.9 and 9.5 mm orifices 1A8328000N2 1/2 and 9/16 in. / 13 and 14 mm orifices 1C4248X0212 1/8, 3/16, 1/4, 5/16 and 3/8 in. / 3.2, 4.8, 6.4, 7.9 and 9.5 mm orifices 1A8328000M2 1/2 and 9/16 in. / 13 and 14 mm orifices 1C4248X0052
4* Disk Holder Assembly(1) (continued) NACE MR0175, Aluminum/Fluorocarbon (FKM) 1/8, 3/16, 1/4, 5/16 and 3/8 in. / 3.2, 4.8, 6.4, 7.9 and 9.5 mm orifices 1A8328X0122 1/2 and 9/16 in. / 13 and 14 mm orifices 1C4248X0182 Stainless Steel/Nitrile (NBR) 1/8, 3/16, 1/4, 5/16 and 3/8 in. / 3.2, 4.8, 6.4, 7.9 and 9.5 mm orifices 1A8328000A2 1/2 and 9/16 in. / 13 and 14 mm orifices 1C4248X0202 5* Diaphragm/Stem Assembly(1)
Aluminum/Nitrile (NBR) ERAA22164A0 Stainless Steel/Nitrile (NBR) ERAA22164A1 Stainless Steel/Fluorocarbon (FKM) 19A0348X012 NACE MR0175 19A0348X022 6 Hair Pin Clip(1) 19A0347X012 7 Bushing Spacer, Acetal (2 required) 18A7021X012 8* O-ring(1) (2 required) Nitrile (NBR) 18A7019X012 Fluorocarbon (FKM) (high-temperature, corrosion) 18A7019X022 NACE MR0175, Fluorocarbon (FKM) 18A7019X022 9 Bonnet For Type 119, Aluminum 48A7025X012 For Types 119EZ and 119EZS, Aluminum ERAA12941A2 10 Internal Retaining Ring(1) (2 required) Nitrile (NBR) and Fluorocarbon (FKM) 18A7020X022 NACE MR0175, Fluorocarbon (FKM) 18A7020X02211* Bonnet O-ring(1)
Nitrile (NBR) 1K594906562 Fluorocarbon (FKM) (high-temperature, corrosion) and NACE MR0175 13A5559X012 12 Adjusting Screw, Zinc-plated steel 1D995448702 13 Locknut, Zinc-plated steel 1D667728982 14 Cap Screw, Zinc-plated steel (8 required) For Type 119 1A391724052 For Types 119EZ and 119EZS Stainless Steel body 1A3917X0062 Cast Iron body 1A391724052 15 Cap Screw, (2 required) (not shown) For Type 119, Zinc-plated steel Cast Iron body 1B787724052 Steel body 1B762424052 For Types 119EZ and 119EZS Stainless steel body 18B3456X012 Cast Iron body 1C856228992 16 Actuator Spring, Zinc-plated steel See Table 1 17 Upper Spring Seat, Zinc-plated steel ERCA00823A0 18 Type Y602-12 Vent (not shown) 27A5516X012 19 Stem Wiper(1), Polytetrafluoroethylene (PTFE) (2 required) 18A7024X012 20 Nameplate, Aluminum - - - - - - - - - - - 23 Vent Screen, Stainless steel (not shown) 0L078343062 24 NACE Tag - - - - - - - - - - - 25 O-ring (For Types 119EZ and 119EZS only) 1P8453X00A0 26 Check Valve (For Types 119EZ and 119EZS only) ERAA15487A0 27 Restraining Ring (For Types 119EZ and 119EZS only) ERAA14977A0 28 Restrictor Screw (For Types 119EZ and 119EZS only) ERAA13988A0 29 Solenoid Valve (For Type 119EZS only) Electric (Standard) ERAA17178A0 Solar ERAA17494A0 30 Connector (For Type 119EZS only) 15A6002XW22 31 Tubing (For Type 119EZS only) 0500213809W 32 Tag Wire (not shown) - - - - - - - - - - - 33 Drive screw (2 required) (not shown) NPS 1 / DN 25, Cast Iron and Stainless Steel body 1A368228982 34 Flow Arrow (not shown) - - - - - - - - - - - 35 Pipe Plug (Types 119EZ and 119EZS) Cast Iron body 1C333528992 Stainless Steel body 1C3335X0012
key description part number
key description part numberparts list (continued)
*Recommended Spare Parts1. Included in repair kit.
9
119 Series
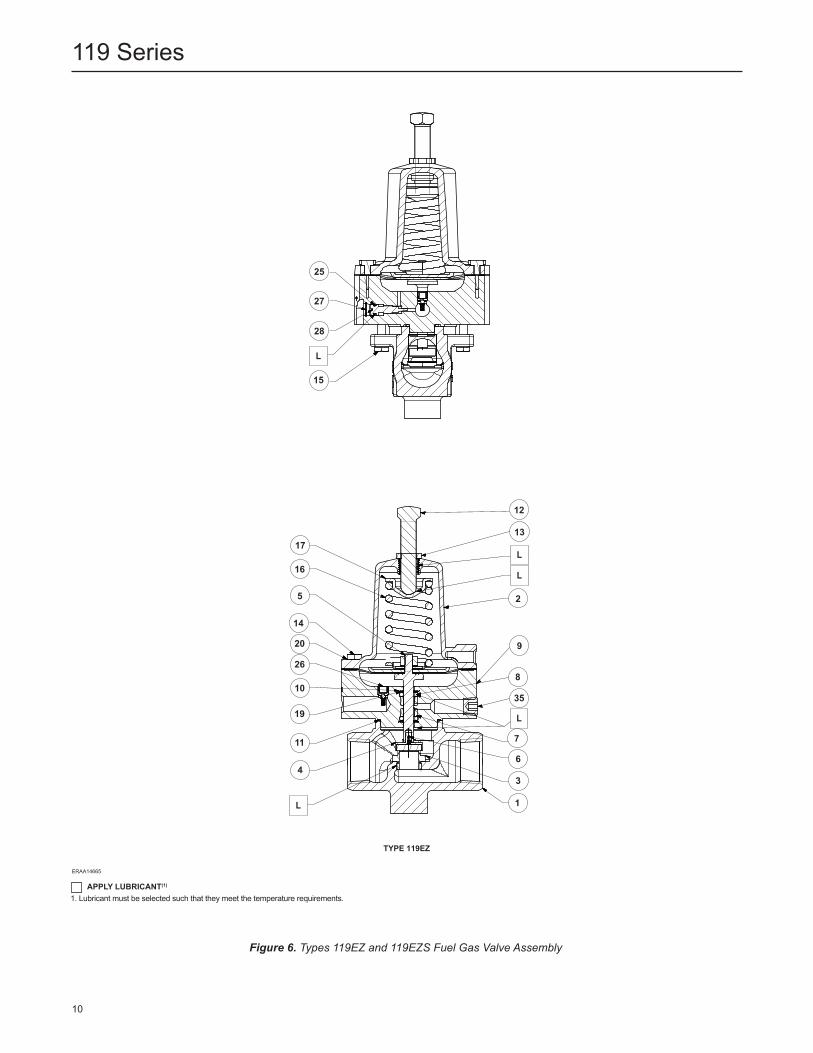
Figure 6. Types 119EZ and 119EZS Fuel Gas Valve Assembly
apply luBriCanT(1)
1. Lubricant must be selected such that they meet the temperature requirements.
15
28
27
25
L
1
3
7
8
9
6
20
26
14
2
13
12
L
L
L
L
4
11
1935
10
5
16
17
ERAA14665
Type 119eZ
10
119 Series
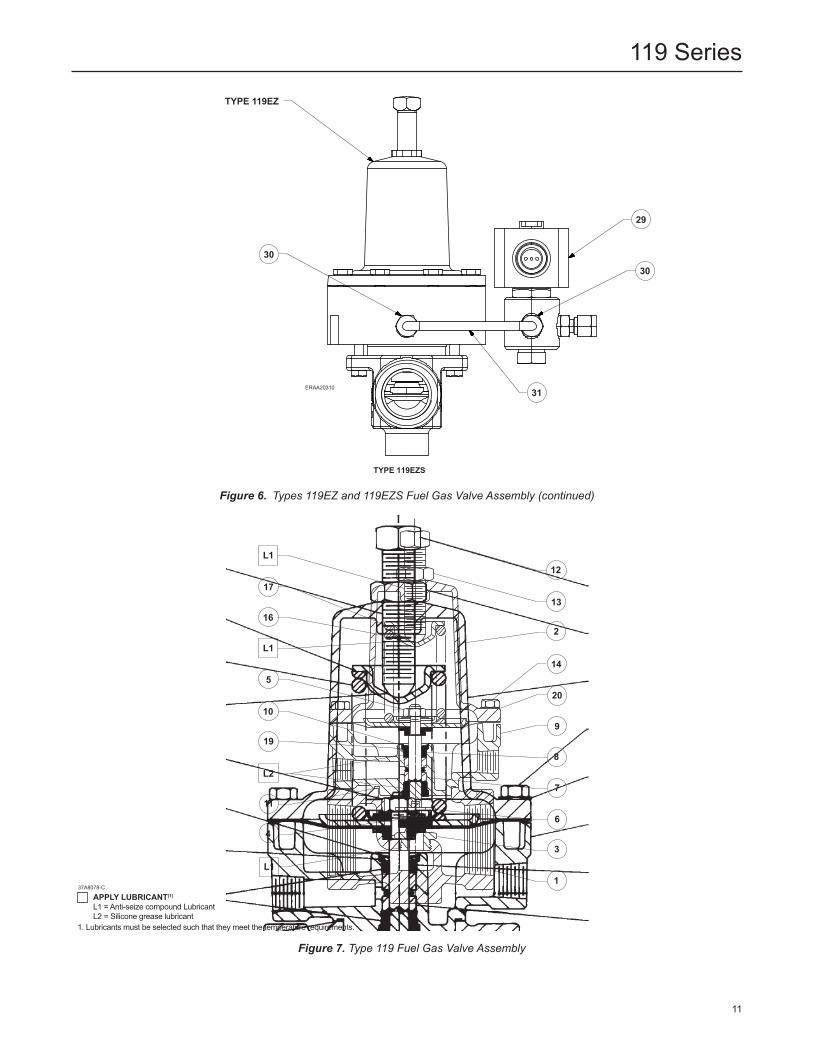
Figure 6. Types 119EZ and 119EZS Fuel Gas Valve Assembly (continued)
Figure 7. Type 119 Fuel Gas Valve Assembly
37A8078-C
ERAA20310
apply luBriCanT(1) L1 = Anti-seize compound LubricantL2 = Silicone grease lubricant
1. Lubricants must be selected such that they meet the temperature requirements.
17
16
12
13
2
14
20
9
8
7
6
3
1
10
5
19
11
4
L1
L1
L1
L2
30
TYPE 119EZ
30
31
29
Type 119eZS
11
119 Series

119 Series
Facebook.com/EmersonAutomationSolutions
LinkedIn.com/company/emerson-automation-solutions
Twitter.com/emr_automation
Fisher.com
D100261X012 © 1990, 2018 Emerson Process Management Regulator Technologies, Inc. All rights reserved. 06/18. The Emerson logo is a trademark and service mark of Emerson Electric Co. All other marks are the property of their prospective owners. Fisher™ is a mark owned by Fisher Controls International LLC, a business of Emerson Automation Solutions.
The contents of this publication are presented for information purposes only, and while effort has been made to ensure their accuracy, they are not to be construed as warranties or guarantees, express or implied, regarding the products or services described herein or their use or applicability. All sales are governed by our terms and conditions, which are available on request. We reserve the right to modify or improve the designs or specifications of our products at any time without notice.
Emerson Process Management Regulator Technologies, Inc. does not assume responsibility for the selection, use or maintenance of any product. Responsibility for proper selection, use and maintenance of any Emerson Process Management Regulator Technologies, Inc. product remains solely with the purchaser.
Emerson Automation Solutions
Americas McKinney, Texas 75070 USA T +1 800 558 5853
+1 972 548 3574
Europe Bologna 40013, Italy T +39 051 419 0611
Asia Pacific Singapore 128461, Singapore T +65 6777 8211
Middle East and Africa Dubai, United Arab Emirates T +971 4 811 8100


