
POST PRODUCTION HANDBOOK
a guide to finishing your film
2008 / 2014
second edition


Contents
contents
preface i
planning post production 1
post production supervisor 1
scheduling 1
budgeting 2
the lab 3
dailies and telecine 4
off-line editing 5
on-line editing 5
sound 5
completion 6
delivery 7
Scheduling 9
sample post schedule 10
telecine 12
understanding frame rates and timecode 17
what is 3:2 pulldown 20
d.i.t. 27
what is a d.i.t. 27
Contents
off-line editing 28
portable hard drives 28
aspect ratios 30
post sound 33
background info 33
update for SFTV students 41
spotting 43
spotting 43
sample pull list for sound effects 44
music 45
scorekeepers 45
howtoacquiremusicforfilms 48
getting clearance for music 51
titles 53
on-line edit 57
lmu hd online 57
lmuhdfiledeliveryguide 58
color correction 60
the mix 64
the mixer 69
preparing for the mix 69
exporting quicktime picture 71
guidelines for lmu mixes 76
layback 81

Contents
deliverables 83
music cue sheet 83
festivals 86
post production standards 87
examples of file-based post workflows 92
file-based camera to edit quick guides 102
dslr camera conversion quick guide 110
redcine-x quick guide 117
media composer to pro tools export 131
i
Themakingofafilmistraditionallydividedintothreegeneralareasofactivity: pre-production, production and post-production. It is a common mistake to think of these as separate and discrete processes. They are, in fact,interconnectedpartsofthewholefilmmakingenterprise.
Post Production includes editing, but it is much more than that. Post be-gins with the script and continues in the Pre-Production phase with the planning,schedulingandbudgetingtheoffinishingprocesses.DuringProduction the Editor is syncing dailies and assembling a rough cut for theDirectortoviewastheshootingprogresses.Finally,thereisthesounddesign, scoring, titles, visual effects, mix, color correction and delivery thatcomprisethefinishingprocess.
StudentsusuallyexperiencelittledifficultywiththePre-ProductionandProductionphaseoffilmmaking,butonceprinciplephotographyiscom-plete their projects tend to lose momentum and unravel. The primary rea-son for this is a failure to think holistically about all of the work involved inmakingafilm.Amovieislikeacake–youaddtheflour,theeggs,thesugar, but until it’s baked it’s not a cake.
Students also have a tendency to think linearly and sequentially about thestepsinvolvedinfinishingafilm.JustasProductionrequiresthatanumber of activities occur simultaneously so does Post involve concur-rentoperations.EfficientPostProductionrequiresseriousmulti-tasking.
Most importantly, Post Production has to be seen as an integrated part of the whole and approached with the same attention to planning and scheduling that is given to Production. No one plans to fail, but failure to plan can lead to disaster. Goals and deadlines have to be set and progress mustbemonitoredcontinuallyifthefilmistobefinished–andafterhavingspentthousandsofdollarsinProduction–whatawastenottohaveafinishedfilmtoshowforallthateffort
This handbook contains material that covers the broadest scope of post production–fromsmallvideostofeaturefilms.Someofitmaynotbeap-plicable to your project. You will have to choose the points that apply and adapt them to your resources..
preface
Planning Post 1
planning post production
post production supervisor Apostsupervisorisnormallybroughtonboardduringpre-production,and has the responsibility of locating the various individuals or compa-niesneededduringpost.Duringproduction,thepostsupervisorcoordi-nates with the production crew, the laboratory, and the editorial staff. In many respects, they are the counterpart to the Production Manager.
Duringpost-production,heorsheoverseestheentirepostprocessanddeliversitallonaspecifictimeline,withinthebudget.Thepostsupervi-sor should have a basic understanding of each of the different processes required during post-production (including the time each stage takes), and the ability to work with the different companies. The greatest error apost-productionsupervisorcanmakeisassuming.Duetothenumberof different areas of post, and the level of coordination required among them, assuming anything can cause lost time and the sudden hemorrhag-ing of money.
schedulingPost-productionprobablyneverentersthemindsoffilmmakersduringpre-production, but it should. There are two big reasons for this:
Money. Not having a good plan for post-production can cost you dearly, orstopyoucompletely.Agoodruleofthumbtorememberis:thesmallerthe budget, the larger the percentage of that budget will be required for post production.
Quality. The best story, beautifully shot and brilliantly acted can be sabo-taged by a poor post, and ruined for the audience. This can happen on both the creative and technical sides of the post-production process.
Traditionally,filmschoolshavefocusedonthecreativeandtechnicalsideof production, without much emphasis placed on post beyond the edito-rial process. The student usually ends up with an edited workprint or
excerpted formPost Perfect: In 10 Easy StepsbySusanJ.Spohr

Planning Post 2
video,butlittleornounderstandingofwhatisrequiredtotrulyfinishafilm.Formanyfilmmakers,thiscanspellfutureproblemsonprojectsthatrequire the complete post process in order to present at festivals or sell theirfilm.
Post-production is something akin to building a house. You, the pro-ducer/director/filmmaker,areactingasthegeneralcontractor.Justasthecontractor hires the various trades to build the house (plumber, carpenter, electrician, etc.), you will hire the various individuals and companies you needtofinishyourfilm.Likethecontractor,themoreyouunderstandtheprocess, the easier it is to deal with potential problems, and the better the finishedproject.Alsolikethecontractor,youshouldcontactthepeopleyou will work with early, to both introduce yourself and educate yourself as to what they will require of you.
Thefirststepistocreatethepostproductionschedule.Makesureeverystep you are going to perform is included. The type of project and your budget will help determine the amount of time it will take to complete postproduction.
If you are shooting at a distant location, you will have to arrange to ship your dailies to the lab or cutting room. This may add days between pro-duction and editing. It may also add days between the time production wrapsandthetimethefinaldailiesreachthecuttingroom.Theseextradays will need to be included in your schedule.
Alsokeepinmindthatsomestepswilltakeplacesimultaneously.Forexample,ifyouareshootingonfilm,principlephotographyandthetransferoffilm-to-tapedailieswilloverlap.Andifyouarefinishingonvideotape, color correction and the sound mix will often happen at the same time.
budgetingThe goal of most projects is to create a high-quality piece that either entertains or informs, or both. The bottom line for most projects is the budget.Unlessyouaremakingahigh-profilefeature,youwillprobablybe required to stay within the budget allotted at the start of the project. Atthestart,yourjobwilloftenbetoputadetailedbudgetonpaper.This can actually be much simpler than it sounds if you just follow a few steps.

Planning Post 3
• Make sure you have an accurate list of all of your delivery require-ments.
• Know the shoot dates, when the picture must lock and the delivery dates.
• Meet with vendors to discuss your project. If these are people with whom you’ve worked in the past, all the better.
• Negotiate packages and volume rates based on the work each facility will be doing.
The areas you’ll likely include in your postproduction budget are:
filmprocessingediting room equipmenttelecine transfer titling and opticalssound editorial and designADRandFoleysound mixinglaybackvisual effectsnegative cuttingdelivery elements
Ifthisisyourfirstproject,yourvendorswillbeabletohelpoutwithbud-geting time and costs.
the labIfyouaren’tshootingfilm,youcanskipthissectionandmoveontodai-lies.Ifshootingfilmdoesapply,youmaywanttoinvestigatewhatreallyhappensinafilmlaboratory.
Inadditiontoprocessingyourfilm,printingfilmdailiesandpreppingyour dailies for transfer to videotape, the lab is also where you go to procure bags, cans and cores which go to the production set. When pick-inguptheseitems,thelabneedstoknowthefilm’sgaugeandwhatsize“loads” you’ll be using. Your production manager can answer these and

Planning Post 4
other questions. Be sure to meet with your laboratory contact prior to the start of production. This will help you avoid expensive mistakes down the road. It will also insure that the lab is prepared to process your dailies when you need them.
Your lab contact will need to know the details of your shoot. This will includetheamountoffilmyouexpectshotonadailybasis,ifyouhaveany night shoots or weekend shoots scheduled, and if you are cutting on filmorvideotape(orboth).
Arrangeafilmlabtourforyourselfpriortostartingthepostproductionprocess.Thiswillgiveyoualeguponhowfilmisprocessedandwhatinformation the lab needs to do the job correct and on time. Have some-one show you what to look for on a camera report. There is vital informa-tion the lab needs from those reports to even begin your job. Understand-ing this information will allow you to properly communicate should information be missing. On a busy night, a lab may process 200,000 to 300,000feetoffilmandyourswilldefinitelygotothebackofthelineifthere is any question on how to process it.
Labsusuallyprocessfilmatnight(machinesarestartedupandtestedbetween 8pm and 10pm). Your lab contact will give you a cutoff time for droppingyourfilmatthelabforprocessing.Unlessarrangedaheadoftime,anyfilmyoudropoffafterthistimemaynotbedevelopedintimefor your morning screening or transfer session. Special daylight process-ing can be arranged, but it must be done ahead of time. Before shooting begins there are usually camera tests shot and processed. You may be responsible for arranging this.
Mostfilmlaboratoriesofferavarietyofservices.Theydevelopyourfilmand prepare it for transfer to videotape, create prints, and repair dam-agedfilm.Somehaveopticaldepartmentswheretheycreateyourfilmef-fects and titles, blow-ups and repositions. To fully understand and appre-ciatetheworkthatgoesonatthefilmlab,takeatour.Yoursalespersonorlaboratory supervisor will be glad to arrange one for you.
dailies and telecineInafilmshoot,dailies,asthenameimplies,isthefootagethatisshoteach day and rushed to the lab for processing. It then moves on to tele-cine or printing so you and your crew can view them, usually the next morning. The dailies from a tape shoot are still the footage that is shot each day; it just does not require processing.

Planning Post 5
Ifyouarehavingyourfilmdailiestransferredtovideotape(telecine),you will need to speak with the transfer facility prior to the beginning of yourjob.Aswiththefilmlab,theywillhavealistofquestionsforyouto answer before they can schedule your job. The information they will needincludesdetailsaboutwhattypeoffilmandsoundyouareshoot-ing,howyouplantocompleteyourprojectonceshootingisfinished,andwhatyourtimescheduleisforyourproject.Howmuchfilmisbudgetedfor each day, and how many days you will be shooting will also be impor-tant.
Someinformationmustbetakendirectlyfromyourfilmduringthetrans-ferprocess.Whetheryouplantodoafilmand/orvideotapefinishwilltell the facility what information they need to gather at the time of tele-cine. Not planning ahead and having to go back to get this information is extremely costly and time consuming.
off-line editingOff-line editing indicates an electronic cut. This means that your pro-cessed negative shot each day will be transferred to videotape or to a hard drive. This videotape is then provided to the off-line editor to be recorded into electronic editing equipment for (non-linear) editing. It can alsomeanyouhavetakenyourdigitalrawfilesandcompressedthemtocreatesmaller,moremanageablefilesizesforyoureditingworkflow.
on-line editingTheon-lineiswhereyoudothefinalassemblyofyourprojectoryoucon-formyourprojectbylinkingtoyourhighestdefinitionorrawdigitalfilesafter the edit is complete.
You may have to change your sequence settings and relink to your high-est resolution footage (2K or 4K for example) to conform your locked cut tothehighestresolutionfilesbeforeyousendthemtocolorcorrection.
Ifyouarenotdoingavideotapefinishfromvideotapedailies,youcanskipoverthisparagraph.Justlikeeachearlierprocess(filmprocessingand telecine dailies transfer), the on-line facility will have a list of details they will need from you before they can book your on-line session and complete this process. This will include questions about what videotape format your dailies are on, where the tapes will be coming from, what off-line system was used to create the editing list (called the edit decision list-EDL),andanyinstructionsinvolvingspecialeffects.Sometimesthesamefacilitythatdidyourfilmprocessingandtelecinewillalsobedoing
Planning Post 6
your on-line, sometimes not. Other steps that will take place as part of this process may be creation of special effects, titling and color correcting your picture.
soundSound for your project actually starts in dailies with your “production sound.” This is sound recorded right on the set at the same time your picturedailiesarerecorded.Whetheryouareshootingonfilmorvideo-tape, you will probably have some production sound. The exception will be a project that relies solely on voiceovers or sound and effects that are recorded later.
Production sound elements are delivered to sound editors to be used to help “sweeten” the sound that was married to the picture either in thefilmeditingroomortheoff-lineeditingroom.Onceallofthesoundedits have been agreed upon, production sound, along with any ancil-lary sound effects and music are mixed together. This is called mixing or “dubbing” (it is also called “audio sweetening in commervials and televi-sion).Mixingtakesyourproductionaudioandfinalizesitwithenhance-ments,ADR,music,soundeffects,andvariousclean-upprocedures.
Once completed, the sound facility creates an element called an “optical tracknegative(OTN)”whichthefilmlabthenmarriesontofilmtomakerelease prints or onto videotape for broadcast or home video release.
completionOnce you have the picture and sound elements nailed down, your deliv-ery requirements will determine how you complete your project.
Afilmfinishmeansthatallofyourworktowarddeliverywillbedoneonfilm.Thisdoesnotprecludemakingafile-basedorvideotapemasterfromyourfilmelements,butthefile-basedorvideotapemasterwillonlybestruckoncethefilm’spictureandsoundelementsarecompleted.Acompletelyfinishedfilmelementmustbecreatedtosatisfyyourdeliveryrequirements.Thenegativeiscutoncetheshowhasbeenlocked(finaledits are approved) and opticals (fades, dissolves and titles) are ordered.Thefilmlabcreatesthecolor-correctedprint.Themovieiscolor-correctedprior to striking release prints and can also be color-corrected for use as a telecine print master.
For a feature or movie-of-the-week, allow at least 10 days for your nega-tivetobecutandsplicedintoafinishedpiece.Allowanotherweek(or

Planning Post 7
more)toarriveattherightcolor-correctedfilmelement.
Ifyourfileorvideotapeistobeyouronlydeliveryformat,andyouwillnot be cutting negative prior to delivery, you have chosen what is referred toasatapefinish.Afileortapefinishcanalsotakeplaceonaprojectthatwillultimatelybefinishedonfilmifmaterialsforprevieworadvertisingarerequiredpriortothefilmfinishbeingcompleted.Atwo-hourshowcan take at least one day to several days to complete. One-hour TV shows usually spend one to two days in color correction.
Themasteriselectronicallycolor-correctedscene-by-scene.Dependingonthe complexity of the look of the project and the evenness of the negative exposures, it can take from hours to days to color correct a master. The facility can help you determine the amount of time necessary to complete this step.
Ifyouarefinishingonfilm,anyformattingwillbetakencareofduringtheeditorialprocessandincorporatedintothefilmcut.Iffinishingonvideotape,formattingwilleitherbeincorporatedintotheEDLordone“tape-to-tape” near the end of the process. Formatting can include adding logos, bars and tone (videotape) and commercial blacks (videotape), and closed captioning (again, videotape).
Whenfinishingonfilm,titles,credits,locales,legends,etc.arecreatedoptically.Theyareshotonfilmusingtheplain“textless”backgrounds.These backgrounds are matted together with titles creating a new piece of “texted”filmwhichisthencutintothefinal-cutfilmnegative.Onvideo-tape, these are done after all of the picture alterations are accomplished (suchasspecialeffectsandcolorcorrecting).Aswithfilm,the“textless”pictures are mixed with text, making a new “texted” picture.
deliveryDeliveryiscompletedsuccessfullyonlywhenyouhavefulfilledallofthedelivery requirements and the distributor has accepted the elements. The only way to safeguard against missing delivery materials is to get, read and understand the delivery requirements.
Deliveryelementsarebestmadealongtheway,atthestepswheretheyare the easiest and most cost-effective to create. They often require paper-work and contracts drawn and signed. Collect delivery requirements at the start of your project. Make a checklist and keep it updated so you are not caught short and costing the producer unnecessary expenses.

Planning Post 8
a few tips
Work backwards and know what you want to deliver before you start shooting.Planyourpostworkflow(i.e.deliveronfilm?DCP?).Whatdoyouwanttoendupwithattheendoftheday?Workfromthere.
In pre-production know what budget is for post and stick to it! Perhaps even account for more money in POST. Many producers end up spending 3x the money in post because they didn’t plan realistically.
Don’tjusttrytopiecetheworkflowtogether.MakesureyourNLE(NonLinearEditor—likeAvidsupportsyourcameraandtheformatsonwhichyouareshooting.Besurethatyourofflineeditwillseamlessmakeittotheonline.Knowhowtogetfinalproductoutofthesystem.
Have a realistic schedule from the get go. Know how many days you will need to shoot, how many weeks you’ll need to edit.
Knowyourstory!Ifchangesneedtobemade–makethemonset,notinpost.Ifthestoryisn’tcomingtogetherbasedontheshots–itcancause2-3x increase in post production.
Noroleisunimportantinfilm.Evenifyoureditingtoolshaveacolorap-plication–youstillneeda“real”coloristtodothejob.
Besuretobookthecorrectadvancededitsuiteforyouroffline,onlinneor color correction session. The rooms have different equipment and you need to make sure that the room you’ve booked can actually do the work you want done.
scheduling post production 9
Work expands to fillthetimeavail-able for its comple-tion.
Parkinson’sLaw
schedulingpost production
how long will it take? The amount of time required for post production will vary depending onanumberoffactors.Adocumentarymayneedsubstantiallymoretimeinoff-lineeditingthanafictionalnarrative.
Whenlayingoutyourschedule,startwiththefirstdateofphotogra-phy,whichtellsyouwhenyourfirstdayofdailieswillbe.Thenfillinthedeliverydateforyourfinishedproject.
Now that you’ve set the parameters for beginning and ending your project,yousimplyfillinthestepsin-between.Eachphaseisdepen-dentonthesuccessfulcompletionofthepreviousphase.Anyinter-ruption may cause a ripple effect throughout your entire schedule. Translation:yourscheduleneedstobeflexibleandyouneedtobeveryorganizedandpossessalotofpatience.
Your post schedule will include a column for many, if not all, of the following:
DailiesPickups and reshootsEditor’s CutDirector’sCutPictureLockOn-Line/AssemblyEditSpotting Music and Sound effectsADR/LoopingScoringColor CorrectionTitling/VFXMixLaybackQuality Control ScreeningFinal ScreeningDelivery
scheduling post production 10
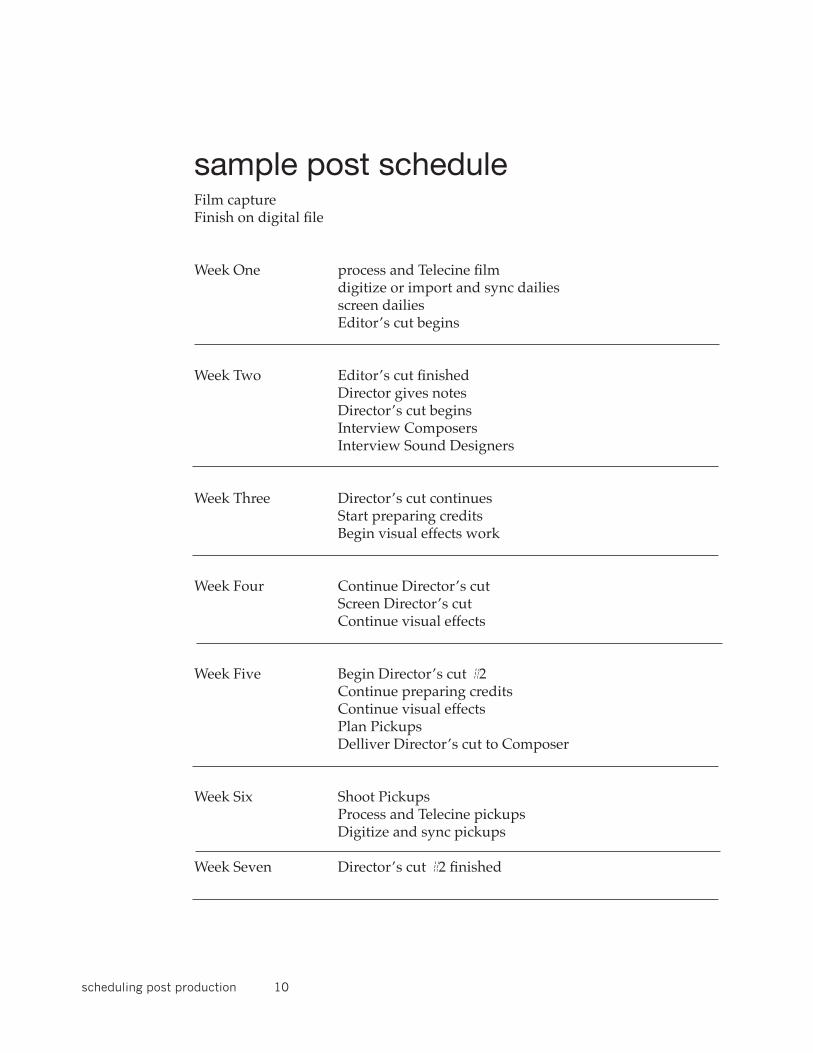
sample post scheduleFilm captureFinishondigitalfile
WeekOne processandTelecinefilmdigitizeorimportandsyncdailies
screen dailies Editor’s cut begins
WeekTwo Editor’scutfinished Directorgivesnotes Director’scutbegins Interview Composers InterviewSoundDesigners
WeekThree Director’scutcontinues Start preparing credits Begin visual effects work
WeekFour ContinueDirector’scut ScreenDirector’scut Continue visual effects
WeekFive BeginDirector’scut#2 Continue preparing credits Continue visual effects Plan Pickups DelliverDirector’scuttoComposer
Week Six Shoot Pickups Process and Telecine pickups Digitizeandsyncpickups
WeekSeven Director’scut#2finished

scheduling post production 11
WeekEight PIXLOCK Cut in titles and effects MakedubsandQuicktimefilesforsoundandmusic ExportembeddedAAFfilesforsound CreateEDL
Week Nine spotting sessions for music and sound effects SoundDesignerbeginseditingdialogueandeffects
Week Ten Foley session Scoring session ADRsession
Week Eleven complete sound editing
Week Twelve MIX SESSION
WeekThirteen ON-LINEImportorLaybacksoundtrack
Week Fourteen Color Grading session ExportAAFforcolorsession Prepare deliverables and documentation for delivery Quality Control screening
WeekFifteen FINALSCREENING Deliverablespresented
Telecine 12
telecine if shooting on filmToday’s video dailies are more than simply a way to evaluate the previ-ous day’s work. The telecine session is an increasingly complex merging oftechnologies;film,video,audioanddigitalinformation.Thistechnol-ogy can be a tremendous aid to the post production process, but if when a link in the chain is faulty, the telecine session can turn into a nightmare ofexplodingcosts.Atfourtofivedollarsaminuteforonelightdailytransfer time, even minor delays can add up to hundreds of dollars in a very short time.By paying attention to a few simple details during production, many of these unexpected delays and expenses can be avoided. Here are some suggestionstohelpmakethemostefficientuseofthetelecinesessionwhile avoiding some of the most common pitfalls.
Before the ShootMuch of the following information is critical to a successful and accurate transfer,andifthefacilityhastotrackdowntheproperspecificationsonthe day of the session, stand by and waiting charges can accrue. Make sure things such as framing requirements, frame rates, edit specs, num-ber and type of elements to be made, and any special technical issues, are clearly spelled out and relayed to the transfer company well before the session.Inthecaseofunusualfilmorvideoformats,specialequipmentmay need to be procured. Surprises and “By the way...” in telecine invari-ably lead to increased cost and delays.
Camera DepartmentModernmotionpicturefilmshavetremendouslatitudeandabilitytowithstand major over and under exposure. Photographic techniques and stylesarepushingthelimitsofthenewfilmstotheextreme.Thecapabil-ityofdigitaltelecinesystemstoalterthefilmimagehasincreaseddra-maticallythepastfewyears.OftentheDirectorofPhotographydoesnotcommunicatewiththecolorist,andthecoloristhastoguesswhattheDPis trying to achieve.
from SuperDailies,Inc.
It is important
that the telecine
facility have as
much informa-
tion regarding
the production
as possible be-
fore the telecine
session starts.
Telecine 13
•Thegreyscaleestablishesabaseexposureandcolorbalance.Using the chip chart as a point of departure, the colorist can detect anyunusuallighting,filters,orexposuresandgivethecamera-manwhatheorsheexpectsinsteadoftryingtofix‘mistakes’that may actually be the intended effects. Of course nothing can replaceeffectivecommunicationbetweentheDPandthetransfersuite. Providing visual references (polaroids, tear sheets, maga-zinepictures,referencestoothermovies,etc.)istremendouslyhelpful (remember 1 picture=1,000 words) and can pinpoint the looktheDPandDirectoristryingtoachieve.
•Theframingchartinsuresthatthecameraman’scriticalfram-ing will be exactly adhered to, and will alert the telecine operator to any unusual framing formats or discrepancies in the camera ground glass.
•Westronglyencourageeveryonetoshootaframingchartattheheadofeachday’sfootage.Aproperlyphotographedframingchart can eliminate a host of frustrating problems and preserve theintentoftheDirectorandDirectorofphotographythroughoutthe post production chain. In theory it is a very simple process: Aligntheframelinesofyourgroundglasswiththedrawnlinesonthechartandburnoff20or30feetoffilm.Intelecine,wealignandsizethetelecinetothechartweseeonthemonitorandpresto-your critical framing is perfectly preserved. It is crucial, however, that the person shooting the chart knows exactly which ground glass markings are being used, and what they represent in terms of telecine.
Mostgroundglassesusedforfilmingfortelevisionhaveatleasttwosetsofmarkings;TVTransmittedandTVSafeActionArea.TheTVTransmit-ted (Trans), usually represented by corner markings, is a larger area than TV Safe. When TV Trans is used for the framing chart, and we properly setupthetelecinetoreflectthis,thephotographedframelinesmaynotappear on every television. This is because most television sets can not display all the information transmitted to them. For this reason, TV Safe Actionwasdevelopedinsidethetransmittedarea.TheareabetweenTVTrans and TV Safe is called underscan. We often put the time code win-dows in the underscan area. On standard TV sets, the windows will not be visible. Most professional monitors have a setting called underscan that will display all the transmitted information.
Photographing a
properly exposed
and color bal-
anced grey scale
or color chart and
framing chart at
the beginning of
each day’s film-
ing gives the col-
orist a good place
to start.

Telecine 14
In underscan, the editor can see the windows if necessary. In regular mode,theyarenotvisible.AnythingwithinTVSafewillbedisplayedon99% of all TV receivers.
•Standard16orSuper16.Withtheincreaseinproductionof16mmfortelevision, we have noticed a corresponding increase in confusion regard-ing these two formats. Standard 16, the “original” 16mm format, can use singleordoubleperffilm,andproducesanaspectratioof1.33:1,perfectfor television. It does not require a special gate for telecine transfer.
•Super16isafilmformatdesignedtousethemaximumimageareaavailableonconventional16mmfilm.Amodified16mmcameraisusedwithsingleperforated16mmfilmstock.Super16hasanaspectratioof1.66:1.ThisisveryclosetothecurrentHDstandardof1.78:1.Itdoesrequire a special gate for telecine transfer. You can also put a standard TV ground glass in a Super 16 Camera causing potential confusion down the line.Alwayscheckwiththerentalhouseastowhatthealignmentisofthecamera you are using, not just what ground glass you are using.
•WhenyoushootSuper16forstandardTV,therearetwooptions.Oneis to letterbox the transfer so the entire negative area is used. If a “full screen” transfer is desired without letterbox bars, we must extract the 1.33:1 TV area from the center of the negative. This still requires the Super 16 telecine gate to avoid scratching the outside area of the negative and to be able to pan far enough over to achieve the correct framing. It is criti-cal that you shoot a framing chart, and let the transfer house know in advancewhatyouaredoing.Otherwise,incorrectframing,scratchedfilmand a costly retransfer may result.
•Ifyouareshootingfilmthatistobeletterboxedinthefinalform,itisimportanttoknowwhataspectratiothefinalframewillbe,andwhetheryou want the mattes put in in the telecine, or to leave it full screen and have the matte inserted in editorial. Many editors want the freedom to move the frame around before applying the letterbox, and many directors and directors of photography want to see the letterbox in the dailies.
•Itisimportanttoletthetransferhouseknowwhattheintendedtransferframe rate is. The transfer rate is not necessarily the same as the shooting frame rate. People routinely shoot at 30 fps, for example, to be transferred at 24 fps for the subtle slow down it provides. They may also shoot at 30
It is especially
important to pro-
vide a framing
chart if you are
shooting a non
standard format
such as Super
35, 1:1.85 for
letterbox, Super
16 etc.

Telecine 15
fps for transfer at 30 fps for the one frame to one frame relationship it provides. Similarly, footage shot at 6 fps will have a very different look when transferred at 24 fps than when transferred at 6 fps.
Sync SoundLMUSFTVdoesnotencouragestudentstohavedailiessyncedduringtelecine.SFTVdoesnotcurrentlyprovidetechsupportfortimecodefieldrecorders. Even in the professional world syncing dailies during telecine is an “option”, not a necessity. Syncing the sound in your non-linear editing software is a viable and more cost-effective choice.
EditorialWhileatfirstglance,itseemstheeditorialprocessdoesnotaffectthecostof the telecine session, preparing today’s dailies for non linear editing can takesignificantlylongerthanthoseoldone-lights.TheeditormayrequireKeykode,asimulaudioDATwithaddresstracktimecode,2ormoresimul 3/4” SP or Beta cassettes, (with or without up to three windows), digitalFLExfileswithfloppydiscsorprintouts,Keykodelogs,etc.
•Everytimeyouturnonanothermachineintelecine,ittakeslongerandcostsmore.LoggingeverysceneandtakeintoaFLExcomputertakestime.(Alotoftime,andtheychargeyouextraforthemachinetoo.)Hooking up all these machines can add a half an hour or more to the initial set up. Many facilities can only make three video tape elements during the transfer session. If you need copies for production, the dub-bing process can add time and additional costs.
•Eacheditorialhousehasitsownuniquespecs,andifsomethingismiss-ing, you might have to re transfer everything. (Ugh!) Make sure the tele-cine facility is capable of providing what you need before you get there withyourfilm,anddoublecheckwiththeeditorastohisrequirements.Clear communication with the editor before shooting starts is the surest way of avoiding expensive misunderstandings.
Make sure the
camera depart-
ment writes both
shooting frame
rate and transfer
frame rate infor-
mation on the
camera reports
and on the slate
whenever pos-
sible.

Telecine 16
•Untilnowithasbeentheresponsibilityoftheproducerorproductionmanager to orchestrate this ever expanding, highly complex meeting of technology, art, and logistics. Often the producer has thousands of things to deal with during preproduction and it is easy for something to fall through the cracks.

Telecine 17
FrameRatesThegenerallyacceptedframerateforfilmingmotionpictures,intendedforthe-atricalprojection,isatrue24fps.Asblack-and-whitetelevisiondeveloped,thefrequency at which images were updated was locked to the rate of electrical line current(AC),whichis60HzintheUS.Inordertoconservebandwidth,televi-siondevelopersadoptedinterlacedscanningtechniques(twofieldsforeachframe),sothesignalwasdividedinto60fields(30fps),correspondingto60Hz.
So far so good, until color television came along. It was decided that the NTSC color TV signal could not have exactly the same rate as the electrical current. To facilitate this change, the TV signal was slightly “slowed down”, running at59.94Hz(aroundedvalue),ratherthanatrue60Hz.UnderthisnewNTSCstandard, the video frame rate was also “slower”, running at 29.97fps (rounded) compared with the previous B&W rate of a true 30fps.
AsHDevolved,itbecomeevidentthatvideoequipmentmanufacturerswereno longer totally locked into the frame rates dictated by the legacies of NTSC andPAL.Theadoptionofadditionalframeratechoiceshasfiltereddownintostandard-definitionvideogear.Currentequipmentoffersthesechoices:
1) progressive scanning at 23.98fps, 24fps, 25fps, 29.97fps, 30fps, 50fps, 59.94fps and 60fps;
2)interlacedscanningat25fps(50fields)and29.97fps(60fields).
Rememberthatthesearealldifferentwaysto“slice”thesameintervaloftime.Note, though, that some of these rates are “video-friendly” and some are not.
Forinstance,youcanshootHDvideoatatrue24fpsora“video-friendly”23.98fps.The24fpsvideocanonlybeeditedinHDandbecomesdifficulttodownconvertanddealwithinthestandard-definitionvideoworld.Itwasintendedforgoingouttofilm.Ontheotherhand,ifyoushootat23.98fps,downconversionstoSDcomeoutcorrectanditisstilleasytogetbacktofilmifyou want to. Knowing the required end result will dictate the rate at which you shoot things in the beginning.
TimecodeThe way editors and editing systems keep track of all of this is timecode. Time-code is an eight-digit clock signal which tracks hours, minutes, seconds and
understanding frame rates and time-code
by Oliver Peters
Telecine 18
frames. The numbers are consecutive and ascending, starting at 00:00:00:00 and endingat23:59:59:29.Eachandeveryframehasauniquenumericalidentifier,whichmakestimecodeidealforediting.Addafour-digitvideotapereelnum-beralongwiththetimecode,anditwouldbepossibletofindANYframein10,000hoursoftape-ifone-hourreelswereused–andevenmoreforothertapelengths.
The timecode count is locked to the frame rate of the video signal, so the frame indicator will go from :00 to :29 in 30fps timecode, :00 to :23 in 24fps timecode, :00 to :24 in 25fps timecode and so on. Even though the video is actually running at 23.98fps or 29.97fps when compared to a very accurate clock, the count is still based on even frames and even numbers. There is no .03 frame!
Timecode started out this way, but immediately ran into some issues. Because of the cumulative timing errors caused by the 29.97 versus 30 issue, a duration of one hour, as indicated by standard timecode, was in fact 108 frames too long. This error of more than three seconds is unacceptable if you are timing a net-work show that has to be edited to an exact duration.
DropFrametimecodewasintroducedtocorrectthis.Peoplefrequentlyreferto29.97fpstimecodeas“dropframe”,butthisisincorrect.AllNTSCtimecodeisreferencedtoarateof29.97fps.“Standard”timecode(calledNonDropFrame)andDropFramebothrunatthesamerateandbothnumbereachandeveryframe.DropFrameusesaschemetoskipcertainnumbersfromthecountingsequencetoequal108framesinanhour.Noframesareactuallydropped–onlynumbersinthesequence.Onehourofduration–asindicatedbythedropframetimecodenumber–isexactlyonehour.
Non drop frame timecode values are expressed with colons (00:00:00:00) and drop frame values use semicolons (00;00;00;00). Some software applications, like AfterEffects,alsoexpresstimecodevalueswithsemicolons.Theyaren’tactu-ally converting anything to drop frame values, but rather apply a drop frame countingschemeinordertoexpressanexactduration.Dropframetimecodeisgenerally used for broadcast television, while non drop frame timecode is used for nearly everything else. Modern editing system can easily mix and match and convertbetweenbothformats,soshootingfieldtapesinonecode-baseandedit-ing in another is no problem.

Telecine 19
Editing systems and editing software algorithms evolved around interlaced video.Consequently,editingHDformatswithframerateshigherthan30fpsposes certain challenges, because these systems aren’t set up to edit at the higher intervals.Videoeditinghasalwaysbeenframeandnotfield-based.Asaresult,producers who choose to work in the 720P format (1280×720 at 60fps progres-sive)havehadsomedifficultiesinfindingsystemswhichcouldbeusedforHDediting.MostoftheNLEsdon’tpermiteditingona60-frametimelineorcontrol-lingaVTRforedit-to-tapefunctionswith60fpstimecode.
Burnt-in timecode is a human-readable on-screen version of the timecode infor-mation for a piece of material superimposed on a video image. Burnt-in time-code is sometimes used in conjunction with “real” machine-readable timecode, but more often used in copies of original material on to a non-broadcast format so that the copies can be traced back to their master tape and the original time codes easily located.
Videotapes that are recorded with timecode numbers overlaid on the video are referred to as window dubs, named after the “window” that displays the burnt-in timecode on-screen.
Timecode can also be superimposed on video using a dedicated overlay device, often called a “window dub inserter”. This inputs a video signal and its separate timecode audio signal, reads the timecode, superimposes the timecode display over the video, and outputs the combined display (usually via composite), all in real time. Stand-alone timecode generator / readers often have the window dub function built-in.

Telecine 20
The term “pulldown” or “3:2 pulldown” originates from the method of convert-ingfilmtovideo,aprocesscalledtelecine.Thisishow24fpsfilmistransferredto 30 fps NTSC video without there being an apparent change in the speed of the film.
Amoreaccuratetermforthemethodofconversionis“2:3pulldown”asthisisthe most common pulldown used. Film in the U.S. is shot at 24 fps for theatrical release. NTSC video in the U.S. is played back at 30 fps (or more precisely, 29.97 fps).Inordertoconvertthefilmtovideowithoutchangingtheapparentspeedofthefilm,apulldownisusedwhich“extends”fourframesoffilmacross5frames of video, converting an original frame rate of 24 to 29.97. This method is alsousedtoconvert24pvideo(SDorHD)to29.97fps(eitherSDorHD).
Its important to understand the basic idea behind pulldown since today it has broaderimplicationsthanjustconvertingfilmtoNTSCvideo.Inthecurrentstate of video production and post production, we are straddling the fence be-tweenthestandarddefinitionandhighdefinitionworlds,andconvertingframerates is now a big part of this process. 24p has become a commonplace term today, yet it does not expressly imply 23.98 or 24 fps- it could be either of the two rates.
Since its possible to shoot either of these two frame rates, it also means that many of us may be faced with the task of trying to convert 24p video to 29.97 fps forSDorHDandwecouldeasilyencounterproblemsifthe“wrong”framerateis used during production. We’ll look at the standard pulldown patterns in use today, and in the process hopefully clear up any confusion on how we convert between 24 fps and 30 fps (and the other way around).Inaddition,manycameras(SDandHD)thatshootat24fpsuseapulldowntorecordthoseframestotape,converting24fpsto29.97fps.Althoughsomecamerasphotographandrecordat24fps,themajoritydonot.HDV,DVCPROHDandXDCAMHDareamongformatsthatphotographatonerate,yetuseapulldown to record to tape. See 2:3:3:2 pulldown later in this article to see how Panasonic uses pulldown to add a pulldown as it records to tape.
what is 3:2 pulldown

Telecine 21
2:3 PulldownAlthoughusuallyreferredtoasa3:2pulldown,thestandardpulldownusesadifferent cadence: 2:3:2:3, and would be more accurately labeled as a 2:3 pull-down.Asmentionedearlier,4framesof24fpsmaterialarespreadacross5frames of 29.97 video.
This is accomplished due to the nature of NTSC video, which is interlaced (2 fieldsperframe).Framesof24fpsfilmarerecordedtovideobyduplicatingcer-tainframestomorethan2fieldsofvideo(morethanoneframe).Thecadencestartsasfollows:thefirstframeoffilmisrecordedtothefirst2fieldsofvideo,creatingawholevideoframe.Thenextfilmframeisrecordedtothenext3fieldsofvideo,creating11/2videoframes.Thecadencethenrepeats,oneframegoesto2fields,thenthenextframegoesto3fields,andtheprocesscontinues over and over.
Telecine 22
The Key To Success Is 23.98 fpsThe above scenario sounds simple enough, except that the math doesn’t quite work: an exact frame rate of 24 doesn’t evenly convert to 29.97. In order to make the conversion with a traditional pulldown, The 24 frame source needs to be precisely 23.976 fps (typically referred to simply as 23.98) to convert to 29.97. This does work:
23.98/29.97 = 4/5
How a 2:3 pulldown works with 24 fps film and 24p videoWith24fpsfilm:Duringthetelecinetransfer,thefilmisrunthroughthefilmscanner slightly slower than 24 (by 0.1%), running at 23.98. The speed difference is not noticeable to the viewer.
With24pvideo(SDorHD).Therearetwoflavorsof24p:23.98andexactly24.Most cameras that shoot 24p are set up to record at 23.98 by default. For the U.S., 23.98 is a must in most cases (for just this reason). For conversion to 29.97 via a pulldown, the 24p video should be 23.98.
Compatibility Between HD and NTSCSinceanyHDvideoshottodayforTVmuststillbedown-convertedtoNTSCforthe majority of U.S. households (remember NTSC is still the current standard in theU.S.),thenHDvideoforTVshouldbeshotat23.98or29.97(or59.94p).
2:3:3:2 PulldownThismodifiedpulldowncadenceisusedbyPanasonicandothermanufactur-ers to shoot 23.98 progressive video and lay it into a 29.97 interlaced video recording (or a 59.94 progressive recording). This is referred to as “advanced” pulldown”. This pulldown is employed as its easier for digital applications to remove or add this pulldown than the traditional 2:3 pulldown.
The pulldown can also be easily removed during capture into an editing system, which will return the footage to 24 fps (23.98).
HD And Pulldown RecordingAswejustsawwiththePanasonicmethodofrecording,theideabehindaddinga pulldown before recording to tape goes to the nature of many recording de-vices.Ifacameraordeckisdesignedtohaveafixedrecordingspeedof29.97fps(59.94Hz),theninordertoachieverecordingadifferentframerate,manufactur-ers came up with an ingenious idea: photograph at one frame rate, but record to tape at another.
Therefore, during a 24p recording, the actual amount of frames photographed are 23.98 in one second. Then, in order to record those frames to tape, without changing the speed at which the camera operates, a pulldown is added to the
Telecine 23
24pmaterialtoenduprecordingat29.97fps.Similartofilmtransferredtotape,extrafieldsareaddedtotheoriginalframestoendupatthenewframerate.Most editing programs now perform this function seamlessly.
Becausethesenewvideofieldsare“extra”,certainvideoeditingapplicationscanremovetheseextrafieldsthatwererecorded,andtheresultisvideothathas returned to its original 23.98 frame rate. This process is often referred to as reverse telecine, which is covered next.
If still working with tape-based formats, several different recording formats employ a pulldown during recording, including:
DVCPROHD
HDV
XDCAMHD(andEX)
A Confusing Array Of New TerminologyOne of the issues that camera departments and post production staff face is they are now being given choices for video formats that seem contradictory in nature.Here’sanexampleofachoiceonaPanasonicHDcamera:
1080i/24p
This means that the line count is 1080. The photographed rate is 24 frames per second (23.98), progressive. The recording to tape or P2 card is 60i, in other words,29.97fpsinterlaced.Apulldownisaddedtothe24pvideotoendupwithafinalrecordedvideoat29.97fps.Thispulldowncanberemovedbyvari-ouseditingsystemstoreturntotheoriginallyrecorded24pvideo.SeeReverseTelecine next.
AnotherexampleisfromSony:
24p/60i
Again,thisreferstophotographing23.98fpsprogressive,butaddingapull-down to record to tape, disc or memory card at 29.97 fps interlaced.
Reverse TelecineThis term is used to describe converting 29.97 video back to an original frame rate of 23.98 (or 24). Called inverse telecine and pulldown removal as well. Use-ful for many purposes:WhenfilmistransferredtoNTSCcompliantvideo,ittakesona29.97framerate.Wheneditingfilmdigitally,wherethefilmnegativewilleventuallyneedtobe
Telecine 24
cutfortraditionalfilmprinting,itisadvisabletodoareversetelecine(convert-ing back to 23.98 or 24) so that when working, you have a 1 to 1 relationship betweenvideoandfilmframes,makingsurethatthenegativecuttingwillbeframe accurate.
When working with a 24p camera that records at 29.97i or 59.94p like Panasonic SDandHDcamcordersareabletodo.DuringcaptureintoaneditingsystemlikeFinalCutorAvid,iftheadvancedpulldownisremoved,youwillendupwith 24p (23.98) video in the computer. This is helpful if you need to output directlytofilmoroutputto24pDVD’s.ManufacturersofHDVvideoalsouseasimilartechniqueofrecording24pvideoto29.97i.Removingthepulldownnotonly returns the footage to 24 frames, but it de-interlaces the video, resulting in a progressive frame.It should be noted that software and hardware can be used to convert telecine filmassetsfrom29.97to23.98or24(inAvidandFinalCut).Whenconvertingfootage back to 29.97, software and/or hardware can be used to convert 23.98 or 24 back to 29.97. The main advantage of 23.98 is that there is an extremely easy out to monitors and decks (at 29.97) through a standard pulldown.
Going From 30 to 24Iffilmorvideoisshotat24frames,wealreadydiscoveredhowthisfootagecanbe converted to 29.97, as well as how to return it to its original frame rate via a reverse telecine procedure. But what about converting footage that is shot at 29.97fpsto24fps(or23.98)?Ifthevideoisoriginallyshotasinterlaced29.97fpsvideo, then converting the footage to 23.98 fps will create problems. Its doable, but there will be a quality hit.
Wheninterlacedvideoisshot,eachfieldiscapturedoneaftertheother.Inotherwords, an interlaced video frame is not really one complete picture from a single momentintime.AswesawearlierinthesectionInterlacedandProgressiveScanning,eachfieldiscapturedslightlylaterintimefromthepreviousfield.Ifthefootageisreversetelecine’d,thenvitalfieldsofinformationareremovedfrom the video. The video will have motion artifacts as a result, a strobe-like ef-fect.Remember,whenareversetelecineisdoneonfootageoriginallyshotat24,thenconvertedto30,extraorredundantfieldsareaddedtothevideo.Duringthereversetelecine,onlytheseextrafieldsareremoved,sothefinalmotionisascleaninthefinal24framemediaasitwasintheoriginal24framemedia.
How To Work With Video Shot Video At 24 and 30If both sets of video footage need to be used in the same project, then one of these formats needs to be converted so all footage is at the same frame rate. Since converting 29.97i to 24p is going to create problems as we just discussed, it is preferable to convert the 24p footage to 29.97 and work with all the video at 29.97.
Telecine 25
TELECINE REQUIREMENTS
Your Telecine Transfer Quotation will be based on a ratio of 4-to-1. To keep the ratio within the quotation please be aware of the requirements and recommendations listed below:
UseofKeyCodedfilmnegativestockinminimumlengthsof1,000feetper35mmor400feetper16mm. There is NO SAVINGS inElectronicDailiesbypurchasing“Short Ends” offilmstock.Theuse of short ends will dramatically increase the transfer ratio and cost!
Afterprocessingdonothave“B”negativephysicallyremovedfromcamerarollsasthisdestroysthe key number continuity and increases transfer ratios and costs.
Allnegativemustbeexposedat24 fps (framespersecond).Allnegativewillbetransferredat24 fps.
UseofADATRecorderorTimeCodeNagraoperating@30fps in Non-Drop Frame (NDF)formatwithaminimum10secondpre-rolloneachtake.Scene/TakeIDshouldberecordedonthetapeaswell.
Cameraslatesmustreflectcorrectscene/takeinformationandmustbereadable.Atimecode“SmartSlate”issuggestedforeasiersyncingoftheaudioandvisualidentificationoftimecodenumbers.
Complete,detailed,legibleandmatchingCameraandSoundReportsindicatingthetransferof“ALL”negativeoronly“SelectedTakes”.Pleasecross-referencecameraandsoundreportstoeliminate the possibility of guess work on the part of our telecine staff. Guess work on our part increases your cost!
ColorChartsandGrayScalesshotwithoutfiltersarerequestedattheheadendofeachcamerarolland/ormajorlightingset-upforcorrectvideocolorbalancingtomaximizethe“look”requested.
A“Framing/FocusorGround-GlassTest”shotbeforewestarttransferswillconfirmthescreenratio requested. Please use a 50mm lens for 35mm or a 25mm lens for 16mm. Contact us for ad-ditional information regarding this critical set-up test.
Alltransferspecificationsmustberequestedinwritingbeforethestartofthetelecinetransferses-sion. This includes screen format, window placement, transfer of wild audio lines, etc.
AProductionScheduleisrequiredtoconfirmandreservetelecinetransfertimeanddates.Addi-tionally, a laboratory pickup schedule is required so we may schedule your session accordingly.
AnySaturday,SundayorHolidaytransfersessionmustbescheduled72hoursinadvanceoftherequestedsession.SpecifictransfersessionrequestswilldependupontheavailabilityoftheTCBay.
Anychangesoradditionstotheoriginaltransferspecificationsmustberequestedinwriting.
We highly recommend the Director of Photography and/or the Director and Editor attend the first transfer session to give their final approval for the transfer specifications and in the event that no camera test is supplied.
All transfers will be performed in the fastest possible time. If any serious problems arise that cannot be immediately resolved, the transfer session will be stopped until the problems can be resolved.Youwillbenotifiedbyphoneand/orFAXastotheparticularproblem.A detailed “Problem Log” will be sent to you daily documenting any problems and the additional costs involved.
Telecine 26
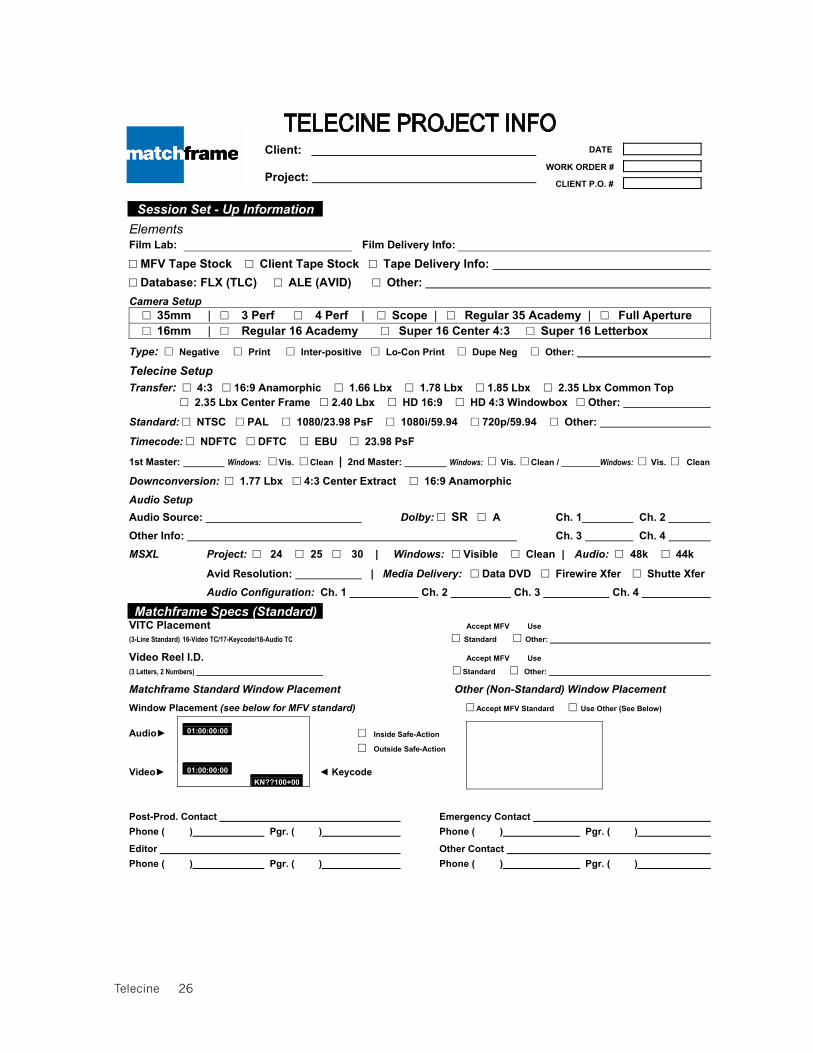
Client:
Project:
DATE
WORK ORDER #
CLIENT P.O. #
Session Set - Up Information ElementsFilm Lab: Film Delivery Info:
□ MFV Tape Stock □ Client Tape Stock □ Tape Delivery Info: □ Database: FLX (TLC) □ ALE (AVID) □ Other:
Camera Setup □ 35mm | □ 3 Perf □ 4 Perf | □ Scope | □ Regular 35 Academy | □ Full Aperture □ 16mm | □ Regular 16 Academy □ Super 16 Center 4:3 □ Super 16 Letterbox
Type: □ Negative □ Print □ Inter-positive □ Lo-Con Print □ Dupe Neg □ Other:
Telecine Setup Transfer: □ 4:3 □ 16:9 Anamorphic □ 1.66 Lbx □ 1.78 Lbx □ 1.85 Lbx □ 2.35 Lbx Common Top
□ 2.35 Lbx Center Frame □ 2.40 Lbx □ HD 16:9 □ HD 4:3 Windowbox □ Other:
Standard: □ NTSC □ PAL □ 1080/23.98 PsF □ 1080i/59.94 □ 720p/59.94 □ Other:
Timecode: □ NDFTC □ DFTC □ EBU □ 23.98 PsF
1st Master: Windows: □ Vis. □ Clean | 2nd Master: Windows: □ Vis. □ Clean / Windows: □ Vis. □ Clean
Downconversion: □ 1.77 Lbx □ 4:3 Center Extract □ 16:9 Anamorphic
Audio Setup
Audio Source: Dolby: □ SR □ A Ch. 1 Ch. 2
Other Info: Ch. 3 Ch. 4
MSXL Project: □ 24 □ 25 □ 30 | Windows: □ Visible □ Clean | Audio: □ 48k □ 44k
Avid Resolution: | Media Delivery: □ Data DVD □ Firewire Xfer □ Shutte Xfer
Audio Configuration: Ch. 1 Ch. 2 Ch. 3 Ch. 4
Matchframe Specs (Standard) VITC Placement Accept MFV Use
(3-Line Standard) 16-Video TC/17-Keycode/18-Audio TC □ Standard □ Other:
Video Reel I.D. Accept MFV Use (3 Letters, 2 Numbers) □ Standard □ Other:
Matchframe Standard Window Placement Other (Non-Standard) Window Placement Window Placement (see below for MFV standard) □ Accept MFV Standard □ Use Other (See Below) Audio► □ Inside Safe-Action □ Outside Safe-Action Video► ◄ Keycode Post-Prod. Contact Emergency Contact
Phone ( ) Pgr. ( ) Phone ( ) Pgr. ( )
Editor Other Contact
Phone ( ) Pgr. ( ) Phone ( ) Pgr. ( )
01:00:00:00
01:00:00:00 KN??100+00

Layback 27
d.i.t.Withourincreasinglydigital-only,tapelessworkflow,anewcrewmember is critical to your post-production process, even though theyworkintheproductionphase.AD.I.T.orDigitalImagingTechnician.
AD.I.T.’sroleismultifaceted.Theyaremanagingimagequality(ex-posure, looks) and managing the physical data by not only copying but verifying all data is correct and uncorrupted, managing camera looksbycreatingLUTS(lookuptables),encodingfilesforofflineediting,andpossiblysyncingfileswhenaproductionisshootingdual-system (where sound is recorded separately from the camera).
TheD.I.T.isimportantinthepost-productionprocessbecausetheyarethefirstinlinedealingwiththedata.Ifasateamyoucanstreamlinethedataworkflow,youcanstreamlinetheedit.Asstatedpreviously, knowing your end outcome or goal is critical. You can work backwards to make sure the data is being captured and en-codedinthemostefficientwaywiththeD.I.T.
Off-line Edit 28
off-line editingOff-lineeditingisthecreativeprocessofedtingyourfilms.Thisiswhereyou shape your story.
portable hard drivesYou will need to buy your own portable hard drive, camera cards, and card reader. The School does not endorse any one hard drive vendor, but students havehadgoodsuccesswithLACIEandG-TECHNOLOGYharddrives.We recommend a minimum 500GB with FireWire 800, USB 3.0 or THUN-DERBOLTwithaFireWire800adapterconnectivityrunningat7200rpm(or higher).
Note: Even though USB-3 is supposed to provide even greater band-width, not all Mac computers in the facility will support 3.0 capabili-ties. Your drive should still be a 7200rpm drive.
Once you have purchased your drive we recommend that you format the drive before you begin using it. This is true even if the drive comes preformatted. UsetheDiskUtilityintheUtilitiesfolderofthecomputerto format your drive as Mac OS Extended. Please note that without a 3rd partysoftwarelikeMacDrivethiswillmakethedrivenotreadableonaPC.
Rememberthatallharddriveshavethepotentialtofail,makesuretokeep a backup of your important data. We recommend that you keep backupcopiesofyourprojectfilesonaUSBflashdrive,onaCD-RW/DVD/disc,orbysomeotherbackupmethod.
FireWire DrivesFireWire disk drives can be effectively used to capture and edit projects. However, most FireWire disk drives lack the performance of internal Ul-traATAdiskdrivesorofinternalorexternalSCSIdiskdrives.Forexam-ple, a FireWire disk drive may not be able to support real-time playback with as many simultaneous audio and video tracks as an internal Ultra ATAdiskdrivecan.Thiscanalsoaffectthenumberofsimultaneousreal-time effects that can be played back.
Keep the following points about FireWire drives in mind:

Off-line Edit 29
•ManydiskdrivesarenotrecommendedforcapturinghighdataratematerialsuchasuncompressedSDorHDvideo.•Yourprojectmayworkfineatfirst,butasyoursequencesgetmore complicated, the drive may lag. This is especially true if the driveisslowerthan7200RPM.
Care of the drivesStatistics show that 25% of lost data is due to a failure of a portable drive. (Source:2001CostofDowntimeSurveyResults)Contrarytoitsseem-ingly rugged appearance, your portable drive is a very delicate device thatwritesandreadsdatausingmicroscopicmagneticparticles.Anyvibration, shock, and other careless operation may damage your drive and cause or contribute to the possibility of a failure.
Be careful with your portable drive. Never bang or jostle it, and when plugging into or out of your bay, be very gentle. If you damage your por-table drive, you not only damage the equipment, but may lose all work on your own projects as well.
Connecting a portable drive Be particularly careful with the plugs, they are the most common source of problems with portable drives.
Note:FireWireDrivesusean8PinFireWireCablethatcanonlybeplugged in one way. If you force the plug in the wrong way you will damage both your hard drive and the computer! The same applies for a USB 3.0 drive.
Never disconnect a disk drive prior to unmounting it from the Finder. Draganddropthedriveicontothetrashicon(noticeitchangesintoaneject icon). The drive should disappear from your desktop.

Off-line Edit 30
Current camerasAlmosteverycurrentconsumer,prosumer,andevenphonevideocam-eraorDSLRshootsinfullHD,ifnot2K.ThefullHDframeis1920x1080.Eachcamerawillhavevariableframerates.Aproject’sframerateshouldbe decided on in advance and documented during the production in the script supervisor notes. If you are working in documentary, try to main-tain a standard over what can be a long shooting process. Cinematogra-phers and editors must bear in mind that they must pay attention to their camera settings.
What is Aspect Ratio?AspectRatioisthehorizontalwidthofatelevisionorprojectionscreeninrelation to it its vertical height. For example, a traditional analog televi-sion has a screen aspect ratio of 4x3, which means that for every 4 units inhorizontalscreenwidth,thereare3unitsofverticalscreenheight.HDTV’shaveaanaspectratioof16x9,whichmeansthatforeverysix-teenunitsinhorizontal.
AtypicalframeofHD(1920pixelswideby1080pixelstall),2KDCI(2048 pixels wide by 1080 pixels tall) and 4K video (4096 pixels wide by 2160 pixels tall) create an apect ratio 16:9. This width to height “ratio” referstothatofastandardframeoffilmorvideo.TheaspectratiosofDV(3:2), standard NTSC (4:3), are “less wide” than that of a widescreen ratio (16:9). If something is shot with an anamorphic lens, the aspect ratio will bedifferentbutmustbeadjustedusingfiltersinyourNLEto‘fit’themtothe frame.
What is 16:9?Withwidescreentelevision,likethatofHDTV,theaspectratioisroughly16 parts wide by 9 parts.
aspect ratios

Off-line Edit 31
WidescreenAspectRatioasseenintheCanvasandtheViewer
imageAnamorphicallySqueezedintoa3:2AspectRatio

Off-line Edit 32
The above table shows the cropping of an image that started off as anamorphic to 16:9 and 4:3.
Post Sound 33
post soundAudioPostProductionistheprocessofcreatingthesoundtrackfor moving images. Ever since the once silent movies developed a prerecordedtrack,filmmakershavebeenlookingtocontrolandimprovethequalityofthesoundoftheirvisions.Assoonasmoviemakersrealizedtherewasawaytocontrolandenhancethesoundoftheirpictures,AudioPostwasbornandhasbeenafactoflifeeversince.
background info about Hollywood Feature Film Post SoundWhat is involved in Audio Post?
Audiopostusuallyconsistsofseveralprocesses.Eachdifferentprojectmay need some or all of these processes in order to be complete. The processes are:
*ProductionDialogueEditing
*ADR(AutomatedDialogueReplacementorLooping)
*SoundEffectsDesignandEditing
* Foley Mixing and Editing
* Music Composition and Editing
*Mixing(alsocalledRe-Recording)
What does all that mean in English ?
ProductionDialogueEditing-Inorderfortheproductionaudiorecordedonthesetoronlocationtobeproperlymixed,aDialogueEditor needs to prepare it. This means locating the takes used by the Picture Editor from the recorded production audio, checking sync (so the audio works with the picture properly), and eliminating extraneous noisesotheDialogueMixerhascleandialoguetouseduringthemix.
WhatisAudioPostProduction?
Bruce C. Nazarian,MPSE,RevisedbyScottG.G. Haller, MPSE

Post Sound 34
ADR[AutomatedDialogueReplacement]-Incaseswheretheproduction audio is too noisy or otherwise unusable (bad line reading, airplanefly-by,etc.),orwherethefilmmakerswanttoaddvoiceovernarration or simply add dialogue that was never recorded, the line will beprogrammedor“cued”for“looping”orADR.ThisprocesstakesplaceontheADRStage,aspecializedrecordingstudiowheretheactorcan record while watching the edited picture, matching the sync of the originallineorfittingthenewlineswiththeactions.
Afteralooplineshavebeenrecorded,theADREditorwillcheckthesync carefully, modifying the take if necessary to precisely match it to the picture, and prepare it for the Mixing Stage.
SoundEffectsDesignandEditing-SoundEffectsEditorsandSoundDesignersarethecraftspeoplewhoaddthecomputerbeeps,gunshots,laser blasts, massive explosions; and more subtle sounds like background ambiencessuchasair,rivers,birds,andcitytraffic.SoundDesignersuse a variety of technologies from bleeding edge to tried & true to create unique sound effects that have never been heard before, or to artistically createspecific“mood”soundstocomplementthefilmmakers’visionof the visuals. Sound Effects Editors put those sounds in sync with the picture as well as selecting from libraries of hundreds of thousands of prerecordedsounds;andorganizethemsotheFXMixerscan“PreDubb”thosesoundsefficiently.
Foley-TakingitsnamefromJackFoley,theHollywoodsoundeditorregarded as the “father” of these effects, Foley effects are sounds that are created by recording (usually) everyday movement while watching theeditedpicture.Differentfromtheenvironmentalbackgrounds(“BGs”) and hard effects (FX), Foley effects are sounds like footsteps, object handling, the rustling of clothing, etc. The people involved in this processaretheFoleyWalkersorArtistswhoperformthosesoundsandtheFoleyMixerwhorecordsthem.AftertheFoleyEffectsare“shot,”theFoley Editor will use his/her craft to polish those sounds to ensure that theyareexactlyinsyncwiththefinalpicture.
Music Composition - Music for motion pictures falls into two general categories: Score and Source. The Composer is the individual hired to prepare the dramatic underscore. Source music is what we hear coming from an on screen or off screen device like stereos, televisions, ice cream trucks, and so on. Source music may be original or licensed from a numberoflibrariesthatspecializeinthecreationof“generic”music.Songs (music with vocals) may occupy either function, depending on the
Post Sound 35
dramaticintentofthedirector.For“PulpFiction”forexample,DirectorQuentinTarantinohiredaMusicSupervisor(KarynRachtman)to“score” the picture using period music of the 1970’s almost exclusively. Mostcontemporaryfilmsuseacombinationofscoreandsourcemusic.
Music Editing - The Music Editor assists the Composer in the preparation of the dramatic underscore. Frequently working also with the Music Supervisor, the Music Editor will take timings for the Composer during aspottingsessioninordertonotatethespecificlocationsinthefilmwhere underscore or source music will punctuate the narrative. Once the underscore is recorded and the source music gathered, the Music Editor wouldbethepersonwhoeditsorsupervisesthefinalsynchronizationofall music elements prior to the mix.
Mixing(alsocalledDubbing)-TheMixershavetheresponsibilityofbalancingthevariouselements,i.e.,theDialogue&ADR,Music,SoundEffects,andFoleyEffects,inthefinalmix.TheDialogueMixer,(alsocalledtheLeadMixerorGaffingMixer)commandsthemixingstage;his/her partners in the mix traditionally were the Effects Mixer and theMusicMixer.Asofnow,theLeadMixercommonlydoestheMusicmixing as well, reducing the traditional mixing team by a third.
Where does post-production sound begin?
Ifyouhaven’tshotyourfilmyet,itbeginsbeforeyoushoot-byselectingthefinestproductiondialoguemixeryoucanafford.Thelittlebitextrapaid to a great production mixer can save you tenfold later in post production.
What does the production sound mixer do?
The production mix team are the individuals charged with recording your live dialogue in sync with the camera team. The production mixer will have a Boom Operator, who handles the boom mikes; and usually a cable person, who will be in charge of wrangling the audio cables needed to mike the set appropriately.
We are done shooting... now what happens?
The editor has been synching dailies all during shooting, choosing which scenesshouldbegintoformthefinalcut.Duringthenextseveralweeks,the process of editing will continue as the decisions are narrowed down tofinalchoices.Itisatthistimethatthefinalformofthefilmbegins
Post Sound 36
totakeshape.Althoughthefilmeditormayhavebeenassemblingthe“editor’scut”duringtheshootingperiod,thefirstformaleditperiodisgenerallyreferredtoasthedirector’scut,anditiswhenthefirstfullassemblyofthefilmisrefined.
What happens once the cut is locked?
The real job of audio post has now begun. In the next weeks or months, thesoundeditorswilllocateandsynchronizeallofthesoundeffectsneededinthefilm.Ifnecessary,theywillcreateFieldRecordingsofnewsoundeffectsneededforthefilm.TheFoleysupervisorwillcuealloftheFoley effects that will be needed; they will be recorded by the Foley Mixer andtheFoleyWalkers;theADRsupervisorwillcuealloftheAutomatedDialogueReplacementlinesthatneedtoberecordedduringtheADRsessions, and the Music Editor will begin providing for the needs of the Composerand/ormusicsupervisor.TheDialogueeditor(s)willbeginpreparingtheproductionaudioforfinalmixing,andtheADReditorscancommenceeditingintheADRlines,oncetheyhavebeenrecorded.
TheDirectorwillbecheckingonthevariousaspectsofthesoundjobastimeprogresses,tobesurethathisvisionisbeingrealized.Usually,thereis provision for one or more “effects reviews” where the effects are listen toandapproved.ThesamegoesforFoley,Dialogue,ADR,SoundDesignand Music. When everything is completed and approved, the next step is Mixing(alsocalled‘dubbing’or‘re-recording’).
What happens during the mix?
Duringthemix,theeditedproductiondialogueandADR,soundeffects,Foley and Musical elements that will comprise the soundtrack are assembled in their edited form, and balanced by a number of mixers to becomethefinalsoundtrack.InNewYork,single-mixersessionsaremorecommonplace than in Hollywood, where two-mixer and three-mixer teams are the norm.
Themixerstraditionallydividethechoresbetweenthemselves:theLeadMixerusuallyhandlesdialogueandADR,andmayalsohandlemusicin a two-person team. In that case, the Effects mixer will handle sound effectsandFoley.Inthree-personteams,theyusuallysplitDialogue,Effects and Music; sometimes the music mixer handles Foley, sometimes the effects mixer covers it.
To keep the mix from becoming overwhelming, each mixer is actually creating a small set of individual sub-mixes, called STEMS. These mix stems (dialogue, effects, Foley, music, adds, extras, etc.) are easier to manipulate and update during the mix.
Post Sound 37
When mixing is done, what then?
Afterthemixiscompletedandapproved,filmsgenerallyrequirealaststepcalledPrintmastering,thatcombinesthevariousstemsintoafinalcompositesoundtrack.Whenthisiscompleted,thefilecanbeexportedforadigitalfileoranopticalordigitalsoundtrackcanbeexportedasafeaturefilmreleaseprint.
Itisalsousualatthistimetorunan‘M&E’(whichstandsforMusicandEffects)track.Thisisessentiallythefilm’ssoundtrackwiththeEnglish language dialogue removed. This allows foreign language versions of the project to be dubbed easily, while preserving the original music,soundeffectsandFoley.DuringtheM&E,effectsorFoleythatare married to the production dialogue tracks are removed along with thedialogue.To“fully-fill”anM&Eforaqualityforeignrelease,thoseeffects and Foley must be replaced.
Television movies usually do not require print masters, unless they have beencreatedusingSURROUNDSOUNDtechniques.Inmostcases,thefinalstemsarecombinedduringaprocesscalledLAYBACK,atwhichtimethesoundtrackisunitedwithafinaleditedmastervideotapeorfilefor ultimate delivery.
What about optical soundtracks?
Opticalsoundtracks(wementionedthemearlier).Almostalloftherelease formats, including the digital ones have provision for some kind of optical soundtrack, even if only as a backup. The optical soundtrack refers to the two-channel soundtrack that is carried on the optical track of thefilmreleaseprint.
How do I get an optical soundtrack?
Once your surround sound format has been selected (see the paragraph below for more), you need to order an optical soundtrack negative for the film.InthecaseofLCRSmixes,atraditionaltwo-channel;Printmastertrack is created, and this is sent to an optical sound house for the creation of the optical negative. The optical sound house will record the soundtrackonto35mmfilmusingaspecialcamera,andsomewillalsodevelop their own soundtrack masters. Once the optical negative is shot and developed, it can be incorporated into your answer printing process, and a composite answer print containing your complete soundtrack can beprintedor“shot”atyourfilmlab.Thisusuallyhappensduringthefirstorsecondtrialanswerprintphase.
Post Sound 38
What about: THX - Dolby - Ultra*Stereo - DTS - SDDS?
This is a BIG question. This one point alone causes much confusion amongstfilmmakers.Pleasetakeamomentandreadthisparagraphcarefully. If you need more information after that, please contact either Gnome Productions or Magnolia Studios and we will help you out.
THX.
THX[tm]isnotsomethingthatyouDOtoyoursoundtrack,itisjustasetofsoundreproductionormixingconditionsthatoptimizethesoundofyourfilm’ssoundtrackinexhibition.Simplyput,theTHXstandardsthatmany dubbing stages and movie theaters adhere to are a way of being certain that “what you mix is what you get”, so to speak. You may choose tomixinastagethatisTHXcertified,andyoumaynot.Ifyoudo,yoursoundtrack should sound reasonably the same in THX theaters all around theworld.ItisthisstandardizationthatTHXbringstothefilmmakingcommunity.
You may want to visit the THX Web Site for further information. They can be found at http://www.thx.com/.
To make sense out of the rest of the names, we need to know about Film (and Television) Surround Sound Film sound tracks (and some television ones)gobeyondjustLeft-RightStereo;thereisaCenterChannelforthedialogue, and at least one “Surround Sound” channel. The Surround channel is used to project the sound out into the theater, to “surround” the audience. This is to enhance the illusion of being “in the picture”. Thisfour-channelformatiscalledLCRS(fortheLeft,Center,RightandSurroundchannelsthatthesoundtrackcontains).Althoughthetechnicalmeansbehindthisprocessisbeyondthescopeofthisdiscussion,sufficeit to say that it works well enough to have become a standard format for release prints for many years.
LCRS
You’veprobablyalreadyfiguredoutthatyoucannotreproduceafour-channel soundtrack from a medium that only plays back two tracks. Youareveryright.InordertoreproducetheLCRSsoundtrackfromatraditionalfilmopticalsoundtrack(moreonopticalslater)youneedaway to encode the channels.... the Matrix
TheSurroundSoundMatrixEncoder(or,howtoputFOURintothespacewhere TWO should go!)
The solution is to use an encoding device that can fold the four channels ofaudiodownintothetwochannelsavailableonthefilm’soptical
Post Sound 39
soundtrack. When the audio tracks have been processed this way, they arelabeledLt/Rt[LeftTotal/RightTotal]inordertodistinguishthemfromordinaryLeft/RightStereosoundtracks.TheSurroundSoundMatrix Encoder is a necessary piece of hardware that the audio post housemusthaveavailableduringyourfilm’smix,inordertocreatethesurround soundtrack.
The Licensing of Surround Sound formats
Nowwe’rereallygettingintotheheartofthematter.DolbyLabs,Ultra*StereoLabs,DTS(DigitalTheaterSystems)andSony[SDDS]allhavetechnologiesavailablefortheencodingoffilmsurroundsoundtracksintofilmreleaseprints.Althoughtheseprocessesvarysomewhat as to their method, they essentially accomplish similar things. Additionally,someofthesevendorsofferDigitalEncodingformats(DolbyDigital,DTSandSDDScurrently,andUltra*Stereosoontocome).
The Differences in Surround Sound formats
Inthemostbasicform,TheatricalSurroundSoundconsistsofLCRS:Left,Center,Right,andmonoSurround.AsoundtrackcanbeencodedintothisformatbyusingaDolbyorUltra*Stereoencodingmatrixduringthefilm’sPrintmasteringsession.DTSalsohasaprocesscalledDTSStereothatcancreateatypicalLCRSfilmsoundtrack(checkwithDTSdirectlyformoreontheirspecificprocesses...).
Surround Sound formats beyond L-C-R-S
Some of the surround sound encoding processes can create different, morecomplexsoundtrackformats;DolbySR/DandDTS,forexample,cancreatesix-tracksoundtracksforrelease,andSony’sSDDSisaneight-trackformat.Inthecaseofsixtracks,yougetLeft,Center,Right,LeftSurround,RightSurroundandaSub-wooferchannel(forenhancedlow-frequency response). The split surrounds (as they are called) make it possible to move sounds around in the surround speakers, or to use stereobackgroundsoundsforevenmoreimpressivefilmsoundtracks(JurassicParkcomestomind,here).AndifyouheardJurassicParkinagoodTHXtheaterwithaDTSDigitalsoundtrack,youknowwhatthesub-woofersaretherefor!ThatT-Rexreallygavethesubwoofersarunfortheirmoney,aswellasJeffGoldblum...Six-tracksoundreproductionhasbeenwithusforawhile,since70mmfilmreleaseshavehadtheability to deliver a six-track soundtrack that was magnetically encoded on the release print. This, unfortunately, was very expensive to produce, and problematic to control quality.
Post Sound 40
Sony’sSDDS(SonyDynamicDigitalSound)usesaneight-trackdeliveryconfigurationthataddstwospeakersinbetweentheLeft/CenterandCenter/Rightpositionsinthefrontspeakerwall.KnownvariouslyasInterLeft,InterRightorLeftCenterandRightCenter,thesechannelsallowfor additional separation of music, effects and dialogue in the front speaker wall, while preserving the split surround format.
The Differences in Digital Sound delivery methods
Thethreedigitalsystems(Dolby,DTSandSDDS)useproprietarymethods to deliver the digital audio to the theater; two of these methods (Dolby,SDDS)encodethedigitalsoundtrackontothereleaseprint.DTSusesadifferentmethod,thatofencodinga“timingstripe”ontothereleaseprint,andsynchronizingadigitalaudioplaybackfromanaccompanyingCD-ROMthatcarriestheencodedsoundtrack.Ineither case, the digital audio is reproduced in the theater with the same fidelityitwasrecordedatduringtheencodingprocess.Thissystemneatly bypasses the traditional limitations of optical soundtracks: noise, bandwidth limitations, and headroom (transient peak) limits. Soundtracks sound cleaner, clearer and louder as a result. Please don’t takethisasacondemnationofopticalsoundtracks.Awellmixedmovie can (and they still do) sound great with a well produced optical soundtrack.
Tosummarizethisdifficulttopic:
THXspecifiesasetofstandardsthataffecthowsoundisrecordedand reproduced in a movie theater.
YougetthebenefitsoftheTHXstandardwheneveryoumixinaTHXcertifiedmixingstage.
There is NO additional fee required.
YoumaydisplaytheTHXlogoinyourfilm’screditsifyousigna simple one-page form.
DolbySurroundisa4-channelopticalsurroundformat;thisformat is encoded in the optical soundtrack
YoumustlicensethisformatfromDolbyLabs;ThereISalicense fee for this service
Ultra*Stereo is a 4-channel optical surround format; this format is encoded in the optical soundtrack
YoumustlicensethisformatfromUltra*StereoLabs;ThereISalicense fee for this service
DTSisa6-channeldigitally-encodedsurroundformat;thisformatisencodedonanexternalCD-ROM,butthetimingand

Post Sound 41
otherinformationinencodedonthefilmreleaseprint;
YoumustlicensethisformatfromDigitalTheaterSystems(DTS);There IS a license fee for this service
DolbyDigitalisa6-channeldigitally-encodedsurroundformat;itisencodedonthefilmreleaseprint;
YoumustlicensethisformatfromDolbyLabs;ThereISalicense fee for this service
SDDSisan8-channeldigitally-encodedsurroundformat;itisencodedonthefilmreleaseprint;
YoumustlicensethisformatfromSonyCorporation-SDDSdivision; There IS a license fee for this service
Update for SFTV students
Much of the previous background information applies mostly to feature films, and some of it is no longer so relevant. For instance, Dolby optical tracks encoded for LCRS are largely obsolete and, increasingly, so are film release prints. For your student works you can embed a simple stereo mix or even a 5.1 surround sound mix into a Quicktime file or author a DVD in either a stereo or 5.1 surround sound format.
The 5.1 format itself is not proprietary. The AC-3 file that is created dur-ing the process of authoring a 5.1 DVD or Blu-ray was developed by Dolby Labs, but you do not need to pay any licensing fee to author those DVDs. (Dolby Labs will make its money from “other people” along the line.)
The AC-3 format applies data compression to deliver high fidelity 5.1 playback; it is used for digital television broadcast and Dolby Digital film prints as well as DVDs. The AC-3 format also provides for an automatic downmix to two track stereo playback for DVD players or television sets equipped with just two stereo audio outputs.

Post Sound 42
Most SFTV projects are mixed in plain stereo and that format should be differentiated from Dolby Stereo by labeling the mix as Left-Only, Right-Only. (“Lo-Ro” for short.) Viewed on most HDTVs, where most people sit directly in front of the screen and hear the mix coming out of two speakers, this simple stereo format works just fine. But in a big theater people can’t always sit right in the middle, so we can’t rely on a simple two speaker stereo mix. By decoding a Lo-Ro mix as if it were Dolby Stereo, dialog will seem to come from the center of the screen regardless of where you sit in the theater.
This kind of decoding is often done by default at film festival screenings and in fact is done at our own Mayer theater screen-ings. Multi-speaker home theater systems equipped with a Dolby Stereo decoder are often set to decode stereo mixes in this same way. If you mixed your film with sounds like dialog panned dead center, those sounds will now come out of the center speaker of a 5.1 speaker system. Sounds that are stereo recordings or have been panned left/right will come out of the left and right speakers. Some true stereo recordings containing small amounts of sound that are naturally slightly out of phase may end up coming out of the surround speakers. Usually this is just a faint, subtle and pleasing enhancement to the overall sound.
If you do a true 5.1 mix you have more control over the placement of the sound, especially in the surround channels, and you also have the option of controlling and choosing which sounds feed into the subwoofer channel.
Most 5.1 home theater systems use a trick called “bass manage-ment” to enhance the sound that comes out of relatively small front speakers. With bass management, any very low frequency sounds in the mix are sent to the subwoofer to beef up the bass content. This is why it is important to use a modest low cut on your production sound during your mix – otherwise very low fre-quency wind buffets or boom pole rumbles that you barely notice on a normal speaker system could get “enhanced” and end up distractingly loud. It’s also a good reason not to get carried away with pumping up the bass in your mix – your mix is already going to get a bit of bass boost in Mayer because the Dolby decoder in the Mayer booth is set up to provide some bass management.
Spotting 43
spotting
Oncethecuthasbeenlocked,thefilmcanbespotted for the placement of sound effectsandmusic.TheSupervisingSoundEditor,theDirectorandpossiblythe Film Editor and Composer will gather at one or more spotting sessions to determinethefilm’saudiopostneeds.
“Spotting for music” is the process of viewing the locked cut and deciding where the music score will be, and where the source music will be needed. “Spotting for sound” is the process of determining:
ifandwhereanydialogueproblemsmayexist,sothatADRcanberecorded
where sound effects are needed and what kind
whatFoleyeffectswillbeneededinthefilm,andwhere
If Sound design (the creation of special sound effects), will also be needed.
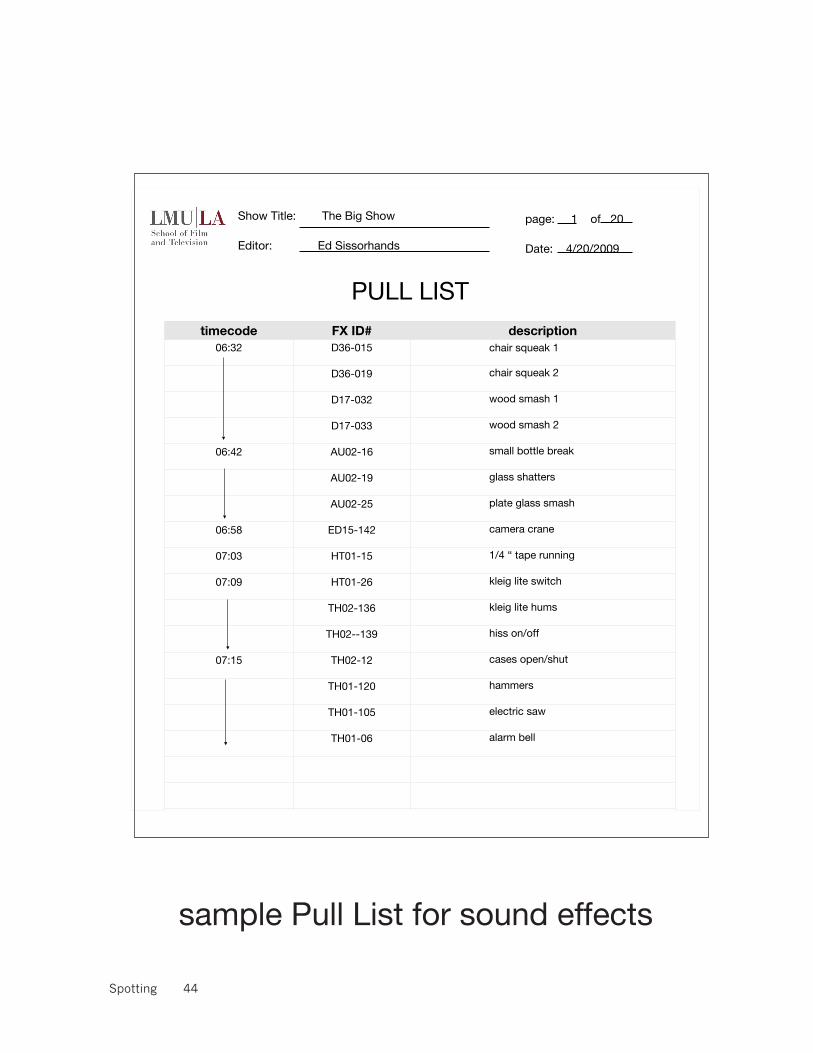
OnthefollowingpageisaPullListforsoundeffects.Youcanusesimilarformsfor spotting music as well.
Spotting 44
timecode FX ID# description
06:32 D36-015 chair squeak 1
D36-019 chair squeak 2
D17-032 wood smash 1
D17-033 wood smash 2
06:42 AU02-16 small bottle break
AU02-19 glass shatters
AU02-25 plate glass smash
06:58 ED15-142 camera crane
07:03 HT01-15 1/4 “ tape running
07:09 HT01-26 kleig lite switch
TH02-136 kleig lite hums
TH02--139 hiss on/off
07:15 TH02-12 cases open/shut
TH01-120 hammers
TH01-105 electric saw
TH01-06 alarm bell
Show Title: The Big Show
Editor: Ed Sissorhands
page: 1 of 20
Date: 4/20/2009
PULL LIST
sample Pull List for sound effects
Music 45
music
Motion picture music falls into three basic categories:
underscore(JamesHorner’sscoretoTitanic,JohnWilliams’scoretoE.T.,orRandyNewman’sscoretoToyStory2);
pre-existing song or song and original master recording (Bruce Springs-teen’s“HungryHeart”forThePerfectStorm,SteveMiller’s“FlyLikeAnEagle”forSpaceJam,theGuessWho’s“AmericanWoman”inAmericanBeauty);
song written specifically for the film(DianeWarren’s“IDon’tWantToMissAThing”forArmageddon,PhilCollins’“You’llBeInMyHeart”forTarzan)
SCOREKEEPERSSFTV has licensed a series of music tracks available for you to use in your projects through a company called Scorekeepers. These music tracks are avail-able for download through the Scorekeepers website. To setup access, please go speaktothestudentsattheRECASoundCheckoutcounter.
THE PRE-EXISTING HIT SONG USED IN A FILMAfilmproducerwhowantstouseanexistingsonginamotionpicturemustsecurethepermissionofthemusicpublishertousethecompositioninthefilm.
Onceanagreementisreachedastoafee,theproducerwillsignasynchroniza-tionlicense,whichwillgivetheproducertherighttodistributethefilmtheatri-cally.
DeterminingHowMuchToChargeForASong.There are a number of factors that must be considered in determining how much tochargefortheinclusionofasonginafilm,including:
How the song is used (i.e. vocal performance by an actor on camera, instrumental background, vocal background)
Theoverallbudgetforthefilm,aswellasthemusicbudget
Thetypeoffilm(i.e.majorstudio,independent,foreign,student,web)
fromMUSIC, MONEY, SUCCESSANDTHE MOVIESbyJeffreyBrabecand Todd Brabec
Music 46
The stature of song being used (i.e. current hit, new song, famous stan-dard, rock n’ roll classic)
The duration of the use (i.e. one minute, four minutes, 10 seconds) and whether there are multiple uses of the song
The term of the license (i.e. two years, 10 years, life of copyright, per-petual)
Theterritoryofthelicense(i.e.theworld,theuniverse,specificforeigncountries)
Whetherthereisaguaranteethatthesongwillbeusedonthefilm’ssoundtrack album
Whether the producer also wants to use the original hit recording of a song,ratherthanre-recordinganewversionforuseinthefilm
Whether the motion picture uses the song as its musical theme as well as its title
ActualFeesPaidForExistingSongs.Thesynchronizationfeeschargedbymusicpublishersformajorstudiofilmsare usually between $15,000 and $60,000. There are no hard and fast rules as the feesarenegotiatedinthecontextofeachindividualfilm;thesamesongmaybelicensed at very different rates for different projects (i.e. major studio release, independentfilm,foreignfilm,filmfestivallicenseonly,webproduction,orstudentfilm).
OpeningAndClosingCredits.Because the songs used over the opening credits of a motion picture many times reflectthethemeorambianceofthefilm,theyaremanytimesmoreimportanttothefilmthanothersongsusedforbackground.
Student-Produced Films.Becausestudent-producedfilmshavelimitedchancesforcommercialsuccessand small budgets, many music publishers will license their songs for substan-tiallyreducedfees.Insuchcases,mostpublishersrecognizetheimportanceofassistingyoungfilmmakers,sincetheyareanintegralpartofthefutureofthe entertainment industry. Most publishers, however, will provide that if the projecthasanytypeofcommercialsuccessorsecuresmorethanjustfilmfestivaldistribution, an additional fee or fees will be paid.
DurationOfLicense.The term of the license is virtually always for the entire copyright life of the song.

Music 47
Territory.The territory of the license is normally the universe or world.
A“filmfestival”licensemaygivetheproducertherightwithin18monthsaftertheinitialshowingofthefilmtoextendtheterritoryandthedurationofthelicense for an additional fee.
THE UNDERSCORETheunderscoreisthemusicthatmakesupthemajorityofmusicusedinfilm.Itis the music you hear under dialogue, in chase scenes, in romantic settings and throughout the picture.
Screen Credit.The type and placement of screen credit for a composer is a negotiable item.
MUSIC CUE SHEETS AND THEIR IMPORTANCEAfteramotionpicturehasbeenproducedandafinalversionhasbeenedited,the producer will prepare a music cue sheet. The cue sheet is used to determine feesandpayments.Itisawrittenrecordofthemusicusedinthefilmandisused to determine that all necessary rights and permissions have been granted.
The cue sheet lists:Allofthemusicusedinthefilm
How the music was used
Its timing in seconds
The identity of the writers and music publishers
Writers’andpublishers’performingrightsaffiliation
If pre-existing master recordings have been used, the identity of record-ing artists and record companies

Music 48
how to acquire music for filmsFrequently Asked Questions For Student and Independent Filmmakers
Q: WHAT LICENSES MUST I GET TO USE A SONG IN MY FILM?
A: If you are using a pre-recorded song or another pre-recorded piece of music in your film, there are two rights you need to clear; that is to say, you need to get two different licenses to use the music.
Synchronization License: This is the right to synchronize a song or a piece of music with your visual image. It must be obtained from the copyright owner of the music, which is usually the publisher. You can find out who the publisher is by using ASCAP’s Clearance Express (ACE) at www.ascap.com. Songs that are not represented by ASCAP might be found at the National Music Publishers’ Association “Songfile” website (www.nmpa.org).You will be provided with a contact at the publisher’s Business Affairs or Licensing Department.
Master Use License: This is the right to reproduce a specific recording of a song in your film. You clear this right with the record label who owns the specific recording you would like to use; see the liner notes of the recording to find out which company this is. Alternatively, you can get contact information for record labels by calling ASCAP’s Film/TV Department. You will be provided with a contact at the record label’s Business Affairs Department.
Q: WHAT DO LICENSE FEES COST?
A: License fees are determined based on various factors, including how the music will be used, the duration and number of times the music will be used and where the film will be performed. In all cases, the fees are negotiable and not all publisers and record labels charge the same amount.
Students working on films that are only shown within an educational environ-ment can often negotiate reduced fees. Independent filmmakers planning to show their films at film festivals can also often negotiate a reduced fee called a Festival Use License. These reduced rates are based on limited screenings of the film. Once the film has been sold for theatrical release, the fees will increase based on the significant increase in viewership and potential increased revenues.

Music 49
Q: WHAT INFORMATION SHOULD I INCLUDE IN MY REQUEST FOR MUSIC RIGHTS?
A: Submit a synopsis of the film and the film’s budget.
Provide as much detail as possible on how you intend to use the song: main title (opening credit) or end title (cloing credit); feature (song is the main focus of the viewers attention) or background (song plays in the background of a scene); number of times the song is used, duration and placement for each use.
Specify where your film will be screened. For example, is your film a stu-dent film being viewed solely in an educational environment? Or is your film an independent film, which will screen at festivals?
Ask how the fee will increase in the event of possible future performances in different types of media.
If you are planning on securing soundtrack rights at the same time, ask how that affects your fees.
Q: WHAT ARE THE CONSEQUENCES OF SCREENING THE FILM WITH-OUT SECURING MUSIC RIGHTS?
A: U.S. Copyright Law provides that you can be sued by a music publisher and/or record label, for using their property without their consent.
Clearing the rights and having step deals in place will also help you in the event that a distributor is interested in buying your film. If your rights are not cleared, the distributor is looking at an unknown expense tied to your film, and this can be a deterrent in a distributor’s interest in acquiring an independent film.
Q: HOW DO I FIND A COMPOSER TO WRITE ORIGINAL MUSIC FOR MY FILM?
A: Music that is composed specifically for a film, as opposed to pre-recorded music placed in a film, is the film score. You can hire a composer to write this music for you. ASCAP works with film composers and composer agents at every level of experience and can help you find a composer appropriate for your film at your budget.
Music 50
Students can also find composers at the following locations:
www.mandy.com (click on “production jobs)www.ifp.org/jobswww.losangeles.craigslist.org/tfr
Q: WHAT DO I PAY A FILM COMPOSER?
A: You will be paying a composer an up front fee for writing and recording the music for your film. You will negotiate this fee based on your film budget, the amount of music required, and the film composer’s experience in the industry. Again, fees vary significantly, case by case.
Q: WHO OWNS THE FILM SCORE?
A: Based on your negotiations with the film composer, your Composer Agree-ment will spell out who owns the filmscore (that is, who retains the publisher share of the music). This will either be the production company or the film com-poser.
If the production company pays the appropriate composer’s fee up front, it usu-ally retains the publisher share of the music while the composer retains the writer share. If the production company is unable to pay the composer an appropri-ate fee up front (as happens often with independent films but never with major releases), a composer will often negotiate to keep the publisher’s share of the music. Regardless, as a filmmaker, if your film will have a broader release than at film festivals, you need your Composer Agreement to give certain Broad Rights to the production company: these may include worldwide synchronization; worldwide free, pay, cable and subscription television; in-context and out-of-context television advertising and film trailer use, including promos on other film videos; theater distribution outside the United States; videocassette and videodisc rights; all future technology rights whether now known or not.
Music 51
Toplayasonginanymedium,youwillneedsynchronizationrightsfromthepublisher of the song. If you want to use a particular recording of a song, you will also need master rights from the record label who released the recording.
You must always contact the publisher for any song use. Here’s how:
1. Lookatthelabelcopyforthesongandgetthenamesofthesongwriters.YoucanalsofrequentlygetsongwriterinformationattheAllMusicGuide(www.allmusic.com)orCDNow(www.cdnow.com).
2. Withthesongwritersnoted,taketheEMGresearchlinktoASCAPand/orBMIandenterthesongtitle.Youmayfindthattherearemanysongswiththesametitle,butusingthewriterswillhelpyouzeroinonyourtitle.IfthesongisnotfoundatASCAP,tryBMInext,orviceversa.
3. ASCAPandBMIwillprovideinformationonthepublisherowningthesong. Copy the address information for the publisher.
4. Prepare a brief letter or email (1 to 1 ½ pages maximum) to the publisher -besuretosayIndependentFilmRequestorLowBudgetFilmatthetopoftheletter.Referencethetitleofthesongandsongwriters,thenthenameofyourproduction.Tellthembrieflyabouttheproductionhowthesongfitsin,as well as:
a. The timing or duration of the song;
b. The visuals accompanying the song;
c. Where your production will be seen and for how long (1-time, 1 year, etc)
d. The titles of other songs you plan to use, particularly if you have already gotten permission.
e. If you have no budget for clearance, say so in your letter. How-ever, publishers will often give priority to requests that offer a token fee ($25.00 to $100.00 per song) because it shows respect for the value of the copyright.
f. Provide the publisher with an address, phone or e-mail so they can reply quickly.
getting clearance for music

Music 52
g. Remember,studentrequestswillonlybeconsideredassuchifthey remain in the realm of the school, or school-related exhibitions. ProductionsforsaleareNOTstudentfilms.
h. Fax or mail your request to the publisher. Wait at least 10 days before following up.
To contact the record label:
1. FindthenameandaddressoftherecordcompanyonacopyoftheCDorrecordingyouplantouse.Ifyoudon’thaveacopy,trytofindtherecord-ing on www.cdnow.com www.amg.com, or iTunes.
2. Prepare a brief letter similar to the publisher letter above.
Afewthingstokeepinmind:1. Music belongs to the publishers and labels and they have no obligation to give you permission, or even respond to your request (although most do).
2. If someone doesn’t respond, it doesn’t mean you’ve been given permis-sion
3. In most cases, you cannot change a song’s lyrics for use in production without permission. In other words, you can’t clear the melody and substi-tute your own words with the publisher’s OK.
4. Permissions take time (especially those being sought for free). Be sure you allow at least a few weeks for copyright owners to respond.
5. Finally, only the owners of the music copyrights you are seeking can grantyoualicense.Receiptofthisreplydoesnotinanywayconstituteaclearanceoragreementbyourfirmtorepresentyouingettingrightsforthismusic use.
GoodLuck!
EMG MUSIC CLEARANCE 4181SunsweptDrive,2ndFloor,StudioCity,CA91604Phone: 818-762-9656 Fax: 818-762-2624 E-mail:[email protected]

Titles 53
Mostpeoplearegoingtoseeyourprojectonatelevisionscreen–eitherStandardDefinitionorHighDef–soyouneedtobeawareofsomeveryimportant things.
What does “Title Safe” mean? (and Action Safe)Acertainamountofthepictureareawillgetcroppedoffalongtheedgesof almost all television screens and digital projectors. This is called overscan. Zero percent overscan means that the entire picture is visible, but this is hardly ever the case.
ACRTTVmayhavemorethan10percentoverscan.AnHDTVwillhaveabout 5 percent or more overscan.
For these reasons, you should not place anything that you want to be sure that the viewer sees outside an area covering 80% of the full picture. This is called the “Title Safe” area. Similarly, everything you would like to be visible should be within 90% of the picture. This is referred to as the “ActionSafe”area.
titles

Titles 54
Using Title SafeYou should use the Title Safe overlay when you are creating titles in any program.MostNLEsdisplaytheentirerasterofthevideoimage.Thismeans that it displays the entire recorded image from your tape, top to bottom and side to side. Many older television sets can crop up to 10% of the actual recorded picture all the way around. Media Composer supplies the Title Safe overlay so that you can be positive that all titles will be seen on all television sets.
activating the title safe overlay
To use the Title Safe overlay, select the Grid from Fast Menu between the SourceandRecordwindowsinMediaComposer.
ThegridwillappearintheRecordwindow.

Titles 55
TheTitleSafeoverlayiscomposedoftwoboxes,asshowninthefigure.The outer box, called the action safe, is set 5% in on all four sides of the image. The second and inner box is drawn a full 10% in on all four sides of the image. You can rest assured that if your titles are set within this smallerarea,theywillbeseenonalltelevisionsets.Remembertoothatthis is a guideline. If you fudge a bit and place titles between the two boxes, they usually will be seen on all sets, but to be absolutely certain, youshouldstaywithintheinnerbox.Don’tworry;thisTitleSafeoverlayisn’t recorded into your program. It’s there to help you make sure that your titles will be seen and won’t be cut off by a television set’s cowling, which covers some of the picture tube.
TheActionSafeboxgivesyouaguideastowhatwillbeseenonTVsas far as picture goes. On many TV sets, the curved tube might distort titles a bit, causing a small amount of geometric distortion, so it’s best to keeptitlesabitawayfromthisedgeofthearea.ModernTVsetswithflatscreens don’t cause this error at the edges of the viewable picture.
What are the best typefaces to use for credits? Bold and simple is best. You would also be well advised to stay away from highly decorative fonts with small details, especially at smaller sizes. You may also get strobing effects if you use small, thin fonts, especially in rolling credits.
Generally, you should avoid mixing typefaces unless you have some training in graphic design.
What is a good line space to use?It all depends on whether you want your credits to be readable (by non-speed readers) or not. If you care about readability, it depends on a couple of factors. If your scrolling speed is very slow, you can use inter-line spacing that is relatively tight - a line-height multiple of 1.0 (single line spacing) or even less. If your scrolling speed is fast, you will needtospaceyourlinesoutmore.Agoodideamightbetogetsomeoneelse to read the credits as they scroll by. If you do it yourself, you might unintentionally choose a line space value that is too small because you already know what your credits say.

Titles 56
What are TV-Safe colors and why use them?Very strong colors and TV don’t get along together. Such colors, particularly pure reds, will look blocky and the colors will bleed on television. Use slightly grayed-down colors, or pastels instead. Similarly, large areas of pure white are a no-no; use light gray instead.
Here’s a more technical answer without getting too technical. When choosing colors for your titles you should:
• Avoidcolorssaturatedover80%
• Colorcombinationswherethehuesareveryfarapart should use even lower saturation values.
• Avoid"PureWhite"backgrounds,astheycancausesome televisionscreensto"bow"
• Avoidusingpurecolors—thosethathaveanon-zero valueforonlyoneoftheRGBcomponents.
• AvoidselectinganyR,G,orBvaluethatislargerthan 204. Some even say to set color values no higher than 180.
• SetyourBlackvaluesnolowerthan16,16,16
• SetyourWhitevaluesnohigherthan235,235,235
Your titles may look dull and dark on your computer monitor but using these suggestions should help them look better on a TV.
NOTE: Even if you follow these guidelines, and all your colors are TV safe, it may not be safe* to watch some combinations of colors without sustaining permanent eye damage*. You probably already know that you shouldnotputMAGENTAtextonaCYANbackground.
Last,butcertainlynotleast,remembertoCHECKYOURSPELLING-ESPECIALLYPEOPLE’SNAMES.
On-line Edit 57
on-line edit
Whentheofflineeditiscomplete,thepictureisre-assembledatfullor‘online’resolution.An edit decision list (EDL)orequivalentisusedtocarryoverthecutsanddissolvesfromtheoffline.Projectsmaybere-captured at the lowest level of compression possible- ideally with no compression at all. This conform is checked against a video copy of the offlineedittoverifythattheeditsarecorrectandframe-accurate.Aswell,this cutting copy provides a reference for any video effects that need to be added.
lmu hd onlineAt this time, LMU supports only a 1920x1080 HD, 23.98 fps delivery.
Connect your external drive to the Mac Pro.Turn on master power switch on the drive if it has one.Turn on Mac Pro.*Ifyouwereworkinginan‘offline’orlowresolution,youwillhaveto relink or reimport your clips at the appropriate high resolution and codec. This can sometimes be done inside of your color correction software. This is a step that is not necessary if you did not edit with lowresolutionfiles.ExportyoursequencefromyourNLEaccordingtotheMayertheaterdelivery requirements (see next page).
LogintotheMacProasSTUDENTandlogontotheserver(GO-->CONNECTTOSERVER)withyourmylmuconnectlogin.Youwillbeassigned a folder at the end of the semester where you will copy your FI-NALSUBMISSION.YouhaveONECHANCEforcorrectdelivery.Please make sure you doublecheck the file before you upload it.

On-line Edit 58
lmu hd mayer theater file delivery guide(23.98 example – substitute your specific frame rate as needed)
TECHNICALSTANDARDSFORDELIVERY
TheTechnicalStandardsoftheLMUSchoolofFilmandTelevisionforthedeliveryoffinalprojectsisonthefollowingpage.Beawarethatifyou elect to deviate from these standards we may not be able to provide technical support or screen your project at the end of the semester.
Choosing something other than these standards means that you have the responsibility to check with your instructor and all departments below prior to shooting to make sure your project can screen:
UpdatedAugust2014

On-line Edit 59
Updated 8/8/2014 Rev.1
File format Quicktime ProRes 422 Note: NOT HQ
File name PROD NO _NAME_ TITLE smstr yr class ID name title 00_00_000_0000_jdoe_ title
Format 1920X1080 psf 23.98 FPS Depending on HD digital capture or film
transfer Others Need Approval
Aspect Ratio 16x9 Others Need Approval
Color grading Broadcast Safe Whites at 235 IRE and blacks at 16 IRE House Color Space Calibration: REC 709
Audio mix Sound Mix in Pro Tools 24Bit .Wav 48khz
Audio levels .-‐20 dbfs Reference Level At standard playback level in a large theater,
pink noise at -20 dBFS produces a loudness of 85 dB SPL
Audio layback CH 1 = Left Only CH 2 = Right Only
Panned correctly in FCP/AVID or other edit/audio software
Others Need Approval
Use this file found on: Production>
Post Prod Shared Media> BARS_TONE_SFTV_COUNTDOWN_FALL2014 >
2014_Color_Bars_Tone_LR_REC709
Color bars & 1KHZ tone: LMU/SFTV Color Bars/Tone
2014_Color_Bars_Tone_LR_REC709 58:32:00-59:32:00 60 Seconds
Black Slug 59:32:00-59:37:00 5 Seconds
Slate
Title:Director:
Production Number:Semester/Year:
TRT: (total running time)Audio: Stereo Left Only Right Only
59:37:00-‐59:47:0010 seconds
Black Slug 59:47:00-‐59:52:00
5 seconds
SFTV COUNTDOWNAvailable in Production Folder on Isilon Server Sync mark and “pop” 2 sec. before Picture Start
59:52:00-‐1:00:00:008 seconds
Media Start Student Film 1:00:00:00 – End.Black Slug 2 Seconds
LMU SFTV logo Available in Production Folder on Isilon Server
5 Seconds
Copyright information © 2012 Jane Doe
End credit
This production was done in partial fulfillment of degree requirements for a
Master of Fine Arts at Loyola Marymount University
For MFA candidates only Single card for 6 seconds
Music Cue Sheets See Production Handbook See Production Handbook
Music Clearances See Production Handbook All music must be cleared
Deliver Quicktime to: Class Folder Isilon Server Projection Share

color corrrection 60
color correction
ColorCorrectionistheprocessbywhichthecolorsinashow(filmorvideotape) are adjusted, enhanced, or changed to create the look you are trying to achieve.
TheColoristmakestheadjustmentsaccordingtospecificationsyougiveregarding how you want your show to look on a scene-by-scene basis.
Some of the main functions of color correction:
• Reproduceaccuratelywhatwasshot
• Compensateforvariationsinthematerial(i.e.filmerrors,whitebalance, varying lighting conditions)
• Optimizetransferforuseofspecialeffects
• Establishadesired‘look’
• Enhanceand/oralterthemoodofascene—thevisualequivalenttothemusicalaccompanimentofafilm.
Why Color Correction is NecessaryFilm is not always a consistent medium. Color variations can occur betweendifferentsetups,lenses,cameras,filmstocks(evendifferentbatches of the same stock). Other variables such as exposure, color temperature, and lighting all affect color balance.
Videotape more consistently reproduces color, but if the color and/or white balance of the camera(s) were not set properly at the time of shooting there will be variations in color.
What is “color balance”?In short: the blacks are pure black - The whites; pure white and skin tones appear normal without a distracting abnormal hue (like purple skin for example)
Put another way: the color the camera “saw” and what the camera recorded, should accurately represent the color our eyes and brains “saw” at the time of the shooting.
color correction 61
However, what a color camera “see’s” and what our visual cortex “see’s”, is often (or more accurately:) not the same.
Our brains perform color balance corrections automatically, dynamically, and over a wide dynamic range - and with far greater precision than anything man has yet created.
For our creations, we must rely on something far more basic, such as ChipChartsandSkinToneReferenceCharts.Comparedtowhatourbrains come pre-wired to do so easily and naturally, camera engineers must rely on calibration reference schemes.
The ability to gauge proper skin tone is subjective. Obviously, someone who is “color blind” could never properly align a camera or make chroma adjustments so that what goes out over the air looks even remotely normal.
Color Correcting DailiesColor correcting your dailies (the footage you will use for your off-line edit) during the telecine process is not only terribly expensive, but completely unnecessary.
First of all, if you shot a 10:1 ratio 90% of what is corrected will never be seen. Secondly, even if you correct the dailies an additional correction will be needed once the shots are cut together since there will be inevitable variations between shots.
Onsetinthedigitalworld,aDIT(DigitalImagingTechician)mayhavetimetoaddsomecolorcorrectionontoyourdailies,oryourDITcan“bake-in”anin-cameraLUT(LookUpTable).Youwillstillwantyouroriginal non-corrected footage to work with inside of your editing system, so you have the greatest amount of latitude to color correct your produceintheend.ThisworkflowshouldbediscussedandtestedwithyourDP,DIT,andEditorbefore production begins.
The Underappreciated Art of Color CorrectionProfessional colorists usually do not get the respect they deserve. The untrained eye often cannot distinguish the work of an expert colorist from untreated raw footage unless it is compared side by side.
I admit to being rather novice at noticing good color correction myself (I liketousemyred-greencolorblindnessasanexcuse),butthefirsttimeIsatinonaDaVincisession,Iwasblownawaybythescopeandprecisionof the colorist’s work. Not only did he correct for hue, brightness, and contrast errors in the original footage, but he also was able to enhance
View from the CuttingRoomFloor–TimLeavitt,2008
color corrrection 62
the tone and mood of each scene by applying lighting gradients and shading that did not previously exist. In short, he was able to turn ordinary looking footage into much more than what it was originally. Andforthatreason,coloristsarerightfullyqualifiedascreativeartists.(Equally underappreciated: audio mixers, sound designers, and Foley artists).
Professional ColoristsColorists drive a powerful, expensive, and rare beast, and drive it with skill, speed and unique good taste. I’ve been known to spend more than agrand(ofotherpeoples’money)foranhouroftimewithanA-listcolorist.Sure,IexpecthisDaVincitorunfastandintuitivelyandgrademyshotsinHDinrealtimewithoutahiccup,butmostlyIexpecthimtolive up to his personal reputation for making my footage more than the sum of its parts. When you see these top people do their thing it gives you a palpable respect for the power of color. To get to that point, or near it, colorists needed access to the pricey and rare color stations like DaVinciResolve.Asexpensiveasitistoownone,it’stwiceasexpensivetoletsomeoneputzaroundononewhenyoucouldbebookingaclientinthatroom.DaVincihasreleaseda‘lite’versionoftheirsoftwareforFREE,whichastonishedtheprofessionalworld.Youcandownloadthisfor mac or pc directly from the Blackmagic website.
TodaycoloristsarestaringdownthebarrelofaworldfullofNLE(non-linear editing) users who may suddenly fancy themselves colorists in their own right. I say, don’t worry. They aren’t going to be any good. Color work is hard. The accessibility of violins has not tarnished the reputations of the Paganinis of the world. Color correcting one shot is fun.Colorcorrectingadozenshotstolookbothlovelyandconsistentishard work.
Moving Deeper Into The Editing “Workflow”Aseditors,wearebeingaskedtodomoreandmoreinsideoureditingbays—theNLEshavebeguntoindoctrinateus(andourclientsandproducers)to the idea that editors can do it all. We can do color correction, we can do titles, we can smooth out dialog tracks removing unwanted sounds and doing EQ in a way that we used to go to a mixing stage for.
But here’s where I part ways with this idea. Even though I love the idea that there is so much more that I can do. Sure, we have the tools to do it all. But does it mean that we can. I’m practically color blind so I’m not the best person to do color correction.
In short, whatever happened to the idea of getting the right person for thejob?I’dratherarealcomposerdothemusicformyfilm,ratherthanknocksomethingout inSoundtrackPro.Areallybrightand innovative
Prolost StuMachwitz,2007
Norm Hollyn, 2007

color correction 63
title designer can usually do a better job than I could, no matter what tool I use.
The best ideas come from a dialectic between multiple creative partners. I would rather edit with a director than by myself any day of the week. Working alone is normally a guarantee that new ideas won’tbetriedout.DoIthinkthatdirectorsshouldbetheirowncameramen?Hellno.Notonlydoesitdividetime,itshutsdowninteraction with another accomplished professional.

The Mix 64
the mix
In a sound mix all the tracks - singly called elements - production dia-logue,ADR,soundeffects,FoleyandMusicareadjustedinvolumeandtonalqualityrelativetoeachotherandthepicture.DuringthemixtheDirectorand/orthePictureEditorwilldecidewiththeMixerwhichsoundsshouldbeemphasized.
To keep the mix from becoming overwhelming the Mixer creates a small set of individual sub-mixes called stems. These mix stems (dia-logue, effects and music) are easier to manipulate during the mix.
TheMixerequalizes,blendsandbalancesthetracksforaseamless,invisiblestyle.Theyhaveanumberoftoolstodothis.Equalizersandfilterscanboostordecreasetheintensityoflow,middleorhighfrequencies to make dialogue or effects match those that came from microphones and sources with different characteristics. Filters can also be used to eliminate steady frequencies.
Great Mixers are artists as much as they are technicians. They are orchestrators who create sonic texture.
preparing for the mixInthedaysofanalogsound,mixingashortfilmwassomethingthatusually took place on one very long stressful day where you might only have a vague idea of how the tracks might sound all playing togetherforthefirsttime,andwhereyoumightmakesuddenandunpleasant discoveries about sounds gone missing or out of sync, and youcouldendupfishingthroughdumpster-likebinsofmagneticspaghetti looking for crucial bits of audio.
Thankstodigitalworkflows,youcanavoidallthat.Thesoundmixcannowevolveandberefinedovertimeinanorderlywaywithafinal“qualitycontrolcheck”inaproperlycalibratedmixroom.
Or if you prefer last-minute nightmares, you can mimic the old ways. But let’s assume you’d like to be well prepared and do most or all of your sound post in Pro Tools
TheArtandTechnique of Post Production Sound
Elisabeth Weis
the mixer

The Mix 65
WHAT YOU SHOULD DELIVERAProToolssessioncontainingallyourtracks,automation,etc.Thisshould be as close to a polished mix as possible, because given the time constraints you really cannot be starting from “square one.”
The following assumes that you have done your previous mix from a ProToolssessionandnotfromwithinyourNLE.Ifyoudon’thaveaProToolssession,pleaserefertotheAppendixforinstructiononcreat-inganAAFfileforexporttoProTools.
ORGANIZE YOUR TRACKSKeepallyourdialog/productionsoundtracksinadjacenttracks.Don’tscatter dialog regions in with sound effects or vice versa. If possible, isolateADRindedicatedtracks,astheADRislikelytorequirediffer-ent processing than the production sound. In Media Composer you can renameallofyourtrackstoorganizetypesoffiles.Youmightwanttofollow a layout something similar to this:
Production dialogADRMusicFoleyHard EffectsBackgroundAmbiences
PRE-DUBS AND STEMSYou may have heard these terms and are unclear about how they ap-plytoyourproject.Apre-dubisamixfileinwhichrelatedcategoriesof sounds have been combined together or pre-mixed, with the aim of combining those pre-mixes with still more sounds further along in the finalmix.Thisiscommoninfeaturefilmworkwhereyoumayhavehundreds of different tracks, more than can be handled in a single Pro Toolssession.Forinstance,anactionfilmwithanintensechasescenemighthavedozensoftracksofvehiclesrevvingandskidding,dozensmore of gunshots, many more of crashes and impacts, etc. To make the finalmixmoremanageable,thevehiclesmightbecombinedaheadoftime into a single pre-dub, the gunshots into another pre-dub, and so on,toreducemanytrackstoasmallnumberofsimplerstereofiles.Thelevels of the various pre-dubs can then be adjusted relative to each other along with all the other, un-predubbed tracks.
The downside of pre-dubbing is that you become more or less commit-ted to the choices you made when you created the pre-dub. Unless you have an unusually complex mix requiring lots of tracks, you may be betteroffsimplytoorganizeandgroupyoursoundsacrossthetracksof
The Mix 66
a single Pro Tools session as suggested earlier.
Organizingthetracksthiswayalsohelpsifyouelecttocreatemixstems.Withstems,insteadofcreatingasinglestereofilethatcombinesDialog,Music, and Effects, you create three separate master recordings: one of Dialogonly,oneofMusiconly,andoneforEffectsonly.Thiscanmakefutureupdatesandre-mixeseasier,especiallyforfeaturefilmsthatre-quire foreign language versions. Simply solo the appropriate tracks and makethreeseparatebouncefilesinProTools.
Anoption,whetherornotyouactuallymakethreeseparatestemre-cordings, is to arrange your Pro Tools tracks in a way that allows you to create submaster faders for controlling these three categories of sound separately. For instance, you may have a number of sound effects tracks that are overpowering your music. If all those effects tracks were as-signed to a single submaster fader you could easily bring them all up or down relative to your music. (The details of that type of signal routing are beyond what we can go into in this brief handbook.)
REAL TIME PLUG-IN COMPATIBILITYIfyou’vebeenusingthestandardDigidesignPlug-ins,suchasEQIII,D-Verb, etc., you should have no problem opening your Pro Tools session on other systems. However, if you’ve been using some of the more exotic real-timeplug-insavailableonsomeofLMU’ssystems(suchasAltiverb,X-Noise, etc.) those plug-ins may not exist on all mixing systems. (This could be especially true of an outside facility; so check with the post sound house to see what plug-ins are available on their systems.)
If you’re using an exotic plug-in, the safest course is to prepare two versions of the processed regions. One, the original, is useful in case it’s decided to go back to square one and apply new processing. The alter-nateprocessedversioncanbecreatedbyfirstsoloingtheaffectedtrackand doing a bounce of only the regions that you want to process. Place thebounceinanadjacenttrackandclearlylabelitasan“ALT.”Thisbouncegivesyouafilethatyoucantaketoanysystem--theprocessingis“built-in”tothefile.
exporting quicktime pictureUseoftheDVcodecisrecommendedforthebestinterchangeabilityinLMUsoundstudiosthatmayusefirewiretooutputvideo.Youwillalsowanttosetupa‘TimecodeBurn-in”sothevideofileisstampedwiththetimecode as it progresses.Duplicateyourpicturelockedsequence.Createanewbinandputthenew sequence into that bin.
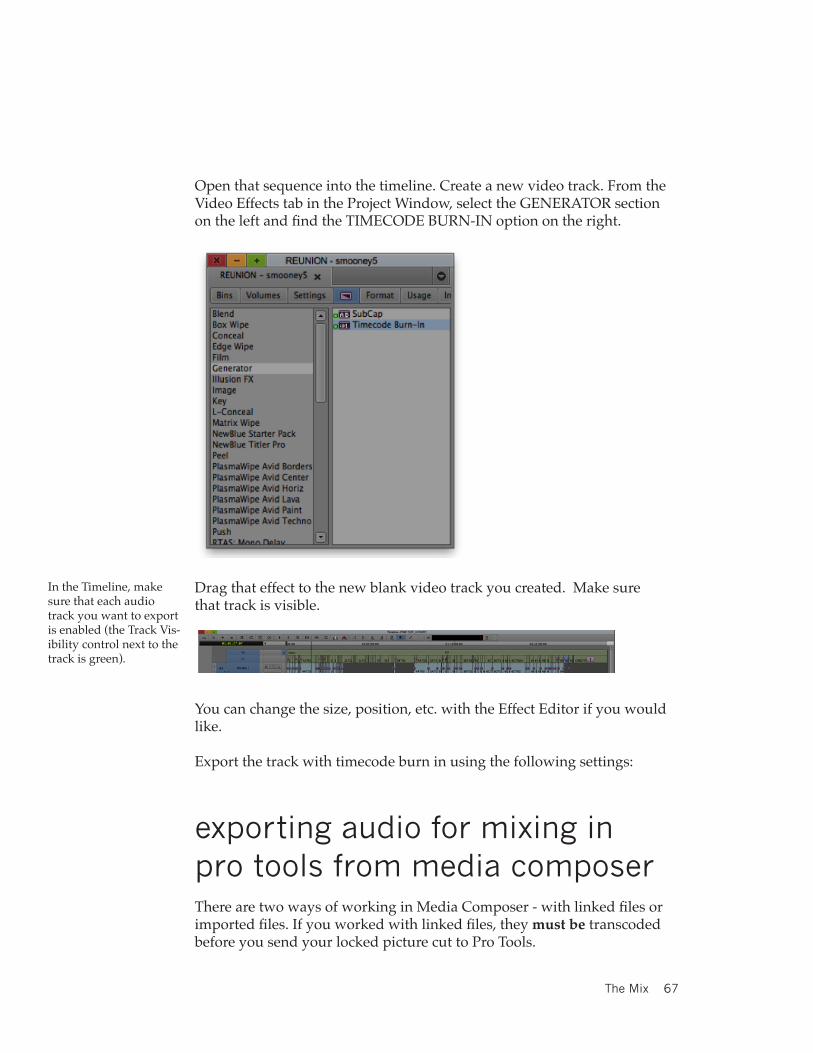
The Mix 67
Open that sequence into the timeline. Create a new video track. From the VideoEffectstabintheProjectWindow,selecttheGENERATORsectionontheleftandfindtheTIMECODEBURN-INoptionontheright.
Dragthateffecttothenewblankvideotrackyoucreated.Makesurethat track is visible.
Youcanchangethesize,position,etc.withtheEffectEditorifyouwouldlike.
Export the track with timecode burn in using the following settings:
exporting audio for mixing in pro tools from media composerTherearetwowaysofworkinginMediaComposer-withlinkedfilesorimportedfiles.Ifyouworkedwithlinkedfiles,they must be transcoded before you send your locked picture cut to Pro Tools.
In the Timeline, make sure that each audio track you want to export is enabled (the Track Vis-ibility control next to the track is green).
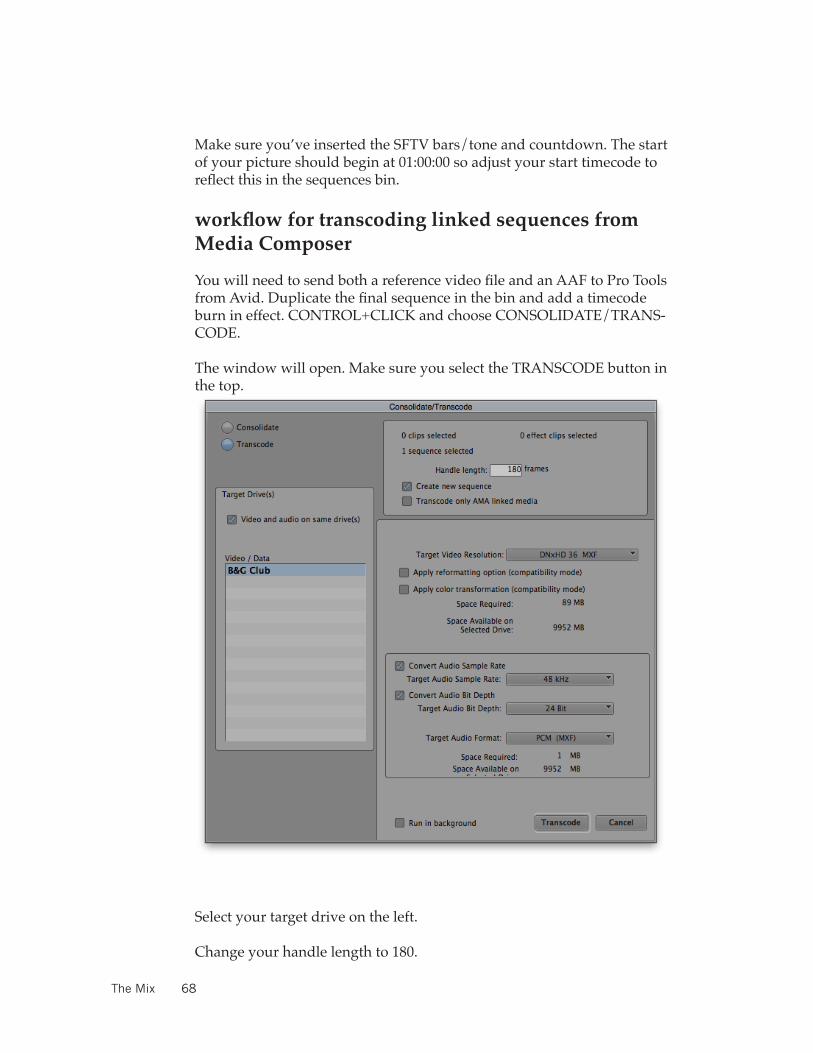
The Mix 68
Make sure you’ve inserted the SFTV bars/tone and countdown. The start of your picture should begin at 01:00:00 so adjust your start timecode to reflectthisinthesequencesbin.
workflow for transcoding linked sequences from Media Composer
YouwillneedtosendbothareferencevideofileandanAAFtoProToolsfromAvid.Duplicatethefinalsequenceinthebinandaddatimecodeburnineffect.CONTROL+CLICKandchooseCONSOLIDATE/TRANS-CODE.
Thewindowwillopen.MakesureyouselecttheTRANSCODEbuttoninthe top.
Select your target drive on the left.
Change your handle length to 180.

The Mix 69
SelectthecheckmarknexttoCREATENEWSEQUENCEandnexttoTRANSCODEONLYAMALINKEDMEDIA.
SelectCONVERTVIDEOandchangethetargetresolutiontoDNxHD36MXF.YoucanalsouseNTSC-DV/DVCPRO.Thiscodecisfor
Double-checkyoursettingsandverifyyouraudioissetto24bit/48kHz,andthenselectTRANSCODE.
workflow for sequences after they have been transcoded or if they were imported
With your sequence setup and premixed, turn on all tracks in the se-quence.FromthefilemenuchooseEXPORT.
IntheExportAsdialogbox,changethepresettoCONSOLIDATEAU-DIOTOFOLDER.
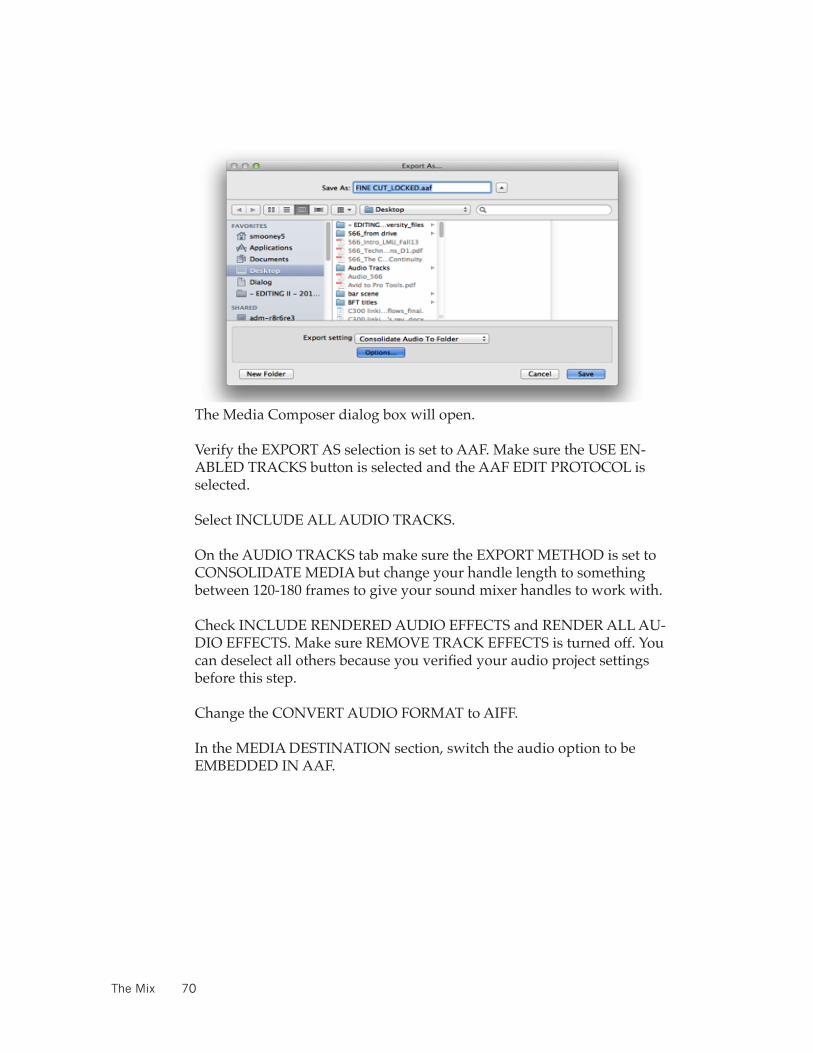
The Mix 70
The Media Composer dialog box will open.
VerifytheEXPORTASselectionissettoAAF.MakesuretheUSEEN-ABLEDTRACKSbuttonisselectedandtheAAFEDITPROTOCOLisselected.
SelectINCLUDEALLAUDIOTRACKS.
OntheAUDIOTRACKStabmakesuretheEXPORTMETHODissettoCONSOLIDATEMEDIAbutchangeyourhandlelengthtosomethingbetween 120-180 frames to give your sound mixer handles to work with.
CheckINCLUDERENDEREDAUDIOEFFECTSandRENDERALLAU-DIOEFFECTS.MakesureREMOVETRACKEFFECTSisturnedoff.Youcandeselectallothersbecauseyouverifiedyouraudioprojectsettingsbefore this step.
ChangetheCONVERTAUDIOFORMATtoAIFF.
IntheMEDIADESTINATIONsection,switchtheaudiooptiontobeEMBEDDEDINAAF.

The Mix 71
Double-checkallsettingsandthenchooseSAVE.
BackintheEXPORTASdialogbox,chooseNEWFOLDERonthebottom left.
Name the folder inside of which all of your project information willbestoredthenselectCREATE.
Double-checkitisselectedinthelistandselectSAVE.
The process of exporting should begin and will save into your se-

The Mix 72
lectedfolder.Whenfinishedtherewillbeasingle,butlarge,filethatwillbe imported into a ProTools session.
exporting quicktime picture from FCP7UseoftheDVcodecisrecommendedforthebestinterchangeabilityinLMUsoundstudiosthatmayusefirewiretooutputvideo.From Final Cut Pro export the FCP project as a “self-contained Quicktime Movie.” The settings should be: Format:DVNTSC48kHzSize:720x480Quality:“Medium”isthedefault(actually,it’llbehighqualityfortheDVNTSC format) FrameRate:29.97isthenormalNTSCframerate.(Ifyourprojectdiffers,make sure your Quicktime movie matches your FCP project settings.)It’s recommended that you choose the “audio & video” option to embed your worktrack audio in the Quicktime movie. This can give you a useful guide track of your mix for checking sync, etc.Settings for sound should be: Format: Uncompressed Samplerate:48kHzSamplesize:16(that’sthebitrate)Channels: either 1 or 2 depending on whether you export mono or stereo. Since this is usually just guide audio, choosing mono is simpler.
exporting audio from FCP7 for mixing in pro tools Change the starting timecode on your sequence to 00:58:32:00 to give yourself room to work.

The Mix 73
Adda1frame“pop”ofaudioexactly2secondsBEFOREstartoffirstpicture on all audio tracks to act as a sync point “just in case”.Adda1frame“pop”ofaudioexactly2secondsAFTERendoflastpic-ture on all audio tracks to act as a sync point “just in case”.
Don’texportaudiountilyou’velockedpicture.Onceyouaresureyourvideo timings won’t change, you are ready to export your audio. Export the entire project audio as an OMF fileThebenefittousingOMFfilesisthatallclipsremainindividualclips,soyou can move them between tracks, each with separate volume and pan controls, as well as adjusting their in and out points and adding custom-izedfades.
SelectFile->Export->AudiotoOMF
Selectthesamplerate,bitdepthandhandles(48kHz,16bitarefine,youmight give yourself an extra second or two on the handles).

The Mix 74
Rate:Chooseasampleratethatsuitswhatyou’reusingtheaudiofor.Allof the audio you export has the same sample rate. If you use audio with different sample rates, it’s converted.
Depth:Choose16-or24-bit.Ifyouchoose24-bitaudio,makesuretheapplicationyouwillusetoimporttheOMFfilesupports24-bitaudio.Note: When exporting to OMF, Final Cut Pro uses the highest quality settingregardlessofwhatyouchoosefromtheAudioPlaybackQualitypop-up menu in the General tab of the User Preferences window.
HandleLength:Enteravalueintimecodeformattoaddhandlestotheaudioclips.Handlesgiveyouraudioeditortheflexibilityneededtofixedits.Handlesof1to3secondsaretypical,butit’sbesttocheckwith your audio editor. Handles are included only when there is addi-tional audio media outside the clip In and Out points. When there is not enough media to create the full handle duration, Final Cut Pro includes as much of a handle as possible.
Include Crossfade Transitions: Because some OMF importing tools do not handle cross fade transitions correctly, and many sound editors prefer to create cross fades themselves, you have the option to leave crossfadesoutwhenexportingyoursequenceasanOMFfile.Whenthischeckbox is deselected, extra source media is substituted for the duration of the cross fade being left out. How much extra source media will be substituted depends on whether the cross fade was edited before, on, or after the edit point. Extra source media included as a result of this option willbeinadditiontoextrasourcemediaaddedbytheHandleLengthoption.
IncludeLevels:AudiolevelsandkeyframesareincludedintheexportedOMFfile.Evenifnoaudiolevelkeyframesareset,thecurrentlevelofeach clip is exported.
Include Pan: Pan settings and keyframes are included in the exported OMFfile.Evenifnopankeyframesareset,thecurrentpansettingofeach clip is exported.
Choosealocationandenteranameforthefile.
The Mix 75
When you’re ready to export, click Save.
OPTION - EXPORTING AIFF FILESTopreserveallyourNLEsoundprocessing,includingnon-destruc-tive“filter”effects,thesolutionistoexporteachindividualtrackasasingleaudiofile.Forinstance,mutealltracksexceptforA1.GotoFile>Export>QuickTime Movie and chance the for From “Format”, chooseAIFF.Under“Options”makesuretoexportthetrackasa24bit48kHzmonofile.Repeattheprocessforeachtrackyouwishtoexport.Ifyou have head and tail leaders on your picture, make sure there are head & tail pops on each track and that they align correctly with your picture.
Now it’s just a question of importing those tracks into a Pro Tools ses-sion, making sure they are in sync with the Quicktime movie for the session,andrefiningyourmixwithinProTools.NOTE:Thisprocedureisvery much like what Pro Tools calls a “bounce”, so any volume graphing andsuchthatyouperforminyourNLEwillbereflectedintheAIFFfiles.
Evenifyou’rehappywithalotofthemixingyoudidinyourNLEandyou do the above option of exporting individual tracks that are highly “mixed”,itwouldbebesttoalsodoanAAFExportofthesequenceandcreateaProToolssessionfromthatAAF.
Thatwayyoucanpresentthemixerwithbothoptions–ifyour“pre-mixed”tracksareworkingoutfine,it’slessworkforthemixer.Butifyou’ve done something questionable that tends to “tie the hands” of the mixer, the original untreated material is available in case the mixer wants to go back to the basic tracks.
PRO TOOLSOpentheembeddedAAFaudiofileinProToolsasasession.
When you are done mixing, it’s time to get your audio out of ProTools andintoyourNLE..
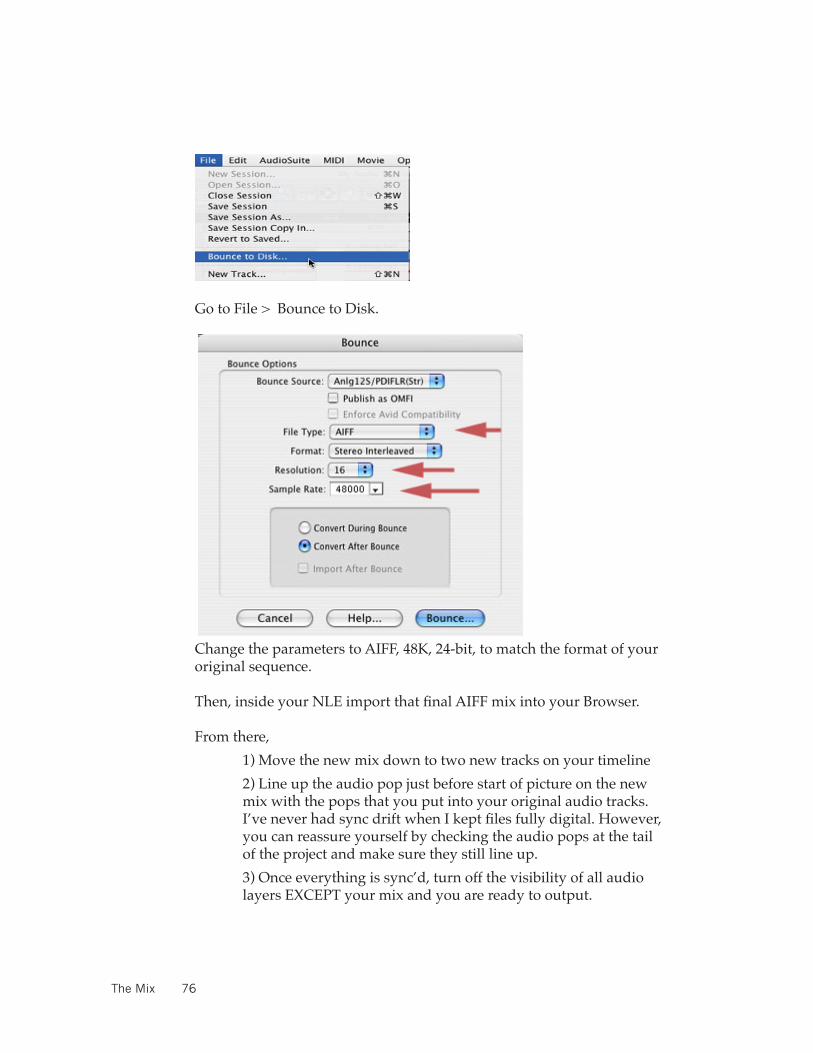
The Mix 76
GotoFile>BouncetoDisk.
ChangetheparameterstoAIFF,48K,24-bit,tomatchtheformatofyouroriginal sequence.
Then,insideyourNLEimportthatfinalAIFFmixintoyourBrowser.
From there,1) Move the new mix down to two new tracks on your timeline2)Lineuptheaudiopopjustbeforestartofpictureonthenewmix with the pops that you put into your original audio tracks. I’veneverhadsyncdriftwhenIkeptfilesfullydigital.However,you can reassure yourself by checking the audio pops at the tail of the project and make sure they still line up.3) Once everything is sync’d, turn off the visibility of all audio layers EXCEPT your mix and you are ready to output.
The Mix 77
guidelines for lmu mixesBy the time you’re ready to do your mix you may be so impatient just to get the project done that you’ll be tempted to skip over theserecommendations.Pleasedon’t.Recordlevelsareespeciallyimportantinfilmandtelevision.
Whenyou’relisteningtosomethinglikeamusicCDyouarefreeto chose a playback level anywhere from “Soft Background” to “AnnoytheNeighbors”.Butforfilmmixing,recordandplaybacklevels are not so arbitrary.
In the professional world, speaker playback levels in a good THX-certifiedtheaterare“carvedinstone”sothattheloudnessafilmmakerhearsinthemixingroomwillmatchtheloudnessthe audience hears in the theater. To get this agreement between mixstageandtheaterrequiresstandardizedreferencelevels.TV broadcast also has rather strict requirements about where the average record levels should fall. For all these reasons some “target” or point of reference for audio loudness is needed, and this usually takes the form of a constant tone recorded at the start of a tape.
Thistoneisrecordedat“ReferenceLevel”or“StandardOperatingLevel”whichrepresentsasignalstrengththatisstrong,butnottoostrong. Your subtlest sounds will fall well below that level; your strongest sounds will be above. For digital recording there are a number of competing standards used for reference levels; these are designedtofitthetechnicalspecsofdifferentreleaseformats.SinceFall2007LMUhasadoptedtheSMPTEstandardforareferencelevel of -20dBFS.
TECHNICAL SPECIFICATIONSStudents should use a digital reference level of -20dBFS for workstation mixing (as the digital equivalent of the analog reference of “0” on a VU meter. The reference tone that accompanies the color bars recorded at the head of a tape should be recorded at this level.That same reference level will be used to set playback levels at screenings.
Tapes must be labeled with the following information:Audio:Stereo-LeftOnly,RightOnly(Sometimesabbreviatedas“StereoLoRo”)ReferenceLevel:-20dBFS.
Duringyourmix,followtherecommendedplaybacklevelsinthoserooms that have calibrated settings. When in doubt, or if you are

The Mix 78
workingathomewithoutcalibratedlevels,playtheaudiofilecalled“-20dBFS_LMU_LevelCheck”andadjustbyear.)ThisfileisavailableontheLMUaudioworkstations.
For more details on getting a good sound mix for your projects, pleaseconsultthe“SoundPostFAQ”ontheLMUworkstations.Inityou’llfindsomehelpwithquestionslike:WhatkindofproductionsoundcanIfixinPost?HowdoImakeediteddialoguescenessoundsmoother?HowcanIdosomeofmysoundworkinProTools®?HowdoIsetmixlevels?HowcanImakethemixsoundbetter?
ADVANCED OPTIONS - 5.1 SURROUND SOUNDIt’s a lot of work to create a really good-sounding two-track stereomix,andcurrentlythatisallthatLMUdeliveryspecsrequire. But you may want to explore the possibilities of further mixinginthe5.1surroundformat,eitheratLMUoratanoutsidefacility.
Before you do that, you should make sure that your intended audience can properly experience the surround mix. In discrete form, a 5.1 surround mix requires six channels. Understand that many common delivery formats do not provide enough audio channelstosupporta5.1mix.HDCAM,forinstance,hasonlyfouraudiochannels.AsurroundmixissometimesplacedonjusttwochannelsofanHDCAMmaster,butthisrequirestheuseofDolbyEencoding/decodingthroughaproprietaryprocessor,whichwouldlimityourvenuetofairlyhigh-endfacilities.D5andDigibetaaretwotapeformatsthatcaneasilysupport5.1surroundsound.Butwhilesomefilmfestivalsmaysupporttheseformats,atpresentthisisnotthenorm.Andcertainlyfewconsumers have access to such equipment.
Fortheatricalpresentation,35mmfilmprintswithdigitalsoundtracks--usuallyDolbyDigitalformat--arethemostcommon means of reproducing 5.1 mixes. However, creating suchaprintisusuallytoocostlyformoststudentfilmmakers.
But there are some common and affordable format that supports 5.1surroundsoundandthatisDVD,BluRay,Filedelivery,andDCP.Pleasenote:asofthiswriting,theeasy-to-useiDVDsoftware does not allow for 5.1 sound; instead you must author theDVDusingaprogramlikeAdobeEncore.Thisiswellwithinthereachofanenterprisingandtechnicallyproficientstudent.
To do this you will need: a discrete 5.1 mix from Pro Tools; this

The Mix 79
meanstherewillbesix48kHz16bitAIFFfilesintheSMPTEformat.ThatmeansLeft,Right,Center,LFE(sub),LeftSurround,RightSurround.You’llbeabletotellwhichfilesarewhichlaterbytheirfilenamesuffixes:.L,.R,.C,.Lf,.Ls,.Rs.ToburnaDVDyouwillneedtouseCompressorsoftwaretocreateanAC3filefromtheseAIFFfiles.But before you do that mixing, you’ll have to do some more editorial work.
EDITING FOR SURROUNDInthecaseofaflashyactionfilmyoumighthavehardeffectsthatcould get panned around from front to surround and back again –spaceshipswhizzingby,forinstance,oroffscreenweaponryfora big battle sequence.
Chancesarethatyourparticularfilmdoesn’tlenditselftosuchexotic treatment. You can still create an enveloping environment thatusesthe5.1surroundformattoadvantage.Justrememberone basic rule: nothing critical to story content should be placed solely in the surrounds. Not every theater or video playback system has the surround channels set up to the proper specs and you don’t want anything important to get lost. So consider the surround channels to be an enhancement to the existing sounds -- the icing on the cake, not the cake itself.
Ambiencesaretypicallythekindsofsoundsthatworkbestinthesurrounds,andyoumayfindthattheambiencesthatworkedjustfineforastereomixwillbealittlethinforsurround.Supposeyou have a scene set in the woods and you have one stereo track ofbirdschirping.AssigningthosetotheLeftandRightworkswell enough, but it leaves the surrounds empty. You could copy and displace in time that same ambience, and the copy could be assigned to the surrounds.
Here are the potential problems with that approach: • You have to displace the copy by several seconds at least
or you can have phasing problems. • Anydistinctiveeventinthattrackcan“echo”or“repeat”
from one channel to another. For instance, a particularly distinctivecrowcawwillstickout,firstinthefrontchannels, and then shortly later in the surrounds.
• Anysoundeffectthatisalreadyonthe“busy”sidegetstwiceasbusy–forinstance,you’llhavetwiceasmuchbird activity as before.

The Mix 80
That’s why it’s usually better, even for plain stereo mixes, to layer sparser sounds that can then be artfully added together tocreatejusttherightamountofactivity.Andforsurroundmixing that gives you the option of placing those sounds slightly differentlyinthespatialfield.Thissameideaapplieseventosoundslikebasiclowtrafficrumbles,wind,orambientroomtones.Thetrickistofindsimilarbutslightlydifferentsoundsthatwill complement each other and sound like different aspects of the same environment.Some suggestions:
• Place busier sounds in the front speakers rather than the surrounds.
• Place crisper, more trebly sounds in the front rather than the surrounds.
• Place higher pitched ambient tones in the front rather than the surrounds.
Thereason?Oneisjustgoodshowbiz:thescreenisupfrontandthat’s where we usually want to keep the audience’s attention focused. Busier, crisper, higher pitched sounds tend to be attention-getters. The other is technical: the surround speakers in most theaters are seldom as good as the front speakers so they’re not likely to sound as crisp and clear anyway. (In fact, forthemonosurroundofDolbyStereo,bandpassfiltersareapplied to that channel to reduce some of the highest and lowest frequencies.)
CONCLUSIONPost production sound can be one of the most satisfying phases of your production - you don’t have to worry about bad weather orotherlocationnightmares,foronething.Justrememberthattoget the most out of your sound mix, you need to budget adequate time in your schedule and set realistic deadlines - then stick to them. Only then will you have the chance to play around and get creative.

Layback 81
export and layback
Upon completion of mix you will have sound with the proper number ofchannels;mono,stereo,LCRSor5.1,butitwillnotyetexistonthefin-ishedmastertape,masterfile,orprint.Ifyouaremakingavideotapeofsomesort,beitNTSCorHD,theremustbea“layback”whenthesoundisrecordedontothefinalmastertape.
If there are multiple versions of the project, such as with text and without text, there will have to be multiple laybacks or exports. Each sequence thatneedstheaudiowillneedtohavetheaudiofilesinserted,linedup,and checked before export.
If you are making a 35mm print, there must be a “printmaster”, when a master audio tape or magneto optical disk is made that will be used to shoot an optical track negative.
Exporting, laybacks and printmastering can take anywhere from a few hours to a day or more, depending upon the needs of the project and are considered to be mixing time.
Typically,audioiscompletedafterthefinalcolorcorrectionsessionisdone and the master is complete.
getting your mix into your nle TogetyourfinishedaudiobacktoyourNLE,exportyourfinalmixasastereoWAVfile.Then,insideofyourNLE,importorlinkthatfinalWAVmix into your project.
From there:1)DUPLICATEthesequence.Movethenewmixdowntotwonew tracks on your timeline2)Lineuptheaudiopopjustbeforestartofpictureonthenewmix with the pops that you put into your original audio tracks. Check the audio pops at the tail of the project and make sure they still line up. Play through the sequence to make sure it is in sync.3) Once everything is sync’d, turn off the visibility of all audio layers EXCEPT your mix and you are ready to output.

Layback 82
general tipsMakesurethatyouraudioprintmasterfile(the“bounce”inProToolsterms)ispannedcorrectlyforstereo.(Ifastereofileispanneddead center, your beautiful stereo mix becomes a slightly less beauti-ful mono mix.)
Makesurethattheaudiolevelfortheprintmasterfiletrackissetto“unity.” That is, the fader level is neither increased nor decreased. (Otherwise your carefully established mix levels get nudged out of balance.)
Some software programs offer a sound level option called “nor-malizing.”Thisisadeceptivetermbecauseitcanrenderyourmixlevelscompletely“abnormal.”Basically,thenormalizingprocessensures that the loudest peak in your mix will hit the digital maxi-mum level. This procedure would violate all industry standards for filmandtelevisionmixes.Thenetresultcouldbethatthedialogforyour quiet understated drama will play at ear-bleed levels. Under nocircumstancesshouldyou“normalize”amixdestinedfortheateror television viewing. (The exception might be for mixes that are destined solely for website viewing. There are currently no widely accepted standards for audio level for the web.)
deliverables 83
deliverables
The term deliverables refers to a collection of “finished products” required toreleaseafilm.Deliverablesarethelastthingscreatedbytheproductionteamanddeliveredtothefilm’sdistributor.
Deliverablescanbedividedintothreecategories:
Print materials: Theactualfilmintheformofnegativesand/orvideotransfer.Usedtocreateprints for release to theaters, plus versions for different media, trailers, etc. Digitaltechnologiesaremakingthisachangeableprocesssoyouneedtostayabreast of developments (no pun intended).
Publicity materials: Stillimages,pressreleases,synopses,profilesofmainactors&crew,etc.Thiscan also include production information, especially if you have a good story to tellabouthowthefilmwasmade.
Legal documentation: Paperwork required to prove that you have all the appropriate rights to make andshowthefilm.Thiscanincluderelease forms and contracts for cast and crew, music licenses, resource/environmental consent and “Chain of Title” (a recordofownershipfordifferentaspectsofthefilm).
TipsThroughoutthefilmmakingprocess,bearthefollowinginmindtoavoidproblemsat the delivery stage:
Ensurethateverythingappearinginthefilmhasbeenlegallycleared(e.g. talent release, product placement, music, etc
Duringproduction,takeplentyofphotographsthatcanbeusedforpublicity, especially key scenes. Include professional photos of cast and crew.
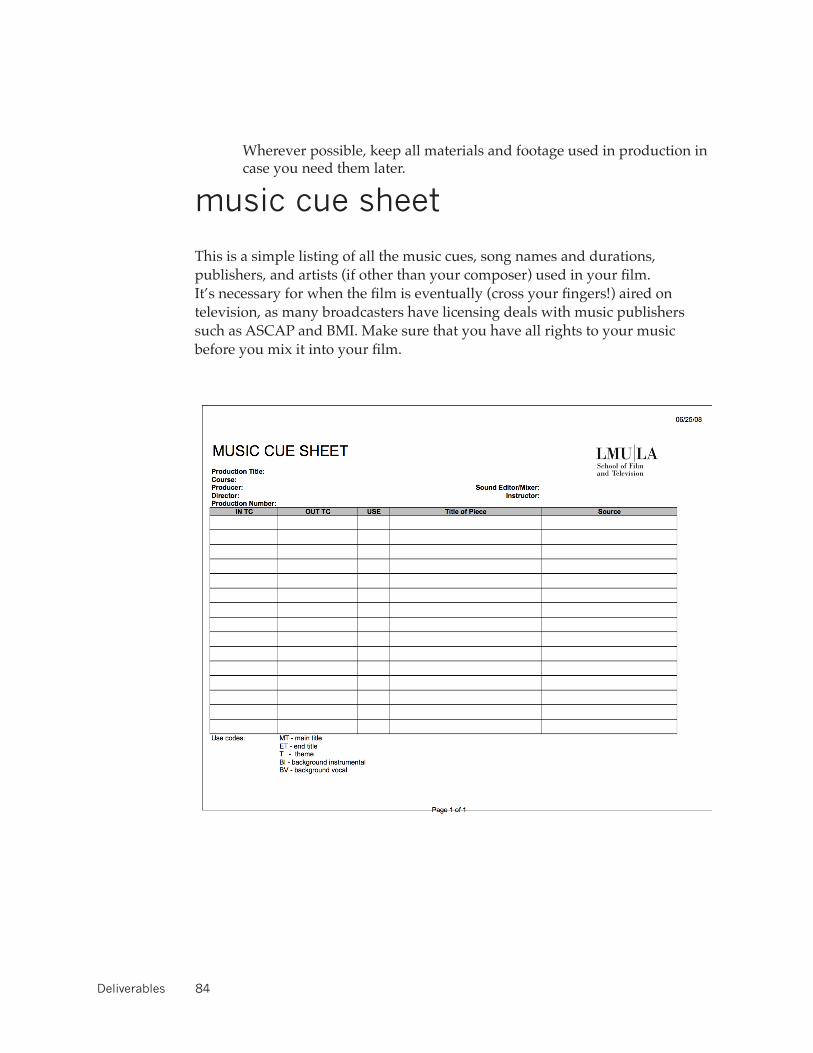
Deliverables 84
Wherever possible, keep all materials and footage used in production in case you need them later.
music cue sheet
This is a simple listing of all the music cues, song names and durations, publishers,andartists(ifotherthanyourcomposer)usedinyourfilm.It’snecessaryforwhenthefilmiseventually(crossyourfingers!)airedontelevision, as many broadcasters have licensing deals with music publishers suchasASCAPandBMI.Makesurethatyouhaveallrightstoyourmusicbeforeyoumixitintoyourfilm.

deliverables 85
For purposes of any claims arising from Worker Compensation Insurance,PropertyInsuranceandLiabilityInsuranceextendedbyLoyolaMarymountUniversitytostudentproductions:
Production Materials Call Sheets ProductionReports Production Budget Cast/CrewList Shooting Schedule DayoutofDays
Minor’s Work Permits (if used)Filming Permits
InordertoprovideindemnificationofLoyolaMarymountUniversityarising from any claims arising from the use of intellectual property and real property in the student’s work:
Legal Materials Copy of Script Supervisor’s Script
LiteraryReleaseMusic Cue SheetPublishedMusicRelease(ifused)LibraryMusicRelease(ifused)Original Music (if used)
Composer and Musician ClearancesTalentReleasesLocationReleases
Ifyouplanonenteringyourfilminfestivalsitisstronglysuggestedthatthe following material also be delivered:
Publicity MaterialsFullCreditListProduction StillsCast biosDirectorbioDirectorstatementPromotional PosterPromotional WebsiteTrailer or Teaser
Post Production Standards 86
festivals
Form a Festival Strategy
•Choosefestivalswith“studentfriendly”categories
•Beabletoattendfestivalsthatacceptyourwork
•Choosefestivalsthatacceptfilmsofyourgenre
Complete Festival Submission Form
•Filloutsubmissionformsthoroughlyandcarefully
•Submitontime—festivalsdonotacceptlateentries
•Ifsubmittingtoseveralfestivals,considerusingwithoutabox.com—anonlinepaperless service that streamlines the entire process. You can also submit the filmonlinethroughWithoutABoxorFilmFreewayandwilleliminatethecostofcreatingDVDsandpostage.
•DONOTmailfilmsinfiberfilledenvelopes
Create a Press Kit
•Cover
•Synopsis
•Bios
•Credits
•ProductionStills
Each festival will vary. Festivals do not require an electronic press kit (EPK), but it is a very good idea to create one. EPK includes all the items listed above and a trailer, behind-the-scenes footage and interviews. You can create one online for free with Withoutabox and Film Freeway submissions.

Post Production Standards 87
post production standards
Audiencesexpect,andinasense,deservetechnicalcompetencefromfilmmakers.Majortechnicalflawscanpreventtheaudiencefrombecom-ming fully immersed in your story and disrupt the connection between artist and audience.
Photography should be in focus, properly exposed, with lighting and compositionthatenhancesthestory.Likewise,productionsoundrecord-ing should be clear and intelligible, free from unwanted noise and distor-tion. Editing should serve the story by effectively controlling screen time and directing the attention of the viewer. The post production mix should aim toward professional standards in terms of overall recording levels and a careful balancing of the elements.
Audiencesmayforgivefilmmakersformanyflaws,buttheyareunforgiv-ing of those who waste their time or confuse them for no purpose.
Anyofthesetechnicalexpectationscanbedeliberatelyviolatedforartisticeffect, for instance, to simulate news footage, home video, etc. But even in those situations, remember that during post it is always easier to degrade good material than it is to enhance poor material.
The following standards pertain to the formats used in the editing pro-cessatLMUonvideobasededitingsystems.Followingthesestandardsinsures proper compatibility of all audio and video editing devices and systemsatLMU.ALLPRODUCTIONSmustfollowthesestandardswith-out exception. Failure to comply will result in denied access to facilities until materials are corrected to standards.
SFTV EDITORIAL STANDARDS
•DROPFRAMETimecode(ifyourproductiontimecodeisdropframe - this is our standard)
•NON-DROPFRAMETimecode(ifyourproductiontimecodeisnon-drop frame)
•Programstartmustbe01:00:00;00onalleditingsystems

Post Production Standards 88
•StandardSFTVbars/tone/slateandvideoblackuntilleaderbegin at 00:58:32:00
•SyncMarkandPopat2secondsbeforepicturestarts(I.e.Acad-emyLeaderbuiltintotheSFTVcountdown)
•30secondsofVideoBlackafterendofthepicture
•Audioistobedigitizedat48Khz–24bit(WAV)
•Audioreferencelevelshouldbeat-20dBFS
SFTV TELECINE STANDARDS
•NON-DROPFRAMETimecode
•ColorBarsatheadofeachtapeorfile
•Toneoverbarsifproductionsoundissyncedtopicturebytele-cine house
•Eachtapeorfileshouldhaveconsecutivetimecodehours
•Provideatapecopywithdisplayedkeycodeandtimecode
•ProvideaDVCamorBetaSPtapewithoutdisplayedkeycodeand timecode
•HaveyourTelecine Op provide you with Flex Files or Telecine Logfiles.
SFTV STANDARDS FOR FINAL PICTURES
•NON-DROPFRAMETimecode(ifyourproductiontimecodeisnon-drop frame)
•Timecodestartis00:58:32:00(withbars/toneandvideoblackuntil leader)
•SyncMarkandPopat2secondsbeforepicturestarts(i.e.Acad-emyLeader)
•MasterPicturestartsat01:00:00:00
•SyncMarkandPopat2secondsafterpicture/titleends
•30secondsofVideoBlackafterendSyncMark/Pop
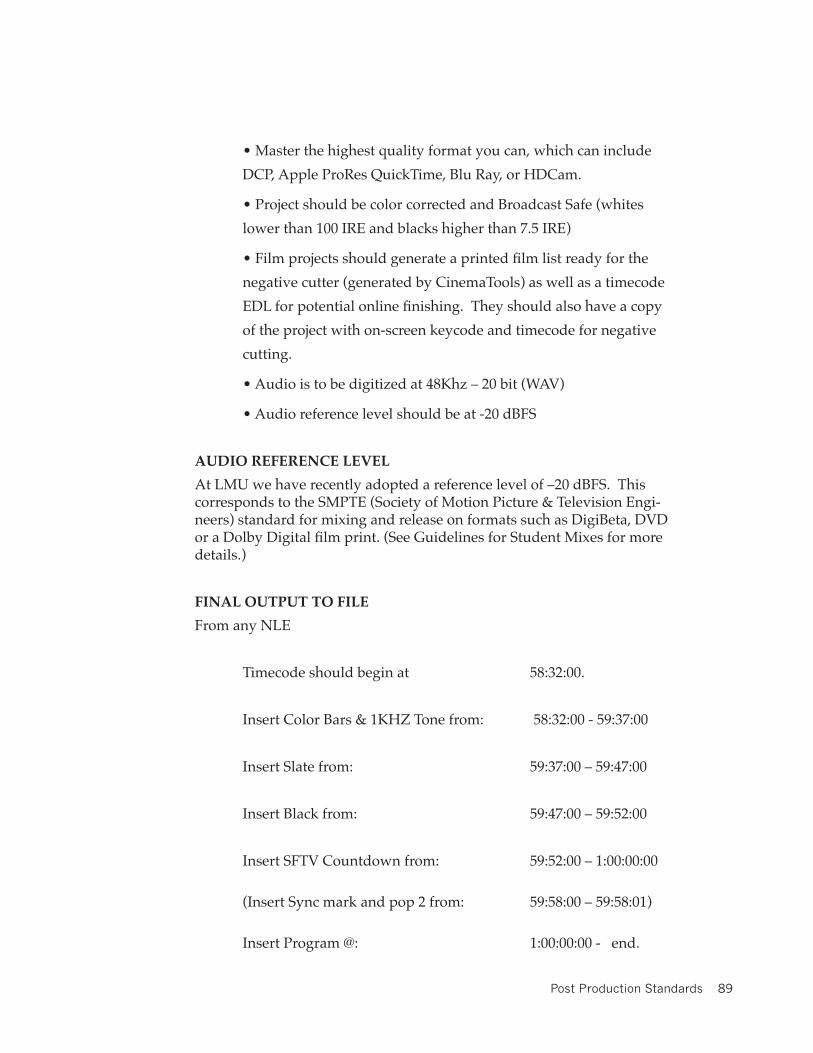
Post Production Standards 89
•Masterthehighestqualityformatyoucan,whichcanincludeDCP,AppleProResQuickTime,BluRay,orHDCam.
•ProjectshouldbecolorcorrectedandBroadcastSafe(whiteslowerthan100IREandblackshigherthan7.5IRE)
•Filmprojectsshouldgenerateaprintedfilmlistreadyforthenegative cutter (generated by CinemaTools) as well as a timecode EDLforpotentialonlinefinishing.Theyshouldalsohaveacopyof the project with on-screen keycode and timecode for negative cutting.
•Audioistobedigitizedat48Khz–20bit(WAV)
•Audioreferencelevelshouldbeat-20dBFS
AUDIO REFERENCE LEVELAtLMUwehaverecentlyadoptedareferencelevelof–20dBFS.Thiscorresponds to the SMPTE (Society of Motion Picture & Television Engi-neers)standardformixingandreleaseonformatssuchasDigiBeta,DVDoraDolbyDigitalfilmprint.(SeeGuidelinesforStudentMixesformoredetails.)
FINAL OUTPUT TO FILEFromanyNLE
Timecode should begin at 58:32:00.
Insert Color Bars & 1KHZ Tone from: 58:32:00 - 59:37:00
InsertSlatefrom: 59:37:00–59:47:00
InsertBlackfrom: 59:47:00–59:52:00
InsertSFTVCountdownfrom: 59:52:00–1:00:00:00
(InsertSyncmarkandpop2from: 59:58:00–59:58:01)
InsertProgram@: 1:00:00:00-end.

Post Production Standards 90
Your project should be archived upon completion onto Post-Production providedHardDriveforSFTVarchives.

Post Production Standards 91

Post Production Standards 92
BASIC WORKFLOW 1: DSLR, XF100, C300, SONY EX3ShootatFullHD,23.976NTSC
Mostoften,single-systemsoundisusedwiththisworkflow,recordingaudiodirectly on the card. However, some projects use double-system sound, record-ing audio on a sync sound recorder. In this case there will be no pull-down, the samplerateforrecordingdigitalaudioshouldnotbea“24FPS”filmspeedwithasampleratesuchas48,048Hz,butrathera“23.976FPS”videospeedsamplerate. 48K, 24 bit is ideal.
Unless cropping or using anamorphic lenses, the native aspect ratios are 16x9. In eithercase,youwillapplythosefiltersandcroppinglater.
ImportorLinktoallfootage.IfusingaDSLR,transcodethefootagebeforelink-ing.
If using double system sound, import or transfer all audio
Sync all takes using Pluraleyes or by hand using autosync inside of Me-dia Composer
Createfinishedtitlesandgraphicsoreditinslugorscratchtitles
Edit the project to a locked cut, the length and sync must be exact includ-ing end credits
Cut in the SFTV head leader (23.976 FPS)
Organizeandsplitoffallsoundtracks
Export the movie as a QuickTime with a timecode burn-in
ExporttheaudioasanEmbeddedAAF
ImporttheAAFintoaProTooolssession
Import the QuickTime movie and guide track into the Pro Tools session
Recordandimportallsoundeffects,ADR,Foleyandmusic
Edit the sound tracks and create the automated mix
examples of file-based workflows
Post Production Standards 93
Export the mix with the “bounce to disc” function
The next three steps can be performed before, during or after the sound edit and mix. These steps can be done in any order.
Ifscratchtitlesandgraphicswereusedintheedit,createthefinishedversions and cut them into the project. Use care not to change the length of the title, it needs to be a straight replacement. NTSC graphics should be 1920x1080 pixels.
GothroughtheprojectshotbyshotandcolorcorrectusingtheNLE’sColor Correction tools.
Ifcroppingtoanotheraspectratio,applythecorrectfiltersorcropping.
Make a copy of the locked sequence in the timeline and delete all of the soundtracks.Donotusetheoriginaledit;useacopy
ImportorLinkthemixintoMediaComposer,dragitintothenewse-quence and line up the 2 pop
When all steps are complete:
Export the QuickTime for delivery.
Post Production Standards 94
Basic Workflow 2: RED Shootat2K,23.976FPS,EditinHD,FinishinHDor2K
For best possible results use double-system sound.
SetupyourMediaComposerprojectasaHD1920x1080for23.976PNTSC.
UseRedCineXtocreate1920x1080‘workfiles’ofyourfootagewithorwithoutaLUT
Importorlinktoall‘workfiles’at23.98FPS
Import or link all audio
Sync all takes using Pluraleyes or the autosync function
Createfinishedtitlesandgraphicsoreditinslugorscratchtitles
Edit the project to a locked cut, the length and sync must be exact includ-ing all credits
Ifyouareplanningafilm-out,dividetheshowintoproperreels.Evenifyouarenotplanningafilmtransfer,ifyourfilmislong,youmaywanttodivideitintoten-minutefilmreelsjusttokeeptheprojectmoremanage-able
Cut in the SFTV head leader (23.98FPS) on every reel
Organizeandsplitoffallsoundtracks
Export the movie (reels) as a QuickTime with timecode burn ins (they will be 23.98FPS QuickTimes)
ExporttheaudioforthereelsasanembeddedAAF
ImporttheAAFintoaProToolssession
Import the QuickTime movie with timecode burn into the Pro Tools ses-sion. Pro Tools will support the 23.98FPS rate
Recordandimportallsoundeffects,ADR,Foleyandmusic
Edit the sound tracks and create the automated mix
If you are making a feature, or want to open up more distribu-

Post Production Standards 95
tionoptions,youwillwanttomakestems.Donotmixdialogue,effects or music in the same tracks
Copy the 2 pop from Pro Tools track 1 into one effects track and one music track. In export, every stem needs a 2 pop.
Export the composite mix with the “bounce to disc” function
Mute the effects and music tracks and export the dialogue stem with the bounce-to-discfunction.Dothesamefortheeffectsstemsandthemusicstems
CreatethefinishedHDtitlesandgraphics.Graphicsshouldbemadeat1920x1080 pixels
Relinkyour‘offline’filestoyourRawfileseitherinsideofMediaCom-poserorinsideofyourColorCorrectionsoftware.RememberthatthecurrentversionofMCsupports2and4kfiles,butthemaxprojectsizeisFullHD.Toworkin2KyouhavetobringitintoDavinciorasimilarprogram.
Theprojectisnowreadyforfinalcolorcorrection.Youmustexportyourse-quenceforthecolorcorrectionsoftware.AgainyoucanreconnecttoyourRawfileseitherbeforeyousendittoDavinciorinsideofDavinci.
ColorCorrectyourfiles
Marryyourmixedaudiotothefiles
RenderandExportyourfinalsequenceas2KorFullHD

Post Production Standards 96

Post Production Standards 97
Basic Workflow 3Shootonfilm(16mm,Super16mmor35mm)FinishonHDCAM(virtualdigitalintermediate)
Therearemanyvariationsonthisworkflow
Attheendofeveryshootingday,thecameranegativeisprocessedanddatacinedtoHDCAMtape(at24or23.98FPS)orfile.DownconvertedclonesaremadetoDVCamwithwindowburnsfor29.97NDFand23.98NDF.
AcopyofthetelecinelogismadeandimportedintoanewdatabaseinFilmscribe.AnXMLisoutput.
TheXMLisimportedintoMediaComposerandthefootageiscaptured,imported,orlinked.AsecondcopyofthebatchlistisopenedinTextEditand used as a cutting log
Anewsequenceiscreatedat23.98andthepictureedited.Withvirtualdigitalintermediate(VDI)doubleusesarefinesothereisnoneedtomake a daily double use report. Edit only to V1 with any superimposi-tions in V2
WhenthepictureislockedyougototheHDon-lineedit.TherestofthefinishwillbeanHDhigh-bandwidthfinish
Aswithotherworkflows,splittheeditintotwenty-minuteorlessreels,and slug for missing titles or effects.
Thesoundishandledexactlyliketheotherworkflows
Cut in the SFTV head leader (23.98 or 24FPS) on every reel
Organizeandsplitoffallsoundtracks
Export the movie (reels) as QuickTime (they will be 23.98FPS Quick-Times)
ExporttheaudioforthereelsasembeddedAAFs
Several digital recorders and theater sound formats now support very high sample rates, 96K at 24 bit. Pro Tools is also capable of these sample rates.
ImporttheAAForopentheOMFasaProToolssessionusingDigiTranslator
Post Production Standards 98
Import the QuickTime movie with timecode burn in into the Pro Tools session. Pro Tools will support the 23.98FPS rate
Recordandimportallsoundeffects,ADR,Foleyandmusic
Edit and sync the sound tracks
On-linetheshowusingtheRawfootage
Perform color correction
Laybackaudiomixtotheon-lineedit
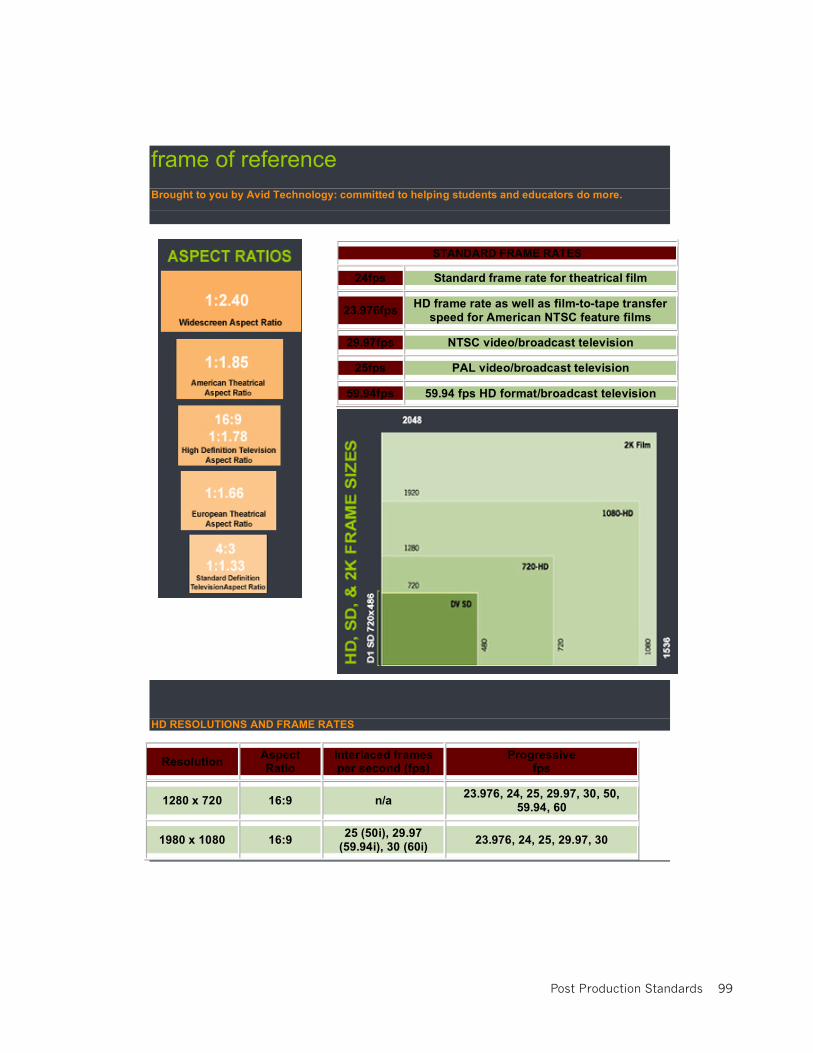
Post Production Standards 99
frame of reference
Brought to you by Avid Technology: committed to helping students and educators do more.
STANDARD FRAME RATES
24fps Standard frame rate for theatrical film
23.976fps HD frame rate as well as film-to-tape transfer
speed for American NTSC feature films
29.97fps NTSC video/broadcast television
25fps PAL video/broadcast television
59.94fps 59.94 fps HD format/broadcast television
HD RESOLUTIONS AND FRAME RATES
Resolution Aspect Ratio
Interlaced frames per second (fps)
Progressive fps
1280 x 720 16:9 n/a 23.976, 24, 25, 29.97, 30, 50,
59.94, 60
1980 x 1080 16:9 25 (50i), 29.97
(59.94i), 30 (60i) 23.976, 24, 25, 29.97, 30
FILM GAUGES
Gauge Perfs Format Counts VIDEO STANDARDS

Post Production Standards 100
16/S16mm 20 Footage 40 frames/foot rollover: +39
16/S16mm KEYKODE™ 20 frames/KeyKode
(2 counts per foot)
rollover:+19
2 perf 32 frames/foot rollover: +39
64 frames/yard
21 frames first foot
rollover: +20
21 frames second foot rollover: +20
3 perf
22 frames third foot
rollover: +21
4 perf 16 frames/foot rollover: +15
35mm 64
8 perf 8 frames/foot rollover: +07
5 perf 24
frames/KeyKode rollover: +14
8 perf 15
frames/KeyKode rollover: +14
12 perf 10
frames/KeyKode rollover: +12
65mm 120
15 perf (IMAX™)
8 frames/KeyKode rollover: +07
KeyKode™ is a trademark of Eastman Kodak Company For more information on KeyKode, Please visit
www.kodak.com
NTSC: The TV standard prepared by the
National Television Systems Committee or
the US, Canada, Japan, Central America,
half of the Caribbean and half of South
America. NTSC video is a standard-
definition format that is made up of 525
lines at 30 Hz. The number of active
display lines per frame is 480.
PAL: Phase Alternating Line is the TV
format used in most of Western Europe,
Australia, and other countries. PAL video is
a standard-definition format that consists of
625 lines at 25 Hz and only refers to the
way color signals are coded for broadcast
purposes. The number of active display
lines per frame is 576.
SECAM: Sequential Couleur Avec
Memoire (sequential color with memory) is
the TV format used in France, Eastern
Europe, and other countries. Like PAL,
SECAM video is 625 lines at 25 Hz. The
number of active lines per frame is 576.
TIME/FOOTAGE FOR VARIOUS FILM FORMATS (24 frames per second)
Time Reg. 8mm Super 8mm 16mm 35mm
10 sec. 3 feet 3 1/3 feet 6 feet 15 feet
30 sec. 9 feet 10 feet 18 feet 45 feet
1 min. 18 feet 20 feet 36 feet 90 feet
3 min. 54 feet 60 feet 108 feet 270 feet
5 min. 90 feet 100 feet 180 feet 450 feet
10 min. 180 feet 200 feet 360 feet 900 feet
guage perfs format counts
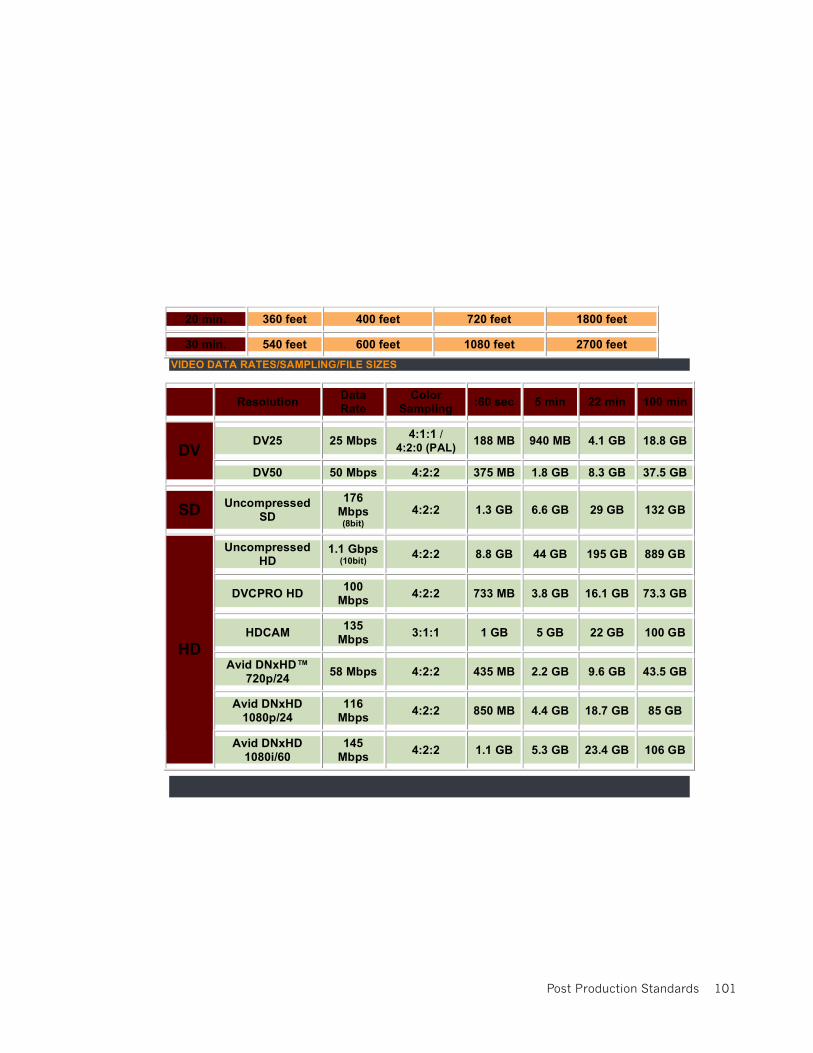
Post Production Standards 101
20 min. 360 feet 400 feet 720 feet 1800 feet
30 min. 540 feet 600 feet 1080 feet 2700 feet
VIDEO DATA RATES/SAMPLING/FILE SIZES
Resolution Data Rate
Color Sampling
:60 sec 5 min 22 min 100 min
DV25 25 Mbps 4:1:1 /
4:2:0 (PAL) 188 MB 940 MB 4.1 GB 18.8 GB
DV
DV50 50 Mbps 4:2:2 375 MB 1.8 GB 8.3 GB 37.5 GB
SD Uncompressed
SD
176 Mbps (8bit)
4:2:2 1.3 GB 6.6 GB 29 GB 132 GB
Uncompressed HD
1.1 Gbps (10bit)
4:2:2 8.8 GB 44 GB 195 GB 889 GB
DVCPRO HD 100
Mbps 4:2:2 733 MB 3.8 GB 16.1 GB 73.3 GB
HDCAM 135
Mbps 3:1:1 1 GB 5 GB 22 GB 100 GB
Avid DNxHD™ 720p/24
58 Mbps 4:2:2 435 MB 2.2 GB 9.6 GB 43.5 GB
Avid DNxHD 1080p/24
116 Mbps
4:2:2 850 MB 4.4 GB 18.7 GB 85 GB
HD
Avid DNxHD 1080i/60
145 Mbps
4:2:2 1.1 GB 5.3 GB 23.4 GB 106 GB

102
file-based camera workflow quick guides for media composer v7VerifythatyouhavethecorrectAMApluginsinstalledonyour machine. This works with the school supported EX-3, XF100,C300,andREDcameras.Ifitdoesnot,thefirstthingto check is whether or not the plugins are installed.
Workflow 1: Linking
DuplicateyouroriginalcamerafilesbycopyingtheENTIRECAMERACARDANDALLOFITSCONTENTStoyourediting hard drive.
Create a new project.
Setup your project format.

103
ChooseFILE-->AMALINK(This option may look different in different versions of Media Composer. The capture below is from version 7.)
Navigatetofirstyourexternalharddrive,thenthemasterfolderinwhichtheAMAfilesarestored.MakesureeitherAUTODETECTAMAPLUGINSorthecorrectcamerapluginis enabled at the bottom of the import box. Select your hard
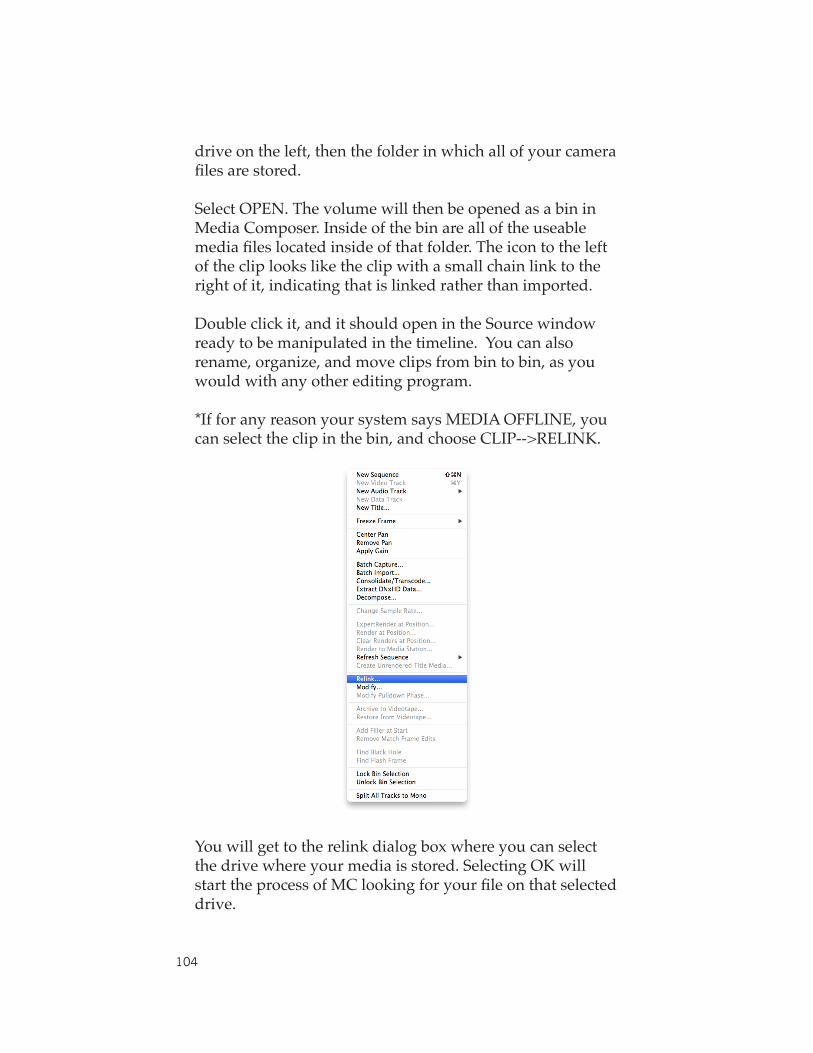
104
drive on the left, then the folder in which all of your camera filesarestored.
Select OPEN. The volume will then be opened as a bin in Media Composer. Inside of the bin are all of the useable mediafileslocatedinsideofthatfolder.Theicontotheleftof the clip looks like the clip with a small chain link to the right of it, indicating that is linked rather than imported.
Doubleclickit,anditshouldopenintheSourcewindowready to be manipulated in the timeline. You can also rename,organize,andmoveclipsfrombintobin,asyouwould with any other editing program.
*IfforanyreasonyoursystemsaysMEDIAOFFLINE,youcanselecttheclipinthebin,andchooseCLIP-->RELINK.
You will get to the relink dialog box where you can select the drive where your media is stored. Selecting OK will starttheprocessofMClookingforyourfileonthatselecteddrive.
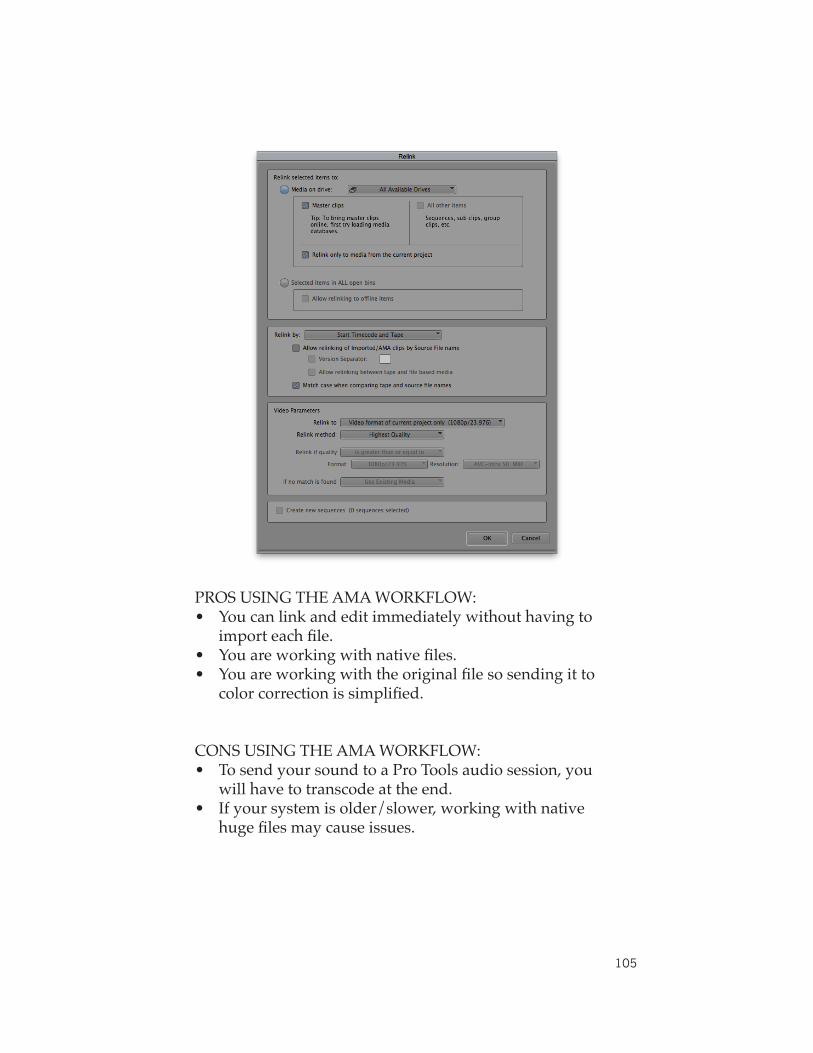
105
PROSUSINGTHEAMAWORKFLOW:• You can link and edit immediately without having to
importeachfile.• Youareworkingwithnativefiles.• Youareworkingwiththeoriginalfilesosendingitto
colorcorrectionissimplified.
CONSUSINGTHEAMAWORKFLOW:• To send your sound to a Pro Tools audio session, you
will have to transcode at the end.• If your system is older/slower, working with native
hugefilesmaycauseissues.
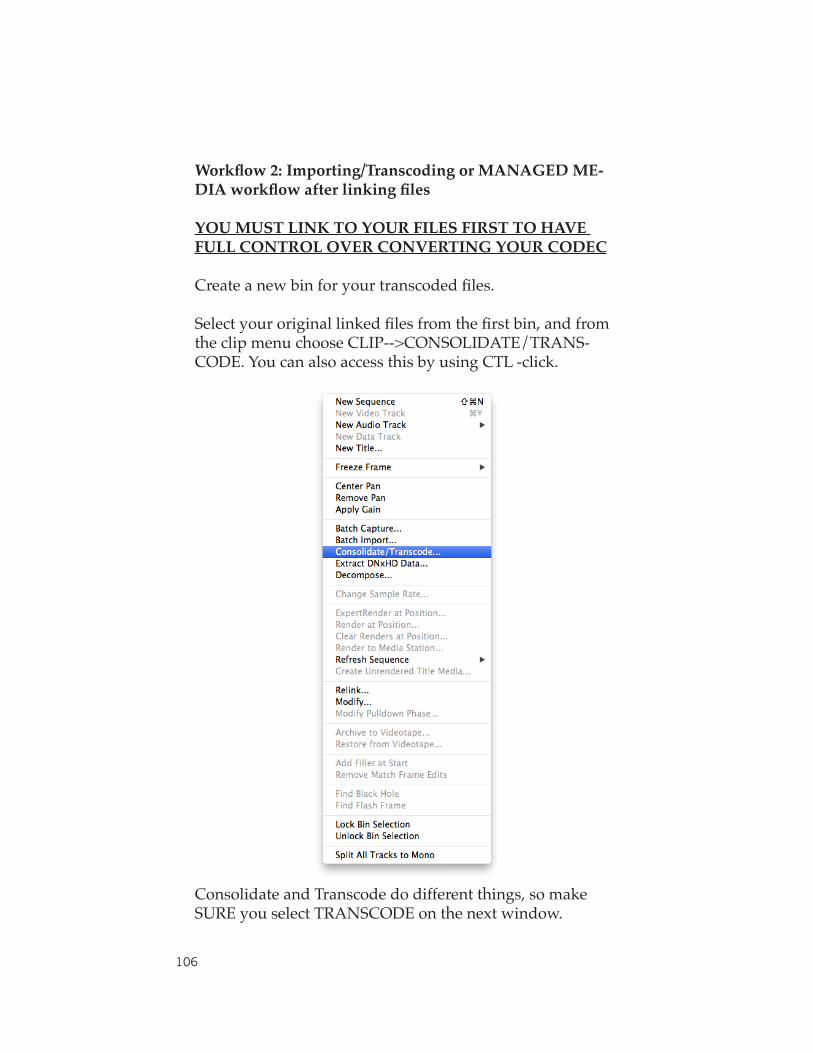
106
Workflow 2: Importing/Transcoding or MANAGED ME-DIA workflow after linking files
YOU MUST LINK TO YOUR FILES FIRST TO HAVE FULL CONTROL OVER CONVERTING YOUR CODEC Createanewbinforyourtranscodedfiles.
Selectyouroriginallinkedfilesfromthefirstbin,andfromtheclipmenuchooseCLIP-->CONSOLIDATE/TRANS-CODE.YoucanalsoaccessthisbyusingCTL-click.
Consolidate and Transcode do different things, so make SUREyouselectTRANSCODEonthenextwindow.

107
Selectthedriveyouwanttostoreiton,selecttheVIDEORESOLUTIONorCODECyouwanttouse,andconverttheaudio sample rate and bit depth if necessary.

108
Oncetranscoded,yourfilewillshowupinthefirstbin,and you can rename it, and drag it to the new bin. Naming conventions are important here for relinking when you are picture locked. It’s up to you to decide how best to do that, but the transcoded clip and the original clip should refer-ence each other clearly for your own convenience later.

109
PROSUSINGTHEMEDIAMANAGEDWORKFLOW:• You can send to pro tools sessions easily. • Youareworkingwithtranscodedfilessothefilesizes
may be easier to manage on slower systems. (esp. im-portantwhenworkingwith4-5KREDfiles)
• YoucaneditmoreefficientlywithfootagefromCanonDSLRsthatshootwithanativeH.264codec.
CONSUSINGTHEMEDIAMANAGEDWORKFLOW:• You are at least doubling the amount of storage you will
need.• Youwillhavetorelinktoyouroriginalfilesorreimport
at a higher resolution in some cases to go to the color correction process if you want to do color correction on thenativefiles.(Importantwhenyouarefinishinga2Kproject)
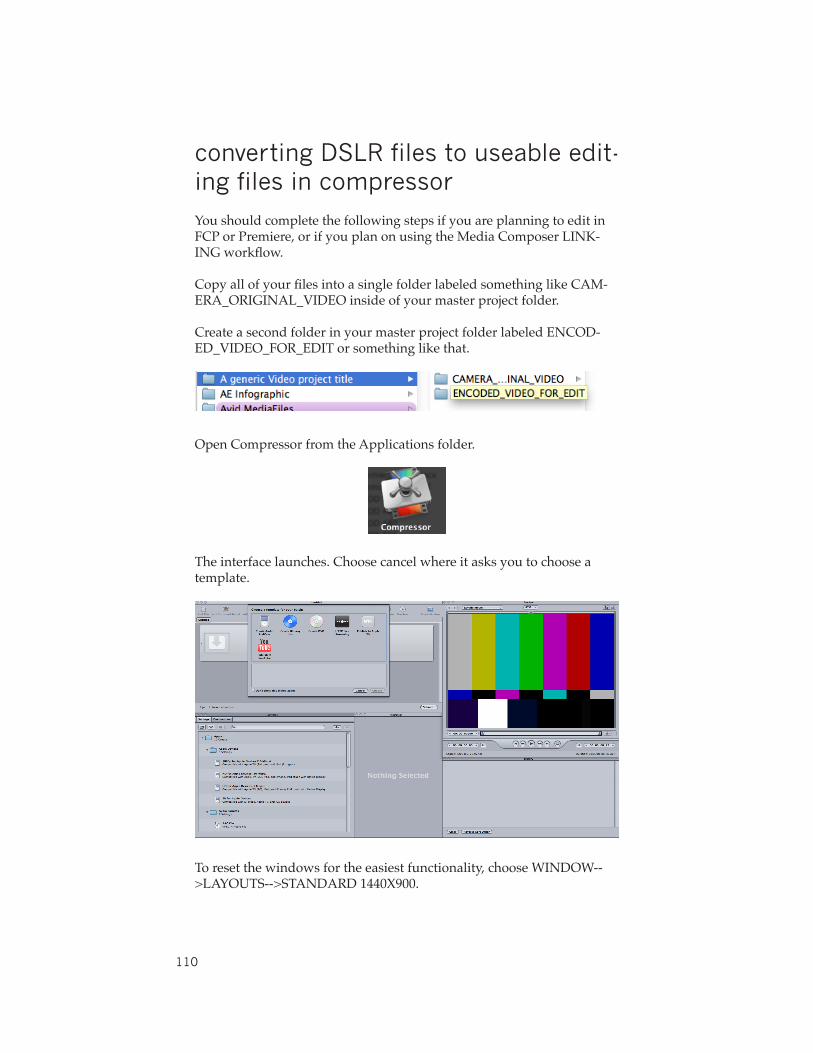
110
converting DSLR files to useable edit-ing files in compressor
You should complete the following steps if you are planning to edit in FCPorPremiere,orifyouplanonusingtheMediaComposerLINK-INGworkflow.
CopyallofyourfilesintoasinglefolderlabeledsomethinglikeCAM-ERA_ORIGINAL_VIDEOinsideofyourmasterprojectfolder.
CreateasecondfolderinyourmasterprojectfolderlabeledENCOD-ED_VIDEO_FOR_EDITorsomethinglikethat.
OpenCompressorfromtheApplicationsfolder.
The interface launches. Choose cancel where it asks you to choose a template.
Toresetthewindowsfortheeasiestfunctionality,chooseWINDOW-->LAYOUTS-->STANDARD1440X900.

111
ClicktheADDFILEbuttonatthetoprightofthebatchwindow.Navi-gatetoyourCAMERA_ORIGINAL_VIDEOfolderandselectallvideosthat need to be encoded. You can select them one by one, or choose COMMMAND+Atoselectall.
When complete, choose OPEN and they will load into the batch moni-tor.
Foreachfileputintothebatchwindow,youwillneedtocreateasettingfor encoding and a setting for a destination.

112
CREATING AN ENCODING SETTING
Compressor does have presets, but they don’t give you full control to createthebestfilepossible.TocreateanewpresetselecttheSETTINGSwindow and then the SETTINGS tab.
InsideoftheApplefolderareabunchofpresets.Wewillcreateanewonebychoosingthe+markonthetoprightofthewindow.
Click and hold it, a submenu appears and we will choose QUICKTIME MOVIE from that menu.
AnewpresetshowsupintheCUSTOMfolderandtheinspectorhaschanged to give us full control of the setting.

113
Name the setting.
WhileontheENCODERTAB,undertheVIDEOsettingclickSET-TINGS.
ChangetheCompressionType(orCodec)toAppleProRes422HQ.
Change the frame rate to CUSTOM and type in the frame rate with which you shot.
Change the Gamma Correction to NONE.
When complete, select OK.
UndertheAUDIOsettingclickSETTINGS.

114
MakesuretheFormatissettoLINEARPCMandthesamplerateissetto48.000kHz.
Change the render settings Quality to BEST.MakesuretheSampleSizeissetto16andtheLITTLEENDIANboxischecked.
Select OK when complete.
SelecttheGEOMETRYtab.
IntheDIMENSIONSsection,holdtheframesizedownandchangeittomatchyouroriginalcamerasource–inthiscase1920x1080.

115
Creating a new DESTINATION setting
SelecttheDESTINATIONStab.
SelectthePLUSmarkonthetoprightofthewindowandnavigatetotheENCODEDVIDEOfolderyoucreatedinyourmasterprojectfolder.

116
Select OPEN and the folder should appear inside of the CUSTOM folder underDESTINATIONS.
Adding your preset and your destination to your camera files
MakethebatchwindowactiveandchooseCOMMAND+Atoselectallof the clips inside of the window.
From the SETTINGS tab and CUSTOM folder drag your new preset to the window and drop it. It should apply to all of the items.
FromtheDESTINATIONStabandCUSTOMfolder,selectthedestina-tionanddraganddropitINDIVIDUALLYontothewordSOURCE.Ican’tfigureoutawaytoapplythistoallonceanotherpresethasbeenadded, so this has to be done one by one.
Beforeyouhitsubmit,doublecheckthateachfilehasthecorrectsettingand the correct destination added to a single line on each video.
ChooseSUBMITandletitrununtilitiscomplete.Allfileswillbestoredinyournewfolderwhencompleted.Youwilllinktothesefilesforedit-ing.
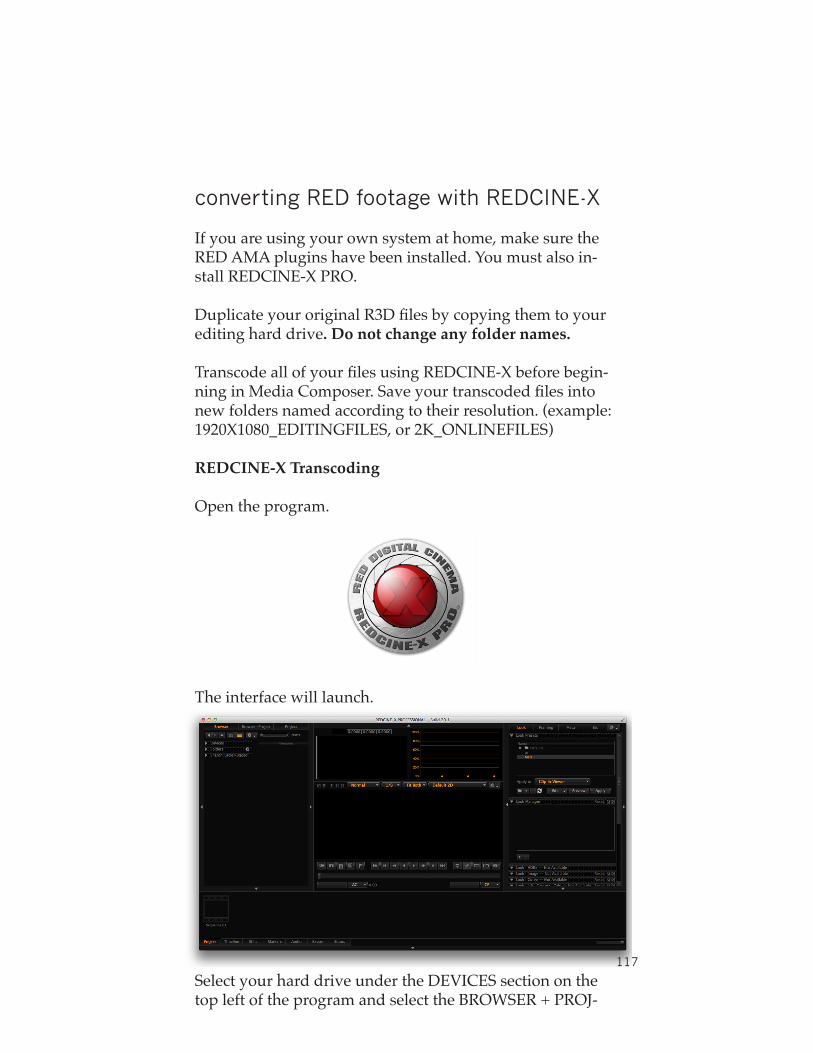
117
converting RED footage with REDCINE-X
If you are using your own system at home, make sure the REDAMApluginshavebeeninstalled.Youmustalsoin-stallREDCINE-XPRO.
DuplicateyouroriginalR3Dfilesbycopyingthemtoyourediting hard drive. Do not change any folder names.
TranscodeallofyourfilesusingREDCINE-Xbeforebegin-ninginMediaComposer.Saveyourtranscodedfilesintonew folders named according to their resolution. (example: 1920X1080_EDITINGFILES,or2K_ONLINEFILES)
REDCINE-X Transcoding
Open the program.
The interface will launch.
SelectyourharddriveundertheDEVICESsectiononthetopleftoftheprogramandselecttheBROWSER+PROJ-
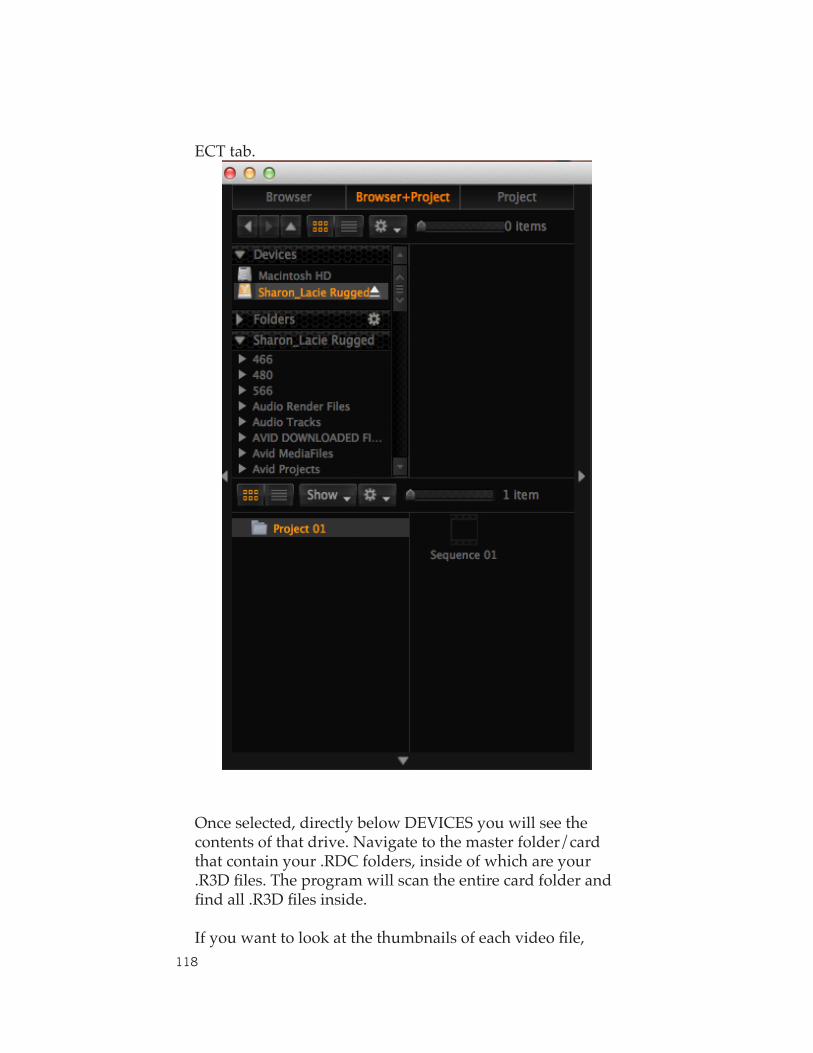
118
ECT tab.
Onceselected,directlybelowDEVICESyouwillseethecontents of that drive. Navigate to the master folder/card thatcontainyour.RDCfolders,insideofwhichareyour.R3Dfiles.Theprogramwillscantheentirecardfolderandfindall.R3Dfilesinside. Ifyouwanttolookatthethumbnailsofeachvideofile,

119
clicktheSHOWITEMSASICONSbuttonatthetop.
Below the icons is the “Project” window. Each project folder defaults to include a sequence in which you could actually edit a scene. This docu-ment just walks you through transcoding for use in another editing pro-gram.
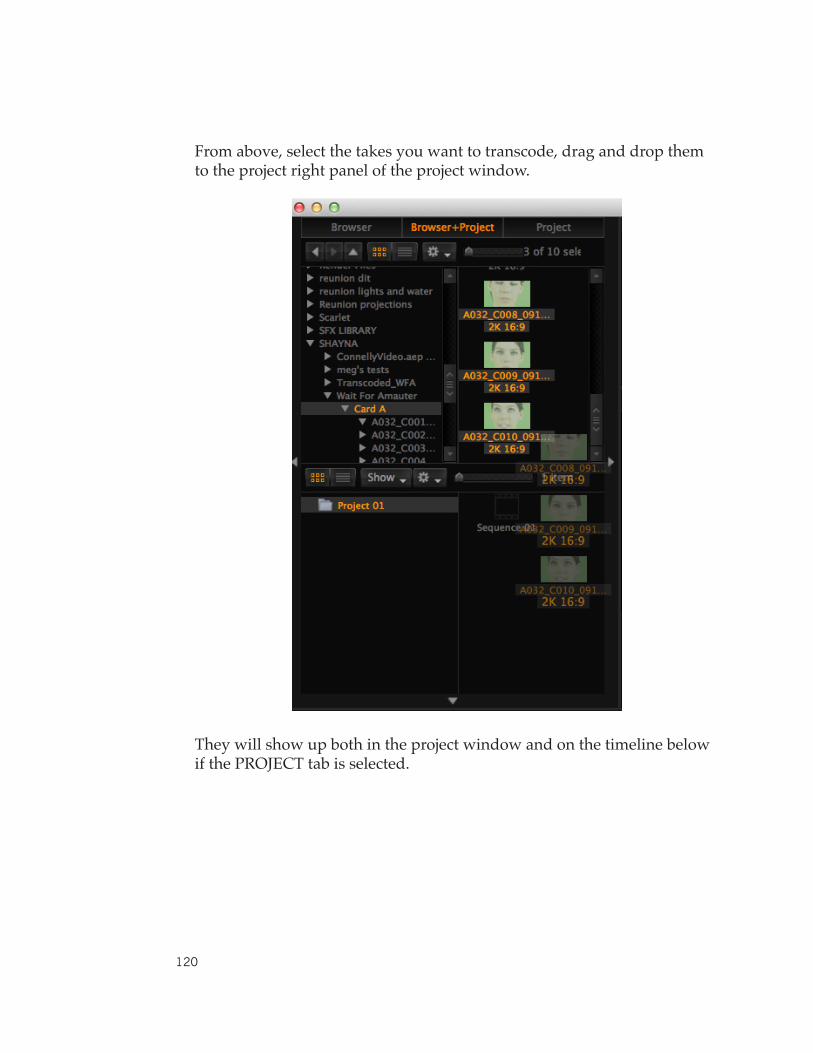
120
From above, select the takes you want to transcode, drag and drop them to the project right panel of the project window.
They will show up both in the project window and on the timeline below ifthePROJECTtabisselected.

121
The bottom window has a series of tabs that perform different functions. ThisdocumentwillconcentrateontheEXPORTtab.Clickthattabtomake it active.
The right side of this panel is where you will create a new preset to transcode your clips for editing. You may want to make both a preset forcreating1920x1080(fullHD)filesforyoureditandoneforcreatinga2048x1152 (2K) online edit. You must evaluate your needs based on the footage you shot. Please note: All deliveries to the SFTV booth are re-quired to be 1920x1080.
Selectthe+buttononthebottomleftofthatpanel.
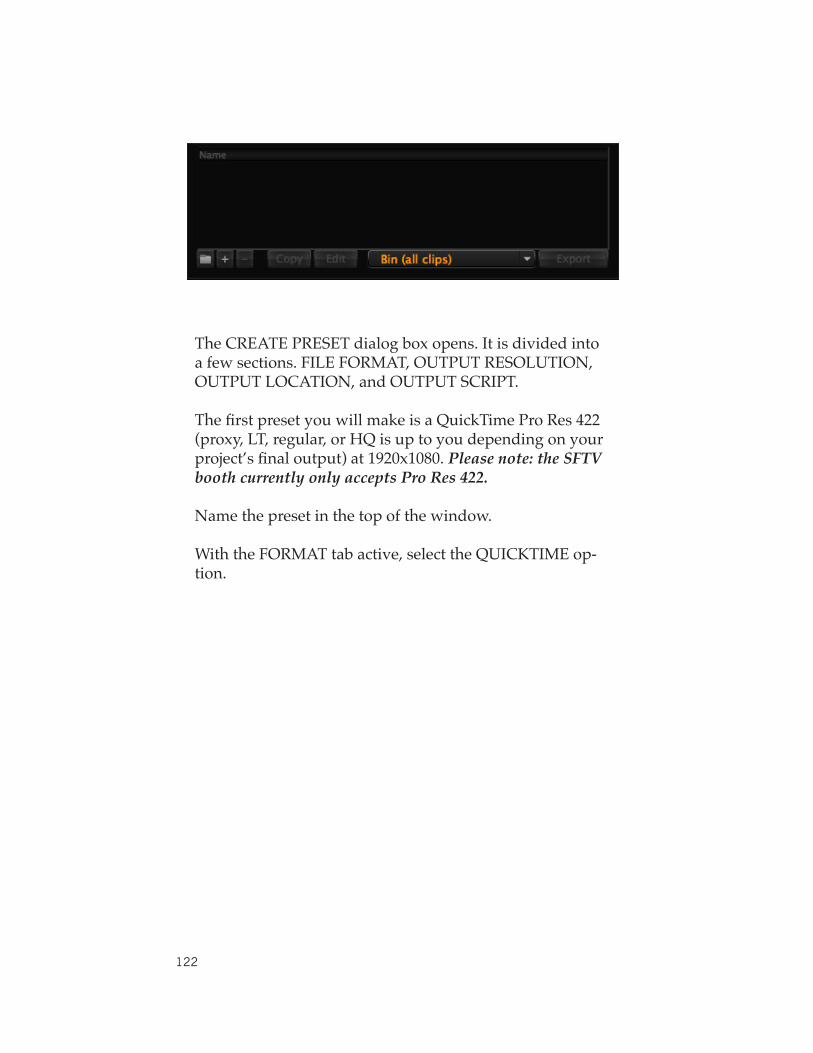
122
TheCREATEPRESETdialogboxopens.Itisdividedintoafewsections.FILEFORMAT,OUTPUTRESOLUTION,OUTPUTLOCATION,andOUTPUTSCRIPT.
ThefirstpresetyouwillmakeisaQuickTimeProRes422(proxy,LT,regular,orHQisuptoyoudependingonyourproject’sfinaloutput)at1920x1080.Please note: the SFTV booth currently only accepts Pro Res 422.
Name the preset in the top of the window. WiththeFORMATtabactive,selecttheQUICKTIMEop-tion.

123
Select the SETUP button.
The QuickTime Settings box will open.
124
Select the Video button and the standard Mac Compres-sion Settings window will open. Here you will select the Compression Type (or Codec), the Frames per Second (you will usually match your footage frame rate), and change the Gamma Correction to NONE. Choose OK when complete. Alwaysdouble-checkthesesettings.
SelecttheAUDIObuttonandchangetheaudioifneedbe
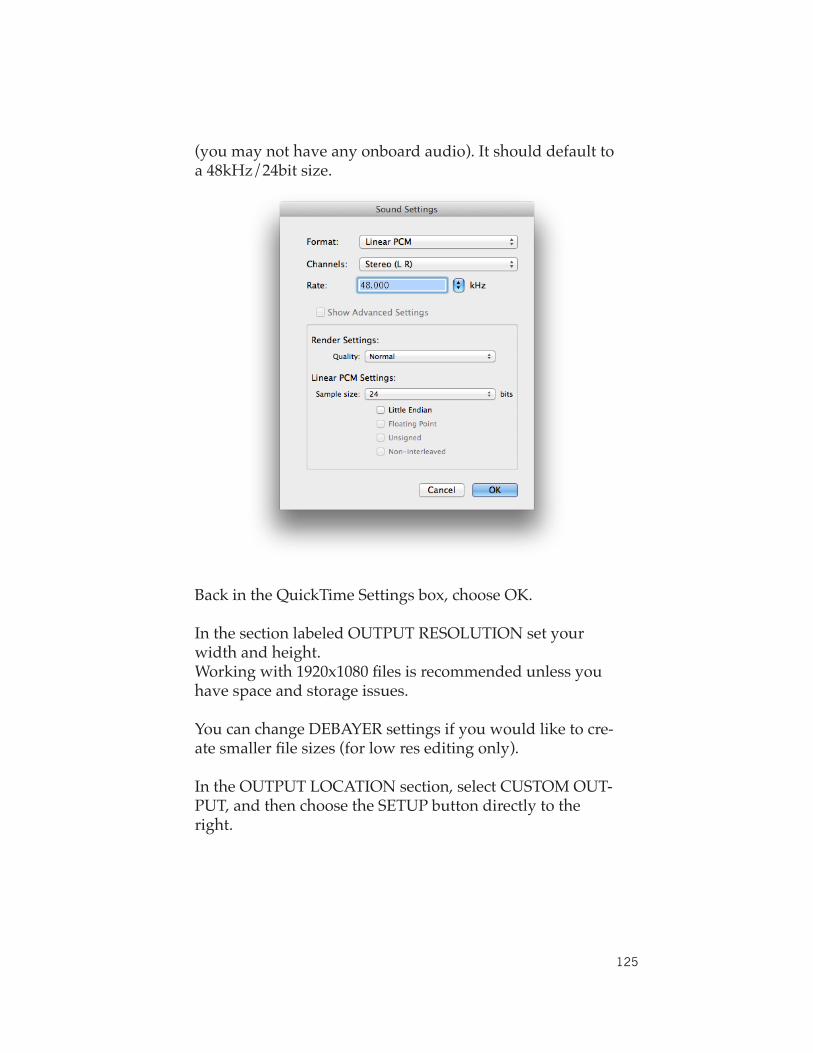
125
(you may not have any onboard audio). It should default to a48kHz/24bitsize.
Back in the QuickTime Settings box, choose OK.
InthesectionlabeledOUTPUTRESOLUTIONsetyourwidth and height. Workingwith1920x1080filesisrecommendedunlessyouhave space and storage issues.
YoucanchangeDEBAYERsettingsifyouwouldliketocre-atesmallerfilesizes(forlowreseditingonly).
IntheOUTPUTLOCATIONsection,selectCUSTOMOUT-PUT, and then choose the SETUP button directly to the right.

126
SelecttheBROWSEbutton.Findyourharddrive,createanew folder, name it appropriately, and select CHOOSE.
Whenfinished,selectOK.Allofyourfilestranscodedwiththis preset will be created and stored in this folder.
BackintheCREATEPRESETdialogbox,double-checkallofyoursettingsandchooseSAVE.
It will now show up in the bottom right panel of the export
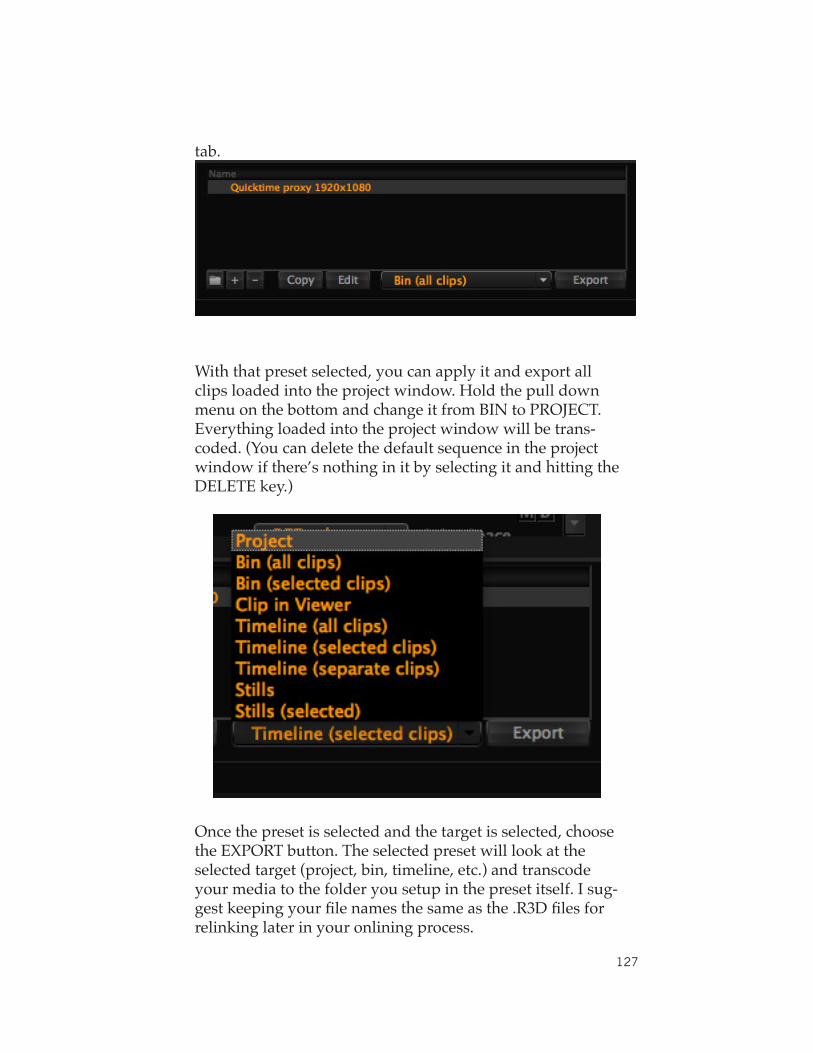
127
tab.
With that preset selected, you can apply it and export all clips loaded into the project window. Hold the pull down menuonthebottomandchangeitfromBINtoPROJECT.Everything loaded into the project window will be trans-coded. (You can delete the default sequence in the project window if there’s nothing in it by selecting it and hitting the DELETEkey.)
Once the preset is selected and the target is selected, choose theEXPORTbutton.Theselectedpresetwilllookattheselected target (project, bin, timeline, etc.) and transcode your media to the folder you setup in the preset itself. I sug-gestkeepingyourfilenamesthesameasthe.R3Dfilesforrelinking later in your onlining process.

128
OnceyouchooseEXPORT,youwillseeyourfilesastheygothrough the transcoding process on the left of this window.
Oncecreated,youcanlinkdirectlytoyourfilesinMediaComposer.
Finishing in 2K
Ifyouareplanningonfinishingin2KforanOUTSIDE DCP CREATION,youcancreateyourfilessimultaneously.Youcaneitherlinkdirectlyto2K.R3Dfilesintheir.RDCfold-ers, or if you shot at various resolutions, you can create a newpresetforyour2Kfinishingfiles.
You walk through the same process of creating a new pre-set. ClickthePLUSmarkonthebottom.Nameyourpresetsomething like QUICKTIME_2K_4444. In the end this is up to you, but make it clear what the new settings specs are.
Change the format to QuickTime and choose the Setup but-ton.
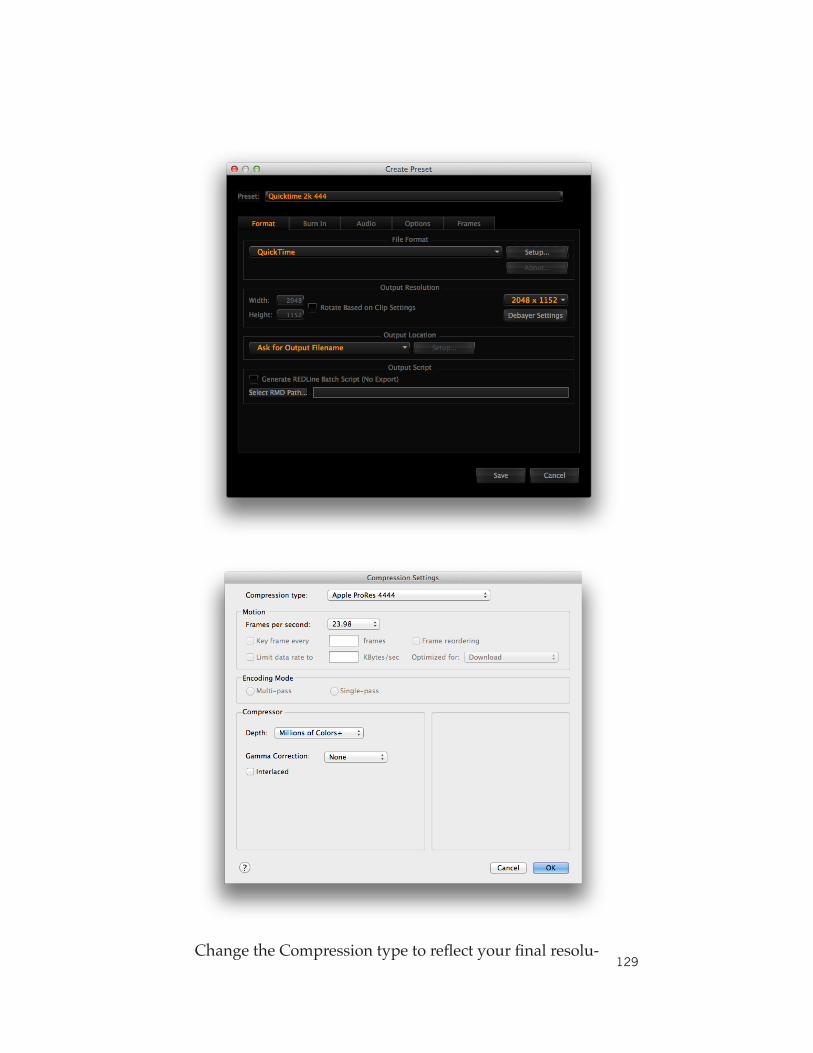
129ChangetheCompressiontypetoreflectyourfinalresolu-
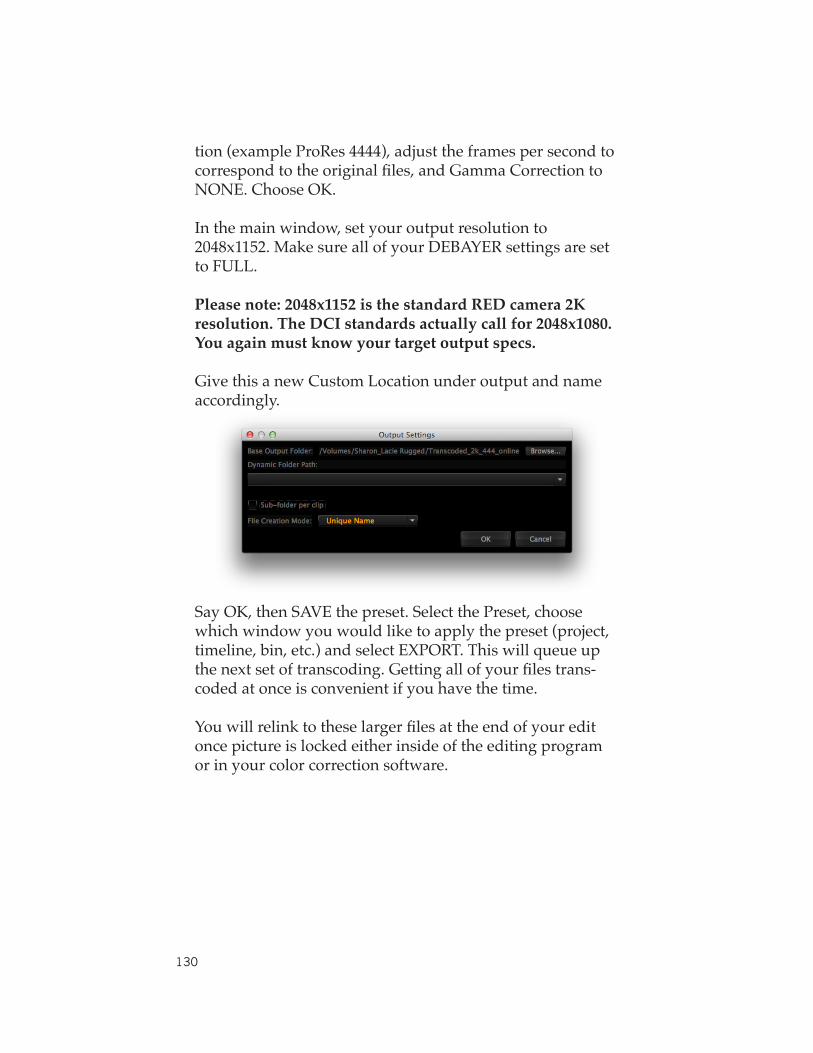
130
tion(exampleProRes4444),adjusttheframespersecondtocorrespondtotheoriginalfiles,andGammaCorrectiontoNONE. Choose OK.
In the main window, set your output resolution to 2048x1152.MakesureallofyourDEBAYERsettingsaresettoFULL.
Please note: 2048x1152 is the standard RED camera 2K resolution. The DCI standards actually call for 2048x1080. You again must know your target output specs.
GivethisanewCustomLocationunderoutputandnameaccordingly.
SayOK,thenSAVEthepreset.SelectthePreset,choosewhich window you would like to apply the preset (project, timeline,bin,etc.)andselectEXPORT.Thiswillqueueupthenextsetoftranscoding.Gettingallofyourfilestrans-coded at once is convenient if you have the time.
Youwillrelinktotheselargerfilesattheendofyoureditonce picture is locked either inside of the editing program or in your color correction software.
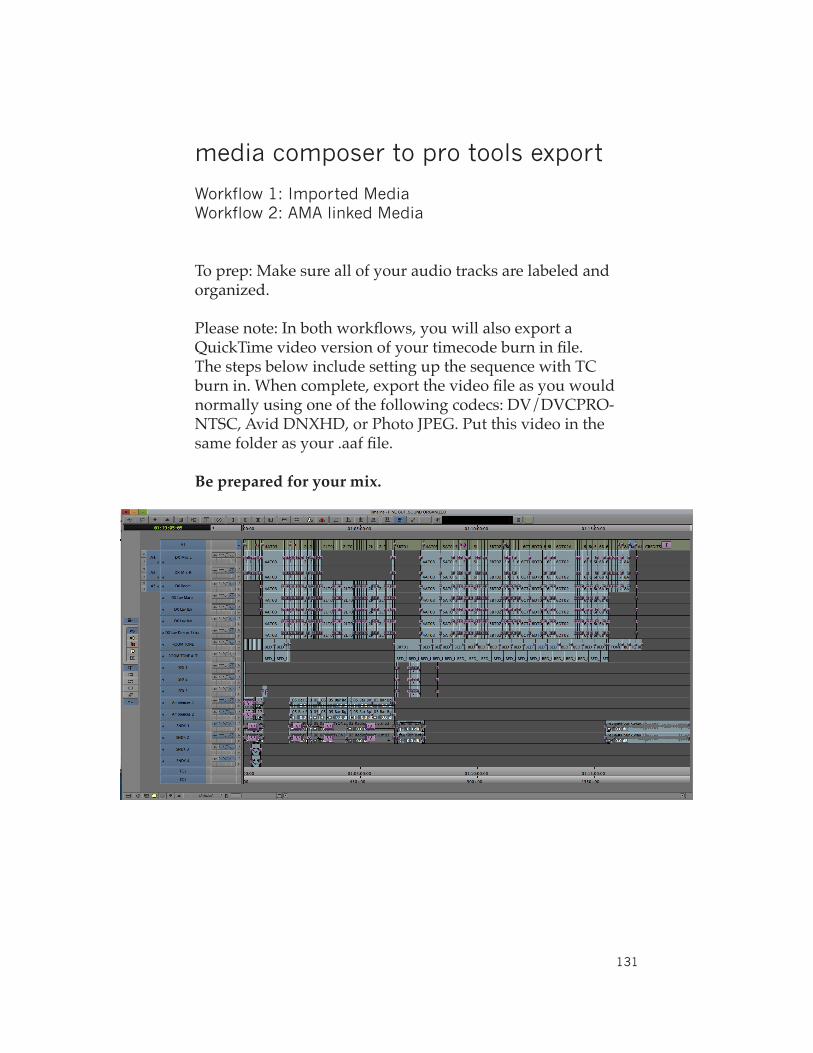
131
media composer to pro tools export Workflow 1: Imported MediaWorkflow 2: AMA linked Media
To prep: Make sure all of your audio tracks are labeled and organized.
Pleasenote:Inbothworkflows,youwillalsoexportaQuickTimevideoversionofyourtimecodeburninfile.The steps below include setting up the sequence with TC burnin.Whencomplete,exportthevideofileasyouwouldnormallyusingoneofthefollowingcodecs:DV/DVCPRO-NTSC,AvidDNXHD,orPhotoJPEG.Putthisvideointhesamefolderasyour.aaffile.
Be prepared for your mix.

132
Workflow 1: If your project footage is imported
PartA:Setup
Verifythatyourprojectissetto24bit/48kHzintheAudioProjectsettings.FromtheSETTINGStabselectAUDIOPROJECT.
Verify your Sample rate is set to 48 and your bit depth is set to 24.

133
Duplicateyourpicturelockedsequence.Createanewbinand put the new sequence into that bin.
Open that sequence into the timeline. Create a new video track. From the Video Effects tab in the Project Window, se-lecttheGENERATORsectionontheleftandfindtheTIME-CODEBURN-INoptionontheright.

134
Dragthateffecttothenewblankvideotrackyoucreated.Make sure that track is visible.
Youcanchangethesize,position,etc.withtheEffectEditorif you would like.
Part B: Exporting
With your sequence setup and premixed, turn on all tracks inthesequence.FromthefilemenuchooseEXPORT.
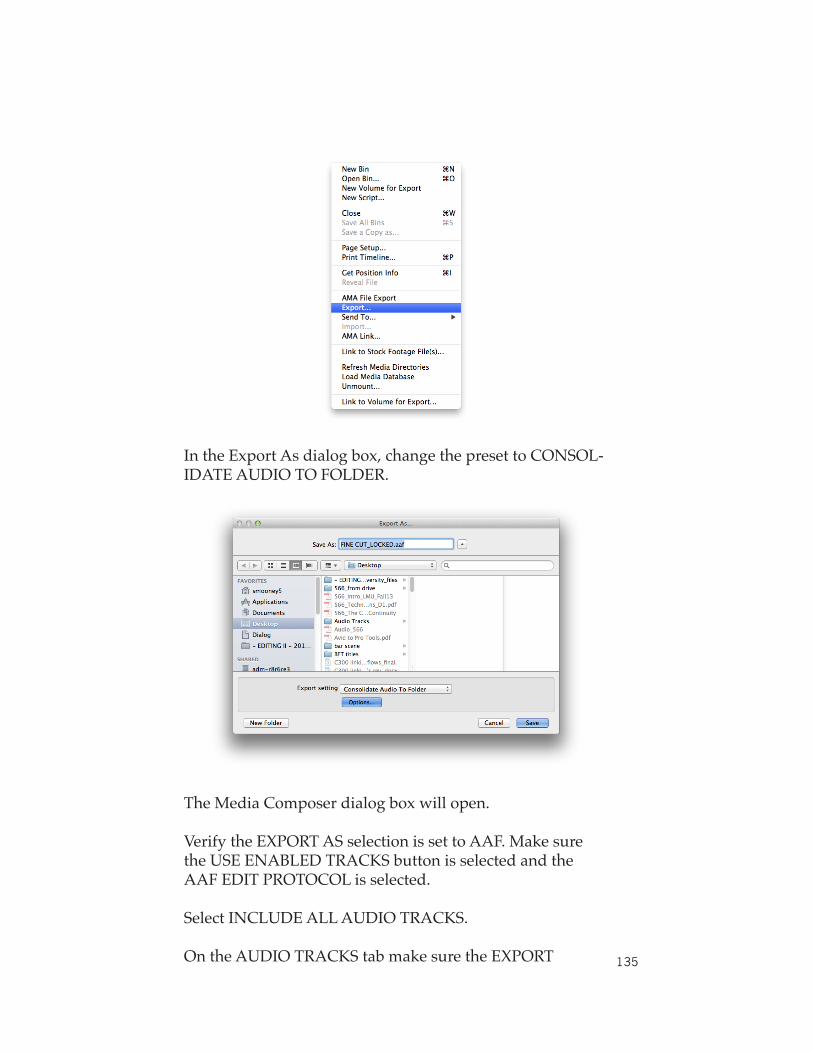
135
IntheExportAsdialogbox,changethepresettoCONSOL-IDATEAUDIOTOFOLDER.
The Media Composer dialog box will open.
VerifytheEXPORTASselectionissettoAAF.MakesuretheUSEENABLEDTRACKSbuttonisselectedandtheAAFEDITPROTOCOLisselected.
SelectINCLUDEALLAUDIOTRACKS.
OntheAUDIOTRACKStabmakesuretheEXPORT

136
METHODissettoCONSOLIDATEMEDIAbutchangeyour handle length to something between 120-180 frames to give your sound mixer handles to work with.
CheckINCLUDERENDEREDAUDIOEFFECTSandREN-DERALLAUDIOEFFECTS.MakesureREMOVETRACKEFFECTS is turned off. You can deselect all others because youverifiedyouraudioprojectsettingsbeforethisstep.
ChangetheCONVERTAUDIOFORMATtoAIFF.
IntheMEDIADESTINATIONsection,switchtheaudioop-tiontobeEMBEDDEDINAAF.
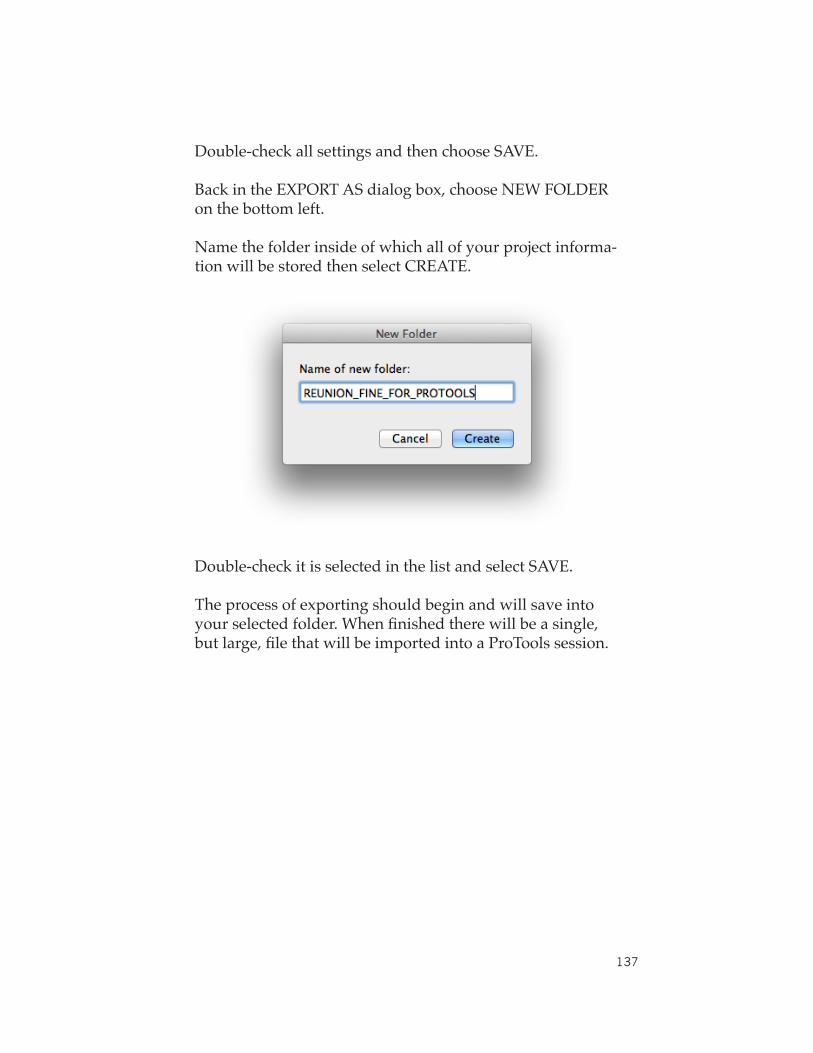
137
Double-checkallsettingsandthenchooseSAVE.
BackintheEXPORTASdialogbox,chooseNEWFOLDERon the bottom left.
Name the folder inside of which all of your project informa-tionwillbestoredthenselectCREATE.
Double-checkitisselectedinthelistandselectSAVE.
The process of exporting should begin and will save into yourselectedfolder.Whenfinishedtherewillbeasingle,butlarge,filethatwillbeimportedintoaProToolssession.
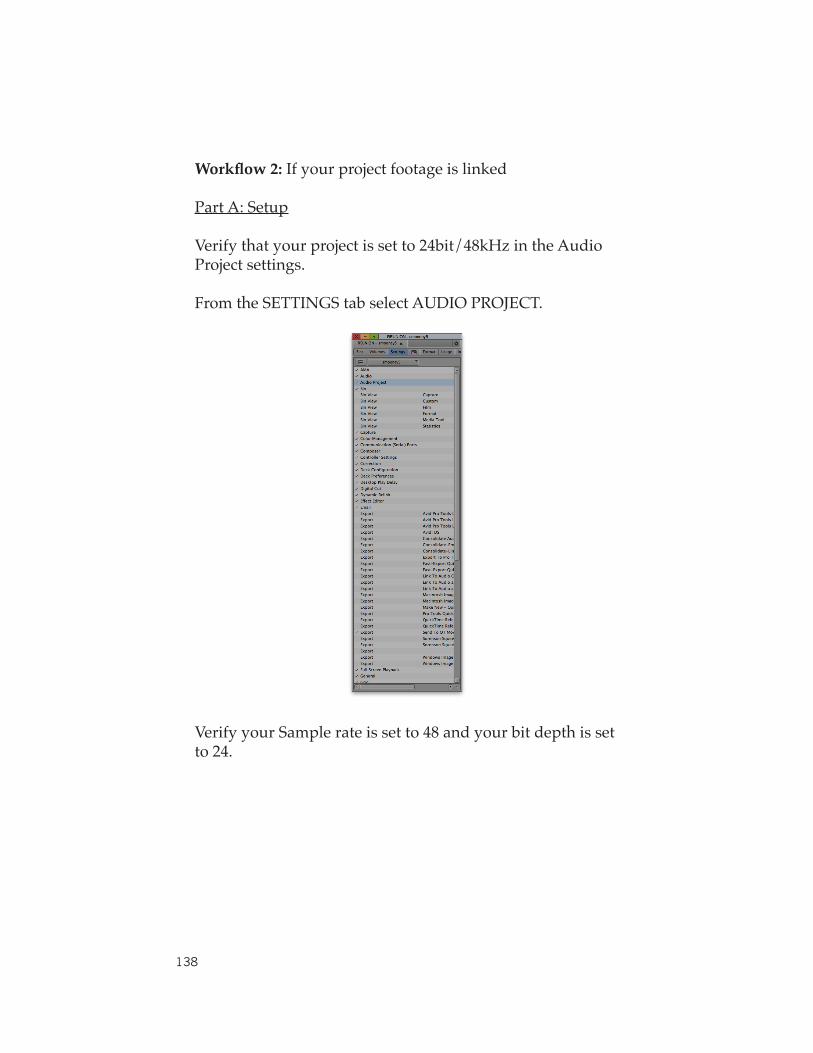
138
Workflow 2: If your project footage is linked
PartA:Setup
Verifythatyourprojectissetto24bit/48kHzintheAudioProject settings.
FromtheSETTINGStabselectAUDIOPROJECT.
Verify your Sample rate is set to 48 and your bit depth is set to 24.
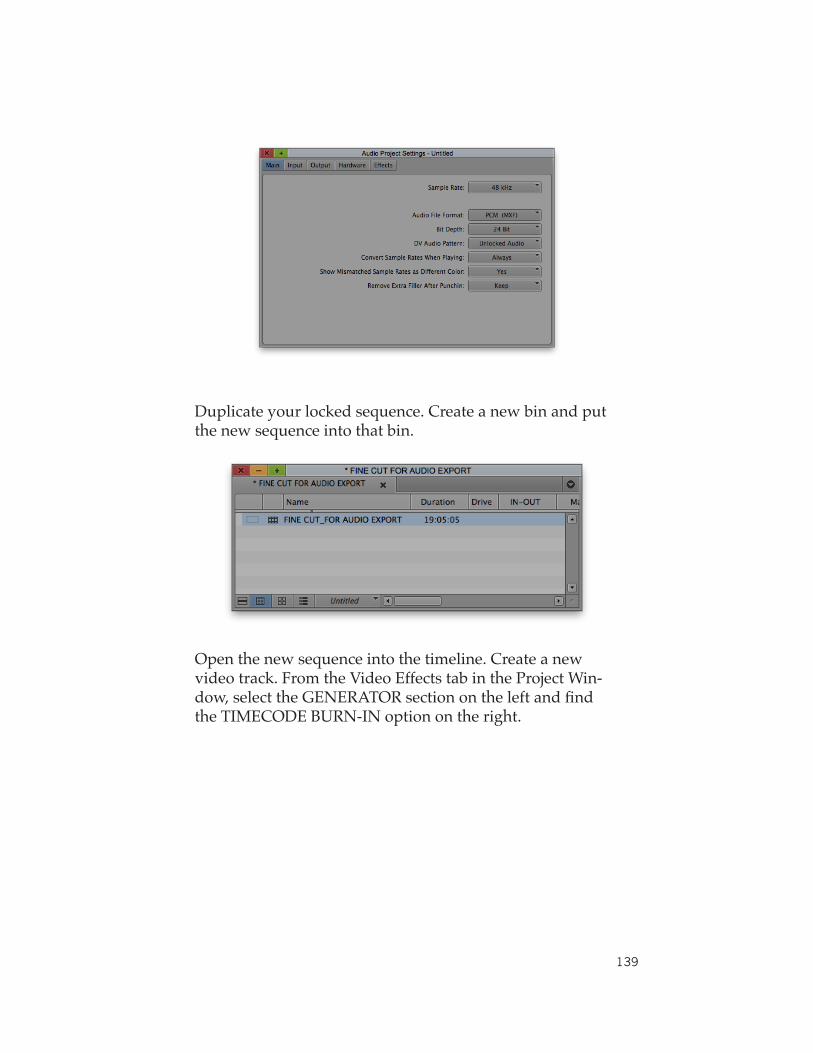
139
Duplicateyourlockedsequence.Createanewbinandputthe new sequence into that bin.
Open the new sequence into the timeline. Create a new video track. From the Video Effects tab in the Project Win-dow,selecttheGENERATORsectionontheleftandfindtheTIMECODEBURN-INoptionontheright.
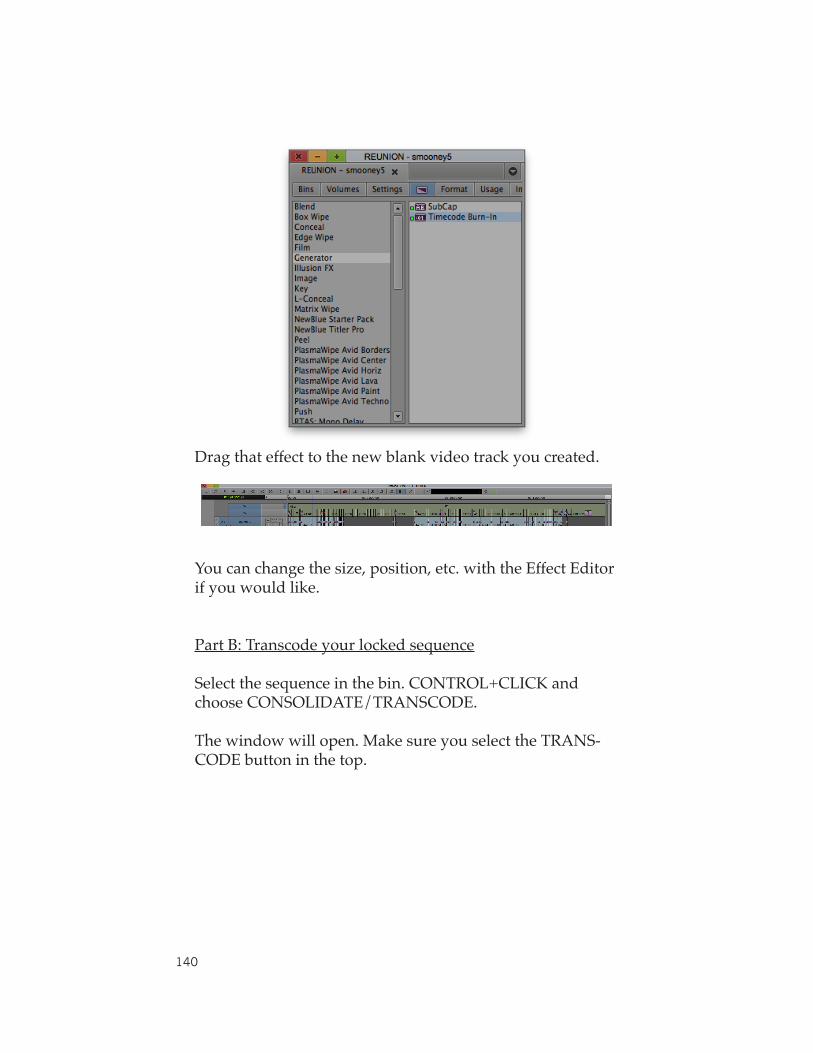
140
Dragthateffecttothenewblankvideotrackyoucreated.
Youcanchangethesize,position,etc.withtheEffectEditorif you would like.
Part B: Transcode your locked sequence
Selectthesequenceinthebin.CONTROL+CLICKandchooseCONSOLIDATE/TRANSCODE.
Thewindowwillopen.MakesureyouselecttheTRANS-CODEbuttoninthetop.
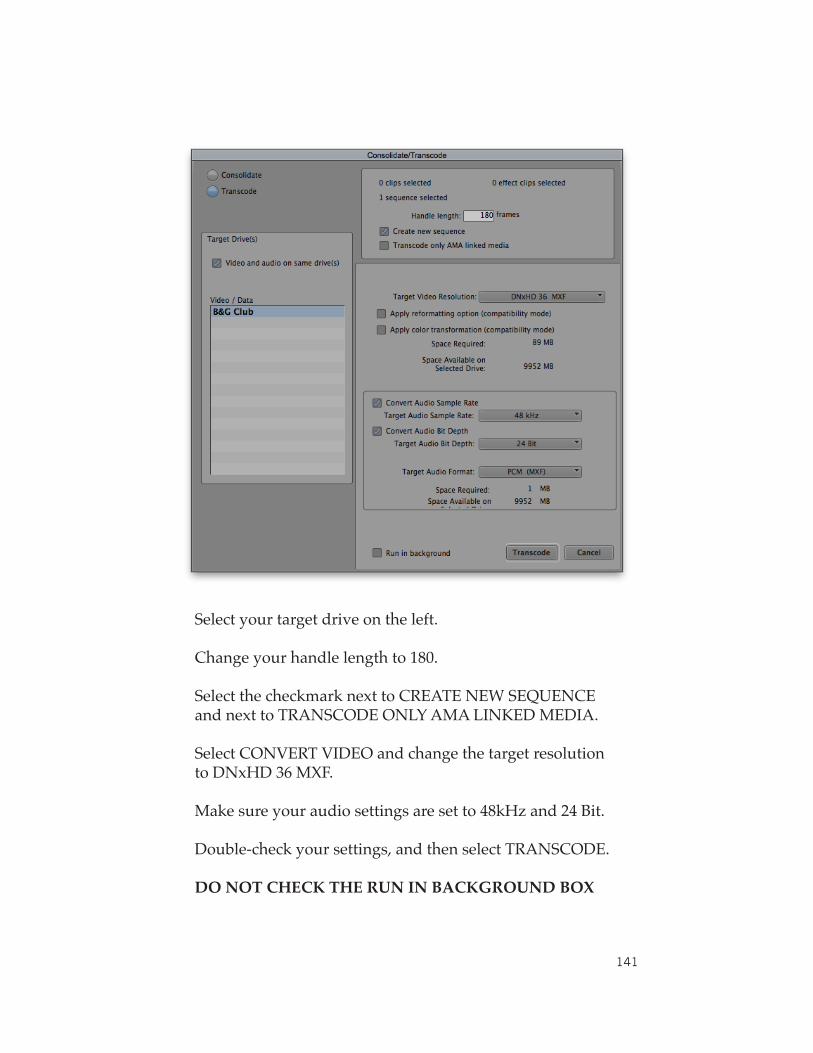
141
Select your target drive on the left.
Change your handle length to 180.
SelectthecheckmarknexttoCREATENEWSEQUENCEandnexttoTRANSCODEONLYAMALINKEDMEDIA.
SelectCONVERTVIDEOandchangethetargetresolutiontoDNxHD36MXF.
Makesureyouraudiosettingsaresetto48kHzand24Bit.
Double-checkyoursettings,andthenselectTRANSCODE.
DO NOT CHECK THE RUN IN BACKGROUND BOX

142
Part C: Exporting
Double-clickthenewtranscodedsequencetoopenitinthetimeline.
Once open in the timeline, turn on all tracks in the se-quence.FromthefilemenuchooseEXPORT.
IntheExportAsdialogbox,changethepresettoCONSOL-IDATEAUDIOTOFOLDER.

143
The Media Composer dialog box will open.
ChangethefirstoptiontoAAFandmakesuretheUSEEN-ABLEDTRACKSbuttonisselected.
SelectINCLUDEALLAUDIOTRACKS.MakesureIN-CLUDEALLVIDEO/DATAisdeselected.
OntheAUDIOTRACKStabmakesuretheEXPORTMETHODissettoCONSOLIDATEMEDIAbutchangeyour handle length to something between 120-180 frames to give your designer handles to work with.
CheckINCLUDERENDEREDAUDIOEFFECTSandREN-DERALLAUDIOEFFECTS.MakesureREMOVETRACKEFFECTS is turned off. You can deselect all others because youverifiedyouraudioprojectsettingsbeforethisstep.
ChangetheCONVERTAUDIOFORMATtoAIFF.IntheMEDIADESTINATIONsection,switchtheaudiooptiontobeEMBEDDEDINAAF.

144
DoublecheckallsettingsandthenchooseSAVE.
BackintheEXPORTASdialogbox,chooseNEWFOLDERon the bottom left.
Name the folder inside of which all of your project informa-tionwillbestoredthenselectCREATE.
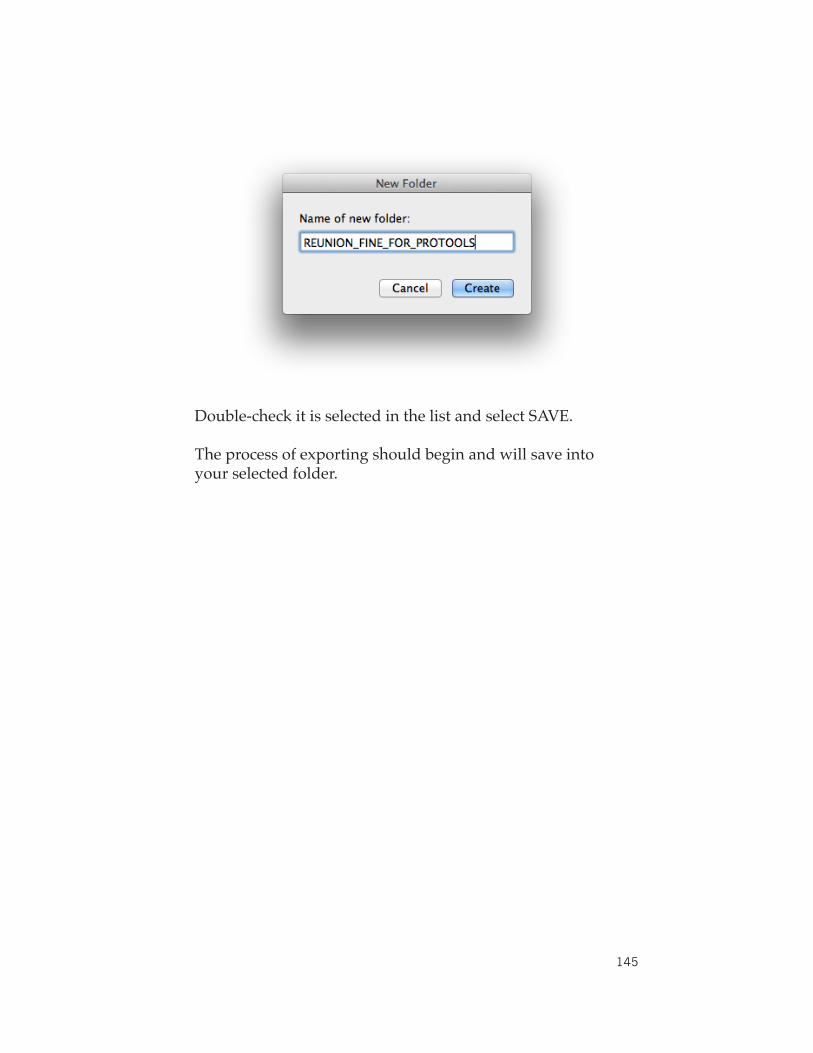
145
Double-checkitisselectedinthelistandselectSAVE.
The process of exporting should begin and will save into your selected folder.


