
Adobe Experience Manager (AEM) Integration with SAP Marketing Cloud
Document Version: 1.0.0

This document supports you with configuring Adobe Experience Manager (AEM) forms with SAP
Marketing Cloud.
Note: Steps and screenshots are tested in AEM 6.3.0 and in other AEM versions it might be
different.
Prerequisites for AEM Forms
To use AEM forms, you must have the following:
• AEM 6.3.0
• Both Author and Publisher instances for AEM
1. Download and Install the Plugin
The Plugin is available in Adobe Package Share and need to be downloaded through your AEM
System. Please follow the steps below to obtain the package:
1. Open the AEM author instance.
• 4502 is the default port for the AEM author instance.
• The hostname is the host of an individual AEM server.
2. Navigate to the Package Share.
• Open the AEM icon at the top left of the screen.
• Choose the Tools icon.
• Click on the Package Share
• Sign in to the Package Share repository. If you need an Adobe ID, click on the “Create an Adobe
ID”
• After successful login the plugin is accessible by searching “SAP-Marketing-Cloud” in the
search box.

• Click on “SAP-Marketing-Cloud” from the search results.
• Press Download and wait for the completion of download (100%).
• Click on the Install and in the opened window press Install again.
• Download and install the plugin.
•
From the upper toolbar click on the Packages
3. Navigate to Package Manager
• From the upper toolbar click on the Packages
• Now a new entry(sapmkt-content-package-<X.X.X>.zip) should be available in the
Package share.
• Choose the package to see the following screen and choose Install to install the package.
4. In the following screen press again Install and do not use any Advanced Settings.
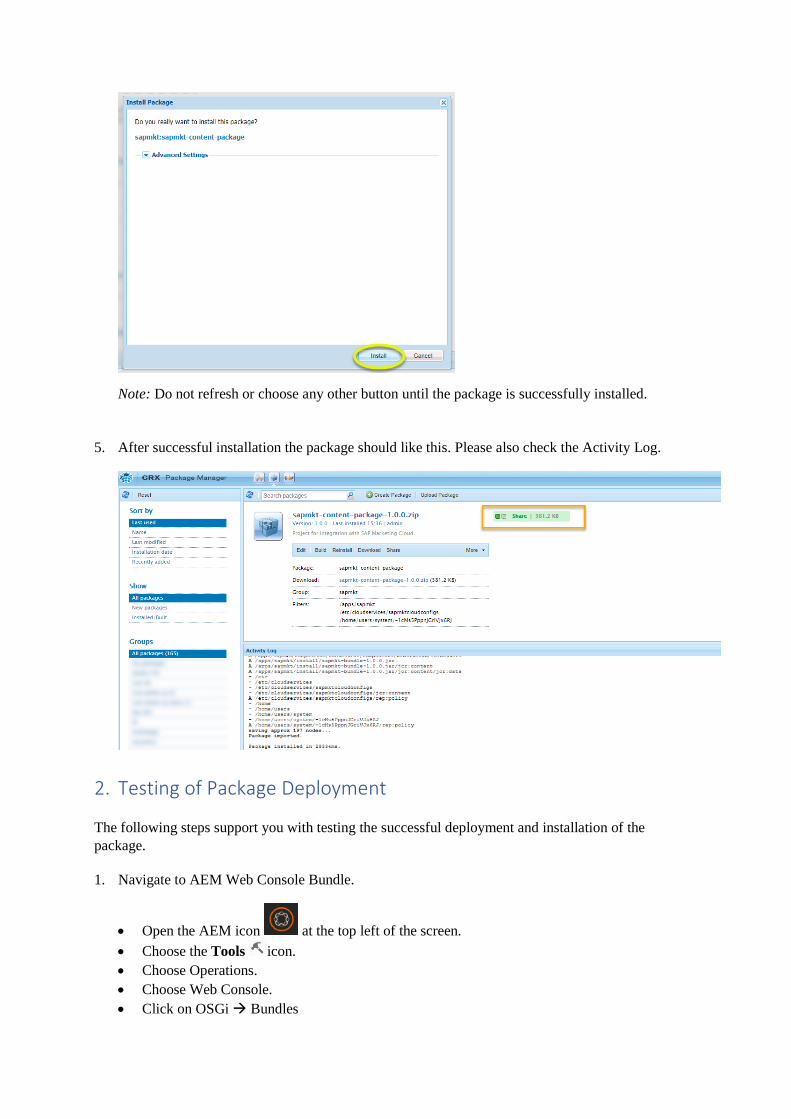
Note: Do not refresh or choose any other button until the package is successfully installed.
5. After successful installation the package should like this. Please also check the Activity Log.
2. Testing of Package Deployment
The following steps support you with testing the successful deployment and installation of the
package.
1. Navigate to AEM Web Console Bundle.
• Open the AEM icon at the top left of the screen.
• Choose the Tools icon.
• Choose Operations.
• Choose Web Console.
• Click on OSGi Bundles

The Web Console opens. This window is called the OSGI console.
2. Find the bundle named sapmkt Bundle and check that it has the status Active.
3. Creating an Adaptive Form
To create an adaptive form, do the following:
1. Choose Open the AEM icon at the top left of the screen.
2. Choose the Navigation icon
3. Choose Forms.
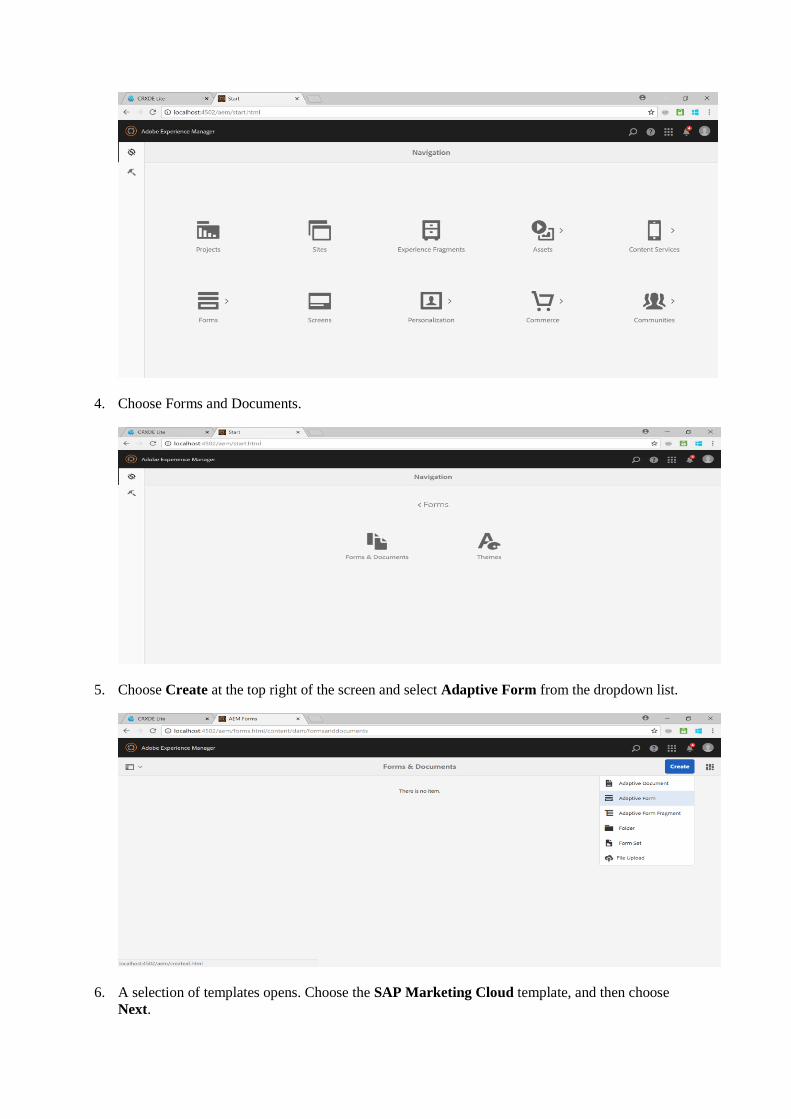
4. Choose Forms and Documents.
5. Choose Create at the top right of the screen and select Adaptive Form from the dropdown list.
6. A selection of templates opens. Choose the SAP Marketing Cloud template, and then choose
Next.
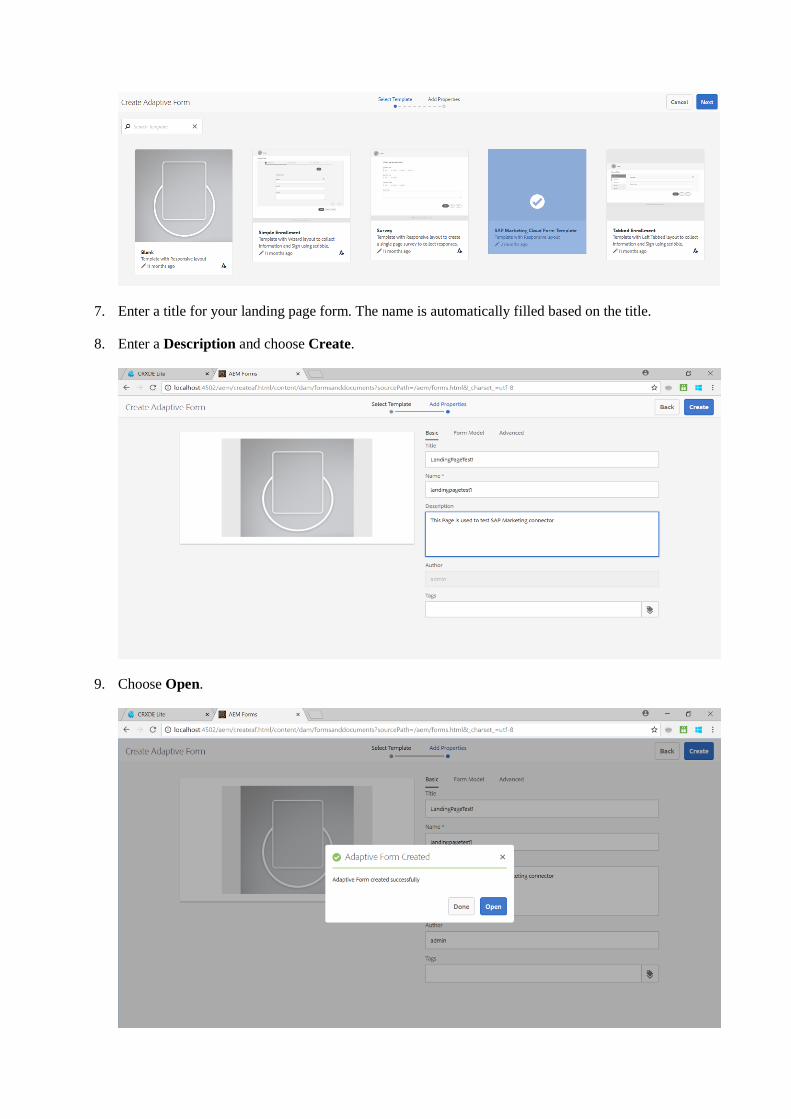
7. Enter a title for your landing page form. The name is automatically filled based on the title.
8. Enter a Description and choose Create.
9. Choose Open.
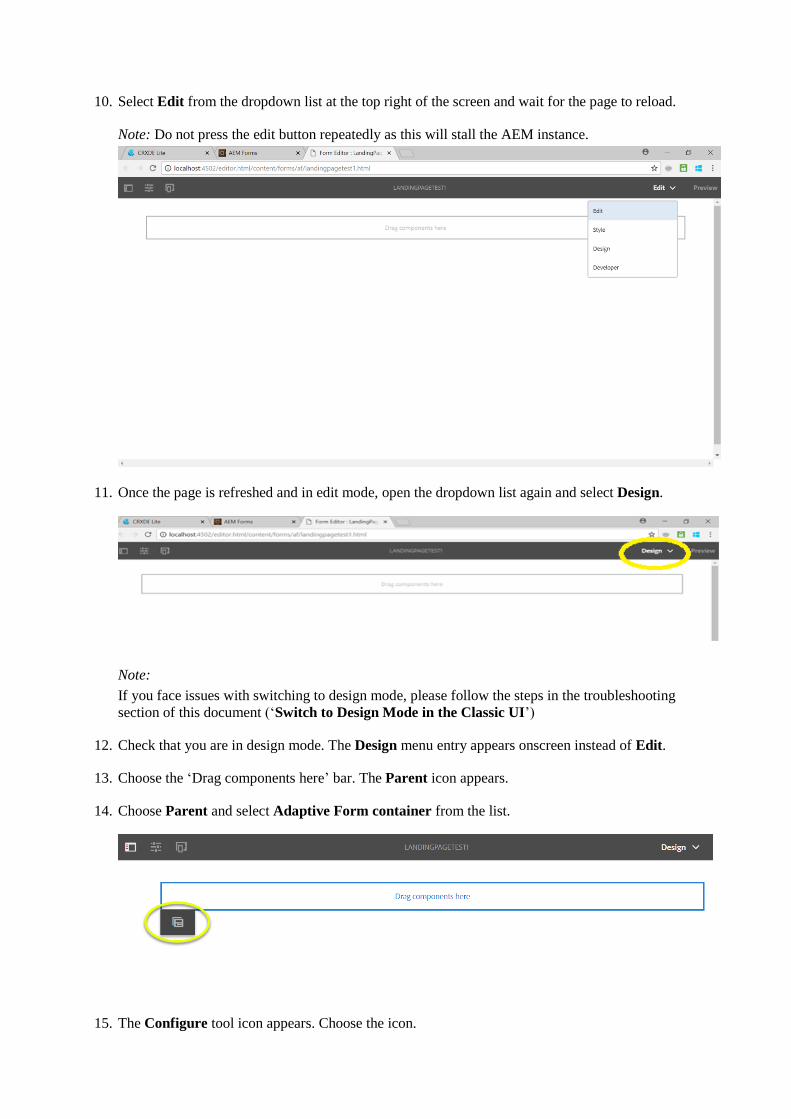
10. Select Edit from the dropdown list at the top right of the screen and wait for the page to reload.
Note: Do not press the edit button repeatedly as this will stall the AEM instance.
11. Once the page is refreshed and in edit mode, open the dropdown list again and select Design.
Note:
If you face issues with switching to design mode, please follow the steps in the troubleshooting
section of this document (‘Switch to Design Mode in the Classic UI’)
12. Check that you are in design mode. The Design menu entry appears onscreen instead of Edit.
13. Choose the ‘Drag components here’ bar. The Parent icon appears.
14. Choose Parent and select Adaptive Form container from the list.
15. The Configure tool icon appears. Choose the icon.
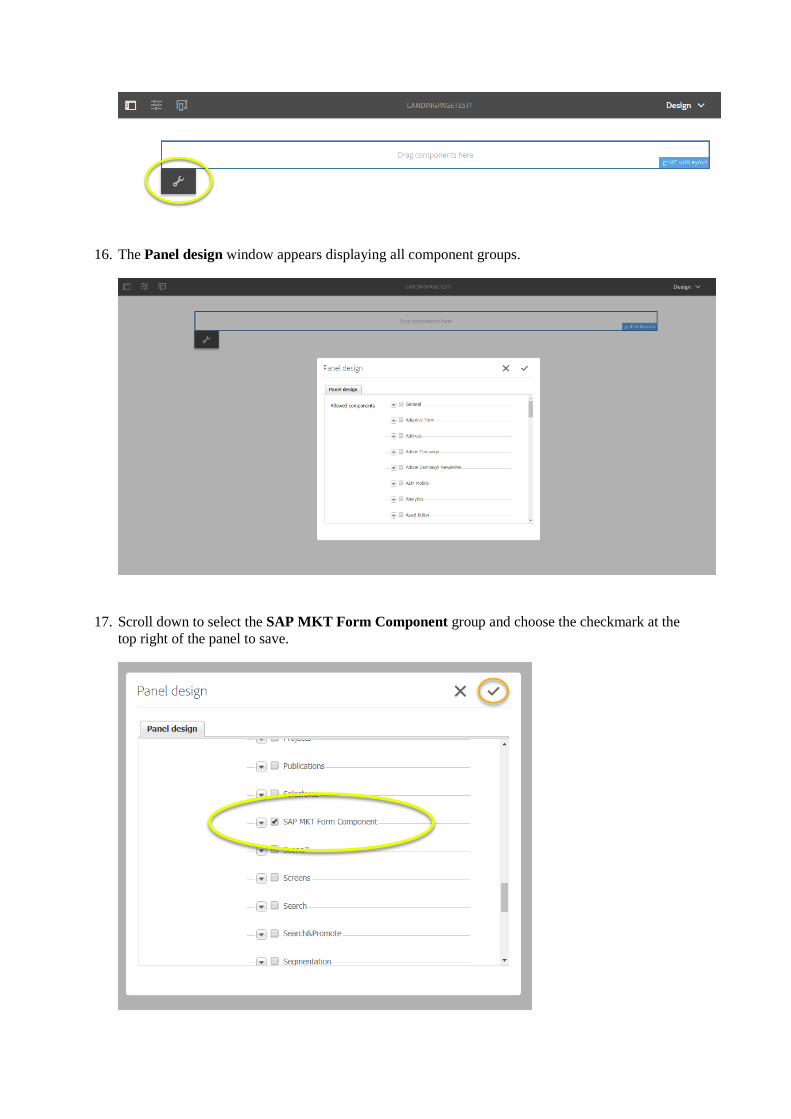
16. The Panel design window appears displaying all component groups.
17. Scroll down to select the SAP MKT Form Component group and choose the checkmark at the
top right of the panel to save.
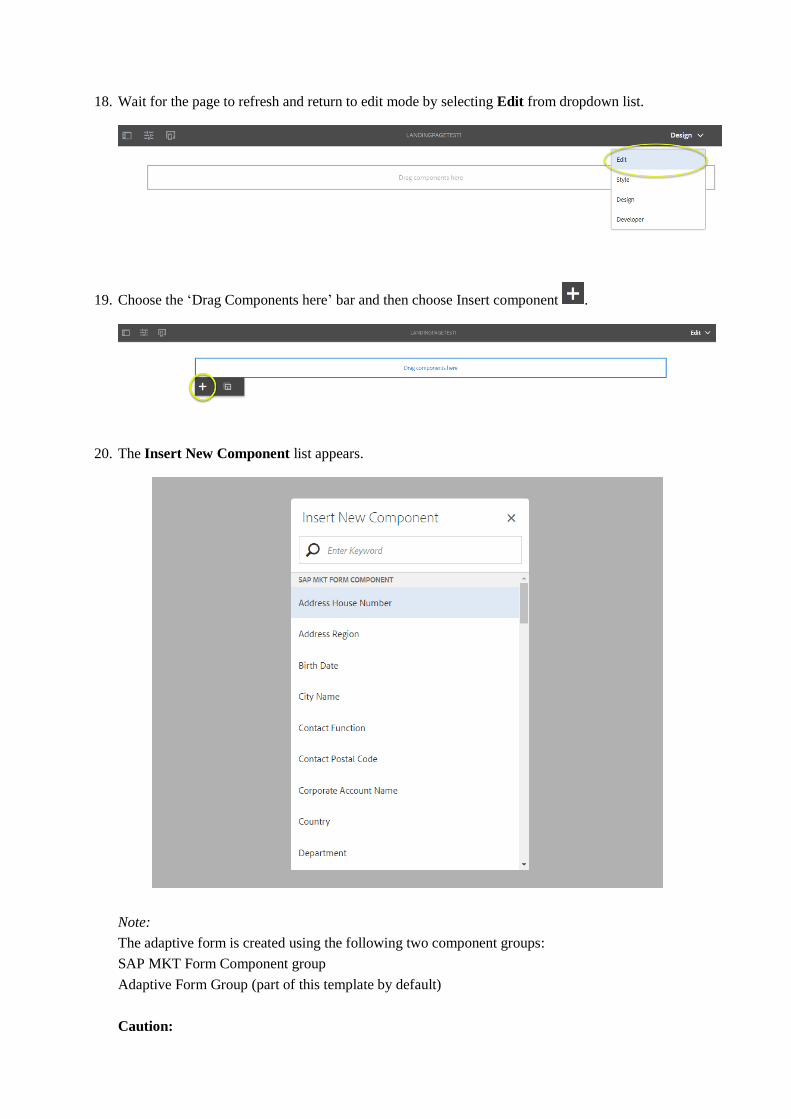
18. Wait for the page to refresh and return to edit mode by selecting Edit from dropdown list.
19. Choose the ‘Drag Components here’ bar and then choose Insert component .
20. The Insert New Component list appears.
Note:
The adaptive form is created using the following two component groups:
SAP MKT Form Component group
Adaptive Form Group (part of this template by default)
Caution:
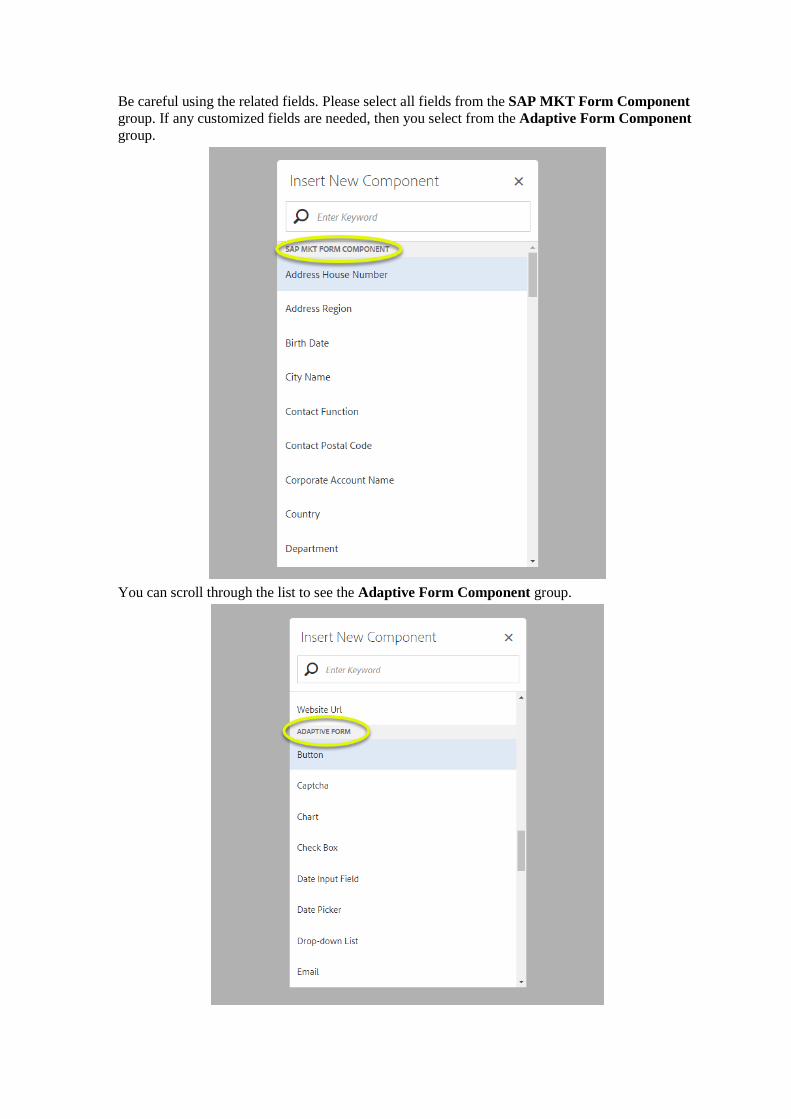
Be careful using the related fields. Please select all fields from the SAP MKT Form Component
group. If any customized fields are needed, then you select from the Adaptive Form Component
group.
You can scroll through the list to see the Adaptive Form Component group.

4. Configuring the Landing Page using the SAP MKT Form Component
1. Choose any field from the list that you want to use on your landing page. For example, Address
House Number. This is a simple text field. When you choose it, it appears directly on the landing
page.
2. To configure this field, choose Address House Number. A row of icons appears. Choose the
Configure icon.
3. In the Properties side panel that appears on left, you can change the title, hide the title, or
configure other properties. The title appears on your landing page. If you select the Hide title
checkbox, no label appears on the page.

4. To save any changes you make, choose the checkmark icon. If you do not make changes, select
the cross icon to close the side panel.
5. Follow the same procedure as explained above to configure the following fields: Address Region,
City Name, Birth Date, Corporate Account Name, First Name, Last Name, Region Name, Street
Name, Website URL.
4.1. Overview of Component Fields
You can add more component fields using the Insert Component icon. The following sections give
an overview of the available component fields and how they can be configured in the side panel using
the Configure icon:
1. Country - appears as a dropdown on the landing page and is prepopulated with a set of countries.
You cannot add new countries from the front end. Country translation should exist in SAP
Marketing Cloud. For example, Germany = DE, Deutschland = DE.
Note:
Like Country, the following components also appear as dropdown list that are prepopulated and
cannot be changed from the front end:
• Department
• Function
• Gender
• Industry
• Language
• Marital Status
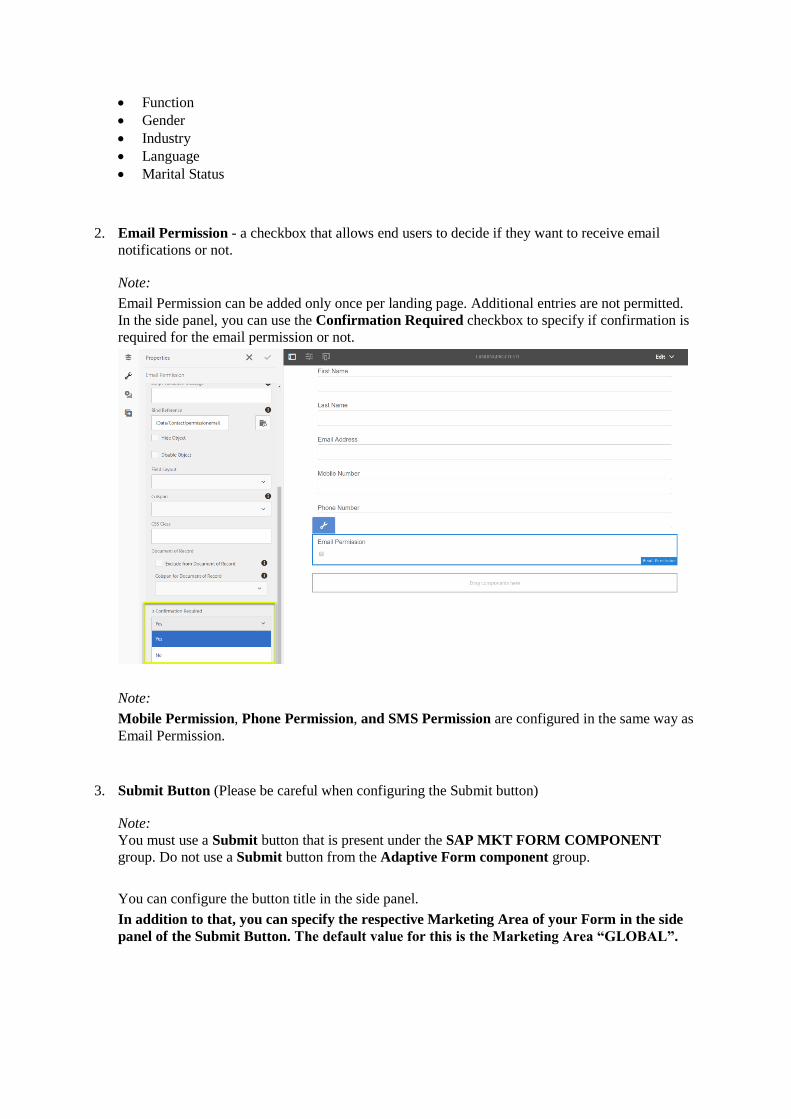
2. Email Permission - a checkbox that allows end users to decide if they want to receive email
notifications or not.
Note:
Email Permission can be added only once per landing page. Additional entries are not permitted.
In the side panel, you can use the Confirmation Required checkbox to specify if confirmation is
required for the email permission or not.
Note:
Mobile Permission, Phone Permission, and SMS Permission are configured in the same way as
Email Permission.
3. Submit Button (Please be careful when configuring the Submit button)
Note:
You must use a Submit button that is present under the SAP MKT FORM COMPONENT
group. Do not use a Submit button from the Adaptive Form component group.
You can configure the button title in the side panel.
In addition to that, you can specify the respective Marketing Area of your Form in the side
panel of the Submit Button. The default value for this is the Marketing Area “GLOBAL”.
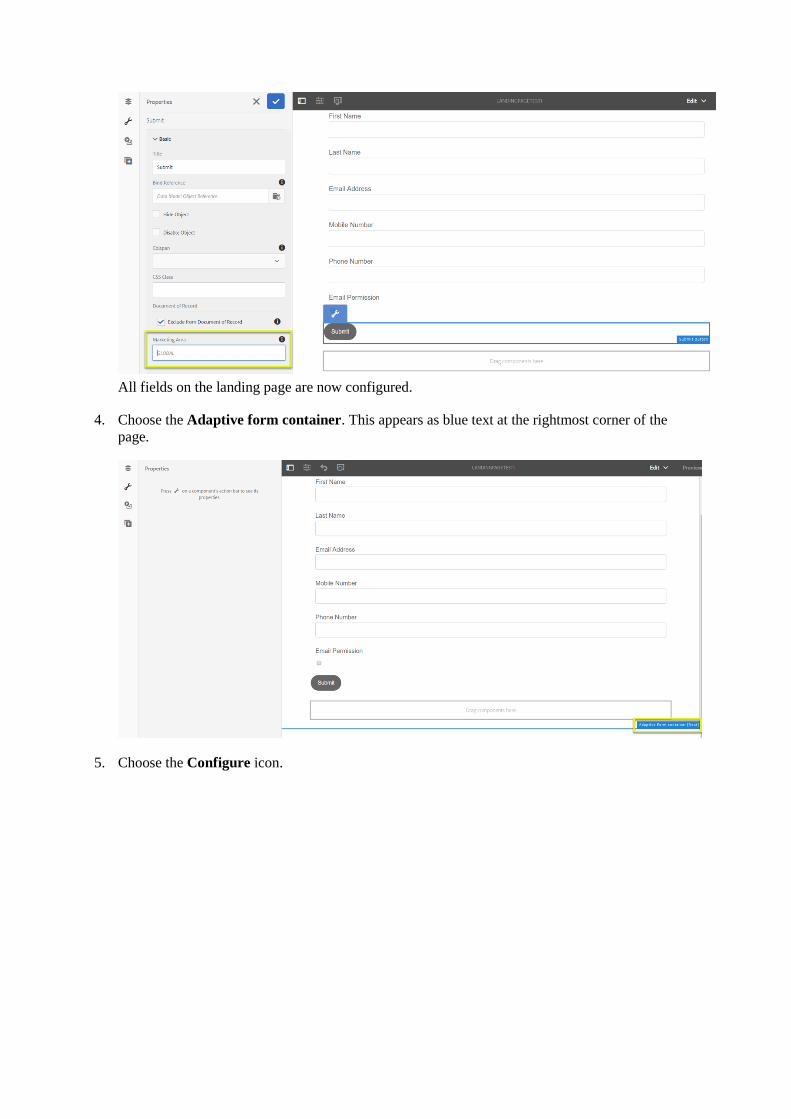
All fields on the landing page are now configured.
4. Choose the Adaptive form container. This appears as blue text at the rightmost corner of the
page.
5. Choose the Configure icon.

6. In the Properties panel, choose Submission.
7. When you have opened the Submission section, proceed as follows:
• Select “SAP Marketing Forms Portal Submit Action” from the Submit Action dropdown list.
• Select the “Store data in forms portal” checkbox.
• Specify the Redirect URL/Path that opens on submission of the form.
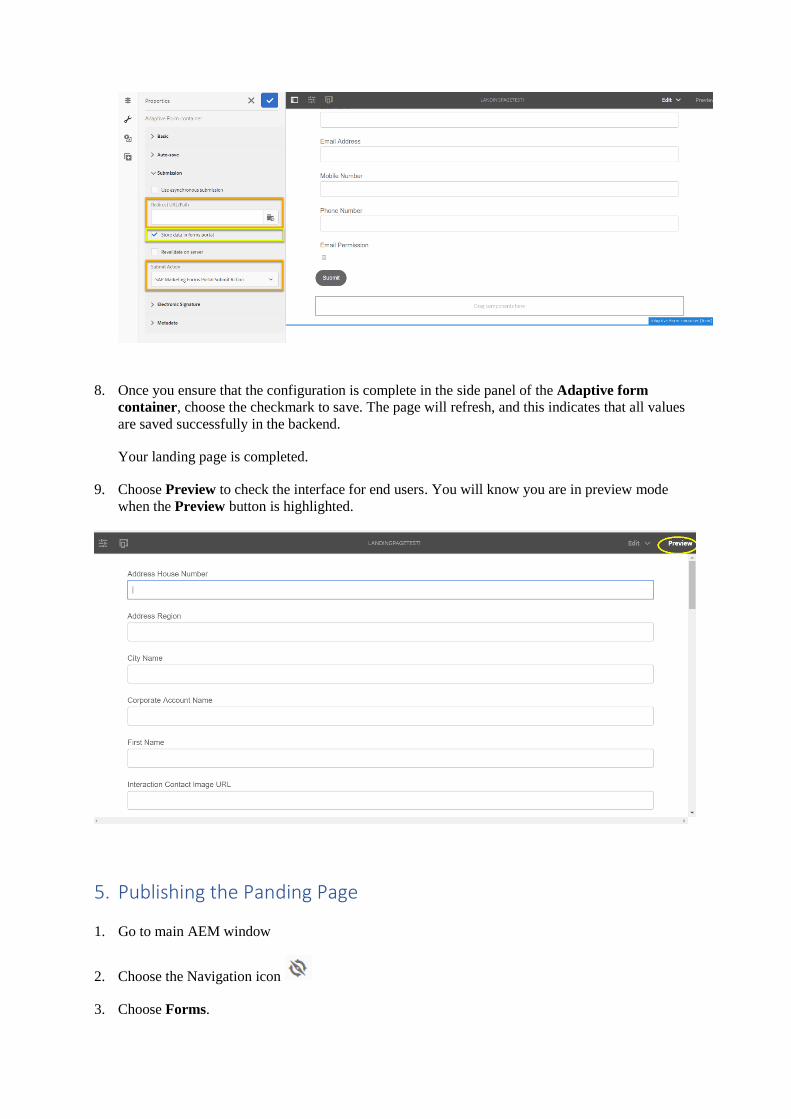
8. Once you ensure that the configuration is complete in the side panel of the Adaptive form
container, choose the checkmark to save. The page will refresh, and this indicates that all values
are saved successfully in the backend.
Your landing page is completed.
9. Choose Preview to check the interface for end users. You will know you are in preview mode
when the Preview button is highlighted.
5. Publishing the Panding Page
1. Go to main AEM window
2. Choose the Navigation icon
3. Choose Forms.
4. Choose Forms and Documents.
5. Locate your page and hover over it to see the possible actions.
6. Choose the icon with the ellipses (...). Two options appear: Copy and Publish.

7. Choose Publish and then choose Publish again on the dialog that appears. For more information,
see Replication.
If the following message appears, this means that your landing page is published, but in a queue.
Please wait and your landing page will be pushed to the publisher environment.
You can access your publisher AEM instance to check the published page.
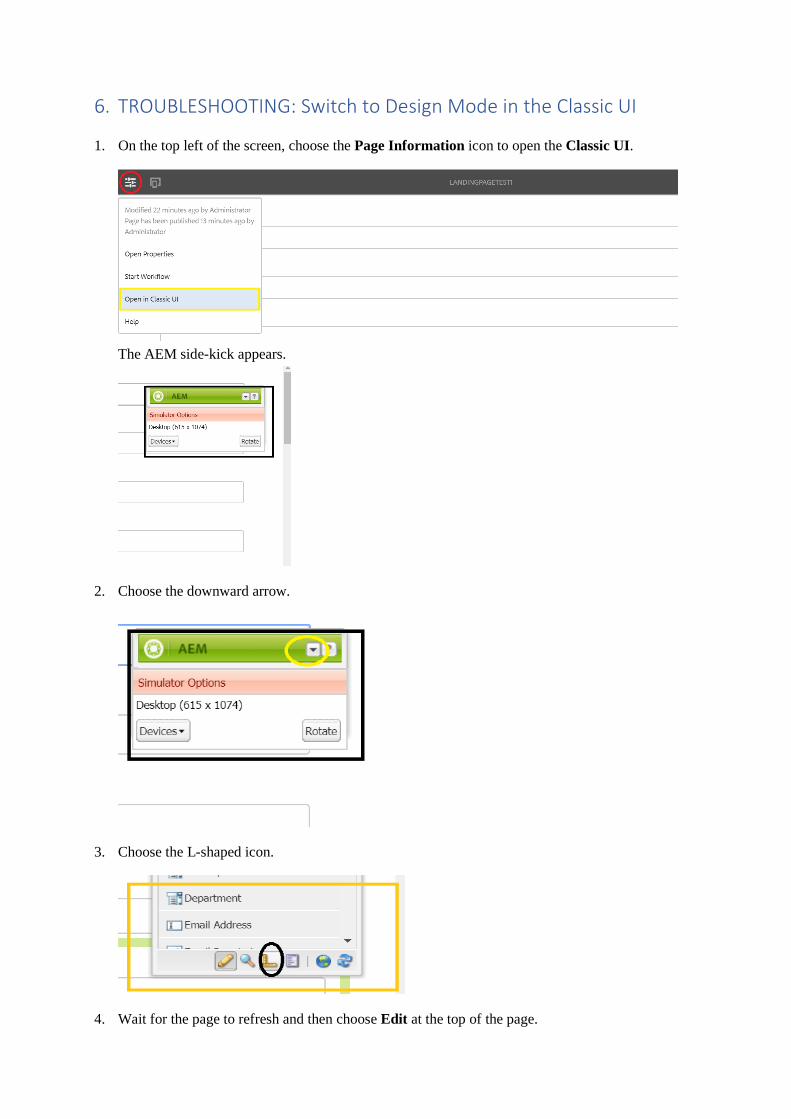
6. TROUBLESHOOTING: Switch to Design Mode in the Classic UI
1. On the top left of the screen, choose the Page Information icon to open the Classic UI.
The AEM side-kick appears.
2. Choose the downward arrow.
3. Choose the L-shaped icon.
4. Wait for the page to refresh and then choose Edit at the top of the page.

The Edit Component popup appears. It contains all component groups.
5. Choose SAP MKT Form Component group from the list and then choose OK.
6. Close the page to return to the Forms & Documents screen.
7. Choose the Open icon on your form .
You can configure your form as explained above.
7. Language Translation AEM Adaptive Forms
AEM adaptive forms out-of-the-box functionality supports many languages including: English(en),
Spanish(es), French(fr), Italian(it), German(de), Japanese(ja), Portugese-Brazilian(pt-br), Chinese-(zh-
tn), Chinese-Taiwan(zh-tw), and Korean(ko-kr). You can follow the steps below to translate your form
to any of the languages mentioned above.
1. On the Forms & Documents screen, choose your adaptive form to open it.
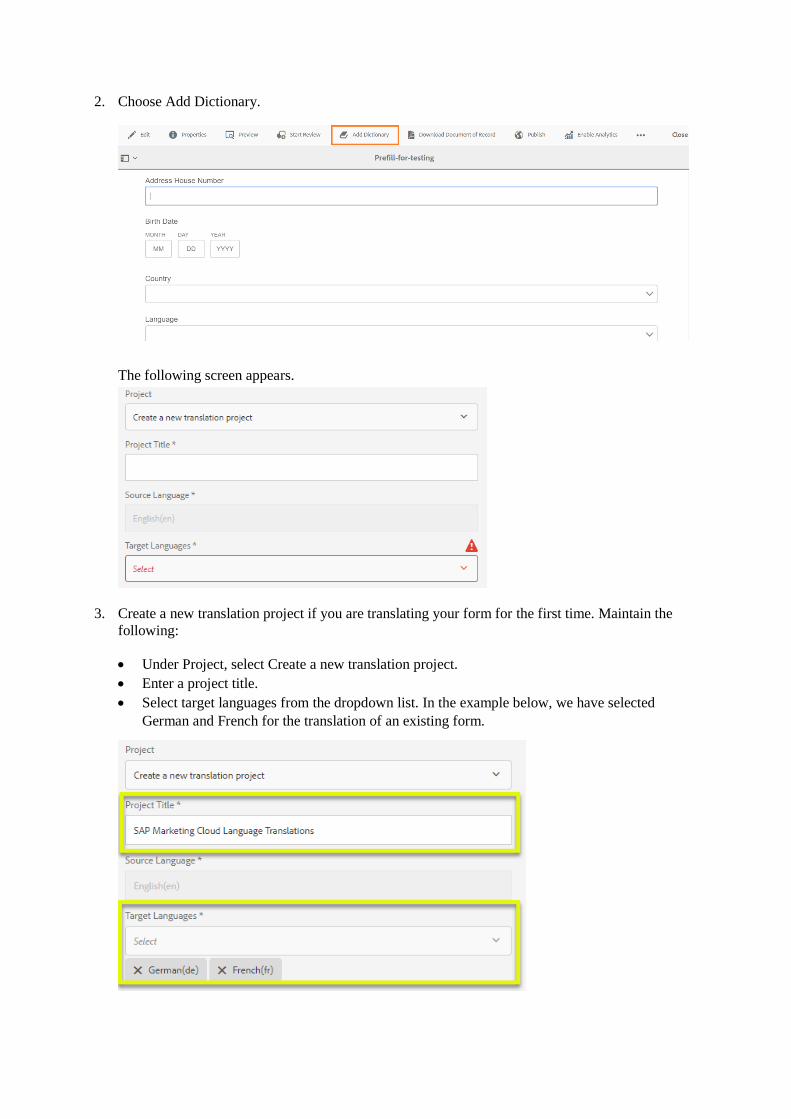
2. Choose Add Dictionary.
The following screen appears.
3. Create a new translation project if you are translating your form for the first time. Maintain the
following:
• Under Project, select Create a new translation project.
• Enter a project title.
• Select target languages from the dropdown list. In the example below, we have selected
German and French for the translation of an existing form.
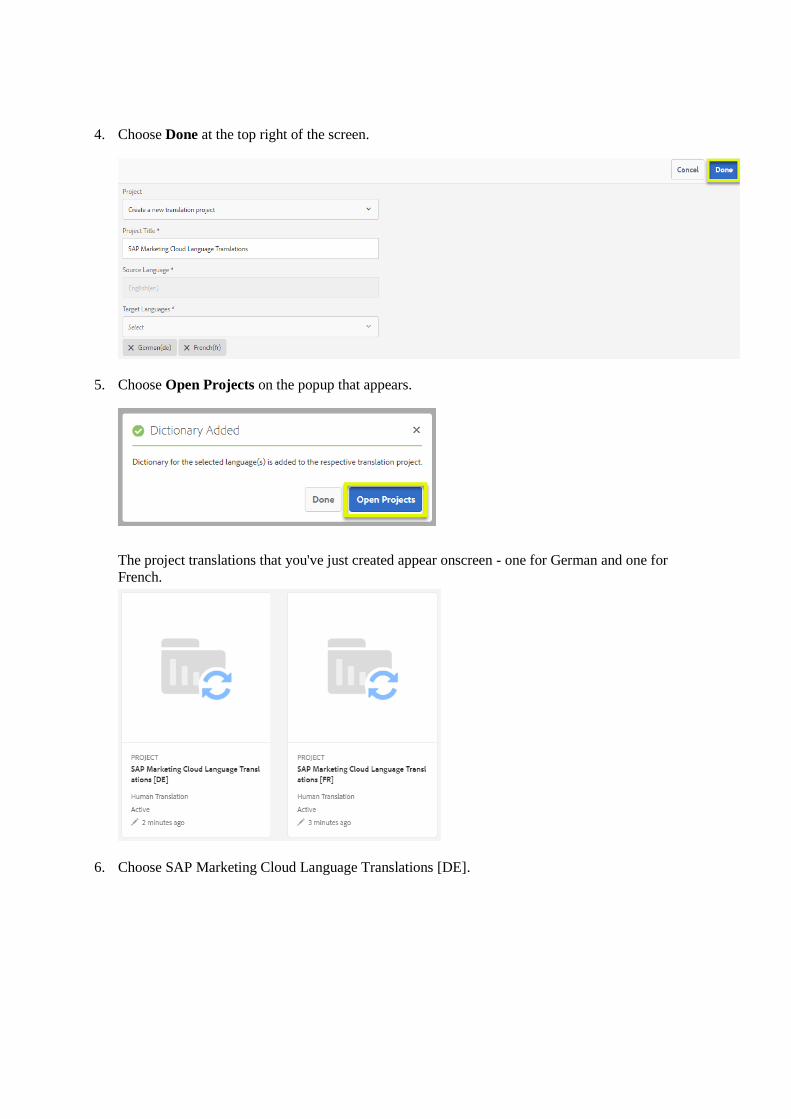
4. Choose Done at the top right of the screen.
5. Choose Open Projects on the popup that appears.
The project translations that you've just created appear onscreen - one for German and one for
French.
6. Choose SAP Marketing Cloud Language Translations [DE].
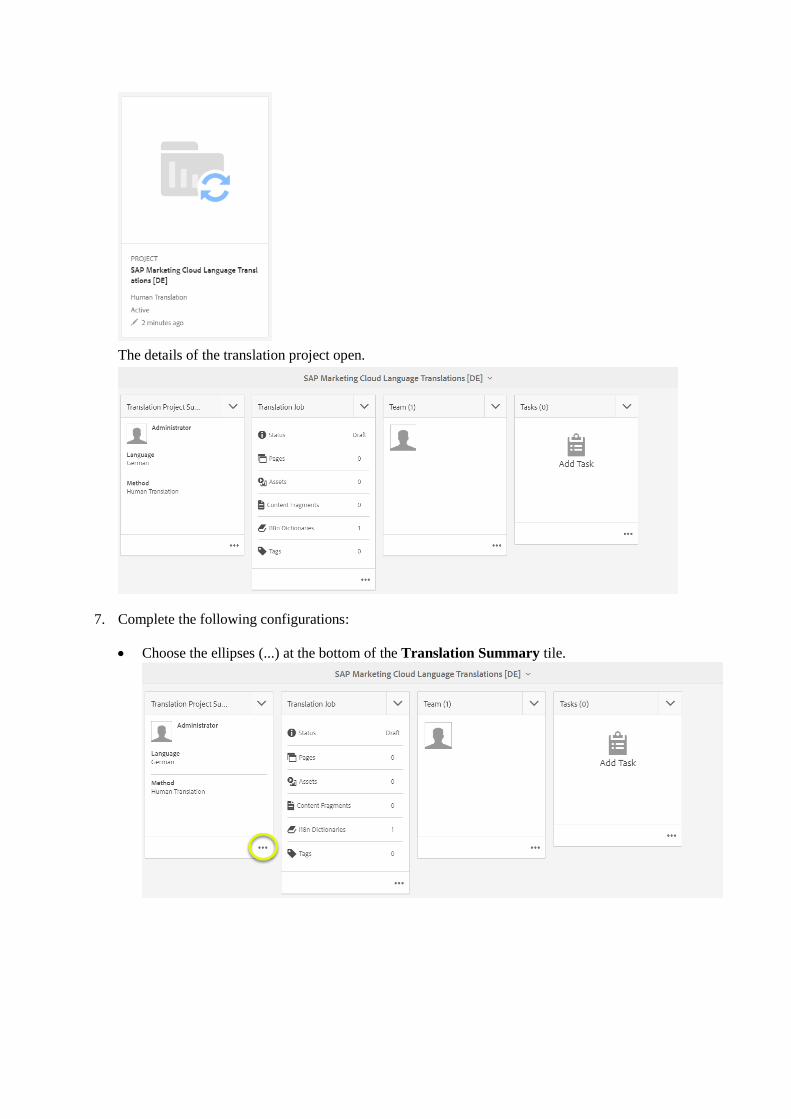
The details of the translation project open.
7. Complete the following configurations:
• Choose the ellipses (...) at the bottom of the Translation Summary tile.

The Translation Project Properties open.
• Choose the Translation tab.
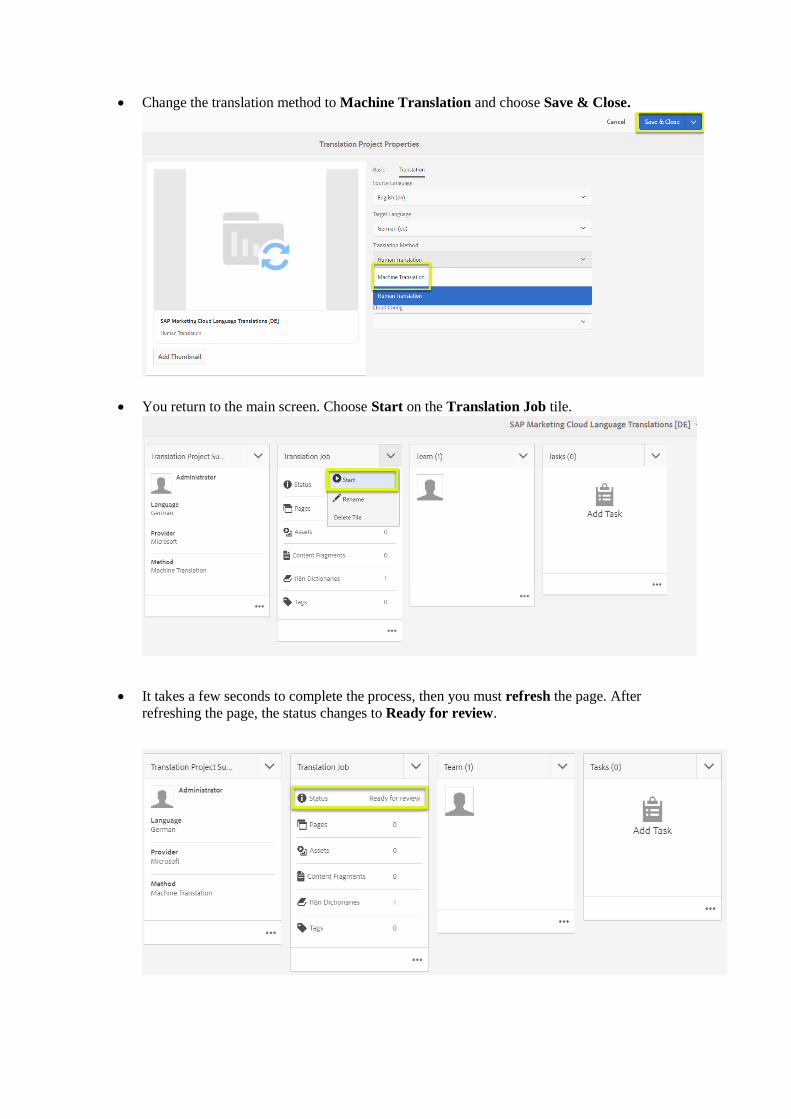
• Change the translation method to Machine Translation and choose Save & Close.
• You return to the main screen. Choose Start on the Translation Job tile.
• It takes a few seconds to complete the process, then you must refresh the page. After
refreshing the page, the status changes to Ready for review.
8. Choose the AEM icon at the top left of the screen.
9. Choose Forms.
10. Choose Forms & Documents.
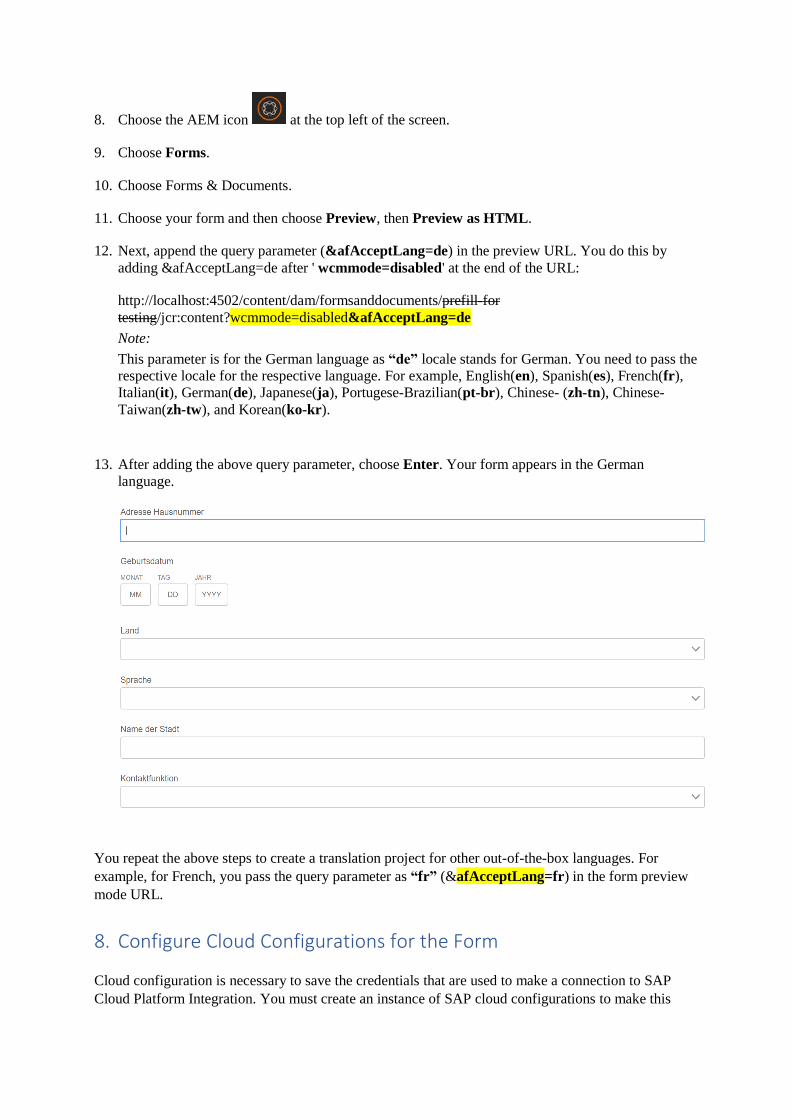
11. Choose your form and then choose Preview, then Preview as HTML.
12. Next, append the query parameter (&afAcceptLang=de) in the preview URL. You do this by
adding &afAcceptLang=de after ' wcmmode=disabled' at the end of the URL:
http://localhost:4502/content/dam/formsanddocuments/prefill-for
testing/jcr:content?wcmmode=disabled&afAcceptLang=de
Note:
This parameter is for the German language as “de” locale stands for German. You need to pass the
respective locale for the respective language. For example, English(en), Spanish(es), French(fr),
Italian(it), German(de), Japanese(ja), Portugese-Brazilian(pt-br), Chinese- (zh-tn), Chinese-
Taiwan(zh-tw), and Korean(ko-kr).
13. After adding the above query parameter, choose Enter. Your form appears in the German
language.
You repeat the above steps to create a translation project for other out-of-the-box languages. For
example, for French, you pass the query parameter as “fr” (&afAcceptLang=fr) in the form preview
mode URL.
8. Configure Cloud Configurations for the Form
Cloud configuration is necessary to save the credentials that are used to make a connection to SAP
Cloud Platform Integration. You must create an instance of SAP cloud configurations to make this
connection. These configurations are used for testing the connection before creating the form, and then
prefilling and pushing the data once the form is created.
Note:
This is an important step as without this connection the form does not work. Please follow these steps
to create cloud configuration for your form.
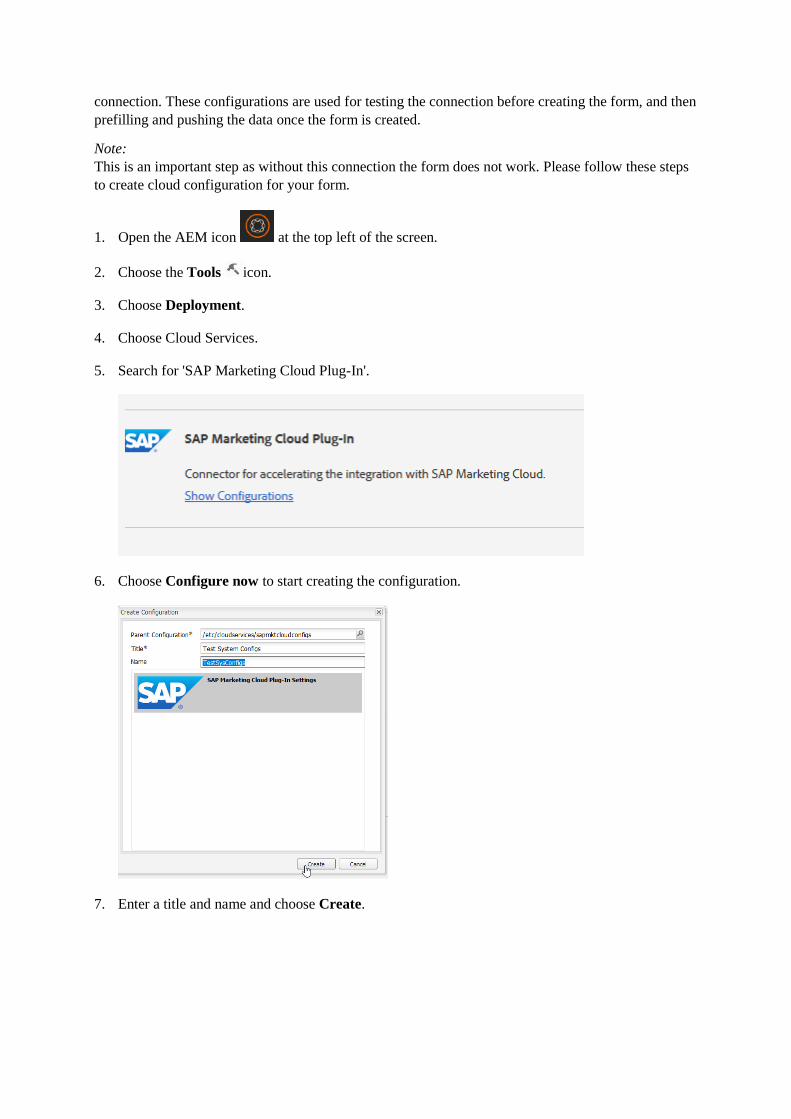
1. Open the AEM icon at the top left of the screen.
2. Choose the Tools icon.
3. Choose Deployment.
4. Choose Cloud Services.
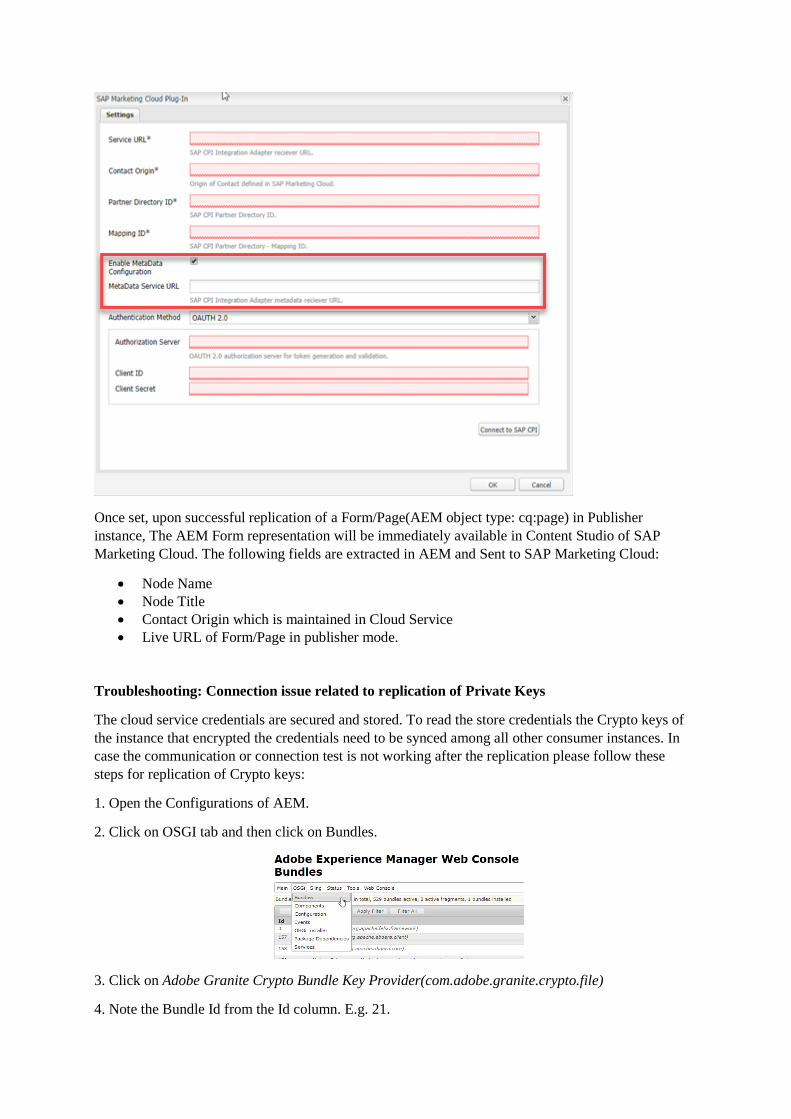
5. Search for 'SAP Marketing Cloud Plug-In'.
6. Choose Configure now to start creating the configuration.
7. Enter a title and name and choose Create.
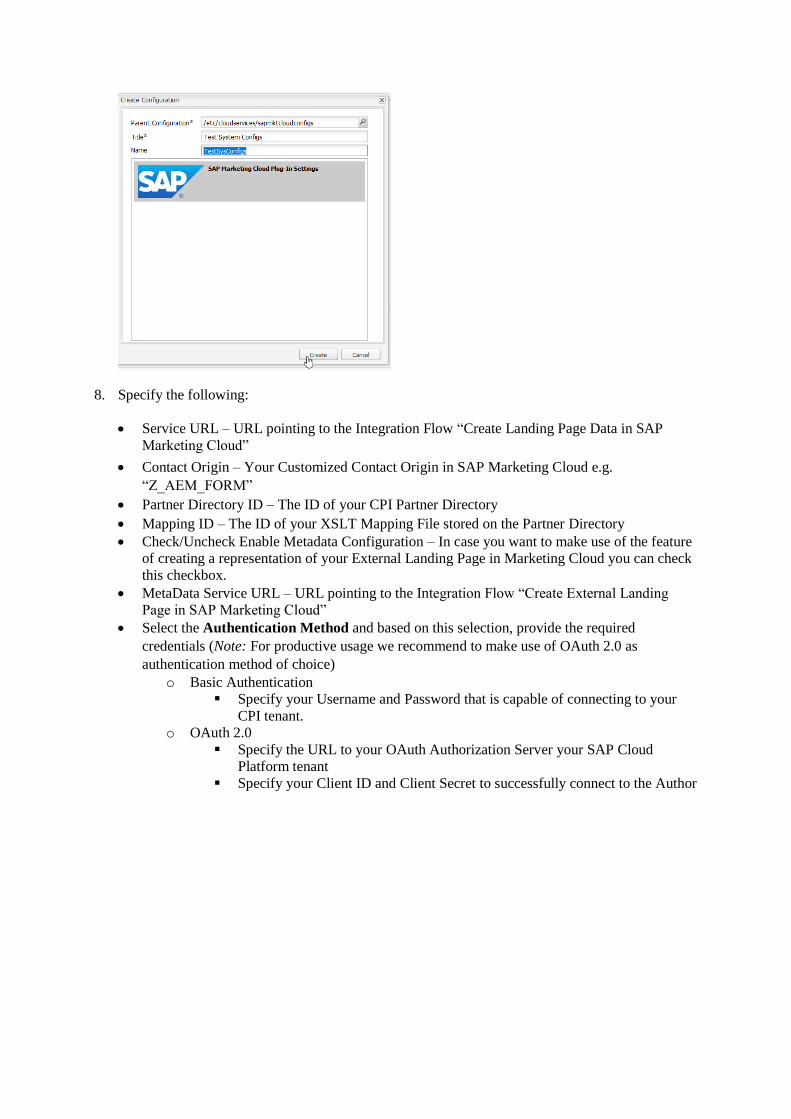
8. Specify the following:
• Service URL – URL pointing to the Integration Flow “Create Landing Page Data in SAP
Marketing Cloud”
• Contact Origin – Your Customized Contact Origin in SAP Marketing Cloud e.g.
“Z_AEM_FORM”
• Partner Directory ID – The ID of your CPI Partner Directory
• Mapping ID – The ID of your XSLT Mapping File stored on the Partner Directory
• Check/Uncheck Enable Metadata Configuration – In case you want to make use of the feature
of creating a representation of your External Landing Page in Marketing Cloud you can check
this checkbox.
• MetaData Service URL – URL pointing to the Integration Flow “Create External Landing
Page in SAP Marketing Cloud”
• Select the Authentication Method and based on this selection, provide the required
credentials (Note: For productive usage we recommend to make use of OAuth 2.0 as
authentication method of choice)
o Basic Authentication
▪ Specify your Username and Password that is capable of connecting to your
CPI tenant.
o OAuth 2.0
▪ Specify the URL to your OAuth Authorization Server your SAP Cloud
Platform tenant
▪ Specify your Client ID and Client Secret to successfully connect to the Author

When all details are specified, you can directly choose the connection to your CPI tenant by
pressing on the button “Connect to SAP CPI” to get immediate feedback on your connection.
If the details specified are correct and the connection is working, a “Connection is successful”
message appears to confirm that your connection is working fine.
If the connection test was successful choose Save Configurations. You will get a confirmation
message that everything is saved.

9. Next, choose Connect to SAP API. If the details specified are correct and the connection is
working, a “Connection is successful” message appears to confirm that your connection is
working fine.
You close this window and proceed with attaching this cloud configuration instance to your form.
10. Navigate to your form in edit mode and click on the Page Information icon at the top left.
11. Choose Open Properties.
12. Choose the CLOUD SERVICES tab on the screen that appears.
13. Select SAP Marketing Cloud, Plug-In from the list.
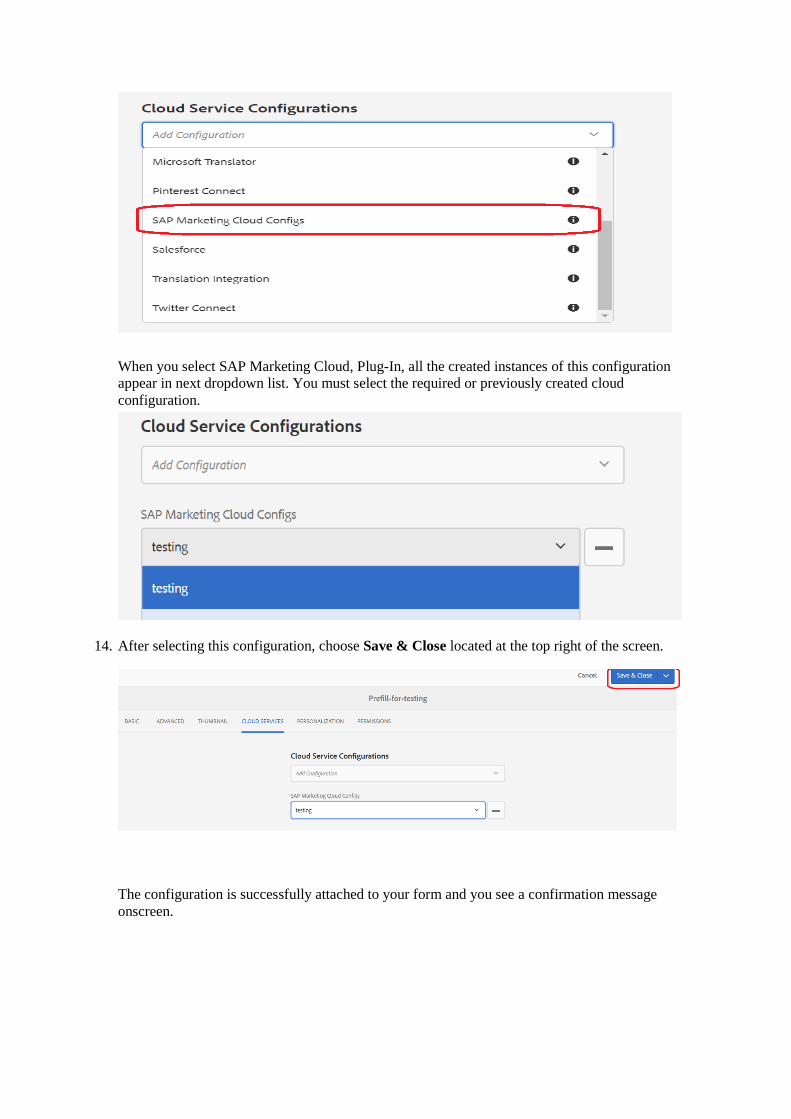
When you select SAP Marketing Cloud, Plug-In, all the created instances of this configuration
appear in next dropdown list. You must select the required or previously created cloud
configuration.
14. After selecting this configuration, choose Save & Close located at the top right of the screen.
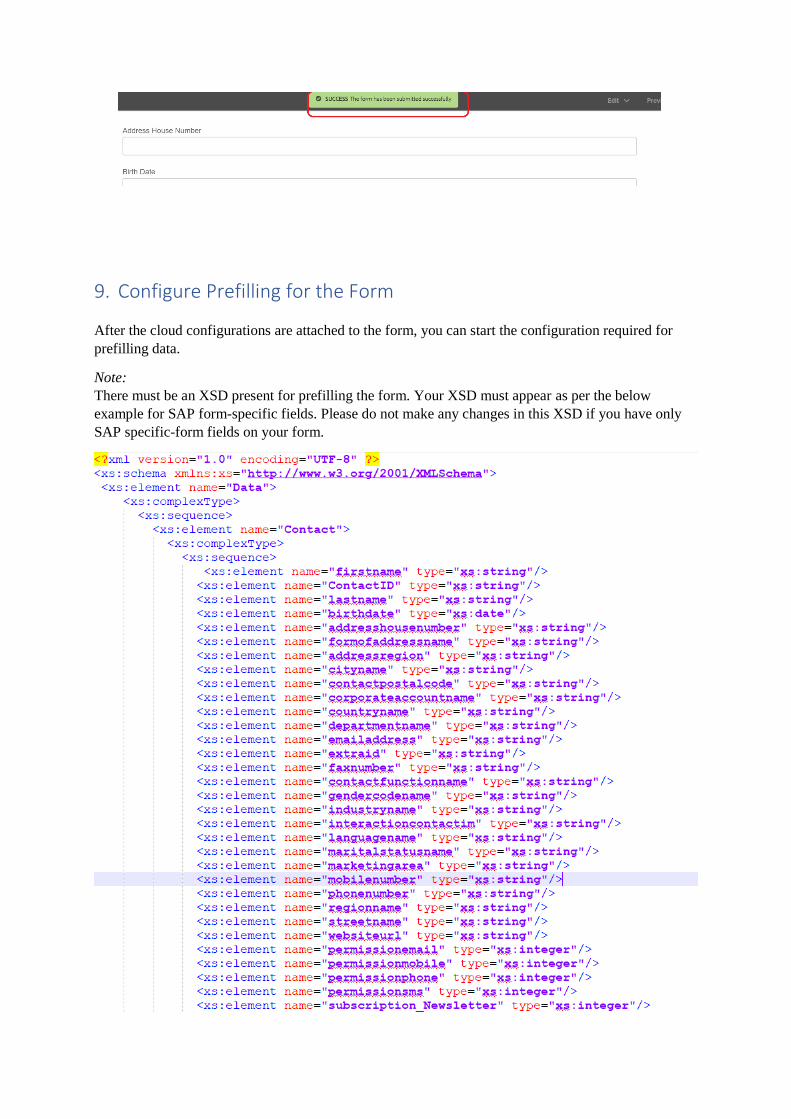
The configuration is successfully attached to your form and you see a confirmation message
onscreen.
9. Configure Prefilling for the Form
After the cloud configurations are attached to the form, you can start the configuration required for
prefilling data.
Note:
There must be an XSD present for prefilling the form. Your XSD must appear as per the below
example for SAP form-specific fields. Please do not make any changes in this XSD if you have only
SAP specific-form fields on your form.
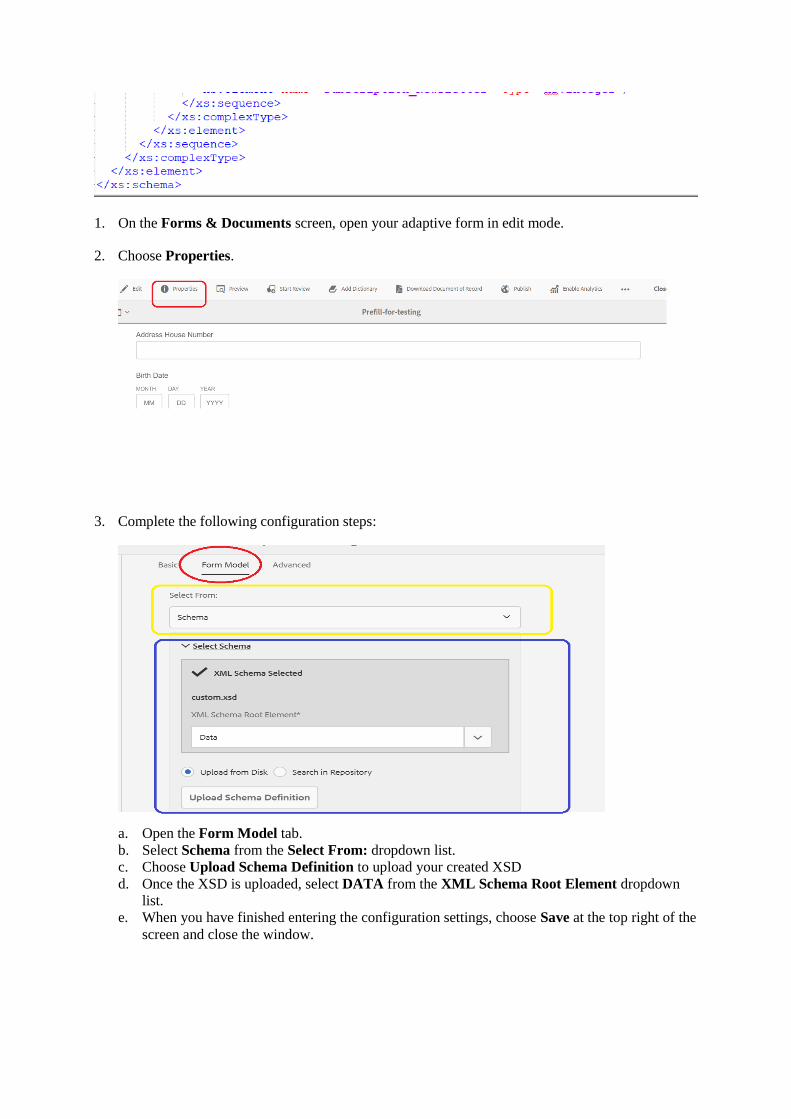
1. On the Forms & Documents screen, open your adaptive form in edit mode.
2. Choose Properties.
3. Complete the following configuration steps:
a. Open the Form Model tab.
b. Select Schema from the Select From: dropdown list.
c. Choose Upload Schema Definition to upload your created XSD
d. Once the XSD is uploaded, select DATA from the XML Schema Root Element dropdown
list.
e. When you have finished entering the configuration settings, choose Save at the top right of the
screen and close the window.

4. Open your adaptive form again in edit mode.
Complete the following configuration steps:
a. At the bottom right of the screen, choose the Adaptive form container tag.
b. In the Properties panel, under Prefill Service, select Prefill Forms Service SAP Marketing
Cloud from the list.
c. Choose the checkmark to save your changes.
d. Next, you navigate to component level. Choose any form component and select the Configure
icon to configure. You can check the properties of the selected component in the panel to the
left. You must ensure that there is a default binding value present in the Bind Reference field
from the XSD.
Note:
Prefilling for the component field only works if it is bound to an XSD element as shown

below.
e. You must check this for all form fields and ensure that they all are bound to an XSD element.
5. Return to your form in edit mode and choose Preview as HTML. This allows you to test before
publishing the form.
Note:
sap-outbound-id is the unique id. It is provided by SAP Marketing Cloud during campaign
execution to customers from SAP Cloud Platform Integration marketing cloud, when the customer
has submitted data before and is known in the system. Based on the sap-outbound-id, it's possible
to get all contact and marketing permission data for an existing contact that is stored in the SAP
Marketing Cloud. The sap-outbound-id mentioned here is just an example.
6. Choose Enter for all contact details to be prefilled for this sap-outbound-id. The following is an
example of a prefilled adaptive form:
10. Configure Prefilling for Custom Fields
The previous section was all about prefilling for SAP-specific form fields. If you want your own
custom fields on the form, then you must follow these steps:
1. Open your adaptive form in edit mode.
2. Drag and Drop component example: add a text box from the ADAPTIVE FORM component
group on your form.
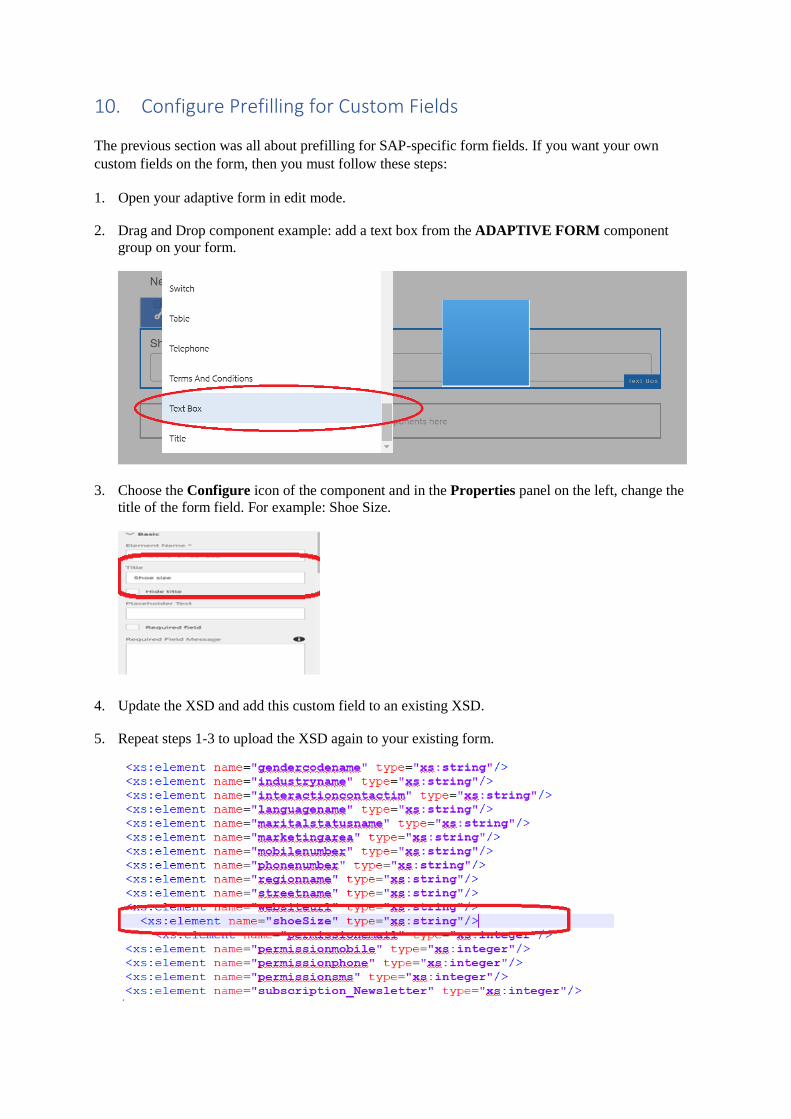
3. Choose the Configure icon of the component and in the Properties panel on the left, change the
title of the form field. For example: Shoe Size.
4. Update the XSD and add this custom field to an existing XSD.
5. Repeat steps 1-3 to upload the XSD again to your existing form.
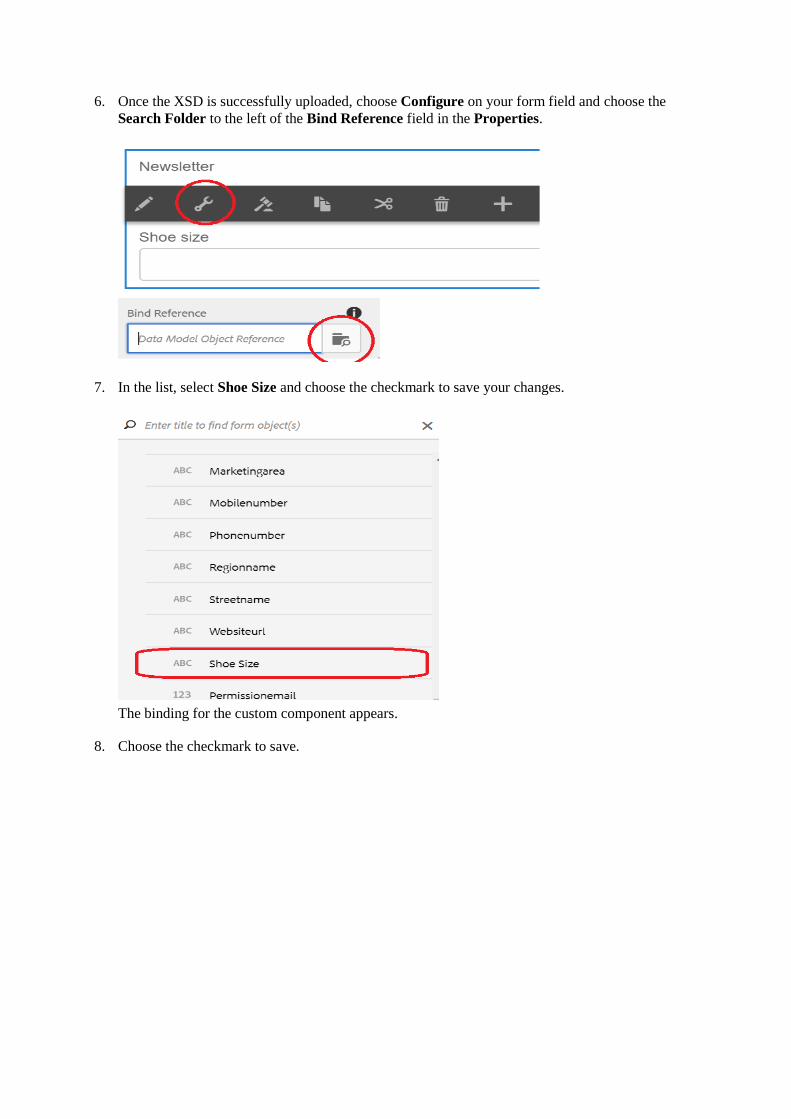
6. Once the XSD is successfully uploaded, choose Configure on your form field and choose the
Search Folder to the left of the Bind Reference field in the Properties.
7. In the list, select Shoe Size and choose the checkmark to save your changes.
The binding for the custom component appears.
8. Choose the checkmark to save.
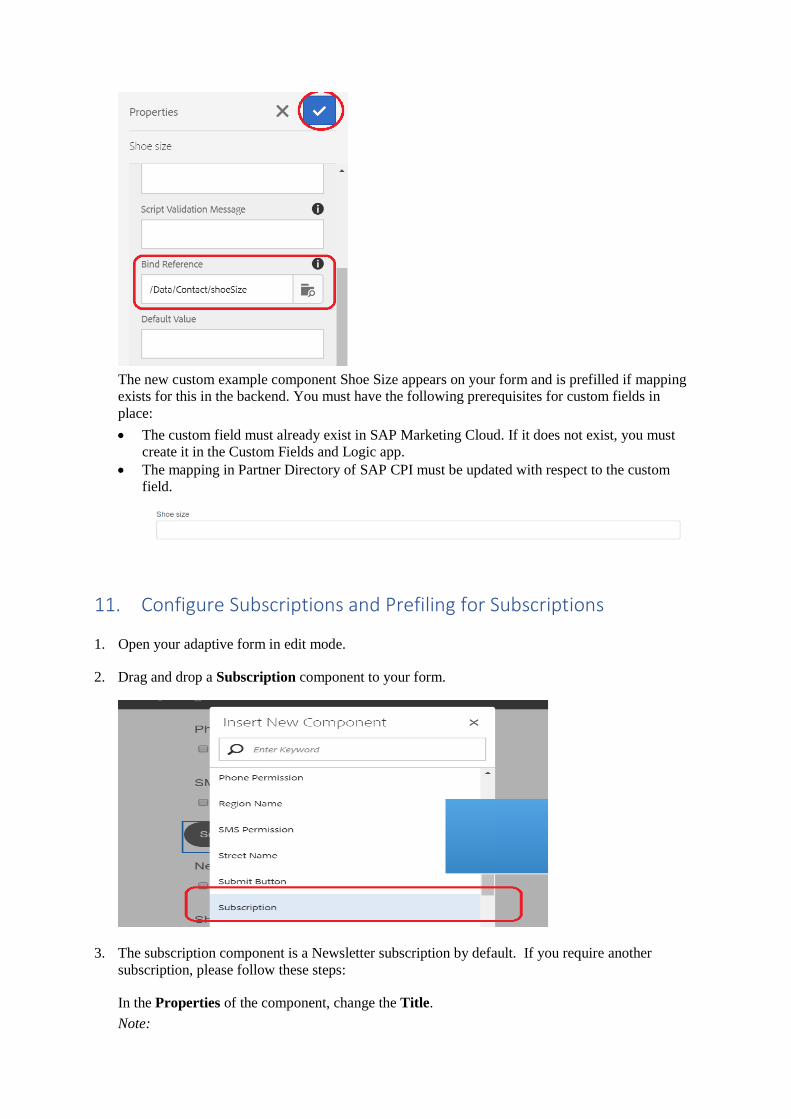
The new custom example component Shoe Size appears on your form and is prefilled if mapping
exists for this in the backend. You must have the following prerequisites for custom fields in
place:
• The custom field must already exist in SAP Marketing Cloud. If it does not exist, you must
create it in the Custom Fields and Logic app.
• The mapping in Partner Directory of SAP CPI must be updated with respect to the custom
field.
11. Configure Subscriptions and Prefiling for Subscriptions
1. Open your adaptive form in edit mode.
2. Drag and drop a Subscription component to your form.
3. The subscription component is a Newsletter subscription by default. If you require another
subscription, please follow these steps:
In the Properties of the component, change the Title.
Note:
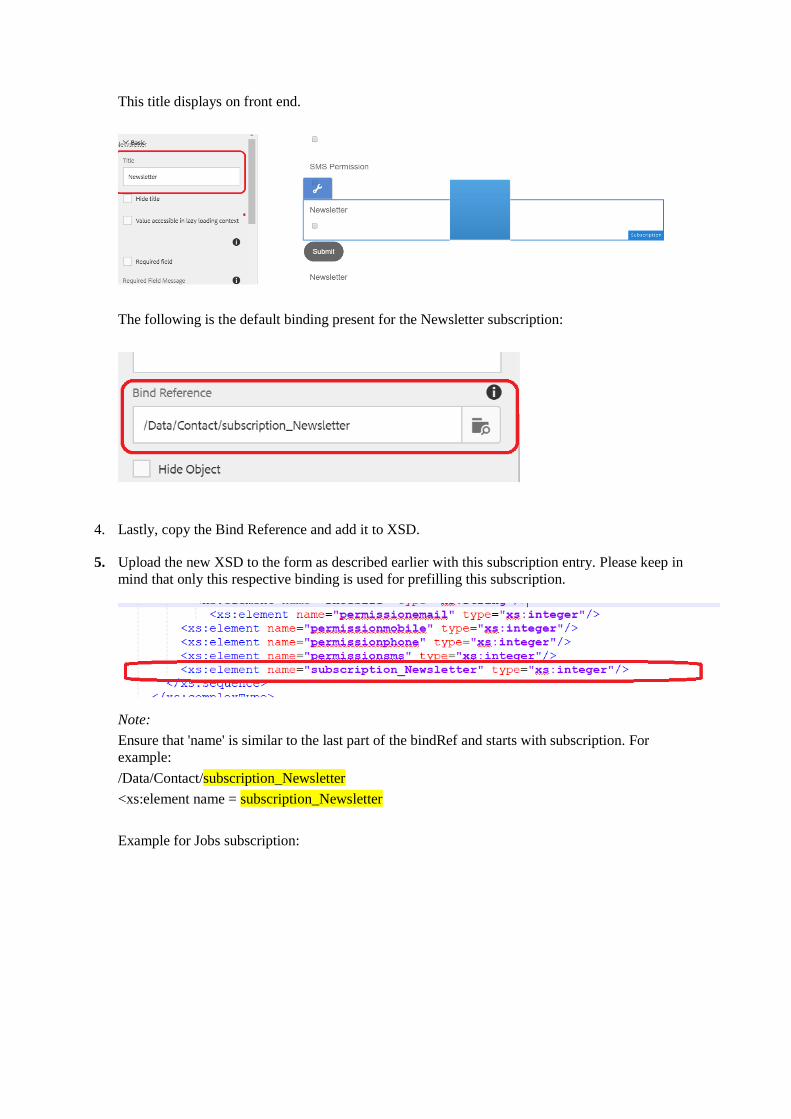
This title displays on front end.
The following is the default binding present for the Newsletter subscription:
4. Lastly, copy the Bind Reference and add it to XSD.
5. Upload the new XSD to the form as described earlier with this subscription entry. Please keep in
mind that only this respective binding is used for prefilling this subscription.
Note:
Ensure that 'name' is similar to the last part of the bindRef and starts with subscription. For
example:
/Data/Contact/subscription_Newsletter
<xs:element name = subscription_Newsletter
Example for Jobs subscription:
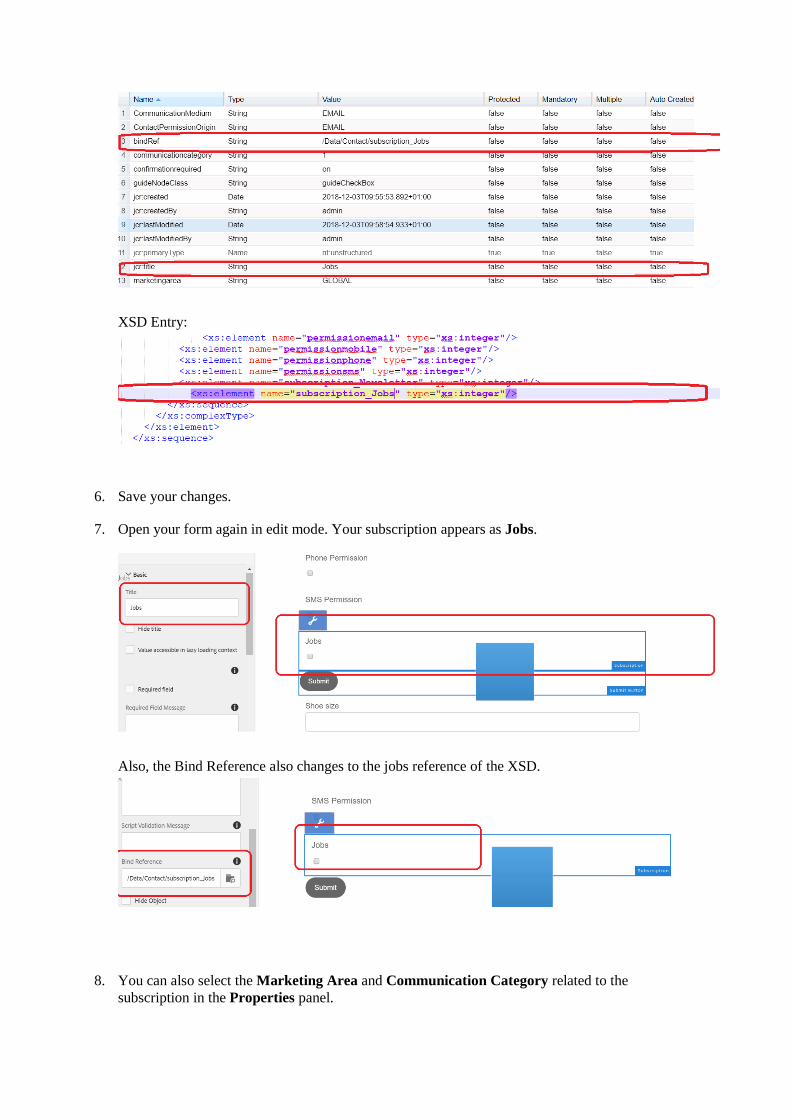
XSD Entry:
6. Save your changes.
7. Open your form again in edit mode. Your subscription appears as Jobs.
Also, the Bind Reference also changes to the jobs reference of the XSD.
8. You can also select the Marketing Area and Communication Category related to the
subscription in the Properties panel.
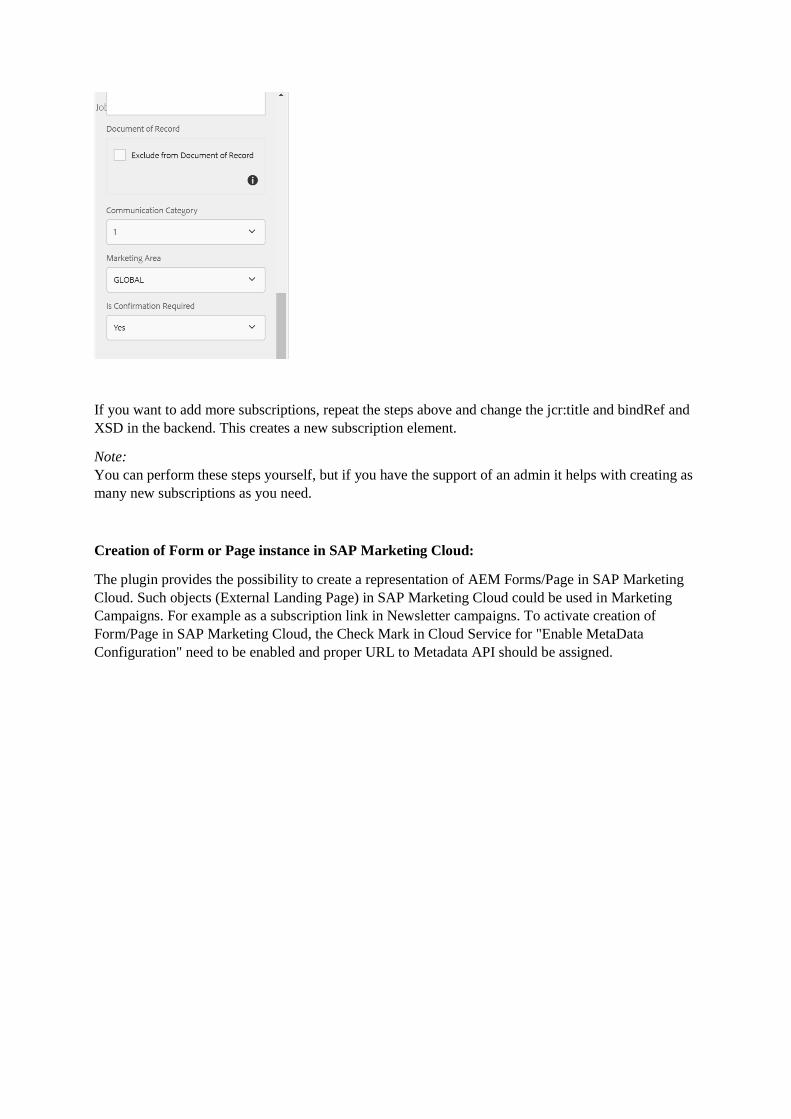
If you want to add more subscriptions, repeat the steps above and change the jcr:title and bindRef and
XSD in the backend. This creates a new subscription element.
Note:
You can perform these steps yourself, but if you have the support of an admin it helps with creating as
many new subscriptions as you need.
Creation of Form or Page instance in SAP Marketing Cloud:
The plugin provides the possibility to create a representation of AEM Forms/Page in SAP Marketing
Cloud. Such objects (External Landing Page) in SAP Marketing Cloud could be used in Marketing
Campaigns. For example as a subscription link in Newsletter campaigns. To activate creation of
Form/Page in SAP Marketing Cloud, the Check Mark in Cloud Service for "Enable MetaData
Configuration" need to be enabled and proper URL to Metadata API should be assigned.
Once set, upon successful replication of a Form/Page(AEM object type: cq:page) in Publisher
instance, The AEM Form representation will be immediately available in Content Studio of SAP
Marketing Cloud. The following fields are extracted in AEM and Sent to SAP Marketing Cloud:
• Node Name
• Node Title
• Contact Origin which is maintained in Cloud Service
• Live URL of Form/Page in publisher mode.
Troubleshooting: Connection issue related to replication of Private Keys
The cloud service credentials are secured and stored. To read the store credentials the Crypto keys of
the instance that encrypted the credentials need to be synced among all other consumer instances. In
case the communication or connection test is not working after the replication please follow these
steps for replication of Crypto keys:
1. Open the Configurations of AEM.
2. Click on OSGI tab and then click on Bundles.
3. Click on Adobe Granite Crypto Bundle Key Provider(com.adobe.granite.crypto.file)
4. Note the Bundle Id from the Id column. E.g. 21.

5. Open the root folder the AEM Instance in the file system and navigate to the following path:
/crx-quickstart/launchpad/felix/bundle<Id>/data
Or
/sling/felix/ bundle<Id>/data
6. Copy the two files: hmac and master from the source instance. E.g. Author Instance.
7. Paste them within the same root in target instance. E.g. Publish Instance.
8. Restart the bundle Adobe Granite Crypto Bundle Key Provider(com.adobe.granite.crypto.file) in
target bundle or the entire target AEM instance.
Adding Forms into the AEM Pages:
<Need to be Added>


