

ANIMATED CSS WEBSITE FOR PROMOTING
STUDENT UNDERSTANDING OF ACID BASE
CHEMISTRY
By
EMAN FREEG MOHAMED FREEG SHAMS
Bachelor of Science in Chemistry & Botany Faculty of Science, Alexandria University
Alexandria, Egypt 2001/2002
Submitted to the Faculty of the Graduate College of the
Oklahoma State University in partial fulfillment of
the requirements for the Degree of
MASTER OF SCIENCE May, 2007

ii
ANIMATED CSS WEBSITE FOR PROMOTING
STUDENT UNDERSTANDING OF ACID BASE
CHEMISTRY
Dissertation Approved:
Professor John I. Gelder
Dissertation Adviser Professor Barry Lavine
Professor Mark G. Rockley
Professor Niel Purdie
Professor A. Gordon Emslie
Dean of the Graduate College

iii
ACKNOWLEDGEMENTS
I would like to thank my advisor, Professor John Gelder, for his guidance,
encouragement, advice, and support throughout my thesis work. I would also
like to thank my committee members for their assistance (Professor Neil
Purdie, Professor Barry Lavine and Professor Mark Rockley). Finally, I wish
to express my appreciation to my mother, my three sisters, and my father for
their help, emotional support, and advice throughout my life. This work
would not have been possible without the financial support of the Chemistry
Department at Oklahoma State University.

iv
TABLE OF CONTENTS
Chapter Page I. REVIEW OF THE LITERATURE…………………………………………………1
1.0 Introduction........................................................................................................1
1.1 Brief History of Educational Technology..........................................................2 1.2 On-Line Materials for Acid-Base Chemistry.....................................................6 1.3 Research Results that Support Teaching with Technology ...............................7 1.4 Construction of the Acid-Base Chemistry Web Pages ....................................15 1.5 CSS Syntax and Language...............................................................................18 1.6 Linking Style Sheets to HTML Files ...............................................................19 1.7 P-Hypertext Preprocessor Language for Acid Base Chemistry Web Page .....20 1.8 Java Script Language .......................................................................................21
II. CONSTRUCTION OF THE ACID BASE CHEMISTRY WEBSITE…………...22
2.0 Organization of the Acid Base Chemistry Web Pages ....................................22 2.1 Styling the Wrapper .........................................................................................25 2.2 Styling the Page-Header ..................................................................................25 2. 3 Styling the Id “logo” .......................................................................................25 2. 4 Positioning the Main Menu.............................................................................27 2.5 Styling the Menu..............................................................................................28 2.6 Positioning the Text Inside Each Block of the Main Menu.............................28 2.7 Adding Color to the First Block of the Main Menu.........................................29 2.8 Styling the Remaining Six Blocks of the Main Menu .....................................29 2.9 Using the Hover Property ................................................................................31 2.10 Styling the Submenu......................................................................................33 2.11 Styling the Subheading Section .....................................................................38 2.12 Styling the Content around the Left and Right Column ................................41 2.13. Creating the Left Column and Right Column of the Page............................41 2.14 Styling the h3 Tag Inside the “Div” Content .................................................45 2.15 Styling the Left Column Menu ......................................................................48 2.16 Applying Background Color to the Six Headings of the Left Column Menu ... ……………………………………………………………………………………52 2.17 Styling the Right Column ..............................................................................56 2.18 Styling the Division “Page-Foot” ..................................................................60 2.19 The Entire Web Page .....................................................................................63

v
III. STUDENT USE OF THE ACID BASE CHEMISTRY WEB SITE…………….69
3.0 Navigation of Acid Base Chemistry Website ..................................................69 3.1 Acid-Base Titrations ........................................................................................75 3.2 Results of Studies to Evaluate the Efficacy of the Website.............................75 3.3 Conclusion .......................................................................................................78
IV. WEB PAGE FOR QUESTIONS ABOUT BRONSTED LOWRY THEORY .....80
4.0 Two Column Web Page ...................................................................................80 4.1 Construction of the Two Column Web Page ...................................................84 4.2 Inserting a Three Dimensional Button Menu...................................................96 4.3 Inserting a Roll Over Box Inside The Right Column ....................................101 4.4 Styling the h2 Tag..........................................................................................115 4.5 Styling the h3 Tag..........................................................................................117 4.6 Two Column Chemistry Web Page ...............................................................119 4.7 Application of Web Page for Questions about the Bronsted Lowry Theory... ... …………………………………………………………………………….…….123
V. CONCLUSION....................................................................................................124
5.0 Overview of Website………………………………………………………..124 5.1 Development of Website................................................................................125 5.2 Assessment of Website ..................................................................................126 REFERENCES ..........................................................................................................127 APPENDIX A............................................................................................................132 APPENDIX B ............................................................................................................145 APPENDIX C ............................................................................................................159

vi
LIST OF TABLES
Table Page CHAPTER II
2.1
2.2
2.3
2.4
2.5
2.6
2.7
2.8
2.9
2.10
2.11
2.12
4.1
4.2
4.3
4.4
CSS and HTML Code for Dividing the Web Page into Seven Divs ………….. CSS Code Required for Styling the Page Wrapper, Header, and Logo ….…… CSS Code Required To Style the Main Menu ………………………………… CSS Code to Insert All of the Sub-Menu Buttons..…………………………… CSS Code Required to Style the div “info” of the Web Page..............................
CSS Code Required to Float the Left Column and the Right Column ……...…
CSS Code Required to Style the h3 Tag in the Div “Content”………………… CSS Code Required for Applying Background to Each Header and Adding the Hover Property …………………….…..…………………….……………….... CSS Code to Apply Color to Each Header in the Left Column ………..….….. CSS Code to Style the Right Column …………………………………………. CSS Code to Style the Page Foot …………….……………………………….. CSS and HTML Code Required to Create Web Page …..……………………..
CHAPTER IV
HTML and CSS Code Used For Styling the Web Page …………………….… CSS Code for Adjusting the Width and Margins of the div “Container”…….... CSS code for Background, Text Color, and Border of the div “Container”…… CSS Code Required to Adjust the Line Height of the div “Container”………...
24
26
32
37
40
43
46
50
54
58
61
65
83
85
86
87

vii
4.5
4.6
4.7
4.8
4.9
4.10
4.11
4.12
4.13
4.14
4.15
4.16
4.17
4.18
4.19
4.20
4.21
4.22
4.23
4.24
4.25
4.26
HTML Code for the Entire Page with Bold CSS Code to Style Header …........ CSS Code to Style the Page Header ….………..……………………………… CSS and HTML Code That Moves Leftnav to the Left Side of the Page …….. CSS Code to Move Text Away from the Edge of the Left Column ….….……. CSS Code that Applies a Left Margin To the div “Content”………………..…. CSS Code to Add Footer and Adjust Both Text-Color and Background ……... CSS Code for Adding a Top Border to the Footer ….………….……………... CSS and HTML Code for a Two Column Page That Consists of Header, Left-Column, Right-Column, and Footer...…………………………… CSS Code to Set Maximum Line Length to Text ……………………………... HTML and CSS Code Used to Build a Three-Dimensional Button List …...…. CSS Code Required to Style the First Step of the Left Column Menu.……….. CSS Code to Design the List Buttons and Apply the Hover Property ………... HTML and CSS Code Used for Creating the Rollover Box ………………....... CSS Code to Center the Box in the Right Column ……………………………. CSS Code Required for the Span Property ……………………………………. CSS Code Required for Creating the Styling Boxes ……………...………..…. CSS code for Switching the Position of the Boxes and the Image ..……...…… CSS code Required to Apply the Hover Property to the Roll Over Box ……… CSS Code for Implementing the Hover Property …………………………..…. CSS Code for Styling the h2 Tag…...………...……………………………..…. CSS code For Styling the h3 Tag………………………………………………. HTML and CSS Code for the Two Column Chemistry Web Page…..………... list…………………………………………………………………….……...….
88
89
90
91
92
93
94
95
96
97
98
101
102
104
106
108
110
112
114
116
118
121

viii
LIST OF FIGURES
1.1 1.2
2.1 2.2 2.3 2.4
2.5
2.6
2.7 2.8 2.9
2.10
CHAPTER I A web page constructed from HTML code.……………………………………. Web page designed by linking CSS code to HTML code ………..………...…..
CHAPTER II Web Page divided into seven divs using CSS and HTML……………..……..... Blocks are styled and the text is left aligned in the main menu........................... Main menu consists of seven blocks with the text at the bottom of each block... The first block in the main menu is “bage” after applying the appropriate color property.….……….……………………………...……………………………... The seven blocks in the main menu after applying the color property to them…………………….………………………………………..……...............
A 10 px white top border appears once the mouse has made contact with the second block in the main menu, which is indicated by a decrease in height of the block............................................................................................................... A play button is inserted onto the top left part of the page.…....….………...…. A second button image is inserted onto the top left part of the page...………… The image “next.gif” has been applied as the backgroung image for the third button in the submenu……………………………………………………..…… The image last.gif has been applied as the backgroung image for the fourth button in the submenu……………………………………………...……...……
15
16
23
27
28
29
30
31
33
34
35
35

ix
2.11
2.12
2.13
2.14 2.15
2.16 2.17 2.18 2.19 2.20 2.21 2.22
3.1
4.1 4.2
4.3
The image home.gif has been applied as the backgroung image for the home button in the submenu.……………..…………………………………………... The web page containing the page_head part, and the “info” division that has the library image, the colored border and the dotted horizontal line …………...
The div “content” was divided into two columns: “left column” and “right column”................................................................................................................ Web page after CSS code was applied to style the h3 tag..………….…………. A creamy background was applied to each header, with a 5 px space around the header text.……………………………………....………………………….. The text in the left column is underlined after the mouse has passed over it ….. The color of each header has been changed in the left column menu …….……
The right column after styling the paragraphs and the text..……………………
Right column after styling the class “one”………………………………..……. The page foot after linking the CSS code to it ………………………………… The menu in the page foot after changing the location of the footer menu ……. The entire page with the chemistry content …………………………………….
CHAPTER III
Results from acid-base identification activity…………………………………..
CHAPTER IV
Two column page with CSS code linked to HTML code………………......….. The file, chemistry.css, is linked externally to the HTML file, chemistry.html ………………………………………………………………………………….. The size of the container, which is wrapped around the whole page content, takes only 90% of the original page size ……………………………………….
36
39
42
45
48
49
53
56
57
60
60
64
78
81
82
84

x
4.4
4.5
4.6 4.7
4.8
4.9 4.10
4.11 4.12 4.13
4.14
4.15 4.16 4.17 4.18 4.19
4.20 4.21
Web page with a black colored text and a faint pink background after adding the background-color code, text color code and border code to the CSS code of the container……………………...……..……………………………………… The text in the page has the same line-height after the appropriate CSS code was applied ………………………………………...….……….………………. The web page with the “div” top being placed at the top of the page ……..…... Web page after removing the margin and padding from the H1 tag in the header section…………………………………………………………………... The div “leftnav” has been moved to the left hand side of the page to a location where the left hand column will be located ……………………….….. Text has been moved away from the edge of the left column “leftnav”……….. By applying a left margin to the right column, the content of the right column starts to move to the right. Two columns have been created: the left column with the word “leftnav” in it, and the right column with text in it.…………….. Web page with footer division at the end of the page………………………..… Web page after the top-border has been applied to the page foot……………… Web page is divided into four sections: Header, left-column, right-column, and footer……………………………………………………………………………. By applying CSS code, the width of the right column is controlled by the text line with the longest length {max-width: 36em;}…………..…………………. Three-dimensional button menu built using CSS code …..……………………. The menu begins to appear in the left-hand column ………………..…………. The menu buttons are in their three dimensional form ...………………………. Roll Over Box Created with CSS Code ………………………………………. The box after being centered in the right column, with the background image applied. The box is surrounded by the top, left, right, and bottom borders …... The effects of applying the span property to the container box …..…………… Styling boxes are created for the roll over box …………………………………
85
86
87
88
89
90
91
92
93
94
95
96
98
100 102
103 105 107

xi
4.22 4.23 4.24 4.25 4.26 4.27 4.28
The position of the 10 small boxes and the flower is switched ………………... Roll over box after applying the hover property on the ten small boxes…….… Explanation box that appears after the mouse strikes box #10……………...…. Application of the h2 tag to the web page …..………………………….…….... Applying the h3 tag to the Web page ...……………………………..……….… Two column web page for acid base chemistry tutorial………………………... The web page after the mouse is over the H2SO4 box ………………………....
109 111 113 115 117 119 120

1
CHAPTER I
REVIEW OF THE LITERATURE
1.0 Introduction
The World Wide Web has impacted teaching and learning. It is popular because it
is both accessible and navigable. During the past five years, a large amount of
educational resources has appeared on the web. Using the appropriate search engine, a
student can find what he or she is seeking. Web based resources are becoming an integral
component of the learning process. The web is often used as a reference source by
students for their homework assignments. Studies have shown that web based
educational software strengthen the desire of students to learn (1-4).
Presentation software, e.g., PowerPoint, and course management tools, e.g.,
Blackboard, are often used in conjunction with web-based teaching tools. Many teachers
have come to view the web as a key enabling technology, which can be used to help
students improve their learning performance. This, in turn, is leading to significant
changes in the audiovisual technology used in the classroom. Because the primary
objective of the educational process is delivering instructional material to students, it has
been recognized that technology can accomplish this goal in a variety of interesting and
attractive ways that encourage students to study and to understand subject matter (5-8).

2
1.1 Brief History of Educational Technology
Teaching has always been associated with the use of chalk and a blackboard to
transmit information to a classroom of students. A blackboard is an effective display
device for presenting lecture material to students, and it can also be used as an ancillary
technique to gain their attention. Blackboards are used to help facilitate communication
between students and their instructors. In the United States, blackboards were first used
in military academies, e.g., WestPoint in 1801. A teacher was no longer required to
spend time writing individual problems or lessons on an individual student slate, but
could speak to an entire class where everyone was able to view the blackboard (9).
In 1944, the overhead projector was developed to facilitate the training of
servicemen. It was widely used in schools and businesses in the 1950’s. A major
manufacturer of overhead projectors in this period was 3M (10, 11). Today, nearly every
classroom in America has an overhead projector, which is used as a technique to visually
communicate to students in a classroom.
Overhead projectors are a simple instructional technology that can be used
anywhere. The teacher is able to face the student when explaining the material and see
the student’s reaction as the subject is being explained. Transparencies are available
during the entire class. Instructors can prepare the material before class and not use class
time to write it down on a blackboard. The presence of the projector can transform a
classroom into a “communication circle”, with students listening to the instructor and
asking questions, while viewing the slides.
In 1953, television (TV) was introduced into the classroom. An instructor on TV
could reach a larger student audience than a teacher with an overhead projector. By using

3
TV to deliver instructional content, the teacher had access to a technology that has all of
the requirements for “face-to-face” teaching. TV is capable of conveying all of the depth
and insight that characterize a contemporary lecture (12).
TV also allowed for the exchange of information between institutions of higher
learning. In 1963, the possibility of interuniversity exchange of lectures and teaching
materials through television occurred between Cambridge University and East Anglia
University (12). As was demonstrated by the participants in this pilot program, the
advantages offered by TV to education included:
1. Distribution and Broadcasting: As television is everywhere, its programs
are available to everyone, which is why it can be used in a university.
2. Magnification: Television can be used to emphasize the results of
experiments, which make it easier for students to understand their
significance.
3. Storage and immediate playback: Students can review the lesson again and
again until they understand it.
However, educational TV had drawbacks, which limited its impact on the
educational process. First and foremost, TV did not provide the viewer with instant
feedback. It was not possible to capture the viewer’s reactions to the program. Because
broadcast television is not interactive, viewer interest often waned. In addition, students
were unable to communicate with the speaker on TV as they would with their teacher in
the classroom.
In 1963, audiotape cassettes were introduced into the classroom. They provided
an extremely low cost information storage, and delivery system that encouraged many

4
educators to investigate new teaching methods and techniques (13). When students listen
to these recorded materials, they focused their attention on the content. This created
interest and confidence on the part of the student, since these tapes provided ancillary
support to the textbook, which strengthened the learning environment of the student. The
decrease in the cost of recorders also encouraged educators to use audiocassettes as a
cost-effective information storage and delivery system. As in the case of TV, a lack of a
feedback, for example, answers to questions posed by students was a drawback when
audiocassettes were used in teaching.
Advantages of audiocassettes included low cost, which allowed the educator to
introduce audiocassette players into the classroom on a limited or full-scale basis. The
cassettes were used for dissemination of information, discussion of errors on tests or
reports, and explanations of procedures used to operate instrumentation. The performance
of these cassettes for disseminating information can be enhanced when they are combined
with color slides, filmstrips or movies (13). In the 1960’s improvements in the quality of
audiovisual equipment occurred as new devices were developed that provided better
synchronization of sound with visual images.
The introduction of personal computers into the classroom, which began in the
early 1980’s, has revolutionized educational technology because it has changed the way
teachers deliver lecture material and the way students receive it. Using computers,
students can review their professor’s notes, take quizzes, and file homework assignments
from the comfort of their dorm room. Programs such as PowerPoint allow faculty to
more effectively teach in a large lecture hall. Email increased communication and
strengthened the faculty-student bond (14). Furthermore computers allow students to

5
store large data sets and solve complex and relevant scientific problems. For example,
with Excel, a student can simulate the titration of an acid with a strong base or determine
the potential energy distance profile of diatomic molecules from spectroscopic data (14).
Computer’s simulation can also be used to enhance the speed and the way in which
students learn. For example, a chemical simulation used in General Chemistry at
Oklahoma State University, in which a student can monitor the pressure of a gas as a
function of its volume and temperature allows the student to uncover Boyles Law and
Charles Law as well as the ideal gas law. Through a guided inquiry activity, students are
directed to use this simulation to collect data, and observe the behavior of a gas. Students
look for trends in the data, which allows them to develop a model to explain the behavior
of the gas. By way of this numerical simulation, a student can take the same experimental
approach used by the original investigators to uncover the behavior of a gas as a function
of its state variables.
For all of the aforementioned reasons, computer technology has the potential
to revolutionize the entire educational process (15-17). The Internet, which is a vast,
global, publicly accessible communication network that connects numerous people, is
probably the most important manifestation of computer technology today because of its
capability to deliver on-line learning. By 1995, the World Wide Web had emerged as the
most popular and effective means of information interchange (18). The power of the
Web can be attributed to its availability - students can have access to it anytime and
anywhere (19). One important aspect of the web is its use of hypertext links, which
allows users to jump from one file or website to another. For example, a web page can
provide the reader with informative material about a particular subject as well as links to

6
online experiments, which can allow the student to further explore the various intricacies
of a particular subject. The web can provide the student with images (e.g., static and
motion video), which gives the viewer a visual sense and helps him or her to better
understand the topic. The development of the World Wide Web has challenged the
academic community to take advantage of this new medium of communication. At
present, many universities are developing on-line courses that are entirely web based.
With the introduction of the Web, some communication between students and their
instructors has changed from face to face learning to online learning.
1.2 On-Line Materials for Acid-Base Chemistry
The purpose of the research described in this thesis is to develop and test online
materials and resources, which facilitate student learning of acid-base concepts. The
website that has been developed for this purpose contains pre-classroom activities and
simulations, as well as ancillary material to promote student understanding of acid-base
chemistry. Questions are posed to the students about various acid-base topics to help
students clarify their understanding. Student answers are recorded and compared to
answers given by an expert on the subject. Links are provided to tutorials, which help the
student to understand the material by watching online simulations, and answering the
given questions. There are also video clips, which demonstrate acid base behavior under
a variety of experimental settings. The students can watch the video clip and write an
explanation as to what has occurred. Feedback is later provided to each student as to the
validity of his/her explanation. Advantages and disadvantages of this approach to a more
traditional approach were evaluated by comparing students who used the aforementioned
web-based resources to students who only had classroom lectures on this material.

7
1.3 Research Results that Support Teaching with Technology
To design a web site to help students in an introductory chemistry course, one must
first decide on the material that is covered in the course and how the material is
organized. Next, technological resources, such as presentation software, that is available
needs to be identified. Integration of this technology into teaching cannot proceed
without an understanding of the different educational teaching styles. The instructor
should have had the opportunity to use the software before teaching the course. The use
of both technology and traditional approaches can enhance the creativity and quality of
the teaching. It is important that technology be applied at the right place and at the right
time. When developing a website, it is best to avoid using graphics that might slow down
the loading of the web page. Also, one should avoid using materials that require too much
accessorizing of the browser with specialized plug-ins as this will decrease student
accessibility to the website (21-23).
An example taken from the literature that demonstrates the effectiveness of
traditional teaching approaches when coupled with technology is cited in a series of
papers that describe a pilot study recently performed at Michigan Technology University
in 1999-2000. The study showed the effect of course management system software, e.g.,
WEBCT, and presentation software, e.g., Microsoft PowerPoint on student learning and
understanding. The expectation was that a combination of the two would increase the
level of motivation and learning of the students than either alone. The on-line materials
provided the students with accessibility that could not be found in a classroom
environment. WEBCT was used to engage the students and personalize their learning
environment. The course management software took advantage of on-line questions,

8
quizzes, examinations, and threaded discussion tools to increase communication between
instructors and students. There were online web notes developed by the instructor to
explain concepts presented to the students in lecture. The online notes were available all
of the time so the students could study the lecture notes at times convenient for them.
Problem sets for each chapter and classroom notes prepared as PowerPoint handouts were
also available for downloading from the web site. The use of this online resource proved
to be an effective teaching tool as tracking data from WebCT showed that students used
their time productively viewing the problem sets and their respective answer keys. It was
also found that students who performed poorly on WebCT quizzes and exams also
performed poorly in the classroom exams. This suggests that students who are able to
take advantage of WebCT will perform well in their classroom exam. Students who
performed poorly in their offline assignments were unable to bolster their grade with
online assignments (24).
Another study that involved the use of web-based software to promote teaching in
large lecture classes was performed at Leibniz-Institute for Science Education at the
University of Kiel in Germany (25). CHEMnet, an online course management system
similar to Blackboard, was used as a substitute for the classroom lectures. CHEMnet
(available in both English and German) has videos of chemical experiments, 3-
dimensional simulations of crystalline structure, and hyperlinks to mathematical contexts
and examples.
CHEMnet provides the instructor with information on the number of pages that
students have read on a specific chapter and how often they have used the various
multimedia elements implemented in CHEMnet. Once a student accesses CHEMnet, his

9
or her responses are registered in log-files. Using this feature of the program, the
instructor can monitor the progress made by the student as he or she is learning the
material. Currently, the primary users of CHEMnet are university and high-school
students and high school teachers. When these three main user groups were compared, it
was discovered that high-school teachers use the video clips more than the university or
the high-school students. This result is not surprising since the high school teachers must
perform their own experiments in the classroom. They may be interested in the effort
needed to perform the experiment and the risked involved.
Two studies that probed the benefits of web based (on-line) quizzes occurred at
Wake Forest University in 1999. In one study, on-line tutorials, and quizzes for students
to monitor student learning showed that pre-class electronic quizzes in both lab and
lecture were useful tools to enhance student preparation. In another study, online quizzes
were used to promote preparedness for the general chemistry laboratory. A web page
was created for the general chemistry laboratory. The web page contained links to the
course syllabus, various web resources, and individual pages created for each lab
experiment. The web page for each experiment contained a link to an online pre-
laboratory quiz. The results of this study showed that online quizzes could serve as
helpful tools to encourage students to prepare for their general chemistry laboratory
experiment. Better preparation helped the students to function more effectively in the lab
and to perform their laboratory experiment in a shorter period of time. They had a better
understanding of the significance of their results. It was assumed that students who were
prepared for the lab by taking quizzes would have a more meaningful laboratory
experience (26).

10
A study that probed the benefits of using a web site to support the lecture was
performed at Purdue University. When students completed a class in which lecturing is a
major component of the teaching, the long-term effectiveness of the class will depend on
the quality of the student’s lecture notes. Therefore, lecture notes become a crucial link
between the class and what the students learn. For this reason, it has been suggested that
instructors post their lecture notes online as HTML or PDF documents. This was done at
Purdue University in a sophomore organic chemistry class consisting of about 250-300
prepharmacy students (27). The lecture notes for the course were posted as either PDF or
PowerPoint files at the course website. Audio-video streaming of annotated PowerPoint
presentations from a personal computer were also placed online using the same
technology. This allowed downloading to either a windows media player or a video ipod.
The effectiveness of this on-line material to facilitate learning was assessed using a
student survey. Almost allof the students in the classs who responded to the survey stated
that the lecture notes and streaming videos were useful. Interestingly enough, no
attendance drop in lecture accompanied the introduction of this online material. The use
of this web based material to support a large lecture class is feasible since it is
inexpensive to post these resources on the web and the students possess the necessary
software via their personal computers to process the posted files.
A 1998 study of Middle Tennessee State University (MTSU) faculty surveyed the
impact of instructional technology on education at MTSU (28). The results of this
survey, which will be used to assist MTSU in future planning, lead to several major
findings, which gave MTSU faculty and administrators a better understanding of the
effect that technology can have on learning. Thes results are summarized below.

11
1. The Use of Instructional Technology Positively Affects Student Learning
Ninety-five percent of responding students agree with the statement, "I believe
that the use of technology in the classroom can enhance student learning."
"It facilitates teaching to students of all learning styles and makes it easier for
instructors to supplement teaching with enrichment and extra activities.
It provides a visual learning source that can help you remember lecture materials."
2. The Use of Instructional Technology Increases Student Interest and Satisfaction
Some students find that instructional technology when used effectively can make
learning more stimulating, interesting, or just plain fun. Their comments are as
follows. "It allows diversity in teaching techniques and keeps material
interesting." "It gets students more involved and interested in learning as it
provides them with a more visual way to learn."
3. The Role of Faculty and Their Ability to Use Instructional Technology are Major
Factors
While the responding students predominantly agree that technology provides
valuable teaching tools, students write, “Technology can be a powerful tool but
classroom success still depends on the quality of student/teacher interaction."
"The use of email as a communication tool is essential. It is another way to
initiate student/instructor interaction." "Some teachers use technology very
effectively and others do not. Its effectiveness depends on the teacher's ability to
use the technology." "Technology can be negative when a teacher loses creativity

12
and energy just because he or she has become dependent on PowerPoint or
videos." "I feel that instructional technology's impact on learning depends on
how well the teacher uses it."
4. Certain Instructional Technology Techniques Better Facilitate Certain Learning
Activities.
Ninety-five percent of the respondents indicate that the organization of content
covered is best facilitated by the instructor's use of computer applications to
present lecture outlines and to demonstrate specific concepts. Most of the
respondents recognize the instructor's use of computer applications as well as his
or her use of audio/visual technology as having a positive effect on their
understanding of the course materials. One student writes, "Technology helps
present information better. For example, we watch videos about ads that we
would otherwise just have to imagine."
5. Instructional Technology is an Integral Part of Today's Learning Environment
Many of the responding students concede that technology is here to stay and that
they must be able to use it effectively as they enter the real world. They
acknowledge the role of instructional technology in helping prepare them for the
future with comments such as: "Technology is everywhere. Its use in the
classroom makes me feel good about my education and also teaches me things I
will need to know when I enter the workforce." "It is undeniably the future. To

13
ignore it would be disastrous to anyone's career. Learning interactively now
prepares us for our future."
Results showed that an overwhelming majority of MTSU faculty believes that
instructional technology is essential, and currently it is being distributed across the
MTSU campus with different technologies accommodating different teaching practices.
A study of MTSU student perceptions about instructional technology and its impact on
learning reinforced the conclusions drawn from the faculty survey.
Web based software can also affect how teachers present information to students.
This was shown in a study performed in the Departments of Curriculum & Instruction
and Chemistry at Iowa State University (29). Animations created using MicroMedia
Director can be viewed on the World Wide Web using the plugin Shockwave and a Web
browser such as Netscape. Shockwave files can be downloaded from the web,
decompressed on the student’s computer, and then played using a Shockwave plug-in.
One advantage of Shockwave is the students can play the animations on computers
running Windows or on Power Macs. When the Shockwave animations were used
inconjunction with chemistry lecture demonstrations, students were better able to make
connections between the microscopic and macroscopic levels of the representation.
Greenbowe used this approach to help students better understand
electrochemistry. Students find this topic difficult and their misconceptions about
electrochemistry have been previously documented in the literature (30). Students have
difficulty using standard reduction potentials to predict the direction of chemical
reactions and were unable to produce an acceptable diagram of an electrochemical cell.

14
Although many students could solve quantitative electrochemical problems that appeared
on an exam, few were able to answer qualitative questions requiring a more in depth
understanding of electrochemical cells. Using computer animations in lecture to
visualize a salt bridge, which included an overall animation that focused on the dynamics
of the electrochemical cell including cation and anion migration out of the salt bridge,
Greenbow (31) was able to improve student understanding of this topic as evidenced by
their performance on their final exam as compared to their midterm exam.
Building on the previous efforts of the studies performed at Michigan
Technological University, Wake Forest University, University of Kiel, and Iowa State
University, a web page was created with tutorial components tailored for students trying
to learn acid-base chemistry. Concepts addressed on this web page through tutorials,
questions, quizzes, and exploration activities include the different components of an acid
base reaction, as well as Arrhenius, Bronsted-Lowry and Lewis definitions of acids and
bases. The students are given the opportunity to learn how to determine the conjugate
acid of a base, if they are given the formula of the base. Because the students often have
difficulty in solving pH problems, the web page also includes online experiments that can
increase their ability to understand acid-base equilibria. There are also questions and
tutorials on the various topics explored by the website, which test student understanding.

15
1.4 Construction of the Acid-Base Chemistry Web Pages
The acid base chemistry web site was developed using several languages: HTML,
PHP, CSS, and JAVA. HTML is an acronym for Hypertext markup language. HTML
consists of a set of tags, and attributes of tags, that are used to arrange the content on the
page as displayed by a browser. Figure 1.1 is an acid base chemistry web page prepared
with HTML.
Figure 1.1. A web page constructed from HTML code
CSS (also known as cascading style sheets) was used in combination with HTML
to prepare web pages for the acid base chemistry site because the combination of the two
produced a more attractive and functional web page than HTML alone. Figure 1.2 is a
CSS/HTML web page with the same acid-base content. CSS improved the accessibility
of the website, saved time, and produced a more sophisticated page styling. Students
would be more likely to access this web page as a result.

16
Figure 1.2. Web page designed by linking CSS code to HTML code
HTML has several drawbacks which necessitated the use of CSS to develop the
website. While HTML is composed of structural elements that were useful for describing
paragraphs, hyperlinks, lists, and heading, even the more advanced versions of HTML
were not able to meet the requirements of all browsers. For example, the <em> tag was
used to make the text bold, but some browsers interpreted this tag as meaning italicized
or normal text with a different color. As a result, there was no guarantee that what was

17
created by the author was exactly what the reader would see (32, 34). Another problem
with HTML was inserting an image into a web page. Web page designers initially
attempted to solve this problem by developing an element tag, <img> for HTML, or
constructing the web site using a different program, e.g., Macromedia flash. This often
resulted in destroying the structural meaning of the web page. HTML was also
inaccessible to many web browsers such as Safari, FireFox, and Mozilla (35). The use of
<table> and <font> elements, added bulk to each HTML web page, which required not
only more time to download, but it, also slowed the browser's rendering engine when it
tried to display the page. It was also difficult to modify websites with many HTML
pages, which had profound ramifications regarding their maintenance.
CSS provides a much richer document presentation and appearance than HTML.
It allowed the user to divide the web page into as many sections as desired (36, 37).
Borders around the elements can be created and one can increase or decrease the space
“padding” around the elements as desired. CSS allows the user to control the part of the
web page in which the text appears. Horizontal or vertical lines can be positioned on the
page and can be repeated. CSS allows different images to be inserted and set next to each
other without their edges overlapping. Drop down menus can be created that facilitate
the navigation between the different pages. Different lists with different designs can be
created. Roll over boxes that can change their shape once you roll the mouse over them
can be created as shown in Chapter 4. CSS can also provide pop up windows. With CSS,
a web page can be divided into sections without the need to use frames or side scroll bars,
which cannot be done by HTML

18
In CSS all of the style information can be centralized on a single page. A style
sheet can be created that can be applied to multiple pages. This is done by placing the
style sheet in its own document, and then linking the CSS code to the HTML code, which
is in another document. Armed with this capability, one can quickly create a consistent
look for an entire web site. All that is required is to link the single style sheet to all of the
documents on your web site. If it is desired to change the look of a page, all that is
needed is to edit a single file. The change will be automatically propagated throughout
the entire web site.
CSS allows the user to create multiple style sheets (also known as cascading),
which can then be applied to the appropriate pages on your website. Because CSS
centralizes all of the style information, your document size will be smaller than if it was
created using HTML resulting in faster downloading times. As a result of CSS, web page
development was no longer limited to specific browsers and the web designer is allowed
full access across all platforms and devices. The Web page author was able to change the
entire design of a site by modifying only one style sheet, rather than updating the markup
in every HTML document used on the site. With CSS, images and text can be placed in
specific page locations using tools such as float. Very attractive drop down menus can be
created. A web page can be divided into as many columns and rows as are needed,
without dividing the page into frames (38).
1.5 CSS Syntax and Language
To specify syntax in CSS, a selector, a property and a value are required, which
are expressed in the following format: selector {property: value}. The selector is usually
the HTML element/tag that one wishes to define; the property is the attribute that you

19
wish to change, and the value is the specified form of the property. The property and
value are separated by a colon, and surrounded by curly braces. When the value is
defined by multiple words, quotes should be placed around the value. When defining
more than one property, it is crucial to separate each property with a semicolon. Selectors
can be grouped by separating each selector with a comma. Comments are often
incorporated in CSS code to explain it, and the comments can help the user to edit the
source code at a later date. The browser ignores all comments. A CSS comment begins
with "/*", and ends with "*/", e.g., /* This is a comment */.
1.6 Linking Style Sheets to HTML Files
When a browser reads a style sheet, it formats the document according to the style
sheet. There are two types of style sheets: the external style sheet and the internal style
sheet. An external style sheet is ideal when the style is applied to many pages. With an
external style sheet, one can change the look of an entire Web site by modifying a few
lines of code in one file. Each page must link to the style sheet using the <link> tag. The
<link> tag goes inside the head section:
<head><link rel="stylesheet" type="text/css" href="chemistry.css" /></head>
The browser will read the style definitions from the file mystyle.css, and format the
document accordingly (39). An external style sheet can be written using any text editor.
The file should not contain any html tags. The style sheet should be saved with a CSS
extension. An example of a style sheet file is shown in Chapter 2. An internal style sheet
should be used when a single document has a unique style. Internal styles are defined in
the head section by using the <style> tag:
<head><style type="text/css">hr {color: sienna}p {margin-left: 20px}body

20
{background-image: url("images/back40.gif")}</style></head>
The browser when it reads the style definitions will format the document according to
these commands.
1.7 P-Hypertext Preprocessor Language For Acid Base Chemistry Web Page
P-hypertext preprocessor (PHP) language is a powerful scripting language for
creating dynamic web-pages. PHP can pass variables between web pages and control
variables in a web page. This allows individual students to receive different web pages.
PHP pages transfer data to a data base. PHP code was used to develop the activity page
and the question pages for the acid base web site because it could be directly embedded
into the HTML code that had been previously developed for this web site.
The activity pages were designed to allow the student to investigate the reactivity
of seven solutions (labeled A, B, C, D, E, F, and G), using three indicators (litmus,
Bromothymol blue, and Phenolphthalein) and three reagents (Mg, CaCO3, and
Mg(NO3)2. The students are asked to observe the interactions of each solution with each
indictor and reagent by watching video clips of their reactions. For each video clip, the
students write a brief summary of their observations. At the end of each set of reactions,
the students summarize the behavior exhibited by the seven unknown solutions. The goal
is to identify the trends in the data, which would allow the students to organize these
solutions into groups based on their reactivity. When the students have responded to all
of the questions on the page, they can click on the submit button. Once this button has
been clicked, their observations are recorded to a database and a new page will be loaded
where all of their responses will be typed. The students will be asked to print these pages
and keep them as part of their laboratory notebook.

21
For the questions on acids and bases, the students will be asked to answer the
questions provided on each topic. When they have responded to all of the questions on
the page, they will again click the submit button. Once this button has been clicked, their
observations will be recorded to a database and a new page will be loaded where all of
their responses will be typed with “expert” responses, which constitute the correct
answers. This allows the students to test their knowledge about this topic before they
begin to read their textbook.
1.8 Java Script Language
Quiz pages were developed to test the student’s understanding of the topics
covered by the web site. JavaScript code was used to develop the Quiz pages for the acid
base web site due to its ability to read and change the content of an HTML element once
it is either linked or embedded into HTML code. Students were asked to provide answers
for multiple-choice questions. Once they have provided an answer to a question, a
feedback line would appear which would tell the student if his/her answer was correct. A
button labeled next would appear which would take the student to the next question.
Once the students have finished their quiz, a summary of the results of the quiz would be
given to the students and their instructor.

22
CHAPTER II
CONSTRUCTION OF THE ACID BASE CHEMISTRY WEBSITE
The work described in this chapter and chapter IV utilizes ideas taken from books
and from web pages found in references 40-86 of the bibliography. Before the web page
described in this chapter was formulated, ideas about developing code pertaining to color
schemes, as well as the layout of the web page including the menus and boxes used were
obtained from on-line materials developed by educators, which can be found on the
Internet and texts about CSS.
2.0 Organization of the Acid Base Chemistry Web Pages
The acid base chemistry web site consists of a main page, which describes the
general content, available activities and simulations for acid-base chemistry
commensurate for a student taking an introductory chemistry course. Acid-base
chemistry is covered in seven secondary pages. Each secondary web page is divided into
seven separate sections known as divs. Each div has a unique ID selector. The seven divs
are labeled as "wrapper" (wrapped around the entire pages), "page_head" (for the top
banner),"page subheader" (which contains the image of the OSU library),
"content"(which wraps around the left and the right column), "left_column" (for left hand
column), "right_column" (for the right column) and "page_foot" (for the footer across the
bottom of the page). The delineation of a web page using the aforementioned

23
organization scheme is shown in Figure 2.1. Table 2.1 lists the HTML and CSS code
used to develop the seven tiered web page. HTML was used to define the number of
divs, whereas CSS was used to style and design each page div (e.g., width, length, height,
position, color, text font, and text size). The Page-head usually has a menu and the title
of the page, whereas the page subheader has the OSU library image. The content of each
page is placed in the left and right columns. The left column consists of menus and links
to other web pages. The right column consists of information about the topic under
discussion. The page-foot also has a menu, and the wrapper provides a border for the
entire page. The menus that appear in the page_head, left column and page_foot are
designed to be used by the student to navigate around the web site.
Figure 2.1.Web Page divided into seven divs using CSS and HTML

24
Table 2.1. CSS and HTML Code for Dividing the Web page into Seven Divs HTML Code CSS Code <div id="wrapper"> wraps around the entire page content </div>
#wrapper {width:750px; margin:10px auto 0 auto; text-align:left; background:#fff;}
<div id="page_head"> <h1>page header</h1> </div>
#page_head {width:750px; height:115px; position:relative; background:#fff;}
<div id="info"> <h1>the div "info"</h1> </div>
#info {clear:both; width:750px; padding-bottom:15px; background:#fff url(horizontal_line.gif) bottom left repeat-x;}
<div id="content"> <div id="right_column"> <h1>page right column</h1></div> <div id="left_column"> <h1>page left column</h1></div> <br class="clear" /></div>
#content {width:750px; background:#fff url(vertical_line.gif) 250px 0 repeat-y;} #right_column {width:480px; float:right;} #left_column {width:240px; float:left;} .clear {clear:both;}
<div id="page_foot"> <h1>Page Footer</h1></div>
#page_foot {clear:both; width:750px; padding-bottom:20px; background:#fff url(horizontal_line.gif) top left repeat-x; padding-top:10px;}

25
2.1 Styling the Wrapper
To ensure that menus, web links, and information about the topic under discussion
were away from the edges of the browser window, the width and margins on the div
wrapper were adjusted using the CSS declaration, width: 750 px. Using the command
“margins: 10px Auto 0 Auto", allowed centering of the web page in the browser window.
The CSS declaration for the wrapper section was #wrapper {width:750px; margin:10px
auto 0 auto; text-align:left; background:#fff;}.
2.2 Styling The Page-Header
Background color was set to white using the following CSS declaration
“background-color: #fff;” The header section width and height was set using the
following CSS code “width: 750px; height: 115px;” The CSS declaration was
“#page_head {width: 750px; height: 115px; position: relative; background: #fff ;}”.
2. 3 Styling the Id “logo”
Inside the page_head banner, there is an H1#logo tag consisting one or two words
to identify which page the user is currently on. The font-size was set to 45px, and the
text-font used was trebuchet ms. The text-style, which was normal “not bolded” left
aligned, was delineated by the CSS declaration, “h1#logo {font-size:45px; font-
family:"trebuchet ms"; float:left; margin:0; color:#000; font-weight:normal;}”. Table 2.2
lists the HTML and CSS code used to style the page wrapper, page header, and id logo.
The web page is centered in the browser and the title of the web page (A/B
Characteristics and Arrhenius Theory) has been placed in the page_head.

26
Table 2.2. CSS Code Required for Styling the Page Wrapper, Header, and Logo CSS Code #wrapper {width:750px; margin:10px auto 0 auto; text-align:left; background:#fff;} #page_head {width:750px; height:115px; position:relative; background:#fff;} h1#logo {font-size:45px; font-family:"trebuchet ms", tahoma, arial, verdana, sans-serif; float:left; margin:0; color:#000; font-weight:normal;} HTML Code <div id="wrapper"> <div id="page_head"> <P>A/B Characteristics & Theory </p> <h1 id="logo"> <b>Arrhenius</b></h1> <ul id="main_menu"> <li><a class="mm1" href=""><b>Box A</b></a></li> <li><a class="mm2" href=""><b>Box B</b></a></li> <li><a class="mm3" href=""><b>Box C</b></a></li> <li><a class="mm4" href=""><b>Box D</b></a></li> <li><a class="mm5" href=""><b>Box E</b></a></li> <li><a class="mm6 href=""><b>Box F</b></a></li> <li><a class="mm7" href=""><b>Box G</b></a></li> </ul> <ul id="sub_menu"> <li class="home"><a href="" title="Home Page"></a></li> <li class="first"><a href="" title="First"></a></li> <li class="previous"><a href="" title="Previous"></a></li> <li class="next"><a href="" title="Next"></a></li> <li class="last"><a href="" accesskey="L" title="Last"></a></li> </ul></div> <!-- end of page_head --> <div id="info"> </div> <!-- end of info --> <div id="content"> <div id="left_column"> <h1>page right column</h1> </div> <div id="right_column"> <h1>page left column</h1></div> <br class="clear" /> </div> <!-- end of content --><div id="page_foot"> <h1>Page Footer</h1></div> <!-- end of page_foot --></div> <!-- end of wrapper -->

27
2. 4 Positioning the Main Menu
Inside the page_ head banner is the main menu. The main-menu was positioned
10px from the top of the page and 0px to the right of the page using the CSS code,
“Position: absolute; top: 10px; right:0”. To ensure that the browser will not apply a
border, padding, margin, or any style type to the menu, the following CSS code was used
ul#main_menu {position:absolute; top:10px; right:0; border:0; padding:0; margin:0; list-
style-type:none;}. The width of each block was set at 78px, and height of each block was
set at 90px. To left align the text in each block, the following command was used, “float;
left”. Figure 2.2 shows the menu, which consists of seven blocks denoted as boxes (A-
G). The main menu consists of seven blocks (boxes); each block will contain a link that
will be used to connect the different pages of the web site.
Figure 2.2. Blocks are styled and the text is left aligned in the main menu
28
2.5 Styling The Menu
A 10px top black border was applied to each block using the CSS code “border-
top: 10px solid#000;”. Black colored text, with no text decoration was applied using the
following CSS code “ul#main_menu li a{display:block; width:78px; height:80px; text-
decoration:none; border-top:10px solid #000; color:#000; font-family:"trebuchet
ms,;position:relative}”.
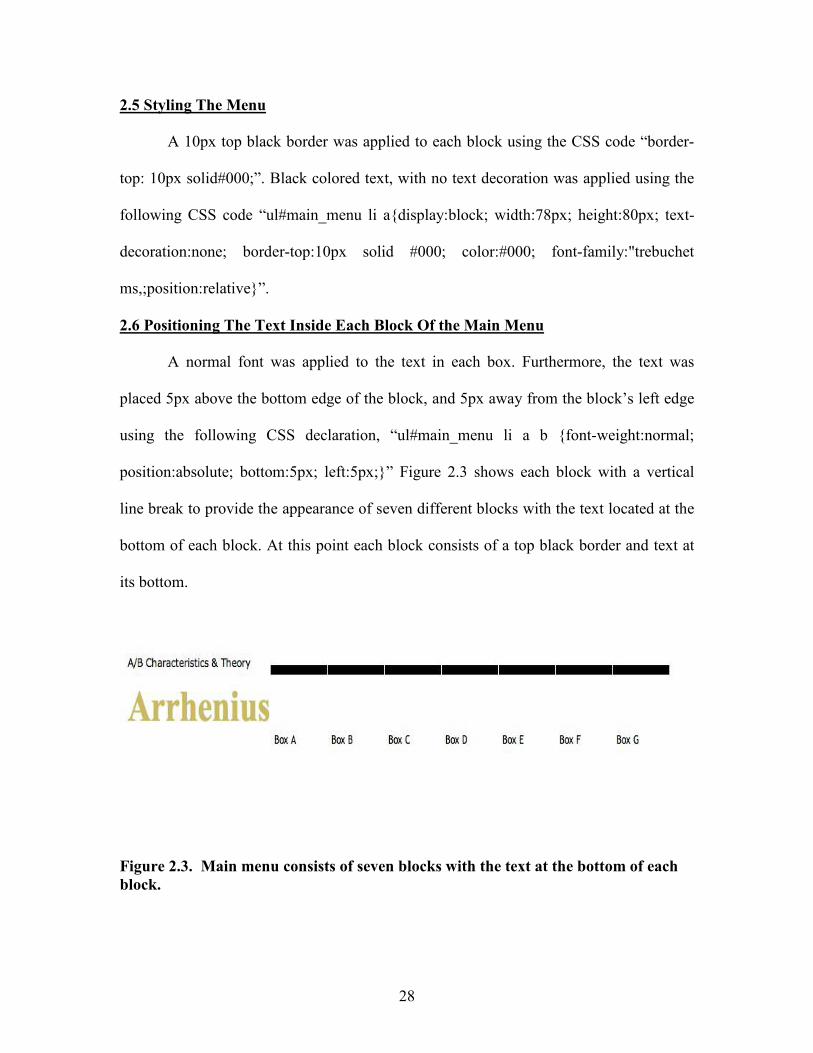
2.6 Positioning The Text Inside Each Block Of the Main Menu
A normal font was applied to the text in each box. Furthermore, the text was
placed 5px above the bottom edge of the block, and 5px away from the block’s left edge
using the following CSS declaration, “ul#main_menu li a b {font-weight:normal;
position:absolute; bottom:5px; left:5px;}” Figure 2.3 shows each block with a vertical
line break to provide the appearance of seven different blocks with the text located at the
bottom of each block. At this point each block consists of a top black border and text at
its bottom.
Figure 2.3. Main menu consists of seven blocks with the text at the bottom of each block.

29
2.7 Adding Color to the First Block of The Main Menu
There are seven blocks inside the main menu. Figures 2.4 shows the first block
after a “bage” color has been applied to the background. To apply a “bage” color to the
background of the first block and to the 10px, top border, the following CSS code was
written, “ul#main_menu li a.mm1 {background:#dfd7ca; border-top:10px solid
#dfd7ca;}” The first block is colored bage with the text at the bottom of the block.
Figure 2.4. The first block in the main menu is “bage” after applying the appropriate color property.
2.8 Styling the Remaining Six Blocks of the Main Menu
Figures 2.5 shows the web page after different colors were applied to the
remaining six blocks. To add background color, border size, and border color to the
remaining six blocks, a six-step procedure was employed.
• Background: #b2ab9b can be applied to the second block “mm2”; and a border-top:10px solid #b2ab9b;
• Background:#c9ba65 can be applied to the third block “mm3”; and a border-
top:10px solid #c9ba65;.

30
• Background:#e2dfa8 can be applied to the fourth block “mm4”; and a border-top:10px solid #e2dfa8;
• Background:#d4d8bd can be applied to the fifth list “mm5”; and a border-
top:10px solid #d4d8bd;
• Background:#949e7c can be applied to the sixth block “mm6”; and a border-top:10px solid #949e7c;
• Background:#758279 can be applied to the seventh block “mm7” ; and a border-
top:10px solid #758279;
Figure 2.5. The seven blocks in the main menu after applying the color property to them

31
2.9 Using the Hover Property
A 10 px, white colored top border will appear above any menu block once the
mouse has rolled over it using the hover property contained in the following CSS
code“ul#main_menu li a:hover {border-top:10px solid #fff; cursor:pointer;}” Figure 2.6
shows the effect of applying the hover property to the second block. The HTML and
CSS code required to build the main menu is shown in Table 2.3. The user can change
the structure of the menu blocks using a mouse.
Figure 2.6. A 10 px white top border appears once the mouse has made contact with the second block in the main menu, which is indicated by a decrease in height of the block

32
Table 2.3. CSS Code Required To Style the Main Menu CSS Code #wrapper {width:750px; margin:10px auto 0 auto; text-align:left; background:#fff;} #page_head {width:750px; height:115px; position:relative; background:#fff;} h1#logo {font-size:45px; font-family:"trebuchet ms", tahoma, arial, verdana, sans-serif; float:left; margin:0; color:#000; font-weight:normal;} ul#main_menu {position:absolute; top:10px; right:0; border:0; padding:0; margin:0; list-style-type:none;} ul#main_menu li {display:block; width:78px; height:90px; float:left; margin-left:1px; position:relative;} ul#main_menu li a{display:block; width:78px; height:80px; text-decoration:none; border-top:10px solid #000; color:#000; font-family:"trebuchet ms", tahoma, arial, verdana, sans-serif;position:relative;} ul#main_menu li a b {font-weight:normal; position:absolute; bottom:5px; left:5px;} ul#main_menu li a.mm1 {background:#dfd7ca; border-top:10px solid #dfd7ca;} ul#main_menu li a.mm2 {background:#b2ab9b; border-top:10px solid #b2ab9b;} ul#main_menu li a.mm3 {background:#c9ba65; border-top:10px solid #c9ba65;} ul#main_menu li a.mm4 {background:#e2dfa8; border-top:10px solid #e2dfa8;} ul#main_menu li a.mm5 {background:#d4d8bd; border-top:10px solid #d4d8bd;} ul#main_menu li a.mm6 {background:#949e7c; border-top:10px solid #949e7c;} ul#main_menu li a.mm7 {background:#758279; border-top:10px solid #758279;} ul#main_menu li a:hover {border-top:10px solid #fff; } HTML Code <div id="wrapper"><div id="page_head"> <P>A/B Characteristics & Theory </p> <h1 id="logo"> <b>Arrhenius</b></h1> <ul id="main_menu"> <li><a class="mm1" href=""><b>Box<br>A</b></a></li> <li><a class="mm2" href=""><b>Box B</b></a></li> <li><a class="mm3" href=""><b>Box C</b></a></li> <li><a class="mm4" href=""><b>Box D</b></a></li> <li><a class="mm5" href=""><b>Box E</b></a></li> <li><a class="mm6" href=""><b>Box F</b></a></li> <li><a class="mm7" href=""><b>Box G</b></a></li></ul> <ul id="sub_menu"> <li class="home"><a href="" title="Home Page"></a></li> <li class="first"><a href="" title="First"></a></li> <li class="previous"><a href="" title="Previous"></a></li> <li class="next"><a href="" title="Next"></a></li> <li class="last"><a href="" title="Last"></a></li></ul></div> <!-- end of page_head --> <div id="info"> </div> <!-- end of info --> <div id="content"> <div id="left_column"> <h1>page right column</h1></div> <div id="right_column"> <h1>page left column</h1></div> <br class="clear" /> </div> <!-- end of content --> <div id="page_foot"> <h1>Page Footer</h1></div> <!-- end of page_foot --></div> <!-- end of wrapper --> </div> <!-- end of wrapper -->

33
2.10 Styling the Submenu
A second, sub-menu was added to the page_head which allowed the user an
alternative navigational method to move between pages on the web site. This submenu
was positioned 85 pixels away from the top edge of the page container. To ensure that the
browser did not change the values of the margin, border or padding, the following CSS
declaration was used, ul#sub_menu {position:absolute; top:85px; left:0; border:0;
padding:0; margin:0; list-style-type:none;}. The various items comprising the sub-menu
were displayed as block-level elements, with a line break before and after each block.
The width of each block was 30 pixels, and the height was 20 pixels. The following CSS
command was used to float the sub-menu to the left of the page, ul#sub_menu li
{display:block; width:30px; height:20px; float:left; position:relative;}. A background
image was applied to the first block of the sub-menu using the following CSS code,
ul#sub_menu li.first {background: url(first.gif);}. Figure 2.7 shows the button required
to take the user to the first page of the website. When the user is at any page on the
website, he/she can move the mouse over the button and a pop up window will appear
with the statement, ”first,” appearing on the screen. Once the button has been clicked, it
will take the user to the first page of the web site.
Figure 2.7. A play button is inserted onto the top left part of the page

34
A second submenu button called previous was inserted into the web page using
the CSS declaration, “ul#sub_menu li.previous {background: url(previous.gif);}” Figure
2.8 shows the two buttons: first and previous. Three other submenu buttons (next, last,
and homepage) were added to the web page submenu. The CSS declarations used to
accomplish this task were
• ul#sub_menu li.next {background: url(next.gif);}
• ul#sub_menu li.last {background: url(last.gif);}
• ul#sub_menu li.home {background: url(home.gif);
Figures 2.9-2.11 show the three buttons being added to the submenu of the web page.
Table 2.6 lists the CSS code required to insert all of the submenu buttons. Holding the
mouse over any of these buttons will cause a popup window to appear which provides the
user with the name of the button and its function.
Figure 2.8. A second button image is inserted onto the top left part of the page

35
Figure 2.9. The image “next.gif” has been applied as the backgroung image for the third button in the submenu
Figure 2.10. The image last.gif has been applied as the backgroung image for the fourth button in the submenu

36
Figure 2.11. The image home.gif has been applied as the backgroung image for the home button in the submenu

37
Table 2.4. CSS Code to Insert All of the Sub-Menu Buttons CSS Code #wrapper {width:750px; margin:10px auto 0 auto; text-align:left; background:#fff;} #page_head {width:750px; height:115px; position:relative; background:#fff;} h1#logo {font-size:45px; font-family:"trebuchet ms", tahoma, arial, verdana, sans-serif; float:left; margin:0; color:#000; font-weight:normal;} ul#main_menu {position:absolute; top:10px; right:0; border:0; padding:0; margin:0; list-style-type:none;} ul#main_menu li {display:block; width:78px; height:90px; float:left; margin-left:1px; position:relative;} ul#main_menu li a{display:block; width:78px; height:80px; text-decoration:none; border-top:10px solid #000; color:#000;font-family:"trebuchet ms", tahoma, arial, verdana, sans-serif;position:relative;} ul#main_menu li a b {font-weight:normal; position:absolute; bottom:5px; left:5px;} ul#main_menu li a.mm1 {background:#dfd7ca; border-top:10px solid #dfd7ca;} ul#main_menu li a.mm2 {background:#b2ab9b; border-top:10px solid #b2ab9b;} ul#main_menu li a.mm3 {background:#c9ba65; border-top:10px solid #c9ba65;} ul#main_menu li a.mm4 {background:#e2dfa8; border-top:10px solid #e2dfa8;} ul#main_menu li a.mm5 {background:#d4d8bd; border-top:10px solid #d4d8bd;} ul#main_menu li a.mm6 {background:#949e7c; border-top:10px solid #949e7c;} ul#main_menu li a.mm7 {background:#758279; border-top:10px solid #758279;} ul#main_menu li a:hover {border-top:10px solid #fff; } ul#sub_menu {position:absolute; top:85px; left:0; border:0; padding:0; margin:0; list-style-type:none;} ul#sub_menu li {display:block; width:30px; height:20px; float:left; position:relative;} ul#sub_menu li.first {background: url(first.gif);} ul#sub_menu li.previous {background: url(previous.gif);} ul#sub_menu li.next {background: url(next.gif);} ul#sub_menu li.last {background: url(last.gif);} ul#sub_menu li.home {background: url(home.gif);} HTML Code <div id="wrapper"> <div id="page_head"> <P>A/B Characteristics & Theory </p> <h1 id="logo"> <b>Arrhenius</b></h1> <ul id="main_menu"> <li><a class="mm1" href=""><b>Box<br> A</b></a></li> <li><a class="mm2" href=""><b>Box B</b></a></li> <li><a class="mm3" href=""><b>Box C</b></a></li> <li><a class="mm4" href=""><b>Box D</b></a></li> <li><a class="mm5" href=""><b>Box E</b></a></li> <li><a class="mm6" href=""><b>Box F</b></a></li> <li><a class="mm7" href=""><b>Box G</b></a></li></ul> <ul id="sub_menu"> <li class="home"><a href="" title="Home Page"></a></li> <li class="first"><a href="" title="First"></a></li> <li class="previous"><a href="" title="Previous"></a></li> <li class="next"><a href="" title="Next"></a></li> <li class="last"><a href="" accesskey="L" title="Last"></a></li></ul></div> <!-- end of page_head --> <div id="info"></div> <!-- end of info --> <div id="content"> <div id="left_column"> <h1>page right column</h1></div> <div id="right_column"> <h1>page left column</h1></div> <br class="clear" /></div> <!-- end of content --> <div id="page_foot"> <h1>Page Footer</h1></div> <!-- end of page_foot --></div> <!-- end of wrapper -->

38
2.11 Styling the Subheading Section
The width of the subheading section (also known as div info) was adjusted to 750
pixels. A border consisting of fourteen colored images below the library image was
constructed using the CSS property, clear: both. A 15 px bottom padding was applied
using the CSS code “padding-bottom: 15px.” The entire CSS code used to construct a
border and apply padding and white background was “#info {clear: both; width: 750px;
padding-bottom: 15px; background: #fff ;}.” A horizontal_line image below the info
section, consisting of repeated dots was applied using the following CSS declaration,
“url(horizontal_line.gif) bottom left repeat-x”. Figure 2.12 shows the completed head
and subhead sections of the web page. Table 2.7 lists the CSS code used to style the head
and subhead section of the webpage. This code provides the web page with a certain
look and feel that will be appealing to the student.

39
Figure 2.12. The web page containing the page_head part, and the “info” division that has the library image, the colored border and the dotted horizontal line

40
Table 2.5. CSS Code Required to Style the div “info” of the Web Page CSS Code #wrapper {width:750px; margin:10px auto 0 auto; text-align:left; background:#fff;} #page_head {width:750px; height:115px; position:relative; background:#fff;} h1#logo {font-size:45px; font-family:"trebuchet ms", tahoma, arial, verdana, sans-serif; float:left; margin:0; color:#000; font-weight:normal;} h1#logo b {color:#c9ba65; font-family:"times new roman", serif;} ul#main_menu {position:absolute; top:10px; right:0; border:0; padding:0; margin:0; list-style-type:none;} ul#main_menu li {display:block; width:78px; height:90px; float:left; margin-left:1px; position:relative;} ul#main_menu li a{display:block; width:78px; height:80px; text-decoration:none; border-top:10px solid #000; color:#000; font-family:"trebuchet ms", tahoma, arial, verdana, sans-serif;position:relative;} ul#main_menu li a b {font-weight:normal; position:absolute; bottom:5px; left:5px;} ul#main_menu li a.mm1 {background:#dfd7ca; border-top:10px solid #dfd7ca;} ul#main_menu li a.mm2 {background:#b2ab9b; border-top:10px solid #b2ab9b;} ul#main_menu li a.mm3 {background:#c9ba65; border-top:10px solid #c9ba65;} ul#main_menu li a.mm4 {background:#e2dfa8; border-top:10px solid #e2dfa8;} ul#main_menu li a.mm5 {background:#d4d8bd; border-top:10px solid #d4d8bd;} ul#main_menu li a.mm6 {background:#949e7c; border-top:10px solid #949e7c;} ul#main_menu li a.mm7 {background:#758279; border-top:10px solid #758279;} ul#main_menu li a:hover {border-top:10px solid #fff; cursor:pointer;} ul#sub_menu {position:absolute; top:85px; left:0; border:0; padding:0; margin:0; list-style-type:none;} ul#sub_menu li {display:block; width:30px; height:20px; float:left; position:relative;} ul#sub_menu li.first {background: url(first.gif);} ul#sub_menu li.previous {background: url(previous.gif);} ul#sub_menu li.next {background: url(next.gif);} ul#sub_menu li.last {background: url(last.gif);} ul#sub_menu li.home {background: url(home.gif);} #info {clear:both; width:750px; padding-bottom:15px; background:#fff url(horizontal_line.gif) bottom left repeat-x;} HTML Code <div id="wrapper"> <div id="page_head"> <P>A/B Characteristics & Theory </p> <h1 id="logo"> <b>Arrhenius</b></h1> <ul id="main_menu"> <li><a class="mm1" href=""><b>Box<br> A</b></a></li> <li><a class="mm2" href=""><b>Box B</b></a></li> <li><a class="mm3" href=""><b>Box C</b></a></li> <li><a class="mm4" href=""><b>Box D</b></a></li> <li><a class="mm5" href=""><b>Box E</b></a></li> <li><a class="mm6" href=""><b>Box F</b></a></li> <li><a class="mm7" href=""><b>Box G</b></a></li> </ul> <ul id="sub_menu"> <li class="home"><a href="" title="Home Page"></a></li> <li class="first"><a href="" title="First"></a></li> <li class="previous"><a href="" title="Previous"></a></li> <li class="next"><a href="" title="Next"></a></li> <li class="last"><a href="" title="Last"></a></li></ul></div><!-- end of page_head --> <div id="info"> <img src="ghostlib385.jpg" width="826" height="233" /> <img src="fade1.gif" title="Fade out 1" alt="Fadeout 1" /><img src="fade2.gif" title="Fade out 2" alt="Fadeout 2" /><img src="fade3.gif" title="Fade out 3" alt="Fadeout 3" /><img src="fade4.gif" title="Fade out 4" alt="Fadeout 4" /><img src="fade5.gif" title="Fade out 5" alt="Fadeout 5" /><img src="fade6.gif" title="Fade out 6" alt="Fadeout 6" /><img src="fade7.gif" title="Fade out 7" alt="Fadeout 7" /><img src="fade8.gif" title="Fade out 8" alt="Fadeout 8" /><img src="fade9.gif" title="Fade out 9" alt="Fadeout 9" /><img src="fade10.gif" title="Fade out 10" alt="Fadeout 10" /><img src="fade11.gif" title="Fade out 11" alt="Fadeout 11" /><img src="fade12.gif" title="Fade out 12" alt="Fadeout 12" /><img src="fade13.gif" title="Fade out 13" alt="Fadeout 13" /><img src="fade14.gif" title="Fade out 14" alt="Fadeout 14" /></div> <!-- end of info --><div id="content"> <div id="left_column"> <h1>page right column</h1></div> <div id="right_column"> <h1>page left column</h1></div> <br class="clear" /> </div> <!-- end of content --> <div id="page_foot"><h1>Page Footer</h1></div> <!-- end of page_foot --></div> <!-- end of wrapper -->

41
2.12 Styling the Content Around the Left and Right Column
The content is the div of the web page that wraps around both the left and right
columns. The width of this div was set using the CSS code, “width: 750 px”. A vertical
line was created from the three-dot image vertical_line.gif. The vertical line was placed
250 px away from the left edge of the content using the vertical repeat property.CSS
Code used to accomplish this task was #content {width:750px; background:#fff
url(vertical_line.gif) 250px repeat-y;}.
2.13. Creating the Left Column and Right Column of the Page
The width of the left column was adjusted to 240 px using the CSS code, “width:
240px”, and placed on the left hand side of the page using the CSS float property,
“{float:left}”. The width of the right column was set to 480px using the CSS code,
“right-column {width: 480px}” and placed on the right hand side of the page using the
css float property, “{float: right}”. The CSS declaration to implement all of these
changes is listed below. Figure 2.13 shows the placement of the left and right columns
on the web page. Table 2.8 lists the CSS code required to style the div “content” and
float the left and right columns.
• #left_column {width:240px; float:left;}
• #right_column {width:480px; float:right;}

42
Figure 2.13. The div “content” was divided into two columns: “left column” and “right column”

43
Table 2.6. CSS Code Required to Float the Left Column and the Right Column CSS Code #wrapper {width:750px; margin:10px auto 0 auto; text-align:left; background:#fff;} #page_head {width:750px; height:115px; position:relative; background:#fff;} h1#logo {font-size:45px; font-family:"trebuchet ms", tahoma, arial, verdana, sans-serif; float:left; margin:0; color:#000; font-weight:normal;} h1#logo b {color:#c9ba65; font-family:"times new roman", serif;} ul#main_menu {position:absolute; top:10px; right:0; border:0; padding:0; margin:0; list-style-type:none;} ul#main_menu li {display:block; width:78px; height:90px; float:left; margin-left:1px; position:relative;} ul#main_menu li a{display:block; width:78px; height:80px; text-decoration:none; border-top:10px solid #000; color:#000; font-family:"trebuchet ms", tahoma, arial, verdana, sans-serif;position:relative;} ul#main_menu li a b {font-weight:normal; position:absolute; bottom:5px; left:5px;} ul#main_menu li a.mm1 {background:#dfd7ca; border-top:10px solid #dfd7ca;} ul#main_menu li a.mm2 {background:#b2ab9b; border-top:10px solid #b2ab9b;} ul#main_menu li a.mm3 {background:#c9ba65; border-top:10px solid #c9ba65;} ul#main_menu li a.mm4 {background:#e2dfa8; border-top:10px solid #e2dfa8;} ul#main_menu li a.mm5 {background:#d4d8bd; border-top:10px solid #d4d8bd;} ul#main_menu li a.mm6 {background:#949e7c; border-top:10px solid #949e7c;} ul#main_menu li a.mm7 {background:#758279; border-top:10px solid #758279;} ul#main_menu li a:hover {border-top:10px solid #fff; cursor:pointer;} ul#sub_menu {position:absolute; top:85px; left:0; border:0; padding:0; margin:0; list-style-type:none;} ul#sub_menu li {display:block; width:30px; height:20px; float:left; position:relative;} ul#sub_menu li.first {background: url(first.gif);} ul#sub_menu li.previous {background: url(previous.gif);} ul#sub_menu li.next {background: url(next.gif);} ul#sub_menu li.last {background: url(last.gif);} ul#sub_menu li.home {background: url(home.gif);} #info {clear:both; width:750px; padding-bottom:15px; background:#fff url(horizontal_line.gif) bottom left repeat-x;} #content {width:750px; background:#fff url(vertical_line.gif) 250px repeat-y;} #right_column {width:480px; float:right;} #left_column {width:240px; float:left;} HTML Code <div id="wrapper"> <div id="page_head"> <P>A/B Characteristics & Theory </p> <h1 id="logo"> <b>Arrhenius</b></h1> <ul id="main_menu"> <li><a class="mm1" href=""><b>Box<br>A</b></a></li> <li><a class="mm2" href=""><b>Box B</b></a></li> <li><a class="mm3" href=""><b>Box C</b></a></li> <li><a class="mm4" href=""><b>Box D</b></a></li> <li><a class="mm5" href=""><b>Box E</b></a></li> <li><a class="mm6" href=""><b>Box F</b></a></li> <li><a class="mm7" href=""><b>Box G</b></a></li></ul> <ul id="sub_menu"> <li class="home"><a href="" title="Home Page"></a></li> <li class="first"><a href="" title="First"></a></li> <li class="previous"><a href="" title="Previous"></a></li> <li class="next"><a href="" title="Next"></a></li> <li class="last"><a href="" " title="Last"></a></li></ul></div><!-- end of page_head --> <div id="info"> <img src="ghostlib385.jpg" width="826" height="233" /> <img src="fade1.gif" " /><img src="fade2.gif" /><img src="fade3.gif" /><img src="fade4.gif" /><img src="fade5.gif" /><img src="fade6.gif" /><img src="fade7.gif" /><img src="fade8.gif" /><img src="fade9.gif" /><img src="fade10.gif" /><img src="fade11.gif" /><img src="fade12.gif" " /><img src="fade13.gif" /><img src="fade14.gif" /></div> <!-- end of info --> <div id="content"> <div id="right_column"> <h3>Welcome to <b class="css">The Acid/Base chemistry</b><span class="play">web-site</span></h3> <p>In this website we will discuss the chemistry of Acids and Bases, as we know Acids and Bases can be considered as the most important chemicals in our lives, so we will take a closer look at <b class="css">Acids and Bases</b> and

44
their general characteristics. we will start with the general characteristics of <b class="css">Acids</b>. <p align="left" class="one">General characteristics of Acids.</p> <p><div align="left" id="navcontainer0"> <ul id="navlist0"> <li id="active">list.1</li> <li>list2</li></ul> </div> <p align="left" class="one">General characteristics of Bases </p> <p><div align="left" id="navcontainer0"> <ul id="navlist0"> <li id="active">list.1.</li> <li>list.2.</li> <li>list.3. </li></ul></div> <p align="left" class="one">Postulated Theories for Acid-Base Definition</p></div> <div id="left_column"> <h3>Acid And Base Topics</h3> <dl class="latest"> <dt class="left_heading0">Acid And Base Topics</dt> <dd><a tabindex="11" href="" title="Acid-Base characteristics"><em></em>Acid/ Base Strengths.</a></dd> <dd><a tabindex="12" href="" title="Acid-Base characteristics"><em></em>Acid/Base Arrhenius theory limitations.</a></dd></dl> <dl class="latest"> <dt class="left_heading1">Acid And Base Topics</dt> <dd><a tabindex="11" href="" title="Acid-Base characteristics"><em></em>A/B Characteristics And Arrhenius Theory.</a></dd></dl> <dl class="latest"> <dt class="left_heading2">Acid-Base experiments</dt> <dd><a tabindex="21" href="" title="Acid-Base characteristics"><em></em>A/B Characteristics And Arrhenius Theory.</a></dd></dl><dl class="latest"> <dt class="left_heading3">Acod-Base activities</dt> <dd><a tabindex="21" href="" title="Acid-Base characteristics"><em></em>A/B Characteristics And Arrhenius Theory.</a></dd></dl><dl class="latest"> <dt class="left_heading4">Acid_Base tutorials</dt> <dd><a tabindex="21" href="" title="Acid-Base characteristics"><em></em>A/B Characteristics And Arrhenius Theory.</a></dd></dl> <dl class="latest"> <dt class="left_heading5">chemistry Quiz</dt> <dd><a tabindex="21" href="" title="Acid-Base characteristics"><em></em>A/B Characteristics And Arrhenius Theory.</a></dd></dl> <h3>Bronsted-Lowry Acid-Base Experiments</h3> <ul class="advertisement" id="links50015"> <li><a href="">Litmus paper experiment </a><br /><span class="text">Explanation.</span></li> <li><a href="">Indicator experiment </a><br /><span class="text">Explanation.</span></li> </ul><ul class="advertisement"> <li><a href="">Acid-Base pH meter titration Experiment</a><br /><span class="text">Explanation</span></li> <li class="spacer"><a href="">Acid-Base Titration experiment</a><br /><span class="text">Explanation</span></li></ul> <h3>Tutorials</h3><ul class="advertisement"> <li><a href="">Acid-Base <b class="css"> Identification</b><span class="play"> <font size="3">Activity</font></span></a></li> <li><a href="">B/L <b class="css">Acid/Base Ionization</b><span class="play"><font size="3">Tutorial</font></span></a></li> <li><a href="">B/L <b class="css">Acid/Base</b><span class="play"><font size="3">Quiz</font></span></a></li> <li><a href="">A/B<b class="css">Characters/ arrhenius theory</b> <span class="play"><font size="3">Question</font></span><br /><br /></a></li></ul></div><br class="clear" /></div> <!-- end of content --> <div id="page_foot"><h1>Page Footer</h1></div><!-- end of page_foot --></div> <!-- end of wrapper -->

45
2.14 Styling the h3 Tag Inside the “Div” Content
The following CSS declaration was applied to the h3 tag, which is inside the
content and defines the style of the header section, “#content h3 {font-size:12px;
color:#b50; margin:10px 0 0 0; font-weight:bold;}”. This declaration applies a text with
font-size of 12 pixels, text color of #b50, top margin of 10 pixels, and a text font with
thick bold characters. Figure 2.14 shows the web page after the application of this CSS
declaration. Table 2.9 lists the CSS code required to construct the h3 tag.
Figure 2.14. Web page after CSS code was applied to style the h3 tag

46
Table 2.7. CSS Code Required to Style the h3 Tag in the Div “Content” CSS Code #wrapper {width:750px; margin:10px auto 0 auto; text-align:left; background:#fff;} #page_head {width:750px; height:115px; position:relative; background:#fff;} h1#logo {font-size:45px; font-family:"trebuchet ms", tahoma, arial, verdana, sans-serif; float:left; margin:0; color:#000; font-weight:normal;} h1#logo b {color:#c9ba65; font-family:"times new roman", serif;} ul#main_menu {position:absolute; top:10px; right:0; border:0; padding:0; margin:0; list-style-type:none;} ul#main_menu li {display:block; width:78px; height:90px; float:left; margin-left:1px; position:relative;} ul#main_menu li a{display:block; width:78px; height:80px; text-decoration:none; border-top:10px solid #000; color:#000; font-family:"trebuchet ms", tahoma, arial, verdana, sans-serif;position:relative;} ul#main_menu li a b {font-weight:normal; position:absolute; bottom:5px; left:5px;} ul#main_menu li a.mm1 {background:#dfd7ca; border-top:10px solid #dfd7ca;} ul#main_menu li a.mm2 {background:#b2ab9b; border-top:10px solid #b2ab9b;} ul#main_menu li a.mm3 {background:#c9ba65; border-top:10px solid #c9ba65;} ul#main_menu li a.mm4 {background:#e2dfa8; border-top:10px solid #e2dfa8;} ul#main_menu li a.mm5 {background:#d4d8bd; border-top:10px solid #d4d8bd;} ul#main_menu li a.mm6 {background:#949e7c; border-top:10px solid #949e7c;} ul#main_menu li a.mm7 {background:#758279; border-top:10px solid #758279;} ul#main_menu li a:hover {border-top:10px solid #fff; cursor:pointer;} ul#sub_menu {position:absolute; top:85px; left:0; border:0; padding:0; margin:0; list-style-type:none;} ul#sub_menu li {display:block; width:30px; height:20px; float:left; position:relative;} ul#sub_menu li.first {background: url(first.gif);} ul#sub_menu li.previous {background: url(previous.gif);} ul#sub_menu li.next {background: url(next.gif);} ul#sub_menu li.last {background: url(last.gif);} ul#sub_menu li.home {background: url(home.gif);} #info {clear:both; width:750px; padding-bottom:15px; background:#fff url(horizontal_line.gif) bottom left repeat-x;} #content {width:750px; background:#fff url(vertical_line.gif) 250px repeat-y;} #content h3 {font-size:12px; color:#b50; margin:10px 0 0 0; font-weight:bold;} .clear {clear:both;} HTML Code <div id="wrapper"> <div id="page_head"> <P>A/B Characteristics & Theory </p> <h1 id="logo"> <b>Arrhenius</b></h1> <ul id="main_menu"> <li><a class="mm1" href=""><b>Box<br>A</b></a></li> <li><a class="mm2" href=""><b>Box B</b></a></li> <li><a class="mm3" href=""><b>Box C</b></a></li> <li><a class="mm4" href=""><b>Box D</b></a></li> <li><a class="mm5" href=""><b>Box E</b></a></li> <li><a class="mm6" href=""><b>Box F</b></a></li> <li><a class="mm7" href=""><b>Box G</b></a></li></ul> <ul id="sub_menu"> <li class="home"><a href="" title="Home Page"></a></li> <li class="first"><a href="" title="First"></a></li> <li class="previous"><a href="" title="Previous"></a></li> <li class="next"><a href="" title="Next"></a></li> <li class="last"><a href="" " title="Last"></a></li></ul></div> <!-- end of page_head --><div id="info"> <img src="ghostlib385.jpg" width="826" height="233" /> <img src="fade1.gif" title="Fade out 1" alt="Fadeout 1" /><img src="fade2.gif" title="Fade out 2" alt="Fadeout 2" /><img src="fade3.gif" title="Fade out 3" alt="Fadeout 3" /><img src="fade4.gif" title="Fade out 4" alt="Fadeout 4" /><img src="fade5.gif" title="Fade out 5" alt="Fadeout 5" /><img src="fade6.gif" title="Fade out 6" alt="Fadeout 6" /><img src="fade7.gif" title="Fade out 7" alt="Fadeout 7" /><img src="fade8.gif" title="Fade out 8" alt="Fadeout 8" /><img src="fade9.gif" title="Fade out 9" alt="Fadeout 9" /><img src="fade10.gif" title="Fade out 10" alt="Fadeout 10" /><img src="fade11.gif" title="Fade out 11" alt="Fadeout 11" /><img src="fade12.gif" title="Fade out 12" alt="Fadeout 12" /><img src="fade13.gif" title="Fade out 13" alt="Fadeout 13" /><img src="fade14.gif" title="Fade out 14" alt="Fadeout 14" /> </div> <!-- end of info --> <div id="content"> <div id="right_column"> <h3>Welcome to <b class="css">The Acid/Base chemistry</b><span class="play">web-site</span></h3> <p>In this website we will discuss the chemistry of Acids and Bases, as we know Acids and Bases can be considered as the most important chemicals in our lives, so we will take a closer look at <b class="css">Acids and Bases</b> and their general characteristics. we will start with the general characteristics of <b class="css">Acids</b>. <p align="left" class="one">General characteristics of Acids.</p> <p><div align="left" id="navcontainer0"> <ul id="navlist0">

47
<li id="active">list.1</li> <li>list2</li></ul> </div> <p align="left" class="one">General characteristics of Bases </p> <p><div align="left" id="navcontainer0"> <ul id="navlist0"> <li id="active">list.1.</li> <li>list.2.</li> <li>list.3. </li></ul></div> <p align="left" class="one">Postulated Theories for Acid-Base Definition</p> </div> <div id="left_column"> <h3>Acid And Base Topics</h3> <dl class="latest"> <dt class="left_heading0">Acid And Base Topics</dt> <dd><a tabindex="11" href="" title="Acid-Base characteristics"><em></em>Acid/ Base Strengths.</a></dd> <dd><a tabindex="12" href="" title="Acid-Base characteristics"><em></em>Acid/Base Arrhenius theory limitations.</a></dd></dl> <dl class="latest"> <dt class="left_heading1">Acid And Base Topics</dt> <dd><a tabindex="11" href="" title="Acid-Base characteristics"><em></em>A/B Characteristics And Arrhenius Theory.</a></dd></dl> <dl class="latest"> <dt class="left_heading2">Acid-Base experiments</dt> <dd><a tabindex="21" href="" title="Acid-Base characteristics"><em></em>A/B Characteristics And Arrhenius Theory.</a></dd></dl> <dl class="latest"> <dt class="left_heading3">Acod-Base activities</dt> <dd><a tabindex="21" href="" title="Acid-Base characteristics"><em></em>A/B Characteristics And Arrhenius Theory.</a></dd></dl> <dl class="latest"> <dt class="left_heading4">Acid_Base tutorials</dt> <dd><a tabindex="21" href="" title="Acid-Base characteristics"><em></em>A/B Characteristics And Arrhenius Theory.</a></dd></dl> <dl class="latest"> <dt class="left_heading5">chemistry Quiz</dt> <dd><a tabindex="21" href="" title="Acid-Base characteristics"><em></em>A/B Characteristics And Arrhenius Theory.</a></dd></dl> <h3>Bronsted-Lowry Acid-Base Experiments</h3> <ul class="advertisement" id="links50015"> <li><a href="">Litmus paper experiment </a><br /><span class="text">Explanation.</span></li> <li><a href="">Indicator experiment </a><br /><span class="text">Explanation.</span></li> </ul><ul class="advertisement"> <li><a href="">Acid-Base pH meter titration Experiment</a><br /><span class="text">Explanation</span></li> <li class="spacer"><a href="">Acid-Base Titration experiment</a><br /><span class="text">Explanation</span></li> </ul><h3>Tutorials</h3> <ul class="advertisement"> <li><a href="">Acid-Base <b class="css"> Identification</b><span class="play"> <font size="3">Activity</font></span></a></li> <li><a href="">B/L <b class="css">Acid/Base Ionization</b><span class="play"><font size="3">Tutorial</font></span></a></li> <li><a href="">B/L <b class="css">Acid/Base</b><span class="play"><font size="3">Quiz</font></span></a></li> <li><a href="">A/B<b class="css"> Characters/ arrhenius theory</b> <span class="play"><font size="3">Question</font></span><br /><br /></a></li> </ul></div> <br class="clear" /> </div> <!-- end of content --> <div id="page_foot"> <h1>Page Footer</h1> </div> <!-- end of page_foot --> </div> <!-- end of wrapper -->

48
2.15 Styling the Left Column Menu
The following CSS declaration was used to apply a 0.85 em font size to set the
size of text of the left column list, “dl.latest {font-size: 0.85em; margin: 10px 0;}.” (One
em is equal to the font size of the element) (dl defines a definition of lists which is a list
of terms and explanation of the terms, A definition list starts with the <dl> tag. Each
definition-list term starts with the <dt> tag. Each definition-list definition starts with the
<dd> tag). The background color of the headers for the menu was set using the CSS
command, “background:#e2dfa8;” A space around each header text was applied using the
CSS property, “padding: 5px;” The following CSS declaration was used, “dl.latest dd
{margin:0; padding:5px 5px 0 5px;}”.A normal, non decorated text was added to each
sub-header in the left column menu using the CSS code, “text-decoration: none;” A text
color was applied using the CSS declaration, “color:#758279;” Figure 2.15 shows a
creamy background applied to each header, with a 5 px space around each header text.
Figure 2.15. A creamy background was applied to each header, with a 5 px space around the header text

49
The hover property was used to add visual effects to the text once the mouse has
rolled over it. To have the subheader underlined after the mouse has come in contact
with it, the following CSS command was applied, “dl.latest dd a:hover {text-
decoration:underline;}” Figure 2.16 shows the web page with the subheader text in the
left column underlined after the mouse has been in contact with it. Table 2.10 lists the
CSS code required to apply the hover property to the subheader text and add a
background color to each header of the left column menu.
Figure 2.16.The text in the left column is underlined after the mouse has passed over it

50
Table 2.8. CSS Code Required for Applying Background to Each Header and Adding the Hover Property CSS Code #wrapper {width:750px; margin:10px auto 0 auto; text-align:left; background:#fff;} #page_head {width:750px; height:115px; position:relative; background:#fff;} h1#logo {font-size:45px; font-family:"trebuchet ms", tahoma, arial, verdana, sans-serif; float:left; margin:0; color:#000; font-weight:normal;} h1#logo b {color:#c9ba65; font-family:"times new roman", serif;} ul#main_menu {position:absolute; top:10px; right:0; border:0; padding:0; margin:0; list-style-type:none;} ul#main_menu li {display:block; width:78px; height:90px; float:left; margin-left:1px; position:relative;} ul#main_menu li a{display:block; width:78px; height:80px; text-decoration:none; border-top:10px solid #000; color:#000; font-family:"trebuchet ms", tahoma, arial, verdana, sans-serif;position:relative;} ul#main_menu li a b {font-weight:normal; position:absolute; bottom:5px; left:5px;} ul#main_menu li a.mm1 {background:#dfd7ca; border-top:10px solid #dfd7ca;} ul#main_menu li a.mm2 {background:#b2ab9b; border-top:10px solid #b2ab9b;} ul#main_menu li a.mm3 {background:#c9ba65; border-top:10px solid #c9ba65;} ul#main_menu li a.mm4 {background:#e2dfa8; border-top:10px solid #e2dfa8;} ul#main_menu li a.mm5 {background:#d4d8bd; border-top:10px solid #d4d8bd;} ul#main_menu li a.mm6 {background:#949e7c; border-top:10px solid #949e7c;} ul#main_menu li a.mm7 {background:#758279; border-top:10px solid #758279;} ul#main_menu li a:hover {border-top:10px solid #fff; cursor:pointer;} ul#sub_menu {position:absolute; top:85px; left:0; border:0; padding:0; margin:0; list-style-type:none;} ul#sub_menu li {display:block; width:30px; height:20px; float:left; position:relative;} ul#sub_menu li.first {background: url(first.gif);} ul#sub_menu li.previous {background: url(previous.gif);} ul#sub_menu li.next {background: url(next.gif);} ul#sub_menu li.last {background: url(last.gif);} ul#sub_menu li.home {background: url(home.gif);} #info {clear:both; width:750px; padding-bottom:15px; background:#fff url(horizontal_line.gif) bottom left repeat-x;} #content {width:750px; background:#fff url(vertical_line.gif) 250px repeat-y;} #content h3 {font-size:12px; color:#b50; margin:10px 0 0 0; font-weight:bold;} .clear {clear:both;} #right_column {width:480px; float:right;} #left_column {width:240px; float:left;} dl.latest {font-size:0.85em; margin:10px 0;} dl.latest dt {background:#e2dfa8; padding:5px;} dl.latest dd {margin:0; padding:5px 5px 0 5px;} dl.latest dd a, dl.latest dd a:visited {text-decoration:none; color:#758279;}dl.latest dd a:hover {text-decoration:underline;} HTML Code <div id="wrapper"><div id="page_head"> <P>A/B Characteristics & Theory </p> <h1 id="logo"> <b>Arrhenius</b></h1><ul id="main_menu"> <li><a class="mm1" href=""><b>Box<br>A</b></a></li> <li><a class="mm2" href=""><b>Box B</b></a></li> <li><a class="mm3" href=""><b>Box C</b></a></li> <li><a class="mm4" href=""><b>Box D</b></a></li> <li><a class="mm5" href=""><b>Box E</b></a></li> <li><a class="mm6" href=""><b>Box F</b></a></li> <li><a class="mm7" href=""><b>Box G</b></a></li></ul> <ul id="sub_menu"> <li class="home"><a href="" title="Home Page"></a></li> <li class="first"><a href="" title="First"></a></li> <li class="previous"><a href="" title="Previous"></a></li> <li class="next"><a href="" title="Next"></a></li> <li class="last"><a href="" " title="Last"></a></li></ul></div><!-- end of page_head --><div id="info"> <img src="ghostlib385.jpg" width="826" height="233" /> <img src="fade1.gif" " /><img src="fade2.gif" /><img src="fade3.gif" /><img src="fade4.gif" /><img src="fade5.gif" /><img src="fade6.gif" /><img src="fade7.gif" /><img src="fade8.gif" /><img src="fade9.gif" /><img src="fade10.gif" /><img src="fade11.gif" /><img src="fade12.gif" " /><img src="fade13.gif" /><img src="fade14.gif" /></div> <!-- end of info -->

51
<div id="content"> <div id="right_column"> <h3>Welcome to <b class="css">The Acid/Base chemistry</b><span class="play">web-site</span></h3> <p>In this website we will discuss the chemistry of Acids and Bases, as we know Acids and Bases can be considered as the most important chemicals in our lives, so we will take a closer look at <b class="css">Acids and Bases</b> and their general characteristics. we will start with the general characteristics of <b class="css">Acids</b>. <p align="left" class="one">General characteristics of Acids.</p> <p><div align="left" id="navcontainer0"> <ul id="navlist0"> <li id="active">list.1</li> <li>list2</li></ul> </div> <p align="left" class="one">General characteristics of Bases </p> <p><div align="left" id="navcontainer0"> <ul id="navlist0"> <li id="active">list.1.</li><li>list.2.</li> <li>list.3. </li></ul></div> <p align="left" class="one">Postulated Theories for Acid-Base Definition</p></div> <div id="left_column"><h3>Acid And Base Topics</h3> <dl class="latest"> <dt class="left_heading1">Acid And Base Topics</dt> <dd><a tabindex="11" href="" title="Acid-Base characteristics"><em></em>A/B Characteristics And Arrhenius Theory.</a></dd></dl> <dl class="latest"> <dt class="left_heading2">Acid-Base experiments</dt> <dd><a tabindex="21" href="" title="Acid-Base characteristics"><em></em>A/B Characteristics And Arrhenius Theory.</a></dd></dl> <dl class="latest"><dt class="left_heading3">Acod-Base activities</dt> <dd><a tabindex="21" href="" title="Acid-Base characteristics"><em></em>A/B Characteristics And Arrhenius Theory.</a></dd></dl> <dl class="latest"><dt class="left_heading4">Acid_Base tutorials</dt> <dd><a tabindex="21" href="" title="Acid-Base characteristics"><em></em>A/B Characteristics And Arrhenius Theory.</a></dd></dl> <dl class="latest"> <dt class="left_heading5">chemistry Quiz</dt> <dd><a tabindex="21" href="" title="Acid-Base characteristics"><em></em>A/B Characteristics And Arrhenius Theory.</a></dd></dl> <h3>Bronsted-Lowry Acid-Base Experiments</h3> <ul class="advertisement" id="links50015"> <li><a href="">Litmus paper experiment </a><br /><span class="text">Explanation.</span></li> <li><a href="">Indicator experiment </a><br /><span class="text">Explanation.</span></li> </ul><ul class="advertisement"> <li><a href="">Acid-Base pH meter titration Experiment</a><br /><span class="text">Explanation</span></li> <li class="spacer"><a href="">Acid-Base Titration experiment</a><br /><span class="text">Explanation</span></li></ul> <h3>Tutorials</h3><ul class="advertisement"> <li><a href="">Acid-Base <b class="css"> Identification</b><span class="play"> <font size="3">Activity</font></span></a></li> <li><a href="">B/L <b class="css">Acid/Base Ionization</b><span class="play"><font size="3">Tutorial</font></span></a></li> <li><a href="">B/L <b class="css">Acid/Base</b><span class="play"><font size="3">Quiz</font></span></a></li> <li><a href="">A/B<b class="css"> Characters/ arrhenius theory</b> <span class="play"><font size="3">Question</font></span><br /><br /></a></li> </ul></div><br class="clear" /></div> <!-- end of content --> <div id="page_foot"><h1>Page Footer</h1></div><!-- end of page_foot --></div> <!-- end of wrapper -->

52
2.16 Applying Background Color to the Six Headings of the Left Column Menu
A cream background color to match the first block in the main menu was applied
to the first header in the left column using the CSS code, “dl.latest dt.left_heading0
{background: #e2dfa8;}” A brown background color was applied to the second header to
match the second block in the main menu using the CSS code, “dl.latest dt.left_heading1
{background:#b2ab9b;}”. A gold color was applied to the third header in the left column
using the CSS code “dl.latest dt.left_heading2 {background:#c9ba65;}” A faint green
color was applied to the fourth header in the left column menu using the CSS command
“dl.latest dt.left_heading3 {background:#d4d8bd;}”. A dark blue background color was
applied to the fifth header in the left column menu using the CSS code, “dl.latest
dt.left_heading4 {background:#758279;}”, and a faint yellow color was added to the
sixth header in the left column menu using the CSS code, “dl.latest dt.left_heading5
{background: #e2dfa8;}.” Figure 2.17 shows the color of each of the six headers, which
has been changed in the left column menu to correspond to the color of the six blocks in
the main menu. Table 2.11 lists the CSS code required to apply background color to all
of the headers in the menu in the left column.

53
Figure 2.17.The color of each header has been changed in the left column menu

54
Table 2.9. CSS Code to Apply Color to Each Header in the Left Column CSS Code #wrapper {width:750px; margin:10px auto 0 auto; text-align:left; background:#fff;} #page_head {width:750px; height:115px; position:relative; background:#fff;} h1#logo {font-size:45px; font-family:"trebuchet ms", tahoma, arial, verdana, sans-serif; float:left; margin:0; color:#000; font-weight:normal;} h1#logo b {color:#c9ba65; font-family:"times new roman", serif;} ul#main_menu {position:absolute; top:10px; right:0; border:0; padding:0; margin:0; list-style-type:none;} ul#main_menu li {display:block; width:78px; height:90px; float:left; margin-left:1px; position:relative;} ul#main_menu li a{display:block; width:78px; height:80px; text-decoration:none; border-top:10px solid #000; color:#000; font-family:"trebuchet ms", tahoma, arial, verdana, sans-serif;position:relative;} ul#main_menu li a b {font-weight:normal; position:absolute; bottom:5px; left:5px;} ul#main_menu li a.mm1 {background:#dfd7ca; border-top:10px solid #dfd7ca;} ul#main_menu li a.mm2 {background:#b2ab9b; border-top:10px solid #b2ab9b;} ul#main_menu li a.mm3 {background:#c9ba65; border-top:10px solid #c9ba65;} ul#main_menu li a.mm4 {background:#e2dfa8; border-top:10px solid #e2dfa8;} ul#main_menu li a.mm5 {background:#d4d8bd; border-top:10px solid #d4d8bd;} ul#main_menu li a.mm6 {background:#949e7c; border-top:10px solid #949e7c;} ul#main_menu li a.mm7 {background:#758279; border-top:10px solid #758279;} ul#main_menu li a:hover {border-top:10px solid #fff; cursor:pointer;} ul#sub_menu {position:absolute; top:85px; left:0; border:0; padding:0; margin:0; list-style-type:none;} ul#sub_menu li {display:block; width:30px; height:20px; float:left; position:relative;} ul#sub_menu li.first {background: url(first.gif);} ul#sub_menu li.previous {background: url(previous.gif);} ul#sub_menu li.next {background: url(next.gif);} ul#sub_menu li.last {background: url(last.gif);} ul#sub_menu li.home {background: url(home.gif);} #info {clear:both; width:750px; padding-bottom:15px; background:#fff url(horizontal_line.gif) bottom left repeat-x;} #content {width:750px; background:#fff url(vertical_line.gif) 250px repeat-y;} #content h3 {font-size:12px; color:#b50; margin:10px 0 0 0; font-weight:bold;} .clear {clear:both;} #right_column {width:480px; float:right;} #left_column {width:240px; float:left;} dl.latest {font-size:0.85em; margin:10px 0;} dl.latest dt {background:#e2dfa8; padding:5px;} dl.latest dd {margin:0; padding:5px 5px 0 5px;} dl.latest dd a, dl.latest dd a:visited {text-decoration:none; color:#758279;} dl.latest dd a:hover {text-decoration:underline;} dl.latest dt.left_heading0 {background: #e2dfa8;} dl.latest dt.left_heading1 {background:#b2ab9b;} dl.latest dt.left_heading2 {background:#c9ba65;} dl.latest dt.left_heading3 {background:#d4d8bd;} dl.latest dt.left_heading4 {background:#758279;} dl.latest dt.left_heading5 {background: #e2dfa8;} HTML Code <div id="wrapper"><div id="page_head"> <P>A/B Characteristics & Theory </p> <h1 id="logo"> <b>Arrhenius</b></h1><ul id="main_menu"> <li><a class="mm1" href=""><b>Box<br>A</b></a></li> <li><a class="mm2" href=""><b>Box B</b></a></li> <li><a class="mm3" href=""><b>Box C</b></a></li> <li><a class="mm4" href=""><b>Box D</b></a></li> <li><a class="mm5" href=""><b>Box E</b></a></li> <li><a class="mm6" href=""><b>Box F</b></a></li> <li><a class="mm7" href=""><b>Box G</b></a></li></ul> <ul id="sub_menu"> <li class="home"><a href="" title="Home Page"></a></li> <li class="first"><a href="" title="First"></a></li> <li class="previous"><a href="" title="Previous"></a></li> <li class="next"><a href="" title="Next"></a></li> <li class="last"><a href="" " title="Last"></a></li></ul></div><!-- end of page_head --><div id="info">

55
<img src="ghostlib385.jpg" width="826" height="233" /> <img src="fade1.gif" " /><img src="fade2.gif" /><img src="fade3.gif" /><img src="fade4.gif" /><img src="fade5.gif" /><img src="fade6.gif" /><img src="fade7.gif" /><img src="fade8.gif" /><img src="fade9.gif" /><img src="fade10.gif" /><img src="fade11.gif" /><img src="fade12.gif" " /><img src="fade13.gif" /><img src="fade14.gif" /></div> <!-- end of info --><div id="content"><div id="right_column"> <h3>Welcome to <b class="css">The Acid/Base chemistry</b><span class="play">web-site</span></h3> <p>In this website we will discuss the chemistry of Acids and Bases, as we know Acids and Bases can be considered as the most important chemicals in our lives, so we will take a closer look at <b class="css">Acids and Bases</b> and their general characteristics. we will start with the general characteristics of <b class="css">Acids</b>. <p align="left" class="one">General characteristics of Acids.</p> <p><div align="left" id="navcontainer0"><ul id="navlist0"><li id="active">list.1</li><li>list2</li></ul> </div> <p align="left" class="one">General characteristics of Bases </p> <p><div align="left" id="navcontainer0"><ul id="navlist0"><li id="active">list.1.</li><li>list.2.</li> <li>list.3. </li></ul></div> <p align="left" class="one">Postulated Theories for Acid-Base Definition</p></div> <div id="left_column"><h3>Acid And Base Topics</h3> <dl class="latest"> <dt class="left_heading0">Acid And Base Topics</dt> <dd><a tabindex="11" href="" title="Acid-Base characteristics"><em></em>Acid/ Base Strengths.</a></dd> <dd><a tabindex="12" href="" title="Acid-Base characteristics"><em></em>Acid/Base Arrhenius theory limitations.</a></dd></dl> <dl class="latest"> <dt class="left_heading1">Acid And Base Topics</dt> <dd><a tabindex="11" href="" title="Acid-Base characteristics"><em></em>A/B Characteristics And Arrhenius Theory.</a></dd></dl> <dl class="latest"> <dt class="left_heading2">Acid-Base experiments</dt> <dd><a tabindex="21" href="" title="Acid-Base characteristics"><em></em>A/B Characteristics And Arrhenius Theory.</a></dd></dl> <dl class="latest"> <dt class="left_heading3">Acod-Base activities</dt> <dd><a tabindex="21" href="" title="Acid-Base characteristics"><em></em>A/B Characteristics And Arrhenius Theory.</a></dd></dl> <dl class="latest"> <dt class="left_heading4">Acid_Base tutorials</dt> <dd><a tabindex="21" href="" title="Acid-Base characteristics"><em></em>A/B Characteristics And Arrhenius Theory.</a></dd></dl> <dl class="latest"> <dt class="left_heading5">chemistry Quiz</dt> <dd><a tabindex="21" href="" title="Acid-Base characteristics"><em></em>A/B Characteristics And Arrhenius Theory.</a></dd></dl> <h3>Bronsted-Lowry Acid-Base Experiments</h3> <ul class="advertisement" id="links50015"> <li><a href="">Litmus paper experiment </a><br /><span class="text">Explanation.</span></li> <li><a href="">Indicator experiment </a><br /><span class="text">Explanation.</span></li> </ul><ul class="advertisement"> <li><a href="">Acid-Base pH meter titration Experiment</a><br /><span class="text">Explanation</span></li> <li class="spacer"><a href="">Acid-Base Titration experiment</a><br /><span class="text">Explanation</span></li></ul> <h3>Tutorials</h3><ul class="advertisement"> <li><a href="">Acid-Base <b class="css"> Identification</b><span class="play"> <font size="3">Activity</font></span></a></li> <li><a href="">B/L <b class="css">Acid/Base Ionization</b><span class="play"><font size="3">Tutorial</font></span></a></li> <li><a href="">B/L <b class="css">Acid/Base</b><span class="play"><font size="3">Quiz</font></span></a></li> <li><a href="">A/B<b class="css"> Characters/ arrhenius theory</b> <span class="play"><font size="3">Question</font></span><br /><br /></a></li> </ul></div><br class="clear" /></div> <!-- end of content --> <div id="page_foot"><h1>Page Footer</h1></div><!-- end of page_foot --></div> <!-- end of wrapper -->

56
2.17 Styling the Right Column
The text font size of the right column paragraphs, which contains information
about the topic, was adjusted to 12px with the space between each line adjusted to16px,
and a top margin of 5px and a left margin of 15px applied using the following CSS code,
“P {font-size: 12px; color: #555; line-height: 16px; margin: 5px 0 15px 0 ;}”. To adjust
the text color for the class called “css”to gold, and the text font to times new roman in the
right column, the following CSS command was used, “.css {color:#983; font-
family:"times new roman", serif;}” The text font for the class called “play” was adjusted
by applying a black color text using the following CSS code,“.play {font-
family:"trebuchet ms", tahoma, arial, verdana, sans-serif; margin:0; color:#000; font-
weight:normal;}” Figure 2.18 shows the right column after applying the aforementioned
CSS commands for the paragraphs and the text.
Figure 2.18. The right column after styling the paragraphs and the text

57
To create four solid borders around the text in the right column, the following
CSS command was used, “border-style:solid”. Yellow was applied to each of the four
solid borders using the CSS code, “border-color:#D9DA26” To apply a yellow
background to the box formed by the four borders, the following CSS command was
employed, “background-color”#D9DA26” To adjust the text size to 15.5px inside the
box, the following CSS command was used, “font-size:15.5px” To left align the text in
the box, the CSS command, “align:left;” was used. To apply a black text in the box, the
following CSS declaration was used, “color:#000000”. Figure 2.19 shows the right
column of the web page after these styling commands were applied. Table 2.12 lists the
CSS code for styling the right column.
Figure 2.19. Right column after styling the class “one”

58
Table 2.10. CSS Code to Style the Right Column CSS Code #wrapper {width:750px; margin:10px auto 0 auto; text-align:left; background:#fff;} #page_head {width:750px; height:115px; position:relative; background:#fff;} h1#logo {font-size:45px; font-family:"trebuchet ms", tahoma, arial, verdana, sans-serif; float:left; margin:0; color:#000; font-weight:normal;} h1#logo b {color:#c9ba65; font-family:"times new roman", serif;} ul#main_menu {position:absolute; top:10px; right:0; border:0; padding:0; margin:0; list-style-type:none;} ul#main_menu li {display:block; width:78px; height:90px; float:left; margin-left:1px; position:relative;} ul#main_menu li a{display:block; width:78px; height:80px; text-decoration:none; border-top:10px solid #000; color:#000; font-family:"trebuchet ms", tahoma, arial, verdana, sans-serif;position:relative;} ul#main_menu li a b {font-weight:normal; position:absolute; bottom:5px; left:5px;} ul#main_menu li a.mm1 {background:#dfd7ca; border-top:10px solid #dfd7ca;} ul#main_menu li a.mm2 {background:#b2ab9b; border-top:10px solid #b2ab9b;} ul#main_menu li a.mm3 {background:#c9ba65; border-top:10px solid #c9ba65;} ul#main_menu li a.mm4 {background:#e2dfa8; border-top:10px solid #e2dfa8;} ul#main_menu li a.mm5 {background:#d4d8bd; border-top:10px solid #d4d8bd;} ul#main_menu li a.mm6 {background:#949e7c; border-top:10px solid #949e7c;} ul#main_menu li a.mm7 {background:#758279; border-top:10px solid #758279;} ul#main_menu li a:hover {border-top:10px solid #fff; cursor:pointer;} ul#sub_menu {position:absolute; top:85px; left:0; border:0; padding:0; margin:0; list-style-type:none;} ul#sub_menu li {display:block; width:30px; height:20px; float:left; position:relative;} ul#sub_menu li.first {background: url(first.gif);} ul#sub_menu li.previous {background: url(previous.gif);} ul#sub_menu li.next {background: url(next.gif);} ul#sub_menu li.last {background: url(last.gif);} ul#sub_menu li.home {background: url(home.gif);} #info {clear:both; width:750px; padding-bottom:15px; background:#fff url(horizontal_line.gif) bottom left repeat-x;} #content {width:750px; background:#fff url(vertical_line.gif) 250px repeat-y;} #content h3 {font-size:12px; color:#b50; margin:10px 0 0 0; font-weight:bold;} .clear {clear:both;} #right_column {width:480px; float:right;} #left_column {width:240px; float:left;} dl.latest {font-size:0.85em; margin:10px 0;} dl.latest dt {background:#e2dfa8; padding:5px;} dl.latest dd {margin:0; padding:5px 5px 0 5px;} dl.latest dd a, dl.latest dd a:visited {text-decoration:none; color:#758279;} dl.latest dd a:hover {text-decoration:underline;} dl.latest dt.left_heading0 {background: #e2dfa8;} dl.latest dt.left_heading1 {background:#b2ab9b;} dl.latest dt.left_heading2 {background:#c9ba65;} dl.latest dt.left_heading3 {background:#d4d8bd;} dl.latest dt.left_heading4 {background:#758279;} dl.latest dt.left_heading5 {background: #e2dfa8;} .advertisement {list-style-type:none; margin:10px 10px 20px 5px; padding:0;} .advertisement li a:hover {text-decoration:underline;} .advertisement li span.text {font-size:10px; color:#000;} .play {font-family:"trebuchet ms", tahoma, arial, verdana, sans-serif; margin:0; color:#000; font-weight:normal;} .css {color: #983; font-family:"times new roman", serif;} .clear {clear:both;} p {font-size:12px; color:#555; line-height:16px; margin:5px 0 15px 0;} .one{border-style: solid; border-color: #D9DA26; background-color:#D9DA26; font-size: 15.5px; align: left; color: #000000;} #navlist0 li { list-style-type: circle; color: #889409;} HTML Code <div id="wrapper"><div id="page_head"> <P>A/B Characteristics & Theory </p> <h1 id="logo"> <b>Arrhenius</b></h1><ul id="main_menu"> <li><a class="mm1" href=""><b>Box<br>A</b></a></li> <li><a class="mm2" href=""><b>Box B</b></a></li> <li><a class="mm3" href=""><b>Box C</b></a></li>

59
<li><a class="mm4" href=""><b>Box D</b></a></li> <li><a class="mm5" href=""><b>Box E</b></a></li> <li><a class="mm6" href=""><b>Box F</b></a></li> <li><a class="mm7" href=""><b>Box G</b></a></li></ul> <ul id="sub_menu"> <li class="home"><a href="" title="Home Page"></a></li> <li class="first"><a href="" title="First"></a></li> <li class="previous"><a href="" title="Previous"></a></li> <li class="next"><a href="" title="Next"></a></li> <li class="last"><a href="" " title="Last"></a></li></ul></div><!-- end of page_head --><div id="info"> <img src="ghostlib385.jpg" width="826" height="233" /> <img src="fade1.gif" " /><img src="fade2.gif" /><img src="fade3.gif" /><img src="fade4.gif" /><img src="fade5.gif" /><img src="fade6.gif" /><img src="fade7.gif" /><img src="fade8.gif" /><img src="fade9.gif" /><img src="fade10.gif" /><img src="fade11.gif" /><img src="fade12.gif" " /><img src="fade13.gif" /><img src="fade14.gif" /></div> <!-- end of info --> <div id="content"><div id="right_column"> <h3>Welcome to <b class="css">The Acid/Base chemistry</b><span class="play">web-site</span></h3> <p>In this website we will discuss the chemistry of Acids and Bases, as we know Acids and Bases can be considered as the most important chemicals in our lives, so we will take a closer look at <b class="css">Acids and Bases</b> and their general characteristics. we will start with the general characteristics of <b class="css">Acids</b></p>. <p align="left" class="one">General characteristics of Acids.</p> <p><div align="left" id="navcontainer0"><ul id="navlist0"><li id="active">list.1</li><li>list2</li></ul> </div> <p align="left" class="one">General characteristics of Bases </p> <div align="left" id="navcontainer0"><ul id="navlist0"><li id="active">list.1.</li><li>list.2.</li> <li>list.3. </li></ul></div> <p align="left" class="one">Postulated Theories for Acid-Base Definition</p><div id="left_column"><h3>Acid And Base Topics</h3> <dl class="latest"><dt class="left_heading0">Acid And Base Topics</dt> <dd><a tabindex="11" href="" title="Acid-Base characteristics"><em></em>Acid/ Base Strengths.</a></dd> <dd><a tabindex="12" href="" title="Acid-Base characteristics"><em></em>Acid/Base Arrhenius theory limitations.</a></dd></dl><dl class="latest"> <dt class="left_heading1">Acid And Base Topics</dt> <dd><a tabindex="11" href="" title="Acid-Base characteristics"><em></em>A/B Characteristics And Arrhenius Theory.</a></dd></dl><dl class="latest"> <dt class="left_heading2">Acid-Base experiments</dt> <dd><a tabindex="21" href="" title="Acid-Base characteristics"><em></em>A/B Characteristics And Arrhenius Theory.</a></dd></dl><dl class="latest"> <dt class="left_heading3">Acod-Base activities</dt> <dd><a tabindex="21" href="" title="Acid-Base characteristics"><em></em>A/B Characteristics And Arrhenius Theory.</a></dd></dl><dl class="latest"> <dt class="left_heading4">Acid_Base tutorials</dt> <dd><a tabindex="21" href="" title="Acid-Base characteristics"><em></em>A/B Characteristics And Arrhenius Theory.</a></dd></dl><dl class="latest"> <dt class="left_heading5">chemistry Quiz</dt> <dd><a tabindex="21" href="" title="Acid-Base characteristics"><em></em>A/B Characteristics And Arrhenius Theory.</a></dd></dl><h3>Bronsted-Lowry Acid-Base Experiments</h3> <ul class="advertisement" id="links50015"> <li><a href="">Litmus paper experiment </a><br /><span class="text">Explanation.</span></li> <li><a href="">Indicator experiment </a><br /><span class="text">Explanation.</span></li> </ul><ul class="advertisement"> <li><a href="">Acid-Base pH meter titration Experiment</a><br /><span class="text">Explanation</span></li> <li class="spacer"><a href="">Acid-Base Titration experiment</a><br /><span class="text">Explanation</span></li></ul> <h3>Tutorials</h3><ul class="advertisement"><li><a href="">Acid-Base <b class="css"> Identification</b><span class="play"> <font size="3">Activity</font></span></a></li> <li><a href="">B/L <b class="css">Acid/Base Ionization</b><span class="play"><font size="3">Tutorial</font></span></a></li> <li><a href="">B/L <b class="css">Acid/Base</b><span class="play"><font size="3">Quiz</font></span></a></li> <li><a href="">A/B<b class="css"> Characters/ arrhenius theory</b> <span class="play"><font size="3">Question</font></span><br /><br /></a></li> </ul></div><br class="clear" /></div> <!-- end of content --><div id="page_foot"><h1>Page Footer</h1></div><!-- end of page_foot --></div> <!-- end of wrapper -->

60
2.18 Styling the Division “Page-Foot”
The foot section of the page was placed at the bottom of the page using the CSS
command, “clear: both”. To set the footer division width to 750 px , and apply a bottom-
padding of 20px with a white background, the following CSS code was used, #page_foot
{ width:750px; padding-bottom:20px; background:#fff}. A top horizontal line was
inserted to separate the page content from the footer division using the repeat left
property which can repeat the three dot image from the left of the page to the right using
the CSS code, “url(horizontal_line.gif) top left repeat-x”. Figure 2.20 shows the page
foot after linking the CSS code to it. To change the location of the footer menu from the
left side to the right side of the footer section, the following CSS code was applied,
“.float_right, img.left {float: right ;}”. Figure 2.21 shows the footer menu after changing
its location from the left to the right side of the page. Table 2.13 lists the CSS code
required to style and to align the page footer and its menu.
Figure 2.20. The page foot after linking the CSS code to it
Figure 2.21.The menu in the page foot after changing the location of the footer menu

61
Table 2.11. CSS Code to Style the Page Foot CSS Code #wrapper {width:750px; margin:10px auto 0 auto; text-align:left; background:#fff;} #page_head {width:750px; height:115px; position:relative; background:#fff;} h1#logo {font-size:45px; font-family:"trebuchet ms", tahoma, arial, verdana, sans-serif; float:left; margin:0; color:#000; font-weight:normal;} h1#logo b {color:#c9ba65; font-family:"times new roman", serif;} ul#main_menu {position:absolute; top:10px; right:0; border:0; padding:0; margin:0; list-style-type:none;} ul#main_menu li {display:block; width:78px; height:90px; float:left; margin-left:1px; position:relative;} ul#main_menu li a{display:block; width:78px; height:80px; text-decoration:none; border-top:10px solid #000; color:#000; font-family:"trebuchet ms", tahoma, arial, verdana, sans-serif;position:relative;} ul#main_menu li a b {font-weight:normal; position:absolute; bottom:5px; left:5px;} ul#main_menu li a.mm1 {background:#dfd7ca; border-top:10px solid #dfd7ca;} ul#main_menu li a.mm2 {background:#b2ab9b; border-top:10px solid #b2ab9b;} ul#main_menu li a.mm3 {background:#c9ba65; border-top:10px solid #c9ba65;} ul#main_menu li a.mm4 {background:#e2dfa8; border-top:10px solid #e2dfa8;} ul#main_menu li a.mm5 {background:#d4d8bd; border-top:10px solid #d4d8bd;} ul#main_menu li a.mm6 {background:#949e7c; border-top:10px solid #949e7c;} ul#main_menu li a.mm7 {background:#758279; border-top:10px solid #758279;} ul#main_menu li a:hover {border-top:10px solid #fff; cursor:pointer;} ul#sub_menu {position:absolute; top:85px; left:0; border:0; padding:0; margin:0; list-style-type:none;} ul#sub_menu li {display:block; width:30px; height:20px; float:left; position:relative;} ul#sub_menu li.first {background: url(first.gif);} ul#sub_menu li.previous {background: url(previous.gif);} ul#sub_menu li.next {background: url(next.gif);} ul#sub_menu li.last {background: url(last.gif);} ul#sub_menu li.home {background: url(home.gif);} #info {clear:both; width:750px; padding-bottom:15px; background:#fff url(horizontal_line.gif) bottom left repeat-x;} #content {width:750px; background:#fff url(vertical_line.gif) 250px repeat-y;} #content h3 {font-size:12px; color:#b50; margin:10px 0 0 0; font-weight:bold;} .clear {clear:both;} #right_column {width:480px; float:right;} #left_column {width:240px; float:left;} dl.latest {font-size:0.85em; margin:10px 0;} dl.latest dt {background:#e2dfa8; padding:5px;} dl.latest dd {margin:0; padding:5px 5px 0 5px;} dl.latest dd a, dl.latest dd a:visited {text-decoration:none; color:#758279;} dl.latest dd a:hover {text-decoration:underline;} dl.latest dt.left_heading0 {background: #e2dfa8;} dl.latest dt.left_heading1 {background:#b2ab9b;} dl.latest dt.left_heading2 {background:#c9ba65;} dl.latest dt.left_heading3 {background:#d4d8bd;} dl.latest dt.left_heading4 {background:#758279;} dl.latest dt.left_heading5 {background: #e2dfa8;} .advertisement {list-style-type:none; margin:10px 10px 20px 5px; padding:0;} .advertisement li a:hover {text-decoration:underline;} .advertisement li span.text {font-size:10px; color:#000;} .play {font-family:"trebuchet ms", tahoma, arial, verdana, sans-serif; margin:0; color:#000; font-weight:normal;} .css {color: #983; font-family:"times new roman", serif;} .clear {clear:both;} p {font-size:12px; color:#555; line-height:16px; margin:5px 0 15px 0;} .one{border-style: solid; border-color: #D9DA26; background-color:#D9DA26; font-size: 15.5px; align: left; color: #000000;} #navlist0 li { list-style-type: circle; color: #889409;} #page_foot {clear:both; width:750px; padding-bottom:20px; background:#fff url(horizontal_line.gif) top left repeat-x; padding-top:10px;} p.float_right, img.left {float:right;} HTML Code <div id="wrapper"><div id="page_head"> <P>A/B Characteristics & Theory </p> <h1 id="logo"> <b>Arrhenius</b></h1><ul id="main_menu">

62
<li><a class="mm1" href=""><b>Box<br>A</b></a></li> <li><a class="mm2" href=""><b>Box B</b></a></li> <li><a class="mm3" href=""><b>Box C</b></a></li> <li><a class="mm4" href=""><b>Box D</b></a></li> <li><a class="mm5" href=""><b>Box E</b></a></li> <li><a class="mm6" href=""><b>Box F</b></a></li> <li><a class="mm7" href=""><b>Box G</b></a></li></ul> <ul id="sub_menu"><li class="home"><a href="" title="Home Page"></a></li><li class="first"><a href="" title="First"></a></li><li class="previous"><a href="" title="Previous"></a></li> <li class="next"><a href="" title="Next"></a></li> <li class="last"><a href="" " title="Last"></a></li></ul></div><!-- end of page_head --><div id="info"> <img src="ghostlib385.jpg" width="826" height="233" /> <img src="fade1.gif" " /><img src="fade2.gif" /><img src="fade3.gif" /><img src="fade4.gif" /><img src="fade5.gif" /><img src="fade6.gif" /><img src="fade7.gif" /><img src="fade8.gif" /><img src="fade9.gif" /><img src="fade10.gif" /><img src="fade11.gif" /><img src="fade12.gif" " /><img src="fade13.gif" /><img src="fade14.gif" /></div> <!-- end of info --><div id="content<div id="content"><div id="right_column"> <h3>Welcome to <b class="css">The Acid/Base chemistry</b><span class="play">web-site</span></h3> <p>In this website we will discuss the chemistry of Acids and Bases, as we know Acids and Bases can be considered as the most important chemicals in our lives, so we will take a closer look at <b class="css">Acids and Bases</b> and their general characteristics. we will start with the general characteristics of <b class="css">Acids</b></p>. <p align="left" class="one">General characteristics of Acids.</p> <p><div align="left" id="navcontainer0"><ul id="navlist0"><li id="active">list.1</li><li>list2</li></ul> </div> <p align="left" class="one">General characteristics of Bases </p> <div align="left" id="navcontainer0"><ul id="navlist0"><li id="active">list.1.</li><li>list.2.</li> <li>list.3. </li></ul></div> <p align="left" class="one">Postulated Theories for Acid-Base Definition</p></div> <div id="left_column"><h3>Acid And Base Topics</h3> <dl class="latest"><dt class="left_heading0">Acid And Base Topics</dt> <dd><a tabindex="11" href="" title="Acid-Base characteristics"><em></em>Acid/ Base Strengths.</a></dd> <dd><a tabindex="12" href="" title="Acid-Base characteristics"><em></em>Acid/Base Arrhenius theory limitations.</a></dd></dl><dl class="latest"><dt class="left_heading1">Acid And Base Topics</dt> <dd><a tabindex="11" href="" title="Acid-Base characteristics"><em></em>A/B Characteristics And Arrhenius Theory.</a></dd></dl><dl class="latest"><dt class="left_heading2">Acid-Base experiments</dt> <dd><a tabindex="21" href="" title="Acid-Base characteristics"><em></em>A/B Characteristics And Arrhenius Theory.</a></dd></dl><dl class="latest"><dt class="left_heading3">Acod-Base activities</dt> <dd><a tabindex="21" href="" title="Acid-Base characteristics"><em></em>A/B Characteristics And Arrhenius Theory.</a></dd></dl><dl class="latest"><dt class="left_heading4">Acid_Base tutorials</dt> <dd><a tabindex="21" href="" title="Acid-Base characteristics"><em></em>A/B Characteristics And Arrhenius Theory.</a></dd></dl><dl class="latest"><dt class="left_heading5">chemistry Quiz</dt> <dd><a tabindex="21" href="" title="Acid-Base characteristics"><em></em>A/B Characteristics And Arrhenius Theory.</a></dd></dl><h3>Bronsted-Lowry Acid-Base Experiments</h3> <ul class="advertisement" id="links50015"> <li><a href="">Litmus paper experiment </a><br /><span class="text">Explanation.</span></li> <li><a href="">Indicator experiment </a><br /><span class="text">Explanation.</span></li></ul><ul class="advertisement"> <li><a href="">Acid-Base pH meter titration Experiment</a><br /><span class="text">Explanation</span></li> <li class="spacer"><a href="">Acid-Base Titration experiment</a><br /><span class="text">Explanation</span></li></ul> <h3>Tutorials</h3><ul class="advertisement"><li><a href="">Acid-Base <b class="css"> Identification</b><span class="play"> <font size="3">Activity</font></span></a></li> <li><a href="">B/L <b class="css">Acid/Base Ionization</b><span class="play"><font size="3">Tutorial</font></span></a></li> <li><a href="">B/L <b class="css">Acid/Base</b><span class="play"><font size="3">Quiz</font></span></a></li> <li><a href="">A/B<b class="css">Characters/ arrhenius theory</b> <span class="play"><font size="3">Question</font></span><br /><br /></a></li> </ul></div><br class="clear" /></div> <!-- end of content --> <div id="page_foot"> <p class="float_right"><a href=" " title="Home">Home</a> | <a href="" title="Previous">Previous</a>| <a href="" title="">NEXT</a> | <a href="" title="Quiz">Quiz</a> | <a href="" title="Activity">Activity</a> | <a href="" title="Question"> Question</a></p></div><!-- end of page foot --></div> <!-- end of wrapper -->

63
2.19 The Entire Web Page
Figure 2.22 shows the entire web page after inserting the chemistry content. The
main menu, which is present at the top of the page, has seven links to seven different web
pages. Under the page title, there are submenus, which are located on the left hand side
of the page. These submenus facilitate the navigation between the different web pages.
The OSU library image is below the main menu. The left and right columns are below
the library image. The left column has links to the following web pages: acid base
identification activity, preclassroom activity, web pages of the web site, quiz, questions
on the different topics, and experiments. The right column contains a description of the
corresponding page title with figures, equations, and links to pertinent material. The page
foot has a menu which has links to different pages and facilitates the navigation between
the various pages of the website. Table 2.14 lists the CSS and HTML code used to create
the web page.
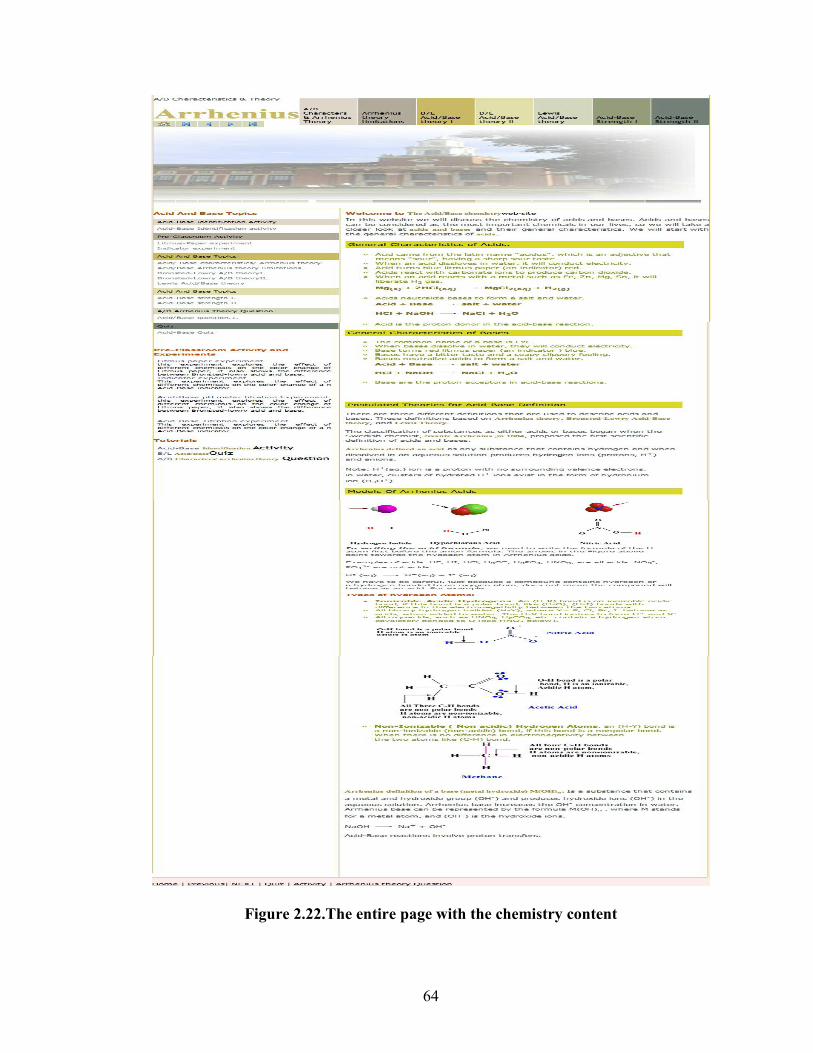
64
Figure 2.22.The entire page with the chemistry content

65
Table 2.12. CSS and HTML Code Required to Create the Web Page CSS Code body {text-align:center; font-family:verdana, arial, helvetica, sans-serif; font-size:76%; color:#000; padding:0; border:0; margin:0; background:#fff;} #wrapper {width:750px; margin:10px auto 0 auto; text-align:left; background:#fff;} #page_head {width:750px; height:115px; position:relative; background:#fff;} h1#logo {font-size:45px; font-family:"trebuchet ms", tahoma, arial, verdana, sans-serif; float:left; margin:0; color:#000; font-weight:normal;} h1#logo b {color:#c9ba65; font-family:"times new roman", serif;} ul#main_menu {position:absolute; top:10px; right:0; border:0; padding:0; margin:0; list-style-type:none;} ul#main_menu li {display:block; width:78px; height:90px; float:left; margin-left:1px; position:relative;} ul#main_menu li a{display:block; width:78px; height:80px; text-decoration:none; border-top:10px solid #000; color:#000; font-family:"trebuchet ms", tahoma, arial, verdana, sans-serif;position:relative;} ul#main_menu li a b {font-weight:normal; position:absolute; bottom:5px; left:5px;} ul#main_menu li a.mm1 {background:#dfd7ca; border-top:10px solid #dfd7ca;} ul#main_menu li a.mm2 {background:#b2ab9b; border-top:10px solid #b2ab9b;} ul#main_menu li a.mm3 {background:#c9ba65; border-top:10px solid #c9ba65;} ul#main_menu li a.mm4 {background:#e2dfa8; border-top:10px solid #e2dfa8;} ul#main_menu li a.mm5 {background:#d4d8bd; border-top:10px solid #d4d8bd;} ul#main_menu li a.mm6 {background:#949e7c; border-top:10px solid #949e7c;} ul#main_menu li a.mm7 {background:#758279; border-top:10px solid #758279;} ul#main_menu li a:hover {border-top:10px solid #fff; cursor:pointer;} ul#sub_menu {position:absolute; top:85px; left:0; border:0; padding:0; margin:0; list-style-type:none;} ul#sub_menu li {display:block; width:30px; height:20px; float:left; position:relative;} ul#sub_menu li.first {background: url(first.gif);} ul#sub_menu li.previous {background: url(previous.gif);} ul#sub_menu li.next {background: url(next.gif);} ul#sub_menu li.last {background: url(last.gif);} ul#sub_menu li.home {background: url(home.gif);} #info {clear:both; width:750px; padding-bottom:15px; background:#fff url(horizontal_line.gif) bottom left repeat-x;} #content {width:750px; background:#fff url(vertical_line.gif) 250px repeat-y;} #content h3 {font-size:12px; color:#b50; margin:10px 0 0 0; font-weight:bold;} .clear {clear:both;} #right_column {width:480px; float:right;} #left_column {width:240px; float:left;} dl.latest {font-size:0.85em; margin:10px 0;} dl.latest dt {background:#e2dfa8; padding:5px;} dl.latest dd {margin:0; padding:5px 5px 0 5px;} dl.latest dd a, dl.latest dd a:visited {text-decoration:none; color:#758279;} dl.latest dd a:hover {text-decoration:underline;} dl.latest dt.latest_demos {background:#dfd7ca;} dl.latest dt.latest_menus {background:#b2ab9b;} dl.latest dt.latest_layouts {background:#c9ba65;} dl.latest dt.latest_mozilla {background:#d4d8bd;} dl.latest dt.latest_opacity {background:#758279;} .advertisement {list-style-type:none; margin:10px 10px 20px 5px; padding:0;} .advertisement li a:hover {text-decoration:underline;} .advertisement li span.text {font-size:10px; color:#000;} .play {font-family:"trebuchet ms", tahoma, arial, verdana, sans-serif; margin:0; color:#000; font-weight:normal;} .css {color: #983; font-family:"times new roman", serif;} .clear {clear:both;} p {font-size:12px; color:#555; line-height:16px; margin:5px 0 15px 0;} .one{border-style: solid; border-color: #D9DA26; background-color:#D9DA26; font-size: 15.5px; align: left; color: #000000;} #navlist0 li { list-style-type: circle; color: #889409;} #page_foot {clear:both; width:750px; padding-bottom:20px; background:#fff url(horizontal_line.gif) top left repeat-x; padding-top:10px;} p.float_right, img.left {float:right;} HTML Code <div id="wrapper"> <div id="page_head">

66
<P>A/B Characteristics & Theory <h1 id="logo"> <b>Arrhenius</b></h1> <ul id="main_menu"> <li><a class="mm1" href="http://genchem.chem.okstate.edu/emanweb/ee.html"><b>A/B Characters<br> & Arrhenius Theory</b></a></li> <li><a class="mm2" href="http://genchem.chem.okstate.edu/emanweb/ee1.html"><b>Arrhenius theory limitations</b></a></li> <li><a class="mm3" href="http://genchem.chem.okstate.edu/emanweb/ee3.html"><b>B/L Acid/Base theory I</b></a></li> <li><a class="mm4" href="http://genchem.chem.okstate.edu/emanweb/ee2.html"><b>B/L Acid/Base theory II</b></a></li> <li><a class="mm5" href="http://genchem.chem.okstate.edu/emanweb/ee4.html"><b>Lewis Acid/Base theory</b></a></li> <li><a class="mm6" href="http://genchem.chem.okstate.edu/emanweb/StrengthI.html"><b>Acid-Base Strength I</b></a></li> <li><a class="mm7" href="http://genchem.chem.okstate.edu/emanweb/strengthII.html"><b>Acid-Base Strength II</b></a></li></ul><ul id="sub_menu"> <li class="home"><a href="http://genchem.chem.okstate.edu/emanweb/page1.html" title="Home Page">Home</a></li> <li class="first"><a href="http://genchem.chem.okstate.edu/emanweb/ee.html" title="First">First</a></li> <li class="previous"><a href="http://genchem.chem.okstate.edu/emanweb/page1.html" title="Previous">Previous</a></li> <li class="next"><a href="http://genchem.chem.okstate.edu/emanweb/ee1.html" title="Next">Next</a></li> <li class="last"><a href="http://genchem.chem.okstate.edu/emanweb/strengthII.html" title="Last">Last</a></li></ul> </div><!-- end of page_head --><div id="info"> <img src="ghostlib385.jpg" width="826" height="233" /> <img src="fade1.gif" title="Fade out 1" alt="Fadeout 1" /><img src="fade2.gif" title="Fade out 2" alt="Fadeout 2" /><img src="fade3.gif" title="Fade out 3" alt="Fadeout 3" /><img src="fade4.gif" title="Fade out 4" alt="Fadeout 4" /><img src="fade5.gif" title="Fade out 5" alt="Fadeout 5" /><img src="fade6.gif" title="Fade out 6" alt="Fadeout 6" /><img src="fade7.gif" title="Fade out 7" alt="Fadeout 7" /><img src="fade8.gif" title="Fade out 8" alt="Fadeout 8" /><img src="fade9.gif" title="Fade out 9" alt="Fadeout 9" /><img src="fade10.gif" title="Fade out 10" alt="Fadeout 10" /><img src="fade11.gif" title="Fade out 11" alt="Fadeout 11" /><img src="fade12.gif" title="Fade out 12" alt="Fadeout 12" /><img src="fade13.gif" title="Fade out 13" alt="Fadeout 13" /><img src="fade14.gif" title="Fade out 14" alt="Fadeout 14" /></div> <!-- end of info --><div id="content"><div id="left_column"> <h3>Welcome to <b class="css">The Acid/Base chemistry</b><span class="play">web-site</span></h3> <p>In this website we will discuss the chemistry of Acids and Bases, as we know Acids and Bases can be considered as the most important chemicals in our lives, so we will take a closer look at <b class="css">Acids and Bases</b> and their general characteristics. we will start with the general characteristics of <b class="css">Acids</b>. <p align="left" class="one">General characteristics of Acids.</p> <p><div align="left" id="navcontainer0"><ul id="navlist0"> <li id="active">Acid came from the latin name "acidus". which is an adjective means "sour" having a sharp sour taste.</li> <li>When an acid disslove in water, it will conduct electricity.</li> <li>When blue litmus paper (an indicator) is immersed in an acidic solution, this acidic solution is going to change the color of the litmus paper from blue to red. </li><li>Acids react with carbonates ion to produce carbon dioxide.</li> <li>When an acid reacts with a metal such as Fe, Zn, Mg, Sn, it will liberate H<sub>2</sub> gas. <P><font color="#827021"><strong> Mg<SUB>(s)</SUB> + 2HCl<sub>(aq)</sub> <img src="onearrow.gif"/> MgCl<sub>2(aq)</sub> + H<sub>2(g)</sub></strong></font> </li> <li>Acids neutralize Bases to form salt and water. <p> <font color="#827021"><strong>Acid + Base <img src="onearrow.gif" /> salt + water</strong></font> <p> <font color="#827021"><strong> HCl + NaOH <img src="onearrow.gif" /> NaCl + H<sub>2</sub>O</strong> </font> </p> </li><li>Acid is the proton donor in the acid-base reaction.</li></ul></div> <p align="left" class="one">General characteristics of Bases </p> <p><div align="left" id="navcontainer0"> <ul id="navlist0"> <li id="active">The common name of base is LYE.</li> <li>When bases dissolve in water, it will conduct electricity.</li> <li>When red litmus paper (an indicator) is immersed in a basic solution, this basic solution is going to change the color of the litmus paper from red to blue. </li> <li>Bases have a bitter taste, with a soapy slippery feel.</li> <li>Bases neutralize Acids to form salt and water.<p><font color="#827021"><strong>Acid + Base <img src="onearrow.gif" /> salt + water</strong></font> <p> <font color="#827021"><strong> HCl + NaOH <img src="onearrow.gif" /> NaCl + H<sub>2</sub>O</strong> </font> </p></li><li>Base is the proton acceptor in the acid-base reaction.</li></ul></div>

67
<p align="left" class="one">Postulated Theories for Acid-Base Definition</p> <P>There are three theories talked about Acid-Base definitions. These theories started with <b class="css">Svante Arrhenius</b>, then followed by <b class="css">Bronsted-Lowry Acid-Base theory</b>, and the last theory was for <b class="css">Lewis Theory</b></P> <P>the chemical work started earlier with the swedish chemist, in 1884,<b class="css"> Svante Arrhenius</b>, proposed the first scientific definition of acid and base. <P><b class="css"> Arrhenius defined an acid</b> as any substance that contains hydrogen and when dissolved in aqueous solution produces hydrogen ions (Protons)(H<sup>+</sup>) and anions.so it will increase the Hydrogen ion concentration in water by the proton donation. </P> <img src="p.gif" alt="CSSplay button" width="402" height="214" title="CSSplay button" /> <P><em><strong>In Writing the acid formula</strong></em>, we need to write the formula of the H atom first before the anion formula.</P> <P>examples of acids. HF, HI, HCl, H<sub>3</sub>O<sup>+</sup>, H<sub>3</sub>PO<suB>4</suB>, HNO<sub>3</sub>, are all acids.</P> <P> while, NO<sub>3</sub><sup>-</sup>, PO<sub>4</sub><sup>3-</sup> are not acids.</P> <p><strong>The effects </strong>in color change from blue litmus paper to red ,the sour taste of the Acidic compounds,the reaction with active metals and evolution of hydrogen gas due to the presence of hydrogen cation (H<sup>+</sup>) in the aqueous medium.</p> <img src="hi.gif" alt="CSSplay button" width="402" height="214" title="CSSplay button" /> <p><b class="css"> Arrhenius definition of a base or (Metal Hydroxide) </b> as a substance that contains a metal and Hydroxide (OH<sup>-</sup>) group and Produces hydroxide ions (OH<Sup>-</Sup>) in the aqueous solution. so it will increase the OH<sup>-</sup> concentration in water. can be represented by the formula M(OH)<sub>n</sub>. where M stands for a metal atom, and (OH<sup>-</sup>) is the Hydroxide Ion.</p> <p> NaOH <img src="onearrow.gif" /> Na<sup>+</sup> + OH<sup>-</sup></p> </div><div id="right_column"><h3>Acid And Base Topics</h3><dl class="latest"> <dt class="latest_demos">Acid-Base identification Activity</dt> <dd><a href="http://genchem.chem.okstate.edu/emanweb/activity.html" title="Acid-Base activity"><em></em>Acid-Base Identification activity</a></dd></dl><dl class="latest"> <dt class="latest_menus">Pre-Classroom Activity</dt> <dd><a href="activity.1..pdf" title="Litmus-Paper experiment"><em></em>Litmus-Paper experiment</a></dd> <dd><a href="activity.2..pdf" title="Indicator experiment"><em></em>Indicator experiment</a></dd></dl><dl class="latest"><dt class="latest_layouts">Acid And Base Topics</dt> <dd><a href="http://genchem.chem.okstate.edu/emanweb/ee.html" title="Acid-Base characteristics and arrhenius theory"><em></em>Acid/ Base characteristics/ Arrhenius theory.</a></dd> <dd><a href="http://genchem.chem.okstate.edu/emanweb/ee1.html" title="Arrhenius theory limitations"><em></em>Acid/Base Arrhenius theory limitations.</a></dd> <dd><a href="http://genchem.chem.okstate.edu/emanweb/ee3.html" title="Bronsted-Lowry A/B theory I"><em></em>Bronsted-Lowry A/B theoryI.</a></dd> <dd><a href="http://genchem.chem.okstate.edu/emanweb/ee2.html" title="Btonsted-Lowry A/B theory II"><em></em>Bronsted-Lowry A/B theoryII.</a></dd> <dd><a href="http://genchem.chem.okstate.edu/emanweb/ee4.html" title="Lewis Theory"><em></em>Lewis Acid/Base theory</a></dd></dl></dl><dl class="latest"><dt class="latest_boxes">Acid And Base Topics</dt> <dd><a href="http://genchem.chem.okstate.edu/emanweb/strengthI.html" title="Acid-Base strength I"><em></em>Acid-Base strength I.</a></dd> <dd><a href="http://genchem.chem.okstate.edu/emanweb/strengthII.html" title="Acid-Base strength II"><em></em>Acid-Base strength II.</a></dd></dl><dl class="latest"> <dt class="latest_mozilla">A/B Arrhenius Theory Question</dt> <dd><a href="http://genchem.chem.okstate.edu/emanweb/question1.php" title="Acid Base Question.1."><em></em>Acid/Base question.1.</a></dd></dl><dl class="latest"><dt class="latest_opacity">Quiz</dt> <dd><a href="http://genchem.chem.okstate.edu/emanweb/ch16.htm" title="Acid-Base Quiz"><em></em>Acid-Base Quiz</a></dd></dl><h3>Pre-Classroom Activity and Experiments</h3><ul class="advertisement" id="links50015"> <li><a href="activity.1..pdf">Litmus paper experiment </a><br /><span class="text">this experiment explores the effect of different chemicals on the color change of Litmus paper, it also shows the difference between Bronsted-lowry acid and base.</span></li> <li><a href="activity.2..pdf">Indicator experiment </a><br /><span class="text">This experiment explores the effect of different chemicals on the color change of a n Acid-Base indicator.</span></li> </ul><ul class="advertisement"><li><a href="http://www.chem.iastate.edu/group/Greenbowe/sections/projectfolder/flashfiles/stoichiometry/a_b_phtitr.html">Acid-Base pH meter titration Experiment</a><br /><span class="text">this experiment explores the effect of different chemicals on the color change of Litmus paper, it also shows the difference between Bronsted-lowry acid and base.</span></li>

68
<li class="spacer"><a href="http://www.chem.iastate.edu/group/Greenbowe/sections/projectfolder/flashfiles/stoichiometry/acid_base.html">Acid-Base Titration experiment</a><br /><span class="text">This experiment explores the effect of different chemicals on the color change of a n Acid-Base indicator.</span></li></ul><h3>Tutorials</h3><ul class="advertisement"> <li><a href="http://genchem.chem.okstate.edu/emanweb/activity.html">Acid-Base <b class="css"> Identification</b><span class="play"> <font size="3">Activity</font></span></a></li> <li><a href="http://genchem.chem.okstate.edu/emanweb/ch16.htm">B/L <b class="css">Acid/Base</b><span class="play"><font size="3">Quiz</font></span></a></li> <li><a href="http://genchem.chem.okstate.edu/emanweb/question1.php">A/B<b class="css"> Characters/ arrhenius theory</b> <span class="play"><font size="3">Question</font></span><br /><br /></a></li></ul> </div><br class="clear" /></div> <!-- end of content --><div id="page_foot"> <p class="float_right"><a href="Http://genchem.chem.okstate.edu/emanweb/page1.html" title="Home">Home</a> | <a href="http://genchem.chem.okstate.edu/emanweb/strengthII.html" title="Previous">Previous</a>| <a href="http://genchem.chem.okstate.edu/emanweb/ee1.html" title="">NEXT</a> | <a href="http://genchem.chem.okstate.edu/emanweb/ch16.htm" title="Quiz">Quiz</a> | <a href="http://genchem.chem.okstate.edu/emanweb/activity.html" title="Activity">Activity</a> | <a href="http://genchem.chem.okstate.edu/emanweb/question1.php" title="Question">A/B Characters/ arrhenius theory Question</a></p> </div> <!-- end of page_foot --></div> <!-- end of wrapper --></body></html>

69
CHAPTER III
STUDENT USE OF THE ACID BASE CHEMISTRY WEB SITE
http://genchem.chem.okstate.edu/emanweb/page1.html
3.0 Navigation of Acid Base Chemistry Website
The home page of the acid base chemistry website has seven different menus that
allow the user to navigate the website. The seven menus for navigation are listed below.
1. Main menu at the top of the page with the seven different colored lists.
2. Sub-menu at the top left part of the page.
3. Acid & Base Topics menu in the left hand column of the page.
4. Pre-Classroom Activity and Experiments in the left column of the page.
5. Tutorials in the left hand column of the page.
6. The “slide-like” menu in the right hand column of the page.
7. The footer menu at the bottom of the page.
The top part of the home page starts with the main menu, which consists of seven
colored lists that allow the students to move between the different pages of the website.
By a simple click of the mouse on the required topic, a new webpage will open with the
desired information. The first block in the main menu is Acid/Base characteristics and
Arrhenius theory. The corresponding webpage for this block discusses the general

70
Characteristics of acids and bases, and the Arrhenius definition of an acid and a base, see
http://genchem.chem.okstate.edu/emanweb/arrhenius.html. The second block in the main
menu is Arrhenius theory limitations. The corresponding webpage provides examples of
compounds that Arrhenius theory fails to recognize as either acids or bases; see
http://genchem.chem.okstate.edu/emanweb/arrheniuslimitation.html. The third block is
entitled, “Bronsted/Lowry Acid/Base Theory I”; the corresponding web page discusses
the Bronsted-Lowry definition of an acid and a base. The web address for this page is
http://genchem.chem.okstate.edu/emanweb/BLI.html.
The fourth topic is entitled, “Bronsted/Lowry Acid/Base Theory II”; the
corresponding web page gives examples of Bronsted-Lowry acids and base. The web
address for this page is http://genchem.chem.okstate.edu/emanweb/BLII.html. The fifth
topic is Lewis acid/base theory. The corresponding web page discusses the Lewis
definition of acids and bases see http://genchem.chem.okstate.edu/emanweb/lewis.html.
The sixth topic is entitled, “Acid-Base Strength I.” The corresponding web page explains
the difference between strong acids and strong bases and weak acids and weak bases.
The page address is http://genchem.chem.okstate.edu/emanweb/strengthI.html. The
seventh topic is entitled, “Acid-Base Strength II.” The corresponding web page explains
the factors affecting the strength of acids and bases. The page address is
http://genchem.chem.okstate.edu/emanweb/strengthII.html.
In the top left part of the page under the page title, there is a sub-menu, which
contains the picture of the home page. Once the student has positioned the mouse over
the button corresponding to the home page, a pop up window having the name “home
page” will appear. By clicking on this button, the student will be taken to the home page

71
on the Acid-Base Chemistry web site. The address of the home page is
http://genchem.chem.okstate.edu/emanweb/page1.html. The second block in the sub-
menu is called, “First.” Once the mouse is placed on top of this button, a pop up window
with the name “First” will appear. The corresponding page for this block is “Acid/Base
Characteristics and Arrhenius Theory Page,” with the page address being
http://genchem.chem.okstate.edu/emanweb/arrhenius.html. The third block in the sub
menu is called “Previous.” Once the mouse is over this button, a pop up window will
appear showing the name “Previous.” The corresponding page for this block is
“Acid/Base Strength II,” and the web address for this page is
http://genchem.chem.okstate.edu/emanweb/strengthII.html. The fourth block for the sub
menu is called “Next”. Once the mouse has passed over this button, a pop up window
will appear with the statement “Next.” The corresponding page for this block is
“Acid/Base Characteristics and Arrhenius Theory Page,” with the page address being
http://genchem.chem.okstate.edu/emanweb/arrhenius.html. The fifth block for the sub
menu is called “Last.” Once the mouse has passed over the button, a pop up window will
appear with the text, “Last.” The corresponding web page for this topic is “Acid/Base
Strength II,” see http://genchem.chem.okstate.edu/emanweb/strengthII.html. The second
section of this page includes the library image followed by the content of the page.
The page content is divided into a left column and a right column. The left
column has a series of menus. Each menu has a header for the title, with sub-headers
following each header. The menu has the title of the topic followed by sub-menus that
include all of the other pages under this topic. The titles of the menus in the left column
of the page are “Acid and Base Topics”, Pre-Classroom Activity and Experiments, and

72
Tutorials. The first header in the left column menu is entitled, “Acid-Base Identification
Activity.” This header is linked to video clips that demonstrate the use of indicators to
identify acids and bases, http://genchem.chem.okstate.edu/emanweb/Activity.html. Once
the mouse is in contact with this link, it is underlined and a pop up window appears with
the page title, “Acid/Base Activity.” The activity has six pages associated with it. Each
activity page provides a space for the students to record their observations. The first
page, which is “Litmus Paper Experiment,” is found at the following address,
http://genchem.chem.okstate.edu/emanweb/litmusPLE3.php. This page contains video
clips that show the effect of solutions (A-G) on the color change of blue and red litmus
paper. The second activity page is entitled, “Bromothymol Blue Experiments,” see
http://genchem.chem.okstate.edu/emanweb/BTBPLE3.php.
This page contains video clips that show the effect of solutions (A-G) on the color
change of Bromothymol blue. The third activity page is entitled, “Phenolphthalein
Experiments,” see http://genchem.chem.okstate.edu/emanweb/PHNPLE3.php. This page
contains video clips that show the effect of different chemicals on the color of
phenolphthalein. The fourth activity page is entitled, “Magnesium Metal Experiments,”
see http://genchem.chem.okstate.edu/emanweb/MgmetalPLE3.php. This page contains
video clips that show the reaction between chemicals (A-G) and magnesium metal. The
fifth activity page is entitled, “Calcium Carbonate Experiments,” see
http://genchem.chem.okstate.edu/emanweb/CaCO3PLE3.php. This page contains video
clips to show the reaction between chemicals (A-G) and calcium carbonate. The sixth
activity page is entitled, “Magnesium Nitrate Experiment,” see
http://genchem.chem.okstate.edu/emanweb/Mg (NO3)2PLE3.php. This page contains

73
video clips to show the effect of the reaction of chemicals (A-G) and magnesium nitrate
solution.
The second header in the left column menu is the Pre-Classroom Activity. This
header has two sub headers and each has a link to a different pre-classroom activity. The
first pre-classroom activity tests the effects of different chemicals (HCl, KOH, HNO3,
NH3, H2O) on the change in color exhibited by litmus paper. Once the mouse is in contact
with the link, it will be underlined, and a pop up window will appear with the title of the
link. The student then clicks the link using the mouse, and a new page will open.
Experiments will be available on this page that will allow the students to test the effect of
different chemicals on the color change exhibited by red and blue litmus paper. After
finishing the experiment, the student will be asked several questions about the experiment
that will test their understanding of the topic. The second pre-classroom activity allows
the student to test the effect of different chemicals on the color change exhibited by other
acid-base indicators. This experiment is also followed by questions that test the student’s
understanding of the topic.
The third header in the left column menu is “Acid-Base Topics”. Four sub headers
follow this header, that link to different pages of the web site, which are listed below.
• Acid-Base Characteristics and Arrhenius Theory
• Acid-Base Arrhenius Theory Limitations
• Bronsted/Lowry Acid/Base Theory I
• Bronsted/Lowry Acid/Base Theory II
• Lewis Acid/Base Theory

74
Under the fourth header, Acid-Base Topics, in the left column menu there are two
sub headers which link to the following two pages of the web site: “Acid-Base Strength
I,” and “Acid-Base Strength II.” The fifth header is “Acid-Base Questions.” Each page
associated with this header has a different question. All question pages provide a space
that allows the students to write down their answers. Once the student finishes the answer
page, a response page will open with the correct answers, so the students can compare
their answers to the correct answer. The sixth header is “Quiz.” This heading is a pool
of different questions that cover the all the topics discussed on the web site. Once the
mouse has passed over this link, the link becomes underlined, and a pop up box will
appear showing the link title. To successfully navigate this website, the student is
encouraged to follow the procedure, which is listed below.
1. The first step is to use the Acid-Base Identification Activity, which will give the
student information about differences between acids and bases.
2. The student should then perform the pre-classroom activity, which will help him
to better understand the concepts enumerated in the Acid Base Identification
Activity.
3. After completing the Acid-Base Identification and Pre-Classroom activity, it is
suggested that different acid/base topics should be explored and questions raised
in each topic answered.
4. The students should then perform the on-line experiments and answer the
questions about these experiments provided by the website.
5. The last step is for the students to tackle the quiz questions
75
3.1 Acid-Base Titrations
There are two acid-base titration experiments on this website for the students. The
first experiment, entitled, “Acid-Base pH Meter Titration Experiment,” allows the student
to mix chemicals of differing (acid and base) strengths and to titrate the acid against the
base or the base against the acid. While performing this experiment, the student is able to
measure the solution pH, after the chemicals are mixed. The students are asked to solve
for the molarity of the new solution and will be told whether their response is correct.
The second experiment entitled, “Acid-Base Titration Experiment”, allows the
students to mix acids or bases with an acid-base indicator before the titration is initiated.
When the students reach the end point of the titration, a color change will be observed
indicative of the endpoint. Once the endpoint of the titration is reached, the student will
be asked to compute the molarity of the new solution for the products of the reaction
formed.
3.2 Results of Studies to Evaluate the Efficacy of the Website
717 students volunteered to evaluate the website. These students were taking
CHEM 1515, which was taught by Professor John Gelder. Acid-Base Identification
video clips were used to test the student’s ability to classify the reactions observed
between solutions (A-G) and the different indicators used. These activity video clips were
found on six web pages. The first page had seven clips. Each clip tested the reaction
between litmus paper and solutions (A-G). The student was asked to watch each video
clip and record their observations in the space provided next to each video clip. At the
end of each page, the students were asked to write down a statement delineating the

76
relationship between the compounds tested and the observed color change of the litmus
paper. The students were then asked to assign solutions A-G into one of three groups
(acid, base, neutral). 105 students tested this web page. 80 students were able to describe
the reactivity of the compound, and correctly classify the compound as an acid, base or a
neutral compound. The other 25 students were also able to correctly ascertain the
changes in color, which the litmus paper had undergone but were not able to correctly
classify the entire set of compounds tested into their respective categories. The second
activity page tested the effects of solutions (A-G) on the color change of Bromothymol
Blue. 106 students participated in this evaluation. 78 students were able to correctly
classify the compounds into three groups based upon the color change of the dye. The
other 28 students were also able to identify acidic solutions, which turned green
Bromothymol Blue to yellow, basic solutions that turned green Bromothymol Blue to
blue and neutral solutions that did not change the color of green Bromothymol blue.
However, these students were not able to assign these compounds to their respective
category (acidic, sic, neutral) based on the response of the dye.The third activity page
tested the effect of solutions (A-G) on the color change of phenolphthalein. 101 students
evaluated this web page. 73 students were able to correctly classify the compounds into
one of three categories. They were able to identify the solutions that turned colorless to
pink as bases, while solutions that had no effect on the color change of phenolphthalein
were identified as acids or neutral compounds. The other 28 students were not able to
correlate the color change of phenolphthalein to the acidic and basic properties of the
compounds tested.

77
The fourth activity page, which was tested the reaction between solutions (A-G)
and CaCO3, was evaluated by 103 students. 79 students concluded that acids react with
CaCO3 and cause it to form a gas, while basic or neutral solutions did not react with
CaCO3. The other 24 students concluded that some of the solutions reacted with CaCO3,
causing noise and bubbling to occur. Furthermore, they reported that some of the
solutions did not react with CaCO3. However, they did not use statements such as acid,
base or neutral to describe the reaction between CaCO3 and the compounds tested.
The fifth page, which tests the reaction between solutions (A-G) and Mg, was
evaluated by 120 students. 93 students were able to recognize that compounds, which
caused hydrogen to evolve from Mg, are acids, while compounds that did not react with
Mg were bases. The other 27 students observed that some of the compounds caused
bubbling to occur when they were mixed with Mg, while other compounds did not cause
a reaction to occur. However, these students did not use the labels “acid, base or neutral”
when describing the reactivity of these compounds towards Mg.
107 students evaluated the sixth page, which tested the reaction between Mg(NO3)2 with
solutions (A-G). 86 students were able to correctly classify the compounds tested into
one of three groups. The acids did not react with the salt to form a precipitate, while
bases reacted with the magnesium salt to form a precipitate. As for the other 21 students,
they classified the chemicals tested into one of three groups based upon their reactivity,
but these students did not use the label acid, base or neutral to describe the compounds
tested.

78
3.3 Conclusion
During this initial testing cycle, it was found that students could readily
differentiate acids from bases. The students were able to use the video clips to identify
the attributes associated with acids and bases. Also, they were able to utilize this
terminology to predict the reactivity of the compounds tested.
Figure 3.1 summarizes the results from the acid-base identification activity which was
performed by approximately 100 CHEM 1515 students. This chart shows the number of
students that were involved in each activity and the reported outcome (The students
correctly answered all of the questions or they did not correctly answer all of the
questions). The graph includes for each activity the number of students who were able to
use the terminology acid, base or neutral (series 1 or the blue block), while the pink block
denotes the students who could not use the terminologies acid, base or neutral (series 2 or
the pink block). This suggests that our web site was by and large successful in imparting
information about acids and bases to students in CHEM 1515.
Figure 3.1. Results of acid-base identification activity

79
The results obtained during this testing cycle also suggest that web sites devoted
to chemistry are capable of educating students because of the way they demonstrate and
explain information, pose questions, provide instantaneous feedback to the students, and
allows the student to perform experiments that facilitate an understanding of the given
topic.

80
CHAPTER IV
WEB PAGE FOR QUESTIONS ABOUT BRONSTED LOWRY THEORY
4.0 Two Column Web Page
Fig 4.1 is an image of a web page created by linking CSS code to HTML code.
The web page is divided into five sections: "container" (virtual holder of the entire page's
content), "Header" (for the top banner), "leftnav" (for the left column), "content" (for the
right column) and "footer" (for the footer across the bottom of the page).
Figure 4.2 shows how to link CSS file "chemistry.css" (right box in Figure 4.2)
externally to the HTML file “chemistry.html" (left side of Figure 4.2). To externally link
a CSS page to an HTML page, one must use the <link> tag, which is inside the head tag
of the HTML file. The browser reads the style definitions from the file, chemistry.css,
and formats the HTML file according to these definitions. Table 4.1 lists the HTML code
within the <body> tag and the corresponding CSS code required to style the page.

81
Figure 4.1. Two column page with CSS code linked to HTML code

82
Figure 4.2. The file, chemistry.css, is linked externally to the HTML file, chemistry.html
CSS Two Column Layout Page

83
Table 4.1. HTML and CSS Code Used For Styling the Web Page
HTML Code CSS Code <div id="container"> this container wrapes around the "Header, left nav, content, and footer" </div>
#container {width: 90%; margin: 10px auto; background-color: #feedea; color: #333; border: 1px solid #e4ecfc; line-height:130%;}
<div id="container"> this container wrapes around the "Header, left nav, content, and footer" </div>
#container {width: 90%; margin: 10px auto; background-color: #feedea; color: #333; border: 1px solid #e4ecfc; line-height:130%;}
<div id=top> <h1>Header</h1> </div>
#top { #top{ padding: 4.8em; background-color: #feedea; color: #6E0023; border-bottom:1px solid gray;} #top h1 {padding: 0; margin: 0;}
<div id="leftnav"> <h1>leftnav</h1> </div>
#leftnav {float: left; width: 165px;; margin: 0; padding: 1em;}
<div id="content"> <h1>this part is the div contentso you can add the text that goes to the right of the page in this section</h1> </div>
#content { color:#6E0023; margin-left: 190px; border-left: 1px solid gray; padding: 1em; max-width: 36em; }

84
4.1 Construction of the Two Column Web Page
To divide a page into two columns, one will usually use as a starting point the
basic page structure. For a two column web page (see Section 2.1), the page is divided
into five divs, with each of the divs having a unique ID selector. The divs are labeled:
"container" (wrapped around the entire page's content), "Header" (for the top banner),
"leftnav" (for the smaller, left column), "content" (for the right column) and "footer" (for
the footer across the bottom of the page) .
To have the page contents away from the edges of the browser window, the width
and margins on the “container” should be adjusted using the CSS declaration "width:
90%”. For centering the contents in the middle of the browser’s page, apply "auto"
margins to both the left and right margins. To move the container’s contents away from
the top and bottom of the view port, use a margin of 10 px, and CSS declaration "margin:
10px Auto", see Figure 4.3. Table 4.2 lists the CSS code required to adjust the width and
the margins of the container, which wraps around the entire page content.
<div id="footer"> <h2>footer</h2> </div>
#footer {clear: both; margin: 0; padding: .5em; color: #333; background-color: #feedea; border-top: 1px solid gray;}

85
Figure 4.3. The size of the container, which is wrapped around the whole page content, takes only 90% of the original page size
Table 4.2. CSS Code for Adjusting the Width and Margins of the div “Container” CSS CODE #Container {width: 90%; margin: 10px auto;}
HTML Code Container <body> <div id="container"> <div id="top">,<h1>Header</h1>,</div> <div id="leftnav">,<h1>leftnav</h1>,</div> <div id="content"> <h1>this part is the div content so you can add the text that goes to the right of the page in this section</h1></div> <div id="footer"><h2>footer</h2></div> </div>
To add a black color to the text and faint pink background color to the “container”
div, the following CSS code is used, “color: #333; background-color: #feedea;” To
apply a border to the div, the following CSS code is used, “border: 1px solid #feedea;”
When this code is used, the border will not be seen because it has the same color as the
background color, see Figure 4.4 for black text and faint pink background and Table 4.3
for the CSS and HTML code used.

86
Figure 4.4. Web page with a black colored text and a faint pink background after adding the background-color code, text color code and border code to the CSS code of the container
Table 4.3. CSS code for Background, Text Color, Border of the div “Container” CSS CODE #container{width: 90%;margin: 10px auto; background-color: #feedea; color: #333; border: 1px solid #feedea;}
HTML Code Container <body><div id="container"> <div id="top">,<h1>Header</h1>,</div> <div id="leftnav">,<h1>leftnav</h1>,</div> <div id="content"> <h1>this part is the div content so you can add the text that goes to the right of the page in this section</h1></div> <div id="footer"><h2>footer</h2></div> </div>
Adjusting the space between the lines can be done using the CSS declaration,
“line-height: 130%;” Using this code, all of the space between the lines in the entire
page will have the same “line-height”, see Figure 4.5 and Table 4.4.

87
Figure 4.5. The text in the page has the same line-height after the appropriate CSS code was applied
Table 4.4. CSS Code Required to Adjust the Line Height of the div “Container” CSS CODE #Container {width: 90%; margin: 10px auto; background-color: #feedea; color: #333; border: 1px solid #e4ecfc; line-height: 130%;}
HTML Code Container<body> <div id="container"> <div id="top">,<h1>Header</h1>,</div> <div id="leftnav">,<h1>leftnav</h1>,</div> <div id="content"> <h1>this part is the div content so you can add the text that goes to the right of the page in this section</h1></div> <div id="footer"><h2>footer</h2></div></div>
For the Header div, the background color is set using the following CSS
declaration, “background-color: #feedea;” A border is added to the bottom of the header
section using the CSS declaration, “border-bottom: 1px solid gray;” To add padding

88
(which is the space between the bottom border and the content) to the header div, the
following code was used, “padding; 4.8em;” Color is also applied to the text in the head
section using the code, “color: #6E0023;”, see Figure 4.6 and Table 4.5.
Figure 4.6. The web page with the “div” top being placed at the top of the page
Table 4.5. HTML Code for the Entire Page with Bold CSS Code to Style Header CSS CODE #container{width: 90%; margin: 10px auto;background-color: #feedea; color: #333; border: 1px solid #feedea; line-height: 130%;} #top{ padding: 4.8em; background-color: #feedea; color: #6E0023; border-bottom:1px solid gray;}
HTML Code Container <body> <div id="container"> <div id="top">,<h1>Header</h1>,</div> <div id="leftnav">,<h1>leftnav</h1>,</div> <div id="content"> <h1>this part is the div content so you can add the text that goes to the right of the page in this section</h1></div> <div id="footer"><h2>footer</h2></div> </div>
In Table 4.5, the word “Header” inside the head section is in the H1 tag element
as <h1>Header</h1>. One can remove both the padding and the margin from the H1 tag

89
to avoid confusion that could occur when different browsers apply different values for the
margins and padding. The CSS Code required to remove the margin and the padding
from the h1 tag is "#top h1 {padding: 0; margin:0;}," see Figure 4.7 and Table 4.6.
Figure 4.7. Web page after removing the margin and padding from the H1 tag in the header section
Table 4.6. CSS Code to Style the Page Header CSS CODE #container{width: 90%; margin: 10px auto;background-color: #feedea; color: #333; border: 1px solid #feedea; line-height: 130%;} #top{ padding: 4.8em; background-color: #feedea; color: #6E0023; border-bottom:1px solid gray;} #top h1{padding: 0; margin: 0;}
HTML Code Container<body> <div id="container"> <div id="top">,<h1>Header</h1>,</div> <div id="leftnav">,<h1>leftnav</h1>,</div> <div id="content"> <h1>this part is the div content so you can add the text that goes to the right of the page in this
section</h1></div> <div id="footer"><h2>footer</h2></div></div>
To create the leftnav div and position that div on the left side of the container div,
the following CSS code, which utilizes the float property is applied, “#leftnav {float:
left;}.” The width of the left column is set using the following CSS declaration, “width:

90
165px;” As shown in Figure 4.8, the left column (leftnav) has started to move to the left
hand side of the page. Table 4.7 is the CSS code used to float the left column to the left
hand side of the page.
Figure 4.8. The div “leftnav” has been moved to the left hand side of the page to a location where the left hand column will be located
Table 4.7. CSS and HTML Code That Moves Leftnav to the Left Side of the Page CSS CODE #container{width: 90%; margin: 10px auto;background-color: #feedea; color: #333; border: 1px solid #feedea; line-height: 130%;} #top{ padding: 4.8em; background-color: #feedea; color: #6E0023; border-bottom:1px solid gray;} #top h1{padding: 0; margin: 0;} #leftnav{ float: left; width: 165px;; }
HTML Code Container <body> <div id="container"> <div id="top">,<h1>Header</h1>,</div> <div id="leftnav">,<h1>leftnav</h1>,</div> <div id="content"> <h1>this part is the div content so you can add the text that goes to the right of the page in this
section</h1></div> <div id="footer"><h2>footer</h2></div></div>
To move the text away from the edges of the left hand column, a margin of "0"
and a padding of 1em is applied, which ensures that a browser will not add additional

91
margin values. As shown in Figure 4.9, the text has been moved away from the edge of
the left column “leftnav”. Table 4.8 lists the CSS code for adding a margin and padding
to the leftnav.
Figure 4.9 Text has been moved away from the edge of the left column “leftnav”

92
Table 4.8. CSS Code to Move Text Away from the Edge of the Left Column CSS CODE #container{width: 90%; margin: 10px auto;background-color: #feedea; color: #333; border: 1px solid #feedea; line-height: 130%;} #top{ padding: 4.8em; background-color: #feedea; color: #6E0023; border-bottom:1px solid gray;} #top h1{padding: 0; margin: 0;} #leftnav{ float: left; width: 165px;margin: 0; padding: 1em;}HTML Code Container <body> <div id="container"> <div id="top">,<h1>Header</h1>,</div> <div id="leftnav">,<h1>leftnav</h1>,</div> <div id="content"> <h1>this part is the div content so you can add the text that goes to the right of the page in this section</h1></div> <div id="footer"><h2>footer</h2></div></div>
The next step is probably the most crucial in the entire process. To make the text
appear as if it is in a new column, the command margin-left is applied to the "content"
div, ensuring that its width is greater than the overall width of the "leftnav" div.
Otherwise, the "content" div will flow down and wrap around the text in the left column
(as it is doing in Figure 4.9). The actual CSS command used is “margin-left: 190px”.
Padding is added to the content div using the command: padding, “1em”. A 1px solid
gray left border is applied to separate the left column from the right column using the
following CSS code, “border-left: 1px solid gray;” (see Figure 4.10 and Table 4.9).
Figure 4.10. By applying a left margin to the right column, the content of the right column starts to move to the right. Two columns have been created: the left column with the word “leftnav” in it, and the right column with text in it

93
Table 4.9. CSS Code that Applies a Left Margin To the div “Content” CSS Code #container{width: 90%; margin: 10px auto;background-color: #feedea; color: #333; border: 1px solid #feedea; line-height: 130%;} #top{ padding: 4.8em; background-color: #feedea; color: #6E0023; border-bottom:1px solid gray;} #top h1{padding: 0; margin: 0;} #leftnav{ float: left; width: 165px;margin: 0; padding: 1em;} #content{color:#6E0023; margin-left: 190px; border-left: 1px solid gray; padding: 1em;} HTML Code Container <body> <div id="container"> <div id="top">,<h1>Header</h1>,</div> <div id="leftnav">,<h1>leftnav</h1>,</div> <div id="content"> <h1>this part is the div content so you can add the text that goes to the right of the page in this section</h1></div> <div id="footer"><h2>footer</h2></div></div>
The footer div is styled using the CSS code, “clear: both”, which forces the footer
at the bottom of the page below any floated elements. The padding and margin are
controlled using the following CSS code, “padding: .5em and margin: 0”. Text color and
background color can be added to the footer section using the following declaration,
“color: #333; and background-color: #feedea;” (see Figure 4.11 and Table 4.10).
Figure 4.11. Web page with footer division at the end of the page

94
Table 4.10. CSS Code to Add Footer and Adjust Both Text Color and Background CSS CODE #container{width: 90%; margin: 10px auto;background-color: #feedea; color: #333; border: 1px solid #feedea; line-height: 130%;} #top{ padding: 4.8em; background-color: #feedea; color: #6E0023; border-bottom:1px solid gray;} #top h1{padding: 0; margin: 0;} #leftnav{ float: left; width: 165px;margin: 0; padding: 1em;}#content{ color:#6E0023; margin-left: 190px; border-left: 1px solid gray; padding: 1em;} #footer{ clear: both; margin: 0; padding: .5em; color: #333;background-color: #feedea; } HTML Code Container <body> <div id="container"> <div id="top">,<h1>Header</h1>,</div> <div id="leftnav">,<h1>leftnav</h1>,</div> <div id="content"> <h1>this part is the div content so you can add the text that goes to the right of the page in this section</h1></div> <div id="footer"><h2>footer</h2></div> </div>
Figure 4.12 shows a web page that has been divided into four sections: an upper
head section at the top of the page, left column, right column, and footer at the bottom of
the page. A border has been added to the top of the footer in the web page using the CSS
code, “border-top: 1px solid gray.” Table 4.11 lists the CSS code used to add a top
border to the footer section.
Figure 4.12. Web page after the top-border has been applied to the page foot

95
Table 4.11. CSS Code for Adding a Top Border to the Footer CSS CODE #container{width: 90%; margin: 10px auto;background-color: #feedea; color: #333; border: 1px solid #feedea; line-height: 130%;} #top{ padding: 4.8em; background-color: #feedea; color: #6E0023; border-bottom:1px solid gray;} #top h1{padding: 0; margin: 0;} #leftnav{ float: left; width: 165px;margin: 0; padding: 1em;}#content{ color:#6E0023; margin-left: 190px; border-left: 1px solid gray; padding: 1em;} #footer{ clear: both; margin: 0; padding: .5em; color: #333; background-color: #feedea; border-top: 1px solid gray; }
HTML Code Container<body> <div id="container"> <div id="top">,<h1>Header</h1>,</div> <div id="leftnav">,<h1>leftnav</h1>,</div> <div id="content"> <h1>this part is the div content so you can add the text that goes to the right of the page in this
section</h1></div> <div id="footer"><h2>footer</h2></div></div>
To ensure that a browser will not change the left and right column margins, the
following CSS declaration is used:, “#leftnav p {margin: 0 0 1em 0;} and #content h2
{margin: 0 0 .5em 0;}”, see Figure 4.13 and Table 4.12.
Figure 4.13. Web page is divided into four sections: Header, left-column, right-column, and footer

96
Table 4.12. CSS and HTML Code for a Two Column Page That Consists of Header, Left-Column, Right-Column, and Footer
CSS CODE #container{width: 90%; margin: 10px auto;background-color: #feedea; color: #333; border: 1px solid #feedea; line-height: 130%;} #top{ padding: 4.8em; background-color: #feedea; color: #6E0023; border-bottom:1px solid gray;} #top h1{padding: 0; margin: 0;} #leftnav{ float: left; width: 165px;margin: 0; padding: 1em;}#content{ color:#6E0023; margin-left: 190px; border-left: 1px solid gray; padding: 1em;} #footer{ clear: both; margin: 0; padding: .5em; color: #333; background-color: #feedea; border-top: 1px solid gray; } #leftnav p { margin: 0 0 1em 0; } #content h2 { margin: 0 0 .5em 0; } HTML Code Container<body> <div id="container"> <div id="top">,<h1>Header</h1>,</div> <div id="leftnav">,<h1>leftnav</h1>,</div> <div id="content"> <h1>this part is the div content so you can add the text that goes to the right of the page in this section</h1></div> <div id="footer"><h2>footer</h2></div></div>
The text line width can be used to control the width of the right column using the
following CSS code, “#content: max-width: 36em;” see Figure 4.14 and Table 4.13 for
details.
Figure 4.14. By applying CSS code, the width of the right column is controlled by the text line with the longest length {max-width: 36em;}

97
Table 4.13. CSS Code to Set Maximum Line Length to Text CSS CODE #container{width: 90%; margin: 10px auto;background-color: #feedea; color: #333; border: 1px solid #feedea; line-height: 130%;} #top{ padding: 4.8em; background-color: #feedea; color: #6E0023; border-bottom:1px solid gray;} #top h1{padding: 0; margin: 0;} #leftnav{ float: left; width: 165px;margin: 0; padding: 1em;} #content{ color:#6E0023; margin-left: 190px; border-left: 1px solid gray; padding: 1em; max-width: 36em } #footer{ clear: both; margin: 0; padding: .5em; color: #333; background-color: #feedea; border-top: 1px solid gray; }
#leftnav p { margin: 0 0 1em 0; } #content h2 { margin: 0 0 .5em 0; } HTML Code Container<body> <div id="container"> <div id="top">,<h1>Header</h1>,</div> <div id="leftnav">,<h1>leftnav</h1>,</div> <div id="content"> <h1>this part is the div content so you can add the text that goes to the right of the page in this section</h1></div> <div id="footer"><h2>footer</h2></div></div>
4.2 Inserting a Three Dimensional Button Menu
Figure 4.15 shows a three-dimensional button menu inserted into a web page.
Table 4.14 lists the CSS code and HTML code required to build this menu. The menu
consists of only one div called navcontainer. The detailed steps required to develop this
menu follow the discussion after Figure 4.15 and the Table 4.14. The menu in Figure
4.15 is used to navigate and facilitate the connection between different web pages on a
web site.
Figure 4.15. Three-dimensional button menu built using CSS code

98
Table 4.14. HTML and CSS Code Used to Build a Three-Dimensional Button List CSS Code for this menu is:#navcontainer { width: auto; } #navlist {color: white; background: #17a; border-bottom: 0.2em solid #17a; border-right: 0.2em solid #17a; padding: 0 1px; margin-left: 0; width: 12em; font: normal 0.8em Verdana, sans-serif; } #navlist a{ display: block; text-decoration: none; margin-bottom: 0.5em; margin-top: 0.5em; color: white; background: #39c; border-width: 1px; border-style: solid; border-color: #5bd #035 #068 #6cf; border-left: 1em solid #fc0; padding: 0.25em 0.5em 0.4em 0.75em; } #navlist a:hover, #navlist a#current:hover{ background: #28b; border-color: #069 #6cf #5bd #fc0; padding: 0.4em 0.35em 0.25em 0.9em; } HTML Code <div id="navcontainer"> <ul id="navlist"> <li id="active"><a href=>B/L Overview.1.</a></li> <li><a href=>A/B Ionization Tutotials</a></li> <li><a href=>B/L Key Equations</a></li> <li><a href=>B/L Quiz</a></li> <li><a href=>B/L Question.2.</a></li> </ul></div>
The HTML code in Table 4.14 creates an unordered list. A blue background color
for this list is generated using the CSS code “background:#17a;” . A 0.2 em dark blue
bottom and right border was applied to the background. (1em is equal to the current font
size, whereas 2em means 2 times the size of the current font.) A 1px right and left
padding was applied to the menu using the CSS code, “padding: 0 1px;” A normal text
character of 0.8 em of the 12em allotted for the total list width was implemented using
the CSS code “font: normal 0.8em verdad, sans-serif;” In Table 4.15, the boldface code is
the code for the three dimensional button menu, which is inserted into the CSS code for
the two column page. The HTML code for the three dimensional navigational button
menu was also inserted as boldface text. Further details about these changes can be seen
in Figure 4.16.

99
Figure 4.16. The menu begins to appear in the left-hand column
Table 4.15. CSS Code Required to Style the First Step of the Left Column Menu CSS CODE #container{width: 90%; margin: 10px auto;background-color: #feedea; color: #333; border: 1px solid #e4ecfc; line-height: 130%;} #top{ padding: 4.8em; background-color: #feedea; color: #6E0023; border-bottom:1px solid gray;} #top h1{padding: 0; margin: 0;} #leftnav{ float: left; width: 165px;margin: 0; padding: 1em;}#content{ color:#6E0023; margin-left: 190px; border-left: 1px solid gray; padding: 1em; max-width: 36em } #footer{ clear: both; margin: 0; padding: .5em; color: #333; background-color: #feedea; border-top: 1px solid gray; }
#leftnav p { margin: 0 0 1em 0; } #content h2 { margin: 0 0 .5em 0; } #navlist {color: white; background: #17a; border-bottom: 0.2em solid #17a; border-right: 0.2em solid #17a; padding: 0 1px; margin-left: 0; width: 12em; font: normal 0.8em Verdana, sans-serif; } HTML Code Container<body> <div id="container"> <div id="top">,<h1>Header</h1>,</div> <div id="leftnav">,<h1>leftnav</h1> <div id="navcontainer"><ul id="navlist"> <li id="active"><a href=>B/L Overview.1.</a></li> <li><a href=>A/B Ionization Tutotials</a></li> <li><a href=>B/L Key Equations</a></li> <li><a href=>B/L Quiz</a></li> <li><a href=>B/L Question.2.</a></li></ul> </div></div><div id="content"> <h1>this part is the div content</h1><h1> so you can add the text that goes to</h1><h1>the right of the page in this section</h1></div> <div id="footer"><h2>footer</h2></div></div>

100
To style the five buttons of the menu, a normal text is applied using the CSS code,
“text_decoration:non;” Space is set between the different text lines using the CSS code,
“margin-bottom:0.5em”. White text was applied using the CSS code, “color: white;” a
faint blue button background was applied using the CSS code, “background:#39c;” Four
white borders of 1px were applied around each button using the CSS code,“border-
width:1px; border-style:solid”. Borders colors for each button were added using the
following order and color, “faint blue top border, dark blue bottom border, right blue
right border, faint blue left border.” This was implemented using the following CSS
code, “border-color:#5bd #035 #068 #6cf;”. The color scheme gives the impression that
the buttons are placed above the page. To give the buttons a three dimensional structure,
a 1 em yellow left border was applied using the CSS code, “border-left:1 em solid# fc0;”.
A 0.25 em top padding, 0.5 em bottom padding, 0.4 em left padding and 0.75 em right
padding was then applied to each button using the following CSS code, “padding: 0.25
em 0.5 em 0.4em 0.75 em;”. Combining these commands into a single command line, the
CSS code used for this part is, “#navlist a{ display: block; text-decoration: none; margin-
bottom: 0.5em; margin-top: 0.5em; color: white; background: #39c; border-width: 1px;
border-style: solid; border-color: #5bd #035 #068 #6cf; border-left: 1em solid #fc0;
padding: 0.25em 0.5em 0.4em 0.75em; }”.
The hover property is used to change the appearance of the button once the mouse
is in contact with any of the buttons. A dark blue background was applied using the CSS
code, “#navlist a:hover, #navlist a#current:hover{ background:#28b;}”. A dark blue top
border, a faint blue bottom border, a faint blue right border and a yellow left border will
appear once the mouse is over any of the buttons by way of the CSS code “#navlist
a:hover, #navlist a#current:hover{ border-color: #069 #6cf #5bd #fc0;}”. A top 0.4 em

101
padding, a bottom 0.35 em padding, a left 0.25 em padding, and a right 0.9 em padding
was applied to the buttons once the mouse is in contact with any of them using the CSS
code, “#navlist a:hover, #navlist a#current:hover padding: 0.4em 0.35em 0.25em
0.9em;”see Figure 4.17 and Table 4.16 below.
Figure 4.17. The menu buttons are in their three dimensional form.
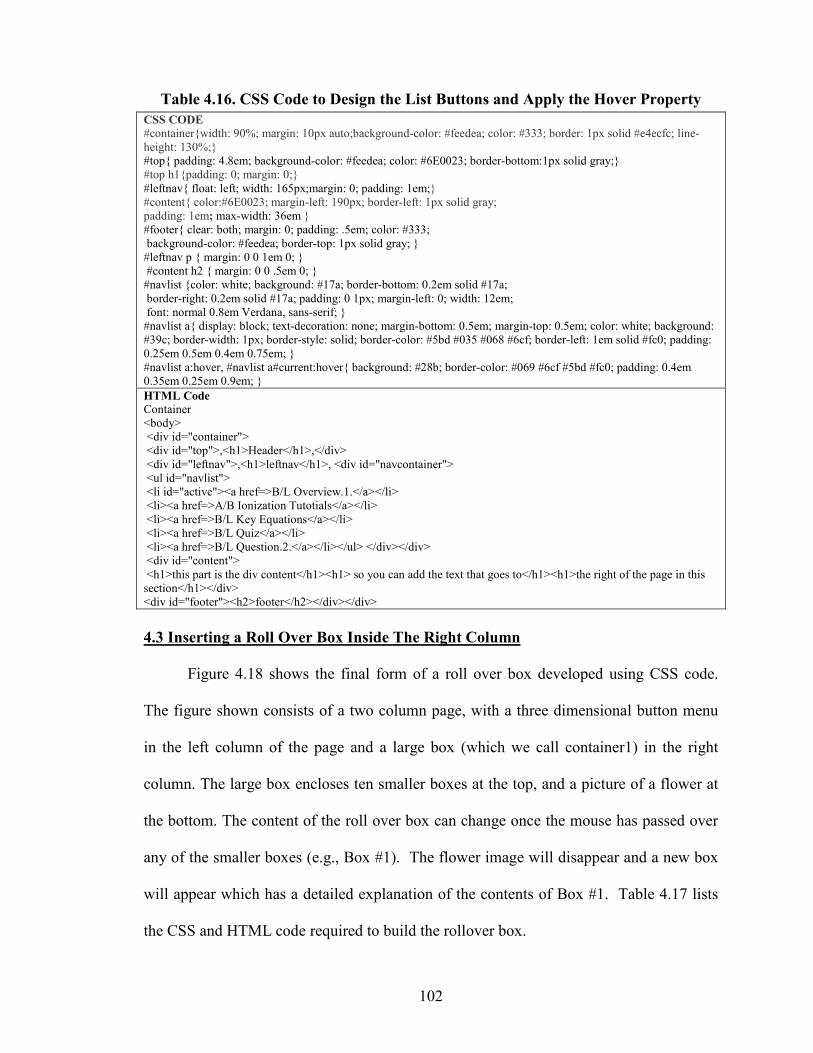
102
Table 4.16. CSS Code to Design the List Buttons and Apply the Hover Property CSS CODE #container{width: 90%; margin: 10px auto;background-color: #feedea; color: #333; border: 1px solid #e4ecfc; line-height: 130%;} #top{ padding: 4.8em; background-color: #feedea; color: #6E0023; border-bottom:1px solid gray;} #top h1{padding: 0; margin: 0;} #leftnav{ float: left; width: 165px;margin: 0; padding: 1em;}#content{ color:#6E0023; margin-left: 190px; border-left: 1px solid gray; padding: 1em; max-width: 36em } #footer{ clear: both; margin: 0; padding: .5em; color: #333; background-color: #feedea; border-top: 1px solid gray; }
#leftnav p { margin: 0 0 1em 0; } #content h2 { margin: 0 0 .5em 0; } #navlist {color: white; background: #17a; border-bottom: 0.2em solid #17a; border-right: 0.2em solid #17a; padding: 0 1px; margin-left: 0; width: 12em; font: normal 0.8em Verdana, sans-serif; } #navlist a{ display: block; text-decoration: none; margin-bottom: 0.5em; margin-top: 0.5em; color: white; background: #39c; border-width: 1px; border-style: solid; border-color: #5bd #035 #068 #6cf; border-left: 1em solid #fc0; padding: 0.25em 0.5em 0.4em 0.75em; } #navlist a:hover, #navlist a#current:hover{ background: #28b; border-color: #069 #6cf #5bd #fc0; padding: 0.4em 0.35em 0.25em 0.9em; } HTML Code Container <body> <div id="container"> <div id="top">,<h1>Header</h1>,</div> <div id="leftnav">,<h1>leftnav</h1>, <div id="navcontainer"> <ul id="navlist"> <li id="active"><a href=>B/L Overview.1.</a></li> <li><a href=>A/B Ionization Tutotials</a></li> <li><a href=>B/L Key Equations</a></li> <li><a href=>B/L Quiz</a></li> <li><a href=>B/L Question.2.</a></li></ul> </div></div> <div id="content"> <h1>this part is the div content</h1><h1> so you can add the text that goes to</h1><h1>the right of the page in this section</h1></div> <div id="footer"><h2>footer</h2></div></div>
4.3 Inserting a Roll Over Box Inside The Right Column
Figure 4.18 shows the final form of a roll over box developed using CSS code.
The figure shown consists of a two column page, with a three dimensional button menu
in the left column of the page and a large box (which we call container1) in the right
column. The large box encloses ten smaller boxes at the top, and a picture of a flower at
the bottom. The content of the roll over box can change once the mouse has passed over
any of the smaller boxes (e.g., Box #1). The flower image will disappear and a new box
will appear which has a detailed explanation of the contents of Box #1. Table 4.17 lists
the CSS and HTML code required to build the rollover box.

103
Figure 4.18. Roll Over Box Created with CSS Code
Table 4.17. HTML and CSS Code Used for Creating the Rollover Box CSS Code is:#container1 {position:relative; width:425px; height:430px; background:#efedec url(back1.gif); border:1px solid #000; margin:0 auto;} a.gallery span {display:block; position:absolute; width:1px; height:1px; top:5px; left:5px; overflow:hidden; background:#efedec url(back1.gif);} a.gallery, a.gallery:visited {display:block; color:#000; text-decoration:none; border:1px solid #000; width:75px; height:47px; float:left; margin:3px; } .slidek {display:block; position:absolute; width:400px; height:250px; top:125px; left:10px; padding:0; border:1px solid #000;} a.gallery:hover {white-space:normal; border:1px solid #fff;} a.gallery:hover span {display:block; position:absolute; width:402px; height:300px; top:120px; left:5px; padding:5px; font-style:italic; color:#000; background:#efedec url(back1.gif); } HTML Code:
<div id="container1"><img class="slidek" src="pic7.jpg" alt="Cascade" title="Cascade" /> <a class="gallery slidea">Box #1<span> Detailed explanation for box #1 </span></a> <a class="gallery slideb">Box #2<span> Detailed explanation for box #2 </span></a> <a class="gallery slidec" >Box #3<span> Detailed explanation for box #3 </span></a> <a class="gallery slided" >Box #4<span> Detailed explanation for box #4 </span></a> <a class="gallery slidee">Box #5<span> Detailed explanation for box #5 </span></a> <a class="gallery slidef" >Box #6<span> Detailed explanation for box #6 </span></a> <a class="gallery slideg" >Box #7<span> Detailed explanation for box #7 </span></a> <a class="gallery slideh" >BOX #8<span> Detailed explanation for box #8 </span></a> <a class="gallery slidei" >Box #9<span>Detailed explanation for box #9 </span></a> <a class="gallery slidej" > Box #10<span>Detailed explanation for box #10 </span></a> </div> <h2>To Solve For The Conjugate Acid of The Base</h2> </div>

104
The procedure used to develop the roll over box consisted of six distinct steps.
First (Step 1), the position of container1 inside the right column was adjusted using the
CSS declaration, “position: relative;” The width of container1 was adjusted to 425 px,
and the height of container1 was adjusted to 430 px using the CSS code, “#container1 {
width: 425px; height: 430px.}” A creamy brown background image called
“back1.gif”was applied using the CSS code, “#container1 {background: #efedec
url(back1.gif)}”. Four borders were added to container1 using the CSS declaration,
“border:1px solid #000”. The position of container1 was centered inside the right column
using the code, “margin:10 auto;”, which applied a 10 px top margin, a 10 px bottom
margin, and auto left and right margins, see Figure 4.19 and Table 4.18.
Figure 4.19. The box after being centered in the right column, with the background image applied. The box is surrounded by the top, left, right, and bottom borders

105
Table 4.18. CSS Code to Center the Box in the Right Column CSS CODE #container{width: 90%; margin: 10px auto;background-color: #feedea; color: #333; border: 1px solid #e4ecfc; line-height: 130%;} #top{ padding: 4.8em; background-color: #feedea; color: #6E0023; border-bottom:1px solid gray;} #top h1{padding: 0; margin: 0;} #leftnav{ float: left; width: 165px;margin: 0; padding: 1em;} #content{ color:#6E0023; margin-left: 190px; border-left: 1px solid gray; padding: 1em; max-width: 36em} #footer{ clear: both; margin: 0; padding: .5em; color: #333; background-color: #feedea; border-top: 1px solid gray; }
#leftnav p { margin: 0 0 1em 0; } #content h2 { margin: 0 0 .5em 0; } #navlist {color: white; background: #17a; border-bottom: 0.2em solid #17a; border-right: 0.2em solid #17a; padding: 0 1px; margin-left: 0; width: 12em; font: normal 0.8em Verdana, sans-serif; } #navlist a{ display: block; text-decoration: none; margin-bottom: 0.5em; margin-top: 0.5em; color: white; background: #39c; border-width: 1px; border-style: solid; border-color: #5bd #035 #068 #6cf; border-left: 1em solid #fc0; padding: 0.25em 0.5em 0.4em 0.75em; } #navlist a:hover, #navlist a#current:hover{ background: #28b; border-color: #069 #6cf #5bd #fc0; padding: 0.4em 0.35em 0.25em 0.9em; } #container1 {position:relative; width:425px; height:430px; background:#efedec url(back1.gif); border:1px solid #000; margin:10 auto;} HTML Code Container <body> <div id="container"> <div id="top">,<h1>Header</h1>,</div> <div id="leftnav">,<h1>leftnav</h1>, <div id="navcontainer"> <ul id="navlist"> <li id="active"><a href=>B/L Overview.1.</a></li> <li><a href=>A/B Ionization Tutotials</a></li> <li><a href=>B/L Key Equations</a></li> <li><a href=>B/L Quiz</a></li> <li><a href=>B/L Question.2.</a></li></ul></div></div> <div id="content"> <h1>this part is the div content</h1><h1> so you can add the text that goes to</h1><h1>the right of the page in this section</h1> <div id="container1"><img class="slidek" src="pic7.jpg" alt="Cascade" title="Cascade" /> <a class="gallery slidea">Box #1<span> Detailed explanation for box #1 </span></a> <a class="gallery slideb">Box #2<span> Detailed explanation for box #2 </span></a> <a class="gallery slidec" >Box #3<span> Detailed explanation for box #3 </span></a> <a class="gallery slided" >Box #4<span> Detailed explanation for box #4 </span></a> <a class="gallery slidee">Box #5<span> Detailed explanation for box #5 </span></a> <a class="gallery slidef" >Box #6<span> Detailed explanation for box #6 </span></a> <a class="gallery slideg" >Box #7<span> Detailed explanation for box #7 </span></a> <a class="gallery slideh" >BOX #8<span> Detailed explanation for box #8 </span></a> <a class="gallery slidei" >Box #9<span>Detailed explanation for box #9 </span></a> <a class="gallery slidej" > Box #10<span>Detailed explanation for box #10 </span></a> </div> <h2>To Solve For The Conjugate Acid of The Base</h2> </div>

106
In Step 2, the span text was styled (see Figure 4.20). The text, “Box#1, Box #2,
Box#3, Box#4, Box#5, Box#6, Box#7, Box#8, Box#9, Box#10,” was placed at the
bottom of the container box. The span text, “Detailed explanation for box#1….” was
moved to the top of container1 using the CSS code, “display: block; position: absolute;
width: 1px; height: 1px”. This same text was also hidden behind the flower image using
the CSS code, “overflow: hidden” and was moved 5px away from the top box edge and
5px away from the left box edge using the CSS code, “top: 5px; left: 5px” (see Figure
4.20 and Table 4.19).
Figure 4.20. The effects of applying the span property to the container box

107
Table 4.19. CSS Code Required for the Span Property CSS CODE #container{width: 90%; margin: 10px auto;background-color: #feedea; color: #333; border: 1px solid #e4ecfc; line-height: 130%;} #top{ padding: 4.8em; background-color: #feedea; color: #6E0023; border-bottom:1px solid gray;} #top h1{padding: 0; margin: 0;} #leftnav{ float: left; width: 165px;margin: 0; padding: 1em;}#content{ color:#6E0023; margin-left: 190px; border-left: 1px solid gray; padding: 1em;max-width: 36em }
#footer{ clear: both; margin: 0; padding: .5em; color: #333; background-color: #feedea; border-top: 1px solid gray; }
#leftnav p { margin: 0 0 1em 0; } #content h2 { margin: 0 0 .5em 0; } #navlist {color: white; background: #17a; border-bottom: 0.2em solid #17a; border-right: 0.2em solid #17a; padding: 0 1px; margin-left: 0; width: 12em; font: normal 0.8em Verdana, sans-serif; } #navlist a{ display: block; text-decoration: none; margin-bottom: 0.5em; margin-top: 0.5em; color: white; background: #39c; border-width: 1px; border-style: solid; border-color: #5bd #035 #068 #6cf; border-left: 1em solid #fc0; padding: 0.25em 0.5em 0.4em 0.75em; } #navlist a:hover, #navlist a#current:hover{ background: #28b; border-color: #069 #6cf #5bd #fc0; padding: 0.4em 0.35em 0.25em 0.9em; } #container1 {position:relative; width:425px; height:430px; background:#efedec url(back1.gif); border:1px solid #000; margin:0 auto;} a.gallery span {display:block; position:absolute; width:1px; height:1px; top:5px; left:5px; overflow:hidden; background:#efedec url(back1.gif);}
HTML Code Container <body><div id="container"> <div id="top">,<h1>Header</h1>,</div> <div id="leftnav">,<h1>leftnav</h1>,<div id="navcontainer"> <ul id="navlist"> <li id="active"><a href=>B/L Overview.1.</a></li> <li><a href=>A/B Ionization Tutotials</a></li> <li><a href=>B/L Key Equations</a></li> <li><a href=>B/L Quiz</a></li> <li><a href=>B/L Question.2.</a></li></ul> </div></div></div> <div id="content"> <h1>this part is the div content</h1><h1> so you can add the text that goes to</h1><h1>the right of the page in this section</h1><div id="container1"><img class="slidek" src="pic7.jpg" /> <a class="gallery slidea" >Box #1<span> Detailed explanation for box #1</span></a> <a class="gallery slideb" >Box #2<span> Detailed explanation for box #2</span></a> <a class="gallery slidec" >Box #3<span> Detailed explanation for box #3</span></a> <a class="gallery slided" >Box #4<span> Detailed explanation for box #4</span></a> <a class="gallery slidee" >Box #5<span> Detailed explanation for box #5 </span></a> <a class="gallery slidef" >Box #6<span> Detailed explanation for box #6 </span></a> <a class="gallery slideg" >Box #7<span> Detailed explanation for box #7 </span></a> <a class="gallery slideh" >BOX #8<span> Detailed explanation for box #8</span></a> <a class="gallery slidei" >Box #9<span>Detailed explanation for box #9 </span></a> <a class="gallery slidej" > Box #10<span>Detailed explanation for box #10 </span></a> </div></div></div><div id="footer"><h2>footer</h2></div></div>

108
In Step 3, ten boxes with borders around each box were placed under the flower
image (see Figure 4.21 and Table 4.20). By applying the CSS code, “display:block;”, for
the gallery content “Box#1……Box#10”, the names of the boxes will lie in a column
under the image of the flower. The names of the boxes are then displayed in black with
the underline removed by applying the CSS code, “color:#000”, and “text-decoration:
none”. Top, left, right, and bottom black 1px borders were applied around each box
using the CSS code: border, “1px solid #000”. The width and the height of the boxes
were adjusted using the command: width, “75px; height:47px”. The position of each box
was adjusted to lie next to each other using the declaration, “float: left”, and their content
was moved 3px away from the top and left margins using the command: margin, “3px”.
Figure 4.21. Styling boxes are created for the roll over box.

109
Table 4.20. CSS Code Required for Creating the Styling Boxes CSS CODE #container{width: 90%; margin: 10px auto;background-color: #feedea; color: #333; border: 1px solid #e4ecfc; line-height: 130%;} #top{ padding: 4.8em; background-color: #feedea; color: #6E0023; border-bottom:1px solid gray;} #top h1{padding: 0; margin: 0;} #leftnav{ float: left; width: 165px;margin: 0; padding: 1em;}#content{ color:#6E0023; margin-left: 190px; border-left: 1px solid gray; padding: 1em;max-width: 36em }
#footer{ clear: both; margin: 0; padding: .5em; color: #333; background-color: #feedea; border-top: 1px solid gray; }
#leftnav p { margin: 0 0 1em 0; } #content h2 { margin: 0 0 .5em 0; } #navlist {color: white; background: #17a; border-bottom: 0.2em solid #17a; border-right: 0.2em solid #17a; padding: 0 1px; margin-left: 0; width: 12em; font: normal 0.8em Verdana, sans-serif; } #navlist a{ display: block; text-decoration: none; margin-bottom: 0.5em; margin-top: 0.5em; color: white; background: #39c; border-width: 1px; border-style: solid; border-color: #5bd #035 #068 #6cf; border-left: 1em solid #fc0; padding: 0.25em 0.5em 0.4em 0.75em; } #navlist a:hover, #navlist a#current:hover{ background: #28b; border-color: #069 #6cf #5bd #fc0; padding: 0.4em 0.35em 0.25em 0.9em; } #container1 {position:relative; width:425px; height:430px; background:#efedec url(back1.gif); border:1px solid #000; margin:0 auto;} a.gallery span {display:block; position:absolute; width:1px; height:1px; top:5px; left:5px; overflow:hidden; background:#efedec url(back1.gif);} a.gallery, a.gallery:visited{display:block; color:#000; text-decoration:none; border:1px solid #000; width:75px; height:47px; float:left; margin:3px;} HTML Code Container <body><div id="container"> <div id="top">,<h1>Header</h1>,</div> <div id="leftnav">,<h1>leftnav</h1>,<div id="navcontainer"> <ul id="navlist"> <li id="active"><a href=>B/L Overview.1.</a></li> <li><a href=>A/B Ionization Tutotials</a></li> <li><a href=>B/L Key Equations</a></li> <li><a href=>B/L Quiz</a></li> <li><a href=>B/L Question.2.</a></li></ul> </div></div></div> <div id="content"> <h1>this part is the div content</h1><h1> so you can add the text that goes to</h1><h1>the right of the page in this section</h1><div id="container1"><img class="slidek" src="pic7.jpg" /> <a class="gallery slidea" >Box #1<span> Detailed explanation for box #1</span></a> <a class="gallery slideb" >Box #2<span> Detailed explanation for box #2</span></a> <a class="gallery slidec" >Box #3<span> Detailed explanation for box #3</span></a> <a class="gallery slided" >Box #4<span> Detailed explanation for box #4</span></a> <a class="gallery slidee" >Box #5<span> Detailed explanation for box #5 </span></a> <a class="gallery slidef" >Box #6<span> Detailed explanation for box #6 </span></a> <a class="gallery slideg" >Box #7<span> Detailed explanation for box #7 </span></a> <a class="gallery slideh" >BOX #8<span> Detailed explanation for box #8</span></a> <a class="gallery slidei" >Box #9<span>Detailed explanation for box #9 </span></a> <a class="gallery slidej" > Box #10<span>Detailed explanation for box #10 </span></a> </div></div></div><div id="footer"><h2>footer</h2></div></div>

110
In Step 4, the position of the flower image and the ten small boxes were switched
when the following CSS code was applied, “block: display;; position:absolute;
width:400px; height:250px; top:125px”. The flower image was moved 10 px away from
the left edge of the container box using the following CSS code: left: 10px;. The flower
image was surrounded with 1px black borders using the following CSS command,
“border: 1px solid #000”. Further details about this step are shown in Figure 4.22, and
Table 4.21.
Figure 4.22. The position of the 10 small boxes and the flower is switched

111
Table 4.21. CSS code for Switching the Position of the Boxes and the Image CSS CODE #container{width: 90%; margin: 10px auto;background-color: #feedea; color: #333; border: 1px solid #e4ecfc; line-height: 130%;} #top{ padding: 4.8em; background-color: #feedea; color: #6E0023; border-bottom:1px solid gray;} #top h1{padding: 0; margin: 0;} #leftnav{ float: left; width: 165px;margin: 0; padding: 1em;} #content{ color:#6E0023; margin-left: 190px; border-left: 1px solid gray; padding: 1em; max-width: 36em } #footer{ clear: both; margin: 0; padding: .5em; color: #333;background-color: #feedea;border-top: 1px solid gray; } #leftnav p { margin: 0 0 1em 0; } #content h2 { margin: 0 0 .5em 0; }
#navlist {color: white; background: #17a; border-bottom: 0.2em solid #17a; border-right: 0.2em solid #17a; padding: 0 1px; margin-left: 0; width: 12em; font: normal 0.8em Verdana, sans-serif; } #navlist a{ display: block; text-decoration: none; margin-bottom: 0.5em; margin-top: 0.5em; color: white; background: #39c; border-width: 1px; border-style: solid; border-color: #5bd #035 #068 #6cf; border-left: 1em solid #fc0; padding: 0.25em 0.5em 0.4em 0.75em; } #navlist a:hover, #navlist a#current:hover{ background: #28b; border-color: #069 #6cf #5bd #fc0; padding: 0.4em 0.35em 0.25em 0.9em; } #container1 {position:relative; width:425px; height:430px; background:#efedec url(back1.gif); border:1px solid #000; margin:0 auto;} a.gallery span {display:block; position:absolute; width:1px; height:1px; top:5px; left:5px; overflow:hidden; background:#efedec url(back1.gif);} a.gallery, a.gallery:visited{display:block; color:#000; text-decoration:none; border:1px solid #000; width:75px; height:47px; float:left; margin:3px;} .slidek {display:block; position:absolute; width:400px; height:250px; top:125px; left:10px; padding:0; border:1px solid #000;} HTML Code Container <body> <div id="container"> <div id="top">,<h1>Header</h1>,</div> <div id="leftnav">,<h1>leftnav</h1>,<div id="navcontainer"> <ul id="navlist"> <li id="active"><a href=>B/L Overview.1.</a></li> <li><a href=>A/B Ionization Tutotials</a></li> <li><a href=>B/L Key Equations</a></li> <li><a href=>B/L Quiz</a></li> <li><a href=>B/L Question.2.</a></li> </ul></div>,</div></div> <div id="content"> <h1>this part is the div content</h1><h1> so you can add the text that goes to</h1><h1>the right of the page in this section</h1> <div id="container1"><img class="slidek" src="pic7.jpg" /> <a class="gallery slidea" >Box #1<span> Detailed explanation for box #1</span></a> <a class="gallery slideb" >Box #2<span> Detailed explanation for box #2</span></a> <a class="gallery slidec" >Box #3<span> Detailed explanation for box #3</span></a> <a class="gallery slided" >Box #4<span> Detailed explanation for box #4</span></a> <a class="gallery slidee" >Box #5<span> Detailed explanation for box #5 </span></a> <a class="gallery slidef" >Box #6<span> Detailed explanation for box #6 </span></a> <a class="gallery slideg" >Box #7<span> Detailed explanation for box #7 </span></a> <a class="gallery slideh" >BOX #8<span> Detailed explanation for box #8</span></a> <a class="gallery slidei" >Box #9<span>Detailed explanation for box #9 </span></a> <a class="gallery slidej" > Box #10<span>Detailed explanation for box #10 </span></a> </div></div></div><div id="footer"><h2>footer</h2></div></div>

112
In Step 5, the hover property is applied to control the shape of the ten small boxes
after the mouse has passed over any one of them. White borders appear over any smaller
box immediately after the mouse has made contact with it. The following CSS code was
used to implement this function, “white-space: normal; border: 1px solid #fff;” (see
Figure 4.23, and Table 4.22 for more details).
Figure 4.23. Roll over box after applying the hover property on the ten small boxes
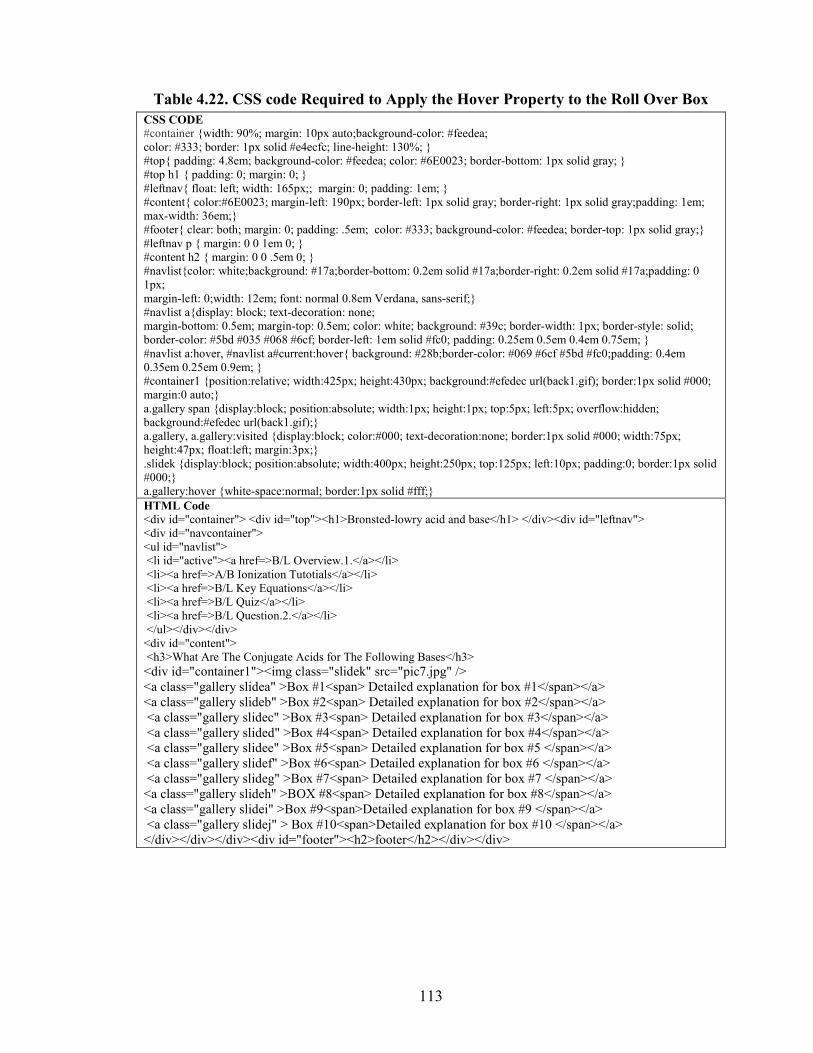
113
Table 4.22. CSS code Required to Apply the Hover Property to the Roll Over Box CSS CODE #container {width: 90%; margin: 10px auto;background-color: #feedea; color: #333; border: 1px solid #e4ecfc; line-height: 130%; } #top{ padding: 4.8em; background-color: #feedea; color: #6E0023; border-bottom: 1px solid gray; } #top h1 { padding: 0; margin: 0; } #leftnav{ float: left; width: 165px;; margin: 0; padding: 1em; } #content{ color:#6E0023; margin-left: 190px; border-left: 1px solid gray; border-right: 1px solid gray;padding: 1em; max-width: 36em;} #footer{ clear: both; margin: 0; padding: .5em; color: #333; background-color: #feedea; border-top: 1px solid gray;} #leftnav p { margin: 0 0 1em 0; } #content h2 { margin: 0 0 .5em 0; } #navlist{color: white;background: #17a;border-bottom: 0.2em solid #17a;border-right: 0.2em solid #17a;padding: 0 1px; margin-left: 0;width: 12em; font: normal 0.8em Verdana, sans-serif;} #navlist a{display: block; text-decoration: none; margin-bottom: 0.5em; margin-top: 0.5em; color: white; background: #39c; border-width: 1px; border-style: solid; border-color: #5bd #035 #068 #6cf; border-left: 1em solid #fc0; padding: 0.25em 0.5em 0.4em 0.75em; } #navlist a:hover, #navlist a#current:hover{ background: #28b;border-color: #069 #6cf #5bd #fc0;padding: 0.4em 0.35em 0.25em 0.9em; } #container1 {position:relative; width:425px; height:430px; background:#efedec url(back1.gif); border:1px solid #000; margin:0 auto;} a.gallery span {display:block; position:absolute; width:1px; height:1px; top:5px; left:5px; overflow:hidden; background:#efedec url(back1.gif);} a.gallery, a.gallery:visited {display:block; color:#000; text-decoration:none; border:1px solid #000; width:75px; height:47px; float:left; margin:3px;} .slidek {display:block; position:absolute; width:400px; height:250px; top:125px; left:10px; padding:0; border:1px solid #000;} a.gallery:hover {white-space:normal; border:1px solid #fff;} HTML Code <div id="container"> <div id="top"><h1>Bronsted-lowry acid and base</h1> </div><div id="leftnav"> <div id="navcontainer"> <ul id="navlist"> <li id="active"><a href=>B/L Overview.1.</a></li> <li><a href=>A/B Ionization Tutotials</a></li> <li><a href=>B/L Key Equations</a></li> <li><a href=>B/L Quiz</a></li> <li><a href=>B/L Question.2.</a></li> </ul></div></div> <div id="content"> <h3>What Are The Conjugate Acids for The Following Bases</h3> <div id="container1"><img class="slidek" src="pic7.jpg" /> <a class="gallery slidea" >Box #1<span> Detailed explanation for box #1</span></a> <a class="gallery slideb" >Box #2<span> Detailed explanation for box #2</span></a> <a class="gallery slidec" >Box #3<span> Detailed explanation for box #3</span></a> <a class="gallery slided" >Box #4<span> Detailed explanation for box #4</span></a> <a class="gallery slidee" >Box #5<span> Detailed explanation for box #5 </span></a> <a class="gallery slidef" >Box #6<span> Detailed explanation for box #6 </span></a> <a class="gallery slideg" >Box #7<span> Detailed explanation for box #7 </span></a> <a class="gallery slideh" >BOX #8<span> Detailed explanation for box #8</span></a> <a class="gallery slidei" >Box #9<span>Detailed explanation for box #9 </span></a> <a class="gallery slidej" > Box #10<span>Detailed explanation for box #10 </span></a> </div></div></div><div id="footer"><h2>footer</h2></div></div>

114
In Step 6, the span boxes (which contain answers to queries) were changed using
the hover span property when the mouse is in contact with any of the ten smaller boxes.
The flower image disappears and the answer to the question in the smaller box appears in
the space vacated by the flower image. This task is accomplished using the following
CSS code, “display: block; position: absolute; width: 402px; height: 300px; top: 120px;
left: 5px”. The text is positioned 5px away from the top, left, right, and bottom edges
using the padding property which is implemented using the following CSS code,
“padding:5px”. The text can also be italicized inside the explanation box and a
background image can be applied using the CSS code, “font-style: italic; color: #000;
background: #efedec url (back1.gif), see Figure 4.24, and Table 4.23.
Figure 4.24. Explanation box that appears after the mouse strikes box #10

115
Table 4.23. CSS Code for Implementing the Hover Property CSS CODE #container {width: 90%; margin: 10px auto;background-color: #feedea; color: #333; border: 1px solid #e4ecfc; line-height: 130%; } #top{ padding: 4.8em; background-color: #feedea; color: #6E0023; border-bottom: 1px solid gray; } #top h1 {padding: 0; margin: 0 ;} #leftnav{ float: left; width: 165px;; margin: 0; padding: 1em; } #content {color: #6E0023; margin-left: 190px; border-left: 1px solid gray; border-right: 1px solid gray;padding: 1em; Max-width: 36em ;} #footer {clear: both; margin: 0; padding: .5em; color: #333; background-color: #feedea; border-top: 1px solid gray ;} #leftnav p {margin: 0 0 1em 0 ;} #content h2 {margin: 0 0 .5em 0 ;} #navlist {color: white;background: #17a;border-bottom: 0.2em solid #17a;border-right: 0.2em solid #17a;padding: 0 1px; Margin-left: 0; width: 12em; font: normal 0.8em Verdana, sans-serif;} #navlist a {display: block; text-decoration: none; Margin-bottom: 0.5em; margin-top: 0.5em; color: white; background: #39c; border-width: 1px; border-style: solid; border-color: #5bd #035 #068 #6cf; border-left: 1em solid #fc0; padding: 0.25em 0.5em 0.4em 0.75em; } #navlist a:hover, #navlist a#current:hover{ background: #28b;border-color: #069 #6cf #5bd #fc0;padding: 0.4em 0.35em 0.25em 0.9em; } #container1 {position:relative; width:425px; height:430px; background:#efedec url(back1.gif); border:1px solid #000; margin:0 auto;} a.gallery span {display:block; position:absolute; width:1px; height:1px; top:5px; left:5px; overflow:hidden; background:#efedec url(back1.gif);} a.gallery, a.gallery:visited {display:block; color:#000; text-decoration:none; border:1px solid #000; width:75px; height:47px; float:left; margin:3px; } .slidek {display:block; position:absolute; width:400px; height:250px; top:125px; left:10px; padding:0; border:1px solid #000;} a.gallery:hover {white-space:normal; border:1px solid #fff;} a.gallery:hover span {display:block; position:absolute; width:402px; height:300px; top:120px; left:5px; padding:5px; font-style:italic; color:#000; background:#efedec url(back1.gif);} HTML Code <div id="container"> <div id="top"><h1>Bronsted-lowry acid and base</h1> </div><div id="leftnav"> <div id="navcontainer"> <ul id="navlist"> <li id="active"><a href=>B/L Overview.1.</a></li> <li><a href=>A/B Ionization Tutotials</a></li> <li><a href=>B/L Key Equations</a></li> <li><a href=>B/L Quiz</a></li> <li><a href=>B/L Question.2.</a></li> </ul></div></div> <div id="content"> <h3>What Are The Conjugate Acids for The Following Bases</h3> <div id="container1"><img class="slidek" src="pic7.jpg" /> <a class="gallery slidea" >Box #1<span> Detailed explanation for box #1</span></a> <a class="gallery slideb" >Box #2<span> Detailed explanation for box #2</span></a> <a class="gallery slidec" >Box #3<span> Detailed explanation for box #3</span></a> <a class="gallery slided" >Box #4<span> Detailed explanation for box #4</span></a> <a class="gallery slidee" >Box #5<span> Detailed explanation for box #5 </span></a> <a class="gallery slidef" >Box #6<span> Detailed explanation for box #6 </span></a> <a class="gallery slideg" >Box #7<span> Detailed explanation for box #7 </span></a> <a class="gallery slideh" >BOX #8<span> Detailed explanation for box #8</span></a> <a class="gallery slidei" >Box #9<span>Detailed explanation for box #9 </span></a> <a class="gallery slidej" > Box #10<span>Detailed explanation for box #10 </span></a> </div></div><div id="footer"><h2>footer</h2></div></div>

116
4.4 Styling the h2 Tag
The text (“To Solve for the Conjugate Acid of The Base”) associated with the h2
tag can be centered and aligned (see Figure 4.25) using the following CSS command,
“text-align-center”. A normal text font with font size1.2 em and 0.2 em spacing between
the letters was applied using the CSS code shown in Table 4.24.
Figure 4.25. Application of the h2 tag to the web page

117
Table 4.24. CSS Code for Styling the h2 Tag CSS CODE #container { width: 90%;margin: 10px auto;background-color: #feedea; color: #333; border: 1px solid #e4ecfc; line-height: 130%; }
#top { padding: 4.8em; background-color: #feedea; color: #6E0023; border-bottom: 1px solid gray;} #top h1 { padding: 0; margin: 0;} #leftnav{ float: left;width: 165px;;margin: 0; padding: 1em; } #content { color:#6E0023; margin-left: 190px; border-left: 1px solid gray; border-right: 1px solid gray; padding: 1em;max-width: 36em;} #footer{clear: both;margin: 0;padding: .5em;color: #333; background-color: #feedea; border-top: 1px solid gray;} #leftnav p { margin: 0 0 1em 0; } #content h2 { margin: 0 0 .5em 0; } #navlist{color: white;background: #17a; border-bottom: 0.2em solid #17a; border-right: 0.2em solid #17a; padding: 0 1px; margin-left: 0; width: 12em; font: normal 0.8em Verdana, sans-serif;} #navlist a { display: block; text-decoration: none; margin-bottom: 0.5em; margin-top: 0.5em;color: white; background: #39c; border-width: 1px; border-style: solid; border-color: #5bd #035 #068 #6cf; border-left: 1em solid #fc0; padding: 0.25em 0.5em 0.4em 0.75em;} #navlist a:hover, #navlist a#current:hover { background: #28b; border-color: #069 #6cf #5bd #fc0; padding: 0.4em 0.35em 0.25em 0.9em;} #container1 {position:relative; width:425px; height:430px; background:#efedec url(back1.gif); border:1px solid #000; margin:0 auto;} a.gallery span {display:block; position:absolute; width:1px; height:1px; top:5px; left:5px; overflow:hidden; background:#efedec url(back1.gif);z-index:100;} a.gallery, a.gallery:visited {display:block; color:#000; text-decoration:none; border:1px solid #000; width:75px; height:47px; float:left; margin:3px; z-index:50;} .slidek {display:block; position:absolute; width:400px; height:250px; top:125px; left:10px; padding:0; border:1px solid #000;} a.gallery:hover {white-space:normal; border:1px solid #fff;} a.gallery:hover span {display:block; position:absolute; width:402px; height:300px; top:120px; left:5px; padding:5px; font-style:italic; color:#000; background:#efedec url(back1.gif); z-index:100;} h2 {text-align:center; font-weight:normal; font-family: georgia, "times new roman", serif; font-size:1.2em; letter-spacing:0.2em; margin:0 0 10px 0; padding-top:5px;} HTML Code <div id="container"> <div id="top"> <h1>Bronsted-lowry acid and base</h1> </div> <div id="leftnav"> <div id="navcontainer"><ul id="navlist"> <li id="active"><a href=>B/L Overview.1.</a></li> <li><a href=>A/B Ionization Tutotials</a></li> <li><a href=>B/L Key Equations</a></li> <li><a href=>B/L Quiz</a></li> <li><a href=>B/L Question.2.</a></li></ul> </div></div> <div id="content"> <h3>What Are The Conjugate Acids for The Following Bases</h3> <div id="container1"><img class="slidek" src="pic7.jpg" /> <a class="gallery slidea" >Box #1<span> Detailed explanation for box #1</span></a> <a class="gallery slideb" >Box #2<span> Detailed explanation for box #2</span></a> <a class="gallery slidec" >Box #3<span> Detailed explanation for box #3</span></a> <a class="gallery slided" >Box #4<span> Detailed explanation for box #4</span></a> <a class="gallery slidee" >Box #5<span> Detailed explanation for box #5 </span></a> <a class="gallery slidef" >Box #6<span> Detailed explanation for box #6 </span></a> <a class="gallery slideg" >Box #7<span> Detailed explanation for box #7 </span></a> <a class="gallery slideh" >BOX #8<span> Detailed explanation for box #8</span></a> <a class="gallery slidei" >Box #9<span>Detailed explanation for box #9 </span></a> <a class="gallery slidej" > Box #10<span>Detailed explanation for box #10 </span></a> </div> <h2>To Solve For The Conjugate Acid of The Base</h2></div> <div id="footer"> </div></div>
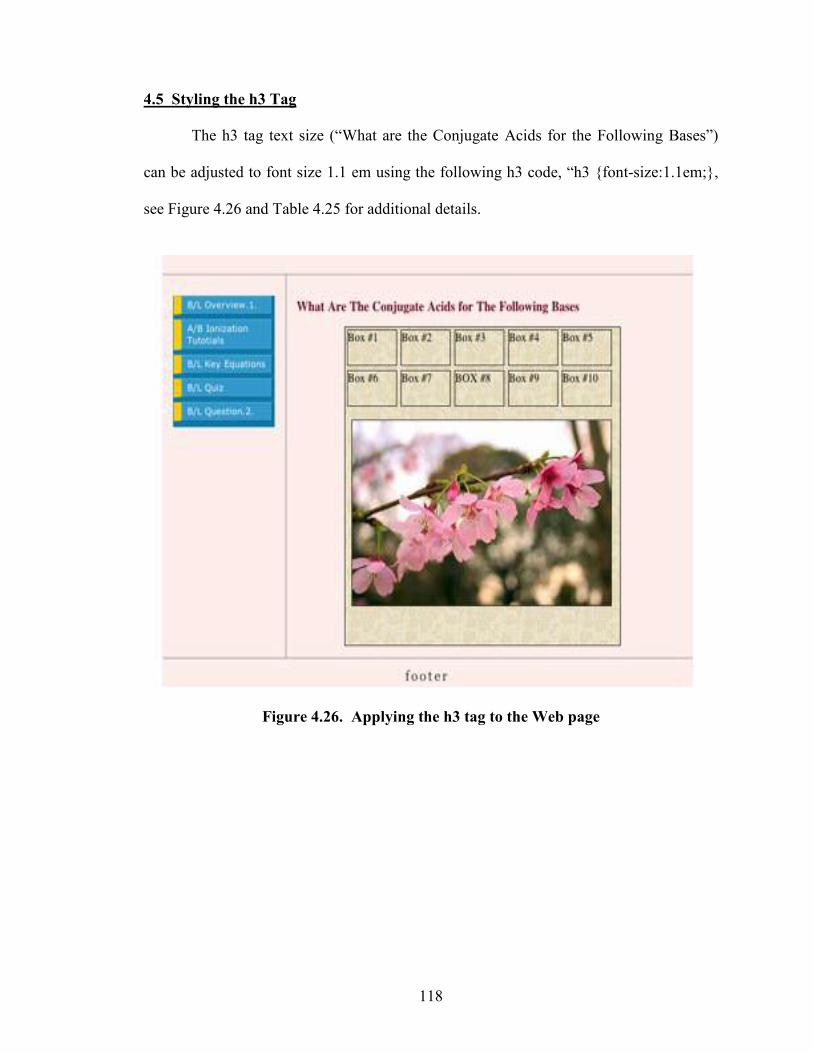
118
4.5 Styling the h3 Tag
The h3 tag text size (“What are the Conjugate Acids for the Following Bases”)
can be adjusted to font size 1.1 em using the following h3 code, “h3 {font-size:1.1em;},
see Figure 4.26 and Table 4.25 for additional details.
Figure 4.26. Applying the h3 tag to the Web page

119
Table 4.25. CSS code for styling the h3 Tag CSS CODE #container { width: 90%; margin: 10px auto;background-color: #feedea; color: #333;border: 1px solid #e4ecfc; line-height: 130%; } #top { padding: 4.8em; background-color: #feedea; color: #6E0023; border-bottom: 1px solid gray; } #top h1 { padding: 0; margin: 0;} #leftnav {float: left; width: 165px;;margin: 0; padding: 1em; } #content { color:#6E0023; margin-left: 190px; border-left: 1px solid gray; border-right: 1px solid gray; padding: 1em;max-width: 36em;} #footer { clear: both;margin: 0;padding: .5em;color: #333; background-color: #feedea; border-top: 1px solid gray;} #leftnav p { margin: 0 0 1em 0; } #content h2 { margin: 0 0 .5em 0; } #navlist {color: white;background: #17a;border-bottom: 0.2em solid #17a; border-right: 0.2em solid #17a; padding: 0 1px; margin-left: 0;width: 12em; font: normal 0.8em Verdana, sans-serif;} #navlist li {list-style: none;margin: 0;font-size: 1em;} #navlist a {display: block;text-decoration: none;margin-bottom: 0.5em;margin-top: 0.5em;color: white;background: #39c; border-width: 1px; border-style: solid;border-color: #5bd #035 #068 #6cf; border-left: 1em solid #fc0; padding: 0.25em 0.5em 0.4em 0.75em;} #navlist a#current { border-color: #5bd #035 #068 #f30; } #navlist a:hover, #navlist a#current:hover{ background: #28b; border-color: #069 #6cf #5bd #fc0;padding: 0.4em 0.35em 0.25em 0.9em; } #container1 {position:relative; width:425px; height:430px; background:#efedec url(back1.gif); border:1px solid #000; margin:0 auto;} a.gallery span {display:block; position:absolute; width:1px; height:1px; top:5px; left:5px; overflow:hidden; background:#efedec url(back1.gif);} a.gallery, a.gallery:visited {display:block; color:#000; text-decoration:none; border:1px solid #000; width:75px; height:47px; float:left; margin:3px; } .slidek {display:block; position:absolute; width:400px; height:250px; top:125px; left:10px; padding:0; border:1px solid #000;} a.gallery:hover {white-space:normal; border:1px solid #fff;} a.gallery:hover span {display:block; position:absolute; width:402px; height:300px; top:120px; left:5px; padding:5px; font-style:italic; color:#000; background:#efedec url(back1.gif); } h2 {text-align:center; font-weight:normal; font-family: georgia, "times new roman", serif; font-size:1.2em; letter-spacing:0.2em; margin:0 0 10px 0; padding-top:5px;} h3 {font-size:1.1em;} HTML Code <div id="container"> <div id="top"> <h1>Bronsted-lowry acid and base</h1></div><div id="leftnav"> <div id="navcontainer"> <ul id="navlist"> <li id="active"><a href=>B/L Overview.1.</a></li> <li><a href=>A/B Ionization Tutotials</a></li> <li><a href=>B/L Key Equations</a></li> <li><a href=>B/L Quiz</a></li> <li><a href=>B/L Question.2.</a></li></ul></div></div><div id="content"> <h3>What Are The Conjugate Acids for The Following Bases</h3> <div id="container1"><img class="slidek" src="pic7.jpg" /> <a class="gallery slidea" >Box #1<span> Detailed explanation for box #1</span></a> <a class="gallery slideb">Box #2<span> Detailed explanation for box #2</span></a> <a class="gallery slidec">Box #3<span> Detailed explanation for box #3</span></a> <a class="gallery slided">Box #4<span> Detailed explanation for box #4</span></a> <a class="gallery slidee">Box #5<span> Detailed explanation for box #5</span></a> <a class="gallery slidef">Box #6<span> Detailed explanation for box #6</span></a> <a class="gallery slideg">Box #7<span> Detailed explanation for box #7</span></a> <a class="gallery slideh">BOX #8<span> Detailed explanation for box #8</span></a> <a class="gallery slidei">Box #9<span>Detailed explanation for box #9</span></a> <a class="gallery slidej"> Box #10<span>Detailed explanation for box #10</span></a> </div> <h2>To Solve For The Conjugate Acid of The Base</h2></div> <div id="footer"> </div></div>

120
4.6 Two Column Chemistry Web Page
The image of the two column web page after inserting the chemistry question,
“what are the conjugate acids for the following bases,” is shown in Figure 4.27. The
formula for each base is given in one of the ten smaller boxes, and the answer to each
question is given in one of the ten larger boxes. The larger boxes are behind the flower
image. Figure 4.28 shows how the page looks after the mouse is moved over the H2SO4
box. The CSS and HTML code used to develop this web page is shown in Table 4.26.
Figure 4.27. Two column web page for acid base chemistry tutorial

121
Figure 4.28. The web page after the mouse is over the H2SO4 box

122
Table 4.26. HTML and CSS Code for the Two Column Chemistry Web Page CSS CODE #container { width: 90%; margin: 10px auto;background-color: #feedea; color: #333;border: 1px solid #e4ecfc; line-height: 130%; } #top { padding: 4.8em; background-color: #feedea; color: #6E0023; border-bottom: 1px solid gray; } #top h1 { padding: 0; margin: 0;} #leftnav {float: left; width: 165px;;margin: 0; padding: 1em; } #content { color:#6E0023; margin-left: 190px; border-left: 1px solid gray; border-right: 1px solid gray; padding: 1em;max-width: 36em;} #footer { clear: both;margin: 0;padding: .5em;color: #333; background-color: #feedea; border-top: 1px solid gray;} #leftnav p { margin: 0 0 1em 0; } #content h2 { margin: 0 0 .5em 0; } #navlist {color: white;background: #17a;border-bottom: 0.2em solid #17a; border-right: 0.2em solid #17a;padding: 0 1px; margin-left: 0;width: 12em; font: normal 0.8em Verdana, sans-serif;} #navlist li {list-style: none;margin: 0;font-size: 1em;} #navlist a {display: block;text-decoration: none;margin-bottom: 0.5em;margin-top: 0.5em;color: white;background: #39c; border-width: 1px; border-style: solid;border-color: #5bd #035 #068 #6cf; border-left: 1em solid #fc0; padding: 0.25em 0.5em 0.4em 0.75em;} #navlist a#current { border-color: #5bd #035 #068 #f30; } #navlist a:hover, #navlist a#current:hover{ background: #28b; border-color: #069 #6cf #5bd #fc0;padding: 0.4em 0.35em 0.25em 0.9em; } #container1 {position:relative; width:425px; height:430px; background:#efedec url(back1.gif); border:1px solid #000; margin:0 auto;} a.gallery span {display:block; position:absolute; width:1px; height:1px; top:5px; left:5px; overflow:hidden; background:#efedec url(back1.gif);} a.gallery, a.gallery:visited {display:block; color:#000; text-decoration:none; border:1px solid #000; width:75px; height:47px; float:left; margin:3px; } .slidek {display:block; position:absolute; width:400px; height:250px; top:125px; left:10px; padding:0; border:1px solid #000;} a.gallery:hover {white-space:normal; border:1px solid #fff;} a.gallery:hover span {display:block; position:absolute; width:402px; height:300px; top:120px; left:5px; padding:5px; font-style:italic; color:#000; background:#efedec url(back1.gif); } h2 {text-align:center; font-weight:normal; font-family: georgia, "times new roman", serif; font-size:1.2em; letter-spacing:0.2em; margin:0 0 10px 0; padding-top:5px;} h3 {font-size:1.1em;} HTML code <body> <div id="container"> <div id="top"> <h1>Bronsted-lowry acid and base</h1> </div> <div id="leftnav"> <p> <div id="navcontainer"> <ul id="navlist"> <li id="active"><a href="overview2.html" id="current">B/L Overview.1.</a></li> <li><ahref=" ">A/B Ionization Tutotials</a></li> <li><a href="e1.html">B/L Key Equations</a></li> <li><a href=" ">B/L Quiz</a></li> <li><a href="ema*.html">B/L Question.2.</a></li></ul></div></p></div> <div id="content"> <h3>What Are The Conjugate Acids for The Following Bases</h3> <div id="container1"><img class="slidek" src="pic7.jpg" /> <a class="gallery slidea" href="#nogo">CH<SUB>3</SUB>NH<SUB>2</SUB></strong><span>CH<SUB>3</SUB>NH<SUB>3</SUB><sup>+</sup> <p>to determine the conjugate acid one must take the formula of the base,<strong>CH<SUB>3</SUB>NH<SUB>2</SUB></strong>, and add a proton (H<sup>+</sup>) to this formula</P> <p>base formula (<strong>CH<SUB>3</SUB>NH<SUB>2</SUB></strong>) + one proton(H<sup>+</sup>) = CH<SUB>3</SUB>NH<SUB>3</SUB><sup>+</sup></p> <p>The conjugate acid has one more H<sup>+</sup> than its base.</p> </span></a> <a class="gallery slideb" href="#nogo">HPO<SUB>4</SUB><SUP>2-</SUP></strong><span>HPO<sub>4</sub><sup>2-</sup> <p>to determine the conjugate base one must take the formula of the acid, H<sub>2</sub>PO<sub>4</sub><sup>-</sup>, and subtract a proton (H<sup>+</sup>) from this formula</P> <p>acid formula ( H<sub>2</sub>PO<sub>4</sub><sup>-</sup>) - one proton(H<sup>+</sup>) = HPO<sub>4</sub><sup>2-</sup></p> <p>The conjugate acid has one more H<sup>+</sup> than its base.</p> </span></a> <a class="gallery slidec" href="#nogo">NO<SUB>3</SUB><SUP>-</SUP><span>HNO<SUB>3</SUB><br /> <p>to determine the conjugate acid one must take the formula of the base,<strong>NO<SUB>3</SUB><SUP>-</SUP></strong>, and add a proton (H<sup>+</sup>) to this formula</p> <p>base formula (<strong>NO<SUB>3</SUB><SUP>-</SUP></strong>) + one proton(H<sup>+</sup>) =

123
HNO<SUB>3</SUB></p> <p>The conjugate acid has one more H<sup>+</sup> than its base.</p> </span></a> <a class="gallery slided" href="#nogo">O<SUP>2-</SUP><span> OH<SUP>-</SUP><br /> <p>to determine the conjugate acid one must take the formula of the base,<strong>O<SUP>2-</SUP></strong> , and add a proton (H<sup>+</sup>) to this formula</p> <p>base formula (<strong>O<SUP>2-</SUP></strong> ) + one proton(H<sup>+</sup>) = OH<SUP>-</SUP></p> <p>The conjugate acid has one more H<sup>+</sup> than its base.</p> </span></a> <a class="gallery slidee" >HCN<span>H<sub>2</sub>CN<sup>+</sup><br /> <p>to determine the conjugate acid one must take the formula of the base,<strong>HCN</strong>, and add a proton (H<sup>+</sup>) to this formula</p> <p>base formula (<strong>HCN</strong>) + one proton(H<sup>+</sup>) = <strong>H<sub>2</sub>CN<sup>+</sup></strong></p> <p>The conjugate base has one less H<sup>+</sup> than its acid.</p> </span></a> <a class="gallery slidef" >HNO<SUB>3</SUB><span>NO<SUB>3</SUB><SUP>-</SUP> <p>to determine the conjugate base one must take the formula of the acid, <strong>HNO<SUB>3</SUB></strong>, and subtract a proton (H<sup>+</sup>) from this formula</p> <p>acid formula ( <strong>HNO<SUB>3</SUB></strong>) - one proton(H<sup>+</sup>) = <strong>NO<SUB>3</SUB><SUP>-</SUP></strong></p> <p>The conjugate acid has one more H<sup>+</sup> than its base.</p> </span></a> <a class="gallery slideg"><strong>H<SUB>2</SUB>O </strong><span>H<SUB>3</SUB>O<sup>+</sup> <br /> <p>to determine the conjugate acid one must take the formula of the base,<strong>H<SUB>2</SUB>O</strong>, and add a proton (H<sup>+</sup>) to this formula</p> <p>base formula (<strong>H<SUB>2</SUB>O</strong>) + one proton(H<sup>+</sup>) = H<SUB>3</SUB>O<sup>+</sup> </p> <p>The conjugate acid has one more H<sup>+</sup> than its base.</p> </span></a> <a class="gallery slideh">CN<sup>-</sup><span>HCN<br /> <p>to determine the conjugate acid one must take the formula of the base,CN<sup>-</sup>, and add a proton (H<sup>+</sup>) to this formula</P> <p>base formula (CN<sup>-</sup>) + one proton(H<sup>+</sup>) = HCN</p> <p>The conjugate acid has one more H<sup>+</sup> than its base.</p> </span></a> <a class="gallery slidei" >H<sub>2</sub>PO<sub>4</sub><sup>-</sup><span>H<sub>3</sub>PO<sub>4</sub><br /> <p> </p> <p>to determine the conjugate acid one must take the formula of the base,<strong>H<sub>2</sub>PO<sub>4</sub><sup>-</sup></strong>, and add a proton (H<sup>+</sup>) to this formula</p> <p>base formula (<strong>H<sub>2</sub>PO<sub>4</sub><sup>-</sup></strong>) + one proton(H<sup>+</sup>) = H<sub>3</sub>PO<sub>4</sub></p> <p>The conjugate acid has one more H<sup>+</sup> than its base.</p> </span></a> <a class="gallery slidej" > H<SUB>2</SUB>SO<SUB>4</SUB><span>HSO<SUB>4</SUB><sup>-</sup><br /> <p>to determine the conjugate base one must take the formula of the acid, <strong>H<SUB>2</SUB>SO<SUB>4</SUB></strong>, and subtract a proton (H<sup>+</sup>) from this formula</p> <p>acid formula ( <strong>H<SUB>2</SUB>SO<SUB>4</SUB></strong>) - one proton(H<sup>+</sup>) = <strong>HSO<SUB>4</SUB><sup>-</sup></strong></p> <p>The conjugate base has one less H<sup>+</sup> than its acid.</p> </span></a> </div> <div class="col2"> <h2>To Solve For The Conjugate Acid of The Base</h2> <div class="col4"> <center><p>one must take the formula of the Base, and add a proton (H<sup>+</sup>) to this formula</P> <p>Base formula + one proton(H<sup>+</sup>) = The Conjugate Acid Of The Base</p> <p>The conjugate Acid has one more H<sup>+</sup> than its Base.</p></center></div> <div id="footer"></div> </div></div></div></body></html>

124
4.7 Application of Web Page for Questions about the Bronsted Lowry Theory
This web page was designed to demonstrate how to solve for the conjugate base
of a Bronsted-Lowry acid, or the conjugate acid of a Bronsted-Lowry base if a student is
given the formula for the corresponding acid or base. The page has solved problems,
which explain the topic in great detail. Inside a table, there are answers to the questions
raised by the web page. There are also equations which can help the study to simplify the
way that he or she solves the problem. It is anticipated that this page will be linked to the
acid-base chemistry web site in the near future as another way to teach students the
machinations of the Bronsted-Lowry theory of acids and bases. Although there is no data
about how students will respond to this web page, there are reasons to believe that it will
be successful in helping students to understand the Bronsted-Lowry concept of acids and
bases. The anticipated success of this web page is predicated on a basic consideration
understanding is garnered through application of knowledge to real world problems.

125
CHAPTER V
CONCLUSION
5.0 Overview of Website
Web pages on acid base chemistry have been created to test the effectiveness of
simulations on student understanding and learning. The seven web pages in question are:
(1) “A/B Characteristics & Theory - Arrhenius”, (2) “Arrhenius Theory Limitations”, (3)
“Bronsted-Lowry Acid/Base Theory I”, (4) “Bronsted-Lowry Acid/Base Theory II”, (5)
“Lewis Acid/Base Theory”, (6) “Acid/Base Strength I”, and (7) “Acid/Base Strength II”.
These pages contain activities that include video tapped experiments, which were created
to test the students understanding of the differences between acids and bases. The
simulations include “Litmus Paper Experiments”, “Bromothymol Blue Experiments”,
“Phenolphthalein Experiments”, “Magnesium Metal Experiments”, “Calcium Carbonate
Experiments”, and “Magnesium Nitrate Experiments”.
Each web page includes Chem-3D and Chem-Draw Graphics, which were created
to improve a students’ visual understanding of the chemical reaction. The web site also
has quizzes, designed to test the student understanding of the topic. The web site also
contains the pre classroom and post classroom activity, which were created to give
students an introduction to the acid-base topic before they attend the classroom lecture.

126
These activities can be used also after the lecture to enhance the student’s understanding
of the topic.
The web site contains linked experiments that allow the students to do titrations
online, using different acids and bases at varying concentrations, and also using different
indicators. The web site also includes questions for each topic. These questions have
been designed to test the student’s understanding of the topic.
5.1 Development of Website
The body of each web page was created with HTML, and linked to CSS files,
which were externally inserted into the HTML code. These CSS files were used to style
and design each HTML page using several CSS properties including background, text,
font, border, margin, padding, list, positioning, dimension, classification, pseudo-class,
and pseudo-elements properties. Constructing the website using CSS was discussed in
great detail in Chapter II, and Chapter IV.
Graphics in the pages were created on a Pentium IV personal computer using
Chem 3D and Chem Draw Microsoft. The files were saved using the “gif” extension and
exported to a Macintosh computer. The images were then inserted into each web page
using the HTML code, “<img src=”url”>. The CSS Code controlled the width and height
of each image.
The Java script language was used to write the quizzes. Using this language, the
number of questions, the manner in which the questions are presented, the instantaneous
feedback response, the quiz summary of results, and the number of correct and false
answers by the student can be obtained.

127
Each pre-classroom activity is accessed through a PDF file. When the PDF file is
opened, a link to a new page appears. On this new page the student is allowed to mix the
chemicals, and perform the experiment while working on the questions associated with
the activity (PDF file).
Each topic question was created using PHP, which allows the student to read the
question, and insert an answer using a space provided by the code. At the end of the
page, the student after submitting the answers can get feedback to his or her response.
5.2 Assessment of Website
The web site was created to enhance student understanding of acid base chemistry
using animated web pages, which were provided by the computer generated graphics,
quick time movies, linked experiments, linked tutorials, pre-classroom activities, quizzes
and review questions. These pages will not only serve as explanatory pages with visual
animations and graphics, but will also act as evaluation pages to gauge the student’s
understanding through quizzes, questions, and activities. The approach used here,
animated teaching, appears to be effective for explaining various topics on acid base
chemistry that will enhance and improve a student’s understanding of this subject matter.
CHEM 1515 students tested the pre-classroom activity, as discussed in Chapter 3. The
results of the evaluation based on the performance of the students were favorable. The
web site was able to explain the material to the students, which enhanced their ability to
use chemical reasoning when answering the question posed by the activity and question
pages.

128
REFERENCES
1. Kelli Cargile Cook and Kieth Grant-Davie. 2005. Online Education, Global Questions, Local Answer, Baywood Pub, Amityville, N.Y.
2. Diana G. Oblinger and James L. Oblinger. 2005. Educating the Net Generation,
EDUCAUSE, Boulder, CO
3. Les Lloyd. 2000. Teaching with Technology: Rethinking Tradition. Information Today, Medford, N.J.
4. Paul Charlesworth and Chelley Vician. 2006. Students' Perspectives of the Influence of Web-Enhanced Coursework on Incidences of Cheating. J. Chem. Educ. 83, 1368.
5. Carole A. Barone, and Paul R. Hanger, 2001, Technology Enhanced Teaching and Learning, Jossey-Bass San Francisco, CA.
6. Paul S. Goodman, 2001. Technology Enhanced Learning, Opportunities for
Change, L. Erlbaum, Mahwah, N.J.
7. Margaret E. Chisholm, and Donald P. Ely, 1976. Media Personnel in Education, Acompetency Approach, Prentice-Hall, Englewood Cliffs, N.J.
8. http://www.wisegeek.com/what-is-the-history-of-the-chalkboard.htm
9. http://en.wikipedia.org/wiki/Overhead_projector#History
10. Derick Unwin. 1969. Media and Methods Instructional Technology in Higher Education, McGraw-Hill, New York.
11. Myles I. Friedman, Diane H. Harwell, and Katherine C. Schnepel. 2006. Effective Instruction: A Handbook of Evidence-Based Strategies, The Institute for Evidence-Based Decision-Making in Education, Columbia, S.C.
12. Larry Cuban. 1986. Teachers and Machines, The Classroom Use of Technology Since 1920, Teachers College Press, New York.

129
13. Robert de Levie 2004 Advanced Excel, Oxford University Press, New York, New York.
14. David T Graham, Jane McNeil, Lioyd Pettiford, 2000.Untangled Web:
Developing Teaching on the Internet, Prentice Hall, New York, New York 15. J. Victor Baldridge, Janine Woodward Roberts, and Terri A Weiner, 1984. The
Campus and the Microcomputer Revolution. Practical Advice for Nontechnical Decision Makers, American Council on Education/, Macmillan, New York
16. Richard C. Forcier, Don E. Descy, 2002. The Computer as an Educational Tool-
Productivity and Problem Solving, Merrill/Prentice Hall, Upper Saddle River, N.J.
17. Rafa Kouki and David Wright.1999. Telelearning via the Internet. Idea Group
Pub., Hershey, PA.
18. Stephen Fallows and Rakesh Bhanot, 2002, Educational Development Through Information and Communications Technology, Sterling, VA: Stylus Pub, Kogan Page, London.
19. Noah Kravitz. 2004. Teaching and Learning with Technology: Learning Where
to Look, ScarecrowEducation, Lanham, Md.
20. Lawrence P. Grayson and Joseph M. Bredenbach (Editors) 1975. Teaching Aids in the College Classroom, American Society for Engineering Education, Washington DC.
21. Hossein Arsham. 2002. Impact of the Internet on Learning and Teaching, Education at a Distance, March, 16(3).
22. Robert J. Merrer. 1985. Information Management System in the Undergraduate Instrumental Analysis Laboratory, J. Chem. Educ., 62, A173.
23. Geraldine L. Kueger and Dorice DesChene. 1980, Introducing On-Line Information Retrieval Systems To the Undergraduate and Graduate Student In Chemistry, J. Chem. Educ. 57, 457.
24. Paul Charlesworth, and Chelley Vician, 2003,Leveraging Teaching for Chemical Science Education: An Early Assessment Of WebCt Usage In First Year Chemistry Courses, J. Chem. Educ., 80, 1333
25. Nick, Sabine. 2006, CHEMnet: Analysis of the Use of Special Features and Multimedia Elements of an Online Chemistry Course, J. Chem. Educ., 83, 1099.

130
26. David G. Brown. 2000, Teaching With Technology: Seventy-FivePprofessors From Eight Universities Tell Their Stories, Bolton, Mass. : Anker Pub. Co.
27. Marc Loudon and Mark Sharp, 2006 Online Class Review – Using Streaming-Media Technology, Journal of College Science Teaching, 36(3), 39-43.
28. Barbara Draude and Sylvia Brace , 1998, Assessing the Impact of Technology on Teaching and Learning: Student Perspectives.
29. Burke, K. A.; Greenbowe, Thomas J.; Windschitl, Mark A, 1998, Developing and
Using Conceptual Computer Animations for Chemistry Instruction, J. Chem. Educ. 75, 1658.
30. Sanger, M. J.; Greenbowe, T. J, 1997, Common Student Misconceptions in
Electrochemistry: Galvanic, Electrolytic, and Concentration Cells, J. Chem. Educ. 34, 377–398.
31. Sanger, M. J.; Greenbowe, T. J, 1997, Students’ Misconceptions in
Electrochemistry: Current Flow In Electrolyte Solutions and The Salt Bridge. , J. Chem. Educ. 74, 819–823.
32. Owen Briggs, Steven Champeon, Eric Costello, and Matt Patterson.2004.Cascading Style Sheets, Separating Content from Presentation, Springer-Verlag New York, NY.
33. Eric A. Meyer, 2004.Cascading Style Sheets, The Definitive Guide, O’Reilly; Cambridge.
34. Jon Duckett, 2004. Beginning Web Programming with HTML, X-HTML and CSS, Wiley Publishing, IN..
35. http://w3schools.com/css/css_syntax.asp
36. http://w3schools.com/css/css_howto.asp
37. http://w3schools.com/css/pr_background-position.asp
38. http://w3schools.com/css/pr_background-repeat.asp
39. http://www.w3schools.com/css/pr_text_color.asp
40. http://w3schools.com/css/css_background.asp
41. http://w3schools.com/css/pr_background.asp
42. http://w3schools.com/css/pr_background-color.asp

131
43. http://w3schools.com/css/pr_background-image.asp
44. http://css.maxdesign.com.au/floatutorial/tutorial0804.htm
45. http://css.maxdesign.com.au/floatutorial/tutorial0805.htm
46. http://www.w3schools.com/css/css_padding.asp
47. http://css.maxdesign.com.au/floatutorial/tutorial0806.htm
48. http://css.maxdesign.com.au/floatutorial/tutorial0807.htm
49. http://css.maxdesign.com.au/floatutorial/tutorial0808.htm 50. http://css.maxdesign.com.au/floatutorial/tutorial0809.htm 51. http://css.maxdesign.com.au/floatutorial/tutorial0810.htm 52. http://css.maxdesign.com.au/floatutorial/tutorial0811.htm 53. http://css.maxdesign.com.au/floatutorial/tutorial0812.htm
54. http://css.maxdesign.com.au/floatutorial/tutorial0813.htm
55. http://css.maxdesign.com.au/floatutorial/tutorial0814.htm
56. http://css.maxdesign.com.au/floatutorial/tutorial0815.htm
57. http://www.w3schools.com/css/pr_list-style-type.asp
58. http://www.w3schools.com/css/pr_pos_left.asp
59. http://css.maxdesign.com.au/listamatic/vertical15.htm
60. http://www.w3schools.com/css/pr_class_display.asp
61. http://www.cssplay.co.uk/menu/gallery.html
62. http://www.w3schools.com/css/pr_pos_top.asp
63. http://www.w3schools.com/css/pr_class_display.asp
64. http://www.w3schools.com/css/pr_class_position.asp
65. http://www.w3schools.com/css/pr_background-image.asp

132
66. http://www.w3schools.com/css/pr_class_clear.asp
67. http://www.w3schools.com/css/css_border.asp
68. http://www.w3schools.com/css/pr_background-repeat.asp
69. http://www.w3schools.com/tags/tag_hn.asp
70. http://css.maxdesign.com.au/floatutorial/tutorial0801.htm
71. http://www.w3schools.com/css/css_margin.asp
72. http://css.maxdesign.com.au/floatutorial/tutorial0802.htm
73. http://css.maxdesign.com.au/floatutorial/tutorial0803.htm
74. http://www.w3schools.com/css/pr_class_float.asp
75. http://www.w3schools.com/css/pr_font_weight.asp
76. http://www.w3schools.com/css/pr_margin-top.asp
77. http://www.w3schools.com/css/css_units.asp
78. http://www.w3schools.com/css/pr_padding-top.asp
79. http://www.w3schools.com/css/pr_padding-right.asp
80. http://www.w3schools.com/css/pr_padding-bottom.asp
81. http://www.w3schools.com/css/pr_padding-left.asp
82. http://www.w3schools.com/css/pr_text_text-decoration.asp
83. http://www.w3schools.com/css/css_pseudo_classes.asp
84. http://www.wwnorton.com
85. http://www.cssplay.co.uk/

133
APPENDICES
Appendix A
Detailed Listing of Multimedia Used
Videotaped experiments, which had feedback for students responses were used on this website. These experiments were first video tapped using a digital camera, then downloaded on a computer using the program “Movie Maker.” They were then exported into “Quick Time Movie,” and incoported into the website via the PHP Page. The following table lists the description of the content of these Quick Time Movies, and their characterizations as either Quick Time Movies or Answer Text Box.The address for the litmus paper experiment is“http://genchem.chem.okstate.edu/emanweb/litmusPLE3.php.” This experiment describes how to differentiate an acid from a base using litmus paper. Characterization Description 1. Quick time movie “NaOHLitmus1.mov”
Is quick time movies which by double clicking on the image, the tapped video will automatically plays to describe the color change of a red litmus paper to Blue when exposed to a Base. That describes the effect of A Base on the color change of litmus paper.
Answer Text Box Is an empty text box used to allow the students to enter
their observations, which will then have a feedback after the student submit his answer.
2. Quick time movie “HCllitmus1.mov”
Is a quick time movie which by double clicking on the image, the tapped video will automatically plays to describe the color change of a blue litmus paper to Red when exposed to an acid. That describes the effect of An Acid on the color change of litmus paper.

134
3. Quick time movie “H2so4litmus1.mov”
Is a quick time movie which by double clicking on the image, the tapped video will automatically plays to describe the color change of a blue litmus paper to Red when exposed to an acid. That describes the effect of An Acid on the color change of litmus paper.
4. Quick time movie “HNO3Litmus1.mov”
Is a quick time movie which by double clicking on the image, the tapped video will automatically plays to describe the color change of a blue litmus paper to Red when exposed to an acid. That describes the effect of An Acid on the color change of litmus paper.
5. Quick Time movie “Ca(OH)2litmus1.mov”
Is quick time movies which by double clicking on the image, the tapped video will automatically plays to describe the color change of a red litmus paper to Blue when exposed to a Base. That describes the effect of A Base on the color change of litmus paper.
6. Quick time movie "KOHLitmus1.mov"
Is quick time movies which by double clicking on the image, the tapped video will automatically plays to describe the color change of a red litmus paper to Blue when exposed to a Base. That describes the effect of A Base on the color change of litmus paper.
7. Quick time movie“H2OLITMUS1.mov”
Is a quick time movie that shows that water has no effect on the color change of a litmus paper.

135
“http://genchem.chem.okstate.edu/emanweb/BTBPLE3.php” is the address for Bromothymol Blue Experiment. This experiment describes how to differentiate an acid from a base using Bromothymol blue indicator. Characterization Description 1. Quick time movie "NaOHBTB1.mov"
Is quick time movies which by double clicking on the image, the tapped video will automatically plays to describe the color change of a green bromothymol blue to Blue when exposed to a Base. That describes the effect of A Base on the color change of Bromothymol blue.
2. Quick time movie "HClBTB1.mov.mov"
Is quick time movies which by double clicking on the image, the tapped video will automatically plays to describe the color change of a green bromothymol blue to yellow when exposed to an acid. That describes the effect of An acid on the color change of Bromothymol blue.
3. Quick time movie " H2SO4BTB1.mov"
Is quick time movies which by double clicking on the image, the tapped video will automatically plays to describe the color change of a green bromothymol blue to yellow when exposed to an acid. That describes the effect of An acid on the color change of Bromothymol blue.
4. Quick time movie " HNO3BTB1.mov"
Is quick time movies which by double clicking on the image, the tapped video will automatically plays to describe the color change of a green bromothymol blue to yellow when exposed to an acid. That describes the effect of An acid on the color change of Bromothymol blue.
5. Quick time movie "Ca(OH)2BTB1.mov"
Is quick time movies which by double clicking on the image, the tapped video will automatically plays to describe the color change of a green bromothymol blue to Blue when exposed to a Base. That describes the effect of A Base on the color change of Bromothymol blue.
6. Quick time movie KOHBTB1.mov
Is quick time movies which by double clicking on the image, the tapped video will automatically plays to describe the color change of a green bromothymol blue to Blue when exposed to a Base. That describes the effect of A Base on the color change of Bromothymol blue.
7. Quick time movie "H2OBTB1.mov"
Is a quick time movie which by double clicking on the image, the tapped video will automatically palys to describe that the water has no effect on the color change of Bromothymol blue, so the green bromothymol blue will remain green when mixed with water.

136
The address for the phenolphthalein experiment is “http://genchem.chem.okstate.edu/emanweb/PHNPLE3.php” This experiment describes how to differentiate an acid from a base using a phenolphthalein indicator. Characterization Description 1. Quick time movie "NaOHphn1.mov"
Is quick time movies which by double clicking on the image, the tapped video will automatically plays to describe the color change of a colorless phenolphthalein to pink when exposed to a Base. That describes the effect of A Base on the color change of phenolphthalein.
2. Quick time movie "HClPHN1.mov"
Is quick time movies which by double clicking on the image, the tapped video will automatically plays to describe the color of a colorless phenolphthalein does not change when exposed to an acid. That describes the absence of effect of An acid on the color change of colorless phenolphthalein.
3. Quick time movie "H2SO4phn1.mov"
Is quick time movies which by double clicking on the image, the tapped video will automatically plays to describe the color of a colorless phenolphthalein does not change when exposed to an acid. That describes the absence of effect of An acid on the color change of colorless phenolphthalein.
4. Quick time movie "HNO3PHN1.mov"
Is quick time movies which by double clicking on the image, the tapped video will automatically plays to describe the color of a colorless phenolphthalein does not change when exposed to an acid. That describes the absence of effect of An acid on the color change of colorless phenolphthalein.
5. Quick time movie "Ca(OH)2phn1.mov"
Is quick time movies which by double clicking on the image, the tapped video will automatically plays to describe the color change of a colorless phenolphthalein to pink when exposed to a Base. That describes the effect of A Base on the color change of phenolphthalein.
6. Quick time movie "KOHPHN1.mov"
Is quick time movies which by double clicking on the image, the tapped video will automatically plays to describe the color change of a colorless phenolphthalein to pink when exposed to a Base. That describes the effect of A Base on the color change of phenolphthalein.
7. Quick time movie "H2OPHN1.mov"
Is a quick time movie which by double clicking on the image, the tapped video will automatically plays to describe that the water has no effect on the color change of Phenolphthalein, so the colorless phenolphthalein will remain green when mixed with water.

137
The address for the experiment involving magnesium metal is “http://genchem.chem.okstate.edu/emanweb/MgmetalPLE3.php” This experiment describes how to differentiate an acid from a base using magnesium metal. Characterization Description 1. Quick time movie "NaOHMgmetal1.mov"
Is quick time movies which by double clicking on the image, the tapped video will automatically plays to describe that the base does not react with magnesium metal.
2. Quick time movie "HClMgMetal1.mov"
Is quick time movies which by double clicking on the image, the tapped video will automatically plays to describe that Mg metal reacts with acids, with the formation of gas bubbles. "medium reaction"
3. Quick time movie "H2SO4MgMetal1.mov"
Is quick time movies which by double clicking on the image, the tapped video will automatically plays to describe that Mg metal reacts with acids, with the formation of gas bubbles. "stronger reaction"
4. Quick time movie "HNO3MgMetal1.mov"
Is quick time movies which by double clicking on the image, the tapped video will automatically plays to describe that Mg metal reacts with acids, with the formation of gas bubbles. "slight reaction"
5. Quick time movie "Ca(OH)2mgmetal1.mov"
Is quick time movies which by double clicking on the image, the tapped video will automatically plays to describe that the base does not react with magnesium metal.
6. Quick time movie "KOHMgmetal1.mov"
Is quick time movies which by double clicking on the image, the tapped video will automatically plays to describe that the base does not react with magnesium metal.
7. Quick time movie "H2OMgmetal1.mov"
Is quick time movies which by double clicking on the image, the tapped video will automatically plays to describe that water does not react with magnesium metal.

138
The address for the calcium carbonate experiment is http://genchem.chem.okstate.edu/emanweb/caco3PLE3.php Characterization Description 1.Quick time movie "NaOHCaCO31.mov"
Is quick time movies which by double clicking on the image, the tapped video will automatically plays to describe that the base does not react with Calcium carbonate.
2.Quick time movie "HClCaCO31.mov"
Is quick time movies which by double clicking on the image, the tapped video will automatically plays to describe that calcium carbonate reacts with acids strongly, with the formation of efferviscencess.
3. Quick time movie "H2so4CaCO31.mov"
Is quick time movies which by double clicking on the image, the tapped video will automatically plays to describe that calcium carbonate reacts with acids strongly, with the formation of efferviscencess.
4. Quick time movie "HNO3CaCO31.mov"
Is quick time movies which by double clicking on the image, the tapped video will automatically plays to describe that calcium carbonate reacts with acids strongly, with the formation of efferviscencess.
5. Quick time movie "Ca(OH)2CaCO31.mov"
Is quick time movies which by double clicking on the image, the tapped video will automatically plays to describe that the base does not react with Calcium carbonate.
6. Quick time movie "KOHCaCO31.mov"
Is quick time movies which by double clicking on the image, the tapped video will automatically plays to describe that the base does not react with Calcium carbonate.
7. Quick time movie "H2ocaco31.mov"
Is quick time movies which by double clicking on the image, the tapped video will automatically plays to describe that water does not react with Calcium carbonate.

139
The address for the magnesium nitrate experiment is http://genchem.chem.okstate.edu/emanweb/Mg(NO3)2PLE3.php Characterization Description 1.Quick time movie "NaOHmg(no3)21.mov"
Is quick time movies which by double clicking on the image, the tapped video will automatically plays to describe that the base reacts with magnesium nitrate solution forming a white gelatinous precipitate.
2. Quick time movie "HClMg(NO3)21.mov"
Is quick time movies which by double clicking on the image, the tapped video will automatically plays to describe that the acid does not react with magnesium nitrate solution.
3. Quick time movie "H2So4Mg(NO3)21.mov"
Is quick time movies which by double clicking on the image, the tapped video will automatically plays to describe that the acid does not react with magnesium nitrate solution.
4. Quick time movie "HNO3Mg(NO3)21.mov"
Is quick time movies which by double clicking on the image, the tapped video will automatically plays to describe that the acid does not react with magnesium nitrate solution.
5. Quick time movie "Ca(OH)2Mg(NO3)21.mov"
Is quick time movies which by double clicking on the image, the tapped video will automatically plays to describe that the base Ca(OH)2 does not react with magnesium nitrate solution forming.
6. Quick time movie "KOHmg(no3)21.mov"
Is quick time movies which by double clicking on the image, the tapped video will automatically plays to describe that the base reacts with magnesium nitrate solution forming a white gelatinous precipitate.
6. Quick time movie "H2OMg(NO3)2 1.mov"
Is quick time movies which by double clicking on the image, the tapped video will automatically plays to describe that the water does not react with magnesium nitrate solution forming.
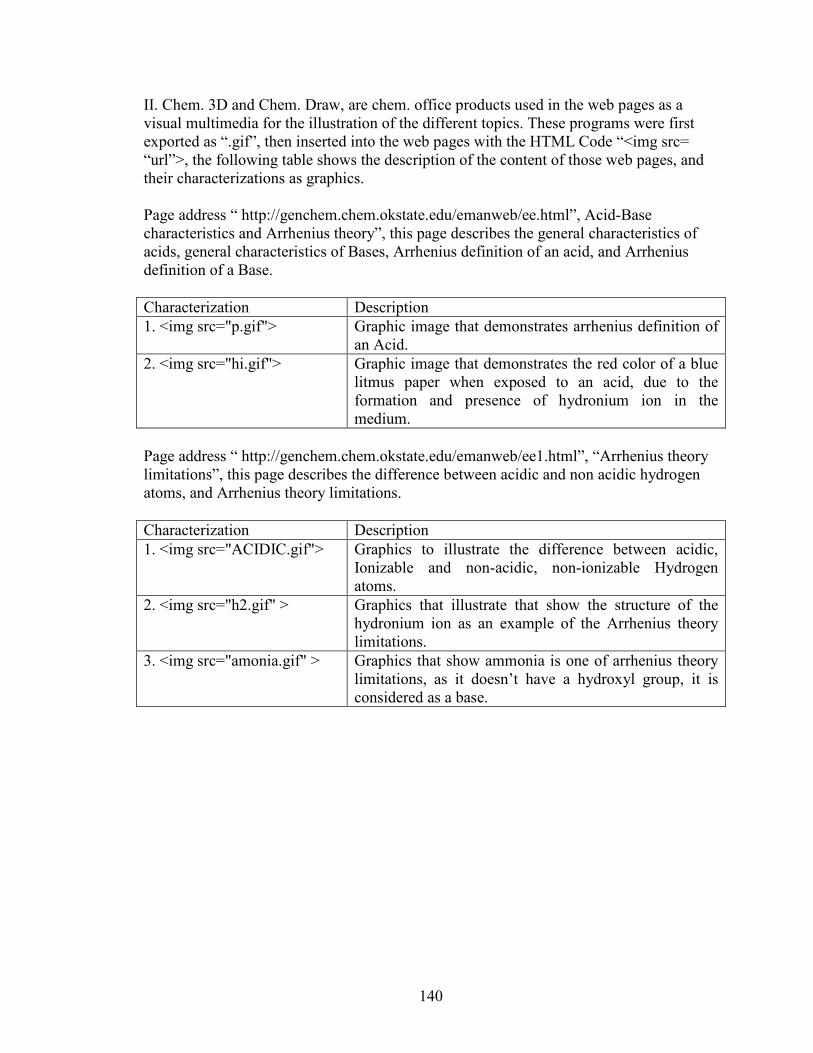
140
II. Chem. 3D and Chem. Draw, are chem. office products used in the web pages as a visual multimedia for the illustration of the different topics. These programs were first exported as “.gif”, then inserted into the web pages with the HTML Code “<img src= “url”>, the following table shows the description of the content of those web pages, and their characterizations as graphics. Page address “ http://genchem.chem.okstate.edu/emanweb/ee.html”, Acid-Base characteristics and Arrhenius theory”, this page describes the general characteristics of acids, general characteristics of Bases, Arrhenius definition of an acid, and Arrhenius definition of a Base. Characterization Description 1. <img src="p.gif">
Graphic image that demonstrates arrhenius definition of an Acid.
2. <img src="hi.gif">
Graphic image that demonstrates the red color of a blue litmus paper when exposed to an acid, due to the formation and presence of hydronium ion in the medium.
Page address “ http://genchem.chem.okstate.edu/emanweb/ee1.html”, “Arrhenius theory limitations”, this page describes the difference between acidic and non acidic hydrogen atoms, and Arrhenius theory limitations. Characterization Description 1. <img src="ACIDIC.gif">
Graphics to illustrate the difference between acidic, Ionizable and non-acidic, non-ionizable Hydrogen atoms.
2. <img src="h2.gif" >
Graphics that illustrate that show the structure of the hydronium ion as an example of the Arrhenius theory limitations.
3. <img src="amonia.gif" >
Graphics that show ammonia is one of arrhenius theory limitations, as it doesn’t have a hydroxyl group, it is considered as a base.

141
Page address “http://genchem.chem.okstate.edu/emanweb/ee3.html”, “Bronsted-Lowry Acid/Base Theory I”, this page describes the first part of the postulated Bronsted-Lowry Acid/Base theory for acids and bases, this page has the Bronsted-Lowry definition of an Acid, the Bronsted-Lowry definition of A Base, the definition of the conjugate acid, the conjugate base definition, an explanation for the basicity of ammonia, and the definition of amphoteric substance. Characterization Description 1. <img src="nh31.gif" >
Graphics illustrating the Bronsted-Lowry definition of the acid and base, also showing the conjugate acid- base pairs.
2. <img src="h3o2.gif" >
Graphics illustrating the structure of water as an amphoteric substance.
Page address “http://genchem.chem.okstate.edu/emanweb/ee2.html”, “Bronsted-Lowry Acid/Base Theory II”, this page is the second page in the postulated Bronsted-Lowry acid/base theory for acids and bases, this page describe in details the proton transfer process in the acid base reaction. Characterization Description 1.<img src="i1.gif">
This graphics describes that both water molecule and nitric acid are polar molecules. With the polarization arrows pointing towards the more electronegative atoms. Also provides an illustrating structure for the lone pairs of electrons on the oxygen atom.
2. <img src="i2.gif">
This graphic to illustrate the effect of the dipole-dipole interaction on attracting the Hydrogen atom away from nitric acid.
3. <img src="i3.gif">
This graphic shows the dipole-dipole interaction.
4. <img src="i5.gif" >
This graphic illustrate the formation of conjugate acid and conjugate base after the acid base reactions.

142
Page address " http://genchem.chem.okstate.edu/emanweb/ee4.html”, "Lewis Acid/Base theory", this page describes Lewis definition of the acids and bases, and the advantages of the Lewis Theory. Characterization Description 1. <img src="lewis.gif" />
This image has a detailed explaination and illustration of the lewis acid and base with different examples.
2. <img src="lewis1.gif" /> This image shows how BF3 as an example of lewis acid 3. <img src="ferric.gif" /> This image shows how Ferric ion can act as a lewis acid
Page address "http://genchem.chem.okstate.edu/emanweb/Strength.html", “Acid Base strengths”, this page describes the difference between a strong and a weak acid and the factors affecting the acid strength. Characterization Description 1. <img src="reactionstre.gif" />
This image shows an example of the reaction of a strong acid with water, and another example to show the reaction of a weak acid with water.
2. <img src="p1.gif" />
This image shows an example of the reaction of a strong acid with water.
3. <img src="p2.gif" width="418" height="88" />
This image shows an example of the reaction of a weak acid with water.
4. <img src="P3.gif" />
Shows two examples, one example for the reaction of a weak acid with water, and another one for the reaction of a strong acid with water.
5. <img src="strong_acids.gif" width="271" height="150" />
Shows different example of different acids, and their tendency of reaction with water.
6. <img src="P5.gif" />
This example explains the presence of carbon dioxide in the acid-base table.
7. <img src="P6.gif" width="339" height="108" />
This example explains the reaction of a base with water.
8. <img src="P6.gif" width="339" height="108" />
This example to illustrate the reaction of ammonia with water.
9. <img src="p10.gif" />
This example shows the dissociation of sodium hydroxide.

143
II. Activity is another media used in the web pages. These is pre-classroom activity, the pictures were first captured using a picture capturing program. It was then inserted into the activity word Pages, which were exported into PDF files and then linked to the web pages. Those activity provide questions on the different topics, the following table shows the description of the content of those activity and their characterization as either images or text. Characterization Description http://genchem.chem.okstate.edu/emanweb/phPLE3.php
This page has a link to the ph meter web page that allows the student to the experiment online and answer the given questions, this page has three tables, the first table gives the student the different values for the hydrogen ion concentration and ask his to solve for the pH value for a strong acid. The second table gives the students the hydroxyl ion concentration and asks them to solve for the pH and pOH values. The third table gives the students the values for the hydrogen ion concentration, and asks the student to solve for the pH value for a weak acid.
“http://genchem.chem.okstate.edu/emanweb/activity.1..pdf”
This page allows the student to test the effect of different acid and Bases on the color change of the red and blue litmus paper experimentally online. Followed by different questions to test the students understanding of the different explained topics.
“http://genchem.chem.okstate.edu/emanweb/activity.2..pdf”
This page allows the student to test the effect of different acids and bases on the color change of different indicators, experimentally online, then followed by different questions to test the students understanding of the different topics.

144
VI linked experiments from Dr Greenbowe’s web site created mostly in Java script.The following table lists all the linked pages to the Acid-Base chemistry web site. Characterization Description “http://www.chem.iastate.edu/group/Greenbowe/sections/projectfolder/flashfiles/stoichiometry/a_b_phtitr.html”
This page to help the student understand and do the experiment online, and test their understanding during their study through different questions. And also testing the prepared solution pH.
“http://www.chem.iastate.edu/group/Greenbowe/sections/projectfolder/flashfiles/stoichiometry/acid_base.html”
This page to help the student understand and do the experiment online, and test their understanding during their study through different questions.
“http://www.chem.iastate.edu/group/Greenbowe/sections/projectfolder/flashfiles/acidbasepH/ph_meter.html”
This page allows the student to mix different acids, bases or salts, and allow them to measure their pH value.
“http://www.chem.iastate.edu/group/Greenbowe/sections/projectfolder/flashfiles/acidbasepH/ph_buffer.html”
This page allows the student to prepare a buffer solution and test their pH value online.
“http://www.chem.iastate.edu/group/Greenbowe/sections/projectfolder/flashfiles/acidbasepH/pHbuffer20.html”
This page allows the student to prepare different buffer solutions with measuring their pH values.

145
VII different questions for each page, created with php code, provided with a feedback answers, the following table shows the linked question pages to the different pages. Characterization Description “http://genchem.chem.okstate.edu/emanweb/question1.php”
This page created with php code,This page is linked to “Acid-Base characteristics and Arhenius theory”, to test the student understanding for the arrhenius theory.
“http://genchem.chem.okstate.edu/emanweb/question2.php”
This page created with php code, and is linked to “arrhenius theory limitations page”, to test the student understanding of this topic.
“http://genchem.chem.okstate.edu/emanweb/question3.php”
This page created with php code, and is linked to “Bronsted-Lowry acid Base theory I”, to test the student understanding of this topic.
‘http://genchem.chem.okstate.edu/emanweb/question4.php”
This page created with php code, and is linked to “Bronsted-Lowry acid Base theory II”, to test the student understanding of this topic.
“http://genchem.chem.okstate.edu/emanweb/question5.php”
This page created with php code, and is linked to “Lewis Acid/Base theory”, to test the student understanding of this topic.
“http://genchem.chem.okstate.edu/emanweb/acidtable.html”
This page has an explanatory table to show the gradual change in the strength of the different acid and bases, which was creted with HTML, and the arrows ere floated to the left and the right of the table using the CSS code.

146
Appendix B
Original Quick time movies
Litmus paper experiments, with the page address, “http://genchem.chem.okstate.edu/emanweb/litmusPLE3.php”

147

148
Bromothymol blue experiments, with the page address, “http://genchem.chem.okstate.edu/emanweb/BTBPLE3.php”

149
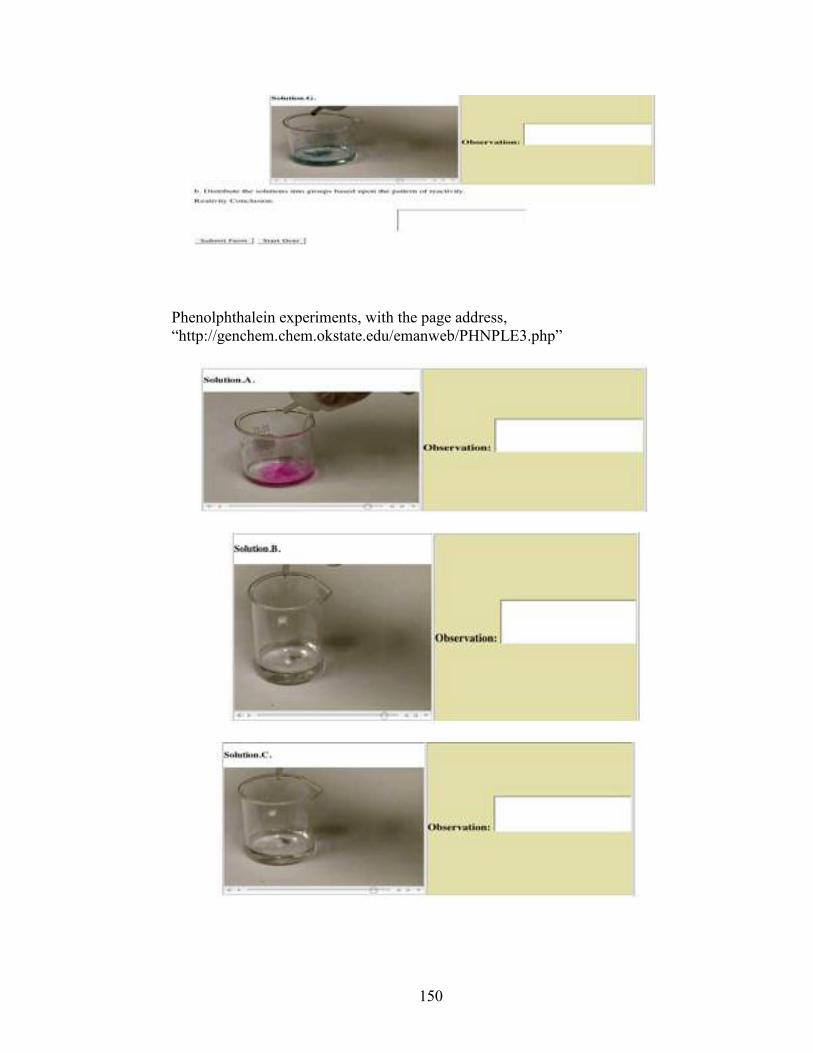
150
Phenolphthalein experiments, with the page address, “http://genchem.chem.okstate.edu/emanweb/PHNPLE3.php”

151

152
Magnesium metal experiments, with the page address, “http://genchem.chem.okstate.edu/emanweb/MgmetalPLE3.php”

153

154
Calcium carbonate experiments, with the page address, “http://genchem.chem.okstate.edu/emanweb/caco3PLE3.php”

155

156

157
Magnesium nitrate experiments, with the page address “http://genchem.chem.okstate.edu/emanweb/Mg (NO3)2PLE3.php”

158

159

160
Appendix C
Linked Graphics experiments from Dr. Greenbowe's web site “http://www.chem.iastate.edu/group/Greenbowe/sections/projectfolder/flashfiles/stoichiometry/a_b_phtitr.html”
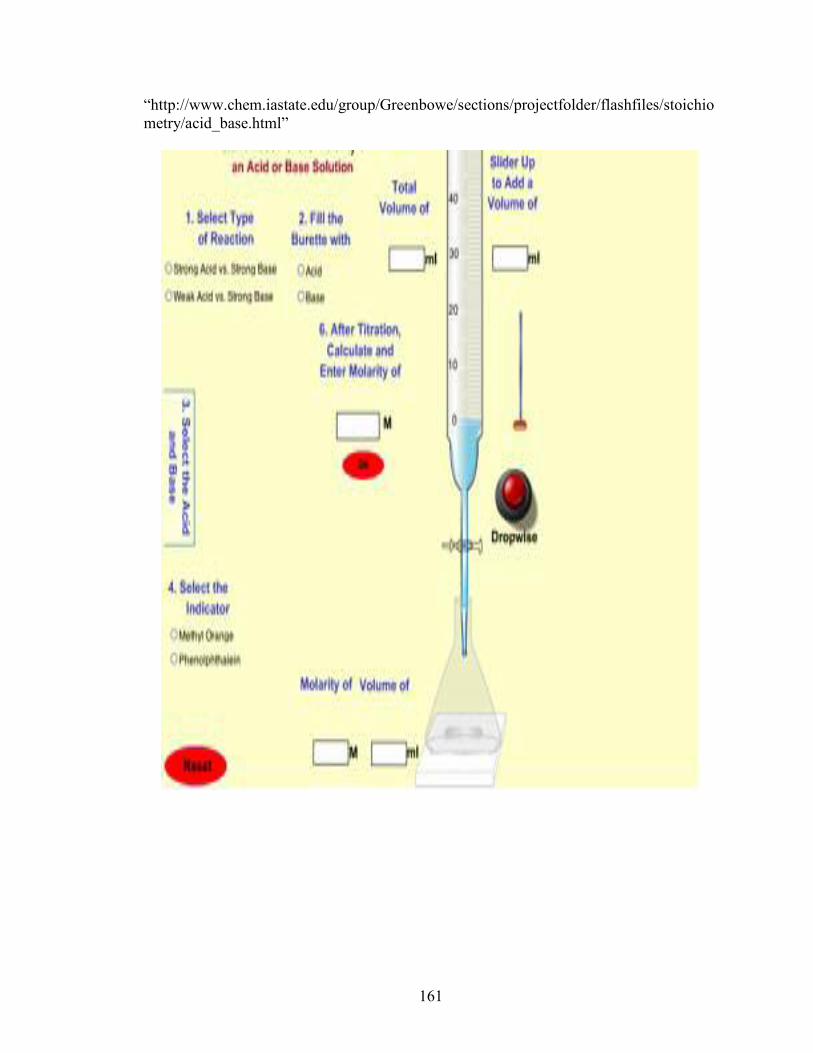
161
“http://www.chem.iastate.edu/group/Greenbowe/sections/projectfolder/flashfiles/stoichiometry/acid_base.html”

VITA
EMAN FREEG MOHAMED FREEG SHAMS
Candidate for the Degree of
Master of Science
Thesis: ANIMATED CSS WEBSITE DESIGNED FOR PROMOTING STUDENT UNDERSTANDING OF ACID-BASE CHEMISTRY
Major Field: CHEMISTRY Biographical:
Major Field: CHEMISTRY Biographical:
Education: Oklahoma State University May 2007 MS Degree in Chemical Education.
Faculty of science, Alexandria university, Egypt (2001/2002) BSC degree in chemistry/Botany Professional: Oklahoma State University: Teaching/Research Assistant (2004-2007)
Alexandria University, Faculty of Science, Egypt Teaching Assistant. (2002-2004)

Name: Eman Shams Date of Degree: May 2007 Institution: Oklahoma State University Location: Stillwater, OK Title of Study: ANIMATED CSS WEBSITE DESIGNED FOR PROMOTING
STUDENTS UNDERSTANDING OF ACID-BASE CHEMISTRY Pages in Study: 160 Candidate for the Degree of Master of Science
Major Field of Study: Chemistry
Abstract: An educational web site for acid base chemistry has been developed using HTML, CSS, PHP, and JAVA script. The acid base chemistry web site provides students with explanatory material that is augmented by audio visual simulations. The web site also includes pre-classroom activities and linked experiments. There are also quizzes and questions on the various acid base topics discussed. The web site was tested by CHEM 1515 students. The results of this study demonstrate the advantages associated with using web based learning to provide support for students in a large lecture class.
ADVISER’S APPROVAL: John I. Gelder


