

Tips:
Over
5555Arts &Crafts
Projects
by Sondra Clarkby Sondra Clarkwith some help from her mom,
Silvana Clark


CRAFTFUNWITH
SONDRASONDRA CLARK

Craft Fun with SondraElectronic book published by ipicturebooks.com
24 W. 25th St.
New York, NY 10010
For more ebooks, visit us at:
http://www.ipicturebooks.com
All rights reserved.
Copyright © 1999 by Sondra Clark and Silvana Clark
Originally published by Meadowbrook Press in 1999
No part of this book may be reproduced or transmitted in any form
or by any means, electronic or mechanical, including photocopying,
recording, or by any information storage and retrieval system,
without permission in writing from the publisher.
e-ISBN 1-59019-916-2
Library of Congress Cataloging-in-Publication Data
Clark, Sondra
Craft Fun with Sondra / Sondra Clark.
p. cm.
Summary: A collection of more than fifty simple craftprojects, including ribbon boxes, pasta necklaces, wind chimes, shakers
and tambourines, puppets, cards, and more.
1. Handicraft Juvenile Literature. [1. Handicraft.
2. Children’s writings.] I. Title
TT160.C56 1999
745.5—dc21 99-32463
CIP

This book is dedicatedto my sister Trina.
She always took time todo crafts with me, even
when I was just 2 years old.She also takes me to the malland doesn’t complain when Itake a long time shopping!
Love,

Acknowledgments:
Thanks to:
Emily Eklund
Melanie Merz
and other members of
Mr. Berg’s Advance Art Class at
Bellingham High School in
Bellingham, Washington for providing
the illustrations in this book.
Sondra has chosenBethany Christian Adoption Agency
to receive a portion of the salesfrom this book.

Introduction
I wrote this book because I love making
crafts. My family calls me the “Queen of
Crafts.” It’s fun to take things like glue, paper,
and yarn and create something brand new.
We even have an extra room that isn’t used
for guests. The whole room is full of craft
supplies, including a five-foot-high bag of
Styrofoam packing peanuts.
I hope you get some ideas from this book.
Most of the projects don’t have complicated
directions. Be creative and feel free to change
the supplies or steps so you can make your
very own, one-of-a kind project.
Happy Crafting!
Sondra
Table of ContentsSupplies . . . . . . . . . . . . . . . . . . . . . . . . . . . . . . . . . . . 1
How to have fun making crafts
without creating a huge mess . . . . . . . . . . . . . . . . . . . . 3
Arts and Crafts ProjectsOld fashioned pencil holder . . . . . . . . . . . . . . . . . . . . . 4
Floppy fashion hats . . . . . . . . . . . . . . . . . . . . . . . . . . . 6
Ribbon Boxes . . . . . . . . . . . . . . . . . . . . . . . . . . . . . . . 8
Colorful Pasta Necklace . . . . . . . . . . . . . . . . . . . . . . 10
Shiny Face Puppets . . . . . . . . . . . . . . . . . . . . . . . . . . 12
Thinking Caps . . . . . . . . . . . . . . . . . . . . . . . . . . . . . . 14
Shaggy Heads . . . . . . . . . . . . . . . . . . . . . . . . . . . . . . 16
Silly Sculptures . . . . . . . . . . . . . . . . . . . . . . . . . . . . . 18
Wacky Wind Chimes . . . . . . . . . . . . . . . . . . . . . . . . . 20
Silent Poppers . . . . . . . . . . . . . . . . . . . . . . . . . . . . . . 22
Sunlight Shapes . . . . . . . . . . . . . . . . . . . . . . . . . . . . . 24
Incredible Shrinking Meat Trays . . . . . . . . . . . . . . . . 26
Quilted Boxes . . . . . . . . . . . . . . . . . . . . . . . . . . . . . . 28
Lick and Stick . . . . . . . . . . . . . . . . . . . . . . . . . . . . . . 30
Grocery Bag Ghost . . . . . . . . . . . . . . . . . . . . . . . . . . 32
Secret Storage Boxes . . . . . . . . . . . . . . . . . . . . . . . . . 34
Noisy Tambourines . . . . . . . . . . . . . . . . . . . . . . . . . . 36
Paint and Tear . . . . . . . . . . . . . . . . . . . . . . . . . . . . . . 38
Rising Cobras . . . . . . . . . . . . . . . . . . . . . . . . . . . . . . 40
Embossed Handprints . . . . . . . . . . . . . . . . . . . . . . . . 42
Creative Crawling Creatures . . . . . . . . . . . . . . . . . . . 44
Squishy Paint Pictures . . . . . . . . . . . . . . . . . . . . . . . . 46
Silly Spoons . . . . . . . . . . . . . . . . . . . . . . . . . . . . . . . 48
Crazy Face Noisemakers . . . . . . . . . . . . . . . . . . . . . . 50
Garden Delight Stepping Stone . . . . . . . . . . . . . . . . . 52
Twisted Shakers . . . . . . . . . . . . . . . . . . . . . . . . . . . . 54
Wacky Rock Creatures . . . . . . . . . . . . . . . . . . . . . . . 56
Sticky Stickers . . . . . . . . . . . . . . . . . . . . . . . . . . . . . 58
Beautiful Button Cards . . . . . . . . . . . . . . . . . . . . . . . 60
Stained Glass Elegant Vases . . . . . . . . . . . . . . . . . . . 62

Pointed Puppets . . . . . . . . . . . . . . . . . . . . . . . . . . . . . 64
Bright and Bubbly Art . . . . . . . . . . . . . . . . . . . . . . . . 66
Big Mouth Puppets . . . . . . . . . . . . . . . . . . . . . . . . . . 68
Lumpy Bumpy Bodies . . . . . . . . . . . . . . . . . . . . . . . . 70
Name Card . . . . . . . . . . . . . . . . . . . . . . . . . . . . . . . . 72
Flower Smash . . . . . . . . . . . . . . . . . . . . . . . . . . . . . . 74
Sondra’s Slimy Goop . . . . . . . . . . . . . . . . . . . . . . . . . 76
Snow Domes . . . . . . . . . . . . . . . . . . . . . . . . . . . . . . . 78
Fluttery Fan Fun . . . . . . . . . . . . . . . . . . . . . . . . . . . . 80
Wiggly, Waving Sculptures . . . . . . . . . . . . . . . . . . . . 82
Innersole Stamps . . . . . . . . . . . . . . . . . . . . . . . . . . . . 84
Swirly Paper . . . . . . . . . . . . . . . . . . . . . . . . . . . . . . . 86
Best-Selling Cassettes . . . . . . . . . . . . . . . . . . . . . . . . 88
Soft and Squishy Sculptures . . . . . . . . . . . . . . . . . . . 90
Designer Light Switch Covers . . . . . . . . . . . . . . . . . . 92
Grouch and Grin Faces . . . . . . . . . . . . . . . . . . . . . . . 94
Coaster Tiles . . . . . . . . . . . . . . . . . . . . . . . . . . . . . . . 96
Extra Smelly Potpourri . . . . . . . . . . . . . . . . . . . . . . . 98
Flowerpot Characters . . . . . . . . . . . . . . . . . . . . . . . . 100
Birdhouse Boots . . . . . . . . . . . . . . . . . . . . . . . . . . . 102
Puzzle Piece Pictures . . . . . . . . . . . . . . . . . . . . . . . . 104
Edible CraftsMini S’mores . . . . . . . . . . . . . . . . . . . . . . . . . . . . . 108
Candy Creations . . . . . . . . . . . . . . . . . . . . . . . . . . . 110
Party Popcorn Hands . . . . . . . . . . . . . . . . . . . . . . . . 112
Giant Kisses . . . . . . . . . . . . . . . . . . . . . . . . . . . . . . 114
Decorated Toast . . . . . . . . . . . . . . . . . . . . . . . . . . . . 116
Fantastic Recipes You’ll Never Want to EatBig Bubble Solution . . . . . . . . . . . . . . . . . . . . . . . . 118
Glurch . . . . . . . . . . . . . . . . . . . . . . . . . . . . . . . . . . . 118
Smelly Art . . . . . . . . . . . . . . . . . . . . . . . . . . . . . . . . 119
Easy Clay Bead Dough . . . . . . . . . . . . . . . . . . . . . . 119
Modeling Dough . . . . . . . . . . . . . . . . . . . . . . . . . . . 119


The most common suppliesused in this book
Acrylic paint Meat traysAdhesive backed paper Newspaper
Borax Paint
Brown paper bags Paper clipsBrushes Paper plates and cups
Butcher paper Pipe cleanersCardboard tubes Plastic bags
Catalogs Pop bottles
Clothes pins Puzzles piecesConstruction paper Ribbons
Cotton balls Rubber bandsCotton swabs Scissors
Crayons Sequins
Crepe paper SocksEgg cartons Sondra’s book!
Fabric straps SpongesFelt Stapler
Film canisters String
Glitter StyrofoamGlue (especially craft glue) Stuffing
Juice cans and lids TapeLiquid starch Wallpaper sample books
Magnets Wiggle eyes
Markers YarnYogurt containers

Ohh!I like less
mess!
2

How to have fun making craftswithout creating a huge mess:
Arts and crafts projects are fun for kids to make. Sometimes,though, adults complain we make too much of a mess. Here are
some tips to having a good time while keeping paint, glue, andpaper off the floor and ceiling.
• Work in an area that has an easy-to-clean floor. Someprojects are best done outside.
• Cover your work area with newspapers. An old showercurtain is wonderful to spread over your craft table.
• If using paint or messy items, wear an old shirt or apron
to protect your clothes.• Make sure an adult is always with you if you need to
use sharp scissors, an iron, or the stove.• Keep a damp rag handy to wipe up any spills.
• Be sure to close paint bottles when you are finished.
• Pick up any loose paper scraps, string, or yarn fromthe floor.
• Put the caps back on all the markers so they don’tdry out.
• Clean up any other messes!
3

SONDRA SAYS:“My mom made one of these
when she was a young girl
at camp. She says they didn’t
have all the bright paints like
we do today.”
Here’s what you need before you begin:empty soup can
glue
25–30 popsicle sticks
acrylic paint or markers
ribbon
stickers (optional)newspaper
rubber band
OLDFASHIONEDPENCILHOLDER
4

Tips:
Adult help:Have an adult check that your can doesn’t have sharp edges
on the top.
Follow these easy steps:1. Wash and dry soup can. Remove label.
2. Lay out your popsicle sticks on the newspaper.
3. Decorate the sticks with paint or markers. Decide if you
want a repeating pattern or a free-form design.
4. Let paint dry.
5. Glue sticks onto the can.
6. Add stickers if you want.
7. When sticks are dry, tie a ribbon around the can as
a decoration.
8. Use as a holder for your crayons or markers.
When gluing on the sticks, slide a rubber band
around the can. Slide sticks under the rubber
band to hold in place until glue dries.
If you don’t eat
enough popsicles
to have a stockpile
of popsicle sticks,
check out alocal craft store.
They sell the sticks
for a reasonable price.
5

Here’s what you need before you begin:large sheets of newspaper (comics are great), or
tissue paper, or newsprint
masking tape
paint or markers
sequins
Adult help:You’ll need an adult to wrap the paper around
your head to create the hat.
FLOPPYFASHION HATS
SONDRA SAYS:“These hats are great to make if
you’re playing dress-up with
your friends.”
6

Tips:
Follow these easy steps:1. Lay 3–4 pieces of paper on a flat surface. Stagger the
paper so they aren’t exactly on top of each other.
2. Pick up paper and center all the sheets over your head.
3. Ask an adult to “mold” the paper around your head
firmly.
4. Wrap masking tape several times around the paper on
your head. This is the form for your hat.
5. Take the hat off and roll up the floppy brim. If you roll it
tightly, the edges will stay up.
6. Decorate with paint, markers, and sequins.
For variety, trim the hat brim with a wavy pattern
so it is out of your face. Try other hat designs such
as rolling up the back and sides while leaving a
brim up front, like a baseball cap.
If you like todress up and make
costumes, lookat the book:
Child’s Play Quickand Easy Costumes ,
Leslie Hamilton,Crown Publishing,
1995.
7

8
Here’s what you need before you begin:box with lid
assorted ribbons
scissors
craft glue or hot glue gun
spray paint, or aluminum foil or construction paper
Adult help:Make sure an adult uses the hot glue gun to attach
the ribbons.
SONDRA SAYS:“These boxes end up looking
like something you would
buy in an expensive store.”
RIBBONBOXES
Tips:
Follow these easy steps:1. For best results, the box and cover should be a
solid color. Spray paint works well, or cover with
construction paper or even aluminum foil.
2. When the top of the lid is a solid color, place a dab of
craft glue on one edge on the underneath side.
3. Attach a piece of ribbon that is 2 inches longer than
the lid.
4. Repeat with 3–4 other pieces of ribbon, spaced evenly
on the lid.
5. Bring the ribbons over the top of the lid and attach with
glue on inside edge of box (the opposite side).
6. You should have 3–4 ribbons glued to the top of the lid.
7. Now you can get ready to weave. Glue 3–4 ribbons
on an inside edge of the lid that doesn’t have ribbons
attached to it.
8. Take the end of the ribbon and weave it over and under
the attached ribbons.
9. Glue the end on the inside of the lid (the opposite side).
10.Repeat with other ribbons.
11.Put the lid on the box and you have a fantastic box to
store your valuable things or give as a gift.
This project lets you be as creative as you want.
Try using different-sized ribbons, or change the
pattern. You can attach 8 or 9 ribbons and have a
tighter weaving design.
Like workingwith ribbons? Try:Bows and Beyond:
Making Magic with Ribbons,Lara Rice Bergen,Grosset & Dunlap,
1996.
9

10
Here’s what you need before you begin:assorted pasta shapes (uncooked)
paper cups
rubbing alcohol
food coloring
plastic spoons
newspaper
yarn or dental floss
Adult help:Make sure an adult is with you when you use the
rubbing alcohol.
COLORFULPASTANECKLACES
SONDRA SAYS:“Pasta is wonderful. You can
eat it or use it for crafts.”

Tips:
Follow these easy steps:1. Fill 3–4 paper cups halfway full with rubbing alcohol.
2. Add 4–5 drops food coloring in each cup.
3. Add a few pasta pieces at a time.
4. Stir so all pasta is covered with the alcohol.
5. Let sit for 3–4 minutes.
6. Remove pasta and spread on several sheets of
newspaper to dry.
7. Let dry overnight.
8. You now have bright pasta to make necklaces or collage
pictures. (The rubbing alcohol keeps the pasta hard
after it dries. If you soaked the pasta in water and food
coloring, it would get mushy.)
9. String your necklace using yarn or dental floss. Make
sure it is long enough to slip over your head.
Pasta with big holes works best for stringing
necklaces. Smaller shapes such as sea shells or
bow ties are great if you’re gluing them on to paper
for pictures.
A great catalogwith supplies and
craft kits is Kids Art:916-926-5076.
You can also callNasco Crafts
for a freecraft catalog:
1-800-558-9595.
11

12
Here’s what you need before you begin:scissors
paper lunch bags
flashlight
scrap paper
yarn
trims (optional)
light-colored tissue paper
rubber band
glue
markers
Adult help:You might have to ask an adult to help you get the
tissue paper inside the bag.
SHINY FACEPUPPETS
SONDRA SAYS:“These are fun to use if you take a
walk with your family at night.”

13
Tips:
Follow these easy steps:1. Cut a face out of the paper bag. Light shines through
all the shapes, so the more details you cut, the more
light will shine out.
2. Add details such as yarn hair, freckles, or a bow tie.
3. Put glue on the inside of the bag, around the cut-out
face shapes.
4. Cut a piece of light-colored tissue paper to fit inside
the bag.
5. Place tissue paper inside bag on top of glue. Let dry.
6. Wrap open edge of bag around top of flashlight. Secure
with a rubber band.
7. Turn on the light and see your puppet face shine.
You can adapt this craft by cutting a face out of a
paper plate. Staple 2 paper plates together, but
leave room to stick in a flashlight.
What do you getwhen a cow iscaught in anearthquake?
A milkshake!

14
Here’s what you need before you begin:glue
stapler
construction paper
Adult help:These are easy to make. Maybe you’ll want to
make one for your mom or dad.
THINKINGCAPS
SONDRA SAYS:“These are fun to make because
you can be as wild as you want
decorating your thinking cap.”

Tips:
Follow these easy steps:1. Cut a 3-inch-wide strip of construction paper.
2. Measure the paper to fit around your forehead like a
headband. Staple or glue the ends together.
3. Get wild and create a one-of-a-kind thinking cap.
4. Using the headband as a base, add strips of paper and
attach with staples and glue. Wrap strips of paper
around a pencil to make “curls.”
5. Try adding paper antennas or colorful flowers onto your
thinking cap.
Next time your teacher tells you to “Put on your
thinking cap,” you’ll have something to put on
your head!
You can wearyour thinking cap
while reading a book.For a great catalogof wonderful books
callChinaberry Books,1-800-421-2242.
15

16
Here’s what you need before you begin:sections of old nylon stockings
sawdust
rubber bands
shallow dish
small amount of grass seed
permanent markers or fabric paint
bucket
Adult help:These need little or no adult help. Watch out—
grownups like to make shaggy heads and take
them to work!
SHAGGYHEADS
SONDRA SAYS:“Make several of these heads
and create different hairstyles.
Try braids or a flat top.”

Tips:
Follow these easy steps:1. Cut about an 8-inch section of nylon stocking. Knot
one end tightly with a rubber band.
2. Turn inside out and put 1–2 tablespoons grass seed
in bottom.
3. Pack firmly with sawdust and shape into a round head.
4. Tie a knot on top or use another rubber band to close
tightly. Trim any extra stocking.
5. Soak entire head in a bucket of water for 5 minutes.
6. Remove from bucket and set in shallow water-filled
dish. Place in a sunny location.
7. The next day, when head is dry, decorate your head
with permanent markers or fabric paint. Draw eyes,
mustache, mouth, etc.
8. Wait 8–9 days and watch your shaggy head start
growing green hair.
9. Keep your shaggy head in the water-filled dish for
months of fun.
If you have difficulty finding sawdust, check with
a lumberyard or home hardware store. They’ll
often scoop sawdust under their power saws and
give it to you for free.
While waiting foryour shaggy headto grow hair, read:Chicken Soup For
Little Souls,Jack Canfield
& Mark Victor Hanson,Health Communications,
1997.
17

18
Here’s what you need before you begin:newspaper
masking tape
paint (optional)
Adult help:Ask an adult if you can tape the base of your
sculpture to the floor.
SONDRA SAYS:“This is a fun project to do
when you have a group of friends
working on it together.”
SILLYSCULPTURES

19
Tips:
Follow these easy steps:1. Tightly roll up sheets of newspaper. Use full or half
sheets of paper to get various lengths.
2. As you roll each sheet, tape the sides so you have solid
newspaper “logs.” These logs are used to make your
sculpture.
3. After you have 15–20 logs, begin taping them together,
any way you want.
4. To make a sturdier base, tape the bottom logs to
the floor.
5. See how high you can make your sculpture before it
topples over!
This is a fun group activity. Make the sculpture
outside and then paint it. You’ll be really amazed
at how high and wide this sculpture becomes as you
add more and more newspaper logs.
If you’re looking formore ways to makesculptures, order
a catalog ofCreative Clay Sets,
with Sculpey, a soft andflexible modeling clay.
PolyformElk Grove Village, IL
60007.

20
Here’s what you need before you begin:empty plastic soda bottle
sharp scissors
hole punch
yarn
permanent markers
assorted items like seashells, small toys, twigs, etc.
tape
Adult help:Since it is awkward to cut plastic, have an adult
cut the soda bottle. You can do the rest.
WACKY WINDCHIMES
SONDRA SAYS:“This is a great excuse for you to
drink pop!”

21
Tips:
Follow these easy steps:1. Wash and dry a plastic soda bottle. Remove label.
2. Cut bottle in half with sharp scissors. (An adult should
do this.)
3. Punch 4–5 holes along the cut edge of the bottle top.
4. Tie one end of an 8-inch piece of yarn to each hole.
5. Attach various items to opposite end of yarn. You could
hang beads, pine cones, or even plastic spoons on the
yarn.
6. Decorate the soda bottle using the permanent markers.
7. Take another 8-inch piece of yarn and wrap it around
the very top of the soda bottle several times. Tie a knot.
8. To keep this yarn secure, put a piece of tape over the
wrapped yarn.
9. Use the loose end of yarn to help you tie your wind
chime to a tree.
These wind chimes work especially well when you
tie shrunken meat trays (see page 26) on each end.
The meat trays are waterproof and make a great
sound when they hit each other.
Need ideas forother wind chimes
or mobiles?Look for
The Big Bookof Mobiles:Ocean Life,
by Time Warner, 1997.

22
Here’s what you need before you begin:empty paper towel cardboard tubes
scrap pieces of ribbon
colorful paper
sequins
glue
aluminum foil
candy or small toys
stickers (optional)
markers (optional)
Adult help:This is an easy project. Tell your parents they can
relax while you make silent poppers.
SILENTPOPPERS
SONDRA SAYS:“Poppers make great stocking
stuffers or gifts for your friends.”
23
Tips :
Follow these easy steps:1. Cut a paper towel tube in half.
2. Cut a piece of colorful paper large enough to cover the
tube, with 3 extra inches on each end.
3. Wrap the paper around the cardboard tube.
4. Tie one end with colorful ribbon.
5. Put a few pieces of candy or small toys in the open end.
Tie shut.
6. Decorate the tube. Glue ribbon with sequins. Add
stickers or draw pictures with markers.
Try covering the poppers with assorted colors of
tissue paper. The tissue creates a colorful effect
when tied at the ends.
To avoid the riskof germs, don’t usetoilet paper tubes.
Paper towel orwrapping paper
rolls workjust as well.

24
Here’s what you need before you begin:tissue paper
liquid starch
wax paper
sponge or paint brush
yarn
permanent marker
Adult help:Sometimes it’s hard to get the yarn to stick to the
wax paper. Ask an adult to help.
SONDRA SAYS:“Your hands will get sticky doing
this project, but the starch washes
off easily.”
SUNLIGHTSHAPES
Tips:
Follow these easy steps:1. Lay out a piece of waxed paper.
2. Draw a simple shape on the paper such as a heart, fish,
or butterfly.
3. Outline the shape with glue.
4. Place a piece of yarn on top of the glue.
5. Let dry.
6. Cut or tear tissue paper into the size of postage stamps.
7. Using the sponge or brush, spread starch inside
the design.
8. Add tissue paper, covering entire area. It’s OK if pieces
of tissue paper go over the yarn edge.
9. Let dry slightly.
10. Then add 2–3 more layers of starch and tissue paper.
11. Let dry overnight.
12. Trim any tissue paper hanging off the edge of
your shape.
13. Slowly peel off the entire tissue paper design from the
wax paper.
14. Hang your picture in a window so the sunlight shines
through it.
The starch makes hands sticky, so keep a damp
cloth nearby to clean them.
If you like to color,Color Time Crafts and
Markers offers T-shirts,pillowcases, and otheritems to decorate withdeluxe fabric markers.Call 1-800-500-0770
for ordering information.
25

26
Here’s what you need before you begin:assorted sizes and colors of clean Styrofoam meat
trays (red and yellow work best)
markers or crayons
yarn
cookie sheet
pencil
Adult help:Ask an adult to preheat the oven to 350 degrees.
To reduce the risk of germs, adults should wash
the meat trays in a mild bleach solution. Dry
thoroughly.
SONDRA SAYS:“It’s fun to watch these trays
shrivel up and shrink.”
INCREDIBLESHRINKINGMEAT TRAYS

Tips :
Follow these easy steps:1. Decorate your meat tray in a colorful design. Bright-
colored crayons will produce a nice picture, while
permanent markers give deeper colors.
2. Use a pencil to poke a hole in one end of the meat tray
if you plan to make it into a necklace.
3. Place decorated meat trays on cookie sheet.
4. An adult should place it in the oven for 45–60 seconds.
The meat trays will curl and then get flat and hard.
5. Remove from oven and place shrunken meat tray on
counter to cool.
6. String a piece of yarn through hole to make a necklace.
7. Shrink several meat trays with a hole in each one. Use
yarn to tie them to a branch for an instant wind chime.
Decorate Styrofoam cups and try shrinking them.
You’ll get cute mini-hat-shaped creations.
Want more craft ideas?Then read
The Colossal Book ofCrafts for Kids
and Their Families,Phyllis and Noel Fiarottl,
Black Dog &Leventhal Publishing,
1997.
27

28
Here’s what you need before you begin:wallpaper sample books
scissors
tray filled with water
assorted boxes
sponge
Adult help:All adults have to do is admire your creative
designs.
SONDRA SAYS:“I like looking at wallpaper sample
books because there are so many
colors and patterns.”
QUILTEDBOXES

Tips:
Follow these easy steps:1. Soak several wallpaper pieces in water for 1 minute.
2. Shake off extra water.
3. Place wet wallpaper on box and use a sponge to smooth
in place. The prepasted glue on the back of the
wallpaper will stick on the box.
4. Once dry, the boxes are great to use as storage
containers for hair clips, pencils, or craft items.
For large-scale fun, get a big appliance box and
put it outside. Cover the box with pieces of
wallpaper for a colorful fort.
Most homeimprovement or
decorating stores gladlygive away outdated
wallpaper sample books.The paper is great for
cards, bookcovers,and
assorted craft projects.
29
30
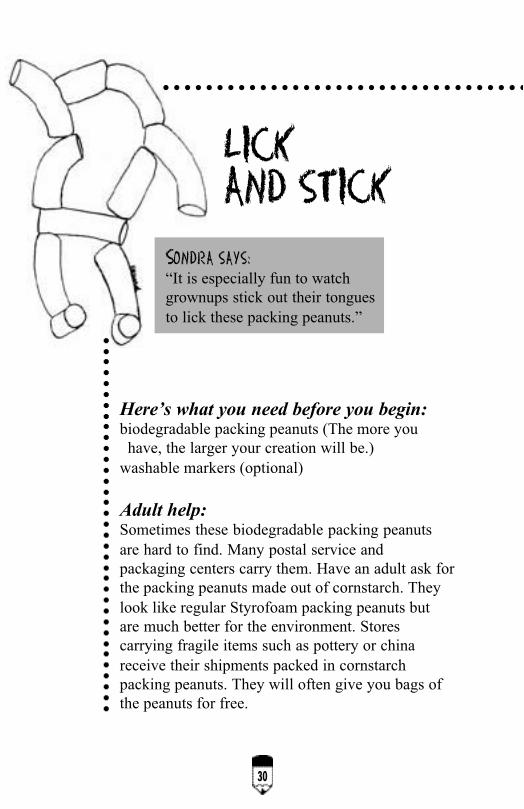
Here’s what you need before you begin:biodegradable packing peanuts (The more you
have, the larger your creation will be.)
washable markers (optional)
Adult help:Sometimes these biodegradable packing peanuts
are hard to find. Many postal service and
packaging centers carry them. Have an adult ask for
the packing peanuts made out of cornstarch. They
look like regular Styrofoam packing peanuts but
are much better for the environment. Stores
carrying fragile items such as pottery or china
receive their shipments packed in cornstarch
packing peanuts. They will often give you bags of
the peanuts for free.
LICKAND STICK
SONDRA SAYS:“It is especially fun to watch
grownups stick out their tongues
to lick these packing peanuts.”

Tips:
Good Earth ArtEnvironmental Art
for Kids,By MaryAnn Kohl& Cindy Gainer,
Bright Ring Publishing,offers craft ideas using
both natural itemsand discarded scrap
boxes, paper, etc.
Follow these easy steps:1. Simply take a biodegradable packing peanut and give a
section a quick lick with your tongue.
2. Attach another peanut to the damp spot. It will stick
immediately to it!
3. Now let your imagination go wild and create forts,
spaceships, or crazy clowns by licking and sticking the
pieces together.
4. If you want, decorate your masterpiece with markers.
If you don’t want to use your tongue to lick,
simply touch the packing peanuts to a damp cloth.
Either way, you’ll have a great time making
wonderful, lightweight creations.
31

32
SONDRA SAYS:“These ghosts can also be hung
from a tree during Halloween.”
GROCERY BAGGHOST
Here’s what you need before you begin:two white whipped-topping lids (or other white
lids)
black permanent marker
wiggle eyes (optional)
white plastic grocery bags
hole punch
craft glue
string
scissors
Adult help:If your scissors are dull, it’s sometimes hard to cut
the plastic bags. Have an adult nearby if you use
sharp scissors.

Follow these easy steps:1. Punch a hole in both lids so that the holes line up when
lids are put together.
2. Draw a ghost face on the top side of one of the white
lids. Use wiggle eyes if you want.
3. Lay the bags on a table. Cut out any sections that have
writing. Trim off the handles.
4. With scissors, cut bag into 2-inch-wide strips.
5. Place one lid face side down, and cover entire back of
the lid with glue.
6. Pick up one piece of plastic strip and place the middle
in the center of the glued lid. Do the same with 4–5
other strips, like the spokes of a wheel.
7. Add more glue over the lid.
8. Put 4–5 more strips over glue.
9. Take other lid and cover inside with glue. Make sure to
glue the edge.
10.Put the two lids together and let dry overnight.
11.Attach a string to holes in lids.
12.Hold on to end of string and run as your ghost chases
after you.
You can geta great catalog
loaded withcraft supplies from
Creative Crafts,1-800-767-2101.
33

34
Here’s what you need before you begin:canceled stamps
glue
paint brush
assorted small boxes (those with lids work best)
Adult help:You might ask several teachers, friends, or other
adults to collect stamps for you. It takes quite a
few stamps to cover a box.
SONDRA SAYS:“I liked spending time
with my grandmother as we
made one of these. It sure
took a whole bunch of stamps!”
SECRETSTORAGEBOXES

Tips :
35
Follow these easy steps:1. Cut out the stamps from old envelopes.
2. Glue the stamps on the box. Overlap stamps or make a
pattern around the edge of the box with stamps that are
the same.
3. After the box is covered, brush the glue over all the
stamps. Don’t worry that the glue is white, because it
will dry clear.
4. For extra shine, apply another layer of glue when the
first coat dries.
Cans also make great secret storage containers.
Use peanut or potato chip cans with lids. You
can save colorful candy wrappers and decorate
your secret storage box with labels from your
favorite candy.
What stays in acorner yet travels
all around
the world?
A stamp.
36
Here’s what you need before you begin:two aluminum pie pans that are the same size
pieces of yarn or ribbon
dried beans
beads or buttons or sequins
glue
hole punch
Adult help:Sometimes it’s hard to punch holes through the
aluminum pans. An adult can help you.
SONDRA SAYS:“If you don’t have aluminum pie plates,
regular paper plates work just as well
—except they are not as noisy.”
NOISYTAMBOURINES
Tips:
Follow these easy steps:1. Punch 8–10 holes in edges of 2 aluminum pie pans.
Make sure holes match up on both pans.
2. Place pans facing each other, rim to rim.
3. Slip a piece of yarn or ribbon between 2 holes and tie
it shut.
4. Continue around the pan so only a few holes are left.
5. Add 1 tablespoon dried beans through the opening.
6. Tie rest of holes shut.
7. Decorate the top of your tambourine with beads,
sequins, or buttons.
8. Let dry well.
9. Put on some lively music so you can start shaking
your tambourine.
Hold the tambourine on the sides so you don’t
knock off the decorations.
Want to make somemore instruments?
Look atMusic Crafts for Kids The
How-To Book of MusicDiscovery,
Noel & Phyllis Fiarotta,Sterling Publishing,
1995.
37

38
Here’s what you need before you begin:newspaper
construction paper
glue
watercolors
paint brushes
container of water
paper towels
Adult help:All grownups need to do is admire your
great masterpiece!
PAINTAND TEARSONDRA SAYS:“It’s a funny feeling to tear up a
picture that you just painted, but
the pieces turn into a whole new
art project.”

39
Tips :
Follow these easy steps:1. Place newspaper on your work surface.
2. Paint a picture with the watercolors. Bold designs
work best.
3. Rinse and dry your paint brush after each color to give
you the brightest picture.
4. After picture dries, carefully tear out sections, such as
the petals of a flower or sections of a house.
5. Glue the torn pieces back together on a fresh piece of
construction paper.
6. You’ll end up with a three-dimensional picture.
If you accidentally tear in the wrong place, don’t
worry. When you glue it on the paper, you can
touch it up with watercolors.
Some craft stores
sell
liquid watercolors.These produce
very bright colors
for your painting.
40
Here’s what you need before you begin:construction paper
scissors
paper clip
small magnet
popsicle stick
glue
crayons or markers
dinner plate
Adult help:Don’t get scared if you see this snake on your
living room couch!
SONDRA SAYS:“When I was younger, I
pretended this was my
pet snake.”
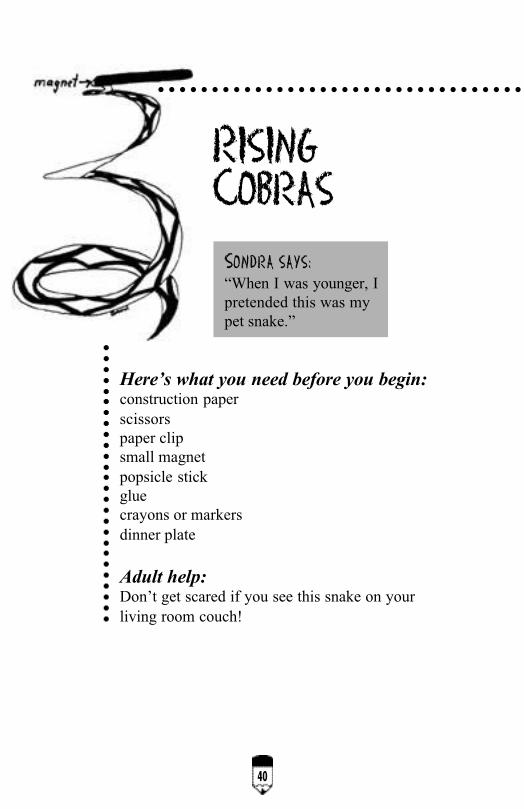
RISINGCOBRAS

Tips :
Follow these easy steps:1. Trace around a dinner plate (placed on paper) to make
your snake out of paper.
2. Use a marker and draw a spiral in the circle. The
snake’s “head” will be in the center of the circle.
3. Decorate the paper with crayons or markers. Add eyes
and a tongue.
4. Cut along the spiral lines to make your snake. Attach a
paper clip to the snake’s “head.”
5. Glue a small magnet to one end of a popsicle stick.
6. Hold the “magnet stick” close to the snake’s “head.” As
you raise your stick, watch the snake rise in the air.
For a sturdier snake, decorate a paper plate and
cut it in a spiral.
If you like snakesand other animals,
check out theRanger Rick magazine
available inmost libraries or from
National WildlifeFoundation,
1-800-588-1650.
41

42
Here’s what you need before you begin:plain paper (light colored)
ink pad
embossing powder; (available at any craft store;
silver or gold powder works best)
toaster
paper towels
Adult help:An adult will need to be with you when you hold
the embossing powder over the toaster.
SONDRA SAYS:“I like this craft because it gives
me a good reason to get my hands
all messy.”
EMBOSSEDHANDPRINTS

Tips:
Follow these easy steps:1. Set out a plain piece of light-colored paper.
2. Here’s the fun part. Put your hand on the ink pad.
You’ll have to make sure all parts of the bottom of your
hand are covered with ink.
3. Press your ink-covered hand firmly on the paper.
4. This is where you must work fast. Sprinkle the emboss-
ing powder all over the ink handprint on the paper. If
the ink dries, embossing powder will not stick.
5. Shake any extra powder back into the jar.
6. Turn on the toaster. With an adult nearby, hold your
picture 1–2 inches above the toaster. Keep it there until
the embossing powder bubbles and hardens. This only
takes 10–15 seconds.
7. Your handprint should now be shiny and slightly raised.
These make great pictures for parents. They like seeing
your handprint on paper instead of on the wall!
8. Wash your hands with soap and water. Use a paper
towel to dry in case a bit of ink is still on your hands.
A small jar of embossing powder lasts a long time.
Just remember to always pour the extra powder
back into the jar.Bill Cosby has
written some greatbooks for children.
His series ofLittle Bill Books for
Beginning Readers ispublished by
Scholastic Trade,1997.
43

44
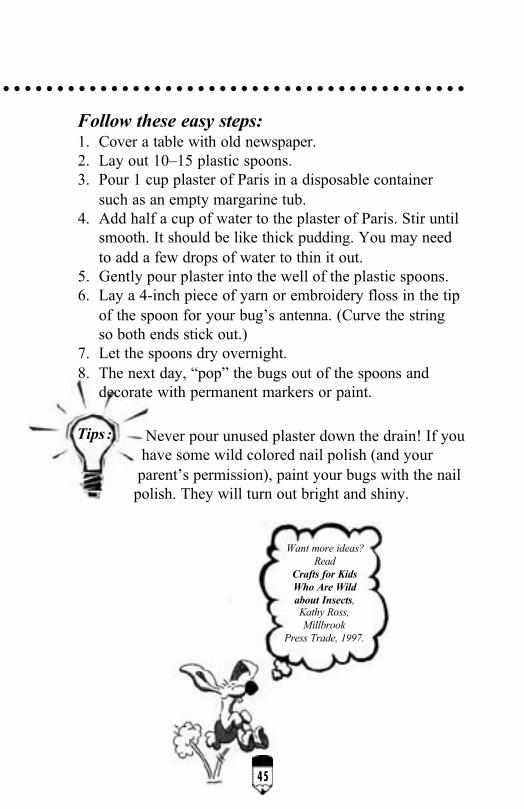
Here’s what you need before you begin:10–15 plastic spoons
disposable container to mix the plaster (old
margarine containers are great)
Half a cup water
permanent markers or assorted colors of paint
old newspapers to put underneath your work area
plaster of Paris
small pieces of yarn or embroidery floss
Adult help:Ask an adult to buy plaster of Paris at a craft or
home-improvement store. You don’t need much.
A little plaster makes a lot of bugs.
SONDRA SAYS:“These bugs are so easy to
make, you can make ten or
more at a time.”
CREATIVECRAWLINGCREATURES
Tips :
Follow these easy steps:1. Cover a table with old newspaper.
2. Lay out 10–15 plastic spoons.
3. Pour 1 cup plaster of Paris in a disposable container
such as an empty margarine tub.
4. Add half a cup of water to the plaster of Paris. Stir until
smooth. It should be like thick pudding. You may need
to add a few drops of water to thin it out.
5. Gently pour plaster into the well of the plastic spoons.
6. Lay a 4-inch piece of yarn or embroidery floss in the tip
of the spoon for your bug’s antenna. (Curve the string
so both ends stick out.)
7. Let the spoons dry overnight.
8. The next day, “pop” the bugs out of the spoons and
decorate with permanent markers or paint.
Never pour unused plaster down the drain! If you
have some wild colored nail polish (and your
parent’s permission), paint your bugs with the nail
polish. They will turn out bright and shiny.
Want more ideas?Read
Crafts for KidsWho Are Wildabout Insects,Kathy Ross,Millbrook
Press Trade, 1997.
45

46
Here’s what you need before you begin:newspapers
construction paper
juice can lids
paints
glue
Adult help:Ask an adult to help you save the tops and
bottoms of juice can lids to use as your “squishers.”
SONDRA SAYS:“If you use bright-colored paint,
the designs turn out best.”
SQUISHYPAINTPICTURES

Tips :
Follow these easy steps:1. Lay out newspapers on your work surface.
2. Place construction paper on table.
3. Put a “dab” (about half of a teaspoon) of paint on
colored paper and press your “squisher” gently on the
paint. It spreads to form a shiny circle of paint.
4. Add other colors of paint and squish them.
5. Try adding two colors of paint, one dab on top of the
other. You’ll get a multicolored design when you
squish the paint.
6. Keep making squishy circles for a one-of-a-kind
modern art painting.
To make your “squishers,” glue a tightly wadded-
up piece of paper the size of a cherry to the top of
the juice lid. This forms an easy-to-grip handle.
For a great new
type of paint substance,
ask an adult if theywill order you
BioColor.
It comes in bright colors,
cleans up easily,
and is inexpensive.Call 1-800-627-2829.
47

48
Here’s what you need before you begin:plastic spoons
markers
felt scraps
yarn
glue
sequins, beads, scrap paper (optional)
egg carton (optional)
Adult help:You won’t need any help from adults on this
project. Why not surprise Mom and Dad and
make a spoon puppet that looks like them?
SONDRA SAYS:“Try making these spoons to look
like your friends. See if they can
guess which one looks like them.”
SILLYSPOONS

Tips:
Follow these easy steps:1. Set out as many plastic spoons as you want to use
for puppets.
2. Draw a face on the back of the spoon.
3. Add yarn for hair.
4. Use felt or paper scraps to make clothes.
5. Decorate clothes with sequins, markers, yarn, beads,
or paper cutouts.
To store your spoon puppets, turn an empty egg
carton upside down. Cut a small slit in the top of
each egg section and insert the handle of the spoon.
Before you useyour spoons for a craft,you can make a snack.
Get ideas fromCooking Art:
Easy Edible Art forYoung Children,Mary Ann Kohl,
Gryphon House, 1997.
49

50
Here’s what you need before you begin:empty plastic soda bottle
old magazines
glue
scissors
scrap yarn or ribbon
dried beans
permanent markers
Adult help:Tell an adult this project produces a noisy craft!
SONDRA SAYS:“This craft is great when you want
a noisemaker for a birthday party
or New Year’s Party.”
CRAZY FACENOISEMAKERS

51
Tips:
Follow these easy steps:1. Wash and dry a plastic soda bottle and remove label.
2. Look through an old magazine and cut out a variety of
eyes, a nose, and mouth to glue on the soda bottle. Try
different combinations until you get the “crazy face”
that you like.
3. After face is complete, add hair. Use cut-up magazine
strips, yarn, or ribbon.
4. Use permanent marker to add eyelashes, freckles, etc.
5. Add 1 tablespoon of dried beans to the bottle and seal
with the cap.
6. Put on some music and shake and dance with your
crazy face.
Empty plastic milk cartons also work for these
crazy face noisemakers. You’ll just end up with a
different shape.
Want more noise?Check out the book
Making Music:6 Instruments You
Can Create,Eddie Herschel,
Oates, HarpercrestPublishing,
1995.
52
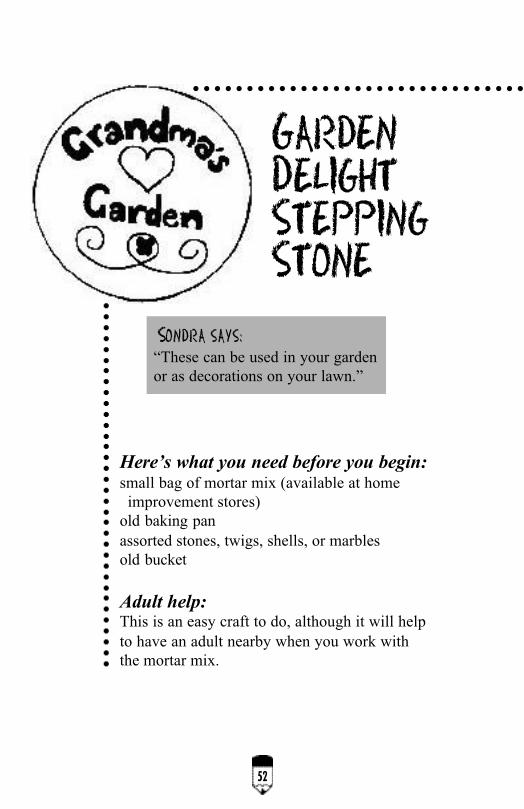
Here’s what you need before you begin:small bag of mortar mix (available at home
improvement stores)
old baking pan
assorted stones, twigs, shells, or marbles
old bucket
Adult help:This is an easy craft to do, although it will help
to have an adult nearby when you work with
the mortar mix.
GARDENDELIGHTSTEPPINGSTONE
SONDRA SAYS:“These can be used in your garden
or as decorations on your lawn.”

Tips:
Follow these easy steps:1. Mix the mortar mix with water in an old bucket,
according to the directions on the package.
2. Pour mix into old baking pan. Let harden slightly.
3. Decorate your garden stepping stone with rocks,
shells, or twigs.
4. If you want, use the end of a stick and write your
name or something like “Grandma’s Garden” in the
mortar mix.
5. Let dry thoroughly.
6. Have an adult help you remove your stepping stone
from the pan. Remember, this craft project is heavy.
7. Place your stepping stone in a garden or on a pathway.
To make cleanup easier, mix the mortar
mix outside.
A directory ofFree Stuff for PeopleWho Enjoy Crafting,
Sewing and Moreoffers 400 free or low-
cost craft booklets,samples, and patterns.
Free Stuff/PrimePublishing, Box 663,
Highland Park, IL 60035.
53

54
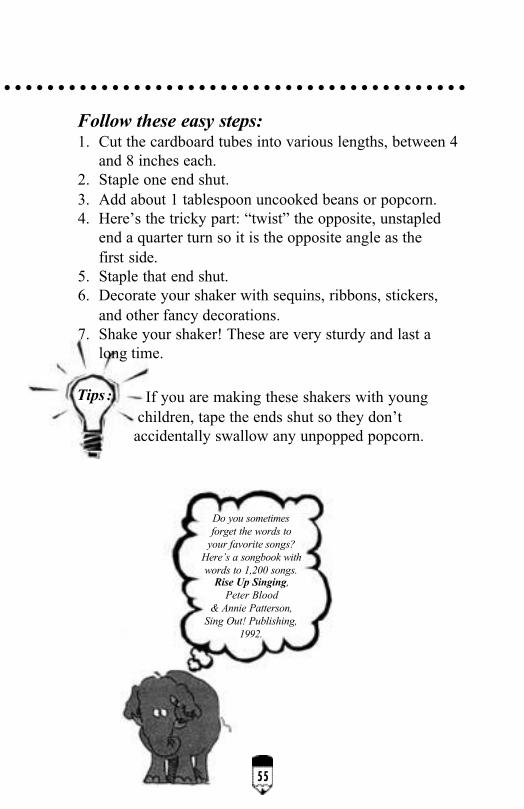
Here’s what you need before you begin:empty cardboard rolls from paper towels or
wrapping paper
glue
stapler
ribbons
sequins
stickers
uncooked beans or popcorn
Adult help:Sometimes it’s hard to staple through the
cardboard. An adult may need to help you.
SONDRA SAYS:“I like to put loud music on the
stereo and have two shakers
that I use when I dance.”
TWISTEDSHAKERS
Do you sometimesforget the words to
your favorite songs?Here’s a songbook withwords to 1,200 songs.
Rise Up Singing,Peter Blood
& Annie Patterson,Sing Out! Publishing,
1992.
Tips :
55
Follow these easy steps:1. Cut the cardboard tubes into various lengths, between 4
and 8 inches each.
2. Staple one end shut.
3. Add about 1 tablespoon uncooked beans or popcorn.
4. Here’s the tricky part: “twist” the opposite, unstapled
end a quarter turn so it is the opposite angle as the
first side.
5. Staple that end shut.
6. Decorate your shaker with sequins, ribbons, stickers,
and other fancy decorations.
7. Shake your shaker! These are very sturdy and last a
long time.
If you are making these shakers with young
children, tape the ends shut so they don’t
accidentally swallow any unpopped popcorn.
56
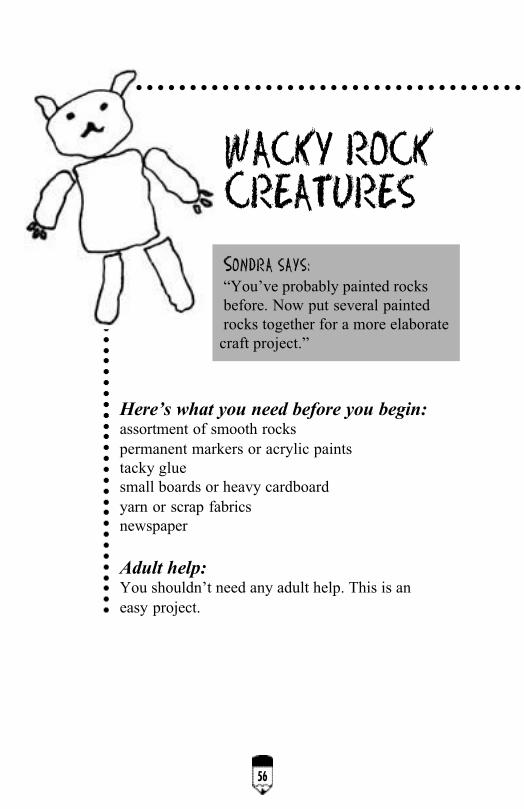
Here’s what you need before you begin:assortment of smooth rocks
permanent markers or acrylic paints
tacky glue
small boards or heavy cardboard
yarn or scrap fabrics
newspaper
Adult help:You shouldn’t need any adult help. This is an
easy project.
SONDRA SAYS:“You’ve probably painted rocks
before. Now put several painted
rocks together for a more elaborate
craft project.”
WACKY ROCKCREATURES
57
Tips:
Follow these easy steps:1. If you collected rocks from outside, make sure they are
clean and dry.
2. Place newspaper on your work surface.
3. Spread out stones and look at their shapes and sizes.
4. Use the rocks to create people, animals, or space
creatures. Attach smaller stones to make legs, arms,
or beaks.
5. After you have designed your creature, paint each rock
and let dry.
6. Glue the rocks onto the board or cardboard.
7. Use yarn and scrap fabrics to add hair and clothes.
8. Be careful not to drop this craft project on your toes!
Since the rocks are heavy, a board as the base
works best. These pictures make a great
paperweight.
If you like working
with rocks, you’ll like aQuicksand Kit
from Hearth Song catalog:
1-800-325-2502.
You’ll be able to add
water to sand, then moldinto a block and
sculpt it into any shape.

Here’s what you need before you begin:white glue
wax paper or aluminum foil
tempera paint
plastic spoon
squeeze bottle (optional)
disposable bowl
Adult help:You can do this on your own. Adults can read the
newspaper while you make these stickers.
58
SONDRA SAYS:“This is one sticker that is easy to
put on and take off a window.”
STICKYSTICKERS

59
Tips:
Follow these easy steps:1. Pour half a cup glue into a bowl.
2. Add one and a half tablespoons paint and stir well.
3. Using the plastic spoon, drip the glue mixture onto the
wax paper. Make squiggles, your initials, or hearts.
4. If you have squeeze bottles, put the glue in the bottle
and squeeze your designs on the wax paper.
5. Let dry overnight.
6. Gently remove your sticky sticker from the wax paper.
7. The stickers will attach to windows.
If you want to make three-dimensional pictures,
squeeze the glue/paint mixture onto construction
paper. You’ll get shiny, raised designs that make
unique greeting cards.
You can jointhe Hands On
Craft Clubfor $12.00 a year.
Call1-800-600-9040
for moreinformation.

Here’s what you need before you begin:construction paper
glue
markers
scissors
buttons
scraps of ribbon or yarn
hole punch (optional)
Adult help:If young children are doing this craft, an adult
should watch so they don’t put buttons in
their mouths.
60
SONDRA SAYS:“My grandma has three big
containers full of buttons I use.
Maybe your grandmother has
some also.”
BEAUTIFULBUTTONCARDS

61
Tips:
Follow these easy steps:1. Cut the construction paper to the size you want. You
can make cards, gift tags, or pictures to frame.
2. Select 3–4 buttons and place them on the paper. Can
you turn the buttons into flowers? How about drawing
a clown and adding buttons for the nose and eyes?
3. Glue the buttons down and use markers to add details
to your card.
4. Use scraps of ribbon or yarn to create flower stems,
hair bows, or other additions to your button picture.
5. If using your picture as a gift card, punch a hole in one
end and attach a ribbon to tie onto the present.
Check with the post office if you plan to mail
a button card. The extra weight might require
more postage.
Buttons can alsobe used for games
and more craftprojects. The book
Button Craft Book ,Dawn Cusick,Lark Books,
1996,gives lots ofbutton ideas.

SONDRA SAYS:“These vases look pretty when you
put them on a window sill so the
light shines through.”
STAINEDGLASSELEGANTVASES
62
Here’s what you need before you begin:plain glass jars
newspaper
small scraps of tissue paper
paint brushes
small disposable container
3 tablespoons white school glue
Adult help:Ask an adult to help you find a glass container
to use.

63
For more fun withtissue paper,
look at the ideasin the book
Rose Windows andHow to Make Them,Helga Meyerbroker,
Gryphon House,1994
Tips:
Follow these easy steps:1. Place newspaper on table to catch glue drips.
2. Mix glue with 1 tablespoon water in a small container.
3. Cover half the jar with glue mixture (using paint
brush).
4. Attach small scraps of tissue paper in a pattern or
however you want. Overlap tissue pieces for extra
colors.
5. Repeat the same thing on other side of jar.
6. When finished, cover the whole jar with another
coating of glue.
7. Let dry overnight.
8. The next day, brush on one more coat of glue to give
your vase extra shine.
9. Tie a wide ribbon or strip of paper around the top rim
of your vase as extra decoration.
10.Fill your vase with pretty flowers and enjoy.
Don’t worry when you brush on the glue and it is
white. It dries clear and shiny.
Tips :

Here’s what you need before you begin:cardboard
scissors
glue
fabric
scrap paper
adhesive-backed paper (optional)
wiggle eyes or buttons
duct tape
Adult help:If using heavy cardboard, ask an adult to help with
the cutting.
SONDRA SAYS:“These puppets sound complicated
to make, but they are very easy and
last a long time.”
POINTEDPUPPETS
64

Tips :
Follow these easy steps:1. Cut 6 triangle shapes out of cardboard, 8 inches at the
base and 9 inches from base to the point (size can be
approximate).
2. Tape 3 triangles together on the sides with duct tape.
3. Tape the other 3 triangles together with duct tape.
4. You should now have 2 separate cardboard pyramid-
shaped pieces.
5. Simply use duct tape to attach the 2 pyramids on one
bottom edge. This forms the finished shape for your
pointed puppets.
6. Decorate your puppet with adhesive-backed paper
or fabric.
7. Add eyes, hair, or tonsils with scraps of paper and cloth.
8. To make using the puppet easier, attach two fabric
strips to the inside mouth. This gives support to your
hand when you open and close the mouth.
Don’t worry about the exact size of your
cardboard. As long as all 6 pieces are the same
size, the puppet will turn out fine.
If you want afree catalog ofcraft supplies,
order fromCraft Catalog,
Box 1069,Reynoldsburg,
OH 43068.
65

Here’s what you need before you begin:tempera paint (powdered)
liquid dishwashing detergent
straws
small shallow bowls
paper
newspaper
Adult help:This is an easy activity that doesn’t require any
adult help.
66
BRIGHTANDBUBBLYART
SONDRA SAYS:“I like blowing the bubbles best.
You can blow large and small
bubbles for your picture.”
Tips:
For more bubble fun,check out the bookThe Unbelievable
Bubble Book,John Cassidy,
Klutz Press, 1995.The book comes witha giant bubble maker.
67
Follow these easy steps:1. Place newspaper on table to absorb any spills.
2. Pour about 1 inch of water in a small shallow bowl.
Add 1 tablespoon powdered tempera paint and 5 table-
spoons liquid detergent. Stir well.
3. Using a straw, blow gently (don’t suck) until bubbles
come over the top of the bowl.
4. Carefully place a sheet of paper on top of the bubbles.
They will pop and create wonderful circular patterns
on the paper.
5. Try several bowls with different colors to make
multicolored designs.
If paint bubbles appear too light on the paper,
add a bit more paint. For lots of bubbles, tape
4–5 straws together for a giant bubble blower.
You can also make bubble pictures by mixing
paint into a bubble-blowing solution.

Here’s what you need before you begin:old sock
rubber band
safety pin
scraps of felt, buttons, ribbons, etc.
fabric glue or hot glue gun (optional)
Adult help:If you decide to use hot glue to decorate
your puppet, have an adult help.
SONDRA SAYS:“When I make these puppets, I
pretend they are opera singers
and sing songs with very high
pitched voices.”
BIG MOUTHPUPPETS
68

Tips:
For more ideas onsocks, look at the bookSock Doll Workshop,
Cindy Crandall-Frazier,Lark Books,
1995.The book even comes
with six socks.
Follow these easy steps:1. Turn a sock inside out.
2. Slip a rubber band into a safety pin.
3. Attach the safety pin to the tip of the toe.
4. Slip your hand into the rubber band and turn the sock
right side out. The rubber band helps pull in the
“mouth” of your puppet.
5. Decorate your big mouth puppet with felt or buttons
for eyes and yarn or ribbon for the hair.
6. Open and close your fingers to make your puppet talk
or sing.
Make sure glue is dry before you start using your
puppet. Otherwise you might end up with a one-
eyed puppet.
69

Here’s what you need before you begin:large sheets of newsprint or butcher paper
stapler
scissors
markers and/or paints
newspaper
Adult help:It is easiest if an adult traces around your body.
You can do the rest.
70
SONDRA SAYS:“These sculptures are almost like
looking in a mirror—except you
are not as lumpy!”
LUMPYBUMPY BODIES

Tips :
Follow these easy steps:1. Lie down on a large piece of newsprint. Get in an
interesting position such as with your arms raised or
leg turned sideways.
2. Ask an adult or friend to trace around the outside of
your body.
3. Cut out your body shape, leaving an extra 2 inches
around the edges.
4. Place this shape over another large piece of newsprint.
5. Trace and cut so you have 2 identical pieces of your
body shape.
6. Color or paint details on the paper so it looks like you.
Color in your eyes, hair, and clothes. If using paint,
make sure it dries before you begin stapling.
7. Staple the two pieces together, leaving an opening
along one side.
8. Gently stuff newspaper into the arms, legs, body, and
head of your sculpture.
9. Staple the opening close.
10.You now have a twin that looks just like you
(well, almost)!
Call your local newspaper office and ask if they
have end rolls of newsprint. These are usually free
or very inexpensive.
Do you enjoydiscounted craftitems? Then call
A+ DiscountDistributors at(800) 443-7900
and ask for their freecatalog.
71

Here’s what you need before you begin:construction paper
crayons or markers
scissors
ruler
Adult help:No adult help needed. All you do is color and cut.
72
SONDRA SAYS:“Make one of these name cards
to hang on your bedroom door.”
NAMECARD

Tips:
Follow these easy steps:1. Cut a piece of construction paper about 3 inches by
11 inches.
2. Print your name very neatly on the paper. (see
example). Make sure the letters touch each other.
3. Use a ruler to make straight, even letters.
4. Color the letters of your name. Make it fancy by using
stripes or dots on each letter.
5. Don’t forget to color in the background around each of
the letters.
6. Cut out the “extra” space around each letter on the top.
7. Now you have a fancy sign to put on the door of your
room or stick on your bulletin board.
Light, colored paper gives the best background
for your fancy name design.
If you likecutting shapes out
of paper, tryEasy to Make
Decorative PaperSnowflakes,
Brenda Lee Road,Dover Publishing,
1987.
73

74
Here’s what you need before you begin:wooden board
white cotton material (old T-shirts work well)
hammer
clear plastic bag
frame or embroidery hoop
fresh flowers
leaves
scissors
Adult help:Young children
will need some
help hammering
the flowers.
FLOWERSMASH
SONDRA SAYS:“You’ll be amazed at how
the color of the flowers
transfers over to
the material.”

75
Tips:
Follow these easy steps:1. Place white material on a smooth wooden board.
2. Lay a flower upside down on the material.
3. Cover flower with clear plastic bag. This helps you see
where the flower is, so you can “smash” it.
4. Use the hammer to hit the flower 6–7 times.
5. Remove plastic bag and scrape off the excess flowers
from the material.
6. Repeat with several different flowers and leaves for a
variety of colors and shapes.
7. After you have a design you like, trim the material to
fit the frame or embroidery hoop.
8. Display and enjoy the sight of colorful flowers all
year long.
Experiment on a scrap of fabric to see which
flowers work best. Pansies and poppies produce
very bright patterns.
If you are interested inflowers, you’ll enjoy books
by Cicely Mary Barker.She writes stories about
flower fairies, who all looklike a different flowering
plant. Some includeThe Fairy Necklaces, and
The Flower FairiesBirthday Book,
Frederick Warner &Company.

Here’s what you need before you begin:Two mixing bowls
8 ounces Elmer’s Glue® (must use Elmer’s)
set of measuring spoons
food coloring
spoon for stirring
1 tablespoon Boraxo
Adult help:Ask an adult to purchase a box of Boraxo. This is
found in the laundry detergent section of the
grocery store. After you use what you need, the
rest of the Boraxo can be used to get your dirty
socks extra clean! Adults might also want to help
you get the very hot water you need to mix with
the Boraxo.
76
SONDRA’SSLIMY GOOP
SONDRA SAYS:“What’s great about this goop is
you can keep it for weeks in a
plastic bag in the refrigerator and
play with it over and over again.”

Tips:
Follow these easy steps:1. Mix 1 cup cold water and 8 ounces Elmer’s Glue in a
mixing bowl.
2. In a separate bowl, mix 1 tablespoon Boraxo with half
a cup very hot water (not boiling). Stir well.
3. If you want, add a few drops of food coloring to the
Boraxo and water mixture.
4. Add this hot water mixture slowly to the glue and
water. Stir a few seconds with a spoon.
5. Here’s the fun part. Using your hands, reach into
the bowl and mix everything together. In just a short
time, you will have a wonderful, gooey, nonsticky,
stretchy substance.
6. After you play with Sondra’s slimy goop, store it in a
reclosable plastic bag or covered container in the
refrigerator. Just make sure your brother doesn’t try to
eat it for lunch!
The key to this recipe is making sure the
Boraxo dissolves completely in the water. Use
very hot water, but not boiling.
For extra fun, add alittle glitter to your goop.If you have an old beanbag chair, add some tiny
pellets to the mixtureand see what happens
to the goop.
77

Here’s what you need before you begin:empty jar with lid (such as a pickle jar or a baby
food jar)
super glue or hot glue
small figurines (fast food toys work well)
glitter
glycerin (optional)
Adult help:Let an adult use the super glue or hot glue to
attach the figurines to the jar lid.
SONDRA SAYS:“If you make several of
these, you can have a
whole snow village.”
SNOW DOMES
78
Tips:
79
Follow these easy steps:1. Remove labels from jar.
2. On the underneath side of the lid, glue several small
plastic figurines with super glue. You can use plastic
animals, marbles, or small stones.
3. Let glue dry.
4. Fill jar with cold water (warm water gets cloudy).
5. Add half a teaspoon of glitter.
6. Add glycerin to water (optional).
7. Spread glue around top of jar.
8. Quickly place lid over jar and tighten.
9. Let dry overnight.
10.Tip your jar over and admire your sparkly snow scene.
You can paint the lid, but most of it seldom shows.
Glycerin is found in your drug store. When 1/2
teaspoon is added to the water, it causes the glitter
to fall slowly over your snow scene. Glycerin also
helps moisten your hands if you’ve been playing
in real snow.
Want anothercatalog full ofcraft supplies?
Call 1-800-216-1601for a catalog
fromEconomy Handicrafts.

Here’s what you need before you begin:large section of adhesive-backed paper
1 fan
assorted scraps of lightweight items such as
Christmas tinsel, yarn, ribbon pieces, tissue, etc.
Adult help:Ask an adult to help you plug in the fan. Never
put your fingers near the spinning fan blade.
80
SONDRA SAYS:“This is good craft to do on a hot
day, because the fan cools you
while you’re working.”
FLUTTERYFAN FUN

Tips:
Follow these easy steps:1. Place a piece of adhesive-backed paper, sticky side
out, on an easel or attach to wall.
2. Place the fan 2–3 feet in front of the sticky paper.
3. Turn on fan.
4. Hold a strip of yarn or paper in front of the fan and . . .
let go!
5. The “wind” pushes your item onto the sticky contact
paper. You’ll have a wild, wind-blown collage.
You’ll need to adjust the distance of the fan from
the paper, depending on the force of the fan.
81
For a variation,draw the outline of a
face on the contact paper.Use colored yarn
and hold it in front ofthe fan. You’ll endup with a picture of
someone havinga really bad-hair day.

Here’s what you need before you begin:construction paper
scissors
glue
markers
wiggle eyes (optional)
paper brads
Adult help:Ask an adult to help you find or buy brads. These
are prong paper fasteners available in any store
that sells staples or paper clips. Brads are very
small, so keep them away from young children.
SONDRA SAYS:“You can take any ordinary
picture, cut it out, and make it
special by adding brads.”
WIGGLY,WAVINGSCULPTURES
82
Tips:
83
In case you runout of
craft ideas, try100 Things to Make
and Do,Marian Elliot,
Smithmark Publishing,1997.
Follow these easy steps:1. Think about what you want to make. You can draw a
person’s body, circles for a caterpillar, or the half-shell
shape of an egg.
2. Cut shape out of construction paper.
3. Make arms, legs, or other parts to your design.
If you made a body, you’ll need to cut out 2 arms and
legs. If you made an egg shell, you’ll need to make a
baby chicken.
4. Attach your paper parts with the brads. This makes a
person with moveable arms and legs or a chicken
“hatching” from the egg.
5. Decorate with markers and add wiggle eyes if you
want to.
Heavy construction paper works best because it’s
more durable where the brad is attached.
84
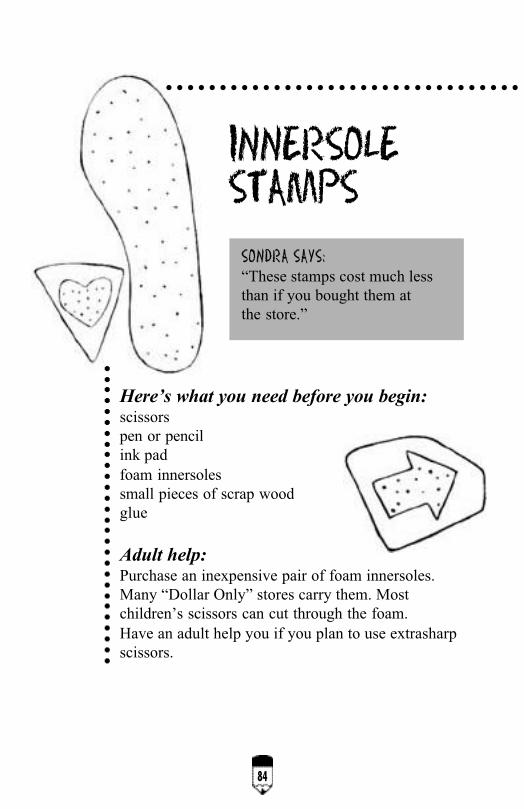
INNERSOLESTAMPS
SONDRA SAYS:“These stamps cost much less
than if you bought them at
the store.”
Here’s what you need before you begin:scissors
pen or pencil
ink pad
foam innersoles
small pieces of scrap wood
glue
Adult help:Purchase an inexpensive pair of foam innersoles.
Many “Dollar Only” stores carry them. Most
children’s scissors can cut through the foam.
Have an adult help you if you plan to use extrasharp
scissors.

Tips:
Follow these easy steps:1. Use a pen or pencil to draw a design on the foam
innersole. Simple shapes work best, such as hearts
or rainbows.
2. Cut out the design.
3. Glue cut innersole piece to scrap of wood. Let dry.
4. Use your handmade stamp to decorate cards, stationery,
or your lunch bags.
5. If you can’t get a foam innersole, see if an adult can
find a scrap piece of foam double-backed weather
stripping. The weather stripping is easy to cut, attaches
to a wood block, and stamps well.
Remember: if you want to make a stamp of your
name, the letters on the stamp must be cut out
backwards. If you don’t, your name will be
backwards when you stamp it on the paper.
If you want more ideason stamp making and
crafts, look atMore Incredible
Awesome Crafts for Kids,Carol Field-Dahlstrom,
Better Homesand Gardens,
1997.
85

Here’s what you need before you begin:any color tempera paint
liquid starch
distilled water
comb or fork
plain paper
square casserole or baking pan
old newspapers
disposable container
Adult help:If there isn’t any liquid laundry starch or distilled
water in your house, ask an adult to buy some.
SONDRA SAYS:“This paper is perfect for
wrapping small presents.”
SWIRLY PAPER
86

Tips:
Follow these easy steps:1. Lay several pieces of newspaper on a smooth surface.
2. Mix 1 tablespoon paint and 1 tablespoon distilled water
in a small container until it is smooth and “creamy.”
3. Pour half an inch of liquid starch in a baking dish.
4. Dribble mixture of paint and water over starch.
5. Carefully swirl the paint with a fork or a wide-toothed
comb.
6. Gently place a piece of paper on top of the starch for
5–10 seconds. The swirled paint will attach to the paper.
7. Remove marbleized paper and let dry on newspapers.
8. Use dyed paper for stationery, or book covers. You can
also dip cardboard frames.
Add a second or third color paint if you like.
Just remember to swirl the paint gently to get
a distinct pattern.
Use pieces ofyour marbleizedpaper to make
origami creations.Try
Easy Origami,Dokuohitei Nakano,
Puffin Books,1994.
87

Here’s what you need before you begin:clear cassette case
cassette tape
acrylic paints or permanent markers
tape recorder
pencil
Adult help:An adult may need to help you record the tape.
SONDRA SAYS:“I like making these because it
makes people happy when they
see the special case and then also
get a tape.”
88
BEST-SELLINGCASSETTES

Tips:
Follow these easy steps:1. Remove any wrapping label or stickers from the
cassette case.
2. Lightly sketch a design on the case. If the tape will be
for someone’s birthday, you might draw balloons and
write the person’s name. If the tape is for a holiday gift,
sketch a snowman or winter scene.
3. Fill in the drawings using acrylic paint or any
permanent markers.
4. While paint dries, you can record your tape.
5. Sing a song to your grandmother, read a story to a
friend, or just share what you’ve been doing.
6. When the tape is complete, and the case is dry, give it
to someone as a special gift.
Ask an adult for an old cassette tape you
can use to record yourself. Then you don’t need to
buy a new one, as long as you have a clear case.
You could alsodecorate the cassettecase by using a setof stencils called
Fun with MusicalInstrument Stencils,
Paul Kennedy,Dover Publications,
1993.
89

Here’s what you need before you begin:chenille stems
Styrofoam packing “peanuts”
ribbon or yarn
markers
Adult help:You should be able to do this on your own.
Cleanup is especially easy to do.
SONDRA SAYS:“This is a quick, easy, and
nonmessy craft to do.”
SOFTAND SQUISHYSCULPTURES
90

Tips:
Follow these easy steps:1. Let your imagination run loose with this project.
2. Take a chenille stem and poke it through the Styrofoam
peanuts. Any size peanuts work.
3. Every sculpture is different, depending on your shape of
peanut and length of chenille stem. For example:
4. String packing peanuts on 2 separate pieces of chenille
stems.
5. Leave about 1 inch empty on each end of the chenille
stem.
6. Connect the 2 pieces of chenille by twisting the ends
together. It looks like you made a circle.
7. Bend into a heart shape. Decorate with a few red
ribbons for a Valentine’s present.
8. Make other sculptures with the wire and peanuts. Try
making bracelets, necklaces, or wreaths.
9. When you’re done with the sculpture, decorate the
peanuts with markers.
Gently poke the chenille stem into the packing
peanuts, or else they will crack.
For more ideas on usingrecycled items, look at
Ecoart! Earth FriendlyArt & Craft Experiences
for 3–9 Year Olds,Laurie Carlson,
Williamson Publishing,1992.
91

Here’s what you need before you begin:plain-colored plastic light switch covers
(These can be purchased for about 15 cents each
at home improvement stores, or use the one you
have in your room now.)
permanent markers or acrylic paints
stickers
stamps
photographs
screwdriver
Adult help:Ask an adult if you can remove the light switch
cover from your bedroom. Keep the loose screws
in a safe place.
SONDRA SAYS:“Instead of having an ordinary
light switch in your room, you
can make a personalized one.”
DESIGNERLIGHT SWITCHCOVERS
92

Tips:
For a great catalogfull of craft kits,call S&S Crafts
at 1-800-243-9232.They have grouppacks if you want
to make craftswith your friends.
93
Follow these easy steps:1. Think about how you want your light switch to look.
2. You could decorate it with paints or markers. Maybe
you’d like to glue small pictures of your friends on it.
How about adding some stickers or shiny stars?
3. If using paint, make sure it is dry before you put the
light plate back on the wall.
Because new light switch covers are inexpensive,
this makes a great activity for birthday parties.

Here’s what you need before you begin:old nylon stockings
thread
rubber bands
batting or cotton balls
scissors
wiggle eyes
permanent markers
glue
yarn
Adult help:Sometimes it’s hard to pinch the “nose” and tie it
at the same time. An adult can help you.
GROUCH ANDGRIN FACES
94
SONDRA SAYS:“My friend Alison and I got carried
away making these. We made ten
grouch and grin faces in one hour.”

Tips:
For more greatcraft ideas, read
Donna Erickson’sRainy Day Fun Book,
Donna Erickson,Augsburg Fortress
Press,1996.
Follow these easy steps:1. Cut the leg of an old pantyhose stocking into sections
6–7 inches long.
2. Take one section of stocking and tie the end shut with
thread or a rubber band.
3. Turn inside out.
4. Stuff stocking with batting or cotton balls.
5. Tie top shut with thick thread. (This may be where an
adult helps.)
6. Pinch a small section of the stocking and batting to
form a “nose.” Wrap and tie thread around base of
nose. (Again, an adult may need to help here.)
7. Glue on wiggle eyes or draw eyes with your
permanent marker.
8. Draw a mouth, ears, or even a mustache.
9. Use extra batting or yarn to glue on hair or beards.
10.You’ll be amazed how every one of these faces turns
out completely different.
You can get different colors of skin for your face
depending on how much batting you use.
The more you stretch the stocking, the lighter
the skin becomes.
95

Here’s what you need before you begin:ceramic tile (plain colors work best)
permanent markers or acrylic paints
felt
scissors
glue
clear adhesive-backed paper
Adult help:See if an adult can find a few plain ceramic tiles
around the house. If not, they are available at any
home improvement store for a low cost.
SONDRA SAYS:“Make a set of these tiles and give
them away as a practical gift.
(You know how adults like
practical gifts.)”
COASTERTILES
96
Tips:
For even more crafts,you can read
Fun at Home withDian Thomas,Dian Thomas,Dian Thomas
Communications,1993.
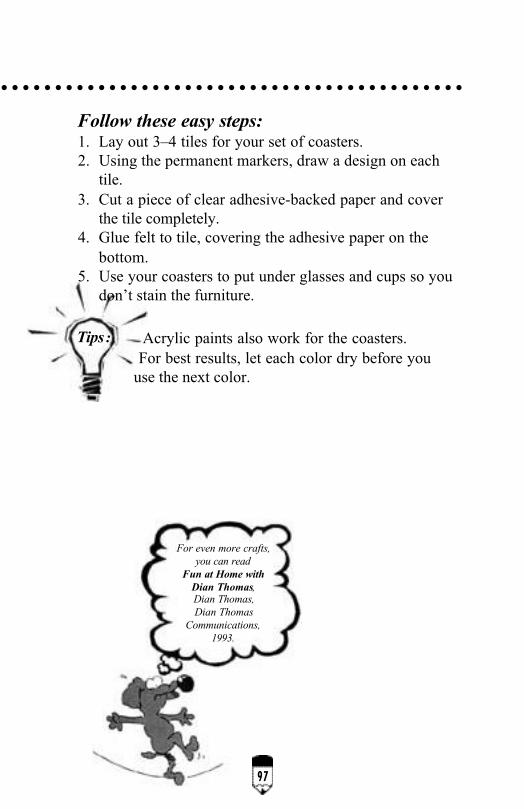
Follow these easy steps:1. Lay out 3–4 tiles for your set of coasters.
2. Using the permanent markers, draw a design on each
tile.
3. Cut a piece of clear adhesive-backed paper and cover
the tile completely.
4. Glue felt to tile, covering the adhesive paper on the
bottom.
5. Use your coasters to put under glasses and cups so you
don’t stain the furniture.
Acrylic paints also work for the coasters.
For best results, let each color dry before you
use the next color.
97

Here’s what you need before you begin:used fabric softener sheets
thin ribbon
potpourri
scissors
nylon net (a quarter yard makes 5–6 potpourri
holders)
Adult help:Ask an adult to save the fabric softener sheets
after doing the laundry.
98
SONDRA SAYS:“This is a good way to recycle
the fabric softener sheets that
have been used to make your
clothes smell fresh.”
EXTRASMELLYPOTPOURRI

Tips:
99
Follow these easy steps:1. Lay out a section of nylon net on a flat surface.
2. Place a used fabric softener sheet on top of the nylon
net.
3. Cut nylon net so it is the same size as the fabric
softener sheet.
4. Scoop 1 tablespoon of potpourri in center of fabric
softener sheet.
5. Carefully gather the edges of both fabrics together to
create a small pouch, with the potpourri in the middle.
6. Tie firmly with thin ribbon.
7. Add a bow if you want.
If you don’t have nylon net, these potpourri
holders can simply be wrapped in the dryer
sheets. Nylon net gives them color and a more
festive appearance.
Put thesepotpourri holders
in your sock drawerfor great
smelling feet!They also make
pretty ornaments.

Here’s what you need before you begin:2 small clay flowerpots
acrylic paint
paint brushes
assorted craft odds and ends such as pipe cleaners,
felt scraps, buttons, etc.
1–2-inch Styrofoam ball
hot glue gun
craft glue
Adult help:Have an adult use a hot glue gun to glue the
two flowerpots together, rim to rim.
100
FLOWERPOTCHARACTERS
SONDRA SAYS:“You’d be amazed at the types of
animals and people you can make
from these flower pots.”

101
Tips:
Follow these easy steps:1. Glue the Styrofoam ball on the top of the flowerpots.
2. Paint the flowerpots a solid color, or leave natural,
depending on your character.
3. Create a face on the Styrofoam ball using your
scrap materials.
4. Add details to your character by painting on clothes or
hair.
5. Embellish even more by using pipe cleaners for
wings or arms. Let your imagination help you create a
one-of-a-kind character.
If clay flowerpots are unavailable, use two
foam cups glued rim to rim. These lightweight
characters can also be used as tree ornaments.
For more fun ideas,read
Rain or ShineActivity Book,Joanna Cole &
Stephanie Calmenson,William Morrow
Publishing,1997.
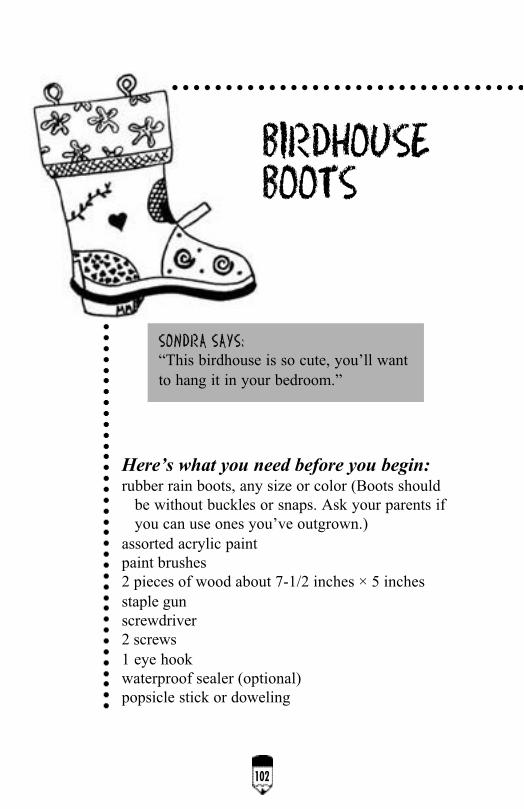
Here’s what you need before you begin:rubber rain boots, any size or color (Boots should
be without buckles or snaps. Ask your parents if
you can use ones you’ve outgrown.)
assorted acrylic paint
paint brushes
2 pieces of wood about 7-1/2 inches × 5 inches
staple gun
screwdriver
2 screws
1 eye hook
waterproof sealer (optional)
popsicle stick or doweling
SONDRA SAYS:“This birdhouse is so cute, you’ll want
to hang it in your bedroom.”
102
BIRDHOUSEBOOTS

Tips:
It’s fun to watch birds cometo your yard. For more information, read
Backyard Birds of Summer, CarolLerner, William Morrow and Co., 1996,
or Extremely Weird Birds,Sarah Lovett &
Mary Sundstrom,John Muir Publications,
1996.
Adult help:An adult needs to cut a hole 1-1/ 2 inches–2 inches in
diameter about 2 inches from top of boot. Utility knife
or sharp scissors work well. One inch below the hole,
make a slit and insert a popsicle stick or small piece of
doweling for the bird perch. With the boot upright, staple
each piece of wood to the side of the boot. Bring top
pieces of wood together and secure with two screws at
top. You just made the roof. Insert eye hook for easy
hanging.
Follow these easy steps:1. Once the adult has done the hard work, you get to
decorate your birdhouse boot!
2. Use the paints to decorate the boot however you want.
3. If you plan to hang the boot outside, spray it with a
waterproof sealer.
This is the most complicated craft in the book,
but the end result is worth the extra effort.
103

Here’s what you need before you begin:puzzle pieces you can’t use anymore
glue
cardboard frame or plastic coffee can lid
assorted colors of paint
newspaper
spray paint (optional)
Adult help:If you don’t have a cardboard frame, ask an adult
to cut a square or circle out of the center of the
coffee can lid. The lid is the basis for your frame.
104
SONDRA SAYS:“This is a good way to use
your puzzles that have
missing pieces.”
PUZZLEPIECEPICTURES

Tips:
Follow these easy steps:1. Spread out the puzzle pieces on newspaper. Paint each
piece a solid color. For the easiest method, go outside
and have an adult spray paint the pieces.
2. Let paint dry.
3. Here’s your chance to be creative. Select a contrasting
color paint and decorate each puzzle piece. Try polka
dots or squiggly lines.
4. After paint has dried, glue puzzle pieces in a random
pattern on your frame.
5. Use the frame to display a picture of your friends or a
drawing you made.
Painted puzzle pieces can be used to decorate
your hair clips, boxes, and cards. If you are in
a hurry, glue puzzle pieces directly onto a frame
without painting them first.
If you useCD-ROM, there’s a
program calledHighlights
Puzzlemania,by Graphix Zone,that has hundreds
of puzzles.
105

106
Nowfor some
yummy stuffto makeand eat.

107
The next craft projectsare just a littledifferent . . .
They involve food, so you get to eat what you make!

Here’s what you need before you begin:graham crackers
chocolate chips
mini-marshmallows
candle
matches
toothpick or uncooked spaghetti
Adult help:Since you are using a candle, make sure an adult
lights the match and stays with you while the
candle is lit.
108
MINI S’MORESSONDRA SAYS:“This isn’t an actual craft, but it
tastes so good I wanted to add it to
the book. These are fun to make on
a rainy day.”
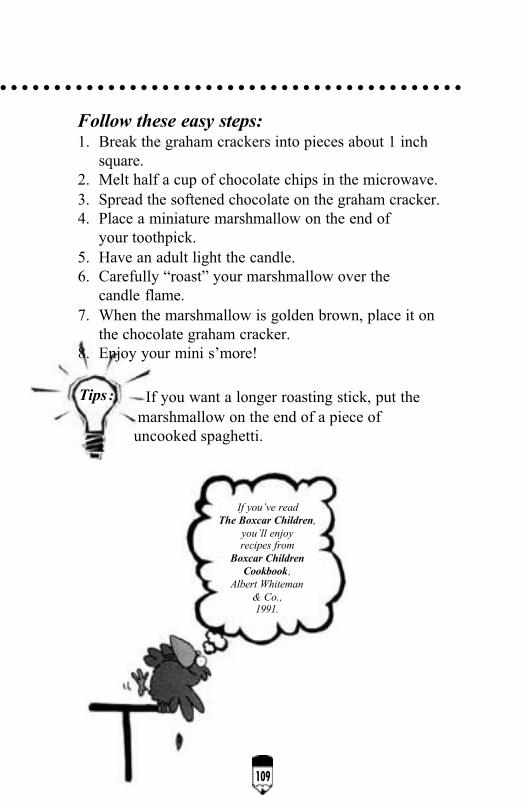
Tips :
If you’ve readThe Boxcar Children,
you’ll enjoyrecipes from
Boxcar ChildrenCookbook,
Albert Whiteman& Co.,1991.
Follow these easy steps:1. Break the graham crackers into pieces about 1 inch
square.
2. Melt half a cup of chocolate chips in the microwave.
3. Spread the softened chocolate on the graham cracker.
4. Place a miniature marshmallow on the end of
your toothpick.
5. Have an adult light the candle.
6. Carefully “roast” your marshmallow over the
candle flame.
7. When the marshmallow is golden brown, place it on
the chocolate graham cracker.
8. Enjoy your mini s’more!
If you want a longer roasting stick, put the
marshmallow on the end of a piece of
uncooked spaghetti.
109

Here’s what you need before you begin:graham crackers
assorted candies, licorice, or cereal
decorating frosting
small boxes or milk cartons (school size)
butter knife or popsicle stick for spreading
clear varnish (optional)
Adult help:You’ll need an electric mixer to make the decorating
frosting, so make sure an adult is nearby.
SONDRA SAYS:“It’s tempting to eat the candy
while you’re making these little
candy houses.”
CANDYCREATIONS
110

Tips:
Cement FrostingBeat 2 egg whites, 3 Tbls.
meringue powder, and 6 Tbls.warm water in a large bowl.
Add one 16 oz. package siftedpowdered sugar, 1 Tbls. vanilla
and 1/2 tsp. cream of tartar.Beat with electric mixer for7–10 minutes. Keep covered
or use immediately. Guaranteedto “glue on” any candy!
Follow these easy steps:1. Take a small box such as a school-size milk carton and
cover the sides with frosting. This forms the “base” for
your candy creation.
2. Place graham crackers around the box, cutting them
gently to fit.
3. Using the frosting as glue, add more graham crackers
to make a roof.
4. Here’s the fun part. Decorate your house with candy,
licorice strips, or colorful pieces of cereal.
5. These houses can be eaten or sprayed with a clear
varnish to use for a permanent display.
Dye the frosting green to make leprechaun
houses. On Halloween, make haunted houses
with crooked doors and walls.
111

Here’s what you need before you begin:thin, clear plastic gloves worn by deli workers
red jelly beans or candy
small pieces of string or yarn
popcorn
Adult help:With an adult’s help, pop some popcorn.
112
SONDRA SAYS:“This is a fun way to serve and
eat an ordinary snack.”
PARTYPOPCORNHANDS
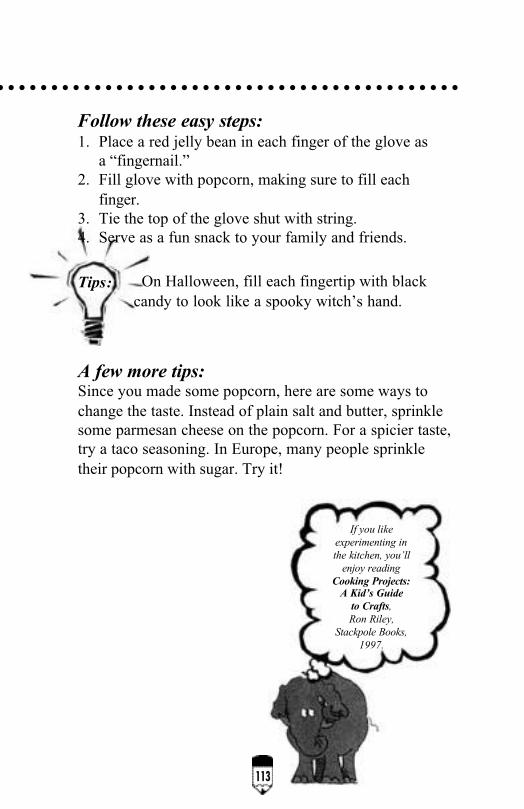
Tips:
Follow these easy steps:1. Place a red jelly bean in each finger of the glove as
a “fingernail.”
2. Fill glove with popcorn, making sure to fill each
finger.
3. Tie the top of the glove shut with string.
4. Serve as a fun snack to your family and friends.
On Halloween, fill each fingertip with black
candy to look like a spooky witch’s hand.
A few more tips:Since you made some popcorn, here are some ways to
change the taste. Instead of plain salt and butter, sprinkle
some parmesan cheese on the popcorn. For a spicier taste,
try a taco seasoning. In Europe, many people sprinkle
their popcorn with sugar. Try it!
If you likeexperimenting inthe kitchen, you’ll
enjoy readingCooking Projects:
A Kid’s Guideto Crafts,Ron Riley,
Stackpole Books,1997.
113

Here’s what you need before you begin:1/4 cup margarine or butter
about 50 large marshmallows or 4 cups miniature
marshmallows
5 cups crispy rice cereal
saucepan
aluminum foil
various size funnels
plastic wrap
wooden stirring spoon
Adult help:Have an adult assist you in using the stove to mix up your
sticky-giant-kiss mixture.
SONDRA SAYS:“These are fun to make
and one of the few craft
projects that you can eat.”
GIANT KISSES
114

Tips:
115
Follow these easy steps:1. Melt margarine or butter in large saucepan over
low heat.
2. Add marshmallows and stir until melted. Keep stirring
about 3 minutes more.
3. Remove from heat and add cereal. It will be hard to stir.
4. Cool slightly.
5. Line each funnel with plastic wrap.
6. Butter your fingers and press warm cereal mixture
into funnels.
7. Let cool 1 hour.
8. Slide giant kisses out of the funnel and wrap in
aluminum foil.
9. Write a message or a person’s name on a white tag and
attach it to the top of your giant kiss.
Be sure to wash your hands before cooking.
(Don’t forget to clean up the kitchen also!)
For more funin the kitchen,
you’ll enjoy theMash & Smash
Cookbook: Fun & YummyRecipes Any
Kid Can Make,Marian Buck-Murray,
John Wiley & SonsPublishing,
1998.

Here’s what you need before you begin:condensed milk
food coloring
white bread
paint brushes
bowls or small cups (4)
toaster
Adult help:Ask an adult to be with you when you use the
toaster.
116
SONDRA SAYS:“It’s always fun to be able to play
with your food and then eat
it afterwards.”
DECORATEDTOAST

Tips:
Follow these easy steps:1. Set out 4 small cups or bowls.
2. Pour 1 tablespoon condensed milk in each bowl.
3. Drop in a few drops of food coloring. Mix well.
4. With a clean paintbrush, use the colored milk as
your “paint.”
5. Draw pictures or designs on the toast.
6. Lightly toast the bread to reveal the decorated toast.
7. Eat and enjoy!
For extra special toast, cut the bread into fancy
shapes with cookie cutters.
How do you findKing Arthurin the night?
With a Knight-light.
117

Tips :
Tips :
118
Fantastic Recipes You’llNever Want to Eat
Don’t get mixed up with the next recipes.You don’t want to eat these—they are for
making craft projects.
BIG BUBBLE SOLUTION:Simply mix together:
1 cup water2 tablespoons Light Karo syrup or glycerin (found in
drug store)4 tablespoons dishwashing liquid
Stir together and let set at least 24 hours. Use to make hundreds of bubbles.
Try blowing a bubble, then catching it and placing
it in the freezer. You’ll have a lightweight frozenbubble. For extra fun, blow bubbles at night and
shine flashlights on them. It’s fun to see them
shimmer in the light.
GLURCH:Mix one cup cornstarch with one cup water. This substancefeels firm when you pick it up, then slowly starts to “ooze”
between your fingers.
Glurch is great to use at Halloween. See if your friends arebrave enough to close their eyes and then reach into a bowl of
glurch and try to pick it up—gross!

SMELLY ART:(good smelling, that is)
Mix 1 cup applesauce, 1-1/2 cup cinnamon, and 1/3 cup glue toform a ball. Chill at least 30 minutes. Roll dough to 1/4 inchthickness. (If it is any thinner, the cookies will crack.) Cut outdough using cookie cutters. Use a straw to punch a hole in thetop for hanging. Let dry at room temperature for 2 days. String aribbon through the hole and hang “cookies” throughout thehouse. You’ll love the smell.
EASY CLAY BEAD DOUGH:Place 1/2 cup salt in a large bowl. Have an adult add 1/2 cupplus 2 tablespoons hot water. Stir until salt is completely dis-solved. Add 1-1/2 cups flour. Stir well. Let mixture cool. Kneaddough until smooth and firm. Shape your clay into beads, tryingnot to get them bigger than a cherry. Use a toothpick to poke ahole in each bead. Put beads on aluminum foil-lined cookiesheet. Bake at 250° for 1 hour and 20 minutes. When beads arecool, decorate with paint or markers. String with carpet thread ordental floss.
MODELING DOUGH:Have an adult use a saucepan over medium heat to mix 1 cupbaking soda, 1/2 cup corn starch, and 2/3 cup warm water. Bringto a boil and stir constantly until mixture looks like mashedpotatoes. Remove from heat and place dough on counter. Letcool and knead until smooth. Makes a great white dough to uselike clay. After you make items, let them air dry 1–2 days.
119


