

BCWS Faller Training
Student Manual
Name: ______________________________________________________________
Contact Information: __________________________________________________
FS 1460 HPR 2018/03
11 - 1
Book 3 – BCWS Faller Training Student Manual
Section 11 Falling Accident and Awareness Review
Background: A Unit Crew was involved in mop-up operations on the Southern flank of a large project fire. The crew had been working on the same five hectare spot for three days so they knew the area well. The crew was on day 11 of their maximum 14 day deployment. It had been a long and challenging fire deployment. The crew had been directed by the division supervisor to conduct mop up of hot spots in an area located approximately 500 meters from the contained edge of the fire. The work undertaken that day would include the removal of danger trees along the outer perimeter by falling teams, with the rest of the crew working a previously established hose lay on another section of the five hectare spot. The Unit Crew supervisor conducted a daily safety and work plan briefing prior to starting work. The daily safety/ work plan established a clear communication plan, first aid plan, medical evacuation procedures and tactical considerations to address safety in the work area. Danger tree removal by four falling teams was incorporated in the work plan. Each team was composed of one faller and one fuel carrier. The fuel carrier for each pair was a certified bucker. After the safety/work briefing was concluded the unit crew broke off into its component pieces to work for the day. However, because tools and equipment were in short supply, one of the four falling teams was unable to begin work as not enough chainsaws were available. This resulted in a 2.5 hour delay before team 4 eventually received a chainsaw to begin work as planned. The chainsaw provided to team 4 had a single wrap handlebar.

11 - 2
Book 3 – BCWS Faller Training Student Manual
The faller on team 4 - who had recently received BCWS faller certification - reported that he was frustrated at having to wait this long to get to work and was anxious to begin work with his partner. Shortly after receiving their chainsaw equipment, team 4 arrived in their work area, and realized there was a potential safe work distance conflict with team 3. They contacted team 3 on the radio and team 3 ceased its work so both teams could have a discussion. The faller on team 3 was a senior faller on the crew. Prior to the commencement of work he took time to review site hazards, minimum safe work distances and the updated falling plan with faller 4. After revising the plan with team 4, team 3 decided to take a lunch break to let team 4 begin work in their new area. Team 4 proceeded into their work area, now five tree lengths from team 3. When they conducted a detailed hazard assessment of their new worksite, they observed extensive fire damage to the ground, and fire scarring that affected roots and stem stability in spruce and deciduous trees. They also noted that many burned out trees had fallen over because of fire damage. The fuel carrier moved to a pre-determined position 2.5 tree length from the faller and the faller began to work. He felled two spruce danger trees and began to assess the third flagged danger tree. Based on his assessment of the tree he picked a falling direction and determined, constructed and tested one escape route. The escape route led to cover behind a spruce tree, approximately 10 feet behind the danger tree to be felled. The faller constructed the humbolt undercut and the backcut using appropriate work procedures. The falling cuts were at waist height and levelled. While the tree fell it brushed an aspen tree. The aspen tree sprung back, broke off at the top, and struck the faller who was in the process of retreating behind cover. The faller was pinned under the broken top. The faller’s partner immediately radioed for assistance and administered first aid to the injured, yet conscious faller. Within minutes the third falling team was on-site and assisting, and a request for immediate helicopter medevac was simultaneously initiated.
11 - 3
Book 3 – BCWS Faller Training Student Manual
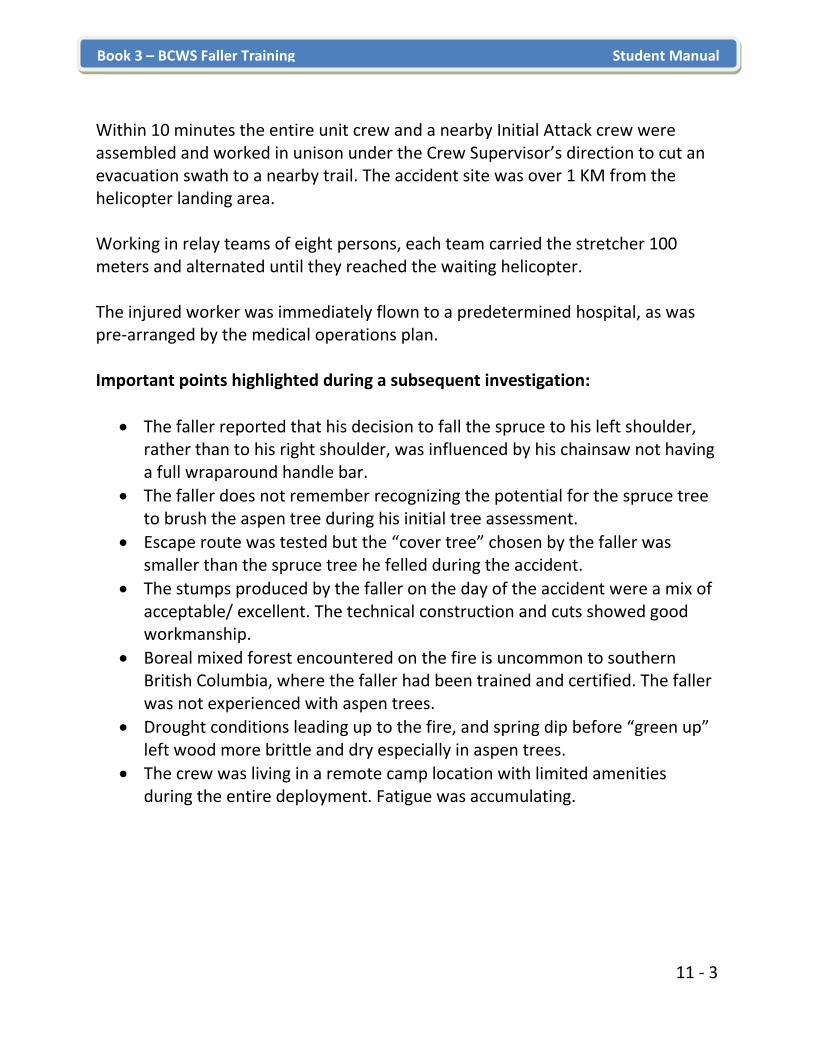
Within 10 minutes the entire unit crew and a nearby Initial Attack crew were assembled and worked in unison under the Crew Supervisor’s direction to cut an evacuation swath to a nearby trail. The accident site was over 1 KM from the helicopter landing area. Working in relay teams of eight persons, each team carried the stretcher 100 meters and alternated until they reached the waiting helicopter. The injured worker was immediately flown to a predetermined hospital, as was pre-arranged by the medical operations plan. Important points highlighted during a subsequent investigation:
• The faller reported that his decision to fall the spruce to his left shoulder, rather than to his right shoulder, was influenced by his chainsaw not having a full wraparound handle bar.
• The faller does not remember recognizing the potential for the spruce tree to brush the aspen tree during his initial tree assessment.
• Escape route was tested but the “cover tree” chosen by the faller was smaller than the spruce tree he felled during the accident.
• The stumps produced by the faller on the day of the accident were a mix of acceptable/ excellent. The technical construction and cuts showed good workmanship.
• Boreal mixed forest encountered on the fire is uncommon to southern British Columbia, where the faller had been trained and certified. The faller was not experienced with aspen trees.
• Drought conditions leading up to the fire, and spring dip before “green up” left wood more brittle and dry especially in aspen trees.
• The crew was living in a remote camp location with limited amenities during the entire deployment. Fatigue was accumulating.

11 - 4
Book 3 – BCWS Faller Training Student Manual
Class Discussion: What are some of the good things that happened during this scenario? Answer:
What are the elements of a tree assessment? Answer:

11 - 5
Book 3 – BCWS Faller Training Student Manual
Is the use of a spotter an acceptable practice? Answer:
What is the priority approach for wildfire suppression chainsaw operations? Answer:

11 - 6
Book 3 – BCWS Faller Training Student Manual
What does “available assistance” mean? Answer:
What is one way to reduce risk exposure to fallers during danger tree removal operations? Answer:

12 - 1
Book 3 – BCWS Faller Training Student Manual
Section 12 – Tree Species Knowledge and Hazards
12.1 Tree Species Identification Tree Species Groups Learning Objectives
• Identify the hazards of 4 tree species groups • Describe two hazard symptoms for each of the four groups of trees
Field Practice Objectives
• Identify tree species groups and hazards associated with the species groups
• Use classification system during site assessment to identify hazards
Section 12 Note: Trees in British Columbia can be categorized into 4 species groups. Each
group has specific hazards
Participant Activity
• Reference the Hazards of Four Tree Species Group Handout • Review and explain the hazards associated with each species group • Identify tree species in your area.
Competency 12

12 - 2
Book 3 – BCWS Faller Training Student Manual
Hazards of the Four Tree Species Groups Handouts Group 1 – Douglas Fir, Larch, Pine, and Spruce
Group 2 – Western Red Cedar, and Yellow Cedar
Group 3 – Hemlocks, and True Firs (Balsam)
Group 4 – All Deciduous
• Dead tops indicate a structural weakened
• Cracked, decayed, broken or hung-up limbs
• Split or cracked trunk • Fungal fruiting bodies indicating
sap, heart or root rot • Excessive lean • Root pull or lifting root mat • Sapwood can become brittle in
old growth fir and larch • Sloughing bark, e.g. Douglas Fir
• Dead tops, e.g. candelabra or multi or single stem
• Dead multiple stems, e.g. widowmakers, cracks, or broken tops
• Hollow stems • Structural damage, e.g. cracks,
splits, scarring • Burnt selections of stem from fire • Loose slabs of sapwood on stem • Tree lean due to wet soils, lifted
root mat, shallow soils, steep slope, damage or root rot
• Brush growing on the tree stem, e.g. hides defects in the stem
• Brittle holding wood • Dead red cedar (grey ghosts) in
wet climate have no root systems • Old growth red cedar tends to
have the weight balance near the base of the trunk
• Internal cavities, e.g. bear dens • Yellow cedar is prone to
barberchair due to elastic holding wood
• Dead tops indicate a structural weakness
• Cracked, decayed, broken, or hung-up limbs
• Split or cracked trunk • Mistletoe infected trees can
develop large and heavy brooms on the limbs
• Second Growth sapwood has limited holding strength
• Prone to heart, sap and root rot indicated by fungal fruiting bodies
• If frozen, prone to shatter • Prone to sliding off the stump • Prone to barberchair • Dead multiple stems, e.g.
widowmakers, broken tops, cracks, hidden large hanging dead limbs
• Prone to split trunk, e.g. lightning • strikes, frost and wind induced
cracks • Stem damage, e.t. butt rot,
animal damage, machine and fire damage
• Butt and stem cankers, e.g. aspen, balsam poplar, paper birch, big-leaf maple, and red alder
• Large pieces of bark separated and sloughing from the stem
• Prone to heart rot and root rot

12 - 3
Book 3 – BCWS Faller Training Student Manual
12.2 Tree Classification Learning Objectives
• Distinguish between the 9 stages of decay in the classification system Field Practice Objectives
• Use the classification system as a guideline to classify trees
Participant Activity
• Reference the Tree Classification Handout
• Review and explain the 9 tree classifications
• Link to risk assessment form from danger tree risk assessment for buckers and fallers.

12 - 4
Book 3 – BCWS Faller Training Student Manual
Tree Classification Handout 1 2 3 4 5 6 7 8 9
Class 1
Class 2 Class 3
Class 4
Class 5
Class 6 Class 7
Class 8
Class 9
Live trees with minimal damage that does not impact on the structural strength. There are no visible indicators of decay present.
Live trees, but may have some visible defects that can affect the tree’s structural strength or introduce decay, e.g. dead or wind snapped top, large dead limbs, fungal conks, a cracked or scarred stem.
Trees that have recently died and may contain most limbs, fine twigs, and needles.
The decay process is beginning, The stem, while remaining hard, will begin to rot and soften. Generally the top has snapped off, loose bark is present, and 50% of the limbs are gone.
Trees will have most bark and branches absent. The stem continues to remain relatively hard, although the wood continues to rot and soften.
Trees will have no branches or bark, and the sapwood is sloughing away from the stem. The decay process is more advanced, and the wood is spongy. Smaller trees have become unstable.
Trees have extensive internal decay. The outer shell may remain hard, but all of the lateral roots are completely decomposed.
Trees are downed trees that are naturally decomposing with only a stub remaining.
Recognize
Evaluate

12 - 5
Book 3 – BCWS Faller Training Student Manual
12.3 Review of DTA General Procedures Review the danger tree process for wildfire from section 4.5 in book 1
Notes:

13 - 1
Book 3 – BCWS Faller Training Student Manual
Section 13 - Review of Emergency and Evacuation Procedures 13.1 Site Specific Safety Meeting for Wildfire
OH&S Regulation 26.5 Learning Objectives
• Identify the two main points of OH&S Regulation 26.5 • Discuss the purpose and key components of the safety meeting • Discuss field safety plan use during wildfire activities
Infoflip 1: “Initial Site Safety Meeting Checklist” & Section 9 What is the responsibility of the supervisor regarding the initial safety meeting? Answer:
What are the two main points of OH&S Regulation 26.5? Answer:
Competency 1-6

13 - 2
Book 3 – BCWS Faller Training Student Manual
Wildfire Chainsaw Operations Plan
Planning the falling and bucking area provides the basis for safe falling and bucking activities. Falling and bucking hazards can be greatly reduced through good planning, communication, and cooperation among chainsaw operators and the supervisor. Prior to the initial safety meeting, the supervisor must conduct an initial walk through of the area, assess the terrain and general lean, identify potential hazards, and create a falling plan based on the Wildfire Suppression plan. The supervisor must preplan a safe location for each faller and bucker so they can safely open up and work their area, considering proximity to other workers, road ways, fire behavior, crew transportation, communication, hazards that may be encountered, access/egress trails, and first aid facilities. The dangers of working too closely cannot be over-emphasized as too many fallers or other workers have died because the minimum distance of two tree lengths was not maintained between themselves and others. The minimum distances could be greater if there is an additional chance of logs or trees rolling, sliding, or causing a reaction hazardous to other workers. The falling plan must take fire behaviour, and fire suppression objectives into consideration and will be the basis for making falling decisions. The falling plan must be communicated to all fallers at the initial safety meeting.

13 - 3
Book 3 – BCWS Faller Training Student Manual
Initial Safety Meeting (BCWS “Field Safety Plan”): Who should attend the initial safety meeting? Answer:
What are the minimum key components of the initial safety meeting? Answer:
Why is the information contained in the Field Safety Plan important? Answer:

13 - 4
Book 3 – BCWS Faller Training Student Manual
13.2 First Aid and Evacuation Procedures
OH&S Regulations 3.16, 3.17, 3.18 (First Aid) OH&S Regulations 33.1, 33.2, 33.28, 33.36, 33.37 (Evacuation)
Learning Objectives:
• Identify and discuss the requirements for first aid, including site specific procedures
• Identify emergency and evacuation procedures
Section 11 Why is it important to have a First Aid program? Answer:
What should be included in an effective First Aid program? Answer:

13 - 5
Book 3 – BCWS Faller Training Student Manual
What basic information should the site specific procedures include? Answer:

13 - 6
Book 3 – BCWS Faller Training Student Manual
Evacuation Procedures Preparing for Evacuation In preparing for evacuation on wildfires or projects, supervisors and workers must:
• Ensure first aid supplies, stretcher, and spine board are readily available • Create a landing area and train workers in emergency and safety
procedures around helicopters if a helicopter is being used to evacuate • Create and mark a suitable access/egress trail • Have chainsaw accessible for enhancing the trail
Notes:
13 - 7
Book 3 – BCWS Faller Training Student Manual
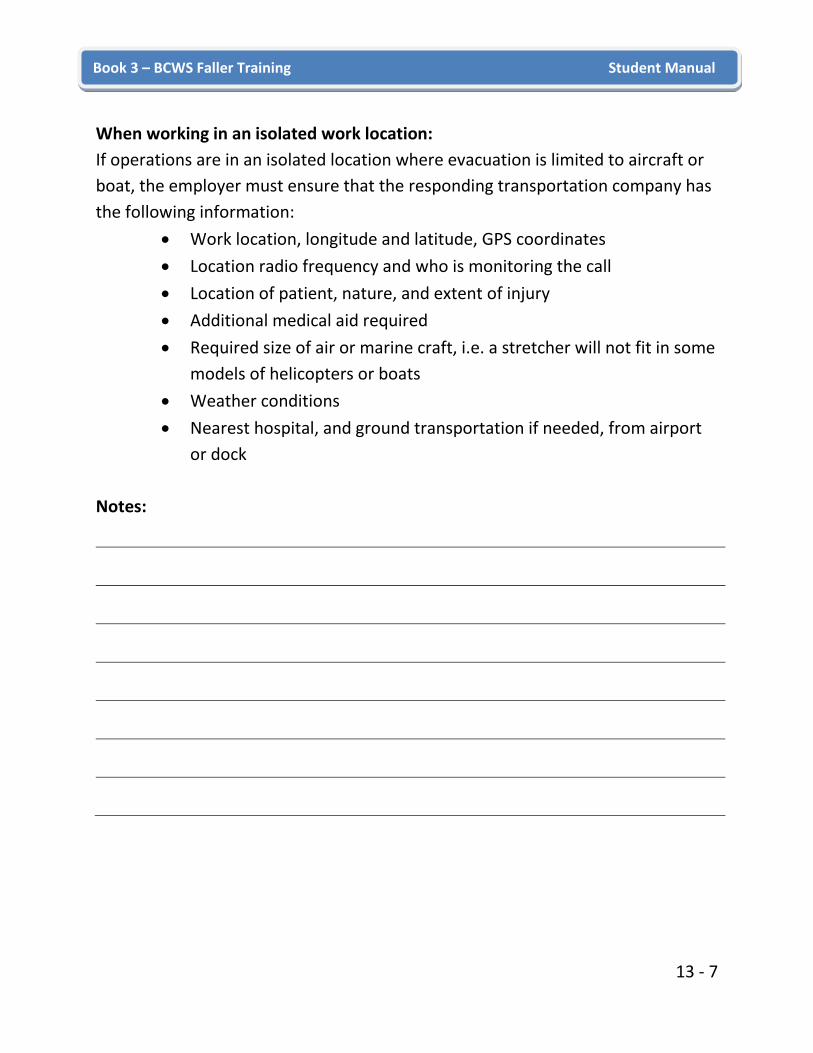
When working in an isolated work location: If operations are in an isolated location where evacuation is limited to aircraft or boat, the employer must ensure that the responding transportation company has the following information:
• Work location, longitude and latitude, GPS coordinates • Location radio frequency and who is monitoring the call • Location of patient, nature, and extent of injury • Additional medical aid required • Required size of air or marine craft, i.e. a stretcher will not fit in some
models of helicopters or boats • Weather conditions • Nearest hospital, and ground transportation if needed, from airport
or dock Notes:

13 - 8
Book 3 – BCWS Faller Training Student Manual
When an Injury Occurs Faller or bucker:
• Each chainsaw operator must carry an audible signaling device, e.g. whistle, and at least one pressure bandage on their person, readily accessible for use in an emergency
• To help himself, an injured faller should: • Keep calm • Call for help with signaling device, e.g. radio or whistle, until help
arrives • Self-administer first aid • Be cautious of movement, e.g. minimize movement to prevent
aggravating injuries • Stay warm
Fire crew members/ Other workers:
• If you hear the whistle, go immediately in the direction of the sound, prepared to offer first aid and summon help
• Before entering the falling area of the injured worker, ensure it is safe to do so
• In the event of an accident, a professional faller will perform effectively, keeping a cool, clear head and follow the emergency procedures
• When reporting the accident by radio, speak slowly and clearly Note: If you hear no answer, continue to deliver your message, and then repeat
it as the radio may transmit but not receive. Do not give the name of the injured person. Stay by the radio, if possible, and wait for instructions. Any person providing first aid response: • Render first aid according to your capabilities • Summon additional first aid or emergency service

13 - 9
Book 3 – BCWS Faller Training Student Manual
Emergency First Aid and Evacuation Worksheet Read through each scenario and highlight important facts for decision making. Decide what would be a safe practice in the situation and support your decision with reasons and the OH&S Regulation.
Key Topics Scenario Safe Work Practice OH&S Regulation First Aid Attendant (FAA) Level
You are one of 4 fallers located 2 hours from the nearest hospital. What level first aid attendant is required before you start work?
FAA Distance Forty minutes after passing the first aid attendant, the fallers arrive at the work site. Is this a problem?
First Aid Kit Is a faller required to have a first aid kit readily available? If so, what first aid kit is required?
Drills You are working in an area that is difficult to access. What drill must you practice to transport an injured faller out of the area?
First Aid Reporting
The faller receives a minor strain and forgets to tell the supervisor and the first aid attendant. Is this a problem?

13 - 10
Book 3 – BCWS Faller Training Student Manual
First Aid Equipment
Six fallers are working adjacent quarters on a block. What first aid equipment is required?
Access Egress You and your crew arrive at an IA fire located 800 meters from the helipad. Give reasons why you must maintain a good walking trail in and out of the right of way.
Personal First Aid Kit
Why is it important for every chainsaw operator/fire fighter to carry a personal first aid kit?

13 - 11
Book 3 – Safe Fire line falling operations Student Manual
13.3 Map Reading, Interpretation and Use of Flagging Tape Learning Objectives:
• Identify key map components on fire area falling map samples • Identify flagging protocols for danger tree assessment, • Identify flagging protocols and procedures for cut-up tree
Fire Area Falling Map: A current map of the fire area must be readily available to the faller at all times. The wildfire map must indicate the location of roads, guards, fire sections, safety zones, Temporary helicopter landing area and landings, and provide a good visual overview of the work area. Using the map, a chainsaw operator must be able to:
• Match the falling area plan to the layout of the ground • Interpret the legend, symbols, and contour lines that give an
indication of the topography, fire edge and fire sections • Identify north, fire boundaries, and the location of streams, wetlands,
roads, falling boundaries, wildlife tree patches and medevac helispots.
• Identify special requirements, and fire site specific information
Flagging Tape What are the different uses of flagging tape during wildfire suppression activities? Answer:

13 - 12
Book 3 – Safe Fire line falling operations Student Manual
Review of Danger Tree Marking/Flagging Protocol in Wildland Fire Operations To ensure work areas on fire situations can be easily identified on the ground relative to their status concerning wildlife/danger tree assessment and hence worker safety, the following procedures are recommended: Flagging Colours No Flagging or paint present: Only applicable to areas open for Very Low Risk (VLR) activities with appropriate safety/work procedures implemented. Heads-up, be aware of dangerous tree defects. Orange: Indicates area has been assessed, but danger trees have NOT yet been removed. Assessors initials, date and time of assessment, and next assessment date should be on an appropriate number of ribbons and maps with updates undertaken as appropriate. The LOD level should also be indicated on flagging and accompanying maps. Yellow: Indicates no-work-zone (NWZ) around dangerous areas or individual trees/defects that have been assessed as dangerous. Lime Green (Safe Tree/Area): To be used as an indicator that the area has been felled out (i.e., danger trees have been removed or NWZs in place around some individual trees) by a qualified person. Therefore, this area is now safe for workers. Can also be used on high

13 - 13
Book 3 – Safe Fire line falling operations Student Manual
value individual wildlife trees that have been assessed as safe and which are to be retained. Paint: Where possible, use same paint colour as the flagging colours described above. Use paint for marking danger trees with ‘D’ on three sides (fluorescent lime green or blue recommended). When paint is in short supply, a stripe can be painted around dangerous trees. Paint can also be used to place an arrow on the tree to identify hung-up limbs and tops and install a no work zone to accommodate the hazard. This will help to minimize fuel loading, as the tree can remain standing. Paint is also useful for making traffic signs such as ‘warning’, ‘no-entry’ and ‘danger tree removal’. Please note that paint should only be used in situations where flagging is not available. Flagging is easily removed, changed and/or updated; paint is not as amenable to change. (Wildland Fire Safety Module Appendix 5-3 July 2010 Communication) Ideally, the assessors will be working in conjunction with the fallers and will provide a detailed map of the areas assessed and felled. Each assessor and or faller will hand in the maps, field cards and assessment forms to the Danger Tree Specialist at the end of every day. The danger tree removal process and all records must be accessible and retrievable. Note: Although preprinted flagging tape is available for the purposes listed
above, it is possible to use generic tape provided that: • Flagging tape colours and messages that are not standard must be
explained to workers. • It is important to know flagging tape systems used to avoid trespass
situations, e.g. other industries and companies

13 - 14
Book 3 – Safe Fire line falling operations Student Manual
13.4 Safe Work Distances and Work Distance Precautions around Chainsaw Operations
OH&S Regulations 26.24, 26.29 and 26.30
Learning Objectives:
• Explain the difference between an “active falling area” and the “falling area”
• Identify Safe Work Procedures to enter a falling area and an active falling area
• Identify safe work distances around chainsaw operations
Section 10
Definitions Falling Area:
Faller Responsibilities for the Falling Area
• The faller is responsible for all other workers including supervisors while they are in the falling area
• Make sure the falling area is clear of workers before falling • All falling and bucking activity must be stopped and permission
granted by the faller before entry into the falling area if there is a potential of hazards caused by the falling activity, e.g. runaways, stumps, rocks
13 - 15
Book 3 – Safe Fire line falling operations Student Manual
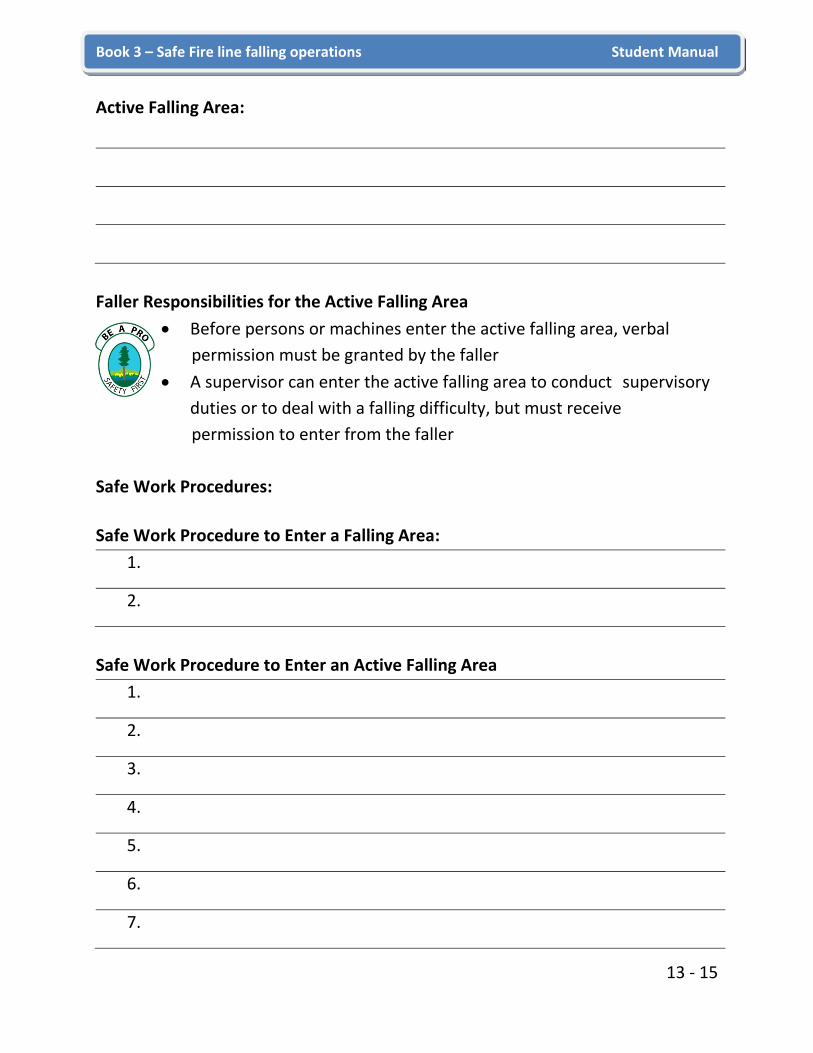
Active Falling Area:
Faller Responsibilities for the Active Falling Area
• Before persons or machines enter the active falling area, verbal permission must be granted by the faller
• A supervisor can enter the active falling area to conduct supervisory duties or to deal with a falling difficulty, but must receive permission to enter from the faller
Safe Work Procedures: Safe Work Procedure to Enter a Falling Area:
1.
2.
Safe Work Procedure to Enter an Active Falling Area
1.
2.
3.
4.
5.
6.
7.

13 - 16
Book 3 – Safe Fire line falling operations Student Manual
8.
9.
10.
11.
Other Safe Work Distances around Chainsaw Operations • Maximum falling and bucking distance- A chainsaw operator must be capable
of calling other workers to his aid in the event of an emergency. Refer to next section – “Working alone and isolation”.
• Minimum bucking / limbing distance - Chainsaw operators must ensure that all personnel are more than 3 meters (10 feet) away from the operator and well clear of any rolling, dropping logs.
• Felled and bucked timber- No Fire crew personnel will work in or directly below any felled / bucked timber while operating a chainsaw.
• Power transmission lines / overhead cables- No Fire crew personnel will fall trees within striking distance of any power transmission lines or overhead cables.
• Buildings / vehicles- No Fire crew personnel will fall trees within striking distance of any building, vehicle or other property
• Steep hillsides- It is the responsibility of the chainsaw operator to ensure all workers and equipment are clear of the falling area. Steep hillsides require the falling area to be extended well downhill of the falling site. Extreme caution must be used to avoid creating runaway logs. IN NO CASE MAY ANY PERSON WORK DIRECTLY BELOW A FALLER.
13 - 17
Book 3 – Safe Fire line falling operations Student Manual
Traffic Control
Workers Compensation Act 116 Every worker must take reasonable care to protect the worker’s health and safety and the health and safety of other people who may be affected by the worker’s acts or omissions at work OH&S Regulation 26.30 If a tree being felled may create a hazard to a user of a traveled road, adequate traffic control must be used to stop or control approaching traffic.
• Ensure the road is effectively blocked into the falling area. • It is recommended that the vehicle be parked across the roadway
behind the active falling signage • A rope with falling warning signs must be tied across the roadway to
provide an effective barrier • Falling signs placed on the side of the road or on the windshields of
vehicles can blow away or not be seen by persons entering the falling area
• Before persons or machines enter the falling area, verbal permission must be granted by the faller
• In some cases, it may be necessary to provide traffic control, i.e. if the company wants to keep the road open to haul logs but the trees you are falling may hit the road
Parking Vehicles Upon arrival at the falling site (fire or training), park the vehicle facing the exit, ready for use. This is important in the case of an emergency. Always secure the vehicle, e.g. set the parking brake or chock the wheel.

13 - 18
Book 3 – Safe Fire line falling operations Student Manual
Falling Area and Active Falling Area Worksheet Instructions: On the diagram, identify the active falling area according to the definition. On the diagram outline other areas that may be made hazardous by the falling activity. Would you hail the faller from 1, 2, or 3? Give your reasons for deciding Yes or No for each location. Area 1: Area 2: Area 3:

14 - 1
Book 3 – BCWS Faller Training Student Manual
Section 14 – Demonstrate Safe Falling Procedures
14.1 Site Assessment and Falling Plan Learning Objectives:
• List and explain the eight steps of a site assessment; • List four safe Work Procedure steps used to open a falling area.
Explain why it is necessary to open a falling area this way; • Describe three main steps used to assess a tree • Reference OH&S 26.24 and identify the main points
Field Practice Objectives
• Perform a site assessment.
Section 17 site/ tree assessment Performing a site assessment: It is important to walk the falling area before making any decisions about falling because fallers need to identify, evaluate and decide how to control the circumstances present on site.
Competency 12

14 - 2
Book 3 – BCWS Faller Training Student Manual
What are the eight steps of a site assessment? Step1
Step 2
Step 3

14 - 3
Book 3 – BCWS Faller Training Student Manual
Step 4
Step 5
Step 6

14 - 4
Book 3 – BCWS Faller Training Student Manual
Step 7
Step 8
Step 8: What should be done if any of these hazards exist? Answer:

14 - 5
Book 3 – BCWS Faller Training Student Manual
Step 8: What are the hazards associated with falling trees in standing timber? Answer:
Some wildfires situations and falling objectives may not have an open face from which to start falling. This requires that the faller walk ahead to look for an open area, according to the safe work procedures. Safe Work Procedure:
• Decide on a place to open up which will avoid brushing adjacent timber
• Look for natural openings • Fall saplings, immature trees to create an opening • Remove dangerous trees to create an opening
Note: If you cannot avoid brushing, minimize brushing by finding a place with
the smallest healthy trees in the canopy to create your opening. Limit brushing to those trees necessary to create the opening.
14 - 6
Book 3 – BCWS Faller Training Student Manual
What are the hazards associated with Danger Trees in the fire environment? Answer:
What should a faller do if it is too hazardous to fall danger trees in a specific section of a fire? Answer:

14 - 7
Book 3 – BCWS Faller Training Student Manual
14.2 Preparing to Fall the Tree Learning Objectives
• List and explain the components of a tree assessment • Decide on a safe place to fall the tree
Field Practice Objectives
• Perform the tree assessment • Determine and create escape route(s)
Section 17 When you have completed your site assessment, you must prepare to fall the tree by assessing the tree itself and preparing the area around the tree for safe falling. There are three steps used to assess a tree:
1. Assess hazards; 2. Determine the high side; 3. Assess lean.
Preparing to fall involves the following steps, which includes assessment of the tree.
Competency 12, 13

14 - 8
Book 3 – BCWS Faller Training Student Manual
What are the steps of tree assessment? Step 1
Step 2
Recognize the Hazard

14 - 9
Book 3 – BCWS Faller Training Student Manual
Step 3
Step 4
Evaluate the Situation/Hazard

14 - 10
Book 3 – BCWS Faller Training Student Manual
Step 5
Step 6
Control the Hazard

14 - 11
Book 3 – BCWS Faller Training Student Manual
Step 7
OH&S Regulation 26.24 “When a tree starts to fall, the faller must move quickly to a predetermined safe position, at least 3 m (10 ft) away from the base of the tree where possible, and take cover if available.” Why is it important to move away 3 meters and seek cover? Answer:
14 - 12
Book 3 – BCWS Faller Training Student Manual
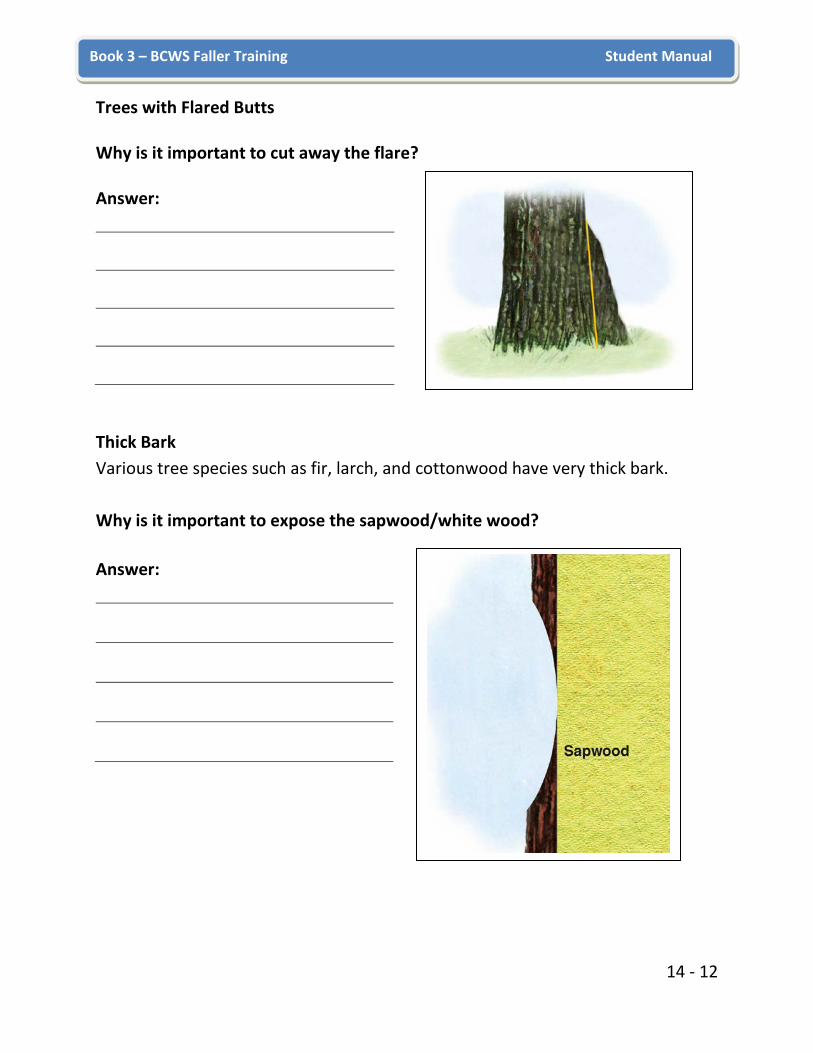
Trees with Flared Butts
Why is it important to cut away the flare? Answer:
Thick Bark Various tree species such as fir, larch, and cottonwood have very thick bark. Why is it important to expose the sapwood/white wood? Answer:

14 - 13
Book 3 – Safe Fire Line Falling Operations Student Manual
14.3 Types of Undercuts and Backcuts Learning Objectives:
• Identify three hazards of an incorrect undercut and backcut • Describe two incomplete falling cuts • Recognize four types of undercuts • Explain the primary purpose of each type of undercut • Choose the correct backcut and undercut for a given falling situation • Reference OHS regulation 26.24 (5) and provide reasoning
Field Practice Objectives :
• Demonstrate safe undercut and backcut for each method; • Reference: faller basic competencies 11a through 11f in the trainee
task book Practice Bolts
• Good – advance from simple cutblock stump training or bolt to complex scenario as faller advances in local cutblocks
• Practice bolts can be prepared by securing 6’ 0” log lengths in the ground leaving 4’ 0” exposed.
• Practice bolts can be prepared on a field site by the trainer falling several trees leaving 4’ 0” high stumps.
• The trainee practices constructing Humbolt Undercuts and completing the backcut.
• Practice until this is performed in a smooth and efficient manner.
Sections 18, 19, 22, 23
Competency 11
14 - 14
Book 3 – Safe Fire Line Falling Operations Student Manual
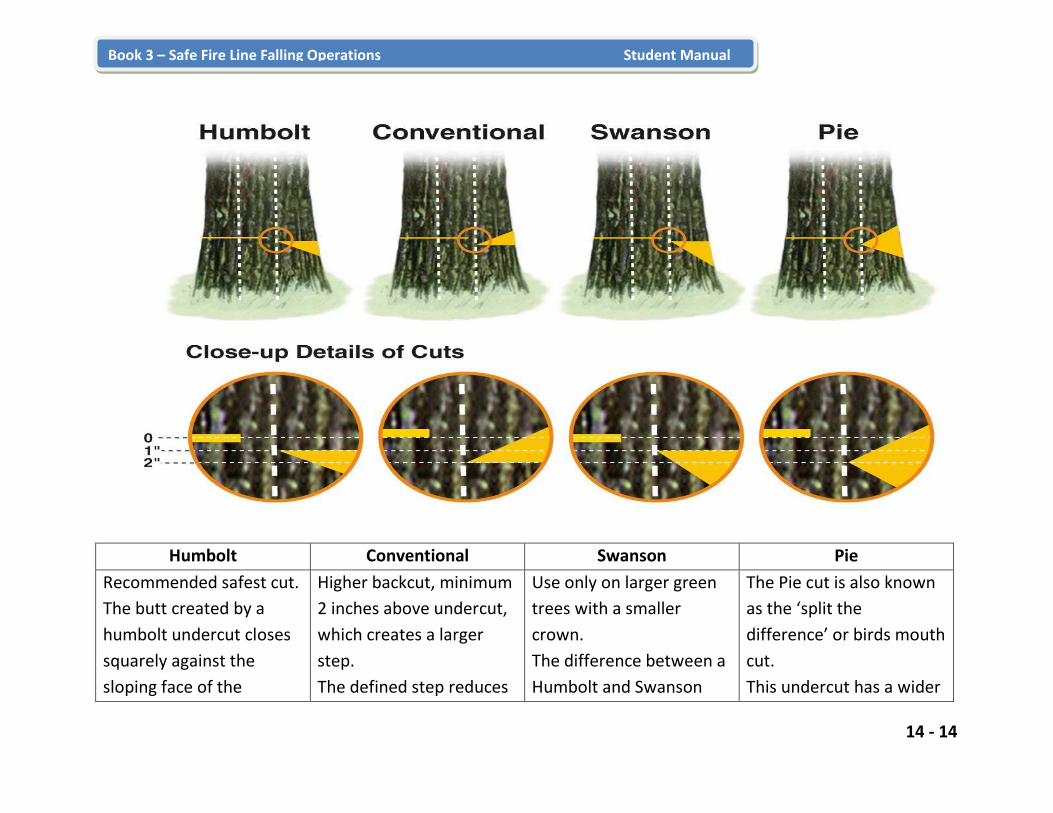
Humbolt Conventional Swanson Pie
Recommended safest cut. The butt created by a humbolt undercut closes squarely against the sloping face of the
Higher backcut, minimum 2 inches above undercut, which creates a larger step. The defined step reduces
Use only on larger green trees with a smaller crown. The difference between a Humbolt and Swanson
The Pie cut is also known as the ‘split the difference’ or birds mouth cut. This undercut has a wider

14 - 15
Book 3 – Safe Fire Line Falling Operations Student Manual
undercut pushing the butt away with less of a chance of a kickback. This cut should be used most of the time Less wood loss from the stem of the tree. Results in a square butt.
the risk of tree kickback and the tree sliding backwards or sideways. Used in deep snow. Results in a lower stump which is important for:
• waste assessment charge for stumps over 12 inches on the high side for large diameter trees
• machine access Can be used to overcome a falling difficulty, e.g. two trees close together where it is difficult to construct a humbolt. undercut on the back tree
undercut is that the Swanson has a larger, steeper bottom cut, which causes the butt of the tree to strike the ground first, removing the whipping action. The larger undercut limits the stem from swinging up, rolling or sliding keeping the butt close to the stump. This specialty undercut is used to ensure the placement of the tree in a safe bucking position on steep slopes.
opening which results in the butt hitting first and close to the stump, similar to the Swanson. This undercut reduces the risk of barberchairs. This undercut has a higher backcut. This specialty undercut is used to manage a falling difficulty, e.g. frozen wood, all deciduous trees, and heavy leaners which have brittle wood fibers.
14 - 16
Book 3 – Safe Fire Line Falling Operations Student Manual
Undercut & Backcut Note: The procedure of tree falling involves two essential cuts, the undercut and
the backcut. There are a variety of undercuts. The Humbolt is the safest recommended cut. The Conventional, Swanson and Pie cuts are specialty cuts used to overcome falling hazards or difficulties
What are the hazards of poor undercuts and backcuts? Poor Undercut:
Poor Backcuts:

14 - 17
Book 3 – Safe Fire Line Falling Operations Student Manual
Look up and read the following: OH&S Regulation 26.24 Notes:
Note: It is a good practice for the faller to evaluate their workmanship at the
stump to assess what has been well what has been done poorly and to apply learning to future cuts. A sign of professionalism in a faller is the on-going improvement of their workmanship.
Correct/Clean Undercut
• An acceptable undercut consists of two cuts, a top cut and a bottom cut • The depth of the undercut should be 1/4 to 1/3 the diameter of the tree • An undercut that is less that 1/4 or more than 1/3 the diameter of the
tree is unacceptable unless used to overcome a falling difficulty such as heavy leaner or short stubby trees
• An undercut less than 1/4 the diameter of the tree increases the risk of kickback and barberchair, i.e. splitting of the trunk
• An undercut more than 1/3 the diameter of the tree is an over cut and could result in the tree collapsing, loss of control, and not enough space in the backcut for wedges

14 - 18
Book 3 – Safe Fire Line Falling Operations Student Manual
Using the Chainsaw Sight Lines Why is it important to use the chainsaw sight lines when making the undercut and backcut? Answer:
Scribing Scribing is a technique in which the faller makes a shallow cut through the bark of the tree. The faller will scribe around the back of a large diameter tree, prior to constructing the backcut, in order to ensure that the backcut will line up to the undercut correctly. This technique also assists the faller in creating a level backcut. The scribing line becomes a visual guide for the faller as the backcut is constructed. Caution: It could be dangerous to scribe on heavy leaners that are not sound, are
brittle or dangerous trees, as the cutting of bark or sapwood, which is the strongest part of the tree, may cause the tree to barberchair.

14 - 19
Book 3 – Safe Fire Line Falling Operations Student Manual
Humbolt Undercut
Section 18
• Recommended safest cut • The square butt created by a humbolt undercut closes squarely against
the sloping face of the undercut pushing the butt away with less of a chance of a tree kickback
• This cut should be used most of the time • Less wood loss from the stem of the tree • Results in a square butt
Small Diameter Tree

14 - 20
Book 3 – Safe Fire Line Falling Operations Student Manual
Large Diameter Tree
Large diameter tree – bottom cut before top cut
Large diameter tree – Cuts do not meet

14 - 21
Book 3 – Safe Fire Line Falling Operations Student Manual
Humbolt Undercut Safe Work Procedure: Undercut:

14 - 22
Book 3 – Safe Fire Line Falling Operations Student Manual
Backcut – Small Diameter Tree:

14 - 23
Book 3 – Safe Fire Line Falling Operations Student Manual
Backcut – Large Diameter Tree:

14 - 24
Book 3 – Safe Fire Line Falling Operations Student Manual
Conventional Undercut:
Safe Work Procedure:

14 - 25
Book 3 – Safe Fire Line Falling Operations Student Manual
Swanson Undercut:
Swanson Undercut Safe work procedure:

14 - 26
Book 3 – Safe Fire Line Falling Operations Student Manual
Pie Undercut:
Pie Undercut Safe Work Procedure:

14 - 27
Book 3 – Safe Fire Line Falling Operations Student Manual
14.4 Incomplete Undercuts Note: There are two common errors that develop when constructing undercuts.
1. A Dutchman – Completing the bottom cut before meeting the top cut
2. Cuts will Not Meet – The faller is unable to complete the bottom cut because it will not meet the top cut before 1/3 the diameter of the tree
A Dutchman
• This diagram illustrates completing the second cut before meeting the first cut. If left this way, it will change the direction of the fall.
• This diagram illustrates what the stump
looks like when the dutchman is not corrected.
• This diagram illustrates the results of
recutting the bottom cut to remove the dutchman.
Competency 11

14 - 28
Book 3 – Safe Fire Line Falling Operations Student Manual
• This diagram illustrates what the stump looks like when the dutchman is corrected.
Cuts will not meet up
• This diagram illustrates the second cut not meeting the first cut
• If the faller had continued cutting until the two cuts met, the resulting undercut would become too deep for the fall
• Overcutting the undercuts also results in inadequate room for a proper backcut which limits the ability to place wedges in the backcut and could cause an unstable tree to collapse on the undercut.
• This diagram illustrates that the faller stopped cutting and removed the undercut using an axe.

14 - 29
Book 3 – Safe Fire Line Falling Operations Student Manual
• This diagram illustrates the cleaned out undercut from the front.
• This diagram illustrates what the stump looks like when the undercut has been knocked out and cleaned.
15 - 1
Book 3 – BCWS Faller Training Student Manual
Section 15 - Safe Directional Falling Procedures
15.1 General Procedures For Use of Axes and Wedges
OH&S Regulation 26.24 Learning Objectives:
• Explain the uses of the axe and wedges • Review the wedging process
Field Practice Objectives
• Demonstrate the safe use of the axe and wedges What are some examples of how a faller uses an axe? Answer:
Competency 14

15 - 2
Book 3 – BCWS Faller Training Student Manual
Choice of Axe • The axe is just as important as the chainsaw therefore make sure it is big
enough to do all the jobs • Minimum acceptable standard is an axe with a 3.5 lbs. head and an 18”
handle measured from the end of the handle to where it fits into the head; however, a full-size axe (minimum of 3.5 lbs. and 28” in overall length) is recommended to ensure fluid motion and good body posture so the weight of the axe does the work, reducing stress and fatigue while wedging or chopping
What are the hazards in having an axe head too light, with too short of a handle? Answer:

15 - 3
Book 3 – BCWS Faller Training Student Manual
Axe Tips • Keep axes sharp enough for chopping and splitting • Axe head must be pinned or secured • Do not carry an axe on your person unless it is carried in an approved
holder • Carry axe by holding the handle just behind the head which allows
you to balance the axe in your hand or throw it clear in the event of a slip, trip or fall
• Keep the axe readily available • Select an axe handle with a hi-vis colour or paint the handle with a hi-
vis colour to make it more visible and easy to find, e.g. colour should contrast with the environment
• Keep a spare axe available, e.g. with spare chainsaw

15 - 4
Book 3 – BCWS Faller Training Student Manual
Why are wedges used? Answer:
‘Wedging tools’ is defined as both the wedges and the axe ‘Immediately available’ is defined as within the fallers reach at the base of the tree being felled

15 - 5
Book 3 – BCWS Faller Training Student Manual
Wedge Pouch • The wedge pouch should contain a minimum of 3 wedges
appropriate to the timber type • It is recommended that spare wedges are carried in your pack
Types of Wedges Note: Wedges differ according to
region and timber type For example: • A stubby wedge (6 X 2 ) is used
for small diameter trees • A short steep taper will give a
quicker lift but is harder to drive in, especially if it is supporting the weight of a heavy tree
• A longer gradual taper wedge is used on heavier trees
PPE for Wedging
• Lower face screen whenever striking wedges to reduce risk of eye and face injury from wedge debris or from sap and loose bark if the axe hits the tree
• Lift face screen between strikes to watch for tree movement • Earmuffs off, listen for falling overhead hazards and tree movement • Always ensure you have stable footing when driving wedges because
supporting yourself with solid footing reduces stress on the body and decreases risk of injury from losing your balance

15 - 6
Book 3 – BCWS Faller Training Student Manual
Wedging terminology Palm a wedge Insert the wedge using your hand to push it into the cut Set a wedge Strike the wedge with the axe once or twice to secure it in the
cut Strike a wedge Use the axe to strike full force blows on the wedge Tap a wedge A gentle tap with the axe is used instead of striking the wedge
on dangerous trees to avoid a shock wave which could cause the stem or top to fail. Also, in frozen wood to reduce the risk of the wedge kicking out of the cut
Notes on Video:

15 - 7
Book 3 – BCWS Faller Training Student Manual
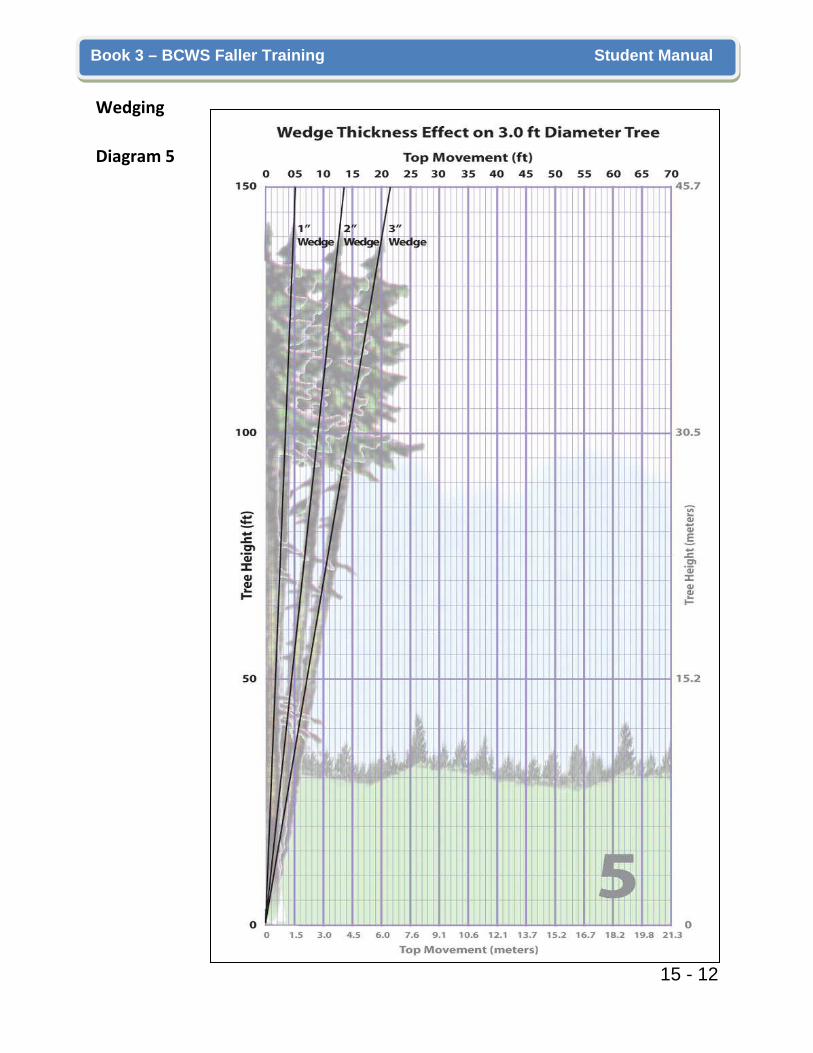
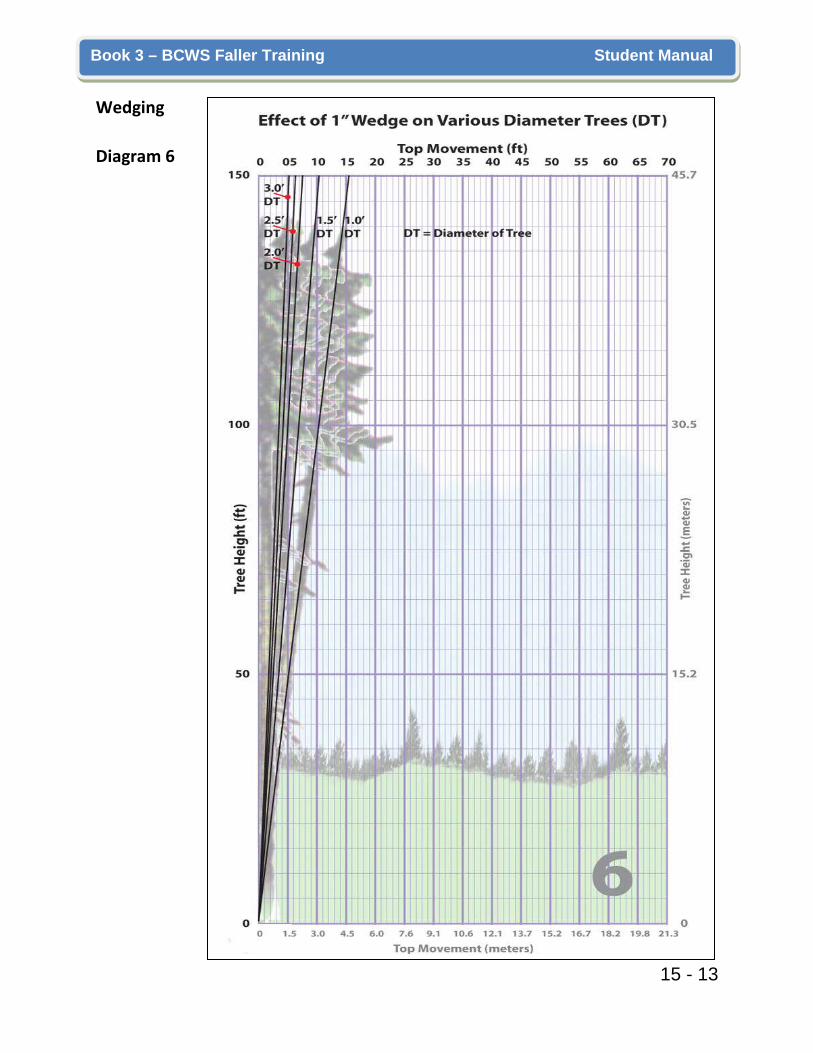
15.2 Physics of Wedging The Physics of Wedging
• A wedge acts as a lever, and lifts the tree towards the undercut • When striking the wedge the force applied to the wedge travels up
through to the top of the tree, therefore it is important to pause before striking again to allow the top to move and tree to lift
• It is much more efficient for the faller to begin wedging by using two 1 inch wedges, which are driven in alternately to evenly displace the weight of the tree ,e.g. the faller should strike first one wedge, pause and then strike the alternate wedge
• If additional lift is required when the wedges are driven in, replace the wedges with a thicker tapered wedge or stack the wedges to complete the lift
• If a thicker wedge is used to start lifting the tree, it may simply compress the wood in the opening instead of lifting the tree which could result in the wedge flying out back at the faller
• Using a thick wedge to start the lift can also result in the holding wood breaking and the tree falling over backwards towards the faller
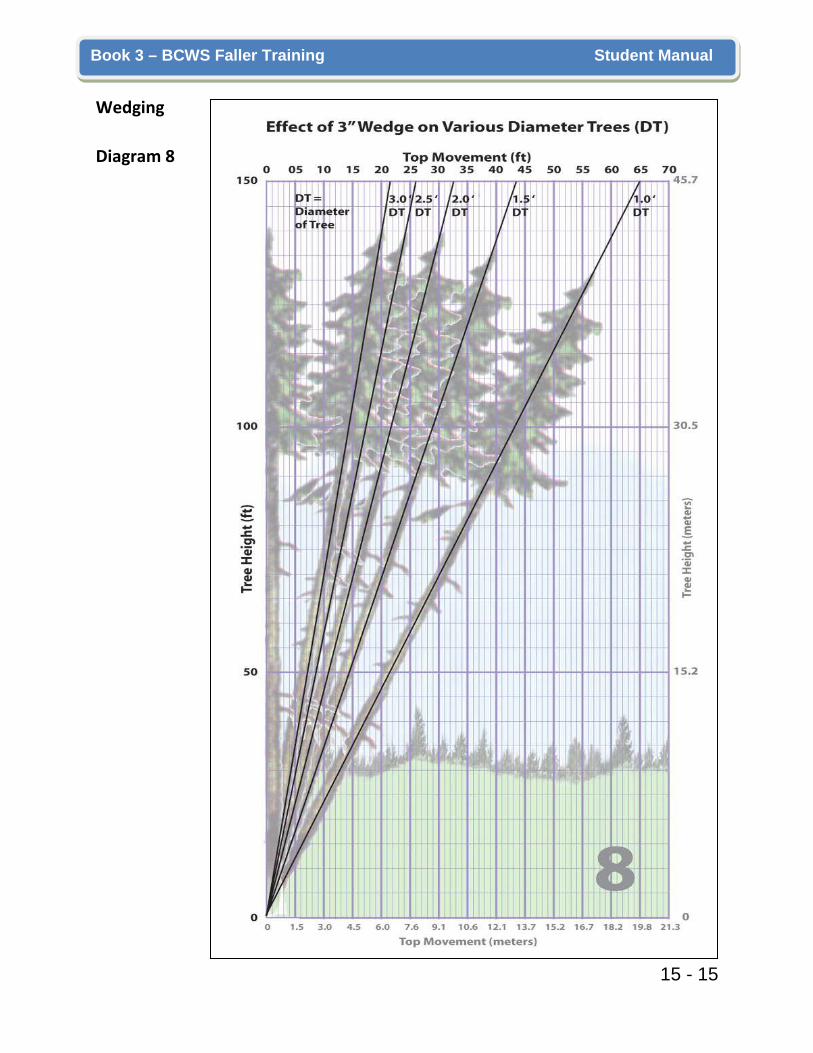
Note: To illustrate the effect of the wedging action and various wedge thickness
on different diameter trees we have included 8 diagrams 1. Wedge Thickness Effect on 1.0 ft Diameter Tree
2. Wedge Thickness Effect on 1.5 ft Diameter Tree
3. Wedge Thickness Effect on 2.0 ft Diameter Tree
4. Wedge Thickness Effect on 2.5 ft Diameter Tree
5. Wedge Thickness Effect on 3.0 ft Diameter Tree
6. Effect of 1” Wedge on Various Diameter Trees
7. Effect of 2” Wedge on Various Diameter Trees
8. Effect of 3” Wedge on Various Diameter Trees
Note: A 3 inch wedge is the stacking of two, 1.5” wedges together

15 - 8
Book 3 – BCWS Faller Training Student Manual
Wedging Diagram 1

15 - 9
Book 3 – BCWS Faller Training Student Manual
Wedging Diagram 2

15 - 10
Book 3 – BCWS Faller Training Student Manual
Wedging Diagram 3

15 - 11
Book 3 – BCWS Faller Training Student Manual
Wedging Diagram 4
15 - 12
Book 3 – BCWS Faller Training Student Manual
Wedging Diagram 5
15 - 13
Book 3 – BCWS Faller Training Student Manual
Wedging Diagram 6

15 - 14
Book 3 – BCWS Faller Training Student Manual
Wedging Diagram 7
15 - 15
Book 3 – BCWS Faller Training Student Manual
Wedging Diagram 8
15 - 16
Book 3 – BCWS Faller Training Student Manual
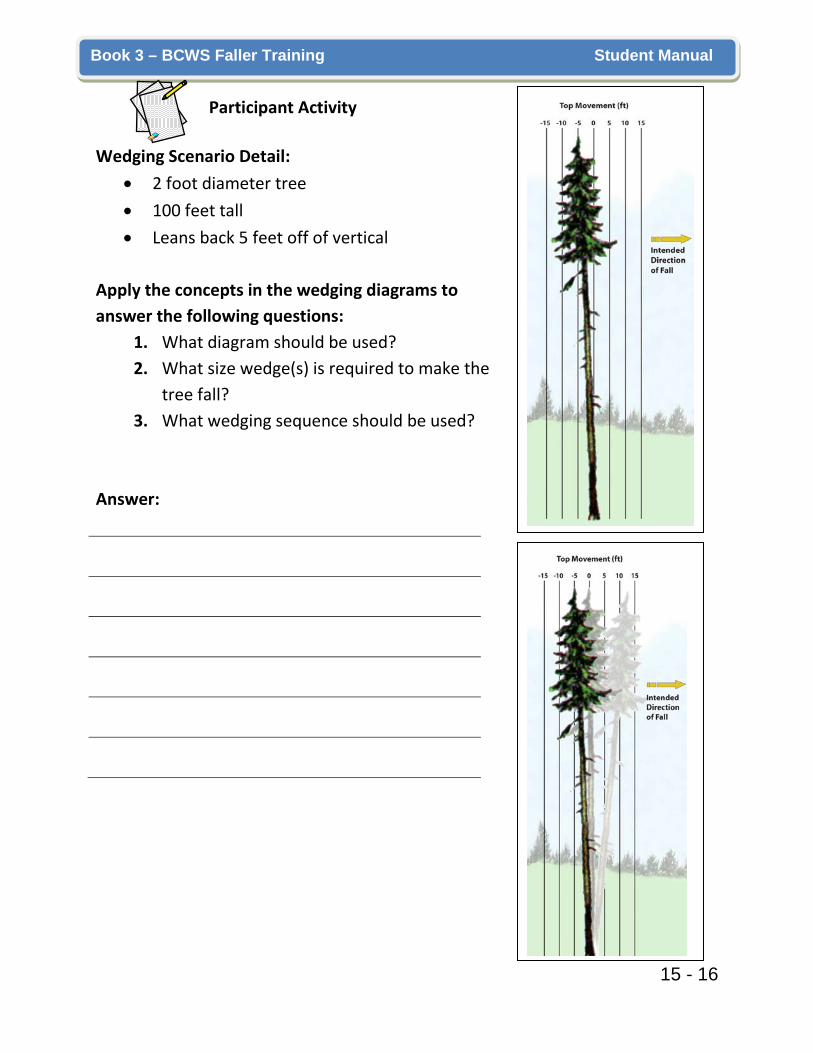
Participant Activity Wedging Scenario Detail:
• 2 foot diameter tree • 100 feet tall • Leans back 5 feet off of vertical
Apply the concepts in the wedging diagrams to answer the following questions:
1. What diagram should be used? 2. What size wedge(s) is required to make the
tree fall? 3. What wedging sequence should be used?
Answer:

15 - 17
Book 3 – BCWS Faller Training Student Manual
15.3 Demonstrate Directional Control Learning Objectives
• Identify two key factors that influence directional control • Explain when directional control should be used • Explain the purpose of holding wood • Compare and contrast the directional control SWPs for a small and a
large diameter tree Field Practice Objectives
• Explain the basic process of using a wedge in falling the tree • Demonstrate a safe undercut and backcut using directional control
Section 20 What two factors affect the directional control? Answer:
Note: The purpose of the holding wood is to control the fall of the tree.
Changing or increasing the angle of the holding wood will adjust the direction of the fall to ensure that the tree will fall in the intended direction. • Directional Control is a technique in which the angle of the holding
wood is used to correct the direction of where the tree will naturally fall due to gravity or lean
The species, diameter, condition of the stem, lean and growth patterns will determine the amount of holding wood required.
Competency 14

15 - 18
Book 3 – BCWS Faller Training Student Manual
Notes:

15 - 19
Book 3 – BCWS Faller Training Student Manual
Directional Control, Small Diameter Tree Safe Work Procedures:

15 - 20
Book 3 – BCWS Faller Training Student Manual
Directional Control, Large Diameter Tree Note: Use this process when the bar length is shorter than the tree diameter. Safe Work Procedures:

16 - 1
Book 3 – BCWS Faller Training Student Manual
Section 16 Safe Falling Procedures / Managing Falling Hazards
16.1 Fire Killed Timber Learning Objective:
• Identify 5 hazards created by working in a fire kill area
Section 28
What are the hazards of working in a fire kill area? Answer:
Recognize the Hazard

16 - 2
Book 3 – BCWS Faller Training Student Manual Accurate tree assessment is crucial in a fire kill area
• Carefully assess each individual tree from all sides to determine the extent of damage and the safest place to make the falling cuts
• Cedar trees do not have a tap root and the heart wood may be burned in the butt area resulting in limited root structure and holding wood to support the tree
Safe Work Procedure:
Chainsaw Maintenance in a Burnt Stand
1. The chain dulls quicker when cutting burnt wood. Check chain regularly and file as required.
2. Guide bars wear out faster due to burnt grit getting in the groove. Check regularly and replace when worn.
3. Air filter must be cleaned more often.
Evaluate the Situation/Hazard
Control the Hazard
16 - 3
Book 3 – BCWS Faller Training Student Manual 16.2 Dangerous Trees Dangerous Trees Learning Objectives
• Identify the hazards related to dangerous trees • Describe how to deal with a dangerous tree in a safe manner,
following BCWS DTA protocols Field Practice Objectives
• Demonstrate the procedure to assess dangerous trees • Demonstrate safe work procedures for falling a dangerous tree
OH&S 26.1, 26.25, 26.26 What is a dangerous tree? Answer:
16 - 4
Book 3 – BCWS Faller Training Student Manual What are the hazards of falling a dangerous tree? Answer:

16 - 5
Book 3 – BCWS Faller Training Student Manual Dangerous Tree Indicators
Note: According to the
Wildlife/Danger Tree Assessor’s Course there are 10 primary danger tree indicators.
1. Hazardous Top can be a
dead top, or multiple stemmed top and will have danger indicators such as evidence of decay (conks and woodpecker cavities), or other structural weakness. The cedar group is less prone to decay in the top, but may have hidden cracked seams and embedded bark between the multiple tops.
2. Dead Limbs regardless of size and species have evidence of decay, e.g.
cracking or loose hung-up limbs.

16 - 6
Book 3 – BCWS Faller Training Student Manual
3. Witches Broom is a condition generally caused
by mistletoe infection. The limbs can grow very large and be heavily weighted, e.g. in excess of 200 lbs. The stem can also be affected and become a weakpoint, e.g. hemlock and balsam.
4. Split Trunk is a condition where the trunk has cracked due to frost, lightning or wind. Visible evidence of advanced decay indicates a serious weakness where the tree could fail.
Examples of Split Trunk

16 - 7
Book 3 – BCWS Faller Training Student Manual
5. Stem and Butt Damage can be caused by windfall scarring, fire damage, machine and animal damage, as well as heart rot diseases. Snow accumulation on the high side of a tree on a steep slope can cause butt rot.

16 - 8
Book 3 – BCWS Faller Training Student Manual
6. Thick sloughing bark or sloughing sapwood is usually found on dead trees. Loose bark on Douglas fir or loose sapwood on old wind snapped cedars can easily dislodge during falling
7. Butt and Stem Cankers are usually found on deciduous trees but can also occur on Douglas fir and pine in some regions of the province. These infected areas weaken the stem.
16 - 9
Book 3 – BCWS Faller Training Student Manual
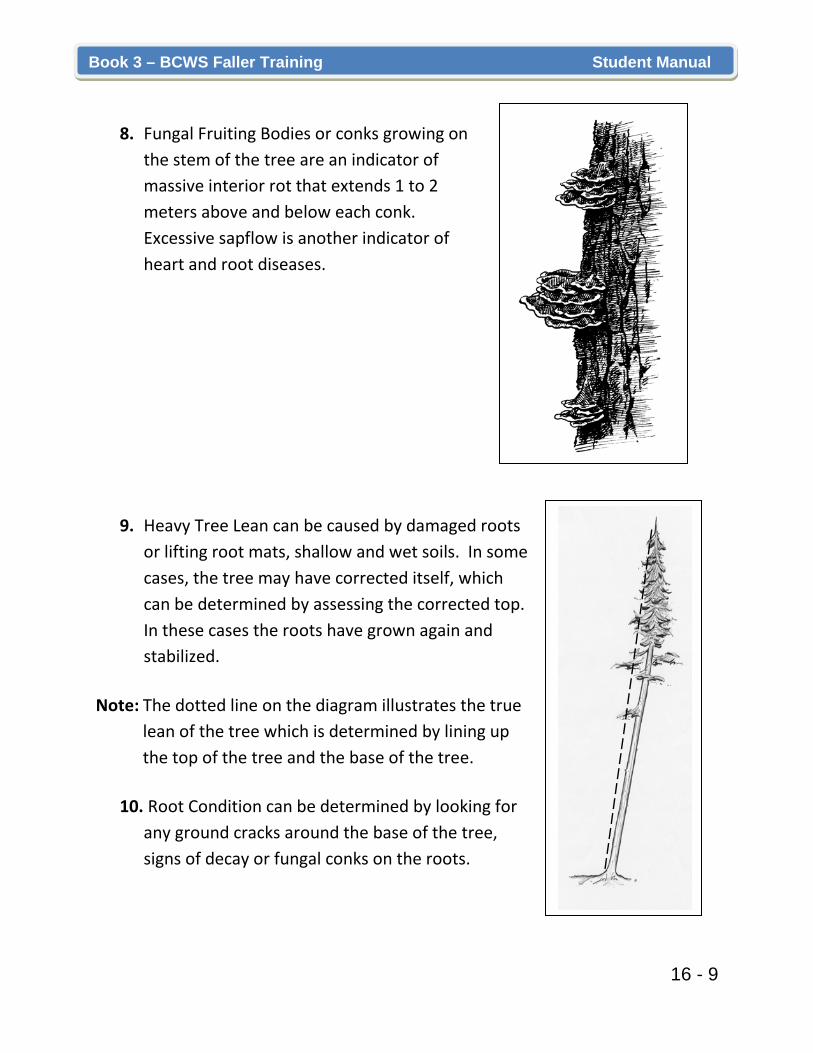
8. Fungal Fruiting Bodies or conks growing on the stem of the tree are an indicator of massive interior rot that extends 1 to 2 meters above and below each conk. Excessive sapflow is another indicator of heart and root diseases.
9. Heavy Tree Lean can be caused by damaged roots or lifting root mats, shallow and wet soils. In some cases, the tree may have corrected itself, which can be determined by assessing the corrected top. In these cases the roots have grown again and stabilized.
Note: The dotted line on the diagram illustrates the true
lean of the tree which is determined by lining up the top of the tree and the base of the tree.
10. Root Condition can be determined by looking for
any ground cracks around the base of the tree, signs of decay or fungal conks on the roots.

16 - 10
Book 3 – BCWS Faller Training Student Manual Dangerous Tree Assessment
1. From a distance, perform a visual assessment of the tree from top to bottom. Assess the tree size, height, condition, and lean. Consider the dangerous tree indicators.
2. If the tree is suspected to be hollow, check the base of the tree by sounding with the axe.
3. To decide the falling direction, consider the following: • Open areas to ensure an unobstructed fall path • Direction of lean • Limb distribution
OH&S Regulation 26.26 Falling, bucking or limbing activities must not be undertaken in an area made hazardous by a leaning dangerous tree, or a dangerous tree which has been brushed by a felled tree, until the dangerous tree has been felled. Dangerous Trees that are Unsafe to Fall
• Do not make any falling cuts • Mark the tree or area according to company procedures using
designated flagging tape • Move away from the hazardous area • Alert all workers who could enter the hazardous area • Notify the supervisor/supervisor immediately • Consider an alternate method of falling, e.g. blasting or machine assist

16 - 11
Book 3 – BCWS Faller Training Student Manual Falling Dangerous Trees
OH&S Regulation 26.26
(1) Where practicable, dangerous trees must be felled (a) Progressively with the falling of other timber but before falling
adjacent live trees, and (b) Into open areas
(2) When falling a dangerous tree,
(a) Dangerous bark must be removed, where practicable, (b) Stump height must, in the judgment of the faller, allow maximum
visibility and freedom of action, (c) The tree must be felled in the direction of lean whenever possible,
and the undercut must be as deep as necessary to minimize the use of wedges and resulting vibration,
(d) Pushing with a green tree must only be undertaken to overcome a falling difficulty, and
(e) Wedging over must be used only if there is no alternative, and after a careful assessment of the ability of the dangerous tree to withstand wedging.
(3) If conventional methods cannot be safely employed to remove a dangerous tree, blasting or other acceptable methods must be used.

16 - 12
Book 3 – BCWS Faller Training Student Manual Falling a Dangerous Tree Safe Work Procedure:
1. Fuel chainsaw prior to starting any cuts and have wedges readily available.
2. Brush out a work area around the base of the tree. Remove material
on the ground that could be thrown back at the faller when the butt of the tree lands. Remove loose bark.
3. Determine the direction of the fall and then create 2 well brushed
out escape routes. Work towards the tree while brushing out the escape route. Do not turn your back on a dangerous tree.
4. Construct the undercut and backcut at a comfortable height to
ensure maximum visibility and freedom of movement, i.e. waist to chest height. Whenever possible, make the cuts in solid wood.
5. Examine the sawdust from the undercut to confirm the condition of
the stem, e.g. dark, soft or crumbly sawdust indicates rot. 6. Ensure undercut is clean, i.e. no dutchman. 7. Watch the top, limbs and defect areas of the stem while making the
falling cuts. At any sign of tree failure or collapse immediately move to the escape route and take cover.
8. Start the backcut a minimum of 2 inches above the undercut. 9. Only use a wedge if it is absolutely necessary to make the tree fall.
Use the following dangerous tree wedging procedures. a. Turn chainsaw off b. Remove earmuffs so that the slightest tree movement can be
heard.
16 - 13
Book 3 – BCWS Faller Training Student Manual
c. Lift face screen. The faller must be able to see the tree top for overhead hazards.
d. Palm 2 wedges side by side e. Gently tap the wedges alternately. Scrutinize the whole stem
after every tap. Wedging vibrations act as shockwaves that can cause loose bark, rotten tops or limbs to break off.
f. Keep free hand against the stem to feel the vibration. Wait until the vibration stops before tapping again. Never drive or strike the wedge as in the normal falling technique. The tree is not sound and striking the wedge could cause the tree to fail.
10. Finish the backcut, watching the cut and top closely for movement. Be prepared to move away and take cover at the first sign the tree is falling or collapsing.
11. As soon as the dangerous tree starts to fall, follow safe escape
procedure. 12. If a high stump is left, remove it, so that it does not become a
hazard.

16 - 14
Book 3 – BCWS Faller Training Student Manual Rotten Dangerous Trees Split Trunk
• This tree has a split trunk exposing a rotten core • The faller checks for sound wood and determines the extent of the
rot • The faller makes the cuts above the rot, at a comfortable height • If possible, place undercut in sound wood • The faller removed the stump so it isn’t a hazard for the harvesting
crew
Pushing a Dangerous Tree Note: Pushing a dangerous tree is only done to overcome a specific falling
difficulty. Seek a second opinion from a qualified person before proceeding.
OH & S Regulation 26.26
(2) When falling a dangerous tree,
(d) Pushing with a green tree must only be undertaken to overcome a falling difficulty

16 - 15
Book 3 – BCWS Faller Training Student Manual Safe Work Procedure
1. Never push a dangerous tree with another dangerous tree. 2. Prepare escape route and alternate escape route for both the
dangerous tree and the pusher tree before any falling work begins. 3. First construct the undercut on the pusher tree. 4. Construct undercut and backcut on the dangerous tree. 5. Palm wedges in the backcut to keep the dangerous tree from falling
or sitting back while the pusher tree is being felled. 6. Go back to the pusher tree and construct the backcut. This sequence
limits the faller’s exposure to a cut up dangerous tree and allows the faller to construct the cuts without turning away from the dangerous tree.
7. As soon as the pusher tree begins to fall, follow safe escape
procedures.

16 - 16
Book 3 – BCWS Faller Training Student Manual Dangerous Trees Scenario
Note: This diagram is a cross section view of a 12 inch tree stump. Due to the
rot it cannot be felled safely (see Diagram A) • Use the dangerous tree indicators, safe work procedures and OH&S
Regulation 26.26 to answer the following questions. • As you answer the questions, use Diagram B to illustrate where you
would place the undercut and wedge.
16 - 17
Book 3 – BCWS Faller Training Student Manual Using the above diagram, answer the following questions and review the answers with the class.
Questions Answers How do you determine if the stem is sound?
At what height would you begin the falling cuts?
Should you fall this tree in lay with previously felled timber?
Would you maintain control if you fall the tree in the intended direction of fall?
Indicate on Diagram B where a wedge could be placed.
Should you fall the tree with the natural lean?
Demonstrate by drawing on the sketch an alternate direction of fall, undercut, holding wood and wedge placement.
How high should the backcut be above the undercut?
What undercut would you use? Why?
What wedging procedure is used? Why?

16 - 18
Book 3 – BCWS Faller Training Student Manual 16.3 Steep slope Learning Objectives:
• List three possible hazards when falling on steep slope • Explain three possible hazards of falling upslope on slopes over 45%
Field Practice Objectives:
• Demonstrate the safe work procedure for falling on steep slope
OH&S Regulations 26.27 What are the hazards of falling on a steep slope? Answer:

16 - 19
Book 3 – BCWS Faller Training Student Manual Note: Take time to accurately assess the situation and plan where and how to
safely fall the tree: • Establish tree lean and soundness, e.g. trees on steep terrain can have
heavy leans which increases the falling difficulty • Check for rocks, stumps or windfalls that may cause the tree to break
when it lands • Find a safe place to fall the tree to avoid these ground hazards • Plan to fall the tree so it is positioned for safe bucking, e.g. avoid a
sliding hazard • Patches and groups of trees on steep slopes should be fallen side-slope
or slightly uphill across the hillside to hold the timber on the slope for safe bucking
• It is difficult to maneuver on steep terrain, so take extra time to plan and clear escape routes
• Always work on the high side of the tree when falling on steep terrain • Ensure good footing before starting any cuts • Never work directly above another faller or other workers if there is any
possibility of a runaway tree, logs or debris being dislodged and rolling downhill (a roadway between you and other work activities will not always stop rolling rocks, logs or runaway trees)
• Place falling cuts above the butt rot when possible

16 - 20
Book 3 – BCWS Faller Training Student Manual Up slope falling What are the hazards of falling upslope especially on slopes over 45%? Answer:
Safe Work Procedure:

16 - 21
Book 3 – BCWS Faller Training Student Manual Notes:
16 - 22
Book 3 – BCWS Faller Training Student Manual
16.4 Falling Kickbacks Learning Objectives:
• List three situations that may cause chainsaw kickbacks
Field Practice Objectives: v
• Demonstrate avoidance of chainsaw kickbacks while falling trees
Section 7

16 - 23
Book 3 – BCWS Faller Training Student Manual What factors contribute to chainsaw kickback when falling trees? Chainsaw Kickback Factors How to Avoid Chainsaw Kickback Chainsaw striking unseen obstructions, e.g. saplings, nearby tree, limbs, debris covered by snow, rocks
Cleaning out undercut with bar tip
Overextension, e.g. reaching for outside corner of undercut or backcut
Chainsaw does not dog in
Backcut closes on the moving chain
A running chain inadvertently strikes a wedge
Boring and backbarring with the chainsaw

16 - 24
Book 3 – BCWS Faller Training Student Manual 16.5 Hung Up Trees/ Catapult trees Learning Objectives:
• Identify the hazards hung up/catapult trees create • Explain how to create NO WORK ZONE around these situations
Section 29
Hung-Up/Catapult Trees What hazards do hung-up/catapult trees create? Answer:

16 - 25
Book 3 – BCWS Faller Training Student Manual
Note: Hung-up/catapult trees can be naturally created by weather conditions or
man made by a faller or machinery. They are trees that have been pushed or fallen into a standing tree or timber. • Many investigations of fatal accidents have revealed that fallers were
working under a hang-up they created. They did not seek assistance to resolve the situation.
• Man made hang-ups are caused by poor planning, shoddy work practices and/or loss of control of the tree

16 - 26
Book 3 – BCWS Faller Training Student Manual Safe Work Procedure: Hung up/Catapult Tree Hang-up situations demand the utmost care in planning the sequence of cuts. Ensure a safe procedure is in place that will not endanger the faller.
1. Assess whether the hang-up can be felled safely, e.g. when the first tree is cut up, it must be safe to fall the other tree(s).
2. Jointly assess the hang-ups with another experience faller. 3. If a faller cannot fall the hang-up safely an alternate method must be
considered, e.g. NO WORK ZONE, blasting, machine assist. 4. Develop a safe work plan prior to removing the trees. 5. Carefully plan escape routes to reduce the chance of being struck by
flying debris and overhead hazards. 6. Never work in the danger zone under the cut up tree. Keep trunk of
supporting tree between the faller and the hung-up tree. Notes:

16 - 27
Book 3 – BCWS Faller Training Student Manual 16.6 Cut-Up Tree
• Identify the process for dealing with a tree that is not completely felled
• Locate OH&S regulation 26.25
Section 29 What is the hazard of a cut up tree?
Answer:

16 - 28
Book 3 – BCWS Faller Training Student Manual Cut Up Tree Procedure Note: If a faller has to leave a cut up tree, strictly follow this procedure.

16 - 29
Book 3 – BCWS Faller Training Student Manual 16.7 Limb Tied Trees Learning Objective:
• Identify three hazards of falling a tree that is limb tied to another tree
Section 26
What are the hazards of falling a tree that is limb tied with another tree? Answer:
Note: Trees with limbs that are tied
together must be felled together. Complete a tree assessment on both trees, e.g. check for overhead hazards such as broken tops, limbs and loose debris in the canopy • Decide which direction to fall
the trees, e.g. usually the direction of the fall goes with the dominant lean

16 - 30
Book 3 – BCWS Faller Training Student Manual
• Identify the first tree • Determine the soundness of tree and root system • Brush out escape routes for both trees • Carefully plan the sequence of cuts • If it appears unsafe to fall either tree, stop work and seek qualified
assistance
Safe Work Procedure:

16 - 31
Book 3 – BCWS Faller Training Student Manual Example of Limb Tied Trees Note: If the first tree is a dangerous tree and the second tree is sound, the
sequence of cuts will begin with constructing the undercut on the second tree first. Then move to the first tree and construct the undercut and backcut, setting wedges. Construct the backcut on the second tree. This sequence will allow the faller to construct the falling cuts without turning away from the dangerous tree. If the first tree is sound but the second tree is a dangerous tree, stop work and seek qualified assistance. Consider alternate methods to fall the trees.
Control the Hazard

16 - 32
Book 3 – BCWS Faller Training Student Manual 16.8 Heavy Leaners Learning Objective:
• Identify four hazards associated with a tree that leans heavily toward the direction of the fall
Section 25 Heavy Leaners Heavy leaners are trees that lean heavily towards the direction of the fall. What are the hazards of falling a tree with a heavy lean? Answer:

16 - 33
Book 3 – BCWS Faller Training Student Manual Caution:
• If any of the following hazards exist stop work and seek qualified assistance: o Signs of advanced decay o Lifted root mat o Lack of adequate escape route(s) o Lack of proper footing o Extensive splitting
• Consider an alternate method such as blasting or machine assist • Ensure there is room for adequate escape routes • Plan the sequence of cuts carefully • Try to fall the tree slightly off lean to limit the risk of barberchair

16 - 34
Book 3 – BCWS Faller Training Student Manual Heavy Leaners, Small Diameter Tree Safe Work Procedure:

16 - 35
Book 3 – BCWS Faller Training Student Manual Heavy Leaner, Large Diameter Tree Option A Safe Work Procedure:

16 - 36
Book 3 – BCWS Faller Training Student Manual Heavy Leaner, Large Diameter Tree Option B Safe Work Procedure:

16 - 37
Book 3 – BCWS Faller Training Student Manual 16.9 Jack pot Learning Objective:
• Differentiate between a Jackpot and a hung up tree
Section 27
Jack Pot
• A jackpot is similar to a hang-up situation but in involves multiple trees. Note:
• Seek qualified assistance to determine if it is safe to fall any of the trees without compromising the safety of the faller.
• Assess all the trees involved in the jackpot. If it is safe to fall one or more of the trees the sequence must be accurately planned.
Safe Work Procedure:
1. Create a NO WORK ZONE considering timber size and terrain 2. Consider an alternate method of falling if hand falling is not safe 3. Fall the trees according to the site specific work plan if a safe plan can be
implemented.

16 - 38
Book 3 – BCWS Faller Training Student Manual 16.10 Overhead Powerlines Learning Objective:
• Explain the BCWS safe work procedure around powerlines Hazard:
• Electrocution Prior to Falling:
• Determine if any of the trees requiring to be felled are within two tree length of a powerline, or any structure related to the powerline system
• Notify applicable fire centre to contact local power authority • Stop work and discuss with supervisor • Request for a contracted professional faller/ specialized arbourist to
deal with any trees within two tree lenths of a powerline
Safe Work Procedures 1. Follow site specific instructions
• Include traffic control requirements if power lines are located beside roads
• Include what should be done in the event of a power line contact 2. Follow instructions from the local Power Authority, as per the written
directions on the current Assurance in writing form.

17 - 1
Book 3 – BCWS Faller Training Student Manual
Section 17 - Safe Special Falling Techniques
17.1 Falling Against the Lean Learning Objectives:
• Identify one hazard related to falling against the lean • Describe how to safely fall against the lean • Identify when falling against the lean should be used
Field Practice Objectives:
• Demonstrate safe work practices when falling against the lean
Section 32 What are the hazards of falling against the lean? Answer:

17 - 2
Book 3 – BCWS Faller Training Student Manual
Use the following special falling technique when: • Conventional wedging is not possible because the tree diameter is too
small to accommodate a wedge and the chainsaw in the backcut, or because the tree is too heavy to lift
• A tree leans against the falling pattern and no pusher tree is available • Falling the tree with the lean would cross a boundary, e.g. excessive fuel
loading, violate Fisheries Act if the tree falls into a creek • The tree would fall into standing timber
Falling Against the Lean, Small Diameter Tree
Safe Work Procedure:
17 - 3
Book 3 – BCWS Faller Training Student Manual 17.2 Short Stubby Tree Learning Objective:
• Identify one hazard related to falling short stubby tree • Describe how to safely fall short stubby tree • Identify when falling short stubby tree should be used
Field practice objective
• Demonstrate safe work practice for falling short stubby tree
Section 32 What are the hazards of falling a short stubby tree or leaving a short stubby tree standing in a falling area? Answer:
Use the following special falling technique when:
• The tree has a large base diameter and the stem has broken off, e.g. 3:1 height to base diameter
• The tree lacks the height to fall over because the base is heavier than the stem

17 - 4
Book 3 – BCWS Faller Training Student Manual
Short Stubby Tree
Safe Work Procedure:

17 - 5
Book 3 – BCWS Faller Training Student Manual Notes:
17 - 6
Book 3 – BCWS Faller Training Student Manual 17.3 Fence Posting Hung up tree Learning Objective:
• Identify hazards related to fence posting hung up trees • Describe procedure to safely fence post a tree • Identify assessment of hung up tree for fence posting
Field practice objective
• Demonstrate safe work practice for fence posting
Section 32
Ask: What are the hazards of fence posting a tree vs falling the tree the hang up are in?
Answer:

17 - 7
Book 3 – BCWS Faller Training Student Manual
Use the following special falling technique when: • If the hazard tree is less than 18 inches at the base.
o Fence posting large diameter trees should not be performed because the cutting technique draws the faller much closer to the tree which can fail unexpectedly under tension.
• Falling the supporting tree would cause unmanageable exposure to the hang up
• Aligning the hang up to the supporting step to reduce overhead hazard failure when falling the supporting stem
Ask: What are the Assessment Considerations of fence posting a tree?
Answer:

17 - 8
Book 3 – BCWS Faller Training Student Manual
Fence Posting a Hang Up Safe Work Procedure:
17 - 9
Book 3 – BCWS Faller Training Student Manual 17.4 Refalling a Cut Up Tree Learning Objectives:
• Identify one hazard related to refalling a cut up tree • Describe how to refall a cut up tree • Identify when refalling a cut up tree should be used
Field Practice Objective
• Demonstrate safe work practice for refalling a cut up tree
Section 32 What are the hazards of refalling a cut up tree? Answer:
Use the following special falling technique when:
• A tree does not fall but sits back and a wedge can no longer be set • The tree already has an undercut and backcut, but did not fall due to:
o An incorrect lean assessment o Failure to set a wedge in the backcut o Wind gusts that set the tree back

17 - 10
Book 3 – BCWS Faller Training Student Manual
Refalling a Cut Up Tree Safe Work Procedure:
17 - 1
Book 3 – BCWS Faller Training Student Manual
Section 17 - Safe Special Falling Techniques
17.1 Falling Against the Lean Learning Objectives:
• Identify one hazard related to falling against the lean • Describe how to safely fall against the lean • Identify when falling against the lean should be used
Field Practice Objectives:
• Demonstrate safe work practices when falling against the lean
Section 32 What are the hazards of falling against the lean? Answer:

17 - 2
Book 3 – BCWS Faller Training Student Manual
Use the following special falling technique when: • Conventional wedging is not possible because the tree diameter is too
small to accommodate a wedge and the chainsaw in the backcut, or because the tree is too heavy to lift
• A tree leans against the falling pattern and no pusher tree is available • Falling the tree with the lean would cross a boundary, e.g. excessive fuel
loading, violate Fisheries Act if the tree falls into a creek • The tree would fall into standing timber
Falling Against the Lean, Small Diameter Tree
Safe Work Procedure:
17 - 3
Book 3 – BCWS Faller Training Student Manual
17.2 Short Stubby Tree Learning Objective:
• Identify one hazard related to falling short stubby tree • Describe how to safely fall short stubby tree • Identify when falling short stubby tree should be used
Field practice objective
• Demonstrate safe work practice for falling short stubby tree
Section 32 What are the hazards of falling a short stubby tree or leaving a short stubby tree standing in a falling area? Answer:
Use the following special falling technique when:
• The tree has a large base diameter and the stem has broken off, e.g. 3:1 height to base diameter
• The tree lacks the height to fall over because the base is heavier than the stem

17 - 4
Book 3 – BCWS Faller Training Student Manual
Short Stubby Tree
Safe Work Procedure:

17 - 5
Book 3 – BCWS Faller Training Student Manual
Notes:

17 - 6
Book 3 – BCWS Faller Training Student Manual
16.3 Refalling a Cut Up Tree Learning Objectives:
• Identify one hazard related to refalling a cut up tree • Describe how to refall a cut up tree • Identify when refalling a cut up tree should be used
Field Practice Objective
• Demonstrate safe work practice for refalling a cut up tree
Section 32 What are the hazards of refalling a cut up tree? Answer:
Use the following special falling technique when:
• A tree does not fall but sits back and a wedge can no longer be set • The tree already has an undercut and backcut, but did not fall due to:
o An incorrect lean assessment o Failure to set a wedge in the backcut o Wind gusts that set the tree back

17 - 7
Book 3 – BCWS Faller Training Student Manual
Refalling a Cut Up Tree Safe Work Procedure:

18 - 1
Book 3 – BCWS Faller Training Student Manual
Section 18 - Dangerous Falling Practices
18.1 Brushing Learning Objectives:
• Explain why brushing causes more serious injuries and fatalities than any other falling practices
• Locate OH&s 26.24 and explain the main points relating to brushing
Section 17 Brushing occurs when a faller loses control of the falling tree, which in turn strikes another standing tree. This causes hazards and damage such as limbs being sheared off and the tops of the tree breaking off and being thrown back towards the stump and faller.
• Causes overhead hazards, e.g. broken limbs and tops • Can cause debris to be thrown back towards the faller • Can cause jackpots • Can result in standing timber being pushed over or out of lead • Can cause potential uncontrolled chain reactions • Creates added debris at base of brushed trees • Can cause dangerous trees to fall
Why is brushing is an unacceptable practice? Answer:
18 - 2
Book 3 – Safe Fire Line Falling Operations Student Manual
Ways to Avoid Brushing:
• Plan the falling sequence to allow the timber to fall free of any obstructions and land in a safe position
• Modify the falling plan if conditions, such as terrain, impact safe tree placement
• Fall any small saplings and dangerous trees that could be an obstruction to the free fall of other trees
• Fall trees with large limbs or multiple tops that extend out and could impact the falling of other trees
• Remove a brushed dangerous tree prior to falling other trees

18 - 3
Book 3 – Safe Fire Line Falling Operations Student Manual
18.2 Inadequate Falling Cuts Learning Objectives:
• Explain why inadequate falling cuts are unacceptable • Locate OH&S 26.24 and explain the main points relating to
inadequate falling cuts
Section 22 Inadequate falling cuts include the following:
• No undercut in trees over 6 inches/15 cm diameter at breast height (dbh)
• Undercut not completely cleaned out, e.g. dutchman • Backcut below undercut • Inadequate undercut • Excessive undercut • Sloping cuts • Cut off holding wood • Falling trees without an undercut or constructing an inadequate
undercut can result in loss of directional control of the tree, kickbacks, or barberchairs.
• If the tree falls in an unplanned location or kicks back, it may throw back debris or other trees at the faller.
Loss of directional control is unacceptable because:
• it leads to excessive brushing and unsafe positioning for harvesting and is an indicator of poor workmanship

18 - 4
Book 3 – Safe Fire Line Falling Operations Student Manual
Look up and read the following: OH&S regulation 26.24 Ways to Avoid Inadequate Falling Cuts A Professional Faller:
• Takes the time to construct undercuts that are complete/cleaned out
• Ensures adequate holding wood is maintained
• Ensures the backcut is higher than the undercut
Recognize the Hazard

18 - 5
Book 3 – Safe Fire Line Falling Operations Student Manual
18.3 Dutchman Note: A dutchman is created in an undercut when the two cuts do not meet to
form a proper ‘V’, e.g. one cut extends past the other creating a flat spot, which can continue across the full diameter of the stump.
• The side where the cuts do not
meet can swing the tree in an unintended direction
• The tree can split • The dutchman can stop the
freefall of the tree, which creates the potential for barberchair or stem failure
• The dutchman makes the tree
more difficult to wedge
• The dutchman may cause the holding wood on the high side to prematurely break off
A Dutchman is unacceptable because: • it is the leading cause of loss of directional control of the tree
Ways to Avoid a Dutchman
A Professional Faller:
• Visually checks to ensure the undercut is cleaned out or corrected prior to starting the backcut, i.e. cut out the dutchman, ensure the cuts meet

18 - 6
Book 3 – Safe Fire Line Falling Operations Student Manual
• Even the most experienced faller cannot determine the amount of pull
or throw created by the dutchman. Therefore, the use of an intentional dutchman is prohibited.
18.4 Sloping Cuts Note: A sloping cut is an undercut and/or backcut angled down in the same
direction, or criss-crossed in undercut and backcut sloped at opposite angles. • Sloping cuts cause the falling tree to slip off the stump and result in
loss of directional control • Criss-crossed cuts in an undercut and backcut sloped at opposite
angles may cause the faller to misjudge the amount of holding wood, resulting in loss of directional control
Sloping cuts are unacceptable because:
• They are an indicator of poor workmanship and loss of directional control of the tree
Ways to Avoid Sloping Cuts:
• A professional faller takes the time to: • Construct correct, level, and angled cuts according to undercut
procedures • Construct level backcuts
18.5 Backcut below Undercut Note: It is when the backcut on the tree being felled is less than ¾ of an inch
below a Humbolt Undercut or less than 2 inches below a Conventional Undercut.
18 - 7
Book 3 – Safe Fire Line Falling Operations Student Manual
Hazards:
• Can result in the tree sliding back off the stump as the tree starts to fall with loss of directional control
• Wedging becomes extremely difficult as the weight of the tree must be lifted above the undercut for the tree to fall
This is unacceptable because:
• The faller can be struck by tree sliding back off the stump
• It is difficult to determine the adequate amount of remaining holding wood
Ways to Avoid a Backcut Below Undercut A professional faller takes the time to:
• Ensure that the backcut is lined up at the appropriate height above the undercut according to safe work procedures
18.6 Insufficient Holding Wood
• Holding wood is hinge wood between the undercut and backcut that remains across the diameter of the tree and maintains the directional control of the fall
• Causes loss of directional control
Insufficient holding wood is unacceptable because: • Enough holding wood must be left to maintain control of the tree so
that it does not break, slip, or twist off the stump and fall in an unplanned direction
Ways to Avoid Insufficient Holding Wood A Professional Faller takes the time to:
• Check regularly to ensure that adequate holding wood is left intact
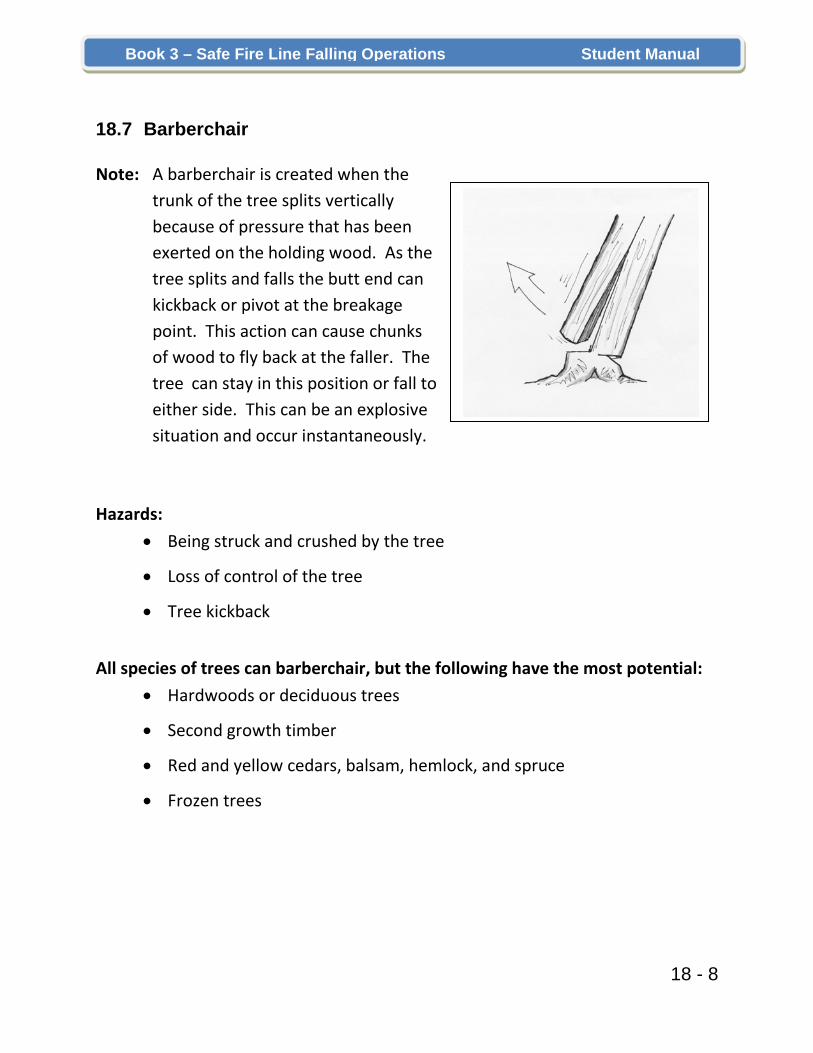
18 - 8
Book 3 – Safe Fire Line Falling Operations Student Manual
18.7 Barberchair Note: A barberchair is created when the
trunk of the tree splits vertically because of pressure that has been exerted on the holding wood. As the tree splits and falls the butt end can kickback or pivot at the breakage point. This action can cause chunks of wood to fly back at the faller. The tree can stay in this position or fall to either side. This can be an explosive situation and occur instantaneously.
Hazards:
• Being struck and crushed by the tree
• Loss of control of the tree
• Tree kickback
All species of trees can barberchair, but the following have the most potential:
• Hardwoods or deciduous trees
• Second growth timber
• Red and yellow cedars, balsam, hemlock, and spruce
• Frozen trees
18 - 9
Book 3 – Safe Fire Line Falling Operations Student Manual
A barberchair is caused by: • Inadequate undercuts, e.g. too shallow, not enough depth
• Unclean undercut, e.g. dutchman
• Leaving too much holding wood
• Heavy lean or pressure on the tree
• Split seams, cracks, or other deformities in the butt section of the
tree
• Tree falls across an obstacle, rock outcropping, or short stubby tree
• Wind
• Tree setting back
Ways to Avoid a Barberchair A professional faller takes the time to:
• Conducts accurate tree assessment for species and defects
• Constructs proper falling cuts
• Sets wedges as soon as possible
• Avoids falling in windy conditions
• Falls heavy leaning trees slightly off lean, e.g. deciduous
• Ensures backcut is completed remain at the base of the tree until it is
committed to the fall
18 - 10
Book 3 – Safe Fire Line Falling Operations Student Manual
18.8 Domino Falling Learning Objectives:
• Explain why the practice of domino falling is unacceptable • Locate the section of OH&s 26.24 where it explains the one exception
where domino falling is permitted
Section 17 What is domino falling? Answer:
Why is this practice unacceptable? Answer:
18 - 11
Book 3 – Safe Fire Line Falling Operations Student Manual
A Professional Faller:
• Does not domino fall, but takes the time to ensure that all trees are felled in a controlled safe manner
• Conducts proper planning and layout of the falling area to allow enough room to safely fall the trees
• Locates skidtrails to take advantage of the general timber lean
• Develops a day plan to avoid domino falling
• Uses appropriate axe and wedges to fall the tree


