

How to build, Use a
A BETTER BONF
Moses AgumbVivienne Abbo
nd Maintain
IRE KILN
a tt
How to build, Use and Maintain A Better Bonfire Kiln
Moses Agumba and Vivienne Abbott Intermediate Technology Kenya 1996
Intermediate Technology Kenya P. O. Box 39493 Nairobi Kenya © Intermediate Technology Kenya 1996 Cover photo: A member of the Keyo Womens Group at Kisumu adds fuelwood into the firebox. ISBN 9966-9606-1-9 This manual was produced with assistance from the Overseas Development Agency – Joint Funding Scheme (ODA-JFS) and Charity Projects of the UK Illustrations by Debbie Riviere, UK Cover photo by Heinz Muller. Originally printed by Africa Church Information Service, Nairobi Contents Acknowledgements 2 Chapter 1 Introduction 3 Chapter 2 Kiln Description 7 Chapter 3 Kiln Construction 8 Chapter 4 Building the Kiln 10 Chapter 5 Using the Kiln 18 Chapter 6 Troubleshooting 22 Glossary 24 Further Reading 24 Acknowledgments The authors would like to thank Pete Young for the work he did on the Kiln Research Project from 1992 until the 'Better Bonfire Kiln' was launched. The project team included women groups that participated in the testing of five different types of kilns. They include the Wise Women Group, Ichingo Women Group, and The Keyo Women Group to name just a few. We thank the GTZ Special Energy Programme and the Ministry of Energy for their contribution in the process of development of the kiln. Special thanks to James Mureithi of the Ministry of Energy for his contribution and comments. We thank the IT communications team of Betty Rabar and Mariam Kundu for the editing and layout of this manual. Thanks also to Lydia Muchiri, Rose Akinyi, Hellen Owalla and Stephen Gitonga for their contributions.
2
Chapter One INTRODUCTION Background There is a story that people first discovered pottery by accident. A basket used for carrying grain, smeared on the inside with mud from a nearby river bank, accidentally rolled into the fire. The basket burned away leaving a brittle shell. The people discovered that this shell did not dissolve in water and in fact could hold water, was heat resistant and so could be used for cooking food.
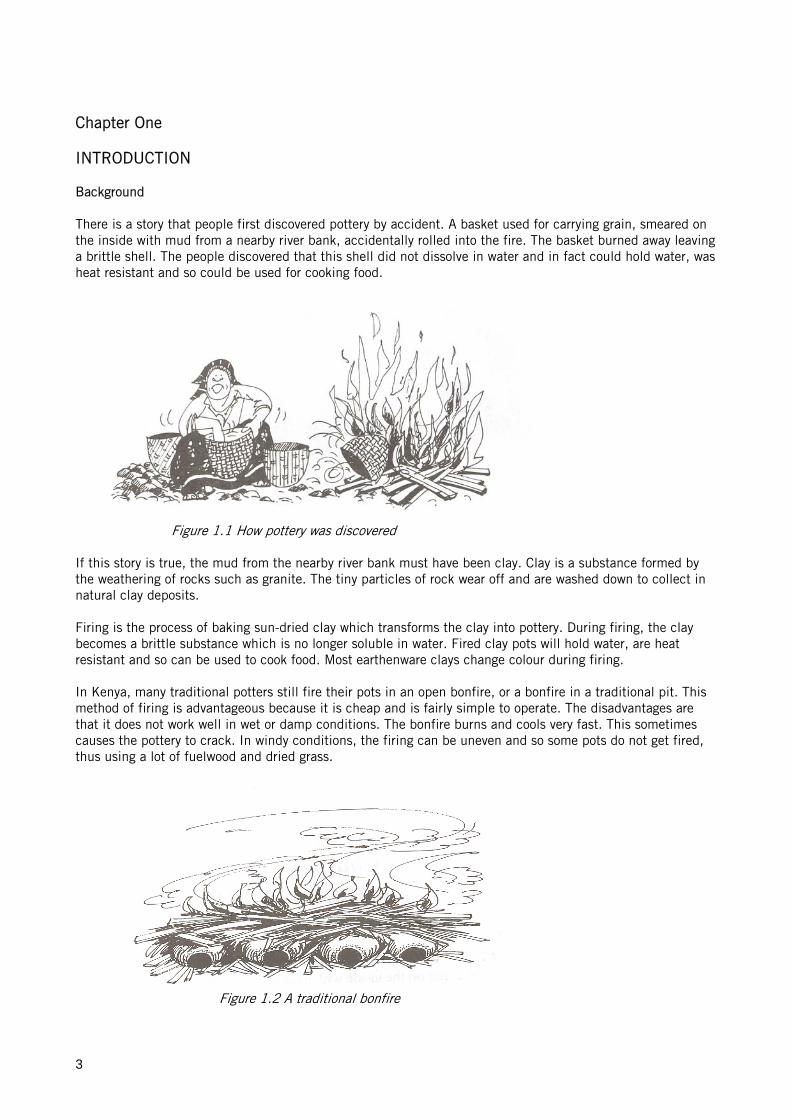
Figure 1.1 How pottery was discovered If this story is true, the mud from the nearby river bank must have been clay. Clay is a substance formed by the weathering of rocks such as granite. The tiny particles of rock wear off and are washed down to collect in natural clay deposits. Firing is the process of baking sun-dried clay which transforms the clay into pottery. During firing, the clay becomes a brittle substance which is no longer soluble in water. Fired clay pots will hold water, are heat resistant and so can be used to cook food. Most earthenware clays change colour during firing. In Kenya, many traditional potters still fire their pots in an open bonfire, or a bonfire in a traditional pit. This method of firing is advantageous because it is cheap and is fairly simple to operate. The disadvantages are that it does not work well in wet or damp conditions. The bonfire burns and cools very fast. This sometimes causes the pottery to crack. In windy conditions, the firing can be uneven and so some pots do not get fired, thus using a lot of fuelwood and dried grass.
Figure 1.2 A traditional bonfire
3
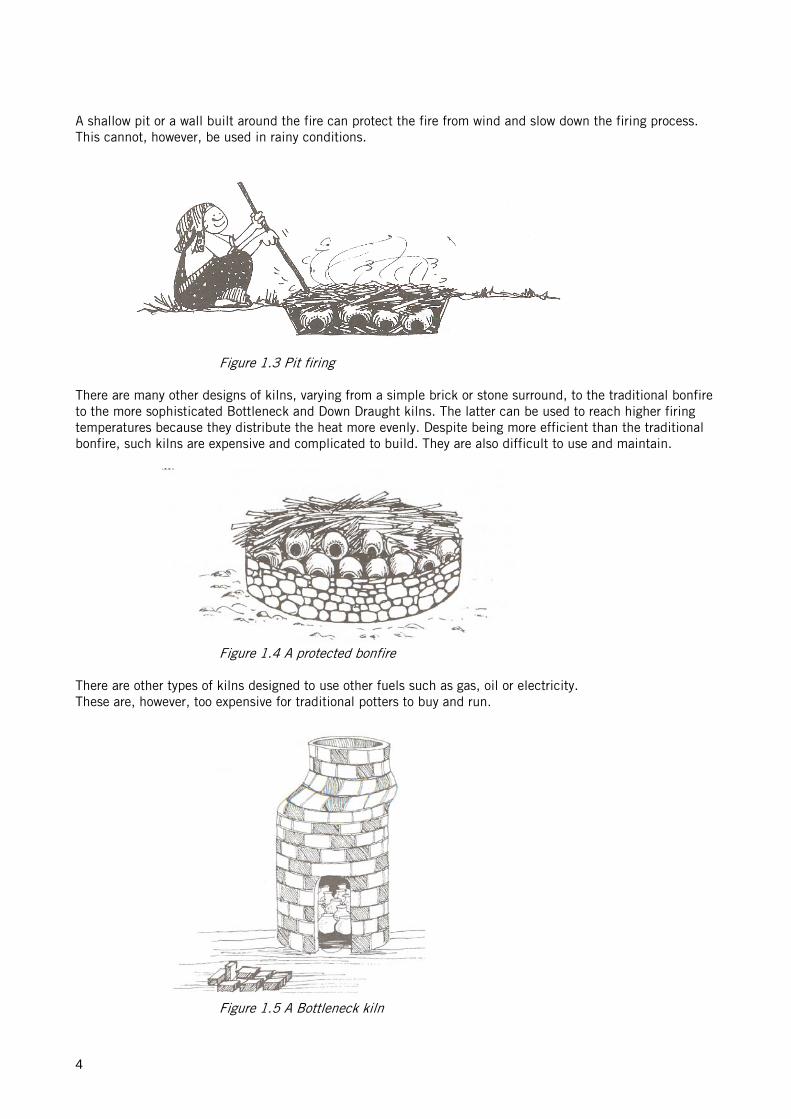
A shallow pit or a wall built around the fire can protect the fire from wind and slow down the firing process. This cannot, however, be used in rainy conditions.
t fir
Figure 1.3 Pit firing There are many other designs of kilns, varying from a simple brick or stone surround, to the traditional bonfire to the more sophisticated Bottleneck and Down Draught kilns. The latter can be used to reach higher firing temperatures because they distribute the heat more evenly. Despite being more efficient than the traditional bonfire, such kilns are expensive and complicated to build. They are also difficult to use and maintain.
Figure 1.4 A protec ed bon e
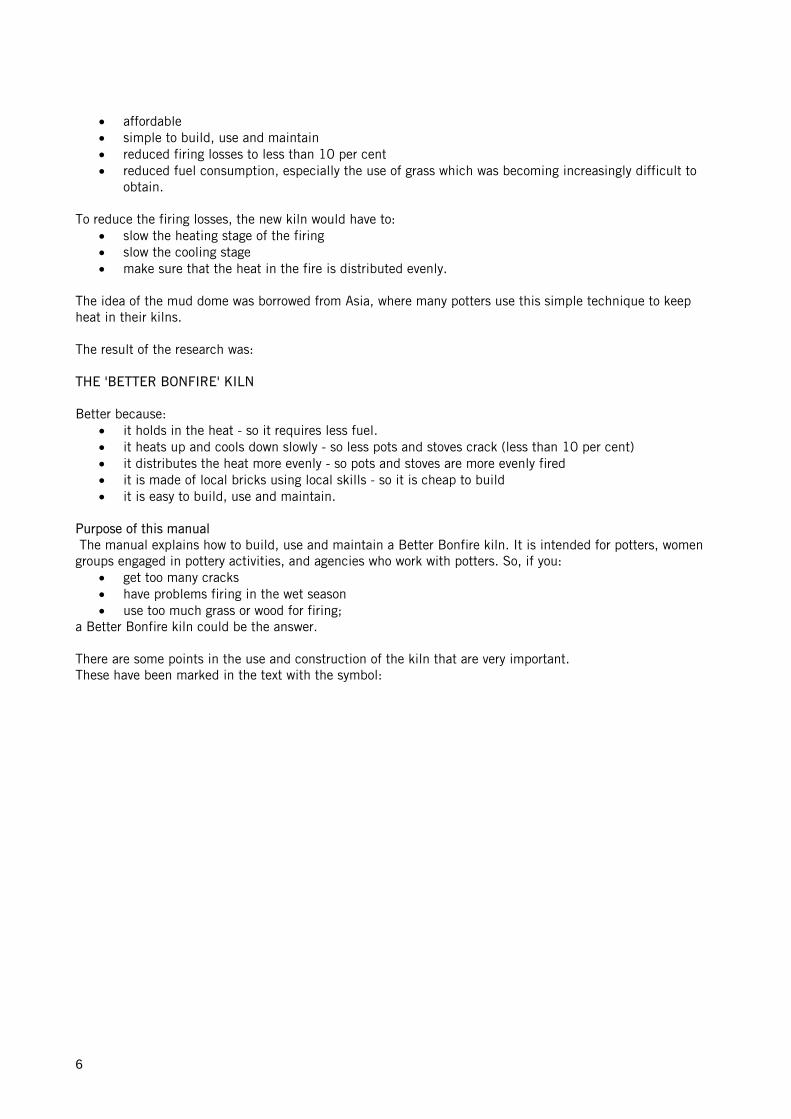
There are other types of kilns designed to use other fuels such as gas, oil or electricity. These are, however, too expensive for traditional potters to buy and run.
Figure 1.5 A Bottleneck kiln
4

r
Figure 1.6 A Down D aught kiln
Why design a new kiln? In 1989, IT started to train groups of women potters in West Kenya to produce and market an improved cooking stove. The stove, known as Upesi or Maendeleo, is designed to burn wood and agricultural waste such as maize cobs and stalks. The improved cooking stove uses less fuel than the traditional three-stone fire. It produces less smoke and is safer for both the cooks and their children. The stove 'liner' is made from fired clay. When the pottery groups first learnt to make the stoves, they fired the liners in Figure 1.7 An Upesi liner their traditional bonfires or pits. The potters were often unable to fire their products during the rainy season. As with their pots, quite a high number of stove liners cracked during firing, sometimes as much as 40 per cent or even higher due to the rapid and uneven heating and cooling processes. The liners have thicker walls than the traditional pots, so they need to be fired for a longer period than pots. Experience of firing Upesi liners in Kenya has shown that if temperatures of 600°C to 700°C are reached and held for two to three hours, the liners will be adequately fired. This is difficult to achieve with a traditional bonfire.
Figure 1.8 An installed Upesi stove In September 1992, ITDG's Stove and Household Energy Programme in Kenya began a one-year Kiln Project to research on alternative simple and affordable methods of firing pottery products. The idea was to develop an intermediate kiln. The design criteria were to ensure that the new kiln was:
• made using local materials, in this case local bricks
5
• affordable • simple to build, use and maintain • reduced firing losses to less than 10 per cent • reduced fuel consumption, especially the use of grass which was becoming increasingly difficult to
obtain. To reduce the firing losses, the new kiln would have to:
• slow the heating stage of the firing • slow the cooling stage • make sure that the heat in the fire is distributed evenly.
The idea of the mud dome was borrowed from Asia, where many potters use this simple technique to keep heat in their kilns. The result of the research was: THE 'BETTER BONFIRE' KILN Better because:
• it holds in the heat - so it requires less fuel. • it heats up and cools down slowly - so less pots and stoves crack (less than 10 per cent) • it distributes the heat more evenly - so pots and stoves are more evenly fired • it is made of local bricks using local skills - so it is cheap to build • it is easy to build, use and maintain.
Purpose of this manual The manual explains how to build, use and maintain a Better Bonfire kiln. It is intended for potters, women groups engaged in pottery activities, and agencies who work with potters. So, if you:
• get too many cracks • have problems firing in the wet season • use too much grass or wood for firing;
a Better Bonfire kiln could be the answer. There are some points in the use and construction of the kiln that are very important. These have been marked in the text with the symbol:
6
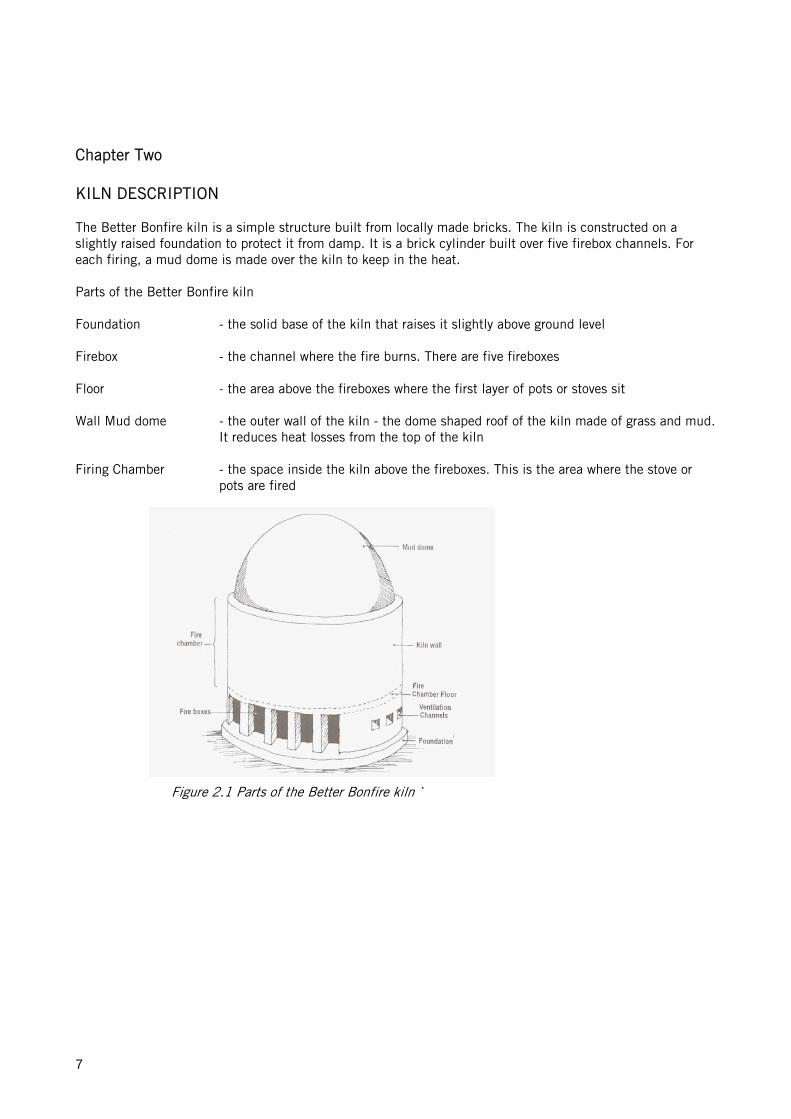
Chapter Two KILN DESCRIPTION The Better Bonfire kiln is a simple structure built from locally made bricks. The kiln is constructed on a slightly raised foundation to protect it from damp. It is a brick cylinder built over five firebox channels. For each firing, a mud dome is made over the kiln to keep in the heat. Parts of the Better Bonfire kiln Foundation - the solid base of the kiln that raises it slightly above ground level Firebox - the channel where the fire burns. There are five fireboxes Floor - the area above the fireboxes where the first layer of pots or stoves sit Wall Mud dome - the outer wall of the kiln - the dome shaped roof of the kiln made of grass and mud.
It reduces heat losses from the top of the kiln Firing Chamber - the space inside the kiln above the fireboxes. This is the area where the stove or
pots are fired
Figure 2.1 Parts of the Bet er Bon e ki n `t fir l
7
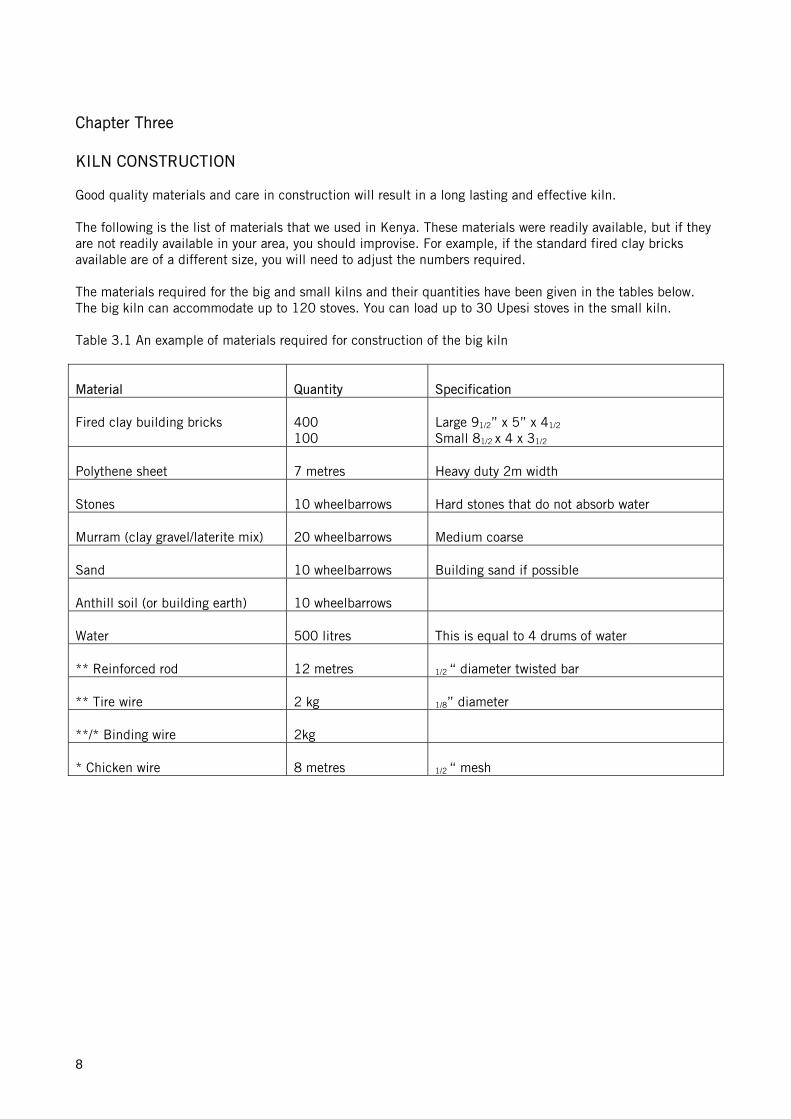
Chapter Three KILN CONSTRUCTION Good quality materials and care in construction will result in a long lasting and effective kiln. The following is the list of materials that we used in Kenya. These materials were readily available, but if they are not readily available in your area, you should improvise. For example, if the standard fired clay bricks available are of a different size, you will need to adjust the numbers required. The materials required for the big and small kilns and their quantities have been given in the tables below. The big kiln can accommodate up to 120 stoves. You can load up to 30 Upesi stoves in the small kiln. Table 3.1 An example of materials required for construction of the big kiln Material
Quantity
Specification
Fired clay building bricks
400 100
Large 91/2” x 5” x 41/2
Small 81/2 x 4 x 31/2
Polythene sheet
7 metres
Heavy duty 2m width
Stones
10 wheelbarrows
Hard stones that do not absorb water
Murram (clay gravel/laterite mix)
20 wheelbarrows
Medium coarse
Sand
10 wheelbarrows
Building sand if possible
Anthill soil (or building earth)
10 wheelbarrows
Water
500 litres
This is equal to 4 drums of water
** Reinforced rod
12 metres
1/2 “ diameter twisted bar
** Tire wire
2 kg
1/8” diameter
**/* Binding wire
2kg
* Chicken wire
8 metres
1/2 “ mesh
8

Table 3.2 Materials requiredfor construction of the small kiln Material
Quantity
Specification
Fired clay building bricks
100 100
Large 91/2” x 5” x 41/2
Small 81/2 x 4 x 31/2
Polythene sheet
2 metres
Heavy duty 2m width
Stones
6 wheelbarrows
Hard stones that do not absorb water
Murram (clay gravel/laterite mix)
10 wheelbarrows
Medium coarse
Sand
6 wheelbarrows
Building sand if possible
Anthill soil (or building earth)
6 wheelbarrows
Water
300 litres
Ceramic plates
6
25 x 20 x 2cm3
.:. Materials marked ** are for a metal support frame over the firebox doors. This can be replaced by
fired clay bars to support the brickwork over the doors. .:. Materials marked * are for a wire mesh skin to strengthen the wall of the kiln.
These are optional.
• The thickness of the kiln wall must be maintained. It will be equal to the length of the bricks. For efficiency and durability, the minimum thickness of the wall should be 10 inches.
• If you are using smaller or bigger bricks, you will need to either increase or decrease the number of courses required to attain the recommended kiln height, which is 75 cm. The recommended height of the firebox channels is 30 cm.
Tools and equipment used for construction .:. rammer .:. spade or hoe .:. pick .:. wheelbarrow .:. tape measure .:. plumb line .:. builder's line .:. spirit level .:. mason's hammer .:. mason's trowel
Figure 3.1 The tools required
9
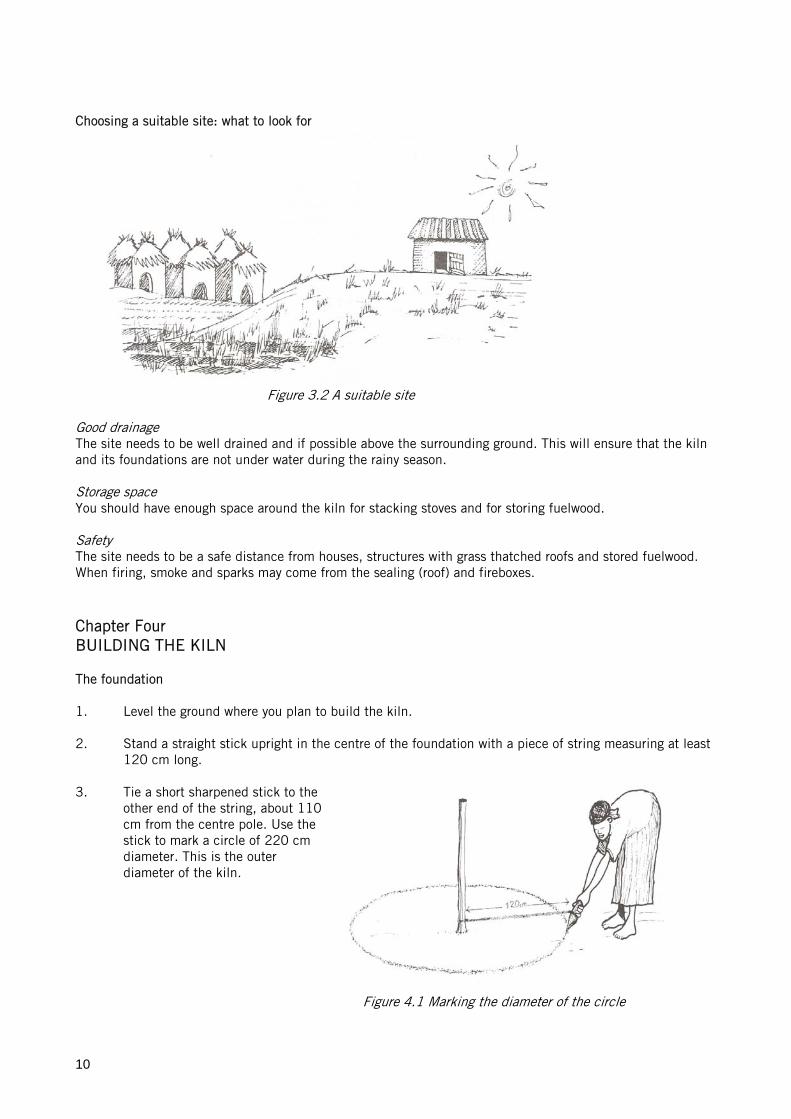
Choosing a suitable site: what to look for
Figure 3.2 A suitable site
od drainage be well drained and if possible above the surrounding ground. This will ensure that the kiln
rage space enough space around the kiln for stacking stoves and for storing fuelwood.
eeds to be a safe distance from houses, structures with grass thatched roofs and stored fuelwood.
hapter Four ILN
he foundation
. Level the ground where you plan to build the kiln.
. Stand a straight stick upright in the centre of the foundation with a piece of string measuring at least
. Tie a short sharpened stick to the
GoThe site needs toand its foundations are not under water during the rainy season. StoYou should have SafetyThe site nWhen firing, smoke and sparks may come from the sealing (roof) and fireboxes. CBUILDING THE K T 1 2
120 cm long.
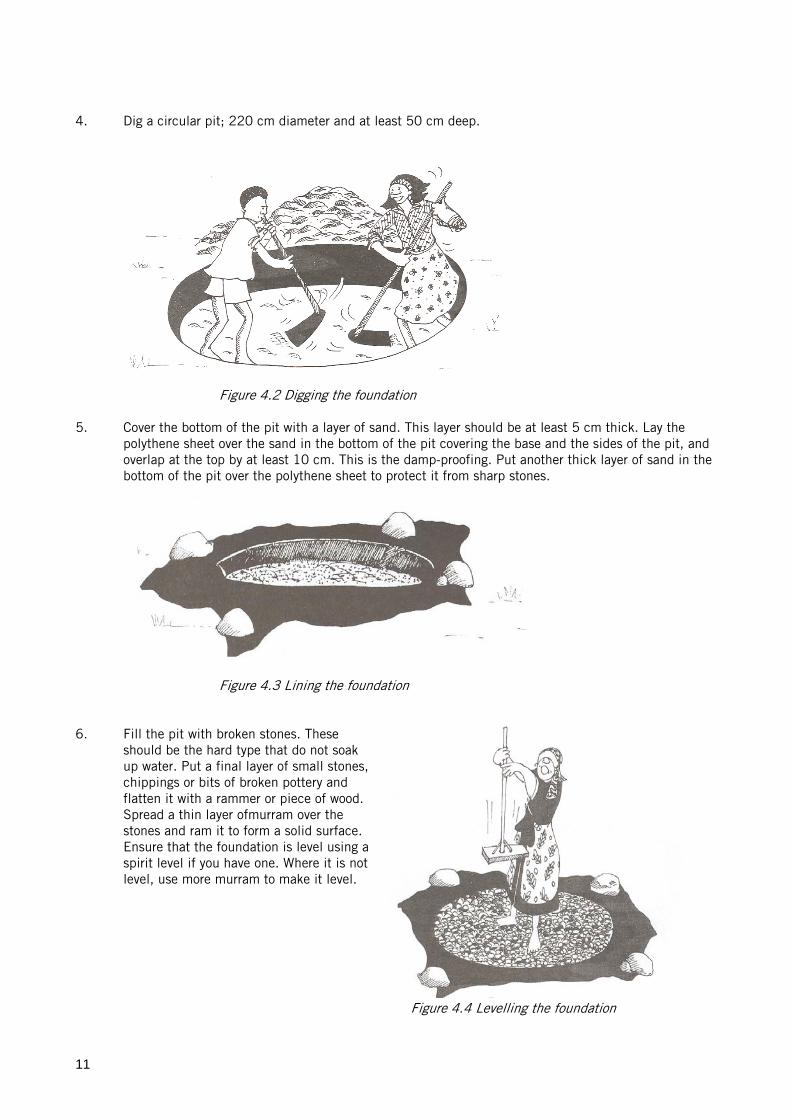
3other end of the string, about 110 cm from the centre pole. Use the stick to mark a circle of 220 cm diameter. This is the outer diameter of the kiln.
Figure 4.1 Marking the diameter of the circle
10
4. Dig a circular pit; 220 cm diameter and a
. Cover the bottom of the pit with a layer of sand. This layer should be at least 5 cm thick. Lay the
nd
Figure 4.3 Lining the foundation
6. Fill the pit with broken stones. These
ak ,
.
e.
t least 50 cm deep.
Figure 4.2 Digging the foundation
5polythene sheet over the sand in the bottom of the pit covering the base and the sides of the pit, aoverlap at the top by at least 10 cm. This is the damp-proofing. Put another thick layer of sand in the bottom of the pit over the polythene sheet to protect it from sharp stones.
should be the hard type that do not soup water. Put a final layer of small stoneschippings or bits of broken pottery and flatten it with a rammer or piece of woodSpread a thin layer ofmurram over the stones and ram it to form a solid surfacEnsure that the foundation is level using aspirit level if you have one. Where it is not level, use more murram to make it level.
Figure 4.4 Levelling the foundation
11
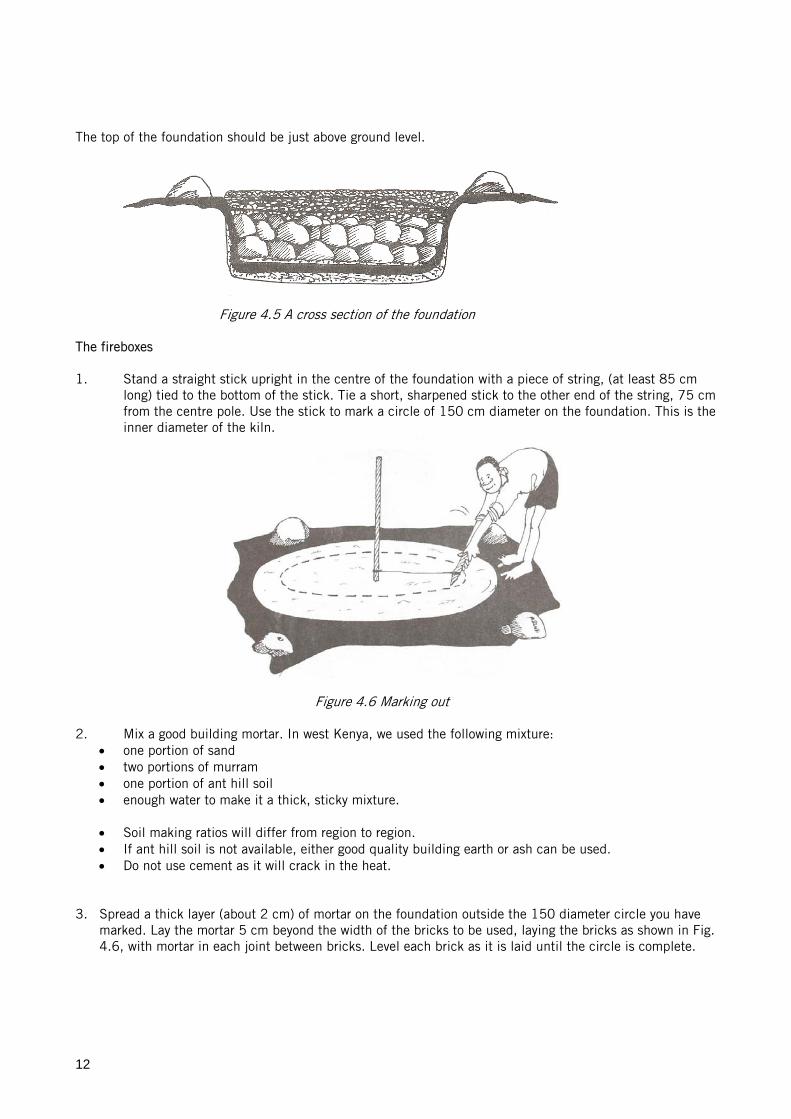
The top of the foundation should be just above ground level.
he fireboxes
. Stand a straight stick upright in the centre of the foundation with a piece of string, (at least 85 cm m
Figure 4.6 Marking out 2. Mix a good building mortar. In we ollowing mixture:
• one portion of sand •
ll soil hick, sticky mixture.
.
• If ant hill soil is not available, either good quality building earth or ash can be used.
. Spread a thick layer (about 2 cm) of mortar on the foundation outside the 150 diameter circle you have marked. Lay the mortar 5 cm beyond the width of the bricks to be used, laying the bricks as shown in Fig.
Figure 4.5 A cross section of the foundation
T 1
long) tied to the bottom of the stick. Tie a short, sharpened stick to the other end of the string, 75 cfrom the centre pole. Use the stick to mark a circle of 150 cm diameter on the foundation. This is the inner diameter of the kiln.
st Kenya, we used the f
two portions of murram • one portion of ant hi• enough water to make it a t
• Soil making ratios will differ from region to region
• Do not use cement as it will crack in the heat.
3
4.6, with mortar in each joint between bricks. Level each brick as it is laid until the circle is complete.
12
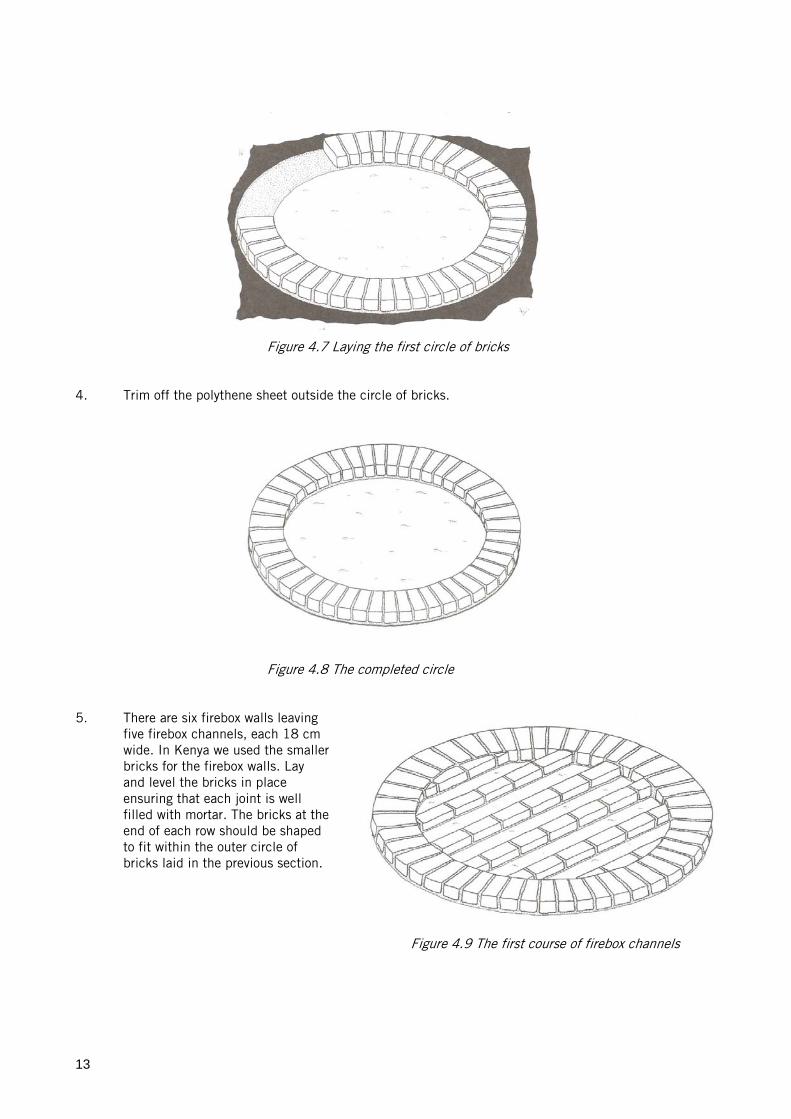
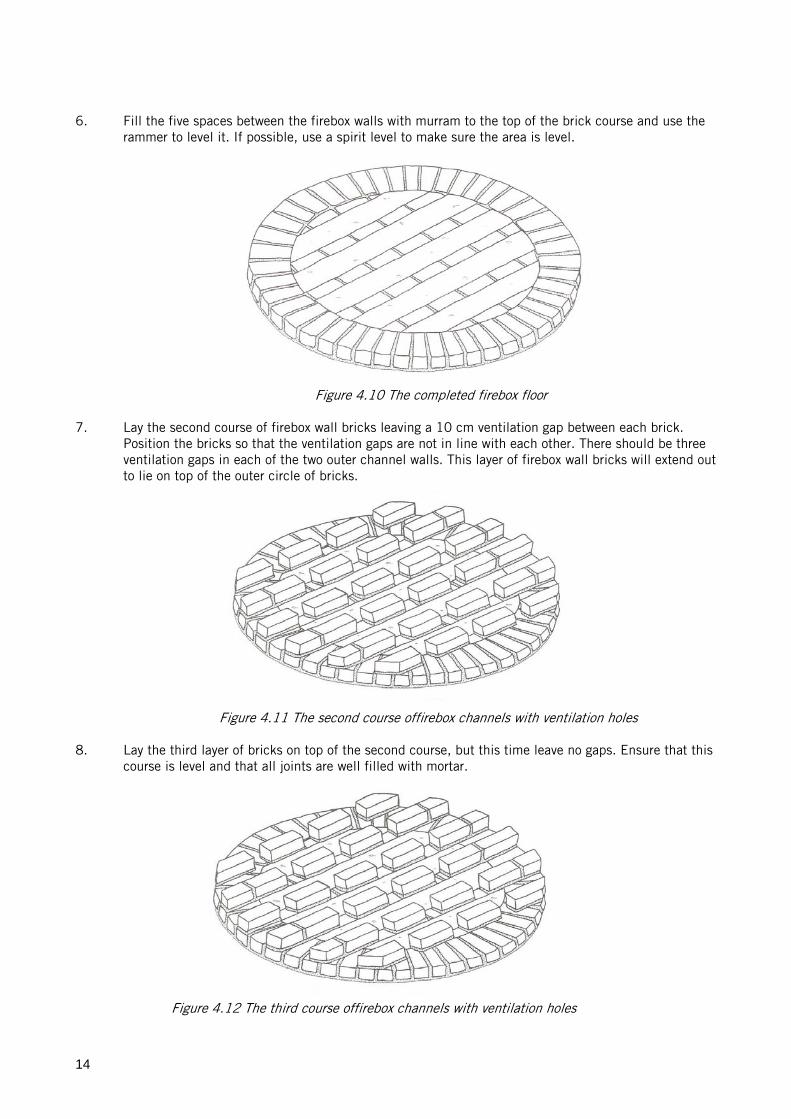
Figure 4.7 Laying the first circle of bricks
. Trim off the polythene sheet outside the circle of bricks.
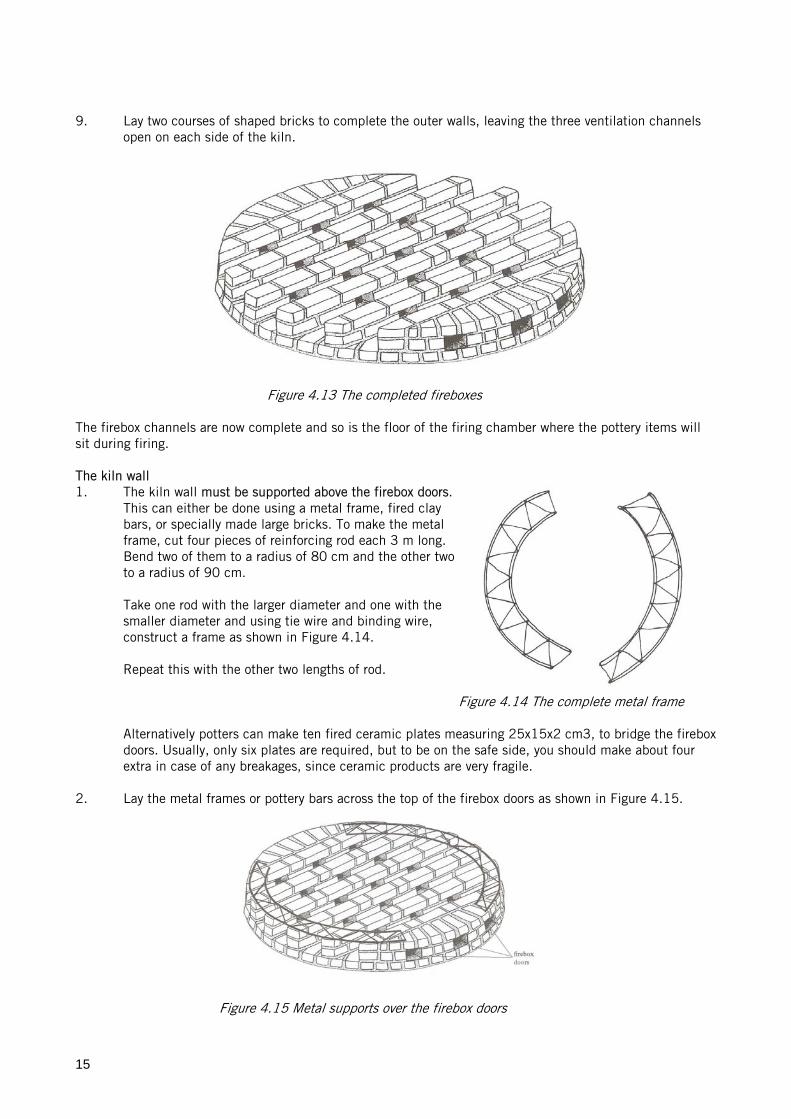
. There are six firebox walls leaving
five firebox channels, each 18 cm r
e ed
on.
4
Figure 4.8 The completed circle
5
wide. In Kenya we used the smallebricks for the firebox walls. Lay and level the bricks in place ensuring that each joint is well filled with mortar. The bricks at thend of each row should be shapto fit within the outer circle of bricks laid in the previous secti
Figure 4.9 The first course of firebox channels
13
6. Fill the five spaces between the firebox walls with murram to the top of the brick course and use the rammer to level it. If possible, use a spirit level to make sure the area is level.
. Lay the second course of firebox wall bricks leaving a 10 cm ventilation gap between each brick. Position the bricks so that the ve er. There should be three ventilation gaps in each of the two outer channel walls. This layer of firebox wall bricks will extend out
holes
. Lay the third layer of bricks on top of the second course, but this time leave no gaps. Ensure that this course is level an
Figure 4.10 The completed firebox floor 7
ntilation gaps are not in line with each oth
to lie on top of the outer circle of bricks.
Figure 4.11 The second course offirebox channels with ventilation 8
d that all joints are well filled with mortar.
Figure 4.12 The third course offirebox channels with ventilation holes
14
9. Lay two courses of shaped bricks to complete the outer walls, leaving the three ventilation channels open on each side of the kiln.
The firebox channel tery items will sit during firing.
all must be supported above the firebox doors. This can either be done using a metal frame, fired clay
pecially made large bricks. To make the metal
o
sing tie wire and binding wire, construct a frame as shown in Figure 4.14.
Alternatively potters can make ten fired ceramic plates me x doors. Usually, only six plates are required, but to be on thextra in case of any breakages, since ceramic products are very fragile.
2.
Figure 4.13 The completed fireboxes
s are now complete and so is the floor of the firing chamber where the pot
The kiln wall 1. The kiln w
bars, or sframe, cut four pieces of reinforcing rod each 3 m long. Bend two of them to a radius of 80 cm and the other twto a radius of 90 cm.
Take one rod with the larger diameter and one with the smaller diameter and u
Repeat this with the other two lengths of rod.
Figure 4.14 The complete metal frame
asuring 25x15x2 cm3, to bridge the fireboe safe side, you should make about four
Lay the metal frames or pottery bars across the top of the firebox doors as shown in Figure 4.15.
Figure 4.15 Metal supports over the firebox doors
15
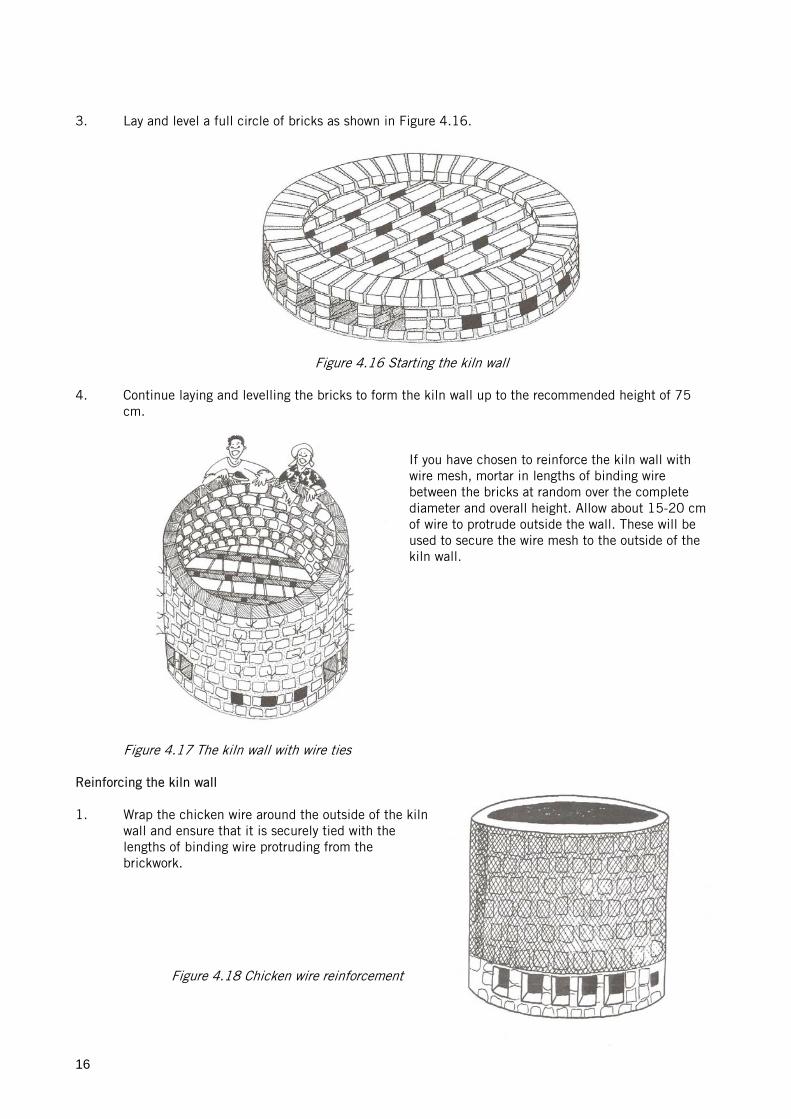
3. Lay and level a full circle of bricks as shown in Figure 4.16.
. Continue laying and levelling the bricks to form the kiln wall up to the recommended height of 75 cm.
to reinforce the kiln wall with
wire mesh, mortar in lengths of binding wire
diameter and overall height. Allow about 15-20 cm of wire to protrude outside the wall. These will be used to secure the wire mesh to the outside of the
Reinforc 1. kiln
wall and ensure that it is securely tied with the he
brickwork.
Figure 4.18 Chicken wire reinforcement
Figure 4.16 Starting the kiln wall 4
If you have chosen
between the bricks at random over the complete
kiln wall.
Figure 4.17 The kiln wall with wire ties
ing the kiln wall
Wrap the chicken wire around the outside of the
lengths of binding wire protruding from t
16

2. Allow the kiln to dry for at least three days before plastering the outside.
3. To make a good or use the best
local mixture for m thick) by hand to the outside of the kiln wall. Finally, plaster the top of the last layer of wall bricks.
4. If the bricks that you have used to build the kiln are of poor quality, you should plaster the inside of
the kiln to protect it from the fire. Plaster used on the inside must be heat resistant. A good mixture
5. ete the drying
process by lighting small fires in the kiln.
6.
Figure 4.19 Plastering the kiln wall
plaster, either mix equal quantities of sand and good quality clay,plastering houses. Apply a thin layer of the mixture (less than 1 c
is equal quantities of grog (a powder of ground fired pottery), ash and good quality clay.
The construction of the kiln is now complete. Allow it to dry for at least 28 days. Compl
The kiln can be protected from the effects of the weather by a simple shelter.
Figure 4.20 A kiln shelter
17

Chapter Five USING THE KILN Loading the kiln
60 and 120 Upes e kiln some stoves will be under-fired.
Check each stove or pot before loading it into the kiln. If there are small " cracks or if it is badly made, do not fire it. Instead, break up the pot or stove and soak the clay so that it can be re-used. Poor quality products often crack during firing which is a waste of time, effort, clay and fuel. 1. When the stoves or pots are ready for firing, put them in the sun for at least one day to make sure that
they are completely dry. 2. Put the first layer of stoves or pots into the chamber with the bottom of the stoves resting on the
firebox bricks.
Figure 5.1 Loading the kiln 3. The rest of the stoves or pots should be packed to
reduce the amount of "free" space in the kiln. Do not pack them in neat stacks. Pack each stove or pot so that it cannot move easily. Continue loading the kiln above the level of the kiln wall to form a dome shape.
Figure 5.2 The loaded kiln
The kiln holds between
i stoves. If you overload th
18
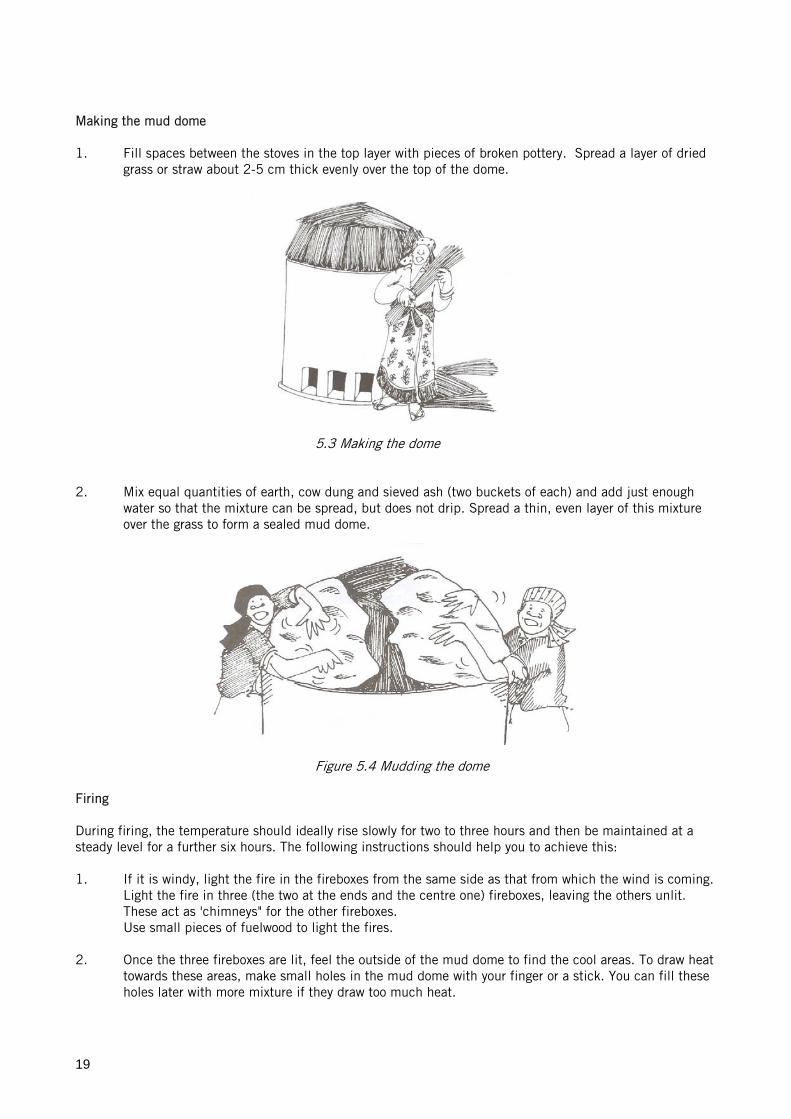
Making the mud dome
een the stoves in the top layer with pieces of broken pottery. Spread a layer of dried raw about 2-5 cm thick evenly over the top of the dome.
2. Mix equal ckets of each) and add just enough
water so th read a thin, even layer of this mixture over the gr
in iring
During firing, the temperature should ideally rise slowly for two to three hours and then be maintained at a steady level for a further six hours. The following instructions should help you to achieve this: 1. If it is windy, light the fire in the fireboxes from the same side as that from which the wind is coming.
Light the fire in three (the two at the ends and the centre one) fireboxes, leaving the others unlit. These act as 'chimneys" for the other fireboxes. Use small pieces of fuelwood to light the fires.
. Once the three fireboxes are lit, feel the outside of the mud dome nd th eas. To draw heat
towards these areas, make small holes in the mud dome with your finger or a stick. You can fill these holes later with more mixture if they draw too much heat.
. Fill spaces betw1
grass or st
5.3 Making the dome
quantities of earth, cow dung and sieved ash (two buat the mixture can be spread, but does not drip. Spass to form a sealed mud dome.
Figure 5.4 Mudd g the dome
F
2 to fi e cool ar
19
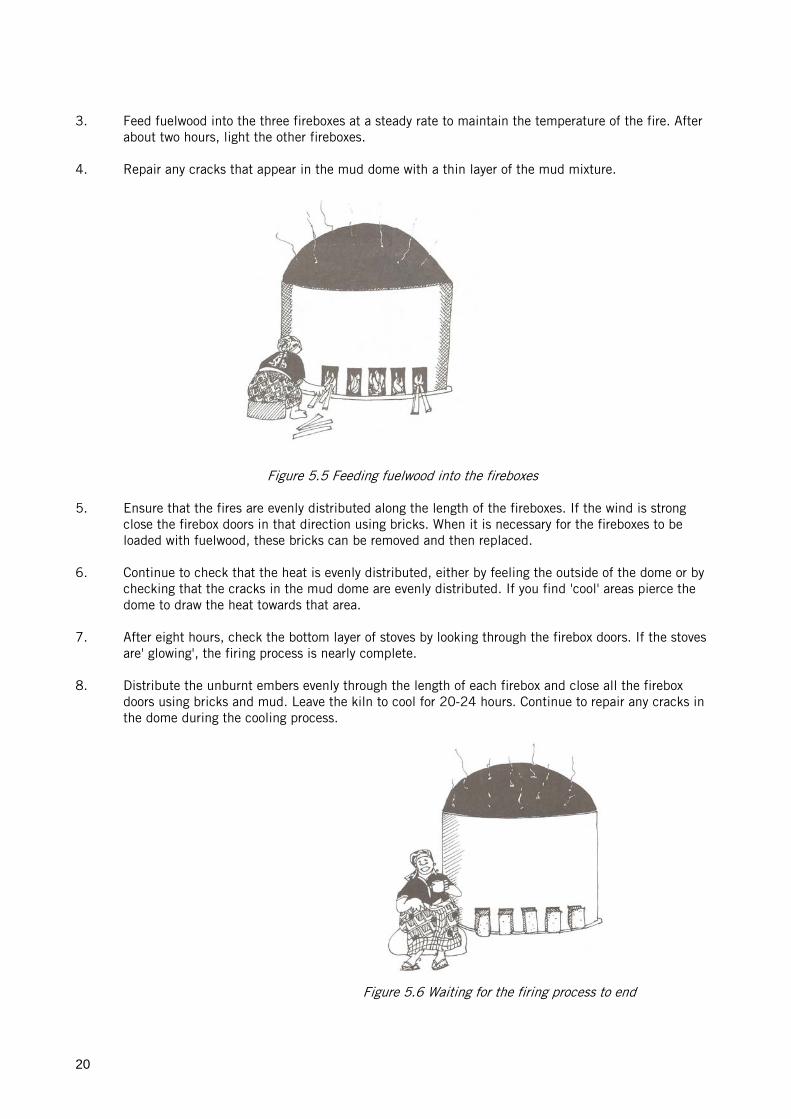
3. Feed fuelwood into the three fireboxes at a steady rate to maintain the temperature of the fire. After about two hours, light the other fireboxes.
4. e mud mixture.
Figure 5.5 Feeding fuelwood into the fireboxes
5. g bricks. When it is necessary for the fireboxes to be
loaded wi
. Continue to check that the heat is evenly distributed, either by feeling the outside of the dome or by checking that the cracks in the mud dome are evenly distributed. If you find 'cool' areas pierce the dome to draw the heat towards that area.
7. After eight hours, check the bottom layer of stoves by looking through the firebox doors. If the stoves
are' glowing', the firing process is nearly complete. 8. Distribute the unburnt embers evenly through the length of each firebox and close all the firebox
doors using bricks and mud. Leave the kiln to cool for 20-24 hours. Continue to repair any cracks in the dome during the cooling process.
g for the firing process to end
Repair any cracks that appear in the mud dome with a thin layer of th
Ensure that the fires are evenly distributed along the length of the fireboxes. If the wind is strong close the firebox doors in that direction usin
th fuelwood, these bricks can be removed and then replaced. 6
Figure 5.6 Waitin
20

• tion is recommended. This slow firing process helps to
prevent cracking in the two critical temperature ranges.
• All unfired pottery contains e at 100°c. If this happens too fast the pottery will cr
• At 580°C the qua o fast the pottery will crack.
Unloading the kiln After 20-24 hours the st the mud dome and the supporting pottery pieces, and careful
you open the kiln too early it will cool too fast. This may cause breakages.
Repairs
• • en out. • Cracks.
2. Repair any of these defects immediatel 3. Replaster the kiln regularly.
For a Better Bonfire, a nine-hour firing dura
some residual water which will vaporiz
ack.
rtz in the clay and expands. If this happens to
oves should be cool enough to handle. Removely unload the stoves or pots.
Figure 5.7 Unloading the kiln
If
and maintenance 1. After each firing inspect the kiln for:
Bricks that are beginning to sink. Joints which have become loose or fall
y.
21

Chapter Six TR B
xpe enhelp u
ren s vary. Only through experience will you be able to achieve maximum ffici ncy
e most common problems and possible solutions.
Light the fire from the direction of the wind ifficult to light of the flames
Wood
All fireb ater the sa
Too littl ome Flames come out Wind in ction of the wind of the firebox door of the fl Too much smoke Wet wo dry w od in the fireboxes
the dome to draw out the smoke
e fuelwood Use more fuelwood
ecially Make more holes in the dome d at the
Use dry wood
ves o perature Reduce amount of fuel used
toves crack Damp liners Dry liners before firing uring firing
Damp kiln Ensure that the kiln floor is above ground level and is provided with a damp-proof layer
Shelter the kiln
Clay is not properly Allow clay to mature for several weeks before use Prepared Clay is too pure Add sand to the clay
OU LESHOOTING E ri ced potters should be familiar with what causes cracks and how to prevent them. Trial and error will
yo to understand the causes of cracking and how to remedy the situation. Remember, every clay is t, and weather conditiondiffe
e e from the kiln.
Below are some of th PROBLEM POSSIBLE CAUSES POSSIBLE SOLUTION The kiln is Wind in opposite direction d
is not dry enough Use dry wood
oxes were lit at Light the two fireboxes lme time
e ventilation Make more holes in the d
opposite direction Light the fire in the direame
od Use o
Too little ventilation Make more holes in
Underfiring Too littl
Too little draught espto the dome top anwall or dome joints
Wet wood
Sto verfired Firing at too high tem SD
22

PROBLEM POSSIBLE CAUSES POSSIBLE SOLUTION
ense Add fine sawdust or fine chopped grass
t be done with
Air holes in liners Wedge clay to remove air bubbles before moulding
s and firebox doors
One of the most cracki ring the production
ome collapsing or Unstable dome Make the dome higher acking
Joints in line Rearrange the joints
kiln before tion, allow the kiln it is dry to dry for at least 28 days
xplosions
High fuel consumption
Waste as flames flow out Close the fireboxes after each stoking cham er
e joints
l tion rate ing
Firing process too fast Re
Cold draughts ring firing
Clay is too d Firing process is to fast Reduce stoking rate fast
Stoves crack during Cold draughts Close firebox doors during firing
Stoves damaged due to Use boards to carry liners. This musmishandling of wet liners care
Fast cooling rate Seal the crack
common reasons for stoves ng is poor quality control du
Dcr Wall cracking Thermal expansion in the Repair the cracks
cks joints and bri
Using the After construc
Damp liners Dry liners in the sun before firing E
Wet fuelwood Use dry wod
of the kiln b Firebox mortar falling Weak joint Replace and repair thff o
n Overfiring Reduce fuelwood consumpStoves on the ki
floor are crack
duce stoking rate
Close firebox doors du
23
GLOSSARY
Brittle Clay flat part each other, making a
pliable material that can be shaped into pots or stoves
iameter a straight line passing from side to side through the centre of a circle Firebox e channel where the fire burns Firing pots o
iring chamber the space inside the kiln above the fireboxes where stoves or pots are fired
rog this is made by grinding broken pottery into a fine powder. It can also be made by e firing
Kiln
oluble that which can dissolve in water
urther Reading
oses Agumba and Pete Young 1994: A Better Bonfire Kiln: A simple Kiln to Fire Upesi Liners, ITDG Rugby,
UK.
s published based e Africa.
ow to Make an Upesi Stove ow to Market Stoves
otes on Stov
iogas Review
easily broken
a substance of very fine icles which can slide across
D
th
the process of baking clay r stoves F
Ggrinding dry clay and th n the powder
an oven or furnace in which dried clay products are fired
Pottery fired clay products S
F
M
IT Kenya ha a series of booklets on th ir experiences on household energy in East HHTechnical N es Mudstove Manual B
24


