
Bra CoveringStep 1: Select bra to cover. You are looking for a bra that fits well, has under-wire support, is sturdy and holds it shape. Push-up bras and strapless bras usually work well, molded t-shirt style bras can also work.
Step 2: Decide what style of costume bra you want to end up with: halter, straight straps, V straps, crisscrossed straps etc. When selecting a style you should consider both function, comfort and style. For example with a halter style you don’t have to worry about the straps falling down, but if your top is heavy it could strain your neck.
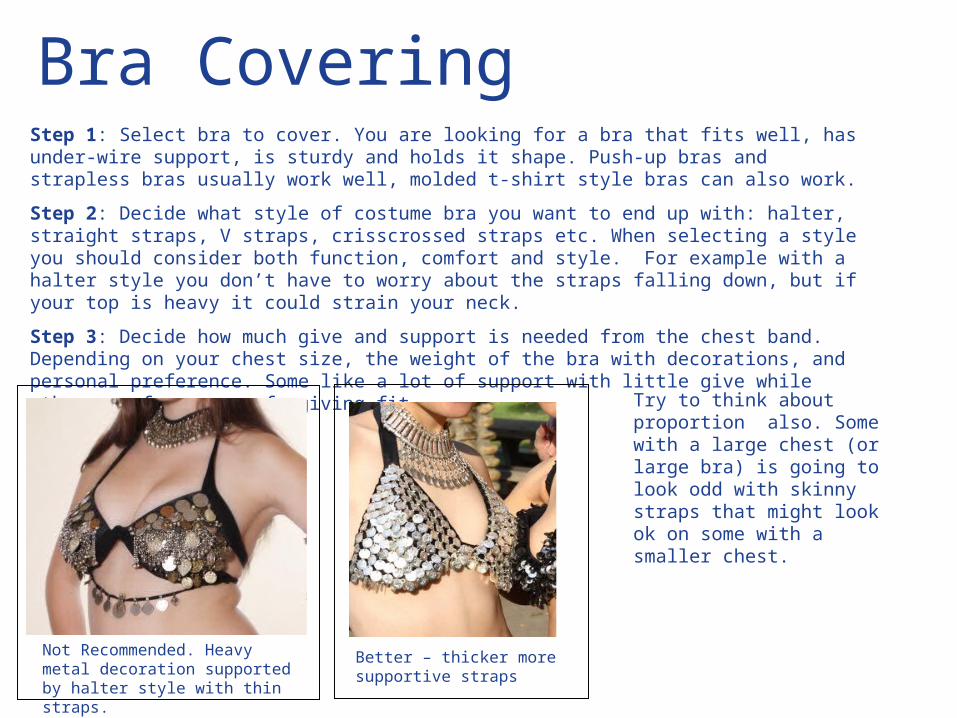
Step 3: Decide how much give and support is needed from the chest band. Depending on your chest size, the weight of the bra with decorations, and personal preference. Some like a lot of support with little give while others prefer a more forgiving fit.
Not Recommended. Heavy metal decoration supported by halter style with thin straps.
Better – thicker more supportive straps
Try to think about proportion also. Some with a large chest (or large bra) is going to look odd with skinny straps that might look ok on some with a smaller chest.
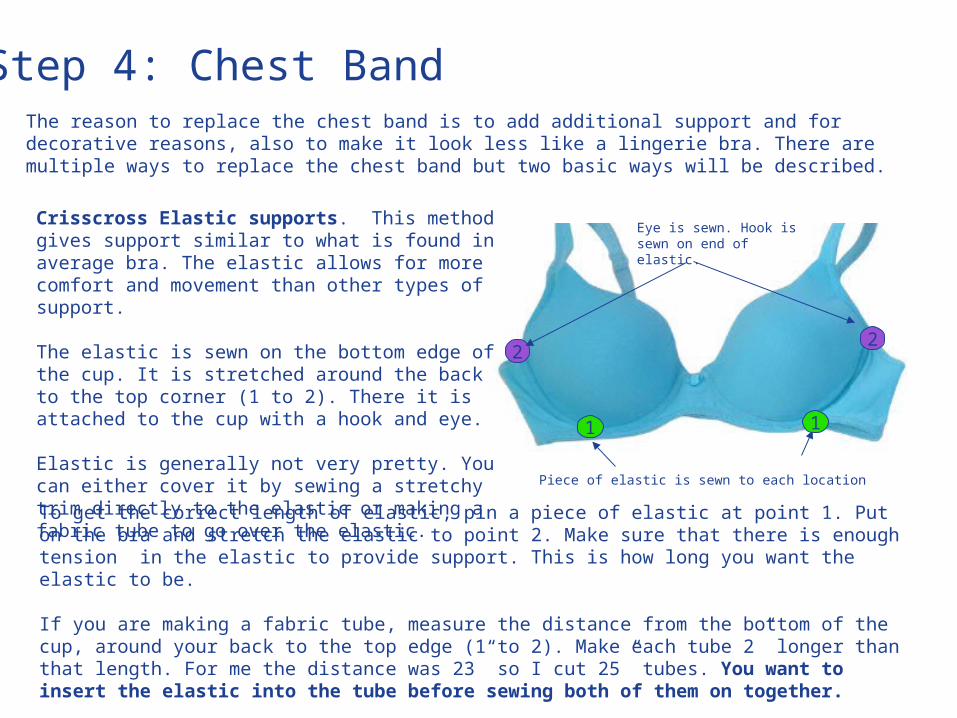
Step 4: Chest Band The reason to replace the chest band is to add additional support and for decorative reasons, also to make it look less like a lingerie bra. There are multiple ways to replace the chest band but two basic ways will be described.
Crisscross Elastic supports. This method gives support similar to what is found in average bra. The elastic allows for more comfort and movement than other types of support.
The elastic is sewn on the bottom edge of the cup. It is stretched around the back to the top corner (1 to 2). There it is attached to the cup with a hook and eye.
Elastic is generally not very pretty. You can either cover it by sewing a stretchy trim directly to the elastic or making a fabric tube to go over the elastic.
1
2
Piece of elastic is sewn to each location
Eye is sewn. Hook is sewn on end of elastic.
1
2
To get the correct length of elastic, pin a piece of elastic at point 1. Put on the bra and stretch the elastic to point 2. Make sure that there is enough tension in the elastic to provide support. This is how long you want the elastic to be.
If you are making a fabric tube, measure the distance from the bottom of the cup, around your back to the top edge (1 to 2). Make each tube 2” longer than that length. For me the distance was 23” so I cut 25” tubes. You want to insert the elastic into the tube before sewing both of them on together.
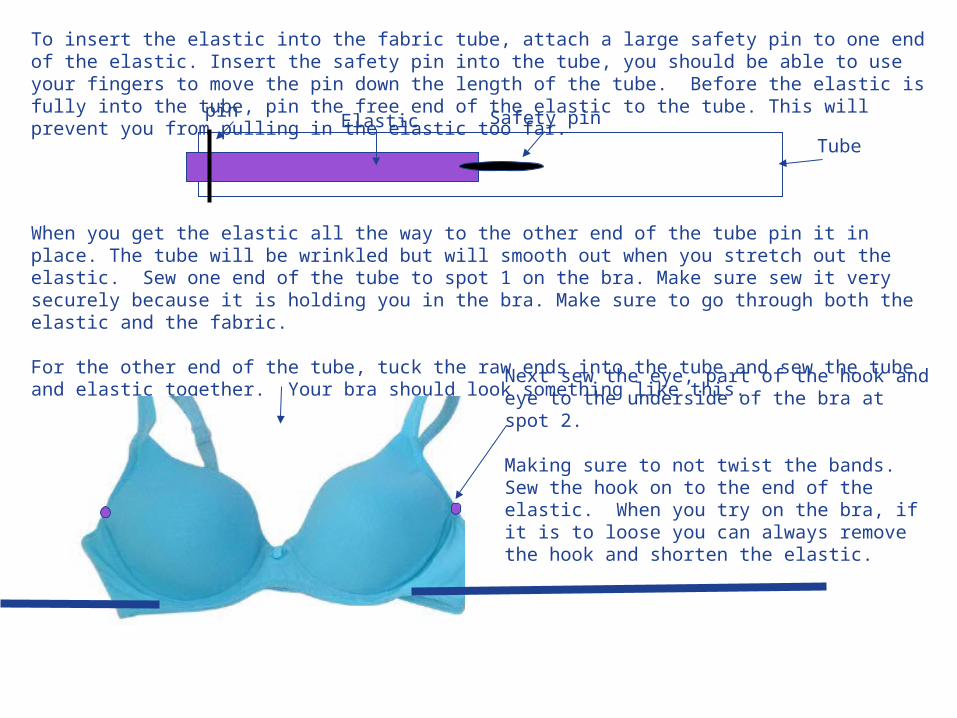
To insert the elastic into the fabric tube, attach a large safety pin to one end of the elastic. Insert the safety pin into the tube, you should be able to use your fingers to move the pin down the length of the tube. Before the elastic is fully into the tube, pin the free end of the elastic to the tube. This will prevent you from pulling in the elastic too far.
TubeElastic Safety pinpin
When you get the elastic all the way to the other end of the tube pin it in place. The tube will be wrinkled but will smooth out when you stretch out the elastic. Sew one end of the tube to spot 1 on the bra. Make sure sew it very securely because it is holding you in the bra. Make sure to go through both the elastic and the fabric.
For the other end of the tube, tuck the raw ends into the tube and sew the tube and elastic together. Your bra should look something like this. Next sew the eye, part of the hook and eye to the
underside of the bra at spot 2.
Making sure to not twist the bands. Sew the hook on to the end of the elastic. When you try on the bra, if it is to loose you can always remove the hook and shorten the elastic.
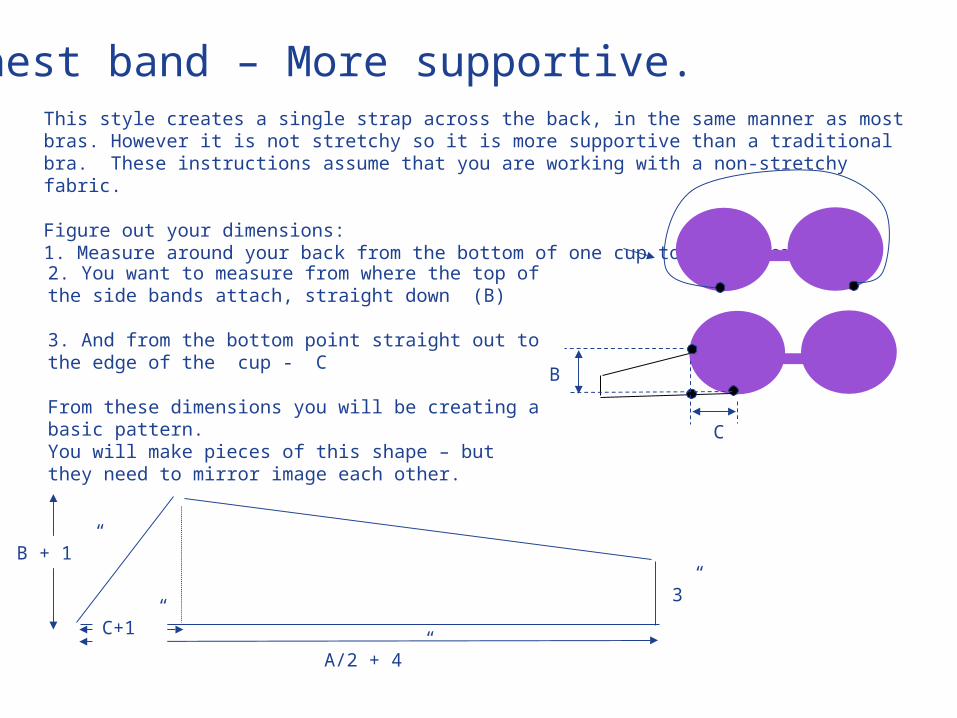
Chest band – More supportive. This style creates a single strap across the back, in the same manner as most bras. However it is not stretchy so it is more supportive than a traditional bra. These instructions assume that you are working with a non-stretchy fabric.
Figure out your dimensions: 1. Measure around your back from the bottom of one cup to the other (A)
2. You want to measure from where the top of the side bands attach, straight down (B)
3. And from the bottom point straight out to the edge of the cup - C
From these dimensions you will be creating a basic pattern.You will make pieces of this shape – but they need to mirror image each other.
B
C
3”
A/2 + 4 ”
B + 1 ”
C+1 ”
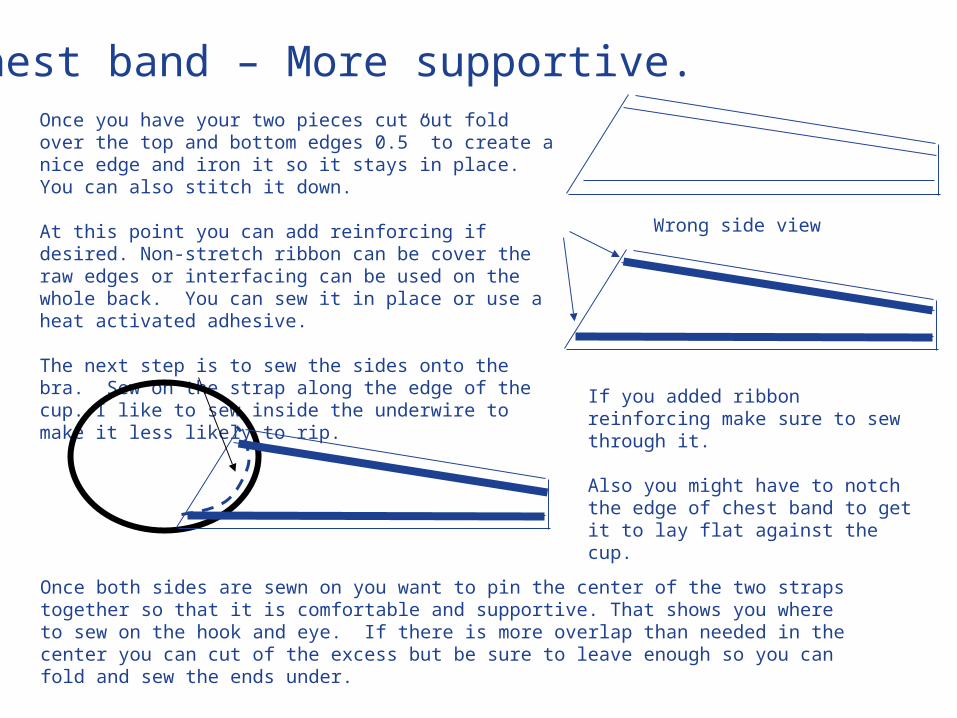
Chest band – More supportive. Once you have your two pieces cut out fold over the top and bottom edges 0.5” to create a nice edge and iron it so it stays in place. You can also stitch it down.
At this point you can add reinforcing if desired. Non-stretch ribbon can be cover the raw edges or interfacing can be used on the whole back. You can sew it in place or use a heat activated adhesive.
The next step is to sew the sides onto the bra. Sew on the strap along the edge of the cup. I like to sew inside the underwire to make it less likely to rip.
Wrong side view
If you added ribbon reinforcing make sure to sew through it.
Also you might have to notch the edge of chest band to get it to lay flat against the cup.
Once both sides are sewn on you want to pin the center of the two straps together so that it is comfortable and supportive. That shows you where to sew on the hook and eye. If there is more overlap than needed in the center you can cut of the excess but be sure to leave enough so you can fold and sew the ends under.
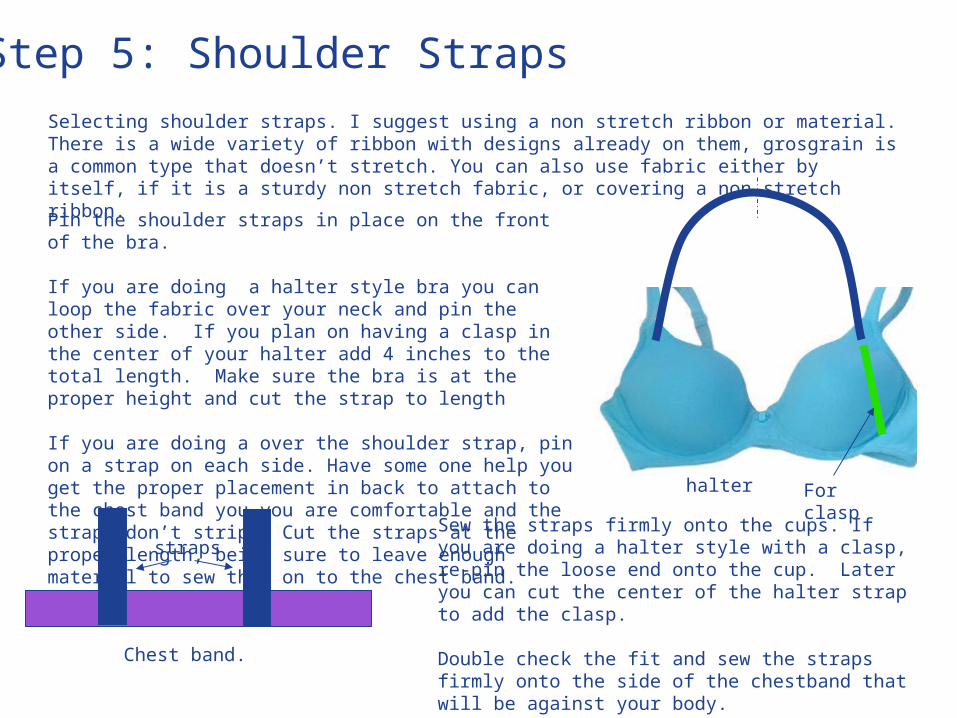
Selecting shoulder straps. I suggest using a non stretch ribbon or material. There is a wide variety of ribbon with designs already on them, grosgrain is a common type that doesn’t stretch. You can also use fabric either by itself, if it is a sturdy non stretch fabric, or covering a non-stretch ribbon.
Step 5: Shoulder Straps
Pin the shoulder straps in place on the front of the bra.
If you are doing a halter style bra you can loop the fabric over your neck and pin the other side. If you plan on having a clasp in the center of your halter add 4 inches to the total length. Make sure the bra is at the proper height and cut the strap to length
If you are doing a over the shoulder strap, pin on a strap on each side. Have some one help you get the proper placement in back to attach to the chest band you you are comfortable and the straps don’t strip. Cut the straps at the proper length, being sure to leave enough material to sew them on to the chest band. halter For clasp
Chest band.
strapsSew the straps firmly onto the cups. If you are doing a halter style with a clasp, re-pin the loose end onto the cup. Later you can cut the center of the halter strap to add the clasp.
Double check the fit and sew the straps firmly onto the side of the chestband that will be against your body.
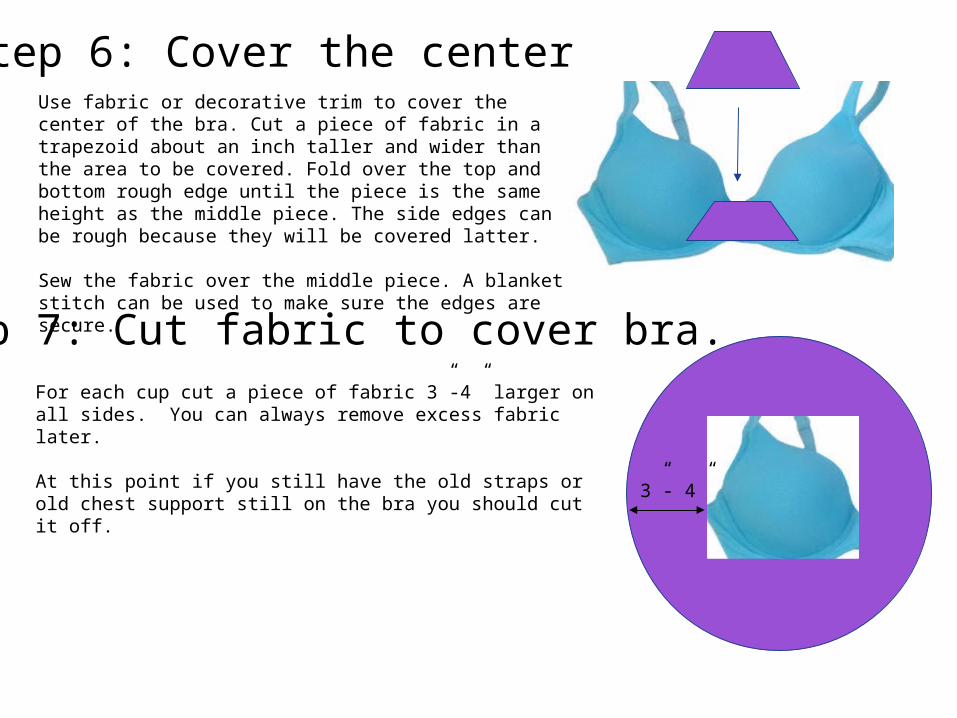
Step 7: Cut fabric to cover bra.
Use fabric or decorative trim to cover the center of the bra. Cut a piece of fabric in a trapezoid about an inch taller and wider than the area to be covered. Fold over the top and bottom rough edge until the piece is the same height as the middle piece. The side edges can be rough because they will be covered latter.
Sew the fabric over the middle piece. A blanket stitch can be used to make sure the edges are secure.
Step 6: Cover the center
For each cup cut a piece of fabric 3”-4” larger on all sides. You can always remove excess fabric later.
At this point if you still have the old straps or old chest support still on the bra you should cut it off. 3”- 4”
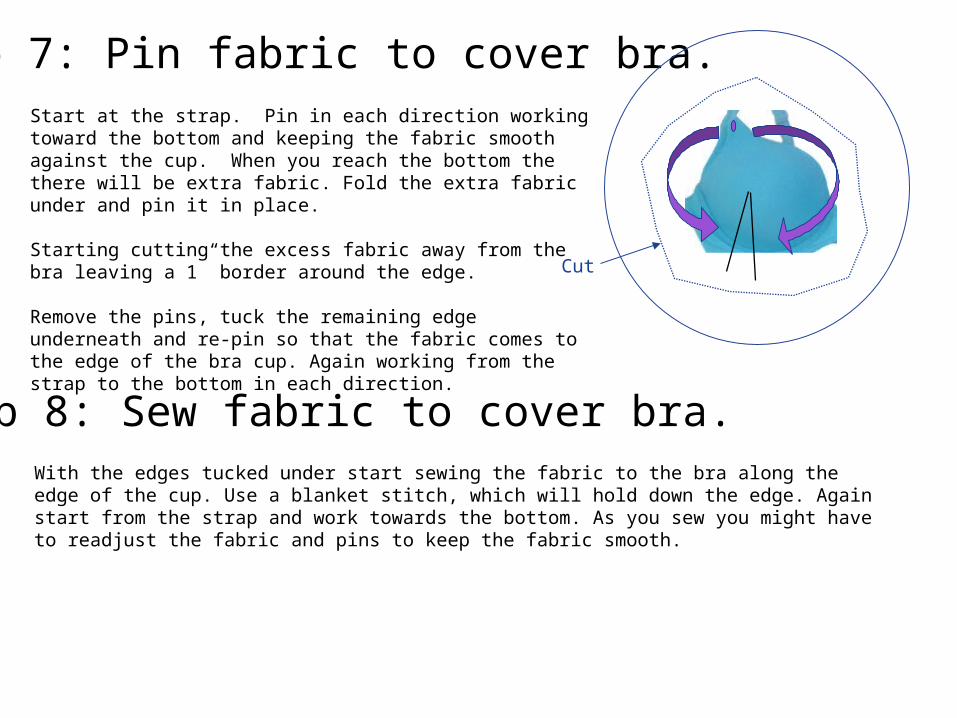
Step 7: Pin fabric to cover bra. Start at the strap. Pin in each direction working toward the bottom and keeping the fabric smooth against the cup. When you reach the bottom the there will be extra fabric. Fold the extra fabric under and pin it in place.
Starting cutting the excess fabric away from the bra leaving a 1” border around the edge.
Remove the pins, tuck the remaining edge underneath and re-pin so that the fabric comes to the edge of the bra cup. Again working from the strap to the bottom in each direction.
Cut
Step 8: Sew fabric to cover bra. With the edges tucked under start sewing the fabric to the bra along the edge of the cup. Use a blanket stitch, which will hold down the edge. Again start from the strap and work towards the bottom. As you sew you might have to readjust the fabric and pins to keep the fabric smooth.
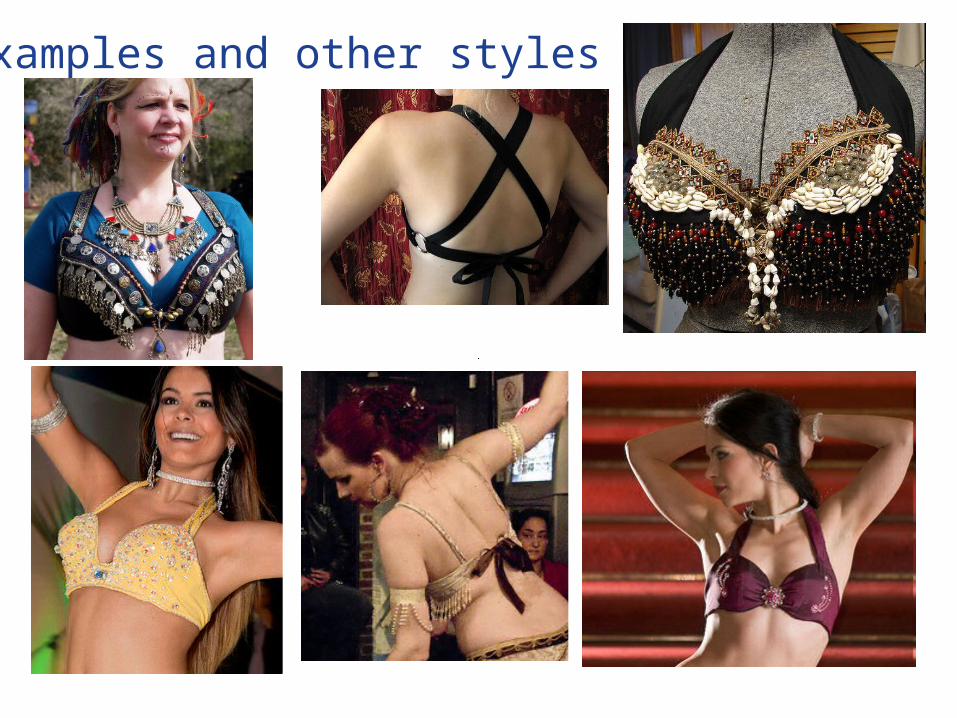
Examples and other styles


