

5/13/2018 Build Your First Application Pega - slidepdf.com
http://slidepdf.com/reader/full/build-your-first-application-pega 1/135
1
Tutorial: Building Your First Application
Friday, May 06, 2011

5/13/2018 Build Your First Application Pega - slidepdf.com
http://slidepdf.com/reader/full/build-your-first-application-pega 2/135
1
© Copyright 2011
Pegasystems Inc., Cambridge, MA
All rights reserved.
This document describes products and services of Pegasystems Inc. It may contain trade secrets and proprietary infor-
mation. The document and product are protected by copyright and distributed under licenses restricting their use, copyingdistribution, or transmittal in any form without prior written authorization of Pegasystems Inc.
This document is current as of the date of publication only. Changes in the document may be made from time to time at the
discretion of Pegasystems. This document remains the property of Pegasystems and must be returned to it upon request.
This document does not imply any commitment to offer or deliver the products or services described.
This document may include references to Pegasystems product features that have not been licensed by your company. If
you have questions about whether a particular capability is included in your installation, please consult your Pegasystems
service consultant.
For Pegasystems trademarks and registered trademarks, all rights reserved. Other brand or product names are trade-
marks of their respective holders.
Although Pegasystems Inc. strives for accuracy in its publications, any publication may contain inaccuracies or typo-
graphical errors. This document or Help System could contain technical inaccuracies or typographical errors. Changes
are periodically added to the information herein. Pegasystems Inc. may make improvements and/or changes in the infor-
mation described herein at any time.
This document is the property of:
Pegasystems Inc.
101 Main Street
Cambridge, MA 02142-1590
Phone: (617) 374-9600
Fax: (617) 374-9620
www.pega.com
Updated: Friday, May 06, 2011

5/13/2018 Build Your First Application Pega - slidepdf.com
http://slidepdf.com/reader/full/build-your-first-application-pega 3/135
2
About this tutorial
Audience
The scenario 2
Tutorial structure 2
Conventions 2
Navigation 3
Images 3
Application login
Errors and enhancements 3
Prerequisites 4
Importing the starter kit 4
About the starter kit 6
Business objectives, work type, use cases, and requirements 6
Globex's Onboarding project's business objectives 7
Equipment Request process and work type 7
Business process atomic use cases 7
Actors
Business requirements 8
Use case descriptions 8
Step 1: Create the application profile 11
Part A: Capture basic project details 11
Part B: Capture essential process steps using the Discovery Map 17
Part C: Complete capturing information in the Application Profiler 25
Review 27
Step 2: Generate the base application 28
Part A: Running the Application Accelerator 28
Review 33

5/13/2018 Build Your First Application Pega - slidepdf.com
http://slidepdf.com/reader/full/build-your-first-application-pega 4/135
3
Step 3: Review the application structure 34
Part A: Update the OnboardingFW RuleSet 34
Part B: Review the class structure 37
Part C: Review the rules generated by the Application Accelerator 40
Part D: Usethe standard heat map to review the number and types of rules in the application 41
Review 42
Step 4: Adjust the initial process 44
Part A: Run the process 45
Part B: Edit the flow 48
Part C: Review the updated process 59
Review 61
Step 5: Create a data model 62
Part A: Create a single value property 63
Part B: Create properties using the Property Wizard 68
Part C: Cr eate embedded properties 72
Review 77
Step 6: Extend the default user interface 78
Part A: Customize the CoreSummary section 80
Part B: Create the sections for selecting hardware and software items 86
Part C: Create the Budgets Section 96
Part D: Create the ReviewSelections section 97
Part E: Add sections to harnesses and flow actions 99
Review 103
Step 7: Refine the process definition 104
Part A: Modify the user interface for the Review step 105
Part B: Edit the flow to refine the process 105
Review 107

5/13/2018 Build Your First Application Pega - slidepdf.com
http://slidepdf.com/reader/full/build-your-first-application-pega 5/135
4
Step 8: Create a finished user interface 109
Part A: Customize the Header section 109
Part B: Add manager's note to the Header section 112
Review 114
Step 9: Create decision rules 115
Part A: Create when condition rules to control sections 116
Part B: Create rules to calculate budget amounts and totals 119
Review 124
Step 10: Document the application 126
Part A: Document the application 126
Review 130

5/13/2018 Build Your First Application Pega - slidepdf.com
http://slidepdf.com/reader/full/build-your-first-application-pega 6/135
1
IntroductionThe Building Your First Application tutorial walks you through the steps of building a Process Commander appli-
cation. In the business scenario for this tutorial, you are an application developer working at a fictional software com-
pany named Globex. Globex is growing by leaps and bounds, and is having a surge in hiring new employees for a
number of its departments.
To increase the speed that the company can adapt to this surge, management is sponsoring development of an
Onboarding application. They picture this application automating and managing all of the Globex processes involved
in onboarding a new hire. Within this broad Onboarding framework, your task is to design and develop the piece that
handles equipment setup for a new hire, while other teams at Globex work on the other onboarding-related proc-
esses. Eventually, Globex wants to integrate all of the onboarding-related processes and applications. This tutorial
is about the equipment setup process.
The application you build simplifies and automates an existing manual process currently used by Globex’s HR staff
to ensure new hires have the necessary equipment on their first day.
You begin by reviewing Globex's requirements and creating an Application Profile. Using this profile, you create the
basic structure of the application using the Application Accelerator. You continue by filling in this basic structure with
the class structure, flow, and data models needed to meet these requirements. Later steps cover evolving and refin-
ing the application to include decision and declarative rules to streamline the application's functionality.
Each step of this process is broken down into smaller tasks, with a review section at the end.
About this tutorial
Audience
This tutorial is intended for Process Commander users who wish to review the steps involved in creating a Process
Commander application and improve their skills. The tutorial content assumes the reader has access to Process
Commander V6.1 SP2, and is familiar with the Designer Studio1 and with creating rules, editing flows, and running
processes in the Designer Studio.
1The Designer Studio is available to users who are associated with an access group that identifies the Developer
rule as their current portal. It provides tools and resources organized into a development environment that speeds
application planning, construction, testing, and updating.

5/13/2018 Build Your First Application Pega - slidepdf.com
http://slidepdf.com/reader/full/build-your-first-application-pega 7/135
2
The scenario
You are an application developer working at a fictional software company named Globex. Globex is growing by leaps
and bounds, and is having a surge in hiring new employees for a number of its departments.
To increase the speed that the company can adapt to this surge, management is sponsoring development of an
Onboarding application. They picture this application automating and managing all of the Globex processes involved
in onboarding a new hire.
Within this broad Onboarding framework, you’ve been charged with developing the piece that handles equipment
setup for a new hire.
The steps of the tutorial cover work that, in a large company, might be done by several colleagues rather than one
developer. The header for each step indicates the role of the employee who would typically do the work in that step.
Tutorial structure
A diagram of the general flow of application development helps indicate where you are in the process. The high-
lighted stage in the diagram indicates the focus of the current tutorial step. This is the image for the step on creating
a data model:
Each step in the tutorial follows this pattern:
n The first screen of the step displays the relevant diagram, describes the situation within the scenario (where
relevant), indicates the skills you will exercise, and provides information you may need to complete the step.
n The step is broken down into parts. Each part provides text and images to help you accomplish the step’s
goals.
n At the end of the step, a review screen summarizes the work you did and provides links for learning more
about the skills you used in the step.
Conventions
The tutorial follows a few display conventions:
n A value that appears within the application, such as the name of a property or a field, appears highlighted in
the tutorial, such as GLBX-FW-OnboardingFW-Work and Name.
n A menu option you are to select appears as New > Data Model > Property.

5/13/2018 Build Your First Application Pega - slidepdf.com
http://slidepdf.com/reader/full/build-your-first-application-pega 8/135
3
n A reference to a button you are to click appears as “Click Create”, or may show an image of the button: “Click
”.
n A small icon to the left of blue text ( ) indicates that more information is available. Click the icon to expand
the area and see the additional information. Click to collapse the area again.
Navigation
At the bottom of the first screen of each step are links to the parts of the step. You can proceed using these links, or
by using the Previous Topic / Next Topic links that appear below the step links.
The left panel of the tutorial window has four sections to help you understand and navigate through the tutorial:
n TOC (table of contents) provides links to all the steps and parts of the tutorial. Click any closed book icon (
) to expand that entry and see the steps within it. Click any link to display the screen related to it.
n Glossary defines key words and concepts found in the tutorial.
n In the Search feature, provide a word or phrase and click Search. The display shows a set of screen titles,with the screen most likely to satisfy your search at the top. Click any link to display that screen. Click the
magnifying glass icon to the right of the Search button to add the current search term to your list of favorites
(see next).
n The Favorites feature lists searches and topics that you have tagged as your favorites. To add a screen to the
list of Favorite Topics, display it in the right panel and click the icon at the extreme left of the task bar.
Images
The tutorial includes many images to illustrate the text. Hover the mouse over any image to expand it to a larger size
for easier viewing. Click away from the image to return it to its original size.
If images appear clipped on the left hand side of the content area, widen the content area (the right panel) of the tuto-
rial window to avoid this behavior.
Application login
The initial import creates default administrator login credentials:
Name [email protected]
Password rules
You can create additional operator IDs within the GLBX.com structure if necessary.
Errors and enhancements
If you find errors in the tutorial, or have suggestions for making it more useful, feel free to write to doc-

5/13/2018 Build Your First Application Pega - slidepdf.com
http://slidepdf.com/reader/full/build-your-first-application-pega 9/135
4
Prerequisites
Before beginning the course in your Process Commander system, verify the following conditions:
Condition How to verify
You have access to a V6.1 SP2 system, and
have an operator ID with which to access the sys-
tem.
Your organization should provide you an operator
ID and the URL to the system. After you log into
the system using that operator ID, select the
Help > About menu item to confirm the version
of your system.
You have Microsoft Visio 2003 or higher installed
on your client machine.
Open your Windows control panel and double-
click Add/Remove Programs. See if Visio is
listed.
Your operator ID references an access group con-
taining the PegaRULES:SysAdm4 role
When you are logged into your system, access
the operator menu (the menu with your name) atthe top of the Designer Studio window. Select
Access Group from the menu.
The system does not contain RuleSets named
GLBX, GLBXInt, OnboardingFW, Onboard-
ingFWInt
On the left panel of the Designer Studio, select
the Rules Explorer. Expand the SysAdmin cat-
egory. Click the RuleSet branch to view a list of
RuleSets in the right panel. If a list does not
appear, select INSTANCES from the drop-down
list at the left of the top toolbar.
The system does not contain an organization
named GLBX.
On the left panel of the Designer Studio, select
the Rules Explorer. Expand the Organization
category. Click the Organization branch to view a
list of organizations in the right panel. If a list
does not appear, select INSTANCES from drop-
down list at the left of the top toolbar.
Importing the starter kit
Before beginning Step 1 of the tutorial, you must import some Process Commander resources that set up the appro-
priate organization and operators for the tutorial scenario, and provide some additional assets needed for the tutorial
steps.
1. Download file Build_Your_App_Organization.zip from http://pdn.pega.co-
m/DevNet/eLearning/byfpca/Content/Resources/Zips/Build_Your_App_Organ-ization.zip and save it to a location on yournetwork.
2. Log on to your V6.1 SP2 system using the operator ID that your organization has assigned to you for access-
ing that system.
3. Open the Import & Export landing page by clicking > Application > Import & Export > Import.

5/13/2018 Build Your First Application Pega - slidepdf.com
http://slidepdf.com/reader/full/build-your-first-application-pega 10/135
5
4. Click Browse, and select the downloaded file.
5. Click Upload File.
6. Check the following boxes - Overwrite Existing Rules, Overwrite Existing Data.

5/13/2018 Build Your First Application Pega - slidepdf.com
http://slidepdf.com/reader/full/build-your-first-application-pega 11/135
6
7. Click Import.
When the system indicates that all of the records have been copied, click Done. The resources are ready for you to
begin Step 1 of the tutorial.
Because Step 1 of the tutorial starts by having you log in with a different operator ID, log out of the system before
beginning Step 1.
About the starter kit
When you import the starter kit, the following assets are imported into your Process Commander system.
Assets Description
GLBX organization and the related
rules and data instances
The GLBX organization and related rules and data instances provide the busin
context for the tutorial scenario. Items such as the GLBX organization, related
ator IDs, and related access groups are imported.
Two data tables named "Hardware
Items" and "Software Items" and their
supporting rules.
These data tables and their supporting rules provide sample data values used
tutorial scenario.
Two activities named "getHardware"and "getSoftware".
These activities are used to retrieve the sample data values from the data tableand make the values available for display at runtime.
Business objectives, work type, use cases, and requirements
As described, the Globex organization wants an Onboarding application. Within this broad Onboarding framework,
you’ve been charged with the piece that handles the process for requesting the equipment setup for a new hire.
This section describes the needed background information about the application and the process. You will use this
information in subsequent steps of the tutorial.
Note: The Globex scenario and the details describing Globex's process, the use cases,and requirements are inten-tionally simple to allow you to more quickly complete the tutorial steps while also illustrating the key concepts. In a
real-world situation, an implementation is typically more complex than this tutorial scenario. In a real-world situation,
the process, use cases, and requirements will involve more details than are provided for this scenario. Throughout
this tutorial, assume that the Globex subject matter experts have provided this information.

5/13/2018 Build Your First Application Pega - slidepdf.com
http://slidepdf.com/reader/full/build-your-first-application-pega 12/135
7
Globex's Onboarding project's business objectives
Business objectives describe why the application is being developed. They are the project goals that, when reached,
provide the sought-after business return or benefit.
The business objectives that Globex wants to achieve with the overall Onboarding application are:
n Automate the approval process for employee onboarding requests
n Reduce turn-around time for new hire equipment setup
Equipment Request process and work type
You find out from the Globex business subject matter experts that their manual (paper-based) equipment request
process today involves:
n Entering information about the new hire (name, department, hiring manager's name)
n Specifying the hardware items to be purchased and set up for the new hire.
n Specifying the software items.
n Approving the equipment request or, alternatively, rejecting the equipment request.
n Stamping the filled-out paper form as "Approved" (if approved) or "Rejected" (if rejected).
The template from which these forms are created is called the work type. For this application, the work type is
Equipment Request. A specific created instance is called the work item.
Business process atomic use cases
To facilitate reuse, a business process is broken down into atomic use cases. Each atomic use case represents oneaction owned by a single actor. By using atomic use cases in the system, it is easy to trace where a use case is
implemented in the application user interface, and assess whether the application is being built appropriately.
The following table illustrates Globex's manual process steps broken down into atomic use cases and the actor
involved in each use case.
Manual Business Process Step Associated Atomic Use Case Typical Actor
Enter information about the new hire Enter New Hire Info HR Staff Member
Specify the hardware items Select Hardware HR Staff Member
Specify the software items Select Software HR Staff Member
Approve the equipment request Approve Hiring Manager
Reject the equipment request Reject Hiring Manager
Stamp the filled-out paper form Update Status System

5/13/2018 Build Your First Application Pega - slidepdf.com
http://slidepdf.com/reader/full/build-your-first-application-pega 13/135
8
Actors
An actor takes action on work at a specific business process point. The actors in this process are:
n HR Staff Member : Begins the process and fills out the request for the new hire’s equipment setup
n Hiring Manager : Approves equipment requests for the new hires in his or her department
n System: Updates status of the work
The system itself meets the definition of an actor for this application, because it takes action on work at specific
process points. In this particular process, the Globex subject matter experts have identified points at which the sys-
tem will update the status of the work item as it moves through the process: after the Approve step and after the
Reject step.
Business requirements
Requirements describe the capabilities the application must fulfill, and typically provide additional details for anatomic use case. They can be viewed as the “success criteria” for the project: the stakeholders expect to see these
items implemented to say the project was a success.
A Process Commander application enables you to capture requirements in the system itself, so that they can be
associated to use cases and tracked as the application is developed. For this project, Globex's subject matter
experts have provided a list of business requirements to enter into the system in Step 1 of the tutorial.
Note: The list below is not intended to represent the complete and exhaustive list of all business requirements a real-
world equipment request process would typically have. In a real-world situation, an implementation is typically more
complex that this tutorial scenario.
Requirement name Description
ER001_Create_ER System shouldenablean employee to createan equipment
request.
ER002_Calculate_Cost System should calculate the cost of selected items during the
process.
ER003_Calculate_Remainder System should calculate the remaining budget (where remaining
budget is the department budget minus the equipment total cost).
ER004_Add_Note System shouldenablea manager toadd a note tothe equipment
request.
Use case descriptions
Globex's subject matter experts have provided the descriptions for each atomic use case in their process. In a real-
world situation, an implementation is typically more complex and would likely have more use cases and more com-
plex descriptions.
Enter New Hire Info
When the process is started, the system displays fields for entering the information about the new hire.

5/13/2018 Build Your First Application Pega - slidepdf.com
http://slidepdf.com/reader/full/build-your-first-application-pega 14/135
9
First Name (entry field)
Last Name (entry field)
Department (drop-down list)
Manager (entry field)
HR Staff Member specifies the information.
Select Hardware
System displays a repeating structure with one row per item selected:
Hardware (drop-down list)
Price (read-only field)
HR Staff Member makes selections from the Hardware list.
Select Software
System displays a repeating structure with one row per item selected:
Software (drop-down list)
Price (read-only field)
HR Staff Member makes selections from the Software list.
Approve
System displays:
Department Budget (read-only field)
Hardware Total (read-only field; running total calculated from selections)
Software Total (read-only field; running total calculated from selections)
Remaining Budget (read-only field; running total calculated from subtracting the total costs from the Department
Budget)
Two lists for the selected Hardware and Software items:
Hardware (read-only field)
Price (read-only field)
Software (read-only f ield)
Price (read-only field)
An Approve button to approve the request and an optionalNote text box.
Hiring Manager optionally enters a note and clicks the
Approve button.
Reject
System displays:

5/13/2018 Build Your First Application Pega - slidepdf.com
http://slidepdf.com/reader/full/build-your-first-application-pega 15/135
10
Department Budget (read-only f ield)
Hardware Total (read-only field; running total calculated from selections)
Software Total (read-only field; running total calculated from selections)
Remaining Budget (read-only field; running total calculated from subtracting the total costs from the Department
Budget)
Two lists for the selected Hardware and Software items:
Hardware (read-only field)
Price (read-only field)
Software (read-only field)
Price (read-only field)
A Reject button to reject the request and a Rejection Note text box to record the reason for the rejection.
Hiring Manager enters a rejection note and clicks the Reject button.
Continue on to Step 1 of the tutorial.

5/13/2018 Build Your First Application Pega - slidepdf.com
http://slidepdf.com/reader/full/build-your-first-application-pega 16/135
11
Step 1: Create the application profile
Typically performed by In the previous
step
Purpose of this step
To... So that...
Business Analysts Noprevious step Capture descriptions of
the use cases and appli-
cation requirements
Later steps can relate specific parts
of the application to individual use
cases and requirements
In this step, you use the Application Profiler tool to capture the project's objectives, use cases, and requirements
directly in the system. The input to this step is used in the next step to generate the base structure of the application.
Creating an application profile using the Application Profiler is the first step when creating an application. It answers
the question “What will I build?” In going through the Application Profiler, important information about the project is
captured such as its business objectives, the stakeholder requirements, and the business process. Typically, a busi-
ness analyst runs the Application Profiler with subject matter experts and other team members to directly capture
that information from them.
Within this tutorial's scenario, the project given to you is the Globex project described in the Business objectives,
work type, use cases, and requirements topic. The Globex organization wants an Onboarding application that canprovide automation and efficiency for getting a new hire started in the company.
In this tutorial step, you run the Application Profiler and specify details about the project. The details you need to
input are provided as you go through the exercise. Running the Application Profiler results in two items:
l An application profile object, which the system uses as the basis for gener ating the basic structure of the
application. You build out this application in subsequent steps.
l An application profile document, which is typically used by the project sponsors to review the project, val-
idate that it is proceeding in the expected direction, and size the effort.
Continue to the next topic to begin this step of the tutorial.
Part A: Capture basic project details
The first task in the Application Profiler is to capture basic project details. For the Globex scenario, use the following
project details.

5/13/2018 Build Your First Application Pega - slidepdf.com
http://slidepdf.com/reader/full/build-your-first-application-pega 17/135
12
For this field Enter this value
Profile option New Application
Build New Framework And Implementation
Build on Framework None
Application Name Onboarding
Project Name Onboarding Version 1
Project Led By External Consultants
Organization Name Globex
Business Objectives Two objectives:
Automate the approval process for employee onboarding
requests
Reduce turn-around time for new hire equipment setup
Project Description Globex (GLBX) is a fast growing software company. Mak-ing the onboarding process more efficient will increase the
ability for the company to grow successfully.
1. Log on to the system as [email protected] with the password rules to access the Designer Stu-
dio1. (That operator ID is the one provided in the zip file archive that needs to be installed before beginning
the tutorial. See Prerequisites for details.)
2. Start the Application Profiler by selecting New Application > Application Profile from the Application menu.
3. In the Application Overview window that displays when the Application Profiler starts, specify the details as
listed in the table above. You can copy text from the table and paste it into the fields.
1The Designer Studio is available to users who are associated with an access group that identifies the Developer
rule as their current portal. It provides tools and resources organized into a development environment that speeds
application planning, construction, testing, and updating.

5/13/2018 Build Your First Application Pega - slidepdf.com
http://slidepdf.com/reader/full/build-your-first-application-pega 18/135
13
To add the second business objective, click . A new line is displayed and you can paste in the text for thesecond business objective.
Confirm that the completed Application Overview window looks like the following image, then click OK to
save the project details.
4. Select Actors from the Actions menu in the upper right area of the Application Profiler:

5/13/2018 Build Your First Application Pega - slidepdf.com
http://slidepdf.com/reader/full/build-your-first-application-pega 19/135
14
5. In the Actors window that opens, leave the Actors Background Information field blank. Specify the fol-
lowing information for the actors that participate in Globex's current process for onboarding. Click twiceto add two more rows.
Name Type Access
HR Staff Member Operator Browser
Hiring Manager Operator Browser
System This System System Agent

5/13/2018 Build Your First Application Pega - slidepdf.com
http://slidepdf.com/reader/full/build-your-first-application-pega 20/135
15
This information will be used in the use cases that are entered in the Application Profiler.
6. Click OK to save the information in the Actors window.
7. After closing the Actors window, the current step is the Processes step. This step is for entering details about
the business processes that are part of this application.
Your assignment in Globex's Onboarding project is their Equipment Request process, as described in theBusiness objectives, work type, use cases, and requirements topic. Therefore, you first want to update the
default values for the work type and the process name to reflect the Equipment Request process.
8. Select the drop-down menu next to the default Onboarding label to update the work type information.
9. In the Edit Work Type window, update the following fields to the indicated values. Confirm that the

5/13/2018 Build Your First Application Pega - slidepdf.com
http://slidepdf.com/reader/full/build-your-first-application-pega 21/135
16
Complexity field is set to Low (the default value). Then click OK to save the updates.
Field Value
Name EquipmentRequest
Display Label Equipment Request
Complexity Low (the default value)
Prefix ER
Description Equipment request work item
10. To update the process name to reflect the fact that the process concerns an equipment request, select the
drop-down menu next to the default label (StartOnboarding) and select Rename.
In the Edit Flow Name Details window, note that the system has supplied a default value based on the
updated work type name (StartEquipmentRequest). Add spaces to the default value to set it to StartEquipment Request. Click OK.
At this point, the system refreshes the display for the Processes step and it should look like the following
image.

5/13/2018 Build Your First Application Pega - slidepdf.com
http://slidepdf.com/reader/full/build-your-first-application-pega 22/135
17
Continue to the next tutorial topic.
Part B: Capture essential process steps using the Dis-
covery Map
The second task in the Application Profiler is to capture the essential process steps using the Discovery Map1. The
main area on the Processes step displays the Discovery Map. The Discovery Map is an inventory of the essential
process steps that affect or alter the work item as it proceeds from its creation to its final resolution. Colored shapes
represent these essential steps.
Note: The Globex scenario and the details describing Globex's process, the use cases,and requirements are inten-
tionally simple to allow you to more quickly complete the tutorial steps while also illustrating the key concepts. In a
real-world situation, an implementation is typically more complex. In this tutorial, assume that the Globex subject
matter experts have provided this information.
Globex's subject matter experts have identified the following essential process steps that affect the Equipment
Request work item:
l Select Hardware
l Select Software
l Approve
1 A Discovery Map is a graphical design tool integrated into the Processes tab of the Application Profiler and Appli-
cation Accelerator. A Discovery Map provides a high-level presentation of steps in the starting business flows in the
application including the subflows and alternate paths.

5/13/2018 Build Your First Application Pega - slidepdf.com
http://slidepdf.com/reader/full/build-your-first-application-pega 23/135
18
l Update Status (system updates the work item status after approval)
l Reject (alternate step to the Approve step)
l Update Status (system updates the work item status after rejection)
Add the essential process steps to the Discovery Map using these steps:
1. In the Discovery Map, click the Step Name label on the default initial shape. Type Select Hardware.
2. Double-click the open shape space next to the Select Hardware shape to add a new green shape. Click
the shape's label and type Select Software.
3. Double-click the open shape space next to the Select Software shape to add a new green shape. Click
the shape's label and type Approve.
4. Double-click the open shape space next to the Approve shape to add a new green shape. Click the shape's
label and type Update Status.
5. Right-click the Update Status shape, and select Add New Alternate Step to add the Reject step,
because Globex's subject matter experts have identified the Reject step as an alternate step in the process. A double red line appears in between the Update Status shape and the new shape to indicate where the
alternate steps begin. Click the new shape's label and type Reject.
6. Double-click the open shape space to the right of the Reject shape to add an Update Status step (in
which the system updates the work item status after rejection). Click the new shape's label and type Update
Status. (You might have to widen the Designer Studio window to add this shape.)
At this point, the Discovery Map should look like the following image.
The following steps describe how to capture the details of Globex's atomic use cases and requirements in the sys-
tem and associate them with the appropriate shapes. This table shows the relationship between the shapes and the
atomic use cases and requirements, using the information provided by Globex's subject matter experts. Some
requirements are associated with more than one use case. Because Globex's subject matter experts have not iden-
tified a requirement associated with the "Update Status" use case, a requirement is not entered for that use case.
The name of the use case is the same as the name of its associated shape.

5/13/2018 Build Your First Application Pega - slidepdf.com
http://slidepdf.com/reader/full/build-your-first-application-pega 24/135
19
Shape Actor Use Case Description Associated Requirements
Select
Hardware
HR Staff
Member
System displays a repeating struc-
ture with one row per item selected:
Hardware (drop-down list)
Price (read-only field)
HR Staff Member makes selections
from the Hardware list.
Name: ER001_Create_ER
Details:
System should enable an employee tocreate an equipment request.
Importance:
1 - Critical
Select
Software
HR Staff
Member
System displays a repeating struc-
ture with one row per item selected:
Software (drop-down list)
Price (read-only field)
HR Staff Member makes selectionsfrom the Software list.
Name: ER001_Create_ER
Details:
System should enable an employee to
create an equipment request.
Importance:
1 - Critical

5/13/2018 Build Your First Application Pega - slidepdf.com
http://slidepdf.com/reader/full/build-your-first-application-pega 25/135
20
Shape Actor Use Case Description Associated Requirements
Approve Hiring
Manager
System displays a list for:
Department Budget (read-only field)
Hardware Total (read-only field; run-
ning total calculated from selections)
Software Total (read-only field; run-
ning total calculated from selections)
Remaining Budget (read-only field;
running total calculated from sub-
tracting the total costs from the
Department Budget)
System displays a repeating struc-
ture listing the selected hardware and
software items:
Hardware (read-only field)
Price (read-only f ield)
Software (read-only field)
Price (read-only f ield)
System displays an Approve button
to approve the request and an
optional Note text box.
Note (optional; entry note box)
Hiring Manager optionally enters a
note and clicks the
Approve button.
Name: ER002_Calculate_Cost
Details:
System should calculate the cost of selected items during the process.
Importance:
2 - Very Important
Name: ER003_Calculate_Remainder
Details:
System should calculate the remaining
budget (where remaining budget is the
department budget minus the equip-
ment total cost).
Importance:
2 - Very Important
Name: ER004_Add_Note
Details:
System should enable a manager to add
a note to the equipment request.
Importance:
4 - Desirable

5/13/2018 Build Your First Application Pega - slidepdf.com
http://slidepdf.com/reader/full/build-your-first-application-pega 26/135
21
Shape Actor Use Case Description Associated Requirements
Reject Hiring
Manager
System displays a list for:
Department Budget (read-only field)
Hardware Total (read-only field; run-
ning total calculated from selections)
Software Total (read-only field; run-
ning total calculated from selections)
Remaining Budget (read-only f ield;
running total calculated from sub-
tracting the total costs from the
Department Budget)
System displays a repeating struc-
ture listing the selected hardware and
software items:
Hardware (read-only field)
Price (read-only field)
Software (read-only field)
Price (read-only field)
System displays a Reject button to
reject the request and a Rejection
Note text box to record the reason for
the rejection.
Rejection Note (entry note box;required)
Hiring Manager enters a rejection
note and clicks the Reject button.
Name: ER002_Calculate_Cost
Details:
System should calculate the cost of selected items during the process.
Importance:
2 - Very Important
Name: ER003_Calculate_Remainder
Details:
System should calculate the remaining
budget (where remaining budget is the
department budget minus the equip-
ment total cost).
Importance:
2 - Very Important
Name: ER004_Add_Note
Details:
System should enable a manager to add
a note to the equipment request.
Importance:
4 - Desirable
Update
Status
System System automatically updates the
status of an Equipment Request as
required.
7. Perform the following steps on the first shape (Select Hardware) to capture the atomic use case, as well as
the relevant requirement for that shape. After you complete these steps on the first shape, repeat the stepsfor the remaining shapes according to the preceding table.
Note: If your V6.1 SP2 system has had hotfix HFix-3278 installed, the window and fields in which you enter
the use case and requirements information look slightly different from what is stated in the following steps
and shown in the images. If your system has HFix-3278 installed, the window has more than two tabs. In that

5/13/2018 Build Your First Application Pega - slidepdf.com
http://slidepdf.com/reader/full/build-your-first-application-pega 27/135
22
case, enter the appropriate use case information on the Details tab and the use case descriptions on the
Description tab (instead of on the Use Case tab as stated in the following steps).
a. Double-click the shape. After a few moments (depending on the speed of your network), the Details
window opens.
b. Enter the relevant information on the Use Case and Requirements tabs using the following steps:
i. On the Use Case tab:
l Confirm that the Shape field is set to Human Based Step (the default value). In this
step, the HR Staff Member selects the hardware items.
l Confirm that the Use Case field is set to the shape label (the default value). For the first
shape, the value should be Select Hardware.
The system uses the shape label as the default for the use case name. Globex's subject
matter experts have agreed to use these default use case names.
l Confirm that the Status field is set to New (the default value).
l In the Actors field, specify HR Staff Member. To use the autocomplete feature, type
the first letter (H) into the field and press your keyboard's down arrow key. The system
displays the available choices. (The choices for actors are the ones you entered pre-
viously. Click the HR Staff Member choice to select it from the displayed choices.
l Confirm that the Use Existing Sub Process field is set to None (the default value).
l Confirm that the Trigger field is empty (no value) and the Complexity field is set to
Low. (The complexity values of the captured use cases are used in the Application Pro-
filer to calculate project sizings for developing the project. This is not a concern in this
tutorial scenario, so retain the default value.)
l In the Business Objective field, select the Automate the approval process
for employee onboarding requests choice.
l In the Description field, enter the description of the Select_Hardware use case:
System displays a repeating structure with one row per item
selected:
Hardware (drop-down list)
Price (read-only field)
You can also copy and paste the text from the table above.

5/13/2018 Build Your First Application Pega - slidepdf.com
http://slidepdf.com/reader/full/build-your-first-application-pega 28/135
23
i. On the Requirements tab:
l In the Name field, enter the name for the requirement associated with this use case
(ER001_Create_ER). Note that the autocomplete in the Name field does not display
any choices because this requirement has not been previously entered into the system.
Click the Expand icon ( ) to the left of the field to display the editor field. Enter therequirement's details in this field:
System should enable an employee to create an equipmentrequest.
l Confirm that the Category field is set to Business Rule (the default value).
l For the Importance field, select Critical (as indicated in the preceding table for this
requirement).
l Confirm that the Status field is set to New (the default value), and that the External Req
ID field is empty (the default).
c. Click OK to save the use case and requirement information and complete association with that step.

5/13/2018 Build Your First Application Pega - slidepdf.com
http://slidepdf.com/reader/full/build-your-first-application-pega 29/135
24
In the Discovery Map, the Select Hardware shape now has a document icon, which indicates a use case
description is captured and associated with that step.
8. To save the work you have completed in the profile up to this point, select Actions > Save.
9. For each of the remaining shapes, repeat the previous steps to associate their use cases and requirements.
You can copy text from the table and paste it into entry fields.
Note that once a requirement has been entered in the system for a previous use case, you do not re-enter its
information to associate it with a use case. Use the autocomplete feature to select the previously entered
requirement: type the first letter in the Name field (E) and press your keyboard's down arrow. The system dis-
plays the previously entered requirements for you to select from. For example, when entering the requirement
for the Select Software shape, after typing E into the Name field and pressing the down arrow key, the sys-
tem displays ER001_Create_ER as a choice. After clicking that choice, press your keyboard's Tab key to
move your cursor to the next field. After a moment (depending on the speed of your network) the system auto-
matically fills in the Importance and other fields with the previously entered information for ER001_Create_
ER. (Depending on the speed of your network, this might take a few moments to display.)
Some use cases have more than one requirement associated with them. To add additional requirements in
the Requirements tab, click to add a new row for entry.
For the two Update Status shapes, in the Shape field, select Automated Step (instead of the default
Human Based Step value).
After entering the use cases and requirements information, confirm that all of the shapes in the Discovery Map dis-
play the document icon and that the two Update Status shapes are yellow. The Discovery Map should look like the
following image.

5/13/2018 Build Your First Application Pega - slidepdf.com
http://slidepdf.com/reader/full/build-your-first-application-pega 30/135
25
Save the profile by selecting Actions > Save.
Continue to the next tutorial topic.
Part C: Complete capturing information in the Appli-
cation Profiler
The Globex subject matter experts inform you that they want the first use case that they identified captured as the
use case for the starting screen of the process, because they want the system to display the fields to enter that infor-
mation when the HR Staff Member begins the process.
1. Select the drop-down menu next to the Start Equipment Request label and select Add > Use case for start-ing screen.
2. In the window that opens, specify the following items in the fields on the Use Case tab:
Field Specified value
Use Case Enter New Hire Info
Status New
Actors HR Staff Member
Trigger Web Browser
(Use the SmartPrompt to select the value by putting your cursor in the field andyour keyboard's down arrow. The system displays the available choices. Doub
Web Browser to select it for the field.)
Complexity Low
Business Objective Automate the approval process for employee onboarding requests
Description When the HR Staff member selects to start the process, the system displays f
entering the information about the new hire.
HR staff member enters the following information about the new hire:
First Name (entry field)
Last Name (entry field)Department (drop-down list)
Manager (entry field)

5/13/2018 Build Your First Application Pega - slidepdf.com
http://slidepdf.com/reader/full/build-your-first-application-pega 31/135
26
3. Click the Requirements tab. In the Name field, use the autocomplete to select the ER001_Create_ER
requirement and press your keyboard's Tab button to move to the next field. After a few moments, the sys-
tem fills in the previously specified values for the remaining fields.
4. Click OK in the window to save the use case.
At this point, you have captured all of the details for the process-related requirements of the project. Each step of the
Application Profiler is designed to capture details of the project related to a specific area. These steps are listed
along the left side once you start the Application Profiler. For example, the Integration step is for capturing details of
connections to external systems the application would have to make, the Reports step is for capturing details of the
types of reports expected from the application, and the Project Roles step is for capturing estimates of the staffing
resources needed for the project.
While larger-scale projects would likely require you to enter information for all of these areas of the project, it is not
needed for this Globex scenario, and you can move directly to the Profile Review part. (Note that even though this
project is for a simple process and the use cases and requirements have been kept intentionally simple, larger-scale
projects would follow this same progression of steps.)
5. Click Profile Review in the Application Profiler's left side navigation.
The display shows the work type you specified in the Application Profiler, as well as supporting types typ-
ically used in a Process Commander application. (The system includes these by default.) You can optionally
expand the EquipmentRequest work type and see the list of use cases you entered.
6. Click the Finish button to complete creation of the application profile.
The system works to generate the data it needs to create the application profile object. Once the system is done, the
profile is completed and the completion window displays.

5/13/2018 Build Your First Application Pega - slidepdf.com
http://slidepdf.com/reader/full/build-your-first-application-pega 32/135
27
Optional: Create a Word document of the information in the created application profile that can be circulated to stake-
holders by selecting Actions > Document. In the Document window, click Create Document. If you have Microsoft
Word on your local system, the program opens and displays the application profile document. You can save a copy
to your local system, or close Word without saving. When you are done reviewing the document, close the Doc-
ument window.
Typically the application is generated at this point. However, for this tutorial, move to Step 2 and complete Step 2
before generating the application. Click Close to close the Application Profiler and complete this step of the tutorial.
Continue to the next tutorial topic.
Review
In this step, you created a profile for the Onboarding application by running the Application Profiler. You created a
Discovery Map that inventories the steps of the business process that the application is to implement, and you
entered information about the use cases and associated requirements.
To read more about the skills you used in this step, see:
l Implementation and Methdology - Getting Started ( )
l Business Analyst Resources overview ( )
l About Direct Capture of Objectives [KB 26133] ( )
l Creating an Application Profile [KB 26128] ( )
In the next step of the tutorial, you generate a starting application structure based on this profile.
Move to the next step in the tutorial.

5/13/2018 Build Your First Application Pega - slidepdf.com
http://slidepdf.com/reader/full/build-your-first-application-pega 33/135
28
Step 2: Generate the base application
Typically performed by In the previous
step, you
Purpose of this step
To... So that...
Business Analysts, with
assistance from System
Architects (SAs)
Built the application
profile
Record your decisions
about names and the pri-
mary process
From the application profile, the Appl
cation Accelerator can automatically
generate rules that provide a solid
base starting point for later steps
This tutorial step generates the base application structure, using the information that you captured with the Appli-
cation Profiler. In subsequent tutorial steps, from that base, you build out and customize the application to the organ-
ization's specific needs.
Generating a base application using the Application Accelerator is the second step in creating a Process Com-
mander application. The Application Accelerator takes the profile created by the Application Profiler and turns it into
a working application. It automates building a specific application by generating a base starting structure that you
can extend with requirements for a specific implementation.
In this tutorial step, you run the Application Accelerator, customize some details for the specific implementation of an application for requesting new hire equipment, and generate the base application.
At the end of this tutorial step, a working application is created in the system.
Continue to the next topic to begin this step of the tutorial.
Part A: Running the Application Accelerator
The Application Accelerator generates a basic application structure automatically from the application profile you
created at the end of Step 1.C of this tutorial. The structure provides a starting point for later tutorial steps. The fol-
lowing steps describe customizing some of the information from the profile to better align with the Globex team's
expectations, and then generating the base application.

5/13/2018 Build Your First Application Pega - slidepdf.com
http://slidepdf.com/reader/full/build-your-first-application-pega 34/135
29
1. In the Designer Studio, start the Application Accelerator 1 by selecting New Application > Application
Accelerator from the Application menu.
2. In the Application Overview window that opens when the wizard starts, click the Select the Application Pro-
file field and select the entry that starts with Profile for Onboarding. That entry is the application pro-
file created in Step 1.C of this tutorial.
The Application Overview window refreshes to display the default values from the profile.
3. Inthe New Implementation Name field, change the default value to EquipReq.
1The Application Accelerator is a wizard that integrates with an Application Profile to launch an automated, best-
practice process that jump-starts the creation of new application and the extension of existing applications and
frameworks.

5/13/2018 Build Your First Application Pega - slidepdf.com
http://slidepdf.com/reader/full/build-your-first-application-pega 35/135
30
4. Confirm the following values in the Application Overview window:
l Framework Name is OnboardingFW
l Both Version fields display 01.01.01
l Business Objectives displays the two business objectives you entered in Step 1.A of this tutorial.
5. Click OK to save the changes.
6. By default, the Application Accelerator begins on the Base and RuleSets step. In this step, the system dis-
plays default names based on the values from the application profile created in Step 1.C and the GLBX organ-
ization structure. For this tutorial, these default values should be used. Confirm the following settings:
l Parent Class is OnboardingFW
l RuleSet Name is OnboardingFW
l Organization Name is GLBX.com and Organization Class is GLBX-
l Division Name is GLBXDiv, Division Class is GLBXDiv-, and Division RuleSet isGLBXGLBXDiv
l Application Class is EquipReq and Application RuleSet is GLBXEquipReq
l Modify test operators checkbox is clear
7. Select the Processes step of the Application Accelerator. Confirm that the Discovery Map you created in

5/13/2018 Build Your First Application Pega - slidepdf.com
http://slidepdf.com/reader/full/build-your-first-application-pega 36/135
31
Step 1.B is displayed.
At this point, for a larger application, the business analyst would typically work with the subject matter
experts to provide information to update the other areas of the Application Accelerator before generating the
base application. In this tutorial scenario, the system provides default selections on the other steps based on
the information from the profile that you created earlier and entered in the preceding steps. No further updatesare needed before generating the base application structure.
8. Select the Review Objects step and confirm that the displayed use cases and requirements match the fol-
lowing images. These are the use cases and requirements you entered into the Application Profiler in Step
1.B of the tutorial. Expand the EquipmentRequest work type to display the use cases.
Select the Requirements tab to see the requirements.
9. Select the Create Application step. In this step, the system displays a list of the rules that the system will
generate for the starting structure.
10. Click Build the Application.
As the system creates the rules and classes for the application, progress is indicated in the Status column by
the clockwise circling arrows ( ). When the Status column displays all check marks and the Finish button isavailable, click Finish.

5/13/2018 Build Your First Application Pega - slidepdf.com
http://slidepdf.com/reader/full/build-your-first-application-pega 37/135
32
11. Click the Switch to new application button that appears.
The system refreshes the Designer Studio window to display the newly generated OnboardingFW application.
As part of this process, the Application Accelerator updated the [email protected] operator ID to set
OnboardingFW as its default application. From now on, whenever you log into the system using Admin-
[email protected] (password rules), the Designer Studio will display the OnboardingFW application by default.

5/13/2018 Build Your First Application Pega - slidepdf.com
http://slidepdf.com/reader/full/build-your-first-application-pega 38/135
33
Continue to the next tutorial topic.
Review
In this step, you generated a starter structure for the Onboarding application by running the Application Accelerator,using information in the profile that you previously created.
To read more about the skills you used in this step, see:
l Introduction to the SmartBPM Implementation Methodology [KB 25665] ( )
l Business Analyst Resources overview ( )
l About the Direct Capture of Objectives [KB 26133] ( )
l Using the Application Accelerator [KB 26129] ( )
Because this is a starter application that you will extend to meet your stakeholders' needs, it's best to review the gen-erated items to gain an understanding of what was created. In the next step of the tutorial, you review the generated
items.
Move to the next step in the tutorial.

5/13/2018 Build Your First Application Pega - slidepdf.com
http://slidepdf.com/reader/full/build-your-first-application-pega 39/135
34
Step 3: Review the application structure
Typically performed by In the previous
step, you
Purpose of this step
To... So that...
Lead System Architects
(LSA)
Generated a base
application structure
Build upon the RuleSets
generated in the previous
step and familiarize you-
self with the generated
base structure
You are familiar with assets gen-
erated in the previous step and have
the appropriate RuleSet prerequisites
for creating and saving rules as you
build out the process (screens, flow,
logic) in the subsequent tutorial steps
This step builds upon the base GLBX-FW-OnboardingFW-Work application structure that was generated in the pre-
vious step. You explore the generated application structure, and set the prerequisites for the RuleSet into which new
rules are saved as you create them in the application development process.
The Application Accelerator that you used in Step 2 created your application and populated it with a structure and
assets that promote efficient development and reusability. For this tutorial, you also need to connect the RuleSet
generated by the Application Accelerator with one that you imported before beginning the tutorial. That step would
not be necessary in a real business setting.
In this step of the tutorial you:
l Update the OnboardingFW RuleSet to add the GLBX RuleSet as a prerequisite and turn off “check-in / check-
out” of rules.
l Review the class structure created for your application by the Application Accelerator.
l Review the rules the Application Explorer created for your application.
l Use the Heat Map to review your application’s assets.
Continue to the next topic to begin this step of the tutorial.
Part A: Update the OnboardingFW RuleSet
The RuleSets generated by the Application Accelerator have rule check-out specified by default. This is the default
setting because in a typical development effort involving more than one person, it is important to enforce rule check-

5/13/2018 Build Your First Application Pega - slidepdf.com
http://slidepdf.com/reader/full/build-your-first-application-pega 40/135
35
out. If Developer A has checked out a rule, Developer B cannot make changes to it until Developer A has checked it
in again. Rule check-out helps prevent colleagues from accidentally overwriting each others’ work.
In this tutorial scenario, the work is done on your own. Turning off rule check-out for the RuleSets into which one
saves rules reduces the number of steps involved each time one wants to create or update a rule. In this tutorial,
rules are saved to the OnboardingFW RuleSet.
Rule check-out for the rules in a RuleSet is governed by a checkbox on the RuleSet form. The following steps
describe turning off rule check-out in the OnboardingFW RuleSet:
1. In the Application Explorer under GLBX-FW-OnboardingFW-Work, expand the SysAdmin category and then
expand the RuleSet category to see the list of RuleSets:
l GLBX
l GLBXInt
l OnboardingFW
l OnboardingFWInt
2. Click OnboardingFW to open its rule form.
Even though there are four RuleSets in this application, check-out is turned off for only the OnboardingFW
RuleSet. The reason is that this is the only RuleSet in which rules are saved in the course of performing the
steps of this tutorial. Because the steps of the tutorial do not involve updating or saving rules into the other
three RuleSets, their check-out settings can be left as they are.

5/13/2018 Build Your First Application Pega - slidepdf.com
http://slidepdf.com/reader/full/build-your-first-application-pega 41/135
36
3. Click the Security tab and clear the Use check-out? checkbox.
Before beginning Step 1 of the tutorial, you imported some Process Commander resources that set up the GLBX
organization and operators for the tutorial scenario. One of those resources is the GLBX RuleSet. So that the rules
that you save to the OnboardingFW RuleSet can use rules in the GLBX RuleSet, you must add the GLBX RuleSet
as a prerequisite to the OnboardingFW RuleSet.
4. Click the Versions tab.
5. Click the Expand icon ( ) at the left of the 01-01-01 to view the Required RuleSets And Versions sec-tion.
6. Click that is within the Required RuleSets And Versions section to add a new row afterthe two exist-ing rows.
7. In the new row, use the SmartPrompt1 to choose from the list of available RuleSets:
a. Set your cursor in the entry field in the new row.
b. Press your keyboard's down arrow key. The system displays a list of appropriate choices.
c. Scroll down through the list until you see GLBX, then double-click GLBX to select it for the entry field.
8. Type a colon (:) and 01-01-01 after GLBX in that row. The new row should look like the following image.
1 A SmartPrompt text box, used on many rule and data forms, makes a dynamic selection list available for fast user
entry. Optionally, SmartPrompt processing can be added to fields on work object forms.

5/13/2018 Build Your First Application Pega - slidepdf.com
http://slidepdf.com/reader/full/build-your-first-application-pega 42/135
37
9. Click to save the updated OnboardingFW RuleSet.
10. Close the form for the OnboardingFW RuleSet by clicking the icon in its tab.
Continue to the next tutorial topic.
Part B: Review the class structure
Classes represent the applicability, or scope, of rules such as properties, sections, and flows. Your application is a
hierarchy of classes, with more specific classes inheriting from more generic classes. In general, if there is a rule in
a generic class in your application, and a rule of the same name in a more specific class that inherits from the first
class, the rule in the more specific class is the one the application uses. Your application cannot use rules that arenot part of the classes in its hierarchy.
Use the Application Explorer in the left panel of the Designer Studio to review your application’s class structure.
Your application’s class hierarchy includes classes created by the Application Accelerator and standard classes pro-
vided by Process Commander (as well as any standard classes from Frameworks your application uses). Most
rules operate on ("apply to") objects of a specific class. However, rules that apply to a parent class are also available
to child classes of that parent. In your application, objects in the EquipmentRequest child class have access to the
rules in its parent class.

5/13/2018 Build Your First Application Pega - slidepdf.com
http://slidepdf.com/reader/full/build-your-first-application-pega 43/135
38
Right-click EquipmentRequest and select Structure from the context menu to open the Class Structure Viewer and
see the relationships among all the elements of your application.

5/13/2018 Build Your First Application Pega - slidepdf.com
http://slidepdf.com/reader/full/build-your-first-application-pega 44/135
39
Use the + and – icons in the Class Structure Viewer to explore the relationships. The full name of the Equip-
mentRequest class is GLBX-FW-OnboardingFW-Work-EquipmentRequest. This class is a direct child of GLBX-
FW-OnboardingFW-Work-, which is a child of GLBX-FW-OnboardingFW-, and so on. The top class in the hierarchy
is named @baseclass.
Close the viewer. Right-click EquipmentRequest again, and select Inheritance to open the Class Inheritance display
and see the inheritance relationships among all the classes in your application.

5/13/2018 Build Your First Application Pega - slidepdf.com
http://slidepdf.com/reader/full/build-your-first-application-pega 45/135
40
Close the Class Inheritance display.
Continue to the next tutorial topic.
Part C: Review the rules generated by the Application
Accelerator
Along with the application’s class structure and starter flows, the Application Accelerator creates RuleSets to hold
the rules your application requires. In the Application Explorer, use the + and – controls to navigate the tree display
and review the rules, RuleSets, and RuleSet versions that the Application Accelerator created.

5/13/2018 Build Your First Application Pega - slidepdf.com
http://slidepdf.com/reader/full/build-your-first-application-pega 46/135
41
During the following tutorial steps, you modify some of these generated rules and create others as you build out the
application to match its requirements.
Continue to the next tutorial topic.
Part D: Use the standard heat map to review the number
and types of rules in the application
A heat map provides another way of visualizing your application’s assets. Select > Application > Inventory >Heat Map to see the heat map.
(The arrangement of rectangles that you see might not precisely match the following image. Narrowing the Designer
Studio window changes the display.)
Note: If you did not complete Steps 1 and 2, and instead imported the zip file at the start of this tutorial step, the
number of rules is different than the one shown in this image.

5/13/2018 Build Your First Application Pega - slidepdf.com
http://slidepdf.com/reader/full/build-your-first-application-pega 47/135
42
Click the label of any rectangle to see a list of its contents.
Heat maps color the rectangles according to a stated criterion to provide additional information. You can choose a
criterion in the Shaded by drop-down list. The heat map typically shows, by color gradation, the number of recently
updated rules in each category rectangle.
Close the heat map (click in the Application-Inventory tab).
Continue to the next tutorial topic.
Review
In this step you reviewed your application's structure and underlying items, and optionally simplified the devel-
opment process by turning off rule check-in/check-out behavior.
To read more about the skills you used in this step, see:
l How class inheritance works [KB 25169] ( )
l Video overview of the Enterprise Application Accelerator ( )
l Application category - Inventory page - Inventory Reports, 6Rs, and Heat Map gadgets [Developer Help] ( )
In the next step of the tutorial, you adjust the draft flow generated by the Application Accelerator.

5/13/2018 Build Your First Application Pega - slidepdf.com
http://slidepdf.com/reader/full/build-your-first-application-pega 48/135
43
Move to the next step in the tutorial.

5/13/2018 Build Your First Application Pega - slidepdf.com
http://slidepdf.com/reader/full/build-your-first-application-pega 49/135
44
Step 4: Adjust the initial process
Typically performed by In the previous
step, you
Purpose of this step
To... So that...
Business Analysts Specified appropriate
settings for the
default RuleSets gen-
erated in Step 2 and
explored the gen-
erated application
structure.
Revise and extend the
process in the default
flow
The process begins to look more like
the business process desired by the
stakeholders, and you can run it for
them to get their feedback
This step builds upon the base Start Equipment Request process that was generated in Step 2. You customize
some of the process defaults until it reaches a point where stakeholders can review it and provide useful feedback
on its development.
After the Application Accelerator generates the application structure, the business analyst can run the process (as
defined in the Discovery Map) immediately, and give stakeholders the opportunity to review the working process and
user interface, without waiting for all of the pieces to be developed. Early reviews let stakeholders verify that theprocess satisfies the project's business requirements. The stakeholders can validate that the application is devel-
oping as they expect, and the developer can quickly incorporate stakeholder feedback.
As you saw in Step 3, generating the application using the Application Accelerator creates a base structure for the
application. The goal is to extend this generated base to deliver an application that meets the project’s requirements
and objectives. One of the generated rules is a draft flow1. The Application Accelerator uses the process steps you
created in the Discovery Map to create this rule. This tutorial step describes how to run the process, and then adjust
the draft flow to have the process align more with the Globex team's expectations.
Continue to the next topic to begin this step of the tutorial.
1 A flow defines a business process or part of a business process. A f low governs how work objects are created,
progress through the system, and become resolved. A flow consists of a network of shapes and connectors (lines),
each with associated parameters and values.

5/13/2018 Build Your First Application Pega - slidepdf.com
http://slidepdf.com/reader/full/build-your-first-application-pega 50/135
45
Part A: Run the process
The goal of running the process at this point in the project is to see what might need adjusting to better meet the
expectations of the subject matter experts and stakeholders.
1. In the Designer Studio, select the Run ( ) menu from the toolbar, and select Run Process.
The words you entered in the Application Accelerator for the process -- Start Equipment Request -- appear
as the first part of the label of the menu choice.
2. Select the menu choice that begins with the words Start Equipment Request to run the initial process that
was generated by the Application Accelerator.
As you progress through the process, temporary messages ("nn system alerts") might appear. These mes-
sages support performance tuning and you can ignore them.
The system presents the user interface screens that are in the base structure created by the Application Accelerator. A new tab is opened in the Designer Studio for the new work item. Click Create in the first
screen and Submit in the subsequent screens to advance through the process. You do not have to enter any
values in the fields.

5/13/2018 Build Your First Application Pega - slidepdf.com
http://slidepdf.com/reader/full/build-your-first-application-pega 51/135
46
3. As you progress from one screen to another by clicking Submit, observe the following items:
l The screens generated by default follow the steps you set in the Discovery Map, and use the names
you entered on the shapes. By running the process at this point, you can quickly see whether the

5/13/2018 Build Your First Application Pega - slidepdf.com
http://slidepdf.com/reader/full/build-your-first-application-pega 52/135
47
process follows the steps provided by the Globex subject matter experts.
l Text in some of the screens indicates that certain items do not exist (such as "Flow Action does not
yet exist."). The steps in the next tutorial topic address these items.
l The final screen of the process shows a confirmation message: "Thank you for your input". Notice that
the work item's status is set to New. Because this is the primary path of the process and the work
item is not being sent to another process, you want the work item's status set to Resolved at this
point. That is, you would like the work item's status in the header to reflect that all of the required ele-
ments of the work are complete ("resolved"). You would also like the work item's status to change
from New to Pending-Approval as it moves to the Approve process step.
4. Close the tab for the work item by clicking the icon in the tab.
Continue to the next tutorial topic.

5/13/2018 Build Your First Application Pega - slidepdf.com
http://slidepdf.com/reader/full/build-your-first-application-pega 53/135
48
Part B: Edit the flow
The following steps describe editing the generated flow so that the items noted in the previous topic are addressed.
1. In the Application Explorer, expand EquipmentRequest to see the rule categories underneath it. Expand theProcess category and then expand the Flow category. Click StartEquipmentRequest.
2. Click the Flow Editor 1 icon ( ) to open the flow in the flow editor. The flow editor uses Microsoft Visio.You might be prompted to enable macros in Visio. If so, select to enable macros.
1This displays the application flow in an editable Visio diagram.

5/13/2018 Build Your First Application Pega - slidepdf.com
http://slidepdf.com/reader/full/build-your-first-application-pega 54/135
49
3. In the displayed flow diagram, observe the following items:
l The flow is in draft mode. You can tell when a flow is in draft mode by the yellow rectangle with the
word Draft at the top of the flow diagram. Draft mode allows you to work with shapes in the flow with-
out having to create all of the underlying rules for the shapes.
l The shapes from the Discovery Map that are specified as Human Based Steps (green shapes) are rep-
resented as assignment shapes in the flow diagram.l The Discovery Map shapes that are specified as System Steps (yellow shapes) are represented as
utility shapes.
l The Discovery Map shapes that are specified as alternate steps (Reject and Update Status) appear in
a separate branch.
4. Click to save the flow with the flow diagram. Afterthe system completes saving the flow, a warning ( )shape might appear in the diagram. This image marks where a shape's required values or underlying rules are
incomplete. When a flow is saved, the system validates whether rules exist for each shape in the flow. Ignore
any ( ) warnings that appear at this point, because the missing rules are created in the following steps of this topic.
5. Create flow action rules for the locations in the running process where the user interface is displaying "Flow
Action does not yet exist" by following these steps:
a. Select the connector that runs between the SelectHardware shape and the SelectSoftware shape.
The Connector Properties panel displays in the upper left corner.

5/13/2018 Build Your First Application Pega - slidepdf.com
http://slidepdf.com/reader/full/build-your-first-application-pega 55/135
50
b. In the Connector Properties panel, enter SelectHardware in the Flow Action field. Do not use
spaces in this field, because this value is the flow action rule name, which does not allow spaces.
c. Click next to the Flow Action field. In the New Rule dialog for the flow action, confirm the followingvalues:
o Applies To is GLBX-FW-OnboardingFW-Work-EquipmentRequest
o Action Name is SelectHardware
o RuleSet is OnboardingFW
o Version is 01-01-01

5/13/2018 Build Your First Application Pega - slidepdf.com
http://slidepdf.com/reader/full/build-your-first-application-pega 56/135
51
o Template is blank (the default)
d. Click Create to create the flow action rule.
e. Click to save the SelectHardware flow action. Then click in its tab to close that tab.
f. In the Connector Properties panel in the flow editor, do not change any other values in the other fields
in the panel. Click Apply in the Connector Properties panel. (Ignore the
warning next to the Flow
Action field. This warning clears the next time you click to save the rule and the system validatesreferences to the new SelectHardware flow action rule.)
g. Repeat steps 5.a through 5.f for the connector that runs between the SelectSoftware shape and the
Approve shape. Enter SelectSoftware in the Flow Action field, and confirm the following values in
the New Rule dialog for the flow action:
o Applies To is GLBX-FW-OnboardingFW-Work-EquipmentRequest
o Action Name is SelectSoftware
o RuleSet is OnboardingFW
o Version is 01-01-01
o Template is blank (the default)
Remember to save ( ) the new SelectSoftware flow action rule.
h. Select the connector that runs between the Approve shape and the UpdateStatus shape. In the

5/13/2018 Build Your First Application Pega - slidepdf.com
http://slidepdf.com/reader/full/build-your-first-application-pega 57/135
52
Connector Properties panel, use the SmartPrompt in the Flow Action field to see the list of available
flow action rules. The first choices displayed by the SmartPrompt are the two flow actions just
created, SelectHardware and SelectSoftware. Double-click the More in the SmartPrompt list to see
the list of standard flow action rules. Double-click Approve to select it for the Flow Action field.
i. Click Apply.
6. When the process first creates the work item, the work item's status is set to New. Adjust the flow to set the
status of the work item to Open as it enters the first assignment (Select Hardware) and to Pending-Approval
as it enters the Approve step.
a. Select the Select Hardware assignment shape.
b. In the Assignment Properties panel, use the SmartPrompt in the StatusWork field to select the stand-
ard Open status value. (You might have to expand the Assignment Properties panel to see the field
labels and locate the StatusWork field). Click
Apply.
c. Select the Approve assignment shape.

5/13/2018 Build Your First Application Pega - slidepdf.com
http://slidepdf.com/reader/full/build-your-first-application-pega 58/135
53
d. In the Assignment Properties panel, use the SmartPrompt in the StatusWork field to select the stand-
ard Pending-Approval status value. (You might have to expand the Assignment Properties panel to
see the field labels and locate the StatusWork field). Click Apply.
7. Use the following steps to select the standard status value for the Update Status step that follows the
Approve step. Recall that the Globex subject matter experts specified that this Update Status step follows
the Approve step, and in this process step, the system updates the status of the work item:
a. Select the UpdateStatus utility shape that follows the Approve assignment. The Utility Properties
panel displays in the upper left corner. The Rule field displays the name of the standard rule Upda-
teStatus. Because the name on the shape is UpdateStatus, and a standard rule with that name
already exists, the system uses that rule as the default for this shape.
b. In the Utility Properties panel, in the StatusWork field, use the SmartPrompt to list the available
choices. Double-click Resolved-Completed in the list.
c. In the Utility Properties panel, in the Name field, update the value to Update Status -
Resolved-Completed. It is a best practice to provide the specified status in the name of the utility
shape in the diagram.
d. Click
Apply
.

5/13/2018 Build Your First Application Pega - slidepdf.com
http://slidepdf.com/reader/full/build-your-first-application-pega 59/135
54
8. Click to save the flow with the updates to this point. The system validates the references made to rules
in the shapes, and clears the warnings ( ) on the shapes in the main branch of the flow. The main branch of the flow should look like the following image:
9. Use the following steps to incorporate the alternate process steps (Reject and Update Status) into the flowdiagram:
a. In the branch with the alternate steps, select the FlowEnd ( ) shape at the end of that branch andpress your keyboard's Delete key to delete it.
b. Select the disconnected head (arrow) of the connector that exits the bottom of the UpdateStatus util-
ity shape and drag the head to connect to the connection point at the top of the remaining FlowEnd () shape.
c. Select the UpdateStatus utility shape and drag it until it is to the right of the UpdateStatus -
Resolved-Completed shape. (The system automatically redraws the connectors. You adjust these in
the next step.)

5/13/2018 Build Your First Application Pega - slidepdf.com
http://slidepdf.com/reader/full/build-your-first-application-pega 60/135
55
d. Select the tail of the connector at the bottom of the Reject assignment shape and drag it to connect at
the rightmost connection point on the bottom of the Approve assignment shape.
e. With that connector selected, in the Connector Properties panel, in the Flow Action field, use theSmartPrompt to select the standard Reject flow action rule. Click Apply.

5/13/2018 Build Your First Application Pega - slidepdf.com
http://slidepdf.com/reader/full/build-your-first-application-pega 61/135
56
f. Select the UpdateStatus shape. In the Utility Properties panel, in the StatusWork field, use the Smart-
Prompt to select the standard Resolved-Rejected status. In the Name field, update the value toUpdate Status - Resolved-Rejected. Click Apply.
g. Because the rejection action is handled by the Reject connector shape, delete the Reject assignment
shape by selecting it and pressing your keyboard's Delete key.
h. Because the approve and rejection actions are handled by the connectors, rename the Approve assign-
ment shape to reflect that fact. Select the Approve shape. In the Assignment Properties panel, in the
Name field, update the value to Review. Click
Apply.
The flow should look like the following image.

5/13/2018 Build Your First Application Pega - slidepdf.com
http://slidepdf.com/reader/full/build-your-first-application-pega 62/135
57
10. Click to save the flow with the updated flow diagram.
11. Select the connector labeled Approve, 100%. In the Connector Properties panel, in the Likelihood field, enter
70. Click Apply.

5/13/2018 Build Your First Application Pega - slidepdf.com
http://slidepdf.com/reader/full/build-your-first-application-pega 63/135
58
12. Select the connector labeled Reject, 100%. In the Connector Properties panel, in the Likelihood field, enter
30. Click Apply.
In a Process Commander application, a likelihood value is a value between 1 and 100, which is interpreted as
a probability associated with that path in the process. For example, a likelihood of 70 on a connector labeled
Approve means that the subject matter experts expect participants in the process to choose the Approveaction 70% of the time. These values determine the presentation order of actions in the user interface, so that
the actions most likely to be chosen are displayed first.
The flow should look like the following image.
13. Click
to exit the flow editor.
If a message displays asking if you want to save changes to the flow diagram, click Yes.
14. Close the flow rule form by clicking on its tab.
Continue to the next tutorial topic.

5/13/2018 Build Your First Application Pega - slidepdf.com
http://slidepdf.com/reader/full/build-your-first-application-pega 64/135
59
Part C: Review the updated process
The following steps describe how to run the process to see how it has changed with the updates made in Step 4.B.
1. Run the updated process using the Run ( ) menu from the Quick Launch toolbar as you did earlier (clickingCreate and Submit to continue to each process step), and notice the differences.
l The user interface no longer displays text saying that something does not exist
l At the point where the process reaches the Review shape, the Status in the work item heading is set
to Pending - Approval
l The user interface at this point now displays the section heading as Approve this selection OR
l The alternate Reject step is provided as a choice in an action drop-down list
l A Note field is displayed to enter a note
The system automatically provides that section heading and that note feature because you used the Smart-
Prompt in the Flow Action field for that connector and selected the standard Approve flow action rule from theSmartPrompt list. Recall that the ER004_Add_Note requirement provided by the Globex subject matter
experts describes enabling the hiring manager to add a note when approving the request. Notice that the
standard Approve rule meets that requirement.
2. When you click Submit and reach the final screen of the process, the work item status now displays
Resolved - Completed. This is a result of specifying the status for the Update Status - Resolved-Com-pleted shape in the flow diagram.

5/13/2018 Build Your First Application Pega - slidepdf.com
http://slidepdf.com/reader/full/build-your-first-application-pega 65/135
60
3. When you reach the final screen of the process, close the process tab by clicking the in its tab.
4. Run the process again, this time selecting the Reject choice from the drop-down list in the Approve this
selection OR section.
The system automatically provides an entry field for the hiring manager to enter a rejection note. In Step 4.B,the standard Reject flow action rule was specified for the Reject connector, and this standard rule provides
that user interface.
5. Click Submit. Notice that after selecting the Reject choice and completing the process, the work item status
now displays Resolved-Rejected. This is a result of specifying the status for the Update Status -
Resolved-Rejected shape in the flow diagram.
6. Close the process tab by clicking the in its tab.
Continue to the next tutorial topic.

5/13/2018 Build Your First Application Pega - slidepdf.com
http://slidepdf.com/reader/full/build-your-first-application-pega 66/135
61
Review
In this step you adjusted the process generated by the Application Accelerator by:
n Incorporating the Reject step into the flow
n Naming the connector shapes (flow actions)
n Specifying the work item's status for the Update Status process steps
You also created the two flow action rules that will present the user interface at the Select Hardware and Select Soft-
ware points in the process. You will associate the user interface with those flow actions in a subsequent step of this
tutorial.
To read more about the skills you used in this step, see
n Flows - Concepts and terms [Developer Help] ( )
n About Flow rules [Developer Help] ( )
n How to create and test a flow model [KB 25166] ( )
In the next tutorial step, you begin working on the data model for this application.
Move to the next step in the tutorial.

5/13/2018 Build Your First Application Pega - slidepdf.com
http://slidepdf.com/reader/full/build-your-first-application-pega 67/135
62
Step 5: Create a data model
Typically performed by In the previous
step, you
Purpose of this step
To... So that...
Business Analysts and Sys-
tem Architects
Revised and
extended the default
process
Extend the system-pro-
vided data model with
items specific to the appli-
cation being built
Later steps have the data properties
needed to display values in the user
interface and store values entered in
the work item
All Process Commander applications collect, process, and display data. The organization and structure of this data
is called the data model. The Process Commander system provides a base data model for every application. This
base data model includes standard items such as the pyStatusWork property for the work item's status. Typ-
ically, you extend the system-provided data model with items that are specific to the application being built.
Properties hold the data associated with a process and work item. They can appear in fields in the user interface or
can be hidden from view. Properties are used to store values, and the property rule can define the on-the-glass dis-
play of those values (such as displaying a value as read only or as a drop-down list). For example, in the Onboarding
application, the values entered into the user interface fields of First Name and Last Name are stored in properties
associated with those fields.
The following table lists the fields that are to appear in the StartEquipmentRequest flow’s user interface. In this tuto-
rial step, you create the corresponding properties that are to display values in the user interface and to store values
that are entered into the work item.
Field Used Corresponding Property
Department .Department
First Name .FirstName
Last Name .LastName
Manager .Manager
Department Budget .DepartmentBudget
Remaining Budget .RemainingBudget
Hardware Total .HardwareTotal
Software Total .SoftwareTotal

5/13/2018 Build Your First Application Pega - slidepdf.com
http://slidepdf.com/reader/full/build-your-first-application-pega 68/135
63
Field Used Corresponding Property
Hardware Items .HardwareItems()
Software Items .SoftwareItems()
Continue to the next topic to begin this step of the tutorial.
Part A: Create a single value property
Create a single value property to hold the Department information.
1. In the Application Explorer, right-click the GLBX-FW-OnboardingFW-Work class. Select New > Data Model
> Property from the context menu.
2. In the New Instance of a Rule dialog, enter Department for the Property Name. Confirm the Applies To,
RuleSet,Version, and Type fields are set to GLBX-FW-OnboardingFW-Work, OnboardingFW, 01-01-
01, and Text.

5/13/2018 Build Your First Application Pega - slidepdf.com
http://slidepdf.com/reader/full/build-your-first-application-pega 69/135
64
3. Click Create . The Property form for this new property rule displays.
4. In the Property form, use the SmartPrompt in the Control field to select PromptSelect.

5/13/2018 Build Your First Application Pega - slidepdf.com
http://slidepdf.com/reader/full/build-your-first-application-pega 70/135
65
5. Inthe Table Type field, select Local List. The Table Values list box displays.
6. Inthe Table Values list box, enter these values in the table:
HR
Documentation
Engineering
Legal
Facilities
Select the first row (1) to enter the first value, then click to add rows and enter the remaining values.

5/13/2018 Build Your First Application Pega - slidepdf.com
http://slidepdf.com/reader/full/build-your-first-application-pega 71/135
66
7. Confirm that the values for the remaining fields on the General tab match the following image.

5/13/2018 Build Your First Application Pega - slidepdf.com
http://slidepdf.com/reader/full/build-your-first-application-pega 72/135
67
8. Click Save ( ) to save the Department property, then click the icon to close the rule form's tab.
Continue to the next tutorial topic.

5/13/2018 Build Your First Application Pega - slidepdf.com
http://slidepdf.com/reader/full/build-your-first-application-pega 73/135
68
Part B: Create properties using the Property Wizard
Use the Property Wizard to create several properties at once.
1. In the Application Explorer, right-click GLBX-FW-OnboardingFW-Work and select Define Properties from thecontext menu. The Define Properties wizard opens.
2. Confirm that the RuleSet and RuleSet Version fields are set to OnboardingFW and 01-01-01. If they con-
tain different values, specify the values as shown.
3. Create the following properties. The wizard will automatically generate property names from the contents of
the Description fields, removing any spaces.

5/13/2018 Build Your First Application Pega - slidepdf.com
http://slidepdf.com/reader/full/build-your-first-application-pega 74/135
69
Description Mode Type
First Name Single Value Text
Last Name Single Value TextManager Singe Value Text
Department Budget Single Value Decimal
Remaining Budget Single Value Decimal
Hardware Total Single Value Decimal
Software Total Single Value Decimal
4. Click Next>> to advance to the Define Display step. Specify the following settings:

5/13/2018 Build Your First Application Pega - slidepdf.com
http://slidepdf.com/reader/full/build-your-first-application-pega 75/135
70
Name Display As Details
First Name TextBox Default
Last Name TextBox Default
Manager TextBox Default
Department Budget TextBox CurrencyAmount
Remaining Budget TextBox CurrencyAmount
Hardware Total TextBox CurrencyAmount
Software Total TextBox CurrencyAmount
5. Click Finish. Use the Application Explorer to verify that the properties were created under the GLBX-FW-
OnboardingFW-Work class.

5/13/2018 Build Your First Application Pega - slidepdf.com
http://slidepdf.com/reader/full/build-your-first-application-pega 76/135
71
6. Click the icon to close the Define Properties wizard's tab.
Continue to the next tutorial topic.

5/13/2018 Build Your First Application Pega - slidepdf.com
http://slidepdf.com/reader/full/build-your-first-application-pega 77/135
72
Part C: Create embedded properties
Now you will create properties of mode Page List. Individual properties that belong to a Page type of property (one
of mode Page, Page List1, or Page Group) are called embedded properties. The Page mode property is called an
embedded page2
.
Here, the embedded properties are created automatically when you associate the Page mode property with a data
class. The properties already defined in the class become the individual properties for that page.
1. In the Application Explorer, under GLBX-FW-OnboardingFW-Work , expand the Data Model category if it is
not already expanded. Right-click Property and select New from the context menu.
The New Rule dialog opens.
2. In the New Rule dialog, enter Hardware Items in the Property Name field.
1 A Page List mode property is a data structure consisting of an ordered list of zero or more pages, each identified by
an integer index (starting with 1). Page List is one of the eleven modes a property rule may have. Pages must be
created with sequential subscripts: 1 before 2, 2 before 3 and so on.2 An embedded page is a clipboard page that has the value of a property of mode Page. Any page on the clipboard
that is not a top-level page is an embedded page. Process Commander uses a recursive page structure. Pages con-
tain properties that can have single or multiple pages as their values. For example, the Obj-Browse method creates
an array of embedded pages (all of the same class) that contain its results.

5/13/2018 Build Your First Application Pega - slidepdf.com
http://slidepdf.com/reader/full/build-your-first-application-pega 78/135
73
3. Confirm the Applies To, RuleSet,Version, and Type fields are set to GLBX-FW-OnboardingFW-Work,
OnboardingFW, 01-01-01, and Text.
4. Click Create. The Property form for this new property rule displays.
5. Inthe Property Mode field, select Page List from the drop-down list.
6. Inthe Page Class field, type GLBX, and then use the SmartPrompt to see the classes beginning with GLBX-.
Select the GLBX-Data-Hardware class. This associates this Page List with the data table that is based on
class GLBX-Data-Hardware and the values in that data table.

5/13/2018 Build Your First Application Pega - slidepdf.com
http://slidepdf.com/reader/full/build-your-first-application-pega 79/135
74
7. Confirm that the General tab matches the following image.

5/13/2018 Build Your First Application Pega - slidepdf.com
http://slidepdf.com/reader/full/build-your-first-application-pega 80/135
75
8. Click the Advanced tab.
9. Check the Auto-populate Property checkbox. This enables the property values to be automatically populatedat run-time with the values from the associated data table.
10. Do not make changes to the other fields, and click Save ( ) to save the property.
11. Use the Application Explorer to verify the newly created HardwareItems property appears. Click the iconto close the rule form's tab.

5/13/2018 Build Your First Application Pega - slidepdf.com
http://slidepdf.com/reader/full/build-your-first-application-pega 81/135
76
12. Repeat steps 1 to 11 above to create the SoftwareItems property.
Property Name Software Items
Property Mode Page List
Page ClassGLBX-Data-Software
At this point, confirm that the HardwareItems and SoftwareItems properties are listed in the Application Explorer,
and each has an embedded property named Price.
The two Price properties came from the zip file you imported before beginning this tutorial. You did not create them.
The zip file provided the data classes specified for the HardwareItems and SoftwareItems properties, and the sys-
tem automatically creates the Price property when you associate the embedded page with the data class.
Continue to the next tutorial topic.

5/13/2018 Build Your First Application Pega - slidepdf.com
http://slidepdf.com/reader/full/build-your-first-application-pega 82/135
77
Review
In this step you created a data model for your application by:
n Creating a single-value property
n Creating multiple properties using the Property Wizard
n Creating embedded properties
To read more about the skills you used in this step, see
n Introduction to Properties [KB 26322] ( )
n Property Mode definition [Developer Help] ( )
n Page definition [Developer Help] ( )
In this step, you created the process-specific properties that display and capture information for the equipmentrequest process. Now a user interface is needed to use that information. The user interface should be designed to
meet the stakeholders' use cases and requirements. In the next tutorial step, you develop an initial user interface
that the business analyst can bring to the stakeholders to get their input.
Move to the next step in the tutorial.

5/13/2018 Build Your First Application Pega - slidepdf.com
http://slidepdf.com/reader/full/build-your-first-application-pega 83/135
78
Step 6: Extend the default user interface
Typically performed by In the previous
step, you
Purpose of this step
To... So that...
System Architects and Busi-
ness Analysts
Extended the sys-
tem-provided data
model with items spe-
cific to the appli-
cation being built
Revise the default rules
and create new rules that
provide the user interface
for the work item
The work item begins to look more
like what is desired by the stake-
holders, and you can run the process
and display the work item for them to
get their feedback
The project has a series of requirements for the application user interface. They include:
n The HR Staff Member has to be able to enter basic new-hire information, including first and last name, depart-
ment, and manager
n The HR Staff Member needs a method to specify the hardware and software package for the new hire
n The Hiring Manager needs to be able to see what the budget limit is for equipping this position, and the cost of
the selections made so far, so that the Hiring Manager knows whether to approve the work item
In addition, the user interface should comply with standard usability guidelines, including these:
n It should be clear at all times what the current operator can do
n The user interface should require a minimum of scrolling to see all elements of the current form
To learn more about interface design, see Top Ten Usability Guardrails [KB 26006].
The application already includes some user interface resources, created in Step 2. These include:
Item Name
Four harness rules Confirm
New
Perform
Review

5/13/2018 Build Your First Application Pega - slidepdf.com
http://slidepdf.com/reader/full/build-your-first-application-pega 84/135
79
Four section rules CoreSummary
Header
NewHeader
WorkObjectInfo
You can see these in the Application Explorer by expanding the User Interface category under GLBX-FW-Onboard-
ingFW-Work, and expanding the Harness and Section categories.
Before beginning this tutorial, you imported a zip file of resources. This collection included the following items:
l Two activities: getHardware and getSoftware
l Two data tables and their associated classes: GLBX-Data-Hardwareand GLBX-Data-Software
These items are provided because creating activities and data tables falls outside the scope of this tutorial. These
data tables provide values that are used in some of the user interface controls you create in this tutorial step.
In Step 4, you created two flow action rules, but did not associate them with user interface resources. You make
those associations in this step.
The data model, which you built in Step 5, provides all the properties you need for this step.
To promote modularity and reuse, a best practice is to create sections to hold needed user interface elements, and
then combine those sections in a meaningful way within the harnesses associated with the various steps of the proc-
ess. This tutorial step describes how to:
1. Update an existing section
2. Create new sections
3. Add properties and controls to the sections
4. Add the sections to harnesses and flow actions
Continue to the next topic to begin this step of the tutorial.

5/13/2018 Build Your First Application Pega - slidepdf.com
http://slidepdf.com/reader/full/build-your-first-application-pega 85/135
80
Part A: Customize the CoreSummary section
Recall from the introduction to the Globex business scenario, that the stakeholders want the fields for entering the
new employee details to appear on the starting screen when the HR Staff Member starts the process. In the appli-
cation’s workflow, when a new work item is created, the system displays a form for the operator to enter information.The New harness rule provides the user interface for that form. The standard New harness rule that is generated by
the Application Accelerator contains a standard section named CoreSummary. This section does not display prop-
erties that satisfy the application's requirements:
To illustrate adapting existing user interface elements, the following steps describe how to modify the standard Core-
Summary section to serve the needs of this application:
1. In the Application Explorer, under GLBX-FW-OnboardingFW-Work , expand the User Interface category, and
then expand the Harness category.
2. Click New to open the New harness rule form.
3. Click to change to wireframe mode. Wireframe mode makes it easy to identify the names of the includedsections used in the harness.

5/13/2018 Build Your First Application Pega - slidepdf.com
http://slidepdf.com/reader/full/build-your-first-application-pega 86/135
81
4. Within the harness rule form, select the Section Include for GLBX-FW-OnboardingFW-Work.CoreSummary
to highlight it, and then click the open rule icon ( ) to open the section's rule form.
If a warning appears, click OK to dismiss it. This warning appears because you are opening the rule form for
an included section. The warning is an alert that indicates the open New harness rule form will not reflect
changes made to its included sections unless you click the refresh button to refresh the form. If you update a
section (in its own tab in the Designer Studio) while the harness is open, and then return to the harness and
save it without first refreshing it to see the updated included section, the system re-saves the section as itexists in the harness, undoing the updates you made in the section rule.

5/13/2018 Build Your First Application Pega - slidepdf.com
http://slidepdf.com/reader/full/build-your-first-application-pega 87/135
82
5. Close (do not save) the New harness rule form by clicking the icon in its tab.
6. In the CoreSummary rule form, click to change to wireframe mode. Use the following steps to add aSmartLayout1 (Double) to the section, just below the existing layout:
a. Click the down arrow at the right end of the Layout control group.
b. Select the Layout choice, and holding down your mouse button, drag it into the section just below the
existing layout. When an orange line appears, release your mouse button. The Select Layout Type win-dow opens.
1 A SmartLayout is a grid (corresponding to an HTML <TABLE> element) of paired cells on a harness, section, or
flow action form that has columns of uniform width, uniform styles, and uniform characteristics. Each pair of cells
holds one label and one property value or other form control. Using SmartLayouts rather than "freeform" table layouts
produces attractive work object forms with less developer effort.

5/13/2018 Build Your First Application Pega - slidepdf.com
http://slidepdf.com/reader/full/build-your-first-application-pega 88/135
83
c. In the Select Layout Type window, confirm that the Template radio button is selected and its asso-ciated drop-down list is set to Double. Then click OK.
At this point, the section rule form should look like the following image.

5/13/2018 Build Your First Application Pega - slidepdf.com
http://slidepdf.com/reader/full/build-your-first-application-pega 89/135
84
7. Select the original layout and delete it by clicking the Delete Row icon ( ). The remaining layout is the onethat you added (Smart Layout (Double) - 2).
8. Use the following steps to add labels and fields to this layout to display the new hire's first and last names,
the hiring manager's name, and provide a drop-down list for the user to select the new hire's department:
a. Apply the FirstName property to the first field by dragging it into the layout from the Application
Explorer:
i. In the Application Explorer, if not already expanded, expand the Data Model category, and then
the Property category until you see the properties you created in Step 5.
ii. Locate the FirstName property in the Application Explorer, select the blue dot to the left of its
name and drag it into the first box in the first Field column (the second column in the layout).
iii. When you see the outline of the box turn to orange, release your mouse button. The First Name
property is added into the field and the property description appears as the associated label in
the Label column.

5/13/2018 Build Your First Application Pega - slidepdf.com
http://slidepdf.com/reader/full/build-your-first-application-pega 90/135
85
iv. Click the Property Viewer icon ( ) to examine this property's options. The Cell Propertiespanel opens.
v. Make sure that Visible is set to Always and select the Required checkbox.
b. Repeat step 7.a for the LastName, Department, and Manager properties. Drag each property to the

5/13/2018 Build Your First Application Pega - slidepdf.com
http://slidepdf.com/reader/full/build-your-first-application-pega 91/135
86
appropriate layout cell according to the following image. The Cell Properties panel reflects the data for
the currently selected cell.
9. Click to save the updated CoreSummary section. Close the CoreSummary section rule form by clicking
the icon inits tab.
Continue to the next tutorial topic.
Part B: Create the sections for selecting hardware and
software items
Globex's requirements for the work item include having selection lists for the user to select the hardware and soft-
ware items for the new hire. The following steps describe how to create section rules that provide the user interface
controls for these lists at runtime.
As you perform these steps, a warning message might display stating "The Property Panel is Dirty. Do you want to
save the changes?". If that message appears, click OK . It indicates that a Cell Properties panel has unsaved
changes.
1. In Step 6.A, you expanded the User Interface category under the GLBX-FW-OnboardingFW-Work class in
the Application Explorer. Right-click on Section and select New from the context menu.2. In the New Instance of a Rule dialog, enter SelectHardware for the Purpose field. Confirm the Applies To,
RuleSet, and Version fields are set to GLBX-FW-OnboardingFW-Work, OnboardingFW, and 01-01-01,
and the Template field is blank. Click Create.
3. Switch to wireframemode by clicking .
4. Add a Repeat Grid under the default layout by adding a layout as you did in Step 6.A, and in the Set Layout
Type window, select the Repeating radio button and select Grid in the drop-down menu. Then delete the
default layout (Smart Layout (Double) -1).

5/13/2018 Build Your First Application Pega - slidepdf.com
http://slidepdf.com/reader/full/build-your-first-application-pega 92/135
87
5. Open the properties panel for the Repeat Grid by selecting the Repeat Grid and clicking the magnifying glass
( ) .
6. In the Repeat Grid properties panel, make sure the Source is set to Property. In the List/Group field, use

5/13/2018 Build Your First Application Pega - slidepdf.com
http://slidepdf.com/reader/full/build-your-first-application-pega 93/135
88
the SmartPrompt to select HardwareItems. Set the Edit Mode to Read/Write.
7. Complete headings for the first two columns of the repeat grid. Select the top cell of the first column. The prop-
erties panel refreshes to reflect the currently selected cell's data. Type Hardware in the Value field. Select
the top cell of the second column. Type Price in the Value field.
8. Add a DynamicSelect control to the cell below the Hardware heading by clicking the down arrow at the right
end of the Advanced control group, selecting the DynamicSelect choice, and dragging it into the cell.

5/13/2018 Build Your First Application Pega - slidepdf.com
http://slidepdf.com/reader/full/build-your-first-application-pega 94/135
89
9. Click next to the cell with the DynamicSelect to open its properties panel. In the Property field, use theSmartPrompt to display the list of choices. Double-click More to see the full list of available properties. Scroll
down until you locate the .pyLabel property, and double-click it to specify it for the Property field.
10. Use the following steps to specify the method for the system to use at runtime to get the contents of the
DynamicSelect list. In this tutorial, an activity is used to get the hardware items to populate this

5/13/2018 Build Your First Application Pega - slidepdf.com
http://slidepdf.com/reader/full/build-your-first-application-pega 95/135
90
DynamicSelect. The activity was provided in the zip file you imported into the system before beginning the
tutorial.
a. Click the magnifying glass ( ) beside the Control field to display the parameters form for the Dynam-icSelect control.
b. Specify the following parameters:
Parameter Setting
Method for Generating Dynamic Select Select the Activity radio button.
Activity Information:
Applies To Use the SmartPrompt to select
GLBX-Data-Hardware.
Activity Name After selecting the class for the
Applies To field, use the Smart-
Prompt to select getHardware.
Class of Returned Results Use the SmartPrompt to select
GLBX-Data-Hardware.
Common DynamicSelect Information:
Select ID Hardware
Default Caption Select Hardware...
Property for Option Display pyLabel
Property for Option Value pyLabel
Enable Caching Select this checkbox.

5/13/2018 Build Your First Application Pega - slidepdf.com
http://slidepdf.com/reader/full/build-your-first-application-pega 96/135
91
c. Do not change any other fields in the window, and click OK to save your choices and close the param-
eters window.
11. Use the following steps to specify the runtime (client-side) event that will trigger the change in the displayed
values. Here, we want the price displayed in the Price column to refresh whenever the selected item in the
Hardware column changes. The event typically used to do this for selection lists is the "On Change" event.
a. In the Cell Properties panel, in the Behavior field, click the magnifying glass ( ) to open the ClientEvent Editor. In the Event field, select On Change, and set the Action field to Refresh this

5/13/2018 Build Your First Application Pega - slidepdf.com
http://slidepdf.com/reader/full/build-your-first-application-pega 97/135
92
Section.
b. Do not change any of the other fields and click Save to save your choices and close the Client EventEditor.
12. In the Cell Properties panel for the DynamicSelect control, make sure the Visible field is set to Always. Do
not change the values for the other fields. The properties panel should look like the following image.
13. Use the following steps to specify that the Price property of the HardwareItems embedded property is dis-
played in the Price column.
a. Select the cell under the Price column heading to display its cell data in the properties panel. In the
Property field, use the SmartPrompt to select the Price property. In the Control field, use the auto-
complete to specify the CurrencyAmount control: type the first three characters (Cur), and the systemdisplays a list of suggestions. If the All Matches tab is not selected, select it to see all matching
results. Double-click CurrencyAmount to select it.

5/13/2018 Build Your First Application Pega - slidepdf.com
http://slidepdf.com/reader/full/build-your-first-application-pega 98/135
93
b. Make sure the Visible field is set to Always and the Read Only checkbox is selected. Do not change
the values in the remaining fields.
14. In the repeat grid, delete the two unused columns by clicking in a cell in the column and then clicking the
Delete Column icon ( ). The grid should have the two columns Hardware and Price, and a third column for
the delete icon ( ).
15. Click to save the SelectHardware section. Click the icon inits tab to close the rule form.
16. Following the procedure in steps 1 through 15 above, create another section called SelectSoftware. When
you add the repeat grid, where you previously specified hardware-related values, specify the following items
related to the software choices:
l In the Repeat Grid properties panel, make sure the Source is set to Property. In the List/Group field,
use the SmartPrompt to specify SoftwareItems. Set the Edit Mode to Read/Write.
l Specify Software as the heading for the first column.
l For the DynamicSelect parameters, specify the following parameters:
Parameter Setting
Method for Generating Dynamic Select Select the Activity radio button.
Activity Information:
Applies To Use the SmartPrompt to select
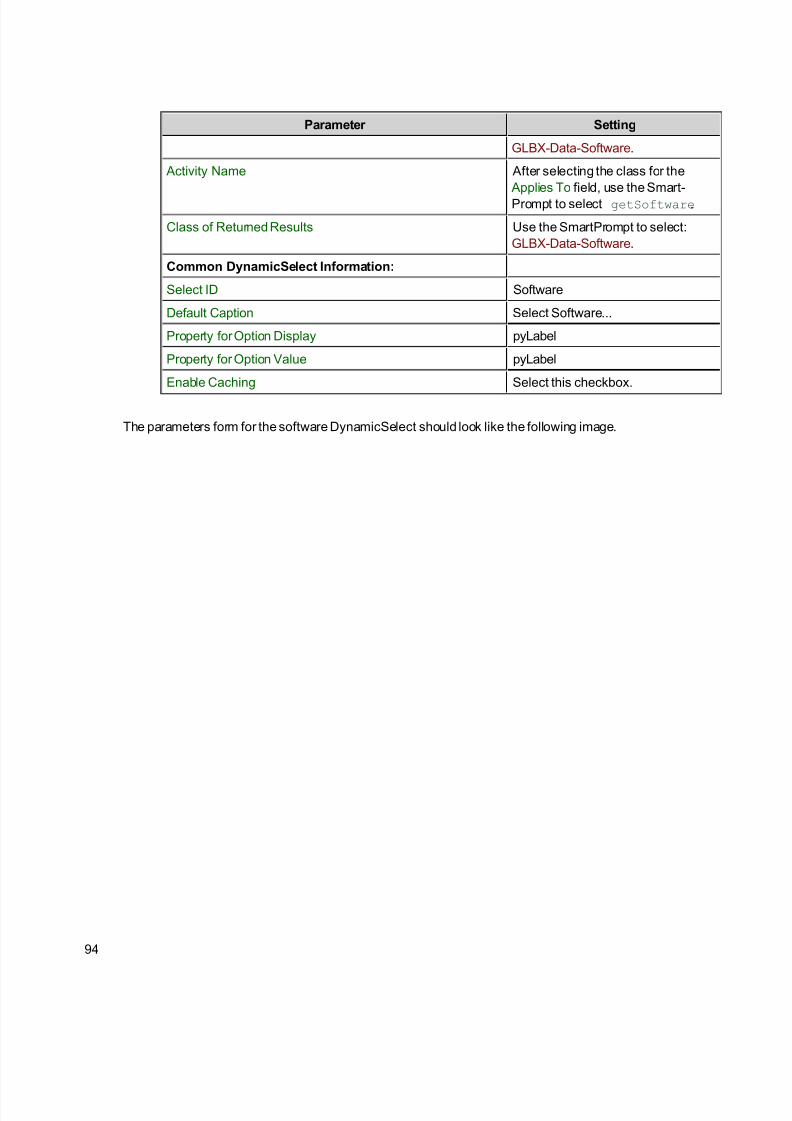
5/13/2018 Build Your First Application Pega - slidepdf.com
http://slidepdf.com/reader/full/build-your-first-application-pega 99/135
94
Parameter Setting
GLBX-Data-Software.
Activity Name After selecting the class for the
Applies To field, use the Smart-
Prompt to select getSoftware.
Class of Returned Results Use the SmartPrompt to select:
GLBX-Data-Software.
Common DynamicSelect Information:
Select ID Software
Default Caption Select Software...
Property for Option Display pyLabel
Property for Option Value pyLabel
Enable Caching Select this checkbox.
The parameters form for the software DynamicSelect should look like the following image.

5/13/2018 Build Your First Application Pega - slidepdf.com
http://slidepdf.com/reader/full/build-your-first-application-pega 100/135
95
17. The section for selecting software items should look like the following image.

5/13/2018 Build Your First Application Pega - slidepdf.com
http://slidepdf.com/reader/full/build-your-first-application-pega 101/135
96
18. Save ( ) the SelectSoftware section. Click the icon in its tab to close the rule form.
Continue to the next tutorial topic.
Part C: Create the Budgets Section
The use case descriptions for this process call for displaying information about the department budget, the totals for
costs of the selected hardware and software items, and the remaining budget (department budget less the costs for
the selected items).
Use the following steps to create a Budgets section to display this information in the process's user interface.
1. Create a new section called Budgets (right-click GLBX-FW-OnboardingFW-Work and select New > User
Interface > Section). Save it to the OnboardingFW RuleSet.
2. Turn on wireframe mode. Add a Layout (Single) under the default layout by dragging a layout and spec-
ifying Single for the Template field. Delete the default Smart Layout (Double) - 1.
3. Populate the Smart Layout (Single) - 1 with the budget-related properties by dragging the properties
from the Application Explorer into the Field column, as you did for the CoreSummary section. The result
should match the following image.

5/13/2018 Build Your First Application Pega - slidepdf.com
http://slidepdf.com/reader/full/build-your-first-application-pega 102/135
97
4. For each control, in its properties panel (select the cell and click to open) confirm that the Visible field isset to Always and that the Read Only checkbox is selected. (If the Read Only checkbox is not selected,
select it). Open the DepartmentBudget property from its properties panel using the edit icon ( ) and observethat its default control,
CurrencyAmount, is set in the property’s General tab. This is true for all the currency
properties in this application’s data model.
5. Save ( ) the section. Click the to close the ruleform.
Continue to the next tutorial topic.
Part D: Create the ReviewSelections section
The use case descriptions from Globex's subject matter experts call for displaying the budget information and the
selected hardware and software items when the hiring manager is approving or rejecting the equipment request. The
hiring manager would like to see the relationship between the selected items and the impact on the department
budget to help decide whether to approve the equipment request.
To display the required information in the process's user interface, use the following steps to create a Review-
Selections section containing the Budget section and two sections (ReviewHardware and ReviewSoftware) that dis-
play the hardwar e and software selections for the new hire.
1. Create a new section called ReviewSelections (right-click GLBX-FW-OnboardingFW-Work and select New
> User Interface > Section). Add the Budgets section to it and delete any default layouts. To add the Budgets
section, turn on wireframe mode, then select the blue dot next to the Budgets section in the Application
Explorer and drag it into the ReviewSelections section rule form. Click to save the ReviewSelectionssection rule.
2. Create a new section called ReviewHardware. Turn on wireframe mode. Add a Repeat Grid to this sectionand remove any other layouts.
3. In the ReviewHardware section's Repeat Grid, specify Hardware and Price as the headings for the first two
columns, as you did when creating the SelectHardware section.

5/13/2018 Build Your First Application Pega - slidepdf.com
http://slidepdf.com/reader/full/build-your-first-application-pega 103/135
98
4. Open the properties panel for the Repeat Grid. In the List/Group field, use the SmartPrompt to select Hard-
wareItems. (Note: After using the SmartPrompt to select HardwareItems from the list, the List/Group
field displays .HardwareItems, with a leading period (.) before the property name.) Set the Edit Mode field
to Read Only. For reviewing, the hardware list should be read-only.
5. In the Repeat Grid, select the cell under the Hardware heading. In the properties panel for this cell, use theSmartPrompt in the Property field to select pyLabel (the text .pyLabel should appear in the field). In the
Control field, use the autocomplete to specify pxDisplayText. Set Visible to Always and make sure the
Wrap Text checkbox is checked.
6. Select the cell under the Price heading. The properties panel updates to display the cell's properties. Use the
SmartPrompt to select Price for the Property field (the text .Price should appear in the field). Set the Con-
trol to CurrencyAmount. In the Advanced tab of the properties panel, specify text-align:right for the
Inline Style field.
7. Remove unneeded columns from the repeat grid, including the column with the icon, and save the
ReviewHardware section. Click the in the rule form's tab to close the form.
8. Follow the same procedure to create, populate, and save a section called ReviewSoftware. Click the inthe rule form's tab to close the form.
9. Return to the ReviewSelections section rule form. To make the best use of the screen display area, and to
reduce the amount the user will have to scroll to read all the material on the review page, the Review-Hardware and ReviewSoftware sections should appear side by side in the ReviewSelections section. In the
ReviewSelections section, below the Budgets section, add a Free Form layout with three columns and one
row.
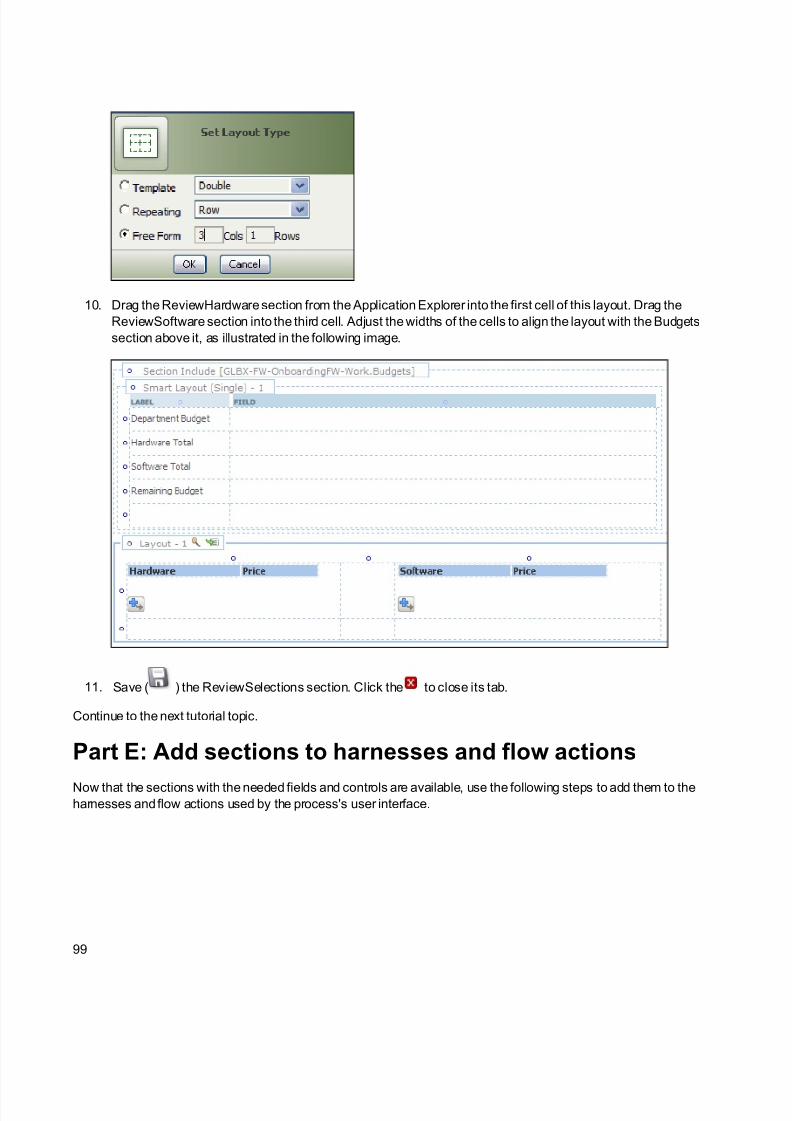
5/13/2018 Build Your First Application Pega - slidepdf.com
http://slidepdf.com/reader/full/build-your-first-application-pega 104/135
99
10. Drag the ReviewHardware section from the Application Explorer into the first cell of this layout. Drag the
ReviewSoftware section into the third cell. Adjust the widths of the cells to align the layout with the Budgets
section above it, as illustrated in the following image.
11. Save ( ) the ReviewSelections section. Click the to close its tab.
Continue to the next tutorial topic.
Part E: Add sections to harnesses and flow actions
Now that the sections with the needed fields and controls are available, use the following steps to add them to theharnesses and flow actions used by the process's user interface.

5/13/2018 Build Your First Application Pega - slidepdf.com
http://slidepdf.com/reader/full/build-your-first-application-pega 105/135
100
1. In the Application Explorer, under EquipmentRequest, expand the User Interface category. Expand the Flow
Action category to see the two flow actions you created in Step 4. Click the SelectHardware flow action to
open its rule form. Add the SelectHardware section to the flow action by dragging it from the Application
Explorer into the flow action rule form. Save ( ) the updated flow action rule.
2. Open the SelectSoftware flow action. Add the SelectSoftware section to it. Save ( ) the updated flowaction rule.
3. In the Application Explorer, under GLBX-FW-OnboardingFW-Work , expand the User Interface category, then
the Section category to see the section names. Click Header to open the Header section. Click to show
the wireframes.
4. Drag the ReviewSelections section into the Header section rule form, below the existing layouts.

5/13/2018 Build Your First Application Pega - slidepdf.com
http://slidepdf.com/reader/full/build-your-first-application-pega 106/135
101
5. Save ( ) the Header section and click to close its tab.
6. Run ( ) the process. Create a work item, select hardware and software, and approve the selections. When
the process is completed, close its tab by clicking .
As you go through the process, notice that the budget and amount-remaining entries in the budget section donot change yet. You'll create the logic to manage this in a later step. Notice that the grids for the Hardware
and Software items do not show a selection drop-down in the work item until you add the first row by clicking
.
7. To ensure an initial row is created when the process begins, use the following steps to update the pyDefault
model to set the first item in the Repeat Grids in the HardwareItems and SoftwareItems sections to an empty
value. The pyDefault model rule was created by the Application Accelerator when it created the base appli-
cation structure in Step 2. Models are used to set property values. This pyDefault model is used to set values
for the work item when the process starts.

5/13/2018 Build Your First Application Pega - slidepdf.com
http://slidepdf.com/reader/full/build-your-first-application-pega 107/135
102
a. In the Application Explorer, underneath EquipmentRequest, expand the Technical category and then
expand the Model category.
b. Click pyDefault to open its rule form. Notice that it already contains one row, to set the prefix for the
work item.
c. Add two rows by clicking the add row icon. In the first new row, specify .Har-
dwareItems(1).Price in the first field and "" (two double quotes) in the second field. In the next
row, specify .SoftwareItems(1).Price in the first field and "" (two double quotes) in the sec-
ond field.
d. Accept the default values for the remaining fields. Save ( ) the rule and close ( ) its tab.
8. Run the process again. This time, at the Select Hardware step, the grid displays an initial row upon reaching
the step.
9. Complete the process and then close ( ) its tab.

5/13/2018 Build Your First Application Pega - slidepdf.com
http://slidepdf.com/reader/full/build-your-first-application-pega 108/135
103
Continue to the next tutorial topic.
Review
In this step, you built a user interface for the process by:
n Updating an existing section
n Creating new sections
n Adding sections to harnesses and flow actions, so that the fields and controls specified by Globex's subject
matter experts display at the appropriate points in the application flow.
To read more about the skills you used in this step, see
n About Section rules [Developer Help] ( )
n
How to add a Grid layout to a section [KB 26089] ( )n Harness, Section, and Flow Action forms - Adding a Dynamic Select control to a field [Developer Help] ( )
n How to configure cascading dynamic select controls [KB 25898] ( )
The application correctly creates a work item and you can add information to it. However, the displayed budget infor-
mation does not yet change, and Globex's subject matter experts have some thoughts about improving the appli-
cation. In the next tutorial step, you receive their expanded requirements and make refinements to meet their
request.
Move to the next step in the tutorial.

5/13/2018 Build Your First Application Pega - slidepdf.com
http://slidepdf.com/reader/full/build-your-first-application-pega 109/135
104
Step 7: Refine the process definition
Typically performed by In the previous step,
you
Purpose of this step
To... So that...
Business Analysts Revised the default
rules and created new
rules that provide the
user interface for the
work item
Refine the process to
incorporate additional
requests from Globex's
stakeholders: to provide
action buttons for the hir-
ing manager's actions
and to add a path to return
the work item to the
Select Hardware step
when the hiring manager
rejects the request.
The additional stakeholder require
met.
After reviewing the process at this point, the Globex stakeholders request some additional behavior:
l Use buttons instead of a drop-down menu for the user interface at the Review step.
l
When a hiring manager rejects an equipment request, return the work item to the Select Hardware step in theprocess, so that the selections can be updated.
This tutorial step describes how to:

5/13/2018 Build Your First Application Pega - slidepdf.com
http://slidepdf.com/reader/full/build-your-first-application-pega 110/135
105
l Change the harness used in the Review step to provide for action buttons.
l Edit the flow to update the process so that the work item returns to the Select Hardware step when the hiring
manager selects the Reject action.
Continue to the next topic to begin this step of the tutorial.
Part A: Modify the user interface for the Review step
Globex's stakeholders prefer to give the hiring manager action buttons to choose the Approve and Reject actions,
instead of the drop-down menu. The standard Perform_Buttons harness provides this user interface.
1. Open the StartEquipmentRequest flow in the flow editor (open the flow in the Designer Studio, then click).
2. Select the Review assignment shape.
3. In the Assignment Properties panel, in the HarnessPurpose field, use the SmartPrompt to specify Perform_ Buttons (double-click More in the initial list to see the Perform_Buttons choice).
4. Click Apply to apply the change. Keep the flow rule form open for the next tutorial topic.
Continue to the next tutorial topic.
Part B: Edit the flow to refine the process
Use the following steps to refine the process so that the work item returns to the Select Hardware step when the hir-
ing manager selects the Reject action.
1. Select the tail end of the connector that runs between the Update Status - Resolved-Rejected shape and
the FlowEnd ( ) shape, and move it to the connection point on the right side of the Update Status -
Resolved-Rejected shape.

5/13/2018 Build Your First Application Pega - slidepdf.com
http://slidepdf.com/reader/full/build-your-first-application-pega 111/135
106
2. Select the head end (arrow head) and move it to the right hand connection point on the top of the Select-
Hardware assignment shape. The flow should look like the following image.
3. Click tosave the updated flow. Click to exit the flow editor. Click toclose the tab.
4. Run ( ) the process:
a. Select hardware and software items.
b. Notice when the process reaches the Review step, the user interface displays buttons for the Approve

5/13/2018 Build Your First Application Pega - slidepdf.com
http://slidepdf.com/reader/full/build-your-first-application-pega 112/135
107
and Reject actions.
c. Click Reject. Enter a rejection note and click Submit. Notice that the work item header displays Open
for the Status, and that the work item is in an assignment step (the link at the bottom of the form that
says "StartEquipmentRequest - Assigned To:").
d. Click the link at the bottom of the form. The user interface for the SelectHardware flow action dis-
plays, because the updated process moves the work item to this step when the hiring manager takes
the reject action.
e. Update the hardware and software selections, clicking Submit to proceed through the process. On the
Review step, click Approve this selection. Update the note to indicate the equipment request is
acceptable, and click
Submit.
5. Click toclose the tab.
Review
In this step you refined the process by:
5/13/2018 Build Your First Application Pega - slidepdf.com
http://slidepdf.com/reader/full/build-your-first-application-pega 113/135
108
l Changing the Review assignment to use the Perform_ Buttons harness.
l Updating the flow to move the work item to the Select Hardware step when the manager rejects an equip-
ment request.
To read more about the skills you used in this step, see
n Flow form - Editing Utility shape properties [Developer Help] ( )
n Flow form - Editing in Visio - Connectors and flow actions [Developer Help] ( )
n Introduction to process definition and flow rules - Utility and Connector sections [KB 25463] ( )
In the next tutorial step, you will complete the remaining updates to the user interface and prepare it for the stake-
holders' review.
Move to the next step in the tutorial.

5/13/2018 Build Your First Application Pega - slidepdf.com
http://slidepdf.com/reader/full/build-your-first-application-pega 114/135
109
Step 8: Create a finished user interface
Typically performed by In the previous
step, you
Purpose of this step
To... So that...
System Architects Refined the process
to add a path for
when the manager
rejects the work item
Refine the user interface
so that the work item
reflects what the stake-
holders request
The work item displays the infor-
mation as described in the use cases
and requirements
After reviewing the addition of the alternative reject path, management has requested the following changes to the
header portion of the work item form so that it matches what is described in the use cases and requirements:
l Remove the default Subject, Duplicate ID, Aging Since, and Urgency Adjustment fields.
l Add a label that reflects the name of the framework (Globex Onboarding).
l Add the following information: first and last names of the employee, department, and manager's name.
l Add a text area control for the rejection note from the hiring manager, to be displayed when the manager
rejects a request and the work item returns to the Select Hardware step. The manager uses this note toinform the HR staff member why the request was rejected and what changes to make.
Continue to the next topic to begin this step of the tutorial.
Part A: Customize the Header section
The Perform and Perform_Buttons harnesses both use the Header section to display information at the top of the
work item. Recall that the Header section was initially generated by the Application Accelerator. As a result, the sec-
tion includes some defaults that the stakeholders do not need. In addition, the stakeholders would like to see infor-
mation such as the name of the new hire, the department, and the manager's name in the work item header as it
goes through the process.
The Header section rule defines what is displayed in the work item's header. Use the following steps to remove the
default information and add the information required by Globex's stakeholders.
1. In the Application Explorer, under GLBX-FW-OnboardingFW-Work , expand the User Interface category, then
the Section category to see the section names. Click Header to open the Header section. Click to show

5/13/2018 Build Your First Application Pega - slidepdf.com
http://slidepdf.com/reader/full/build-your-first-application-pega 115/135
110
the wireframes.
2. The Header section generated by the Application Accelerator includes two layouts by default. Select each lay
out in turn, and click the Delete Row button ( ).
3. Add a layout (select Template Double) above the included ReviewSelections section.
4. Select the upper-left cell in the new layout. Type Globex Onboarding and click to open the Cell Prop-erties panel. Select the Advanced tab.
5. Next to the Inline Style field, click to open the Style Editor.
6. In the Style Editor dialog, select the following values from the drop-down menus: font family - Arial,
font size - 16, and font weight - bold. Do not change the values of the other fields.

5/13/2018 Build Your First Application Pega - slidepdf.com
http://slidepdf.com/reader/full/build-your-first-application-pega 116/135
111
7. Click Save in the Style Editor. Close the Cell Properties panel.
8. With the cell containing Globex Onboarding selected, click the Merge Right ( ) icon, so that the textspans the Label and Field columns.
9. In the Application Explorer, expand the Data Model category and the Property category until you see the prop-
erties created in Step 5.
10. In turn, add the FirstName, LastName, Department, and Manager properties to the layout by selecting the
blue dot next to a property and dragging it into a cell in one of the Field columns. Add each property until the
layout matches the following image.
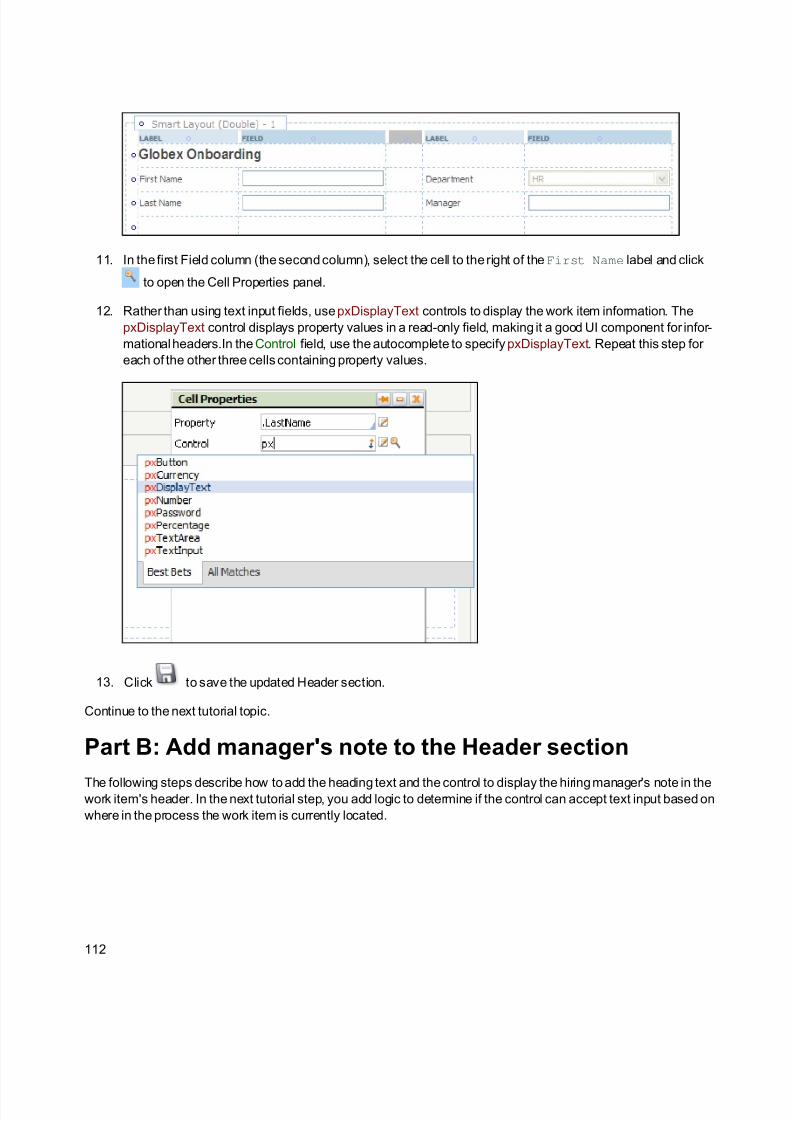
5/13/2018 Build Your First Application Pega - slidepdf.com
http://slidepdf.com/reader/full/build-your-first-application-pega 117/135
112
11. In the first Field column (the second column), select the cell to the right of the First Name label and click
to open the Cell Properties panel.
12. Rather than using text input fields, use pxDisplayText controls to display the work item information. The
pxDisplayText control displays property values in a read-only field, making it a good UI component for infor-
mational headers.In the Control field, use the autocomplete to specify pxDisplayText. Repeat this step for
each of the other three cells containing property values.
13. Click to save the updated Header section.
Continue to the next tutorial topic.
Part B: Add manager's note to the Header section
The following steps describe how to add the heading text and the control to display the hiring manager's note in thework item's header. In the next tutorial step, you add logic to determine if the control can accept text input based on
where in the process the work item is currently located.

5/13/2018 Build Your First Application Pega - slidepdf.com
http://slidepdf.com/reader/full/build-your-first-application-pega 118/135
113
1. In the Header section, add a new layout between the top layout and the included ReviewSelections section.
Select Single for the Template field.
2. In the upper-left cell of the new layout, type Manager notes. Use the Style Editor to give the text a bold
weight.
3. Select the cell below Manager notes. In the Layout toolbar, click the Merge Right icon ( ).
4. Drag a Text Area control into the merged cell.

5/13/2018 Build Your First Application Pega - slidepdf.com
http://slidepdf.com/reader/full/build-your-first-application-pega 119/135
114
5. Using the Cell Properties ( ) for the Text Area control, in the Property field, specify .pyNote.
6. Save ( ) the Header section. Leave the tab open, as it is used in the next tutorial step.
7. Optional: Run the process to see the changes made in this tutorial step reflected in the work item's header.
Continue to the next tutorial topic.
Review
In this step you enhanced the user interface by customizing the Header section, which is used at the top of the work
form. You also added a text area for a manager's note, which is further enhanced in the next step.
To read more about the skills you used in this step, see
n How to create attractive flow actions using SmartLayouts [KB 25623] ( )
In the next tutorial step, you enhance the behavior of the manager's note and the budget and hardware and software
selection information, to conditionally display them in the work item.
Move to the next step in the tutorial.
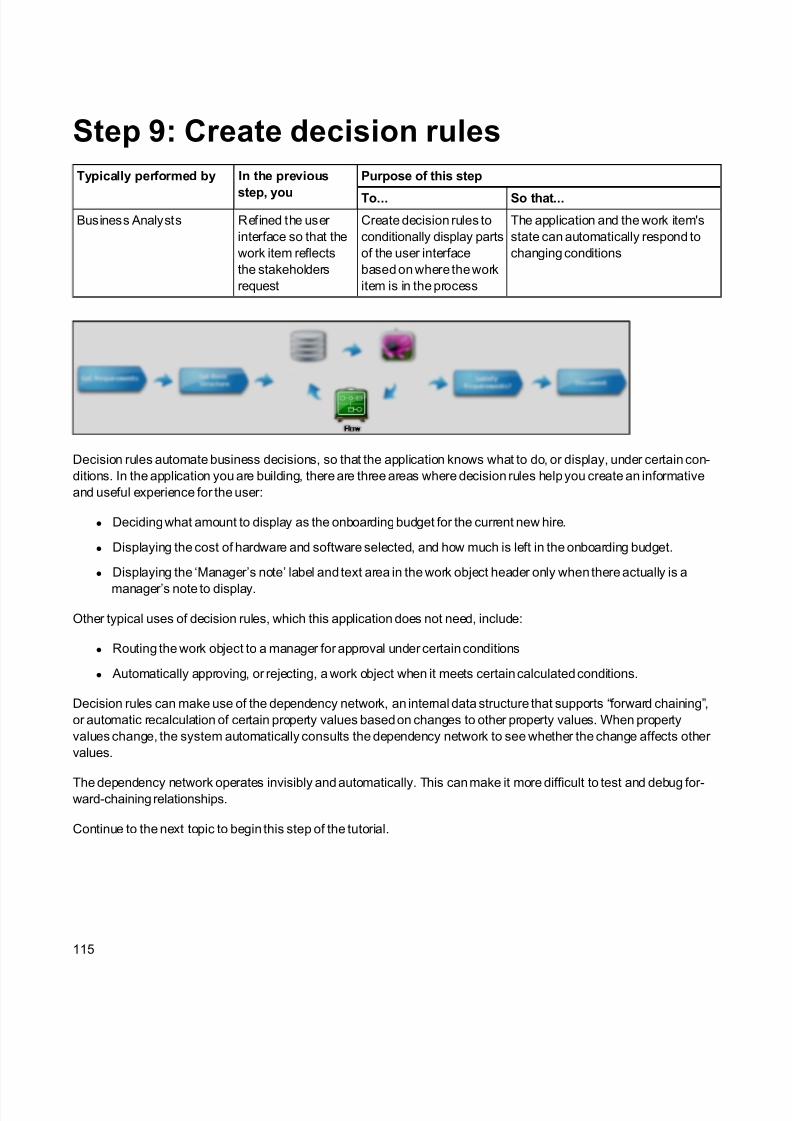
5/13/2018 Build Your First Application Pega - slidepdf.com
http://slidepdf.com/reader/full/build-your-first-application-pega 120/135
115
Step 9: Create decision rules
Typically performed by In the previous
step, you
Purpose of this step
To... So that...
Business Analysts Refined the user
interface so that the
work item reflects
the stakeholders
request
Create decision rules to
conditionally display parts
of the user interface
based on where the work
item is in the process
The application and the work item's
state can automatically respond to
changing conditions
Decision rules automate business decisions, so that the application knows what to do, or display, under certain con-
ditions. In the application you are building, there are three areas where decision rules help you create an informative
and useful experience for the user:
l Deciding what amount to display as the onboarding budget for the current new hire.
l Displaying the cost of hardware and software selected, and how much is left in the onboarding budget.
l Displaying the ‘Manager’s note’ label and text area in the work object header only when there actually is a
manager’s note to display.
Other typical uses of decision rules, which this application does not need, include:
l Routing the work object to a manager for approval under certain conditions
l Automatically approving, or rejecting, a work object when it meets certain calculated conditions.
Decision rules can make use of the dependency network, an internal data structure that supports “forward chaining”,
or automatic recalculation of certain property values based on changes to other property values. When property
values change, the system automatically consults the dependency network to see whether the change affects other
values.
The dependency network operates invisibly and automatically. This can make it more difficult to test and debug for-ward-chaining relationships.
Continue to the next topic to begin this step of the tutorial.

5/13/2018 Build Your First Application Pega - slidepdf.com
http://slidepdf.com/reader/full/build-your-first-application-pega 121/135
116
Part A: Create when condition rules to control sections
The stakeholders want the header ‘Manager notes’ to appear only when a manager has actually entered a note. They
also want the budget information and the lists of selections to appear only at the Review step of the process.
To govern these conditions, use when condition rules. A when condition rule evaluates a Boolean logical statement
involving properties, and returns 'true' or 'false'. In this tutorial step, you create a when condition rule so that when it
reports 'true', the associated user interface item displays.
For the case of the manager note, you create a when condition rule that reports 'true' when the property pyNote is not
empty. For the case of the budget and selection information, you create a when condition rule that reports 'true' when
the work object status is Pending-Approval. (Recall that in Step 4.B, you set the StatusWork field to Pending-
Approval on the Review assignment shape.)
1. In the Header section rule form, turn on wireframe mode. Select the layout holding the Manager notes text
area (the Smart Layout (Single) -2). Click to display the properties panel for the layout.
2. In the properties panel, in the Visible When field, type NoteExists.
3. Click the edit icon ( ) to the right of the field to create a new when condition rule with the name NoteExists.
4. Do not change the defaults in the New Instance of a Rule form, and click Create. The rule form opens.

5/13/2018 Build Your First Application Pega - slidepdf.com
http://slidepdf.com/reader/full/build-your-first-application-pega 122/135
117
5. Click the Advanced tab of the rule form. Set conditions so that the when condition rule will return “true” when
both of these conditions are met:
l .pyNote is not a blank text item (“”)
l .pyNote is not a null value
Specify the values so that the Advanced tab of the rule form matches the following image. Note that you have
to incorporate all of the conditions in the Logic field in the Logic of Table Elements section.
6. Save ( ) the when condition rule and return to the Header section rule form.
7. In the Header section rule, select the Section Include for the ReviewSelections section. The properties panel
refreshes to display the Section Include properties. In the Visible When field, type PendingApproval and
click the edit icon ( ) to the right of that field to create a new when condition rule with the name Pend-ingApproval.
8. In the New Instance of a Rule form, do not change the defaults. Click Create. The rule form opens.
9. On the Conditions tab of the rule form, click the blue "second value" text. The display changes to entry fields

5/13/2018 Build Your First Application Pega - slidepdf.com
http://slidepdf.com/reader/full/build-your-first-application-pega 123/135
118
with SmartPrompts.
10. Click the icon and select the work object's status is [given value] from the list.
11. Select Pending-Approval from the drop-down list.
12. Save ( ) the when condition rule, and click toclose its tab.
13. In the Header section rule form, click to save, and click to close its tab.
Now when you run the process, the budget information and selected hardware and software lists only appear at the
Review step. In addition, the ‘Manager notes’ label text area will only appear in the header when a manager has actu-
ally added a note (typically to provide a reason for rejecting the equipment plan and sending the equipment request
back for revision).
Continue to the next tutorial topic.

5/13/2018 Build Your First Application Pega - slidepdf.com
http://slidepdf.com/reader/full/build-your-first-application-pega 124/135
119
Part B: Create rules to calculate budget amounts and
totals
Globex's stakeholders want the work item to display the amount of money available to equip the new hire with hard-
ware and software at the Review step, so that the manager can easily see his or her budget and the impact of the
selections on the budget. Each department has its own maximum amount, so the displayed value depends on the
department in which the new hire will work. The stakeholders also want the work item to show the cost of hardware
and software that is selected for the new employee, and how much is left in the budget.
1. Use the following steps to create a decision table rule that specifies the budget figures for each department:
a. In the Application Explorer, right-click GLBX-FW-OnboardingFW-Work , and select New > Decision >
Decision Table from the context menu.
b. In the New Instance of a Rule form, enter DepartmentBudget for the Purpose field. Confirm that
the Applies To field is set to GLBX-FW-OnboardingFW-Work, the RuleSet is set to Onboard-
ingFW and the Version is 01-01-01. Click Create.
c. Click the top cell of the Conditions column. The Decision Table Property Chooser opens. In this win-
dow:
i. Use the SmartPrompt to select Department for the Property field.
ii. Confirm that the Label field is set to Department.
iii. Leave the Use Range checkbox unchecked.

5/13/2018 Build Your First Application Pega - slidepdf.com
http://slidepdf.com/reader/full/build-your-first-application-pega 125/135
120
iv. Confirm that the Use Operator field is set to =.
v. Click Save.
d. Specify the following values in the decision table, adding ‘else if’ rows ( ) for the second throughfifth departments. Click in one of the cells in the Department column and use the SmartPrompt to
select a value.
Department ReturnHR 3000
Documentation 3500
Engineering 5000
Legal 4000
Facilities 1500
e. Because the user selects a choice using a drop-down menu during the process, it is highly unlikely
that the table would have to evaluate any other department name. However, to secure against the
unexpected, enter a zero (0)inthe Return column of the otherwise row. The decision table should

5/13/2018 Build Your First Application Pega - slidepdf.com
http://slidepdf.com/reader/full/build-your-first-application-pega 126/135
121
look like this:
f. Save ( ) the decision table, and click to close its tab.
2. Use the following steps to create a Declare Expression rule that automatically computes the budget for thedepartment selected using this decision table:
a. In the Application Explorer, under GLBX-FW-OnboardingFW-Work , expand the Data Model category,
and then expand the Property category. Right-click on the DepartmentBudget property and select
Define Expression from the context menu.
b. In the New Instance of a Rule form, confirm that the Applies To field is GLBX-FW-OnboardingFW-
Work, the Target Property is .DepartmentBudget, the Page Context is empty, the RuleSet is
OnboardingFW, and the Version is 01-01-01. Click Create.
c. On the Expressions tab click 'Value of' in the line beginning Set .DepartmentBudget=. A drop-
down menu appears. Select Result of Decision Table.

5/13/2018 Build Your First Application Pega - slidepdf.com
http://slidepdf.com/reader/full/build-your-first-application-pega 127/135
122
d. A field with a SmartPrompt appears to the right of the drop-down menu. Use the SmartPrompt to
select DepartmentBudget.
e. Save( ) the rule, and click tocloseits tab.
3. Repeat step 2 to create three additional Declare Expression rules for properties HardwareTotal, Soft-
wareTotal, and RemainingBudget. Use the following specifications:
l For the HardwareTotal property, specify the expression as Set .HardwareTotal = Sum of .Har-
dwareItems().Price. Click the Change Tracking tab, and set the Calculate Value field to When-
ever Used to ensure that the target property value (HardwareTotal) matches the computed value at
every point in the process where the property is used. Do not change any of the other fields. Click
to save the rule, and click to close its tab.
When you save the rule, a warning appears stating "For best performance, avoid the Whenever Used
option for change tracking." This warning alerts you to the fact that the Whenever Used choice can be
costly in terms of performance. By setting the Whenever Used option, each time the system reads the
target property, the system evaluates this Declare Expression rule. If the property is used in many
locations in the application, the system recomputes this expression multiple times, which can affect
system performance. The warning message is an alert that you might want to reconsider that choice.
Because this is a small application and these properties are only accessed at the Review step of the
process, the level of recomputation is minimal and this alert can be ignored.
l For the SoftwareTotal property, specify the expression as Set .SoftwareTotal = Sum of .Sof-
twareItems().Price. Click the Change Tracking tab, and set the Calculate Value field to When-
ever Used. Do not change any of the other fields. Click to save the rule (ignore the
performance warning for the reasons described for the HardwareTotal property), and click to closeits tab.

5/13/2018 Build Your First Application Pega - slidepdf.com
http://slidepdf.com/reader/full/build-your-first-application-pega 128/135
123
l For the RemainingBudget property, specify the expression as Set .RemainingBudget = Value of
.DepartmentBudget - (.HardwareTotal + .SoftwareTotal). Click the Change Tracking
tab, and set the Calculate Value field to Whenever Used. Do not change any of the other fields.
Click to save the rule (ignore the performance warning for the reasons described for the Hard-
wareTotal property), and click to close its tab.
4. Run the process. When you get to the Review step, the work item should display:
l A budget figure appropriate for the selected department. (These figures are the ones specified in the
DepartmentBudget decision table.)
l Totals for the selected hardware and software.
l The amount of the department budget remaining, less the totals for the selected hardware and soft-
ware. (Note that you can make selections that exceed the budget. The application displays the budget
figures, but is not enforcing them.)
The following image shows the work item when Legal is chosen for the Department, and the hardware and soft-
ware are selected as shown. In the decision table, the budget for the Legal department is 4000, and the work item
form displays $4000.

5/13/2018 Build Your First Application Pega - slidepdf.com
http://slidepdf.com/reader/full/build-your-first-application-pega 129/135
124
Continue to the next tutorial topic.
Review
In this step you enhanced the display of the work object by:
l Using when condition rules to govern the display of the budget and selected items information and the “Man-
ager notes” area.
l Providing a decision table and Declare Expression rules to display the correct budget and total amounts.
To read more about the skills you used in this step, see:

5/13/2018 Build Your First Application Pega - slidepdf.com
http://slidepdf.com/reader/full/build-your-first-application-pega 130/135
125
l Declarative Expressions and Forward Chaining
l How to create and execute test cases for decision tree and decision table rules
The application should now satisfy all the requirements that were set for it. The next tutorial step describes how to
document the created application.
Move to the next step in the tutorial.

5/13/2018 Build Your First Application Pega - slidepdf.com
http://slidepdf.com/reader/full/build-your-first-application-pega 131/135
126
Step 10: Document the application
Typically performed by In the previous
step, you
Purpose of this step
To... So that...
Business Analysts Created decision
rules to conditionally
display parts of the
user interface to
meet the stake-
holders' final require-
ments and complete
development of this
application
Document the current
state of the application
You can communicate details about
the application to others.
With the application functioning and satisfying its requirements, it is time to document what you built.
In this step you prepare and export a detailed application documentation package.
The output document is for the guidance of colleagues who may need to extend, connect to, or support the appli-cation you have built. It is a Microsoft Word document that lists all of the use cases, work types, and rules asso-
ciated with your application in sufficient detail so that other people in the organization can quickly understand how
the application works. Creating such a document might also be a requirement of the company’s internal policies, reg-
ulatory bodies, or investors.
Continue to the next topic to begin this step of the tutorial.
Part A: Document the application
Process Commander provides an automated tool to create documentation quickly. You can then modify the result-
ing document by adding images, additional content, or other essential information, before saving a final copy.

5/13/2018 Build Your First Application Pega - slidepdf.com
http://slidepdf.com/reader/full/build-your-first-application-pega 132/135
127
1. Click > Application > Tools > Document. The Application Documentation wizard appears:
2. Confirm that your application appears in the Application field. Select ApplicationDocument in the Tem-
plate field, and click Next >>.
3. Inthe Select RuleSets step, confirm that all RuleSets related to your application are selected.

5/13/2018 Build Your First Application Pega - slidepdf.com
http://slidepdf.com/reader/full/build-your-first-application-pega 133/135
128
4. Click Next >> to move to the Select Work Types step. Confirm that all work types and supporting use case
categories are selected.
5. Click Next >> to move to the Select Criteria step. Select Full Application Documentation in the
Detail Level drop-down menu. The system refreshes the display. Review the items on the Application Criteria
and Work Type Criteria tabs to see what items are selected by default. You can select other unselected
items if you wish, but do not clear any checkboxes that are selected after specifying the Full Appli-
cation Documentation choice.

5/13/2018 Build Your First Application Pega - slidepdf.com
http://slidepdf.com/reader/full/build-your-first-application-pega 134/135
129
6. Click Next to advance through the Order Flows, Define Diagrams, and Define Screenshot Data steps
without modifying any values.
7. On the Capture Screens step, select a style from the Preview Style field and click Start Captures to collect
screen captures of the significant steps in your application’s process. A progress bar shows the wizard’s prog-
ress.
8. When the capture is complete, the wizard moves automatically to the Create Document step. Click Create
Document. The wizard launches Microsoft Word and assembles the document. When the document is
ready, a confirmation message is displayed. You can then review the document.
The resulting document provides a great deal of information about your application, inserting flow diagrams, screen
shots, and informative tables at relevant points.
Notice that several sections have almost no information at all. Small applications, like the one you built in this tuto-
rial, often do not exercise all dimensions of Process Commander. The light documentation in sections such as Data
Management reflects the amount of attention applied to that area during this tutorial.
If you decide to add text, further graphics, or other material to the document, remember to save a copy to preventoverwriting the next time you run the documentation wizard.
When you are finished reviewing the document, close Microsoft Word and then click
Cancel to end the Application
Documentation wizard. Click to close the wizard's tab.
This step completes the tutorial. You can log out of the Process Commander system if you want.

5/13/2018 Build Your First Application Pega - slidepdf.com
http://slidepdf.com/reader/full/build-your-first-application-pega 135/135
130
Continue to the next tutorial topic.
Review
This is the end of the tutorial. You have followed a hands-on process, from directly capturing the application's objec-tives and requirements in the system to documenting the complete, working application you have built. Creating this
modest application has given you a chance to experience many of the features and challenges common to all Proc-
ess Commander development projects.
In a typical business environment, future directions for this application would typically include such items as:
l Routing the work item to a manager for approval
l Routing the work item to a financial analyst when the cost of the selected items exceeds the department
budget
l Automatically approving, or rejecting, a work item if it meets certain calculated conditions
In following the steps of the tutorial, you might have had questions about what you were doing or why you had to do
it. If that is the case, take advantage of the links to further resources provided at the end of each step. Those
resources will help you address your Process Commander questions.
Don't end your journey here! The material on the Pega Development Network provides instructions and examples
covering many complex development tasks. The members of the forum community have a great deal of experience
with Process Commander that they are eager to share. Process Commander is designed to help you meet big devel-
opment challenges, and the more you work with it, the more its strengths will become clear to you.


