

Our free Sewing School pattern is proudly supported by Oekaki Renaissance from Toyota Home Sewing - a revolutionary new sewing and free-motion embroidery machine designed to help you make beautiful things. ‘Draw’ your ideas directly onto fabric and create the designs of your dreams for quilting, textile arts, dressmaking, home furnishings and more.
CARDIGAN
SIZES A - K | BEGINNER
Pattern made exclusively for Peppermint Magazine by In the Folds

contents
3 4
5
6
7
8
9 - 10
11-16
17
Garment overview (details + suggested fabrics)
Sizing + garment measurements
Printing the pattern
Printing plan
Sewing with knits
Fabric requirements + suggested cutting plans
Instructions
Glossary
About In the Folds patterns

about in the folds patterns
In the Folds patterns are designed to enable you to create beautiful and innovative garments, as well as encourage interesting and thought-provoking learning experiences.
Techniques may differ slightly to the home sew-ing methods you are used to, but in some cases industrial finishes will give you the cleanest and most professional finish. Due to this, seam al-lowances vary. Seam allowances are highlighted in each step, but can also be found below.
In the Folds patterns are designed to include thoughtful details and interesting techniques so that you can enjoy the process of making the garment as much as the end result.
If we slow down and take in every stitch, we can better our skills, appreciate the amazing things we can do with our hands, understand the pro-cess more fully and create garments that will be worn, loved and cared for long into the future.
We'd love to see your work in progress.
Find us on Instagram @inthefolds and @peppermintmagazine and tag your photos with #peppermintsewingschool
Happy sewing!
Please consider the environment before printing this instruction booklet.
Also consider using fabric from your stash before going to buy something new. I dare you. You might be surprised by what you find there. Before selecting your fabric, really think about how this garment will fit into your wardrobe and how you plan to care for it. Choose a fabric that fits the bill.
THE ENVIRONMENT
SLOW SEWING
3

NOTIONS
• Fabric (yardage on p. 5) • Coordinating thread
garment overview
FRONT
GARMENT DETAILS
This Cardigan is a knee-length slouchy cardigan, with wrap around collar / hem band and sleeve cuffs. It has a relaxed fit, perfect for autumn / winter layering and has in-seam pockets, for a really cosy feel.
Through the creation of this garment you will gain confidence in:
- sewing with knit fabrics- sewing straight seams- sewing curved seams- sewing in-seam pockets
FABRIC SUGGESTIONS
This cardigan is designed to be sewn with light to mid-weight knit fabrics with at least 20% stretch. For more details on how to check the stretch content of your fabric go to p. 8.
Consider using: French terry, sweater fleece or jersey.
4
BACK

5
Taking your measurements:
If your measurements fall between sizes, use the finished measurements to help you select your size.
If your measurements range between several sizes, print the sizes your measurements lie between and grade between the sizes by drawing diagonal lines from one size to another.
The pattern is drafted for height of 170cm (5’7”).
There are ‘Lengthen / Shorten’ lines on the pattern that you can use if you would like to adjust the length of the garment.
sizing + garment measurements
A B C D E F G J H K
HIGH BUST
FULL BUST
WAIST
76cm30”
81cm32”
86cm34”
91cm36”
96cm38”
101cm40”
108.5cm43”
116cm45½”
123.5cm48½”
71cm28”
76cm30”
81cm32”
86cm34”
91cm36”
96cm38”
103.5cm41”
111cm43½”
118.5cm46½”
61cm24”
66cm26”
71cm28”
76cm30”
81cm32”
86cm34”
93.5cm37”
101cm39½”
108.5cm42½”
131cm51½”
126cm49½”
116cm45½”
BODYMEASUREMENTS
A B C D E F G J H K
1.5 m1.8 yds
1.6 m1.8 yds
1.6 m1.8 yds
1.7 m1.9 yds
1.8 m2 yds
1.8 m2 yds
2m2.2 yds
2.1 m2.3 yds
2.2 m2.4 yds
2.3 m2.5 yds
115cm45”
150cm60”
2.3 m2.5 yds
2.4 m2.6 yds
2.4 m2.6 yds
2.5 m2.7 yds
2.5 m2.7 yds
2.6 m2.9 yds
2.6 m2.9 yds
2.7 m3.0 yds
2.3 m2.5 yds
2.8 m3.1 yds
FABRICREQUIREMENTS*
A B C D E F G J H K
A B C D E F G J H K
BUST
WAIST
HIP
101cm39¾ ”
106cm41¾ ”
111cm43¾ ”
116cm45¾ ”
121cm47¾ ”
126cm49¾ ”
133.5 cm52½ ”
141cm55½ ”
148.5cm58½ ”
97cm38⅛ ”
102cm40⅛ ”
107cm42⅛ ”
112cm44⅛ ”
117cm46⅛ ”
122cm48⅛ ”
129.5 cm50⅞ ”
137.0 cm53⅞ ”
144.5 cm56⅞ ”
103cm40½ ”
108cm42½ ”
113cm44½ ”
118cm46½ ”
123cm48½ ”
128cm50½ ”
135.5 cm53¼ ”
143cm56¼ ”
150.5 cm59¼ ”
156cm61½ ”
152.0 cm59⅞ ”
158cm62¼ ”
FINISHED LENGTH(centre back neck to hem)
91.4 cm36 ”
92cm36¼ ”
92.6 cm36½ ”
93.2 cm36¾ ”
93.8 cm36⅞ ”
94.4 cm37⅛ ”
95cm37⅜ ”
95.6 cm37⅝ ”
96.2 cm37⅞ ”
96.8 cm38⅛ ”
FINISHED GARMENTMEASUREMENTS
*Please note : If you are using fabric with a di-rectional print, it is likely you will require more fabric than suggested.
6
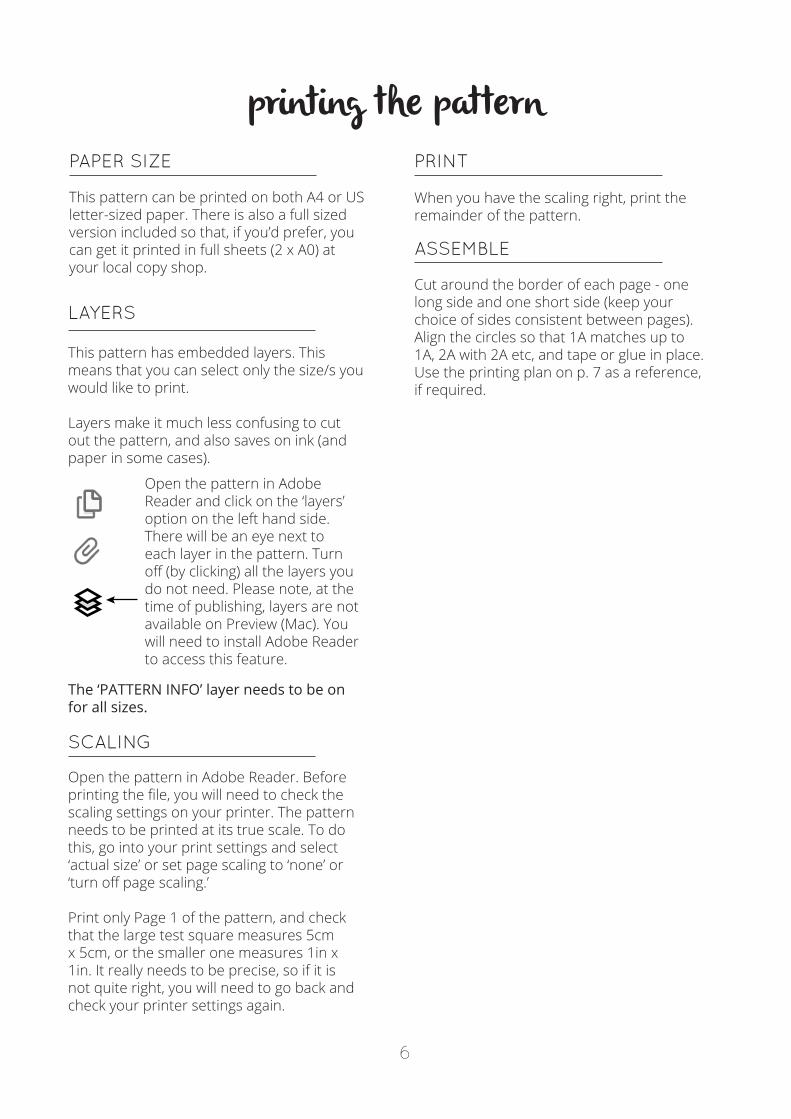
printing the pattern PAPER SIZE
This pattern can be printed on both A4 or US letter-sized paper. There is also a full sized version included so that, if you’d prefer, you can get it printed in full sheets (2 x A0) at your local copy shop.
SCALING
Open the pattern in Adobe Reader. Before printing the file, you will need to check the scaling settings on your printer. The pattern needs to be printed at its true scale. To do this, go into your print settings and select ‘actual size’ or set page scaling to ‘none’ or ‘turn off page scaling.’
Print only Page 1 of the pattern, and check that the large test square measures 5cm x 5cm, or the smaller one measures 1in x 1in. It really needs to be precise, so if it is not quite right, you will need to go back and check your printer settings again.
When you have the scaling right, print the remainder of the pattern.
ASSEMBLE
Cut around the border of each page - one long side and one short side (keep your choice of sides consistent between pages). Align the circles so that 1A matches up to 1A, 2A with 2A etc, and tape or glue in place. Use the printing plan on p. 7 as a reference, if required.
LAYERS
This pattern has embedded layers. This means that you can select only the size/s you would like to print.
Layers make it much less confusing to cut out the pattern, and also saves on ink (and paper in some cases).
The ‘PATTERN INFO’ layer needs to be on for all sizes.
Open the pattern in Adobe Reader and click on the ‘layers’ option on the left hand side. There will be an eye next to each layer in the pattern. Turn off (by clicking) all the layers you do not need. Please note, at the time of publishing, layers are not available on Preview (Mac). You will need to install Adobe Reader to access this feature.
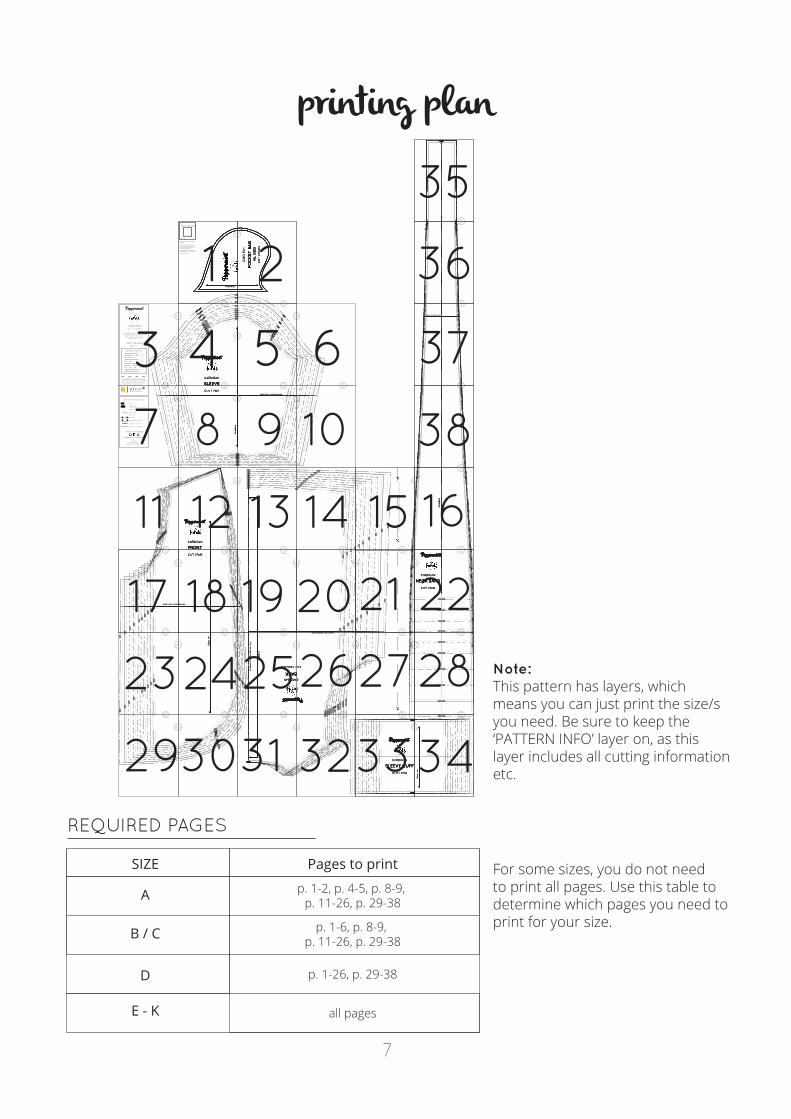
printing plan
7
CARDIGAN
SLEEVE
CUT 1 PAIR
Gra
inlin
e
LENGTHEN / SHORTEN LINE
CARDIGAN
SLEEVE CUFF
CUT 1 PAIR
Gra
inlin
e
FOLD LINE
CARDIGAN
NECK BAND
CUT 1 PAIR
Gra
inlin
eCARDIGAN
BACK
CUT 1 ON FOLD
Gra
inlin
e
Ce
ntre
ba
ck (p
lace
on
fold
)CARDIGAN
FRONT
CUT 1 PAIR
Gra
inlin
e
LENGTHEN / SHORTEN LINE
LENGTHEN / SHORTEN LINE
LENGTHEN / SHORTEN LINE
CARDIGAN
FRONT
CUT 1 PAIR
Gra
inlin
e
CARDIGAN
BACK
CUT 1 ON FOLD
Gra
inlin
e
Ce
ntre
ba
ck (p
lace
on
fold
)
CARDIGAN
NECK BAND
CUT 1 PAIR
Gra
inlin
e
CARDIGAN
SLEEVE
CUT 1 PAIR
Gra
inlin
e
LENGTHEN / SHORTEN LINE
CARDIGAN
SLEEVE CUFF
CUT 1 PAIR
Gra
inlin
e
FOLD LINE
LENGTHEN / SHORTEN LINE
LENGTHEN / SHORTEN LINE
LENGTHEN / SHORTEN LINE
CARDIGAN
FRONT
CUT 1 PAIR
Gra
inlin
e
CARDIGAN
BACK
CUT 1 ON FOLD
Gra
inlin
e
Ce
ntre
ba
ck (p
lace
on
fold
)
CARDIGAN
NECK BAND
CUT 1 PAIR
Gra
inlin
e
CARDIGAN
SLEEVE
CUT 1 PAIR
Gra
inlin
e
LENGTHEN / SHORTEN LINE
CARDIGAN
SLEEVE CUFF
CUT 1 PAIR
Gra
inlin
e
FOLD LINE
LENGTHEN / SHORTEN LINE
LENGTHEN / SHORTEN LINE
LENGTHEN / SHORTEN LINE
CA
RD
IGA
N
PO
CK
ET
BA
G
CU
T 2
PA
IRS
Grainline
ALL
SIZ
ES
CA
RD
IGA
N
PO
CK
ET
BA
G
CU
T 2
PA
IRS
Grainline
ALL
SIZ
ES
CA
RD
IGA
N
PO
CK
ET
BA
G
CU
T 2
PA
IRS
Grainline
ALL
SIZ
ES
CA
RD
IGA
N
PO
CK
ET
BA
G
CU
T 2
PA
IRS
Grainline
ALL
SIZ
ES
CA
RD
IGA
N
PO
CK
ET
BA
G
CU
T 2
PA
IRS
Grainline
ALL
SIZ
ES
CA
RD
IGA
N
PO
CK
ET
BA
G
CU
T 2
PA
IRS
Grainline
ALL
SIZ
ES
CA
RD
IGA
N
PO
CK
ET
BA
G
CU
T 2
PA
IRS
Grainline
ALL
SIZ
ES
CA
RD
IGA
N
PO
CK
ET
BA
G
CU
T 2
PA
IRS
Grainline
ALL
SIZ
ES
CA
RD
IGA
N
PO
CK
ET
BA
G
CU
T 2
PA
IRS
Grainline
ALL
SIZ
ES
CA
RD
IGA
N
PO
CK
ET
BA
G
CU
T 2
PA
IRS
Grainline
ALL
SIZ
ES
1B
1B
3A
3A
5A
5A
3B
3B
3C
3C
4A
4A
4B
4B
4C
4C
4D
4D
2B
2B
2C
2C
5B
5B
5C
5C
7A
7A
7B
7B
7C
7C
7D
7D
7E
7E
9A
9A
9B
9B
9C
9C
9D
9D
9E
9E
11A
11A
11B
11B
11C
11C
11D
11D
11E
11E
13A 13
A 13B 13
B 13C 13
C 13D 13
D 13E 13
E
8B
8B
8C
8C
8D
8D
8E
8E
8F
8F
6F
6F
4F
4F
2F
2F
0F
0F
8A
8A
10A
10A
10B
10B
10C
10C
10D
10D
10E
10E
10F
10F
12A
12A
12B
12B
12C
12C
12D
12D
12E
12E
12F
12F
Did you know this sewing pattern has layers?
This means that you can select only the size/s you would like to print. Look to p. 5 of the instruction booklet for more details.
You can also look to p. 7, to find out what pages you need to print for
your size and style.
TEST SQUARE
1 inch x 1 inch
5cm x 5cm
CARDIGANSEWING PATTERN
FEEL FREE TO HACK THIS PATTERN, ADD TO THIS PATTERN, LOVE THIS PATTERN
AND TO MAKE IT OVER & OVER BUT PLEASE REMEMBER THAT IT’S
FOR PERSONAL USE ONLY
HAPPY SEWING!
Emily HundtC
SHARE YOUR MAKES
#peppermintsewandtell
PATTERN SYMBOL KEY
notch
double notch (indicates the back of the pattern piece)
cutting line
stitch line
grainline
place pattern on fold
lengthen / shorten line
drill hole
Our free Sewing School pattern is proudly supported by Oekaki Renaissance from Toyota Home Sewing - a revolutionary new sewing and free-motion embroidery machine designed to help you make make beautiful things. ‘Draw’ your ideas directly onto fabric and create the designs of your dreams for quilting, textile arts, dressmaking, home furnishings and more.
SIZE A
SIZE B
SIZE C
SIZE D
SIZE E
SIZE F
SIZE G
SIZE H
SIZE J
SIZE K
PATTERN SIZE KEY
Tag us @inthefolds
@peppermintmagazine
direction to fold pleat
CU
T A
LON
G L
INE T
O M
AK
E PAT
TE
RN
MO
RE M
AN
AG
EA
BLE
TO
AS
SEM
BLE
16
17 18 19 2021 22
232425262728
293031 3233
1 2
3 4 5 6
7 8 9
11 13 14 15
10
12
34
35
36
37
38
Note:This pattern has layers, which means you can just print the size/s you need. Be sure to keep the ‘PATTERN INFO’ layer on, as this layer includes all cutting information etc.
REQUIRED PAGES
SIZE Pages to print
A
B / C
E - K
p. 1-2, p. 4-5, p. 8-9, p. 11-26, p. 29-38
all pages
D
p. 1-6, p. 8-9, p. 11-26, p. 29-38
p. 1-26, p. 29-38
For some sizes, you do not need to print all pages. Use this table to determine which pages you need to print for your size.

sewing with knits
This pattern has been designed to be used in conjunction with mid weight knits with at least 20% stretch.
PATTERN MARKINGS
To mark a notch, snip into the fabric 3-4mm. If your fabric is delicate or prone to pulling, I suggest indicating your notches with a horizontal pin.
FITTING
If you would like to check the fit of your cardigan, simply use a basting stitch (long stitch on your sewing machine) to assemble the garment and then check the fit. Make necessary adjustments and then stitch together with your sewing machine or overlocker.
USING AN OVERLOCKER
If you are using an overlocker (serger) to assemble your garment there is no need to sew your seams together with a sewing machine first. Stitch your seams with your overlocker, ensuring your stitch width is no larger than the 6mm (¼in) seam allowance.
TESTING STRETCH INKNIT FABRICS
Cut a square from your fabric 10cm x 10cm avoiding the selvedge. With the stretch running from side-to-side, stretch your fabric as far as you can comfortably, being sure not to overstretch it, and measure. If the fabric stretches to 12cm (or more) it is suitable for this pattern.
USING A SEWING MACHINE
If you are using a standard sewing machine to make your garment, use a stretch stitch (available on some sewing machines) or a narrow zig zag stitch. This will ensure that your stitches don’t break when the garment is stretched. Finish seams with a standard zig zag stitch if you like.
Use a ballpoint needle in your sewing machine and normal thread. If the fabric is stretching too much or is too bulky, consider lessening the foot pressure or using a walking foot.
Take your pre-washed fabric and fold it in half lengthways, with right sides together. Bring the selvedges together and smooth out any wrinkles. By folding the fabric in half, you will be able to cut two pieces at the same time.
Take your pattern pieces and lay them on your fabric, with the grainline of each pattern piece running exactly parallel to the selvedge.
If a pattern asks for ‘CUT 1 ON FOLD’ - align the pattern piece with the fold of the fabric, so that you will be left with a full pattern piece once cut.
Use weights and pins to hold the pieces in place. Carefully cut out each piece. Be sure to transfer all pattern markings onto your fabric.
CUTTING YOUR FABRIC
8
9
fabric requirements + suggested cutting plans
Although cutting on the fold is the fastest way to cut your fabric, if you cut flat (fabric is not folded) and cut each piece independently, you will use less fabric.If you use this method, when cutting a pair, be sure to cut one piece with the pattern face up, and then the other with the pattern face down.
TIP
FO
LD
SELV
ED
GES
5
6
3
2
4
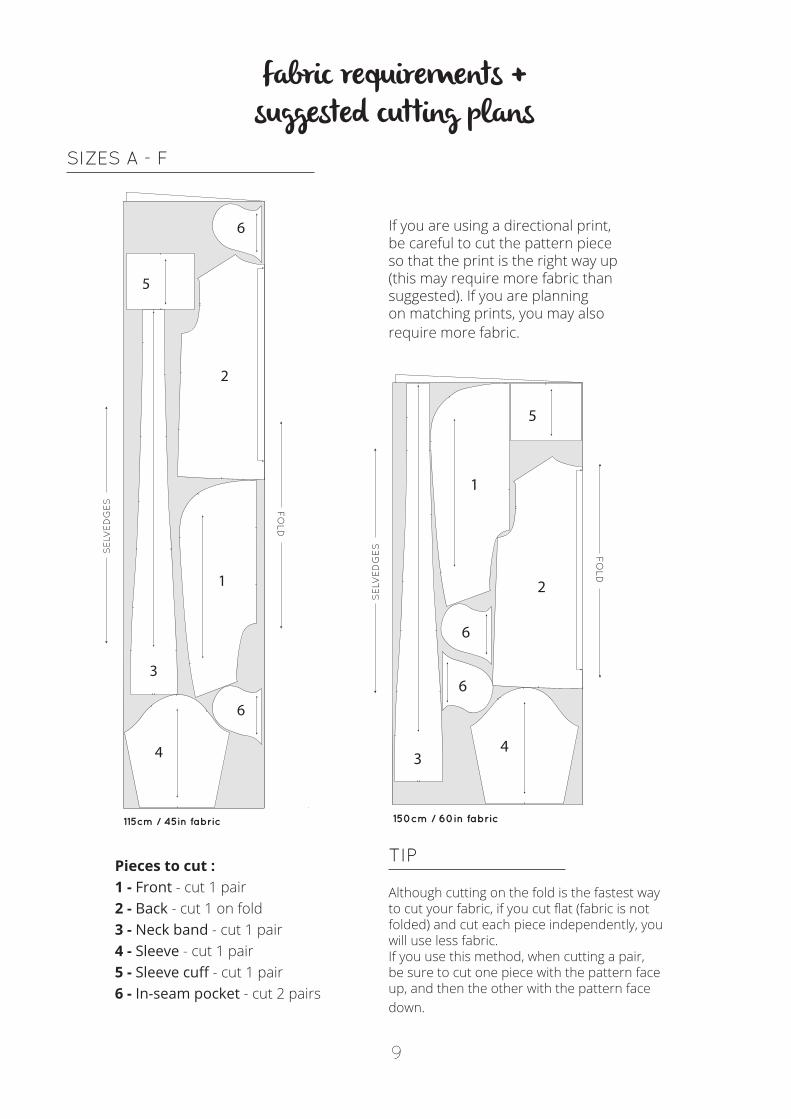
115cm / 45in fabric
1
6
SIZES A - F
Pieces to cut :1 - Front - cut 1 pair2 - Back - cut 1 on fold3 - Neck band - cut 1 pair4 - Sleeve - cut 1 pair5 - Sleeve cuff - cut 1 pair6 - In-seam pocket - cut 2 pairs
If you are using a directional print, be careful to cut the pattern piece so that the print is the right way up (this may require more fabric than suggested). If you are planning on matching prints, you may also require more fabric.
FO
LD
SELV
ED
GES
6
5
3
2
4
150cm / 60in fabric
1
6

10
Although cutting on the fold is the fastest way to cut your fabric, if you cut flat (fabric is not folded) and cut each piece independently, you will use less fabric.If you use this method, when cutting a pair, be sure to cut one piece with the pattern face up, and then the other with the pattern face down.
TIP
FO
LD
SELV
ED
GES
6
5
3
2
4
115cm / 45in fabric
1
6
SIZES G - K
Pieces to cut :1 - Front - cut 1 pair2 - Back - cut 1 on fold3 - Neck band - cut 1 pair4 - Sleeve - cut 1 pair5 - Sleeve cuff - cut 1 pair6 - In-seam pocket - cut 2 pairs
If you are using a directional print, be careful to cut the pattern piece so that the print is the right way up (this may require more fabric than suggested). If you are planning on matching prints, you may also require more fabric.
FO
LD
SELV
ED
GES
6
5
3
2
4
150cm / 60in fabric
16
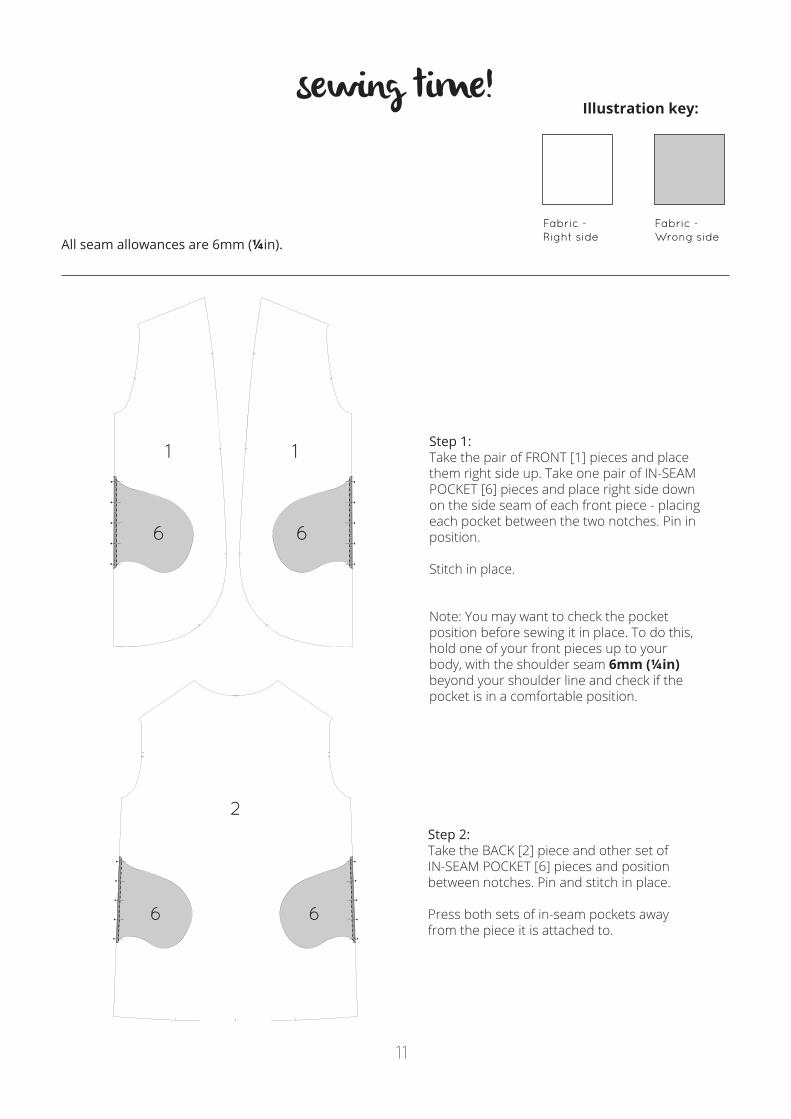
Step 1:Take the pair of FRONT [1] pieces and place them right side up. Take one pair of IN-SEAM POCKET [6] pieces and place right side down on the side seam of each front piece - placing each pocket between the two notches. Pin in position.
Stitch in place.
11
1 1
6 6
Step 2:Take the BACK [2] piece and other set of IN-SEAM POCKET [6] pieces and position between notches. Pin and stitch in place.
Press both sets of in-seam pockets away from the piece it is attached to.
sewing time!
Fabric -Right side
Fabric -Wrong side
Illustration key:
All seam allowances are 6mm (¼in).
6 6
2
Note: You may want to check the pocket position before sewing it in place. To do this, hold one of your front pieces up to your body, with the shoulder seam 6mm (¼in) beyond your shoulder line and check if the pocket is in a comfortable position.
12
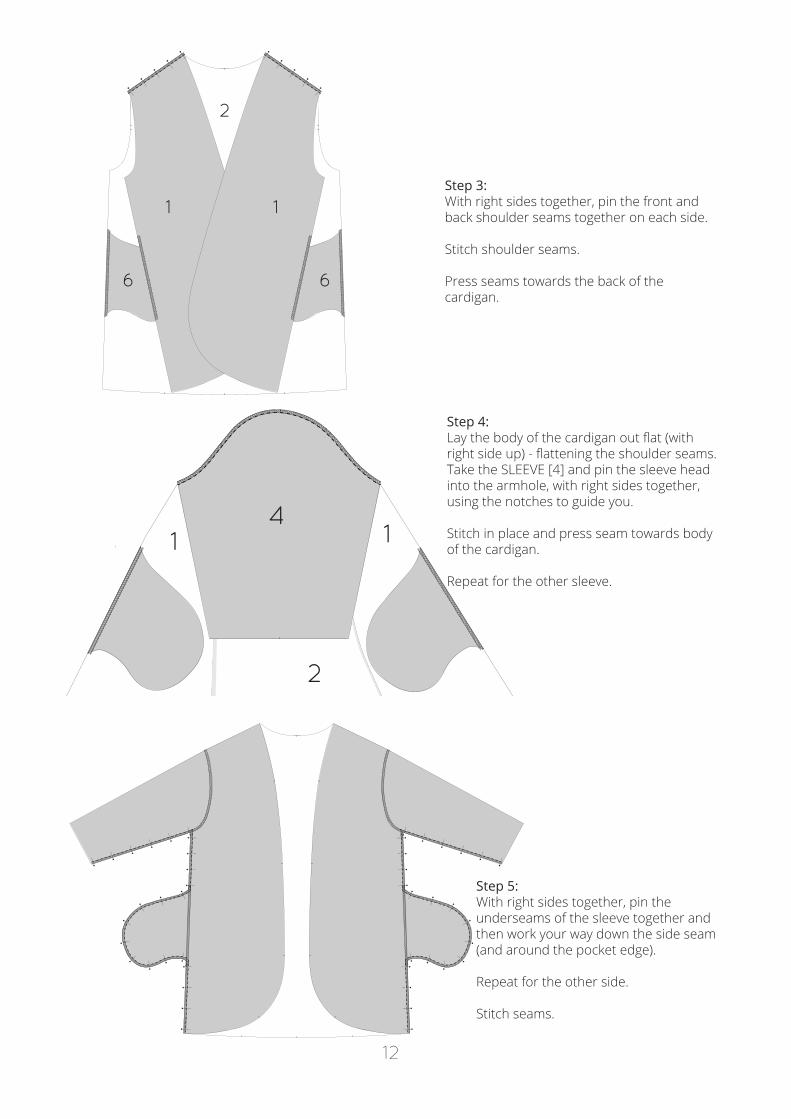
Step 3:With right sides together, pin the front and back shoulder seams together on each side.
Stitch shoulder seams.
Press seams towards the back of the cardigan.
Step 5:With right sides together, pin the underseams of the sleeve together and then work your way down the side seam (and around the pocket edge).
Repeat for the other side.
Stitch seams.
Step 4:Lay the body of the cardigan out flat (with right side up) - flattening the shoulder seams. Take the SLEEVE [4] and pin the sleeve head into the armhole, with right sides together, using the notches to guide you.
Stitch in place and press seam towards body of the cardigan.
Repeat for the other sleeve.
6 6
2
1 1
1 1
2
4

13
Step 6:To ensure the pockets remain on the inside of the garment (and you get a nice smooth side seam) take a ruler and draw a line that continues the side seam into the pocket - 3cm (1¼in) from the top of the pocket and 3cm (1¼in) from the bottom. Mark endpoints with a horizontal pin.
Step 7:Using your sewing machine, carefully stitch along each line, being sure to check that the seam allowance on the underside is out of the way.
Step 8:Turn the cardigan right side out and give it a good press (pressing the pocket and side seams towards the front of the garment).
3 cm
3 cm
3 cm
3 cm
BACK
FRONT FRONT
SLEEVE SLEEVE
POCKET BAG 6BACK
FRONT FRONT
SLEEVE SLEEVE
POCKET BAG 6
33
14
3
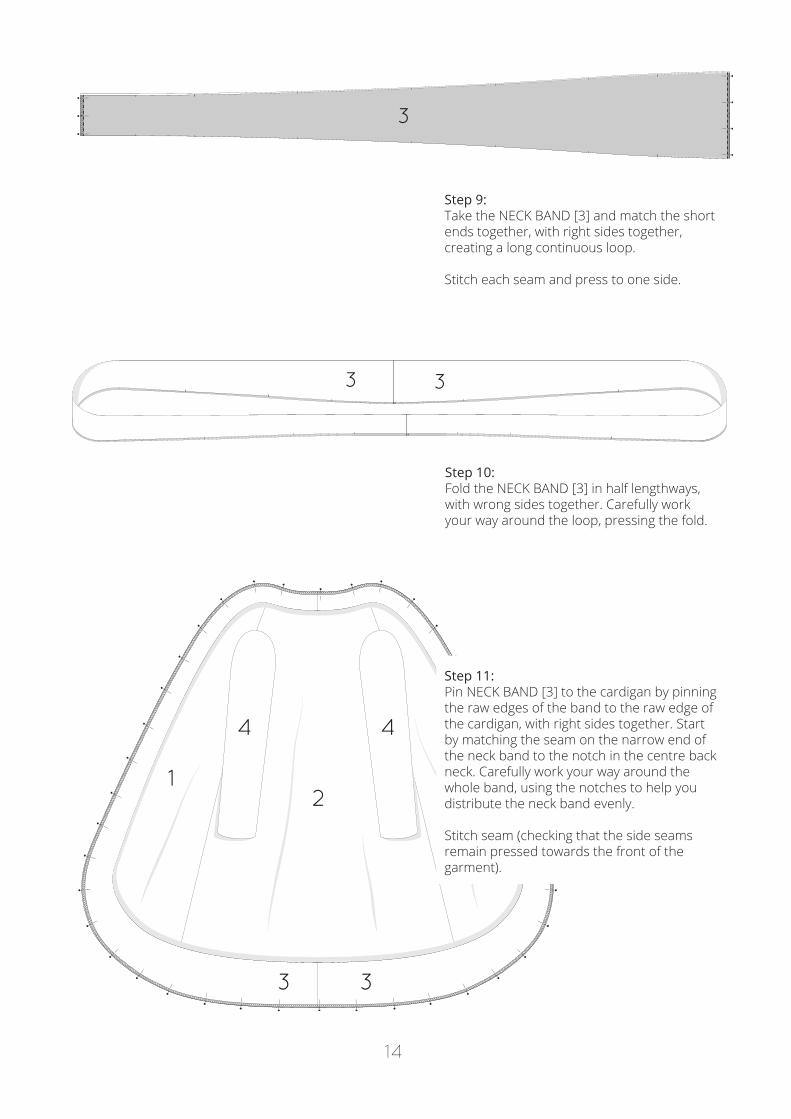
Step 9:Take the NECK BAND [3] and match the short ends together, with right sides together, creating a long continuous loop.
Stitch each seam and press to one side.
Step 10:Fold the NECK BAND [3] in half lengthways, with wrong sides together. Carefully work your way around the loop, pressing the fold.
33
21 1
4 4
Step 11:Pin NECK BAND [3] to the cardigan by pinning the raw edges of the band to the raw edge of the cardigan, with right sides together. Start by matching the seam on the narrow end of the neck band to the notch in the centre back neck. Carefully work your way around the whole band, using the notches to help you distribute the neck band evenly.
Stitch seam (checking that the side seams remain pressed towards the front of the garment).

Step 13:Take the SLEEVE CUFF [5] pieces and fold in line lengthways (along the grain), with right sides together, pinning the raw edges together.
Stitch and press seams to one side.
15
Step 12:With the cardigan inside out, press the seam allowance towards the body of the cardigan. Turn to the right side and now give the seam a good press from the right side, to ensure the band is sitting nice and flat.
Optional: You can topstitch the neck band in place if you like (by stitching close to the seam on the cardigan - catching the seam allowance on the inside).
Step 14:Fold SLEEVE CUFFS [5] in half, with wrong sides together.
5 5
5 5

16
Step 15:Pin SLEEVE CUFF [5] to SLEEVE [4] - using the notches to help you evenly distribute it. You will need to stretch the sleeve cuff slightly to make it fit.
Repeat on other side and stitch in place.
Step 16:Flip the cuffs to the right side and press the seam up towards the sleeve (a sleeve ham will help with this if you have one).
Give your cardigan and a good press and you’re all done!
FRONT
SLEEVE
NECK BAND NECK BAND
SLEEVE CUFF 5
4
SLEEVE
NECK BAND
SLEEVE CUFF 5
4

17
glossary
BASTE - Sew temporary stitches to hold pieces in place before sewing permanently. Bast-ing can be done by hand or machine (on a long stitch length). Consider using a contrast thread when basting to make stitches easier to remove later.
CLIP - Snip into the seam allowance (perpendicular to the raw edge) getting close to the stitch line, to help open up curved seams or corners.
FINISH - Neaten the raw edges of your project using an overlocker, zigzag stitch or binding.
INTERFACING - A (normally) fusible fabric that is used to stiffen or strengthen fabric, in certain parts of a garment. It is often used in collars, cuffs and button plackets.
NOTCH - A notch is a small cut in the fabric that helps guide you while you are sewing. It can be used to indicate seam allowance, dart arms, the location of design details or indicate key points on the pattern (like the centre front or centre back). Notches are also used to indicate balance points (points on your pattern that help you sew the right pieces together, as well as help you when you are sewing long or curved seams).
PRESS - Use a hot iron to press seams flat, using steam (if appropriate for your fabric).
RIGHT SIDE / WRONG SIDE - The right side of the fabric is the side you would like to see on the outside of the finished garment, while the wrong side is the side that will be hidden inside the garment.
SEAM ALLOWANCE - The space between the stitching line and the raw edge of the fabric. The seam allowance varies throughout this pattern, depending on the seam. For example, larger seam allowances are required for centre back and side seams, while smaller seam allowances are required for curved seams so that you can achieve a clean finish.
TRIM - Cut back a seam allowance to make a seam easier to manage or less bulky.
UNDERSTITCH - Stitch the seam allowance to a facing or binding, close to the seam edge. This helps the facing (or binding) roll to the inside of the garment, preventing it from being seen on the outside of a garment.
DRILL HOLE - Drill holes are small holes marked on a pattern, often used to indicate a dart point or other design features, such as the location of patch pockets, belt loops or pivot points (any feature that is located in an area where you are unable to notch a seam).
GRADE SEAM ALLOWANCES - Minimise bulk by trimming down raw edges in varying widths. Trim down the seam allowance that will sit closest to the body close to the stitch line. Trim the next layer, leaving a slightly wider seam allowance than the first, and so on until all layers are trimmed back.
STAY STITCH - "Staystitching" is a line of stitching inside the permanent stitch line (so it remains hidden inside the seam allowances) that is used to reinforce curved and bias cut seams, so that they do not stretch or distort during the sewing process.

Woohoo, you have finished your cardigan!
We’d love to see what you made! Find us on Instagram @peppermintmagazine and @inthefolds
and tag your new skirt with #peppermintsewingschool
C Emily Hundt 2017 - made with love in Sydney, Australia for Peppermint Magazine
Pattern is for individual use onlyYou can make the garment for yourself or as a gift. It does not enti-
tle you to print, copy or distribute the pattern to others, whether you profit from it or not, nor to sell garments that
you have made from this sewing pattern.
Thank you for respecting the rights of the designer.
Love the pattern? Plenty more patterns can be found at
www.peppermintmag.com/other/sewing-school/+
www.inthefolds.com
Our free Sewing School pattern is proudly supported by Oekaki Renaissance from Toyota Home Sewing - a revolutionary new sewing and free-motion embroidery machine designed to help you make beautiful things. ‘Draw’ your ideas directly onto fabric and create the designs of your dreams for quilting, textile arts, dressmaking, home furnishings and more.


