

Cercon®
ceram press
Product description and instructions forCercon® ceram press – Press-on porcelain –

2 Indications
Published: September, 2006Market launch: September, 2006
Cercon® ceram press
Indications� Cercon® ceram press is a press-on porcelain developed specifi-
cally and solely for pressing onto zirconia frameworks (Y-TZP)with a CTE of 10.5 µm/m·K (25–500°C), preferably made ofCercon® base.
� Cercon® ceram press is indicated for pressing onto anterior and posterior zirconia crowns and bridges as well as inlaybridgework.
� Cercon® ceram press must only be veneered with Cercon®
ceram kiss porcelain.� For dental use only.
Contraindications� Solely indicated for the range of indications listed above.� Cercon® ceram press is contraindicated for cases with bruxism
or other parafunctions.� Cercon® ceram press is also contraindicated for cases with
compromised periodontal tissues or clinical crowns of inade-quate height or which are severely damaged.
Warnings for medical productsIt is expected that undesired side-effects caused by these medicalproducts will be extremely rare if they are processed and used correctly. However, immune reactions (e.g. allergies) and/or localparalgesia (e.g. taste irritation or irritations of the mucosa) cannotbe ruled out completely. Should you become aware of undesiredside-effects – even where doubts exist – please let us know.
General instructions
0124
Should the patient be hypersensitive to Cercon® ceram press orone of its constituents, either do not use this medical product oronly use it under the strict supervision of the doctor/dentist inattendance. Known cross-reactions or interactions of this medicalproduct with other medical products/materials already in themouth must be taken into account by the doctor/dentist whenusing this product. Please provide the attending doctor/dentist with all the abovementioned information if you are using this medical product forfabricating a custom restoration.� Do not inhale dust from grinding.� The pastes and paste liquids are hazardous to health if
swallowed (R 22).
PrecautionsWhen using this product, please heed the instructions and safetydata sheets.
Side-effects/InteractionsWe know of no risks and/or side-effects concerning Cercon®
ceram press.
Technical data� CTE: 10.5 µm/m·K (25–500°C)� Dental ceramic, type 2 according to DIN EN ISO 6872
Transport and storage� Protect pellets against dampness during storage.
Keep dry.
Please note the following symbols on the product labels:REF Product numberLOT Batch number
Use-by date Read the instructionsDo not re-use
Liquids for combining� Opaquer powder: Ducera® Liquid B
Ducera® Liquid ODucera® Liquid OCL universalDucera® Liquid OL
� Opaquer paste/Liner: Fluid paste opaque� Shoulder porcelains: Ducera® Liquid Quick� Dentines/Enamels etc.: Ducera® Liquid SD
Ducera® Liquid Form� Stains/Glazes: Ducera® Liquid Stain� Separating: Ducera® Sep Isolating Fluid
Furnace For best results, make sure that the required pressing / firing temperatures and times are observed strictly.If necessary, please adjust the furnace settings.
2
Contents 3
Contents2 General instructions
3 Contents
4–5 Objective
6 Cercon® base versus Cercon® base colored
7 Pellet selection for Cercon® base colored
8 Coping fabrication
9 Wax-up and sprue attaching
10 Cercon® PressMaster
11 Pellet selection
12 Pressing
13 Trimming
14 Shading
15 Shade combination chart
16–17 press&stain step-by-step
18–21 press&veneer step-by-step
22–23 Clinical information
24 Porcelain shoulders
25 Troubleshooting
26–27 press&esthetics – Finished restorations
28 Tips&tricks/Service
29 Pressing and firing settings

4 press&smile™
When starting in dental technology, an understanding of the use of wax in dental technology accompanies us right fromday one.
Much more than just a material!Cercon® press&smile combines mechanised perfection and customised
dental technical manual work with previously unheard of options. This
material concept provides you with the necessary flexibility during your
everyday work – ranging from efficient to aesthetic applications.
Carsten Fischer
Objective

press&smile™ 5
press&smile™ enables you to create a detailed reproduction of your wax pattern for the fascinating world of all-ceramics.

6 Instructions
Cercon® base versus Cercon® base colored
Cercon® ceram press is a special pressable porcelain for pressing onto zirconia frameworks (Y-TZP) with a
CTE of 10.5 µm/m·K (25–500°C) and preferably made of Cercon® base. Cercon® ceram press is then
completed using either the press&stain or press&veneer techniques.
Selecting the correct blank is essential for both techniques. When using the press&smile concept, the
press&stain technique requires an ivory framework using Cercon® base colored. When creating light tooth
shades with the press&veneer technique, classic, white Cercon® base blanks may be used.
No liner is required when using press&smile pellets. The porcelain can be pressed directly onto the zirconia
framework, yet another stage is eliminated from this efficient technique. In case of discoloured preparations or
similar indications, the framework may be coated with liner. In such cases, please use the same shade of liner
as the basic shade of the Cercon® ceram kiss veneering porcelain. Please refer to the Cercon® ceram kiss
instructions for the processing details and furnace settings.

Instructions 7
Pellet selection for Cercon® base colored
Since the framework shade is standardised, the specific pellet is very important for the shade of the
restoration. Therefore, the mixture of the pellet has a very decisive influence. It must meet the
requirements for light-optical phenomena and provide the user with the multiplicity of natural tooth
shades.

The coping is either fabricated/designed after scanning the die with a Cercon® eye CAD module or classically via a wax pattern which is then scannedand milled in a Cercon® brain milling unit.Any adjustments and thinning of the cervical margin are carried out with a water-cooled turbine to prevent localised overheating. The zirconia copingmust be at least 0.4 mm thick. Principally, all copings must be designed with the anatomical form of the tooth but with smaller overall dimensions – thisensures that the pressable and veneering porcelains are supported uniformly.
8 Instructions
Coping fabrication

Instructions 9
Wax-up:
A fully anatomical or cut-back wax pattern is applied to the Cercon® base coping. You may
use your all-ceramic waxes for this as usual. The sides of the wax pattern must be at least
0.4 mm thick.
Sprue attaching:
Normal 3.5 mm diameter wax sprues may be attached to the pattern. All junctures must be
smoothed. The material must always flow from thick to thin areas. The sprue must be attached
to the thickest section of the wax pattern and the joint smoothed. Never apply wetting agent of
any kind to the wax patterns. A very thin coating of Vaseline should be smeared onto the
casting ring. Allow to harden without exerting pressure. Speed investment materials are an
advantage but their instructions must be strictly adhered to.
Wax-up and sprue attaching

The Cercon® PressMaster enables large volume patterns to be injected and different shades of
pellet to be used for the same pressing cycle.
The pattern is placed on the foil. The wax must be at least 0.4 mm thick and the weight of the wax
must not exceed 6.4g (17.6g pellet). The pellets may be joined with Fixpaste to simplify placing
them in the hot ring. The segment shape reduces the devesting times and enables the different
shades of pellet to be allotted easily.
10 Instructions
Cercon® PressMaster

Instructions 11
The full press&smile assortment was kept to a minimum on purpose.
Most natural tooth shades can be reproduced with only 4 enamel and 2 dentine shades.
White (W) Light shades, medium opacity, B1, A1,
bleaching shades or shades with light incisal areas
and minimal translucency.
Universal (U) Highly translucent, for universal use.
Particularly with C- and D-shades.
Red (R) A2–A4
Yellow (Y) B2–B4
Dentin Dentine base material for light base tones, high opacity
High Value (HV) (press&veneer technique using Cercon® ceram kiss).
Dentin Dentine base material for dark base tones, high opacity
Low Value (LV) (press&veneer technique using Cercon® ceram kiss).
Pellet selection

12 Instructions
We recommend the following preparatory measures:
� Run a full pressing cycle to preheat the furnace.
� Use disposable investment plungers.
� Do not preheat the investment plungers or pellets.
� Several pellets may be fixed together with Fixpaste (DeguDent) to simplify placing
them in the insert.
� If speed investment is used, the instructions must be strictly adhered.
(Preheating temperature of Cergo® fit speed – 850°C)
1–4: Devesting
Pressing
1
2 3 4
Instructions 13
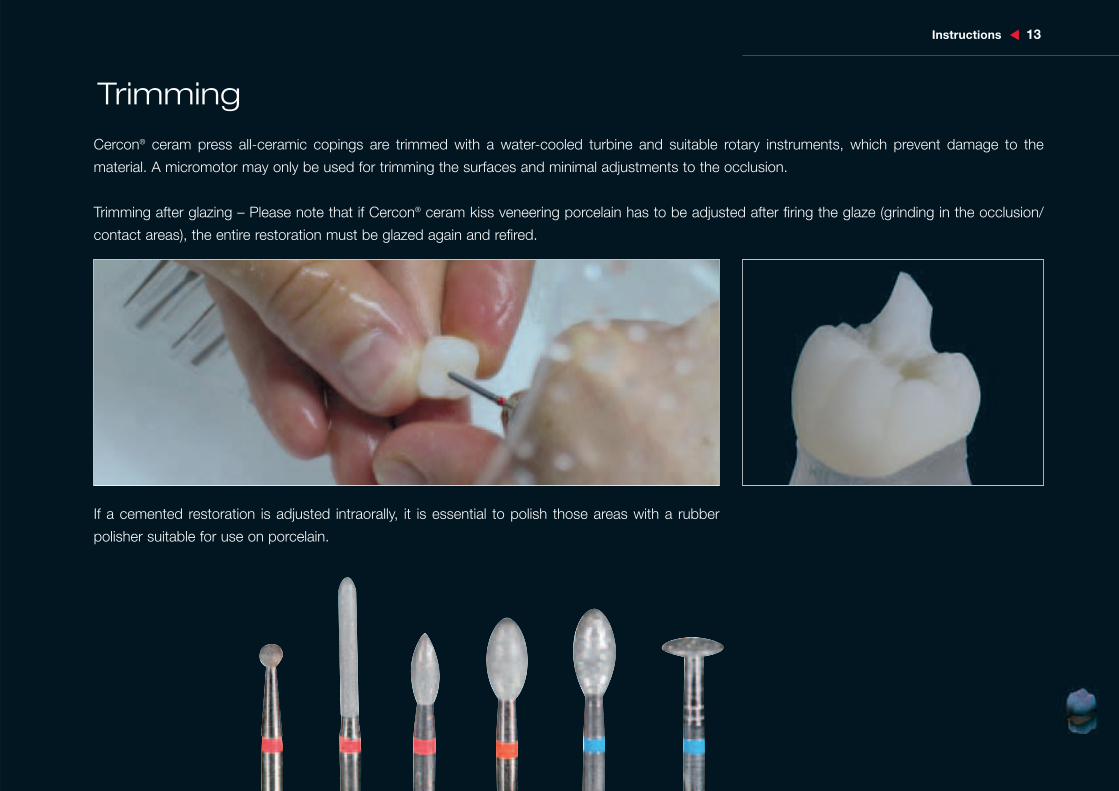
Trimming
Cercon® ceram press all-ceramic copings are trimmed with a water-cooled turbine and suitable rotary instruments, which prevent damage to the
material. A micromotor may only be used for trimming the surfaces and minimal adjustments to the occlusion.
Trimming after glazing – Please note that if Cercon® ceram kiss veneering porcelain has to be adjusted after firing the glaze (grinding in the occlusion/
contact areas), the entire restoration must be glazed again and refired.
If a cemented restoration is adjusted intraorally, it is essential to polish those areas with a rubber
polisher suitable for use on porcelain.

If required, the surface of the crown can be sandblasted with 50 µm aluminium oxide to
enhance shade application. Localised areas can be polished with a rubber polisher. press&smile
absorbs the stain like a sponge. Amazing results can be achieved with just a minimal amount of
Cercon® body stains.
14 Instructions
Shading
Crown ready for staining
Crown glazed but without stain
Crown after firing the first layer of stain and glazing

Instructions 15
Shade combination chart – press&stain
Body stain Dentine shade Pellet Number of
orders
Body 3 A1 U(W) 1x
A2 R 1x
A3 R 2x
A3,5 R 3x
A4 R 4x
Body 5 B1 U(W) 1x
B2 U 1–2x
B3 U(Y) 2x
B4 Y 4x
Body 6 C1 U 1x
Body 7 C2 U 1x
C3 U 2x
C4 U 3x
Body 8 D2 U 1x
D3 U 2x
Body 9 D4 U 2x
Shade combination chart

16 Instructions
The framework is provided with the anatomical shape of a tooth, but with smaller overall dimensions. The junctures must be smooth and rounded. The
framework should be sandblasted with 110–125 µm aluminium oxide at a pressure of 3–3.5 bars before being steam-cleaned. The surface must be free
of grease and clean.
Prefabricated occlusal patterns are positioned according to the functional criteria and the functional details added. The pattern is then waxed-up fully
anatomical.
press & stain

Instructions 17
1: This press&smile bridge has been prepared for staining and steam-cleaned.
2/3: The stain fixation firing simply fixes the stain which is matt after firing. The shade can be checked by wetting with Stain Liquid to make it visible.
4/5: The glaze firing completes the case. Adjustments are easily carried out with Final kiss.
1 2
3 4 5
2
5

18 Instructions
press & veneer
All pellets in the assortment can be coated with Cercon® ceram kiss. First, produce a full wax-up (Fig. 2) on the Cercon® base/Cercon® base colored
framework (Fig. 1).
1 2

Instructions 19
press & veneer
A silicone overcast can be used to reduce the incisal and occlusal areas in a controlled manner (Fig. 1). When using the press&veneer technique,
shading or custom adjustments can be achieved with two methods. Using the HV and LV pellets, the body shade can be modified with body stains as
in the press&stain technique. When using this method, only the incisal region is cut back. Finally, the stains are fired to fix them in place and then coated
with incisal and occlusal porcelain.
Alternatively, the porcelain can be cut back tothe body region of the crown to allow the shadeto be customised with dentine and enamel porcelains (Fig 2). Using this technique, highlyaesthetic all-ceramic restorations can be createdeasily and quickly (Figs. 3&4). In addition, “V”-shade porcelains can be pressed over the zirconia framework. In this case, only a minimumamount has to be cut back and rebuilt with enamel and opal porcelains.
1
2 4
3

20 Instructions
Aesthetically sophisticated prosthetic restorations can be fabricated reliably, accurately and efficiently:
1: Initial status
2–5: Wax-up
press & veneer
1
3
2
4 5

Instructions 21
1: Fully anatomical restoration, pressed to reproduce the wax-up.
2: The visible area is reduced in a controlled manner with a water-cooled turbine, as when preparing for a laminate veneer.The shade can be applied with Cercon® ceram kiss body stains or dentine porcelains. The palatal and interdental zones remain untouched and only need glazing.
3/4/5: Advanced aesthetics can be achieved in the visible region with Cercon® ceram kiss.
4 5
1 2 3

22 Clinical procedures
Clinical information
Predictable prosthetics can only be achieved with a clearly defined, clinical treatment concept.
1: Conventional luting is feasible with
phosphate cement or glass ionomer cement.
Resin-blonding is also possible.
2: Excess cement must be cleaned
off carefully.
3: Temporary cementation is possible,
but not without risk.
1 2 3

Clinical procedures 23
1: Initial status.
2: The temporary phase is over.
3: A “prep guide”, produced from the wax-up, is used for guidance during preparation.
4: All clinically risky areas have been stabilised and the gingiva is sufficiently mature.
5: The double cord technique has been employed in readiness for taking an optimum impression of the preparations.
Cementation: Cercon® ceram press restorations must be luted as described in the guidelines for Cercon® smart ceramics technology.
1 2
3 4 5

24 Clinical procedures
Porcelain shoulders
Creating a porcelain shoulder always weakens the framework. The following hints must always be
followed when fabricating a porcelain shoulder:
1/2: Prepare an adequate shoulder or deep chamfer.
2: Resin-bonding is a must.
3: Trim the cervical areas of the copings minimally (0.5–0.8 mm).
4: Only the visible area is reduced.
� Do not cement temporarily
1
2 3 4

Troubleshooting 25
� It is essential to support the side of the mould fully(avoids defective pressing).
� Ensure that the supporting surface is clean and smooth.
� Excessive pressure.� Investment processed incorrectly.� Incorrect setting time.� The plunger wedged.
� Incorrect temperature cycle.� Coping not fixed firmly in investment.� Mould cooled excessively before pressing.
� Mould too cold.� Sprues attached incorrectly.� Inadequate pressing time.� Inadequate pellet material.� Inadequate pressure.
� The coping was thinner than the minimum thickness.� Trimmed before cooling.� Excessive pressure.� Already fractured before firing.� Incorrect investment.
� Neither the pellets nor the single-use plunger should be preheated.
Troubleshooting

26 Finished restorations
press & esthetics
2 3
1 4
Views of finished Cercon® ceram press restorations. Teeth 15–17: press&stain. Teeth 14, 13–23, 24–26: press&veneer.
1: Initial status.
2: Cercon® base colored copings.
3/4: Show the finished restoration on the model and in situ.

Finished restorations 27
This product manual was produced in
cooperation with Carsten Fischer.
Special thanks go to Dr. Rafaela
Jenatschke/Frankfurt for the clinical
support.
1/2: Show the finished restoration on the model and in situCarsten Fischer Patient
1 2

28 Service
Preparation/Wax-up
� Only waxes and materials suitable for use with pressing systems may be used.
� Do not apply wetting agents.� Contaminated wax instruments and pattern resins
are not suitable.� The framework must be absolutely clean and free
of grease.� It should be sandblasted with 110–120 µm grit at
3–3.5 bars pressure.� The framework must be steam-cleaned.
Trimming/Staining
� The coping should be shaped like a tooth, but withreduced overall dimensions, to provide the requireddependability to withstand the shearing forces experienced in the mouth.
� Trimming is carried out with a Cercon® turbine.� Only special diamond burs may be used.� Porcelain shoulders must only be of minimal
dimensions and must be resin-bonded.� The framework must be at least 0.5–0.6 mm thick.
Veneering
� All pellets can be veneered with Cercon® ceram kiss.� The surface must be clean.� A stain fixation firing may be run to create the shade.� The surface of the framework must shine after firing to
ensure that the pellet and porcelain bond properly.� The Cercon® ceram kiss instructions must be
adhered to.
Tips & tricks

Service 29
Pressing settings in a Cergo® Press Furnace:
Initial temp. Final temp. Heat-rate Hold-time Press time Pressure Vacuum
100 g ring 700 940 60 20 10 5 cont200 g ring 700 940 60 20 10 5 contCercon® Press 700 940 60 40 20 5 contMaster
Pressing settings in a Multimat® Touch&Press Furnace:
Initial temp. Final temp. Heat-rate Hold-time Press time Pressure Vacuum
100 g ring 700 940 60 20 10 2,7 50 hPa200 g ring 700 940 60 20 10 2,7 50 hPaCercon® Press 700 940 60 40 20 3,0 50 hPaMaster
Pressing and firing settings
These values are only approximate and are intended as guidelines only. The firedrestorations may vary. The firing results depend on the performance of the particular furnace, its manufacturer and age. Therefore, the settings must beadjusted for every firing. We recommend running a test firing to check the furnace. Although we have written and checked all details carefully, we cannotguarantee them.
Shade combination table for press&smile V classic (veneering technique):
A1 A2 A3 A3,5 A4 B1 B2 B3 B4 C1 C2 C3 C4 D2 D3 D4
Blank* B B/C C C C B B/C C C B C C C C C C
Veneering tech- A1 A2 A3 A3,5 A4 B1 B2 B3 B4 C1 C2 C3 C4 D2 D3 D4nique**(Dentine blank)
Shade combination table for press&smile pellets (stain and veneer techniques):
A1 A2 A3 A3,5 A4 B1 B2 B3 B4 C1 C2 C3 C4 D2 D3 D4
Blank (1) C C C C C C C C C C C C C C C C
press&stain (2) U(W) R R R R U(W) U U(Y) Y U U U U U U U
Body stain (3) 3 3 3 3 3 5 5 5 5 6 7 7 7 8 8 9
Number orders 1 1 2 3 4 1 1–2 2 4 1 1 2 3 1 2 2
press&veneer (2)* HV LV LV LV LV HV HV LV HV HV LV LV LV HV LV LV
Body stain (3) 3 – 3 3 3 – 5 5 5 6 7 7 7 8 8 9
Number orders 1 – 1 2 4 – 1 2 4 1 1 2 3 1 2 2
* Blank: B = Cercon® base, C = Cercon® base colored
** Further special shade effects can be created with body stains or porcelains.
(1) Blank: press&smile pellets must only be pressed onto Cercon® base colored (C) blanks.(2) press&smile pellets (PS): W = White, U = Universal, R = Red, Y = Yellow, HV = High Value, LV = Low Value(3) These values are guidelines only. Body stains can always be used as required. * Further special shade effects can be created with body stains or porcelains.
* When firing bridgework with more than 5 units, the final temperature should be raised 5°C and for bridges with more than 10 units it should be raised 10°C.
Firing settings in Cergo® Press and Multimat Touch&Press Furnaces:
Predrying Predrying Closing Preheating Preheating Heat-rate Vacuum Vacuum Vacuum Final temp. Hold Hold
°C min min °C min °C/min On °C Off °C °C V min min
Staining technique
Stain fixation firing* 135 2:00 2:00 450 0:00 55 Cont 450 700 700 – 1:00
Glaze firing* 135 2:00 2:00 450 0:00 55 Off – – 800 – 1:00
Veneering techniqueDentine/Enamel* 135 2:00 3:00 450 3:00 55 Cont 450 830 830 – 1:30
Glaze firing* 135 0:00 3:00 450 2:00 55 Off – – 800 – 1:00
Add-on firing* 135 2:00 3:00 450 3:00 55 Cont 450 680 680 – 1:00

Inhalt 302
815
1/0
611
/DB
Sta
nd
/La
st r
evi
sio
n:
11/0
6
www.degudent.com www.cercon-smart-ceramics.com
For further information or to place an order, please visit:


