

ClientLine 2.0 User Training
© 2016 Wells Fargo Bank, N.A. All rights reserved. For public use.
Technical issues - Contact ClientLine Support at 1-800-285-3978, Monday-Friday 8:00 AM-10:00 PM EST

1 1
ClientLine Overview
A web-based tool that gives you 24/7 access to your electronic payment information
Access to recently processed transactions, charges and bank deposits
Information available to download into MS Excel®, PDF, HTML and CSV files
13 months of Detailed Transaction information
25 months of Summary Information including trending reports to help you identify opportunities that may reduce processing expenses
25 months of Chargeback Detail Information
Research tools to help identify both internal and external fraud, resolve chargebacks, and answer your customer’s inquiries
– Supported browsers: IE version 8.0+, Mozilla Firefox, Google Chrome, and Safari 5.1+
2 2
ClientLine Access & Login Process
3 3
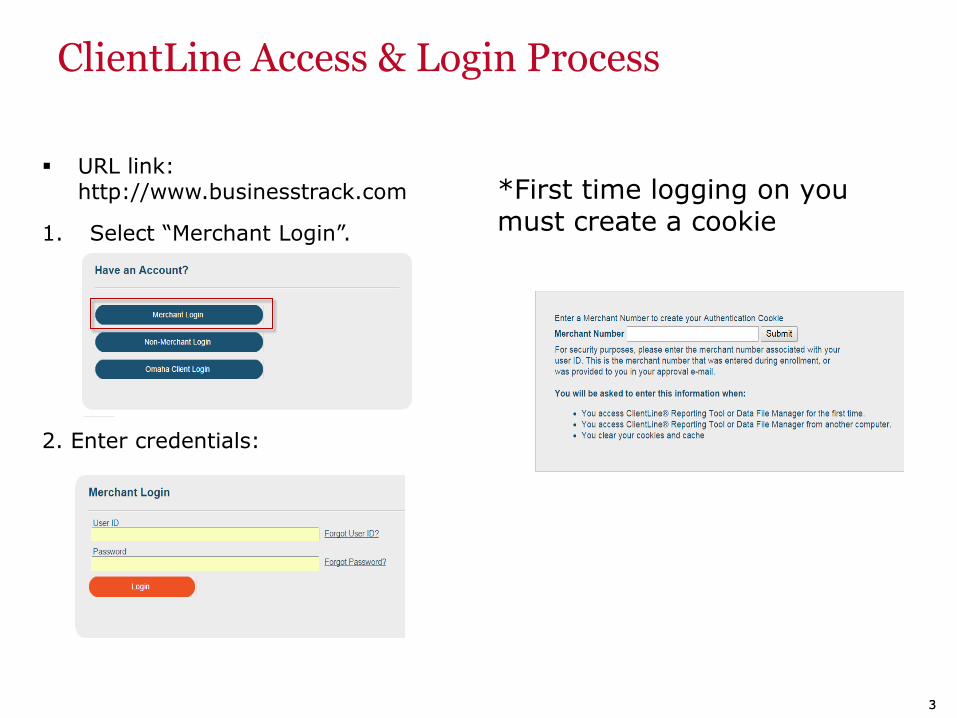
ClientLine Access & Login Process
URL link: http://www.businesstrack.com
1. Select “Merchant Login”.
2. Enter credentials:
*First time logging on you must create a cookie

4 4 4
Business Track Portal

5 5
Business Track Portal Homepage
6 6
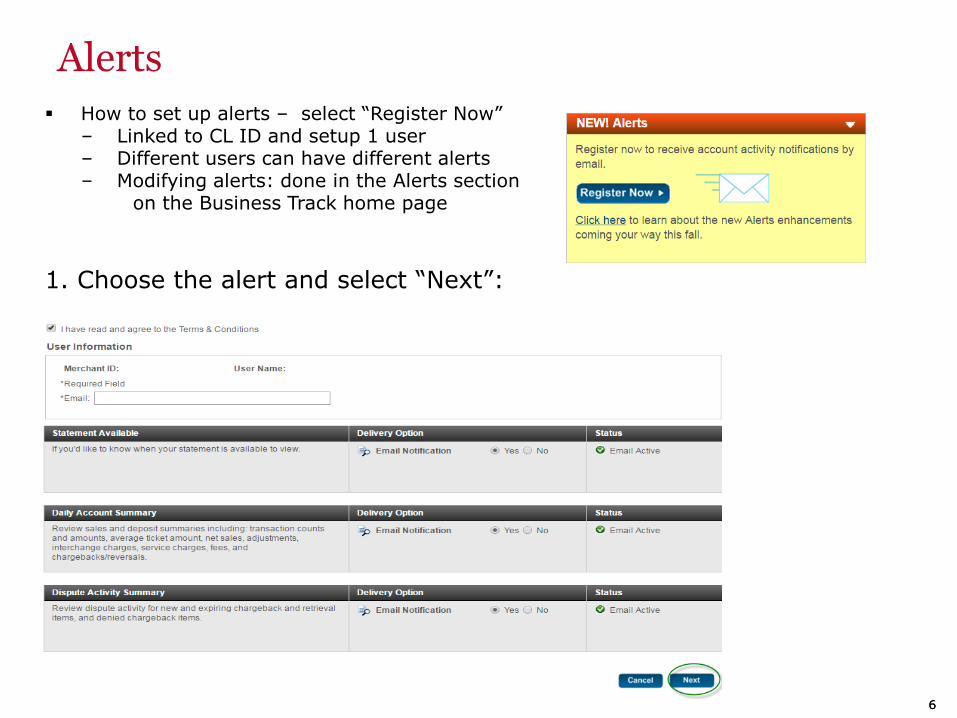
How to set up alerts – select “Register Now” – Linked to CL ID and setup 1 user – Different users can have different alerts – Modifying alerts: done in the Alerts section on the Business Track home page
1. Choose the alert and select “Next”:
Alerts

7 7
Alerts - Confirm

8 8
Statement STATEMENT – right side
1. Select “Card Processing statements” link
2. Select Location of Statement desired depending on account hierarchy

9 9

10 10
Transaction Search
TRANSACTION SEARCH – right side
For Card number, the options are:
Search Example – Last 4 digits:
Results open in a separate window:

11 11 11
Overview Page

12 12
Business Track Portal Accessing ClientLine

ClientLine Tutorial
Users can access the ClientLine Tutorial link in the upper right once they have accessed the ClientLine Overview Page and it provides a comprehensive overview of the ClientLine reporting tool

14 14
ClientLine Overview Page
WEEKLY OVERVIEW 1. Click Overview from the toolbar 2. Select “Weekly” from the dropdown 3. Result: The Weekly Overview Appears

15 15
ClientLine Overview Page - Changing Hierarchy Level
1. Select Hierarchy Level – If there is only 1 location then no Hierarchy ID box appears:
2. Select Hierarchy Level – If there is more than1 location then you must specify hierarchy desired:
Lead Corporate= Corporate account that has
office and/or outlet locations chained to it that have different tax id’s within the chain. Will show all locations data when selecting this level. Corporate= Head Office account that has outlet locations with the same tax id chained to it. Will show all locations data when selecting this level. Location= Individual location, will only show the specified locations data when selecting this level.

16 16
ClientLine Overview Page Submitted Transactions

17 17
ClientLine Overview Page Submitted Transactions

18 18
Batch Summary – Consolidates the submitted transaction details and the bank deposits summary to show the submitted transaction date, funding date and item count all in one place.
ClientLine Overview Page Batch Summary

19 19 19
Bank Deposits Summary

20 20
Drill down to look at the deposit detail.
ClientLine Overview Page Bank Deposits Summary

21 21
Step 1- Bank Deposits Drill down –Deposit detail
ClientLine Overview Page Bank Deposits Summary
22 22
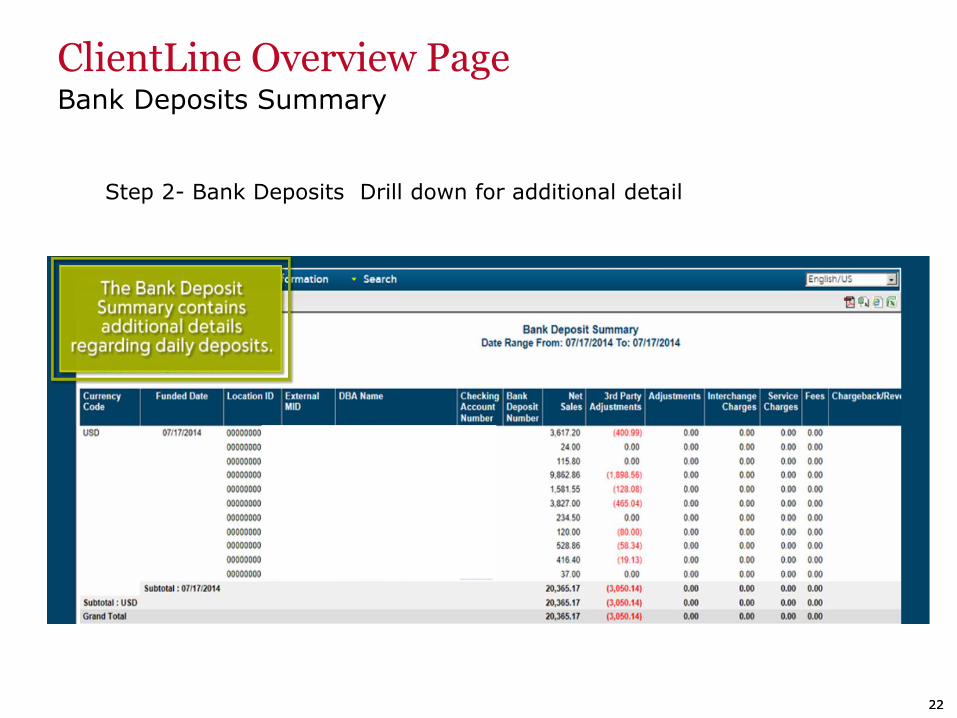
Step 2- Bank Deposits Drill down for additional detail
ClientLine Overview Page Bank Deposits Summary

23 23
Step 3- Bank Deposits Drill down –
ClientLine Overview Page Bank Deposits Summary

24 24
Select specific transaction to drill down to see the transaction detail record:
ClientLine Overview Page Bank Deposits Summary
25 25 25
ClientLine- Creating Reports

26 26
ClientLine Creating Reports
27 27
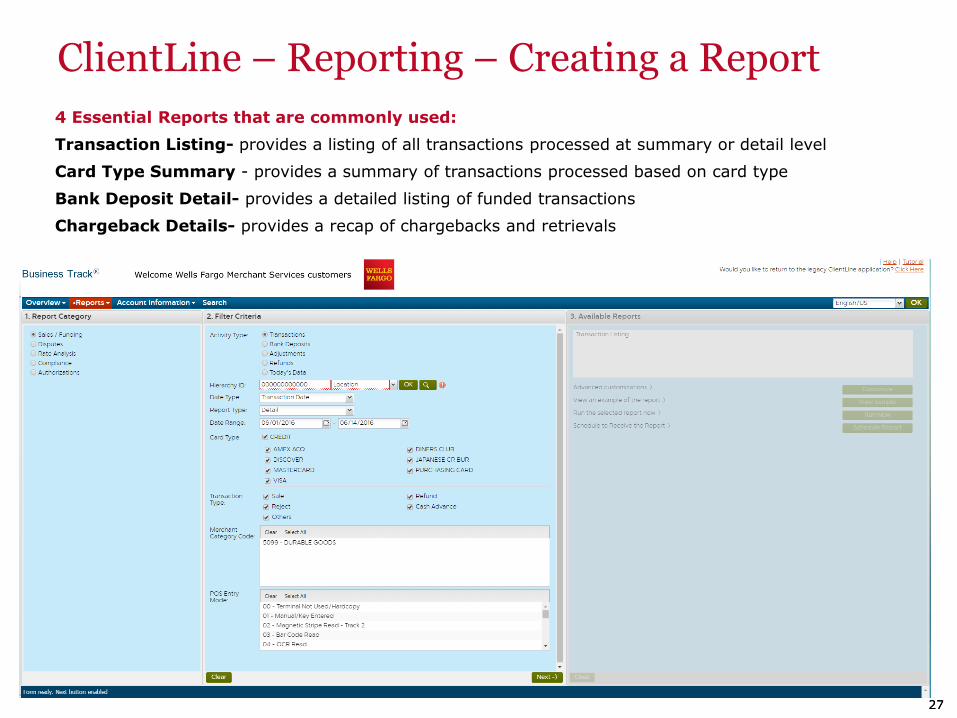
ClientLine – Reporting – Creating a Report
4 Essential Reports that are commonly used:
Transaction Listing- provides a listing of all transactions processed at summary or detail level
Card Type Summary - provides a summary of transactions processed based on card type
Bank Deposit Detail- provides a detailed listing of funded transactions
Chargeback Details- provides a recap of chargebacks and retrievals
28 28
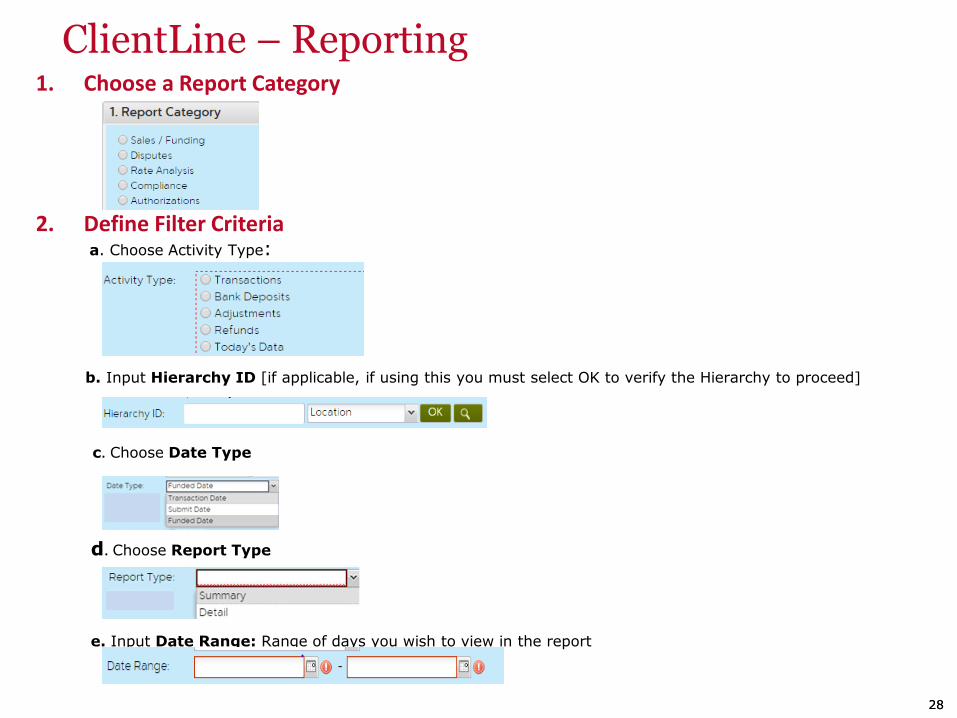
1. Choose a Report Category
2. Define Filter Criteria a. Choose Activity Type:
b. Input Hierarchy ID [if applicable, if using this you must select OK to verify the Hierarchy to proceed]
c. Choose Date Type
d. Choose Report Type
e. Input Date Range: Range of days you wish to view in the report
ClientLine – Reporting

29 29
ClientLine – Reporting
"Run Now" Report

30 30
ClientLine – Reporting – "Run Now" Report Steps to create a report:
After choosing the Filter Criteria, generate available reports:
To run a real-time report, select “Run Now”
2. Define report filter criteria

31 31
ClientLine – Reporting – "Run Now" Report Sample Transaction Summary Report-
32 32
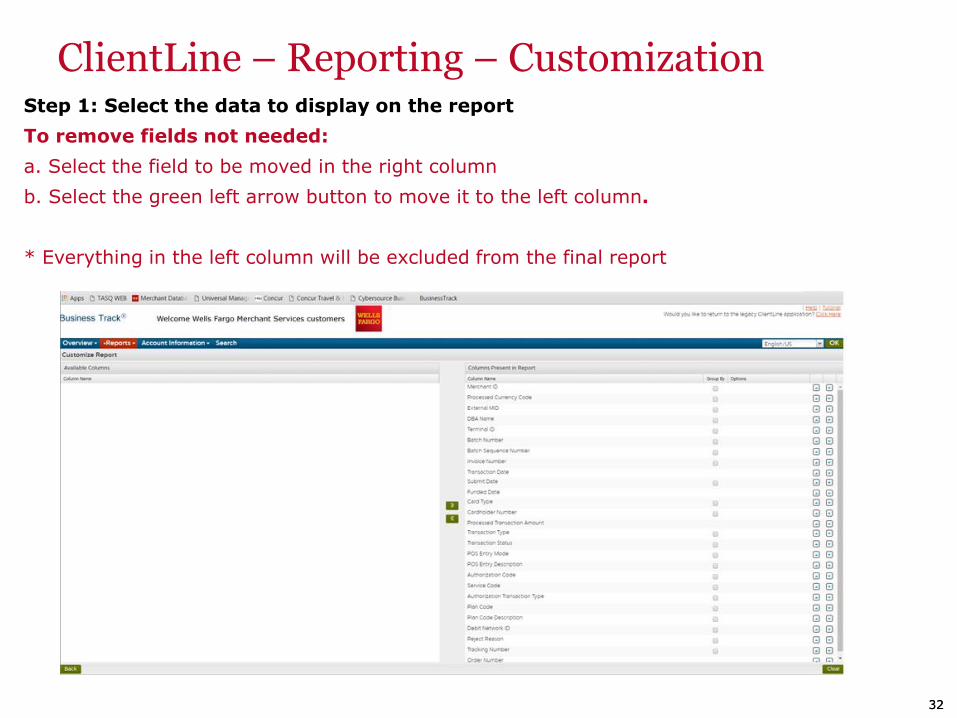
ClientLine – Reporting – Customization Step 1: Select the data to display on the report
To remove fields not needed:
a. Select the field to be moved in the right column
b. Select the green left arrow button to move it to the left column.
* Everything in the left column will be excluded from the final report

33 33
ClientLine – Reporting – Customization Step 1 Result: Report columns will remain on the right under Columns Present in Report. Data on the left will not appear in the report

34 34
ClientLine – Reporting – Customization Step 2: Determine if grouping is required based on account set up. Note to PM- typically grouped by TID for a single location or MID for head office and corporate level access.
35 35
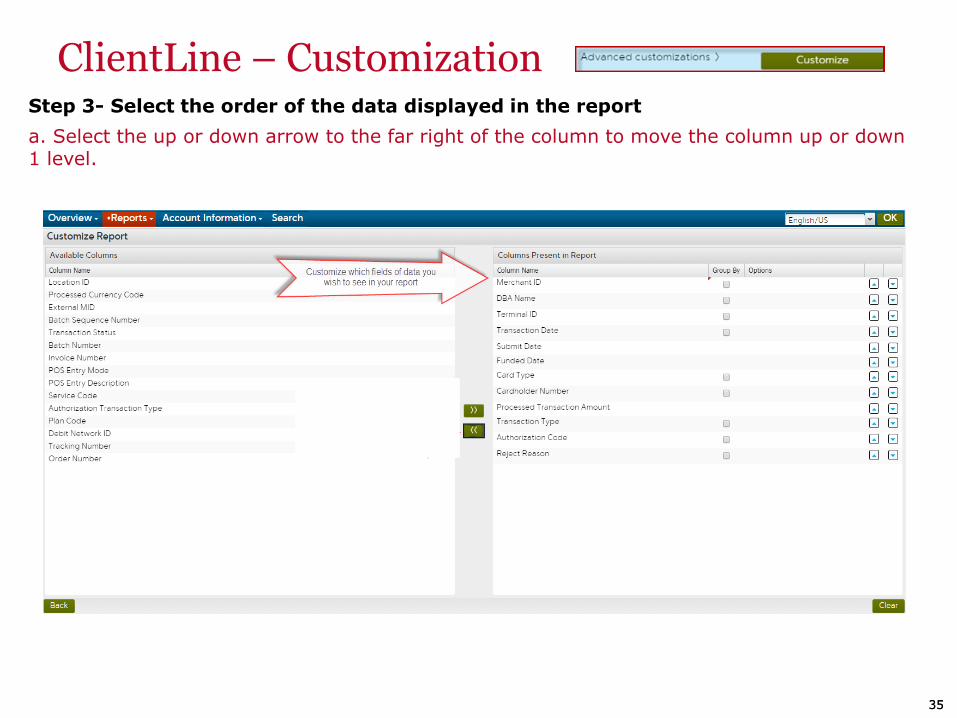
ClientLine – Customization Step 3- Select the order of the data displayed in the report
a. Select the up or down arrow to the far right of the column to move the column up or down 1 level.

36 36
ClientLine – Reporting – Customization
Step 3 Result Grouped by TID:

37 37
ClientLine Reporting Schedule a Report
Steps to create a report: To schedule the selected report as a recurring report , select “Schedule Report”
Result: The schedule report options screen will appear:

38 38
ClientLine Reports Mailbox
Reports can be viewed from the Reports Mailbox
1. Go to Reports – select “Reports Mailbox”
2. Select “Display”

39 39
ClientLine Reports Mailbox
3. Select Content Type:
4. Click on Report Name hyperlink:
5. Viewing a report: Click on View icon

40 40
ClientLine Monthly Statement
Monthly Statements can be pulled from the Reports Tab
1. Select Monthly Statement:
2. Select Filter:
.

41 41
ClientLine – Monthly Statement 3. Results:
4. Click on the Statement Month you wish to open
5. The individual monthly statement will be displayed

ClientLine Tutorial
Users can access the ClientLine Tutorial link in the upper right once they have accessed the ClientLine Overview Page and it provides a comprehensive overview of the ClientLine reporting tool.

43 43
Thank you!

44 44
Additional material & resources

45 45
User ID Overview User ID is specific to an individual user and each user is enrolled/setup
separately
– There is no 'administrator' at the company level
User ID is system generated starting with “cl.”
User ID is linked to the location hierarchy determined by the company and determines what locations you have access to
– Outlet - single location
– Head Office [called Corporate in Client Line] – all locations under a single tax ID
– Corporate [called Lead Corporate in Client Line] – all locations for companies with multiple tax ID’s or many locations that are separated by business line, region etc.
Note: In order to retain access to the Business Track portal, the user must sign on at least once every 120 days. After 120 days without signing on, access will be disabled and the user will need to make a new request for enrollment where so they can receive a new user ID.

46 46
Business Track Portal Review – Graph & Disputes
CARD PROCESSING SUMMARY GRAPH –
DISPUTES–
For users who reconcile daily they may want to use the provided for net sales to match their daily batch total to get a quick match on deposit totals but they will need to ignore the expense data.
If the user is not showing the Enroll Now option They have already enrolled for the service

47 47
Card Usage –This section is a graphical depiction of your customer’s card usage. It shows the count and amount breakdown by card type for transactions processed during the prior 7 days.
ClientLine Overview Page – Card Usage

48 48
ClientLine – Account Information
Special Use Case Only

49 49
ClientLine – Account Information 1. Location Profile: Will provide accounts information including address, contacts, set-up info
and fees
“The location Profile Tab will provide account information including address, contacts, set-up information and fees.”
50 50
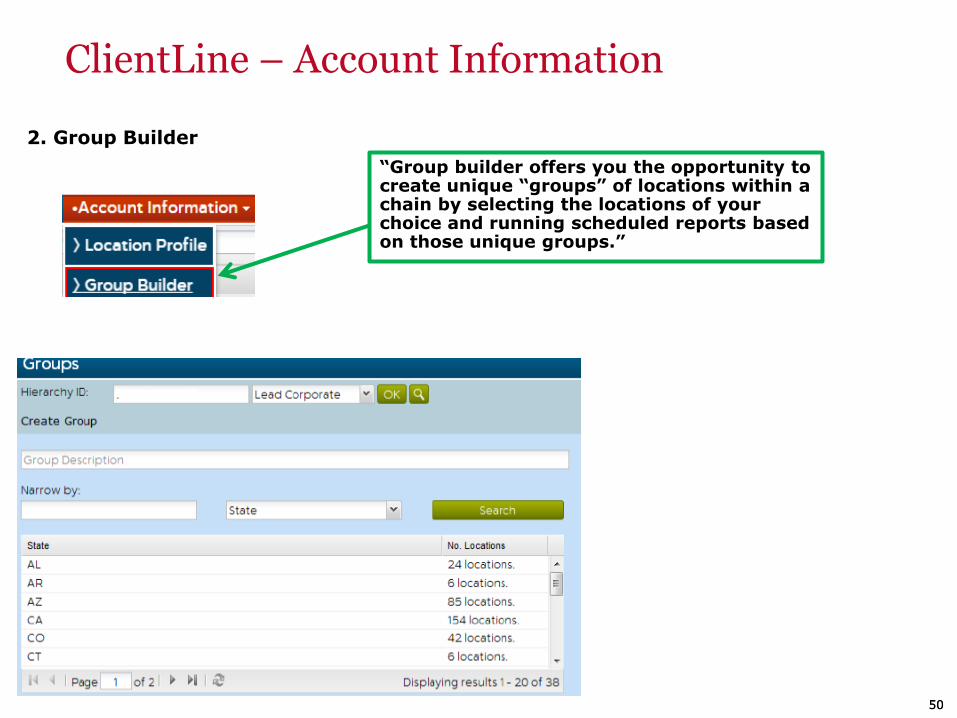
2. Group Builder
ClientLine – Account Information
“Group builder offers you the opportunity to create unique “groups” of locations within a chain by selecting the locations of your choice and running scheduled reports based on those unique groups.”
51 51
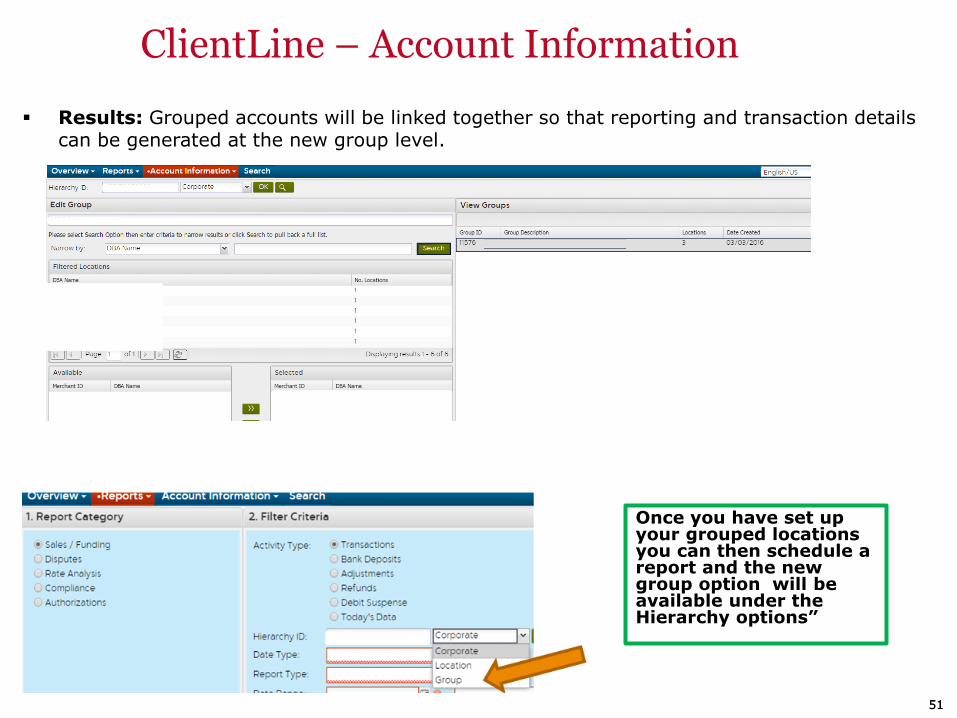
Results: Grouped accounts will be linked together so that reporting and transaction details can be generated at the new group level.
ClientLine – Account Information
Once you have set up your grouped locations you can then schedule a report and the new group option will be available under the Hierarchy options”

52 52
Other Reports

53 53
1. Choose a Report Category
2. Define Filter Criteria a. Choose Activity Type:
b. Input Hierarchy ID [if applicable, if using this you
must select OK to verify the Hierarchy to proceed
c. Choose Date Type
d. Choose Report Type
e. Input Date Range: Range of days you wish to view in the report
ClientLine – Reporting- Card Type Summary
“To generate the Card Type Summary Report you will choose:
1. Sales/Funding
2. a. Activity Type-Transactions
3. b. The Hierarchy if applicable
c. Date Type- Submit date is recommended d. Report Type- Summary e. Date Range within 25 months for summary data”

54 54
1. Choose a Report Category
2. Define Filter Criteria a. Choose Activity Type: b. Input Hierarchy ID [if applicable, if using this you
must select OK to verify the Hierarchy to proceed
c. Choose Date Type d. Choose Report Type
e. Input Date Range: Range of days you wish to view in the report
ClientLine – Reporting- Bank Deposit Detail “To generate the Bank Deposit Detail Report you will choose:
1. Sales/Funding
2. a. Activity Type- Bank Deposit
3. b. The Hierarchy if applicable
c. Date Type- Funded Date (only option)
d. Report Type-Summary
e. Date Range within 25 months for summary data.

55 55
1. Rate Analysis
ClientLine – Reporting- Rate Analysis Reports
Qualification – Depending on your pricing plan all transactions may not be processed at the same rate. ClientLine Reporting provides you with 25 months of summary and 13 months of detail history for each clear plan. Typically, clients use the information to quantify and evaluate the amount and the percentage of sales that were processed at higher rates.
Non-Qualification - This selection provides information regarding the count and dollar amount of transactions which failed the edit criteria for the given Association, and thus were “downgraded” from the best possible rate to the given settlement rate.
Downgrades – Allows a user to see the reasons why transactions didn’t qualify at the best rate as expected. This can help identify potential opportunities at the point of sale to reduce processing expenses

56 56
2. Compliance
ClientLine – Reporting- Compliance Reports
Invalid Data – Visa and MasterCard have various data requirements for transaction processing. Visa requires a valid Visa Transaction ID and MasterCard a valid BankNet Reference Number on each transaction. This report will provide a information on transaction received without valid data.
Authorization Settlement – Depending on the type of business you operate Visa and MasterCard have certain rules requiring timely settlement of authorized transactions. This reporting will provide information on transactions received that did not meet the requirements and could result in an assessment of fees.
FANF – Visa’s Fixed Acquirer Network fee is passed on to you as a part of doing business. You can view the details of how this fee was calculated in these reports.

57 57
3. Choose Report Category-Authorizations
a. Choose Activity Type:
a1. Today’s Data* – View authorizations within the last 2 hours that have been processed.
a2. Authorizations – View all authorizations which have been received
b. Input Hierarchy ID [if applicable]
c. Chose Date Type
ClientLine – Reporting- Authorization Reports
The authorization report will allow you to view just the last 2 hours of authorizations
or all authorizations received’
.

58 58
ClientLine – Reporting- Authorization Reports
d. Choose Report Type
e. Input Date Range: Range of days you wish to view in the report
f. Choose from Available Reports
Authorization Listing -provides all authorizations received for the timeframe specified.
Multi- Authorization Detail- provides multiple authorization attempts to the same card on the same day.
Decline Reason Code Detail- provides a definition of the reason a specific authorization attempt was declined.

59 59
ClientLine –Special Scenarios
Tips & Tricks

60 60
Special Scenarios- Tips & Tricks
Multiple TIDs per MID:
• The Client may want to have reporting done by TID in order to differentiate business segments in which
units are located. Custom reporting will allow you to group together transactions by TID.
• Best Practice- 72 hours prior to the call, enroll as a merchant user and generate custom reporting to
show grouping options by TID. You can then use these reports to compare MSA funding to ClientLine
funding and review the reporting options with the client.
MSA DEPOSIT Screen to Compare to ClientLine Reporting

61 61
ClientLine – Card Issuer Identification
*Allows you to retrieve the issuing data for Visa and MasterCard transactions.
*Will require you to input the first 6 digits of the Visa or MasterCard number
*Click on ‘View Card Issuer Info’ button from any Credit Transaction Detail or Debit Transaction Detail screen to also view Card Issuer Identification information. *Only MasterCard and Visa issuing bank information is available. Issuing bank information provided is updated periodically and details provided are contingent upon being supplied by the issuing bank.

62 62
Special Scenarios- Tips & Tricks
ClientLine Custom Reporting

63 63
ClientLine – Search 13 months of history

64 64
ClientLine – Search
Search Options:
Transactions Authorizations
Chargebacks Retrievals
“The Search tab provides a list of transactions associated with a specific cardholder account number. You can search the last 13 months and you can search by Transactions, Authorizations, Chargebacks, Retrievals.”

65 65
ClientLine – Transaction Search Tips & Tricks Transactions Search
“The Transaction Search option provides a list of all individual transactions associated with a specific cardholder account number for up to 13 months.”

66 66
Quick Definitions: o Location ID - Location where the transaction was processed o External Merchant ID - Additional merchant number associated with the location o Currency Code - 3 digit code identifying the currency the transaction was processed in o Terminal ID - ID number of the terminal on which the transactions was processed o Batch Number - Number of the batch in which the transaction was submitted o Submit Date - Date the batch was submitted to Merchant Services o Card Type - The brand associated with the card number o Cardholder Number - The number identifying the cardholder, issuer and card brand o Trans Amount - The amount of the sale or refund o Trans Type - Numeric code that identifies the transactions as a sale, credit or cash advance o Trans Date - Date the transaction occurred o Status - Indicates whether transaction is Active or Cancelled or Rejected o Entry Mode - Code identifying how the cardholder account information was entered or captured at the point of sale o Auth Code - Code
Helpful Hints: *When searching by the cardholder number either the full card number or just the last four digits needs to be
entered (ex. 1234567891234567 or *1234).
*Use this report to verify if customer has been double billed for a transaction, check for credit for a disputed
transaction or how frequent a customer makes purchases at your business.
* Click on Cardholder Number hyperlink to view Credit Transaction Detail.
ClientLine – Transaction Search Tips & Tricks

67 67
1. Authorization Search
ClientLine – Authorization Search Tips & Tricks
“The Authorization Search option provides a list of authorizations associated with a specific cardholder account number, token number, or authorization code or dollar amount range for up to 13 months.”

68 68
Quick Definitions:
o Location ID - Location where the transaction was processed
o External Merchant ID - Additional merchant number associated with the location o Currency Code - The 3 digit code identifying the currency the transaction was processed in o Cardholder Number - The number identifying the cardholder, issuer and card brand o Expiration Date - Month and year the credit card expires o Amount - Amount of authorization o Auth Date - Date the transaction was authorized o Auth Code - Code provided during the authorization process if an authorization approval was received o Response Code - 2 digit code identifying the authorization response
Helpful Tips: *Results are available for 6 months *When searching by the cardholder number either the full card number or just the last four digits+ an asterisk (*) needs to be entered (ex. 1234567891234567 or *1234). *Card Number/Token Number search access is limited to Corporate and Location Level only
ClientLine – Authorization Search Tips & Tricks

69 69
2. Chargebacks Search-
ClientLine – Chargebacks Search Tips & Tricks
“The Chargebacks Search option allows you to view chargeback information for a specific card number. You can access this by typing the cardholder number, date range, amount, transaction date or status date.
70 70
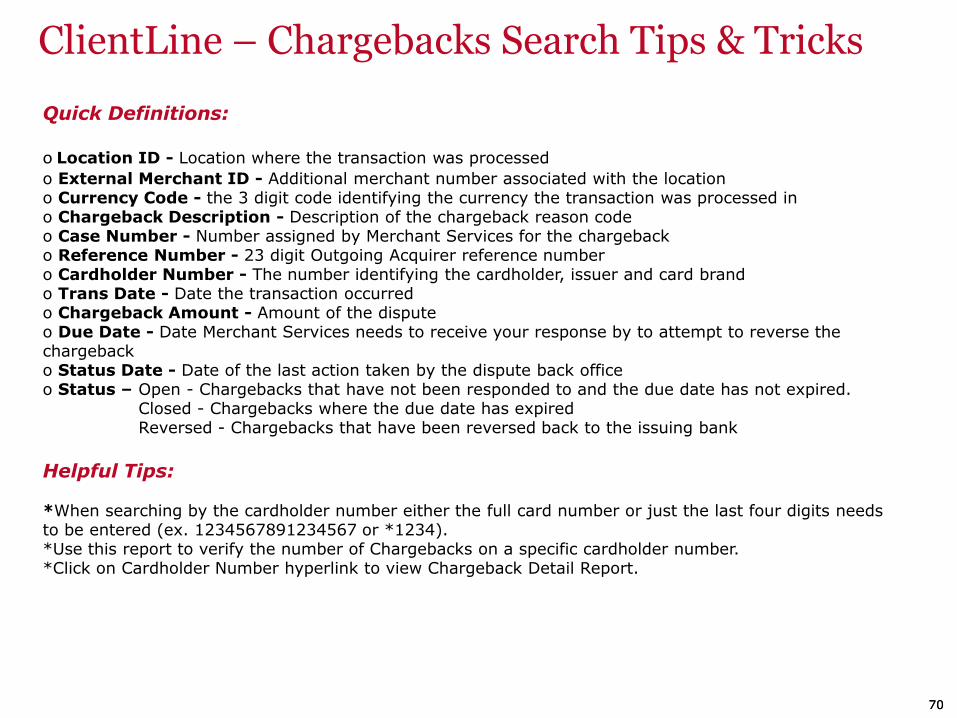
Quick Definitions: o Location ID - Location where the transaction was processed
o External Merchant ID - Additional merchant number associated with the location o Currency Code - the 3 digit code identifying the currency the transaction was processed in o Chargeback Description - Description of the chargeback reason code o Case Number - Number assigned by Merchant Services for the chargeback o Reference Number - 23 digit Outgoing Acquirer reference number o Cardholder Number - The number identifying the cardholder, issuer and card brand o Trans Date - Date the transaction occurred o Chargeback Amount - Amount of the dispute o Due Date - Date Merchant Services needs to receive your response by to attempt to reverse the chargeback o Status Date - Date of the last action taken by the dispute back office o Status – Open - Chargebacks that have not been responded to and the due date has not expired. Closed - Chargebacks where the due date has expired Reversed - Chargebacks that have been reversed back to the issuing bank
Helpful Tips: *When searching by the cardholder number either the full card number or just the last four digits needs to be entered (ex. 1234567891234567 or *1234). *Use this report to verify the number of Chargebacks on a specific cardholder number. *Click on Cardholder Number hyperlink to view Chargeback Detail Report.
ClientLine – Chargebacks Search Tips & Tricks

71 71
Retrievals Search-
Client Line– Retrievals Search Tips & Tricks
The Retrievals Search option allows you to view retrievals received for a specific card number. You can access this by typing the cardholder number, date range, amount, transaction date or status date.

72 72
Client Line– Retrievals Search Tips & Tricks
Quick Definitions: o Location ID - Location where the transaction was processed o External Merchant ID - Additional merchant number associated with the location o Currency Code - The 3 digit code identifying the currency the transaction was processed in o Request Reason - Code sent by issuing bank identifying reason for request o Case Number - Number assigned by Merchant Services for the chargeback o Card Type - The brand associated with the card number o Cardholder Number - The number identifying the cardholder, issuer and card brand o Trans Date - Date the transaction occurred o Trans Amount - The amount of the sale or refund o Due Date - Date Merchant Services needs to receive your response by to attempt to reverse the chargeback o Status Date - Date of the last action taken by the dispute back office area o Status - Open - retrieval requests that have not been fulfilled and the due date has not expired Expired - retrieval requests that were not fulfilled within the requested timeframe Fulfilled - retrieval requests responded to by the merchant and sent to the issuer
Helpful Tips:
*When searching by the cardholder number either the full card number or just the last four digits needs to be entered (ex. 1234567891234567 or *1234). *Use this report to verify the number of Retrievals on a specific cardholder number. Click on Cardholder *Number hyperlink to view the Retrieval List

73 73
ClientLine Overview Page Submitted Transactions


