1
RockOn! 2008
Command & Data Handling
PCB Build Procedure
RockOn! 2008

4
RockOn! 2008
The C&DH PCB 2:
AVR Board
Data Board
Z-Accel. Board

5
RockOn! 2008
Organization:
The boards may seem like an array of confusing electronics, but one can easily break the board into smaller subsystems of related components.
This build is organized by different sub systems integral to the board.

6
RockOn! 2008
Integral Systems:
-ATMega 32L Microprocessor
-2 MB Flash Memory
-0-15 Psi Pressure Sensor
-3-Axis Acceleration
-Temperature Sensor
-In-System-Programming
-Power Regulation

8
RockOn! 2008
Board Safety:
Caution:
Many of the components used in this workshop are sensitive to electrostatic discharge (ESD). Please ensure that you are wearing your protective wrist strap at all times. There will be a warning slide when components are ESD and heat sensitive.
Clipping leads can sometimes cause them to separate in a rapid manner that could cause injury. Please take caution when clipping leads. Wear your safety glasses at ALL TIMES!

9
RockOn! 2008
Reading a Resistor:
The resistors in this workshop have already been organized by value.
In the event that your resistors get mixed, please refer to the chart at the left to classify your resistors, or use your multimeter
If you are unsure, don’t hesitate to raise your hand and ask for assistance.

11
RockOn! 2008
Kit Contents—PCBs:
PCBs:
- One (1) Main Board
- One (1) Data Board
- One (1) Z Accel. Board
- One (1) XY Accel. Board
-Note: All boards were tested in-house and are currently in working order.

12
RockOn! 2008
Kit Contents—PCBs:
PCBs:
- One (1) Main Board
- One (1) Data Board
- One (1) Z Accel. Board
- One (1) XY Accel. Board
-Note: All boards were tested in-house and are currently in working order.

13
RockOn! 2008
Kit Contents—Resistors:
Resistors:
- Two (2) 1 K Ω Resistors
-R8, R9
- Eight (8) 10 K Ω Resistors
-R1, R2 R3, R4, R5, R6, R10, R11
- One (1) 3.3 K Ω Resistors
-Indicator
- One (1) 100 K Ω Resistor
-R7

14
RockOn! 2008
Kit Contents—Capacitors:
Capacitors:
- Eleven (11) .1 μF Capacitors
-C2, C3, C4, C5, C6, C7, C8, C9, CX, CY, CZ
- One (1) 1 μF Capacitor
-C10
- One (1) 10 μF Capacitors
-C1
15
RockOn! 2008
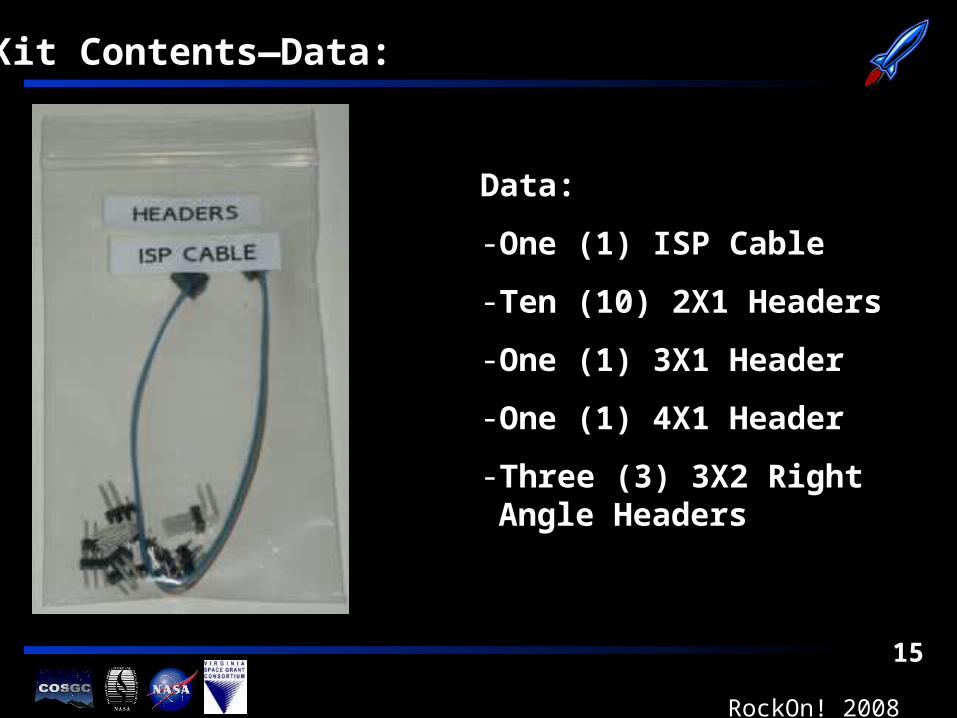
Kit Contents—Data:
Data:
- One (1) ISP Cable
- Ten (10) 2X1 Headers
- One (1) 3X1 Header
- One (1) 4X1 Header
- Three (3) 3X2 Right Angle Headers

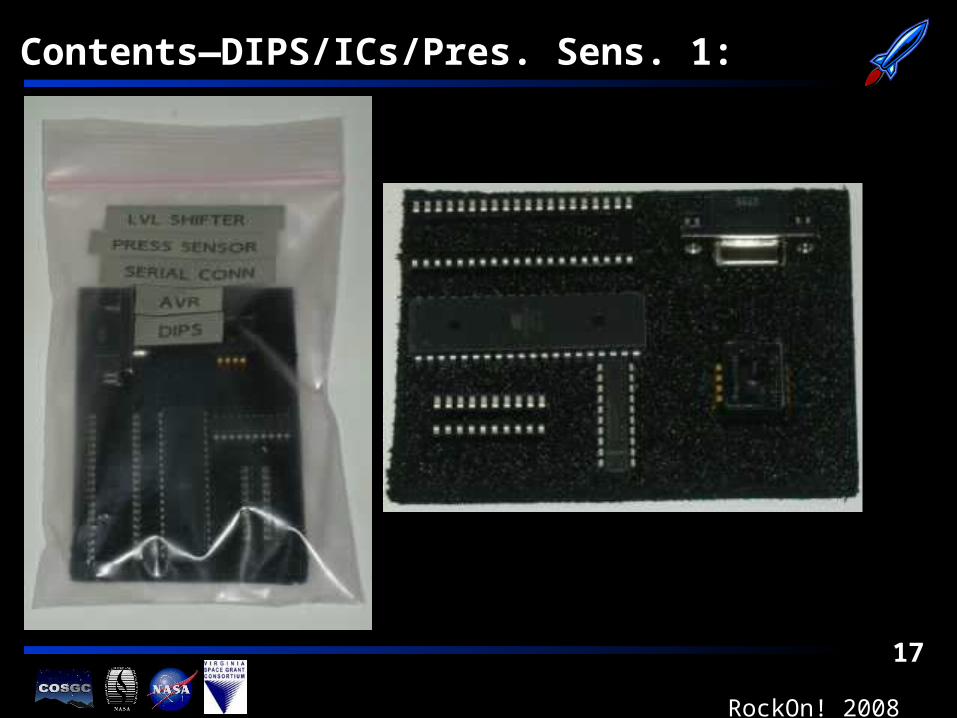
18
RockOn! 2008
Kit Contents—DIPS/ICs/Pres. Sens. 2:
DIPS/ICs/Press. Sens.:
- One (1) AVR DIP
- One (1) AVR
- One (1) Level Shifter (LS)
- One (1) LS DIP
- One (1) Pressure Sensor
- One (1) DB9 Connector
LS DIP
AVR
AVR DIP
LS
Press. Sens
DB9 Conn.

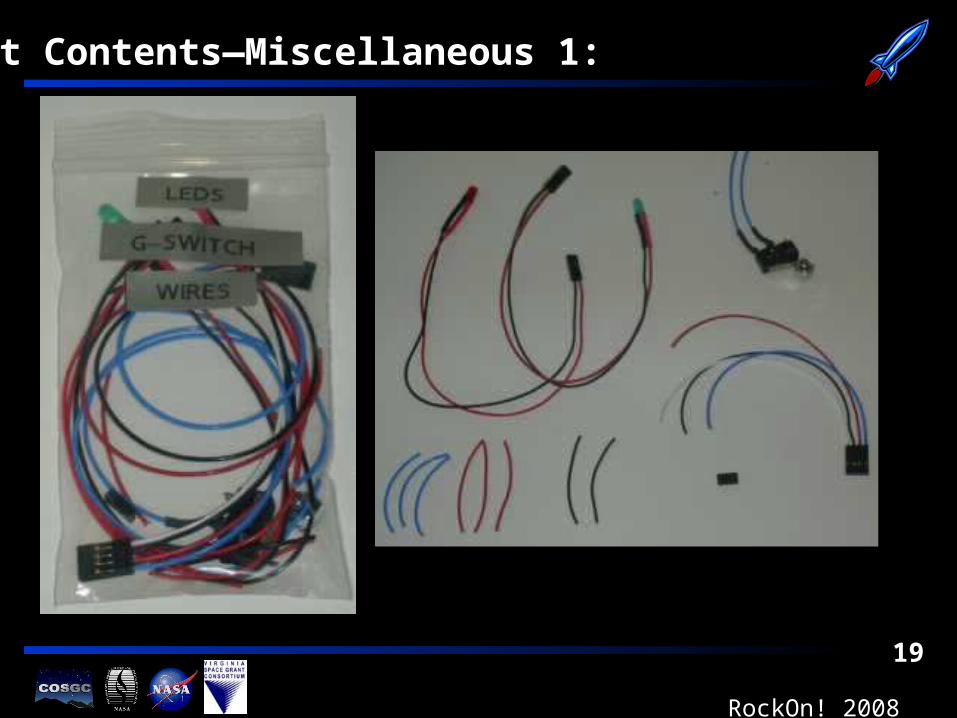
20
RockOn! 2008
Kit Contents—Miscellaneous 2:
Miscellaneous:
- One (1) Red LED
- One (1) Green LED
- One (1) G-Switch
- One (1) Jumper
- One (1) Z-Accelerometer Connector
Green LED
Red LED
Jumper
Z-Acc. Conn.
G-Switc
h

21
RockOn! 2008
Kit Contents—Miscellaneous 3:
Miscellaneous:
- Wires:
-Three (3) Blue
-Three (3) Red
-Two (2) Black
Bla
ck
Red
Blu
e

22
RockOn! 2008
Kit Contents—Transistors:
Transistors:
- One (1) NPN Transistor
-T1
- One (1) PNP Transistor
-T2

23
RockOn! 2008
Kit Contents—VREGS:
VREGS:
- One (1) 5V VREG
- One (1) 3.3 VREG

24
RockOn! 2008
Kit Contents—Diodes:
Diodes:
- Three (3) Diodes
-D1, D2, D3

25
RockOn! 2008
Board Check:
- Check to ensure that your boards have: flash memory (1), a level shifter (2), and four accelerometers (3).
- Please raise your hand if any components are missing.
21
3

27
RockOn! 2008
Current Sub System:
Power Sub System:Activation
Power Regulation Construction
Sensor Sub System:Temperature Sensor
Pressure SensorX & Y Axis Accelerometers
Z Axis AccelerometersGeiger Counter Interface
Command and Data Handling:In-System Serial Programming (ISP)
Data Retrieval

28
RockOn! 2008
RBF/G-Switch Headers:
- Solder two (2) of the 2X1 headers into the footprints labeled RBF Pin and G-Switch.
- As always, ensure they are flush with the board.
G-Switch
RBF Pin

29
RockOn! 2008
On and RDY Headers:
- Solder two more (2) of the 2X1 headers into the footprints labeled On and RDY.
- These headers will be used for indicator LEDs.
On
RD
Y

30
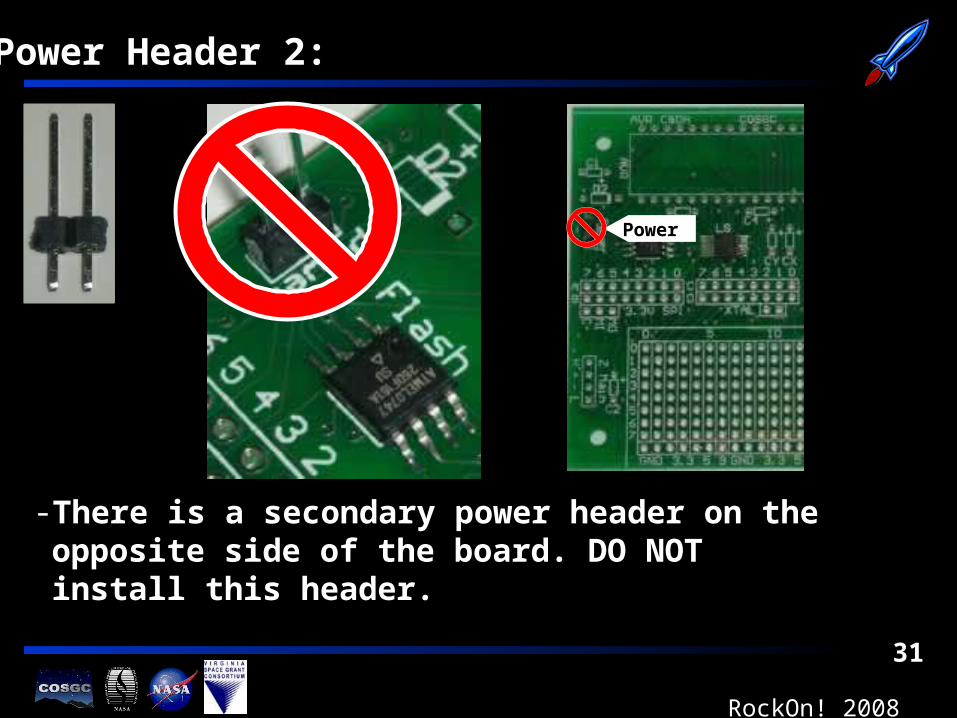
RockOn! 2008
Power Header 1:
- Solder one (1) of the 2X1 headers into the footprint labeled Power.
- This is the primary power header.
On
31
RockOn! 2008
Power Header 2:
- There is a secondary power header on the opposite side of the board. DO NOT install this header.
Power

32
RockOn! 2008
Pre-Bending:
Pre-Bending 101:
- Pre-bending is a technique that allows components to be easily inserted into a PCB.
- Pre-bending also allows components to lay more flush with the board.
- Bending components to the correct bend radius takes practice, but mastering the technique will reap rewarding benefits!

33
RockOn! 2008
Pre-Bending:
Pre-Bending 101:
- Start with the bending and prodding tool in the position shown in the top picture.
- Choose a location along the length of the tool that will yield the appropriate bend radius.
- Use your thumb to bend the lead such that the component and lead are orthogonal.
90°

34
RockOn! 2008
Diodes:
- Take three (3) diodes from your supplies and use the supplied bending and prodding tool to bend the leads at 90 degrees as shown above.
Right: Bent diode ready for installation.
Left: Diode as it comes in the kit.

35
RockOn! 2008
Diodes (D1-D3):
- Solder one (1) of the bent diodes into the footprint labeled D1 on the board.
- Note: Diodes are polarized and the black line on the diode must overlay the while line on the footprint.
D1
D2 D3
Black and white overlay

36
RockOn! 2008
Diodes (D1-D3):
- Solder one (1) of the bent diodes into the footprint labeled D2.
- Check polarity.
D1
D2 D3
37
RockOn! 2008
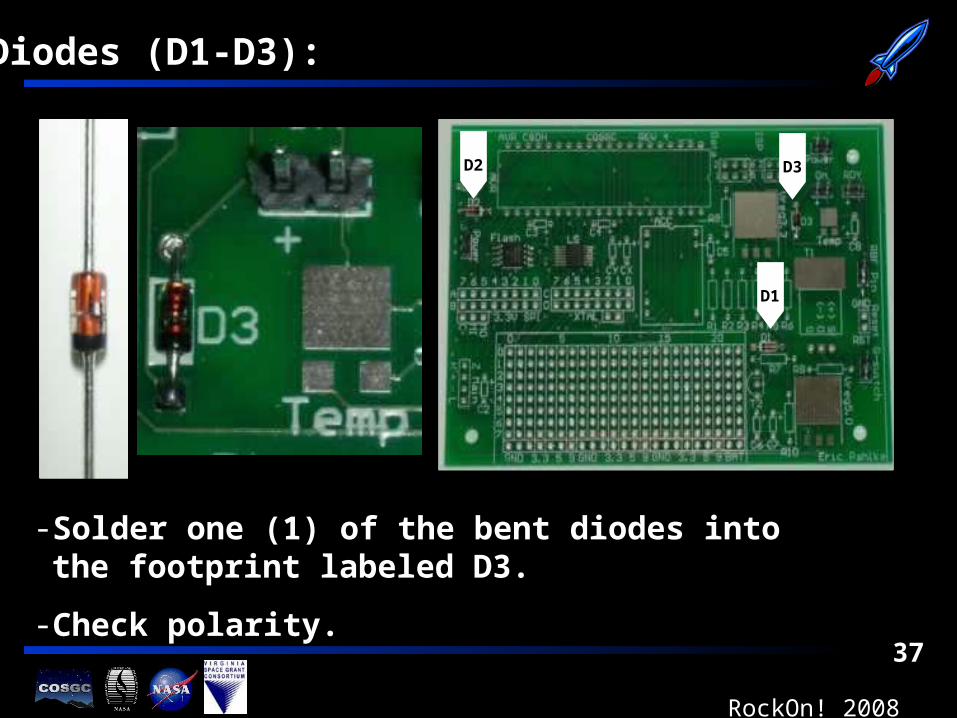
Diodes (D1-D3):
- Solder one (1) of the bent diodes into the footprint labeled D3.
- Check polarity.
D1
D2 D3

38
RockOn! 2008
ESD/Heat Concern:
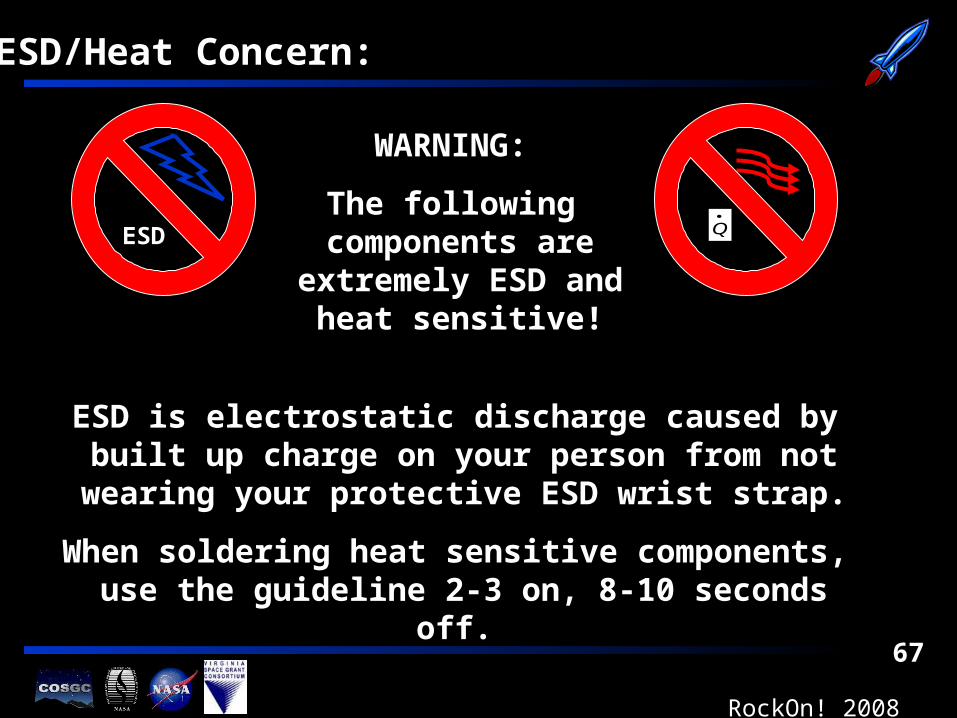
ESD is electrostatic discharge caused by built up charge on your person from not wearing your protective ESD wrist
strap.
When soldering heat sensitive components, use the guideline 2-3 on, 8-10 seconds off.
ESD
Q
WARNING:
The following components are extremely ESD and
heat sensitive!

39
RockOn! 2008
Transistors:
- Take the power transistor, T1, and the NPN transistor, T2, from the kit and use the bending and prodding tool to bend the leads as shown above.
- Note: Advance to the next slide/page to place these transistors in their footprints to determine the bend location and radius.
Above: Bent power transistor, T1. Above: Bent NPN transistor, T2.

40
RockOn! 2008
Transistors (T1):
- Solder the power transistor, T1, into its footprint and ensure that the bend allows it to lay flush with its heat sink.
- Ensure that T1 is flush with the heat sink BEFORE soldering it into its footprint.
- DO NOT solder T1 to the heat sink.
T1

41
RockOn! 2008
Transistors (T2):
- Place and solder the bent NPN transistor, T2, into its footprint and ensure that the bend allows it to lay flush with the board.
T2

42
RockOn! 2008
Transistors (T2):
- Place and solder the bent NPN transistor, T2, into its footprint and ensure that the bend allows it to lay flush with the board.
T2

43
RockOn! 2008
Resistors:
- The next several steps install the resistors for the power sub system. There are four (4) different types of resistors for this sub system: 10K, 100K, 1K, and 3.3K.
- The resistors will lay more flush with the board if the bending and prodding tool is used first to bend the resistors are shown above.

44
RockOn! 2008
Resistors (10K):
R2
R3
R4
R10
- Bend four (4) of the 10K resistors in the kit as indicated previously and solder them into footprints R2, R3, R4, and R10.

45
RockOn! 2008
Resistors (1K):
- Bend one (1) of the 1K resistors in the kit as indicated previously and solder it into footprint R8.
R8

46
RockOn! 2008
Resistors (1K):
- Bend one (1) of the 1K resistors in the kit as indicated previously and solder it into footprint R9.
R9
47
RockOn! 2008
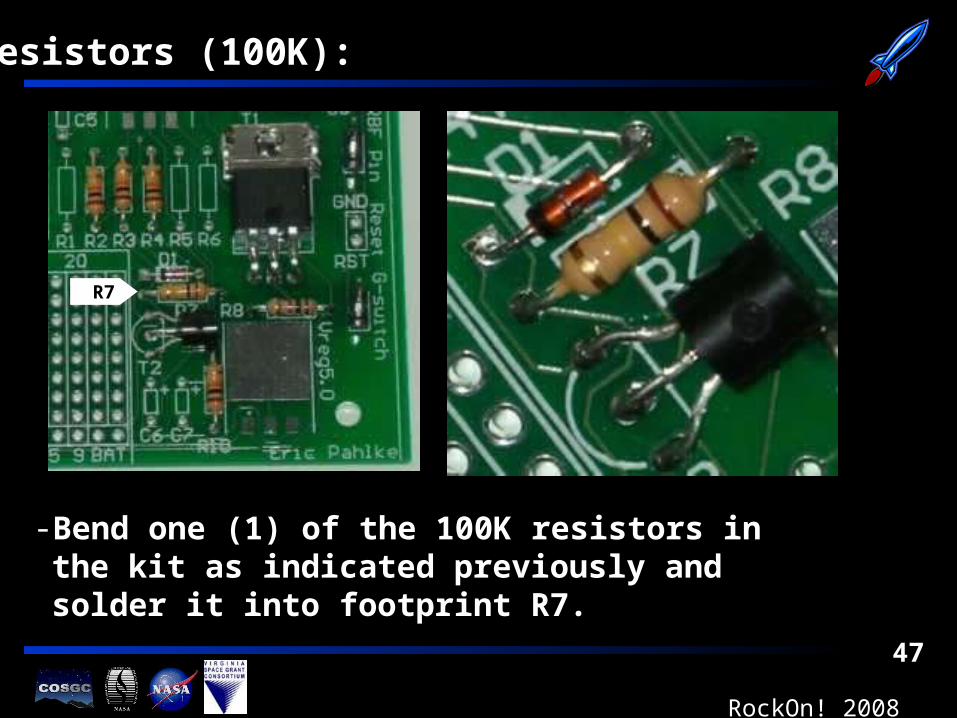
Resistors (100K):
- Bend one (1) of the 100K resistors in the kit as indicated previously and solder it into footprint R7.
R7

48
RockOn! 2008
Power System Test 1:
9V Supply, Flight Pin, RDY LED
RockOn! 2008

49
RockOn! 2008
Power System Test 1:
- Take out the multimeter that was provided.
- Insert the red plug into the port labeled VΩHz.
- Insert the black plug into the port labeled COM.
- DO NOT turn it on at this point in time.COM VΩHz

50
RockOn! 2008
Power System Test 1:
- Turn on the multimeter.- Turn the dial to the 20V setting.- Place the red lead on the positive battery terminal.- Place the black lead on the negative battery terminal.- If you do not get a reading of above 9V, raise your hand.

51
RockOn! 2008
Power System Test 1:
+
-
- Set multimeter in continuity test mode.- Place red lead on positive power terminal.- Place black lead on GND.- If a beep is heard, please raise your hand.

52
RockOn! 2008
Power System Test 1:
- Connect your battery to the circuit (red wire is positive).- Connect the red LED to the “RDY” header.- Connect the jumper to “RBF Pin.”- If the red LED does not light, please raise your hand.
Jumper

53
RockOn! 2008
Current Sub System:
Power Sub System:Activation
Power Regulation Construction
Sensor Sub System:Temperature Sensor
Pressure SensorX & Y Axis Accelerometers
Z Axis AccelerometersGeiger Counter Interface
Command and Data Handling:In-System Serial Programming (ISP)
Data Retrieval

54
RockOn! 2008
ESD/Heat Concern:
ESD is electrostatic discharge caused by built up charge on your person from not wearing your protective ESD wrist
strap.
When soldering heat sensitive components, use the guideline 2-3 on, 8-10 seconds off.
ESD
Q
WARNING:
The following components are extremely ESD and
heat sensitive!

55
RockOn! 2008
3.3 Voltage Regulator:
Take one (1) 3.3 VREG from the kit (L69B) and solder it to the board.
TIP: Place a large blob of solder (2 linear inches) onto the side of the soldering iron’s tip, and tack the large pad on first. Once the large pad is tacked, solder the remaining pads.
3.3 VREG

56
RockOn! 2008
3.3 Voltage Regulator:
Using the technique described on the previous slide, solder one (1) 5.0 VREG onto the board as shown above.
5.0 VREG

57
RockOn! 2008
Capacitors (C1):
Take one (1) 10μF capacitor from the kit and solder it into the footprint labeled C1.
Note: Unlike the Geiger build, capacitor directions are not important for this portion of the build.
10μF(C1)

58
RockOn! 2008
Capacitors (C2, C6, C7):
Take three (3) .1μF capacitors from the kit and solder them into the footprints labeled C1, C6, and C7.
.1μF(C2)
.1μF(C6) .1μF(C7)

59
RockOn! 2008
Power System Test 2:
ON LED, 3.3 V Supply, 5.0 V Supply
RockOn! 2008

60
RockOn! 2008
ON LED Test:
G-Switch
ON LED
9 V Batt.
RDY LED
Jumper
Connections:
- Connect the battery- Connect the LEDs:
-Red to RDY-Green to ON
- Connect the G-Switch- Connect the jumper to RBF Pin

61
RockOn! 2008
ON LED Test 2:
G-Switch
ON LED
9 V Batt.
RDY LED
Jumper
Expected Results:
- The red LED should be illuminated
- Click the G-Switch- The green LED should
now illuminate
- Raise your hand if you do not see these results
62
RockOn! 2008
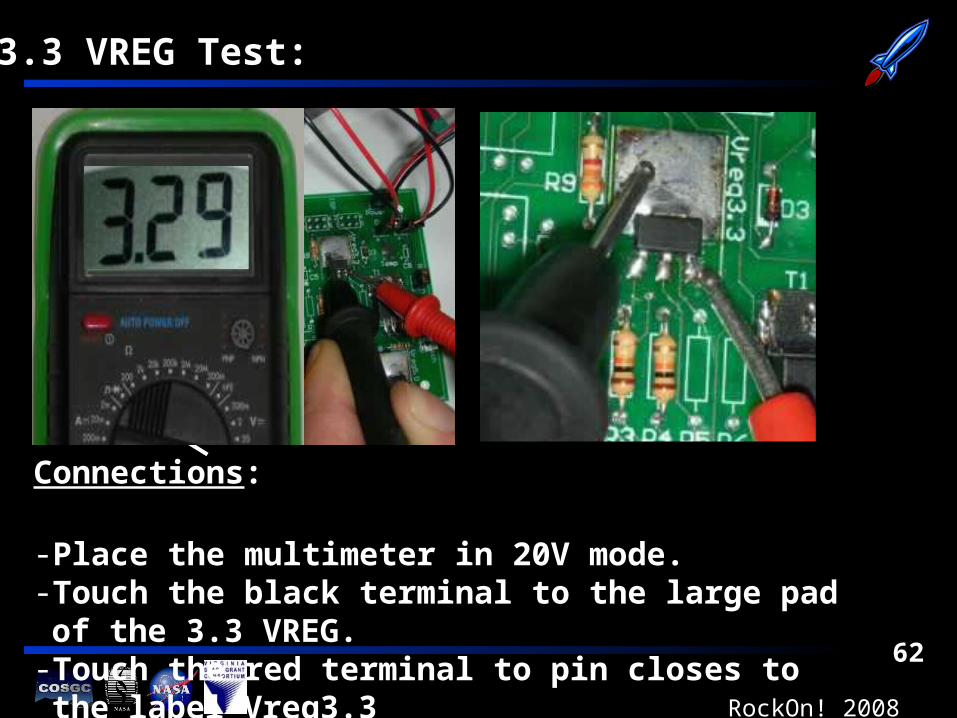
3.3 VREG Test:
Connections:
- Place the multimeter in 20V mode.- Touch the black terminal to the large pad of the 3.3 VREG.- Touch the red terminal to pin closes to the label Vreg3.3

63
RockOn! 2008
3.3 VREG Test:
Expected Results:
- The multimeter should read 3.3 ± 0.1 Volts.- If you do not see these results, please raise your hand.

64
RockOn! 2008
5.0 VREG Test:
Connections:
- Place the multimeter in 20V mode.- Touch the black terminal to the large pad of the 5.0 VREG.- Touch the red terminal to pin closes to the label Vreg5.0

65
RockOn! 2008
5.0 VREG Test:
Expected Results:
- The multimeter should read 5.0 ± 0.1 Volts.- If you do not see these results, please raise your hand.

66
RockOn! 2008
Current Sub System:
Power Sub System:Activation
Power Regulation Construction
Sensor Sub System:Temperature Sensor
Pressure SensorX & Y Axis Accelerometers
Z Axis AccelerometersGeiger Counter Interface
Command and Data Handling:In-System Serial Programming (ISP)
Data Retrieval
67
RockOn! 2008
ESD/Heat Concern:
ESD is electrostatic discharge caused by built up charge on your person from not wearing your protective ESD wrist
strap.
When soldering heat sensitive components, use the guideline 2-3 on, 8-10 seconds off.
ESD
Q
WARNING:
The following components are extremely ESD and
heat sensitive!

68
RockOn! 2008
Temperature Sensor:
Temp. Sens.
- The assistants will now give you a temperature sensor.- Use a similar technique used on the VREGS to solder
the temperature sensor to its pads
- TIP: Have one of your partners hold it in place with the provided tweezers while the large pin is tacked in place.
69
RockOn! 2008
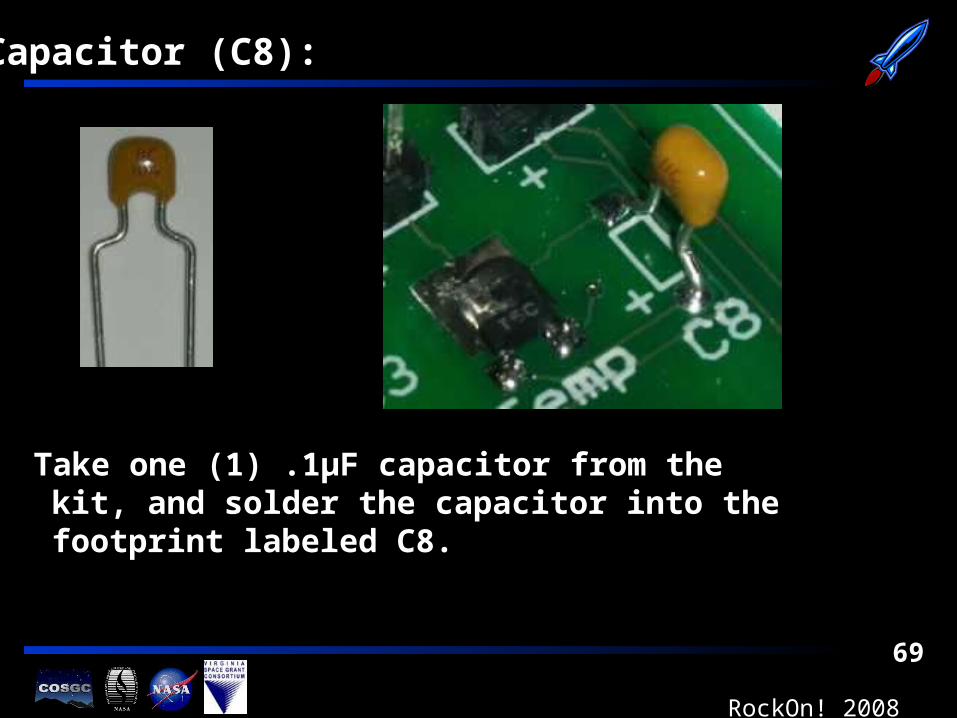
Capacitor (C8):
Take one (1) .1μF capacitor from the kit, and solder the capacitor into the footprint labeled C8.

71
RockOn! 2008
Temperature Sensor Test 1:
Connections:
- Connect the battery- Connect the LEDs:
-Red to RDY-Green to ON
- Connect the G-Switch- Connect the jumper to RBF Pin- Click/Activate the G-Switch

72
RockOn! 2008
Temperature Sensor Test 1:
Connections:
- Connect the battery- Connect the LEDs:
-Red to RDY-Green to ON
- Connect the G-Switch- Connect the jumper to RBF Pin- Click/Activate the G-Switch
73
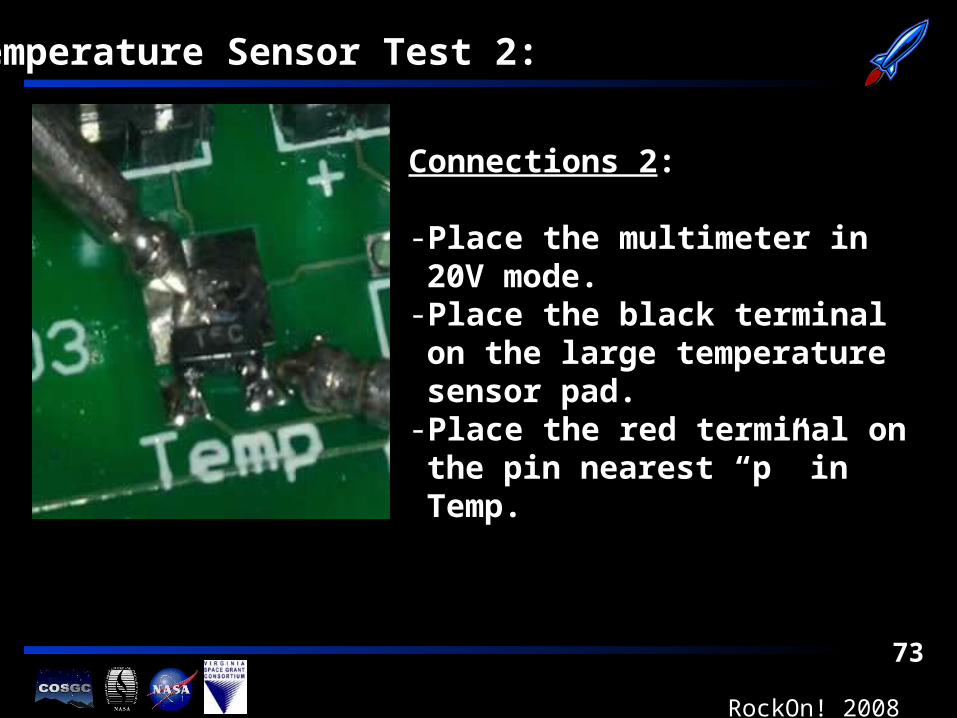
RockOn! 2008
Temperature Sensor Test 2:
Connections 2:
- Place the multimeter in 20V mode.- Place the black terminal on the
large temperature sensor pad.- Place the red terminal on the pin
nearest “p” in Temp.

74
RockOn! 2008
Temperature Sensor Test 2:
Expected Results:
- If the multimeter does not display a voltage of 0.7 ± 0.1 Volts, please raise your hand.
- Ensure that your partner has his/her ESD band on and have him/her place his/her finger on the sensor.
- If you do not see an increase in voltage, raise your hand.
75
RockOn! 2008
Current Sub System:
Power Sub System:Activation
Power Regulation Construction
Sensor Sub System:Temperature Sensor
Pressure SensorX & Y Axis Accelerometers
Z Axis AccelerometersGeiger Counter Interface
Command and Data Handling:In-System Serial Programming (ISP)
Data Retrieval
76
RockOn! 2008
Development Area:
When using the breadboard, keep in mind that other parts will use it later, so make sure that the wires crossing the breadboard are not so tight that the area underneath them is unusable.
For wires, use the convention that red is power, black is ground, and blue and white are data.

77
RockOn! 2008
ESD/Heat Concern:
ESD is electrostatic discharge caused by built up charge on your person from not wearing your protective ESD wrist
strap.
When soldering heat sensitive components, use the guideline 2-3 on, 8-10 seconds off.
ESD
Q
WARNING:
The following components are extremely ESD and
heat sensitive!

78
RockOn! 2008
Pressure Sensor 1:
- Remove one (1) pressure sensor from the kit.
- Find the notched pin (shown above) that will be connected to 5 Volts DC.
Notched PWR Pin

79
RockOn! 2008
Pressure Sensor 2:
- Carefully insert the pressure sensor into the breadboard. - The row of NC pins should be in column 8.
- The notched power pin should be in row 4, column 2.
NC
Power
Data
Ground
NC
NC
NC
NC
Power Goes Here.

80
RockOn! 2008
Pressure Sensor 3:
- Now turn the board over and solder all 8 pins.
- Note: DO NOT KEEP THE IRON ON ANY PIN LONGER THAN 2-3 SECONDS WITHOUT ALLOWING 10 SECONDS OF COOLING TIME.

81
RockOn! 2008
Bridging 1:
Bridging 101:- Building in a bread board section usually calls for a technique called “bridging.”- If you are unfamiliar with bridging, it is used to make electrical connection between components when pre-printed traces do not already exits.

82
RockOn! 2008
Bridging 2:
Bridging 101:- To bridge, a good technique calls for bending leads and wire over each other before clipping them.- Once leads and/or wires are in contact, apply a generous amount of solder to create a solder bead between the leads of interest. See the pictures above.
Good Bridge
Cross-Over

83
RockOn! 2008
Pressure Sensor 4:
- Strip both ends of one (1) 1.5 inch red wire.- Insert one end of the wire into a 5V source.- Insert the other end into row 4, column 1 (next to power pin).- Bridge the red wire to the power pin on the pressure sensor.
PWR Bridge

84
RockOn! 2008
Pressure Sensor 5:
GND Bridge
- Strip both ends of one (1) 1.5 inch black wire.- Insert one end of the wire into GND.- Insert the other end into row 2, column 1 (next to ground pin).- Bridge the black wire to the ground pin on the pressure sensor.

85
RockOn! 2008
Pressure Sensor 6:
Data Bridge
- Strip both ends of one (1) 1.5 inch blue wire.- Insert one end of the wire into A7.- Insert the other end into row 3, column 1 (next to data pin).- Bridge the blue wire to the data pin on the pressure sensor.

87
RockOn! 2008
Pressure Sensor Test:
Connections 1:
- Connect the battery- Connect the LEDs:
-Red to RDY-Green to ON
- Connect the G-Switch- Connect the jumper to RBF Pin- Click/Activate the G-Switch

88
RockOn! 2008
Pressure Sensor Test:
Connections 2:
- Place the multimeter in 20V mode.- Place the black terminal on GND.- Place the red terminal on the data
(blue wire) pin.
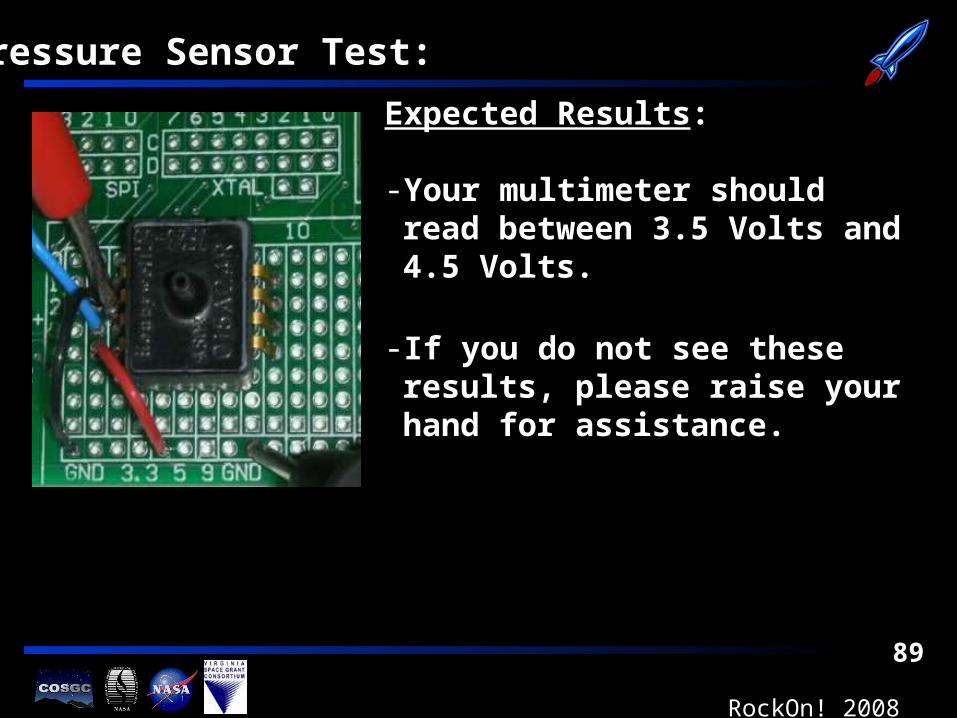
89
RockOn! 2008
Pressure Sensor Test:
Expected Results:
- Your multimeter should read between 3.5 Volts and 4.5 Volts.
- If you do not see these results, please raise your hand for assistance.
90
RockOn! 2008
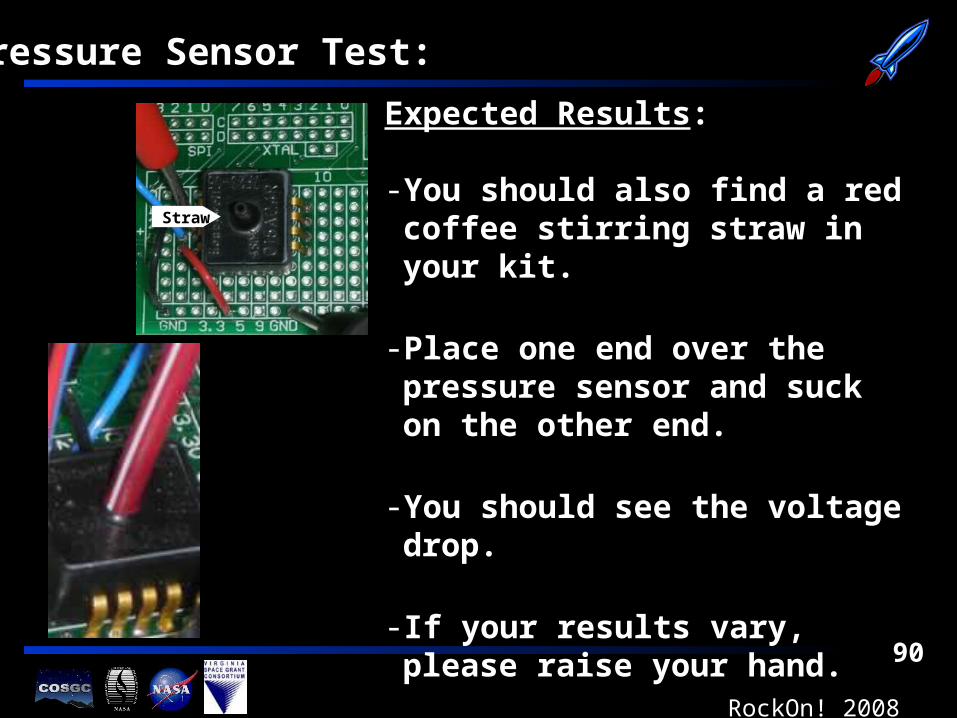
Pressure Sensor Test:
Expected Results:
- You should also find a red coffee stirring straw in your kit.
- Place one end over the pressure sensor and suck on the other end.
- You should see the voltage drop.
- If your results vary, please raise your hand.
Straw

91
RockOn! 2008
Current Sub System:
Power Sub System:Activation
Power Regulation Construction
Sensor Sub System:Temperature Sensor
Pressure SensorX & Y Axis Accelerometers
Z Axis AccelerometersGeiger Counter Interface
Command and Data Handling:In-System Serial Programming (ISP)
Data Retrieval

92
RockOn! 2008
X & Y Accelerometers 1:
- Take out four (4) of the 2X1 headers from the kit. Share pliers with your neighbors, and break one (1) 2X1 header into two (1X1) headers.

93
RockOn! 2008
X & Y Accelerometers 2:
- Place and solder the three (3) 2X1 headers into the 2X1 holes in the Acc footprint.
- Place and solder the one (1) 1X1 header into the 1X1 hole in the Acc footprint.
2X1
2X1
1X1
2X1

94
RockOn! 2008
X & Y Accelerometers 3:
- Place and solder the provided X&Y accelerometer board onto the headers added in the previous step.
- Caution: When clipping these leads, ensure that you have your safety glasses on. Hold the leads while clipping them.

95
RockOn! 2008
Capacitors (C5, CX, CY):
- Solder three (3) of the .1μF capacitors into the footprints labeled CX, CY, and C5.
- Note: These capacitors are located near the accelerometers that were just mounted.
CY
CX
C5
96
RockOn! 2008
Current Sub System:
Power Sub System:Activation
Power Regulation Construction
Sensor Sub System:Temperature Sensor
Pressure SensorX & Y Axis Accelerometers
Z Axis AccelerometersGeiger Counter Interface
Command and Data Handling:In-System Serial Programming (ISP)
Data Retrieval

97
RockOn! 2008
Z Accelerometer Header:
- Solder one (1) 4X1 header into the footprint next to the pressure sensor.
- Note: This header will connect the Z accelerometer board to the main board.

98
RockOn! 2008
Z Accelerometer Cable:
- Strip and solder the four (4) wire Z Accelerometer Connector into the Z Accelerometer board.
- White goes to “L”, Black to “-”, Red to “+”, and Blue to “H”.

99
RockOn! 2008
Z Accelerometer Cable:
- Now that the wire have been soldered in, make sure that the leads are clipped as close to the board as possible to prevent shorting on the structural mount that will be added later.

100
RockOn! 2008
Capacitors (CZ and C9):
Solder two (2) .1μF capacitors into the footprints labeled C9 and CZ on the Z accelerometer board.

101
RockOn! 2008
Capacitors (CZ and C9):
- Now that the capacitors have been soldered in, make sure that the leads are clipped as close to the board as possible to prevent shorting on the structural mount that will be added later.

102
RockOn! 2008
Accelerometer Test:
X, Y, and Z Axis
RockOn! 2008

103
RockOn! 2008
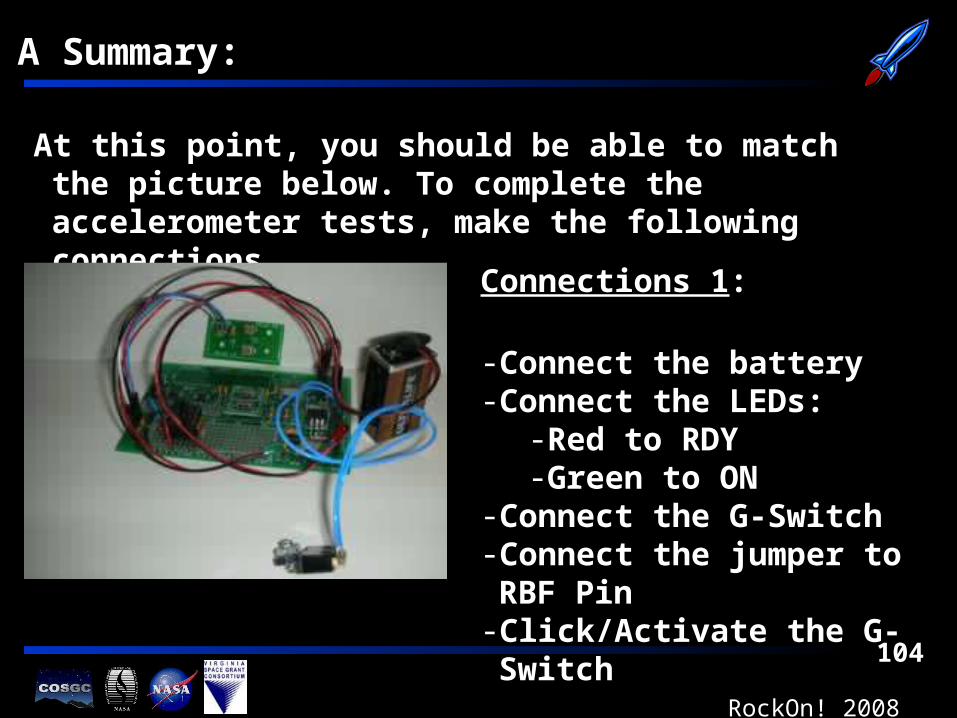
A Summary:
At this point, you should be able to match the picture below. To complete the accelerometer tests, make the following connections.
Connections 1:
- Connect the battery- Connect the LEDs:
-Red to RDY-Green to ON
- Connect the G-Switch- Connect the jumper to RBF Pin- Click/Activate the G-Switch
104
RockOn! 2008
A Summary:
At this point, you should be able to match the picture below. To complete the accelerometer tests, make the following connections.
Connections 1:
- Connect the battery- Connect the LEDs:
-Red to RDY-Green to ON
- Connect the G-Switch- Connect the jumper to RBF Pin- Click/Activate the G-Switch
105
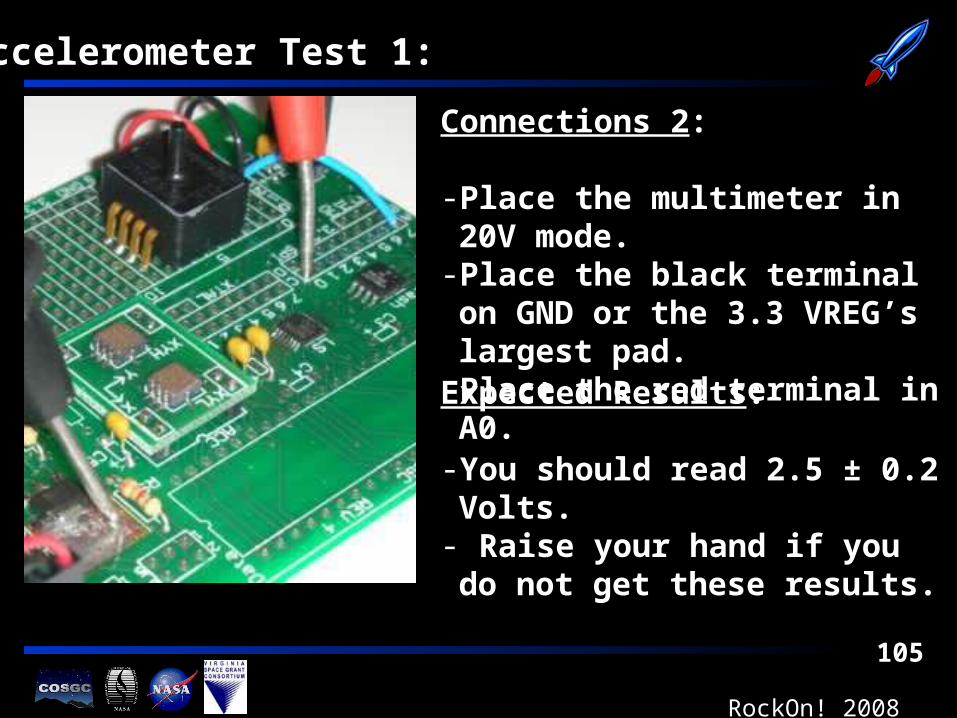
RockOn! 2008
Accelerometer Test 1:
Connections 2:
- Place the multimeter in 20V mode.- Place the black terminal on GND
or the 3.3 VREG’s largest pad.- Place the red terminal in A0.
Expected Results:
- You should read 2.5 ± 0.2 Volts.- Raise your hand if you do not get
these results.

106
RockOn! 2008
Accelerometer Test 2:
Connections 3:- Ensure that one partner has an
ESD strap on.- Have this partner hold the Z
Accelerometer board flat against the static mat.
- Keep black terminal on GND- Move red terminal from A0
through A5.
Expected Results:
- If you do not read 2.5 ± 0.2 Volts on all pins, please raise your hand.

107
RockOn! 2008
Accelerometer Test 3:
Pin Summary:A0: X-Low RangeA1: Y-Low RangeA2: Z-Low RangeA3: X-High RangeA4: Y-High RangeA5: Z-High Range
Sanity Check:- Have your ESD safe partner
reorient the Z Accelerometer board and main board.
- Measure voltages on A0-A5- If you do not see voltages other
than 2.5 Volts, raise your hand.

108
RockOn! 2008
ESD/Heat Concern:
ESD is electrostatic discharge caused by built up charge on your person from not wearing your protective ESD wrist
strap.
When soldering heat sensitive components, use the guideline 2-3 on, 8-10 seconds off.
ESD
Q
WARNING:
The following components are extremely ESD and
heat sensitive!
109
RockOn! 2008
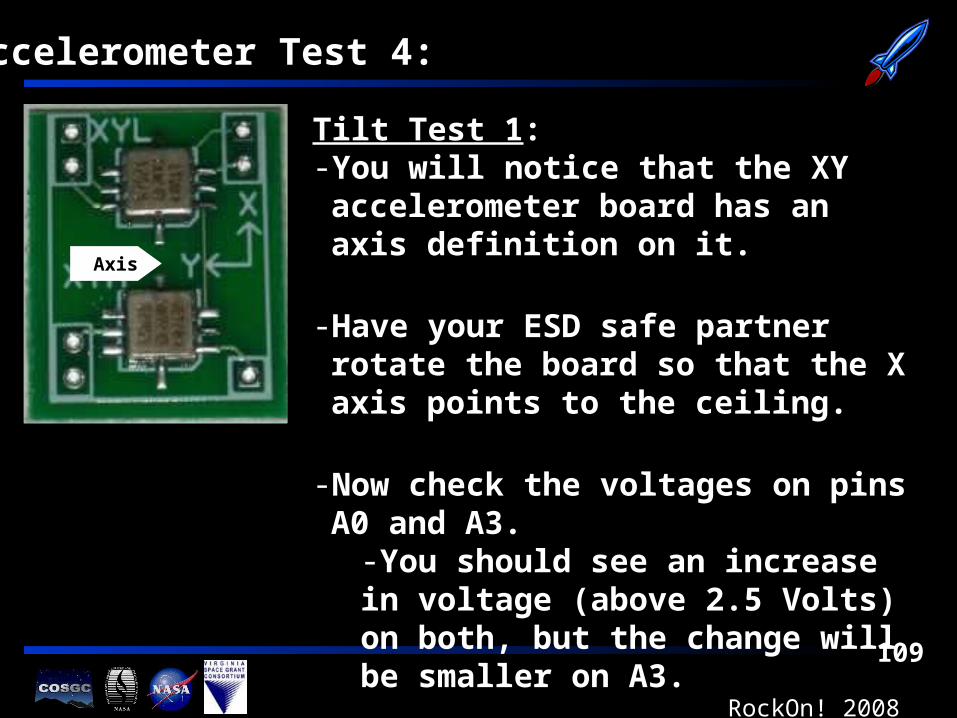
Accelerometer Test 4:
Tilt Test 1:- You will notice that the XY accelerometer
board has an axis definition on it.
- Have your ESD safe partner rotate the board so that the X axis points to the ceiling.
- Now check the voltages on pins A0 and A3.
-You should see an increase in voltage (above 2.5 Volts) on both, but the change will be smaller on A3.
Axis

110
RockOn! 2008
Accelerometer Test 5:
Tilt Test 2:- You will notice that the XY accelerometer
board has an axis definition on it.
- Have your ESD safe partner rotate the board so that the Y axis points to the ceiling.
- Now check the voltages on pins A1 and A4.
-You should see an increase in voltage (above 2.5 Volts) on both, but the change will be smaller on A4.
Axis
111
RockOn! 2008
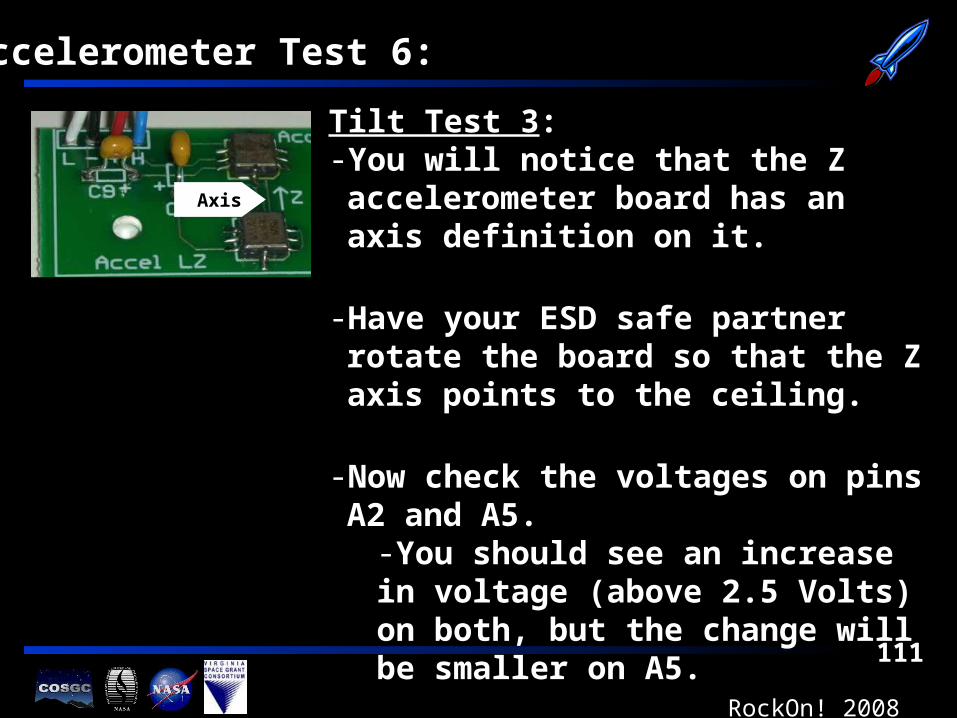
Accelerometer Test 6:
Tilt Test 3:- You will notice that the Z accelerometer
board has an axis definition on it.
- Have your ESD safe partner rotate the board so that the Z axis points to the ceiling.
- Now check the voltages on pins A2 and A5.
-You should see an increase in voltage (above 2.5 Volts) on both, but the change will be smaller on A5.
Axis

112
RockOn! 2008
Current Sub System:
Power Sub System:Activation
Power Regulation Construction
Sensor Sub System:Temperature Sensor
Pressure SensorX & Y Axis Accelerometers
Z Axis AccelerometersGeiger Counter Interface
Command and Data Handling:In-System Serial Programming (ISP)
Data Retrieval

113
RockOn! 2008
Geiger Header 1:
- Solder one (1) 3X1 header into the bread board section of the board.
- The left most pin should be in row1, column 11.
114
RockOn! 2008
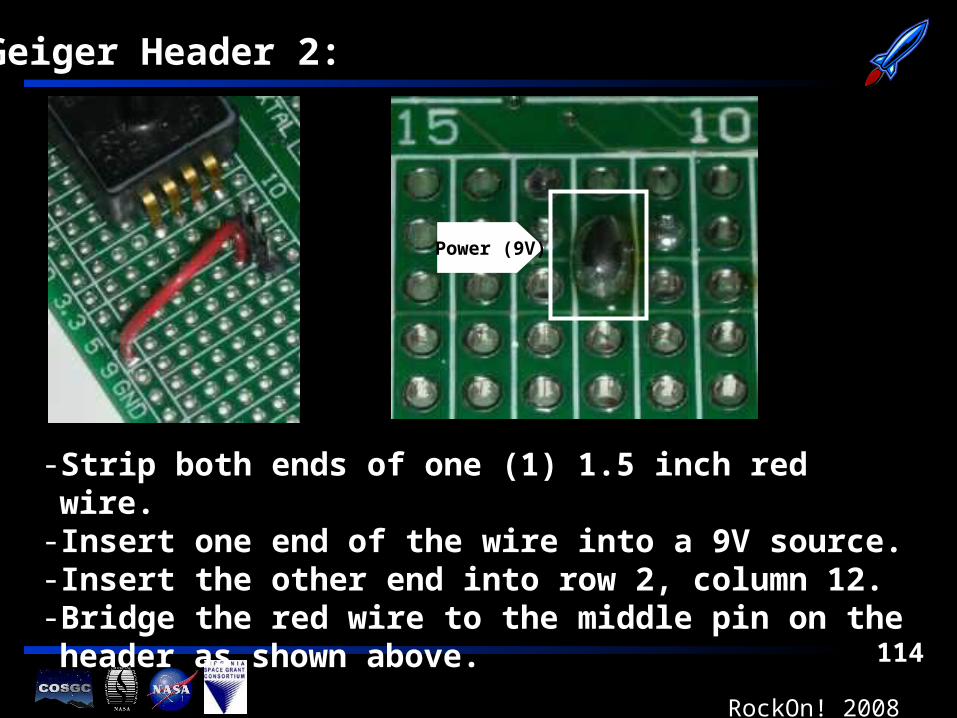
Geiger Header 2:
Power (9V)
- Strip both ends of one (1) 1.5 inch red wire.- Insert one end of the wire into a 9V source.- Insert the other end into row 2, column 12.- Bridge the red wire to the middle pin on the header as shown
above.

115
RockOn! 2008
Geiger Header 3:
GN
D
- Strip both ends of one (1) 1.5 inch black wire.- Insert one end of the wire into GND.- Insert the other end into row 2, column 13.- Bridge the black wire to the right most pin on the header as
shown above.

116
RockOn! 2008
Geiger Header 3:
Data
- Strip both ends of one (1) 1.5 inch blue wire.- Insert one end of the wire into D2.- Insert the other end into row 0, column 11.- Bridge the blue wire to the pin closest to the pressure sensor
on the header as shown above.

117
RockOn! 2008
Current Sub System:
Power Sub System:Activation
Power Regulation Construction
Sensor Sub System:Temperature Sensor
Pressure SensorX & Y Axis Accelerometers
Z Axis AccelerometersGeiger Counter Interface
Command and Data Handling:In-System Serial Programming (ISP)
Data Retrieval

118
RockOn! 2008
AVR Socket:
- Solder one (1) AVR DIP into the “AVR” footprint.- Warning: Make sure that the notches are aligned as indicated
above and socket is flush with the board. - Tip: It works well to tack two corners on the back side to
ensure it is mounted correctly before soldering all 40 pins.
Notches

119
RockOn! 2008
Capacitors (C3 and C4):
- Solder two (2) .1μF capacitors into the footprints labeled C3 and C4.
- Note: The footprints are located directly below the AVR Dip that was installed in the previous step.
C3 C4

120
RockOn! 2008
Resistors (R1, R5, R6):
- Solder three (3) 10K resistors from the kit and solder them into the footprints labeled R1, R5, and R6.
R1
R6
R5

121
RockOn! 2008
ISP Header:
- Solder one (1) right angle header into the footprints labeled ISP.
- The bent pins should be the ones that are soldered. - Caution: When clipping these leads, ensure that you are
wearing your eye protection and holding the leads.
ISP

122
RockOn! 2008
Indicator LED 1:
- Solder one (1) 3.3K resistor into bread board section as indicated above.
- The right most lead of the resistor should be in row 1, column 15.
- The left most lead of the resistor should be in row 1, column 19.
123
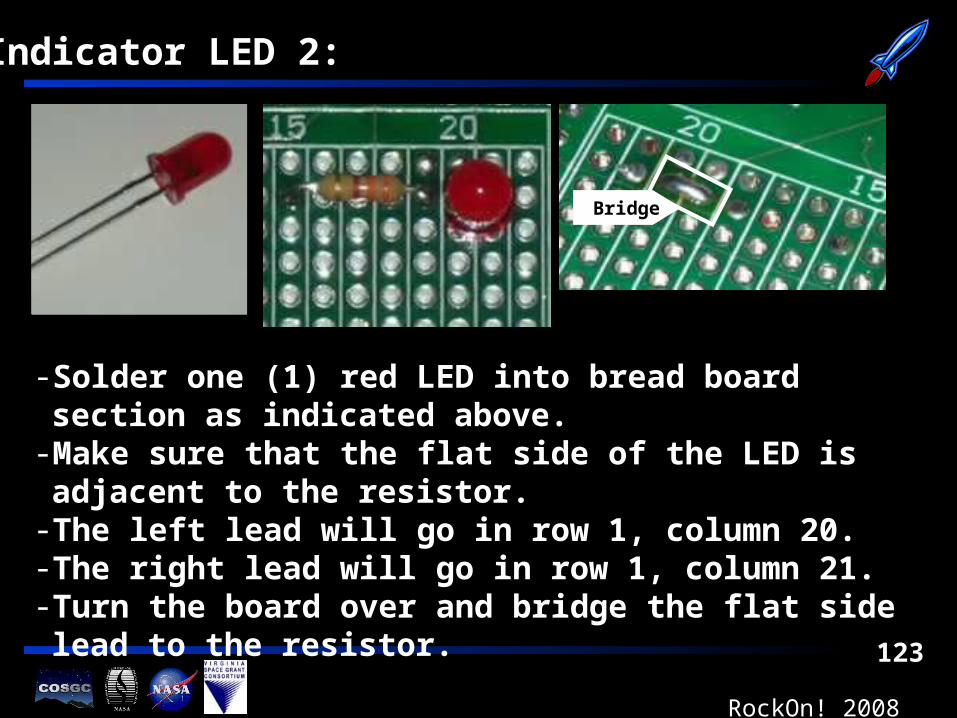
RockOn! 2008
Indicator LED 2:
- Solder one (1) red LED into bread board section as indicated above.
- Make sure that the flat side of the LED is adjacent to the resistor.
- The left lead will go in row 1, column 20. - The right lead will go in row 1, column 21. - Turn the board over and bridge the flat side lead to the resistor.
Bridge
124
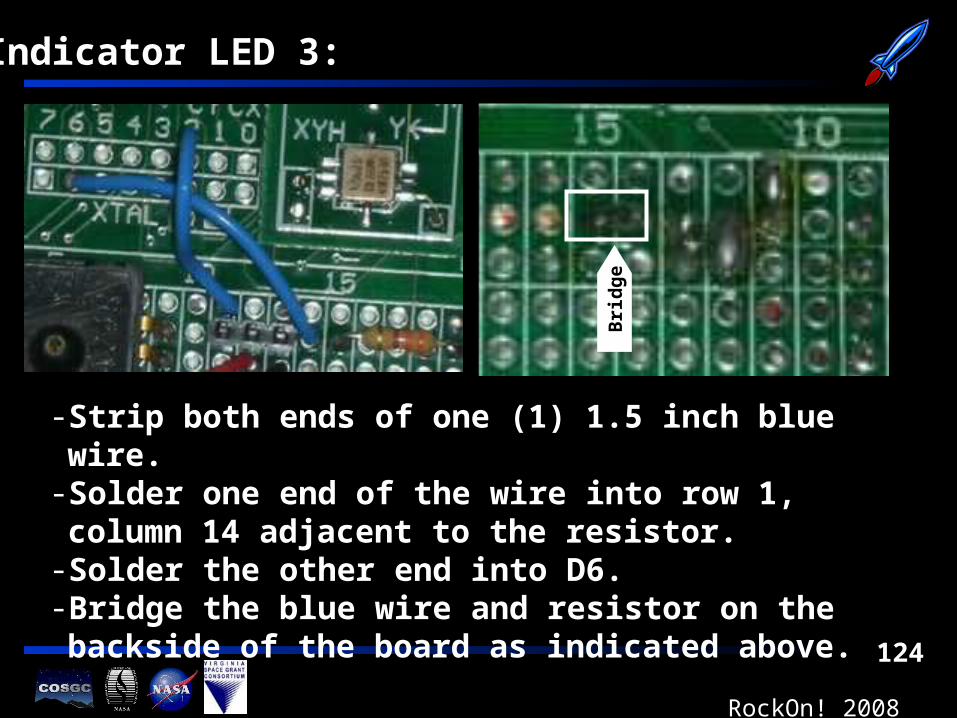
RockOn! 2008
Indicator LED 3:
Bri
dg
e
- Strip both ends of one (1) 1.5 inch blue wire.- Solder one end of the wire into row 1, column 14 adjacent to
the resistor.- Solder the other end into D6.- Bridge the blue wire and resistor on the backside of the board
as indicated above.

125
RockOn! 2008
Indicator LED 4:
Bri
dg
e
5V PWR
- Strip both ends of one (1) 1.5 inch red wire.- Solder one end of the wire into row 1, column 22 adjacent to
the LED.- Solder the other end into a 5 Volt source.- Bridge the wire and LED on the backside of the board as
indicated above.

126
RockOn! 2008
Current Sub System:
Power Sub System:Activation
Power Regulation Construction
Sensor Sub System:Temperature Sensor
Pressure SensorX & Y Axis Accelerometers
Z Axis AccelerometersGeiger Counter Interface
Command and Data Handling:In-System Serial Programming (ISP)
Data Retrieval

127
RockOn! 2008
Data Header:
- Solder one (1) right angle header and solder it into the footprints labeled Data on the Main Board.
- The bent pins should be the ones that are soldered. - Caution: When clipping these leads, ensure that you are
wearing your eye protection.

128
RockOn! 2008
Data Header 2:
Data
- Solder one (1) right angle header and solder it into the footprints labeled Data on the Data Board.
- The bent pins should be the ones that are soldered. - Caution: When clipping these leads, ensure that you are
wearing your eye protection.

129
RockOn! 2008
Level Shifter DIP:
- Solder one (1) level shifter DIP into the footprint labeled Level Shifter.
- Tip: It works well to tack two corners on the back side to ensure it is mounted correctly before soldering all pins.

130
RockOn! 2008
DB9 Serial Connector:
- Solder one (1) DB9 serial connector into the data transfer board.
- Make sure that the connector is flush with the board and the prongs are securing the board before you begin soldering.

131
RockOn! 2008
Resistors (R11):
- Solder one (1) 10k resistor into the footprint labeled R11.
- This resistor is adjacent to the level shifter DIP that was installed two steps back.
132
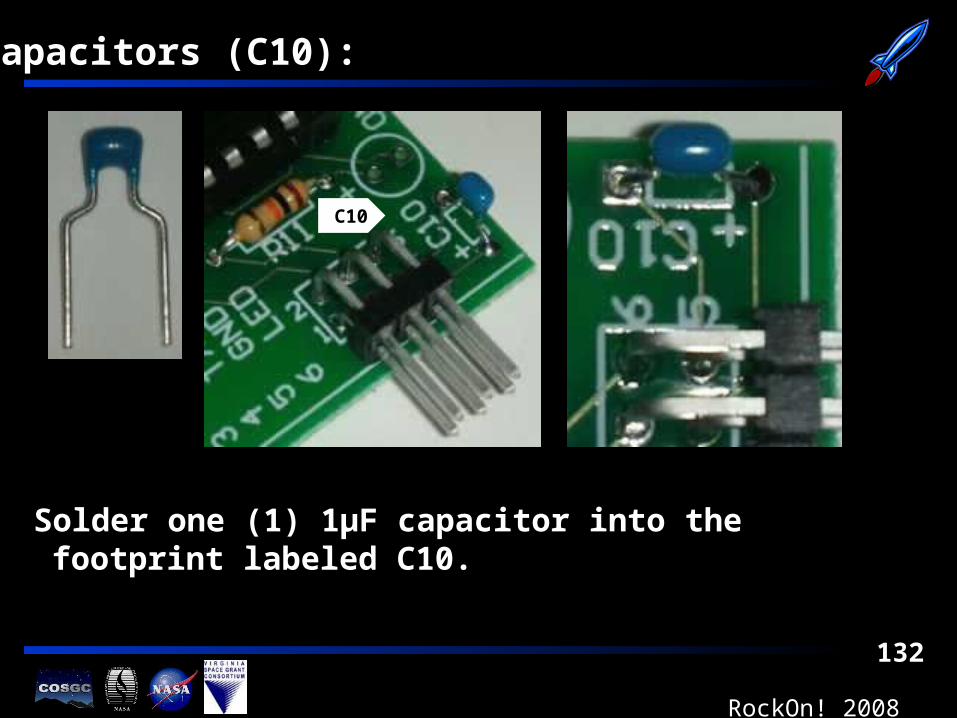
RockOn! 2008
Capacitors (C10):
Solder one (1) 1μF capacitor into the footprint labeled C10.
C10

133
RockOn! 2008
Data LED:
- Solder one (1) red LED into the footprint labeled ON.
- Note: LEDs are polar. The flat side of the LED is the negative side and should be placed in the footprint accordingly.

134
RockOn! 2008
ESD/Heat Concern:
ESD is electrostatic discharge caused by built up charge on your person from not wearing your protective ESD wrist
strap.
When soldering heat sensitive components, use the guideline 2-3 on, 8-10 seconds off.
ESD
Q
WARNING:
The following components are extremely ESD and
heat sensitive!

135
RockOn! 2008
ESD/Heat Concern:
ESD is electrostatic discharge caused by built up charge on your person from not wearing your protective ESD wrist
strap.
When soldering heat sensitive components, use the guideline 2-3 on, 8-10 seconds off.
ESD
Q
WARNING:
The following components are extremely ESD and
heat sensitive!

136
RockOn! 2008
AVR Insertion:
- Remove the AVR from the ESD foam.
- Align the notch from the AVR with the one on the AVR dip on the board, and GENTLY work the AVR into the socket.
- Take your time with this, bent leads are extremely difficult to straighten.
AVR Notch
Notch

137
RockOn! 2008
Level Shifter Insertion:
LS
- Remove the level shifter from the ESD foam.
- Align the notch from the level shifter with the one on the level shifter dip on the board, and GENTLY work the level shifter into the socket.
- Take your time with this, bent leads are extremely difficult to straighten.
No
tch
No
tch

138
RockOn! 2008
Final Products:
AVR Board
Data Board
Z-Accel. Board

139
RockOn! 2008
Congratulations!
The board is now complete and ready for software and
testing.
RockOn! 2008

141
RockOn! 2008
141
Brains…
- Now we will make your electronics come alive
- These steps are designed to teach you how to program your AVR and test its functionality

142
RockOn! 2008
142
Brains…
- Now we will make your electronics come alive
- These steps are designed to teach you how to program your AVR and test its functionality

143
RockOn! 2008
143
Materials
- All necessary coding files provided -Programs you will need
- WinAVR (Version 20071221)- AVR Studio- RealTerm-Drivers for ISP and USB-to-Serial Converter-All installed on laptop and contained on DVD-ROM
- Utility suite to assist in development- Timer Setup Utility- In System Memory Programming Utility- Data Parser Utility

144
RockOn! 2008
144
AVR Studio
- Integrated Development Environment (IDE)
- Allows for easy interface to AVR from coding to device programming
- Allows all programming to be done within 1 program
- Provides framework for platform lessons and flight code
146
RockOn! 2008
146
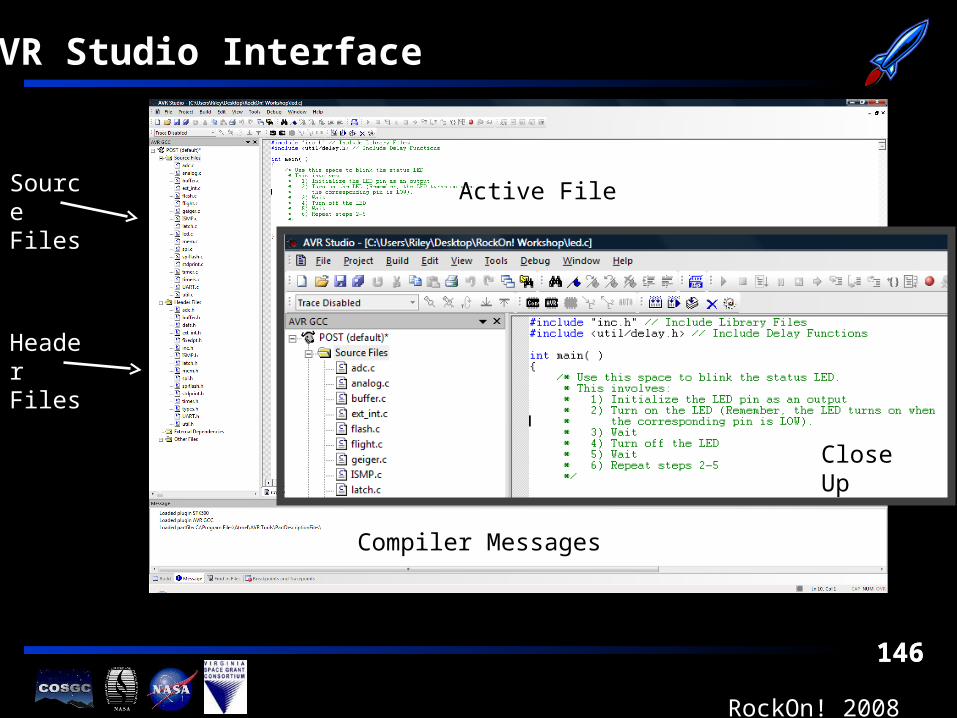
AVR Studio Interface
Source Files
Header Files
Active File
Compiler Messages
Close Up

148
RockOn! 2008
148
Lesson 0: POST
- What is a POST?- Power-On System Test- Checks functionality of AVR board systems
- Objectives- Verify functionality of AVR board- Learn to load code onto the AVR
- What systems are checked?- EEPROM memory for data memory protection- Analog Sensors- Flash Memory

149
RockOn! 2008
149
Lesson 0: POST
- Open Atmel AVR Studio
- On the welcoming screen, press “Open”
150
RockOn! 2008
150
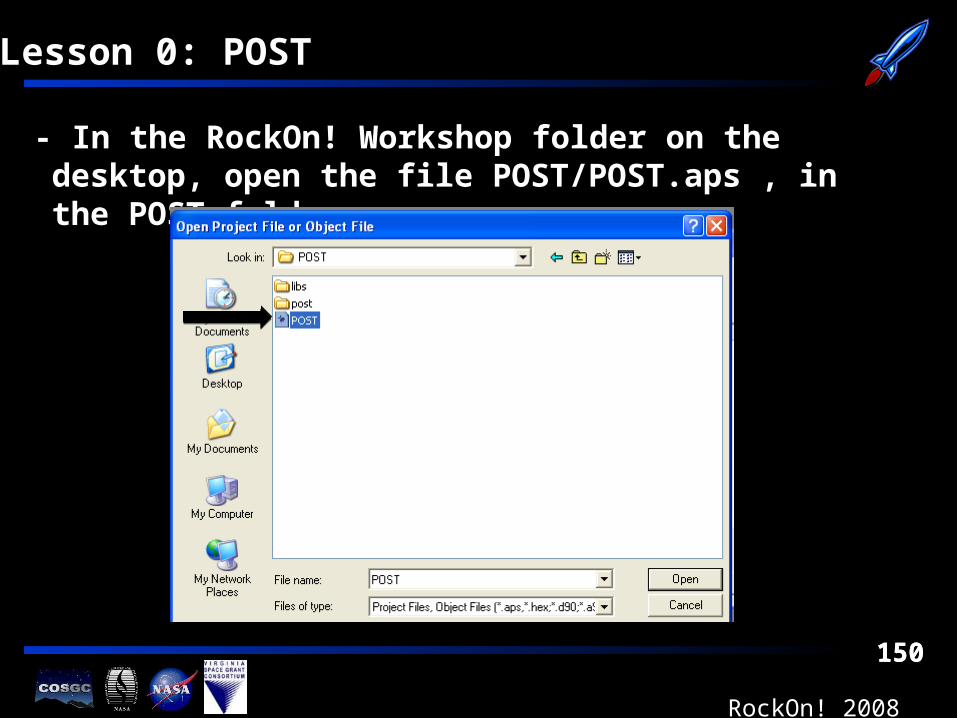
Lesson 0: POST
- In the RockOn! Workshop folder on the desktop, open the file POST/POST.aps , in the POST folder

151
RockOn! 2008
151
Lesson 0: POST
- During build, compiler warnings are okay, errors are not
- Build the code- Click Build -> Build (F7)
- If any errors occur, check your code for typos or errors- Ask for help if you cannot fix the error
152
RockOn! 2008
152
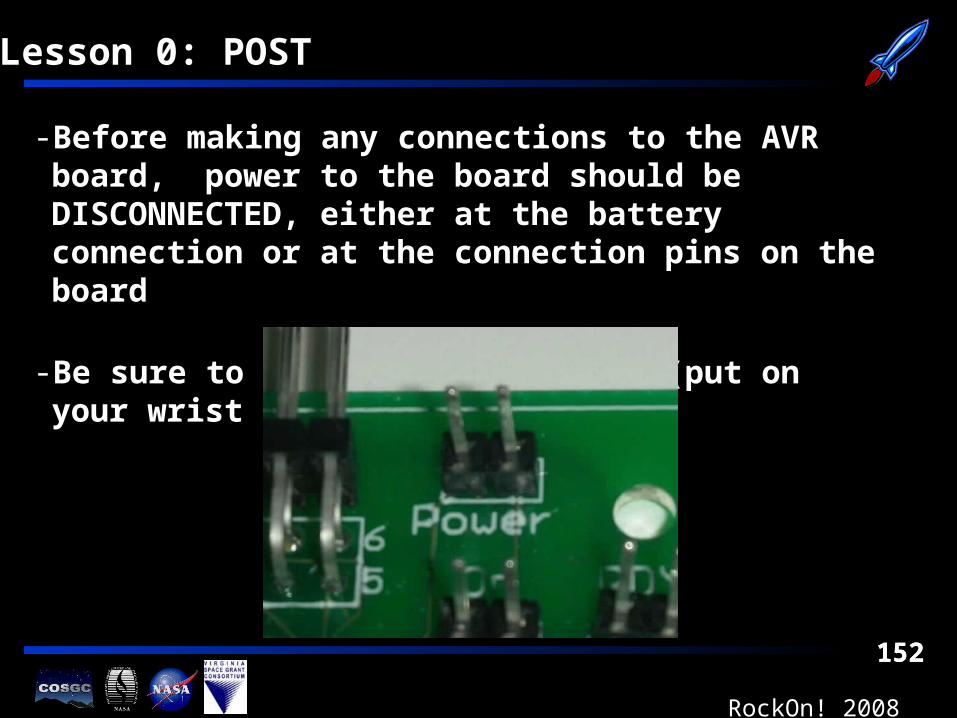
Lesson 0: POST
- Before making any connections to the AVR board, power to the board should be DISCONNECTED, either at the battery connection or at the connection pins on the board
- Be sure to take ESD precautions (put on your wrist strap)

153
RockOn! 2008
153
Lesson 0: POST
- Connect the AVRISP to the computer
- Connect the AVRISP to the AVR board

155
RockOn! 2008
155
Lesson 0: POST
- NOTE: The programming header must be connected as shown. Flipping it around will cause programming to fail.

156
RockOn! 2008
156
Lesson 0: POST
- Create a serial connection between the AVR board and the computer by,
- Connecting the USB to Serial Adapter to the computer

157
RockOn! 2008
157
Lesson 0: POST
- Connecting the USB to Serial Adapter to the data retrieval board

158
RockOn! 2008
158
Lesson 0: POST
- Connecting the data retrieval board to the AVR board
- NOTE: the orientation of the cables must match those shown below

159
RockOn! 2008
159
Lesson 0: POST
- Both the serial connection between board and computer and the ISP connection between board and computer will be needed
- The ISP connection is necessary for loading code onto the board
- The serial connection is necessary for analysis of the board by the computer
- For loading code or data retrieval and conversion, the AVR board needs to be powered on and activated

160
RockOn! 2008
160
Lesson 0: POST
- To use the USB-to-Serial Converter, the COM port it is connected to must be identified
- Click Start and right click on “My Computer”
- Left click on “Properties”

161
RockOn! 2008
161
Lesson 0: POST
- Click on “Hardware” - Click on “Device Manager”

162
RockOn! 2008
162
Lesson 0: POST
- Click on “Ports (COM & LPT)- Keyspan USB Serial Port = COM4

163
RockOn! 2008
163
Lesson 0: POST
- At this point, connect power to the AVR board
- RDY LED should be on if the RBF jumper is inserted
- Click the G-Switch (ON LED should be activated)

164
RockOn! 2008
164
Lesson 0: POST
- Now, go to the start menu and open up RealTerm
- RealTerm allows serial communication with the AVR board
- Will be used to collect results of POST
166
RockOn! 2008
166
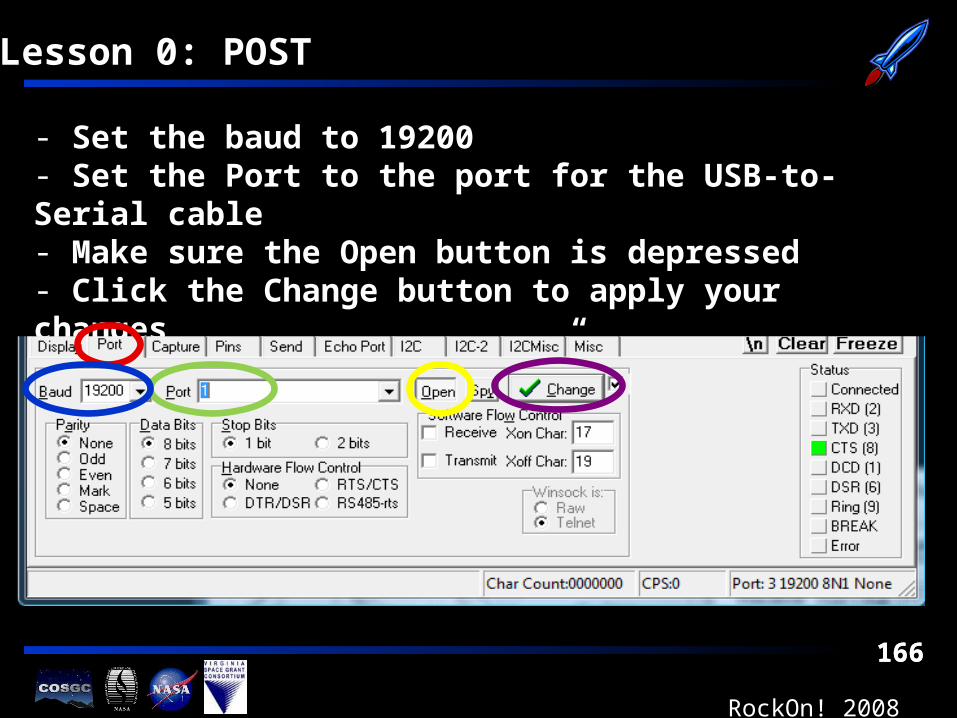
Lesson 0: POST
- Set the baud to 19200- Set the Port to the port for the USB-to-Serial cable- Make sure the Open button is depressed- Click the Change button to apply your changes - CTS(8) and DSR(6) “lights” should turn green

167
RockOn! 2008
167
Lesson 0: POST
- Click on the “Display” tab

168
RockOn! 2008
168
Lesson 0: POST
- Check the “newLine mode” box- Make sure the top bubble on the left, reading “Ascii”, is
selected- Check the “Scrollback” box

169
RockOn! 2008
169
Lesson 0: POST
- Go back to AVR Studio
- Click the “AVR” button on the bottom toolbar

170
RockOn! 2008
170
Lesson 0: POST
- This is the image you should have received.
- On the main tab, make sure that ATmega32 is the selected device, the programming mode is ISP, and the ISP Frequency is 125.0 kHz
171
RockOn! 2008
171
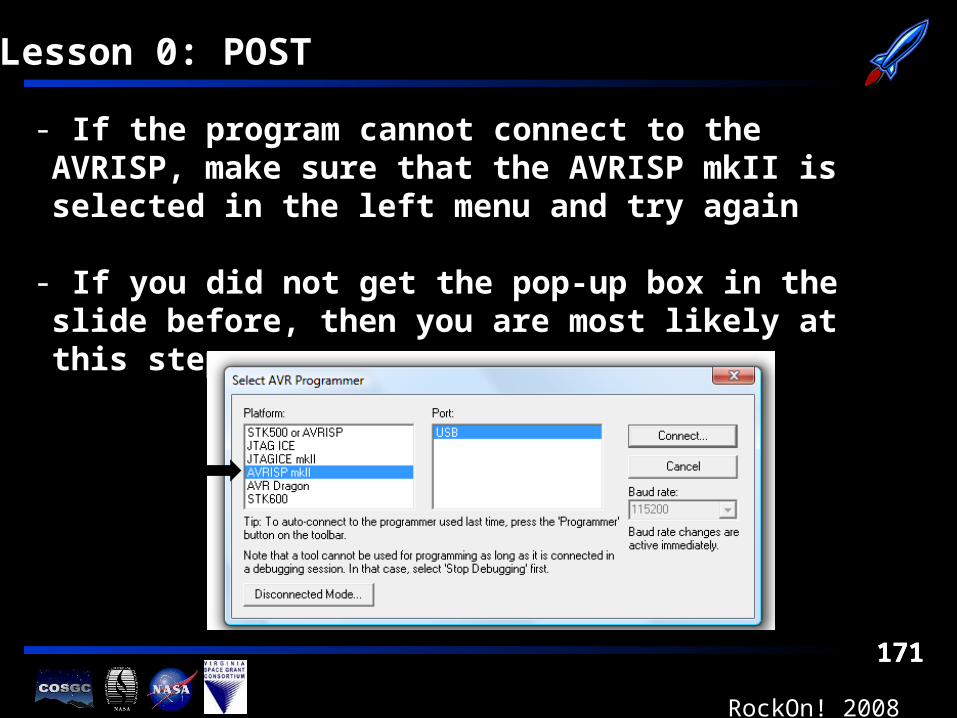
Lesson 0: POST
- If the program cannot connect to the AVRISP, make sure that the AVRISP mkII is selected in the left menu and try again
- If you did not get the pop-up box in the slide before, then you are most likely at this step.

172
RockOn! 2008
172
Lesson 0: POST
- The first time you program the AVR, you must set the fuses.
- Click on the “Fuses” tab
- Set your fuse settings as shown

173
RockOn! 2008
173
Lesson 0: POST
- On the “Program” tab, click the “…” in the FLASH section and select “POST/post/POST.hex” as the executable file, found in the RockOn folder.

174
RockOn! 2008
174
Lesson 0: POST
- On the “Program” tab, click the “…” in the FLASH section and select “POST/post/POST.hex” as the executable file, found in the RockOn folder.

175
RockOn! 2008
175
Lesson 0: POST
- Click “Program” in the FLASH section
- While this programs, go back to the RealTerm window

176
RockOn! 2008
176
Lesson 0: POST
- Once the code has been programmed, click on the black text section of the screen and press any key to begin the POST

177
RockOn! 2008
177
Lesson 0: POST
- Let the POST run (5 to 10 minutes)
- Results will be shown at the end of the POST
- If any tests fail ask for assistance from workshop personnel

178
RockOn! 2008
178
Lesson 0: POST
- Highlight text in the RealTerm window and select “CTRL C” on your keyboard.
- Open Microsoft Word- Select “CTRL V” to paste text- Save file as “POST_KIT_XX.doc” to your desktop

179
RockOn! 2008
179
Lesson 0: POST
- Remove power from the AVR board
- Remove the Data Retrieval connector from the AVR board
- Close the RealTerm program
- Close the AVR Studio program
- You are now ready to start programming and testing your AVR board