

Containerization with Samsung Knox
VMware Workspace ONE UEM 2005

You can find the most up-to-date technical documentation on the VMware website at:
https://docs.vmware.com/
If you have comments about this documentation, submit your feedback to
VMware, Inc.3401 Hillview Ave.Palo Alto, CA 94304www.vmware.com
Copyright © 2020 VMware, Inc. All rights reserved. Copyright and trademark information.
Containerization with Samsung Knox
VMware, Inc. 2

Contents
1 Containerization With Samsung Knox 4Devices and OS Versions Supported by Samsung Knox 4
Enable Samsung Knox Container 5
2 Knox Profiles 6Device Profiles and Container Profiles 7
Passcode Profile (Knox) 8
Deploy Passcode (Knox) 8
Enforce Browser Restrictions (Knox) 9
Enable Per App VPN for Knox Container Applications 10
Activate Email Settings (Knox) 12
Configure Exchange Active Sync Mail Client (Knox) 13
Configure Single Sign-On (Knox) 14
Deploy Credentials (Knox) 15
Configure Application Control (Knox) 15
Application Groups 16
Implement Smart Card Authentication (Knox) 17
Configure Firewall Rules 17
Set Restrictions (Knox) 18
Common Criteria (CC) Mode (Knox) 20
Create Custom Settings (Knox) 20
Bookmarks (Knox) 21
Deploy Bookmarks 21
Set Date/Time (Knox) 22
3 Knox Management 23Knox Container Passcode Management 23
Audit Logs 24
Configure Audit Logs 24
4 Applications for Samsung Knox Overview 26Public Applications for Samsung Knox Container 26
Setup Public Apps in Samsung Knox Container 27
5 Knox for the End User Overview 28Create Knox Container on a Device 28
User Interface 28
VMware, Inc. 3

Containerization With Samsung Knox 1Samsung Knox is making it easier to use personal devices for work purposes for Bring Your Own Device (BYOD) programs and deploy truly corporate- dedicated devices to end-users with Workspace ONE UEM powered by AirWatch.
Samsung Knox Workspace is a feature that allows you to use your phone as an enterprise and personal device, by using an enterprise container. Within this container, all enterprise functions are securely managed with its own home screen, launcher, apps, and widgets. Outside of the enterprise container, you can use your phone as a personal device with an uninterrupted end-user experience. In some scenarios, a device can be enrolled as Container Only Mode which locks the devices into the Knox container with no access to the personal side of the device. This is a solution for corporate-owned devices who do not want end-users use devices for personal use.
The key benefits of containerization with Samsung Knox are:
n Two Devices in One - Switch between the password-protected Knox Workspace and the personal side of the device with the tap of an icon.
Note This applies to BYOD and certain corporate- owned device scenarios only. Access to the personal side of the device is disabled while enrolled.
n Powerful Apps - Install internal applications automatically within the Knox container. Configure Knox Play for Work to grant access to whitelisted public applications.
n Secure Data - Data is secure using hardware-level encryption and multifactor authentication, including biometric.
n Android Lockdown - You are allowed to have a device password and Samsung Knox container password to keep your sensitive enterprise information safe.
This chapter includes the following topics:
n Devices and OS Versions Supported by Samsung Knox
n Enable Samsung Knox Container
Devices and OS Versions Supported by Samsung KnoxThe following devices and OS versions are compatible with Samsung Knox. Different OS versions can support different versions of the Knox container.
VMware, Inc. 4

Supported Operating Systemsn 4.4.X Kit Kat
n 5.0.X Lollipop
n 6.0.X Marshmallow
n 7.0.X Nougat
n 8.0.X Oreo
n 9.0.X Pie
n 10.0
Supported DevicesFor an exhaustive list of supported devices, visit the Samsung Knox website.
Enable Samsung Knox ContainerBefore you can configure Knox for your devices, you must first enable the Knox container.
Procedure
1 Navigate to Devices > Device Settings > Android > Hub Settings.
2 Select Enable Knox Containers under Samsung Knox.
3 Enter your Knox License Key you obtained from Samsung.
The license key is stored in the console, but is not visible. It is only viewable one time by selecting Show Password button during initial entry. The license key is only validated during the enrollment process not upon input into the console. This key is part of the Samsung Knox License Management System. For more information on obtaining a license key, see the Samsung Knox web site.
4 Select Save to enable the creation of container profiles.
5 Navigate to Devices > List View > Details View > Summary and see the Container section of the page to view the creation status. The status is listed as Success, Failed or No Container.
Containerization with Samsung Knox
VMware, Inc. 5

Knox Profiles 2Containerization of enterprise content provides you with a dual device experience, successfully splitting the enterprise functions of your device into an encrypted container. Configuring profiles helps you secure the corporate container with your Samsung Knox-enabled device. This allows you to use your phone as a personal and work device without threatening security.
Certain corporate-owned device scenarios support the creation of Container Only Mode which locks the device into to Knox container with no dual persona or personal side to the device. In this case, profiles only applies to the container. The prompt for configuring the device in Container Only Mode is selected during enrollment and the user cannot change this setting.
Device AccessSome device profiles configure the settings for accessing an Knox device. Use these profiles to ensure that access to a device is limited only to authorized users.
Some examples of device access profiles include:
n Secure a device with a Passcode profile. For more information, see Passcode Profile (Knox).
n Specify and control how, when and where your employees use their devices. For more information, seeSet Restrictions (Knox) .
Device SecurityEnsure that your Knox devices remain secure through device profiles. These profiles configure the native Knox security features or configure corporate security settings on a device through AirWatch.
n Access internal resources such as email, files, and content. For more information, see Enable Per App VPN for Knox Container Applications.
n Take administrative actions when a user installs or uninstalls certain applications. For more information, see Configure Application Control (Knox).
VMware, Inc. 6
Device ConfigurationConfigure the various settings of your Knox devices with the configuration profiles. These profiles configure the device settings to meet your business needs.
n Access a URL directly from an icon on the device's menu. For more information, see Bookmarks (Knox).
n Set the date and time and the display format to provide your fleet with the appropriate regional format. For more information, see Set Date/Time (Knox).
This chapter includes the following topics:
n Device Profiles and Container Profiles
n Passcode Profile (Knox)
n Enforce Browser Restrictions (Knox)
n Enable Per App VPN for Knox Container Applications
n Activate Email Settings (Knox)
n Configure Exchange Active Sync Mail Client (Knox)
n Configure Single Sign-On (Knox)
n Deploy Credentials (Knox)
n Configure Application Control (Knox)
n Implement Smart Card Authentication (Knox)
n Configure Firewall Rules
n Set Restrictions (Knox)
n Create Custom Settings (Knox)
n Bookmarks (Knox)
n Set Date/Time (Knox)
Device Profiles and Container ProfilesWith containerization for Samsung Knox, it is still possible to have two different profiles on your device. You can deploy a device profile to a Knox- enabled device and this profile will only apply to the personal side of the device and not affect the Knox container.
You can create profiles for two modes on Knox-enabled devices. The first is for devices, and applies to the entire device. The second is for containers, and only applies to the corporate container created on the device.
Containerization with Samsung Knox
VMware, Inc. 7

Passcode Profile (Knox)As an extra line of defense for your corporate data and content, you can enforce a container passcode to secure the isolated business container on a Knox enabled device.
You can allow fingerprint unlocking on the Knox container so that the end user can open the Knox container with a single swipe to recognize their fingerprint. Users have to specify a PIN or password as a backup unlock method. You can enable multifactor authentication which requires a pattern, PIN, or passcode in addition to a fingerprint.
If fingerprint or multifactor is enabled, users create a passcode based on standard requirements such as minimum passcode length, passcode content, and other settings in the console.
Admins can clear or change the passcode from the VMware Workspace ONE UEM™ console without affecting the device passcode. See the Chapter 3 Knox Management
Deploy Passcode (Knox)Setting a passcode policy requires your end-users to enter a passcode, providing a first layer of defense for sensitive data on devices. The container Passcode profile is required to initiate the creation of the Knox Container.
Procedure
1 Navigate to Devices > Profiles & Resources > Profiles > Add > Add Profile > Android (Legacy).
2 Select Container.
3 Configure the profile's General settings. These General profile settings determine how the profile is deployed and who receives it.
4 Access the Passcode tab and configure the following settings:
Setting Description
Fingerprint Authentication Enable this option to allow user to unlock the Knox container using their fingerprint.
The available settings, if enabled are:
n Multifactor Authentication
n Maximum Number of Failed Attempts
n Device Lock Timeout (in Minutes)
Important Samsung requires users to have a backup PIN.
Multifactor Authentication Enable this option to require a two-step unlock process.
The content must include a PIN or pattern and a fingerprint as the second authentication factor.
This option only displays when Fingerprint Authentication is enabled.
Minimum Passcode Length Enter the minimal number of passcode characters allowed.
Maximum Number of Failed Attempts Enter the number of times a passcode can be entered incorrectly before the Knox container is disabled.
Containerization with Samsung Knox
VMware, Inc. 8

Setting Description
Passcode Content Determine the strength of the passcode. More text boxes display based on the selection chosen.
Important For Knox v2.2 and above, if the minimum number of complex characters in the password set by the profile is greater than 4, then at least one lowercase character and one uppercase character are required.
Maximum Passcode Age Enter the maximum number of days before a passcode must be changed.
Passcode History Determines the number of passwords stored for a user account before an old password can be reused.
Device Lock Timeout (in Minutes) Set how much time can lapse before the Knox container automatically locks.
Maximum Length of Numeric Sequences
Set the allowed length of a passcode sequence.
Minimum Number of Characters Changed
Set how many characters can be reused from a previous passcode.
Forbidden Strings Enter the characters that cannot be used in a passcode.
Select Addto insert more settings.
Password Visibility Enable to allow users to view passcode as it is entered. If disabled, the passcode shows as asterisks when entered.
5 Select Save & Publish.
Enforce Browser Restrictions (Knox)Knox browser restrictions helps to minimize vulnerability and maximize security as end-users access the corporate container using the browser to view and use internal content.
Procedure
1 Navigate to Devices > Profiles & Resources > Profiles > Add > Add Profile > Android (Legacy).
2 Select Container.
3 Configure the profile's General settings. These General profile settings determine how the profile is deployed and who receives it.
4 Select the Browser payload and configure the settings accordingly.
Setting Description
Allow Pop-Ups Enables Pop-up browser setting to allow or prevent any web site from launching a new browser window when the user navigates to a web site that invokes such action.
Allow Cookies Applies to the native Android browser to allow or prevent any web site from storing cookies related to the web site on the device.
Allow Auto Fill Applies to the native Android browser to allow or prevent any web site from providing autofill suggestions when a user is filling in form data on the webpage, even if the user has previously filled in the form.
Containerization with Samsung Knox
VMware, Inc. 9

Setting Description
Allow JavaScript Applies to the native Android browser to allow or prevent the browser from running JavaScript code for a web site.
Force Fraud Warning Applies to the native Android browser to force the browser to show an untrusted certificate security warning to the user when applicable.
5 Select Save & Publish.
Enable Per App VPN for Knox Container ApplicationsA virtual private network (VPN) connection provides devices a secure and encrypted tunnel to an internal network, effectively allowing each device to function as seamlessly as if they were using the network on-site.
For Samsung Knox enabled devices, configuring Per App VPN for container applications secures the network traffic specifically for those applications inside the Knox container.
Procedure
1 Navigate to Devices > Profiles & Resources > Profiles > Add > Add Profile > Android (Legacy).
2 Select Container.
3 Configure the profile's General settings. These General profile settings determine how the profile is deployed and who receives it.
4 Select the VPN payload.
5 Configure the VPN profile as desired. These text boxes defined in the table vary depending on the Client Type selected from the Connection Info section. This table details all configurations available.
Setting Description
Client Type Determine the VPN provider.
Connection Name Enter the name of the connection displayed on the device.
Server Specify the Hostname or IP address for the server.
Enforce Service Validation Establish trust relationship between server and device.
Server Suffix Designate the domain in which the authenticating server must belong.
Use Authentication Enable this text box to require user credentials for VPN access. The selected Client Type determines applicable text boxes displayed in this section.
The following text boxes displays upon selection:
n Username – Enter the username users are required to enter at setup.
n Password – Enter a password provided to users.
Connection Type Select the type of certificate used to authenticate the VPN.
Identity Certificate Use the drop down to select the credentials for authenticating the connection.
Root Certificate Specify the trust certificate authority.
Containerization with Samsung Knox
VMware, Inc. 10

Setting Description
Enable Advanced Configurations Select the check box to display more options to configurable your VPN profile based on the selected client type.
Backup Server Name Enter the name of the server to connect to in the event the primary VPN gateway fails.
Default Route Enabled Enable to ensure that all network traffic goes through the tunnel.
IKE Version Internet Key Exchange (IKE) protocol version for setting up security association.
Dead Peer Detection Enable dead peer detection to allow the KeyVPN client to detect a dead IKE peer.
PFS Exchange PFS Exchange (Perfect Forward Secrecy) to be enabled if the session key should be protected.
Suite B Use Suite B cryptography for connecting to VPN for higher security.
Phase 1 Mode Sets up a secure tunnel to authenticate and secure the IKE tunnel.
DH Group (Diffie-Hellman (DH) Group)
Sets the key strength used in phase 1 during key exchange. The higher the group number, the more secure the key exchange. You can select Default or a specific DH group: 1, 2, 5, 14, 15, 16, 17, 18, and 24.
Split Tunnel Type Allow/disallow VPN user to access a public network and a local WAN/LAN at the same time using the same physical network.
Forward Routes Enter an alternate destination for the split tunnel to be directed. This text box only displayd if Split Tunnel Type is set to Manual.
Authentication Type Select the authentication types to be used with enterprise applications as certificate based or CAC based.
Proxy Type Select whether the proxy connects by Static Proxy or Proxy Auto Configuration.
PAC URL This text boxdisplays when Proxy Auto Configuration is selected form the Proxy Type text box.
Server Enter the Host name of IP address for the proxy server.
Port Specify the target port for the proxy server.
Username Enter user credentials.
Password Enter user credentials.
Assignment Select the assignment level as All Container Applications or Individual Applications.
For Individual Applications, enter the application package name (app identifier) for the apps you want to have app level VPN. Examples include:
n Container application – sec_container_1.airwatchEmailClient.xxx
n Application outside the container – com.airwatch.androidagent
Enable Debug Logging Include more detailed information in the diagnostics reports for troubleshooting.
Show Warnings Show message in case of connectivity problems or when server name can not be resolved.
Containerization with Samsung Knox
VMware, Inc. 11
6 Set Advanced to enable more configurations, if necessary.
a Split Tunnel Type – Allow/disallow VPN user to access a public network and a local WAN/LAN at the same time using the same physical network.
n Disable – Prevent end-users from access a public network and a local WAN/LAN at the same time.
n Manual – Send specific traffic through the VPN gateway for end-users connecting to the Internet.
n Auto – No configuration on which traffic is sent through the VPN gateway.
b Forward Routes –
c Authentication Types – Select the authentication types to be used with enterprise applications:
n Certificate Based Authentication – Uses certificates sent through the profile for authenticating into the VPN client.
n CAC Based Authentication – Uses Common Access Card (CAC) for authentication.
7 Select Save & Publish.
Activate Email Settings (Knox)You can configure email settings externally from Exchange Active Sync (EAS) by pushing an Email Settings profile payload.
Procedure
1 Navigate to Devices > Profiles & Resources > Profiles > Add > Add Profile > Android (Legacy).
2 Select Container.
3 Configure the profile's General settings. These General profile settings determine how the profile is deployed and who receives it.
4 Select the Email payload.
5 Configure the Email settings:
Setting Description
Email Account Define how the account is labeled in the mail client.
Email Address Enter the email address used for the account.
Sender’s Name Determine how the sender's name appears.
Email Signature Determine the default signature that appears on all outgoing emails.
Set As Default Account Set the email as the primary email account.
Allow Email Forwarding Set so end users can forward content and HTML Email.
Use SSL Set to encrypt EAS data.
Protocol Set which server the email client uses to receive and send emails.
Containerization with Samsung Knox
VMware, Inc. 12

Setting Description
Host Name Enter the hostname or IP address for the server.
Port Set the port number.
Username Define the Username for the authentication credentials using lookup values.
Password Leave the Passwordblank to allow end users to set their own password.
Ignore SSL Errors Set to ignore certificate errors.
Use SSL Set to encrypt EAS data.
Protocol Set which server the email client uses to receive and send emails.
Host Name Enter the hostname or IP address for the server.
Port Set the port number.
Username Define the Username for the authentication credentials using lookup values.
Password Leave the Passwordblank to allow end users to end-users own password.
Ignore SSL Errors Set to ignore certificate errors.
6 Select Save & Publish.
Configure Exchange Active Sync Mail Client (Knox)To guarantee a secure connection to internal email, calendars, and contacts, Workspace ONE UEM uses the native email client to access EAS mail from the corporate container on Knox devices.
Once each user has an email address and email user name you can create an EAS profile with the following steps:
Procedure
1 Navigate to Devices > Profiles & Resources > Profiles > Add > Add Profile > Android (Legacy).
2 Select Container.
3 Configure the profile's General settings. These General profile settings determine how the profile is deployed and who receives it.
4 Select the Exchange ActiveSync (EAS) payload.
5 Enter the Exchange Active Settings:
Setting Description
Mail Client Select the native email client to be used on the device from the drop-down menu.
Account Name Enter a label for the account.
Exchange Active Sync Host Enter the public host name for the email server.
Domain Use lookup values to define the domain for authentication credentials.
User Use lookup values to define the user for authentication credentials.
Email Address Use lookup values to define the email address for authentication credentials.
Containerization with Samsung Knox
VMware, Inc. 13
Setting Description
Password Leave this text box blank to allow end-users to create their own password.
Path Prefix Enter your path prefix.
Identity Certificate Select an Identity Certificate from the drop-down if you require the end-user to pass a certificate to connect to the Exchange ActiveSync, otherwise selectNone (default).
Past Days of Mail to Sync Specify the number of past days of mail to sync.
Sync Interval Set to define how often EAS Mail Sync occurs.
Sync Schedule for Roaming Determine the sync frequency while roaming using the drop-down menu.
Retrieval Size Indicate the maximum email size that is automatically delivered to your device without having to download the message.
Period Calendar Select frequency from the drop-down menu.
Accept Certificates Enable to allow certificates for email authentication.
Enable HTML Email Enable to allow HTML formatted emails.
Allow Email Forwarding Enable to allow emails to be forwarded.
Email Signature Enter a default signature that displays on outgoing emails.
Peak Days Schedule peak days for sync schedule.
Peak Start Time Determine the hour the peak time starts.
Peak End Time Determine the hour the peak time ends.
Sync Schedule Peak Select the time to sync schedule settings.
Use SSL Enable SSL to encrypt EAS data enable.
Always Vibrate On Email Notification Enable to set the alert option for email notifications.
Default Account Assign the EAS account as the default for sending email messages.
6 Select Save & Publish.
Configure Single Sign-On (Knox)Single Sign-on (SSO) allows your employees to move from application to application within the container without the hassle of repetitively signing in.
Procedure
1 Navigate to Devices > Profiles & Resources > Profiles > Add > Add Profile > Android (Legacy).
2 Select Container.
3 Configure the profile's General settings. These General profile settings determine how the profile is deployed and who receives it.
4 Select the Single Sign-On payload.
Containerization with Samsung Knox
VMware, Inc. 14

5 Configure the Bookmarks settings, including:
Setting Description
Single Sign-On Vendor Select your SSO vendor from the drop-down menu.
Company Name Provide a company name.
Icon Upload an icon.
Customer ID Provide a form of identification.
SSO Applications Select Add to add applications that are included with SSO.
6 Select Save & Publish.
Deploy Credentials (Knox)Credentials profiles deploy corporate certificates for user authentication to managed devices.
Procedure
1 Navigate to Devices > Profiles & Resources > Profiles > Add > Add Profile > Android (Legacy).
2 Select Container.
3 Configure the profile's General settings. These General profile settings determine how the profile is deployed and who receives it.
4 Select the Credentials payload.
5 Configure the Credentials settings:
Setting Description
Enable TIMA Keystore Stores all certificates sent to the Knox container in the TIMA Key Store, if enabled.
Credential Source Enter the source of your credential.
When you configure Credential Source, the remaining text boxes are source-dependent. If you select Upload, you must enter a Credential Name and upload a new certificate. If you select Defined Certificate Authority, you must choose a predefined Certificate Authority and Template. If you select User Certificate ,select an S/MIME certificate or S/MIME Encryption Certificate.
Credential Name Enter the name of the credential.
Certificate Select the certificate used for authentication.
6 Select Save & Publish.
Configure Application Control (Knox)Set parameters around your application deployments on devices by Preventing Installation of Blacklisted Apps and Only Allowing installation of Whitelisted Apps.
Containerization with Samsung Knox
VMware, Inc. 15

Procedure
1 Navigate to Devices > Profiles & Resources > Profiles > Add > Add Profile > Android (Legacy).
2 Select Container to deploy your profile to a container within a Samsung Knox device.
3 Configure the General profile settings. These General profile settings determine how the profile is deployed and who receives it.
4 Select the Application Control payload.
5 Enable or disable the following settings to set the level of control for your application deployments:
Setting Description
Prevent Installation of Blacklisted Apps
Enable to prevent blacklisted apps and enforce the automatic removal of these apps defined in Application Groups.
Only Allow installation of Whitelisted Apps
Enable to prevent the installation of any application that is not a whitelisted app defined in Applications Groups.
Prevent Un-installation of Required Apps
Enable to prevent the un-installation of required apps defined in Applications Groups. This option is only available for Knox 2.0 or higher.
To find out more about Application Groups, see Application Groups.
6 Select Save.
Application GroupsApplication Groups lets you group applications into blacklisted, whitelisted, and required applications. Use application groups to give access to desired users and to restrict access to unnecessary users.
Using the Workspace ONE UEM console you can ensure users have access to the appropriate applications based on their organizational roles.
Procedure
1 Navigate to Apps & Books > Applications > Applications Settings > App Groups.
2 Select Add Group.
3 List tab:
a Select Type as Whitelist, Blacklist, Required or MDM Application. On selecting the Type, the Name field gets automatically populated.
b Enter the Application Name and the Application ID. The Application ID automatically completes when you use the search function to search for the app from an app store.
c Select Add Application to add multiple applications and then select Next to navigate to the Assignment tab. Add exceptions to your application group to create detailed whitelists and blacklists.
Containerization with Samsung Knox
VMware, Inc. 16

4 Assignment tab:
a Enter a Description for the application group.
b Define the Device Ownership as Corporate-Dedicated, Corporate-Shared, Employee Owned, or Undefined.
c Assign the device Model and the Operating System.
d Select the Organization Group and User Group for the application group to be assigned to and then select Finish to complete the process.
Implement Smart Card Authentication (Knox)You can require end-user identity verification using SmartCard authentication for browser and email access. End-users who try to authenticate without a Smart Card after this feature is enabled, cannot access their email.
Procedure
1 Navigate to Devices > Profiles & Resources > Profiles > Add > Add Profile > Android (Legacy).
2 Select Container.
3 Configure the profile's General settings. These General profile settings determine how the profile is deployed and who receives it.
4 Select the SmartCard payload.
5 Enable Require SmartCard Authentication for Email and Require SmartCard Authentication for Browser.
Enter lookup values for the Email Addressrequired for SmartCard authentication.
6 Select Save & Publish.
Configure Firewall RulesThe Firewall payload allows admins to configure firewall rules within the Knox container.
The available rules are: Allow, Deny, Reroute. Each firewall rule type allows you to add multiple rules.
Procedure
1 Navigate to Devices > Profiles & Resources > Profiles > Add > Add Profile > Android (Legacy).
2 Select Container.
3 Configure the profile's General settings. These General profile settings determine how the profile is deployed and who receives it.
4 Select the Firewall tab.
Containerization with Samsung Knox
VMware, Inc. 17
5 Select the Add button under the desired rule to configure the setting:
Settings Description
Allow Rules Allows the device to send and receive from a specific network location.
Deny Rules Blocks the device from sending and receiving traffic from a specific network location.
Reroute Rules Redirects traffic from a specific network location to an alternate network.
Redirect Exception Avoids traffic from being redirected.
6 Select Save & Publish.
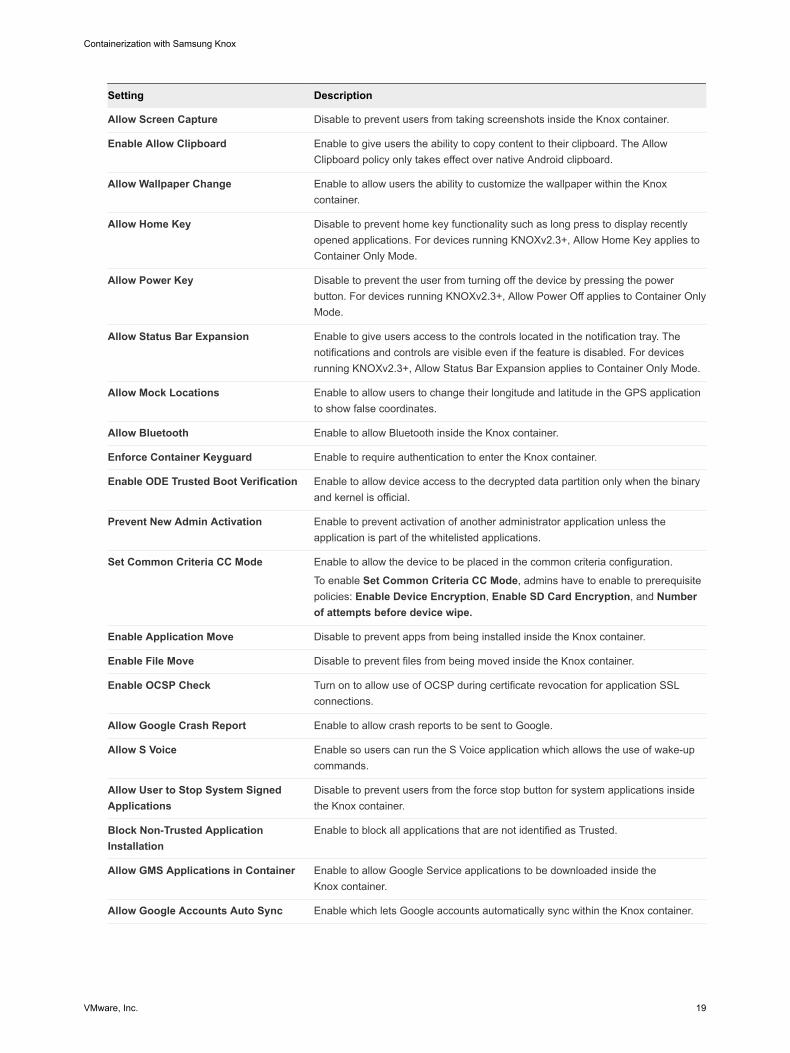
Set Restrictions (Knox)Prevent data leaks by enabling listed restrictions in the Knox container.
Procedure
1 Navigate to Devices > Profiles & Resources > Profiles > Add > Add Profile > Android (Legacy).
2 Select Container.
3 Configure the profile's General settings. These General profile settings determine how the profile is deployed and who receives it.
4 Select the Restrictions payload.
5 Enable or disable the Device Functionality settings:
Setting Description
Allow Camera Enable to allow users to use their camera inside the Knox container. If Allow Camera has been turned off for the device side, then the camera will be disabled for all the containers and users created on the device.
Allow Video Recording if Microphone is Allowed
Enable which allows video recording within the Knox container.
Allow Microphone Enable to allow use of the microphone inside the Knox container. If Allow Microphone has been turned off for the device side, then the microphone will be disabled for all the containers and users created on the device.
Allow Audio Recording if Microphone is Allowed
Enable to give users access to audio recording.
Allow Display of Share Via List Disable to prevent your end-users from accessing their share options for sensitive content.
Force Secure Keypad Usage Enable to prevent end-users from downloading and using third-party keyboard applications.
Allow Contact Info Outside the Container
Enable to allow contact information from the container to sync with personal contact information.
Allow Account Addition Enable to allow users the ability add new email accounts within the Knox container.
Allow Google Account Activation Enable to let users activate their Google account inside the Knox container.
Containerization with Samsung Knox
VMware, Inc. 18
Setting Description
Allow Screen Capture Disable to prevent users from taking screenshots inside the Knox container.
Enable Allow Clipboard Enable to give users the ability to copy content to their clipboard. The Allow Clipboard policy only takes effect over native Android clipboard.
Allow Wallpaper Change Enable to allow users the ability to customize the wallpaper within the Knox container.
Allow Home Key Disable to prevent home key functionality such as long press to display recently opened applications. For devices running KNOXv2.3+, Allow Home Key applies to Container Only Mode.
Allow Power Key Disable to prevent the user from turning off the device by pressing the power button. For devices running KNOXv2.3+, Allow Power Off applies to Container Only Mode.
Allow Status Bar Expansion Enable to give users access to the controls located in the notification tray. The notifications and controls are visible even if the feature is disabled. For devices running KNOXv2.3+, Allow Status Bar Expansion applies to Container Only Mode.
Allow Mock Locations Enable to allow users to change their longitude and latitude in the GPS application to show false coordinates.
Allow Bluetooth Enable to allow Bluetooth inside the Knox container.
Enforce Container Keyguard Enable to require authentication to enter the Knox container.
Enable ODE Trusted Boot Verification Enable to allow device access to the decrypted data partition only when the binary and kernel is official.
Prevent New Admin Activation Enable to prevent activation of another administrator application unless the application is part of the whitelisted applications.
Set Common Criteria CC Mode Enable to allow the device to be placed in the common criteria configuration.
To enable Set Common Criteria CC Mode, admins have to enable to prerequisite policies: Enable Device Encryption, Enable SD Card Encryption, and Number of attempts before device wipe.
Enable Application Move Disable to prevent apps from being installed inside the Knox container.
Enable File Move Disable to prevent files from being moved inside the Knox container.
Enable OCSP Check Turn on to allow use of OCSP during certificate revocation for application SSL connections.
Allow Google Crash Report Enable to allow crash reports to be sent to Google.
Allow S Voice Enable so users can run the S Voice application which allows the use of wake-up commands.
Allow User to Stop System Signed Applications
Disable to prevent users from the force stop button for system applications inside the Knox container.
Block Non-Trusted Application Installation
Enable to block all applications that are not identified as Trusted.
Allow GMS Applications in Container Enable to allow Google Service applications to be downloaded inside the Knox container.
Allow Google Accounts Auto Sync Enable which lets Google accounts automatically sync within the Knox container.
Containerization with Samsung Knox
VMware, Inc. 19

Setting Description
Allow Change Data Sync Policy Enable to allow users to change Data Sync policies specific to applications. For devices running Knox v2.3+, Allow Change Data Sync Policy will always enable notification sanitization for the email app only, in case of MDFPP(Mobile Device Fundamentals Protection Profile) SDP enabled container.
Allow SD Card Move Disable to stop users from moving applications to the SD card.
Allow Settings Change Disable to prevent users from changing settings or system preferences within the Knox container.
Allow Reset Container on Reboot Enable to allow user to reset the Knox container after restart.
6 Select Save & Publish.
Common Criteria (CC) Mode (Knox)Common Criteria (CC) Mode is the international standard for defining security requirements for IT products and to assess vendor compliance with these requirements.
The current CC certification targets the new Mobile Device Fundamentals Protection Profile (MDFPP) of the National Information Assurance Partnership (NIAP), which addresses the security requirements of mobile devices for use in business. Samsung Knox is approved by the United States government as the first NIAP-validated consumer mobile devices to handle the full range of classified information.
To fully enable Common Criteria-evaluated configuration, below prerequisites should be satisfied:
n Storage Encryption should be enabled on the Device Passcode profile. This means a full encryption of the device - Fast Encryption option will not work.
n SD Card Encryption should be enabled.
n Maximum Number of Failed Attempts should be configured to a value of 10 or fewer on the Device Passcode profile.
n Passcode History must be set to zero on the device passcode profile.
Create Custom Settings (Knox)The Custom Settings profile can be used when new Knox functionality or features that the Workspace ONE UEM console does not currently support or if there are any custom device changes you want implemented. Custom profiles can be used to maintain separate application groups for the device and container with XML code to enable or disable certain settings manually.
Procedure
1 Navigate to Devices > Profiles & Resources > Profiles > Add > Add Profile > Android (Legacy).
2 Select Container.
3 Configure the profile's General settings. These General profile settings determine how the profile is deployed and who receives it.
Containerization with Samsung Knox
VMware, Inc. 20
4 Configure the appropriate payload (for example, Restrictions or Passcode).
You can work on a copy of your profile, saved under a "test" organization group, to avoid affecting other users before you are ready to Save and Publish.
5 Save, but do not publish, your profile.
6 Select the radio button from the Profiles List View for the row of the profile you want to customize.
7 Select the XML button at the top to view the profile XML.
8 Find the section of text starting with <characteristic> … </characteristic> that you configured previously, for example, Restrictions or Passcode. The section contains a configuration type identifying its purpose, for example, restrictions.
9 Copy this section of text and close the XML View. Open your profile.
10 Select the Custom Settings payload and select Configure. Paste the XML you copied in the text box. The XML code you paste needs to contain the complete block of code, from <characteristic> … </characteristic>.
11 Remove the original payload you configured by selecting the base payload section and selecting the minus [-] button. You can now enhance the profile by adding custom XML code for the new functionality.
Any device not upgraded to the latest version ignores the enhancements you create. Test the profile devices with older versions to verify expected behavior.
12 Select Save & Publish.
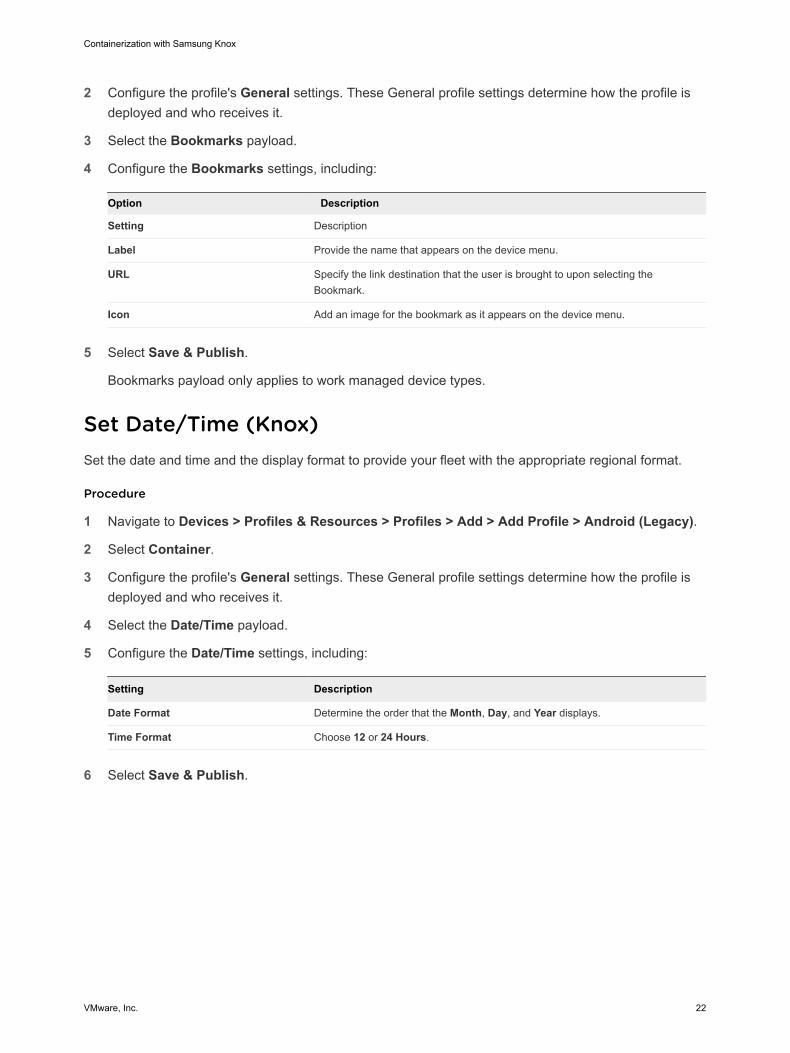
Bookmarks (Knox)Bookmarks function much like an app on a device, providing end users a simple way to access a URL directly from an icon on their device's menu. Admins can send bookmarks for users to access an important URL without having to switch to the personal container on the device.
Bookmarks are particularly useful for easy navigation to extended URLs with a large amount of characters. Bookmark icons can be placed on an end user's springboard directly next to the app. These icons can be used to connect to internal content repositories or login screens without having to open a browser and type out a long URL.
Note Bookmarks payload only applies to work managed device types.
Deploy BookmarksBookmarks function much like an app on a device, providing end users a simple way to access a URL directly from an icon on their device's menu. The end-user sees the bookmark icon and title, selects the bookmark and connects directly to a specified URL.
Procedure
1 Navigate to Devices > Profiles & Resources > Profiles > Add > Add Profile > Android (Legacy).
Containerization with Samsung Knox
VMware, Inc. 21
2 Configure the profile's General settings. These General profile settings determine how the profile is deployed and who receives it.
3 Select the Bookmarks payload.
4 Configure the Bookmarks settings, including:
Option Description
Setting Description
Label Provide the name that appears on the device menu.
URL Specify the link destination that the user is brought to upon selecting the Bookmark.
Icon Add an image for the bookmark as it appears on the device menu.
5 Select Save & Publish.
Bookmarks payload only applies to work managed device types.
Set Date/Time (Knox)Set the date and time and the display format to provide your fleet with the appropriate regional format.
Procedure
1 Navigate to Devices > Profiles & Resources > Profiles > Add > Add Profile > Android (Legacy).
2 Select Container.
3 Configure the profile's General settings. These General profile settings determine how the profile is deployed and who receives it.
4 Select the Date/Time payload.
5 Configure the Date/Time settings, including:
Setting Description
Date Format Determine the order that the Month, Day, and Year displays.
Time Format Choose 12 or 24 Hours.
6 Select Save & Publish.
Containerization with Samsung Knox
VMware, Inc. 22

Knox Management 3After your devices are enrolled and configured, manage the devices using the Workspace ONE ™ UEM console. The management tools and functions enable you to keep an eye on your devices and remotely perform administrative functions.
You can manage all your devices from the UEM console. The Dashboard is a searchable, customizable view that you can use to filter and find specific devices. This feature makes it easier to perform administrative functions on a particular set of devices. The Device List View displays all the devices currently enrolled in your Workspace ONE UEM environment and their status. The Device Details page provides device-specific information such as profiles, apps, Workspace ONE Intelligent Hub version and which version of any applicable OEM service currently installed on the device. You can also perform remote actions on the device from the Device Details page that are platform-specific.
This chapter includes the following topics:
n Knox Container Passcode Management
n Audit Logs
Knox Container Passcode ManagementOnce a passcode is set for the container, you have the ability to clear or change the passcode from the Details View page of the Workspace ONE UEM console.
Once the minimum passcode requirement is set in the passcode profile, users have to create the passcode once while enrolling their devices. Select the desired device in the list view and select More to access the management options.
Setting Description
Clear Passcode
Container Allows you to clear the passcode from the Knox container. If you clear or change the Knox container passcode, the device passcode settings are not affected.
Management
Change Container Passcode
Gives the user the ability to reset their Knox container passcode. This command is available for devices running Knox v2.1 and below.
VMware, Inc. 23

Audit LogsThe Workspace ONE UEM console has the ability to monitor errors that might prevent successful creation of the Knox container. The log provides the cause of the error and what needs to be resolved for successful Knox deployment.
The audit logs are sent to the UEM console from the Knox enabled devices and stored in the Device Details page. The Transmits Logs Automatically setting determines the threshold at which the log file is reported to the device details.
Configure Audit LogsBefore you can obtain audit logs for Samsung Knox, you must first configure the feature in the Workspace ONE UEM console.
Procedure
1 Navigate to Groups & Settings > All Settings > Devices > Devices & Users > Android > Hub Settings to configure the audit logs.
2 Select Enable Audit Logging under Samsung Knox.
3 Set parameters for retrieving the audit logs.
a Logging Level – Determines how severe an error has to be in order for it to be sent to the log file. The logging levels are listed in order or severity where Notice is the least severe and Alert is the most severe.
n Alert
n Critical
n Error
n Warning
n Notice
4 Set the minimum level (in percentage) of the log files that are sent to the Workspace ONE UEM console. The following text boxes determine how frequent the log files are sent.
a Critical Log Size – Enter a percentage (up to 70 percent) to define the critical log size. When the log file passes this percentage, a critical log size alert is sent to the admin.
b Maximum Log Size – Enter a percentage (up to 90 percent) to define the maximum log size. When the log file passes this percentage, a maximum log size alert is sent to the admin.
c Full Log size – Set to 97 percent by default. When the log file reaches this percentage, a full log size alert is sent to the admin and immediate action is required.
Critical Log Size and Maximum Log Size are configurable. Full Log Size is required to be set at 97%.
Containerization with Samsung Knox
VMware, Inc. 24
5 Set when the log files are automatically transmitted to the Workspace ONE UEM console.
a Transmits Logs Automatically – Determines when the audit logs are to be transmitted to the Workspace ONE UEM console to notify the admins of errors.
n Never – The log file is never transmitted to the console.
n Critical – The log file needs be at critical size to be transmitted to the console.
n Maximum – The log file needs be at maximum size to be transmitted to the console.
n Full – The log file needs be at full size to be transmitted to the console.
6 Select Save.
7 Navigate to Devices > List View > Select desired device > More > Attachments > Documents to view the log files.
Containerization with Samsung Knox
VMware, Inc. 25
Applications for Samsung Knox Overview 4Samsung Knox supports the deployment of internal and public applications.
Internal apps are company-specific apps developed by your organization that you may not necessarily want to be searchable in the public app store, but you want your users to have access to this application from their device. Use Workspace ONE UEM to distribute, track, and manage your internal applications.
In order to deploy and manage public apps from Google Play inside the Knox Container, Android and the Google Play Store needs to be enabled through the Workspace ONE UEM console. Play for Work applications are available inside the Knox container after the device is enrolled, the Knox container is created, and Android is configured in the console. Play for Work public apps that are configured in the console will be pushed through Play for Work. In cases where the device is already enrolled, the Workspace ONE Intelligent Hub Settings may need to be re-saved after configuring Android and Google Play, in order to send the Play for Work configuration to devices.
For more extensive information about deploying public and internal applications, including Google Play for Work, see the comprehensive AirWatch Mobile Application Management Guide.
Important VMware productivity apps (Browser, Boxer, Content Locker, etc) are not supported with Android (Legacy) Knox container deployments, such as Dual Persona or Container Only Mode, due to technical limitations with Knox container data separation. The Workspace ONE Intelligent Hub manages the container from the outside, and is not able to communicate with apps on the inside. Since the apps require a direct link to the Workspace ONE Intelligent Hub in order to communicate with the Workspace ONE UEM console, the apps cannot be configured inside the container. In order to use productivity apps with Knox, the device must be enrolled using Android Enterprise on a device running Knox 3.x or higher.
This chapter includes the following topics:
n Public Applications for Samsung Knox Container
n Setup Public Apps in Samsung Knox Container
Public Applications for Samsung Knox ContainerIn order to deploy and manage public apps from Google Play inside the Knox Container, Android and the Google Play Store needs to be enabled through the Workspace ONE UEM console.
VMware, Inc. 26
Play for Work applications are configured inside the Knox container after the device is enrolled, the Knox container is created, and Android is configured in the Console. Admin-approved public apps that are configured in the UEM console are pushed through Play for Work. In cases where the device is already enrolled, the Workspace ONE Intelligent Hub will check on-demand for an Android token, which will be used to configure Play for Work.
This process includes adding and approving applications for integration between Workspace ONE UEM and Samsung Knox from the Google Play Store which can be accessed from the Workspace ONE UEM console. After approval, assign the application to devices using smart groups, a Workspace ONE UEM system that allows you to group devices on criteria you set. The final step is to assign the Terms of Use.
Applications that you push through the integration of Workspace ONE UEM and Samsung Knox have the capability of both On Demand and Automatic app installs. Automatic installation requires fresh enrollments with Workspace ONE Intelligent Hub v8.2 for Android or higher. End users only have access to whitelisted applications inside the managed Play Store within the Knox Container.
Setup Public Apps in Samsung Knox ContainerIn order to deploy and manage public apps from Google Play inside the Knox Container, Android and the Google Play Store needs to be enabled through the Workspace ONE UEM console.
To confirm Android and Knox Container setup, navigate to Devices > Device Settings > Devices & Users > Android > Android to confirm Google Admin Console Settings and Google API Settings are enabled. Samsung Knox should also be enabled under the Hub Settings tab. Use the Passcode profile to create a Samsung Knox Container passcode which prompts from Knox container creation. Add and approve public apps and use smart Groups to assign to devices.
For more information on configuring Samsung Knox License Key, see Enable Samsung Knox Container.
Containerization with Samsung Knox
VMware, Inc. 27

Knox for the End User Overview 5This section shows you how end users create the Knox container on their devices as well as how the user's interface will look between the personal side and the Knox container.
If during enrollment of the device the device ownership has been set to Corporate-dedicated, there will be no dual persona on the device meaning no personal and business container. The device will be locked into Container Mode for Knox container functionality only. If the default ownership is designated to be Corporate–Dedicated then the container will be created in Container Only Mode.
This chapter includes the following topics:
n Create Knox Container on a Device
n User Interface
Create Knox Container on a DeviceEnd users have to simply walk through device enrollment to create the Knox Container on their device.
Procedure
1 Enroll the device using the Workspace ONE Intelligent Hub.
A message displays showing successful authentication.
2 Tap Accept on the Set your Workspace page to accept the Terms and Conditions.
3 Tap the Worspaceapp to set the Workspace pin.
Confirm that apps have the Knox Workspace icon.
User InterfaceThe Knox container is auto-configured upon selection. This one-time configuration can be expanded with more container profiles. When complete, you can access corporate configurations from Knox Workspace.
All Applications and data inside the Knox container are isolated from applications located on the personal side. If users unenroll their device from the Workspace ONE Intelligent Hub, that removes the Knox container from their device.
VMware, Inc. 28
While Knox is installing, users are prompted to set the Knox password and password timeout. The Knox container only requires the passcode setup for activation. Other settings come down with the passcode profile. The password and timeout settings can be changed or reset from the Workspace ONE UEM console. Users cannot create the Knox container without completing this step. The password timeout determines how long Knox can be inactive before the user is required to enter the password to open Knox. Users are also prompted to set a backup pin if they are using the fingerprint passcode setting. The backup pin setting is a Samsung requirement and cannot be changed by Workspace ONE UEM Knox container provides a separate Android environment within the mobile device, complete with its own home screen, launcher applications, and widgets.
Here are some tips on features and actions end users may perform from their device home screen:
n Users can add shortcuts to their Knox applications on the personal side of their device. Tapping the Knox application shortcut opens the application in the Knox container. The Knox container passcode and timeout rules still applies.
n Users are notified of Knox messages or email from the notification tray while they are using their device as a personal device. Tapping a notification from the tray starts the Knox container.
n End-users return to the personal container by tapping the Personal home icon within the Knox container.
Containerization with Samsung Knox
VMware, Inc. 29


