

USER MANUAL
COLLATERAL REGISTRY SYSTEM
JULY, 2018

ii
TABLE OF CONTENTS
TABLE OF CONTENTS .................................................................................................................... II
TABLE OF GLOSSARY .................................................................................................................... V
1.0 GENERAL INFORMATION .................................................................................................. 1
ABOUT COLLATERAL REGISTRY SYSTEM (CRS) ................................................................................ 1
TYPE OF USERS OF THE CRS WEBSITE ................................................................................................ 1
HOW TO ACCESS THE COLLATERAL REGISTRY SYSTEM
(HTTPS://WWW.COLLATERALREGISTRY.GOV.GH) ............................................................................... 1
2.0 SYSTEM OVERVIEW............................................................................................................. 2
INTRODUCTION .................................................................................................................................... 2
Web Browser ................................................................................................................................... 2
Internet Speed ................................................................................................................................. 2
3.0 GETTING STARTED .............................................................................................................. 3
HOME PAGE ......................................................................................................................................... 3
4.0 USING THE SYSTEM ............................................................................................................. 6
CREATING A CLIENT ACCOUNT .......................................................................................................... 6
How To Create An Institution Account ........................................................................................... 6
CLIENT LOGIN ................................................................................................................................... 9
HOW TO SETUP PASSWORD ................................................................................................................. 9
HOW TO RESET YOUR PASSWORD .................................................................................................... 11
HOW TO CHANGE YOUR PASSWORD ................................................................................................ 12
HOW TO SETUP A POSTPAID ACCOUNT ............................................................................................ 13
5.0 THE MENU ............................................................................................................................. 15
THE MAIN MENU AND NAVIGATIONAL TABS .................................................................................. 15
The Navigational Tabs .................................................................................................................. 15
The Main Menus ........................................................................................................................... 16
HOW TO REGISTER A SECURITY INTEREST OR CHARGE ................................................................ 18
How To Add The Charge details to a Security Interest ................................................................ 21
How To Add An Institution Lender To A Security Interest ........................................................... 22
How To Add A Institution Borrower To A Security Interest ......................................................... 23
How To Add Individual Borrower To A Security Interest ............................................................. 24
iii
How To Add Collateral Details To A Security Interest ................................................................. 25
How To Save Security Interest Registration As Draft ................................................................... 26
How To Use A Saved Draft To Register A Security Interest ......................................................... 26
HOW TO REVIEW AND AUTHORIZE A SECURITY INTEREST ............................................................. 27
HOW TO EDIT A RESUBMITTED SECURITY INTEREST ...................................................................... 30
HOW TO HANDLE PENDING TASKS ................................................................................................... 31
Option 1 – Using The Dashboard View ........................................................................................ 31
Option 2 – Using The Task Menu ................................................................................................. 32
6.0 POST REGISTRATION ACTIVITIES ................................................................................ 34
HOW TO REGISTER AN AMENDMENT (UPDATE) ON A SECURITY INTEREST ................................... 34
HOW TO REGISTER AN EXTENSION ................................................................................................... 37
HOW TO REGISTER TRANSFER (ASSIGNMENT) ON A SECURITY INTEREST ...................................... 40
HOW TO ACCEPT TRANSFER (ASSIGNMENT) ON A SECURITY INTEREST ......................................... 43
HOW TO REGISTER NOTICE OF DEFAULT ON A SECURITY INTEREST .............................................. 45
HOW TO CANCEL NOTICE OF DEFAULT ON A SECURITY INTEREST ................................................ 47
HOW TO DISCHARGE A REGISTERED SECURITY INTEREST .............................................................. 48
HOW TO REGISTER A NOTICE OF APPOINTMENT OF A RECEIVER OR MANAGER ............................. 50
HOW TO REGISTER A NOTICE OF REMOVAL OF A RECEIVER OR MANAGER .................................... 52
HOW TO REGISTER REALISATION WITHOUT COURT ORDER ............................................................ 54
HOW TO AUTHORIZE A POST REGISTRATION ACTIVITY .................................................................. 56
HOW TO REGISTER COURT ORDER POST REGISTRATION ACTIVITY ................................................ 57
7.0 PAYMENTS ............................................................................................................................ 58
HOW TO VIEW PAYMENTS ................................................................................................................ 58
HOW TO VIEW CLIENT ACCOUNT TRANSACTIONS ........................................................................... 59
8.0 PERFORMING A SEARCH ................................................................................................. 60
HOW TO SEARCH BY BORROWER ..................................................................................................... 60
HOW TO SEARCH BY COLLATERAL IDENTIFICATION NUMBER ....................................................... 61
HOW TO SEARCH BY SECURITY INTEREST (CHARGE) REGISTRATION NUMBER .............................. 63
HOW TO VIEW YOUR PREVIOUS SEARCHES ..................................................................................... 65
9.0 ADMINISTRATION .............................................................................................................. 66
HOW TO EDIT CLIENT PROFILE......................................................................................................... 66
HOW TO CREATE GROUPS/CLASSIFICATIONS .................................................................................. 67
MANAGING USERS ............................................................................................................................ 68

iv
How to Create New Users ............................................................................................................. 68
How To Edit User Profiles ............................................................................................................ 70
How To Assign Roles To A User ................................................................................................... 70
How To Deactivate A User ........................................................................................................... 71
How To Activate A User................................................................................................................ 72
How To Delete A User .................................................................................................................. 73
AUDIT TRAILS ................................................................................................................................... 73
10.0 CONFIGURATION SETTINGS ........................................................................................... 75
HOW TO CONFIGURE WORKFLOW .................................................................................................... 75
11.0 NOTIFICATIONS .................................................................................................................. 76
HOW TO RETRIEVE EMAIL NOTICES ................................................................................................. 76
HOW TO VIEW GLOBAL MESSAGES .................................................................................................... 76

v
TABLE OF GLOSSARY
Term Definition
Administrator The User assigned the Administrator role and responsible for the
system administration, setting up client accounts, Groups/
Classifications and managing users. Each registered Client Institution
need to appoint a Client Administrator for the use of the system.
Amend (Update) Authorizer The user responsible for authorizing the submission of an amendment
on a Security Interest in workflow mode. Authorization is not required
for individual clients. Authorization is required if your Institution uses
the default “Global Setting” for workflow.
Amend (Update) Officer The user responsible for creating and submitting an amendment on a
Security Interest in workflow mode.
Appointment of Receiver
Authoriser
The user responsible for authorizing the submission of the appointment
of receiver or manager on a security interest registration in workflow
mode.
Appointment of Receiver
Officer
The user responsible for creating or submitting the appointment of
receiver on a security interest registration in workflow mode.
Auditor The user responsible for viewing the audit trail of User actions for the
institution.
Business Registration Number The registration number for institutions by which they are uniquely
identified.
Client Authorizer The user responsible for authorizing the submission of a new Security
Interest or any post registrations activity on a Security Interest in
workflow mode. Authorization is not required for individual clients.
Client Code Client Code is the automatic generated code assigned to the client
when the client membership account is created.
Client Officer The user responsible for creating and submitting a new Security
Interest or performing any post registrations activity on a Security
Interest in a workflow mode.
Collateral Description The description of a collateral by which one can identify the said
collateral.
Collateral Identification
Number
The number imprinted by the manufacturer on the body of a serial
numbered collaterals or the number that uniquely identifies a collateral
like Vehicle, Land, etc.
Date of Expiry The effectiveness of a Security Interest or charge registration indicated
by the Registrant.
Discharge Authorizer The user responsible for authorizing the submission of a discharge on a
Security Interest in workflow mode. Authorization is not required for
individual clients.
Discharge Officer The user responsible for creating and submitting a discharge on a
Security Interest in workflow mode.
Extension Authorizer The user responsible for authorizing the submission of an extension on
a security interest in workflow mode. Authorization is not required for
individual clients.

vi
Extension Officer The user responsible for creating and submitting renewals on a security
interest in workflow mode.
Extinguishment Authorizer The user responsible for authorizing the submission of an
extinguishment on a Security Interest in workflow mode.
Authorization is not required for individual clients.
Extinguishment Officer The user responsible for creating and submitting an extinguishment on
a Security Interest in workflow mode.
Finance Officer The user responsible for managing the client payment account in the
application.
Generate Reports The user responsible for reports.
Initial Registration Number Registration Number is the initial registration number on the Security
Interest or Charge.
Notice of Default Authorizer The user responsible for authorizing the submission of an Notice of
Default on a Security Interest in workflow mode.
Notice of Default Officer The user responsible for creating and submitting an Notice of Default
on a Security Interest in workflow mode.
Post Registration Authorizer The user responsible for authorizing the submission of post registration
activities on a security interest in workflow mode. Authorization is not
required for individual clients.
Post Registration Officer The user responsible for creating and submitting post registration
activities on a security interest in workflow mode.
Postpaid Account Payment Account held by Registered Clients with the Bank of Ghana
that allows them to be billed for their use of the Collateral Registry for
registration of security interests and searches and settle payments at a
later period.
Principal Business Activity Borrower’s business operation type. In Security Interest registration
principal business activity cannot be more than one selection (1)
selection.
Public Client Un-Registered Client User. Such Users can only search the Registry.
Realisation without Court
Order Authoriser
The user responsible for authorizing the submission of a realization
without court order request on a security interest in workflow mode.
Authorization is not required for individual clients.
Realisation without Court
Order Office
The user responsible for creating and a realization without court order
request on a security interest in workflow mode
Search Officer The user responsible for performing and generating search reports.
Security Interest Authorizer The user responsible for authorizing the submission of a Security
Interest in workflow mode. Authorization is not required for individual
clients.
Security Interest Officer The user responsible for creating and submitting a new Security
Interest for authorization in workflow mode.
TIN Tax Identification Number
Transaction Reference
Number
The reference number stated on the payment receipt issued to the
Client by the bank after payment.

vii
Transfer (Assignment)
Authorizer
The user responsible for authorizing the submission of a transfer
(Assignment) on a security interest in workflow mode. Authorization is
not required for individual clients.
Transfer (Assignment) Officer The user responsible for creating and submitting a transfer
(Assignment) on a security interest in workflow mode.
1
1.0 GENERAL INFORMATION
ABOUT COLLATERAL REGISTRY SYSTEM (CRS) The CRS provides online registration of security interests in both immovable and movable assets
pledged as collateral, pursuant to the Borrowers and Lenders Act, 2008 (Act 773). The overall goal of
the Act is to promote lending and ultimately increase access to credit by small scale businesses, in
particular.
Note: This User Manual provides the information necessary to effectively use the automated
Collateral Registry System.
TYPE OF USERS OF THE CRS WEBSITE The Collateral Registry System is to provide access to three main user groups: Frequent users,
infrequent users and public user. The kind of access to the Collateral Registry System that you require
depends on the kind of transaction to be undertaken. It also depends on whether you are an Institution
going to use the system to register a security interest (pledge or charge) regularly or infrequently or a
Public user who only search the registry system.
HOW TO ACCESS THE COLLATERAL REGISTRY SYSTEM
(HTTPS://WWW.COLLATERALREGISTRY.GOV.GH)
The Collateral Registry’s website can be accessed by entering the URL address
https://www.collateralregistry.gov.gh in a web browser.
Any person can access the CRS but only registered users are able to enter and save data to the
database. Accessing the Collateral Registry System depends on the Client Type. Unlike a Registered
Client, Public Clients need no client registration in the system to perform a search.
Transactions in the CRS are both Prepaid and Postpaid. Registered Clients can pay for services using
either a post-paid account setup for them by the Bank of Ghana or funds initially deposited in their
prepaid virtual accounts. To pay for a transaction in the CRS, first determine the total amount of fees
for all the services you want to do from the Fees option under the ABOUT US menu.
As the Collateral Registry is electronic, it is accessible 24 hours a day, even outside official working
hours. An application for registration can therefore be made anytime from the comfort of your location,
beyond normal business hours without visiting the registry office. The same applies to searches. The
web-based nature of the system increases transparency and timeliness to information. However, the
Registrar may occasionally suspend business for purposes of maintenance or where circumstances so
require.

2
2.0 SYSTEM OVERVIEW
INTRODUCTION The Collateral Registry System is a comprehensive centralized web-based software solution designed
and developed to international standards to store information on the parties to a security interest and is
concerned with assets pledged as collateral - whether they are encumbered and who has a priority
security interest.
The Collateral Registry System automatically assigns a sequential registration number, date and time
of registration to each registration record. Information retrieved in a search can establish a party’s
priority rights in a Borrower’s collateral among competing security interests according to the time and
date of registration.
WEB BROWSER
The application requires connection to the Internet using any compatible web browser namely Microsoft
Internet Explorer 8.0 or higher, Microsoft Edge, Mozilla Firefox 3.5 or higher, Google Chrome 10.0 or
higher and Safari 4.0 or higher. For optimal functionality of the software, your system browser must be
configured according to the default settings with Java Script enabled. Optimal functionality of the
system cannot be guaranteed when a lower version of recommended browsers are used.
INTERNET SPEED
With a minimum of 128Mbps internet connectivity speed, the application can be accessed by entering
the URL address https://www.collateralregistry.gov.gh in your web browser. A lower internet speed
may affect the performance of the application.

3
3.0 GETTING STARTED
HOME PAGE You can access the Collateral Registry System by entering the site address
https://www.collateralregistry.gov.gh in your web browser. This will display the Home page below.
The Home page of the Collateral Registry System shows five (5) main Menu Tabs at the top and two
(2) Access Control Buttons.
Below are details of the various sections on the Home page:
A. The Access Control buttons are:
1. Login: Click this to Login to the system at the Login Page if you are a Registered Client of the
system.
2. Create New Account: Click this to Register an Account in the system as a first time client who
wants to use the system to register security interests frequently.

4
3. Search The Registry: Click this to Search the Registry if you are a Public User
B. The Menu Tabs are:
1. Click on the Home Menu tab from any page on the website to return to the Home page.
2. Click Useful Resources Menu tab to access the numerous resources of the registry.
3. The About Us Menu tab provides information about the Registry.
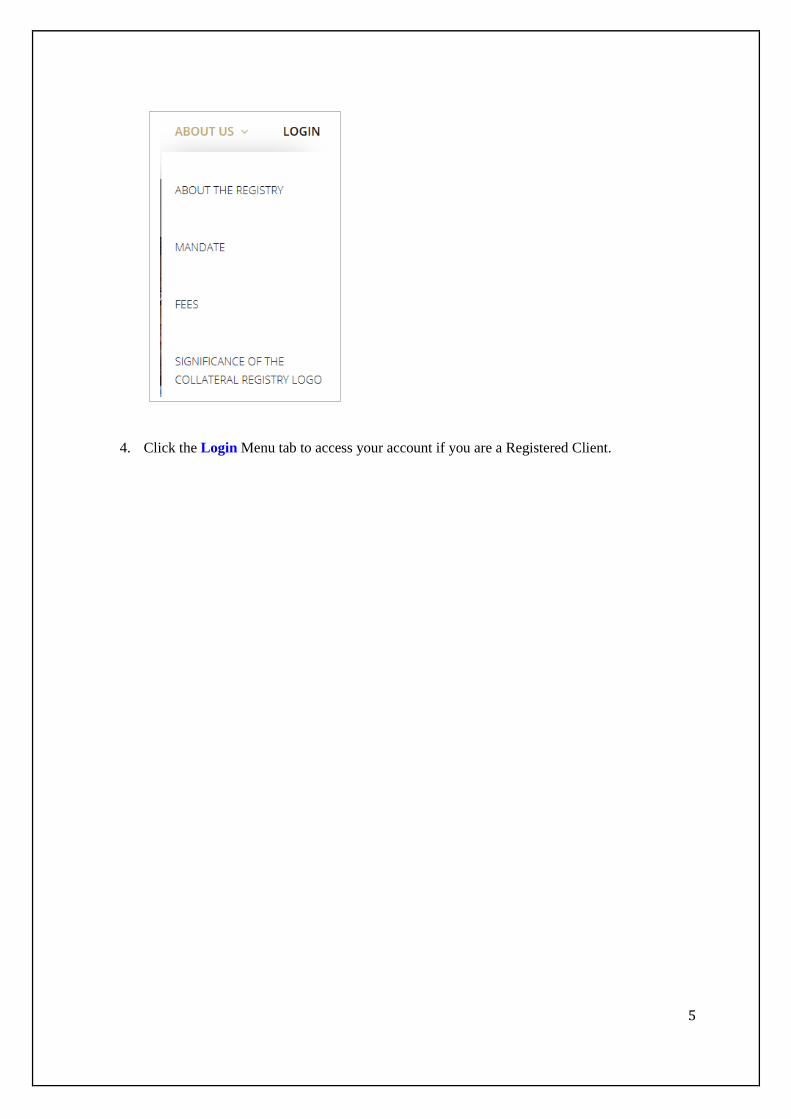
5
4. Click the Login Menu tab to access your account if you are a Registered Client.

6
4.0 USING THE SYSTEM
CREATING A CLIENT ACCOUNT If your business activities require you to register Security Interests on regular basis, then you are
required to create a client account in the registry as Institution. You require approval from the Registrar
of the Collateral Registry to create an account in the system.
HOW TO CREATE AN INSTITUTION ACCOUNT
An Institution is required to create an account with the Collateral Registry System (CRS) in order to
register a Security Interest for self or on behalf of its clients. Creating a Client Account requires approval
from the Registrar of the Collateral Registry.
To create an account:
1. Enter the URL address https://www.collateralregistry.gov.gh in your browser to take you directly
to the Home page of the Collateral Registry System.
2. On the Home Page, click on the button to display Step One - Choose
Client Type page.
3. Select the client type option Institution and click Continue to proceed.
4. This displays Step Two – Provide Registration Information page where the client is requested to
provide the Institution Business Information to complete the registration.
5. Ensure that information provided is accurate leaving no mandatory data box with red asterisks
blank.
6. Indicate the major role your institution will be playing in the Collateral Registry System and then
select your institution type as shown.
7. Provide details of both your physical and postal addresses.
7
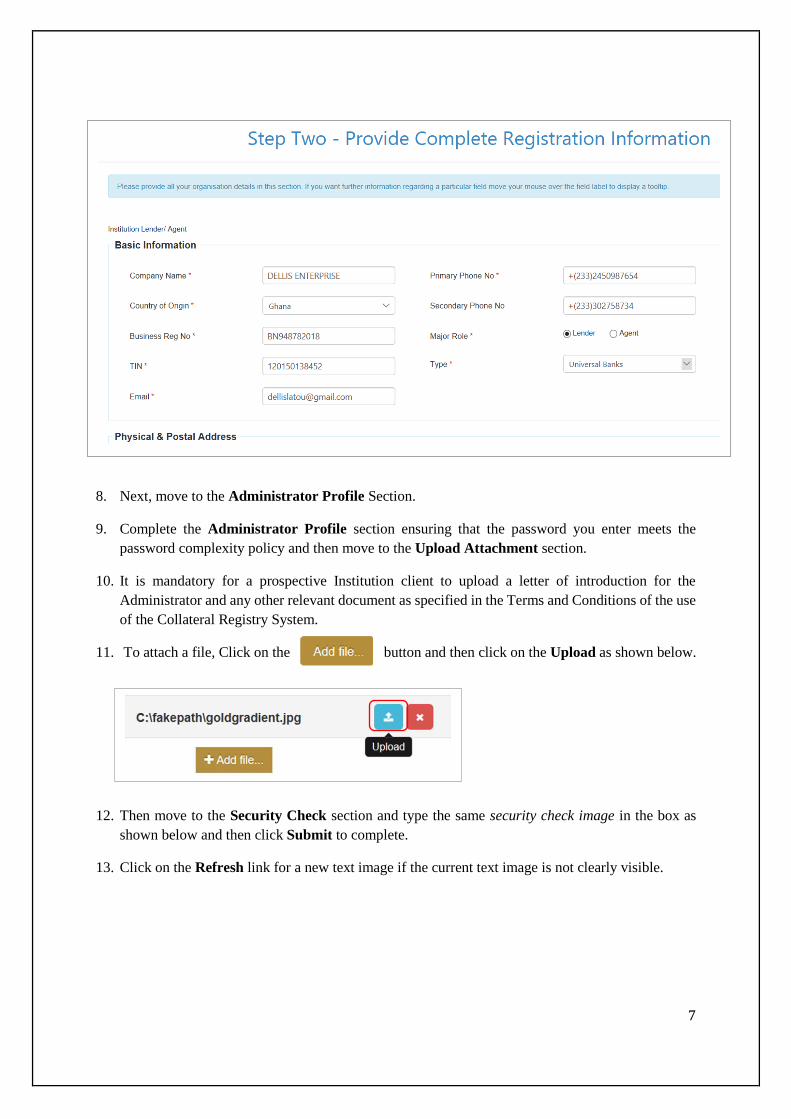
8. Next, move to the Administrator Profile Section.
9. Complete the Administrator Profile section ensuring that the password you enter meets the
password complexity policy and then move to the Upload Attachment section.
10. It is mandatory for a prospective Institution client to upload a letter of introduction for the
Administrator and any other relevant document as specified in the Terms and Conditions of the use
of the Collateral Registry System.
11. To attach a file, Click on the button and then click on the Upload as shown below.
12. Then move to the Security Check section and type the same security check image in the box as
shown below and then click Submit to complete.
13. Click on the Refresh link for a new text image if the current text image is not clearly visible.
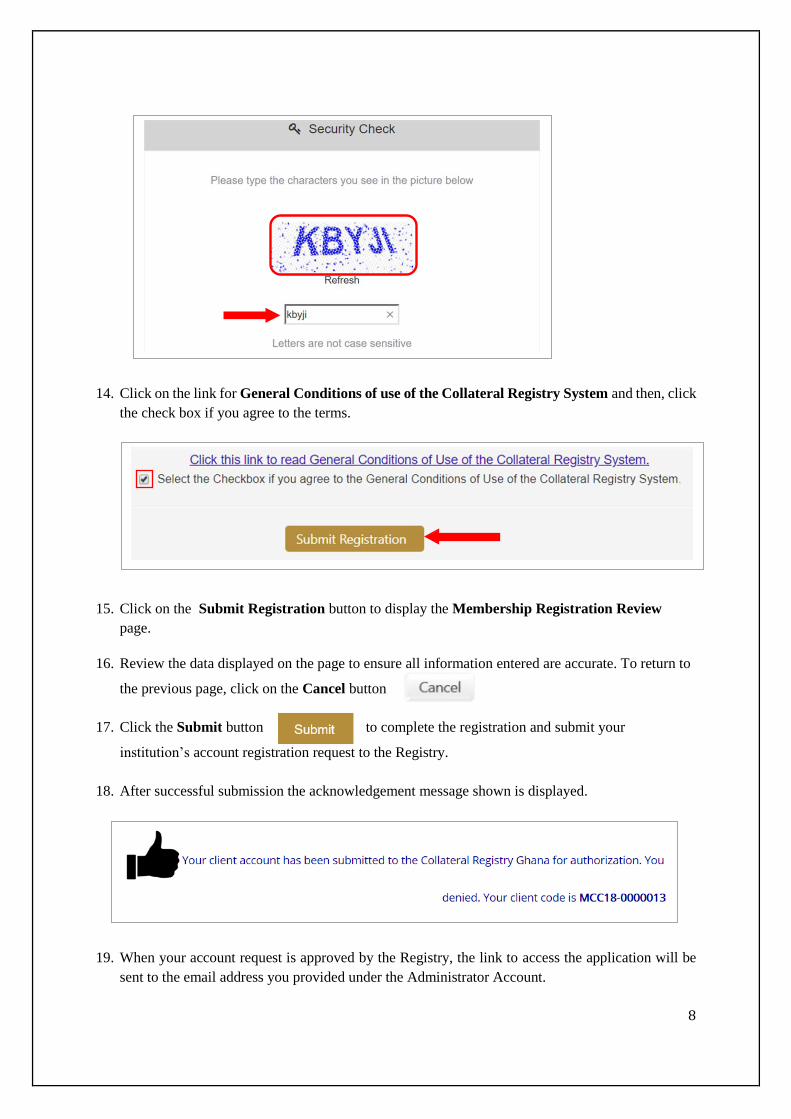
8
14. Click on the link for General Conditions of use of the Collateral Registry System and then, click
the check box if you agree to the terms.
15. Click on the Submit Registration button to display the Membership Registration Review
page.
16. Review the data displayed on the page to ensure all information entered are accurate. To return to
the previous page, click on the Cancel button
17. Click the Submit button to complete the registration and submit your
institution’s account registration request to the Registry.
18. After successful submission the acknowledgement message shown is displayed.
19. When your account request is approved by the Registry, the link to access the application will be
sent to the email address you provided under the Administrator Account.

9
20. To access your client account click on the link.
CLIENT LOGIN Once your institution Administrator creates your user account in the collateral registry system, you will
receive a notification on your Username with a link to setup your password and access the registry.
To Login to the Registry:
1. Click on the Login button on the Home page.
2. The Login page is displayed.
3. Enter your Username in the Username box.
4. Then, enter your password in the Password box.
5. When completed, click the Login button or simply press on the Enter key on your keyboard to
Login to the registry.
HOW TO SETUP PASSWORD A User created in the Collateral Registry System is required to setup his/her password.
To Setup Your Password:
1. Visit the inbox of the email account used to create your User account and retrieve the email sent
to you from the Collateral Registry System.
2. Click on the link that appears in the email that was sent.
3. The Password Setup page is displayed.
3
4

10
4. Enter your New Password in the boxes provided.
5. Then, on the Security Check section, enter the same text on the security image in the box as
shown by the arrow. NOTE: Text is not case sensitive.
6. When completed, click on the Submit button to send request for password reset.
7. After successfully setting up your new Password, the page below is displayed with link to click
to the Login page to access the system.

11
HOW TO RESET YOUR PASSWORD The Login page provides you with the facility to reset your password when forgotten.
To Reset Your Password:
1. Click on the button on the Home page.
2. At the Login page, click on the link Forgot Password?
3. The Password Reset page loads with a request for your email address.
4. Enter your email address in the email box as shown above.
5. Then, on the Security Check section, enter the same text on the security image in the box as
shown by the arrow. NOTE: Text is not case sensitive.
6. When completed, click on the Submit button to send request for password reset.
7. After submitting password reset request the Password Reset Confirmation page shown below
opens confirming that the link to reset password has been sent to the email address you provided.
8. Visit the inbox of the email address you provided during password reset.
9. Open the system generated email received from the Registry and Click on the Reset Password
link to take you to the Change Password page to reset your Password.
10. After successfully resetting password a confirmation notice as shown is displayed.

12
HOW TO CHANGE YOUR PASSWORD You can change your password by editing your profile.
To Change Password:
1. Login to the application with your Username and Password.
2. On the Dashboard Page, click on the My Profile menu tab to display the User Page.
3. Click on the Change Password button to display page.
4. Enter your Previous password.
5. Enter your New password and then confirm in the Confirm New Password box as shown
below.
6. Move to the Security Check section.
7. Enter the text in the security image into the box as shown. NOTE:Text is not case sensitive.
4
5

13
8. Click on the button when done.
9. After clicking Submit, wait for the confirmation message dialog shown below to confirm the
success of password reset.
10. You may now Login to the application with your new password.
HOW TO SETUP A POSTPAID ACCOUNT Clients with account with the Bank of Ghana needs to setup a Postpaid account in order to settle the
payment for security interest registrations and searches. By setting up a Postpaid account, fees charged
on security interest registrations and searches will be debited to their Postpaid accounts and payment
be settled through account payment reconciliations. By default, all universal banks setup in the collateral
Registry are on the Postpaid account. However, any other financial institution requesting for a Postpaid
account setup will require approval and acceptance from the Registrar of the Collateral Registry.
To setup a Postpaid Account:
1. Login to the application with your Username and Password.
2. Click on the Payment menu tab. Select “Submit Postpaid Request” from the drop down list.
3. The Postpaid Setup page is displayed.
4. Indicate the representative bank by selecting it form the dropdown and enter the bank account
number in the Bank Account No. box as shown.

14
5. Then click on the Submit button to conclude.
6. After successful submission, the notification message is displayed.

15
5.0 THE MENU
THE MAIN MENU AND NAVIGATIONAL TABS When you successfully Login into the system, you are welcomed with the dashboard. You will also find
five (5) Navigational Tabs and eight (8) Menu Tabs which appears in the application pages. The Menu
tabs appear below the Navigational tabs.
THE NAVIGATIONAL TABS
The Navigational Tabs consist of:
1. The Home tab: Clicking the Home tab from any page in the main application takes the user to
the Home Page.
2. The Dashboard tab: When you log into the application, the first menu that welcomes you is the
Dashboard. On the dashboard the User is presented with notices and analytic information on
pending tasks, emails, Security Interest registrations and searches generated; so that he/she is
able to handle pending issues and tasks promptly when notifications are received. The user is
also notified with recent Login activities and alerts.
3. The My Profile (Username) tab: Clicking the My Profile (Username) tab from the main
application opens the User profile.

16
4. The Sign Out tab: Clicking the Sign Out tab logs the user out of the system.
5. The Help tab: Clicking the Help tab displays the User Manual.
THE MAIN MENUS
There are eight (8) main Menu Tabs in the application. However, depending on your User role in the
system certain menus will not be accessible to you.
The Main Menu consists of:
1. The My Tasks menu with one (1) sub-menu for handling pending tasks.
2. The Search menu comes with two (2) sub-menus for handling Search.
3. The Security Interest menu has three (3) sub-menus for handling charge registrations.
4. The Payments menu tab makes available to the Client three (3) sub-menus for handling
payments.

17
5. Clicking the Reports menu tab opens the Reports Index page where you may generate your
standard and adhoc management or financial reports.
6. The Administration menu tab contains five (5) sub-menus for handling administrative related
functions. Depending on the client type and user role in the system, some of the listed submenu
items may not be accessible to you.
7. The Configuration menu tab has one (1) sub-menu related to configuration.

18
8. The Notification menu has two (2) sub-menus for handling system generated messages.
HOW TO REGISTER A SECURITY INTEREST OR CHARGE To register a Security Interest, you must have an account with Username and Password to the registry
and be assigned a Security Interest Officer or Client Officer role. Registering a Security Interest in the
CRS attracts payment.
To Register Security Interest or Charge:
1. Login into the application with your Username and Password.
2. On the Dashboard Page, click on the Security Interest menu tab.
3. To register a security interest, select Create New Security Interest (Charge) from the drop
down list as shown below.
4. The Security Interest Registration page is displayed.
5. Provide the Charge details ensuring that all mandatory boxes are filled.
6. Next, move to the Registration Information section.
7. Click on the Lender tab. For a Registrant, the Lender profile details captured at the time of
account setup is displayed as shown. In the case of Agents registering security interests on
behalf of their clients, the Lender form displayed is blank.
8. You may replace Addresses or Phone Numbers with the most recent accurate data if they
have changed. Make sure to provide every other missing mandatory information required on
the form.

19
9. If there are two or more Lenders you may continue to add more by clicking the appropriate
button below the page depending on what you want.
10. Click on the Institution Lender button to include an additional Lender details as shown below.
11. After providing data for the Lender, click on the Borrower tab and select the appropriate
Borrower type button to add Borrower details.
a. Click on the Add Individual Borrower button if the Borrower is an individual
b. Click on the Add Institution Borrower button if the Borrower is an Institution.
12. If there are two or more Borrowers, continue to add new Borrower by clicking on the required
button and then, enter all mandatory information in their boxes.
13. Next, click on the Collateral tab to add the Collateral details.
14. Select Nature Of Charge on the collateral, enter Restrictions on Charge, select the
Collateral Subtype from the drop down list, then enter the Serial Number (for all serial
numbered collaterals as specified in the regulations.) and Description of the collateral in their
boxes respectively.
15. To add more collaterals, click on the Add New Collateral button.

20
16. You may include the details of the Guarantor by clicking on the tab.
17. Make sure all mandatory information has been provided on the Security Interest and then
move to the Acknowledgement section.
18. Click inside the box that reads: “ I have obtained the borrower's authorisation to enter this
information in the Collateral Registry System”.
19. At the Workflow Details section you are presented with the name(s) of the assigned
authorizer(s) whose authorization is required for the transaction to be registered in the system.
20. Add your comments to the registration in the Comments box as indicated by the arrow.
21. To complete, click on the Register Security Interest button
and register.
22. A preview of the Security Interest information is then displayed on the screen for final review.
Client Authorizer
Comments

21
23. Click on the Register Security Interest button again to
confirm the registration or the Cancel button to return to previous page.
24. In workflow mode you click on the Submit Security Interest for Authorization button to
confirm submission.
25. Upon successful registration of the Security Interest, a confirmation message with summary
view of the registered Security Interest is displayed for preview.
HOW TO ADD THE CHARGE DETAILS TO A SECURITY
INTEREST
To Add the Charge Details:
1. From the Create New Security Interest (Charge) page, enter the Charge Creation Date and
Expiry Date
2. Select Interest Rate Period and Sector of Economy for Credit from their respective drop down
list.
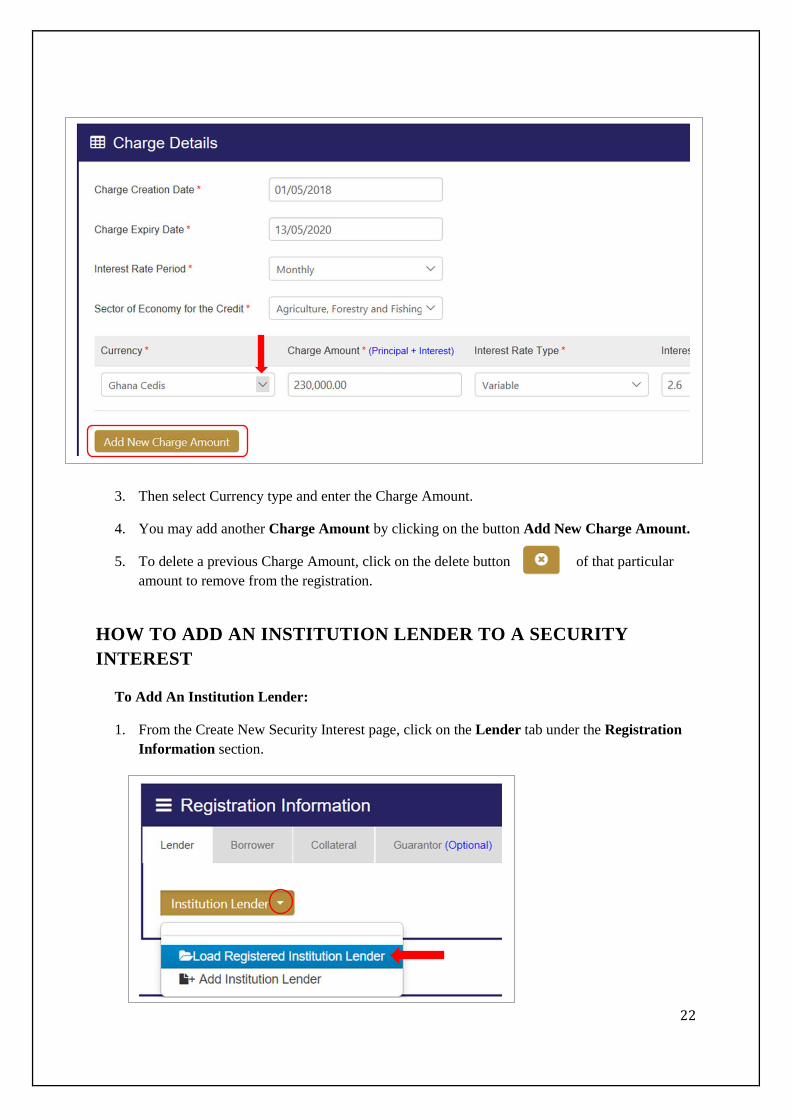
22
3. Then select Currency type and enter the Charge Amount.
4. You may add another Charge Amount by clicking on the button Add New Charge Amount.
5. To delete a previous Charge Amount, click on the delete button of that particular
amount to remove from the registration.
HOW TO ADD AN INSTITUTION LENDER TO A SECURITY
INTEREST
To Add An Institution Lender:
1. From the Create New Security Interest page, click on the Lender tab under the Registration
Information section.

23
2. Click on the Institution Lender button and then select from the dropdown options whether
you want the details of an already registered lender or not as shown.
3. Select the option Load Registered Institution Lender to add the details of a lender registered
in the system.
4. Select the option Add New Institution Lender to display a blank form to fill the details of the
new lender.
HOW TO ADD A INSTITUTION BORROWER TO A SECURITY
INTEREST
To Add An Institution Borrower:
1. From the Create New Security Interest page, Click on the Borrower tab under the
Registration Information section and select the appropriate Borrower type.
2. Select Add Individual Borrower if the Borrower is an individual or Add Institution
Borrower if the Borrower is an Institution.
5. Click on the Add Institution Borrower button and provide the business information of the
borrower.
6. Select Owner Composition from the Owner Composition drop down list. Indicate Borrower’s
relationship with the Lender by clicking on any of the options at the Relationship with Borrower
section.
7. Provide Borrower physical and postal address details
8. Next, move to the Principal Business Activity section and select Borrower’s business activity.
Note: Only a single selection is allowed.

24
HOW TO ADD INDIVIDUAL BORROWER TO A SECURITY
INTEREST
To Add An Individual Borrower:
1. From the Create New Security Interest page, click on the Add Individual Borrower button
. to open the Individual Borrower page.
2. Select the nationality from the drop down list of the Nationality box
3. Provide the Borrower’s information by entering surname, first name and middle name in the
Surname, First Name and Middle Name boxes respectively.
4. Then select the Identification Number Type from the Identification Type drop down list and
enter the identification number in the Identification No. box.
5. Enter the Date Of Birth and Indicate the Gender by selecting either Male or Female.
6. Enter the Email Address and the Phone Number.
7. Provide Borrower physical and postal address details
8. Next, move to the Principal Business Activity section and select Borrower’s business activity.

25
HOW TO ADD COLLATERAL DETAILS TO A SECURITY
INTEREST
To Add Collateral Details:
1. From the Create New Security Interest page, click on the Collateral tab under the
Registration Information section to add the Collateral details.
2. Select Nature of Charge from the drop down list by Clicking on the arrow as shown and enter
the Restrictions on the Charge.
3. Select Collateral Subtype from the drop down list as shown below.
4. Next, enter the Identification Number in the Identification Number box. It is mandatory to
enter the Identification Number for collaterals such as Motor Vehicles, Land, etc, that are
uniquely identified by its number.
5. Enter a narrative description of the collateral in the Description box.
6. Provide the Collateral Valuation details.

26
7. Enter the Collateral Region details when the Collateral is an immovable asset.
8. To add more collateral, click on the Add New Collateral button
and follow the steps above.
HOW TO SAVE SECURITY INTEREST REGISTRATION AS DRAFT
Registration of a Security Interest can be saved as a draft and finished later.
To Save Security Interests Registration As Draft:
1. On the Create Security Interest page, click on the Save as Draft button
on top of the Charge Details section. This displays the Save dialog box for you to enter a
Name for the draft.
2. Enter a name and Click on the Save Draft button to Save draft as shown
below or click on the button to Cancel the process.
3. Next, Click OK to confirm and complete the Save.
HOW TO USE A SAVED DRAFT TO REGISTER A SECURITY
INTEREST
To load a Saved Draft to Register a Security Interest:
1. Login into the application with your Username and Password.
2. Click the Security Interest Menu tab and select Saved Drafts from the drop down list as
shown below.
3. Clicking Saved Drafts opens the Saved Draft page.
4. You may search for drafts by entering your Search Date as shown below.

27
5. Click on the Submit Search button to submit search request.
6. After the page returns your Search, move to the List of Saved Drafts section.
7. At the Actions column, Click on the Open icon of that particular draft to load the
draft Security Interest for Edit.
8. To use the draft to register a new Security Interest follow the steps outlined in How to Register
a new Security Interest to continue.
9. To delete the Saved Draft Click on the Close icon of that particular draft.
Note: Saved Draft items are automatically deleted from the system after successfully
registered.
HOW TO REVIEW AND AUTHORIZE A SECURITY INTEREST Authorization is required if your Institution has been setup to use a workflow to handle the charge
registrations and post registration activities in the system. To be able to review and authorize tasks of
such nature on a Security Interest, you must be assigned the Authorizer role for the specific task.

28
To Review and Authorize:
1. Login to the application with your Username and Password.
2. Click the Task Menu tab and Select My Pending Tasks.
3. At the My Pending Task page search for a pending task by entering your search date.
4. Click on the Submit Search button to submit your search request.
5. Move to My Tasks section. Locate the Security Interest.
6. Click on the Handle button below the Action heading of the Security Interest of interest to authorize
as shown below.
7. This displays the Task Handle page where you may review the Charge Information, Lender,
Borrower and Collateral details. Click on the heading to expand the details for review.

29
8. To perform the assigned task, scroll down to the Authorization section as shown below. Select
Authorize to approve, Deny to terminate or Resend to Submitter to return the Security Interest to
the Client Officer for editing and resubmission.

30
9. To authorize this Security Interest registration, Select the Authorize option.
10. In the Add Comment box shown by the arrow, the authorizer may enter his/her comments for the
registration there.
11. Then click on the Submit button to complete.
12. A confirmation dialog box is displayed. Click Yes to confirm.
13. Upon successful registration of the security interest, a confirmation message as shown below is
displayed.
HOW TO EDIT A RESUBMITTED SECURITY INTEREST After the Client Authorizer has resubmitted the Security Interest to the Client Officer for edit, the
resubmitted Security Interest is log on the task page of the Client Officer.
To Edit a Resubmitted Security Interest:
1. Login to the application with your Username and Password.
2. On the Dashboard, task for the resubmitted registration shall read “Authorize Security Interest
…… Resubmitted” and shall be listed under Latest Pending Task.
3. Click the highlighted text “Authorize Security Interest” to open the Task Handle page. The
task handle page may also be opened using My Tasks Menu.
4. Scroll down to the Authorization window and click Edit Item as shown.

31
5. This opens the Security Interest for editing. Edit the fields you want to change making sure that
all mandatory boxes have been filled with the required data.
6. Click inside the Acknowledgement message box
7. Click the Resubmit Changes button to resubmit for authorization.
8. A preview of the Security Interest information entered is shown on the screen for final review.
Click the Cancel button to go back to the registration page or the Resubmit Changes button
to confirm submission and complete.
9. Upon successful resubmission the confirmation message shown below is displayed.
HOW TO HANDLE PENDING TASKS There are two options by which the user may use to view and handle pending tasks.
OPTION 1 – USING THE DASHBOARD VIEW
Tasks may be viewed and handled from the Dashboard.
To View and Handle Tasks from the Dashboard:
1. Login to the application with your Username and Password.
2. On the Dashboard a list of pending tasks that requires your attention will be log under Latest
Pending Tasks. Pending task for Registration shall read “Authorize Security Interest -
.…….Waiting for Authorization as shown.

32
3. Click the highlighted text “Authorize Security Interest - Borrower Name”.
4. This displays the Task Handle page where you may review the Charge Information, Lender,
Borrower, Guarantor and Collateral details.
OPTION 2 – USING THE TASK MENU
To View and Handle Tasks from the Task Menu:
1. Login to the application with your Username and Password.
2. Click the Task Menu tab and Select My Pending Tasks.
3. At the My Pending Task page you may search for a pending task by entering your search date
at the search section and then clicking on the Submit Search button to submit your request.
This returns your search results.
4. Move to My Tasks section.
5. Under Actions, Click on the Handle button of the particular Security Interest as shown below.
6. This displays the Task Handle page. Review the Assigned Task detail.

33
7. Scroll down to the Authorization section. You may either Authorize to approve, Resend to
Submitter or Deny to reject the authorization request.
8. Select the option Authorize as shown below to accept the request and approve the registration.
9. Then enter your comments in the Add Comment box.
10. Then Click the “Submit” button to confirm action.
11. In the case of charge registrations and amendments (updates), the authorization request can be
resent to the submitter for corrections. In such a case, the user must select Resend to Submitter
option.
12. Then click the YES button to confirm action and complete or NO button to decline.

34
6.0 POST REGISTRATION ACTIVITIES There are seven (7) main forms of post registration activities that can be performed on a registered
Security Interest (Charge). These are:
• Amendment (Update)
• Extension
• Transfer (Assignment) of Security Interest
• Discharge
• Notice of Default
• Appointment of Receiver or Manager
• Realisation without Court Order
HOW TO REGISTER AN AMENDMENT (UPDATE) ON A SECURITY
INTEREST Updates or changes to the registered Security Interest that may involve the addition, change or deletion
to the Charge Amount, Lender, Borrower and Collateral information is termed an Amendment. A user
assigned with the Amendment Officer, Post Registration Officer or Client Officer role is able to register
Amendment.
To Register An Post Registration:
1. Login to the application and click on the Security Interest menu.
2. Select My Security Interests from the dropdown to open the My Security Interests page.
3. When the View Security Interests page is displayed, do a condition filter of the page from the
dropdown list by entering start and end date to locate your Security Interest as shown.
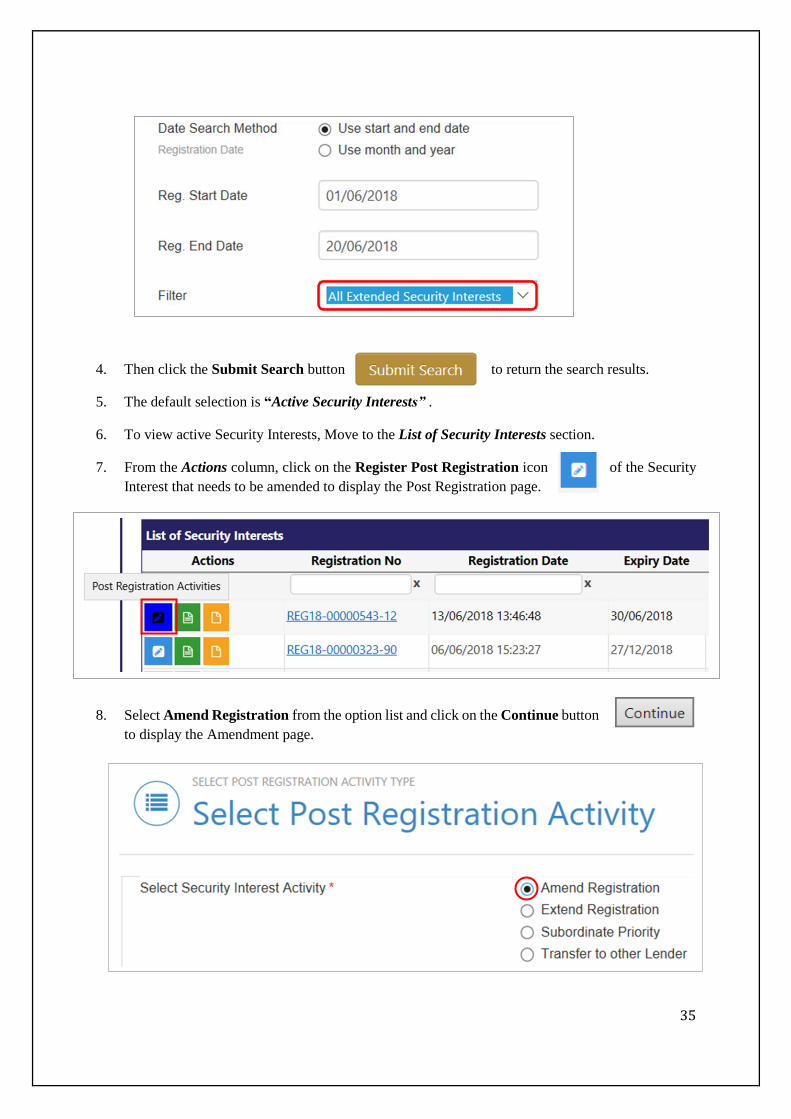
35
4. Then click the Submit Search button to return the search results.
5. The default selection is “Active Security Interests” .
6. To view active Security Interests, Move to the List of Security Interests section.
7. From the Actions column, click on the Register Post Registration icon of the Security
Interest that needs to be amended to display the Post Registration page.
8. Select Amend Registration from the option list and click on the Continue button .
to display the Amendment page.

36
9. With the exception of the Charge Creation Date and Registration Date all other fields can be
amended.
10. Edit the Security Interest to record your change.
11. After making changes, ensure that all information on mandatory boxes have been provided.
12. Then click on the Acknowledgement box to confirm the Borrower’s acceptance of registering the
amendment.
13. In workflow mode, the Workflow Details section lists the name(s) of the assigned authorizer(s)
required for the authorization of the registered amendment on the Security Interest.
14. Click on the Register Security Interest Amendment button
to register the changes.
15. A preview of the amended Security Interest is displayed on screen for final review.

37
16. Review the information and then click on the button to confirm
the amendment and register or click the Cancel button to cancel the amendment and return to the
previous page.
17. Upon successful registration, the confirmation message such as that shown is displayed.
HOW TO REGISTER AN EXTENSION Extension involves renewal of the Security Interest registration expiry date. Only Users assigned with
the Extension Officer, Post Registration Officer or Client Officer role are allowed to perform the
extension.
To Extend a Registration:
1. Login to the application and click on the Security Interest menu.
2. Select View Security Interests from the dropdown to open the Security Interests View page.

38
3. When the Security Interests View page is displayed, do a condition filter of the page from the
dropdown list by entering start and end date to locate your Security Interest.
4. Then click the Submit Search button to return the search results.
5. The default selection is “Active Security Interests” .
6. To view active Security Interests, Move to the List of Security Interests section.
7. From the Actions column, click on the Register Post Registration icon of the Security
Interest that needs to be extended to display the Post Registration page.

39
8. Select Extend Registration from the option list and click on the Continue button
to display the Extension page.
9. Enter the new expiry date in in the New Expiry Date box as shown.
10. Then click on the Extend Security Interest button to complete.
11. The confirmation dialog box opens requesting you to confirm the renewal action.
12. Click YES to confirm submission and add the renewal to the Post Registration list or click the NO
button to cancel the renewal and return to the previous page.
13. After successful submission of the extension, the confirmation message is displayed.

40
HOW TO REGISTER TRANSFER (ASSIGNMENT) ON A SECURITY
INTEREST
Transfer is the assignment of an entire registered Security Interest to another. Upon the successful
registration of a Transfer, the Security Interest is sent to the Transferee Authorizer for approval before
the Transfer is registered. After the successful acceptance of the Transfer, the Security Interest is moved
from the Transferor account to the Transferee account. To register a Transfer of a security interest, you
must be assigned the Transfer Officer, Post Registration Officer or Client Officer Role.
To Transfer (Assign) a Security Interest:
1. Login to the application and click on the Security Interest menu.
2. Select View Security Interests from the dropdown to open the Security Interests View page.
3. When the Security Interests View page is displayed, do a condition filter of the page from the
dropdown list by entering start and end date to locate your Security Interest.
4. Then click the Submit Search button to return the search results.
5. The default selection is “Active Security Interests” .
6. To view active Security Interests, Move to the List of Security Interests section.

41
7. From the Actions column, click on the Register Post Registration icon of the Security
Interest that needs to be transferred to display the Post Registration page.
8. Select Transfer to Other Lender from the option list and click on the Continue button to
display the Select Client page.
9. Search for client from the Select Client page by entering the Client Code or Client Name and
then click the Find Client button.

42
10. After clicking Find Client, the Client Summary View of the Transferee is displayed. Confirm
the Transferee details, and then click on the button below
the page.
11. Clicking the Continue with this Client button displays the full details of the Transferee and the
Charge. Click on the Submit Transfer Request button to
transfer the entire security interest.
12. A confirmation dialog page is displayed. Click YES to continue or No to end and return to
previous page.
13. Click OK to complete.
43
14. A confirmation message as shown below is displayed to show the success of the Transfer
registration.
HOW TO ACCEPT TRANSFER (ASSIGNMENT) ON A SECURITY
INTEREST
To complete the process of Transfers (assignments) the Transferee (Assignee) has to accept the
transferred Security Interest and amend the registration with the new lender detail. It is only upon
successful acceptance of a transferred registration that, the Security Interest moves from the Transferor
account to the Transferee account. To register a Transfer of a security interest, you must be assigned
the Transfer Officer, Post Registration Officer or Client Officer Role.
To Transfer (Assign) a Security Interest:
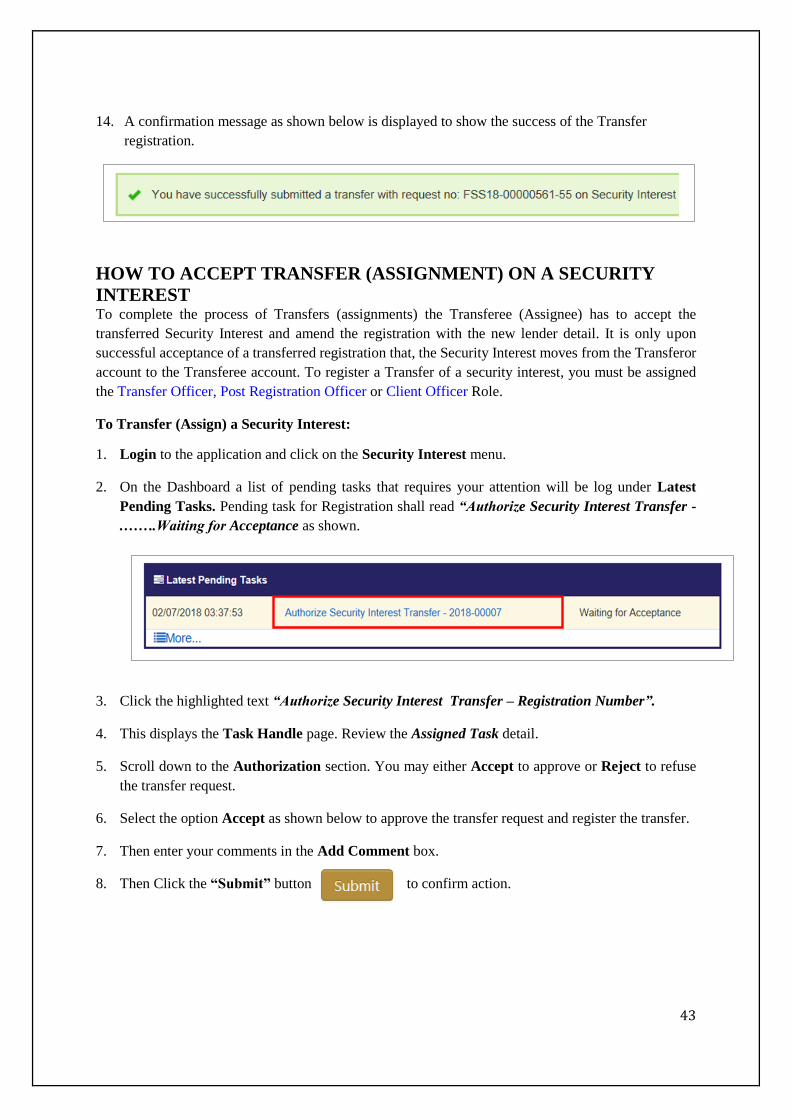
1. Login to the application and click on the Security Interest menu.
2. On the Dashboard a list of pending tasks that requires your attention will be log under Latest
Pending Tasks. Pending task for Registration shall read “Authorize Security Interest Transfer -
.…….Waiting for Acceptance as shown.
3. Click the highlighted text “Authorize Security Interest Transfer – Registration Number”.
4. This displays the Task Handle page. Review the Assigned Task detail.
5. Scroll down to the Authorization section. You may either Accept to approve or Reject to refuse
the transfer request.
6. Select the option Accept as shown below to approve the transfer request and register the transfer.
7. Then enter your comments in the Add Comment box.
8. Then Click the “Submit” button to confirm action.

44
9. Then click the YES button to confirm action and complete or NO button to decline.
10. A confirmation message as shown below is displayed to show the success of the Transfer
registration.
11. To amend (update) the transferred security interest registered with the new Lender details,
following the steps outlined under How to Register an Amendment (Update) to complete the
transfer (assignment) process.

45
HOW TO REGISTER NOTICE OF DEFAULT ON A SECURITY
INTEREST When the Borrower defaults, the Lender can register an imposition on the collateral by registering a
Notice of Default on the Security Interest. Users assigned with the Notice of Default Officer, Post
Registration Authorizer or Client Officer role are able to perform the task.
To Register a Notice of Defaults:
1. Login to the application and click on the Security Interest menu.
2. Select View Security Interests from the dropdown to open the Security Interests View page.
3. When the Security Interests View page is displayed, do a condition filter of the page from the
dropdown list by entering start and end date to locate your Security Interest.
4. Then click the Submit Search button to return the search results.
5. The default selection is “Active Security Interests” .
6. To view active Security Interests, Move to the List of Security Interests section.

46
7. From the Actions column, click on the Register Post Registration icon of the Security
Interest that needs to be enforced to display the Post Registration page.
8. Select Register Notice of Default from the option list and click on the Continue button
to display the Notice of Default page.
9. Enter the Default Date and Date Borrower Received Default Notice in their respective boxes
accordingly as shown.
10. Click on the Register Notice of Default button to complete.
11. The confirmation dialog box is displayed for you to confirm the action.

47
12. Click YES to confirm submission and register the notice of default or click NO button to cancel
the action and return to the previous page.
13. After successful registration of a notice of default on the security interest, a confirmation message
is displayed.
HOW TO CANCEL OR REMOVE A NOTICE OF DEFAULT ON
SECURITY INTEREST When a Borrower cures a default and the Lender reinstates the security agreement on the Security
Interest, the Notice of Default that had been previously created must be cancelled.
To Cancel Notice of Default on a Security Interest:
1. Login to the application and click on the Security Interest menu.
2. Select View Security Interests from the dropdown to open the Security Interests View page.
3. When the Security Interests View page is displayed, do a condition filter of the page from the
dropdown list by entering start and end date to locate your Security Interest.
4. Then click the Submit Search button to return the search results.
5. The default selection is “Active Security Interests” .
6. To view active Security Interests, Move to the List of Security Interests section.

48
7. From the Actions column, click on the Register Post Registration icon of the Security
Interest that holds the notice of default registration that must be cancelled.
8. Select Remove Notice of Default from the option list and click on the Continue button to display
the Notice of Default page.
9. Click the Submit Removal of Notice of Default Request button at the bottom of the page.
10. Then, click YES to confirm or NO to cancel and return to the previous page.
11. Upon successful removal of the registered Notice of Default, a confirmation message is displayed.
HOW TO DISCHARGE A REGISTERED SECURITY INTEREST Discharge involves the release of one or more collaterals on the Security Interest. There are two (2)
types of Discharge - Partial and Full. In order to perform a discharge, you must be assigned the
Discharge Officer, Post Registration Officer or Client Officer role.

49
To Discharge a Security Interest:
1. Login to the application and click on the Security Interest menu.
2. Select View Security Interests from the dropdown to display the Security Interests View page.
3. When the Security Interests View page is displayed, do a condition filter of the page from the
dropdown list by entering start and end date to locate your Security Interest.
4. Then click the Submit Search button to return the search results.
5. The default selection is “Active Security Interests” .
6. To view active Security Interests, Move to the List of Security Interests section.
7. From the Actions column, click on the Register Post Registration icon of the Security
Interest registration that must be discharged to display the Select Post Registration page.

50
8. Select Discharge Registration from the option lists and click the Continue button
to display the Discharge page.
9. Select the Discharge type. Partial or Discharge.
10. For a Partial Discharge, the collaterals applicable must be specified as shown.
11. Then click the Register Discharge button to discharge the registration
and click YES to confirm your action or NO to cancel and return to the previous page.
12. After successful registration of the Discharge, a confirmation message is displayed.
HOW TO REGISTER A NOTICE OF APPOINTMENT OF A
RECEIVER OR MANAGER When the lender or court appoints a Receiver or Manager, the appointment details must be registered
in the collateral registry. In order to register a notice of appointment of a Receiver or Manager, you
must be assigned the Appointment Officer, Post Registration Officer or Client Officer role.
To Register a Notice of Appointment of Receiver:
1. Login to the application and click on the Security Interest menu.

51
2. Select View Security Interests from the dropdown to display the Security Interests View page.
3. When the Security Interests View page is displayed, do a condition filter of the page from the
dropdown list by entering start and end date to locate your Security Interest.
4. Then click the Submit Search button to return the search results.
5. The default selection is “Active Security Interests” .
6. To view active Security Interests, move to the List of Security Interests section.
7. From the Actions column, click on the Register Post Registration icon of the Security
Interest that the notice of appointment of receiver or manager relates to.
8. This displays the Select Post Registration page.
9. Select from the option lists Appoint Receiver or Manager and click the Continue button
. to display the Appointment of Receiver or Manager page.

52
10. Provide data for all boxes specified making sure not leave any field blank as shown.
11. Then click the Register Appointment of Receiver or Manager button to register and then click
YES to confirm your action or NO to cancel and return to the previous page.
12. After successful registration of the notice of appointment of receiver or manager, a confirmation
message is displayed to complete the process.
HOW TO REGISTER A NOTICE OF REMOVAL OF A RECEIVER OR
MANAGER When the appointed Receiver or Manager ceases to act as such, the notice of removal must be registered
in the collateral registry. In order to register a notice of removal of a Receiver or Manager, you must be
assigned the Appointment Officer, Post Registration Officer or Client Officer role.

53
To Register a Notice of Removal of Receiver or Manager:
1. Login to the application and click on the Security Interest menu.
2. Select View Security Interests from the dropdown to display the Security Interests View page.
3. When the Security Interests View page is displayed, do a condition filter of the page from the
dropdown list by entering start and end date to locate your Security Interest.
4. Then click the Submit Search button to return the search results.
5. The default selection is “Active Security Interests” .
6. To view active Security Interests, move to the List of Security Interests section.
7. From the Actions column, click on the Register Post Registration icon of the Security
Interest that the notice of removal of receiver or manager relates to.
8. This displays the Select Post Registration page.

54
9. Select from the option lists Remove Receiver or Manager and click the Continue button
. to display the Removal of Receiver or Manager page.
10. Provide the Reason for removal of the Receiver or Manager as shown.
11. Then click the Register Removal of Receiver or Manager button to register and then click YES
to confirm your action or NO to cancel and return to the previous page.
12. After successful registration of the notice of removal of receiver or manager, a confirmation
message is displayed to complete the process.
HOW TO REGISTER REALISATION WITHOUT COURT ORDER To realize a charge registered in the Collateral Registry without Court Order requires registration of the
notice of that intent. In order to register a Realisation without court order, you must be assigned the
Realisation Officer, Post Registration Officer or Client Officer role.
To Register a Notice of Realisation with Court Order:
1. Login to the application and click on the Security Interest menu.
2. Select View Security Interests from the dropdown to display the Security Interests View page.

55
3. When the Security Interests View page is displayed, do a condition filter of the page from the
dropdown list by entering start and end date to locate your Security Interest.
4. Then click the Submit Search button to return the search results.
5. The default selection is “Active Security Interests” .
6. To view active Security Interests, Move to the List of Security Interests section.
7. From the Actions column, click on the Register Post Registration icon of the Security
Interest registration that must be realized without Court Order to display the Select Post
Registration page.
8. Then select from the option lists Realization without Court Order and click the Continue
button to display the Realisation page.
9. Enter the effective date of realization.

56
10. Then click the Register Discharge button to submit the
Notice of Realisation without Court Order request and click YES to confirm your action or NO to
cancel and return to the previous page.
11. After successful submission of the notice of realisation without court order, a confirmation message
is displayed.
HOW TO AUTHORIZE A POST REGISTRATION ACTIVITY Authorization is required if your institution has been setup to use workflow to handle Post Registration
of Security Interests. To review or authorize security interest post registrations, you should be a user
assigned with the specific post registration activity authorizer role, Post Registration Authorizer or
Client Officer role.
To Review and Authorize Post Registration:
1. Login to the application and click on the Security Interest menu.
2. On the Dashboard, under the Latest Pending Task the task for authorization of the Post Registration
will be listed as “Authorization of Post Registration…… - Waiting for authorization” as shown.
3. Refer to: How to Handle Pending Task for more details.

57
HOW TO REGISTER COURT ORDER POST REGISTRATION
ACTIVITY
To Register a Court Order Amendment or Discharge:
1. Follow the steps outline on the Amendment or Discharge page.
1. On the Amendment or Discharge page, click on the check box that indicates your willingness to
register a Court Order Amendment or Discharge.
2. Then enter the Court Order details as shown to complete.

58
7.0 PAYMENTS Fees are charged on every transaction performed in the collateral registry system. Payment are Prepaid
or Postpaid. Registered Clients NOT on the Postpaid account are required to upload their Virtual
Accounts with funds at the Registry office or the designated centres. Only Users assigned with the
Finance Officer role are able to view transactions related to payments.
HOW TO VIEW PAYMENTS Clients can view their payment transactions using the Payments page.
To View Payment:
1. Login to the application with your Username and Password.
2. Click the Payment menu.
3. Select Payments from the drop down list.
4. The Payments page is displayed.
5. You may filter the list by payment date and the click on the Submit Search button.
6. Click on the Download icon to download the payment details.
7. Wait for the Save dialog box to open.
8. Select the directory you wish to Save the file to and give the file a Name.
9. Click on the save button to Save or Cancel to close.

59
HOW TO VIEW CLIENT ACCOUNT TRANSACTIONS
To view client Account Transactions:
1. Login to the application with your Username and Password.
2. Click on the Payment menu tab
3. Select Account Transactions from the drop down list.
4. The Account Transactions page is displayed with all the payment transaction details as shown
below.
60
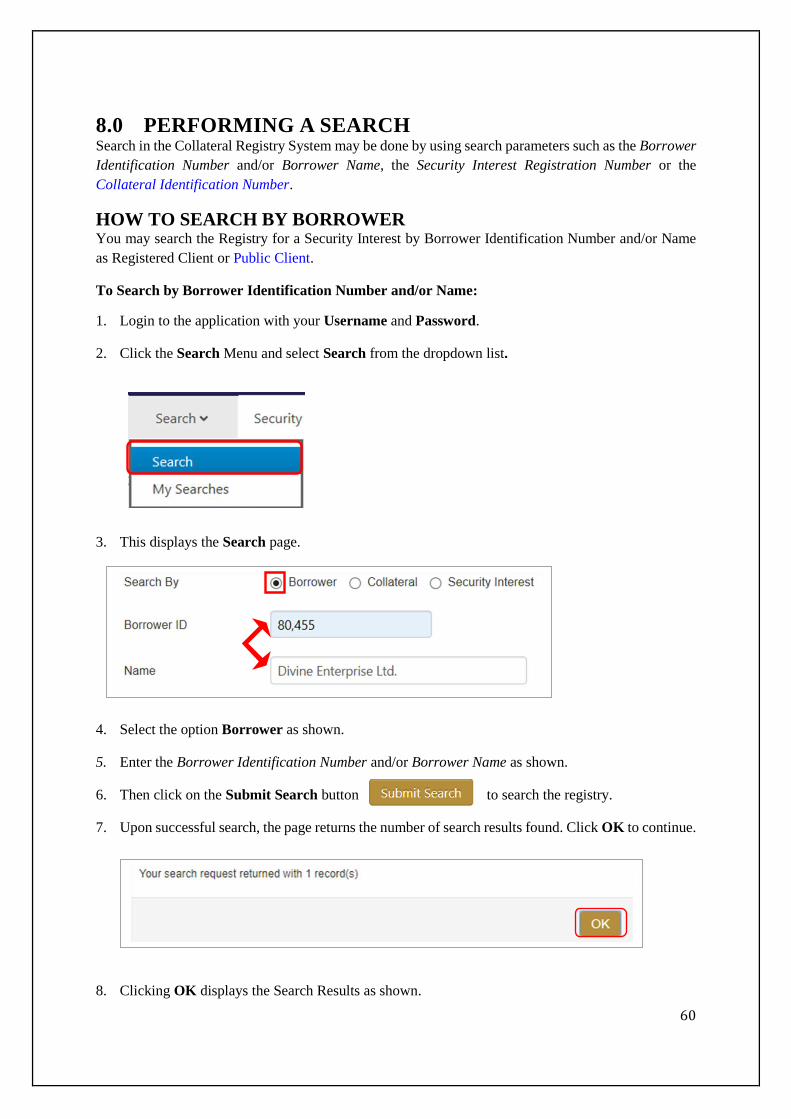
8.0 PERFORMING A SEARCH Search in the Collateral Registry System may be done by using search parameters such as the Borrower
Identification Number and/or Borrower Name, the Security Interest Registration Number or the
Collateral Identification Number.
HOW TO SEARCH BY BORROWER You may search the Registry for a Security Interest by Borrower Identification Number and/or Name
as Registered Client or Public Client.
To Search by Borrower Identification Number and/or Name:
1. Login to the application with your Username and Password.
2. Click the Search Menu and select Search from the dropdown list.
3. This displays the Search page.
4. Select the option Borrower as shown.
5. Enter the Borrower Identification Number and/or Borrower Name as shown.
6. Then click on the Submit Search button to search the registry.
7. Upon successful search, the page returns the number of search results found. Click OK to continue.
8. Clicking OK displays the Search Results as shown.

61
9. Check the box to select the required search result as shown.
10. Then click on the Generate Search Report button to download the search report as shown.
11. You may also enter your email address for a copy of the search report to be mailed to the address.
HOW TO SEARCH BY COLLATERAL IDENTIFICATION NUMBER
To Search by Collateral Identification Number:
1. Login to the application with your Username and Password.
2. Click the Search Menu and select Search from the dropdown list.

62
3. This displays the Search page.
4. Select the option Collateral as shown.
5. Enter the Collateral Identification Number in the box provided.
6. Then, click on the Submit Search button to search the registry.
7. Upon successful search, the page returns the number of search results found. Click OK to continue.
8. Clicking OK displays the Search Results as shown.

63
9. Check the box to select the required search result as shown.
10. Then click the Generate Search Report button to download the
search report.
11. You may also enter your email address for a copy of the search report to be mailed to the address.
HOW TO SEARCH BY SECURITY INTEREST (CHARGE)
REGISTRATION NUMBER
To Search by Security Interest (Charge) Registration Number:
1. Login to the application with your Username and Password.
2. Click the Search Menu and select Search from the dropdown list.
3. This displays the Search page.
4. Select the option Security Interest as shown.
5. Enter the Security Interest (Charge) Number in the box provided.

64
6. Then, click on the Submit Search button to search the registry.
7. Upon successful search, the page returns the number of search results found. Click OK to continue.
8. Click OK to display the Search Results. Then check the box to select the required search result as
shown.
9. Click on the Generate Search Report button to download the search report as shown.
10. You may also enter your email address for a copy of the search report to be mailed to the address.

65
HOW TO VIEW YOUR PREVIOUS SEARCHES When you generate a search, a copy of the search is stored in your search repository for future use.
To View Previous Searches
1. Login to the application with your Username and Password.
2. Click the Search Menu and select My Searches from the dropdown list.
3. This displays the Search List page.
4. Below this would be a list of previous searches.
5. To open and download the search report, click on the Search Report link as shown by the arrow.
6. A notice on the date the search was conducted is also displayed.
7. Click on the Download Report button or the Search No. link to generate the Search Report and
Save the report.
8. Wait for the Save dialog box to open.
9. Select the directory you wish to Save the file to and give the file a Name.
10. Click on the save button to Save or Cancel to close.

66
9.0 ADMINISTRATION This section describes how an Administrator performs administrative duties in the system. The Client
Administrator is responsible for managing client administrative activities.
HOW TO EDIT CLIENT PROFILE
To Edit Client Profile:
1. Login to the application as the Administrator
2. Click on the Administration menu tab and Select Client Profile from the drop down list.
3. This displays the Client Profile page.
4. Click the Edit Client Profile button to open the Client Profile page
for editing.

67
5. Click on the Submit button at the bottom of the page when done to update
client profile and complete.
6. After successful updating client profile, a confirmation message similar to that below is
displayed.
HOW TO CREATE GROUPS/CLASSIFICATIONS Groups/Classifications may be created under a client account to monitor the operations of selected
Groups/Classifications of the Institution.
To Create a New Unit:
1. Login to the application as the Administrator
2. Click on Administration and Select Groups/Classifications from the drop down list.
3. The Group/Classification page is displayed.
4. Click on the Create New Group/ Classification button.
5. The Group/Classification Registration page is displayed.

68
6. Provide the Name, Email address and a brief Description of the Group.
7. Then Click on the Save button to create a New Group/Classification.
8. You may also click on the button to return to the previous page.
9. A confirmation message similar to that shown below appears to indicate the success of the
creation of the new unit.
MANAGING USERS
HOW TO CREATE NEW USERS
To create a New User:
1. Login to the application as the Administrator
2. Click on the Administration menu tab and Select My Users from the drop down list.

69
3. This takes you to the Users page.
4. Click on the Create New User button to display the User page.
5. Taking note of mandatory fields, provide information for First Name, Middle Name, Surname,
Email, Username and Group where applicable.
6. Click on the Save button to create new user.
7. To Cancel or Return to previous page, Click on Back to List button
8. Clicking the Save button creates a new user and displays a confirmation message.

70
9. Below the confirmation message is displayed the new user profile information.
10. After creating a user you need to assign a role to the user.
HOW TO EDIT USER PROFILES
Apart from Username and Password, all other user profile can be edited.
To Edit User Profiles:
1. Login to the application as the Administrator
2. Click on the Administration menu tab and Select My Users from the drop down list.
3. This takes you to the Users page.
4. Under the List of Users Click the Edit button to display the user page.
5. Edit User profile by changing editable fields.
6. When completed Click on the Save button.
HOW TO ASSIGN ROLES TO A USER
Roles are assigned to enable a client user perform functions within the application.

71
To Assign Roles To Users:
1. Login to the application as the Administrator
2. Click on the Administration menu tab and Select My Users from the drop down list to create
the new user.
3. After creating a new user, click on the modify roles button.
4. Click in the box of a role to assign to user as shown below.
5. Click on the Save Roles button when completed and then click YES to confirm as shown below.
6. After Saving Roles a confirmation message similar to that shown below is displayed.
HOW TO DEACTIVATE A USER
A user may be deactivated to disable the User.
To Deactivate A User:
1. Login to the application as the Administrator.

72
2. Click on the Administration menu tab and Select My Users from the drop down list.
3. This takes you to the Users page.
4. Under the List of Users Click the Deactivate button.
5. A new dialog window is displayed asking you to confirm User Deactivation.
6. Click YES to confirm or NO to reject.
7. After successful deactivation a confirmation message is displayed.
8. Click OK to complete.
HOW TO ACTIVATE A USER
A deactivated user may be activated to enable the user.
To Activate A User:
1. Login to the application as the Security/Client Administrator.
2. Click on the Administration menu tab and Select My Users from the drop down list.
3. This takes you to the Users page.
4. Under the List of Users Click the Activate button.
5. A dialog window is displayed requesting you to confirm User Activation.

73
6. Click YES to confirm or NO to reject.
7. After successful activation a confirmation message is displayed.
8. Click OK to complete.
HOW TO DELETE A USER
To Delete A User:
1. Login to the application as the Security/Client Administrator.
2. Click on the Administration menu tab and Select My Users from the drop down list.
3. This takes you to the Users page.
4. Under the List of Users Click the Delete button.
5. A dialog window loads requesting you to confirm User deletion.
6. Click YES to confirm or NO to reject.
7. After successful deletion a confirmation message is displayed.
8. Click OK to complete.
AUDIT TRAILS
Administrators of CRS or Users assigned with the Audit role are able to view user and client audit trails
To view client audit trails:
1. Login to the application with your Username and password.
2. Click the Audit Trail tab or the Administration menu tab and Select Audit Trail
from the dropdown list.
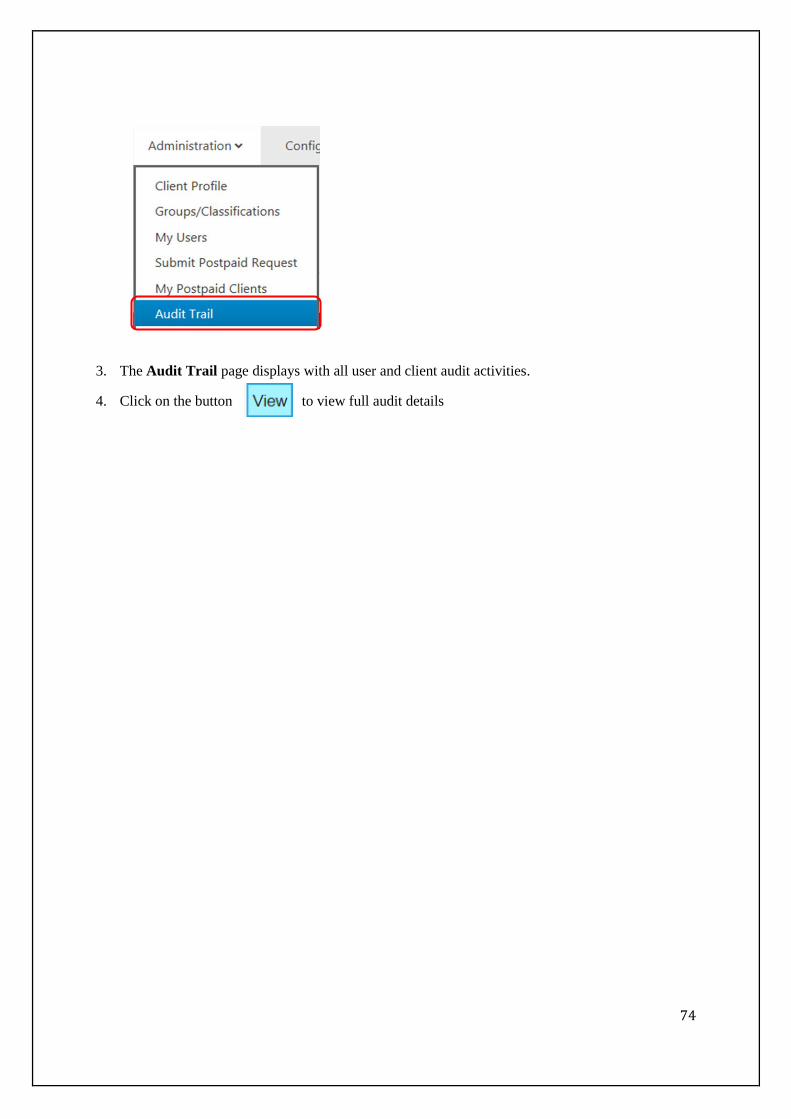
74
3. The Audit Trail page displays with all user and client audit activities.
4. Click on the button to view full audit details

75
10.0 CONFIGURATION SETTINGS This system provides you with options to configure the application.
HOW TO CONFIGURE WORKFLOW
To Configure the Workflow:
1. Login to the application as the Administrator.
2. Click the Configuration menu tab.
3. Select Workflow Configuration from the drop down list.
4. This displays the Workflow Configuration page.
5. Choose the option Use Personalised Setting to edit as shown.
6. Under the Status column, click inside the transaction box of the item to assign the workflow as
shown below.
7. When completed, click on the Save button.

76
11.0 NOTIFICATIONS All notifications to clients and users are listed here
HOW TO RETRIEVE EMAIL NOTICES
To View Your Emails:
1. Login to the application with your Username and Password.
2. Click on the Notification menu tab and Select Email Messages from the dropdown list.
3. This opens the Email Messaging page. Move to the Actions section and Click on View Mail as
shown to view the details.
HOW TO VIEW GLOBAL MESSAGES
To View Your Global Emails:
1. Login to the application with your Username and Password.
2. Click on the Notification menu tab and Select Global Messages from the dropdown list.

77
3. The Global Messaging page is displayed.


