

User’s Tutorial
. . . . . . . . .
. . . . . . . . . .
. . . . . .. . . .
Bytescribe Development Company
DocShuttle Internet Transcription Software
User’s Tutorial
Bytescribe Development Co., Inc.
3603 Pine Lane SE
Birmingham, AL 35022
Software Version 5.0

Table of Contents Page 2
Table of Contents
TABLE OF CONTENTS..................................................................................................................................................2 WELCOME TO DOCSHUTTLE.......................................................................................................................................4
About this Tutorial.................................................................................................................................................4
SETTING UP
INSTALLING DOCSHUTTLE..........................................................................................................................................5 Installing from the CD...........................................................................................................................................5 Downloading the installation files.........................................................................................................................6 Installing from the downloaded files .....................................................................................................................7
CONFIGURING CONNECTION INFORMATION ................................................................................................................8 Set up subfolders on FTP site ................................................................................................................................8 Connect with DocShuttle Administrator ................................................................................................................9 Set up type folders................................................................................................................................................11 Connect with DocShuttle Dictator.......................................................................................................................11 Connect with DocShuttle Client...........................................................................................................................13 Turn off Automatic Document Creation ..............................................................................................................14
PERMISSIONS ............................................................................................................................................................15 Create user profiles .............................................................................................................................................15 Set permissions ....................................................................................................................................................18 Test User Permissions .........................................................................................................................................19
SETTING UP DOCSHUTTLE DICTATOR FOR IMPORTING .............................................................................................19 Create download folders......................................................................................................................................19 Put audio files in the download folders ...............................................................................................................20 Entering import paths..........................................................................................................................................20
BASIC OPERATIONS
IMPORTING WITH DOCSHUTTLE DICTATOR...............................................................................................................22 Import dictation files manually............................................................................................................................22 Upload dictation files manually...........................................................................................................................23 Import & Upload dictation files automatically....................................................................................................25
DOWNLOADING WITH DOCSHUTTLE CLIENT.............................................................................................................26 Download dictation files......................................................................................................................................26
PLAY AUDIO..............................................................................................................................................................28 ATTACHING AND SENDING DOCUMENTS WITH DOCSHUTTLE CLIENT.......................................................................29
Create sample documents ....................................................................................................................................29 Manually attaching documents............................................................................................................................29 Upload documents ...............................................................................................................................................30
RETRIEVING DOCUMENTS.........................................................................................................................................31 Download document ............................................................................................................................................32 View Document....................................................................................................................................................33 Print Document....................................................................................................................................................34 Download document files automatically..............................................................................................................34
ADVANCED OPERATIONS
MANAGING THE WORKFLOW WITH DOCSHUTTLE ADMINISTRATOR .........................................................................36 Setting up for manual workflow management .....................................................................................................36 Move files.............................................................................................................................................................37
ARCHIVING FILES WITH DOCSHUTTLE ADMINISTRATOR...........................................................................................38

Table of Contents Page 3
Manually download dictation and document files to DocShuttle Administrator.................................................38 Automatically download dictation and document files to DocShuttle Administrator..........................................39
THE QA PROCESS
SEND A FILE FOR QA.................................................................................................................................................41 Download another file .........................................................................................................................................41 Attach new document...........................................................................................................................................42 Manually mark file for QA...................................................................................................................................42 Upload file for QA ...............................................................................................................................................44
SET UP QA TRANSCRIPTIONIST.................................................................................................................................44 PERFORM QA ON FILE...............................................................................................................................................46
Download file for QA ..........................................................................................................................................46 Edit & save file ....................................................................................................................................................47 Upload completed document ...............................................................................................................................47
AUTOMATICALLY SENDING FILES TO QA ..................................................................................................................48
APPENDICES
STATUSES IN DOCSHUTTLE ......................................................................................................................................50 Status list .............................................................................................................................................................50 Status progressions..............................................................................................................................................50
REGISTERING DOCSHUTTLE......................................................................................................................................51 Using DocShuttle as a demo................................................................................................................................51 Registering a purchased license ..........................................................................................................................51
REGISTRATION FAQ .................................................................................................................................................52

Setting Up - Welcome to DocShuttle Page 4
Welcome to DocShuttle
Thank you for your interest in DocShuttle by Bytescribe Development Company. DocShuttle is an
FTP transport and workflow management system designed for transcription. It offers three main
benefits:
• Encrypted transport of dictated audio files and transcribed document files across the Internet
using File Transfer Protocol (FTP), which is designed for large file transport
• Workflow transparency and management that can be as manual or as automated as you need
• Document management and integration using Microsoft Word
About this Tutorial
This tutorial will show you how to configure and use the many features of DocShuttle by walking you
through setting up and running DocShuttle in a test environment. Even if you have already purchased
DocShuttle, and/or if you are certain that you are going to use DocShuttle in your own production
environment, it is still a good idea to go through this tutorial in a test environment to ensure that you
are familiar with all of the features of the system.
This tutorial is broken up into three sections:
• Setting Up – installing, registering, and connecting with DocShuttle; preparing the FTP site;
permissions
• Basic Operations – importing, uploading, downloading, and playing dictation files; attaching,
uploading, downloading, and printing document files
• Advanced Operations – workflow management; archiving files; the QA process; templates;
reports
We have already set up a sample FTP site for you to use and you have audio files on your computer
that can stand in for dictation files. Do not use actual dictations in this tutorial, and do not upload
actual dictations to our sample FTP site.

Setting Up - Installing DocShuttle Page 5
Setting Up
This section covers all of the things you will need to do to get DocShuttle and your FTP site ready to
carry dictation and transcription files.
First, you will be given step-by-step instructions for installing each of the three DocShuttle modules:
DocShuttle Administrator, DocShuttle Client, and DocShuttle Dictator. Second, you will set up the
FTP site for use by DocShuttle. Third and finally, you will be shown how to enter the connection
information that allows each DocShuttle module to access the FTP site.
When you are finished setting up, you will be ready to transfer dictation and document files across the
Internet.
Installing DocShuttle
You may install DocShuttle from your CD or by downloading the installation file from our website.
Downloading from the website will ensure that you are installing the most recent version, so you may
wish to download even if you have a CD.
All three modules may be installed on the same computer. However, DocShuttle Administrator and
DocShuttle Dictator cannot run on the same computer at the same time. So you may want to install
DocShuttle Administrator and DocShuttle Dictator on separate computers, if you have them available.
This tutorial assumes that both are installed on the same computer.
Also, to test out the QA process you will need to have a second installation of DocShuttle Client on a
second computer.
Installing from the CD
1. Close all other programs on your computer
2. Insert the CD into your CD-ROM drive. The installation program should start automatically.
3. Follow the instructions for installing the software, and accept all the defaults.
4. The last step of the installation process will ask you if you want to launch the program file.
Click to put a check in that box
5. Click the Finish button to finish the installation and open DocShuttle Administrator
6. When the DocShuttle Administrator software starts, a window will pop up telling you that you
have an unregistered version of the software. Cancel out of that window to use the trial
version of the software.
Repeat steps 2-6 for the DocShuttle Client and DocShuttle Dictator installation files.
Chapter
1

Setting Up - Installing DocShuttle Page 6
When finished, you should have desktop icons for each of the three DocShuttle modules, as in the
figure below. You can double click on those icons to open the DocShuttle software.
Downloading the installation files
1. Go to www.bytescribe.com
2. On the left-hand side of the main page is a button that says Downloads. Click on that button
to go to the Downloads page
3. On the Downloads page is a form. The first box is labeled Products. Click in the Products
box and choose DocShuttle Administrator.
4. Fill out the rest of the form, including the email field. You will need the Installation Password
to install the software, and that password will be emailed to the address you enter on this form.
5. When you have finished filling out all of the fields on the form, click the Submit Request
button. (Note: depending on your browser’s security settings, you may see a box pop up
telling you that you are being redirected to a non-secure page. If so, click Yes to continue.)
6. A File Download window will pop up, asking if you want to Open or Save the file. Click on
the Save button to download the file.
7. A Save As window will pop up, asking you where you want to save the DocShuttle
Administrator installation file. Click on the Button labeled Desktop, or click in the Save in
box at the top to select Desktop. Then click the Save button to begin downloading the
installation file. The DocShuttle Administrator installation file will begin downloading.
8. When the file has finished downloading, repeat the above steps to download the installation
file for DocShuttle Client and DocShuttle Dictator.

Setting Up - Installing DocShuttle Page 7
When you are finished, you should have the installation files saved to your Desktop, as in the figure
below. Now you are ready to install the three DocShuttle modules.
Installing from the downloaded files
1. Check your email for the Installation Passwords and write them down here:
• DocShuttle Administrator – ____________________
• DocShuttle Client – ____________________
• DocShuttle Dictator – ____________________
2. Close all other programs on your computer, including your email program.
3. On your Desktop, find the DocShuttle Administrator installation file and double-click it to
begin installation.
4. When prompted, enter the Installation Password that you wrote down in step 1. If the
password is correct, then the Next button should become available. Click Next.
5. Continue to follow the instructions for installing the software, and accept all the defaults.
6. After the files are installed, a window will pop up with a box labeled “Yes, Launch the
program file.” Click to put a check in that box.
7. Click the Finish button to finish the installation and open DocShuttle Administrator.
8. A window will pop up containing the text of the license agreement. Read the agreement and
then click in the circle labeled “I accept the terms of the license agreement.” (If you do not
accept the terms, cancel the registration and uninstall the DocShuttle software.) Click the
Next button.
9. When the DocShuttle Administrator software starts, a window will pop up telling you that you
have an unregistered version of the software. Click Register Later to use the trial version of
the software.
10. A small window will pop up saying “Software has not been successfully registered.” Click
OK.
11. A window will pop up labeled “Did you know?” This window contains some tips about using
DocShuttle and will pop up every time you open the program. (If you do not wish to see this

Setting Up - Configuring Connection Information Page 8
window every time, find the box in the lower left-hand corner labeled “Show this window at
startup.” Click to remove the check from the box.) Click OK.
12. Finally, the DocShuttle Administrator window will open. Note that in the blue bar at the top
of the DocShuttle window is a message saying “**Unregistered Version – 14 Days
Remaining**”. You may now close DocShuttle Administrator.
Repeat steps 2-12 for the DocShuttle Client and DocShuttle Dictator installation files.
When finished, you should have desktop icons for each of the three DocShuttle modules, as in the
figure below. You can double click on those icons to open the DocShuttle software.
Configuring Connection Information
Set up subfolders on FTP site
Bytescribe keeps an FTP site available for you to use when evaluating DocShuttle. But to allow you to
fully evaluate DocShuttle and its internal security system, you will need to set up a subfolder on the
FTP site for your own use.
Please note: the sample FTP site that you will be using is a public site. Do not upload actual dictation
to the site.

Setting Up - Configuring Connection Information Page 9
1. Using Internet Explorer, connect to Bytescribe’s sample FTP site by clicking on the following
link or by typing it into the address bar of your web browser:
ftp://sample:[email protected]. This should open up a window that looks at the FTP site.
You may see some folders on the sample FTP site, as in the figure below.
2. Right-click in the white space in the window and choose New, then select Folder. This will
create a new subfolder on the FTP site for you to use. The name of the new folder is
highlighted, so type in a folder name made up of your initials and today’s date. For example,
if your name is Jane Doe and today’s date is June 30, then your folder name would be jd0630.
This is the subfolder name we will use for the purposes of this guide.
Write your own subfolder name here: ____________________
3. Now you have a subfolder on the FTP site that you can use for the evaluation. When you’re
finished with the evaluation, please come back and delete the folder.
Now you’re ready to connect up with DocShuttle Administrator and finish preparing the FTP site. You
can close the Internet Explorer window.
Connect with DocShuttle Administrator
DocShuttle uses a particular folder structure and particular filenames in order to manage workflow.
Before you can upload dictation files to your FTP site, you will need to use DocShuttle Administrator
to set up the FTP site.
Note: you will need to be connected to the Internet in order to connect to the FTP site.
1. Open DocShuttle Administrator
2. Click on the Tools Menu and select Settings
3. On the FTP tab, enter the following information in the first four boxes:
• Host Address: simpleftp.net
• Username: sample
Setting Up - Configuring Connection Information Page 10
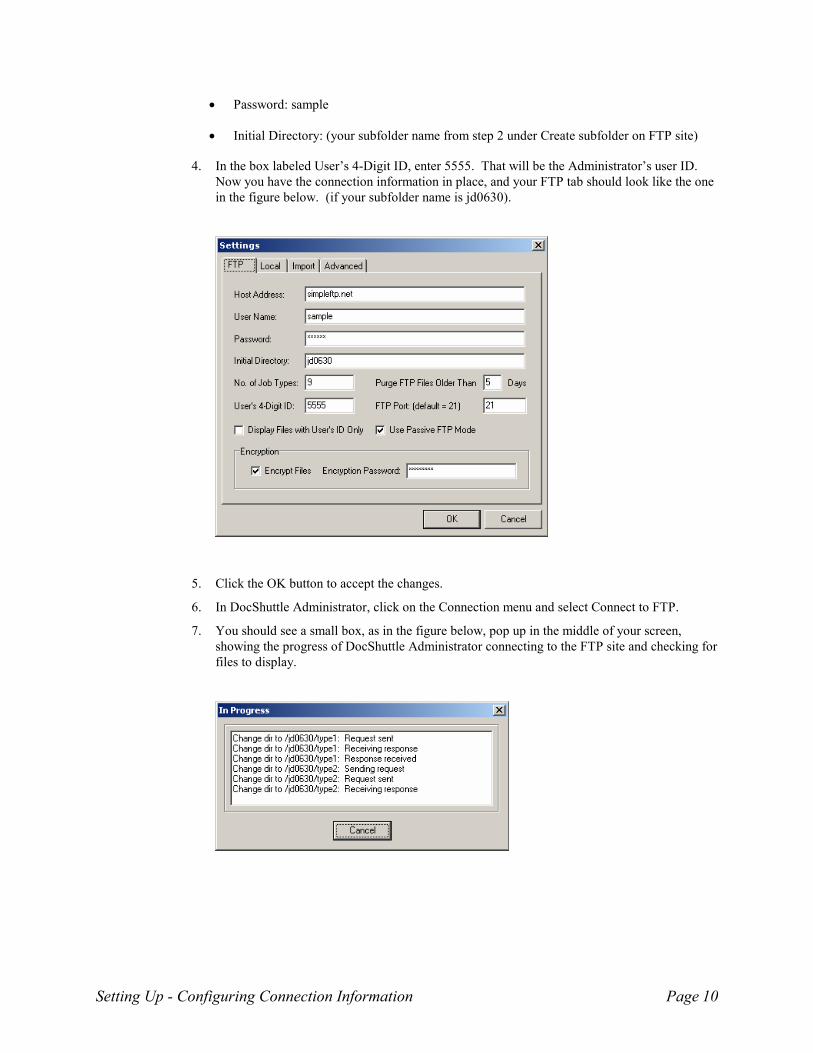
• Password: sample
• Initial Directory: (your subfolder name from step 2 under Create subfolder on FTP site)
4. In the box labeled User’s 4-Digit ID, enter 5555. That will be the Administrator’s user ID.
Now you have the connection information in place, and your FTP tab should look like the one
in the figure below. (if your subfolder name is jd0630).
5. Click the OK button to accept the changes.
6. In DocShuttle Administrator, click on the Connection menu and select Connect to FTP.
7. You should see a small box, as in the figure below, pop up in the middle of your screen,
showing the progress of DocShuttle Administrator connecting to the FTP site and checking for
files to display.

Setting Up - Configuring Connection Information Page 11
Once the box goes away, you should be connected to the FTP site. You can look at the top of the
DocShuttle Administrator window for information about your connection status, as in the figure below.
In the top status bar, directly under the buttons, you should see the Status as Displaying FTP folders.
To the immediate right, you should see Connected to simpleftp.net/ and then your subfolder name.
Now you are ready to set up DocShuttle own folder structure on the FTP site.
Set up type folders
1. In DocShuttle Administrator, click on the Tools menu and select Create Folders on FTP site.
2. A box will pop up asking if you want to create the folders in your subfolder. Click Yes.
3. A box should pop up telling you that the operation was successful. Click OK.
You will not notice any change in the DocShuttle Administrator interface, but the folders have been
created on the FTP site.
You may now close DocShuttle Administrator. If you are still logged into the FTP site, then a box will
pop up asking, “Do you wish to disconnect and exit?” Click OK.
Connect with DocShuttle Dictator
1. Open DocShuttle Dictator

Setting Up - Configuring Connection Information Page 12
2. Click on the Tools menu and select Settings
3. Click on the FTP tab and enter the exact same information in the first 4 boxes that you entered
into DocShuttle Administrator:
• Host Address: simpleftp.net
• Username: sample
• Password: sample
• Initial Directory: (your subfolder name)
4. In the box labeled User’s Job Type, enter 1
5. In the box labeled User’s 4-Digit ID, enter 1001, so that your FTP tab looks like the figure
below.
6. Do not make any other changes, and click OK to accept the information you have entered
7. Click on the Connection menu and select Connect to FTP.
Just like with DocShuttle Administrator, you should see the In Progress box pop up in the middle of
your screen.
Once the box goes away, you should be connected to the FTP site. And just like with DocShuttle
Administrator, you can look in the top status bar for your connection status. The only exception is that
DocShuttle Dictator can only connect to and display one type folder at a time. In this case, you should
see Displaying FTP Folder: type1.
At this point, both DocShuttle Administrator and DocShuttle Dictator are set up and ready to go. Go
ahead and close DocShuttle Dictator, and we will finish setting with DocShuttle Client.
Setting Up - Configuring Connection Information Page 13
Connect with DocShuttle Client
DocShuttle Client is the piece of the DocShuttle system that is used by the transcriptionist. DocShuttle
Client can download audio files from the FTP site and can also upload document files back to the FTP
site for both the dictator and the transcription administrator.
In this section, we are going to set up DocShuttle Client to connect to the FTP site.
1. Open DocShuttle Client
2. Click on the Tools menu and select Settings
3. Click on the FTP tab and enter the exact same information in the first 4 boxes that you entered
into DocShuttle Administrator and DocShuttle Dictator:
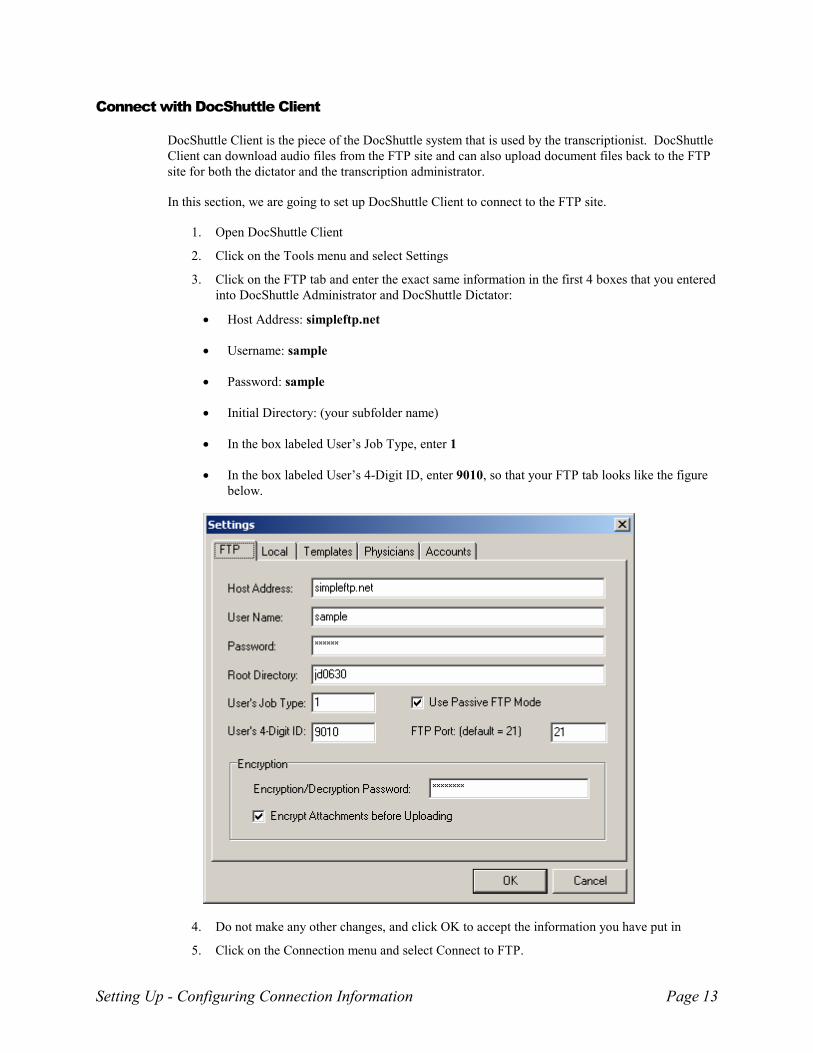
• Host Address: simpleftp.net
• Username: sample
• Password: sample
• Initial Directory: (your subfolder name)
• In the box labeled User’s Job Type, enter 1
• In the box labeled User’s 4-Digit ID, enter 9010, so that your FTP tab looks like the figure
below.
4. Do not make any other changes, and click OK to accept the information you have put in
5. Click on the Connection menu and select Connect to FTP.

Setting Up - Configuring Connection Information Page 14
Just like with the other DocShuttle modules, you should see the In Progress box pop up in the middle of
your screen.
Once the box goes away, you should be connected to the FTP site. And just like with the other
DocShuttle modules, you can look in the top status bar for your connection status.
DocShuttle Client is like DocShuttle Dictator, and can only connect to and display one type folder at a
time. In this case, you should see Displaying FTP Folder: type1.
Now the setup for the FTP site and the connection information for each of the DocShuttle modules is
complete. You only need to do this setup once.
Turn off Automatic Document Creation
DocShuttle Client does have an Automatic Document Creation function, which will not be used at this
point in the evaluation. So it’s best to turn off this feature for a little while.
1. In DocShuttle Client, click on the Tools menu and select Settings
2. Click on the Local tab
3. At the bottom of the window there is a box labeled “Create new Word document when
transcribing file.” Click to remove the check in that box, as in the figure below.
4. Click OK to return to the DocShuttle Client main screen.
5. Close DocShuttle Client.

Setting Up - Permissions Page 15
Permissions
DocShuttle uses its own internal security system, based on User Permissions. In the last section, you
created a set of folders on the FTP site. Those folders will hold both the audio and document files, and
you can either allow or deny access to each folder for each user in DocShuttle.
In DocShuttle, the folders are called alternately Job Types, Type Folders, or just Types. These all
mean the same thing. A file that shows as being in Job Type 4 in the DocShuttle window will be kept
in the type4 folder on your local computer and in the type4 folder on the FTP site. DocShuttle can
work with up to 99 type folders.
A user is allowed or denied access to a type folder based on their 4-Digit User ID. For the purposes of
this evaluation, we are going to set up permissions for 5 users: 1 Administrator, 2 Transcriptionists, and
2 Dictators.
Create user profiles
1. Open DocShuttle Administrator
2. Click on the Security Menu and select Users Permissions. The Users Permissions window
should pop up, as in the figure below.

Setting Up - Permissions Page 16
3. Click on the User menu and choose Add to begin creating a new user. The Add New User
box should pop up, as in the figure below.
4. We will create the Administrator user first. In the box labeled User Name, type in your name.
In the box labeled 4-Digit User ID type in 5555. Note that this is the user ID you have already
been using to log in. Until permissions have been set, it is possible for anyone to log into the
FTP site with any user ID. Once permissions have been set, it is only possible to log in with a
valid user ID.
5. The next box is labeled Max No. of Files. Leave it blank.
6. In the box labeled User Type, click and choose Administrator. A user ID with the user type
Administrator can only log in with DocShuttle Administrator. The same applies to user type
Dictator and DocShuttle Dictator and user type Transcriptionist and DocShuttle Client.
7. In the first box labeled Job Types, leave the selection as All Types. The Administrator needs
to see all files in all job types. The other 4 Job Types boxes should remain blank.

Setting Up - Permissions Page 17
Your Administrator user is now complete, and the Add New User window should look like the figure
below.
8. Click OK to accept the new user. Now there is a user in the DocShuttle Users window, like
the figure below.
9. Now add 4 more users with the following information:
• Dictator #1
User Name: Dr. Smith
4-Digit User ID: 1001
Max No. of Files: (leave blank)
User Type: Dictator
Job Type: type1 (leave the other boxes blank)

Setting Up - Permissions Page 18
• Dictator #2
User Name: Dr. Jones
4-Digit User ID: 1002
Max No. of Files: (leave blank)
User Type: Dictator
Job Type: type1 (leave the other boxes blank)
• Transcriptionist #1
User Name: Elizabeth Bennet
4-Digit User ID: 9010
Max No. of Files: 1
User Type: Transcriptionist
Grant Permission for QA: (leave unchecked)
Job Type: type1 (leave the other boxes blank)
• Transcriptionist #2 (QA Transcriptionist)
User Name: Anne Shirley
4-Digit User ID: 9500
Max No. of Files: (leave blank)
User Type: Transcriptionist
Grant Permission for QA: check
Job Type: type1 in the first box, type2 in the second box (leave the other boxes blank)
There should now be 5 users in the DocShuttle Users window, as in the figure below.
Now the permissions have been created, but in order for them to take effect, the permissions need to be
set. Setting permissions puts a copy of the permissions file (enc.prm) on the FTP site. Whenever a
DocShuttle module logs into the FTP site, it downloads a copy of the permissions file and checks to see
if the user has permission to access the folder they are trying to open. If so, they can log in; if not, they
will be denied access and will receive an error message.
Set permissions
1. Close the DocShuttle Users window by clicking on the X in the upper-right corner. There will
be a message box telling you that you need to set the permissions. Click OK in the box.
Setting Up - Setting up DocShuttle Dictator for Importing Page 19
2. Connect to the FTP site again
3. Click on the Security menu and select Set Permissions.
4. A box will pop up asking if you wish to continue. Click OK.
5. Another box will pop up saying Permissions Set. Click OK.
The permissions are now set on the FTP site, and only someone with a valid user ID can log in using
DocShuttle. Now would be a good time to test it.
Test User Permissions
1. Disconnect from the FTP site.
2. Click on the Tools menu and select Settings
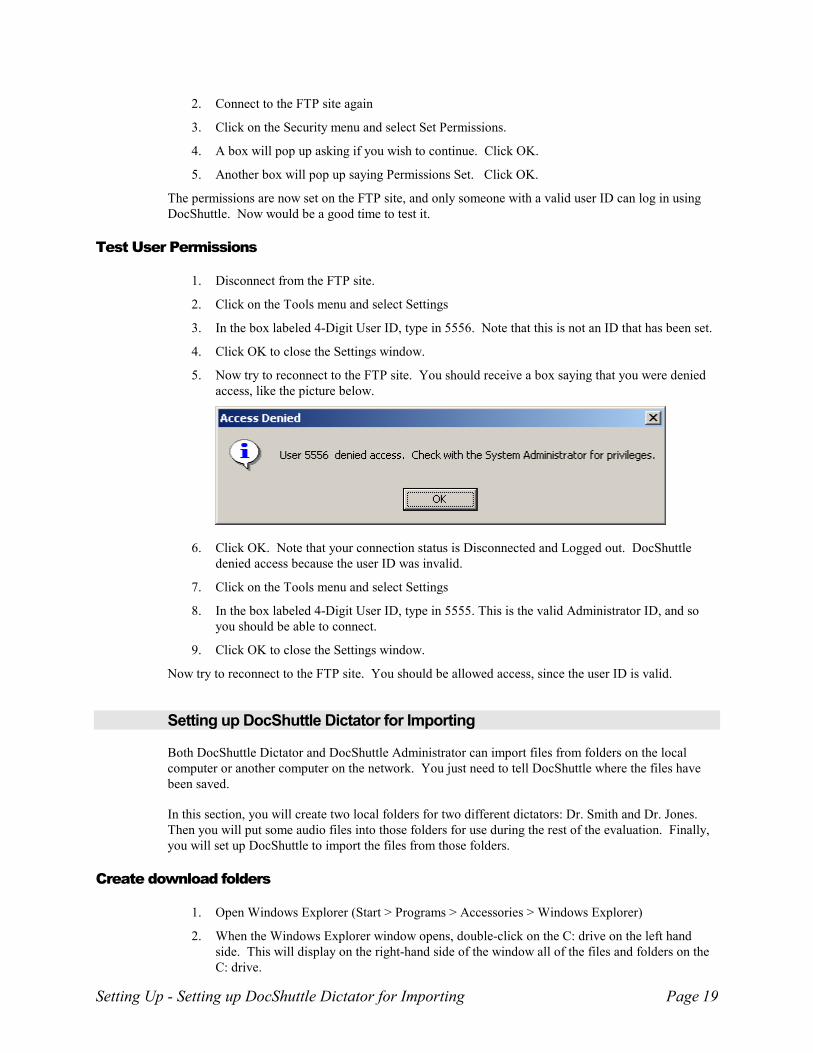
3. In the box labeled 4-Digit User ID, type in 5556. Note that this is not an ID that has been set.
4. Click OK to close the Settings window.
5. Now try to reconnect to the FTP site. You should receive a box saying that you were denied
access, like the picture below.
6. Click OK. Note that your connection status is Disconnected and Logged out. DocShuttle
denied access because the user ID was invalid.
7. Click on the Tools menu and select Settings
8. In the box labeled 4-Digit User ID, type in 5555. This is the valid Administrator ID, and so
you should be able to connect.
9. Click OK to close the Settings window.
Now try to reconnect to the FTP site. You should be allowed access, since the user ID is valid.
Setting up DocShuttle Dictator for Importing
Both DocShuttle Dictator and DocShuttle Administrator can import files from folders on the local
computer or another computer on the network. You just need to tell DocShuttle where the files have
been saved.
In this section, you will create two local folders for two different dictators: Dr. Smith and Dr. Jones.
Then you will put some audio files into those folders for use during the rest of the evaluation. Finally,
you will set up DocShuttle to import the files from those folders.
Create download folders
1. Open Windows Explorer (Start > Programs > Accessories > Windows Explorer)
2. When the Windows Explorer window opens, double-click on the C: drive on the left hand
side. This will display on the right-hand side of the window all of the files and folders on the
C: drive.
Setting Up - Setting up DocShuttle Dictator for Importing Page 20
3. Right-click in the right-hand side of the window and select New, then Folder. This will cause
a new folder to be created.
4. The name of the new folder is highlighted, so type in dr_smith. Then hit Enter. Now you have
a folder on your C: drive named dr_smith. The pathname for that folder is C:\dr_smith.
5. Right-click in the right-hand side of the window and again select New, then Folder. This will
cause another new folder to be created.
6. The name of the second new folder is highlighted, so type in dr_jones. Then hit Enter. Now
you have another new folder on your C: drive, this one named dr_jones. The pathname for
that folder is C:\dr_jones.
Now Dr. Smith and Dr. Jones have folders on the computer. For the purposes of this evaluation, we
will pretend that these are the folders where the files from the handheld recorders would get saved.
Put audio files in the download folders
1. Leave the Windows Explorer window open. The contents of the C: drive should still be
available. Double-click on the folder named WINDOWS to view its contents (you may not
have a WINDOWS folder. If not, then you should have a folder named WINNT. Double-
click on that one.)
2. In the WINDOWS (or WINNT) folder find the folder named Media and double-click on it to
view its contents. You should see a lot of .wav and other audio files.
3. Find the two files named chimes.wav and chord.wav (they may be named just chimes and
chord). Select them both, click on the Edit menu, and choose Copy.
4. Go back to the dr_smith folder you just made on the C: drive. Double-click to open the
folder, click on the Edit menu, and select Paste to put the two files in the folder.
5. Do the same thing to put the files in the dr_jones folder.
Now both Dr. Smith and Dr. Jones have files in their folders. For the purposes of this evaluation, we
will pretend that these are the dictation files that have been downloaded from their handhelds.
Entering import paths
1. Open DocShuttle Dictator
2. Click on the Tools menu and select Settings
3. Click on the Import tab. You will see 5 rows of 2 boxes.
4. Notice that in the first row, the second box (User ID) has Dr. Smith’s user ID already entered
and in gray: 1001. This box always gets the user ID from the FTP tab. You can type user
ID’s into each of the other boxes in this column, but not the first one.
5. Delete all text from the 9 boxes that allow you to delete.
6. In the first box of the first row, type in the full path name to Dr. Smith’s folder: C:\dr_smith
7. In the first box of the second row, type in the full path name to Dr. Jones’s folder: C:\dr_jones
8. In the second box of the second row, type in 1002. This is going to be Dr. Jones user ID in
DocShuttle.

Setting Up - Setting up DocShuttle Dictator for Importing Page 21
9. On the bottom half of the Import tab are 3 boxes. Click to put check marks in the second and
third boxes. There should not be a check in the first box (Delete Source Files after Import).
When you are done, the Import tab should look like the figure below.
10. Click on the OK button to accept the changes.
Now DocShuttle Dictator is set up to import the dictation files that are in the doctors’ folders.
Basic Operations - Importing with DocShuttle Dictator Page 22
Basic Operations
The basic process for using DocShuttle is very simple:
• Import and upload dictation files using DocShuttle Dictator
• Download dictation files using DocShuttle Client
• Transcribe dictation file and save document
• Attach document files and upload using DocShuttle Client
• Download and print document files using DocShuttle Dictator
This section will walk you through each of the steps in this process. First you will do it all manually.
Then you will be shown how to turn on the automated features.
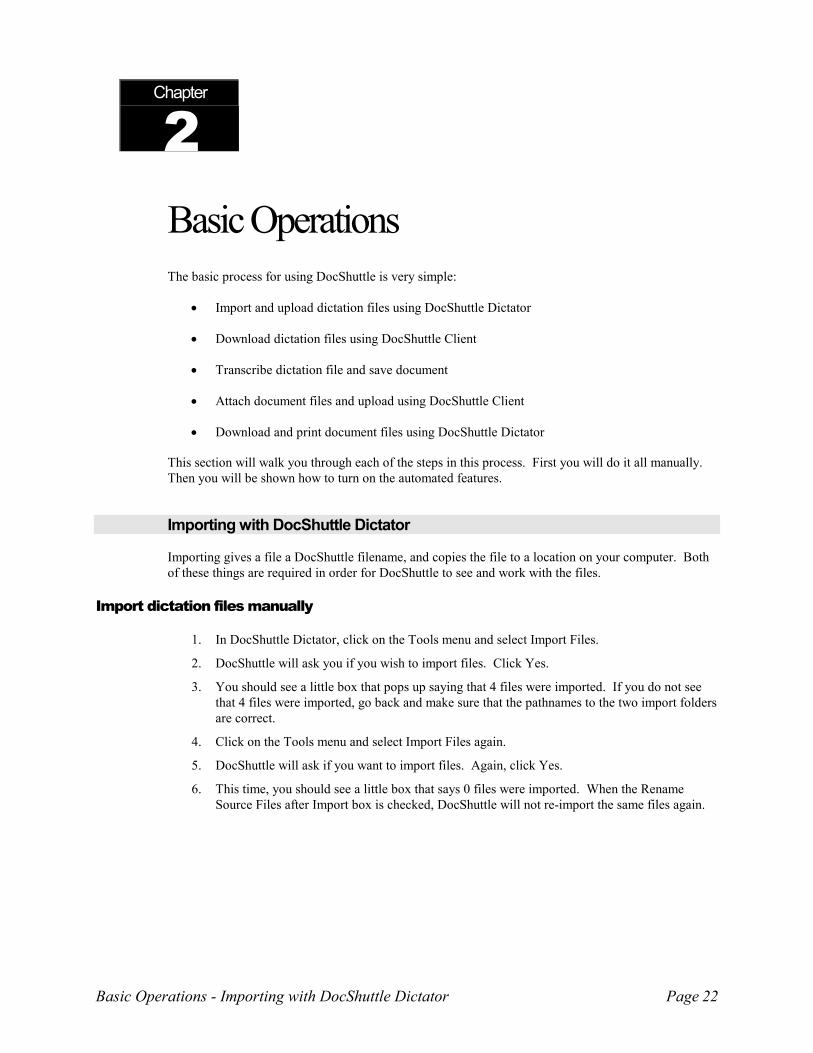
Importing with DocShuttle Dictator
Importing gives a file a DocShuttle filename, and copies the file to a location on your computer. Both
of these things are required in order for DocShuttle to see and work with the files.
Import dictation files manually
1. In DocShuttle Dictator, click on the Tools menu and select Import Files.
2. DocShuttle will ask you if you wish to import files. Click Yes.
3. You should see a little box that pops up saying that 4 files were imported. If you do not see
that 4 files were imported, go back and make sure that the pathnames to the two import folders
are correct.
4. Click on the Tools menu and select Import Files again.
5. DocShuttle will ask if you want to import files. Again, click Yes.
6. This time, you should see a little box that says 0 files were imported. When the Rename
Source Files after Import box is checked, DocShuttle will not re-import the same files again.
Chapter
2

Basic Operations - Importing with DocShuttle Dictator Page 23
Once the files are imported, you should see 4 files in the bottom pane of DocShuttle. Two of those
files should have 1001 in the Dictator column, and two should have 1002, just like in the figure below.
Now the files are available for DocShuttle Dictator to upload. To do that, DocShuttle Dictator must
have the proper connection information for the FTP site.
Upload dictation files manually
Both DocShuttle Dictator and DocShuttle Administrator can upload dictation files. Uploading places
the files on the FTP site where a transcriptionist with proper permissions and DocShuttle Client can see
and retrieve them.
1. In DocShuttle Dictator, click on the green up arrow, shown in the figure below.
2. You will be asked if you want to upload the files. Click OK to proceed with uploading.

Basic Operations - Importing with DocShuttle Dictator Page 24
A Transfer Progress box will pop up (like the one in the figure below), showing the progress of each
file as it uploads, the total number of files in this upload batch, and which file is currently uploading.
Once the upload is complete, you should see all 4 files in the top pane of DocShuttle Dictator, as in the
figure below. This means that the files are up on the FTP site.
Now take a look at the status of the files. The bottom pane of DocShuttle Dictator shows the Local
Files. These are the files that are located on your computer. The status of the local files has changed
from New to Transferred. This lets you know that the files were uploaded to the FTP site.
The top pane of the DocShuttle Dictator window shows the files on the FTP site. These files have the
status of New, and are now available to anyone who has DocShuttle Client or DocShuttle Administrator
and who has permission to access the type1 folder.
The files are now available for transcription. You can leave DocShuttle Dictator open while using
DocShuttle Client, so that you can see the change of the status of the files during the basic process.

Basic Operations - Importing with DocShuttle Dictator Page 25
Import & Upload dictation files automatically
Instead of manually connecting, importing, and uploading dictation files each time, you can schedule
DocShuttle to do each of these things automatically, on a timer.
1. In DocShuttle Dictator, click on the Tools menu and select Settings
2. Go to the Local tab
3. The bottom section of the tab is labeled Scheduled Processes. In that section are several
boxes. Click to place check marks in the boxes labeled Schedule Uploads and Schedule
Importing.
4. Also in the Scheduled Processes section is a box labeled Timer Interval. This is how long
DocShuttle waits between scheduled processes. Type 5 in the box to set the timer to wait 5
minutes between scheduled processes, as in the figure below.
5. Click OK.
Now DocShuttle Dictator is set up to automatically import files from the import folders that were
entered, automatically connect to the FTP site, and automatically upload files to the FTP site. When it
is done, it will wait 5 minutes and then do everything again.
The computer will need to remain connected to the Internet, and DocShuttle Dictator will need to
remain on in order for the scheduled processes to run.

Basic Operations - Downloading with DocShuttle Client Page 26
Downloading with DocShuttle Client
Download dictation files
1. Once DocShuttle has been set up, you can log in at any time to see what files are available for
transcription.
2. Open DocShuttle Client and connect to the FTP site
3. Once you are connected, you should see the four files in the top pane, as in the figure below.
4. Now click on the green down arrow, shown in the figure below, to download all available
dictation files.
5. You will be asked if you want to download the files. Click OK to proceed with downloading.

Basic Operations - Downloading with DocShuttle Client Page 27
A Transfer Progress box will pop up (like the one in the figure below), showing the progress
of each file as it uploads, the total number of files in this upload batch, and which file is
currently uploading.
6. Remember that when you set up user permissions, user 9010 was given a limit of the number
of files to download. That limit is set to 1 file, so after the first file is downloaded, the
Maximum Limit Reached box will pop up, as in the figure below. Click OK.
Once the download is complete, you should see one file in the bottom pane of DocShuttle Client, as in
the figure below. This means that the file has been downloaded to the local computer.
Now take a look at the status of the files. The bottom pane of DocShuttle Dictator shows the Local
Files. There is one file there, with the status of D for Downloaded.

Basic Operations - Play audio Page 28
The top pane of the DocShuttle Dictator window shows the files on the FTP site. See that the file on
the FTP site that was downloaded now has the status of D for Downloaded as well. The other files
remain New. Also, note that the name of the user who downloaded the file is shown.
The status of the downloaded file and the name of the user who downloaded it are available to anyone
in your DocShuttle system that is looking in the type1 folder.
The downloaded file is now saved to your computer and can be played in your wav player.
Play audio
To play the file, just double-click on it in the bottom pane of the DocShuttle Client window.
If you are using a Bytescribe WavPlayer to transcribe your audio files, then the WavPlayer will open
up with the file already loaded, as in the figure below.
If you do not have Bytescribe’s WavPlayer installed, then double-clicking on the file will open the
audio file in Windows Sound Recorder, as in the figure below.
If you wish to use another wav player, that is fine. DocShuttle is not affected by which wav player you
use, except that it cannot automatically load the files into other wav players; so you will need to open
the files manually.
All downloaded files are stored on your computer at C:\Program Files\Bytescribe\ DocShuttle
Client\TypeX, where X is the job type of the file. So, for example, the file you currently have
downloaded is in job type 1, so it is stored on your computer at C:\Program Files\Bytescribe\
DocShuttle Client\Type1.
To make opening files easier with other wav players, you can create a desktop shortcut to the Type1
folder.
This guide will assume that you are using Bytescribe’s WavPlayer.
Basic Operations - Attaching and Sending Documents with DocShuttle Client Page 29
Attaching and Sending Documents with DocShuttle Client
Now that the audio file has been downloaded and played, it is time to attach the typed document and
send it back to the dictator. In this section we will create a sample text document, attach it to the audio
file, and upload it back to the FTP server. Once the file is on the FTP server, DocShuttle Administrator
and DocShuttle Dictator can download, print, and save it.
Create sample documents
DocShuttle can work with most types of document files. Let’s create the simplest kind of document
file, a .txt file, to send back to the server.
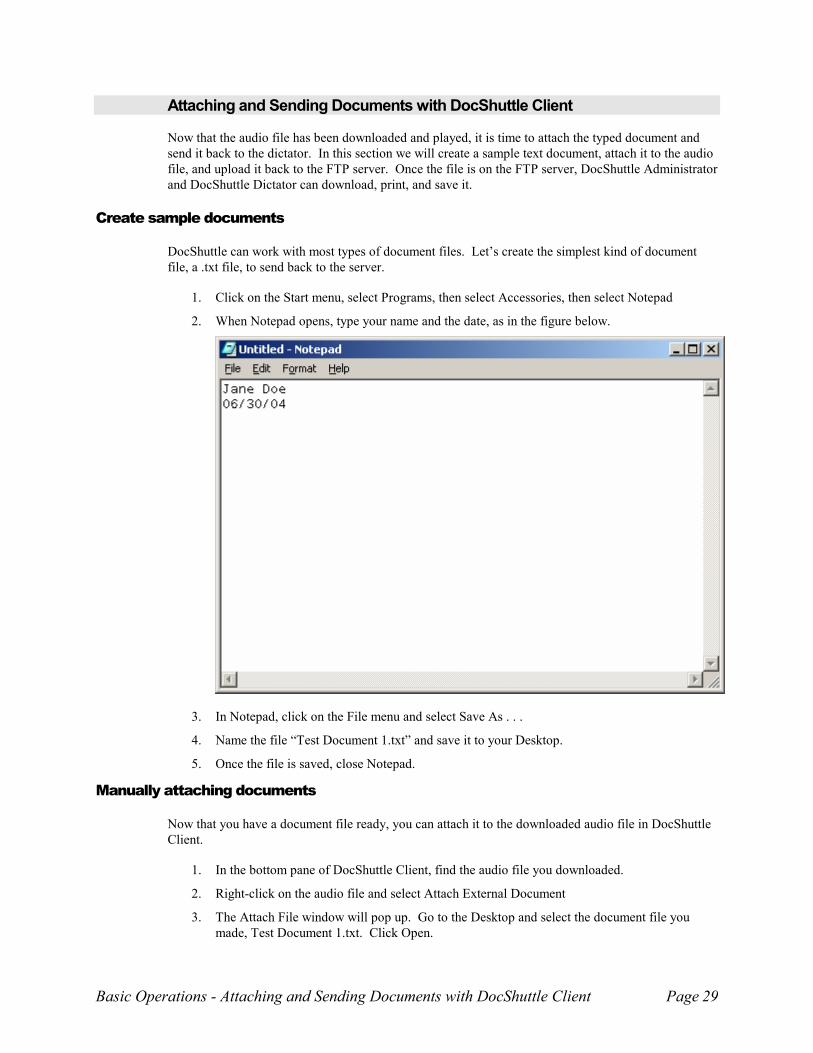
1. Click on the Start menu, select Programs, then select Accessories, then select Notepad
2. When Notepad opens, type your name and the date, as in the figure below.
3. In Notepad, click on the File menu and select Save As . . .
4. Name the file “Test Document 1.txt” and save it to your Desktop.
5. Once the file is saved, close Notepad.
Manually attaching documents
Now that you have a document file ready, you can attach it to the downloaded audio file in DocShuttle
Client.
1. In the bottom pane of DocShuttle Client, find the audio file you downloaded.
2. Right-click on the audio file and select Attach External Document
3. The Attach File window will pop up. Go to the Desktop and select the document file you
made, Test Document 1.txt. Click Open.

Basic Operations - Attaching and Sending Documents with DocShuttle Client Page 30
Note that the status of the audio file changes from a D (for Downloaded) to an A (for Attachment), as
in the figure below. This means that a document has been attached to the audio file, but that the
document has not yet been uploaded to the server.
Upload documents
In order for the document to be available to other people in DocShuttle, you will need to upload it to
the server. Uploading attached document files with DocShuttle Client is very similar to uploading
dictation files with DocShuttle Dictator.
1. In DocShuttle Client, click on the green up arrow
2. You will be asked if you want to upload the files. Click OK to proceed with uploading.
A Transfer Progress box will pop up, showing information for the document file.

Basic Operations - Retrieving Documents Page 31
Once the upload is complete, the file will change in status from A (for Attachment) to U (for Upload)
as in the figure below.
This means that the document file is available for download by DocShuttle Administrator and
DocShuttle Dictator.
Retrieving Documents
In both DocShuttle Administrator and DocShuttle Dictator, you can monitor the status of a file in the
top pane of the DocShuttle window. When the status of the file changes, and if the DocShuttle Client
user is connected to the FTP site, then the status of the file on the FTP site will change as well.
Once the status of the file is U (for Uploaded), you can download the document into DocShuttle
Administrator and DocShuttle Dictator. We will work with DocShuttle Dictator for now.

Basic Operations - Retrieving Documents Page 32
Download document
1. Open DocShuttle Dictator. You should see the file marked as U (for Uploaded) in the top
pane, as in the figure below.
2. Click on the green down arrow to download the document file
3. You will be asked if you want to download the attachments. Click OK to proceed with
downloading.
A Transfer Progress box will pop up, showing information for each attachment.
Basic Operations - Retrieving Documents Page 33
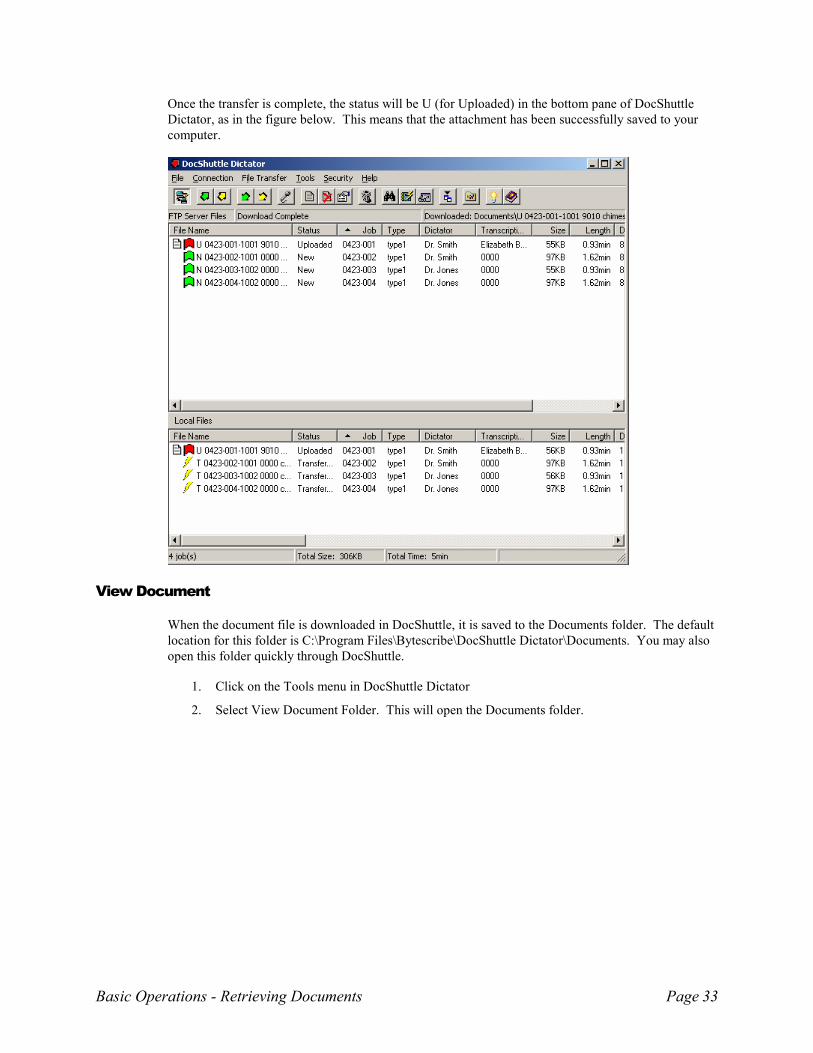
Once the transfer is complete, the status will be U (for Uploaded) in the bottom pane of DocShuttle
Dictator, as in the figure below. This means that the attachment has been successfully saved to your
computer.
View Document
When the document file is downloaded in DocShuttle, it is saved to the Documents folder. The default
location for this folder is C:\Program Files\Bytescribe\DocShuttle Dictator\Documents. You may also
open this folder quickly through DocShuttle.
1. Click on the Tools menu in DocShuttle Dictator
2. Select View Document Folder. This will open the Documents folder.

Basic Operations - Retrieving Documents Page 34
3. You will see the contents of the Documents folder, including the file you just downloaded, as
in the figure below.
The document file will have the same name as the audio file (U 0423-001-1001 9010) with the
original file name for the text document (Test Document 1) added to the end.
4. Double-click on the file to open it.
5. Verify that it is the file that you typed originally.
Print Document
You can print the document either by opening it and using your word processor’s Print feature, or by
right-clicking in the Documents folder and selecting Print.
Download document files automatically
Instead of manually connecting and downloading document files each time, you can schedule
DocShuttle to do each of these things automatically, on a timer.
1. In DocShuttle Dictator, click on the Tools menu and select Settings
2. Go to the Local tab

Basic Operations - Retrieving Documents Page 35
3. The bottom section of the tab is labeled Scheduled Processes. In that section are several
boxes. Click to place a check in the box labeled Schedule Downloads as in the figure below.
4. Click OK.
Now DocShuttle Dictator is set up to automatically connect to the FTP site and automatically download
document files from the FTP site. When it is done, it will wait 5 minutes and then do everything again.
The computer will need to remain connected to the Internet, and DocShuttle Dictator will need to
remain on in order for the scheduled processes to run.

Advanced Operations - Managing the Workflow with DocShuttle Administrator Page 36
Advanced Operations
Managing the Workflow with DocShuttle Administrator
Setting up for manual workflow management
You may have noticed that both of the dictators and both of the transcriptionists have access to the
type1 folder. This way, the transcriptionists have access to the files as soon as they are up on the site.
At this point, it is possible to connect with DocShuttle Client, download the files, and begin
transcription. However, there are a few features in DocShuttle Administrator that allow you to manage
the workflow.
First, let’s connect to the FTP site and confirm that you can see the newly uploaded files.
1. Open DocShuttle Administrator
2. Connect to the FTP site. When the connection is complete, you should see, in the top pane of
the DocShuttle window, the 4 files that were uploaded earlier. Your DocShuttle Administrator
window should look like the picture below.
Chapter
3

Advanced Operations - Managing the Workflow with DocShuttle Administrator Page 37
Note that DocShuttle Administrator has files in the top pane (on the FTP server), but not in the bottom
pane. This means that DocShuttle Administrator does not have a copy of the files locally.
[Note: usually, DocShuttle Dictator and DocShuttle Administrator are installed on different computers.
For this evaluation, they are installed on the same computer. But DocShuttle Administrator and
DocShuttle Dictator store their local files in different folders, so they cannot “see” each other’s files on
the same computer.]
In some cases, you may want to get directly involved in the workflow. For example, let’s say that Dr.
Smith calls and tells you that she needs her files to be done immediately. So you’ll want to move the
files so that only your more experienced transcriptionist, working in job type 2, has access to the files.
Move files
1. While connected to the FTP site, find the two files that belong to Dr. Smith in the top pane.
2. Select both files by clicking on the first file, then press and hold the shift key while clicking on
the second file.
3. Right-click on the files, and on the menu that pops up select Move Files To.
4. The Move Files box will appear, asking which Job Type you want to move the files to, as
pictured below. Type 2 into the box and click OK.

Advanced Operations - Archiving Files with DocShuttle Administrator Page 38
The Transfer Progress box will appear. When it is done, the files on the FTP site will be moved to the
type2 folder and will show up as Job Type 2 files, as in the picture below.
Note that the files will remain in type1 on the bottom. It is possible to change those files as well, but
we will let those remain in type1, since we will need to move the files on the FTP site back to type1 for
downloading when the documents are complete.
Archiving Files with DocShuttle Administrator
You may want to download the files locally and archive them. That way, if something happens to the
files elsewhere in the workflow, you will have a copy of the dictation.
Manually download dictation and document files to DocShuttle Administrator
1. While connected to the FTP site, click on the green down arrow to download the files.
2. A box will pop up asking if you want to download the files. Click OK.
3. The Transfer Progress box will appear, providing information about the download, just as it
did with the upload from DocShuttle Dictator.

Advanced Operations - Archiving Files with DocShuttle Administrator Page 39
4. When the download is complete, you should see the 4 files in the bottom pane of the
DocShuttle Administrator window, just like in the picture below.
Note that there was no change to the status of the files on the FTP site. This is because the download
function in DocShuttle Administrator is “transparent,” as a management activity, and does not affect
workflow.
Automatically download dictation and document files to DocShuttle Administrator
Instead of manually connecting and downloading files each time, you can schedule DocShuttle to do
each of these things automatically, on a timer.
1. Open DocShuttle Administrator
2. Click on the Tools menu and select Settings
3. Go to the Local tab

Advanced Operations - Archiving Files with DocShuttle Administrator Page 40
4. The bottom section of the tab is labeled Scheduled Processes. In that section are several
boxes. Click to place a check in the box labeled Schedule Downloads as in the figure below.
5. Click OK.
Now DocShuttle Administrator is set up to automatically connect to the FTP site and automatically
download files from the FTP site. When it is done, it will wait 5 minutes and then do everything again.
The computer will need to remain connected to the Internet, and DocShuttle Administrator will need to
remain on in order for the scheduled processes to run.

The QA process - Send a file for QA Page 41
The QA process
DocShuttle makes it possible for a document file to be reviewed and edited by another transcriptionist
without the original dictator being able to access the file before it’s done. This is called the QA
process.
The QA workflow adds some additional steps to the normal workflow described earlier:
• After attaching a document, but before uploading the document to the FTP site, the
transcriptionist marks the file for QA.
• After marking the file for QA, the transcriptionist uploads the document file to the FTP
server.
• A second DocShuttle Client user, called a QA Transcriptionist, downloads the dictation
and document files and reviews them.
• Changes (if necessary) are made, the document is saved, and the QA transcriptionist
uploads the edited document to the FTP server.
Send a file for QA
Download another file
To begin the QA process, the first transcriptionist needs to download another dictation file.
1. Open DocShuttle Client and connect to the FTP site
Chapter
4

The QA process - Send a file for QA Page 42
Once you are connected, you should see the three remaining New files in the top pane, as in
the figure below.
2. Click on the green down arrow again to download the next available dictation file.
3. You will be asked if you want to download the files. Click OK to proceed with downloading.
4. A Transfer Progress box will pop up showing the status of the downloading file.
5. Again, you will be limited to downloading one file. Click OK on the Maximum Limit Reached
box.
Once the download is complete, you should see two files in the bottom pane of DocShuttle Client. One
is marked U for Uploaded, and the most recent download will be marked D for Downloaded.
Attach new document
Just like with the Basic Operation, you will attach a document file to the dictation file. You can attach
the same document created earlier, “Test Document 1.txt.”
1. In the bottom pane of DocShuttle Client, find the audio file you downloaded.
2. Right-click on the audio file and select Attach External Document
3. The Attach File window will pop up. Go to the Desktop and select the document file you
made, Test Document 1.txt. Click Open.
Note that the status of the audio file changes from a D (for Downloaded) to an A (for Attachment).
Manually mark file for QA
Once the document has been attached, you can mark it for QA. When a file is marked for QA, a QA
transcriptionist has the opportunity to view and edit a document file before DocShuttle Dictator is
allowed to download or view the document.
1. In the bottom pane of DocShuttle Client, right-click on the file marked A (for Attachment).

The QA process - Send a file for QA Page 43
2. From the menu that pops up, select “Mark Attachment for QA,” as in the figure below.
3. A box will pop up, asking “Do you wish to mark the attachment for QA?” Click Yes.
Note that the status of the audio file changes from A (for Attachment) to M (for Marked for QA), as in
the figure below.

The QA process - Set up QA Transcriptionist Page 44
This means that a document has been attached to the audio file and has been marked for QA, but that
the document has not yet been uploaded to the server.
Upload file for QA
Uploading attached document files for QA is exactly like uploading other document files.
1. In DocShuttle Client, click on the green up arrow
2. You will be asked if you want to upload the files. Click OK to proceed with uploading.
A Transfer Progress box will pop up, showing information for the document file.
Once the upload is complete, the file will change in status from M (for Marked for QA) to Q (for Sent
for QA) as in the figure below.
This means that the document file is available to be downloaded and edited by a QA Transcriptionist
using DocShuttle Client.
Set up QA Transcriptionist
In order to be able to download files marked for QA, a QA Transcriptionist must be using DocShuttle
Client and must have permission to download files marked for QA.
Remember that when you set up the permissions you set up a second transcriptionist user, 9500, who
has QA permissions.
Since you cannot QA files on the same DocShuttle Client installation from which the documents were
originally uploaded, you will need to install DocShuttle Client on a second computer for this tutorial.
Please refer to the first chapter of this tutorial for information on installing DocShuttle Client.
Next, configure DocShuttle Client using the information for the QA Transcriptionist:

The QA process - Set up QA Transcriptionist Page 45
1. In DocShuttle Client, click on the Tools menu and select Settings
2. Click on the FTP tab and enter the exact same information in the first 4 boxes that you entered
into DocShuttle Administrator and DocShuttle Dictator:
• Host Address: simpleftp.net
• Username: sample
• Password: sample
• Initial Directory: (your subfolder name)
• In the box labeled User’s Job Type, enter 1
• In the box labeled User’s 4-Digit ID, enter 9500, so that your FTP tab looks like the figure
below.
3. Do not make any other changes, and click OK to accept the information you have put in
4. Click on the Connection menu and select Connect to FTP.
As before, you should see the In Progress box pop up in the middle of your screen.

The QA process - Perform QA on file Page 46
Once the box goes away, you should be connected to the FTP site. You should see the file marked Q
(for Sent for QA) among the other files on the site, as in the figure below.
Perform QA on file
Download file for QA
In order to view and edit the document, you need to download the document to this computer.
1. In the top pane of DocShuttle Client, click on the file marked Q (for Sent for QA) to select the
file.
2. Click on the yellow down arrow to download just the selected file.
3. A box will pop up asking “Do you wish to download the selected jobs?” Click Yes.
4. A Transfer Progress box will pop up showing the status of the downloading file.
5. Once the download is complete, you should see the downloaded file in the bottom pane of
DocShuttle Client.

The QA process - Perform QA on file Page 47
Note that the status of the file has changed from Q (for Sent for QA) to R (for Being Reviewed), as in
the figure below.
The Transcriptionist associated with this file has also changed, to reflect the user who has downloaded
the file most recently.
Edit & save file
Now that the file is downloaded, you can open the document to view and edit it.
1. In DocShuttle Client, click on the Tools menu and select “View Document Folder.”
2. An Explorer window will pop up, showing all of the files you have downloaded. Find the one
with the exact same Job Number and User ID’s as the audio file you just downloaded.
3. Double-click on the document file to open it.
4. Add a third line to the document, typing, “This is an edited document.”
5. Click on the file menu and choose Save.
Note: it is very important to save the document with the exact same filename as the original document.
Do not change the name. If you do, DocShuttle will not recognize the document file and you will not
be able to upload it.
For that reason, it is best always to use the Save feature instead of the Save As feature in your word
processor.
After saving the document, close it.
Upload completed document
Once the document has been edited and saved, you can upload it back to the FTP site so that it is
available for retrieval by DocShuttle Dictator.

The QA process - Automatically sending files to QA Page 48
1. In DocShuttle Client, click on the file marked R (for Being Reviewed) to select it.
2. Click on the yellow up arrow to upload the file.
Note: Do not change the status of the file. Changing the status will delete the edited
document.
3. You will be asked if you want to upload the files. Click OK to proceed with uploading.
A Transfer Progress box will pop up, showing information for the document file.
Once the upload is complete, the file will change in status from R (for Being Reviewed) to U (for
Uploaded) as in the figure below.
This means that the document file is available to be downloaded DocShuttle Dictator.
Automatically sending files to QA
Finally, it is possible to set up your original transcriptionist on DocShuttle Client so that all of the files
that are attached and uploaded are sent for QA.
1. In DocShuttle Client, click on the Tools menu and select Settings
2. Click on the Local tab

The QA process - Automatically sending files to QA Page 49
3. At the bottom of the window there is a box labeled “Mark attachments for QA when attaching
files.” Click to place a check in that box, as in the figure below.
4. Click OK to return to the DocShuttle Client main screen.
5. Close DocShuttle Client.
Now DocShuttle Client is set up to automatically mark every file attached for QA. Once the file is
attached it will have the status of M (for Marked for QA) instead of A (for Attachment). Once the file
uploads, it will automatically have the status Q (for Sent for QA).

Appendices - Statuses in DocShuttle Page 50
Chapter
6
Appendices
Statuses in DocShuttle
Status list
T – Transferred: The dictation file has been uploaded to the FTP server by DocShuttle Administrator or
DocShuttle Dictator and has not yet been downloaded into DocShuttle Client. (Note: This status will
only be shown in the bottom pane of DocShuttle Administrator and DocShuttle Dictator)
N – New: The dictation file has been uploaded to the FTP server and has not yet been downloaded into
DocShuttle Client.
D – Downloaded: Someone using DocShuttle Client has downloaded the dictation file.
A – Attachment: A document file has been attached to the dictation file in DocShuttle Client, but the
document has not yet been uploaded to the server. QA is not being used.
M – Marked for QA: A document file has been attached to the dictation file, and the file has been
marked for review by QA, but the document has not yet been uploaded to the server.
C – Complete: Someone using DocShuttle Client has marked the file Complete. No document is
attached.
Q – Ready for QA: A document file has been attached to the dictation file, the file has been marked for
review by QA, and the document has been uploaded to the server.
R – Being Reviewed: Someone using DocShuttle Client has downloaded a document that was sent for
QA.
U – Uploaded: A document file has been attached to the dictation file and both are available for
download.
Status progressions
Here are the statuses that each file should go through, in order, for each of the following DocShuttle
workflows.
Documents not being sent back through DocShuttle: N � D � C
Documents being sent back through DocShuttle, QA not used: N � D � A � U
Documents being sent back through DocShuttle, QA being used: N ���� D ���� M ���� Q ���� R ���� U

Appendices - Registering DocShuttle Page 51
Registering DocShuttle
Using DocShuttle as a demo
You may continue to use DocShuttle for evaluation purposes for 14 days from the time you first install
it on your computer. Each DocShuttle module is fully functional for those 14 days. When the trial
period is over, DocShuttle will display “0 Days Remaining” and you will not be able to connect to an
FTP site.
Registering a purchased license
Once you have purchased a license for your DocShuttle software, you may register your existing
installation of the software. There is no need to reinstall.
1. To register your DocShuttle installation, open the DocShuttle software.
2. A window will pop up containing the text of the license agreement. Read the agreement and
then click in the circle labeled “I accept the terms of the license agreement.” (If you do not
accept the terms, cancel the registration and uninstall the DocShuttle software.) Click the
Next button.
3. When the DocShuttle Administrator software starts, a window will pop up telling you that you
have an unregistered version of the software, as in the figure below.
Type your name and your Product Serial Number into the appropriate boxes in the window.
Then click Register Online.
4. A small window will pop up saying “Registration Successful!” Click OK.

Appendices - Registration FAQ Page 52
5. The Registration Results window will pop up, as in the figure below.
6. This window shows the number of times your license has been used to register your
DocShuttle software. Click OK.
You may see the “Did you know?” window again.
Finally, the DocShuttle Administrator window will open. Note that the blue bar at the top of the
DocShuttle window no longer says “Unregistered Version.” Your DocShuttle Administrator is
properly registered
If you have licenses for DocShuttle Client and DocShuttle Dictator, then you may register using the
same procedure. Do not use the same Product Serial Number to register different modules of the
software.
Registration FAQ
1. Where do I go to register my software?
To register your DocShuttle software, please go to http://www.bytescribe.com/register.
2. When I installed my software on a new computer, my Registration Number changed. What
happened?
The Registration Number and Confirmation Code are different for each computer on which the
software is installed. Please take note of the new Registration Number and register online to get the
new Confirmation Code.
3. I had to reinstall Windows on my computer, and my Registration Number changed. What
happened?
Sometimes, when you reinstall or upgrade Windows on your computer, the Registration Number and
Confirmation Code will change. Please take note of the new Registration Number and register online
to get the new Confirmation Code.
4. I registered and got a Confirmation Code, but when I put it in I get an error message saying
“Invalid Code.” Why?
There are three things that might cause you to receive an invalid Confirmation Code.

Appendices - Registration FAQ Page 53
The first is that you may be using an old Registration Number. The Registration Number and
Confirmation Code are different for each computer on which the software is installed. Even if you use
the same disk to install the software on different computers, you will get different Registration
Numbers. Please make sure that you are using the new Registration Number when registering.
Second, please check to see if there is a hyphen ( - ) somewhere in the Registration Number. If there is,
that will affect the Confirmation Code. If the Registration Number contains a hyphen ( - ), then so will
the Confirmation Code.
The third possibility is that the Registration Number was typed incorrectly. Please double-check the
Registration Number that is on your screen and make sure that it exactly matches the number that was
entered online.
5. When I go to register online, I get the message that says “You have exceeded the number of
licenses.” What does that mean?
Software purchased from Bytescribe is a single user license intended for one user. The Product Serial
Number that comes with your Bytescribe software can be used to register up to 3 times. If you have
exceeded this number of registrations, you will need to purchase a new license or contact Bytescribe
and request that the Product Serial Number be reset so that you can register online.
6. I change computers and/or re-format my computer a lot. I will need to register my software
several times. Is there a way to avoid the registration process?
Yes. Bytescribe has a product called a USB Dongle (hardware license key), which plugs into a USB
port on your computer. This dongle contains the registration information necessary for the Bytescribe
software and it can be transferred from one computer to another. As long as the USB Dongle is
plugged in, your software is registered. If you already have a valid software license, you may order a
dongle from our online store. For more information, contact Bytescribe at (408) 987-5628 or send an
email to [email protected] .
7. I don’t have a Product Serial Number. Can I register?
Bytescribe requires that you have a valid Product Serial Number in order to register or receive
upgrades. If you do not have a Product Serial Number, you will need to purchase a license in order to
receive one. (Bytescribe began using Product Serial Numbers in April of 2001. If you purchased your
Bytescribe software before April 2001, then you will need to purchase a new license in order to receive
a Product Serial Number.)
8. I want to buy/sell a Bytescribe software license. Is it transferable?
No. When a customer purchases a software license, the software must be registered on the customer's
computer. Once registered, this software cannot be transferred to a different party. Bytescribe
provides technical support to the purchaser of the software license.
9. When I try to register DocShuttle, I get the message “Connection Timed Out.” How can I
complete the registration process?
First, check your DocShuttle software version. Click on the Help menu and select About. If you have a
version earlier than 4.0.5, you will need to update your software. You can download DocShuttle
version 4.1 from our website at http://www.bytescribe.com/docshuttle/version4/index.htm. Please call
Bytescribe at 408-987-5628 or send an email to [email protected] with your Product Serial
Number for the installation password.

Appendices - Registration FAQ Page 54
Second, check to see that you are connected to the Internet. Unlike WavPlayer and SwiftText,
DocShuttle needs to go online to complete registration. So try connecting to a web page that you don’t
normally access and make sure that it works.
Finally, try checking the little box on the registration screen that says “Register Through Firewall.”


