

FareManager Routings Managing Routing Maps and Restrictions
Updated 1 April 2016 © 2016 Airline Tariff Publishing Company. All rights reserved.

FareManager Routings
i
Table of Contents
Introduction to FareManager Routings ............................................................................... 3 Mission .......................................................................................................................... 5 Understanding the significance of the system .............................................................. 6 Basis for fares: Routing or mileage ............................................................................. 6 The function of routing maps ........................................................................................ 7 The function of routing restrictions ............................................................................... 7 Accessing FareManager Routings ............................................................................... 8 Summary ...................................................................................................................... 9
Inquiry ................................................................................................................................ 11 Mission ........................................................................................................................ 13 How to display a list of routings .................................................................................. 14 How to interpret routing data ...................................................................................... 16 How to view routing maps and restrictions ................................................................. 18 Reference Option........................................................................................................ 20 Using the Find/Replace feature .................................................................................. 21 Summary .................................................................................................................... 24
Creating Routings in FareManager ................................................................................... 25 Mission ........................................................................................................................ 27 Toolbars and function windows .................................................................................. 28 How to create a new routing map ............................................................................... 34 Drawing a simple routing map .................................................................................... 40 Completing the creation of a routing map .................................................................. 50 Resolving errors.......................................................................................................... 56 Summary .................................................................................................................... 58
Modifying Routing Maps .................................................................................................... 59 Mission ........................................................................................................................ 61 How to modify a routing map ...................................................................................... 62 Modifying and creating routing restrictions ................................................................. 71 Steps for creating routing restrictions ......................................................................... 72 Adding a Reference Option ........................................................................................ 80 Canceling Routing Maps ............................................................................................ 83 Summary .................................................................................................................... 93
Creating Routing Partials .................................................................................................. 95 Mission ........................................................................................................................ 97 US/CA domestic tariff routing partials ........................................................................ 98 Changing original routings to source routings ............................................................ 98 Changing the routing type to source........................................................................... 99
FareManager Routings
ii
Creating new routing for partials .............................................................................. 103 How to manually unlock a routing ............................................................................ 106 Summary .................................................................................................................. 108
The Copy/Paste Function ............................................................................................... 109 Mission ...................................................................................................................... 111 The Copy/Paste function .......................................................................................... 112 Summary .................................................................................................................. 117
Routing Conventions and Guidelines .............................................................................. 119 Mission ...................................................................................................................... 121 Conventions and guidelines ..................................................................................... 122 Summary .................................................................................................................. 131
Introduction to FareManager Routings Managing Routing Restrictions and Maps

Introduction to FareManager Routings
5
Mission After completing this module, participants will have an introductory understanding of the purpose and functionality of FareManager Routings.
Why is this module important? Enhancements to the ATPCO system make it possible for customers to create, update, and cancel their routing maps and restrictions in lieu of sending an instruction to ATPCO. Previously, online capabilities of data providers were limited to only viewing or inquiring about routing information.
Many customers will continue to instruct ATPCO analysts when changes are desired. However, FareManager Routings makes the display and maintenance of routings easier and more efficient for all users.
Learning objectives After completing this module, participants will be able to do the following:
• Understand the significance of the FareManager Routings system
• Identify the function of routing maps
• Identify the function of routing restrictions
• Identify the steps for accessing FareManager Routings

Introduction to FareManager Routings
6
Understanding the significance of the system FareManager Routings is a Web-based tool that gives data owners control over their own routing data and makes the management of the routing database easier for all users.
You can create, modify, and cancel routing maps and restrictions. The printing of routing tariff pages remains limited to ATPCO only. Data owners are responsible for instructing ATPCO to update the associated tariff pages for any routing changes that the owner makes.
Features of the system include the following: • Free and secure web access • A drawing tool for routing maps • Access to restriction updates via a single screen • Copy and paste functionality • Find and replace functionality • Print capability • Zoom feature • Valid values lists • Online help
Basis for fares: Routing or mileage International fares may be published as either routing - or mileage-based.
Fares that are mileage-based do not necessarily restrict how a passenger gets from origin to destination. Instead, the passenger is allowed a Maximum Permitted Mileage (MPM). As long as the passenger’s schedule is within the MPM, the fare stands. However, if the MPM is exceeded, the passenger will be assessed a mileage surcharge.
It is very common for an international ticket to be issued with a combination of both types of fares. For instance a passenger traveling ATH—LON—NYC may be ticketed on a mileage-based fare for the first leg and routing-based fare for the second.
US/CA domestic fares are always routing-based.
Routing-based fares require more planning for making pricing decisions. However, when strategically used, they help to clarify intent, categorize travelers, and ultimately boost revenues.
The printing of routing tariff pages remains limited to ATPCO only.
Introduction to FareManager Routings
7
The function of routing maps A routing map is like a miniature rule—it is another way to add restrictions to a fare. A routing map is an online system that provides the following restrictions:
• It specifies routing restrictions based on a linear map or specified textual restrictions.
• It defines which carriers may be used for travel.
• It defines which transfer or stopover points are permitted.
The function of routing restrictions A restriction is a subsystem within the routing map that handles exceptions or limitations to a routing. These exceptions are similar to those found in the rules system. Restrictions are composed of a series of categories, where each category handles a different type of restriction.
Introduction to FareManager Routings
8
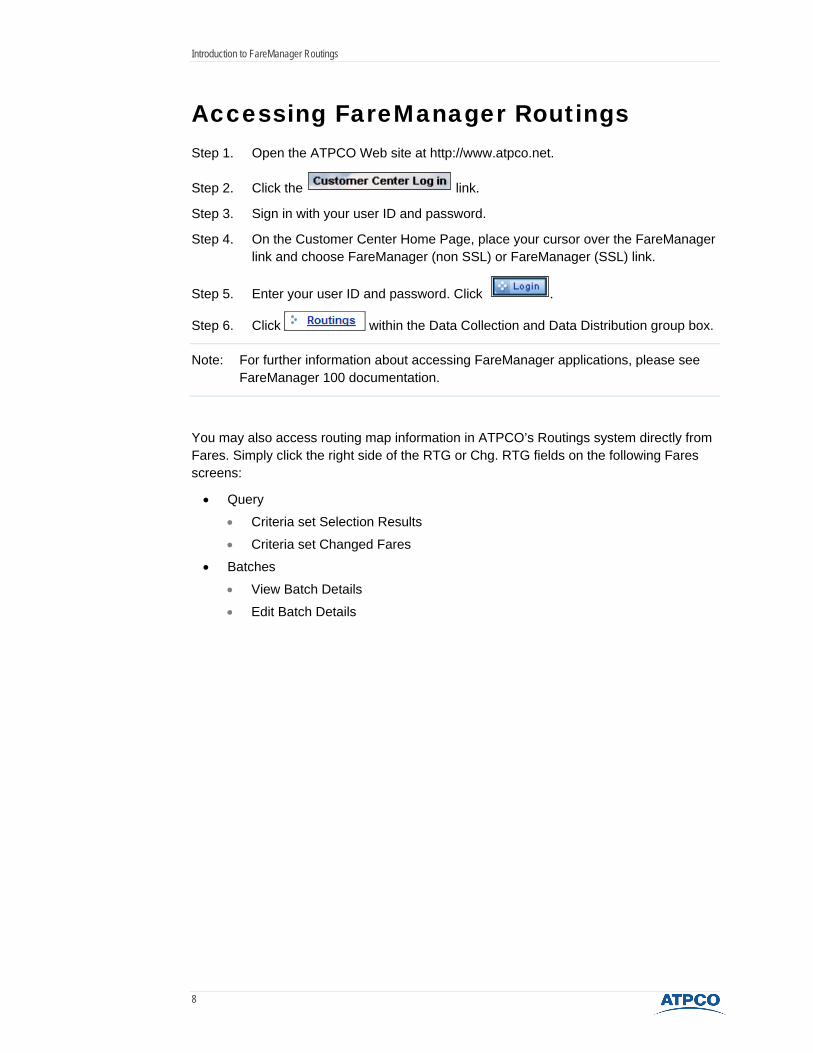
Accessing FareManager Routings Step 1. Open the ATPCO Web site at http://www.atpco.net.
Step 2. Click the link.
Step 3. Sign in with your user ID and password.
Step 4. On the Customer Center Home Page, place your cursor over the FareManager link and choose FareManager (non SSL) or FareManager (SSL) link.
Step 5. Enter your user ID and password. Click .
Step 6. Click within the Data Collection and Data Distribution group box.
Note: For further information about accessing FareManager applications, please see FareManager 100 documentation.
You may also access routing map information in ATPCO’s Routings system directly from Fares. Simply click the right side of the RTG or Chg. RTG fields on the following Fares screens:
• Query
• Criteria set Selection Results
• Criteria set Changed Fares
• Batches
• View Batch Details
• Edit Batch Details
Introduction to FareManager Routings
9
Summary FareManager Routings makes the display and maintenance of routings easy and efficient for all users. Customers are now able to create, update, and cancel their routing maps and restrictions in lieu of sending an instruction to ATPCO.
Customers may continue to instruct ATPCO analysts when changes are desired.
The printing of routing tariff pages remains limited to ATPCO. Data owners must instruct ATPCO to update tariff pages when online changes are made.
You may access Routings from the FareManager home page or from certain screens of the Fares system.
The following modules will describe methods of how to view data and how to create or modify routing maps and restrictions.


Inquiry Using FareManager to View Routing Restrictions and Maps

Inquiry
13
Mission After completing this module, participants will know how to list and view routing maps and restrictions, and how to interpret routing data.
Why is this module important? Data owners and system users must know how to research routing information in order to check for accuracy and effectively manage the database.
Learning objectives After completing this module, participants will be able to do the following:
• Display a list of routing numbers
• Interpret routing data
• View routing maps
• View routing restrictions
• View reference options
• Use the Find/Replace function

Inquiry
14
How to display a list of routings Step 1. Enter the desired carrier and tariff on the Routings screen in the search
parameter fields.
Step 2. Click .
Note: The search parameter may also be coded with only a tariff. In that case the resulting list will show all carriers and routings within that tariff.
Figure 1 Getting In
A list of applicable routings will appear.
Figure 2 Routing screen
Getting in: Enter the desired carrier and tariff on the Routings screen.
Inquiry
15
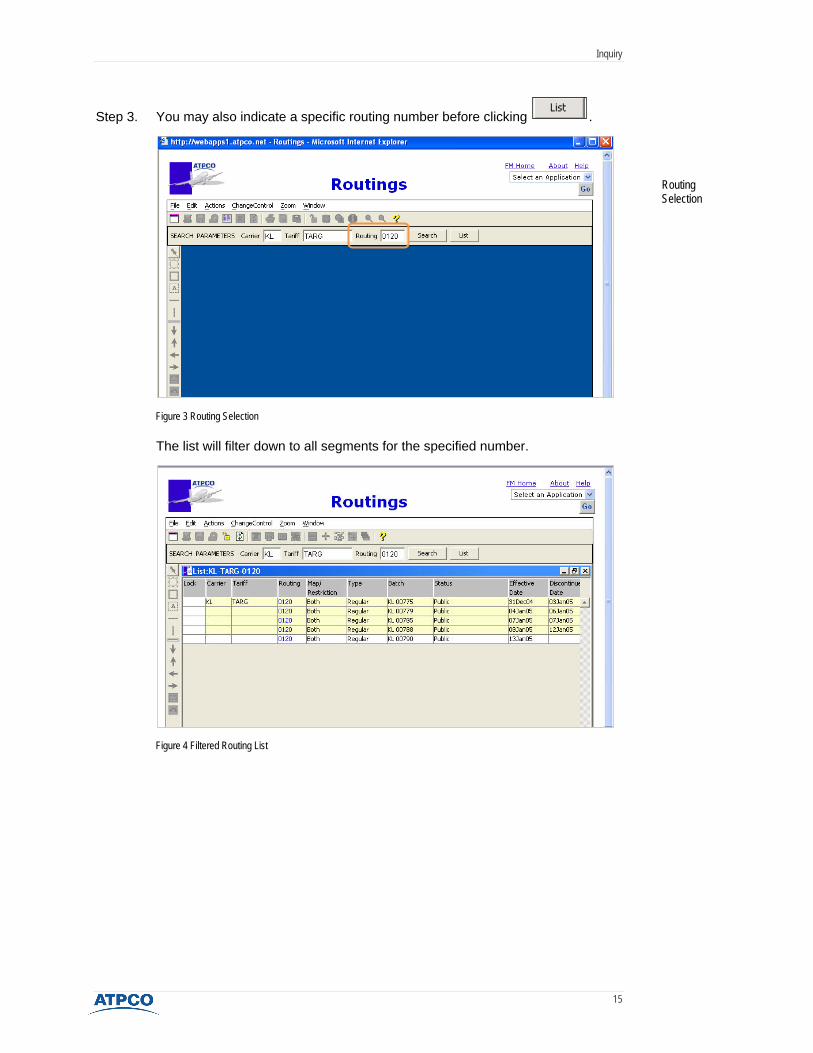
Step 3. You may also indicate a specific routing number before clicking .
Figure 3 Routing Selection
The list will filter down to all segments for the specified number.
Figure 4 Filtered Routing List
Routing Selection

Inquiry
16
How to interpret routing data
Part A: List Screen field descriptions
Figure 5 Routing List fields
Field Description Lock Padlock icon indicates a user is modifying a routing. Routings remain locked until
update or until they are manually unlocked. Carrier The data owner. Tariff Routing tariff (Note: One routing tariff can be linked to multiple fares tariffs). Routing Four-digit routing number. Map/Restriction Indicates whether the routing includes a linear map, restriction, or both. Type Routings may be Regular, Source, Partial, or Option.
Batch Batch number that is currently manipulating or that last updated a routing. Status Indicates if a batch/routing is Incomplete–Edited, Incomplete–Unedited,
Incomplete–Updated, or has been made Public/Secured. Effective Date Effective date of the last update. Discontinue Date Will appear if the routing number has been canceled or if recently modified. If the
effective date of the last modification was fewer than seven days in the past, the discontinue date of the previous version will appear.
Direction Indicates whether a map may be read in both directions: from left to right, or right to left.
DRV Domestic Route Validation Indicator. May be Blank (default), 1 (routing used as shown), or 2 (default to any online point).
Inquiry
17
Field Description CP Common Point Indicator. May be Blank (default, add-ons and routings may be
linked at any common entry/exit points), or 1 (restricts add-ons and routings to be linked only at common entry/exit points, published fares must begin/end at entry/exit points).
IP Intermediate Point Indicator. May be Blank (default) or 1 (Allow entry/exit at intermediate points)
UP Un-ticketed point Indicator, May be Blank (must validate only ticketed points) or 1 (validate ticketed and un-ticketed points on the fare component).
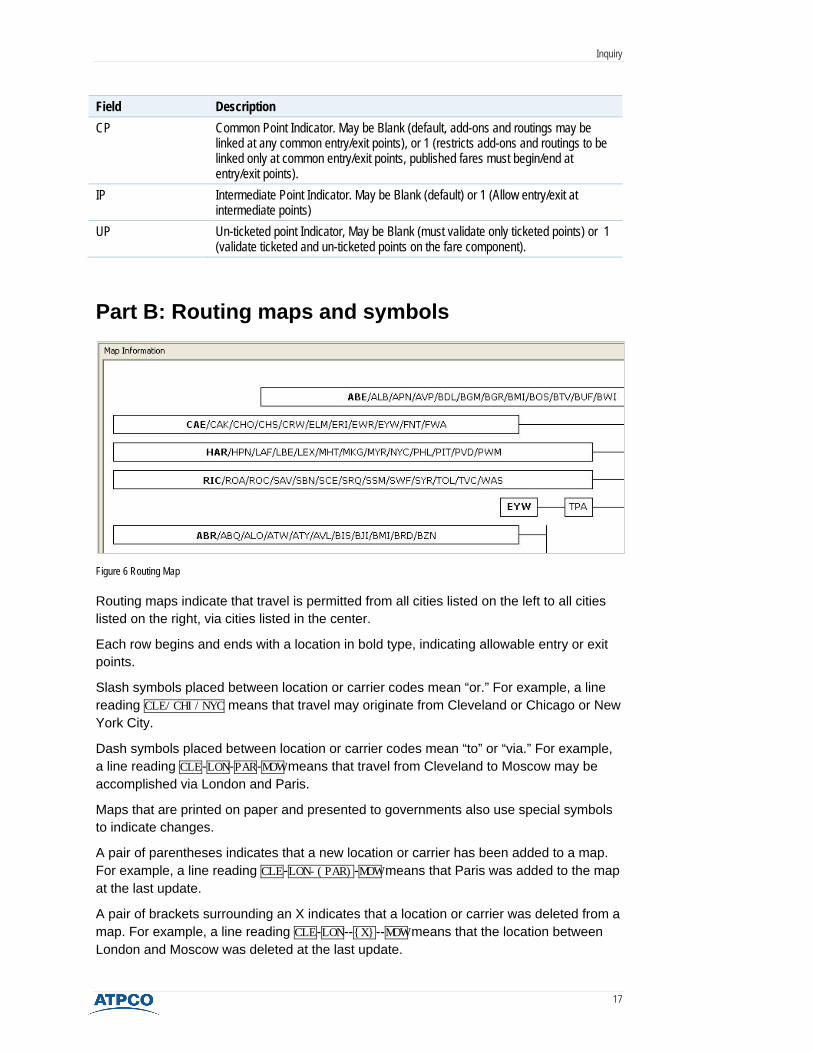
Part B: Routing maps and symbols
Figure 6 Routing Map
Routing maps indicate that travel is permitted from all cities listed on the left to all cities listed on the right, via cities listed in the center.
Each row begins and ends with a location in bold type, indicating allowable entry or exit points.
Slash symbols placed between location or carrier codes mean “or.” For example, a line reading CLE/CHI/NYC means that travel may originate from Cleveland or Chicago or New York City.
Dash symbols placed between location or carrier codes mean “to” or “via.” For example, a line reading CLE-LON-PAR-MOW means that travel from Cleveland to Moscow may be accomplished via London and Paris.
Maps that are printed on paper and presented to governments also use special symbols to indicate changes.
A pair of parentheses indicates that a new location or carrier has been added to a map. For example, a line reading CLE-LON-(PAR)-MOW means that Paris was added to the map at the last update.
A pair of brackets surrounding an X indicates that a location or carrier was deleted from a map. For example, a line reading CLE-LON--{X}--MOW means that the location between London and Moscow was deleted at the last update.
Inquiry
18
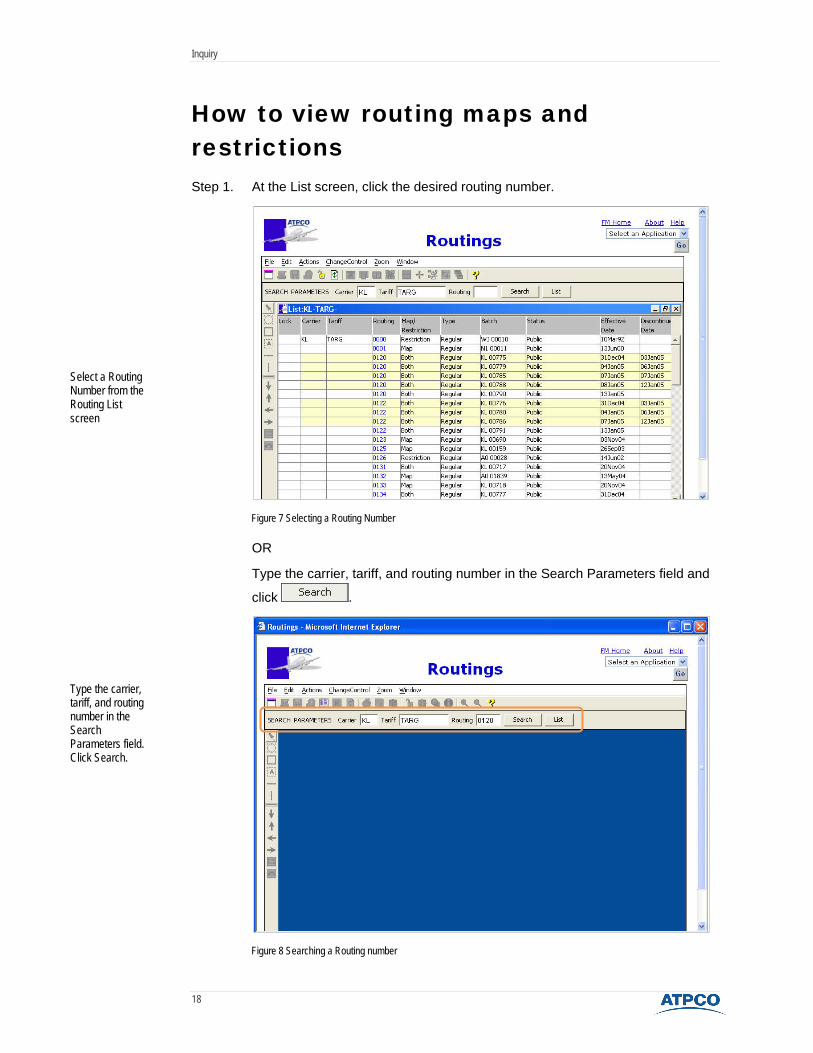
How to view routing maps and restrictions Step 1. At the List screen, click the desired routing number.
Figure 7 Selecting a Routing Number
OR
Type the carrier, tariff, and routing number in the Search Parameters field and
click .
Figure 8 Searching a Routing number
Select a Routing Number from the Routing List screen
Type the carrier, tariff, and routing number in the Search Parameters field. Click Search.

Inquiry
19
The map information screen will appear. If the routing number is associated with both a map and a restriction, the map will appear on the top of the screen and the restriction(s) will be at the bottom.
Step 2. Drag the scroll bar on the far-right side of the screen to move down for a better view of the restrictions.
Figure 9 Both Routing Map and Restriction
If the routing number is associated with only a restriction, the Map Information screen will indicate “No Map Data Found.”
Figure 10 Restriction Only
Routing restriction
Inquiry
20
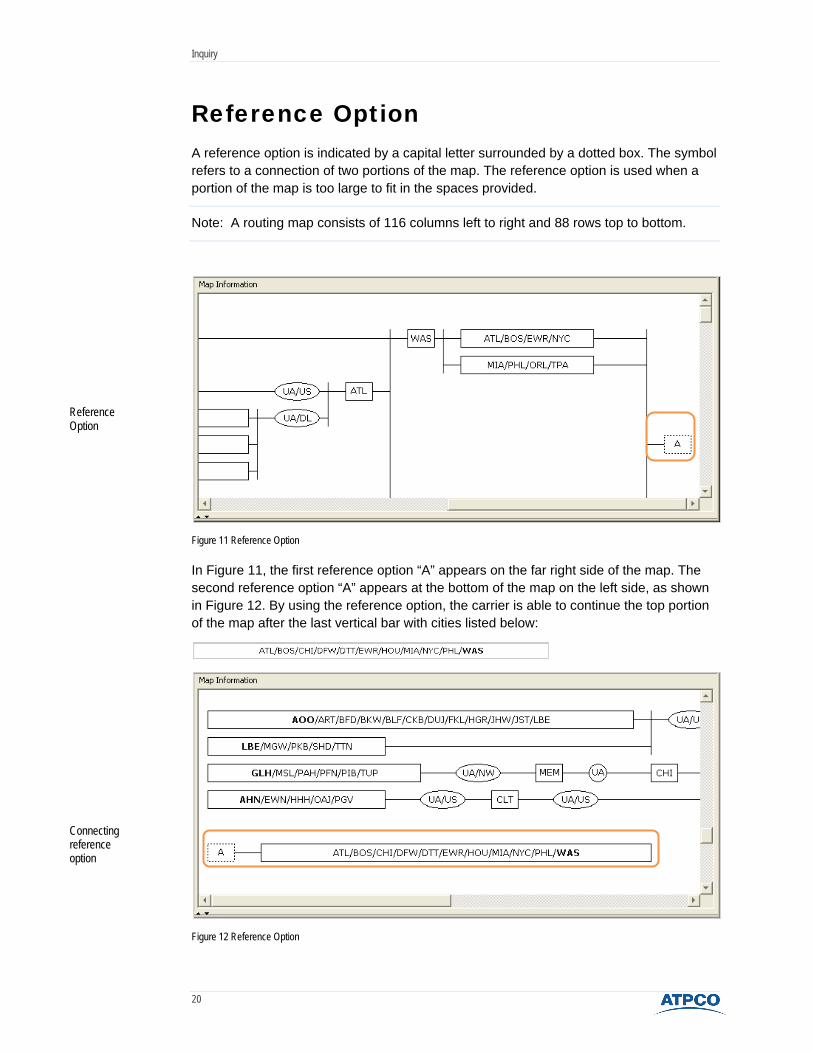
Reference Option A reference option is indicated by a capital letter surrounded by a dotted box. The symbol refers to a connection of two portions of the map. The reference option is used when a portion of the map is too large to fit in the spaces provided.
Note: A routing map consists of 116 columns left to right and 88 rows top to bottom.
Figure 11 Reference Option
In Figure 11, the first reference option “A” appears on the far right side of the map. The second reference option “A” appears at the bottom of the map on the left side, as shown in Figure 12. By using the reference option, the carrier is able to continue the top portion of the map after the last vertical bar with cities listed below:
Figure 12 Reference Option
Reference Option
Connecting reference option

Inquiry
21
Using the Find/Replace feature The Find/Replace tool is an easy way to locate cities or carriers in a map or restriction. When a user is modifying a routing, the tool also allows for quick substitutions of location or carrier codes with other location or carrier codes.
Use the shortcut icon , as shown in Figure 13, to access the Find/Replace feature.
Figure 13 Find tool for Routings
Find/Replace Tool
Inquiry
22
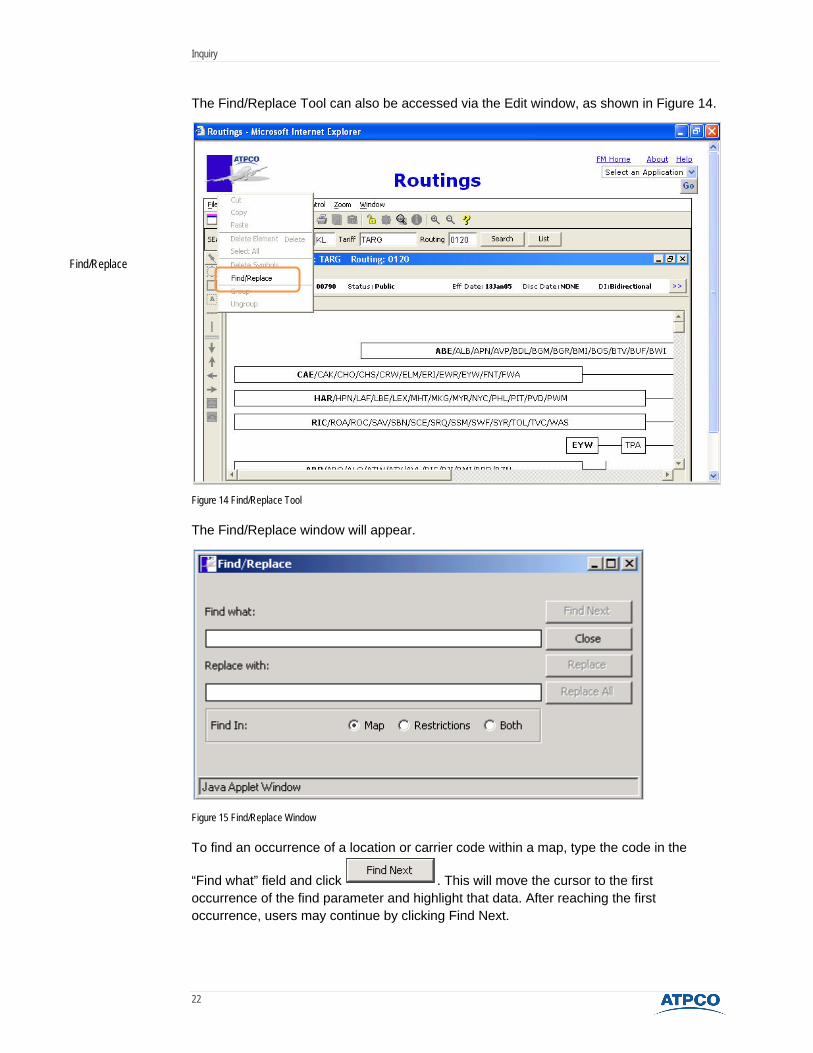
The Find/Replace Tool can also be accessed via the Edit window, as shown in Figure 14.
Figure 14 Find/Replace Tool
The Find/Replace window will appear.
Figure 15 Find/Replace Window
To find an occurrence of a location or carrier code within a map, type the code in the
“Find what” field and click . This will move the cursor to the first occurrence of the find parameter and highlight that data. After reaching the first occurrence, users may continue by clicking Find Next.
Find/Replace

Inquiry
23
When modifying a routing, the “Replace with” field may be used to substitute the
indicated code. The button will execute the substitution only once. The
button will execute the substitution at every occurrence of the indicated code.
If no occurrence of the find parameter is found, the system will present the message; “FareManager has finished searching the routing. The search item was not found.”
Deletion of codes (without government presentation symbols) may be quickly accomplished by entering the dollar sign ($) in the “Replace with” field. Symbols may be added to maps using the “Replace with” function for any place a specified location or carrier appears.
Note: The “Find in” field defaults to routing maps. You may also select the option of using the Find/Replace tool in routing restrictions or both maps and restrictions by clicking the desired radio button.
For replacement of a location or carrier within parentheses (MIA), the information in the “Find what” field also has to be within parentheses ( ).
There are no wild cards in either the find or replace functions. The system will find an exact match of the data placed in the “Find what” field.
The symbol $ functions as a delete tool when entered in the “Replace with” field of the Find/Replace tool.

Inquiry
24
Summary A list of routing numbers may be found by entering the desired carrier/tariff in the search
parameter of the Routings screen and clicking .
A routing number may be specified to filter the list down to that particular number only.
View routing maps and restrictions by clicking the selected routing number on the List screen.
The reference option is used to connect two parts of the map that would not otherwise fit together.
The Find/Replace feature quickly locates location or airline codes. It can also quickly substitute one code for another.

Creating Routings in FareManager How to Create Routings Data

Creating Routings in FareManager
27
Mission After completing this module, participants will be able to create and draw new routing maps and resolve errors quickly and accurately.
Why is this module important? Routing data is one of the essential components of fare data. Without correct routing data a fare will not be presented nor price properly in the markets for which it was designed.
Learning objectives After completing this module participants will know how to use FareManager Routings to create new routing maps and resolve errors.
Module contents • Toolbars and function windows
• How to create a new routing map
• Drawing a routing map
• Completing the routing map
• Resolving errors

Creating Routings in FareManager
28
Toolbars and function windows Routing Toolbar
Figure 16 Routing Toolbar
Creating Routings in FareManager
29
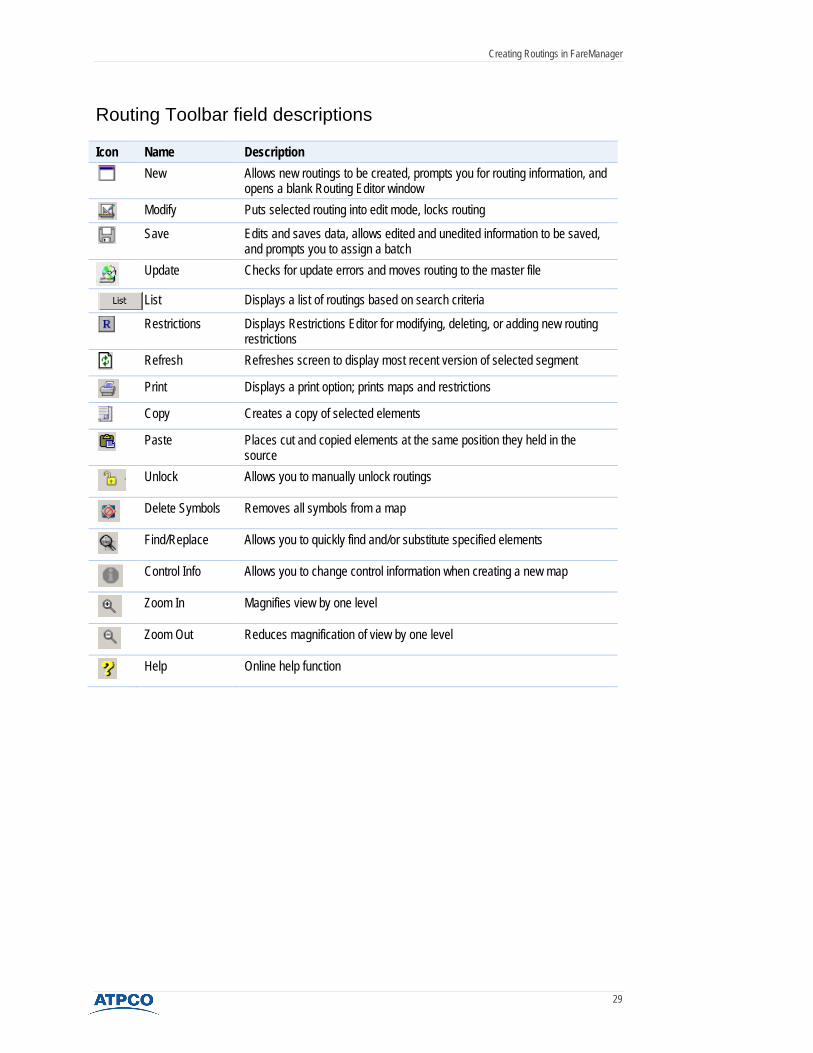
Routing Toolbar field descriptions
Icon Name Description
New Allows new routings to be created, prompts you for routing information, and opens a blank Routing Editor window
Modify Puts selected routing into edit mode, locks routing
Save Edits and saves data, allows edited and unedited information to be saved, and prompts you to assign a batch
Update Checks for update errors and moves routing to the master file
List Displays a list of routings based on search criteria
Restrictions Displays Restrictions Editor for modifying, deleting, or adding new routing restrictions
Refresh Refreshes screen to display most recent version of selected segment
Print Displays a print option; prints maps and restrictions
Copy Creates a copy of selected elements
Paste Places cut and copied elements at the same position they held in the source
Unlock Allows you to manually unlock routings
Delete Symbols Removes all symbols from a map
Find/Replace Allows you to quickly find and/or substitute specified elements
Control Info Allows you to change control information when creating a new map
Zoom In Magnifies view by one level
Zoom Out Reduces magnification of view by one level
Help Online help function
Creating Routings in FareManager
30
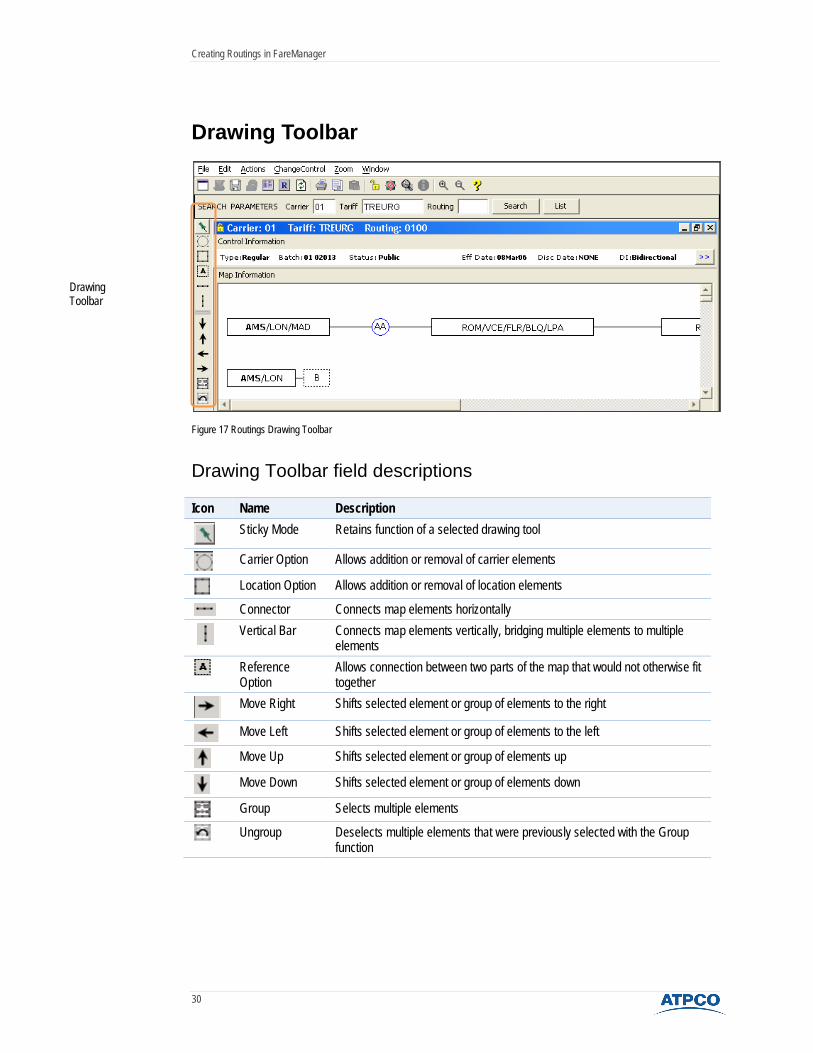
Drawing Toolbar
Figure 17 Routings Drawing Toolbar
Drawing Toolbar field descriptions
Icon Name Description
Sticky Mode Retains function of a selected drawing tool
Carrier Option Allows addition or removal of carrier elements
Location Option Allows addition or removal of location elements
Connector Connects map elements horizontally
Vertical Bar Connects map elements vertically, bridging multiple elements to multiple
elements
Reference Option
Allows connection between two parts of the map that would not otherwise fit together
Move Right Shifts selected element or group of elements to the right
Move Left Shifts selected element or group of elements to the left
Move Up Shifts selected element or group of elements up
Move Down Shifts selected element or group of elements down
Group Selects multiple elements
Ungroup Deselects multiple elements that were previously selected with the Group function
Drawing Toolbar

Creating Routings in FareManager
31
List Screen Toolbar
Figure 18 Routings List Screen toolbar
File Functions
Search Allows you to display a routing after entering carrier, tariff, and routing number.
List Displays the List screen in a new window per entries in the search criteria.
Create New Allows you to create new routings. Prompts you for routing info and opens a blank Routing Editor window.
Edit restrictions Displays the Restrictions Editor where you can select a new restriction or modify an existing one.
Modify Puts the displayed routing in edit mode for update purposes and locks it.
Save Saves the data by sending it through the edit process and allows you to save as edited or unedited in the database. Prompts you to assign a batch and begins the edit process.
Update Checks for update error and moves the routing to the master file.
Print Displays the print option and prints the map and restrictions.
Creating Routings in FareManager
32
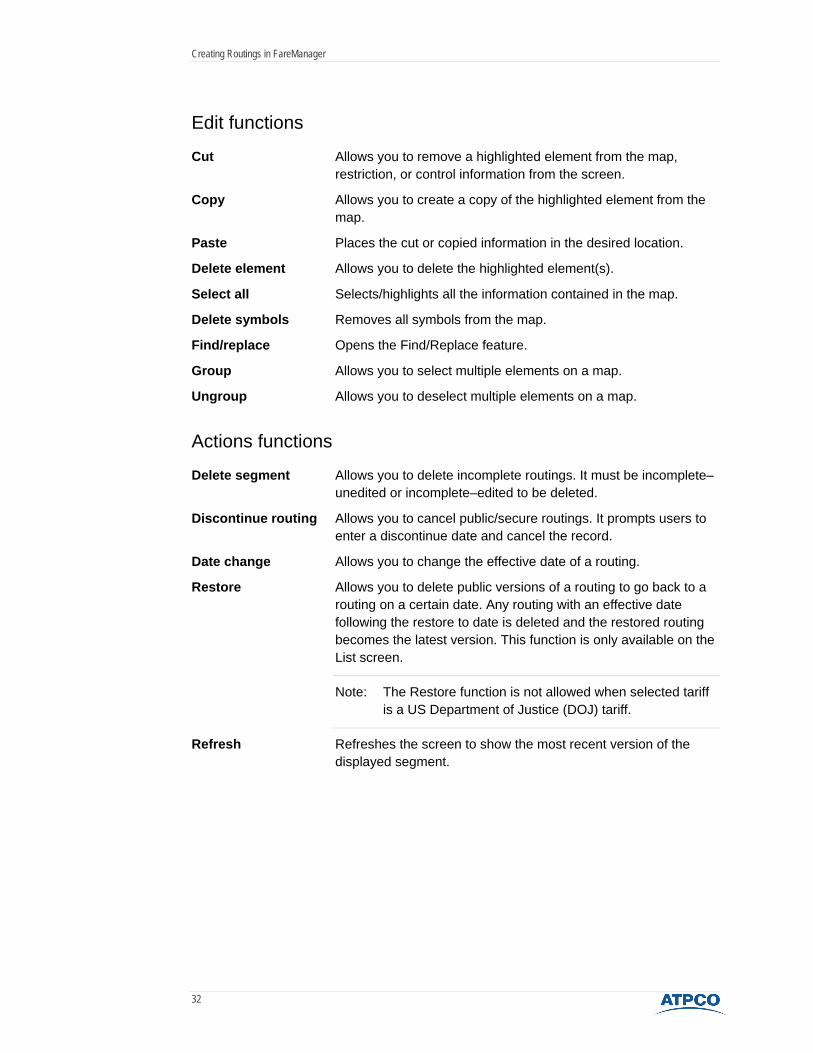
Edit functions
Cut Allows you to remove a highlighted element from the map, restriction, or control information from the screen.
Copy Allows you to create a copy of the highlighted element from the map.
Paste Places the cut or copied information in the desired location.
Delete element Allows you to delete the highlighted element(s).
Select all Selects/highlights all the information contained in the map.
Delete symbols Removes all symbols from the map.
Find/replace Opens the Find/Replace feature.
Group Allows you to select multiple elements on a map.
Ungroup Allows you to deselect multiple elements on a map.
Actions functions
Delete segment Allows you to delete incomplete routings. It must be incomplete–unedited or incomplete–edited to be deleted.
Discontinue routing Allows you to cancel public/secure routings. It prompts users to enter a discontinue date and cancel the record.
Date change Allows you to change the effective date of a routing.
Restore Allows you to delete public versions of a routing to go back to a routing on a certain date. Any routing with an effective date following the restore to date is deleted and the restored routing becomes the latest version. This function is only available on the List screen.
Note: The Restore function is not allowed when selected tariff is a US Department of Justice (DOJ) tariff.
Refresh Refreshes the screen to show the most recent version of the displayed segment.
Creating Routings in FareManager
33
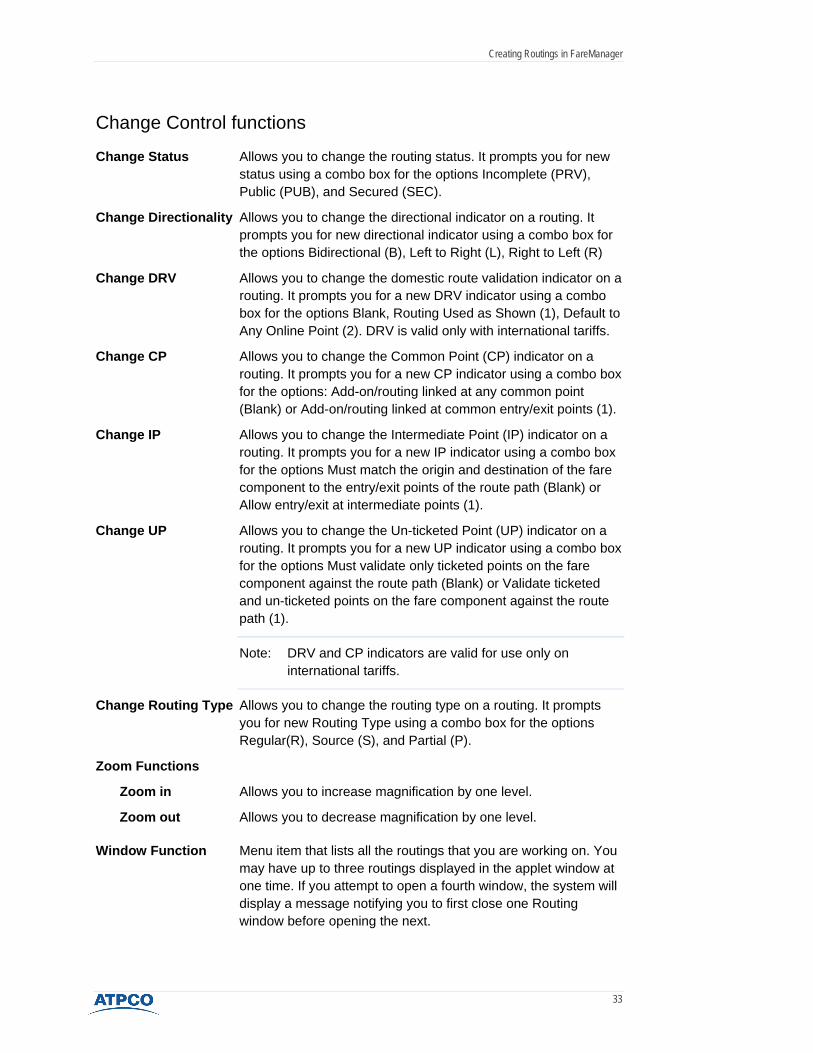
Change Control functions
Change Status Allows you to change the routing status. It prompts you for new status using a combo box for the options Incomplete (PRV), Public (PUB), and Secured (SEC).
Change Directionality Allows you to change the directional indicator on a routing. It prompts you for new directional indicator using a combo box for the options Bidirectional (B), Left to Right (L), Right to Left (R)
Change DRV Allows you to change the domestic route validation indicator on a routing. It prompts you for a new DRV indicator using a combo box for the options Blank, Routing Used as Shown (1), Default to Any Online Point (2). DRV is valid only with international tariffs.
Change CP Allows you to change the Common Point (CP) indicator on a routing. It prompts you for a new CP indicator using a combo box for the options: Add-on/routing linked at any common point (Blank) or Add-on/routing linked at common entry/exit points (1).
Change IP Allows you to change the Intermediate Point (IP) indicator on a routing. It prompts you for a new IP indicator using a combo box for the options Must match the origin and destination of the fare component to the entry/exit points of the route path (Blank) or Allow entry/exit at intermediate points (1).
Change UP Allows you to change the Un-ticketed Point (UP) indicator on a routing. It prompts you for a new UP indicator using a combo box for the options Must validate only ticketed points on the fare component against the route path (Blank) or Validate ticketed and un-ticketed points on the fare component against the route path (1).
Note: DRV and CP indicators are valid for use only on international tariffs.
Change Routing Type Allows you to change the routing type on a routing. It prompts you for new Routing Type using a combo box for the options Regular(R), Source (S), and Partial (P).
Zoom Functions
Zoom in Allows you to increase magnification by one level.
Zoom out Allows you to decrease magnification by one level.
Window Function Menu item that lists all the routings that you are working on. You may have up to three routings displayed in the applet window at one time. If you attempt to open a fourth window, the system will display a message notifying you to first close one Routing window before opening the next.
Creating Routings in FareManager
34
How to create a new routing map
Overview The following steps are the general procedure for creating a new routing map. These steps are explained in more detail in this module.
Step 1. At the search parameter of the Routings screen, enter carrier, tariff, and routing number.
Step 2. Click New icon .
Step 3. Enter control information. Click .
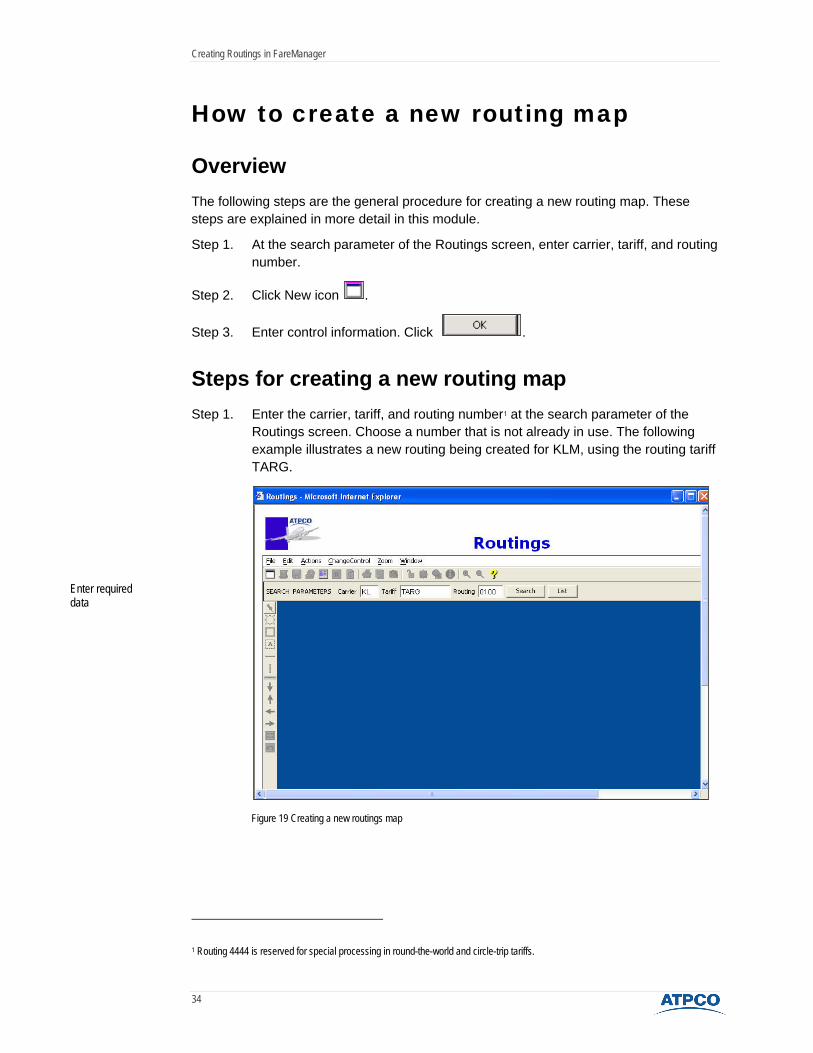
Steps for creating a new routing map Step 1. Enter the carrier, tariff, and routing number1 at the search parameter of the
Routings screen. Choose a number that is not already in use. The following example illustrates a new routing being created for KLM, using the routing tariff TARG.
Figure 19 Creating a new routings map
1 Routing 4444 is reserved for special processing in round-the-world and circle-trip tariffs.
Enter required data
Creating Routings in FareManager
35
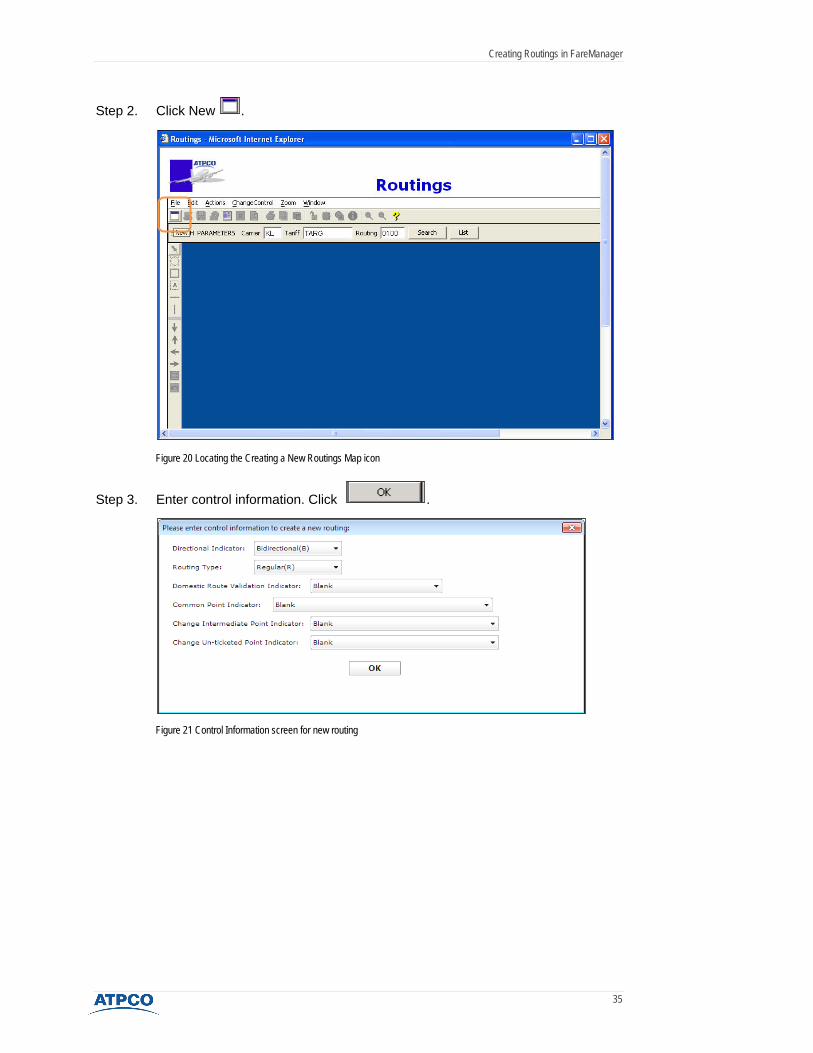
Step 2. Click New .
Figure 20 Locating the Creating a New Routings Map icon
Step 3. Enter control information. Click .
Figure 21 Control Information screen for new routing
Creating Routings in FareManager
36
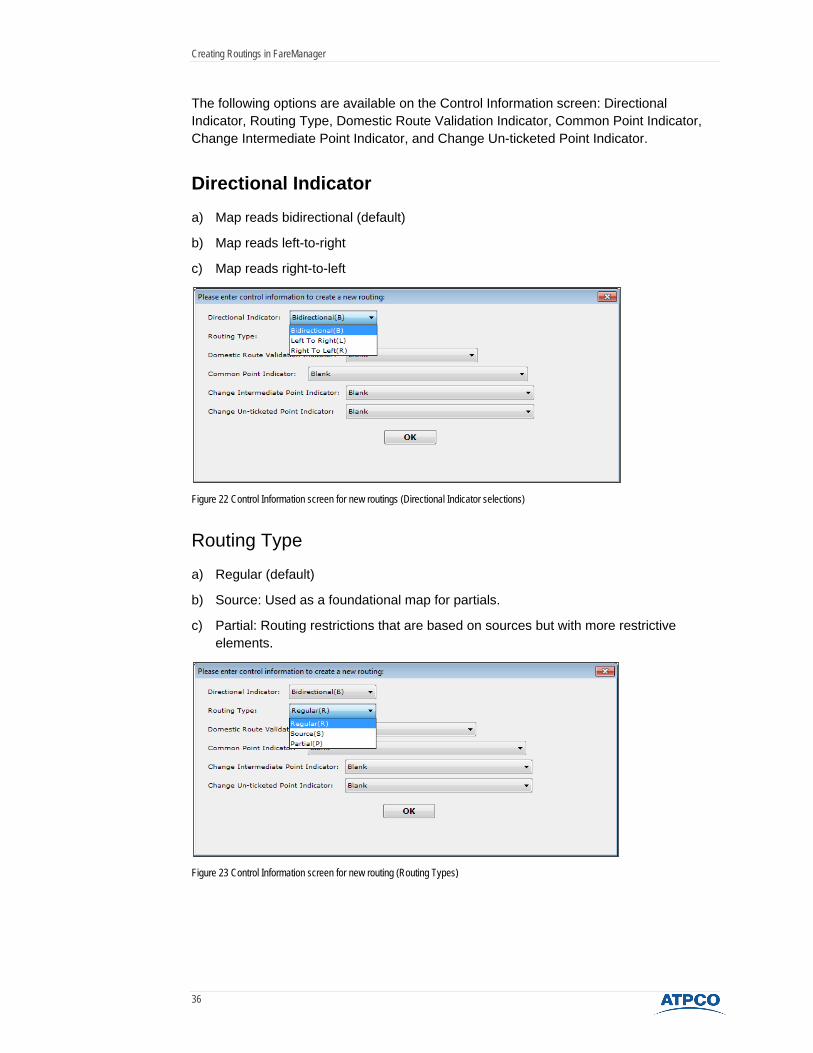
The following options are available on the Control Information screen: Directional Indicator, Routing Type, Domestic Route Validation Indicator, Common Point Indicator, Change Intermediate Point Indicator, and Change Un-ticketed Point Indicator.
Directional Indicator a) Map reads bidirectional (default)
b) Map reads left-to-right
c) Map reads right-to-left
Figure 22 Control Information screen for new routings (Directional Indicator selections)
Routing Type
a) Regular (default)
b) Source: Used as a foundational map for partials.
c) Partial: Routing restrictions that are based on sources but with more restrictive elements.
Figure 23 Control Information screen for new routing (Routing Types)
Creating Routings in FareManager
37
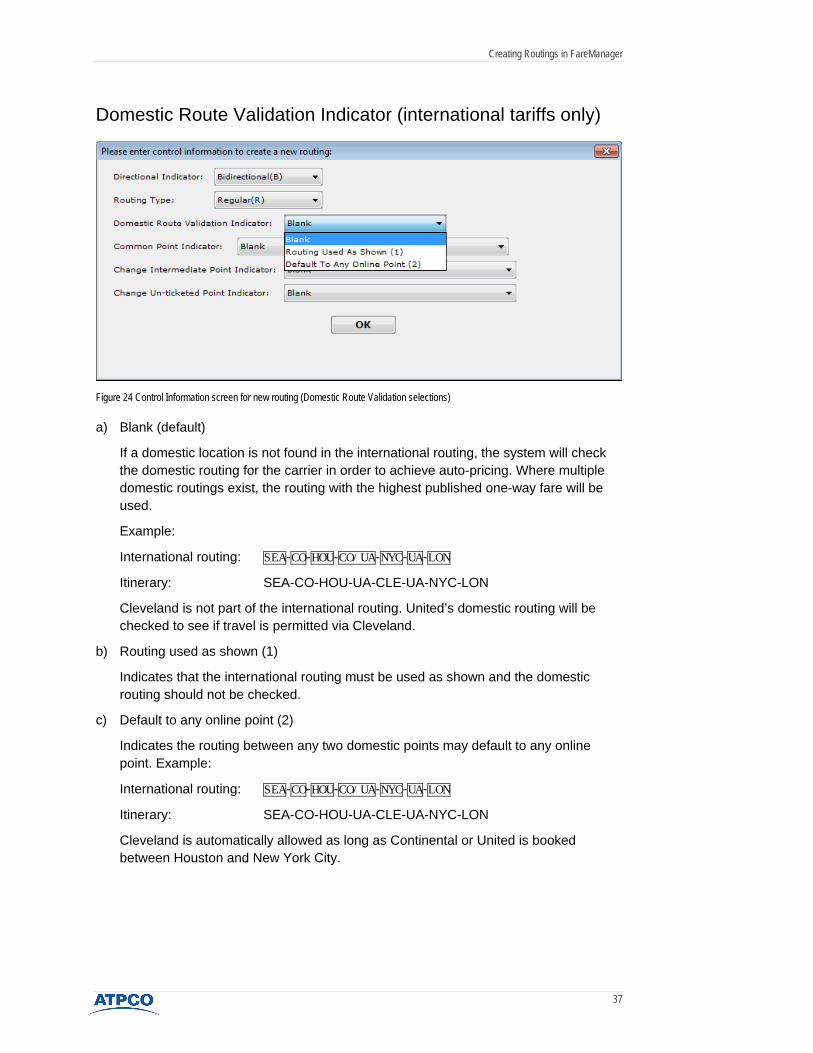
Domestic Route Validation Indicator (international tariffs only)
Figure 24 Control Information screen for new routing (Domestic Route Validation selections)
a) Blank (default)
If a domestic location is not found in the international routing, the system will check the domestic routing for the carrier in order to achieve auto-pricing. Where multiple domestic routings exist, the routing with the highest published one-way fare will be used.
Example:
International routing: SEA-CO-HOU-CO/UA-NYC-UA-LON
Itinerary: SEA-CO-HOU-UA-CLE-UA-NYC-LON
Cleveland is not part of the international routing. United’s domestic routing will be checked to see if travel is permitted via Cleveland.
b) Routing used as shown (1)
Indicates that the international routing must be used as shown and the domestic routing should not be checked.
c) Default to any online point (2)
Indicates the routing between any two domestic points may default to any online point. Example:
International routing: SEA-CO-HOU-CO/UA-NYC-UA-LON
Itinerary: SEA-CO-HOU-UA-CLE-UA-NYC-LON
Cleveland is automatically allowed as long as Continental or United is booked between Houston and New York City.
Creating Routings in FareManager
38
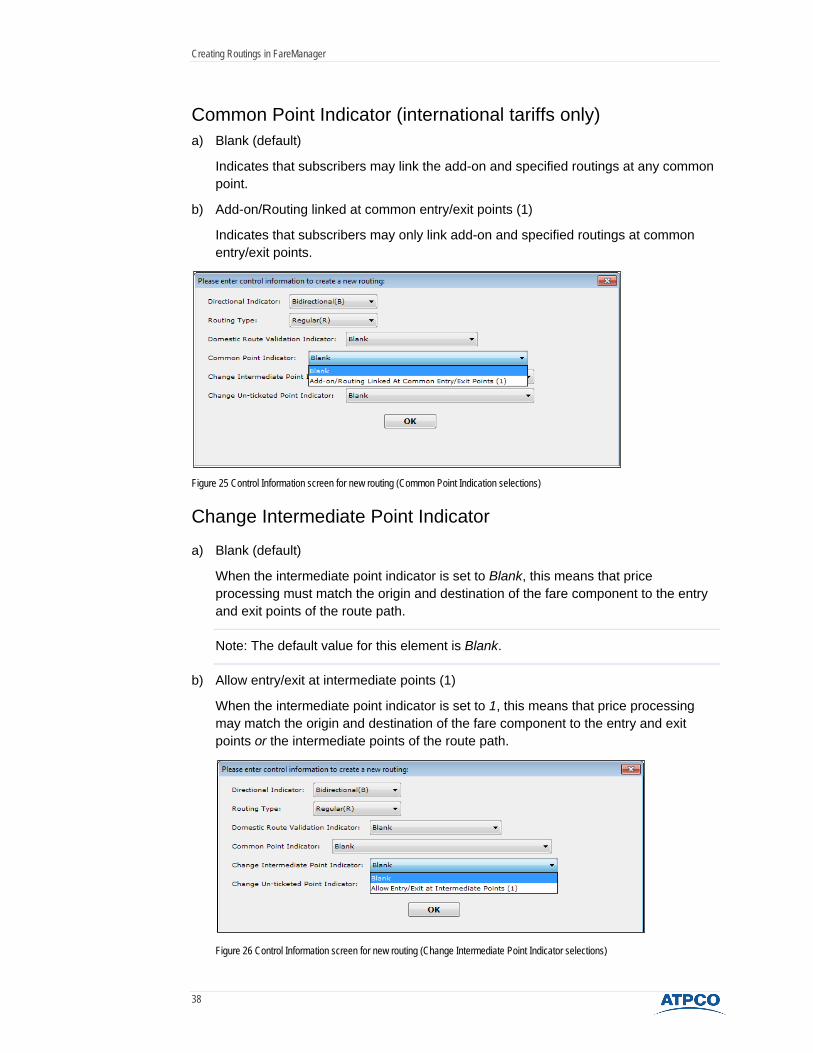
Common Point Indicator (international tariffs only) a) Blank (default)
Indicates that subscribers may link the add-on and specified routings at any common point.
b) Add-on/Routing linked at common entry/exit points (1)
Indicates that subscribers may only link add-on and specified routings at common entry/exit points.
Figure 25 Control Information screen for new routing (Common Point Indication selections)
Change Intermediate Point Indicator
a) Blank (default)
When the intermediate point indicator is set to Blank, this means that price processing must match the origin and destination of the fare component to the entry and exit points of the route path.
Note: The default value for this element is Blank.
b) Allow entry/exit at intermediate points (1)
When the intermediate point indicator is set to 1, this means that price processing may match the origin and destination of the fare component to the entry and exit points or the intermediate points of the route path.
Figure 26 Control Information screen for new routing (Change Intermediate Point Indicator selections)
Creating Routings in FareManager
39
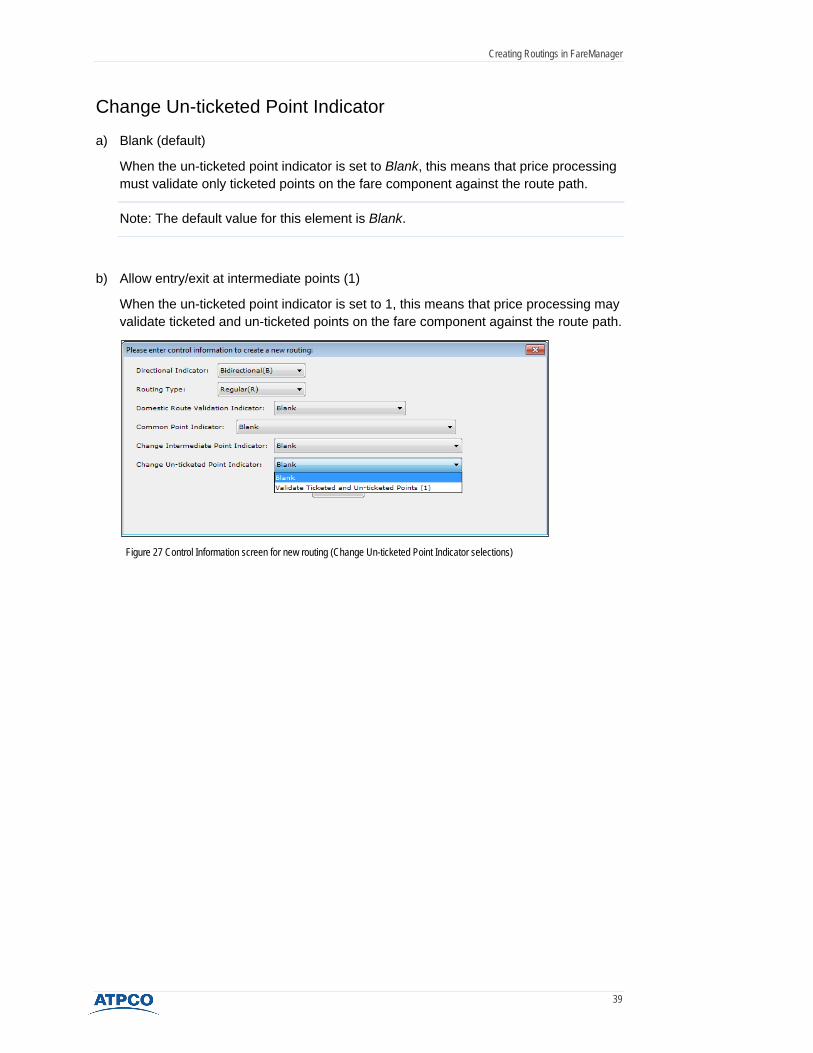
Change Un-ticketed Point Indicator
a) Blank (default)
When the un-ticketed point indicator is set to Blank, this means that price processing must validate only ticketed points on the fare component against the route path.
Note: The default value for this element is Blank.
b) Allow entry/exit at intermediate points (1)
When the un-ticketed point indicator is set to 1, this means that price processing may validate ticketed and un-ticketed points on the fare component against the route path.
Figure 27 Control Information screen for new routing (Change Un-ticketed Point Indicator selections)

Creating Routings in FareManager
40
Drawing a simple routing map
Overview Following is the general procedure for drawing a simple routing map using the icons on the drawing toolbar. These steps are also covered in more detail in this module.
Step 1. Click Location Option .
Step 2. Click the desired spot on the map for the new cities and open the Location Editor.
Step 3. Enter the location codes. Click .
Step 4. Repeat steps 1-3 until all cities are entered on the map.
Step 5. Click Carrier Option .
Step 6. Click the desired point on the map for the new carrier(s). Open the Carrier Editor.
Step 7. Enter carrier code(s). Click .
Step 8. Repeat steps 5-7 until all carrier codes have been entered.
Step 9. Click Connector .
Step 10. Draw horizontal lines to connect elements.

Creating Routings in FareManager
41
Figure 28 Routings Toolbar screen
Drawing Toolbar field descriptions
Icon Name Description
Sticky Mode Retains function of a selected drawing tool
Carrier Option Allows addition or removal of carrier elements
Location Option Allows addition or removal of location elements
Connector Connects map elements horizontally
Vertical Bar Connects map elements vertically, bridging multiple elements to
multiple elements
Reference Option Allows connection between two parts of the map that would otherwise not fit together
Move Right Shifts selected element or group of elements to the right
Move Left Shifts selected element or group of elements to the left
Move Up Shifts selected element or group of elements up
Move Down Shifts selected element or group of elements down
Group Selects multiple elements
Ungroup Deselects multiple elements that were previously selected with the Group function
Drawing Toolbar

Creating Routings in FareManager
42
Steps for drawing a simple routing map Step 1. Select the Location Option tool.
Figure 29 Location Options tool on the Routings screen
Step 2. Click the desired spot of the map for the new cities. Double-click the blue square to open the Location Editor.
Figure 30 Opening the Location Editor on the Routings screen
Double-click the blue square to open the City Editor
City Option Tool

Creating Routings in FareManager
43
Step 3. Enter location codes. In this example, New York City, Washington, and Boston are to appear on the left-hand side of the map. The option of “First Location is entry/exit point” has been selected. Users of the previous legacy Routing Map system will remember asterisk (*) symbols
indicating the beginning and end of a routing line. Click
Figure 31 Location Editor screen
Click the button in the Location Editor to display valid location values.
Figure 32 List of valid location codes
This option allows the user to identify location codes or encode location names. You can also select the location or location code from the list of valid values, entering the location in the routing via the Location Editor by clicking
the location or location code and clicking .
Creating Routings in FareManager
44
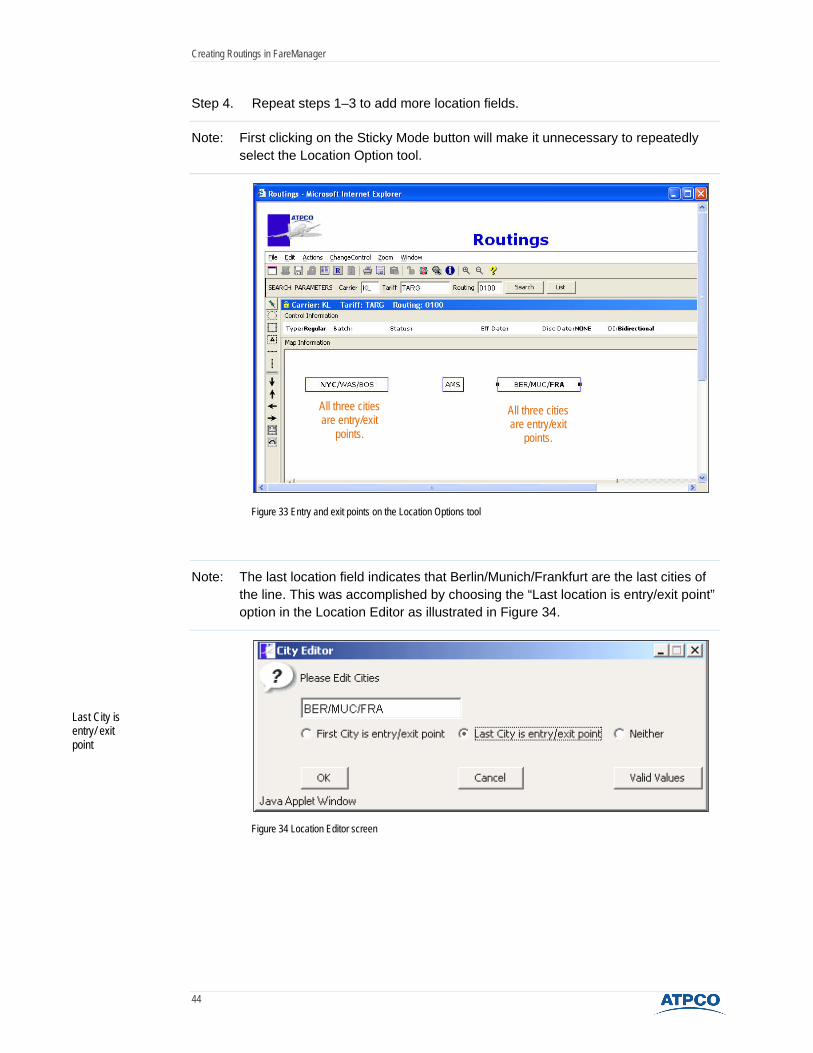
Step 4. Repeat steps 1–3 to add more location fields.
Note: First clicking on the Sticky Mode button will make it unnecessary to repeatedly select the Location Option tool.
Figure 33 Entry and exit points on the Location Options tool
Note: The last location field indicates that Berlin/Munich/Frankfurt are the last cities of the line. This was accomplished by choosing the “Last location is entry/exit point” option in the Location Editor as illustrated in Figure 34.
Figure 34 Location Editor screen
All three cities are entry/exit
points.
All three cities are entry/exit
points.
Last City is entry/ exit point
Creating Routings in FareManager
45
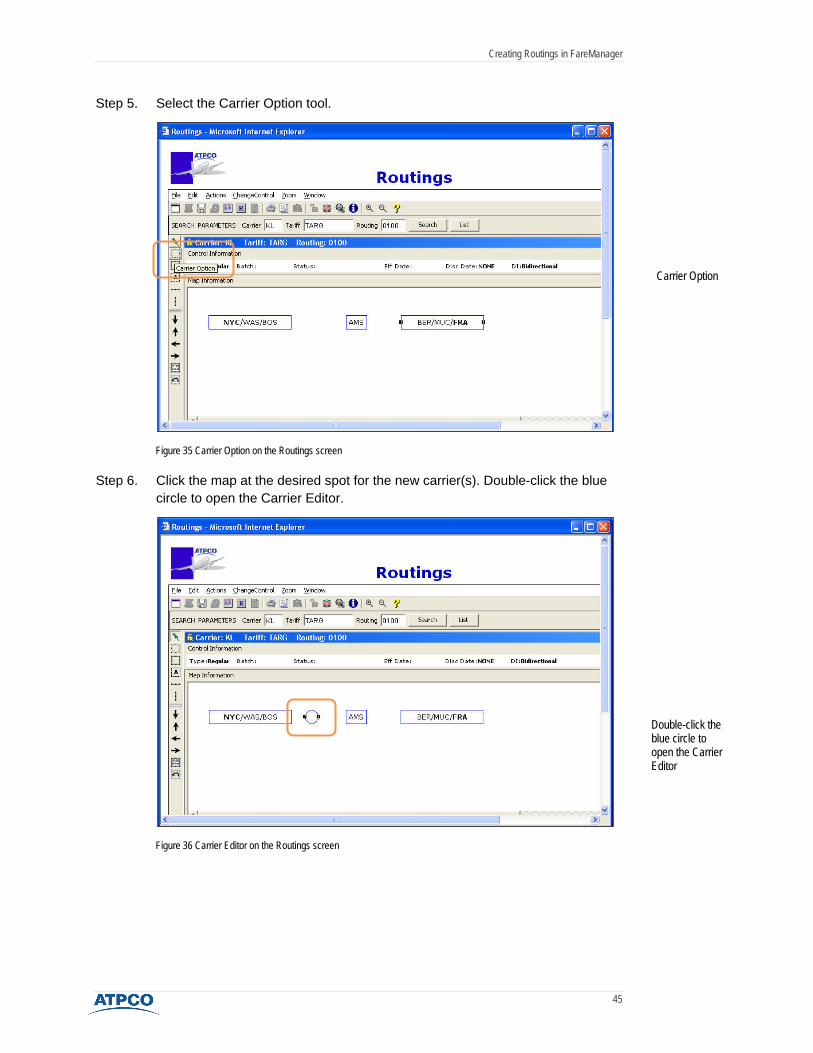
Step 5. Select the Carrier Option tool.
Figure 35 Carrier Option on the Routings screen
Step 6. Click the map at the desired spot for the new carrier(s). Double-click the blue circle to open the Carrier Editor.
Figure 36 Carrier Editor on the Routings screen
Double-click the blue circle to open the Carrier Editor
Carrier Option

Creating Routings in FareManager
46
Step 7. Enter carrier code(s). Click .
Figure 37 Carrier Editor screen
Click the button in the Carrier Editor to display valid carrier values:
Figure 38 List of valid carrier codes
This option allows the user to identify carrier codes or encode carrier names. You can also select carrier or carrier code from the list of valid values, entering the carrier in the routing via the Carrier Editor by clicking the carrier or carrier
code to select. Click .
Note: If carrier YY is entered in the Carrier Option, then text must be also be entered in restriction Category 98. An example of category text is “YY means any carrier.”

Creating Routings in FareManager
47
Step 8. Repeat steps 5–7 to add more carrier codes.
Note: First clicking on the Sticky Mode button will make it unnecessary to repeatedly select the Carrier Option tool.
Figure 39 Tool for adding more carrier codes
Note: If a carrier code is not present between elements, travel must be on the carrier that owns the routing map. No code should be entered if travel may only be on the owning carrier.
Add more carrier codes

Creating Routings in FareManager
48
Step 9. Select the Connector tool. Dots appear on both sides of each element and the cursor appears as a crosshair.
Figure 40 Connector option on the Routings screen
Step 10. Draw horizontal lines to connect elements.
Click a dot of one element.
Then drag the crosshairs and click a dot of the next element.
Note: First clicking the Sticky Mode button will make it unnecessary to repeatedly select the connector tool.
Connector Tool

Creating Routings in FareManager
49
Figure 41 Connecting elements on the Routings screen
Connecting elements on the Routing screen
Creating Routings in FareManager
50
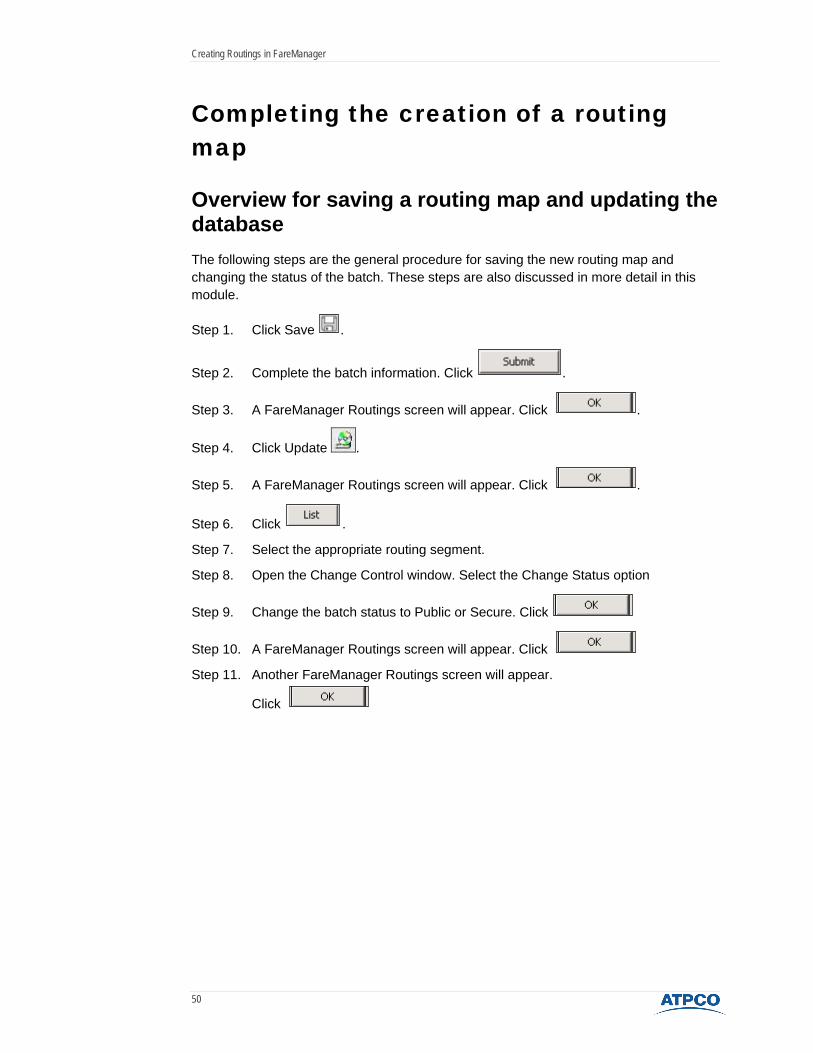
Completing the creation of a routing map
Overview for saving a routing map and updating the database The following steps are the general procedure for saving the new routing map and changing the status of the batch. These steps are also discussed in more detail in this module.
Step 1. Click Save .
Step 2. Complete the batch information. Click .
Step 3. A FareManager Routings screen will appear. Click .
Step 4. Click Update .
Step 5. A FareManager Routings screen will appear. Click .
Step 6. Click .
Step 7. Select the appropriate routing segment.
Step 8. Open the Change Control window. Select the Change Status option
Step 9. Change the batch status to Public or Secure. Click
Step 10. A FareManager Routings screen will appear. Click
Step 11. Another FareManager Routings screen will appear.
Click

Creating Routings in FareManager
51
Steps for saving a routing map
Step 1. Click Save .
Figure 42 Saving routings information
Step 2. Complete the batch information on the Assign Batch screen. Click
.
Figure 43 Assign Batch screen
Note: Default dates are the next day for international tariffs and the same day for US/CA domestic tariffs. Comments are in free-form text and may be up to 51 characters in length.
Creating Routings in FareManager
52
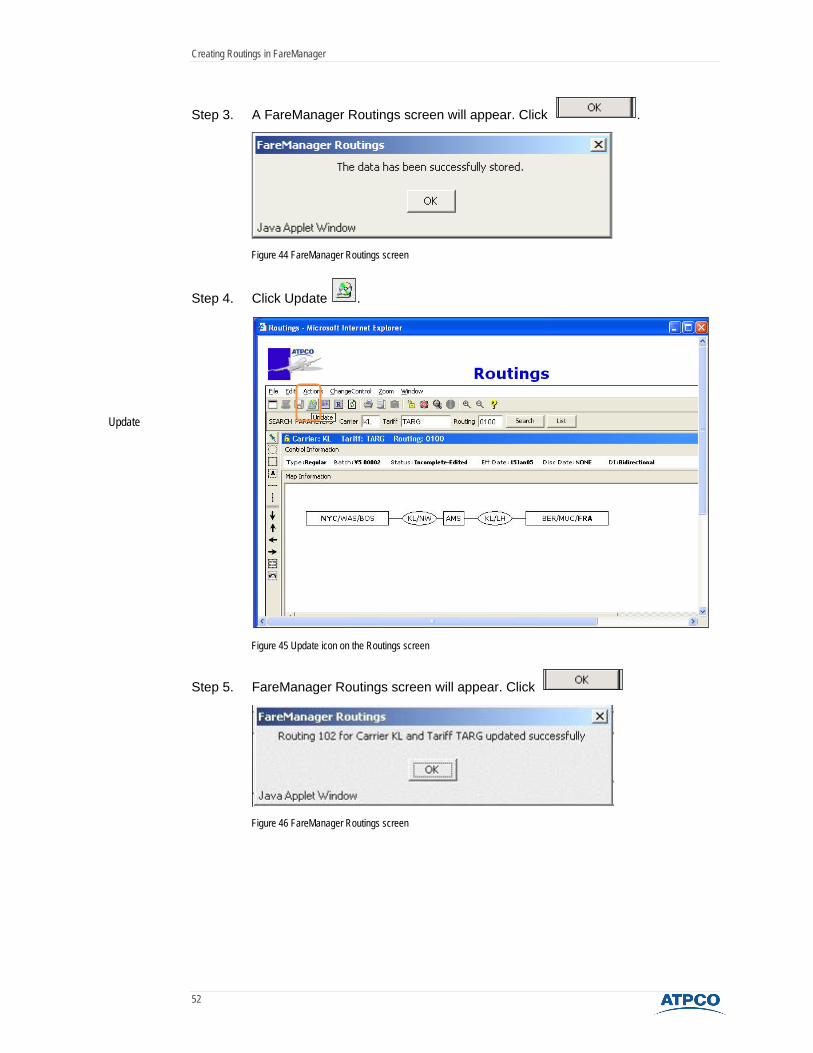
Step 3. A FareManager Routings screen will appear. Click .
Figure 44 FareManager Routings screen
Step 4. Click Update .
Figure 45 Update icon on the Routings screen
Step 5. FareManager Routings screen will appear. Click
Figure 46 FareManager Routings screen
Update

Creating Routings in FareManager
53
Step 6. Click List .
Figure 47 List button on the Routings screen
Step 7. Select the appropriate routing segment, as shown in Figure 48.
Note: The list shown in Figure 48 was filtered down to only one routing.
Figure 48 Selecting a Routing
Select a routing by clicking anywhere on the line except for the routing number
Creating Routings in FareManager
54
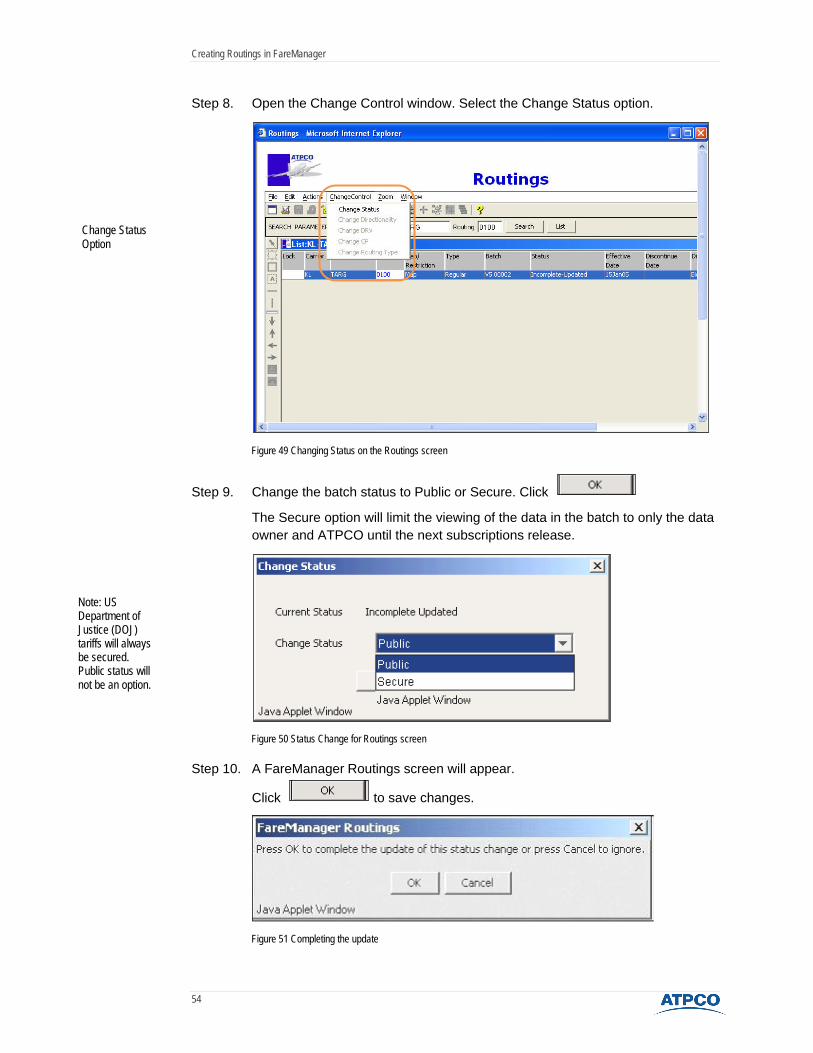
Step 8. Open the Change Control window. Select the Change Status option.
Figure 49 Changing Status on the Routings screen
Step 9. Change the batch status to Public or Secure. Click
The Secure option will limit the viewing of the data in the batch to only the data owner and ATPCO until the next subscriptions release.
Figure 50 Status Change for Routings screen
Step 10. A FareManager Routings screen will appear.
Click to save changes.
Figure 51 Completing the update
Note: US Department of Justice (DOJ) tariffs will always be secured. Public status will not be an option.
Change Status Option
Creating Routings in FareManager
55
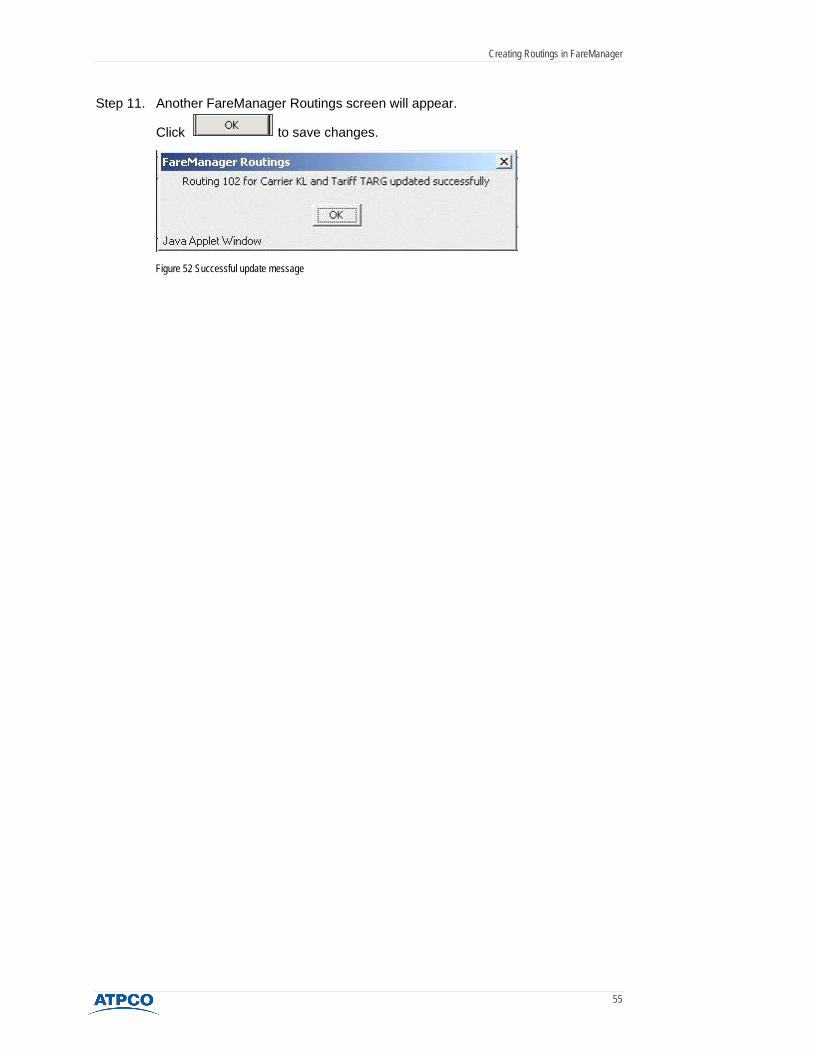
Step 11. Another FareManager Routings screen will appear.
Click to save changes.
Figure 52 Successful update message

Creating Routings in FareManager
56
Resolving errors FareManager Routings will indicate that transactions have errors if the system detects invalid information or invalid drawing connectors. Edit errors must be corrected before routings may be successfully updated and released to subscribers. The edit error check
occurs after you click .
There are four critical errors:
1. Empty elements 2. Overlapping elements 3. Source saving without map 4. Partials saving without map
Critical errors will prevent changes from being saved, meaning that no new version of a routing will be created. Errors must be corrected before another attempt to save is made.
If an error other than a critical error occurs, changes may be saved as unedited and a new version of the routing will be created. In this case, if a routing is closed and later re-opened, the changes will still be in place. Update is not possible until the errors are corrected.

Creating Routings in FareManager
57
Example of a critical error A location element has been added, however no location codes were included. In Figure 53, a message indicates that one edit error has occurred. When you right-click the element in question (it will be highlighted in red), the system will open a menu describing the problem.
Figure 53 Error reporting on the Routings screen
The system indicated that one error is present.
When you right-click the element in question (it will be highlighted in red), the system will open a menu describing the problem.

Creating Routings in FareManager
58
Summary This module described methods for creating new routing maps and resolving problems.
Step 1. Click Location Option .
Step 2. Click the desired spot on the map for the new cities and open the Location Editor.
Step 3. Enter the location codes. Click .
Step 4. Repeat steps 1-3 until all cities are entered on the map.
Step 5. Click Carrier Option .
Step 6. Click the desired point on the map for the new carrier(s). Open the Carrier Editor.
Step 7. Enter carrier code(s). Click .
Step 8. Repeat steps 5-7 until all carrier codes have been entered.
Step 9. Click Connector .
Step 10. Draw horizontal lines to connect elements.
Modifying Routing Maps How to Modify Routing Data

Modifying Routing Maps
61
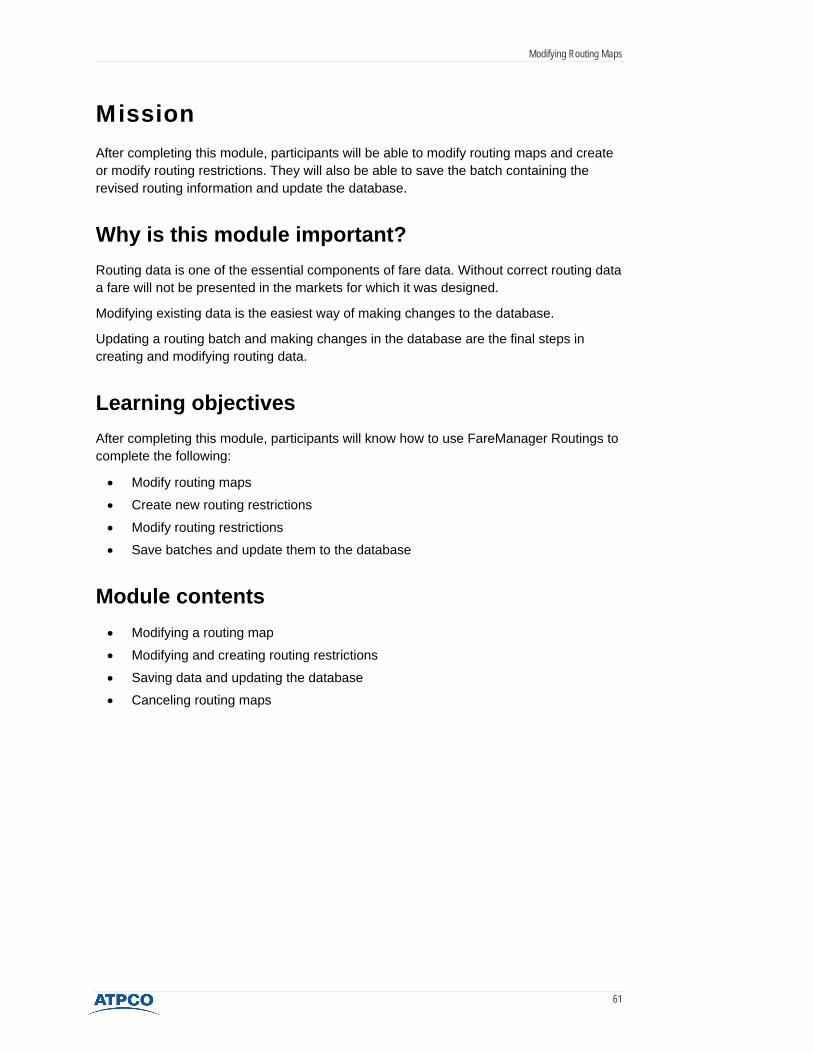
Mission After completing this module, participants will be able to modify routing maps and create or modify routing restrictions. They will also be able to save the batch containing the revised routing information and update the database.
Why is this module important? Routing data is one of the essential components of fare data. Without correct routing data a fare will not be presented in the markets for which it was designed.
Modifying existing data is the easiest way of making changes to the database.
Updating a routing batch and making changes in the database are the final steps in creating and modifying routing data.
Learning objectives After completing this module, participants will know how to use FareManager Routings to complete the following:
• Modify routing maps
• Create new routing restrictions
• Modify routing restrictions
• Save batches and update them to the database
Module contents • Modifying a routing map
• Modifying and creating routing restrictions
• Saving data and updating the database
• Canceling routing maps

Modifying Routing Maps
62
How to modify a routing map
Overview The following steps are the general procedure for modifying a routing map. These steps are also covered in more detail in this module.
Step 1. At the search parameter of the Routing screen, enter the carrier and tariff. Click
. Select the routing segment to be changed.
Step 2. Click Modify .
Step 3. Add or delete location and/or carrier codes.
Step 4. Click Save .
Step 5. Complete the batch information. Click .
Step 6. A FareManager Routings screen will appear. Click .
Step 7. Click Update .
Step 8. A FareManager Routings screen will appear. Click .
Step 9. Close the Map Editor.
Step 10. On the List screen, click Refresh .
Step 11. Select the appropriate routing segment.
Step 12. Open the Change Control window. Select the Change Status option.
Step 13. Change the batch status to Public or Secure. Click .
Step 14. A FareManager Routings screen will appear. Click .
Step 15. Another FareManager Routings screen will appear.
Click
Modifying Routing Maps
63
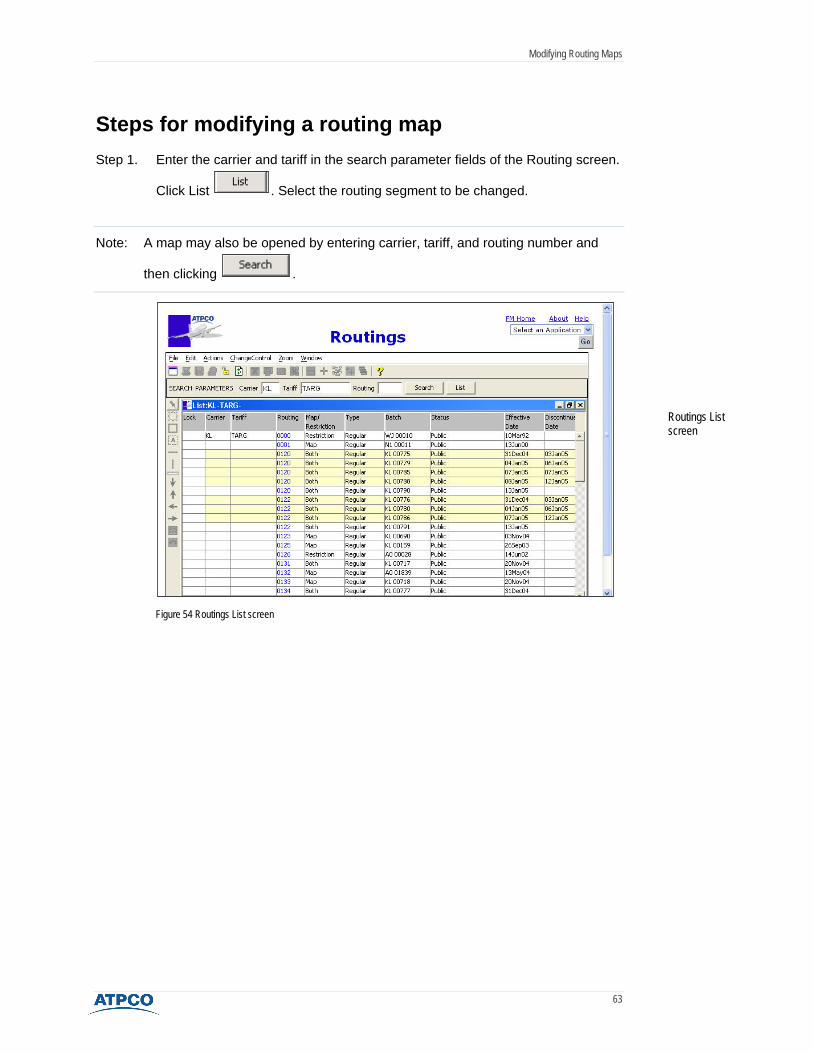
Steps for modifying a routing map Step 1. Enter the carrier and tariff in the search parameter fields of the Routing screen.
Click List . Select the routing segment to be changed.
Note: A map may also be opened by entering carrier, tariff, and routing number and
then clicking .
Figure 54 Routings List screen
Routings List screen
Modifying Routing Maps
64
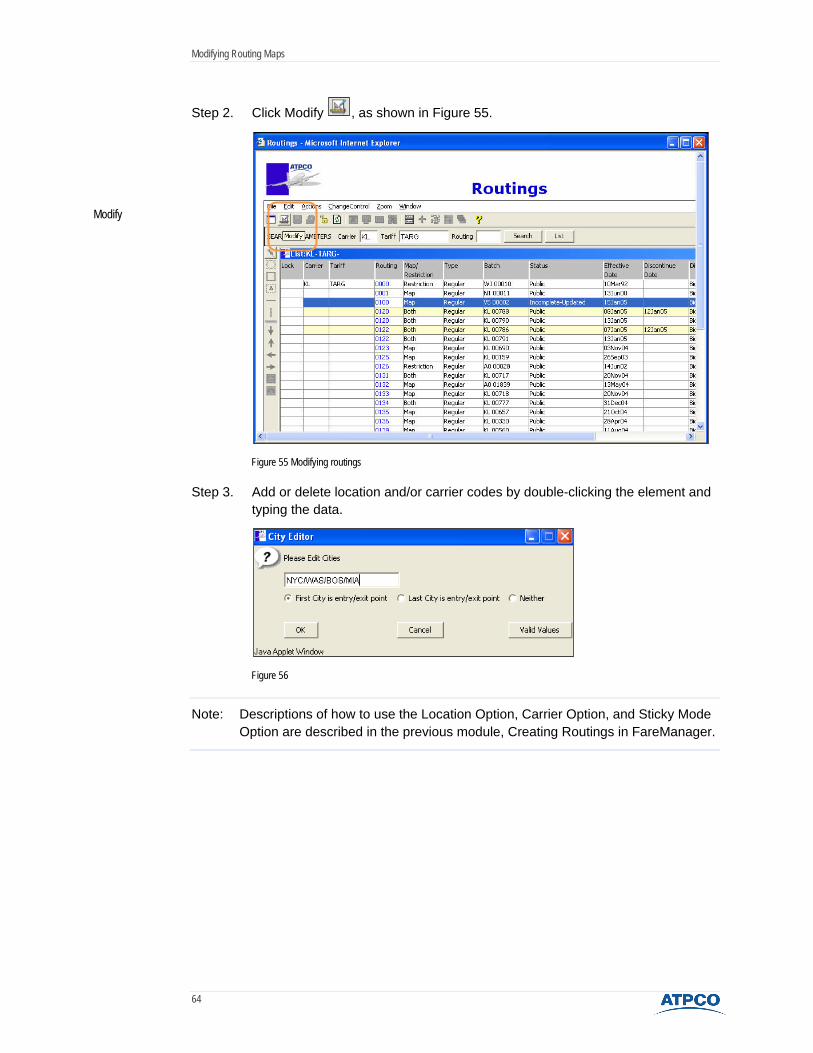
Step 2. Click Modify , as shown in Figure 55.
Figure 55 Modifying routings
Step 3. Add or delete location and/or carrier codes by double-clicking the element and typing the data.
Figure 56
Note: Descriptions of how to use the Location Option, Carrier Option, and Sticky Mode Option are described in the previous module, Creating Routings in FareManager.
Modify
Modifying Routing Maps
65
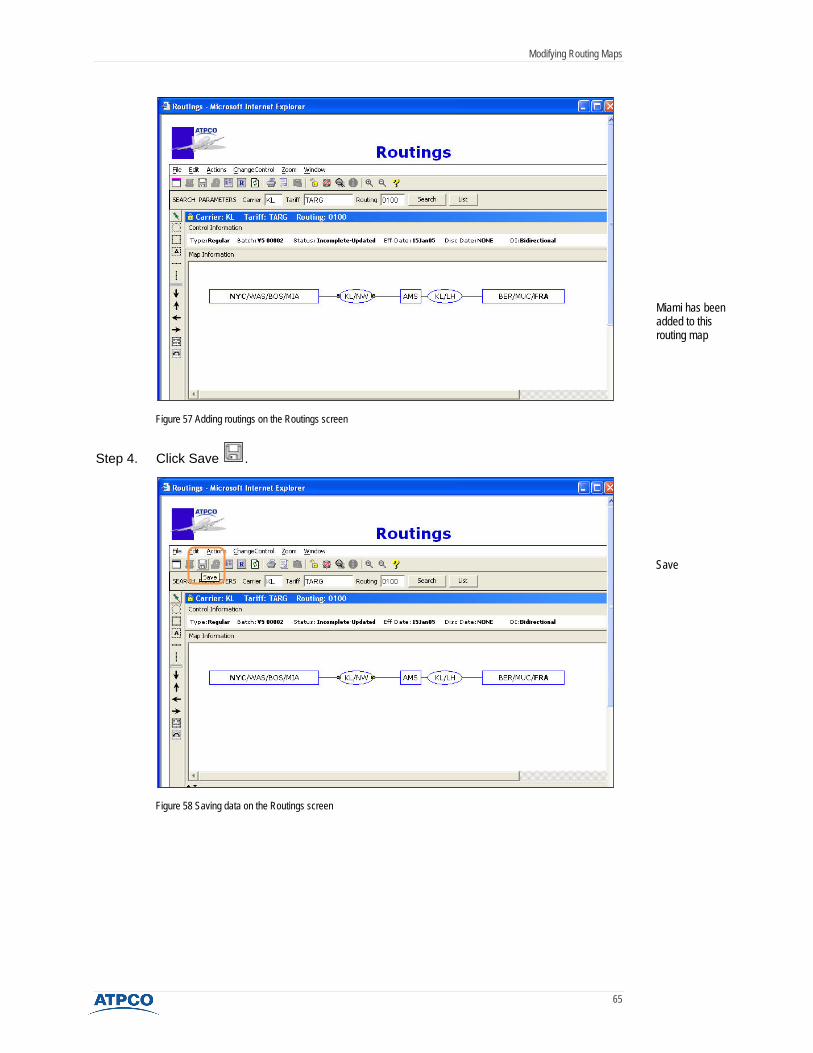
Figure 57 Adding routings on the Routings screen
Step 4. Click Save .
Figure 58 Saving data on the Routings screen
Miami has been added to this routing map
Save
Modifying Routing Maps
66
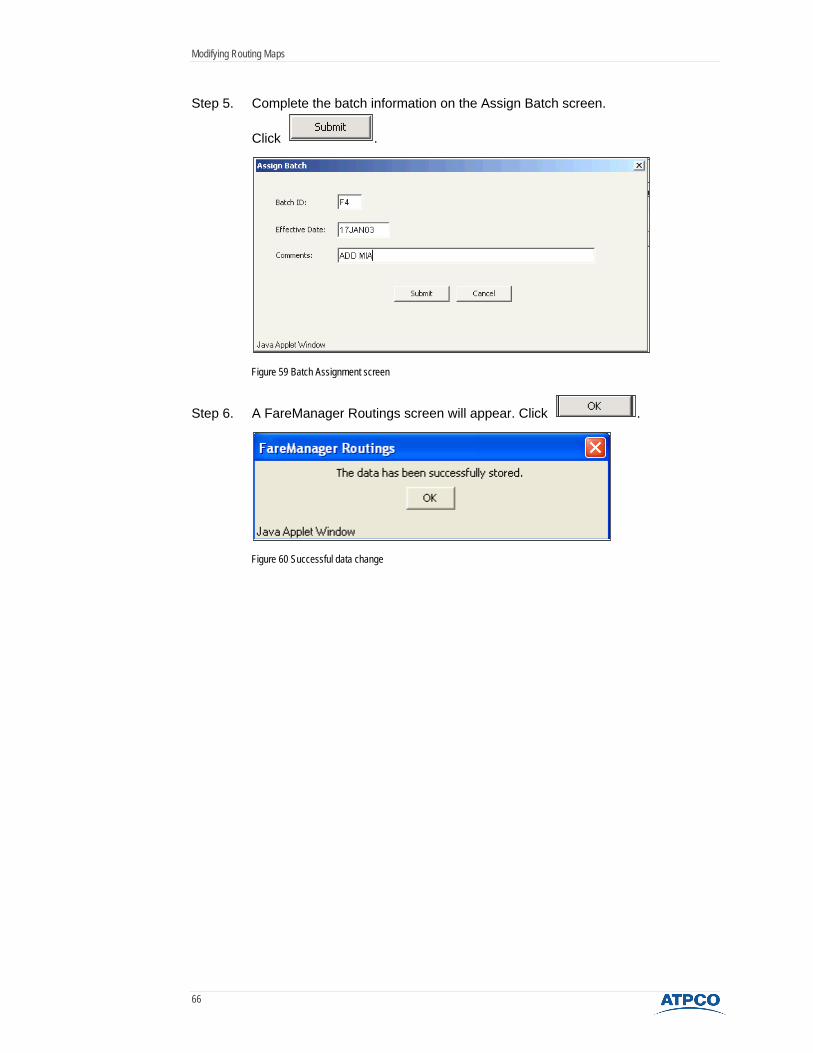
Step 5. Complete the batch information on the Assign Batch screen.
Click .
Figure 59 Batch Assignment screen
Step 6. A FareManager Routings screen will appear. Click .
Figure 60 Successful data change
Modifying Routing Maps
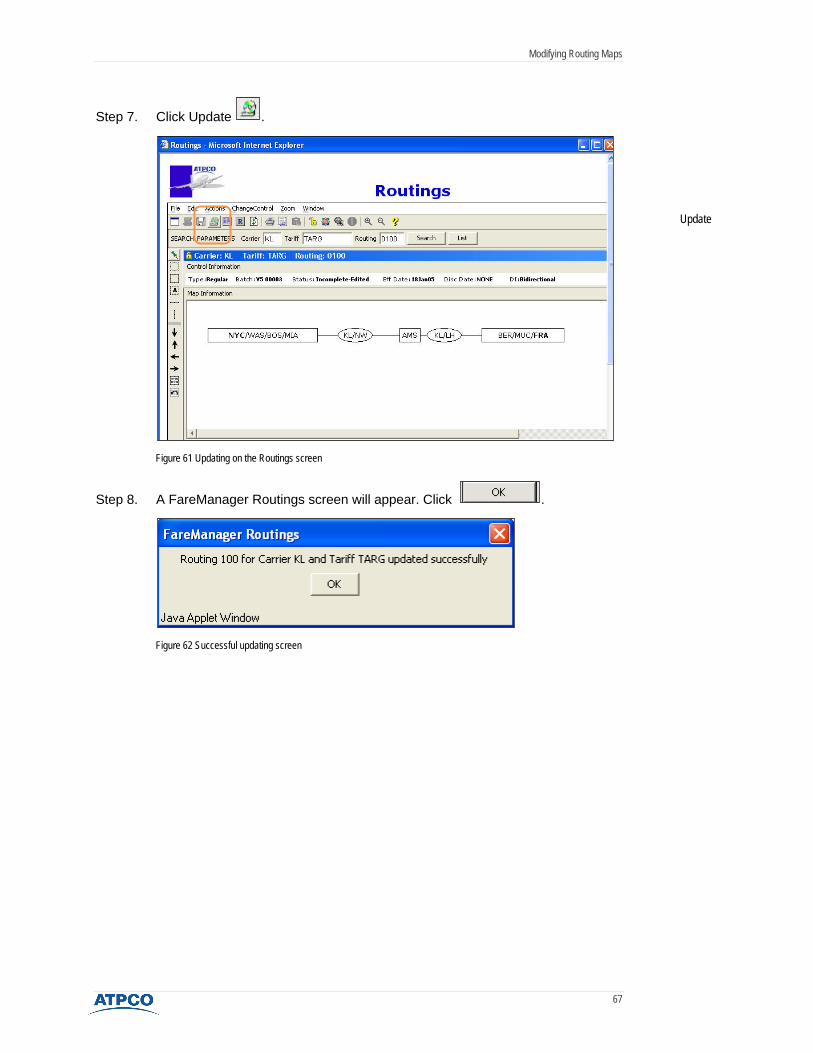
67
Step 7. Click Update .
Figure 61 Updating on the Routings screen
Step 8. A FareManager Routings screen will appear. Click .
Figure 62 Successful updating screen
Update
Modifying Routing Maps
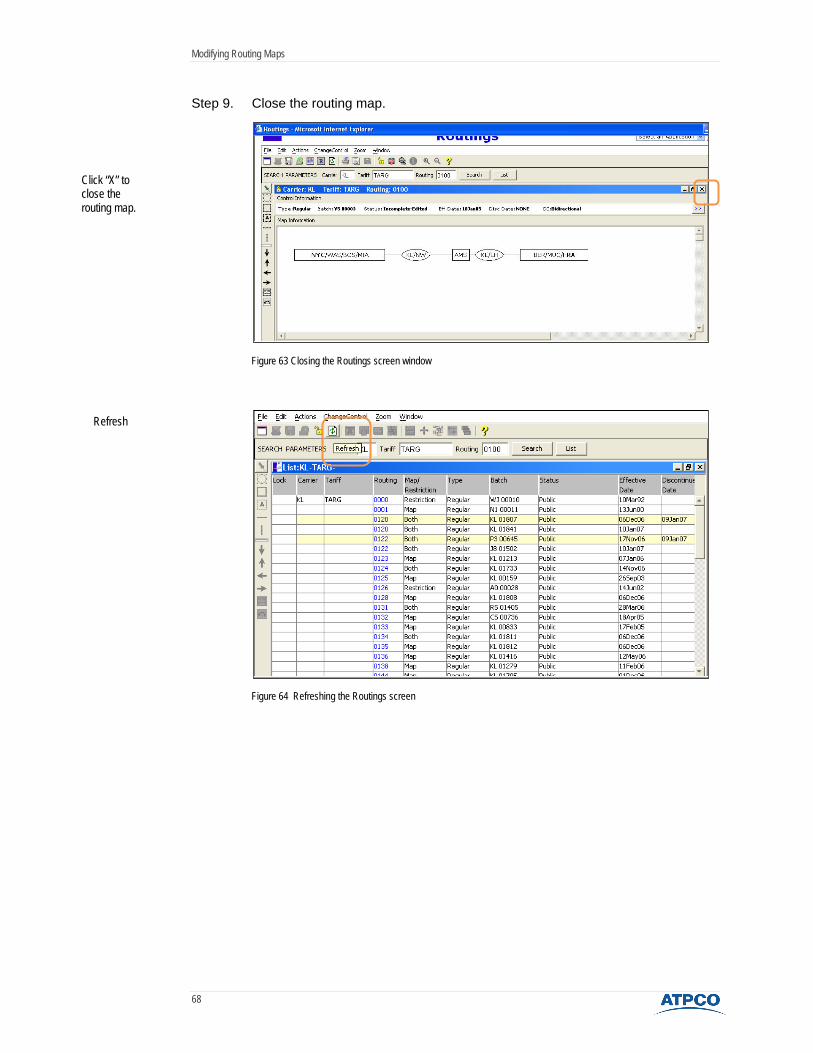
68
Step 9. Close the routing map.
Figure 63 Closing the Routings screen window
Figure 64 Refreshing the Routings screen
Click “X” to close the routing map.
Refresh

Modifying Routing Maps
69
Step 10. Select the appropriate routing segment by clicking anywhere on the line except for the routing number.
Figure 65 Selecting a routings segment
Step 11. Open the Change Control menu. Select the Change Status option.
Figure 66 Opening the Change Control menu
Select a Routing Segment
Change Status

Modifying Routing Maps
70
Step 12. Change the batch status to Public or Secure.
Click .
Figure 67 Status Change
Step 13. A FareManager Routings screen will appear. Click .
Figure 68 Completing the update
Step 14. Another FareManager Routings screen will appear.
Click
Figure 69 Successful updating
Modifying Routing Maps
71
Modifying and creating routing restrictions
Overview The following steps are the general procedure for modifying and creating routing restrictions. These steps are also discussed in more detail in this module.
Step 1. Enter the carrier, tariff, and routing number at the search parameter fields of the Routings screen.
Step 2. Click New
or
open an existing routing by clicking Modify .
Step 3. Click Restrictions .
Step 4. Add or delete restrictions. Click .
Step 5. Click Save .
Step 6. Complete batch information. Click .
Step 7. A FareManager Routings screen will appear. Click .
Step 8. Click Update .
Step 9. A FareManager Routings screen will appear. Click .
Step 10. Close the Map Editor.
Step 11. On the List screen, click Refresh .
Step 12. Select the appropriate routing.
Step 13. Open the Change Control window. Select the Change Status option.
Step 14. Change the batch status to Public or Secure. Click .
Step 15. A FareManager Routings screen will appear. Click .
Step 16. Another FareManager Routings screen will appear.
Click .

Modifying Routing Maps
72
Steps for creating routing restrictions Step 1. Enter the carrier, tariff, and routing number at the search parameter fields of
the Routing screen. If the routing already exists, click to open. If the
routing is new, click New .
The following example will show how to add a restriction to an existing map.
Figure 70 The Search function on the Routings screen
Search function
Modifying Routing Maps
73
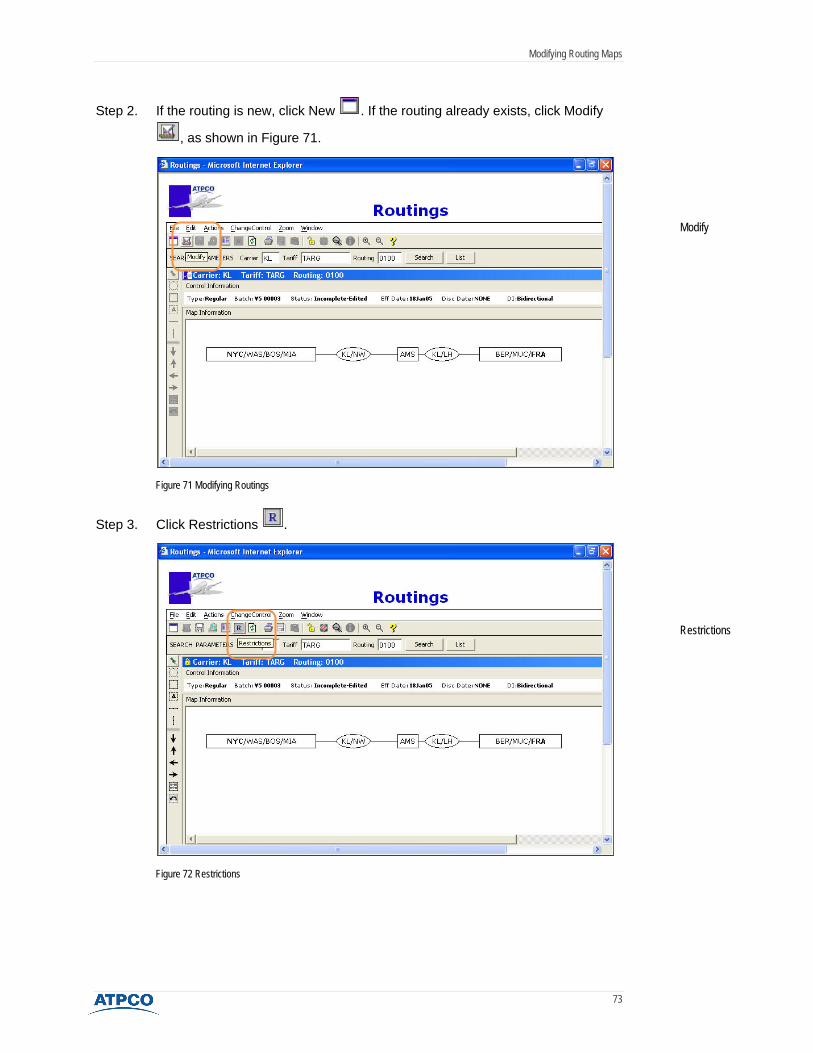
Step 2. If the routing is new, click New . If the routing already exists, click Modify
, as shown in Figure 71.
Figure 71 Modifying Routings
Step 3. Click Restrictions .
Figure 72 Restrictions
Modify
Restrictions
Modifying Routing Maps
74
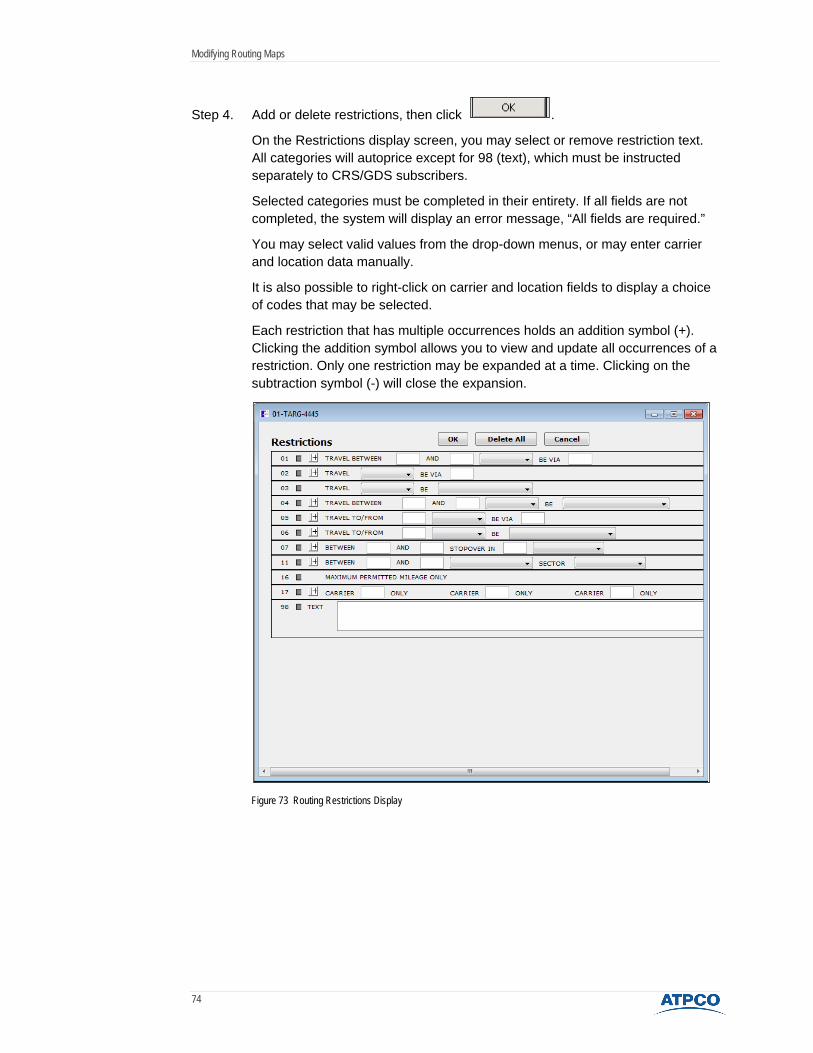
Step 4. Add or delete restrictions, then click .
On the Restrictions display screen, you may select or remove restriction text. All categories will autoprice except for 98 (text), which must be instructed separately to CRS/GDS subscribers.
Selected categories must be completed in their entirety. If all fields are not completed, the system will display an error message, “All fields are required.”
You may select valid values from the drop-down menus, or may enter carrier and location data manually.
It is also possible to right-click on carrier and location fields to display a choice of codes that may be selected.
Each restriction that has multiple occurrences holds an addition symbol (+). Clicking the addition symbol allows you to view and update all occurrences of a restriction. Only one restriction may be expanded at a time. Clicking on the subtraction symbol (-) will close the expansion.
Figure 73 Routing Restrictions Display

Modifying Routing Maps
75
Step 5. Click Save .
4.75
Figure 74 Saving new routings restrictions
Step 6. Complete the batch information. Click
Figure 75 Assign Batch screen
Save

Modifying Routing Maps
76
Step 7. A FareManager Routings screen will appear. Click .
Figure 76 Successful storage of new data
Step 8. Click Update .
Figure 77 Updating routings
Step 9. A FareManager Routings screen will appear. Click .
Figure 78 Successful updating
Update
Modifying Routing Maps
77
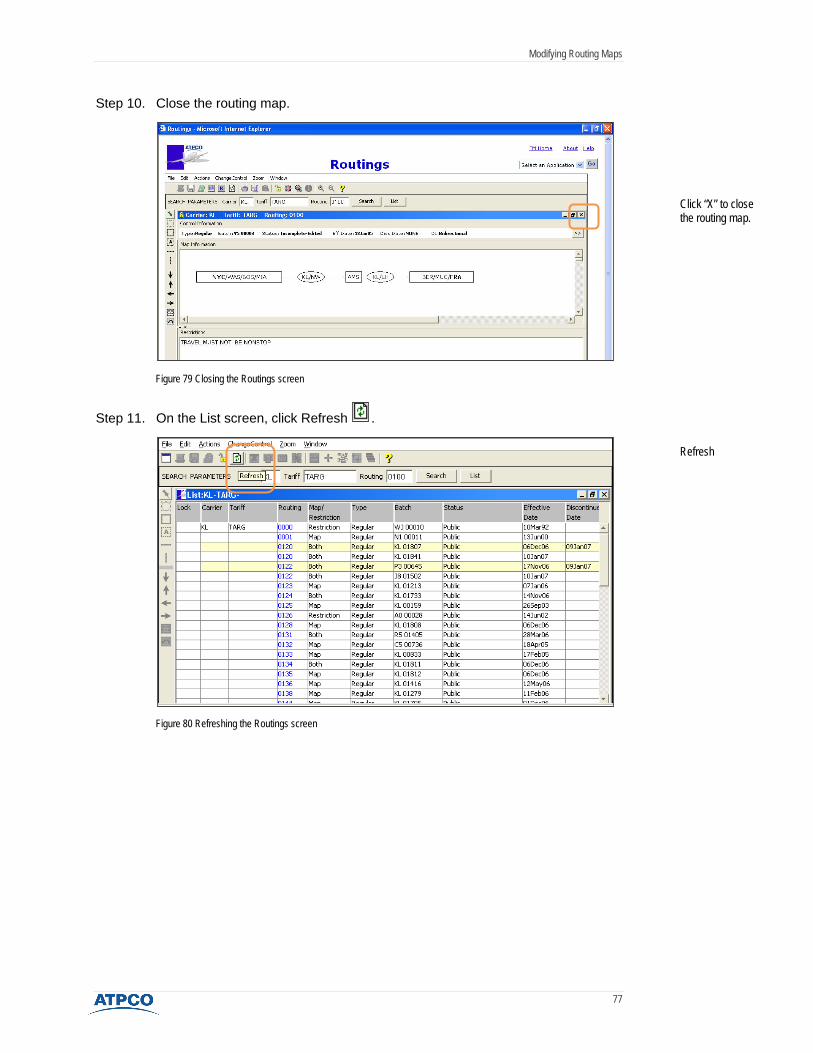
Step 10. Close the routing map.
Figure 79 Closing the Routings screen
Step 11. On the List screen, click Refresh .
Figure 80 Refreshing the Routings screen
Click “X” to close the routing map.
Refresh
Modifying Routing Maps
78
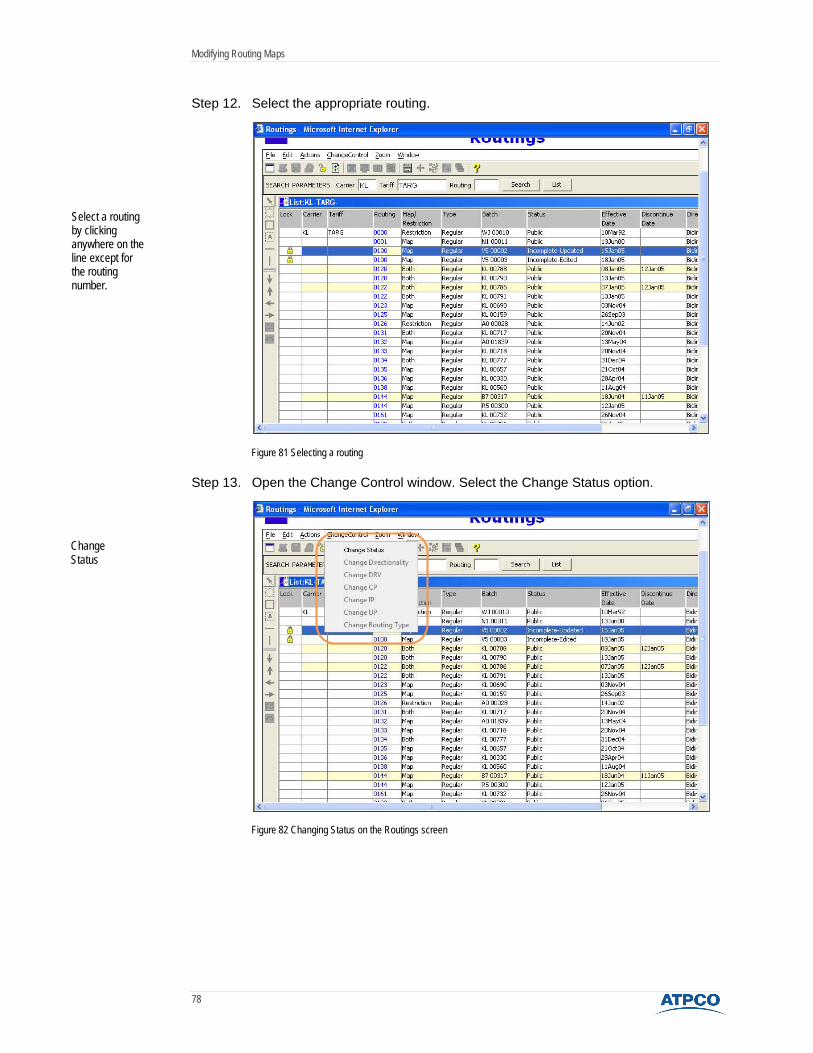
Step 12. Select the appropriate routing.
Figure 81 Selecting a routing
Step 13. Open the Change Control window. Select the Change Status option.
Figure 82 Changing Status on the Routings screen
Select a routing by clicking anywhere on the line except for the routing number.
Change Status

Modifying Routing Maps
79
Step 14. Change the batch status to Public or Secure. Click .
Figure 83 Change Status screen
Step 15. A FareManager Routings screen will appear. Click .
Figure 84 Status Change Message screen
Step 16. Another FareManager Routings screen will appear.
Click .
Figure 85 Confirmation of successful update

Modifying Routing Maps
80
Adding a Reference Option You must be in Modify mode of a map in order to use the reference option. In this example, carrier 01 would like to add cities SPC/SVQ/VGO/ZAZ/XRY to the right of a vertical bar. However, there is not enough space available so the cities must be added to a portion of the map that contains sufficient space and connected to the vertical line with a Reference Option.
Figure 86 Adding a Reference Option in tight space
Follow the steps described below to add a Reference Option.
Step 1. Click the Reference option on the Drawing Toolbar.
Figure 87 The Reference option
Not enough space to add cities SPC/SVQ/VGO/ZAZ/XRY
Reference option
Modifying Routing Maps
81
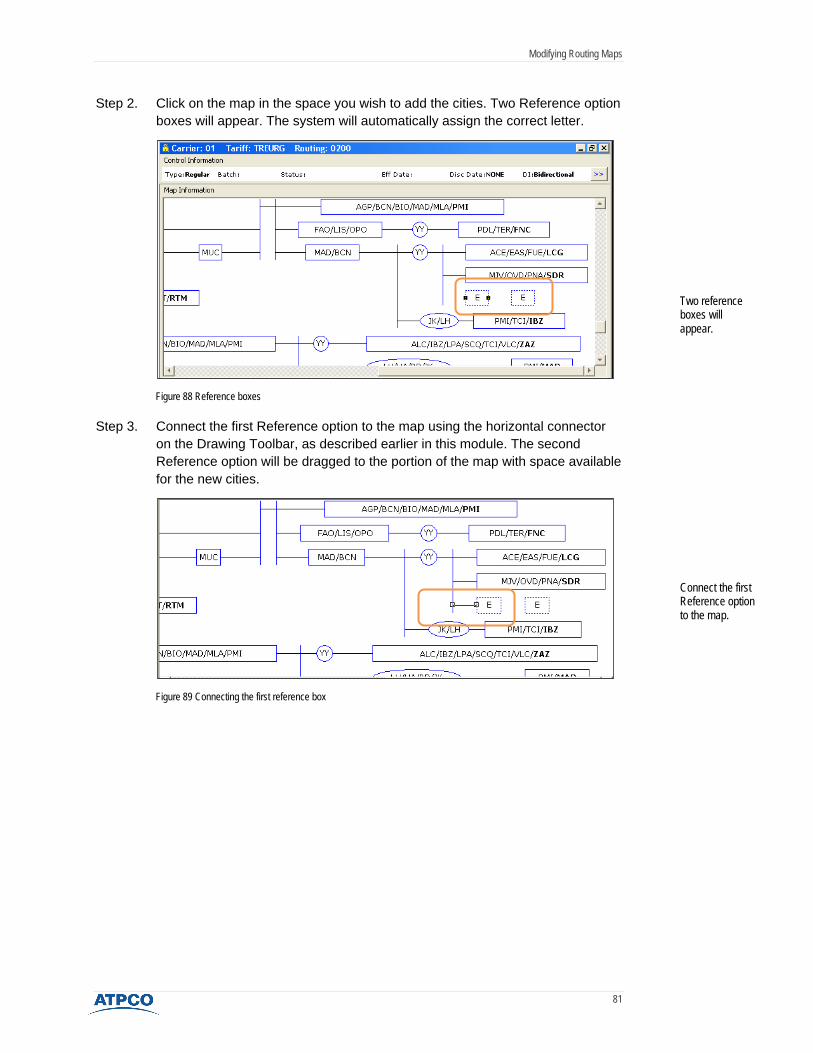
Step 2. Click on the map in the space you wish to add the cities. Two Reference option boxes will appear. The system will automatically assign the correct letter.
Figure 88 Reference boxes
Step 3. Connect the first Reference option to the map using the horizontal connector on the Drawing Toolbar, as described earlier in this module. The second Reference option will be dragged to the portion of the map with space available for the new cities.
Figure 89 Connecting the first reference box
Two reference boxes will appear.
Connect the first Reference option to the map.

Modifying Routing Maps
82
Step 4. Click and drag the second Reference option to anywhere on the map that contains sufficient space to add the new cities.
Figure 90 Placing the second Reference option
Step 5. Add the location element and type the cities you wish to add. Be sure to select the correct First City/Last City option in the Location Editor box to avoid errors when saving the map.
Figure 91 Adding and connecting new cities
After completing the Reference options, save and update the map, as described earlier in the module.
Place second Reference option elsewhere in the map
Add new cities and connect to Reference option
Modifying Routing Maps
83
Canceling Routing Maps
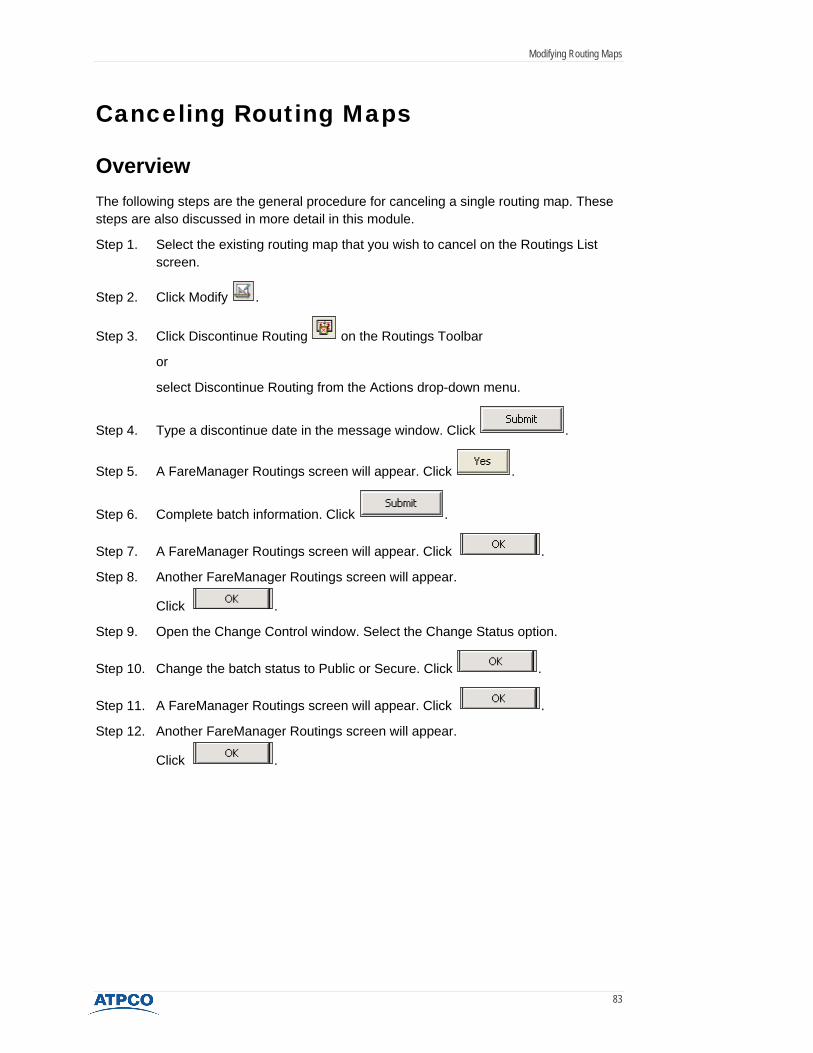
Overview The following steps are the general procedure for canceling a single routing map. These steps are also discussed in more detail in this module.
Step 1. Select the existing routing map that you wish to cancel on the Routings List screen.
Step 2. Click Modify .
Step 3. Click Discontinue Routing on the Routings Toolbar
or
select Discontinue Routing from the Actions drop-down menu.
Step 4. Type a discontinue date in the message window. Click .
Step 5. A FareManager Routings screen will appear. Click .
Step 6. Complete batch information. Click .
Step 7. A FareManager Routings screen will appear. Click .
Step 8. Another FareManager Routings screen will appear.
Click .
Step 9. Open the Change Control window. Select the Change Status option.
Step 10. Change the batch status to Public or Secure. Click .
Step 11. A FareManager Routings screen will appear. Click .
Step 12. Another FareManager Routings screen will appear.
Click .
Modifying Routing Maps
84
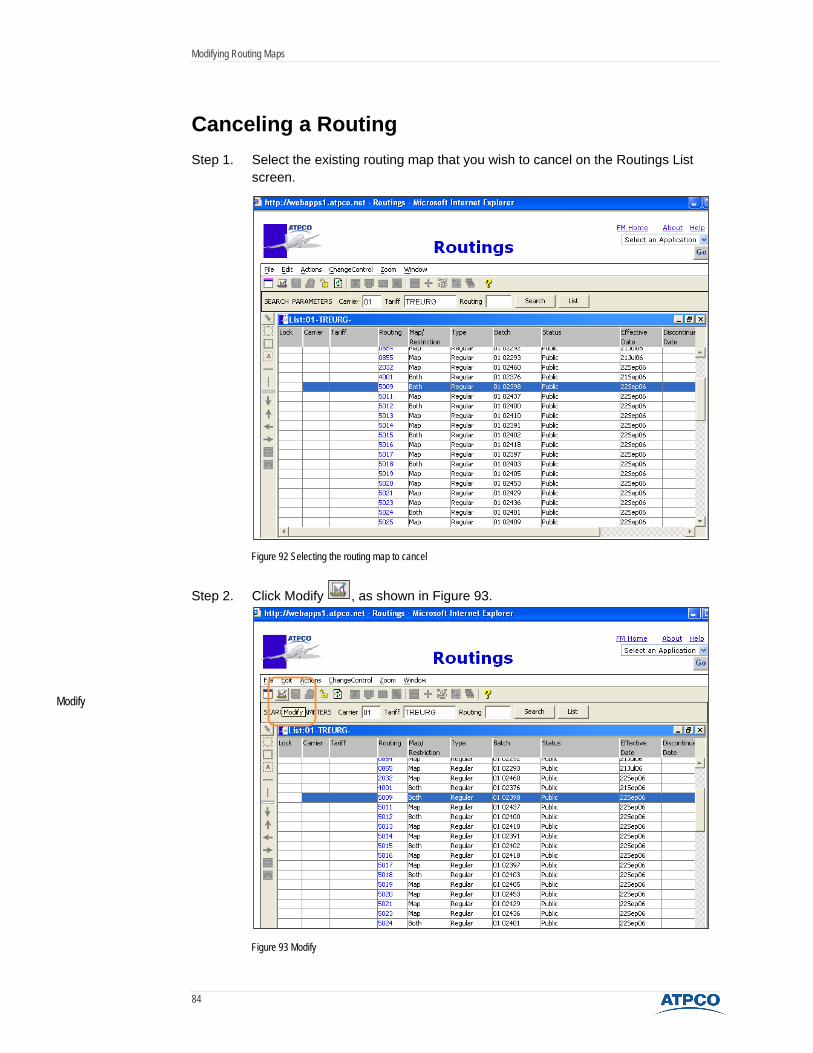
Canceling a Routing Step 1. Select the existing routing map that you wish to cancel on the Routings List
screen.
Figure 92 Selecting the routing map to cancel
Step 2. Click Modify , as shown in Figure 93.
Figure 93 Modify
Modify
Modifying Routing Maps
85
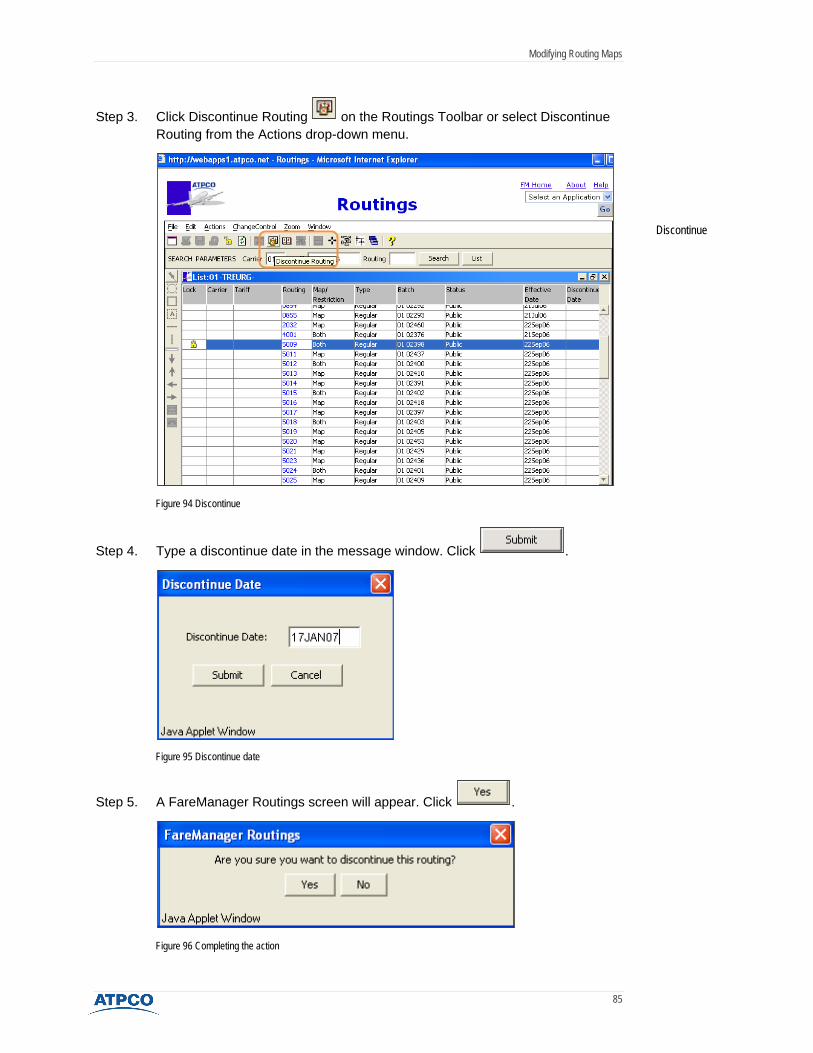
Step 3. Click Discontinue Routing on the Routings Toolbar or select Discontinue Routing from the Actions drop-down menu.
Figure 94 Discontinue
Step 4. Type a discontinue date in the message window. Click .
Figure 95 Discontinue date
Step 5. A FareManager Routings screen will appear. Click .
Figure 96 Completing the action
Discontinue

Modifying Routing Maps
86
Step 6. Complete batch information. Click .
Figure 97 Batch information
Step 7. A FareManager Routings screen will appear. Click .
Figure 98 Completing the change
Step 8. Another FareManager Routings screen will appear.
Click .
Figure 99 Confirmation screen
Modifying Routing Maps
87
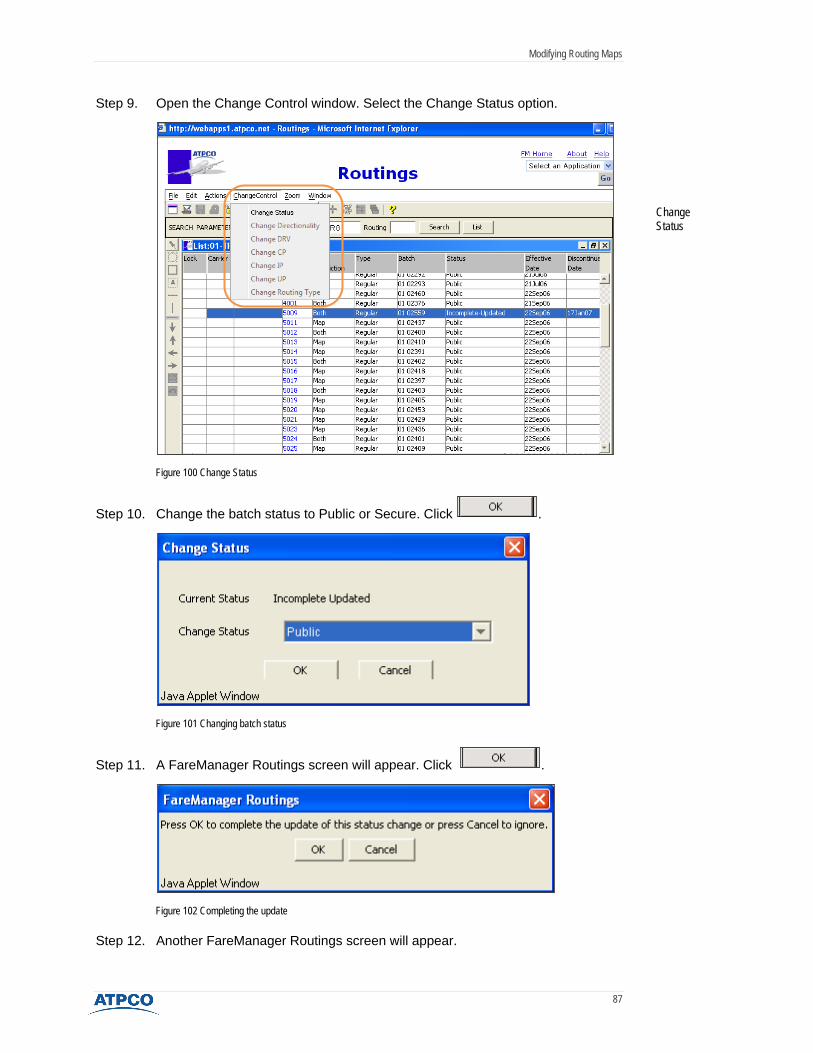
Step 9. Open the Change Control window. Select the Change Status option.
Figure 100 Change Status
Step 10. Change the batch status to Public or Secure. Click .
Figure 101 Changing batch status
Step 11. A FareManager Routings screen will appear. Click .
Figure 102 Completing the update
Step 12. Another FareManager Routings screen will appear.
Change Status
Modifying Routing Maps
88
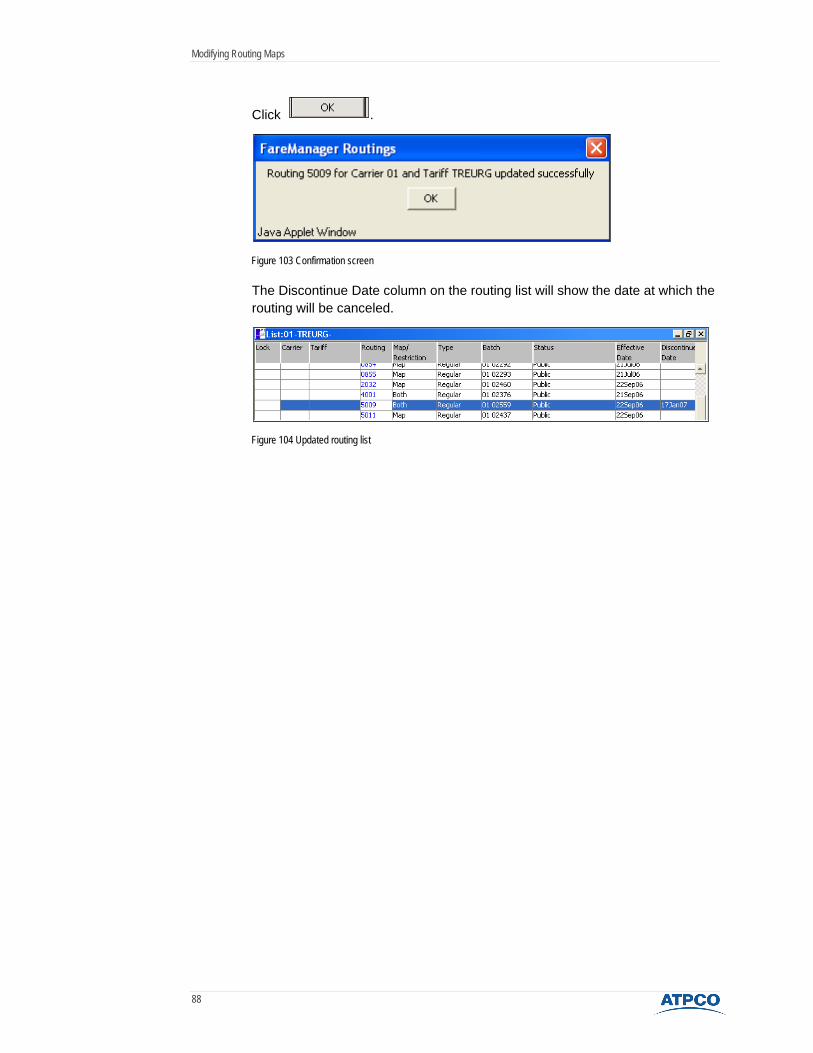
Click .
Figure 103 Confirmation screen
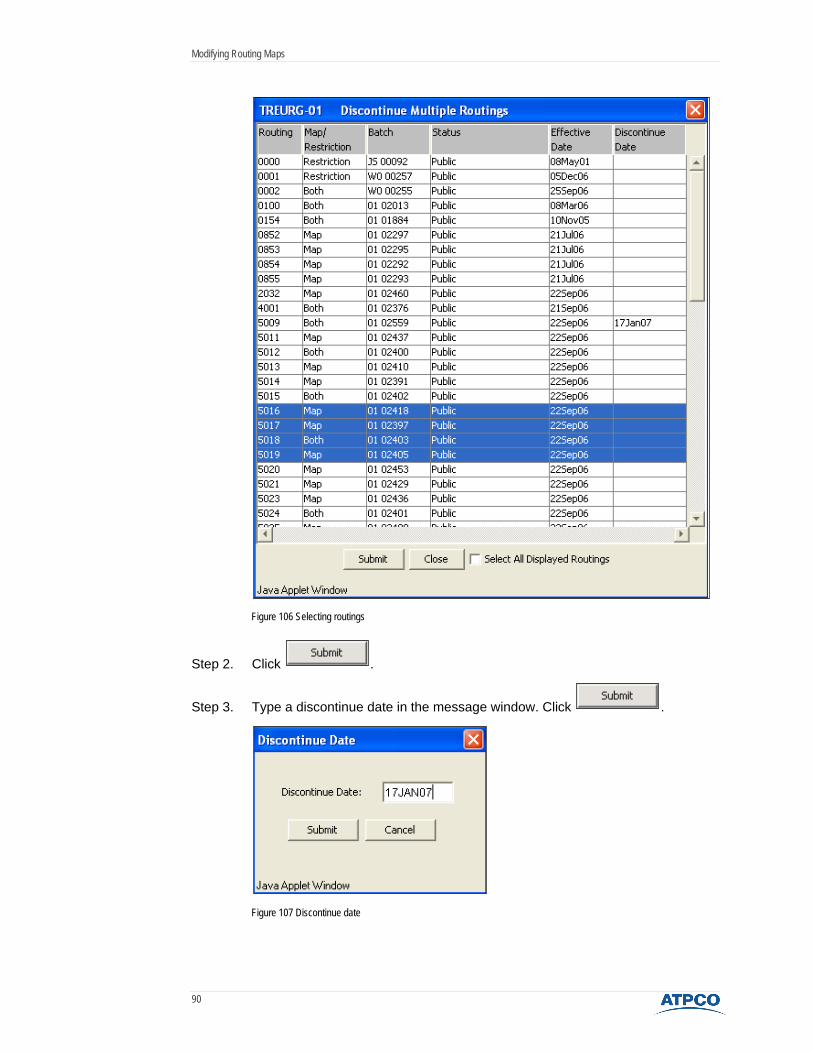
The Discontinue Date column on the routing list will show the date at which the routing will be canceled.
Figure 104 Updated routing list

Modifying Routing Maps
89
Cancel Multiple Routings The following steps describe how to cancel multiple routings at one time.
Step 1. On the Routings List screen, select Discontinue Multiple Routings from the Actions drop-down menu.
Figure 105 Discontinue multiple routings
A separate window will appear with the list of routings. Click the routing you wish to cancel. To select multiple routing numbers, press and hold the Control key and click the desired routings, as shown in Figure 106.
Discontinue Multiple Routings
Modifying Routing Maps
90
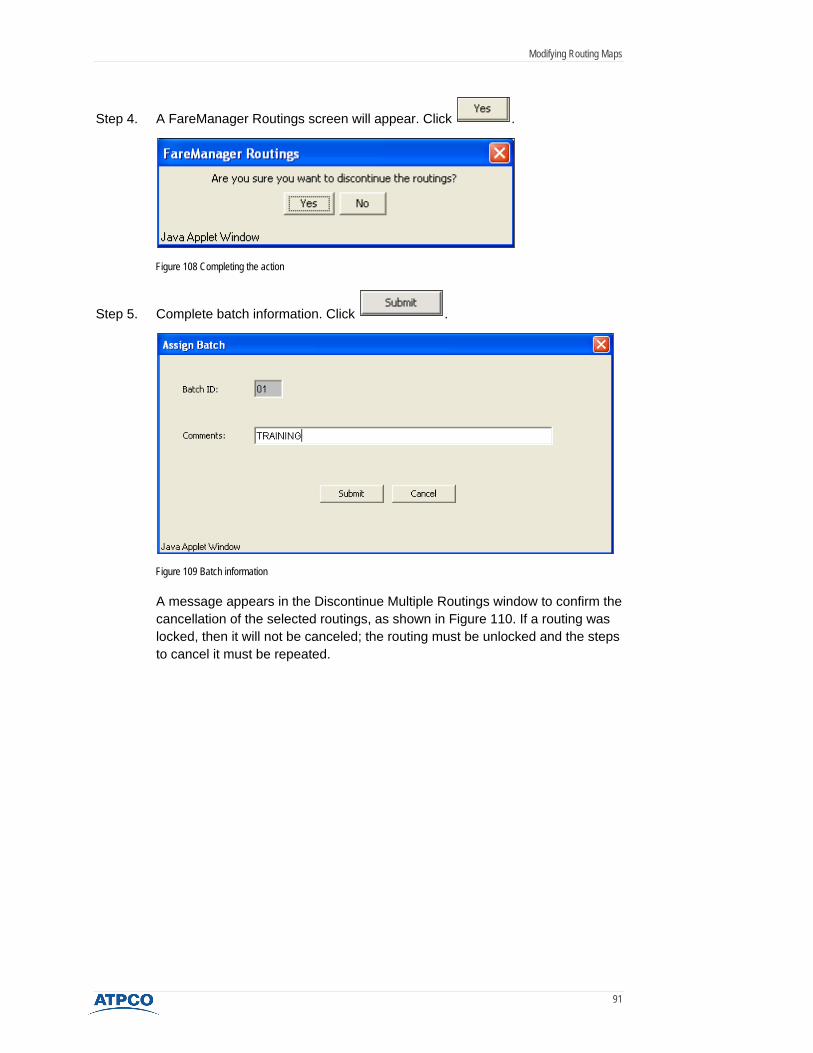
Figure 106 Selecting routings
Step 2. Click .
Step 3. Type a discontinue date in the message window. Click .
Figure 107 Discontinue date
Modifying Routing Maps
91
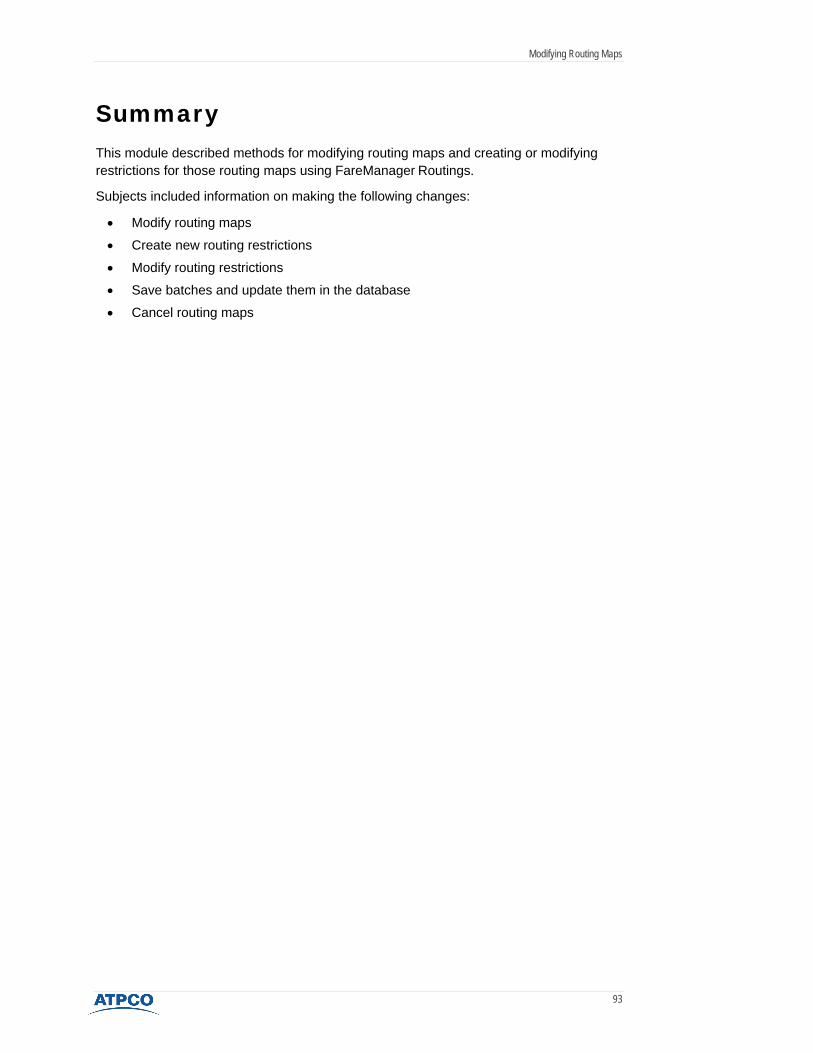
Step 4. A FareManager Routings screen will appear. Click .
Figure 108 Completing the action
Step 5. Complete batch information. Click .
Figure 109 Batch information
A message appears in the Discontinue Multiple Routings window to confirm the cancellation of the selected routings, as shown in Figure 110. If a routing was locked, then it will not be canceled; the routing must be unlocked and the steps to cancel it must be repeated.

Modifying Routing Maps
92
Figure 110 Confirmation screen
Step 6. Click .
The Discontinue Date column on the routing list will show the date at which the routing will be canceled. The status of the canceled routings will automatically be changed to Public or Secure.
Figure 111 Routing list
Modifying Routing Maps
93
Summary This module described methods for modifying routing maps and creating or modifying restrictions for those routing maps using FareManager Routings.
Subjects included information on making the following changes:
• Modify routing maps
• Create new routing restrictions
• Modify routing restrictions
• Save batches and update them in the database
• Cancel routing maps


Creating Routing Partials How to Create and Modify Routing Partials for US/CA Domestic Tariffs


Creating Routing Partials
97
Mission After completing this module, participants will be able to create and modify routing source maps and create or modify routing restrictions, known as partials, in the US/CA domestic tariffs. They will also be able to unlock a routing batch manually.
Why is this module important? Routing partials enable a carrier to have many routing restrictions based on one routing map. Carriers use source maps and partials to organize their data in a more efficient fashion. If a source map is modified, then all the attached partials are automatically updated. Source maps and partials are generally used only in US/CA tariffs; however, there is no restriction in the system to prevent use in International tariffs.
Unlocking batches manually is a part of this process.
Learning objectives After completing this module, participants will know how to use FareManager Routings to complete the following:
• Create partials for US/CA domestic routings
• Manually unlock a routing
Module contents • Identifying original routings and changing them to source
• Creating and modifying new routing for partials
• Manually unlocking routing batches

Creating Routing Partials
98
US/CA domestic tariff routing partials Partials are routing restrictions that are linked to an original (source) routing to add more specific provisions to fares. They allow a single source routing to be applied to different (multiple) fares with different restrictions.
Changing original routings to source routings
Overview The following steps are the general procedure for changing a regular routing to a source routing. These steps are also discussed in more detail in this module.
Step 1. Select the routing to be used as a source and click Modify .
Step 2. Open the Change Control window and select the option to Change Routing Type.
Step 3. Select the Source option. Click .
Step 4. A FareManager Routings screen will appear. Click .
Step 5. Assign the batch information. Click .
Step 6. A FareManager Routings screen will appear. Click .
Step 7. Another FareManager Routings screen will appear. Click .
Step 8. With the new source routing selected, choose the Change Status option from the Change Control menu.
Step 9. A FareManager Routings screen will appear. Click .
Step 10. A confirmation window will appear. Click .
Step 11. A FareManager Routings screen will appear. Click .
Step 12. Another FareManager Routings screen will appear. Click .
Creating Routing Partials
99
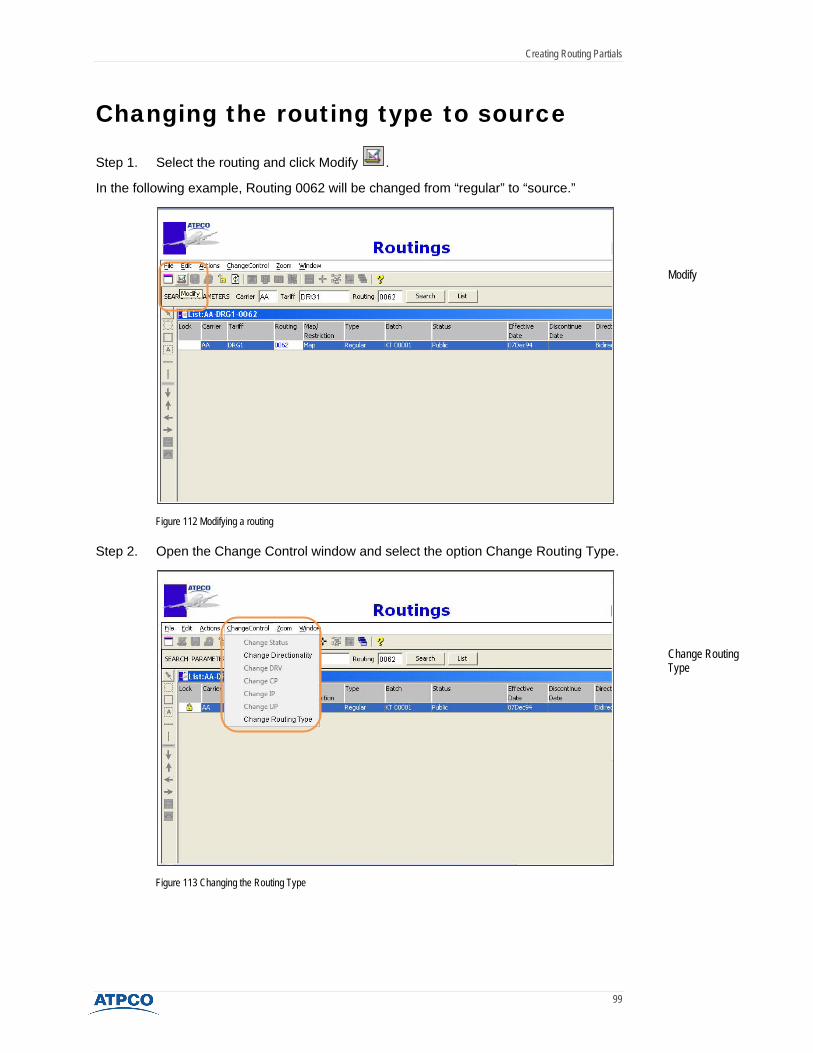
Changing the routing type to source
Step 1. Select the routing and click Modify .
In the following example, Routing 0062 will be changed from “regular” to “source.”
Figure 112 Modifying a routing
Step 2. Open the Change Control window and select the option Change Routing Type.
Figure 113 Changing the Routing Type
Modify
Change Routing Type

Creating Routing Partials
100
Step 3. Select the Source option. Click .
Figure 114 Change Routing Type screen
Step 4. A FareManager Routings screen will appear. Click
Figure 115 Saving Control Information Changes screen
Step 5. Assign the batch information. Click .
Figure 116 Assign Batch screen

Creating Routing Partials
101
Step 6. A FareManager Routings screen will appear. Click
Figure 117 Notification of successful routing change
Step 7. Another FareManager Routings screen will appear. Click
Figure 118 Routing and tariff confirmation
Step 8. With the new source routing selected, choose the Change Status option from
the Change Control menu.
Figure 119 Change Status selection

Creating Routing Partials
102
Step 9. A FareManager Routings screen will appear.
Click
Figure 120 Past date notification
Step 10. A confirmation window will appear. Click
Figure 121 Change Status notification
Step 11. A FareManager Routings screen will appear.
Click
Figure 122 Confirm Status Change request
Step 12. Another FareManager Routings screen will appear.
Click
Figure 123 Routing and tariff confirmation
Creating Routing Partials
103
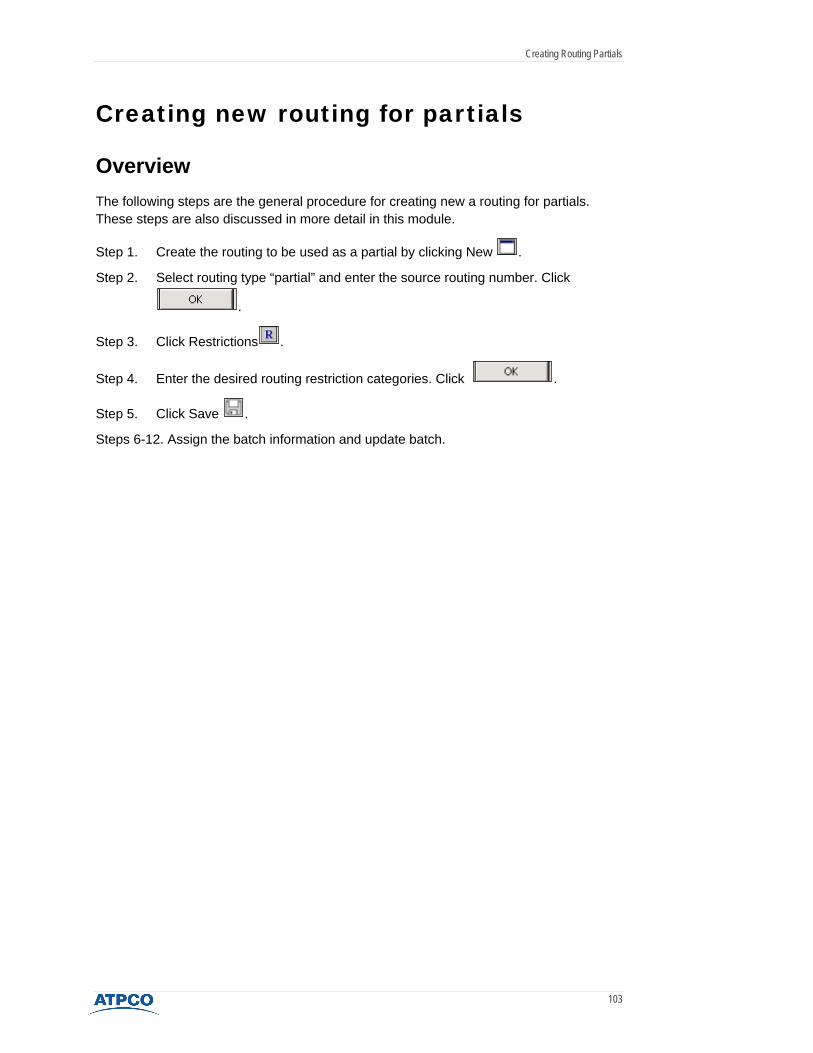
Creating new routing for partials
Overview The following steps are the general procedure for creating new a routing for partials. These steps are also discussed in more detail in this module.
Step 1. Create the routing to be used as a partial by clicking New .
Step 2. Select routing type “partial” and enter the source routing number. Click
.
Step 3. Click Restrictions .
Step 4. Enter the desired routing restriction categories. Click .
Step 5. Click Save .
Steps 6-12. Assign the batch information and update batch.

Creating Routing Partials
104
Steps for creating new routing for partials
Step 1. Create the routing to be used as a partial by clicking New . In the following example, Routing 0200 will be created.
Figure 124 Creating a partial routing
Step 2. Select “partial” from the drop-down menu in the Routing Type field and enter
the source routing number. Click .
Figure 125 Control Information screen
New

Creating Routing Partials
105
Step 3. The map information and restrictions windows will appear. Click Restrictions
.
Figure 126 Creating restrictions
Step 4. Always type a reference to the source in Category 98, as shown in Figure 127.
Enter any other desired categories. Click
Figure 127 Creating restrictions
Restrictions
Creating Routing Partials
106
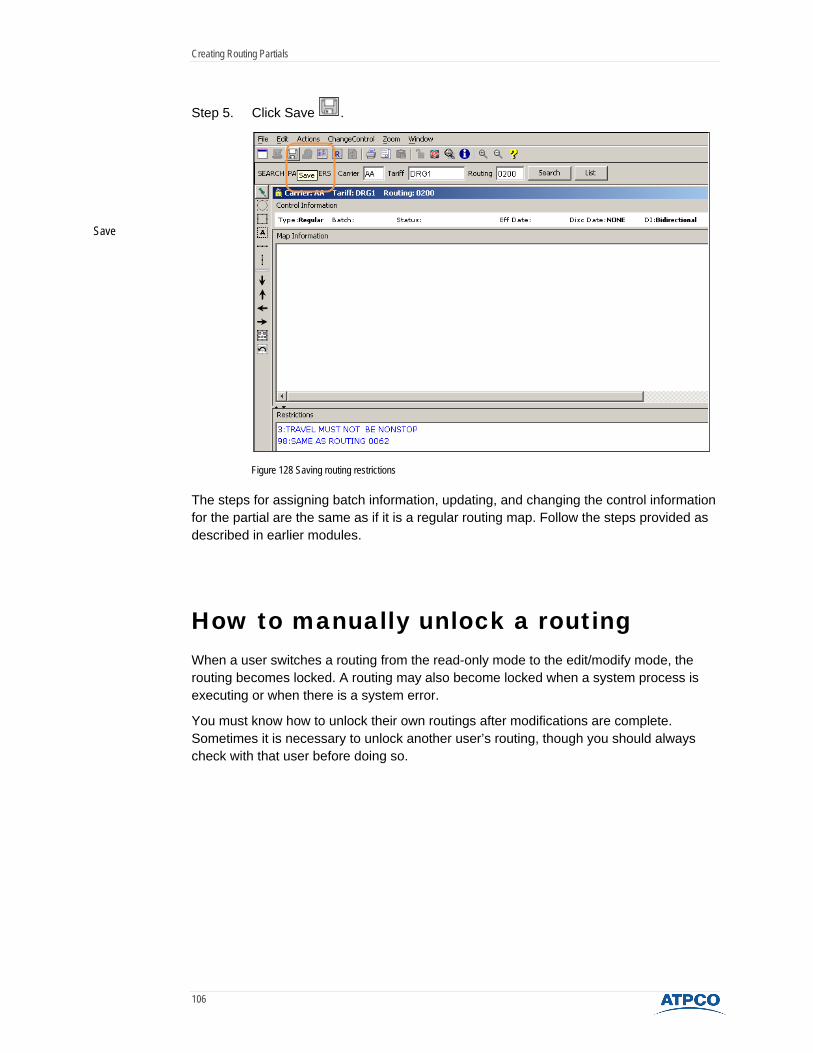
Step 5. Click Save .
Figure 128 Saving routing restrictions
The steps for assigning batch information, updating, and changing the control information for the partial are the same as if it is a regular routing map. Follow the steps provided as described in earlier modules.
How to manually unlock a routing When a user switches a routing from the read-only mode to the edit/modify mode, the routing becomes locked. A routing may also become locked when a system process is executing or when there is a system error.
You must know how to unlock their own routings after modifications are complete. Sometimes it is necessary to unlock another user’s routing, though you should always check with that user before doing so.
Save

Creating Routing Partials
107
Only the action of updating to the database will automatically unlock a routing. All other locks must be manually changed. Locked routings will display a padlock icon in the List screen (shown below) and in the Map Editor.
Figure 129 Manually unlocking a routing
Clicking Unlock to release the routing.
Figure 130 Routings unlock confirmation
A warning message will appear if the routing is locked by another user. Unlocking the routing of another user will cause that user to lose any unsaved changes. The initial user will not receive any message stating that the routing has been unlocked.
No warning message will appear when a user unlocks a routing that he or she has locked and completed.
Routings that are locked because of save or update processing cannot be unlocked. If a user attempts to unlock it, a message will appear instructing the user to try again later.
Warning! The initial user will not receive any message stating that the routing has been unlocked by another user.
Locked Routing
Creating Routing Partials
108
Summary Source maps and partials are an important feature to help carriers organize their data. By using sources and partials carriers can build many restrictions that are based off of one routing map.
This module describes the steps to do the following:
• Change a regular map to a source map
• Create a new partial The steps to manually unlock a routing and the dangers involved are also discussed.

The Copy/Paste Function How to Copy and Paste Routing Information


The Copy/Paste Function
111
Mission After completing this module, participants will be able to accurately use the Copy/Paste function in the Routing section to create or modify fares.
Why is this module important? Copying and pasting routing information saves analysts time and increases accuracy.
The Copy/Paste Function
112
The Copy/Paste function The Copy/Paste function may be used to cut or copy data in one routing map and paste it in the same or another routing map.
Remote you may only copy you r own routings. ATPCO analysts may copy, on behalf of remote users, from any carrier’s public data.
Overview The following steps are the general procedure for using the Copy/Paste function. These steps are also discussed in more detail in this module.
Step 1. Open the routing map that contains the data to be copied.
Step 2. Click Modify .
Step 3. Select the element(s) to be copied.
Step 4. Click Copy
or
Select the Copy or Cut function from the Edit menu.
Step 5. Open the desired routing or create a new routing to paste the copied data.
Step 6. Click Modify .
Step 7. Click Paste .
Step 8. Modify as desired. Update the routing as previously described in the Modifying Routing Maps module.

The Copy/Paste Function
113
Steps for using the Copy/Paste function Step 1. Open the routing map that contains the data to be copied.
In the following example, data from Routing 063 will be copied.
Figure 131 Selecting a routing number
Step 2. Click Modify .
Figure 132 Choosing to modify a routing number
Click the selected routing number
Modify

The Copy/Paste Function
114
Step 3. Select the element(s) to be copied.
Figure 133 Selecting data to be modified
Step 4. Click Copy or select the Copy or Cut function from the Edit menu.
Figure 134 Copying the routing information
Use a mouse to draw a box around data to be copied
Copy
The Copy/Paste Function
115
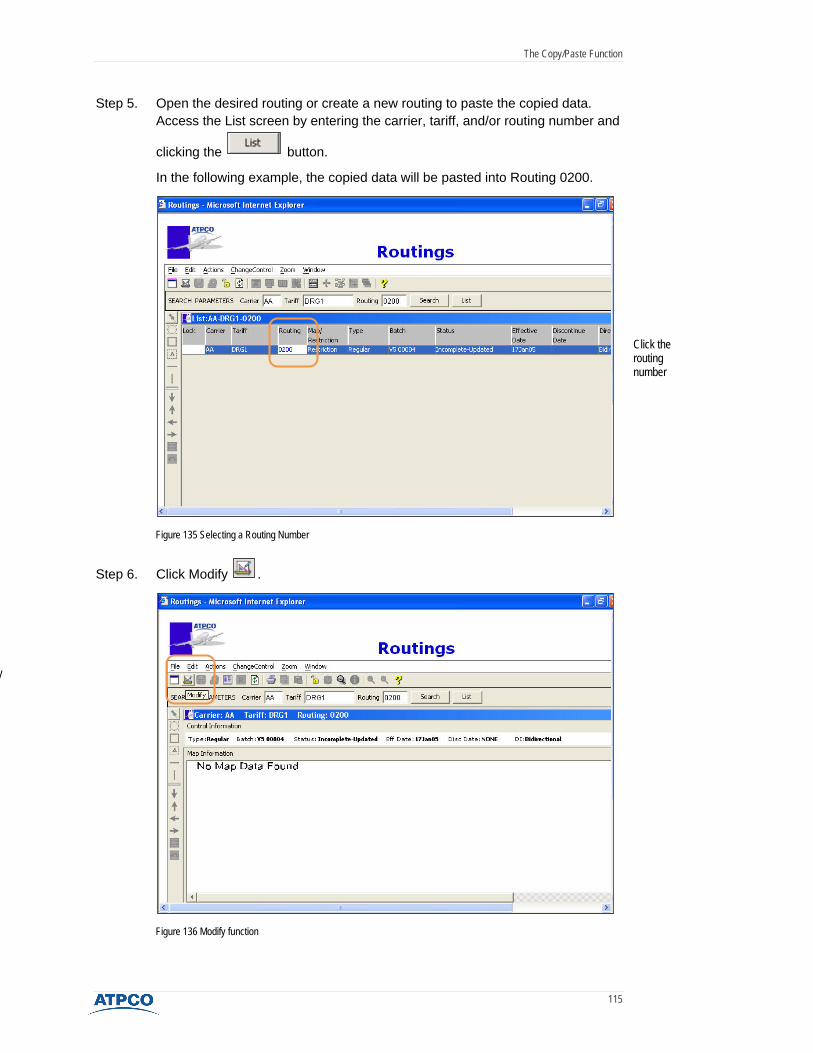
Step 5. Open the desired routing or create a new routing to paste the copied data. Access the List screen by entering the carrier, tariff, and/or routing number and
clicking the button.
In the following example, the copied data will be pasted into Routing 0200.
Figure 135 Selecting a Routing Number
Step 6. Click Modify .
Figure 136 Modify function
Click the routing number
y
The Copy/Paste Function
116
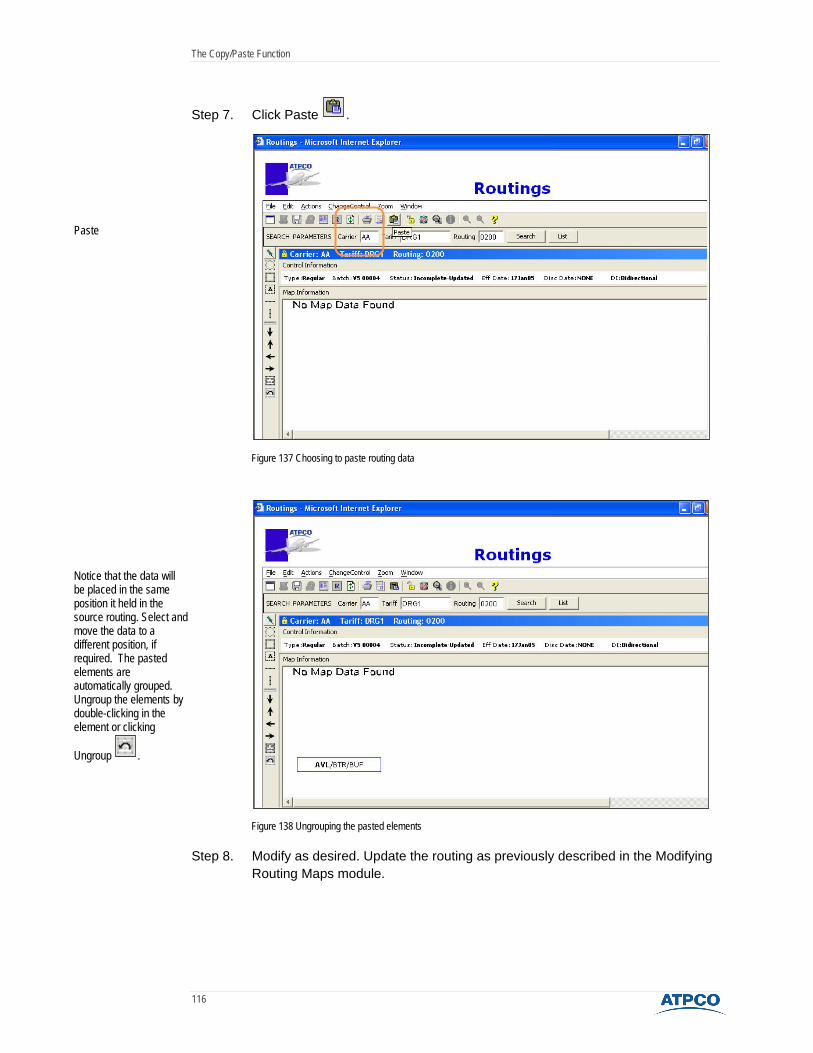
Step 7. Click Paste .
Figure 137 Choosing to paste routing data
Figure 138 Ungrouping the pasted elements
Step 8. Modify as desired. Update the routing as previously described in the Modifying Routing Maps module.
Notice that the data will be placed in the same position it held in the source routing. Select and move the data to a different position, if required. The pasted elements are automatically grouped. Ungroup the elements by double-clicking in the element or clicking
Ungroup .
Paste

The Copy/Paste Function
117
Summary The Copy/Paste function can be used to cut or copy data in one routing map and paste it in the same or another routing map.
Copying and pasting routing information saves analysts time and increases accuracy.
Step 1. Open the routing map that contains the data to be copied.
Step 2. Click Modify .
Step 3. Select element(s) to be copied.
Step 4. Click Copy
or
Select the Copy or Cut function from the Edit menu.
Step 5. Open the desired routing or create a new routing to paste the copied data.
Step 6. Click Modify .
Step 7. Click Paste .
Step 8. Modify as desired. Update routing as previously described in the Modifying Routing Maps module.

Routing Conventions and Guidelines Applying Conventions and Guidelines to Routings


Routing Conventions and Guidelines
121
Mission After completing this module, participants will be able to correctly and easily follow the conventions and guidelines that ATPCO and carriers have designed to be applied to routing information.
Why is this module important? Applying the conventions and guidelines that data providers and subscribers have provided for routing information is necessary for an accurate reflection of the carrier intent in fare data. Following these conventions and guidelines accurately and in a timely fashion makes the analyst’s work easier.

Routing Conventions and Guidelines
122
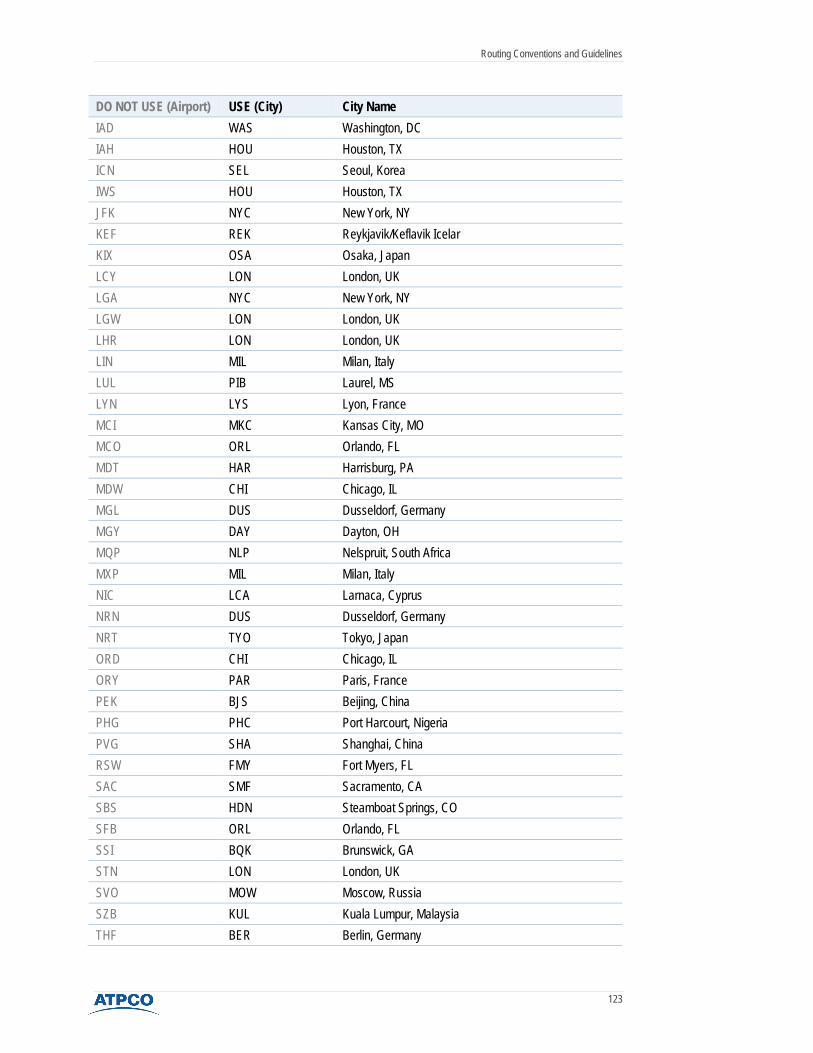
Conventions and guidelines Data providers and subscribers have identified certain guidelines that should be applied to routing provisions to ensure proper autopricing.
In most cases city codes, not airport codes, should be used.
DO NOT USE (Airport) USE (City) City Name ACY AIY Atlantic City, NJ ADJ AMM Amman, Jordan AEP BUE Buenos Aries, Argentina AFK ADP Ampara, Sri Lanka ARN STO Stockholm, Sweden AUW CWA Wausau, WI BGY MIL Milan, Italy BHD BFS Belfast, UK BKL CLE Cleveland, OH BMA STO Stockholm, Sweden CDG PAR Paris, France CGF CLE Cleveland, OH CGK JKT Jakarta, Indonesia CNF BHZ Belo Horizonte, Brazil CSL SBP San Luis Obispo, CA CTS SPK Sapporo, Japan CWA AUW Wausau, WI DAL DFW Dallas/Ft. Worth, TX DCA WAS Washington, DC DET DTT Detroit, MI DTW DTT Detroit, MI EKA ACV Arcata, CA ESF AEX Alexandria, LA EZE BUE Buenos Aries, Argentina FCO ROM Rome, Italy FOE TOP Topeka, KS GIG RIO Rio De Janeiro, Brazil GMP SEL Seoul, Korea GRU SAO Sao Paulo, Brazil HAH YVA Moroni, Comoros HEX SDQ Santo Domingo, Dominican Republic HFD BDL Hartford, CT HND TYO Tokyo, Japan
Routing Conventions and Guidelines
123
DO NOT USE (Airport) USE (City) City Name IAD WAS Washington, DC IAH HOU Houston, TX ICN SEL Seoul, Korea IWS HOU Houston, TX JFK NYC New York, NY KEF REK Reykjavik/Keflavik Icelar KIX OSA Osaka, Japan LCY LON London, UK LGA NYC New York, NY LGW LON London, UK LHR LON London, UK LIN MIL Milan, Italy LUL PIB Laurel, MS LYN LYS Lyon, France MCI MKC Kansas City, MO MCO ORL Orlando, FL MDT HAR Harrisburg, PA MDW CHI Chicago, IL MGL DUS Dusseldorf, Germany MGY DAY Dayton, OH MQP NLP Nelspruit, South Africa MXP MIL Milan, Italy NIC LCA Larnaca, Cyprus NRN DUS Dusseldorf, Germany NRT TYO Tokyo, Japan ORD CHI Chicago, IL ORY PAR Paris, France PEK BJS Beijing, China PHG PHC Port Harcourt, Nigeria PVG SHA Shanghai, China RSW FMY Fort Myers, FL SAC SMF Sacramento, CA SBS HDN Steamboat Springs, CO SFB ORL Orlando, FL SSI BQK Brunswick, GA STN LON London, UK SVO MOW Moscow, Russia SZB KUL Kuala Lumpur, Malaysia THF BER Berlin, Germany
Routing Conventions and Guidelines
124
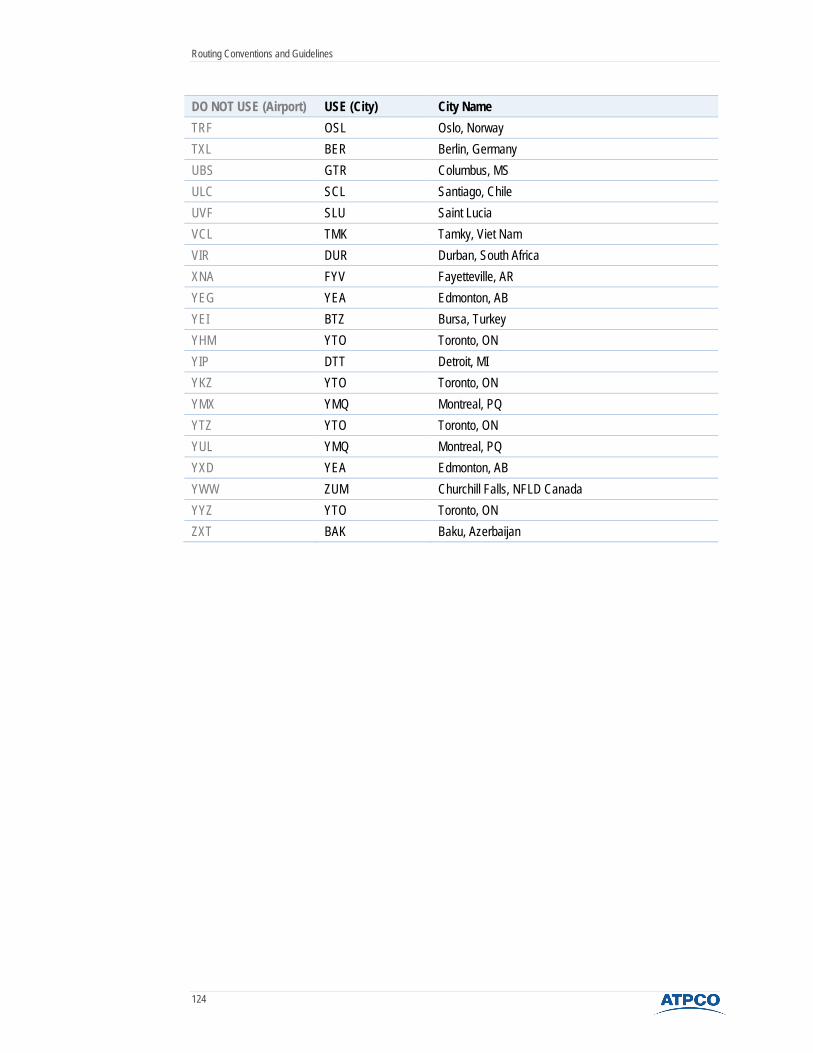
DO NOT USE (Airport) USE (City) City Name TRF OSL Oslo, Norway TXL BER Berlin, Germany UBS GTR Columbus, MS ULC SCL Santiago, Chile UVF SLU Saint Lucia VCL TMK Tamky, Viet Nam VIR DUR Durban, South Africa XNA FYV Fayetteville, AR YEG YEA Edmonton, AB YEI BTZ Bursa, Turkey YHM YTO Toronto, ON YIP DTT Detroit, MI YKZ YTO Toronto, ON YMX YMQ Montreal, PQ YTZ YTO Toronto, ON YUL YMQ Montreal, PQ YXD YEA Edmonton, AB YWW ZUM Churchill Falls, NFLD Canada YYZ YTO Toronto, ON ZXT BAK Baku, Azerbaijan
Routing Conventions and Guidelines
125
Standard formats should always be used when creating data • Transatlantic routings should be coded from left to right, starting with a point in
Area 1 and ending in a point in Area 2 or 3. For example: ATL-NYC-LON-PAR-CAI
• Transpacific routings should be coded from left to right, starting with a point in Area 1 and ending in a point in Area 2 or 3.
For example: CHI-LAX-TYO-MNL
• Western hemisphere routings should be coded from left to right in a north-to-south direction.
For example: YMQ-LAX-GUA-RIO
• Add-on routings should be coded from left to right (sideline city to the gateway city) when the routing is for points within Canada and the United States. In this scenario, Canada and the United States are considered to be the same country.
For example: PHX-CHI-NYC (NYC is the gateway)
• Add-on routings should be coded from left to right (gateway city to sideline city) when the routing is for points other than Canada or the United States.
For example: SYD-BNE-DRW (SYD is the gateway)
Symbols help to identify changes Filed tariff routings and US/CA domestic tariffs for foreign carriers must be symbolized when changes are made.
A Filed tariff is any international tariff that involves Canada or the United States. All other international tariffs are categorized as AllFares tariffs.
Symbols are used because routings are presented to governments on paper, in black and white. They make it easier for analysts to determine where changes took place.
A pair of parentheses indicates that a new city or carrier has been added to a map. For example, a line reading CLE-LON-(PAR)-MOW means that Paris was added to the map at the last update. When opening a new parenthesis, the system will automatically provide closing parenthesis and position the cursor in between the two so that additional data may be added easily.
A pair of brackets surrounding a letter X indicates that a city or carrier was deleted from a map. For example, a line reading CLE-LON-{X}-MOW means that the city between London
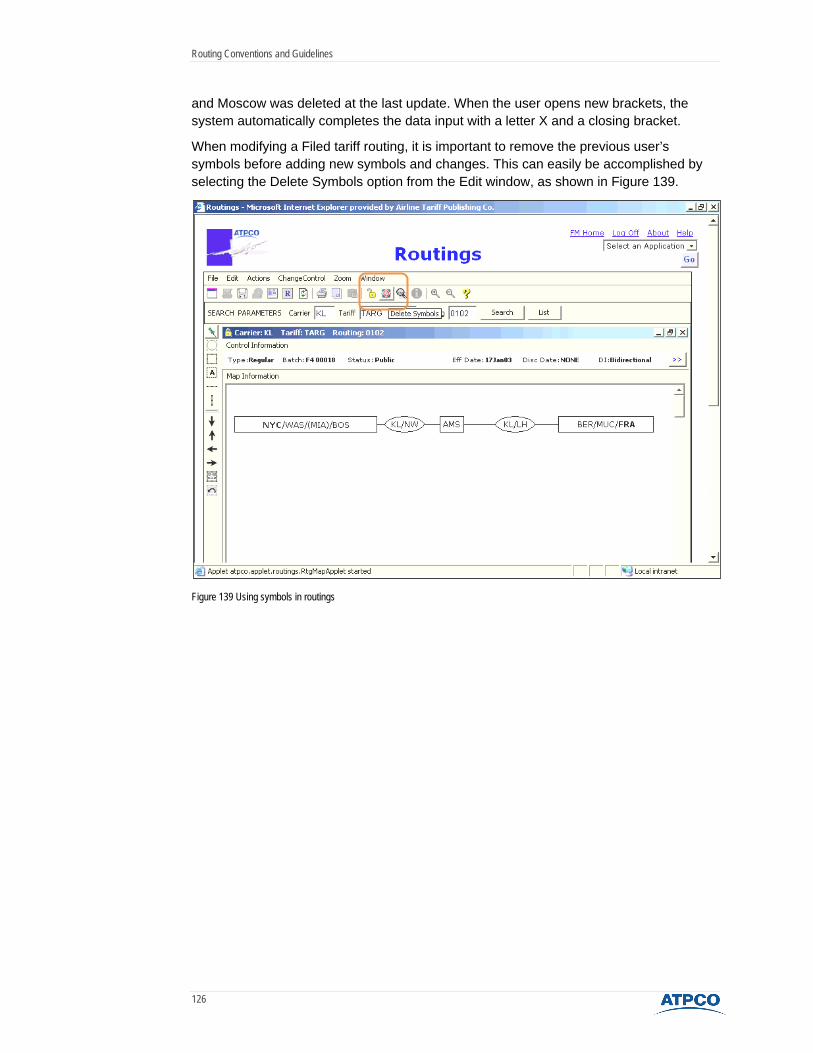
Routing Conventions and Guidelines
126
and Moscow was deleted at the last update. When the user opens new brackets, the system automatically completes the data input with a letter X and a closing bracket.
When modifying a Filed tariff routing, it is important to remove the previous user’s symbols before adding new symbols and changes. This can easily be accomplished by selecting the Delete Symbols option from the Edit window, as shown in Figure 139.
Figure 139 Using symbols in routings

Routing Conventions and Guidelines
127
How to determine which paper tariff pages to update Although carriers will now have the ability to modify routings using FareManager Routings, updates to the tariff pages—when required—will continue to be made by ATPCO.
• For International tariffs (includes international markets to/from US/CA) 1. Because the Canadian Transportation Agency (CTA) considers tariff pages as
the official filing for routings (maps and restrictions), carriers are responsible for instructing ATPCO when creating, modifying, or canceling online routings containing Canadian markets so that ATPCO can update the corresponding tariff pages.
2. Since its 1999 Final Rule Exemptions from Passenger Tariff-Filing Requirements, the United States Department of Transportation (DOT) no longer accepts tariff pages. However, although not required, most carriers continue requesting that tariff pages be updated in order to reflect modifications in routings containing US markets. If a carrier wishes to have tariff pages issued but chooses to update the online routing remotely, that carrier is still responsible for instructing ATPCO when creating, modifying or canceling online routings containing US markets so that ATPCO can update the corresponding tariff pages.
• For US/CA Domestic tariffs (includes all markets within US, within CA, or transborder between US and CA) 1. Other than for the tariff that supports Foreign Carriers (FC1/FCR), neither the
DOT nor the CTA requires tariff pages to be filed when routings are modified for US/CA Domestic tariffs. Although most routing tariffs do not require that tariff pages be updated, most carriers continue to request this option. As in the International tariffs above, if a carrier wishes to have tariff pages issued but chooses to update the online routing remotely, that carrier is still responsible for instructing ATPCO when creating, modifying, or canceling online routings so that ATPCO can update the corresponding tariff pages.

Routing Conventions and Guidelines
128
Instructing ATPCO to update tariff pages Carriers requesting that ATPCO update tariff pages because of government filing requirements and/or carrier’s preference should send an instruction to their usual Coding and Analysis and Processing team (e-mail address [email protected], where xx is the carrier code) immediately after updating the online routing.
The instruction should contain the following elements:
• Routing tariff
• Carrier
• Routing maps/restrictions containing amendments
• Paper tariff (if known)
Note: The actual modifications do not need to be indicated in the instruction.
Example Instruction
Please update corresponding pages in paper tariff XX-1 for the following WHRG routing maps/restrictions: 105, 110, and 500.
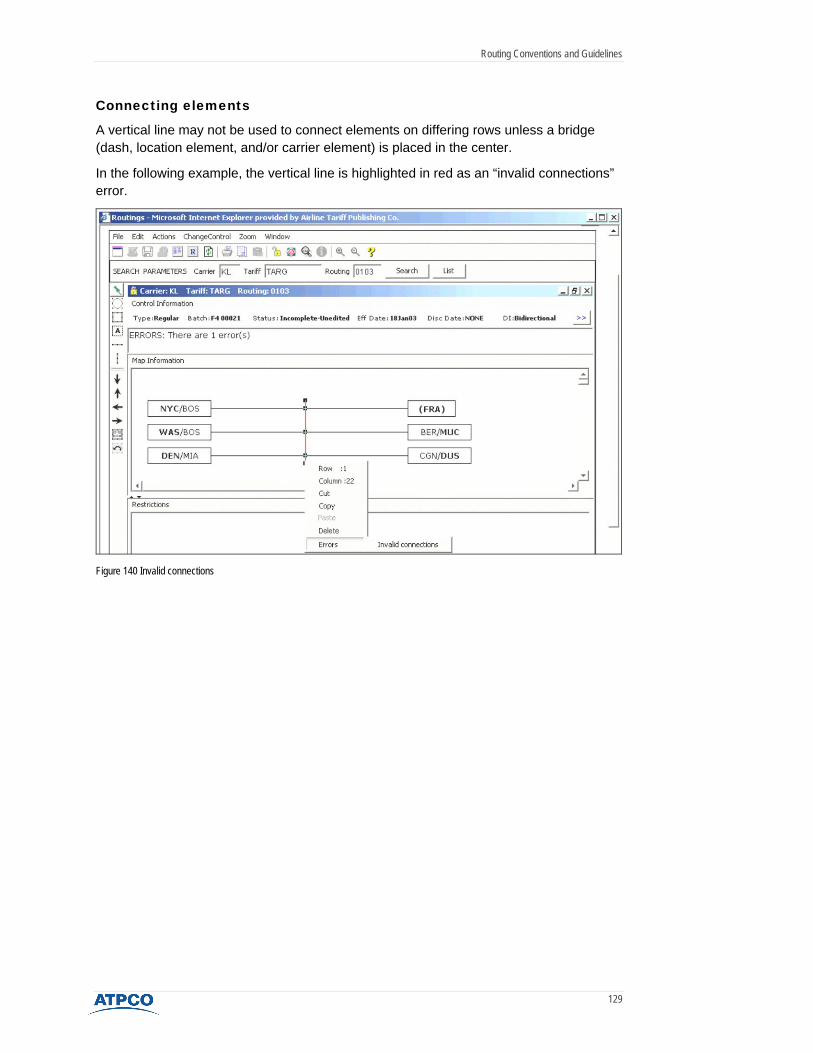
Routing Conventions and Guidelines
129
Connecting elements
A vertical line may not be used to connect elements on differing rows unless a bridge (dash, location element, and/or carrier element) is placed in the center.
In the following example, the vertical line is highlighted in red as an “invalid connections” error.
Figure 140 Invalid connections
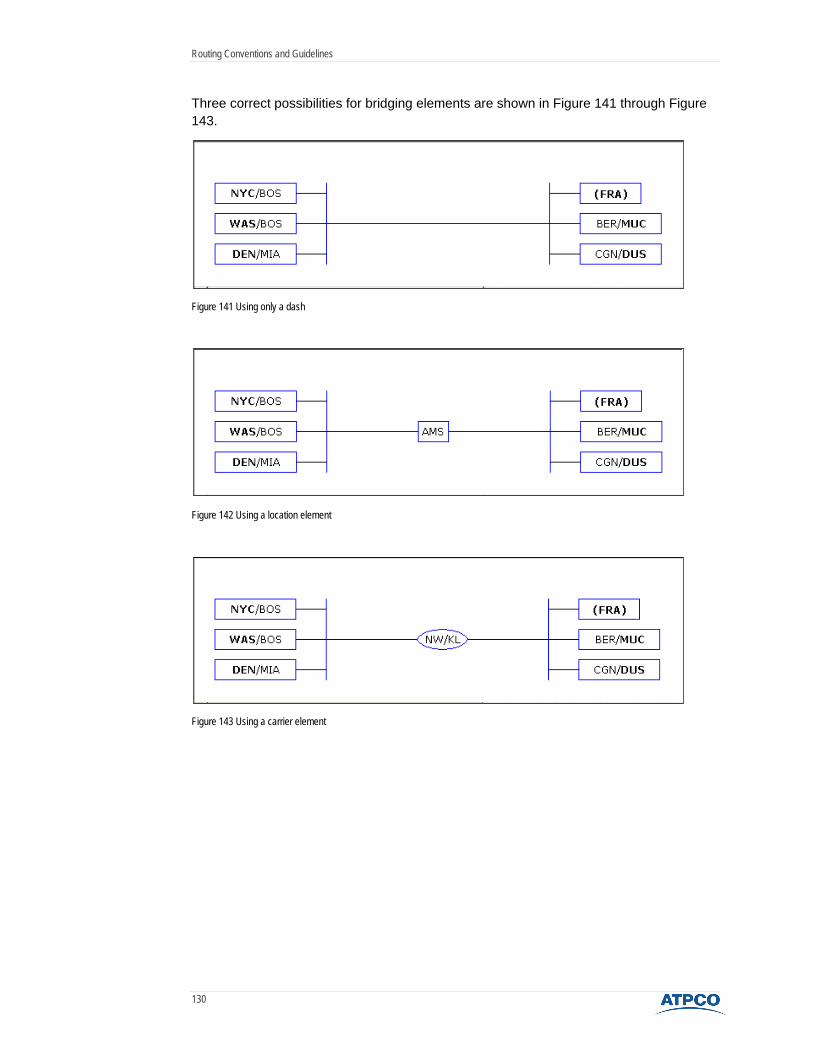
Routing Conventions and Guidelines
130
Three correct possibilities for bridging elements are shown in Figure 141 through Figure 143.
Figure 141 Using only a dash
Figure 142 Using a location element
Figure 143 Using a carrier element
Routing Conventions and Guidelines
131
Summary This module has described conventions and guidelines that ATPCO and carriers have designed to be applied to routing information.
Applying the conventions and guidelines that data providers and subscribers have provided for routing information is necessary for an accurate reflection of the carrier intent in fare data. Following these conventions and guidelines accurately and in a timely fashion makes the analyst’s work easier.


