

Force One
MDT
Technical Manual V 1.6

The information contained here are property of DIGITAX Automotive Electronics Italy, and extremely confidential. Any disclosure, copying, distribution to third party is strictly prohibited.
2
Contents
General concepts & architecture ..................................................................................................... 4
Main Features ..................................................................................................................................... 4
Block Diagram...................................................................................................................................... 7
Appearance ..................................................................................................................................... 8
Dimensions (in millimeters) ................................................................................................................ 8
Weight (in grams) ................................................................................................................................ 8
Views ................................................................................................................................................... 8
Left & Right ..................................................................................................................................... 8
Top ................................................................................................................................................... 9
Bottom............................................................................................................................................. 9
Docking Station ............................................................................................................................. 10
Views ................................................................................................................................................. 10
Front .............................................................................................................................................. 10
Rear with mounting bracket ......................................................................................................... 10
How to detach the Force One from its docking station .................................................................... 11
Step 1 ............................................................................................................................................. 11
Step 2 ............................................................................................................................................. 11
Step 3 ............................................................................................................................................. 11
How to Seal the Force One ............................................................................................................ 12
Regular Way of Sealing the Force One .............................................................................................. 12
Dashboard Fitting .......................................................................................................................... 13
Dashboard Fitting .......................................................................................................................... 14
Windscreen Fitting ........................................................................................................................ 15
Combo Antenna Installation .......................................................................................................... 16
Covers ........................................................................................................................................... 17
Main Connectors Panel ................................................................................................................. 17
Jumper Settings ................................................................................................................................. 19
USB/COM SEL-1 and USB/COM SEL-2 ........................................................................................... 19
USB INT/EXT (internal external) .................................................................................................... 19
RS485 TERM (120 Ohm terminator resistor) ................................................................................. 19
Connectors and Cables ...................................................................................................................... 20
Serial USB/COM – IN/OUT Connector ........................................................................................... 20
Digital I/O ...................................................................................................................................... 21
Mov Sensors .................................................................................................................................. 21
Deriv Box ....................................................................................................................................... 22
Power Connector ........................................................................................................................... 22

The information contained here are property of DIGITAX Automotive Electronics Italy, and extremely confidential. Any disclosure, copying, distribution to third party is strictly prohibited.
3
Mini USB Connector ...................................................................................................................... 22
Active Sync..................................................................................................................................... 22
Ports mapping ................................................................................................................................... 23
Serial COM ..................................................................................................................................... 23
Digital Input/Outputs ........................................................................................................................ 23
Outputs .......................................................................................................................................... 23
Inputs ............................................................................................................................................. 23
Sealing .......................................................................................................................................... 24
User and Demo Software .............................................................................................................. 25
Sample Applications .......................................................................................................................... 25
Autorun ......................................................................................................................................... 25
AITP ............................................................................................................................................... 26
GPSPub .......................................................................................................................................... 29
GSMCall ......................................................................................................................................... 29
InstallReg ....................................................................................................................................... 30
SaveReg ......................................................................................................................................... 30
SysUtils .......................................................................................................................................... 31
Terminal ........................................................................................................................................ 32
Test ................................................................................................................................................ 33
Backup and Restore ........................................................................................................................... 34
Developer’s CD .................................................................................................................................. 36
Active Sync (Usb Connection) ........................................................................................................... 37
Force One .NET libraries ................................................................................................................ 38
Aitp.Wrapper41 ................................................................................................................................. 38
ComTax2.Wrapper41 ........................................................................................................................ 38
DigitalIO.Wrapper41 ......................................................................................................................... 38
Digitax.Mobile.Modem ..................................................................................................................... 39
Digitax.Mobile.RAS ............................................................................................................................ 39
Digitax.Mobile.RAS.Link .................................................................................................................... 39
GPS.Wrapper41 ................................................................................................................................. 40
Source Code Examples ...................................................................................................................... 41
1. Modem-RAS sample application ........................................................................................... 41
2. ComTax2 (Taximeter) ............................................................................................................ 45
3. AITP (Odometer) .................................................................................................................... 47
4. AITP (Version and information) ............................................................................................. 48
5. AITP (Force One keyboard) .................................................................................................... 49
6. AITP (Light Dimmer) .............................................................................................................. 51
7. Digital I/O (IPreShut) ............................................................................................................. 53
8. GPS......................................................................................................................................... 54

The information contained here are property of DIGITAX Automotive Electronics Italy, and extremely confidential. Any disclosure, copying, distribution to third party is strictly prohibited.
4
General concepts & architecture
Main Features
Feature Description
Display Viewing area 4.3" diagonal
WQVGA 480x272 Resolution
Colour TFT LED Back-light Display
Display clearly viewable with 400 cd/m2
Ambient Light Sensor with 32 Steps Automatic Regolation
Touchscreen Full Automotive Rugged Touchscreen with configurable touch areas.
Extended Temperature Range
Pencil / Finger Type
CPUs Fanless Device with Primary CPU Samsung ARM 400MHz
Secondary CPU M16 for Automotive Intensive Tasks
Ram Memory 128MB RAM Memory
Storage Memory 128MB up to 256MB capacity of Internal Flash Memory
microSD HC (High Capacity compatible) socket
GPRS Modem GSM / GPRS Class 12
Modem can be powered on when the terminal is off.
Wake-up on ring programmable features
Board to Board connector pin to pin compatible with "GPRS (base)" "EDGE (option)" and "UMTS (option)" retrofit upgradable
Warm reset and cold reset (dedicated electronic circuit) available through API calls
2 Hardware RS232 Serial Ports available on the modem (Hardware MUX) allow both RAS and AT command from user applications
2 Sim Card slots with Software switcher available through API calls
Support international standard protocol (ETSI AT command set)
Supports RAS (Remote Access Service) dialup function
GPS / GPRS Rugged Combo antenna (option)
GPS Receiver Ublox 5 SuperSense Technology and Indoor Navigation, new generation GPS chipsets with improved precision and fast acquisition of position fix on start up and sleep mode
50 Channels, 1 Million correlators, GALILEO Compatible
Antenna Monitor (Disconnection and Short Circuit Detection / Protection)
Hot / Warm / Cold start time – 1 / 29 / 29 sec.
Supports international NMEA standard format and proprietary UBX Binary protocol
Messages interval up to 4 Hz Frequency
Warm reset and cold reset (dedicated electronic circuit) available through API calls
Assisted GPS (A-GPS) available
Dead Reckoning System (GPS + Gyroscope + Odometer) with EKF (Enhanced Kalmann Filter) (option)
GPS / GPRS Rugged Combo antenna (option)
USB Ports 2 USB Host (with USB Support for Mouse and Keyboard)
1 USB Device
Hardware Keys 9 Lighted and Software programmable Hardware Buttons
Power on key 1 Power On button
Serial Ports 2 Internal RS232 Serial Ports
8 RS232 Serial Ports Available through External DerivBox (option)
2 RS232 Serial Ports available on embedded meter to connect 2G IU, Printer and
The information contained here are property of DIGITAX Automotive Electronics Italy, and extremely confidential. Any disclosure, copying, distribution to third party is strictly prohibited.
5
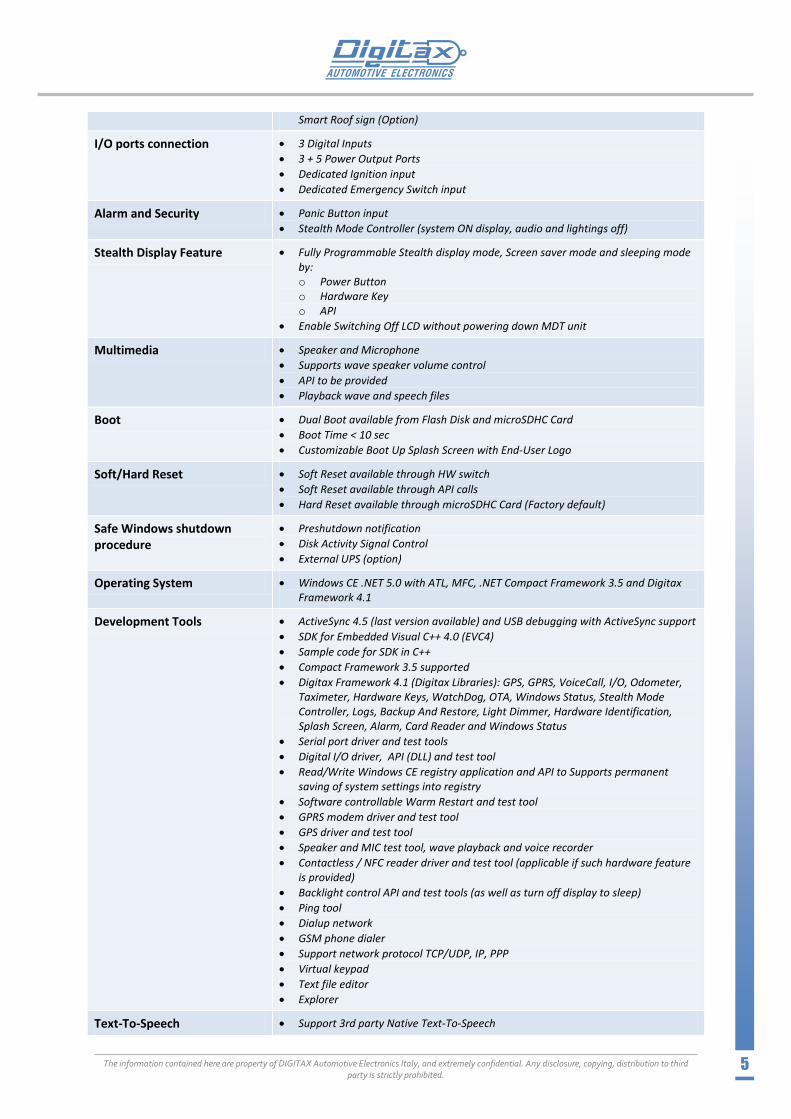
Smart Roof sign (Option)
I/O ports connection 3 Digital Inputs
3 + 5 Power Output Ports
Dedicated Ignition input
Dedicated Emergency Switch input
Alarm and Security Panic Button input
Stealth Mode Controller (system ON display, audio and lightings off)
Stealth Display Feature Fully Programmable Stealth display mode, Screen saver mode and sleeping mode by: o Power Button o Hardware Key o API
Enable Switching Off LCD without powering down MDT unit
Multimedia Speaker and Microphone
Supports wave speaker volume control
API to be provided
Playback wave and speech files
Boot Dual Boot available from Flash Disk and microSDHC Card
Boot Time < 10 sec
Customizable Boot Up Splash Screen with End-User Logo
Soft/Hard Reset Soft Reset available through HW switch
Soft Reset available through API calls
Hard Reset available through microSDHC Card (Factory default)
Safe Windows shutdown procedure
Preshutdown notification
Disk Activity Signal Control
External UPS (option)
Operating System Windows CE .NET 5.0 with ATL, MFC, .NET Compact Framework 3.5 and Digitax Framework 4.1
Development Tools ActiveSync 4.5 (last version available) and USB debugging with ActiveSync support
SDK for Embedded Visual C++ 4.0 (EVC4)
Sample code for SDK in C++
Compact Framework 3.5 supported
Digitax Framework 4.1 (Digitax Libraries): GPS, GPRS, VoiceCall, I/O, Odometer, Taximeter, Hardware Keys, WatchDog, OTA, Windows Status, Stealth Mode Controller, Logs, Backup And Restore, Light Dimmer, Hardware Identification, Splash Screen, Alarm, Card Reader and Windows Status
Serial port driver and test tools
Digital I/O driver, API (DLL) and test tool
Read/Write Windows CE registry application and API to Supports permanent saving of system settings into registry
Software controllable Warm Restart and test tool
GPRS modem driver and test tool
GPS driver and test tool
Speaker and MIC test tool, wave playback and voice recorder
Contactless / NFC reader driver and test tool (applicable if such hardware feature is provided)
Backlight control API and test tools (as well as turn off display to sleep)
Ping tool
Dialup network
GSM phone dialer
Support network protocol TCP/UDP, IP, PPP
Virtual keypad
Text file editor
Explorer
Text-To-Speech Support 3rd party Native Text-To-Speech

The information contained here are property of DIGITAX Automotive Electronics Italy, and extremely confidential. Any disclosure, copying, distribution to third party is strictly prohibited.
6
Software Navigation Support 3rd party map application and navigation software with SDK
System diagnostic tools On Field Test (OFT) OnBoard Diagnostic Utilities included, with Customizable CheckList to make tests of GPS Fix, GPS Antenna, GPRS Connectivity and Base Station Signal Quality, Odometer, Ignition, Panic Button, TouchScreen calibration, Hardware Keys, Ambient Light Sensor, Device version, OS Version, AITP Version, Taximeter, UPS and Battery Status, Roof Light, Navigation Software
All On Field Tests and enrolling features can be used during first installation and swap of devices
OS Image Loader Over The Air (OTA) OS image loader or microSDHC Card Image Loader
System Update Fleet Management
Professional OTA (Over The Air) Client allows the update of the whole Operating System and all the CPUs Firmware (option).
Professional OTA (Over The Air) Server with vehicles enrolling, group management and selective update, remote debugging and logging. Web based user interface (option)
Taximeter Embedded Taximeter (Full Firmware and TARIF OTA Programmable)
Power Supply 8 - 32 V with Surge Protector
Battery External UPS Battery Package, Standard Battery Pack 1 hour (option)
Mounting Removable Display with Docking Station
Professional Docking Station with align and locking guides provided
Docking Station may be locked with the terminal
All the External Connectors, Accessible slots (such as SIM Card, microSDHC, USB, etc.) and Screws are Sealed
Operating Temperature -20°C to 70°C
Humidity Humidity up to 95% non-condensing
Vibration Vibration Sine wave, 10 ~ 500 ~ 10Hz, 1.5G, 0.37oct/min 3 axis, 1hour/axis
Dust Ingress Protection All connectors covers sealed, no open holes
Dimension 94 mm x 186 mm x 30 mm (H x W x D)
Weight 260 g
The information contained here are property of DIGITAX Automotive Electronics Italy, and extremely confidential. Any disclosure, copying, distribution to third party is strictly prohibited.
7
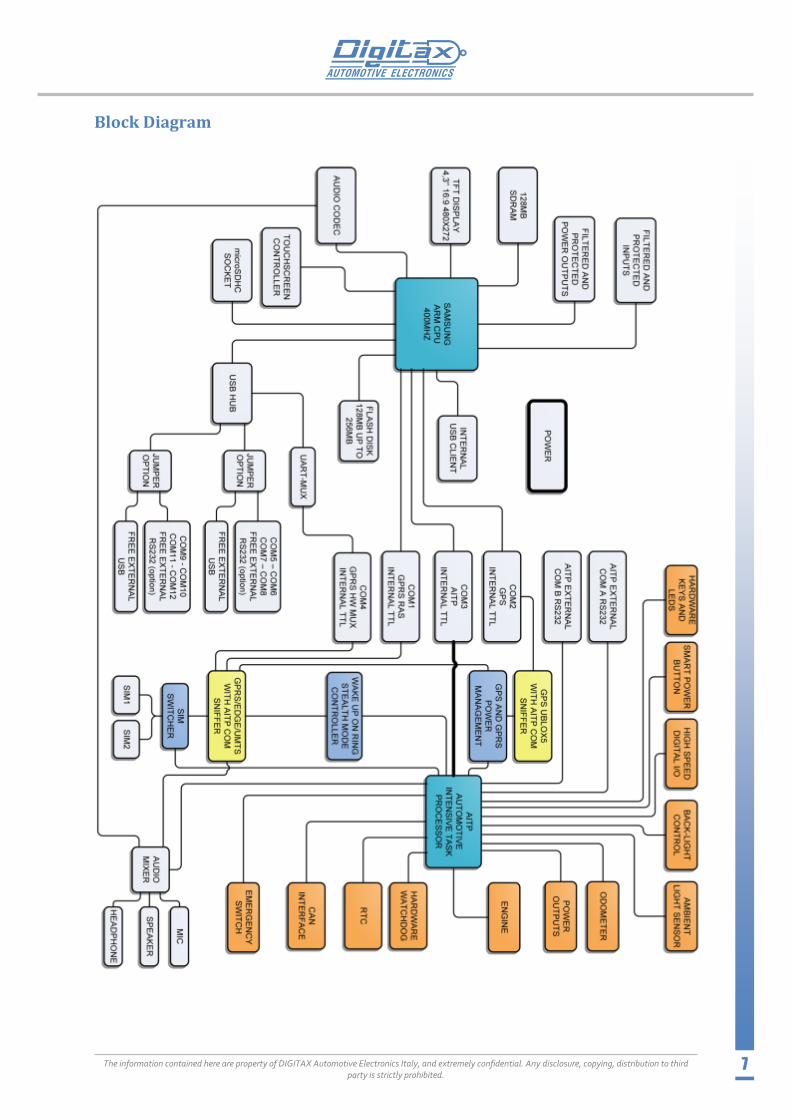
Block Diagram
The information contained here are property of DIGITAX Automotive Electronics Italy, and extremely confidential. Any disclosure, copying, distribution to third party is strictly prohibited.
8
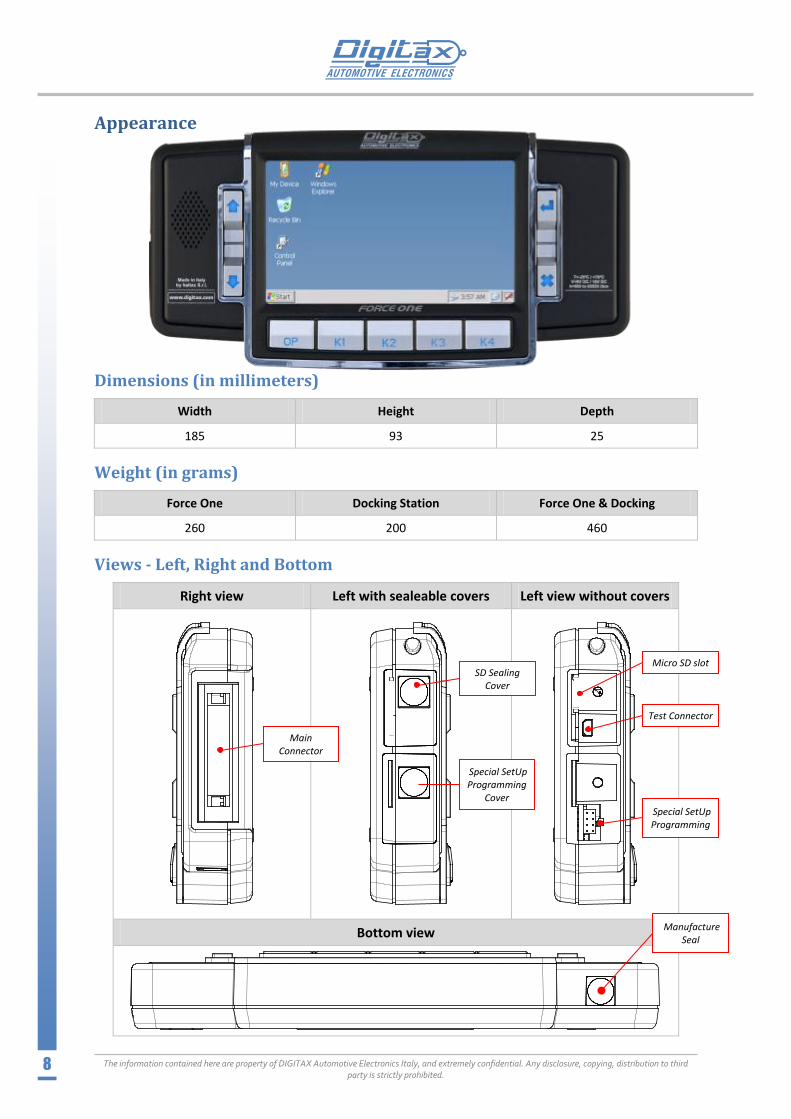
Appearance
Dimensions (in millimeters)
Width Height Depth
185 93 25
Weight (in grams)
Force One Docking Station Force One & Docking
260 200 460
Views - Left, Right and Bottom
Right view Left with sealeable covers Left view without covers
Bottom view
Micro SD slot
Test Connector
Special SetUp Programming
Special SetUp Programming
Cover
Main Connector
SD Sealing Cover
Manufacture Seal
The information contained here are property of DIGITAX Automotive Electronics Italy, and extremely confidential. Any disclosure, copying, distribution to third party is strictly prohibited.
9
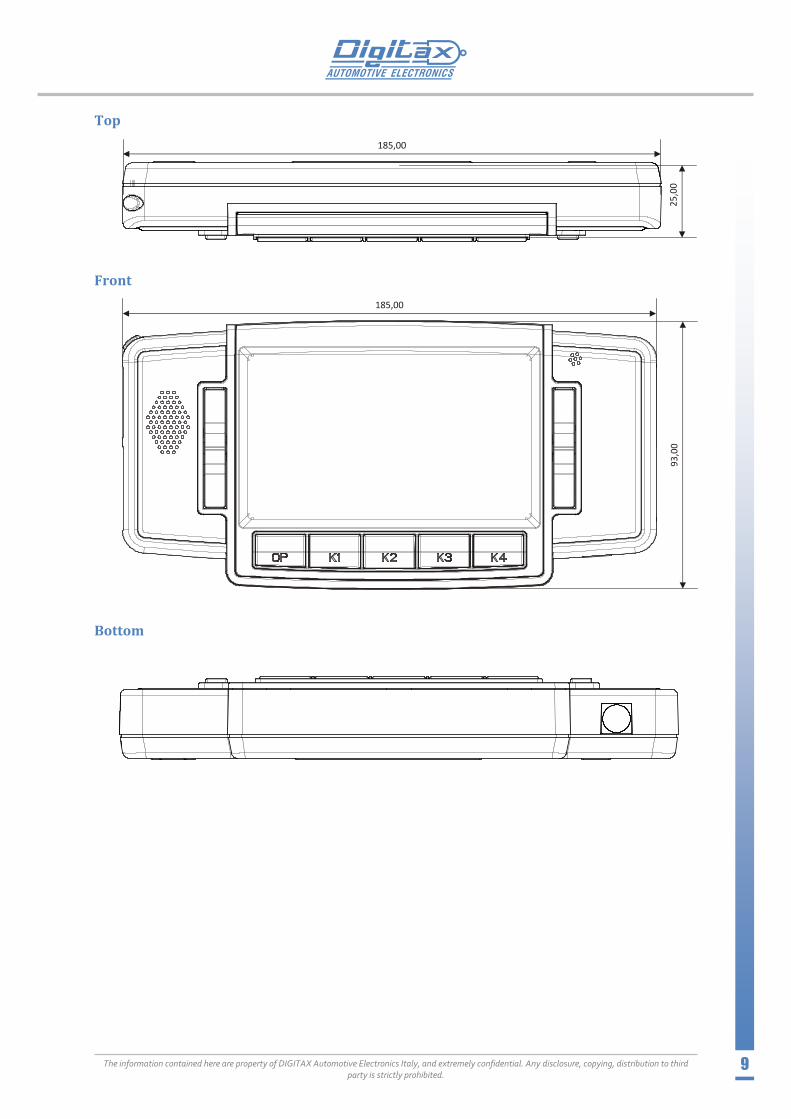
Top
Front
Bottom

The information contained here are property of DIGITAX Automotive Electronics Italy, and extremely confidential. Any disclosure, copying, distribution to third party is strictly prohibited.
10
Docking Station
Views
Front
Rear with mounting bracket

The information contained here are property of DIGITAX Automotive Electronics Italy, and extremely confidential. Any disclosure, copying, distribution to third party is strictly prohibited.
11
How to detach the Force One from its docking station
Step 1
Press down the release lever
Step 2
While keeping down the release lever, push the Force One right side.
Step 3
Continue to push right side slightly raising the Force One until it is completely detached.

The information contained here are property of DIGITAX Automotive Electronics Italy, and extremely confidential. Any disclosure, copying, distribution to third party is strictly prohibited.
12
How to Seal the Force One
Regular Way of Sealing the Force One
Sealing Force One to Docking Block Sealing Point
By default Force One is removable, you can block it by fixing a screw in the point to avoid the Force One removal.

The information contained here are property of DIGITAX Automotive Electronics Italy, and extremely confidential. Any disclosure, copying, distribution to third party is strictly prohibited.
13
Dashboard Fitting
The information contained here are property of DIGITAX Automotive Electronics Italy, and extremely confidential. Any disclosure, copying, distribution to third party is strictly prohibited.
14
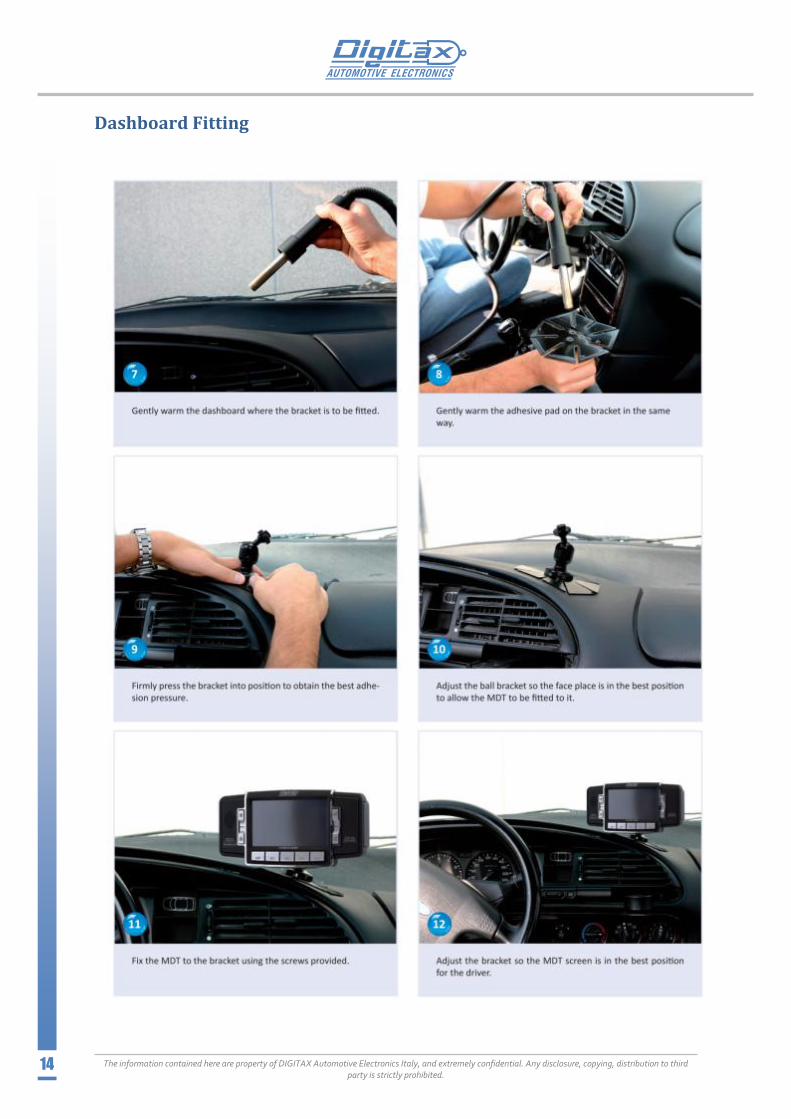
Dashboard Fitting

The information contained here are property of DIGITAX Automotive Electronics Italy, and extremely confidential. Any disclosure, copying, distribution to third party is strictly prohibited.
15
Windscreen Fitting
The information contained here are property of DIGITAX Automotive Electronics Italy, and extremely confidential. Any disclosure, copying, distribution to third party is strictly prohibited.
16
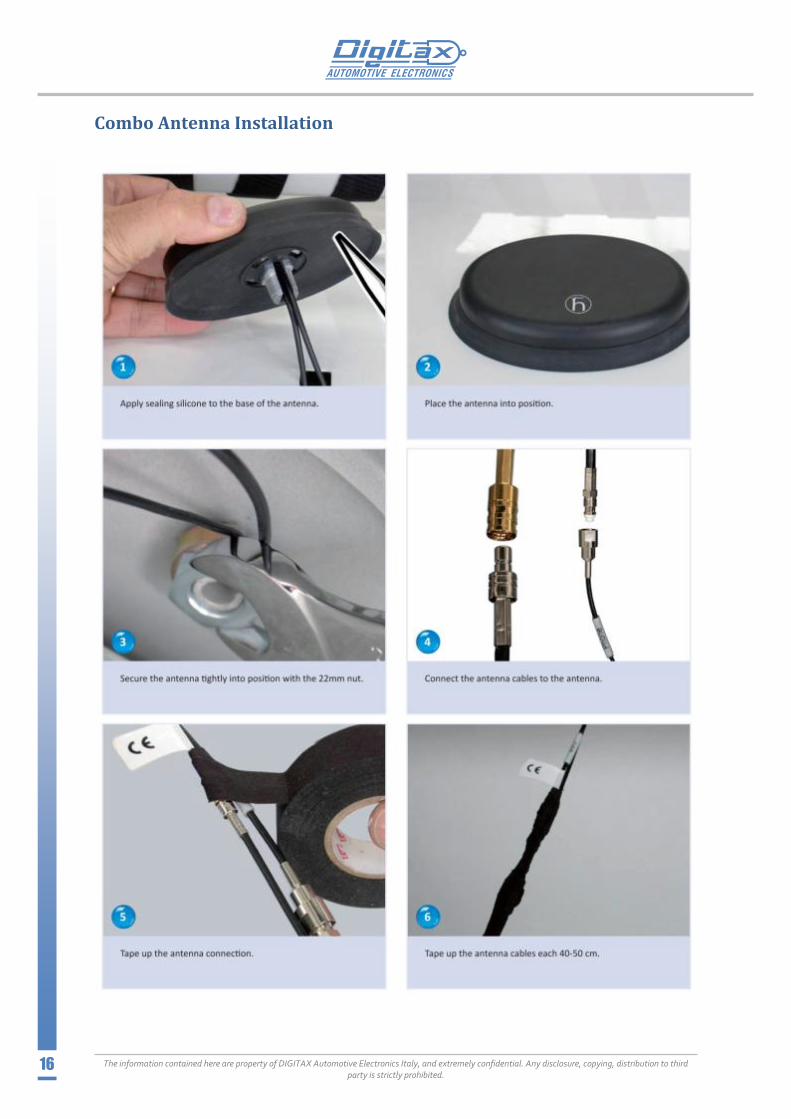
Combo Antenna Installation

The information contained here are property of DIGITAX Automotive Electronics Italy, and extremely confidential. Any disclosure, copying, distribution to third party is strictly prohibited.
17
Covers
Main Connectors Panel
SIM & USB Cover
Main connectors Cover
SIM Card 1 Holder Host
USB port
Mini Client USB port for ActiveSync Connection
GPRS Antenna MMCX jack
GPS Antenna SMB plug
Mov Sensors Connector
Power Connector
Hub Connector
Digital I/O
Serial USB/COM I/O
HeadPhone Jack
SIM Card 2 Holder

The information contained here are property of DIGITAX Automotive Electronics Italy, and extremely confidential. Any disclosure, copying, distribution to third party is strictly prohibited.
18
Force One Exploded View
Docking Exploded View

The information contained here are property of DIGITAX Automotive Electronics Italy, and extremely confidential. Any disclosure, copying, distribution to third party is strictly prohibited.
19
Jumper Settings
USB/COM SEL-1 and USB/COM SEL-2
Used to select alternative RS232 or USB output. It is a jumper selection:
For RS232 OUTPUT (COM6)
For USB OUTPUT (USB 2)
USB INT/EXT (internal external)
Used to select the fixed USB port to inner cable connector or built-in USB connector:
For built-in USB connector
For inner connector
RS485 TERM (120 Ohm terminator resistor)
Used to select this device as chain end in RS485 environ (it is on request Force One option):
Open
120 Ohm terminator

The information contained here are property of DIGITAX Automotive Electronics Italy, and extremely confidential. Any disclosure, copying, distribution to third party is strictly prohibited.
20
Microphone
Used to select this device as chain end in RS485 environ (it is on request Force One option):
Internal
External
2nd Speaker
Used to select this device as chain end in RS485 environ (it is on request Force One option):
External Speaker
Power 1 and 2
Connectors and Cables
Serial USB/COM – IN/OUT Connector
USB Internal/external, RS-232/485:
PIN FUNCTION
1 GND
2 USB1-P
3 USB2 + 5V POWER 500 mA
4 USB2-P / COM6 RX
5 GND COM 5
6 COM5 RX
PIN FUNCTION
7 USB1 GND
8 USB1-N
9 USB1 + 5V POWER 500 mA
10 USB2-N / COM6 TX
11 USB2 GND / COM6 GND
12 COM5 TX
Note for Development Cable By default, the USB port is the same as the top USB host connector.
6
12
5
11
4 3 2 1
10 9 8 7
The information contained here are property of DIGITAX Automotive Electronics Italy, and extremely confidential. Any disclosure, copying, distribution to third party is strictly prohibited.
21
Digital I/O
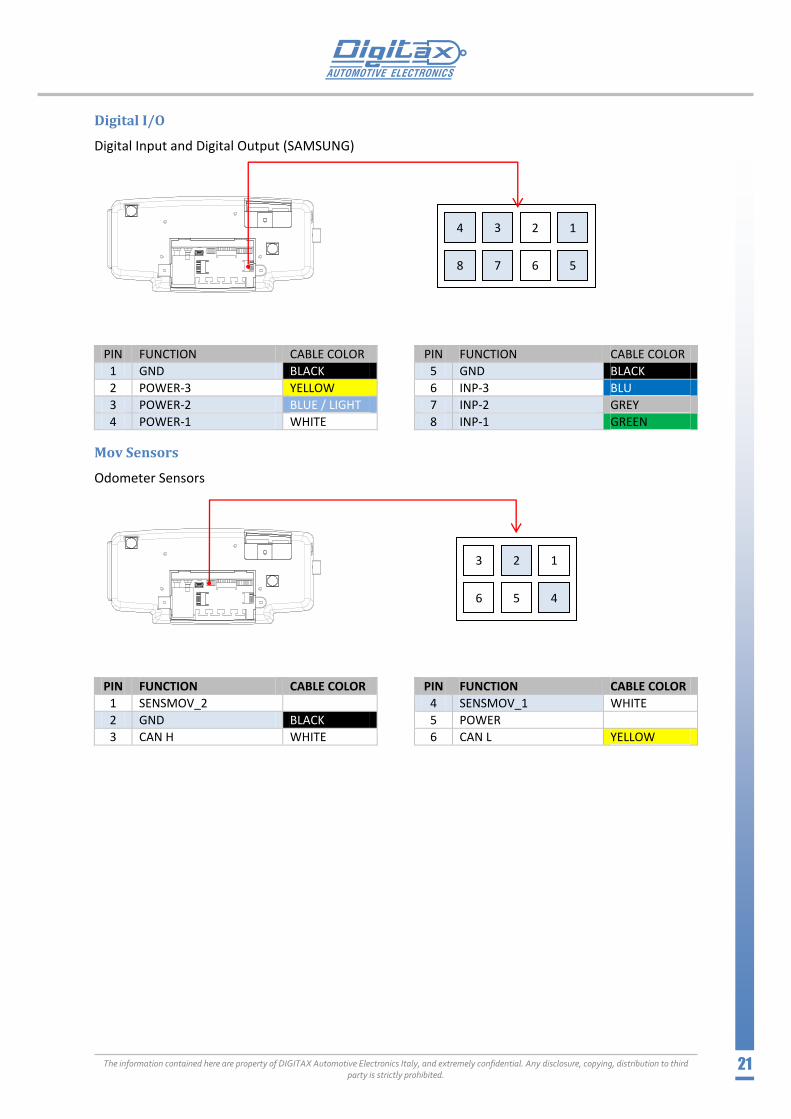
Digital Input and Digital Output (SAMSUNG)
PIN FUNCTION CABLE COLOR
1 GND BLACK
2 POWER-3 YELLOW
3 POWER-2 BLUE / LIGHT
4 POWER-1 WHITE
PIN FUNCTION CABLE COLOR
5 GND BLACK
6 INP-3 BLU
7 INP-2 GREY
8 INP-1 GREEN
Mov Sensors
Odometer Sensors
PIN FUNCTION CABLE COLOR
1 SENSMOV_2
2 GND BLACK
3 CAN H WHITE
PIN FUNCTION CABLE COLOR
4 SENSMOV_1 WHITE
5 POWER
6 CAN L YELLOW
1 2 3 4
8 7 6 5
1 2 3
6 5 4

The information contained here are property of DIGITAX Automotive Electronics Italy, and extremely confidential. Any disclosure, copying, distribution to third party is strictly prohibited.
22
Deriv Box
Taximeter Printer and COM
PIN FUNCTION 1 GND
2 TX2
3 RX2
4 AUX2
5 AUX1
PIN FUNCTION 6 TX0
7 RX0
8 PIO1
9 +8 / 32V
10 PIO0
Power Connector
General Power and Signals:
PIN FUNCTION CABLE COLOR
1 POWER-4 YELLOW
2 POWER-3 GREEN
3 POWER-2 VIOLET
4 POWER-1 GRAY
5 GND BLACK
6 ENGINE BLUE
7 +8/32V RED
8 +8/32V RED
PIN FUNCTION CABLE COLOR
9 POWER-5 WHITE
10 POWER-5 WHITE
11 PASS/S PINK
12 + LIGHTS BROWN
13 GND BLACK
14 GND BLACK
15 +8/32V RED
16 +8/32V RED
Mini USB Connector
Used to connect the Force One to a PC via Microsoft ActiveSync. You can use a standard USB “A” ->
mini USB “B” cable.
Active Sync
Go to page 33 for details to activate or deactivate it.
1 2 3
8 7 6
4 5
9 10
1 2 3
11 10 9
4 5
12 13
6 7 8
16 15 14
The information contained here are property of DIGITAX Automotive Electronics Italy, and extremely confidential. Any disclosure, copying, distribution to third party is strictly prohibited.
23
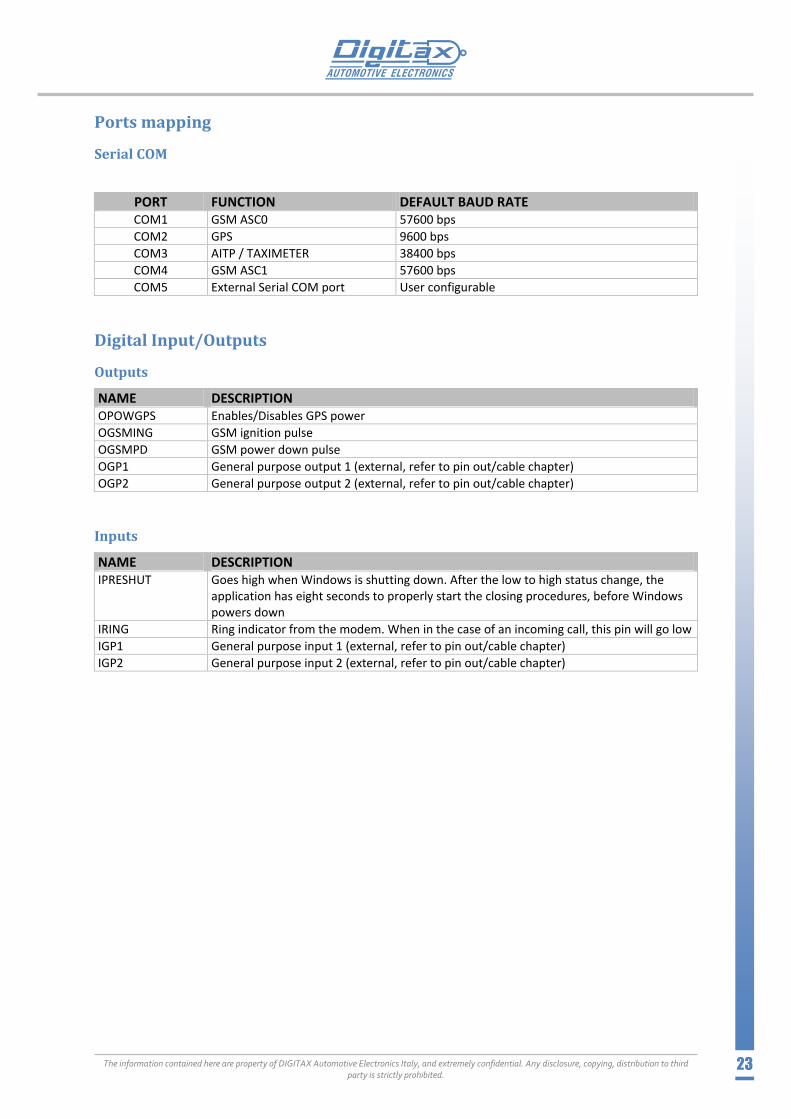
Ports mapping
Serial COM
PORT FUNCTION DEFAULT BAUD RATE COM1 GSM ASC0 57600 bps
COM2 GPS 9600 bps
COM3 AITP / TAXIMETER 38400 bps
COM4 GSM ASC1 57600 bps
COM5 External Serial COM port User configurable
Digital Input/Outputs
Outputs
NAME DESCRIPTION OPOWGPS Enables/Disables GPS power
OGSMING GSM ignition pulse
OGSMPD GSM power down pulse
OGP1 General purpose output 1 (external, refer to pin out/cable chapter)
OGP2 General purpose output 2 (external, refer to pin out/cable chapter)
Inputs
NAME DESCRIPTION IPRESHUT Goes high when Windows is shutting down. After the low to high status change, the
application has eight seconds to properly start the closing procedures, before Windows powers down
IRING Ring indicator from the modem. When in the case of an incoming call, this pin will go low
IGP1 General purpose input 1 (external, refer to pin out/cable chapter)
IGP2 General purpose input 2 (external, refer to pin out/cable chapter)

The information contained here are property of DIGITAX Automotive Electronics Italy, and extremely confidential. Any disclosure, copying, distribution to third party is strictly prohibited.
24
Sealing
There are four sealing points in the Force One Docking Station:
1) Docking Station Sealing Point
To avoid manomissions by users opening the docking station
2) SIM & USB Sealing Point .
To avoid access to the Sim Card and the Usb port
3) Main Connectors Cover Sealing Point
To avoid access to cable connections.
4) Force One to Docking Block Sealing Point
By default FO is removable, you can block it by fixing a screw in the point to avoid the FO
removal.
Cover Sealing Point
1 - Docking Station Sealing Point
2 - SIM & USB Sealing Point
4 - FO to Docking Block Sealing Point
3 - Main connectors Cover Sealing Point
(3MA x 25mm)

The information contained here are property of DIGITAX Automotive Electronics Italy, and extremely confidential. Any disclosure, copying, distribution to third party is strictly prohibited.
25
User and Demo Software
Sample Applications
The Force One MDT is supplied with several applications developed by Digitax. Some of them are system applications that perform several tasks necessary to get the full hardware functionalities, some other are sample applications used to demonstrate the internal hardware. These applications are located in the \Hard Disk\SysApps folder.
All of them have been developed using some custom DLLs useful for interfacing digital I/O, serial ports, AITP functionalities and the other internal hardware.
Those DLLs are part of the Software Development Kit provided with the Force One MDT, and the source code of those applications is available as example for the developers.
Autorun
As soon as Windows CE is started, the “Autorun.exe” program is launched.
It is a system application that take care of many tasks:
Power up and initializes GPS and GSM modem;
Updates AITP firmware if the file ”MDT_40.hex” is found in the ”\Hard Disk\SysApps\Box” folder;
Updates AITP setup if the file ” EESetup.ait” is found in the ”\Hard Disk\SysApps\Box” folder;
Updates Embedded Taximeter setup if the file ”FxMitsu.m16” is found in the ”\Hard Disk\SysApps\Box” folder;
Copies all DLL’s that are in the ”\Hard Disk\ ” folder to Windows folder so all the other applications are able to use them without having local copies.
Copies all desktop links that are in the ”\Hard Disk\SysApps\Desk” folder to the Desktop
Runs the “.exe” files listed in the ”\Hard Disk\RunOnce.txt” file, then clears the file.
Runs the “.exe” files listed in the ”\Hard Disk\ RunList.txt” file
You can freely use the services provided by the Autorun application.
For example, in order to run your application(s) every time the MDT starts, simply add the full exe name to the RunList.txt file.

The information contained here are property of DIGITAX Automotive Electronics Italy, and extremely confidential. Any disclosure, copying, distribution to third party is strictly prohibited.
26
AITP
Automotive Intensive Task Processor
This application is made as a ”control panel” to interface the AITP processor. It allows to view current setup, or to monitor all activities that are under control of the AITP.
Is useful both as a system application and as a sample application for developers, because it completely uses the DLL interface modules provided by Digitax to simplify the application development.
Dimmer
This panel allows you to modify TFT brightness, and to view the current light intensity and also to change the setup table for the Automatic Dimmer mode.
When in the Automatic Mode, TFT brightness is regulated by the AITP using the external light intensity reading. For every light intensity value, from 0 to 7, the corresponding Dimmer intensity is taken from the Dimmer Table and used to set the brightness. The user or the customer can modify the Dimmer table according to his own preference.
When the Manual Dimmer Mode is used, the brightness can be regulated from this panel or if you want from the user application, calling the corresponding function in the supplied Protoc.DLL.

The information contained here are property of DIGITAX Automotive Electronics Italy, and extremely confidential. Any disclosure, copying, distribution to third party is strictly prohibited.
27
Odometer
The AITP also provides Odometer functionalities to the applications. Travelled distance can be either read, or read & resetted by DLL functions. This is done by application polling. Otherwise it is possible to program 2 Overspeed and 1 Underspeed events, setting the speed threshold that need to be monitored and for how many seconds this threshold have to be overcame before AITP declares the event and sends the notification message. Another message is sent to the application when the speed event is finished.
Wheel Code is the number of pulses received for every kilometer travelled. To detect that, it is possible to follow this calibration procedure:
1. Go with the cars where you can travel 1 Kilometer more accurately as possible. 2. Set value 1 as Wheel Code 3. Select ”Ask 1 then reset” to reset counters 4. Select ”Ask Speed every 1 s” 5. Start the car and travel for 1 Kilometer looking a known reference 6. The final value read in ”Distance from last Reset” is the Wheel Code to be set.
Keyboard
With this tab you can check the functionality of each of the 9 hardware keys and LEDs
The information contained here are property of DIGITAX Automotive Electronics Italy, and extremely confidential. Any disclosure, copying, distribution to third party is strictly prohibited.
28
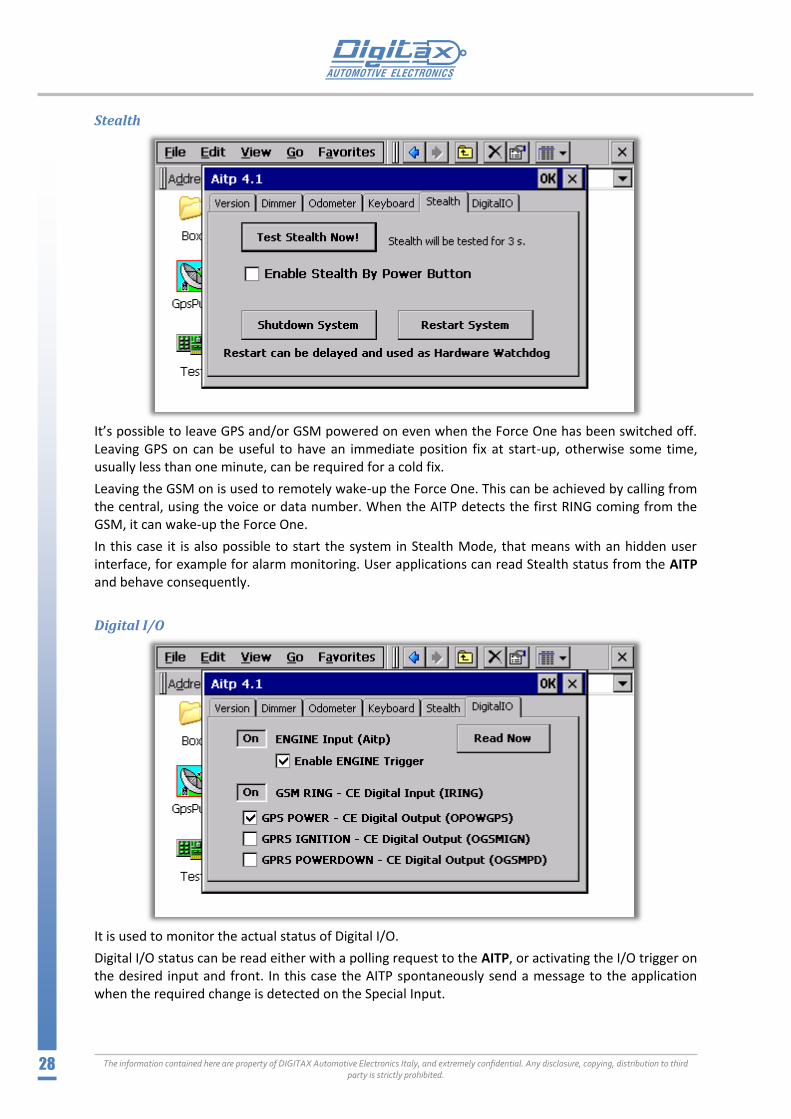
Stealth
It’s possible to leave GPS and/or GSM powered on even when the Force One has been switched off. Leaving GPS on can be useful to have an immediate position fix at start-up, otherwise some time, usually less than one minute, can be required for a cold fix.
Leaving the GSM on is used to remotely wake-up the Force One. This can be achieved by calling from the central, using the voice or data number. When the AITP detects the first RING coming from the GSM, it can wake-up the Force One.
In this case it is also possible to start the system in Stealth Mode, that means with an hidden user interface, for example for alarm monitoring. User applications can read Stealth status from the AITP and behave consequently.
Digital I/O
It is used to monitor the actual status of Digital I/O.
Digital I/O status can be read either with a polling request to the AITP, or activating the I/O trigger on the desired input and front. In this case the AITP spontaneously send a message to the application when the required change is detected on the Special Input.
The information contained here are property of DIGITAX Automotive Electronics Italy, and extremely confidential. Any disclosure, copying, distribution to third party is strictly prohibited.
29
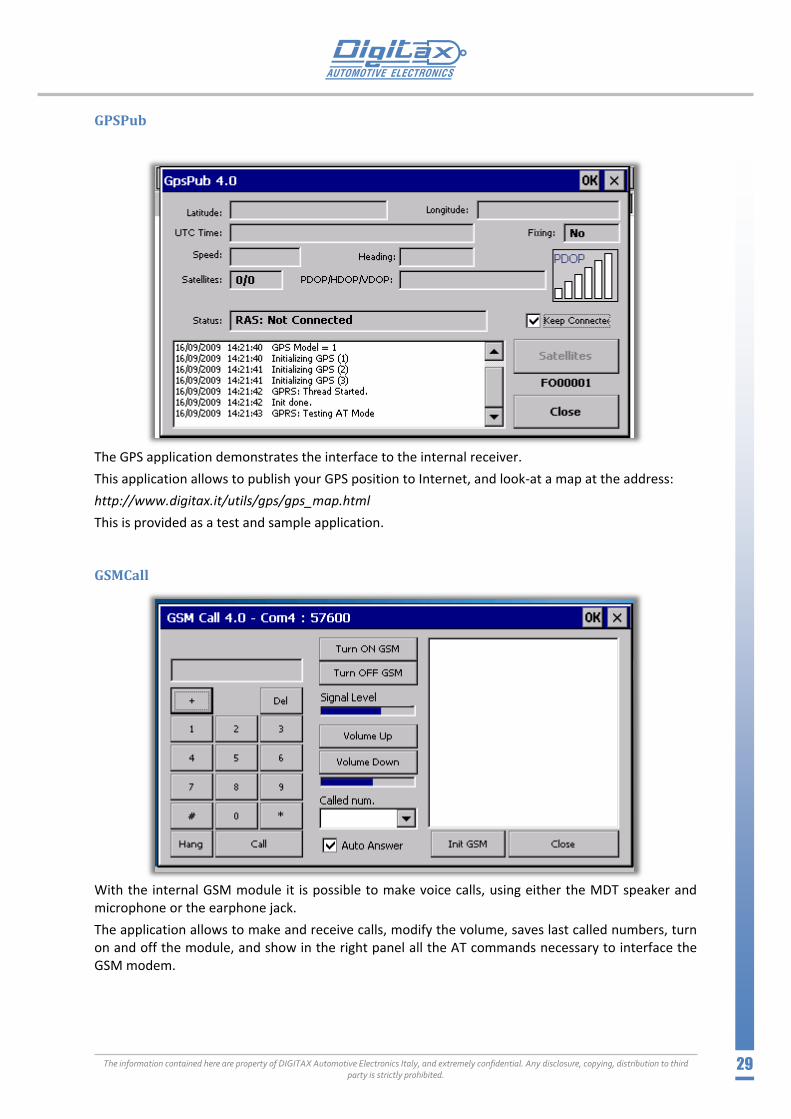
GPSPub
The GPS application demonstrates the interface to the internal receiver.
This application allows to publish your GPS position to Internet, and look-at a map at the address:
http://www.digitax.it/utils/gps/gps_map.html
This is provided as a test and sample application.
GSMCall
With the internal GSM module it is possible to make voice calls, using either the MDT speaker and microphone or the earphone jack.
The application allows to make and receive calls, modify the volume, saves last called numbers, turn on and off the module, and show in the right panel all the AT commands necessary to interface the GSM modem.

The information contained here are property of DIGITAX Automotive Electronics Italy, and extremely confidential. Any disclosure, copying, distribution to third party is strictly prohibited.
30
InstallReg
This system application is needed to import a customized reg file into the Registry.
Don’t forget to use the “SaveReg” application (described below) to save your reg file once installed.
SaveReg
This system application is needed to save all information that the Operating System or the applications save into the Registry.
It’s necessary because Windows Registry, and also all the folders except the ones in the Hard Disk or the Storage Card, are not saved to disk but to RAM, and so their content is lost when the Force One is powered off. This assures that Windows boots from a known clean situation every time. To save registry changes you need to use this program.
We suggest to the developers not to use the registry to save application’s configurations files, but to save them in “Hard Disk” folder instead. This avoids the necessity of continuous registry savings, which is a discouraged operation. Using configuration files also allows a faster and safer update of application’s parameters, because only a small configuration file has to be transferred instead of the whole big Windows Registry.

The information contained here are property of DIGITAX Automotive Electronics Italy, and extremely confidential. Any disclosure, copying, distribution to third party is strictly prohibited.
31
SysUtils
This is a collection of utilities that allows to set some advanced system parameters. It is divided in three tabs called “Options 1”, “Options 2” and “Options 3”.
Options 1
Here you can set the amount of memory reserved for storage and applications. You can optimize the system performances by changing these values as you prefer.
Furthermore, from this panel you can enable or disable the autorun of external USB devices.
Options 2
CE STARTUP OPTIONS
These system options allows to set many Windows CE startup options.
GPS STARTUP
You can set the static threshold for the embedded GPS receiver.

The information contained here are property of DIGITAX Automotive Electronics Italy, and extremely confidential. Any disclosure, copying, distribution to third party is strictly prohibited.
32
Options 3
This panel permits the creation of a full System and application image into a SD memory card.
For detailed information about this feature, please refer to page 48: “Backup and Restore” chapter.
Furthermore you can load an OEM logo at the windows startup to customize the Force One for your costumers.
Terminal
This is a simple ASCI terminal that you can use for debugging and testing of peripherals connected via serial ports
The information contained here are property of DIGITAX Automotive Electronics Italy, and extremely confidential. Any disclosure, copying, distribution to third party is strictly prohibited.
33
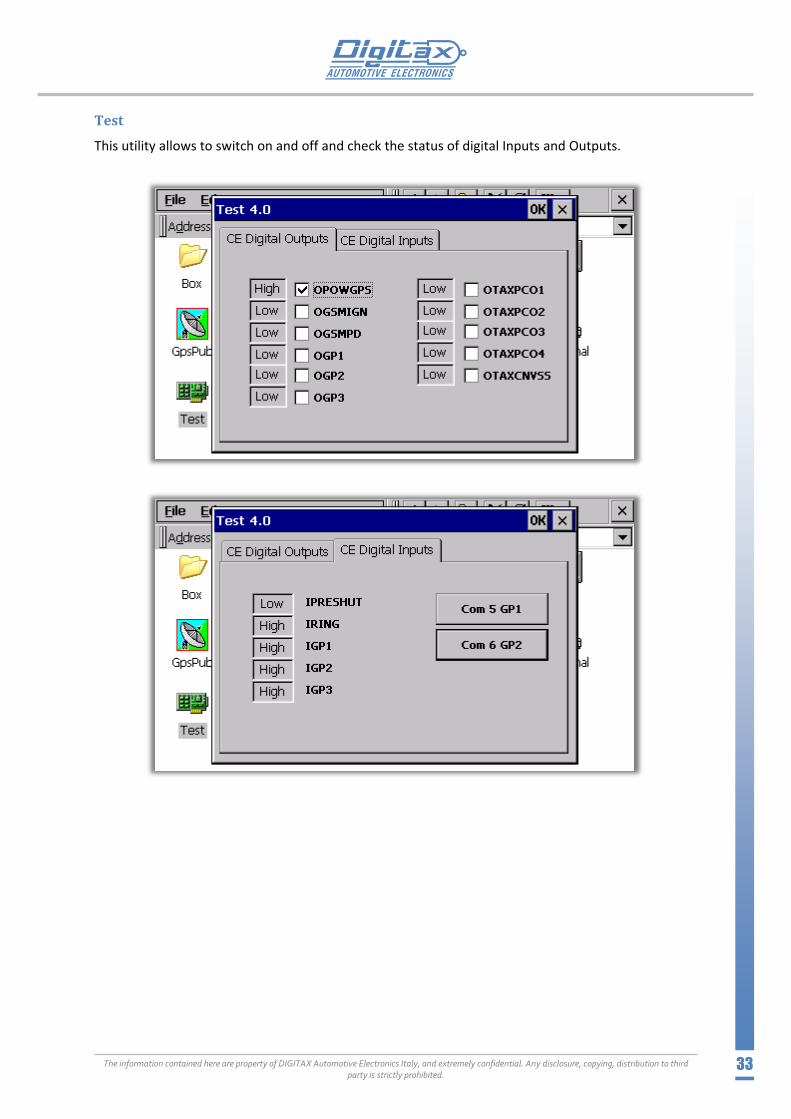
Test
This utility allows to switch on and off and check the status of digital Inputs and Outputs.

The information contained here are property of DIGITAX Automotive Electronics Italy, and extremely confidential. Any disclosure, copying, distribution to third party is strictly prohibited.
34
Backup and Restore
In order to make a Restore SD is enough to run the \Hard Disk\SysApps\SysUtils\SysUtils.exe program.
This program creates an special folder structure inside of the SD card ready to transfer all the contents of the current system (including Windows CE registry, DLLs, new drivers, user programs, etc.).
By pressing the Create System Restore SD, the program will copy all necessary files and prepare the SD for the next reboot, where the Backup procedure will take place.
When asked if “Do you want to copy also the Windows CE Image to SD?” consider the copy time is about 15 minutes. If “No” is chosen, you can always copy the image from the provided CD (located at \Sd\BOOT\Restore\IMG_FULL\NK.BIN) to the SD (at \BOOT\RESTORE\IMG_FULL\NK.BIN), after the backup procedure is finished.

The information contained here are property of DIGITAX Automotive Electronics Italy, and extremely confidential. Any disclosure, copying, distribution to third party is strictly prohibited.
35
Once the ForceOne reboots, the backup procedure will begin. It will launch a minimal Windows CE image to copy all protected files and the Windows registry to the SD card.
When the procedure ends, you can copy the Windows CE image provided, if the answer was NO when asked to copy the Windows CE image.
At this point the SD card is ready to restore.
All the backup/restore operations can be started by turning off the device, inserting the SD card, and pressing the Power Up button for 15 seconds. If successfully started, it can be seen on the screen the backup/restore procedure instead of the usual splash screen.
The information contained here are property of DIGITAX Automotive Electronics Italy, and extremely confidential. Any disclosure, copying, distribution to third party is strictly prohibited.
36
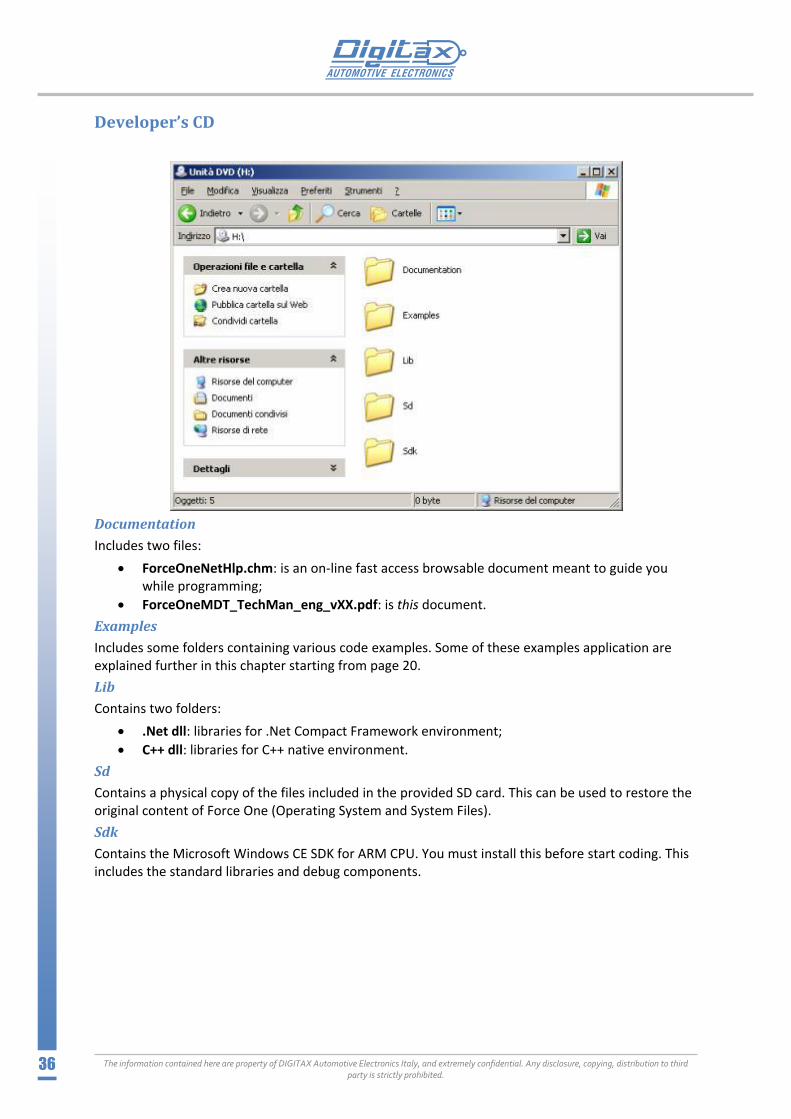
Developer’s CD
Documentation
Includes two files:
ForceOneNetHlp.chm: is an on-line fast access browsable document meant to guide you while programming;
ForceOneMDT_TechMan_eng_vXX.pdf: is this document.
Examples
Includes some folders containing various code examples. Some of these examples application are explained further in this chapter starting from page 20.
Lib
Contains two folders:
.Net dll: libraries for .Net Compact Framework environment;
C++ dll: libraries for C++ native environment.
Sd
Contains a physical copy of the files included in the provided SD card. This can be used to restore the original content of Force One (Operating System and System Files).
Sdk
Contains the Microsoft Windows CE SDK for ARM CPU. You must install this before start coding. This includes the standard libraries and debug components.

The information contained here are property of DIGITAX Automotive Electronics Italy, and extremely confidential. Any disclosure, copying, distribution to third party is strictly prohibited.
37
Active Sync (Usb Connection)
To avoid accidental or intentional damage by default the active sync is disabled, to enable it open control panel, double click on pc connection icon and check the “Allow connection with desktop computer when device is attached” box and press ok (see picture for details). To save this configuration go to \hard disk\sysapps and lunch savereg.exe and press “save windows registry”.
Notes: Before distribution device to users it’s recomanded to disable active sync connection in order to avoid the users to access to the system.

The information contained here are property of DIGITAX Automotive Electronics Italy, and extremely confidential. Any disclosure, copying, distribution to third party is strictly prohibited.
38
Force One .NET libraries Developers using .NET Compact Framework can build their mobile applications over the ForceOne .NET libraries developed by Digitax. The libraries abstract the communication protocols between the applications and the underling device to allow a more flexible and quick development.
In this summary are introduced the main features of these library:
Aitp.Wrapper41
ComTax2.Wrapper41
DigitalIO.Wrapper41
Digitax.Mobile.Modem
Digitax.Mobile.RAS
Digitax.Mobile.RAS.Link
GPS.Wrapper41
Aitp.Wrapper41
Aitp.Wrapper41 library provides a .NET interface to interact with the AITP hardware. With this library the developer can control several ForceOne/MDT/MCU specific features such as:
light dimmer;
hardware watchdog;
odometer;
hardware keys;
analog inputs (MDT and MCU only);
digital inputs/outputs (AITP-managed);
power status;
alarm and stealth mode;
temperature and fans (MDT and MCU only);
magnetic card reader;
Windows status;
other hardware informations (like hardware ID);
The developer can initialize only the needed callbacks (for example with the AITPInitOdometer() method only the odometer event will be initialized).
ComTax2.Wrapper41
CamTax2.Wrapper41 library provides a .NET interface for the Digitax ComTax2 protocol; it allows to communicate with every Digitax ComTax2-enabled device like taximeters, AITP, or smart standalone displays. It contains methods and events to send and receive ComTax2 binary messages and to manage the serial port. It is possible to have Aitp.Wrapper41 and ComTax2.Wrapper41 working on the same serial port, for example on the ForceOne device the underline unmanaged layer will avoid deadlock in concurrent requests.
DigitalIO.Wrapper41
DigitalIO.Wrapper41 library provides a .NET interface to handle windows-managed digital inputs/outputs. The digital I/O allows to monitor and switch on/off several system devices like GPS, modem, speaker and more. One useful digital input is the IPRESHUT which goes High when Windows is shutting down; monitoring this digital input applications can perform a safe closure.

The information contained here are property of DIGITAX Automotive Electronics Italy, and extremely confidential. Any disclosure, copying, distribution to third party is strictly prohibited.
39
Digitax.Mobile.Modem
This library contains the classes used to interact with the embedded modem. The main class to use is ModemManager which exposes all the methods, properties and events to work. It allows to view phone network status such as registration, signal strength, operator name and more. By dedicated events the application is updated in real-time about the changes. Modem manager can work with PIN-locked SIM simply by entering the correct PIN code in the ModemManager.PIN property; the manager will try to write the PIN to the SIM only if there are at least 3 remaining attempts. If only 2 attempts left the manager will disable itself to avoid a definitive SIM-lock and permit a hand-removal of PIN. If the SIM property is not set the manager will trigger the ModemManager.OnPINRequest event specifying the remaining attempts. The application can then provide the PIN code and can specify if the SIM must be unlocked definitively. If no PIN code is provided the manager will disable itself. Note that the manager will not unlock definitively the SIM if the PIN is provided by the PIN property; the SIM will remain unlocked until modem is powered on. Instead, if the PIN code is provided by the event, the manager will not check the remaining attempts; the count of the remaining attempts will be only notified to the delegate as an argument. The manager than has the goal of maintaining the modem always usable, so if the application needs to power off the modem, the correct procedure is to call the ModemManager.PowerOffModem() method and then disable the manager.
Other features of the modem manager are:
the possibility of send/receive SMS messages;
the possibility of answer/hang incoming voice calls;
the possibility of get information (such as ID and signal strength) about the neighbor cell stations;
the possibility of send/receive direct AT commands to the modem.
Digitax.Mobile.RAS
This library contains the classes to work with the RAS entries configured on the system. By the RasManager's static methods the application can retrieve the configured RAS entry names, the configured RAS-enabled devices and the active RAS connections.
The RasEntryManager is the class to use to handle a specific RAS entry name. It allows to open (dial) or close (hang up) a RAS connection; when its state changes the RAS entry manager notifies it by triggering the ConnectionStateChanged event. When the entry is connected the RAS entry manager can retrieve the connection's system statistics (bytes sent, bytes received, connection time, ...) and the network projection information such as the IP address assigned by the telephony provider.
Digitax.Mobile.RAS.Link
This library extends the Digitax.Mobile.RAS library. The main class in this namespace is LinkManager which has the goal of keeping the RAS link always up. It implements logics to Dial or HangUp the RAS entry as best as possible using a working instance of the ModemManger if provided in the constructor. If the modem manager instance is provided the RAS entry will be connected only if the network status is valid to begin to establish a connection. Otherwise it will be hanged-up if there is no more network availability for some time avoiding connection inconsistencies between mobile device and the telephony provider. If the modem is not registered to the network, RAS entry dial will begin as soon as network availability comes back again.
The RAS link manager then has the ability to evaluate the link status. If an application requests a re-dial evaluation by the EvaluateRedial() method, the manager will query all the delegates registered

The information contained here are property of DIGITAX Automotive Electronics Italy, and extremely confidential. Any disclosure, copying, distribution to third party is strictly prohibited.
40
to the OnRasUtilizerHasLinkQuery event asking if they are ok to re-dial the RAS entry. If some of them do not agree, the link manger will perform a ping (ICMP protocol) to the configured reference end points. If the ping echo replies come back the manager assumes that the RAS connection is still valid so the re-dial request will be rejected. If no reference end point is set, the library needs that every delegate allow re-dial to begin the HangUp-Dial procedure.
GPS.Wrapper41
GPS.Wrapper41 library provides a .NET interface to the GPS receiver; it allows the applications to have positioning information without knowledge of the NMEA protocol used by the receivers to output their data. It triggers events that return specific structures containing position and satellites data; are also implemented some specific commands for Antaris and Ublox receivers which allows to monitor if the GPS antenna is connected or if it is in shortcut. If GPS is not communicating the library will automatically turn the receiver off and then on. A specific event (EvtGPSReInitCallback) notifies the user when the GPS has been reset.
Note
For further information, please refer to the ForceOneNetHlp.chm online reference guide in the developer’s CD, located at Documentation folder.

The information contained here are property of DIGITAX Automotive Electronics Italy, and extremely confidential. Any disclosure, copying, distribution to third party is strictly prohibited.
41
Source Code Examples
1. Modem-RAS sample application
This application shows how to use modem and RAS libraries on the Digitax Force One:
The modem library allows to get real time information about telephony environment;
The RAS library simply permits to open (dial) and close (hang-up) a remote dial-up connection providing its system name.
The RAS link library tries to keep the RAS entry connected in the best way by analyzing modem status.
The application shows the modem status in real time, allows to dial and hang-up the RAS connection, enable and disable the RAS link manager. It also demonstrates how to send SMS messages.
Sample code: using System;
using System.Collections.Generic;
using System.ComponentModel;
using System.Data;
using System.Drawing;
using System.Text;
using System.Windows.Forms;
using System.Threading;
using System.Net;
using Digitax.Mobile.Modem;
using Digitax.Mobile.RAS;
using Digitax.Mobile.RAS.Link;
namespace Digitax.Mobile.Demo
{
public partial class Demo : Form
{
private const string MODEM_PORT_NAME = "COM4:"; // set here Com Port Name (leave 'COM4:' for the ForceOne)
private const int MODEM_PORT_BAUD = 57600; // set here Com Port baud rate (leave 57600 for the ForceOne)
private const string RAS_ENTRY_NAME = "GPRS"; // set here the system RAS connection name
private ModemManager _modem;
private RasEntryManager _rasEntry;
private LinkManager _rasLink;
public Demo()
{
InitializeComponent();
// instantiate modem manager
_modem = new ModemManager(MODEM_PORT_NAME, MODEM_PORT_BAUD);
//_modem.PIN = "1234"; // set here you SIM PIN
// register to modem events
_modem.CellNameChanged += new CellNameChangedHandler(_modem_CellNameChanged);
_modem.DataProtocolChanged += new DataProtocolChangedHandler(_modem_DataProtocolChanged);
_modem.IMEIChanged += new IMEIChangedHandler(_modem_IMEIChanged);
_modem.IMSIChanged += new IMSIChangedHandler(_modem_IMSIChanged);
_modem.NetOperatorChanged += new NetworkOperatorChangedHandler(_modem_NetOperatorChanged);
_modem.NetStatusChanged += new NetworkStatusChangedHandler(_modem_NetStatusChanged);
_modem.SignalStrengthChanged += new SignalStrengthChangedHandler(_modem_SignalStrengthChanged);
_modem.SimCardStatusChanged += new SimCardStatusChangedHandler(_modem_SimCardStatusChanged);
_modem.RxSms += new RxSmsHandler(_modem_RxSms);
// check for the existance of the RAS connection name
bool connectionNameFound = false;
foreach (RasEntryName rasName in RasManager.GetEntryNames())
{
if (rasName.Name == RAS_ENTRY_NAME)
{
connectionNameFound = true;
break;
}
}
if (!connectionNameFound)
{
// RAS connection name DOES NOT exist
MessageBox.Show(
"The RAS connection '" + RAS_ENTRY_NAME +
"' does not seem to be configured. RAS connection will not be opened.",
"Demo");
return;
}
// create RAS and Link managers
_rasEntry = new RasEntryManager(RAS_ENTRY_NAME);
_rasLink = new LinkManager(_rasEntry, _modem, false);
// register to RAS events
_rasEntry.ConnectionStateChanged +=
new RasEntryManager.ConnectionStateChangedHandler(_rasEntry_ConnectionStateChanged);
The information contained here are property of DIGITAX Automotive Electronics Italy, and extremely confidential. Any disclosure, copying, distribution to third party is strictly prohibited.
42
// register to Link events
_rasLink.IpAddressChanged += new IpAddressChangedHandler(_rasLink_IpAddressChanged);
}
private void Demo_Load(object sender, EventArgs e)
{
btnDial.Enabled = false;
btnHangUp.Enabled = false;
// enable managers
_modem.Enabled = true;
if (_rasLink != null)
{
_rasLink.Enabled = true;
chkRasLinkManagerEnabled.Checked = true;
}
else
{
chkRasLinkManagerEnabled.Enabled = false;
}
}
private void Demo_Closing(object sender, CancelEventArgs e)
{
// dispose managers
if (_rasLink != null) _rasLink.Dispose();
if (_rasEntry != null)
{
_rasEntry.HangUp();
_rasEntry.Dispose();
}
_modem.Dispose();
}
#region Modem events handlers
/* This region contains the handlers for the events fired by the modem manager
*/
void _modem_SimCardStatusChanged(SimCardStatus status)
{
if (InvokeRequired)
{
BeginInvoke(new SimCardStatusChangedHandler(_modem_SimCardStatusChanged), new object[] { status });
return;
}
switch (status)
{
case SimCardStatus.Absent:
case SimCardStatus.Present:
txtSim.Text = status.ToString();
break;
default:
txtSim.Text = "";
break;
}
if (status == SimCardStatus.Present)
txtSim.Text += " [" + _modem.SimID.ToString() + "]";
}
void _modem_SignalStrengthChanged(int strength)
{
if (InvokeRequired)
{
BeginInvoke(new SignalStrengthChangedHandler(_modem_SignalStrengthChanged), new object[] { strength });
return;
}
if (strength == 99)
{
txtSignalStrength.Text = "no signal";
}
else
{
txtSignalStrength.Text = strength.ToString() + "/5";
}
}
void _modem_NetStatusChanged(NetworkStatus newStatus)
{
if (InvokeRequired)
{
BeginInvoke(new NetworkStatusChangedHandler(_modem_NetStatusChanged), new object[] { newStatus });
return;
}
switch (newStatus)
{
case NetworkStatus.NotRegistered:
case NetworkStatus.Registered:
case NetworkStatus.RegisteredRoaming:
case NetworkStatus.RegistrationDenied:
case NetworkStatus.Scanning:
txtNetStatus.Text = newStatus.ToString();
break;
default:
txtNetStatus.Text = "";
break;
}

The information contained here are property of DIGITAX Automotive Electronics Italy, and extremely confidential. Any disclosure, copying, distribution to third party is strictly prohibited.
43
}
void _modem_NetOperatorChanged(string newOperatorName)
{
if (InvokeRequired)
{
BeginInvoke(new NetworkOperatorChangedHandler(_modem_NetOperatorChanged), new object[] { newOperatorName });
return;
}
txtNetOperator.Text = newOperatorName;
}
void _modem_IMSIChanged(string newIMSI)
{
if (InvokeRequired)
{
BeginInvoke(new IMSIChangedHandler(_modem_IMSIChanged), new object[] { newIMSI });
return;
}
txtImsi.Text = newIMSI;
}
void _modem_IMEIChanged(string newIMEI)
{
if (InvokeRequired)
{
BeginInvoke(new IMEIChangedHandler(_modem_IMEIChanged), new object[] { newIMEI });
return;
}
txtImei.Text = newIMEI;
}
void _modem_DataProtocolChanged(DataProtocolType protocolType)
{
if (InvokeRequired)
{
BeginInvoke(new DataProtocolChangedHandler(_modem_DataProtocolChanged), new object[] { protocolType });
return;
}
switch (protocolType)
{
case DataProtocolType.EDGE:
case DataProtocolType.GPRS:
case DataProtocolType.None:
txtDataProtocol.Text = protocolType.ToString();
break;
default:
txtDataProtocol.Text = "";
break;
}
}
void _modem_CellNameChanged(string newCellName)
{
if (InvokeRequired)
{
BeginInvoke(new CellNameChangedHandler(_modem_CellNameChanged), new object[] { newCellName });
return;
}
txtCellName.Text = newCellName;
}
void _modem_RxSms(Sms sms)
{
MessageBox.Show(
"NEW SMS\r\n" +
"==============\r\n" +
sms.Time.ToString() + "\r\n\r\n" +
"From " + sms.Sender + "\r\n" +
sms.Text,
"New SMS");
}
#endregion
#region RAS events handlers
/* This region contains the handlers for the events fired by the RAS entry manager
*/
void _rasEntry_ConnectionStateChanged(RasConnectionState oldConnState, RasConnectionState newConnState)
{
if (InvokeRequired)
{
BeginInvoke(
new RasEntryManager.ConnectionStateChangedHandler(_rasEntry_ConnectionStateChanged),
new object[] { oldConnState, newConnState });
return;
}
txtRasStatus.Text = newConnState.ToString();
switch (newConnState)
{
case RasConnectionState.Connected:
btnDial.Enabled = false;
btnHangUp.Enabled = true;
break;
case RasConnectionState.Disconnected:
btnDial.Enabled = true;
btnHangUp.Enabled = false;

The information contained here are property of DIGITAX Automotive Electronics Italy, and extremely confidential. Any disclosure, copying, distribution to third party is strictly prohibited.
44
break;
default:
btnDial.Enabled = false;
btnHangUp.Enabled = false;
break;
}
}
#endregion
#region Link events handlers
/* This region contains the handlers for the events fired by the RAS Link manager
*/
void _rasLink_IpAddressChanged(IPAddress ipAddress)
{
if (InvokeRequired)
{
BeginInvoke(new IpAddressChangedHandler(_rasLink_IpAddressChanged), new object[] { ipAddress });
return;
}
if (ipAddress == null)
txtIpAddress.Text = "";
else
txtIpAddress.Text = ipAddress.ToString();
}
#endregion
private void btnClose_Click(object sender, EventArgs e)
{
btnClose.Enabled = false;
Close();
}
private void btnSmsSend_Click(object sender, EventArgs e)
{
btnSmsSend.Enabled = false;
_modem.SendSMS(txtSmsRecipient.Text, txtSmsText.Text, SmsSendCallback);
}
private void SmsSendCallback(AT_Rx rx)
{
MessageBox.Show("Send result: " + rx.Type.ToString(), "SMS");
BeginInvoke(new ThreadStart(
delegate()
{
btnSmsSend.Enabled = true;
}));
}
private void btnDial_Click(object sender, EventArgs e)
{
btnDial.Enabled = false;
_rasEntry.BeginDial();
}
private void btnHangUp_Click(object sender, EventArgs e)
{
btnHangUp.Enabled = false;
_rasEntry.BeginHangUp();
}
private void chkRasLinkManagerEnabled_CheckStateChanged(object sender, EventArgs e)
{
_rasLink.Enabled = chkRasLinkManagerEnabled.Checked;
if (chkRasLinkManagerEnabled.Checked == false)
txtIpAddress.Text = "N/A";
}
}
}

The information contained here are property of DIGITAX Automotive Electronics Italy, and extremely confidential. Any disclosure, copying, distribution to third party is strictly prohibited.
45
2. ComTax2 (Taximeter)
This application shows how to use COMTAX2 protocol to interact with a Digitax Taximeter. It demonstrates how to ask for some data to the taximeter (e.g. Odometer, Status…) and how to interpret taximeter answers. For a complete specification, please refer to the COMTAX2 protocol guide.
Sample code: using System;
using System.Collections.Generic;
using System.ComponentModel;
using System.Data;
using System.Drawing;
using System.Text;
using System.Windows.Forms;
namespace Digitax.Sample.ComTax2Test
{
//simple program that shows a simple way to interact with the embedded or external taximeter
public partial class Comtax2TestForm : Form
{
//camtax 2 wrapper instance
ComTax2.Wrapper41.ComTax2Core _ct2 = new ComTax2.Wrapper41.ComTax2Core();
public Comtax2TestForm()
{
InitializeComponent();
this.Closing += new CancelEventHandler(Comtax2TestForm_Closing);
_ct2.EvCT2TxRxCallback += new ComTax2.Wrapper41.ComTax2Core.delCT2SetTxRxCallback(_ct2_EvCT2TxRxCallback);
bool inited = false;
//inizialize comtax 2 wrapper
inited = _ct2.Init("COM3:", 38400, true, 1500, 1500, 2, new byte[10000], 10000);
WriteLog("Comtax2 Inited: " + inited.ToString());
}
void _ct2_EvCT2TxRxCallback(ushort RemoteDevID, string Command, byte EventCode, byte[] RxMsgBuff, uint RxMsgLen,
ushort RxLastPackLen, uint lpParam)
{
// for the complete list of commands and their description please refer to the Comtax2 Protocol manual
if (EventCode == (byte)ComTax2.Wrapper41.EvtCodeEnum.COMTAX2_RX_MSGOK &&
RemoteDevID == (byte)ComTax2.Wrapper41.EnumDest.DEST_TAX)
{
switch (Command)
{
case "AR":
//Extended status message
string dispMain, dispSecond, dispTariff;
ASCIIEncoding asc = new ASCIIEncoding();
dispMain = asc.GetString(RxMsgBuff, 0 + 1, 8);
dispSecond = asc.GetString(RxMsgBuff, 8 + 1, 8);
dispTariff = asc.GetString(RxMsgBuff, 26 + 1, 1);
WriteLog("Ext. Status Recived: |" + dispTariff + "|" + dispMain + "|" + dispSecond + "|");
break;
case "CD":
//Clock Data message
DateTime taxTime = new DateTime((RxMsgBuff[4]) | RxMsgBuff[5] << 8, RxMsgBuff[2], RxMsgBuff[3],
RxMsgBuff[1], RxMsgBuff[0], 0);
bool legalHour = (RxMsgBuff[6] != 0x00);
WriteLog("Taximeter clock : " + taxTime.ToString("G") + " Daylaight Saving: " +
legalHour.ToString());
break;
case "SM":
//Taximeter Status message
string status = "";
if (RxMsgBuff[0] == 0x01) status = "FOR HIRE";
else if (RxMsgBuff[0] == 0x02) status = "HIRED";
else if (RxMsgBuff[0] == 0x03) status = "STOPPED";
else if (RxMsgBuff[0] == 0x04) status = "SPECIAL FUNCTION";
else if (RxMsgBuff[0] == 0xFF) status = "DISABLED";
WriteLog("Taximiter Status : " + status);
break;
case "RQ":
//Odometer data message
uint meters;
ushort speed;
meters = (uint)(RxMsgBuff[0] | RxMsgBuff[1] << 8 | RxMsgBuff[2] << 16 | RxMsgBuff[3] << 24);
speed = (ushort)(RxMsgBuff[4] | RxMsgBuff[5] << 8);
WriteLog("Odometer - Meters: " + meters.ToString() + " Speed: " + speed);
break;
}
}
}
private void btExtStat_Click(object sender, EventArgs e)
{
bool res;
//Request Extended status
res = _ct2.SendMsg((ushort)ComTax2.Wrapper41.EnumDest.DEST_TAX,
new byte[] { (byte)'A', (byte)'S' }, new byte[0], 0);
WriteLog("Extended Status Request Deliverd: " + res.ToString());
}

The information contained here are property of DIGITAX Automotive Electronics Italy, and extremely confidential. Any disclosure, copying, distribution to third party is strictly prohibited.
46
private void btStatus_Click(object sender, EventArgs e)
{
bool res;
//reques Taximeter status
res = _ct2.SendMsg((ushort)ComTax2.Wrapper41.EnumDest.DEST_TAX,
new byte[] { (byte)'R', (byte)'M' }, new byte[0], 0);
WriteLog("Taximeter Status Request Deliverd: " + res.ToString());
}
private void btClock_Click(object sender, EventArgs e)
{
bool res;
//request Taximeter Clock
res = _ct2.SendMsg((ushort)ComTax2.Wrapper41.EnumDest.DEST_TAX,
new byte[] { (byte)'C', (byte)'R' }, new byte[0], 0);
WriteLog("Taximeter Clock Request Deliverd: " + res.ToString());
}
private void btOdometer_Click(object sender, EventArgs e)
{
bool res;
//Request Odometer data to the taximeter without reset
res = _ct2.SendMsg((ushort)ComTax2.Wrapper41.EnumDest.DEST_TAX,
new byte[] { (byte)'O', (byte)'Q' }, new byte[1] {0x00}, 1);
WriteLog("Odometer Data Request Deliverd: " + res.ToString());
}
private void btClear_Click(object sender, EventArgs e)
{
lbxLog.Items.Clear();
}
private delegate void delWriteLog(string text);
private void WriteLog(string text)
{
if (InvokeRequired)
{
this.BeginInvoke(new delWriteLog(WriteLog), new object[] { text });
return;
}
lbxLog.Items.Add("-> " + text);
}
void Comtax2TestForm_Closing(object sender, CancelEventArgs e)
{
_ct2.Release();
}
}
}

The information contained here are property of DIGITAX Automotive Electronics Italy, and extremely confidential. Any disclosure, copying, distribution to third party is strictly prohibited.
47
3. AITP (Odometer)
This application shows how to use AITP to interact with the odometer. You can ask odometer status, set the automatic odometer trigger and it shows the odometer data as these arrive from the AITP.
Sample code: using System;
using System.Collections.Generic;
using System.ComponentModel;
using System.Data;
using System.Drawing;
using System.Text;
using System.Windows.Forms;
namespace Digitax.Sample.Odometer
{
//simple application that shows how to interact with the odometer using the aitp
public partial class OdometerTest : Form
{
//aitp instance
Aitp.Wrapper41.AitpCore _aitp = new Aitp.Wrapper41.AitpCore();
//odometer object
Aitp.Wrapper41.AitpObjects.OdometerData _odom;
public OdometerTest()
{
InitializeComponent();
this.Closing += new CancelEventHandler(OdometerTest_Closing);
//init aitp in MDT/MCU "COM4:" 19200 on ForceOne "COM3:" 38400
_aitp.AITPInit("COM3:", 38400);
_aitp.EvAITPOdometerTrigger += new
Aitp.Wrapper41.AitpCore.delAITPActivateOdometerTrigger(_aitp_EvAITPOdometerTrigger);
//init odometer callback
_aitp.AITPInitOdometer();
}
void OdometerTest_Closing(object sender, CancelEventArgs e)
{
//release aitp
_aitp.AITPRelease();
}
void _aitp_EvAITPOdometerTrigger(Aitp.Wrapper41.AitpObjects.OdometerData od)
{
_odom = od;
UpdForm();
}
private delegate void delUpdForm();
private void UpdForm()
{
if (InvokeRequired)
{
this.BeginInvoke(new delUpdForm(UpdForm));
return;
}
//update text
tbMeters.Text = _odom.MetersFromReset.ToString();
tbPulses.Text = _odom.PulsesFromReset.ToString();
tbSpeed.Text = _odom.RealTimeSpeed.ToString();
tbSeconds.Text = _odom.SecondsFromReset.ToString();
tbConst.Text = _odom.WheelCodePulsesKm.ToString();
}
private void btReadOdom_Click(object sender, EventArgs e)
{
_aitp.AITPAskOdometerData(cbReset.Checked);
}
private void cbAutoTrig_CheckStateChanged(object sender, EventArgs e)
{
if (cbAutoTrig.Checked)
{
_aitp.AITPSetOdometerTriggerParams(3, cbReset.Checked);
}
else
{
_aitp.AITPSetOdometerTriggerParams(0, cbReset.Checked);
}
}
private void cbReset_CheckStateChanged(object sender, EventArgs e)
{
if (cbAutoTrig.Checked)
{
_aitp.AITPSetOdometerTriggerParams(3, cbReset.Checked);
}
else
{
_aitp.AITPSetOdometerTriggerParams(0, cbReset.Checked);
}
}
}
}

The information contained here are property of DIGITAX Automotive Electronics Italy, and extremely confidential. Any disclosure, copying, distribution to third party is strictly prohibited.
48
4. AITP (Version and information)
This application shows how to use AITP to retrieve some hardware specific information like Hardware ID, Hardware version, AITP version etc…
Sample code: using System;
using System.Collections.Generic;
using System.ComponentModel;
using System.Data;
using System.Drawing;
using System.Text;
using System.Windows.Forms;
namespace Digitax.Sample.HardwareInfo
{
//simple application that shows how to get from aitp hardware information like the HardwareID
public partial class HardwareInfoForm : Form
{
//aitp instance
Aitp.Wrapper41.AitpCore _aitp = new Aitp.Wrapper41.AitpCore();
Aitp.Wrapper41.AitpObjects.AitpVersionData _ver;
public HardwareInfoForm()
{
InitializeComponent();
this.Closing += new CancelEventHandler(HardwareInfoForm_Closing);
//init aitp in MDT/MCU "COM4:" 19200 on ForceOne "COM3:" 38400
_aitp.AITPInit("COM3:", 38400);
_aitp.EvAITPAskSoftwareVersion += new
Aitp.Wrapper41.AitpCore.delAITPAskSoftwareVersion(_aitp_EvAITPAskSoftwareVersion);
}
void _aitp_EvAITPAskSoftwareVersion(Aitp.Wrapper41.AitpObjects.AitpVersionData avd)
{
_ver = avd;
UpdForm();
}
private delegate void delUpdForm();
private void UpdForm()
{
if (InvokeRequired)
{
this.BeginInvoke(new delUpdForm(UpdForm));
return;
}
//update text
tbCountryCode.Text = _ver.CountryCode.ToString();
tbFWCheck.Text = _ver.FirmwareCheckSum.ToString();
tbHwSubVer.Text = _ver.HardwareSubVersion.ToString();
tbHwType.Text = _ver.HardwareType.ToString();
tbHwVer.Text = _ver.HardwareVersion.ToString();
tbHwID.Text = _ver.HwID.ToString();
tbProdDate.Text = _ver.ProductionDate.ToString();
tbSubVer.Text = _ver.SubVersion.ToString();
tbVer.Text = _ver.Version.ToString();
}
private void btAskVer_Click(object sender, EventArgs e)
{
_aitp.AITPAskSoftwareVersion();
}
void HardwareInfoForm_Closing(object sender, CancelEventArgs e)
{
_aitp.AITPRelease();
}
}
}
The information contained here are property of DIGITAX Automotive Electronics Italy, and extremely confidential. Any disclosure, copying, distribution to third party is strictly prohibited.
49
5. AITP (Force One keyboard)
This application shows how to use AITP to intercept the Digitax Force One key status changed events.
Sample code: using System;
using System.Collections.Generic;
using System.ComponentModel;
using System.Data;
using System.Drawing;
using System.Text;
using System.Windows.Forms;
namespace Digitax.Sample.ForceOneKeys
{
//simple application that shows how to manage ForceOne keys
public partial class ForceOneKeysForm : Form
{
//aitp instance
Aitp.Wrapper41.AitpCore _aitp = new Aitp.Wrapper41.AitpCore();
ushort _fokstatus;
public ForceOneKeysForm()
{
InitializeComponent();
this.Closing += new CancelEventHandler(ForceOneKeysForm_Closing);
//init aitp in MDT/MCU "COM4:" 19200 on ForceOne "COM3:" 38400
_aitp.AITPInit("COM3:", 38400);
_aitp.EvAITPFOKeyboardTrigger += new
Aitp.Wrapper41.AitpCore.delAITPActivateFOKeyboardTrigger(_aitp_EvAITPFOKeyboardTrigger);
_aitp.AITPInitKeyboard(true);
}
void _aitp_EvAITPFOKeyboardTrigger(ushort FOKeysStatusMask, uint lparam)
{
_fokstatus = FOKeysStatusMask;
UpdForm();
}
private delegate void delUpdForm();
private void UpdForm()
{
if (InvokeRequired)
{
this.BeginInvoke(new delUpdForm(UpdForm));
return;
}
// FORCE ONE KEYS / LEDS Mapping
// bits 15 14 13 12 11 10 9 8 7 6 5 4 3 2 1 0
// Up Down Enter Canc K4 K3 K2 K1 OP
//update colors
if ((_fokstatus & 0x0001) == 0x0001)
{
pOP.BackColor = Color.Red;
}
else
{
pOP.BackColor = Color.Green;
}
if ((_fokstatus & 0x0002) == 0x0002)
{
pK1.BackColor = Color.Red;
}
else
{
pK1.BackColor = Color.Green;
}
if ((_fokstatus & 0x0004) == 0x0004)
{
pK2.BackColor = Color.Red;
}
else
{
pK2.BackColor = Color.Green;
}
if ((_fokstatus & 0x0008) == 0x0008)
{
pK3.BackColor = Color.Red;
}
else
{
pK3.BackColor = Color.Green;
}
if ((_fokstatus & 0x0010) == 0x0010)
{
pK4.BackColor = Color.Red;
}
else

The information contained here are property of DIGITAX Automotive Electronics Italy, and extremely confidential. Any disclosure, copying, distribution to third party is strictly prohibited.
50
{
pK4.BackColor = Color.Green;
}
if ((_fokstatus & 0x0100) == 0x0100)
{
pCANC.BackColor = Color.Red;
}
else
{
pCANC.BackColor = Color.Green;
}
if ((_fokstatus & 0x0200) == 0x0200)
{
pENTER.BackColor = Color.Red;
}
else
{
pENTER.BackColor = Color.Green;
}
if ((_fokstatus & 0x0400) == 0x0400)
{
pDown.BackColor = Color.Red;
}
else
{
pDown.BackColor = Color.Green;
}
if ((_fokstatus & 0x0800) == 0x0800)
{
pUP.BackColor = Color.Red;
}
else
{
pUP.BackColor = Color.Green;
}
}
void ForceOneKeysForm_Closing(object sender, CancelEventArgs e)
{
_aitp.AITPRelease();
}
}
}

The information contained here are property of DIGITAX Automotive Electronics Italy, and extremely confidential. Any disclosure, copying, distribution to third party is strictly prohibited.
51
6. AITP (Light Dimmer)
This application shows how to use AITP to interact with the light dimmer. You can change display brightness, retrieve light intensity, activate the automatic brightness regulation, etc…
Sample code: using System;
using System.Collections.Generic;
using System.ComponentModel;
using System.Data;
using System.Drawing;
using System.Text;
using System.Windows.Forms;
namespace Digitax.Sample.Dimmer
{
//simple application to interact with the light dimmer
public partial class DiimerSample : Form
{
//aitp instance
Aitp.Wrapper41.AitpCore _aitp = new Aitp.Wrapper41.AitpCore();
byte _lightInt = 0x00;
byte _dimmer = 0x00;
byte[] _dimmTable = new byte[8];
byte _dimVal = (byte)20;
public DiimerSample()
{
InitializeComponent();
this.Closing += new CancelEventHandler(DiimerSample_Closing);
//init aitp in MDT/MCU "COM4:" 19200 on ForceOne "COM3:" 38400
_aitp.AITPInit("COM3:", 38400);
_aitp.EvAITPDimmerValueAndTableTrigger += new
Aitp.Wrapper41.AitpCore.delAITPActivateDimmerValueAndTableTrigger(_aitp_EvAITPDimmerValueAndTableTrigger);
_aitp.EvAITPLightIntensityTrigger += new
Aitp.Wrapper41.AitpCore.delAITPActivateLightIntensityTrigger(_aitp_EvAITPLightIntensityTrigger);
//init light dimmer
_aitp.AITPInitLightDimmer();
tbDimVal.Text = _dimVal.ToString();
_aitp.AITPSetDimmerValue(_dimVal);
_aitp.AITPAskLightIntensity();
_aitp.AITPAskDimmerValueAndTable();
}
void _aitp_EvAITPLightIntensityTrigger(byte LightIntensity, uint lparam)
{
_lightInt = LightIntensity;
UpdForm();
}
void _aitp_EvAITPDimmerValueAndTableTrigger(byte DimmerValue, byte[] DimmerTable, uint lparam)
{
_dimmer = DimmerValue;
_dimmTable = DimmerTable;
UpdForm();
}
private delegate void delUpdForm();
private void UpdForm()
{
if (InvokeRequired)
{
this.BeginInvoke(new delUpdForm(UpdForm));
return;
}
//update text
tbDimmer.Text = _dimmer.ToString();
tbLight.Text = _lightInt.ToString();
StringBuilder sb = new StringBuilder();
foreach (byte val in _dimmTable)
{
sb.Append(val);
sb.Append(" ");
}
tbTable.Text = sb.ToString();
}
private void btMinus_Click(object sender, EventArgs e)
{
//decrease light intesity
if (_dimVal > 1 && !cbAuto.Checked)
{
_dimVal--;
tbDimVal.Text = _dimVal.ToString();
_aitp.AITPSetDimmerValue(_dimVal);
}
}
private void btPlus_Click(object sender, EventArgs e)
{

The information contained here are property of DIGITAX Automotive Electronics Italy, and extremely confidential. Any disclosure, copying, distribution to third party is strictly prohibited.
52
//increase light intesity
if (_dimVal < 32 && !cbAuto.Checked)
{
_dimVal++;
tbDimVal.Text = _dimVal.ToString();
_aitp.AITPSetDimmerValue(_dimVal);
}
}
void DiimerSample_Closing(object sender, CancelEventArgs e)
{
//release aitp
_aitp.AITPRelease();
}
private void btAskLight_Click(object sender, EventArgs e)
{
_aitp.AITPAskLightIntensity();
}
private void btAskDimmer_Click(object sender, EventArgs e)
{
_aitp.AITPAskDimmerValueAndTable();
}
private void cbAuto_CheckStateChanged(object sender, EventArgs e)
{
if (cbAuto.Checked)
{
//set auto dimmer -> value 33
_aitp.AITPSetDimmerValue((byte)33);
}
else
{
_aitp.AITPSetDimmerValue(_dimVal);
}
}
}
}
The information contained here are property of DIGITAX Automotive Electronics Italy, and extremely confidential. Any disclosure, copying, distribution to third party is strictly prohibited.
53
7. Digital I/O (IPreShut)
This application shows how to use the Digital I/O library to monitor the IPreShut (digital value) that becomes high (true) when Windows is shutting down. This feature is very important because makes possible, for an application, to make a safe closure.
Sample code: using System;
using System.Collections.Generic;
using System.ComponentModel;
using System.Data;
using System.Drawing;
using System.Text;
using System.Windows.Forms;
namespace Digitax.Sample.DigitalIOTest
{
// simple application that cheks the Ipreshut digital value
public partial class DigitalIOTest : Form
{
//DigitalIO Wrapper Instance
DigitalIO.Wrapper41.DigitalIO _digitalIO = new DigitalIO.Wrapper41.DigitalIO();
//ipreshut check tread
System.Threading.Thread ipreshutThread;
bool stopExecuting = false;
public DigitalIOTest()
{
InitializeComponent();
this.Closing += new CancelEventHandler(DigitalIOTest_Closing);
ipreshutThread = new System.Threading.Thread(new System.Threading.ThreadStart(CheckiPreShut));
ipreshutThread.Start();
}
void DigitalIOTest_Closing(object sender, CancelEventArgs e)
{
stopExecuting = false;
if (!ipreshutThread.Join(3000))
{
ipreshutThread.Abort();
}
}
private void CheckiPreShut()
{
bool shuttingDown = false;
//check ipreshut every second
while (!stopExecuting)
{
shuttingDown = _digitalIO.DGRead(DigitalIO.Wrapper41.DGIndex.IPRESHUT);
if (shuttingDown)
{
UpdForm();
//safe exit from the thread
break;
}
System.Threading.Thread.Sleep(1000);
}
}
private delegate void delUpdForm();
private void UpdForm()
{
if (InvokeRequired)
{
this.BeginInvoke(new delUpdForm(UpdForm));
return;
}
lblShutDownDetected.Visible = true;
}
}
}
The information contained here are property of DIGITAX Automotive Electronics Italy, and extremely confidential. Any disclosure, copying, distribution to third party is strictly prohibited.
54
8. GPS
This application shows how to use the GPS library to interact with the GPS receiver. You can get the position and satellites data. There is also the possibility to ask for the receiver version and the antenna connection status.
Sample code: using System;
using System.Collections.Generic;
using System.ComponentModel;
using System.Data;
using System.Drawing;
using System.Text;
using System.Windows.Forms;
namespace Digitax.Sample.GPSTest
{
//simple application that shows how to get data from the GPS receiver
public partial class GPSTestForm : Form
{
//gps wrapper and data instances
GPS.Wrapper41.GPSWrapper _gps = new GPS.Wrapper41.GPSWrapper();
GPS.Wrapper41.GSADATA _gsaData = new GPS.Wrapper41.GSADATA();
GPS.Wrapper41.RMCDATA _rmcData = new GPS.Wrapper41.RMCDATA();
GPS.Wrapper41.SatelliteData[] _satellites;
string _swVersion = "";
string _HwVersion = "";
ushort _agc = 0;
byte _antennaStatus = 0;
bool _satsUpd = false;
bool _rmcUpd = false;
bool _versUpd = false;
bool _hwMonUpd = false;
public GPSTestForm()
{
InitializeComponent();
this.Closing += new CancelEventHandler(GPSTestForm_Closing);
//init reciver on MDT/MCU reciver is on COM1: - ForceOne COM2:
_gps.GPSInitData("COM2:", 9600);
//init events and callbacks
_gps.EvGPSGSVSatellitesCallback += new
GPS.Wrapper41.GPSWrapper.delGPSGSVSatellitesCallback(_gps_EvGPSGSVSatellitesCallback);
_gps.EvGPSPositionCallback += new
GPS.Wrapper41.GPSWrapper.delGPSSetPositionCallback(_gps_EvGPSPositionCallback);
_gps.EvGPSUbxCallbacksAntarisHwMonitor += new
GPS.Wrapper41.GPSWrapper.delGPSSetUbxCallbacksAntarisHwMonitor(_gps_EvGPSUbxCallbacksAntarisHwMonitor);
_gps.EvGPSUbxCallbacksAntarisVersion += new
GPS.Wrapper41.GPSWrapper.delGPSSetUbxCallbacksAntarisVersion(_gps_EvGPSUbxCallbacksAntarisVersion);
_gps.GPSInitPositionCallback();
_gps.GPSInitGSVSatellitesCallback();
_gps.GPSInitUbxCallbacks();
}
void _gps_EvGPSUbxCallbacksAntarisVersion(string wzSwVersion, string wzHwVersion, uint lpParam)
{
//version recived
_swVersion = wzSwVersion;
_HwVersion = wzHwVersion;
_versUpd = true;
UpdForm();
}
void _gps_EvGPSUbxCallbacksAntarisHwMonitor(ushort wAgcPermille, byte bAntennaStatus, byte bAntennaPower,
uint lpParam)
{
//hw monitor data recived
_agc = wAgcPermille;
_antennaStatus = bAntennaStatus;
_hwMonUpd = true;
UpdForm();
}
void _gps_EvGPSPositionCallback(GPS.Wrapper41.RMCDATA pRMCData, GPS.Wrapper41.GSADATA pGSAData, uint lpParam)
{
//rmc and gsa data racived
_rmcData = pRMCData;
_gsaData = pGSAData;
_rmcUpd = true;
UpdForm();
}
void _gps_EvGPSGSVSatellitesCallback(GPS.Wrapper41.SatelliteData[] satsData, uint lpParam)
{
//satellites data recived
_satellites = satsData;
_satsUpd = true;
UpdForm();
}
private delegate void delUpdForm();
private void UpdForm()
{

The information contained here are property of DIGITAX Automotive Electronics Italy, and extremely confidential. Any disclosure, copying, distribution to third party is strictly prohibited.
55
if (InvokeRequired)
{
this.BeginInvoke(new delUpdForm(UpdForm));
return;
}
//update texts
if (_satellites != null && _satsUpd)
{
lbSats.Items.Clear();
foreach (GPS.Wrapper41.SatelliteData s in _satellites)
{
if (s.PRN != 0)
{
StringBuilder sb = new StringBuilder();
sb.Append(s.PRN);
sb.Append(" | ");
sb.Append(s.Azimut);
sb.Append(" | ");
sb.Append(s.Elevation);
sb.Append(" | ");
sb.Append(s.SNR);
lbSats.Items.Add(sb.ToString());
}
}
_satsUpd = false;
}
if (_rmcUpd)
{
tbFix.Text = _rmcData.bIsFixing.ToString();
tbDirection.Text = _rmcData.Direction_deg.ToString();
tbLat.Text = _rmcData.Latitude_deg.ToString();
tbLon.Text = _rmcData.Longitude_deg.ToString();
tbSpeed.Text = _rmcData.Speed_kmH.ToString();
tbFixMode.Text = _gsaData.iFixMode.ToString();
tbUsedSats.Text = _gsaData.iSatsUsed.ToString();
tbPDOP.Text = _gsaData.dPDOP.ToString();
tbHDOP.Text = _gsaData.dHDOP.ToString();
_rmcUpd = false;
}
if (_versUpd)
{
tbSwVersion.Text = _swVersion;
tbHwVers.Text = _HwVersion;
_versUpd = false;
}
if (_hwMonUpd)
{
tbAgc.Text = _agc.ToString();
tbAnt.Text = _antennaStatus.ToString();
_hwMonUpd = false;
}
}
void GPSTestForm_Closing(object sender, CancelEventArgs e)
{
_gps.GPSRelease();
}
private void btAskVersion_Click(object sender, EventArgs e)
{
_gps.GPSAskAntarisVersion();
}
private void cbHwMonitor_CheckStateChanged(object sender, EventArgs e)
{
if (cbHwMonitor.Checked)
{
_gps.GPSSetHwMonitorRate(3);
}
else
{
_gps.GPSSetHwMonitorRate(0);
}
}
}
}

Digitax Italy Headquarter
Via dell’Industria 16
62017 Porto Recanati (MC) - ITALY
Phone +39 071 7590984 – Fax +39 071 9797405
Web: www.digitax.com – E-mail: [email protected]
Digitax UK Digitax Mauritius Digitax Deutschland Smokehouse, 31 Tanners
Bank North Shields
Tyne & Wear NE 30 1 JH
ENGLAND
P.O. box 775, Bel Village
MAURITIUS
Taxitech Handelsges. mbh
Sommerkamp 31a 22335
Hamburg
GERMANY
Digitax España Digitax Nederland B.V. C/Tomás Bretón, 7 - 28045 Madrid
SPAIN
Postbus 84112 – 3009 CC ROTTERDAM
HOLLAND


