
Hands-on Lab
Windows Server 2012 R2
Remote Apps Publishing
within the enterprise and
beyond Powered by Remote Desktop Services (RDS) in Windows Server 2012 R2, Microsoft
RemoteApps allows users to seamlessly access applications published from any device.
RDS offers one platform, one experience, and different access methods. In this lab, you
will explore the Windows Server 2012 R2 Remote Applications Publishing and Various
methods to connect with published resources.
Estimated time to complete this lab is 1 hour 15 minutes.

Information in this document, including URL and other Internet Web site references, is subject to change without notice. Unless
otherwise noted, the example companies, organizations, products, domain names, e-mail addresses, logos, people, places, and
events depicted herein are fictitious, and no association with any real company, organization, product, domain name, e-mail
address, logo, person, place, or event is intended or should be inferred. Complying with all applicable copyright laws is the
responsibility of the user. Without limiting the rights under copyright, no part of this document may be reproduced, stored in or
introduced into a retrieval system, or transmitted in any form or by any means (electronic, mechanical, photocopying, recording, or
otherwise), or for any purpose, without the express written permission of Microsoft Corporation.
The names of manufacturers, products, or URLs are provided for informational purposes only and Microsoft makes no
representations and warranties, either expressed, implied, or statutory, regarding these manufacturers or the use of the products
with any Microsoft technologies. The inclusion of a manufacturer or product does not imply endorsement of Microsoft of the
manufacturer or product. Links are provided to third party sites. Such sites are not under the control of Microsoft and Microsoft is
not responsible for the contents of any linked site or any link contained in a linked site, or any changes or updates to such sites.
Microsoft is not responsible for webcasting or any other form of transmission received from any linked site. Microsoft is providing
these links to you only as a convenience, and the inclusion of any link does not imply endorsement of Microsoft of the site or the
products contained therein.
Microsoft may have patents, patent applications, trademarks, copyrights, or other intellectual property rights covering subject matter
in this document. Except as expressly provided in any written license agreement from Microsoft, the furnishing of this document
does not give you any license to these patents, trademarks, copyrights, or other intellectual property.
Copyright © 2009 Microsoft Corporation. All rights reserved.
Microsoft Windows Server 2008 R2, System Center Operations Manager 2007, System Center Operations Manager 2012, Microsoft
SQL Server 2008 R2, Windows 7 Enterprise Edition are either registered trademarks or trademarks of Microsoft Corporation in the
United States and/or other countries.
The names of actual companies and products mentioned herein may be the trademarks of their respective owners.

Introduction
EXPLORING WINDOWS SERVER 2012 R2 REMOTE APPLICATIONS USER EXPERIENCE
RemoteApp makes it possible for administrators to deliver remote applications to users instead
of full desktops. Specifically, RemoteApp enables a straight forward publishing process that
allows apps on session or VDI hosts to be provided to users, allows RemoteApps to run side by
side with local apps and offers integration with the Start menu to make it simple for users to
find and launch RemoteApps.
RD Web Access enables users to access RemoteApp and Desktop Connection through a web
browser.
RD Gateway enables authorized users to connect to remote computers on a corporate network
from any computer with an Internet connection.
RD Licensing manages the RDS client access licenses (RDS CALs) that are required for each
device or user to connect to an RD Virtualization Host or RD Session Host.
RD Connection Broker provides users with access to RemoteApp and Desktop Connection.
RD Virtualization Host integrates with Hyper-V to provide VMs by using RemoteApp and
Desktop Connection.
RD Session Host hosts Windows-based programs or the full Windows desktop for Remote
Desktop Services clients. Users can connect to an RD Session Host server to run programs, to
save files, and to use network resources on that server. Users can access an RD Session Host
server by using Remote Desktop Connection or by using RemoteApp.
Formatted: Heading 1
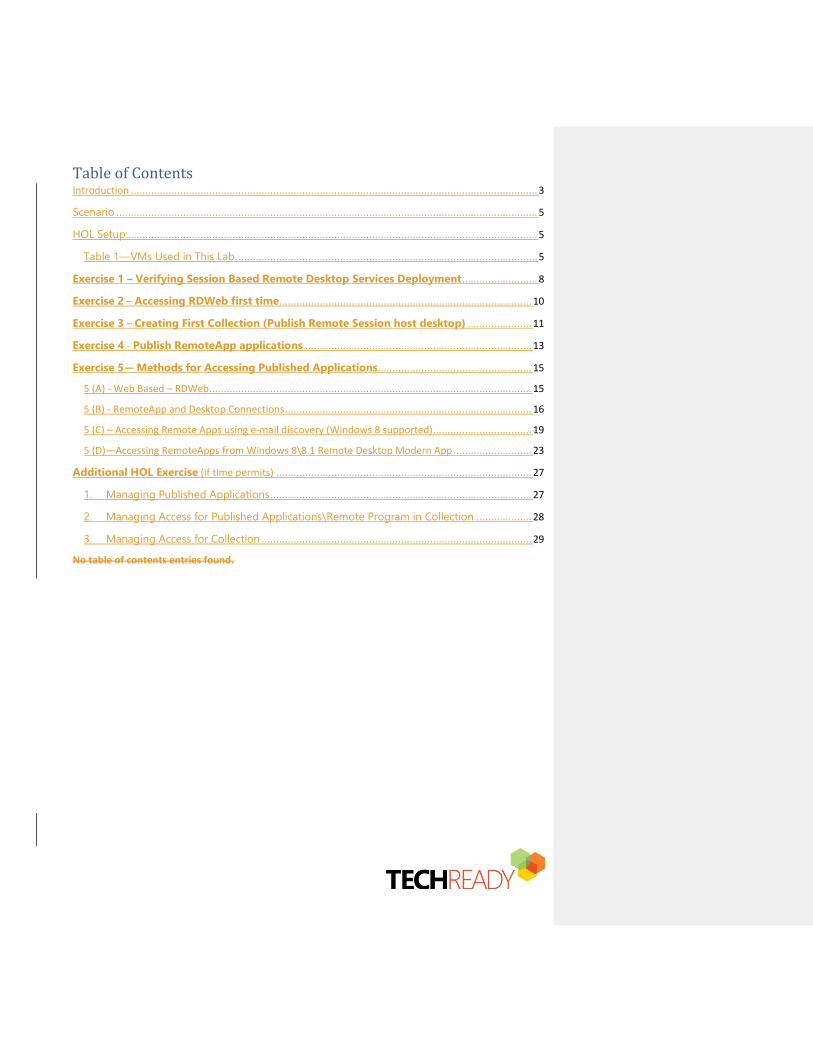
Table of Contents Introduction ............................................................................................................................................ 3
Scenario ................................................................................................................................................. 5
HOL Setup:............................................................................................................................................. 5
Table 1—VMs Used in This Lab ........................................................................................................ 5
Exercise 1 – Verifying Session Based Remote Desktop Services Deployment .......................... 8
Exercise 2 – Accessing RDWeb first time ....................................................................................... 10
Exercise 3 – Creating First Collection (Publish Remote Session host desktop) ...................... 11
Exercise 4 - Publish RemoteApp applications .............................................................................. 13
Exercise 5— Methods for Accessing Published Applications ..................................................... 15
5 (A) - Web Based – RDWeb ............................................................................................................... 15
5 (B) - RemoteApp and Desktop Connections ..................................................................................... 16
5 (C) – Accessing Remote Apps using e-mail discovery (Windows 8 supported) .................................. 19
5 (D)—Accessing RemoteApps from Windows 8\8.1 Remote Desktop Modern App ........................... 23
Additional HOL Exercise (if time permits) ........................................................................................ 27
1. Managing Published Applications .......................................................................................... 27
2. Managing Access for Published Applications\Remote Program in Collection ................... 28
3. Managing Access for Collection ............................................................................................. 29
No table of contents entries found.

Scenario Contoso, Ltd is pilot testing Session based Windows Server 2012 R2 Remote
Desktop Services with Windows 78 and Windows 8.1 for users. As the project lead, Mark has
chosen to lab test session-based Remote Applications. He will complete this lab test from
desktop running Windows 78 and Windows 8.1. He will test the end user experience with
RemoteApp environment.
HOL Setup Usage:
Table 1—VMs Used in This Lab Computer
Name
Operating
System
Roles Credentials
Contoso-dc Windows Server 2012
R2 Datacenter RTM
(Eval)
AD DC
DHCP
DNS
Username: Administrator
Password: P@ssword
Domain: Contoso
Contoso-rds Windows Server 2012
R2 Datacenter RTM
(Eval)
Remote Desktop Services Username: Administrator
Password: P@ssword
Domain: Contoso
Contoso-client1 Windows 78 Client Username: Mark
Password: P@ssword
Domain: Contoso
Contoso-client2 Windows 8.1 Client Username: Mark
Formatted: Heading 1 Char, Font: 12 pt, Font color: Auto
Formatted: Heading 1 Char, Font: (Default) Times NewRoman, 12 pt, Font color: Auto
Formatted: Heading 1 Char, Font: 16 pt, Font color: Accent1
Formatted: Heading 1
Formatted: Heading 1 Char, Font: (Default) Segoe UI
Formatted: Heading 1 Char, Font: 16 pt, Font color: Accent1
Formatted: Font: (Default) Segoe UI
Password: P@ssword
Domain: Contoso
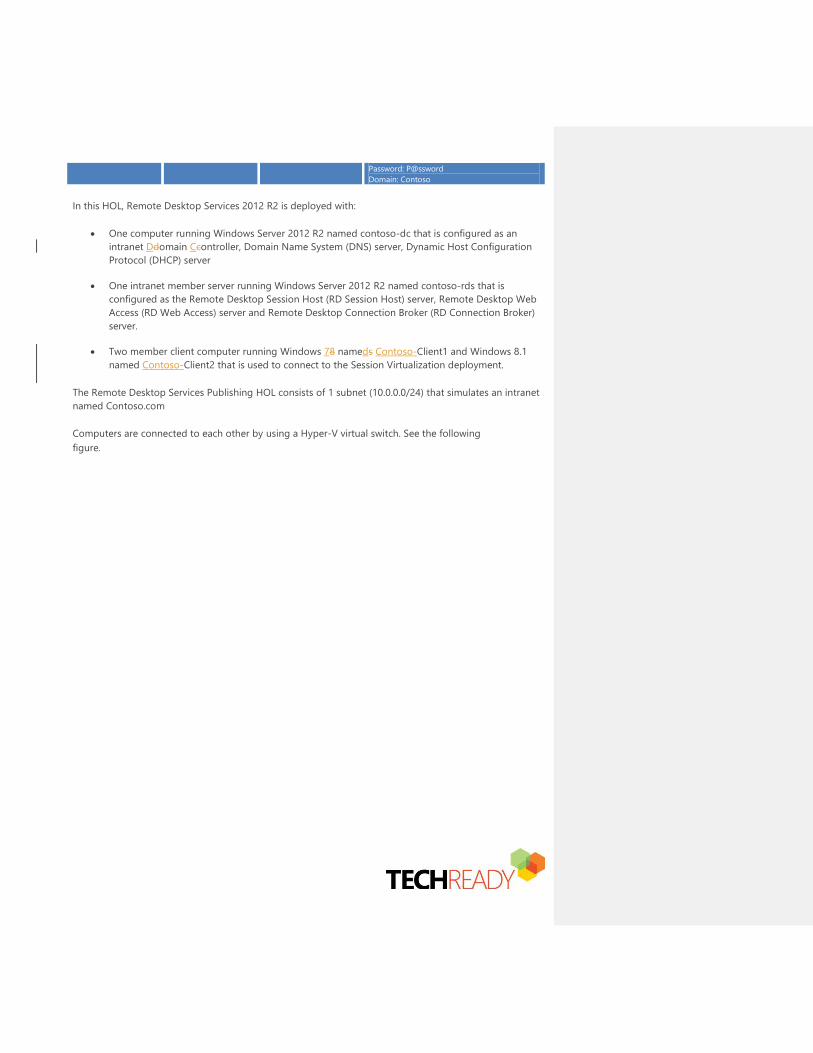
In this HOL, Remote Desktop Services 2012 R2 is deployed with:
One computer running Windows Server 2012 R2 named contoso-dc that is configured as an
intranet Ddomain Ccontroller, Domain Name System (DNS) server, Dynamic Host Configuration
Protocol (DHCP) server
One intranet member server running Windows Server 2012 R2 named contoso-rds that is
configured as the Remote Desktop Session Host (RD Session Host) server, Remote Desktop Web
Access (RD Web Access) server and Remote Desktop Connection Broker (RD Connection Broker)
server.
Two member client computer running Windows 78 nameds Contoso-Client1 and Windows 8.1
named Contoso-Client2 that is used to connect to the Session Virtualization deployment.
The Remote Desktop Services Publishing HOL consists of 1 subnet (10.0.0.0/24) that simulates an intranet
named Contoso.com
Computers are connected to each other by using a Hyper-V virtual switch. See the following
figure.Windows 8 Enterprise Release Preview
Windows Server 2012 Datacenter Release Candidate
None
Hyper-V I
Credentials

User name:
VM Snapshot details:
VM Name Snapshot Name Details
CONTOSO-DC
CONTOSO-DC – Base Restore VM state to start.
Good to go with exercise 1
CONTOSO-RDS CONTOSO-RDS –Base
Restore VM state to start.
Good to go with exercise 1
CONTOSO-CLIENT1 CONTOSO-CLIENT1-Base Restore VM state to start.
Good to go with exercise 1
CONTOSO-CLIENT2 CONTOSO-CLIENT2-Base Restore VM state to start.
Good to go with exercise 1

Exercise 1 – Verifying Session Based Remote Desktop Services
Deployment
Objective: In this exercise user will verify different RDS roles installed on CONTOSO-RDS Server as part
of Session based remote desktop deployment. User will get to know the various options available in RDS.
Machines for Exercise 1
Computer
Name
Operating
System
Roles Credentials
Contoso-rds Windows Server 2012
R2 Datacenter RTM
(Eval)
Remote Desktop
Services
Username: Administrator
Password: P@ssword
Domain: Contoso
Steps: Complete the following steps on CONTOSO-RDS:
1. Press Windows logo key
2. Click Server Manager Tile
3. Click Remote Desktop Services
When you select Remote Desktop Services, there are three options in the middle pane:
- Overview
- Servers
- Collections
Let’s look at all three of them one by one.
(A) Overview: Once the RDS Roles are installed on the Session Host servers and RD web access
servers, we see the graphical description of our environment, the roles installed on each of
the servers and the FQDN names of each server on the Overview page. From this page
additional servers can be added to the deployment and additional roles can be installed using
the Deployment overview/Deployment Servers right-click options. The Gateway and RD
Licensing options are reflecting in Green as these roles are not yet installed but can be
installed by clicking the Green Plus sign if needed.
1. Verify following roles\services are installed on CONTOSO-RDS in ‘Remote Desktop Services |
Overview | DEPLOYMENT SERVERS
o RD Connection Broker
o RD Session Host
o RD Web Access
(B) Servers: The “Servers” page enables us to manage all of the servers belonging to the RDS
Environment. A variety of remote management tasks can be performed including adding roles
and features.
(C) Collections: Collection is a logical grouping of Remote Desktop Servers that provides either
session-based or virtual machine-based (VDI) deployments.
Formatted: Heading 1 Char, Font: Not Bold, Font color:Accent 1
Formatted: Heading 1
Formatted: Font: (Default) Segoe UI
Formatted: Font: (Default) Segoe UI, Bold

Note Each Session host that’s a member of an RDS collection is limited to only participating in
one collection.

Exercise 2 – Accessing RDWeb first time
Objective: Access RDWeb for the first time without any collections.
Machines for Exercise 2
Computer
Name
Operating
System
Roles Credentials
Contoso-client1 Windows 77 Client Username: Mark
Password: P@ssword
Domain: Contoso
Steps: Complete the following steps on CONTOSO-CLIENT1:
4. Press Ctrl +Alt +Del for contoso-client1 VM
5. Login to contoso-client1
6. Open IE and enter https://contoso-rds.contoso.com/RDWeb
7. Click on Continue to this website (not recommended)
8. Enter below credentials
a. Domain\user name: Contoso\Mark
b. Password: P@ssword
9. Click on Sign in to login
10. Once you login to the portal you will see there is nothing published so far for thefor the user ‘Mark’
since no collection is created for the user.
Formatted: Heading 1
Formatted: Font: (Default) +Body (Calibri), Not Bold
Formatted: Font: (Default) Segoe UI, Bold
Formatted: Font: (Default) Segoe UI, Bold
Formatted: Font: Bold

Exercise 3 – Creating First Collection (Publish Remote Session
host desktop)
Objective: The starting point is to create a collection. When you used the Quick Start option a
collection is created by default with some basic applications. In the collection you specify which servers
are parts of the collection, which users will have access to the collection. To a collection, a Published
Desktop or Published Applications can be assigned. When you create first collection, process will publish
Session host server desktop for remote access. In this exercise we will publish Session host server itself by
creating first collection.
Machines for Exercise 3
Computer
Name
Operating
System
Roles Credentials
Contoso-rds Windows Server 2012
R2 Datacenter RTM
(Eval)
Remote Desktop Services Username: Administrator
Password: P@ssword
Domain: Contoso
Contoso-client1 Windows 77 Client Username: Mark
Password: P@ssword
Domain: Contoso
Steps: Complete the following steps on CONTOSO-RDS:
1. Open the Server Manager, Click Remote Desktop Services and Select Collections
2. In Collection Section, Click Tasks and Select Create Session Collection
3. Type the Name of the Collection as ‘HOL Remote Applications’ and Click Next
4. Specify the Contoso-rds.contoso.com (Select it under Server Pool and move it to Selected area) as RD
Session Host Server and Click Next
5. Specify User Groups as CONTOSO\Domain Users and Click Next
6. Uncheck the User Profile Disk and Click Next
7. Confirm Selections and Click Create
Note It will take several minutes for the creation process to complete.
8. Click Close
Complete the following steps on CONTOSO-CLIENT1:
1. Open IE and enter https://contoso-rds.contoso.com/RDWeb
2. Click on Continue to this website (not recommended)
3. Enter below credentials
a. Domain\user name: Contoso\Mark
b. Password: P@ssword
4. Click on Sign in to login
Formatted: Font: (Default) Segoe UI, Bold
Formatted: Heading 1
Formatted: Font: (Default) Segoe UI, Bold
Formatted: Font: (Default) Segoe UI

This time user ‘Mark’ has collection published with name ‘HOL Remote Applications’. Since it’s a first
collection, process has published Session host server desktop for remote access in ‘HOL Remote Applications’.
5. Click HOL Remote Applications collection
6. Click Connect in remote Desktop Connection
7. Enter ‘Mark’ Credentials as
User name: Mark
Password: P@ssword
User will connect with the Remote session host (Contoso-rds.contoso.com)
Note Close\Disconnect Remote Desktop services session on CONTOSO-CLIENT1
Close IE on CONTOSO-CLIENT1

Exercise 4 - Publish RemoteApp applications
Objective: In session based deployments, a collection set can host a Remote Desktop or Remote
Applications. So a combination of both is not possible. As soon as RemoteApp will be added to the
‘Collection, the Remote Desktop will be removed. In this exercise we will publish Paint, Calculator, Paint,
MS Office Word 2013, Office Excel 2013 and Notepad for domain users.
Machines for Exercise 4
Computer
Name
Operating
System
Roles Credentials
Contoso-dc Windows Server 2012
Datacenter RTM (Eval)
AD DC
DHCP
DNS
Username: Administrator
Password: P@ssword
Domain: Contoso
Contoso-rds Windows Server 2012
Datacenter RTM (Eval)
Remote Desktop Services Username: Administrator
Password: P@ssword
Domain: Contoso
Contoso-client1 Windows 7 Client Username: Mark
Password: P@ssword
Domain: Contoso
Contoso-client2 Windows 8.1 Client Username: Mark
Password: P@ssword
Domain: Contoso
Steps: Complete the following steps on CONTOSO-RDS:
1. Select ‘HOL Remote Applications’ (Name of the Collection) under Collections Tile. Click on Publish Remote
App Program from TASKS under REMOTEAPP PROGRAMS section
Formatted: Font: (Default) Segoe UI, Bold
Formatted: Heading 1
Formatted: Font: (Default) Segoe UI, Bold

4. In RemoteApp Programs, Select ‘Calculator’, ‘Excel 2013’ ‘Paint’ and ‘Microsoft Word 20130’
Note Most of the installed applications will be available in the list. We can add unlisted applications by clicking
‘Add’ and selecting the .exe file for the application.
2. Click Add. Give path as ‘\\Contoso-rds.contoso.com\c$\windows\system32\notepad.exe’ and click Open.
This step will add notepad in the RemoteApp Programs list
3. Click Next
4. Confirmation and Click Publish
This process once completed succesfully will publish Remote Applications for domain users under the collection
name as ‘HOL Remote Applications’. weWe should able to see screen like below:
Formatted: Font: (Default) Segoe UI, 20 pt, Font color:Custom Color(RGB(0,84,140))
Formatted: Font: (Default) Segoe UI, Font color: CustomColor(RGB(0,84,140))

5. Click Close
Exercise 5— Methods for Accessing Published Applications
There are two supported methods of accessing sessions and RemoteApps that are part of a session
collection:
1. Web Access - RDWeb
2. WebFeed ( Remote(Remote Applications and Desktop Connections) – supported on windows 7,
windows 8 and later. and windows 8
- Remote Applications and desktop tool – using email ID – feature supported only on windows 8
and later.
- Remote Desktop App – from Windows 8 Application Store – feature supported only on
Windows 8 and later. 8
Exercise 5 (A) - Web Based – RDWeb
Formatted: Font: (Default) Segoe UI, Font color: CustomColor(RGB(0,84,140))
Formatted: Font: (Default) Segoe UI, Bold
Formatted: Heading 1
Formatted: Font: Bold
Formatted: Font: (Default) Segoe UI, Bold
Formatted: Font: Bold
Formatted: Highlight
Formatted: Highlight
Formatted: Highlight
Formatted: Highlight
Formatted: Font: +Body (Calibri), 16 pt, Font color: Accent1
Formatted: Heading 2

Objective: The Web Access method can be used to access (launch) RemoteApps or Desktop Sessions.
In this exercise user will login to the web console from windows 7 and windows 8.1 client machines to
access the published resources.
Machines for Exercise 5 (A)
Computer
Name
Operating
System
Roles Credentials
Contoso-client1 Windows 77 Client Username: Mark
Password: P@ssword
Domain: Contoso
Contoso-client2 Windows 8.1 Client Username: Mark
Password: P@ssword
Domain: Contoso
Steps: Complete the following steps on CONTOSO-CLIENT1 and CONTOSO-CLIENT2:
(Follow the same steps for both the client machines)
1. Press Ctrl +Alt +Del for CONTOSO-CLIENT1 VM
2. Login to CONTOSO-CLIENT1
3. Open IE and enter https://contoso-rds.contoso.com/RDWeb
4. Click on Continue to this website (not recommended)
5. Enter below credentials
a. Domain\user name: Contoso\Mark
b. Password: P@ssword
6. Click on Sign in to login
Once you login to the portal as user ‘Mark’ you will see 54 applications are published and available for users to
access.
7. Click Calculator
8. Click Connect
User should able to connect and use the Calculator
Pls. click on other published applications to launch them remotely
9. Close IE once done testing the other applications launch.
5 (B) - RemoteApp and Desktop Connections
Objective: In Windows 7 and Windows 8\8.1, you have the ability to connect to a Windows Server 2012
RDS environment and retrieve a list of Remote Apps assigned to the users. RemoteApp and Desktop
Connections allow RemoteApps to be deployed and accessed on the client machine's Start menu
(Windows 7) or Start screen (Windows 8\8.1). In this exercise user will configure ‘RemoteApp and
Desktop Connections’ and will access the published resources.
Formatted: Font: (Default) +Body (Calibri), 16 pt, Fontcolor: Accent 1
Formatted: Heading 2
Formatted: Font: (Default) +Body (Calibri), 16 pt, Fontcolor: Accent 1
Formatted: Font: Bold
Formatted: Font: Bold
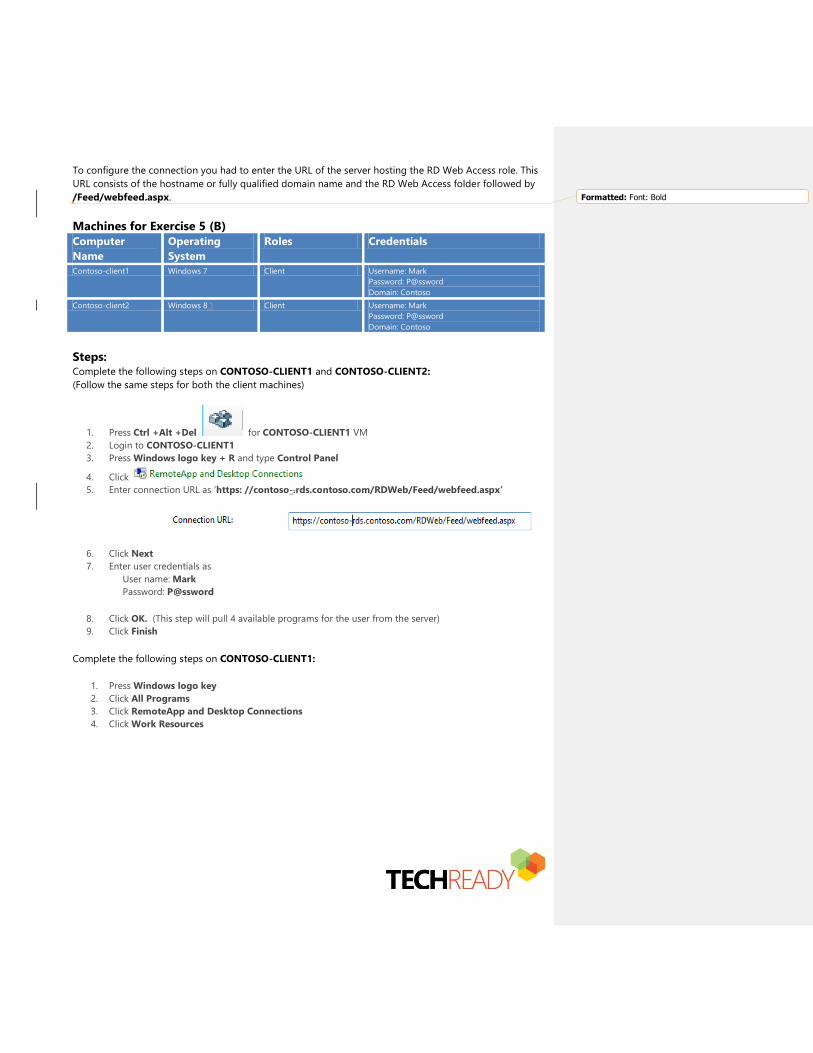
To configure the connection you had to enter the URL of the server hosting the RD Web Access role. This
URL consists of the hostname or fully qualified domain name and the RD Web Access folder followed by
/Feed/webfeed.aspx.
Machines for Exercise 5 (B)
Computer
Name
Operating
System
Roles Credentials
Contoso-client1 Windows 7 Client Username: Mark
Password: P@ssword
Domain: Contoso
Contoso-client2 Windows 8.1 Client Username: Mark
Password: P@ssword
Domain: Contoso
Steps: Complete the following steps on CONTOSO-CLIENT1 and CONTOSO-CLIENT2:
(Follow the same steps for both the client machines)
1. Press Ctrl +Alt +Del for CONTOSO-CLIENT1 VM
2. Login to CONTOSO-CLIENT1
3. Press Windows logo key + R and type Control Panel
4. Click
5. Enter connection URL as ‘https: //contoso-.rds.contoso.com/RDWeb/Feed/webfeed.aspx’
6. Click Next
7. Enter user credentials as
User name: Mark
Password: P@ssword
8. Click OK. (This step will pull 4 available programs for the user from the server)
9. Click Finish
Complete the following steps on CONTOSO-CLIENT1:
1. Press Windows logo key
2. Click All Programs
3. Click RemoteApp and Desktop Connections
4. Click Work Resources
Formatted: Font: Bold

Click published applications to launch them remotely.
Complete the following steps on CONTOSO-CLIENT2:
5.1. Press Windows logo key
2. On the Start Screen, Published 4 applications should be visible as tile for the userclick the down arrow
3. 5 new 5 published Apps should be visible under ‘Work Resources (RADC)’ as NEW Applications
6.
Formatted: Numbered + Level: 1 + Numbering Style: 1, 2,3, … + Start at: 1 + Alignment: Left + Aligned at: 0.25" +Indent at: 0.5"
Formatted: Font: (Default) Segoe UI, 9.5 pt, Font color:Custom Color(RGB(66,66,66))
Formatted: Font: Bold
Formatted: Font: Not Bold
Formatted: Font: Not Bold
Formatted: List Paragraph, No bullets or numbering
Formatted: Indent: Left: 0.5", No bullets or numbering
Formatted: Font: (Default) Segoe UI, 20 pt, Font color:Custom Color(RGB(0,84,140))

Click published applications to launch them remotely.
5 (C) – Accessing Remote Apps using e-mail discovery (Windows 8 supported)
Objective: With Windows 8, we can configure RemoteApp access using e-mail discovery (so users don’t
have to type the whole URL anymore). In this exercise, user will access RemoteApps by entering and
creating connection using e-mail discovery.
Note we don’t need Exchange to configure RemoteApp with e-email discovery.
Machines for Exercise 5 (C)
Computer
Name
Operating
System
Roles Credentials
Contoso-dc Windows Server 2012
Datacenter RTM (Eval)
AD DC
DHCP
DNS
Username: Administrator
Password: P@ssword
Domain: Contoso
Contoso-client2 Windows 8.1 Client Username: Mark
Password: P@ssword
Domain: Contoso
Steps: Complete the following steps on CONTOSO-DC:
Configure DNS Feed Lookup for RemoteApp and Desktop Connections
1. Press Ctrl+Alt+Del for CONTOSO-DC VM
2. Login to CONTOSO-DC as Domain Administrator (pls. use the credentials given in above table)
3. In Server Manager, Click DNS. Right Click CONTOSO-DC (under SERVERS) and Select DNS Manager
4. In DNS Manager, Under CONTOSO-DC, right click Contoso.com
5. Select Other New Records
Formatted: Font: (Default) +Body (Calibri), 16 pt, Fontcolor: Accent 1
Formatted: Heading 2
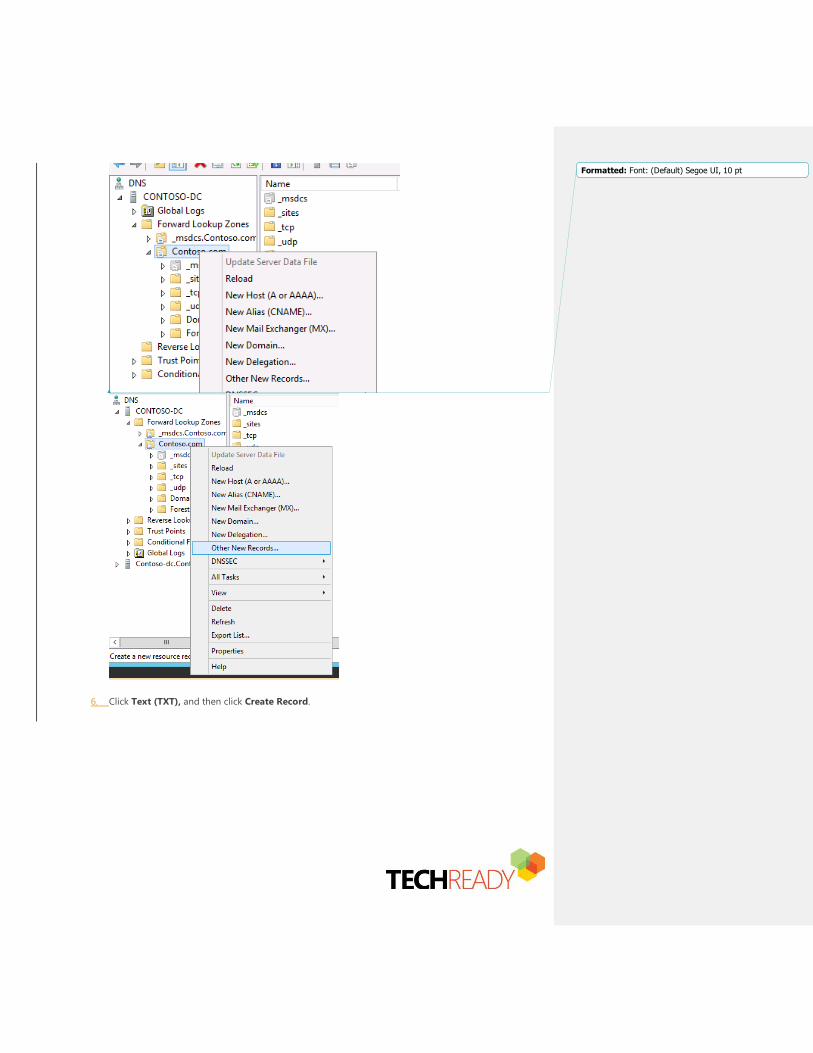
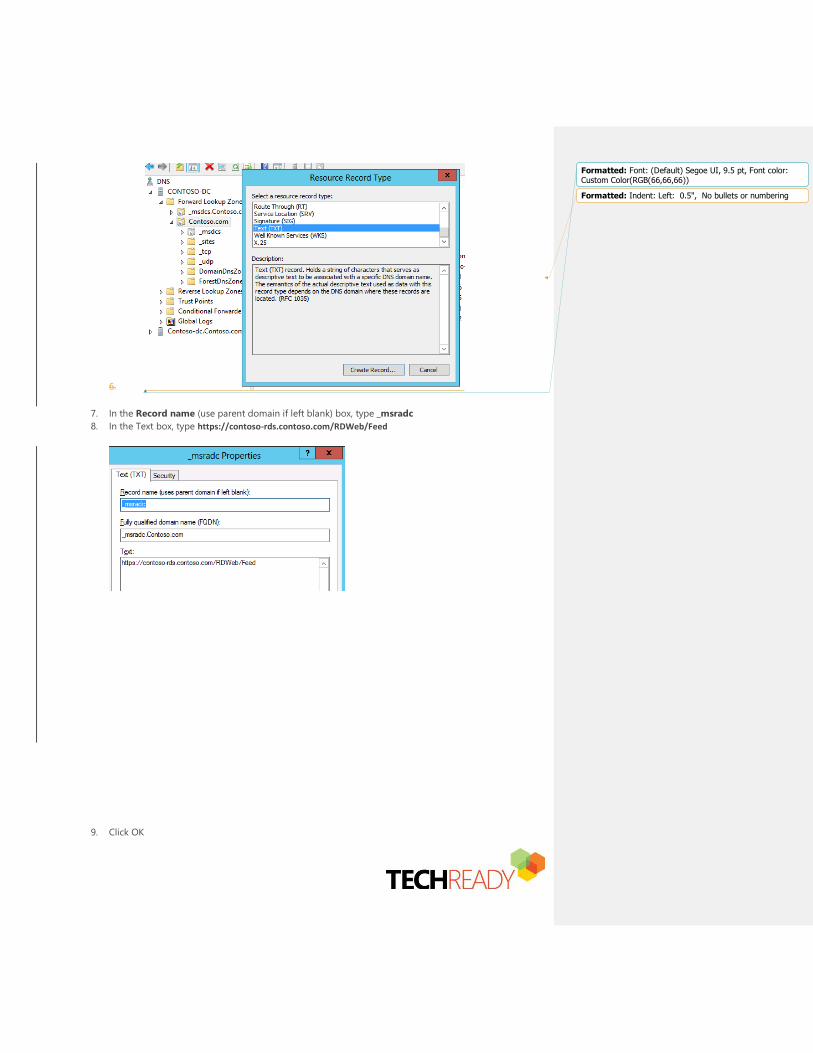
6. Click Text (TXT), and then click Create Record.
Formatted: Font: (Default) Segoe UI, 10 pt
6.
7. In the Record name (use parent domain if left blank) box, type _msradc
8. In the Text box, type https://contoso-rds.contoso.com/RDWeb/Feed
9. Click OK
Formatted: Font: (Default) Segoe UI, 9.5 pt, Font color:Custom Color(RGB(66,66,66))
Formatted: Indent: Left: 0.5", No bullets or numbering

Complete the following steps on CONTOSO-CLIENT2:
1. Press Ctrl +Alt +Del for CONTOSO-CLIENT2 VM
2. Login to CONTOSO-CLIENT2
3. Press Windows logo key + R and type Control Panel
4. Click
Note If there are any existing connections in RemoteApp and Desktop Connections. Pls. remove it before
going to step 5. Click Remove in Date Created section, to remove the connection.
5. Enter Email Address as [email protected]
6. Click Next.
Please verify if connection URL is been resolved correctly from DNS as ‘https://contoso-
rds.contoso.com/Rdweb/Feed’
7. Click Next
8. Enter user credentials as
User name: Mark
Password: P@ssword
9. Click Finish
10. Click OK. (This step will pull 4 available programs for the user from the server)
11. Click Finish
12. Press Windows logo key
13. On Start Screen, Published 4 applications should be visible as tile for the user
Click published applications to launch them remotely.
Note Remove connections in RemoteApp and Desktop before going to the next Exercise. Click
Remove in Date Created section, to remove the connection.
5 (D)—Accessing RemoteApps from Windows 8\8.1 Remote Desktop Modern App Objective: With the Remote Desktop app, user can connect to a remote PC and Remote Applications
from almost anywhere. Read moreFew of the features that come with Remote Desktop App from store
include:
Formatted: Font: (Default) +Body (Calibri), 16 pt, Fontcolor: Accent 1
Formatted: Heading 2
Access work resources published via RemoteApp and Desktop Connections.
See all your remote connections in the home screen and open them with a single touch.
Connect to multiple remote desktops at the same time. Keep an eye on different sessions while
you multitask by snapping the resources
Remote Desktop App Download Link:
http://apps.microsoft.com/windows/en-us/app/remote-desktop/051f560e-5e9b-4dad-8b2e-
fa5e0b05a480
Note Remote Desktop App is already been installed from Windows Store to the CONTOSO-CLIENT2 to
save time. Installing the App from internet using Microsoft Account (Live account previously is a simple
process and not covered in this HOL)
In this exercise user will create connection and access resources from Remote Desktop App downloaded
from online Store.
Machines for Exercise 5 (D)
Computer
Name
Operating
System
Roles Credentials
Contoso-client2 Windows 8.1 Client Username: Mark
Password: P@ssword
Domain: Contoso
Steps: Complete the following steps on CONTOSO-CLIENT2:
Remote Desktop App is pinned on the Start screen. You otherwise you can also search for the application using
Search feature in Windows 8.1
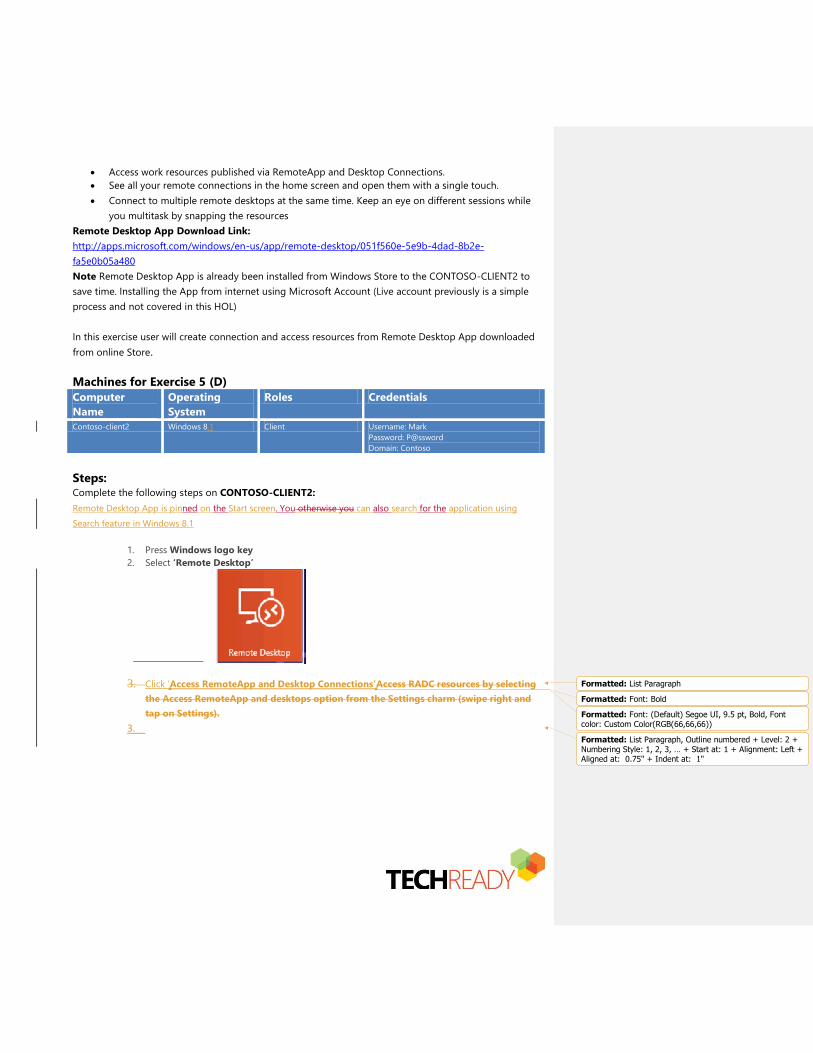
1. Press Windows logo key
2. Select ‘Remote Desktop’
3. Click ‘Access RemoteApp and Desktop Connections’Access RADC resources by selecting
the Access RemoteApp and desktops option from the Settings charm (swipe right and
tap on Settings).
3.
Formatted: List Paragraph
Formatted: Font: Bold
Formatted: Font: (Default) Segoe UI, 9.5 pt, Bold, Fontcolor: Custom Color(RGB(66,66,66))
Formatted: List Paragraph, Outline numbered + Level: 2 +Numbering Style: 1, 2, 3, … + Start at: 1 + Alignment: Left +Aligned at: 0.75" + Indent at: 1"
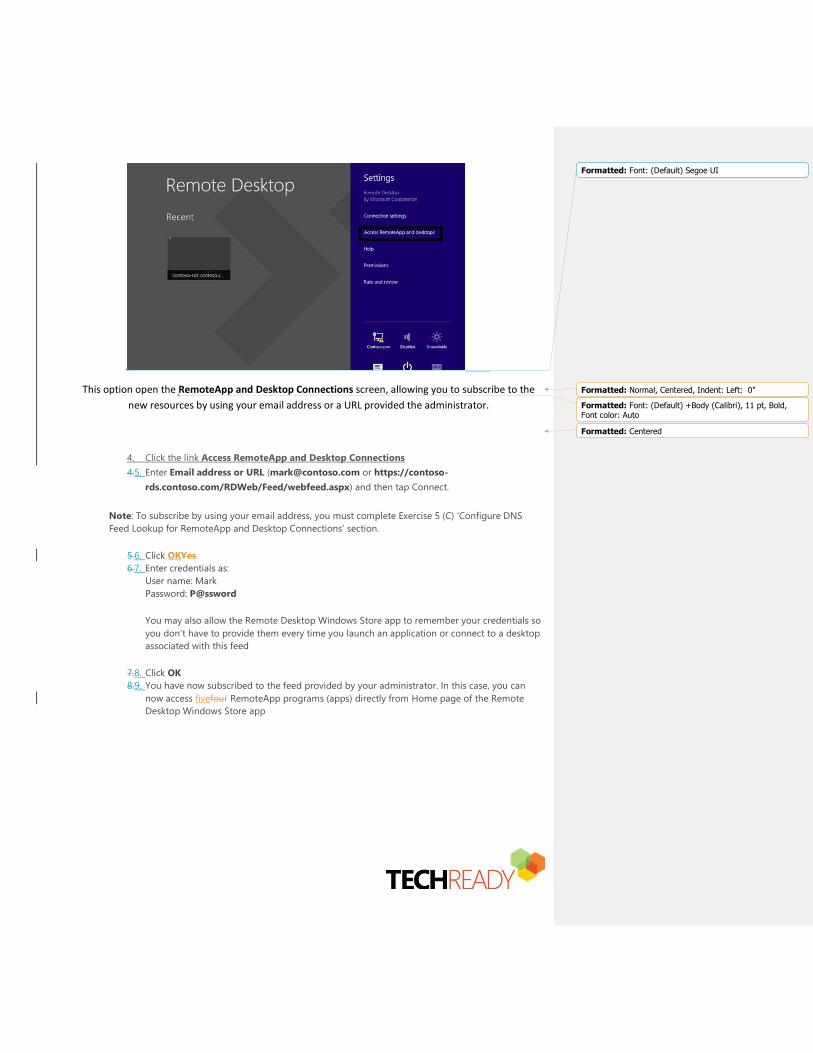
This option open the RemoteApp and Desktop Connections screen, allowing you to subscribe to the
new resources by using your email address or a URL provided the administrator.
4. Click the link Access RemoteApp and Desktop Connections
4.5. Enter Email address or URL ([email protected] or https://contoso-
rds.contoso.com/RDWeb/Feed/webfeed.aspx) and then tap Connect.
Note: To subscribe by using your email address, you must complete Exercise 5 (C) ‘Configure DNS
Feed Lookup for RemoteApp and Desktop Connections’ section.
5.6. Click OKYes
6.7. Enter credentials as:
User name: Mark
Password: P@ssword
You may also allow the Remote Desktop Windows Store app to remember your credentials so
you don’t have to provide them every time you launch an application or connect to a desktop
associated with this feed
7.8. Click OK
8.9. You have now subscribed to the feed provided by your administrator. In this case, you can
now access fivefour RemoteApp programs (apps) directly from Home page of the Remote
Desktop Windows Store app
Formatted: Font: (Default) Segoe UI
Formatted: Normal, Centered, Indent: Left: 0"
Formatted: Font: (Default) +Body (Calibri), 11 pt, Bold,Font color: Auto
Formatted: Centered
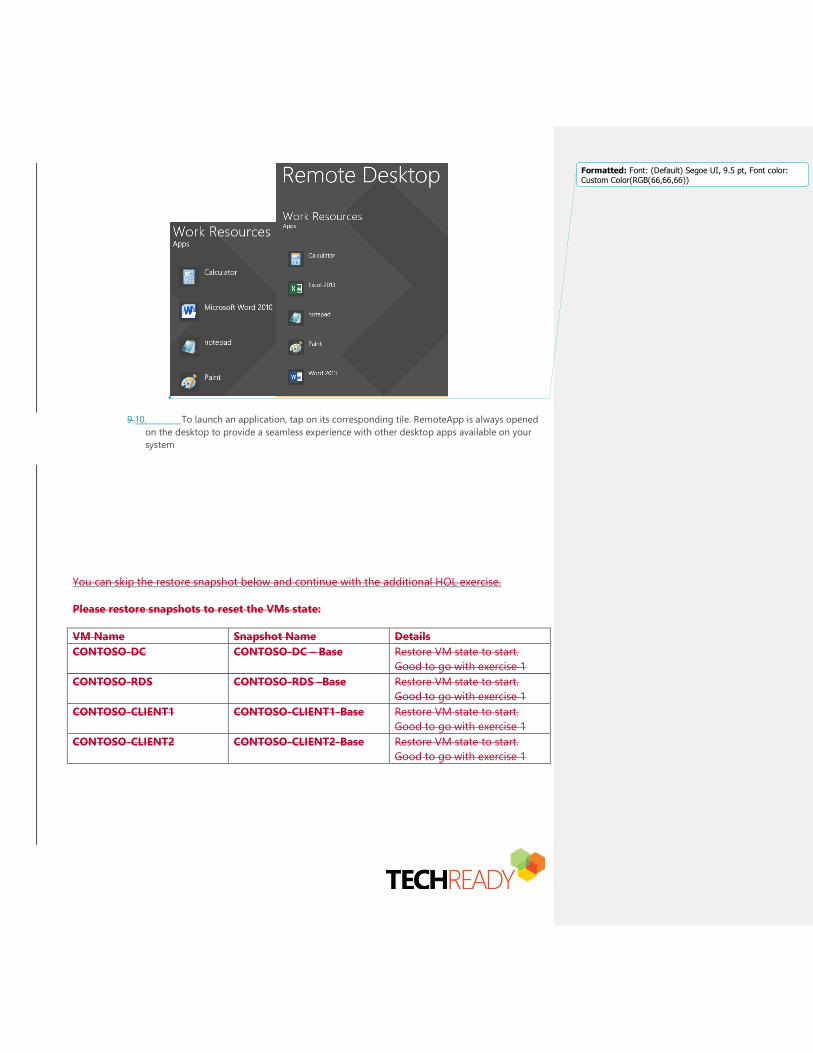
9.10. To launch an application, tap on its corresponding tile. RemoteApp is always opened
on the desktop to provide a seamless experience with other desktop apps available on your
system
You can skip the restore snapshot below and continue with the additional HOL exercise.
Please restore snapshots to reset the VMs state:
VM Name Snapshot Name Details
CONTOSO-DC
CONTOSO-DC – Base Restore VM state to start.
Good to go with exercise 1
CONTOSO-RDS CONTOSO-RDS –Base
Restore VM state to start.
Good to go with exercise 1
CONTOSO-CLIENT1 CONTOSO-CLIENT1-Base Restore VM state to start.
Good to go with exercise 1
CONTOSO-CLIENT2 CONTOSO-CLIENT2-Base Restore VM state to start.
Good to go with exercise 1
Formatted: Font: (Default) Segoe UI, 9.5 pt, Font color:Custom Color(RGB(66,66,66))

Additional HOL Exercise (if time permits)
1. Managing Published Applications Objective: To arrange Applications in folder
Machines for Exercise 1
Computer
Name
Operating
System
Roles Credentials
Contoso-rds Windows Server 2012
Datacenter RTM (Eval)
Remote Desktop Services Username: Administrator
Password: P@ssword
Domain: Contoso
Contoso-client1 Windows 7 Client Username: Mark
Password: P@ssword
Domain: Contoso
Formatted: Font: (Default) Segoe UI, Bold
Formatted: Heading 1
Formatted: Font: (Default) Segoe UI, 14 pt, Font color: Text2
Formatted: Heading 2, Numbered + Level: 1 + NumberingStyle: 1, 2, 3, … + Start at: 1 + Alignment: Left + Aligned at: 0.25" + Indent at: 0.5"

Steps: Complete the following steps on CONTOSO-RDS:
1. In Server Manager, Click Remote Desktop Services
2. Click HOL Remote Applications
3. Right click Microsoft Word 20130
4. Click Edit properties
5. On General Tab, Type Microsoft Office Suite under RemoteApp program folder field
6. Click Apply
7. Click Ok
Complete the following steps on CONTOSO-CLIENT1:
1. Login to CONTOSO-CLIENT12 Open IE and enter https://contoso-rds.contoso.com/RDWeb
2. Enter user credentials as :
3. Domain\User: contoso\mark
4. Password: P@ssword
5. This time user should able to see one new folder folder named as ‘Microsoft Office Suite’
6.
7. Click Microsoft Office Suite to access Microsoft Word 20130 Remote Application.
8. Click Microsoft Word 20130 to launch the application
2. Managing Access for Published Applications\Remote Program in
Collection Objective: To assign rights to published Remote Application\Program to users. In this exercise, we will
restrict user ‘Mark’ to access specific program
Machines for Exercise 3
Computer
Name
Operating
System
Roles Credentials
Contoso-rds Windows Server 2012
Datacenter RTM (Eval)
Remote Desktop Services Username: Administrator
Password: P@ssword
Domain: Contoso
Contoso-client1 Windows 7 Client Username: Mark
Password: P@ssword
Domain: Contoso
Formatted: Font: 14 pt, Not Bold, Font color: Text 2
Formatted: Heading 2, Numbered + Level: 1 + NumberingStyle: 1, 2, 3, … + Start at: 1 + Alignment: Left + Aligned at: 0.25" + Indent at: 0.5"
Steps: Complete the following steps on CONTOSO-RDS:
1. In Server Manager, Click Remote Desktop Services
2. Click HOL Remote Applications
3. Right click Microsoft Word 20130
4. Click Edit properties
5. On User Assignment Tab, Select Only specified users and groups
6. Add CONTOSO\John in Users and groups (we are actually restricting user ‘Mark’ here since we
are making program access exclusive to user ‘John’)
7. Click Apply
8. Click Ok
Complete the following steps on CONTOSO-CLIENT1:
1. Login to CONTOSO-CLIENT1
2. Open IE and enter https://contoso-rds.contoso.com/RDWeb
3. Enter user credentials as :
Domain\User: contoso\mark
Password: P@ssword
4. User ‘Mark’ should not able to see ‘Microsoft Word 20130’ in Remote programs
3. Managing Access for Collection Objective: To assign rights to published Remote Application\Program to users. In this exercise, we will
restrict user ‘Mark’ to access specific program
Machines for Exercise 2
Computer
Name
Operating
System
Roles Credentials
Contoso-rds Windows Server 2012
Datacenter RTM (Eval)
Remote Desktop Services Username: Administrator
Password: P@ssword
Domain: Contoso
Contoso-client1 Windows 7 Client Username: Mark
Password: P@ssword
Domain: Contoso
Username: John
Password: P@ssword
Domain: Contoso
Formatted: Font: Bold
Formatted: Font: 14 pt, Not Bold, Font color: Text 2
Formatted: Heading 2, Numbered + Level: 1 + NumberingStyle: 1, 2, 3, … + Start at: 1 + Alignment: Left + Aligned at: 0.25" + Indent at: 0.5"

Steps: Complete the following steps on CONTOSO-RDS:
9. In Server Manager, Click Remote Desktop Services
10. Click HOL Remote Applications
11. Click TASKS for the collection
12. Click Edit properties
13. On User Groups Tab, Click Add
14. Enter John in Enter the object names to select user groups
15. Add CONTOSO\John and Click OK
16. Select CONTOSO\Domain Users and Click Remove
This process will assign exclusive rights to user ‘John’ on the collection and remove the access
rights for all domain users.
17. Click Apply
18. Click Ok
Complete the following steps on CONTOSO-CLIENT1:
5. Login to CONTOSO-CLIENT1
6. Open IE and enter https://contoso-rds.contoso.com/RDWeb
7. Enter user credentials as :
Domain\User: contoso\mark
Password: P@ssword
8. Click Sign in
User ‘Mark’ should not able to see HOL Remote Applications Collection at all since rights are
been removed from domain users.
9. Close IE
10. Open IE and enter https://contoso-rds.contoso.com/RDWeb
11. Enter user credentials as :
Domain\User: contoso\john
Password: P@ssword
12. If you are presented with the following error “Another user of your computer is currently
using this connection”, click the little up arrow in the taskbar, click the Connected to
RemoteApp and Desktop Connections, and then click Disconnect all connections
12.13. Click Sign in
User ‘John’ should still able to see published applications since he has given exclusive rights to
‘HOL Remote Applications’ Collection on RDS Server.
Formatted: Font: Bold


