

MK-93HDID002-00
Hitachi Data Instance Director Quick Start Guide
FASTFIND LINKS
Software Version
Getting Help
Contents
ii
Hitachi Data Instance Director Quick Start Guide
© 2013 - 2015 Hitachi, Ltd. All rights reserved.
No part of this publication may be reproduced or transmitted in any form or by any means, electronic or mechanical, including photocopying and recording, or stored in a database or retrieval system for any purpose without the express written permission of Hitachi, Ltd.
Hitachi, Ltd. reserves the right to make changes to this
document at any time without notice and assumes no responsibility for its use. This document contains the most
current information available at the time of publication. When new and or revised information becomes available,
this entire document will be updated and distributed to all registered users.
Some of the features described in this document might not
be currently available. Refer to the most recent product announcement for information about feature and product availability, or contact Hitachi Data Systems Corporation at https://portal.hds.com.
Notice: Hitachi, Ltd. products and services can be ordered
only under the terms and conditions of the applicable Hitachi Data Systems Corporation agreements. The use of Hitachi, Ltd. products is governed by the terms of your agreements with Hitachi Data Systems.
By using this software, you agree that you are responsible for: a) Acquiring the relevant consents as may be required under local privacy laws or otherwise
from employees and other individuals to access relevant data; and b) Verifying that data continues to be held, retrieved, deleted, or otherwise processed in accordance with relevant laws. Hitachi is a registered trademark of Hitachi, Ltd., in the
United States and other countries. Hitachi Data Systems is a registered trademark and service mark of Hitachi, Ltd., in the United States and other countries.
All other trademarks, service marks, and company names in
this document or website are properties of their respective owners.
Microsoft product screen shots are reprinted with permission from Microsoft Corporation.

Contents iii
Data Instance Director Quick Start Guide
Contents
Preface .................................................................................................... v
Intended audience ............................................................................................... vi Software version .................................................................................................. vi Related documents ............................................................................................... vi Document conventions ......................................................................................... vii Accessing product documentation ......................................................................... vii Getting help ........................................................................................................ viii Comments .......................................................................................................... viii
Introduction .......................................................................................... 1-1
Overview ........................................................................................................... 1-2
Policy orientated data management .............................................................. 1-2
Next steps: configuration, setup ............................................................ 1-3
Reviewing the installation prerequisites ............................................................... 1-4
Supported operating systems ....................................................................... 1-4
Supported applications ................................................................................. 1-5
Support for archiving to Hitachi Content Platform (HCP) ................................. 1-6
Support for snapshotting Hitachi block (VSP) and file (HNAS) ......................... 1-7
Hardware requirements................................................................................ 1-9
Hitachi Content Platform indexing requirement ............................................ 1-10
Firewall configuration ................................................................................. 1-10
Hitachi VSP snapshotting requirements ....................................................... 1-10
Installation and license activation .............................................................. 1
Overview .............................................................................................................. 2
Installation: Windows, Linux ............................................................................ 3
Installation: Cluster environment ............................................................................ 9
Upgrading Data Instance Director ........................................................................ 10
Upgrade order ....................................................................................... 10
Upgrade alert message ........................................................................... 10

iv Contents
Data Instance Director User’s Guide
Upgrading Clients from Master ................................................................ 11
Licensing Data Instance Director .......................................................................... 12
Manual license activation ............................................................................... 13
Preface v
Data Instance Director Quick Start Guide
Preface
This document describes how to install and license Hitachi Data Instance
Director.
This preface includes the following information:
Intended Audience
Software Version
Related Documents
Document Revision Level
Document Conventions
Accessing Product Documentation
Getting Help
Comments

vi Preface
Data Instance Director Quick Start Guide
Intended audience
This document is intended for system administrators and other users who are responsible for installing, configuring, and operating Hitachi Data Instance
Director.
Software version
This document revision applies to Data Instance Director version 5.0.0 or later.
Related documents
Hitachi Data Instance Director Software Version 5.0.0 Release Notes, RN-93HDID000
Hitachi Data Instance Director User’s Guide, MK-93HDID001

Preface vii
Data Instance Director Quick Start Guide
Document conventions
This document uses the following typographic conventions:
Convention Description
Bold Indicates text on a window, other than the window title, including menus, menu options, buttons, fields, and labels. Example: Click OK.
Italic Indicates a variable, which is a placeholder for actual text provided by the user or system. Example: copy source-file target-file
Note: Angled brackets (< >) are also used to indicate variables.
screen/code Indicates text that is displayed on screen or entered by the user.
Example: # pairdisplay -g oradb
< > angled brackets Indicates a variable, which is a placeholder for actual text provided by the user or system. Example: # pairdisplay -g <group>
Note: Italic font is also used to indicate variables.
[ ] square brackets Indicates optional values. Example: [ a | b ] indicates that you can choose a, b, or nothing.
{ } braces Indicates required or expected values. Example: { a | b } indicates that you must choose either a or b.
| vertical bar Indicates that you have a choice between two or more options or arguments. Examples:
[ a | b ] indicates that you can choose a, b, or nothing.
{ a | b } indicates that you must choose either a or b.
This document uses the following icon to draw attention to information:
Icon Label Description
Note Calls attention to important and/or additional information.
Accessing product documentation
The Data Instance Director user documentation is available on the Hitachi Data Systems Portal: https://portal.hds.com. Check this site for the most current
documentation, including important updates that may have been made after the release of the product.

viii Preface
Data Instance Director Quick Start Guide
Getting help
The Hitachi Data Systems Support Center staff is available 24 hours a day, seven days a week. If you need technical support, log on to the Hitachi Data
Systems Portal for contact information: https://portal.hds.com.
Before calling the Hitachi Data Systems Support Center, please provide as much information about the problem as possible, including:
The circumstances surrounding the error or failure.
The exact content of any error messages displayed on the host systems.
Comments
Please send us your comments on this document: [email protected]. Include the document title and number, including the revision level (for example, -07), and refer to specific sections and paragraphs whenever
possible. All comments become the property of Hitachi Data Systems Corporation.
Thank you!

1
Introduction 1-1
Data Instance Director Quick Start Guide
Introduction
Hitachi Data Instance Director is a software application for the data center and
IT infrastructure of small, medium, and large organizations. It supports the protection and management of all data, from Laptop to File Server, Application Server, and Direct Attached Storage or Enterprise Storage Array.
This chapter introduces the quick start configuration and system requirements.
Overview
Reviewing the Installation Prerequisites

1-2 Introduction
Data Instance Director Quick Start Guide
Overview
To understand the installation options for Hitachi Data Instance Director, it is important to review the software’s basic architecture. At the heart of the data
management process is the Master node. The Master node provides instruction to all other nodes.
The following are the different node types:
Master node: The machine that controls the actions of all other nodes on the system. Only one Master node is deployed in a network. A Master node
can also be either a source or destination node, or both.
Source node: This node (server, workstation or virtual machine) stores data to be managed. The source node has an Active Data Change Agent,
which is responsible for monitoring the host file system, and performing the relevant actions defined by the policies. Nodes need to be configured as
a source node if they need to transfer locally stored data, or implement data tracking, blocking and auditing functions.
Destination node: This machine is capable of receiving data. This
machine might be the Data Instance Director Repository, a general-purpose system designated as the recipient of data in a replication configuration.
Policy orientated data management
Data Instance Director is designed to allow your site to implement a Business
Process by using policies. Policies are mapped to machines or groups, and to the data management agents that implement those policies. A large, complex environment can be configured in a matter of minutes rather than days
through the use of only two panels:
The Policy Definition panel allows you to design the business objective.
The Data Flow panel is used to define where those policies are applied, and the path of the data flow, reflecting the information life cycle.
Data Instance Director compiles the policies into more granular instructions,
and sends those instructions to each of the elements involved in data management activity.
Once you have identified the machines and their role and responsibility, you
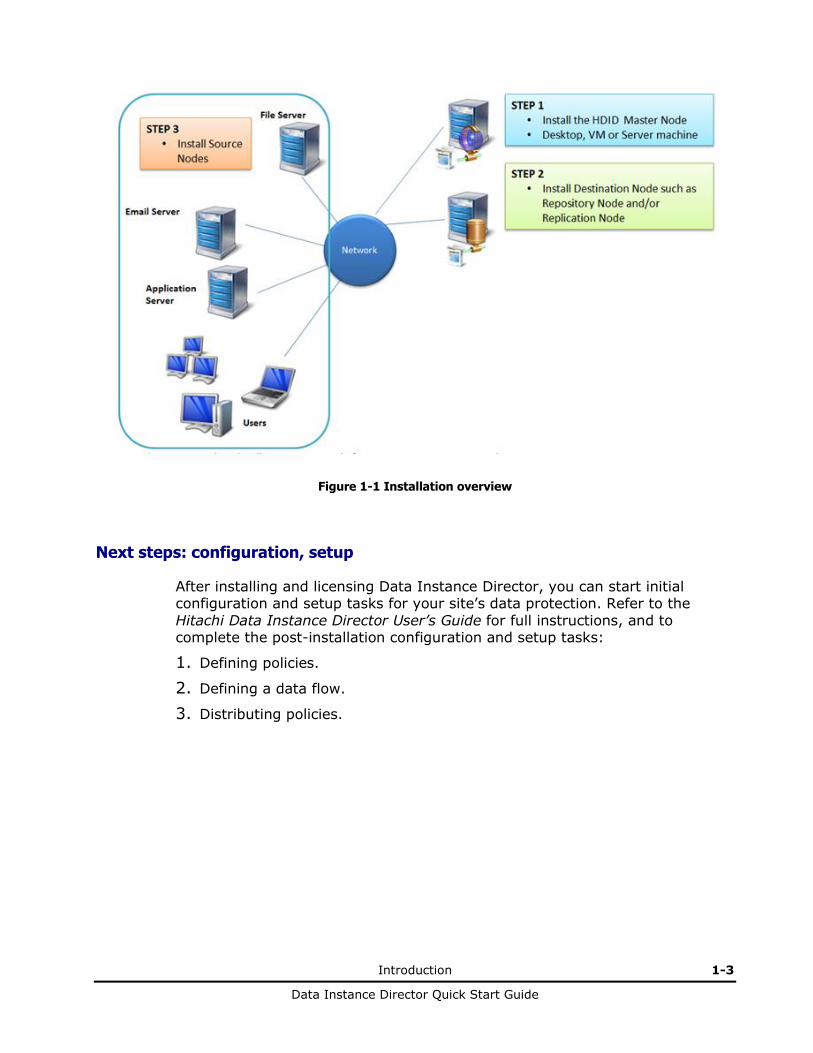
can start the installation.
Figure 1-1 provides an overview of the installation tasks.
Introduction 1-3
Data Instance Director Quick Start Guide
Figure 1-1 Installation overview
Next steps: configuration, setup
After installing and licensing Data Instance Director, you can start initial configuration and setup tasks for your site’s data protection. Refer to the
Hitachi Data Instance Director User’s Guide for full instructions, and to complete the post-installation configuration and setup tasks:
1. Defining policies.
2. Defining a data flow.
3. Distributing policies.

1-4 Introduction
Data Instance Director Quick Start Guide
Reviewing the installation prerequisites
Before you install Data Instance Director, confirm that your site’s hardware and software meet the requirements that are outlined in the following
sections.
Supported operating systems
Table 1-1 lists the supported ESX, Hyper-V, File System, and Windows cluster
operating systems.
Table 1-1 Supported operating systems for backup, version, CDP, replication, track and block operations
Batch backup
Live backup version CDP
Real-time replication
Scheduled replication Tracking Blocking
ESX ESX vSphere 5.0 ✗ ✗ ✗ ✗ ✗ ✗ ✗ ESX vSphere 5.1 ✗ ✗ ✗ ✗ ✗ ✗ ✗ ESX vSphere 5.5 ✗ ✗ ✗ ✗ ✗ ✗ ✗ Hyper-V3
Windows Server 2008
✗
Windows Server 2008 R2
✗
Windows Server 2012
✗
Windows Server 2012 R2
✗
File System
Windows XP Pro SP2, SP3
Windows Vista SP1+
Windows Vista SP1+ (64 Bit)
Windows 7(1)
Windows 8
Windows Server 2003 SP2+
Windows Server 2003 SP2+ (64 Bit)
Windows Server 2003 R2 SP1+
Windows Server 2003 R2 SP1+ (64 Bit)
Windows Server 2008(1)
Windows Server 2008 (64 Bit) (1)
Windows Server 2008 R2 (64 Bit) (1)

Introduction 1-5
Data Instance Director Quick Start Guide
Batch backup
Live backup version CDP
Real-time replication
Scheduled replication Tracking Blocking
Windows Server 2012 (64 Bit) (2)
Windows Server 2012 R2
LINUX RedHat / CentOS 4.8 (64 bit) and newer ✗ ✗ ✗ ✗ ✗
Ubuntu 10.04 (64 bit) and newer ✗ ✗ ✗ ✗ ✗
Legend: : Supported
✗: Not supported
(1) On the Master node, the UAC "User Account Control" must be turned off.
(2) Supported, with the following limitation: A restoration of a Hyper-V guest requires the guest to be
added again, manually, using the Hyper-V console.
(3) Hyper-V is supported in a Cluster Shared Volume (CSV), on Windows Server 2012. All virtual
machines must either be located on a specified drive (for example, C:\) or located on the CSV, but
not both. Additionally, Data Instance Director must be installed on each node of the cluster.
Supported applications
Table 1-2 lists the applications that support tasks such as batch backup, continuous data protection, and tracking.
Table 1-2 Supported applications for backup, version, CDP, replication, track and block operations
Batch
backup Live
backup version CDP Real-time
replication Scheduled replication Tracking Blocking
SQL 2003 and older
✗
SQL 2005 ✗ SQL 2008 ✗ SQL 2012 ✗ Exchange 2003 ✗ Exchange 2007 ✗ Exchange 2010 ✗ Exchange 2013 ✗ Oracle 10g (WIN only)-Crash Consistence
✗
Oracle 10g (WIN only)-Crash Consistence
✗
Domino Notes (WIN only)-Crash Consistence
✗
Legend: : Supported
✗: Not supported

1-6 Introduction
Data Instance Director Quick Start Guide
Support for archiving to Hitachi Content Platform (HCP)
Table 1-3 lists the applicable archive, restore, and virtual machine backup
support with the HCP.
Table 1-3 Supported operating systems and applications for archiving to HCP
Real-time archive Restore
File System
Windows XP Pro SP2, SP3 ✗ ✗ Windows Vista SP1+ Windows Vista SP1+ (64-bit) Windows 7 Windows 8
Windows Server 2003 SP2+
Windows Server 2003 SP2+ (64-bit) Windows Server 2003 R2 SP1+ Windows Server 2003 R2 SP1+ (64-bit) Windows Server 2008(1) Windows Server 2008 (64-bit) Windows Server 2008 R2 (64-bit) Windows Server 2012 (64-bit) Windows Server 2012 R2 LINUX RedHat / CentOS 4.8 (64-bit) and newer N/A N/A
Ubuntu 10.04 (64-bit) and newer N/A N/A
Application
SQL 2003 and older N/A N/A
SQL 2005 N/A N/A
SQL 2008 N/A N/A
SQL 2012 N/A N/A
Exchange 2003 N/A N/A
Exchange 2007
Exchange 2010
Exchange 2013
Oracle 10g (WIN only)-Crash Consistence N/A N/A
Oracle 10g (WIN only)-Crash Consistence N/A N/A
Domino Notes (WIN only)-Crash Consistence N/A N/A Legend: : Supported
✗: Not supported N/A: Not compatible

Introduction 1-7
Data Instance Director Quick Start Guide
Support for snapshotting Hitachi block (VSP) and file (HNAS)
Table 1-4 lists the operating system requirements for client and hardware
proxy nodes involved in snapshotting Hitachi block and file storage.
Table 1-4 Supported operating system for snapshotting Hitachi block and file storage
Client node(*) Hardware proxy node(+)
Windows 7 (32-bit)
Windows 7 (64-bit)
Windows Server 2008 (64-bit)
Windows Server 2008 R2 (64-bit)
Windows Server 2012 (64-bit)
Windows Server 2012 R2 (64-bit)
RHEL 6 x64 (6.3 and newer) (3)
OEL 6 x64 (6.5 and newer) (3)
SUSE 11 x64 (11.3 and newer) (3)
Legend: = Supported, ✗= Not supported, N/A= Not compatible
(*) The client node is the machine that hosts the application whose data is to be snapshotted or replicated.
(+) The hardware proxy node is a machine that communicates with the storage hardware to manage the snapshot or
replication operations.
(3) Prior to installing HDID on a Linux platform, ensure that you install the sg3_utils package which contains rescan-
scsi-bus.sh. This is required by HDID in order to successfully rescan for SCSI devices.

1-8 Introduction
Data Instance Director Quick Start Guide
Table 1-5 lists the operating system requirements for client and hardware proxy nodes involved in snapshotting Hitachi block and file storage.
Table 1-5 Supported applications for snapshotting Hitachi block and file storage
Block File
Exchange Standalone 2010 on Windows 2008 R2
Exchange Standalone 2013 on Windows 2012
Exchange DAG 2010 on Windows 2008 R2
Exchange DAG 2013 on Windows 20012 R2
SQL Standalone 2012 on Windows 20012
SQL Standalone 2014 on Windows 20012 R2
Oracle ASM 11g RHEL 7
Oracle ASM 11g OEL 6.3
Oracle ASM 11g SUSE 11.35
Oracle 11g RHEL 6.3
Oracle 11g OEL 7.0
Oracle 11g SUSE 11g
Oracle RAC ASM 11g RHEL 6.3
Oracle RAC ASM 11g OEL 7.0
Oracle RAC ASM 11g SUSE 11.3
Oracle 11g RHEL 7
Oracle 11g OEL 6.3
Oracle 11g SUSE 11
Oracle RAC 11g RHEL 6.3
Oracle RAC 11g OEL 7.0
Oracle RAC 11g SUSE 11.3
Legend: = Supported, ✗= Not supported, N/A= Not compatible

Introduction 1-9
Data Instance Director Quick Start Guide
Hardware requirements
Table 1-4 lists the minimum hardware and operating system requirements for
the Data Instance Director nodes.
Table 1-6 Node and Hardware, OS Requirements
Source Node and
Replication Node Master Node Repository Node
Hardware Memory 512 megabytes (MB) or as
recommended by the OS type 2 gigabytes (GB) or greater 16 GB or greater
Disk space 50 MB for Data Instance Director, +16 GB for cache + 16
GB for filter logs (2)
50 MB for Data Instance Director, +4 GB Logs
50 MB for Data Instance Director, + 16 GB cache per source, + repository
space(2)
Network interface Min 100 megabits per second (Mbps)
Min 100 Mbps Min 1,000 Mbps
RAID Not Required Not Required Performance Based RAID, 16 GB Cache per Source Node, Repository disk
space(3)
Processor 1 CPU, 1 gigahertz (GHz) 2 CPU, 2+ GHz 4+ CPU, 2+ GHz
Recommended OS Any supported Win 2008 R2, Linux Win 2008 R2, Linux
Display 1024 x 768 1024 x 768 Via Master
Third party software N/A Oracle Java, JRE(4)
Operating System: Windows
Windows 7 x64
Windows 7 x32
Windows 2003 x64
Windows 2003 x32
Windows 2003 R2 x64
Windows 2003 R2 x32
Windows 2008 x64 (1) (1)
Windows 2008 x32 (1)
Windows 2008 R2 (1) (1)
Windows 2012 (1) (1)
Windows 2012 R2 (1) (1)
Windows XP x32
Windows Vista x64
Windows Vista x32
Windows 8 x64
Windows 8 x32
Linux5
RHEL 6.3 x64 and newer
SUSE 10 x64 and newer (5)
Ubuntu 10.04 (64-bit) and newer
AIX
AIX 6.1 TL09
AIX 7.1 TL03
(1) UAC "User Account Control" must be turned off.

1-10 Introduction
Data Instance Director Quick Start Guide
(2) Repository configuration should plan for 16 GB of hard disk space for cache per Live Source Node.
(3) While the repository can be placed on any supported Windows or Linux machine, best practices
suggest a RAID configuration to ensure that data survives in the event of disk failure.
(4) The Master and Repository nodes require Java Runtime Environment (JRE), which can be downloaded
from: http://www.java.com
(5) We recommend that Linux source nodes have a Logical Volume Manager (LVM) on each volume
group that is to be backed up. A minimum of 10 GB of free space is required in the ‘unused’ portion
of the LVM, which is in addition to the required space for the allocated storage area. For example, if
100 GB of usable storage is required, then the total disk size will be 110 GB (100 GB of usable
storage and 10 GB of unused storage).
Notes:
When more than one configuration is applied to a single node, the higher
specification is required.
To prevent problems, maintain operating system updates and patches.
Hitachi Content Platform indexing requirement
If you plan to use the Hitachi Content Platform (HCP) with Data Instance Director, then the following Search Facility Settings must be selected within the Settings tab of the HCP, for the Metadata Query Engine (MQE):
Enable indexing
Enable indexing of custom metadata
Click Update MQE Settings to reflect the changes.
Firewall configuration
If a third party firewall is installed within your network, then when processes are started as part of the Data Instance Director software installation, firewall warnings may be generated.
Configure the firewall to allow access for all Internet-connected nodes (or nodes that are separated by firewalls) on one open port: 30304 (TCP and UDP).
Additional ports that may need to be opened are:
The HCP node (30306, by default)
The Data Instance Director Microsoft Exchange notification client (30500)
Hitachi VSP snapshotting requirements
If you plan to perform snapshotting of VSP volumes then the following
prerequisites are required:
Introduction 1-11
Data Instance Director Quick Start Guide
General: o The command device must ONLY have user authentication
enabled o A dedicated user for HDID must be in Administration user group o The proxy must be a repository node
o HORCM must be installed on the proxy node o If using virtual machines, they must use NPIV
VSP:
o Must be licensed for TC, SI etc. o Must have adequate shared memory – see Provisioning and
Technical Guides
o Thin Image and Dynamic Pools must be set up o Journals must be set up for UR – Refer to the UR Guide
Windows:
o None
Linux: o Needs ‘rescan-scsi-bus.sh’ CLI tool (see
http://sg.danny.cz/sg/sg3_utils.html) o Needs ‘Multipath’ CLI command o Anything done directly on the VSP (outside of HDID) is not
supported by HDID

2
Installation and License Activation 2-1
Data Instance Director Quick Start Guide
Installation and license activation
This chapter describes the data management capabilities of Data Instance Director.
Overview
Installation: Windows, Linux
Installation: Cluster environment
Upgrading Data Instance Director
License Activation

2-2 Installation and License Activation
Data Instance Director Quick Start Guide
Overview
Data Instance Director is distributed as an installation package for Windows and Linux.
The installation process allows you to set the installation destination and select which components are to be installed. The same installation program is used for the master node and client node installations. The following sections
provide installation instructions for both nodes.
If a previous version of Data Instance Director is detected, the installer runs an upgrade. A separate upgrade package is not needed.
Notes:
Data Instance Director 32-bit version is supported for installation on a 32-bit operating system. If you attempt to install a 32-bit Data Instance Director on a 64-bit operating system, then you will be prompted to use the 64-bit installer
instead.
Data Instance Director 64-bit version is supported for installation on a 64-bit operating system. If you attempt to install a 64-bit Data Instance Director on a
32-bit operating system, then you will be prompted to use the 32-bit installer instead.
For the master and repository installation, Data Instance Director v4.2.0 is
supported on 64-bit operating systems, only. Source node installation can be done on either a 32-bit or 64-bit operating system.
Only one master node can be installed in an environment. Install the master
node before installing other types of nodes.
Windows 7 and Windows Vista are considered to be workstation operating systems, and by default, have additional security measures known as User
Account Control (UAC). Installation of the Data Instance Director master components on a Windows 7 or Vista machine requires that the UAC system be disabled. Ideally the Master node should be installed on server-based operating
systems, such as Windows 2003 or Windows 2008.
If you must install Data Instance Director master components on a machine running Windows 7 or Vista, you can disable UAC in the Control Panel:
Go to User Accounts and select Turn User Account Control on or off.

Installation and License Activation 2-3
Data Instance Director Quick Start Guide
Installation: Windows, Linux
Note: If this is a new installation on a 32-bit operating system, then the installation will be for a Client node only.
To install Data Instance Director:
1. In Windows, double-click on Data Instance Director-5.xxxx.exe in the
directory where you downloaded it.
2. For Linux installation, verify you have execute permissions and type the
command:
chmod og+rx ./Data Instance Director-5.xxxx-Linux.bin
The Setup program checks for previous installations of Data Instance
Director. If a previous installation is found, Setup launches the upgrade
process. For more information, see Upgrading Data Instance Director.
3. Click Next in the Setup Welcome Wizard.
Figure 2-1 Data Instance Director installer
4. When prompted, accept the License Agreement, and click Next>.

2-4 Installation and License Activation
Data Instance Director Quick Start Guide
Figure 2-2 Accepting the License Agreement
5. The default installation directory for Data Instance Director is entered
automatically:
C:\Program Files\Hitachi\HDID
Alternatively, if you are installing on a 64-bit OS, it may display:
C:\Program Files (x86)\Hitachi\HDID
To install Data Instance Director in a different location, enter the path in the
Installation Directory field or use the folder browser button.
Click Next>.

Installation and License Activation 2-5
Data Instance Director Quick Start Guide
Figure 2-3 Installation Directory
Note: If this is a new installation on a 32-bit operating system, then the installation will be for a Client node only, and steps 6, 7, and 8 are not
applicable.
6. Select the Data Instance Director components to install, and click Next>.
By default, Client is selected.
Figure 2-4 Installation type

2-6 Installation and License Activation
Data Instance Director Quick Start Guide
Master: Installs the components required to make the current system the
Master node. Only one Master node can be installed in a network. The main
Data Instance Director user interface is installed and only accessible on the
Master node. The Data Instance Director environment is set up and
managed through the Master node. A Master can also act as a Client and a
Repository, enabling the node to have data captured from it and be able to
store data from Source nodes in a Repository.
Client: This option enables the node to be a Source node, and allows data
to be captured on that node. This is required if the machine will send data to
another Data Instance Director enabled system. A Client will also be able to
have block or track operations performed on it.
Custom: This option allows specific components to be installed, allowing the
Data Instance Director installation to be tailored to a specific need.
If the Master option was selected, skip step 7.
If the Client option was selected, skip steps 7 and 8.
7. Select the Data Instance Director components to install, and click Next. By
default, Data Source is selected.
Figure 2-5 Custom Install
A Custom node can be any combination of the following components:
Master: Installs the components required to make the current system the
Master node. Only one Master node can be installed in a network. The main
Data Instance Director user interface is installed and only accessible on the
Master node. The Data Instance Director environment is set up and managed
through the Master node.

Installation and License Activation 2-7
Data Instance Director Quick Start Guide
Data Source: This option enables the node to be a Source node, and allows
data to be captured on that node. This is required if the machine will send data
to another Data Instance Director enabled system. The Data Source component
is also required to perform block or track operations on this node.
Repository: This option enables the node to store data from source nodes as a
Repository node.
Mirror: This option allows the node to be designated as a Replication node,
making it suitable for replication operations and to make use of the Mirror
mover.
8. If a Repository is being installed, the installer prompts you for a Repository
Directory. This directory allows the repository and the data stored within it to
be separated from the other Data Instance Director components and files which
are installed.
Figure 2-6 Repository install destination
Note: Because the Repository grows in large blocks, even for a small amount of test data, ensure that the Repository Destination has a minimum of 10 GB of free space.
9. Specify a node name to be used within Data Instance Director. By default, the
name is set to the machine’s host name. This name is only for running Data
Instance Director, and will not change the name set in the operating system.
If it is known that the node will operate over a non-secure network such as the
Internet, then components enabling the Internet connected node option is
recommended. This will encrypt transmitted data as an extra security
precaution.

2-8 Installation and License Activation
Data Instance Director Quick Start Guide
Figure 2-7 Node name
10. If the Master component was not selected, the node is configured as a Client
Node. Enter the IP address or a DNS resolvable name of the Master node.
Figure 2-8 Enter Master IP address or DNS resolvable name
11. Indicate whether you want to place a Data Instance Director GUI shortcut
on the desktop. Afterward, click Next>.

Installation and License Activation 2-9
Data Instance Director Quick Start Guide
Figure 2-9 Create shortcut
12. Click Next> when Setup indicates that it is ready to begin the
installation. Data Instance Director files are copied to the designated
directories.
13. Click Finish when the message is displayed stating that the installation
is complete.
You do not need to restart your machine after the installation is complete.
At the end of the file copying process, the installer starts all installed and
required Data Instance Director components on the system.
Note: If a third party firewall is installed on the network, then starting these
processes generates firewall warnings. Configure the firewall to allow access for all
Data Instance Director components on one open port: 30304 (TCP and UDP).
Installation: Cluster environment
Data Instance Director can be installed on the servers which are in a Windows cluster. For details, please refer to the Hitachi Data Instance Director User’s Guide.

2-10 Installation and License Activation
Data Instance Director Quick Start Guide
Upgrading Data Instance Director
The Data Instance Director installation package automatically detects any currently installed versions of Data Instance Director. If a previous version is
found, an upgrade can be run with the same installation package.
An upgrade can be performed if a newer version of Data Instance Director is available or if the existing installation has become corrupt.
During an upgrade, no options are available to change the installation directory, repository directory (if installed), machine name, installation type, capabilities or master name or IP address.
When an upgrade starts, the Data Instance Director services are shut down. These services are restarted when the upgrade process is exited or completed.
Note: We recommend upgrading Data Instance Director only after backups have been completed, and not while backups are currently in progress.
Upgrade order
It is recommended that nodes be upgraded in the following order:
Master nodes
Repository destination nodes
Replication destination nodes
Source nodes
After upgrading, the rules should be redistributed and all destination nodes should be manually resynchronized with their sources.
Upgrade alert message
An upgrade starts with the following alert message:
Figure 2-10 Upgrade alert

Installation and License Activation 2-11
Data Instance Director Quick Start Guide
Note: If this is an upgrade installation on a 32-bit operating system, all previously defined roles are retained.
However, if you upgrade a 32-bit version Data Instance Director that is
installed on a 64-bit operating system (in the installation default location), then in addition to retaining the previous roles, the installer converts Data Instance Director to a 64-bit version. The Hitachi file system structure (and
the location of the filter log file) will be moved to the Program Files location, for example: C:\Program Files\Hitachi
In this case, the following upgrade alert message is displayed:
The file system structure is not moved if Data Instance Director was installed in a non-default location.
Click Yes to proceed with the upgrade, or No to quit and exit Setup.
Upgrading Clients from Master
While the Master can be upgraded by running the update executable, Data Instance Director clients, Source, Repository, and Replication nodes, (virtual and physical) can be automatically updated from direct control from the
Master. To do this, place the updated Data Instance Director executable into the following directory on the Master: <INSTALL>\Hitachi\HDID\runtime\updater
Then, select the Upgrade Clients option.

2-12 Installation and License Activation
Data Instance Director Quick Start Guide
Afterward, a new window launches and lists all Data Instance Director clients.
Check the boxes on the nodes to upgrade and choose the installer version to
use from the drop-down list at the bottom of the window, this will display all the executables that have been placed into the updater directory. The Master will push the install package and execute the upgrade automatically all
together.
Note: The Upgrade Clients dialog lists nodes that are running on a Windows OS.
Licensing Data Instance Director
To distribute rules, the master machine must have a valid Data Instance
Director activation key.
As of Data Instance Director version 4.2.0, the software installation includes a built-in evaluation key for sites that want to use the product on a trial-to-
permanent basis. After the software is installed, it can be used for 45 days, with up to 10 TB of maximum data usage before a permanent license key is required. (Existing, purchased customers who upgrade to version 4.2.0 are
unaffected by the feature: Their permanent license continues to convey during the upgrade.)
After a trial license has expired, the permanent license must be entered
manually.

Installation and License Activation 2-13
Data Instance Director Quick Start Guide
Manual license activation
If you have a valid activation key, then it can be entered directly within the Data Instance Director GUI.
1. Start Data Instance Director.
Double-click on the desktop shortcut. - or - Access Programs → HDID → HDID from the Start menu.
2. Open the HDID License dialog. If Data Instance Director is unlicensed,
then this will be opened automatically upon starting the user interface.
Otherwise, it can be accessed through Help → License.
Figure 2-11 License dialog
3. Select the Manual Activation tab.
4. Enter the Activation Key, then click Enter Key.


MK-93HDID002-00
Hitachi Data Systems
Corporate Headquarters 2845 Lafayette Street Santa Clara, California 95050-2639
U.S.A. www.hds.com
Regional Contact Information
Americas +1 408 970 1000 [email protected]
Europe, Middle East, and Africa
+ 44 (0)1753 618000 [email protected]
Asia Pacific
+852 3189 7900 [email protected]


