

In-camera lens compensation
High resolution sensor are really demanding
when it comes to the resolution of the lens as
well as to shading, chromatic aberration and
distortion which are more important on
DSLMs like the Sony A7 and the Sony
A6000 due to the shorter flange (distance
between sensor and lens mount). Most of
these optical errors can already be corrected
in the construction of the lens for a higher
price (see Zeiss Otus). In-camera lens
compensation is one mean to reduce the costs of lens construction. This article shows the
effects of the three different correction parameters of the in-camera lens compensation on
JPG and RAW based on pictures taken with the combinations of Sony Vario-Tessar® T* FE
16-35mm F4 ZA OSS on the Sony A7 and Sony E 10 – 18mm F4 OSS on the A6000.
Trade-Off
Many DSLR (Digital Single-Lens Reflex) and DSLM (Digital Single-Lens Mirrorless) user
want more and more megapixel; be it the professional photographer who wants the best
possible quality for large prints or be it the ambitious hobby photographer who simply wants
the best gear for his hobby or the beginner who thinks that more resolution is equal to better
pictures.
The trade-off between lens price and quality called „in-camera lens correction“ is fed by the
ambitions of the manufacturer who wants to build the best product possible and the
photographer who wants to use the best possible lens for the lowest price. The most
uncomprising lenses currently available which deliver outstanding image quality on mainly
all available sensors are surely the Otus lenses build by Zeiss. Image quality, which one can
expect at a price level far above the level of $ 3.000. This lens are surely made for the
enthusiasts which have the money and the willingness to pay the price and less interesting for
the professionals that think in economic dimensions or the hobbyist with smaller budget. The
later are rather interested in those lenses found at mid-range price levels which deliver the
best performance in combination with the internal lens corrections – as far as available in the
camera firmware.

A note to the image material
Cameras and lenses
Using a full-frame lens on a camera with APS-C sensor would not really show the real
amount of distortion and shading because the APS-C sensor is only using the good center part
of the full-frame lens. The following drawing shows the relationship of image circle and
sensor size of full-frame and APC-C sensors:
The in-camera lens correction is best shown when using wide-angle focal length and surely in
the outer image areas and corners of the picture. The following combinations of camera and
lens have been used to create as much lens errors as possible:
Sony A7 with Sony Vario-Tessar® T* FE 16-35 mm F4 ZA OSS Sony A6000 with Sony E 10 – 18 mm F4 OSS

RAW and JPG
There is an ongoing discussion whether the in-camera lens correction is applied to RAW
images. All pictures have been made in RAW and JPG each with activated and deactivated
lens correction to find out whether lens correction is applied to RAWs.
All comparable pictures have been taken with the same event of simultaneous shutter release
in Sony A7 and Sony A6000 to create the highest rate of comparability and to avoid
difference in images caused by e.g. cloud moving into sunlight. The cameras have been
mounted as shown in below picture and the shutter was released by a radio trigger.

Analysis of images
Shortly after Sony started selling the lens I wrote a first Hands-on about the Sony Vario-
Tessar® T* FE 16-35mm F4 ZA OSS. In one of the comments of the German version of the
hands-on I was asked about my opinion on the in-camera lens correction – here it is.
Frame 1 – Chromatic aberration
JPG 10-18 Obj.korrektur Aus / lens corr. off PG 10-18 Obj.korrektur Auto / lens corr. auto
RAW 10-18 Obj.korrektur Aus / lens corr. off RAW 10-18 Obj.korrektur Auto / lens corr. auto

SEL 10-18mm F4 OSS, JPG and RAW, mit und ohne Korrektur / with and without correction
The red marked area is used for comparison of JPGs and RAWs:
left: lens correction off | right: lens correction auto
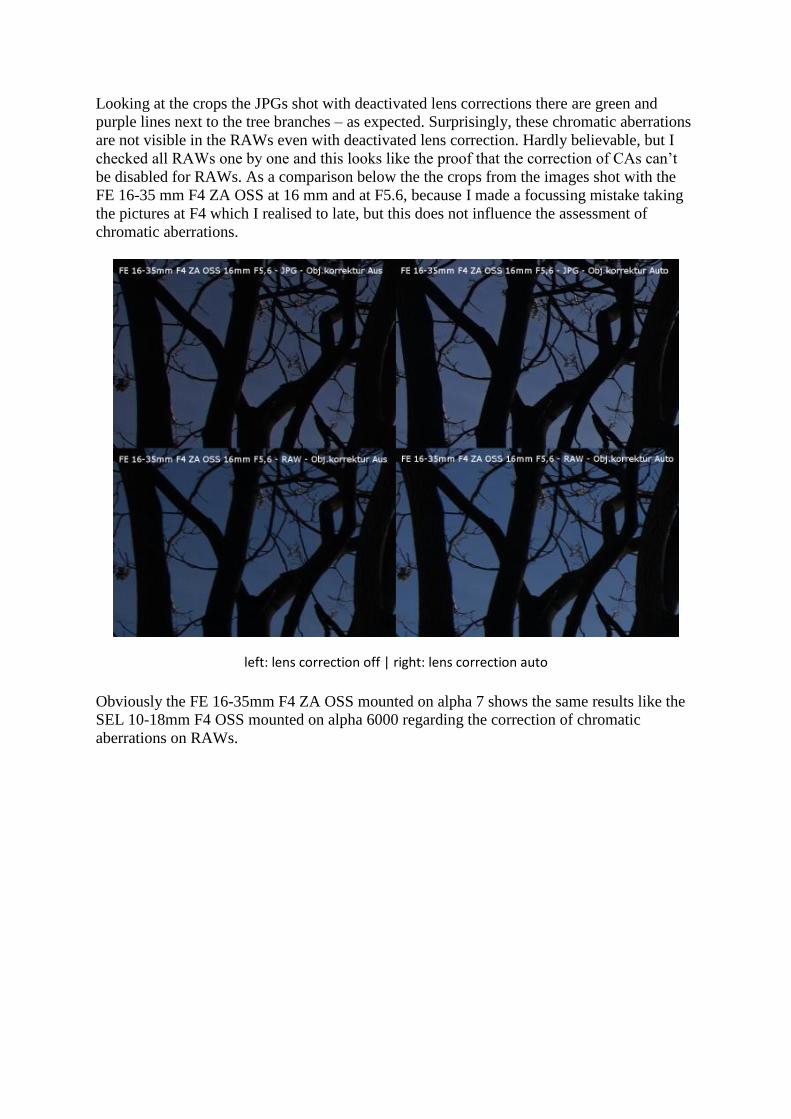
Looking at the crops the JPGs shot with deactivated lens corrections there are green and
purple lines next to the tree branches – as expected. Surprisingly, these chromatic aberrations
are not visible in the RAWs even with deactivated lens correction. Hardly believable, but I
checked all RAWs one by one and this looks like the proof that the correction of CAs can’t
be disabled for RAWs. As a comparison below the the crops from the images shot with the
FE 16-35 mm F4 ZA OSS at 16 mm and at F5.6, because I made a focussing mistake taking
the pictures at F4 which I realised to late, but this does not influence the assessment of
chromatic aberrations.
left: lens correction off | right: lens correction auto
Obviously the FE 16-35mm F4 ZA OSS mounted on alpha 7 shows the same results like the
SEL 10-18mm F4 OSS mounted on alpha 6000 regarding the correction of chromatic
aberrations on RAWs.
Frame 2 and 3 – Shading and distortion
JPG 10-18 Obj.korrektur Aus / lens corr. off JPG 10-18 Obj.korrektur Auto / lens corr. auto
RAW 10-18 Obj.korrektur Aus / lens corr. off RAW 10-18 Obj.korrektur Auto / lens corr. auto

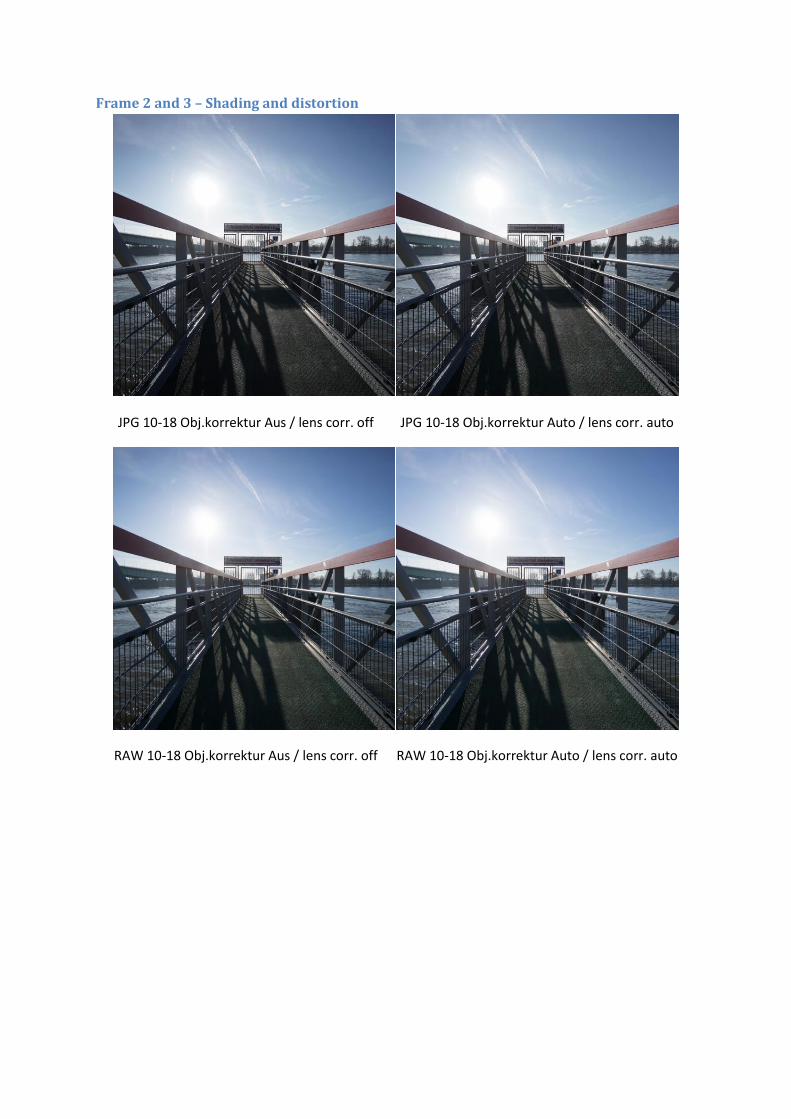
The following pictures show the effect of in-camera lens correction regarding corner shading
and distortion.
SEL 10-18mm F4 OSS @ F4 – JPG:
SEL 10-18mm F4 OSS @ F4 – RAW:
It is easily visible that the correction of shading is applied to the RAWs as well, whereas the
activation or deactivation of the correction of distortion has no effect on the RAWs. The
following comparison between JPG and RAW with deactivated correction of distortion
shows, that JPG and RAW are the same. The small differences in shading are caused by the
selected creative style „Neutral“ and are not related to any lens correction.

Let’s have a look on the same images shot with FE 16-35mm F4 ZA OSS mounted on the
alpha 7.
FE 16-35mm F4 ZA OSS @ F4 – JPG:
FE 16-35mm F4 ZA OSS @ F4 – RAW:
FE 16-35mm F4 ZA OSS @ F4 – JPG+RAW deactivated correction:
There is a lot more image material taken from other subjects and with different apertures and
focal lengths and lens correction activated or deactivated which I did not include in this
article but which I provide as zip-files for download at the end of this post and which can be
used for your own analysis. If you use this material for your own publications I only require
being listed as reference with a link to this post.
Verdict
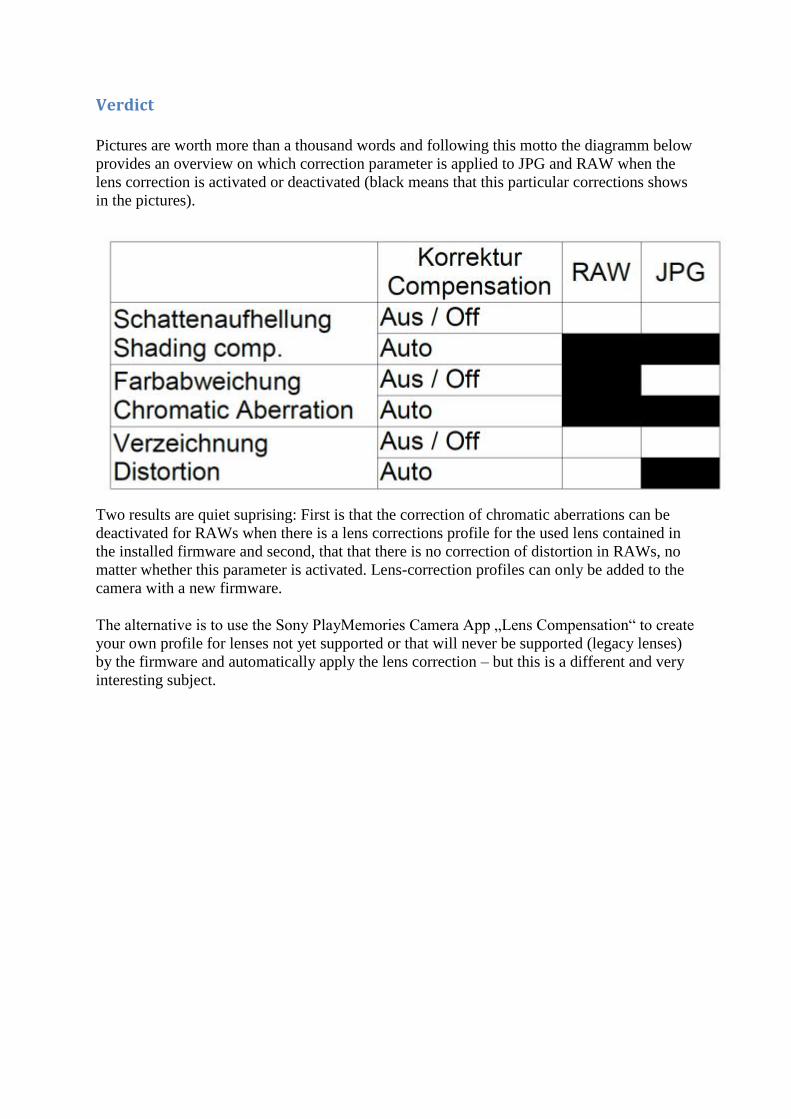
Pictures are worth more than a thousand words and following this motto the diagramm below
provides an overview on which correction parameter is applied to JPG and RAW when the
lens correction is activated or deactivated (black means that this particular corrections shows
in the pictures).
Two results are quiet suprising: First is that the correction of chromatic aberrations can be
deactivated for RAWs when there is a lens corrections profile for the used lens contained in
the installed firmware and second, that that there is no correction of distortion in RAWs, no
matter whether this parameter is activated. Lens-correction profiles can only be added to the
camera with a new firmware.
The alternative is to use the Sony PlayMemories Camera App „Lens Compensation“ to create
your own profile for lenses not yet supported or that will never be supported (legacy lenses)
by the firmware and automatically apply the lens correction – but this is a different and very
interesting subject.
![TAmROn®MAIL-IN REBATES - B&H Photo Video Digital …€¦ · Serial number of my new lens: My new lens fits: [ ] Canon [ ] Nikon [ ] Sony Do not discard your lens box. You must](https://static.documents.pub/doc/80x56/5b5219aa7f8b9a35278cd92c/tamronmail-in-rebates-bh-photo-video-digital-serial-number-of-my-new-lens.jpg)


