

0 User’s Guide
User’s Guide
2009, Insite Mitra Inovindo, All Right Reserved.
1 User’s Guide
2 Adding a Page
5 Editing a Page
7
13
24
28
Rich Media Content
Listing
Page Options
Online Shop
33 Modules
7 Inserting an Image
9 Inserting Music
10 Inserting a Video
11 Inserting Flash
12 Inserting PDF
25 Page Properties
25 Publishing Schedule
26 Side Content
27 Shop
28 Adding an Online Shop
30 Placing an Order
33 Embedding a Module on a Page
34 Positioning a Module within Text
36 Embedding Modules that require Page ID
39 “Content Block” Module
Contents
13 Built-in Listings
21 Creating a Listing

2 User’s Guide
InsiteCreation 2010 provides a simple, self-explanatory interface in almost any part of the application,
including the content authoring process. Simply click on the Add New link after login; the system will guide
you through the process of creating a new page.
Click the Add New link.
Adding a Page
1
3 User’s Guide
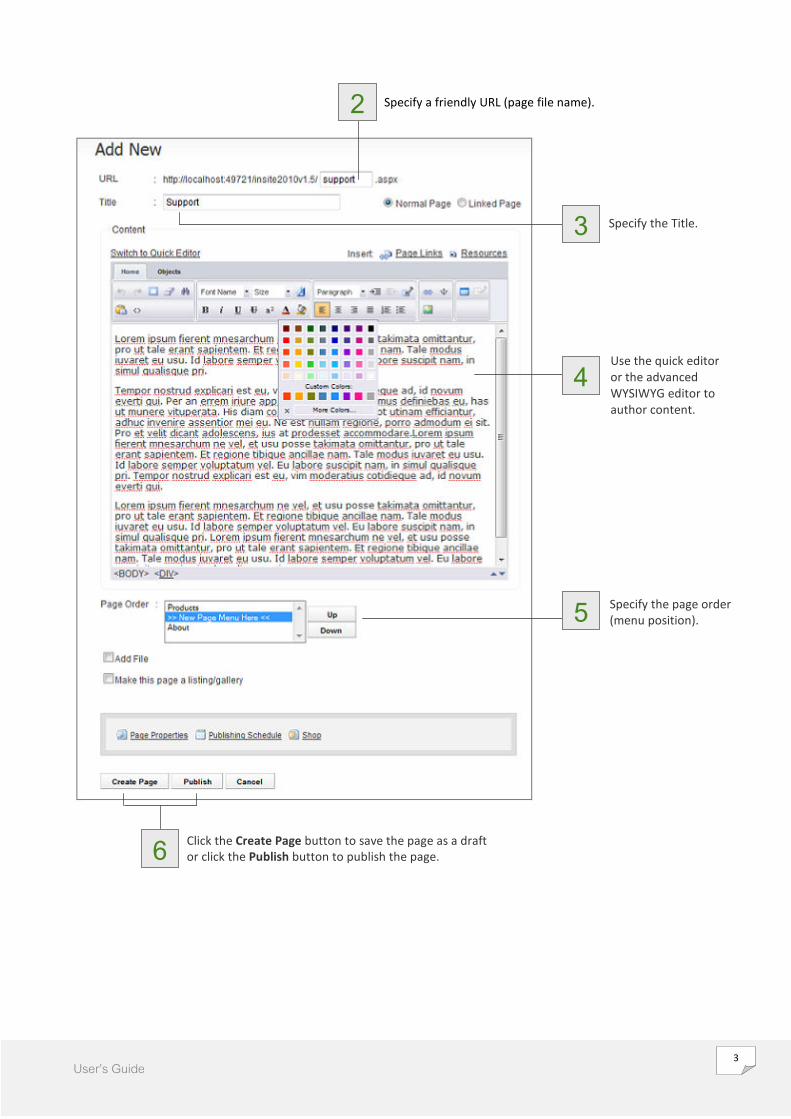
2 Specify a friendly URL (page file name).
3 Specify the Title.
4 Use the quick editor
or the advanced
WYSIWYG editor to
author content.
5 Specify the page order
(menu position).
6 Click the Create Page button to save the page as a draft
or click the Publish button to publish the page.

4 User’s Guide
7 The page is created and a new menu item
is now displayed on the site menu.
8 You can create sub pages under the newly created page using the
same steps. The sub pages will also be displayed on the site menu.
5 User’s Guide
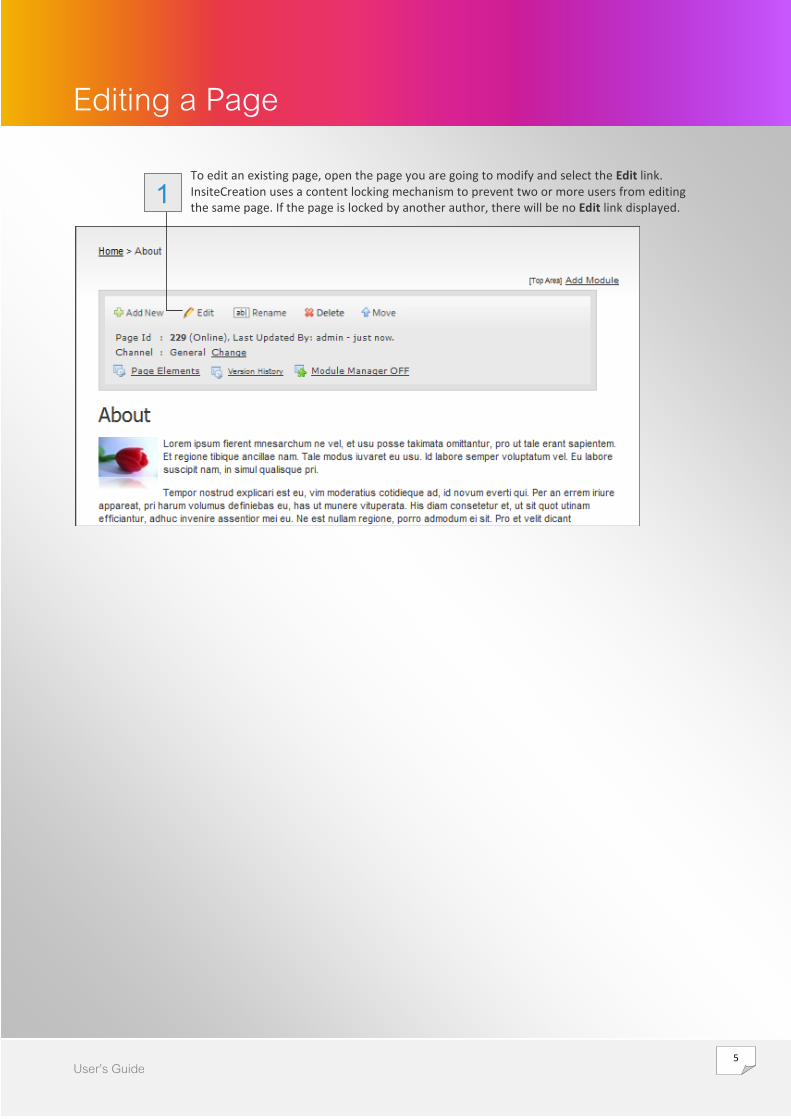
1 To edit an existing page, open the page you are going to modify and select the Edit link.
InsiteCreation uses a content locking mechanism to prevent two or more users from editing
the same page. If the page is locked by another author, there will be no Edit link displayed.
Editing a Page

6 User’s Guide
2 On the Edit form,
you can update
title and content.
3 Click Save to save your changes while still keeping the page open for editing.
Click Save & Finish to save the changes as a draft and close the content editor.
Click Publish to publish your changes to your website.

7 User’s Guide
When editing content, you can insert multimedia files (images, videos, music), or any other file as link or
embedded object.
Inserting an Image
1 Click the Resources link.
2 The Insert Resources dialog is now opened.
Select an image.
3 If you select Insert as a
thumbnail, InsiteCreation will
display a thumbnail version of
the image at the size you
specify in the drop-down list.
4 Here you can give
a link to the
thumbnail that
will open the
actual image.
5 A cool reflection effect
can be added to the
thumbnail.
6 Click Insert.
Rich Media Content

8 User’s Guide
7 Here is the inserted
Image. 8 Publish the page to
see the result.
9 Finished! A thumbnail is inserted. This is a real thumbnail (not a resized image). If you
click on the thumbnail, the actual image is displayed in a smooth lightbox (no new
windows or page reloads required).
9 User’s Guide
Inserting Music
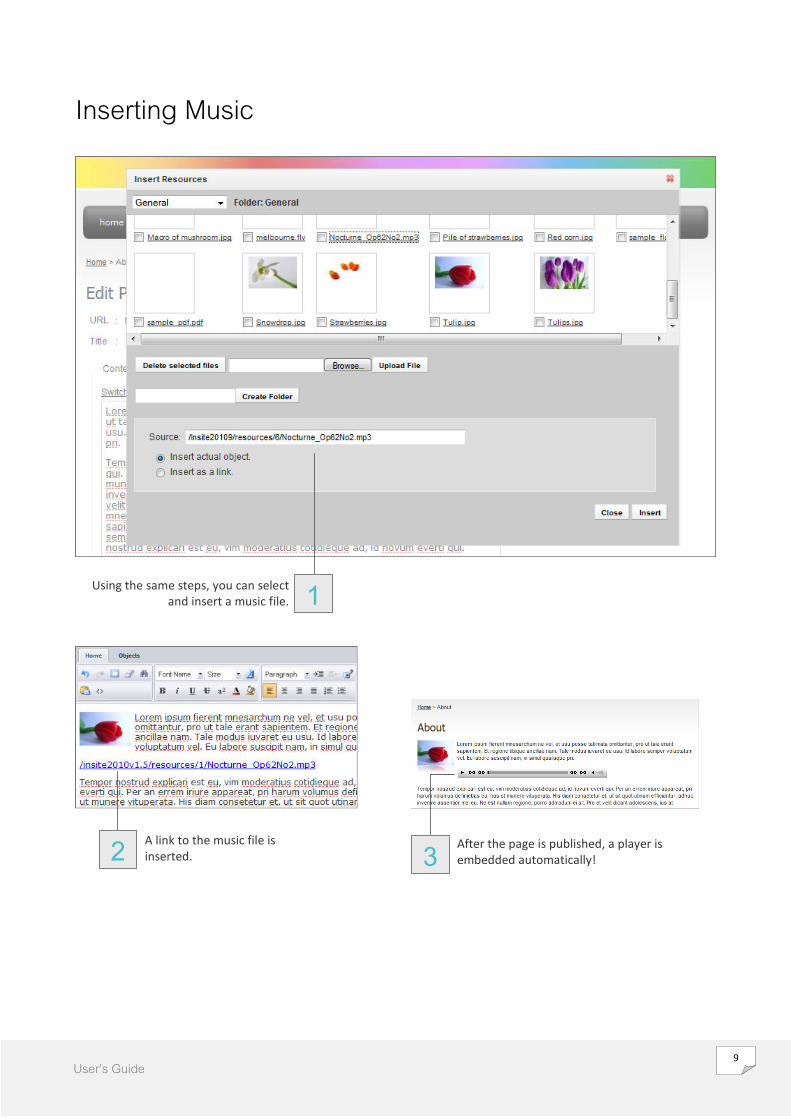
1 Using the same steps, you can select
and insert a music file.
2 A link to the music file is
inserted. 3 After the page is published, a player is
embedded automatically!

10 User’s Guide
Inserting a Video
1 You can insert various video files
(flv, avi, wmv and mov).
Select a video file & click Insert.
2 A link to the video file is
inserted. 3 After the page is published, a player is
embedded automatically!

11 User’s Guide
Inserting Flash
1 Select a flash file and click Insert.
2 A link to the flash file is
inserted. 3 Publish the page and see the result.

12 User’s Guide
Inserting PDF
1 Inserting a PDF file is also supported.
Select a PDF file and click Insert.
2 A link to the PDF file is
inserted. 3 Publish the page and see the result.

13 User’s Guide
InsiteCreation allows you to make a listing from any page. By checking the Make this page a listing/gallery
option when creating or editing a page, a listing template selection will be displayed to create almost any
type of listing.
Built-in Listings Below are some examples of the built-in listings in InsiteCreation:
Listing

14 User’s Guide

15 User’s Guide

16 User’s Guide

17 User’s Guide

18 User’s Guide

19 User’s Guide

20 User’s Guide

21 User’s Guide
Creating a Listing You can make a listing from any page. Edit the page and check option Make this page a listing/gallery.
1 Try selecting Photo Gallery (with Lightbox &
Reflection Effect) and publish the page.
2 Finished! Your listing page
is now created.
3 Now you can start adding
entries for your listing.
Adding entries is the same as
adding a normal page.
Click the Add New link.
Note:
To quickly add listing entries, you
can use the Quick Add panel.
Just upload as many as images as
you want and the gallery will
show them instantly.

22 User’s Guide
Note:
Clicking the Details link will bring you
to the photo page.
5
Check the
Add File
option. 6
Here you can upload an image file
as a thumbnail for the gallery.
InsiteCreation performs a real &
automatic thumbnail creation, so
you can upload an image of any
size/dimension.
8 Optionally, you can upload any file for
downloading (ZIP, PDF, DOC, etc). 7 Here you can upload an image to be displayed at
actual size on the page.
Note: the system also allows you to upload video
(FLV) or audio (MP3) files that will be embedded
on the page with a built-in player. 9 Publish the page and Done!
Our listing (Photo Gallery) now has an entry.
Note:
The thumbnail is displayed on the listing
with a reflection effect added.
Actual Image
File Download
Note:
Clicking the thumbnail will open the actual image in a
stylish light window.
Actual Image
4 After selecting the Add New link, the Add New form
is displayed. Enter a title.
23 User’s Guide
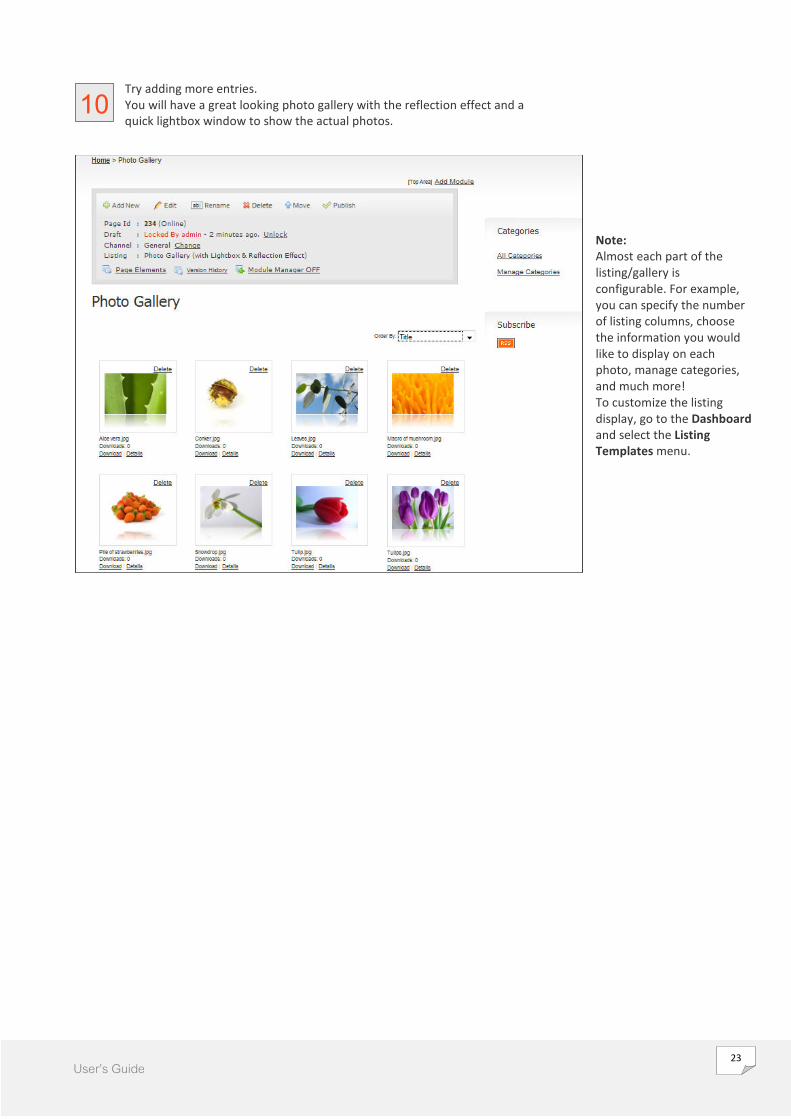
10 Try adding more entries.
You will have a great looking photo gallery with the reflection effect and a
quick lightbox window to show the actual photos.
Note:
Almost each part of the
listing/gallery is
configurable. For example,
you can specify the number
of listing columns, choose
the information you would
like to display on each
photo, manage categories,
and much more!
To customize the listing
display, go to the Dashboard
and select the Listing
Templates menu.
24 User’s Guide
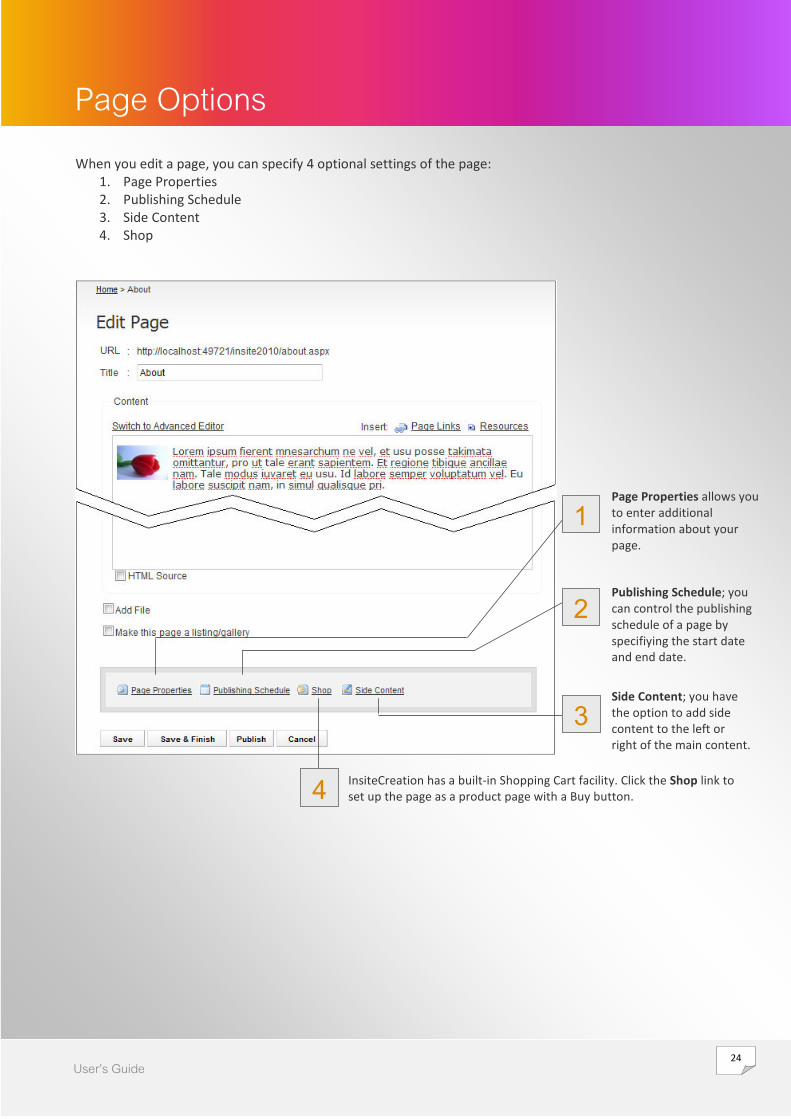
When you edit a page, you can specify 4 optional settings of the page:
1. Page Properties
2. Publishing Schedule
3. Side Content
4. Shop
1
Page Properties allows you
to enter additional
information about your
page.
2 Publishing Schedule; you
can control the publishing
schedule of a page by
specifiying the start date
and end date.
3
Side Content; you have
the option to add side
content to the left or
right of the main content.
4 InsiteCreation has a built-in Shopping Cart facility. Click the Shop link to
set up the page as a product page with a Buy button.
Page Options

25 User’s Guide
Page Properties
Here are the settings in the Page Properties dialog:
Publishing Schedule
You can control the publishing schedule of a page. The page will become accessible on the Start Publishing
date and cease to be visible on the Stop Publishing date.
If the page title is too long to be
displayed in the navigation menu,
you can specify a shorter title in
Display Link.
Enter meta data (Title, Description
and Keywords) to help search engines
index your page.
Specify interactions with search
engine here.
Check this option if you want to
hide the page from the site
menu/navigation.
26 User’s Guide
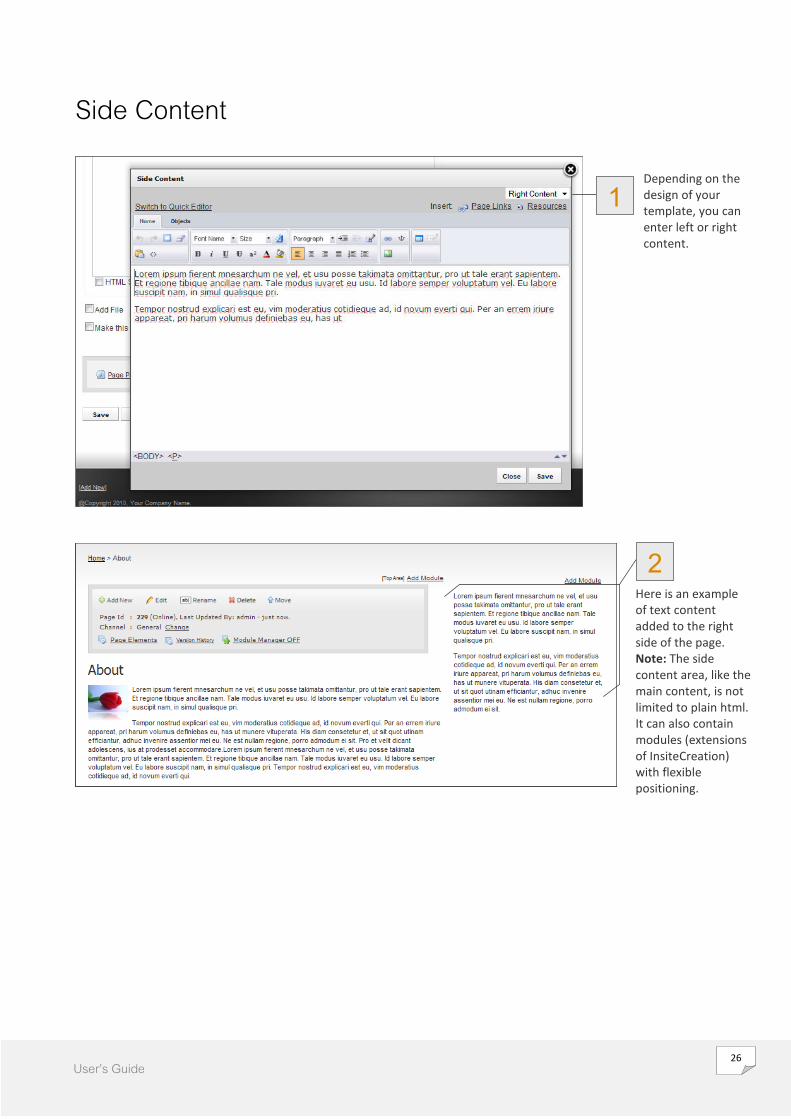
Side Content
1 Depending on the
design of your
template, you can
enter left or right
content.
2
Here is an example
of text content
added to the right
side of the page.
Note: The side
content area, like the
main content, is not
limited to plain html.
It can also contain
modules (extensions
of InsiteCreation)
with flexible
positioning.

27 User’s Guide
Shop
1 By specifying a price,
a page then becomes
a product item.
2
Publish the
page and an
Order Now
module will
automatically
be embedded
on the page.

28 User’s Guide
Adding an Online Shop
With InsiteCreation’s built-in eCommerce capability, any page can easily be turned into a product item,
enabling visitors to purchase the item displayed on the page.
1 Open the Shop dialog by selecting
the Shop link when editing a page.
2 Specify product price here.
When you specify a price, the page
then becomes a product item.
3 You can sell both physical
(shippable) products or digital
(downloadable) products. You can
specify the weight of a physical
product if your shipping costs are
based on product weight.
Note: To configure shipping cost,
go to the Dashboard, select the
Shop menu, and then select
Shipments.
4
A promotional discount can be set
here.
Note: Promotional discounts can also
be provided using a Coupon Code.
To create a coupon code, go to the
Dashboard, select the Shop menu,
and then select Coupons.
5 Here you can choose Product
Options. To configure product
options, go to the Dashboard,
select the Shop menu, and then
select Product Options.
6 Publish the page and an Order Now module is
automatically embedded on the page.
Online Shop
29 User’s Guide
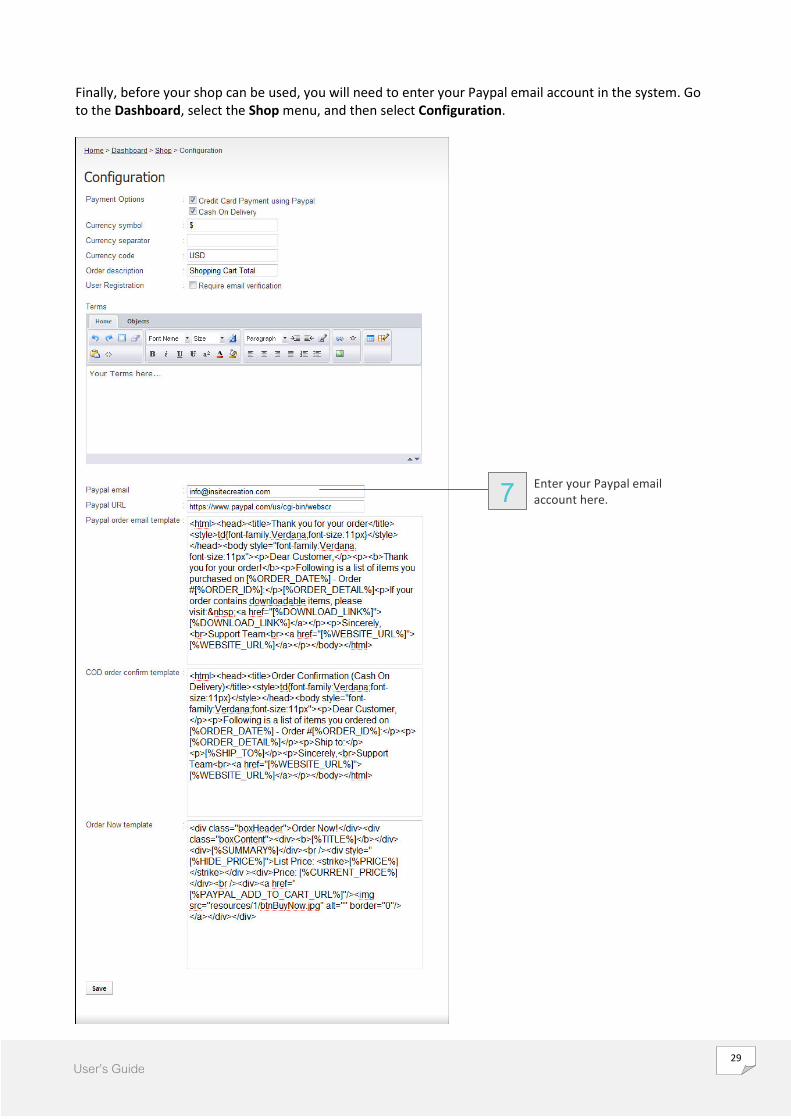
Finally, before your shop can be used, you will need to enter your Paypal email account in the system. Go
to the Dashboard, select the Shop menu, and then select Configuration.
7 Enter your Paypal email
account here.
30 User’s Guide
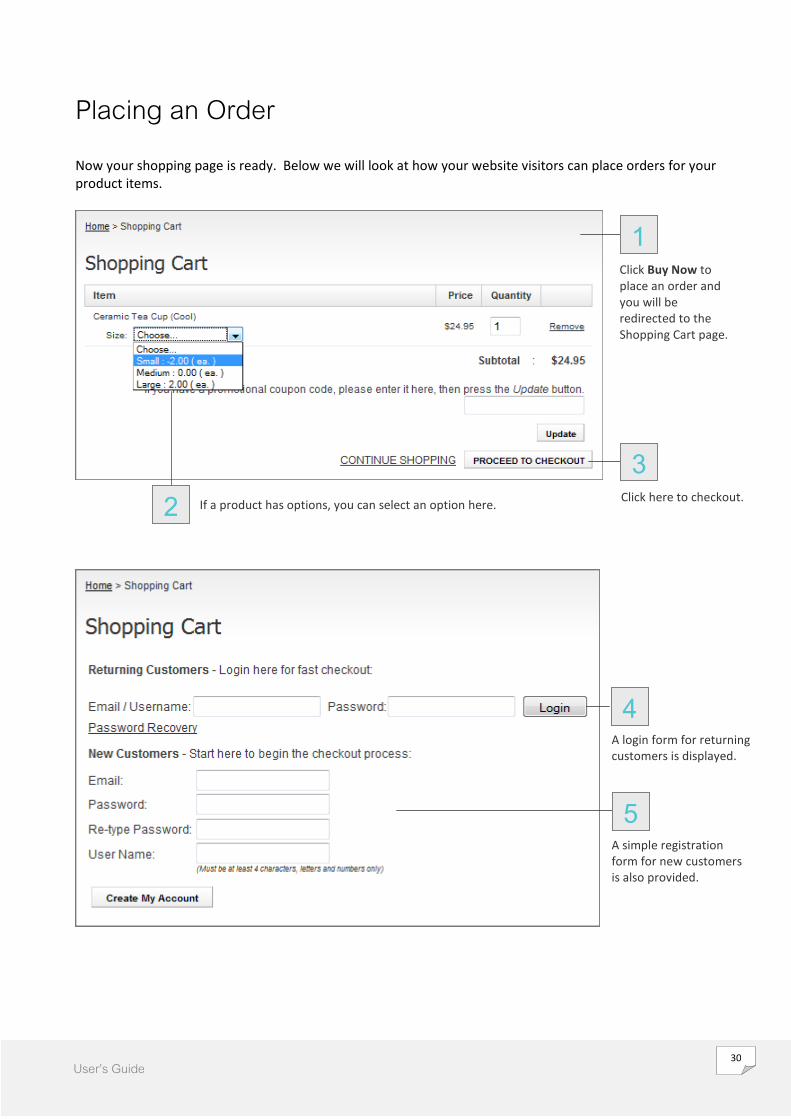
Placing an Order
Now your shopping page is ready. Below we will look at how your website visitors can place orders for your
product items.
1
Click Buy Now to
place an order and
you will be
redirected to the
Shopping Cart page.
3
Click here to checkout. 2 If a product has options, you can select an option here.
4
A login form for returning
customers is displayed.
5
A simple registration
form for new customers
is also provided.

31 User’s Guide
7
6
If a product is
shippable, a form is
displayed to gather
the customer’s
shipping information.
The customer can
then review the
order before
committing to buy.
8 Click Pay Here to pay
using Paypal.
Note: a Cash on
Delivery option is
also supported. To
configure this, go to
the Dashboard, select
the Shop menu, and
then select
Configuration.

32 User’s Guide

33 User’s Guide
InsiteCreation has various built-in modules for you to embed on any page on your website. With modules,
you can extend your website functionalities with various applications such as Forum, Event Calendar,
Newsletter Subscription, Custom Form, Custom Listing, etc.
Embedding a Module on a Page If you are logged in with a Module Manager or Administrator role, an Add Module link will be displayed on
every page.
1 Click the Add Module
link.
2 The Add Module dialog
opens.
3 Click the Add link to
embed a module on the
page. In this example,
try embedding the
Newsletter
Subscription Form
module.
4 Finished! The Newsletter Subscription Form
module is embedded. on the page.
Click this button to
detach the module from
the page.
If you have multiple
modules embedded, this
up/down button will
move the position of the
module up or down.
Modules

34 User’s Guide
Positioning a Module within Text
If there is text (in the main content or side content), by default, the module will be embedded after the
text.
InsiteCreation gives you the flexibility to position the module anywhere within the text by placing a text
break: [%BREAK%] tag (when editing the text).
5 Select Settings to
configure the module.
6 The configuration dialog
is opened. 7 Here you can specify the
visibility of the module;
whether it is displayed only
on the current page, on all
pages derived from this
page, or on all pages using
the same template.
1 On the page edit form, select
the Side Content link.

35 User’s Guide
Insert a text
break.
Here the
[%BREAK%] tag is
inserted within the
text.
2
3 Click Save
and then
publish the
page.
4 Now you can see that the embedded module is
positioned within the text (specifically where the
text break is placed).

36 User’s Guide
Embedding Modules that require Page ID
InsiteCreation has built-in modules for you to use on your website. Some of the modules require you to fill
in a Page ID after embedding them on your page.
Each page in InsiteCreation has a unique Page ID.
Let’s say that you have a BLOG page: myblog.aspx that has Page ID = 244 as seen above. You may want to
show the most recent posts of your BLOG on the home page (default.aspx). To do this, go to your home
page and embed a module named Listing. Then you will need to fill in your BLOG Page ID 244 on the
module settings.
Here you can find the
Page ID info. In this
example, the Page ID
value is 244.
Go to your home
page and then click
the Add Module link. 1

37 User’s Guide
Embed the Listing
module by clicking
the Add link.
2
The Listing module is
now embedded. Click
the Settings link. 3

38 User’s Guide
Fill in your BLOG
Page ID here. In this
example the Page ID
is set to 244.
4
Then you can
configure how the
listing will look on
your home page.
Click Save to finish.
5
The listing (from
your BLOG page) is
now displayed on
the home page.
6

39 User’s Guide
By using the same process, you can show listings from any page on your website. With this capability, you
can create featured product list, most recent photos, latest news/articles, etc which can be embedded in
the main content or side content on any page of your website.
InsiteCreation also has a module named: Listing – Custom Entries, that allows you to specify pages that you
want to display on the listing (here you can specify more than one Page ID).
“Content Block” Module Content Block is one of InsiteCreation’s very useful built-in modules. With this module, you can show
content from any page you choose on any page on your website.
Let’s say that you have a company profile page named: about-us.aspx (with Page ID=380). You may also
want to show your company profile on your home page. To do this, go to your home page end embed the
Content Block module. Fill in the Page ID setting with 380 (the Page ID of your company profile page). Then
your company profile will be displayed on your home page.


