
Certificate Authority Integrations
VMware Workspace ONE UEM 2011
You can find the most up-to-date technical documentation on the VMware website at:
https://docs.vmware.com/
VMware, Inc.3401 Hillview Ave.Palo Alto, CA 94304www.vmware.com
Copyright ©
2020 VMware, Inc. All rights reserved. Copyright and trademark information.
Certificate Authority Integrations
VMware, Inc. 2
Contents
1 Certificate Authority Integrations 4
2 Compare Microsoft Certificate Authority Models 5
3 AD CS Via DCOM 10
4 NDES for SCEP 21
5 EAS with AD CS 34
6 EAS with NDES-MSCEP 42
7 CiscoAnyConnect 51
8 Cisco IPSec VPN 60
9 SCEP 67
10 EOBO with AD CS via DCOM 71
11 Symantec MPKI 86
12 EJBCA 93
13 SecureAuth 99
14 GlobalSign 106
15 JCCH Gléas 111
16 Entrust IdentityGuard 117
VMware, Inc. 3
Certificate Authority Integrations 1Certificates help protect your infrastructure from brute force attacks, dictionary attacks, and employee error. If you use certificates, integrate your certificate authority with VMware Workspace ONE® UEM powered by AirWatch for increased stability, security, and authentication.
VMware, Inc. 4
Compare Microsoft Certificate Authority Models 2Find out what Microsoft certificate authority (CA) models Workspace ONE UEM supports. View a high-level comparison of each CA type and consider which configuration might work best for your deployment.
n Available Microsoft Certificate Authority Models
n Comparison Matrix by Protocol
n Workspace ONE UEM Directly to CA
n Device to CA with UEM as Delegate
n Workspace ONE UEM SCEP Proxy Between Device and CA
Available Microsoft Certificate Authority Models
Workspace ONE UEM offers several deployment options for Microsoft certificate authorities.
n Workspace ONE UEM to the CA- This model uses the DCOM protocol. Workspace ONE UEM communicates directly with the Microsoft CA or through the AirWatch Cloud Connector to the CA.
n Mobile Devices to the CA - This model uses the NDES (a Microsoft proprietary version of SCEP) or SCEP protocol. Workspace ONE UEM only delegates certificate transactions between the device and the Microsoft CA.
n Workspace ONE UEM SCEP Proxy - This model uses the NDES or SCEP protocol. Workspace ONE UEM is the proxy that sends certificate transactions between the device and the CA endpoint. The NDES/SCEP endpoint is not exposed to the Internet.
VMware, Inc. 5
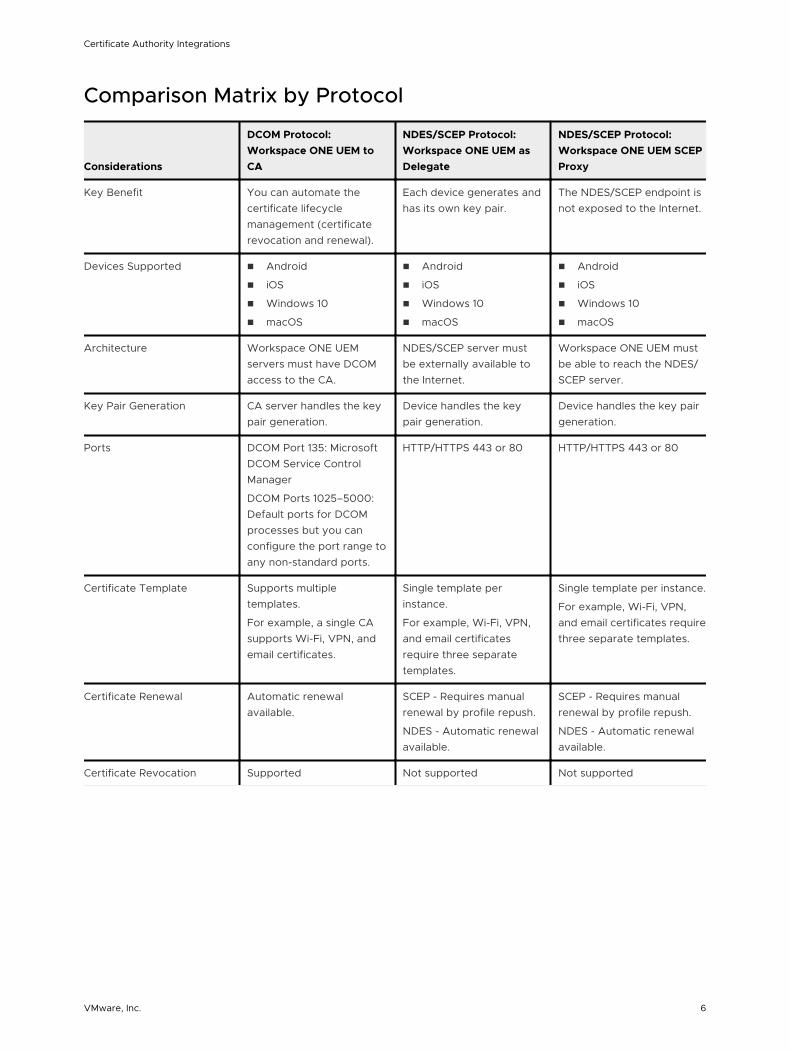
Comparison Matrix by Protocol
Considerations
DCOM Protocol: Workspace ONE UEM to CA
NDES/SCEP Protocol: Workspace ONE UEM as Delegate
NDES/SCEP Protocol: Workspace ONE UEM SCEP Proxy
Key Benefit You can automate the certificate lifecycle management (certificate revocation and renewal).
Each device generates and has its own key pair.
The NDES/SCEP endpoint is not exposed to the Internet.
Devices Supported n Android
n iOS
n Windows 10
n macOS
n Android
n iOS
n Windows 10
n macOS
n Android
n iOS
n Windows 10
n macOS
Architecture Workspace ONE UEM servers must have DCOM access to the CA.
NDES/SCEP server must be externally available to the Internet.
Workspace ONE UEM must be able to reach the NDES/SCEP server.
Key Pair Generation CA server handles the key pair generation.
Device handles the key pair generation.
Device handles the key pair generation.
Ports DCOM Port 135: Microsoft DCOM Service Control Manager
DCOM Ports 1025–5000: Default ports for DCOM processes but you can configure the port range to any non-standard ports.
HTTP/HTTPS 443 or 80 HTTP/HTTPS 443 or 80
Certificate Template Supports multiple templates.
For example, a single CA supports Wi-Fi, VPN, and email certificates.
Single template per instance.
For example, Wi-Fi, VPN, and email certificates require three separate templates.
Single template per instance.
For example, Wi-Fi, VPN, and email certificates require three separate templates.
Certificate Renewal Automatic renewal available.
SCEP - Requires manual renewal by profile repush.
NDES - Automatic renewal available.
SCEP - Requires manual renewal by profile repush.
NDES - Automatic renewal available.
Certificate Revocation Supported Not supported Not supported
Certificate Authority Integrations
VMware, Inc. 6
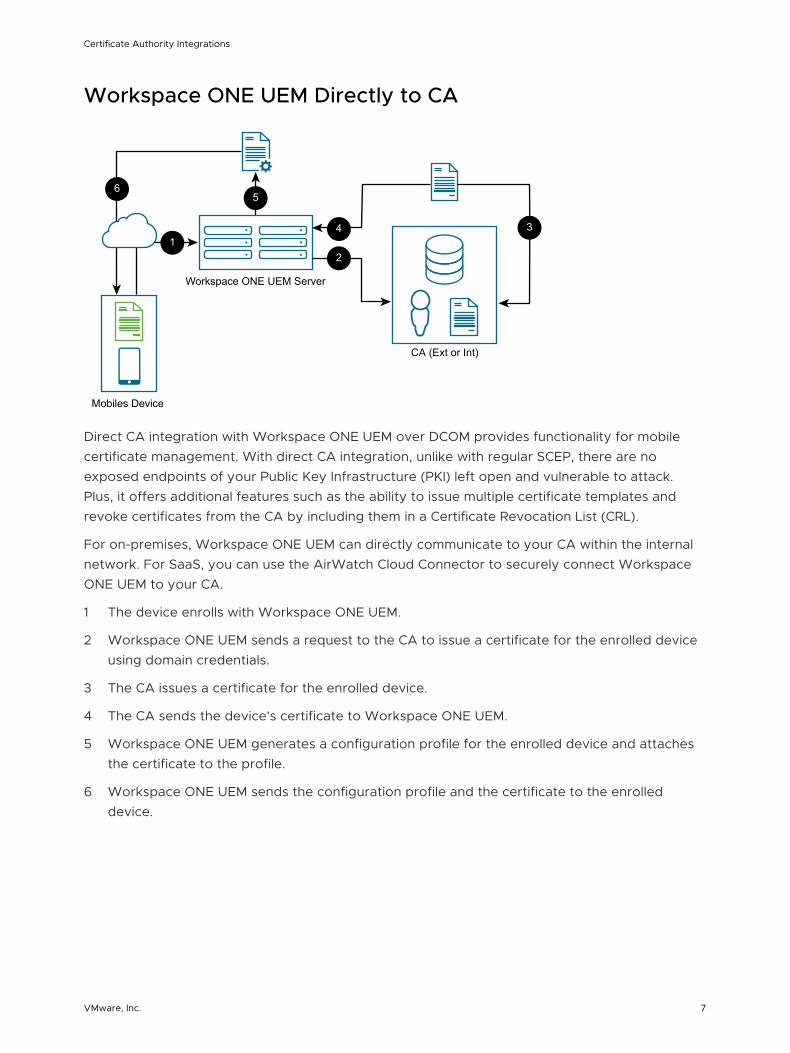
Workspace ONE UEM Directly to CA
1
65
2
4
3
3
Workspace ONE UEM Server
Mobiles Device
CA (Ext or Int)
Direct CA integration with Workspace ONE UEM over DCOM provides functionality for mobile certificate management. With direct CA integration, unlike with regular SCEP, there are no exposed endpoints of your Public Key Infrastructure (PKI) left open and vulnerable to attack. Plus, it offers additional features such as the ability to issue multiple certificate templates and revoke certificates from the CA by including them in a Certificate Revocation List (CRL).
For on-premises, Workspace ONE UEM can directly communicate to your CA within the internal network. For SaaS, you can use the AirWatch Cloud Connector to securely connect Workspace ONE UEM to your CA.
1 The device enrolls with Workspace ONE UEM.
2 Workspace ONE UEM sends a request to the CA to issue a certificate for the enrolled device using domain credentials.
3 The CA issues a certificate for the enrolled device.
4 The CA sends the device's certificate to Workspace ONE UEM.
5 Workspace ONE UEM generates a configuration profile for the enrolled device and attaches the certificate to the profile.
6 Workspace ONE UEM sends the configuration profile and the certificate to the enrolled device.
Certificate Authority Integrations
VMware, Inc. 7
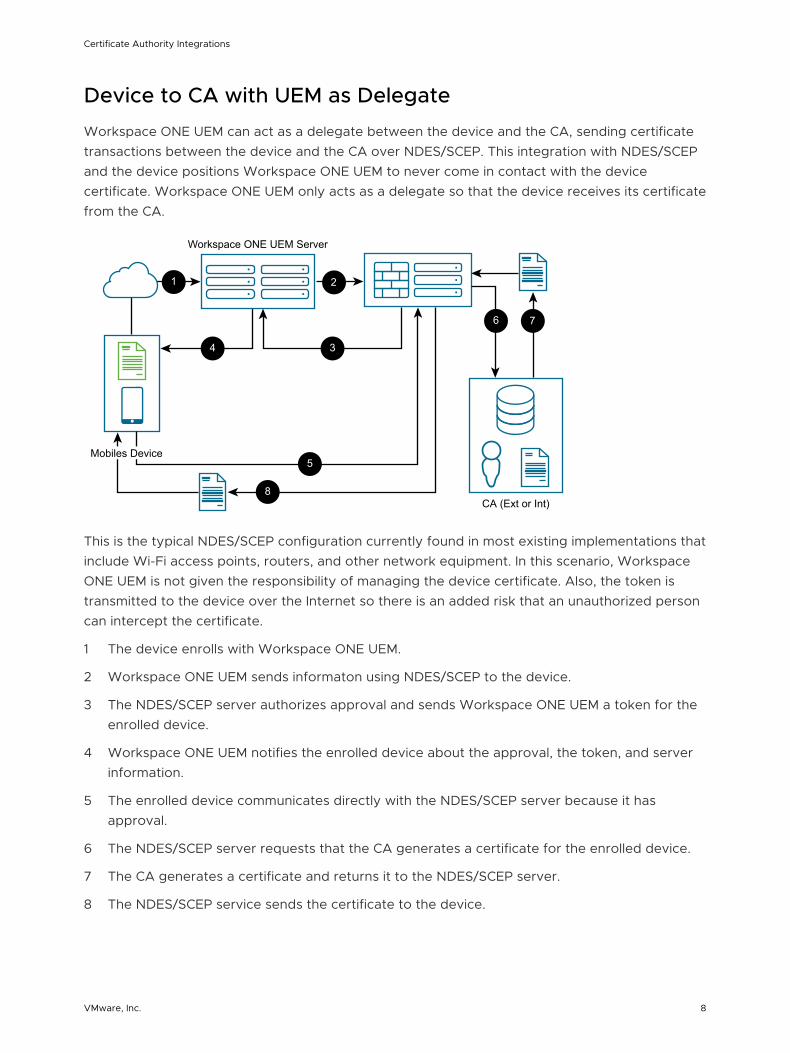
Device to CA with UEM as Delegate
Workspace ONE UEM can act as a delegate between the device and the CA, sending certificate transactions between the device and the CA over NDES/SCEP. This integration with NDES/SCEP and the device positions Workspace ONE UEM to never come in contact with the device certificate. Workspace ONE UEM only acts as a delegate so that the device receives its certificate from the CA.
1 2
4 3
5
8
76
CA (Ext or Int)
Workspace ONE UEM Server
Mobiles Device
This is the typical NDES/SCEP configuration currently found in most existing implementations that include Wi-Fi access points, routers, and other network equipment. In this scenario, Workspace ONE UEM is not given the responsibility of managing the device certificate. Also, the token is transmitted to the device over the Internet so there is an added risk that an unauthorized person can intercept the certificate.
1 The device enrolls with Workspace ONE UEM.
2 Workspace ONE UEM sends informaton using NDES/SCEP to the device.
3 The NDES/SCEP server authorizes approval and sends Workspace ONE UEM a token for the enrolled device.
4 Workspace ONE UEM notifies the enrolled device about the approval, the token, and server information.
5 The enrolled device communicates directly with the NDES/SCEP server because it has approval.
6 The NDES/SCEP server requests that the CA generates a certificate for the enrolled device.
7 The CA generates a certificate and returns it to the NDES/SCEP server.
8 The NDES/SCEP service sends the certificate to the device.
Certificate Authority Integrations
VMware, Inc. 8
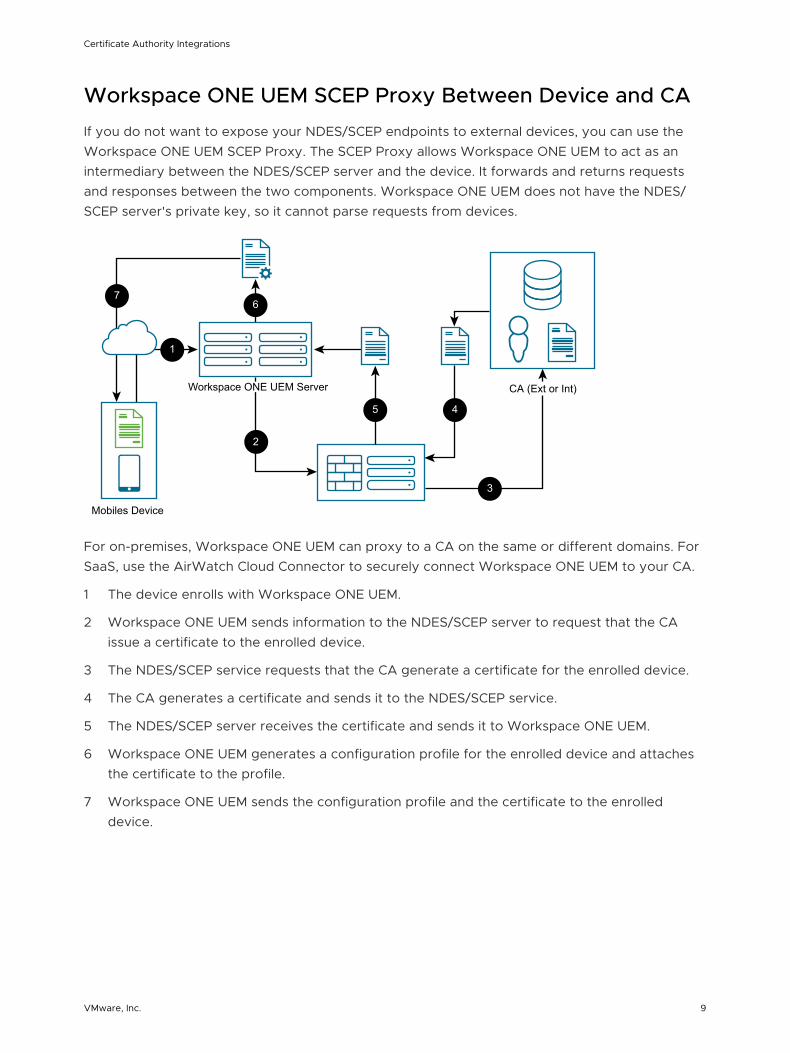
Workspace ONE UEM SCEP Proxy Between Device and CA
If you do not want to expose your NDES/SCEP endpoints to external devices, you can use the Workspace ONE UEM SCEP Proxy. The SCEP Proxy allows Workspace ONE UEM to act as an intermediary between the NDES/SCEP server and the device. It forwards and returns requests and responses between the two components. Workspace ONE UEM does not have the NDES/SCEP server's private key, so it cannot parse requests from devices.
1
76
2
4
3
5
Workspace ONE UEM Server CA (Ext or Int)
Mobiles Device
For on-premises, Workspace ONE UEM can proxy to a CA on the same or different domains. For SaaS, use the AirWatch Cloud Connector to securely connect Workspace ONE UEM to your CA.
1 The device enrolls with Workspace ONE UEM.
2 Workspace ONE UEM sends information to the NDES/SCEP server to request that the CA issue a certificate to the enrolled device.
3 The NDES/SCEP service requests that the CA generate a certificate for the enrolled device.
4 The CA generates a certificate and sends it to the NDES/SCEP service.
5 The NDES/SCEP server receives the certificate and sends it to Workspace ONE UEM.
6 Workspace ONE UEM generates a configuration profile for the enrolled device and attaches the certificate to the profile.
7 Workspace ONE UEM sends the configuration profile and the certificate to the enrolled device.
Certificate Authority Integrations
VMware, Inc. 9
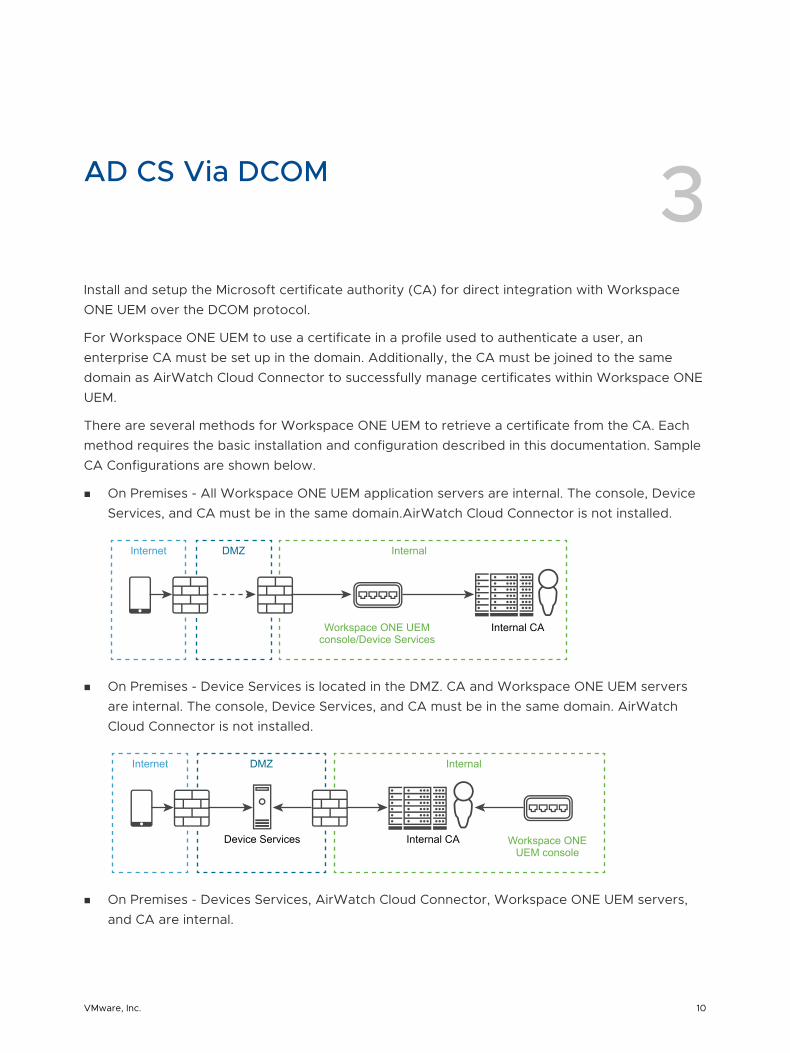
AD CS Via DCOM 3Install and setup the Microsoft certificate authority (CA) for direct integration with Workspace ONE UEM over the DCOM protocol.
For Workspace ONE UEM to use a certificate in a profile used to authenticate a user, an enterprise CA must be set up in the domain. Additionally, the CA must be joined to the same domain as AirWatch Cloud Connector to successfully manage certificates within Workspace ONE UEM.
There are several methods for Workspace ONE UEM to retrieve a certificate from the CA. Each method requires the basic installation and configuration described in this documentation. Sample CA Configurations are shown below.
n On Premises - All Workspace ONE UEM application servers are internal. The console, Device Services, and CA must be in the same domain.AirWatch Cloud Connector is not installed.
Internet DMZ Internal
Internal CAWorkspace ONE UEMconsole/Device Services
n On Premises - Device Services is located in the DMZ. CA and Workspace ONE UEM servers are internal. The console, Device Services, and CA must be in the same domain. AirWatch Cloud Connector is not installed.
Internet DMZ Internal
Internal CA Workspace ONEUEM console
Device Services
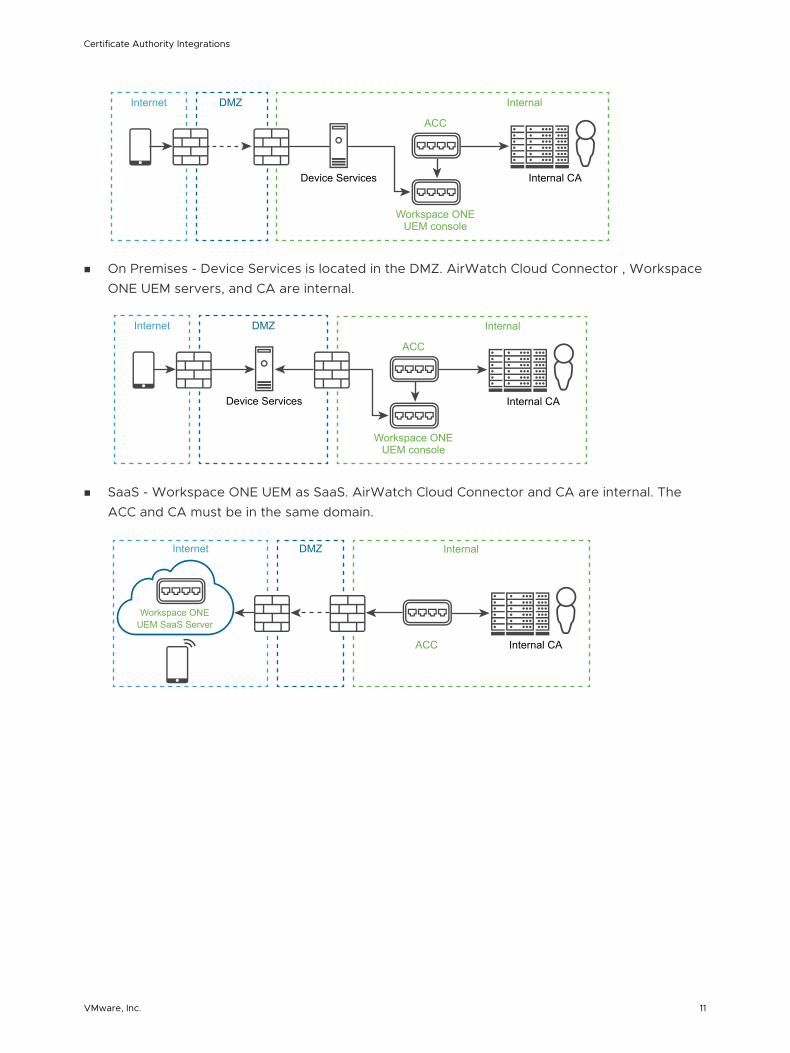
n On Premises - Devices Services, AirWatch Cloud Connector, Workspace ONE UEM servers, and CA are internal.
VMware, Inc. 10
Internet DMZ Internal
Internal CA
Workspace ONEUEM console
Device Services
ACC
n On Premises - Device Services is located in the DMZ. AirWatch Cloud Connector , Workspace ONE UEM servers, and CA are internal.
Internal
Internal CA
Workspace ONEUEM console
ACC
Internet DMZ
Device Services
n SaaS - Workspace ONE UEM as SaaS. AirWatch Cloud Connector and CA are internal. The ACC and CA must be in the same domain.
Internal
Internal CAACC
Workspace ONEUEM SaaS Server
Internet DMZ
Certificate Authority Integrations
VMware, Inc. 11
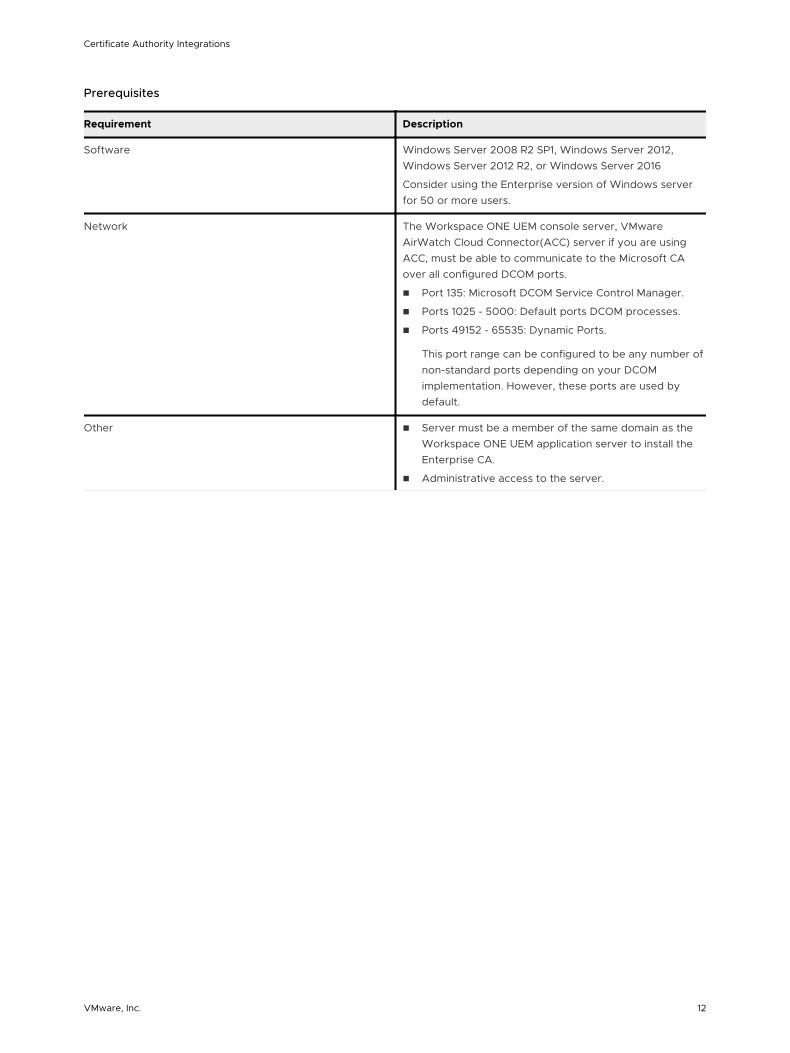
Prerequisites
Requirement Description
Software Windows Server 2008 R2 SP1, Windows Server 2012, Windows Server 2012 R2, or Windows Server 2016
Consider using the Enterprise version of Windows server for 50 or more users.
Network The Workspace ONE UEM console server, VMware AirWatch Cloud Connector(ACC) server if you are using ACC, must be able to communicate to the Microsoft CA over all configured DCOM ports.
n Port 135: Microsoft DCOM Service Control Manager.
n Ports 1025 - 5000: Default ports DCOM processes.
n Ports 49152 - 65535: Dynamic Ports.
This port range can be configured to be any number of non-standard ports depending on your DCOM implementation. However, these ports are used by default.
Other n Server must be a member of the same domain as the Workspace ONE UEM application server to install the Enterprise CA.
n Administrative access to the server.
Certificate Authority Integrations
VMware, Inc. 12
Procedure
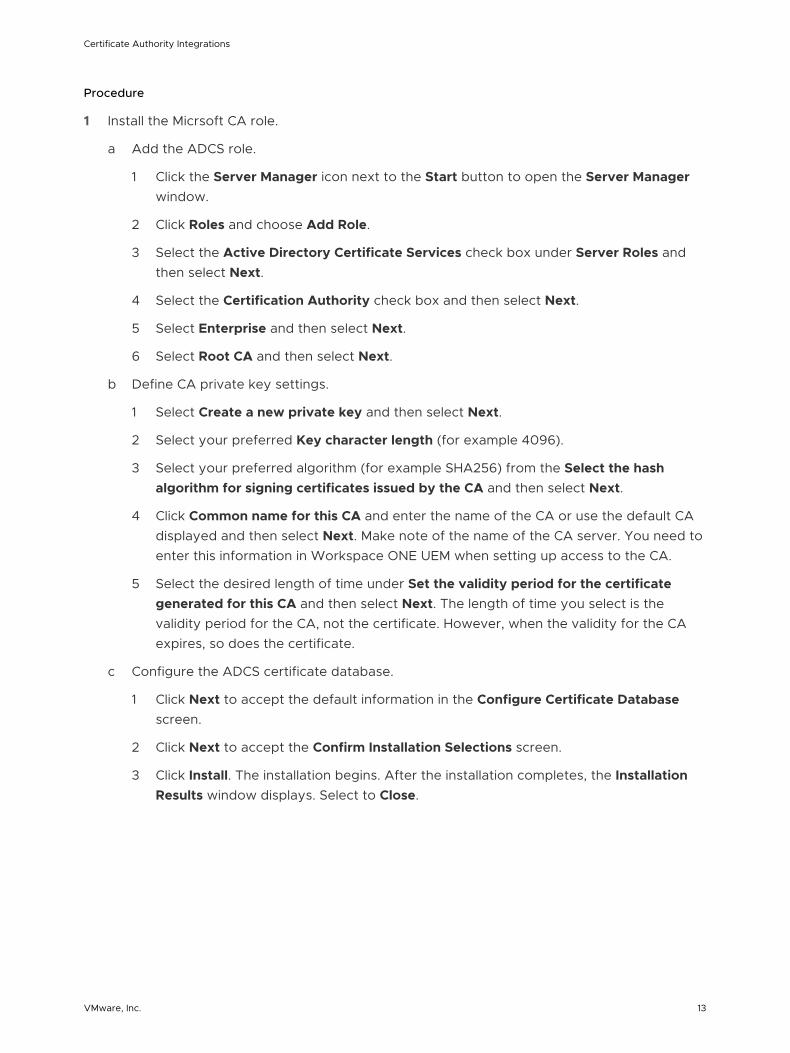
1 Install the Micrsoft CA role.
a Add the ADCS role.
1 Click the Server Manager icon next to the Start button to open the Server Manager window.
2 Click Roles and choose Add Role.
3 Select the Active Directory Certificate Services check box under Server Roles and then select Next.
4 Select the Certification Authority check box and then select Next.
5 Select Enterprise and then select Next.
6 Select Root CA and then select Next.
b Define CA private key settings.
1 Select Create a new private key and then select Next.
2 Select your preferred Key character length (for example 4096).
3 Select your preferred algorithm (for example SHA256) from the Select the hash algorithm for signing certificates issued by the CA and then select Next.
4 Click Common name for this CA and enter the name of the CA or use the default CA displayed and then select Next. Make note of the name of the CA server. You need to enter this information in Workspace ONE UEM when setting up access to the CA.
5 Select the desired length of time under Set the validity period for the certificate generated for this CA and then select Next. The length of time you select is the validity period for the CA, not the certificate. However, when the validity for the CA expires, so does the certificate.
c Configure the ADCS certificate database.
1 Click Next to accept the default information in the Configure Certificate Database screen.
2 Click Next to accept the Confirm Installation Selections screen.
3 Click Install. The installation begins. After the installation completes, the Installation Results window displays. Select to Close.
Certificate Authority Integrations
VMware, Inc. 13
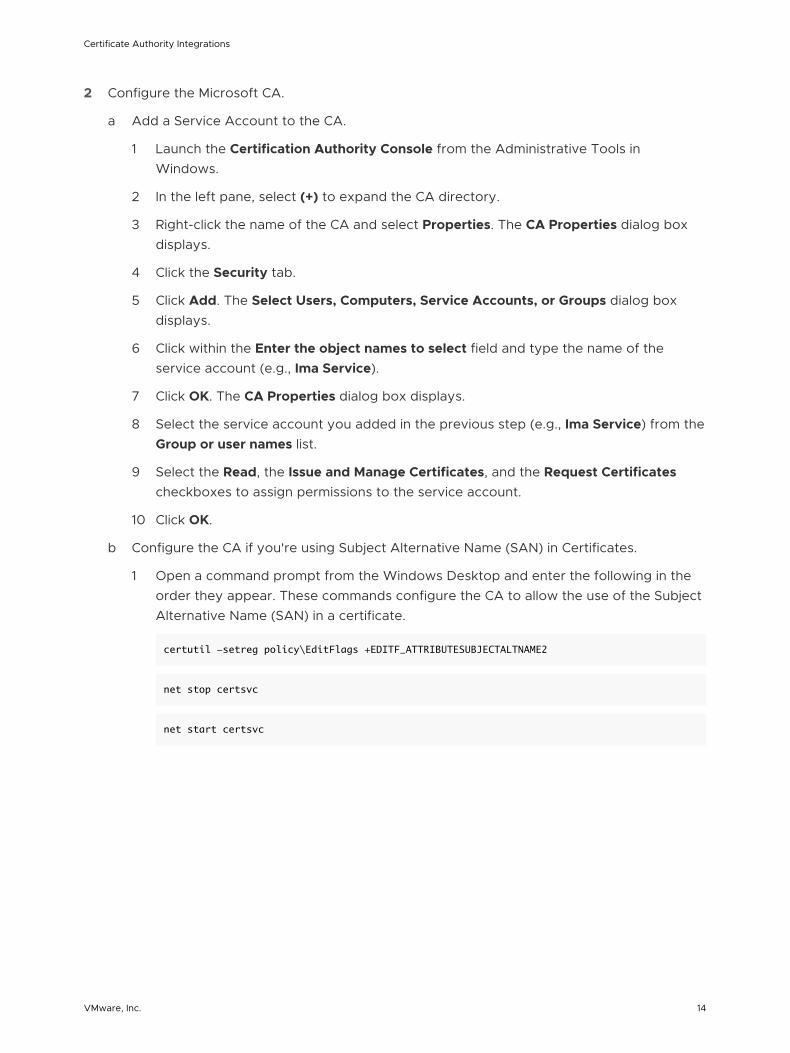
2 Configure the Microsoft CA.
a Add a Service Account to the CA.
1 Launch the Certification Authority Console from the Administrative Tools in Windows.
2 In the left pane, select (+) to expand the CA directory.
3 Right-click the name of the CA and select Properties. The CA Properties dialog box displays.
4 Click the Security tab.
5 Click Add. The Select Users, Computers, Service Accounts, or Groups dialog box displays.
6 Click within the Enter the object names to select field and type the name of the service account (e.g., Ima Service).
7 Click OK. The CA Properties dialog box displays.
8 Select the service account you added in the previous step (e.g., Ima Service) from the Group or user names list.
9 Select the Read, the Issue and Manage Certificates, and the Request Certificates checkboxes to assign permissions to the service account.
10 Click OK.
b Configure the CA if you're using Subject Alternative Name (SAN) in Certificates.
1 Open a command prompt from the Windows Desktop and enter the following in the order they appear. These commands configure the CA to allow the use of the Subject Alternative Name (SAN) in a certificate.
certutil -setreg policy\EditFlags +EDITF_ATTRIBUTESUBJECTALTNAME2
net stop certsvc
net start certsvc
Certificate Authority Integrations
VMware, Inc. 14
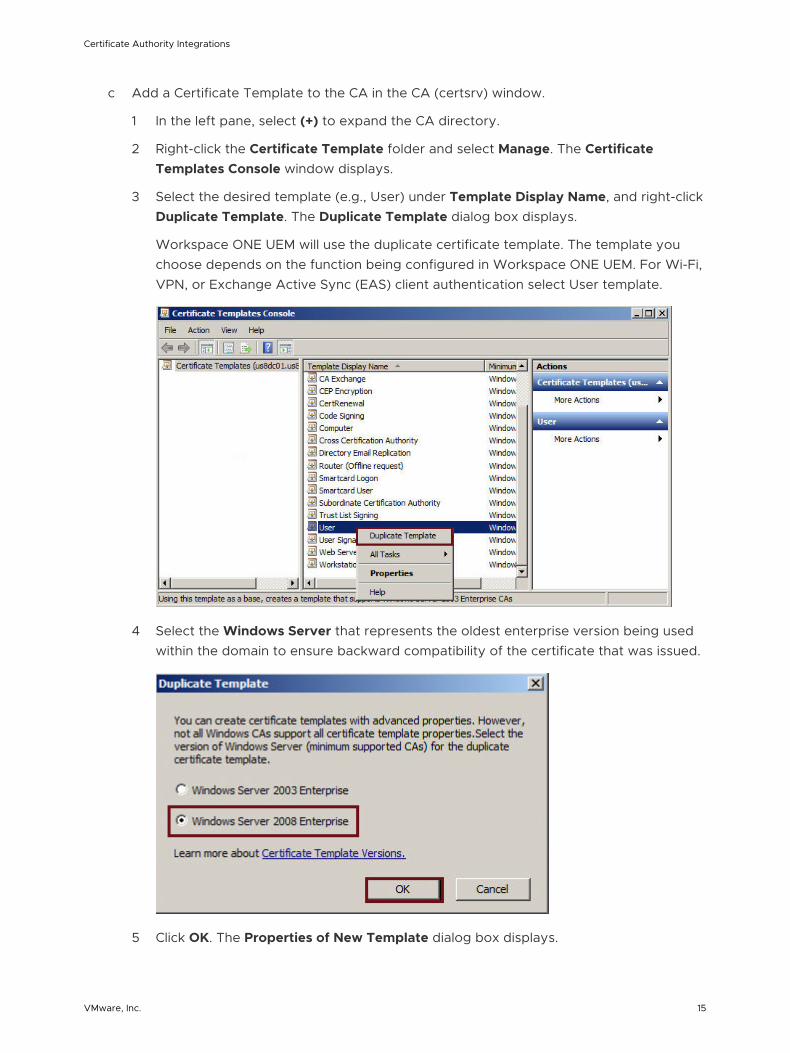
c Add a Certificate Template to the CA in the CA (certsrv) window.
1 In the left pane, select (+) to expand the CA directory.
2 Right-click the Certificate Template folder and select Manage. The Certificate Templates Console window displays.
3 Select the desired template (e.g., User) under Template Display Name, and right-click Duplicate Template. The Duplicate Template dialog box displays.
Workspace ONE UEM will use the duplicate certificate template. The template you choose depends on the function being configured in Workspace ONE UEM. For Wi-Fi, VPN, or Exchange Active Sync (EAS) client authentication select User template.
4 Select the Windows Server that represents the oldest enterprise version being used within the domain to ensure backward compatibility of the certificate that was issued.
5 Click OK. The Properties of New Template dialog box displays.
Certificate Authority Integrations
VMware, Inc. 15
d Configure the Certficate Template properties.
1 Click the General tab.
2 Type the name of the template displayed to users in the Template display name field. The Template name field auto-fills with the template display name without spaces.
You may use this default value or enter a new template name if desired. The template name may not contain spaces. Make note of the template name. You will need to enter this information inWorkspace ONE UEM.
You will enter the Template name you just configured with no spaces in the Workspace ONE UEM console in the Issuing Template field within the Configuring the Certificate Template screen.
3 Select the desired length of time for the certificate to be active from the Validity period entry field/drop-down menu.
You should choose a length of time that is less than the time you chose for the CA (step 1.b.v.). By doing this the certificate will expire before the CA.
4 Click Apply.
5 Click the Request Handling tab.
6 Select the appropriate client authentication method from thePurpose: drop-down menu. This selection might be based on the application of the certificate being issued, although for general purpose client authentication, select Signature and Encryption.
7 Click Apply.
8 Select the Subject Name tab.
9 Select Supply in the request. If Supply in the request is not selected, the certificate will be generated to the service account instead of the desired end user.
e Enable the template for CA.
1 Click the Extensions tab.
2 Select Application Policies from the Extensions included in this template: field. This allows you to add client authentication.
3 Click Edit. The Edit Application Policies Extension dialog box displays.
4 Click Add. The Add Application Policy dialog box displays.
5 Select Client Authentication from the Application policies: field.
6 Click OK. The Properties of New Template dialog box displays.
Certificate Authority Integrations
VMware, Inc. 16
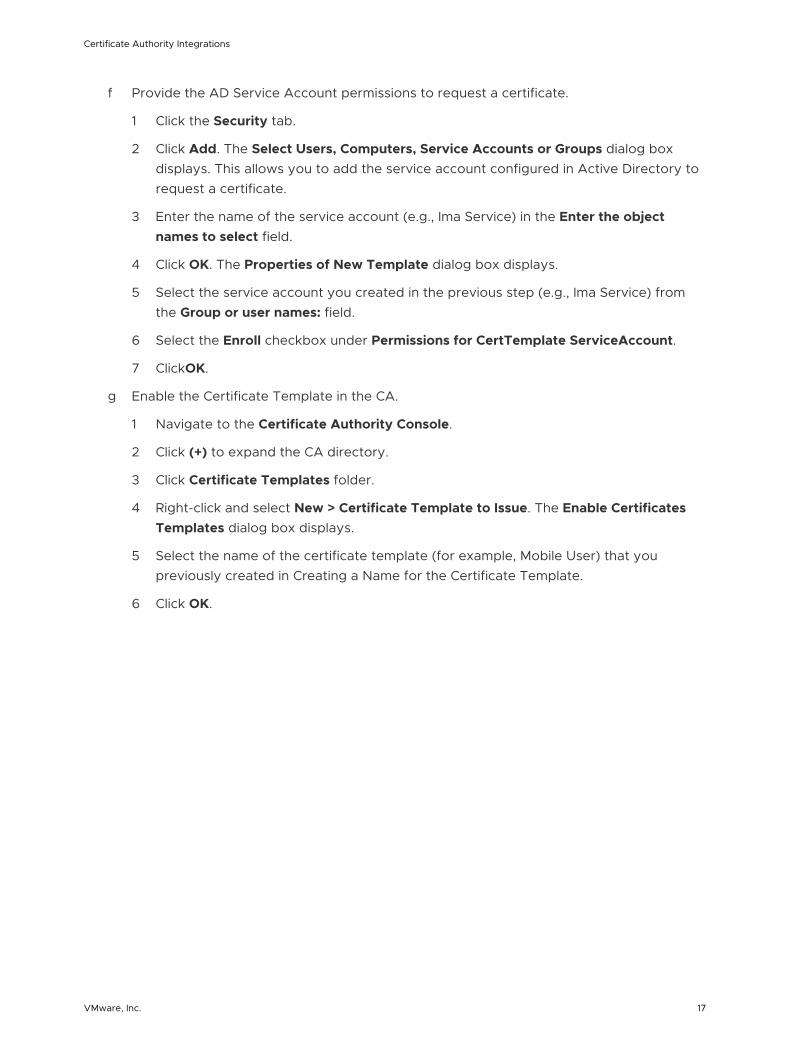
f Provide the AD Service Account permissions to request a certificate.
1 Click the Security tab.
2 Click Add. The Select Users, Computers, Service Accounts or Groups dialog box displays. This allows you to add the service account configured in Active Directory to request a certificate.
3 Enter the name of the service account (e.g., Ima Service) in the Enter the object names to select field.
4 Click OK. The Properties of New Template dialog box displays.
5 Select the service account you created in the previous step (e.g., Ima Service) from the Group or user names: field.
6 Select the Enroll checkbox under Permissions for CertTemplate ServiceAccount.
7 ClickOK.
g Enable the Certificate Template in the CA.
1 Navigate to the Certificate Authority Console.
2 Click (+) to expand the CA directory.
3 Click Certificate Templates folder.
4 Right-click and select New > Certificate Template to Issue. The Enable Certificates Templates dialog box displays.
5 Select the name of the certificate template (for example, Mobile User) that you previously created in Creating a Name for the Certificate Template.
6 Click OK.
Certificate Authority Integrations
VMware, Inc. 17
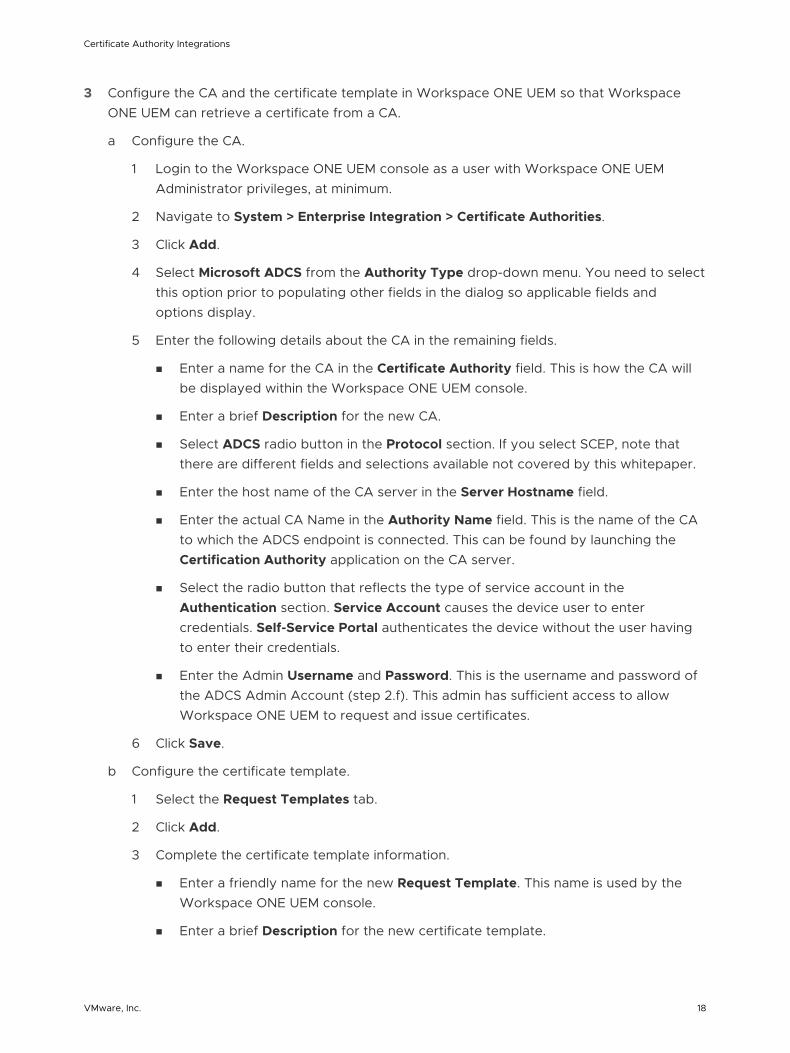
3 Configure the CA and the certificate template in Workspace ONE UEM so that Workspace ONE UEM can retrieve a certificate from a CA.
a Configure the CA.
1 Login to the Workspace ONE UEM console as a user with Workspace ONE UEM Administrator privileges, at minimum.
2 Navigate to System > Enterprise Integration > Certificate Authorities.
3 Click Add.
4 Select Microsoft ADCS from the Authority Type drop-down menu. You need to select this option prior to populating other fields in the dialog so applicable fields and options display.
5 Enter the following details about the CA in the remaining fields.
n Enter a name for the CA in the Certificate Authority field. This is how the CA will be displayed within the Workspace ONE UEM console.
n Enter a brief Description for the new CA.
n Select ADCS radio button in the Protocol section. If you select SCEP, note that there are different fields and selections available not covered by this whitepaper.
n Enter the host name of the CA server in the Server Hostname field.
n Enter the actual CA Name in the Authority Name field. This is the name of the CA to which the ADCS endpoint is connected. This can be found by launching the Certification Authority application on the CA server.
n Select the radio button that reflects the type of service account in the Authentication section. Service Account causes the device user to enter credentials. Self-Service Portal authenticates the device without the user having to enter their credentials.
n Enter the Admin Username and Password. This is the username and password of the ADCS Admin Account (step 2.f). This admin has sufficient access to allow Workspace ONE UEM to request and issue certificates.
6 Click Save.
b Configure the certificate template.
1 Select the Request Templates tab.
2 Click Add.
3 Complete the certificate template information.
n Enter a friendly name for the new Request Template. This name is used by the Workspace ONE UEM console.
n Enter a brief Description for the new certificate template.
Certificate Authority Integrations
VMware, Inc. 18
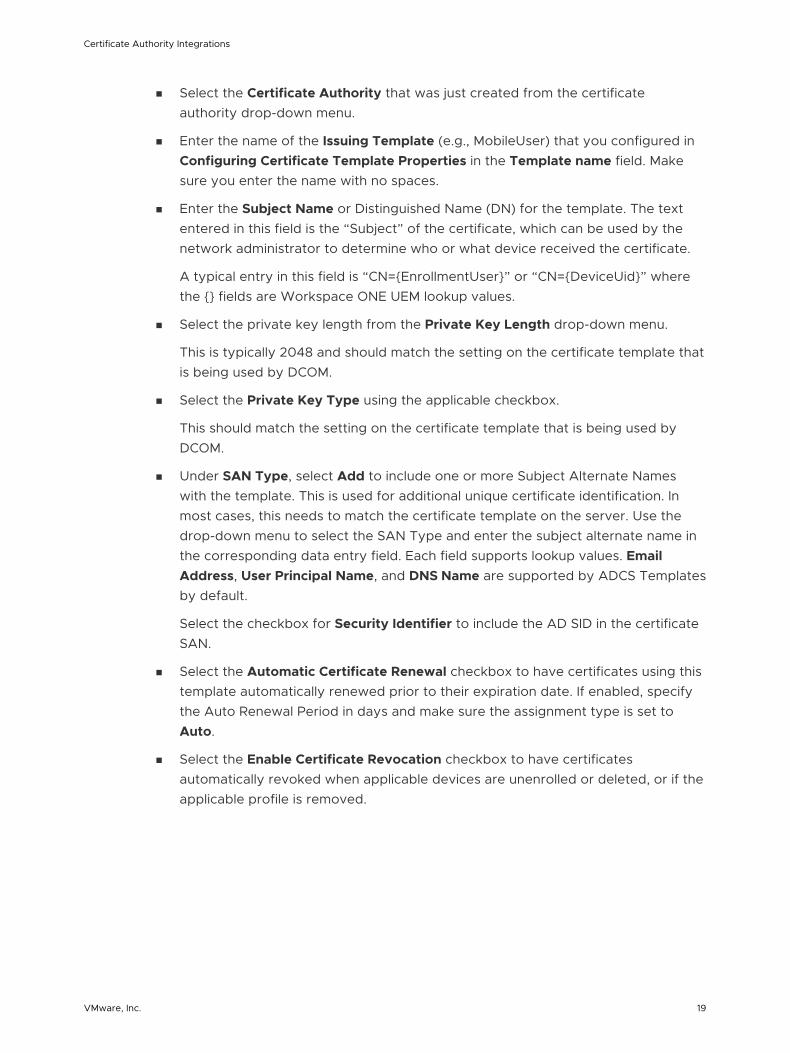
n Select the Certificate Authority that was just created from the certificate authority drop-down menu.
n Enter the name of the Issuing Template (e.g., MobileUser) that you configured in Configuring Certificate Template Properties in the Template name field. Make sure you enter the name with no spaces.
n Enter the Subject Name or Distinguished Name (DN) for the template. The text entered in this field is the “Subject” of the certificate, which can be used by the network administrator to determine who or what device received the certificate.
A typical entry in this field is “CN={EnrollmentUser}” or “CN={DeviceUid}” where the {} fields are Workspace ONE UEM lookup values.
n Select the private key length from the Private Key Length drop-down menu.
This is typically 2048 and should match the setting on the certificate template that is being used by DCOM.
n Select the Private Key Type using the applicable checkbox.
This should match the setting on the certificate template that is being used by DCOM.
n Under SAN Type, select Add to include one or more Subject Alternate Names with the template. This is used for additional unique certificate identification. In most cases, this needs to match the certificate template on the server. Use the drop-down menu to select the SAN Type and enter the subject alternate name in the corresponding data entry field. Each field supports lookup values. Email Address, User Principal Name, and DNS Name are supported by ADCS Templates by default.
Select the checkbox for Security Identifier to include the AD SID in the certificate SAN.
n Select the Automatic Certificate Renewal checkbox to have certificates using this template automatically renewed prior to their expiration date. If enabled, specify the Auto Renewal Period in days and make sure the assignment type is set to Auto.
n Select the Enable Certificate Revocation checkbox to have certificates automatically revoked when applicable devices are unenrolled or deleted, or if the applicable profile is removed.
Certificate Authority Integrations
VMware, Inc. 19
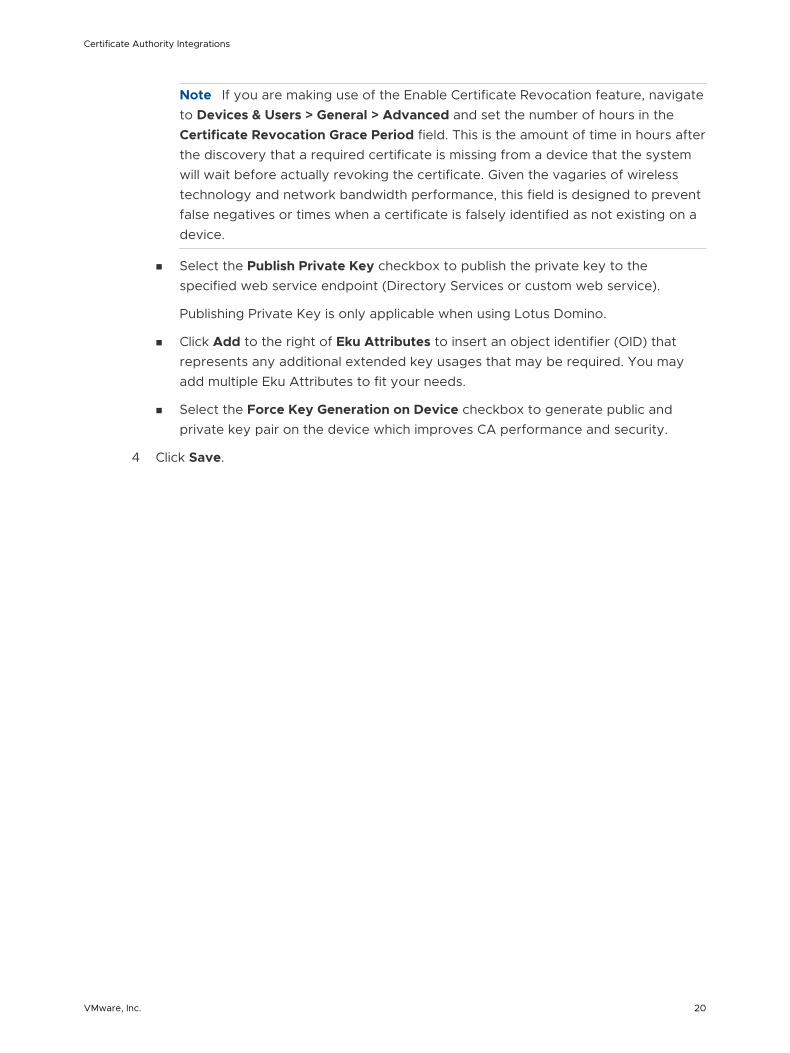
Note If you are making use of the Enable Certificate Revocation feature, navigate to Devices & Users > General > Advanced and set the number of hours in the Certificate Revocation Grace Period field. This is the amount of time in hours after the discovery that a required certificate is missing from a device that the system will wait before actually revoking the certificate. Given the vagaries of wireless technology and network bandwidth performance, this field is designed to prevent false negatives or times when a certificate is falsely identified as not existing on a device.
n Select the Publish Private Key checkbox to publish the private key to the specified web service endpoint (Directory Services or custom web service).
Publishing Private Key is only applicable when using Lotus Domino.
n Click Add to the right of Eku Attributes to insert an object identifier (OID) that represents any additional extended key usages that may be required. You may add multiple Eku Attributes to fit your needs.
n Select the Force Key Generation on Device checkbox to generate public and private key pair on the device which improves CA performance and security.
4 Click Save.
Certificate Authority Integrations
VMware, Inc. 20
NDES for SCEP 4Install and set up the Microsoft certificate authority (CA) over the NDES for SCEP protocol for integration with Workspace ONE UEM.
In order for Workspace ONE UEM to use a certificate in a profile, which is used to authenticate a user, an enterprise certificate authority does not need to be set up in the same domain as the Workspace ONE UEM server.
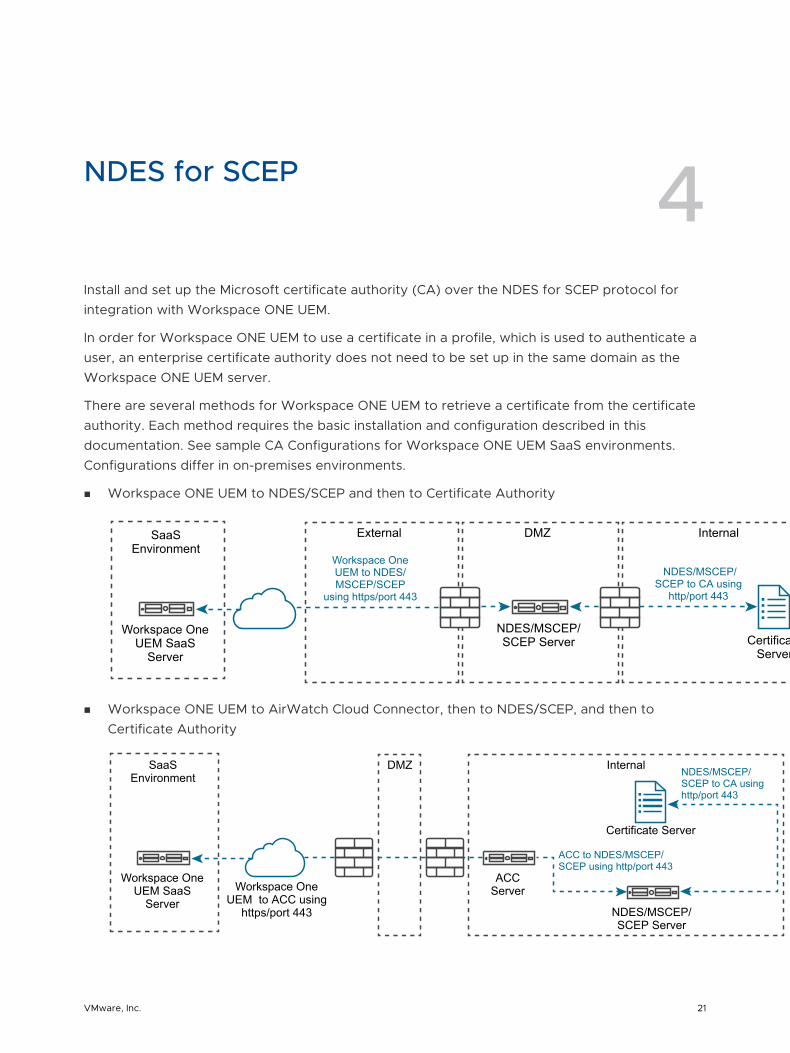
There are several methods for Workspace ONE UEM to retrieve a certificate from the certificate authority. Each method requires the basic installation and configuration described in this documentation. See sample CA Configurations for Workspace ONE UEM SaaS environments. Configurations differ in on-premises environments.
n Workspace ONE UEM to NDES/SCEP and then to Certificate Authority
ExternalSaaSEnvironment
Workspace OneUEM SaaS
ServerCertificate
Server
Workspace OneUEM to NDES/MSCEP/SCEP
using https/port 443
NDES/MSCEP/SCEP Server
NDES/MSCEP/SCEP to CA using
http/port 443
DMZ Internal
n Workspace ONE UEM to AirWatch Cloud Connector, then to NDES/SCEP, and then to Certificate Authority
DMZSaaSEnvironment
Internal
Workspace OneUEM SaaS
Server
Certificate Server
Workspace OneUEM to ACC using
https/port 443
ACCServer
NDES/MSCEP/SCEP Server
ACC to NDES/MSCEP/SCEP using http/port 443
NDES/MSCEP/SCEP to CA using http/port 443
VMware, Inc. 21
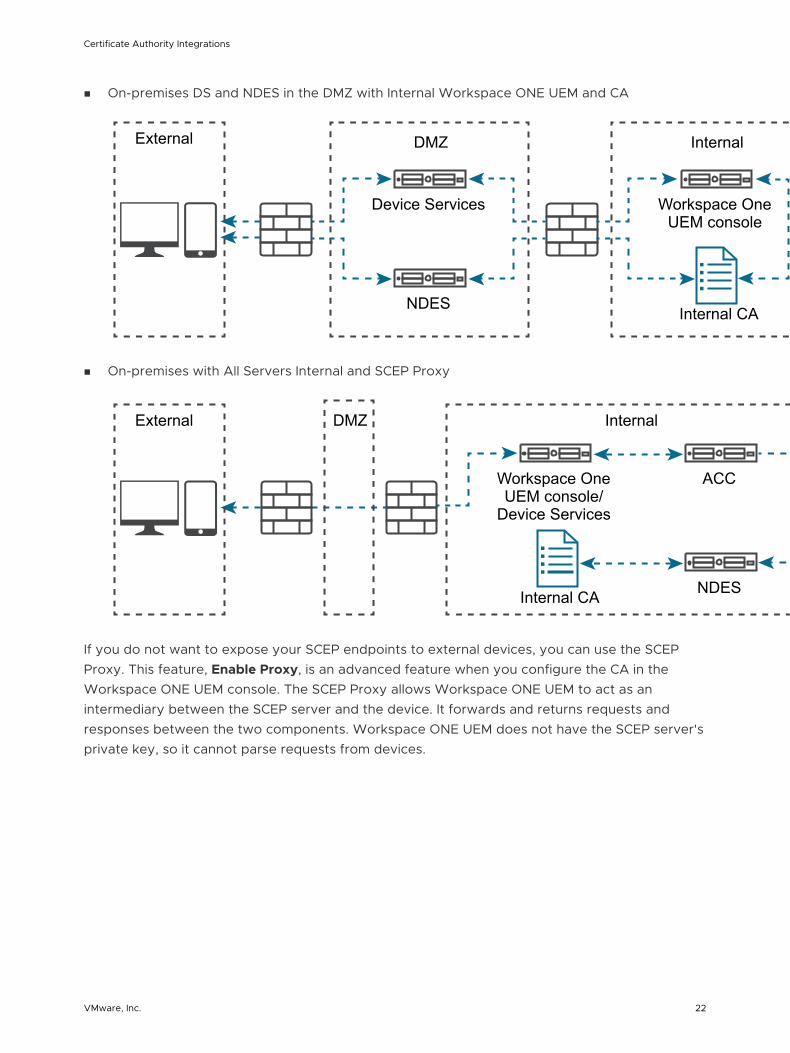
n On-premises DS and NDES in the DMZ with Internal Workspace ONE UEM and CA
Device Services
DMZExternal Internal
Workspace OneUEM console
NDES Internal CA
n On-premises with All Servers Internal and SCEP Proxy
Workspace OneUEM console/
Device Services
DMZExternal Internal
ACC
Internal CA NDES
If you do not want to expose your SCEP endpoints to external devices, you can use the SCEP Proxy. This feature, Enable Proxy, is an advanced feature when you configure the CA in the Workspace ONE UEM console. The SCEP Proxy allows Workspace ONE UEM to act as an intermediary between the SCEP server and the device. It forwards and returns requests and responses between the two components. Workspace ONE UEM does not have the SCEP server's private key, so it cannot parse requests from devices.
Certificate Authority Integrations
VMware, Inc. 22
SCEP Server
Workspace ONE UEM Device
Services
Device
4
5
10
19
Request SCEP Challenge
SCEP payload with Challenge and URL
GetCACert
GetCACaps (optional)
List of supported operations by CA
PKIOperation
PKIMessage
SCEP Challenge Response
GetCACert
Get CACaps (optional)
List of supported operations by CA
PKIOperation
PKIMessage
Generates CSR
1
2
7
8
12
3
6
9
11
14
15
18
13
16
17
Generates Local Certificate
CSR
Encrypted CSR (PKCS #10)
Encrypt
Sign
Decrypt
CA Certificate
Local Certificate
CA Certificate
CA Certificate
Signed Message
PKI Message
Local Certificate
User Certificate
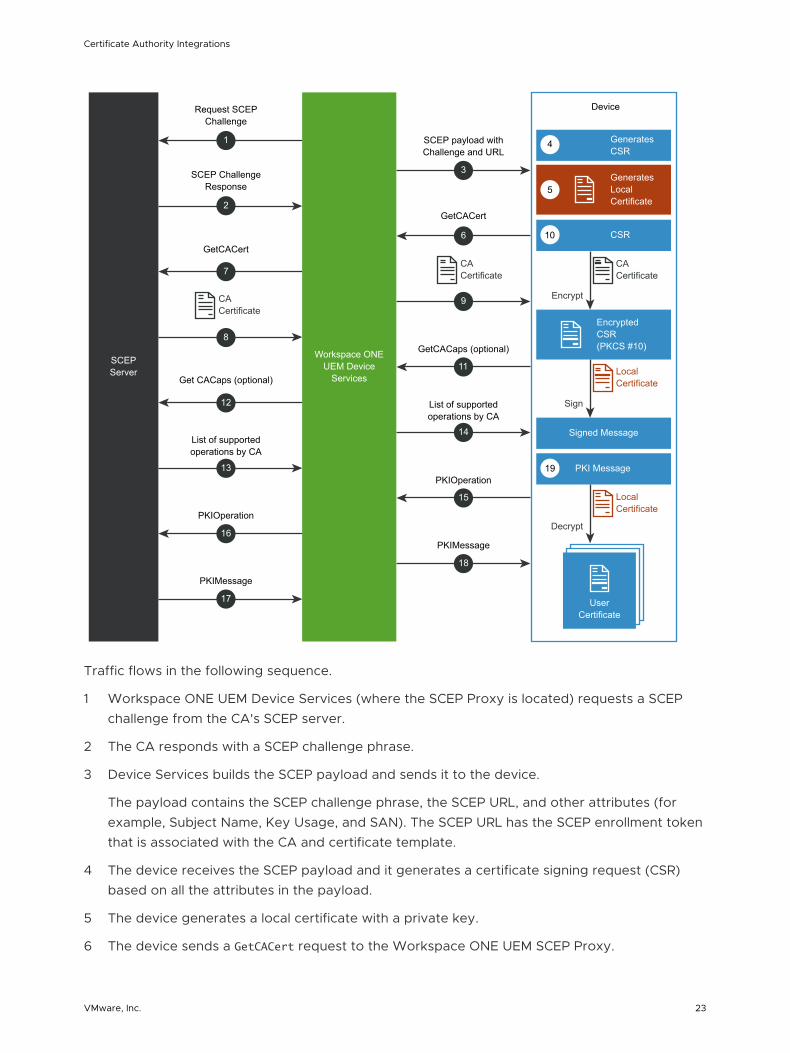
Traffic flows in the following sequence.
1 Workspace ONE UEM Device Services (where the SCEP Proxy is located) requests a SCEP challenge from the CA's SCEP server.
2 The CA responds with a SCEP challenge phrase.
3 Device Services builds the SCEP payload and sends it to the device.
The payload contains the SCEP challenge phrase, the SCEP URL, and other attributes (for example, Subject Name, Key Usage, and SAN). The SCEP URL has the SCEP enrollment token that is associated with the CA and certificate template.
4 The device receives the SCEP payload and it generates a certificate signing request (CSR) based on all the attributes in the payload.
5 The device generates a local certificate with a private key.
6 The device sends a GetCACert request to the Workspace ONE UEM SCEP Proxy.
Certificate Authority Integrations
VMware, Inc. 23
7 The Workspace ONE UEM SCEP Proxy resolves the GUID to the CA's SCEP endpoint and forwards the request to the respective SCEP endpoint.
8 The CA responds with a CA certificate to the Workspace ONE UEM SCEP Proxy.
9 The Workspace ONE UEM SCEP Proxy forwards the CA certificate to the device.
10 The CA certificate encrypts the CSR the device generated. The local device certificate signs the encrypted CSR to build a signed message.
11 Optionally, the device sends a GetCACaps request to the Workspace ONE UEM SCEP Proxy.
12 The Workspace ONE UEM SCEP Proxy forwards the request to the CA's SCEP endpoint.
13 If the CA supports the GetCACaps request, the CA returns a list of all the supported operations to the Workspace ONE UEM SCEP Proxy.
14 The Workspace ONE UEM SCEP Proxy forwards the list of supported operations to the device.
15 The device sends a PKIOperation request to the Workspace ONE UEM SCEP Proxy.
The request includes the generated signed message.
16 The Workspace ONE UEM SCEP Proxy validates that the SCEP enrollment token is compliant and enrolled with Workspace ONE UEM. If the validation is successful, it forwards the request to the CA SCEP endpoint.
17 If the PKIOperation is valid, the CA responds with PKIMessage that contains the user certificate.
18 The Workspace ONE UEM SCEP Proxy sends the response to the device.
19 The CA certificate signs the PKIMessage, it decrypts it using the local device certificate, and it installs the user certificate on the device.
Prerequisites
Meet the list requirements to configure the protocol.
n NDES is available in the Enterprise version of Microsoft Server 2008, 2008 R2, and 2012 or 2016 Standard and Enterprise.
n A Certificate Authority (CA) installed, configured, and made available to the NDES/SCEP/MSCEP server.
n You can install the CA and NDES for SCEP on the same server or on different servers. If you do put them both on the same server, complete the CA installation first and restart the server before installing NDES for SCEP.
n You need certificate templates during NDES for SCEP setup and service certificate renewal:
n Exchange Enrollment Agent (Offline request)
Certificate Authority Integrations
VMware, Inc. 24
n CEP Encryption
Note It is possible for all the following accounts to be the same account. However, using a single account has security concerns.
Connection Requirements
n The SCEP endpoint must be accessible from the device in order for certificate enrollment to finish.
n The exception to this requirement is when you use the Enable Proxy menu item in the Certificate Authority - Add/Edit page for non-generic, SCEP protocol use.
n An Admin Account must exist in the domain. This account is used to install the NDES/SCEP/MSCEP role service and must meet the following requirements.
n Member of the Local Administrators group (Standalone Installation)
n Member of the Domain Admins group (Enterprise)
n ‘Enroll’ permissions on the NDES for SCEP service certificate templates (Enterprise).
n A Service Account must exist. It is used by the NDES for SCEP application pool and must meet the following requirements.
n Member of the local IIS_USRS group. If this setting is not configured, role installation fails.
n ‘Request’ permission on the configured CA.
n ‘Read’ and ‘Enroll’ permissions on configured device certificate templates.
n A Service Principal Name (SPN) must be added by using: SetSpn –a HTTP/<ComputerName> <AccountName>.
n <ComputerName> is the name of the computer where NDES for SCEP is installed.
n <AccountName> is the computer account name when NetworkService is used, or the domain user account when a custom application pool identity is configured.
n The Device Administrator account used to request password challenges from NDES for SCEP must meet the following requirements.
n ‘Enroll’ permissions on all configured device certificate templates (Enterprise).
n Member of the Local Administrator group (standalone).
Certificate Authority Integrations
VMware, Inc. 25
Procedure
1 Install the Microsoft CA role.
a Add the ADCS role.
1 Click the Server Manager icon next to Start to open the Server Manager window.
2 Click Roles in the left pane.
3 Click Add Role in the right pane. An Add Roles Wizard window displays.
4 Under Server Roles, select the Active Directory Certificate Services check box.
5 Click Next.
6 Select the Certification Authority check box and then select Next.
7 Select Enterprise and then select Next.
8 Select Root CA and then select Next.
b Define CA private key settings.
1 Select Create a new private key and then select Next.
2 Select your preferred Key character length (for example 4096).
3 Select your preferred algorithm (for example SHA256) from the Select the hash algorithm for signing certificates issued by the CA and then select Next.
4 Click Common name for this CA and enter the name of the CA or use the default CA displayed and then select Next.
Note the name of the CA server. You must enter this information in Workspace ONE UEM when setting up access to the CA.
5 Select the desired length of time under Set the validity period for the certificate generated for this CA and then select Next.
The length of time you select is the validity period for the CA, not the certificate. However, when the validity for the CA expires, so does the certificate.
c Configure the ADCS certificate database.
1 Click Next to accept the default information in the Configure Certificate Database screen.
2 Click Next to accept the Confirm Installation Selections screen.
3 Click Install. The installation begins. After the installation completes, the Installation Results window displays.
4 Click Close.
2 Set permissions for the NDES/SCEP Admin Account.
a Run the Certification Authority Console from the Administrative Tools in Windows.
b Right-click the server name and select Properties.
Certificate Authority Integrations
VMware, Inc. 26
c Select the Security tab.
d Click Add. The Select Users, Computers, Service Accounts, or Groups dialog box displays.
e Click within the Enter the object names to select text box and type the name of the SCEP Admin Account.
f Click OK. The CA Properties dialog box displays.
g Select the SCEP Admin Account from the Group or user names list.
h Select the Manage CA permission Allow check box.
i Select the Request Certificates permission Allow check box.
j Click OK.
3 Set the Read and Enroll permissions on the certificate template for the NDES/SCEP Service Account and the Device Administrator.
a Run the Certificate Templates Console by running certtmpl.msc from the Windows Desktop.
b Right-click the required template and select Properties. The example here is ‘MobileUser’ from the CA Setup Document.
c Select the Security tab.
d Click Add. The Select Users, Computers, Service Accounts, or Groups dialog box displays.
e Click within the Enter the object names to select text box and type the name of the Service Account.
f Click OK. The Properties dialog box displays.
g Select the Service Account from the Group or user names: list.
h Select the Read permission Allow check box.
i Select the Enroll permission Allow check box.
j Click OK.
4 Install the NDES/SCEP role.
a Run the Server Manager on the server to be used as the NDES/SCEP/MSCEP server.
b Select Roles.
c Click Add Roles. The Add Roles Wizard displays.
d Click Next. The Select Server Roles dialog box displays.
e Select Active Directory Certificate Services.
f Click Next. The Select Role Services dialog box displays.
Certificate Authority Integrations
VMware, Inc. 27
g Clear the Certification Authority check box.
h Select Network Device Enrollment Service (or SCEP).
i Click Next.
j Click Select User. The user selected MUST be in the local IIS_USRS Group.
k Enter the Username and Password for the account NDES/SCEP Admin Account.
l Click Next. The Specify CA for Network Device Enrollment Service (or SCEP) dialog box displays.
m Select CA Name.
n Click Browse.
o Select the CA in the Select Certification Authority dialog box.
p Click OK.
q In the Specify Registration Authority dialog box, select Next.
r In the Configure Cryptography for Registration Authority dialog box, select Next.
s Navigate through any additional required services or roles and then select Install and Next.
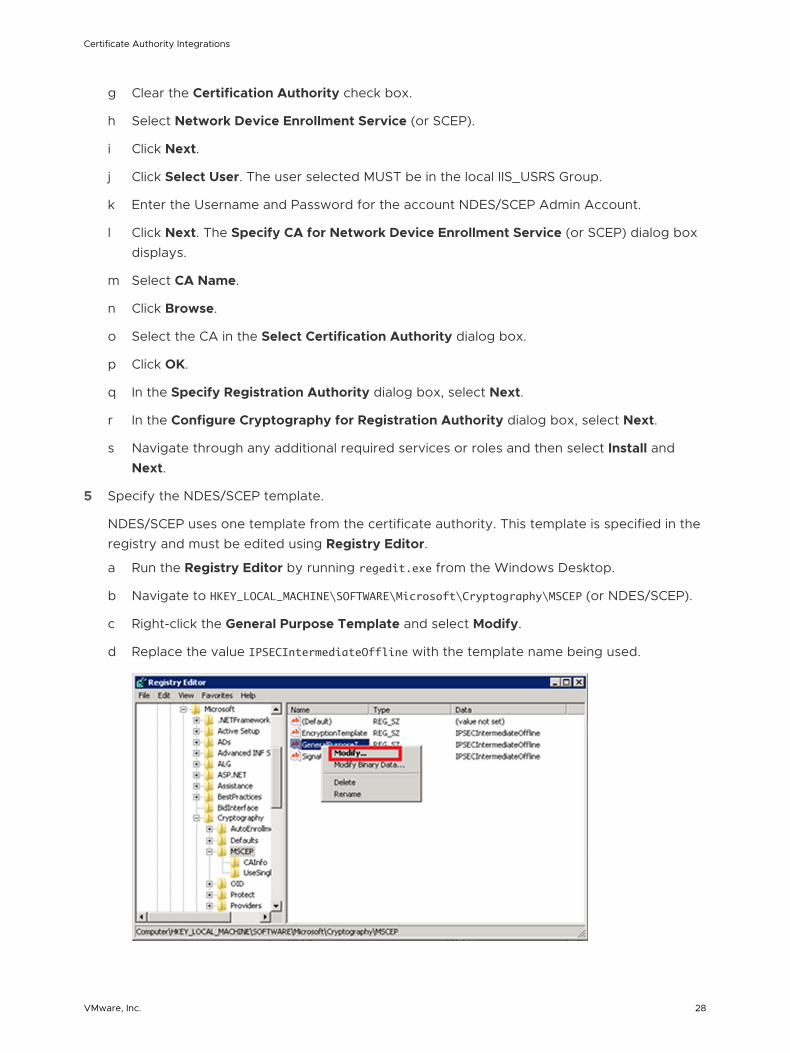
5 Specify the NDES/SCEP template.
NDES/SCEP uses one template from the certificate authority. This template is specified in the registry and must be edited using Registry Editor.
a Run the Registry Editor by running regedit.exe from the Windows Desktop.
b Navigate to HKEY_LOCAL_MACHINE\SOFTWARE\Microsoft\Cryptography\MSCEP (or NDES/SCEP).
c Right-click the General Purpose Template and select Modify.
d Replace the value IPSECIntermediateOffline with the template name being used.
Certificate Authority Integrations
VMware, Inc. 28
e Close the Registry Editor.
f Restart Internet Information Services by opening a command prompt and running iisreset.
6 Configure IIS to allow for large query strings.
When the device requests a certificate from NDES/SCEP, it sends a string of over 2700 characters as part of the request. This string is larger than the default size for query strings and results in a 404.15 error. The default query string length must be increased to accommodate this large string.
a Open a command prompt from the Windows Desktop.
b Enter c:\windows\system32\inetsrv\appcmd.exe set config -section:system.webServer/security/requestFiltering /requestLimits.maxQueryString:"3072" /commit:apphost.
Certificate Authority Integrations
VMware, Inc. 29
7 Configure the CA and the certificate template in Workspace ONE UEM so that Workspace ONE UEM can retrieve a certificate from a CA.
a Configure the CA.
1 Log in to the Workspace ONE UEM console as a user with Workspace ONE UEM admin privileges, at minimum.
2 Navigate to System > Enterprise Integration > Certificate Authorities.
3 Click Add.
4 Enter details about the CA:
n Select ‘Microsoft ADCS’ from the Authority Type drop-down menu. Configure this setting first, because dependent settings appear.
n Enter the Name and Description of the new certificate authority.
n Select the Protocol: ADCS or SCEP.
n Select the Version: NDES 2008/2012 or SCEP 2003.
n Enter the URL of the CA server in the SCEP URL text box.
n Select the Challenge Type that reflects whether a challenge phrase is required for authentication.
n If you want basic authentication, select Static and enter an authentication phrase consisting of a singular key or password that is used to authenticate the device with the certificate enrollment URL.
n To enable a new challenge to be generated for every SCEP enrollment request, select Dynamic.
n Enter the Challenge Username/Challenge Password. This user-name and password combination is used to authenticate the device making the request.
For additional security, upload a certificate under Challenge Client Certificate for Workspace ONE UEM to present when fetching the dynamic challenge from the SCEP endpoint.
n Finish the SCEP Challenge URL text box with a URL in the following format: http://host/certsrv/mscep_admin/.
n Advanced Options
n Enter the SCEP Challenge Length, which represents the number of characters in the challenge password.
n Enter the Retry Timeout, which is the time the system waits between retries.
n For Windows 10 devices, this should be a non-zero value.
n Enter the Max Retries When Pending, which is the maximum number of retries the system allows while the authority is pending.
Certificate Authority Integrations
VMware, Inc. 30
n With Enable Proxy selected, Workspace ONE UEM acts as a proxy between the device and the SCEP endpoint defined in the CA configuration.
n Click Test Connection. If you select Save before Test Connection, a “Test is unsuccessful” error displays.
5 Click Save.
b Configure the certificate template.
1 Click the Request Templates tab.
2 Click Add.
3 Enter the following details about the template in the remaining text boxes:
n Enter the template Name and Description.
n Select the certificate authority that was created from the Certificate Authority drop-down box.
n Enter the distinguished name in the Subject Name text box. The text entered in this text box becomes the Subject of the certificate, which lets the network administrator determine which devices receive the certificate.
A typical entry in this text box is “CN={EnrollmentUser}” or “CN={DeviceUid}” where the {} text boxes are Workspace ONE UEM lookup values.
If you select Automatic Certificate Renewal for the certificate, CN=sceprenew-{GUID} get's automatically added in backend. CA needs to issue certs with retaining this attribute.
n Select the private key length from the Private Key Length drop-down menu.
This value is typically 2048 matches the setting on the certificate template that is being used by NDES/SCEP.
n Select the applicable Private Key Type.
This value can be Signing, Encryption, or both, and the value matches the certificate template being used by NDES/SCEP.
n You can optionally select any of the following:
n If Workspace ONE UEM renews the certificate when it expires, select Automatic Certificate Renewal and make sure the assignment is set to Auto. Enter the number of days before expiration that Workspace ONE UEM automatically reissues a certificate to the device in the Auto Renewal Period (days) text box .
n Select Publish Private Key if the certificate is published to Active Directory or any other customer web service. Then select the proper destination by selecting the appropriate Private Key Destination, either Directory Services or a Custom Web Service.
Certificate Authority Integrations
VMware, Inc. 31
n Click Add to the right of Eku Attributes to insert an object identifier (OID) that represents any additional extended key usages that might be required. You can add multiple Eku Attributes to fit your needs.
n The EKU Attribute is required for Windows 10 devices.
n Select Force Key Generation On Device to generate a public and private key pair on the device itself. This setting improves CA performance and security.
4 Click Save.
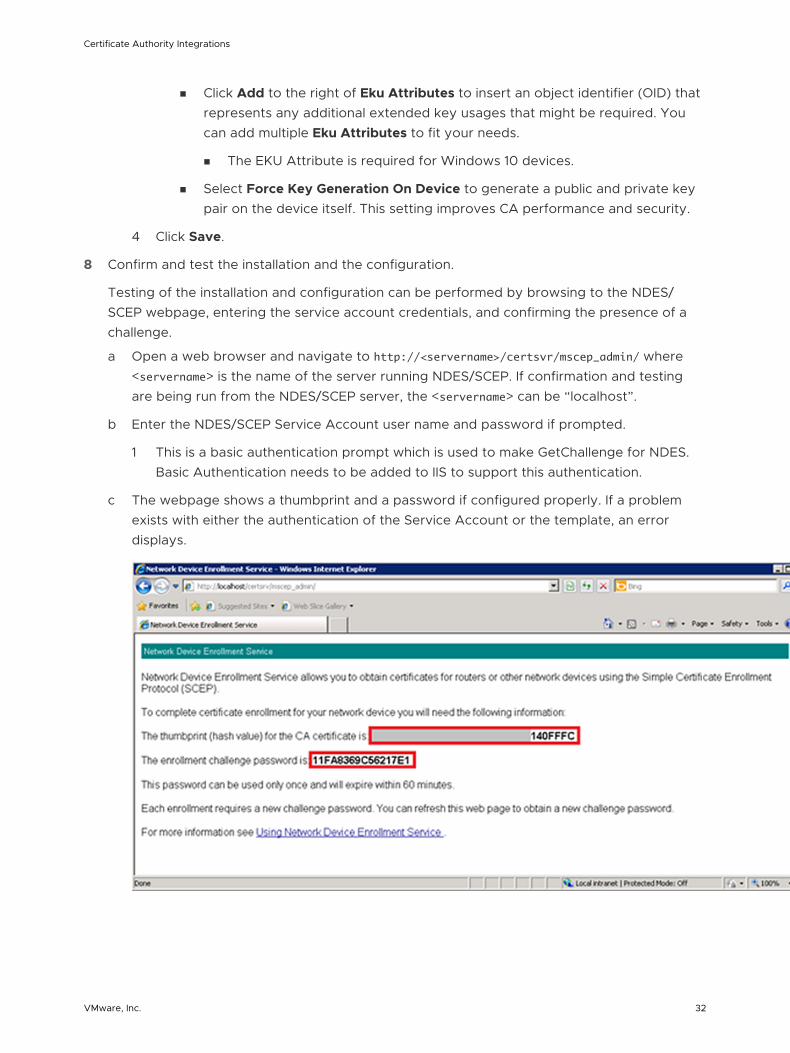
8 Confirm and test the installation and the configuration.
Testing of the installation and configuration can be performed by browsing to the NDES/SCEP webpage, entering the service account credentials, and confirming the presence of a challenge.
a Open a web browser and navigate to http://<servername>/certsvr/mscep_admin/ where <servername> is the name of the server running NDES/SCEP. If confirmation and testing are being run from the NDES/SCEP server, the <servername> can be “localhost”.
b Enter the NDES/SCEP Service Account user name and password if prompted.
1 This is a basic authentication prompt which is used to make GetChallenge for NDES. Basic Authentication needs to be added to IIS to support this authentication.
c The webpage shows a thumbprint and a password if configured properly. If a problem exists with either the authentication of the Service Account or the template, an error displays.
Certificate Authority Integrations
VMware, Inc. 32
What to do next
Review some tips and troubleshooting steps for the integration.
n When configuring the certificate password settings, use the default setting (dynamic password mode).
n Although Workspace ONE UEM supports the use of the registry setting for Single Password mode, consider not using it. The “Single Password” mode sets a static challenge password all devices can use which can expose security vulnerabilities.
n If the NDES/SCEP challenge cache is full, (an issue which can arise when publishing a profile, for example), edit the cache value by:
a Run regedit.exe to edit the PasswordMax value.
b The PasswordMax value is at: HKEY_LOCAL_MACHINE\Software\Microsoft\Cryptography\MSCEP (or NDES/SCEP) within the registry.
c Increase the PasswordMax value to a number greater than the default value of 5.
n If you receive a Password Not Present error when installing the SCEP Profile to a device, confirm that the challenge response length setting in the Workspace ONE UEM console matches the length setting associated with the certificate.
Certificate Authority Integrations
VMware, Inc. 33
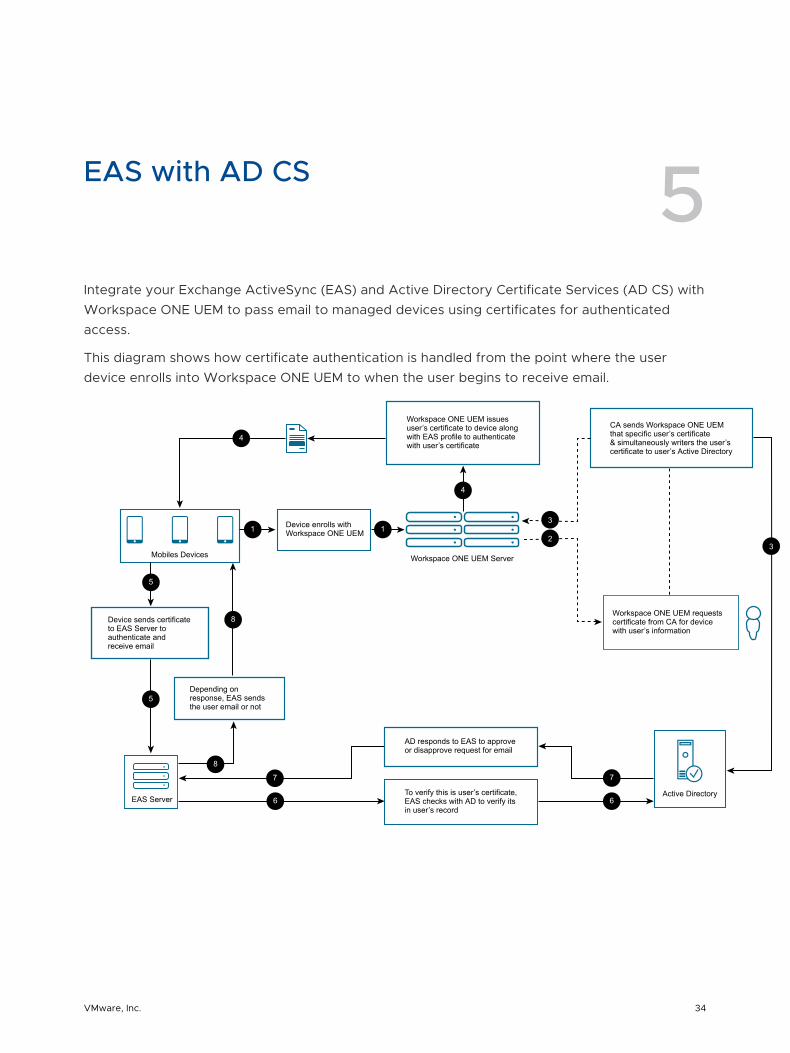
EAS with AD CS 5Integrate your Exchange ActiveSync (EAS) and Active Directory Certificate Services (AD CS) with Workspace ONE UEM to pass email to managed devices using certificates for authenticated access.
This diagram shows how certificate authentication is handled from the point where the user device enrolls into Workspace ONE UEM to when the user begins to receive email.
Workspace ONE UEM issues user’s certificate to device along with EAS profile to authenticate with user’s certificate
AD responds to EAS to approve or disapprove request for email
To verify this is user’s certificate, EAS checks with AD to verify its in user’s record
Device enrolls with Workspace ONE UEM
CA sends Workspace ONE UEM that specific user’s certificate & simultaneously writers the user’s certificate to user’s Active Directory
Workspace ONE UEM requests certificate from CA for device with user’s information
Device sends certificate to EAS Server to authenticate and receive email
Depending on response, EAS sends the user email or not
Workspace ONE UEM Server
Active Directory
Mobiles Devices
EAS Server
7
4
3
23
1
4
8
5
5
8
1
6 6
7
VMware, Inc. 34

Prerequisites
Meet these requirements including setting up a certificate authority server, enabling Microsoft Exchange with ActiveSync, and selecting the option to install Client Certificate Mapping Authentication.
n Set up an enterprise certificate authority server for Microsoft as opposed to a standalone certificate authority. A standalone certificate authority does not allow for the configuration and customization of templates.
Important Certificate Authorities can be set up on servers running a variety of operating systems. However, not all operating systems support all features or design requirements, and creating an optimal design requires careful planning and lab testing before you deploy a client access server like ADCS in a production environment.
n Microsoft Exchange with ActiveSync enabled.
n Install Client Certificate Mapping Authentication on the Internet Information Services (IIS) on the Exchange ActiveSync server.
Procedure
1 Set up a trust relaitionship between Active Directory and the Certificate Authority (CA), which is EAS with ADCS.
a On the Certificate Authority server, select Start > Run.
b Type MMC in the dialog box and press Enter to launch the Microsoft Management Console (MMC).
c Click File > Add/Remove Snap-ins from the MMC main menu.
d Select Enterprise PKI from the list of Available snap-ins and then select Add.
e Click OK.
f Right-click Enterprise PKI and select Manage AD Containers.
g Select the NT AuthCertificates tab and verify the Certificate Authority is listed. If not, select Add to add the Certificate Authority to the group.
h Click OK.
Certificate Authority Integrations
VMware, Inc. 35
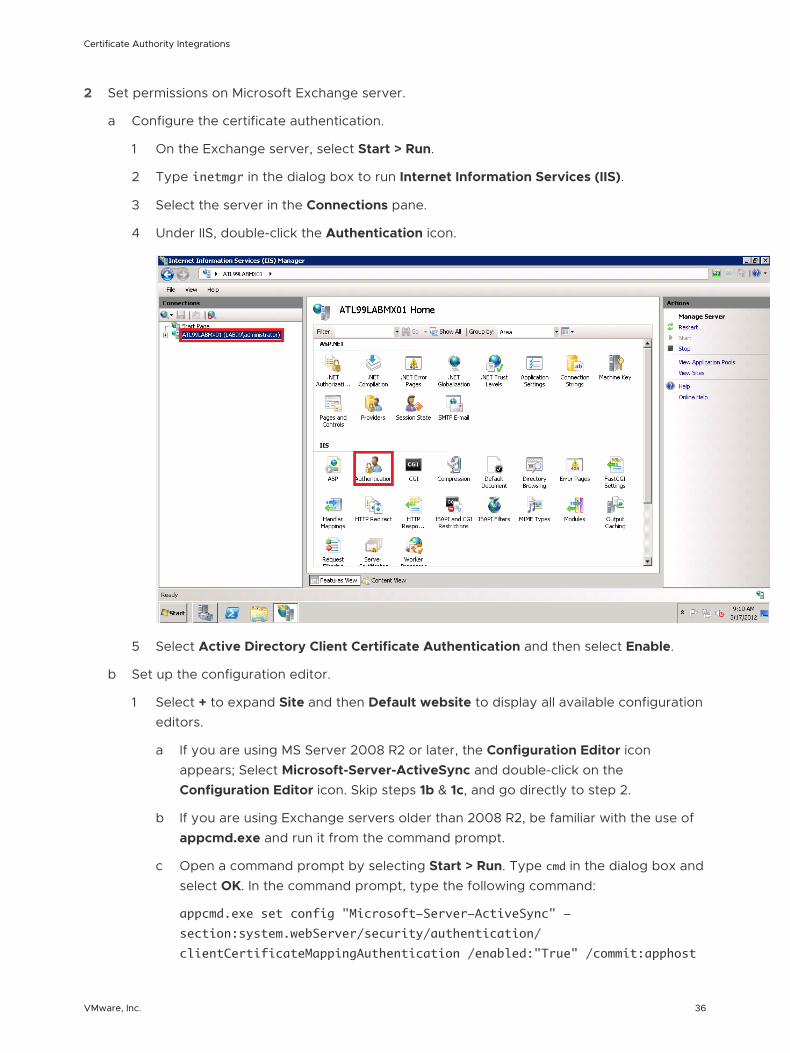
2 Set permissions on Microsoft Exchange server.
a Configure the certificate authentication.
1 On the Exchange server, select Start > Run.
2 Type inetmgr in the dialog box to run Internet Information Services (IIS).
3 Select the server in the Connections pane.
4 Under IIS, double-click the Authentication icon.
5 Select Active Directory Client Certificate Authentication and then select Enable.
b Set up the configuration editor.
1 Select + to expand Site and then Default website to display all available configuration editors.
a If you are using MS Server 2008 R2 or later, the Configuration Editor icon appears; Select Microsoft-Server-ActiveSync and double-click on the Configuration Editor icon. Skip steps 1b & 1c, and go directly to step 2.
b If you are using Exchange servers older than 2008 R2, be familiar with the use of appcmd.exe and run it from the command prompt.
c Open a command prompt by selecting Start > Run. Type cmd in the dialog box and select OK. In the command prompt, type the following command:
appcmd.exe set config "Microsoft-Server-ActiveSync" -
section:system.webServer/security/authentication/
clientCertificateMappingAuthentication /enabled:"True" /commit:apphost
Certificate Authority Integrations
VMware, Inc. 36
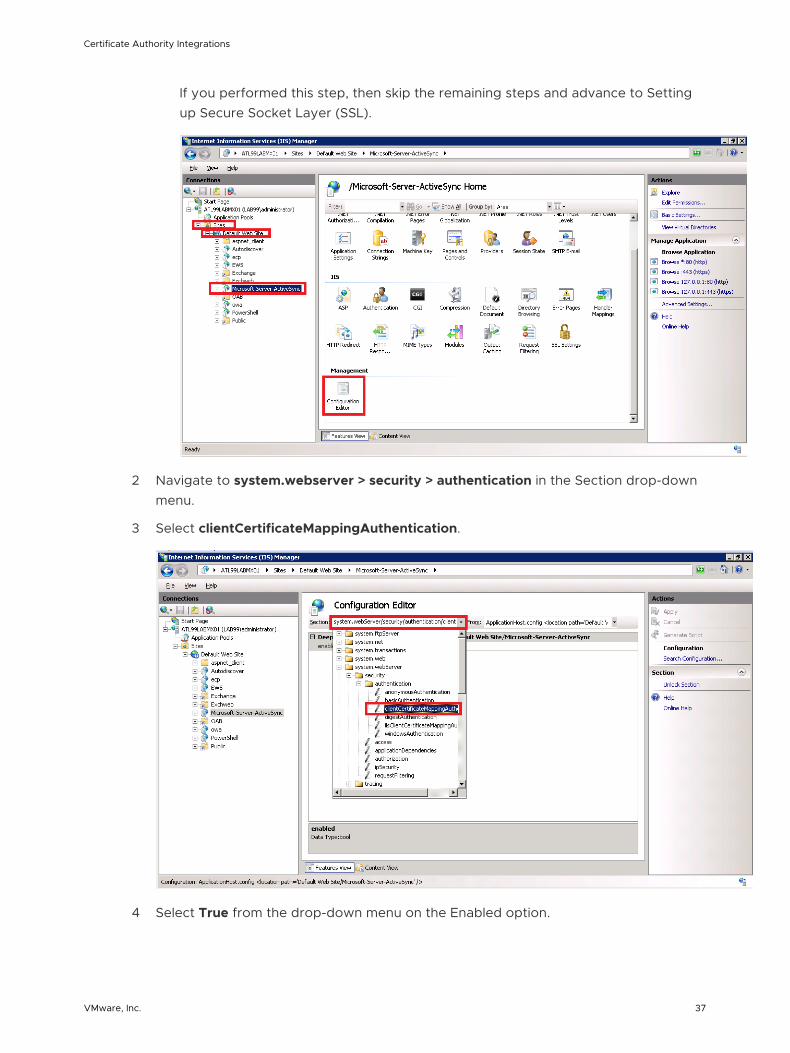
If you performed this step, then skip the remaining steps and advance to Setting up Secure Socket Layer (SSL).
2 Navigate to system.webserver > security > authentication in the Section drop-down menu.
3 Select clientCertificateMappingAuthentication.
4 Select True from the drop-down menu on the Enabled option.
Certificate Authority Integrations
VMware, Inc. 37
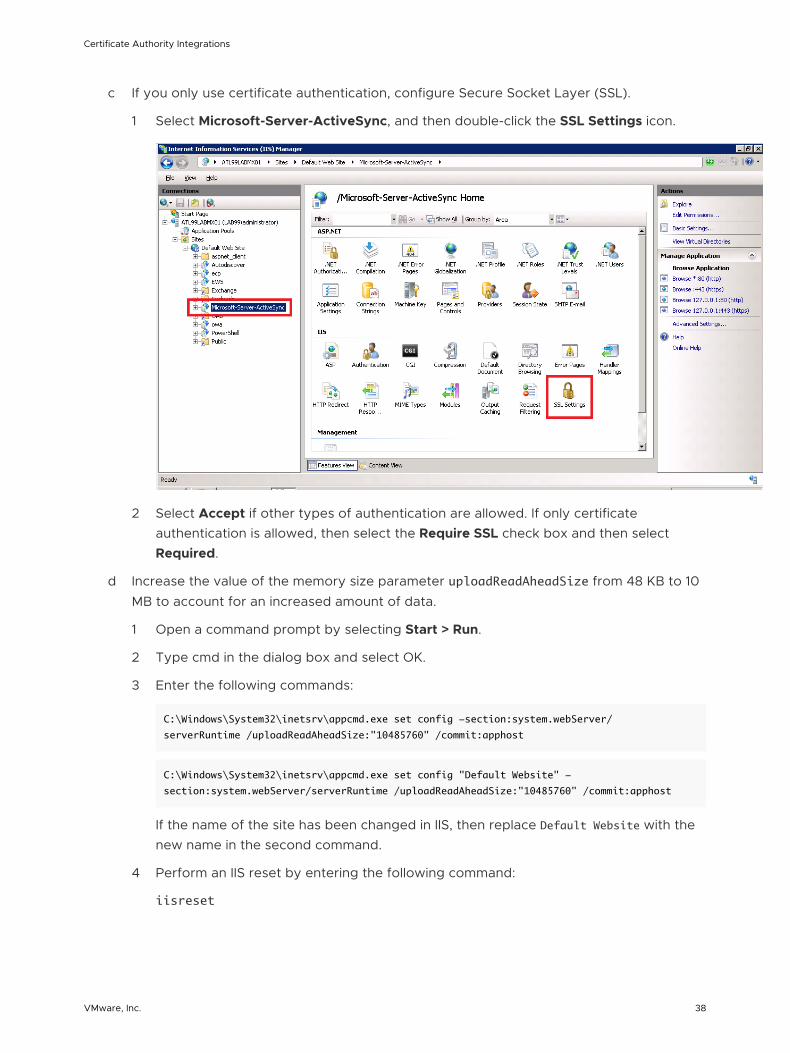
c If you only use certificate authentication, configure Secure Socket Layer (SSL).
1 Select Microsoft-Server-ActiveSync, and then double-click the SSL Settings icon.
2 Select Accept if other types of authentication are allowed. If only certificate authentication is allowed, then select the Require SSL check box and then select Required.
d Increase the value of the memory size parameter uploadReadAheadSize from 48 KB to 10 MB to account for an increased amount of data.
1 Open a command prompt by selecting Start > Run.
2 Type cmd in the dialog box and select OK.
3 Enter the following commands:
C:\Windows\System32\inetsrv\appcmd.exe set config -section:system.webServer/
serverRuntime /uploadReadAheadSize:"10485760" /commit:apphost
C:\Windows\System32\inetsrv\appcmd.exe set config "Default Website" -
section:system.webServer/serverRuntime /uploadReadAheadSize:"10485760" /commit:apphost
If the name of the site has been changed in IIS, then replace Default Website with the new name in the second command.
4 Perform an IIS reset by entering the following command:
iisreset
Certificate Authority Integrations
VMware, Inc. 38
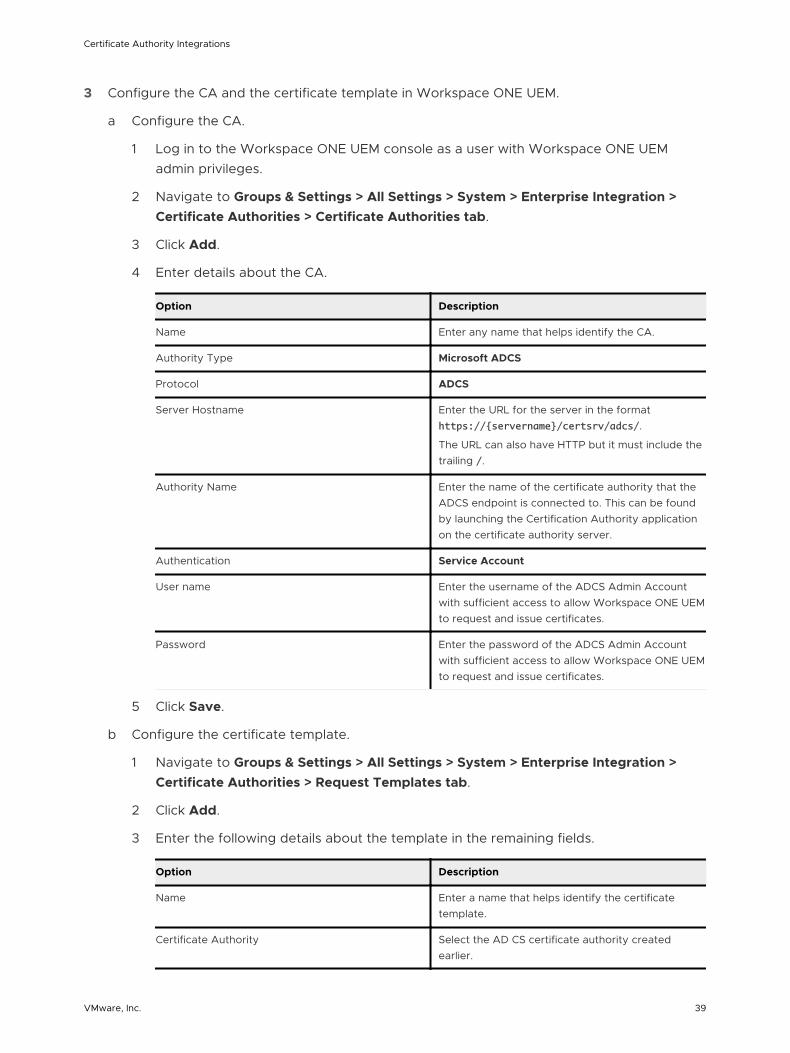
3 Configure the CA and the certificate template in Workspace ONE UEM.
a Configure the CA.
1 Log in to the Workspace ONE UEM console as a user with Workspace ONE UEM admin privileges.
2 Navigate to Groups & Settings > All Settings > System > Enterprise Integration > Certificate Authorities > Certificate Authorities tab.
3 Click Add.
4 Enter details about the CA.
Option Description
Name Enter any name that helps identify the CA.
Authority Type Microsoft ADCS
Protocol ADCS
Server Hostname Enter the URL for the server in the format https://{servername}/certsrv/adcs/.
The URL can also have HTTP but it must include the trailing /.
Authority Name Enter the name of the certificate authority that the ADCS endpoint is connected to. This can be found by launching the Certification Authority application on the certificate authority server.
Authentication Service Account
User name Enter the username of the ADCS Admin Account with sufficient access to allow Workspace ONE UEM to request and issue certificates.
Password Enter the password of the ADCS Admin Account with sufficient access to allow Workspace ONE UEM to request and issue certificates.
5 Click Save.
b Configure the certificate template.
1 Navigate to Groups & Settings > All Settings > System > Enterprise Integration > Certificate Authorities > Request Templates tab.
2 Click Add.
3 Enter the following details about the template in the remaining fields.
Option Description
Name Enter a name that helps identify the certificate template.
Certificate Authority Select the AD CS certificate authority created earlier.
Certificate Authority Integrations
VMware, Inc. 39
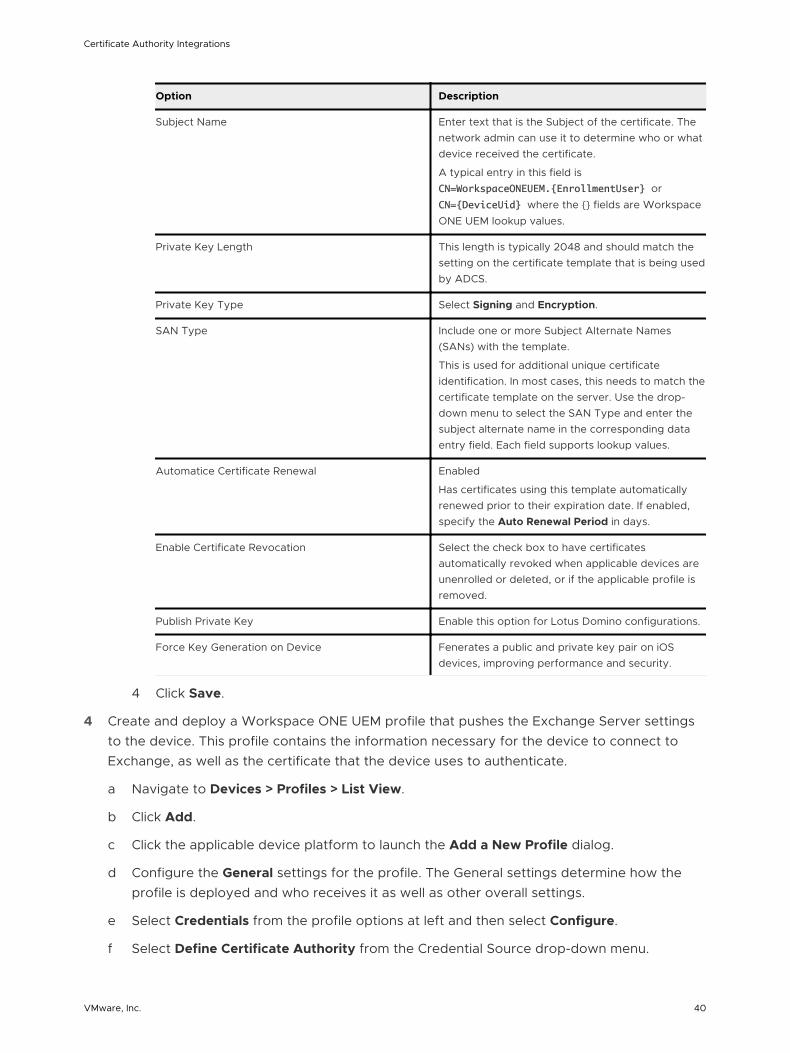
Option Description
Subject Name Enter text that is the Subject of the certificate. The network admin can use it to determine who or what device received the certificate.
A typical entry in this field is CN=WorkspaceONEUEM.{EnrollmentUser} or CN={DeviceUid} where the {} fields are Workspace ONE UEM lookup values.
Private Key Length This length is typically 2048 and should match the setting on the certificate template that is being used by ADCS.
Private Key Type Select Signing and Encryption.
SAN Type Include one or more Subject Alternate Names (SANs) with the template.
This is used for additional unique certificate identification. In most cases, this needs to match the certificate template on the server. Use the drop-down menu to select the SAN Type and enter the subject alternate name in the corresponding data entry field. Each field supports lookup values.
Automatice Certificate Renewal Enabled
Has certificates using this template automatically renewed prior to their expiration date. If enabled, specify the Auto Renewal Period in days.
Enable Certificate Revocation Select the check box to have certificates automatically revoked when applicable devices are unenrolled or deleted, or if the applicable profile is removed.
Publish Private Key Enable this option for Lotus Domino configurations.
Force Key Generation on Device Fenerates a public and private key pair on iOS devices, improving performance and security.
4 Click Save.
4 Create and deploy a Workspace ONE UEM profile that pushes the Exchange Server settings to the device. This profile contains the information necessary for the device to connect to Exchange, as well as the certificate that the device uses to authenticate.
a Navigate to Devices > Profiles > List View.
b Click Add.
c Click the applicable device platform to launch the Add a New Profile dialog.
d Configure the General settings for the profile. The General settings determine how the profile is deployed and who receives it as well as other overall settings.
e Select Credentials from the profile options at left and then select Configure.
f Select Define Certificate Authority from the Credential Source drop-down menu.
Certificate Authority Integrations
VMware, Inc. 40
g Select the certificate authority you created previously from the Certificate Authority drop-down menu.
h Select the certificate template you created previously from the Certificate Template drop-down menu.
i Select Exchange ActiveSync from the profile options at left and then select Configure.
j Configure the Exchange ActiveSync.
1 Enter an account name in the Account Name field. This is the name that displays on the device to indicate which email account is active so it should be accurately descriptive.
2 Enter the Exchange ActiveSync host in the Exchange Active Sync Host data entry field. This is the actual endpoint of the mail server.
Do not include http:// or https:// at the beginning or /Microsoft-server-activesync at the end.
3 Ensure the Use SSL checkbox is selected. Authentication using certificates fails over a non-SSL connection.
4 Deselect the Use S/MIME checkbox if enabled by default.
5 The Domain data entry field should contain the email domain for the user account.
6 The Username data entry field should contain the email address of the user when on the device.
7 The Email Address text box should contain the email address of the user when on the device
Domain, Username, and Email Address can be obtained using Lookup Values which will retrieve the text stored in the applicable field of the User Profile.
8 Select the credential you created previously from the Payload Certificate drop-down menu.
k Click Save or select Save and Publish to publish this profile to a device.
Certificate Authority Integrations
VMware, Inc. 41
EAS with NDES-MSCEP 6Integrate the Microsoft Exchange Client Access Server (CAS) and Workspace ONE UEM to allow a device to connect to Microsoft Exchange ActiveSync (EAS) using a certificate for authentication.
Prerequisites
n Set up a certificate authority server and configure it. Ensure that the CA is an Enterprise CA as opposed to a Stand Alone CA. The Stand Alone version does not allow for the configuration and customization of templates.
Note A Network Device Enrollment Service, also referred to as MSCEP server setup. NDES is only available in the Enterprise version of Microsoft Server 2008 and 2008 R2.
n Enable Microsoft Exchange with ActiveSync.
n Cofigure Internet Information Services (IIS) on the EAS server with the option Client Certificate Mapping Authentication installed.
Procedure
1 Set up a trust between active directory and the certificate authority, eas with NDES-MSCEP.
a On the Certificate Authority server, select Start > Run.
b Type MMC in the dialog box and press Enter to launch the Microsoft Management Console (MMC).
c Click File > Add/Remove Snap-in… from the MMC main menu.
d Select Enterprise PKI from the list of available snap-ins and then select Add.
e Click OK.
f Right-click Enterprise PKI and select Manage AD Containers.
g Select the NT AuthCertificates tab and verify the Certificate Authority is listed. If not, select Add to add the Certificate Authority to the group.
h Click OK.
VMware, Inc. 42
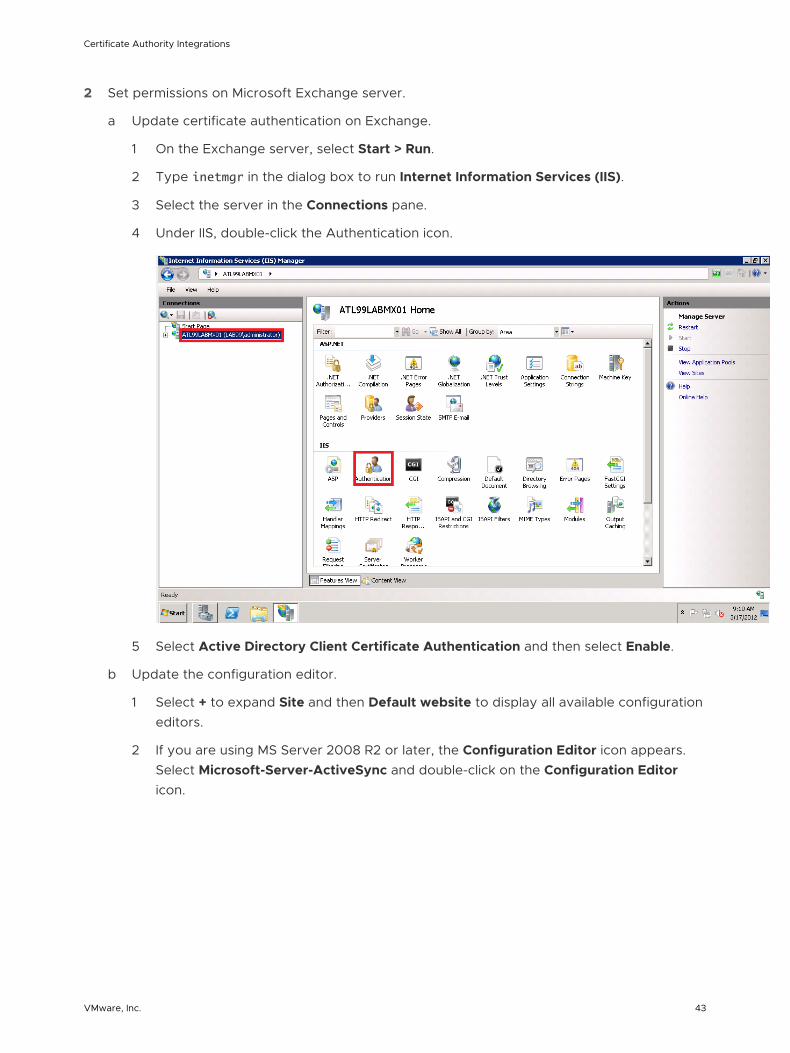
2 Set permissions on Microsoft Exchange server.
a Update certificate authentication on Exchange.
1 On the Exchange server, select Start > Run.
2 Type inetmgr in the dialog box to run Internet Information Services (IIS).
3 Select the server in the Connections pane.
4 Under IIS, double-click the Authentication icon.
5 Select Active Directory Client Certificate Authentication and then select Enable.
b Update the configuration editor.
1 Select + to expand Site and then Default website to display all available configuration editors.
2 If you are using MS Server 2008 R2 or later, the Configuration Editor icon appears. Select Microsoft-Server-ActiveSync and double-click on the Configuration Editor icon.
Certificate Authority Integrations
VMware, Inc. 43
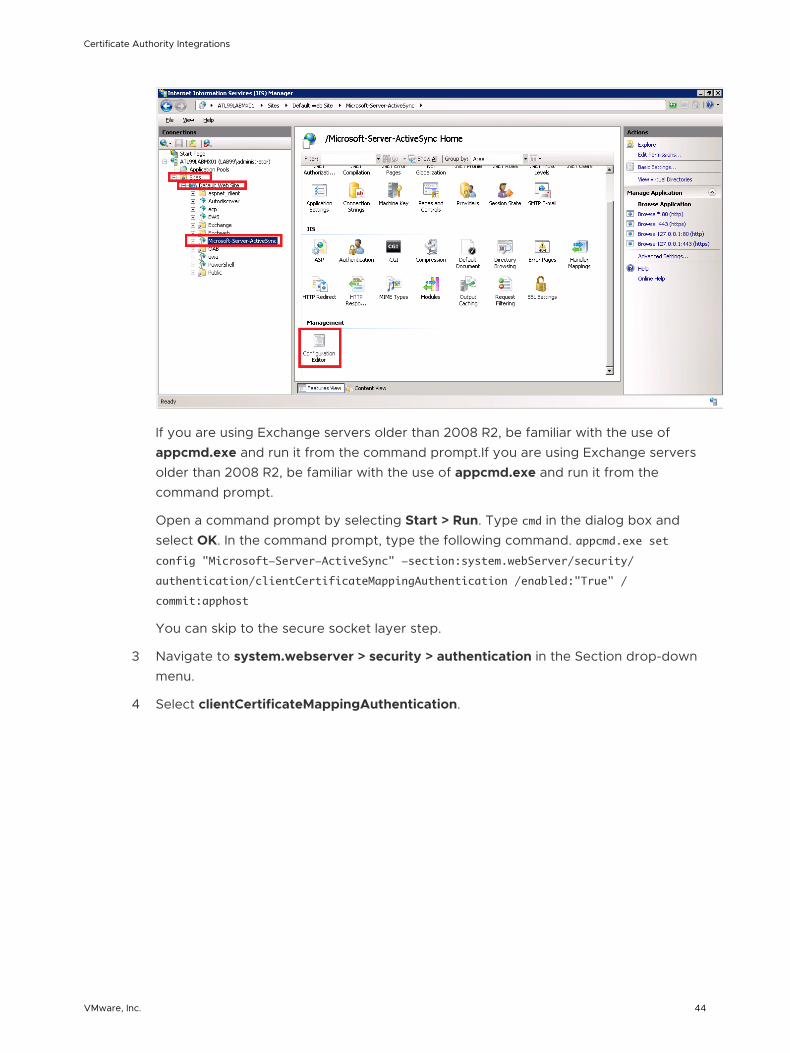
If you are using Exchange servers older than 2008 R2, be familiar with the use of appcmd.exe and run it from the command prompt.If you are using Exchange servers older than 2008 R2, be familiar with the use of appcmd.exe and run it from the command prompt.
Open a command prompt by selecting Start > Run. Type cmd in the dialog box and select OK. In the command prompt, type the following command. appcmd.exe set config "Microsoft-Server-ActiveSync" -section:system.webServer/security/
authentication/clientCertificateMappingAuthentication /enabled:"True" /
commit:apphost
You can skip to the secure socket layer step.
3 Navigate to system.webserver > security > authentication in the Section drop-down menu.
4 Select clientCertificateMappingAuthentication.
Certificate Authority Integrations
VMware, Inc. 44
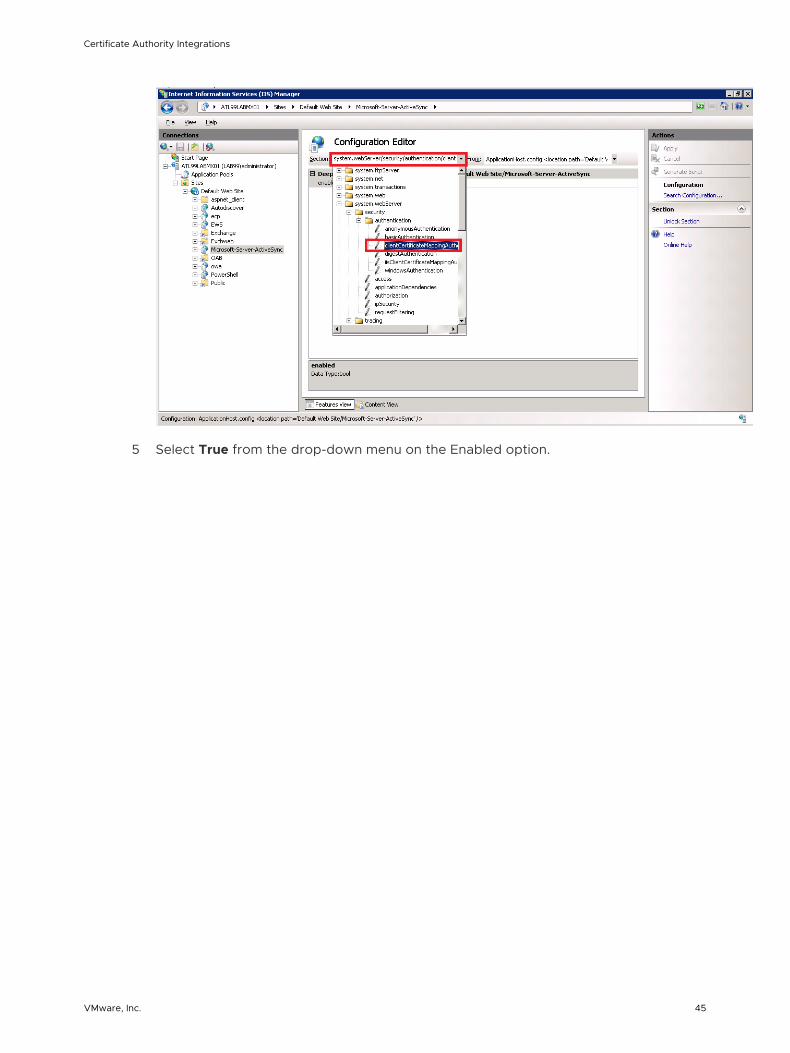
5 Select True from the drop-down menu on the Enabled option.
Certificate Authority Integrations
VMware, Inc. 45

c Set up secure socket layer.
If only certificate authentication is being used, then you must configure Secure Socket Layer (SSL).
1 Select Microsoft-Server-ActiveSync, and then double-click the SSL Settings icon.
2 Select Accept if other types of authentication are allowed. If only certificate authentication is allowed, then select the Require SSL check box and then select Required.
d Adjust uploadReadAheadSize memory size.
Since certificate-based authentication uses a larger amount of data during the authentication process, you must increase the value of the uploadReadAheadSize from 48 KB to 10 MB to account for the increased amount of data.
1 Open a command prompt by selecting Start > Run.
2 Type cmd in the dialog box and select OK.
3 If the name of the site has been changed in IIS, then replace Default Website with the new name in the second command.
4 Perform an IIS reset by entering iisreset.
Certificate Authority Integrations
VMware, Inc. 46

3 Configure certificate authority and template in Workspace ONE UEM.
a Configure the certificate authority (CA).
1 Open the Workspace ONE UEM console.
2 Login as a user with a minimum of Workspace ONE UEM administrator privileges.
3 Navigate to Devices > Certificates > Certificate Authorities.
4 On the Certificate Authorities tab, select Add.
5 Select Generic SCEP from the Authority Type drop-down menu.
6 Complete the following options.
Setting Description
Name Enter the name of the CA to which the NDES/SCEP/MSCEP endpoint is connected. Find the name by launching the Certification Authority application on the CA server.
SCEP URL Enter the URL of the CA server.
Challenge Type The Static item requires you to enter an authentication phrase consisting of a key or password used to authenticate the device with the certificate enrollment URL.
7 Click Test Connection.
If you select Save prior to Test Connection, a Test is unsuccessful error displays.
8 Select Save.
b Configure the request template.
1 Navigate to Devices > Certificates > Certificate Authorities and select the Request Templates tab.
2 Select Add and complete the settings.
Setting Description
Name Enter any name that helps to identify this template.
Certificate Authority Select the CA you configured earlier in this process.
Subject Name Enter the Distinguished Name (DN) for the template. The text entered in this field is the “Subject” of the certificate. The network admin can use the DN to determine who or what device received the certificate.
A typical entry in this field is CN=WorkspaceONEUEM.{EnrollmentUser}” or
“CN={DeviceUid}. The {} fields are Workspace ONE UEM lookup values.
Certificate Authority Integrations
VMware, Inc. 47
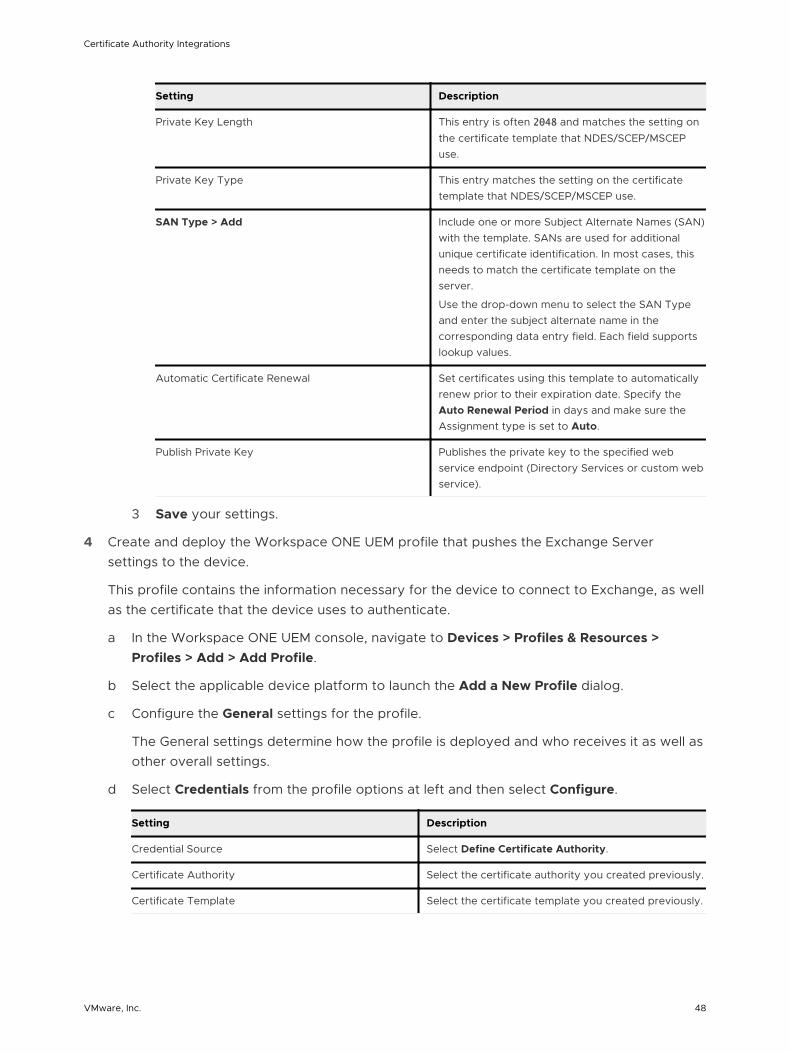
Setting Description
Private Key Length This entry is often 2048 and matches the setting on the certificate template that NDES/SCEP/MSCEP use.
Private Key Type This entry matches the setting on the certificate template that NDES/SCEP/MSCEP use.
SAN Type > Add Include one or more Subject Alternate Names (SAN) with the template. SANs are used for additional unique certificate identification. In most cases, this needs to match the certificate template on the server.
Use the drop-down menu to select the SAN Type and enter the subject alternate name in the corresponding data entry field. Each field supports lookup values.
Automatic Certificate Renewal Set certificates using this template to automatically renew prior to their expiration date. Specify the Auto Renewal Period in days and make sure the Assignment type is set to Auto.
Publish Private Key Publishes the private key to the specified web service endpoint (Directory Services or custom web service).
3 Save your settings.
4 Create and deploy the Workspace ONE UEM profile that pushes the Exchange Server settings to the device.
This profile contains the information necessary for the device to connect to Exchange, as well as the certificate that the device uses to authenticate.
a In the Workspace ONE UEM console, navigate to Devices > Profiles & Resources > Profiles > Add > Add Profile.
b Select the applicable device platform to launch the Add a New Profile dialog.
c Configure the General settings for the profile.
The General settings determine how the profile is deployed and who receives it as well as other overall settings.
d Select Credentials from the profile options at left and then select Configure.
Setting Description
Credential Source Select Define Certificate Authority.
Certificate Authority Select the certificate authority you created previously.
Certificate Template Select the certificate template you created previously.
Certificate Authority Integrations
VMware, Inc. 48
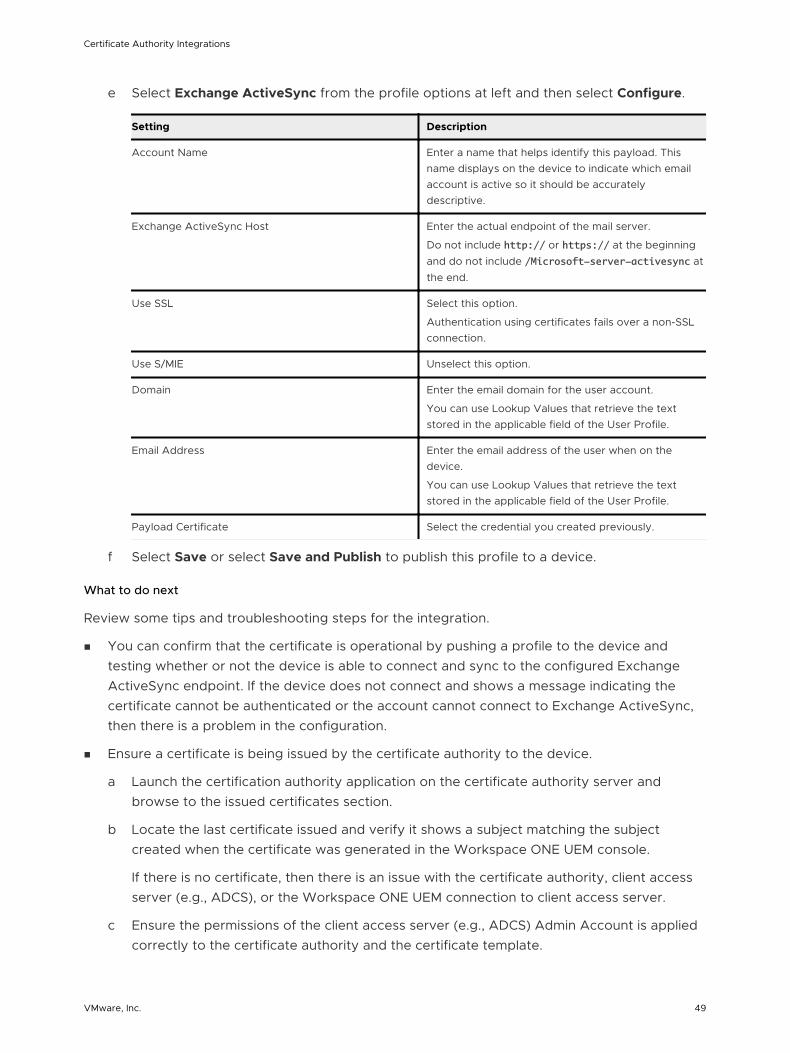
e Select Exchange ActiveSync from the profile options at left and then select Configure.
Setting Description
Account Name Enter a name that helps identify this payload. This name displays on the device to indicate which email account is active so it should be accurately descriptive.
Exchange ActiveSync Host Enter the actual endpoint of the mail server.
Do not include http:// or https:// at the beginning and do not include /Microsoft-server-activesync at the end.
Use SSL Select this option.
Authentication using certificates fails over a non-SSL connection.
Use S/MIE Unselect this option.
Domain Enter the email domain for the user account.
You can use Lookup Values that retrieve the text stored in the applicable field of the User Profile.
Email Address Enter the email address of the user when on the device.
You can use Lookup Values that retrieve the text stored in the applicable field of the User Profile.
Payload Certificate Select the credential you created previously.
f Select Save or select Save and Publish to publish this profile to a device.
What to do next
Review some tips and troubleshooting steps for the integration.
n You can confirm that the certificate is operational by pushing a profile to the device and testing whether or not the device is able to connect and sync to the configured Exchange ActiveSync endpoint. If the device does not connect and shows a message indicating the certificate cannot be authenticated or the account cannot connect to Exchange ActiveSync, then there is a problem in the configuration.
n Ensure a certificate is being issued by the certificate authority to the device.
a Launch the certification authority application on the certificate authority server and browse to the issued certificates section.
b Locate the last certificate issued and verify it shows a subject matching the subject created when the certificate was generated in the Workspace ONE UEM console.
If there is no certificate, then there is an issue with the certificate authority, client access server (e.g., ADCS), or the Workspace ONE UEM connection to client access server.
c Ensure the permissions of the client access server (e.g., ADCS) Admin Account is applied correctly to the certificate authority and the certificate template.
Certificate Authority Integrations
VMware, Inc. 49
d Ensure the account information is entered correctly in the Workspace ONE UEM configuration.
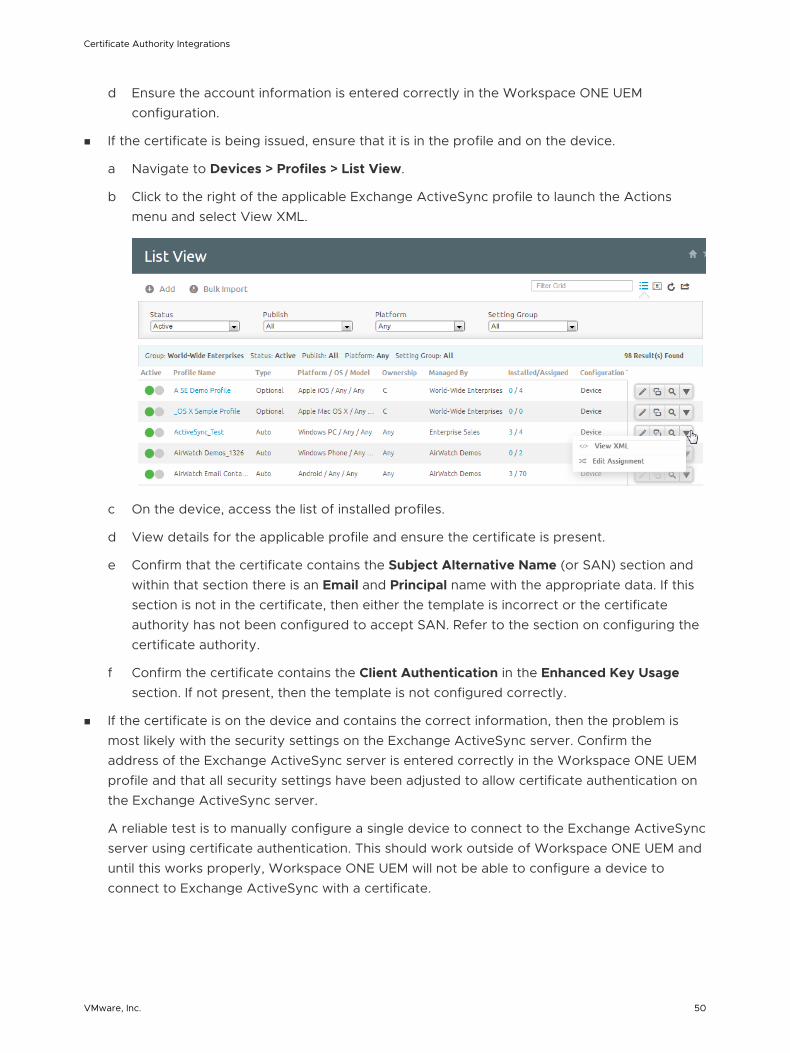
n If the certificate is being issued, ensure that it is in the profile and on the device.
a Navigate to Devices > Profiles > List View.
b Click to the right of the applicable Exchange ActiveSync profile to launch the Actions menu and select View XML.
c On the device, access the list of installed profiles.
d View details for the applicable profile and ensure the certificate is present.
e Confirm that the certificate contains the Subject Alternative Name (or SAN) section and within that section there is an Email and Principal name with the appropriate data. If this section is not in the certificate, then either the template is incorrect or the certificate authority has not been configured to accept SAN. Refer to the section on configuring the certificate authority.
f Confirm the certificate contains the Client Authentication in the Enhanced Key Usage section. If not present, then the template is not configured correctly.
n If the certificate is on the device and contains the correct information, then the problem is most likely with the security settings on the Exchange ActiveSync server. Confirm the address of the Exchange ActiveSync server is entered correctly in the Workspace ONE UEM profile and that all security settings have been adjusted to allow certificate authentication on the Exchange ActiveSync server.
A reliable test is to manually configure a single device to connect to the Exchange ActiveSync server using certificate authentication. This should work outside of Workspace ONE UEM and until this works properly, Workspace ONE UEM will not be able to configure a device to connect to Exchange ActiveSync with a certificate.
Certificate Authority Integrations
VMware, Inc. 50
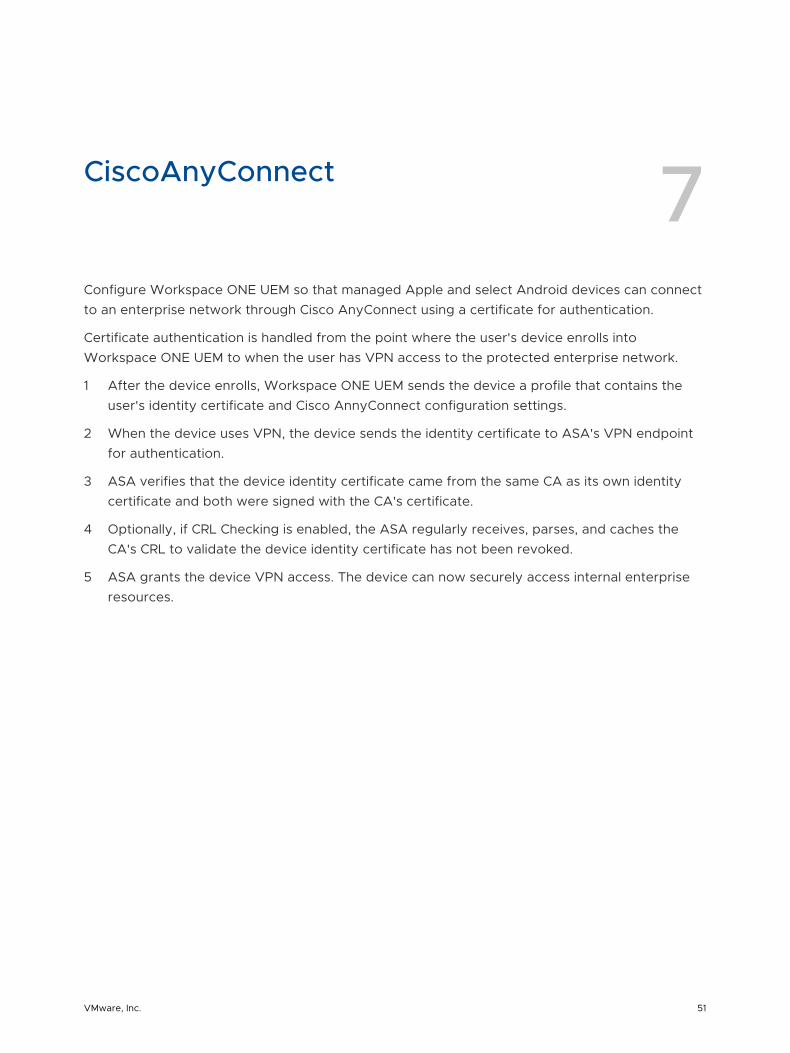
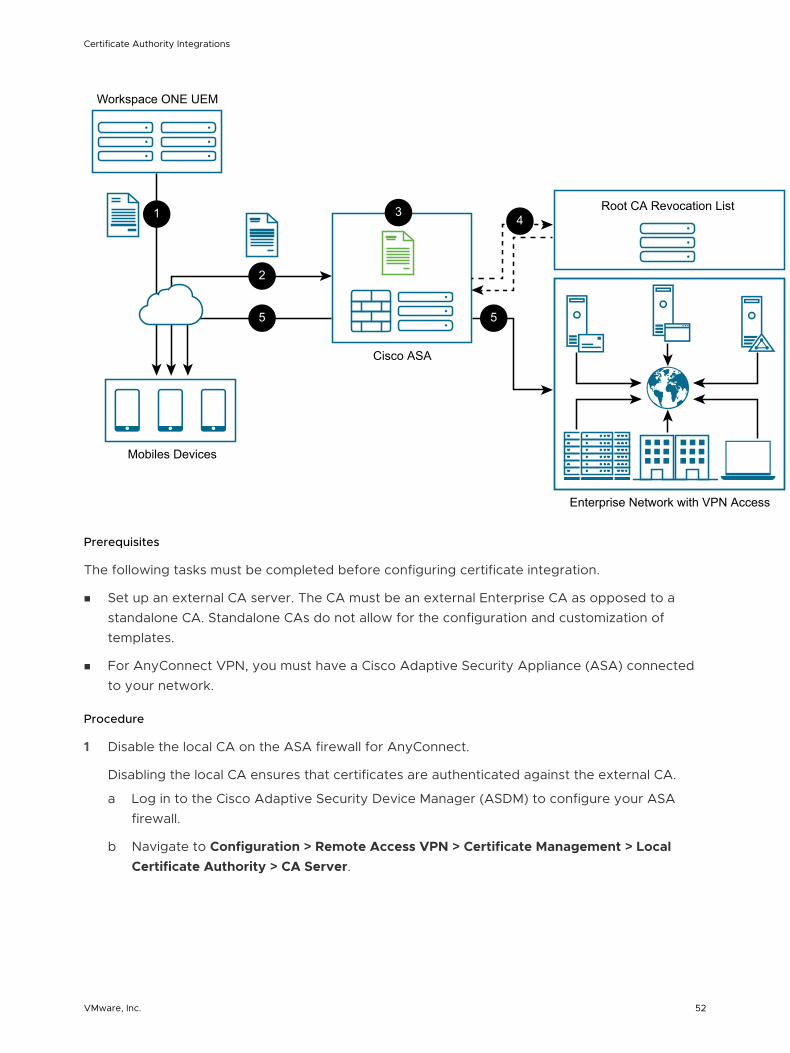
CiscoAnyConnect 7Configure Workspace ONE UEM so that managed Apple and select Android devices can connect to an enterprise network through Cisco AnyConnect using a certificate for authentication.
Certificate authentication is handled from the point where the user's device enrolls into Workspace ONE UEM to when the user has VPN access to the protected enterprise network.
1 After the device enrolls, Workspace ONE UEM sends the device a profile that contains the user's identity certificate and Cisco AnnyConnect configuration settings.
2 When the device uses VPN, the device sends the identity certificate to ASA's VPN endpoint for authentication.
3 ASA verifies that the device identity certificate came from the same CA as its own identity certificate and both were signed with the CA's certificate.
4 Optionally, if CRL Checking is enabled, the ASA regularly receives, parses, and caches the CA's CRL to validate the device identity certificate has not been revoked.
5 ASA grants the device VPN access. The device can now securely access internal enterprise resources.
VMware, Inc. 51
Root CA Revocation List
Cisco ASA
Mobiles Devices
Enterprise Network with VPN Access
Workspace ONE UEM
2
1 4
5 5
3
Prerequisites
The following tasks must be completed before configuring certificate integration.
n Set up an external CA server. The CA must be an external Enterprise CA as opposed to a standalone CA. Standalone CAs do not allow for the configuration and customization of templates.
n For AnyConnect VPN, you must have a Cisco Adaptive Security Appliance (ASA) connected to your network.
Procedure
1 Disable the local CA on the ASA firewall for AnyConnect.
Disabling the local CA ensures that certificates are authenticated against the external CA.
a Log in to the Cisco Adaptive Security Device Manager (ASDM) to configure your ASA firewall.
b Navigate to Configuration > Remote Access VPN > Certificate Management > Local Certificate Authority > CA Server.
Certificate Authority Integrations
VMware, Inc. 52
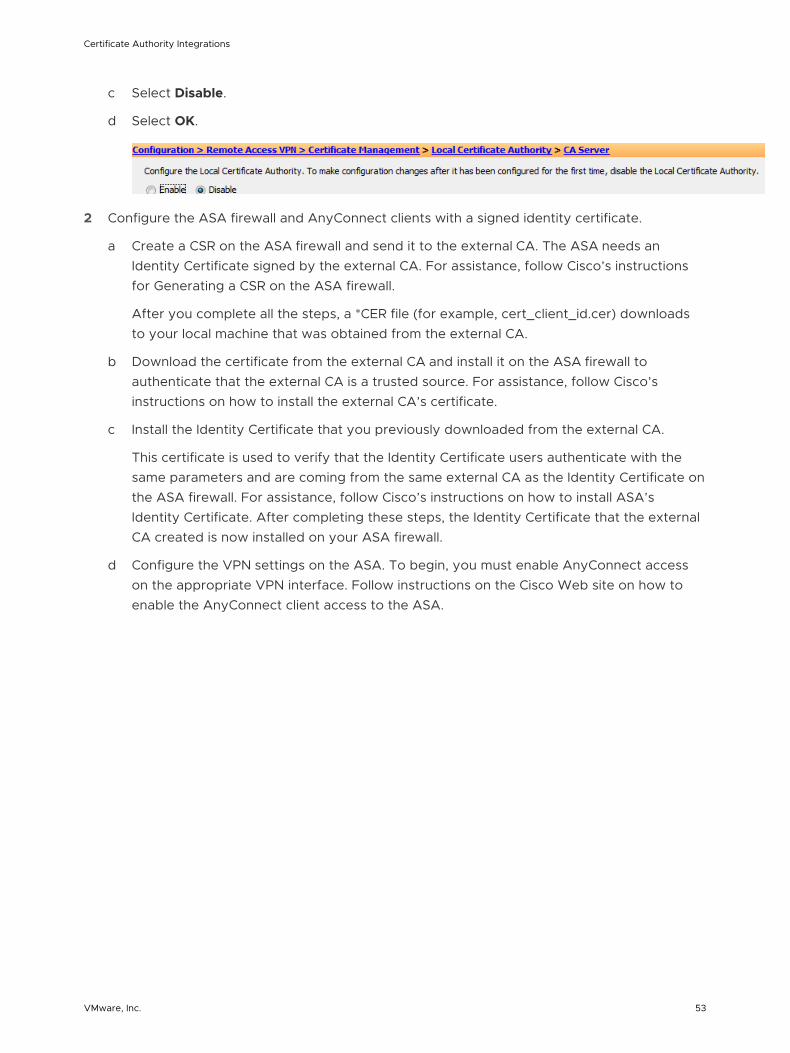
c Select Disable.
d Select OK.
2 Configure the ASA firewall and AnyConnect clients with a signed identity certificate.
a Create a CSR on the ASA firewall and send it to the external CA. The ASA needs an Identity Certificate signed by the external CA. For assistance, follow Cisco’s instructions for Generating a CSR on the ASA firewall.
After you complete all the steps, a *CER file (for example, cert_client_id.cer) downloads to your local machine that was obtained from the external CA.
b Download the certificate from the external CA and install it on the ASA firewall to authenticate that the external CA is a trusted source. For assistance, follow Cisco’s instructions on how to install the external CA’s certificate.
c Install the Identity Certificate that you previously downloaded from the external CA.
This certificate is used to verify that the Identity Certificate users authenticate with the same parameters and are coming from the same external CA as the Identity Certificate on the ASA firewall. For assistance, follow Cisco’s instructions on how to install ASA’s Identity Certificate. After completing these steps, the Identity Certificate that the external CA created is now installed on your ASA firewall.
d Configure the VPN settings on the ASA. To begin, you must enable AnyConnect access on the appropriate VPN interface. Follow instructions on the Cisco Web site on how to enable the AnyConnect client access to the ASA.
Certificate Authority Integrations
VMware, Inc. 53
e Specify the group policy that is applied to AnyConnect clients and devices that connect to SSL VPN through the ASA firewall. Follow instructions on the Cisco Web site on how to create a SSL VPN Group Policy that is used by the ASA firewall.
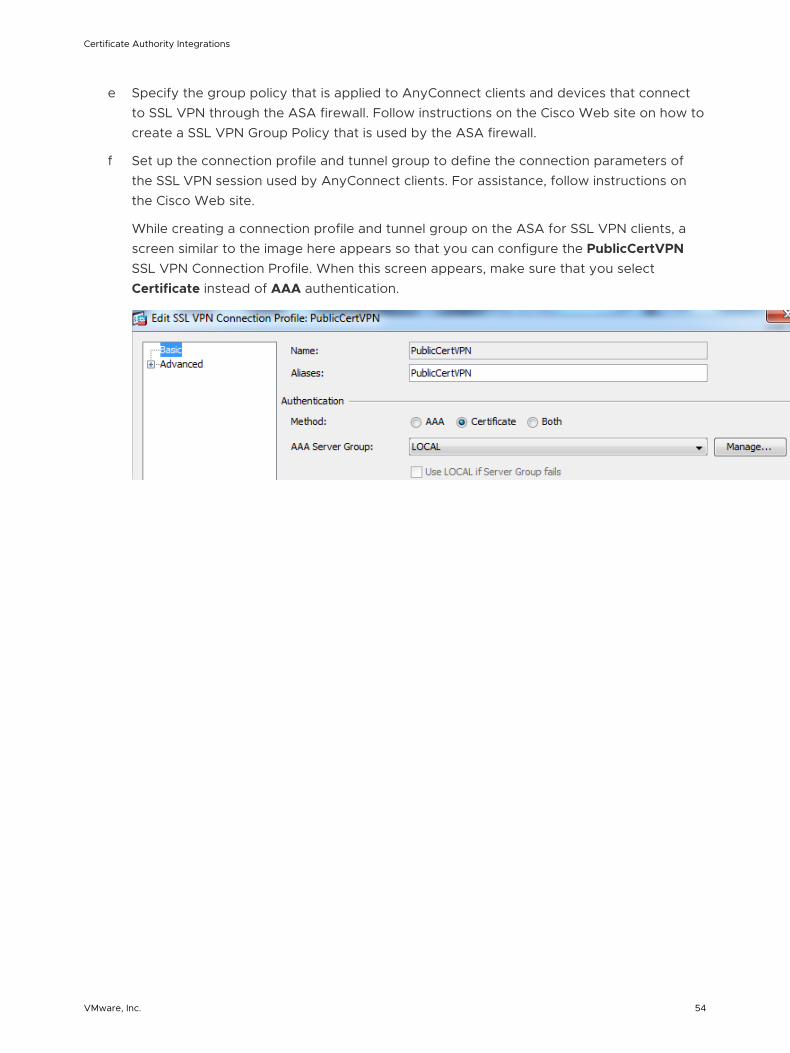
f Set up the connection profile and tunnel group to define the connection parameters of the SSL VPN session used by AnyConnect clients. For assistance, follow instructions on the Cisco Web site.
While creating a connection profile and tunnel group on the ASA for SSL VPN clients, a screen similar to the image here appears so that you can configure the PublicCertVPN SSL VPN Connection Profile. When this screen appears, make sure that you select Certificate instead of AAA authentication.
Certificate Authority Integrations
VMware, Inc. 54
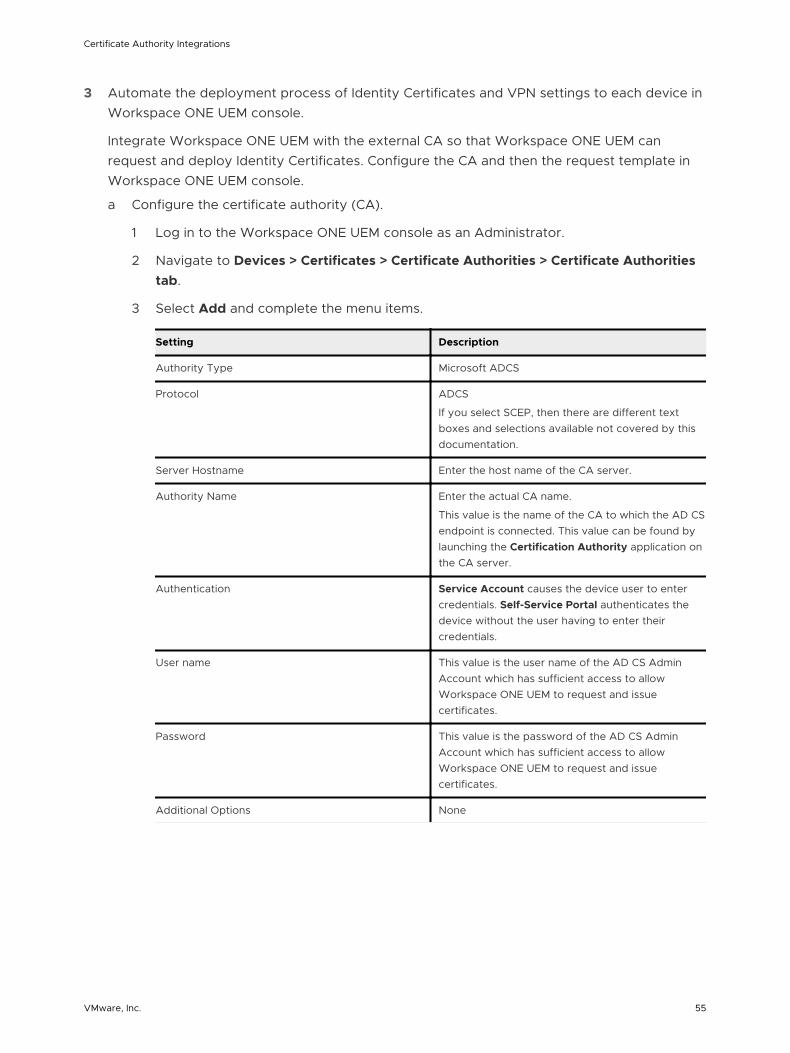
3 Automate the deployment process of Identity Certificates and VPN settings to each device in Workspace ONE UEM console.
Integrate Workspace ONE UEM with the external CA so that Workspace ONE UEM can request and deploy Identity Certificates. Configure the CA and then the request template in Workspace ONE UEM console.
a Configure the certificate authority (CA).
1 Log in to the Workspace ONE UEM console as an Administrator.
2 Navigate to Devices > Certificates > Certificate Authorities > Certificate Authorities tab.
3 Select Add and complete the menu items.
Setting Description
Authority Type Microsoft ADCS
Protocol ADCS
If you select SCEP, then there are different text boxes and selections available not covered by this documentation.
Server Hostname Enter the host name of the CA server.
Authority Name Enter the actual CA name.
This value is the name of the CA to which the AD CS endpoint is connected. This value can be found by launching the Certification Authority application on the CA server.
Authentication Service Account causes the device user to enter credentials. Self-Service Portal authenticates the device without the user having to enter their credentials.
User name This value is the user name of the AD CS Admin Account which has sufficient access to allow Workspace ONE UEM to request and issue certificates.
Password This value is the password of the AD CS Admin Account which has sufficient access to allow Workspace ONE UEM to request and issue certificates.
Additional Options None
Certificate Authority Integrations
VMware, Inc. 55
4 Select Save. Next,
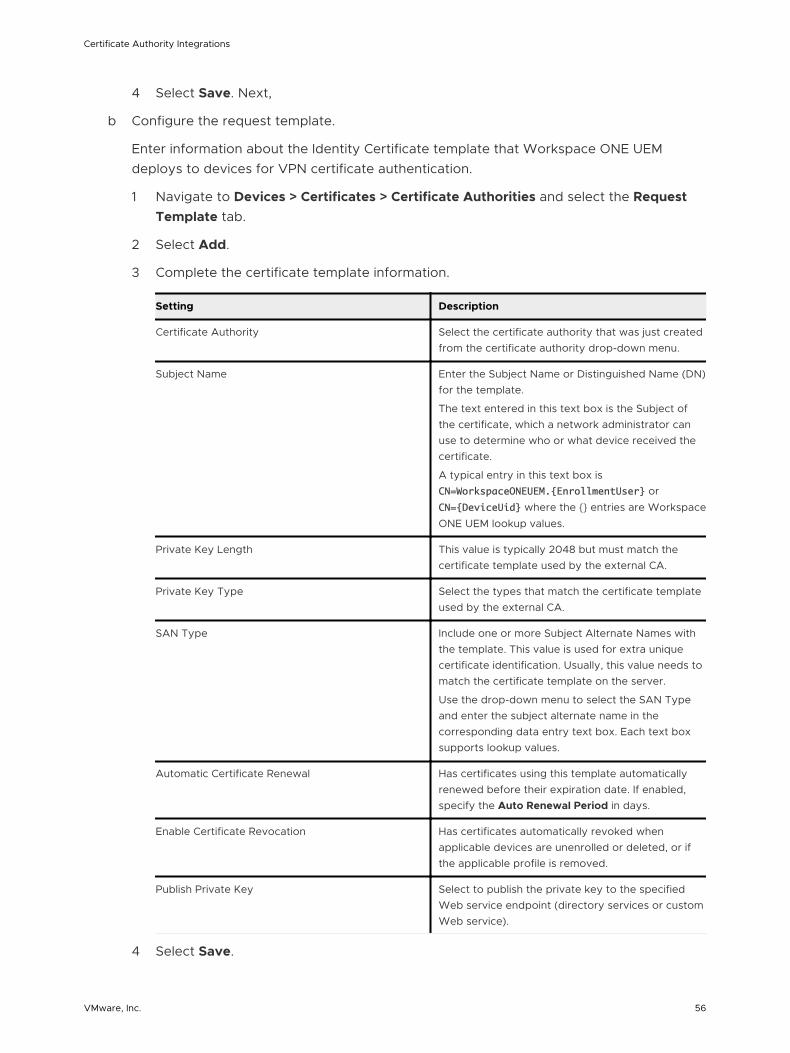
b Configure the request template.
Enter information about the Identity Certificate template that Workspace ONE UEM deploys to devices for VPN certificate authentication.
1 Navigate to Devices > Certificates > Certificate Authorities and select the Request Template tab.
2 Select Add.
3 Complete the certificate template information.
Setting Description
Certificate Authority Select the certificate authority that was just created from the certificate authority drop-down menu.
Subject Name Enter the Subject Name or Distinguished Name (DN) for the template.
The text entered in this text box is the Subject of the certificate, which a network administrator can use to determine who or what device received the certificate.
A typical entry in this text box is CN=WorkspaceONEUEM.{EnrollmentUser} or CN={DeviceUid} where the {} entries are Workspace ONE UEM lookup values.
Private Key Length This value is typically 2048 but must match the certificate template used by the external CA.
Private Key Type Select the types that match the certificate template used by the external CA.
SAN Type Include one or more Subject Alternate Names with the template. This value is used for extra unique certificate identification. Usually, this value needs to match the certificate template on the server.
Use the drop-down menu to select the SAN Type and enter the subject alternate name in the corresponding data entry text box. Each text box supports lookup values.
Automatic Certificate Renewal Has certificates using this template automatically renewed before their expiration date. If enabled, specify the Auto Renewal Period in days.
Enable Certificate Revocation Has certificates automatically revoked when applicable devices are unenrolled or deleted, or if the applicable profile is removed.
Publish Private Key Select to publish the private key to the specified Web service endpoint (directory services or custom Web service).
4 Select Save.
Certificate Authority Integrations
VMware, Inc. 56
4 Deploy a device profile from Workspace ONE UEM console with AnyConnect VPN and Certificate payloads to devices.
This device profile deploys an Identity Certificate and AnyConnect VPN settings to configure all assigned devices.
a Navigate to Devices > Profiles > List View from the Workspace ONE UEM console main menu.
b Select Add.
c Select the applicable device platform to open the Add a New Profile screen.
d Configure the General settings for the profile. The General settings determine how the profile is deployed and who receives it and other overall settings.
e Select Credentials from the profile options at left and then select Configure.
f Select Defined Certificate Authority from the Credential Source drop-down menu.
g Select the external CA created previously from the Certificate Authority drop-down menu.
h Select the certificate template created previously from the Certificate Template drop-down menu.
i Select VPN from the profile options at left and then select Configure.
Credentials profile settings must be configured before the VPN profile settings because the VPN configuration refers to the Credential that was created in the previous step. Also, some of the configuration settings described here are not applicable to all device platforms.
Certificate Authority Integrations
VMware, Inc. 57
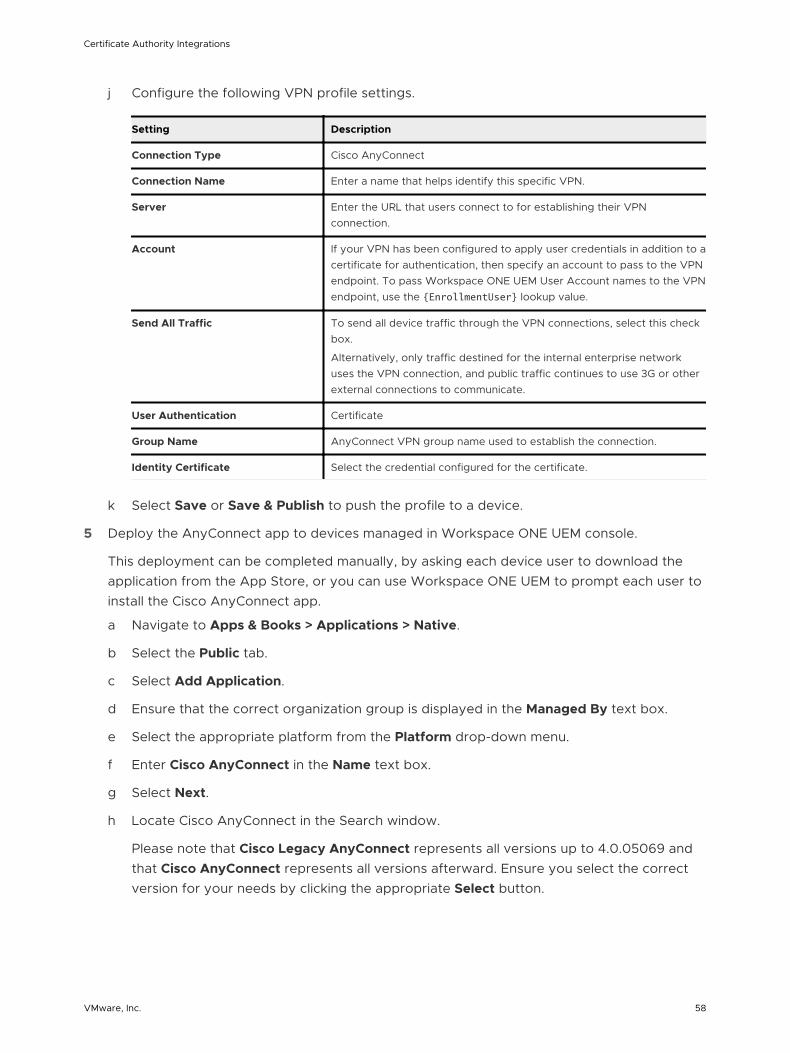
j Configure the following VPN profile settings.
Setting Description
Connection Type Cisco AnyConnect
Connection Name Enter a name that helps identify this specific VPN.
Server Enter the URL that users connect to for establishing their VPN connection.
Account If your VPN has been configured to apply user credentials in addition to a certificate for authentication, then specify an account to pass to the VPN endpoint. To pass Workspace ONE UEM User Account names to the VPN endpoint, use the {EnrollmentUser} lookup value.
Send All Traffic To send all device traffic through the VPN connections, select this check box.
Alternatively, only traffic destined for the internal enterprise network uses the VPN connection, and public traffic continues to use 3G or other external connections to communicate.
User Authentication Certificate
Group Name AnyConnect VPN group name used to establish the connection.
Identity Certificate Select the credential configured for the certificate.
k Select Save or Save & Publish to push the profile to a device.
5 Deploy the AnyConnect app to devices managed in Workspace ONE UEM console.
This deployment can be completed manually, by asking each device user to download the application from the App Store, or you can use Workspace ONE UEM to prompt each user to install the Cisco AnyConnect app.
a Navigate to Apps & Books > Applications > Native.
b Select the Public tab.
c Select Add Application.
d Ensure that the correct organization group is displayed in the Managed By text box.
e Select the appropriate platform from the Platform drop-down menu.
f Enter Cisco AnyConnect in the Name text box.
g Select Next.
h Locate Cisco AnyConnect in the Search window.
Please note that Cisco Legacy AnyConnect represents all versions up to 4.0.05069 and that Cisco AnyConnect represents all versions afterward. Ensure you select the correct version for your needs by clicking the appropriate Select button.
Certificate Authority Integrations
VMware, Inc. 58
i All required configuration settings populate automatically in the Add Application window. Specify any additional parameters.
j Select Save & Publish.
What to do next
Review some tips and troubleshooting steps to help with the integration.
n You can confirm that the VPN certificate is operational by pushing a profile to the device. Then, test whether or not the device can connect and sync to the configured ASA firewall.
n If the device is not connecting, it may show a message that the certificate cannot be authenticated or the account cannot connect to the ASA firewall. In this case, there is a problem in the configuration.
n Make sure that a certificate is issued by the external CA to the device by checking the following information:
n Go to the external CA’s server, start the certification authority application, and browse to the “issued certificates” section.
n Find the last certificate that was issued. Ensure it has a subject that matches the one created in the certificate template section earlier in this documentation.
If there is no certificate, then there is an issue with the external CA, client access server (for example, ADCS), or with the Workspace ONE UEM connection to the client access server.
n Check that the permissions of the client access server (for example, ADCS) Admin Account are applied correctly to the external CA and the template on the external CA.
n Check that the account information is entered correctly in the Workspace ONE UEM configuration.
n If the certificate is being issued, make sure that it is in the Profile payload and on the device.
n Navigate to Devices > Profiles > List View. In the Device Profiles screen for the user’s device, select Actions and then, select </ > View XML to view the profile XML. There is certificate information that appears as a large section of text in the payload.
n On the device, go to the profiles list, select details, and see if the certificate is present.
n If the certificate is on the device and contains the correct information, then the problem is most likely with the security settings on the ASA firewall.
Confirm that the address of the VPN endpoint is correct in the Workspace ONE UEM profile. Also confirm that all the security settings have been adjusted for allowing certificate authentication on the firewall.
n A good test to run is to configure a single device to connect to AnyConnect VPN using certificate authentication. Ensure this test works outside of Workspace ONE UEM, as until this works properly, Workspace ONE UEM is not able to configure a device to connect to AnyConnect VPN with a certificate.
Certificate Authority Integrations
VMware, Inc. 59
Cisco IPSec VPN 8Configure Workspace ONE UEM so that managed Apple and select Android devices can connect to an enterprise network through Cisco IPsec using a certificate for authentication.
Certificate authentication is handled from the point where the user's device enrolls into Workspace ONE UEM to when the user has VPN access to the protected enterprise network.
1 After the device enrolls, Workspace ONE UEM sends the device a profile that contains the user's identity certificate and Cisco IPSec VPN configuration settings.
2 When the device uses VPN, the device sends the identity certificate to ASA's VPN endpoint for authentication.
3 ASA verifies that the device identity certificate came from the same CA as its own identity certificate and both were signed with the CA's certificate.
4 Optionally, if CRL Checking is enabled, the ASA regularly receives, parses, and caches the CA's CRL to validate the device identity certificate has not been revoked.
5 ASA grants the device VPN access. The device can now securely access internal enterprise resources.
VMware, Inc. 60
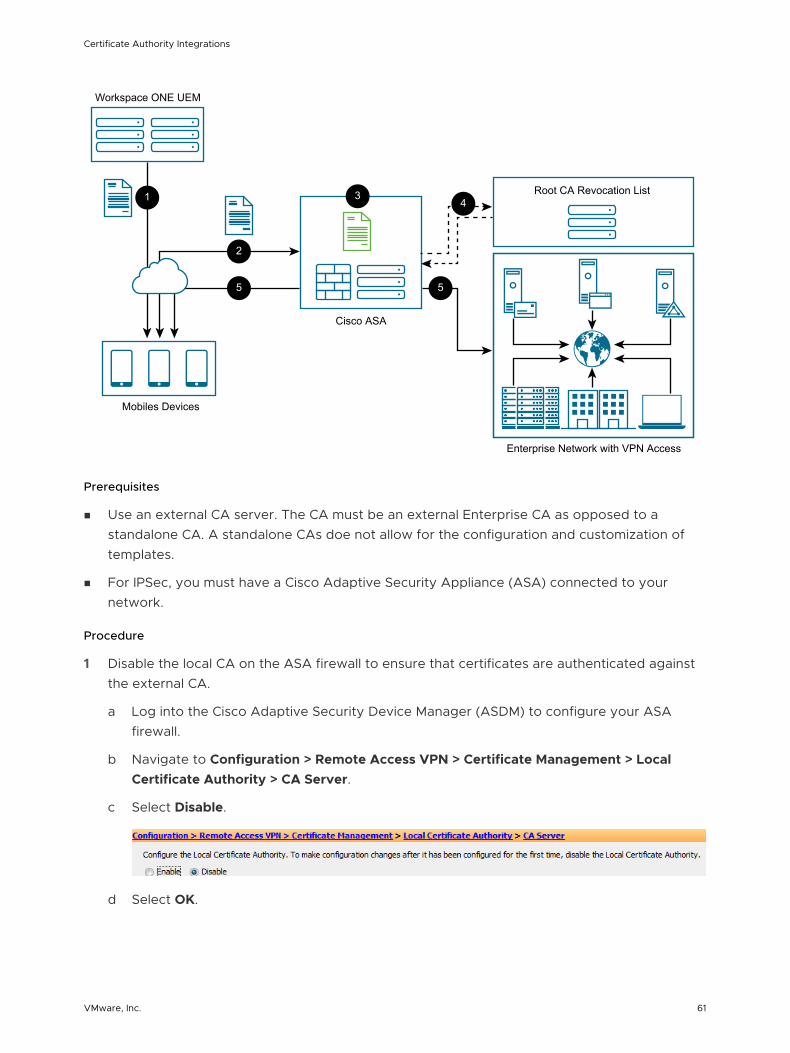
Root CA Revocation List
Cisco ASA
Mobiles Devices
Enterprise Network with VPN Access
Workspace ONE UEM
2
1 4
5 5
3
Prerequisites
n Use an external CA server. The CA must be an external Enterprise CA as opposed to a standalone CA. A standalone CAs doe not allow for the configuration and customization of templates.
n For IPSec, you must have a Cisco Adaptive Security Appliance (ASA) connected to your network.
Procedure
1 Disable the local CA on the ASA firewall to ensure that certificates are authenticated against the external CA.
a Log into the Cisco Adaptive Security Device Manager (ASDM) to configure your ASA firewall.
b Navigate to Configuration > Remote Access VPN > Certificate Management > Local Certificate Authority > CA Server.
c Select Disable.
d Select OK.
Certificate Authority Integrations
VMware, Inc. 61
2 Configure IPsec VPN.
a Create a CSR on the ASA firewall and send it to the external CA. This is because the ASA needs an Identity Certificate signed by the external CA. For assistance, follow Cisco’s instructions for Generating a CSR on the ASA firewall.
After you have completed all the steps, a CER file (for example, cert_client_id.cer) downloads to your local machine that was obtained from the external CA.
b Download the certificate from the external CA and install it on the ASA firewall to authenticate that the external CA is a trusted source.
Follow Cisco’s instructions on how to install the external CA’s certificate.
c Configure the IKE policies, tunnel properties and policies, group policies, available VPN client IP addresses (pool), user accounts and group assignments, and associate these configurations to create an IPSec profile used by the VPN clients.
Visit the Cisco website for instructions on creating a remote access connection profile and tunnel group on the ASA for IPSec VPN clients. Complete the steps necessary to configure the external CA and ASA firewall to create a trust using certificates and configure a remote access connection profile and tunnel group so that IPSec VPN certificate authentication can be used by your VPN clients to gain access into your enterprise network.
Certificate Authority Integrations
VMware, Inc. 62
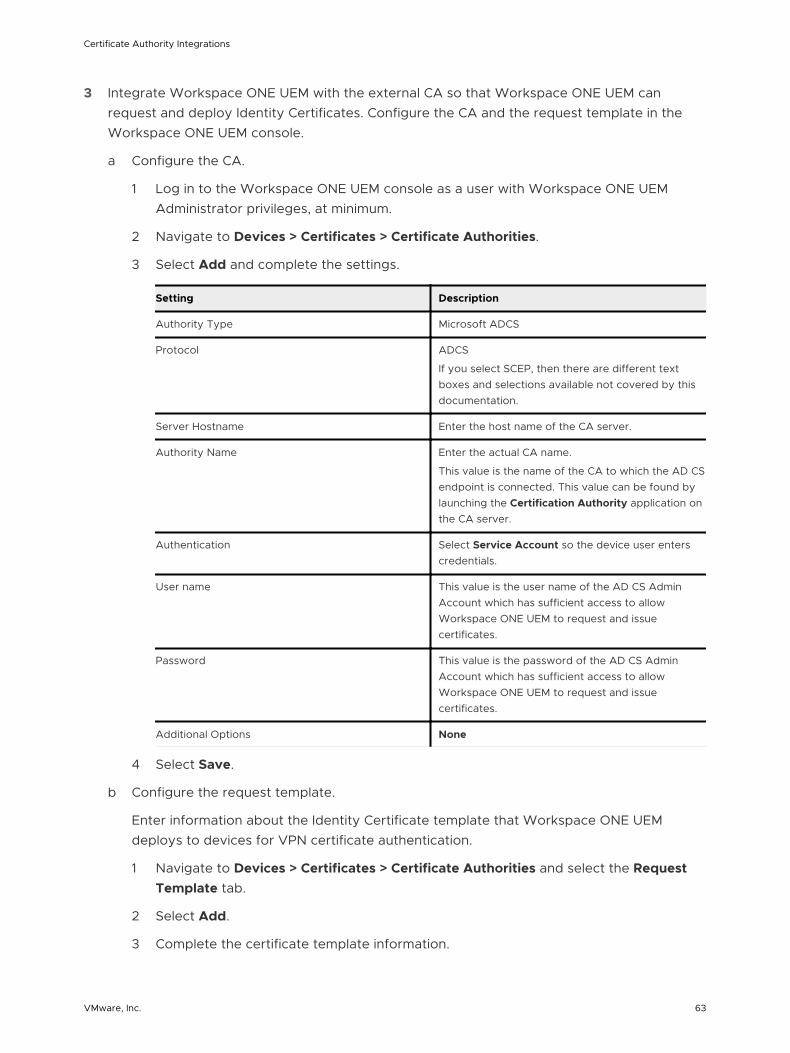
3 Integrate Workspace ONE UEM with the external CA so that Workspace ONE UEM can request and deploy Identity Certificates. Configure the CA and the request template in the Workspace ONE UEM console.
a Configure the CA.
1 Log in to the Workspace ONE UEM console as a user with Workspace ONE UEM Administrator privileges, at minimum.
2 Navigate to Devices > Certificates > Certificate Authorities.
3 Select Add and complete the settings.
Setting Description
Authority Type Microsoft ADCS
Protocol ADCS
If you select SCEP, then there are different text boxes and selections available not covered by this documentation.
Server Hostname Enter the host name of the CA server.
Authority Name Enter the actual CA name.
This value is the name of the CA to which the AD CS endpoint is connected. This value can be found by launching the Certification Authority application on the CA server.
Authentication Select Service Account so the device user enters credentials.
User name This value is the user name of the AD CS Admin Account which has sufficient access to allow Workspace ONE UEM to request and issue certificates.
Password This value is the password of the AD CS Admin Account which has sufficient access to allow Workspace ONE UEM to request and issue certificates.
Additional Options None
4 Select Save.
b Configure the request template.
Enter information about the Identity Certificate template that Workspace ONE UEM deploys to devices for VPN certificate authentication.
1 Navigate to Devices > Certificates > Certificate Authorities and select the Request Template tab.
2 Select Add.
3 Complete the certificate template information.
Certificate Authority Integrations
VMware, Inc. 63
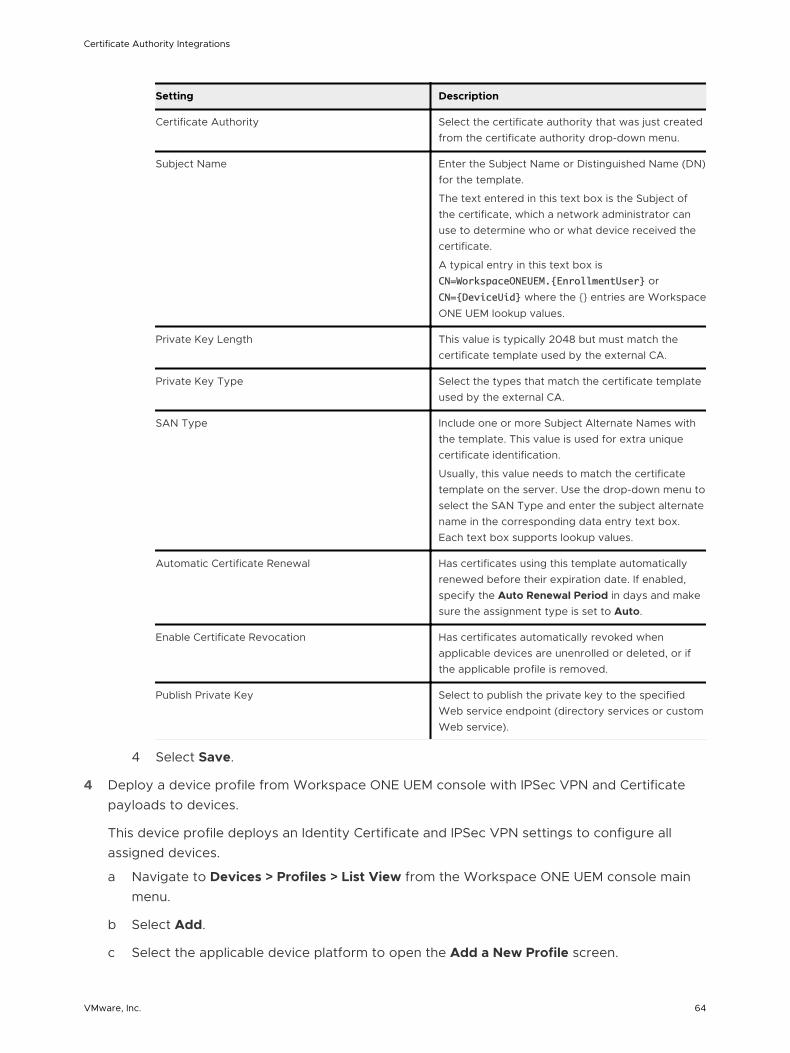
Setting Description
Certificate Authority Select the certificate authority that was just created from the certificate authority drop-down menu.
Subject Name Enter the Subject Name or Distinguished Name (DN) for the template.
The text entered in this text box is the Subject of the certificate, which a network administrator can use to determine who or what device received the certificate.
A typical entry in this text box is CN=WorkspaceONEUEM.{EnrollmentUser} or CN={DeviceUid} where the {} entries are Workspace ONE UEM lookup values.
Private Key Length This value is typically 2048 but must match the certificate template used by the external CA.
Private Key Type Select the types that match the certificate template used by the external CA.
SAN Type Include one or more Subject Alternate Names with the template. This value is used for extra unique certificate identification.
Usually, this value needs to match the certificate template on the server. Use the drop-down menu to select the SAN Type and enter the subject alternate name in the corresponding data entry text box. Each text box supports lookup values.
Automatic Certificate Renewal Has certificates using this template automatically renewed before their expiration date. If enabled, specify the Auto Renewal Period in days and make sure the assignment type is set to Auto.
Enable Certificate Revocation Has certificates automatically revoked when applicable devices are unenrolled or deleted, or if the applicable profile is removed.
Publish Private Key Select to publish the private key to the specified Web service endpoint (directory services or custom Web service).
4 Select Save.
4 Deploy a device profile from Workspace ONE UEM console with IPSec VPN and Certificate payloads to devices.
This device profile deploys an Identity Certificate and IPSec VPN settings to configure all assigned devices.
a Navigate to Devices > Profiles > List View from the Workspace ONE UEM console main menu.
b Select Add.
c Select the applicable device platform to open the Add a New Profile screen.
Certificate Authority Integrations
VMware, Inc. 64
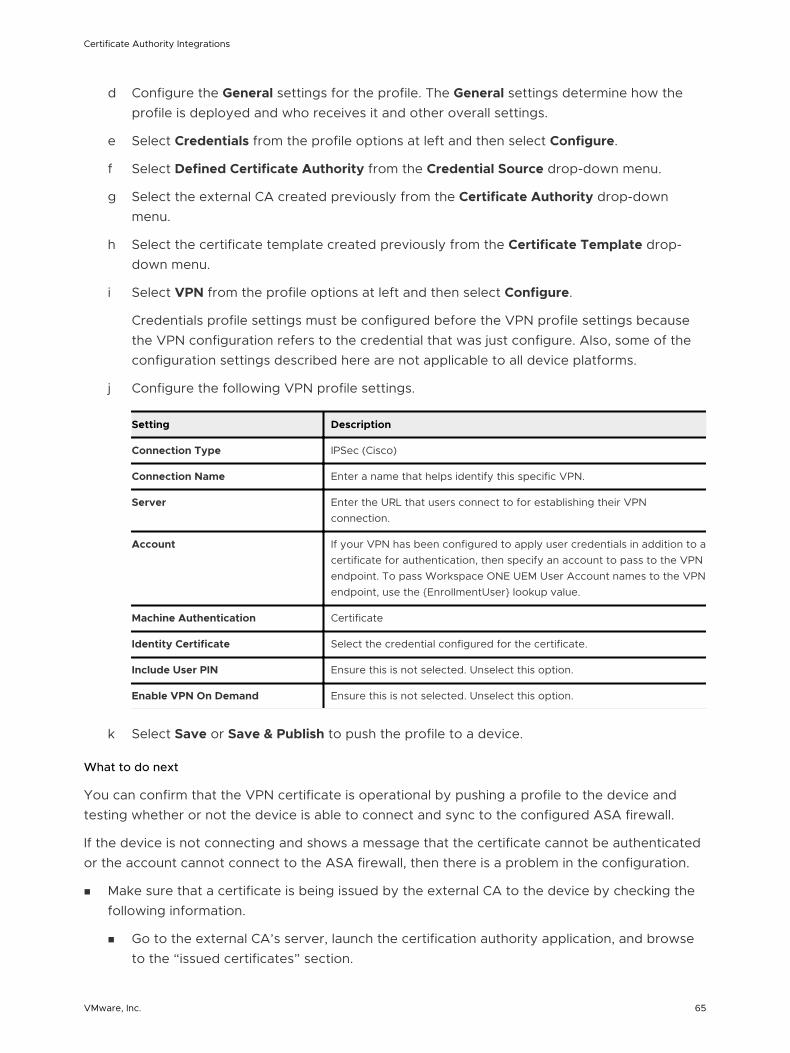
d Configure the General settings for the profile. The General settings determine how the profile is deployed and who receives it and other overall settings.
e Select Credentials from the profile options at left and then select Configure.
f Select Defined Certificate Authority from the Credential Source drop-down menu.
g Select the external CA created previously from the Certificate Authority drop-down menu.
h Select the certificate template created previously from the Certificate Template drop-down menu.
i Select VPN from the profile options at left and then select Configure.
Credentials profile settings must be configured before the VPN profile settings because the VPN configuration refers to the credential that was just configure. Also, some of the configuration settings described here are not applicable to all device platforms.
j Configure the following VPN profile settings.
Setting Description
Connection Type IPSec (Cisco)
Connection Name Enter a name that helps identify this specific VPN.
Server Enter the URL that users connect to for establishing their VPN connection.
Account If your VPN has been configured to apply user credentials in addition to a certificate for authentication, then specify an account to pass to the VPN endpoint. To pass Workspace ONE UEM User Account names to the VPN endpoint, use the {EnrollmentUser} lookup value.
Machine Authentication Certificate
Identity Certificate Select the credential configured for the certificate.
Include User PIN Ensure this is not selected. Unselect this option.
Enable VPN On Demand Ensure this is not selected. Unselect this option.
k Select Save or Save & Publish to push the profile to a device.
What to do next
You can confirm that the VPN certificate is operational by pushing a profile to the device and testing whether or not the device is able to connect and sync to the configured ASA firewall.
If the device is not connecting and shows a message that the certificate cannot be authenticated or the account cannot connect to the ASA firewall, then there is a problem in the configuration.
n Make sure that a certificate is being issued by the external CA to the device by checking the following information.
n Go to the external CA’s server, launch the certification authority application, and browse to the “issued certificates” section.
Certificate Authority Integrations
VMware, Inc. 65
n Find the last certificate that was issued and it should have a subject that matches the one created in the certificate template section earlier in this documentation.
If there is no certificate then there is an issue with the external CA, client access server (e.g., ADCS), or with the Workspace ONE UEM connection to the client access server.
n Check that the permissions of the client access server (e.g., ADCS) Admin Account are applied correctly to the external CA and the template on the external CA.
n Check that the account information is entered correctly in the Workspace ONE UEM configuration.
n If the certificate is being issued, make sure that it is in the Profile payload and on the device.
n Navigate to Devices > Profiles > List View. In the Device Profiles screen for the user’s device, select Actions and then, select </ > View XML to view the profile XML. There is certificate information that appears as a large section of text in the payload.
n On the device, go to the profiles list, select details and see if the certificate is present.
n If the certificate is on the device and contains the correct information, then the problem is most likely with the security settings on the ASA firewall.
Confirm that the address of the VPN endpoint is correct in the Workspace ONE UEM profile and that all the security settings have been adjusted for allowing certificate authentication on the firewall.
n A very good test to run is to manually configure a single device to connect to IPSec VPN using certificate authentication. This should work outside of Workspace ONE UEM and until this works properly, Workspace ONE UEM will not be able to configure a device to connect to IPSec VPN with a certificate.
Certificate Authority Integrations
VMware, Inc. 66

SCEP 9Workspace ONE UEM supports SCEP (Simple Certificate Enrollment Protocol) for iOS and macOS devices. The integration includes the use of key pairs and the submission of the certificate signing request (CSR) that results in a signed certificate from the SCEP endpoint to devices.
If you’re looking to leverage certificates as part of your mobile deployment, SCEP allows you to securely deploy certificate enrollment requests to iOS devices, even when Workspace ONE UEM does not natively support your PKI infrastructure of choice.
Workspace ONE UEM provisions the device with the parameters to generate the key pair and submit the CSR to the SCEP endpoint. The SCEP endpoint returns a signed certificate back to the mobile device. The device manages the certificate and its private key. The benefit to SCEP is that the private key never leaves the mobile device.
Device enrolls with UEM
Device generates
the key pair
3
2
4 5
6
7
1
Device communicates
directly with SCEP Endpoint
UEM delivers the SCEP Profile you created
SCEP EndpointMobile
Device
Internal CA
SCEP Endpoint sends signed cert
to the device
Workspace ONE UEM Server
CA generates certificate and
returns it to SCEP Endpoint
SCEP Endpoint requests CA to
generate a certificate for the device
Prerequisites
n Workspace ONE UEM 9.5 or later
n iOS 5.0 or later
VMware, Inc. 67

n macOS 10.9 or later
n CA or SCEP endpoint must support SCEP as per the Internet Engineering Task Force's Simple Certificate Enrollment Protocol draft document.
n SCEP endpoint must be accessible from the device in order for the certificate enrollment to finish.
n The exception to this requirement is when you use the Enable Proxy item in the Certificate Authority - Add/Edit page for non-generic SCEP protocol use.
Note Renewal and revoke are not supported.
Procedure
1 Configure the SCEP CA in the Workspace ONE UEM console.
a Navigate to Devices > Certificates > Certificate Authorities, and select Add.
b Select Generic SCEP from the Authority Type drop-down.
c Enter the information pertaining to your SCEP Endpoint.
Settings Description
Name The friendly name of your certificate authority in Workspace ONE UEM.
Description An optional field that you can use to give details about this defined-CA and its uses.
Authority Type The type of certificate authority being defined in Workspace ONE UEM.
SCEP Provider The type of SCEP provider Workspace ONE UEM is integrating with. Basic is the only option supported currently. (This field cannot be changed.)
SCEP URL The URL the device uses during certificate enrollment.
Challenge Type Allows the admin to choose between static challenge and no challenge.
Static Challenge If static challenge is selected, this is the necessary challenge the device must have in order to get its CSR signed by the CA.
d Select Save.
Certificate Authority Integrations
VMware, Inc. 68
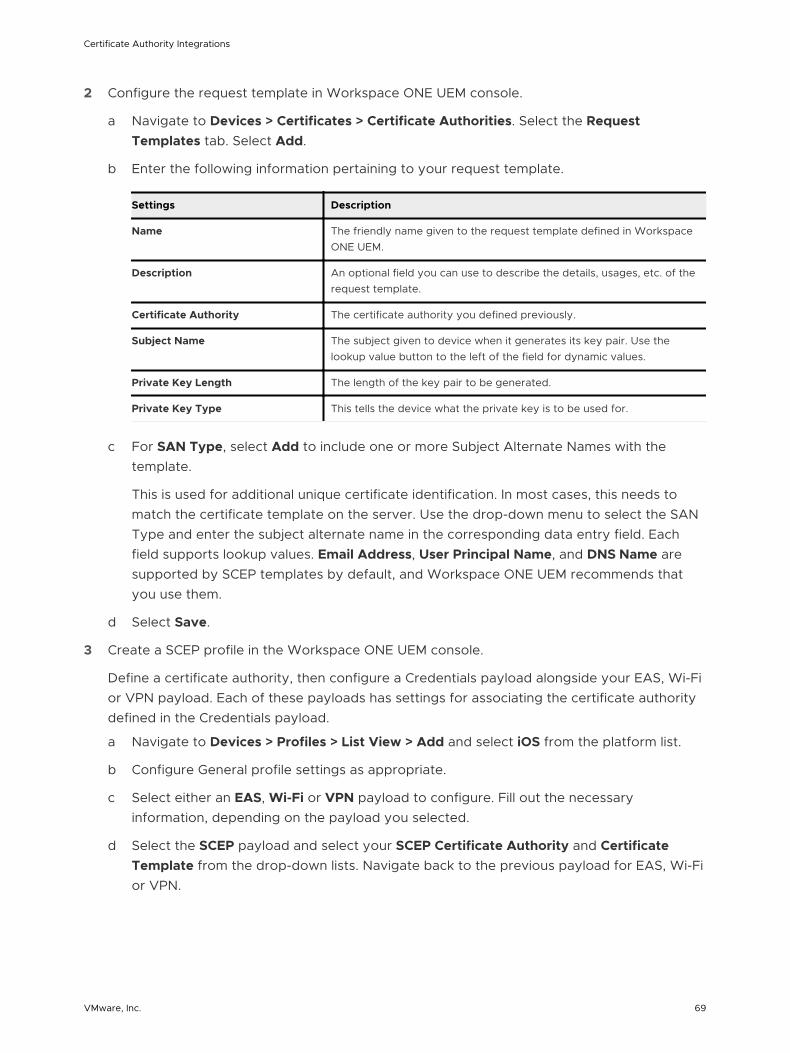
2 Configure the request template in Workspace ONE UEM console.
a Navigate to Devices > Certificates > Certificate Authorities. Select the Request Templates tab. Select Add.
b Enter the following information pertaining to your request template.
Settings Description
Name The friendly name given to the request template defined in Workspace ONE UEM.
Description An optional field you can use to describe the details, usages, etc. of the request template.
Certificate Authority The certificate authority you defined previously.
Subject Name The subject given to device when it generates its key pair. Use the lookup value button to the left of the field for dynamic values.
Private Key Length The length of the key pair to be generated.
Private Key Type This tells the device what the private key is to be used for.
c For SAN Type, select Add to include one or more Subject Alternate Names with the
template.
This is used for additional unique certificate identification. In most cases, this needs to match the certificate template on the server. Use the drop-down menu to select the SAN Type and enter the subject alternate name in the corresponding data entry field. Each field supports lookup values. Email Address, User Principal Name, and DNS Name are supported by SCEP templates by default, and Workspace ONE UEM recommends that you use them.
d Select Save.
3 Create a SCEP profile in the Workspace ONE UEM console.
Define a certificate authority, then configure a Credentials payload alongside your EAS, Wi-Fi or VPN payload. Each of these payloads has settings for associating the certificate authority defined in the Credentials payload.
a Navigate to Devices > Profiles > List View > Add and select iOS from the platform list.
b Configure General profile settings as appropriate.
c Select either an EAS, Wi-Fi or VPN payload to configure. Fill out the necessary information, depending on the payload you selected.
d Select the SCEP payload and select your SCEP Certificate Authority and Certificate Template from the drop-down lists. Navigate back to the previous payload for EAS, Wi-Fi or VPN.
Certificate Authority Integrations
VMware, Inc. 69
e Specify the Identity Certificate in the payload.
n EAS – Select the Payload Certificate under Login Information.
n Wi-Fi – Select a compatible Security Type (WEP Enterprise, WPA/WPA2 Enterprise or Any (Enterprise)) and select the Identity Certificate under Authentication.
n VPN – Select a compatible Connection Type (for example, CISCO AnyConnect, F5 SSL) and select Certificate from the User Authentication drop-down. Select the Identity Certificate.
f Select Save and Publish when you are done configuring any remaining settings.
Certificate Authority Integrations
VMware, Inc. 70
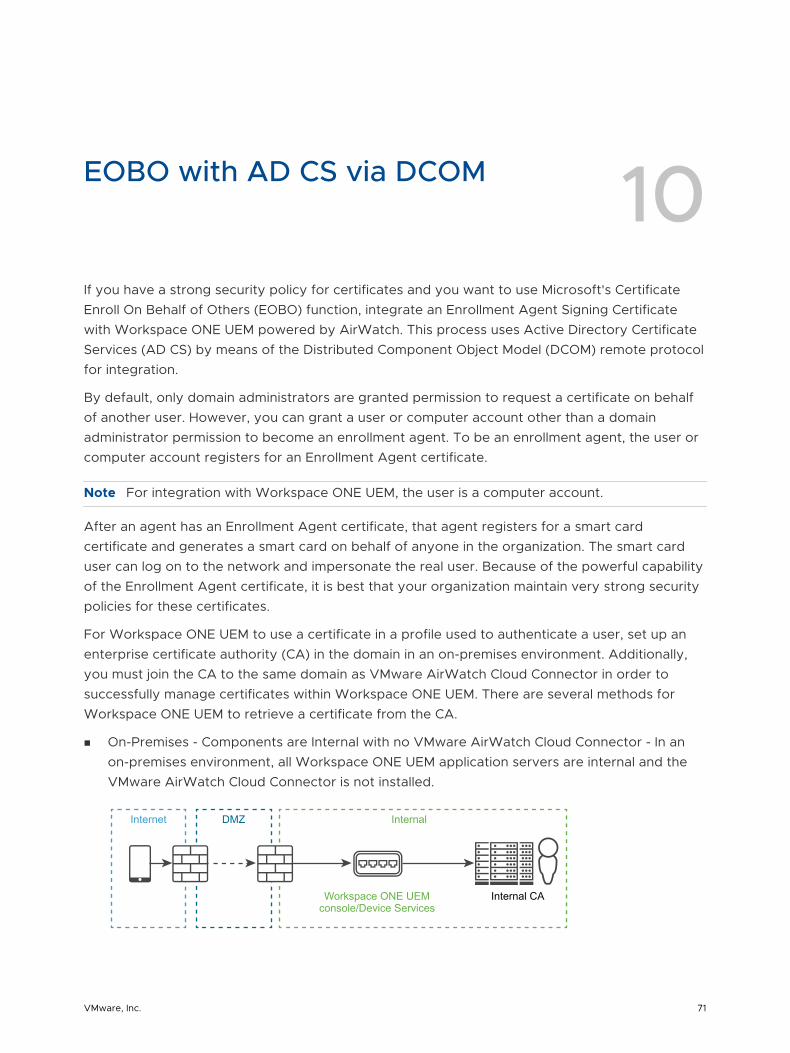
EOBO with AD CS via DCOM 10If you have a strong security policy for certificates and you want to use Microsoft's Certificate Enroll On Behalf of Others (EOBO) function, integrate an Enrollment Agent Signing Certificate with Workspace ONE UEM powered by AirWatch. This process uses Active Directory Certificate Services (AD CS) by means of the Distributed Component Object Model (DCOM) remote protocol for integration.
By default, only domain administrators are granted permission to request a certificate on behalf of another user. However, you can grant a user or computer account other than a domain administrator permission to become an enrollment agent. To be an enrollment agent, the user or computer account registers for an Enrollment Agent certificate.
Note For integration with Workspace ONE UEM, the user is a computer account.
After an agent has an Enrollment Agent certificate, that agent registers for a smart card certificate and generates a smart card on behalf of anyone in the organization. The smart card user can log on to the network and impersonate the real user. Because of the powerful capability of the Enrollment Agent certificate, it is best that your organization maintain very strong security policies for these certificates.
For Workspace ONE UEM to use a certificate in a profile used to authenticate a user, set up an enterprise certificate authority (CA) in the domain in an on-premises environment. Additionally, you must join the CA to the same domain as VMware AirWatch Cloud Connector in order to successfully manage certificates within Workspace ONE UEM. There are several methods for Workspace ONE UEM to retrieve a certificate from the CA.
n On-Premises - Components are Internal with no VMware AirWatch Cloud Connector - In an on-premises environment, all Workspace ONE UEM application servers are internal and the VMware AirWatch Cloud Connector is not installed.
Internet DMZ Internal
Internal CAWorkspace ONE UEMconsole/Device Services
VMware, Inc. 71
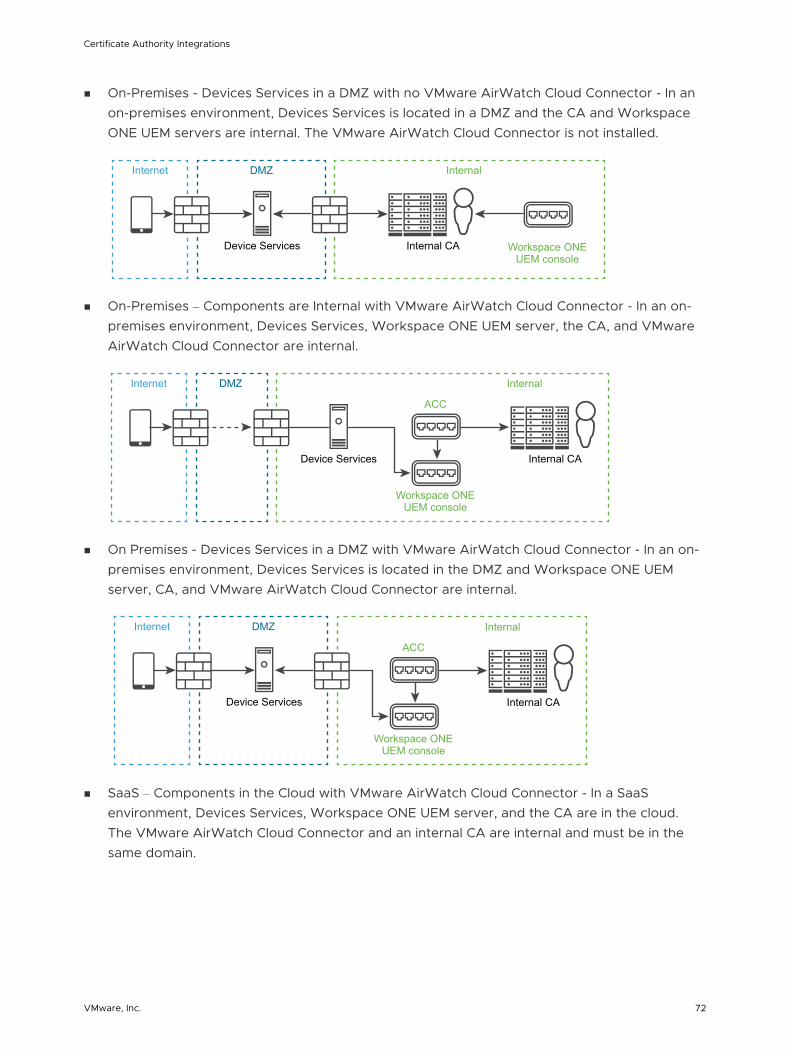
n On-Premises - Devices Services in a DMZ with no VMware AirWatch Cloud Connector - In an on-premises environment, Devices Services is located in a DMZ and the CA and Workspace ONE UEM servers are internal. The VMware AirWatch Cloud Connector is not installed.
Internet DMZ Internal
Internal CA Workspace ONEUEM console
Device Services
n On-Premises ‒ Components are Internal with VMware AirWatch Cloud Connector - In an on-premises environment, Devices Services, Workspace ONE UEM server, the CA, and VMware AirWatch Cloud Connector are internal.
Internet DMZ Internal
Internal CA
Workspace ONEUEM console
Device Services
ACC
n On Premises - Devices Services in a DMZ with VMware AirWatch Cloud Connector - In an on-premises environment, Devices Services is located in the DMZ and Workspace ONE UEM server, CA, and VMware AirWatch Cloud Connector are internal.
Internal
Internal CA
Workspace ONEUEM console
ACC
Internet DMZ
Device Services
n SaaS ‒ Components in the Cloud with VMware AirWatch Cloud Connector - In a SaaS environment, Devices Services, Workspace ONE UEM server, and the CA are in the cloud. The VMware AirWatch Cloud Connector and an internal CA are internal and must be in the same domain.
Certificate Authority Integrations
VMware, Inc. 72
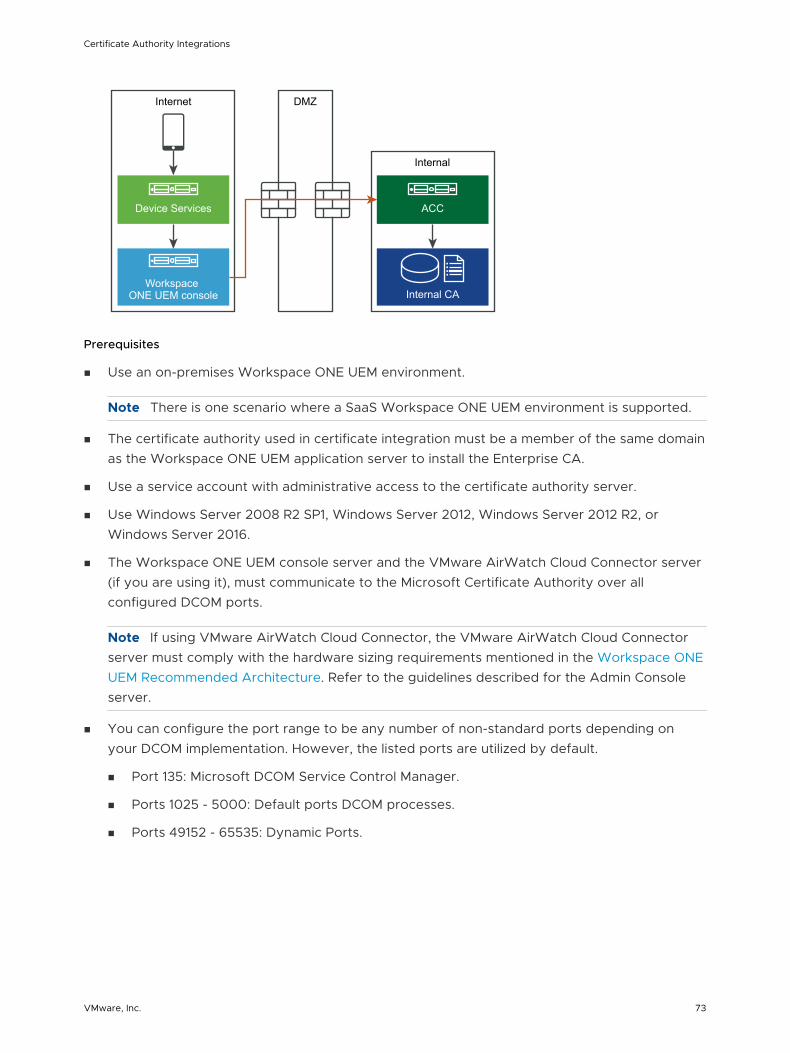
Device Services
Internet DMZ
Workspace ONE UEM console
ACC
Internal
Internal CA
Prerequisites
n Use an on-premises Workspace ONE UEM environment.
Note There is one scenario where a SaaS Workspace ONE UEM environment is supported.
n The certificate authority used in certificate integration must be a member of the same domain as the Workspace ONE UEM application server to install the Enterprise CA.
n Use a service account with administrative access to the certificate authority server.
n Use Windows Server 2008 R2 SP1, Windows Server 2012, Windows Server 2012 R2, or Windows Server 2016.
n The Workspace ONE UEM console server and the VMware AirWatch Cloud Connector server (if you are using it), must communicate to the Microsoft Certificate Authority over all configured DCOM ports.
Note If using VMware AirWatch Cloud Connector, the VMware AirWatch Cloud Connector server must comply with the hardware sizing requirements mentioned in the Workspace ONE UEM Recommended Architecture. Refer to the guidelines described for the Admin Console server.
n You can configure the port range to be any number of non-standard ports depending on your DCOM implementation. However, the listed ports are utilized by default.
n Port 135: Microsoft DCOM Service Control Manager.
n Ports 1025 - 5000: Default ports DCOM processes.
n Ports 49152 - 65535: Dynamic Ports.
Certificate Authority Integrations
VMware, Inc. 73
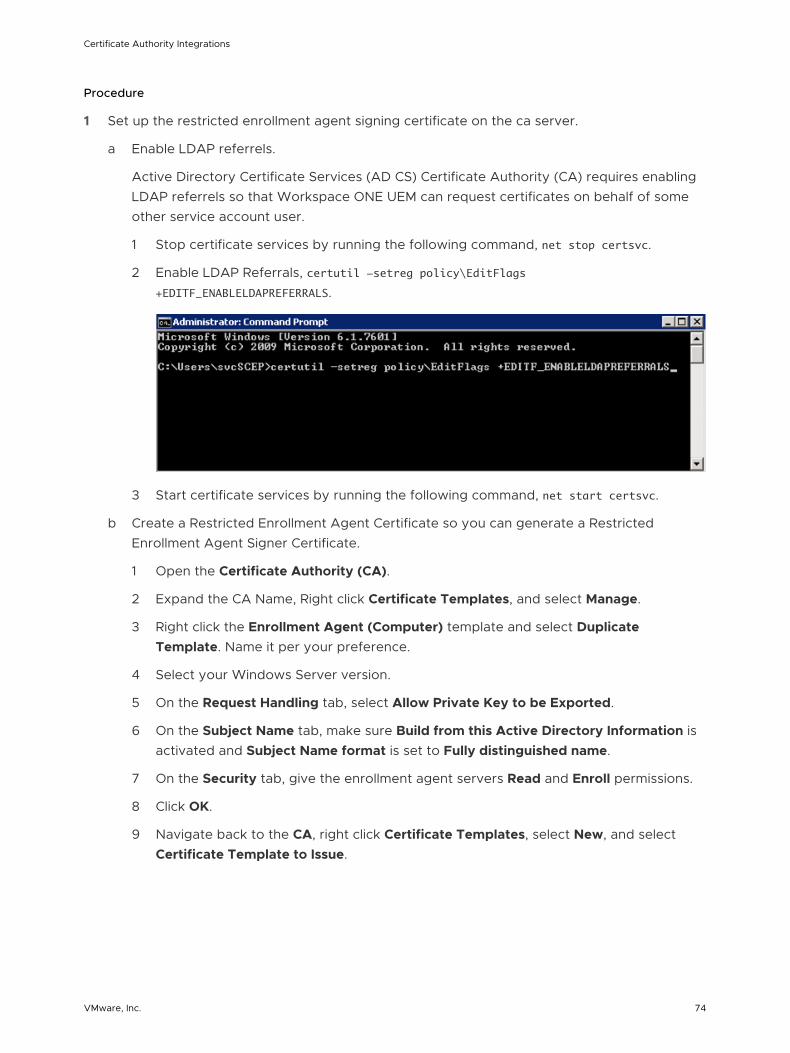
Procedure
1 Set up the restricted enrollment agent signing certificate on the ca server.
a Enable LDAP referrels.
Active Directory Certificate Services (AD CS) Certificate Authority (CA) requires enabling LDAP referrels so that Workspace ONE UEM can request certificates on behalf of some other service account user.
1 Stop certificate services by running the following command, net stop certsvc.
2 Enable LDAP Referrals, certutil -setreg policy\EditFlags +EDITF_ENABLELDAPREFERRALS.
3 Start certificate services by running the following command, net start certsvc.
b Create a Restricted Enrollment Agent Certificate so you can generate a Restricted Enrollment Agent Signer Certificate.
1 Open the Certificate Authority (CA).
2 Expand the CA Name, Right click Certificate Templates, and select Manage.
3 Right click the Enrollment Agent (Computer) template and select Duplicate Template. Name it per your preference.
4 Select your Windows Server version.
5 On the Request Handling tab, select Allow Private Key to be Exported.
6 On the Subject Name tab, make sure Build from this Active Directory Information is activated and Subject Name format is set to Fully distinguished name.
7 On the Security tab, give the enrollment agent servers Read and Enroll permissions.
8 Click OK.
9 Navigate back to the CA, right click Certificate Templates, select New, and select Certificate Template to Issue.
Certificate Authority Integrations
VMware, Inc. 74
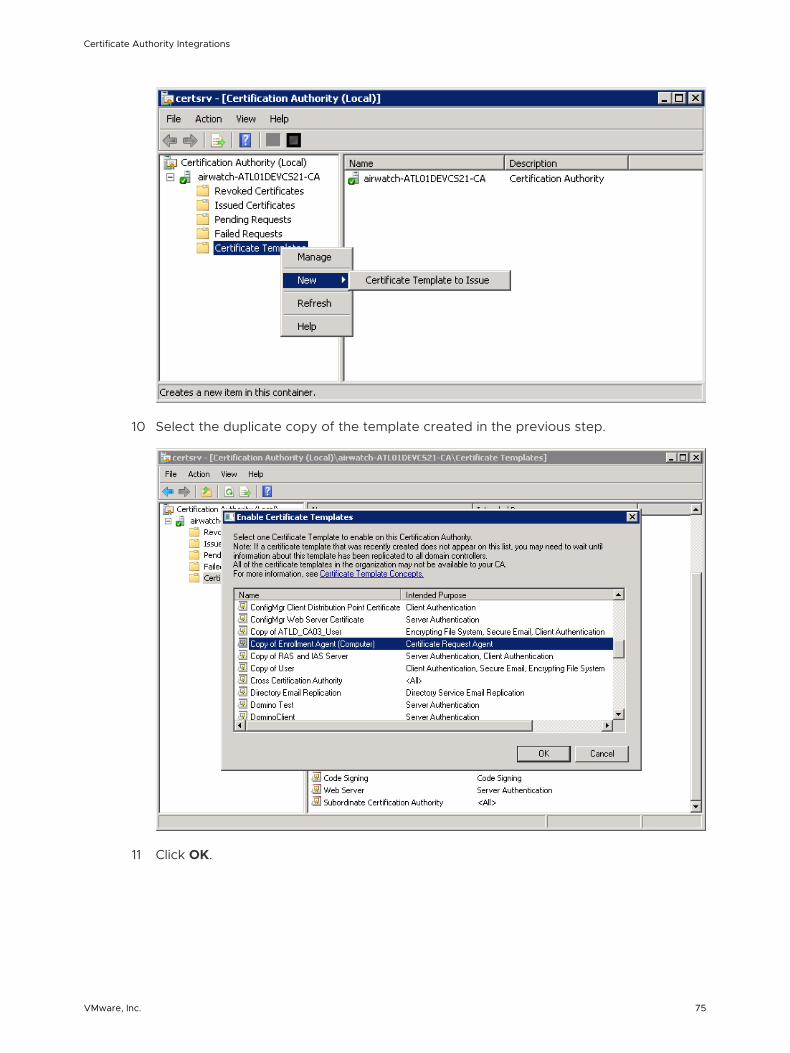
10 Select the duplicate copy of the template created in the previous step.
11 Click OK.
Certificate Authority Integrations
VMware, Inc. 75

c Generate the Restricted Enrollment Agent Signer Certificate on any server that can connect to the Certificate Authority.
1 Log in with a local admin account on the server when requesting the Enrollment Agent certificate on the ACC/DS/CN server.
2 Open Microsoft Management Console, (MMC).
3 Click File and select Add/Remove Snap in.
4 Select Certificates.
5 Select Computer Account.
6 Select Local Computer and select Finish.
7 Click OK.
8 Expand Certificates (Local Computer), double click Personal, right click Certificates, select All Tasks, and select Request New Certificate.
9 Click Next.
10 Select Active Directory Enrollment Policy and select Next.
Certificate Authority Integrations
VMware, Inc. 76
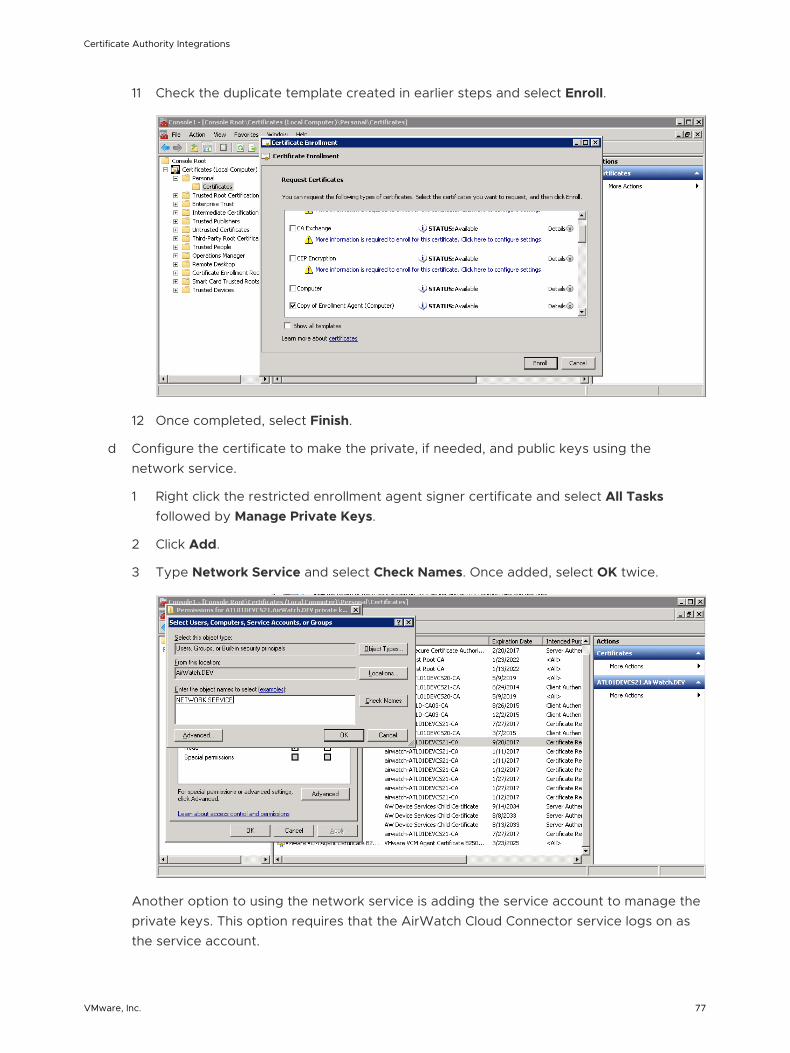
11 Check the duplicate template created in earlier steps and select Enroll.
12 Once completed, select Finish.
d Configure the certificate to make the private, if needed, and public keys using the network service.
1 Right click the restricted enrollment agent signer certificate and select All Tasks followed by Manage Private Keys.
2 Click Add.
3 Type Network Service and select Check Names. Once added, select OK twice.
Another option to using the network service is adding the service account to manage the private keys. This option requires that the AirWatch Cloud Connector service logs on as the service account.
Certificate Authority Integrations
VMware, Inc. 77
e Depending on the need to install certificates on multiple servers, either export the public key or both the public and private keys.
n If the certificate needs to be installed on multiple Device Services servers or VMware AirWatch Cloud Connector servers, export the public and the private key.
When exporting the certificate to install on additional AirWatch Cloud Connector servers, the subject name is the name of the server the certificate was requested from (for example, requested from ACC1). Even though the subject name does not match the other servers you are importing the certificate to (for example, importing to ACC2 and ACC3), this disparity does not cause issues because the private key is also imported along with the certificate.
1 Right click the issued certificate, select All Tasks followed by Export.
2 Click Next.
3 Select Yes, export the private key and select Next. Select Include all certificates in the certification path if possible as well as Export all extended properties. Click Next.
4 Set a password and select Next.
5 Select a folder in which to save the exported certificate.
6 Click Finish.
n If the certificate is installed on a single Device Services server or VMware AirWatch Cloud Connector server, export only the public key.
1 Right click the issued certificate, select All Tasks followed by Export.
2 Select No, do not export the private key, select Next.
3 Select DER encoded binary X.509 (.CER), select Next.
4 Select a destination for the exported certificate and select Next.
5 Click Finish.
f If you have other DS servers or VMware AirWatch Cloud Connector (ACC) servers, you must import the certificate that was exported in previous steps. Skip this section if you have no other DS or ACC servers.
1 Open Micrsoft Management Console (MMC).
2 Click File and select Add/Remove Snap in.
3 Select Certificates.
4 Select Computer Account and select Next.
5 Select Local Computer and select Finish.
6 Click OK.
Certificate Authority Integrations
VMware, Inc. 78
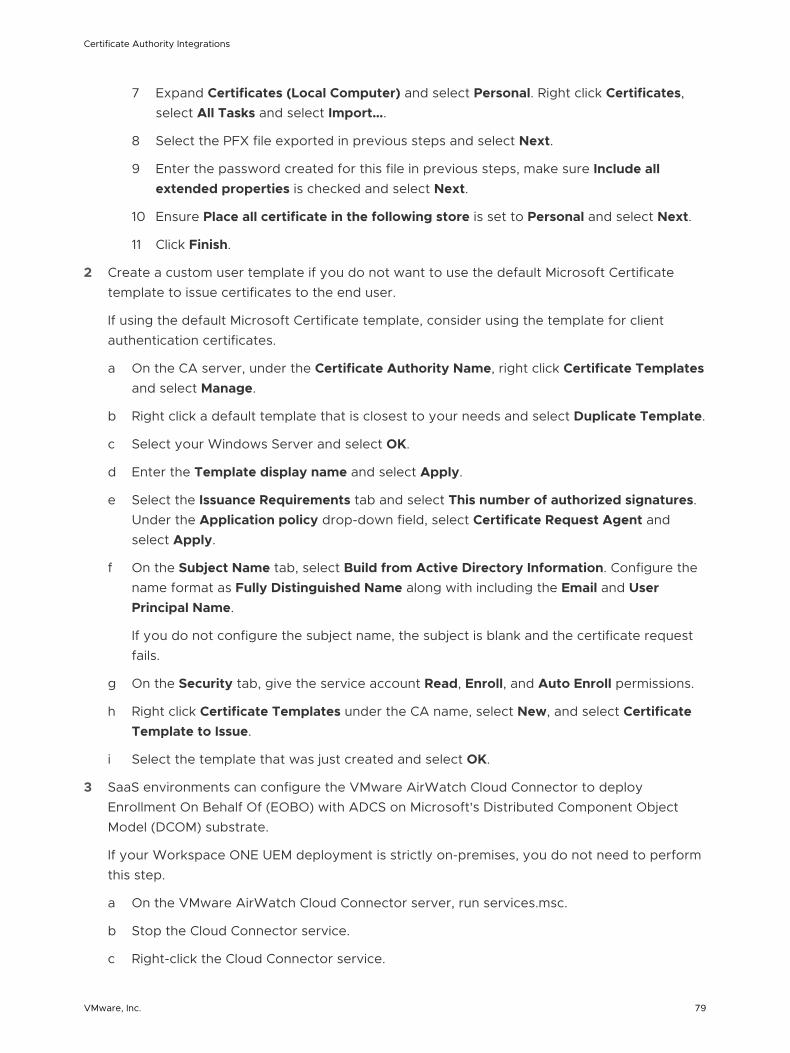
7 Expand Certificates (Local Computer) and select Personal. Right click Certificates, select All Tasks and select Import….
8 Select the PFX file exported in previous steps and select Next.
9 Enter the password created for this file in previous steps, make sure Include all extended properties is checked and select Next.
10 Ensure Place all certificate in the following store is set to Personal and select Next.
11 Click Finish.
2 Create a custom user template if you do not want to use the default Microsoft Certificate template to issue certificates to the end user.
If using the default Microsoft Certificate template, consider using the template for client authentication certificates.
a On the CA server, under the Certificate Authority Name, right click Certificate Templates and select Manage.
b Right click a default template that is closest to your needs and select Duplicate Template.
c Select your Windows Server and select OK.
d Enter the Template display name and select Apply.
e Select the Issuance Requirements tab and select This number of authorized signatures. Under the Application policy drop-down field, select Certificate Request Agent and select Apply.
f On the Subject Name tab, select Build from Active Directory Information. Configure the name format as Fully Distinguished Name along with including the Email and User Principal Name.
If you do not configure the subject name, the subject is blank and the certificate request fails.
g On the Security tab, give the service account Read, Enroll, and Auto Enroll permissions.
h Right click Certificate Templates under the CA name, select New, and select Certificate Template to Issue.
i Select the template that was just created and select OK.
3 SaaS environments can configure the VMware AirWatch Cloud Connector to deploy Enrollment On Behalf Of (EOBO) with ADCS on Microsoft's Distributed Component Object Model (DCOM) substrate.
If your Workspace ONE UEM deployment is strictly on-premises, you do not need to perform this step.
a On the VMware AirWatch Cloud Connector server, run services.msc.
b Stop the Cloud Connector service.
c Right-click the Cloud Connector service.
Certificate Authority Integrations
VMware, Inc. 79
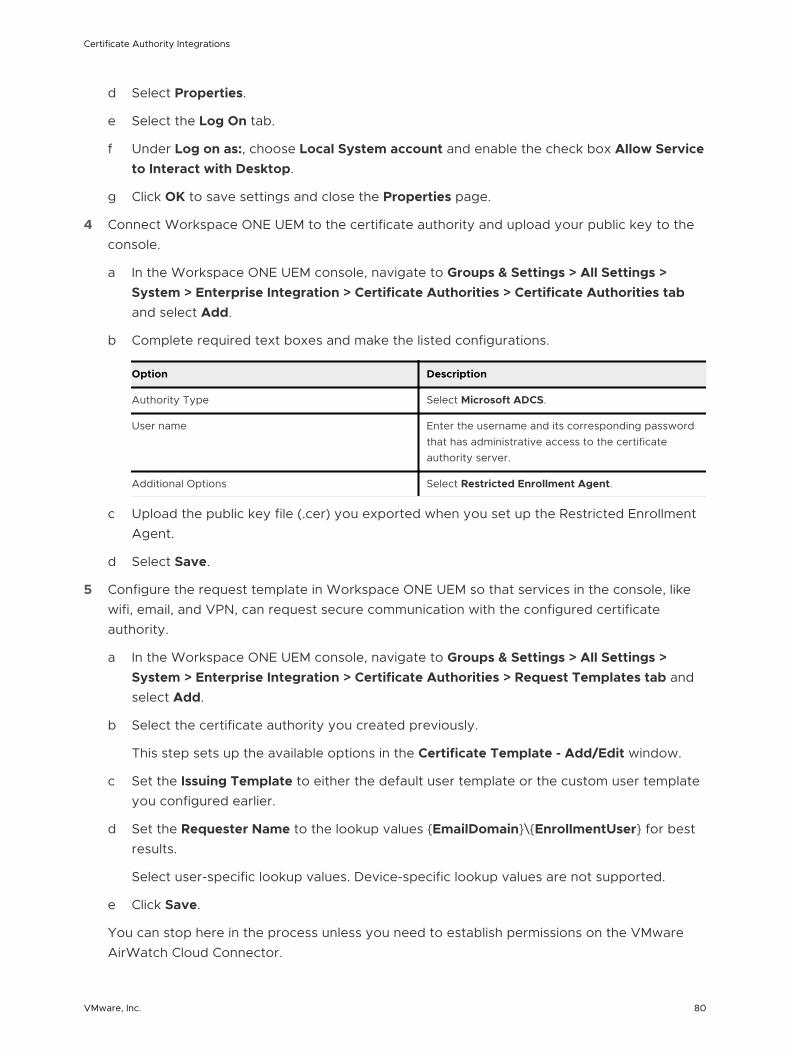
d Select Properties.
e Select the Log On tab.
f Under Log on as:, choose Local System account and enable the check box Allow Service to Interact with Desktop.
g Click OK to save settings and close the Properties page.
4 Connect Workspace ONE UEM to the certificate authority and upload your public key to the console.
a In the Workspace ONE UEM console, navigate to Groups & Settings > All Settings > System > Enterprise Integration > Certificate Authorities > Certificate Authorities tab and select Add.
b Complete required text boxes and make the listed configurations.
Option Description
Authority Type Select Microsoft ADCS.
User name Enter the username and its corresponding password that has administrative access to the certificate authority server.
Additional Options Select Restricted Enrollment Agent.
c Upload the public key file (.cer) you exported when you set up the Restricted Enrollment Agent.
d Select Save.
5 Configure the request template in Workspace ONE UEM so that services in the console, like wifi, email, and VPN, can request secure communication with the configured certificate authority.
a In the Workspace ONE UEM console, navigate to Groups & Settings > All Settings > System > Enterprise Integration > Certificate Authorities > Request Templates tab and select Add.
b Select the certificate authority you created previously.
This step sets up the available options in the Certificate Template - Add/Edit window.
c Set the Issuing Template to either the default user template or the custom user template you configured earlier.
d Set the Requester Name to the lookup values {EmailDomain}\{EnrollmentUser} for best results.
Select user-specific lookup values. Device-specific lookup values are not supported.
e Click Save.
You can stop here in the process unless you need to establish permissions on the VMware AirWatch Cloud Connector.
Certificate Authority Integrations
VMware, Inc. 80

6 In some cases, steps used to configure the VMware AirWatch Cloud Connector may not be sufficient to establish the proper permissions required to log in to the server. Troubleshoot the permissions using a suggested method.
a Create a service account with full permissions.
A service account runs the VMware AirWatch Cloud Connector service. Current service account permissions are subject to change if the permission levels can be successfully lowered.
1 Add permissions for members of the following groups in Active Directory.
n Domain Users
n Enterprise Admins
n Remote Desktop Users
For example, the screen shot displays the permissions for the service account 'caadmin'.
2 Configure permission on the certificate authority (CA) server.
n Member of Local Administrator Group
For example, the screen shot displays Local Administrator Group permissions on the CA Server.
Certificate Authority Integrations
VMware, Inc. 81
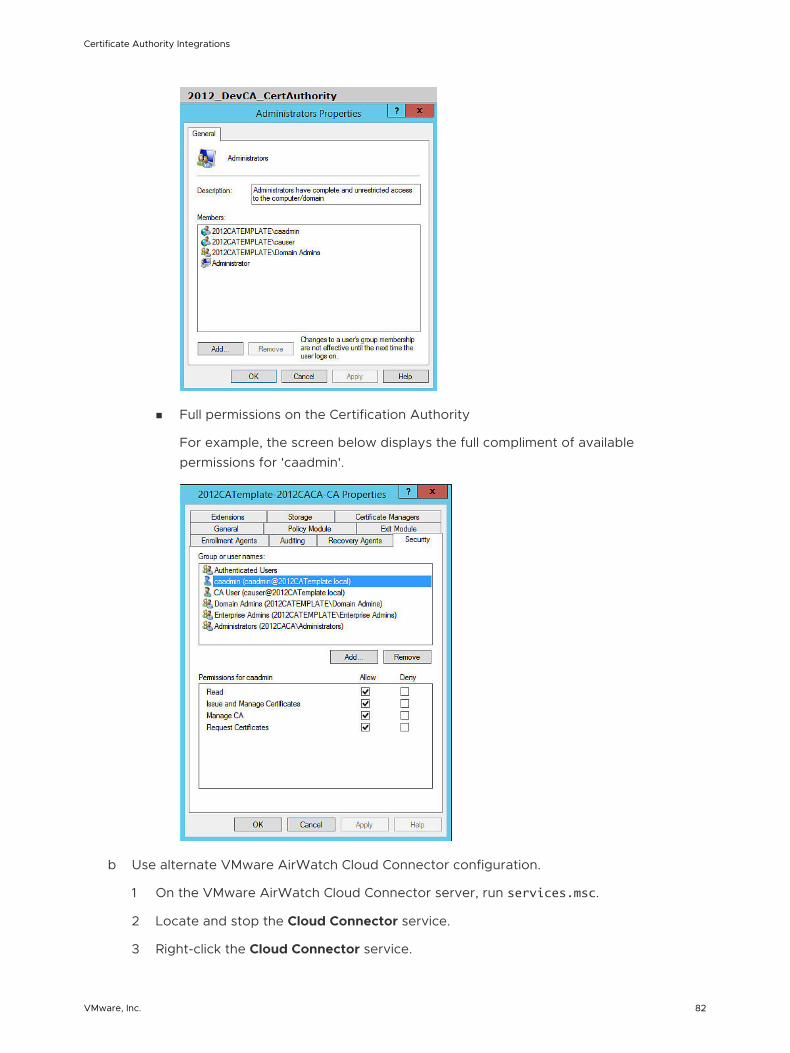
n Full permissions on the Certification Authority
For example, the screen below displays the full compliment of available permissions for 'caadmin'.
b Use alternate VMware AirWatch Cloud Connector configuration.
1 On the VMware AirWatch Cloud Connector server, run services.msc.
2 Locate and stop the Cloud Connector service.
3 Right-click the Cloud Connector service.
Certificate Authority Integrations
VMware, Inc. 82
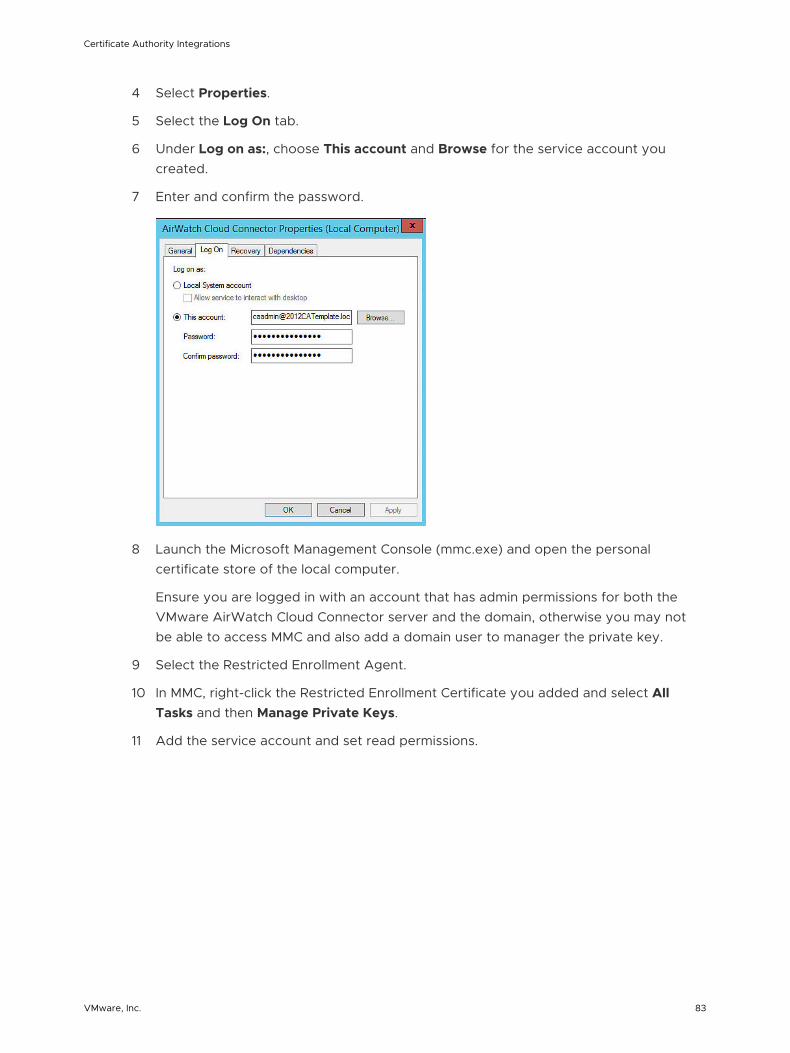
4 Select Properties.
5 Select the Log On tab.
6 Under Log on as:, choose This account and Browse for the service account you created.
7 Enter and confirm the password.
8 Launch the Microsoft Management Console (mmc.exe) and open the personal certificate store of the local computer.
Ensure you are logged in with an account that has admin permissions for both the VMware AirWatch Cloud Connector server and the domain, otherwise you may not be able to access MMC and also add a domain user to manager the private key.
9 Select the Restricted Enrollment Agent.
10 In MMC, right-click the Restricted Enrollment Certificate you added and select All Tasks and then Manage Private Keys.
11 Add the service account and set read permissions.
Certificate Authority Integrations
VMware, Inc. 83
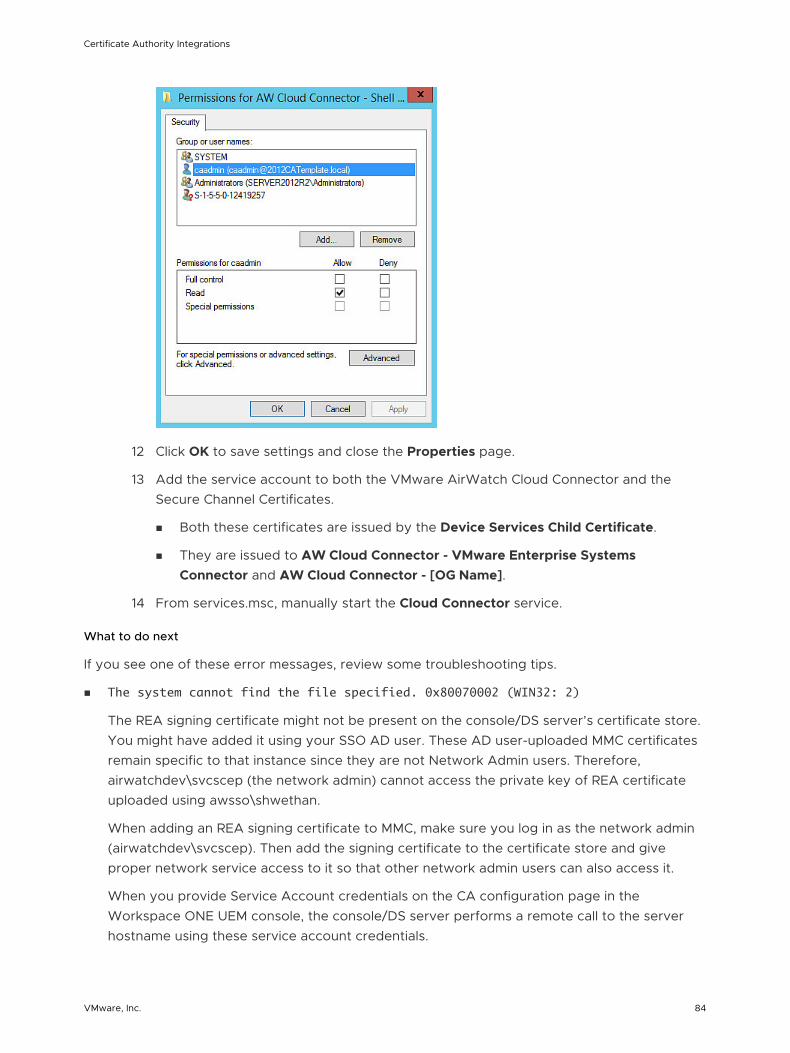
12 Click OK to save settings and close the Properties page.
13 Add the service account to both the VMware AirWatch Cloud Connector and the Secure Channel Certificates.
n Both these certificates are issued by the Device Services Child Certificate.
n They are issued to AW Cloud Connector - VMware Enterprise Systems Connector and AW Cloud Connector - [OG Name].
14 From services.msc, manually start the Cloud Connector service.
What to do next
If you see one of these error messages, review some troubleshooting tips.
n The system cannot find the file specified. 0x80070002 (WIN32: 2)
The REA signing certificate might not be present on the console/DS server’s certificate store. You might have added it using your SSO AD user. These AD user-uploaded MMC certificates remain specific to that instance since they are not Network Admin users. Therefore, airwatchdev\svcscep (the network admin) cannot access the private key of REA certificate uploaded using awsso\shwethan.
When adding an REA signing certificate to MMC, make sure you log in as the network admin (airwatchdev\svcscep). Then add the signing certificate to the certificate store and give proper network service access to it so that other network admin users can also access it.
When you provide Service Account credentials on the CA configuration page in the Workspace ONE UEM console, the console/DS server performs a remote call to the server hostname using these service account credentials.
Certificate Authority Integrations
VMware, Inc. 84
n Object reference not set to an instance of an object
The CA server received the certificate request, but the policy module denied the request. The denial happens either because the LDAP forest referrals are not set (Step 1 of CA server), or because the user domain used is not correct or not associated with the CA server.
For Issued certificates on the CA server, only requests from the Airwatchdev domain are processed. AWSSO domain requests are rejected (atl01devcs21 CA is synced only with Airwatchdev AD, not with AWSSO). Therefore, we changed the directory mapping on the LGs to Airwatchdev and users from this domain for enrolling devices. The profile lands on the device with the correct client certificate for REA.
Certificate Authority Integrations
VMware, Inc. 85
Symantec MPKI 11Workspace ONE UEM is flexible with PKI integration by being able to request certificates from either internal or external certificate authorities (CA). Integrate with Symantec MPKI services to issue certificates for your Workspace ONE UEM MDM solution.
In order for Workspace ONE UEM to communicate with Symantec as a Registration Authority (RA), you must first establish an account with Symantec. After your Symantec account is active, you can generate an RA certificate and store it on the RA server.
Workspace ONE UEM can then be configured to use the certificate to communicate with the Symantec MPKI CA. Once communication is successfully established, you can define which certificate Workspace ONE UEM will deploy to the device.
Prerequisites
n Symantec version 8.0 or later
n A Symantec MPKI account
n Workspace ONE UEM version 9.5 or later
n When using PKI protocol, verify the Symantec certificate profile(s) under Primary certificate options.
Ensure Enrollment Method is set to PKI Web Services and Authentication method is set to 3rd party application. This gives Workspace ONE UEM the ability to deploy certificate profiles through APIs.
n When using SCEP protocol, verification that the Symantec certificate profile(s), under Primary certificate options, within Authentication method, has Enrollment Code selected. This gives the SCEP server the ability to deploy certificate profiles through APIs.
VMware, Inc. 86
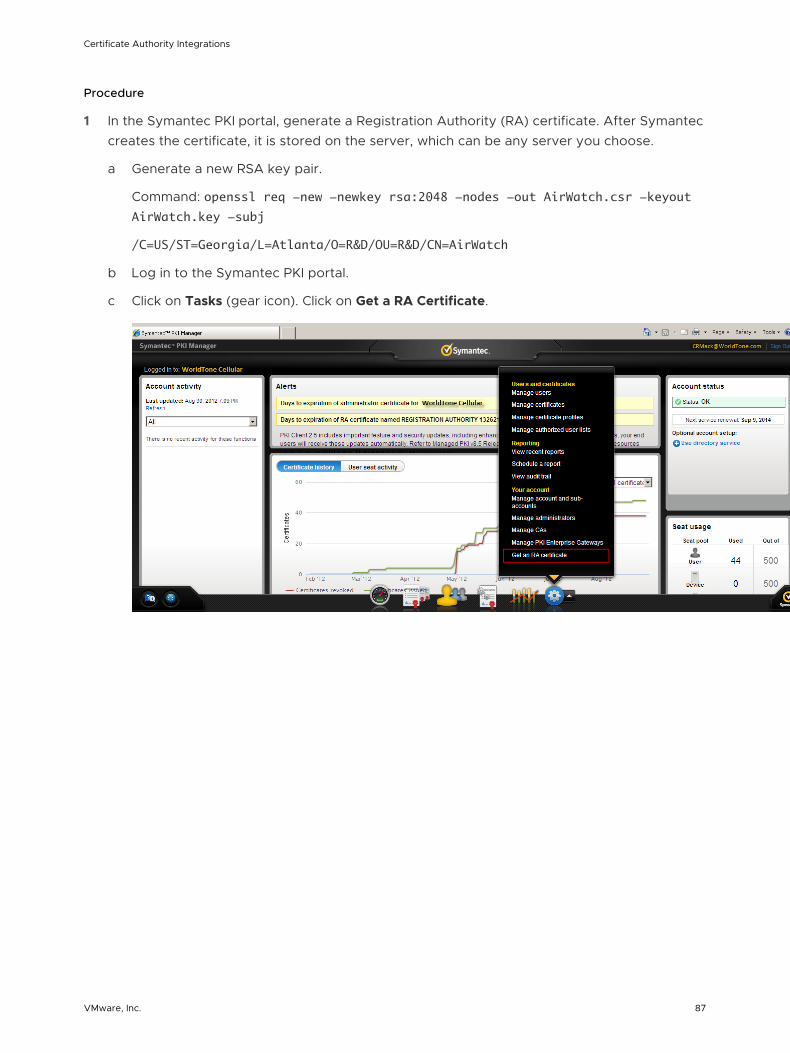
Procedure
1 In the Symantec PKI portal, generate a Registration Authority (RA) certificate. After Symantec creates the certificate, it is stored on the server, which can be any server you choose.
a Generate a new RSA key pair.
Command: openssl req -new -newkey rsa:2048 -nodes -out AirWatch.csr -keyout AirWatch.key -subj
/C=US/ST=Georgia/L=Atlanta/O=R&D/OU=R&D/CN=AirWatch
b Log in to the Symantec PKI portal.
c Click on Tasks (gear icon). Click on Get a RA Certificate.
Certificate Authority Integrations
VMware, Inc. 87
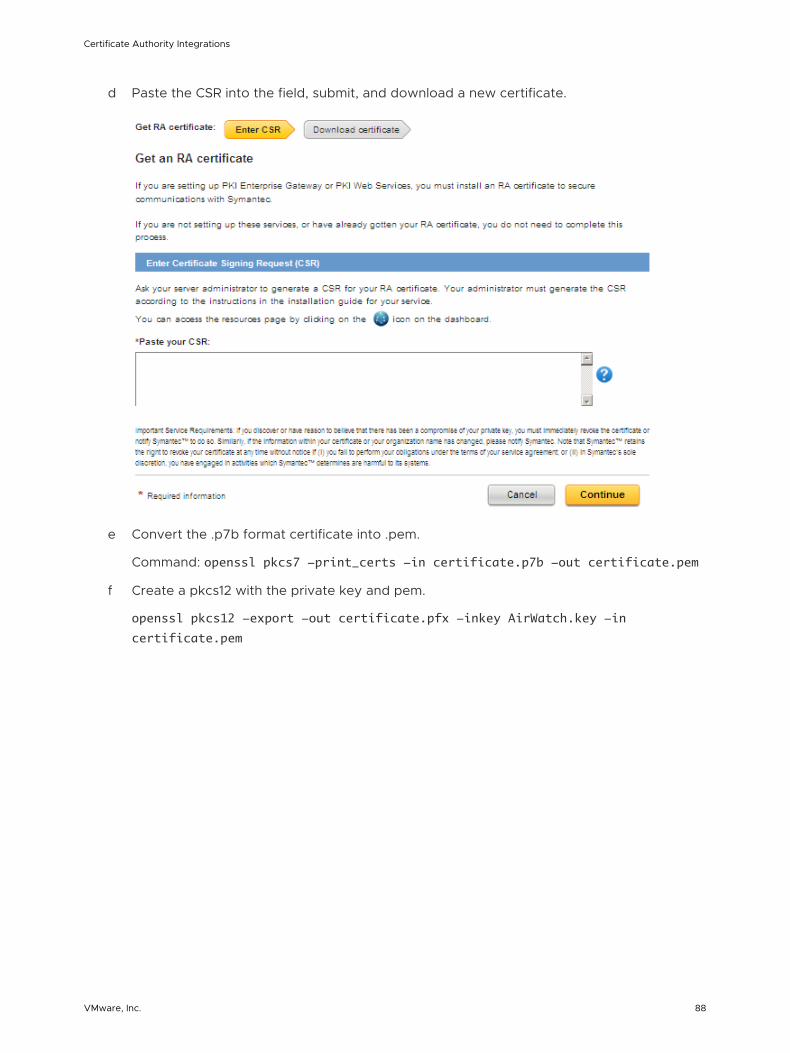
d Paste the CSR into the field, submit, and download a new certificate.
e Convert the .p7b format certificate into .pem.
Command: openssl pkcs7 -print_certs -in certificate.p7b -out certificate.pem
f Create a pkcs12 with the private key and pem.
openssl pkcs12 -export -out certificate.pfx -inkey AirWatch.key -in
certificate.pem
Certificate Authority Integrations
VMware, Inc. 88
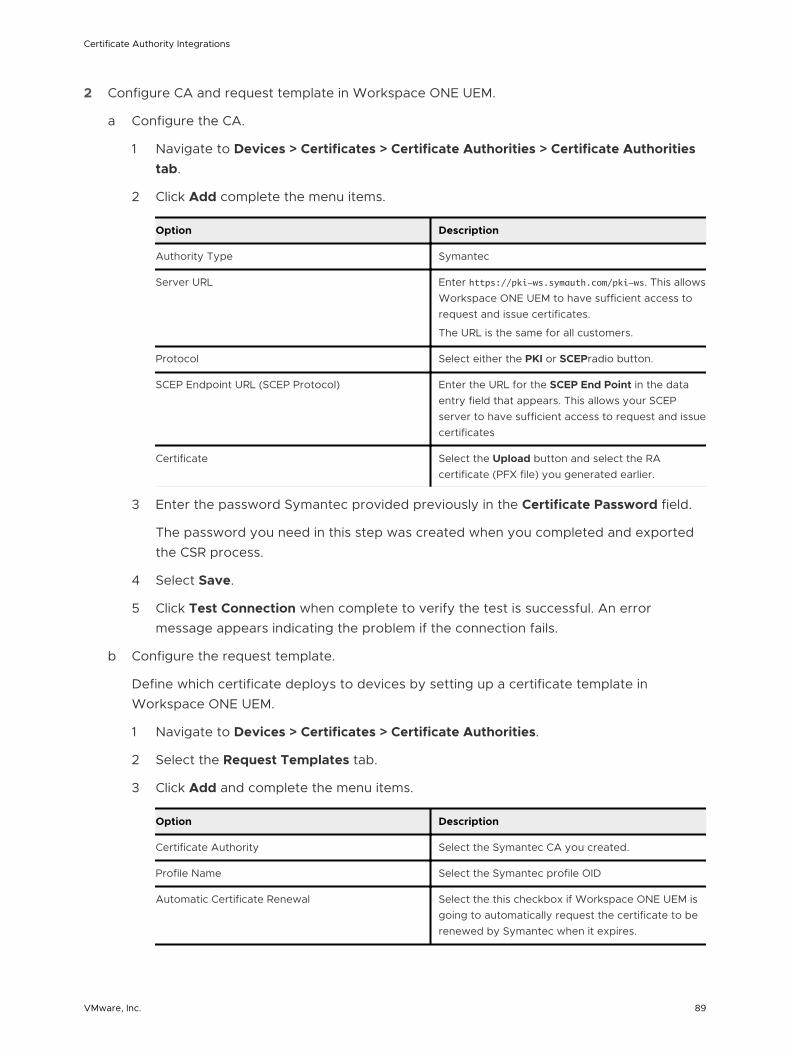
2 Configure CA and request template in Workspace ONE UEM.
a Configure the CA.
1 Navigate to Devices > Certificates > Certificate Authorities > Certificate Authorities tab.
2 Click Add complete the menu items.
Option Description
Authority Type Symantec
Server URL Enter https://pki-ws.symauth.com/pki-ws. This allows Workspace ONE UEM to have sufficient access to request and issue certificates.
The URL is the same for all customers.
Protocol Select either the PKI or SCEPradio button.
SCEP Endpoint URL (SCEP Protocol) Enter the URL for the SCEP End Point in the data entry field that appears. This allows your SCEP server to have sufficient access to request and issue certificates
Certificate Select the Upload button and select the RA certificate (PFX file) you generated earlier.
3 Enter the password Symantec provided previously in the Certificate Password field.
The password you need in this step was created when you completed and exported the CSR process.
4 Select Save.
5 Click Test Connection when complete to verify the test is successful. An error message appears indicating the problem if the connection fails.
b Configure the request template.
Define which certificate deploys to devices by setting up a certificate template in Workspace ONE UEM.
1 Navigate to Devices > Certificates > Certificate Authorities.
2 Select the Request Templates tab.
3 Click Add and complete the menu items.
Option Description
Certificate Authority Select the Symantec CA you created.
Profile Name Select the Symantec profile OID
Automatic Certificate Renewal Select the this checkbox if Workspace ONE UEM is going to automatically request the certificate to be renewed by Symantec when it expires.
Certificate Authority Integrations
VMware, Inc. 89
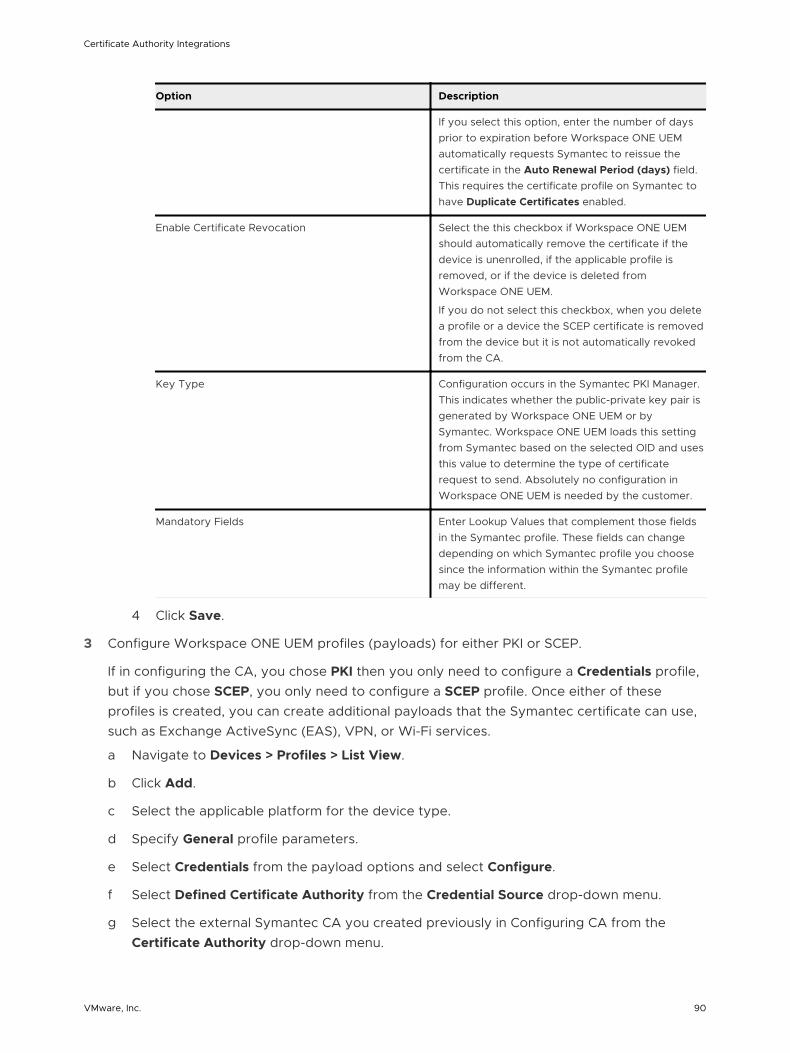
Option Description
If you select this option, enter the number of days prior to expiration before Workspace ONE UEM automatically requests Symantec to reissue the certificate in the Auto Renewal Period (days) field. This requires the certificate profile on Symantec to have Duplicate Certificates enabled.
Enable Certificate Revocation Select the this checkbox if Workspace ONE UEM should automatically remove the certificate if the device is unenrolled, if the applicable profile is removed, or if the device is deleted from Workspace ONE UEM.
If you do not select this checkbox, when you delete a profile or a device the SCEP certificate is removed from the device but it is not automatically revoked from the CA.
Key Type Configuration occurs in the Symantec PKI Manager. This indicates whether the public-private key pair is generated by Workspace ONE UEM or by Symantec. Workspace ONE UEM loads this setting from Symantec based on the selected OID and uses this value to determine the type of certificate request to send. Absolutely no configuration in Workspace ONE UEM is needed by the customer.
Mandatory Fields Enter Lookup Values that complement those fields in the Symantec profile. These fields can change depending on which Symantec profile you choose since the information within the Symantec profile may be different.
4 Click Save.
3 Configure Workspace ONE UEM profiles (payloads) for either PKI or SCEP.
If in configuring the CA, you chose PKI then you only need to configure a Credentials profile, but if you chose SCEP, you only need to configure a SCEP profile. Once either of these profiles is created, you can create additional payloads that the Symantec certificate can use, such as Exchange ActiveSync (EAS), VPN, or Wi-Fi services.
a Navigate to Devices > Profiles > List View.
b Click Add.
c Select the applicable platform for the device type.
d Specify General profile parameters.
e Select Credentials from the payload options and select Configure.
f Select Defined Certificate Authority from the Credential Source drop-down menu.
g Select the external Symantec CA you created previously in Configuring CA from the Certificate Authority drop-down menu.
Certificate Authority Integrations
VMware, Inc. 90
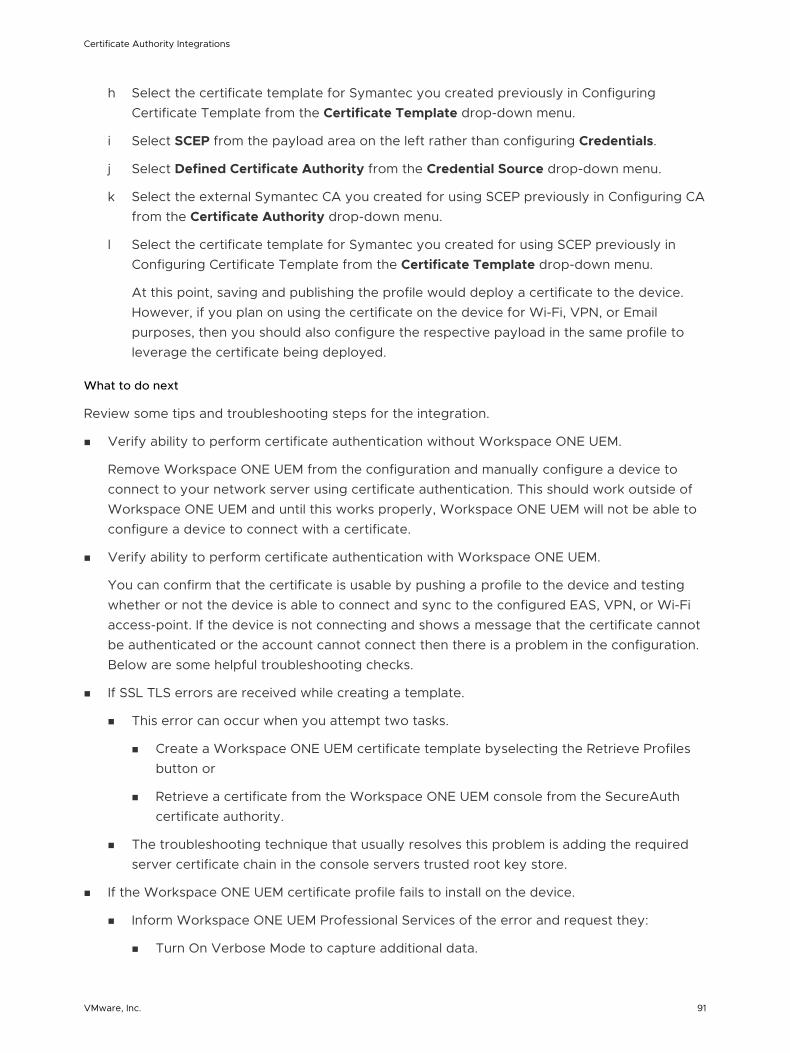
h Select the certificate template for Symantec you created previously in Configuring Certificate Template from the Certificate Template drop-down menu.
i Select SCEP from the payload area on the left rather than configuring Credentials.
j Select Defined Certificate Authority from the Credential Source drop-down menu.
k Select the external Symantec CA you created for using SCEP previously in Configuring CA from the Certificate Authority drop-down menu.
l Select the certificate template for Symantec you created for using SCEP previously in Configuring Certificate Template from the Certificate Template drop-down menu.
At this point, saving and publishing the profile would deploy a certificate to the device. However, if you plan on using the certificate on the device for Wi-Fi, VPN, or Email purposes, then you should also configure the respective payload in the same profile to leverage the certificate being deployed.
What to do next
Review some tips and troubleshooting steps for the integration.
n Verify ability to perform certificate authentication without Workspace ONE UEM.
Remove Workspace ONE UEM from the configuration and manually configure a device to connect to your network server using certificate authentication. This should work outside of Workspace ONE UEM and until this works properly, Workspace ONE UEM will not be able to configure a device to connect with a certificate.
n Verify ability to perform certificate authentication with Workspace ONE UEM.
You can confirm that the certificate is usable by pushing a profile to the device and testing whether or not the device is able to connect and sync to the configured EAS, VPN, or Wi-Fi access-point. If the device is not connecting and shows a message that the certificate cannot be authenticated or the account cannot connect then there is a problem in the configuration. Below are some helpful troubleshooting checks.
n If SSL TLS errors are received while creating a template.
n This error can occur when you attempt two tasks.
n Create a Workspace ONE UEM certificate template byselecting the Retrieve Profiles button or
n Retrieve a certificate from the Workspace ONE UEM console from the SecureAuth certificate authority.
n The troubleshooting technique that usually resolves this problem is adding the required server certificate chain in the console servers trusted root key store.
n If the Workspace ONE UEM certificate profile fails to install on the device.
n Inform Workspace ONE UEM Professional Services of the error and request they:
n Turn On Verbose Mode to capture additional data.
Certificate Authority Integrations
VMware, Inc. 91
n Retrieve web console log.
n Workspace ONE UEM analyzes the log and works with customer to resolve the problem.
n If the certificate is not populated in the View XML option of the profile.
n Confirm that lookup values configured on the Symantec certificate profile match the look up values in the Workspace ONE UEM console’s request template.
n Confirm that lookup values in Workspace ONE UEM request template are actually populated in the user information being pulled from AD.
n Confirm you are pointing to the right profile in Symantec.
Certificate Authority Integrations
VMware, Inc. 92
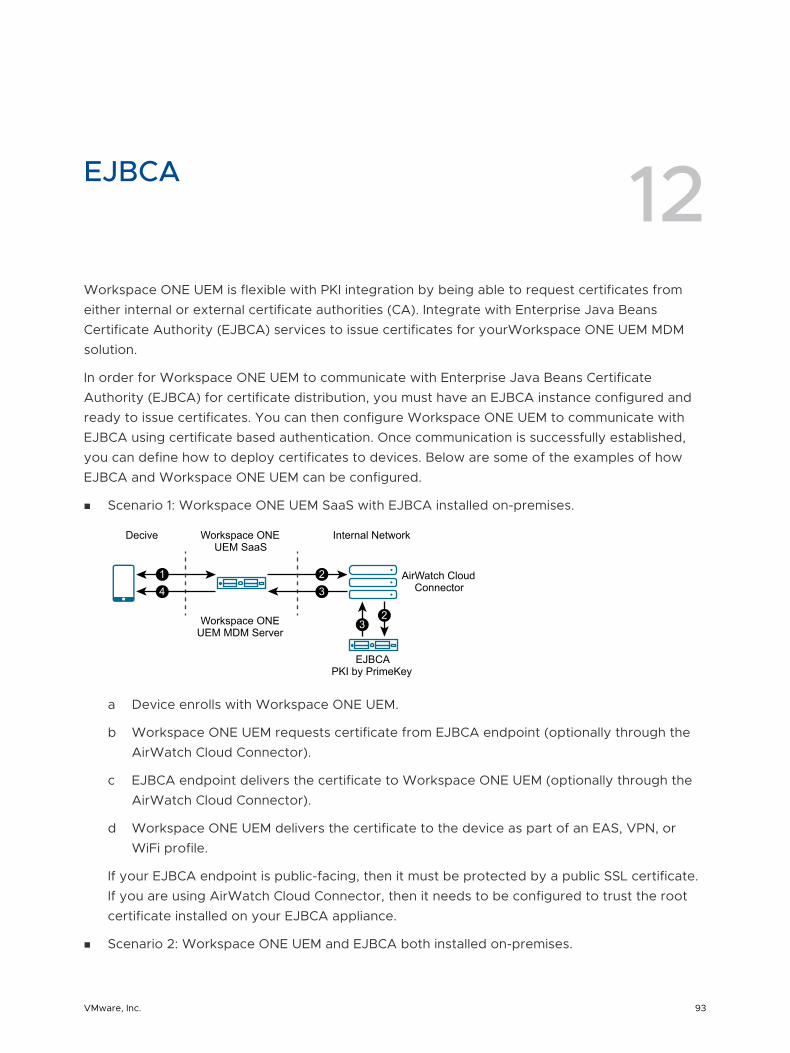
EJBCA 12Workspace ONE UEM is flexible with PKI integration by being able to request certificates from either internal or external certificate authorities (CA). Integrate with Enterprise Java Beans Certificate Authority (EJBCA) services to issue certificates for yourWorkspace ONE UEM MDM solution.
In order for Workspace ONE UEM to communicate with Enterprise Java Beans Certificate Authority (EJBCA) for certificate distribution, you must have an EJBCA instance configured and ready to issue certificates. You can then configure Workspace ONE UEM to communicate with EJBCA using certificate based authentication. Once communication is successfully established, you can define how to deploy certificates to devices. Below are some of the examples of how EJBCA and Workspace ONE UEM can be configured.
n Scenario 1: Workspace ONE UEM SaaS with EJBCA installed on-premises.
Decive Internal Network
AirWatch CloudConnector
EJBCAPKI by PrimeKey
Workspace ONEUEM SaaS
Workspace ONEUEM MDM Server
23
234
1
a Device enrolls with Workspace ONE UEM.
b Workspace ONE UEM requests certificate from EJBCA endpoint (optionally through the AirWatch Cloud Connector).
c EJBCA endpoint delivers the certificate to Workspace ONE UEM (optionally through the AirWatch Cloud Connector).
d Workspace ONE UEM delivers the certificate to the device as part of an EAS, VPN, or WiFi profile.
If your EJBCA endpoint is public-facing, then it must be protected by a public SSL certificate. If you are using AirWatch Cloud Connector, then it needs to be configured to trust the root certificate installed on your EJBCA appliance.
n Scenario 2: Workspace ONE UEM and EJBCA both installed on-premises.
VMware, Inc. 93
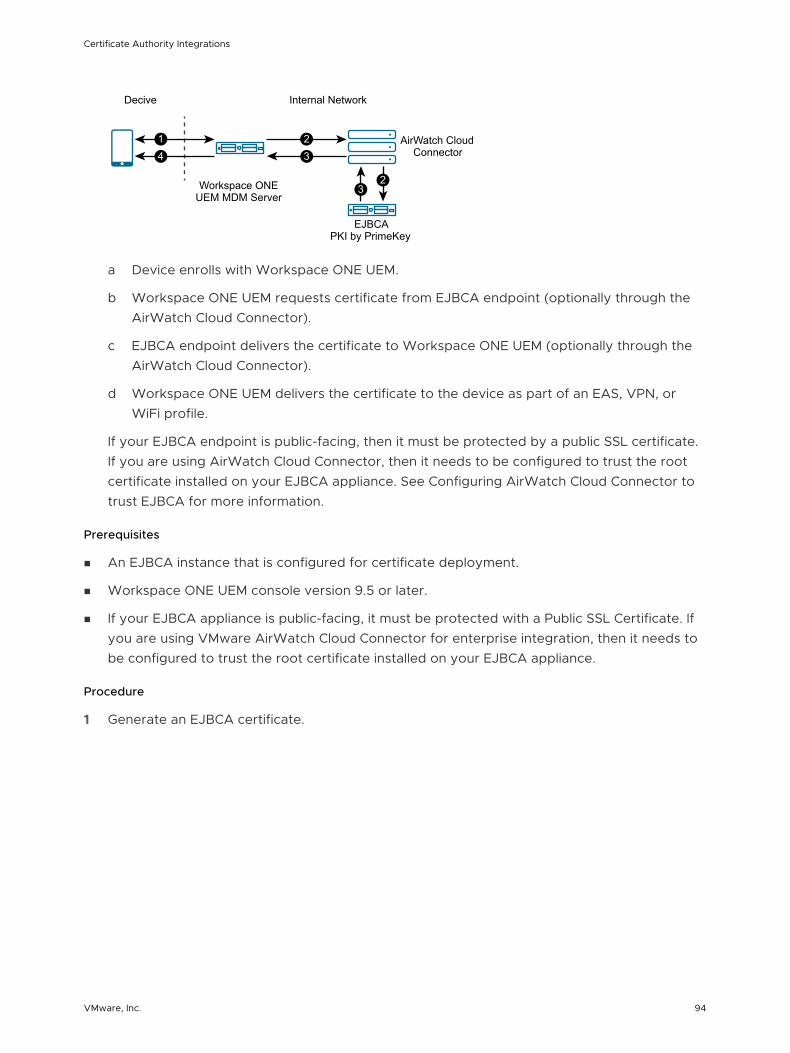
Decive Internal Network
AirWatch CloudConnector
EJBCAPKI by PrimeKey
Workspace ONEUEM MDM Server
32
23
41
a Device enrolls with Workspace ONE UEM.
b Workspace ONE UEM requests certificate from EJBCA endpoint (optionally through the AirWatch Cloud Connector).
c EJBCA endpoint delivers the certificate to Workspace ONE UEM (optionally through the AirWatch Cloud Connector).
d Workspace ONE UEM delivers the certificate to the device as part of an EAS, VPN, or WiFi profile.
If your EJBCA endpoint is public-facing, then it must be protected by a public SSL certificate. If you are using AirWatch Cloud Connector, then it needs to be configured to trust the root certificate installed on your EJBCA appliance. See Configuring AirWatch Cloud Connector to trust EJBCA for more information.
Prerequisites
n An EJBCA instance that is configured for certificate deployment.
n Workspace ONE UEM console version 9.5 or later.
n If your EJBCA appliance is public-facing, it must be protected with a Public SSL Certificate. If you are using VMware AirWatch Cloud Connector for enterprise integration, then it needs to be configured to trust the root certificate installed on your EJBCA appliance.
Procedure
1 Generate an EJBCA certificate.
Certificate Authority Integrations
VMware, Inc. 94
2 Configure the CA and the request template in the Workspace ONE UEM console.
a Configure the CA.
1 Navigate to Devices > Certificates > Certificate Authorities.
2 Click Add and complete the menu items.
Option Description
Authority Type EJBCA
Server URL Enter the URL of your EJBCA instance.
This is the web endpoint that Workspace ONE UEMuses to submit requests and issue certificates.
Certificate Select to Upload the certificate from the location on your PC to which it has been saved.
3 Click Save.
4 Click Test Connection when complete to verify the test is successful. An error message appears indicating the problem if the connection fails.
b Configure the request template.
Define which certificate deploys to devices by setting up a certificate template in Workspace ONE UEM. Use the following to set up a template.
1 Navigate to Devices > Certificates > Certificate Authorities.
2 Select the Request Templates tab.
3 Click Add and complete the menu items.
Option Description
Certificate Authority EJBCA
End Entity Profiles Define those parts of the DN that require registration.
Certificate Profiles Define the actual certificate profile/template.
Available CA Enter the CA that issues the certificates.
Subject Name Select a lookup value that defines the identity bound to the certificate.
Automatic Certificate Renewal Select this checkbox if Workspace ONE UEM is going to automatically request the certificate to be renewed by EJBCA when it expires.
Certificate Authority Integrations
VMware, Inc. 95

Option Description
If you select this option, enter the number of days prior to expiration before Workspace ONE UEM automatically requests EJBCA to reissue the certificate in the Auto Renewal Period (days) field. This requires the certificate profile on EJBCA to have the Duplicated Certificates setting enabled.
Enable Certificate Revocation Select the this checkbox if you wantWorkspace ONE UEM to be able to revoke certificates.
4 Click Save.
3 Configure Workspace ONE UEM profiles (payloads). Once either of these profiles is created, you can create additional payloads that the EJBCA certificate can use, such as Exchange ActiveSync (EAS), VPN, or Wi-Fi services.
a Navigate to Devices > Profiles > List View.
b Click Add.
c Select the applicable platform for the device type.
d Specify all General profile parameters.
e Select Credentials from the payload options and select Configure.
f Select Defined Certificate Authority from the Credential Source drop-down menu.
g Select the external EJBCA certificate you created previously.
h Select the request template for EJBCA you created previously.
Saving and publishing the profile would deploy a certificate to the device. If you plan on using the certificate on the device for Wi-Fi, VPN, or email purposes, you should also configure the respective payload in the same profile to leverage the certificate being deployed.
4 (Optional) If you are using AirWatch Cloud Connector and the EJBCA appliance is not public-facing, then you need to ensure the AirWatch Cloud Connector configuration trusts the appliance.
a Open the EJBCA console certificate and view the Certificate Path tab.
1 If multiple certificates are listed, they will need to be separated and added to the appropriate stores.
2 The remaining steps address adding the root certificate to the Trust Root Store.
b Open MMC by searching for it using Windows Search and launching the mmc.exe file.
c Navigate to File > Add/Remove Snap-in. The Add or Remove Snap-ins screen displays.
d Select the Certificates snap-in in the left pane and select Add.
e Select Computer account as Snap-in source. Select Next.
f Select Local computer and then select Finish.
Certificate Authority Integrations
VMware, Inc. 96

g Select OK.
h Expand the newly added Certificates tree.
i Expand the Trusted Root Certification Authorities folder.
j Right-click the Certificates folder here and select All Tasks > Import.
k Proceed through the Certificate Import Wizard. You will be prompted to Browse and select the file of the root certificate used to generate the EJBCA Console certificate. Select Next.
l Select Place all certs in the following store and then select Next.
m Click Finish.
n Select all other intermediate and child certificates to add them to their associated stores within the Certificates tree.
What to do next
Review some tips and troubleshooting steps for the integration.
n Verify ability to perform certificate authentication without Workspace ONE UEM.
Remove Workspace ONE UEM from the configuration and manually configure a device to connect to your network server using certificate authentication. This should work outside of Workspace ONE UEM and until this works properly, Workspace ONE UEM will not be able to configure a device to connect with a certificate.
n Verify ability to perform certificate authentication with Workspace ONE UEM.
You can confirm that the certificate is usable by pushing a profile to the device and testing whether or not the device is able to connect and sync to the configured EAS, VPN, or Wi-Fi access-point. If the device is not connecting and shows a message that the certificate cannot be authenticated or the account cannot connect then there is a problem in the configuration. Below are some helpful troubleshooting checks.
n If SSL TLS errors are received while creating a template.
n This error can occur when you attempt two tasks.
n Create a Workspace ONE UEM certificate template byselecting the Retrieve Profiles button or
n Retrieve a certificate from the Workspace ONE UEM console from the SecureAuth certificate authority.
n The troubleshooting technique that usually resolves this problem is adding the required server certificate chain in the console servers trusted root key store.
n If the Workspace ONE UEM certificate profile fails to install on the device.
n Inform Workspace ONE UEM Professional Services of the error and request they:
n Turn on Verbose Mode to capture additional data.
Certificate Authority Integrations
VMware, Inc. 97
n Retrieve web console log.
n Workspace ONE UEM analyzes the log and works with customer to resolve the problem.
n If the certificate is not populated in the View XML option of the profile.
n Confirm that lookup values configured on the EJBCA certificate profile match the look up values in the Workspace ONE UEM console request emplate.
n Confirm that lookup values in Workspace ONE UEM request template are actually populated in the user information being pulled from AD.
n Confirm you are pointing to the right profile in EJBCA.
Certificate Authority Integrations
VMware, Inc. 98
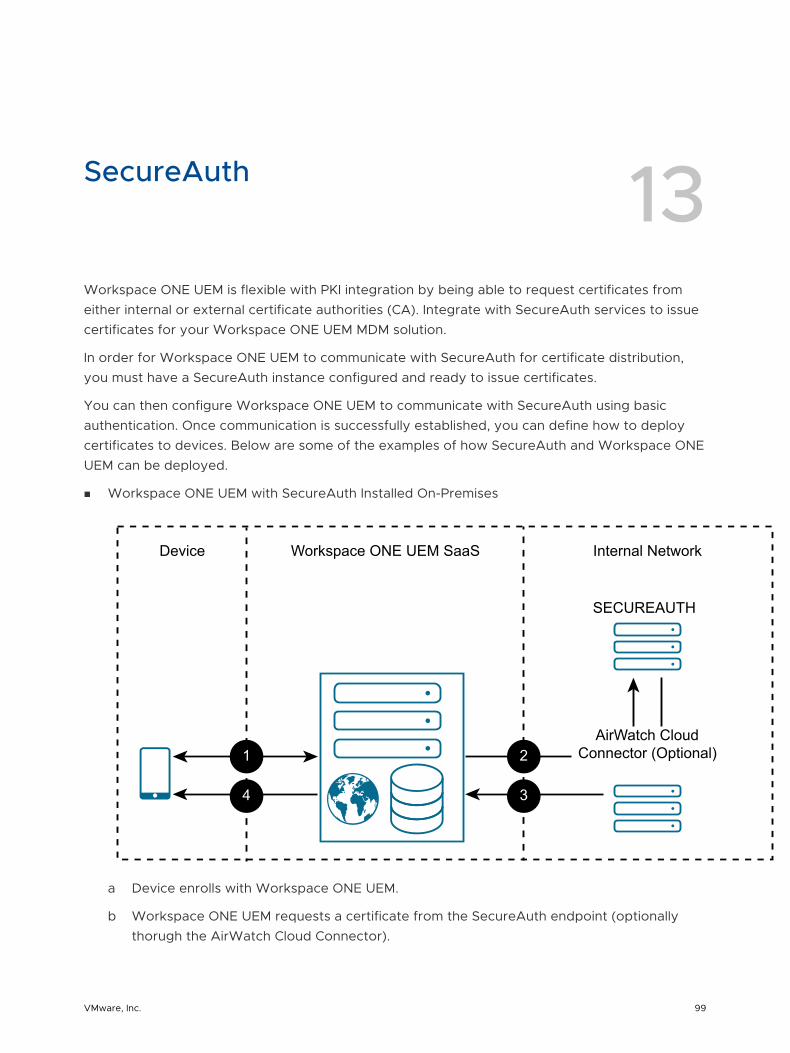
SecureAuth 13Workspace ONE UEM is flexible with PKI integration by being able to request certificates from either internal or external certificate authorities (CA). Integrate with SecureAuth services to issue certificates for your Workspace ONE UEM MDM solution.
In order for Workspace ONE UEM to communicate with SecureAuth for certificate distribution, you must have a SecureAuth instance configured and ready to issue certificates.
You can then configure Workspace ONE UEM to communicate with SecureAuth using basic authentication. Once communication is successfully established, you can define how to deploy certificates to devices. Below are some of the examples of how SecureAuth and Workspace ONE UEM can be deployed.
n Workspace ONE UEM with SecureAuth Installed On-Premises
Device Workspace ONE UEM SaaS Internal Network
2
3
1
4
AirWatch CloudConnector (Optional)
SECUREAUTH
a Device enrolls with Workspace ONE UEM.
b Workspace ONE UEM requests a certificate from the SecureAuth endpoint (optionally thorugh the AirWatch Cloud Connector).
VMware, Inc. 99
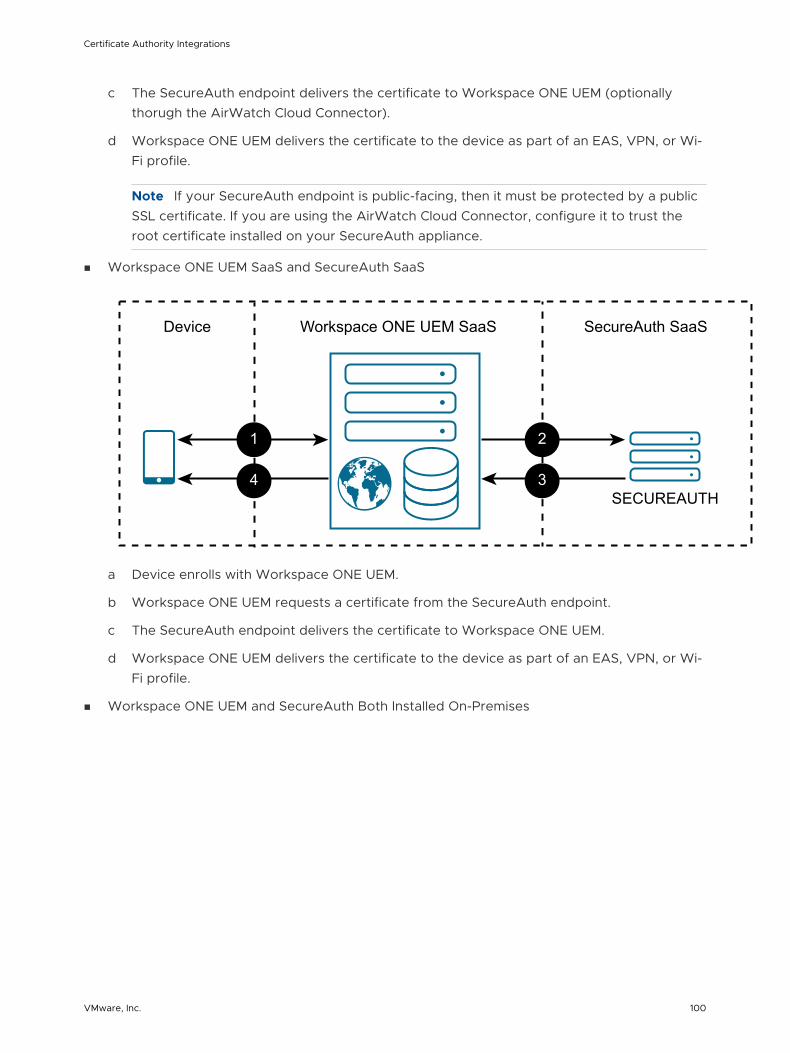
c The SecureAuth endpoint delivers the certificate to Workspace ONE UEM (optionally thorugh the AirWatch Cloud Connector).
d Workspace ONE UEM delivers the certificate to the device as part of an EAS, VPN, or Wi-Fi profile.
Note If your SecureAuth endpoint is public-facing, then it must be protected by a public SSL certificate. If you are using the AirWatch Cloud Connector, configure it to trust the root certificate installed on your SecureAuth appliance.
n Workspace ONE UEM SaaS and SecureAuth SaaS
Device Workspace ONE UEM SaaS SecureAuth SaaS
2
3
1
4SECUREAUTH
a Device enrolls with Workspace ONE UEM.
b Workspace ONE UEM requests a certificate from the SecureAuth endpoint.
c The SecureAuth endpoint delivers the certificate to Workspace ONE UEM.
d Workspace ONE UEM delivers the certificate to the device as part of an EAS, VPN, or Wi-Fi profile.
n Workspace ONE UEM and SecureAuth Both Installed On-Premises
Certificate Authority Integrations
VMware, Inc. 100
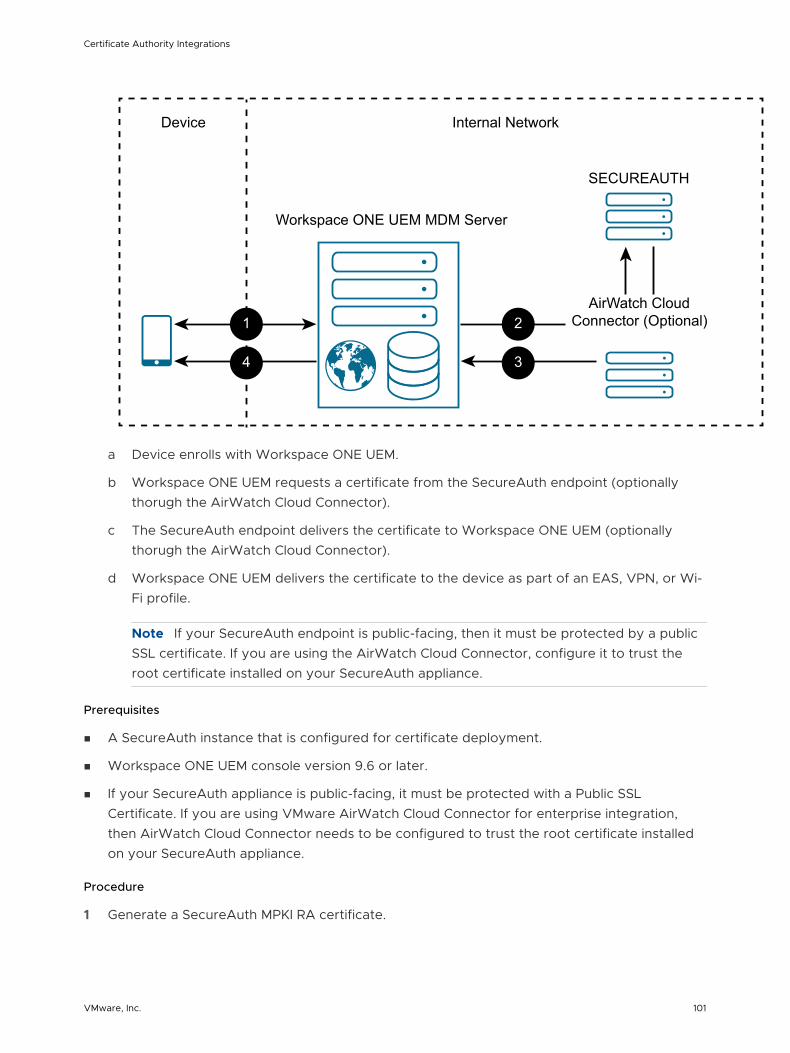
Device
Workspace ONE UEM MDM Server
Internal Network
AirWatch CloudConnector (Optional)
SECUREAUTH
1
4
2
3
a Device enrolls with Workspace ONE UEM.
b Workspace ONE UEM requests a certificate from the SecureAuth endpoint (optionally thorugh the AirWatch Cloud Connector).
c The SecureAuth endpoint delivers the certificate to Workspace ONE UEM (optionally thorugh the AirWatch Cloud Connector).
d Workspace ONE UEM delivers the certificate to the device as part of an EAS, VPN, or Wi-Fi profile.
Note If your SecureAuth endpoint is public-facing, then it must be protected by a public SSL certificate. If you are using the AirWatch Cloud Connector, configure it to trust the root certificate installed on your SecureAuth appliance.
Prerequisites
n A SecureAuth instance that is configured for certificate deployment.
n Workspace ONE UEM console version 9.6 or later.
n If your SecureAuth appliance is public-facing, it must be protected with a Public SSL Certificate. If you are using VMware AirWatch Cloud Connector for enterprise integration, then AirWatch Cloud Connector needs to be configured to trust the root certificate installed on your SecureAuth appliance.
Procedure
1 Generate a SecureAuth MPKI RA certificate.
Certificate Authority Integrations
VMware, Inc. 101
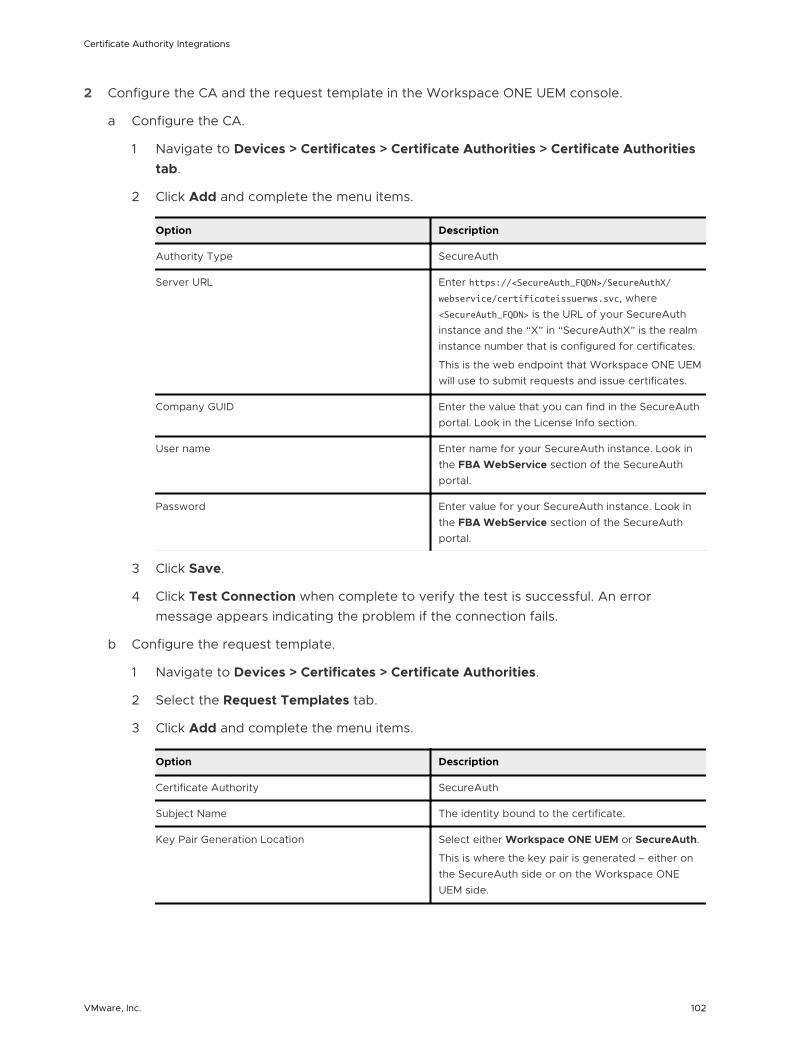
2 Configure the CA and the request template in the Workspace ONE UEM console.
a Configure the CA.
1 Navigate to Devices > Certificates > Certificate Authorities > Certificate Authorities tab.
2 Click Add and complete the menu items.
Option Description
Authority Type SecureAuth
Server URL Enter https://<SecureAuth_FQDN>/SecureAuthX/webservice/certificateissuerws.svc, where <SecureAuth_FQDN> is the URL of your SecureAuth instance and the “X” in “SecureAuthX” is the realm instance number that is configured for certificates.
This is the web endpoint that Workspace ONE UEM will use to submit requests and issue certificates.
Company GUID Enter the value that you can find in the SecureAuth portal. Look in the License Info section.
User name Enter name for your SecureAuth instance. Look in the FBA WebService section of the SecureAuth portal.
Password Enter value for your SecureAuth instance. Look in the FBA WebService section of the SecureAuth portal.
3 Click Save.
4 Click Test Connection when complete to verify the test is successful. An error message appears indicating the problem if the connection fails.
b Configure the request template.
1 Navigate to Devices > Certificates > Certificate Authorities.
2 Select the Request Templates tab.
3 Click Add and complete the menu items.
Option Description
Certificate Authority SecureAuth
Subject Name The identity bound to the certificate.
Key Pair Generation Location Select either Workspace ONE UEM or SecureAuth.
This is where the key pair is generated – either on the SecureAuth side or on the Workspace ONE UEM side.
Certificate Authority Integrations
VMware, Inc. 102
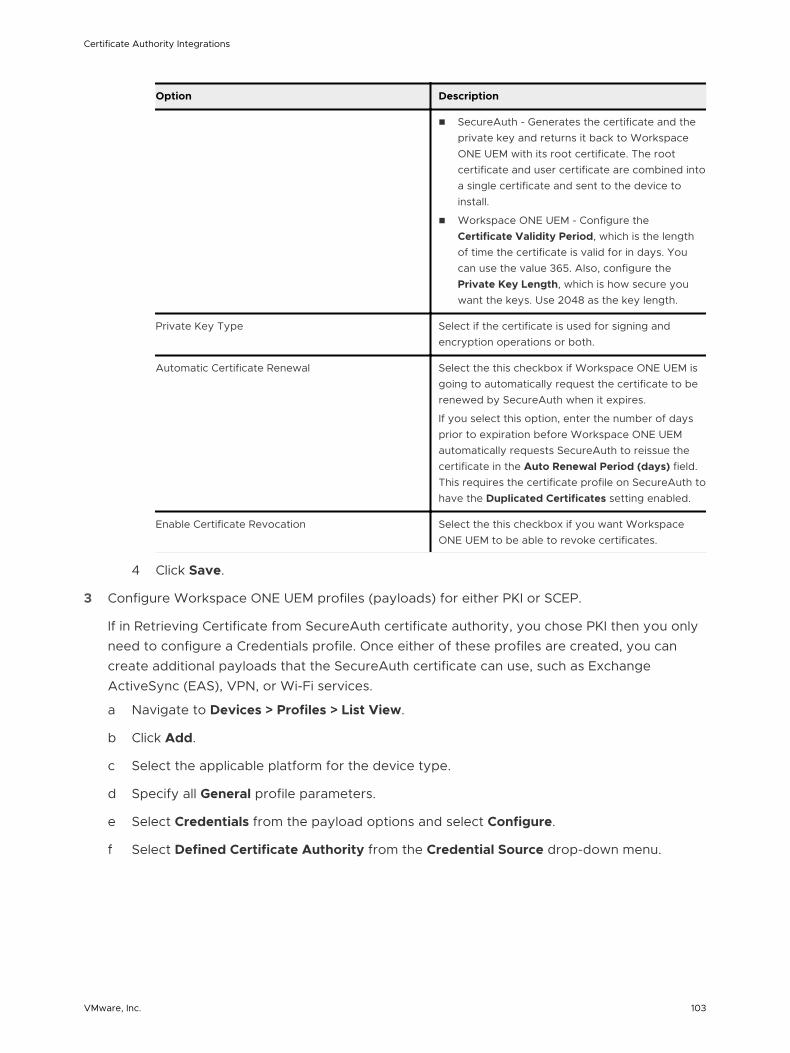
Option Description
n SecureAuth - Generates the certificate and the private key and returns it back to Workspace ONE UEM with its root certificate. The root certificate and user certificate are combined into a single certificate and sent to the device to install.
n Workspace ONE UEM - Configure the Certificate Validity Period, which is the length of time the certificate is valid for in days. You can use the value 365. Also, configure the Private Key Length, which is how secure you want the keys. Use 2048 as the key length.
Private Key Type Select if the certificate is used for signing and encryption operations or both.
Automatic Certificate Renewal Select the this checkbox if Workspace ONE UEM is going to automatically request the certificate to be renewed by SecureAuth when it expires.
If you select this option, enter the number of days prior to expiration before Workspace ONE UEM automatically requests SecureAuth to reissue the certificate in the Auto Renewal Period (days) field. This requires the certificate profile on SecureAuth to have the Duplicated Certificates setting enabled.
Enable Certificate Revocation Select the this checkbox if you want Workspace ONE UEM to be able to revoke certificates.
4 Click Save.
3 Configure Workspace ONE UEM profiles (payloads) for either PKI or SCEP.
If in Retrieving Certificate from SecureAuth certificate authority, you chose PKI then you only need to configure a Credentials profile. Once either of these profiles are created, you can create additional payloads that the SecureAuth certificate can use, such as Exchange ActiveSync (EAS), VPN, or Wi-Fi services.
a Navigate to Devices > Profiles > List View.
b Click Add.
c Select the applicable platform for the device type.
d Specify all General profile parameters.
e Select Credentials from the payload options and select Configure.
f Select Defined Certificate Authority from the Credential Source drop-down menu.
Certificate Authority Integrations
VMware, Inc. 103
g Select the external SecureAuth CA you created previously from the Certificate Authority drop-down menu.
h Select the certificate template for SecureAuth you created previously from the Certificate Template drop-down menu.
Saving and Publishing the profile would deploy a certificate to the device. However, if you plan on using the certificate on the device for Wi-Fi, VPN, or email purposes, then you should also configure the respective payload in the same profile to leverage the certificate being deployed.
4 (Optional) If you are using AirWatch Cloud Connector and the SecureAuth appliance is not public-facing, configure AirWatch Cloud Connector to trust the SecureAuth appliance.
a Open MMC by searching for it using Windows Search and launching the mmc.exe file.
b Navigate to File > Add/Remove Snap-in.
The Add or Remove Snap-ins screen displays.
c Select the Certificates snap-in in the left pane and select Add.
d Select Computer account as Snap in source. Select Next.
e Select Local computer. Select Finish.
f Select OK.
g Expand the newly added Certificates tree.
h Expand the Trusted Root Certification Authorities folder.
i Right-click the Certificates folder here and select All Tasks > Import.
j Proceed through the Certificate Import Wizard. As prompted, browse and select the file of the root certificate used to generate the SecureAuth SSL certificate. Select Next.
k Select Place all certs in the following store. Select Next.
l Click Finish.
What to do next
Review some tips and troubleshooting steps for the integration.
n Verify ability to perform certificate authentication without Workspace ONE UEM.
Remove Workspace ONE UEM from the configuration and manually configure a device to connect to your network server using certificate authentication. This should work outside of Workspace ONE UEM and until this works properly, Workspace ONE UEM will not be able to configure a device to connect with a certificate.
n Verify ability to perform certificate authentication with Workspace ONE UEM.
Certificate Authority Integrations
VMware, Inc. 104

You can confirm that the certificate is usable by pushing a profile to the device and testing whether or not the device is able to connect and sync to the configured EAS, VPN, or Wi-Fi access-point. If the device is not connecting and shows a message that the certificate cannot be authenticated or the account cannot connect then there is a problem in the configuration. Below are some helpful troubleshooting checks.
n If SSL TLS errors are received while creating a template.
n This error can occur when you attempt two tasks.
n Create a Workspace ONE UEM certificate template byselecting the Retrieve Profiles button or
n Retrieve a certificate from the Workspace ONE UEM console from the SecureAuth certificate authority.
n The troubleshooting technique that usually resolves this problem is adding the required server certificate chain in the console servers trusted root key store.
n If the Workspace ONE UEM Certificate Profile fails to install on the device.
n Inform Workspace ONE UEM Professional Services of the error and request they:
n Turn On Verbose Mode to capture additional data.
n Retrieve web console log.
n Workspace ONE UEM analyzes the log and works with customer to resolve the problem.
n If the certificate is not populated in the View XML option of the profile.
n Confirm that lookup values configured on the SecureAuth certificate profile match the look up values in the Workspace ONE UEM console’s Request Template.
n Confirm that lookup values in Workspace ONE UEM Request Template are actually populated in the user information being pulled from AD.
n Confirm you are pointing to the right profile in SecureAuth.
Certificate Authority Integrations
VMware, Inc. 105
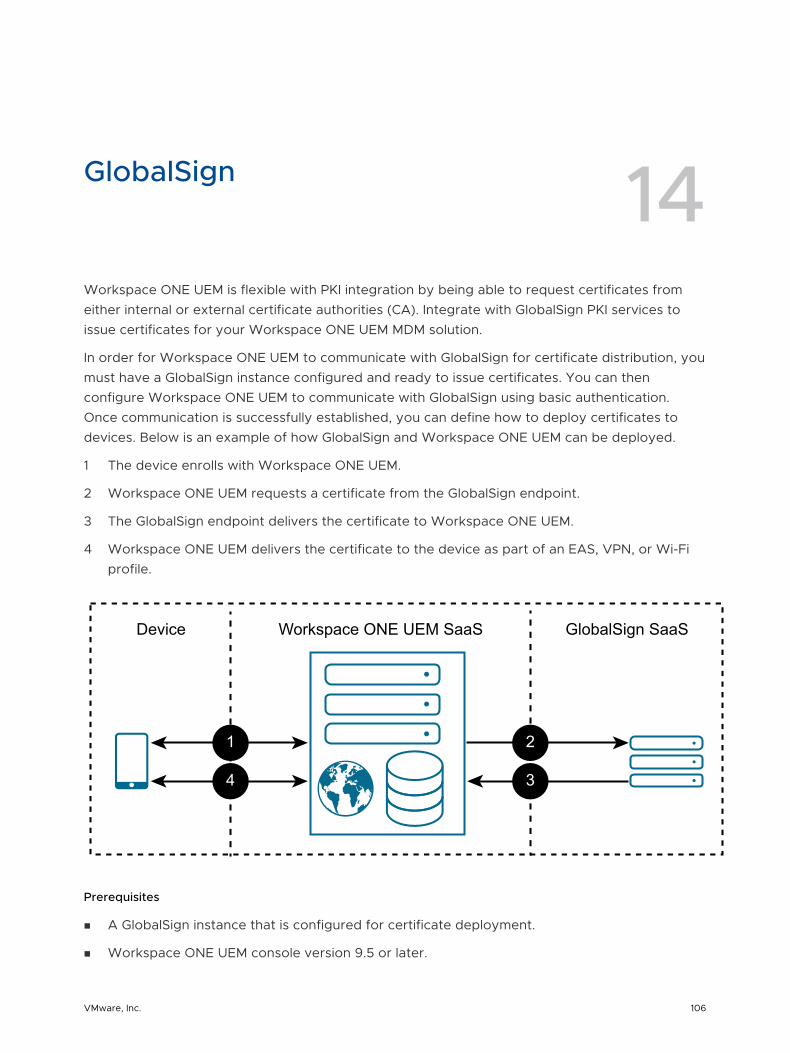
GlobalSign 14Workspace ONE UEM is flexible with PKI integration by being able to request certificates from either internal or external certificate authorities (CA). Integrate with GlobalSign PKI services to issue certificates for your Workspace ONE UEM MDM solution.
In order for Workspace ONE UEM to communicate with GlobalSign for certificate distribution, you must have a GlobalSign instance configured and ready to issue certificates. You can then configure Workspace ONE UEM to communicate with GlobalSign using basic authentication. Once communication is successfully established, you can define how to deploy certificates to devices. Below is an example of how GlobalSign and Workspace ONE UEM can be deployed.
1 The device enrolls with Workspace ONE UEM.
2 Workspace ONE UEM requests a certificate from the GlobalSign endpoint.
3 The GlobalSign endpoint delivers the certificate to Workspace ONE UEM.
4 Workspace ONE UEM delivers the certificate to the device as part of an EAS, VPN, or Wi-Fi profile.
1
4
2
3
Device Workspace ONE UEM SaaS GlobalSign SaaS
Prerequisites
n A GlobalSign instance that is configured for certificate deployment.
n Workspace ONE UEM console version 9.5 or later.
VMware, Inc. 106
n A service account with authentication permissions.
Procedure
1 Generate the GlobalSign certificate.
2 Configure the GlobalSign certificate authority in Workspace ONE UEM console.
a Navigate to Devices > Certificates > Certificate Authorities.
b Click Add.
c Select GlobalSign from the Authority Type drop-down menu.
d Enter a unique name and description that identifies the GlobalSign certificate authority in the Certificate Authority and Description fields.
e In the Server URL field enter the URL of your GlobalSign instance.
This is the web endpoint that Workspace ONE UEM will use to submit requests and issue certificates.
f Enter the Username and Password fields belonging to the service account with authentication permissions mentioned in System Requirements above.
g Click Save.
h Click Test Connection when complete to verify the test is successful. An error message appears indicating the problem if the connection fails.
i Click Save.
Certificate Authority Integrations
VMware, Inc. 107
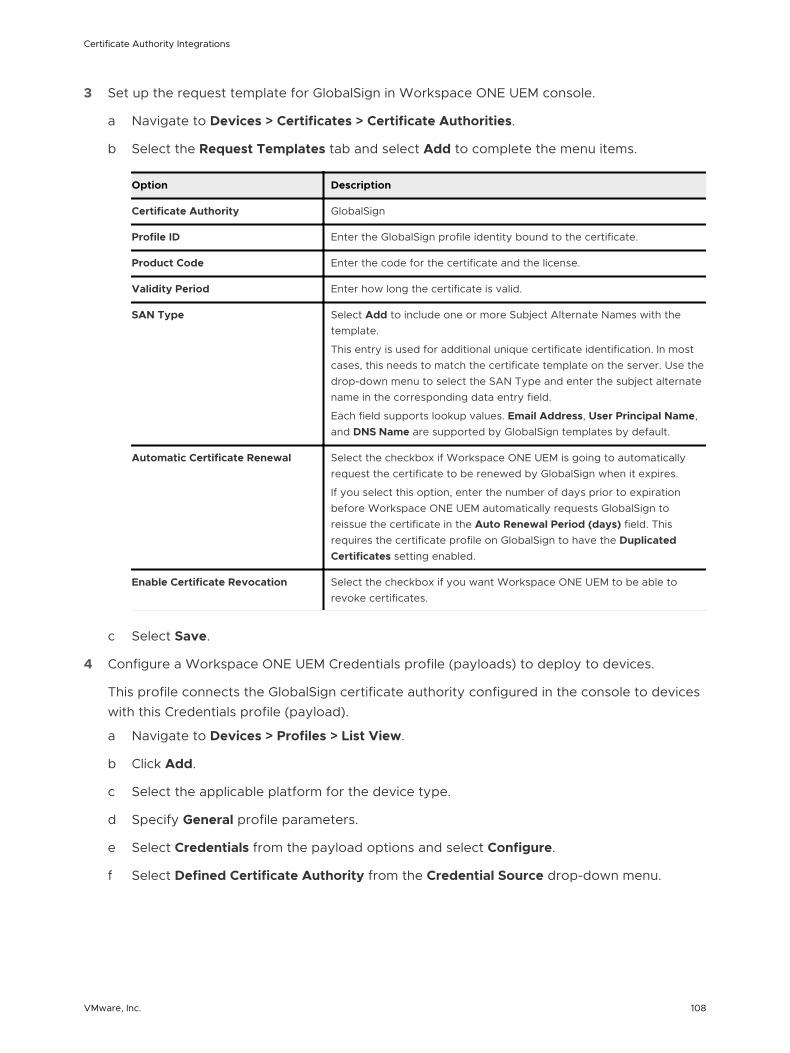
3 Set up the request template for GlobalSign in Workspace ONE UEM console.
a Navigate to Devices > Certificates > Certificate Authorities.
b Select the Request Templates tab and select Add to complete the menu items.
Option Description
Certificate Authority GlobalSign
Profile ID Enter the GlobalSign profile identity bound to the certificate.
Product Code Enter the code for the certificate and the license.
Validity Period Enter how long the certificate is valid.
SAN Type Select Add to include one or more Subject Alternate Names with the template.
This entry is used for additional unique certificate identification. In most cases, this needs to match the certificate template on the server. Use the drop-down menu to select the SAN Type and enter the subject alternate name in the corresponding data entry field.
Each field supports lookup values. Email Address, User Principal Name, and DNS Name are supported by GlobalSign templates by default.
Automatic Certificate Renewal Select the checkbox if Workspace ONE UEM is going to automatically request the certificate to be renewed by GlobalSign when it expires.
If you select this option, enter the number of days prior to expiration before Workspace ONE UEM automatically requests GlobalSign to reissue the certificate in the Auto Renewal Period (days) field. This requires the certificate profile on GlobalSign to have the Duplicated Certificates setting enabled.
Enable Certificate Revocation Select the checkbox if you want Workspace ONE UEM to be able to revoke certificates.
c Select Save.
4 Configure a Workspace ONE UEM Credentials profile (payloads) to deploy to devices.
This profile connects the GlobalSign certificate authority configured in the console to devices with this Credentials profile (payload).
a Navigate to Devices > Profiles > List View.
b Click Add.
c Select the applicable platform for the device type.
d Specify General profile parameters.
e Select Credentials from the payload options and select Configure.
f Select Defined Certificate Authority from the Credential Source drop-down menu.
Certificate Authority Integrations
VMware, Inc. 108
g Select the external GlobalSign CA you created from the Certificate Authority drop-down menu.
h Select the request template for GlobalSign you createdfrom the Certificate Template drop-down menu.
Saving and publishing the profile would deploy a certificate to the device. However, if you plan on using the certificate on the device for Wi-Fi, VPN, or email purposes, then you should also configure the respective payload in the same profile to leverage the certificate being deployed.
What to do next
Review some tips and troubleshooting steps for the integration.
n Verify ability to perform certificate authentication without Workspace ONE UEM.
Remove Workspace ONE UEM from the configuration and manually configure a device to connect to your network server using certificate authentication. This should work outside of Workspace ONE UEM and until this works properly, Workspace ONE UEM will not be able to configure a device to connect with a certificate.
n Verify ability to perform certificate authentication with Workspace ONE UEM.
You can confirm that the certificate is usable by pushing a profile to the device and testing whether or not the device is able to connect and sync to the configured EAS, VPN, or Wi-Fi access-point. If the device is not connecting and shows a message that the certificate cannot be authenticated or the account cannot connect then there is a problem in the configuration. Below are some helpful troubleshooting checks.
n If SSL TLS errors are received while creating a template.
n This error can occur when you attempt two tasks.
n Create a Workspace ONE UEM certificate template byselecting the Retrieve Profiles button or
n Retrieve a certificate from the Workspace ONE UEM console from the SecureAuth certificate authority.
n The troubleshooting technique that usually resolves this problem is adding the required server certificate chain in the console servers trusted root key store.
n If the Workspace ONE UEM Certificate Profile fails to install on the device.
n Inform Workspace ONE UEM Professional Services of the error and request they:
n Turn On Verbose Mode to capture additional data.
n Retrieve web console log.
n Workspace ONE UEM analyzes the log and works with customer to resolve the problem.
Certificate Authority Integrations
VMware, Inc. 109

n If the certificate is not populated in the View XML option of the profile.
n Confirm that lookup values configured on the GlobalSign certificate profile match the look up values in the Workspace ONE UEM console’s Request Template.
n Confirm that lookup values in Workspace ONE UEM Request Template are actually populated in the user information being pulled from AD.
n Confirm you are pointing to the right profile in GlobalSign.
Certificate Authority Integrations
VMware, Inc. 110
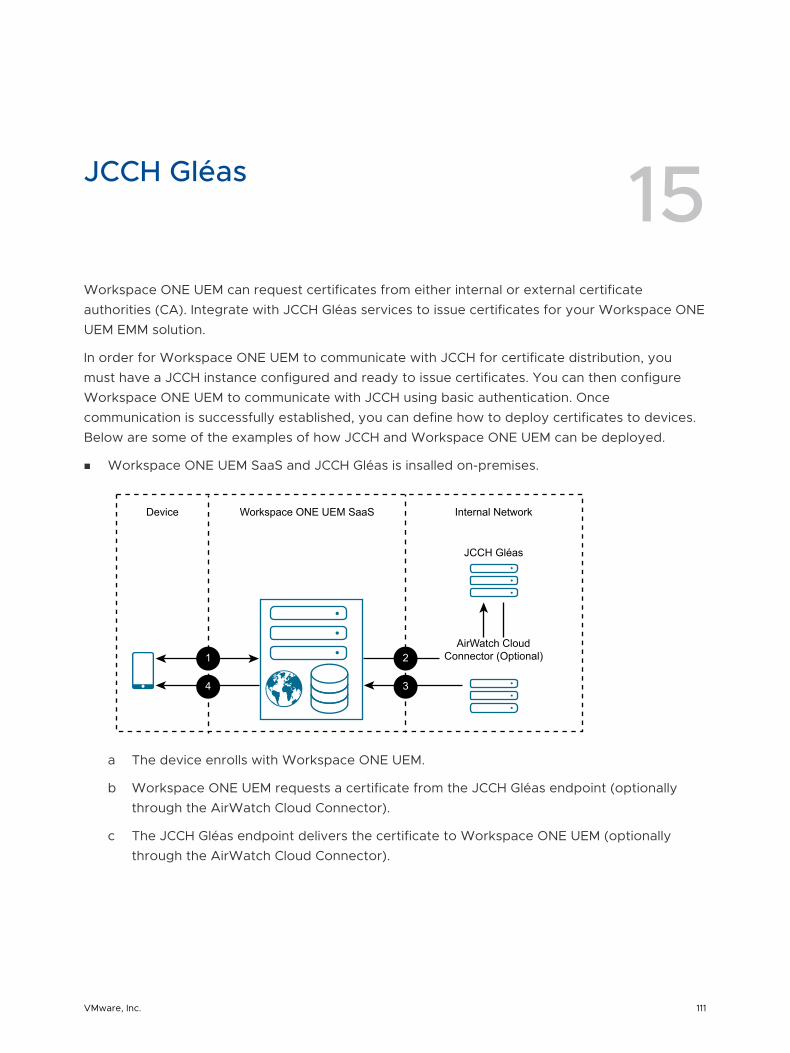
JCCH Gléas 15Workspace ONE UEM can request certificates from either internal or external certificate authorities (CA). Integrate with JCCH Gléas services to issue certificates for your Workspace ONE UEM EMM solution.
In order for Workspace ONE UEM to communicate with JCCH for certificate distribution, you must have a JCCH instance configured and ready to issue certificates. You can then configure Workspace ONE UEM to communicate with JCCH using basic authentication. Once communication is successfully established, you can define how to deploy certificates to devices. Below are some of the examples of how JCCH and Workspace ONE UEM can be deployed.
n Workspace ONE UEM SaaS and JCCH Gléas is insalled on-premises.
AirWatch CloudConnector (Optional)
JCCH Gléas
Device Workspace ONE UEM SaaS Internal Network
2
3
1
4
a The device enrolls with Workspace ONE UEM.
b Workspace ONE UEM requests a certificate from the JCCH Gléas endpoint (optionally through the AirWatch Cloud Connector).
c The JCCH Gléas endpoint delivers the certificate to Workspace ONE UEM (optionally through the AirWatch Cloud Connector).
VMware, Inc. 111
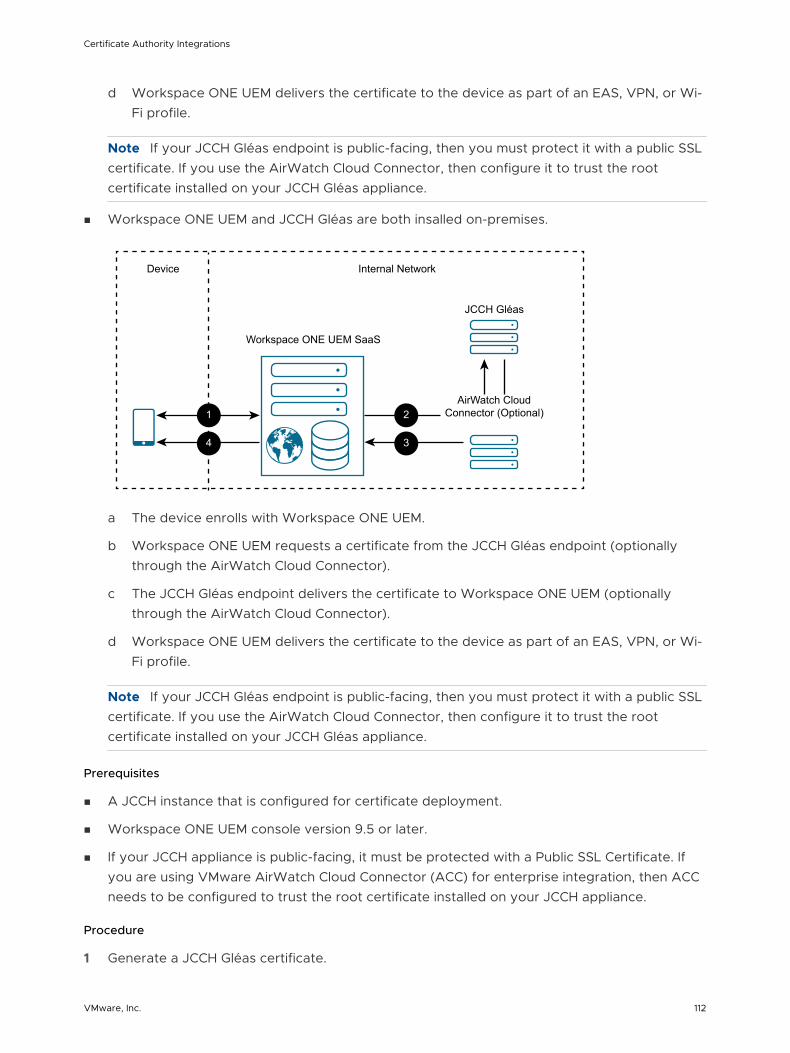
d Workspace ONE UEM delivers the certificate to the device as part of an EAS, VPN, or Wi-Fi profile.
Note If your JCCH Gléas endpoint is public-facing, then you must protect it with a public SSL certificate. If you use the AirWatch Cloud Connector, then configure it to trust the root certificate installed on your JCCH Gléas appliance.
n Workspace ONE UEM and JCCH Gléas are both insalled on-premises.
Device
Workspace ONE UEM SaaS
Internal Network
AirWatch CloudConnector (Optional)
JCCH Gléas
1
4
2
3
a The device enrolls with Workspace ONE UEM.
b Workspace ONE UEM requests a certificate from the JCCH Gléas endpoint (optionally through the AirWatch Cloud Connector).
c The JCCH Gléas endpoint delivers the certificate to Workspace ONE UEM (optionally through the AirWatch Cloud Connector).
d Workspace ONE UEM delivers the certificate to the device as part of an EAS, VPN, or Wi-Fi profile.
Note If your JCCH Gléas endpoint is public-facing, then you must protect it with a public SSL certificate. If you use the AirWatch Cloud Connector, then configure it to trust the root certificate installed on your JCCH Gléas appliance.
Prerequisites
n A JCCH instance that is configured for certificate deployment.
n Workspace ONE UEM console version 9.5 or later.
n If your JCCH appliance is public-facing, it must be protected with a Public SSL Certificate. If you are using VMware AirWatch Cloud Connector (ACC) for enterprise integration, then ACC needs to be configured to trust the root certificate installed on your JCCH appliance.
Procedure
1 Generate a JCCH Gléas certificate.
Certificate Authority Integrations
VMware, Inc. 112
2 Configure JCCH Gléas as a certificate authority in Workspace ONE UEM console.
a Navigate to Devices > Certificates > Certificate Authorities.
b Click Add.
c Select JCCH Gléas from the Authority Type drop-down menu.
d Enter a unique name and description that identifies the JCCH certificate authority in the Certificate Authority and Description fields.
e In the Server URL field enter the URL of your JCCH instance.
This is the web endpoint that Workspace ONE UEM will use to submit requests and issue certificates.
f Select the Upload button in the Client Certificate field and upload the new certificate from the location on your PC to which it has been saved.
g Click Save.
h Click Test Connection when complete to verify the test is successful. An error message appears indicating the problem if the connection fails.
3 Define which certificate deploys to devices by setting up a request template in the Workspace ONE UEM console.
a Navigate to Devices > Certificates > Certificate Authorities.
b Select the Request Templates tab, select Add, and complete the menu items.
Option Description
Certificate Authority JCCH
Profile ID Enter the identification that corresponds to the profile identity bound to the certificate.
Product Code Enter the code bound to the certificate.
Validity Period Enter the time period the certificate is valid.
Automatic Certificate Renewal Select this checkbox if Workspace ONE UEM is going to automatically request the certificate to be renewed by JCCH when it expires.
If you select this option, enter the number of days prior to expiration before Workspace ONE UEM automatically requests JCCH to reissue the certificate in the Auto Renewal Period (days) field. This requires the certificate profile on JCCH to have the Duplicated Certificates setting enabled.
Enable Certificate Revocation Select this checkbox if you want Workspace ONE UEM to be able to revoke certificates.
c Click Save.
Certificate Authority Integrations
VMware, Inc. 113
4 Configure Workspace ONE UEM profiles (payloads). Once Crendential profile is created, you can create additional payloads that the JCCH certificate can use, such as Exchange ActiveSync (EAS), VPN, or Wi-Fi services.
a Navigate to Devices > Profiles > List View.
b Click Add.
c Select the applicable platform for the device type.
d Specify General profile parameters.
e Select Credentials from the payload options.
f Click Configure.
g Select Defined Certificate Authority from the Credential Source drop-down menu.
h Select the external JCCH CA you created from the Certificate Authority drop-down menu.
i Select the request template for JCCH you created from the Certificate Template drop-down menu.
Saving and publishing the profile would deploy a certificate to the device. However, if you plan on using the certificate on the device for Wi-Fi, VPN, or email purposes, then you should also configure the respective payload in the same profile to leverage the certificate being deployed.
5 (Optional) If you are using AirWatch Cloud Connector and the JCCH appliance is not public-facing, then you need to ensure the AirWatch Cloud Connector configuration trusts the appliance.
a Open the JCCH console certificate and view the Certificate Path tab.
1 If multiple certificates are listed, they will need to be separated and added to the appropriate stores.
2 The remaining steps address adding the root certificate to the Trust Root Store.
b Open MMC by searching for it using Windows Search and launching the mmc.exe file.
c Navigate to File > Add/Remove Snap-in. The Add or Remove Snap-ins screen displays.
d Select the Certificates snap-in in the left pane and select Add.
e Select Computer account as Snap-in source. Select Next.
f Select Local computer and then select Finish.
g Select OK.
h Expand the newly added Certificates tree.
i Expand the Trusted Root Certification Authorities folder.
j Right-click the Certificates folder here and select All Tasks > Import.
Certificate Authority Integrations
VMware, Inc. 114
k Proceed through the Certificate Import Wizard. You will be prompted to Browse and select the file of the root certificate used to generate the EJBCA Console certificate. Select Next.
l Select Place all certs in the following store and then select Next.
m Click Finish.
n Select all other intermediate and child certificates to add them to their associated stores within the Certificates tree.
What to do next
Review some tips and troubleshooting steps for the integration.
n Verify ability to perform certificate authentication without Workspace ONE UEM.
Remove Workspace ONE UEM from the configuration and manually configure a device to connect to your network server using certificate authentication. This should work outside of Workspace ONE UEM and until this works properly, Workspace ONE UEM will not be able to configure a device to connect with a certificate.
n Verify ability to perform certificate authentication with Workspace ONE UEM.
You can confirm that the certificate is usable by pushing a profile to the device and testing whether or not the device is able to connect and sync to the configured EAS, VPN, or Wi-Fi access-point. If the device is not connecting and shows a message that the certificate cannot be authenticated or the account cannot connect then there is a problem in the configuration. Below are some helpful troubleshooting checks.
n If SSL TLS errors are received while creating a template.
n This error can occur when you attempt two tasks.
n Create a Workspace ONE UEM certificate template byselecting the Retrieve Profiles button or
n Retrieve a certificate from the Workspace ONE UEM console from the SecureAuth certificate authority.
n The troubleshooting technique that usually resolves this problem is adding the required server certificate chain in the console servers trusted root key store.
n If the Workspace ONE UEM certificate profile fails to install on the device.
n Inform Workspace ONE UEM Professional Services of the error and request they:
n Turn on Verbose Mode to capture additional data.
n Retrieve web console log.
n Workspace ONE UEM analyzes the log and works with customer to resolve the problem.
Certificate Authority Integrations
VMware, Inc. 115
n If the certificate is not populated in the View XML option of the profile.
n Confirm that lookup values configured on the JCCH certificate profile match the look up values in the Workspace ONE UEM console request emplate.
n Confirm that lookup values in Workspace ONE UEM request template are actually populated in the user information being pulled from AD.
n Confirm you are pointing to the right profile in JCCH.
Certificate Authority Integrations
VMware, Inc. 116
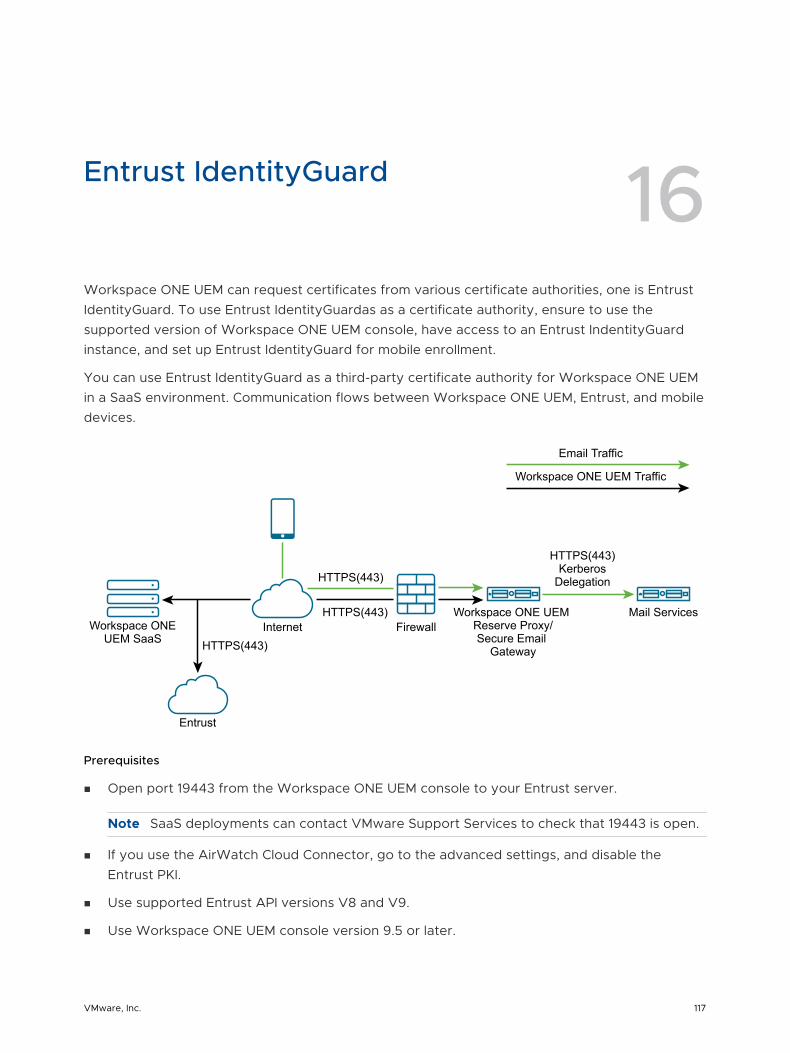
Entrust IdentityGuard 16Workspace ONE UEM can request certificates from various certificate authorities, one is Entrust IdentityGuard. To use Entrust IdentityGuardas as a certificate authority, ensure to use the supported version of Workspace ONE UEM console, have access to an Entrust IndentityGuard instance, and set up Entrust IdentityGuard for mobile enrollment.
You can use Entrust IdentityGuard as a third-party certificate authority for Workspace ONE UEM in a SaaS environment. Communication flows between Workspace ONE UEM, Entrust, and mobile devices.
Workspace ONEUEM SaaS
HTTPS(443)
HTTPS(443)Kerberos
Delegation
HTTPS(443)
Entrust
Workspace ONE UEM Reserve Proxy/Secure Email
Gateway
HTTPS(443)
Internet FirewallMail Services
Email Traffic
Workspace ONE UEM Traffic
Prerequisites
n Open port 19443 from the Workspace ONE UEM console to your Entrust server.
Note SaaS deployments can contact VMware Support Services to check that 19443 is open.
n If you use the AirWatch Cloud Connector, go to the advanced settings, and disable the Entrust PKI.
n Use supported Entrust API versions V8 and V9.
n Use Workspace ONE UEM console version 9.5 or later.
VMware, Inc. 117
n VMware AirWatch Cloud Connector is required if the Entrust IdentityGuard instance is installed behind a firewall.
n An Entrust IdentityGuard instance needs to be available.
n Configure Entrust IdentityGuard for mobile enrollment.
Procedure
1 Set up Entrust IdentityGuard for mobile enrollment with Workspace ONE UEM. This task creates an Entrust Managed certificate authority (CA) and issues the instance of Entrust with a digital ID.
Perform this task with help from your Entrust IdentityGuard representative. If you are using Entrust Managed Services PKI, your representative gives you several values you need for configuring Entrust as a CA in Workspace ONE UEM console.
n URL to enter as the Server URL of the CA.
n Credentials for the Server URL.
n A digital ID configuration to enter while completing the certificate template.
a Configure an Entrust Managed CA in Entrust IdentityGuard.
Adding a Managed CA allows Entrust IdentityGuard to communicate with your Security Manager CA.
b Configure a Digital ID Configuration in Entrust IdentityGuard.
A Digital ID Configuration is a template that Entrust IdentityGuard uses to issue digital IDs.
c Configure the Entrust IdentityGuard digital ID policies.
d Mirror the password rules set in Security Manager and Entrust IdentityGuard.
If the password rules do not match, errors can occur when issuing digital IDs.
e Add an Entrust IdentityGuard administrator that your Workspace ONE UEM MDM uses to issue digital IDs.
2 Configure Entrust IdentityGuard as a certificate authority (CA) in the Workspace ONE UEM console.
Configuration sets communication between the systems using values from your Entrust IdentityGuard managed certificate authority.
a Navigate to Devices > Certificates > Certificate Authorities and in the System Settings page that displays, select the Certificate Authorities tab.
b Select the Add button.
The Certificate Authority – Add / Edit page displays.
c Enter in the Name field a unique name that identifies the Entrust certificate authority.
d Select the Authority Type drop-down and select Entrust.
Certificate Authority Integrations
VMware, Inc. 118
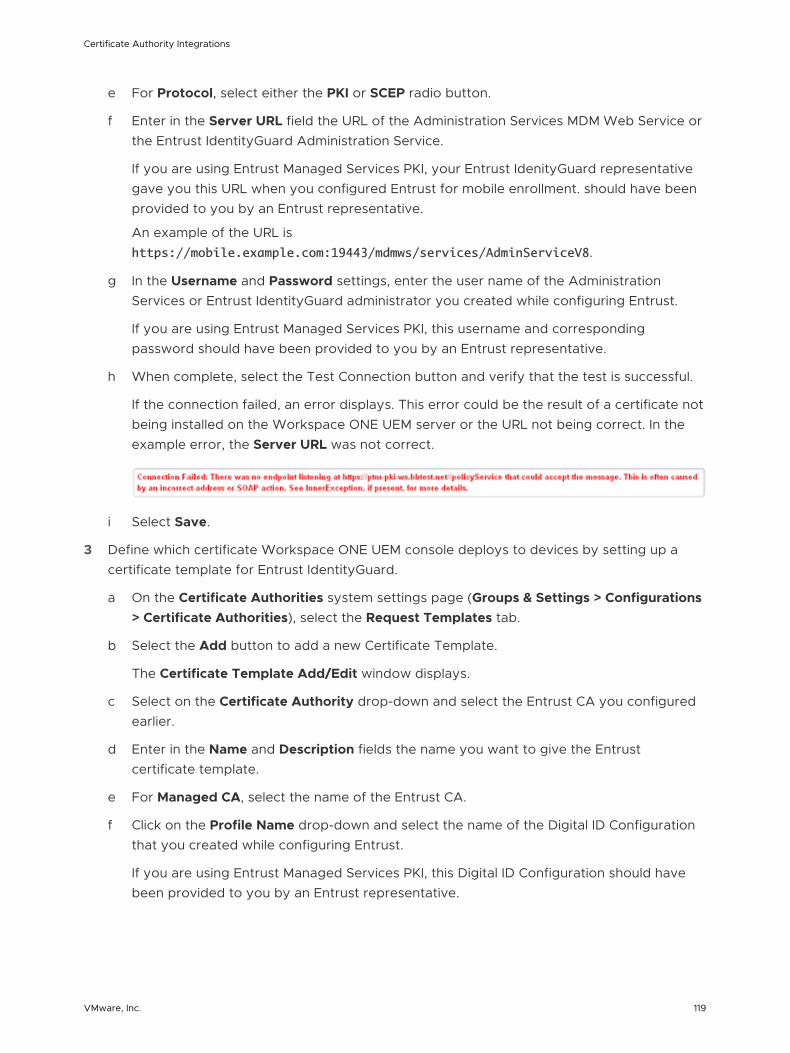
e For Protocol, select either the PKI or SCEP radio button.
f Enter in the Server URL field the URL of the Administration Services MDM Web Service or the Entrust IdentityGuard Administration Service.
If you are using Entrust Managed Services PKI, your Entrust IdenityGuard representative gave you this URL when you configured Entrust for mobile enrollment. should have been provided to you by an Entrust representative.
An example of the URL is https://mobile.example.com:19443/mdmws/services/AdminServiceV8.
g In the Username and Password settings, enter the user name of the Administration Services or Entrust IdentityGuard administrator you created while configuring Entrust.
If you are using Entrust Managed Services PKI, this username and corresponding password should have been provided to you by an Entrust representative.
h When complete, select the Test Connection button and verify that the test is successful.
If the connection failed, an error displays. This error could be the result of a certificate not being installed on the Workspace ONE UEM server or the URL not being correct. In the example error, the Server URL was not correct.
i Select Save.
3 Define which certificate Workspace ONE UEM console deploys to devices by setting up a certificate template for Entrust IdentityGuard.
a On the Certificate Authorities system settings page (Groups & Settings > Configurations > Certificate Authorities), select the Request Templates tab.
b Select the Add button to add a new Certificate Template.
The Certificate Template Add/Edit window displays.
c Select on the Certificate Authority drop-down and select the Entrust CA you configured earlier.
d Enter in the Name and Description fields the name you want to give the Entrust certificate template.
e For Managed CA, select the name of the Entrust CA.
f Click on the Profile Name drop-down and select the name of the Digital ID Configuration that you created while configuring Entrust.
If you are using Entrust Managed Services PKI, this Digital ID Configuration should have been provided to you by an Entrust representative.
Certificate Authority Integrations
VMware, Inc. 119
g Configure Subject Alternative Name (SAN) attributes as required.
These are used for additional unique identification of the device and need to match the Digital ID configuration.
h If Workspace ONE UEM automatically requests the certificate to be reviewed by Entrust when it expires, check the Automatic Certificate Renewal check box and make sure the assignment type is set to Auto. Set the number of days prior to expiration beforeWorkspace ONE UEM auotmatically requests Entrust to reissue the certificate in Auto Renewal Period (days) field.
i If certificates must be revoked, either manually or when they are removed from the device, select Enable Certificate Revocation.
j Complete the Mandatory Fields that are used to form the common name of the distinguished name within the certificate.
These fields can change depending on which Entrust profile you choose since the information within the profile may be different.
The fields you see on the left side correspond to the data source fields you declared on the Entrust side. The values on the right are the Workspace ONE UEM variables. Enter Lookup Values in each of the fields that complement those fields in the Entrust profile. Make sure the lookup values you use match those used in the Digital ID configuration.
If you are using Entrust Managed Services PKI, this information should have been provided to you by an Entrust representative.
k Click Save.
What to do next
To fix a (40) error that occurrs in your integration of Entrust IdentityGuard and Workspace ONE UEM, delete old profiles and update the values for two parameters.
If you see the error (40) Error AirWatch.CloudConnector.CertificateService.CertificateService.TestConnection, take the following steps to fix the error.
n Clean up stale profiles.
n Increase the size of MaxRecievedMessageSize to 2147483647.
n Increase the size of MaxBufferSize to 2147483647.
Certificate Authority Integrations
VMware, Inc. 120


