

…just got better

Understanding ECM Motors
What does ECM mean?
Electrically Commutated Motor

The GE ECMTM motor is a brushless DC, Three - phase motor with a permanent magnet rotor. Motor phases are sequentially energized by the electronic control, powered from a single-phase supply.
The ECM Technology

Control Construction
• Microcomputer module
• Power Conditioning module
• Encapsulated with a polyurethane
compound to protect against moisture

Stator Construction
• Laminated, interlocked stator
• Steel shell, aluminum end shield,
through-bolt construction
• Inslot Salient wound
• Available in closed, partial, or fully
vented shell

• 3 Iron Ferrite magnets glued on rotor sleeve• Magnetized at GE Factory• Two Resilient Rings isolate the shaft from the rotor• Ball Bearings
Rotor Construction

Thermostatic Control (TSTAT)...Most widely used in Residential systems
Discrete field selection of airflow settings and comfort options.• Direct 24 VAC interface to conventional thermostats• Supports 1 or 2 “stage” systems• Suitable for furnaces, heat pumps, and fan coils• 4 levels of cooling airflow + trim• 4 levels of heating airflow + trim• Enables use of 4 unique delay profiles
Thermostat Tap Board * Motor
* OEM Specific
Connects to Connects to
ECM Modes of Operation Control Cont…
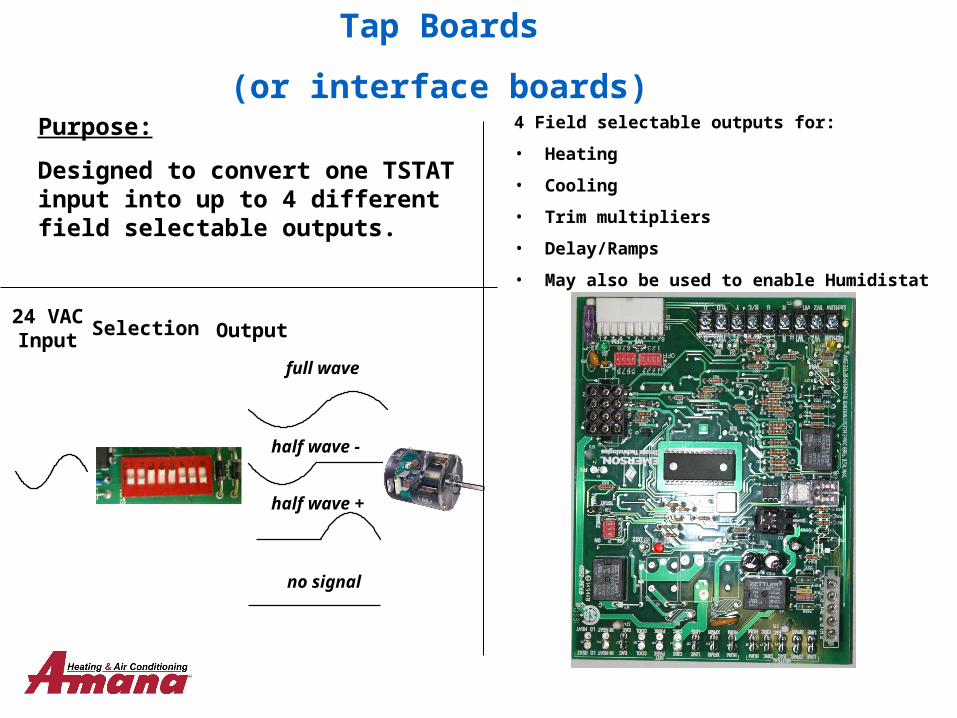
Tap Boards
(or interface boards)
full wave
half wave -
half wave +
no signal
24 VAC Input
Selection Output
Purpose:
Designed to convert one TSTAT input into up to 4 different field selectable outputs.
4 Field selectable outputs for:
• Heating
• Cooling
• Trim multipliers
• Delay/Ramps
• May also be used to enable Humidistat

How the Tap Board Communicates with the ECM
full wave
half wave -
half wave +
no signal
24 VAC Input Selection* Output
* For Cool, Heat, Adjust, Delay
D
C
B
A

• Permanently connected to AC line• Controlled by low voltage inputs• Motor starts softly, ramps to speed• Wide and efficient airflow range
between hi and low taps
• Start-up by contact to AC line • Controlled by AC line • Abrupt turn-on stress, noise• Motor speed taps are inefficient and
produce only minor speed adjustment
How is a PSC motor different than an ECM?
ECMPSC vs.
PowerConditioning
AC to DCConversion
InterfaceControl
Inverter
MotorControl
AC Power
Motor
ECM
HVAC System Control
INPUTS 24 VAC Constant Fan
Rev Valve
Heat Call Capacity Select Delay selects Trim/Adjust Humidistat
Compressor Call
Available Outputs RPM OverSpeed UnderSpeed CFM Demand
HVAC System Control
RelayContacts Motor
PSCAC Power
Start / RunCapacitor
INPUTS24Vac
Compressor Calls low /hi / off
Constant Fan
Heat Calls low stage hi stage
aux/emerg
Variable Speed vs. Constant VolumeVariable Speed vs. Constant Volume
• Variable speed motor will change or vary RPM.
• Constant volume will change or vary motor RPM to deliver a preset or programmed CFM.
What is the difference?

• Low static, high quality ducted applications will run slowly, quietly and efficiently….. while delivering the correct airflow.
• High static applications will run fast, be noisy and power hungry…. The ECM may still provide the correct airflow, but at a price!
Airflow Control TipsFor GE ECMTM
Use good duct design practices and hold static pressure to less than .8”, ideally less than .5”

Rotor Position Sensing
• At any given time while the motor is running, two of the three phases are energized
• The movement of the magnetized rotor past the third phase induces a voltage,
or back EMF, in this unenergized phase
• The voltage in the third phase communicates the rotor’s position to the control
Phase 1
Phase 3
Pha
se 2
• Motor Torque is regulated at a given
level by an accurate control of the
current in motor phases.
• The microcomputer control keeps
torque constant regardless of
operating speed.

How Does the ECM Sense Static Pressure?
Input Power vs. RPM
0
50
100
150
200
250
300
350
400
450
500
550
250 300 350 400 450 500 550 600 650 700 750 800 850 900 950 1000 1050 1100 1150
RPM
Inp
ut
Po
we
r (w
att
s)
1000 RPM280 Watts
500 RPM35 Watts
P = kN^3
1/2 N = 1/8 P
1/8 X 280W = 35W

0.0
0.2
0.4
0.6
0.8
0 1 2 3 4 5 6 7
CFM/ Watt
Sys
tem
Pre
ssure
(Pr)
PSC
ECM
408W745W
Lower static pressure yields greater efficiency gain
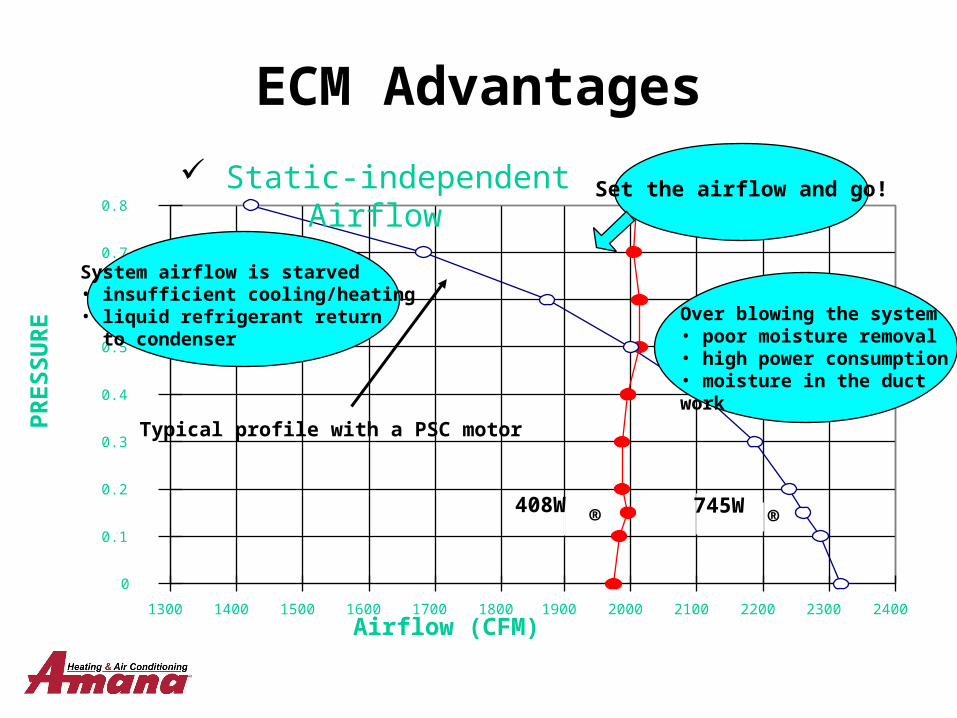
ECM Advantages
Efficiency gain
0
0.1
0.2
0.3
0.4
0.5
0.6
0.7
0.8
1300 1400 1500 1600 1700 1800 1900 2000 2100 2200 2300 2400
®408W ®745W
PR
ES
SU
RE
Airflow (CFM)
Over blowing the system • poor moisture removal • high power consumption• moisture in the duct work
System airflow is starved• insufficient cooling/heating• liquid refrigerant return to condenser
Set the airflow and go!
Typical profile with a PSC motor
ECM Advantages
Static-independent Airflow
Troubleshooting ECM Motors
The # 1 failure of ECM motors…………… No Fault Found ! (80%)
The # 2 failure of ECM Motors …………… Moisture. (16%)
All other failures (4%).

High Voltage5 PIN
CONNECTOR
Low Voltage16 PIN
CONNECTOR
Power Connectors• Connectors are keyed
• Don’t force in the wrong orientation
• Pull on the plug, NOT the cable
• DO NOT pull power cable out during
operation – Arching could occur

Power Connectors Continued5 Pin Power Connector
• 120 VAC uses a jumper (red wire)
• Control operates at 240 VAC
• Jumper enables voltage doubler
• Do not apply 240 VAC with jumper installed as motor and
control will fail.
• 240 VAC input does not use a JUMPER
• Pulse Width Modulation (PWM) or
• 24 VAC Thermostat Mode or
• Digital Serial Interface (DSI)
16 Pin Signal Connector
Operating Voltages Application Note

How Does the ECM Work?
The End Bell defines motor characteristics.
Only 3 motor sections ½, ¾, or 1 hp.
The motor is really a three phase motor with a permanent magnet rotor.
Motor Section
End Bell Assembly
Motor Connector

Troubleshooting ECM Motors
There are some ECM motor testers on the market today.

Troubleshooting ECM Motors
What is Normal?
It is normal for the blower to rock back and forth at start up.
It is normal for the shaft to feel rough or bumpy when turned.
Don’t judge the motor by the RPM or ramp up sequence.

Troubleshooting ECM Motors
Don’t judge the motor by the RPM or ramp up sequence.
Profile AProfile BProfile C
Fullcapacity
OffDelay
Pre-run Shortrun
Time: 0 - 15 min, 16 stepsLevel: 6 - 100% 16 steps
off
on
All slew rates are controlled

Troubleshooting ECM Motors
Drip LoopElectrical Connections on Bottom
• Always make sure the motor is oriented such that the connectors are on the bottom
• Make sure the electrical connections form a drip loop to prevent any moisture from running down the harness and into the end bell assembly.
• A blower wheel loose on the motor shaft can cause the blower to vibrate, excessive noise, and may cause motor malfunction.

Troubleshooting ECM Motors
How do we troubleshoot ECM motors?
Rule # 1 – If the motor is running at all. The problem is not in the motor.
Rule # 2 – If the motor is running at the wrong RPM/CFM, the most likely cause is the installation or controls sending signals to the ECM motor.
Rule # 3 – What is the most common failure mode? Water. Look for signs of moisture damage and correct before replacing end bell.
Troubleshooting ECM Motors
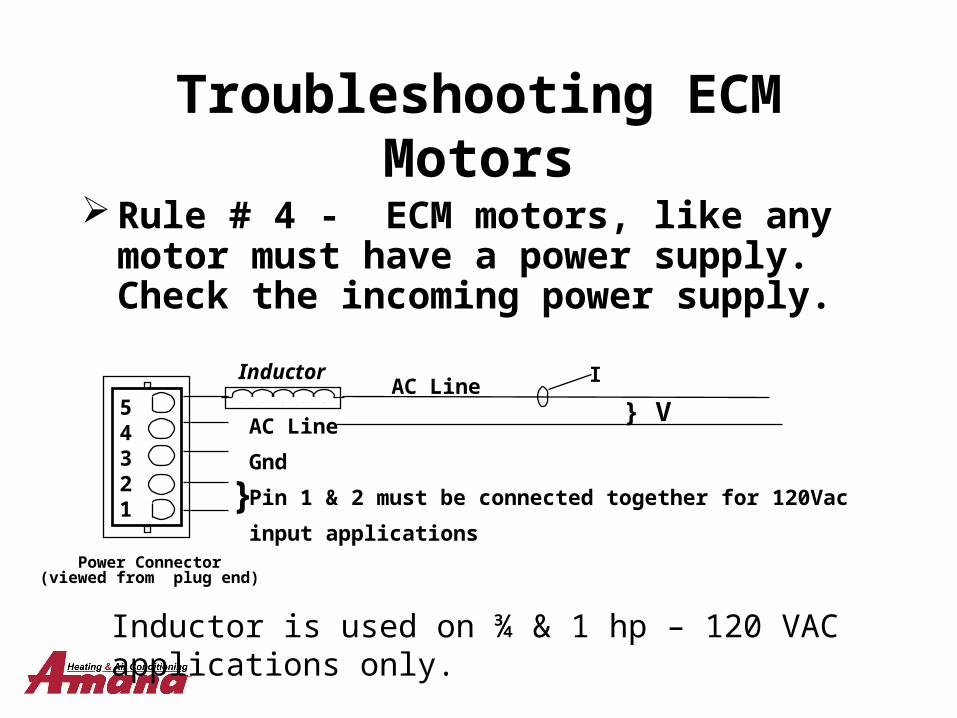
Rule # 4 - ECM motors, like any motor must have a power supply. Check the incoming power supply.
AC Line
Gnd
Pin 1 & 2 must be connected together for 120Vac
input applications
}
Power Connector(viewed from plug end)
54321
InductorAC Line
} V
I
Inductor is used on ¾ & 1 hp – 120 VAC applications only.

Troubleshooting ECM Motors # 5 Check inductor coil

TSTAT Connections
12345678
9 10111213141516
Pin number
1 2 3 4 5 6 7 8 9 10 11 12 13 14 15 16
Common C1 W/W1 Common C2 Delay tap select Cool tap Select Y1 Adjust tap select Output - Return valve (heat pump only) Humidistat (BK) Heat tap select 24 VAC (R) 2nd stage heat (EM/W2) 2nd stage cool (Y/Y2) Fan (G) Output +
Control (male)
Connector (female)

Troubleshooting ECM Motors
Rule # 5 - ECM motors, like any motor must have a signal or switch to turn it on, or tell it to run.
Controls should be checked with a true RMS meter or analog meter.
Controls will activate at ½ nominal voltage and 12 milliamps.
Control Connector Cable Half(viewed from connector end)
8
5
4
3
2
1
6
716
13
12
11
10
9
14
15Out
Cool
Delay
Common 2
W /W1
Common 1
Y1
Adjust +/-Out +
EM Ht/W2
24VAC (R)
Heat
BK/PWM (Speed)
(Rev Valve)
Y /Y2
G(fan)

Troubleshooting ECM Motors Check power to control.
Pins 1 to 12 and 3 to 12. You must have 24 VAC.
Set thermostat to demand for cooling. Check for 24 VAC at pins 1 to 6 and 3 to 6.
If you don’t record voltage as noted, repeat test at control or interface board.
Control Connector Cable Half(viewed from connector end)
8
5
4
3
2
1
6
716
13
12
11
10
9
14
15Out
Cool
Delay
Common 2
W /W1
Common 1
Y1
Adjust +/-Out +
EM Ht/W2
24VAC (R)
Heat
BK/PWM (Speed)
(Rev Valve)
Y /Y2
G(fan)
Troubleshooting ECM Motors
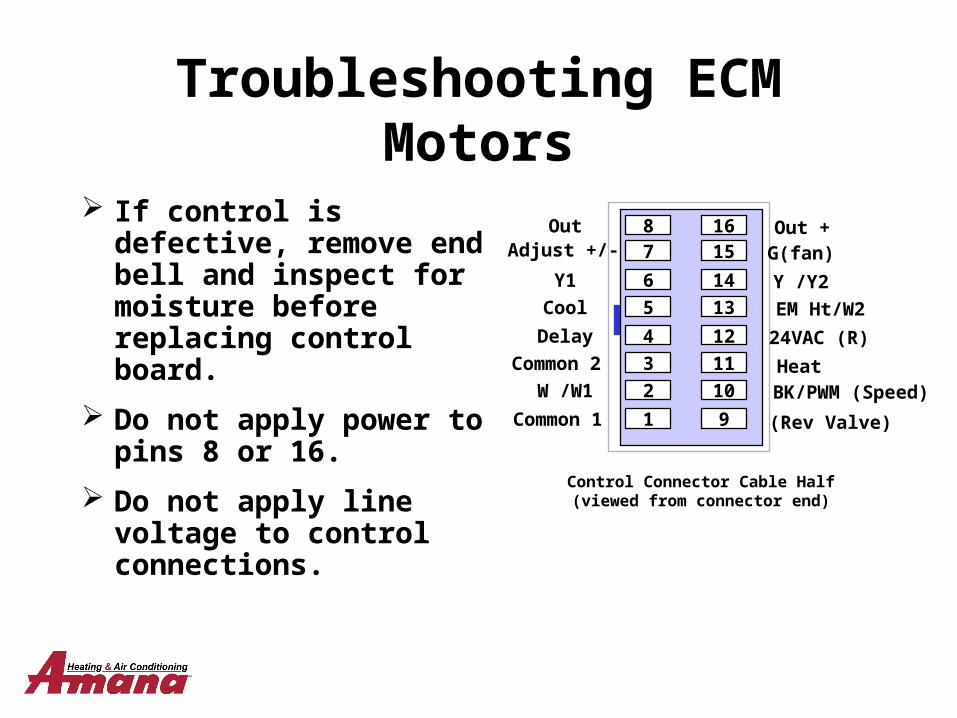
If control is defective, remove end bell and inspect for moisture before replacing control board.
Do not apply power to pins 8 or 16.
Do not apply line voltage to control connections.
Control Connector Cable Half(viewed from connector end)
8
5
4
3
2
1
6
716
13
12
11
10
9
14
15Out
Cool
Delay
Common 2
W /W1
Common 1
Y1
Adjust +/-Out +
EM Ht/W2
24VAC (R)
Heat
BK/PWM (Speed)
(Rev Valve)
Y /Y2
G(fan)

Troubleshooting ECM Motors
Control Connector Cable Half(viewed from connector end)
8
5
4
3
2
1
6
716
13
12
11
10
9
14
15Out
Cool
Delay
Common 2
W /W1
Common 1
Y1
Adjust +/-Out +
EM Ht/W2
24VAC (R)
Heat
BK/PWM (Speed)
(Rev Valve)
Y /Y2
G(fan)
Should see 24 volts here

Troubleshooting ECM Motors
Control Connector Cable Half(viewed from connector end)
8
5
4
3
2
1
6
716
13
12
11
10
9
14
15Out
Cool
Delay
Common 2
W /W1
Common 1
Y1
Adjust +/-Out +
EM Ht/W2
24VAC (R)
Heat
BK/PWM (Speed)
(Rev Valve)
Y /Y2
G(fan)
Should see 12 volts here
Energize Fan Only Switch

thank you!
any questions?


