

Classroom Technology: Alumni Hall
Scan QR code for more
Classsroom resources! 12/19/2017

Press CTRL + ALT + DEL to open the Login
Screen
Enter “faculty” for the username and don’t
put anything for the password in
the provided fields
Hit Enter key, or click arrow to login
If this is your first time logging into
the PC, it may take a minute to
create your account—this is normal
ACCESS THE WINDOWS 8 DESKTOPACCESS THE WINDOWS 8 DESKTOP Login to the Classroom WorkstationLogin to the Classroom Workstation

Upon logging into the Podium PC, a webpage will soon load the Network Access page How to: 1. Enter “faculty” for the username and don’t
put anything for the password in
the provided fields
2. Click Log-In
3. Upon successful login, you will then be redirected to the UD Porches login page.
4. You now have full internet access and can navigate to your desired website from this page. (Porches login is not mandatory)
ACCESS THE INTERNET (PODIUM PC)ACCESS THE INTERNET (PODIUM PC)
1
2
1
2
3 4
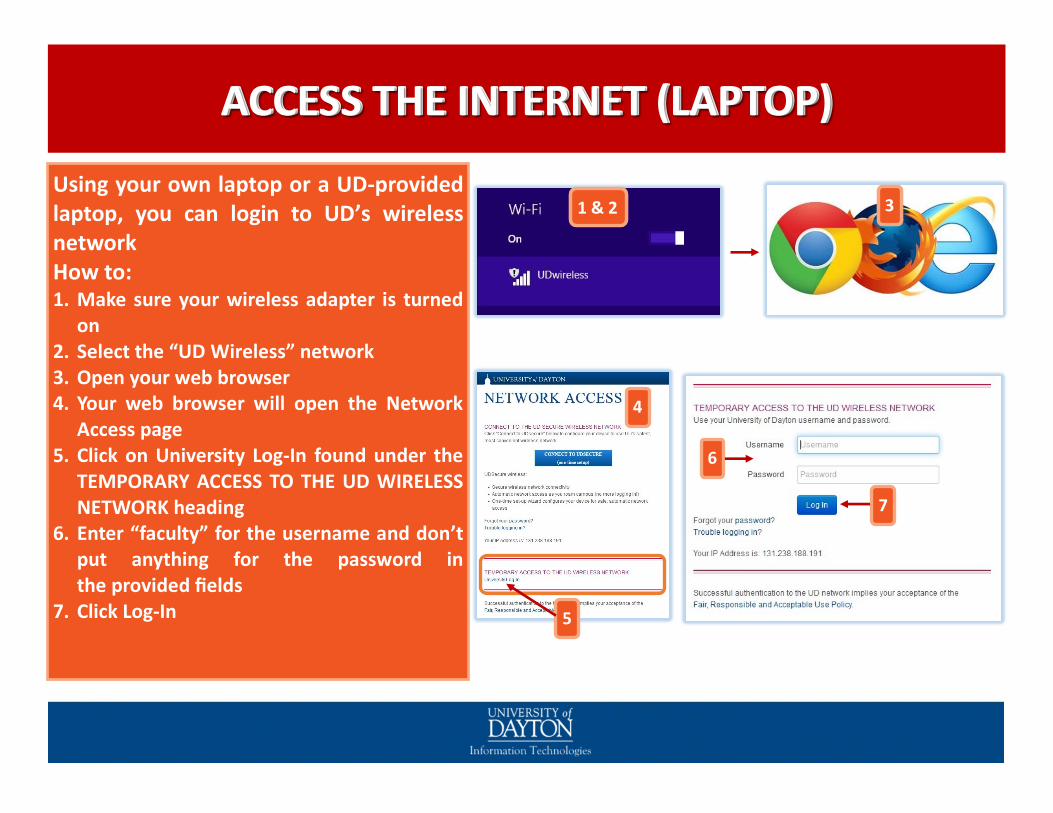
Using your own laptop or a UD-provided laptop, you can login to UD’s wireless network How to: 1. Make sure your wireless adapter is turned
on 2. Select the “UD Wireless” network 3. Open your web browser 4. Your web browser will open the Network
Access page 5. Click on University Log-In found under the
TEMPORARY ACCESS TO THE UD WIRELESS NETWORK heading
6. Enter “faculty” for the username and don’t put anything for the password in the provided fields
7. Click Log-In
ACCESS THE INTERNET (LAPTOP)ACCESS THE INTERNET (LAPTOP)
1 & 2 3
4
5
6
7
1 & 2 3

How to (Continued): 8. Upon successful login, you will then be
redirected to the UD Porches login page. 9. You now have full internet access and can
navigate to your desired website from this page. (Porches login is not mandatory)
ACCESS THE INTERNET (LAPTOP)ACCESS THE INTERNET (LAPTOP)
8 9

ACCESS TO NOVELL NETWORKACCESS TO NOVELL NETWORK
To access your shared (Novell) drive from the Desktop Shortcut:
Double-Click the Novell Login shortcut icon on the desktop
The Novell Login will appear
Enter your Novell/LDAP username and password
Click OK (a status window will open to display
the login process, it will close when fully completed)
Your shared drives will now appear in Windows Explorer
under “Network locations”

DATA PROJECTOR CONTROLS DATA PROJECTOR CONTROLS
PowerPower
To power the projector
ON/OFF, touch DISPLAY
POWER .
The DISPLAY POWER
button flashes during the
projector warm up/cool
down period, wait for
flashing to stop before
pressing POWER ON/OFF
again
The SCREEN UP/DOWN manually makes the screen go
up/down.
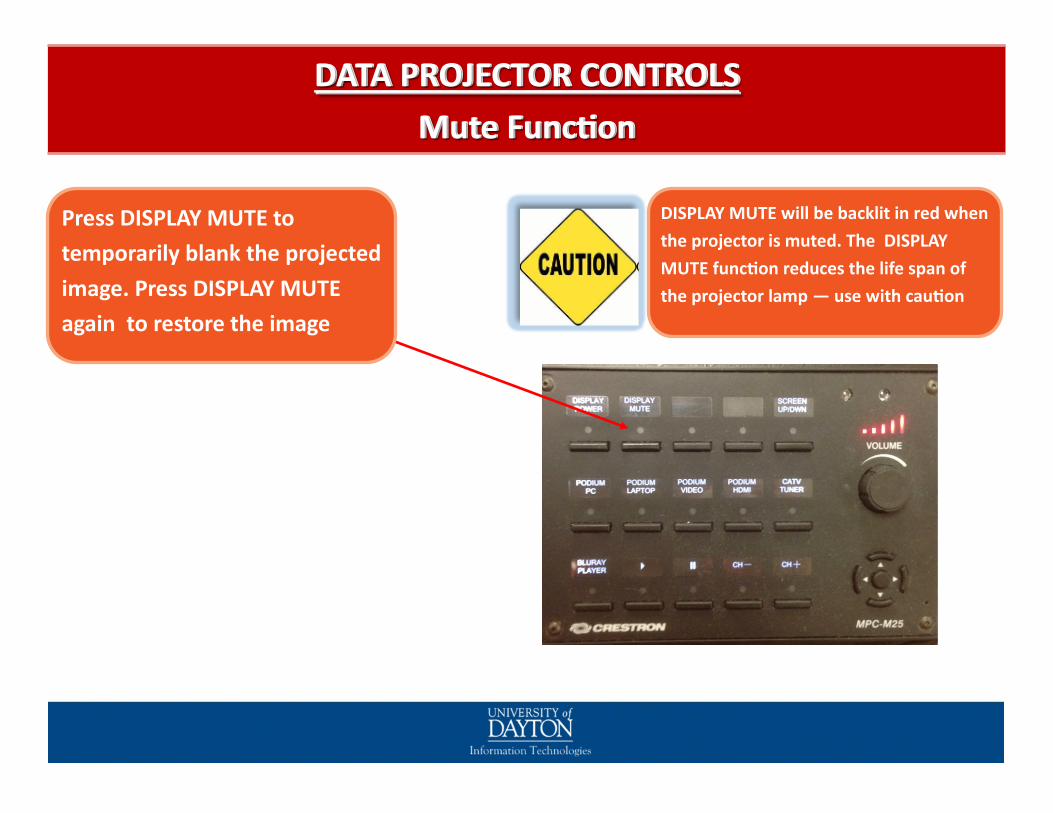
DISPLAY MUTE will be backlit in red when
the projector is muted. The DISPLAY
MUTE function reduces the life span of
the projector lamp — use with caution
Press DISPLAY MUTE to
temporarily blank the projected
image. Press DISPLAY MUTE
again to restore the image
DATA PROJECTOR CONTROLS DATA PROJECTOR CONTROLS
Mute FunctionMute Function

Select which INPUT to display on the projector. The selected input will
be lit red.
DATA PROJECTOR CONTROLS DATA PROJECTOR CONTROLS
Input SelectionInput Selection

Dial the VOLUME dial clockwise to raise the
volume, dial it counter-clockwise to lower it.
DATA PROJECTOR CONTROLS DATA PROJECTOR CONTROLS
AudioAudio
Make sure the volume at your selected
input is turned up and not muted
before adjusting room audio

Select the center button to commit to a
selection on the DVD or Blu-ray Player’s
menu.
DATA PROJECTOR CONTROLS DATA PROJECTOR CONTROLS
BluBlu--ray Playerray Player
Play, Pause, Search, Forward, and
Search Back functions for VCR,DVD or
Blu-ray
Use the directional buttons to navigate
through the DVD or Blu-ray player’s
menus.

Select the CATV Tuner input first!
DATA PROJECTOR CONTROLS DATA PROJECTOR CONTROLS
CableTV ControlsCableTV Controls
Channel Up/Down

USB ports are connected
to the podium PC
DATA PROJECTOR CONTROLS DATA PROJECTOR CONTROLS
Additional InputsAdditional Inputs
Additional inputs HDMI,
Laptop (VGA), and AUX can be
used to connect devices such
as laptops, DVD/VHS players,
and cameras. Make sure to
select the appropriate input on
the control panel to display to
the projector.
Data port for hardline
internet connection

Ensure that you have already selected the VGA or HDMI input
DATA PROJECTOR CONTROLS DATA PROJECTOR CONTROLS
LAPTOP LAPTOP
Connect your laptop via VGA or HDMI cable For VGA, connect the audio cable
to the laptop’s headphone jack

If your laptop is not being displayed to the projector,
double-check the following:
DATA PROJECTOR CONTROLS DATA PROJECTOR CONTROLS
LAPTOP LAPTOP
1. Make sure the laptop is connected via VGA or HDMI cable and
that the connections on each end are secure
2. Make sure the projector has been turned on, and that you have
selected the correct input based on what cable your laptop is
connected to (VGA or HDMI)

If your laptop is still not being displayed and you have a Windows PC,
it may be necessary to perform an additional step:
DATA PROJECTOR CONTROLS DATA PROJECTOR CONTROLS
LAPTOP LAPTOP
1. Press the Windows key and
the “P” key at the same time
2. Select “Duplicate”
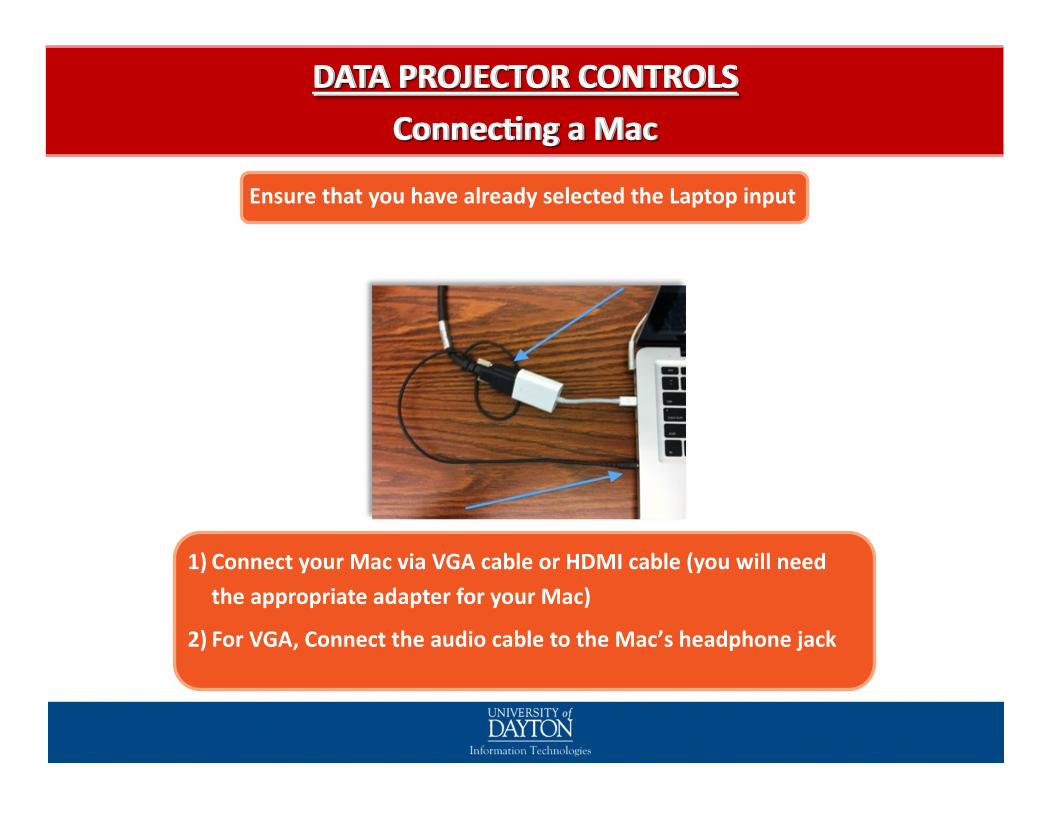
Ensure that you have already selected the Laptop input
DATA PROJECTOR CONTROLS DATA PROJECTOR CONTROLS
Connecting a Mac Connecting a Mac
1) Connect your Mac via VGA cable or HDMI cable (you will need
the appropriate adapter for your Mac)
2) For VGA, Connect the audio cable to the Mac’s headphone jack

If your Mac is not being displayed to the projector, perform the following steps:
DATA PROJECTOR CONTROLS DATA PROJECTOR CONTROLS
LAPTOP LAPTOP
1. Unplug the Mac’s VGA or HDMI adapter and
plug it back into your Mac. This will resolve most
issues
2. If Step 1 is not effective, perform the following:
Click the Apple icon. Then select “System
Preferences”
Click “Displays”
Select the “Arrangement” tab and then check
the “Mirror Displays” box
3. If Steps 1 and 2 are not effective, reboot your
Mac

DOCUMENT CAMERA DOCUMENT CAMERA
LIGHT
Move switch to left
to light subject
Move switch to right
to turn off light
LED Color Indicates Status
GREEN Normal
RED Standby Press power
button to activate
ORANGE Incorrect
input Switch input from
TV to VGA or con-
tact support for
assistance

DOCUMENT CAMERA DOCUMENT CAMERA
Doc Cam power
button: Silver
button found on
side of device
NOTE: Make sure to se-
lect the Doc Cam input
on the control panel to
display to the projector

SAFELY REMOVE YOUR FLASH DRIVESAFELY REMOVE YOUR FLASH DRIVE
Use your mouse to right-click the icon in
the activity tray
Click the ‘Safely Remove Hardware’
command using your left mouse button
Click the Eject USB Disk
A message box will pop up letting you
know it is now safe to unplug the USB
flash drive from the computer

•Use the Podium PC; you won’t need to connect any cables
•Copy presentations to the desktop rather than running them from a USB drive. Delete
the file when complete
•If using a Mac, have the correct adapter and test connecting it in advance (or schedule a
technology review appointment!) UDit does not provide these adapters
•Have a backup plan! Save presentations in multiple places (flash drive, Google Drive,
Novell drive, E-mail)
PRESENTATION TECHNOLOGY TIPSPRESENTATION TECHNOLOGY TIPS

Do not store sensitive data on the dedicated PC
Turn off room lighting
Remember any flash drives, belongings
Leave computers powered on. This allows us to run updates and
maintenance routines at night (and not during your time!)
Power projector(s) off at the end to save bulb life
Log out before you leave to ensure other faculty and/or students don’t
inadvertently gain access to your Novell drives or internet session.
THIS IS A SHARE SPACE SO PLEASE THIS IS A SHARE SPACE SO PLEASE

Immediate Assistance Hotline Phones
1. Need our help right now? Pick up the classroom support phone near your classroom.
2. No need to dial. We'll answer.
IT Service Center
Anderson Center 028
Phone: 937-229-3888
Email: [email protected]
CONTACT US FOR ASSISTANCECONTACT US FOR ASSISTANCE

Classroom Technology Orientation
Appointments
Request an appointment online
Make request at least 48 hours in
advance
Appointments last 15-30 minutes
go.udayton.edu/classroomorientation
CONTACT US FOR ASSISTANCECONTACT US FOR ASSISTANCE
Scan QR code for more
Classroom Resources!


