

pg. 1 Copyright © 2015 WinWire Technologies
On-premise and Online connection with Provider Hosted APP
(Part 2)
WinWire Technologies Inc.
2350 Mission College Boulevard,
Suite 925, Santa Clara,
California, 95054

pg. 2 Copyright © 2015 WinWire Technologies
Contents
Step By Step for Connecting to an on-premises SQL Server from an Azure provider hosted app using
Hybrid Connections ................................................................................................................................... 3
Step 1 Install SQL Server ...................................................................................................................... 4
Step 2 Allow connection to firewall on port 1433. ............................................................................. 6
Step 3 Create a new Database and Table. ........................................................................................... 9
Step 4 Create Hybrid Connection on existing Web Application. ...................................................... 11
Step 5 Install the on-premises Hybrid Connection Manager to complete the connection ............. 15
Step 6 Update the MVC Project to interact with On-Premise Database .......................................... 18
Step 7 Update the default start page for MVC .................................................................................. 25
Step 8 Re-Build and publish the updated solution............................................................................ 26

pg. 3 Copyright © 2015 WinWire Technologies
Step By Step for Connecting to an on-premises SQL Server from an Azure provider hosted app using
Hybrid Connections
The following steps are required for creating a provider hosted App
Step 1 – Install SQL Server – You can skip this step if you already have a SQL Server installed
Step 2 - Allow connection to firewall on port 1433
Step 3 - Create a new Database and Table
Step 4 - Create Hybrid Connection on existing Web Application
Step 5 - Install the on-premises Hybrid Connection Manager to complete the connection
Step 6 - Update the MVC Project to interact with On-Premise Database
Step 7 - Update the default start page for MVC
Step 8 - Re-Build and publish the updated solution

pg. 4 Copyright © 2015 WinWire Technologies
Step 1 Install SQL Server This is the starting point of the blog series for creating a Provider hosted APP using MVC.
To start with one need to have an SQL Server Installed.
To install SQL Server Express, run the SQLEXPRWT_x64_ENU.exe or SQLEXPR_x86_ENU.exe file that
you downloaded. The SQL Server Installation Center wizard appears.
Choose New SQL Server stand-alone installation or add features to an existing installation.
Please see the screen shot below for reference:
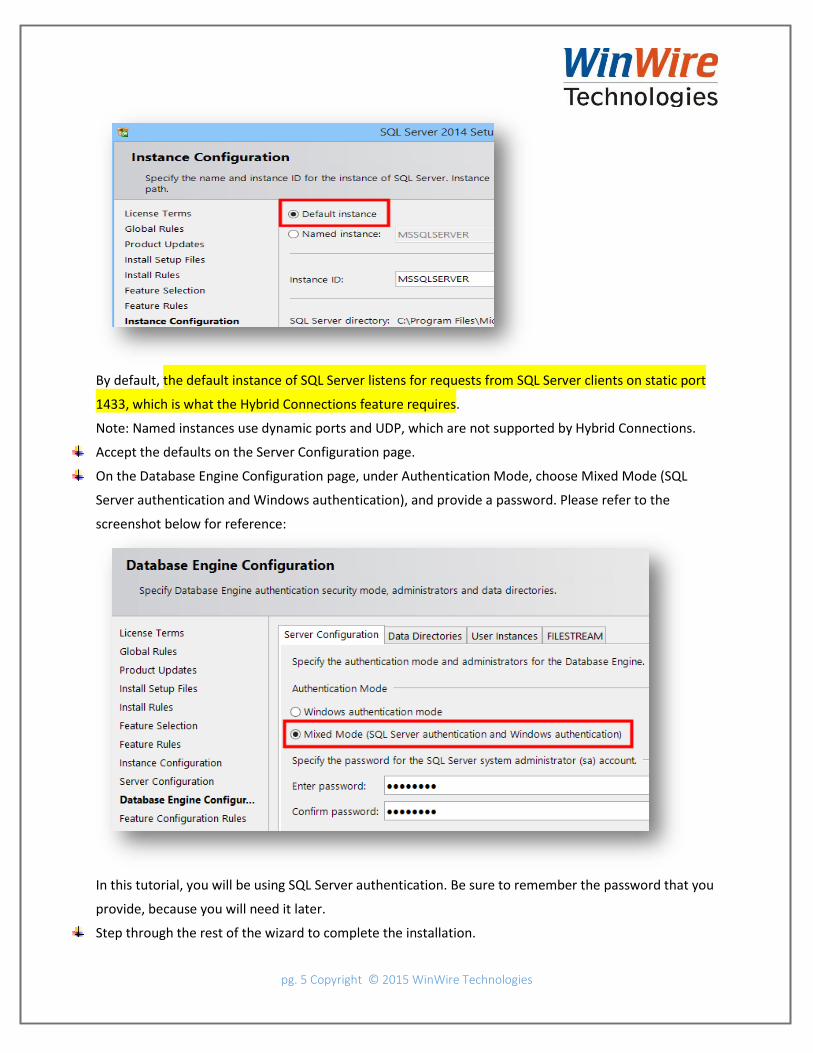
Follow the instructions, accepting the default choices and settings, until you get to the Instance
Configuration page.
On the Instance Configuration page, choose Default instance.
pg. 5 Copyright © 2015 WinWire Technologies
By default, the default instance of SQL Server listens for requests from SQL Server clients on static port
1433, which is what the Hybrid Connections feature requires.
Note: Named instances use dynamic ports and UDP, which are not supported by Hybrid Connections.
Accept the defaults on the Server Configuration page.
On the Database Engine Configuration page, under Authentication Mode, choose Mixed Mode (SQL
Server authentication and Windows authentication), and provide a password. Please refer to the
screenshot below for reference:
In this tutorial, you will be using SQL Server authentication. Be sure to remember the password that you
provide, because you will need it later.
Step through the rest of the wizard to complete the installation.
pg. 6 Copyright © 2015 WinWire Technologies
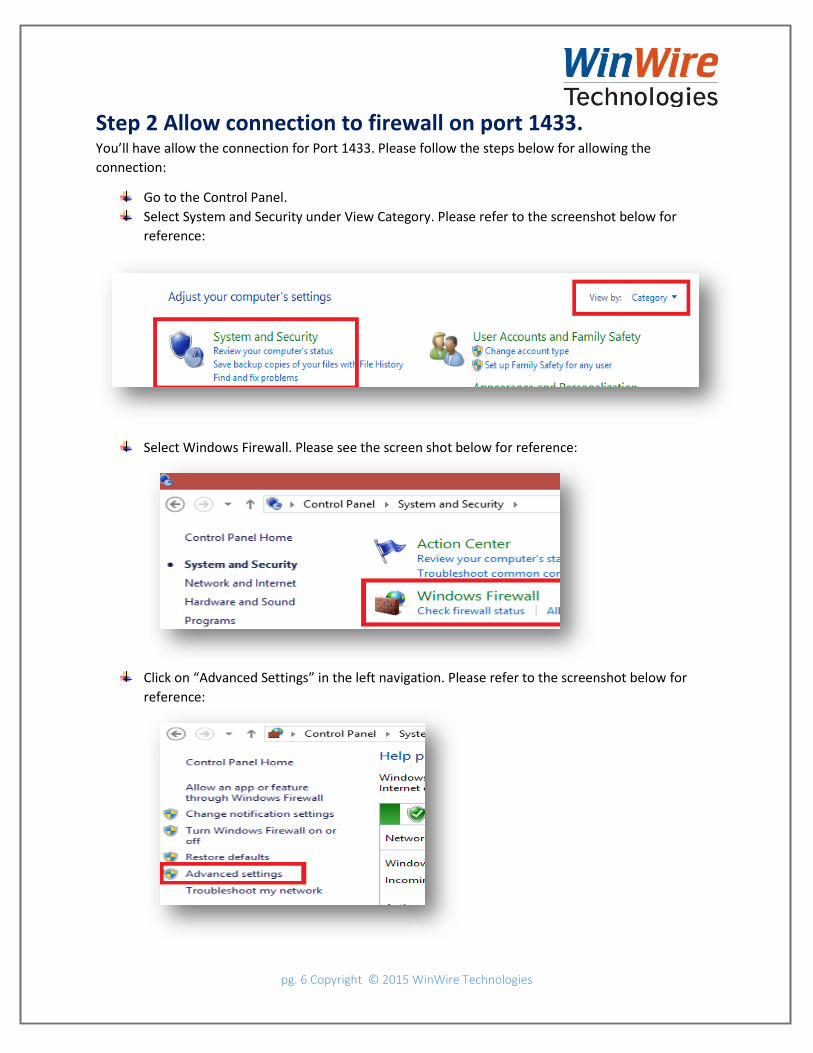
Step 2 Allow connection to firewall on port 1433. You’ll have allow the connection for Port 1433. Please follow the steps below for allowing the
connection:
Go to the Control Panel.
Select System and Security under View Category. Please refer to the screenshot below for
reference:
Select Windows Firewall. Please see the screen shot below for reference:
Click on “Advanced Settings” in the left navigation. Please refer to the screenshot below for
reference:

pg. 7 Copyright © 2015 WinWire Technologies
On the popup click on “Inbound Rules” and then click on “New Rule”. Please see the screen shot
below for reference:
On the New Rule Wizard, select “Port” and click “Next”. Please refer to the screenshot below for
reference:
Select “TCP” and enter the port number “1433” and click “Next”. Please see the screen shot for
more details:

pg. 8 Copyright © 2015 WinWire Technologies
Select the default option on the Wizard for the next two screens
On the Name tab. enter the name and click “Finish”. Please refer to the screenshot below for
reference:

pg. 9 Copyright © 2015 WinWire Technologies
Step 3 Create a new Database and Table.
In SQL Server Management Studio, connect to the SQL Server you just installed. (If the Connect to
Server dialog does not appear automatically, navigate to Object Explorer in the left pane, click Connect,
and then click Database Engine.)
For Server type, choose Database Engine. For Server name, you can use localhost or the name of the
computer that you are using. Choose SQL Server authentication, and then log in with the sa user name
and the password that you created in Step 1.
To create a new database by using SQL Server Management Studio, right-click Databases in
Object Explorer, and then click New Database.

pg. 10 Copyright © 2015 WinWire Technologies
Create a new Database name “Organization”. Set the recovery mode to “Simple”. Please see the
screen shot below for reference:
Once the database is created, let us create a table name Employee with the following Schema.
Please refer to the screenshot below for reference:
Note: We will be using this database table as the data for the MVC Application.

pg. 11 Copyright © 2015 WinWire Technologies
Step 4 Create Hybrid Connection on existing Web Application. To create hybrid connection, let us go back to the Web Application created in Series 1 of the blog series.
To create a hybrid connection, follow the below mentioned steps:
Open the Azure portal. https://manage.windowsazure.com/
Login with your (tenant).onmirosoft.com account. You will see the Web App created as shown in
the screen shot below:
Now to create a hybrid connection, move to the new Azure portal. To do this click on the name
on the top right corner, and select “Azure preview portal”. Please see the screen shot below for
reference:
On the portal, select the Browse option from the left Navigation and select “Web Apps”. Please
refer to the screenshot below for reference:

pg. 12 Copyright © 2015 WinWire Technologies
Now, click on the “SampleProviderApp” created. A view will open to the right. Scroll down on
the Monitoring section and look for “Hybrid connection”. Please refer to the screenshot below
for reference:
Click on the Hybrid Connections and then click on “Add”. Please refer to the screenshot below
for reference:

pg. 13 Copyright © 2015 WinWire Technologies
On the Create hybrid connection blade:
For Name, provide a name for the connection.
For Hostname, enter the computer name of your SQL Server host computer.
For Port, enter 1433 (the default port for SQL Server).
Click Biz Talk Service and enter a name for the BizTalk service.
Click OK twice.
When the process completes, the Notifications area will flash a green SUCCESS and the Hybrid
connection blade will show the new hybrid connection with the status as not connected.

pg. 14 Copyright © 2015 WinWire Technologies
At this point, you have completed an important part of the cloud hybrid connection infrastructure. Next,
you will create a corresponding on-premises piece.

pg. 15 Copyright © 2015 WinWire Technologies
Step 5 Install the on-premises Hybrid Connection Manager to
complete the connection
In the Hybrid connections blade, click the hybrid connection you just created, then click Listener Setup.
The Hybrid connection properties blade opens. Under On-premises Hybrid Connection Manager,
choose Click here to install.

pg. 16 Copyright © 2015 WinWire Technologies
In the Application Run security warning dialog, choose Run to continue.
pg. 17 Copyright © 2015 WinWire Technologies
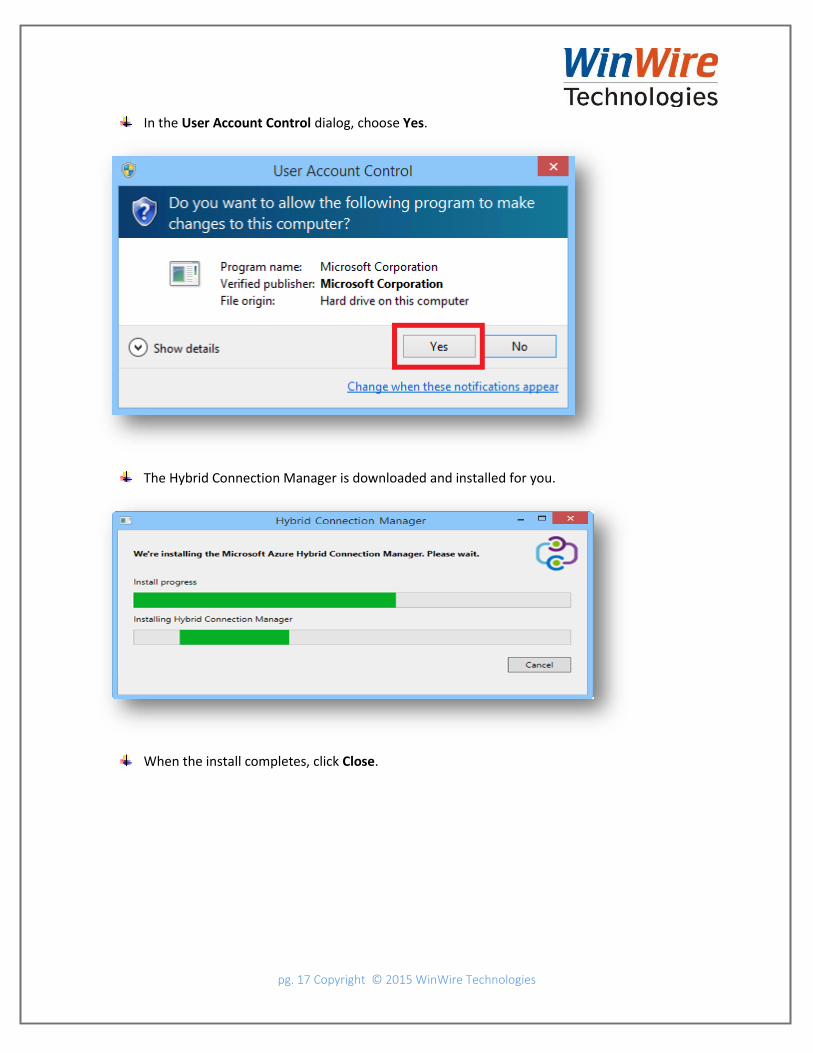
In the User Account Control dialog, choose Yes.
The Hybrid Connection Manager is downloaded and installed for you.
When the install completes, click Close.

pg. 18 Copyright © 2015 WinWire Technologies
On the Hybrid connections blade, the Status column now shows Connected.
Now that the hybrid connection infrastructure is complete, you will create a web application that uses it.
Step 6 Update the MVC Project to interact with On-Premise
Database Now open the solution created in the series 1 of the Blog.
Please follow the step below for updating the solution:
Right click on the MVC Project and select “Manage NuGet packages”. Please refer to the
screenshot below for reference:

pg. 19 Copyright © 2015 WinWire Technologies
Search for “Entity Framework” online and click “Install”. Please refer to the screenshot below for
reference:
Click “I Accept” on the License Agreement. Please refer to the screenshot below for reference:

pg. 20 Copyright © 2015 WinWire Technologies
On successful installation, close the window.
This will make sure the required resources are present for the Entity Model framework.
In order to work with MVC and Entity framework. Once need to have the model and model
context classes created.
To do this Add new item as shown below:

pg. 21 Copyright © 2015 WinWire Technologies
Name the class “Employee.cs”. Add the following piece of code as per the database Schema.
Please refer to the screenshot below for reference:
Add another class “EmployeeContext.cs”. This is required for the DbContext parameter for
Entity Framework. Please refer to the screenshot below for reference:

pg. 22 Copyright © 2015 WinWire Technologies
The Model classes are created as per the MVC framework.
Re-Build the project.
Add the connection string in “Web.config” with name “EmployeeContext”. Please refer to the
screenshot below for reference:
Now we will focus on the controller and View. The short hand for doing this is, right click on the
Controller and select controller. Please refer to the screenshot below for reference:
Select “MVC controller with Views, using Entity Framework” option. Please refer to the
screenshot below for reference:

pg. 23 Copyright © 2015 WinWire Technologies
Select the option created in the above steps and click Add.
1. Model class: Employee.cs
2. Data Context class : EmployeeContext.cs
Please refer to the screenshot below for reference:
The scaffolding will generate all the required CRUD operation classes. Please see the screen shot
below for reference:

pg. 24 Copyright © 2015 WinWire Technologies

pg. 25 Copyright © 2015 WinWire Technologies
Step 7 Update the default start page for MVC Once the above steps are completed, we can update the default view to display Employee instead of
Home page. To do this please follow the steps below:
Open “App_Start” Folder.
Double click on “RouteConfig.cs” file
Update the default controller to “Employees”. Please refer to the screenshot below for
reference:

pg. 26 Copyright © 2015 WinWire Technologies
Step 8 Re-Build and publish the updated solution Re-Build the whole solution.
Click on “Deploy your Web Project” on “Publish Your App” page”. Please refer to the
screenshot below for reference:
Check the connection string on the “Connections” Tab. Please see the screen shot below for
reference:
Click on “Publish” button to publish the changes. Please see the screen shot below for
reference:

pg. 27 Copyright © 2015 WinWire Technologies
Browse the APP to view the On-premise details:


