
Oracle® Discoverer AdministratorTutorial
10g (9.0.4)
Part No. B10271-01
August 2003
Oracle Discoverer Administrator Tutorial, 10g (9.0.4)
Part No. B10271-01
Copyright © 1996, 2003 Oracle Corporation. All rights reserved.
The Programs (which include both the software and documentation) contain proprietary information of Oracle Corporation; they are provided under a license agreement containing restrictions on use and disclosure and are also protected by copyright, patent and other intellectual and industrial property laws. Reverse engineering, disassembly or decompilation of the Programs, except to the extent required to obtain interoperability with other independently created software or as specified by law, is prohibited.
The information contained in this document is subject to change without notice. If you find any problems in the documentation, please report them to us in writing. Oracle Corporation does not warrant that this document is error-free. Except as may be expressly permitted in your license agreement for these Programs, no part of these Programs may be reproduced or transmitted in any form or by any means, electronic or mechanical, for any purpose, without the express written permission of Oracle Corporation.
If the Programs are delivered to the U.S. Government or anyone licensing or using the programs on behalf of the U.S. Government, the following notice is applicable:
Restricted Rights Notice Programs delivered subject to the DOD FAR Supplement are "commercial computer software" and use, duplication, and disclosure of the Programs, including documentation, shall be subject to the licensing restrictions set forth in the applicable Oracle license agreement. Otherwise, Programs delivered subject to the Federal Acquisition Regulations are "restricted computer software" and use, duplication, and disclosure of the Programs shall be subject to the restrictions in FAR 52.227-19, Commercial Computer Software - Restricted Rights (June, 1987). Oracle Corporation, 500 Oracle Parkway, Redwood City, CA 94065.
The Programs are not intended for use in any nuclear, aviation, mass transit, medical, or other inherently dangerous applications. It shall be the licensee's responsibility to take all appropriate fail-safe, backup, redundancy, and other measures to ensure the safe use of such applications if the Programs are used for such purposes, and Oracle Corporation disclaims liability for any damages caused by such use of the Programs.
Oracle is a registered trademark, and Oracle Discoverer, Oracle Transparent Gateway, Oracle 7, Oracle 8i, Oracle 9i, Oracle9iAS Discoverer, Oracle Application Server Discoverer, OracleAS Discoverer, PL/SQL, SQL*Net and SQL*Plus are trademarks or registered trademarks of Oracle Corporation. Other names may be trademarks of their respective owners.
Perspective® for Java licensed from Three D Graphics, Inc. Copyright © 1997, 2002, Three D Graphics, Inc.
iii
Contents
Send Us Your Comments ................................................................................................................... ix
Preface............................................................................................................................................................ xi
Oracle9i Discoverer Navigation and Accessibility ........................................................................... xiKeyboard Navigation............................................................................................................................ xiDocumentation Accessibility ............................................................................................................... xiIntended Audience ............................................................................................................................... xiiStructure................................................................................................................................................. xiiBefore you begin ................................................................................................................................... xiiiRelated Documents............................................................................................................................... xiiiConventions.......................................................................................................................................... xiv
1 Introducing the Discoverer Administrator tutorial
Introducing the Discoverer Administrator tutorial ..................................................................... 1-1
2 Lesson 1: Creating a private End User Layer
Lesson 1: Creating a private End User Layer for a new tutorial database user....................... 2-1Exercise 1: Creating a private End User Layer for a new tutorial database user ................ 2-1
Lesson summary.................................................................................................................................. 2-9
3 Lesson 2: Connecting to Discoverer Administrator, using the Load Wizard and the Workarea
Lesson 2: Connecting to Discoverer Administrator, using the Load Wizard and the Workarea ............................................................................................................................................... 3-1
iv
Exercise 1: Connecting to Discoverer Administrator .............................................................. 3-1Exercise 2: Creating a new business area using the Load Wizard......................................... 3-3Exercise 3: Getting to know the Workarea.............................................................................. 3-14
Lesson summary................................................................................................................................ 3-19
4 Lesson 3: Granting access privileges
Lesson 3: Granting access privileges ............................................................................................... 4-1Exercise 1: Using the Privileges dialog: Privileges tab ............................................................ 4-2Exercise 2: Using the Privileges dialog: User/Role tab........................................................... 4-3Exercise 3: Using the Privileges dialog: Query Governor tab ................................................ 4-5Exercise 4: Using the Privileges dialog: Scheduled Workbooks tab ..................................... 4-6Exercise 5: Using the Security dialog: Business Area -> User tab ......................................... 4-8
Lesson summary.................................................................................................................................. 4-9
5 Lesson 4: Modifying the business area
Lesson 4: Modifying the business area........................................................................................... 5-1Exercise 1: Adding a description to the business area ............................................................ 5-1Exercise 2: Renaming and adding descriptions to folders...................................................... 5-2Exercise 3: Renaming items in the Time Information folder .................................................. 5-5
Lesson summary.................................................................................................................................. 5-7
6 Lesson 5: Working with custom folders
Lesson 5: Working with custom folders ......................................................................................... 6-1Exercise 1: Creating a custom folder.......................................................................................... 6-1Exercise 2: Editing the SQL statement in a custom folder ...................................................... 6-4
Lesson summary.................................................................................................................................. 6-6
7 Lesson 6: Creating joins
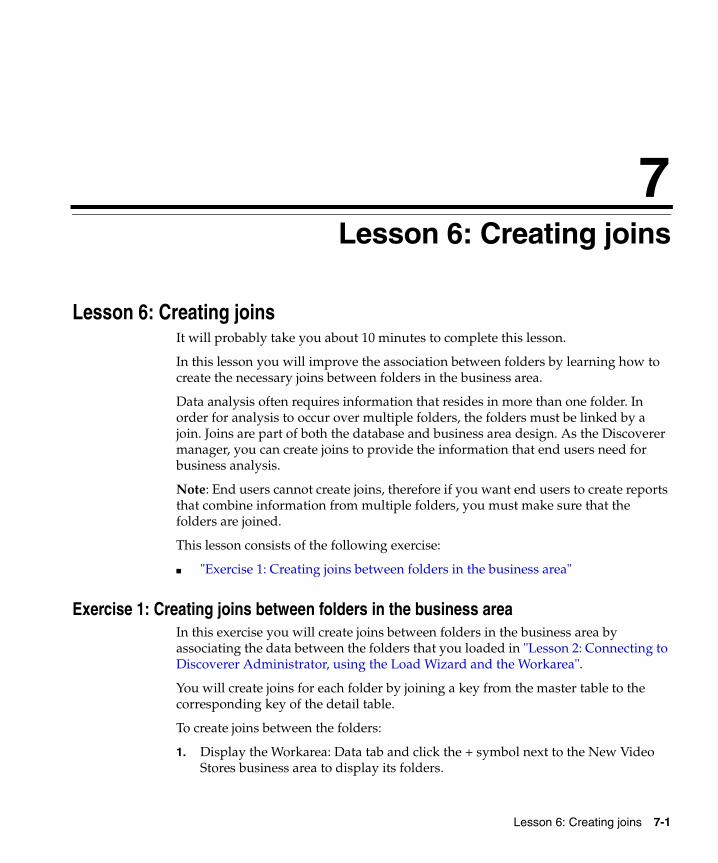
Lesson 6: Creating joins ..................................................................................................................... 7-1Exercise 1: Creating joins between folders in the business area ............................................ 7-1
Lesson summary.................................................................................................................................. 7-8

v
8 Lesson 7: Customizing items
Lesson 7: Customizing items ............................................................................................................ 8-1Exercise 1: Hiding items in the business area........................................................................... 8-1Exercise 2: Setting the display axis and display sequence for items..................................... 8-3Exercise 3: Creating a list of values............................................................................................ 8-6Exercise 4: Viewing the list of values item class .................................................................... 8-10
What the Discoverer Plus user sees - selecting from a list of values in Discoverer Plus .................................................................................................................... 8-12
Exercise 5: Creating an alternative sort ................................................................................... 8-13Exercise 6: Viewing the alternative sort item class ................................................................ 8-18Exercise 7: Creating a new calculated item............................................................................. 8-19
What the Discoverer Plus user sees - calculations in Discoverer Plus ........................ 8-21Examples of other calculated items ......................................................................................... 8-23
Address record calculated item:........................................................................................ 8-23Personnel record calculated item: ..................................................................................... 8-23Annual compensation based on monthly salary and commission (NVL permits a zero value) calculated item:................................................................... 8-24Aggregated calculated items ............................................................................................. 8-24
Lesson summary................................................................................................................................ 8-24
9 Lesson 8: Designing a complex folder
Lesson 8: Designing a complex folder ............................................................................................ 9-1Exercise 1: Creating a complex folder........................................................................................ 9-2Exercise 2: Creating a condition ................................................................................................. 9-5
What the Discoverer Plus user sees - conditions displayed in Discoverer Plus .......... 9-7Lesson summary.................................................................................................................................. 9-8
10 Lesson 9: Working with hierarchies
Lesson 9: Working with hierarchies .............................................................................................. 10-1Exercise 1: Defining a simple item hierarchy ......................................................................... 10-1
What the Discoverer Plus user sees - navigating the hierarchy ................................... 10-6Exercise 2: Defining a more complex item hierarchy............................................................ 10-7 Exercise 3: Creating a date hierarchy template ................................................................... 10-10
What the Discoverer Plus user sees - navigating through levels of a hierarchy...... 10-14
vi
Exercise 4: Modifying the content type of an item............................................................... 10-15What the Discoverer Plus user sees - external application icons in the worksheet . 10-16
Exercise 5: Defining drill to detail data ................................................................................. 10-18Lesson summary.............................................................................................................................. 10-20
11 Lesson 10: Creating summary folders to optimize performance
Lesson 10: Creating summary folders to optimize performance ............................................. 11-1Exercise 1: Creating a summary folder using Automated Summary Management (ASM) ................................................................................................................... 11-2Exercise 2: Manually creating a summary folder................................................................... 11-6
Lesson summary.............................................................................................................................. 11-13
12 Lesson 11: Tasks on completion of the tutorial
Lesson 11: Tasks on completion of the tutorial ........................................................................... 12-1Exercise 1: Deleting summary folders from the business area............................................. 12-1Exercise 2: Deleting the New Video Stores business area .................................................... 12-2Exercise 3: Deleting the EUL owned by the tutorial database user..................................... 12-2Exercise 4: Deleting the tutorial database user from the database ...................................... 12-3
Lesson summary................................................................................................................................ 12-3
A Installing the Discoverer tutorial EUL, data, and workbook
Installing the Discoverer tutorial EUL, data, and workbook ..................................................... A-1What must exist in the database before Discoverer Administrator tutorial users can start using the tutorial lessons? ................................................................................................................. A-2What happens when you install the Discoverer tutorial EUL, data, and workbook? ........... A-2What privileges do you need to install the tutorial data? ........................................................... A-4What conditions apply when you connect to Discoverer Administrator for the first time? A-5Why must you create an EUL? .......................................................................................................... A-6What steps do I follow to install the Discoverer tutorial EUL, data, and workbook?........... A-6How to create a private EUL for the tutorial .................................................................................. A-6How to install the Discoverer tutorial .......................................................................................... A-13How to grant access privileges to the VIDEO5 database user for the tutorial EUL............. A-19How to install the tutorial business area in another End User Layer ..................................... A-21How to uninstall the tutorial business area, tables and data ................................................... A-25

vii
How to reinstall the tutorial data................................................................................................... A-29
Index

viii
ix
Send Us Your Comments
Oracle Discoverer Administrator Tutorial, 10g (9.0.4)
Part No. B10271-01
Oracle Corporation welcomes your comments and suggestions on the quality and usefulness of this document. Your input is an important part of the information used for revision.
■ Did you find any errors?■ Is the information clearly presented?■ Do you need more information? If so, where?■ Are the examples correct? Do you need more examples?■ What features did you like most?
If you find any errors or have any other suggestions for improvement, please indicate the document title and part number, and the chapter, section, and page number (if available). You can send com-ments to us in the following ways:
■ Electronic mail: [email protected]
■ FAX: 650 506 7421 Attn: Oracle Discoverer
■ Postal service:
Oracle Corporation
Oracle Discoverer Documentation
200 Oracle Parkway, 2OP9
Redwood Shores, CA 94065
USA
If you would like a reply, please give your name, address, telephone number, and (optionally) elec-tronic mail address.

x
If you have problems with the software, please contact your local Oracle Support Services.
xi
Preface
Welcome to the Oracle Discoverer Administrator Tutorial! This tutorial provides a set of lessons that show you how to use the main features of Oracle Discoverer Administrator.
Oracle Discoverer Navigation and Accessibility
Keyboard NavigationOracle Discoverer supports standard keyboard navigation. Standard keyboard navi-gation includes the use of the tab key, mnemonics (using the Alt key and the under-lined character), and accelerators (such as Alt+F4 to exit a window).
Documentation AccessibilityOur goal is to make Oracle products, services, and supporting documentation accessible, with good usability, to the disabled community. To that end, our documentation includes features that make information available to users of assistive technology. This documentation is available in HTML format, and contains markup to facilitate access by the disabled community. Standards will continue to evolve over time, and Oracle Corporation is actively engaged with other market-leading technology vendors to address technical obstacles so that our documentation can be accessible to all of our customers. For additional information, visit the Oracle Accessibility Program Web site at http://www.oracle.com/accessibility/.
Accessibility of Code Examples in Documentation JAWS, a Windows screen reader, may not always correctly read the code examples in this document. The
xii
conventions for writing code require that closing braces should appear on an otherwise empty line; however, JAWS may not always read a line of text that consists solely of a bracket or brace.
Accessibility of Links to External Web Sites in Documentation This documentation may contain links to Web sites of other companies or organizations that Oracle Corporation does not own or control. Oracle Corporation neither evaluates nor makes any representations regarding the accessibility of these Web sites.
Intended AudienceComputer users with some database knowledge and expertise as well as an under-standing of the following areas:
■ SELECT statements
■ database privileges
■ database users and roles
■ experience using Discoverer Desktop and Discoverer Plus would also be useful
StructureEach lesson begins with an introduction and a list of exercises. Before you start each lesson, you may want to survey the list of exercises to get a sense of how much time you need to schedule for completing the lesson.
This tutorial consists of the following lessons:
■ Lesson 1: Creating a private End User Layer for a new tutorial database user
■ Lesson 2: Connecting to Discoverer Administrator, using the Load Wizard and the Workarea
■ Lesson 3: Granting access privileges
■ Lesson 4: Modifying the business area
■ Lesson 5: Working with custom folders
■ Lesson 6: Creating joins
■ Lesson 7: Customizing items
xiii
■ Lesson 8: Designing a complex folder
■ Lesson 9: Working with hierarchies
■ Lesson 10: Creating summary folders to optimize performance
Before you beginBefore you can do this tutorial, you need install the Discoverer tutorial EUL, data, and workbook. If the Discoverer tutorial EUL, data, and workbook are not already installed, see Appendix A, "Installing the Discoverer tutorial EUL, data, and work-book".
To follow this tutorial you must be able to connect to Discoverer Administrator ini-tially as a user with a DBA role (see your database administrator for details). The reason for doing this is because the tutorial involves creating a new database user to run the tutorial. Normal use of Discoverer Administrator does not require DBA privileges.
Remember that the video store sample database is designed so that you already have read access to the tutorial tables. When you create your own business areas, you will need SELECT access to the database tables you need to access. You will also need to know the database user names who own the data tables.
Remember that this tutorial is your introduction to Discoverer Administrator’s basic features and procedures. When you are working with Discoverer Administra-tor outside the tutorial, you may find that you need more detailed explanations. You should find the context sensitive Help system which is part of the Oracle Discov-erer Administrator Administration Guide to be a reliable, useful source of information.
Related DocumentsFor more information, see the following manuals:
■ Oracle Discoverer Administrator Administration Guide
■ Oracle Application Server Discoverer Configuration Guide
■ Oracle Application Server Discoverer Plus User’s Guide
■ Oracle Discoverer Release Notes
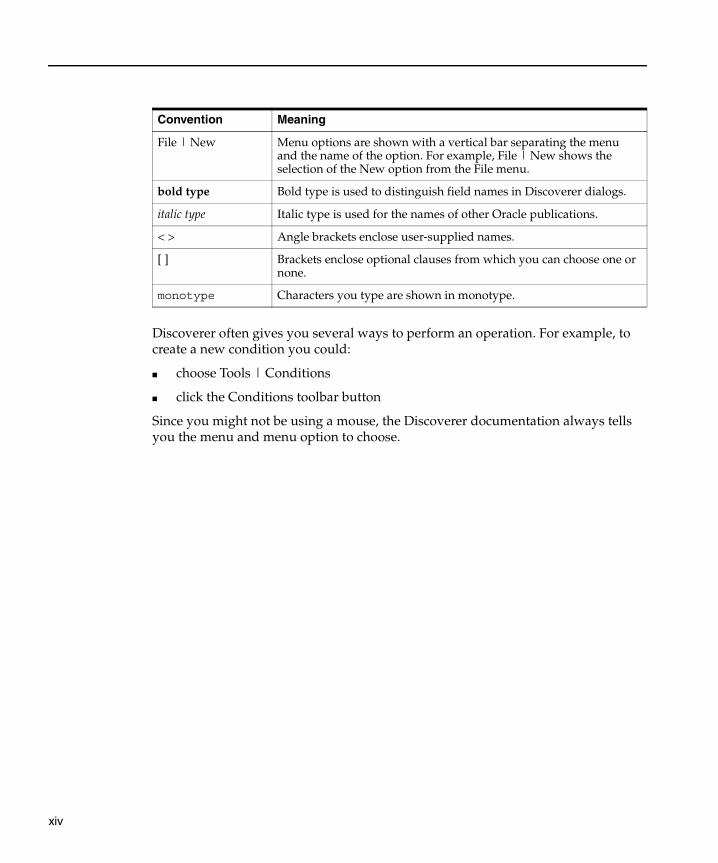
ConventionsThe following conventions are used in this manual:
xiv
Discoverer often gives you several ways to perform an operation. For example, to create a new condition you could:
■ choose Tools | Conditions
■ click the Conditions toolbar button
Since you might not be using a mouse, the Discoverer documentation always tells you the menu and menu option to choose.
Convention Meaning
File | New Menu options are shown with a vertical bar separating the menu and the name of the option. For example, File | New shows the selection of the New option from the File menu.
bold type Bold type is used to distinguish field names in Discoverer dialogs.
italic type Italic type is used for the names of other Oracle publications.
< > Angle brackets enclose user-supplied names.
[ ] Brackets enclose optional clauses from which you can choose one or none.
monotype Characters you type are shown in monotype.
Introducing the Discoverer Administrator tutorial 1-1
1Introducing the Discoverer Administrator
tutorial
Introducing the Discoverer Administrator tutorialThis tutorial uses a hypothetical chain of video rental stores as a business example, to show how to develop a business area using sales and inventory data. Your Discoverer Administrator software includes the video store demonstration database (VIDEO5) that this tutorial uses. This must be installed and populated with data before you begin the tutorial lessons.
For details about how you install the tutorial data, see Appendix A, "Installing the Discoverer tutorial EUL, data, and workbook".
This tutorial consists of a set of lessons that show you how to use the main features of Discoverer Administrator. Each lesson begins with an introduction and a list of exercises. Before you start each lesson, you may want to survey the list of exercises to get a sense of how much time you need to schedule for completing the lesson.
This tutorial consists of the following lessons:
■ "Lesson 1: Creating a private End User Layer for a new tutorial database user"
■ "Lesson 2: Connecting to Discoverer Administrator, using the Load Wizard and the Workarea"
■ "Lesson 3: Granting access privileges"
■ "Lesson 4: Modifying the business area"
■ "Lesson 5: Working with custom folders"
■ "Lesson 6: Creating joins"
■ "Lesson 7: Customizing items"
Introducing the Discoverer Administrator tutorial
1-2 Oracle Discoverer Administrator Tutorial
■ "Lesson 8: Designing a complex folder"
■ "Lesson 9: Working with hierarchies"
■ "Lesson 10: Creating summary folders to optimize performance"
To follow this tutorial you must be able to connect to Discoverer Administrator initially as a user with a DBA role (for more information, see your database administrator). The reason for doing this is because the tutorial requires that you create a new database user to run the tutorial. Normal use of Discoverer Administrator does not require DBA privileges.
Remember that the video store sample database is designed so that you already have read access to the tutorial tables. When you create your own business areas, you will need SELECT access to the database tables that you need to access. You will also need to know the names of the database users who own the data tables.
Remember that this tutorial is your introduction to Discoverer Administrator’s basic features and procedures. When you are working with Discoverer Administrator outside the tutorial, you may find that you need more detailed explanations. You should find the Oracle Discoverer Administrator Administration Guide Help system to be a reliable, useful source of information.
Lesson 1: Creating a private End User Layer 2-1
2Lesson 1: Creating a private End User Layer
Lesson 1: Creating a private End User Layer for a new tutorial database user
It will probably take you about 5 minutes to complete this lesson.
In this lesson you will create a private End User Layer (EUL) for a new tutorial database user.
Each tutorial database user has their own EUL. This enables each tutorial database user to create their own version of a Discoverer Administrator business area.
The VIDEO5 user, tables and tutorial data must have been installed by your Discoverer manager before you can complete the tutorial (for more information, see Appendix A, "Installing the Discoverer tutorial EUL, data, and workbook").
This lesson consists of the following exercise:
■ "Exercise 1: Creating a private End User Layer for a new tutorial database user"
Exercise 1: Creating a private End User Layer for a new tutorial database userIn this exercise you will create a private end user layer for a new tutorial database user. The tutorial database user that you create in this exercise you will use in the other tutorial lessons.
To create a private End User Layer for a new tutorial database user:
1. Choose Programs | Oracle Developer Suite - <HOME_NAME> | Discoverer Administrator from the Windows Start menu to display the Connect dialog.
Lesson 1: Creating a private End User Layer for a new tutorial database user
2-2 Oracle Discoverer Administrator Tutorial
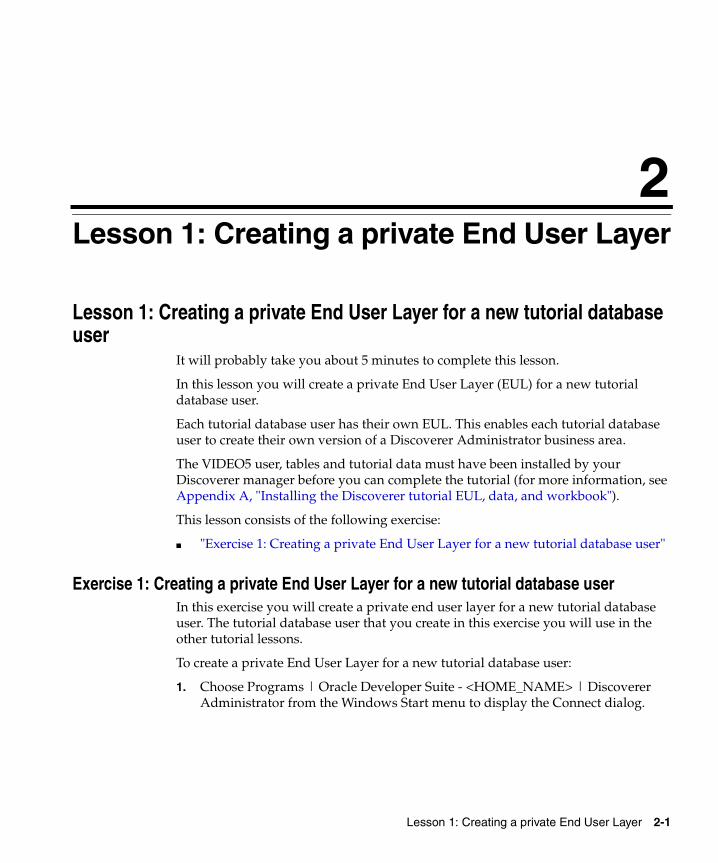
Figure 2–1 Connect to Oracle Discoverer Administrator dialog
2. Enter a database user with DBA privileges (for more information about the DBA username and password, see your database administrator).
3. Enter the database user password in the Password field.
4. In the Connect field:
■ If you are connecting to a default database, leave this field blank and click Connect.
With Oracle 8.1.7 (or later) Enterprise Edition databases an entry is required in your tnsnames.ora file for this to work (for more information, see your Discoverer manager).
■ If you are connecting to an Oracle database that is not your default database, specify the appropriate SQL*Net connect string and click Connect (for more information about the connect string, see your database administrator).
■ If you are connecting to a non-Oracle database, type ODBC:<data source name> and click Connect.
5. To display the EUL Manager dialog:
Discoverer Administrator behaves differently depending on whether an EUL has already been created for the database user that you use to connect with.
■ If no End User Layers exist, Discoverer Administrator displays a dialog with the message Do you want to create an EUL now? Click Yes to display the EUL Manager dialog.
Lesson 1: Creating a private End User Layer for a new tutorial database user
Lesson 1: Creating a private End User Layer 2-3
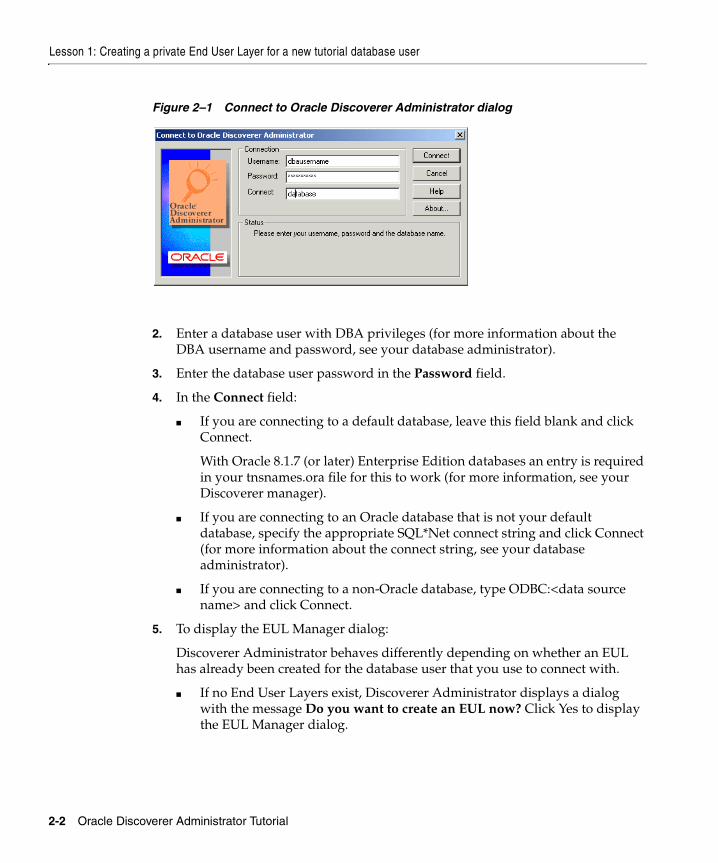
■ If one or more End User Layers exist, Discoverer Administrator displays the Load Wizard. Click Cancel in the Load Wizard and choose Tools | EUL Manager to display the EUL Manager dialog.
Figure 2–2 EUL Manager dialog
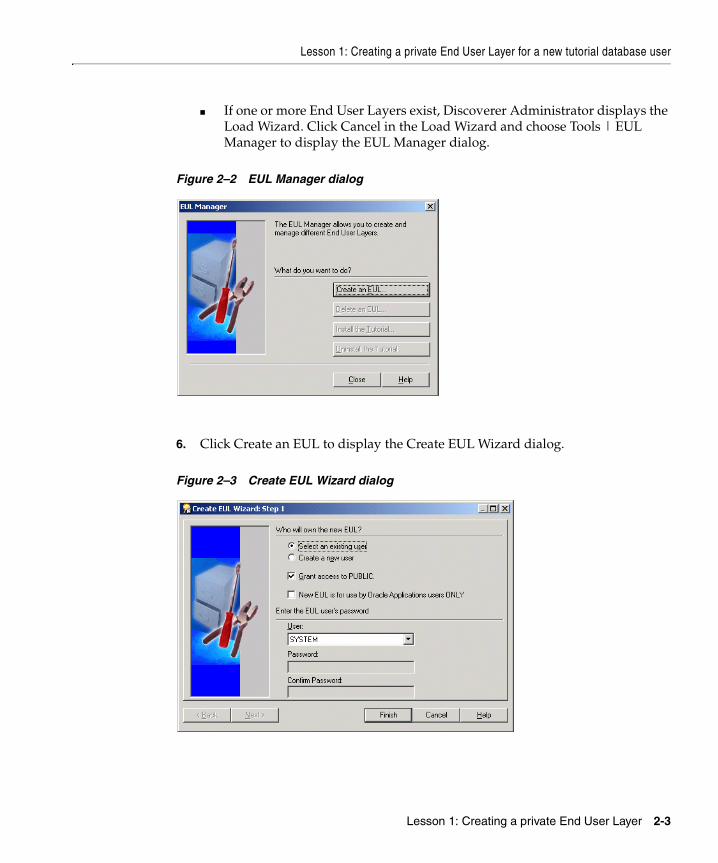
6. Click Create an EUL to display the Create EUL Wizard dialog.
Figure 2–3 Create EUL Wizard dialog
Lesson 1: Creating a private End User Layer for a new tutorial database user
2-4 Oracle Discoverer Administrator Tutorial
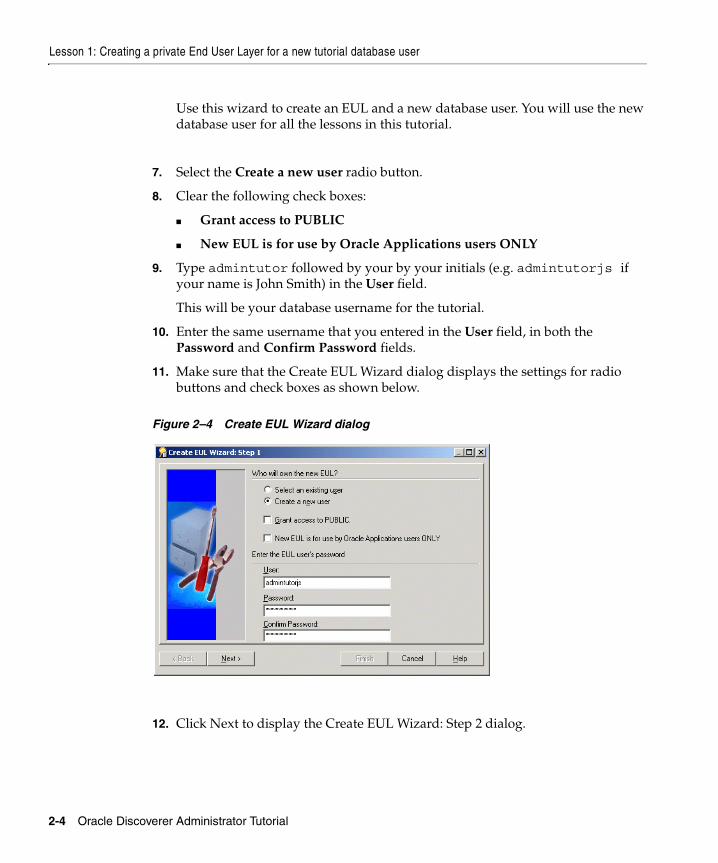
Use this wizard to create an EUL and a new database user. You will use the new database user for all the lessons in this tutorial.
7. Select the Create a new user radio button.
8. Clear the following check boxes:
■ Grant access to PUBLIC
■ New EUL is for use by Oracle Applications users ONLY
9. Type admintutor followed by your by your initials (e.g. admintutorjs if your name is John Smith) in the User field.
This will be your database username for the tutorial.
10. Enter the same username that you entered in the User field, in both the Password and Confirm Password fields.
11. Make sure that the Create EUL Wizard dialog displays the settings for radio buttons and check boxes as shown below.
Figure 2–4 Create EUL Wizard dialog
12. Click Next to display the Create EUL Wizard: Step 2 dialog.
Lesson 1: Creating a private End User Layer for a new tutorial database user
Lesson 1: Creating a private End User Layer 2-5
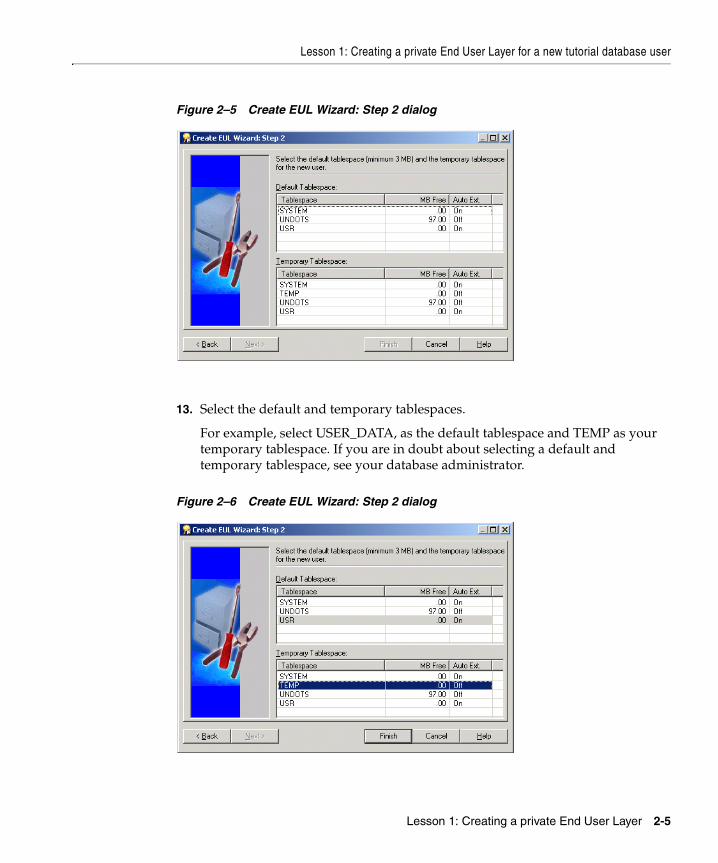
Figure 2–5 Create EUL Wizard: Step 2 dialog
13. Select the default and temporary tablespaces.
For example, select USER_DATA, as the default tablespace and TEMP as your temporary tablespace. If you are in doubt about selecting a default and temporary tablespace, see your database administrator.
Figure 2–6 Create EUL Wizard: Step 2 dialog

Lesson 1: Creating a private End User Layer for a new tutorial database user
2-6 Oracle Discoverer Administrator Tutorial
14. Click Finish for Discoverer Administrator to build the EUL.
Discoverer Administrator displays a progress bar showing the creating EUL status.
Figure 2–7 Creating EUL progress bar
Once Discoverer has created the new EUL Discoverer Administrator displays a message that the EUL has been created successfully.
Figure 2–8 EUL created successfully message
Note: The following steps enable you to close Discoverer Administrator by navigating through a series of dialogs. This help you to start the other tutorial lessons from a common starting point.
15. Click OK to display the following dialog.
Figure 2–9 Install tutorial data in EUL dialog
Lesson 1: Creating a private End User Layer for a new tutorial database user
Lesson 1: Creating a private End User Layer 2-7
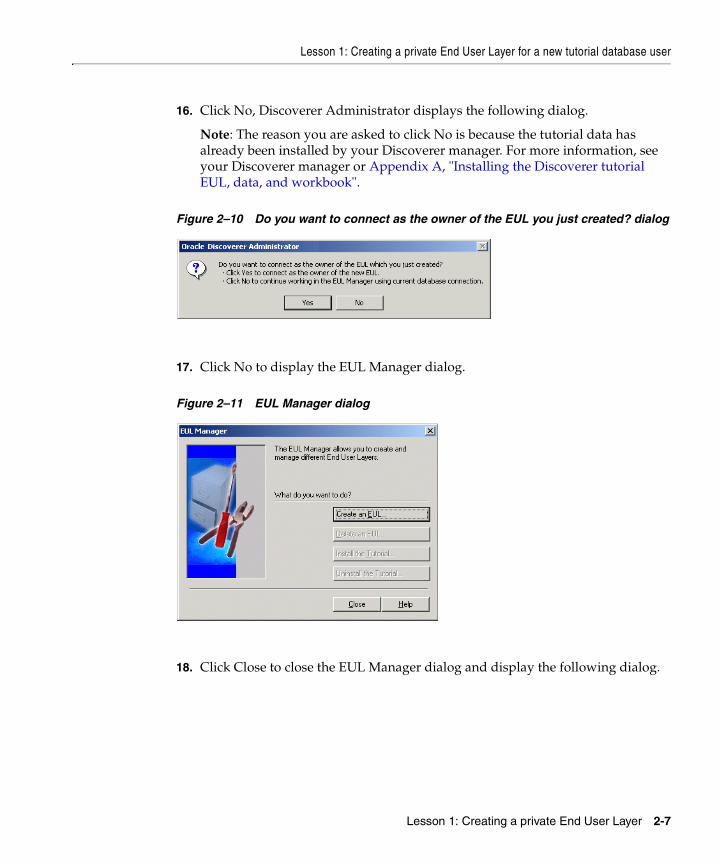
16. Click No, Discoverer Administrator displays the following dialog.
Note: The reason you are asked to click No is because the tutorial data has already been installed by your Discoverer manager. For more information, see your Discoverer manager or Appendix A, "Installing the Discoverer tutorial EUL, data, and workbook".
Figure 2–10 Do you want to connect as the owner of the EUL you just created? dialog
17. Click No to display the EUL Manager dialog.
Figure 2–11 EUL Manager dialog
18. Click Close to close the EUL Manager dialog and display the following dialog.

Lesson 1: Creating a private End User Layer for a new tutorial database user
2-8 Oracle Discoverer Administrator Tutorial
Figure 2–12 Do you want to create an EUL now? dialog
19. Click No to close the above dialog and display the following dialog.
Figure 2–13 Unable to connect to dialog
20. Click OK. to close the above dialog and display the Connect dialog
Figure 2–14 Connect dialog
21. Click Cancel to close the Connect dialog.
22. Click File | Exit to close Discoverer Administrator.
In this exercise you have created a private end user layer for a new tutorial database user.
Lesson summary
Lesson 1: Creating a private End User Layer 2-9
Lesson summaryIn this lesson you:
■ created a private EUL for a new tutorial database user
Having created a new EUL for a new tutorial database user you can now complete the tutorial lessons in the following chapters.
In the next lesson you will create a business area, described in "Lesson 2: Connecting to Discoverer Administrator, using the Load Wizard and the Workarea".

Lesson summary
2-10 Oracle Discoverer Administrator Tutorial
Lesson 2: Connecting to Discoverer Administrator, using the Load Wizard and the Workarea 3-1
3Lesson 2: Connecting to Discoverer
Administrator, using the Load Wizard andthe Workarea
Lesson 2: Connecting to Discoverer Administrator, using the Load Wizard and the Workarea
It will probably take you about 15 minutes to complete this lesson.
In this lesson you will connect to Discoverer Administrator, create a business area and get to know the Workarea.
This lesson consists of the following exercises:
■ "Exercise 1: Connecting to Discoverer Administrator"
■ "Exercise 2: Creating a new business area using the Load Wizard"
■ "Exercise 3: Getting to know the Workarea"
Exercise 1: Connecting to Discoverer AdministratorIn this exercise you will connect to Discoverer Administrator as the tutorial database user that you created in Lesson 1.
To complete other tutorial exercises you must connect to Discoverer Administrator using the tutorial database user.
To connect to Discoverer Administrator using the tutorial database user:
1. Choose Programs | Oracle Developer Suite - <HOME_NAME> | Discoverer Administrator from the Windows Start menu to display the Connect dialog.
Lesson 2: Connecting to Discoverer Administrator, using the Load Wizard and the Workarea
3-2 Oracle Discoverer Administrator Tutorial
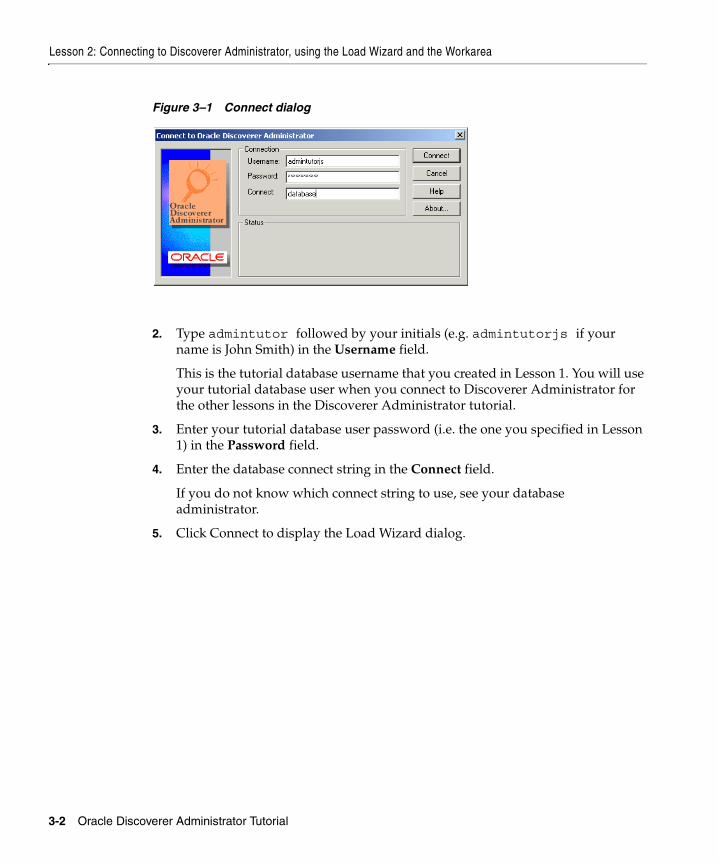
Figure 3–1 Connect dialog
2. Type admintutor followed by your initials (e.g. admintutorjs if your name is John Smith) in the Username field.
This is the tutorial database username that you created in Lesson 1. You will use your tutorial database user when you connect to Discoverer Administrator for the other lessons in the Discoverer Administrator tutorial.
3. Enter your tutorial database user password (i.e. the one you specified in Lesson 1) in the Password field.
4. Enter the database connect string in the Connect field.
If you do not know which connect string to use, see your database administrator.
5. Click Connect to display the Load Wizard dialog.
Lesson 2: Connecting to Discoverer Administrator, using the Load Wizard and the Workarea
Lesson 2: Connecting to Discoverer Administrator, using the Load Wizard and the Workarea 3-3
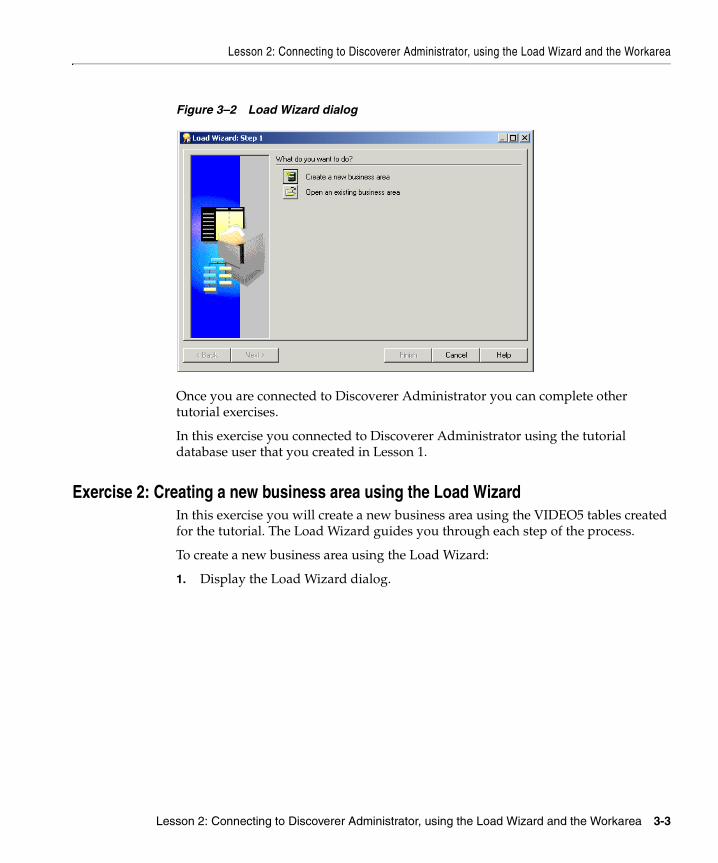
Figure 3–2 Load Wizard dialog
Once you are connected to Discoverer Administrator you can complete other tutorial exercises.
In this exercise you connected to Discoverer Administrator using the tutorial database user that you created in Lesson 1.
Exercise 2: Creating a new business area using the Load WizardIn this exercise you will create a new business area using the VIDEO5 tables created for the tutorial. The Load Wizard guides you through each step of the process.
To create a new business area using the Load Wizard:
1. Display the Load Wizard dialog.
Lesson 2: Connecting to Discoverer Administrator, using the Load Wizard and the Workarea
3-4 Oracle Discoverer Administrator Tutorial
Figure 3–3 Load Wizard dialog
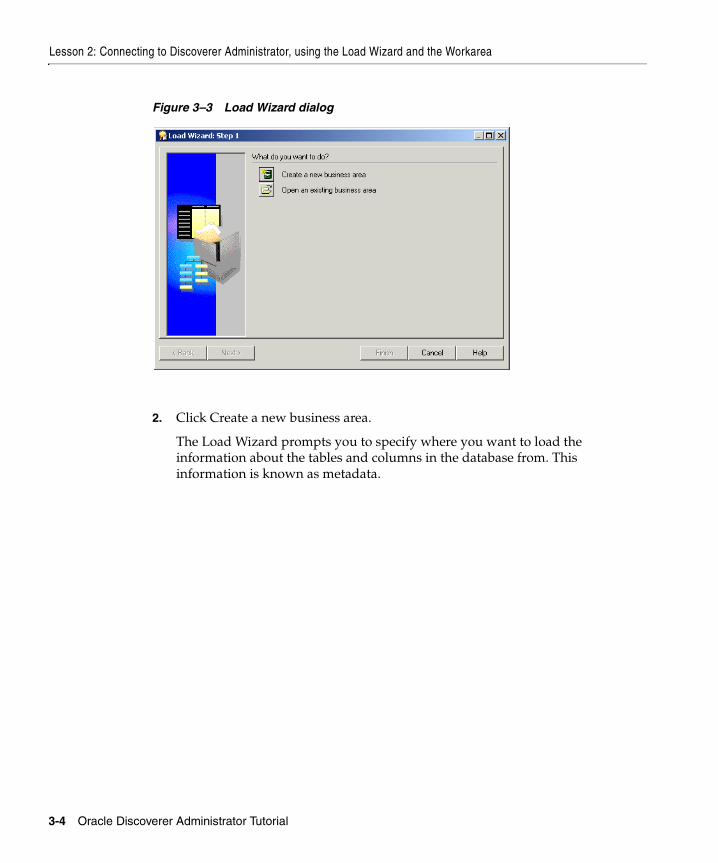
2. Click Create a new business area.
The Load Wizard prompts you to specify where you want to load the information about the tables and columns in the database from. This information is known as metadata.
Lesson 2: Connecting to Discoverer Administrator, using the Load Wizard and the Workarea
Lesson 2: Connecting to Discoverer Administrator, using the Load Wizard and the Workarea 3-5
Figure 3–4 Load Wizard dialog
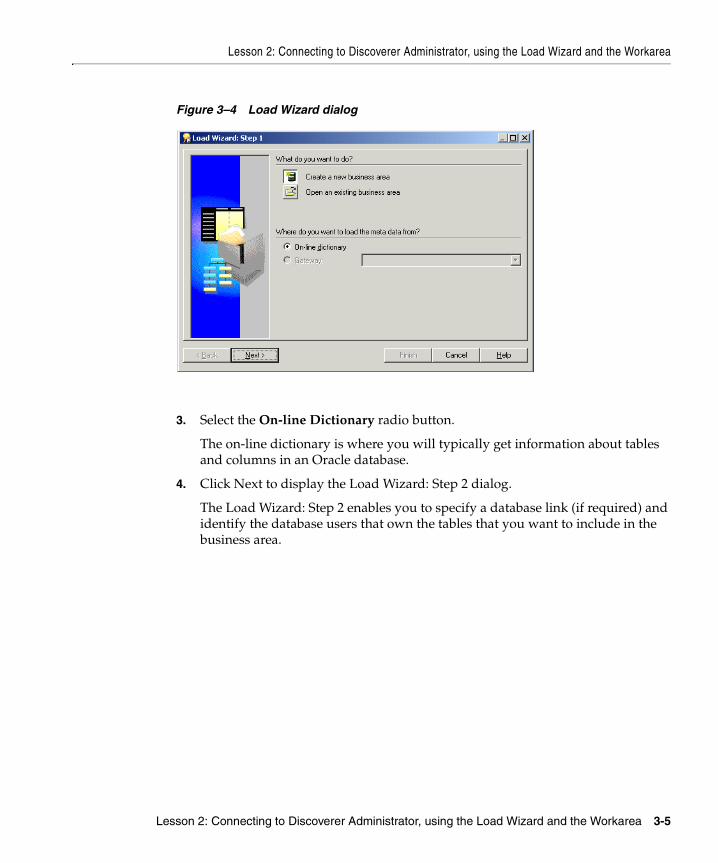
3. Select the On-line Dictionary radio button.
The on-line dictionary is where you will typically get information about tables and columns in an Oracle database.
4. Click Next to display the Load Wizard: Step 2 dialog.
The Load Wizard: Step 2 enables you to specify a database link (if required) and identify the database users that own the tables that you want to include in the business area.
Lesson 2: Connecting to Discoverer Administrator, using the Load Wizard and the Workarea
3-6 Oracle Discoverer Administrator Tutorial
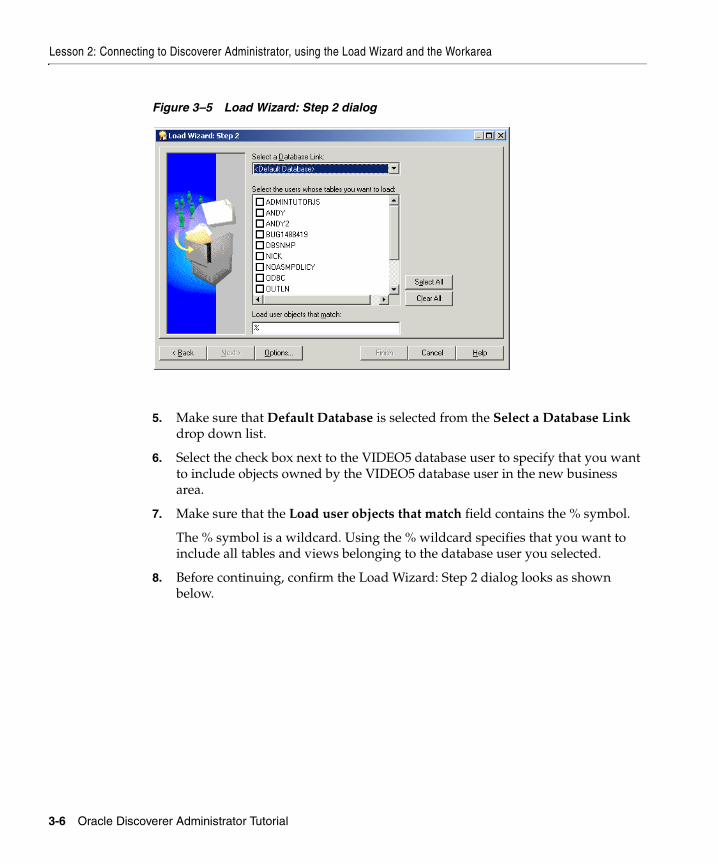
Figure 3–5 Load Wizard: Step 2 dialog
5. Make sure that Default Database is selected from the Select a Database Link drop down list.
6. Select the check box next to the VIDEO5 database user to specify that you want to include objects owned by the VIDEO5 database user in the new business area.
7. Make sure that the Load user objects that match field contains the % symbol.
The % symbol is a wildcard. Using the % wildcard specifies that you want to include all tables and views belonging to the database user you selected.
8. Before continuing, confirm the Load Wizard: Step 2 dialog looks as shown below.
Lesson 2: Connecting to Discoverer Administrator, using the Load Wizard and the Workarea
Lesson 2: Connecting to Discoverer Administrator, using the Load Wizard and the Workarea 3-7
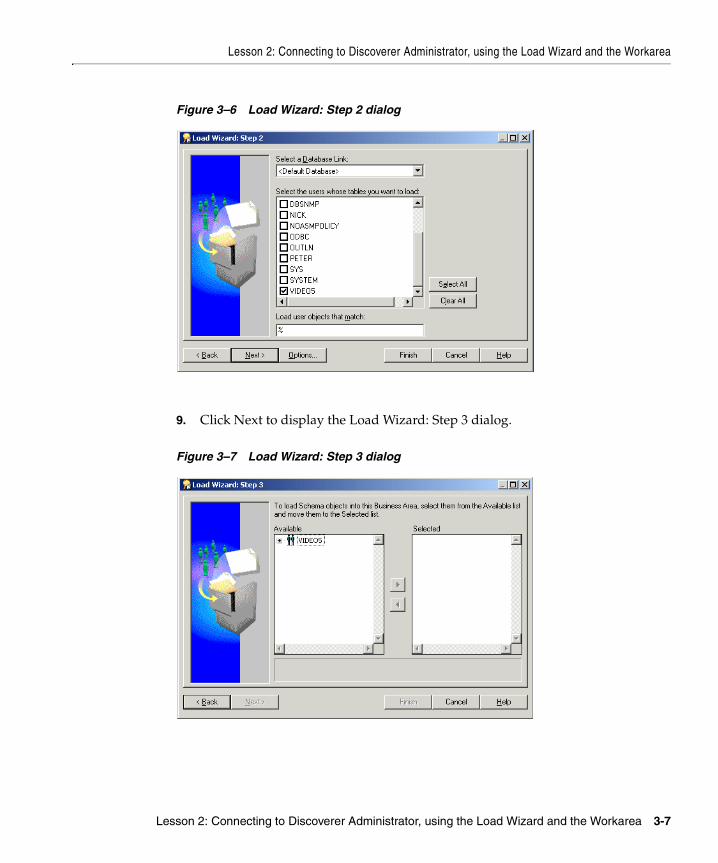
Figure 3–6 Load Wizard: Step 2 dialog
9. Click Next to display the Load Wizard: Step 3 dialog.
Figure 3–7 Load Wizard: Step 3 dialog
Lesson 2: Connecting to Discoverer Administrator, using the Load Wizard and the Workarea
3-8 Oracle Discoverer Administrator Tutorial
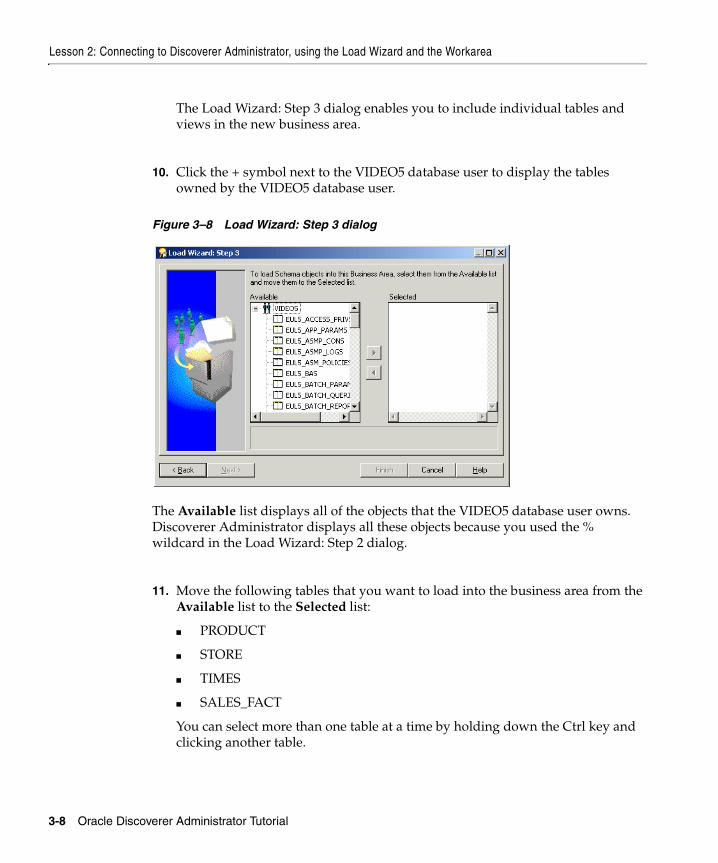
The Load Wizard: Step 3 dialog enables you to include individual tables and views in the new business area.
10. Click the + symbol next to the VIDEO5 database user to display the tables owned by the VIDEO5 database user.
Figure 3–8 Load Wizard: Step 3 dialog
The Available list displays all of the objects that the VIDEO5 database user owns. Discoverer Administrator displays all these objects because you used the % wildcard in the Load Wizard: Step 2 dialog.
11. Move the following tables that you want to load into the business area from the Available list to the Selected list:
■ PRODUCT
■ STORE
■ TIMES
■ SALES_FACT
You can select more than one table at a time by holding down the Ctrl key and clicking another table.
Lesson 2: Connecting to Discoverer Administrator, using the Load Wizard and the Workarea
Lesson 2: Connecting to Discoverer Administrator, using the Load Wizard and the Workarea 3-9
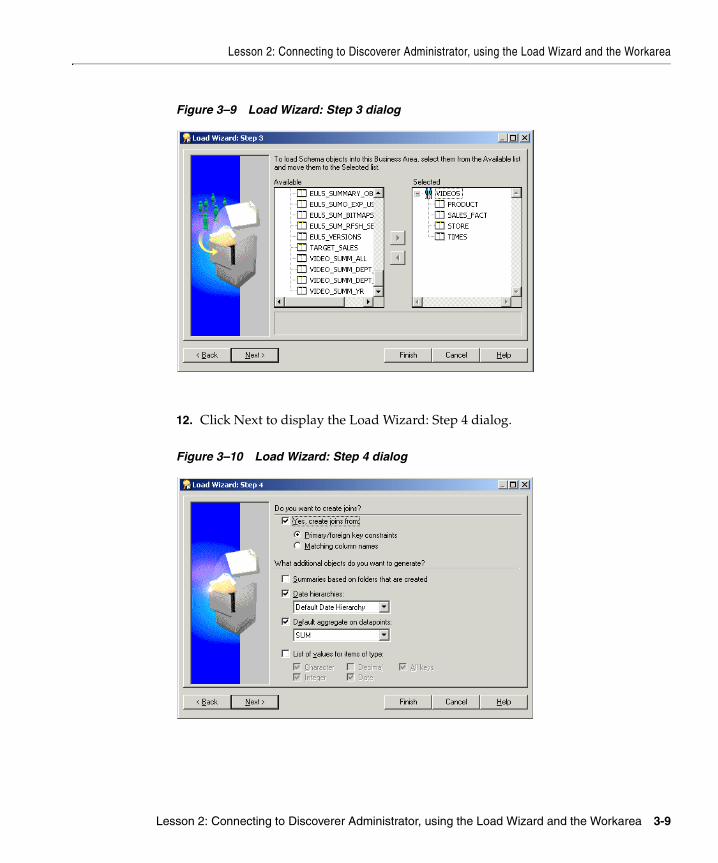
Figure 3–9 Load Wizard: Step 3 dialog
12. Click Next to display the Load Wizard: Step 4 dialog.
Figure 3–10 Load Wizard: Step 4 dialog
Lesson 2: Connecting to Discoverer Administrator, using the Load Wizard and the Workarea
3-10 Oracle Discoverer Administrator Tutorial
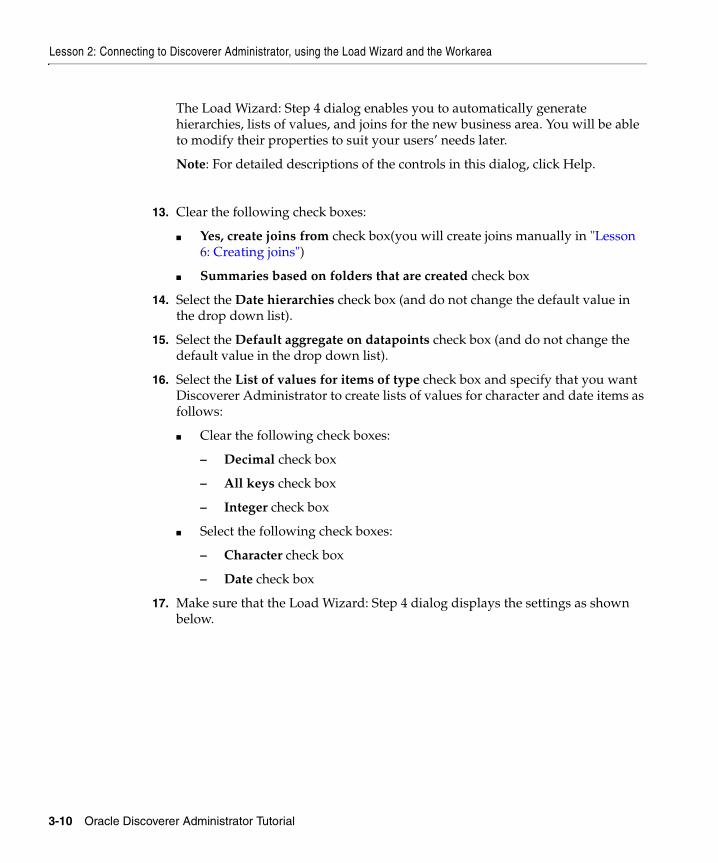
The Load Wizard: Step 4 dialog enables you to automatically generate hierarchies, lists of values, and joins for the new business area. You will be able to modify their properties to suit your users’ needs later.
Note: For detailed descriptions of the controls in this dialog, click Help.
13. Clear the following check boxes:
■ Yes, create joins from check box(you will create joins manually in "Lesson 6: Creating joins")
■ Summaries based on folders that are created check box
14. Select the Date hierarchies check box (and do not change the default value in the drop down list).
15. Select the Default aggregate on datapoints check box (and do not change the default value in the drop down list).
16. Select the List of values for items of type check box and specify that you want Discoverer Administrator to create lists of values for character and date items as follows:
■ Clear the following check boxes:
– Decimal check box
– All keys check box
– Integer check box
■ Select the following check boxes:
– Character check box
– Date check box
17. Make sure that the Load Wizard: Step 4 dialog displays the settings as shown below.
Lesson 2: Connecting to Discoverer Administrator, using the Load Wizard and the Workarea
Lesson 2: Connecting to Discoverer Administrator, using the Load Wizard and the Workarea 3-11
Figure 3–11 Load Wizard: Step 4 dialog
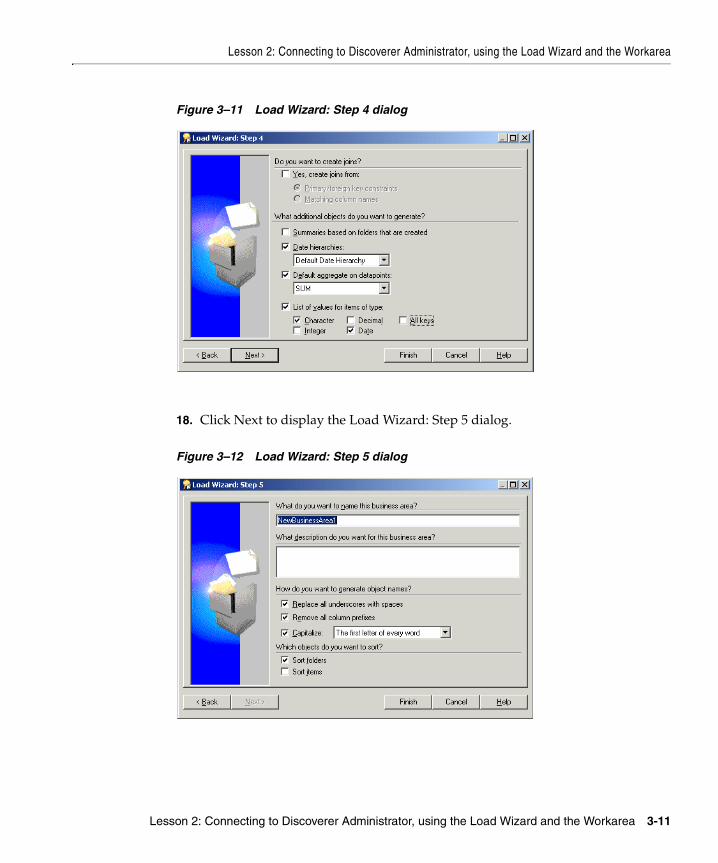
18. Click Next to display the Load Wizard: Step 5 dialog.
Figure 3–12 Load Wizard: Step 5 dialog
Lesson 2: Connecting to Discoverer Administrator, using the Load Wizard and the Workarea
3-12 Oracle Discoverer Administrator Tutorial
The Load Wizard: Step 5 dialog enables you to name the business area, generate object names, and sort folders and items.
19. Type New Video Stores in the What do you want to name this business area? field.
20. Type Tutorial Business Area in the What description do you want to use for this business area? field.
21. Specify how you want Discoverer Administrator to create folder and item names from database object names by selecting the following check boxes:
■ Replace all underscores with spaces check box
■ Remove all column prefixes check box
■ Capitalize check box (and do not change the default value in the drop down list)
22. Specify whether you want the contents of folders and items to be sorted as follows:
■ select the Sort folders check box
■ clear the Sort items check box
23. Before continuing, confirm the Load Wizard: Step 5 dialog looks as shown below.
Lesson 2: Connecting to Discoverer Administrator, using the Load Wizard and the Workarea
Lesson 2: Connecting to Discoverer Administrator, using the Load Wizard and the Workarea 3-13
Figure 3–13 Load Wizard: Step 5 dialog
24. Click Finish to create the new business area.
Discoverer Administrator displays a progress bar while creating the business area.
When the business area has been created, Discoverer Administrator displays the Workarea.
Lesson 2: Connecting to Discoverer Administrator, using the Load Wizard and the Workarea
3-14 Oracle Discoverer Administrator Tutorial
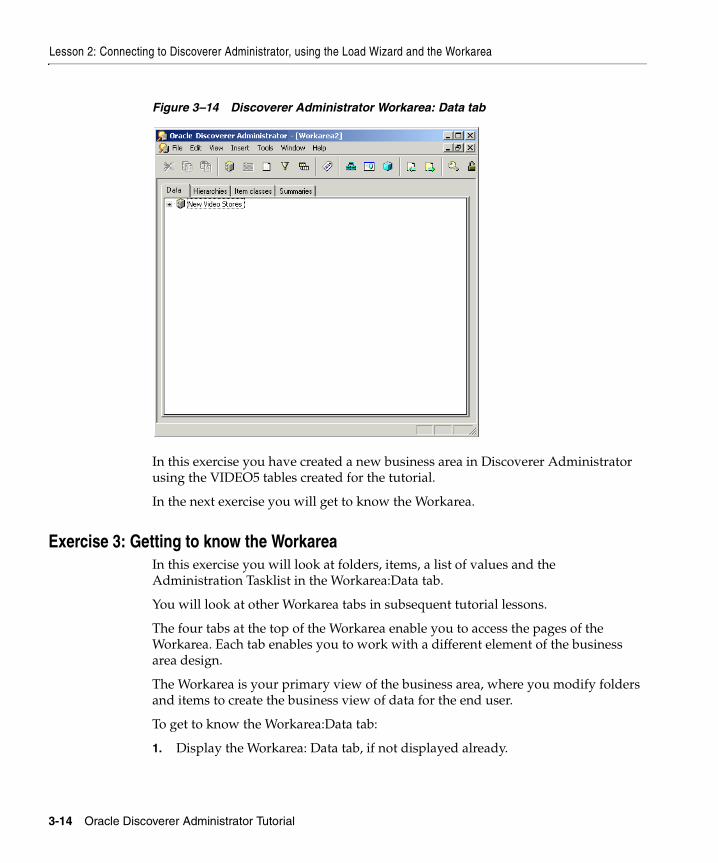
Figure 3–14 Discoverer Administrator Workarea: Data tab
In this exercise you have created a new business area in Discoverer Administrator using the VIDEO5 tables created for the tutorial.
In the next exercise you will get to know the Workarea.
Exercise 3: Getting to know the WorkareaIn this exercise you will look at folders, items, a list of values and the Administration Tasklist in the Workarea:Data tab.
You will look at other Workarea tabs in subsequent tutorial lessons.
The four tabs at the top of the Workarea enable you to access the pages of the Workarea. Each tab enables you to work with a different element of the business area design.
The Workarea is your primary view of the business area, where you modify folders and items to create the business view of data for the end user.
To get to know the Workarea:Data tab:
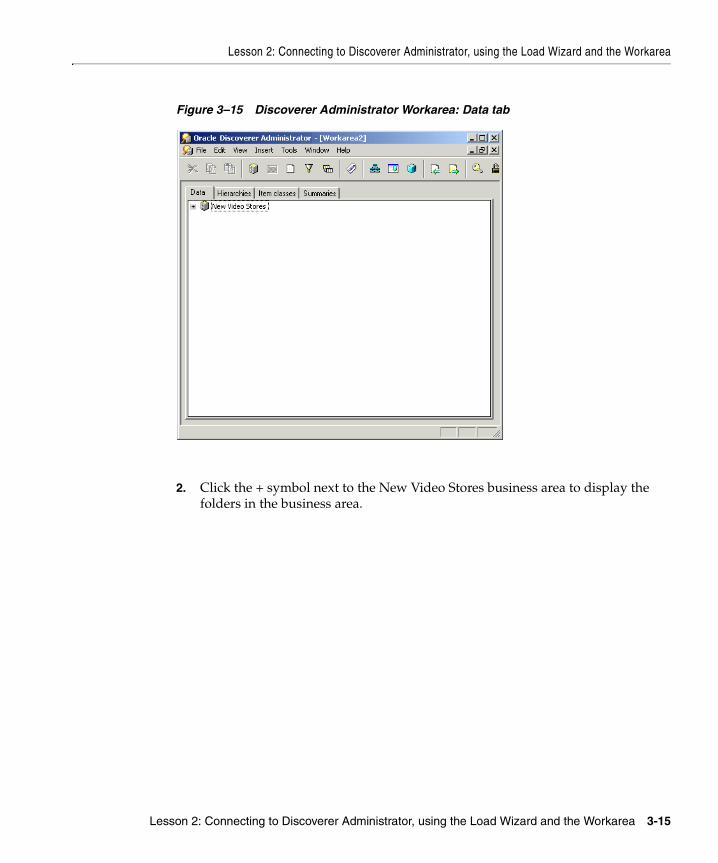
1. Display the Workarea: Data tab, if not displayed already.
Lesson 2: Connecting to Discoverer Administrator, using the Load Wizard and the Workarea
Lesson 2: Connecting to Discoverer Administrator, using the Load Wizard and the Workarea 3-15
Figure 3–15 Discoverer Administrator Workarea: Data tab
2. Click the + symbol next to the New Video Stores business area to display the folders in the business area.
Lesson 2: Connecting to Discoverer Administrator, using the Load Wizard and the Workarea
3-16 Oracle Discoverer Administrator Tutorial
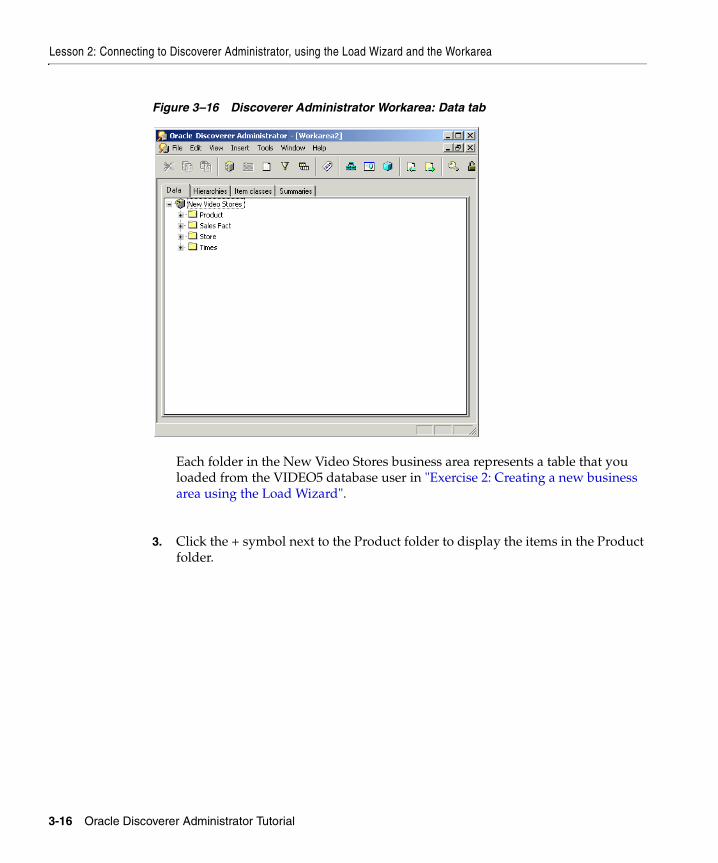
Figure 3–16 Discoverer Administrator Workarea: Data tab
Each folder in the New Video Stores business area represents a table that you loaded from the VIDEO5 database user in "Exercise 2: Creating a new business area using the Load Wizard".
3. Click the + symbol next to the Product folder to display the items in the Product folder.
Lesson 2: Connecting to Discoverer Administrator, using the Load Wizard and the Workarea
Lesson 2: Connecting to Discoverer Administrator, using the Load Wizard and the Workarea 3-17
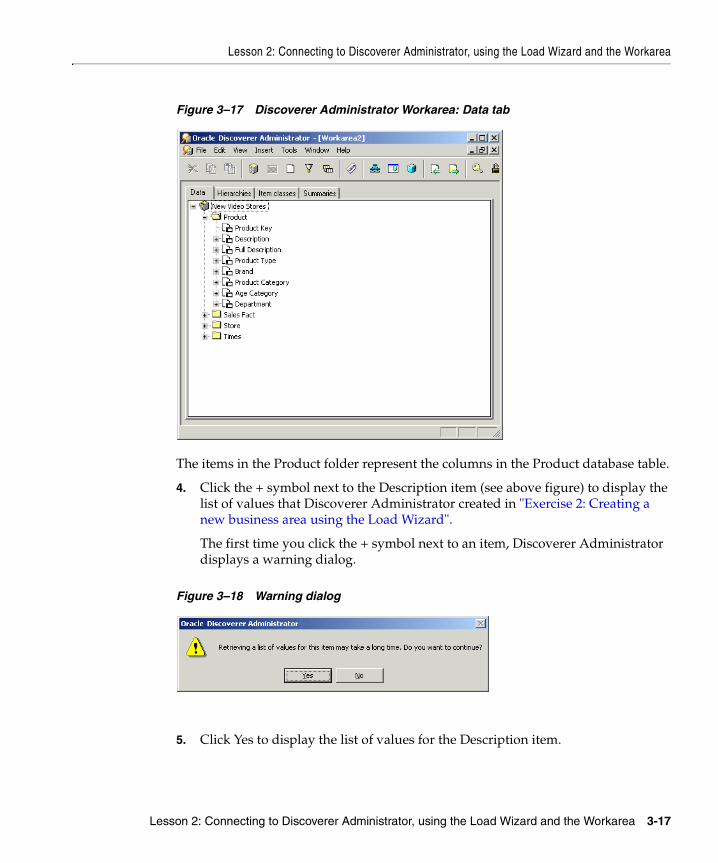
Figure 3–17 Discoverer Administrator Workarea: Data tab
The items in the Product folder represent the columns in the Product database table.
4. Click the + symbol next to the Description item (see above figure) to display the list of values that Discoverer Administrator created in "Exercise 2: Creating a new business area using the Load Wizard".
The first time you click the + symbol next to an item, Discoverer Administrator displays a warning dialog.
Figure 3–18 Warning dialog
5. Click Yes to display the list of values for the Description item.
Lesson 2: Connecting to Discoverer Administrator, using the Load Wizard and the Workarea
3-18 Oracle Discoverer Administrator Tutorial
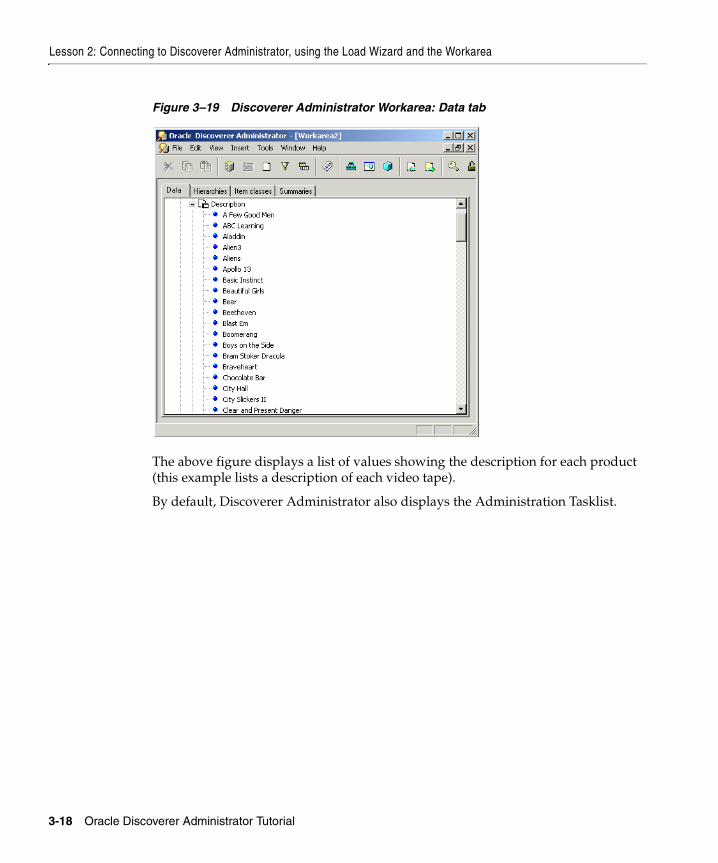
Figure 3–19 Discoverer Administrator Workarea: Data tab
The above figure displays a list of values showing the description for each product (this example lists a description of each video tape).
By default, Discoverer Administrator also displays the Administration Tasklist.
Lesson summary
Lesson 2: Connecting to Discoverer Administrator, using the Load Wizard and the Workarea 3-19
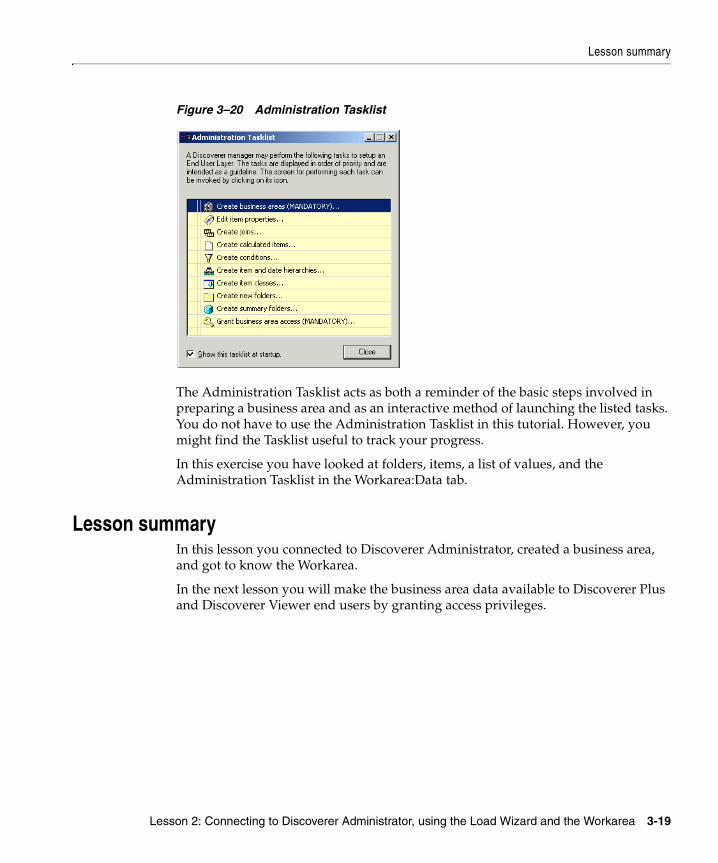
Figure 3–20 Administration Tasklist
The Administration Tasklist acts as both a reminder of the basic steps involved in preparing a business area and as an interactive method of launching the listed tasks. You do not have to use the Administration Tasklist in this tutorial. However, you might find the Tasklist useful to track your progress.
In this exercise you have looked at folders, items, a list of values, and the Administration Tasklist in the Workarea:Data tab.
Lesson summaryIn this lesson you connected to Discoverer Administrator, created a business area, and got to know the Workarea.
In the next lesson you will make the business area data available to Discoverer Plus and Discoverer Viewer end users by granting access privileges.

Lesson summary
3-20 Oracle Discoverer Administrator Tutorial
Lesson 3: Granting access privileges 4-1
4Lesson 3: Granting access privileges
Lesson 3: Granting access privilegesIt will probably take you about 15 minutes to complete this lesson.
In this lesson you will grant access privileges to users and grant security access to the business area.
Access privileges determine who can see and use the data in the business area. The Privileges and Security dialogs are your means for setting those rights and privileges for the appropriate database users. Data access rights to the application database tables are controlled by the database administrator, and are not affected by Discoverer Administrator. Database users need SELECT access to the application database tables in order to use Discoverer.
The database user Admintutor[your initials] is the creator and owner of the business area in this tutorial. The database user Admintutor[your initials] is the only user with the authority to grant other users access privileges to the new business area. This user can also grant administration rights to other users.
For more detailed information about working with the Privileges and Security dialogs, click Help.
This lesson consists of the following exercises:
■ "Exercise 1: Using the Privileges dialog: Privileges tab"
■ "Exercise 2: Using the Privileges dialog: User/Role tab"
■ "Exercise 3: Using the Privileges dialog: Query Governor tab"
■ "Exercise 4: Using the Privileges dialog: Scheduled Workbooks tab"
■ "Exercise 5: Using the Security dialog: Business Area -> User tab"
Lesson 3: Granting access privileges
4-2 Oracle Discoverer Administrator Tutorial
Exercise 1: Using the Privileges dialog: Privileges tabIn this exercise you will use the Privileges dialog: User/Role tab to grant Discoverer Desktop and Discoverer Plus privileges to the VIDEO5 database user.
The Privileges dialog enables you to grant access privileges to database users and has four tabs, (i.e. Privileges, User/Role, Query Governor and Scheduled Workbooks).
The Privileges tab displays a list of privileges available in Discoverer Administrator and another list in Discoverer Desktop and Discoverer Plus. The check box next to each privilege enables you to grant and revoke privileges to the specified database user or role.
To use the Privileges dialog: Privileges tab:
1. If you are not connected to Discoverer Administrator, complete Chapter 3, "Exercise 1: Connecting to Discoverer Administrator", Discoverer Administrator displays the Load Wizard.
2. Click Cancel to close the Load Wizard dialog.
3. Choose Tools | Privileges to display the Privileges dialog: Privileges tab.
This tab enables you to grant access privileges to database users or roles.
■ A database user is represented in Discoverer Administrator as a user.
■ A database role is defined in the Oracle database and is another means of grouping users for security purposes.
Note: The database administrator can assign database users to a role and then modify the role to affect the privileges for all database users assigned to that role. As a Discoverer manager, this saves you from having to recreate the same set of privileges over and over. For example, you could use a Store Manager role to assign the same privileges to any manager in the video store chain.
Lesson 3: Granting access privileges
Lesson 3: Granting access privileges 4-3
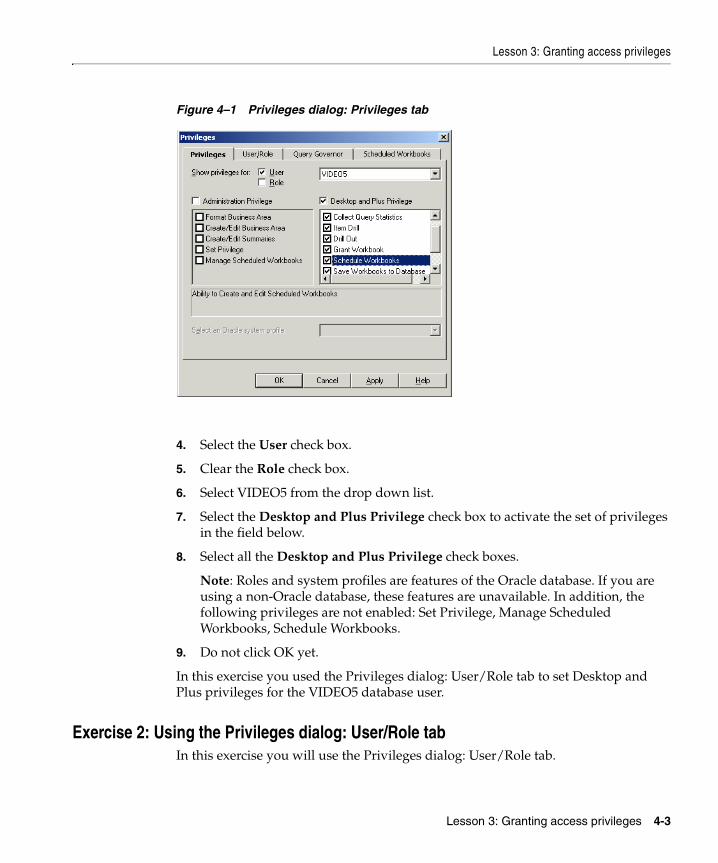
Figure 4–1 Privileges dialog: Privileges tab
4. Select the User check box.
5. Clear the Role check box.
6. Select VIDEO5 from the drop down list.
7. Select the Desktop and Plus Privilege check box to activate the set of privileges in the field below.
8. Select all the Desktop and Plus Privilege check boxes.
Note: Roles and system profiles are features of the Oracle database. If you are using a non-Oracle database, these features are unavailable. In addition, the following privileges are not enabled: Set Privilege, Manage Scheduled Workbooks, Schedule Workbooks.
9. Do not click OK yet.
In this exercise you used the Privileges dialog: User/Role tab to set Desktop and Plus privileges for the VIDEO5 database user.
Exercise 2: Using the Privileges dialog: User/Role tabIn this exercise you will use the Privileges dialog: User/Role tab.
Lesson 3: Granting access privileges
4-4 Oracle Discoverer Administrator Tutorial
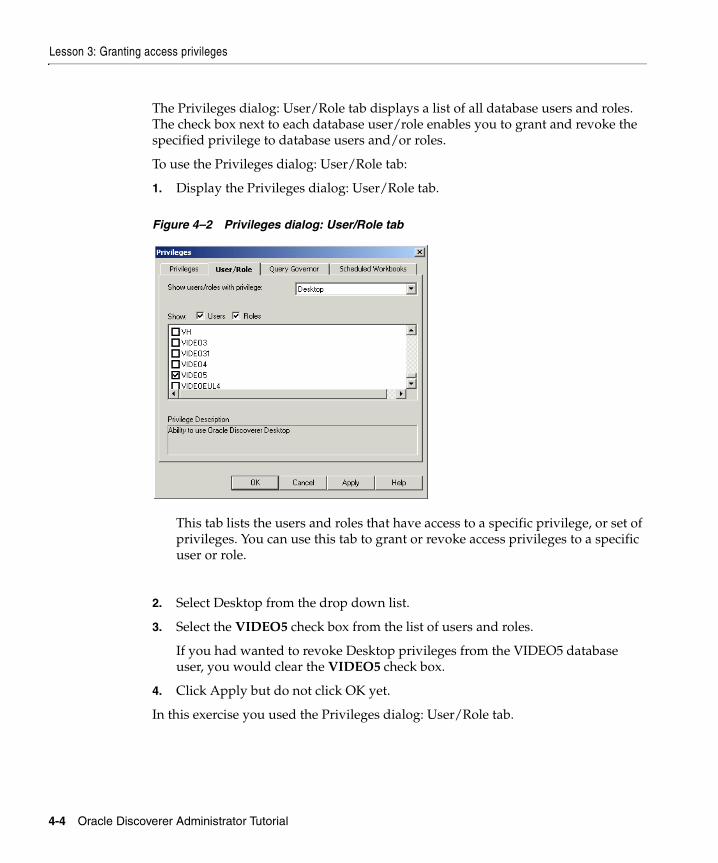
The Privileges dialog: User/Role tab displays a list of all database users and roles. The check box next to each database user/role enables you to grant and revoke the specified privilege to database users and/or roles.
To use the Privileges dialog: User/Role tab:
1. Display the Privileges dialog: User/Role tab.
Figure 4–2 Privileges dialog: User/Role tab
This tab lists the users and roles that have access to a specific privilege, or set of privileges. You can use this tab to grant or revoke access privileges to a specific user or role.
2. Select Desktop from the drop down list.
3. Select the VIDEO5 check box from the list of users and roles.
If you had wanted to revoke Desktop privileges from the VIDEO5 database user, you would clear the VIDEO5 check box.
4. Click Apply but do not click OK yet.
In this exercise you used the Privileges dialog: User/Role tab.
Lesson 3: Granting access privileges
Lesson 3: Granting access privileges 4-5
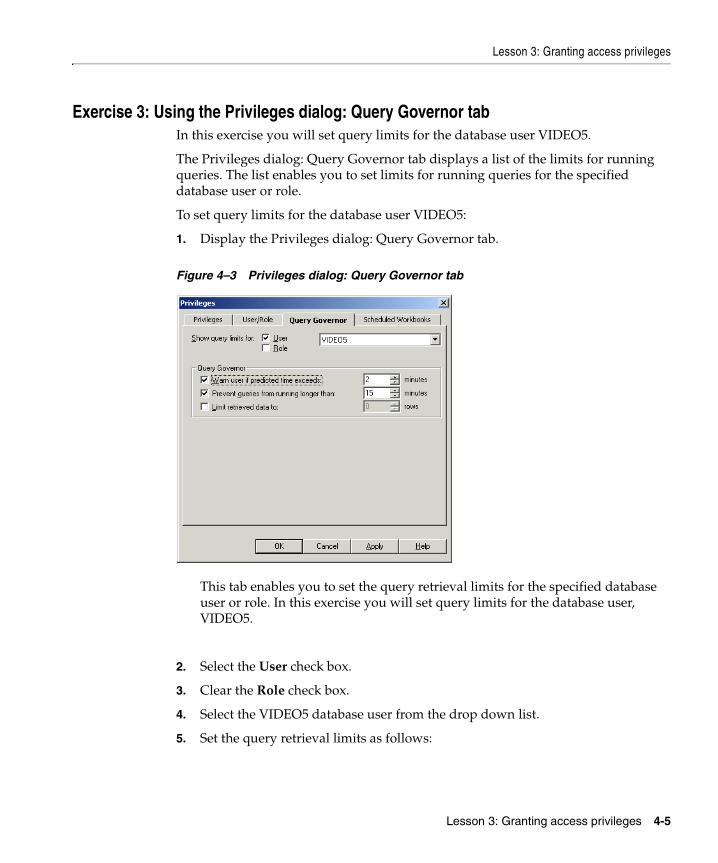
Exercise 3: Using the Privileges dialog: Query Governor tabIn this exercise you will set query limits for the database user VIDEO5.
The Privileges dialog: Query Governor tab displays a list of the limits for running queries. The list enables you to set limits for running queries for the specified database user or role.
To set query limits for the database user VIDEO5:
1. Display the Privileges dialog: Query Governor tab.
Figure 4–3 Privileges dialog: Query Governor tab
This tab enables you to set the query retrieval limits for the specified database user or role. In this exercise you will set query limits for the database user, VIDEO5.
2. Select the User check box.
3. Clear the Role check box.
4. Select the VIDEO5 database user from the drop down list.
5. Set the query retrieval limits as follows:
Lesson 3: Granting access privileges
4-6 Oracle Discoverer Administrator Tutorial
■ Select the Warn user if predicted time exceeds check box and set the time to 2:00 minutes.
This option is not available if you are using a non-Oracle database.
■ Select the Prevent queries longer than check box and set the time to 15:00 minutes.
■ Clear the Limit retrieved data to check box so that no limit is set.
6. Click Apply but do not click OK yet.
In this exercise you set query limits for the database user VIDEO5.
Exercise 4: Using the Privileges dialog: Scheduled Workbooks tabIn this exercise you will set limits for scheduling workbooks in Discoverer Plus and Discoverer Desktop.
The Privileges dialog: Scheduled Workbooks tab displays limits for running scheduled workbooks. It enables you to set different parameters for scheduling workbooks for each database user or role that has that privilege.
To set limits for scheduling workbooks in Discoverer Plus and Discoverer Desktop:
1. Display the Privileges dialog: Scheduled Workbooks tab.
Lesson 3: Granting access privileges
Lesson 3: Granting access privileges 4-7
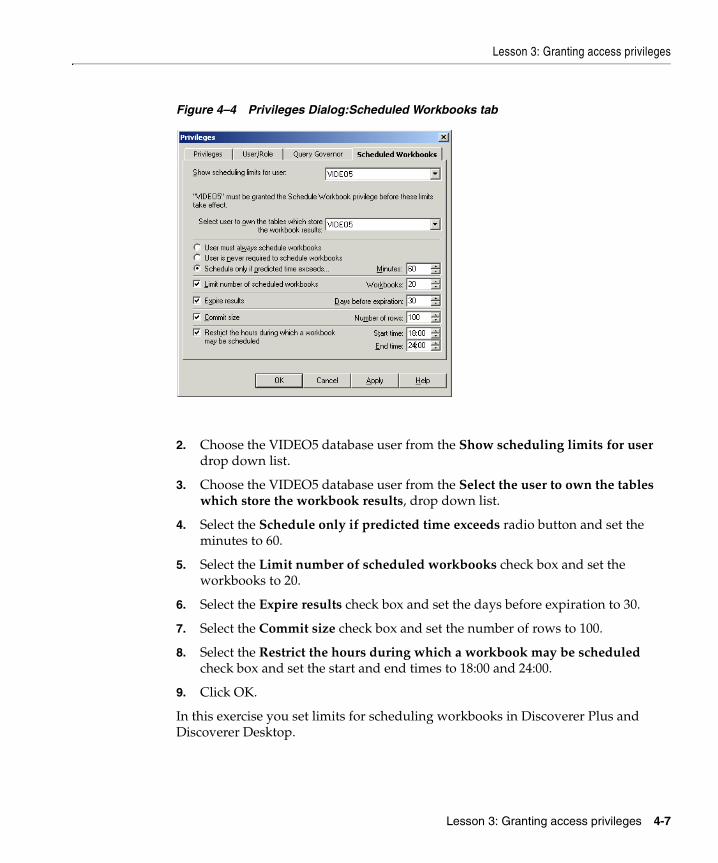
Figure 4–4 Privileges Dialog:Scheduled Workbooks tab
2. Choose the VIDEO5 database user from the Show scheduling limits for user drop down list.
3. Choose the VIDEO5 database user from the Select the user to own the tables which store the workbook results, drop down list.
4. Select the Schedule only if predicted time exceeds radio button and set the minutes to 60.
5. Select the Limit number of scheduled workbooks check box and set the workbooks to 20.
6. Select the Expire results check box and set the days before expiration to 30.
7. Select the Commit size check box and set the number of rows to 100.
8. Select the Restrict the hours during which a workbook may be scheduled check box and set the start and end times to 18:00 and 24:00.
9. Click OK.
In this exercise you set limits for scheduling workbooks in Discoverer Plus and Discoverer Desktop.
Lesson 3: Granting access privileges
4-8 Oracle Discoverer Administrator Tutorial
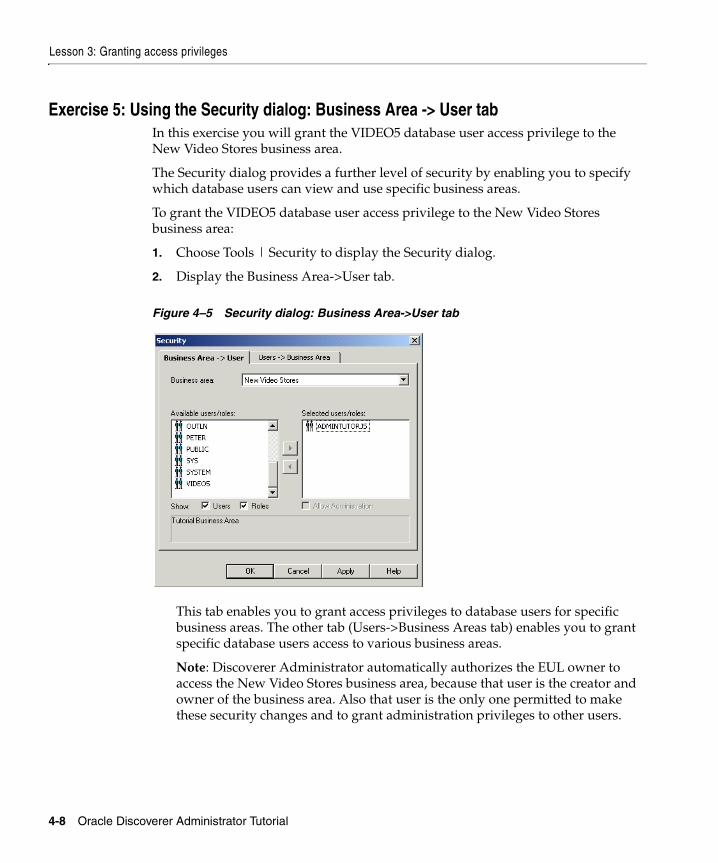
Exercise 5: Using the Security dialog: Business Area -> User tabIn this exercise you will grant the VIDEO5 database user access privilege to the New Video Stores business area.
The Security dialog provides a further level of security by enabling you to specify which database users can view and use specific business areas.
To grant the VIDEO5 database user access privilege to the New Video Stores business area:
1. Choose Tools | Security to display the Security dialog.
2. Display the Business Area->User tab.
Figure 4–5 Security dialog: Business Area->User tab
This tab enables you to grant access privileges to database users for specific business areas. The other tab (Users->Business Areas tab) enables you to grant specific database users access to various business areas.
Note: Discoverer Administrator automatically authorizes the EUL owner to access the New Video Stores business area, because that user is the creator and owner of the business area. Also that user is the only one permitted to make these security changes and to grant administration privileges to other users.
Lesson summary
Lesson 3: Granting access privileges 4-9
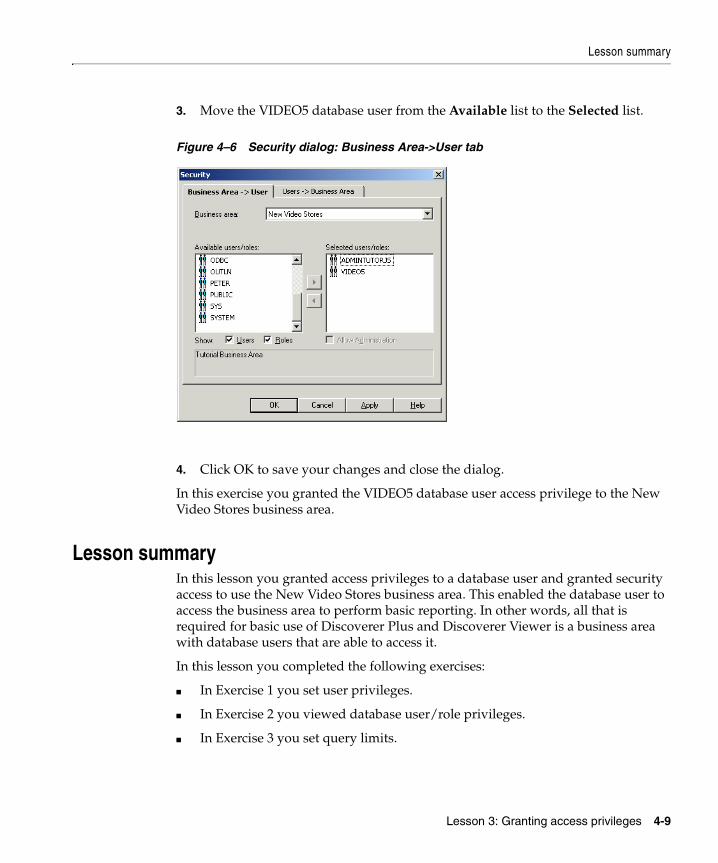
3. Move the VIDEO5 database user from the Available list to the Selected list.
Figure 4–6 Security dialog: Business Area->User tab
4. Click OK to save your changes and close the dialog.
In this exercise you granted the VIDEO5 database user access privilege to the New Video Stores business area.
Lesson summaryIn this lesson you granted access privileges to a database user and granted security access to use the New Video Stores business area. This enabled the database user to access the business area to perform basic reporting. In other words, all that is required for basic use of Discoverer Plus and Discoverer Viewer is a business area with database users that are able to access it.
In this lesson you completed the following exercises:
■ In Exercise 1 you set user privileges.
■ In Exercise 2 you viewed database user/role privileges.
■ In Exercise 3 you set query limits.
Lesson summary
4-10 Oracle Discoverer Administrator Tutorial
■ In Exercise 4 you set workbook scheduling limits.
■ In Exercise 5 you granted a database user the privilege to use the New Video Stores business area.
In the next lesson, you will enhance the business area by providing a useful, expanded business view of the data to end users.
Lesson 4: Modifying the business area 5-1
5Lesson 4: Modifying the business area
Lesson 4: Modifying the business areaIt will probably take you about 10 minutes to complete this lesson.
In this lesson you will label information in a business area to help end users identify the information they will want to access. This includes adding a description to the New Video Stores business area and renaming folders and items to more clearly identify the data that they represent.
This lesson consists of the following exercises:
■ "Exercise 1: Adding a description to the business area"
■ "Exercise 2: Renaming and adding descriptions to folders"
■ "Exercise 3: Renaming items in the Time Information folder"
Exercise 1: Adding a description to the business areaIn this exercise you will add a description to the business area.
A descriptive phrase about the business area can help remind end users of the purpose of a business area.
To add a description to the business area:
1. Display the Workarea: Data tab.
2. Click the New Video Stores business area.
3. Choose Edit | Properties to display the Business Area Properties dialog.
Lesson 4: Modifying the business area
5-2 Oracle Discoverer Administrator Tutorial
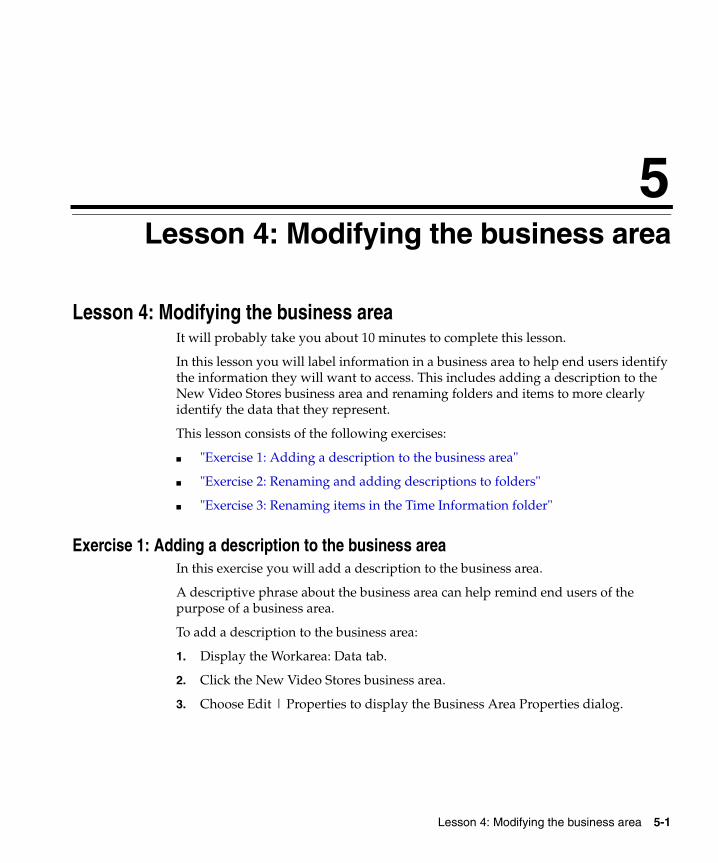
Figure 5–1 Business Area Properties dialog
4. Click the Description field and type Stores Information for 1998, 1999 and 2000.
5. Click OK.
Hint: Many Discoverer dialogs have an OK button and an Apply button. If you click the Apply button, Discoverer puts the changes into effect, but does not close the dialog. You can continue making changes to other items using the same dialog. If you click the OK button, Discoverer applies the changes and closes the dialog. If you select the Automatically save changes after each edit check box, you don’t have to click the Apply button as changes are saved as you make them.
In this exercise you added a description to the business area.
Exercise 2: Renaming and adding descriptions to foldersIn this exercise you will rename and add descriptions to folders.
Folders are the basic elements that end users see when working with a business area. For that reason, folders must have meaningful names as well as useful descriptions that explain the folder’s primary use.
To rename and add descriptions to folders:
Lesson 4: Modifying the business area
Lesson 4: Modifying the business area 5-3
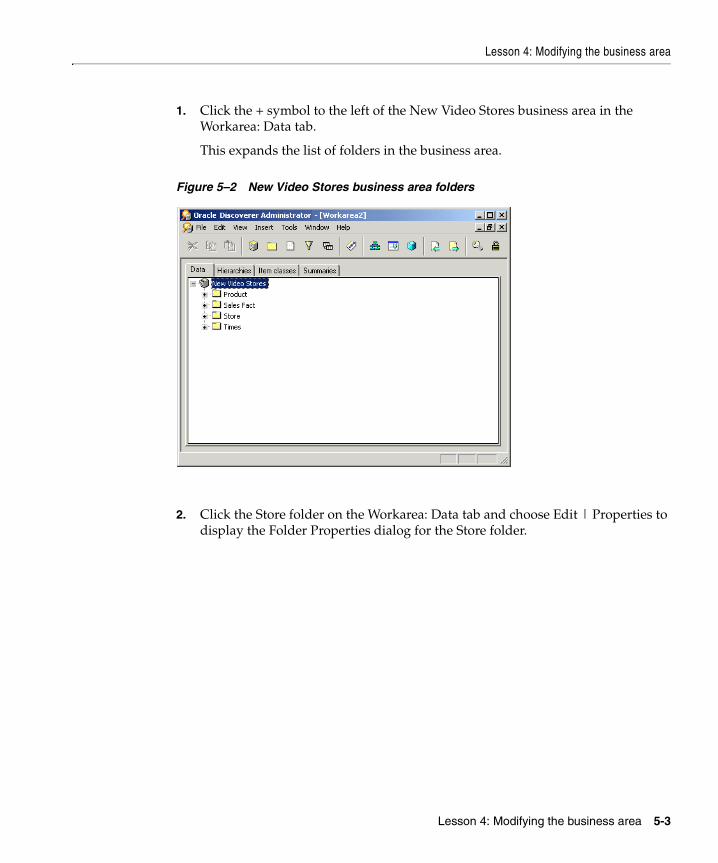
1. Click the + symbol to the left of the New Video Stores business area in the Workarea: Data tab.
This expands the list of folders in the business area.
Figure 5–2 New Video Stores business area folders
2. Click the Store folder on the Workarea: Data tab and choose Edit | Properties to display the Folder Properties dialog for the Store folder.

Lesson 4: Modifying the business area
5-4 Oracle Discoverer Administrator Tutorial
Figure 5–3 Folder Properties dialog
3. Click the Name field and rename 'Store' to 'Store Information'.
4. Click the Description field and type Store details including values such as name, floor plan type, and location.
The folder name and description will be visible in Discoverer Plus and Discoverer Viewer.
Click Apply and repeat the steps for each folder using the new text listed in the table below under the column heading New folder name.
5. Click OK when you have completed renaming the folders.
Hint: While the Properties dialog is open, you can click another object in the Workarea to switch your view to the properties for that object.
Original folder name New folder name
Product Product Information
Sales Fact Sales Details
Times Time Information
Lesson 4: Modifying the business area
Lesson 4: Modifying the business area 5-5
Now that you have given the folders more meaningful names and provided a description for the contents of each folder, end users can see the new names and descriptions when deciding which folders to use in a report.
In this exercise you renamed and added descriptions to folders.
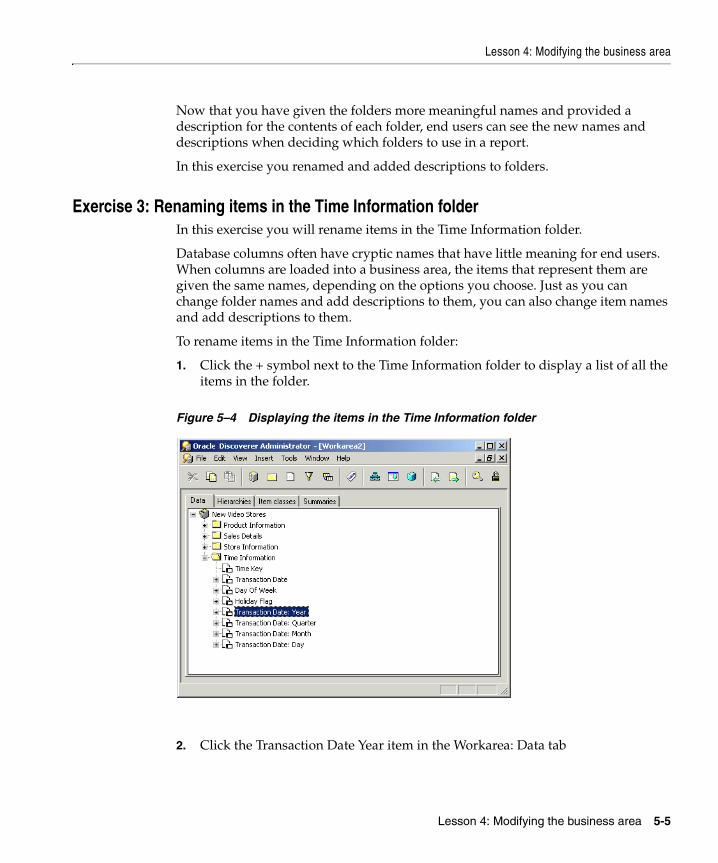
Exercise 3: Renaming items in the Time Information folderIn this exercise you will rename items in the Time Information folder.
Database columns often have cryptic names that have little meaning for end users. When columns are loaded into a business area, the items that represent them are given the same names, depending on the options you choose. Just as you can change folder names and add descriptions to them, you can also change item names and add descriptions to them.
To rename items in the Time Information folder:
1. Click the + symbol next to the Time Information folder to display a list of all the items in the folder.
Figure 5–4 Displaying the items in the Time Information folder
2. Click the Transaction Date Year item in the Workarea: Data tab
Lesson 4: Modifying the business area
5-6 Oracle Discoverer Administrator Tutorial
3. Choose Edit | Properties to display the Item Properties dialog for the Transaction Date Year item.
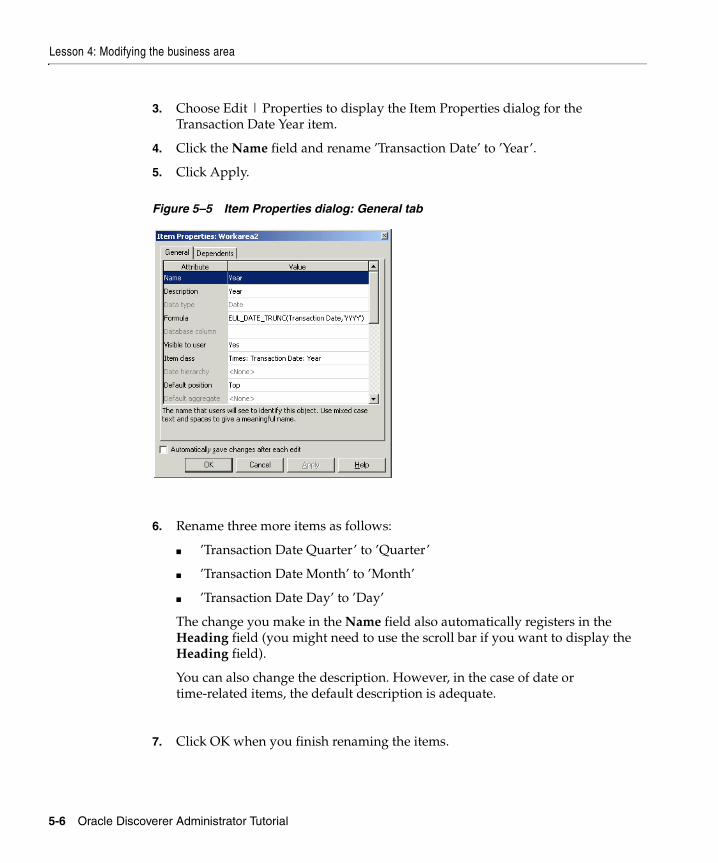
4. Click the Name field and rename ’Transaction Date’ to ’Year’.
5. Click Apply.
Figure 5–5 Item Properties dialog: General tab
6. Rename three more items as follows:
■ ’Transaction Date Quarter’ to ’Quarter’
■ ’Transaction Date Month’ to ’Month’
■ ’Transaction Date Day’ to ’Day’
The change you make in the Name field also automatically registers in the Heading field (you might need to use the scroll bar if you want to display the Heading field).
You can also change the description. However, in the case of date or time-related items, the default description is adequate.
7. Click OK when you finish renaming the items.
Lesson summary
Lesson 4: Modifying the business area 5-7
In this exercise you renamed items in the Time Information folder.
Lesson summaryIn this lesson you labelled information in a business area to help end users identify the information they will want to access.
In this lesson you completed the following exercises:
■ In Exercise 1 you added a description to the business area
■ In Exercise 2 you renamed and added descriptions to folders.
■ In Exercise 3 you renamed and added descriptions for an item in a folder.
In the next lesson, you will further enhance the business area by creating a custom folder.

Lesson summary
5-8 Oracle Discoverer Administrator Tutorial
Lesson 5: Working with custom folders 6-1
6Lesson 5: Working with custom folders
Lesson 5: Working with custom folders It will probably take you about 5 minutes to complete this lesson.
In this lesson you will enhance the business area by creating a custom folder and learning how to edit the SQL statement that defines the custom folder.
A Discoverer folder is a SQL statement that references data in the database, it represents data much like a database view. The simple folders that you have worked with until this stage, refer to SQL statements that are stored in the End User Layer.
Discoverer Administrator enables you to create custom folders based on arbitrary SQL statements that you specify. You can use set operators, such as UNION, CONNECT BY, MINUS, INTERSECT, and synonyms and quickly set up a custom folder that represents a complex result set.
This lesson consists of the following exercises:
■ "Exercise 1: Creating a custom folder"
■ "Exercise 2: Editing the SQL statement in a custom folder"
Exercise 1: Creating a custom folderIn this exercise you will create a custom folder that creates a local list of values within the EUL for an item with a small number of possible values. The exercise enables days of the week to be displayed in their logical order rather than alphabetically. The list of values to be created (e.g. days of the week) has a numeric sequence that we will use later in the tutorial (for more information, see "Lesson 7: Customizing items").
Lesson 5: Working with custom folders
6-2 Oracle Discoverer Administrator Tutorial
You will use a SQL statement to create a custom folder that has two items, one is a list of values representing the days of the week (DAY_OF_WEEK) and the other represents an alternative sort sequence (ALTERNATE_SORT).
To create a custom folder:
1. Display the Workarea: Data tab and click the New Video Stores business area.
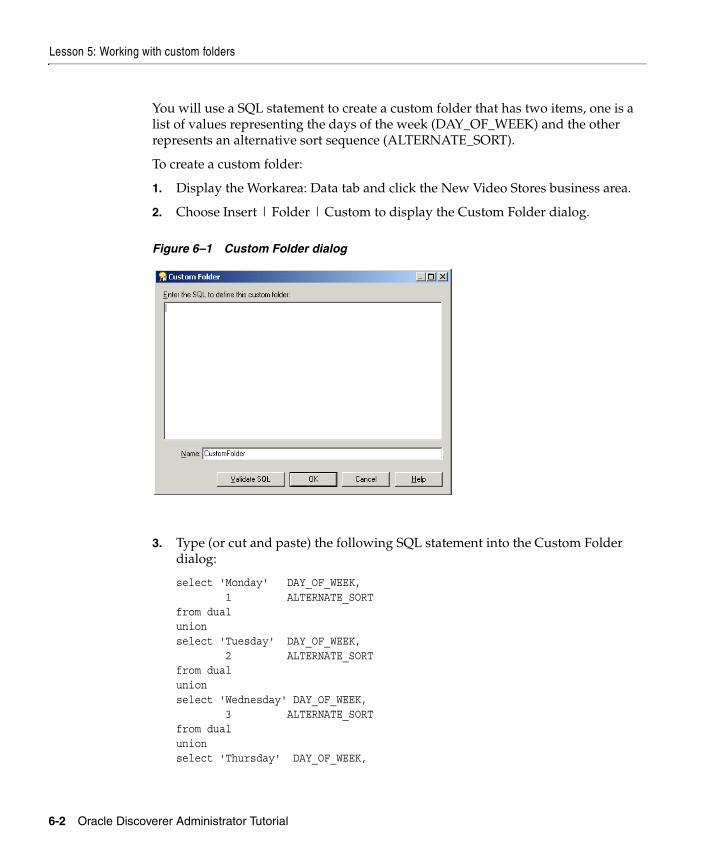
2. Choose Insert | Folder | Custom to display the Custom Folder dialog.
Figure 6–1 Custom Folder dialog
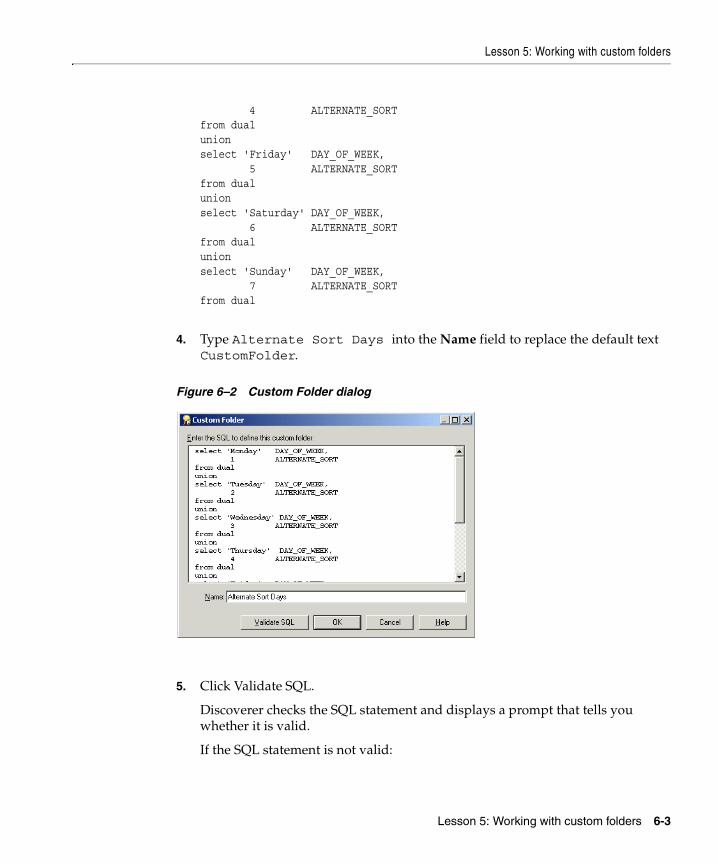
3. Type (or cut and paste) the following SQL statement into the Custom Folder dialog:
select 'Monday' DAY_OF_WEEK, 1 ALTERNATE_SORTfrom dualunionselect 'Tuesday' DAY_OF_WEEK, 2 ALTERNATE_SORTfrom dualunionselect 'Wednesday' DAY_OF_WEEK, 3 ALTERNATE_SORTfrom dualunionselect 'Thursday' DAY_OF_WEEK,
Lesson 5: Working with custom folders
Lesson 5: Working with custom folders 6-3
4 ALTERNATE_SORTfrom dualunionselect 'Friday' DAY_OF_WEEK, 5 ALTERNATE_SORTfrom dualunionselect 'Saturday' DAY_OF_WEEK, 6 ALTERNATE_SORTfrom dualunionselect 'Sunday' DAY_OF_WEEK, 7 ALTERNATE_SORTfrom dual
4. Type Alternate Sort Days into the Name field to replace the default text CustomFolder.
Figure 6–2 Custom Folder dialog
5. Click Validate SQL.
Discoverer checks the SQL statement and displays a prompt that tells you whether it is valid.
If the SQL statement is not valid:
Lesson 5: Working with custom folders
6-4 Oracle Discoverer Administrator Tutorial
a. Click OK to close the prompt.
b. Correct the SQL statement.
c. Click Validate SQL again.
If the SQL statement is valid:
a. Click OK to close the prompt.
b. Click OK to close the Custom Folder dialog and create the custom folder.
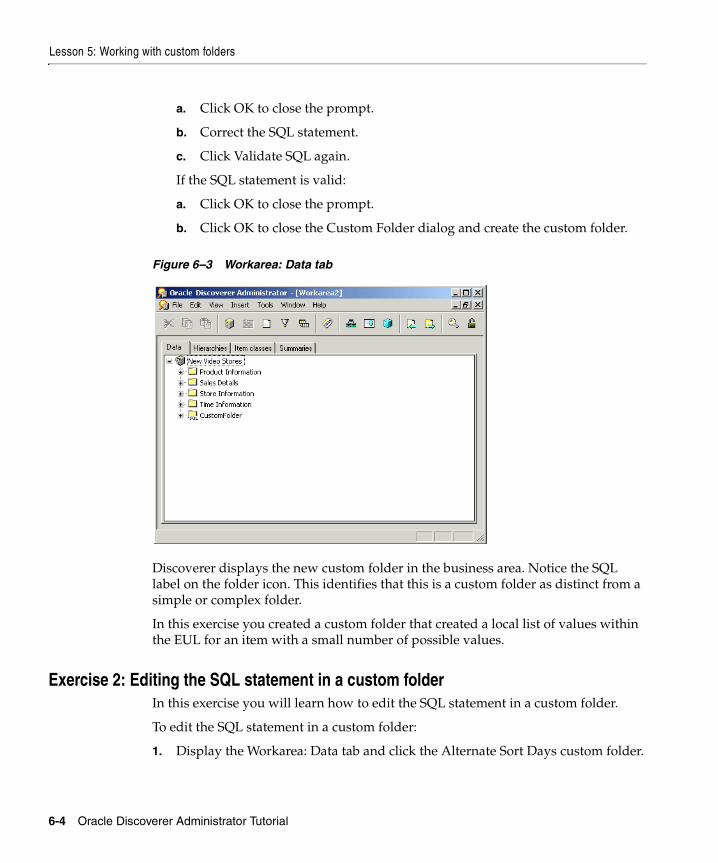
Figure 6–3 Workarea: Data tab
Discoverer displays the new custom folder in the business area. Notice the SQL label on the folder icon. This identifies that this is a custom folder as distinct from a simple or complex folder.
In this exercise you created a custom folder that created a local list of values within the EUL for an item with a small number of possible values.
Exercise 2: Editing the SQL statement in a custom folderIn this exercise you will learn how to edit the SQL statement in a custom folder.
To edit the SQL statement in a custom folder:
1. Display the Workarea: Data tab and click the Alternate Sort Days custom folder.
Lesson 5: Working with custom folders
Lesson 5: Working with custom folders 6-5
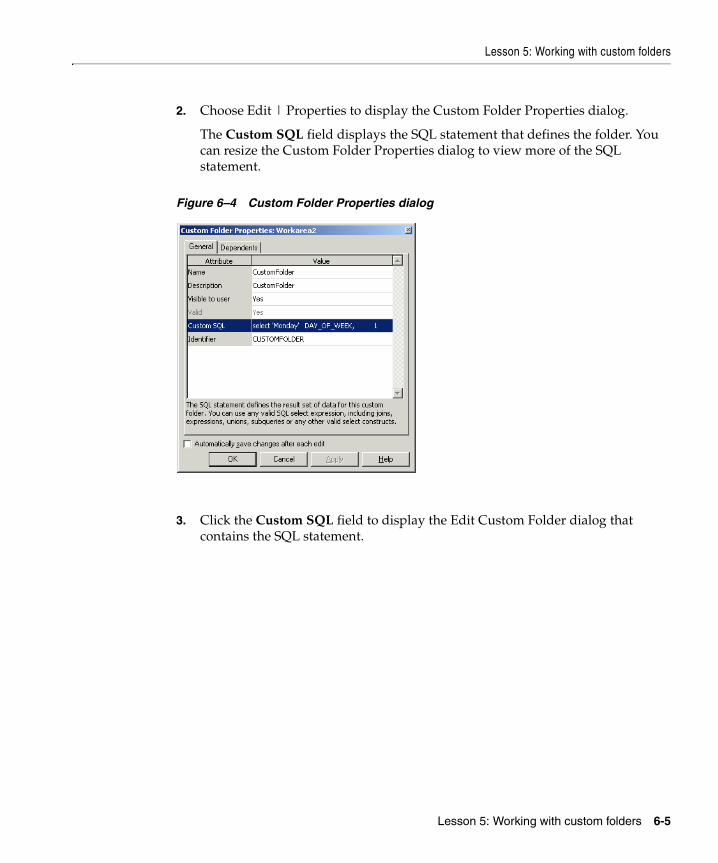
2. Choose Edit | Properties to display the Custom Folder Properties dialog.
The Custom SQL field displays the SQL statement that defines the folder. You can resize the Custom Folder Properties dialog to view more of the SQL statement.
Figure 6–4 Custom Folder Properties dialog
3. Click the Custom SQL field to display the Edit Custom Folder dialog that contains the SQL statement.
Lesson summary
6-6 Oracle Discoverer Administrator Tutorial
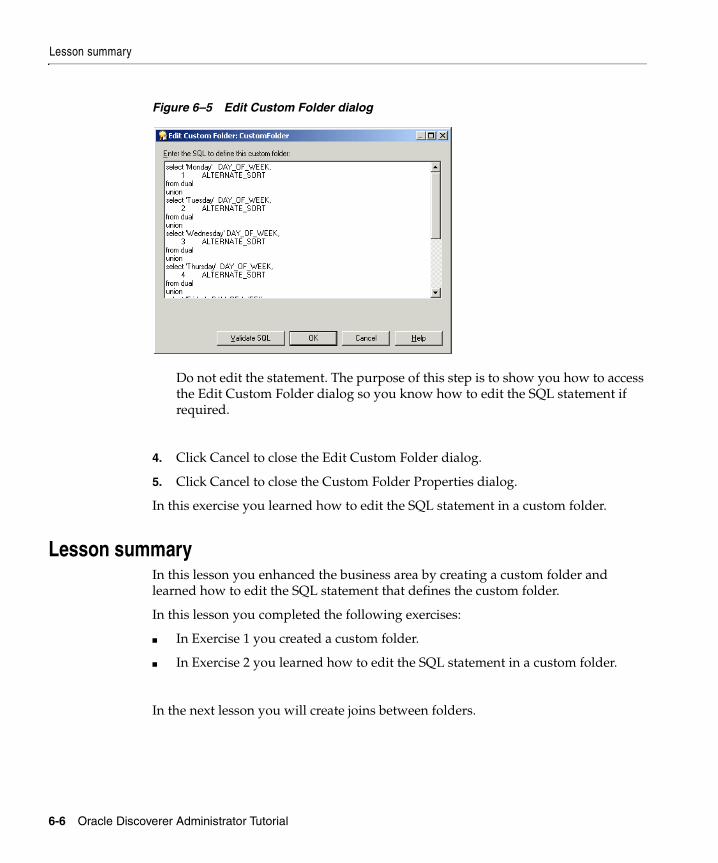
Figure 6–5 Edit Custom Folder dialog
Do not edit the statement. The purpose of this step is to show you how to access the Edit Custom Folder dialog so you know how to edit the SQL statement if required.
4. Click Cancel to close the Edit Custom Folder dialog.
5. Click Cancel to close the Custom Folder Properties dialog.
In this exercise you learned how to edit the SQL statement in a custom folder.
Lesson summaryIn this lesson you enhanced the business area by creating a custom folder and learned how to edit the SQL statement that defines the custom folder.
In this lesson you completed the following exercises:
■ In Exercise 1 you created a custom folder.
■ In Exercise 2 you learned how to edit the SQL statement in a custom folder.
In the next lesson you will create joins between folders.
Lesson 6: Creating joins 7-1
7Lesson 6: Creating joins
Lesson 6: Creating joinsIt will probably take you about 10 minutes to complete this lesson.
In this lesson you will improve the association between folders by learning how to create the necessary joins between folders in the business area.
Data analysis often requires information that resides in more than one folder. In order for analysis to occur over multiple folders, the folders must be linked by a join. Joins are part of both the database and business area design. As the Discoverer manager, you can create joins to provide the information that end users need for business analysis.
Note: End users cannot create joins, therefore if you want end users to create reports that combine information from multiple folders, you must make sure that the folders are joined.
This lesson consists of the following exercise:
■ "Exercise 1: Creating joins between folders in the business area"
Exercise 1: Creating joins between folders in the business areaIn this exercise you will create joins between folders in the business area by associating the data between the folders that you loaded in "Lesson 2: Connecting to Discoverer Administrator, using the Load Wizard and the Workarea".
You will create joins for each folder by joining a key from the master table to the corresponding key of the detail table.
To create joins between the folders:
1. Display the Workarea: Data tab and click the + symbol next to the New Video Stores business area to display its folders.
Lesson 6: Creating joins
7-2 Oracle Discoverer Administrator Tutorial
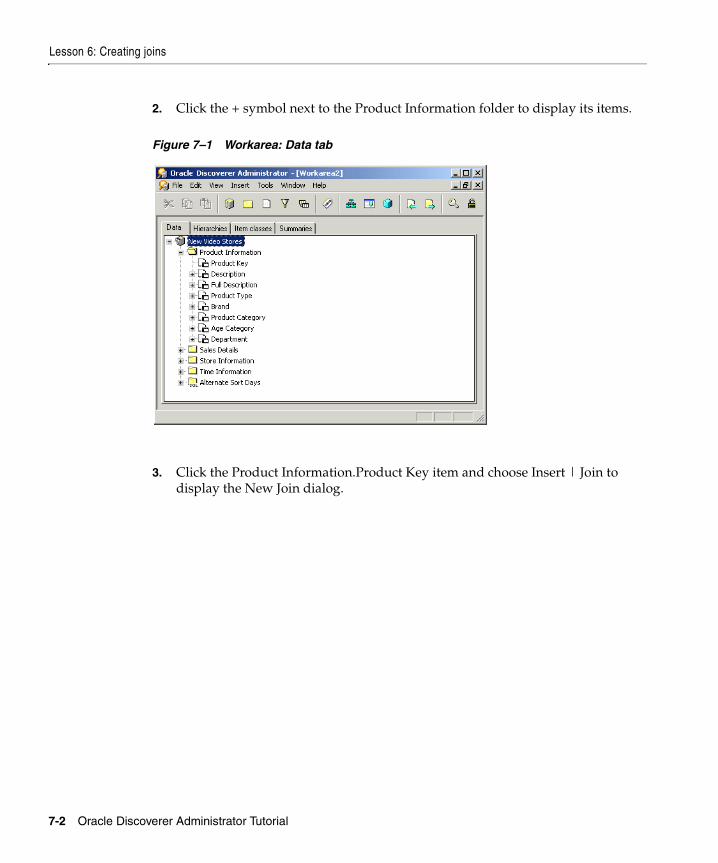
2. Click the + symbol next to the Product Information folder to display its items.
Figure 7–1 Workarea: Data tab
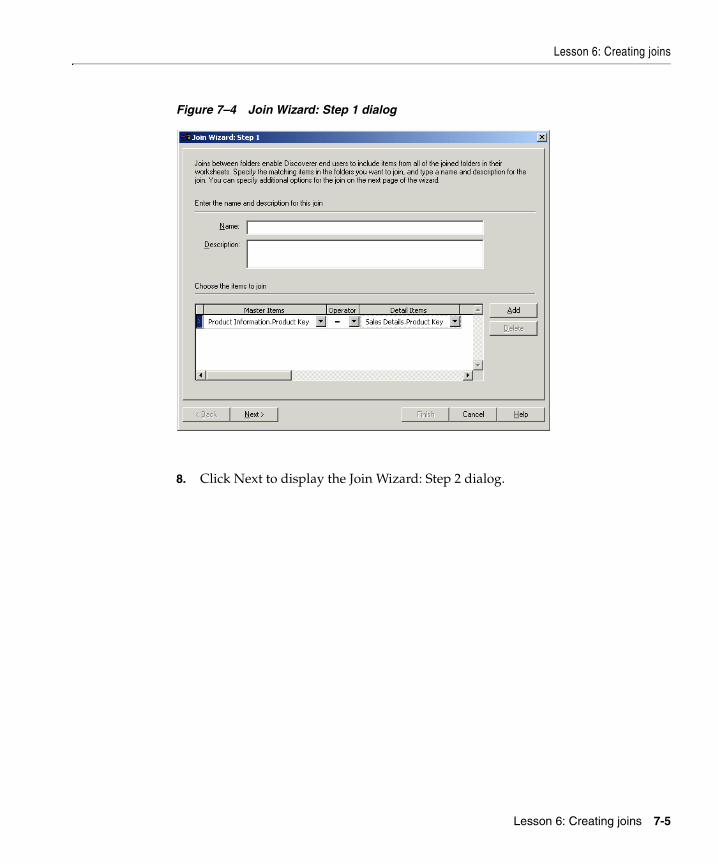
3. Click the Product Information.Product Key item and choose Insert | Join to display the New Join dialog.
Lesson 6: Creating joins
Lesson 6: Creating joins 7-3
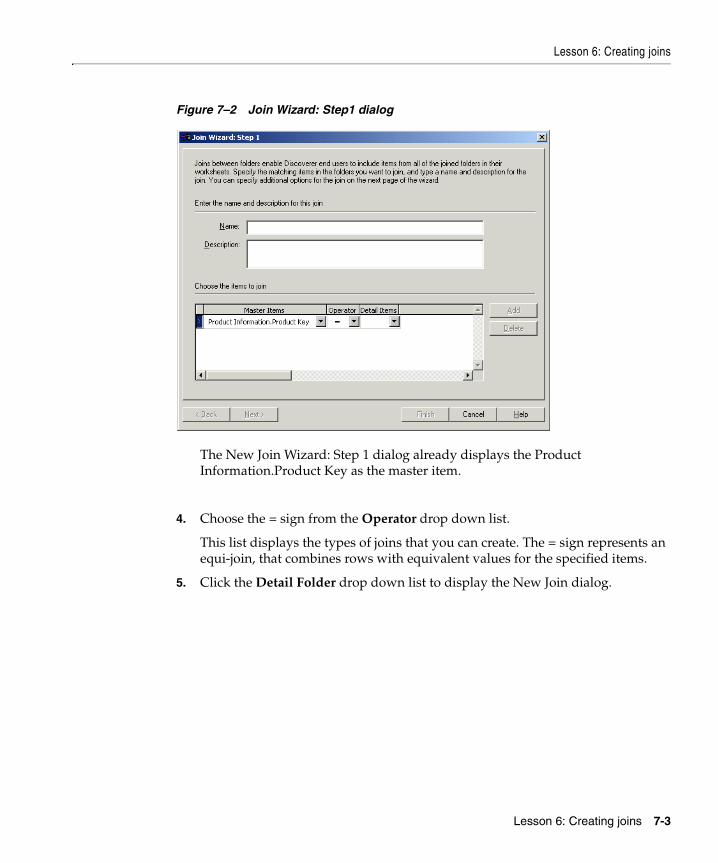
Figure 7–2 Join Wizard: Step1 dialog
The New Join Wizard: Step 1 dialog already displays the Product Information.Product Key as the master item.
4. Choose the = sign from the Operator drop down list.
This list displays the types of joins that you can create. The = sign represents an equi-join, that combines rows with equivalent values for the specified items.
5. Click the Detail Folder drop down list to display the New Join dialog.
Lesson 6: Creating joins
7-4 Oracle Discoverer Administrator Tutorial
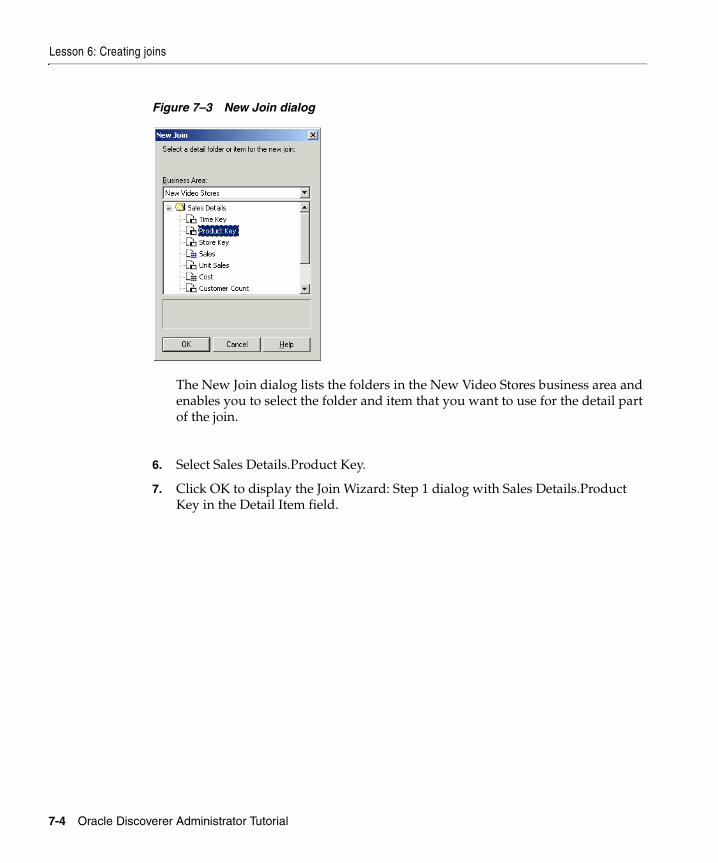
Figure 7–3 New Join dialog
The New Join dialog lists the folders in the New Video Stores business area and enables you to select the folder and item that you want to use for the detail part of the join.
6. Select Sales Details.Product Key.
7. Click OK to display the Join Wizard: Step 1 dialog with Sales Details.Product Key in the Detail Item field.
Lesson 6: Creating joins
Lesson 6: Creating joins 7-5
Figure 7–4 Join Wizard: Step 1 dialog
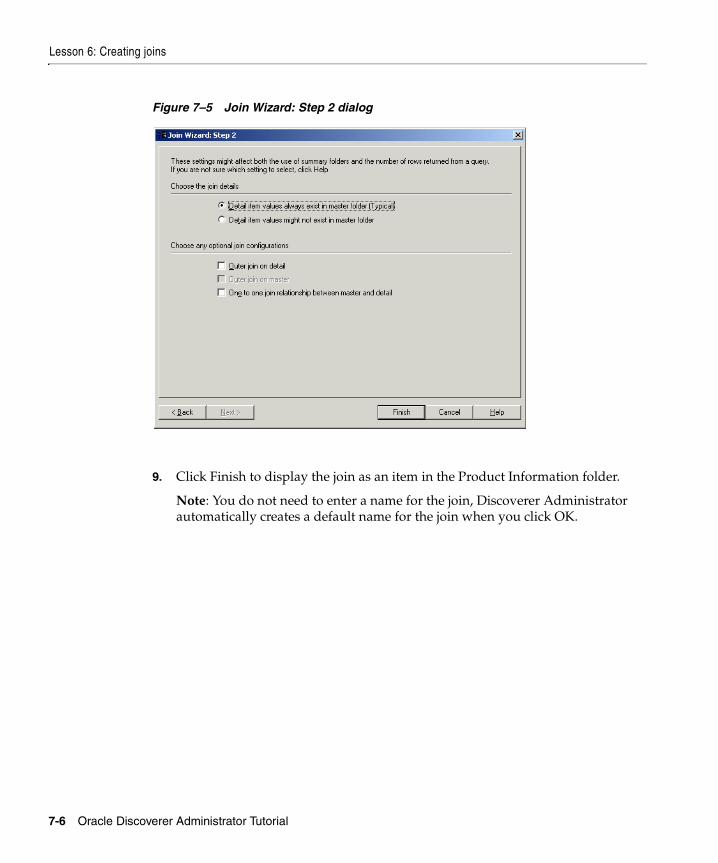
8. Click Next to display the Join Wizard: Step 2 dialog.
Lesson 6: Creating joins
7-6 Oracle Discoverer Administrator Tutorial
Figure 7–5 Join Wizard: Step 2 dialog
9. Click Finish to display the join as an item in the Product Information folder.
Note: You do not need to enter a name for the join, Discoverer Administrator automatically creates a default name for the join when you click OK.
Lesson 6: Creating joins
Lesson 6: Creating joins 7-7
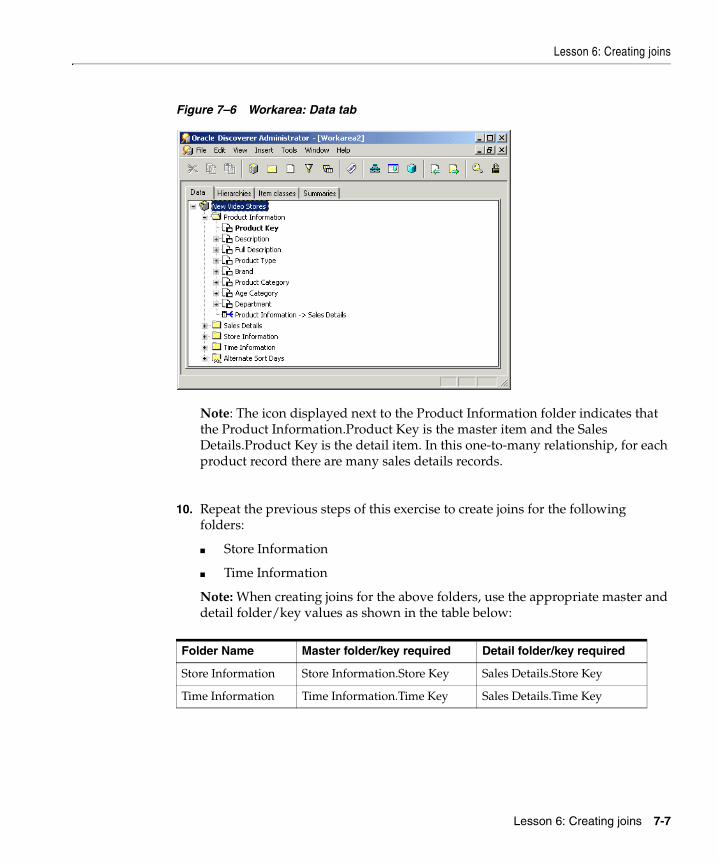
Figure 7–6 Workarea: Data tab
Note: The icon displayed next to the Product Information folder indicates that the Product Information.Product Key is the master item and the Sales Details.Product Key is the detail item. In this one-to-many relationship, for each product record there are many sales details records.
10. Repeat the previous steps of this exercise to create joins for the following folders:
■ Store Information
■ Time Information
Note: When creating joins for the above folders, use the appropriate master and detail folder/key values as shown in the table below:
Folder Name Master folder/key required Detail folder/key required
Store Information Store Information.Store Key Sales Details.Store Key
Time Information Time Information.Time Key Sales Details.Time Key
Lesson summary
7-8 Oracle Discoverer Administrator Tutorial
Once you have created joins between the Product Information, Store Information, Time Information and the Sales Details folders, they can be used for analysis in Discoverer Plus and Discoverer Viewer.
Note: You must create joins in Discoverer Administrator to make folders available to end users of Discoverer Plus and Discoverer Viewer. When an end user selects an item or folder to create a worksheet, only the folders that are joined to the selected folder are available. Therefore, if you have not created a join between two folders, neither the unselected folder nor its items will be available to the worksheet.
For more information about creating and editing joins, click Help.
In this exercise you created joins between folders in the business area by associating the data between the folders that you loaded in "Lesson 2: Connecting to Discoverer Administrator, using the Load Wizard and the Workarea".
Lesson summaryIn this lesson you improved the association between folders by learning how to create the necessary joins between folders in the business area.
In this lesson you learned how to create the necessary joins between folders in the business area, and completed the following exercise:
■ created joins between folders in the business area
In the next lesson you will learn how to customize items in a business area.
Lesson 7: Customizing items 8-1
8Lesson 7: Customizing items
Lesson 7: Customizing itemsIt will probably take you about 20 minutes to complete this lesson.
In this lesson you will customize items in the business area.
As the Discoverer manager, your concern is not only what Discoverer Plus, Discoverer Desktop and Discoverer Viewer display to end users, but that data is presented in a way that makes the information more readable, and therefore easier to analyze. In this lesson you will learn how to hide items from end users, make changes to the axis structure, create lists of values and alternative sorts for them. You will also learn how to create derived items and aggregated calculations that are useful for queries and reports.
This lesson consists of the following exercises:
■ "Exercise 1: Hiding items in the business area"
■ "Exercise 2: Setting the display axis and display sequence for items"
■ "Exercise 3: Creating a list of values"
■ "Exercise 4: Viewing the list of values item class"
■ "Exercise 5: Creating an alternative sort"
■ "Exercise 6: Viewing the alternative sort item class"
■ "Exercise 7: Creating a new calculated item"
■ "Examples of other calculated items"
Exercise 1: Hiding items in the business areaIn this exercise you will hide items in the business area so that end users do not see them.
Lesson 7: Customizing items
8-2 Oracle Discoverer Administrator Tutorial
End users might not need to see all the items in a business area (e.g. primary and foreign keys). Also, sensitive information such as pay scale, time in service, and some items used in calculations might be inappropriate to display to end users. The items listed in the following table are essential to the business area as they are used in join conditions, but they are of no interest to the business user.
Hiding items does not delete them, they remain in the business area, but are not visible to the end user. However, deleted items are removed from the business area.
In general it is a good idea to hide all items that end users do not need to query. This reduces the length of the list of items presented to the end user, making it easier to find what they are looking for.
In the New Video Stores business area, typical items in a folder that would be hidden are shown in the following table:
To hide the key items from end users:
1. Select all of the following items by holding down the Ctrl key and clicking each item in turn:
■ Product Information.Product Key
■ Time Information.Time Key
■ Store Information.Store Key
■ Sales Details.Time Key
■ Sales Details.Product Key
■ Sales Details.Store Key
2. Right click one of the selected items and choose Properties from the popup menu to display the Item Properties dialog
Folder Item
Product Information Product Key
Time Information Time Key
Store Information Store Key
Sales Details Time Key
Sales Details Product Key
Sales Details Store Key
Lesson 7: Customizing items
Lesson 7: Customizing items 8-3
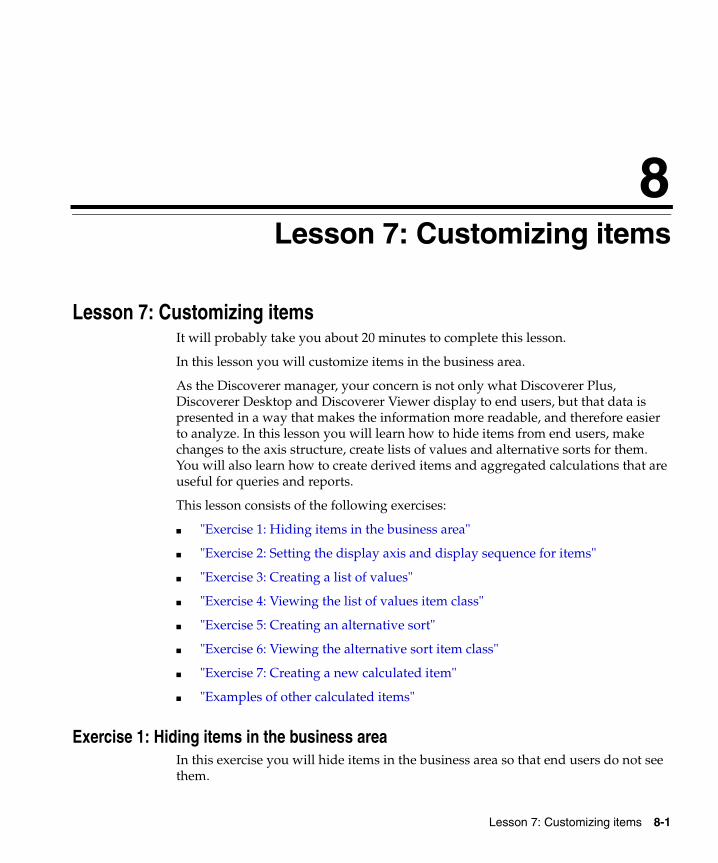
Figure 8–1 Item Properties dialog
The Item Properties dialog displays the properties that each of the selected items have in common.
3. Set the Visible to user field to No.
4. Click OK.
Note: Discoverer now displays items that are hidden from the user in grayed text.
In this exercise you hid items in the business area so that end users do not see them.
Exercise 2: Setting the display axis and display sequence for itemsIn this exercise you will set the default axis position of an item and learn how you can rearrange the display axes in Discoverer Plus.
A crosstab worksheet in Discoverer Plus can display data along three axes named top, side, and page (for more information, see the figure below). In Discoverer Administrator, you can specify the default axis for each item. Specifying a default axis does not prevent the end user from switching an item from one axis to another during data analysis.
To set the default position of an item to the side axis and rearrange the display axes:
1. Display the Workarea: Data tab and click the Store Information.Region item.
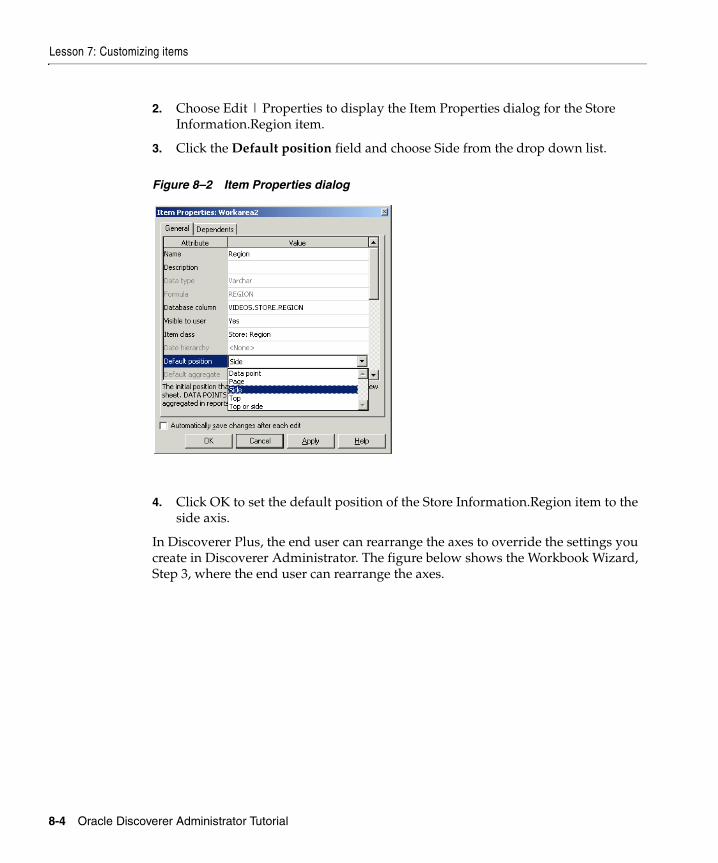
Lesson 7: Customizing items
8-4 Oracle Discoverer Administrator Tutorial
2. Choose Edit | Properties to display the Item Properties dialog for the Store Information.Region item.
3. Click the Default position field and choose Side from the drop down list.
Figure 8–2 Item Properties dialog
4. Click OK to set the default position of the Store Information.Region item to the side axis.
In Discoverer Plus, the end user can rearrange the axes to override the settings you create in Discoverer Administrator. The figure below shows the Workbook Wizard, Step 3, where the end user can rearrange the axes.
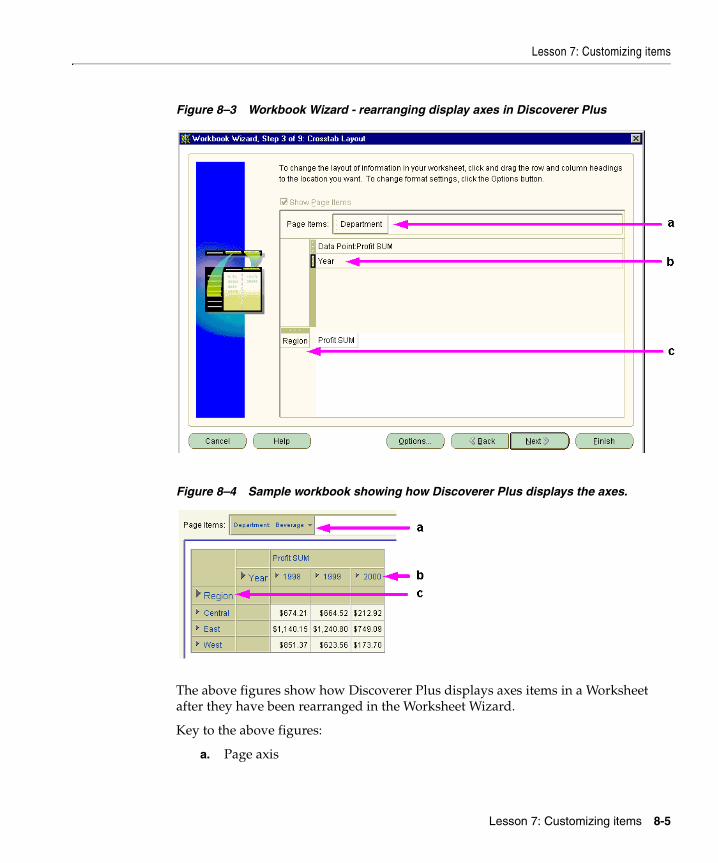
Lesson 7: Customizing items
Lesson 7: Customizing items 8-5
Figure 8–3 Workbook Wizard - rearranging display axes in Discoverer Plus
Figure 8–4 Sample workbook showing how Discoverer Plus displays the axes.
The above figures show how Discoverer Plus displays axes items in a Worksheet after they have been rearranged in the Worksheet Wizard.
Key to the above figures:
a. Page axis
Lesson 7: Customizing items
8-6 Oracle Discoverer Administrator Tutorial
b. Top axis
c. Side axis
In this exercise you set the default axis position of an item and learned how to rearrange the display axes in Discoverer Plus.
Exercise 3: Creating a list of valuesIn this exercise you will create a list of values that displays each department name in the New Video Stores business area.
You create lists of values by using an item class. Most of the item classes used in the tutorial were generated automatically when you loaded the EUL in "Lesson 2: Connecting to Discoverer Administrator, using the Load Wizard and the Workarea". However, you can create new item classes that contain lists of the unique data values represented by an item.
To create a list of values:
1. Display the Workarea: Item classes tab.
2. Click the New Video Stores business area and choose Insert | Item Class to display the Item Class Wizard: Step 1 dialog.
3. Select the List of values check box.
4. Clear the Alternative sort check box.
5. Clear the Drill to detail check box.

Lesson 7: Customizing items
Lesson 7: Customizing items 8-7
Figure 8–5 Item Class Wizard: Step 1 dialog
6. Click Next to display the Item Class Wizard: Step 2 dialog.
Figure 8–6 Item Class Wizard:Step 2 dialog

Lesson 7: Customizing items
8-8 Oracle Discoverer Administrator Tutorial
7. Select the Product Information.Department item.
This is the source that Discoverer uses to create a list of values for the new item class.
8. Click Next to display the Item Class Wizard: Step 3 dialog.
Figure 8–7 Item Class Wizard: Step 3 dialog
9. Click Next to display the Item Class Wizard: Step 4 dialog.
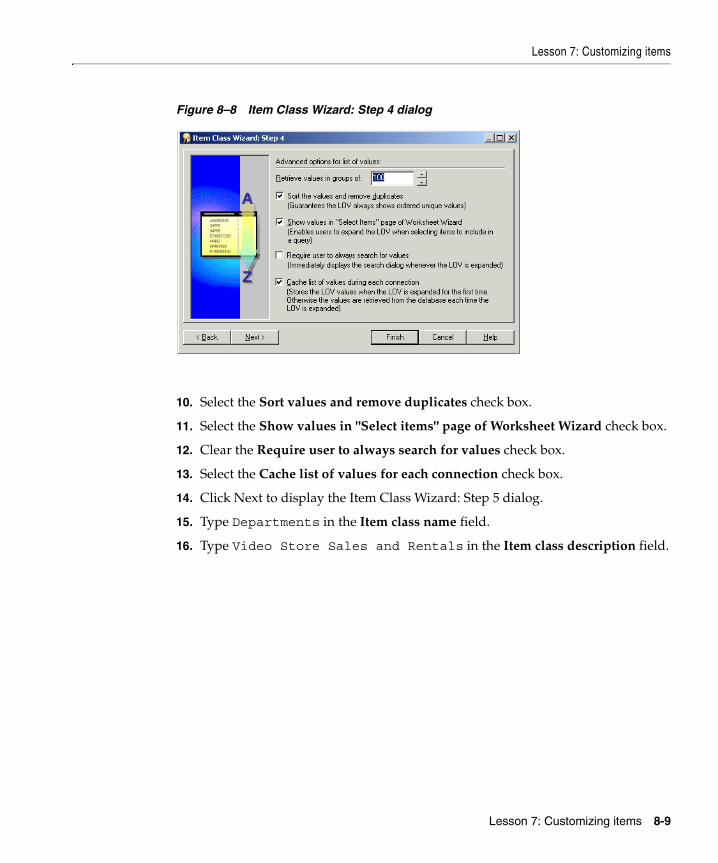
Lesson 7: Customizing items
Lesson 7: Customizing items 8-9
Figure 8–8 Item Class Wizard: Step 4 dialog
10. Select the Sort values and remove duplicates check box.
11. Select the Show values in "Select items" page of Worksheet Wizard check box.
12. Clear the Require user to always search for values check box.
13. Select the Cache list of values for each connection check box.
14. Click Next to display the Item Class Wizard: Step 5 dialog.
15. Type Departments in the Item class name field.
16. Type Video Store Sales and Rentals in the Item class description field.
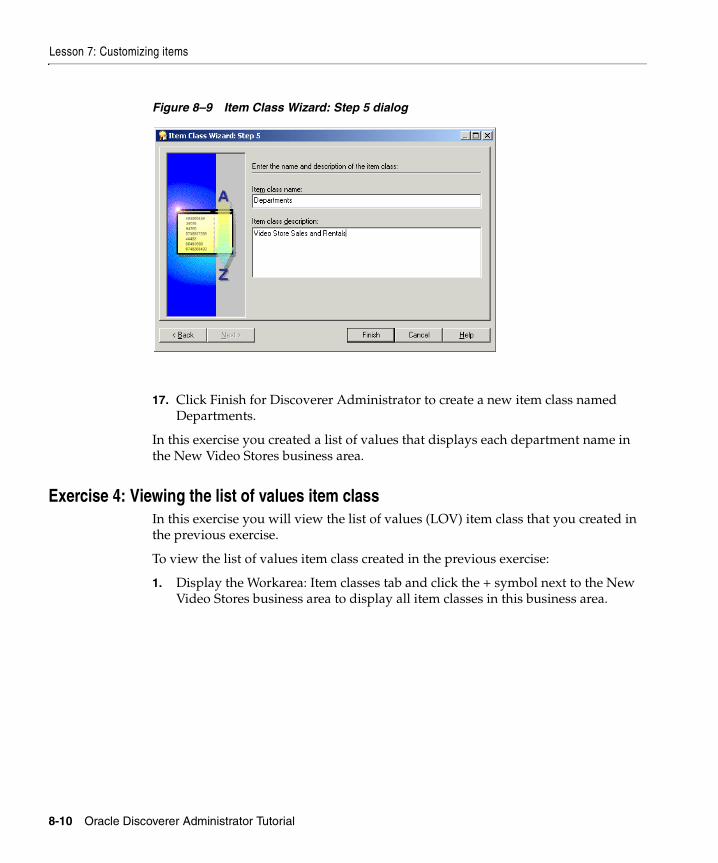
Lesson 7: Customizing items
8-10 Oracle Discoverer Administrator Tutorial
Figure 8–9 Item Class Wizard: Step 5 dialog
17. Click Finish for Discoverer Administrator to create a new item class named Departments.
In this exercise you created a list of values that displays each department name in the New Video Stores business area.
Exercise 4: Viewing the list of values item classIn this exercise you will view the list of values (LOV) item class that you created in the previous exercise.
To view the list of values item class created in the previous exercise:
1. Display the Workarea: Item classes tab and click the + symbol next to the New Video Stores business area to display all item classes in this business area.
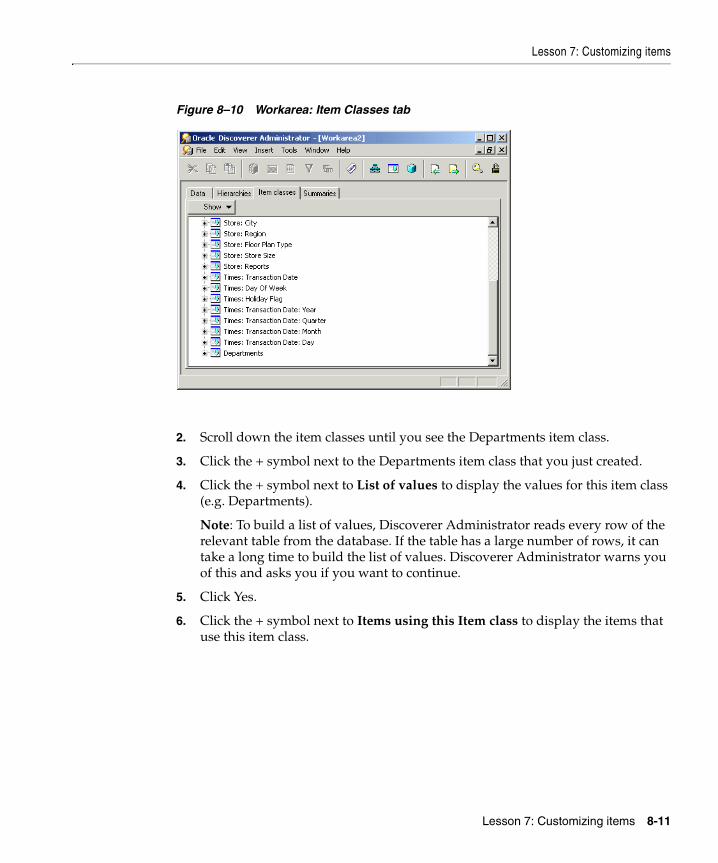
Lesson 7: Customizing items
Lesson 7: Customizing items 8-11
Figure 8–10 Workarea: Item Classes tab
2. Scroll down the item classes until you see the Departments item class.
3. Click the + symbol next to the Departments item class that you just created.
4. Click the + symbol next to List of values to display the values for this item class (e.g. Departments).
Note: To build a list of values, Discoverer Administrator reads every row of the relevant table from the database. If the table has a large number of rows, it can take a long time to build the list of values. Discoverer Administrator warns you of this and asks you if you want to continue.
5. Click Yes.
6. Click the + symbol next to Items using this Item class to display the items that use this item class.
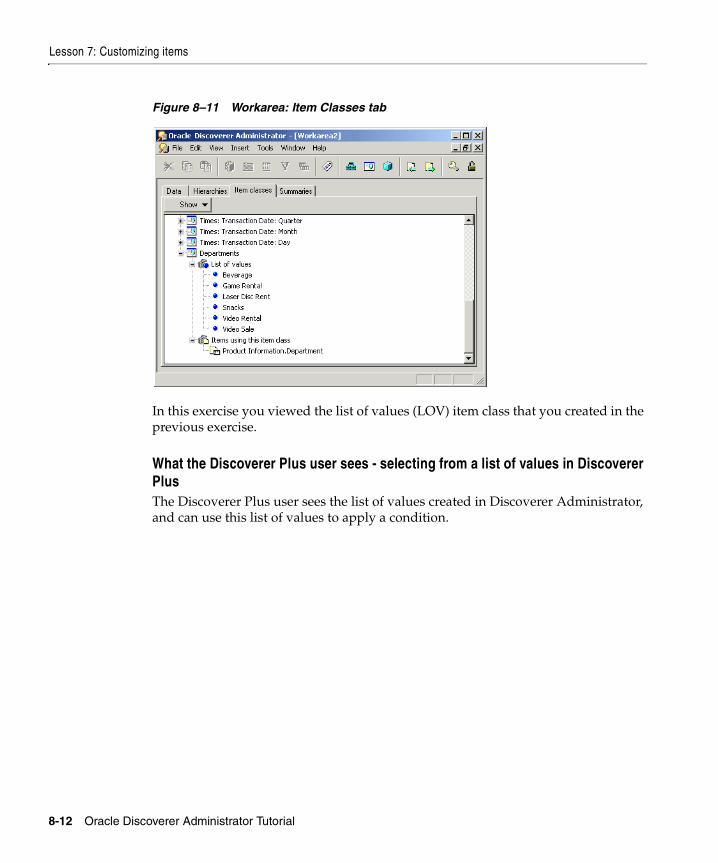
Lesson 7: Customizing items
8-12 Oracle Discoverer Administrator Tutorial
Figure 8–11 Workarea: Item Classes tab
In this exercise you viewed the list of values (LOV) item class that you created in the previous exercise.
What the Discoverer Plus user sees - selecting from a list of values in Discoverer PlusThe Discoverer Plus user sees the list of values created in Discoverer Administrator, and can use this list of values to apply a condition.
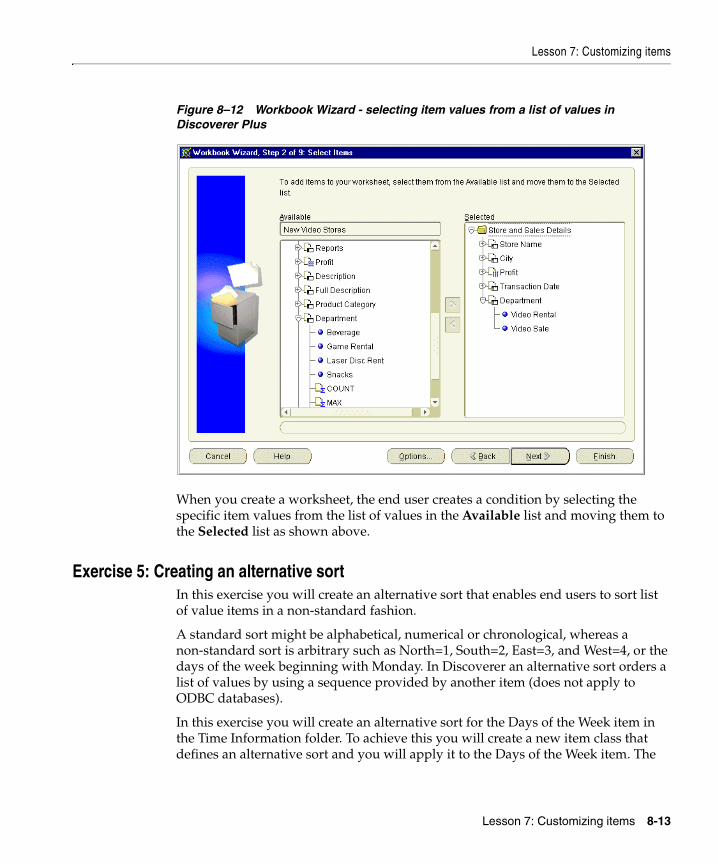
Lesson 7: Customizing items
Lesson 7: Customizing items 8-13
Figure 8–12 Workbook Wizard - selecting item values from a list of values in Discoverer Plus
When you create a worksheet, the end user creates a condition by selecting the specific item values from the list of values in the Available list and moving them to the Selected list as shown above.
Exercise 5: Creating an alternative sortIn this exercise you will create an alternative sort that enables end users to sort list of value items in a non-standard fashion.
A standard sort might be alphabetical, numerical or chronological, whereas a non-standard sort is arbitrary such as North=1, South=2, East=3, and West=4, or the days of the week beginning with Monday. In Discoverer an alternative sort orders a list of values by using a sequence provided by another item (does not apply to ODBC databases).
In this exercise you will create an alternative sort for the Days of the Week item in the Time Information folder. To achieve this you will create a new item class that defines an alternative sort and you will apply it to the Days of the Week item. The
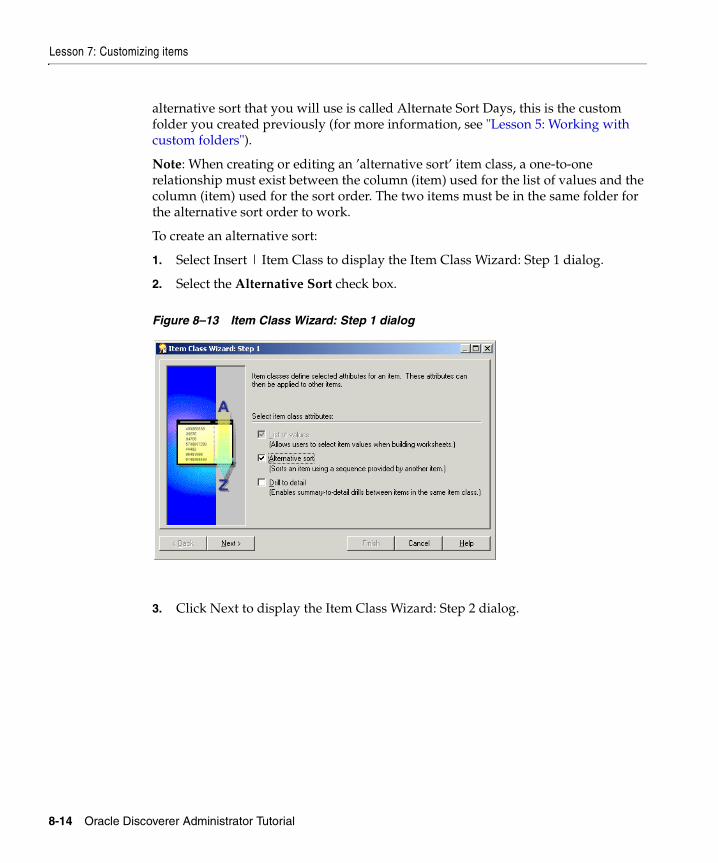
Lesson 7: Customizing items
8-14 Oracle Discoverer Administrator Tutorial
alternative sort that you will use is called Alternate Sort Days, this is the custom folder you created previously (for more information, see "Lesson 5: Working with custom folders").
Note: When creating or editing an ’alternative sort’ item class, a one-to-one relationship must exist between the column (item) used for the list of values and the column (item) used for the sort order. The two items must be in the same folder for the alternative sort order to work.
To create an alternative sort:
1. Select Insert | Item Class to display the Item Class Wizard: Step 1 dialog.
2. Select the Alternative Sort check box.
Figure 8–13 Item Class Wizard: Step 1 dialog
3. Click Next to display the Item Class Wizard: Step 2 dialog.

Lesson 7: Customizing items
Lesson 7: Customizing items 8-15
Figure 8–14 Item Class Wizard: Step 2 dialog
4. Select Day of the Week from the Alternate Sort Days custom folder.
This is the item that will generate the list of values.
5. Click Next to display the Item Class Wizard: Step 3 dialog.
Figure 8–15 Item Class Wizard: Step 3 dialog
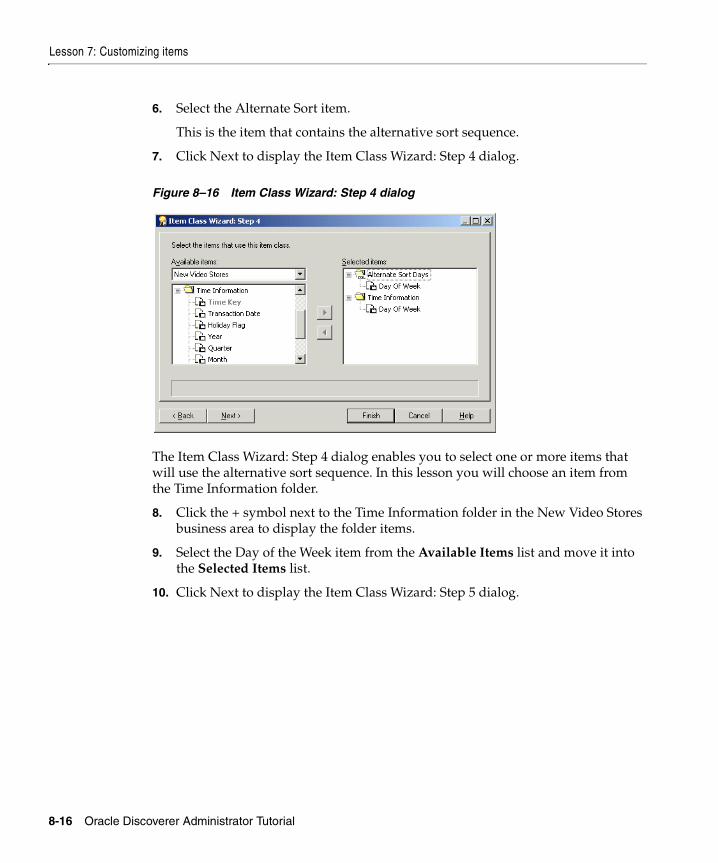
Lesson 7: Customizing items
8-16 Oracle Discoverer Administrator Tutorial
6. Select the Alternate Sort item.
This is the item that contains the alternative sort sequence.
7. Click Next to display the Item Class Wizard: Step 4 dialog.
Figure 8–16 Item Class Wizard: Step 4 dialog
The Item Class Wizard: Step 4 dialog enables you to select one or more items that will use the alternative sort sequence. In this lesson you will choose an item from the Time Information folder.
8. Click the + symbol next to the Time Information folder in the New Video Stores business area to display the folder items.
9. Select the Day of the Week item from the Available Items list and move it into the Selected Items list.
10. Click Next to display the Item Class Wizard: Step 5 dialog.

Lesson 7: Customizing items
Lesson 7: Customizing items 8-17
Figure 8–17 Item Class Wizard: Step 5 dialog
11. Select the Sort values and remove duplicates check box.
12. Select the Show values in "Select items" page of Worksheet Wizard check box.
13. Clear the Require user to always search for values check box.
14. Select the Cache list of values for each connection check box.
15. Click Next to display the Item Class Wizard: Step 6 dialog.
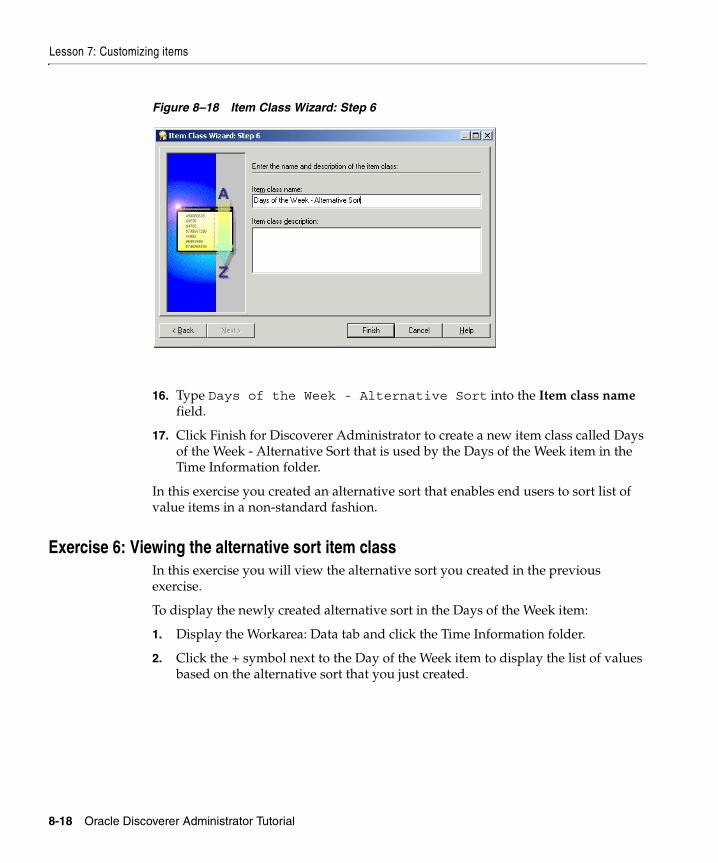
Lesson 7: Customizing items
8-18 Oracle Discoverer Administrator Tutorial
Figure 8–18 Item Class Wizard: Step 6
16. Type Days of the Week - Alternative Sort into the Item class name field.
17. Click Finish for Discoverer Administrator to create a new item class called Days of the Week - Alternative Sort that is used by the Days of the Week item in the Time Information folder.
In this exercise you created an alternative sort that enables end users to sort list of value items in a non-standard fashion.
Exercise 6: Viewing the alternative sort item classIn this exercise you will view the alternative sort you created in the previous exercise.
To display the newly created alternative sort in the Days of the Week item:
1. Display the Workarea: Data tab and click the Time Information folder.
2. Click the + symbol next to the Day of the Week item to display the list of values based on the alternative sort that you just created.
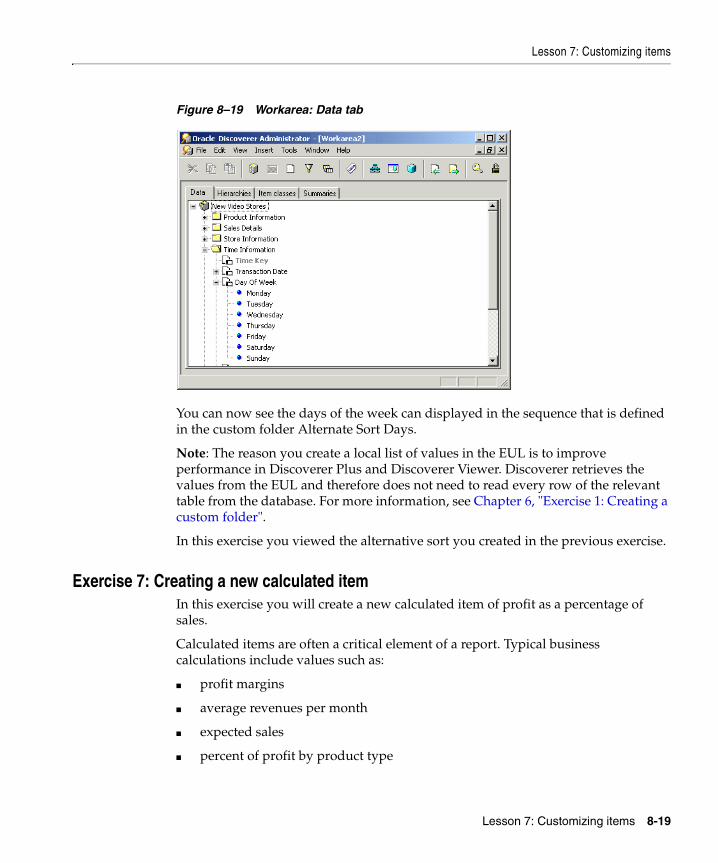
Lesson 7: Customizing items
Lesson 7: Customizing items 8-19
Figure 8–19 Workarea: Data tab
You can now see the days of the week can displayed in the sequence that is defined in the custom folder Alternate Sort Days.
Note: The reason you create a local list of values in the EUL is to improve performance in Discoverer Plus and Discoverer Viewer. Discoverer retrieves the values from the EUL and therefore does not need to read every row of the relevant table from the database. For more information, see Chapter 6, "Exercise 1: Creating a custom folder".
In this exercise you viewed the alternative sort you created in the previous exercise.
Exercise 7: Creating a new calculated itemIn this exercise you will create a new calculated item of profit as a percentage of sales.
Calculated items are often a critical element of a report. Typical business calculations include values such as:
■ profit margins
■ average revenues per month
■ expected sales
■ percent of profit by product type
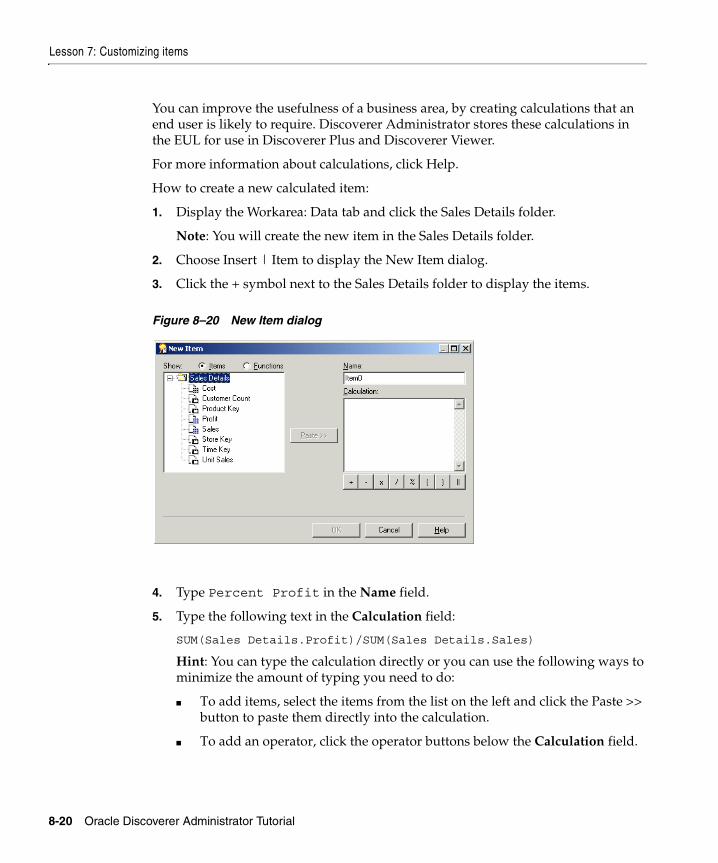
Lesson 7: Customizing items
8-20 Oracle Discoverer Administrator Tutorial
You can improve the usefulness of a business area, by creating calculations that an end user is likely to require. Discoverer Administrator stores these calculations in the EUL for use in Discoverer Plus and Discoverer Viewer.
For more information about calculations, click Help.
How to create a new calculated item:
1. Display the Workarea: Data tab and click the Sales Details folder.
Note: You will create the new item in the Sales Details folder.
2. Choose Insert | Item to display the New Item dialog.
3. Click the + symbol next to the Sales Details folder to display the items.
Figure 8–20 New Item dialog
4. Type Percent Profit in the Name field.
5. Type the following text in the Calculation field:
SUM(Sales Details.Profit)/SUM(Sales Details.Sales)
Hint: You can type the calculation directly or you can use the following ways to minimize the amount of typing you need to do:
■ To add items, select the items from the list on the left and click the Paste >> button to paste them directly into the calculation.
■ To add an operator, click the operator buttons below the Calculation field.
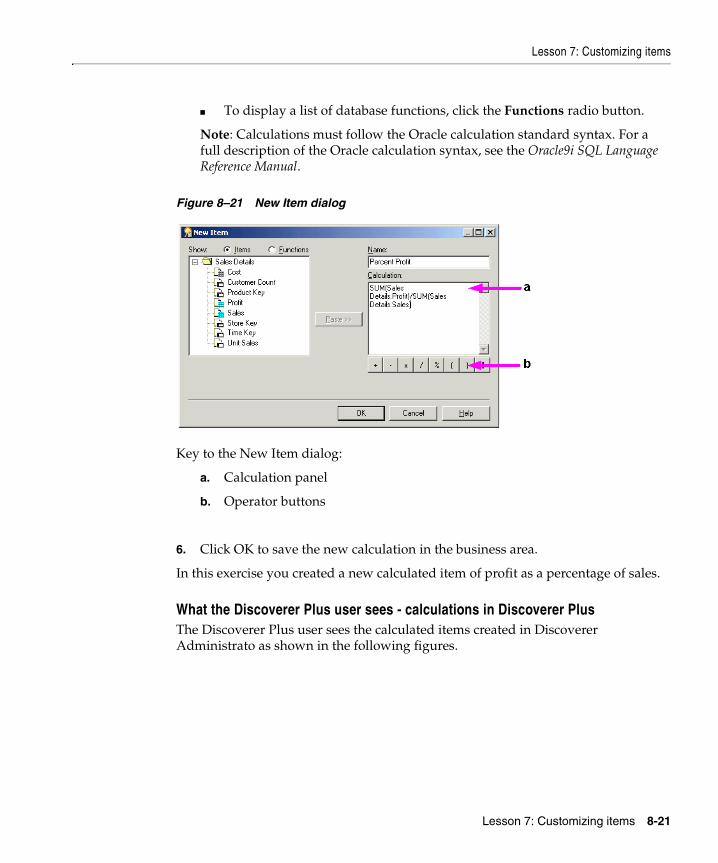
Lesson 7: Customizing items
Lesson 7: Customizing items 8-21
■ To display a list of database functions, click the Functions radio button.
Note: Calculations must follow the Oracle calculation standard syntax. For a full description of the Oracle calculation syntax, see the Oracle9i SQL Language Reference Manual.
Figure 8–21 New Item dialog
Key to the New Item dialog:
a. Calculation panel
b. Operator buttons
6. Click OK to save the new calculation in the business area.
In this exercise you created a new calculated item of profit as a percentage of sales.
What the Discoverer Plus user sees - calculations in Discoverer PlusThe Discoverer Plus user sees the calculated items created in Discoverer Administrato as shown in the following figures.
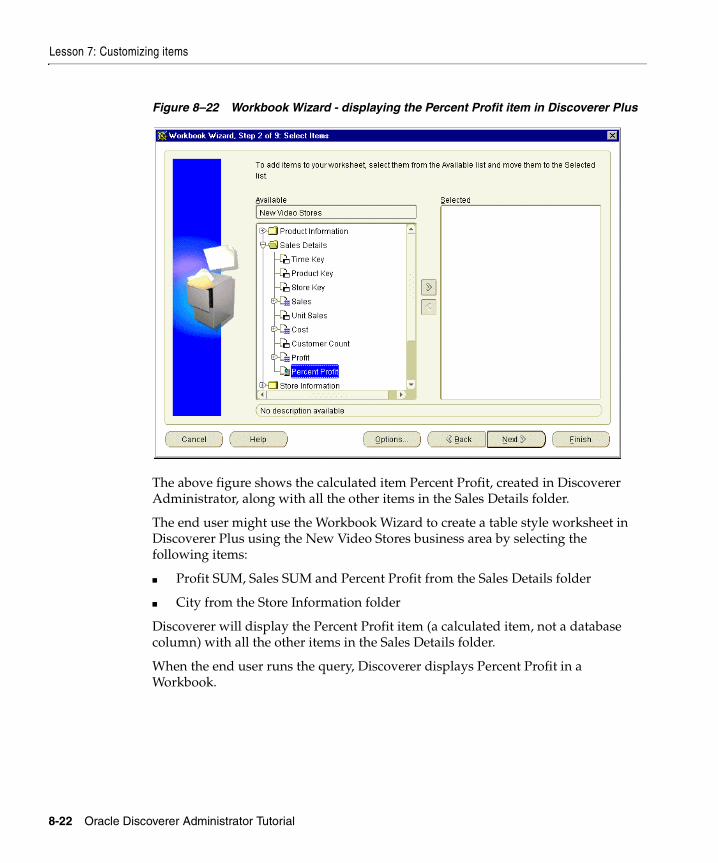
Lesson 7: Customizing items
8-22 Oracle Discoverer Administrator Tutorial
Figure 8–22 Workbook Wizard - displaying the Percent Profit item in Discoverer Plus
The above figure shows the calculated item Percent Profit, created in Discoverer Administrator, along with all the other items in the Sales Details folder.
The end user might use the Workbook Wizard to create a table style worksheet in Discoverer Plus using the New Video Stores business area by selecting the following items:
■ Profit SUM, Sales SUM and Percent Profit from the Sales Details folder
■ City from the Store Information folder
Discoverer will display the Percent Profit item (a calculated item, not a database column) with all the other items in the Sales Details folder.
When the end user runs the query, Discoverer displays Percent Profit in a Workbook.
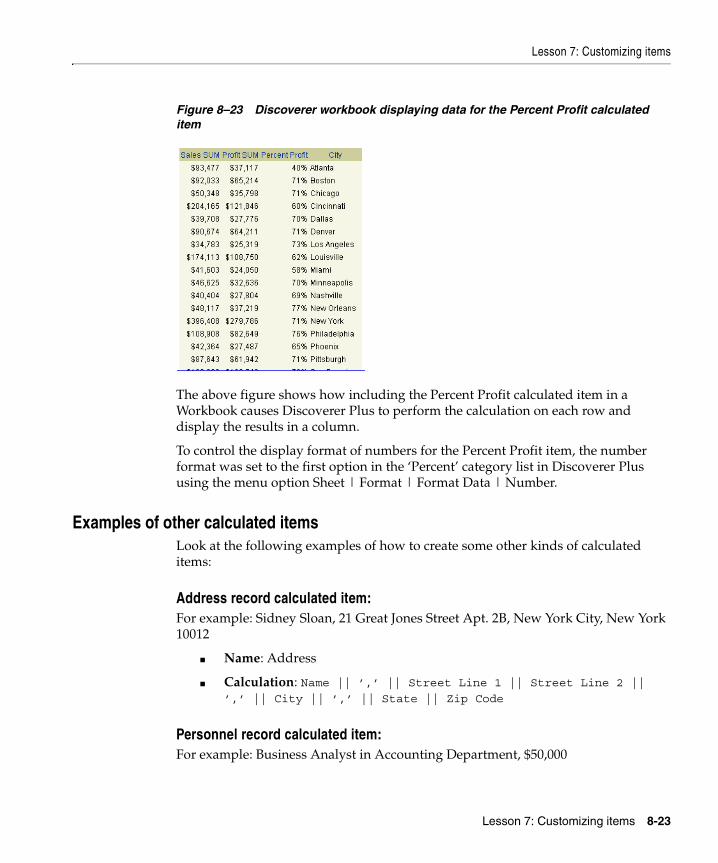
Lesson 7: Customizing items
Lesson 7: Customizing items 8-23
Figure 8–23 Discoverer workbook displaying data for the Percent Profit calculated item
The above figure shows how including the Percent Profit calculated item in a Workbook causes Discoverer Plus to perform the calculation on each row and display the results in a column.
To control the display format of numbers for the Percent Profit item, the number format was set to the first option in the ‘Percent’ category list in Discoverer Plus using the menu option Sheet | Format | Format Data | Number.
Examples of other calculated itemsLook at the following examples of how to create some other kinds of calculated items:
Address record calculated item:For example: Sidney Sloan, 21 Great Jones Street Apt. 2B, New York City, New York 10012
■ Name: Address
■ Calculation: Name || ’,’ || Street Line 1 || Street Line 2 || ’,’ || City || ’,’ || State || Zip Code
Personnel record calculated item:For example: Business Analyst in Accounting Department, $50,000

Lesson summary
8-24 Oracle Discoverer Administrator Tutorial
■ Name: Function
■ Calculation: Job Title || ’in’ || Department || ’,’ || Salary
Annual compensation based on monthly salary and commission (NVL permits a zero value) calculated item:
■ Name: Compensation
■ Calculation: Salary*12+NVL(Commission, 0)
Hint: NVL is a database function that can replace NULL with an alternative value, such as 0.
Aggregated calculated itemsFor example:
■ Name: Total Compensation
Calculation: SUM(Salary + NVL(Commission, 0))
■ Name: % Commission
Calculation: SUM(Commission)/SUM(Salary)
■ Name: Avg. Units per Customer
Calculation: SUM(unit_sales)/SUM(customer_count)
For more detailed information about creating calculations, click Help.
Lesson summaryIn this lesson you customized items in the business area and completed the following exercises:
■ Hiding items in the business area
■ Setting the display axis for items and display sequence
■ Creating lists of values
■ Viewing the list of values item class
■ Creating an alternative sort
■ Viewing the alternative sort item class
■ Creating a new calculated item
Lesson summary
Lesson 7: Customizing items 8-25
In the next lesson you will create a complex folder that is made up of items from other folders in a business area.

Lesson summary
8-26 Oracle Discoverer Administrator Tutorial
Lesson 8: Designing a complex folder 9-1
9Lesson 8: Designing a complex folder
Lesson 8: Designing a complex folderIt will probably take you about 15 minutes to complete this lesson.
In this lesson you will create a complex folder and then create a condition within the complex folder.
A complex folder is a special type of folder that contains items from other folders. When you place an item from a simple folder into a complex folder, you are really making a reference to the original item.
You can simplify the data analysis tasks of an end user by gathering items from separate folders into one complex folder. This avoids the need for end users to select items from multiple folders and completely hides joins from end users.
Discoverer Administrator does not allow you to add an item to a complex folder if the item does not have a join associating it with the other items in the complex folder.
Note: If you place an item into a complex folder with the same name as another item, Discoverer Administrator adds a numeric suffix to the duplicate item. You cannot have two items with the same name in a folder.
For more information, click Help.
This lesson consists of the following exercises:
■ "Exercise 1: Creating a complex folder"
■ "Exercise 2: Creating a condition"
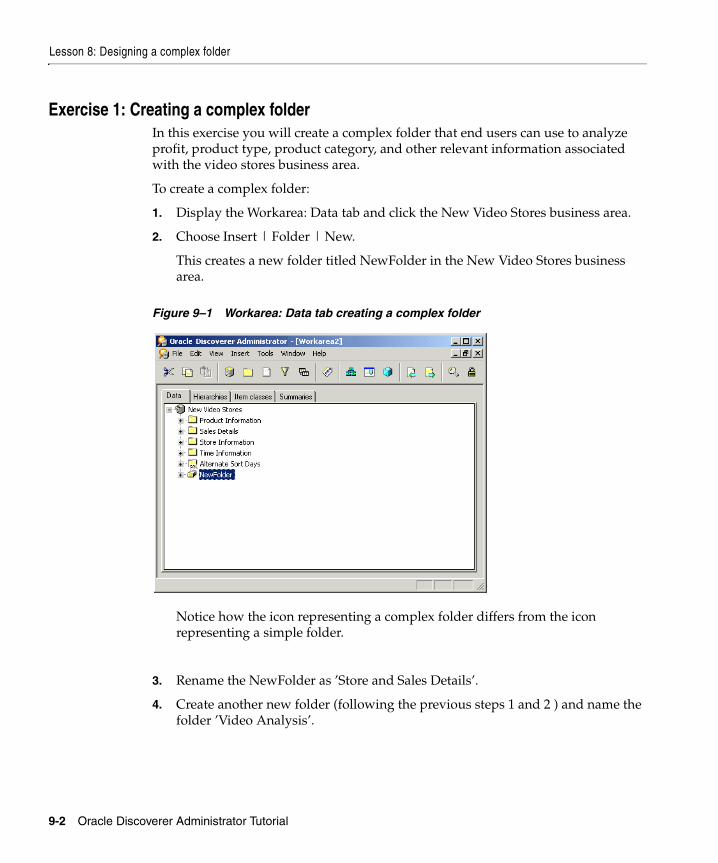
Lesson 8: Designing a complex folder
9-2 Oracle Discoverer Administrator Tutorial
Exercise 1: Creating a complex folderIn this exercise you will create a complex folder that end users can use to analyze profit, product type, product category, and other relevant information associated with the video stores business area.
To create a complex folder:
1. Display the Workarea: Data tab and click the New Video Stores business area.
2. Choose Insert | Folder | New.
This creates a new folder titled NewFolder in the New Video Stores business area.
Figure 9–1 Workarea: Data tab creating a complex folder
Notice how the icon representing a complex folder differs from the icon representing a simple folder.
3. Rename the NewFolder as ’Store and Sales Details’.
4. Create another new folder (following the previous steps 1 and 2 ) and name the folder ’Video Analysis’.
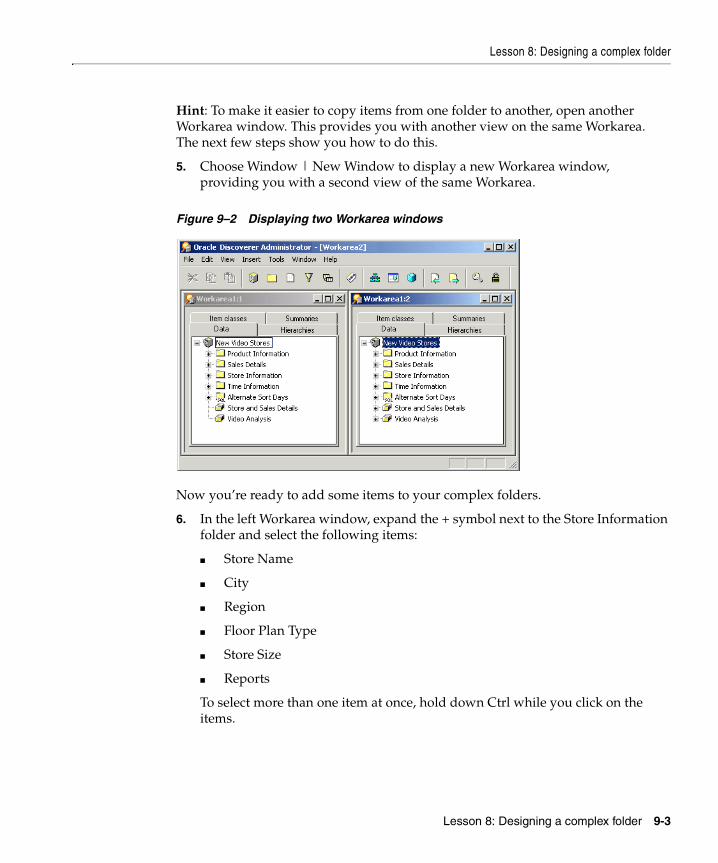
Lesson 8: Designing a complex folder
Lesson 8: Designing a complex folder 9-3
Hint: To make it easier to copy items from one folder to another, open another Workarea window. This provides you with another view on the same Workarea. The next few steps show you how to do this.
5. Choose Window | New Window to display a new Workarea window, providing you with a second view of the same Workarea.
Figure 9–2 Displaying two Workarea windows
Now you’re ready to add some items to your complex folders.
6. In the left Workarea window, expand the + symbol next to the Store Information folder and select the following items:
■ Store Name
■ City
■ Region
■ Floor Plan Type
■ Store Size
■ Reports
To select more than one item at once, hold down Ctrl while you click on the items.
Lesson 8: Designing a complex folder
9-4 Oracle Discoverer Administrator Tutorial
7. Move the selected items to the Workarea window on the right and drop them into the Store and Sales Details complex folder.
This copies the selected items into the complex folder.
You will now repeat the process of copying items from other folders to populate the complex folder with all the items your end user needs.
8. Copy the Sales Details.Profit item to the Store and Sales Details complex folder.
9. Copy the following items from the Product Information folder into the Store and Sales Details folder:
■ Description
■ Full Description
■ Product Category
■ Department
10. Copy the following items from the Time Information folder into the Store and Sales Details folder.
■ Transaction Date
■ Year
You are now ready to populate the Video Analysis folder.
11. Copy the following items from the Sales Details folder into the Video Analysis folder.
■ Sales
■ Unit Sales
■ Cost
■ Profit
12. Copy the following items from the Store Information folder into the Video Analysis folder.
■ Store Name
■ City
■ Region
■ Reports
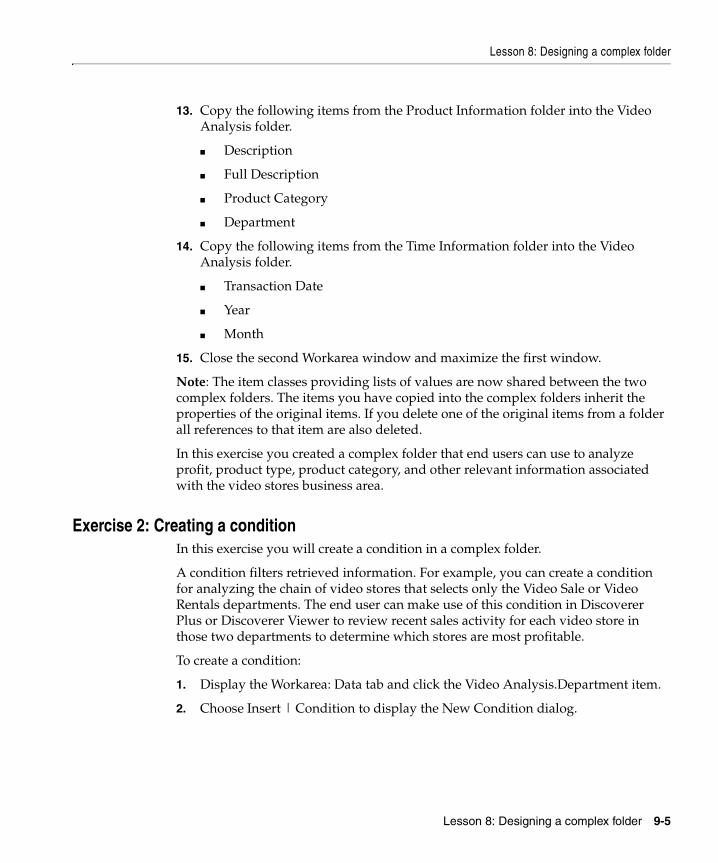
Lesson 8: Designing a complex folder
Lesson 8: Designing a complex folder 9-5
13. Copy the following items from the Product Information folder into the Video Analysis folder.
■ Description
■ Full Description
■ Product Category
■ Department
14. Copy the following items from the Time Information folder into the Video Analysis folder.
■ Transaction Date
■ Year
■ Month
15. Close the second Workarea window and maximize the first window.
Note: The item classes providing lists of values are now shared between the two complex folders. The items you have copied into the complex folders inherit the properties of the original items. If you delete one of the original items from a folder all references to that item are also deleted.
In this exercise you created a complex folder that end users can use to analyze profit, product type, product category, and other relevant information associated with the video stores business area.
Exercise 2: Creating a conditionIn this exercise you will create a condition in a complex folder.
A condition filters retrieved information. For example, you can create a condition for analyzing the chain of video stores that selects only the Video Sale or Video Rentals departments. The end user can make use of this condition in Discoverer Plus or Discoverer Viewer to review recent sales activity for each video store in those two departments to determine which stores are most profitable.
To create a condition:
1. Display the Workarea: Data tab and click the Video Analysis.Department item.
2. Choose Insert | Condition to display the New Condition dialog.
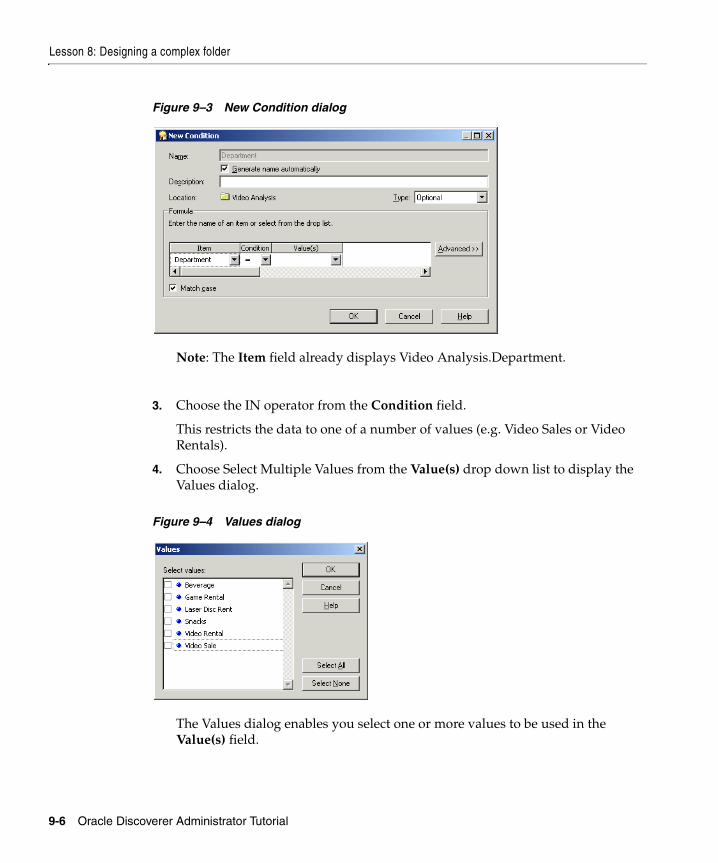
Lesson 8: Designing a complex folder
9-6 Oracle Discoverer Administrator Tutorial
Figure 9–3 New Condition dialog
Note: The Item field already displays Video Analysis.Department.
3. Choose the IN operator from the Condition field.
This restricts the data to one of a number of values (e.g. Video Sales or Video Rentals).
4. Choose Select Multiple Values from the Value(s) drop down list to display the Values dialog.
Figure 9–4 Values dialog
The Values dialog enables you select one or more values to be used in the Value(s) field.
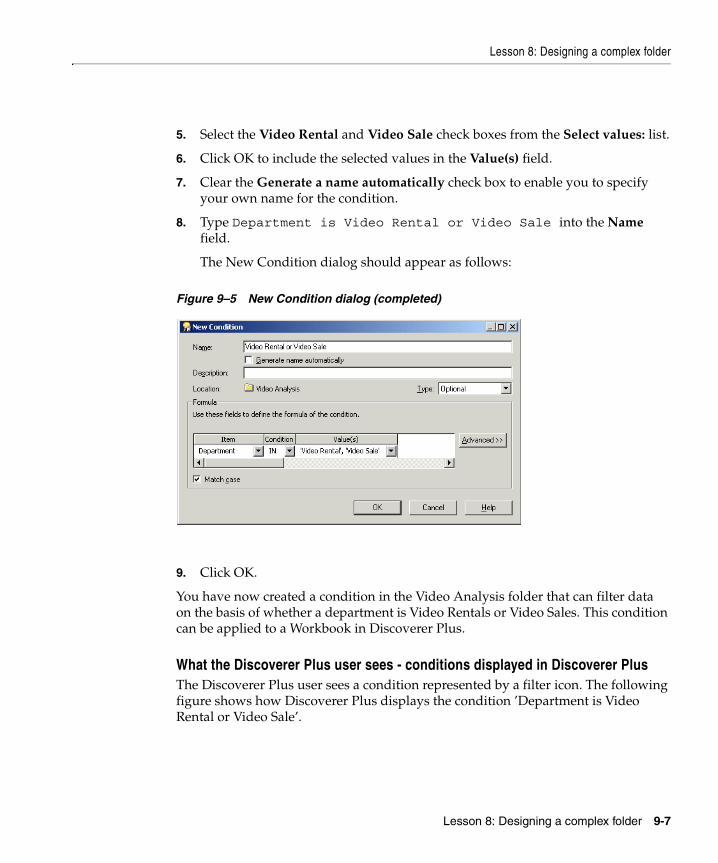
Lesson 8: Designing a complex folder
Lesson 8: Designing a complex folder 9-7
5. Select the Video Rental and Video Sale check boxes from the Select values: list.
6. Click OK to include the selected values in the Value(s) field.
7. Clear the Generate a name automatically check box to enable you to specify your own name for the condition.
8. Type Department is Video Rental or Video Sale into the Name field.
The New Condition dialog should appear as follows:
Figure 9–5 New Condition dialog (completed)
9. Click OK.
You have now created a condition in the Video Analysis folder that can filter data on the basis of whether a department is Video Rentals or Video Sales. This condition can be applied to a Workbook in Discoverer Plus.
What the Discoverer Plus user sees - conditions displayed in Discoverer PlusThe Discoverer Plus user sees a condition represented by a filter icon. The following figure shows how Discoverer Plus displays the condition ’Department is Video Rental or Video Sale’.
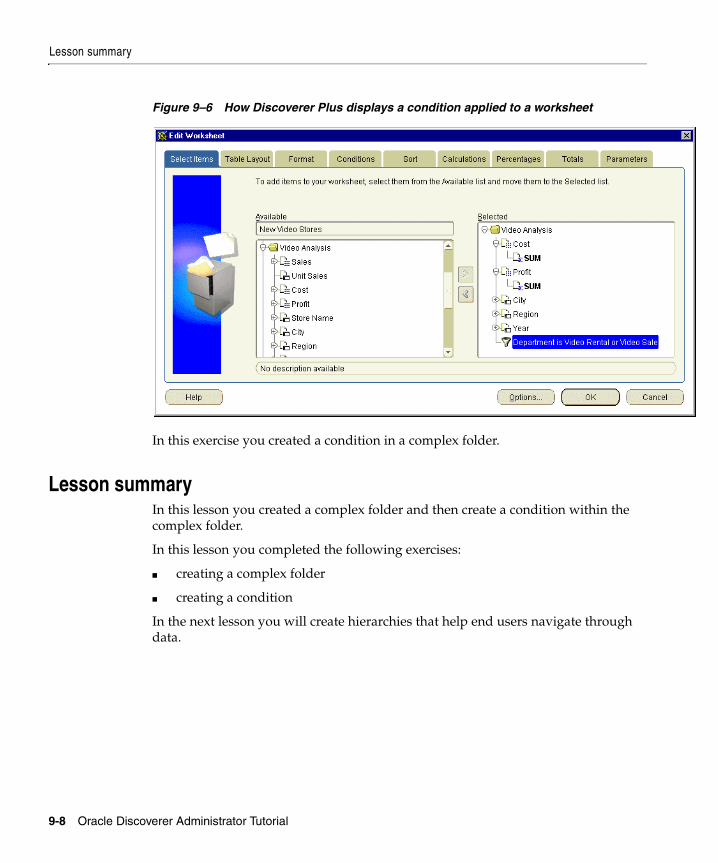
Lesson summary
9-8 Oracle Discoverer Administrator Tutorial
Figure 9–6 How Discoverer Plus displays a condition applied to a worksheet
In this exercise you created a condition in a complex folder.
Lesson summaryIn this lesson you created a complex folder and then create a condition within the complex folder.
In this lesson you completed the following exercises:
■ creating a complex folder
■ creating a condition
In the next lesson you will create hierarchies that help end users navigate through data.

Lesson 9: Working with hierarchies 10-1
10Lesson 9: Working with hierarchies
Lesson 9: Working with hierarchiesIt will probably take you about 20 minutes to complete this lesson.
In this lesson you will set up items in a hierarchy to enable end users to drill up and down the hierarchy to view related information.
Drilling between items in a hierarchy usually involves displaying a lesser or greater detail of aggregated information. For example, drilling through the sales figures of an entire company from a region level to a district level and finally to the level of a single store. Each level of the hierarchy reveals a greater detail of aggregated information. End users can perform either filtered or unfiltered drill downs. For example, end users might select either a specific data value for an axis item (e.g. the year 2000), or all data values for the axis item (e.g. all years) and then drill down.
As the Discoverer manager, you can provide end users with several methods of drilling into related information. In this section, you will enable the drill up/down capability.
This lesson consists of the following exercises:
■ "Exercise 1: Defining a simple item hierarchy"
■ "Exercise 2: Defining a more complex item hierarchy"
■ "Exercise 3: Creating a date hierarchy template"
■ "Exercise 4: Modifying the content type of an item"
■ "Exercise 5: Defining drill to detail data"
Exercise 1: Defining a simple item hierarchyIn this exercise you will create a new hierarchy in the New Video Stores business area.
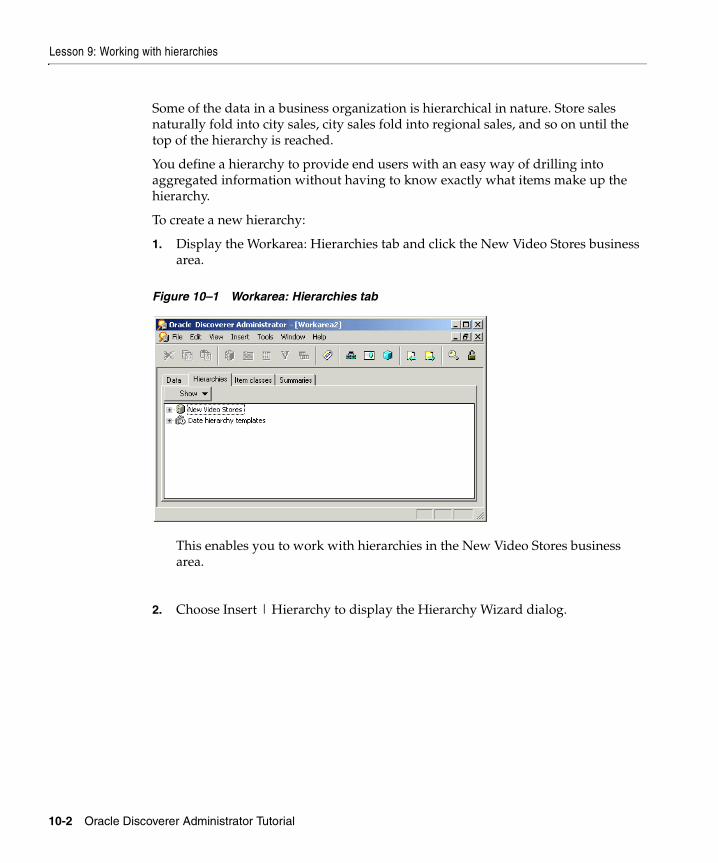
Lesson 9: Working with hierarchies
10-2 Oracle Discoverer Administrator Tutorial
Some of the data in a business organization is hierarchical in nature. Store sales naturally fold into city sales, city sales fold into regional sales, and so on until the top of the hierarchy is reached.
You define a hierarchy to provide end users with an easy way of drilling into aggregated information without having to know exactly what items make up the hierarchy.
To create a new hierarchy:
1. Display the Workarea: Hierarchies tab and click the New Video Stores business area.
Figure 10–1 Workarea: Hierarchies tab
This enables you to work with hierarchies in the New Video Stores business area.
2. Choose Insert | Hierarchy to display the Hierarchy Wizard dialog.
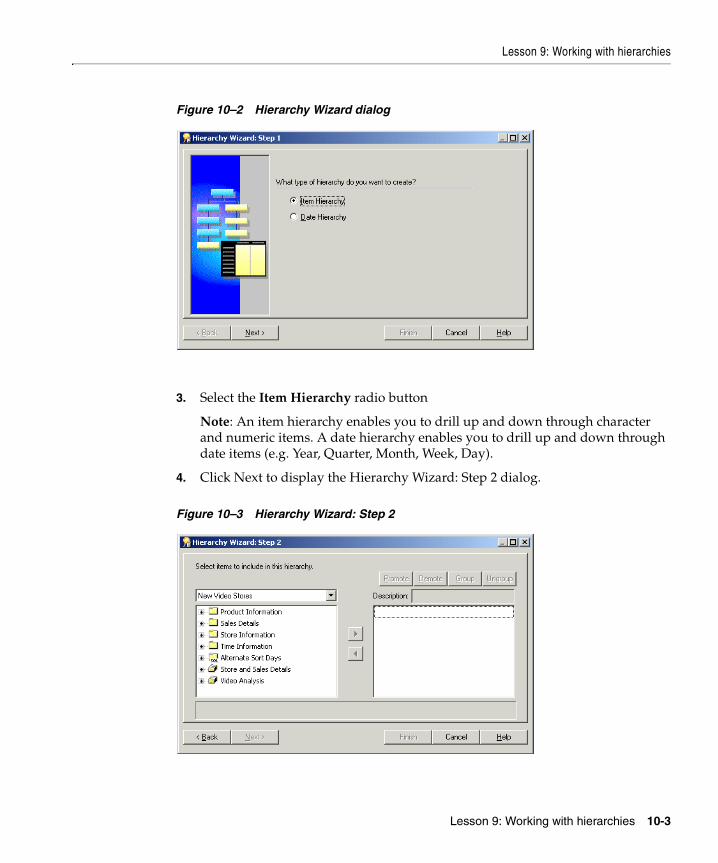
Lesson 9: Working with hierarchies
Lesson 9: Working with hierarchies 10-3
Figure 10–2 Hierarchy Wizard dialog
3. Select the Item Hierarchy radio button
Note: An item hierarchy enables you to drill up and down through character and numeric items. A date hierarchy enables you to drill up and down through date items (e.g. Year, Quarter, Month, Week, Day).
4. Click Next to display the Hierarchy Wizard: Step 2 dialog.
Figure 10–3 Hierarchy Wizard: Step 2
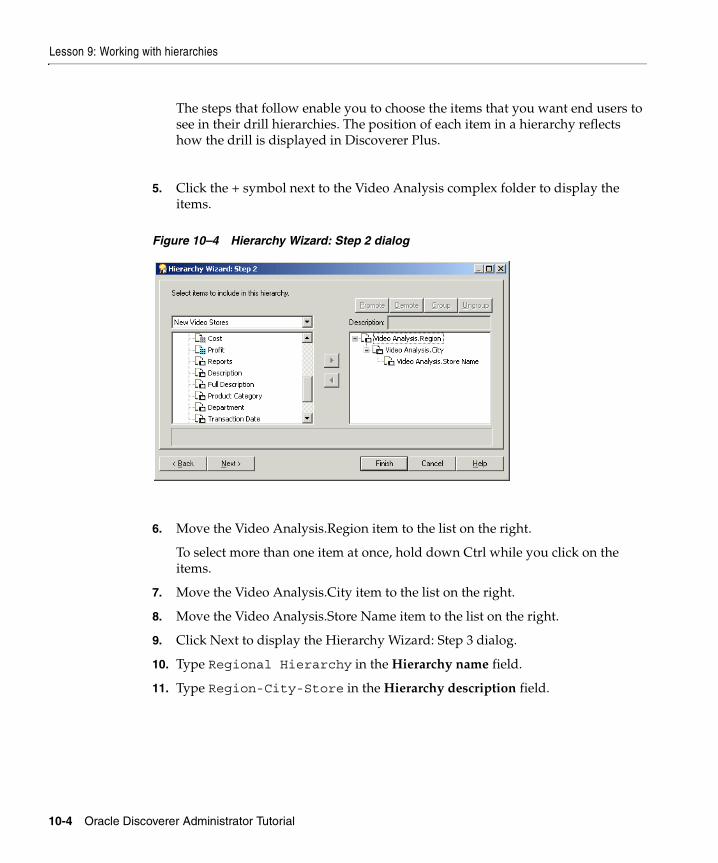
Lesson 9: Working with hierarchies
10-4 Oracle Discoverer Administrator Tutorial
The steps that follow enable you to choose the items that you want end users to see in their drill hierarchies. The position of each item in a hierarchy reflects how the drill is displayed in Discoverer Plus.
5. Click the + symbol next to the Video Analysis complex folder to display the items.
Figure 10–4 Hierarchy Wizard: Step 2 dialog
6. Move the Video Analysis.Region item to the list on the right.
To select more than one item at once, hold down Ctrl while you click on the items.
7. Move the Video Analysis.City item to the list on the right.
8. Move the Video Analysis.Store Name item to the list on the right.
9. Click Next to display the Hierarchy Wizard: Step 3 dialog.
10. Type Regional Hierarchy in the Hierarchy name field.
11. Type Region-City-Store in the Hierarchy description field.
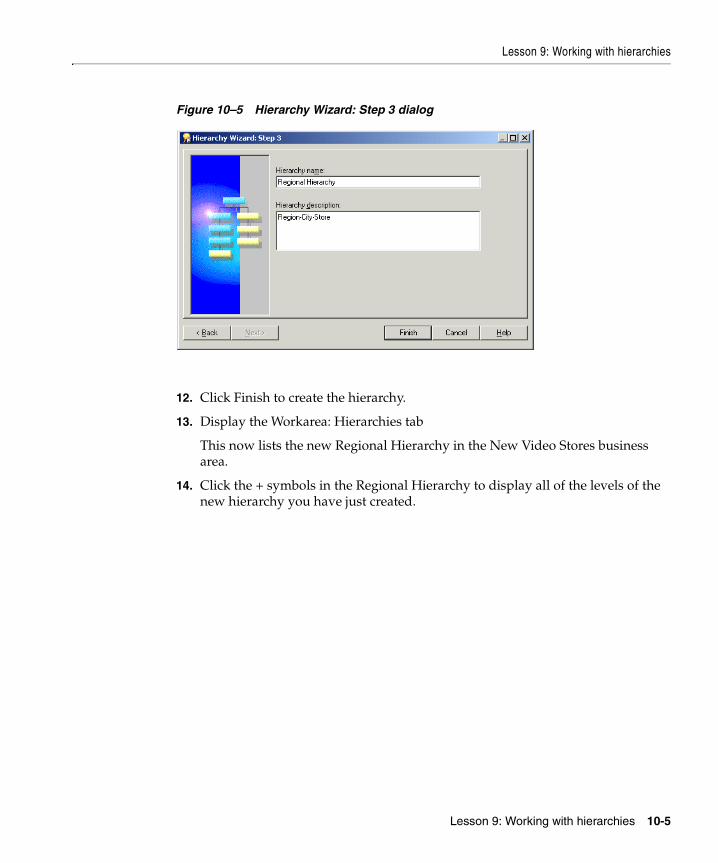
Lesson 9: Working with hierarchies
Lesson 9: Working with hierarchies 10-5
Figure 10–5 Hierarchy Wizard: Step 3 dialog
12. Click Finish to create the hierarchy.
13. Display the Workarea: Hierarchies tab
This now lists the new Regional Hierarchy in the New Video Stores business area.
14. Click the + symbols in the Regional Hierarchy to display all of the levels of the new hierarchy you have just created.
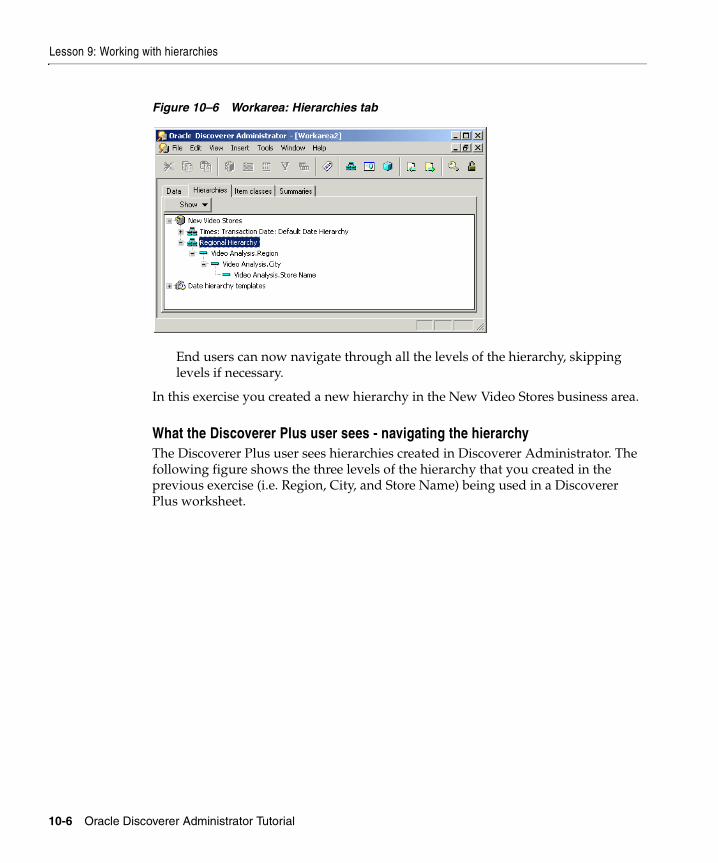
Lesson 9: Working with hierarchies
10-6 Oracle Discoverer Administrator Tutorial
Figure 10–6 Workarea: Hierarchies tab
End users can now navigate through all the levels of the hierarchy, skipping levels if necessary.
In this exercise you created a new hierarchy in the New Video Stores business area.
What the Discoverer Plus user sees - navigating the hierarchyThe Discoverer Plus user sees hierarchies created in Discoverer Administrator. The following figure shows the three levels of the hierarchy that you created in the previous exercise (i.e. Region, City, and Store Name) being used in a Discoverer Plus worksheet.
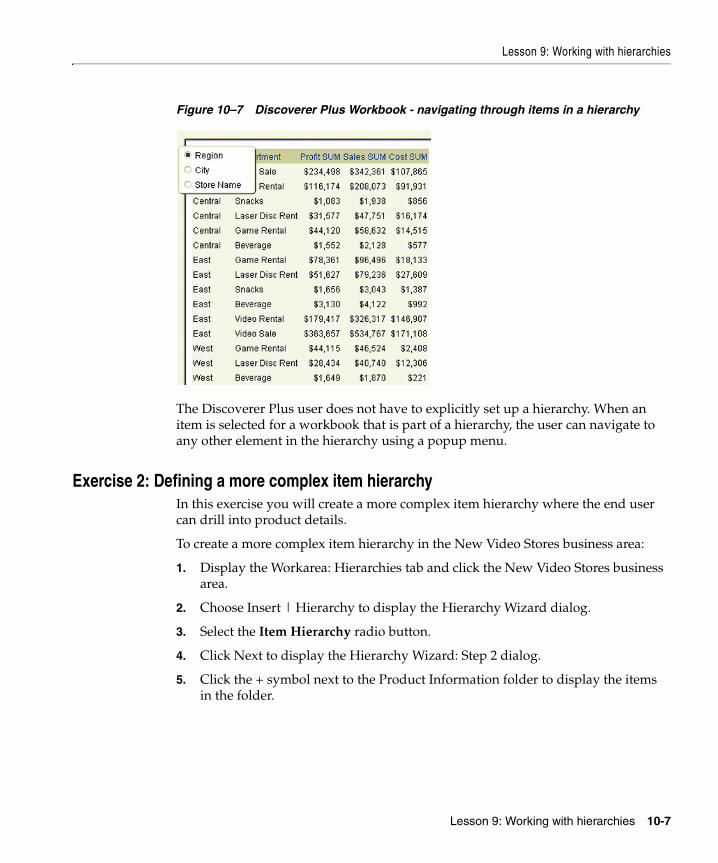
Lesson 9: Working with hierarchies
Lesson 9: Working with hierarchies 10-7
Figure 10–7 Discoverer Plus Workbook - navigating through items in a hierarchy
The Discoverer Plus user does not have to explicitly set up a hierarchy. When an item is selected for a workbook that is part of a hierarchy, the user can navigate to any other element in the hierarchy using a popup menu.
Exercise 2: Defining a more complex item hierarchyIn this exercise you will create a more complex item hierarchy where the end user can drill into product details.
To create a more complex item hierarchy in the New Video Stores business area:
1. Display the Workarea: Hierarchies tab and click the New Video Stores business area.
2. Choose Insert | Hierarchy to display the Hierarchy Wizard dialog.
3. Select the Item Hierarchy radio button.
4. Click Next to display the Hierarchy Wizard: Step 2 dialog.
5. Click the + symbol next to the Product Information folder to display the items in the folder.
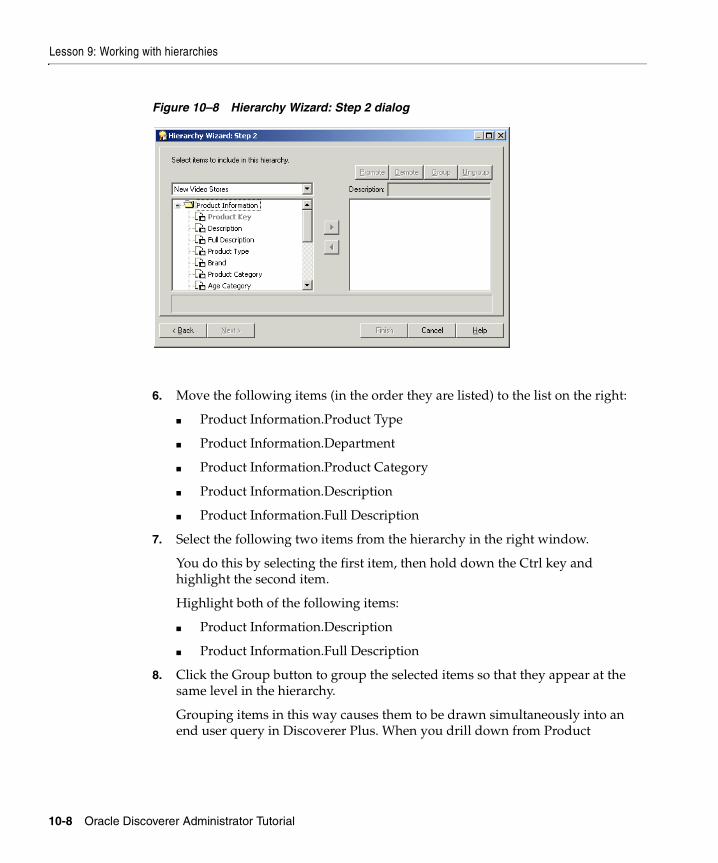
Lesson 9: Working with hierarchies
10-8 Oracle Discoverer Administrator Tutorial
Figure 10–8 Hierarchy Wizard: Step 2 dialog
6. Move the following items (in the order they are listed) to the list on the right:
■ Product Information.Product Type
■ Product Information.Department
■ Product Information.Product Category
■ Product Information.Description
■ Product Information.Full Description
7. Select the following two items from the hierarchy in the right window.
You do this by selecting the first item, then hold down the Ctrl key and highlight the second item.
Highlight both of the following items:
■ Product Information.Description
■ Product Information.Full Description
8. Click the Group button to group the selected items so that they appear at the same level in the hierarchy.
Grouping items in this way causes them to be drawn simultaneously into an end user query in Discoverer Plus. When you drill down from Product
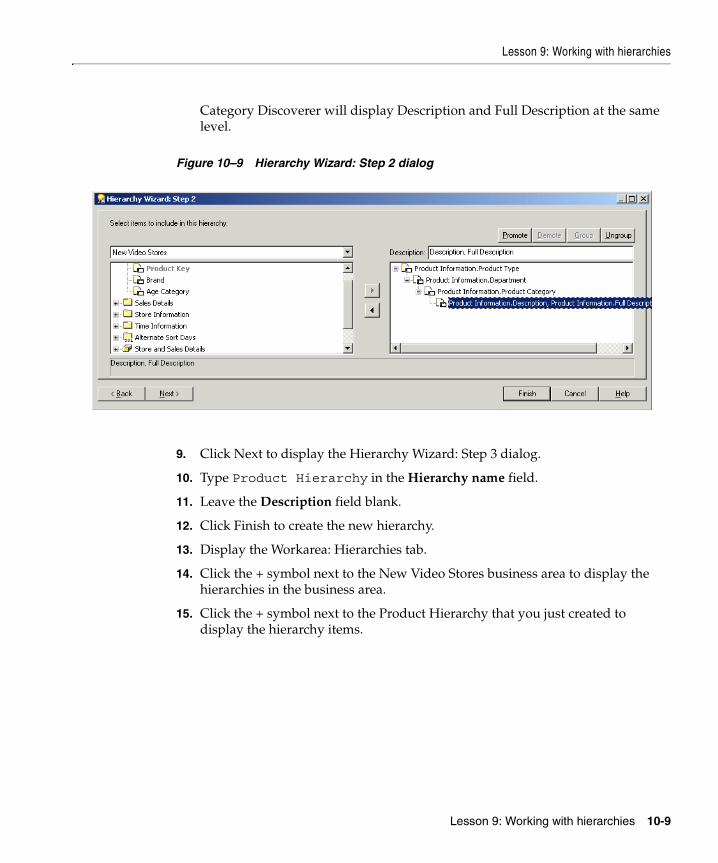
Lesson 9: Working with hierarchies
Lesson 9: Working with hierarchies 10-9
Category Discoverer will display Description and Full Description at the same level.
Figure 10–9 Hierarchy Wizard: Step 2 dialog
9. Click Next to display the Hierarchy Wizard: Step 3 dialog.
10. Type Product Hierarchy in the Hierarchy name field.
11. Leave the Description field blank.
12. Click Finish to create the new hierarchy.
13. Display the Workarea: Hierarchies tab.
14. Click the + symbol next to the New Video Stores business area to display the hierarchies in the business area.
15. Click the + symbol next to the Product Hierarchy that you just created to display the hierarchy items.
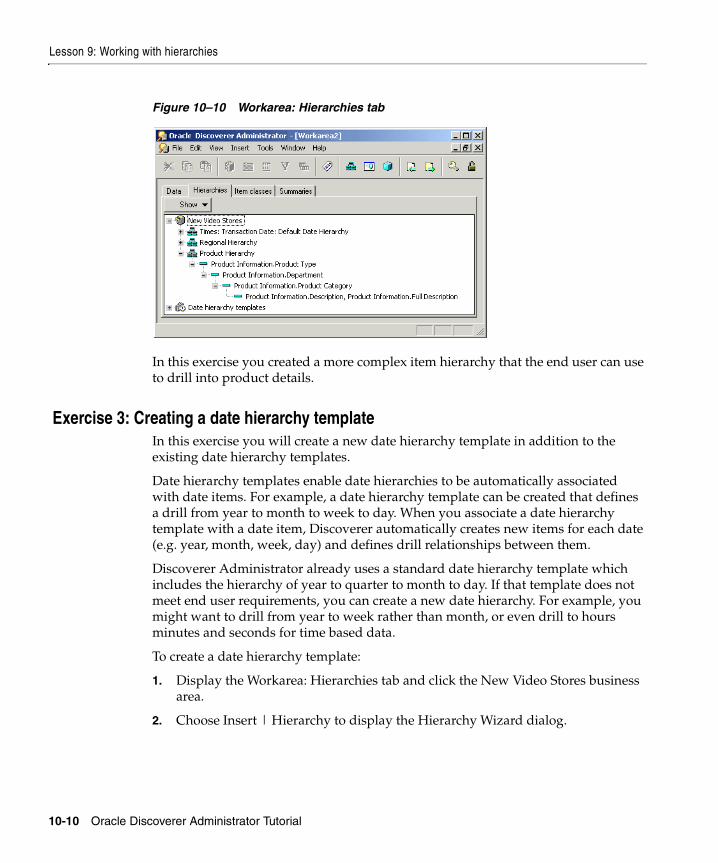
Lesson 9: Working with hierarchies
10-10 Oracle Discoverer Administrator Tutorial
Figure 10–10 Workarea: Hierarchies tab
In this exercise you created a more complex item hierarchy that the end user can use to drill into product details.
Exercise 3: Creating a date hierarchy templateIn this exercise you will create a new date hierarchy template in addition to the existing date hierarchy templates.
Date hierarchy templates enable date hierarchies to be automatically associated with date items. For example, a date hierarchy template can be created that defines a drill from year to month to week to day. When you associate a date hierarchy template with a date item, Discoverer automatically creates new items for each date (e.g. year, month, week, day) and defines drill relationships between them.
Discoverer Administrator already uses a standard date hierarchy template which includes the hierarchy of year to quarter to month to day. If that template does not meet end user requirements, you can create a new date hierarchy. For example, you might want to drill from year to week rather than month, or even drill to hours minutes and seconds for time based data.
To create a date hierarchy template:
1. Display the Workarea: Hierarchies tab and click the New Video Stores business area.
2. Choose Insert | Hierarchy to display the Hierarchy Wizard dialog.
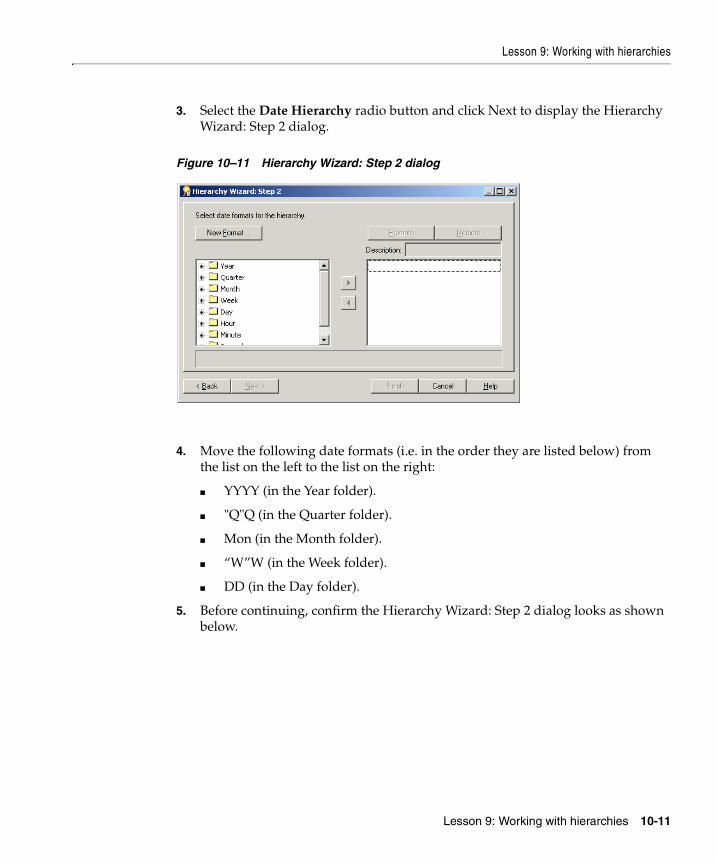
Lesson 9: Working with hierarchies
Lesson 9: Working with hierarchies 10-11
3. Select the Date Hierarchy radio button and click Next to display the Hierarchy Wizard: Step 2 dialog.
Figure 10–11 Hierarchy Wizard: Step 2 dialog
4. Move the following date formats (i.e. in the order they are listed below) from the list on the left to the list on the right:
■ YYYY (in the Year folder).
■ "Q"Q (in the Quarter folder).
■ Mon (in the Month folder).
■ “W”W (in the Week folder).
■ DD (in the Day folder).
5. Before continuing, confirm the Hierarchy Wizard: Step 2 dialog looks as shown below.
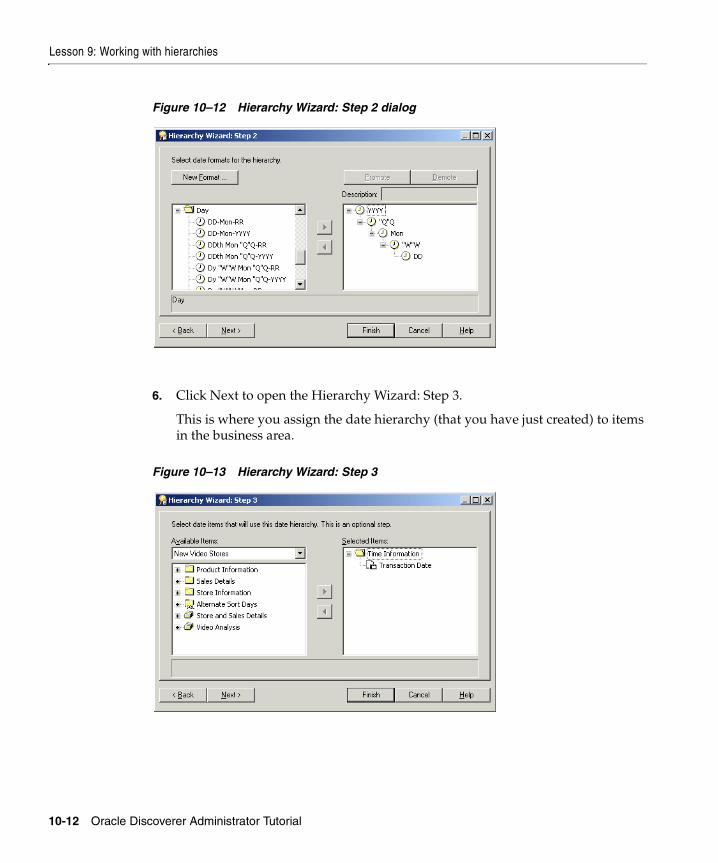
Lesson 9: Working with hierarchies
10-12 Oracle Discoverer Administrator Tutorial
Figure 10–12 Hierarchy Wizard: Step 2 dialog
6. Click Next to open the Hierarchy Wizard: Step 3.
This is where you assign the date hierarchy (that you have just created) to items in the business area.
Figure 10–13 Hierarchy Wizard: Step 3

Lesson 9: Working with hierarchies
Lesson 9: Working with hierarchies 10-13
7. Move Time Information.Transaction Date from the Available Items to the Selected Items list on the right.
8. Click Next to display the Hierarchy Wizard: Step 4 dialog.
9. Type Y-Q-M-W-D Hierarchy into the Hierarchy Name field and leave the Description field blank.
Figure 10–14 Hierarchy Wizard: Step 4 dialog
10. Click Finish.
Discoverer creates the new date hierarchy template (Y-Q-M-W-D Hierarchy) and applies the hierarchy items to the Transaction Date item in the Time Information folder. Discoverer displays the new date hierarchy items in the Time Information folder.
Note: When you apply a date hierarchy template to a date item that already has a date hierarchy applied, Discoverer creates additional date items for the new date hierarchy but does not remove date items from the old date hierarchy. If you want to remove the unused date items you must manually delete them from the folder.
In this exercise you created a new date hierarchy template in addition to the existing date hierarchy templates.
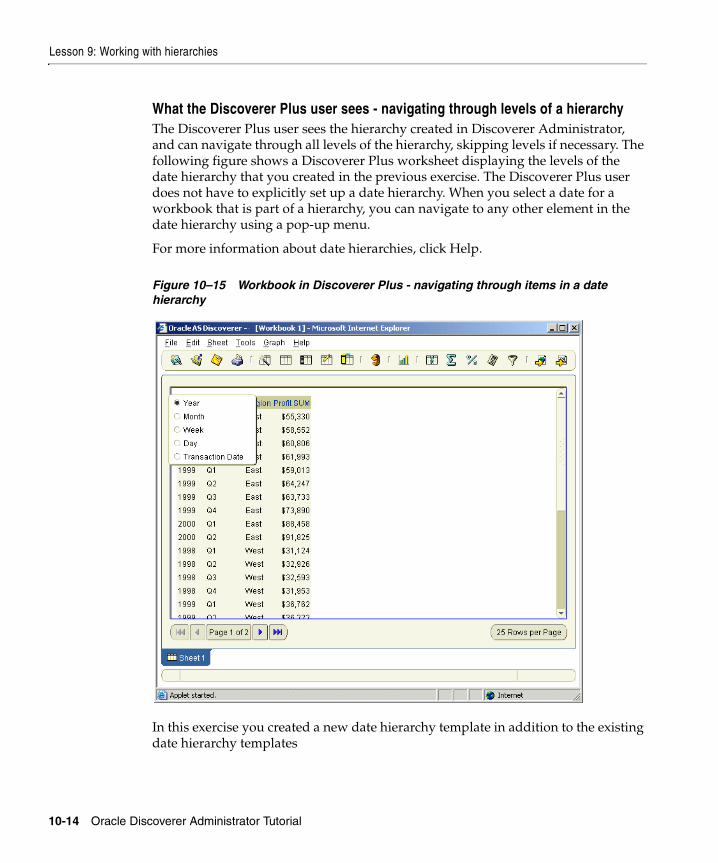
Lesson 9: Working with hierarchies
10-14 Oracle Discoverer Administrator Tutorial
What the Discoverer Plus user sees - navigating through levels of a hierarchyThe Discoverer Plus user sees the hierarchy created in Discoverer Administrator, and can navigate through all levels of the hierarchy, skipping levels if necessary. The following figure shows a Discoverer Plus worksheet displaying the levels of the date hierarchy that you created in the previous exercise. The Discoverer Plus user does not have to explicitly set up a date hierarchy. When you select a date for a workbook that is part of a hierarchy, you can navigate to any other element in the date hierarchy using a pop-up menu.
For more information about date hierarchies, click Help.
Figure 10–15 Workbook in Discoverer Plus - navigating through items in a date hierarchy
In this exercise you created a new date hierarchy template in addition to the existing date hierarchy templates
Lesson 9: Working with hierarchies
Lesson 9: Working with hierarchies 10-15
Exercise 4: Modifying the content type of an itemIn this exercise you will modify the content type property of some items.
The content type property determines how Discoverer Plus treats items that it displays in a workbook.
Discoverer Plus displays items in one of two ways:
■ as data returned from the database
For example, product names, regions, sales figures, calculation results. Discoverer displays the data directly in a workbook.
■ as data returned from the database in the form of a reference to a file stored outside the database
For example, the name and path of a video file stored in the local or network file system (e.g. d:\salesfilms\january.avi). For Discoverer to display the data contained in this file a video application must run.
Where an item contains a reference to a file that requires another application to run, Discoverer finds and loads the application that displays the contents of the file.
The content type item property can have one of the two following values:
■ FILE
Discoverer displays data about the file in a cell in a workbook. When the end user clicks the cell, Discoverer launches an application appropriate to the file extension (defined on the end user machine) and the application displays the contents of the file.
■ NONE
Discoverer displays the data from the database in a cell in a workbook.
The table below lists some applications and the file extensions that are used to launch them.
Application File name extension
MS Word .doc
Media Player .avi
MS Excel .xls
Lotus Screencam .scm

Lesson 9: Working with hierarchies
10-16 Oracle Discoverer Administrator Tutorial
In the New Video Stores business area, the Store Information.Reports item refers to a MSWord document and the information in the database column is the directory path and filename. The Product Information.Full Description item refers to a Web page containing HTML code and the information in the database column is also the directory path and filename. The Reports document must be opened by a word processor, and the Full Description document by a Web browser.
The following exercise shows how you modify the content type of an item so that Discoverer Plus will pass the contents of the item (i.e. the directory path and file name) to the operating system, which will launch the appropriate application to view the contents of the file.
How to modify the content type of an item:
1. Display the Workarea: Data tab and select the following items:
■ Video Analysis.Reports
■ Video Analysis.Description
■ Video Analysis.Full Description
2. Choose Edit | Properties to display the Item Properties dialog for the items selected above.
3. Set the Content type to FILE.
4. Click OK.
In this exercise you modified the content type property of some items.
What the Discoverer Plus user sees - external application icons in the worksheetThe Discoverer Plus user sees the information in the appropriate word processor application or Web browser.
The Discoverer Plus user can tell which items need external applications to run based on the icon displayed in the worksheet. The following figure shows an example of a worksheet that can invoke Microsoft Word and an HTML page.
Web Browser .html
Application File name extension
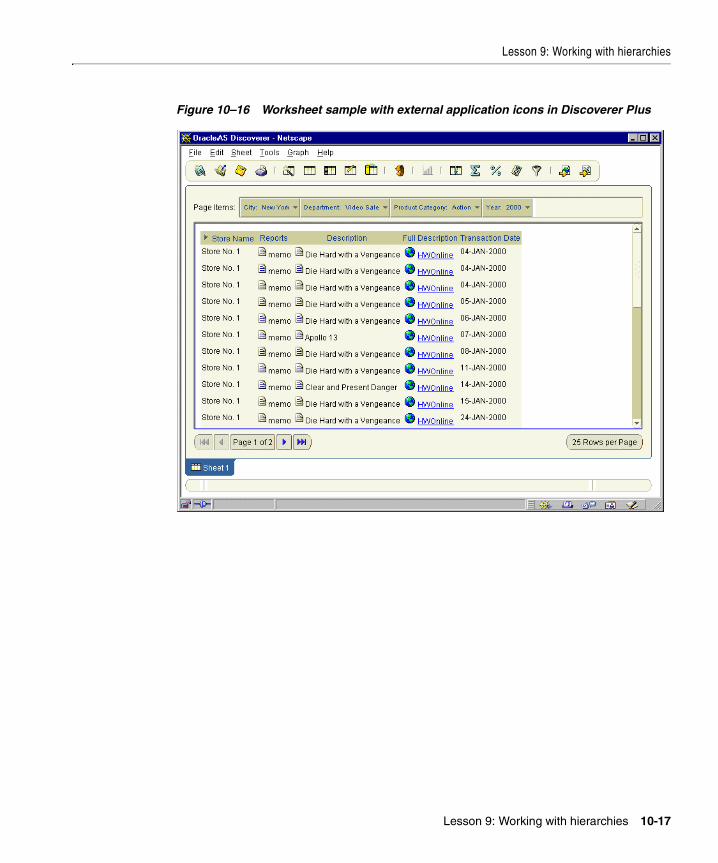
Lesson 9: Working with hierarchies
Lesson 9: Working with hierarchies 10-17
Figure 10–16 Worksheet sample with external application icons in Discoverer Plus
Lesson 9: Working with hierarchies
10-18 Oracle Discoverer Administrator Tutorial
Exercise 5: Defining drill to detail dataIn this exercise you will edit a list of values item class that is also used for drill-to-detail.
In Discoverer Plus, end users can use the hierarchies that you create to drill up or down to view different levels of aggregated data. End users want to drill to detail, that is jump to related information details in the aggregated data. For example, an end user reviewing daily sales figures from a number of video stores might want to see the detail transaction records that make up the daily total.
To enable an end user to drill to the detail data, you need to create a drill-to-detail item class. A drill-to-detail item class enables end users to select an aggregated detail item in a worksheet and drill directly to the source data that was aggregated to produce the result.
You can drill to any item in an item class and the items in an item class can be from different folders. These two conditions mean that a link exists between the items, and end users can easily drill to detail to any folder which has an item in the same item class.
The following steps show how easy it is to edit an item class that drills from aggregated information into more detailed information, and for viewing a list of unique values from the Region folder. (i.e. an item class created by the Load Wizard at the start of this tutorial. for more information, see Chapter 3, "Exercise 2: Creating a new business area using the Load Wizard")
To edit a drill-to-detail item class:
1. Display the Workarea: Item classes tab.
2. Click the + symbol to expand the New Video Stores business area to display all item classes.
3. Right-click Region and choose Edit Item Class from the popup menu.
4. Display the Edit Item Class dialog: List of Values tab.
5. Make sure that the Region item in the Store Information folder is selected (see the figure below).
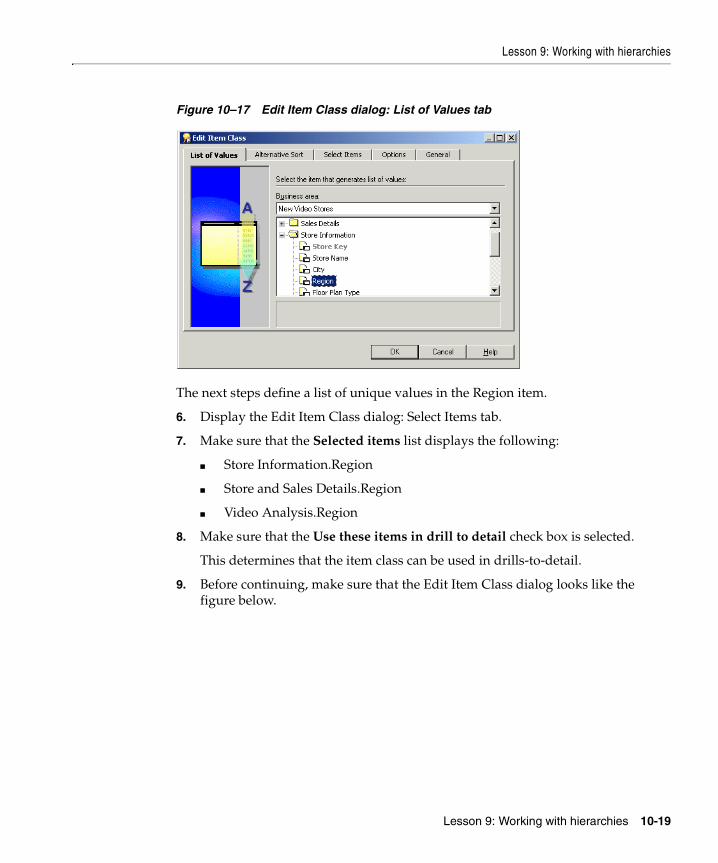
Lesson 9: Working with hierarchies
Lesson 9: Working with hierarchies 10-19
Figure 10–17 Edit Item Class dialog: List of Values tab
The next steps define a list of unique values in the Region item.
6. Display the Edit Item Class dialog: Select Items tab.
7. Make sure that the Selected items list displays the following:
■ Store Information.Region
■ Store and Sales Details.Region
■ Video Analysis.Region
8. Make sure that the Use these items in drill to detail check box is selected.
This determines that the item class can be used in drills-to-detail.
9. Before continuing, make sure that the Edit Item Class dialog looks like the figure below.
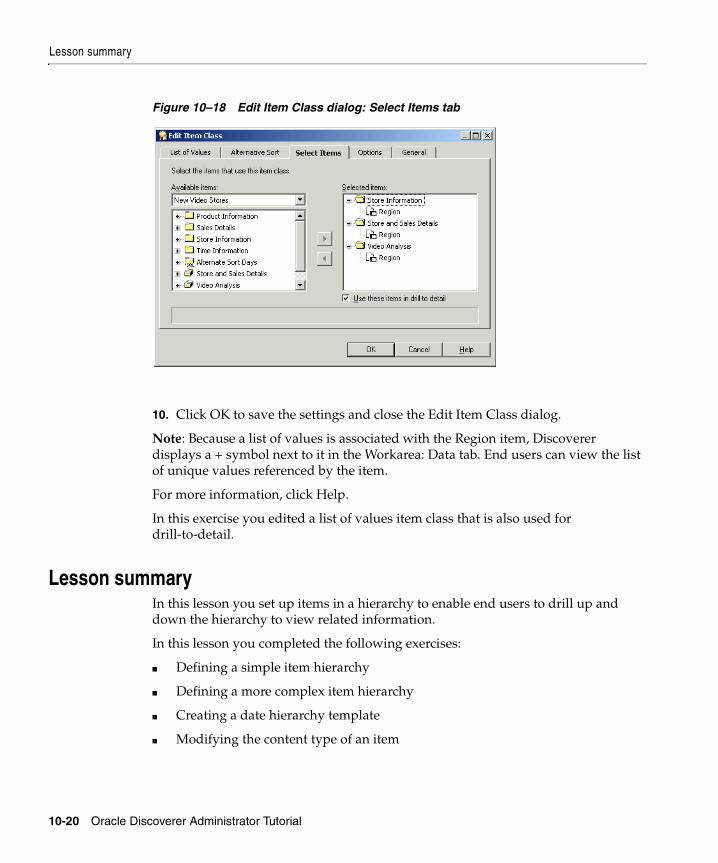
Lesson summary
10-20 Oracle Discoverer Administrator Tutorial
Figure 10–18 Edit Item Class dialog: Select Items tab
10. Click OK to save the settings and close the Edit Item Class dialog.
Note: Because a list of values is associated with the Region item, Discoverer displays a + symbol next to it in the Workarea: Data tab. End users can view the list of unique values referenced by the item.
For more information, click Help.
In this exercise you edited a list of values item class that is also used for drill-to-detail.
Lesson summaryIn this lesson you set up items in a hierarchy to enable end users to drill up and down the hierarchy to view related information.
In this lesson you completed the following exercises:
■ Defining a simple item hierarchy
■ Defining a more complex item hierarchy
■ Creating a date hierarchy template
■ Modifying the content type of an item
Lesson summary
Lesson 9: Working with hierarchies 10-21
■ Defining drill to detail data
In the next lesson you will create summary folders. Summary folders help reduce the time taken to retrieve data for Discoverer Plus and Discoverer Viewer users.

Lesson summary
10-22 Oracle Discoverer Administrator Tutorial
Lesson 10: Creating summary folders to optimize performance 11-1
11Lesson 10: Creating summary folders to
optimize performance
Lesson 10: Creating summary folders to optimize performanceIt will probably take you about 20 minutes to complete this lesson.
In this lesson you will use the Summary Wizard to create summary folders:
■ using the Automated Summary Management (ASM) facility (creates the summary folders for you)
■ manually (using items from the EUL)
Although the New Video Stores business area is now ready for end users, it might be inefficient to allow frequently repeated end user queries to access the detail tables in a production database. It can take a long time to return query results if the detail tables contain very large numbers of rows.
To improve query efficiency, Discoverer Administrator enables you to create summary folders. A summary folder references pre-aggregated data that you know your end users will want to analyze in a worksheet. Discoverer queries can be directed to the pre-aggregated data, avoiding aggregating large volumes of detail data each time a query runs, and therefore optimizing query efficiency.
Note: As the Discoverer manager, you are advised to use Discoverer’s ASM facility to create summary folders. For more information about ASM, click Help.
This lesson consists of the following exercises:
■ "Exercise 1: Creating a summary folder using Automated Summary Management (ASM)"
■ "Exercise 2: Manually creating a summary folder"
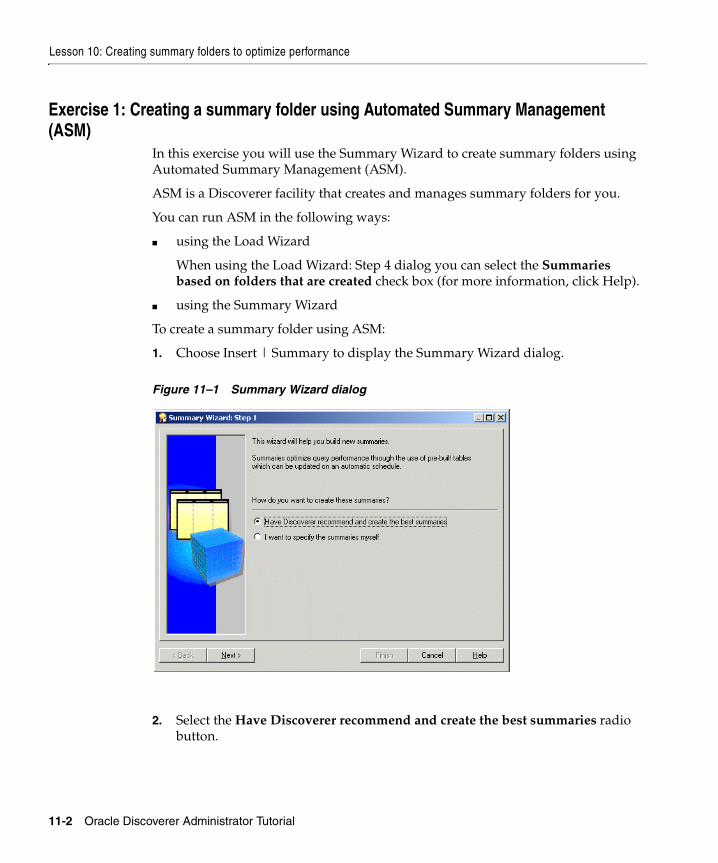
Lesson 10: Creating summary folders to optimize performance
11-2 Oracle Discoverer Administrator Tutorial
Exercise 1: Creating a summary folder using Automated Summary Management (ASM)
In this exercise you will use the Summary Wizard to create summary folders using Automated Summary Management (ASM).
ASM is a Discoverer facility that creates and manages summary folders for you.
You can run ASM in the following ways:
■ using the Load Wizard
When using the Load Wizard: Step 4 dialog you can select the Summaries based on folders that are created check box (for more information, click Help).
■ using the Summary Wizard
To create a summary folder using ASM:
1. Choose Insert | Summary to display the Summary Wizard dialog.
Figure 11–1 Summary Wizard dialog
2. Select the Have Discoverer recommend and create the best summaries radio button.
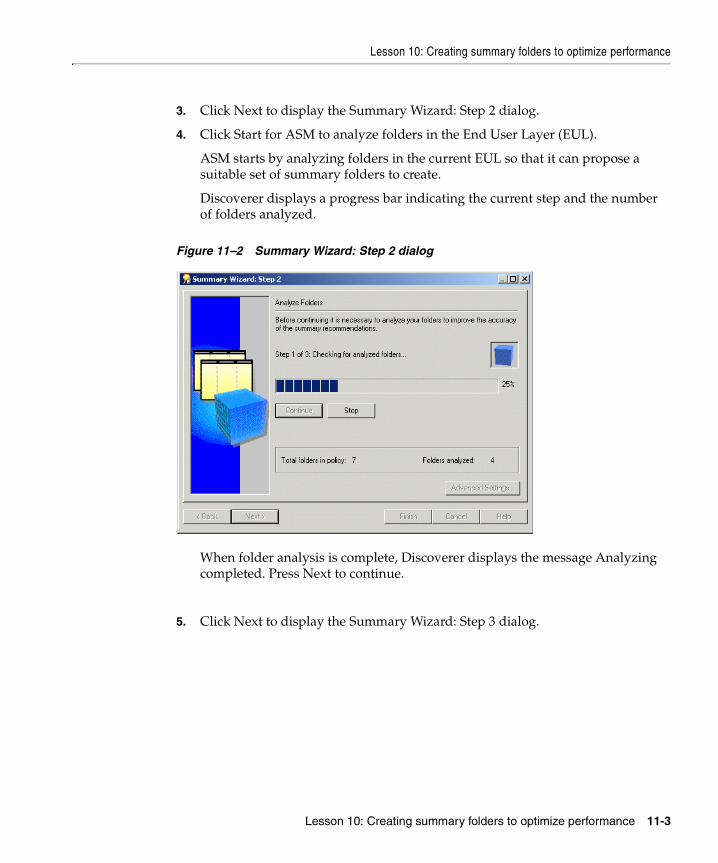
Lesson 10: Creating summary folders to optimize performance
Lesson 10: Creating summary folders to optimize performance 11-3
3. Click Next to display the Summary Wizard: Step 2 dialog.
4. Click Start for ASM to analyze folders in the End User Layer (EUL).
ASM starts by analyzing folders in the current EUL so that it can propose a suitable set of summary folders to create.
Discoverer displays a progress bar indicating the current step and the number of folders analyzed.
Figure 11–2 Summary Wizard: Step 2 dialog
When folder analysis is complete, Discoverer displays the message Analyzing completed. Press Next to continue.
5. Click Next to display the Summary Wizard: Step 3 dialog.
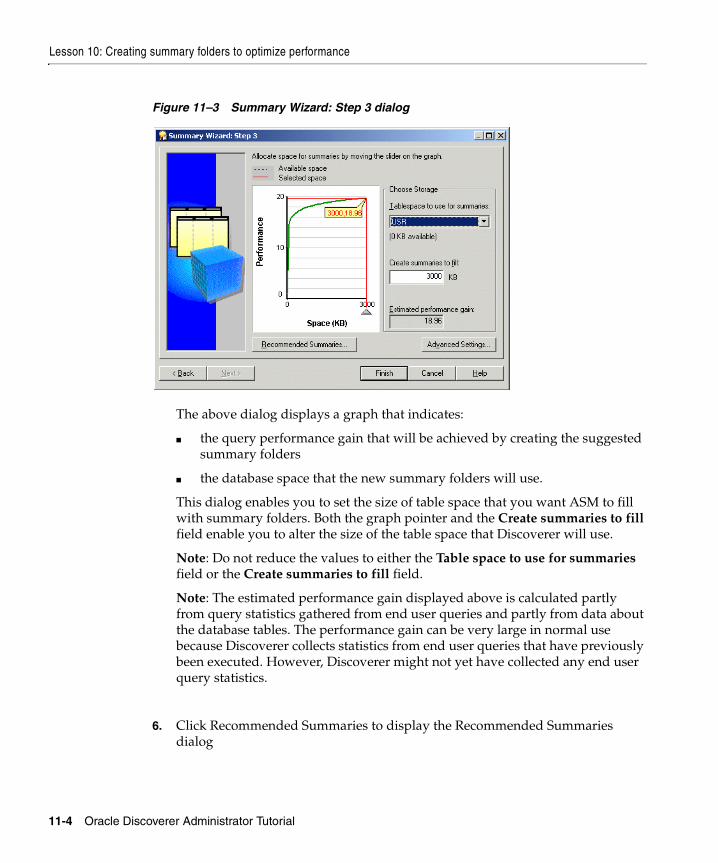
Lesson 10: Creating summary folders to optimize performance
11-4 Oracle Discoverer Administrator Tutorial
Figure 11–3 Summary Wizard: Step 3 dialog
The above dialog displays a graph that indicates:
■ the query performance gain that will be achieved by creating the suggested summary folders
■ the database space that the new summary folders will use.
This dialog enables you to set the size of table space that you want ASM to fill with summary folders. Both the graph pointer and the Create summaries to fill field enable you to alter the size of the table space that Discoverer will use.
Note: Do not reduce the values to either the Table space to use for summaries field or the Create summaries to fill field.
Note: The estimated performance gain displayed above is calculated partly from query statistics gathered from end user queries and partly from data about the database tables. The performance gain can be very large in normal use because Discoverer collects statistics from end user queries that have previously been executed. However, Discoverer might not yet have collected any end user query statistics.
6. Click Recommended Summaries to display the Recommended Summaries dialog
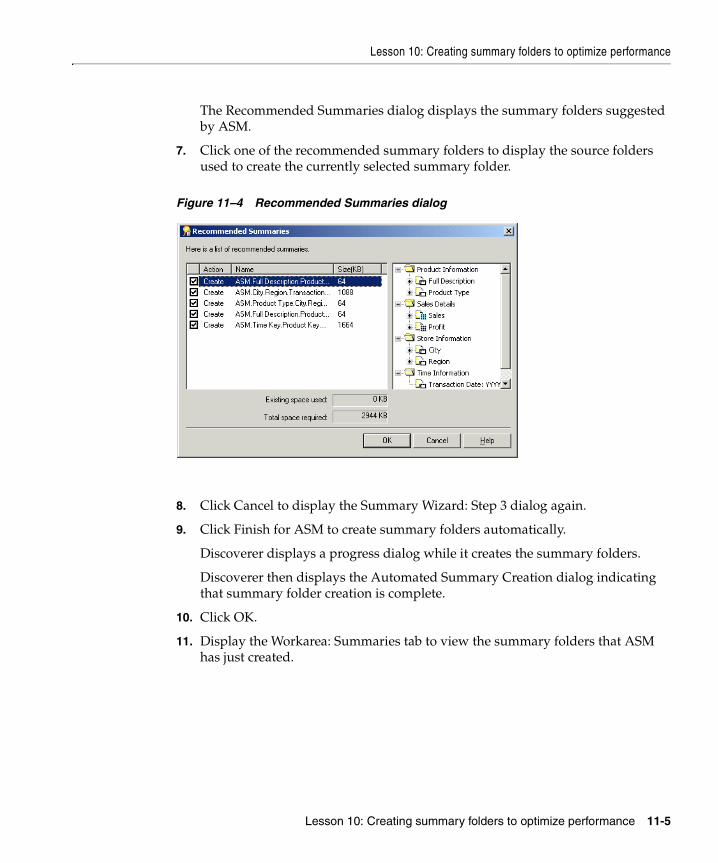
Lesson 10: Creating summary folders to optimize performance
Lesson 10: Creating summary folders to optimize performance 11-5
The Recommended Summaries dialog displays the summary folders suggested by ASM.
7. Click one of the recommended summary folders to display the source folders used to create the currently selected summary folder.
Figure 11–4 Recommended Summaries dialog
8. Click Cancel to display the Summary Wizard: Step 3 dialog again.
9. Click Finish for ASM to create summary folders automatically.
Discoverer displays a progress dialog while it creates the summary folders.
Discoverer then displays the Automated Summary Creation dialog indicating that summary folder creation is complete.
10. Click OK.
11. Display the Workarea: Summaries tab to view the summary folders that ASM has just created.
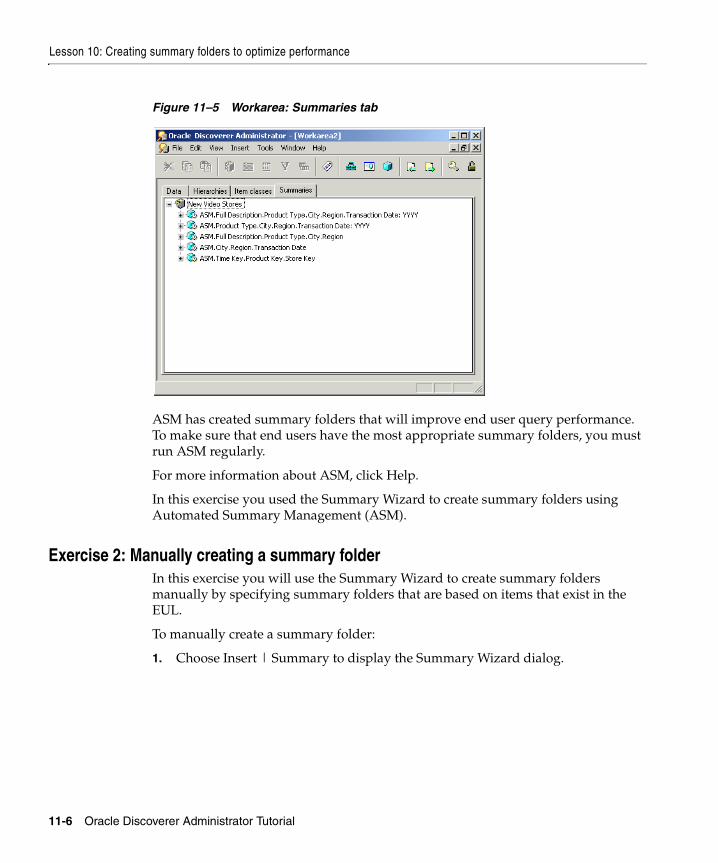
Lesson 10: Creating summary folders to optimize performance
11-6 Oracle Discoverer Administrator Tutorial
Figure 11–5 Workarea: Summaries tab
ASM has created summary folders that will improve end user query performance. To make sure that end users have the most appropriate summary folders, you must run ASM regularly.
For more information about ASM, click Help.
In this exercise you used the Summary Wizard to create summary folders using Automated Summary Management (ASM).
Exercise 2: Manually creating a summary folderIn this exercise you will use the Summary Wizard to create summary folders manually by specifying summary folders that are based on items that exist in the EUL.
To manually create a summary folder:
1. Choose Insert | Summary to display the Summary Wizard dialog.
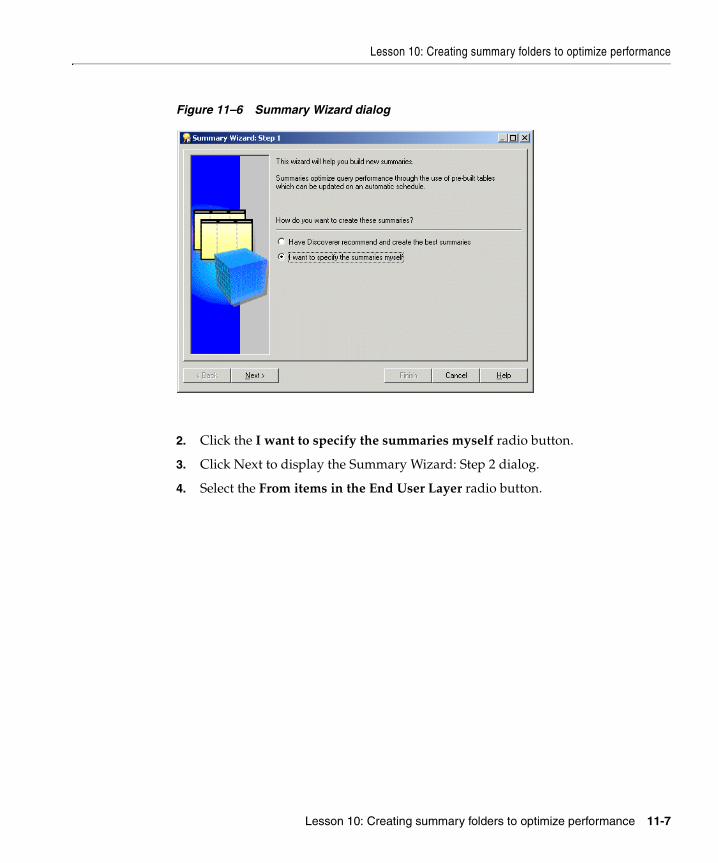
Lesson 10: Creating summary folders to optimize performance
Lesson 10: Creating summary folders to optimize performance 11-7
Figure 11–6 Summary Wizard dialog
2. Click the I want to specify the summaries myself radio button.
3. Click Next to display the Summary Wizard: Step 2 dialog.
4. Select the From items in the End User Layer radio button.
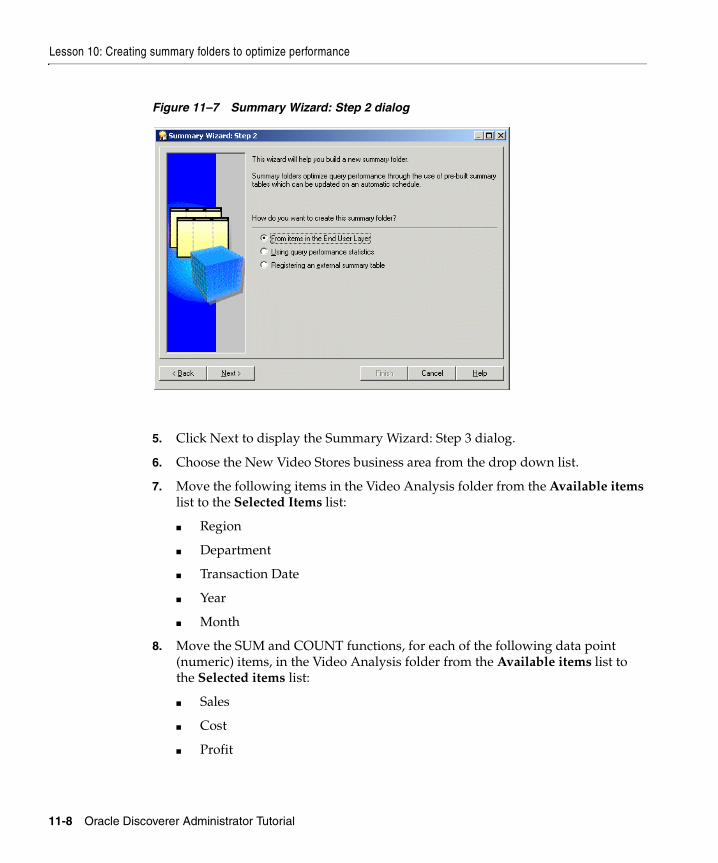
Lesson 10: Creating summary folders to optimize performance
11-8 Oracle Discoverer Administrator Tutorial
Figure 11–7 Summary Wizard: Step 2 dialog
5. Click Next to display the Summary Wizard: Step 3 dialog.
6. Choose the New Video Stores business area from the drop down list.
7. Move the following items in the Video Analysis folder from the Available items list to the Selected Items list:
■ Region
■ Department
■ Transaction Date
■ Year
■ Month
8. Move the SUM and COUNT functions, for each of the following data point (numeric) items, in the Video Analysis folder from the Available items list to the Selected items list:
■ Sales
■ Cost
■ Profit
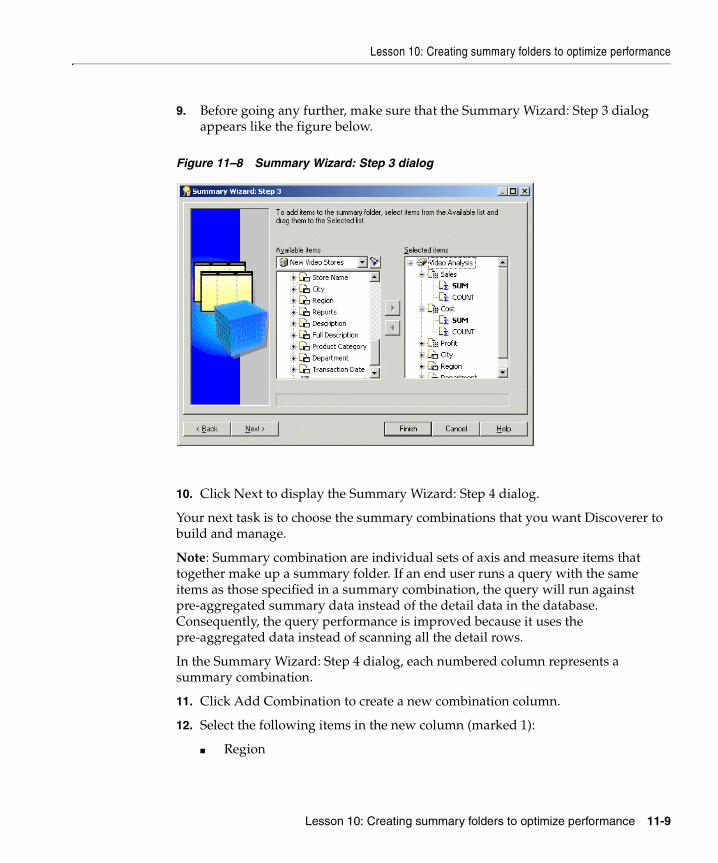
Lesson 10: Creating summary folders to optimize performance
Lesson 10: Creating summary folders to optimize performance 11-9
9. Before going any further, make sure that the Summary Wizard: Step 3 dialog appears like the figure below.
Figure 11–8 Summary Wizard: Step 3 dialog
10. Click Next to display the Summary Wizard: Step 4 dialog.
Your next task is to choose the summary combinations that you want Discoverer to build and manage.
Note: Summary combination are individual sets of axis and measure items that together make up a summary folder. If an end user runs a query with the same items as those specified in a summary combination, the query will run against pre-aggregated summary data instead of the detail data in the database. Consequently, the query performance is improved because it uses the pre-aggregated data instead of scanning all the detail rows.
In the Summary Wizard: Step 4 dialog, each numbered column represents a summary combination.
11. Click Add Combination to create a new combination column.
12. Select the following items in the new column (marked 1):
■ Region

Lesson 10: Creating summary folders to optimize performance
11-10 Oracle Discoverer Administrator Tutorial
■ Department
■ Transaction Date
13. Clear the check boxes next to Year and Month in column 1.
14. Before going any further, make sure that the Summary Wizard: Step 4 dialog appears like the figure below.
Figure 11–9 Summary Wizard: Step 4 dialog
15. Click Next to display Summary Wizard: Step 5 dialog.
Your next task is to schedule the initial summary folder refresh and periodic refresh intervals then name the summary folder and schedule its build.
Note: The refresh schedule establishes the time frame in which Discoverer automatically updates the data in the summary folder. It is important for you, as the Discoverer manager, to set up a periodic refresh that ensures that the aggregated summary data is current at the periods required by end users.
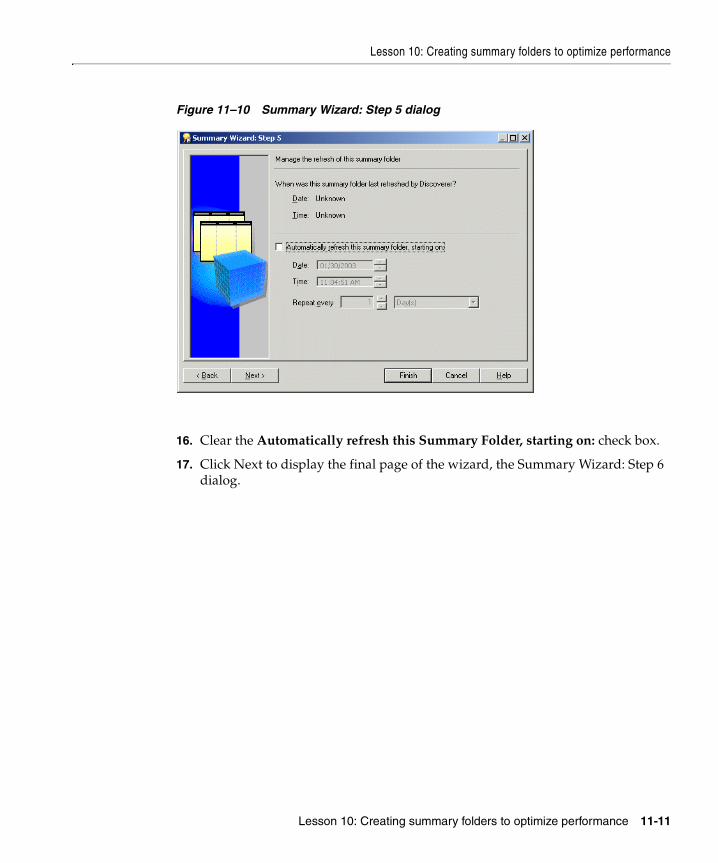
Lesson 10: Creating summary folders to optimize performance
Lesson 10: Creating summary folders to optimize performance 11-11
Figure 11–10 Summary Wizard: Step 5 dialog
16. Clear the Automatically refresh this Summary Folder, starting on: check box.
17. Click Next to display the final page of the wizard, the Summary Wizard: Step 6 dialog.
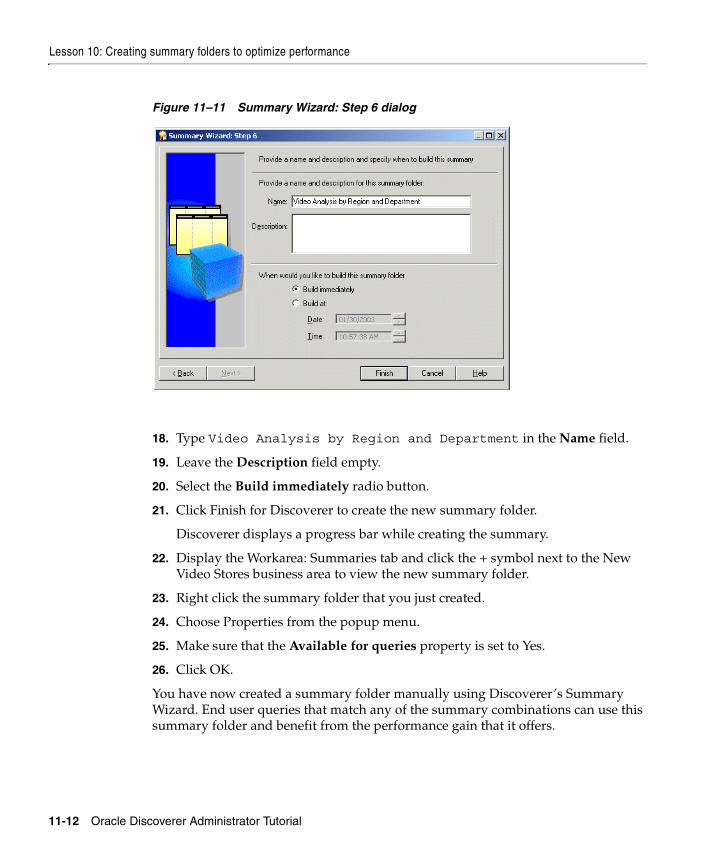
Lesson 10: Creating summary folders to optimize performance
11-12 Oracle Discoverer Administrator Tutorial
Figure 11–11 Summary Wizard: Step 6 dialog
18. Type Video Analysis by Region and Department in the Name field.
19. Leave the Description field empty.
20. Select the Build immediately radio button.
21. Click Finish for Discoverer to create the new summary folder.
Discoverer displays a progress bar while creating the summary.
22. Display the Workarea: Summaries tab and click the + symbol next to the New Video Stores business area to view the new summary folder.
23. Right click the summary folder that you just created.
24. Choose Properties from the popup menu.
25. Make sure that the Available for queries property is set to Yes.
26. Click OK.
You have now created a summary folder manually using Discoverer’s Summary Wizard. End user queries that match any of the summary combinations can use this summary folder and benefit from the performance gain that it offers.
Lesson summary
Lesson 10: Creating summary folders to optimize performance 11-13
In this exercise you used the Summary Wizard to create a summary folder manually by specifying that the summary folder is based on items that exist in the EUL.
Lesson summaryIn this lesson you used the Summary Wizard to create summary folders:
■ using the Automated Summary Management (ASM) facility (creates the summary folders for you)
■ manually (using items from the EUL)
In the next chapter you can remove remove all of the work that you completed as part of this tutorial.

Lesson summary
11-14 Oracle Discoverer Administrator Tutorial
Lesson 11: Tasks on completion of the tutorial 12-1
12Lesson 11: Tasks on completion of the
tutorial
Lesson 11: Tasks on completion of the tutorialCongratulations! You have just completed the Oracle Discoverer Administrator tutorial. By now, you should have a solid understanding of the major features of Oracle Discoverer Administrator and how it affects every aspect of an end users view of database information through business areas.
You have learned that you can use Oracle Discoverer Administrator to help end users make much more effective use of database information by creating business areas that reflect their view of data, and simplify their tasks by creating conditions and joins they will need to use in worksheets.
In this tutorial you created your own unique tutorial database user, an EUL, a business area and a summary folder. You can now delete all of these objects from the database.
In this lesson you will remove all of the work that you completed as part of the tutorial.
In order to remove all of the work that you completed as part of this tutorial you must complete the following exercises:
■ "Exercise 1: Deleting summary folders from the business area"
■ "Exercise 2: Deleting the New Video Stores business area"
■ "Exercise 3: Deleting the EUL owned by the tutorial database user"
■ "Exercise 4: Deleting the tutorial database user from the database"
Exercise 1: Deleting summary folders from the business areaTo delete summary folders from the business area:
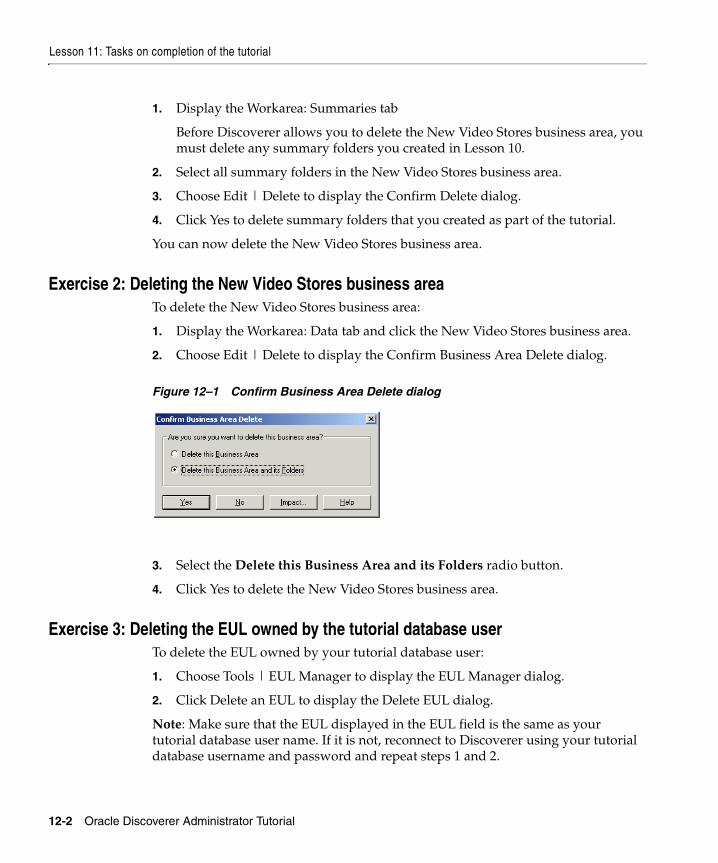
Lesson 11: Tasks on completion of the tutorial
12-2 Oracle Discoverer Administrator Tutorial
1. Display the Workarea: Summaries tab
Before Discoverer allows you to delete the New Video Stores business area, you must delete any summary folders you created in Lesson 10.
2. Select all summary folders in the New Video Stores business area.
3. Choose Edit | Delete to display the Confirm Delete dialog.
4. Click Yes to delete summary folders that you created as part of the tutorial.
You can now delete the New Video Stores business area.
Exercise 2: Deleting the New Video Stores business areaTo delete the New Video Stores business area:
1. Display the Workarea: Data tab and click the New Video Stores business area.
2. Choose Edit | Delete to display the Confirm Business Area Delete dialog.
Figure 12–1 Confirm Business Area Delete dialog
3. Select the Delete this Business Area and its Folders radio button.
4. Click Yes to delete the New Video Stores business area.
Exercise 3: Deleting the EUL owned by the tutorial database userTo delete the EUL owned by your tutorial database user:
1. Choose Tools | EUL Manager to display the EUL Manager dialog.
2. Click Delete an EUL to display the Delete EUL dialog.
Note: Make sure that the EUL displayed in the EUL field is the same as your tutorial database user name. If it is not, reconnect to Discoverer using your tutorial database username and password and repeat steps 1 and 2.
Lesson summary
Lesson 11: Tasks on completion of the tutorial 12-3
3. Click OK.
Discoverer displays a warning dialog.
4. Click Yes to delete the EUL owned by your tutorial database user.
Discoverer displays the Commit Status dialog.
5. Click OK when Discoverer displays The EUL has been successfully deleted dialog.
You have now deleted all of the work that you have done as part of this tutorial from the EUL. You must now remove your tutorial database user from the database.
Exercise 4: Deleting the tutorial database user from the databaseTo delete your tutorial database user from the database:
1. Start SQL*Plus.
For more information about SQL*Plus, see your database administrator.
2. Connect to the database using a database username and password that has DBA privileges.
3. Type the following SQL at the SQL> prompt:
SQL> drop user admintutor(your initials) cascade;
4. Type the following SQL at the SQL> prompt:
SQL> commit;
SQL*Plus deletes your tutorial database user from the database and displays the message:
User dropped
You have now deleted all of the work that you have built up as part of this tutorial from the EUL.
For more information regarding any Discoverer Administrator feature, click Help.
Lesson summaryIn this lesson you removed all of the work that you completed as part of this tutorial by:
■ deleting summary folders from the business area
Lesson summary
12-4 Oracle Discoverer Administrator Tutorial
■ deleting the New Video Stores business area
■ deleting the EUL owned by the tutorial database user
■ deleting the tutorial database user from the database
Installing the Discoverer tutorial EUL, data, and workbook A-1
AInstalling the Discoverer tutorial EUL, data,
and workbook
Installing the Discoverer tutorial EUL, data, and workbookThis section explains how to install the Discoverer tutorial EUL, data, and workbook so that you can do the Discoverer Administrator Tutorial. This procedure also installs the Video Tutorial Workbook, which is used in the Discoverer Plus Tutorial.
This section contains the following topics:
■ "What must exist in the database before Discoverer Administrator tutorial users can start using the tutorial lessons?"
■ "What happens when you install the Discoverer tutorial EUL, data, and workbook?"
■ "What privileges do you need to install the tutorial data?"
■ "What conditions apply when you connect to Discoverer Administrator for the first time?"
■ "Why must you create an EUL?"
■ "What steps do I follow to install the Discoverer tutorial EUL, data, and workbook?"
■ "How to create a private EUL for the tutorial"
■ "How to install the Discoverer tutorial"
■ "How to grant access privileges to the VIDEO5 database user for the tutorial EUL"
■ "How to install the tutorial business area in another End User Layer"

What must exist in the database before Discoverer Administrator tutorial users can start using the tutorial lessons?
A-2 Oracle Discoverer Administrator Tutorial
■ "How to uninstall the tutorial business area, tables and data"
■ "How to reinstall the tutorial data"
What must exist in the database before Discoverer Administrator tutorial users can start using the tutorial lessons?
Before Discoverer Administrator tutorial users can start using the tutorial lessons, the following must exist in the database:
■ an End User Layer (EUL)
■ the VIDEO5 database user
■ the VIDEO5 data
Note: When you use Discoverer Administrator for the first time, the VIDEO5 database user might not exist. If the VIDEO5 database user does not exist, you can create it when you install the tutorial (for more information, see "How to install the Discoverer tutorial").
What happens when you install the Discoverer tutorial EUL, data, and workbook?
When you install the Discoverer EUL, data, and workbook Discoverer Administrator does the following:
■ creates a new database user with a name that you specify (this user will own the EUL)
■ creates a new EUL
■ if the VIDEO5 database user does not already exist, Discoverer:
■ creates a new database user called VIDEO5
■ creates tutorial tables in the VIDEO5 database user’s tablespace
■ populates the tutorial tables with tutorial data
■ populates the new EUL with metadata about the VIDEO5 tables (i.e. it imports the tutorial business area from the file vidstr.eex, located in the \demo directory)
The following figure illustrates events that can occur when you install the tutorial.
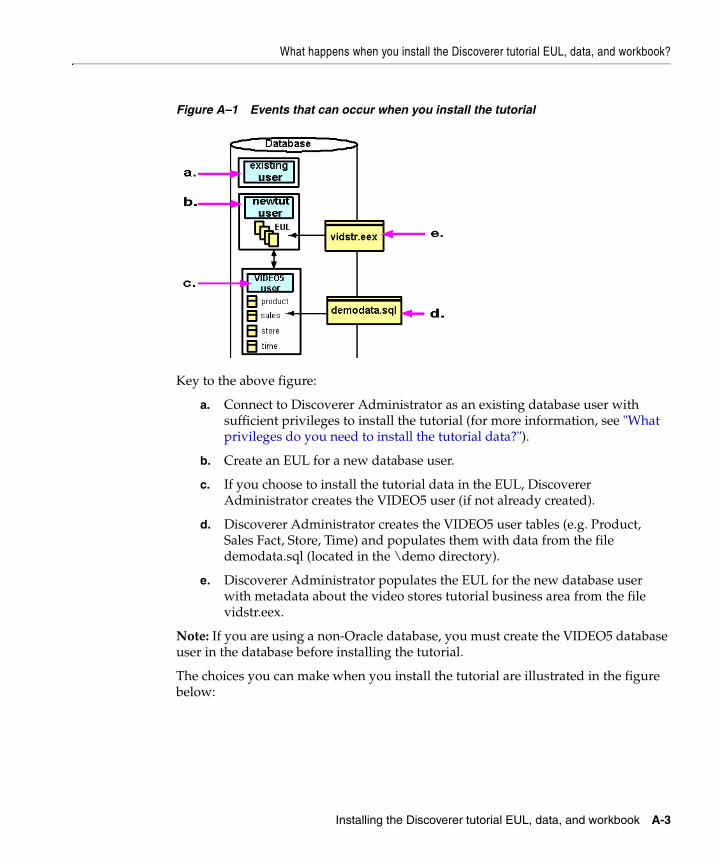
What happens when you install the Discoverer tutorial EUL, data, and workbook?
Installing the Discoverer tutorial EUL, data, and workbook A-3
Figure A–1 Events that can occur when you install the tutorial
Key to the above figure:
a. Connect to Discoverer Administrator as an existing database user with sufficient privileges to install the tutorial (for more information, see "What privileges do you need to install the tutorial data?").
b. Create an EUL for a new database user.
c. If you choose to install the tutorial data in the EUL, Discoverer Administrator creates the VIDEO5 user (if not already created).
d. Discoverer Administrator creates the VIDEO5 user tables (e.g. Product, Sales Fact, Store, Time) and populates them with data from the file demodata.sql (located in the \demo directory).
e. Discoverer Administrator populates the EUL for the new database user with metadata about the video stores tutorial business area from the file vidstr.eex.
Note: If you are using a non-Oracle database, you must create the VIDEO5 database user in the database before installing the tutorial.
The choices you can make when you install the tutorial are illustrated in the figure below:
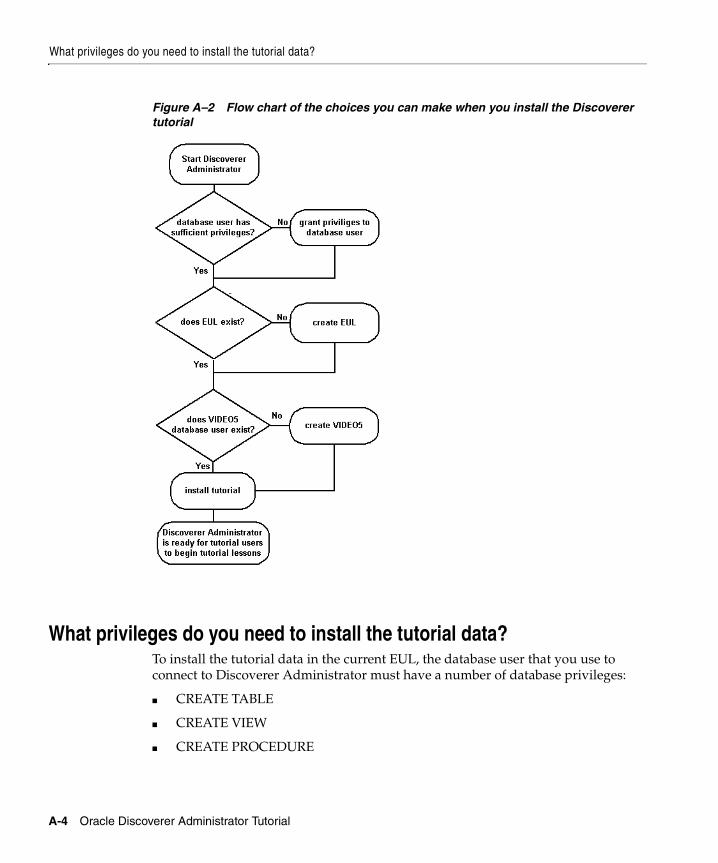
What privileges do you need to install the tutorial data?
A-4 Oracle Discoverer Administrator Tutorial
Figure A–2 Flow chart of the choices you can make when you install the Discoverer tutorial
What privileges do you need to install the tutorial data?To install the tutorial data in the current EUL, the database user that you use to connect to Discoverer Administrator must have a number of database privileges:
■ CREATE TABLE
■ CREATE VIEW
■ CREATE PROCEDURE
What conditions apply when you connect to Discoverer Administrator for the first time?
Installing the Discoverer tutorial EUL, data, and workbook A-5
Hint: You can grant the above privileges to the database user by running the script <ORACLE_HOME>\discoverer\util\eulasm.sql.
■ if the VIDEO5 user has not already been created, you must have the following additional database privileges:
■ CREATE USER
■ GRANT ANY PRIVILEGE
■ ALTER USER
■ if you are running against an Oracle 8.1.7 (or later) Enterprise Edition database, you must also have the following additional database privileges to use the Discoverer summary management and ASM functionality:
■ CREATE ANY MATERIALIZED VIEW
■ DROP ANY MATERIALIZED VIEW
■ ALTER ANY MATERIALIZED VIEW
■ GLOBAL QUERY REWRITE
■ ANALYZE ANY
Hint: You can grant the above privileges to the database user by running the script <ORACLE_HOME>\discoverer\util\eulasm.sql.
■ SELECT ON V_$PARAMETER
For more information about how you grant the above database privileges, click Help.
What conditions apply when you connect to Discoverer Administrator for the first time?
When you connect to Discoverer Administrator for the first time the following conditions apply:
■ you must connect as a database user having specific privileges (e.g. a DBA user to install the tutorial data)
For more information, see "What privileges do you need to install the tutorial data?".
■ no EULs or EUL metadata will exist in the database
■ the VIDEO5 database user and tables will not have been created
Why must you create an EUL?
A-6 Oracle Discoverer Administrator Tutorial
When the VIDEO5 database user does not exist, you must create it and populate the VIDEO5 tables with tutorial data before you can begin the tutorial lessons. For more information, see "What happens when you install the Discoverer tutorial EUL, data, and workbook?".
Why must you create an EUL?You must create an EUL (if an EUL does not already exist) to enable you to:
■ install the Discoverer tutorial
■ create the VIDEO5 user and populate the VIDEO5 tables with data
■ complete the Discoverer Administrator tutorial
Installing the tutorial into an EUL makes the tutorial data available to all users who have access privileges to that EUL.
What steps do I follow to install the Discoverer tutorial EUL, data, and workbook?
To install the Discoverer tutorial EUL, data and workbook, follow these steps:
1. Create a private EUL - see "How to create a private EUL for the tutorial".
2. Install the Discoverer tutorial data into the private EUL that you have just created - see "How to install the Discoverer tutorial".
3. Make sure that the VIDEO5 user has the necessary privileges to access the tutorial EUL - see "How to grant access privileges to the VIDEO5 database user for the tutorial EUL".
How to create a private EUL for the tutorialYou must create an EUL if one does not already exist. To create the tutorial EUL, you must connect to Discoverer as a database user with sufficient privileges (for more information, see "What privileges do you need to install the tutorial data?") and create an EUL for a new database user.
To create the tutorial EUL:
1. Choose Programs | Oracle Developer Suite - <HOME_NAME> | Discoverer Administrator from the Windows Start menu to display the Connect dialog.
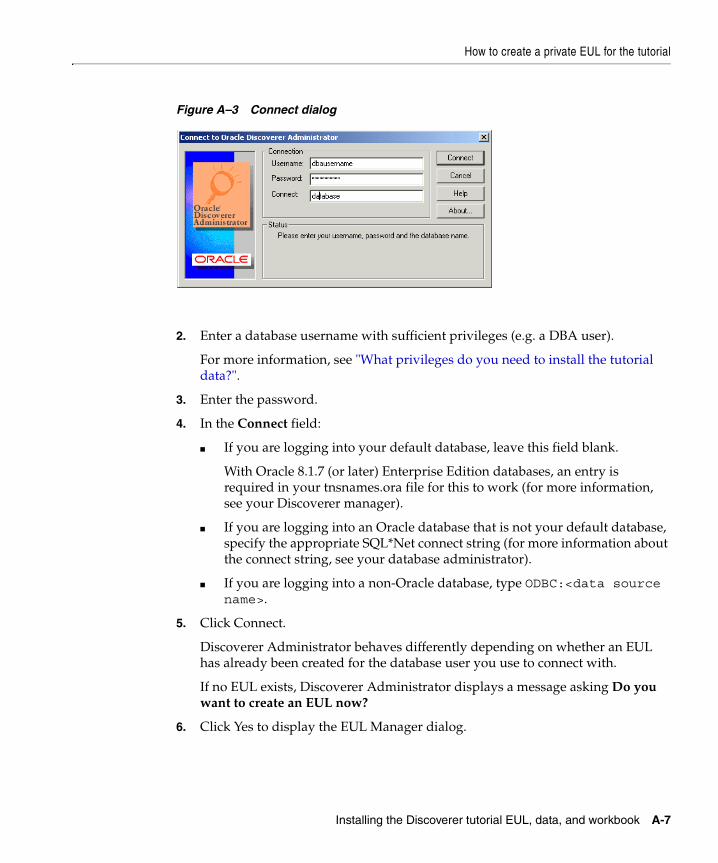
How to create a private EUL for the tutorial
Installing the Discoverer tutorial EUL, data, and workbook A-7
Figure A–3 Connect dialog
2. Enter a database username with sufficient privileges (e.g. a DBA user).
For more information, see "What privileges do you need to install the tutorial data?".
3. Enter the password.
4. In the Connect field:
■ If you are logging into your default database, leave this field blank.
With Oracle 8.1.7 (or later) Enterprise Edition databases, an entry is required in your tnsnames.ora file for this to work (for more information, see your Discoverer manager).
■ If you are logging into an Oracle database that is not your default database, specify the appropriate SQL*Net connect string (for more information about the connect string, see your database administrator).
■ If you are logging into a non-Oracle database, type ODBC:<data source name>.
5. Click Connect.
Discoverer Administrator behaves differently depending on whether an EUL has already been created for the database user you use to connect with.
If no EUL exists, Discoverer Administrator displays a message asking Do you want to create an EUL now?
6. Click Yes to display the EUL Manager dialog.
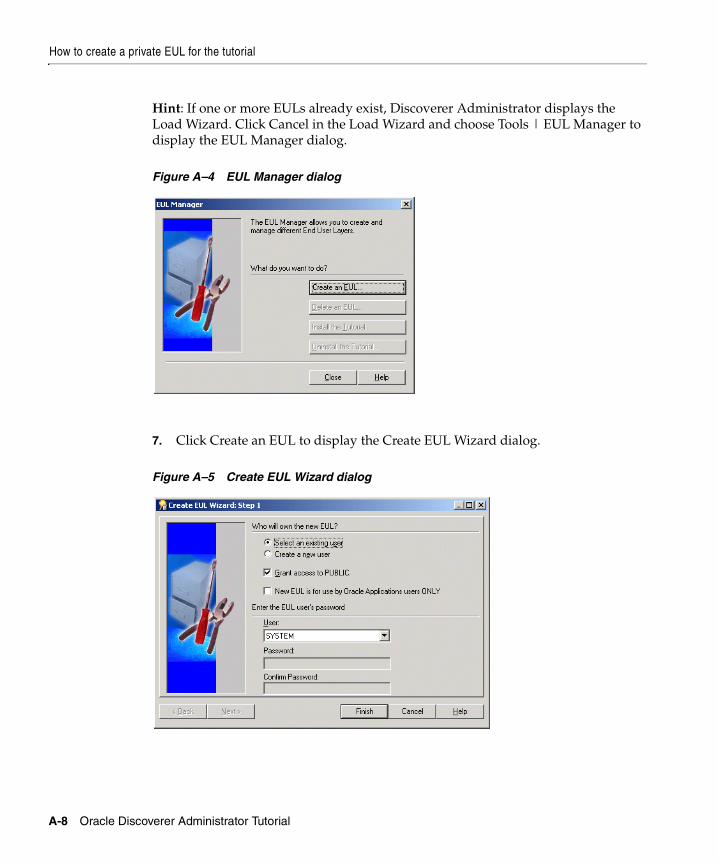
How to create a private EUL for the tutorial
A-8 Oracle Discoverer Administrator Tutorial
Hint: If one or more EULs already exist, Discoverer Administrator displays the Load Wizard. Click Cancel in the Load Wizard and choose Tools | EUL Manager to display the EUL Manager dialog.
Figure A–4 EUL Manager dialog
7. Click Create an EUL to display the Create EUL Wizard dialog.
Figure A–5 Create EUL Wizard dialog
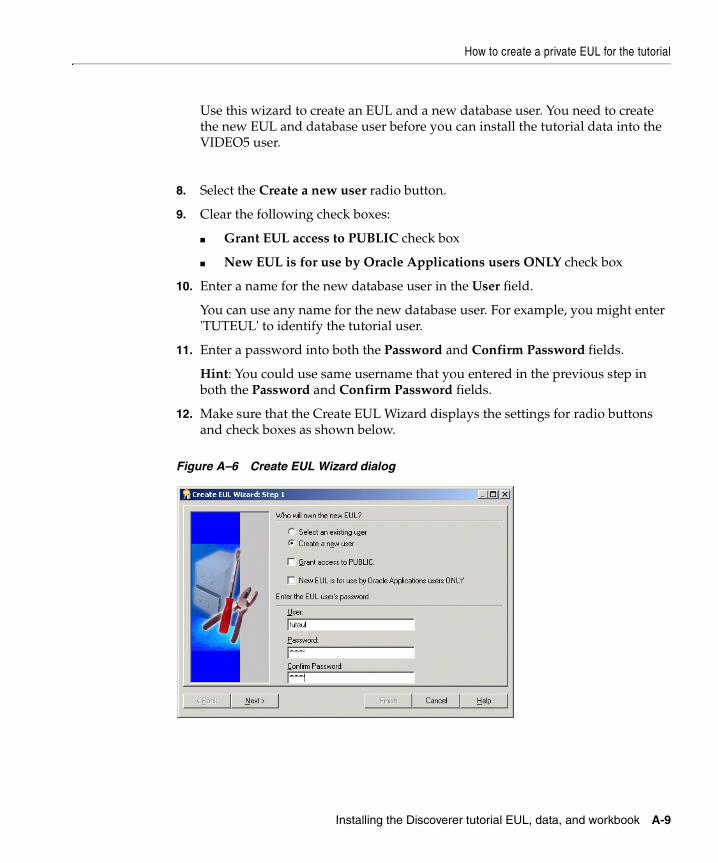
How to create a private EUL for the tutorial
Installing the Discoverer tutorial EUL, data, and workbook A-9
Use this wizard to create an EUL and a new database user. You need to create the new EUL and database user before you can install the tutorial data into the VIDEO5 user.
8. Select the Create a new user radio button.
9. Clear the following check boxes:
■ Grant EUL access to PUBLIC check box
■ New EUL is for use by Oracle Applications users ONLY check box
10. Enter a name for the new database user in the User field.
You can use any name for the new database user. For example, you might enter 'TUTEUL' to identify the tutorial user.
11. Enter a password into both the Password and Confirm Password fields.
Hint: You could use same username that you entered in the previous step in both the Password and Confirm Password fields.
12. Make sure that the Create EUL Wizard displays the settings for radio buttons and check boxes as shown below.
Figure A–6 Create EUL Wizard dialog
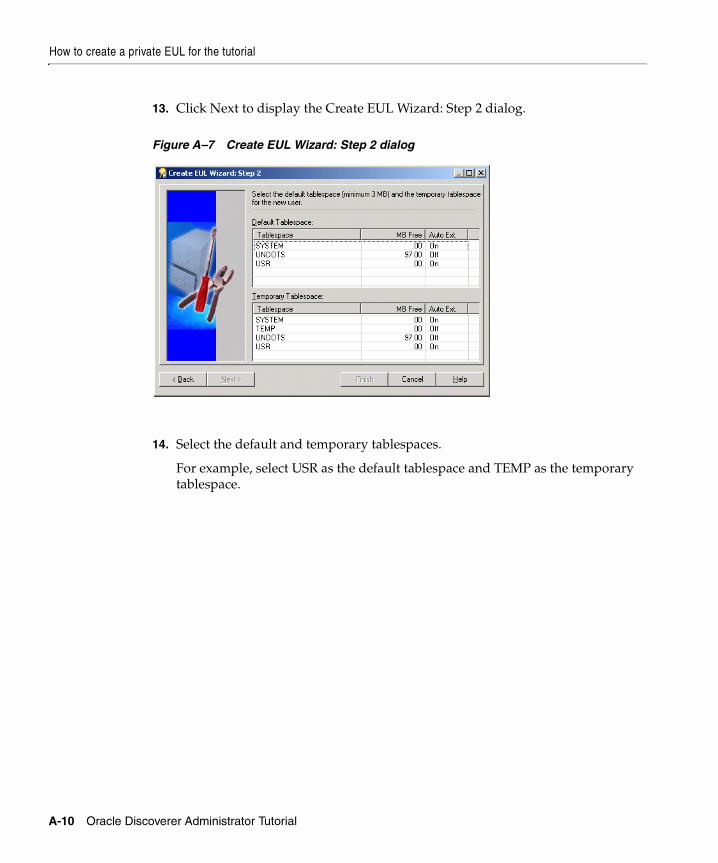
How to create a private EUL for the tutorial
A-10 Oracle Discoverer Administrator Tutorial
13. Click Next to display the Create EUL Wizard: Step 2 dialog.
Figure A–7 Create EUL Wizard: Step 2 dialog
14. Select the default and temporary tablespaces.
For example, select USR as the default tablespace and TEMP as the temporary tablespace.
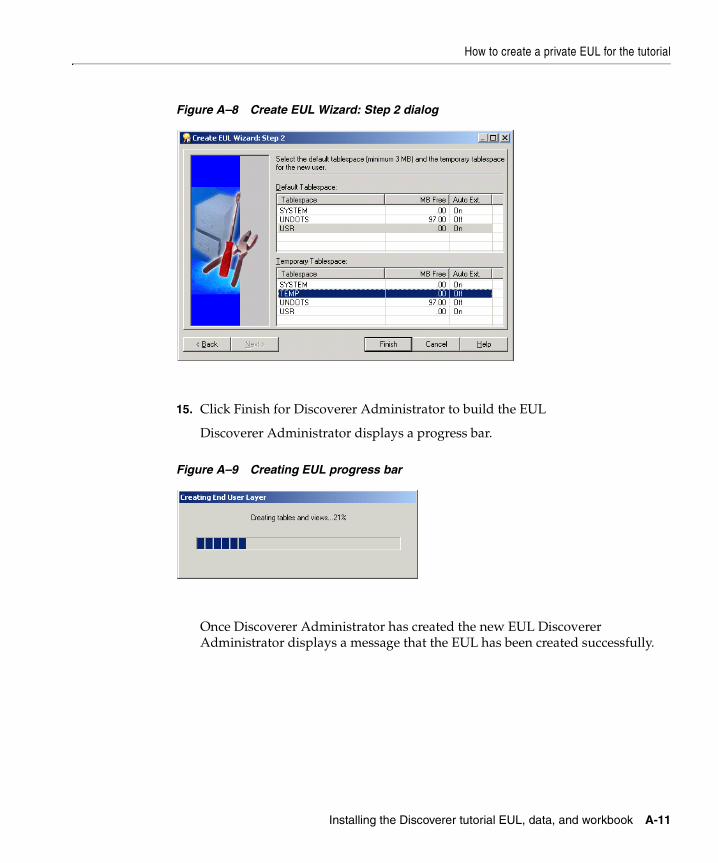
How to create a private EUL for the tutorial
Installing the Discoverer tutorial EUL, data, and workbook A-11
Figure A–8 Create EUL Wizard: Step 2 dialog
15. Click Finish for Discoverer Administrator to build the EUL
Discoverer Administrator displays a progress bar.
Figure A–9 Creating EUL progress bar
Once Discoverer Administrator has created the new EUL Discoverer Administrator displays a message that the EUL has been created successfully.
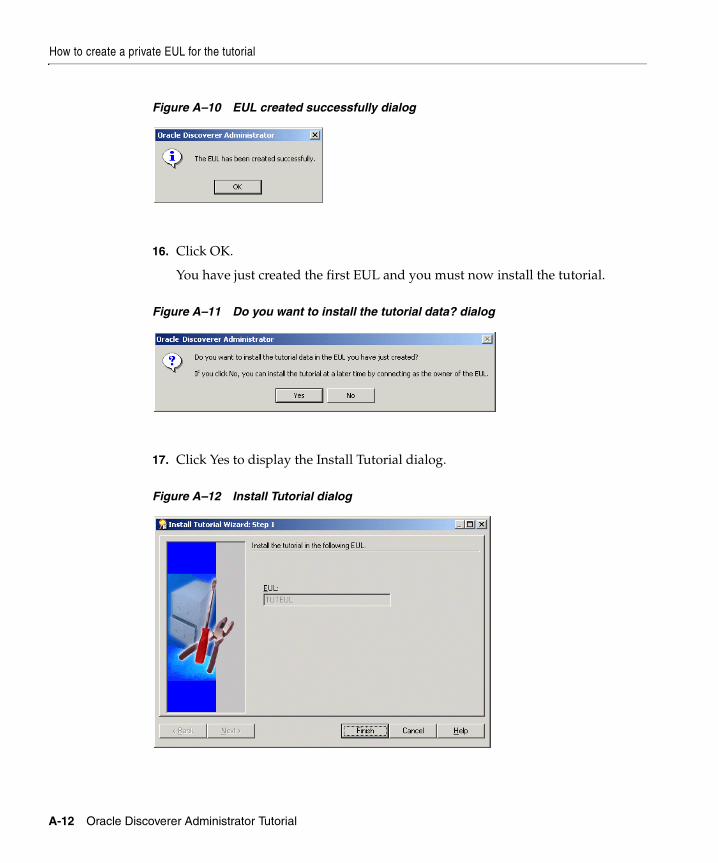
How to create a private EUL for the tutorial
A-12 Oracle Discoverer Administrator Tutorial
Figure A–10 EUL created successfully dialog
16. Click OK.
You have just created the first EUL and you must now install the tutorial.
Figure A–11 Do you want to install the tutorial data? dialog
17. Click Yes to display the Install Tutorial dialog.
Figure A–12 Install Tutorial dialog
How to install the Discoverer tutorial
Installing the Discoverer tutorial EUL, data, and workbook A-13
18. Complete the steps in the following section "How to install the Discoverer tutorial".
How to install the Discoverer tutorialHaving created a private EUL for the tutorial, you can install the Discoverer tutorial into the private EUL (for more information, see "How to create a private EUL for the tutorial").
How you install the Discoverer tutorial depends on when you decide to install the tutorial:
■ to install the Discoverer tutorial immediately after creating the tutorial EUL, start at step 5 of the following procedure
■ to install the Discoverer tutorial into an existing EUL, start at step 1 of the following procedure
1. Connect to Discoverer Administrator as the owner of the EUL that you want to contain the tutorial business area (for more information, see Chapter , "Exercise 1: Connecting to Discoverer Administrator").
Note: Make sure that the database user you connect with has sufficient privileges to install the tutorial (for more information, see "What privileges do you need to install the tutorial data?")
Discoverer Administrator displays the Load Wizard.
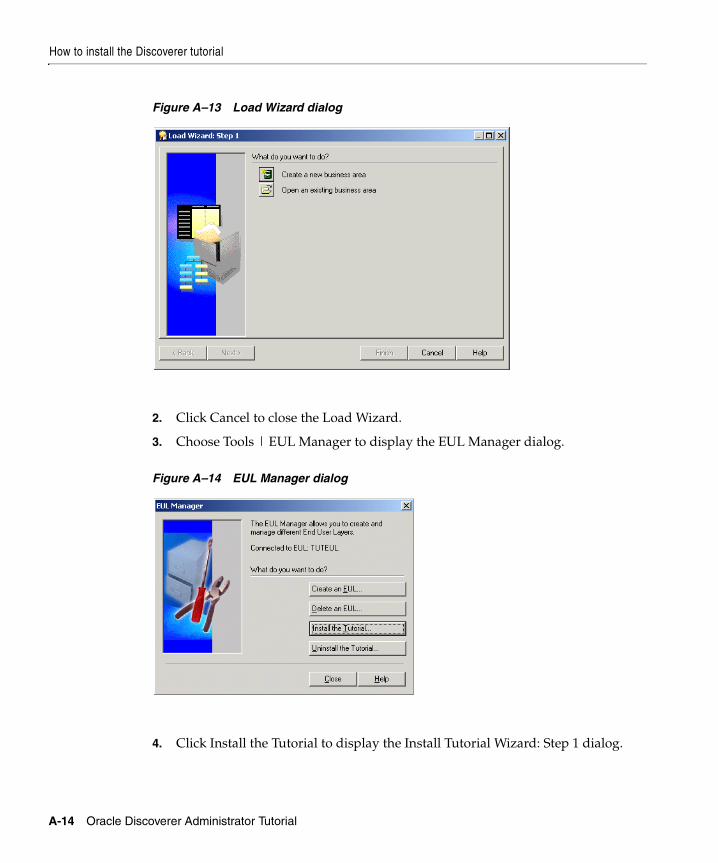
How to install the Discoverer tutorial
A-14 Oracle Discoverer Administrator Tutorial
Figure A–13 Load Wizard dialog
2. Click Cancel to close the Load Wizard.
3. Choose Tools | EUL Manager to display the EUL Manager dialog.
Figure A–14 EUL Manager dialog
4. Click Install the Tutorial to display the Install Tutorial Wizard: Step 1 dialog.
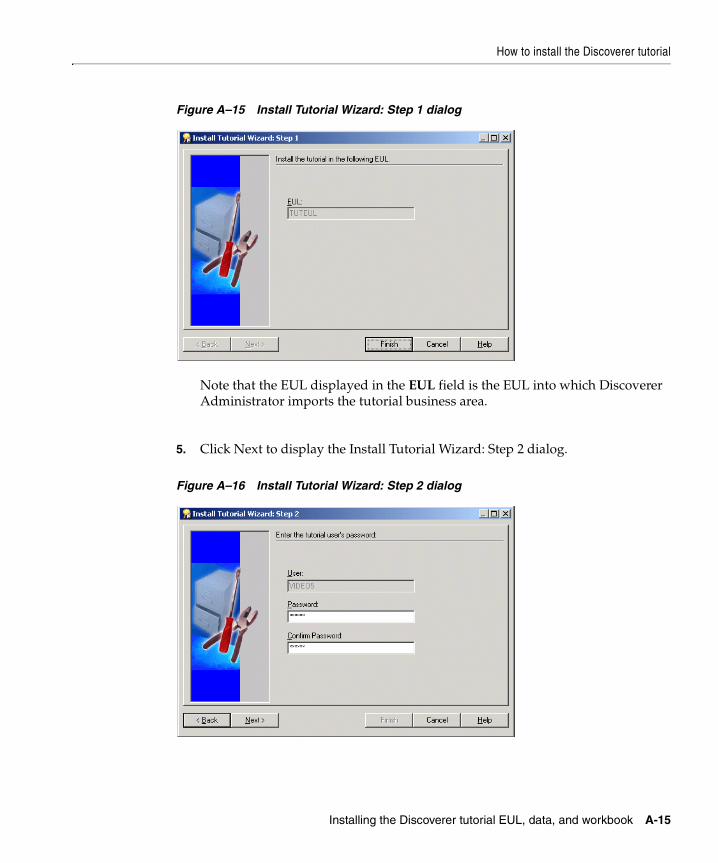
How to install the Discoverer tutorial
Installing the Discoverer tutorial EUL, data, and workbook A-15
Figure A–15 Install Tutorial Wizard: Step 1 dialog
Note that the EUL displayed in the EUL field is the EUL into which Discoverer Administrator imports the tutorial business area.
5. Click Next to display the Install Tutorial Wizard: Step 2 dialog.
Figure A–16 Install Tutorial Wizard: Step 2 dialog
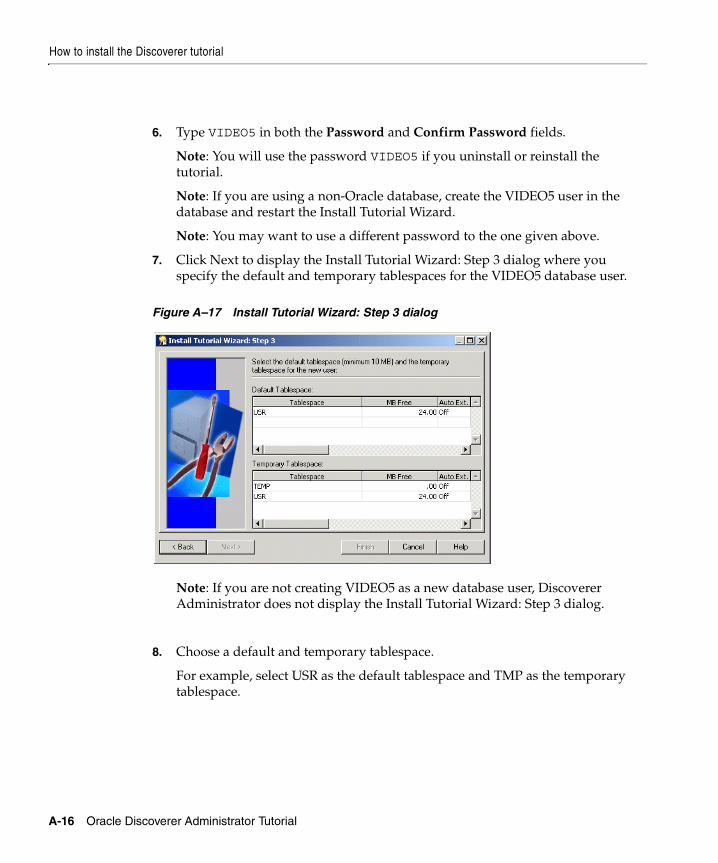
How to install the Discoverer tutorial
A-16 Oracle Discoverer Administrator Tutorial
6. Type VIDEO5 in both the Password and Confirm Password fields.
Note: You will use the password VIDEO5 if you uninstall or reinstall the tutorial.
Note: If you are using a non-Oracle database, create the VIDEO5 user in the database and restart the Install Tutorial Wizard.
Note: You may want to use a different password to the one given above.
7. Click Next to display the Install Tutorial Wizard: Step 3 dialog where you specify the default and temporary tablespaces for the VIDEO5 database user.
Figure A–17 Install Tutorial Wizard: Step 3 dialog
Note: If you are not creating VIDEO5 as a new database user, Discoverer Administrator does not display the Install Tutorial Wizard: Step 3 dialog.
8. Choose a default and temporary tablespace.
For example, select USR as the default tablespace and TMP as the temporary tablespace.

How to install the Discoverer tutorial
Installing the Discoverer tutorial EUL, data, and workbook A-17
Figure A–18 Install Tutorial Wizard: Step 3 dialog
9. Click Finish, Discoverer Administrator displays the Commit Status dialog.
Figure A–19 Commit Status message dialog
Discoverer Administrator populates the VIDEO5 database user tables with default data using the file demodata.sql (located in the \demo directory) and imports the video stores tutorial business area into the new EUL using the file vidstr.eex (located in the \demo directory).
When the process is complete, Discoverer Administrator displays a dialog indicating that the tutorial data has been successfully installed.
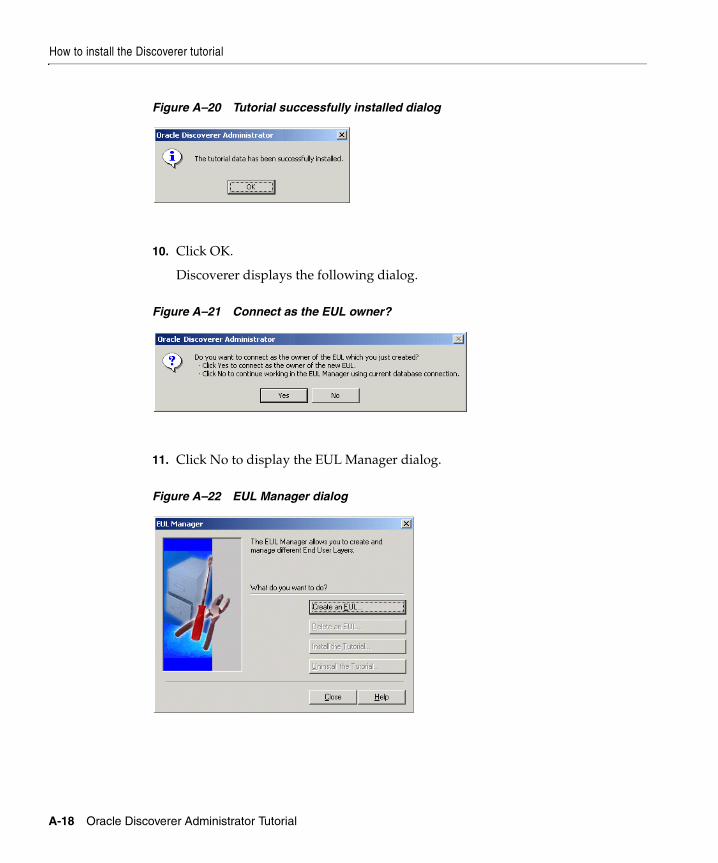
How to install the Discoverer tutorial
A-18 Oracle Discoverer Administrator Tutorial
Figure A–20 Tutorial successfully installed dialog
10. Click OK.
Discoverer displays the following dialog.
Figure A–21 Connect as the EUL owner?
11. Click No to display the EUL Manager dialog.
Figure A–22 EUL Manager dialog
How to grant access privileges to the VIDEO5 database user for the tutorial EUL
Installing the Discoverer tutorial EUL, data, and workbook A-19
12. Click Close to close the EUL Manager dialog.
You have just completed the following tasks:
■ created the VIDEO5 database user
■ populated the VIDEO5 tables with data
■ imported the tutorial business area into the new EUL
Discoverer Administrator is now correctly configured so that tutorial users can complete the tutorial lessons described in the following chapters.
How to grant access privileges to the VIDEO5 database user for the tutorial EUL
Now that you have created a private EUL and installed the Discoverer tutorial data, you must make sure that the VIDEO5 database user has access to the tutorial EUL. This enables Discoverer end users connecting to Discoverer as the VIDEO5 database user to access the tutorial data, EUL, and workbook.
To make sure that the VIDEO5 database user has access to the tutorial EUL:
1. Connect to Discoverer Administrator as the owner of the private tutorial EUL that you created in "How to create a private EUL for the tutorial" (TUTEUL).
2. Choose Tools | Security to display the Security dialog.
3. Display the Business Area -> User tab.
You must make sure that the VIDEO5 database user is displayed in the Selected users/roles list.
4. If the VIDEO5 database user is not displayed in the Selected users/roles list, move the VIDEO5 user from the Available users/roles list to the Selected users/roles list.
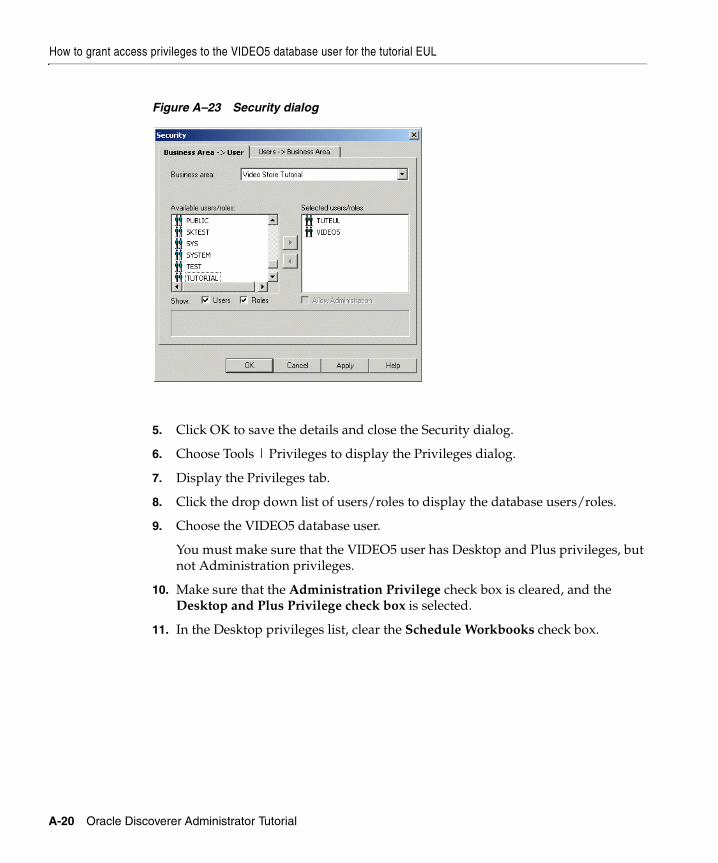
How to grant access privileges to the VIDEO5 database user for the tutorial EUL
A-20 Oracle Discoverer Administrator Tutorial
Figure A–23 Security dialog
5. Click OK to save the details and close the Security dialog.
6. Choose Tools | Privileges to display the Privileges dialog.
7. Display the Privileges tab.
8. Click the drop down list of users/roles to display the database users/roles.
9. Choose the VIDEO5 database user.
You must make sure that the VIDEO5 user has Desktop and Plus privileges, but not Administration privileges.
10. Make sure that the Administration Privilege check box is cleared, and the Desktop and Plus Privilege check box is selected.
11. In the Desktop privileges list, clear the Schedule Workbooks check box.
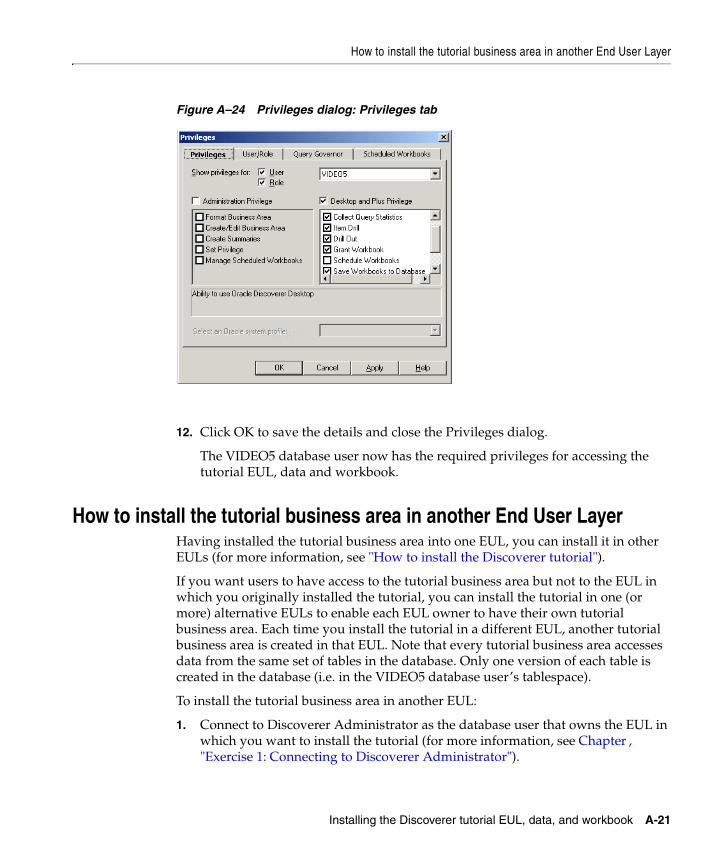
How to install the tutorial business area in another End User Layer
Installing the Discoverer tutorial EUL, data, and workbook A-21
Figure A–24 Privileges dialog: Privileges tab
12. Click OK to save the details and close the Privileges dialog.
The VIDEO5 database user now has the required privileges for accessing the tutorial EUL, data and workbook.
How to install the tutorial business area in another End User LayerHaving installed the tutorial business area into one EUL, you can install it in other EULs (for more information, see "How to install the Discoverer tutorial").
If you want users to have access to the tutorial business area but not to the EUL in which you originally installed the tutorial, you can install the tutorial in one (or more) alternative EULs to enable each EUL owner to have their own tutorial business area. Each time you install the tutorial in a different EUL, another tutorial business area is created in that EUL. Note that every tutorial business area accesses data from the same set of tables in the database. Only one version of each table is created in the database (i.e. in the VIDEO5 database user’s tablespace).
To install the tutorial business area in another EUL:
1. Connect to Discoverer Administrator as the database user that owns the EUL in which you want to install the tutorial (for more information, see Chapter , "Exercise 1: Connecting to Discoverer Administrator").
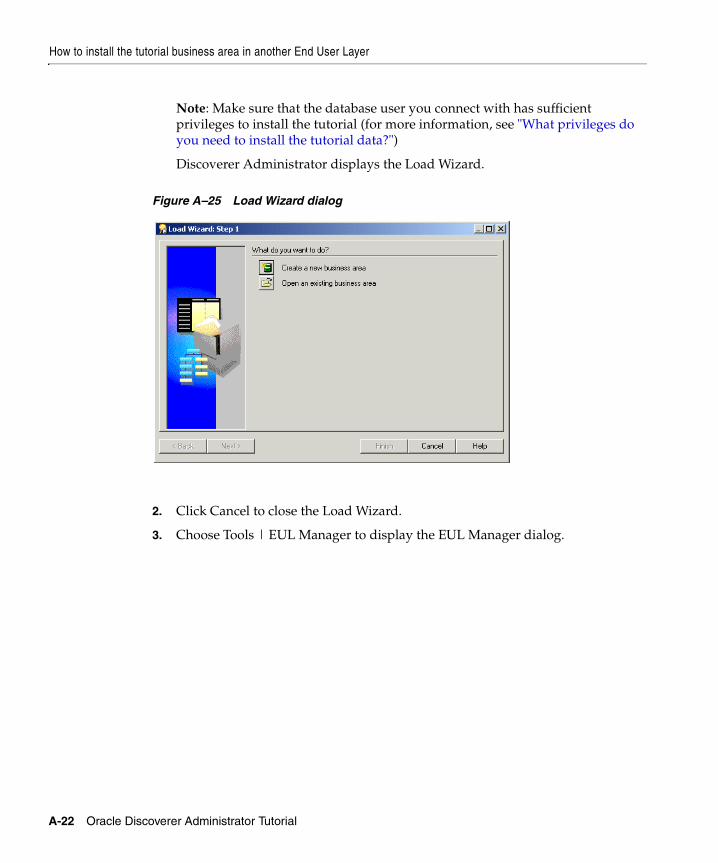
How to install the tutorial business area in another End User Layer
A-22 Oracle Discoverer Administrator Tutorial
Note: Make sure that the database user you connect with has sufficient privileges to install the tutorial (for more information, see "What privileges do you need to install the tutorial data?")
Discoverer Administrator displays the Load Wizard.
Figure A–25 Load Wizard dialog
2. Click Cancel to close the Load Wizard.
3. Choose Tools | EUL Manager to display the EUL Manager dialog.

How to install the tutorial business area in another End User Layer
Installing the Discoverer tutorial EUL, data, and workbook A-23
Figure A–26 EUL Manager dialog
4. Click Install the Tutorial to display the Install Tutorial Wizard: Step 1 dialog.
Figure A–27 Install Tutorial Wizard: Step 1 dialog
Note that the EUL displayed in the EUL field is the EUL into which Discoverer Administrator imports the tutorial business area.
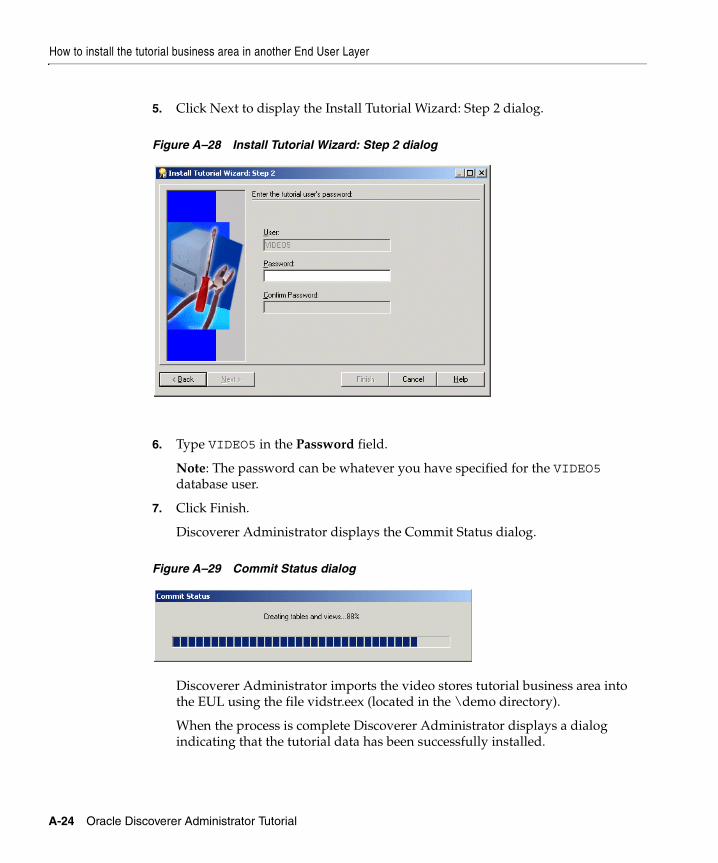
How to install the tutorial business area in another End User Layer
A-24 Oracle Discoverer Administrator Tutorial
5. Click Next to display the Install Tutorial Wizard: Step 2 dialog.
Figure A–28 Install Tutorial Wizard: Step 2 dialog
6. Type VIDEO5 in the Password field.
Note: The password can be whatever you have specified for the VIDEO5 database user.
7. Click Finish.
Discoverer Administrator displays the Commit Status dialog.
Figure A–29 Commit Status dialog
Discoverer Administrator imports the video stores tutorial business area into the EUL using the file vidstr.eex (located in the \demo directory).
When the process is complete Discoverer Administrator displays a dialog indicating that the tutorial data has been successfully installed.
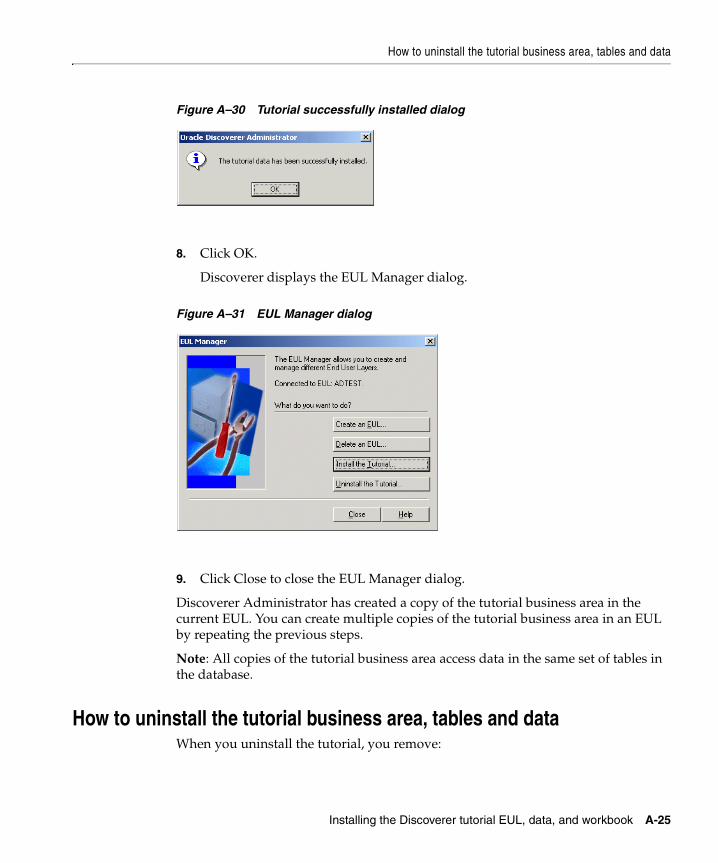
How to uninstall the tutorial business area, tables and data
Installing the Discoverer tutorial EUL, data, and workbook A-25
Figure A–30 Tutorial successfully installed dialog
8. Click OK.
Discoverer displays the EUL Manager dialog.
Figure A–31 EUL Manager dialog
9. Click Close to close the EUL Manager dialog.
Discoverer Administrator has created a copy of the tutorial business area in the current EUL. You can create multiple copies of the tutorial business area in an EUL by repeating the previous steps.
Note: All copies of the tutorial business area access data in the same set of tables in the database.
How to uninstall the tutorial business area, tables and dataWhen you uninstall the tutorial, you remove:
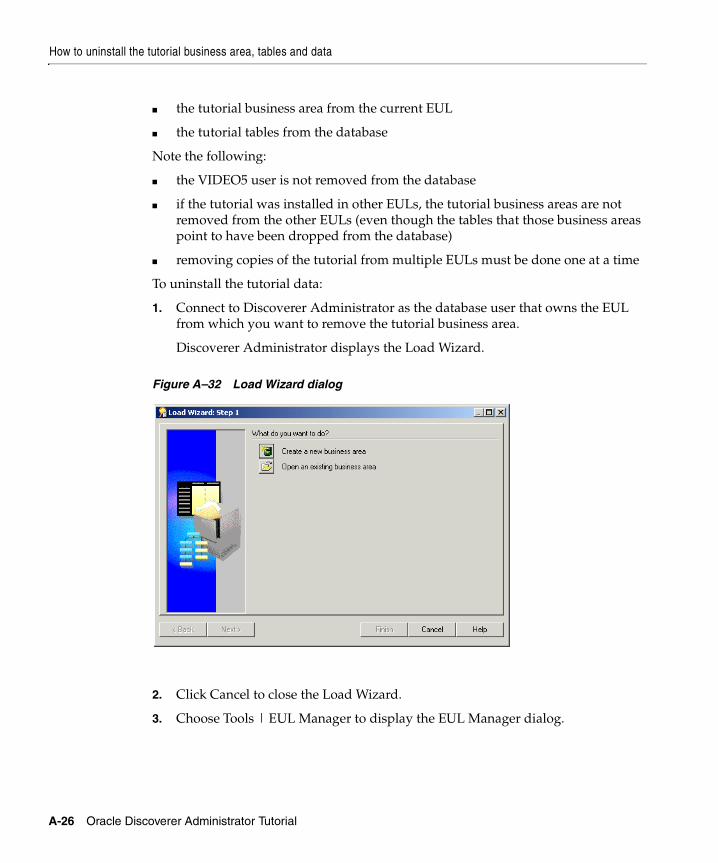
How to uninstall the tutorial business area, tables and data
A-26 Oracle Discoverer Administrator Tutorial
■ the tutorial business area from the current EUL
■ the tutorial tables from the database
Note the following:
■ the VIDEO5 user is not removed from the database
■ if the tutorial was installed in other EULs, the tutorial business areas are not removed from the other EULs (even though the tables that those business areas point to have been dropped from the database)
■ removing copies of the tutorial from multiple EULs must be done one at a time
To uninstall the tutorial data:
1. Connect to Discoverer Administrator as the database user that owns the EUL from which you want to remove the tutorial business area.
Discoverer Administrator displays the Load Wizard.
Figure A–32 Load Wizard dialog
2. Click Cancel to close the Load Wizard.
3. Choose Tools | EUL Manager to display the EUL Manager dialog.
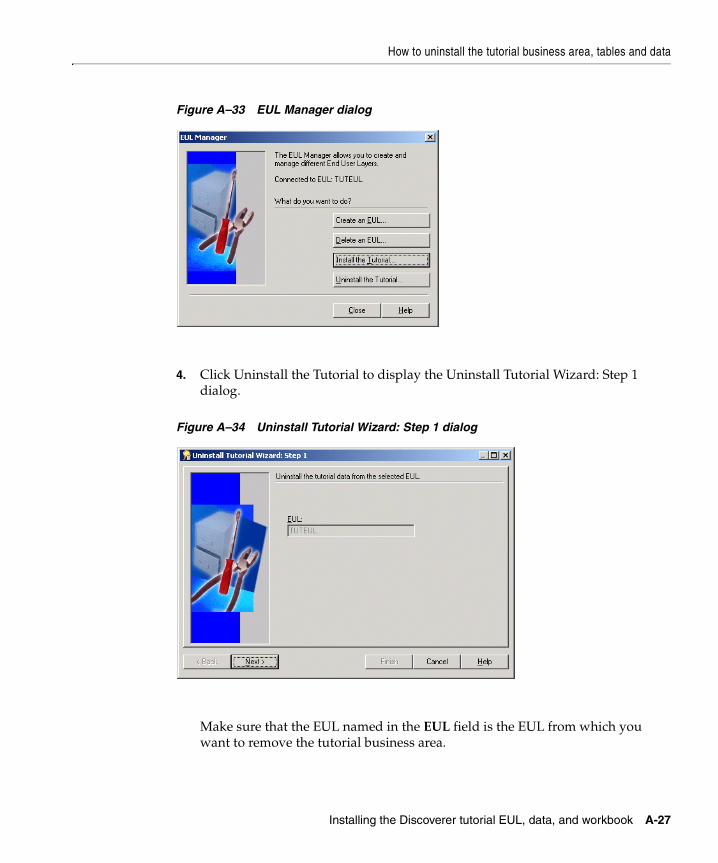
How to uninstall the tutorial business area, tables and data
Installing the Discoverer tutorial EUL, data, and workbook A-27
Figure A–33 EUL Manager dialog
4. Click Uninstall the Tutorial to display the Uninstall Tutorial Wizard: Step 1 dialog.
Figure A–34 Uninstall Tutorial Wizard: Step 1 dialog
Make sure that the EUL named in the EUL field is the EUL from which you want to remove the tutorial business area.
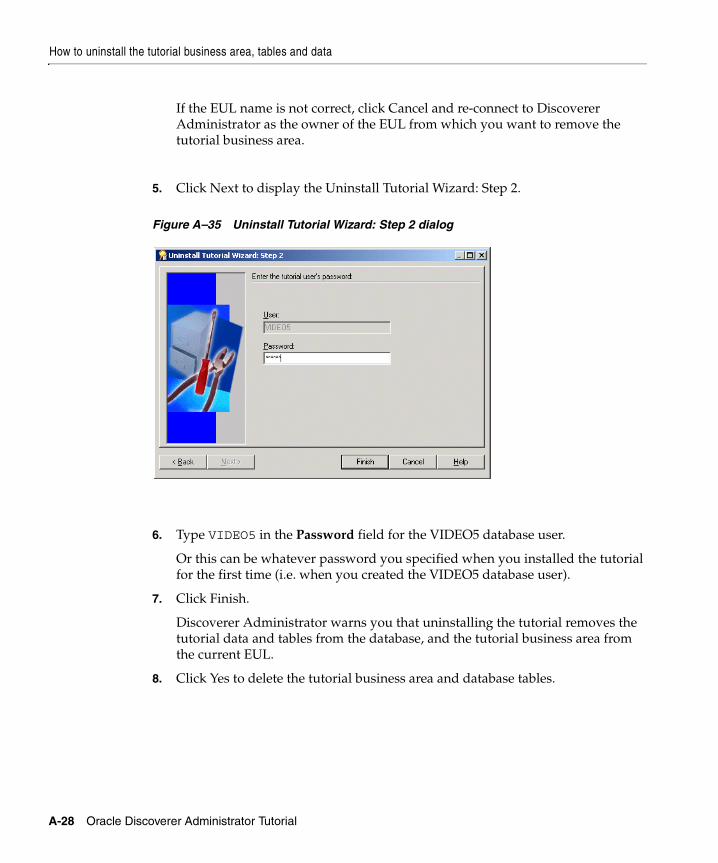
How to uninstall the tutorial business area, tables and data
A-28 Oracle Discoverer Administrator Tutorial
If the EUL name is not correct, click Cancel and re-connect to Discoverer Administrator as the owner of the EUL from which you want to remove the tutorial business area.
5. Click Next to display the Uninstall Tutorial Wizard: Step 2.
Figure A–35 Uninstall Tutorial Wizard: Step 2 dialog
6. Type VIDEO5 in the Password field for the VIDEO5 database user.
Or this can be whatever password you specified when you installed the tutorial for the first time (i.e. when you created the VIDEO5 database user).
7. Click Finish.
Discoverer Administrator warns you that uninstalling the tutorial removes the tutorial data and tables from the database, and the tutorial business area from the current EUL.
8. Click Yes to delete the tutorial business area and database tables.
How to reinstall the tutorial data
Installing the Discoverer tutorial EUL, data, and workbook A-29
How to reinstall the tutorial dataIf you have previously uninstalled the tutorial and you want to reinstall it, follow the steps in "How to install the tutorial business area in another End User Layer".

How to reinstall the tutorial data
A-30 Oracle Discoverer Administrator Tutorial
Index-1
Index
Aaccess privileges
granting access privileges to users, 4-2granting access to the business area, 4-8how to grant to VIDEO5 database user, A-19
alternative sortscreating an alternative sort, 8-13
Bbusiness areas
adding a description to, 5-1granting access to, 4-8hiding items in, 8-1identifying the source location in the load
wizard, 3-3renaming and adding descriptions for an item in
a folder, 5-5renaming and adding descriptions to
folders, 5-2
Ccomplex folders
creating a complex folder, 9-2creating a condition in, 9-5
conditionscreating a condition, 9-5
connect for the first timewhat conditions apply?, A-5
content typemodifying for an item, 10-15
custom folders
creating a custom folder, defining the SQL, 6-1editing the SQL, 6-4
Ddatabase prerequisites for tutorial users, A-2date hierarchies
creating a date hierarchy template, 10-10descriptions
adding a description to the business area, 5-1drill to detail
defining a drill to detail item class, 10-18
EEnd User Layer (EUL), creating a private EUL, 2-1EUL
installing tutorial, A-4why must you create one?, A-5, A-6
Ffolders
creating a complex folder, 9-2creating custom folders, defining the SQL, 6-1creating joins for, 7-1custom folders, editing the SQL, 6-4renaming and adding descriptions for an item
in, 5-5renaming and adding descriptions to, 5-2
Hhierarchies
Index-2
creating a date hierarchy template, 10-10defining a more complex item hierarchy, 10-7defining a simple item hierarchy, 10-1defining drill to detail, 10-18modifying an item’s content type, 10-15
Iinstall tutorial
how to, A-13what happens?, A-2what privileges do you need?, A-4what steps do you follow?, A-6
installationtutorial, A-4
item classesdrill to detail, 10-18
itemscreating an alternative sort, 8-13creating lists of values, 8-6hiding items in the business area, 8-1modifying an item’s content type, 10-15renaming and adding descriptions for an item in
a folder, 5-5
Jjoins
creating for folders in the business area, 7-1
Llists of values
creating lists of values, 8-6load wizard
identifying the source location for the business area, 3-3
Pprivate EUL
how to create, A-6
Rreinstall tutorial data, A-29
SSQL
defining in a custom folder, 6-1editing in a custom folder, 6-4
summary folderscreating a summary folder, 11-2
Ttutorial
installing, A-4tutorial business area
how to install in another EUL, A-21how to uninstall, A-25
tutorial datahow to reinstall it, A-29
Uusers
granting access privileges to, 4-2


